If you’re craving fresh clay vase design ideas, you’re in the right mindset—playful, curious, and totally ready to experiment. I love how one simple vase shape can turn into a whole new vibe with the right texture, pattern, or little sculpted detail.
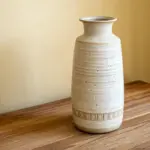
Simple Cylinder With Ribbed Texture
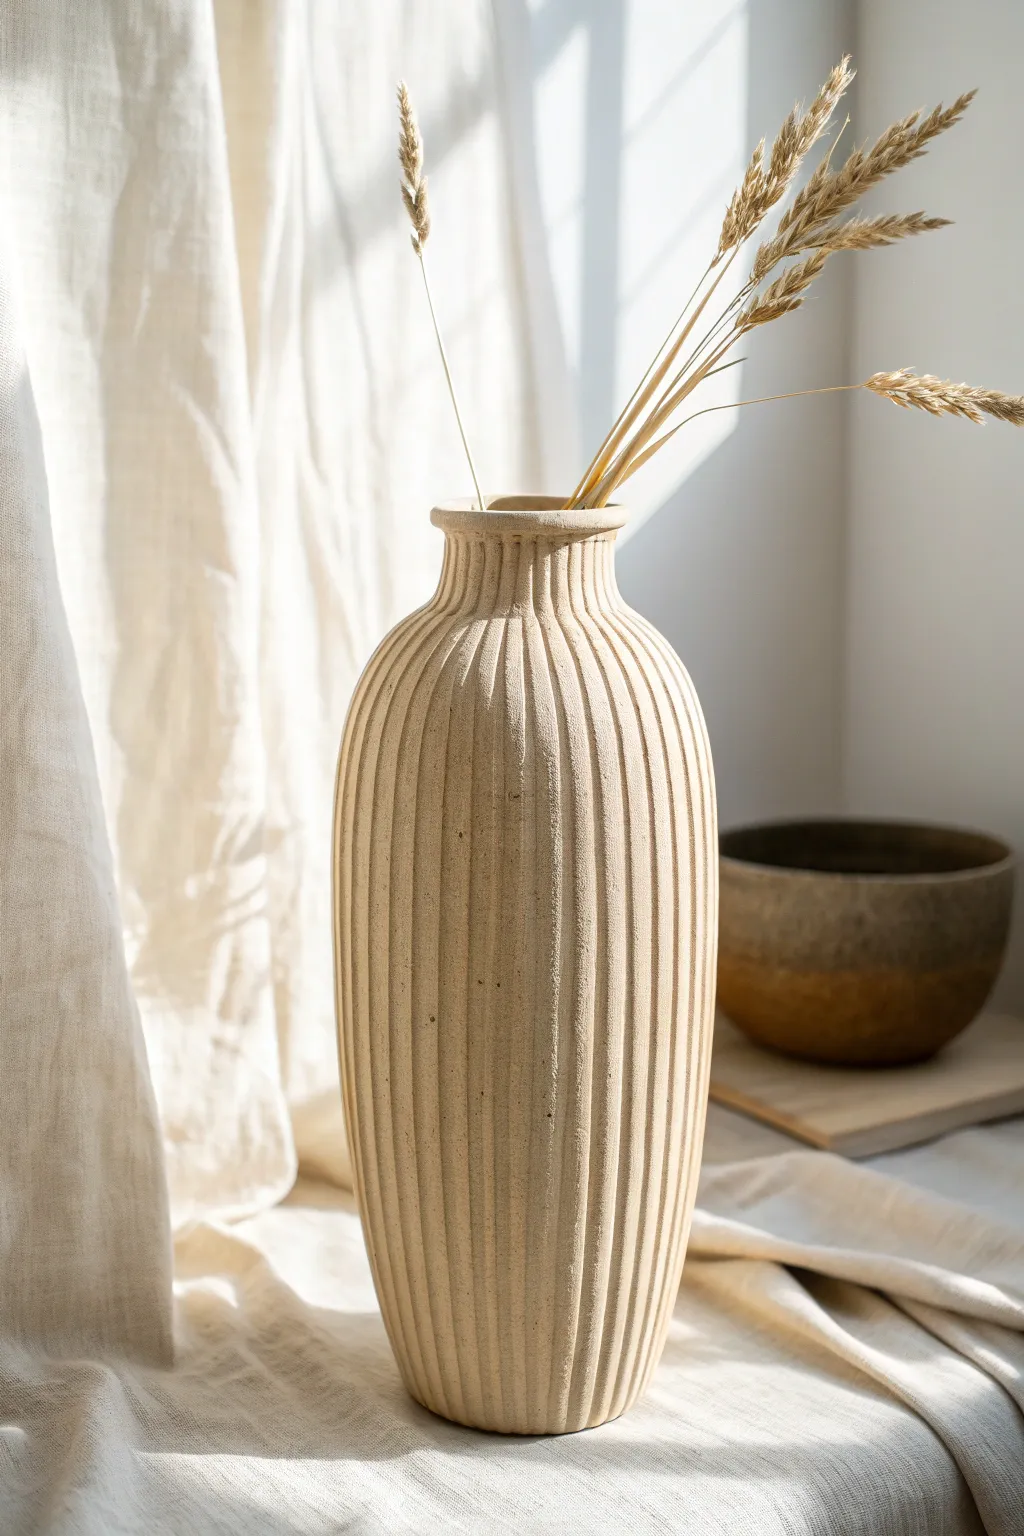
Embrace the beauty of repetition with this tall, cylinder-style vase featuring a distinct vertically ribbed texture. The matte, sandy finish and organic lines give it a timeless, handcrafted appeal that perfectly complements dried botanicals.
Step-by-Step Tutorial
Materials
- 5 lbs stoneware clay (light or speckled finish)
- Potter’s wheel (or materials for coil building)
- Ribbing tool or loop tool (curved profile)
- Wooden modeling tool
- Sponge
- Cutting wire
- Calipers (optional)
- Matte transparent glaze or clear matte sealant
Step 1: Forming the Base Vessel
-
Center and open:
Begin by centering your clay on the wheel. Open the mound down to the bat, leaving about a half-inch thickness for the floor to support the height. -
Establish the width:
Pull the floor out to your desired width. Since this is a tall, slender vase, keep the base relatively narrow, perhaps 4-5 inches in diameter. -
Pull the cylinder:
Begin pulling up the walls. Focus on gaining height rather than width. You want a tall, consistent cylinder. Aim for walls slightly thicker than usual (about 3/8 inch) to accommodate the carving later. -
Shape the belly:
Once you have your height, gently push from the inside to create a subtle curve or ‘belly’ in the main body, tapering it back inward as you reach the shoulder. -
Refine the neck:
Collar the clay in at the neck to narrow it significantly. This creates the elegant transition from the body to the rim. -
Flare the rim:
Gently flare the very top lip outward. It shouldn’t be dramatic, just a soft opening to frame the stems. -
Smooth the exterior:
Use a metal rib to remove all throwing lines from the outside. The surface needs to be perfectly smooth before you add the texture.
Steady Hands
For straighter lines, lock your elbows against your ribs and turn the banding wheel or potter’s wheel slowly by hand while holding the tool stationary.
Step 2: Carving the Texture
-
Leather hard stage:
Allow the vase to dry to a firm leather-hard state. It needs to be sturdy enough to handle pressure but soft enough to carve cleanly. -
Mark vertical guides:
Identify the midpoint of the vessel visually. While I sometimes eyeball this, you can lightly mark four equidistant vertical lines to help keep your carving straight. -
Select your tool:
Choose a loop tool with a rounded, U-shaped profile. The width of the loop will determine the width of your ribs. -
Begin the first cut:
Start at the bottom of the vase. Drag the loop tool upward in a continuous, straight motion toward the neck. -
Navigate the curve:
As you move up over the ‘belly’ and into the neck, adjust the pressure slightly. Follow the contour of the pot naturally rather than forcing a straight line against the curve. -
Stop at the collar:
End your carving stroke just below the flared rim. Lift the tool gently to taper the groove rather than stopping abruptly. -
Repeat around perimeter:
Continue carving parallel lines around the entire vessel. Leave a small ridge of high clay between each groove to create the ‘ribbed’ effect. -
Detail the neck:
Notice how the ribs converge at the neck. You may need to taper your cuts to be slightly thinner here so they don’t overlap as the circumference shrinks.
Step 3: Finishing Touches
-
Soften the edges:
Once the carving is complete, use a slightly damp sponge or a soft brush to gently wipe down the ridges. This removes sharp burrs without destroying the texture. -
Clean the rim and foot:
Trim any excess clay from the foot ring and ensure the rim is smooth and rounded. -
Dry slowly:
Cover the vase loosely with plastic to let it dry slowly. Uneven drying can cause warping in tall forms. -
Bisque fire:
Fire the piece to cone 04 (or your clay body’s bisque temperature) once bone dry. -
Glaze application:
Apply a matte transparent glaze or a sheer wash. Avoid thick, glossy glazes which will pool in the grooves and obscure the beautiful ribbed texture you just created.
Uneven Spacing?
If your last few ribs don’t fit perfectly, don’t panic. Gently widen the neighboring grooves with a damp brush to visually distribute the space evenly.
Once fired, fill your new vase with dried wheat or grasses to highlight those stunning vertical lines


Classic Belly Vase With Soft Curves
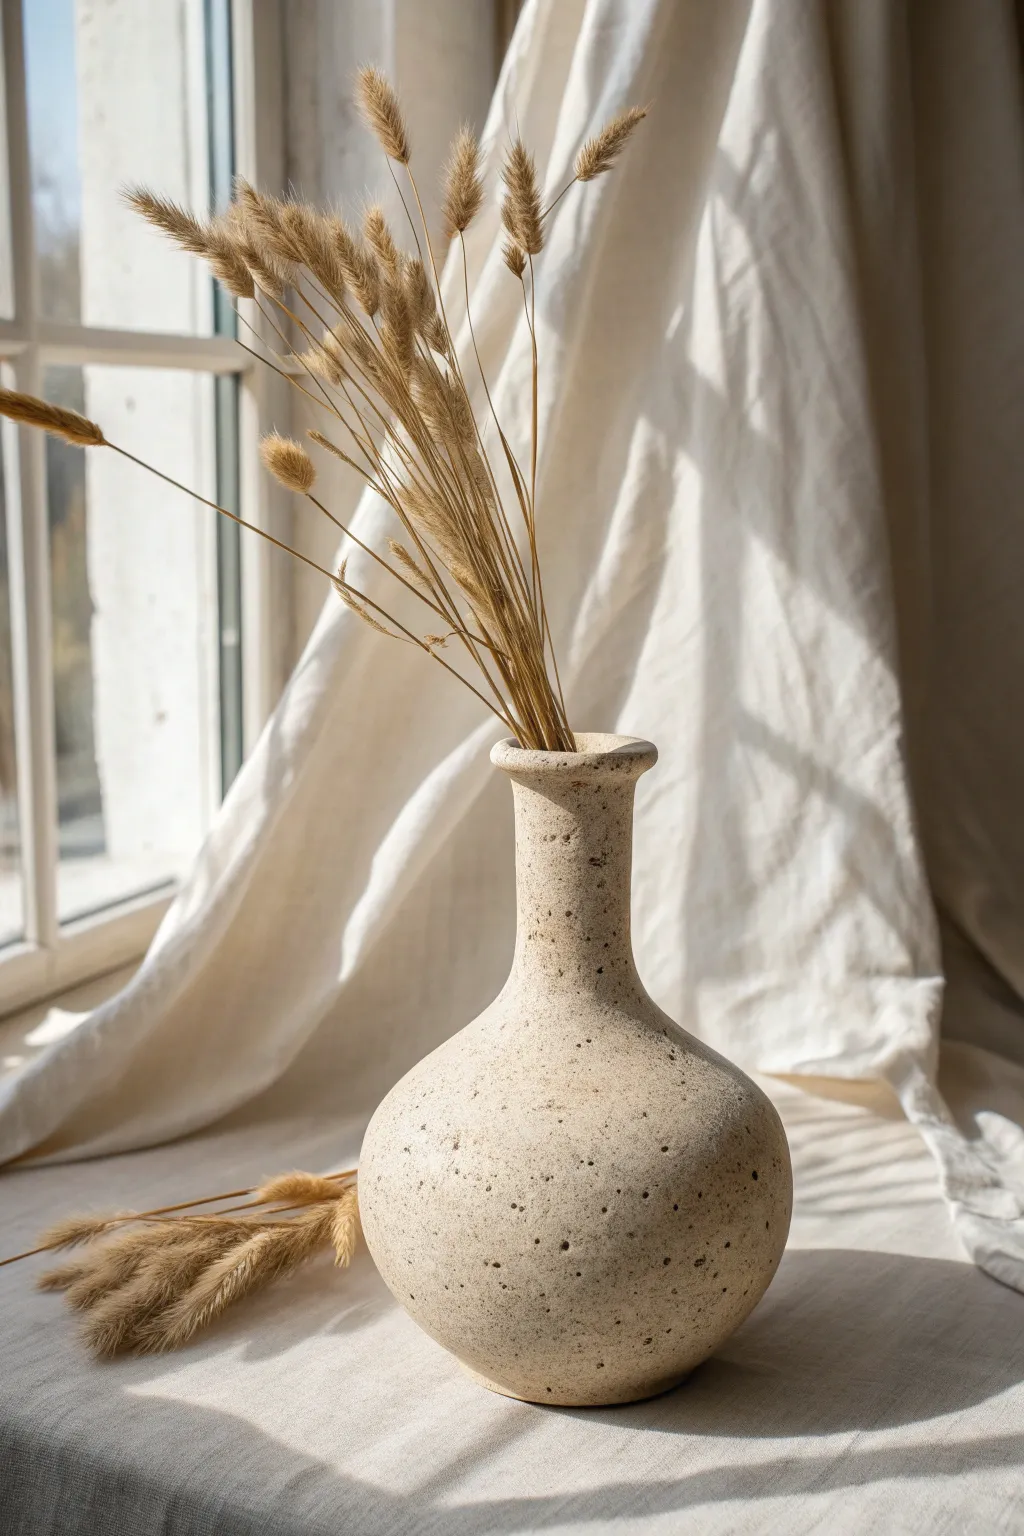
Embrace the beauty of imperfection with this handcrafted clay vase, featuring a classic rounded belly and an elongated neck. The finish mimics natural stone with delicate speckling, bringing an organic warmth to any minimalist setting.
Detailed Instructions
Materials
- Air-dry clay (white or cream)
- Rolling pin
- Pottery sponge
- Clay sculpting tools (rib tool, needle tool)
- Small bowl of water
- Acrylic paints (beige, dark brown, black)
- Old toothbrush
- Fine-grit sandpaper (220-400 grit)
- Clear matte sealant spray
- Rolling mat or canvas sheet
Step 1: Forming the Base Structure
-
Prepare the Clay:
Cut off a generous block of air-dry clay and knead it thoroughly until it is soft, pliable, and free of air bubbles. This conditioning step is crucial to prevent cracking later. -
Create the Base:
Pinch off a tennis-ball-sized amount of clay and flatten it into a thick disc, about half an inch thick. This will be the stable bottom of your vase. -
Roll Coils:
Take the remaining clay and roll out long, even snakes (coils) about the thickness of your index finger. Try to keep the thickness consistent along the entire length. -
Build the Walls:
Score the outer edge of your base disc and wet it slightly. Lay the first coil in a circle on top of the base edge. Continue stacking coils, spiral-fashion or ring by ring. -
Blend the Seams:
As you stack, stop every few layers to blend. Use your thumb or a modeling tool to drag clay from the upper coil down to the lower one on both the inside and outside surfaces, ensuring a seamless bond.
Step 2: Shaping the Belly and Neck
-
Widen the Belly:
To create that lovely round belly, place each subsequent coil slightly toward the outside of the one below it. Gently push from the inside out with a sponge to encourage the curve. -
Start Tapering:
Once you’ve reached the desired width of the belly (about 4-5 inches tall), reverse the process. Place coils slightly inward to begin narrowing the form toward the neck. -
Form the Neck:
Continue tapering until the opening is about 1.5 to 2 inches wide. Now, stack coils vertically straight up to build the chimney-style neck. This neck adds elegance to the silhouette. -
Refine the Rim:
Flare the final coil slightly outward to create a gentle lip. Smooth the rim carefully with a wet fingertip so it looks soft and finished, not sharp. -
Initial Smoothing:
Take a slightly damp sponge or a kidney rib tool and run it over the entire exterior. I prefer to spend extra time here to remove large lumps while leaving some hand-formed texture visible.
Crack Repairs
If hairline cracks appear during drying, don’t panic. Mix a small amount of fresh clay with water to make a paste (slip) and fill the cracks, then smooth over.
Step 3: Finishing and Texturing
-
Dry Completely:
Let the vase dry slowly away from direct heat or sunlight. This usually takes 24-48 hours. Rotate it occasionally so all sides dry evenly. -
Sand for Texture:
Once bone dry, use fine-grit sandpaper to smooth out any harsh tool marks, but don’t aim for perfection. The goal is a matte, slightly tactile surface. -
Base Coat:
Mix a warm beige acrylic paint that matches the natural clay tone (or use the clay’s natural color if you like it). Apply a watered-down wash over the vase to unify the surface color. -
Create the Speckles:
Dilute a small amount of dark brown or black acrylic paint with water until it’s inky. Dip an old toothbrush into this mixture. -
Spatter Technique:
Hold the toothbrush near the vase and run your thumb across the bristles to flick tiny droplets of paint onto the surface. Rotate the vase to get even coverage, varying the density for a natural stone look. -
Seal the Surface:
Once the paint is completely dry, take the vase to a well-ventilated area and apply two thin coats of clear matte sealant to protect your work.
Weighted Base
For better stability with tall dried grasses, drop a few small, clean stones into the bottom of the vase before you begin narrowing the neck.
Now you have a timeless vessel ready to display your favorite dried botanicals


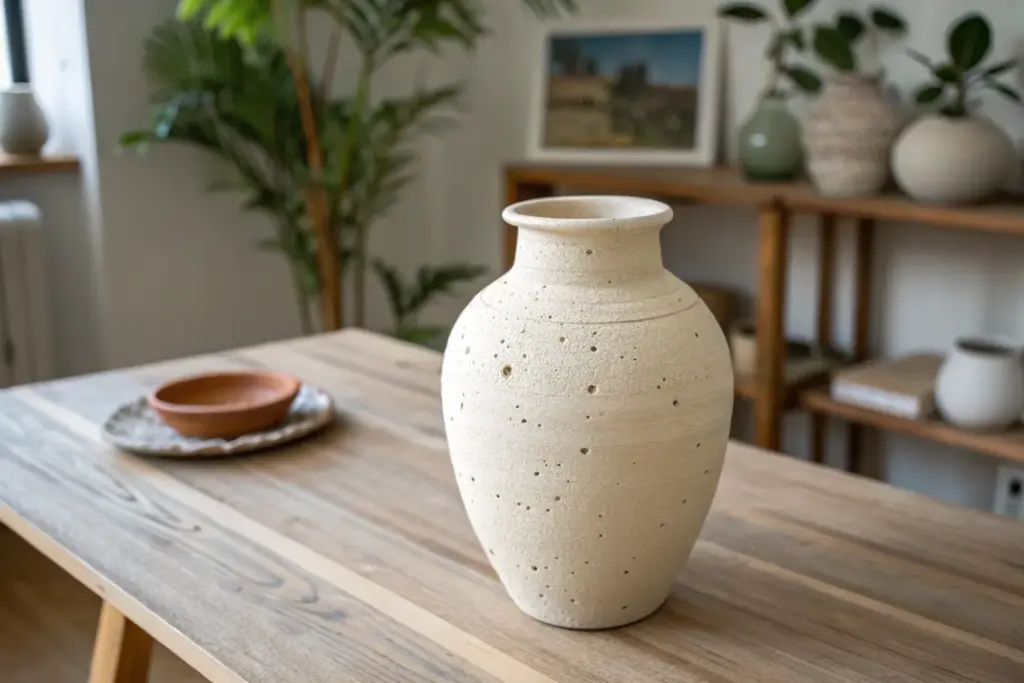
Upcycled Jar Wrapped in Air-Dry Clay

Transform a simple glass jar into high-end home decor with this wonderfully tactile project. The result is a stoneware-inspired vessel with a raw, matte white finish that looks beautiful holding fresh or dried stems.
Step-by-Step Guide
Materials
- Clean glass jar (pasta sauce or pickle jar)
- White or sandstone air-dry clay (approx. 500g)
- Small rolling pin
- Sharp craft knife
- Cup of water
- Sponge or scourer pad
- Toothpick or needle tool
- Waterproof matte varnish or sealant (optional)
- Sandpaper (medium grit)
Step 1: Preparation & Wrapping
-
Clean surface:
Begin by removing any labels and adhesive residue from your glass jar. Ensure the outside is completely dry so the clay adheres properly. -
Roll the clay:
Knead your air-dry clay until it’s pliable and warm. Roll it out on a flat surface into a rectangular slab that is roughly 1/4 inch thick. Make sure the slab is long enough to wrap entirely around the circumference of your jar. -
Wrap the jar:
Lift the clay slab and gently wrap it around the glass jar. Press it firmly against the glass to remove air pockets. -
Create the seam:
Where the two ends of the clay meet, overlap them slightly. Use your knife to cut a straight line through both layers, remove the excess, and press the fresh edges together. -
Blend the join:
Dip your finger in a little water and smooth over the seam line until it disappears completely. I find a gentle circular motion works best here.
Cracking Issues?
If small cracks appear as the clay shrinks against the rigid glass while drying, simply mix a small amount of fresh clay with water to make a paste, fill the crack, and smooth it over.
Step 2: Sculpting the Shape
-
Form the shoulder:
Gently push the clay near the top inwards to follow the curve of the jar’s neck. If your jar has a screw top tread, make sure the clay covers this area thickly enough to hide the ridges. -
Build the rim:
Roll a separate, thick coil of clay. Place this ring on top of the jar rim to create a chunky, rounded mouth for the vase. -
Secure the rim:
Use your thumb or a modeling tool to drag clay from the coil down onto the main body, blending them seamlessly. Then, smooth the top lip so it is rounded and uneven for an organic look. -
Flatten the bottom:
Tap the vase gently on your table surface to ensure the bottom is flat and the vessel stands straight.
Step 3: Texturing & Detailing
-
Rough it up:
Take a dry sponge or a rough scourer pad and dab it all over the surface of the damp clay. This creates that lovely stone-like pitting seen in the image. -
Add detail holes:
Use a toothpick to randomly poke small, deeper pockmarks into the surface. Keep these irregular and sparse to mimic natural erosion. -
Create the detail line:
Using a needle tool or the back of your knife, gently scribe a horizontal line around the neck of the vase, right where the shoulder meets the rim. -
Add lower texture lines:
Lightly incise a few faint, imperfect horizontal lines near the bottom third of the vase to break up the visual weight. -
Refine the surface:
Look over the piece and smooth out any accidental fingerprints with a slightly damp finger, but be careful not to erase your intentional texture.
Add Color Depth
Mix some used coffee grounds into your clay before rolling it out. This adds subtle speckles and a warmer tint that mimics expensive stoneware pottery perfectly.
Step 4: Finishing
-
Slow drying:
Let the vase dry slowly away from direct heat or sunlight. This usually takes 24-48 hours. Turn it occasionally to ensure even drying. -
Sand ridges:
Once bone dry, use medium-grit sandpaper to gently knock back any overly sharp peaks or rough spots on the rim. -
Apply protection:
Since air-dry clay dissolves with water, apply two coats of a matte waterproof varnish. This protects the finish from incidental splashes when you arrange your flowers.
Now you have a stunning, bespoke vessel ready to display your favorite greenery


Two-Tone Color Block Vase
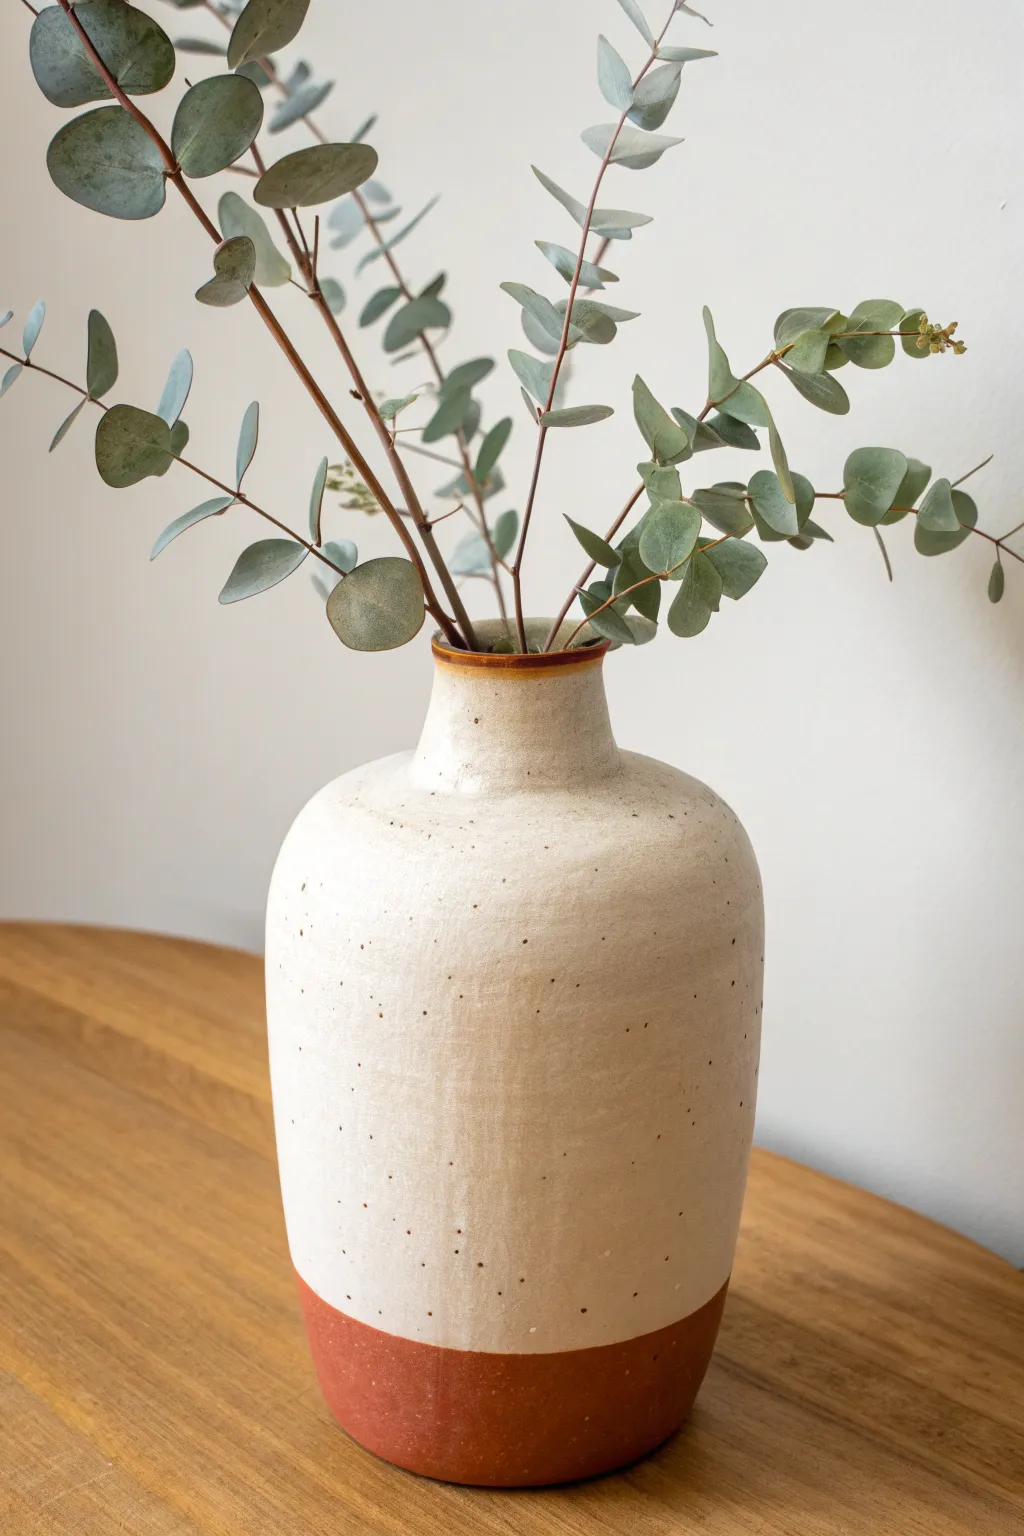
Embrace the beauty of contrast with this two-tone vase that pairs the raw, earthy warmth of terracotta with a smooth, speckled cream glaze. The clean lines and exposed clay base create a timeless, minimalist aesthetic perfect for displaying dried botanicals.
Detailed Instructions
Materials
- Terracotta stoneware clay (unsanded/smooth body)
- Pottery wheel
- Throwing tools (sponge, rib, wire cutter)
- Trimming tools
- Cream or off-white glossy glaze (cone 5/6 compatible)
- Speckle additive (iron oxide or ilmenite sand)
- Wax resist emulsion
- Sponge or brush for wax
- Kiln (bisque and glaze firing capability)
Step 1: Throwing and Shaping
-
Center the Clay:
Begin with about 3-4 pounds of well-wedged terracotta clay. Slam it onto the center of your wheel head and use water and steady pressure to cone it up and down until fully centered. -
Open and Pull:
Open the centered mound, leaving about a half-inch thickness for the floor. Compress the bottom well, then begin pulling the walls upward, aiming for a consistent cylinder height of roughly 10-12 inches. -
Belly the Form:
Using a rib tool on the outside and your hand on the inside, gently push the belly of the vase outward to create a soft, rounded curve that tapers slightly toward the top. -
Collar the Neck:
Slowly collar the top third of the vessel inward to form a distinct neck. Keep the wheel speed steady and compress the clay frequently to prevent the neck from twisting or buckling. -
Refine the Rim:
Use a chamois or a damp sponge to smooth and round the rim. This small detail ensures the finished lip is pleasant to touch and visually sharp. -
Dry to Leather Hard:
Cut the vase from the wheel using your wire tool. Allow it to dry slowly under plastic until it reaches a leather-hard state, firm enough to be handled without deforming.
Uneven Glaze Line?
If your dip line ended up crooked, don’t panic. Before firing, use a stiff brush or sponge to carefully wipe back the glaze to a straight edge while spinning the piece on a banding wheel.
Step 2: Trimming and Bisque Firing
-
Trimming the Foot:
Center the vase upside down on the wheel head—using a chuck if necessary for the narrow neck. Trim away excess weight from the bottom and define a flat, stable foot ring. -
Smoothing the Surface:
While spinning, use a smooth metal rib to burnish the bottom quarter of the vase. Since this area will remain unglazed, you want the raw clay to feel smooth to the touch. -
Bisque Fire:
Once bone dry, load the vase into the kiln for a bisque firing (usually to Cone 04). This sets the shape and prepares the porous surface for glazing.
Step 3: Glazing and Finishing
-
Prepare the Speckled Glaze:
If your cream glaze doesn’t already have speckles, mix in a very small amount (start with 0.5%) of granular ilmenite or iron oxide. Test the consistency; it should be like heavy cream. -
Mark the Glaze Line:
Place the bisque-fired vase back on a banding wheel. Decide where you want the color break—aim for the bottom quarter mark for that grounded look shown in the photo. -
Apply Wax Resist:
Brush a coat of wax resist carefully over the entire bottom section, up to your designated line. I also like to apply a thin ring of wax on the very top rim to expose a hint of clay there. -
Dip the Vase:
Suspend the vase by the foot (or use dipping tongs if the neck is too narrow for hand-holding) and dip it swiftly into the bucket of cream glaze. -
Clean Up Drips:
Immediately wipe away any glaze beads that formed on the waxed bottom section using a damp sponge. The wax resists the glaze, but droplets can sometimes sit on top. -
Final Firing:
Load the vase into the kiln for the glaze firing (typically Cone 5 or 6, depending on your clay body specifications). Ensure it doesn’t touch other pieces. -
Sanding the Base:
After the kiln has cooled and the piece is removed, use a high-grit sanding block or diamond pad to lightly smooth the unglazed terracotta bottom so it won’t scratch your furniture.
Speckle Variation
For diverse texture, try mixing two different mesh sizes of granular manganese or iron into your base glaze. This creates variation in speckle size rather than a uniform dotted pattern.
Fill your new vessel with dried eucalyptus or fresh blooms and enjoy the warm, organic atmosphere it brings to your space

The Complete Guide to Pottery Troubleshooting
Uncover the most common ceramic mistakes—from cracking clay to failed glazes—and learn how to fix them fast.
Speckled Terrazzo-Style Surface
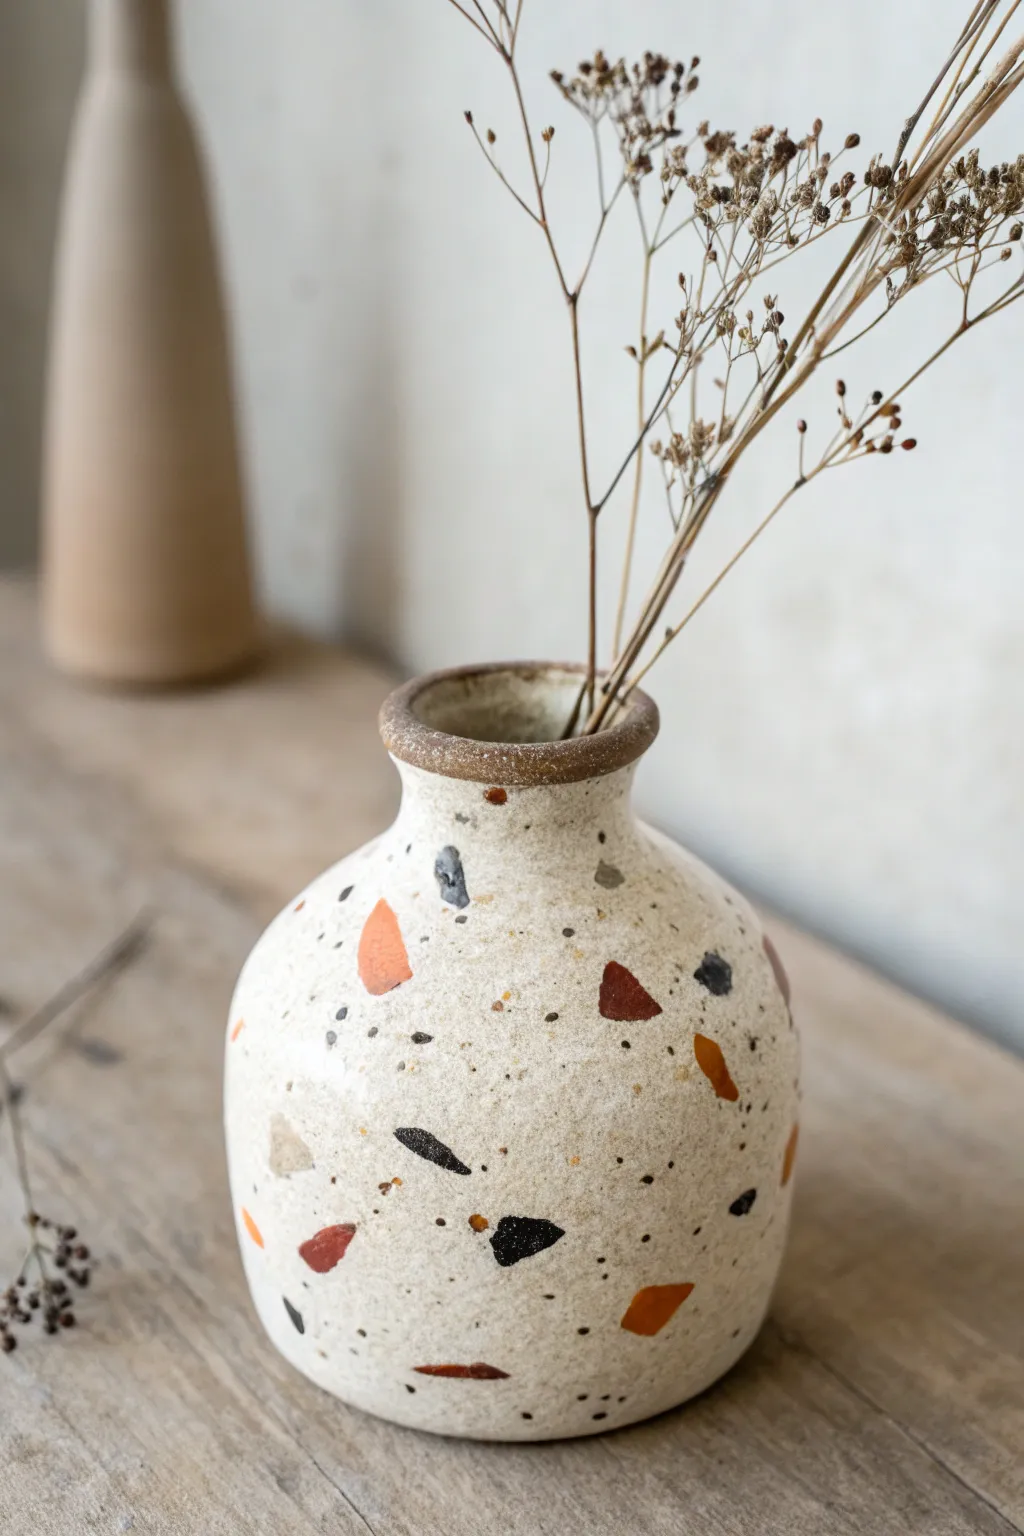
Embrace the playful yet sophisticated look of terrazzo with this handheld bud vase project, featuring scattered chips of color against a warm, sandy backdrop. This technique mimics traditional stone terrazzo using simple ceramic glazes and underglazes for a stunning visual texture.
Step-by-Step Tutorial
Materials
- Bisque-fired stoneware vase (small bottle shape)
- Matte white glaze (stoneware compatible)
- Red iron oxide or beige underglaze (for tinting)
- Small flat brush
- Detail liner brush
- Underglazes in: burnt orange, terracotta, dark grey, and black
- Old toothbrush (optional for speckling)
- Wax resist
- Sponge and water bucket
- Clear matte glaze (optional overlay)
Step 1: Base Preparation
-
Prepare the surface:
Start with your bisque-fired vase. Wipe it down thoroughly with a damp sponge to remove any kiln dust or oils from your hands, ensuring the glaze will adhere perfectly. -
Wax the foot:
Apply a coat of wax resist to the bottom foot ring of the vase. This saves you from having to wipe glaze off later and keeps the kiln shelf clean. -
Mix the base color:
Pour a small amount of matte white glaze into a cup. To achieve that warm, sandy tone seen in the image, mix in a very small amount of beige underglaze or a pinch of red iron oxide. Stir until fully blended. -
Apply the base coat:
Pour the glaze inside the vase first, swirl it around to coat the interior, and pour out the excess. Then, dip the exterior or brush on two even coats of your custom sandy mix. -
Create texture:
While the second coat is still slightly damp, I like to gently dab the surface with a dry sponge. This breaks up smooth brush strokes and gives the finished piece a more stone-like, organic texture.
Natural Variation Tip
Don’t overthink the placement of your colored chips. Terrazzo is random aggregates of stone, so overlapping shapes or clustering them slightly creates a more realistic look.
Step 2: Painting the Terrazzo Chips
-
Select your palette:
Pour small coin-sized puddles of your burnt orange, terracotta, dark grey, and black underglazes onto a palette. -
Paint the large shards:
Using a small flat brush, paint irregular geometric shapes with the terracotta and burnt orange colors. Think triangles, trapezoids, and jagged shards. Space them out randomly, avoiding any distinct patterns. -
Add dark contrast:
Switch to the dark grey and black underglazes. Paint smaller, sharper shard shapes in the empty spaces between the orange pieces. These dark elements anchor the design. -
Vary the sizes:
Ensure you have a mix of sizes. You want a few ‘hero’ chips that are larger, surrounded by medium-sized fragments. -
Refine the edges:
If any shapes look too round or blobby, use a damp detail brush to square off the edges or cut into the shape to make it look broken and angular like real stone chips.
Step 3: Fine Details & Rim
-
Create micro-speckles:
Dip an old toothbrush into slightly watered-down black underglaze. Hold it near the vase and run your thumb across the bristles to flick tiny specks onto the surface. This mimics the sandy grit found in real terrazzo. -
Add manual dots:
Use your finest liner brush to add individual pin-prick dots of dark grey and black in areas that feel too empty. -
The rim accent:
Using a brush loaded with a brown or dark bronze glaze, carefully paint the rim of the vase. Allow the color to overlap just slightly onto the inside and outside lips for a finished, framed look. -
Clean and dry:
Check the foot of the vase one last time to ensure no glaze drips are on the bottom. Let the piece dry completely for 24 hours. -
Final firing:
Fire the vase to the temperature recommended for your specific clay and glaze (likely Cone 5 or 6 for stoneware). The heat will fuse the colored chips into the base glaze for a smooth, unified surface.
Level Up: Texture Play
Instead of full glaze, use colored slips on greenware (unfired clay) for the chips. Once leather hard, clear glaze over it. This creates slightly raised texture for the ‘stones’.
Once fired, fill your new stone-effect vase with dried botanicals to complement those warm earth tones
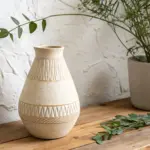
Carved Line Pattern Wraparound
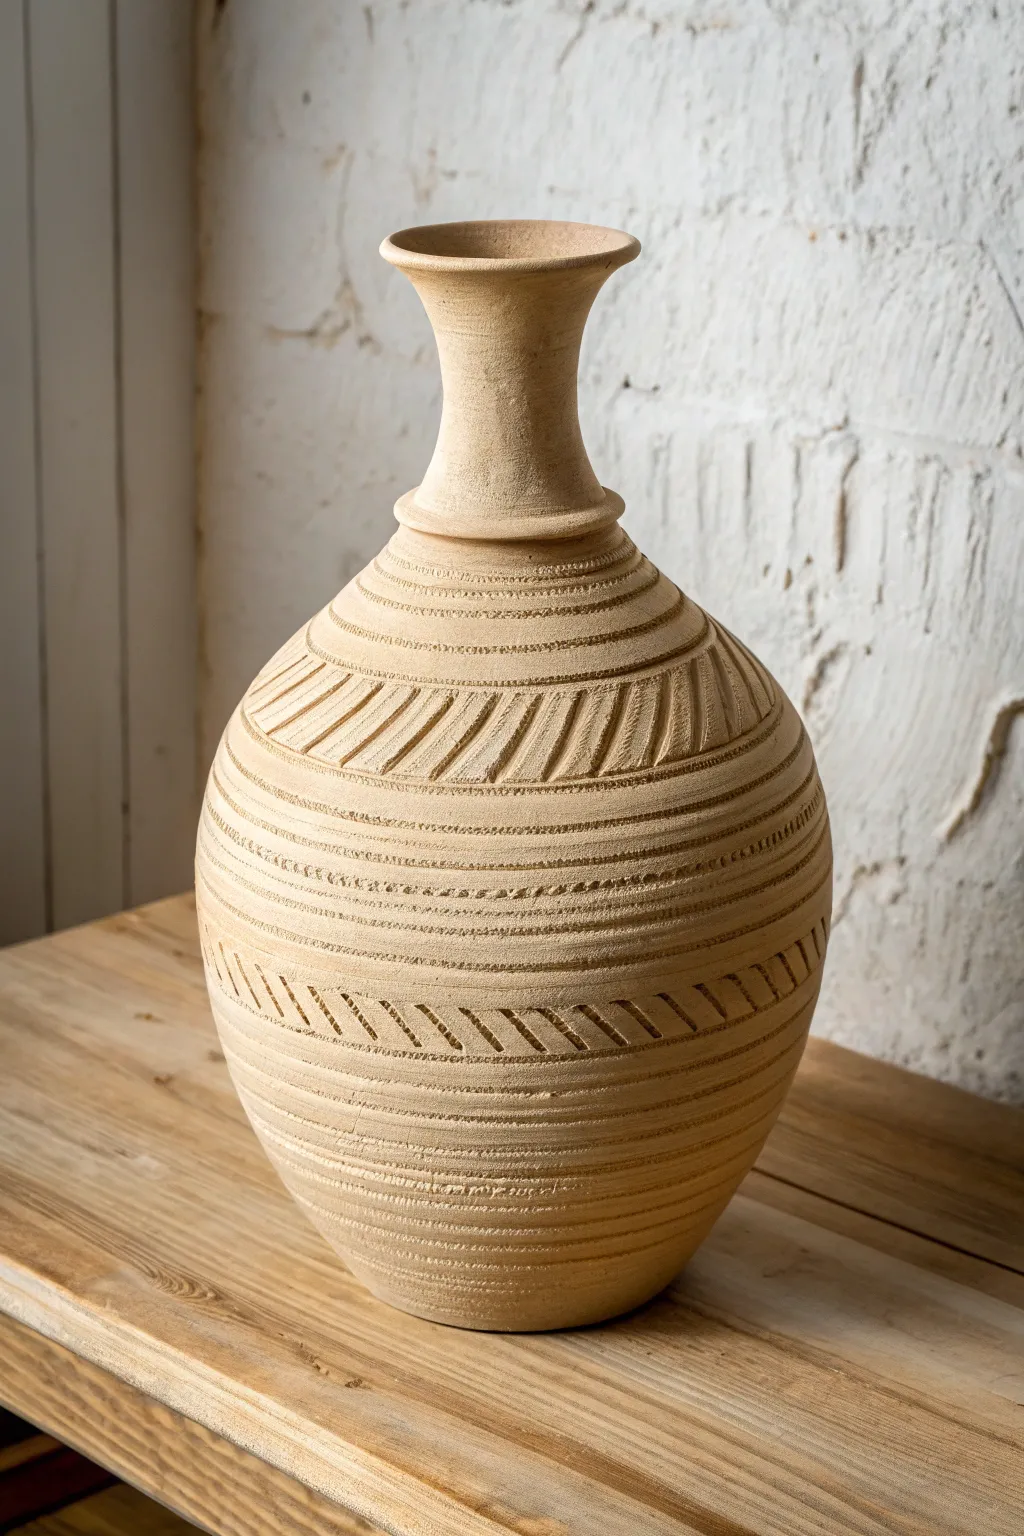
This elegant vessel combines clean architectural lines with organic texture, featuring a bulbous body that tapers gracefully into a trumpet-like neck. The mesmerizing warmth of the raw clay is highlighted by alternating bands of horizontal scoring and diagonal carvings, creating a rhythmic wraparound effect.
Step-by-Step Guide
Materials
- High-quality stoneware clay (buff or speckled)
- Pottery wheel (or knowledge of coil building)
- Wire clay cutter
- Pointed carving tool or needle tool
- Loop tool (small)
- Rib tool (metal or wood)
- Sponge
- Spray bottle with water
- Banding wheel (if hand-building)
Step 1: Forming the Base Shape
-
Center the clay:
Start with a substantial ball of clay (approx. 3-4 lbs) on your wheel or banding wheel. Center it firmly, ensuring a stable base for the vertical height. -
Open and pull the cylinder:
Open the centered clay and pull up a tall, consistent cylinder. Aim for even wall thickness from bottom to top to support the texturing process later. -
Shape the belly:
Gently push the clay outward from the inside while supporting the exterior with a rib tool to create the round, bulbous ‘belly’ of the vase. The widest point should be just below the center line. -
Collar the neck:
Begin to collar the clay inward significantly as you move up past the belly. Compress the clay frequently to prevent wrinkling as the neck gets narrower. -
Flare the rim:
Drawing the clay upward into a long, slender neck, gently flare the rim outward at the very top to create that delicate trumpet shape. -
Refine the surface:
Smooth the entire surface with a metal rib to remove finger marks and create a blank canvas for your carving. Let the vase dry to a firm leather-hard stage.
Step 2: Carving the Wraparound Patterns
-
Mark the sections:
Use a needle tool to lightly scribe horizontal guide lines around the vase while spinning it slowly. I find it helpful to mark out where the diagonal bands will go versus the horizontal straight lines. -
Initial horizontal scoring:
Starting near the bottom, use a pointed tool or a small loop tool to carve tight, horizontal parallel lines. Apply consistent pressure as the wheel turns slowly to keep the depth uniform. -
Create the lower diagonal band:
Above the bottom section of horizontal lines, carve a band of diagonal slashes. These should be short, deeply angled cuts that flow in the same direction around the curviture of the belly. -
Carve the central texture:
Move to the main body of the vase. Carve multiple bands of fine horizontal grooves. Vary the spacing slightly—group three or four tight lines together, leave a tiny gap, then repeat. -
Execute the upper diagonal band:
At the shoulder of the vase (where it begins to taper in), carve the prominent upper band of diagonal lines. Make these cuts slightly longer and bolder than the lower band to emphasize the shoulder curve. -
Detail the neck transition:
Just below the neck, add a small, protruding ridge or ‘collar’ of clay. Carve fine lines immediately below this ridge to define the separation between the body and the neck. -
Finish the neck texture:
Leave the long neck mostly smooth, or add very faint, barely-there horizontal texturing contrast the heavy carving on the body.
Depth Consistency
Use a trimming tool with a fixed depth gauge or hold your carving tool at a consistent angle against a steady resting hand to ensure all carved grooves are equally deep.
Step 3: Finishing and Drying
-
Clean up burrs:
Once the carving is complete, let the clay stiffen slightly more. Then, gently rub the surface with a soft, slightly damp sponge or a scouring pad to knock off any sharp clay crumbs or burrs. -
Final smooth:
Check the rim and the foot one last time. Burnish the rim with a piece of plastic or soft leather if you want a particularly smooth drinking edge or visual finish. -
Slow drying:
Cover the vase loosely with plastic to ensure slow, even drying. This is crucial for pieces with varying wall thicknesses due to carving. -
Bisque fire:
Once bone dry, bisque fire the vase according to your clay body’s specifications.
Crumbling Clay?
If the clay crumbles or tears as you carve, it is too dry. Spray a fine mist of water over the area, wrap it in plastic for an hour to rehydrate, and try again when softer.
Once fired, the interplay of light and shadow on the carved ridges will give your vase a timeless, archaic beauty.


What Really Happens Inside the Kiln
Learn how time and temperature work together inside the kiln to transform clay into durable ceramic.
Pressed Botanical Texture All Over
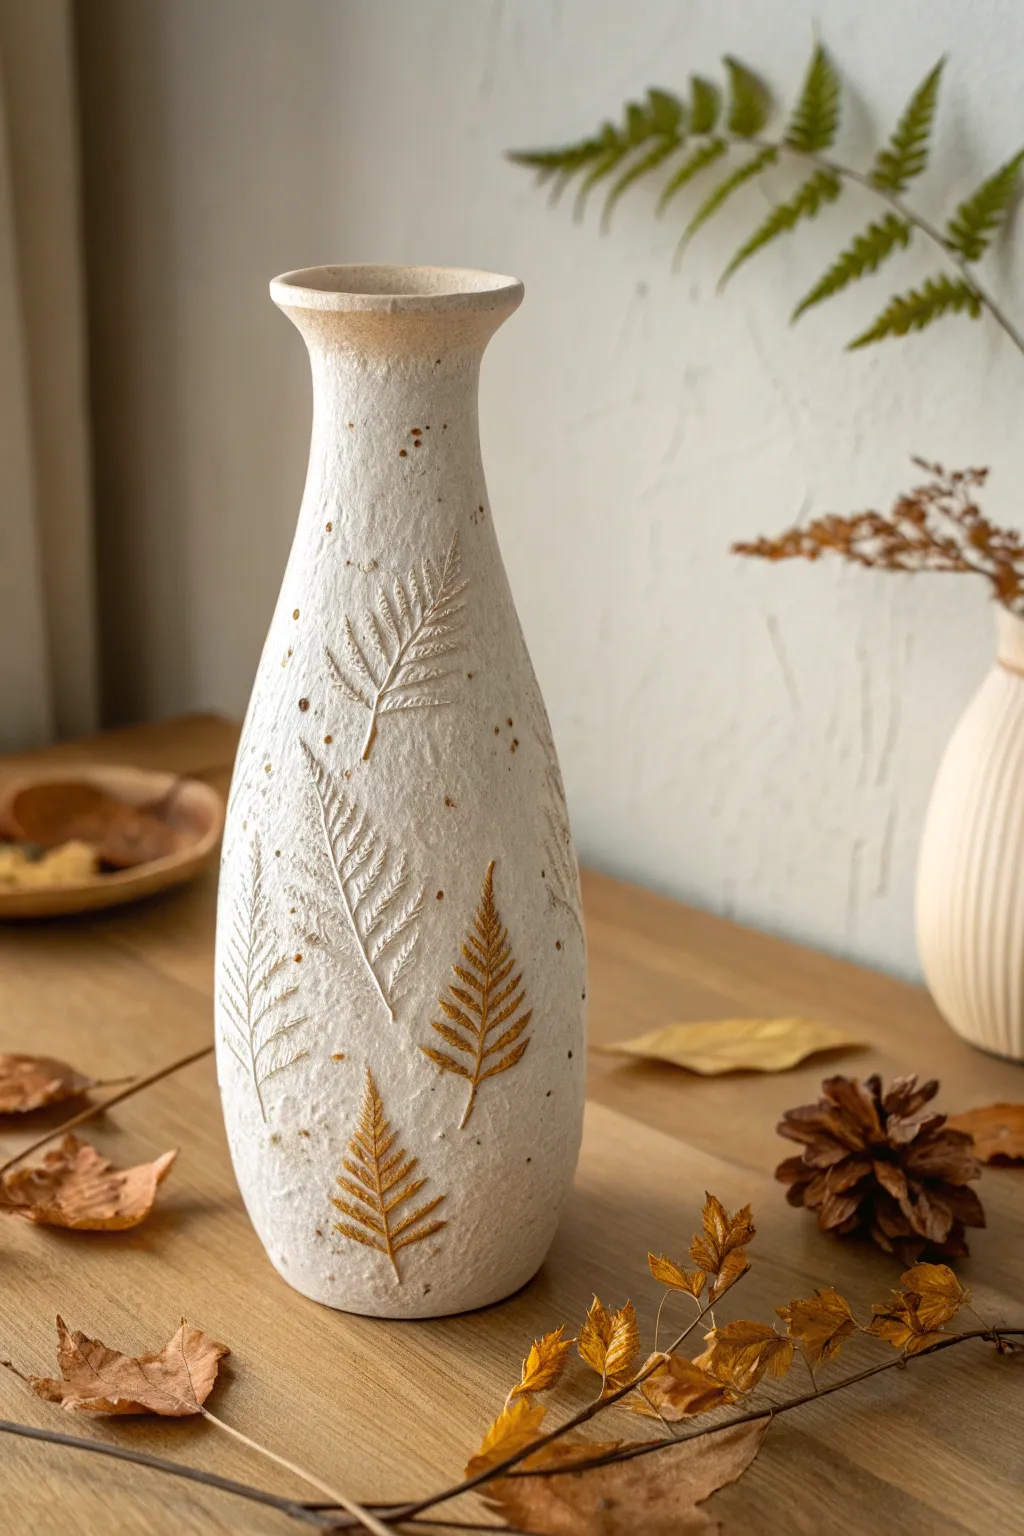
Capture the delicate beauty of nature with this textured clay vase featuring fossil-like fern imprints. The rough, sandy finish combined with golden-brown botanical relief creates an organic, antique aesthetic perfect for fall decor.
Step-by-Step Tutorial
Materials
- White stoneware or earthenware clay
- Rolling pin
- Fresh or pressed fern leaves (sturdy varieties work best)
- Slip (clay mixed with water)
- Pottery sponge
- Rib tool
- Needle tool or fettling knife
- Grogged clay or grit additive (optional for extra texture)
- Iron oxide wash or watered-down brown underglaze
- Clear matte glaze
- Small paintbrush
- Kiln (or air-dry clay alternatives for non-functional wear)
Step 1: Forming the Base
-
Prepare the clay slab:
Begin by rolling out a medium-sized slab of white clay to a consistent thickness, about 1/4 inch. If you want that gritty texture seen in the photo, knead in some grog or sand before rolling, or use a clay body that already has a high grog content. -
Cut the template:
Calculate the dimensions for your vase. For this tapered shape, you’ll need a tall trapezoid shape where the bottom edge is wider than the top, plus a circular base piece. -
Texturize the surface:
Before assembling, lightly tap the entire surface of the slab with a stiff-bristle brush or a rough stone. This creates the pitted, limestone-like background texture that gives the piece its ancient character. -
Assemble the cylinder:
Stand the slab up and curve it into a tube. Score and slip the connecting edges thoroughly, then press them together to form a seam. Smooth the seam inside and out so it disappears completely. -
Attach the base:
Score the bottom edge of your cylinder and the outer edge of your circular base piece. Joing them with slip, pressing firmly to ensure a watertight seal. -
Shape the neck:
Gently collar the top of the cylinder inward by squeezing lightly with damp hands while rotating the piece (if using a wheel) or carefully modeling it by hand. Flare the very top rim outward slightly to create the lip.
Clean Impressions
If the leaves stick to the clay, dust the back of the fern lightly with cornstarch before pressing. This acts as a release agent and burns off completely in the kiln.
Step 2: Botanical Impressions
-
Select your greenery:
Choose fern fronds that have firm veins. Soft, wilting leaves won’t leave a distinct enough impression. -
Plan the layout:
Lay your ferns against the vase to visualize the spacing. I like to let them flow diagonally upwards, mimicking how they grow in nature. -
Press the leaves:
Place a leaf against the clay wall. Support the clay from the inside with one hand, and use a small pony roller or your fingers to firmly press the leaf into the surface. The clay should still be slightly leather-hard at this stage. -
Peel and reveal:
Carefully find the stem of the fern and peel the leaf away. You should be left with a crisp, indented fossil of the plant. -
Clean up edges:
If the pressing caused any unwanted clay ridges around the leaf shape, gently tap them down or smooth them with a finger. Avoid erasing the fine texture of the leaf veins. -
Dry slowly:
Cover the vase loosely with plastic to let it dry slowly. Uneven drying can cause warping, especially with tall, slender forms.
Step 3: Finishing and Firing
-
Bisque fire:
Once bone dry, fire the piece to bisque temperature (usually Cone 04) to prepare it for glazing. -
Apply the oxide wash:
Mix red iron oxide with water (or use a brown underglaze). Paint this wash into the fern depressions and the random textural pits you created earlier. The goal is to stain the recessed areas. -
Wipe back:
Using a clean, damp sponge, wipe the surface of the vase. This removes the dark color from the high points (the white clay body) but leaves the pigment trapped in the leaf veins and texture pits, creating that golden-brown definition. -
Add speckles:
Dip a stiff toothbrush into the remaining oxide wash. Run your thumb over the bristles to flick tiny specks of color onto the vase’s surface for an organic, granite look. -
Glaze application:
Apply a coat of clear matte glaze over the entire exterior. A matte finish is crucial here; a glossy glaze would distract from the raw, stony texture we are aiming for. -
Final fire:
Fire the kiln again to the maturity temperature of your specific clay and glaze (often Cone 5 or 6 for stoneware).
Gold Leaf Accent
After the final firing, use gold leaf or gold luster pens to highlight just the main stems of the ferns. This adds a modern, luxurious touch to the rustic design.
Place your finished vase near a window where natural light can catch the subtle relief of the fossilized ferns
Dot and Pebble Appliqué Accents
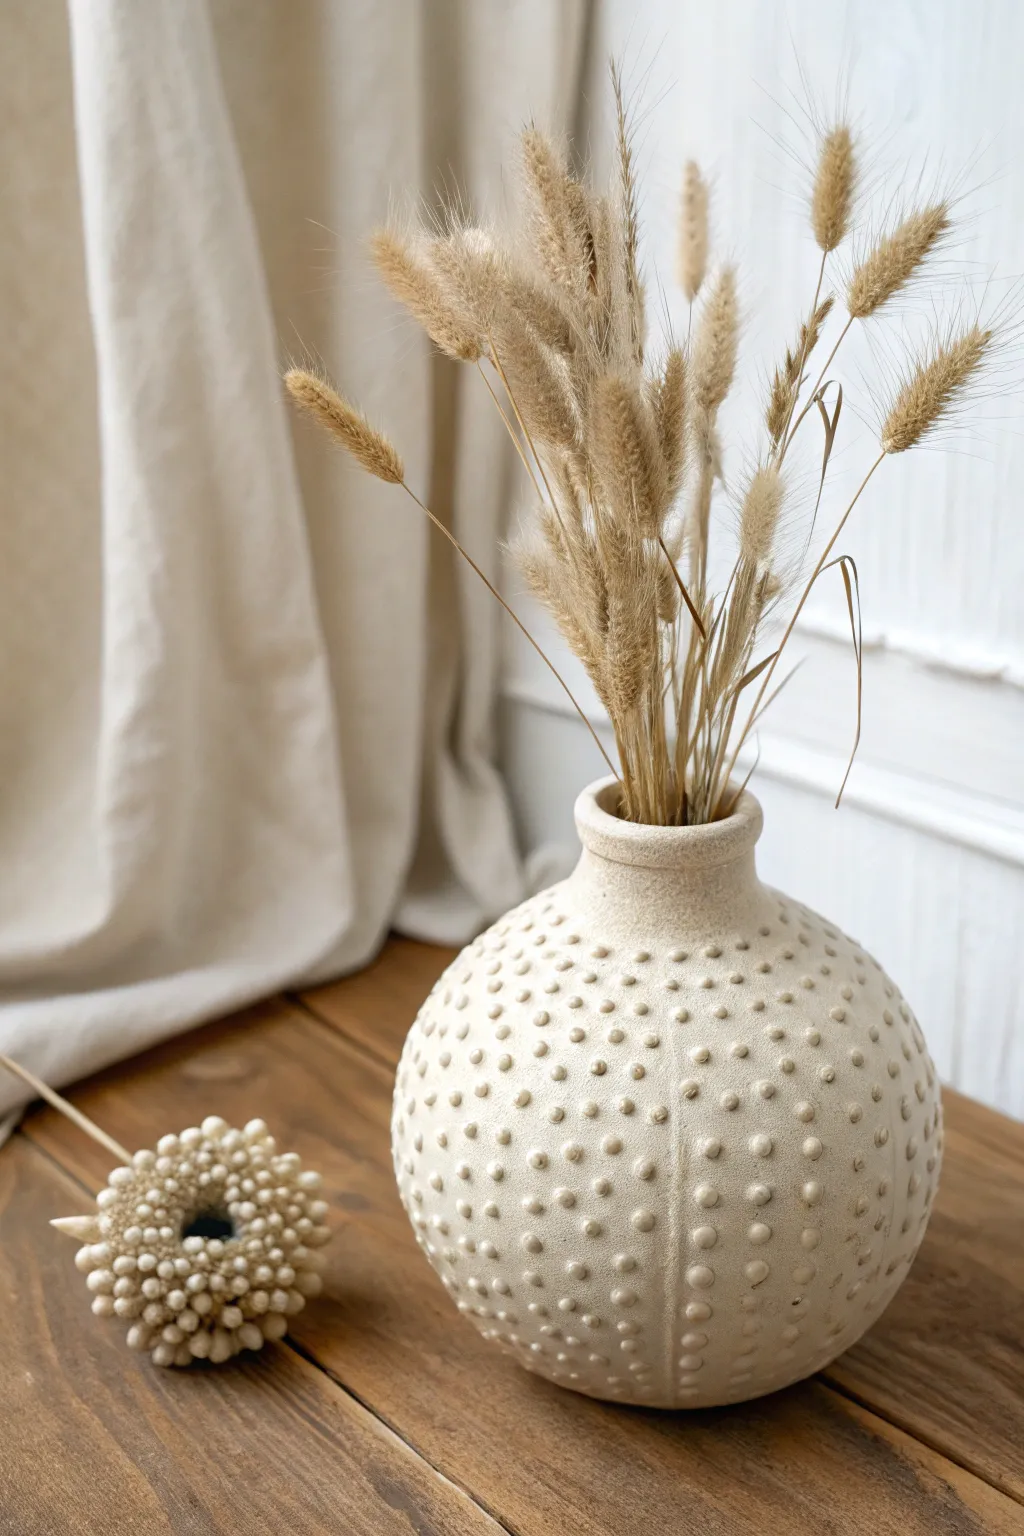
Bring the calming symmetrical beauty of a sea urchin into your home with this tactile clay project. This design combines a classic bulbous form with repetitive dot textural accents to create a piece that feels both organic and modern.
Step-by-Step Guide
Materials
- Air-dry clay or stoneware clay (white or cream)
- Pottery wheel or coil-building supplies
- Metal rib tool
- Sponge
- Wooden modeling tool or slip trailing bottle
- Scoring tool (needle or serrated rib)
- Slip (clay slurry)
- Matte cream or oatmeal glaze (or acrylic paint)
- Sandpaper (fine grit)
Step 1: Forming the Base Vessel
-
Establish the Sphere:
Begin by centering a substantial ball of clay on your wheel or creating a pinch pot base. Whether throwing or building with coils, aim for a perfectly round, spherical belly as the main body of the vase. -
Refine the Wall Thickness:
As you expand the walls outward, ensure they remain even—about 1/4 inch thick is ideal to support the weight of the appliqué texture later. -
Close the Neck:
Gently collar the clay inward at the top of the sphere to create a narrow neck. Pull it up about an inch to form a short, vertical collar. -
Flare the Rim:
Carefully flare the very top lip outward to create a distinct, rolled rim that balances the roundness of the body below. -
Smooth the Canvas:
Use a metal rib to compress the exterior surface while the clay is leather hard. You want a very smooth, uninterrupted surface before beginning the texture work.
Step 2: Creating the Pebble Texture
-
Map Your Grid:
Lightly trace vertical meridian lines down the vase using a needle tool or pencil. This will act as a guide to keep your pebble rows straight and evenly spaced. -
Prepare the Dots:
Roll tiny balls of clay, roughly the size of sparse peppercorns. Making a large batch of these ahead of time ensures consistent sizing and speeds up the application process. -
Score the Attachment Points:
Following your guidelines, make tiny scratch marks where each dot will go. I find it easiest to work in vertical columns from the rim down to the base. -
Apply Slip:
Dab a tiny amount of slip onto a row of scored marks. Do not flood the area, or the dots will slide. -
Attach the Pebbles:
Press a clay ball firmly onto each slip spot. Use your thumb to flatten it slightly into a dome shape rather than a full sphere. -
Refine the Shape:
Use a damp sponge or a soft brush to smooth the edges of each dot where it meets the vase body, ensuring a seamless, integrated look rather than a stuck-on appearance. -
Repeat the Pattern:
Continue this process, rotating the vase and filling in the vertical columns. Maintain consistent spacing between the dots for that uniform, sea urchin effect.
Batch Rolling Tip
Roll a long, thin coil of clay first, then slice it into equal tiny segments. Roll these segments into balls to guarantee every single dot is the exact same size.
Step 3: Finishing Touches
-
Dry Slowly:
Because of the added moisture from the slip and dots, cover the vase loosely with plastic for the first 24 hours to prevent cracking around the appliqués. -
Bisque Fire or Cure:
Once fully bone dry, bisque fire the piece if using kiln clay, or let it cure completely if using air-dry clay. -
Glaze Selection:
Choose a matte, stony glaze in an oatmeal or off-white shade. Avoid high-gloss glazes, as they can obscure the subtle shadows cast by the texture. -
Apply the Finish:
Brush or dip the glaze. If painting air-dry clay, mix a little baking soda into your acrylic paint to replicate that gritty, ceramic texture shown in the photo.
Dots Falling Off?
If your dots pop off as they dry, your base clay was likely too dry. Score deeper and use more slip, or cover the finished piece tighter to slow down the drying process.
Fill your new textured vessel with dried grasses to complete the natural, earthy aesthetic

TRACK YOUR CERAMIC JOURNEY
Capture glaze tests, firing details, and creative progress—all in one simple printable. Make your projects easier to repeat and improve.
Wavy Rim for a Soft Organic Look
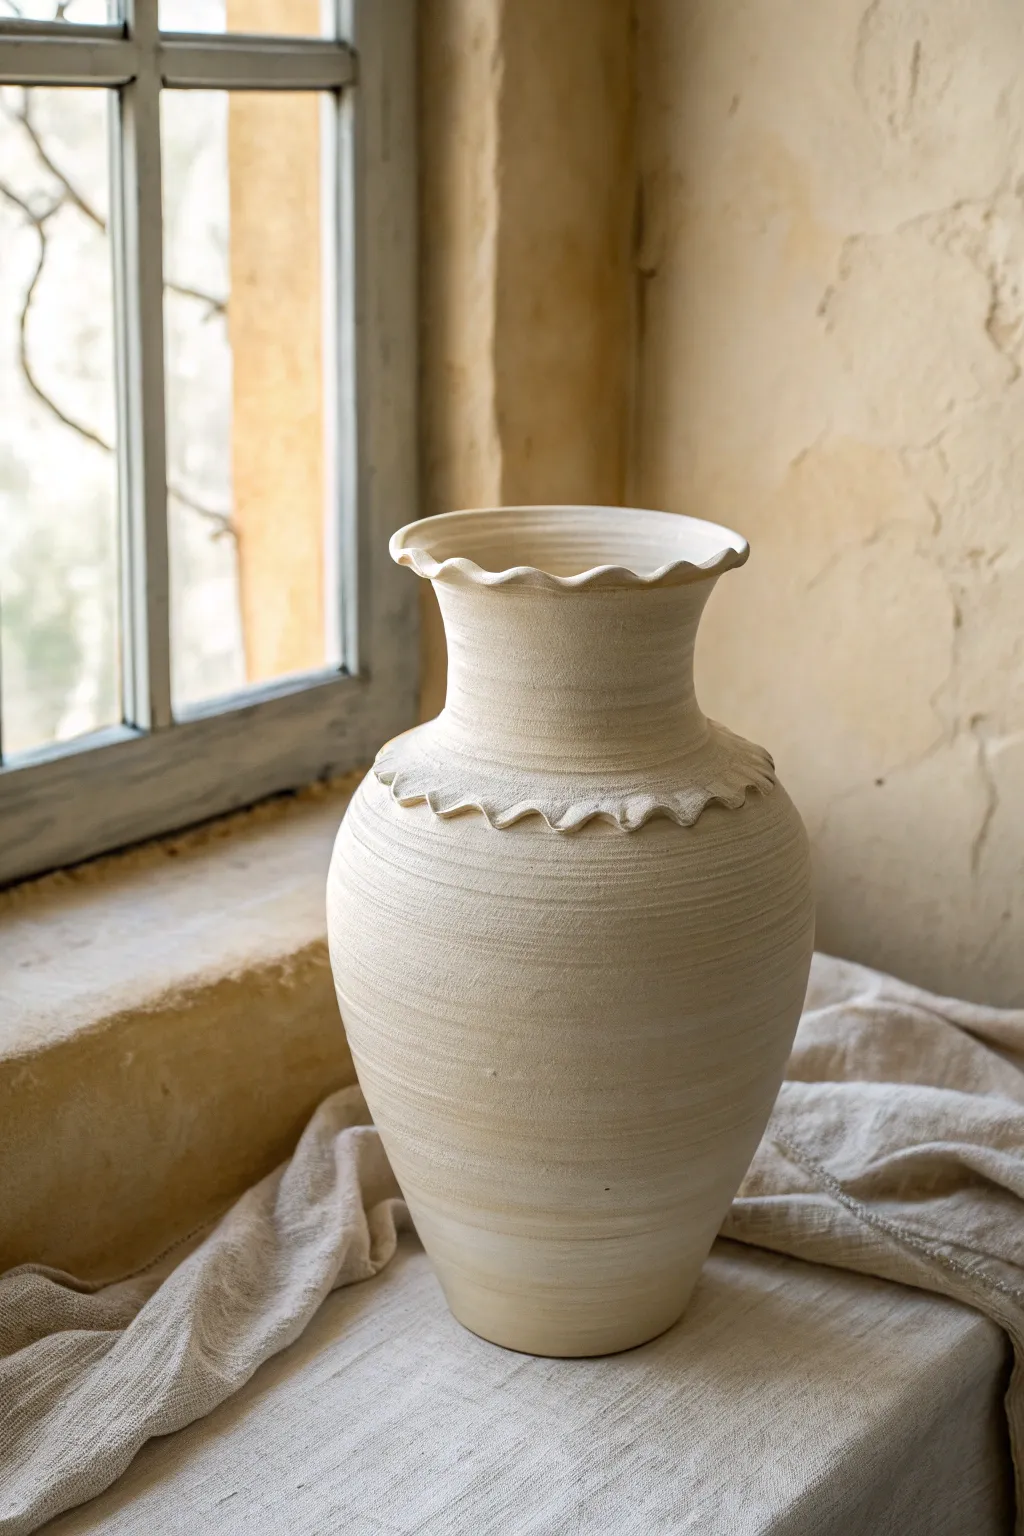
Embrace the natural beauty of unfinished ceramics with this wheel-thrown vase featuring delicate wavy accents. The creamy stoneware body and subtle throwing rings create a soft, organic aesthetic perfect for any rustic interior.
How-To Guide
Materials
- Light-colored stoneware clay (approx. 4-5 lbs)
- Pottery wheel
- Bucket of water
- Sponge
- Needle tool
- Wooden throwing rib
- Wire cutter
- Wooden modeling tool or finger (for fluting)
Step 1: Throwing the Base Form
-
Center the clay:
Begin by wedging your clay thoroughly to remove air bubbles. Slam the ball onto the wheel head and center it using steady pressure and water until it spins without wobbling. -
Open the form:
Drill your thumbs into the center of the mound, leaving about a half-inch of clay at the bottom. Pull the clay outward to establish the width of the floor. -
Pull the first cylinder:
Using a wet sponge and your fingers, compress the walls and begin pulling the clay upward. Keep your speed steady and don’t rush the height yet. -
Shape the belly:
As you gain height, gently push the clay outward from the inside to create a rounded belly shape. Aim for a gradual curve that starts widening from the base. -
Narrow the neck:
Once the belly is established, collar the clay in at the top to form a narrower neck. Use both hands to gently squeeze and lift the clay inward. -
Define the shoulder ridge:
Instead of a smooth transition, leave a slightly thicker band of clay where the shoulder meets the neck. This will become the secondary ruffle later. -
Flare the rim:
At the very top, pull the clay outward slightly to create a flared lip. Ensure the rim isn’t too thin, as you’ll need material to manipulate create the waves.
Step 2: Adding Texture and Detail
-
Enhance throwing lines:
Instead of smoothing the surface with a metal rib, use a soft sponge or just your fingers to leave subtle horizontal throwing spirals on the vase body. -
Create the shoulder ruffle:
Return to that thicker band of clay at the shoulder. Support the wall from the inside and use your finger to gently push the clay outward and down slightly, flattening it into a horizontal ring. -
Flute the shoulder:
With the wheel stopped, use your thumb and forefinger to gently pinch and twist the shoulder ring at regular intervals, creating a uniform wavy edge. -
Flute the rim:
Move to the top flared rim. Using the same pinching technique, create a matching wavy pattern. I find using a wet finger helps prevent cracking during this step. -
Refine the waves:
Go back over your waves with a damp sponge to soften any sharp edges. The goal is a soft, organic undulation rather than sharp spikes. -
Trim the base:
Use a wooden knife tool to undercut the bottom of the vase while it is still on the wheel, cleaning up any excess clay skirt.
Uneven Ruffles?
If your waves look irregular, mark the rim lightly with a needle tool at 12, 3, 6, and 9 o’clock positions first. This acts as a guide to space your pinches evenly around the circumference.
Step 3: Finishing
-
Wire off:
Pull a wire cutter taut and slice underneath the vase to separate it from the wheel head. -
Dry slowly:
Cover the vase loosely with plastic to ensure slow drying. This is crucial for the delicate ruffled edges, which dry faster than the body. -
Bisque fire:
Once bone dry, bisque fire the vase in a kiln to cone 04 or your clay body’s specification. -
Surface treatment:
To maintain the look in the image, leave the exterior unglazed or apply a very matte, transparent wash. A light sanding after firing can enhance the raw clay feel.
Level Up: Oxide Wash
Enhance the texture by wiping a diluted iron oxide wash over the bisque ware and sponging it off. The oxide will settle into the throwing lines and ruffles, highlighting the depth.
Place your finished vase near a window to let the light play across those beautiful organic contours
Fluted Scallop Vase
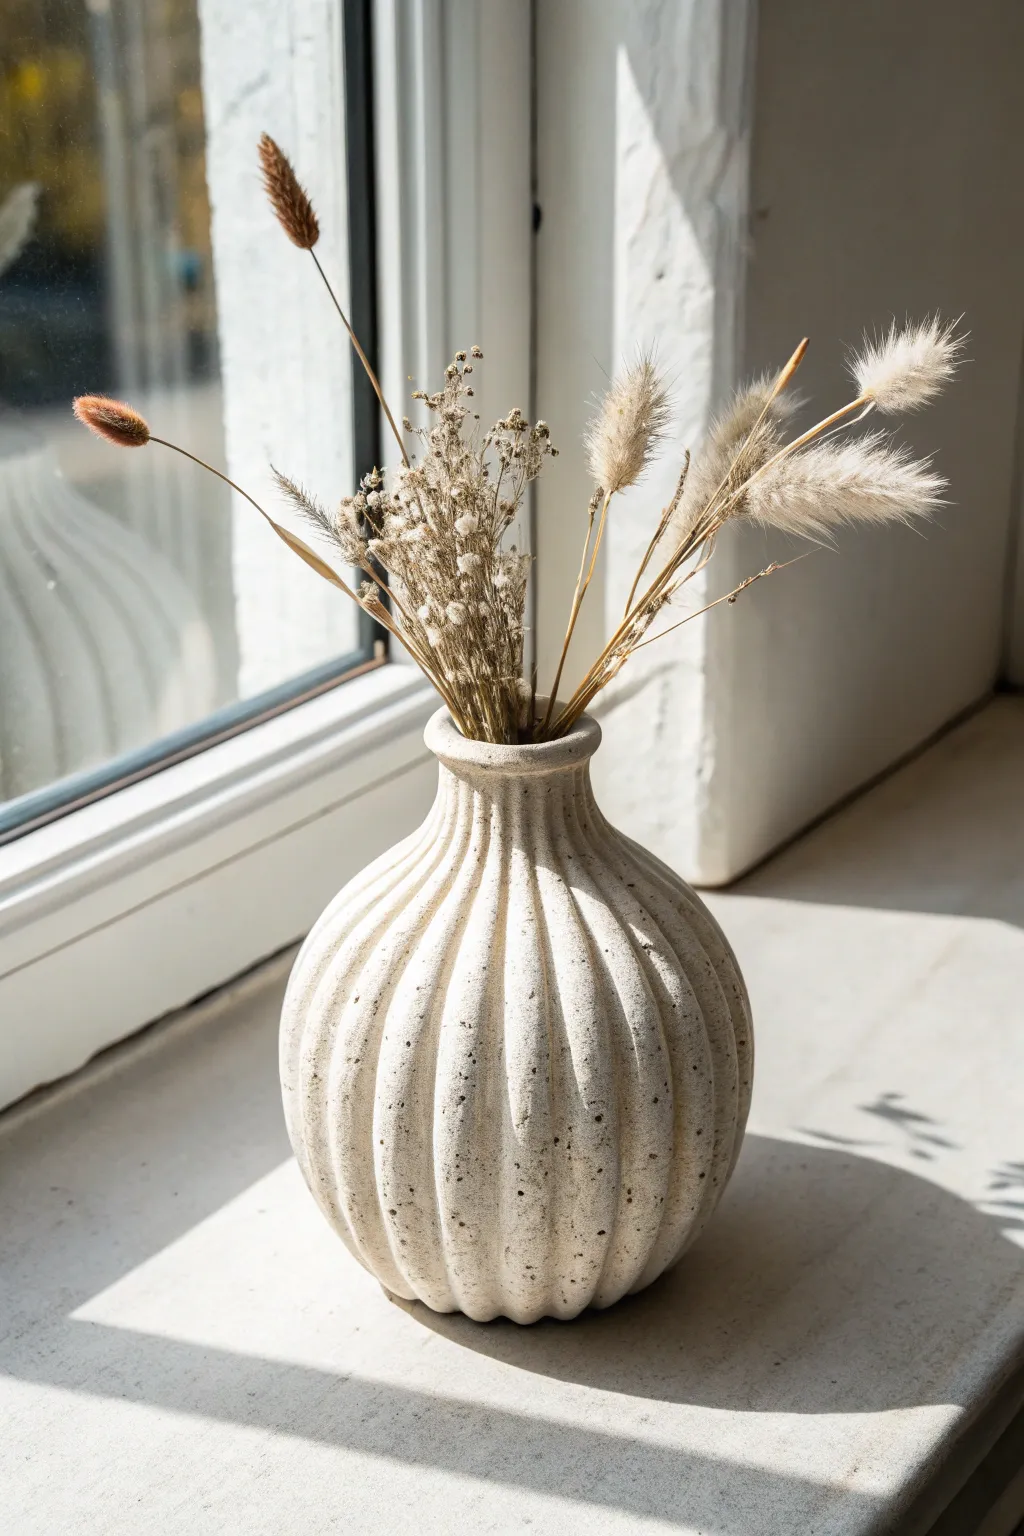
Create a serene, minimalist statement piece with this fluted vase, featuring deep vertical grooves and a soft, speckled stone effect. Its organic shape and textured finish bring a modern, earthy touch that perfectly complements dried botanicals.
Step-by-Step Guide
Materials
- Air-dry clay (white or cream)
- Small rolling pin
- Pottery sponge
- Loop tool (medium U-shape)
- Sharp clay knife or needle tool
- Basic clay adhesive (slip)
- Water in a small dish
- Fine-grit sandpaper (220 and 400 grit)
- Faux stone spray paint (cream/beige speckle)
- Matte clear sealant spray
Step 1: Forming the Base Structure
-
Prepare the clay:
Start by grabbing a generous amount of air-dry clay, about the size of a large grapefruit. Knead it thoroughly in your hands to warm it up and remove any trapped air bubbles, ensuring the consistency is smooth and pliable. -
Roll the bottom slab:
Pinch off a small portion of the clay and roll it flat with your rolling pin to create the base. Use a cookie cutter or a cup rim to cut out a perfect circle, about 3-4 inches in diameter. -
Create the coil base:
Roll the remaining large chunk of clay into thick, snake-like coils. The thickness should be roughly equivalent to a sturdy thumb. -
Build the walls:
Stack the coils onto the perimeter of your circular base. As you spiral upward, blend the coils together on both the inside and outside using your thumb or a modeling tool to create a solid, seamless wall. -
Shape the bulb:
Shape the vessel as you build. Gently push the clay outward from the inside to create a bulbous, rounded belly. Bring the walls back inward as you reach the top to form the narrower neck. -
Form the rim:
Flare the very top edge slightly outward to create a delicate lip. It doesn’t need to be perfectly symmetrical yet, but ensure the thickness is consistent around the circumference. -
Smooth the surface:
Dip your sponge lightly in water and run it over the entire exterior. I like to spend a few extra minutes here to erase all coil lines and ensure the surface is completely uniform before carving.
Clean Carving Trick
Wait until the clay is ‘leather hard’ (stiff but cold to the touch) before carving grooves. If the clay is too wet, the tool will drag and tear rather than slice.
Step 2: Carving the Flutes
-
Mark the guides:
Using a needle tool, lightly sketch vertical lines from the neck down to the base to plan where your flutes will go. Spacing them evenly is key to the rhythmic look. -
Carve the first channel:
Take your U-shaped loop tool and position it at the base of the darker ‘neck’ area. Drag the tool downward with steady, even pressure, carving out a strip of clay all the way to the bottom edge. -
Repeat the carving:
Continue carving adjacent channels around the entire vase. Leave a narrow ridge (about 2-3mm) between each carved channel to create the raised ribbing effect. -
Refine the ridges:
The carving process often leaves rough scraps of clay on the ridges. Use a slightly damp finger to gently smooth these edges down without blending the grooves away. -
Define the neck:
Where the carved flutes meet the neck, use a modeling tool to clean up the termination point so each flute has a soft, rounded top rather than a jagged stop. -
Initial drying:
Let the vase sit undisturbed in a cool, dry place. Depending on humidity, this needs to dry for 24 to 48 hours until it is bone dry and turns a chalky white color.
Level Up: Color Wash
Before sealing, apply a very watered-down brown acrylic paint into the grooves and wipe the surface immediately. This emphasizes the depth of the fluting.
Step 3: Finishing and Painting
-
Sand the flaws:
Once fully dry, take your 220-grit sandpaper and gently sand the outer ridges. Focus on smoothing the ‘hills’ while leaving the carved ‘valleys’ slightly rougher for texture contrast. -
Final polish:
Follow up with 400-grit sandpaper for an ultra-smooth finish on the raised areas. Wipe away all clay dust with a dry tack cloth or a clean brush. -
Apply stone texture:
Use the faux stone spray paint. Shake the can vigorously and apply thin, light coats from about 12 inches away. The goal is a subtle speckle, not a heavy, solid blanket of paint. -
Seal the piece:
After the stone effect is dry (usually 1-2 hours), apply two coats of matte clear sealant. This protects the finish and prevents the faux stone texture from shedding over time.
Fill your new textured vase with pampas grass or dried bunny tails to complete the soft, natural aesthetic.
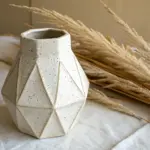
Geometric Slab-Built Box Vase
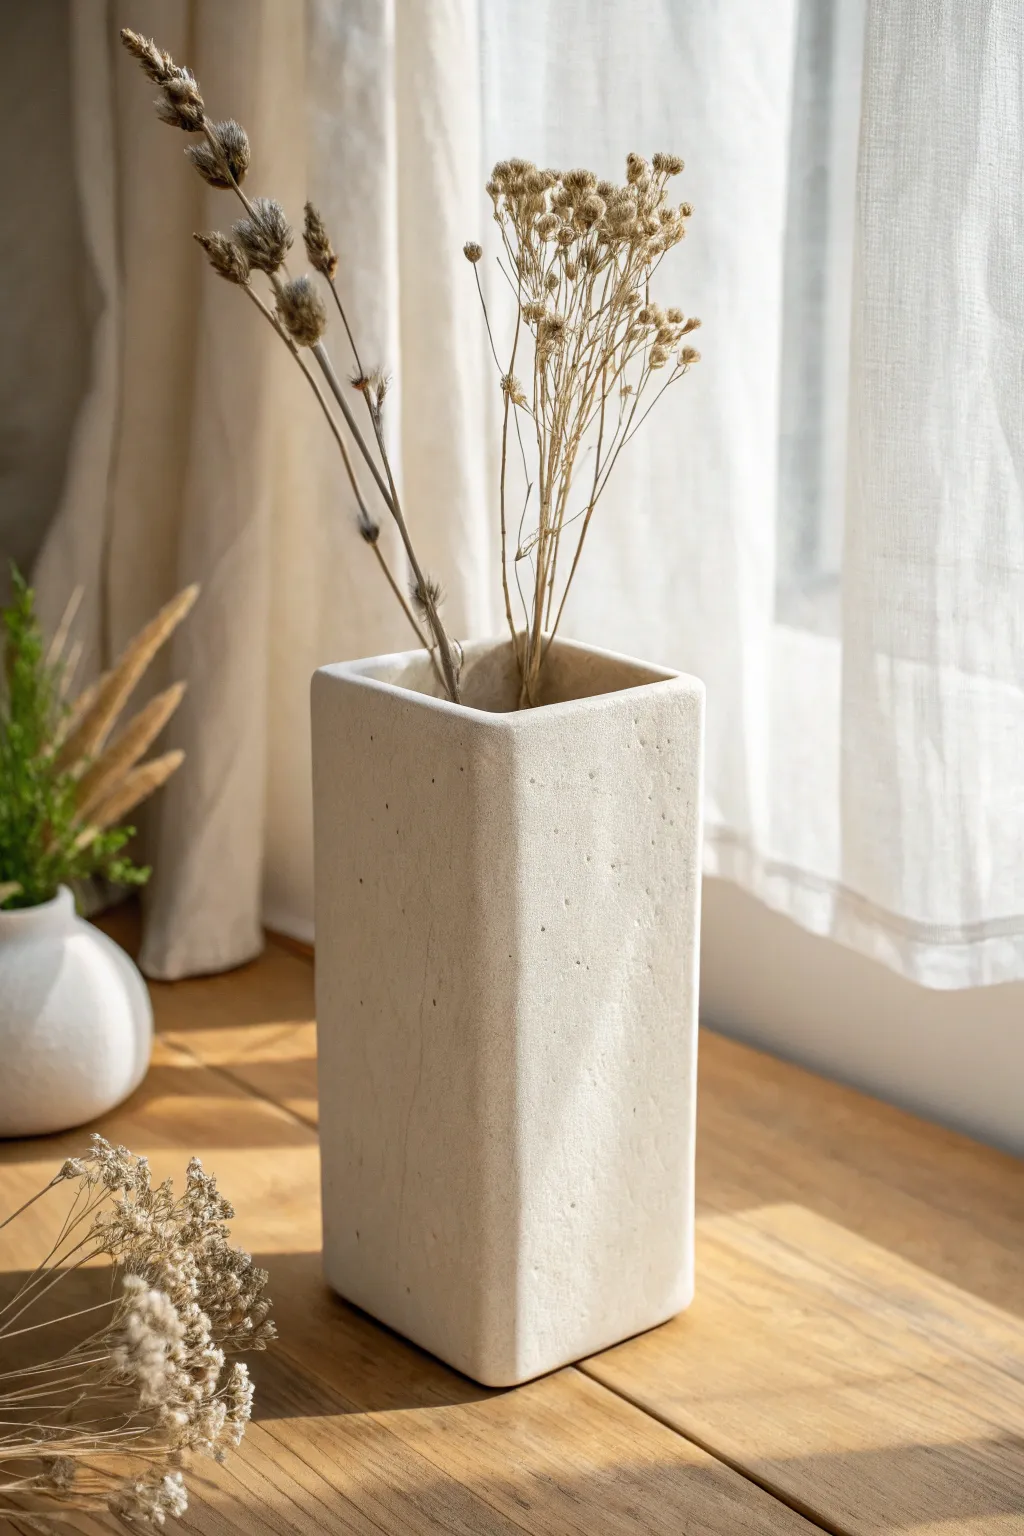
Embrace the beauty of simplicity with this tall, slab-built vase that mimics the look of natural white limestone. Its clean geometric lines and subtle, pitted texture create a modern yet organic vessel perfect for displaying dried botanicals.
Step-by-Step Tutorial
Materials
- Stoneware clay (buff or white groggy clay recommended)
- Rolling pin
- Two wooden guide strips (approx. 1/4 inch thick)
- Fettling knife or creative cutter
- Ruler
- Serrated rib or flexible metal rib
- Needle tool
- Slip (clay and water mixture)
- Rib tool
- Paddle tool
- Coarse sponge or toothbrush (for texturing)
- Matte white or transparent glaze
Step 1: Preparing the Slabs
-
Roll the clay:
Begin by wedging your clay to remove air bubbles, then place it between two wooden guide strips. Roll out a large, even slab of clay using your rolling pin, ensuring the thickness is consistent throughout. -
Compress the surface:
Use a flexible rib to compress the clay on both sides. This aligns the clay particles, reducing the chance of warping later, and creates a smooth canvas for our texture. -
Measure your templates:
You will need four identical rectangular walls and one square base. For the proportions seen in the photo, aim for walls approximately 3 inches wide by 8 inches tall. Create paper templates first to ensure accuracy. -
Cut the components:
Place your templates on the leather-hard slab. Using a fettling knife and a ruler, cut out the four walls and the square base. Be precise with your angles to ensure the box stands straight. -
Miter the edges (optional):
For a seamless corner like the one shown, cut the vertical edges of your wall slabs at a 45-degree angle. If this feels too advanced, a standard butt joint works too, just requiring more blending later. -
Dry to leather hard:
Let the slabs sit until they are ‘leather hard’—stiff enough to hold their shape upright without bending, but still soft enough to score and join.
Warping Walls?
If walls start bowing inward while building, stuff the inside with crumpled newspaper for support. It burns out smoothly in the kiln later.
Step 2: Assembling the Form
-
Score and slip:
Take your tools and heavily score (scratch) the edges where the walls will meet the base and each other. Apply a generous amount of slip to these rough areas. -
Attach the first wall:
Press one wall firmly onto the square base. Use a small coil of clay on the inside seam for reinforcement, smoothing it down with a modeling tool. -
Construct the box:
Attach the remaining walls one by one, joining them to the base and to each neighbor. Wipe away excess slip as you go, ensuring the corners are square. -
Paddle the shape:
Once assembled, gently tap the exterior walls with a wooden paddle. This helps bond the joints and straightens the flat planes of the vase. -
Refine the rim:
Check the slightly rounded top rim seen in the image. Use a damp chamois or your finger to smooth and slightly round the top edges so they aren’t sharp.
Level Up: Earthy Wash
Before glazing, wipe a diluted iron oxide wash over the surface and sponge it off. The oxide will settle in the texture pits for an aged stone look.
Step 3: Texturing and Finishing
-
Initial smoothing:
Use a metal rib to scrape away any major imperfections on the outside, but don’t over-polish; we want a natural look. -
Create the stone texture:
To achieve that specific pitted look, take a coarse, dry sponge or an old toothbrush. Dab and stipple it gently over the surface to create random, subtle pores. -
Add detail marks:
I like to use a needle tool to add a few tiny, deeper pinholes here and there to mimic natural travertine stone defects. -
Slow drying:
Loosely cover the vase with plastic to let it dry very slowly. This prevents the corners from cracking due to uneven shrinkage. -
Bisque fire:
Fire the piece in a kiln to bisque temperature (usually Cone 04) once it is bone dry. -
Glazing:
Apply a matte white or very thin satin glaze. If using a speckled clay body, a transparent matte glaze will let the natural clay texture shine through. -
Final firing:
Fire the vase a second time to the maturation temperature of your specific clay and glaze.
Now your sculptural vase is ready to bring a touch of serene architecture to your home decor
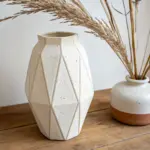
Faceted Vase With Angular Planes
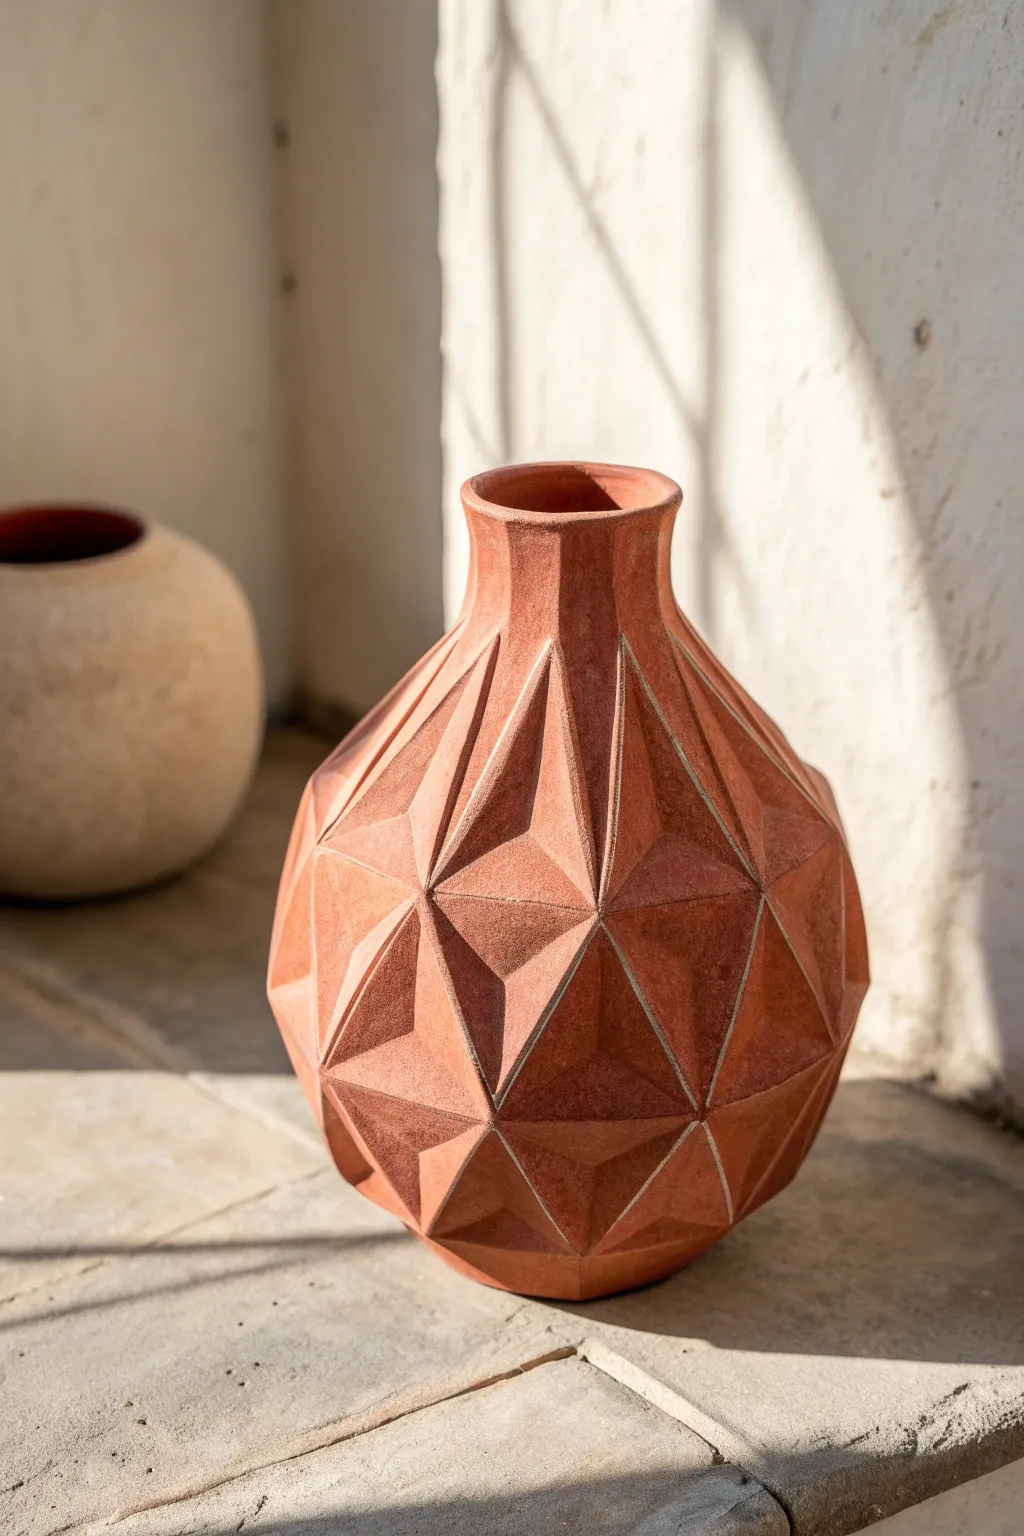
This striking vase combines modern geometry with the warmth of traditional terracotta, creating a sophisticated play of light and shadow across its surface. By carving precise angular planes, you transform a simple round form into an architectural statement piece that feels both ancient and futuristic.
Detailed Instructions
Materials
- High-grog terracotta or earthenware clay
- Pottery wheel (or coil/slab building tools)
- Wire texturing tool or rasp
- Rib tool (wooden or metal)
- Fettling knife
- Loop tools (flat-edged)
- Wire cutter
- Sponge
- Ruler or flexible measuring tape
- Needle tool
Step 1: Throwing the Base Form
-
Center and open:
Begin by centering a substantial amount of clay on the wheel, around 4-6 lbs, to ensure thick enough walls for deep carving later. Open the clay and pull the floor. -
Pull the cylinder:
Pull the walls upward into a tall cylinder, keeping them thicker than usual—aim for about 1/2 to 3/4 inch thickness throughout the body. -
Shape the belly:
Gently balloon the form outward from the inside to create a rounded, bulbous belly, maintaining that crucial wall thickness. -
Collar the neck:
Collar the top inward significantly to form a narrow, elegant neck, then flare the rim slightly for a finished look. -
Smooth and dry:
Use a rib to remove throwing lines and smooth the surface perfectly. Cut the vase off the bat but leave it in place or move to a ware board. Let it dry to a solid leather-hard state; this firmness is non-negotiable for crisp carving.
Step 2: Mapping the Geometry
-
Measure the grid:
Using a flexible ruler, lightly mark even vertical divisions around the circumference of the belly. I find that 8 or 10 vertical sections usually work best for this scale. -
Establish horizontal bands:
Lightly scribe horizontal lines around the pot to define rows for the triangles. You’ll need at least three rows: one for the bottom facets, a central row, and a top row leading into the neck. -
Draw the triangles:
Connect your grid points with a needle tool to draw a tessellating pattern of diamonds and triangles. The points of the diamonds should align vertically.
Uneven Wall Thickness?
If you carve through the wall, patch it immediately with soft clay and score well. In the future, use a needle tool to gauge thickness before carving deep facets.
Step 3: Carving the Facets
-
Initial cuts:
Select a sharp, flat-edged loop tool. Begin shaving away clay from the center of a marked triangle, sloping purely toward the lines you drew. -
Define the planes:
Continue carving each triangle so that the deepest part is near the center or edges (depending on if you want concave or convex pyramids), creating a sharp ridge where the lines meet. For this design, we are creating ‘pyramids’ that stick out, so you carve the valleys between the peaks. -
Refine the edges:
Work slowly around the pot. As you crave adjacent sections, a sharp, raised ridge will emerge between them. Keep these ridges crisp and un-rounded. -
Address the neck:
Carve vertical flutes or elongated triangles up the neck to transition the complex body geometry into the rim. -
Clean up:
Once all facets are carved, use a slightly damp sponge to soften distinct tool marks just slightly without destroying the sharp architectural edges.
Enhance the Edges
After the final firing, lightly sand the raised ridges with fine-grit sandpaper. This highlights the geometry by creating a subtle color contrast on the high points.
Step 4: Texture and Finish
-
Texturize the surface:
Gently drag a rasp or wire texture tool across the faceted planes. This creates the stone-like, gritty finish seen in the image. -
Slow drying:
Cover the vase loosely with plastic to equalize the moisture content, especially since the carved areas are thinner than the peaks. Dry slowly to prevent cracking. -
Introduction to firing:
Bisque fire according to your clay body’s specifications. -
Final look:
To match the reference, leave the exterior unglazed or apply a very thin matte wash of iron oxide to enhance the terracotta color, then fire to maturity.
Place your vase in a spot with side lighting to fully appreciate the dramatic shadows cast by your hand-carved facets
Pierced Cutout Pattern Vase
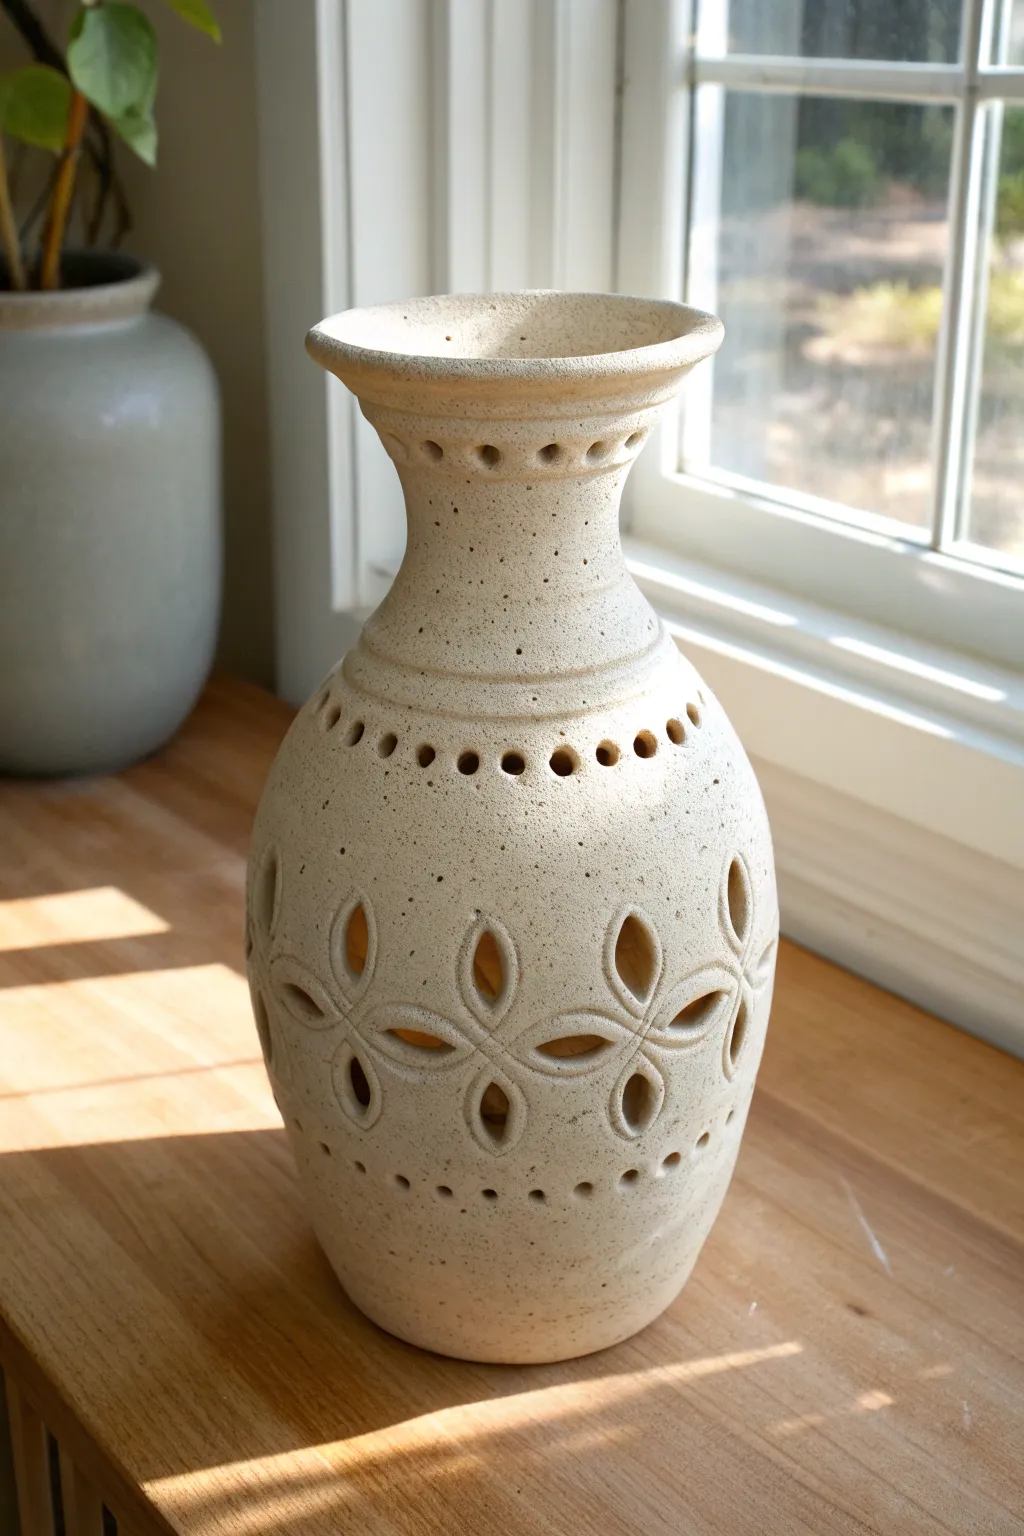
This project transforms simple stoneware clay into an airy, elegant vessel that plays with light and shadow. The speckled cream finish and delicate floral cutouts create a stunning centerpiece that feels both earthy and refined.
Step-by-Step
Materials
- Speckled buff stoneware clay (approx. 3-4 lbs)
- Pottery wheel
- Throwing sponges and ribs
- Wire cutter
- Loop trimming tools
- Needle tool
- Small circular hole punch or drill bit tool
- X-Acto knife or sharp fettling knife
- Flexible metal rib
- Transparent matte glaze
- Sponge for smoothing
- Kiln
Step 1: Throwing and Shaping
-
Center and open:
Begin by firmly wedging your speckled clay to remove air bubbles. Center the clay on the wheel and open it up, creating a flat floor about 3-4 inches wide. -
Pull the cylinder:
Pull the walls up into a tall, even cylinder. Focus on keeping the walls consistent in thickness, slightly thicker than usual (about 1/4 inch) to support the future cutouts. -
Belly out the form:
Using a rib on the inside and a sponge on the outside, gently push the clay outward from the inside to create a rounded belly at the bottom third of the vessel. -
Collar the neck:
Slowly choke or ‘collar’ the clay inward as you move up past the belly, narrowing the form significantly to create a distinct neck. -
Flare the rim:
Once the neck is narrow, gently pull the very top rim outward to create a flared, trumpet-like opening. Smooth the lip with a chamois for a professional finish. -
Dry to leather hard:
Cut the vase from the bat but leave it in place or move to a ware board. Let it dry slowly until it reaches a sturdy leather-hard stage; if it’s too soft, the cutouts will warp the shape.
Step 2: Trimming and Planning
-
Trim the foot:
Place the vase upside down on the wheel (use a chuck if the neck is too narrow). Trim away excess weight from the bottom and refine the curve of the belly. -
Mapping the design:
Lightly sketch your design directly onto the clay with a needle tool. Mark a horizontal band near the neck and another near the bottom for the small holes, and map out the center floral motif.
Clean Cuts Pro Tip
Wait until the clay is stiff leather-hard before carving. If the knife drags or the clay deforms, it’s too wet. If it chips or cracks, it’s too dry—try misting it lightly.
Step 3: Carving the Patterns
-
Drill the neck detail:
Using a small circular hole punch or drill tool, create a row of evenly spaced holes around the top flared section of the neck. -
Create the shoulder row:
Move down to the shoulder area (where the neck meets the body) and punch a second row of slightly larger circular holes. -
Carve the floral petals:
For the main body design, carefully cut out the petal shapes. I find it helpful to first punch a small pilot hole, then use a sharp X-Acto knife to carve the elongated teardrop shapes. -
Add the center accents:
Between the four-petal arrangements, carve small diamond or oval shapes to connect the pattern visually. -
Punch the bottom border:
Finish the pierced work by adding a final row of small circular holes near the base of the vase.
Slumping Issues?
If your vase starts to sag while carving the large belly holes, stuff the inside loosely with newspaper or foam to provide internal support without distorting the shape.
Step 4: Finishing and Firing
-
Clean the edges:
Once the clay is bone dry, use a slightly damp sponge or a dry scouring pad to gently smooth any sharp burrs left from the carving process. -
Bisque fire:
Load the vase into the kiln for a bisque firing (usually Cone 04 or 06). Handle carefully, as the cutouts make the greenware fragile. -
Glaze application:
Dip the vase into a transparent matte glaze. This will seal the clay while allowing the natural speckles of the buff clay to show through. -
Clean the cutouts:
Check every single cutout hole. If glaze has spanned across a hole, specific surface tension might keep it there; blow it out gently or wipe it away with a brush. -
Final firing:
Fire to the maturity temperature of your stoneware (typically Cone 5 or 6). Ensure no other pots are touching it, as the heat needs to circulate through the cutouts.
Place your finished vessel near a window to enjoy the beautiful patterns of light it casts throughout the day
Raised Squiggle “Noodle” Lines
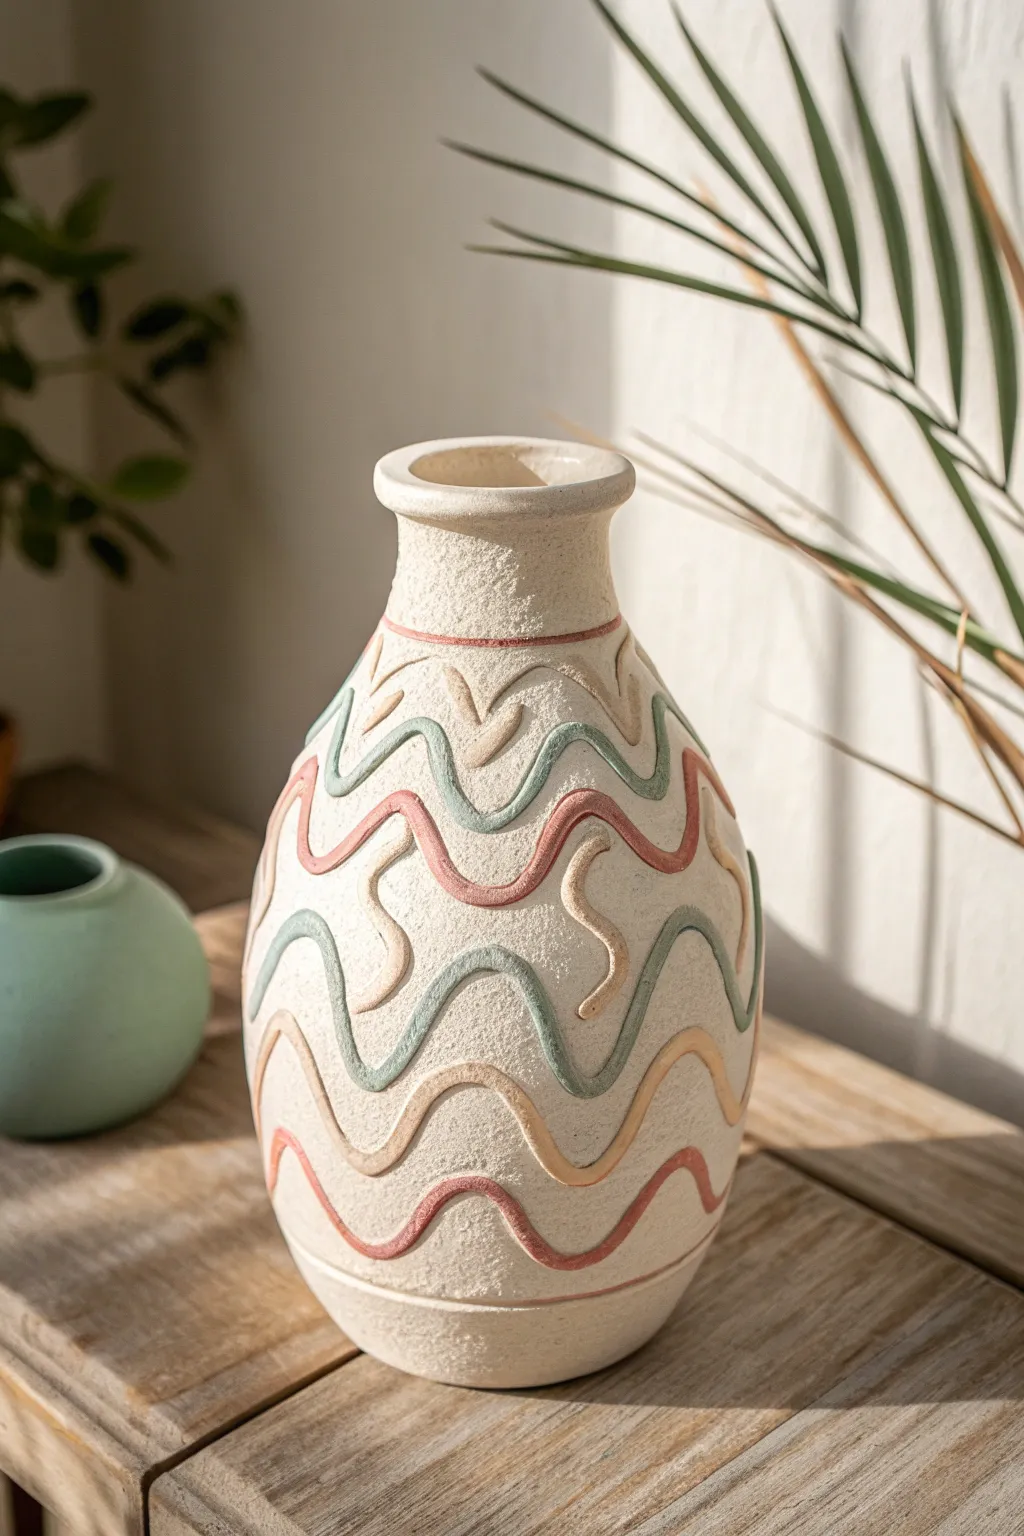
Transform a plain ceramic form into a tactile piece of art with this raised relief technique using air-dry clay or texture paste. The finished vase features charming, organic “noodle” squiggles in soft pastel tones, set against a beautifully textured, sandy background that mimics high-end stoneware.
Step-by-Step Tutorial
Materials
- Smooth glass or ceramic vase (as a base)
- Air-dry clay (white or terracotta)
- Texture paste or plaster of Paris mixed with sand
- Gesso primer
- Palette knife or stiff brush
- Rolling pin
- Clay extruder or exacto knife
- Slip (clay mixed with water) or heavy gel medium
- Acrylic paints (pastel pink, sage green, sand/beige, off-white)
- Matte finish spray sealant
- Fine grit sandpaper
Step 1: Prepping the Base Texture
-
Clean the surface:
Wipe down your base vase with rubbing alcohol to ensure it is free of dust and oils, which helps the new layers adhere properly. -
Mix the texture base:
Create a gritty paste by mixing acrylic gesso with fine sand or baking soda. The consistency should be like thick frosting. -
Apply the base coat:
Using a palette knife or a stiff bristle brush, stipple this mixture all over the vase. I like to dab it on rather than brush it smooth to create that rough, stone-like pitted surface. -
Let it cure:
Allow this base texture layer to dry completely, preferably overnight, until it is hard to the touch. -
Base painting:
Paint the entire textured surface with a warm off-white or cream acrylic paint. Apply two coats if necessary for full coverage.
Step 2: Creating the Noodle Squiggles
-
Condition the clay:
Take a handful of air-dry clay and knead it until it is soft and pliable. If it feels dry, add a tiny drop of water. -
Create coils:
Roll thin, even snakes of clay on a flat surface. For uniform thickness, a clay extruder works wonders, but hand-rolling works if you are careful. -
Flatten slightly:
Gently press down on your coils so they aren’t perfectly round tubes; a slightly flattened back helps them adhere better to the vase curve. -
Plan the pattern:
Lightly sketch wavy horizontal lines around the vase with a pencil to guide your placement, alternating between long waves and short ‘s’ curves. -
Attach the first wave:
Apply a line of slip or heavy gel medium along your first pencil guide. Press a clay coil onto the adhesive, gently shaping it into the wave pattern as you go. -
Smooth the edges:
Use a damp paintbrush or a clay tool to smooth the edges of the coil where it meets the vase, ensuring there are no gaps. -
Repeat the process:
Continue adding rows of squiggles. Vary the patterns slightly—do a continuous wave, then perhaps a row of separated ‘v’ or ‘s’ shapes. -
Texture the noodles:
Before the clay dries, take a stiff dry brush and tap the surface of the clay coils to give them a texture that matches the rough pot. This makes them look integrated rather than stuck on.
Adhesion Hack
Score the surface of the vase slightly with sandpaper where the clay lines will go. Roughing up the texture helps the glue and clay grip significantly better.
Step 3: Painting and Finishing
-
Dry time:
Let the applied clay noodles dry completely. This usually takes 24 hours depending on humidity. -
Prime the details:
Paint the dried clay coils with the same off-white base color used on the vase body so you have a neutral starting point. -
Apply the pastel colors:
Mix your acrylics into soft matte shades: dusty rose, sage green, and warm beige. Carefully paint the raised squiggles, using a small angle brush to keep crisp lines. -
Add depth:
I usually mix a very watered-down brown wash and lightly brush it into the crevices of the texture, then wipe it away immediately with a rag. This emphasizes the gritty stone look. -
Seal the work:
Once all paint is dry, spray the entire piece with a matte clear coat. This protects the clay from moisture and unifies the sheen of the different paints.
Speckled Stone Effect
Mix used coffee grounds or cracked pepper into your base paint. When dry, it mimics the tiny mineral deposits found in real stoneware pottery.
Now you have a stunning, tactile vessel that brings a touch of modern bohemian style to your shelf
Minimal Face Line Art Vase
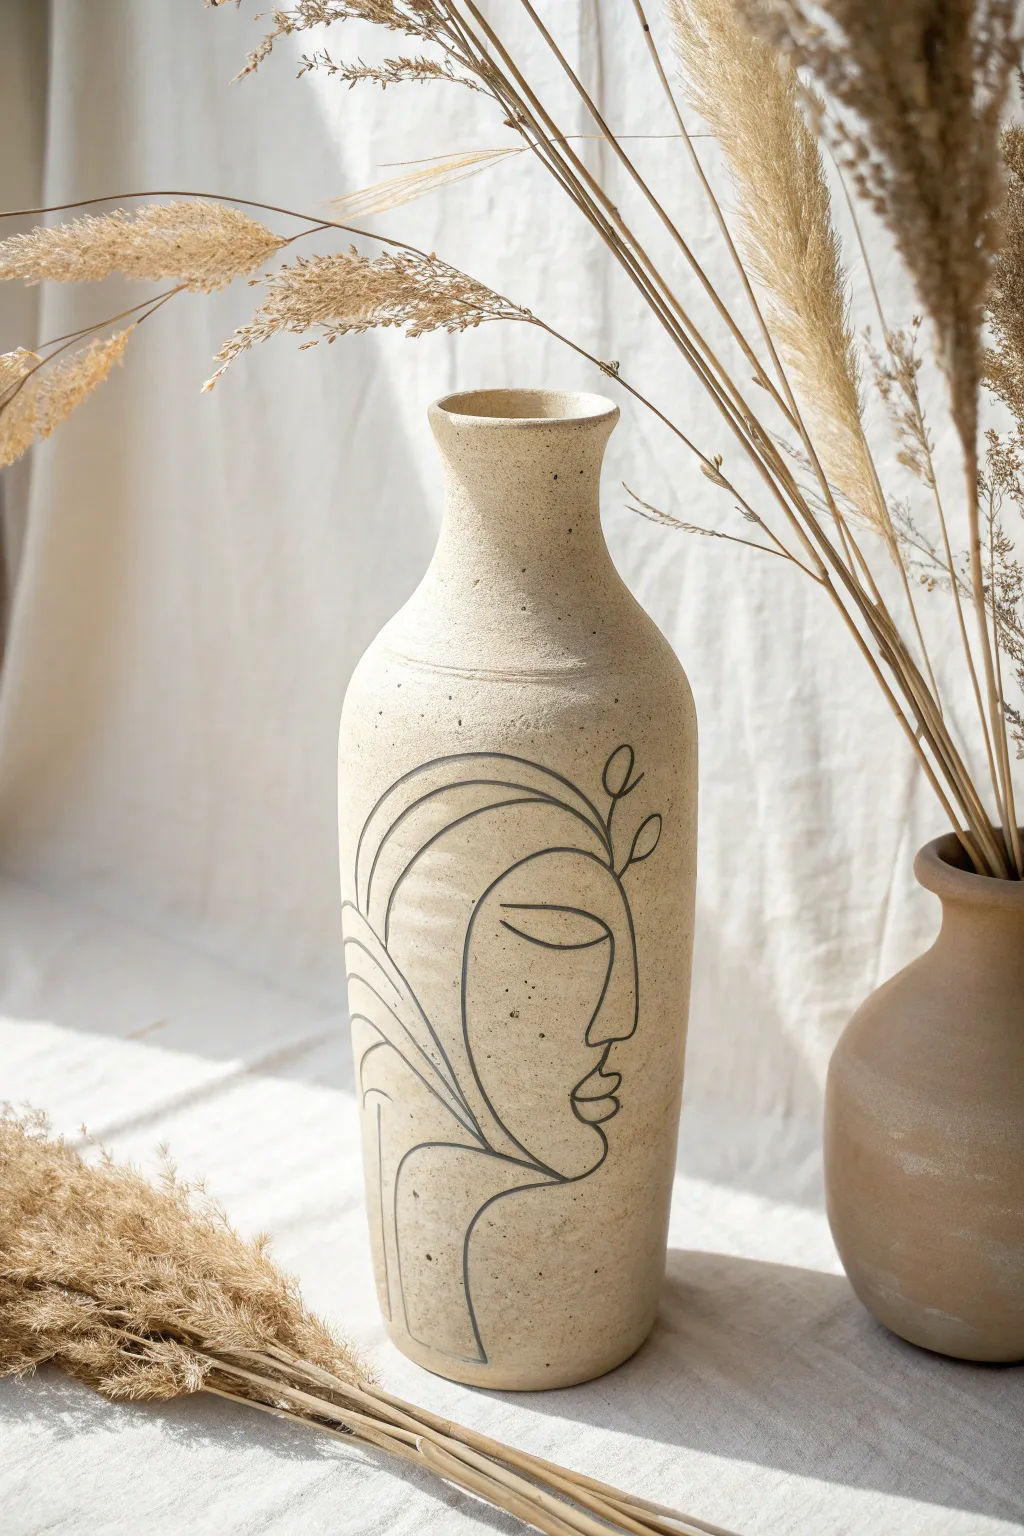
Embrace the beauty of wabi-sabi with this stunning textured vase project. By combining simple hand-building techniques with sleek, continuous line art, you’ll create a sophisticated vessel that feels both ancient and unmistakably modern.
How-To Guide
Materials
- Stoneware clay with speckles (e.g., speckled buff)
- Rolling pin
- Canvas mat or slab roller
- Needle tool
- Serrated rib tool
- Soft rubber rib
- Slip (clay mixed with water)
- Scoring tool or fork
- Line art template (optional)
- Carving tool (small loop or sharp stylus)
- black underglaze or mason stain wash
- Small paintbrush
- Sponge
- Clear matte glaze (optional)
Step 1: Fomring the Vase
-
Prepare the slab:
Start by wedging your speckled stoneware clay thoroughly to remove air bubbles. Roll it out into a large, consistent slab about 1/4 to 3/8 inch thick. Using guide sticks on either side of your rolling pin helps keep the thickness uniform. -
Cut the body:
Measure and cut a large rectangle from your slab. The height of the rectangle will be the height of your vase body, and the length will determine the circumference. For a tall vase like this, try 12 inches high by 14 inches wide. -
Bevel the edges:
On the two shorter sides of your rectangle (the sides that will join), cut 45-degree angles in opposite directions. This allows the seam to overlap cleanly without adding extra bulk. -
Score and slip:
Generously score the beveled edges using a serrated rib or fork. Apply slip to both scored areas creating a sticky mud ‘glue’. -
Create the cylinder:
Stand the rectangle up and curve it into a cylinder, pressing the beveled edges together firmly. Support the wall from the inside with one hand while you smooth the seam on the outside with a wooden tool. -
Add the base:
Roll a small separate slab for the bottom. Place your cylinder on top of it and trace around the base. Cut out this circle, score and slip the contact points, and attach the base to the cylinder wall. -
Form the neck:
To achieve the tapered neck shown in the image, gently collar the clay inward at the top third of the cylinder. Use wet hands to slowly compress the clay diameter, moving upward to create that elegant bottleneck shape. -
Refine the surface:
I prefer to use a soft rubber rib at this stage to smooth the entire surface. This removes fingerprints and canvas texture while bringing the natural speckles of the clay to the forefront.
Step 2: Adding the Design
-
Leather hard stage:
Let the vase dry slowly under loose plastic until it reaches a ‘leather hard’ state. The clay should be firm enough to hold its shape perfectly but soft enough to carve into without chipping. -
Plan the face:
Lightly sketch your continuous line face design onto the surface using a needle tool or pencil. Don’t press deep yet; just mark the placement of the profile, the closed eye, and the stylized botanical hair elements. -
Carve the lines:
Using a sharp carving stylus or a very small loop tool, go over your sketch lines. Carve a clean, shallow trench for every line. Keep the depth consistent so the inlay material will sit evenly later. -
Clean the burrs:
Carving often leaves little clay crumbs or sharp edges (burrs). Wait about 30 minutes for these to stiffen slightly, then gently brush them away with a soft, dry brush or smooth them down with a finger. -
Bisque fire:
Allow the vase to dry completely (bone dry) before firing it in the kiln to bisque temperature (usually cone 04). This hardens the clay for the glazing phase.
Smudged Lines?
If wiping back the underglaze smears the black into the clay pores, your sponge is too wet. Squeeze it out thoroughly and wipe in one direction, rinsing frequently.
Step 3: Inlay and Finishing
-
Apply the inlay:
Once bisqued, mix black underglaze with a little water. Paint this mixture generously over the carved lines, ensuring it gets deep into the grooves. Don’t worry if it gets on the surrounding surface. -
Wipe back:
Wait until the underglaze is touch-dry. Using a clean, slightly damp sponge, wipe away the excess black pigment from the surface of the vase. The black should remain trapped only in the carved lines. -
Surface check:
Continue wiping with a clean area of the sponge until the background clay is clean and the speckles are visible again. This creates that sharp, contrasting graphic look. -
Final glaze (optional):
For the matte, stone-like finish in the photo, you can either leave the outside unglazed (if the clay vitrifies fully) or apply a very thin coat of clear matte glaze. Always glaze the interior to make it waterproof. -
Final Fire:
Fire the vase a second time to the maturation temperature of your specific clay body (e.g., Cone 5, 6, or 10).
Level Up: Gold Luster
After the final glaze firing, apply gold luster accent details to the leaves or the eye line and fire a third time at a very low temperature for a luxurious touch.
Fill your new vessel with dried pampas grass or fresh blooms and admire your handiwork
Sculpted Face Vase With Features
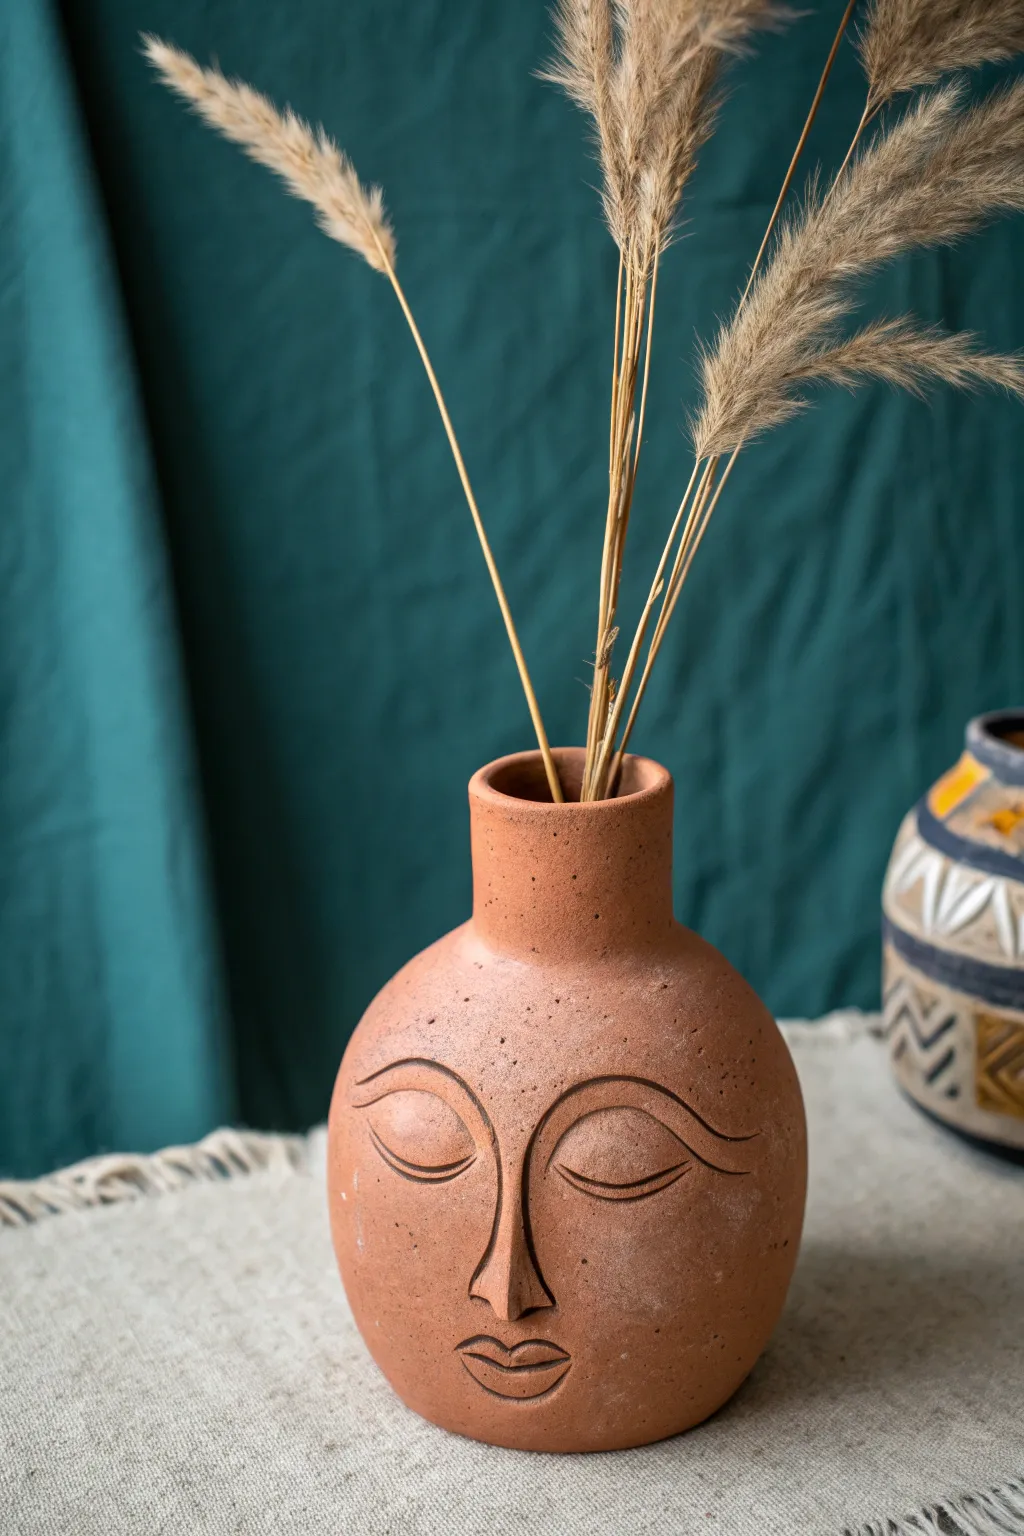
Bring a sense of calm to your decor with this terracotta vase featuring a peaceful, sleeping face. The minimalist carved features on the rounded form create a modern yet ancient aesthetic that perfectly complements dried florals.
Step-by-Step Guide
Materials
- Air-dry clay (terracotta color) or earthenware clay
- Rolling pin
- Water and slip (clay slurry)
- Needle tool or sharp toothpick
- Loop tool (small size)
- Sponge
- Flexible rib (rubber or metal)
- Small paintbrush
- Wooden modeling tool
- Canvas mat or work board
Step 1: Forming the Vase Body
-
Prepare the clay:
Begin with a substantial ball of terracotta-colored clay, removing air bubbles by wedging it thoroughly until it feels smooth and consistent. -
Pinch pot base:
Push your thumb into the center of the ball, leaving about half an inch at the bottom for the base. Pinch and rotate the clay to open up the walls. -
Build height:
Continue pinching upward to create a rounded, spherical shape. Aim for an even wall thickness of about 1/4 inch to ensure structural integrity. -
Close the form:
As you reach the top of the sphere, gently collar the clay inward by circling it with your hands to narrow the opening, preparing it for the neck. -
Add the neck:
Roll a thick coil of clay. Score and slip the rim of your sphere, then attach the coil. Blend the clay downwards onto the body so no seam remains visible. -
Refine the shape:
Use a flexible rib to smooth the exterior walls. I like to support the inside with one hand while smoothing the outside to maintain that perfect roundness.
Depth Perception
Make your carving lines slightly deeper than you think you need. As clay dries and shrinks, shallow lines can disappear, but deep grooves will hold the shadow.
Step 2: Sculpting the Features
-
Map out the face:
Lightly sketch the position of the eyes, nose, and mouth directly onto the clay using a needle tool. Ensure the nose is centered on the fullest part of the curve. -
Build the nose bridge:
Roll a small, triangular wedge of clay. Score the area between the eyes and attach the wedge to create a raised nose bridge. -
Connect the brow:
Blend the top of the nose bridge outward to flow seamlessly into the eyebrow line. The nose should look like it emerges naturally from the surface. -
Carve the eyelids:
Using a needle tool or small loop tool, carve deep, curving lines for the closed eyelids. Create a second, slightly lighter curve above each to suggest the eyelid crease. -
Define the nostrils:
Use a small rounded tool to gently press indentations at the base of the nose for nostrils, then refine the outer shape of the nose wings. -
Shape the lips:
Add a tiny, flattened oval of clay for the mouth. Blend the edges, then use a needle tool to cut a horizontal line across the center to separate the upper and lower lips. -
Accentuate the outlines:
Go back over your main lines—the brows, eyes, and lips—with a modeling tool to deepen the grooves. This creates the bold, illustrative style seen in the project.
Step 3: Finishing Touches
-
Smooth the surface:
Dip a sponge in water and wring it out well. Gently wipe the entire vase to soften any harsh carving marks and remove clay crumbs. -
Texturize (Optional):
If you want that speckled, stone-like look, you can gently tap a stiff brush against the surface or flick tiny droplets of diluted darker clay slip onto the pot. -
Slow drying:
Cover the vase loosely with plastic for the first 24 hours to prevent cracking, then uncover and let it air dry completely for several days. -
Seal:
Once bone dry (and fired, if using kiln clay), apply a matte sealer to protect the finish and deepen the terracotta color.
Uneven Drying?
If the neck dries faster than the thick body, it might crack. Wrap just the rim in a strip of damp paper towel while the rest of the body begins to dry.
Fill your new sculpture with tall grasses to emphasize the vertical lines of the neck and enjoy the peaceful vibe it brings to your room
Totem Stack Vase With Ring Layers
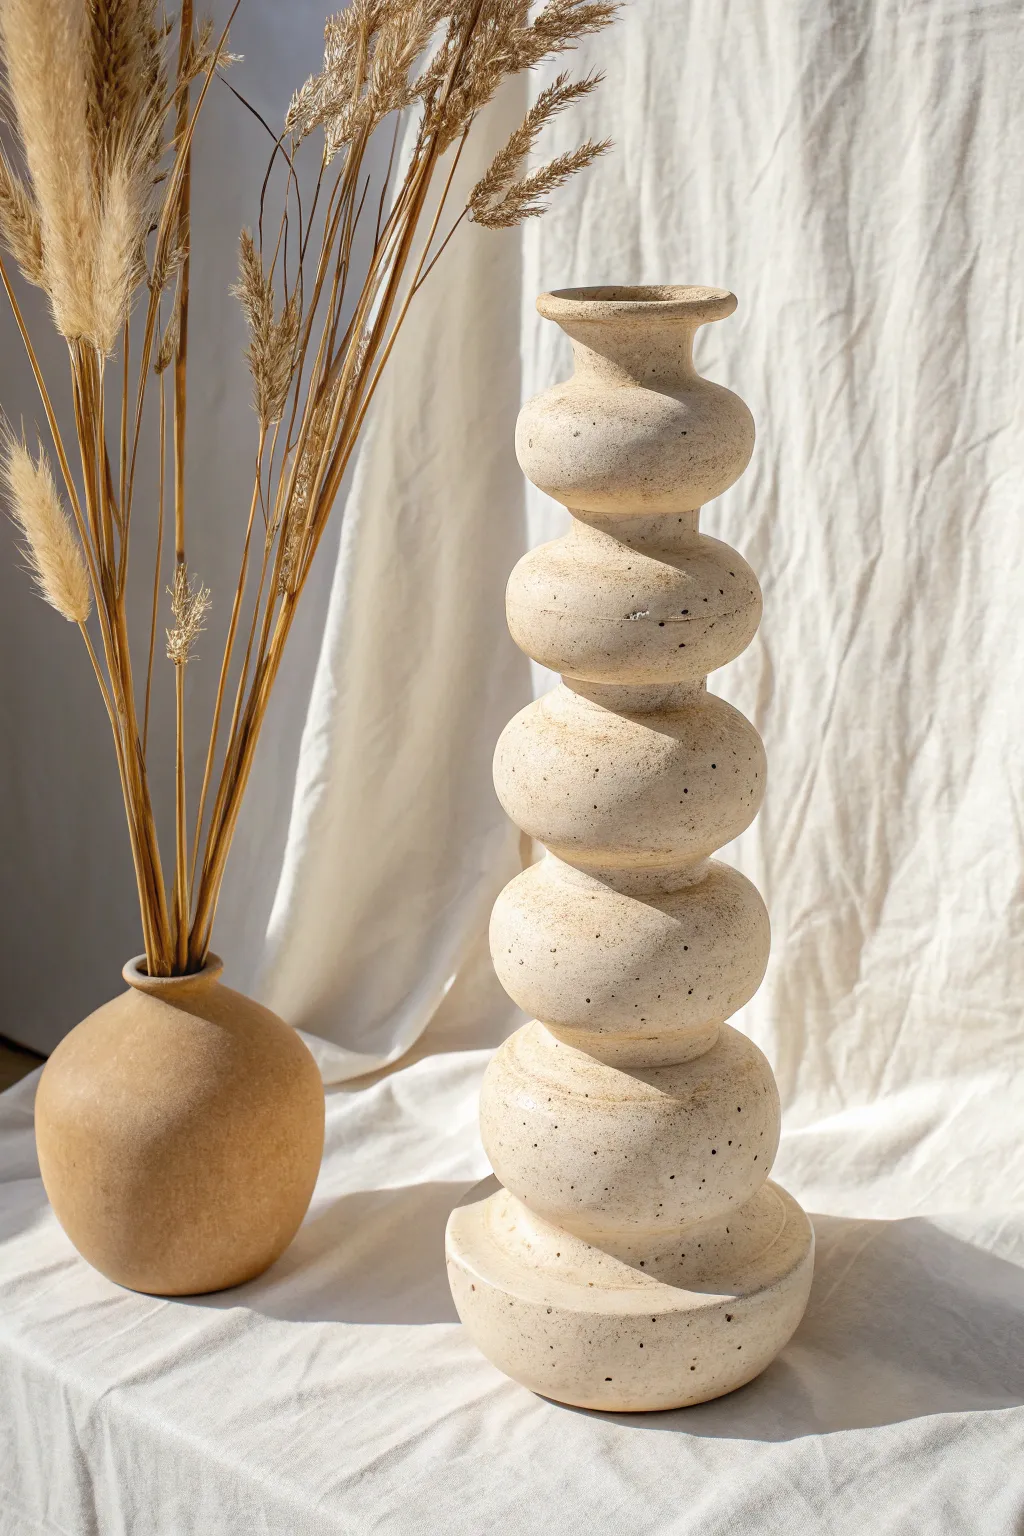
This striking sculptural vase mimics the look of stacked stones or totem art with its repeating, organic, bulbous forms. The unglazed finish and natural speckling give it a modern, earthy aesthetic that perfectly complements dried florals.
Step-by-Step
Materials
- Stoneware clay (preferably speckled)
- Pottery wheel (or materials for coil building)
- Wooden throwing ribs / kidney tools
- Wire cutter
- Needle tool
- Calipers (for measuring bulb width)
- Sponge
- Loop trimming tools
- Kiln
Step 1: Throwing the Form
-
Center the clay:
Start with a substantial amount of clay (around 4-5 lbs) on the wheel head. This is a tall vessel, so ensuring your clay is perfectly centered and coned is crucial for stability. -
Open the cylinder:
Open the clay and pull a tall, narrow cylinder. Focus on height rather than width, keeping the walls relatively thick initially to support the sculptural trimming later. -
Establish the base:
Use your fingers or a wooden rib to flare the very bottom of the cylinder outward slightly, creating a stable foot for the totem. -
Segment the clay:
Starting from the bottom, gently press inwards with a rib or your finger vertically at regular intervals to map out where each ‘bulb’ or ring will sit. Aim for about 5 distinct stacked sections. -
Shape the bulbs:
Using a rounded wooden rib on the outside/inside, gently push the clay outward from the inside to create the spherical shapes between your indented markers. -
Refine the neck:
Shape the top section into a flared neck, echoing the curve of the bulbs below but opening up slightly at the rim. -
Smooth the transitions:
Go back over the indented areas between the bulbs. I like to use the edge of a curved rib here to make sharp, clean definitions between each stacked layer. -
Dry to leather hard:
Wire the vase off the wheel but leave it on the bat if possible. Let it dry slowly until it reaches a sturdy leather-hard stage.
Use Calipers
To get that uniformed look, measure the width of the bottom bulb with calipers and use that measurement to check the bulbs as you move up.
Step 2: Trimming and Finishing
-
Center for trimming:
Place the vase upside down on the wheel (using a chuck or foam bat if the neck is delicate) and secure it with lugs of clay. -
Refine the bulbs:
Use a sharp loop tool to trim away excess weight and refine the curve of each ‘stone’ in the stack. This helps emphasize the separation between layers. -
Clean the foot:
Trim the underside of the flared base to create a clean foot ring, ensuring the vase sits flat. -
Enhance the texture:
Once trimmed, use a slightly damp sponge to smooth out tooling marks, but don’t over-smooth if you want to keep the natural, gritty texture visible. -
Bisque fire:
Load the bone-dry vase into the kiln for a bisque firing (usually Cone 04 or 06 depending on your clay body). -
Glaze strategy:
To match the photo, leave the exterior unglazed (raw clay) to show off the speckles. If you want it watertight, pour a clear liner glaze strictly on the inside. -
Final firing:
Fire the piece to maturity (Cone 5, 6, or 10 depending on clay). The raw exterior will vitrify and develop that beautiful stony matte finish.
Color Wash
Apply a very thin oxide wash (iron or manganese) and wipe it back before firing to highlight the crevices between the stacked rings.
Now you have a stunning, architectural centerpiece ready to display your favorite tall grasses or branches