
Whenever I’m craving a fresh project, I reach for a clay vase—it’s the perfect mix of relaxing and instantly useful. These clay vase ideas are the kind you can totally make at home, whether you’re keeping it simple or going for a big statement piece.
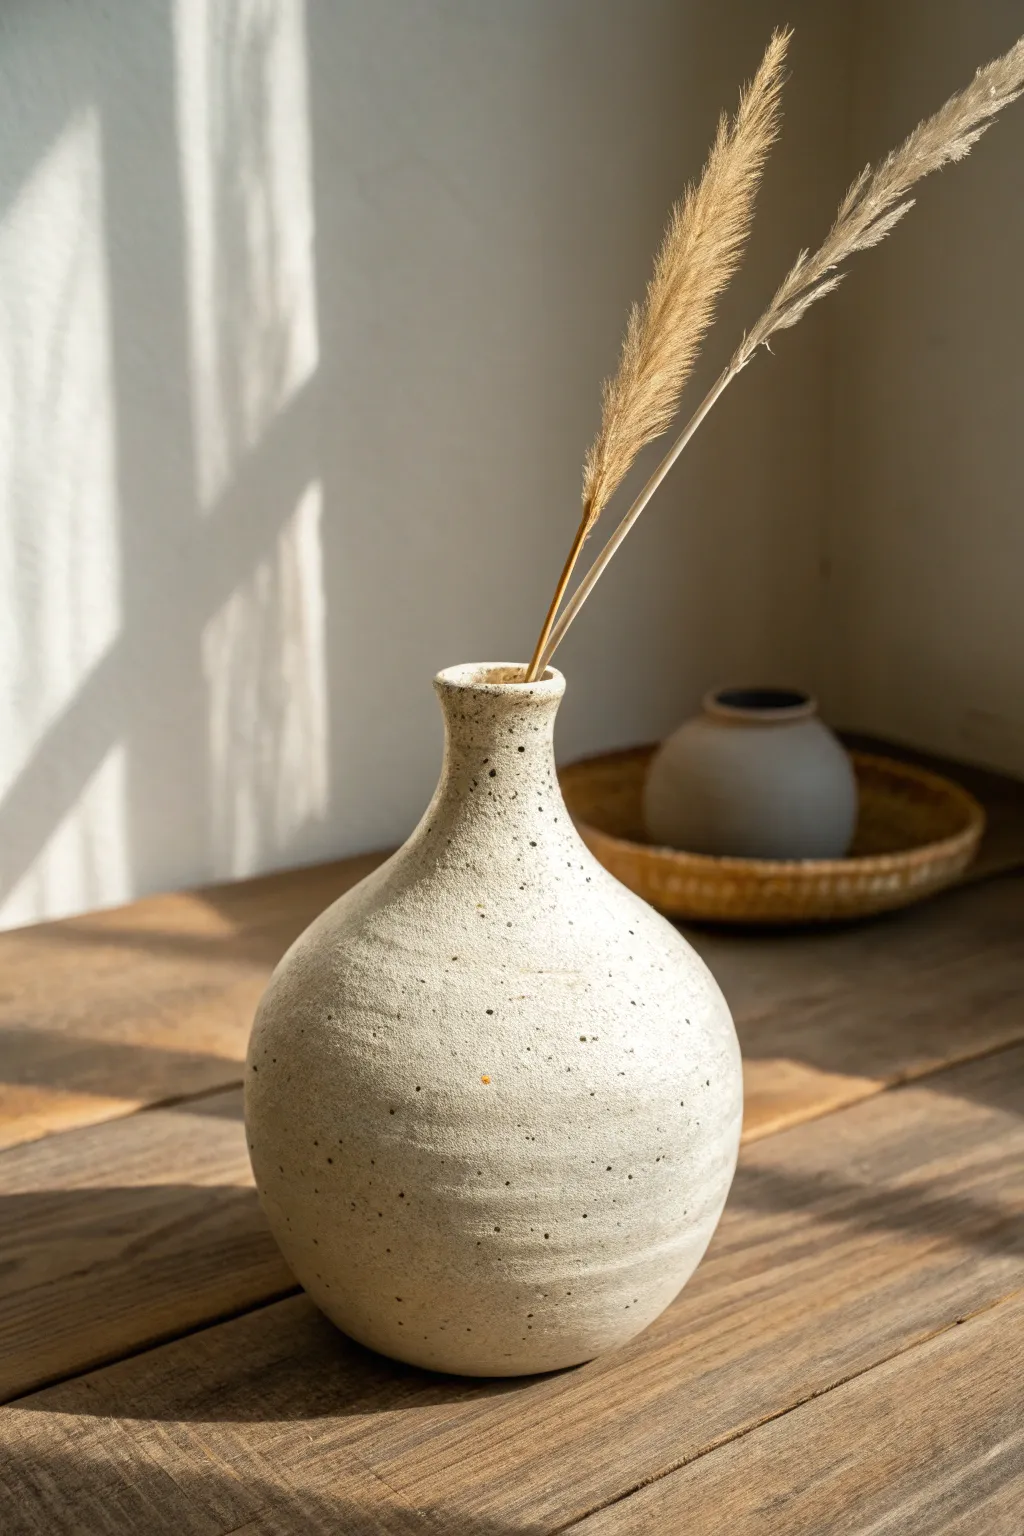
Minimal Bud Vase With a Smooth Cylinder Shape
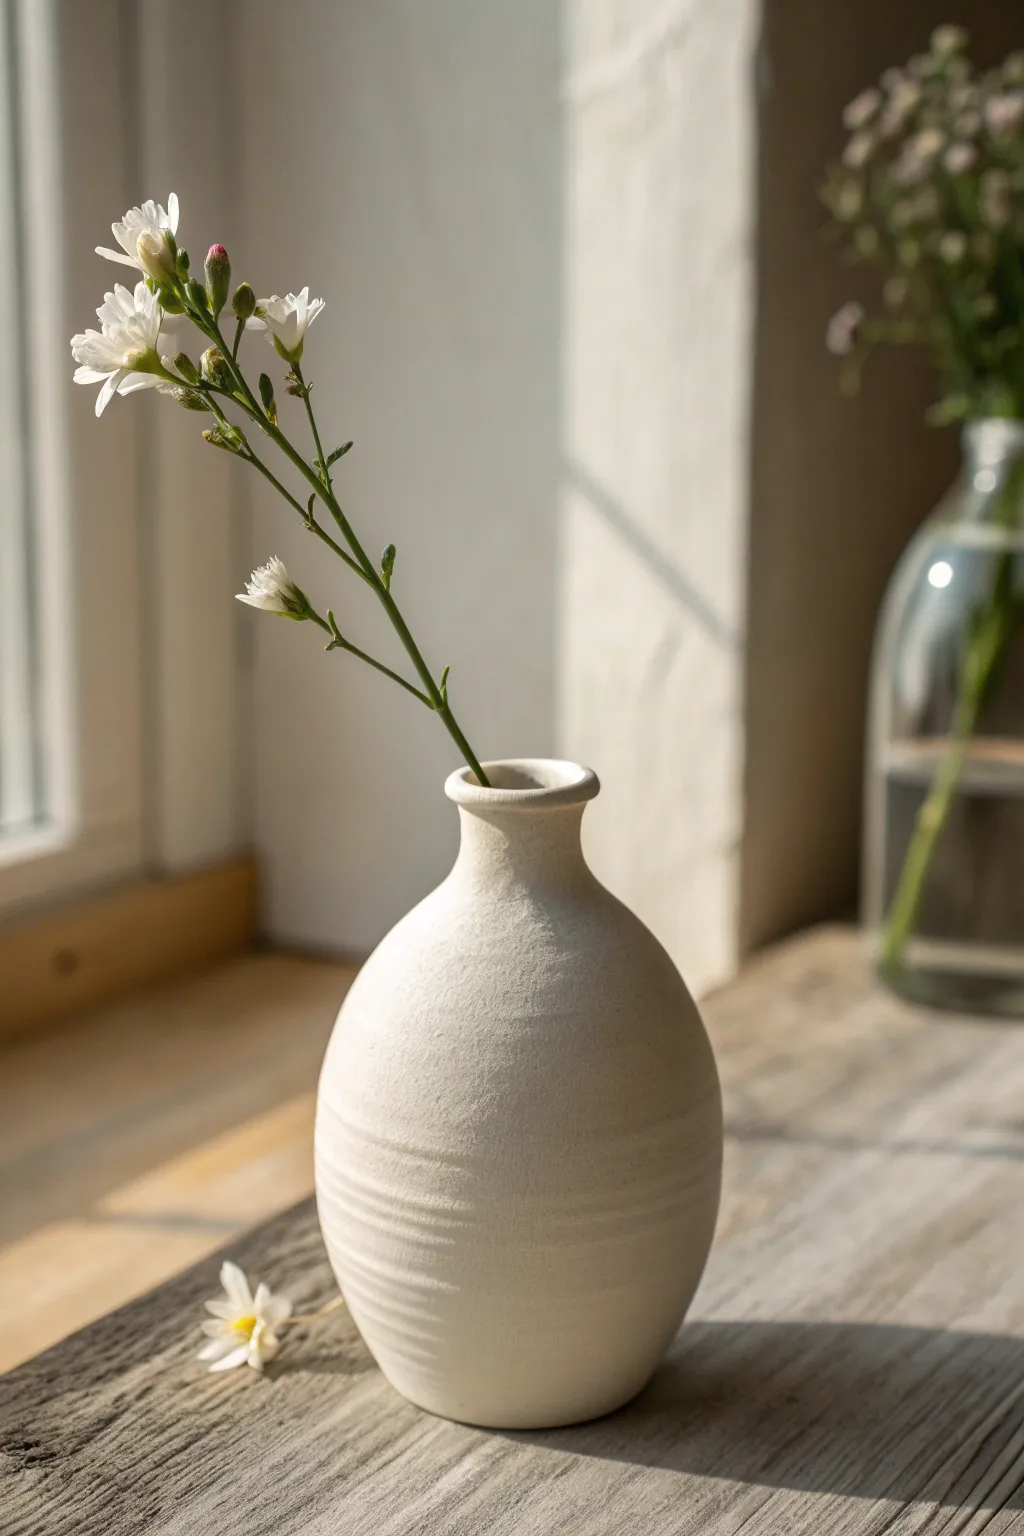
Embrace the serene beauty of minimalism with this handcrafted clay bud vase, featuring a softly rounded body and a delicate, narrow neck. Its matte, textured finish and subtle horizontal ribbing capture the essence of organic modern design, perfect for displaying a single stem.
How-To Guide
Materials
- White or speckled stoneware clay (approx. 1 lb)
- Pottery wheel
- Sponge
- Needle tool
- Wooden rib tool
- Wire cutter
- Trimming tools (loop tool)
- Clean water
Step 1: Throwing the Base Form
-
Prepare the clay:
Begin by thoroughly wedging your ball of stoneware clay to remove any air bubbles and ensure an even consistency. Center the clay firmly on your wheel head. -
Open the clay:
Press your thumbs into the center to open the clay, leaving about a half-inch of thickness at the bottom for the foot. Widen the floor slightly, but keep it relatively narrow since this is a bulbous vase. -
Pull the first cylinder:
Slowly pull up the walls into a basic cone or cylinder shape. Keep the walls even, but leave slightly more clay near the base to support the eventual curve. -
Belly out:
Using one hand inside and one outside, gently push the clay outward from the inside to create the round, bulbous ‘belly’ of the vase. Move slowly to avoid collapsing the wall. -
Refining the curve:
Smooth the curve using a flexible rib on the exterior while supporting from the inside. This compresses the clay and removes excess slip.
Collaring Woes?
If the clay ripples or twists while narrowing the neck, you are squeezing too hard or the wheel is too slow. Increase speed slightly and use plenty of water.
Step 2: Forming the Neck and Texture
-
Collar the top:
Gently squeeze the upper portion of the clay inward with both hands (collaring) to narrow the opening. Do this in stages to prevent the clay from buckling. -
Create the neck:
Pull the remaining clay at the top upward to form a distinct, narrow neck, about 1-1.5 inches tall. Ensure the transition from the belly to the neck is smooth. -
Shape the rim:
Round off the very top edge (the rim) with a piece of chamois or your fingertips for a soft, finished look that slightly flares out. -
Add texture:
While the wheel is spinning slowly, adhere a small wooden tool or the edge of your rib against the lower half of the belly to create subtle horizontal grooves. -
Dry surface texture:
I prefer to use a slightly rough sponge to wipe the exterior once the shape is final; this exposes the grog in the clay and gives that beautiful matte, stone-like texture shown in the photo. -
Cut off:
Run a wire cutter underneath the vase to separate it from the wheel head. Let it dry until leather-hard.
Step 3: Trimming and Finishing
-
Trimming setup:
Once leather-hard, center the vase upside down on the wheel. Secure it with small clay lugs. -
Trim the foot:
Use a loop tool to trim away excess weight from the bottom, carving out a small foot ring that lifts the bulbous shape slightly off the table. -
Smooth the bottom:
Use your thumb or a smooth rib to burnish the trimmed area, ensuring there are no sharp edges. -
Bisque fire:
Load the bone-dry vase into the kiln for a bisque firing (usually to cone 04). -
Final Surface:
To achieve the look in the image, leave the exterior unglazed if your clay body is vitrified and beautiful on its own, or apply a very thin, matte white wash. Glaze the interior with a clear liner glaze to make it watertight. -
Final Fire:
Fire the piece to the maturity temperature of your clay (likely Cone 5 or 6 for stoneware).
Speckled Finish
Use a clay body with “manganese speckles” or heavy grog. When unglazed, these specks fire through the surface, creating a lovely organic, dotted appearance.
Enjoy the calm simplicity of your new vase as it holds your favorite wildflower stems


Pinch-Pot Mini Vase Set (Cute as a Trio)
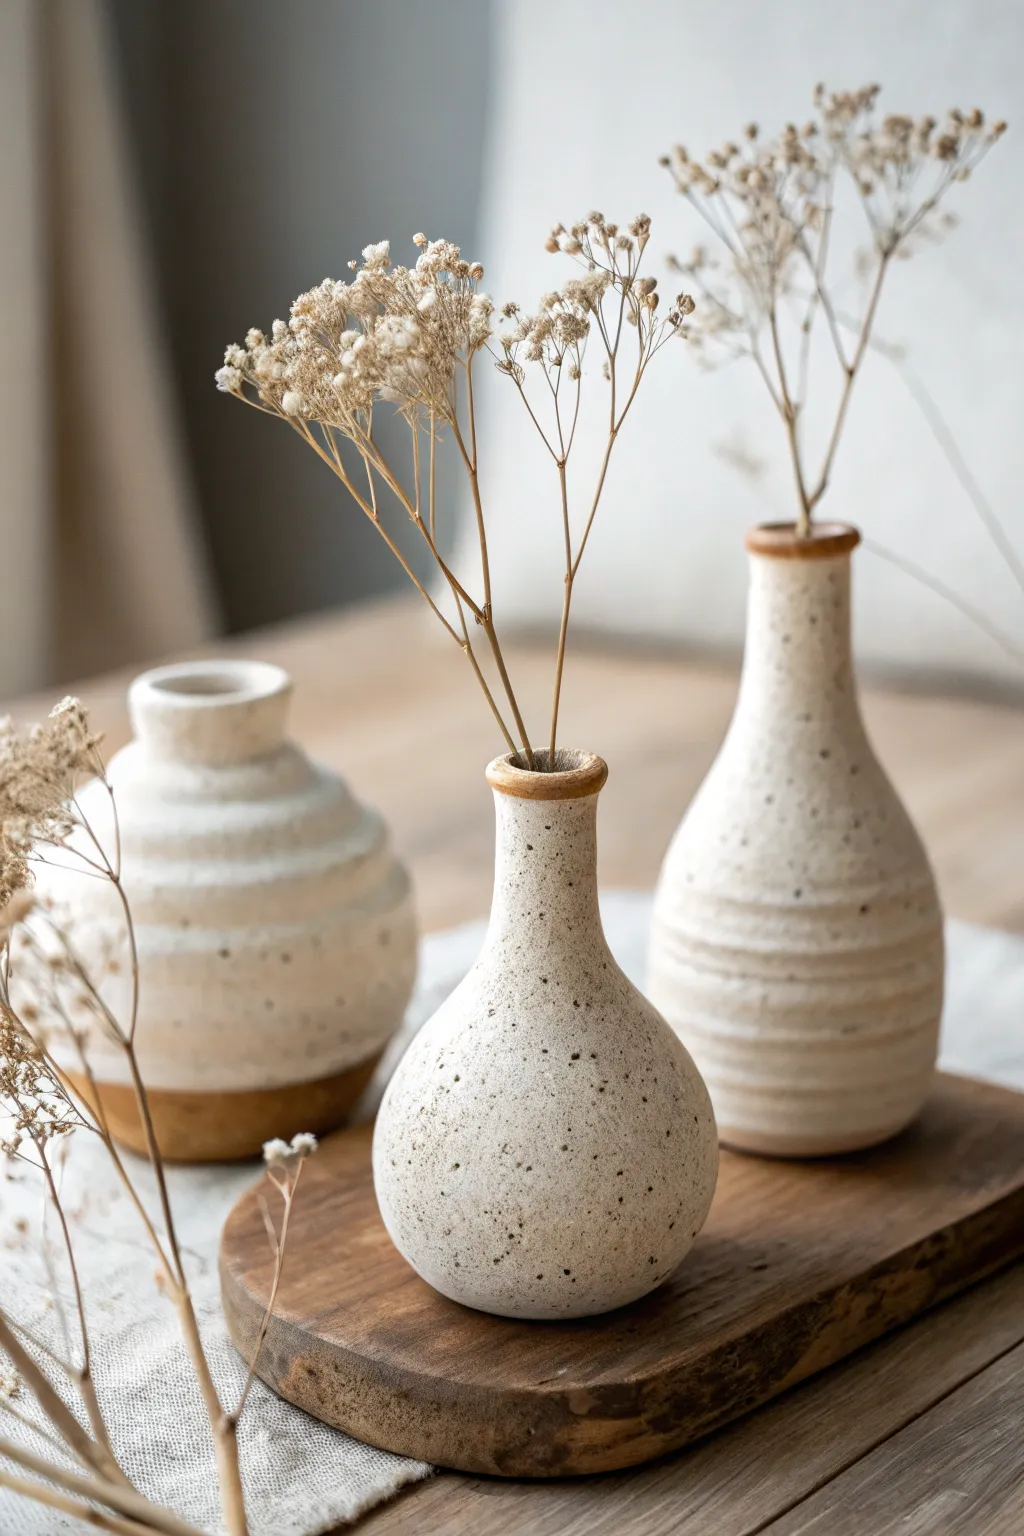
Embrace the imperfect charm of handmade ceramics with this trio of textured, faux-pottery clay vases. Using air-dry clay and a clever painting technique, you’ll achieve that high-end speckled stoneware look without ever needing a kiln.
Step-by-Step
Materials
- White or grey air-dry clay (approx. 2 lbs)
- Acrylic paints: Cream/Off-white, Burnt Sienna, Dark Brown/Black
- Small bowl or cup (for water)
- Sponge
- Old toothbrush
- Mod Podge or matte varnish sealant
- Pottery tools or a plastic knife/credit card
- Fine-grit sandpaper
- Rolling pin
Step 1: Sculpting the Vases
-
Prepare the Clay:
Cut your clay block into three equal sections. Knead each piece in your hands until it is warm, pliable, and free of air bubbles. Roll each section into a smooth ball. -
Shape the Spherical Vase:
Take the first ball and use your thumbs to create an indentation in the center, pinching the walls gently to hollow it out while keeping a round belly. Narrow the clay at the top to form a tight, short neck, and smooth the opening with wet fingers. -
Form the Bottle Vase:
For the second vase, roll the ball into a thick cylinder first. Shape the base to be slightly bulbous, then gently pull and stretch the top half of the clay upward to create an elongated, elegant neck. Flare the rim slightly outward. -
Build the Beehive Vase:
For the final, widest vase, start with a pinch pot base. Roll thin snakes (coils) of clay and stack them on top of the base, blending the inside seams together but leaving the outside textures visible to mimic the ribbed look in the reference. -
Refine the Surfaces:
Dip your finger in water and smooth out any unwanted cracks. For the beehive vase, you can use a modeling tool to emphasize the horizontal grooves if the coils got too blended. -
Level the Bottoms:
Gently tap the base of each vase against your work surface to flatten it so they stand stable and upright. -
Drying Time:
Set your trio aside in a cool, dry place. Allow them to dry completely for 24-48 hours. I find turning them upside down halfway through helps the bottoms dry evenly.
Splatter Control Pro-Tip
Test your toothbrush splatter technique on a piece of scrap paper first. If the dots are too big, your paint is too thick or the brush is overloaded.
Step 2: Sanding and Painting
-
Sand for Texture:
Once fully dry, use fine-grit sandpaper to gently smooth the necks and rims. Don’t over-sand the bodies; a little roughness adds to the rustic stone aesthetic. -
Base Coat:
Mix a warm cream or off-white acrylic paint. Apply two coats to the exterior and inner rim of all three vases, allowing the first coat to dry before applying the second. -
Terracotta Accents:
On the taller bottle vase and the spherical vase, carefully paint just the very top rim with Burnt Sienna mixed with a tiny drop of water. This creates that exposed clay lip effect. -
Creating the Base Dipped Look:
For the wider beehive vase, paint the bottom third in the same Burnt Sienna tone to mimic a raw clay base. -
Prepare the Speckle Mix:
Dilute a small amount of dark brown or black acrylic paint with water until it is very runny and ink-like. -
Apply the Speckles:
Dip an old toothbrush into the runny paint. hold it near the vases and run your thumb across the bristles to flick tiny droplets onto the surface. Rotate the vases to get even coverage. -
Add Variation:
Vary the distance of your toothbrush flicking; get close for dense clusters and move back for a lighter mist. -
Seal the Finish:
Once the paint is bone dry, apply a coat of matte varnish or Mod Podge. This protects the finish and unifies the sheen of the paint layers.
Level Up: Texture
Before painting, mix a teaspoon of baking soda or fine sand into your cream acrylic paint. This creates a gritty, authentic ceramic texture.
Arrange your finished trio on a wooden board with dried botanicals for a cozy corner display


Coil-Built Vase With Finger-Ridge Texture
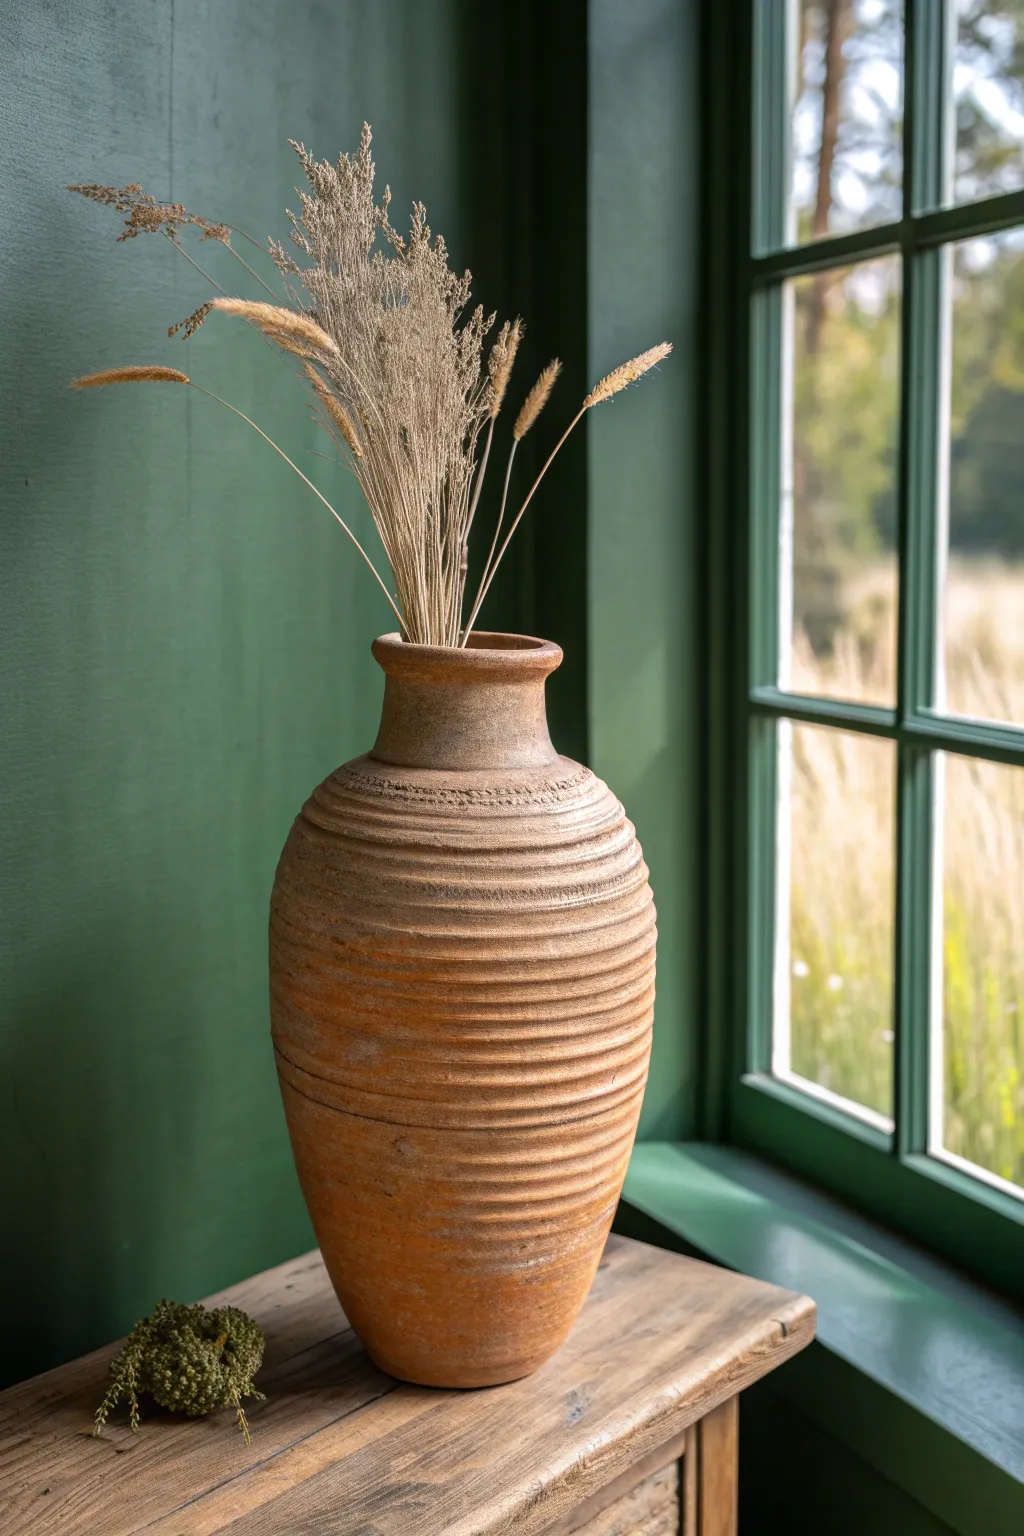
This earthy, oversized vase brings texture to the forefront with its prominent, rhythmic ridges that mimic ancient pottery styles. Using traditional coil-building techniques, you create a tall, tapering form where every fingerprint adds to the rustic, time-worn character.
Step-by-Step Guide
Materials
- Stoneware clay (terracotta or groggy brown body)
- Scoring tool or serrated rib
- Slip (clay mixed with water)
- Wooden modeling tool
- Sponge
- Cutting wire
- Can of matte spray sealer (optional)
- Kiln (for firing)
Step 1: Building the Base and Lower Body
-
Form the base slab:
Begin by rolling out a circular slab of clay approximately 1/2 inch thick and about 5 inches in diameter. This will be the heavy foot of your vase. Compress the clay on both sides with a rib tool to prevent cracking later. -
Prepare your first coils:
Roll out several long, even ropes of clay, roughly the thickness of your thumb (about 3/4 inch). Keeping them consistent is key to an even build, so take your time rolling them on a canvas board. -
Attach the first ring:
Score the outer edge of your base slab and apply a generous amount of slip. Lay your first coil on top of this scored edge, pressing it down firmly. Cut the ends at an angle to join them seamlessly. -
Blend the interior:
Using your thumb or a wooden tool, smear the inside edge of the coil down into the base slab to lock it in place. Leave the outside unblended to start creating that distinct ridged texture shown in the photo. -
Build outward:
Continue adding coils, stacking each slightly to the outside of the one below it. This will make the vase widen as it grows taller. Remember to score and slip between every single layer. -
Create the texture:
As you stack, use your finger to gently smooth the coil horizontally, but don’t vertical blend the outside seams completely. You want that deep horizontal groove to remain visible.
Slumping Walls?
If the clay starts to wobble or sag as you build high, stop immediately. Cover the rim with plastic but leave the bottom exposed to air for 1-2 hours to stiffen before adding more height.
Step 2: Shaping the Taper and Neck
-
Begin the inward taper:
Once you reach the widest point of the vase (the belly), start placing your coils slightly toward the inside of the ring below. This requires patience; if you taper too fast, the walls might collapse. -
Refine the ridges:
The ridges in the image are slightly flattened. Run a damp finger or a soft rib tool lightly over the exterior coils to knock down high spots while keeping the deep valleys between them intact. -
Form the straight neck:
When the opening narrows to your desired width, stack the next 3-4 coils directly on top of each other vertically to create the distinct neck section before the rim flares out. -
Establish the rim:
For the flaring rim, add a final thick coil. Pinch it outwards gently while supporting the clay from below, creating a wide, rounded lip that overhangs the neck slightly. Smooth this section thoroughly so it’s pleasant to touch. -
Dry slowly:
This is a tall, heavy vessel. Cover the rim loosely with plastic and let the bottom stiffen up first. I prefer to let these dry over several days to ensure the coils don’t pull apart. -
Bisque fire:
Once bone dry, fire the piece in a kiln to bisque temperature (usually cone 04). This hardens the clay permanently. -
Apply a wash (optional):
To enhance the ‘aged’ look without glazing, wipe a watered-down iron oxide or dark clay stain over the surface, then sponge it off the high points. This leaves darkness in the crevices. -
Final firing:
Fire again to the maturity temperature of your specific clay body. The result should be a matte, stony finish rather than a shiny glazed one.
Pro Texture Tip
For that rough, sandy look in the photo, use a clay body with heavy grog (sand). When you sponge it down before drying, the clay washes away slightly, exposing the gritty texture.
Now your sculptural vessel is ready to hold a dramatic arrangement of dried pampas grass or wheat.


Slab-Built Square Vase With Crisp Edges
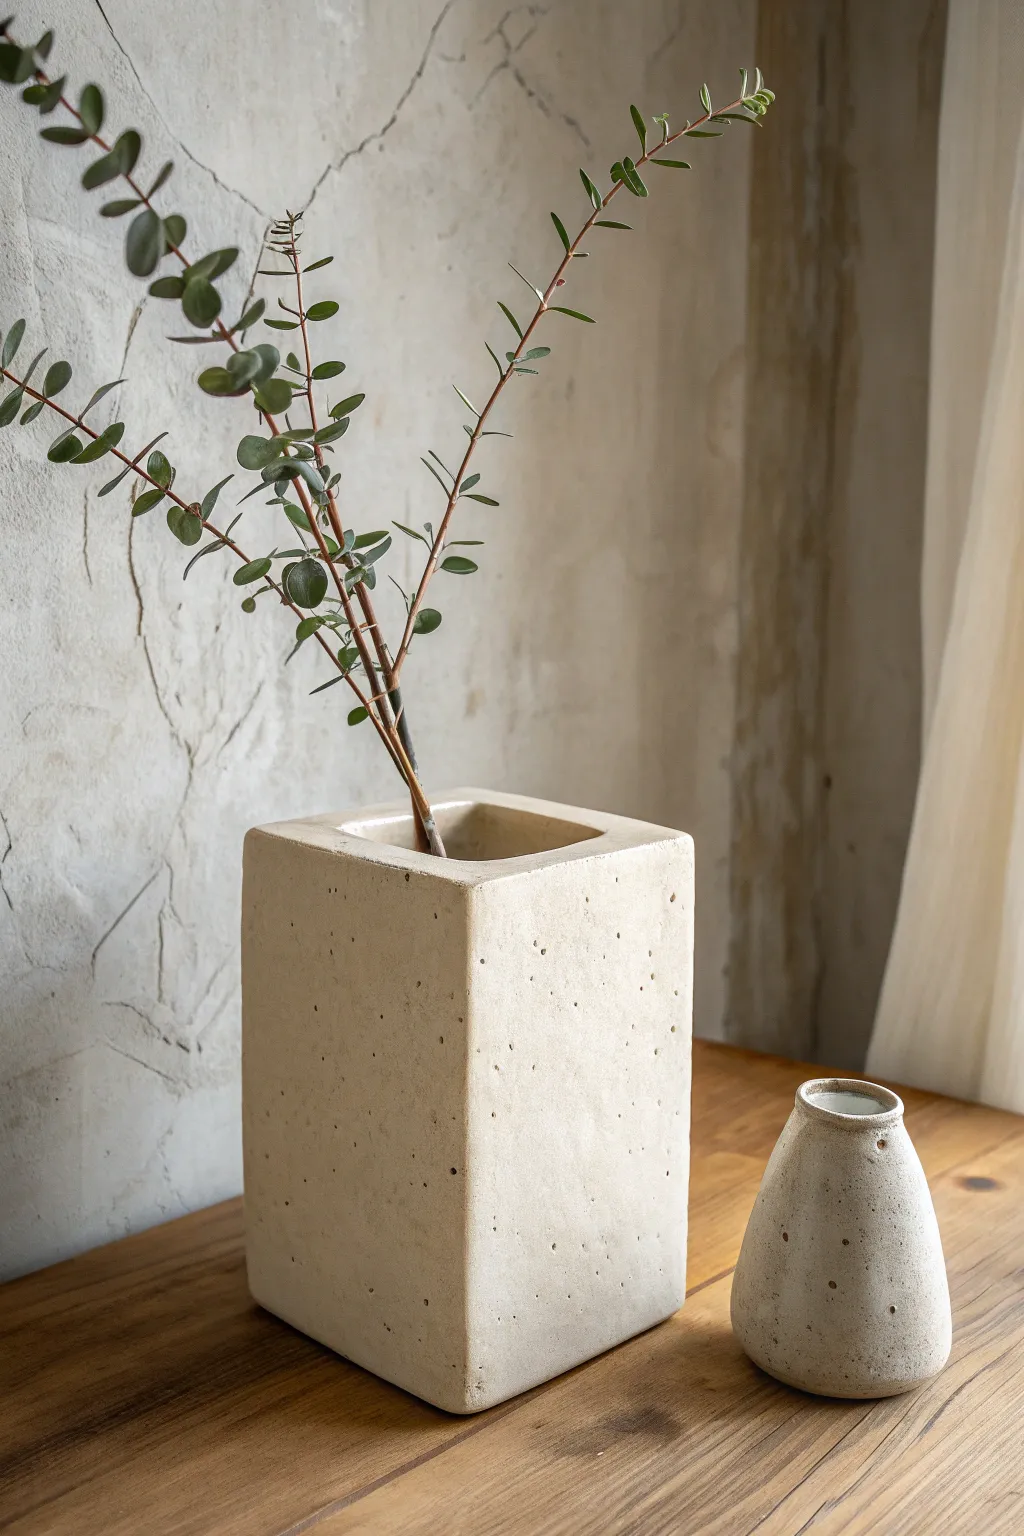
Embrace clean lines and architectural beauty with this tall, slab-built square vase, perfect for displaying minimalist branches like eucalyptus. The creamy, speckled matte finish adds organic warmth to the severe geometric form, making it a standout piece for any mantle.
Detailed Instructions
Materials
- Stoneware clay (preferably with grog or speckles)
- Slab roller or rolling pin and canvas
- Two long wooden guide strips (1/4 inch thick)
- Paper template (four rectangles for sides, one square for base)
- Fettling knife or needle tool
- Serrated rib and scoring tool
- Slip (clay mixed with water)
- Rubber kidney rib
- Sponge
- Matte white or cream speckled glaze
Step 1: Preparing the Slabs
-
Roll the clay:
Begin by rolling out a substantial amount of stoneware clay. If you’re using a rolling pin, place your 1/4 inch wooden guide strips on either side of the clay to ensure an even thickness throughout. -
Smooth the surface:
Before cutting, run a rubber kidney rib firmly over both sides of your slab. This compresses the clay particles, preventing future warping during the firing process. -
Cut the components:
Lay your paper templates onto the leather-hard slab. You will need four identical tall rectangles for the walls and one square for the base. Use a fettling knife for clean, decisive cuts. -
Bevel the edges:
For the strongest corner joints, cut the vertical edges of your four wall pieces at a 45-degree angle. This mitered joint creates more surface area for connection and a cleaner corner. -
Let them stiffen:
Allow your cut pieces to dry to a firm leather-hard state. I find that if they are too soft, the tall walls will slump under their own weight during assembly.
Tip: Seamless Box Edges
Rather than cutting 4 separate walls, try cutting one very long rectangle. Score 3 vertical lines where corners should be, then fold it into a box shape with only one vertical seam to join.
Step 2: Assembling the Form
-
Score and slip the base:
Take your square base piece and thoroughly score the top edges. Apply a generous amount of slip. -
Attach the first wall:
Score the bottom edge of your first wall piece. Press it firmly onto the base, ensuring it stands upright. You might need to prop it up with a heavy object temporarily. -
Join the remaining walls:
Continue adding the walls one by one. Score and slip every beveled vertical edge and the bottom connection points. Press the mitered corners together firmly to lock them in place. -
Reinforce the interior:
Reach inside (or use a tool on a stick if the vase is narrow) to smooth a thin coil of soft clay into the interior corners. This fillet adds crucial structural integrity. -
Refine the exterior corners:
Using a wooden paddle or a flat board, gently tap the outside corners to sharpen them and ensure the walls are perfectly straight.
Troubleshooting: Warping Walls
If your flat walls start bowing inward or outward during the glaze firing, try using a clay body with higher grog content (sand) next time. It provides better structure for geometric shapes.
Step 3: Refining and Glazing
-
Soften the rim:
The image shows a slightly softened, rounded opening. Use a damp sponge or your fingers to gently round over the sharp top edge of the rim. -
Surface texture:
If you want that pitted, organic look seen in the photo, lightly pounce a coarse sponge over the leather-hard surface before it dries completely. -
Slow drying:
Cover the vase loosely with plastic to let it dry very slowly. This helps prevent cracks at the seams, which are common in box-like forms. Bisque fire once bone dry. -
Glaze application:
Pour your matte speckled white glaze inside the vase first, swirl to coat, and pour out. Then, dip or spray the exterior. -
Clean the distinct corners:
If the glaze pools too thickly on the corners, it can hide the sharp geometry. Wipe the glaze slightly thinner on the edges if necessary before the final firing.
Place your finished vase near natural light to highlight the subtle texture and enjoy the modern elegance it brings to your space

The Complete Guide to Pottery Troubleshooting
Uncover the most common ceramic mistakes—from cracking clay to failed glazes—and learn how to fix them fast.
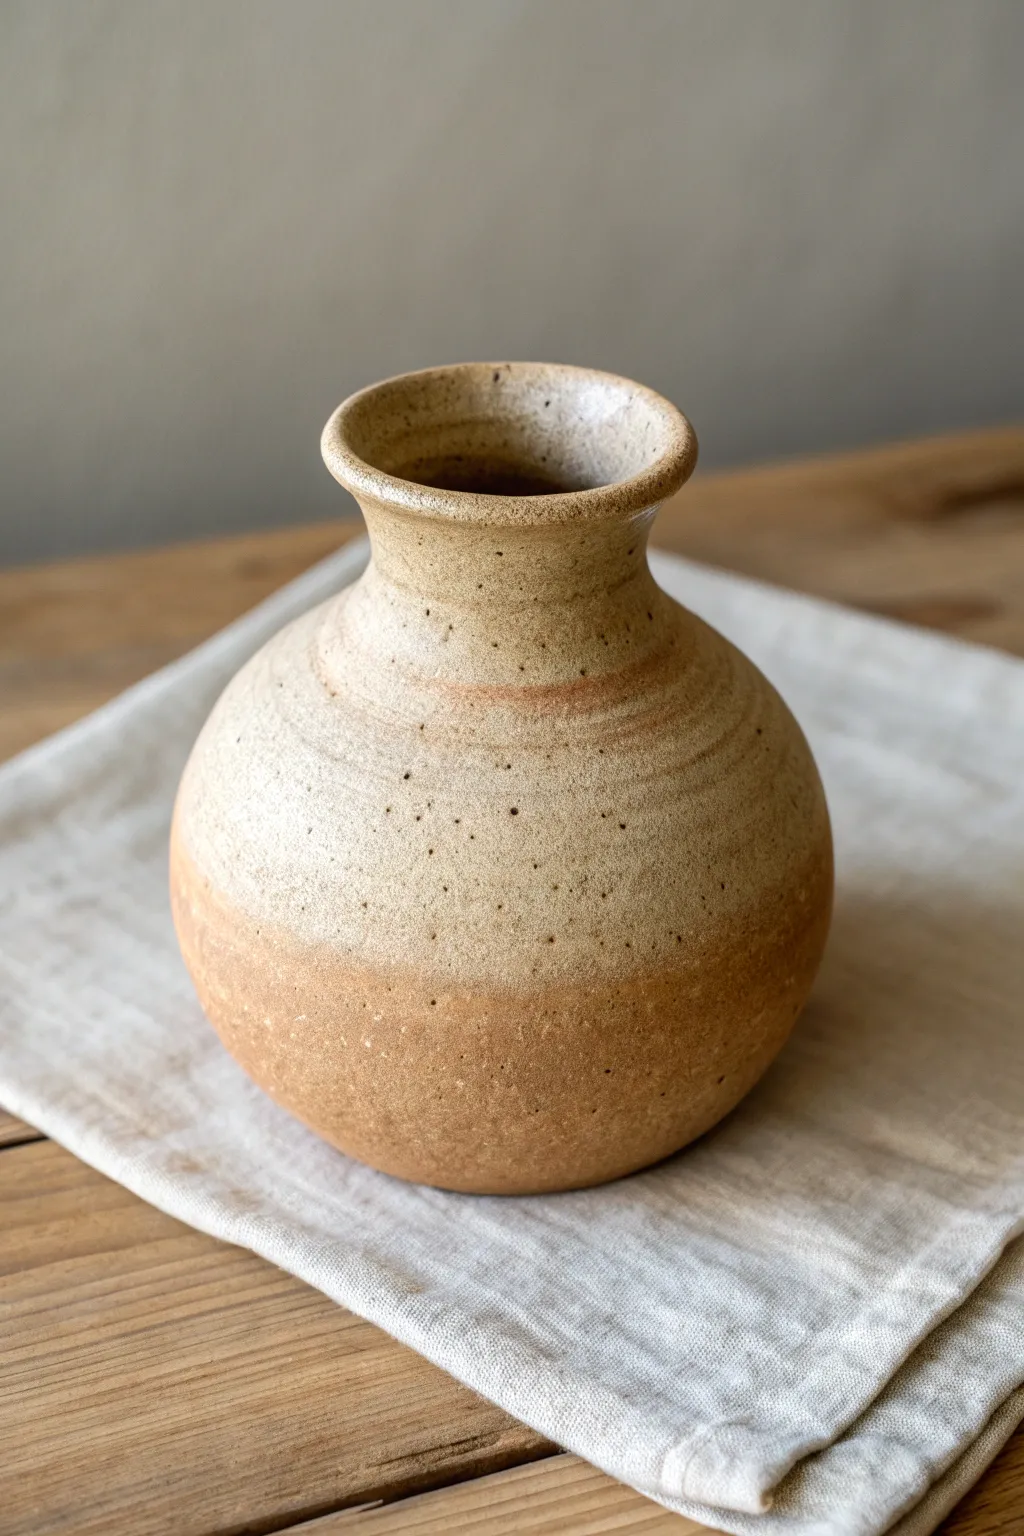
Bottle-Neck Vase for Single-Stem Arrangements
Embrace the beauty of minimalism with this textured pottery project, featuring a classic bulbous body and a slender neck perfect for single stems. The natural speckled finish gives it an organic, timeless feel that warms up any corner of your home.
How-To Guide
Materials
- Stoneware clay (speckled or flecked variety)
- Pottery wheel
- Throwing sponge
- Needle tool
- Wire cutter
- Rib tool (wooden or metal)
- Trimming tools
- Matte white or clear glaze
- Kiln
Step 1: Throwing the Form
-
Center the clay:
Begin with a ball of wedged speckled clay, roughly 1-2 pounds. Secure it firmly to the center of your wheel head and use water to center the clay until it spins without wobbling. -
Open the clay:
Press your thumbs into the center to create the initial opening, leaving about a half-inch of clay at the bottom for the floor. -
Pull the cylinder:
Slowly pull the walls upward to create a cylinder. Aim for even thickness from bottom to top, but keep slightly more clay at the base to support the eventual curve. -
Belly the form:
Position your inside hand against the wall and gently push outward while supporting the outside with a rib or your other hand. Create a round, bulbous shape, keeping the top rim narrow. -
Collar the neck:
Using both hands, gently squeeze the upper portion of the clay inward to narrow the opening. Do this gradually to avoid buckling the clay walls. -
Refine the neck:
Once collared, pull the neck upward slightly to create that distinct bottle shape. Use a sponge to smooth the transition between the belly and the neck. -
Shape the rim:
Compress the very top rim with a piece of chamois or your sponge to make it smooth and slightly flared, ensuring it’s durable. -
Create surface texture:
While the wheel spins slowly, run a dampened sponge or a soft rib with a slightly uneven pressure up the sides to leave subtle throwing rings visible.
Step 2: Trimming and Drying
-
Wire off:
Run a wire cutter underneath the base to separate the vase from the wheel head. Let it dry to a leather-hard state. -
Secure for trimming:
Once leather-hard, place the vase upside down on the wheel. Secure it with lumps of clay (giffen grip works too) and center it perfectly. -
Trim the foot:
Use a trimming loop tool to carve away excess weight from the bottom, creating a tidy foot ring that lifts the curve slightly off the table. -
Smooth the surface:
Run a smooth rib over the trimmed areas to burnish the clay slightly, blending the trimmed texture with the thrown texture. -
Bisque fire:
Allow the vase to dry completely (bone dry) before loading it into the kiln for the initial bisque firing.
Collaring Success
When narrowing the neck, increase your wheel speed slightly and keep the clay very lubricated. Dry clay will twist and tear when compressed.
Step 3: Glazing and Finishing
-
Clean the bisque:
Wipe the fired vase with a damp sponge to remove any dust that might prevent the glaze from adhering properly. -
Apply glaze:
Dip the vase into a matte white or semi-transparent glaze. I prefer a thinner application here so the natural speckles of the clay body can show through the finish. -
Wipe the foot:
Carefully sponge off any glaze from the bottom foot ring to prevent it from fusing to the kiln shelf. -
Glaze fire:
Fire the piece again to the appropriate temperature for your specific clay and glaze combination. -
Final inspection:
Once cool, check the bottom for any sharp burrs and sand them smooth if necessary before displaying.
Contrast Texture
Before glazing, wax resist the bottom third of the vase to leave raw, speckled clay exposed for a beautiful contrast against the smooth glazed neck.
Place a few dried stems inside your new vase to enjoy the delicate balance of your handiwork
Hand-Carved Vertical Stripe Vase
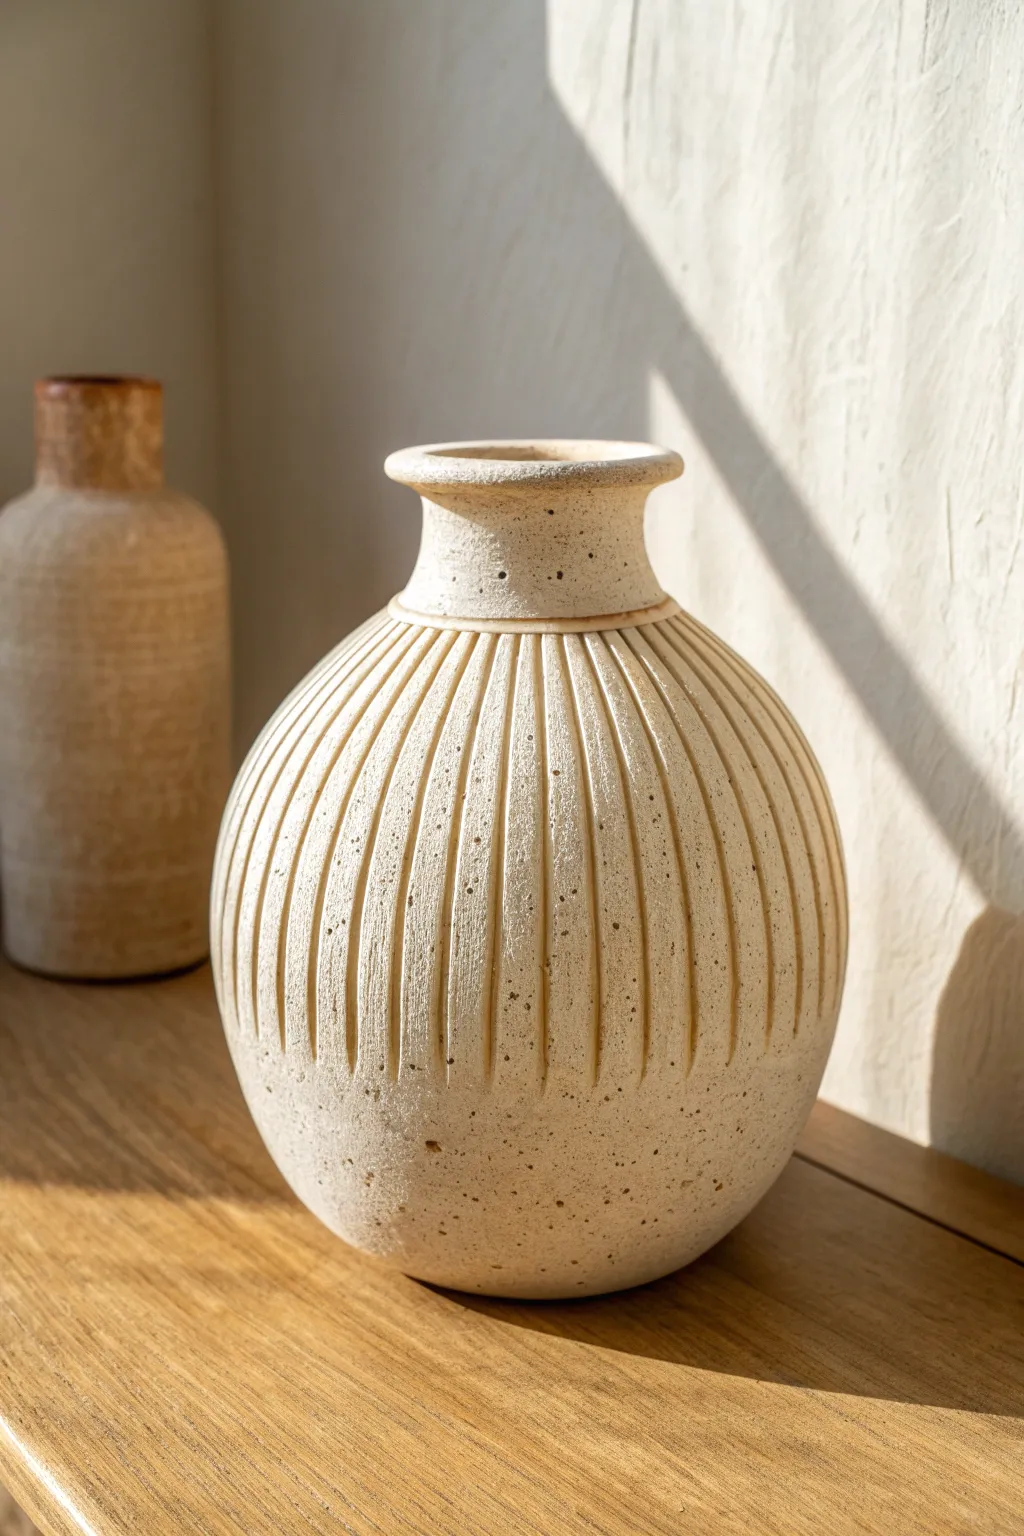
This project transforms simple clay into an organic, sophisticated vessel featuring satisfying vertical fluting and a raw, speckled finish. The result mimics the look of high-end stoneware with its tactile ridges and natural sandstone tones.
Step-by-Step Tutorial
Materials
- White or light tan stoneware clay (preferably with grog/speckles)
- Pottery wheel (or coil building supplies if hand-building)
- Wire clay cutter
- Rib tool (metal and rubber)
- Loop tool (medium size, U-shaped)
- Needle tool
- Sponge
- Water bowl
- Bat for wheel
- Matte clear glaze or raw clay sealant
Step 1: Forming the Base
-
Center the clay:
Start with a generous ball of wedged clay, about 3-4 pounds, and center it firmly on your wheel bat. Getting a solid center is crucial for the symmetry of those vertical lines later. -
Open and pull:
Opening the clay, create a flat interior floor of about 3 inches. Begin pulling up the walls, focusing on creating a cylinder first before shaping. -
Belly out the form:
Use a rib on the inside to gently push the walls outward while supporting the outside with a sponge. You want to create a full, round sphere shape for the main body. -
Collar the neck:
As you reach the top third, gently collar the clay inward to narrow the opening. This creates the transition from the round body to the neck. -
Refine the rim:
Pull the remaining clay at the top upward to form a short vertical neck. Use your fingers or a chamois to flare the rim slightly outward, creating a defined lip. -
Smooth the surface:
While the wheel is spinning slowly, run a metal rib over the exterior to remove throwing lines. A smooth canvas is essential for the carving step.
Uneven Lines?
Don’t panic if your vertical lines wobble. Go over the fluctuating section again with a slightly wider loop tool to even out the curve, or embrace the ‘wabi-sabi’ natural imperfection.
Step 2: Carving the Texture
-
Wait for leather hard:
Allow the vase to dry until it is leather hard. It should be firm enough to handle without deforming but soft enough to carve easily. -
Mark the boundaries:
Using a needle tool, lightly score a guideline circle around the base of the neck where the fluting will stop. Do the same near the bottom of the vase. -
Start the first cut:
Support the inside of the vase with one hand. With your other hand, take your U-shaped loop tool and drag it vertically from the top guideline down to the bottom guideline. -
Maintain pressure:
Try to keep steady, even pressure so the depth of the groove remains consistent from top to bottom. The groove should be widest in the middle of the ‘belly’ and taper slightly at the ends. -
Create spacing:
Leave a small ridge of uncarved clay, roughly the same width as your tool, right next to your first cut. I find spacing them visually rather than measuring keeps the organic feel. -
Continue rhythmically:
Proceed around the entire circumference of the vase. Don’t rush; settling into a rhythm helps keep the lines parallel. -
Refine the ridges:
Once carved, run a slightly damp sponge very lightly over the ridges to soften any sharp burrs or jagged clay crumbs, but don’t erase the texture.
Make it Pop
Before the final firing, rub a dark iron oxide wash into the carved crevices and sponge away the excess on the high spots. This adds instant antique depth and highlights the carving.
Step 3: Finishing Touches
-
Trimming the foot:
Place the vase upside down on the wheel (using a grip or chunks of soft clay to hold it). Trim away excess weight from the bottom and carve a neat foot ring. -
Bone dry:
Let the piece dry completely to the bone-dry stage. This usually takes several days depending on humidity. The color will lighten significantly. -
Bisque fire:
Load the vase into the kiln for a bisque firing (usually cone 04 or 06). This hardens the clay and prepares it for glazing. -
Enhance the speckle:
If your clay body naturally has speckles (like the iron spots shown), simply wash the vase with a sponge and clean water to remove dust. -
Glaze application:
Apply a very thin matte clear glaze to seal the piece if you want it to be functional, or leave the exterior raw for a purely decorative, stone-like texture. -
Final firing:
Fire the piece to the maturity temperature of your specific clay body (e.g., Cone 5, 6, or 10) to finalize the strength and surface finish.
Now you have a stunning, tactile vessel that brings an earthy elegance to any shelf


What Really Happens Inside the Kiln
Learn how time and temperature work together inside the kiln to transform clay into durable ceramic.
Dot-Impressed Polka Dot Vase

This charming, earthy vase combines a classic spherical shape with a playful, tactile twist. The raised polka dot texture adds modern interest to the warm terracotta clay, making it a perfect vessel for dried grasses or minimal stems.
How-To Guide
Materials
- Air-dry clay (terracotta color) or polymer clay
- Rolling pin
- Flexible rib tool or old credit card
- Sponge
- Water in a small bowl
- Needle tool or toothpick
- Slip (clay mix) or liquid clay adhesive
- Small round piping tip or straw (for dots)
- Sandpaper (fine grit)
- Matte sealant or varnish
Step 1: Creating the Base Form
-
Prepare the Clay:
Start by conditioning your terracotta clay. Knead it thoroughly in your hands until it is warm, soft, and pliable to prevent cracking later. -
Form the Sphere:
Roll a large portion of the clay into a smooth ball. I like to aim for the size of a large grapefruit for this project. -
Hollow the Shape:
Using your thumb, press into the center of the ball and begin pinching the walls to create a hollow pinch pot. Keep the walls about 1/4 inch thick relatively even. -
Close the Top:
Instead of leaving the opening wide like a bowl, gently coerce the clay inwards as you pinch, narrowing the opening at the top to create a nearly closed sphere. -
Smooth the Surface:
Use a damp sponge or your fingers to smooth out any fingerprints or cracks on the exterior. It’s crucial to have a clean surface before adding texture.
Step 2: Adding the Neck
-
Roll a Coil:
Roll a small snake or coil of clay, roughly the thickness of your pinky finger. -
Shape the Neck:
Form the coil into a ring that matches the size of the opening on your sphere. -
Attach the Neck:
Score the top of the sphere and the bottom of the coil ring with a needle tool. Apply a little slip or water, then press the ring firmly onto the opening. -
Blend the Seams:
Use a modeling tool or your finger to smooth the clay downward on the outside and upward on the inside so the neck becomes one seamless piece with the body. -
Refine the Lip:
Gently flare the top of the neck outward slightly for a finished look, smoothing the rim with a damp finger.
Cracks Appearing?
If you see hairline cracks while drying, mix a tiny bit of clay with vinegar (if air-dry) or water to make a paste. Fill the crack, smooth it over, and let it dry again.
Step 3: Creating the Texture
-
Make the Dots:
Roll out a flat sheet of clay to about 1/8 inch thickness. Use a small round cutter, like the back use of a piping tip or a straw, to punch out many small circles. -
Plan placement:
Before attaching, visualize a grid pattern. You want the dots spaced evenly. -
Score and Slip:
For each dot, gently scratch the back and the spot on the vase where it will go. Add a tiny dab of water or slip. -
Attach the Dots:
Press the dot firmly onto the vase. Start from the top near the neck and work your way down in rows or offset lines. -
Round the Dots:
Once attached, the dots might look flat. Use your finger to gently rub the edges of each dot to dome them slightly, making them look like integral bumps rather than stickers. -
Clean Up:
Check for any excess slip that squished out from under the dots and wipe it away immediately with a barely damp brush.
Try an Ombré Effect
Paint the dots in a gradient of colors after the clay dries, starting with the base clay color at the top and fading to white at the bottom for a modern dipped look.
Step 4: Finishing Touches
-
Dry Slowly:
Cover the vase loosely with plastic wrap for the first day to let it dry slowly; this prevents cracks. Remove the plastic and let it air dry completely for another 24-48 hours. -
Sand Imperfections:
Once bone dry, take fine-grit sandpaper and very gently smooth the rim or any rough patches between the dots. -
Seal:
Apply a coat of matte varnish or sealant to protect the clay and give it a finished sheen. If using polymer clay, bake according to package instructions first.
Now you have a stunning, textural decor piece ready to hold your favorite dried botanicals
Two-Tone Color-Block Vase With a Dipped Look
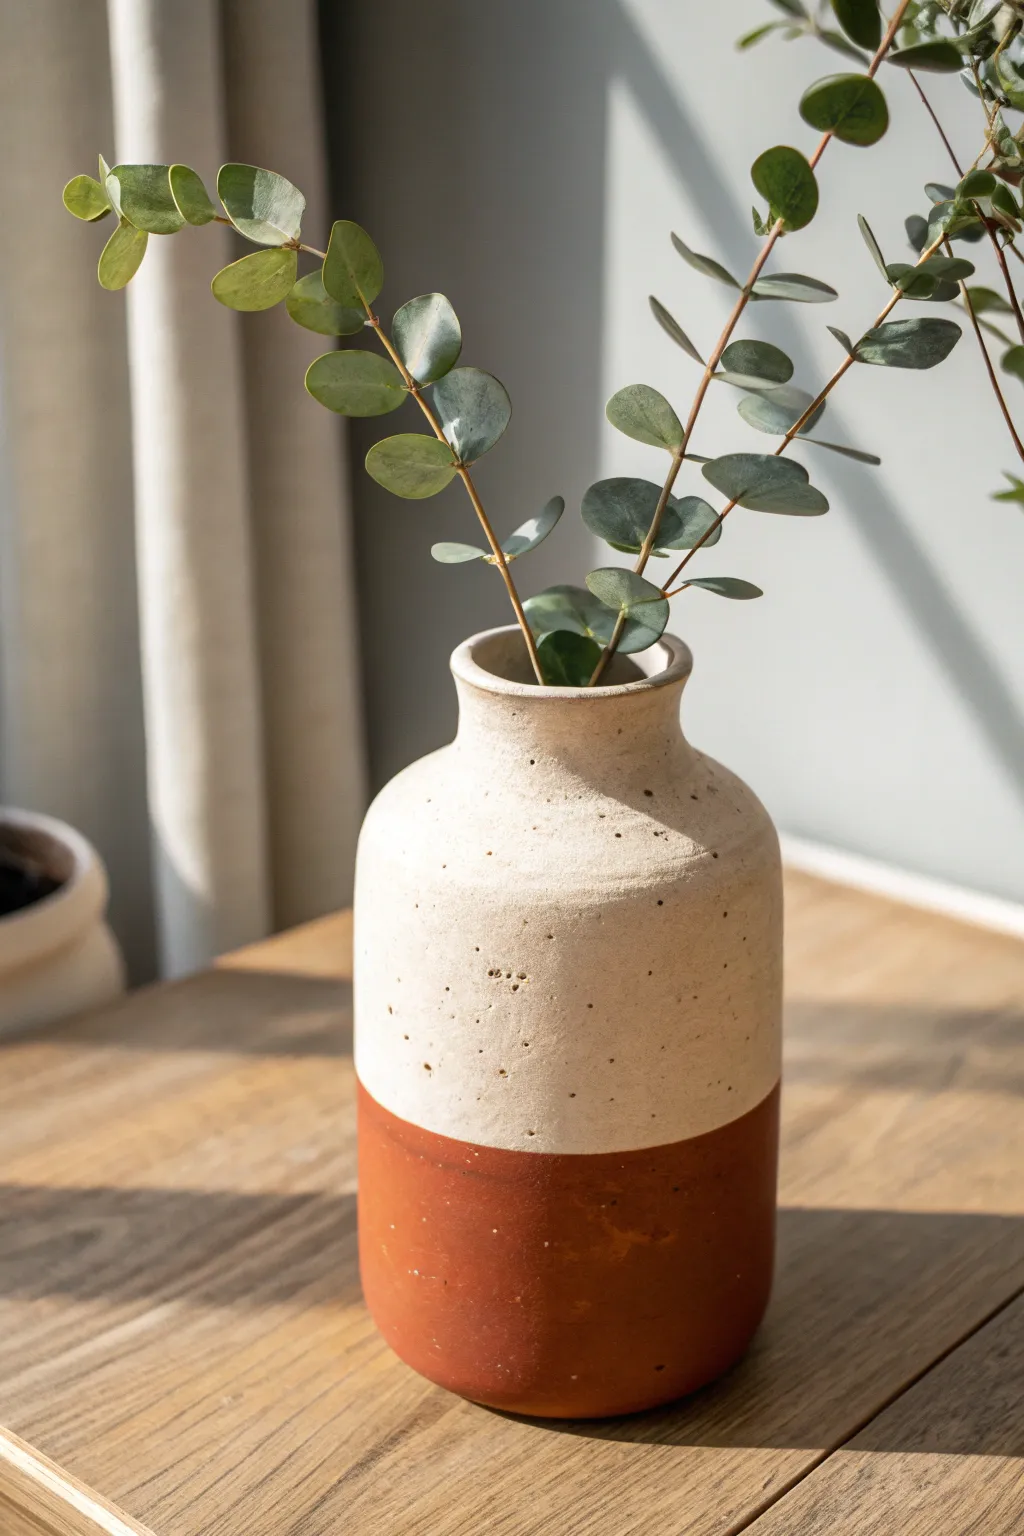
Achieve a modern rustic aesthetic with this simple color-blocking project that transforms a plain vessel into a statement piece. The contrast between the creamy, speckled top and the warm terra cotta base mimics the look of high-end artisan pottery without the kiln.
Step-by-Step Tutorial
Materials
- Plain ceramic or glass vase (preferably with a textured or matte finish)
- Terra cotta colored acrylic paint or chalk paint
- Cream or off-white acrylic paint (matte finish)
- Baking soda (for texture)
- Painter’s tape (high-quality masking tape)
- Medium flat paintbrush
- Foam sponge brush
- Small cup for mixing
- Sandpaper (fine grit)
- Clear matte sealer spray (optional)
- Toothbrush (optional for speckling)
Step 1: Preparation & Base Coat
-
Clean the surface:
Begin by thoroughly washing your vase with warm soapy water to remove any dust or oils. Dry it completely with a lint-free cloth. -
Sand for adhesion:
Lightly scuff the entire surface of the vase with fine-grit sandpaper. This helps the paint grip the surface, especially if you are upcycling a shiny glass or glazed ceramic vase. -
Mix the textured base:
Squeeze a generous amount of your cream-colored acrylic paint into a mixing cup. Stir in baking soda gradually—aim for a ratio of about 1 part baking soda to 2 parts paint. -
Adjust consistency:
Mix until the paint resembles a fluffy mousse. If it’s too thick to spread, add a tiny drop of water; if it’s too runny, add a pinch more baking soda. -
Apply the first coat:
Using a flat paintbrush, apply the cream mixture over the entire vase. Don’t worry about brushstrokes; the texture is part regarding the charm. I like to use crisscross strokes here to build random texture. -
Let it dry:
Allow the first coat to dry completely, which usually takes about 30 to 60 minutes depending on humidity. The baking soda texture will become more apparent as it dries. -
Apply a second coat:
Add a second layer of the textured cream paint to ensure full coverage and opaque color. Let this dry fully for several hours or overnight.
Bleeding Lines?
If paint bled under the tape, don’t panic. Wait for it to dry fully, then use a small, stiff brush dipped in the cream base color to carefully paint over the mistake and create a straight edge again.
Step 2: Creating the Dipped Look
-
Masking the line:
Decide how high you want your ‘dipped’ section to be—usually, the bottom third looks best. Wrap painter’s tape around the circumference of the vase at this height. -
Seal the tape edge:
Press down firmly on the edge of the tape with your fingernail. Brush a very thin layer of the *cream* base paint over the tape edge. This seals the gap and prevents the darker color from bleeding under. -
Mix the terra cotta color:
Prepare your terra cotta or rust-colored paint. If you want the bottom to have the same sandy texture, mix in baking soda just like you did for the top. For a smoother contrast, leave this paint plain. -
Paint the bottom section:
Using a sponge brush specifically for this step helps avoid ridges. Dab or stroke the terra cotta paint onto the bottom section of the vase, covering everything below the tape line. -
Check for coverage:
Terra cotta pigments can sometimes be translucent. Apply a second or third coat as needed, letting the paint dry to the touch between layers. -
Remove the tape:
The crucial moment: peel off the painter’s tape while the final coat of terra cotta paint is still slightly tacky, not fully hardened. This ensures a crisp, clean line without chipping.
Step 3: Finishing Touches
-
Add speckles (optional):
To mimic the natural clay look in the photo, dilute a tiny bit of brown or black paint with water. Dip an old toothbrush in it and flick the bristles with your thumb to mist tiny speckles over the cream section. -
Clean up edges:
If there are any uneven spots on your color-block line, use a small detail brush to carefully touch them up. -
Seal the project:
Once the vase is 100% dry, take it outside and spray it with a clear matte sealer. This protects the textured finish from chipping and makes it easier to dust later.
Faux Stone Effect
For a more realistic raw pottery look, gently dab the wet paint with a crumpled paper towel or sea sponge. This creates deeper pits and divots than brushing alone.
Place your favorite dried eucalyptus or fresh stems inside to admire your handmade design

TRACK YOUR CERAMIC JOURNEY
Capture glaze tests, firing details, and creative progress—all in one simple printable. Make your projects easier to repeat and improve.
Speckled Clay Terrazzo-Style Vase Finish
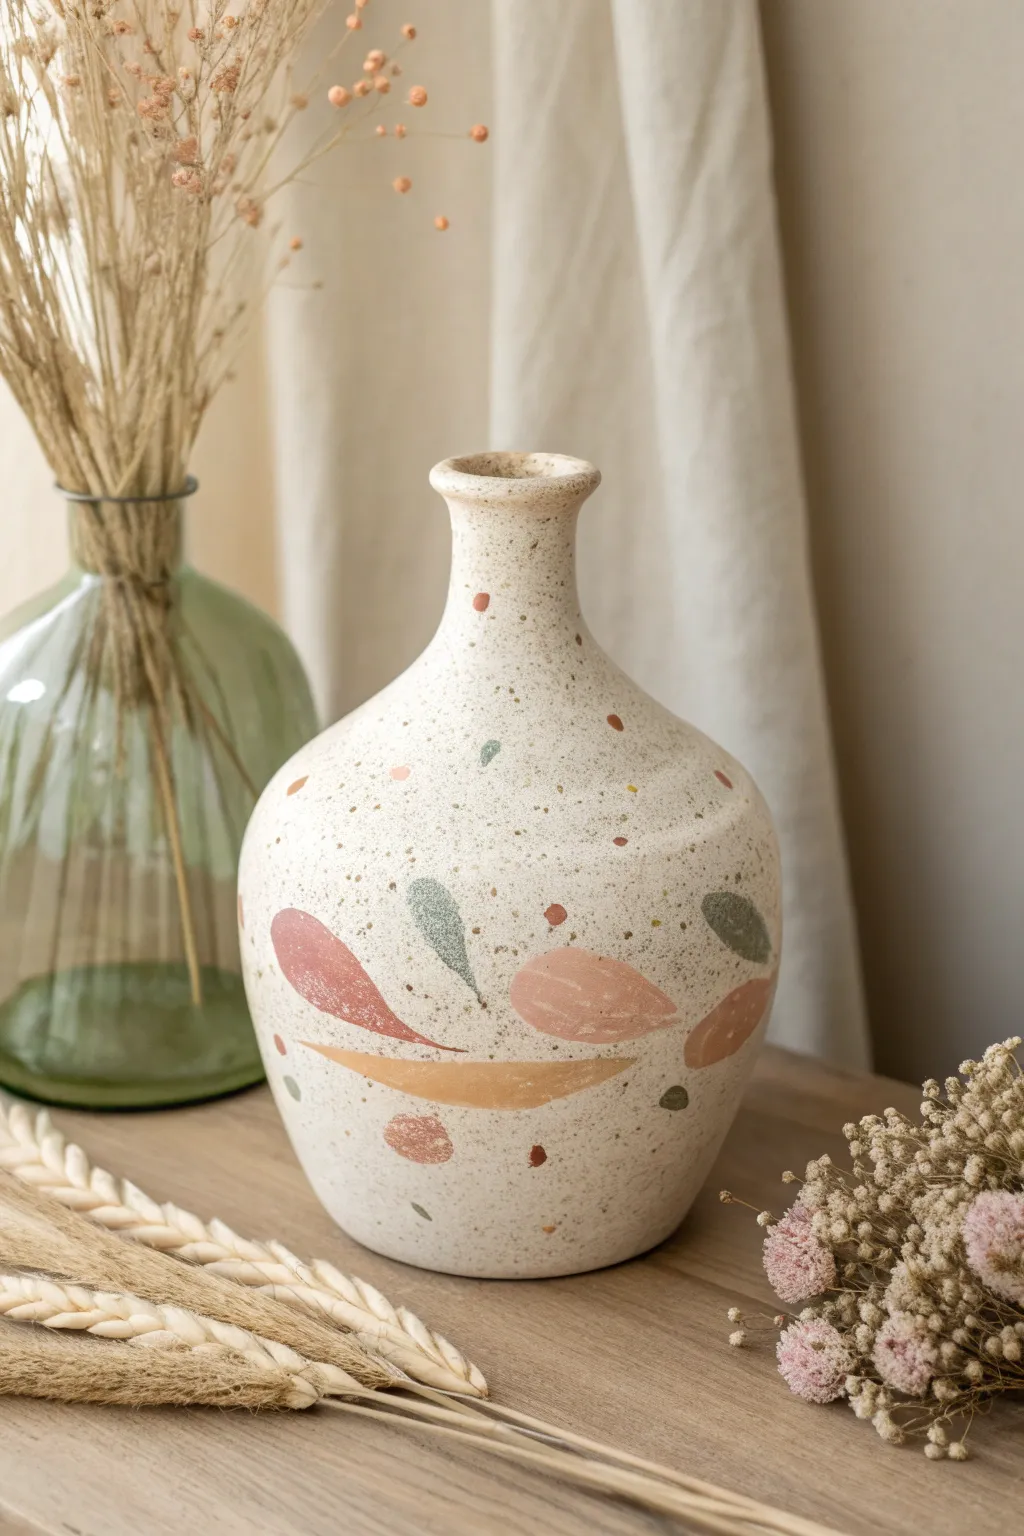
Learn how to transform a plain vessel into a stunning faux-ceramic masterpiece featuring an organic, terrazzo-inspired design. This project uses clever painting techniques to mimic the look of speckled stoneware clay without needing a kiln.
Step-by-Step Guide
Materials
- Glass or ceramic vase (thrifted is fine)
- White primer spray paint
- Baking soda or plaster of Paris
- Acrylic paints (cream/off-white, terracotta, sage green, mustard yellow, dark brown)
- Stiff bristle brush (e.g., an old toothbrush or chip brush)
- Small round synthetic brushes
- Palette or paper plate
- Matte clear sealant spray
- Paper towels
- Plastic drop cloth or newspaper
Step 1: Preparation & Base Coat
-
Clean surface:
Begin by thoroughly washing your vase with warm soapy water to remove any dust, grease, or sticker residue. Dry it completely with a lint-free towel. -
Prime the vase:
In a well-ventilated area, apply a coat of white primer spray paint. This ensures your acrylics will stick to slick glass or glazed ceramic surfaces. -
Mix textured paint:
Create your stoneware texture by mixing cream or off-white acrylic paint with baking soda. Aim for a ratio of about 1 part baking soda to 2 parts paint. Using plaster of Paris creates an even grittier texture if you prefer. -
Apply base layer:
Paint the baking soda mixture onto the vase. Use horizontal strokes for a hand-thrown pottery look, or dab it on for a rougher stone effect. -
Let it dry:
Allow this first textured coat to dry completely. It usually takes about 30-60 minutes depending on humidity. Don’t rush this, or the texture might pull away. -
Apply second coat:
Apply a second layer of your textured paint mixture to ensure full opacity and build up that rich, earthy dimension.
Clean Edges Trick
If your large hand-painted shapes look messy, go back with your base cream color and cut in around the edges to clean up the silhouette.
Step 2: Creating the Speckle Effect
-
Prepare splatter paint:
Dilute a small amount of dark brown paint with water until it has an inky consistency. You want it fluid enough to fly off bristles easily. -
Load the brush:
Dip a stiff bristle brush or an old toothbrush into the watered-down paint. Tap off any large drips onto a paper towel first. -
Splatter technique:
Hold the brush about 6 inches from the vase and run your thumb across the bristles to flick tiny droplets onto the surface. Rotate the vase constantly to get even coverage. -
Vary the distance:
Experiment with moving closer or further away to create variations in the dot sizes, giving it a more natural, imperfect stone appearance. -
Dry the speckles:
Let the speckles dry completely before moving on to avoid smudging the tiny dots into streaks.
Texture Twist
For an even rougher, aged pottery look, gently sand the dry baking soda paint with fine-grit sandpaper before adding the colored shapes.
Step 3: Painting the Terrazzo Shapes
-
Plan placement:
Visualize where you want your abstract shapes. The design works best with organic, floating forms rather than a structured pattern. -
Mix shape colors:
Prepare your palette with terracotta, sage green, and mustard yellow. I like to mute these colors slightly by mixing in a tiny drop of the base cream color to keep the palette cohesive. -
Paint large forms:
Using a small round brush, paint freely shaped ovals, elongated leaves, or soft triangular forms. Keep the edges smooth but irregular. -
Layering shapes:
Don’t be afraid to let some shapes sit close together. Paint a long mustard swoosh or a sage green leaf-like shape near a terracotta oval. -
Add detail dots:
Once the main shapes are placed, use a very small brush to add a few larger, intentional dots in different colors to bridge the gaps between the forms. -
Check balance:
Step back and look at the vase from a distance. If a spot looks too empty, add a small shape or a cluster of larger painted dots to fill the void.
Step 4: Sealing
-
Final dry time:
Allow all your painted designs to dry for at least an hour or two. The baking soda paint is porous and needs to be fully set. -
Apply sealant:
Finish with a light coat of matte clear spray sealant. This protects the textured surface from moisture and prevents the baking soda from shedding over time.
Now step back and admire your custom, high-end looking decor piece that brings warmth to any corner of your home
Wabi-Sabi Asymmetrical Vase With a Softly Wonky Rim
This project embraces the beauty of imperfection with a softly asymmetrical form and a natural, speckled finish. The resulting vase features a grounded, two-tone earthy gradient that feels both ancient and modern.
How-To Guide
Materials
- Stoneware clay (speckled or buff)
- Pottery wheel
- Throwing sponge
- Wooden throwing rib
- Needle tool
- Wire cutter
- Trimming tools
- Matte transparent glaze
- Iron oxide wash (optional)
- Kiln access
Step 1: Preparing and Centering
-
Wedge the clay:
Start with about 2-3 pounds of speckled stoneware clay. Wedge it thoroughly to remove air bubbles and ensure even consistency, shaping it into a round ball. -
Mount on the wheel:
Slam the clay ball down onto the center of your wheel head. Seal the edges against the wheel to prevent it from flying off when you start spinning. -
Center the clay:
With the wheel spinning at a moderate-fast speed, use wet hands to cone the clay up and push it back down until it is perfectly centered and running smooth.
Embrace the wobble
Don’t fix every mistake! If the rim dips slightly or the belly isn’t perfectly spherical, leave it. This creates the authentic wabi-sabi character.
Step 2: Throwing the Form
-
Open the clay:
Press your thumbs into the center of the mound, opening it up until you are about a quarter-inch from the wheel head. Create a flat internal bottom. -
Pull the walls:
Slow the wheel down. Using a sponge on the inside and fingertips on the outside, gently pull the clay upward to create a cylinder. Maintain a slightly thicker wall than usual to allow for shaping. -
Belly out the form:
To create that lovely round shape, press gently from the inside of the cylinder with your sponge while supporting the outside with a rib. Push outward progressively to expand the belly. -
Collar the neck:
As you reach the top third, use both hands on the outside to gently squeeze or ‘collar’ the clay inward. This narrows the opening to create the distinct neck transition. -
Refine the curve:
Use a wooden rib on the exterior to smooth the curve of the belly. I find this step crucial for erasing the throwing rings if you want that smooth, stone-like texture. -
Flare the rim:
At the very top of the neck, apply gentle pressure with your thumb to flare the rim outward slightly. Don’t worry if it isn’t perfectly level; a slight wave adds to the wabi-sabi aesthetic.
Clay cracking?
Cracks often happen during drying. Cover your vase loosely with plastic for the first 24 hours to slow down the drying process and ensure even shrinkage.
Step 3: Trimming and Finishing
-
Wire off and dry:
Run a wire tool under the base to separate it from the wheel. Let the vase dry to a leather-hard state, where it is firm but still cool to the touch. -
Trim the foot:
Invert the pot onto the wheel (using a grip or clay wads). Trim the excess clay from the bottom to create a rounded curve that flows into the foot ring. -
Burnish for texture:
While leather hard, rub the surface with a smooth stone or the back of a spoon. This compresses the clay particles and enhances the natural speckled finish. -
Bisque fire:
Place the bone-dry vase in the kiln and bisque fire it according to your clay body’s specifications (usually Cone 04 or 06).
Step 4: Glazing and Firing
-
Apply resistance (optional):
If you want the two-tone look seen in the photo, leave the bottom third unglazed or apply a wax resist to that area. -
Glaze the interior:
Pour a matte transparent or satin cream glaze inside the vase, swirl it to coat, and pour out the excess. -
Dip the exterior:
Dip the top two-thirds of the vase into the same matte glaze. The goal is a thin application that lets the clay’s natural speckles show through. -
Final wipe:
Clean any stray glaze off the foot ring with a damp sponge to prevent it from sticking to the kiln shelf. -
Final firing:
Fire the vase to maturity (likely Cone 6 or 10, depending on your clay). This final heat will bring out the toasted color of the bare clay at the bottom.
Place your finished vase on a simple linen cloth to highlight its quiet, harmonic presence.
Faceted Geometric Vase With Soft Planes
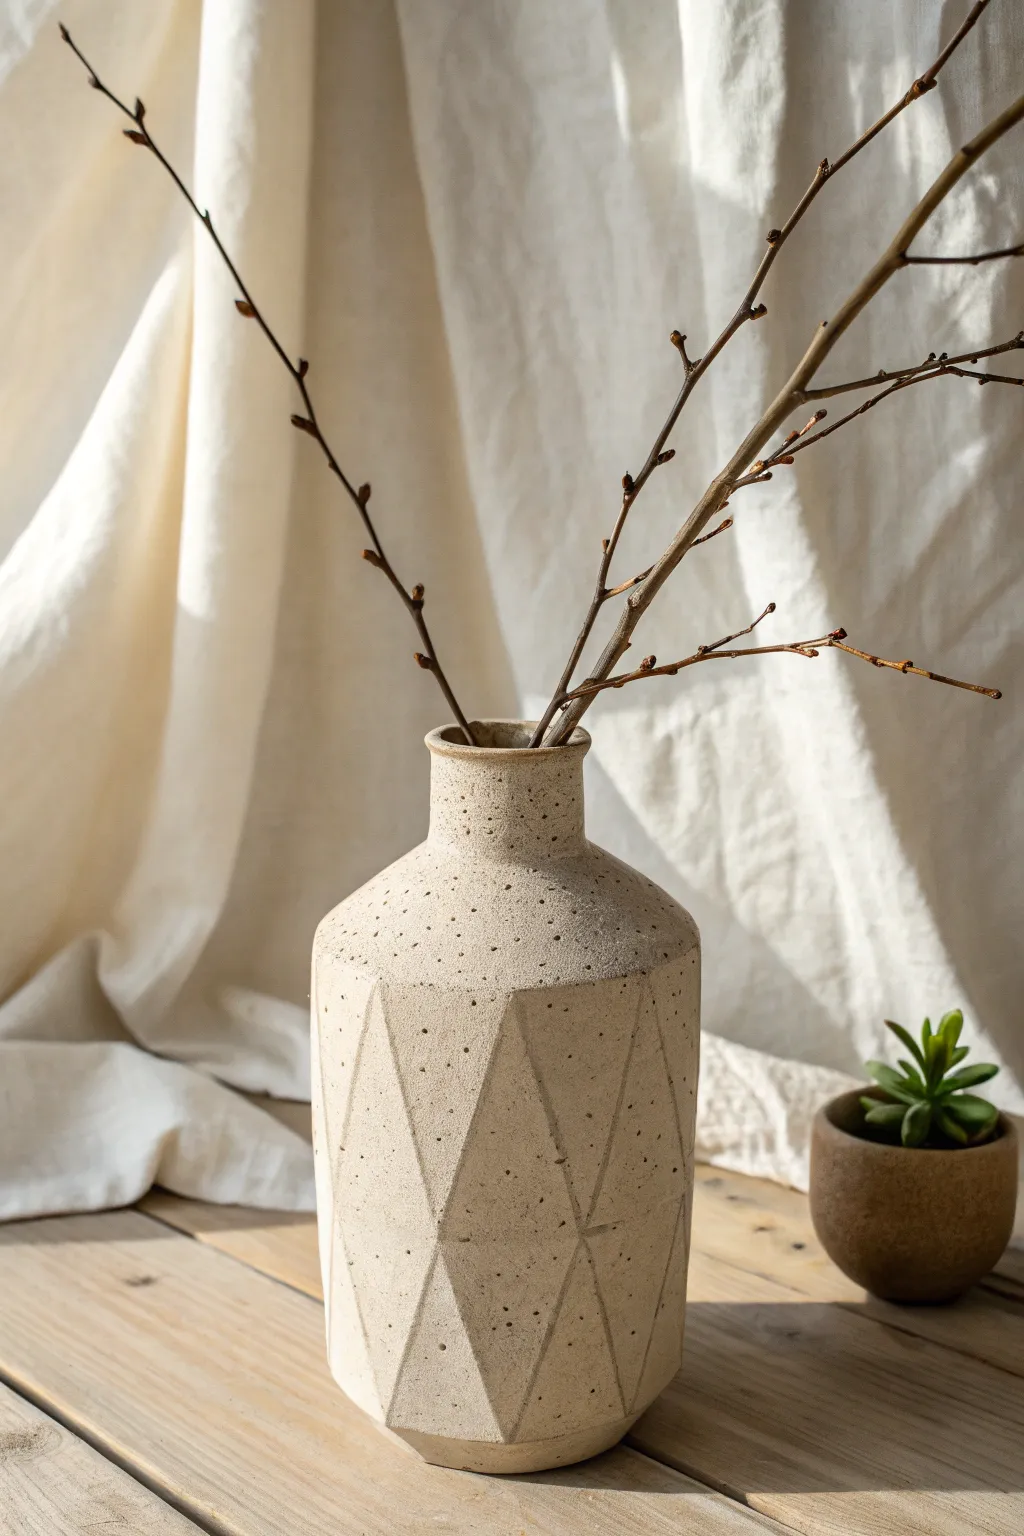
This project combines the rustic charm of speckled stoneware with clean, modern lines. By carving geometric planes into the leather-hard clay, you’ll create a striking play of light and shadow that gives this vase its sophisticated architectural feel.
Step-by-Step
Materials
- Speckled stoneware clay (mid-fire)
- Pottery wheel (or coil building tools if hand-building)
- Wire clay cutter
- Metal kidney rib
- Wooden modeling tool
- Sharp carving tool or fettling knife
- Sponge
- Ruler or straight edge
- Calipers (optional)
- Clear matte glaze
Step 1: Forming the Base Vessel
-
Wedge the clay:
Start by wedging about 3-4 pounds of speckled stoneware clay. This ensures all air bubbles are removed and the consistency is uniform, which is crucial for throwing a tall cylinder. -
Center and open:
Secure the clay on the wheel head and center it. Open the clay up, leaving a floor thickness of about 3/8 inch to provide enough weight at the bottom for stability. -
Pull the walls:
Pull the walls into a tall cylinder. For this specific design, you want the belly of the vase to be wider than the neck. Keep the walls slightly thicker than usual (about 1/2 inch) because you will be carving into them later. -
Shape the shoulder:
Collar the top third of the cylinder inward to create a distinct shoulder. Refine the neck into a narrow, vertical chimney shape, smoothing the rim with a chamois or sponge. -
Refine the surface:
Use a metal kidney rib to scrape the exterior walls smooth, removing throwing lines. This clean surface is essential for the geometric carving to stand out clearly. -
Dry to leather hard:
Allow the piece to dry slowly until it reaches a sturdy leather-hard stage. The clay needs to be firm enough to hold its shape when carved, but soft enough to slice cleanly.
Step 2: Carving the Facets
-
Map out the design:
Before cutting, lightly sketch your geometric grid onto the clay surface using a dull pencil or needle tool. I find it helpful to mark vertical guidelines first to ensure the diamond shapes remain symmetrical around the vase. -
Start the first cuts:
Using a sharp fettling knife or a wire loop tool, make your first slice. Cut diagonally downwards to create one side of a triangle. Keep your hand steady and maintain a consistent depth. -
Complete the diamonds:
Cut the opposing diagonal line to form the diamond or triangular shapes. Notice how the facets in the image interlock; try to make the peaks of one row meet the valleys of the next. -
Bevel the edges:
Ensure the planes of your cuts are flat, not curved. You are aiming for a chiseled look. If the clay drags, your tool might be dull or the clay too wet. -
Clean up crumbs:
Use a slightly damp sponge or a soft brush to wipe away clay crumbs. Be very careful not to round over the sharp edges you just carved—crisp lines are key to this aesthetic.
Crisp Corners Tip
Wait until the clay is almost overly firm before carving. If it’s too soft, the knife drags and creates blurry edges. Sharper tools equal sharper shadows.
Step 3: Finishing and Firing
-
Dry completely:
Cover the vase loosely with plastic for a day to equalize moisture, then uncover and let it dry completely to bone dry status. This slow drying prevents cracks from forming at the carving points. -
Bisque fire:
Load the vase into the kiln and bisque fire to roughly Cone 04 (depending on your specific clay body instructions). -
Glaze interior:
Pour clear glaze inside the vase, swirl it around to coat the entire inner surface, and pour out the excess. Wipe any drips off the rim immediately. -
Glaze exterior (Optional):
For the exterior, you have a choice. The example image looks like bare, fired clay or a very thin matte wash. To replicate this, apply a thin coat of matte clear glaze which highlights the speckles without adding shine. -
Final wipe:
Sponge the foot of the vase so no glaze touches the kiln shelf. Ensure the geometric groves aren’t pooled with thick glaze, which would obscure the carving. -
Glaze fire:
Fire the kiln to the maturity temperature of your clay (likely Cone 5 or 6 for stoneware) to finish the piece.
Dual-Tone Effect
Glaze only the carved facets with a semi-transparent white glaze and leave the raised ridges raw. This exaggerates the geometry and depth.
Now perfectly fired, fill your new sculpture with simple dried botanicals to complete the serene, modern look
Sculpted Abstract Face Vase (Easy Features, Big Personality)
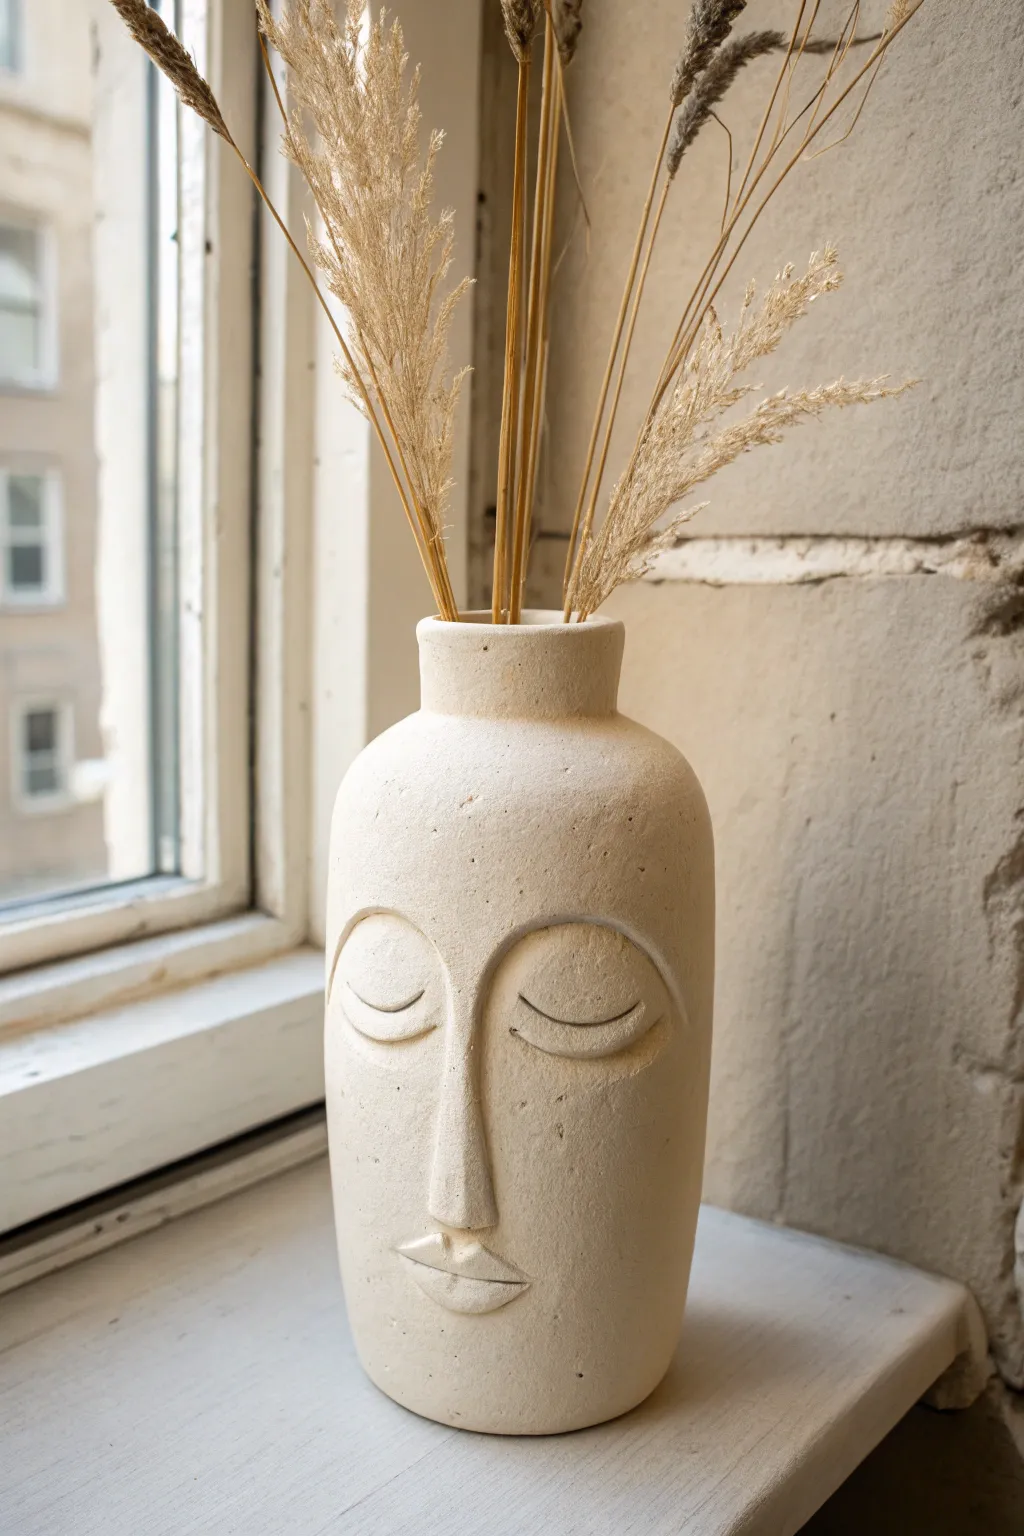
Embrace minimalist sculpture with this tall, cylindrical face vase that radiates calm energy. Featuring a matte, stone-like texture and simple, closed-eye features, this piece transforms basic clay into a sophisticated home decor statement.
Step-by-Step Tutorial
Materials
- Air-dry clay (white or light beige, approx. 1kg)
- Tall cylindrical container (glass jar or cardboard tube as armature)
- Rolling pin
- Clay knife or craft knife
- Small bowl of water
- Sponge
- Pottery needle tool or toothpick
- Sandpaper (fine grit)
- Matte cream or beige acrylic paint
- Baking soda (for texture mixture)
- Paintbrush
Step 1: Building the Base Form
-
Prepare your armature:
Choose a tall, straight-sided cylindrical container to act as your support structure. If you are using a non-porous material like glass, you might want to wrap it lightly in cling film so the clay doesn’t stick permanently if you plan to remove it later, though leaving it in provides weight and waterproofing. -
Roll the main slab:
Roll out a large slab of air-dry clay to a consistent thickness of about 1/4 inch. Ensure the slab is wide enough to wrap completely around your chosen cylinder and tall enough to cover it with some extra at the top for the neck. -
Wrap the cylinder:
Carefully lift your clay slab and wrap it around the armature. Cut away any excess overlap with your knife, creating a clean vertical seam where the edges meet. -
Seal the seam:
Score the edges of the seam (scratch hatch marks), apply a little water, and press them firmly together. Use your fingers or a modeling tool to smooth the join until it is invisible. -
Form the shoulder and neck:
At the top of the cylinder, gently gently curve the clay inward to create a rounded shoulder. Add a smaller coil or strip of clay on top of this rounded section to build a short, vertical neck. -
Smooth the transition:
Dip your fingers in water and blend the clay from the shoulder into the neck so it looks like one continuous piece, erasing any coil lines.
Seamless Blending
Keep a spray bottle of water nearby. Mist the clay lightly if it starts cracking while you work, but avoid soaking it or the structure may sag.
Step 2: Sculpting the Features
-
Outline the nose:
Roll a long, tapered carrot shape of clay for the nose. Position it vertically in the center of the vase face. I find it helpful to place it slightly lower than center to elongate the forehead area for that modern look. -
Blend the nose bridge:
Score and slip the back of the nose piece, then press it onto the vase. Carefully blend the edges of the nose into the main body, particularly at the bridge where it flows into the eyebrow line. -
Create the eyebrow ridge:
Roll two thin snakes of clay. Attach them extending from the top of the nose bridge, arching outwards to form the brow bone. Blend them downwards to create a subtle ridge rather than a stark line. -
Form the closed eyelids:
Roll two semi-circles of clay. Place them beneath the brow ridges. These should be fairly flat but distinct enough to look like sleeping eyelids. -
Define the eye line:
Take your needle tool and gently carve a curved line along the bottom of the eyelid shape to define where the lashes would be. -
Sculpt the lips:
Form a small, wide diamond shape for the mouth. Attach it below the nose. Use your needle tool to indent the center horizontal line, creating the separation between the upper and lower lip. -
Refine the surface:
Once all features are attached, take a slightly damp sponge and wipe over the entire piece to remove fingerprints and soften any harsh tooling marks.
Step 3: Finishing and Texture
-
Let it dry completely:
Allow the vase to dry for 24-48 hours away from direct heat. It should be bone dry and room temperature to the touch. -
Sand for smoothness:
Use fine-grit sandpaper to gently buff the surface. Pay special attention to the nose and lips to ensure they are smooth and free of burrs. -
Mix textured paint:
Mix your beige acrylic paint with a teaspoon of baking soda. This creates a fluffy, textured paint that mimics the look of sandstone or terracotta. -
Apply the finish:
Paint the entire vase with your textured mixture. Use a dabbing motion rather than long strokes to enhance the stone-like effect. -
Final dry:
Let the paint set completely before adding any dried florals or grasses to display.
Faux-Stone Speckle
To get the exact look in the photo, dip an old toothbrush in watered-down brown paint and flick tiny speckles over the dried beige base coat.
Now you have a serene, sculptural piece ready to bring a moment of calm to your favorite corner
Raised Floral Appliqué Vase With Contrast Details
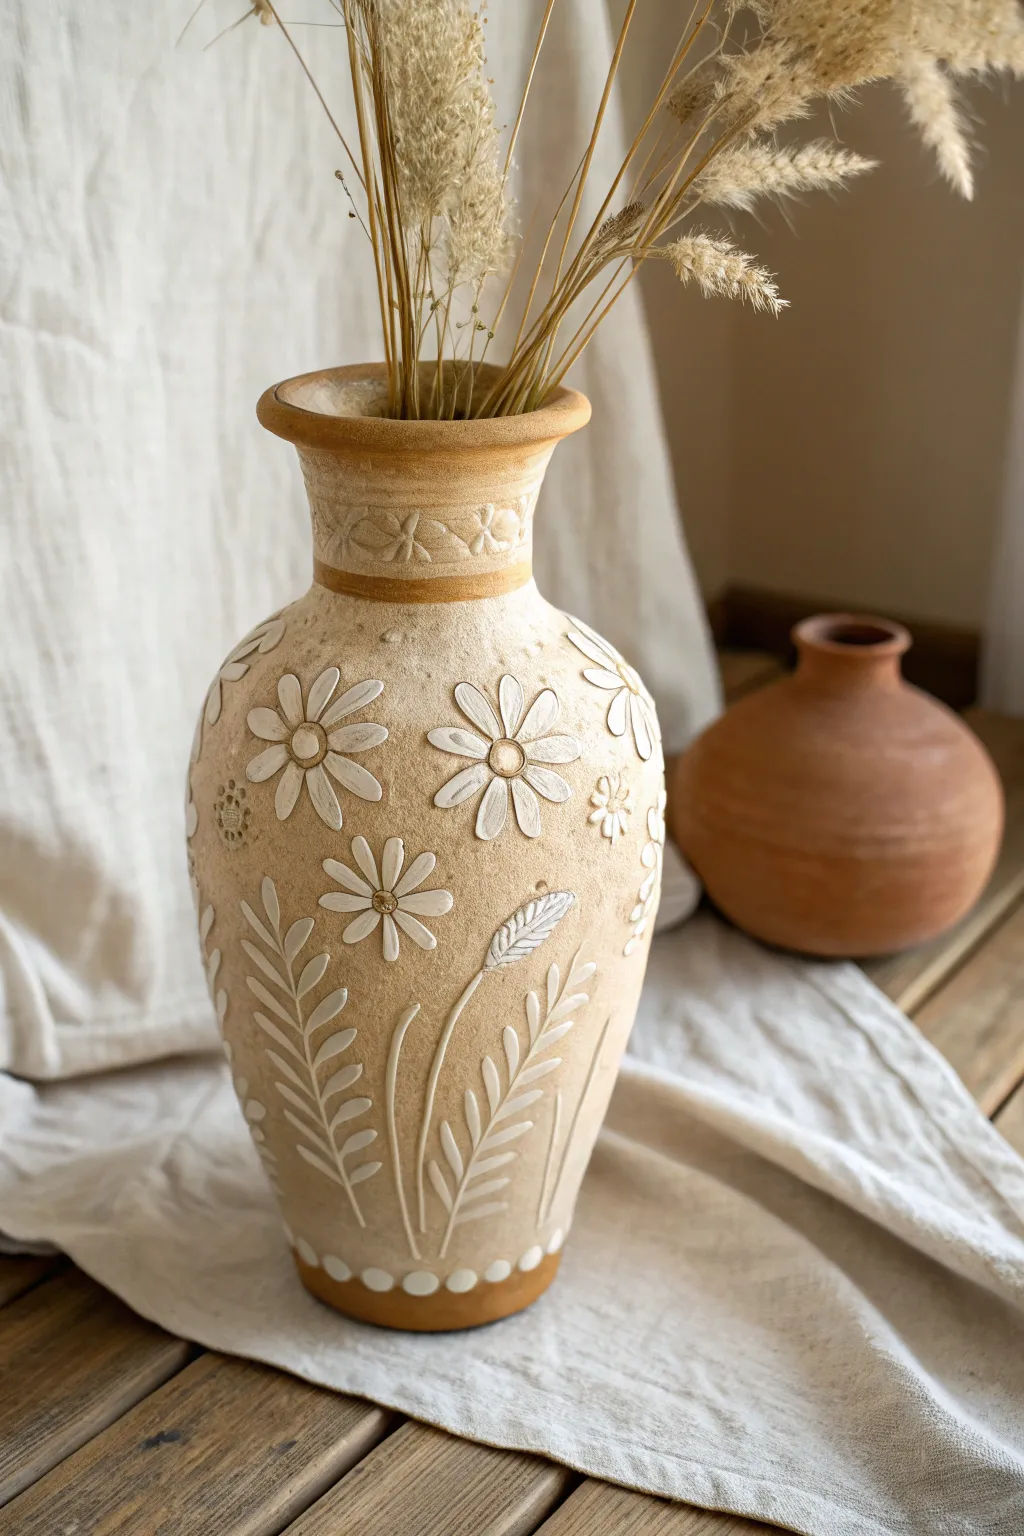
Bring the charm of a sun-drenched garden indoors with this textured clay vase project, featuring tactile floral appliqués. The combination of sandy beige tones, crisp white petals, and warm terracotta accents creates a timeless, artisanal look perfect for dried bouquets.
Step-by-Step
Materials
- Air-dry clay (white)
- Terra cotta colored acrylic paint
- Cream or sandy-beige acrylic paint (textured finish optional)
- White acrylic paint
- Clay sculpting tools (needle tool, small ball stylus)
- Water cup and sponge
- Rolling pin
- Plain glass or ceramic vase (as a base structure)
- Sandpaper (fine grit)
- Matte varnish or sealant
- Small round paintbrush
- Flat shader brush
- Strong craft glue (if attaching shapes after drying)
Step 1: Base Construction
-
Prepare the armature:
Thoroughly clean and dry your glass or ceramic vase. This hidden structure will give your project stability and ensure it is watertight. -
Roll out the base clay:
Roll out a large slab of white air-dry clay to about 1/4 inch thickness. I find it helpful to roll it out on a piece of fabric or canvas to prevent sticking and add a subtle texture to the back. -
Wrap the vase:
Carefully wrap the clay sheet around the vessel. Trim the excess with a knife and join the seam by scoring the edges, adding a little water, and smoothing the clay together until the line disappears. -
Shape the rim and base:
Build up the rim by rolling a thick coil of clay and attaching it to the top opening, flaring it outward slightly. Repeat this process at the bottom to create a distinct, sturdy foot for the vase. -
Add surface texture:
Before the clay dries, take a stiff-bristled brush or a crumpled ball of foil and gently tap it all over the surface. This creates that lovely organic, stippled texture that mimics stone or rough pottery.
Slip & Score is Key
When attaching raised clay pieces like petals to the main body, always score (scratch) both surfaces and add water. This ensures they bond permanently and won’t pop off later
Step 2: Appliqué Details
-
Create the neck band:
Roll a thin, flat strip of clay and attach it around the neck of the vase. Use a small tool to press X-shapes or small floral impressions into this band while it is still soft. -
Form the petals:
To make the daisies, pinch off small pieces of clay and roll them into teardrop shapes. Flatten them slightly to form individual petals. -
Attach the flowers:
Score the back of each petal and the spot on the vase where it will go. Apply a dab of water (slip) and press the petals onto the vase in a circle. Use a ball stylus to press the center of each petal down slightly for dimension. -
Add flower centers:
Roll tiny balls of clay, flatten them into discs, and press them into the center of each flower arrangement. -
Sculpt the foliage:
Roll thin coils for stems and attach them below the flowers. For the fern-like leaves, attach a central stem, then add tiny teardrop shapes in pairs all the way up the stem. -
Detail the wheat sheaf:
Create a wheat-like element by making a longer oval shape. Use a needle tool to carve angled hatch marks along its length, resembling grain. -
Add base dots:
Roll small, uniform balls of clay and press them in a row around the very bottom edge of the vase, just above the foot. -
Dry completely:
Let the vase sit undisturbed for 24 to 48 hours. Air-dry clay shrinks slightly, so keep it away from direct heat sources to prevent cracking.
Add Real Texture
For an authentic gritty stone look, mix a teaspoon of baking soda or fine sand into your beige acrylic paint before applying the base coat to the vase body
Step 3: Painting and Finishing
-
Sand imperfections:
Once bone dry, use fine-grit sandpaper to gently smooth any sharp burrs on the flower petals or leaves, being careful not to remove the texture on the main body. -
Base coat the body:
Mix a sandy-beige color and paint the entire body of the vase, avoiding the rim and the foot. You can dab the paint on to enhance the stippled texture we created earlier. -
Paint the contrast areas:
Use the terra cotta acrylic paint for the flared rim, the bottom foot, and the narrow band on the neck. This warm reddish-brown frames the design beautifully. -
Highlight the appliqué:
Using a small round brush, carefully paint the flower petals, leaves, and raised dots in a crisp, matte white. This step requires patience to keep the edges clean. -
Detail the centers:
Mix a diluted brown wash (brown paint with lots of water) and settle it into the grooves of the flower centers and the neck band pattern to create antique-style shadows. -
Seal the work:
Apply two coats of matte varnish to protect the paint and clay from humidity and dust.
Fill your new handmade vessel with dried wheat or pampas grass to complete the rustic aesthetic
Fluted Scallop Rim Vase for a Soft, Romantic Edge
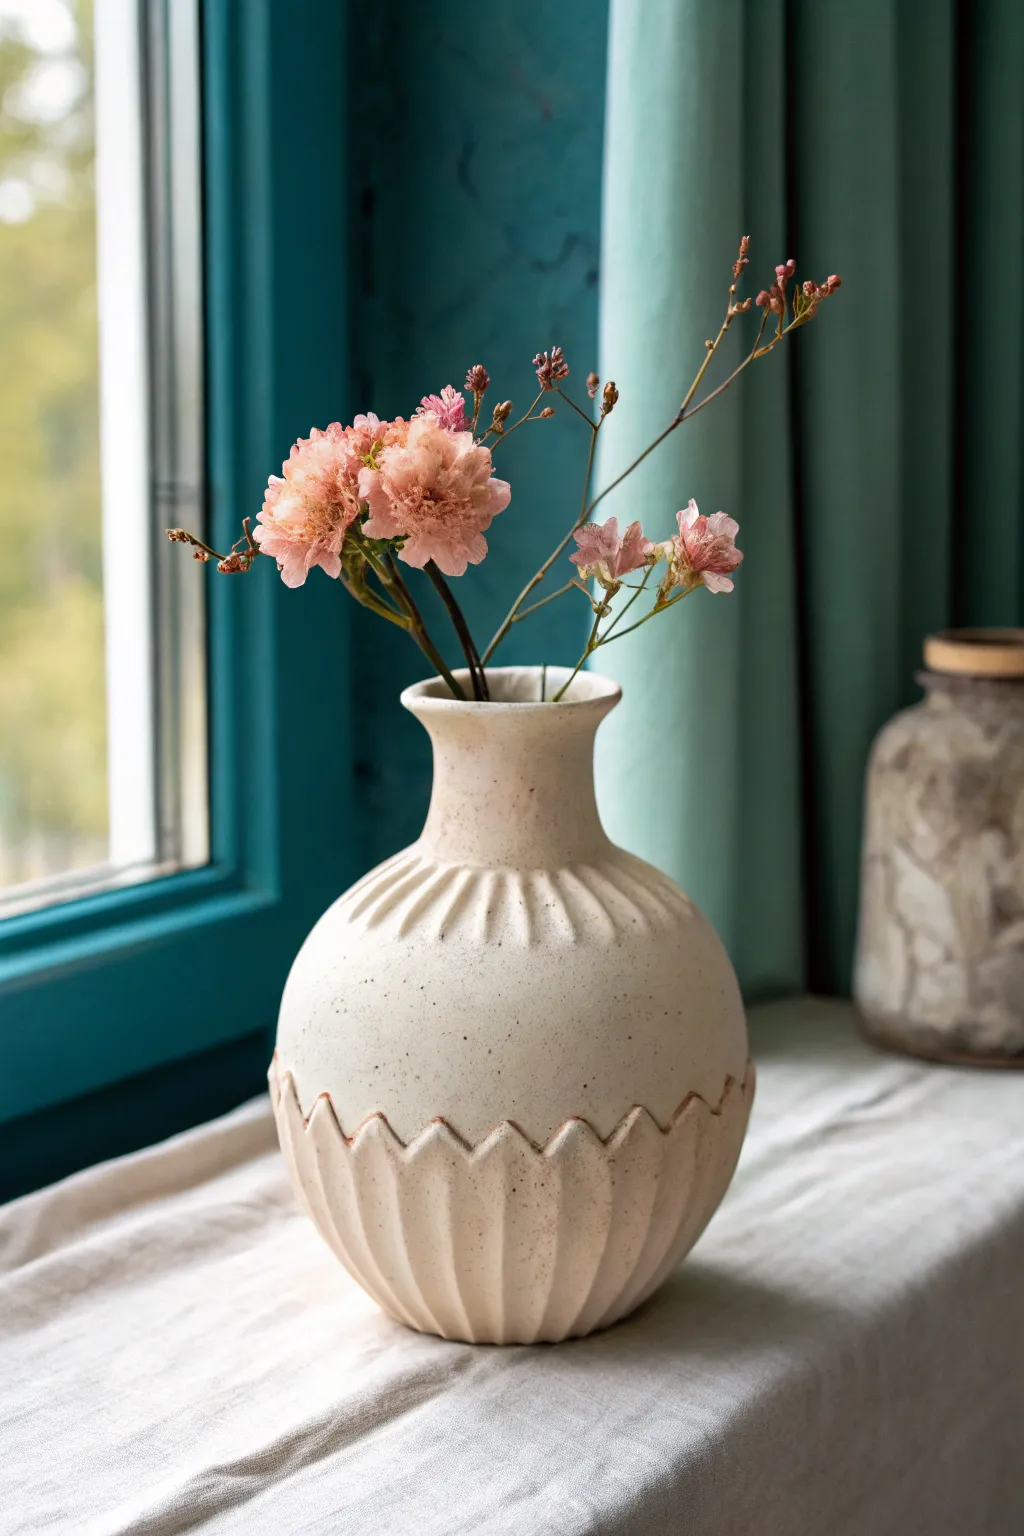
This project transforms simple clay into a romantic vessel featuring a distinctive scalloped lower section and gentle fluting around the neck. The speckled cream finish gives it an organic, high-end ceramic look without needing a kiln.
Detailed Instructions
Materials
- Air-dry clay (white or light grey)
- Rolling pin
- Clay knife or fettling knife
- Small bowl relative to vase size (for water)
- Sponge
- Modeling tool with a rounded edge
- Acrylic paint (warm cream/off-white)
- Acrylic paint (dark brown or black for speckling)
- Old toothbrush
- Clear matte varnish or sealant
- Glass jar or bottle (to use as an armature/mold)
Step 1: Forming the Vase Body
-
Prepare the armature:
Find a glass jar or bottle that has a shape similar to the main body of the vase you want. If you can’t find the perfect shape, you can bulk up a thinner bottle with aluminum foil to create that rounded belly. -
Roll the slab:
Roll out a large slab of air-dry clay to about 1/4 inch thickness. You want it consistent so the drying time is even across the piece. -
Wrap the base:
Cut a circle for the base and a large rectangle to wrap around your armature. Join the seams by scoring the edges (making scratch marks) and adding a little water (slip) before pressing them together. Smooth the seam completely with your fingers. -
Shape the neck:
Add a coil of clay to the top to extend the neck if your armature is short, or simply smooth the clay up the neck of the bottle. Flare the very top lip outward slightly.
Step 2: Sculpting the Textures
-
Carve the neck fluting:
Using a rounded modeling tool, press vertical indentations around the neck area. These should start at the shoulder of the vase and fade as they reach the rim. -
Create the lower skirt:
Roll a second strip of clay layer, slightly thicker than the first. This will be the textured bottom section. -
Cut the scallop pattern:
Before attaching the strip, use your knife to cut a zig-zag or saw-tooth pattern along one long edge. This creates the ‘scallop’ points. -
Attach the lower section:
Score and slip the bottom half of your vase body. Wrap the scalloped strip around the base, with the points facing upward toward the neck. -
Model the heavy fluting:
Using your thumb or a thick modeling tool, press into the valleys between each scalloped point. Drag this indentation down to the foot of the vase to create deep vertical grooves. -
Refine the points:
Gently pinch the tip of each scallop to sharpen it. Use a slightly damp sponge to smooth out any rough fingerprints or harsh tool marks. -
Allow to dry:
Let the piece dry thoroughly. Depending on humidity and thickness, this often takes 24-48 hours. Turn it occasionally if possible to ensure airflow.
Seamless Smoothing
Use a slightly damp sponge, not just fingers, to smooth the clay. It erases fingerprints and creates that professional ‘thrown’ pottery texture.
Step 3: Painting and Finishing
-
Base coat:
Apply two coats of warm cream acrylic paint. I find that a matte finish paint looks most like natural pottery. -
Add dimension (optional):
Mix a tiny drop of brown into your cream paint. Water it down heavily to make a wash, and paint it into the grooves of the fluting. Immediately wipe the high points clean with a paper towel to leave shadows in the cracks. -
Create the speckles:
Dilute a small amount of dark brown or black paint with water. Dip an old toothbrush into this mixture. -
Splatter technique:
Hold the toothbrush about 6 inches from the vase and run your thumb across the bristles to flick tiny specks onto the surface. Rotate the vase to get even coverage. -
Seal the piece:
Once the paint is fully dry, apply a coat of clear matte varnish. This protects the finish and gives it a unified sheen. -
Waterproofing note:
Remember that air-dry clay is not waterproof even with varnish. Always keep the glass jar inside if you plan to use fresh flowers, or stick to dried botanicals.
Cracks Appearing?
If hairline cracks appear while drying, mix a small amount of fresh clay with water to make a paste and fill them in gently with your finger.
Place your finished vase near a window to let natural light highlight the beautiful fluted textures you created
Upcycled Vase With Polymer Clay Squiggle Wrap
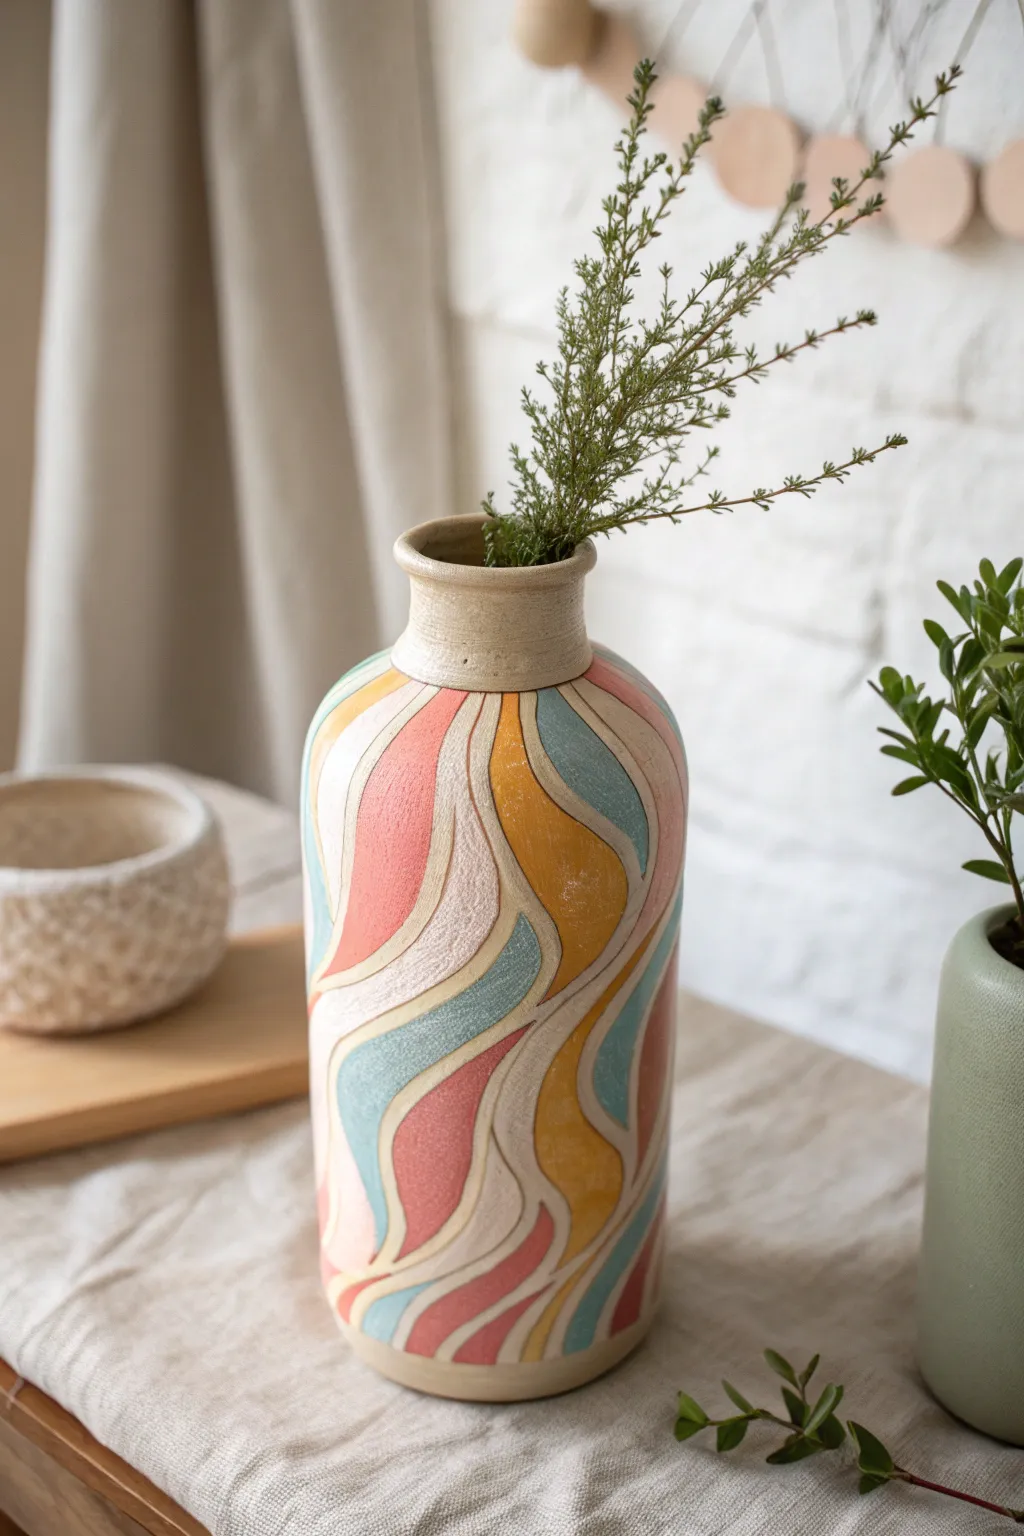
Transform a plain glass or ceramic cylinder into a stunning piece of modern decor with this textured polymer clay wrap technique. The earthy palette of coral, mustard, sage, and cream creates a flowing ‘squiggle’ pattern that feels both organic and delightfully retro.
Step-by-Step Tutorial
Materials
- Tall cylindrical glass or ceramic vase (smooth surface)
- Polymer clay in Coral, Mustard Yellow, Sage Green, Light Blue, and Cream/Beige
- Pasta machine or acrylic rolling pin
- Craft knife or scalpel
- Flexible tissue blade (long clay slicer)
- Liquid polymer clay (Bake & Bond)
- Texture sponge or coarse sandpaper
- Needle tool or toothpick
- Oven (for baking)
- Matte varnish (optional)
Step 1: Preparation & Base Layer
-
Clean the substrate:
Thoroughly clean your base vase with rubbing alcohol to remove any oils or dust. This ensures the clay adheres properly during the baking process. -
Condition the clay:
Start with your Cream/Beige clay. Condition it by kneading it in your hands until it is soft and pliable, ensuring no air bubbles remain inside. -
Roll the base sheet:
Using your pasta machine on a medium setting (or a rolling pin with guides), roll the cream clay into a large, uniform sheet. It needs to be big enough to wrap around the main body of the vase, stopping just below the neck. -
Apply the adhesive:
Brush a thin layer of liquid polymer clay onto the vase surface. This acts as a ‘glue’ and helps the solid clay sheet stick firmly to the smooth glass or ceramic. -
Wrap the vase:
Carefully wrap the cream clay sheet around the vase. Use your flexible blade to slice a clean vertical seam where the ends meet, smoothing the join with your finger so it disappears.
Air Bubble Trouble?
If you see a bubble after applying clay, don’t peel it off! Pierce the bubble with a needle tool to release the air, then smooth the hole closed with your finger.
Step 2: Creating the Wave Pattern
-
Prepare colored sheets:
Condition and roll out your colored clays (Coral, Mustard, Sage, Light Blue) into sheets of equal thickness, slightly thinner than your base layer. -
Cut organic curves:
Using your craft knife or tissue blade, cut freeform, wavy shapes from the colored sheets. Think of flowing water or topographical maps—avoid perfect straight lines. -
Begin the mosaic:
Place your first colored wave shape onto the cream base. I like to start near the bottom and work my way up, pressing gently so no air gets trapped underneath. -
Add spacing strips:
For the separation lines, roll a thin sheet of cream clay and slice it into narrow, consistent ribbons. Place these ribbons between your colored shapes to create the defined borders seen in the design. -
Fill the gaps:
Continue adding colored shapes like a puzzle. You can overlap them slightly and trim the excess with a knife to get a flush fit against the cream borders. -
Detail the neck:
Roll a strip of cream clay for the vase neck. Wrap it around firmly, blending the bottom edge into the main body clay with a modeling tool for a seamless transition.
Step 3: Refining & Baking
-
Smooth the surface:
Once the pattern is complete, roll the vase gently on a smooth work surface or use an acrylic roller to flatten the appliqued pieces so everything is flush and level. -
Add stone texture:
To mimic the stoneware look, gently press a coarse texture sponge or sandpaper all over the intricate clay surface. This removes fingerprints and adds that rustic, matte finish. -
Sharpen the lines:
If the cream borders got smudged during texturing, re-trace the lines gently with a needle tool to define the separation between colors again. -
Clean up:
Wipe away any lint or dust specks with a tiny amount of rubbing alcohol on a brush or your finger before baking. -
Bake the project:
Bake the entire vase in your oven according to the polymer clay manufacturer’s temperature instructions. Usually, this is around 275°F (130°C) for 30-45 minutes. -
Cool down technique:
Turn off the oven and open the door slightly, letting the vase cool down inside completely. This prevents the glass/ceramic core from cracking due to thermal shock. -
Optional sealing:
The textured finish looks great raw, but if you want extra protection, apply a very thin coat of matte varnish to finish.
Stone Effect TIp
For a true speckled ceramic look, mix ground black pepper or dried used coffee grounds into your cream clay before rolling it out.
Now you have a wonderfully tactile, custom vase ready to display dry florals or fresh greenery
Multi-Opening Pocket Vase for Tiny Stem Clusters
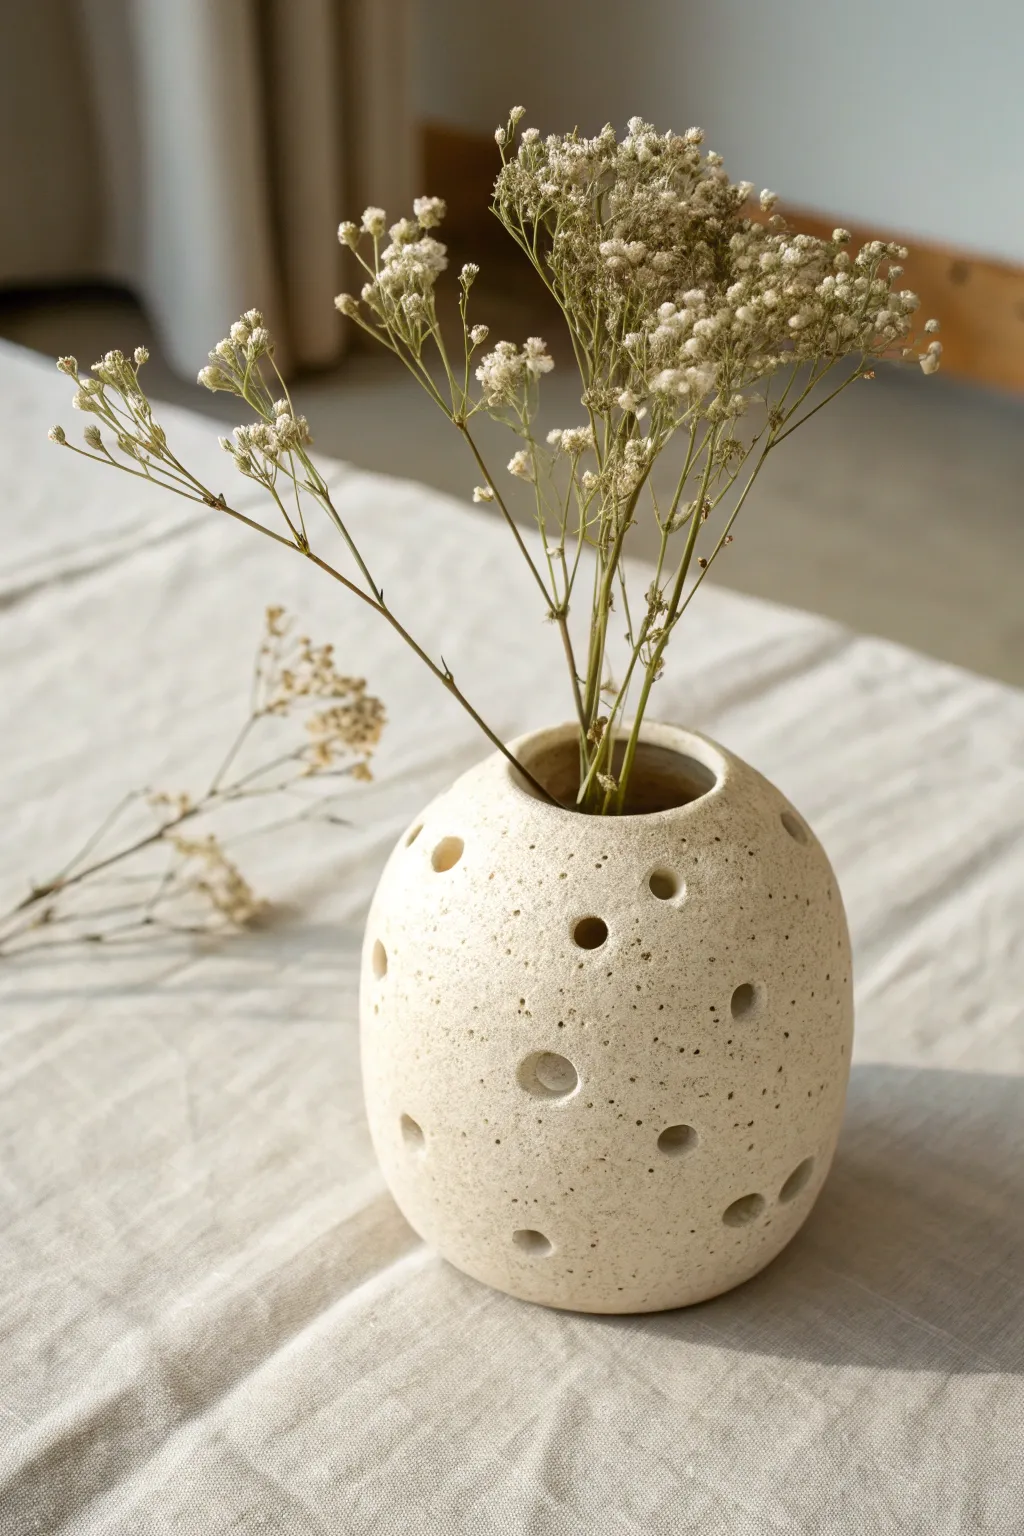
Embrace organic forms with this charming, speckled clay orb vase featuring playful circular cutouts. Its naturally textured surface and unique perforated design make it a perfect vessel for displaying delicate dried stems or airy grasses.
Step-by-Step
Materials
- Speckled stoneware clay (approx. 2 lbs)
- Pottery wheel (or materials for coil building)
- Needle tool
- Metal rib tool
- Wooden rib tool
- Sponge
- Hole cutters or small circular cookie cutters (various small sizes)
- Chamois leather strip
- Wire clay cutter
- Clear matte glaze or transparent satin glaze
Step 1: Throwing the Form
-
Center the clay:
Start by wedging your speckled stoneware clay thoroughly to remove air bubbles. Place the ball on the wheel head and center it using firm pressure and water for lubrication. -
Open the form:
Create an opening in the center, ensuring you leave a floor thickness of about a quarter-inch. Widen the floor slightly, but keep it relatively narrow since we are aiming for a rounded, globe-like shape. -
Pull the walls:
Begin pulling up the walls. As you pull, gently bell the clay outward to create a voluminous, rounded belly. Maintain a steady speed to ensure the walls are even. -
Collar the neck:
Once you’ve achieved the desired width for the body, begin collaring the top edge inward. Use both hands to gently compress the clay towards the center, narrowing the opening significantly. -
Refine the curve:
Use a metal or wooden rib on the exterior while supporting the interior with your other hand. Smooth the curve to create a continuous, pleasing orb shape, erasing any throwing lines if a smoother look is desired. -
Create the rim:
Finish the top opening by compressing the rim with a chamois or your sponge. Keep the opening roughly 2-3 inches wide to accommodate the main bouquet.
Step 2: Adding Texture and Cuts
-
Initial drying:
Allow the vase to dry to a ‘leather hard’ stage. The clay should be firm enough to handle without deforming but still hold moisture. I find wrapping it loosely in plastic overnight usually does the trick. -
Trim the foot:
Flip the vase over and center it on the wheel. Trim away excess weight from the bottom and carve a neat foot ring to give the piece a slight lift. -
Plan placement:
Lightly mark where you want your decorative holes to go. Aim for a random, scattered pattern around the belly of the vase, varying the spacing for visual interest. -
Punch the holes:
Using circular hole cutters in varying small sizes (approx. 1/4 to 1 inch), punch directly into the leather-hard clay at your marked spots. Twist the tool gently as you push to get a clean cut. -
Clean the edges:
Once holes are cut, use a slightly damp sponge or your fingertip to smooth the sharp edges of each circle, both inside and out. This softening is crucial for a professional finish. -
Enhance texture:
If the throwing process smoothed out the natural speckles too much, you can gently sponge the surface with a damp, coarse sponge to reveal the grog and create that earthy, stone-like texture.
Insider Info
When punching holes, support the inner wall of the vase gently with a finger or a smooth stick to prevent the wall from collapsing inward under the pressure.
Step 3: Firing and Glazing
-
Bisque fire:
Let the piece dry completely (bone dry) before loading it into the kiln for the bisque firing (usually around Cone 04 or 06, depending on your clay body). -
Glaze application:
Once bisqued, wipe the vase down with a damp sponge to remove dust. We want to highlight the clay’s natural speckle, so select a translucent matte or satin clear glaze. -
Dip or brush:
Dip the vase into the glaze or brush on 2-3 even coats. Be very careful around the holes; make sure glaze doesn’t pool in them or create sharp drips. -
Clean the foot:
Wipe the bottom foot ring completely clean of glaze to prevent it from fusing to the kiln shelf. -
Final firing:
Fire the vase to the maturity temperature of your clay (typically Cone 5 or 6 for stoneware). Allow the kiln to cool naturally before unloading.
Oops, Cracked?
If tiny cracks appear around the holes while drying, compress them immediately with a damp paintbrush handle. To prevent this, cover the piece while it dries to slow the process.
Fill your new vessel with dried botanicals and enjoy the play of light through the unique openings
Pierced Cutout Lacework Vase for Light-and-Shadow Drama
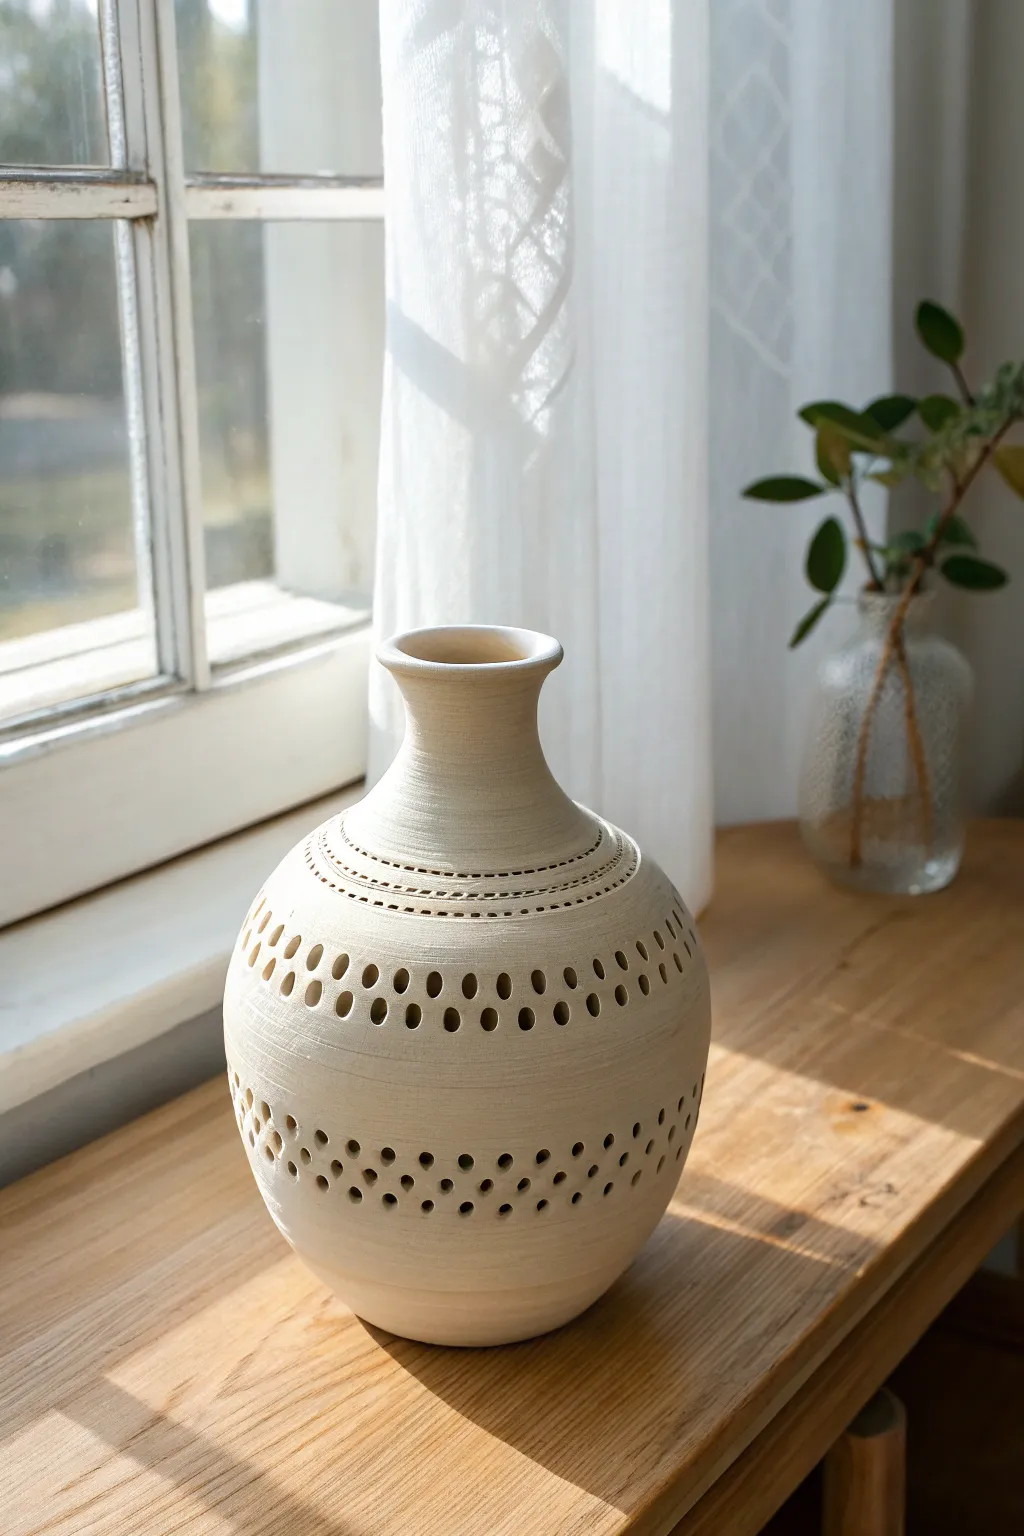
Capture the interplay of light and shadow with this elegant ceramic project featuring delicate bands of pierced lacework. The natural, unglazed finish highlights the texture of the clay while the systematic cutouts create beautiful patterns when backlit.
Detailed Instructions
Materials
- Light stoneware or earthenware clay (avoid grog-heavy clay for cleaner cuts)
- Pottery wheel (or materials for coil building)
- Rib tool (metal or rubber)
- Needle tool
- Hole cutter tool set (small circular punch)
- Sponge
- Wire cutter
- Fettling knife
- Ware board
Step 1: Throwing and Shaping
-
Center the clay:
Start with a well-wedged ball of clay on your wheel head. Center it firmly, ensuring there are no wobbles before you begin opening. -
Open and pull:
Open the clay and pull up the walls to create a tall cylinder. Keep the walls even, aiming for about a quarter-inch thickness throughout to support the eventual cutouts. -
Balloon the form:
Gently push from the inside with your fingers or a curved rib to swell the belly of the vase outward. Create a rounded, bulbous shape for the main body. -
Collar the neck:
Collar the top third of the pot inward to form a distinct, narrower neck. Do this gradually to avoid buckling the clay. -
Refine the rim:
Flare the very top slightly to create a soft, inviting rim. Use a chamois or a wet sponge to compress and smooth this edge. -
Smooth the surface:
While the wheel is spinning slowly, run a metal or rubber rib up the exterior. This removes throwing lines and creates the smooth ‘canvas’ needed for your incision work.
Step 2: Detailing and Piercing
-
Leather hard stage:
Allow the vase to dry to a firm leather-hard state. The clay must be stiff enough to hold its shape when punched, but not so dry that it cracks. -
Mark the bands:
Place the vase back on the wheel (or a banding wheel). While spinning slowly, use a needle tool to lightly scribe horizontal guide lines where your pattern bands will go—one set at the shoulder and a wider band near the base. -
Scribe the shoulder:
At the shoulder, use the needle tool to incise two parallel rings. Inside these rings, add tiny vertical dashes or a ‘stitch’ pattern for texture. -
Punch the upper holes:
Select a small circular hole cutter. Carefully punch a single row of holes just below your shoulder scribe lines. Support the wall from the inside with your hand to prevent deformation. -
Plan the lower lattice:
Move to the bottom section of the vase. Visualise a grid pattern for the multiple rows of holes. -
Punch the lower holes:
Start punching the bottom rows. I prefer to offset each row slightly (like bricks) to create a dynamic, honeycomb-like effect rather than a straight grid. -
Clean the cuts:
Once all holes are punched, wait for the clay to dry a tiny bit more, then use a dry sponge or soft brush to whisk away the little clay crumbs or ‘burrs’ left around the holes.
Clean Cuts Tip
Twist the hole cutter slightly as you pull it out of the clay wall. This shearing action helps release the clay plug cleanly and reduces cleanup time significantly.
Step 3: Finishing
-
Final smooth:
Check the interior for any sharp clay shards pushed through by the hole cutter. Smooth these away gently with a fingertip or tool handle. -
Slow drying:
Cover the vase loosely with plastic to ensure slow, even drying. Cutout areas dry faster than solid areas, which can cause tension cracks if rushed. -
Bisque fire:
Once bone dry, bisque fire the piece to the appropriate cone for your clay body. -
High fire:
Should you wish to keep the natural look like the reference photo, simply fire the unglazed bisque to maturity (or glaze just the interior for functionality).
Glow Up
Turn this into a lantern by leaving the top open or cutting a hole in the base for an LED puck light. The patterns will cast amazing shadows on your walls.
Place your finished vase near a sunny window to enjoy the shifting patterns of light throughout the day