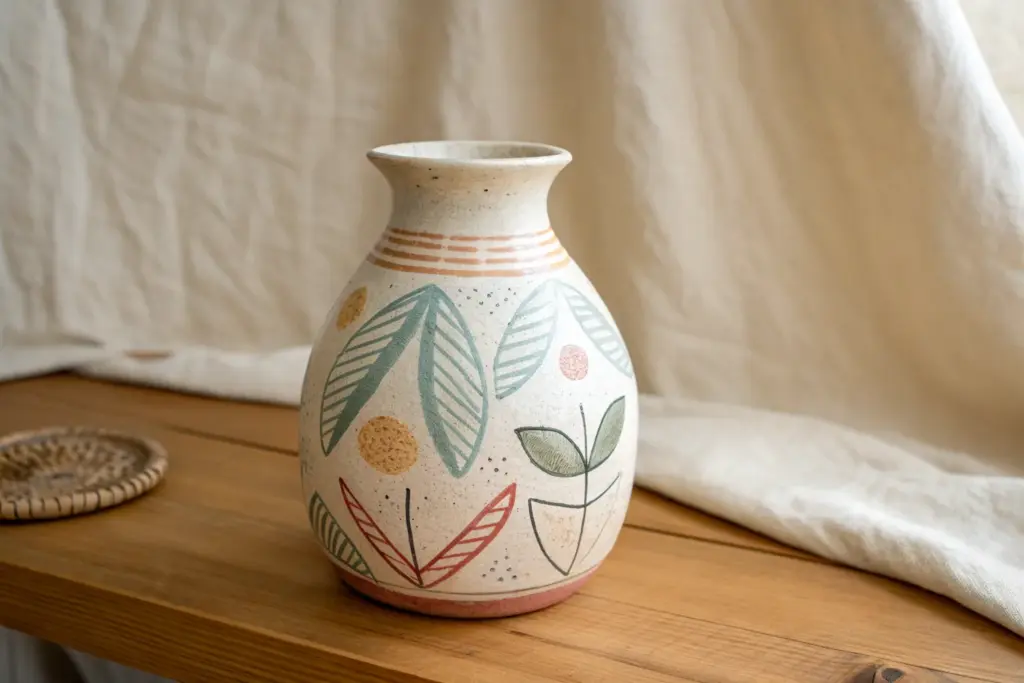
If you’ve got a plain clay vase sitting on your shelf, paint is the fastest way to make it feel like a one-of-a-kind piece. Here are my favorite clay vase painting ideas—starting with the classics everyone loves and ending with a few “how is that so cute?” twists.
Minimalist Monochrome Bands

Embrace the natural beauty of raw materials with this understated design that uses negative space as a key feature. By painting crisp white bands onto a textured clay or ceramic vase, you create a sophisticated rhythm of color that feels both modern and timeless.
How-To Guide
Materials
- Unfinished ceramic or terracotta vase (matte finish)
- Painter’s tape (various widths or 1 inch standard)
- White matte acrylic paint or chalk paint
- Soft synthetic flat brush (medium size)
- Sea sponge (optional, for distressing)
- Fine-grit sandpaper (220 grit)
- Clean rag or tack cloth
- Palette or paper plate
Step 1: Preparation and Planning
-
Clean surface:
Begin by wiping down your vase thoroughly with a slightly damp cloth to remove any dust or oils from the store shelves. The surface must be bone dry before you apply any tape. -
Light sanding:
If your vase has any sharp bumps or imperfections you want to minimize, lightly scuff those areas with sandpaper. Wipe away the dust immediately afterward. -
Establish the rhythm:
Look at the reference image. Notice how the bands aren’t perfectly uniform—there’s a thick clay band, a thin white band, a medium clay band, etc. Visualize where you want your lines to sit on the bottom half of the vase.
Bleed Prevention
Before painting white, paint over the tape edges with a clear matte medium first. This seals the gap so any ‘bleeding’ is invisible clear paint, keeping your white lines razor sharp.
Step 2: Creating the Mask
-
Tape the first line:
Apply your first strip of painter’s tape horizontally around the vase. This first piece of tape will represent a section of *unpainted* clay. -
Check level:
Spin the vase slowly to ensure the tape ends meet perfectly and the line appears straight. On curved surfaces, you may need to gently stretch or notch the tape slightly to lay flat, but try to keep the edge crisp. -
Tape the second gap:
Place a second strip of tape parallel to the first, leaving a gap of exposed clay between them. This exposed gap will become a white stripe. -
Vary the widths:
Continue taping down the vase. Vary the distance between tape strips to create different widths of stripes. I find that mixing thin and thick gaps creates a more organic, visually interesting pattern. -
Seal the edges:
Run your fingernail or the back of a spoon firmly along the edges of all the tape strips. This step is crucial to prevent paint from bleeding under the tape and ruining your crisp lines.
Texture Level Up
Mix a teaspoon of baking powder into your white acrylic paint. It will fluff up slightly and dry with a stone-like texture that perfectly matches the rustic clay surface.
Step 3: Painting the Bands
-
Load the brush:
Dispense a small amount of white matte acrylic or chalk paint. You want a creamy consistency—not too watery, which would cause drips. -
First coat application:
Using your flat brush, paint the exposed clay gaps between the tape. Paint *away* from the tape edge or parallel to it, rather than pushing paint underneath it. -
Feathering technique:
Keep the paint layer thin. A thick glob of paint will create a raised ridge when the tape is removed, which we want to avoid for this textured look. -
Let it dry:
Allow the first coat to dry to the touch, usually about 15-20 minutes depending on your humidity. -
Second coat:
Apply a second thin coat of white paint to ensure solid opacity. If you are using chalk paint, two coats are usually plenty for full coverage.
Step 4: Weathering and Finish
-
Remove tape:
This is the satisfying part. Before the second coat is fully cured (while it’s still slightly tacky/flexible), gently peel off the painter’s tape at a 45-degree angle. -
Cleanup:
If any paint bled through, use a damp Q-tip immediately to wipe it away, or gently scrape it off with a craft knife once dry. -
Distress texture:
To mimic the weathered look in the photo, take your fine-grit sandpaper and very lightly scuff horizontal strokes across the painted white bands. This reveals tiny specks of the darker clay underneath. -
Sponge dabbing (optional):
If the white looks too pristine, you can dip a sea sponge in a tiny bit of brown or grey diluted paint, blot most of it off, and lightly tap it over the white bands for an aged effect. -
Final wipe:
Use a tack cloth to remove any sanding dust from the distressed areas so the colors pop.
Place your finished vase near a window where natural light can highlight the contrast between the smooth paint and the rough clay texture


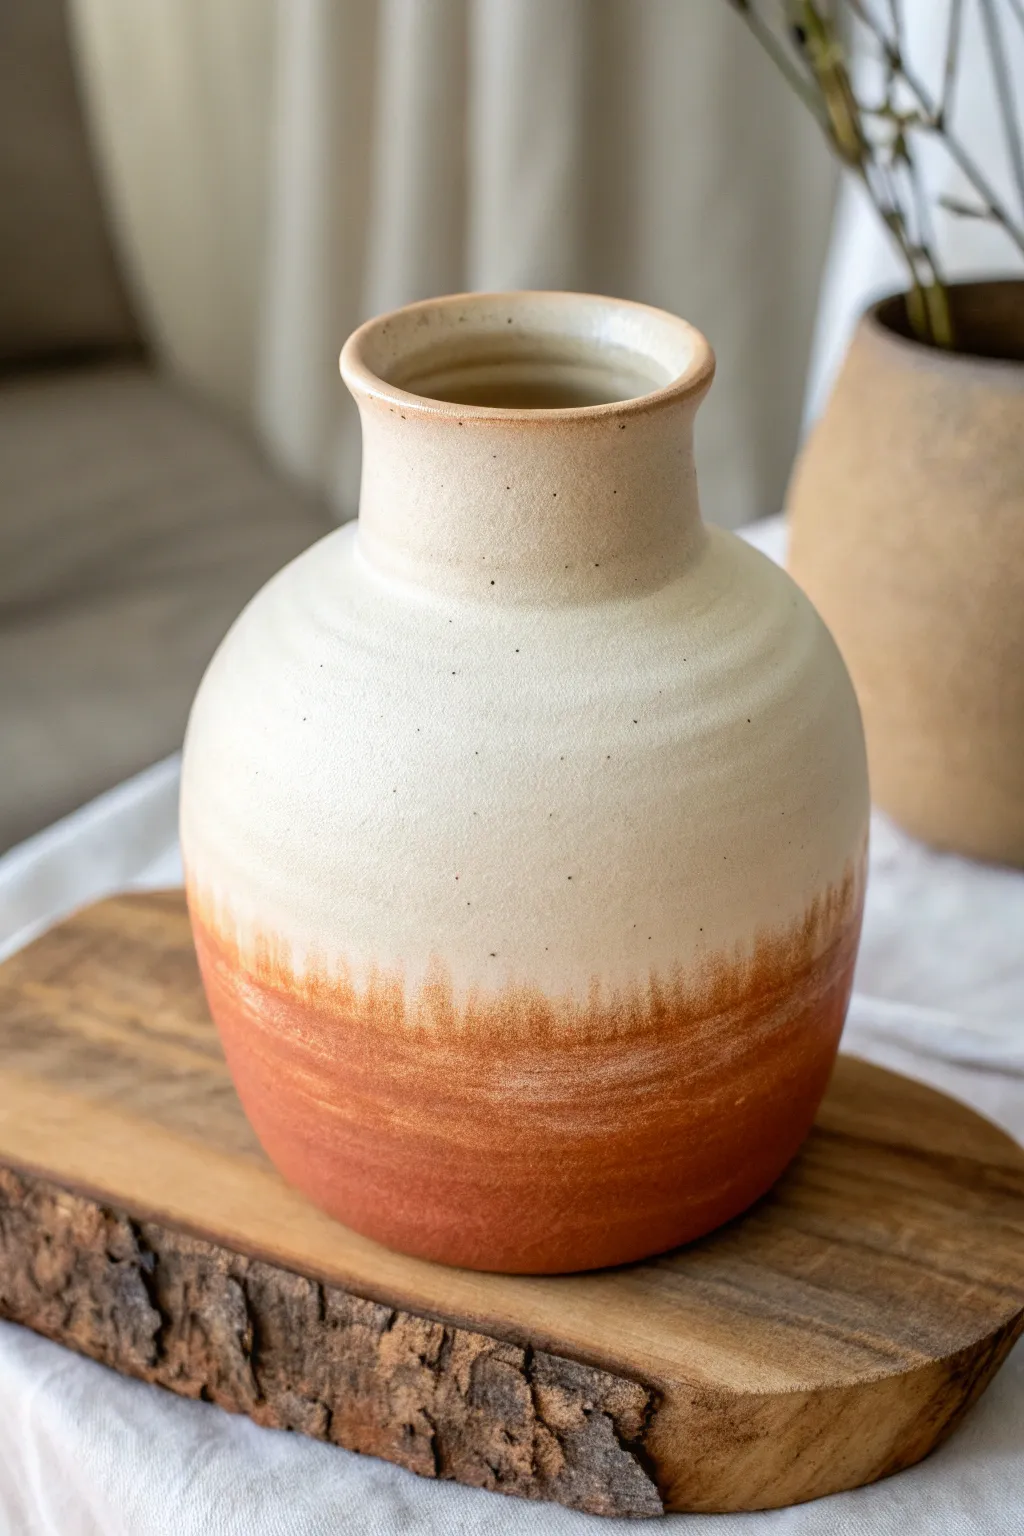
Crisp Color-Blocked Halves
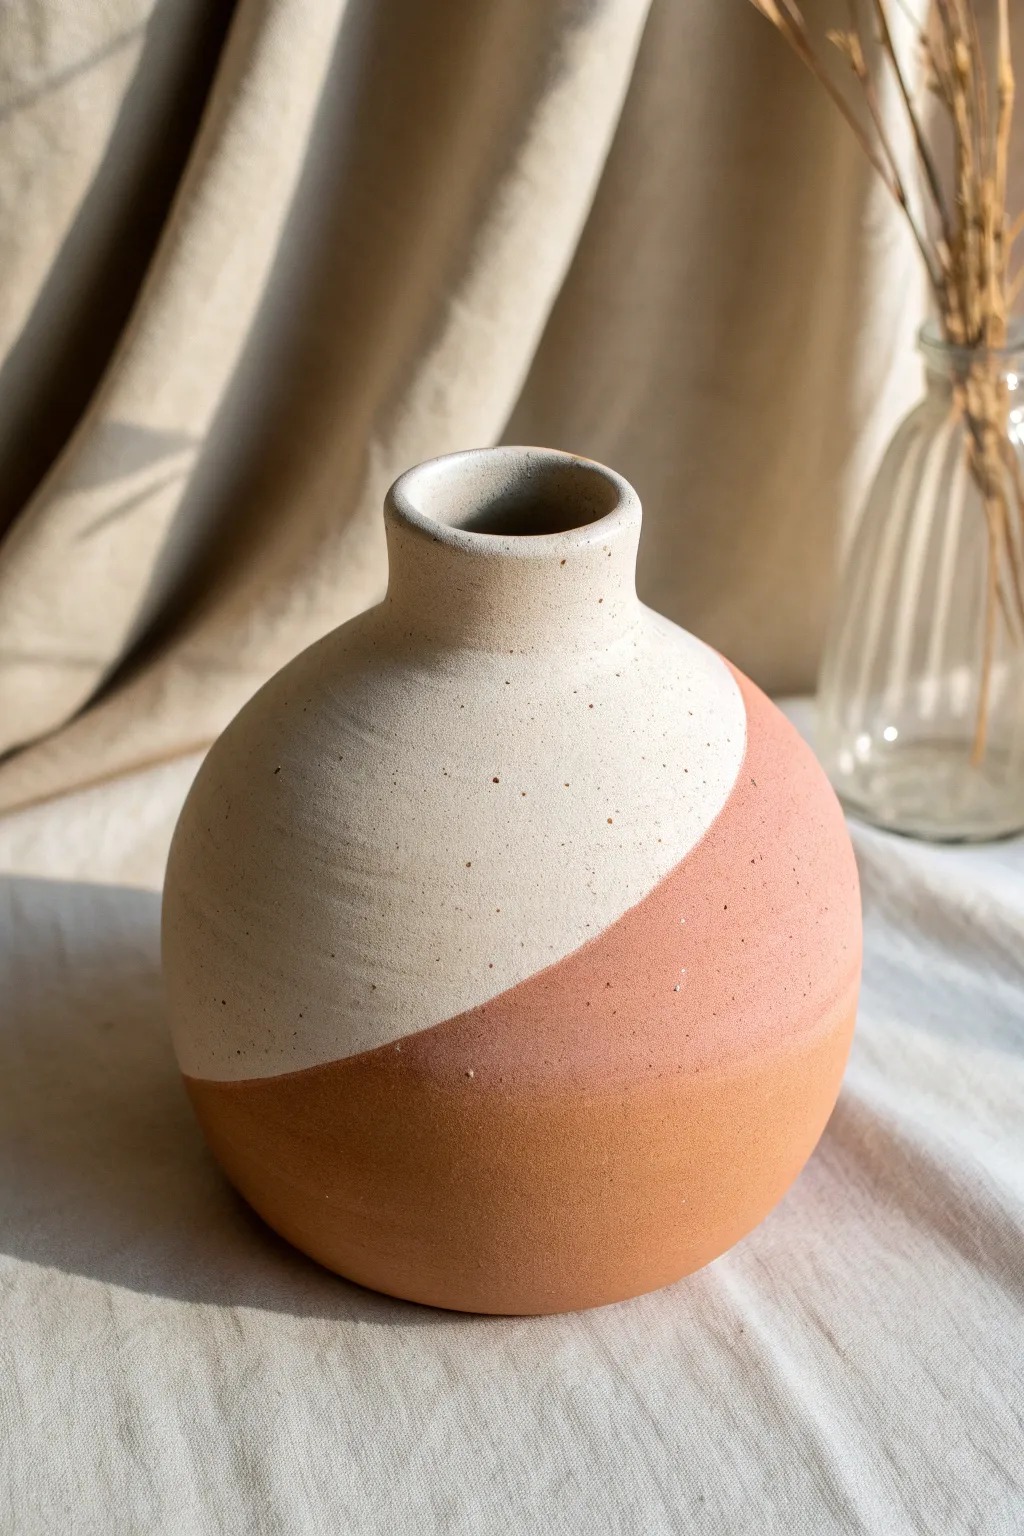
Embrace the natural beauty of clay with this minimalist color-blocked design that features a sweeping curve to separate a creamy speckled top from a warm terracotta base. This project mimics the high-end look of dipped ceramic glaze without needing a kiln.
Detailed Instructions
Materials
- Round ceramic or bisque vase
- Matte warm creamy-white acrylic paint
- Matte terracotta or burnt sienna acrylic paint
- Paintbrush (flat shader brush recommended)
- Old toothbrush or bristle brush
- Painter’s tape (flexible or thin)
- Pencil
- Paper plate or palette
- Matte spray sealer (clear)
- Newspaper or drop cloth
Step 1: Preparation & Mapping
-
Clean surface:
Begin by wiping down your vase thoroughly with a damp cloth to remove any dust or oils that might prevent the paint from adhering properly. -
Dry completely:
Ensure the vase is bone dry before moving on to the next step, as moisture can trap under the paint and cause bubbling later. -
Visualize the curve:
Decide on the angle of your color block. For this look, you want a sweeping, asymmetrical curve that dips lower on one side than the other. -
Sketch the line:
Using a pencil, very lightly sketch your dividing line onto the vase. Keep your wrist loose to create a fluid, organic shape rather than a stiff geometric line.
Step 2: Painting the Base
-
Mix the terracotta shade:
Squeeze out your terracotta paint. If it looks too bright, I like to mix in a tiny drop of brown to deepen it, achieving that earthy, pottery-studio look. -
First bottom coat:
Using your flat brush, paint the bottom section of the vase up to your pencil line. Don’t worry about a perfect edge just yet. -
Smooth coverage:
Apply the paint in smooth, horizontal strokes to minimize brush marks. Let this first coat dry for about 20 minutes. -
Second coat:
Apply a second coat of the terracotta color to ensure full opacity, especially if your vase started as a white base. -
Refine the edge:
While applying this second coat, use the edge of your flat brush to carefully paint up to your pencil line, creating a reasonably sharp edge. -
Dry thoroughly:
Allow the bottom half to dry completely—ideally for an hour—so you don’t smudge it while working on the top.
Bleeding Lines?
If you used tape and paint seeped under, wait for it to dry fully. Then, use a small detail brush and the original base color to carefully touch up the line.
Step 3: Painting the Top
-
Apply cream paint:
Paint the top half of the vase with your matte creamy-white shade. Be careful where the two colors meet. -
Cut in the line:
Instead of using tape which can sometimes peel acrylic off rounded surfaces, carefully ‘cut in’ the line with a small brush, painting the cream color right up against the dry terracotta edge. -
Build opacity:
Let the first cream layer dry, then add a second or third coat until the finish is solid and opaque.
Pro Tip: Faux Clay Texture
To make the vase look like real stone or raw bisque, mix a teaspoon of baking soda into your acrylic paints before applying. It creates a gritty, matte texture.
Step 4: Adding Texture & Finish
-
Create speckle mix:
Dilute a tiny amount of black or dark brown paint with water until it has an inky consistency. -
Test the spatter:
Dip an old toothbrush into this mixture and run your thumb across the bristles over a scrap piece of paper to test the size of the droplets. -
Speckle the vase:
Gently flick speckles over the *entire* vase. Focus slightly more on the cream section where the contrast is strongest, but let them land on the terracotta side too for cohesion. -
Dry splatter:
Wait for the speckles to dry completely to avoid smearing them during the sealing process. -
Seal the work:
Take the vase to a ventilated area and apply a light coat of matte clear spray sealer. This protects the paint and unifies the sheen of the two colors.
Place your finished vase near a sunny window where the natural light can highlight your beautiful hand-painted textures


Clean Painter’s Tape Stripes
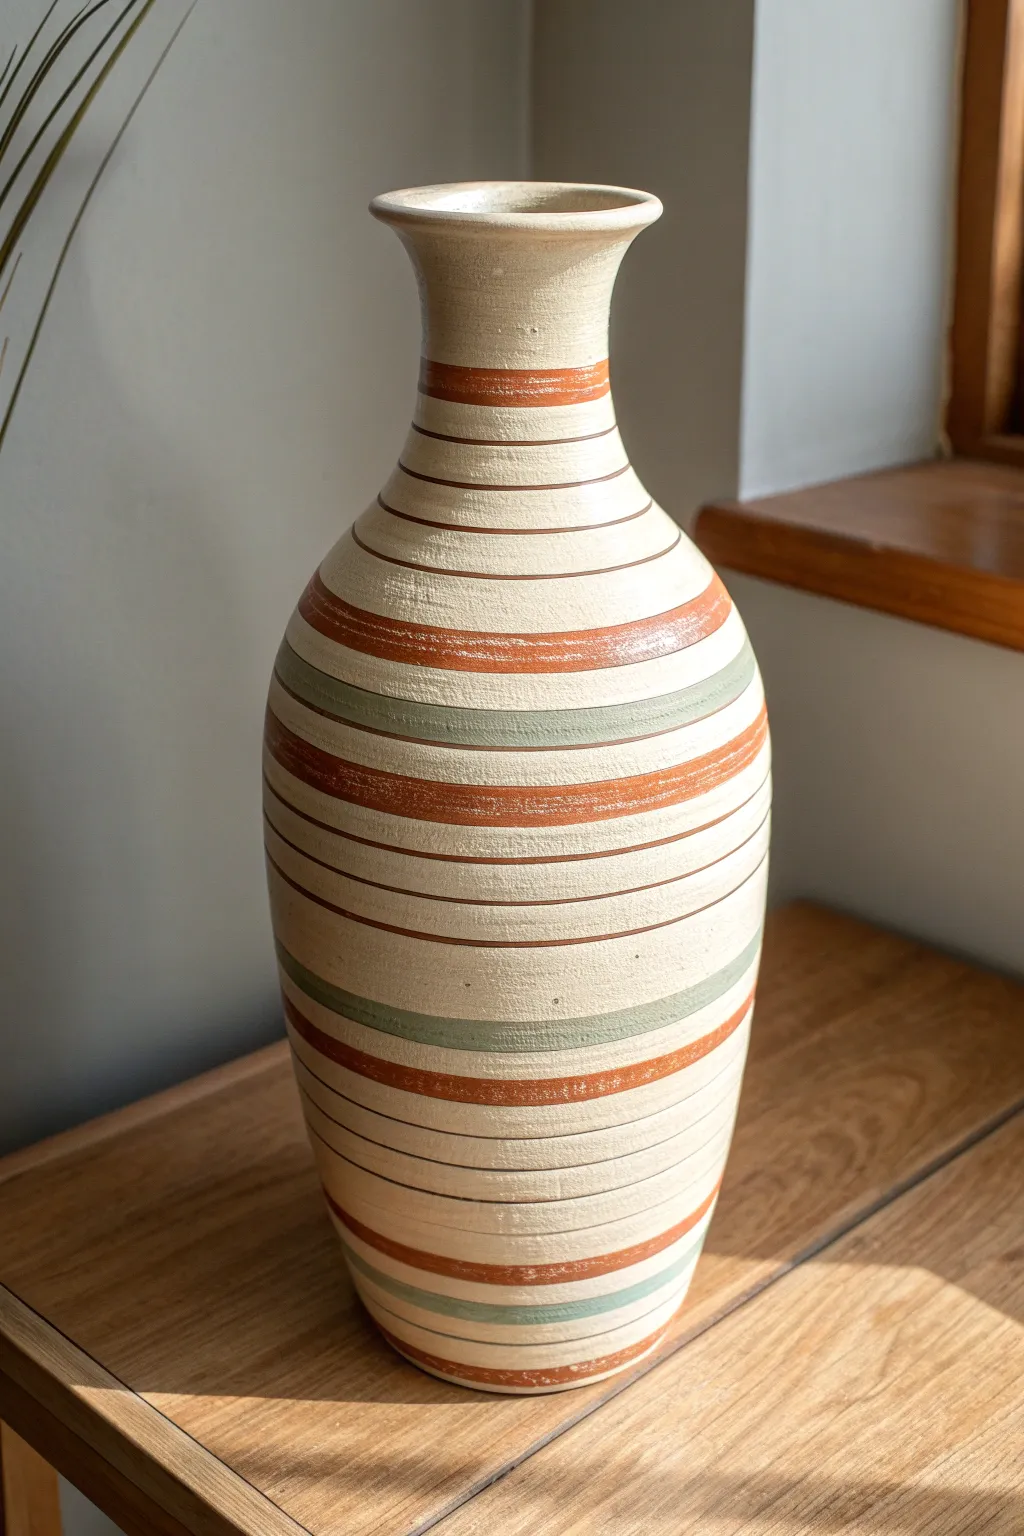
Transform a plain vase into a piece of distinct, modern decor with these crisp yet textured horizontal stripes. This project combines the clean lines of painter’s tape with earthy terracotta and sage tones to create a warm, organic look that feels like handmade pottery.
Step-by-Step Guide
Materials
- Tall, narrow ceramic vase (clean and dry)
- Matte acrylic paints (Cream/Beige, Terracotta/Rust, Sage Green, Dark Brown)
- Baking soda or plaster of paris (for texture)
- Painter’s tape or masking tape (various widths, including thin 1/8 inch)
- Flat paintbrushes (medium and small)
- Detail liner brush
- Palette or paper plate
- Matte clear sealer spray
Step 1: Base Coat & Texture
-
Prepare your texturizing mix:
Mix your cream or beige acrylic paint with baking soda in a 1:1 ratio. You want a fluffy, slightly gritty consistency that resembles ceramic clay. -
Apply the first layer:
Paint the entire exterior of the vase with your textured mixture. Use horizontal brush strokes to mimic the direction of wheel-thrown pottery. -
Let it dry completely:
Allow the first coat to dry fully. This usually takes about an hour, depending on how thick you applied the texture. -
Add a second coat:
Apply a second layer of the textured cream paint to ensure full coverage and a rich, stone-like surface.
Use a Turntable
Place your vase on a lazy susan while applying tape or hand-painting lines. Spinning the object while holding your brush steady creates perfectly straight rings.
Step 2: Creating the Striped Pattern
-
Plan your spacing:
Look at the vase and visualize where your main colored bands will go. You want a mix of wide and narrow stripes. -
Mask the thin lines:
Use extremely thin painter’s tape (or cut standard tape into slivers) to create the separators. Apply these rings around the vase where you want the original cream color to show through. -
Tape off color blocks:
Apply wider bands of tape to protect areas that will remain cream. Leave exposed gaps of varying widths for your terracotta and green stripes. -
Seal the tape edges:
I like to lightly brush a tiny bit more of the cream base paint over the tape edges. This prevents colored paint from bleeding under the tape later.
Step 3: Painting the Bands
-
Mix the terracotta color:
Squeeze out your rust or terracotta acrylic. If it’s too bright, mix in a tiny drop of brown to knock it back to an earthy tone. -
Paint the warm stripes:
Fill in your designated terracotta sections. Use a flat brush and apply the paint horizontally, going with the grain of your texture. -
Mix the sage green:
Prepare your sage green paint. Again, if it looks too synthetic, a touch of grey or beige will ground it. -
Paint the cool stripes:
Fill in the remaining exposed bands with the sage green mixture. -
Peel while slightly tacky:
Carefully peel off the painter’s tape before the paint is rock hard. Pulling while it’s still slightly gummy helps keep the edges crisp.
Create Faux Grooves
Before the base texture dries, use a comb or a stiff brush to physically etch horizontal grooves into the paint. When you paint over this later, it looks like wheel-thrown clay.
Step 4: Detailing & Finishing
-
Add the pinstripes:
Using a very fine detail liner brush and dark brown paint, carefully hand-paint thin lines between some of the larger color blocks or in the cream spaces. -
Soften the lines:
If your hand-painted lines look too perfect, gently dry brush over them with a little base color to make them look worn and embedded in the clay. -
Distress (Optional):
Lightly sand a few random spots with fine-grit sandpaper to reveal the texture beneath and give it an aged feel. -
Seal the project:
Finish by spraying the vase with a matte clear sealer to protect the paint without adding unwanted shine.
Place your finished vase near a window where natural light can highlight the beautiful texture you’ve created


Playful Polka Dot Pop
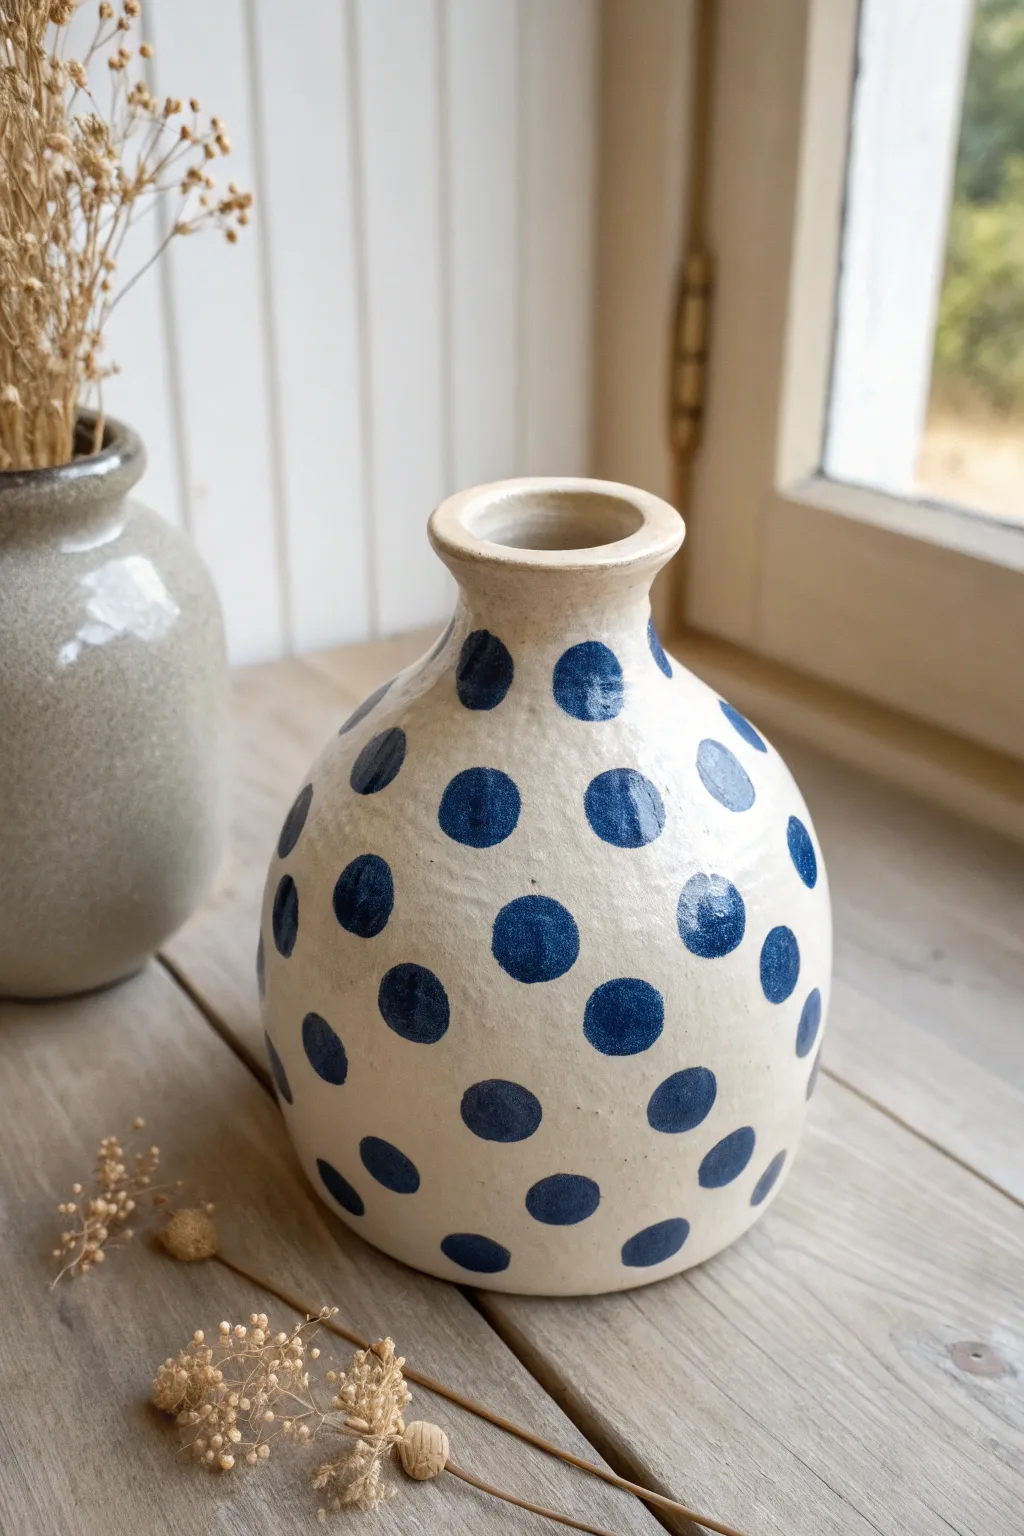
Embrace the charm of imperfection with this delightful hand-painted vase project. The soft, creamy base glaze pairs perfectly with organic indigo rounds to create a piece that feels both rustic and modern.
How-To Guide
Materials
- Bisque-fired ceramic vase (narrow neck)
- Cream or off-white glaze (low-fire or underglaze depending on preference)
- Indigo or deep navy blue underglaze
- Medium round brush (size 6 or 8)
- Small round brush (size 2)
- Clear dipping glaze (if using underglazes)
- Sponge
- Water container
- Paper towel
Step 1: Preparation & Base Coat
-
Clean the Bisque:
Start by gently wiping down your bisque-fired vase with a damp sponge. This removes any kiln dust or oils from your hands that might repel the glaze. -
Prepare the Base Color:
Stir your cream or off-white base glaze thoroughly. You want a consistency similar to heavy cream for the best coverage. -
First Base Layer:
Apply the first coat of the cream glaze over the entire exterior of the vase. Use long, smooth strokes to minimize brush marks. -
Dry and Repeat:
Allow the first coat to dry until it’s chalky and no longer cool to the touch. Apply a second coat to ensure a solid, opaque background. Three coats might be necessary if your glaze is thin. -
Glaze the Rim:
Don’t forget the inside of the rim! Carefully paint the cream color just inside the lip of the vase to give it a finished look.
Step 2: Painting the Polka Dots
-
Load the Brush:
Switch to your medium round brush and load it generously with the indigo underglaze. You want enough paint to create a solid dot without constantly reloading. -
Establish Placement:
Visualize a grid on the vase. Start by placing your first dot near the center of the vase’s belly. Press the brush down gently and twirl it slightly to form a circle. -
Create the First Row:
Paint a horizontal row of dots around the widest part of the vase, spacing them roughly 1 to 1.5 inches apart. -
Stagger the Second Row:
Move upwards towards the neck. Paint the next row of dots in the spaces between the dots below (brick-lay pattern). This prevents the design from looking too rigid. -
Paint the Lower Section:
Repeat the staggered pattern for the lower section of the vase. Don’t worry if the dots near the bottom get cut off by the edge; this adds to the natural look. -
Embrace Irregularity:
Avoid using stencils. The beauty of this piece lies in the hand-painted nature of the circles. If a dot is slightly oval or wobbly, leave it be. -
Neck Details:
As the vase narrows at the neck, you might need to space the dots closer together or make them slightly smaller to fit the curvature. -
Refine Edges:
If any dots look too scratchy or thin, go back over them with a second layer of indigo underglaze. I like to use the smaller brush for this to keep the edges crisp.
Twirl Technique
Instead of drawing a circle perimeter and filling it in, place your brush tip down and rotate the vase itself to create a fluid, organic round spot.
Step 3: Finishing Up
-
Final Inspection:
Check the vase for any smudges or unwanted drips. You can often gently scrape these away with a crafting knife or stiff brush once the glaze is dry. -
Clear Glaze Application:
If you used underglazes for the design, you’ll need to apply a clear transparent glaze over the entire piece. Dipping is usually best for an even coat, but brushing works too. -
Wipe the Foot:
Crucial step: Use a wet sponge to wipe all glaze off the very bottom (the foot) of the vase so it doesn’t fuse to the kiln shelf during firing. -
Fire It:
Place your vase in the kiln and fire it according to the specific temperature requirements of your chosen clay and glaze (usually Cone 06 or Cone 6).
Textured Touch
For a tactile finish, leave the base unglazed (raw clay) and use a glossy glaze only for the blue dots. The contrast in textures is stunning.
Once fired, fill your new vase with dried flowers to complement its warm, rustic aesthetic

The Complete Guide to Pottery Troubleshooting
Uncover the most common ceramic mistakes—from cracking clay to failed glazes—and learn how to fix them fast.
Soft Ombré Gradient Dip-Dye
This project captures the warmth of a setting sun with a soft, natural gradient that transitions from creamy stoneware to a rich terracotta. The finish mimics a sophisticated dip-dye technique, celebrating the raw texture of the clay with a subtle, organic bleed.
Step-by-Step
Materials
- Bisque-fired ceramic vase or unglazed terracotta vase (smooth finish)
- Cream or off-white acrylic paint (matte finish)
- Terracotta or burnt sienna acrylic paint
- Water-based glazing medium or flow improver
- Wide, flat synthetic paintbrush
- Medium soft-bristle brush
- Sea sponge or damp cloth
- Palette or mixing plate
- Water cups
- Paper towels
- Clear matte sealant spray
Step 1: Base Preparation
-
Clean the Surface:
Wipe down your vase thoroughly with a slightly damp cloth to remove any dust or oils that might repel the paint. Let it dry completely. -
Mix the Base Tone:
On your palette, mix a small amount of glazing medium into your cream acrylic paint. The goal is a consistency that is smooth but opaque enough to cover the clay. -
Apply the Base Coat:
Using the wide flat brush, paint the entire upper two-thirds of the vase with the cream mixture. Start from the rim and work your way down. -
Smooth the Rim:
Carefully paint the inside of the rim to ensure a finished look, making sure no drips run down the outside. -
Feather the Edge:
As you reach the point where the colors will transition (about halfway down), lighten your brush pressure to create a rough, uneven edge rather than a straight line. -
Initial Drying:
Allow this base layer to dry until it feels chalky to the touch, usually about 20 minutes.
Step 2: Creating the Ombré Effect
-
Prepare the Terracotta:
Squeeze out your terracotta or burnt sienna paint. Thin it slightly with water rather than glazing medium this time; a thinner paint absorbs more naturally into the unpainted lower section. -
Paint the Bottom:
Flip the vase upside down if it’s easier to handle, or prop it up securely. Paint the bottom third of the vase with the terracotta color, ensuring solid coverage at the very base. -
Work Upward:
Gradually paint upward toward the cream section. As you get closer to the join, wipe most of the paint off your brush onto a paper towel. -
The Dry Brush Technique:
Using that ‘dry’ brush, flick upward strokes from the wet terracotta paint into the dry cream area. This creates the textured, transitional look seen in the photo. -
Sponge Blending:
While the terracotta paint is still tacky, take a slightly damp sea sponge and very lightly dab the transition line. This softens the brush strokes and mimics a dip-dye bleed. -
Adding Depth:
If the bottom looks too pale, add a second coat of terracotta paint just to the lowest 1-2 inches for a richer foundation. -
Refining the Speckles:
To mimic the natural clay speckling seen in the photo, dilute a tiny drop of dark brown or black paint with lots of water. Load an old toothbrush (or thick bristle brush) and flick tiny droplets onto the cream section. -
Spot Correction:
If you accidentally get dark speckles where you don’t want them, quickly dab them away with a clean, wet Q-tip.
Uneven transition?
If the line between colors looks too harsh, dampen a clean brush with water and gently run it back over the boundary to re-wet and blend the acrylics together.
Step 3: Finishing Touches
-
Full Cure:
Let the vase sit undisturbed for at least 2-3 hours to ensure all layers are completely bonded and dry. -
Check for Texture:
Run your hand lightly over the vase. If the paint feels rough where the colors meet, you can gently buff it with a piece of brown paper bag (which acts like ultra-fine sandpaper). -
Sealing the Work:
Take the vase to a well-ventilated area. Hold the matte sealant spray about 12 inches away and apply a light, even mist. -
Rotate and Spray:
Rotate the vase and apply a second light coat of sealant to ensure full coverage, protecting the intricate gradient from dust and moisture.
Use real dirt!
Rub a small amount of actual garden soil into the wet terracotta paint before sealing. It adds authentic grit and an ultra-realistic aged pottery texture.
Place your newly finished vase near a window where natural light can highlight the subtle texture and warm gradient transition
Loose Watercolor Florals
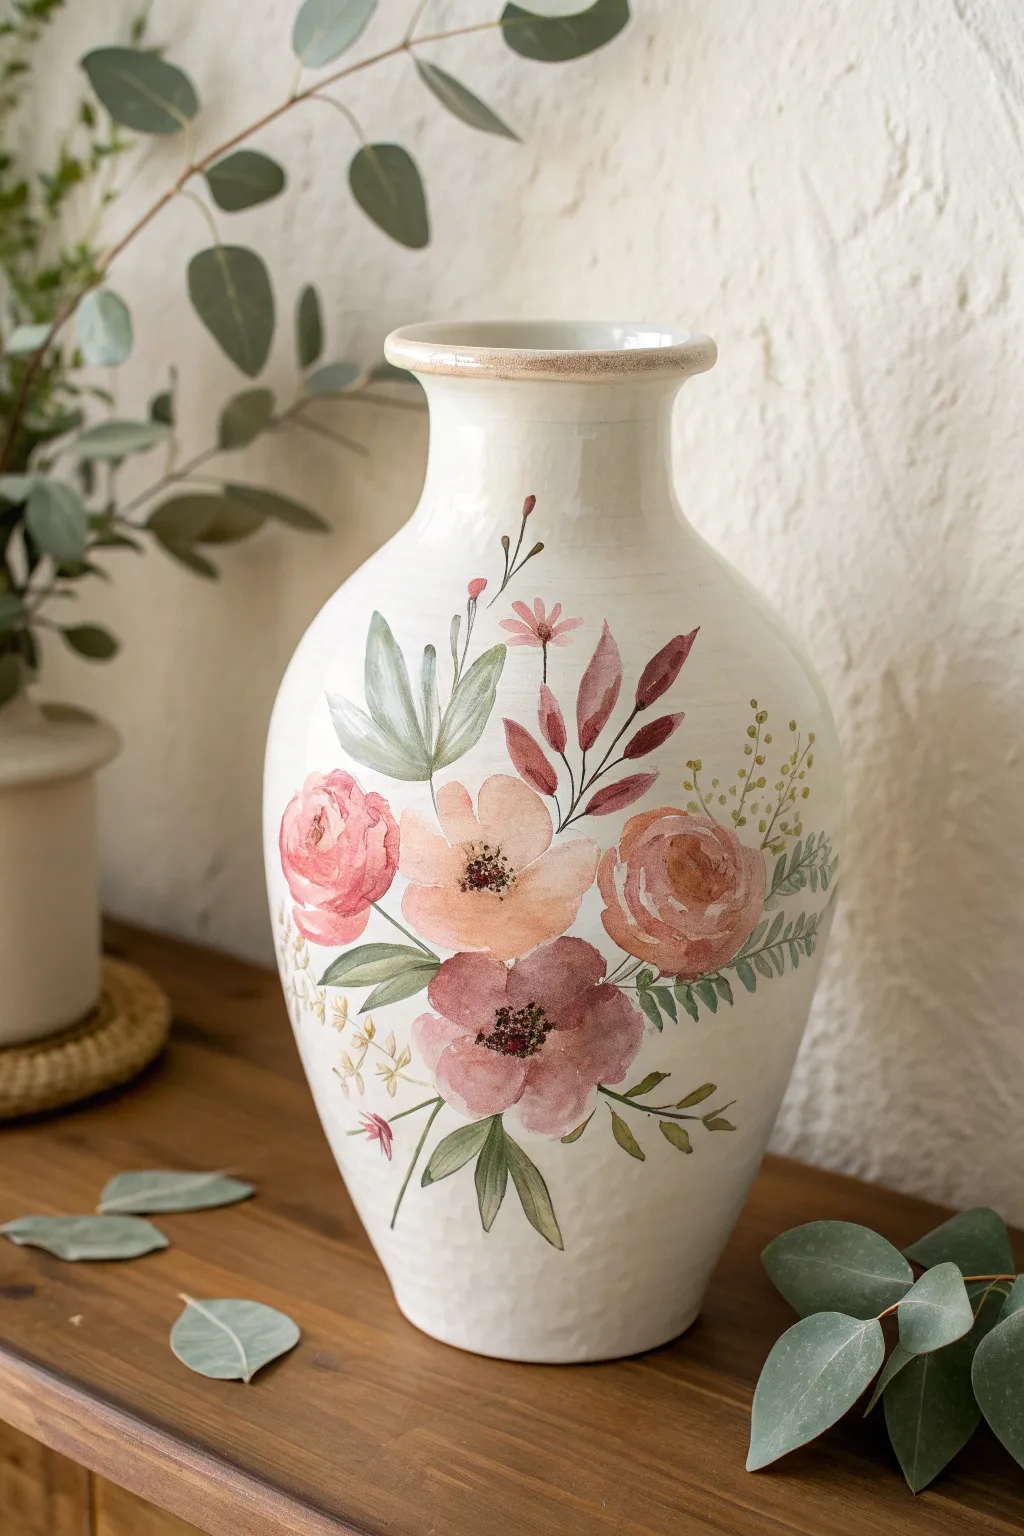
Transform a plain ceramic vessel into a piece of art that looks like a watercolor painting come to life. This project uses soft washes and loose brushstrokes to create a dreamy, romantic bouquet that feels organic and hand-painted.
Step-by-Step Tutorial
Materials
- White or cream ceramic vase (matte finish works best)
- Acrylic paints (Soft Pink, Rose Madder, Peach, Burnt Sienna, Sage Green, Olive Green, Deep Burgundy)
- Textile medium or glazing medium
- Assorted brushes: Round #4, Round #8, and a fine liner brush
- Palette or mixing plate
- Cup of water and paper towels
- Clear matte spray sealer
Step 1: Preparation and Base Colors
-
Surface Prep:
Ensure your vase is perfectly clean and dry. If the surface is too glossy, lightly sand it with fine-grit sandpaper to give the paint something to grip. -
Mixing the Medium:
To achieve that translucent watercolor look with acrylics, mix your paints with a glazing medium or a significant amount of water. You want the consistency of heavy cream to start, thinning it further as you go. -
Mapping the Composition:
Visually divide the center of the vase. Imagine a loose oval shape where your main bouquet will sit. You don’t need pencil lines; just keep a mental map. -
Painting the Main Blooms:
Start with the large peach and pink flowers. Load a #8 round brush with watered-down Peach paint. Press the belly of the brush down to create wide, petal-like shapes radiating from a center point. -
Adding Depth to Petals:
While the peach layer is still slightly damp, drop a tiny bit of darker Rose Madder into the center or base of the petals. Let it bleed naturally for that authentic watercolor effect. -
Forming the Rose Shapes:
For the darker reddish-pink roses, use a spiraling motion. Start in the center with a defined ‘C’ shape and work outward with looser, larger curved strokes to suggest wrapping petals. -
Softening Edges:
If a paint edge looks too hard, quickly run a damp, clean brush along it to soften the line into the white background.
Paint dripping too much?
If your watery paint runs down the vertical surface, keep a dry brush handy to catch drips immediately. Work in thinner layers, letting each dry briefly before adding the next.
Step 2: Leaves and Stems
-
Mixing Greenery Shades:
Create two pools of green on your palette: a pale, dusty Sage Green and a deeper Olive Green mixed with a touch of brown. -
Painting Broad Leaves:
Using the #8 brush again, paint the large leaves near the peach flower. Press down hard at the base of the leaf and lift up as you drag to create a pointy tip. -
Layering Foliage:
I like to vary the opacity here. Make some leaves very sheer and watery, while others are more opaque and dark to create a sense of depth. -
Adding Burgundy Stems:
Mix a Deep Burgundy color. Using a liner brush or the tip of your #4 round, paint thin, arching stems shooting upwards and outwards from the bouquet. -
Painting Pointed Red Leaves:
Along these burgundy stems, add small, almond-shaped leaves in a matching reddish-brown tone. These provide a lovely contrast to the soft greens.
Step 3: Details and Finishing
-
Flower Centers:
Once the main flowers are dry, mix a dark brown-black color. Use the very tip of your liner brush or a toothpick to stipple tiny dots into the centers of the open flowers. -
Accent Sprigs:
Mix a faint yellow-green. Paint delicate, fern-like sprigs or tiny dot clusters on the right side of the arrangement to fill empty space without memorable weight. -
Review and Balance:
Step back and look at the vase. If an area feels too empty, add a floating petal or a small green leaf. Do not overwork the main flowers. -
Rim Detail:
Take a diluted Burnt Sienna wash and run it casually along the rim of the vase. Let it look imperfect and organic. -
Sealing:
Allow the vase to cure for at least 24 hours. Because we used watered-down acrylics, spray the finished piece with a clear matte sealer to protect your beautiful work from moisture.
Create a vintage finish
Before sealing, lightly dry-brush a bit of diluted brown paint over the empty white spaces. This simulates an aged ceramic glaze or subtle crackle effect.
Place your new vase on a shelf where the light can highlight those delicate translucent layers


What Really Happens Inside the Kiln
Learn how time and temperature work together inside the kiln to transform clay into durable ceramic.
Delicate Botanical Line Art Vines

Transform a plain ceramic or clay vessel into an elegant piece of home decor with delicate, hand-drawn botanical illustrations. This project combines a textured, aged base with crisp green line work to create a beautiful juxtaposition of rustic and refined styles.
How-To Guide
Materials
- Plain ceramic or terra cotta vase (curvaceous shape preferred)
- White or cream chalk paint
- Baking soda (optional, for texture)
- Fine-grit sandpaper
- Foam brush or wide flat paintbrush
- Fine tip paint pen (olive green or dark sage)
- OR: Detail round brush (size 0 or 1) and dark green acrylic paint
- Pencil with a good eraser
- Matte spray sealer or clear varnish
Step 1: Preparing the Canvas
-
Clean the surface:
Before you begin, ensure your vase is completely free of dust, oils, or price tag residue. A quick wipe with rubbing alcohol helps paint adhere better. -
Mix the base coat:
To achieve that lovely matte, slightly gritty texture seen in the photo, mix your cream chalk paint with a teaspoon of baking soda. This creates a plaster-like effect. -
Apply the first layer:
Using a foam brush, dab or stipple the paint mixture onto the vase rather than dragging it. This dabbing motion builds up organic texture. -
Let it dry:
Allow the first coat to dry completely, which usually takes about 30 to 45 minutes depending on the humidity. -
Add a second coat:
Apply a second layer of your textured paint. Aim for full coverage so no original clay color peeks through. Let this dry overnight for the best durability. -
Create a distressed look:
Once fully cured, use fine-grit sandpaper to very lightly distress the surface. Focus on high points or the rim to mimic the subtle cracking and aging shown in the inspiration image.
Step 2: Sketching the Vines
-
Plan your composition:
Visualize where your main stems will flow. The example shows vines rising from the bottom and curving naturally around the vase’s belly. -
Lightly pencil the design:
Using a soft pencil, barely graze the surface to sketch your main stem lines. Keep the pressure incredibly light so you don’t scratch the paint. -
Add leaf placement:
Mark small dashes where leaves or berry sprigs will go. Vary the angles to make the plant look alive and moving, rather than stiff. -
Draft secondary elements:
Sketch in the smaller, delicate sprigs with circular buds or tiny berries that act as filler between the larger leaves.
A Smudgy Situation?
If you smudge the ink while tracing, wait for it to fully dry. Then, dab a tiny bit of your base coat paint over the mistake to “white it out” before redrawing.
Step 3: Inking the Design
-
Prepare your tool:
Shake your fine tip paint pen well to ensure the pigment is flowing smoothly. I always test it on a scrap piece of paper first to prevent blobs. -
Trace the main stems:
Start at the bottom and draw your main vine lines with confident, fluid strokes. It helps to pull the pen toward you rather than pushing it away. -
Draw the leaves:
Create the leaves with a single continuous motion if possible—start at the stem, curve out, and taper to a point. Use two strokes for wider leaves to create an outline. -
Add interior details:
For the larger leaves, draw a very fine line down the center. This vein detail gives the botanical illustration more dimension. -
Detail the berries:
For the circular buds or berries, press the nib down gently to create small dots or draw tiny open circles at the ends of the finer stems. -
Refine the lines:
Look over your work. If any lines look too thin or break up due to the vase texture, carefully go over them again to darken the green. -
Erase pencil marks:
Wait at least an hour for the paint pen to fully set. Then, gently tap an eraser over any visible pencil lines to lift them without smudging the ink.
Add a Vintage Touch
Dilute brown acrylic paint with water (1:10 ratio) and brush it over the dried white base, then immediately wipe it off creates an antique patina.
Step 4: Finishing Up
-
Seal the artwork:
To protect your delicate line work from scratches, take the vase outside and spray a light, even coat of matte clear sealer. -
Dry and display:
Let the sealer dry for 24 hours before filling the vase with dried eucalyptus or faux greenery as shown.
You have crafted a timeless piece that brings a breath of fresh air to any corner of your home
Modern Geometric Triangles and Blocks
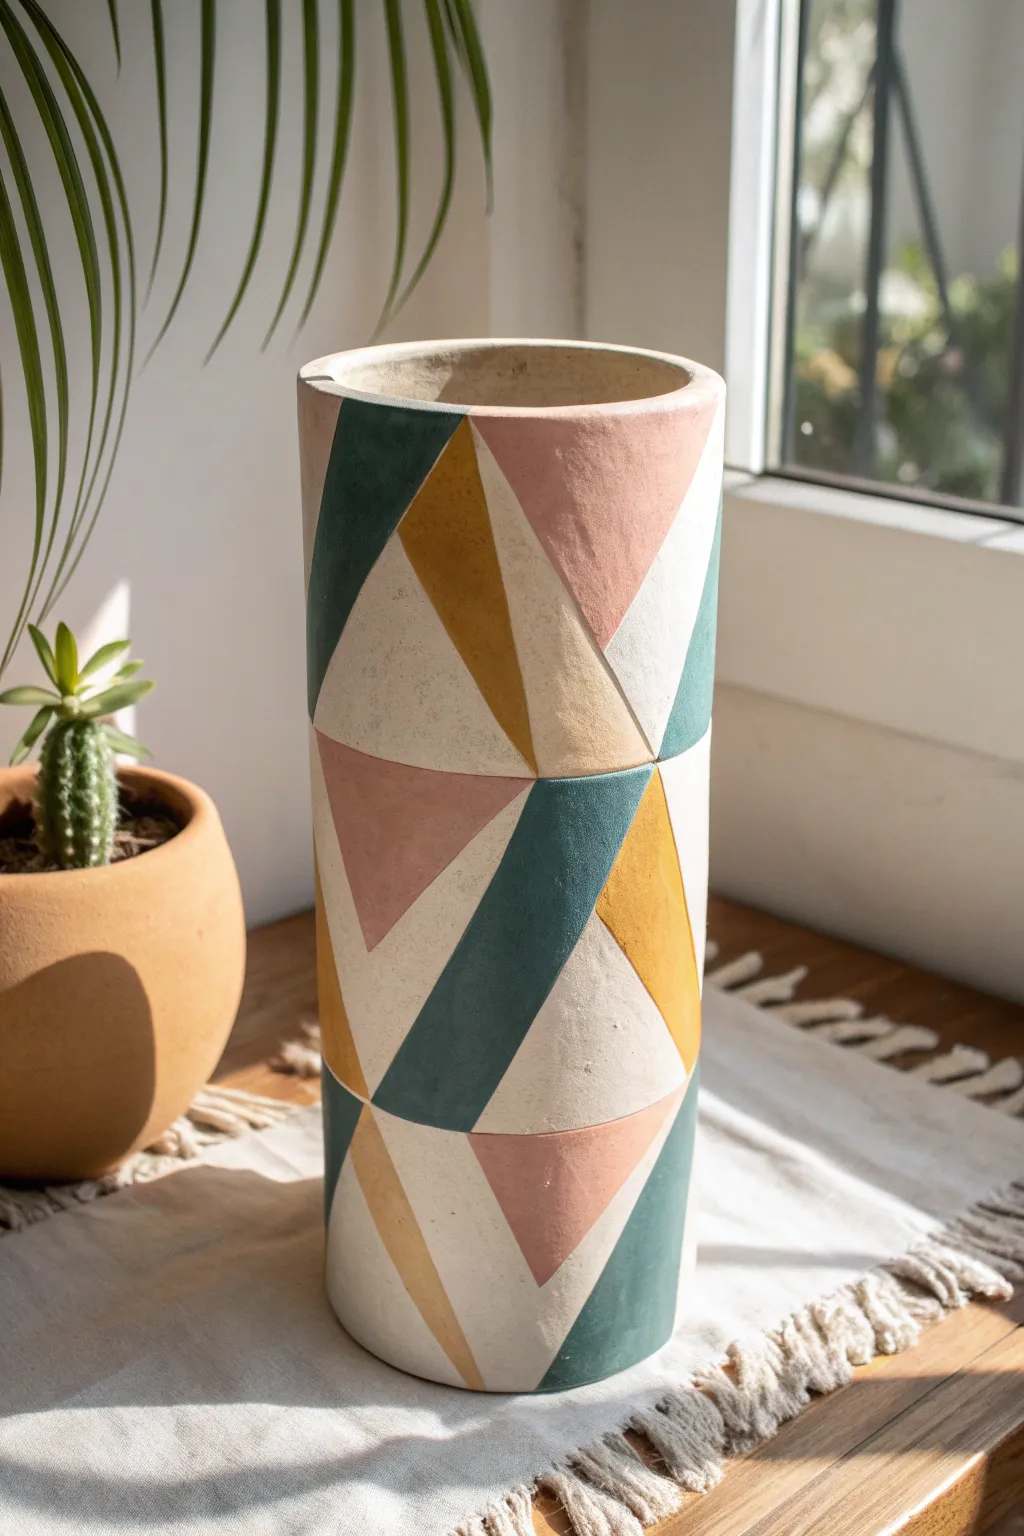
Transform a plain cylindrical vase into a stunning piece of modern decor with this geometric painting project. Using a soothing palette of teal, mustard, blush pink, and cream, crisp angles create a sophisticated yet playful look perfect for any sunlit corner.
Step-by-Step Tutorial
Materials
- Tall cylindrical clay or ceramic vase (matte finish preferred)
- Acrylic paints: Cream (or Titanium White), Teal/Dark Green, Mustard Yellow, Blush Pink
- Painter’s tape (various widths, 0.5 inch is ideal)
- Flat shader brushes (medium and large sizes)
- Small angled brush (for touch-ups)
- Pencil and eraser
- Ruler or flexible measuring tape
- Palette or small dishes for mixing
- Matte clear sealant spray
Step 1: Preparation & Base Coat
-
Clean the Surface:
Begin by wiping down your vase with a damp cloth to remove any dust or oils. If the clay is particularly rough, you might give it a very light sanding with fine-grit sandpaper for a smoother painting surface. -
Apply the Base Color:
Squeeze out a generous amount of your cream-colored acrylic paint. Using your largest flat brush, cover the entire exterior of the vase. Use long, vertical strokes to minimize brush marks. -
Check for Coverage:
Let the first coat dry completely (about 20 minutes). If the original clay color is showing through, apply a second coat for a solid, opaque background. This cream layer will serve as the negative space between your colored shapes. -
Dry Thoroughly:
Allow the base coat to cure for at least an hour. The paint must be completely dry and hard before you apply tape, otherwise, the tape might peel up your base layer.
Bleeding Lines?
If paint bleeds under the tape, don’t panic. Let it dry fully, then use a small detail brush with the base color (cream) to paint a straight line over the bleed, acting like an eraser.
Step 2: Drafting the Design
-
Map Out Large Shapes:
Using a pencil and a flexible ruler, lightly sketch large intersecting lines across the surface of the vase. You are aiming for a mix of large triangles and irregular quadrilaterals. -
Create Intersections:
Draw diagonal lines that span from the top rim down towards the middle, and others rising from the base. Let them cross over each other to form the smaller geometric segments seen in the design. -
Refine the Pattern:
Look at the composition. If a section looks too empty, bisect a large shape with another diagonal line. Aim for a balanced distribution of sizes, but keep it random enough to feel organic and modern.
Step 3: Taping & Painting
-
Tape the First shapes:
Select a few non-adjacent shapes to paint first. Apply painter’s tape along the pencil lines for these specific shapes. Press the edges of the tape down firmly with your fingernail to prevent paint bleed. -
Start with Mustard:
Load your medium flat brush with mustard yellow paint. Fill in the selected taped-off triangles. Brush inward from the tape edge toward the center of the shape to keep the line crisp. -
Paint the Teal Sections:
While the yellow dries, identify non-adjacent shapes for your teal/dark green color. Tape them off carefully. I like to check that I’m not taping over wet paint—patience is key here. Apply the teal paint in smooth, even layers. -
Add the Blush Pink:
Once the previous sections act as dry anchors, tape off the areas designated for blush pink. Paint these shapes, ensuring the color is opaque. The pink often needs two thin coats to look solid. -
Reveal the Lines:
Carefully peel back the painter’s tape while the paint is still slightly tacky, not bone dry. This helps prevent the paint from chipping at the edge. Pull the tape away at a 45-degree angle. -
Wait and Repeat:
Allow the painted sections to dry completely. Then, re-apply tape to define the remaining shapes that share borders with the ones you just painted. This staged approach ensures crisp lines between touching colors. -
Paint Touching Shapes:
Fill in the remaining shapes with their respective colors. Since you are painting directly against a dry painted edge, you can use the tape to protect the finished section, or carefully freehand the edge if you have a steady hand.
Seal For Crispness
For ultra-crisp lines, paint a thin layer of base color over the tape edge first. This seals the gap; any bleed will be invisible base color. Then paint your color on top.
Step 4: Finishing Touches
-
Clean Up Edges:
Inspect your lines. If any paint bled under the tape, use your small angled brush and a bit of the cream base paint to tidy up the edges and cover mistakes. -
Erase Pencil Marks:
Once the vase is 100% dry, gently erase any visible pencil lines that weren’t covered by paint. Be gentle so you don’t burnish the matte paint. -
Seal the Work:
Take the vase to a well-ventilated area. Spray a light, even coat of matte clear sealant over the entire vase. This protects the paint from scratches and gives the finish a unified sheen.
Now you have a striking, custom-designed vase ready to hold your favorite dried botanicals or fresh greens

TRACK YOUR CERAMIC JOURNEY
Capture glaze tests, firing details, and creative progress—all in one simple printable. Make your projects easier to repeat and improve.
Terrazzo Speckle Sprinkle
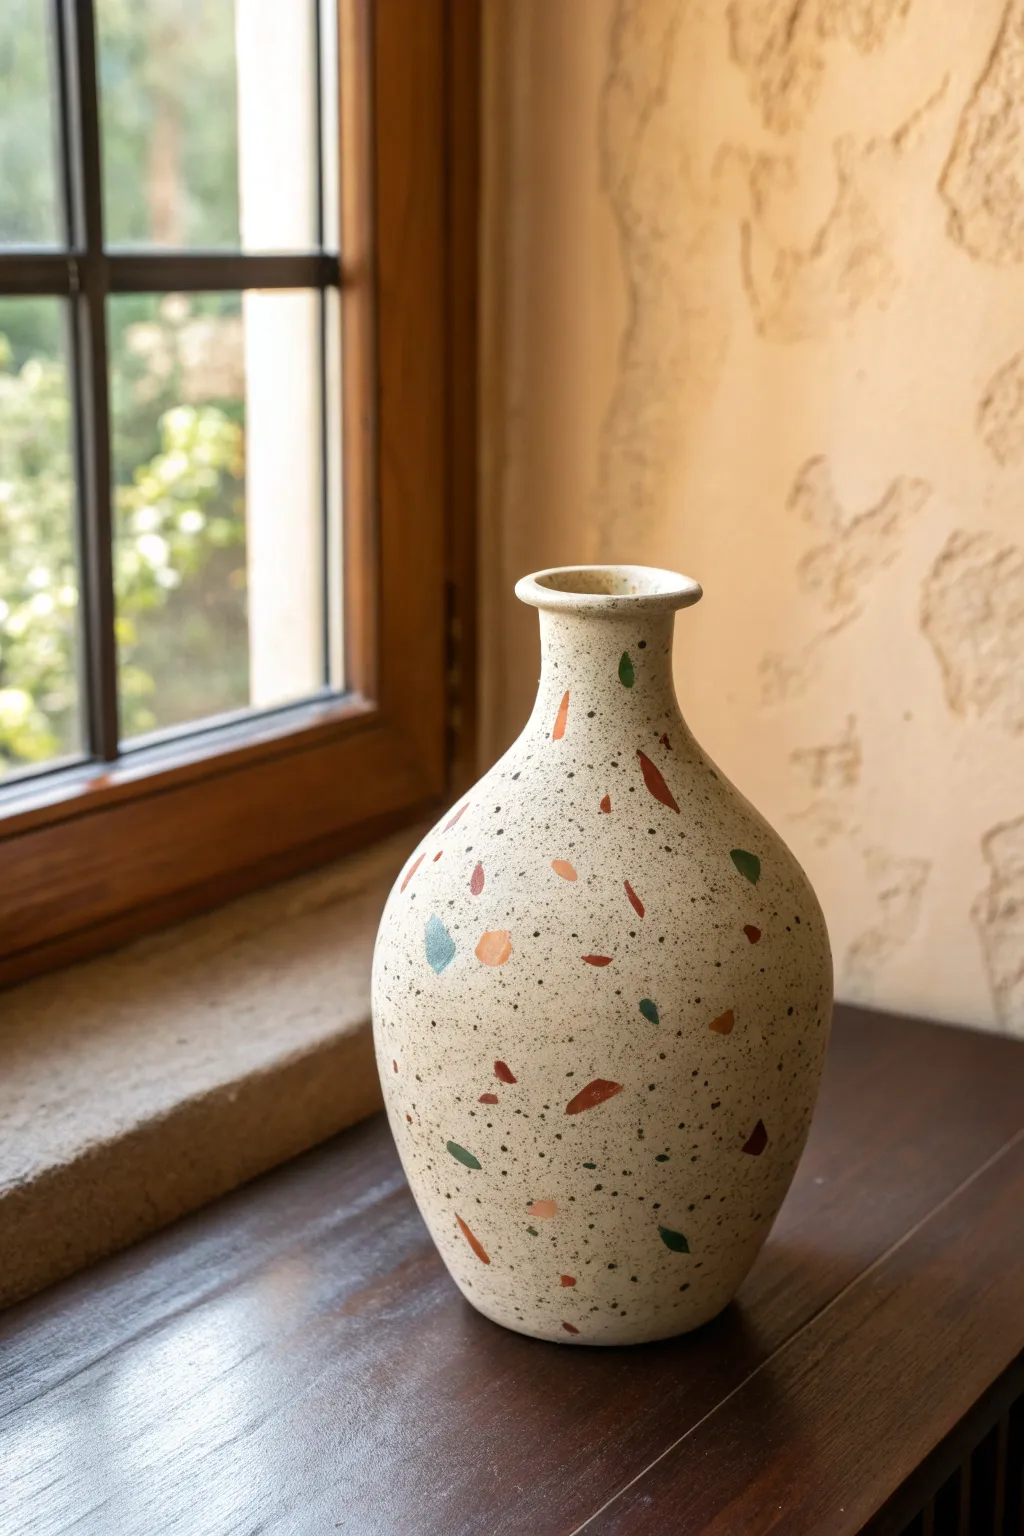
Bring the timeless elegance of Italian flooring to your home decor with this modern terrazzo-style vase. Using simple painting techniques, you’ll transform a plain ceramic vessel into an upscale, speckled masterpiece featuring earthy tones of terracotta, sage, and sand.
How-To Guide
Materials
- Bisque or smooth ceramic vase (cleaned and dried)
- Acrylic paints (Cream/Beige, Terracotta, Forest Green, Maroon, Teal, Light Peach, Black)
- Medium flat synthetic brush
- Fine detail brush or small round brush
- Old toothbrush or stiff fan brush (for splattering)
- Palette or paper plate
- Cup of water and paper towels
- Matte spray sealant or varnish
- Drop cloth or cardboard to protect your workspace
Step 1: Base Coat Preparation
-
Prepare the surface:
Begin by wiping down your vase with a slightly damp cloth to remove any dust or oils. Let it dry completely. -
Mix the base color:
On your palette, squeeze out a generous amount of cream or beige acrylic paint. If you want a warmer undertone like the photo, mix in a tiny drop of yellow ochre or brown. -
Apply the first layer:
Using your medium flat brush, paint the entire exterior of the vase. Use long, smooth strokes to minimize brush marks. -
Let it dry:
Allow the first coat to dry for about 20-30 minutes. Acrylics darken slightly as they dry, so don’t worry if it looks light at first. -
Second coat:
Apply a second coat of the base color to ensure full opacity. You shouldn’t see any of the original vase material showing through.
Flicking Technique
Wear gloves when using the toothbrush splatter method. It’s messy! If you splatter a spot too heavily, quickly dab it gently with a damp paper towel to lift the excess paint.
Step 2: Creating the Terrazzo Stones
-
Prepare accent colors:
Squeeze dime-sized amounts of your accent colors onto the palette: terracotta, forest green, maroon, teal, and light peach. Keep them separate. -
Paint the first shapes:
Dip your fine detail brush into the terracotta paint. Paint small, irregular geometric shapes randomly around the vase. Think triangles with softened corners, shards, or uneven trapezoids. -
Rotate and space:
Continuously rotate the vase as you work. Leave plenty of negative space between shapes; remember, we have several more colors to add. -
Add the green accents:
Clean your brush thoroughly and switch to forest green. Paint similar irregular shapes, slightly varying the sizes. Some can be tiny slivers, others larger chunks. -
Layer in deep tones:
Switch to maroon. Add these deeper shapes sparingly to create contrast. I prefer to place these near lighter areas to make the pattern pop. -
Add cool tones:
Using the teal or deep blue paint, fill in some of the empty gaps with new shapes. Try to maintain a random distribution so no area looks too clustered. -
Final pastel highlights:
Finish the main shapes with the light peach color. These softer tones help bridge the gap between the beige background and the dark accents. -
Review and refine:
Step back and look at the vase from a distance. If there are large empty voids, add a small shape there now. Let all the accent shapes dry completely.
Texture Twist
Mix baking soda into your base coat paint (50/50 mix) before applying it. This creates a gritty, stone-like texture that makes the final terrazzo effect feel incredibly realistic.
Step 3: The Speckle Effect
-
Prepare the splatter paint:
Mix a small amount of black paint with a few drops of water. You want an inky consistency—runny enough to fly off a brush, but pigmented enough to be dark. -
Test the splatter:
Dip an old toothbrush into the thinned black mix. Point it at a piece of scrap paper and run your thumb across the bristles to flick the paint. Adjust the consistency if needed. -
Apply the speckles:
Hold the toothbrush about 6 inches from the vase and flick the bristles to create a fine mist of speckles. Rotate the vase constantly to get even coverage. -
Control the density:
Vary your distance slightly. Closer flicks create denser clusters; further flicks create a lighter mist. This fine grit mimics the cement binder in real terrazzo. -
Hand-paint larger specks:
To add depth, take your smallest detail brush and manually paint a few slightly larger black dots here and there to break up the uniformity of the splatter. -
Seal the artwork:
Once the paint is bone dry (wait at least an hour), take the vase to a well-ventilated area. Apply a coat of matte spray sealant to protect the paint and give it a unified finish.
Place your finished vase near a window to let the natural light highlight those beautiful earthy speckles
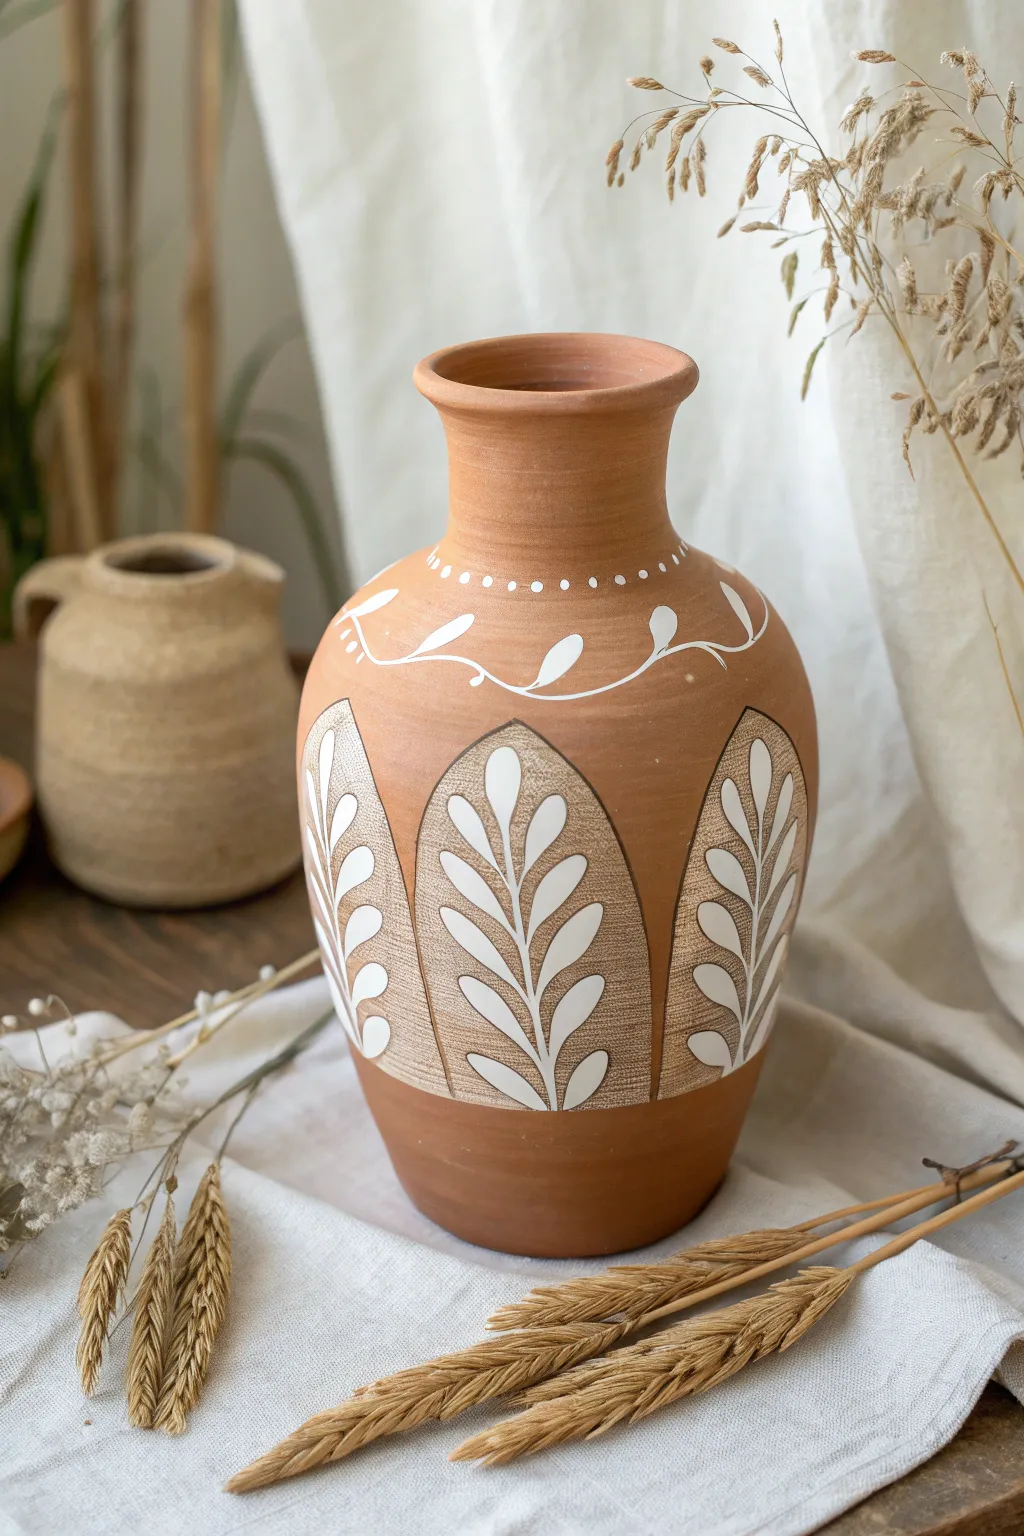
Bold Folk-Inspired Pattern Bands
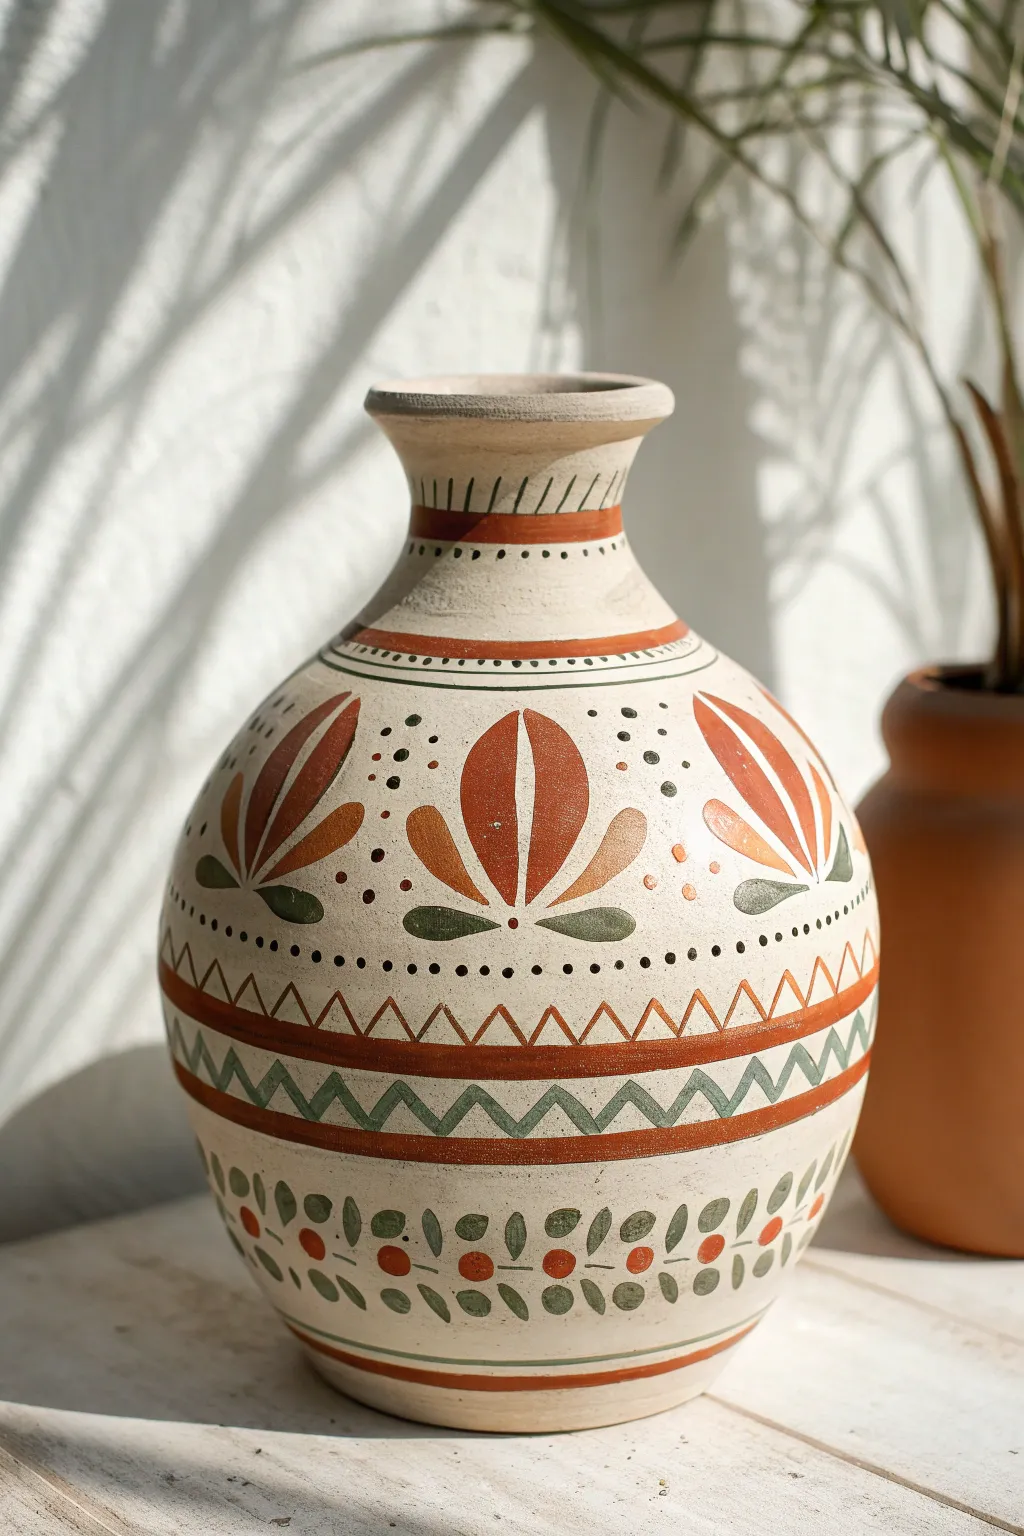
Capture the warmth of traditional pottery with this stunning vase project featuring rhythmic bands of botanical and geometric motifs. Using a simple palette of rust, olive, and charcoal on a raw clay base, you’ll create a piece that feels both ancient and refreshingly modern.
Step-by-Step
Materials
- Bisque-fired clay vase or terracotta vase (matte finish)
- Acrylic paints (terracotta/rust orange, olive green, dark charcoal/soft black)
- Matte acrylic sealer or varnish
- Round synthetic brushes (sizes 2, 4, and 6)
- Fine liner brush (size 0 or 00)
- Pencil
- Eraser
- Palette
- Water cup and paper towels
- Painter’s tape (optional, for guidelines)
Step 1: Preparation & Base Planning
-
Prep the Surface:
Ensure your vase is clean and free of dust. If you are using a raw terracotta vase, you might want to seal the inside first to prevent moisture seepage later. -
Map the Bands:
Using a pencil, lightly sketch horizontal rings around the vase to divide the space. Start with the neck, then the shoulder area, the wide central belly, and finally the lower third. These guidelines ensure your patterns stay level as they wrap around the curve. -
Define the Central Zone:
The largest section sits right at the belly of the vase. Mark this clearly, as it will hold the large floral motifs.
Steady Hand Trick
For perfectly straight horizontal bands, rest your pinky finger against the vase itself while you rotate the vase on a lazy susan or turntable with your other hand.
Step 2: Painting the Neck & Shoulder
-
Neck Ring:
Using a size 4 round brush and rust orange paint, create a solid band around the narrowest part of the neck. Just below the rim, use your liner brush and charcoal paint to add small, slanted hatch marks. -
Dotted Detail:
Below the rust neck band, paint a ring of tiny charcoal dots. Keep your spacing consistent to maintain that structured folk look. -
Shoulder Stripe:
Moving down to the shoulder, paint a slightly thinner rust orange stripe. Once dry, frame this stripe with two very thin charcoal lines—one above and one below—using your liner brush. -
Secondary Dots:
Add another circle of charcoal dots just beneath that second banded section to frame the top of the main design area.
Step 3: The Main Botanical Belly
-
Drafting the Petals:
In the large central band, lightly sketch large, stylized tulip-like shapes. Each motif consists of a central petal and two side petals. -
Painting Petals:
Fill in the petals with the rust orange paint using a size 6 brush. Leave a tiny sliver of unpainted clay between the petals to define them without outlining. -
Adding Leaves:
At the base of each flower, paint two curved leaves spreading outward using olive green. Create a small semi-circle or dot in rust red at the very center base where leaves and petals meet. -
Filler Dots:
Folk art abhors a vacuum. Use the charcoal paint to add clusters of small decorative dots in the negative spaces between the flower heads. -
Closing the Section:
Finish this main section by painting a row of slightly larger charcoal dots along the bottom boundary.
Make It Antique
Mix a tiny drop of water into burnt umber paint and do a very light wash over the dried design, wiping it off immediately creates an aged patina.
Step 4: Geometric Lower Bands
-
Zig-Zag Rows:
Below the flowers, paint a continuous zig-zag line in rust orange. I find it easier to paint the peaks first, then connect them. -
Solid Anchors:
Paint a thick, bold band of rust orange below the zig-zag. This heavy line visually anchors the vase. -
Green Chevron:
Beneath the heavy rust band, paint a second, thicker zig-zag pattern using the olive green paint. This chevron pattern should be bolder than the delicate orange one above. -
Final Rust Stripe:
Add one last medium-thickness rust orange stripe below the green chevrons to close out the geometric section.
Step 5: The Vine Base & Finish
-
Vine Structure:
In the bottom-most section, use the liner brush and olive green to paint a wavy, undulating vine wrapping around the base. -
Adding Leaves & Berries:
Attach small green leaves to the vine curves. Intersperse these with small rust orange circles to represent berries. -
Bottom Rim:
Paint a final thin rust orange line near the very bottom edge of the vase to frame the entire piece. -
Sealing:
Allow the paint to cure for at least 24 hours. Because the raw clay look is essential to this style, apply a dead-flat matte varnish to protect the paint without adding unwanted shine.
Place your newly painted vase in a sunlit spot where the earthy tones can truly shine
Blue-and-White Porcelain-Inspired Motifs
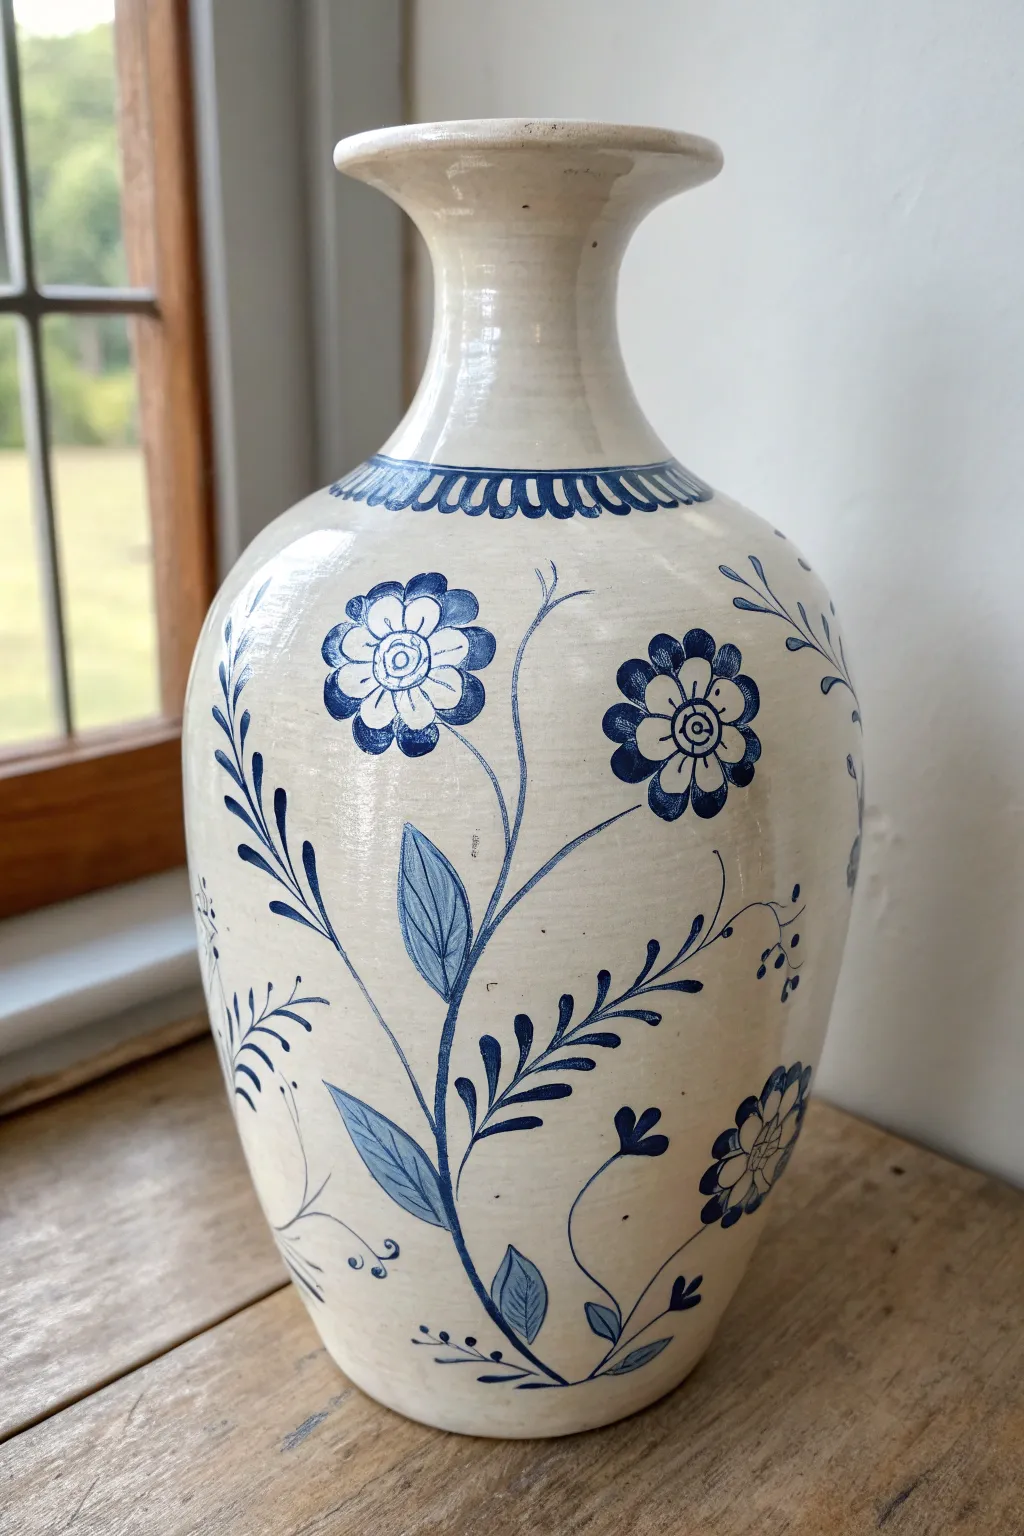
Capture the timeless elegance of classic blue and white porcelain with this hand-painted clay vase project. Using simple floral motifs and a minimal palette, you will transform a plain ceramic vessel into a stunning piece of faux-antique decor.
Detailed Instructions
Materials
- Tall, light-colored ceramic or bisque vase
- Ceramic paint or high-quality acrylics (Midnight Blue and Royal Blue)
- Gloss varnish or glaze (if using acrylics)
- Round brushes (sizes 2, 4, and 0 for fine lines)
- Pencil for sketching
- Palette
- Paper towels
- Cup of water
Step 1: Preparation & Planning
-
Clean surface:
Begin by wiping down your vase thoroughly with a damp cloth to remove any dust or oils. Let it dry completely to ensure the paint adheres properly. -
Sketch the collar:
Using a pencil very lightly, draw a guideline around the base of the vase’s neck. This will serve as the boundary for the decorative collar pattern. -
Draft the stems:
Sketch two or three main curved lines rising from the bottom third of the vase. These flowing S-curves will become the primary stems for your floral arrangement. -
Place the blooms:
Lightly draw circles where you want your main flowers to sit. In the image, there are two large focal flowers and one smaller bud lower down.
Step 2: Painting the Motifs
-
Mix your blues:
On your palette, squeeze out your midnight blue. I like to keep a second puddle where I mix in a tiny drop of water to create a slightly more transparent, ink-like consistency for the initial lines. -
Outline the flowers:
Using a size 2 round brush, carefully paint the scalloped outlines of the flower petals over your pencil sketches. Keep the pressure light for delicate edges. -
Fill the centers:
Paint a small ring in the center of the main flowers. Add a central dot and thin radiating lines or loops to create the intricate pistil details shown in the reference. -
Add petal details:
Inside the flower petals, paint a smaller, inner petal shape or simple lines to give the bloom depth. This mimics the stylized look of traditional porcelain painting. -
Paint the stems:
Switch to your size 4 brush for the main stems. Paint over your pencil lines with smooth, confident strokes. Vary the pressure—press down for thickness and lift up for tapered ends.
Brushwork Tip
Use a “comma stroke” for the leaves: press the brush down at the base of the leaf and lift while pulling away to create a sharp, tapered point.
Step 3: Adding Foliage & Accents
-
Create large leaves:
Paint the large, lance-shaped leaves attached to the main stem. Outline the leaf shape first, then fill it in with a wash of blue. -
detail the leaves:
Once the filled leaf is slightly tacky or dry, use your size 0 brush with undiluted dark blue to paint the central vein and side veins for contrast. -
Add fern-like fronds:
Extending from the main stems, paint smaller branches with tiny, repetitive teardrop shapes on either side to create fern-like foliage. -
Paint the collar:
Return to the neck of the vase. Using the size 2 brush, paint a series of small, connected ‘U’ shapes or scallops along your guideline. Fill strict lines above and below this pattern to frame it. -
Intersperse wispy vines:
Look for empty white spaces and fill them with very thin, curling vines and tiny dots using your finest brush. These filigree elements tie the composition together.
Fixing Smudges
Did a line go rogue? use a damp Q-tip to instantly wipe away acrylic paint while it’s wet. If it’s dry, scrape gently with a craft knife.
Step 4: Finishing Touches
-
Erase guidelines:
Allow the paint to cure for at least 24 hours. Once fully dry, gently erase any visible pencil marks with a kneaded eraser. -
Apply gloss:
To achieve that authentic procelain shine, apply a coat of high-gloss varnish or clear glaze over the entire vase. -
Final cure:
Let the varnish dry completely according to the manufacturer’s instructions before using the vase.
Display your new masterpiece on a sunny windowsill where the glossy finish can catch the light
Abstract Brushstroke Color Field
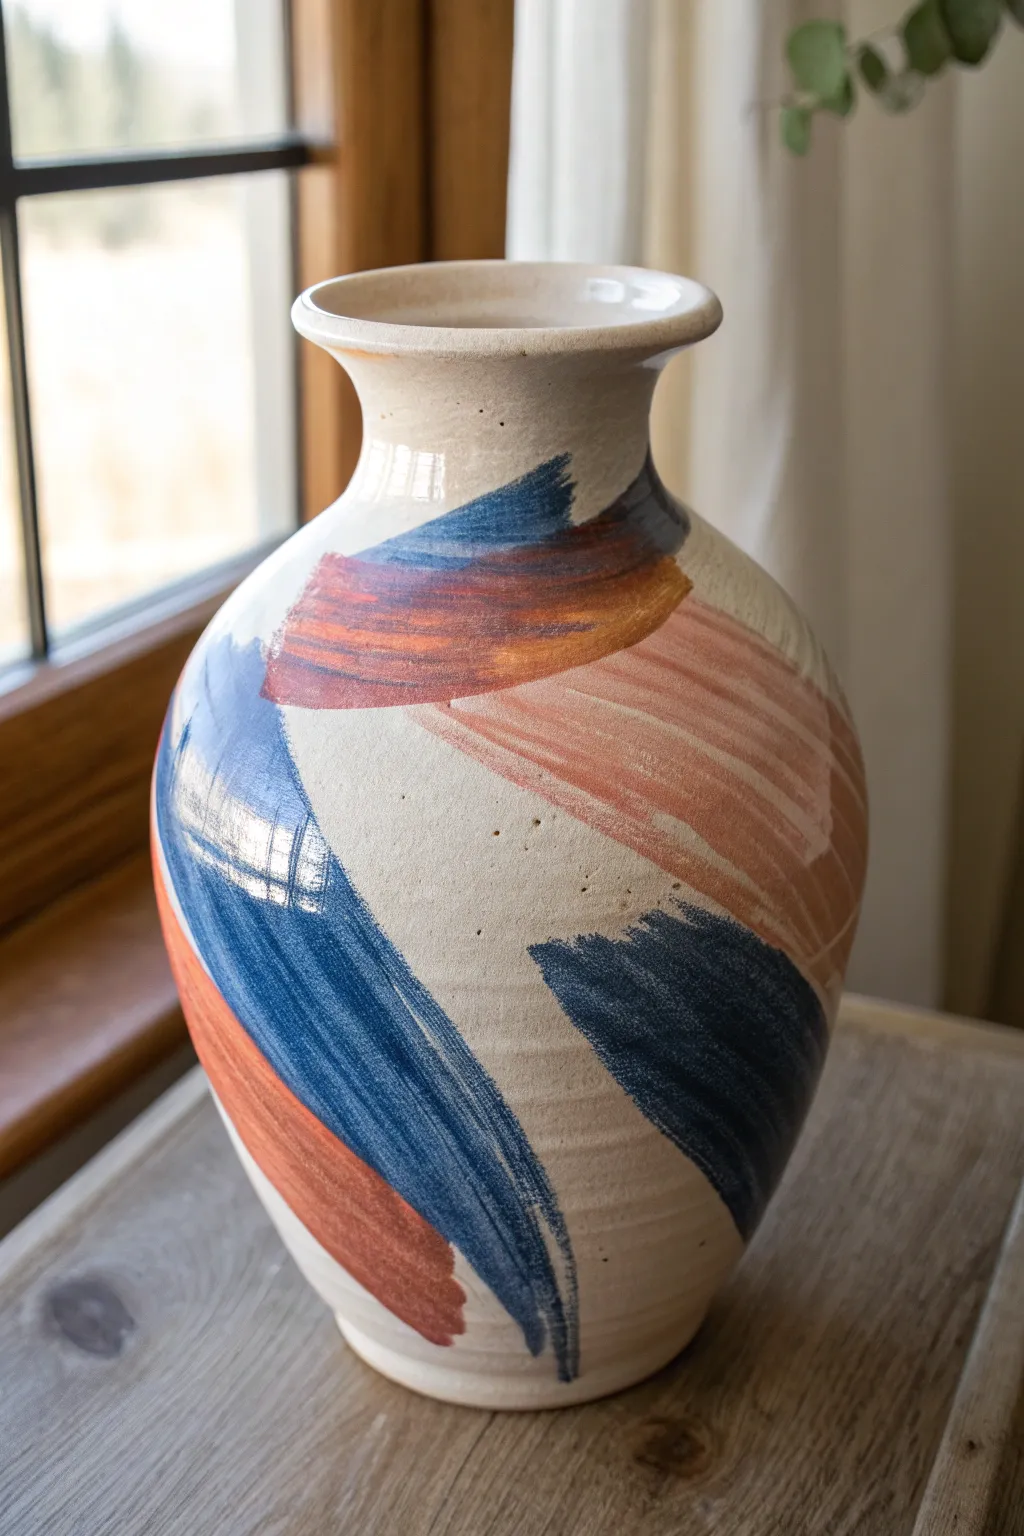
Transform a plain ceramic vase into a stunning piece of modern art with this abstract painting technique. Featuring bold, sweeping brushstrokes in deep blues, earthy terracottas, and soft blush tones, this project embraces the beauty of imperfection and visible texture.
How-To Guide
Materials
- Large ceramic vase (bisque or matte glazed cream/beige)
- Acrylic paints (Deep Navy Blue, Terracotta/Rust, Blush Pink)
- Glazing medium or water (to thin paints)
- Wide flat synthetic brushes (1-2 inch width)
- Palette or paper plate
- Clear matte or satin spray sealant
- Paper towels
- Drop cloth or newspaper
Step 1: Preparation & Planning
-
Surface Prep:
Begin by wiping down your vase with a damp cloth to remove any dust or oils. If you are using a thrifted vase with a smooth, glossy finish, lightly sand the surface with fine-grit sandpaper to give the paint something to grip. -
Color Mixing:
Squeeze out your Deep Navy, Terracotta, and Blush Pink paints onto your palette. Leave plenty of space between them. If your blue feels too bright, add a tiny touch of the terracotta to deepen it into a moodier navy. -
Texture Medium:
For that semi-translucent, painterly look seen in the photo, mix a small amount of glazing medium into each color puddle. A ratio of roughly 3 parts paint to 1 part medium works well. I find this helps the brushstrokes glide longer without becoming opaque blocks of color.
Brushstroke Mastery
Don’t overthink your strokes! Fast, confident movements create clearer brush marks than slow, hesitant ones. Practice on paper first to get the feel.
Step 2: Painting the Base Strokes
-
First Blue Sweep:
Load a wide flat brush with your Deep Navy mixture. Don’t overload it; you want the bristles to create visible streaks. Start near the bottom third of the vase and pull the brush upward and diagonally in a confident, sweeping motion. -
Creating Movement:
Add a second large blue stroke on the opposite side, perhaps starting higher and sweeping downwards. The goal is to create dynamic angles, not a repetitive pattern. -
Dry Brushing:
As the paint runs out on your brush, let the stroke trail off naturally. This ‘dry brush’ effect at the tail end of the stroke adds wonderful texture and makes the piece look hand-thrown and artistic. -
Brief Drying Time:
Allow the blue strokes to dry to the touch, which should take about 10-15 minutes depending on how thick you applied the paint.
Step 3: Layering Colors
-
Introducing Terracotta:
Using a clean wide brush, pick up the Terracotta paint. Apply a bold stroke that intersects or sits adjacent to your blue strokes. Try a horizontal sweep near the shoulder of the vase to contrast the vertical energy of the blue. -
Overlapping Technique:
Don’t be afraid to let the strokes overlap slightly. Because we added glazing medium, the underlying colors will peek through, creating interesting third colors where they meet. -
Adding Softness:
Now, switch to the Blush Pink. These strokes should be wider and softer. Apply a large, curving patch of pink that spans a significant portion of the white space, perhaps bridging a gap between a blue and rust section. -
Feathering Edges:
While the pink paint is wet, you can lightly feather the edges with a dry brush to soften the transition into the bare vase surface.
Level Up: Texture
Mix baking soda into your acrylic paint before applying. This creates a gritty, stone-like texture that mimics high-end pottery glazes.
Step 4: Refining & Finishing
-
Visual Balance Check:
Step back about five feet from your vase. Look for any large empty spaces that feel unbalanced. Add smaller ‘echo’ strokes—little dashes of blue or rust—near the main strokes to integrate the composition. -
Texture Enhancement:
If your strokes look too flat, take a mostly dry brush with a tiny bit of the original cream base color (or unpainted clay coloy) and lightly drag it over the thickest colored areas to simulate a weathered, worn-away look. -
Final Cleanup:
Check the rim and the very bottom edge. If any stray brushstrokes went over the lip where you didn’t intend, wipe them away with a damp paper towel before they fully cure. -
Curing:
Let the vase sit undisturbed for at least 24 hours to allow the acrylics to fully bond with the ceramic surface. -
Sealing:
To protect your work, take the vase outside and apply two light coats of clear matte spray sealant. This preserves the matte, clay-like aesthetic while protecting the paint from scratches.
Place your newly painted vase near a window where natural light can highlight the beautiful brush textures you’ve created
Wavy Checkerboard Pattern
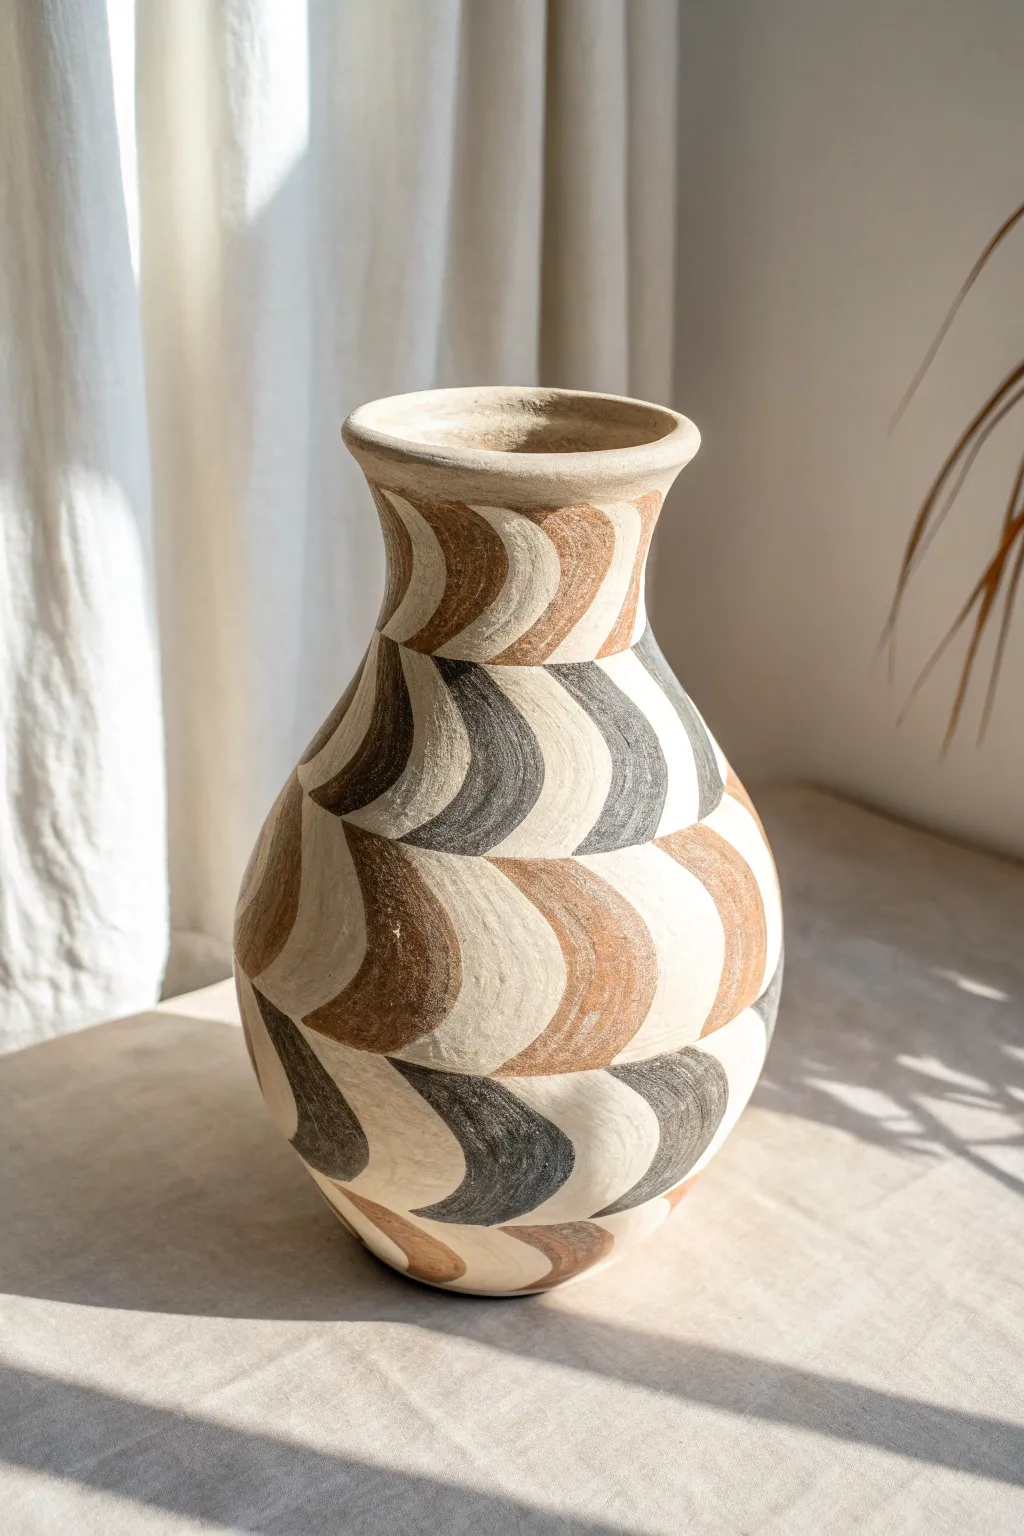
Transform a plain ceramic vessel into a statement piece with this rhythmic, organic pattern that plays with positive and negative space. The alternating warm brown and charcoal black waves create a sophisticated checkerboard effect that feels both ancient and refreshingly modern.
Step-by-Step
Materials
- Bisque fired ceramic vase or unglazed terracotta vase (smooth surface preferred)
- Acrylic paints (matte finish) in Burnt Sienna or Terracotta
- Acrylic paints (matte finish) in Carbon Black or Charcoal
- Flat shader brush (size 6 or 8)
- Small round detail brush (size 2)
- Pencil (HB or lighter)
- Flexible measuring tape
- Eraser
- Matte spray varnish or sealant
Step 1: Planning the Grid
-
Clean surface:
Begin by wiping down your vase with a slightly damp cloth to remove any dust or oils. Let it dry completely so the pencil marks will take clearly. -
Measure the circumference:
Use your flexible tape measure to find the circumference of the vase at its widest point. Divide this number by how many wave columns you want (e.g., 6 or 8 columns) to determine the width of each section. -
Mark vertical guides:
Lightly mark vertical lines down the vase at your calculated intervals. These lines will be the center points where the wave tips meet. It’s okay if they curve slightly with the form of the vase. -
Mark horizontal bands:
Decide on the height of your wave rows. Using the pencil, lightly sketch horizontal rings around the vase to create a grid. The grid doesn’t need to be geometrically perfect; a little organic variation adds to the handmade charm.
Step 2: Sketching the Waves
-
Draw the first wave:
In the first grid box, draw a curved swoosh shape. Start at the top left corner of the box, curve down deep into the center, and swoop back up to the top right corner. It should look like a draped fabric or a crescent moon on its side. -
Mirror the pattern:
For the row immediately below, you want the waves to curve in the same direction, but you’ll be alternating colors later. Sketch these repeating crescent shapes into every grid box on your vase. -
Refine the curves:
Go back over your sketch. Ensure the points of the crescents touch the vertical guide lines. The negative space (the unpainted clay) should form a matching crescent shape interlocking with your drawn shape.
Wobbly Lines?
Don’t panic if your curves aren’t perfect! Simply use a damp Q-tip to wipe away wet acrylic paint mistakes, or wait for it to dry and paint over the error with a color matching your bare clay.
Step 3: Painting the Pattern
-
Mix the brown tone:
Squeeze out your Burnt Sienna paint. I like to add a tiny drop of white if the clay body is very light, to ensure the contrast isn’t too harsh, but straight from the tube works for a bold look. -
Paint standard rows:
Using the flat shader brush, fill in the wave shapes on your first row. Use smooth, confident strokes that follow the curve of the wave to mimic the texture of the clay. -
Skip rows:
Skip the second row for now. Move to the third row and paint these waves with the brown paint as well. Continue this pattern: brown, skip, brown, skip. -
Dry break:
Allow the brown paint to dry to the touch, which usually takes about 10-15 minutes depending on humidity. -
Paint the black rows:
Load your brush with the Carbon Black paint. Fill in the empty rows you skipped earlier. Be careful where the black tips meet the brown tips; use the finer round brush here if you need more control. -
Manage edges:
If your brushstrokes look streaky, let the first coat dry and apply a second thin coat. This is often necessary with darker colors like black to get solid coverage. -
Clean up:
Once all paint is dry, check for any visible pencil lines. Gently erase them, being careful not to rub off any paint.
Add Dimension
Mix a small amount of fine sand or baking soda into your acrylic paint before applying. This adds a gritty, stone-like texture that makes the vase look like an ancient artifact.
Step 4: Finishing Touches
-
Texture check:
The image has a wonderful matte texture. If you want to enhance this, you can dry brush a tiny amount of the background clay color (or a beige mix if you don’t have the original clay exposed) lightly over the painted areas to soften them. -
Seal the work:
Take the vase outdoors or to a well-ventilated area. Spray a light, even coat of matte varnish over the entire piece. This protects the acrylic from chipping and seals any exposed raw clay.
Place your new vase near a window where the light can highlight the rhythmic curves of your handiwork
Meditative Mandala Dot Painting
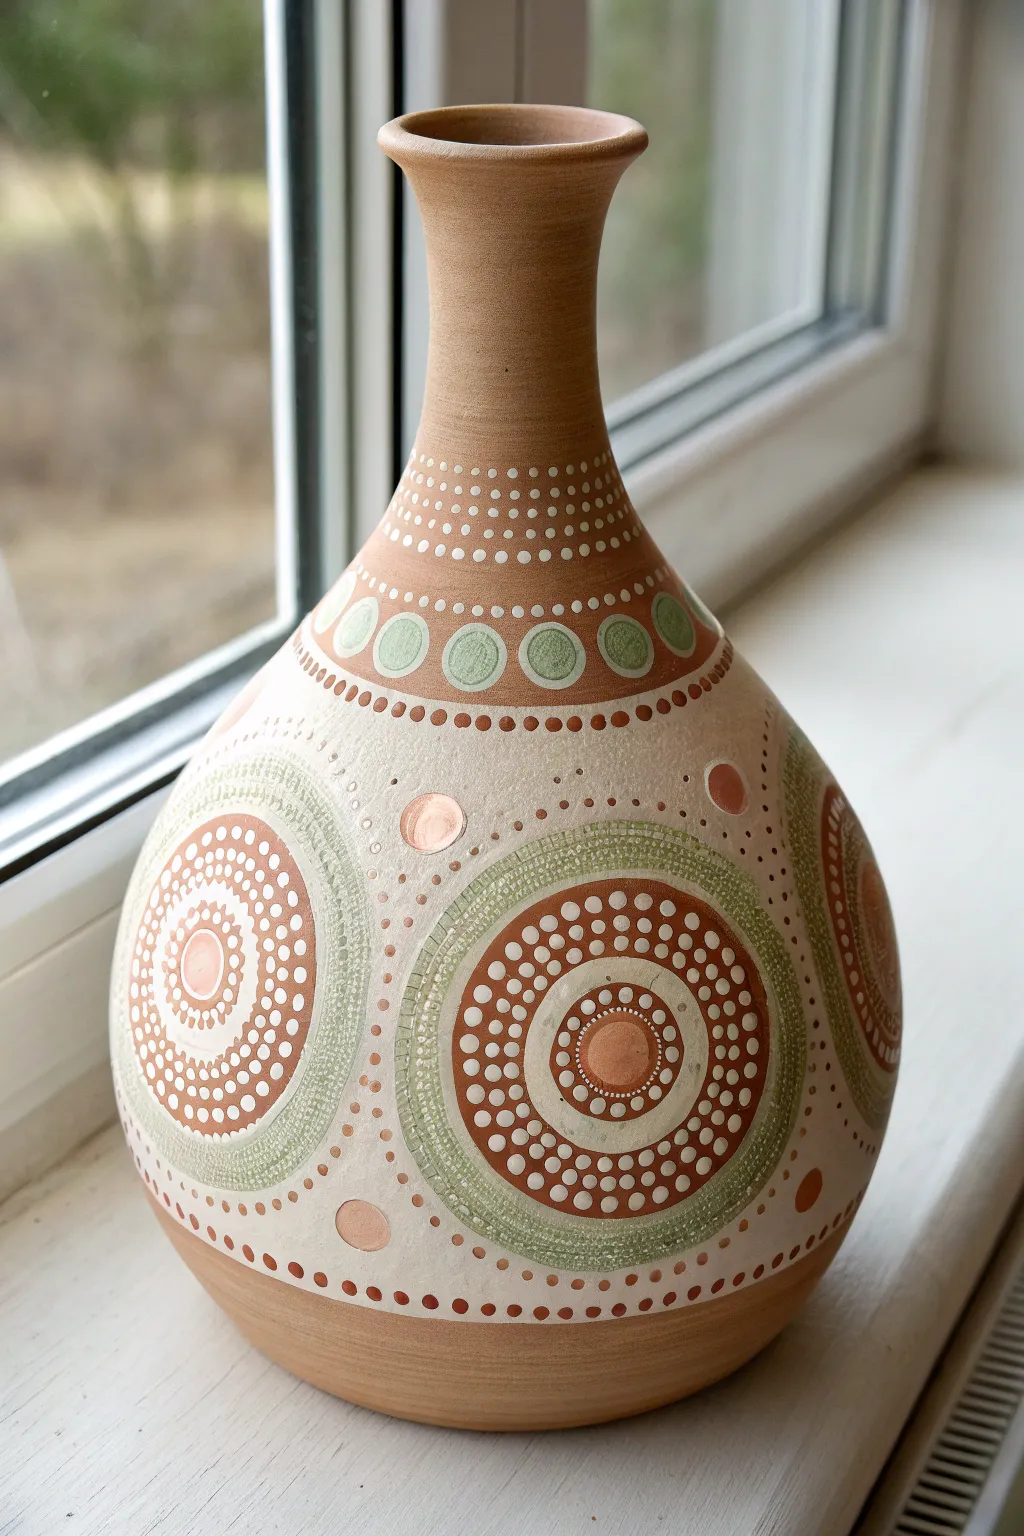
Transform a plain terracotta vessel into a mesmerizing piece of art using meditative dotting techniques. This project combines earthy sage greens, creams, and terracotta tones in rhythmic mandala patterns for a finish that feels both organic and structured.
Step-by-Step Guide
Materials
- Bisque-fired ceramic or terracotta vase (classic bottle neck shape)
- Acrylic paints: Titanium White, Unbleached Titanium (Cream), Sage Green, Burnt Sienna, Terracotta/Rust Orange
- Dotting tools (set of various sizes) or household substitutes (drill bits, pencil erasers, crochet hooks)
- Fine liner paintbrush (size 0 or 00)
- Damp cloth or baby wipes
- Palette or small plate
- Matte spray varnish
Step 1: Base Preparation
-
Clean surface:
Wipe down your vase with a damp cloth to remove any dust or oils. Let it dry completely to ensure the paint adheres properly. -
Establish the background:
Mix Titanium White with a tiny drop of Unbleached Titanium to create a soft, warm off-white. Using a wide brush, paint the large central bulb of the vase, leaving the neck and the very bottom base raw terracotta. This creates a canvas for your main mandala work. -
Refine the edges:
Use a damp brush or a wipe to clean up the transition lines where the cream paint meets the raw terracotta on the neck and base. A clean, defined curve looks best here.
Pro Tip: Consistency
If your paint is too thick, dots will have pointy peaks. Add a drop of flow medium or water to get a yogurt-like consistency for smooth, rounded domes.
Step 2: Designing the Neck
-
Start the neck collar:
At the base of the neck, just above where the cream paint ends, use your smallest dotting tool to create three uniform rows of tiny white dots on the raw clay. Keep them tightly spaced. -
Create the scalloped transition:
Just below the cream paint line, mix your Sage Green with a little White to lighten it. Use a medium dotting tool to stamp a row of circles around the shoulder of the pot. -
Layer the scallops:
Once the sage dots are dry, place a slightly smaller white dot inside each sage one. This ‘double-dot’ technique adds immediate depth. -
Add separation details:
Using Burnt Sienna, dot a simple ring of small dots right below the sage circles to frame the upper section.
Step 3: The Main Mandala Circles
-
Map out the centers:
Visualize three large circles evenly spaced around the belly of the vase. Mark the center of each with a large dab of Terracotta paint. -
Build the core rings:
Using a small tool, dot a ring of cream paint tightly around the central terracotta dot. Follow this with a ring of slightly larger Rust Orange dots. -
Expand with contrast:
Dip a medium tool into the Cream paint. Create a bold ring outside the orange one. I usually reload the tool every 2-3 dots to keep the size consistent. -
Create the outer definition:
Switch to your dark Burnt Sienna. Create two concentric rings of dots that frame the lighter inner circle. -
Add the sage halo:
Mix a wash of Sage Green by adding water to the paint until it’s semi-transparent. Paint a wide 1-inch band around your dotted circle. This creates that lovely washed-out green halo effect visible in the image. -
Texture the halo:
While the green wash is dry, use a fine tool to add rows of tiny, faint white or cream dots over the green area to give it texture without overwhelming the color. -
The final dark ring:
Enclose the entire large mandala shape with a final ring of Burnt Sienna dots on the outer edge of the green halo.
Level Up: Glossy Gems
Once fully sealed with matte spray, go back and add a drop of 3D Gloss Glaze or resin only on the center dots of the mandalas to make them look like inlaid stones.
Step 4: Filler Details & Finishing
-
Fill negative space:
Look at the white spaces between your large mandalas. Add single large Terracotta dots floating in these empty areas to balance the composition. -
Add bottom border:
Near the bottom of the creamy off-white section, create a border using Burnt Sienna dots. Vary the sizes—large, small, large—for visual interest. -
Tiny accents:
Using your smallest tool or a toothpick, place tiny ‘dusting’ dots of Burnt Sienna scattered loosely around the filler dots for an organic feel. -
Dry and seal:
Allow the vase to dry for at least 24 hours. Because specific dot thickness varies, drying takes time. Finish with a matte spray varnish to protect the design without making it too shiny.
Place your finished vase near a window to let the natural light highlight the texture of your dot work
Sun-and-Moon Celestial Night Sky

Transform a plain clay vase into a dreamy piece of decor with a celestial night sky theme. This project features a deep, matte charcoal base adorned with delicate white crescent moons, twinkling stars, and tiny constellation dots for a cosmic look.
How-To Guide
Materials
- Bisque ceramic or smooth clay vase
- Matte charcoal or soft black acrylic paint
- Medium flat paintbrush
- White paint marker (extra fine point)
- White acrylic paint (optional, for moons)
- Small fine-point paintbrush
- Pencil
- Matte clear spray sealer
- Palette or paper plate
- Water cup and paper towels
Step 1: Preparing the Canvas
-
Clean surface:
Begin by wiping down your vase with a damp cloth to remove any dust or oils that might interfere with paint adhesion. Let it dry completely. -
Base coat application:
Using your medium flat brush, apply an even coat of the matte charcoal or soft black acrylic paint. I like to use long, vertical strokes to mimic the texture of the clay. -
Check for coverage:
Once the first coat is dry to the touch (usually 15-20 minutes), hold it up to the light to check for thin spots. Apply a second coat if necessary to achieve a solid, opaque dark background. -
Full dry time:
Allow the base coat to cure fully for at least an hour. The surface needs to be completely dry so your white details don’t blend with the background color.
Keep it Steady
Rest your pinky finger against the vase surface while drawing delicate lines. This acts as an anchor, steadying your hand for crisp star points.
Step 2: Designing the Night Sky
-
Sketch layouts:
Lightly plan the placement of your largest elements—the crescent moons and biggest sunburst stars—using a pencil. Don’t press too hard; you just want a faint guide. -
Painting the moons:
Start with the focal points. Use white acrylic paint and a fine-point brush (or a thicker paint pen) to fill in the crescent moon shapes. You may need two thin layers to make the white pop against the dark base. -
Texturing the moons:
For a more artistic touch like the reference image, don’t make the moon perfectly solid white. Allow some slight brushstrokes to show, giving it a cratered, dimensional texture. -
Major stars:
Locate the spots for your largest stars. Draw an eight-pointed starburst by first drawing a cross, then a smaller ‘X’ through the center. -
Refining star points:
Use your extra fine paint marker to pull the lines of the starbursts outward, tapering them into sharp, thin points.
Step 3: Adding Celestial Details
-
Secondary stars:
Scattered around the vase, add slightly smaller star shapes. These can be simple four-pointed crosses or smaller six-pointed bursts. -
Tiny accents:
Draw tiny five-pointed stars (the classic doodled star shape) in empty areas to create variety in the galaxy. -
Dotting the constellations:
Create the feeling of distant galaxies by adding small dots. Gently tap the tip of your paint marker onto the vase in clusters. -
Varying dot sizes:
Mix up your pressure as you dot the surface. Some should be tiny specks, while others can be slightly bold circular dots to represent planets or brighter stars. -
Filling gaps:
Step back and look at the composition. If any area feels too empty, add a small cluster of dots or a tiny star to balance the visual weight. -
Sealing the work:
Once all white paint is bone dry (give it a few hours to be safe), mist the vase with a matte clear spray sealer. This protects the design without adding unwanted gloss.
Add Metallic Magic
Instead of pure white, try using metallic silver or pale gold for the stars. It catches the light beautifully and adds a richer, magical feel.
Fill your new celestial vase with dried grasses or wheat stalks to complete the enchanting, rustic look
Faux Marble Swirl Finish
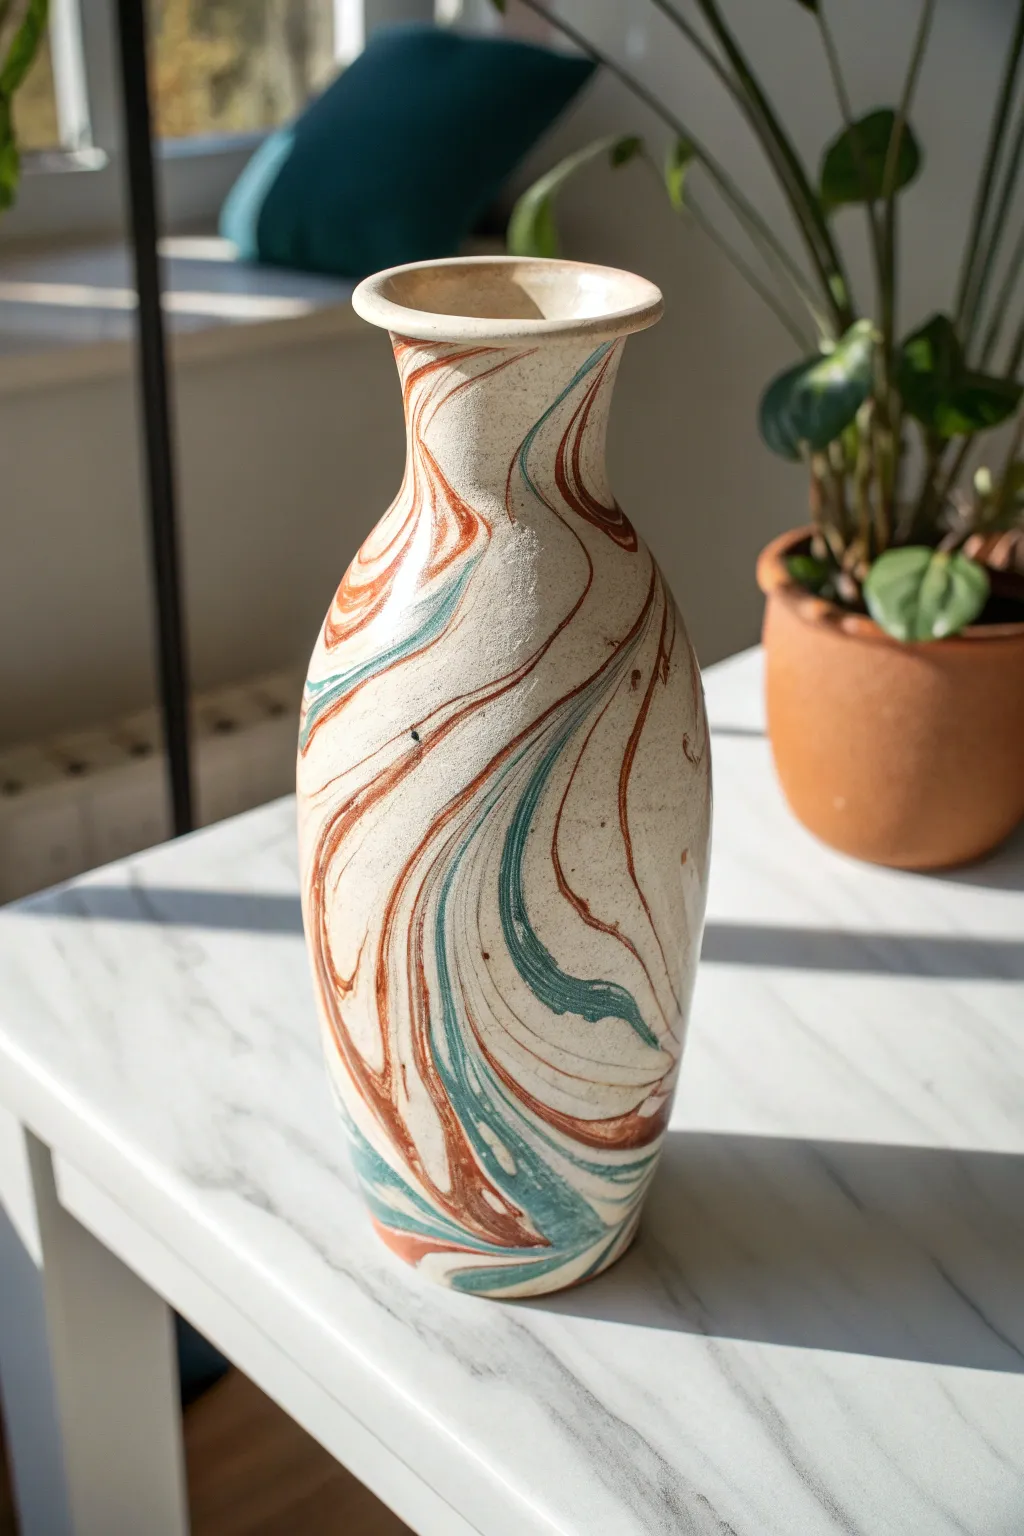
Transform a plain clay vase into a high-end statement piece using the magic of water marbling. This faux finish mimics the organic, swirling veins of agate stone with surprising realism.
Step-by-Step
Materials
- Plain ceramic or bisque vase (white or cream)
- Acrylic paints (Reddish-Brown/Terracotta, Deep Teal/Green, White)
- Large plastic tub or bucket (deep enough to submerge the vase)
- Water
- Floetrol or pouring medium (optional but recommended)
- Wooden skewers or toothpicks
- Clear acrylic sealer spray (matte finish)
- Rubber gloves
- Sandpaper (fine grit)
- Painter’s tape
Step 1: Preparation
-
Surface Prep:
Begin by ensuring your vase is clean and free of oils. Lightly sand the surface with fine-grit sandpaper to give the paint a better grip, then wipe away any dust with a damp cloth. -
Base Coat Application:
Apply a solid base coat of white or cream acrylic paint to the entire vase. This ensures the marble colors pop and provides a uniform background. Let this dry completely, preferably overnight. -
Masking Off:
If you want the inside of the rim to remain pristine, carefully apply painter’s tape to the inner neck. Seal the edges tightly so water doesn’t sneak underneath. -
Paint Consistency Check:
Prepare your marbling colors. You need reddish-brown and deep teal acrylics. If the paint is thick, thin it slightly with water or a few drops of pouring medium until it has the consistency of whole milk. It needs to float, not sink.
Muddy Waters?
If your colors are blending into gray or brown sludge, you are over-mixing with the skewer. Limit your swirls to just 3 or 4 gentle passes through the paint bath.
Step 2: Creating the Swirls
-
Setting the Bath:
Fill your plastic tub with room-temperature water. Start adding drops of your thinned paints onto the water’s surface. Alternate between the terracotta and teal colors. -
Building Layers:
Continue dropping paint until the surface is mostly covered. You’ll see circles forming inside one another. -
Swirling the Pattern:
Here comes the fun part. Gently drag a wooden skewer through the floating paint. Use slow, curvy motions to break the concentric circles into elongated, organic ribbons. Don’t over-mix, or it will turn muddy. -
Testing the Dip:
Before committing the vase, I sometimes dip a scrap piece of paper or a stick to ensure the paint clings well and the pattern looks right.
Use Borax for Stability
Add 1 tablespoon of Borax to your dipping water. This changes the surface tension, helping the paint spread wider and float longer without sinking.
Step 3: The Dip and Seal
-
The Plunge:
Wearing rubber gloves, hold the vase by the inner rim (or use a makeshift handle taped inside). Slowly dip the vase into the water at a 45-degree angle. Rotate the vase slightly as you push it down to wrap the pattern around the curves. -
Clearing the Surface:
Once the vase is fully submerged, keep it under the water. Use your free hand (or blow on the surface) to clear away the remaining floating paint before pulling the vase back up. This prevents a ‘double pattern’ from ruining the design. -
Initial Inspection:
Carefully lift the vase out and set it on a protected surface to drip dry. Avoid touching the wet paint, as it slides easily at this stage. -
Water Droplet Removal:
If large water droplets are sitting on the surface, gently dab them with a corner of a paper towel, but be extremely careful not to smudge the marbled lines. -
Full Cure Time:
Allow the vase to dry completely for at least 24 hours. The acrylic needs to bond permanently to the base coat. -
Protective Coat:
Take the vase outdoors or into a ventilated area. Apply a light, even coat of matte clear acrylic sealer. This protects the delicate swirls and gives the piece a unified, fired-ceramic look. -
Final Polish:
Once the sealer is dry, remove the painter’s tape from the rim. If there are any rough paint ridges at the bottom edge, lightly sand them smooth.
Enjoy styling your new faux-stone masterpiece on a bright windowsill or shelf
Negative Space Silhouettes on Raw Clay
Embrace the natural warmth of terra cotta with this sophisticated project that plays with negative space and organic forms. By layering a sandy beige tone over raw clay and carving out crisp white botanical silhouettes, you’ll create a vase that feels both modern and timelessly rustic.
Step-by-Step Tutorial
Materials
- Terra cotta vase (unglazed, clean, and dry)
- White acrylic paint (matte finish)
- Beige or sand-colored acrylic paint (matte finish)
- Fine detail paintbrush (size 0 or 1)
- Medium flat paintbrush
- Pencil (HB or lighter)
- Eraser
- Paper palette or small dish
- Cup of water
- Paper towels
- Ruler or measuring tape (optional)
Step 1: Planning and Sketching
-
Prepping the surface:
Ensure your terra cotta vase is completely free of dust or oils. Wipe it down with a slightly damp cloth and let it dry fully before starting so the paint adheres properly. -
Marking the arches:
Using a light pencil, lightly sketch the outline of the large arches around the belly of the vase. Aim for three to four large arches depending on the vase’s circumference, ensuring they are evenly spaced. -
Drafting the neck design:
Move up to the shoulder of the vase and sketch a delicate, wavy vine line that encircles the neck area gracefully. -
Adding the vine details:
Along this wavy vine line, draw small, simple leaf shapes sprouting outwards. Keep these loose and organic. -
Dotting the rim:
Just below the neck rim, mark small dots in a straight horizontal line to act as a guide for your final painted details later.
Uneven Coverage?
If the beige paint looks streaky, don’t rush. Let it dry completely, then dab—don’t drag—a second coat on for a smoother, stone-like finish.
Step 2: Creating the Textured Panels
-
Painting the base arches:
Load your medium flat brush with the beige or sand-colored paint. Carefully fill in the large arch shapes you sketched on the belly of the vase. -
Building opacity:
Terra cotta is porous and will soak up the first layer. Apply a second coat of beige paint once the first is dry to get a solid, opaque look. -
Adding texture (optional):
To mimic the textural look in the photo, you can use a dry brush technique. Wipe most of the wet paint off your brush and lightly drag it differently across the dried beige panels to create a subtle, scratchy texture. -
Defining the borders:
Using a fine liner brush and black or dark brown paint (diluted slightly), outline the beige arches with a thin, steady line to separate them crisply from the raw clay background.
Pro Tip: Scratch for Texture
For an authentic etched look, paint the beige layer, let it dry, then use a sewing needle to gently scratch cross-hatching before painting the white leaves.
Step 3: Painting the Botanicals
-
Drafting the inner leaves:
Once the beige panels are completely dry, lightly sketch a vertical stem down the center of each arch with pairs of leaves branching out. -
Painting the white leaves:
Switch to your fine detail brush and white acrylic paint. Carefully fill in the leaf shapes inside the beige arches. This creates the ‘negative space’ illusion where the white pops against the tan background. -
Refining the edges:
Go back over the edges of your white leaves to make them crisp. The contrast between the white leaf, the beige fill, and the raw clay outside is the key to this look. -
Painting the neck vine:
Using the white paint again, trace over your wavy vine sketch on the vase’s shoulder. Use fluid strokes to keep the vine looking natural and lively. -
Filling the neck leaves:
Paint the small leaves attached to the neck vine solid white. I find that pressing the brush down and lifting up creates a perfect tapered leaf shape automatically. -
Adding the dotted necklace:
Dip the back end of your paintbrush (the handle) into the white paint and stamp dots along the guide marks you made near the neck rim for uniform circles.
Step 4: Final Touches
-
Cleaning up sketches:
Wait until all paint is bone dry—give it at least an hour. Then, gently erase any visible pencil marks with a clean, soft eraser. -
Sealing the work:
If you plan to use this vase for fresh flowers, seal the inside with a waterproof sealant. For the outside, a matte spray varnish will protect your painting without making it too shiny.
Place your finished masterpiece near a window where the natural light can highlight the beautiful contrast of textures and tones
Raised 3D Clay Doodles Painted Bright
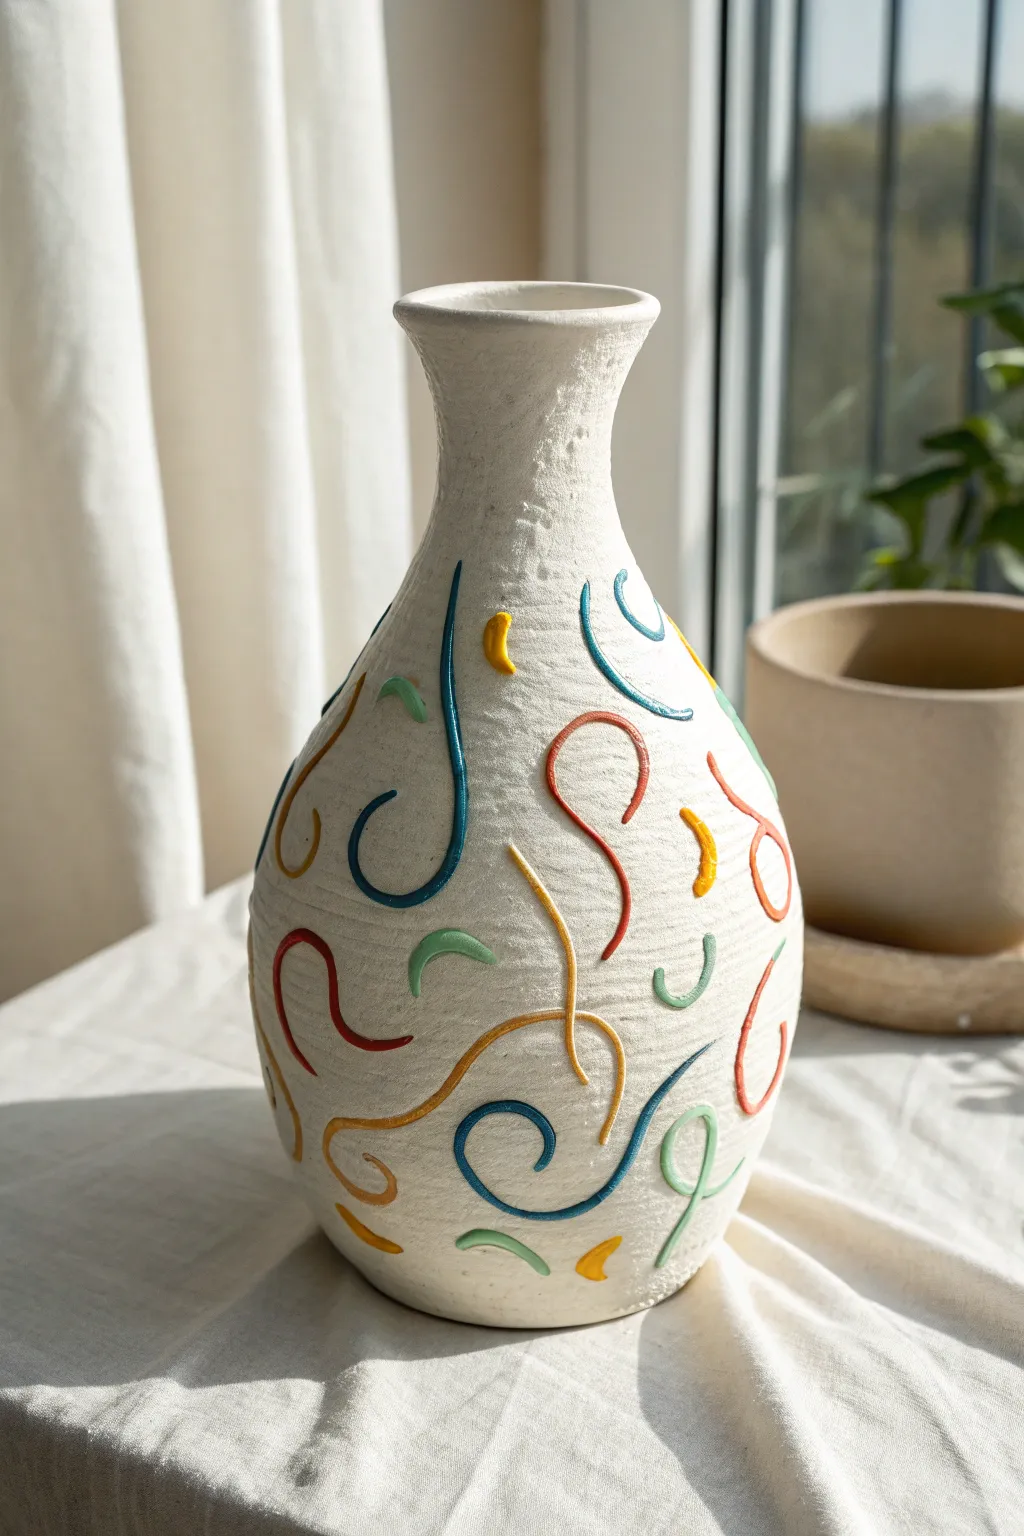
Transform a plain glass or ceramic vessel into a piece of modern art with this playful texture technique. By using air-dry clay to create raised swirls and squiggles, you’ll achieve a lively, dimensional surface that pops with joyful colors.
Step-by-Step Guide
Materials
- Glass or ceramic vase (thrifted is fine)
- Air-dry modeling clay or foam clay
- Rolling pin
- Matte white spray paint (or textured stone spray)
- Acrylic paints (red, yellow, blue, turquoise, forest green)
- Small fine-tip paintbrush
- Water cup
- Sandpaper (medium grit)
- Super glue or heavy-duty craft glue (optional but recommended depending on clay type)
Step 1: Preparation & Clay Work
-
Clean the surface:
Start by thoroughly washing and drying your vase to ensure it is free from dust and oils, which helps the clay adhere better. -
Condition the clay:
Take small portions of your air-dry clay and knead it in your warm hands until it is soft, pliable, and free of cracks. -
Roll out coils:
On a flat surface, roll the clay into thin, even noodles or ‘snakes’ roughly 1/8 to 1/4 inch thick. Varying lengths will give the design more movement. -
Form the doodles:
While the coils are fresh, shape them into various abstract forms: tight spirals, loose waves, S-curves, and small arches. -
Apply the first shapes:
Press a clay shape gently onto the vase surface. If using standard air-dry clay, dab a tiny bit of water on the contact side to act as glue; for a slick glass vase, a drop of super glue is more secure. -
Build the pattern:
Continue adding shapes all around the vase. I find it helpful to rotate the vase constantly to ensure the pattern looks balanced from every angle. -
Vary the density:
Leave negative space between the swirls. The white background needs to breathe for the colors to standout later. -
Smooth the edges (optional):
If any clay edges look jagged or lifted, use a damp finger to smooth them down so they blend slightly onto the vase surface. -
Let it cure:
Set the vase aside in a dry area. Allow the clay to dry completely according to the package instructions—usually 24 to 48 hours for solid adhesion.
Sticky Situation?
If clay keeps falling off your slick glass vase, lightly sand the glass surface first or use ‘texture paste’ instead of clay for better grip.
Step 2: Painting & Finishing
-
Prime the surface:
Once the clay is rock hard, take the vase to a well-ventilated area. Apply a coat of matte white spray paint over the entire vase, covering both the original surface and the new clay additions. -
Add a second coat:
Depending on opacity, you may need a second coat of white to unify the textures and hide the original vase color completely. Let this dry fully. -
Prepare your palette:
Squeeze small amounts of red, yellow, blue, turquoise, and green acrylic paint onto a palette. -
Paint the red swirls:
Select a few random clay curves and carefully paint just the raised surface red using your fine-tip brush. Keep a steady hand to avoid getting paint on the flat white background. -
Add the blues:
Rinse your brush and move on to the dark blue and turquoise colors. Paint swirls that are distant from each other to distribute the ‘cool’ tones evenly. -
Fill in warm tones:
Paint the remaining shapes with yellow and orange (mix yellow and red if you don’t have orange). These bright pops act as visual highlights. -
Check for gaps:
Rotate the vase and look at the sides of the raised clay. Ensure the color wraps slightly around the curve of the clay so no white clay shows from the side view. -
Clean up mistakes:
If you accidentally got color on the white background, wait for it to dry, then carefully touch it up with a tiny dab of white acrylic paint. -
Seal the work (optional):
For extra durability, you can apply a matte clear spray varnish over the finished piece once all paint is completely dry.
Level Up: Texture Play
Mix baking soda into your white acrylic paint for the base coat to create a gritty, faux-terracotta finish before painting the colored swirls.
Place your newly textured vase near a window where the light can cast interesting shadows off the raised patterns
Layered Stencil-and-Sponge Texture Mashup
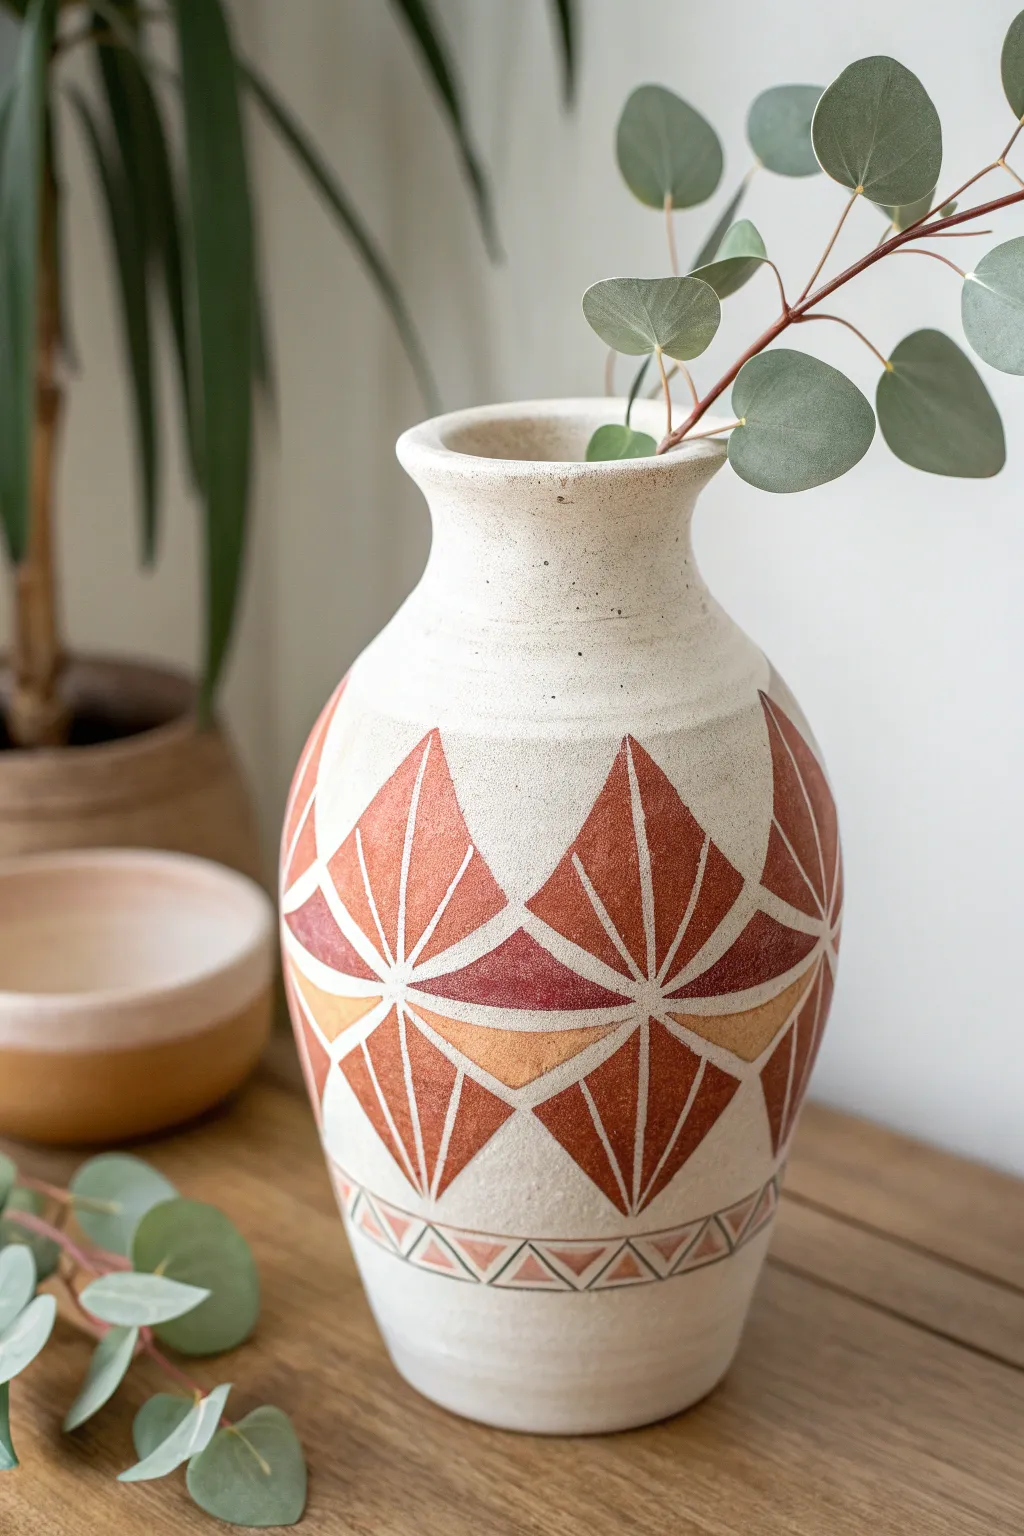
Transform a plain ceramic vessel into a rustic, bohemian centerpiece with this layered texture technique. Using a clever combination of sponge-painting and fine-line detailing, you’ll recreate the look of authentic, sun-bleached pottery with distinctive geometric motifs.
Step-by-Step
Materials
- Bisque or matte white ceramic vase (bulbous shape preferred)
- Acrylic paints: Terra cotta/Rust, Mustard Yellow, Deep Burgundy, and Off-White/Cream
- Sea sponge or textured synthetic sponge
- Fine liner brush (size 0 or 00)
- Flat angled brush (medium sized)
- Pencil
- Ruler or flexible measuring tape
- Matte spray varnish
- Paper plate or palette
- Sandpaper (fine grit, optional)
Step 1: Base Preparation
-
Clean the surface:
Wipe down your vase with a damp cloth to remove any dust or oils. If the vase has a glossy glaze, lightly sand it first to give the paint something to grip. -
Create the stone texture:
Mix a large amount of Off-White paint with a tiny drop of brown or grey. Dip your dampened sponge into this mixture and dab off the excess on a paper towel. -
Apply the sponge layer:
Pounce the sponge all over the vase. Don’t aim for solid coverage; you want a mottled, uneven texture that mimics natural stone or clay. Let this dry completely. -
Add the speckles:
Dilute a small amount of black or dark brown paint with water. Dip an old toothbrush into it and run your thumb across the bristles to flick tiny speckles onto the vase for that authentic ceramic look.
Clean Lines Hack
If you struggle with steady hand-painting, apply thin delineating tape (washi tape) over your pencil lines before painting the colors. Peel it off wet to reveal perfect white gaps.
Step 2: Geometric Mapping
-
Mark the center line:
Using a pencil and flexible measuring tape, lightly mark a horizontal line around the widest part of the vase belly. This will be the anchor for your main diamonds. -
Draft the diamond grid:
Draw large, vertical diamond shapes around the center. Ensure the points of the diamonds touch each other at the widest part of the belly. -
Divide the shapes:
Inside each large diamond, draw a vertical line and a horizontal line relative to the diamond’s orientation, creating four smaller sections within the main shape. -
Sketch the bottom border:
Near the base of the vase, draw two parallel horizontal lines about an inch apart. Fill the space between them with a simple zig-zag line to create triangles.
Step 3: Painting the Pattern
-
Start with the rust tones:
Load your flat angled brush with the Terra Cotta paint. Fill in the top and bottom quadrants of your main diamonds. I find painting from the outside edge inward helps keep the lines crisp. -
Add mustard accents:
Paint the side quadrants of the diamonds using the Mustard Yellow paint. Depending on your paint opacity, you might need two thin coats. -
Deepen the palette:
For variety, paint a few of the central horizontal diamond bands with the Deep Burgundy or a darker mixed rust color to create visual depth. -
Paint the bottom border:
Using the Terra Cotta and a smaller brush, carefully fill in the downward-pointing triangles on your bottom border row. -
Let the paint set:
Allow all the colored sections to dry fully. They need to be dry to the touch before you add the defining lines.
Make it Ancient
After the final varnish dries, mix a watery brown wash and brush it over the whole vase, then immediately wipe it back. Ideally, the wash stays in the crevices for an aged look.
Step 4: Fine Line Detailing
-
Prepare the line work:
Thin your Off-White paint slightly with water so it flows smoothly off a liner brush like ink. -
Define the diamonds:
With the liner brush, paint over the pencil lines that separate the color blocks. Draw a vertical line through the center of each diamond and radiating lines out to the corners. -
Outline the shapes:
Outline the entire diamond shape with the off-white paint to separate it cleanly from the background. -
detail the border:
Paint over the horizontal lines and zig-zag lines on the bottom border using the same fine brush. -
Seal the work:
Once everything is bone dry (give it at least an hour), spray the entire vase with a matte varnish to protect the paint and unify the sheen.
Place your favorite dried eucalyptus stems inside to complete this warm, earthy aesthetic