If you’re craving clay projects that feel useful and adorable, hand-built clay vessels are where it’s at. I love how a simple pinch pot can turn into everything from a cozy succulent planter to a little lidded jar that looks like it has a personality.
Classic Pinch Pot Bowl With a Soft Rim
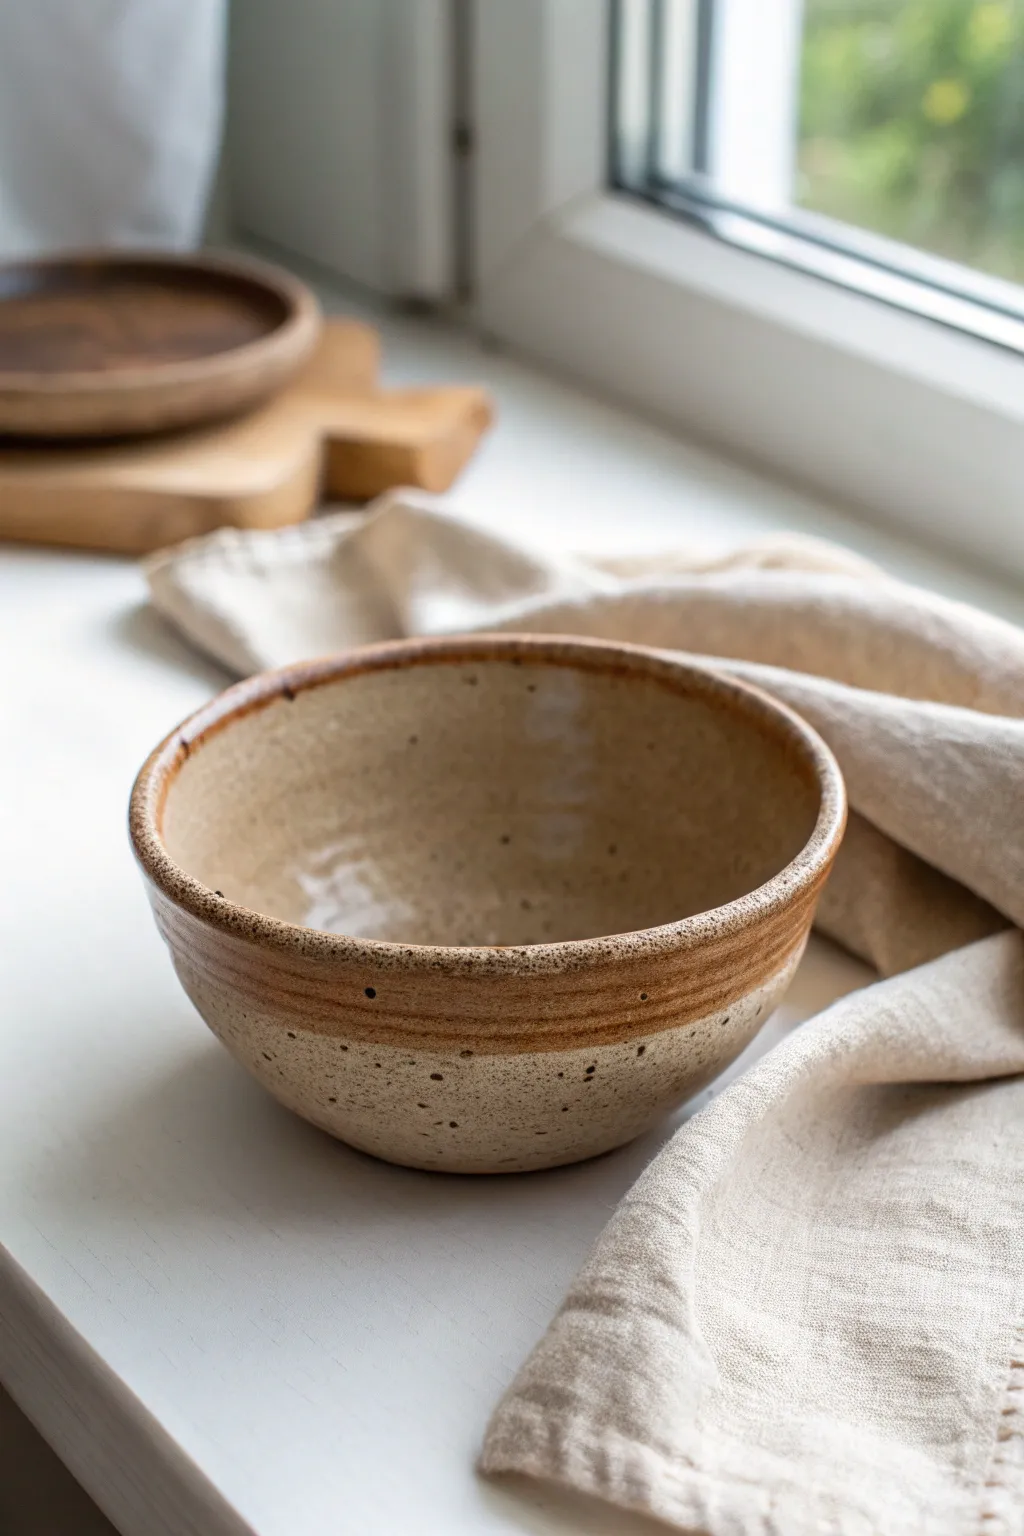
This charming, rustic bowl features a warm, speckled clay body with a distinct toasted rim that adds character and depth. Its simple, open form and gentle curves make it a classic introduction to hand-building, resulting in a functional piece that feels both grounded and elegant.
Detailed Instructions
Materials
- Speckled stoneware clay (mid-fire)
- Potter’s needle tool
- Wooden modeling tool or rib
- Smooth river stone or metal spoon (for burnishing)
- Sponge
- Bowl of water
- Clear glaze (food safe)
- Kiln access
Step 1: Forming the Base
-
Prepare your clay:
Cut a piece of speckled stoneware clay roughly the size of a large orange or grapefruit. Wedge it thoroughly to remove air pockets and ensure an even consistency. -
Form a sphere:
Roll the clay between your hands or on a canvas surface until you have a smooth, round ball. -
Create the opening:
Hold the ball in one hand. With your other thumb, press gently into the center of the ball, stopping about half an inch from the bottom to leave enough thickness for the base. -
Start pinching:
Begin pinching the clay between your thumb (inside) and fingers (outside). Rotate the ball slightly with each pinch to ensure even wall thickness. -
Build the height:
Work your way from the bottom center up towards the rim. Keep your pinching pressure consistent to avoid thin spots.
Step 2: Refining the Shape
-
Widen the form:
As you pinch upwards, gently pull the walls outward to create that generous, open bowl shape seen in the photo. Aim for a diameter of about 5-6 inches. -
Smooth the interior:
Use a slightly damp sponge or a wooden rib tool to compress the interior floor and walls, smoothing out your finger marks. -
Address the rim:
The rim in the image has a soft, specific detail. Use a damp sponge to round over the lip. You can slightly thicken this area by compressing it downwards gently for that sturdy look. -
Create the external ridge:
About an inch below the rim, use a wooden modeling tool to press a subtle indentation or groove around the circumference. This acts as a guide for your glazing later. -
Check symmetry:
Place the bowl on a flat surface and look at it from eye level. Give it a gentle tap or paddle with a wooden spoon if one side is bulging more than the others.
Iron Bloom Tip
To enhance speckles, wipe the raw clay with a damp sponge before firing. This exposes the iron particles (grog) so they bloom beautifully through the clear glaze.
Step 3: Finishing and Firing
-
Dry slowly:
Cover the bowl loosely with plastic and let it dry slowly to the leather-hard stage. This usually takes a day or two. -
Clean up the foot:
Once leather-hard, flip the bowl over. Use a trimming tool or rib to smooth the bottom and ensure it sits flat without wobbling. -
Bisque fire:
Allow the bowl to become bone dry, then load it into the kiln for a bisque firing (usually to Cone 04 or 06). -
Apply clear glaze:
Wipe the bisque-fired bowl with a damp sponge to remove dust. Pour a clear, dipping glaze inside the bowl. Pour it out quickly to coat the interior evenly. -
Glaze the exterior rim:
Dip just the top rim (down to that groove line you created) into the clear glaze. I prefer to leave the bottom exterior unglazed to show off the raw, speckled clay texture. -
Wipe the foot:
Use a sponge to wipe any stray glaze off the very bottom foot ring so it doesn’t stick to the kiln shelf. -
Final firing:
Fire the piece to the maturity temperature of your clay (likely Cone 5 or 6). This will melt the glaze and bring out the toasty iron speckles.
Rim Variation
Try dipping the rim in a second, darker glaze (like a tenmoku or iron saturate) over the clear for a deeper, more defined border effect.
Now you have a durable, handcrafted bowl perfect for your morning oatmeal or serving snacks


Simple Cylinder Planter Built With Slab Walls
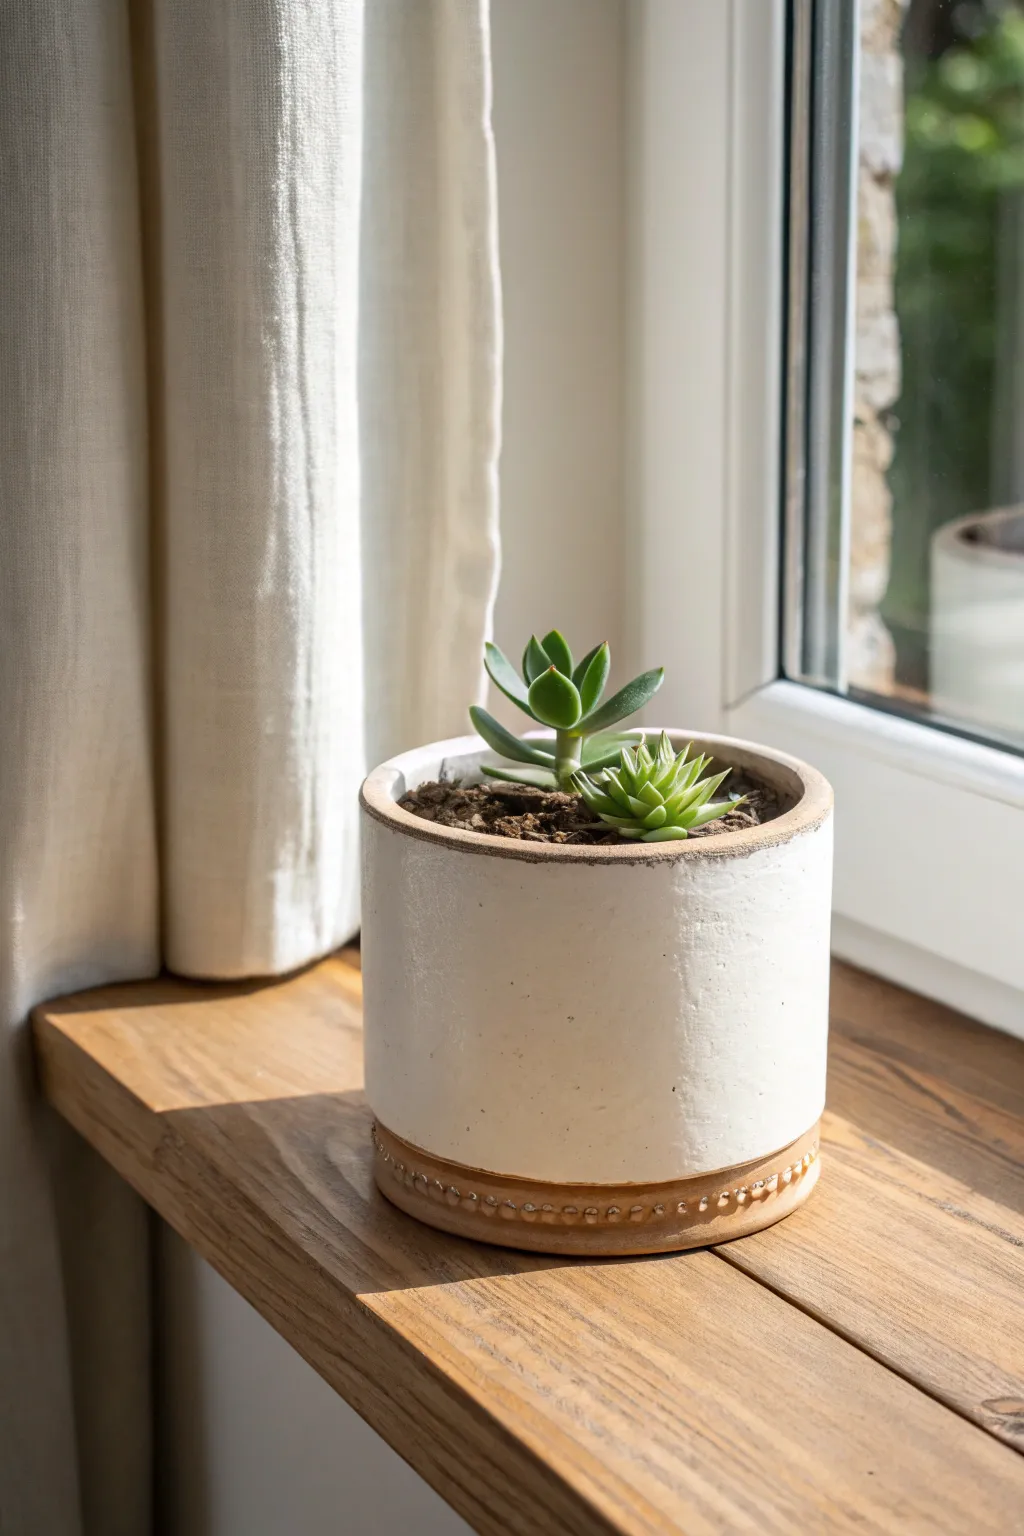
Embrace the beauty of minimalism with this clean-lined cylinder planter that highlights the contrast between glossy white glaze and raw earthy clay. The subtle beaded base adds a touch of intricate detail to an otherwise simple modern form, making it a perfect home for your favorite succulents.
Step-by-Step Guide
Materials
- Mid-fire stoneware clay (buff or terracotta colored)
- Rolling pin
- Canvas or slab mat
- Guide strips (1/4 inch thick)
- Needle tool or fettling knife
- Rib tool (metal or rubber)
- Serrated rib or scoring tool
- Slip (clay mixed with water)
- Cylindrical form for template (optional, e.g., PVC pipe or large can)
- Wooden modeling tool (for the beading)
- Sponge
- White gloss glaze
- Paintbrush
Step 1: Preparing the Slab
-
Roll out the clay:
Begin by wedging your clay to remove air bubbles, then place it on your canvas. Using 1/4 inch guide strips on either side to ensure even thickness, roll the slab out until it is smooth and uniform. -
Compress the slab:
Take a rubber rib tool and gently drag it across the surface of the clay in multiple directions. This compression step is crucial to prevent warping during firing and creates a smooth canvas for your pot. -
Cut the rectangle:
Determine the desired height and circumference of your pot. Using a ruler and needle tool, cut a precise rectangle from your slab. Remember to add a little extra length to the width for the overlap joint. -
Cut the base:
Use a round cookie cutter or trace a circle onto the remaining slab that matches the diameter of the cylinder you intend to make. Cut this circle out for the floor of the pot.
Warping Walls?
If your cylinder keeps slumping into an oval, let the slab stiffen to ‘leather hard’ before bending it up. Standing it around a rigid form like a PVC pipe or can helps hold shape.
Step 2: Assembling the Cylinder
-
Bevel the edges:
On the short sides of your rectangle, cut 45-degree angles in opposite directions. This beveling allows for a stronger, seamless flush joint when you roll the clay into a tube. -
Score and slip:
Rough up the beveled edges with your serrated rib and apply a generous amount of slip. Score the outer edge of your circular base as well. -
Form the wall:
Carefully lift rigidity into the slab and curve it into a cylinder, pressing the beveled edges together firmly. I like to stand the cylinder up at this point to ensure it isn’t slumping. -
Attach the base:
Place the cylinder on top of the scored base. Press down gently from the inside to seal the wall to the floor. Use a wooden tool to blend the clay on the outside seam where the wall meets the floor. -
Smooth the seams:
Use a rib tool on both the interior and exterior to completely disappear the vertical seam. Support the wall with one hand inside while you smooth the outside.
Step 3: Adding the Beaded Detail
-
Create a coil:
Roll a thin, even coil of clay, roughly the thickness of a pencil. This will become the decorative rim at the bottom. -
Attach the coil:
Score and slip the very bottom exterior edge of your cylinder. Wrap the coil around the base, pressing it firmly into place so it adheres well. -
Texture the coil:
Using the rounded end of a small wooden modeling tool or the back of a paintbrush, press indentations into the coil at regular intervals. This creates the ‘beaded’ look shown in the image. -
Refine the rim:
Smooth the top rim of the pot with a damp sponge or a piece of chamois leather to ensure it is soft and pleasant to touch. -
Dry slowly:
Cover the pot loosely with plastic to let it dry slowly for a few days. Uneven drying can cause slab-built pots to crack or warp.
Pro Tip: Drainage
Don’t forget to punch a hole in the center of the base before the clay dries! Succulents hate sitting in water, and a 1/2 inch hole ensures healthy roots.
Step 4: Glazing and Finishing
-
Bisque fire:
Once bone dry, fire the piece to bisque temperature (usually cone 04) to prepare it for glazing. -
Mask the base:
To achieve the crisp line shown in the photo, apply wax resist or masking tape just above the beaded area at the bottom. This protects the raw clay look of the base. -
Apply glaze:
Pour white gloss glaze inside the pot, roll it around to coat, and pour out the excess. Then, dip or brush the exterior down to your wax line. -
Clean up:
Wipe away any stray glaze droplets from the unglazed base area with a damp sponge. Any glaze left on the bottom will stick to the kiln shelf. -
Final fire:
Fire the kiln to the maturity temperature of your specific clay and glaze (likely cone 5 or 6). Once cooled, your planter is ready for potting.
Now you have a sleek, custom planter that perfectly frames your greenery with handmade charm


Mini Trinket Dish Vessel for Rings and Coins
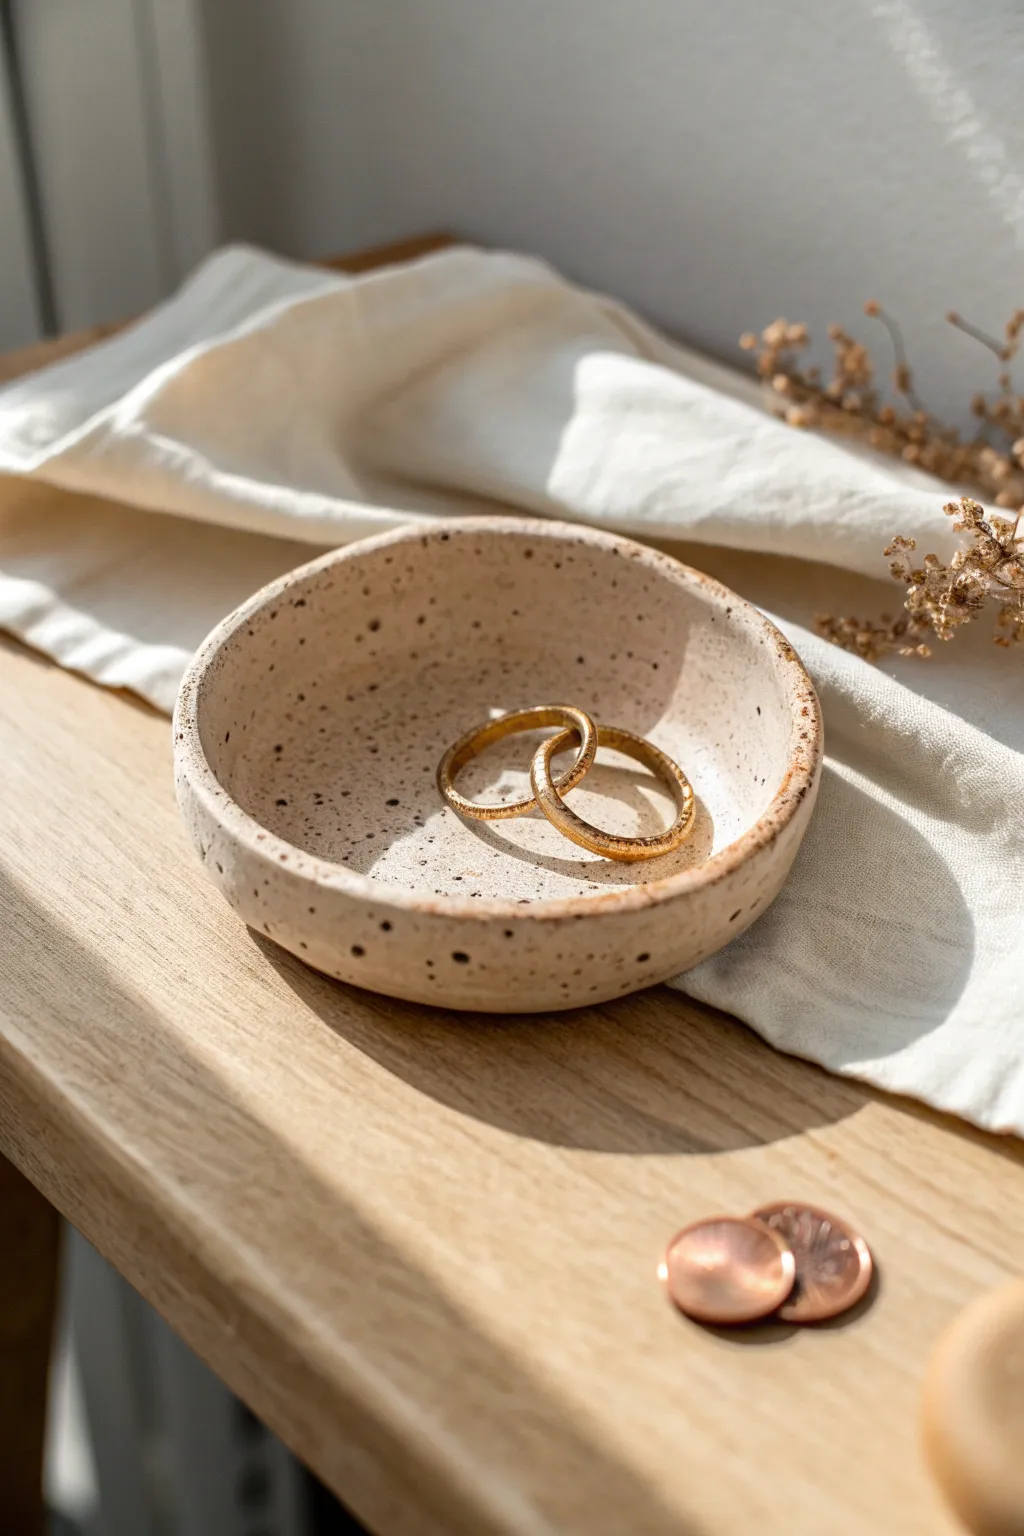
This charming, shallow bowl mimics the look of raw speckled stone with a gentle, organic rim that frames your jewelry perfectly. Its warm beige tone and subtle flecks make it a minimalist yet earthy addition to any bedside table.
Step-by-Step Tutorial
Materials
- White air-dry clay or polymer clay (approx. 100g)
- Acrylic rolling pin
- Small round bowl or plastic lid (for use as a mold/template)
- Craft knife or needle tool
- Sandpaper (fine grit)
- Acrylic paint (warm beige/sand color)
- Acrylic paint (dark brown or black)
- Old toothbrush
- Soft paintbrush
- Sponge
- Matte varnish or sealant
- Small bowl of water (for smoothing)
Step 1: Shaping the Base
-
Condition the Clay:
Begin by kneading your white clay in your hands for several minutes until it is soft, pliable, and free of cracks. -
Roll it Out:
Place the clay on a clean surface and use your acrylic roller to flatten it into an even sheet, aiming for about 1/4 inch thickness. Rotate the clay occasionally to prevent sticking. -
Cut the Circle:
Place your round template or bowl guide onto the clay sheet. Using your knife or needle tool, trace around the edge to cut out a clean circle. -
Soften the Edges:
Dip your finger into a little water and run it along the cut edge of the circle. This removes sharp cuts and gives the rim that soft, handmade pottery look you see in the photo. -
Create the Curve:
Lift your clay circle and gently press it into your mold bowl to give it a cupped shape. Alternatively, you can pinch the edges upward slightly with your thumb and forefinger for a more organic, freeform shape. -
Level the Bottom:
While the clay is still malleable, gently tap the bottom of the curved form against your table surface. This creates a flat spot so the finished dish won’t wobble. -
Smooth Imperfections:
Inspect the surface for fingerprints or dents. Use a damp sponge or wet finger to glide over these areas, buffering them out until silky smooth. -
Initial Drying:
Set the dish aside to dry completely. For air-dry clay, this usually takes 24-48 hours. I prefer to rotate it occasionally so the bottom dries evenly.
Step 2: Refining and Painting
-
Sanding:
Once fully cured and hard, take your fine-grit sandpaper and gently sand the rim and any rough patches on the body. Wipe away the dust with a barely damp cloth. -
Base Color:
Mix a warm beige or sand-colored acrylic paint. Apply an even coat over the entire dish, inside and out. Let this layer dry completely before flipping it over. -
Second Coat:
Apply a second coat of the beige paint to ensure opacity, hiding the white clay underneath entirely. -
Prepare the Speckles:
Dilute a small amount of dark brown or black acrylic paint with water until it is somewhat runny/inky in consistency. -
Splatter Technique:
Dip your old toothbrush into the diluted dark paint. Hold the brush over the dish and run your thumb across the bristles to flick tiny droplets onto the surface. -
Control the Density:
Vary your distance from the dish to create different speckle sizes. Aim for a random distribution, focusing slightly more density on one side for natural variation. -
Clean Up Edges:
If any large blobs land where you don’t want them, quickly dab them with a paper towel while wet to mute them. -
Seal the piece:
Once the paint is bone dry, apply a layer of matte varnish. This removes the chalky paint feel and protects the dish from scratches or moisture from coins.
Splatter Test Run
Before flicking paint on your finished dish, test the toothbrush technique on a scrap piece of paper first. This helps you gauge how much water to add for the perfect mist.
Rim Gold Accent
For a luxe upgrade, paint just the very top edge of the rim with metallic liquid gold leaf. This creates a stunning contrast against the matte speckled finish.
Now you have a perfect spot to keep your rings safe while you sleep


Lidded Jar Vessel for Cotton Swabs or Tea Bags
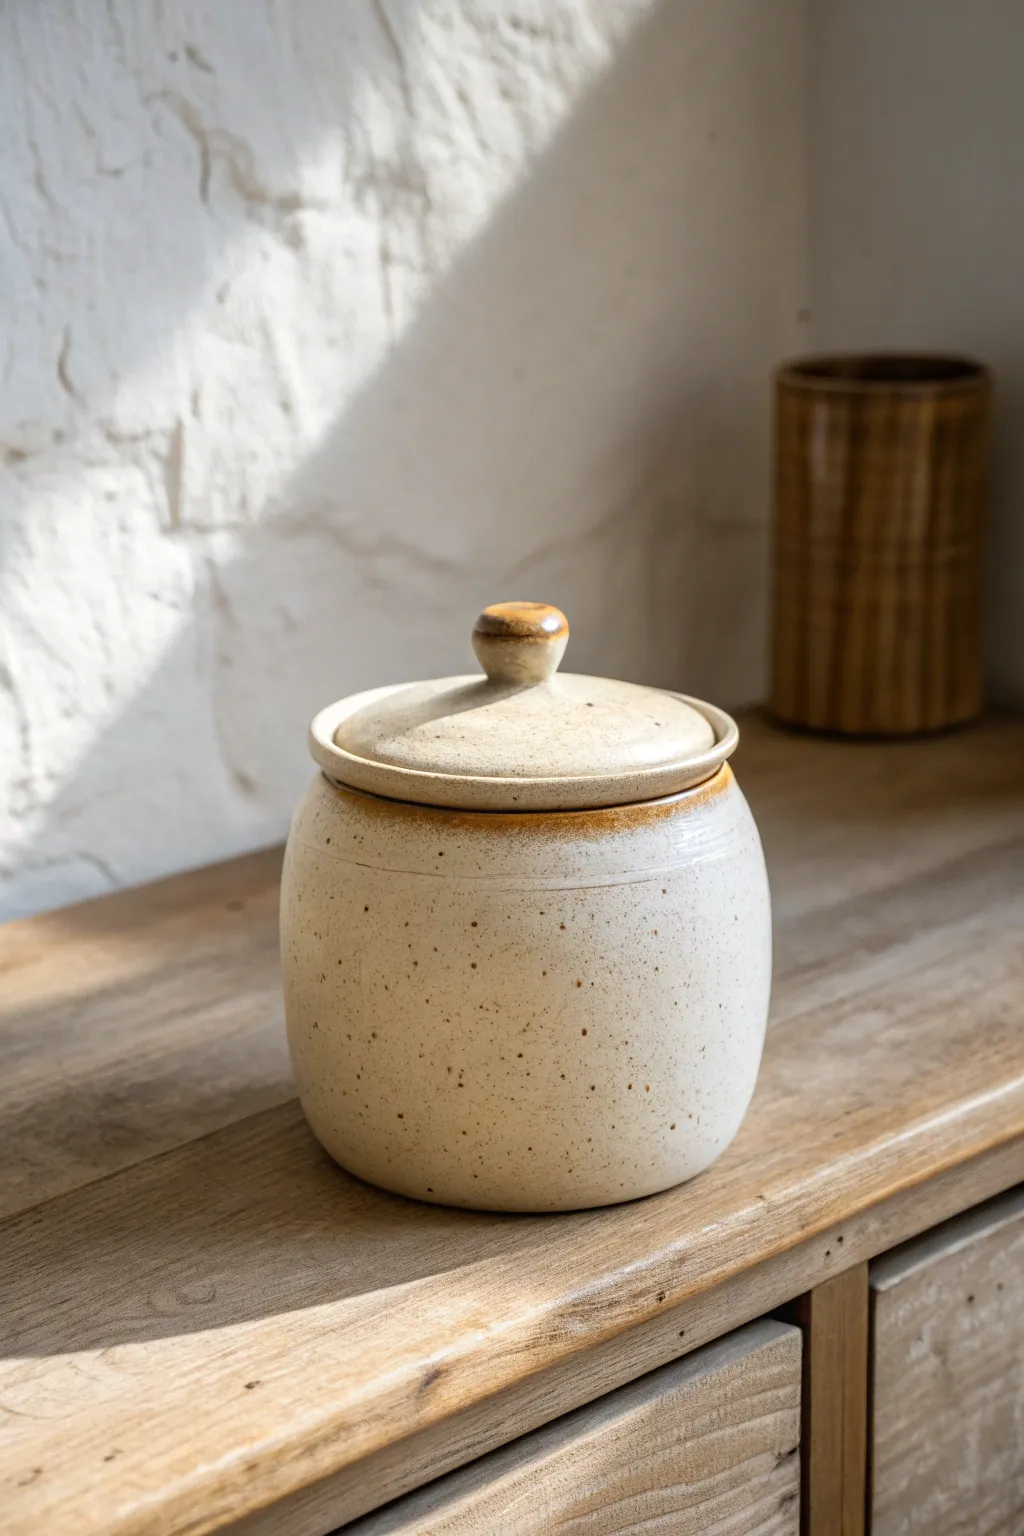
Bring earthy charm to your vanity or kitchen with this wheel-thrown lidded vessel, featuring a creamy speckled clay body and touches of warm iron oxide. This versatile jar is perfect for discreetly storing cotton swabs, tea bags, or other small essentials while adding a rustic handmade aesthetic to your space.
Step-by-Step
Materials
- Speckled stoneware clay (mid-fire)
- Pottery wheel
- Throwing sponge
- Needle tool
- Wire cutter
- Rib tool (wooden and metal)
- Trimming tools (loop tools)
- Calipers
- Clear or semi-matte transparent glaze
- Kiln
Step 1: Throwing the Vessel Body
-
Center the clay:
Start with a ball of well-wedged speckled stoneware clay, roughly 1.5 to 2 pounds. Secure it firmly to the center of your wheel head and use wet hands to cone the clay up and down until it is perfectly centered. -
Open and widen:
Press your thumbs into the center to open the clay, leaving about a half-inch of thickness for the floor. Carefully pull the clay outward to establish the interior width, keeping in mind this will be a round-bellied jar. -
Pull the cylinder:
Slow the wheel slightly and begin pulling up the walls. Aim for an even thickness from bottom to top. Don’t worry about the shape yet; focus on getting vertical height first. -
Shape the belly:
Once you have your height, use a wooden rib inside the pot to belly out the form gently. Push from the inside while supporting the outside with a sponge, creating a pleasing curve that tucks back in at the top. -
Create the gallery:
This is crucial for the lid. At the rim, split the clay thickness slightly or press down with a tool to create a distinct horizontal shelf (gallery) inside the rim. This internal ledge must be perfectly round to hold the lid. -
Measure and finish:
Use your calipers to measure the exact diameter of the gallery shelf you just made. Write this measurement down or lock the calipers. Smooth the rim with a chamois or sponge, cut the pot from the wheel with a wire tool, and set it aside.
Step 2: Creating the Lid
-
Throw off the hump:
Using a larger lump of clay centered on the wheel, isolate a small section at the top to create the lid. This technique, called throwing off the hump, is often easier for small components. -
Check the measurement:
Shape a low, wide bowl form that is inverted. The outer rim of this lid needs to match the caliper measurement you took from the jar’s gallery. Check frequently to ensure a snug fit. -
Refine the lid profile:
Keep the curve of the lid gentle, mirroring the curve of the jar’s shoulder. Ensure the rim is thick enough to withstand handling. -
Cut and dry:
Use your needle tool to cut the lid from the hump, leaving a bit of extra clay in the center for the knob. Let both the jar and lid dry to leather-hard.
Lid Wobbles?
If the lid rocks after firing, use a little grinding paste or water and sandpaper. Twist the lid back and forth on the jar gallery to grind the two surfaces until they sit flush.
Step 3: Trimming and Assembly
-
Trim the jar:
Invert the leather-hard jar onto the wheel. Secure it with clay lugs or a Giffin Grip. Trim away excess weight from the bottom and refine the curve of the foot so it lifts slightly off the table. -
Trim the lid:
Flip the lid upside down (right side up, visually) and center it on the wheel. Trim the top surface to a smooth curve. -
Carve the knob:
From the extra clay left in the center of the lid, trim out a small, rounded knob. Create a slight undercut at the base of the knob to make it easy to grip. -
Check fit:
Before the clay dries completely, test the lid on the jar. If it’s too tight, you can lightly sand or trim the edge; if it’s too loose, the glaze might help fill the gap later.
Level Up: Oxide Wash
Before glazing, brush a light iron oxide wash onto the rim and knob. This enhances the toasted, brownish-orange edges seen in the reference photo.
Step 4: Glazing and Firing
-
Bisque fire:
Once bone dry, fire both pieces in the kiln to a bisque temperature (usually cone 04 or 06). This prepares the ceramic for glazing. -
Wax the contact points:
Apply wax resist carefully to the gallery of the jar and the outer rim of the lid where it will sit. This prevents the lid from fusing to the jar during the firing. -
Apply glaze:
Dip the jar and lid into a clear or semi-matte milky white glaze. The key here is using a glaze that allows the natural iron speckles of the clay body to bleed through. -
Clean and refine:
Wipe back any glaze that may have dripped onto the waxed areas or the foot of the jar. I usually double-check the knob area to ensure glaze hasn’t pooled too thickly. -
Final firing:
Fire the pieces to the maturation temperature of your clay body (likely Cone 5 or 6). Allow the kiln to cool naturally before removing your finished vessel.
Place your finished jar on a shelf where the light can catch the subtle texture of the speckles.

The Complete Guide to Pottery Troubleshooting
Uncover the most common ceramic mistakes—from cracking clay to failed glazes—and learn how to fix them fast.
Speckled Bud Vase Vessel for One Stem
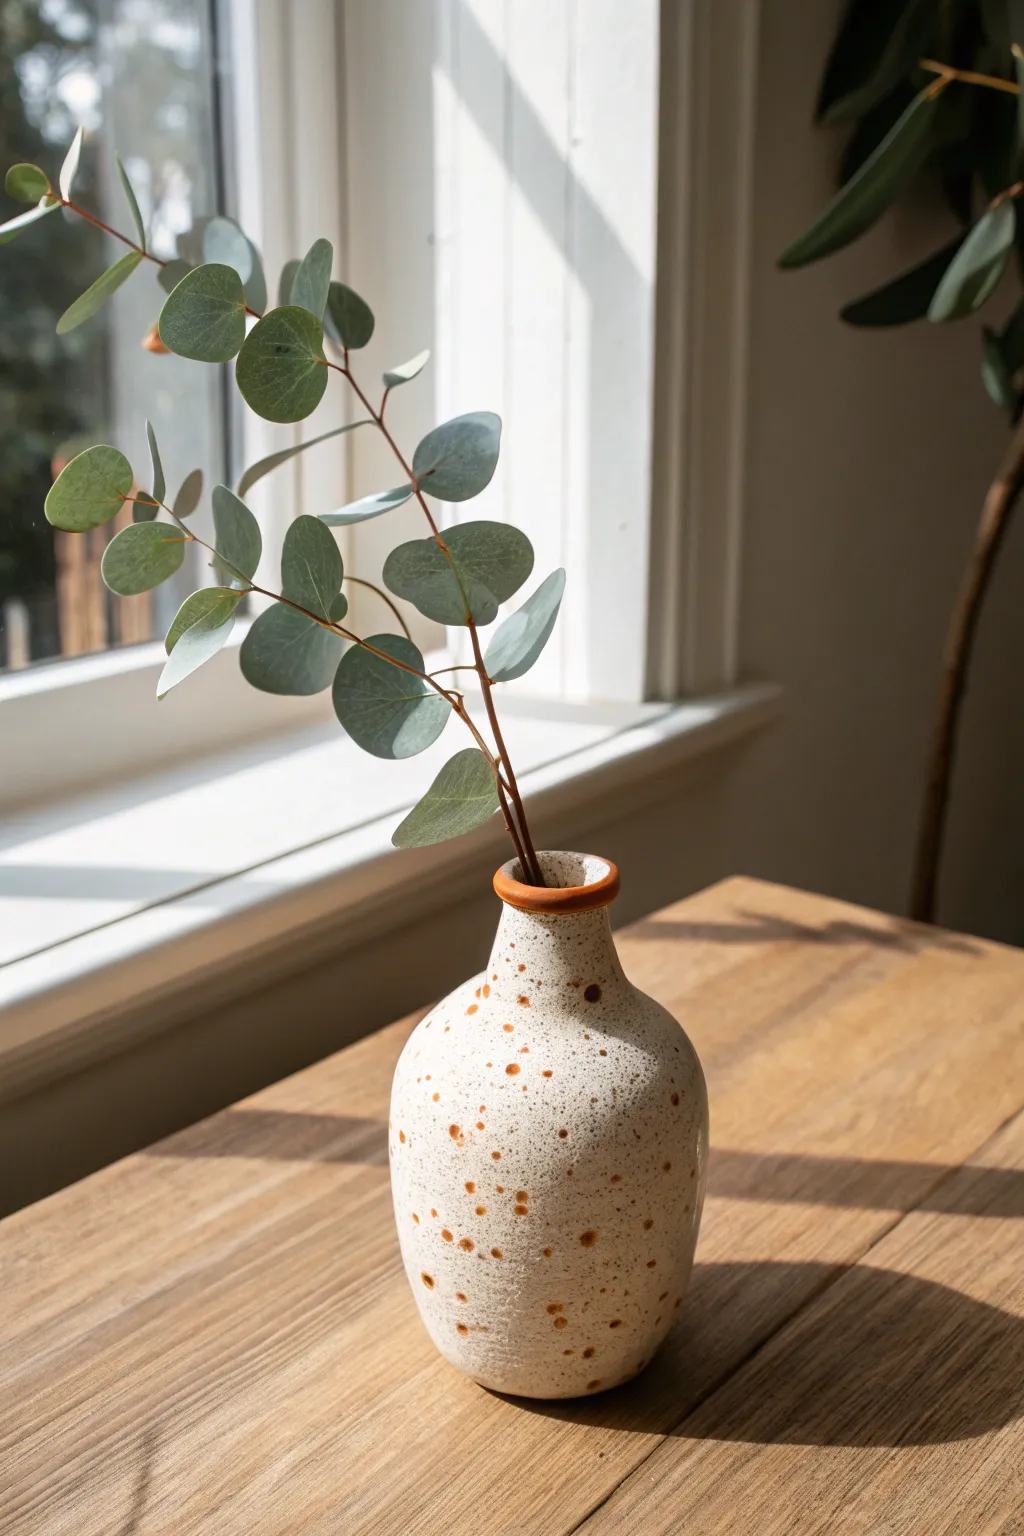
Capture the essence of organic modern design with this charming clay bud vase. Featuring a soft cream finish dotted with rust-colored speckles and a terracotta rim, this vessel is the perfect home for a single eucalyptus stem.
Step-by-Step Tutorial
Materials
- White or buff stoneware clay
- Pottery wheel (or coil building tools)
- Sponge and bucket of water
- Wire cutter
- Loop trimming tool
- Rust-colored underglaze or iron oxide wash
- Cream or translucent white glaze
- Stiff bristle brush (e.g., toothbrush)
- Small paintbrush
- Kiln
Step 1: Forming the Vessel
-
Center the Clay:
Begin with a small ball of stoneware clay, roughly 1 pound. Throw it onto the wheel head and center it thoroughly, ensuring it feels stable and symmetrical under your hands. -
Open the Form:
Drill your thumbs into the center to open the clay, leaving about a half-inch of thickness for the base. Pull the floor outward slightly to establish the bottom width. -
Pull the Cylinder:
Slowly pull up the walls to create a cylinder. You want to maintain some thickness at the bottom to support the bulbous shape later, thinning it out as you reach the top. -
Shape the Belly:
From the inside, apply gentle outward pressure with your fingers to push the belly of that vase out. Use a rib tool on the outside to smooth and refine this curve, creating a rounded, teardrop-like base. -
Collar the Neck:
As you move upward, gently collar (squeeze) the clay inwards to narrow the form into a tight neck. Go slowly to avoid buckling the clay. -
Flare the Rim:
At the very top, use your thumb and forefinger to gently flare the lip outward. This creates the distinct rim seen in the photo which will remain unglazed later. -
Refine and Cut:
Smooth the surface with a soft sponge to remove throwing lines. Run a wire cutter underneath the pot to separate it from the wheel head, then lift it off carefully to dry to leather-hard.
Splatter Control
Test your splatter technique on a piece of cardboard first. This helps you gauge how wet the brush should be to get distinct dots rather than runny drips.
Step 2: Trimming and Bisque
-
Trim the Foot:
once the piece is leather-hard (firm but cool to the touch), center it upside down on the wheel. Use a loop tool to trim away excess clay from the bottom, creating a clean foot ring. -
Smooth the Transition:
I like to run a damp sponge or a smooth rib over the trimmed area to ensure there are no sharp edges where the trimming meets the thrown body. -
Bisque Fire:
Place the bone-dry vase into the kiln for a bisque firing (typically Cone 04 or 06). This prepares the clay to accept glaze.
Rim Cleanup
If the glaze looks messy near the rim wax, don’t just wipe it. Let it dry to a powder first, then scrape it back with a precision knife for a crisp line.
Step 3: Glazing and Surface Design
-
Wax the Foot and Rim:
Apply wax resist to the bottom foot ring. Crucially, strictly apply a ring of wax to the very top rim of the vase. This will keep the clay body exposed at the lip, creating that lovely terracotta accent. -
Apply Base Glaze:
Dip the vase into a bucket of cream or translucent white glaze. Count to three and pull it out, letting excess glaze drip off completely. -
Clean the Rim:
Even with wax, some glaze might bead up on the rim. Use a damp sponge to wipe the rim completely clean, exposing the raw bisque color. -
Prepare the Speckle:
Mix a small amount of rust-colored underglaze or iron oxide wash with a little water. You want a consistency that flicks easily but isn’t too runny. -
Splatter Technique:
Load a stiff toothbrush with the oxide mixture. Hold it about 6-10 inches away from the vase and run your thumb across the bristles to flick droplets onto the glazed surface. -
Vary the Application:
Rotate the vase as you splatter. Aim for a random, organic look—some clusters of dots and some open space. Don’t overdo it; less is often more for this minimalist style. -
Final Fire:
Load the glazed vase into the kiln for the final glaze firing (temperature depends on your specific clay and glaze, usually Cone 5 or 6). Once cool, add your eucalyptus stem.
Now you have a beautifully bespoke vessel ready to bring a touch of nature onto your table
Textured Coil Pot Vessel With Gentle Ridges
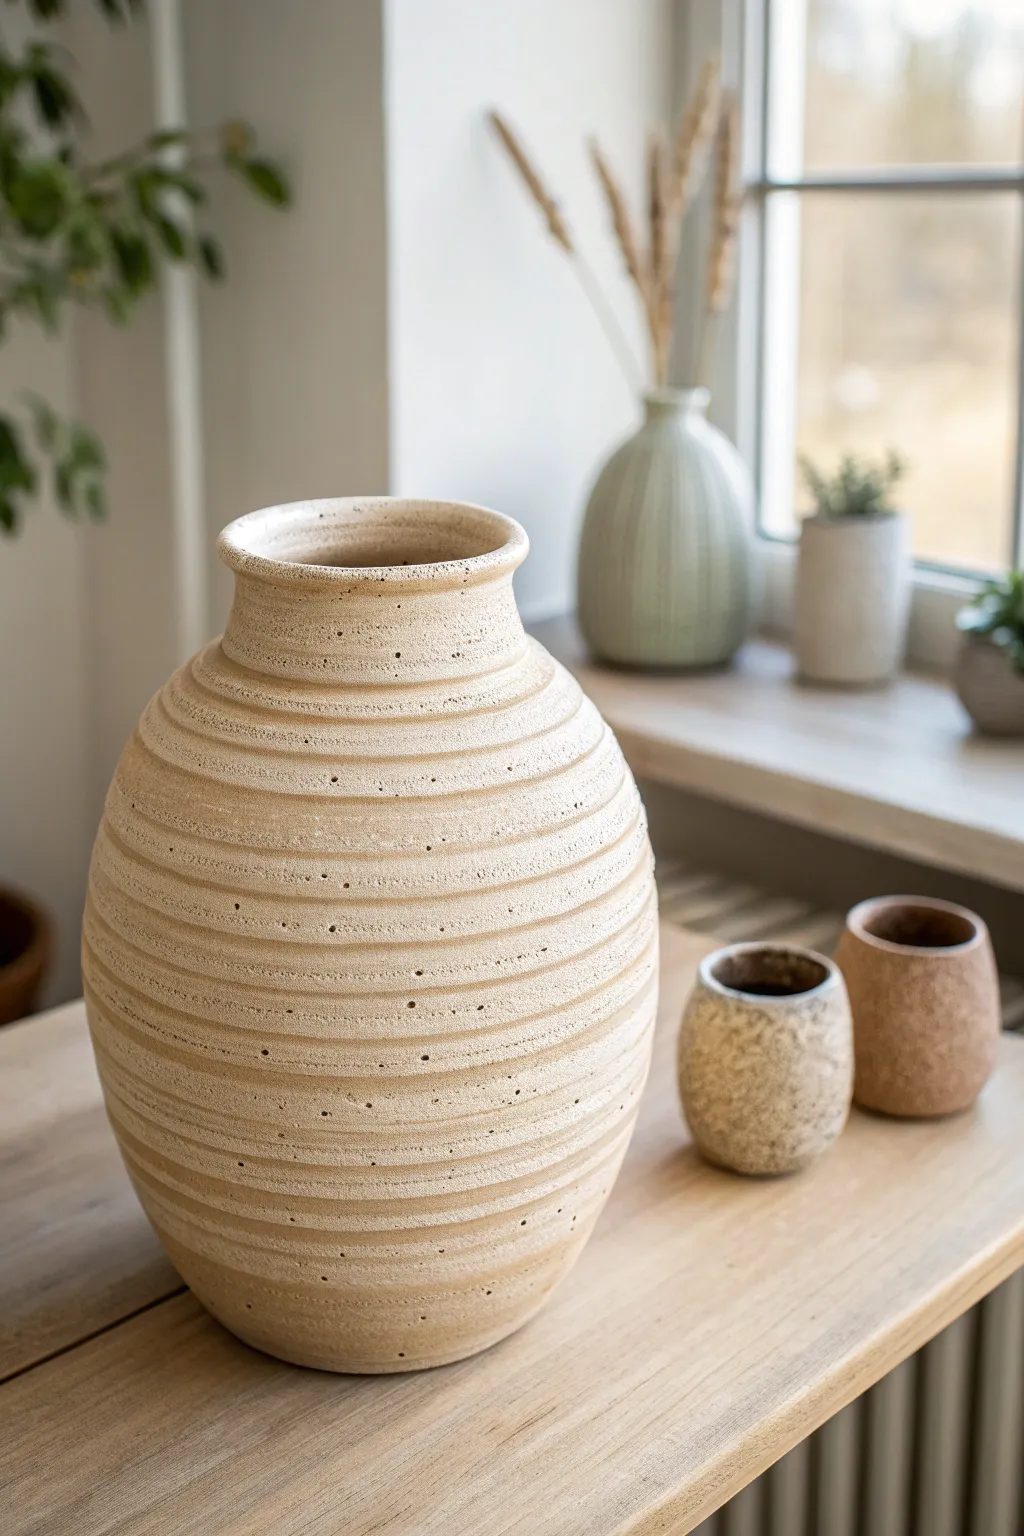
This project captures the organic beauty of hand-building with a design that emphasizes texture over perfection. You will create a stunning, full-bellied vessel featuring continuous horizontal ridges and a speckled, sandy finish that mimics natural stone.
How-To Guide
Materials
- Speckled sandstone or grogged stoneware clay
- Pottery wheel (optional, but recommended for symmetry)
- Banding wheel (if hand-building)
- Needle tool
- Wooden rib tool with a flat edge
- Serrated metal rib (kidney scraper)
- Sponge
- Wire cutter
- Clear matte glaze
Step 1: Forming the Base Structure
-
Prepare the Clay:
Start by wedging your clay thoroughly to remove air bubbles. For a vessel of this size (about 10-12 inches tall), you will want approximately 4-6 pounds of clay. -
Center and Open:
If using a wheel, center the clay and open it up, leaving a floor about half an inch thick. If hand-building, roll out a thick slab for the base and prepare thick coils. -
Pull the Cylinder:
Begin pulling the walls upward. Don’t worry about the final shape yet; focus on getting even wall thickness and achieving the height you want. -
Shape the Belly:
Once you have a cylinder, use a rib tool on the inside to push the clay outward gently. Start from the bottom third and swell the form out to create that generous, rounded belly seen in the photo. -
Collar the Neck:
As you move upward, gently collar the clay inward to narrow the shoulder and neck. This creates the classic urn silhouette. -
Refine the Rim:
Thicken the rim slightly by compressing it downward with a sponge or chamois cloth. A rolled, sturdy rim balances the visual weight of the textured body.
Uneven Ridges?
If your ridges look too wobbly, hold your tool hand steady against a stationary object (like a splash pan or stack of books) while rotating the pot. Stability creates cleaner lines.
Step 2: Creating the Ridged Texture
-
Initial Smoothing:
Use a metal rib to smooth the exterior surface, but don’t over-polish it. The clay should be leather-hard or slightly softer for the best texturing results. -
Marking the Spirals:
While the pot stops spinning (or rotating slowly on a banding wheel), use a needle tool or a specialized texture tool to carve continuous horizontal grooves around the entire vessel. -
Deepening the Grooves:
Go back over your lines. Instead of just scratching, press a rounded wooden tool into the grooves to create distinct ‘hills and valleys.’ This mimics the look of exposed coils. -
Adding the Imperfections:
To achieve that specific weathered look, take a stiff-bristled brush or a serrated rib and tap it randomly across the ridges. I find this breaks up the mechanical look of the lines. -
Enhancing the Speckle:
If your clay body isn’t naturally speckled, create a slip using iron oxide or manganese dioxide mixed with clay. Spatter this onto the surface with a toothbrush for that dotted stone effect. -
Dry Slowly:
Cover the vessel loosely with plastic to let it dry very slowly. This equalization of moisture prevents cracks, especially since the walls have varying textures.
Groove Depth
Don’t carve too deep! The grooves should be surface decoration, not structural cuts. If the wall feels flimsy, stop carving and reinforce the interior.
Step 3: Firing and Glazing
-
Bisque Fire:
Once bone dry, fire the piece to Cone 04 (or your clay’s specific bisque temperature). -
Wax the Bottom:
Apply wax resist to the foot of the vase to prevent glaze from adhering to the kiln shelf. -
Apply Wash (Optional):
For extra depth in the grooves, wipe a diluted iron oxide wash over the whole piece, then sponge it off the high points. The dark wash will stay in the crevices. -
Glaze Application:
Dip or spray the vessel with a clear matte glaze. A matte finish is crucial here—a glossy glaze would reflect too much light and hide the subtle ridge texture. -
Final Fire:
Fire the piece to maturity (Cone 5, 6, or 10 depending on your clay). Allow the kiln to cool naturally before unloading.
Place your finished vessel near a window where natural light can play across the ridges and highlight the earthly texture


What Really Happens Inside the Kiln
Learn how time and temperature work together inside the kiln to transform clay into durable ceramic.
Stamped Pattern Bowl Vessel Using Found Textures

This project captures the delicate beauty of nature by using real plant materials or stamps to create deep impressions in the clay. The result is a stunning teal vessel where every leaf vein and flower petal is highlighted by the glaze pooling in the texture.
Detailed Instructions
Materials
- High-quality pottery clay (stoneware or earthenware)
- Rolling pin
- Canvas mat or cloth (to prevent sticking)
- Pottery wheel (optional, for throwing) or slump mold (for hand-building)
- Variety of textured stamps or fresh/dried sturdy leaves (ferns, twigs)
- Sponge
- Fettling knife or needle tool
- Rib tool
- Teal celadon glaze or a breaking translucent glaze
- Kiln
Step 1: Forming the Base Vessel
-
Prepare the Clay:
Begin by wedging your clay thoroughly to remove any air bubbles. This is crucial for a smooth surface that will take impressions well. -
Create the Slab:
Roll out a slab of clay to a uniform thickness, aiming for about 1/4 inch thick. Smooth the surface with a rib tool to erase any canvas marks. -
Apply the Texture:
While the slab is flat, arrange your stamps or plant materials. For this bowl, create a dense pattern of ferns, leaves, and small flowers. -
Pressing the Pattern:
Gently but firmly roll over your stamps or plants with a rolling pin or press them in by hand. Ensure the impression is deep enough to catch glaze later but not so deep it weakens the wall. -
Shape the Bowl:
Drape your textured slab over a slump mold (bowl-shaped form) or gently form it inside a plaster mold. Be careful not to smudge your beautiful textures while handling the clay. -
Refine the Rim:
Trim the excess clay from the rim using a needle tool or fettling knife. Smooth the edge with a damp sponge so it’s pleasant to touch.
Step 2: Alternative Wheel Method
-
Throw the Form:
If you prefer the wheel, throw a simple, smooth bowl shape with slightly thicker walls than usual to accommodate the stamping. -
Wait for Leather Hard:
Let the bowl dry until it is leather hard—firm enough to hold its shape but soft enough to be dented. -
Stamp the Surface:
Support the wall from the inside with one hand while pressing your stamps into the exterior with the other. This prevents the bowl from collapsing.
Sticky Stamps?
If your stamps or leaves are sticking to the clay, lightly dust the clay surface with cornstarch before pressing. It burns off in the kiln without leaving a trace.
Step 3: Finishing and Glazing
-
Drying:
Allow the bowl to dry slowly under plastic to prevent warping, especially if the wall thickness varies near the heavy textures. -
Bisque Fire:
Fire the piece to cone 04 (or your clay’s specific bisque temperature) to prepare it for glazing. -
Clean the Bisque:
Wipe down the fired piece with a damp sponge to remove any kiln dust. This ensures the glaze adheres properly. -
Select the Glaze:
Choose a translucent teal glaze or a celadon. These types of glazes ‘break’ over edges, meaning they go thin and light on high points and pool dark in the recesses. -
Apply Glaze:
Dip or brush the glaze onto the bowl. I personally prefer dipping to get an even coat that naturally flows into all those intricate fern details. -
Check Thickness:
Ensure the glaze isn’t too thick, or it might obscure the fine texture. If it’s too thin, you won’t get that rich depth of color. -
Clean the Foot:
Wipe the bottom of the bowl completely clean of glaze to prevent it from fusing to the kiln shelf. -
Glaze Fire:
Fire the bowl to the maturity temperature of your clay and glaze (often cone 5 or 6 for stoneware). Let the kiln cool completely before opening.
Add Subtle Detail
Before glazing, rub a dark iron oxide wash into the deepest textures and wipe away the excess with a sponge to make the pattern pop even more.
Once cooled, your bowl is ready to hold fresh fruit or simply sit on display as a permanent piece of forest art
Carved Sgraffito Cup Vessel With Simple Lines
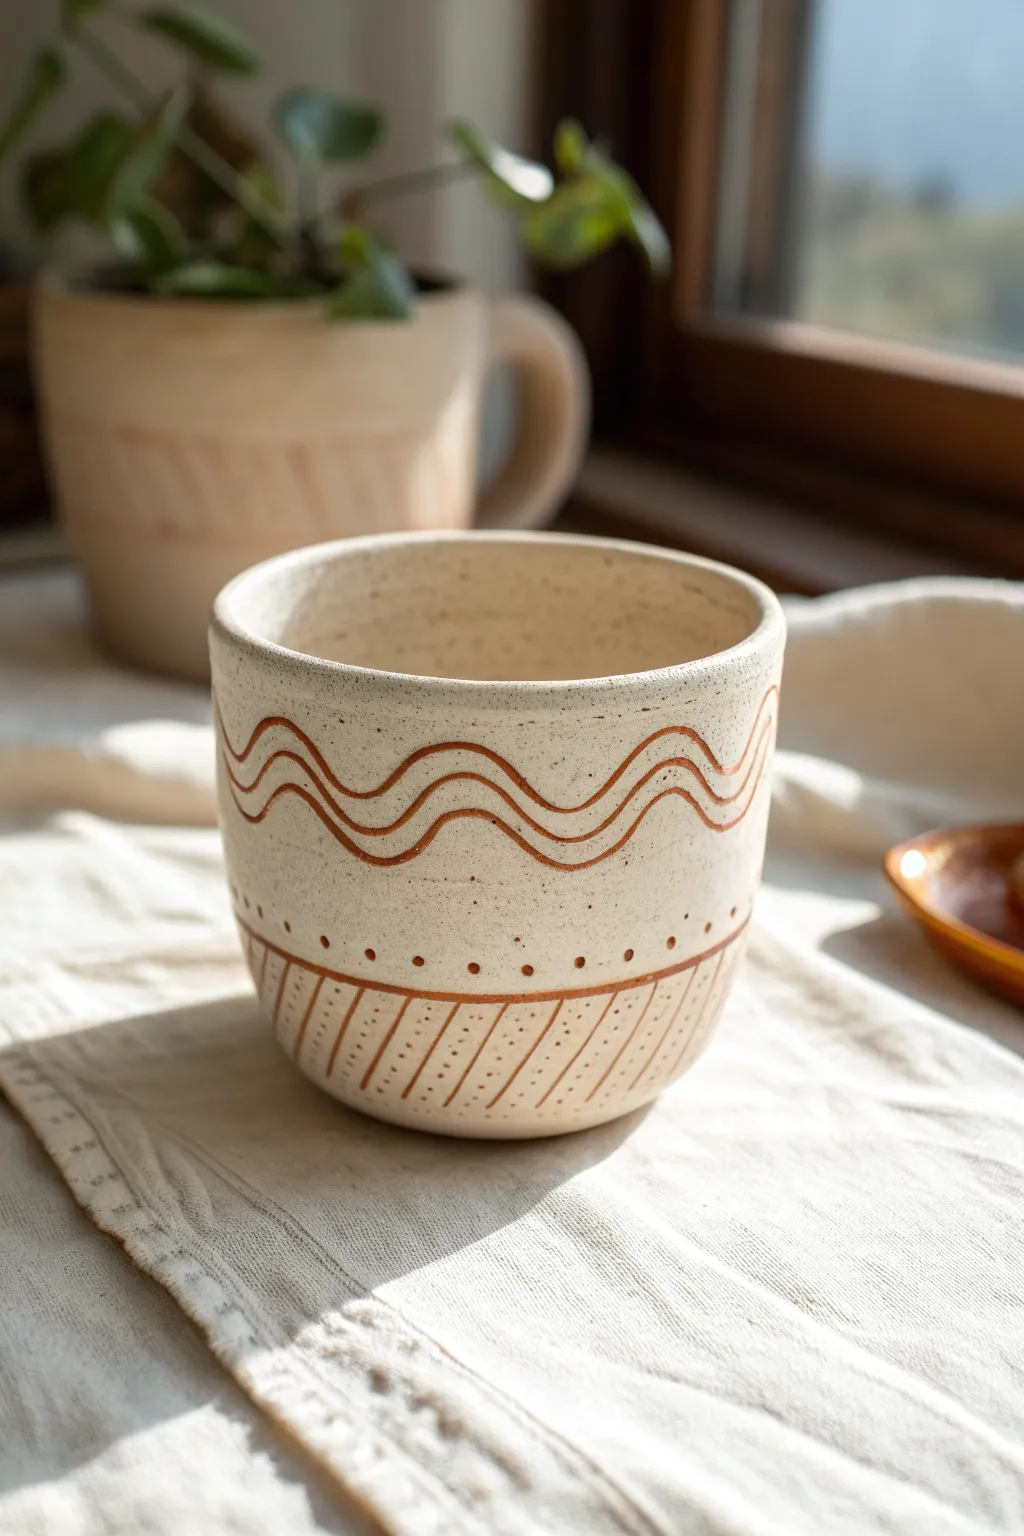
This charming handmade cup features a creamy speckled clay body adorned with warm, earthy sgraffito patterns. The design combines playful wavy lines, simple dots, and angled hash marks to create a vessel that feels both modern and pleasantly rustic.
Step-by-Step Tutorial
Materials
- Light-colored stoneware clay (speckled or plain)
- Red iron oxide wash or terracotta underglaze
- Pottery wheel or rolling pin (for slab building)
- Rib tool (metal or rubber)
- Needle tool
- Small loop carving tool
- Sponge
- Clear matte or satin glaze
- Soft brush
- Pottery trimming tools
Step 1: Forming the Vessel
-
Prepare the clay:
Begin by wedging about 1 to 1.5 pounds of light stoneware clay to remove any air bubbles. If you want that speckled look in the final piece, choose a clay body with granite or iron flecks included. -
Create the cylinder:
Throw a simple cylinder on the pottery wheel, aiming for straight sides and a flat bottom. Alternatively, if hand-building, roll out a slab, cut a rectangle, and join the seam to create a cylinder, attaching a circular base. -
Refine the shape:
Use a rib tool to smooth the exterior walls. Gently curve the bottom edge inward slightly to create a pleasant, cupped shape rather than a harsh 90-degree angle. -
Dry to leather hard:
Allow the cup to dry slowly until it reaches the leather-hard stage. It should be firm enough to hold its shape well but soft enough to carve into without chipping. -
Trim the foot:
Turn the cup upside down (if wheel-thrown) and trim the bottom to create a neat foot ring. Smooth any rough edges with a slightly damp sponge.
Clean Lines Pro-Tip
When wiping back the oxide wash, wipe diagonally across your carved lines rather than parallel to them. This prevents the sponge from scooping the pigment back out of the grooves.
Step 2: Applying the Design
-
Plan the wavy lines:
Lightly trace two parallel wavy lines around the upper third of the cup using a needle tool. I find it helpful to spin the wheel very slowly while moving my hand up and down to get an organic wave. -
Carve the waves:
Using a small loop tool or a specialized sgraffito tool, carve out the clay along your traced wavy lines. Dig deep enough to create a distinct groove but careful not to go through the wall. -
Add the middle channel:
Carve a third wavy line sitting right between the top and bottom waves, following their rhythm parallelly. -
Define the sections:
Carve a straight horizontal line around the cup, about an inch from the bottom. This separates the dot section from the bottom pattern. -
Add dots:
In the space above that horizontal line, press the tip of a small round tool or the back of a paintbrush into the clay to create a row of evenly spaced indentations. -
Create the bottom border:
Carve a second horizontal line near the very bottom edge of the cup to frame the lowest section. -
Carve diagonal dashes:
Fill the bottom band with slanted diagonal lines. Try to keep the spacing consistent, sketching them lightly first if you need a guide. -
Clean up burrs:
Once the carving is complete, gently brush away any clay crumbs. Wait for the piece to dry a bit more, then lightly rub the surface with a soft scrubber or finger to knock off any sharp burrs.
Level Up: Texture
Instead of leaving the main body smooth, try lightly paddling the outside before carving to create soft facets. The geometric planes add a beautiful contrast to the fluid wavy lines.
Step 3: Inlaying and Finishing
-
Bisque fire:
Load the bone-dry cup into the kiln and bisque fire it to the appropriate temperature for your clay (usually Cone 04). -
Apply the wash:
Mix red iron oxide with water or use a terracotta-colored underglaze. Paint this wash liberally into all the carved lines and indentations. -
Wipe back:
Using a clean, damp sponge, wipe the surface of the cup. You want to remove the color from the high points (the uncarved surface) while leaving the pigment trapped inside the carved crevices. -
Clean rinse:
Rinse your sponge frequently. You may need a few passes to get the main surface back to the clean, creamy clay color. -
Glaze application:
Dip the entire cup into a clear matte or satin glaze. A clear glaze will seal the clay and make it food safe while allowing the speckled clay body and red inlaid lines to show through clearly. -
Final firing:
Fire the piece a second time to the maturation temperature of your glaze and clay (typically Cone 5 or 6). Let the kiln cool completely before unloading.
Now you have a beautifully custom vessel ready for your morning coffee or tea

TRACK YOUR CERAMIC JOURNEY
Capture glaze tests, firing details, and creative progress—all in one simple printable. Make your projects easier to repeat and improve.
Hanging Air Plant Pocket Vessel With a Loop
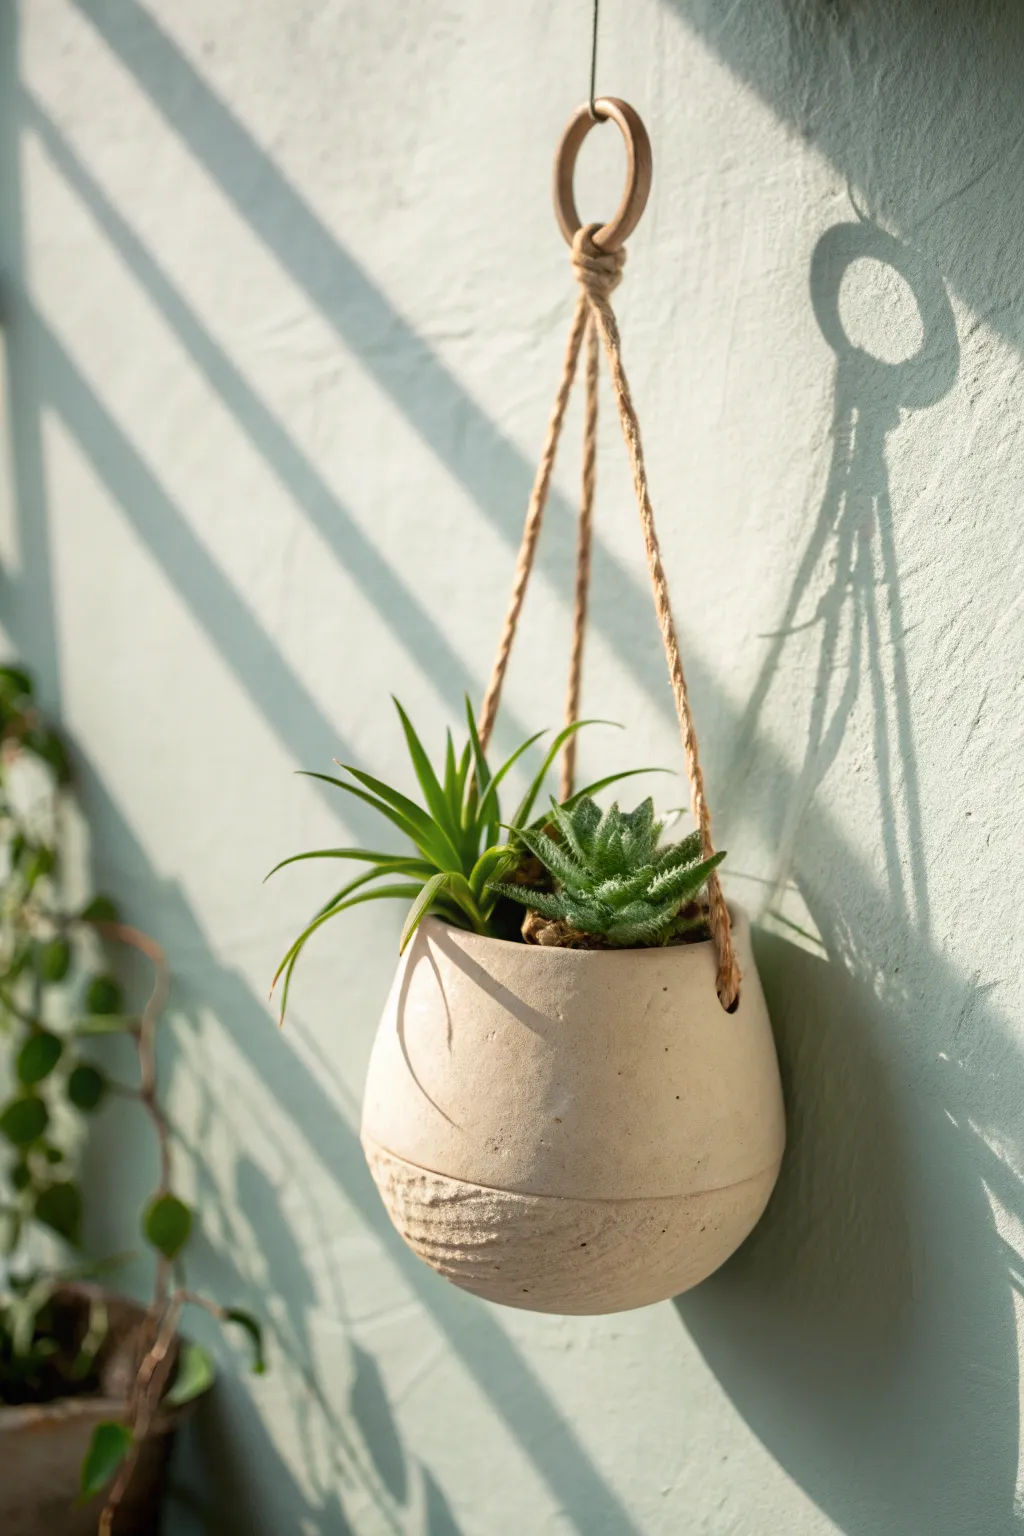
This charming, bulbous hanging vessel combines smooth minimalism with earthy textures to create the perfect home for your air plants or small succulents. Suspended by simple twine and a clay ring, it adds a touch of organic warmth to any sunlit wall.
Step-by-Step
Materials
- Air-dry clay (white or light grey)
- Rolling pin
- Small bowl or balloon (for molding)
- Pottery needle tool or knife
- Sponge
- Water
- Rough sandpaper or a textured stone
- Jute twine or hemp cord
- Small circle cookie cutter (optional)
- Clear sealant (matte finish)
Step 1: Forming the Vessel Base
-
Prepare the Clay:
Start by conditioning a large handful of air-dry clay until it is soft and pliable. Roll it into a smooth ball to remove any air pockets. -
Create the Pinch Pot:
Press your thumb into the center of the ball and gently pinch the walls while rotating the clay. Aim for an even thickness of about 1/4 inch all around. -
Shape the Bulb:
If you want a perfectly round shape, you can drape your clay slab over a small bowl or a blown-up balloon, but freehand pinching works well for an organic look. Gently curve the walls inward near the top to create a slightly enclosed opening. -
Define the Rim:
Smooth out the top rim with your fingers or a damp sponge. It doesn’t need to be perfect; a slight undulation adds character. -
Pierce the Hanging Holes:
Using a needle tool or a straw, poke three evenly spaced holes about half an inch down from the rim. Make sure they are large enough for your twine to pass through.
Step 2: Adding Texture and Details
-
Smooth the Top Half:
Dip your sponge in a little water and meticulously smooth the upper two-thirds of the vessel until it is sleek and glass-like. -
Texture the Bottom:
For the rough bottom section, resist smoothing. Instead, take a rough stone, a crumpled ball of foil, or coarse sandpaper and press it firmly into the bottom third of the clay to create a pitted, earthy texture. -
Create a Separation Line:
Use a needle tool or the edge of a credit card to lightly score a horizontal line separating the smooth top from the textured bottom, enhancing the two-tone effect. -
Form the Suspension Ring:
Roll a small snake of clay and form it into a ring about 1.5 inches in diameter. Join the ends securely by scoring and wetting the clay, then smoothing the seam. -
Dry Completely:
Set both the vessel and the ring aside to dry. This usually takes 24-48 hours depending on humidity. Rotate the vessel occasionally so the bottom dries evenly.
Cracking Up?
If small cracks appear while drying, mix a tiny bit of clay with water to make a paste (slip) and fill them in. Smooth over with a damp finger and let dry again.
Step 3: Finishing and Assembly
-
Sand for Perfection:
Once bone dry, take fine-grit sandpaper and lightly sand the top smooth section to remove any fingerprints or imperfections. Leave the textured bottom alone. -
Seal the Clay:
Apply a coat of matte clear sealant to the entire piece, inside and out. This creates a barrier against moisture, which is vital when watering plants. -
Cut the Twine:
Cut three equal lengths of jute twine, roughly 20-25 inches long each. -
Attach Twine to Vessel:
Thread one end of each piece of twine through a hole in the vessel from the outside in. Tie a sturdy double knot on the inside so the cord can’t slip back through. -
Attach the Ring:
Gather the three loose ends of twine at the top. Bring them through your clay ring, fold them back over, and wrap a separate piece of twine around the bundle to secure it (a gathering knot looks best here). -
Trim and Hang:
Trim any excess twine from your knot. Place your air plant or small succulent inside and find a sunny spot for your new creation.
Color Pop
Before sealing, dilute some acrylic paint with water to create a ‘wash’ and brush it over the textured bottom section for a subtle tint of terracotta or sage green.
Now you have a stylish, handmade vessel ready to display your favorite greenery
Scalloped Edge Candy Bowl Vessel With a Wavy Lip
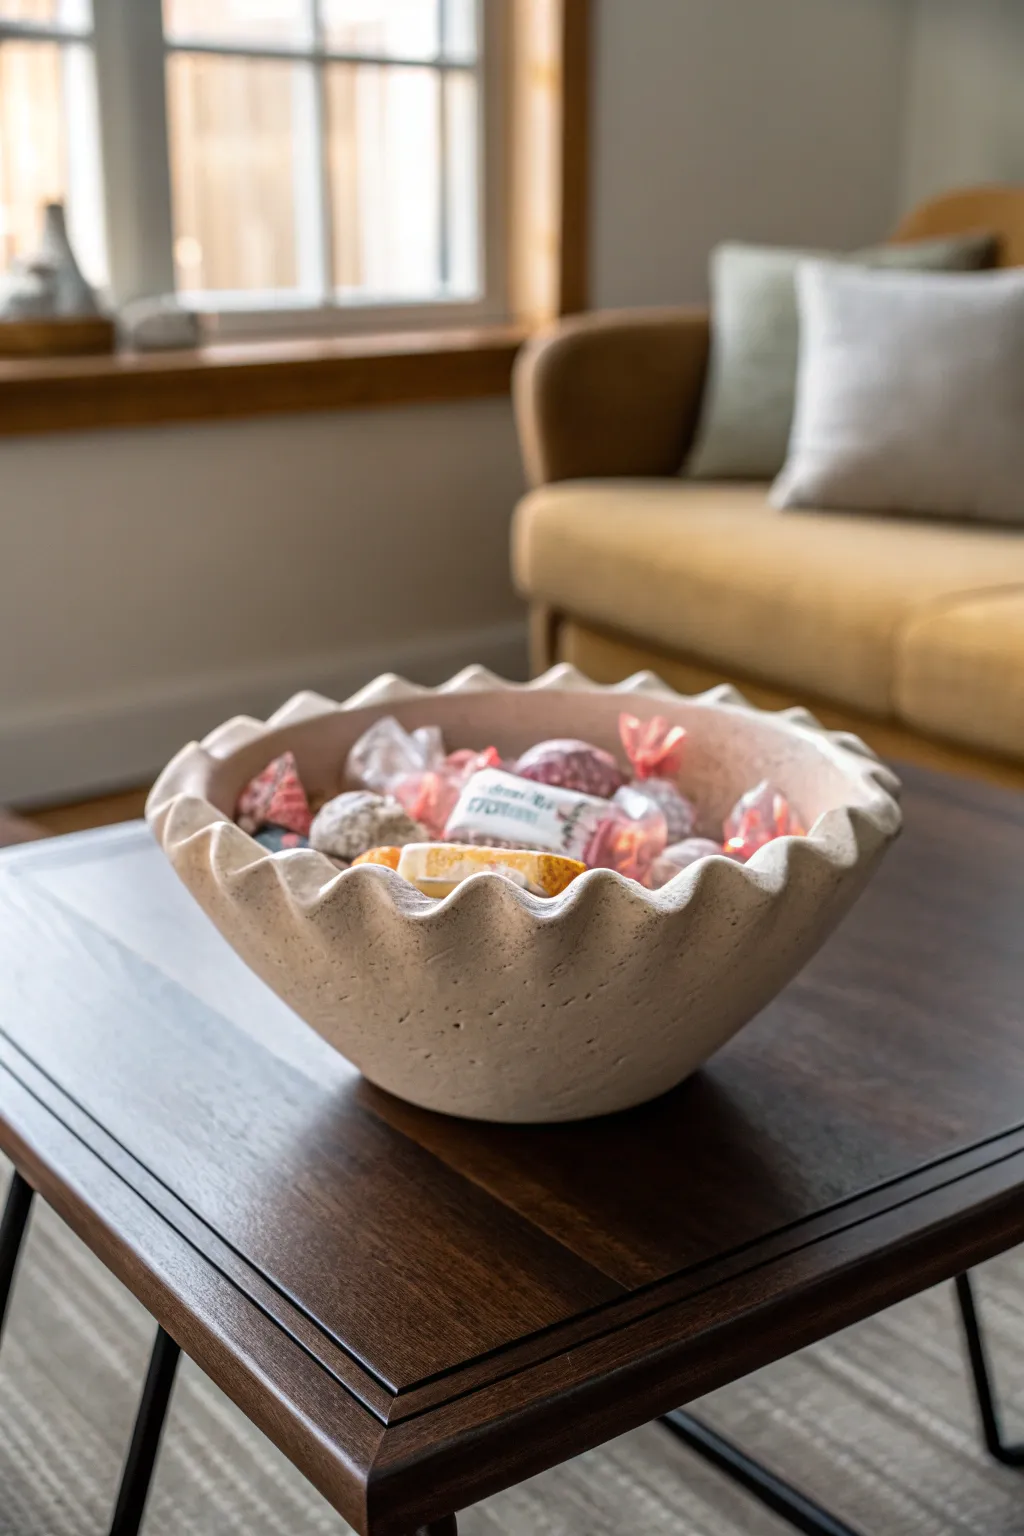
This charming vessel combines a rough, organic stone-like texture with a playful, rhythmic scalloped edge. It’s a perfect beginner-friendly project that looks surprisingly high-end on a coffee table, ideal for holding wrapped candies or trinkets.
How-To Guide
Materials
- Air-dry clay (white or cream)
- Rolling pin
- Canvas or cloth mat (for rolling)
- Bowl mold (a kitchen bowl to drape over)
- Plastic wrap
- Circle template or compass
- Sponge
- Kidney scraper or rib tool
- Needle tool or fettling knife
- Sandpaper (medium grit)
- Stone-textured spray paint or acrylic paint with baking soda
- Matte sealant
Step 1: Forming the Base
-
Prepare your clay:
Cut off a substantial chunk of air-dry clay and knead it briefly to warm it up and remove any potential air bubbles. You want a smooth, pliable consistency before you start rolling. -
Roll out a slab:
Place your clay on a canvas mat to prevent sticking. Using your rolling pin, roll the clay out into a large, even slab. Aim for a thickness of about 1/4 to 1/3 inch—too thin and the waves won’t hold their shape; too thick and it will be heavy. -
Cut the circle:
Using a circle template, large plate, or a compass, lightly mark a large circle onto the clay slab. This will determine the overall size of your bowl. Cut along this line cleanly with a needle tool or fettling knife. -
Prep the mold:
Select a kitchen bowl that has a similar curve to the one in the photo. Cover the outside of this bowl tightly with plastic wrap to ensure your clay doesn’t stick permanently to your kitchenware. -
Drape the clay:
Carefully lift your clay circle and drape it over the upside-down bowl mold. Gently press the clay against the mold, smoothing it downward from the center to ensure it takes the shape without trapping air pockets.
Rim Sagging?
If your scallops flop down while wet, prop them up with small balls of paper towel or foam wedges underneath the rim until the clay stiffens.
Step 2: Sculpting the Scallops
-
Mark the rim:
Before sculpting, lightly mark even intervals around the edge of your clay bowl with a needle tool. These marks will guide where the peaks and valleys of your wave pattern will sit. -
Pinch the peaks:
Using your thumb and forefinger, gently pinch the clay at every other mark to push it upward and outward, creating the ‘peaks’ of the wave. -
Depress the valleys:
Use the side of your index finger to gently press down in the spaces between your peaks. I find alternating between pinching up and pressing down creates the most fluid rhythm. -
Refine the wave:
Go around the rim several times, smoothing the transitions between high and low points. The top edge should be rounded, not sharp, so use a slightly damp sponge to soften the rim. -
Add surface texture:
To mimic the stone-like look in the photo, take a stiff bristle brush or even a crumpled ball of aluminum foil and gently press it into the exterior surface of the clay to create subtle pockmarks and roughness.
Step 3: Finishing Touches
-
Let it dry:
Allow the bowl to dry completely while still on the mold for at least 24 hours. The wave shape needs support while it hardens. Once the outside feels dry, carefully pop it off the mold and let the inside dry for another day. -
Sand for imperfections:
Once fully cured, use medium-grit sandpaper to smooth out any sharp jagged bits on the rim or uneven spots on the base, but keep the intentional texture you added earlier. -
Create the stone finish:
If you are using acrylics, mix a little baking soda into a cream or beige paint to create a thick, gritty paste. Paint the entire bowl, dabbing the brush rather than stroking to enhance the texture. -
Alternative spray method:
Alternatively, take the bowl outdoors and use a stone-texture spray paint in a ‘bleached stone’ color. Apply light, even coats to avoid drips. -
Highlight the texture:
Once the base color is dry, use a very dry brush with a slightly lighter shade of off-white to lightly dust the peaks of the texture and the rim scallops. This adds depth and emphasizes the form. -
Seal the piece:
Finish with a coat of matte clear sealant spray. This protects the finish and makes it easier to dust later, though remember air-dry clay is not food-safe for wet foods.
Speckled Stone Effect
Flick a toothbrush loaded with diluted brown or grey paint over the finished bowl for tiny, realistic stone speckles.
Now you have a stunning, sculptural centerpiece ready to be filled with your favorite treats
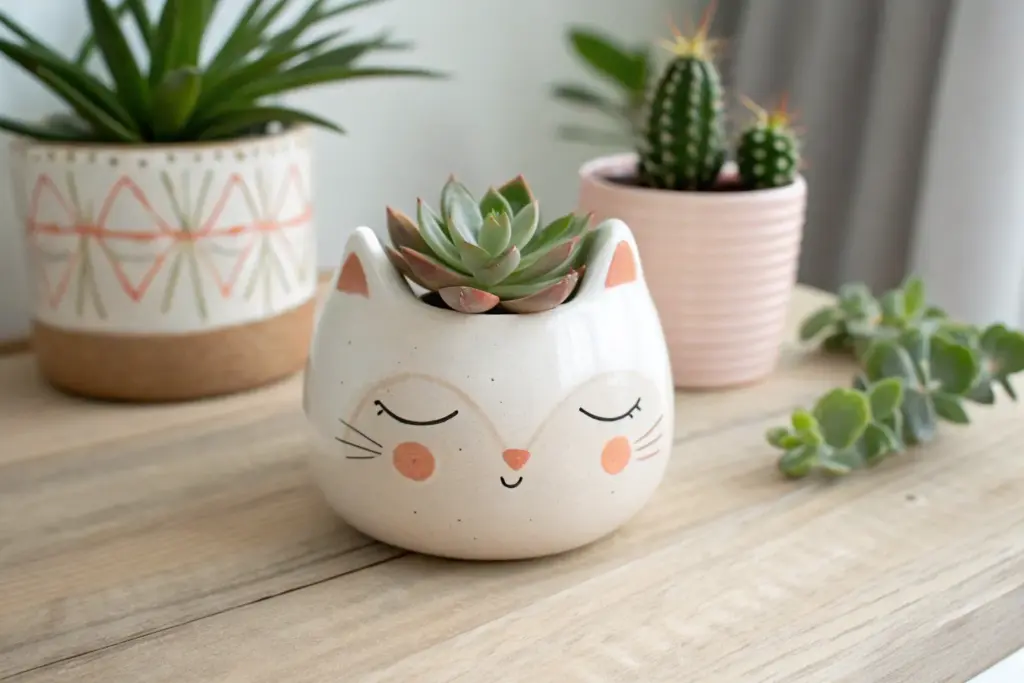
Fruit-Inspired Strawberry Planter Vessel
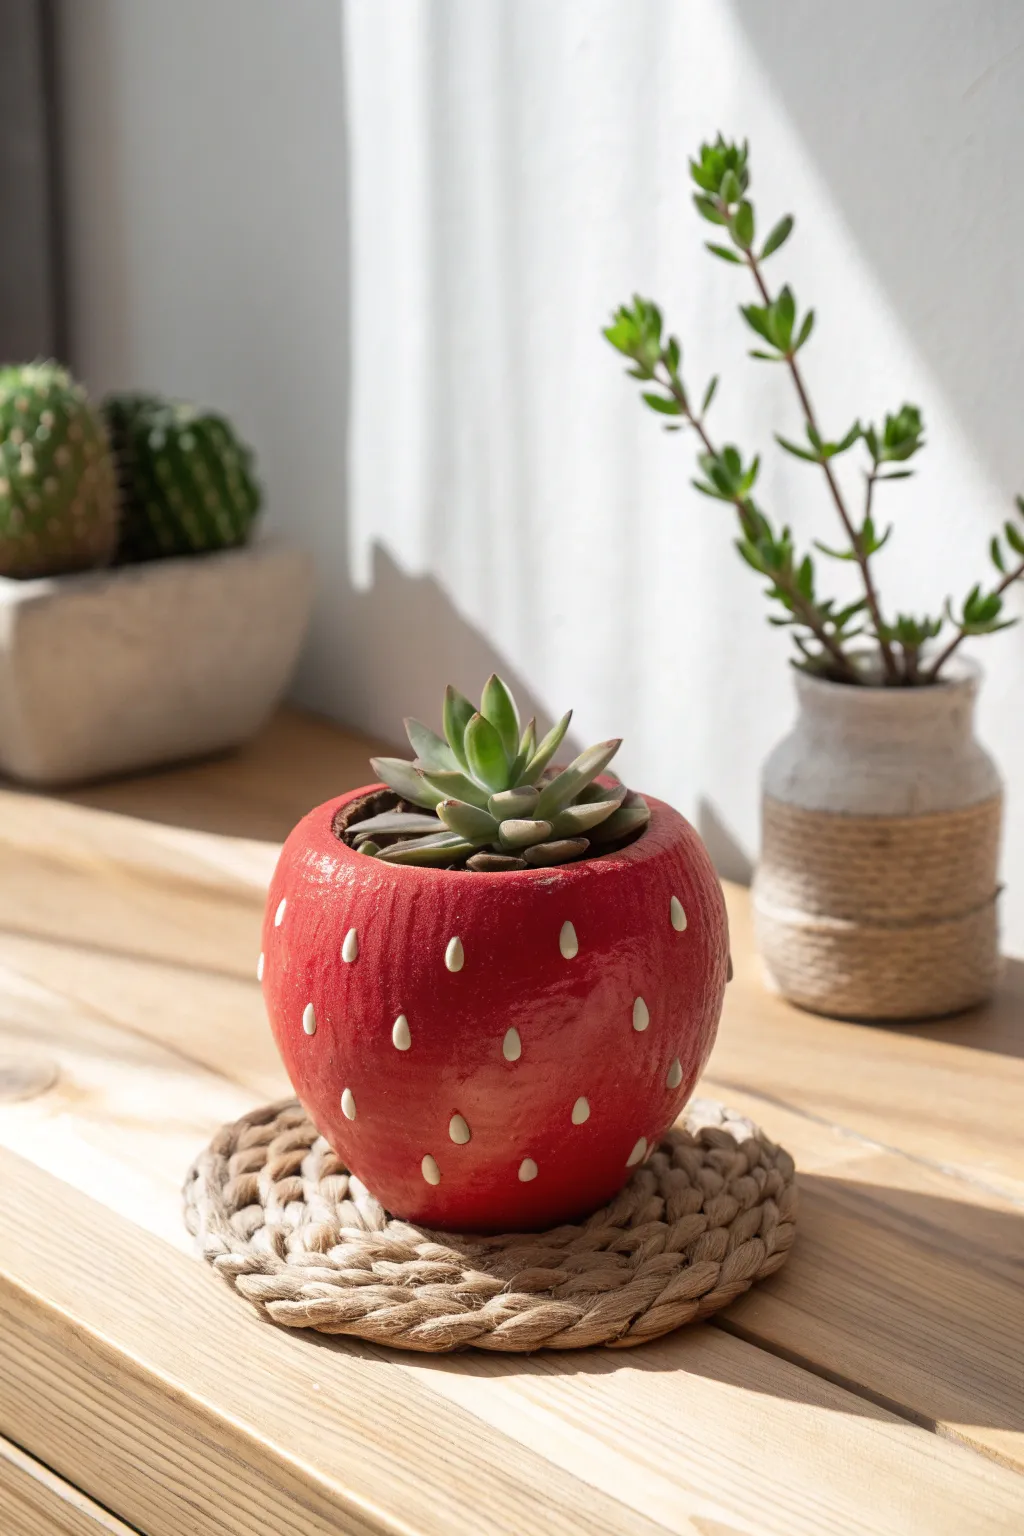
Bring a burst of berry charm to your windowsill with this adorable strawberry-shaped planter. Perfect for housing petite succulents, this project combines simple pinch-pot techniques with a glossy, vibrant finish that looks good enough to eat.
Detailed Instructions
Materials
- Air-dry clay or kiln-fire clay
- Basic sculpting tools (needle tool, sponge, rib tool)
- Water in a small cup
- Rolling pin
- Acrylic paints (bright red, pure white)
- High-gloss varnish or sealant
- Paintbrushes (medium flat brush, fine detail brush)
- Fine-grit sandpaper
- Small succulent and potting soil
Step 1: Shaping the Berry Base
-
Prepare the Clay:
Start with a ball of clay roughly the size of a tennis ball. Knead it well to remove any air bubbles, ensuring the material is pliable and smooth. -
Create a Pinch Pot:
Press your thumb into the center of the ball, leaving about a half-inch of thickness at the bottom. Rotate the ball in your hand while gently pinching the walls upward to create a cup shape. -
Form the Taper:
As you build the walls, gently curve the bottom slightly inwards to mimic the tapered point of a strawberry, rather than a flat cylinder. It should look slightly heart-shaped from the side. -
Build the Shoulders:
Curve the upper rim of the pot inward slightly. This creates the rounded ‘shoulder’ of the strawberry where the leaves would naturally sit, making the opening slightly smaller than the widest part of the pot. -
Smooth the Surface:
Dip your finger or a sponge in a little water and smooth out any cracks or fingerprints on the exterior. Aim for a nice, continuous curve. -
Impress Seed Indentations:
Using the rounded end of a small paintbrush handle or a sculpting tool, gently press small, teardrop-shaped indentations into the clay. Scatter them evenly around the entire body of the pot, sinking them about 2mm deep.
Step 2: Drying and Refining
-
Initial Drying:
Let the vessel sit freely on a shelf to dry. If using air-dry clay, loosely cover it with plastic wrap for the first 24 hours to prevent cracking, then uncover to dry completely (usually 24-48 hours). -
Sanding:
Once bone dry, take your fine-grit sandpaper and gently buff the exterior. I like to pay special attention to the rim to ensure it’s smooth and level. -
Dust Clean:
Wipe the entire piece down with a slightly damp cloth or sponge to remove all clay dust before painting.
Seed Precision
If painting the tiny seeds is difficult, try using a white paint pen or a toothpick dipped in paint for better control.
Step 3: Painting and Finishing
-
Base Coat:
Apply a coat of bright red acrylic paint to the exterior. Don’t worry about filling the seed holes yet; just focus on getting good coverage on the smooth surfaces. -
Apply Second Coat:
Let the first layer dry, then apply a second coat of red for a rich, opaque color. Ensure the paint gets into the recessed seed indentations this time for a uniform background. -
Paint the Seeds:
Using your finest detail brush and pure white paint, carefully fill in the teardrop indentations you made earlier. A steady hand is key here to keep the edges crisp. -
Paint the Interior:
Paint the inside of the rim red to match the exterior. You can leave the deep interior unpainted if you plan to waterproof it, or paint it a dark color to hide soil lines. -
Glazing:
Once the paint is fully cured, apply a generous coat of high-gloss varnish. This mimics the juicy sheen of a real strawberry and protects the paint from water damage. -
Planting:
After the varnish has dried completely (check your product’s instructions), add a small layer of gravel for drainage, followed by soil and your chosen succulent.
Go Green
Sculpt clay leaves around the rim before drying to create a green strawberry hull for extra botanical realism.
Place your finished strawberry vessel in a sunny spot and enjoy the pop of color it adds to your space
Fruit-Inspired Pineapple Jar Vessel With a Lid
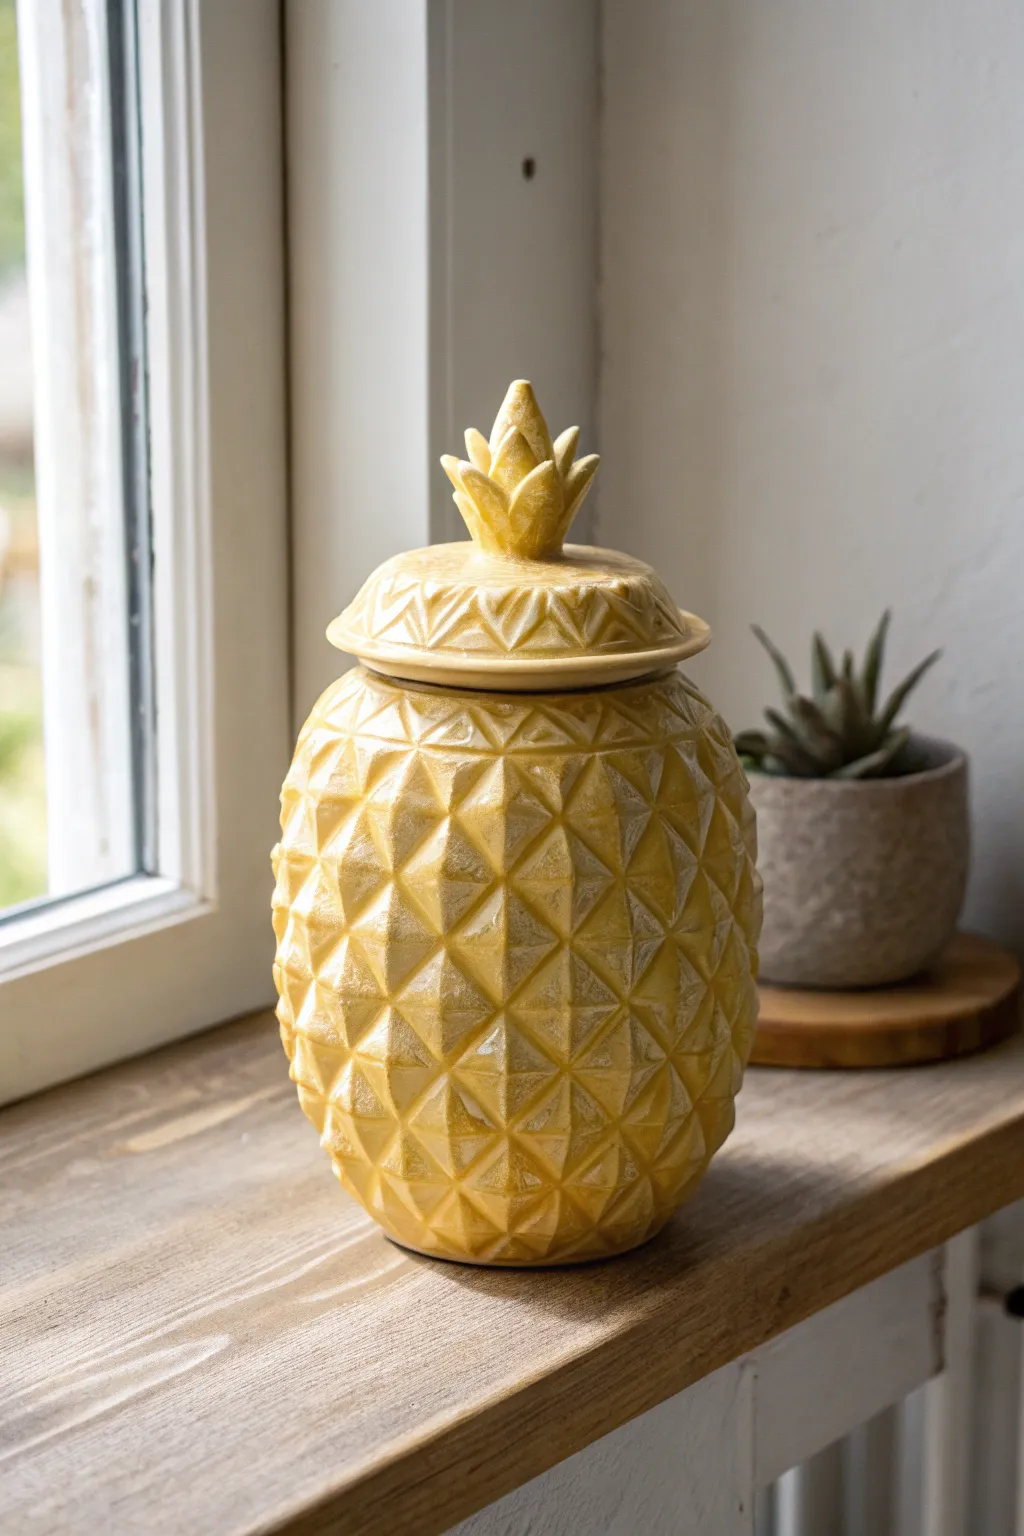
Brighten up your windowsill with this cheerful ceramic pineapple jar, featuring a deeply textured diamond surface and a sculptural leafy lid. The warm yellow glaze pools beautifully in the recesses, giving the piece a vintage, sun-baked quality that functions perfectly as a sugar pot or trinket box.
Step-by-Step Tutorial
Materials
- Stoneware or white earthenware clay (approx 2-3 lbs)
- Pottery wheel (or can be hand-built with coils)
- Patterned texture roller or diamond carving tool
- Needle tool
- Loop trimming tools
- Scoring tool and slip
- Sponge
- Transparent yellow or amber celadon glaze
- Kiln
- Calipers
Step 1: Forming the Body
-
Center and open:
Begin by centering about 1.5 to 2 pounds of well-wedged clay on the wheel head. Open the clay to create a flat internal floor about 3 inches wide, compressing deeply to prevent cracking later. -
Pull the walls:
Pull the walls upward to form a cylinder first, aiming for an even thickness of about 1/4 inch. Ensure you leave a slightly thicker rim to support the future lid. -
Shape the pineapple form:
Gently belly out the cylinder from the inside using a rib or your fingers. You want an oval, egg-like shape that tapers slightly toward the top rim and the foot, mimicking the natural silhouette of a pineapple. -
Establish the gallery:
Create a gallery for the lid to sit on. Use a wooden tool or your thumb to split the rim, pressing the inner section down to create a shelf while keeping the outer wall vertical. -
Initial carving setup:
Once the form is leather hard, you can begin the texture work. I find it useful to lightly sketch a diagonal grid across the surface with a needle tool to map out where the diamond patterns will go.
Clean Lines Tip
Wait until the clay is a firm leather-hard state before carving. If it’s too wet, the diamonds will mush; too dry, and it will chip.
Step 2: Sculpting the Texture
-
Carve the diamonds:
Using a sharp carving loop tool, cut into the clay following your grid. Instead of just lines, carve small pyramid shapes by angling your tool to create raised centers for each diamond. -
Refine the facets:
Smooth the edges of each diamond shape with a damp sponge or soft brush. The goal is sharp geometric lines, but without burrs or sharp crumbs of clay left behind. -
Add detail notes:
For extra realism, you can use a small detailing tool to prick the center of each raised diamond, suggesting the prickly nature of pineapple skin.
Step 3: Creating the Lid
-
Throw the lid base:
Using remaining clay, throw a small, domed lid on the wheel. Measure the diameter frequently with calipers to ensure it fits the gallery of your jar perfectly. -
Add texture to lid:
While leather hard, carve a smaller version of the diamond pattern onto the dome of the lid so the design flows uninterrupted from the body. -
Sculpt the leaves:
Hand-build several small, pointed leaf shapes from clay scraps. Score and slip them together in a cluster, creating a spiky crown. -
Attach the handle:
Score the center of the lid dome and the bottom of your leaf cluster.Attach firmly with slip, blending the clay where they meet so the leaves appear to grow directly out of the lid. -
Dry slowly:
Place the lid on the jar (with a paper towel separator to prevent sticking) and wrap the whole piece loosely in plastic. Slow drying is crucial here to keep the lid fitting perfectly as the clay shrinks.
Tropical Twist
Paint the leafy handle with a transparent green celadon glaze before dipping the body in yellow for a realistic two-tone fruit look.
Step 4: Glazing and Firing
-
Bisque fire:
Once bone dry, fire the piece to cone 04 (or your clay body’s bisque temperature). -
Sponge clean:
Wipe the bisqueware down with a damp sponge to remove any dust that might resist the glaze application. -
Glaze application:
Dip the entire piece into a transparent yellow or amber glaze. This type of glaze is essential because it is thinner on the high points (appearing lighter) and pools in the carved grooves (appearing darker), highlighting the texture. -
Wipe the foot:
Thoroughly wipe the glaze off the bottom foot of the jar and the contact points of the lid gallery to prevent them from fusing shut in the kiln. -
Final firing:
Glaze fire to cone 5 or 6 (depending on your clay and glaze specs) to achieve that glossy, juicy finish.
Fill your new vessel with treats or keep it empty as a sunny piece of decor to warm up any room
Animal-Inspired Owl Planter Vessel With Big Eyes
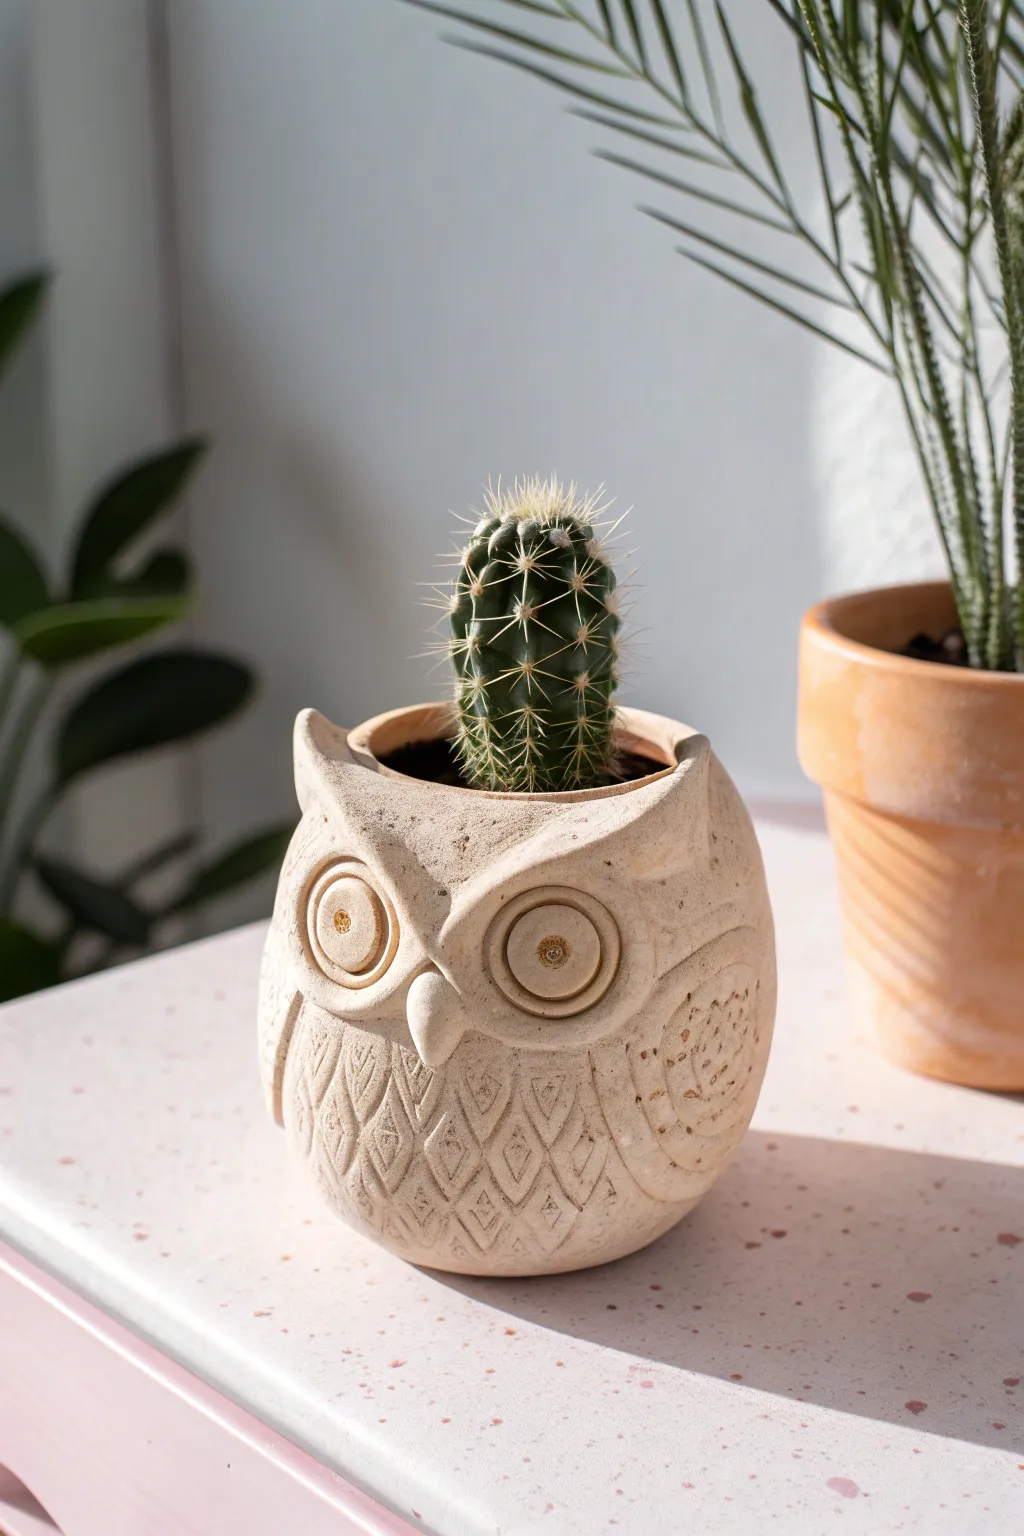
This charming, unglazed owl planter brings a touch of woodland magic to any succulent collection. With its textured feather patterns and prominent eyes, it offers a perfect balance of playful character and sleek, natural pottery design.
Detailed Instructions
Materials
- Stoneware or earthenware clay (light beige/buff color)
- Pottery wheel (optional, can be hand-built)
- Needle tool
- Small loop tool
- Wooden modeling tool
- Rib tool (kidney)
- Sponge
- Score and slip tool (or fork)
- Small round cutter (approx. 1 inch)
- Very small round cutter (approx. 0.25 inch)
- Stylus tool or dull pencil
Step 1: Forming the Body
-
Create the base cylinder:
Begin by throwing a small, bulbous cylinder on the wheel, narrowing slightly at the top to create a rounded belly shape. If hand-building, create a pinch pot base and add coils to build up the height, smoothing the walls as you go. -
Shape the owl silhouette:
While the clay is still plastic, gently push the rim inwards at two opposite points to imply the curve of the owl’s head, leaving two peaks for the ‘ears’. -
Refine the surface:
Use a rib tool to smooth the exterior walls thoroughly, removing any throwing rings or fingerprints to achieve a clean, matte canvas for your carving. -
Leather hard stage:
Allow the vessel to dry to a leather-hard state. It needs to be firm enough to hold detailed carving without warping, but soft enough to cut easily.
Clean Lines
When carving the diamond feathers, wait until the clay is on the drier side of leather-hard. The tool will cut cleaner lines with fewer crumbly bits.
Step 2: Face and Features
-
Define the brow:
Roll a thin coil of clay and attach it in a distinct ‘V’ shape across the upper third of the pot using the score and slip method. Flatten it gently to merge the top edge into the pot while leaving the bottom edge slightly raised to act as the heavy brow line. -
Add the beak:
Form a small, triangular cone of clay. Attach this right at the center point below the brow line. Smooth the top connection point but let the tip of the beak protrude outwards. -
Create the eye sockets:
Take two small balls of clay, flatten them into discs, and attach them firmly into the spaces defined by the V-shaped brow. -
Sculpt the eyes:
Press a medium-sized round cutter gently into the clay discs to create the outer eye ring. Use a smaller cutter or tool to impress the inner pupil ring. -
Detail the pupils:
I like to use a needle tool or small stamp to add texture inside the pupil for that intense, staring look.
Features Falling Off?
If the beak or eyes pop off during drying, you likely didn’t score deeply enough. Use vinegar on your scratching marks to create a stronger bond.
Step 3: Texture and Patterning
-
Outline the wings:
Use a needle tool to lightly sketch outline ovals on the sides of the body to define where the wings will sit. -
Carve the belly feathers:
On the owl’s belly area, carve a repeated diamond pattern. Press the needle tool in deeper at the center of each diamond and taper out to create a quilted look. -
Add wing texture:
Inside the wing outlines, press the side of a small loop tool into the clay to create curved, scalloped impressions that mimic layered feathers. -
Refine the ears:
Pinch and smooth the two points at the rim to sharpen the ear tufts, ensuring they curve slightly inward. -
Final smoothing:
Take a barely damp sponge and critically go over any sharp burrs created by the carving tools, softening the edges without erasing the details. -
Drying:
Let the piece dry slowly under loose plastic to prevent the attached features (like the beak and eyes) from cracking away from the body. -
Bisque firing:
Fire the piece to cone 04 (or your clay body’s bisque temp). Since this is a planter, leaving the exterior unglazed highlights the natural clay texture seen in the photo. -
Optional interior glazing:
If you want the pot to be waterproof, brush a clear glaze on the interior only and fire again to maturity. Otherwise, leave it raw for a breathable home for cacti.
Once fired, pop in a prickly cactus to complete the spiky look of your new avian friend
Animal-Inspired Whale Vessel With a Wide Opening
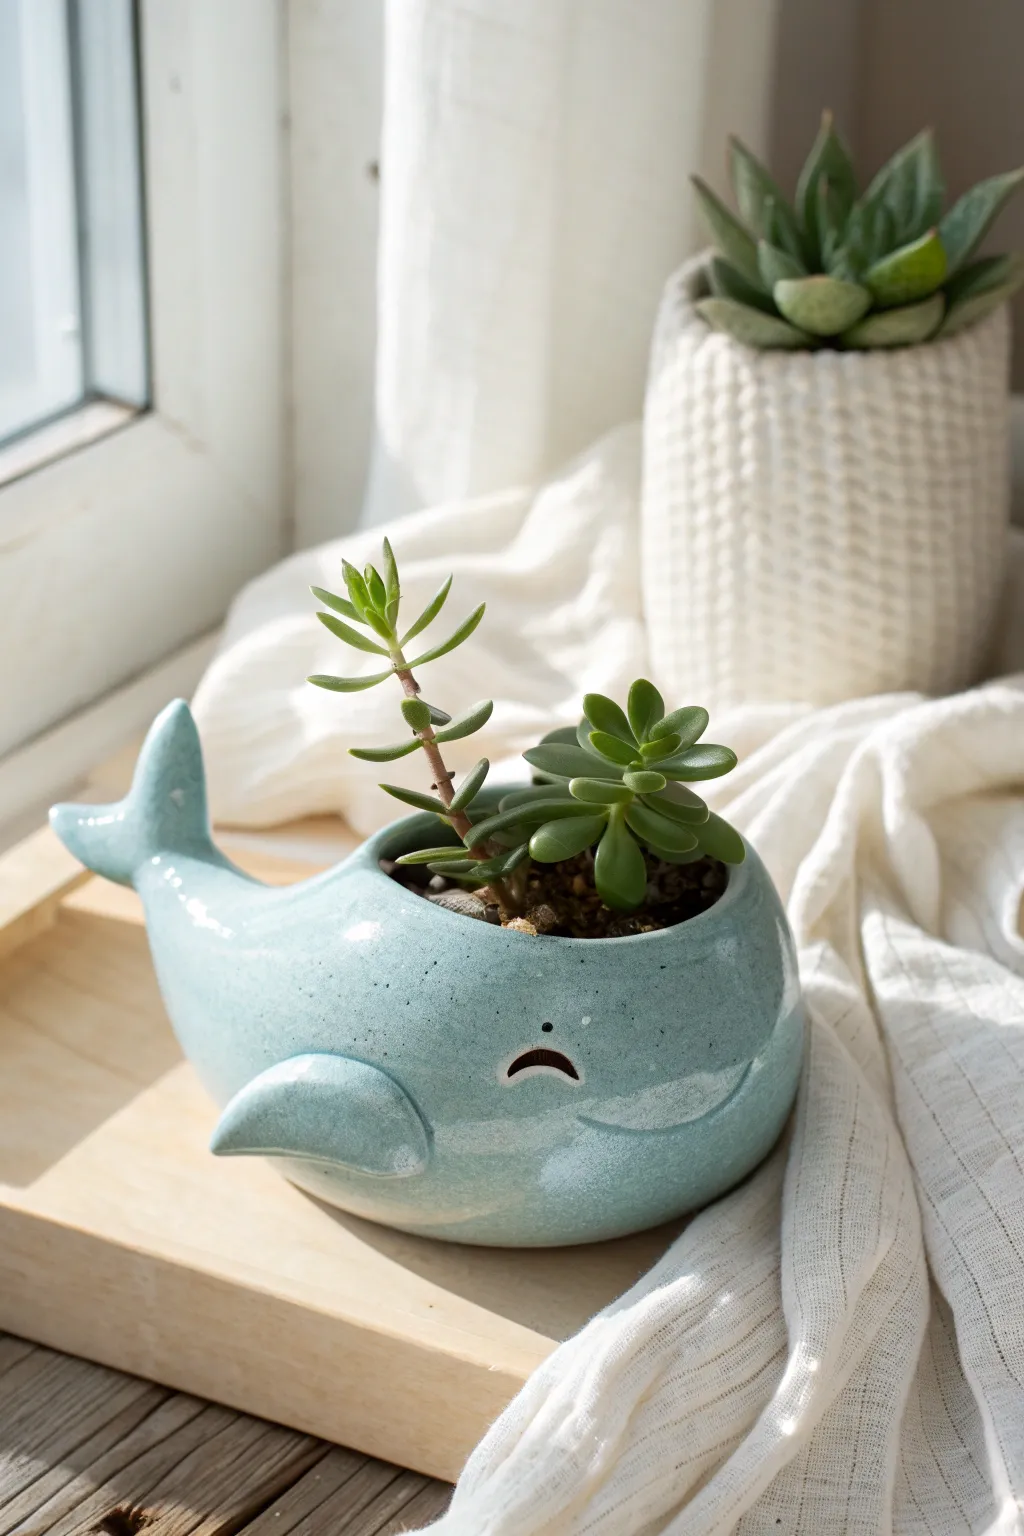
Bring the ocean to your windowsill with this adorable, hand-built whale planter crafted from clay. The finished piece features a charming, smooth turquoise glaze and a wide opening perfect for holding your favorite small succulents.
How-To Guide
Materials
- Stoneware clay (cone 5 or 6 recommended)
- Pottery wheel (can also be hand-built with pinch/coil method)
- Wooden modeling tools
- Metal kidney rib
- Needle tool
- Sponge
- Scoring tool (or fork)
- Slip (clay and water slurry)
- Turquoise celadon glaze
- Small paintbrush for details
- Underglaze (black or dark brown) for the eye
Step 1: Forming the Body
-
Prepare the clay:
Begin by wedging about 1.5 to 2 pounds of stoneware clay to remove any air bubbles. This ensures a smooth base for your vessel. -
Create the enclosed form:
If using a wheel, throw a fully enclosed shape resembling a horizontal egg or a wide cylinder that domes at the top. If hand-building, create two pinch pots and join them rim-to-rim to make a hollow sphere. -
Refine the shape:
While the clay is still plastic but firming up, gently shape the sphere into an oblong, teardrop-like body. The front should be slightly bulbous for the head, tapering toward the back. -
Cut the opening:
Allow the form to reach leather-hard consistency. Use a needle tool to trace a large oval opening on the top-center of the back. Carefully cut this section out to create the planting space. -
Smooth the rim:
Take a damp sponge or a piece of soft plastic and run it over the cut edge of the opening to round it off so it isn’t sharp.
Step 2: Adding the Fins and Tail
-
Sculpt the tail:
Roll a small coil of clay and flatten two triangular paddle shapes for the flukes. Join them together at the center to create a classic whale tail silhouette. -
Attach the tail:
Score the tapered end of the whale body and the base of the tail piece. Add slip to both sides and press firmly to attach. Smooth the seams with a wooden tool until the transition is invisible. -
Create the side fins:
Form two smaller, rounded triangular slabs for the pectoral fins. Give them a slight curve so they cup downwards against the body. -
Attach the fins:
Score and slip the spots on the lower sides of the body where the fins will go. Press them on securely, blending the clay from the fin onto the body for a strong bond. -
Refine the surface:
I prefer to use a metal kidney rib at this stage to smooth out the entire surface, erasing any fingerprints or tool marks to get that sleek, aquatic look.
Trapped Air Warning
If you make a closed form first, poke a tiny pinhole somewhere inconspicuous immediately so the expanding air doesn’t crack the clay as it dries.
Step 3: Detailing and Firing
-
Carve the mouth:
Use a sharp trimming tool or needle tool to crave a long, curving line for the mouth. Start low on the front and curve upwards toward the sides to give it a happy expression. -
Add the eye and blowhole:
Using the needle tool, puncture a very small hole for the blowhole near the top front. For the eye, impress a small circle or create a small indentation. -
Bisque fire:
Let the piece dry slowly and completely. Once bone dry, fire the vessel to bisque temperature (usually cone 04) to prepare it for glazing. -
Glazing:
Dip or brush the entire piece with a glossy turquoise celadon glaze. This type of glaze breaks beautifully over texture, highlighting the curves. -
Accent the eye:
Carefully wipe the glaze out of the eye indentation. Use a tiny brush to apply a dot of black or dark brown underglaze to make the eye pop. -
Final firing:
Fire the piece again to the maturation temperature of your specific clay and glaze (likely cone 5 or 6). Once cool, add soil and your chosen succulents.
Drainage is Key
Don’t forget to punch a hole in the bottom of the belly before firing! Succulents hate sitting in water and need proper drainage.
Place your finished whale in a sunny spot and enjoy the cheerful personality it adds to your room
Face Vase Vessel With a Minimal Modern Expression
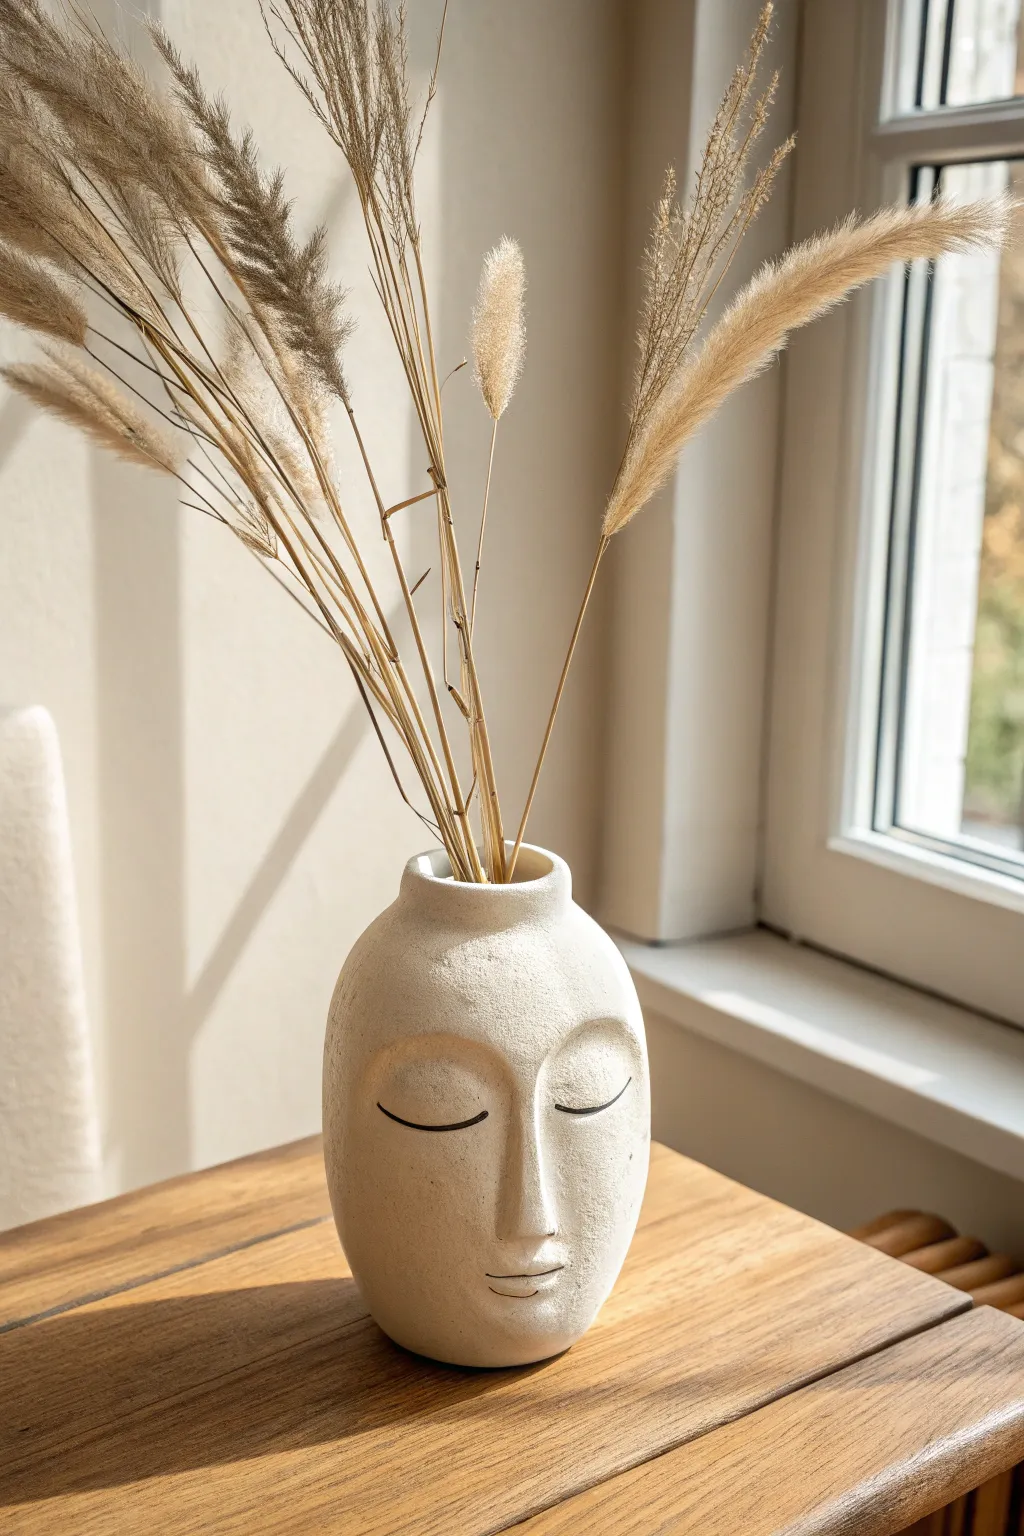
Bring a touch of calm to your decor with this minimalist face vase tutorial. Featuring a distinctly organic texture and simple line-work features, this piece channels a modern, tranquil aesthetic perfect for displaying dried grasses.
Step-by-Step
Materials
- Air-dry clay (white or cream)
- Small rolling pin
- Clay carving tools (needle tool, loop tool)
- Small bowl of water
- Sponge
- Fine-grit sandpaper
- Black acrylic paint
- Fine detail paintbrush (00 or 000 size)
- Matte spray varnish or sealant
- Tall drinking glass or jar (for armature)
Step 1: Forming the Base
-
Prepare your armature:
Find a tall, cylindrical glass or jar to use as an internal support so your vase holds its shape. Wrap this armature loosely in a single layer of parchment paper or plastic wrap to ensure the clay doesn’t stick permanently to the glass. -
Roll the slab:
Roll out a substantial portion of your air-dry clay into an even slab, approximately 1/4 inch thick. Aim for a rectangular shape that is tall and wide enough to wrap fully around your armature with a little overlap. -
Wrap the cylinder:
Carefully lift your clay slab and wrap it around the glass armature. Join the two ends by scoring the edges (making hatch marks) and adding a dab of water, then smoothing the seam together with your thumb until it disappears. -
Shape the neck:
At the top of your cylinder, gently pinch and taper the clay inward to create a narrower neck, then flair it slightly outward again for the rim. This creates the classic bottle silhouette. -
Close the bottom:
Cut a circle of clay slightly larger than the base. Score and slip the bottom edge of your cylinder, place it onto the circle, and smooth the clay upward to seal the bottom completely.
Cracking Up?
If small cracks appear while drying, mix a small amount of clay with water to make a paste (slip). Fill the cracks with this paste and smooth over with a damp finger immediately.
Step 2: Sculpting the Features
-
Add volume for the nose:
Roll a small, elongated coil of clay for the nose bridge. Score the center of the face area and attach the coil. Use a modeling tool to blend the edges outward into the cheeks so the nose looks like it emerges naturally from the surface, not just stuck on. -
Build the brow line:
Add small, flat pads of clay above where the eyes will go to create a subtle brow structure. I like to blend these thoroughly so they create a soft shadow rather than a harsh ridge. -
Refine the bridge:
Use your thumb to smooth the sides of the nose, ensuring it remains straight and connects seamlessly to the brow area you just built. -
Add the lips:
Roll two very tiny coils for the mouth. Attach them below the nose, blending the outer corners into the face. Use a needle tool to gently press a horizontal line between them to separate the upper and lower lip. -
Define the eye sockets:
With your thumbs, gently press into the area flanking the nose bridge to create shallow, smooth depressions where the eyes will be painted later. This adds dimension to the sculpture.
Faux Stone Hack
For an even grittier, terra-cotta feel, mix a teaspoon of baking soda or used coffee grounds into your white paint before sealing the vase to create physical speckles.
Step 3: Texturing and Finishing
-
Create the stone texture:
Take a damp sponge and dab it firmly all over the clay surface. Do not smooth it perfectly; you want to leave a slightly pitted, organic texture that mimics sandstone or limestone. -
Dry thoroughly:
Allow the vessel to dry completely. This can take 24-48 hours depending on humidity. Rotate it occasionally so it dries evenly. -
Remove armature:
Once the clay is leather-hard (mostly firm but not bone dry), carefully slide the glass armature out. If fully dry, the clay shrinks so remove the glass before it cracks your work. -
Sand for finish:
Once bone dry, lightly sand any sharp ridges or rough seams with fine-grit sandpaper, but be careful not to remove the sponge texture you created. -
Paint the details:
Dip a fine detail brush into black acrylic paint. With a steady hand, paint two simple, downward-curving arcs for the closed eyelids and a small line for the mouth separation. Keep the lines thin for a minimal look. -
Seal the piece:
Spray the entire vessel with a matte varnish. This protects the clay and the paint without adding an unnatural glossy shine.
Now pop in some dried pampas grass or wheat stems to complete your tranquil vignette
Fabric-Wrapped Clay Vessel for Mixed-Media Decor

Transform a plain clay jar into a charming vintage-inspired centerpiece with this simple fabric-wrapping technique. By combining textured pottery with soft floral prints, you create a tactile mixed-media piece that brings rustic warmth to any shelf.
How-To Guide
Materials
- Bisque or matte-finish white clay vessel (milk jug shape)
- Floral cotton fabric (cream background with red/green print)
- Coordinating reddish-pink patterned fabric or fabric tape
- Decoupage medium (like Mod Podge Matte)
- Fabric stiffener (optional)
- Foam brush
- Fabric scissors
- Measuring tape
- Hot glue gun and glue sticks
- Fine-grit sandpaper (optional)
Step 1: Preparation
-
Clean the Surface:
Begin by wiping down your clay vessel with a damp cloth to remove any dust or oils. This ensures your adhesives will bond properly to the textured ceramic surface. -
Measure the Circumference:
Use a measuring tape to determine the circumference of the widest part of the jar’s belly. Add an extra inch to this measurement for overlap. -
Cut the Main Panel:
Cut a strip of your main floral fabric. It should be wide enough to cover the middle third of the jar (approximately 3-4 inches high) and long enough to wrap around with the overlap you calculated. -
Prepare the Borders:
Cut two thin strips of the reddish coordinating fabric, each about 0.5 inches wide, to serve as the top and bottom borders for your main panel. Alternatively, you can use pre-made fabric tape. -
Create the Neck Tie:
Cut a separate strip of the floral fabric for the neck. This needs to be long enough to wrap around the narrow neck and tie into a small, neat knot.
Wrinkle Rescue
If stubborn wrinkles appear while gluing the main fabric band, use a brayer or the back of a spoon to firmly smooth them out before the glue sets completely.
Step 2: Application
-
Apply Base Adhesive:
Using a foam brush, apply a thin, even layer of decoupage medium directly onto the clay surface where the main fabric band will sit. Work in sections if the glue dries too quickly. -
Position the Main Fabric:
Carefully press the floral fabric strip onto the wet adhesive. Smooth it out with your fingers as you go to prevent air bubbles or wrinkles, ensuring it sits straight horizontally. -
Seal the Overlap:
When the ends meet, apply a little extra decoupage medium to the underside of the overlapping fabric edge and press it down firmly for a seamless look. -
Add Top Border:
Apply a thin line of decoupage medium along the very top edge of your floral fabric. Press the thin reddish strip over this seam, covering the raw edge of the floral cloth. -
Add Bottom Border:
Repeat the previous step for the bottom edge, securing the second reddish strip to create a framed effect for the central band. -
Seal Everything:
Coat the entire fabric section (main band and borders) with a layer of matte decoupage medium. I find this seals the raw threads and protects the fabric from dust.
Step 3: Finishing Touches
-
Prepare the Neck Strip:
Take your neck strip and fold the raw long edges inward slightly, pressing them down. You can use a dab of glue or simply iron them to hide fraying threads. -
Wrap the Neck:
Position the strip around the narrowest part of the vessel’s neck. Secure the back with a tiny dot of hot glue to keep it from sliding down. -
Tie the Knot:
Tie the front ends into a simple overhand knot. Adjust the fabric ‘ears’ so they perk up slightly; if your fabric is too floppy, a spray of fabric stiffener here helps hold the shape. -
Distress (Optional):
If you want an aged look, lightly run fine-grit sandpaper over the fabric edges once the glue is fully dry to create a worn, vintage appearance.
Style Upgrade
Add a dried lavender sprig or a small skeleton key into the neck knot for an extra touch of farmhouse charm.
Place your newly decorated vessel on a wooden shelf or mantel to enjoy its handmade country appeal
Egg-Shaped Mini Planter Vessels in a Tray Display
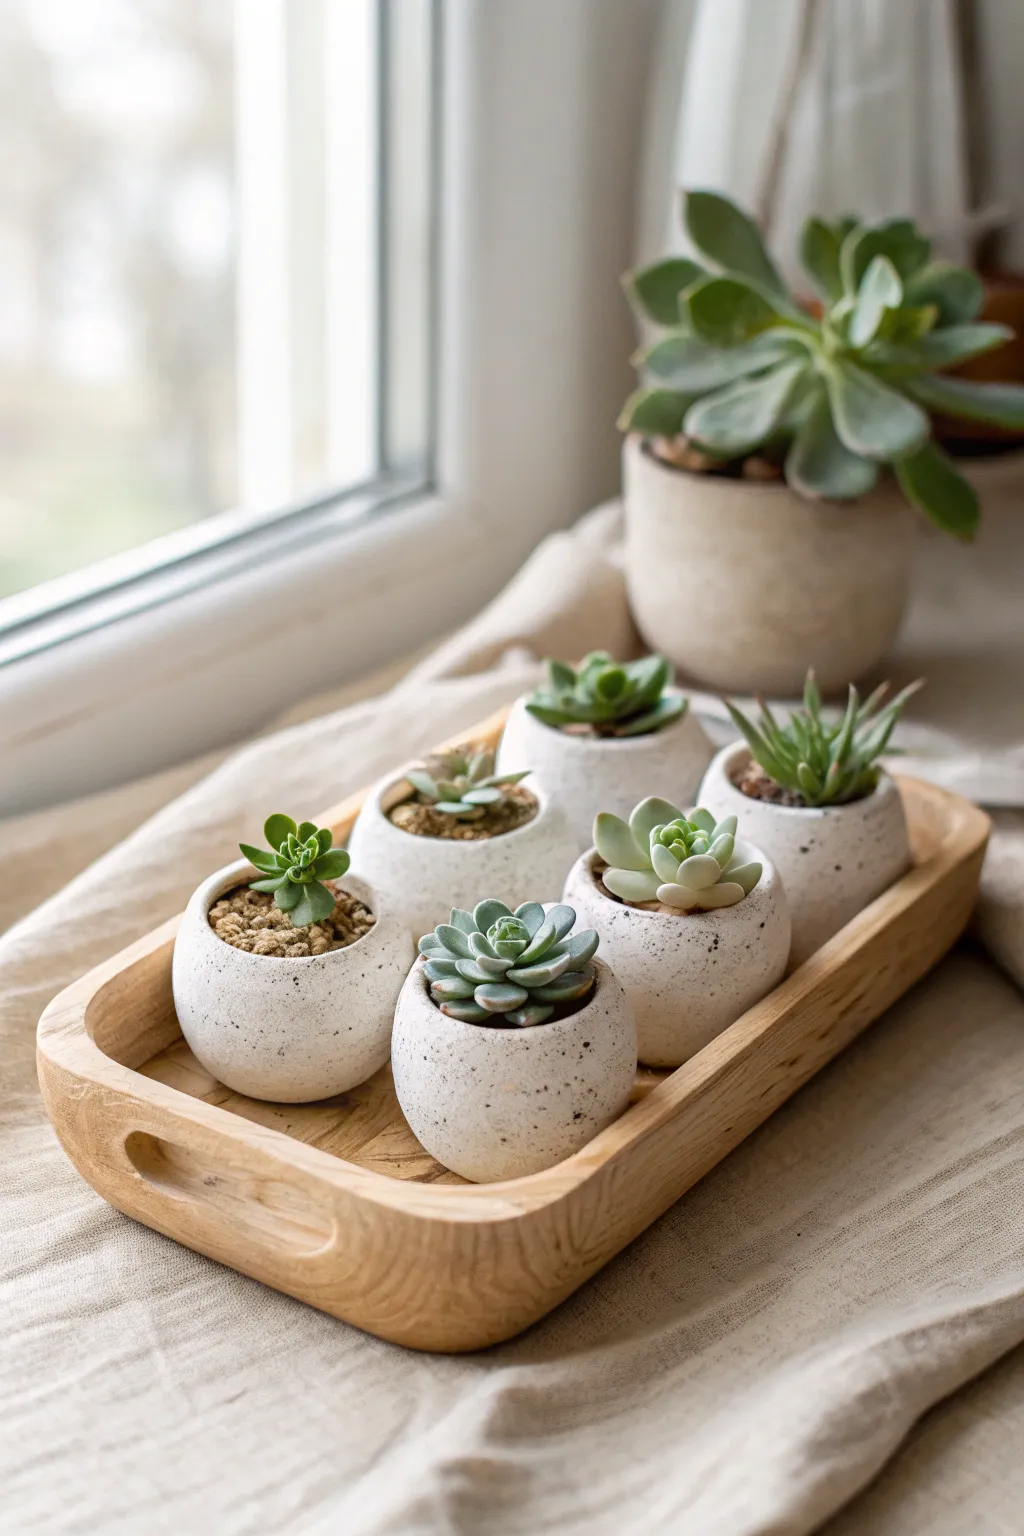
Create a charming windowsill display with these miniature egg-shaped planters crafted from air-dry clay. Their smooth, rounded forms nestled in a wooden tray offer a clean, minimalist aesthetic that perfectly highlights tiny succulents.
Step-by-Step Guide
Materials
- White stone air-dry clay or polymer clay
- Wooden tray (rectangular with rounded corners)
- Small rolling pin
- Sandpaper (fine grit)
- Black acrylic paint
- Stiff bristle brush or toothbrush
- Matte spray sealant
- Miniature succulents
- Small river rocks or succulent soil mix
- Plastic wrap
- Small bowl of water
- Knife or clay cutting tool
Step 1: Shaping the Vessels
-
Prepare the Clay:
Begin by conditioning your white clay until it is pliable and smooth. Break off six equal-sized portions, each roughly the size of a golf ball, to ensure your set looks uniform. -
Form the Base Sphere:
Roll one portion of clay between your palms to create a perfect sphere. Take your time here to smooth out any cracks or seams, as these will be harder to fix later. -
Create the Opening:
Gently press your thumb into the center of the sphere to start the opening. Don’t go all the way through; stop about a quarter-inch from the bottom to leave a solid base. -
Pinch the Walls:
Using a pinching motion with your thumb inside and fingers outside, slowly rotate the clay to thin the walls. Aim for a slightly thicker bottom and thinner rim, tapering the shape inwards at the top to mimic an egg. -
Refine the Rim:
Carefully tap the top rim with your finger to flatten it just slightly, ensuring it isn’t sharp. I find that wetting my finger slightly helps smooth this top edge perfectly without distorting the shape. -
Check Stability:
Gently press the bottom of the egg shape onto a flat surface to create a tiny flat spot. This ensures the planter will sit upright in your tray without rolling over. -
Repeat the Process:
Repeat these steps for the remaining five balls of clay. Line them up next to each other to check for consistent height and width, adjusting as necessary while the clay is still workable.
Smooth Operator
Keep a small sponge handy while shaping. A damp sponge smooths clay faster than fingers and removes tiny cracks instantly.
Step 2: Finishing and Sealing
-
Dry the Clay:
Allow your clay vessels to dry completely according to the manufacturer’s instructions. For air-dry clay, this usually takes 24-48 hours. Rotate them occasionally to ensure even airflow. -
Sand for Smoothness:
Once fully cured, take a piece of fine-grit sandpaper and gently buff the exterior. Focus on removing any fingerprints or uneven bumps to achieve that polished, stone-like appearance. -
Speckle the Surface:
Dilute a small amount of black acrylic paint with water. Dip a toothbrush or stiff brush into the mixture, then run your thumb across the bristles to flick tiny specks of paint onto the white vessels. -
Seal the Planters:
In a well-ventilated area, spray the planters with a matte clear coat. Apply two thin coats with drying time in between. This step is crucial to protect the clay from moisture when you water the plants.
Cracked Up?
If tiny cracks appear while drying, mix a small amount of clay with water to make a paste and fill the cracks, then sand smooth once dry.
Step 3: Planting and Display
-
Prepare the Tray:
Select a wooden tray that fits all six planters comfortably. If the wood is unfinished, you might want to sand it or apply a light oil to bring out the grain. -
Fill with Gravel:
Place a small layer of pea gravel or tiny stones at the very bottom of each clay egg. Since these mini planters don’t have drainage holes, the stones will help prevent root rot. -
Add Soil:
Add a spoonful of succulent-specific potting soil on top of the gravel layer, filling the pot about halfway. -
Insert Succulents:
Gently remove your mini succulents from their nursery pots, loosening the root ball slightly. Nestle one plant into each egg planter. -
Top Dressing:
Backfill any gaps with a little more soil or decorative sand. Use a small brush to sweep away any dirt that may have landed on the white clay rim or leaves. -
Final Arrangement:
Arrange the planted vessels in two rows of three inside your wooden tray. Position them so the different succulent shapes and textures complement each other.
Place your new miniature garden in a bright spot to watch it thrive