If you’ve been craving more texture and personality on your walls, clay wall art is such a satisfying way to get there. I’m sharing a mix of beginner-friendly and more “stretch your skills” ideas you can make with air-dry clay, polymer clay, or simple handbuilding clay methods.
Textured Abstract Clay Panel
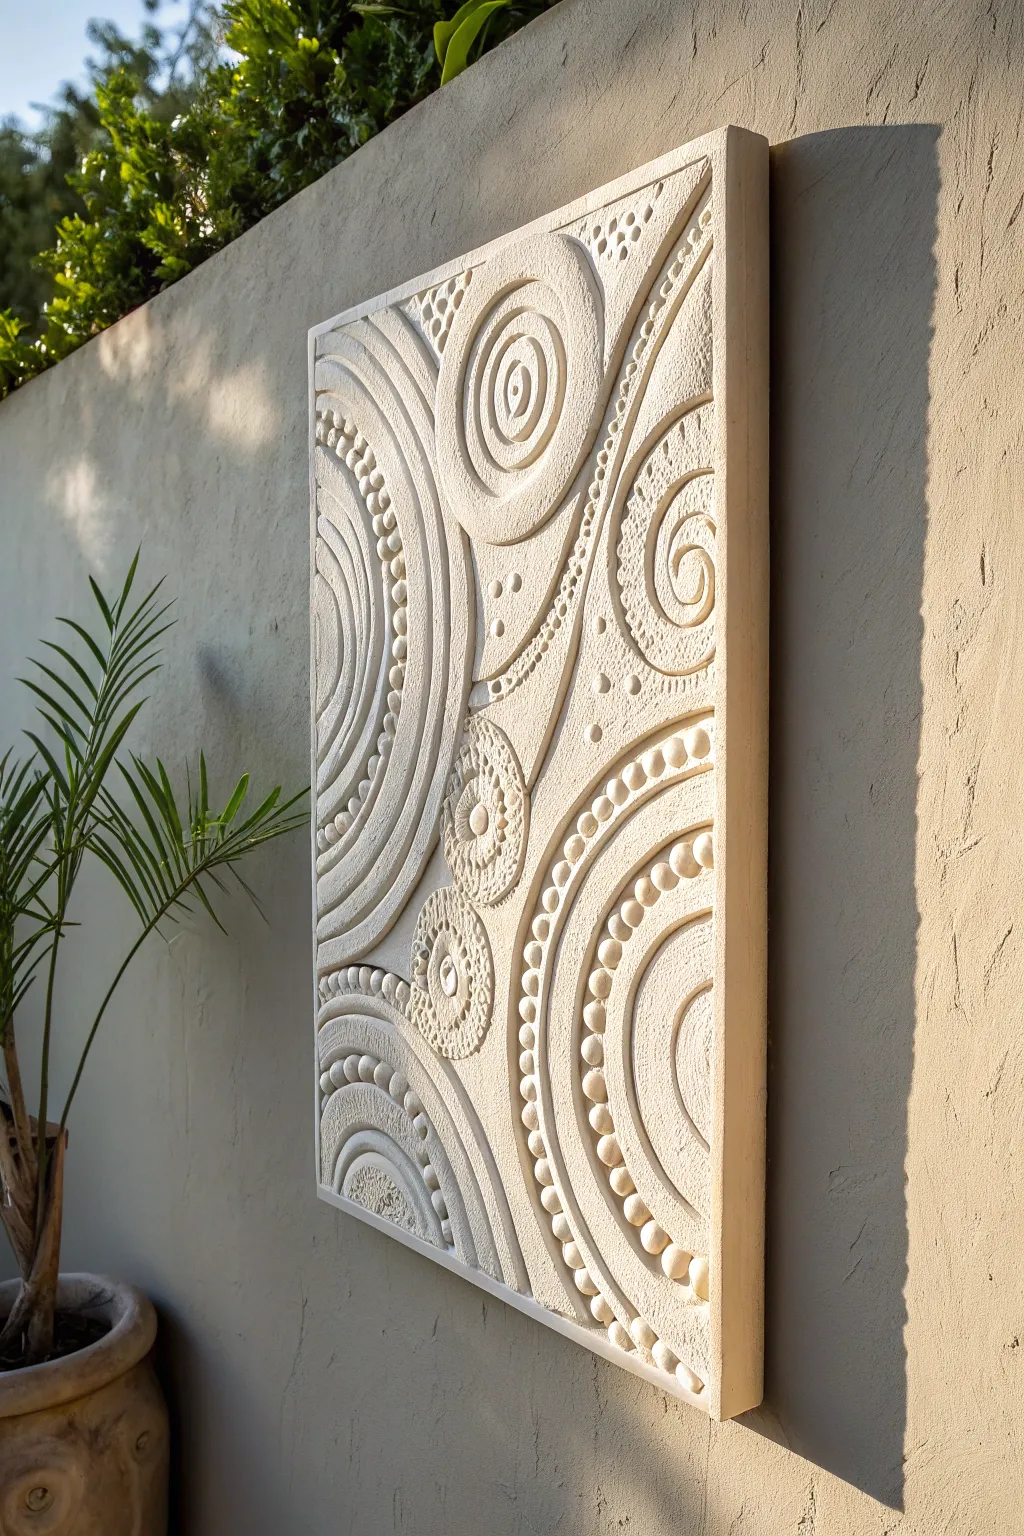
This stunning piece of wall art mimics the serene movement of water or sound waves using the tactile beauty of clay. With its spiraling patterns, dotted accents, and deep relief texture, this panel brings an organic, meditative focal point to any outdoor or indoor space.
How-To Guide
Materials
- Large wooden canvas or MDF board (approx. 24″ x 40″)
- Gesso primer
- Air-dry creative paper clay or stone-effect modeling paste (approx. 5-7 lbs)
- Palette knives (assorted sizes)
- Clay sculpting tools (loop tools, needle tool)
- Piping bag with round tip (optional, for dots)
- Spray bottle with water
- Sandpaper (medium and fine grit)
- Cream or off-white acrylic paint (matte finish)
- Matte spray sealant
Step 1: Preparation and Base Layer
-
Prime the Surface:
Begin by applying two coats of gesso to your wooden board or canvas. This seals the wood and gives the clay or paste something substantial to grip onto. Let it dry completely. -
Sketch the Flow:
Lightly sketch the design onto the board with a pencil. Mark out the four main focal points: the large central spiral near the top, the cascading curves on the left, the rhythmic arches on the bottom right, and the smaller decorative medallions in the center. -
Establish the Background:
Apply a thin, even layer of clay or texture paste over the entire board to create a unified surface. While it’s still wet, use a sponge or crumpled paper to give it a subtle, stone-like texture.
Cracks happen!
Clay shrinks as it dries, which can cause cracking. Don’t panic! Simply fill cracks with a mix of fresh clay and water (slip), smooth it over, and let it dry again.
Step 2: Building the Major Forms
-
Sculpt the Upper Spiral:
Roll a thick coil of clay and lay it in a spiral formation for the top-center focus. Flatten it slightly with your thumb stripes, then use a kidney tool to smooth the ridges, creating concentric circles that look like ripples. -
Create the Left Cascades:
For the long, sweeping curves on the left side, apply bands of clay about 1/4 inch thick. Use a wide modeling tool to carve deep grooves between the bands, emphasizing the vertical flow. -
Form the Right Arches:
On the bottom right, build up arched layers. Establish a high ridge for the outermost arch to catch the light, tapering the clay down as you move toward the center of the design. -
Smooth the Transitions:
Use a damp sponge or your finger to smooth the edges where different major forms meet the background. You want distinct shapes, but not rough, unfinished seams.
Step 3: Adding Textural Details
-
Detail the Medallions:
In the central area, add two small circular mounds of clay. Press a pattern into them using a texture stamp or the end of a marker cap to create the intricate floral-like seed pod designs seen in the reference. -
Apply the Dot Work:
Roll many small, uniform balls of clay (about the size of a pea). Press these firmly along the ridges of the lower-right arches and the left-side curves to create the beaded rows. I find using a dab of water helps them stick securely. -
Create Pitted Texture:
On the flat areas surrounding the spirals, use a needle tool or a small stylus to poke clusters of tiny holes. Vary the density of these pockmarks to create visual interest and mimic coral or porous stone. -
Refine the Edges:
Go back over your main lines with a sculpting tool to sharpen the relief. Deepen the valleys between the spirals and the dots so the shadows will be strong when the piece is hung.
Add some grit
Mix a handful of fine sand into your acrylic paint for the final coat. This gives the sculpture an authentic, gritty sandstone feel that looks amazing in sunlight.
Step 4: Finishing Touches
-
Slow Drying:
Allow the piece to dry slowly over 24-48 hours. If you are in a dry climate, loosely cover it with plastic to prevent cracking. -
Sand Imperfections:
Once bone dry, lightly sand any jagged peaks or rough fingerprints. Be gentle around the dot work to avoid knocking them off. -
Painting:
Paint the entire sculpture with a creamy, off-white matte acrylic. Use a stiff brush to get the paint into all the deep textures and pits. -
Dry Brushing:
After the base coat is dry, mix a slightly lighter shade of white. Lightly dry-brush this over the raised surfaces—the tops of the dots and ridges—to enhance the stone effect. -
Sealing:
Finish with a matte spray sealant to protect the surface from dust and moisture, especially if hanging outdoors in a covered area.
Hang your relief panel where the changing angle of the sun can play across the surface, highlighting the depth of your handiwork throughout the day


Botanical Leaf Imprint Plaques

Capture the ephemeral beauty of nature in stone with this elegant leaf imprint plaque. The project features a deep, fossil-like relief on a smooth oval medallion, finished with a subtle wash to highlight the intricate veins and serrated edges.
Step-by-Step Tutorial
Materials
- Air-dry clay (stone or stark white)
- Fresh leaf with prominent veins (maple or sycamore work well)
- Rolling pin
- Oval cookie cutter or knife with oval cardstock template
- Smooth work surface (canvas or silicone mat)
- Small straw or skewer (for the hanging hole)
- Fine-grit sandpaper
- Brown acrylic paint or antique wax
- Water and paper towels
- Clear matte varnish (optional)
- Jute twine for hanging
Step 1: Preparation & Impression
-
Condition the Clay:
Begin by taking a handful of air-dry clay and kneading it in your hands to warm it up. You want it pliable and smooth, without any cracks or air bubbles. -
Roll the Slab:
Place the clay on your work surface. Roll the clay out into an even slab, aiming for a consistent thickness of about 1/4 inch (6mm). This thickness ensures durability without being too heavy. -
Select Your Leaf:
Choose a fresh leaf rather than a dried one, as dried leaves tend to crumble. Ensure the leaf is clean and dry. I prefer to flip the leaf over and press the vein-side (backside) down into the clay, as the veins are much more prominent there. -
Position the Botanical:
Lay the leaf carefully onto your rolled slab. Arrange it so the stem points towards the bottom, leaving enough room at the top for the hanging hole. -
Create the Imprint:
Taking your rolling pin, roll firmly and evenly directly over the leaf. Don’t be afraid to apply pressure; you want the leaf to become flush with the surface of the clay to capture the finest details. -
Shape the Plaque:
Place your oval cutter or template over the imprinted area, framing the leaf pleasingly in the center. Cut the shape cleanly. If using a knife, keep the blade vertical to avoid beveled edges. -
Reveal the Design:
Carefully lift the corner of the leaf stem and peel the leaf away from the clay. Do this slowly to ensure no plant matter gets stuck in the deep grooves.
Warping Woes?
If the edges curl up while drying, place a lightweight book on top of the clay (sandwiching it between parchment paper) once it’s semi-dry but still leathery.
Step 2: Refining & Finishing
-
Add Suspension Point:
Use a straw or a skewer to punch a hole at the top center of the oval. Make sure the hole isn’t too close to the edge to prevent cracking later. -
Smooth the Edges:
Dip your finger in a tiny bit of water and run it along the cut outer edge of the oval to smooth out any roughness or sharp corners left by the cutting tool. -
Drying Process:
Move the plaque to a drying rack. Let it dry completely for 24-48 hours. To keep it flat, turn it over gently every few hours so both sides dry at the same rate. -
Sanding:
Once fully dry and hard, use fine-grit sandpaper to buff the edges and surface. Be careful not to sand over the leaf texture itself, just the surrounding smooth area. -
Prepare the Wash:
Mix a small amount of brown acrylic paint with water (about a 1:5 ratio) to create a watery antiquing wash. -
Apply the Antiquing:
Brush the wash over the entire leaf imprint, ensuring the liquid pools into the deep veins and recesses. -
Wipe Back:
Immediately use a damp paper towel or sponge to wipe the surface paint away. The brown pigment will stay trapped in the sunken lines of the leaf, creating depth and definition while leaving the high points light. -
Seal (Optional):
If you want to protect the finish, apply a thin coat of matte varnish. -
Final Assembly:
Cut a length of jute twine, thread it through the hole, and tie a secure knot to create the hanging loop.
Add Subtle Shimmer
Mix a tiny amount of gold mica powder into your sealing varnish. It catches the light on the raised veins for a sophisticated, sun-kissed look.
Hang your botanical relief in a spot where the side light will catch the texture and bring the fossilized details to life


Raised Line Mandala Wall Tile
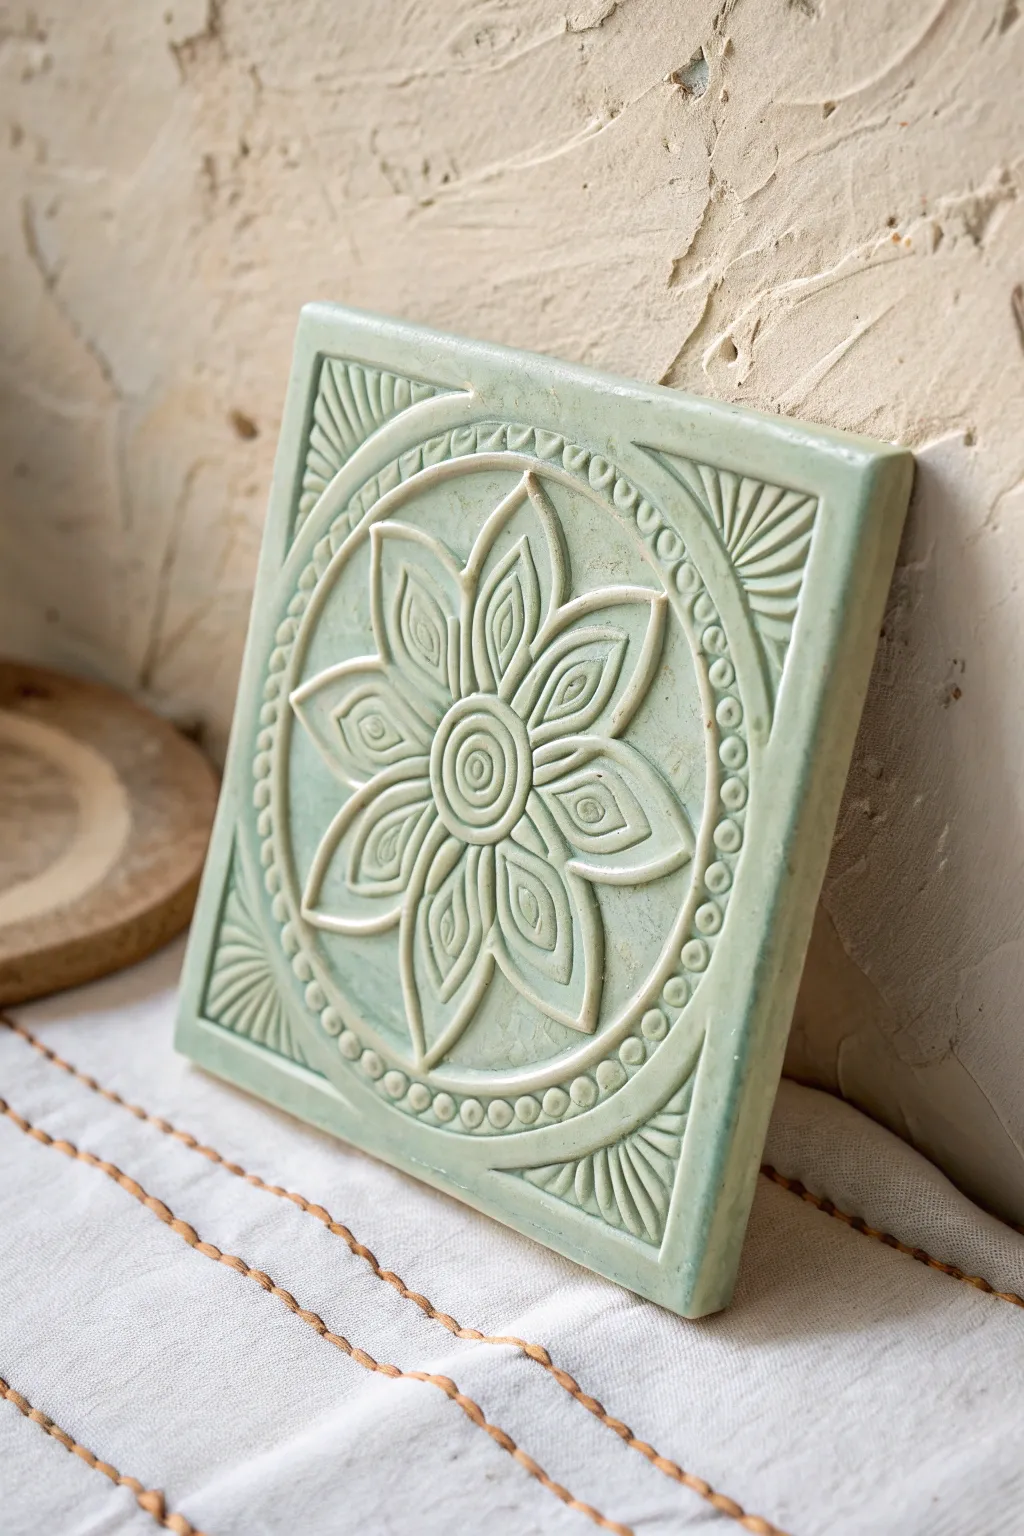
This elegant square tile features a soothing pale green glaze that pools beautifully in the recesses of a raised mandala design. The symmetrical floral motif and radiating geometric patterns create a sense of calm and structure, perfect for a subtle wall accent.
How-To Guide
Materials
- White or light-colored earthenware clay (low-fire)
- Rolling pin
- Two wooden guide strips (approx. 1/4 inch thick)
- Square tile cutter or ruler and craft knife
- Needle tool
- Small loop carving tool
- Ball stylus tool (small and medium)
- Compass
- Sponge
- Celadon or translucent pale green glaze
- Kiln (or air-dry clay and varnish for a non-fired version)
Step 1: Shaping the Tile Base
-
Prepare the slab:
Begin by wedging your clay to remove air bubbles, then place it between two wooden guide strips on a canvas surface. Roll the clay out until the rolling pin rests on the strips, ensuring a perfectly even thickness. -
Cut the square:
Using a square cutter or a ruler and knife, cut the slab into a crisp square shape, approximately 6×6 inches. Clean up the edges with a slightly damp sponge to remove any sharp burs.
Step 2: Drafting the Design
-
Mark the center:
Use a ruler to lightly find the exact center of the tile. Make a tiny pinprick mark to guide your compass. -
Scribe the circles:
Using a compass with a light touch, scribe three concentric circles. The smallest will be the flower center, the middle defines the petal tips, and the largest creates the beaded border. -
Sketch the flower:
Lightly scratch in an eight-petaled flower shape. Draw a central spiral, then eight large petals reaching the middle circle, and smaller tear-drop shapes inside each petal. -
Add corner details:
In the four corners outside the main circle, sketch fan-like shapes radiating inward toward the center.
Clean Lines Tip
Wait until the clay is ‘leather hard’ before doing the finest carving. It crumbles less and allows for much sharper, cleaner lines than wet clay.
Step 3: Carving and Relief Work
-
Carve the background:
Using a small loop tool, gently carve away the negative space around the flower petals and between the border lines. You want the design lines to remain raised while the background is recessed. -
Refine the petals:
Use the needle tool to deepen the lines defining the petals and the internal teardrop shapes. Smooth the edges of the raised areas with a damp finger so they look embossed rather than sharp. -
Create the beaded border:
Take a medium-sized ball stylus and press it firmly into the clay along the outer circular border. Space the impressions evenly to create a continuous ring of raised dots or beads. -
Detail the corners:
Use the needle tool or a small sculpting tool to press varying lines into the corner fans, giving them a textured, ribbed appearance. -
Smooth the surface:
Once the carving is refined, take a very slightly damp sponge and gently wipe the entire surface to soften tool marks and unify the texture. I find this step crucial for that professional, soft finish.
Make It A Set
Create a triptych by making two more tiles with slightly different floral centers but identical borders and corners for a cohesive wall display.
Step 4: Glazing and Finishing
-
Bisque fire:
Allow the tile to dry slowly under plastic for a few days to prevent warping, then bisque fire it according to your clay body’s specifications. -
Apply the glaze:
Choose a translucent celadon or pale green glaze. Brush on two to three coats, ensuring the glaze gets into all the carved recesses. -
Wipe back (optional):
If your glaze is opaque, lightly wipe the raised surfaces with a damp sponge after application. This leaves more pigment in the grooves and highlights the relief texture. -
Final firing:
Glaze fire the piece to the appropriate cone temperature. The glaze should pool in the carved areas, creating depth and varying shades of green.
Hang this serene tile in a spot where natural light can catch the subtle ridges and glaze depths


Minimalist Geometric Tile Grid

Bring modern, tactile warmth to your walls with this grid of nine distinct clay tiles. Featuring a mix of raised relief circles, etched linear patterns, and bold black accents, this project celebrates the imperfect beauty of handcrafted minimalism.
Step-by-Step
Materials
- Air-dry clay (white or light terracotta, approx. 2-3kg)
- Square cookie cutter (4×4 or 5×5 inch) or cardboard template
- Rolling pin
- Two wooden guide strips (approx. 1/4 inch thick) for consistent thickness
- Clay carving tools (needle tool, loop tool, wire cutter)
- Ruler and protractor
- Sponge and small bowl of water
- Fine-grit sandpaper
- Black acrylic paint
- Small flat brush and detail brush
- Matte spray varnish
- Heavy-duty mounting tape or framing adhesive
Step 1: Preparation and Base
-
Condition the Clay:
Begin by wedging your air-dry clay thoroughly to remove air bubbles. This ensures a smooth surface and prevents cracking later. -
Roll the Slabs:
Place your wooden guide strips on either side of the clay ball. Roll the clay out until the rolling pin rests on the strips, guaranteeing a perfectly even thickness across all tiles. -
Cut the Squares:
Using your square cutter or a sharp knife with a cardboard template, cut out nine identical squares. Smooth the cut edges with a damp finger or sponge to soften any sharpness.
Step 2: Sculpting the Patterns
-
Plan the Layout:
Lightly sketch your nine designs onto paper first. Note that three tiles feature concentric circles, two rely on intersecting diagonals, and others mix linear etching with bold shapes. -
Carve the Circles:
For the circular designs, use a needle tool or compass to lightly trace concentric rings. I find using bottle caps or jar lids as press molds creates cleaner initial impressions than freehand drawing. -
Deepen the Relief:
Use a ribbon or loop tool to carve out the clay between the rings, creating raised ridges. V-shaped tools work best for the sharper, linear pyramid designs found on the center tile. -
Etch Linear Textures:
For tiles with striped sections, use a ruler to press straight, varying lines into the soft clay. Vary the depth to create visual interest where the light hits. -
Create Texture Contrast:
On the bottom-left tile with the ‘X’ shape, use a stiff bristle brush to stipple the surface, giving it a rougher, stone-like texture compared to the smooth geometric lines. -
Refine Edges:
Go over every carved groove with a slightly damp brush to remove clay crumbs and smooth out the tool marks before setting them aside.
Preventing warping
Flip your tiles over every 12 hours during the drying phase. Uneven drying causes corners to lift, creating a rocking tile.
Step 3: Finishing and Mounting
-
Slow Drying:
Lay the tiles on a wire rack or flat board covered with paper towels. Cover them loosely with plastic wrap for the first 24 hours to prevent curling, then let them air dry completely for 2-3 days. -
Sanding:
Once fully dry and chalky white, gently sand the edges and main surfaces with fine-grit sandpaper to achieve a professional, finished look. -
Painting Accents:
Using black acrylic paint, carefully fill in the specific geometric sections shown in the reference: the opposing triangles on the hourglass shape, the large corner triangle, and the bottom corner section. -
Seal the Work:
Spray all tiles with a matte varnish. This seals the clay, protects the paint, and makes the tiles easier to dust later without adding an unnatural shine. -
The Grid Install:
On your wall, mark a grid using a pencil and level. Apply heavy-duty mounting tape to the back of each tile and press them firmly into place, spacing them about 1/2 inch apart.
Think outside the box
Instead of black paint, try using gold leaf or a metallic copper paint on similar sections for a luxe, mid-century modern twist.
Step back and admire how the changing daylight casts shifting shadows across your custom relief sculpture grid.

The Complete Guide to Pottery Troubleshooting
Uncover the most common ceramic mistakes—from cracking clay to failed glazes—and learn how to fix them fast.
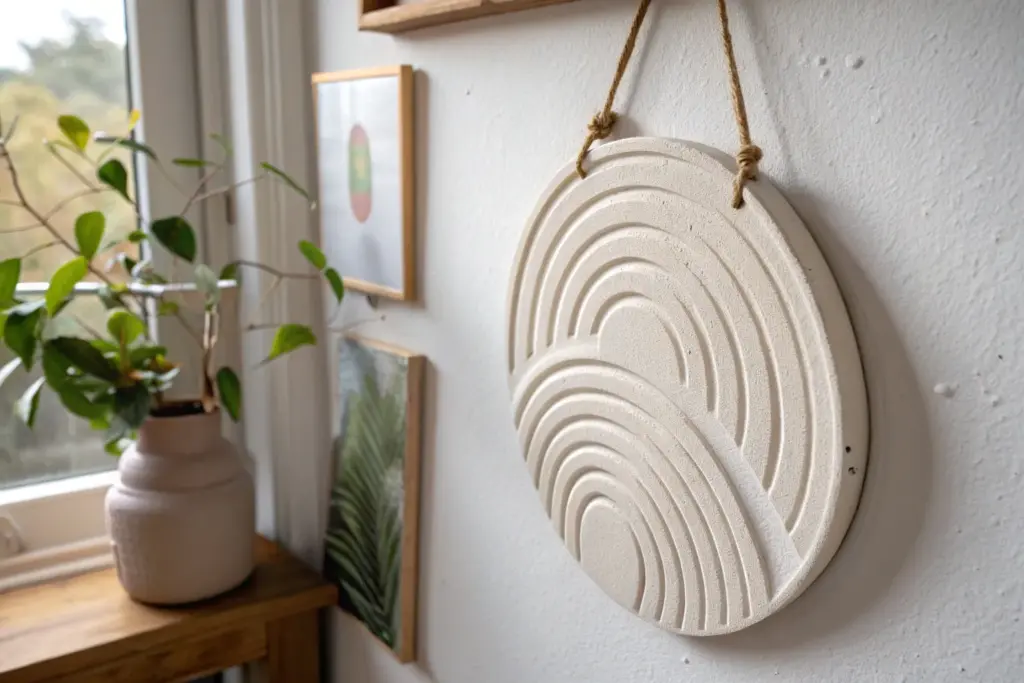
Sculpted Flower Relief Bouquet
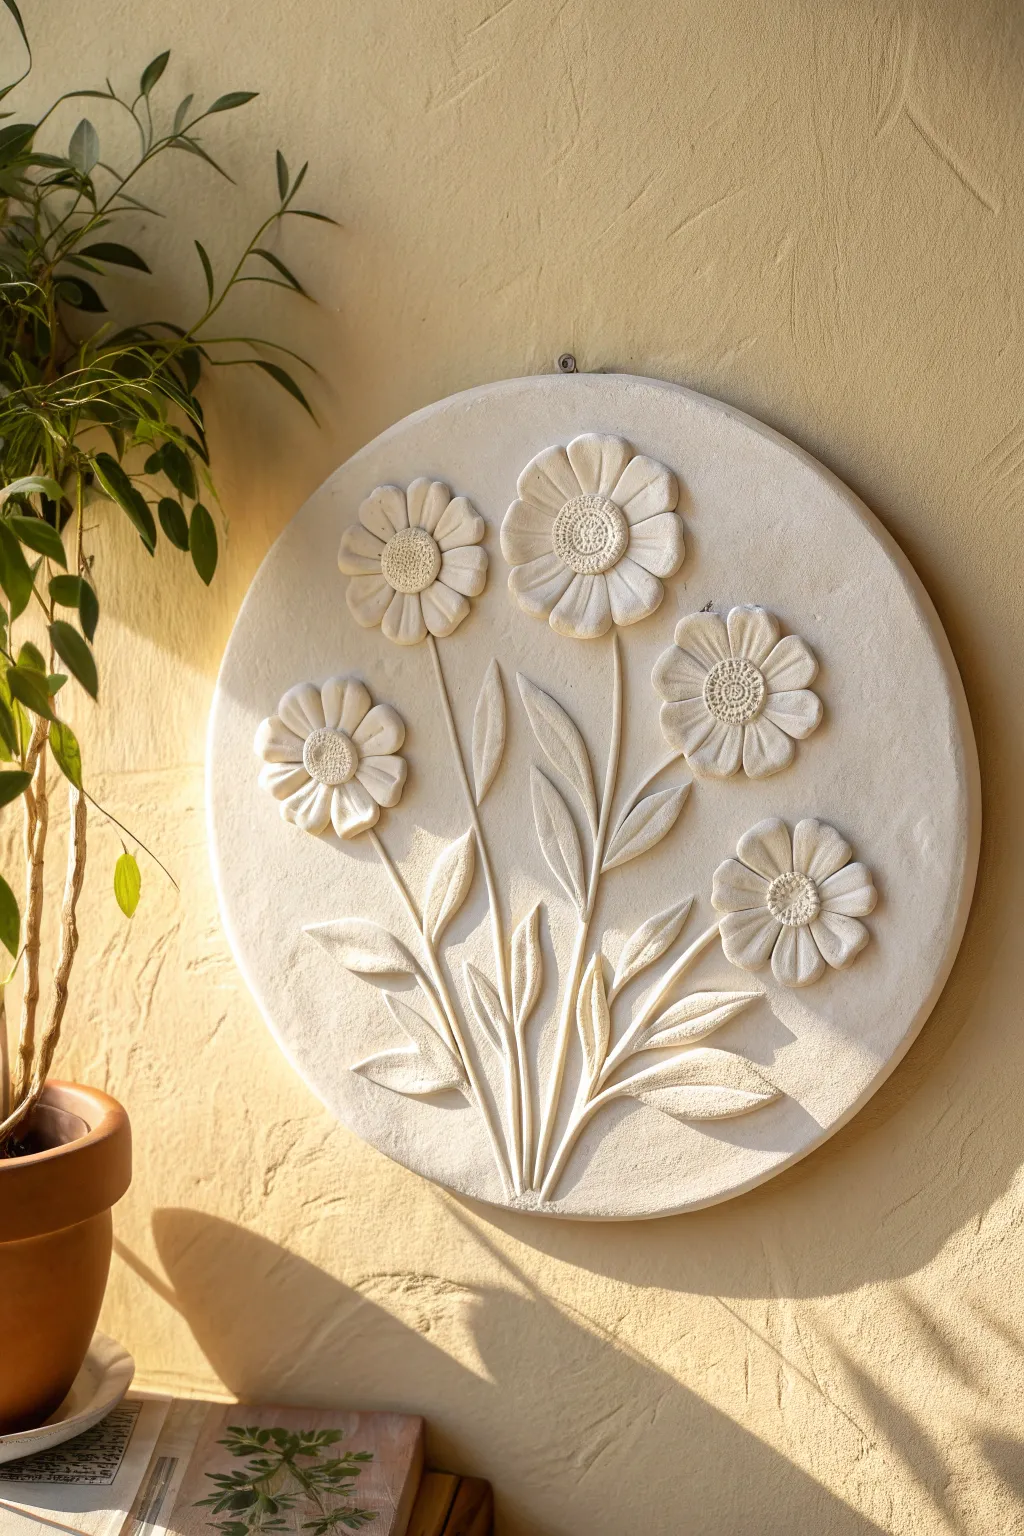
Capture the delicate beauty of a wildflower bouquet with this elegant clay bas-relief project. The result is a stunning, textured round artwork that brings a touch of organic botanical charm to any wall space.
How-To Guide
Materials
- Air-dry clay (white or stone color) or polymer clay
- Rolling pin
- Circle cutter or a round bowl to use as a template (approx. 10-12 inches)
- Clay sculpting tools (needle tool, ball stylus, loop tool)
- Small cup of water (for smoothing)
- Canvas mat or parchment paper (to work on)
- Fine-grit sandpaper
- Acrylic paint (matte cream or off-white) and paintbrush (optional)
- Small picture hanging hardware or strong adhesive hook
Step 1: Forming the Base
-
Prepare your workspace:
Lay down your canvas mat or parchment paper to prevent sticking. Knead a large ball of air-dry clay until it is warm and pliable, removing any air bubbles. -
Roll the slab:
Roll out the clay to a consistent thickness of about 1/2 inch. You want the base to be sturdy enough to hang but not excessively heavy. -
Cut the circle:
Place your large circle template or bowl onto the clay slab. Use a needle tool or knife to cut cleanly around the edge to create your round ‘tondo’ background. -
Smooth the edges:
Dip your finger in a little water and run it along the cut edge of the circle to smooth out any roughness or sharp corners.
Crack Control
If small cracks appear while drying, don’t panic! Mix a tiny bit of fresh clay with water to make a paste and fill the cracks, then smooth over.
Step 2: Sculpting the Flowers
-
Sketch the layout:
Lightly trace the positions of your five flower heads and stems onto the wet clay slab using a needle tool. I like to keep the arrangement slightly asymmetrical for a natural look. -
Create stem coils:
Roll thin snakes of clay for the stems. Attach them to your traced lines using the ‘score and slip’ method (scratching both surfaces and adding a drop of water) to ensure they stick permanently. -
Form the petals:
Roll small teardrop shapes for the flower petals. Flatten them slightly with your thumb. You will need about 7-10 petals for each flower. -
Attach the petals:
Arrange the petals in a circle at the top of each stem, pressing them gently onto the base. Overlap them slightly or vary their angles to create dimension. -
Detail the petals:
Use a sculpting tool to press a central vein line down the middle of each petal, giving them that characteristic daisy shape. -
Add the centers:
Roll small balls of clay for the flower centers. Flatten them slightly and press them into the middle of the petals. -
Texture the centers:
Use a needle tool or a stiff-bristled brush to stipple tiny dots into the flower centers, mimicking the texture of pollen.
Level Up: Antique Look
After painting white, apply a diluted brown wash into the crevices of the relief and wipe away the excess on top to highlight the carved details.
Step 3: Adding Foliage
-
Shape the leaves:
Create larger, elongated teardrop shapes for the leaves. Flatten them and pinch the ends to sharpen the points. -
Attach leaves to stems:
Score and slip the leaves onto the main base, positioning them branching off the stems near the bottom half of the bouquet. -
Carve leaf veins:
Use your needle tool to carve a central vein and smaller branching veins into each leaf for realistic detail. -
Refine the relief:
Look over the entire piece. Use a damp brush to smooth out any fingerprints or harsh transitions where the added clay meets the base.
Step 4: Finishing Touches
-
Let it dry slowly:
Allow the piece to dry flat in a cool area away from direct sunlight. This can take 24-48 hours. Flipping it gently halfway through helps prevent warping. -
Sand imperfections:
Once fully cured and bone dry, use fine-grit sandpaper to gently smooth the outer rim and any unintentional rough spots on the petals. -
Paint (Optional):
For a uniform finish like the photo, apply a coat of matte cream or white acrylic paint. This unifies the texture of the base and the relief elements. -
Add hanging hardware:
Secure a hanging loop to the back using strong epoxy glue, or if you made a hole before drying, thread a ribbon through.
Hang your botanical relief near a window to let the changing daylight highlight the beautiful shadows and depth of your sculpture
Bird-on-a-Branch Relief Plaque
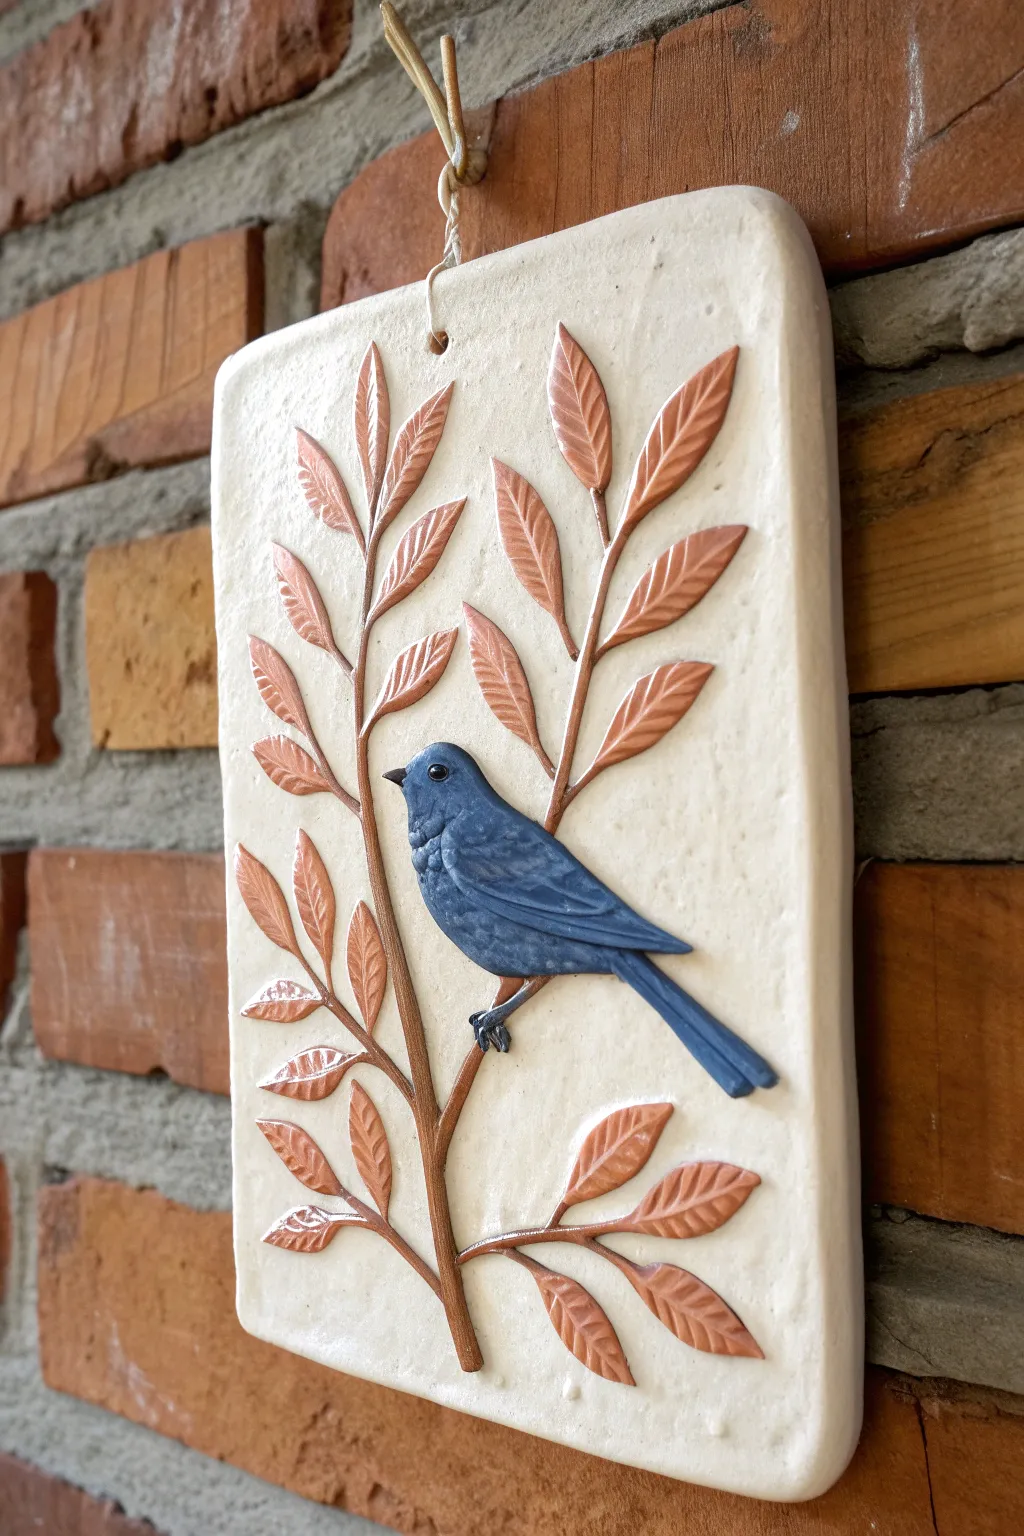
Capture the stillness of nature with this elegant clay wall hanging featuring a detailed relief sculpture. The contrast between the matte cream background, metallic bronze leaves, and deep blue bird creates a timeless piece perfect for bringing a touch of the outdoors inside.
Step-by-Step Guide
Materials
- White polymer clay or air-dry clay (approx. 1 lb)
- Clay rolling pin
- Rolling guides or slat sticks (1/4 inch thick)
- Rectangular clay cutter or ruler and craft knife
- Sculpting tools (needle tool, ball stylus, rubber shaper)
- Acrylic paints (Cream/Off-White, Deep Blue, Black, Metallic Bronze/Copper)
- Fine detail paintbrushes
- Small piece of clear wire or twine for hanging
- Sandpaper (fine grit)
- Matte spray varnish
Step 1: Creating the Base
-
Condition the clay:
Begin by thoroughly conditioning your white clay until it is soft and pliable. If using polymer clay, warm it in your hands to prevent cracking. -
Roll out the slab:
Using your rolling pin and 1/4-inch guides, roll out a uniform slab of clay. The guides are crucial here to ensure the plaque has an even thickness for stability. -
Cut the rectangle:
Use a rectangular cutter or measure and cut a rectangle approximately 4×6 inches using your ruler and craft knife. Smooth the cut edges with your finger or a little water to soften any sharpness. -
Add hanging holes:
Pierce two small holes near the top center of the rectangle using a needle tool or straw. Position them about half an inch from the top edge to support the weight of the finished piece.
Clay Shrinkage
Most clay shrinks when drying. If your slab curls while drying, place a light board (like a book protected by parchment paper) on top during the first 12 hours of drying to keep it flat.
Step 2: Sculpting the Design
-
Form the main branch:
Roll thin coils of clay to create the branches. Gently press a long, slightly curved coil onto the clay slab, starting from the bottom center and reaching upward. Flatten it slightly to adhere. -
Attach secondary stems:
Add smaller offshoot branches on either side of the main stem using thinner coils, blending the seams where the clay pieces join to make the connection look organic. -
Shape the leaves:
Create small tear-drop shapes from tiny balls of clay. Flatten them slightly and press them onto the ends of the stems. -
Detail the foliage:
Using a needle tool, carefully score a central vein down each leaf. Add tiny, angled textural lines branching from the center vein to mimic realistic leaf patterns. -
Base shape for the bird:
Form a larger teardrop shape for the bird’s body and press it onto the branch. The bird should be slightly thicker than the leaves to create a true relief effect. -
Refine the bird:
Smooth the clay to define the head and beak. I like to use a small rubber shaper tool here to gently delineate the wing shape folded against the body. -
Add feather texture:
Use a needle tool or a stiff brush to press faint lines into the wing and tail area, suggesting feathers without getting too fussy with the details. Add a tiny indentation for the eye.
Antique Effect
Dilute dark brown paint with water to make a ‘wash.’ Brush it over the textured leaves and quickly wipe it off with a paper towel. The dark paint stays in the crevices.
Step 3: Finishing and Painting
-
Dry or Bake:
Follow the manufacturer’s instructions for your specific clay. If using air-dry clay, let it dry for at least 24-48 hours. If using polymer, bake at the recommended temperature. -
Sand edges:
Once fully cured and cool, lightly sand the outer edges of the rectangular plaque to ensure a professional, clean finish. -
Paint the background:
Apply a coat of cream or off-white acrylic paint to the entire background, carefully working around the raised relief elements. A second coat may be needed for full opacity. -
Paint the leaves:
Using a fine brush, carefully paint the branches and leaves with metallic bronze or copper paint. The metallic sheen adds a beautiful contrast to the matte background. -
Paint the bird:
Paint the bird using a deep blue acrylic. You might want to mix a tiny bit of grey into the blue for the underside to create a subtle shadow effect. -
Final details:
Use the tip of a toothpick or a size 000 brush to add a tiny black dot for the eye and a small highlight of white to make it look alive. Paint the beak a dark charcoal or black. -
Seal the piece:
Once all paint is completely dry, spray the entire plaque with a matte varnish to protect the surface and unify the sheen. -
Add the hanger:
Thread a piece of rustic twine or wire through the top holes and knot it securely to complete your wall art.
Hang your relief plaque near a window where natural light can play across the sculpted textures.


What Really Happens Inside the Kiln
Learn how time and temperature work together inside the kiln to transform clay into durable ceramic.
Sun and Moon Medallions
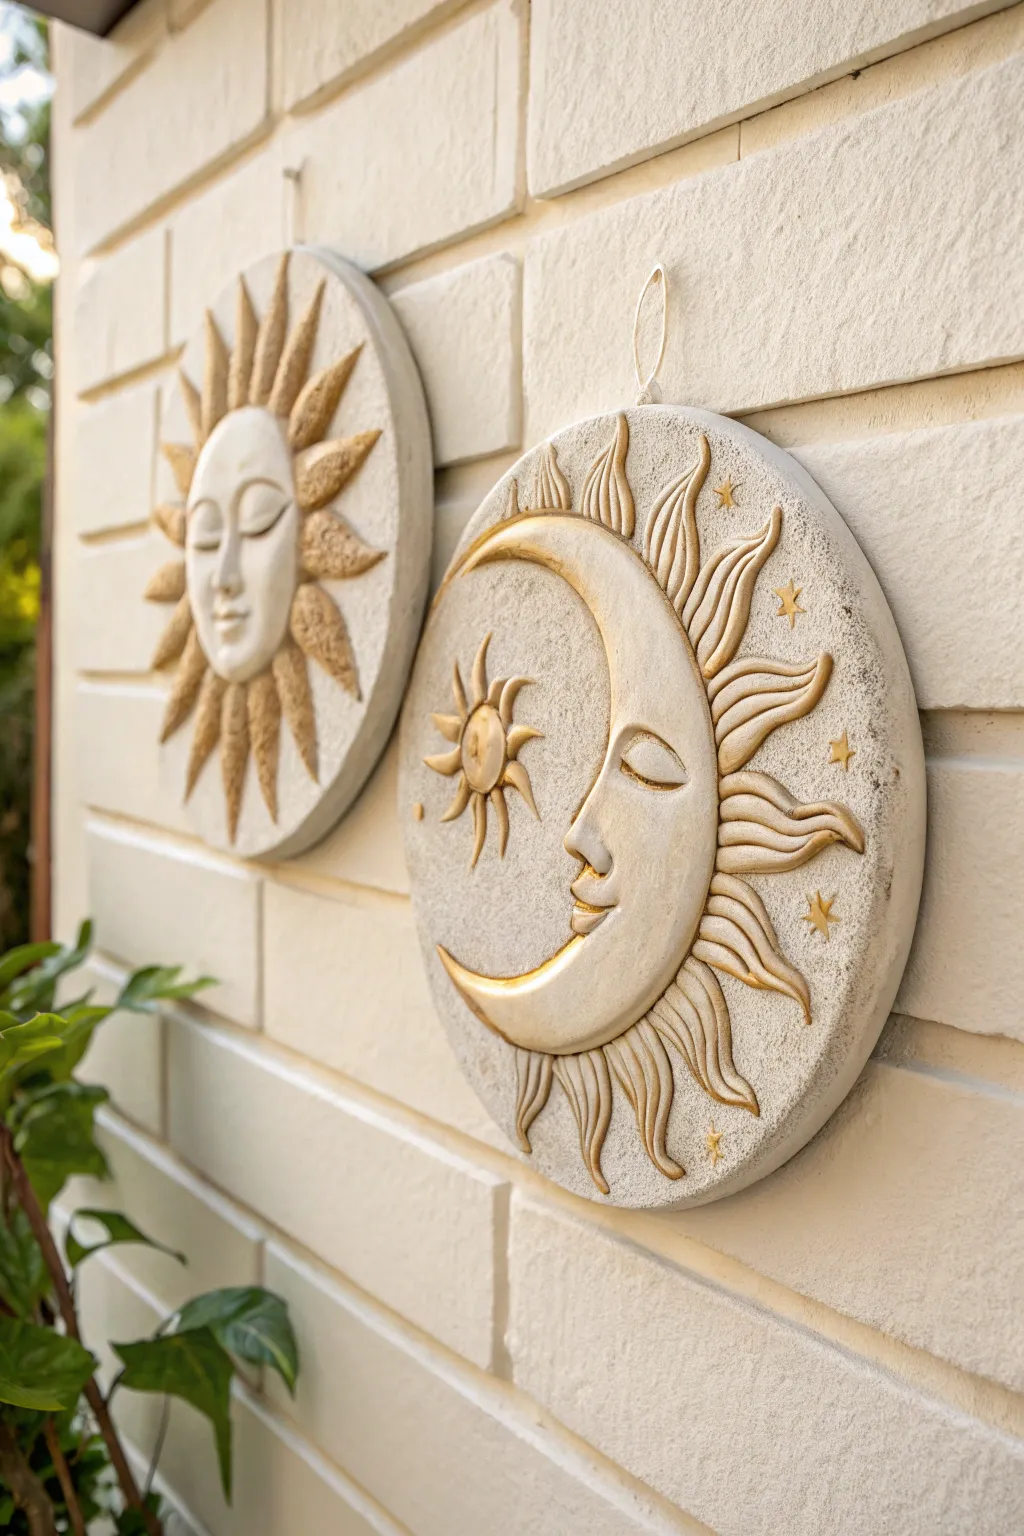
These serene celestial medallions bring a touch of cosmic magic to any garden wall or patio space. Combining the warmth of the sun and the mystery of the moon, this project uses air-dry clay and simple sculpting techniques to create textured, weather-resistant reliefs with subtle golden highlights.
Detailed Instructions
Materials
- White air-dry clay (e.g., DAS or Crayola)
- Two round wooden plaques or sturdy cardboard circles (approx. 8-10 inches)
- Rolling pin
- Sculpting tool set (needle tool, loop tool, smoothing tool)
- Small cup of water (for slip and smoothing)
- Acrylic paints (White, Cream, Metallic Gold)
- Paintbrushes (flat brush and fine detail brush)
- Clear matte outdoor varnish or sealant
- Strong craft glue or E6000
- Sandpaper (fine grit)
- Hanging hardware (d-rings or wire)
Step 1: Base Preparation and Sun Face
-
Prepare the substrate:
Begin by sanding your round wooden plaques to ensure a good surface for adhesion. Wipe away any dust with a damp cloth. -
Roll the clay base:
Roll out a slab of clay about 1/4 inch thick. Cut it into a circle slightly smaller than your wooden base. Keep the texture slightly rough or pockmarked to mimic stone. -
Attach the base:
Apply a thin layer of glue to the center of the plaque and press your clay circle firmly onto it. Alternatively, score the wood and use a clay slip if working directly on porous surfaces. -
Form the sun’s central face:
Roll a ball of clay and flatten it into a thick disc for the sun’s face. Place this in the center of your first medallion. -
Sculpt facial features:
Use your thumbs to press eye sockets gently. Add a small snake of clay for the nose and blend the edges smooth. Carve a gentle smile and closed eyelids using a needle tool. -
Create the sun rays:
Roll several tapered snakes of clay to serve as sun rays. Arrange them radiating outward from the face, alternating between longer and shorter rays. -
Detail the rays:
Flatten the rays slightly onto the background. Use a textured tool or an old toothbrush to stipple the surface of the rays, giving them a gritty, sandstone appearance.
Step 2: Sculpting the Crescent Moon
-
Form the crescent shape:
For the second medallion, roll a thick log of clay and curve it into a ‘C’ shape. Flatten it slightly, ensuring one end is thicker for the face profile. -
Define the profile:
On the inner curve of the crescent, sculpt a nose, lips, and closed eye. I find using a small loop tool helps carve out the negative space cleanly. -
Add radiating flames:
similar to the sun, create wavy, flame-like shapes radiating from the outer edge of the moon. These shoulder be curved and fluid to suggest motion. -
Include celestial details:
Roll a tiny ball, flatten it, and trim edges to create a small sun or starburst on the flat space opposite the moon face. Add small clay stars scattered around the background. -
Refine textures:
Smooth the faces of both the sun and moon with a little water on your finger until they look porcelain-smooth, contrasting with the rougher background texture. -
Drying time:
Let both sculptures dry completely. This usually takes 24-48 hours depending on humidity; flip them occasionally if possible or dry on a wire rack.
Cracks Appearing?
If small cracks appear while drying, mix a slurry of clay and vinegar into a paste. Fill the cracks, smooth over, and let dry again.
Step 3: Finishing and Painting
-
Sand imperfections:
Once fully dry, lightly sand any sharp edges or unwanted bumps. Be careful around the delicate nose and lip areas. -
Base coat:
Paint the entire surface of both medallions with a mix of white and a tiny drop of cream acrylic to create an off-white, stony base color. -
Apply gold accents:
Using a dry-brush technique, lightly brush metallic gold paint over the rays, the edges of the moon, and the small stars. This highlights the texture without covering the stone look. -
Highlight the faces:
Mix a very watery wash of light grey paint. Apply it to the deep crevices (like the closed eyes and mouth corners) and wipe it away immediately to create depth. -
Seal for protection:
Apply two coats of matte outdoor varnish to protect your work from moisture, especially if these will live outside. -
Add hanging hardware:
Secure a D-ring or strong loop of wire to the back of the wooden plaque using strong epoxy glue or screws.
Go Antiqued
For an aged look, apply a dark brown wash over the dried clay and wipe most of it off with a rag before adding the gold highlights.
Hang your new celestial guardians together on a featured wall and enjoy the peaceful atmosphere they create
Coastal Shell Texture Wall Disc
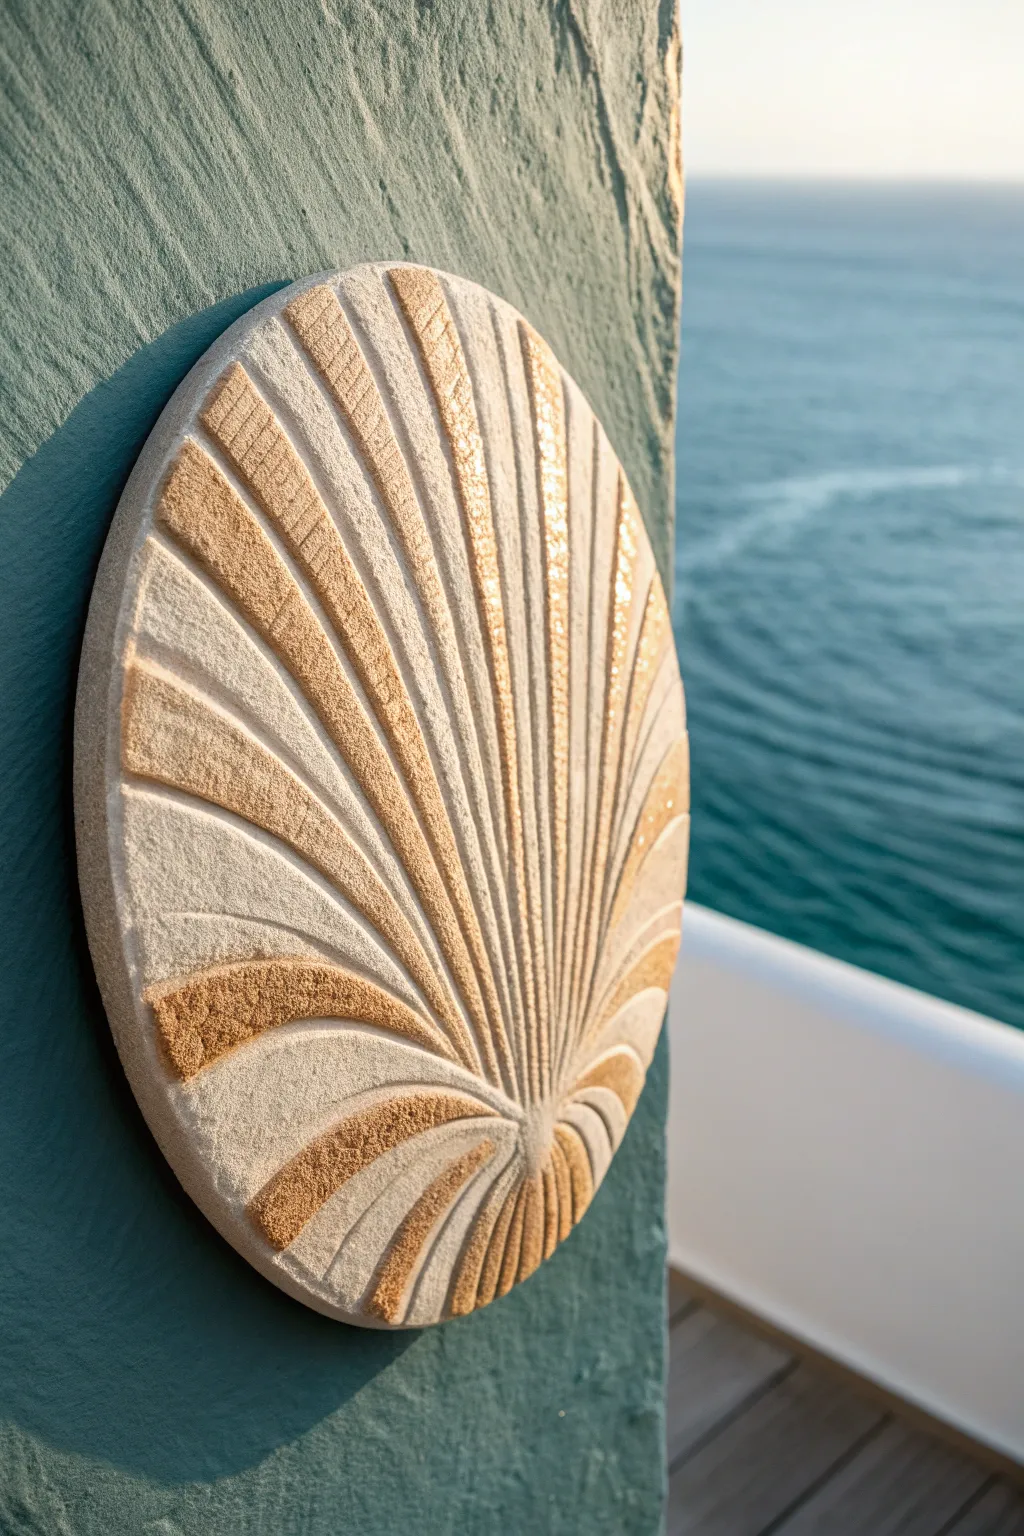
Bring the serene elegance of the ocean to your walls with this textured clay disc, mimicking the radial beauty of a scallop shell. The interplay of smooth pale clay and rough golden sand creates a sophisticated coastal accent that feels both modern and timeless.
Step-by-Step Tutorial
Materials
- Air-dry clay (white or light stone color, approx. 1kg)
- Round wooden board or MDF circle (12-14 inches diameter)
- PVA glue or heavy-duty craft adhesive
- Rolling pin
- Sculpting tools (needle tool, ribbon tool, spatula)
- Coarse sand or textured pumice gel
- Acrylic paints (warm beige, white, golden ochre)
- Matte spray sealant
- Sandpaper (fine grit)
- Mixing palette and synthetic brushes
Step 1: Base Preparation
-
Prime the board:
Begin by applying a thin layer of PVA glue to your wooden circle to ensure the clay adheres strongly. Let it become tacky before proceeding. -
Roll the slab:
Roll your air-dry clay out on a flat surface until it is about 1/4 inch thick, ensuring it is large enough to cover your wooden disc. -
Mount and trim:
Carefully lift the clay slab and press it onto the glued wooden board. Use a knife to trim the excess clay flush with the edge of the board, smoothing the rim with a wet finger. -
Smoothing the surface:
Take a moment to smooth the entire face of the clay with a damp sponge or your fingertips to remove any rolling pin marks or fingerprints.
Crack Control
If small cracks appear while drying, fill them with a ‘slip’ made of clay dissolved in vinegar. Smooth over and let dry again.
Step 2: Sculpting the Design
-
Mark the focal point:
Identify a point near the bottom edge of the circle (not the dead center) to serve as the hinge of the shell. Mark this lightly with a needle tool. -
Draft radial lines:
Lightly sketch curved lines radiating outward from your focal point to the top and side edges, fanning them out to mimic the segments of a scallop shell. -
Carve the relief:
Using a ribbon tool or carving loop, gently carve out every other segment. You want to create distinct channels between the raised ridges. -
Refine the ridges:
Go back over your raised sections. I find using a damp sculpting spatula helps to round off the sharp edges, giving them a softer, weathered stone look. -
Add deep grooves:
Use a needle tool to deepen the very center lines between the segments for added definition. -
Create texture variability:
For the recessed areas you just carved, press a stiff-bristled brush or a texture sponge into the damp clay to create a pitted, sandy surface.
Step 3: Finishing and Coloring
-
Dry thoroughly:
Allow the piece to dry completely. This usually takes 24-48 hours depending on humidity; flip it occasionally if possible to prevent warping. -
Sand the high points:
Once dry, lightly sand the raised ridges with fine-grit sandpaper to make them ultra-smooth, contrasting with the textured valleys. -
Mix the sandy texture:
Mix your golden ochre acrylic paint with coarse sand or a pumice medium to create a thick, gritty paste. -
Paint the valleys:
Carefully paint this gritty mixture into the recessed channels of the shell design. The texture should look like accumulated sand. -
Highlight the ridges:
Paint the smooth, raised ridges with a mix of white and warm beige. Apply this in thin layers to keep it looking like natural stone rather than painted plastic. -
Dry brush for unity:
Lightly dry brush a tiny bit of the lighter color over the textured areas to highlight the ‘sand’ grains. -
Seal the artwork:
Finish with a coat of matte spray sealant to protect the clay and hold the sandy texture in place.
Metallic Accent
Add a hint of luxury by gently brushing gold leaf adhesive on just the rough textured valleys, then applying diluted gold leaf.
Hang your relief on a colored wall to let the neutral tones pop and bring a calming beach vibe to your space.

TRACK YOUR CERAMIC JOURNEY
Capture glaze tests, firing details, and creative progress—all in one simple printable. Make your projects easier to repeat and improve.
Clay-Framed Mini Mirror Accent
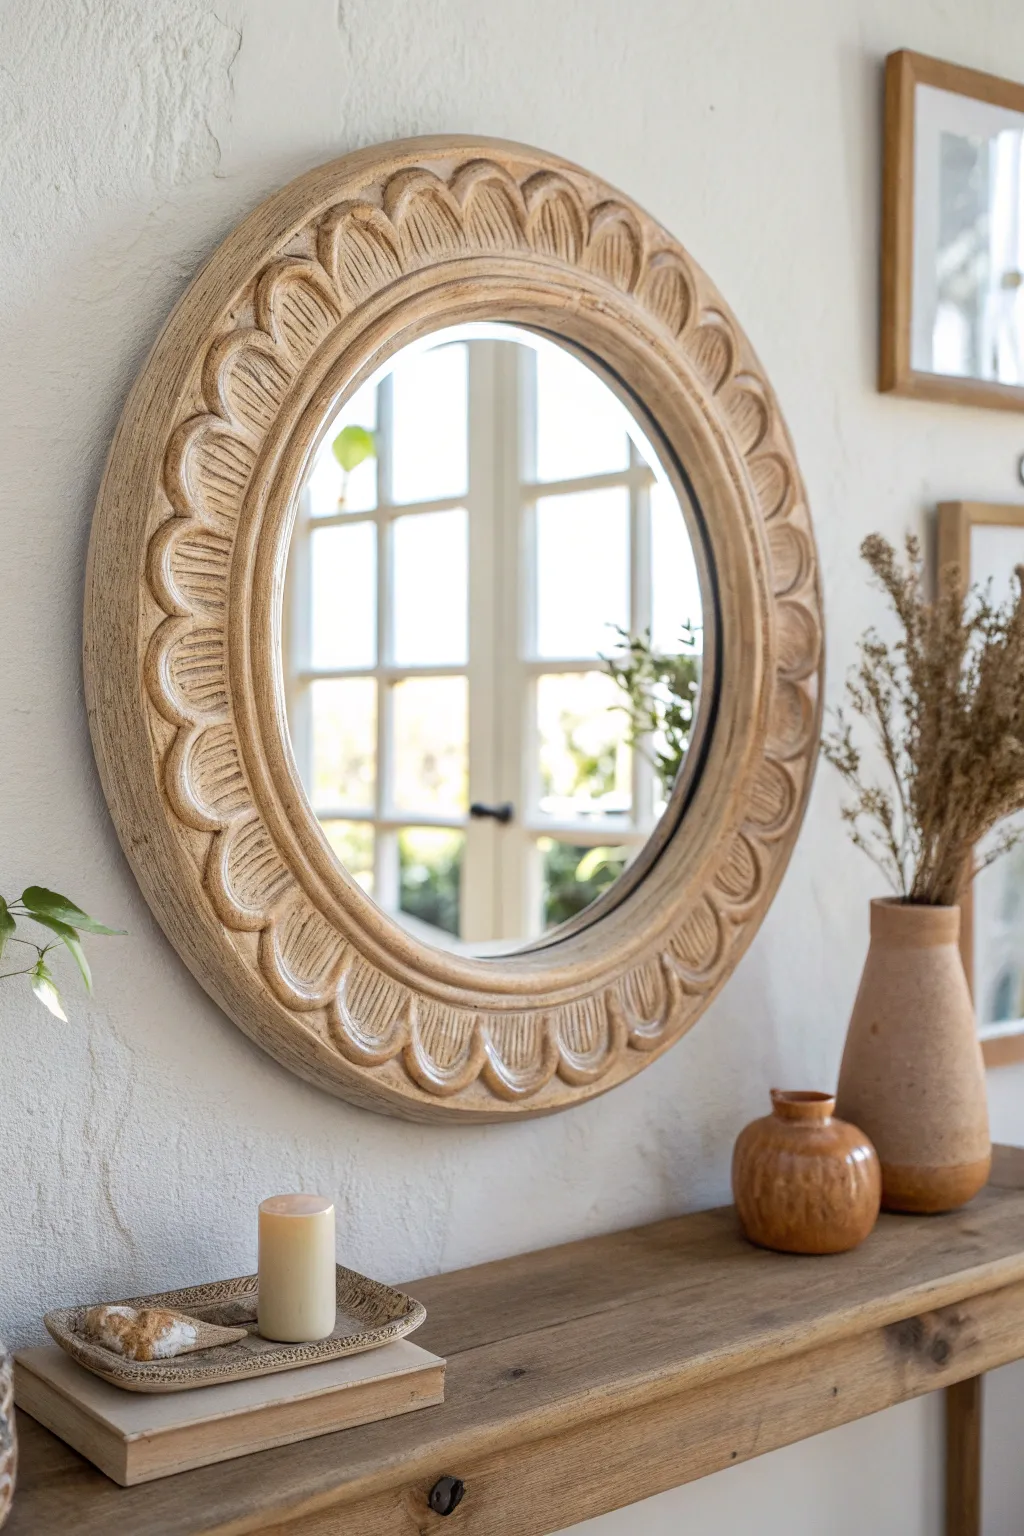
Transform a plain round mirror into a stunning focal point with a handcrafted clay frame that mimics carved wood. This project features a repetitive scallop design and a textured antique finish, bringing organic warmth to any room.
Step-by-Step
Materials
- Round mirror (approx. 10-12 inches diameter)
- Air-dry clay (white or terracotta)
- Plywood or MDF backing board (2 inches wider than mirror)
- Strong construction adhesive (e.g., E6000)
- Rolling pin
- Clay sculpting tools (loop tool and needle tool)
- Bowl of water
- Sandpaper (medium and fine grit)
- Acrylic paints (cream, beige, tan, dark brown)
- Glazing medium
- Paintbrushes (flat and detail brushes)
- Clear matte sealant spray
- Picture hanging hardware
Step 1: Preparation and Base Structure
-
Prepare the backing foundation:
Cut your plywood or MDF into a circle that is approximately 3-4 inches larger in diameter than your mirror glass. This extra width will support the clay frame. Sand the edges smooth. -
Mount the mirror:
Center the mirror glass onto the wooden backing. Use a strong construction adhesive to secure it in place. Let this cure fully according to the glue manufacturer’s instructions before moving on. -
Condition the clay:
Take a large chunk of air-dry clay and knead it thoroughly until it is warm and pliable. This prevents cracking later on. I like to keep a damp cloth nearby to keep my hands slightly moist while working.
Crack Prevention
Cover the drying clay with a loose plastic bag for the first 24 hours. This slows evaporation and significantly reduces the chance of large shrinkage cracks forming.
Step 2: Sculpting the Scalloped Frame
-
Roll out the base coil:
Roll thick snakes of clay, about 1.5 inches thick. Flatten them slightly with a rolling pin to create a long, thick strip. Apply a thin layer of PVA glue or adhesive to the exposed wood border around the mirror. -
Apply the clay border:
Lay the clay strip onto the wood rim, buttressing it right up against the edge of the mirror glass. Smooth the seams where clay strips join using a little water and your fingers. -
Establish the outer shape:
Use a modeling tool or your fingers to slope the clay downwards toward the outer edge of the wood, creating a convex, domed profile for the frame. -
Mark the scallop guides:
Using a ruler or spacing tool, lightly mark even intervals around the entire circumference of the clay ring. These marks will be the center points of your scallops. -
Carve the scallop details:
Use a large loop tool to carve out the curved indentations between each mark. Press firmly to create deep, definitive grooves that separate each ‘petal’ shape. -
Refine the petal shapes:
Use a damp sponge or your fingers to round off the top of each scallop. They should look soft and organic, not sharp. -
Add surface texture:
To mimic the carved wood grain seen in the inspiration, take a needle tool or a stiff bristle brush and drag it lengthwise along each scallop heavily. Create deep, parallel striations. -
Clean up the inner rim:
Run a smooth modeling tool around the inner edge where the clay meets the glass to ensure a clean, professional line. Wipe away any smudges on the glass immediately.
Gilded Touch
For a luxe update, lightly brush some gold rubbing wax or metallic gold paint specifically onto the highest ridges of the scallops after the dark wash dries.
Step 3: Finishing and Painting
-
Allow specifically long drying time:
Because the clay is thick, let the frame dry for at least 48-72 hours. Avoid heat sources which can cause cracking; slow, air drying is best. -
Sand imperfections:
Once bone dry, lightly sand any sharp burrs or rough patches on the edges. Be careful not to sand away the wood-grain texture you created. -
Apply the base coat:
Paint the entire frame with a creamy beige acrylic paint. Ensure you get the paint into all the deep textures and cracks. Let this layer dry completely. -
Mix an antiquing glaze:
Mix a dark brown acrylic paint with glazing medium (or water, if you work fast) to create a translucent wash. -
Apply the wash:
Brush the dark wash over the frame, working in sections. The dark color should settle into the carved lines and texture marks. -
Wipe back the glaze:
Immediately use a damp rag to wipe the dark paint off the raised surface areas. This leaves the dark color only in the recesses, highlighting the texture and creating that aged wood look. -
Seal the piece:
Finish with a clear matte spray sealant to protect the clay from moisture and dust. -
Attach hardware:
Secure a heavy-duty D-ring or hanging wire to the back of the wood base.
Hang your beautiful new mirror in an entryway or above a console to reflect light and add artisan charm
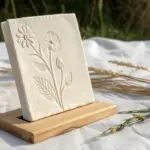
Clay-Embellished Picture Frame
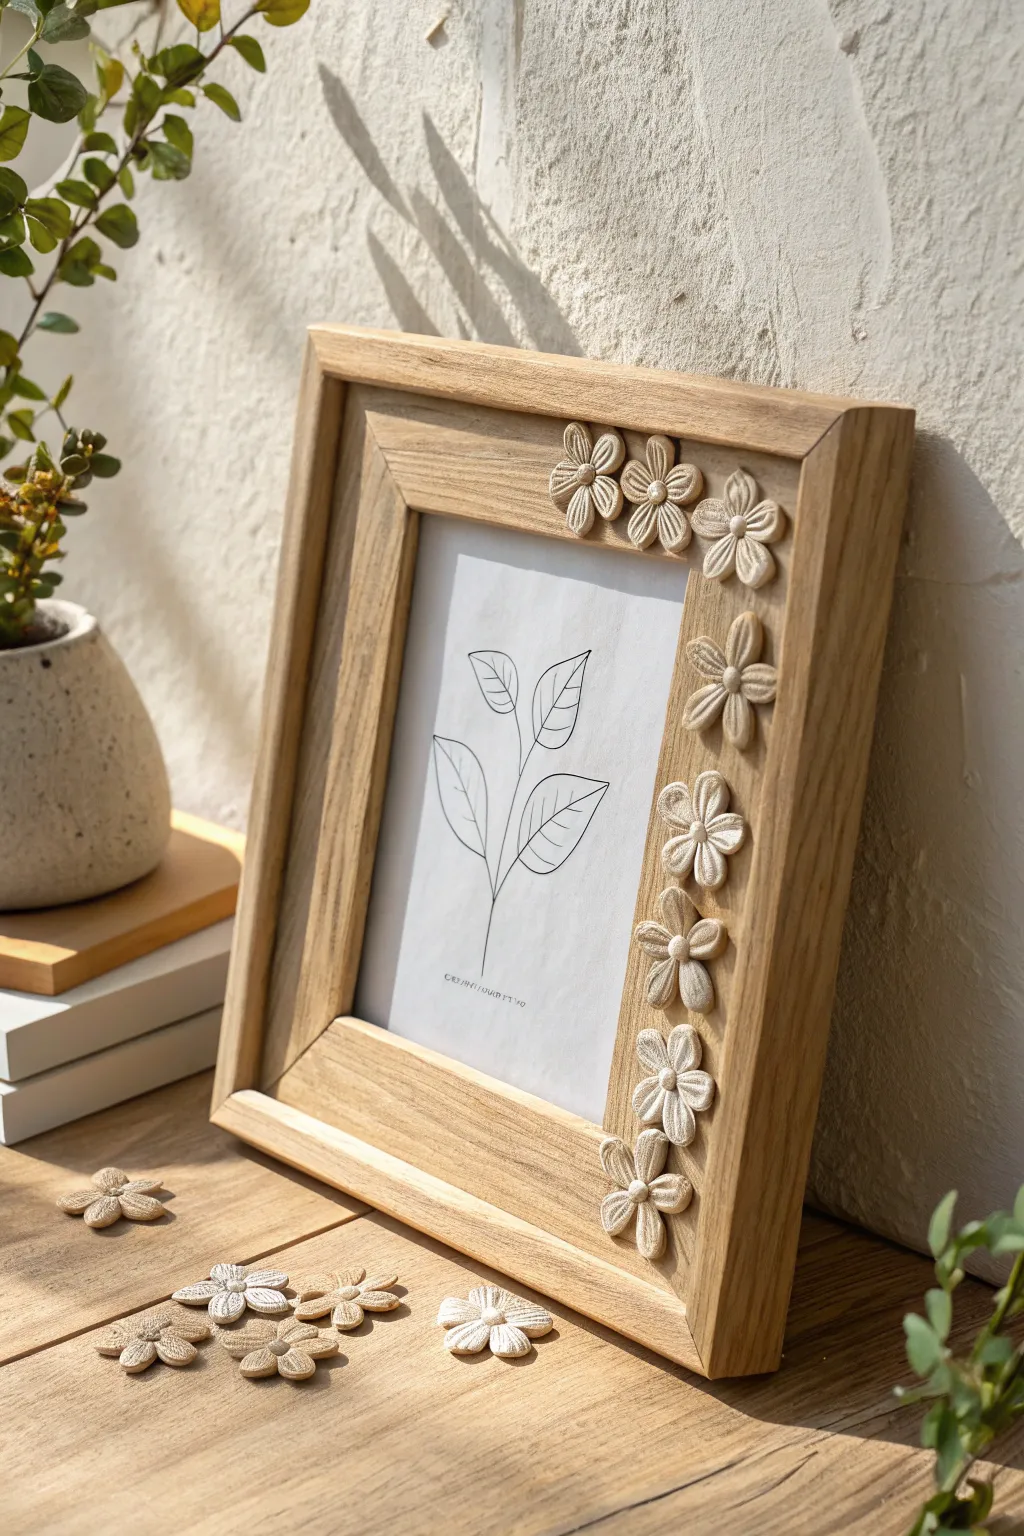
Transform a plain wooden frame into a textural masterpiece by adding delicate clay flowers. This simple project combines the warmth of natural wood with the soft, matte finish of air-dry clay to create a charming border perfect for minimalist botanical art.
Step-by-Step Guide
Materials
- Plain wooden picture frame (light oak or pine finish)
- White or beige air-dry clay (or polymer clay)
- Small floral cookie cutters (optional)
- Sculpting tools or a toothpick
- Rolling pin
- Strong craft glue (E6000 or wood glue)
- Fine-grit sandpaper
- Clear matte varnish (optional)
- Botanical line drawing print or artwork
Step 1: Preparing the Clay Flowers
-
Condition the clay:
Begin by taking a chunk of your air-dry clay and kneading it in your hands until it becomes soft, pliable, and free of cracks. -
Form small spheres:
Pinch off small pieces of clay and roll them into varying sizes of balls, aiming for roughly 1/2 inch to 3/4 inch in diameter to start. -
Flatten into discs:
Gently press each ball flat against your work surface to create a thick disc shape, which will become the base of your flower. -
Divide the petals:
Using a toothpick or a small knife tool, press indentations around the edge of the disc to mark where the five or six petals will be. -
Sculpt petal shapes:
Carefully pinch the clay between each indentation to define the individual petals, smoothing the edges with your fingertip to round them out. -
Add detail lines:
Press a clean toothpick or sculpting tool gently down the center of each petal, starting from the middle of the flower and pulling outward to create a textured vein. -
Create the center:
Roll a tiny ball of clay or press the end of a round tool into the very center of the flower to create the stamen area. -
Make variations:
Repeat this process to make about 7-10 flowers, varying the sizes slightly for a more organic look; I like to make a few half-flowers to place right at the edge of the frame. -
Drying phase:
Lay all your finished clay pieces on a piece of parchment paper and allow them to dry completely according to the package instructions, usually 24-48 hours.
Step 2: Assembling the Frame
-
Prep the frame:
While the clay dries, take your wooden frame and ensure the surface is clean and dry; if the wood feels rough, give it a quick pass with fine-grit sandpaper. -
Layout design:
Before gluing, arrange your dried clay flowers on the frame to finalize the composition, clustering them primarily on the top right and bottom right corners. -
Cascading effect:
Try to arrange the flowers so they look like they are tumbling down the right side, leaving the left side of the frame mostly bare for contrast. -
Apply adhesive:
Place a dab of strong craft glue on the back of the first flower. -
Secure the corner:
Press the flower firmly onto the top corner of the frame, holding it for a few seconds to ensure the glue tacks. -
Glue the cascade:
Working your way down the right side, glue the remaining flowers in your predetermined arrangement, ensuring some overlap onto the inner edge of the frame. -
Cleanup:
Check for any excess glue squeezing out from under the flowers and wipe it away immediately with a damp cloth or cotton swab. -
Insert artwork:
Once the glue is fully cured, disassemble the back of the frame, clean the glass, and insert your botanical line drawing. -
Final reassembly:
Secure the backing onto the frame, being careful not to put too much pressure on the front where the clay flowers are attached.
Smoother Petals
Dip your finger in a tiny bit of water (or baby oil for polymer clay) while sculpting. This smooths out fingerprints and cracks instantly for a professional finish.
Textured Centers
Instead of a smooth center, press a piece of textured fabric or a mesh screen into the very middle of the flower for realistic pollen texture.
Hang your new frame in a sunny spot to let the shadows play across the textured petals
Marbled Clay Wall Clock Face
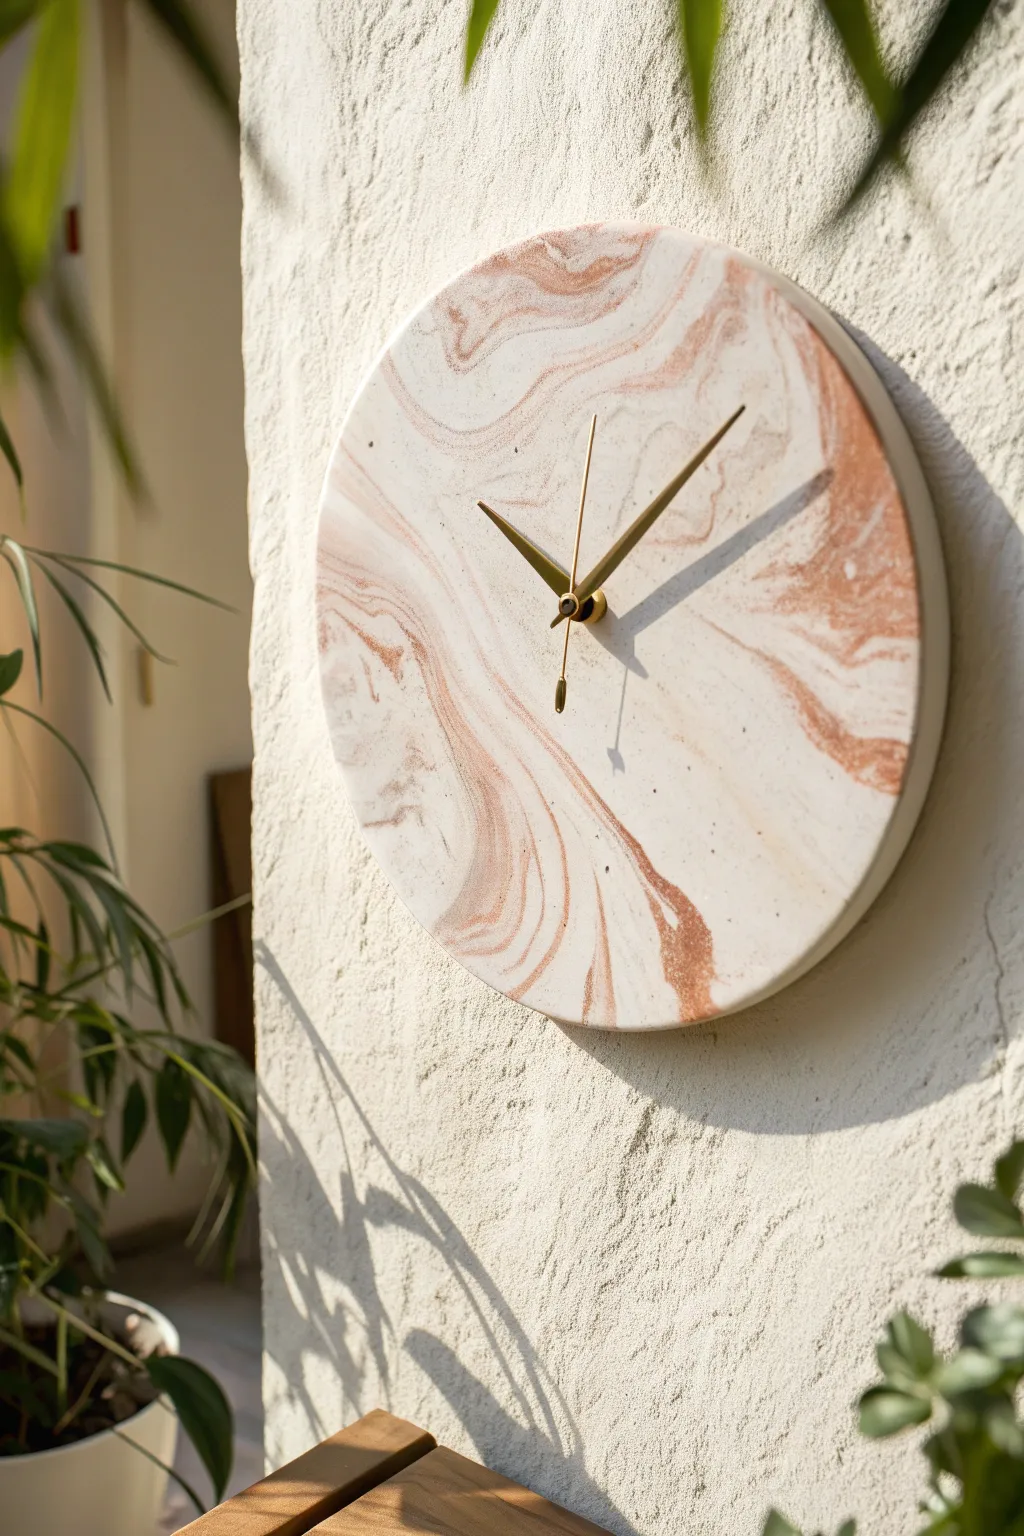
Transform simple polymer clay into a functional piece of modern art with this elegant marbled wall clock. The swirling copper and cream tones create a sophisticated stone-like effect that looks far more expensive than it is to make.
Step-by-Step
Materials
- White polymer clay (approx. 8oz)
- Translucent polymer clay (approx. 2oz)
- Copper or metallic brown polymer clay (approx. 2oz)
- Acrylic rolling pin or pasta machine
- Round clay cutter or large bowl/plate template (approx. 10-12 inches)
- Craft knife or scalpel
- Clock mechanism kit with gold hands
- Sandpaper (wet/dry, various grits 400-1000)
- Small drill bit or piercing tool
- Parchment paper
- Oven
Step 1: Preparing the Clay
-
Condition the white clay:
Begin by thoroughly kneading the white polymer clay until it is soft, warm, and pliable. This is the bulk of your clock, so ensure there are no air bubbles trapped inside. -
Prepare accent colors:
Condition the translucent and copper clays separately. Roll them into thin snakes or ropes, roughly 6 inches long. -
Create the base log:
Roll your conditioned white clay into a thick log, about 2 inches in diameter. Place the colored ropes of translucent and copper clay along the length of the white log. -
Twist and fold:
Twist the entire log candy-cane style to begin blending the colors. Fold the log in half, roll it smooth again, and twist once more. Repeat this process 3-4 times, but be careful not to over-blend, or you will lose the distinct marble veins.
Muddy Marbling?
If colors are blending into messy gray/brown instead of distinct veins, you are over-mixing. Twist fewer times and stop while stripes are still clearly defined.
Step 2: Forming the Clock Face
-
Roll out the slab:
Form your marbled clay into a ball and begin rolling it out on parchment paper. You want a slab that is approximately 1/4 inch thick. I find using chopsticks as depth guides on either side of the clay helps keep it even. -
Check the pattern:
Examine your rolled slab. If you have any areas that look too plain, you can slice a thin piece from the edge and patch it onto the surface, rolling gently to incorporate it. -
Cut the circle:
Place your round template or large bowl onto the clay slab. Use your craft knife to trace around the edge for a perfect circle. Remove the excess clay. -
Smooth the edges:
Dip your finger in a little water or baby oil and run it along the cut edge of the circle to smooth out any jagged bits or harsh angles. -
Create the center hole:
Measure exactly to the center of your circle. Use a straw or a tool slightly larger than the shaft of your clock movement to punch a hole right in the middle.
Step 3: Baking and Finishing
-
Bake the clay:
Preheat your oven according to the manufacturer’s instructions on your specific brand of clay. Bake the clock face on a ceramic tile or thick glass usually for about 30-45 minutes to ensure strength. -
Cool under weight:
Once removed from the oven, immediately place a heavy book or flat board on top of the still-warm clay circle while it cools. This prevents the clock face from warping. -
Sand the surface:
Once fully cool, use wet sandpaper to polish the surface. Start with 400 grit and work up to 1000 grit under running water to bring out the depth of the translucent clay and sharpness of the marbling. -
Buff (optional):
For an extra glossy stone finish, vigorously buff the surface with a heavy denim cloth or a buffing wheel on a rotary tool. -
Install mechanism:
Insert the clock movement shaft through the back of the hole. Secure it with the washer and nut provided in your kit on the front side. -
Attach the hands:
Press the hour hand onto the shaft first, followed by the minute hand, and finally the second hand (if using). Make sure they are parallel and don’t touch each other as they rotate. -
Testing:
Insert a battery and adjust the time using the dial on the back of the mechanism, rather than pushing the hands manually.
Go for Glamour
Add patches of gold leaf to the raw clay surface just before the final rolling. The leaf will crackle and embed into the clay for a luxe finish.
Hang your new timepiece in a bright spot where the light can catch those subtle copper details
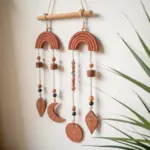
Hanging Clay Charm Wall Hanging
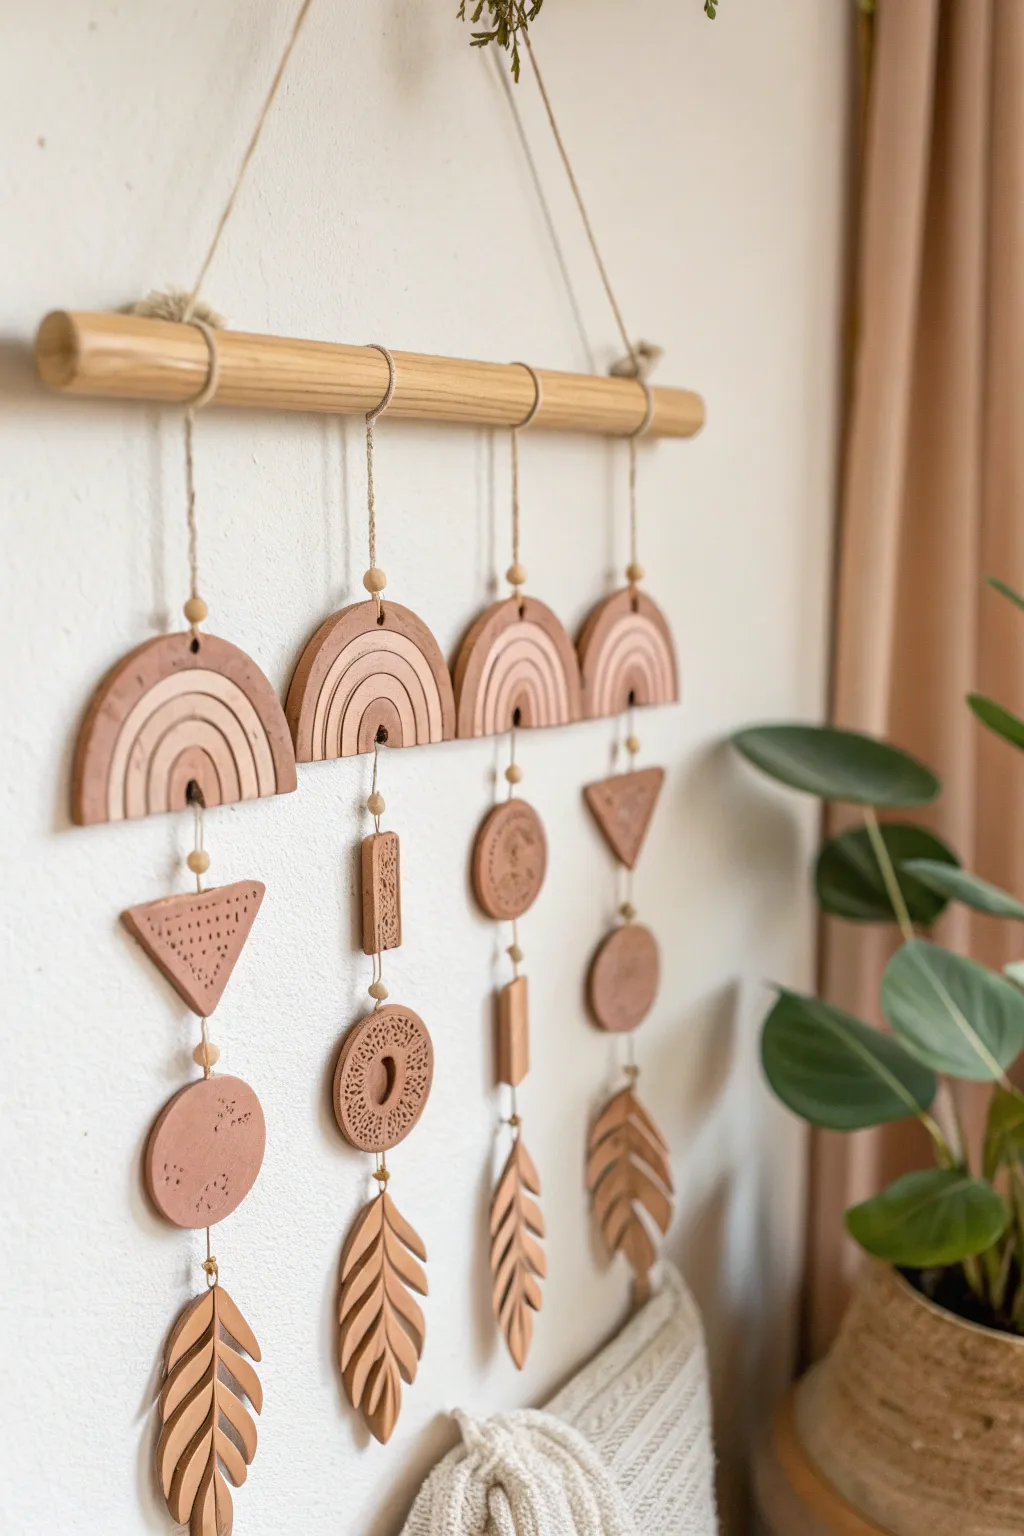
Bring an earthy, tranquil vibe to your space with this stunning multi-strand wall hanging. Featuring handcrafted clay rainbows, geometric shapes, and leaves suspended from a simple wooden dowel, this project combines modern boho aesthetics with tactile warmth.
Step-by-Step Tutorial
Materials
- Terra cotta or brown polymer clay (approx. 4-6 blocks)
- Wooden dowel (12-16 inches long)
- Natural jute twine or hemp cord
- Rolling pin or clay machine
- Clay cutting tools (X-Acto knife or clay blades)
- Cookie cutters (circle, triangle) or cardstock templates
- Texturing tools (toothpicks, stamps, or random household objects)
- Small wooden beads
- Needle tool or cocktail stick (for piercing holes)
- Oven and baking tray
- Sandpaper (optional)
Step 1: Designing and Shaping the Charms
-
Condition the clay:
Begin by warming the clay in your hands and kneading it until it is soft and pliable. This step is crucial preventing cracks later on. -
Roll out the base:
Roll your clay out onto a smooth surface to an even thickness, about 1/4 inch thick. Aim for consistency across all your pieces so they look cohesive. -
Create the rainbows:
For the four rainbow toppers, use a circular cutter to make four large circles, then cut them in half to create semi-circles. Use a dull tool or back of a knife to gently groove slightly curved lines into the surface to mimic stacked arches. -
Cut geometric shapes:
Cut out your middle connecting pieces. You will need a variety of shapes: two triangles, two circles, one rectangle, and two small discs. You can freehand these or use small cutters. -
Sculpt the leaves:
For the bottom weights, cut four elongated oval shapes. Pinch the top and bottom slightly to point them. -
Detail the leaves:
Use a knife tool to score a central vein down each leaf. Then, carefully cut notches out of the sides to create the separated leaf frond look, smoothing the cut edges with your finger. -
Add texture:
This is the fun part where I like to get creative. Use a needle tool to stipple dots onto the circles or triangles, or press a stamp into the clay to create intricate patterns on the connector pieces.
Clean Cuts Every Time
If your clay drags while cutting, put the rolled slab in the fridge for 10 minutes. The firmer clay will slice cleanly without deforming.
Step 2: Refining and Baking
-
Pierce holes for hanging:
Using a needle tool or cocktail stick, careful punch holes in every piece. The rainbows need a hole at the top center and bottom center. Middle pieces need top and bottom holes. Leaves only need a top hole. Make sure the holes are large enough for your twine. -
Smooth the edges:
Dip your finger in a little bit of water (or baby oil if using polymer clay) and gently run it along the cut edges of every piece to remove any jagged bits. -
Bake the clay:
Arrange all pieces on a parchment-lined baking sheet. Follow the temperature and timing instructions on your specific package of clay. Typically, this is around 275°F (135°C) for 15-30 minutes. -
Cool and finish:
Let the clay cool completely on the tray. Once hard, you can lightly sand any rough edges with fine-grit sandpaper if needed.
Fingerprint Fixer
Notice fingerprints on your raw clay? Lightly brush the surface with a little cornstarch or baby powder before baking to buff them out.
Step 3: Assembly
-
Cut the twine:
Cut four lengthy pieces of jute twine. They should be long enough to fold over the dowel and hang down past your longest strand. -
Attach to dowel:
Attach each length of twine to the wooden dowel using a lark’s head knot. Space them evenly across the rod. -
String the first charm:
Start with the rainbow pieces. Thread the twine through the top hole, add a small wooden bead if you like, and knot it securely behind or above the piece to hold it in place. -
Connect middle sections:
Continue threading down. Add a few inches of space, tie a knot, thread a wooden bead, then add your geometric connector piece. Repeat this rhythm based on the design shown: some strands have one middle piece, some have two. -
Attach the leaves:
Finish each strand by tying on a leaf charm at the very bottom. Trim any excess string close to the knot. -
hang the mobile:
Cut a final piece of twine to serve as the main hanger. Tie each end securely to the far ends of the wooden dowel depending on how low you want it to hang against the wall.
Now you have a beautiful, organic piece of art ready to add warmth to your favorite wall.
Clay Disc Garland Wall Swag

Bring a touch of earthy elegance to your walls with this alternating terracotta and white clay garland. The stamped botanical motifs and natural twine create a warm, textural piece that embodies rustic simplicity.
How-To Guide
Materials
- Air-dry clay (terracotta color)
- Air-dry clay (white color)
- Small rolling pin
- Circle cookie cutter (approx. 2-3 inches)
- Jute twine or hemp cord
- Botanical stamps (leaves, ferns, sprigs)
- Plastic straw or bamboo skewer
- Fine-grit sandpaper
- Parchment paper or craft mat
- Small bowl of water
- Acrylic matte sealer (optional)
Step 1: Prepping and Cutting
-
Condition the terra cotta clay:
Start by taking a chunk of your terracotta-colored air-dry clay. Knead it in your hands for a minute or two until it feels pliable and warm, which helps prevent cracks later. -
Roll it out:
Place the clay on a sheet of parchment paper. Use your rolling pin to flatten it into an even slab, aiming for a thickness of about 1/4 inch so the discs feel substantial but not too heavy. -
Cut the circles:
Using your circle cookie cutter, punch out as many discs as you need for your desired length. For a standard garland, 6-8 terracotta discs is a good starting point. -
Repeat with white clay:
Clean your roller and work surface, then repeat the conditioning, rolling, and cutting process with the white air-dry clay to create an equal number of white discs. -
Smooth the edges:
Dip your finger lightly into a small bowl of water and run it around the circumference of each cut circle. This smooths out any jagged bits left by the cutter for a professional finish.
Stamp Release Trick
If your stamp sticks to the wet clay, lightly dust the stamp surface with cornstarch or baby powder before pressing it down. This acts as a release agent for a crisp impression.
Step 2: Stamping and Piercing
-
Position the stamps:
Select a botanical stamp, such as a fern or leaf sprig. Press it firmly into the center of a terracotta disc. Apply even pressure to ensure all the veins and details transfer clearly. -
Vary the designs:
Switch up your stamps or rotate the angle of the impression for each disc. I like to have some leaves leaning left and others right to create a sense of natural movement. -
Add holes for hanging:
Use a plastic straw or a thick skewer to punch two holes in each disc: one at the very top and one at the very bottom. Make sure the holes are at least 1/4 inch away from the edge to prevent tearing. -
Clean up the holes:
If the straw pulled up any messy bits of clay on the back, gently smooth them down with your finger. Ensure the hole is wide enough for your jute twine to pass through easily. -
Allow to dry:
Lay all the discs flat on parchment paper in a cool, dry place. Let them dry completely according to the package directions, usually 24-48 hours. Carefully flip them halfway through to ensure even drying.
Add Metallic Flair
For a luxe touch, use a fine paintbrush to fill the recessed stamp impressions with liquid gold leaf or metallic copper paint after the clay has fully dried.
Step 3: Finishing and Assembly
-
Sand imperfections:
Once the discs are bone dry, take a piece of fine-grit sandpaper and very gently buff the edges. This removes any final roughness or sharp points. -
Seal the clay (optional):
If you want extra protection or a slight sheen, apply a thin coat of matte acrylic sealer to the front and back of each disc. -
Measure the twine:
Cut a long length of jute twine. It’s better to cut it too long (around 4-5 feet) and trim it later than to run out of rope mid-project. -
Start the knotting:
Tie a knot at the top end of your twine to create a hanging loop. Thread the twine through the top hole of your first disc (let’s start with a terracotta one). -
Secure the disc:
Pull the twine down across the back of the disc and out through the bottom hole. Tie a simple overhand knot right below the disc to hold it in place. -
Add the next tier:
Measure about 1-2 inches of space below that knot, then tie another knot. This second knot will be the ‘stopper’ for the top hole of your next disc. -
Continue the pattern:
Thread on a white disc, passing the twine through the top, down the back, and out the bottom. Keep repeating this alternating color pattern until all discs are attached. -
Final trim:
Once your last disc is secured with a final knot at the bottom, trim any excess twine, leaving a small tail for a rustic look.
Hang your new garland near a window or alongside dried flowers to enjoy the organic warmth it brings to your space
Geometric Clay Mobile for the Wall
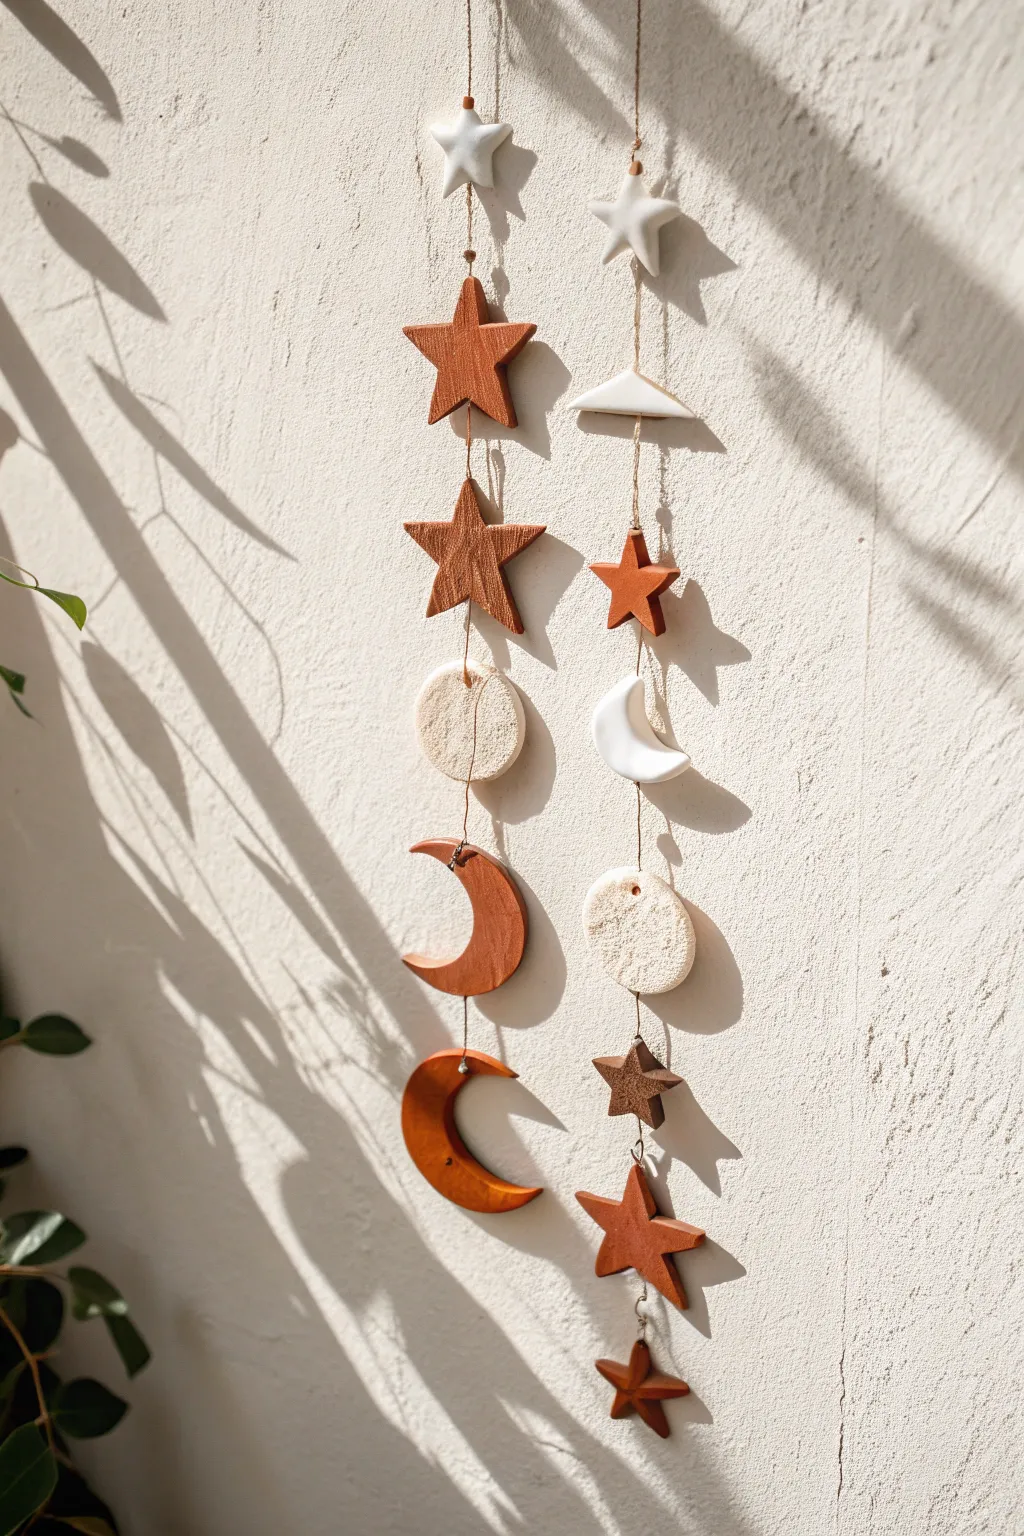
Bring a touch of the cosmos into your home with these charming vertical mobiles featuring stars, moons, and abstract shapes. The mix of terracotta tones, bright white, and speckled textures creates an earthy, bohemian aesthetic that looks beautiful catching the sunlight.
Detailed Instructions
Materials
- Air-dry clay or polymer clay (terracotta color)
- Air-dry clay or polymer clay (white)
- Rolling pin
- Parchment paper or canvas mat
- Cookie cutters (various sized stars, moon, circle)
- Knife or clay cutting tool
- Drinking straw or skewer
- Sandpaper (fine grit)
- Jute twine or heavy string
- Wooden beads (optional, small)
- Texturing tool (old toothbrush or sponge)
Step 1: Shaping the Elements
-
Prepare your workspace:
Lay down parchment paper or a canvas mat to prevent sticking. Decide if you are making two strands like the photo or just one, and plan your sequence of shapes. -
Roll the terracotta clay:
Start with the terracotta-colored clay. Roll it out to an even thickness of about 1/4 inch (6mm). Aim for consistency so the pieces have the same visual weight. -
Cut the terracotta shapes:
Using cookie cutters or a sharp knife and template, cut out several stars (large and medium) and crescent moons. For the moons, you can use a circle cutter twice to create the crescent shape. -
Roll the white clay:
Clean your rolling pin and surface to avoid color transfer, then roll out the white clay to the same 1/4 inch thickness. -
Create white and textured shapes:
Cut out small stars, crescents, and circles from the white clay. To replicate the speckled look seen in the photo, take a few white circles and press a dry sponge or toothbrush into the surface to give it a rough, stone-like texture. -
Pierce holes:
While the clay is still wet, carefully poke holes through each piece using a straw or skewer. For vertically hanging shapes, ensure the hole goes through the top and bottom center. For top or bottom anchor pieces, you only need one hole. -
Smooth the edges:
Dip your finger in a little water and gently run it along the cut edges of each shape to soften any sharp corners for a more finished look. -
Dry completely:
Place all pieces on a flat surface to dry. If using air-dry clay, this usually takes 24-48 hours. Flip them occasionally to ensure even drying and prevent warping.
Fixing large holes
If your drilled hole is too big for a knot, thread a small bead underneath the clay piece. The bead will catch the knot and support the weight.
Step 2: Assembly
-
Sand imperfections:
Once fully dry (and baked, if using polymer), lightly sand any rough edges with fine-grit sandpaper. I find doing this outdoors helps keep dust off your work surface. -
Layout the design:
Arrange your dried pieces on a table in the desired vertical order to visualize the final strand. Mix the terracotta, white, and textured pieces for balance. -
Begin stinging:
Cut a long length of jute twine, allowing extra at the top for a hanging loop. Start at the bottom-most shape. Thread the twine through and tie a sturdy knot underneath it to secure the base. -
Add spacing knots:
Determine how much space you want between the bottom piece and the next one up. Tie a simple overhand knot in the twine at that location. This knot will hold the next clay piece in place. -
Thread the next piece:
Slide the next clay shape down the string until it rests on the knot you just created. If the hole is large, you might need to insert a small wooden bead or washer between the knot and the clay to prevent slipping. -
Repeat the process:
Continue tying knots at measured intervals and threading your stars, moons, and circles until the strand is complete. -
Create the top loop:
Once the top shape is secured, tie a loop at the very end of the twine for hanging. Trim any excess string from the bottom knot for a clean finish.
Faux stone effect
Mix dried tea leaves or cracked black pepper into your white clay before rolling it out to create realistic organic speckles.
Hang your mobile near a window where the light can cast beautiful geometric shadows across your wall
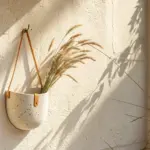
Wall Pocket Planter in Clay
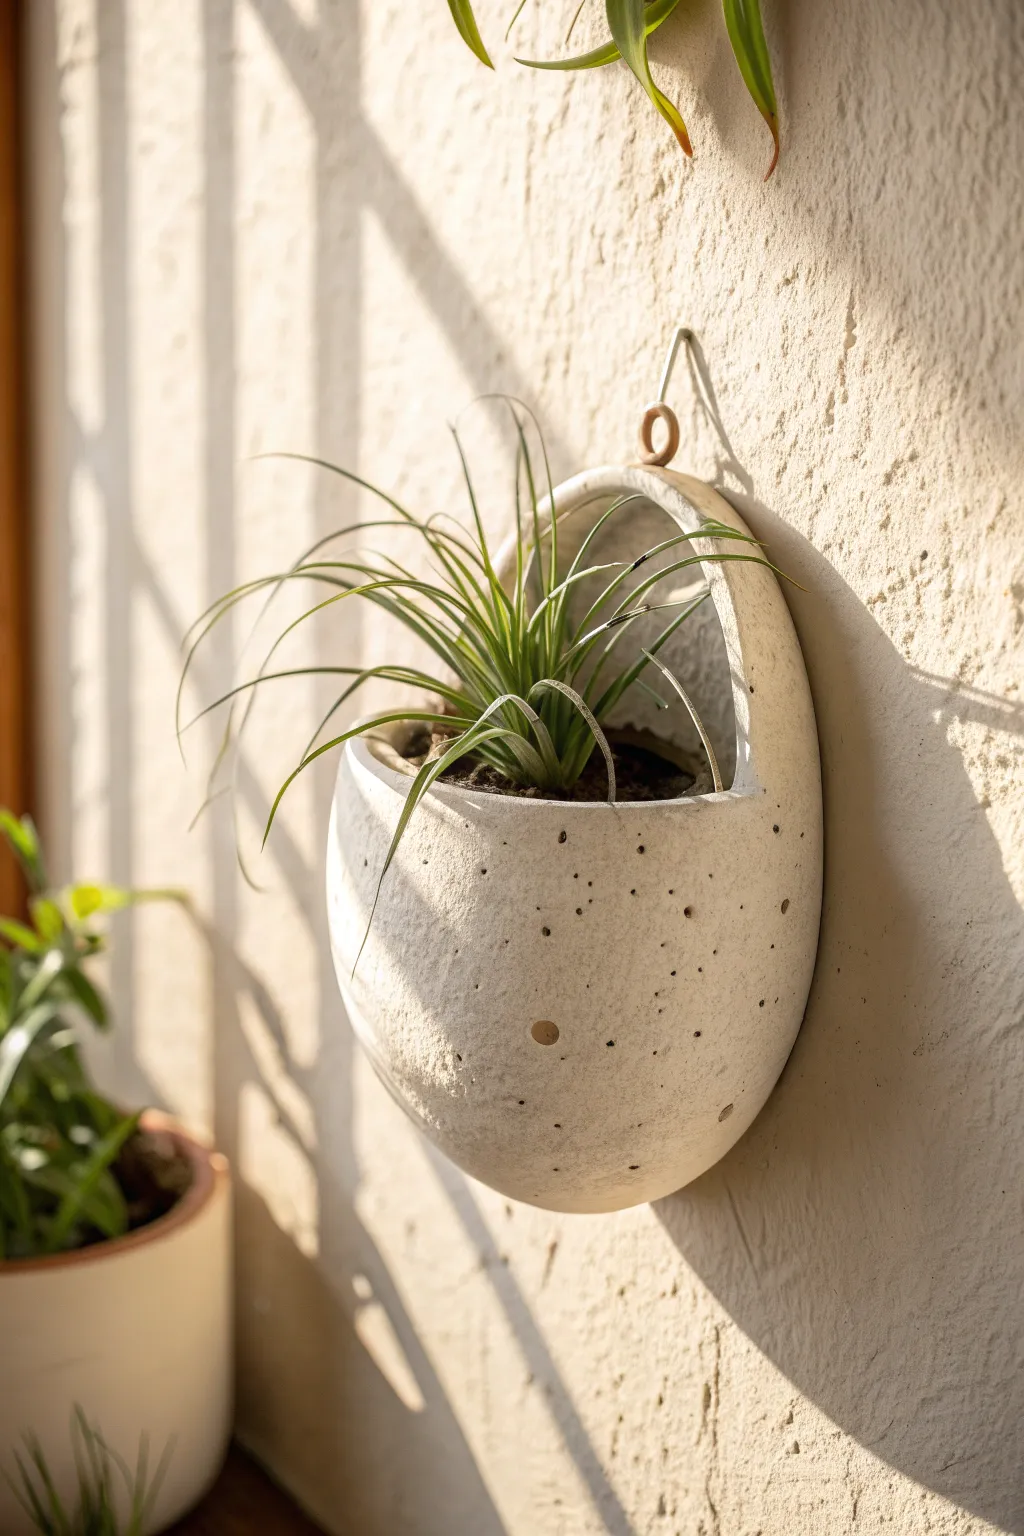
This minimalist wall planter combines a soft, organic egg shape with a modern speckled finish that mimics natural stone. It is perfect for holding air plants or small succulents, adding a touch of greenery directly to your vertical spaces.
Step-by-Step
Materials
- White polymer clay or air-dry clay (approx. 1lb block)
- Black pepper or dried coffee grounds (for speckling)
- Rolling pin
- Large round cookie cutter or bowl (approx. 6 inches diameter)
- Medium round cookie cutter or bowl (approx. 4 inches diameter)
- Aluminum foil
- Small leather cord or twine
- Clay sculpting tool or butter knife
- Sandpaper (fine grit)
- Water (for smoothing)
- Oven (if using polymer clay) or drying rack
- Clear matte varnish (optional)
Step 1: Preparing the Clay Base
-
Condition the Clay:
Start by kneading your white clay until it is soft and pliable. If it feels too stiff, warm it up in your hands for a few minutes to prevent cracking later. -
Add Texture:
To achieve that natural, stony look seen in the photo, sprinkle a small amount of coarse black pepper or dried coffee grounds into the clay. Knead it thoroughly until the specks are evenly distributed throughout the white base. -
Roll the Slab:
Roll out the clay on a flat surface to an even thickness of about 1/4 inch. Creating a consistent thickness is key for structural integrity. -
Cut the Main Shape:
Using your largest round cutter or a bowl as a template, cut out a large circle from the slab. This will become the back of the planter.
Stone Effect Trick
Mix in different spices like dried basil or chili flakes alongside the pepper for varied speckle colors that look like authentic terrazzo.
Step 2: Forming the Pocket
-
Create the Front Piece:
Re-roll your scraps if necessary and cut a second circle the same size as the first. This time, take your medium cutter (or a knife) and cut off the top third of this circle creates the ‘pocket’ opening. -
Form a Spacer shape:
Crumple aluminum foil into a flattened semi-circle shape that fits roughly inside the pocket area. This acts as an armature to keep the pocket puffed out while it dries or bakes. -
Assemble the Layers:
Place the foil spacer on the bottom half of the backing circle. Lay the cut ‘pocket’ circle on top, sandwiching the foil between the two clay layers. -
Seal the Edges:
Press the outer edges of the two clay circles together firmly. I like to use a little water on my fingertip to help blend the seams so they disappear completely. -
Smooth the Seam:
Use a sculpting tool or your thumb to drag clay across the joined edge, smoothing it until the planter looks like one continuous piece rather than two slabs stuck together.
Cracking Issues?
If using air-dry clay, cracking happens when it dries too fast. Cover the piece loosely with plastic wrap to slow the drying process.
Step 3: Detailing and Finishing
-
Add Decorative Holes:
Using a small circular tool or the end of a straw, punch a few random decorative indentations into the surface to mimic the porous look of the original artwork. -
Create the Hanging Loop:
Roll a small snake of clay and form a loop at the very top of the back circle. Attach it securely by blending the clay downwards into the main body. -
Refine the Shape:
Gently pat the planter to round out any sharp edges and ensure the overall form is egg-like and organic. -
Dry or Bake:
Follow the instructions for your specific clay type. If using air-dry clay, let it sit for 24-48 hours. If using polymer, bake according to package directions. -
Remove Armature:
Once fully cured and cool, carefully reach inside and pull out the aluminum foil spacer. -
Sand for Smoothness:
Use fine-grit sandpaper to gently buff away any fingerprints or rough edges on the rim. The texture should feel smooth to the touch. -
Seal (Optional):
Apply a coat of clear matte varnish if you plan to put real plants with soil inside, as this will help protect the clay from moisture. -
Add Suspension:
Thread a leather cord or piece of twine through the top loop to hang your new creation.
Hang your planter in a sunny spot to enjoy the interplay of light and shadow on the textured surface
Terrazzo-Style Clay Slab Art
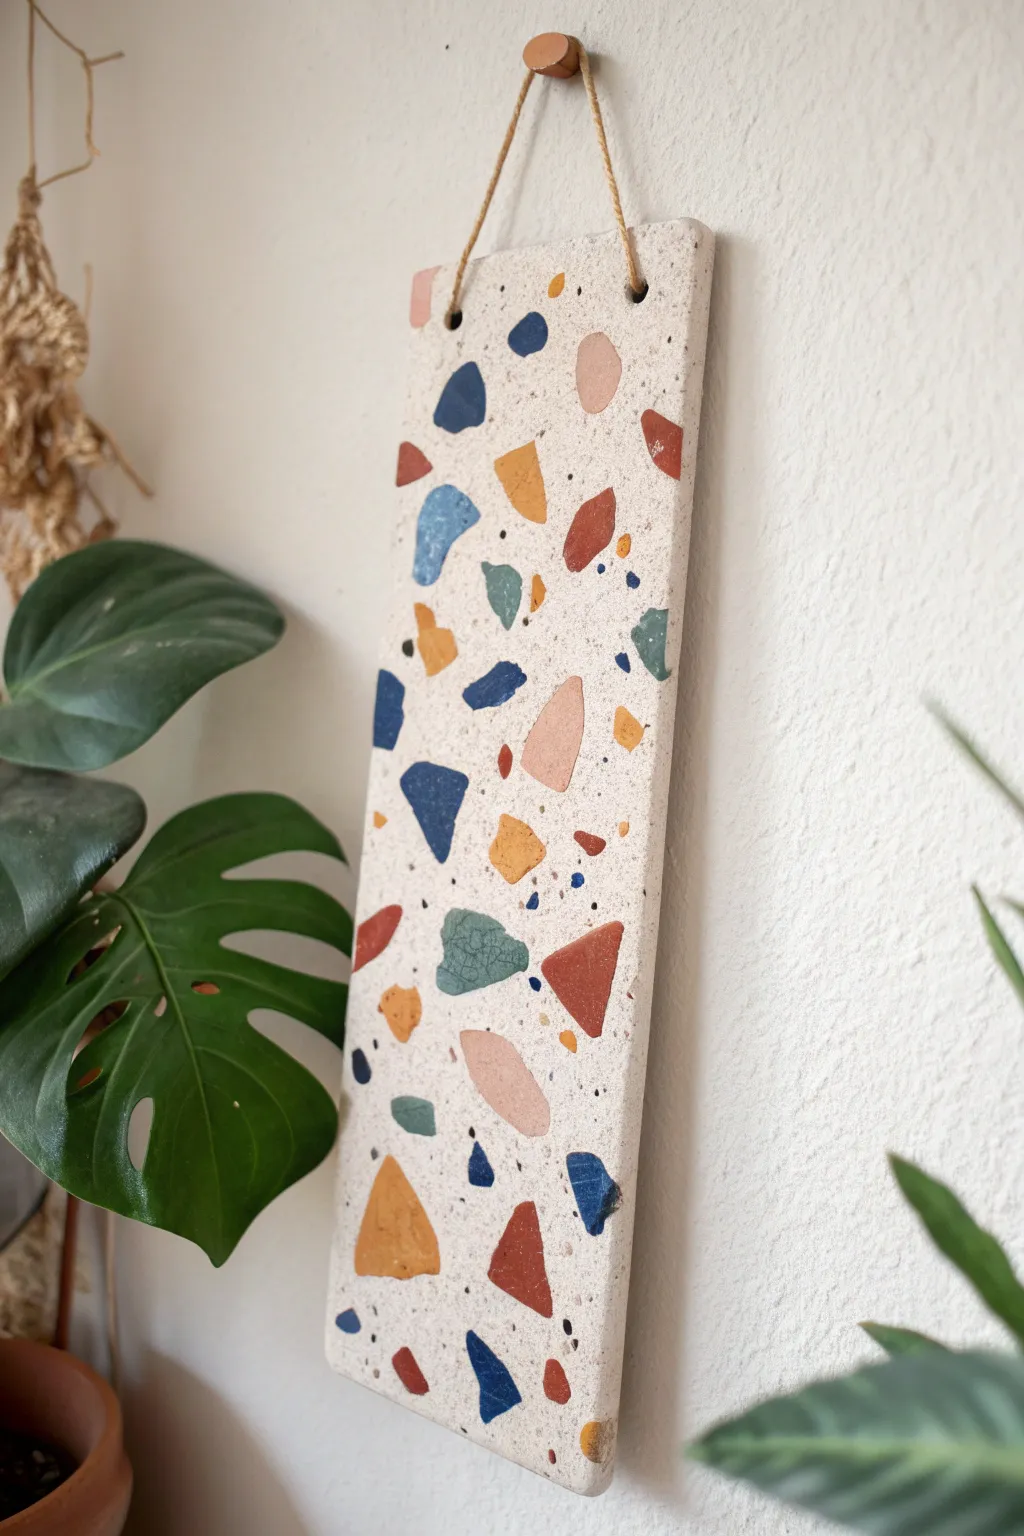
Bring the trendy, speckled charm of terrazzo into your home without the heavy concrete pour. This project uses polymer clay to create a lightweight, colorful wall hanging that mimics the look of authentic stone chips embedded in a limestone base.
Detailed Instructions
Materials
- White or granite-effect polymer clay (for the base)
- Assorted colored polymer clays (navy, ochre, terracotta, sage green, blush pink)
- Rolling pin or acrylic roller
- Sharp craft knife or tissue blade
- Parchment paper or baking mat
- Jute twine or leather cord
- Sandpaper (various grits from 400 to 1000)
- Ruler
- Something round to cut a hole (like a wide straw)
- Oven
- Matte varathane or clay sealer (optional)
Step 1: Preparing the Chips
-
Condition the colors:
Begin by conditioning your colored clays separately. Warm them in your hands and roll them out into thin sheets, approximately 1-2mm thick. These will become your terrazzo ‘stones’. -
Create irregular shapes:
Using your craft knife, cut the colored sheets into small, random geometric shapes. Aim for jagged triangles, lopsided trapezoids, and uneven squares. Avoid perfect circles or rectangles to keep the organic feel. -
Vary the sizes:
Ensure you cut a mix of sizes. You want a few large ‘hero’ chunks (about the size of a thumbnail) mixed with medium pieces and tiny specks. -
Pre-bake the chips (Optional):
I like to bake these chips for just 5-10 minutes at the recommended temperature. This hardens them slightly so they don’t smear when rolled into the white base later, keeping the edges crisp.
Crisp Chip Tip
For the sharpest definition, put your unbaked colored chips in the freezer for 10 minutes before pressing them into the base. This stops colors from dragging.
Step 2: Assembling the Slab
-
Prepare the base:
Condition a large block of white or granite-effect clay. Roll it out into a thick slab, about 5-6mm thick. This needs to be sturdy enough to hang. -
Cut the slab shape:
Use a ruler and your blade to cut the base into a long rectangle. The example shown is roughly 4 inches wide by 12 inches tall, but customize it to fit your wall space. -
Scatter the chips:
Take your colored chips and gently press them onto the surface of the white slab. Arrange them randomly, leaving plenty of negative white space between them. -
Add tiny details:
Don’t forget the smallest specks. Use leftover crumbles of colored clay or even ground black pepper (if you want a gritty look) to fill in the gaps between larger shapes.
Make It Stone
Mix actual sand or dried used coffee grounds into your white base clay before rolling. This adds genuine gritty texture that looks incredible when sanded.
Step 3: Finishing the Surface
-
Embed the design:
Place a sheet of parchment paper over the decorated slab. With your rolling pin, roll over the entire piece with firm, even pressure. You want to push the colored chips flush into the white base. -
Smooth the edges:
Rolling usually distorts the rectangular shape. Use your ruler and blade to trim the edges back to straight lines, creating a clean, crisp border. -
Create suspension holes:
Use a straw or a small circular cutter to punch two holes near the top corners. Ensure they are at least half an inch from the edge to prevent tearing. -
Final texture check:
Inspect the surface. If you want a more stone-like texture, gently tap the white areas with a toothbrush or coarse sandpaper before baking.
Step 4: Baking and Assembly
-
Bake the project:
Place the slab on parchment paper and bake according to the manufacturer’s instructions for the white clay. Usually, this is around 275°F (135°C) for 30-45 minutes depending on thickness. -
Cool under weight:
As soon as it comes out of the oven, place a heavy book on top of the slab (with paper in between) while it cools. This ensures it stays perfectly flat. -
Sand for smoothness:
Once fully cool, wet-sand the surface. Start with 400 grit to reveal the crisp edges of the colored chips, then move to higher grits to polish the surface smooth. -
Add the hanger:
Cut a length of jute twine. Thread the ends through the holes from the front to the back and tie sturdy knots on the backside to secure them. -
Hang firmly:
Place the twine loop over a wall hook or peg. The neutral tones and pop of color make it a versatile piece for varied decor styles.
You now have a modern, durable piece of art that looks like stone but hangs as lightly as a feather
3D Clay Landscape Wall Panel
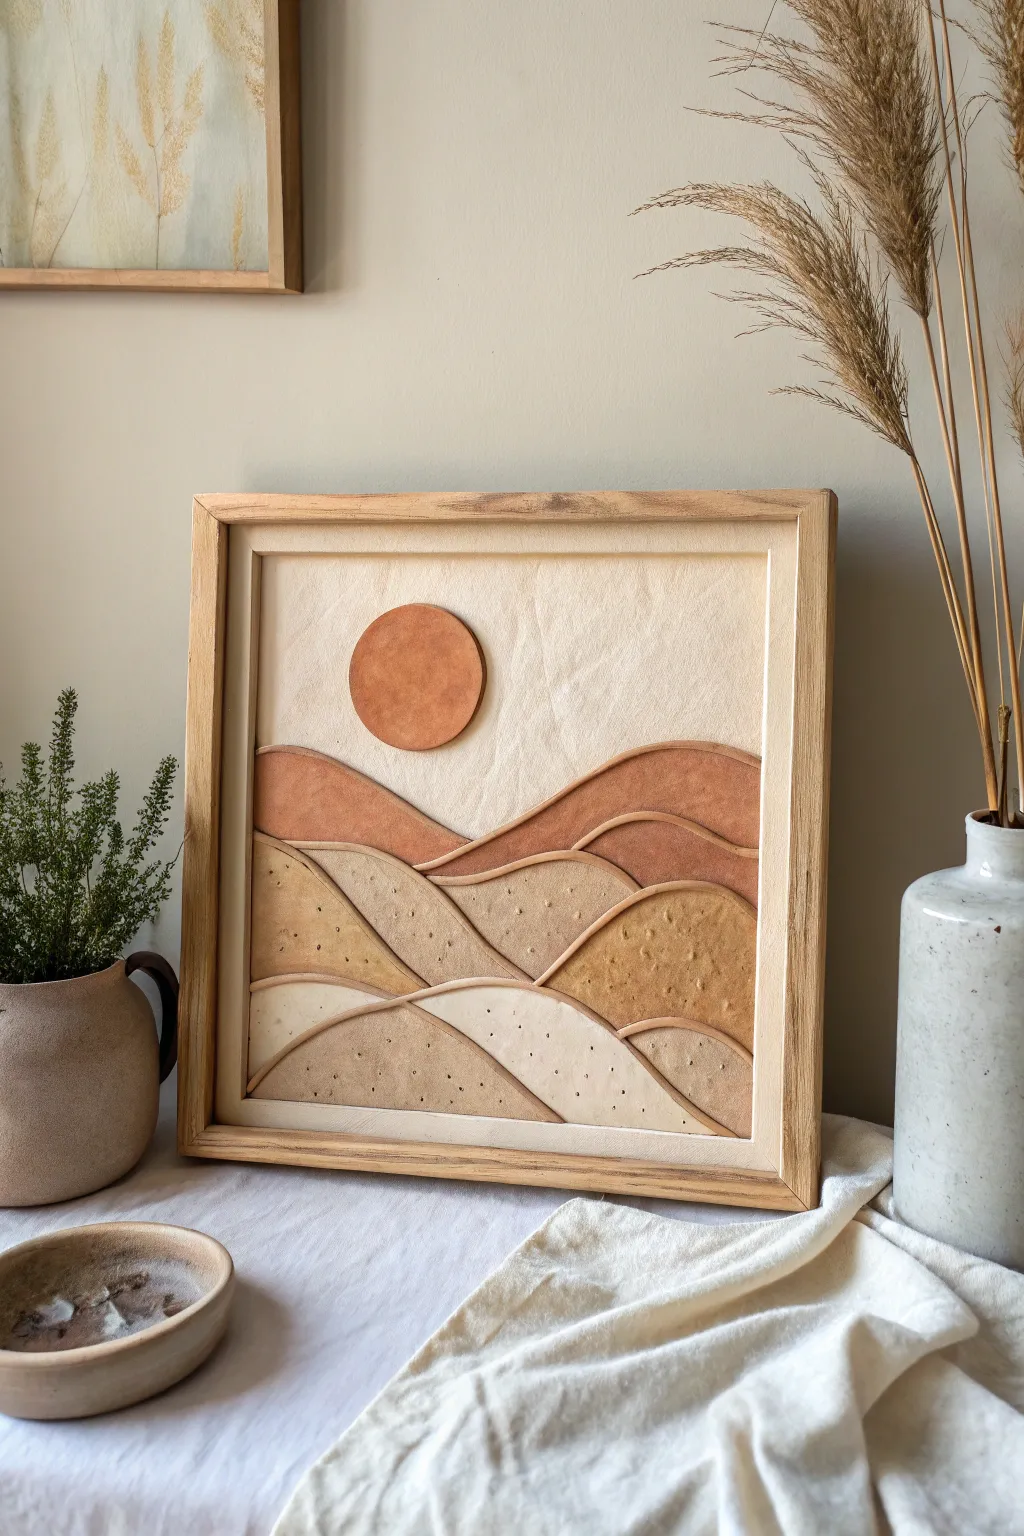
Capture the serenity of a desert sunset with this beautiful dimensional clay relief art. Using slabs of air-dry or polymer clay in graduated earthy tones, you will build gentle rolling hills and a sun motif that adds warmth and texture to any wall.
Step-by-Step Guide
Materials
- Air-dry clay or polymer clay (white base)
- Acrylic paints (terracotta, beige, raw sienna, cream)
- Rolling pin or clay machine
- sharp craft knife or scalpel
- Wooden canvas frame or shadow box backboard (square)
- Canvas fabric (natural/unbleached)
- Strong craft glue or heavy gel medium
- Texture tools (toothbrush, sponge, or sandpaper)
- Needle tool
- Matte finish varnish
Step 1: Preparation and Base
-
Prepare the substrate:
Begin by removing the glass from your frame, leaving only the backing board. Cut a piece of natural canvas fabric slightly larger than the board. Stretch the fabric taut over the board and secure it firmly on the back with glue or staples. -
Draft your landscape:
On a piece of paper the same size as your frame, sketch out your hill design. Create about 4-5 layers of rolling hills that overlap, leaving space in the upper left for the sun. -
Mix your clay tones:
If using air-dry clay, divide it into four or five batches. Knead acrylic paint directly into the wet clay to tint it, creating a gradient from dark terracotta for the back hills to light cream for the front. I find mixing the color into the wet clay gives a more natural, stone-like look than painting it later.
Crack Control
If small cracks appear while drying, don’t panic. Mix a small amount of fresh clay with water to make a paste (slip) and fill the crack. Smooth it with a wet finger and let dry again.
Step 2: Creating the Relief Layers
-
Roll the slabs:
Roll out your tinted clay batches into even slabs, approximately 3-4mm thick. Consistency is key here, so use depth guides if available. -
Cut the background hills:
Using your paper sketch as a template, cut out the furthest back hill shape from your darkest terracotta clay using a sharp craft knife. -
Add the ridge detail:
To mimic the style in the photo, roll a very thin ‘snake’ or coil of clay in a slightly lighter shade. Carefully adhere this along the top edge of your cut hill shape to create a defined ridge line. Smooth the connection slightly on the back side only. -
Cut the middle layers:
Repeat the cutting process for the middle layers using your medium-tone clays (siennas and tans). Keep the shapes organic and flowing. -
Texturing the clay:
Before the clay dries, add subtle texture to the lower hills. Gently press a sponge or a toothbrush into the surface to create a pitted, sandy effect. Leave the upper hills smoother for contrast. -
Create the foreground:
Cut your final, front-most hill layers from the lightest cream clay. Add the thin clay coil trim to the top edges of these pieces as well for that consistent, outlined look. -
Form the sun:
Use a round cookie cutter or a jar lid to cut a perfect circle from the terracotta clay slab. Texture it slightly with a sponge to match the rustic aesthetic. -
Dry check:
Lay all your cut pieces on a flat surface to dry. If creating a large piece, place a light book or board on top (sandwiched between parchment paper) to prevent the edges from curling up as moisture evaporates.
Step 3: Assembly and Finishing
-
Arrange the composition:
Once fully dry, dry-fit your clay pieces onto the canvas-covered board. Adjust the positioning until the overlaps look natural and the hills flow nicely. -
Glue the background:
Begin gluing with the piece furthest back (the dark terracotta hill). Apply a strong craft glue to the back of the clay and press firmly onto the canvas. -
Layer the hills:
Work your way forward, gluing the middle layers and then the foreground layers. Ensure each layer slightly overlaps the bottom of the one behind it to create depth. -
Attach the sun:
Glue the sun disc into the open sky area, pressing gently to ensure good adhesion to the canvas texture. -
Add the frame:
Place the mounted artwork back into the wooden frame. The natural wood tone complements the earthy clay colors perfectly. -
Seal the work:
Apply a coat of matte varnish over the clay elements to protect them from dust and UV light without adding unnatural shine.
Define Your Edges
For sharper lines, lightly sand the edges of your dried clay pieces with fine-grit sandpaper before gluing. This removes any burrs from the cutting process.
Hang your new textural masterpiece where it can catch the light and cast distinct shadows across the landscape
Storybook Clay Village Relief Plaque
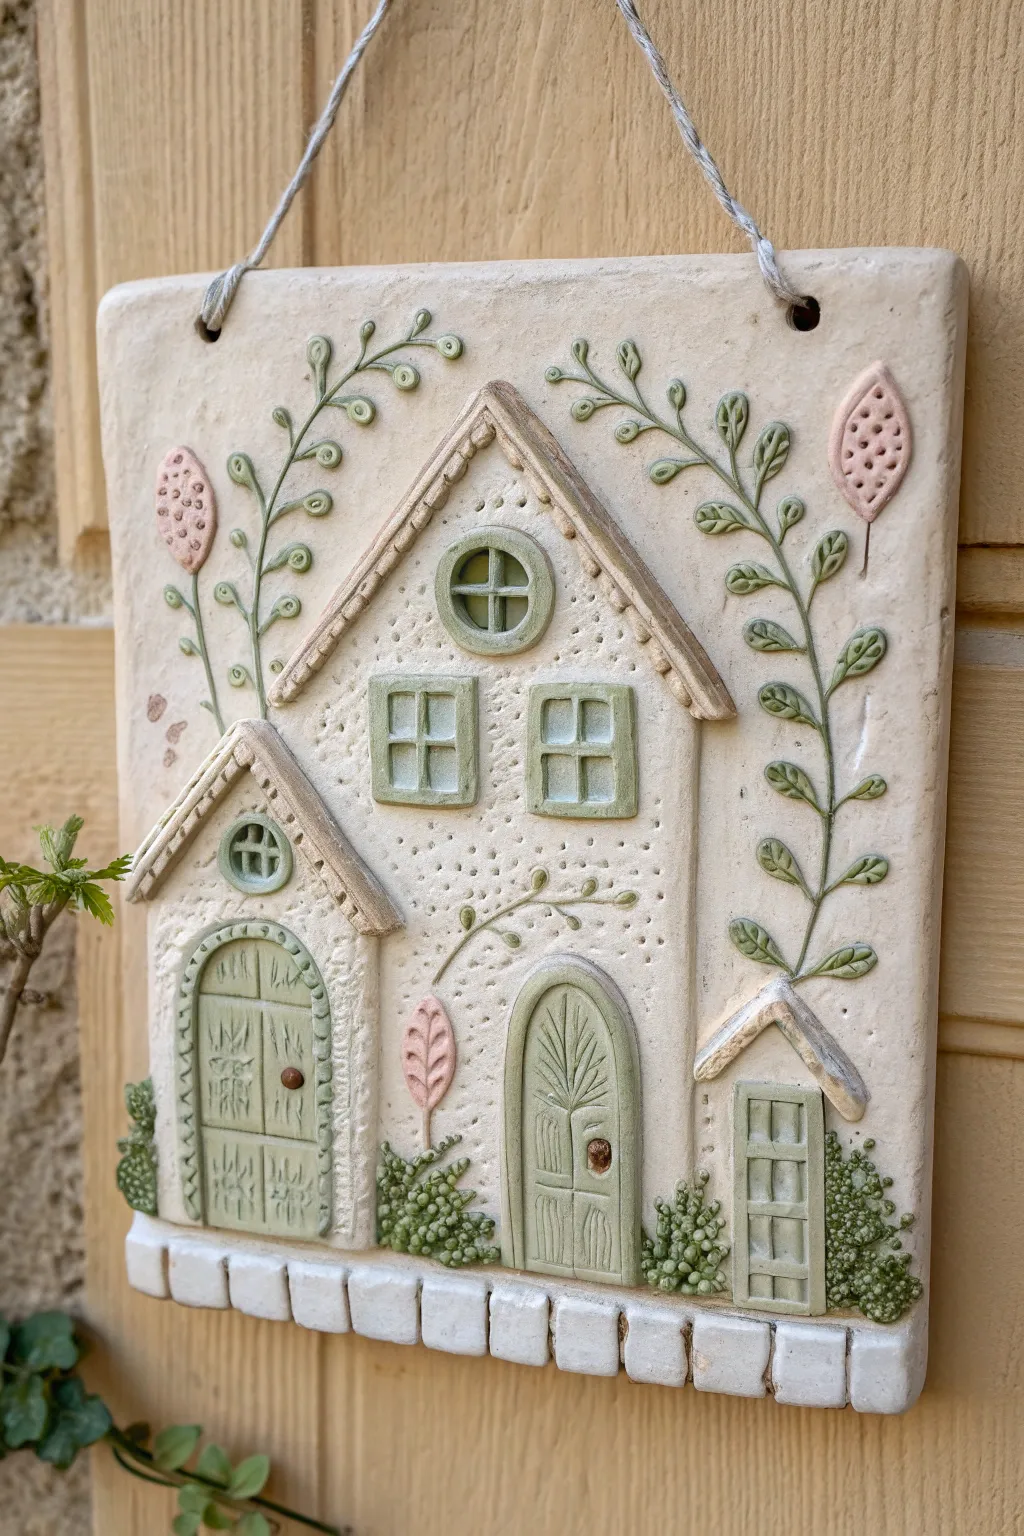
Capture the charm of a fairytale village with this adorable relief sculpture featuring stylized clay houses. The project combines soothing sage greens and soft pinks with intricate textures for a dimensional piece that looks lovely hanging in any entryway.
Step-by-Step Tutorial
Materials
- Air-dry clay or low-fire earthenware clay
- Rolling pin
- Clay knife or X-Acto blade
- Needle tool or toothpick
- Small circle cutters (or bottle caps)
- Slip (clay and water mixture) or scoring tool
- Acrylic paints (Cream/White, Sage Green, Muted Pink, Brown)
- Matte sealant/varnish
- Twine or jute cord
- Small sponges for texture
- Fine grit sandpaper
Step 1: Sculpting the Base and Structures
-
Roll the foundation:
Begin by rolling out a rectangular slab of clay approximately 1/4 inch thick. Trim the edges with your knife to create a clean rectangle, roughly 5×7 inches, softening the corners slightly with your finger. -
Mark hanging holes:
While the clay is fresh, punch two holes in the top corners using the end of a paintbrush handle or a straw. Ensure they are at least half an inch from the edge to prevent tearing. -
Cut the house shapes:
Roll out a separate, thinner piece of clay. Cut out the main body shapes for three distinct house sections—a tall central one and two smaller side annexes—and place them onto your base slab to check fit. -
Attach the houses:
Score the back of your house shapes and the corresponding area on the base slab with a needle tool. Apply a dab of slip or water, then press the house shapes firmly onto the base to bond them. -
Add the roofs:
Create roof triangles. For added dimension, roll tiny ropes of clay and flatten them slightly to form the eaves. Attach these over the tops of your house shapes, allowing them to overhang slightly. -
Create the cobblestone bottom:
Roll a long strip of clay for the bottom edge. Cut it into small, uniform rectangular blocks and attach them in a row along the very bottom edge of the plaque to mimic a stone foundation or picket fence.
Fixing Warp
If the corners of your base slab curl up while drying, gently weigh them down with a heavy book placed over a piece of parchment paper once the surface is dry to the touch.
Step 2: Adding Details and Texture
-
Texture the background:
Before the clay hardens, use a needle tool to gently stipple the background space around the houses. This small dotted texture contrasts beautifully with the smooth house walls. -
Install windows:
Roll out small flat squares and circles. Attach them to the house facades. Use thin strips of clay to create mullions (crosses) inside the windows. -
Carve the doors:
Add arched slabs for doors on the bottom level. Use your needle tool to incise vertical wood grain lines and leaf-like patterns into the door surfaces. Add a tiny ball of clay for a doorknob. -
Sculpt the vines:
Roll very thin, worm-like coils of clay. Arrange them swirling up the sides of the plaque and around the houses. Press them gently to attach. -
Apply leaves and pods:
Form tiny teardrop shapes for leaves and oval shapes for seed pods. Attach them along your vine coils. Use the needle tool to press veins into the leaves and poke holes into the seed pods for texture. -
Add shrubbery:
Create small clusters of tiny clay balls and press them at the base of the houses to represent bushes or rounded cobblestones.
Step 3: Finishing and Painting
-
Dry completely:
Allow the piece to dry fully. Depending on the thickness and your climate, air-dry clay might take 24-48 hours. If using kiln-fire clay, fire it now according to manufacturer instructions. -
Base coat:
Paint the entire sculpture with a creamy off-white or light beige acrylic paint. Let this base layer dry completely. -
Highlight the greens:
Mix a soft sage green. Carefully paint the vines, leaves, door frames, and window frames. Using a small detail brush here helps keep edges crisp. -
Add pink accents:
Paint the oval seed pods with a dusty blush pink. You can also dry-brush a tiny amount of this pink on the roof textures for warmth. -
Distress for depth:
Mix a watery brown wash. Paint it over the textured areas (like the background dots and wood grain) and immediately wipe it back with a damp cloth. The dark paint will stay in the crevices, highlighting the relief. -
Seal and hang:
Once all paint is dry, apply a matte varnish to protect the surface. Thread your twine through the top holes and knot securely.
Seasonal Switch
Make the design modular by painting the seed pods in different seasonal colors—orange for autumn pumpkins or red for winter berries—to create a year-round display.
Hang your charming little village on a bright wall to enjoy the cozy atmosphere it brings to the room