Clay wall hangings are one of my favorite ways to bring handmade texture to a room without committing to a big pottery project. If you’ve got air-dry clay or polymer clay, you can make something that feels artsy, cozy, and totally you.
Moon Phase Wall Hanging

Bring the serene cycles of the moon indoors with this minimalist textural wall hanging. Using air-dry clay and simple twine, you’ll create a vertical double-strand mobile that adds an earthy, bohemian touch to any blank vertical space.
Step-by-Step
Materials
- White air-dry clay (or polymer clay)
- Rolling pin
- Circle cookie cutters (approx. 2-3 inches diameter)
- Butter knife or clay cutting tool
- Wooden dowel or thick straw (for piercing holes)
- Fine-grit sandpaper
- Natural jute twine
- Wooden hanging bar (approx. 12 inches long)
- Scissors
- Parchment paper or baking mat
Step 1: Shaping the Moons
-
Prepare your workspace:
Lay down a sheet of parchment paper or a silicone mat to prevent the clay from sticking to your table. Take a large chunk of air-dry clay and knead it in your hands until it becomes warm and pliable. -
Roll out the slab:
Use your rolling pin to flatten the clay into an even slab. Aim for a thickness of about 1/4 inch (5-6mm) to ensure the pieces are sturdy but not too heavy. -
Cut the primary circles:
Using your circle cutter, punch out 10 full circles. These will form the base for both the full moons and the phases. -
Create the half-moons:
Take four of your cut circles. Use your knife to slice them directly in half. You will need four distinct half-moon shapes for this specific design. -
Create the crescent (optional bottom piece):
For the bottom-right strand, you might want a leaf or crescent shape. To get the shape shown, take a circle and slice two curved lines to create a pointed oval or ‘marquise’ shape. -
Add texture:
Before the clay dries, gently press a crumpled piece of foil or a textured stone into the surface of each piece to give it that organic, crater-like moon appearance.
Uneven Drying?
If your clay starts curling while drying, place a light book on top of the pieces (sandwich them between parchment paper first) once they are semi-dry to keep them perfectly flat.
Step 2: Piercing and Drying
-
Pierce vertical holes:
Using your dowel or straw, poke a hole near the top and bottom edge of every full circle and oval. The holes should line up vertically through the center. -
Pierce the half-moons:
For the half-moon shapes, which sit horizontally, poke a hole in the center of the curved top edge and the center of the flat bottom edge. -
Check hole size:
Wiggle the tool slightly to ensure the holes are wide enough to accommodate your jute twine, keeping in mind that clay sometimes shrinks slightly as it dries. -
Let them cure:
Arrange all your pieces on a flat surface in a safe area. Allow them to air dry according to the package instructions, usually 24-48 hours. I like to flip them halfway through to ensure even drying. -
Sand the edges:
Once fully hard, take your fine-grit sandpaper and gently smooth the rough outer edges of each piece, removing any burrs from the cutting process.
Step 3: Assembly
-
Cut the twine:
Cut two long lengths of jute twine, each about 3 to 4 feet long, to allow plenty of excess for knotting. -
Start the first strand:
Tie a secure double knot at the very bottom of your first piece of twine. Thread on your bottom-most clay piece (for the left strand, this is a half-moon). -
Connect the pieces:
Tie a knot a few inches above that first piece to act as a stopper for the next one. Thread the next clay shape down until it rests on this new knot. -
Continue spacing:
Continue this pattern—tying a knot, then threading a piece—until the left strand is complete (approx. 6 pieces total). -
Assemble the second strand:
Repeat the process for the right strand. Pay attention to the order: full circle, full circle, half moon, full circle, full circle, half moon, and finally the bottom oval/leaf shape. -
Prepare the wooden bar:
Ensure your wooden hanging bar is clean. If it has pre-drilled holes, great; if not, you’ll simply tie the twine around the bar itself. -
Attach strands to the bar:
Tie the top of the left strand to the left side of the wooden bar. Repeat with the right strand, ensuring they hang at roughly the same starting height. -
Create the main hanger:
Cut a final piece of twine for the main hanging loop. Tie each end to the far edges of the wooden bar so you can mount it largely on the wall. -
Final adjustment:
Hang the piece up and adjust the spacing of the specific clay pieces if needed by loosening and re-tightening specific knots before trimming excess string.
String Theory
Instead of multiple knots, you can use small wooden beads between the clay pieces. Not only does this look cute, but it also helps stabilize the clay so the moons don’t spin around.
Hang your new lunar artwork in a spot that catches the daylight to highlight those lovely textures you created


Clay Disc Garland
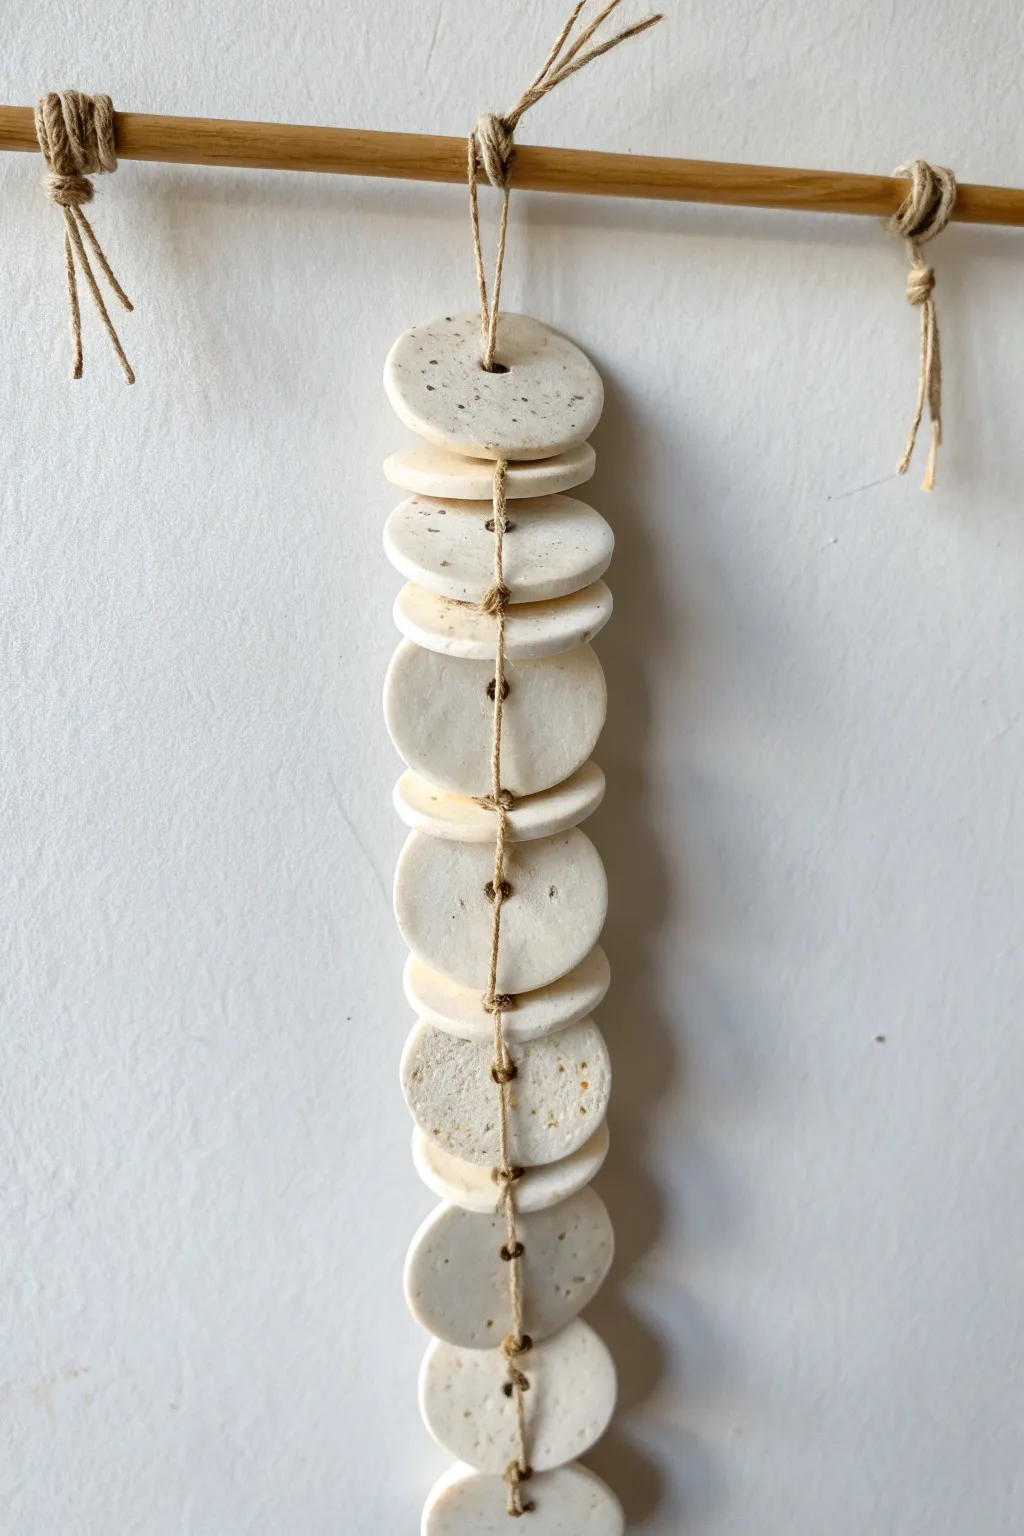
This minimalist wall hanging brings a touch of organic texture to any room with its cascading column of handmade clay discs. Suspended from a simple wooden dowel, the speckled cream rounds create a calming, rhythmic visual that works beautifully in modern or bohemian interiors.
Detailed Instructions
Materials
- White air-dry clay or polymer clay
- Used coffee grounds or fine black pepper (for speckles)
- Rolling pin
- Circle cookie cutter (approx. 2 inches)
- Wooden dowel (approx. 12 inches long)
- Natural jute twine
- Straw or skewer (for piercing holes)
- Fine-grit sandpaper
- Scissors
- Water (for smoothing)
Step 1: Preparing and Shaping the Clay
-
Condition the Clay:
Begin by taking a large chunk of your white clay and kneading it in your hands to warm it up and make it pliable. -
Add Texture:
To achieve that natural, stony look, sprinkle a pinch of used coffee grounds or cracked black pepper onto the clay block. -
Knead in Speckles:
Fold the clay over the grounds and knead thoroughly until the speckles are evenly distributed throughout the batch. -
Roll It Out:
Place the clay on a smooth surface or craft mat. Use a rolling pin to flatten it into an even sheet, aiming for about 1/4 inch thickness so the discs are sturdy but not too heavy. -
Cut the Discs:
Using your circle cutter, press firmly into the clay to create your rounds. You will need about 10–12 discs for a garland of this length. -
Smooth the Edges:
Dip your finger in a little water and gently run it along the rim of each cut circle to soften any sharp ridges left by the cutter.
Cracking Up?
If your clay cracks while drying, mix a tiny bit of fresh clay with water to make a paste (slip) and fill in the cracks. Smooth it over and let it dry again.
Step 2: Piercing and Drying
-
Mark the Centers:
Before piercing, eyeball the center of each disc to ensure your garland hangs straight. -
Create Holes:
Use a drinking straw or a thick skewer to punch a hole directly in the center of every disc. Twist the tool slightly as you pull it out to keep the hole clean. -
Allow to Dry:
Lay the discs flat on a wire rack or parchment paper. Let them dry completely according to package instructions—usually 24–48 hours for air-dry clay. -
Sand for Finish:
Once fully cured, take a piece of fine-grit sandpaper and lightly buff the edges and surfaces to remove any remaining imperfections or fingerprints.
Make It Yours
Try varying the size of the circles from large to small for a tapered look, or paint the edges of the discs with gold leaf for a hint of elegance.
Step 3: Assembly
-
Prepare the Hanger:
Cut a length of jute twine roughly 4 feet long. Fold it in half to find the center point. -
Attach to Dowel:
Loop the folded center of the twine around the middle of your wooden dowel and secure it with a lark’s head knot. -
Thread the First Disc:
Take your first clay disc and thread both tail ends of the jute twine through the center hole. -
Secure with Knots:
Push the disc up near the dowel, leaving about an inch of space. Tie a simple overhand knot with the two twine ends directly underneath the disc to hold it in place. -
Continue Stranding:
Thread the next disc onto the twine, slide it up towards the first knot, leaving a small gap (about 1/2 inch) so the discs can move slightly. Tie another knot underneath it. -
Complete the Strand:
Repeat this process until all discs are attached, maintaining consistent spacing between each one. -
Finishing the Hanger:
Cut a separate piece of twine for the wall hanger. Tie each end to the far extremities of the wooden dowel, double-knotting them securely.
Now you have a stunning, handcrafted piece of art ready to bring warmth to your favorite wall space


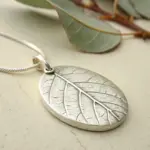
Botanical Leaf Imprint Hanging
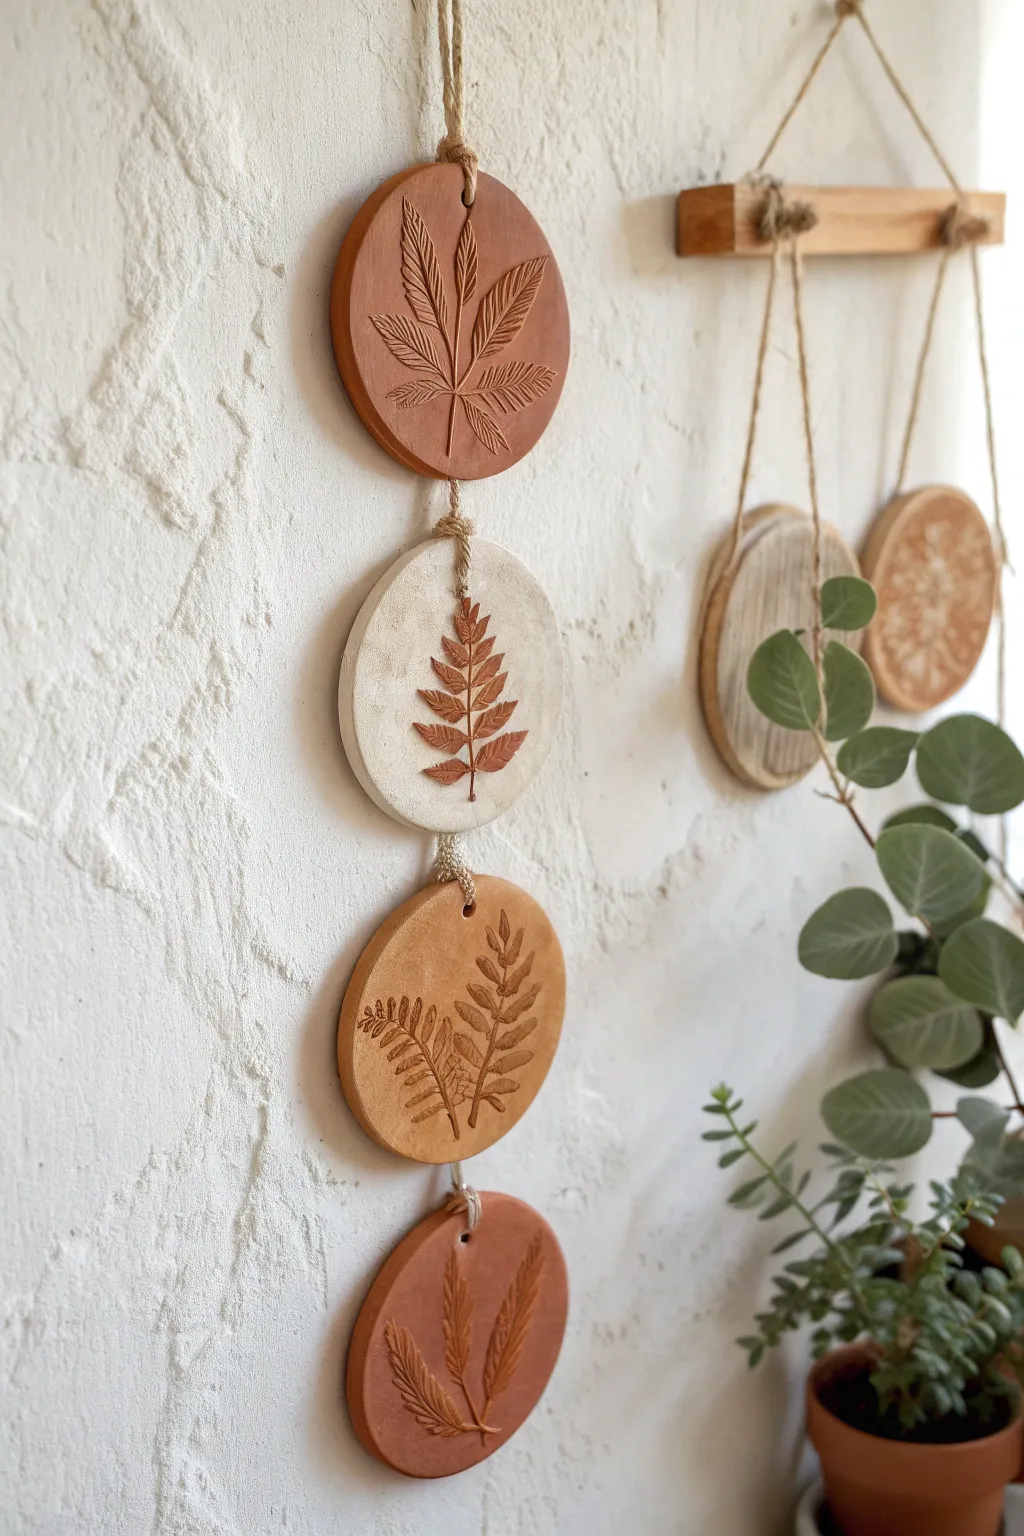
Bring the serene beauty of the outdoors inside with this vertical clay wall hanging featuring delicate botanical imprints. The alternating warm earth tones of terracotta, white, and ochre create a textured, organic accent perfect for a boho-inspired corner.
How-To Guide
Materials
- Air-dry clay (terracotta, white, and ochre/yellow)
- Small rolling pin
- Round cookie cutter (approx. 3-4 inches diameter) or a cup
- Fresh or sturdy faux leaves (fern, hemp, Japanese maple)
- Jute twine or hemp cord
- Clear straw or chopstick (for making holes)
- Fine-grit sandpaper
- Acrylic paint (burnt sienna or dark brown)
- Small detail paintbrush
- Matte spray varnish (optional)
Step 1: Prepping the Clay Discs
-
Roll out the first color:
Start with your terracotta clay. Knead a handful until pliable, then roll it out on a smooth surface to an even thickness of about 1/4 inch. Smooth out any major cracks with a damp finger. -
Select your botanical:
Choose a fresh or faux leaf with prominent veins. Place the leaf vein-side down onto the rolled clay slab. Gently press it with your fingers to tack it in place. -
Create the impression:
Using your rolling pin, roll firmly over the leaf once or twice. Applying even pressure is key here to ensure a deep, detailed imprint without distorting the clay shape too much. -
Cut the shape:
Place your round cutter over the leaf imprint, centering the design nicely. Press down firmly to cut out your circle. Peel away the excess clay from the outside. -
Reveal the design:
Carefully lift the leaf off the clay by the stem. Use a needle tool or tweezers if the edge is stuck, revealing the crisp botanical texture underneath. -
Make connecting holes:
Using a straw or chopstick, poke a hole near the top edge and another directly opposite near the bottom edge. Ensure they are aligned vertically so your mobile hangs straight. -
Repeat for variety:
Repeat this process to make four discs total. For the alternating look, make two terracotta discs, one white disc, and one ochre disc. Vary the leaf types for visual interest. -
Smooth the edges:
Dip your finger in a little water and gently run it along the cut edges of each disc to smooth out any sharpness or roughness left by the cutter.
Pro Tip: Vein Definition
If using fresh leaves, choose ones with stiff, thick veins like sage or fern. Soft leaves like basil won’t leave a deep enough impression to catch the glaze later.
Step 2: Finishing and Assembly
-
Allow to dry:
Lay all discs flat on a drying rack or parchment paper. Let them dry completely for 24-48 hours, flipping them occasionally to prevent curling. -
Sand imperfections:
Once fully dry and hard, lightly sand the edges with fine-grit sandpaper for a professional, polished finish. -
Highlight the white disc:
For the white clay disc, the imprint can disappear visually. Dilute a tiny amount of brown acrylic paint with water to make a wash. Paint it specifically into the leaf depression. -
Wipe back the paint:
Immediately wipe the surface with a damp paper towel or sponge. The dark paint will remain in the deep veins of the leaf imprint while the surface returns to white, creating high contrast. -
Seal the clay:
I prefer to give everything a light coat of matte spray varnish at this stage to protect the clay from humidity and dust, though this is optional. -
Prepare the twine:
Cut five pieces of jute twine. You’ll need one longer piece for the top hanging loop and three shorter pieces (about 4-5 inches each) to connect the discs. -
Connect the top disc:
Thread the doubled-over long piece through the top hole of your first terracotta disc. Secure it with a lark’s head knot or just tie a simple knot at the rim to create a hanging loop. -
Link the discs:
Take a short piece of twine and thread it through the bottom hole of the first disc and the top hole of the second (white) disc. Tie a knot at both ends (front and back) close to the holes to link them. -
Complete the chain:
Continue linking the white disc to the ochre one, and the ochre one to the final terracotta disc using the remaining short twine pieces. Trim any long, unruly twine ends.
Level Up: Beads & Tassels
Thread a raw wooden bead onto the connecting twine between each disc for extra texture, or add a long jute tassel to the very bottom hole for a dramatic finish.
Now find a bright wall space where the natural light can catch the textures of your new botanical artwork

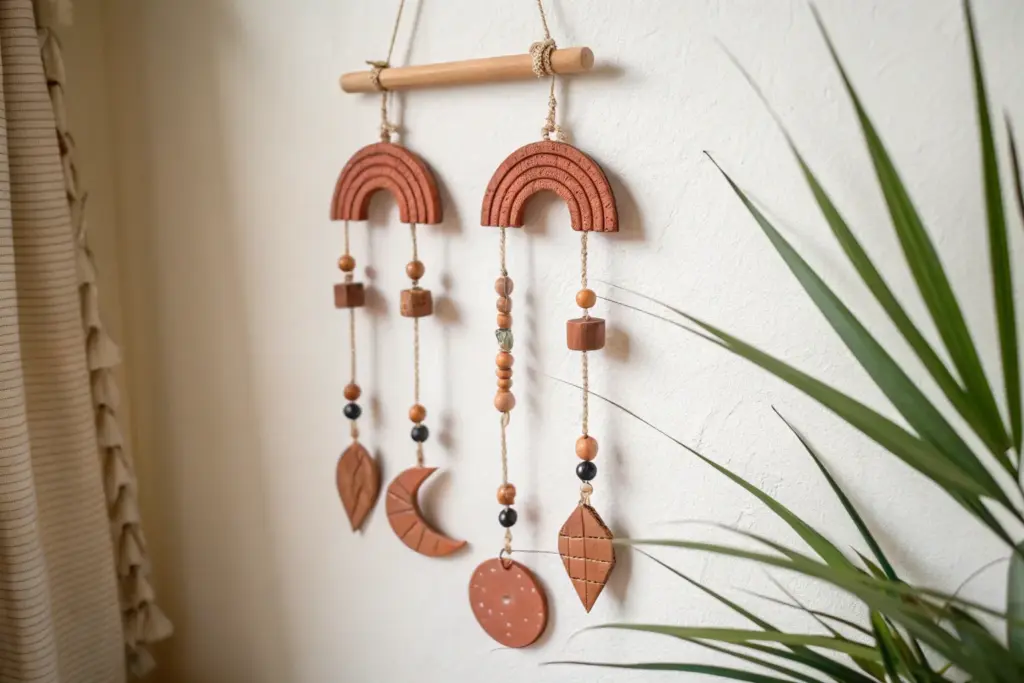
Simple Geometric Mobile
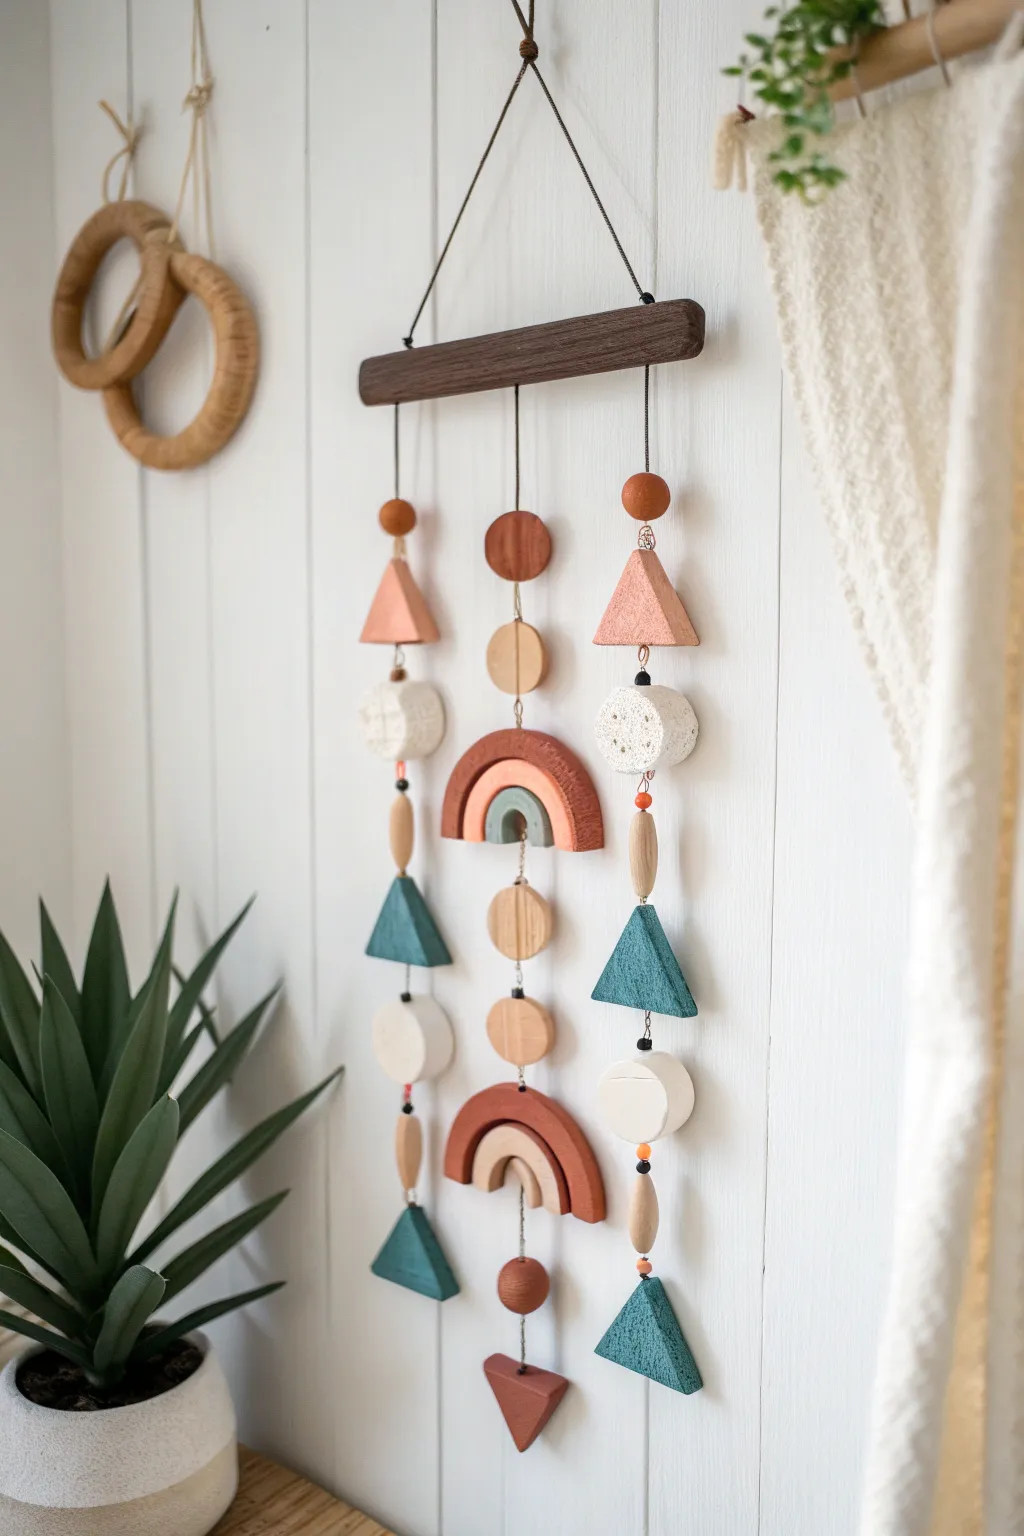
Bring modern bohemian charm to your walls with this mixed-media mobile featuring raw wood textures and soft, earthy clay tones. The alternating shapes creates a soothing visual rhythm that balances geometric precision with organic warmth.
Step-by-Step
Materials
- Polymer clay (terracotta, white, teal, peach)
- Wooden dowel rod (approx. 8-10 inches, dark stained)
- Nylon cord or waxing thread (black)
- Natural wood beads (various shapes: rounds, ovals)
- Needle tool or toothpick
- Rolling pin
- Clay knife or geometric cutters (triangle, circle)
- Sandpaper (fine grit)
- Dark wood stain (optional)
- Parchment paper
- Baking sheet
Step 1: Shaping the Clay Elements
-
Condition the clay:
Begin by kneading your polymer clay blocks until they are soft and pliable. You’ll need four distinct colors: a terracotta rust, a soft white (or granite effect), a muted teal, and a peach tone. -
Create the triangles:
Roll out the teal and peach clay to about 1/4 inch thickness. Cut three generous triangles from the teal and two from the peach. Keep edges sharp or slightly soften them with your finger depending on the look you prefer. -
Form the textured discs:
Using the white granite-effect clay, form two thick, irregular discs. To achieve the porous texture shown in the image, press a piece of coarse sandpaper or a scrunched ball of aluminum foil into the surface before baking. -
Craft the rainbows:
For the center strand, create two small rainbow arches. Roll snakes of terracotta, peach, and teal clay. Arch them together, trim the bottom edge flat with your knife, and smooth the seams gently on the back. -
Make the circle beads:
Roll small balls of terracotta clay to create the spherical beads seen at the top and bottom of the strands. You will need about three or four of these. -
Create the final pendant:
Cut a downward-pointing triangle from the rust-colored clay for the very bottom of the center strand. -
Pierce the holes:
Before baking, use a needle tool or toothpick to create holes in every piece. Crucially, the pieces that sit in the middle of a strand need holes running vertically through the entire shape (top to bottom), while pendant pieces just need a hole at the top.
Hole Piercing Hack
For thick pieces like the white discs, pierce partway from the top, then flip and meet the hole from the bottom. This prevents the exit hole from blowing out or distorting.
Step 2: Baking and Preparation
-
Bake the batch:
Arrange all your clay pieces on a parchment-lined baking sheet. Follow the temperature instructions on your specific brand of clay, usually baking for 15-30 minutes. -
Cool and sand:
Let the pieces cool completely. Once hard, use fine-grit sandpaper to smooth any rough edges or fingerprints, particularly on the flat sides of the triangles. -
Prepare the wood bar:
If your wooden dowel or rectangular bar isn’t already dark, apply a coat of walnut wood stain. Let it dry fully, then drill three small holes through it: one in the center and one near each end.
Uneven Hanging?
If the mobile tilts, the clay pieces might be heavier on one side. Balance it by gluing a small metal washer or coin to the back of a lighter clay piece on the opposite side.
Step 3: Assembly
-
Cut the cords:
Cut three lengths of black nylon cord. The center cord should be the longest (about 24 inches), and the two side cords slightly shorter (about 18 inches) to create a tiered look. -
Start the left strand:
Tie a knot at the end of a side cord. Thread on a teal triangle, then a wooden oval bead, white textured disc, and finally a peach triangle and round wooden bead. Tie a knot after the top bead to secure the stack. -
Build the center strand:
This is your longest strand. Start with the rust triangle at the bottom, then thread on a round wood bead, the lower rainbow, a flat wood disc, another wood disc, the upper rainbow, a wood disc, and a flat rust circle. -
Assemble the right strand:
Mirror the visual weight of the left strand but vary the order slightly if desired. Thread a teal triangle, white flat disc, teal triangle, wooden oval, white textured disc, peach triangle, and top bead. -
Attach to the bar:
Feed the top of each cord up through the corresponding hole in your wooden bar. Adjust the heights so the strands hang symmetrically, then tie secure double knots on top of the bar. -
Add the hanger:
Cut a final piece of cord for the hanging loop. Tie each end to the outer edges of the wooden bar (or through the same outer holes if there’s room), creating a triangle shape for hanging. -
Secure everything:
Add a tiny dab of super glue to the structural knots at the top bar to ensure they don’t slip over time. Trim any excess thread tails closely for a clean finish.
Hang your new mobile near a window to catch the light and enjoy the subtle movement of your handmade art

The Complete Guide to Pottery Troubleshooting
Uncover the most common ceramic mistakes—from cracking clay to failed glazes—and learn how to fix them fast.
Arch Tile Wall Hanging
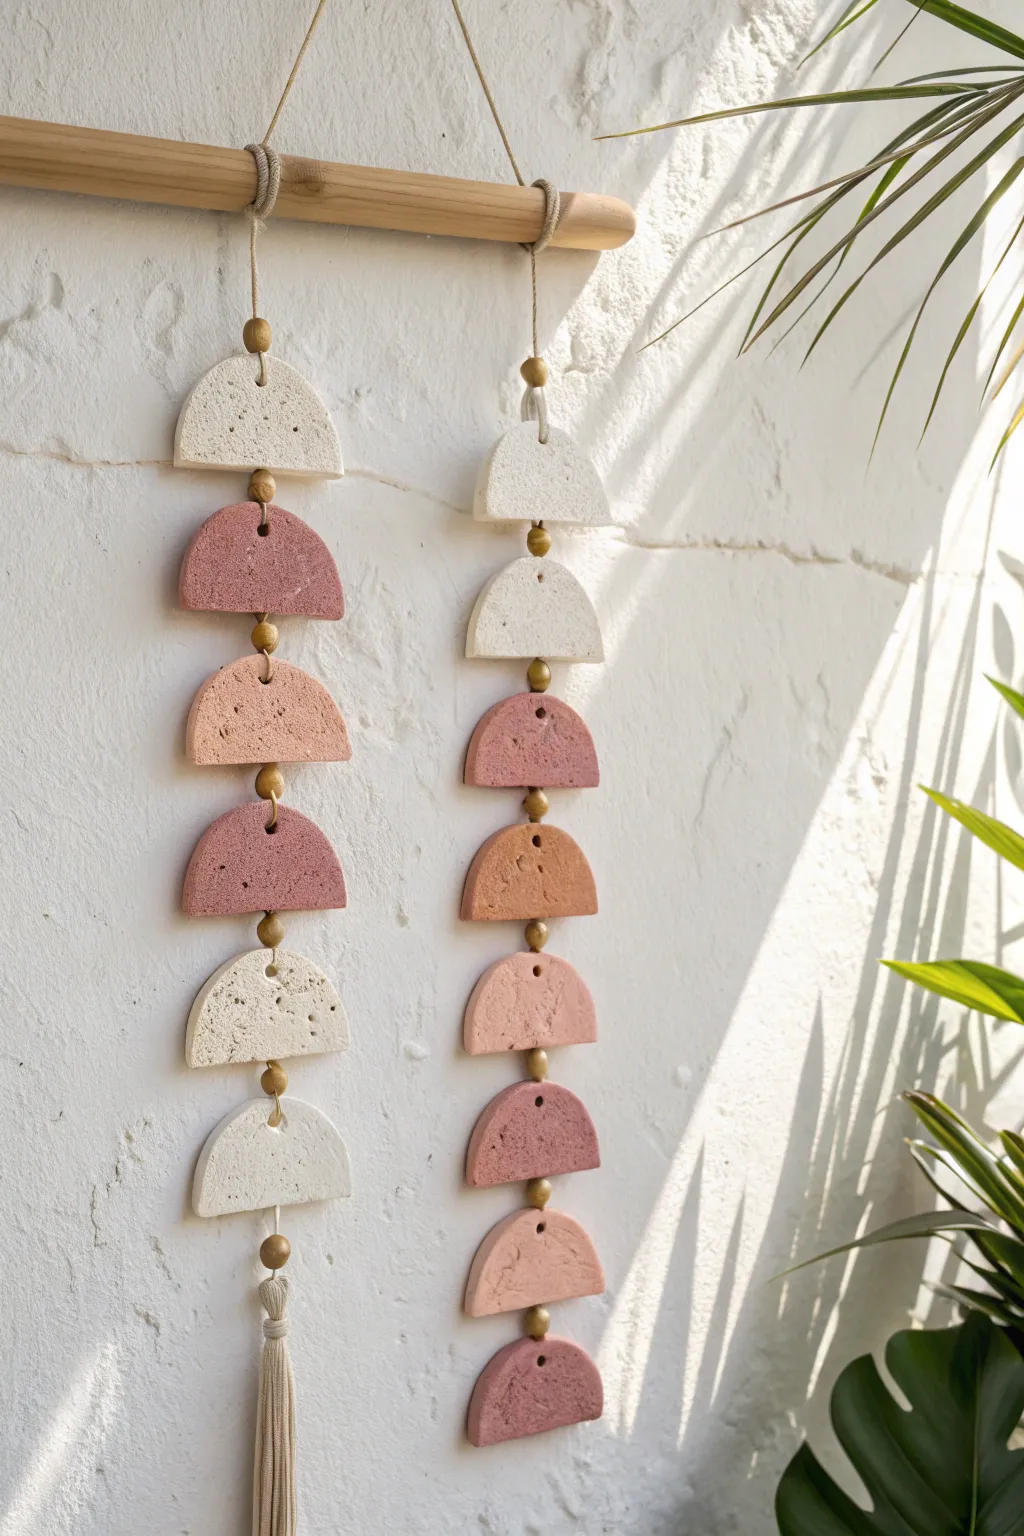
Bring a touch of desert-inspired warmth to your walls with this textured polymer clay hanging. This project combines soft, earthy tones in a repeating arch motif, paired with natural wooden beads and organic twine for a perfectly balanced piece of modern decor.
Step-by-Step Guide
Materials
- Polymer clay (white, terracotta, blush pink, beige)
- Rolling pin or acrylic roller
- Circle cutters (approx. 2-3 inches in diameter)
- Craft knife or tissue blade
- Wooden dowel (approx. 12-14 inches long)
- Natural jute twine or cotton cord
- Wooden beads (small/medium size)
- Toothpick or skewer
- Parchment paper
- Baking sheet
- Sandpaper (fine grit)
- Oven
Step 1: Shaping the Clay Arches
-
Prepping your workspace:
Begin by cleaning your work surface thoroughly to prevent dust from sticking to the clay. Lay down a sheet of parchment paper to work on, which makes moving the pieces easier later. -
Conditioning the clay:
Warm up your polymer clay by kneading it between your hands until it becomes soft and pliable. If you want custom shades like the speckled ones in the image, mix a little granite-effect clay or black pepper into your white clay. -
Rolling out slabs:
Roll each color of clay into a flat, even slab. Aim for a thickness of about 1/4 inch (6mm) to ensure the pieces are sturdy enough to hang without being too heavy. -
Cutting the circles:
Use your circle cutter to press firmly into the clay slabs. Create enough circles for your desired length; the example uses about 14 semi-circles total, so you would need 7 full circles to start. -
Creating the arches:
Take your craft knife or tissue blade and slice each circle exactly in half. This transforms your rounds into the semi-circle ‘arch’ shapes seen in the hanging. -
Adding texture:
To mimic the stone-like finish in the photo, gently pat the surface of the clay with an old toothbrush, a piece of sandpaper, or a crumpled ball of aluminum foil. This adds a lovely organic dimension. -
Piercing holes:
Using a toothpick or skewer, carefully poke a hole through the center top of each arch (the flat side) and the center bottom (the curved side). Ensure the hole is large enough for your twine to pass through easily.
Clean Cuts Only
Before baking, dip your finger in a little cornstarch and rub it gently over the raw clay edges. This smooths out rough cutting lines without needing to sand extensively later.
Step 2: Baking and Assembly
-
Baking the pieces:
Arrange your clay arches on a parchment-lined baking sheet. Bake according to your specific clay brand’s package instructions—usually around 275°F (135°C) for 15-30 minutes per 1/4 inch of thickness. -
Cooling and sanding:
Allow the pieces to cool completely on the baking sheet. Once hard, use fine-grit sandpaper to smooth out any rough edges or fingerprints on the sides of the arches. -
Cutting the cord:
Cut two long lengths of jute twine or cotton cord. Make them at least double the length you want the final hanging to be to allow for knotting and adjustment. -
Attaching to the dowel:
Fold each piece of cord in half and attach it to the wooden dowel using a lark’s head knot. Space the two hanging cords apart so the columns of clay won’t bump into each other. -
Stringing the first bead and arch:
Thread a wooden bead onto one cord, pushing it up towards the dowel. Next, thread on your first clay arch, passing the cord through the center top hole and out the bottom curved hole. -
Securing the spacing:
Add another wooden bead directly under the first arch. Tie a simple overhand knot underneath this bead to hold the entire section in place. This knot supports the weight of the clay piece above it. -
Continuing the pattern:
Repeat the sequence: string a bead, then a clay arch, then another bead, and secure with a knot. Vary the colors (white, pink, terracotta) as you go down to create a pleasing gradient or random pattern. -
Finishing the ends:
Once you’ve added your final arch and bottom bead on a strand, tie a secure double knot. You can fray the remaining cord to create a tassel effect, or add a pre-made tassel as shown on one of the strands in the photo. -
Adding the hanger:
Finally, tie a separate piece of twine to both ends of the wooden dowel to create a triangular hanger for mounting on the wall.
Level Up: Mixed Media
Try mixing gold leaf flakes into the white clay before rolling it out. The metallic flecks will add a subtle, high-end shimmer that catches the light beautifully.
Now hang your finished piece in a sunny spot to enjoy those warm textures and shadows
Textured Slab Statement Piece
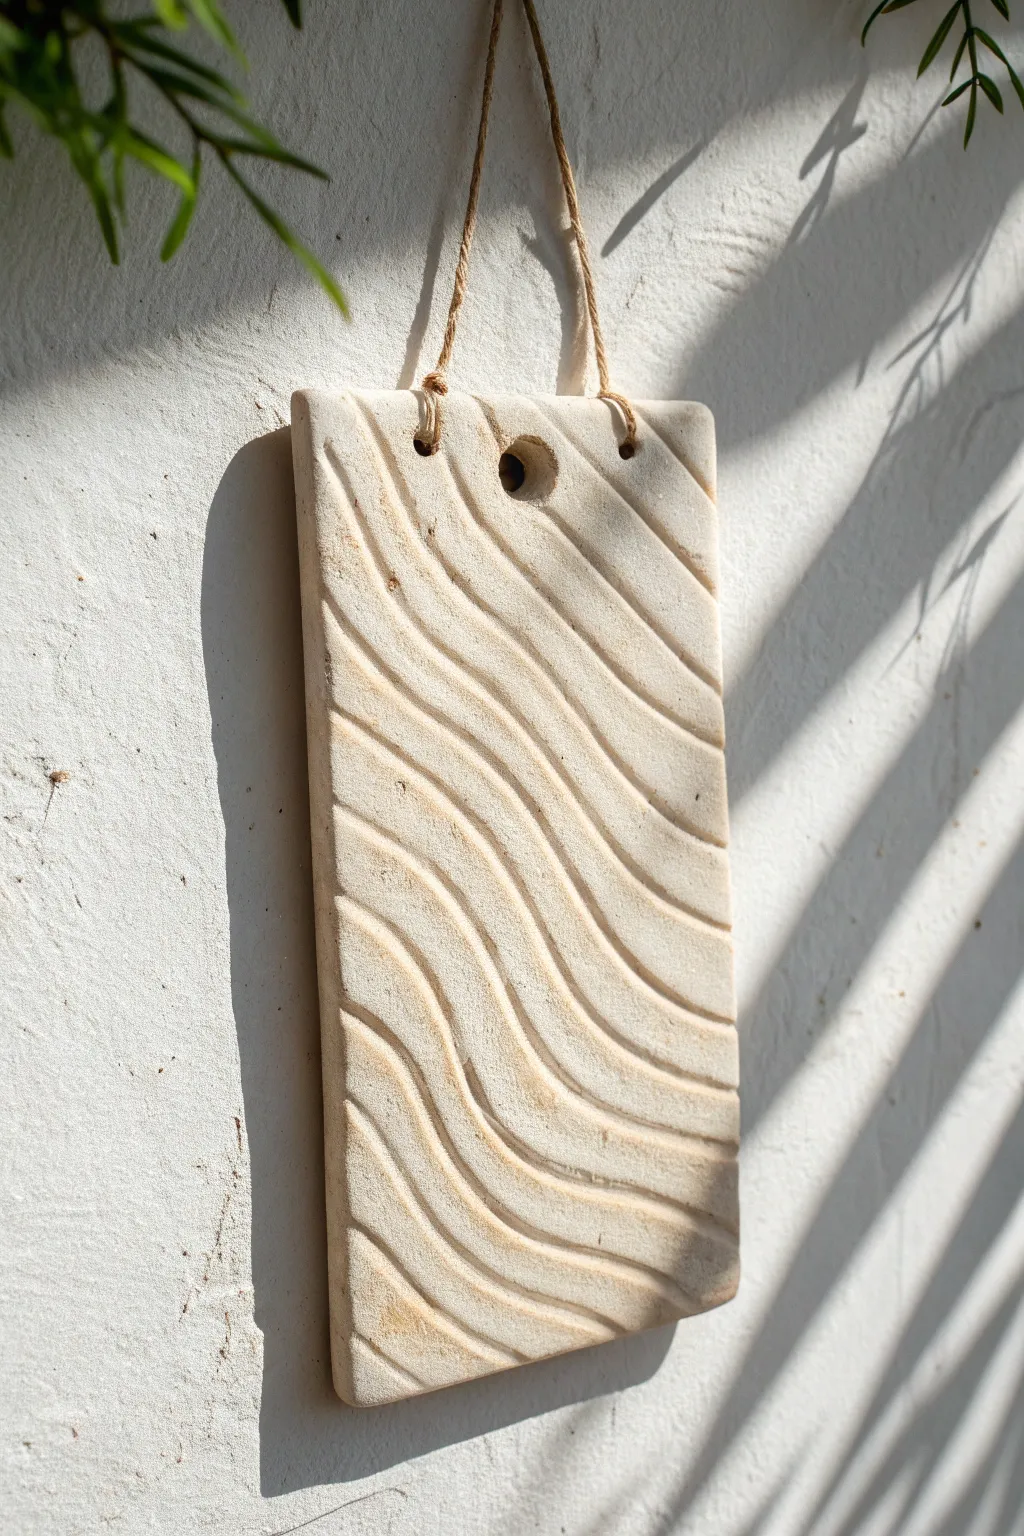
Embrace minimalist texture with this elegant, wave-patterned clay slab. Its creamy, sandstone-like finish and rhythmic diagonal grooves create a calming focal point that brings a natural, organic feel to any wall.
How-To Guide
Materials
- Air-dry clay (stone or white color) or stoneware clay
- Rolling pin
- Two wooden guide strips (approx. 1/4 inch thick)
- Rectangular paper template (approx. 4″ x 8″)
- Fettling knife or craft knife
- Loop tool or ribbons tool (medium rounded profile)
- Sponge
- Water cup
- Straw or small circle cutter
- Sanding block or fine-grit sandpaper
- Jute twine or leather cord
- Canvas mat or non-stick work surface
Step 1: Preparing the Slab
-
Wedge the clay:
Begin by thoroughly wedging your clay to remove any air bubbles and ensure an even consistency. This is crucial whether you use kiln-fire or air-dry clay to prevent cracks later. -
Set up guides:
Place your canvas mat on a flat work surface. Position your two wooden guide strips parallel to each other, slightly wider than the width of your intended finished piece. -
Roll the slab:
Place your ball of clay between the guides. Using the rolling pin, roll the clay out until the pin rests on the wooden strips, ensuring a perfectly uniform thickness across the entire slab. -
Smooth the surface:
Take a damp sponge or a flexible rib tool and gently compress the surface of the clay. This removes canvas texture and creates a pristine, smooth canvas for your carving. -
Cut the shape:
Lay your rectangular paper template gently onto the clay. Use your fettling knife or craft knife to slice cleanly around the edges. hold the knife vertically to keep the edges straight. -
Soften edges:
Once the rectangle is cut, run a slightly damp finger or sponge along the sharp cut edges to round them off just a little, preventing them from being too fragile or sharp.
Step 2: Carving the Texture
-
Mark hanging holes:
Before texturing, measure about an inch down from the top edge and use a straw or small circle cutter to punch two holes equally spaced from the center. Twist the straw as you pull it out to get a clean hole. -
Plan your flow:
Lightly visualize or very faintly sketch a diagonal direction for your waves. They should flow from the top left towards the bottom right to match the reference style. -
Carve the first groove:
Using a medium-sized loop tool, carve your first wavy line. Start from one edge and pull the tool smoothly across the clay to the opposite side, maintaining steady pressure for consistent depth. -
Continue the pattern:
Repeat the carving process, creating parallel wavy lines next to your first one. I find it helpful to leave a raised ridge of roughly equal width between each carved trough to create that rhythmic shadow play. -
Clean up burrs:
As you carve, little crumbs or ‘burrs’ of clay will accumulate. wait until the clay is slightly leather-hard (stiff but cool) to brush these away with a soft dry brush, rather than smearing them while wet. -
Refine the troughs:
Once the larger crumbs are gone, use a damp finger or a slightly wet paintbrush to smooth out the inside of the carved grooves. This removes visible tool marks and gives that stone-eroded look. -
Final check:
Inspect the hanging holes again. Sometimes carving distorts the surrounding clay; re-insert your straw or tool gently to ensure the holes remain open and round.
Warping Woes?
If corners curl up while drying, gently weigh them down with small sandbags or books (use paper between to prevent sticking). Slow drying is key for flat slabs.
Step 3: Finishing
-
Initial drying:
Place the slab on a piece of drywall or a completely flat board to dry. To prevent warping, you can rest a light board on top of the corners or flip the slab carefully once a day. -
Complete drying:
Allow the piece to dry completely. For air-dry clay, this takes 24-48 hours. For ceramic clay, dry until bone dry and then bisque fire (and glaze fire if you choose a matte glaze). -
Sanding:
If using air-dry clay, take your piece outside and gently sand the edges and surface with fine-grit sandpaper to achieve a flawless, stone-like finish. Wipe away dust with a barely damp cloth. -
Seal (Optional):
For air-dry clay, apply a matte varnish or sealant to protect the surface from humidity and dust while maintaining that natural look. -
Stringing:
Cut a length of natural jute twine. Feed one end through the left hole from back to front, and the other end through the right hole from back to front. -
Knotting:
Tie a secure overhand knot at the front of each hole. The knot acts as a stopper, keeping the twine in place and adding a rustic detail to the front face of the slab.
Add Color Depth
After drying, dilute a dark brown acrylic paint into a ‘wash’. Brush it over the texture and wipe the surface immediately. Paint stays in the grooves, highlighting the waves.
Hang your textured masterpiece in a spot where the light hits it from the side to truly show off those beautiful carved shadows


What Really Happens Inside the Kiln
Learn how time and temperature work together inside the kiln to transform clay into durable ceramic.
Daisy Chain Wall Hanging
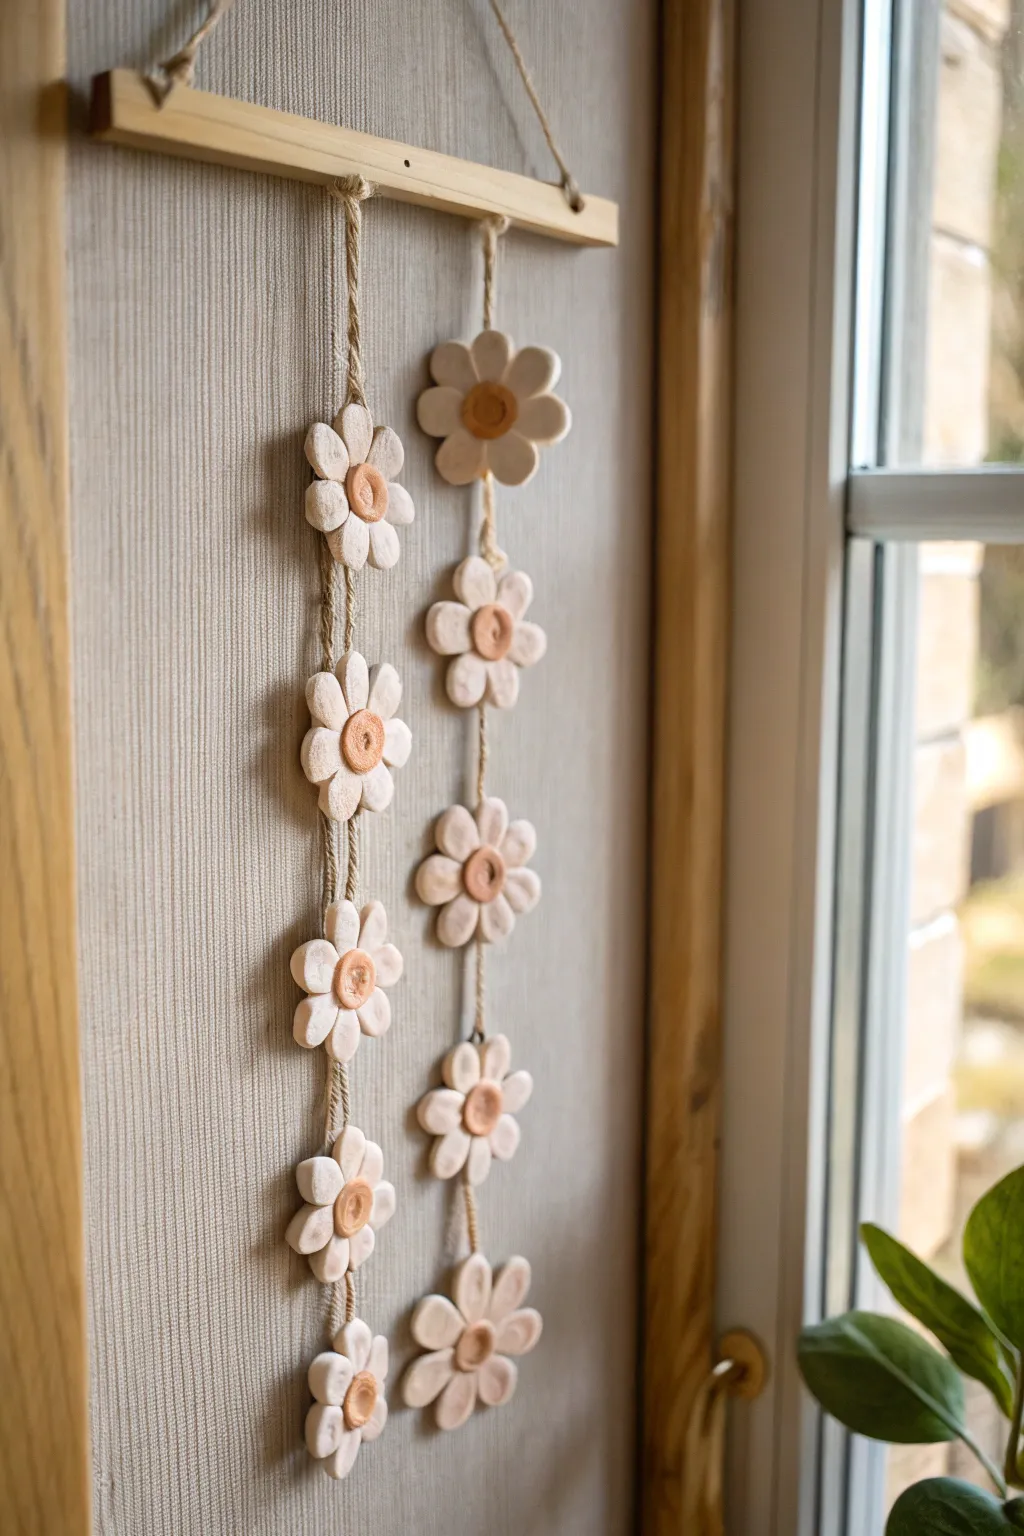
Bring a touch of cottagecore whimsy to your space with this charming ceramic daisy mobile. This project features delicate white blooms with earthy terracotta centers, strung simply on jute for a natural, rustic aesthetic that looks beautiful catching the light near a window.
Step-by-Step
Materials
- Air-dry clay (white)
- Air-dry clay (terracotta/natural) or acrylic paint
- Jute twine
- Small wooden dowel or flat slat (approx. 10 inches)
- Rolling pin
- Flower cookie cutter (daisy shape) or craft knife
- Small circular cutter (for centers)
- Needle tool or toothpick
- Water cup and small sponge
- Sandpaper (fine grit)
- Quick-dry craft glue (optional)
Step 1: Sculpting the Blooms
-
Roll the base:
Begin by conditioning your white air-dry clay, kneading it until soft and pliable. Roll it out on a smooth surface to an even thickness of about 1/4 inch. -
Cut the shapes:
Using a daisy-shaped cookie cutter, punch out 10 to 12 flower shapes. If you don’t have a cutter, you can sketch a flower on paper, cut it out, and use it as a stencil to cut the clay with a craft knife. -
Soften edges:
Dip your finger in a little water and gently run it along the cut edges of each petal to smooth out any roughness or sharp clay burrs. -
Shape the petals:
To give the flowers a more organic, 3D look, gently pinch or curve the tips of a few petals upward or downward so they aren’t perfectly flat. -
Create centers:
Roll out a small amount of terracotta-colored clay. If you only have white clay, you can mix in a drop of brown paint or plan to paint these centers later. -
Cut center discs:
Use a small circle cutter or a bottle cap to cut out small discs for the flower centers, making sure they fit proportionally within your white petals. -
Texture the centers:
Before attaching, press a texture into the center discs. You can use the end of a marker cap, a button, or simply poke a spiral pattern with a needle tool. -
Attach the centers:
Score the back of the center disc and the middle of the flower with a needle tool. Add a dab of water (slip) and press the center firmly onto the flower petals. -
Pierce holes:
This is crucial: careful pierce a hole through the top of one petal and the bottom of an opposing petal on each flower. Ensure the hole is wide enough for your jute twine to pass through. -
Drying time:
Lay all the flowers flat on a piece of parchment paper or a wire rack. Let them dry completely for 24-48 hours, flipping them halfway through to ensure even drying.
Step 2: Assembly
-
Sand imperfections:
Once fully dry, inspect your flowers. Use fine-grit sandpaper to gently smooth away any remaining rough edges on the petals. -
Prep the hanger:
Drill two small holes on either end of your wooden slat. Thread a piece of jute twine through these holes to create the triangle hanger for the wall. -
Cut vertical strings:
Cut two long lengths of jute twine, each about 3 feet long. You want extra length to work with for knots. -
Tie the first anchor:
Tie a secure knot at the very end of one piece of twine. Thread your bottom-most flower onto the twine so it rests on this knot. -
Secure the flower:
If the flower tips forward, I usually add a small dab of clear craft glue inside the hole or on the back of the knot to keep the bloom facing forward. -
Add spacing knots:
Decide on the spacing—about 2 inches looks nice. Tie a knot at that distance above the first flower, thread the next flower on, and repeat until you have a column of 5 or 6 flowers. -
Repeat for second strand:
Repeat the threading process for the second strand of flowers, trying to align the height of the blooms with the first strand for symmetry. -
Attach to slat:
Tie the top of each flower garland securely to the wooden slat. Adjust the knot placement so both strands hang evenly side-by-side. -
Trim ends:
Snip off any excess twine from your knots at the top and bottom for a clean finish.
Smooth Seams
To prevent the centers from popping off as the clay shrinks during drying, really work the ‘seams’ together with a tool or wet finger, rather than just pressing them on top.
Level Up
Add wooden beads between the flowers for extra texture, or paint subtle pastel patterns on the white petals before sealing.
Now hang your beautiful clay creation near a window and enjoy the cheerful vibes it brings to the room
Feather-Inspired Clay Hanging
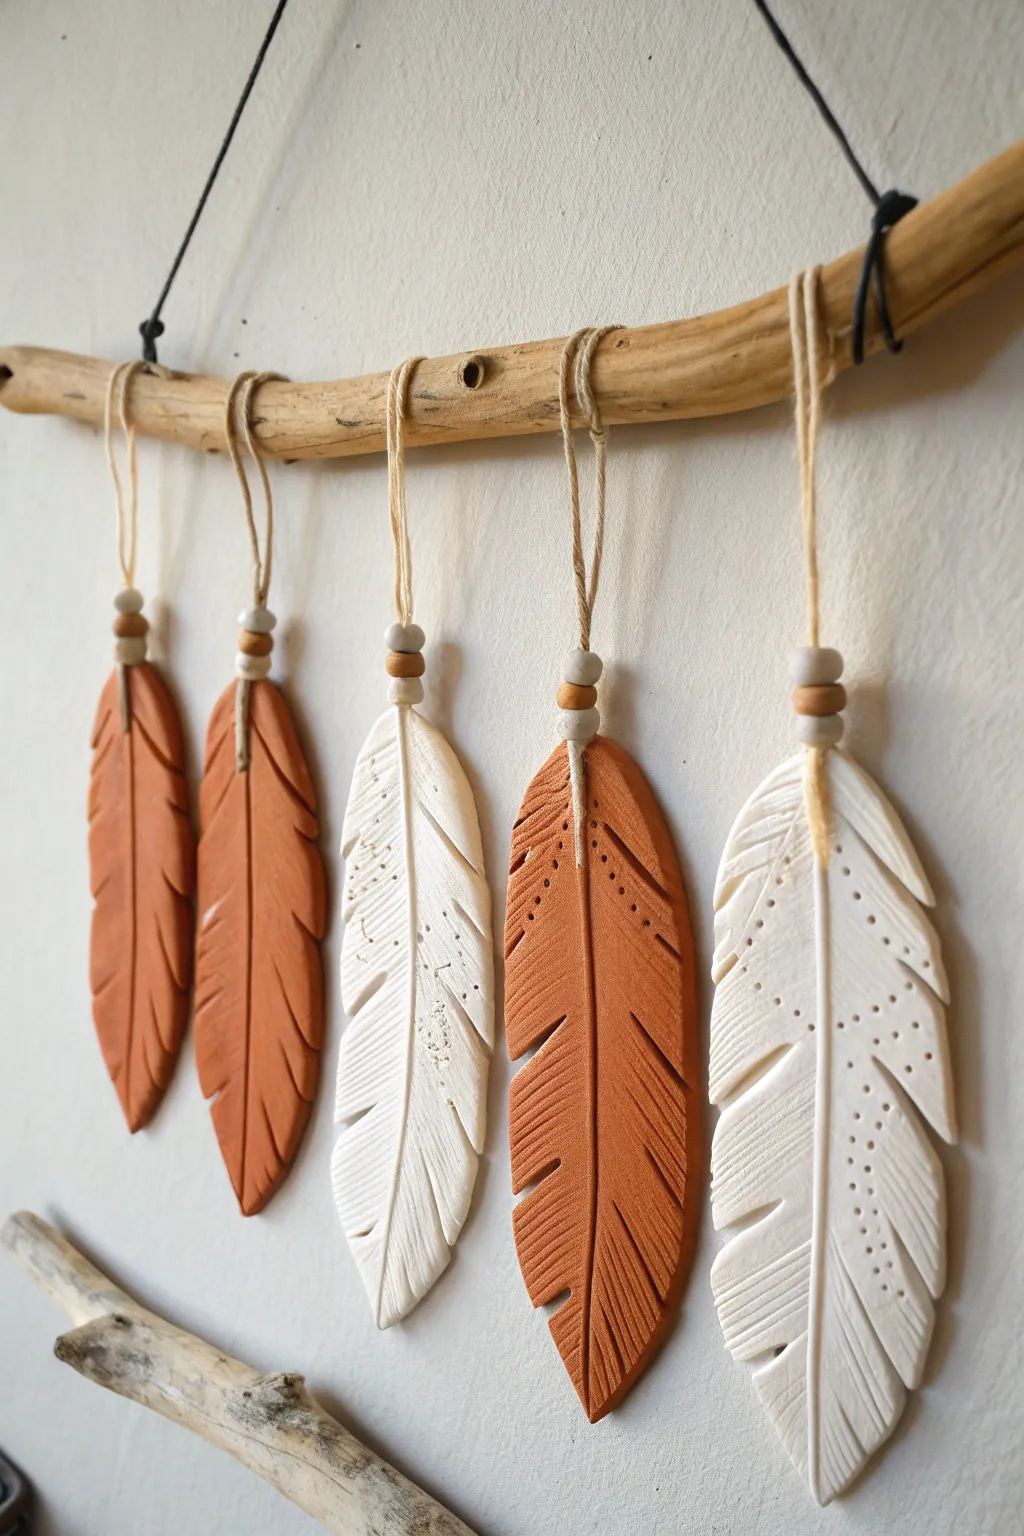
Bring an earthy, bohemian touch to your wall with this driftwood mobile, featuring handcrafted clay feathers in alternating warm terracotta and soft white hues. The textured surfaces and organic shapes create a beautiful interplay of shadow and light that feels both rustic and modern.
Step-by-Step Guide
Materials
- Air-dry clay (terra cotta color)
- Air-dry clay (white)
- Small rolling pin
- Rolling mat or parchment paper
- Pointed clay sculpting tool or tapestry needle
- Knife or plastic clay cutter
- Driftwood branch (approx. 12-15 inches)
- Natural twine
- Wooden beads (natural and white)
- Black cord (for hanging main branch)
- Fine-grit sandpaper
Step 1: Shaping the Feathers
-
Prepare your workspace:
Lay down your mat or parchment paper to prevent sticking. Start by kneading a small handful of terra cotta clay until it’s smooth and pliable. -
Roll out the clay:
Use your rolling pin to flatten the clay into an oval slab, aiming for a consistent thickness of about 1/4 inch. It doesn’t need to be perfectly round—organic shapes work best. -
Cut the basic shape:
Using your knife tool, cut freehand feather shapes. Make them roughly 4-5 inches long, tapering at the bottom and slightly rounded at the top. -
Repeat with colors:
Create three feathers from the terra cotta clay and two from the white clay. I usually make them slightly different sizes for visual interest. -
Smooth the edges:
Dip your finger in a tiny bit of water and run it along the cut edges of each feather to smooth out any roughness or sharp debris.
Step 2: Adding Texture and Detail
-
Draw the central vein:
Take your pointed sculpting tool and gently carve a line down the center of each feather, stopping just short of the tip and the top edge. Don’t cut all the way through. -
Create barbs:
Etch diagonal lines branching out from the central vein toward the edges. Vary the pressure to create depth, making the lines look like natural feather barbs. -
Add carved notches:
Use your knife to cut small, triangular notches out of the sides of the feathers. This mimics the natural separation found in real feathers. -
Detail with dots:
For extra texture, poke small holes or indentations along the spine or in clusters on the white feathers using your needle tip. -
Create the hanging hole:
While the clay is still wet, use a straw or a larger tool to punch a hole at the very top center of each feather. Ensure it’s wide enough for your twine to pass through later. -
Dry thoroughly:
Lay the feathers flat on parchment paper to dry. Flip them over halfway through the drying process (usually 24 hours total) to prevent curling.
Fixing the Curvature
If your feathers curl while drying, slightly dampen the concave side with a sponge and place a heavy book on top (with parchment in between) overnight to flatten.
Step 3: Assembly
-
Sand edges:
Once fully dry and hard, use fine-grit sandpaper to gently smooth any sharp edges or burrs around the outline of the feathers. -
Attach the twine:
Cut five lengths of natural twine, each about 12 inches long. Thread one piece through the hole of a feather. -
Tie the knot:
Bring the two ends of the twine together and tie a knot just above the top of the feather to secure it. -
Add beads:
Thread 2-3 wooden beads onto the double strand of twine, sliding them down until they rest on the specific knot you just made. -
Tie to branch:
Tie the feathers onto the driftwood branch. Space them evenly, alternating the colors (orange, white, orange…). Trim any excess twine. -
Final hanger:
Cut a length of black cord and tie it securely to both ends of the driftwood branch to create the main hanger for the wall.
Getting Clean Lines
Wipe your sculpting tool with a damp cloth frequently while carving. Built-up clay residue on the tool causes dragging and rougher lines in the texture.
Hang your new creation in a well-lit spot to watch the shadows play across the textured clay surface

TRACK YOUR CERAMIC JOURNEY
Capture glaze tests, firing details, and creative progress—all in one simple printable. Make your projects easier to repeat and improve.
Eye Motif Talisman Hanging

Channel protective energy and boho vibes with this striking vertical wall hanging. Featuring five handcrafted clay discs adorned with a minimalist eye motif, this talisman makes a beautiful focal point for a gallery wall or a narrow nook.
Step-by-Step
Materials
- Air-dry clay (white or light cream)
- Circle cookie cutter (approx. 2-3 inches diameter)
- Rolling pin
- Parchment paper or smooth work surface
- Sandpaper (fine grit)
- Acrylic paint (black)
- Fine-point paintbrush or black paint marker
- Jute twine or hemp cord
- Wooden skewer or straw (for poking holes)
- Scissors
Step 1: Sculpting the Base
-
Prepare your workspace:
Lay down a sheet of parchment paper on a flat surface to prevent sticking. Unwrap your air-dry clay and knead a large handful until it feels pliable and warm. -
Roll the slab:
Use a rolling pin to flatten the clay into an even slab. Aim for a thickness of about 1/4 inch—not too thin, or it will be brittle, but not so thick that it becomes heavy. -
Cut the shapes:
Using your circle cutter, stamp out five identical discs. If the edges are ragged, dip your finger in a little water and gently smooth the rims. -
Create connection points:
With a skewer or straw, poke a hole near the top edge and another directly opposite near the bottom edge of each disc. Ensure the holes are large enough for your twine to pass through easily. -
Special instruction for top and bottom:
For the very top disc, you only need one hole at the top (for hanging) and one at the bottom. Actually, keep the standard two holes for all of them to maintain visual symmetry, but note that the top loop will be for the hanger. -
Let them cure:
Place the discs on a flat, dry surface. Allow them to air dry completely for 24-48 hours. I suggest flipping them over halfway through the drying process to prevent curling. -
Smooth the surface:
Once fully dry and hard, lightly sand the faces and edges of each disc with fine-grit sandpaper to create a smooth canvas for your painting.
Uneven Drying?
If your clay discs start to curl up like potato chips while drying, place a heavy book on top of them (use parchment paper in between) once they are semi-dry to flatten them out.
Step 2: Painting the Motif
-
Outline the eye shape:
Using a pencil very lightly, sketch the outline of an eye in the center of each disc. Draw an almond shape first, then a circle in the center for the iris. -
Paint the pupil:
With black acrylic paint and a fine brush (or a paint pen for more control), fill in the center circle completely to create a bold pupil. -
Define the lids:
Trace the upper and lower curves of the almond shape with a steady hand. Make the lines slightly thick for a graphic look. -
Add the lashes:
Paint short, radiating lines extending from both the top and bottom eyelids. Space them somewhat evenly, but don’t worry about perfection; rustic charm is part of the appeal. -
Set the paint:
Allow the paint to dry completely. If you want extra durability, you can apply a matte varnish coat now, though raw clay has a lovely texture on its own.
Step 3: Assembly & Finishing
-
Cut the connecting cords:
Cut five short pieces of jute twine, each about 4 inches long. You will also need a longer piece for the top hanger. -
Knot the top hanger:
Thread a long loop of twine through the top hole of the first disc and knot it securely. This will be how you hang the piece on the wall. -
Link the discs:
To connect the first disc to the second, thread a short piece of twine through the bottom hole of the top disc and the top hole of the second disc. Tie a knot leaving about 0.5 to 1 inch of space between the clay pieces. -
Repeat the chain:
Continue linking all five discs in a vertical column using the short twine pieces. Try to keep the spacing consistent between each tier. -
Make the tassel:
Wrap jute twine around your four fingers about 20 times. Slide the loops off your hand and tie a separate piece of string tightly around the top third to create the ‘head’ of the tassel. -
Cut the loops:
Use scissors to cut the bottom loops of your tassel bundle, creating a fringe. Trim the ends so they are even. -
Attach the tassel:
Tie the finished tassel securely to the bottom hole of the lowest clay disc.
Level Up: Golden Touch
After the black paint dries, add small dots of gold leaf or metallic gold paint to the center of the pupil or along the lashes for a touch of mystical glamour.
Hang your new talisman near an entryway or window to watch over your space with style
Terrazzo Clay Wall Hanging
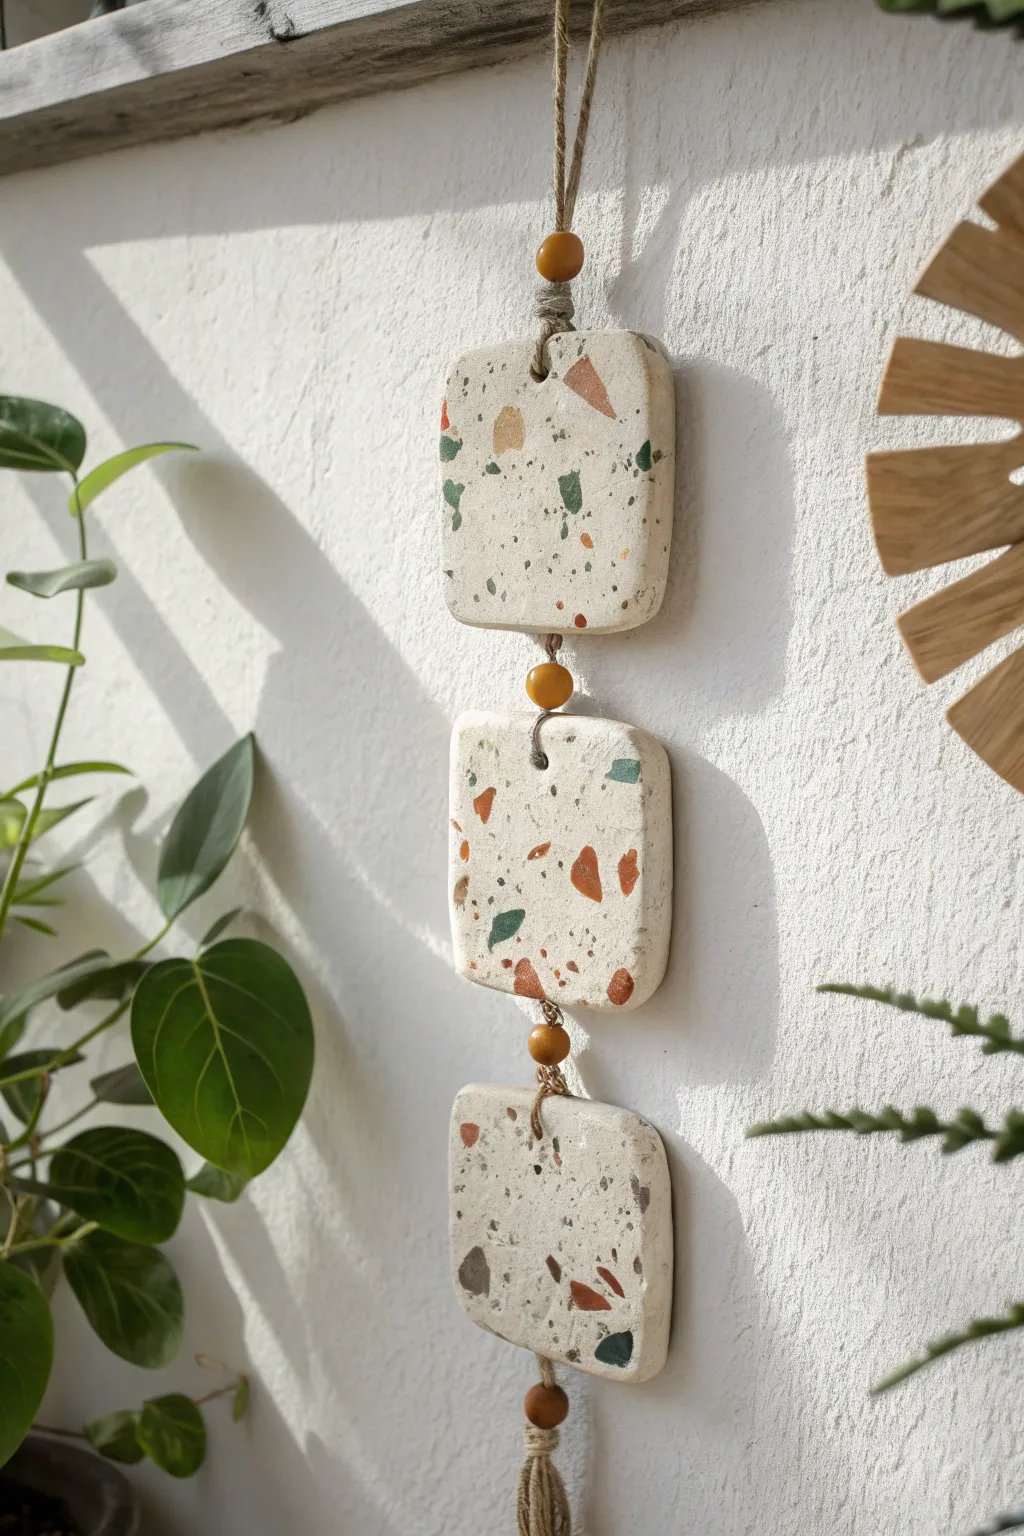
Bring a touch of modern desert style to your space with this stunning faux-terrazzo wall hanging. By embedding colored chips into a neutral base, you’ll create three substantial rectangular tiers that dangle elegantly from jute twine and wooden beads.
How-To Guide
Materials
- White or cream air-dry clay (approx. 500g)
- Small amounts of colored polymer clay or air-dry clay (terracotta, sage green, mustard yellow, dark grey)
- Rolling pin
- Square cookie cutter (approx. 3-4 inches) or a knife and ruler
- Jute twine
- 4 wooden beads (medium size, honey or dark wood tone)
- Straw or skewer (for making holes)
- Fine-grit sandpaper
- Matte sealant (optional)
Step 1: Preparing the Terrazzo Chips
-
Flatten the colored clay:
Take your small portions of colored clay—terracotta, sage green, mustard, and grey—and flatten each color into a very thin sheet. The thinner these are, the more natural the chips will look later. -
Create the chips:
Once flattened, tear or cut these sheets into small, irregular fragments. Aim for a mix of sizes, from tiny specks to slightly larger chunks, to mimic the random nature of real stone aggregate. -
Set aside:
Keep your pile of colorful chips nearby. If you are using air-dry clay for the chips, let them dry just slightly so they hold their shape; if using polymer clay, they can be used immediately.
Clean Edges Pro Tip
When sanding the face of your tiles to reveal the terrazzo, give the edges a quick pass too. Sharp, defined edges make the piece look like real cut stone.
Step 2: Forming the Clay Base
-
Roll the main slab:
Take your large block of white or cream air-dry clay and roll it out on a smooth surface. Aim for a thickness of about 1/4 inch to ensure the final pieces have enough weight and durability. -
Scatter the chips:
Generously sprinkle your prepared colored chips over the surface of the white clay slab. Don’t overthink the placement; randomness is key to the terrazzo effect. -
Embed the color:
Using your rolling pin, gently roll over the slab again. Press firmly enough to force the colored chips flush into the white base, creating a unified, flat surface.
Level Up: Texture
Before drying, gently press a piece of coarse linen or canvas onto the back of the tiles. It gives a hidden, professional texture to the reverse side.
Step 3: Cutting and Refining
-
Cut the squares:
Using a square cookie cutter or a ruler and knife, cut out three identical squares from your terrazzo-patterned slab. Round off the corners slightly with your fingertips for a softer, organic look. -
Pierce the holes:
Use a straw or skewer to poke holes in each square. The top square needs a hole at the top and bottom center. The middle square also needs top and bottom holes. The bottom square only needs a top hole. -
Clean the edges:
Dip your finger in a little water and smooth down any rough sides or jagged edges where you cut the clay. This professional touch makes a huge difference. -
Allow to dry:
Place the three squares on a flat surface to dry completely. This usually takes 24-48 hours depending on humidity. Flip them halfway through so the backs dry evenly. -
Sand for contrast:
Once fully dry, lightly sand the surface with fine-grit sandpaper. This removes the top film of white clay and makes the colors of the embedded chips pop vividly.
Step 4: Assembly
-
Cut the twine:
Cut a long piece of jute twine, approximately 3-4 feet long, to ensure you have plenty of room for knotting. -
Create the hanger:
Fold the twine in half to create a loop at the top for hanging. Tie a knot about 3 inches down from the loop, then thread on the first wooden bead. -
Attach the top tile:
Thread both ends of the twine through the top hole of your first square tile. Tie a secure knot at the back or simply loop it through if you prefer a cleaner front. -
Connect the middle section:
Bring the twine out through the bottom hole of the first tile. Add another wooden bead, then thread the twine into the top hole of the second tile. Leave a little slack so the tiles hang freely without bumping. -
Add the final tier:
Repeat the process: thread out the bottom of the second tile, add a wooden bead, and enter the top hole of the final, third tile. -
Finish with a tassel:
Thread the twine out the bottom of the final tile (if you added a bottom hole) or tie it off at the back. Add one final bead at the bottom and fray the ends of the twine to create a rustic tassel tail.
Hang your new terrazzo creation in a sunny spot where the earthy tones can warm up the room
Marbled Clay Hanging Pieces
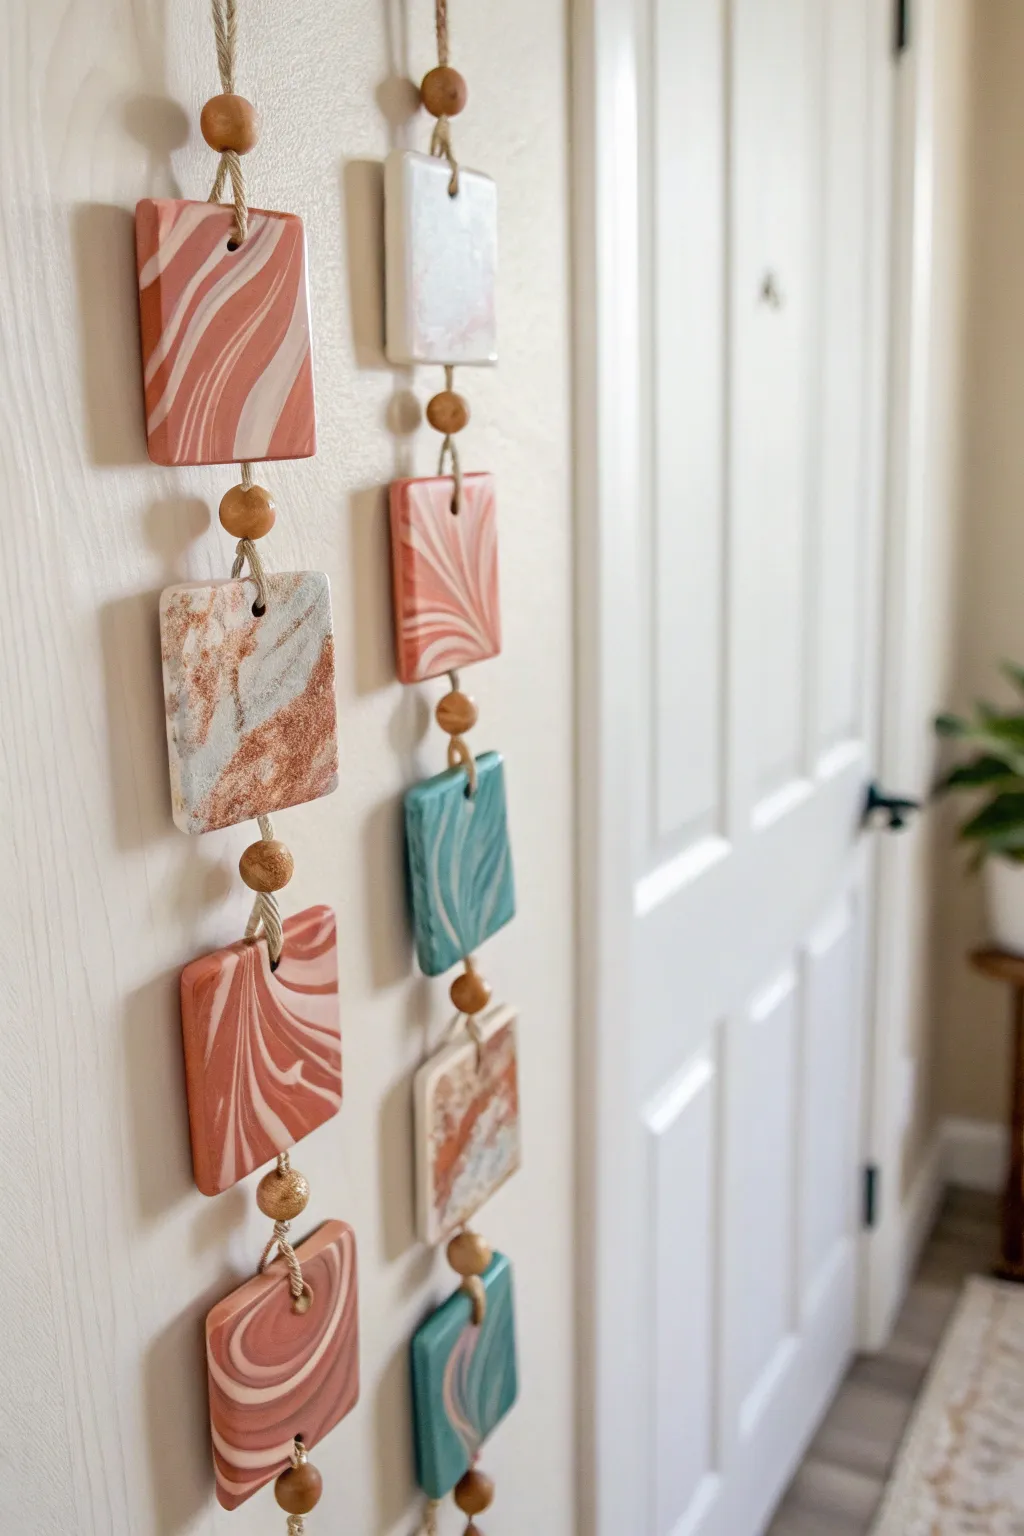
This project combines the modern appeal of marbled polymer clay with rustic wooden beads to create a striking vertical wall hanging. The organic swirls of terracotta, teal, cream, and stone textures make each square distinct while tying the whole piece together.
Step-by-Step
Materials
- Polymer clay (terracotta, white, teal, grey/granite effect)
- Acrylic rolling pin
- Square clay cutter (approx. 2-3 inches)
- Wooden beads (unfinished, various sizes)
- Jute twine or hemp cord
- Skewer or toothpick (for poking holes)
- Baking sheet
- Parchment paper
- Sandpaper (fine grit)
- Matte sealer or glaze (optional)
Step 1: Marbling the Clay
-
Condition the clay:
Start by warming up your polymer clay in your hands until it’s soft and pliable. You’ll need separate balls for your base colors: terracotta, white, teal, and a granite-effect grey. -
Create color snakes:
Roll each color into thin snakes or logs. For the terracotta pieces, you’ll want mostly terracotta snakes with thinner white snakes for contrast. For the teal ones, pair teal with white. -
Twist to combine:
Take your primary color snakes (e.g., three terracotta) and one secondary color snake (e.g., one white) and twist them together like a candy cane. -
Roll and fold:
Roll the twisted log into a ball, then roll it out into a snake again. Fold this snake in half and twist it once more. Repeating this process creates the intricate marble veins. -
Check the pattern:
Stop twisting when you see a pattern you like. Be careful not to over-mix, or the colors will blend into a muddy solid tone rather than distinct swirls. -
Flatten the marble:
Form your marbled clay into a loose ball and use the acrylic rolling pin to flatten it into a sheet. Aim for a consistent thickness of about 1/4 inch.
Muddy Colors?
If your marble pattern looks blurry or grey, you’ve over-mixed the clay. Stop twisting as soon as distinct streaks appear. Less is more when marbling!
Step 2: Shaping and Baking
-
Cut the shapes:
Place your square cutter over the most interesting part of the marbled pattern and press down firmly to cut out your tile. Repeat this to create roughly 8-10 squares in varying color palettes. -
Smooth the edges:
Gently run your finger around the perimeter of each square to soften the sharp cut edges and remove any loose bits of clay. -
Pierce holes:
Using a skewer, poke a hole through the center of the top edge and directly opposite on the bottom edge of each square. Make sure the hole is large enough for your twine to pass through easily. -
Bake carefully:
Arrange the squares on a parchment-lined baking sheet. Bake according to your brand of clay’s instructions—usually around 275°F (135°C) for 15-30 minutes. -
Cool and sand:
Let the tiles cool completely on a flat surface. I like to inspect them here and use fine-grit sandpaper to buff away any fingerprints or rough spots on the edges. -
Seal (Optional):
If you want a shinier finish or extra durability, brush a thin layer of matte or satin glaze over the tiles and let them dry.
Go Geometric
Swap the squares for circles, hexagons, or even organic pebble shapes. Mixing different geometric shapes in one strand adds amazing visual interest.
Step 3: Assembly
-
Prepare the cord:
Cut a long length of jute twine, at least 4 feet long. Fold it in half and tie a loop at the folded end for hanging. -
Start the top section:
Thread a wooden bead onto both strands of the twine below the loop. Secure it with a knot underneath so it stays in place. -
Attach the first tile:
Thread the two twine ends through the top hole of your first clay square. Pull them down along the back of the square and bring them out through the bottom hole. -
Add a spacer bead:
Slide a wooden bead onto the twine immediately after it exits the bottom of the square. Tie a knot below the bead to hold everything taut. -
Continue the pattern:
Leave a small gap of exposed twine (about 1-2 inches) below the knot, then tie another knot to support the next tile. Thread the next square and bead exactly as before. -
Adjust and finish:
Repeat until all tiles are attached. Finish the bottom by threading a final wooden bead and tying a sturdy double knot. Trim any excess twine for a clean look.
Hang your new art piece near a window to catch the light and enjoy the earthy vibes it brings to your space.
Rainbow Arch Wall Hanging
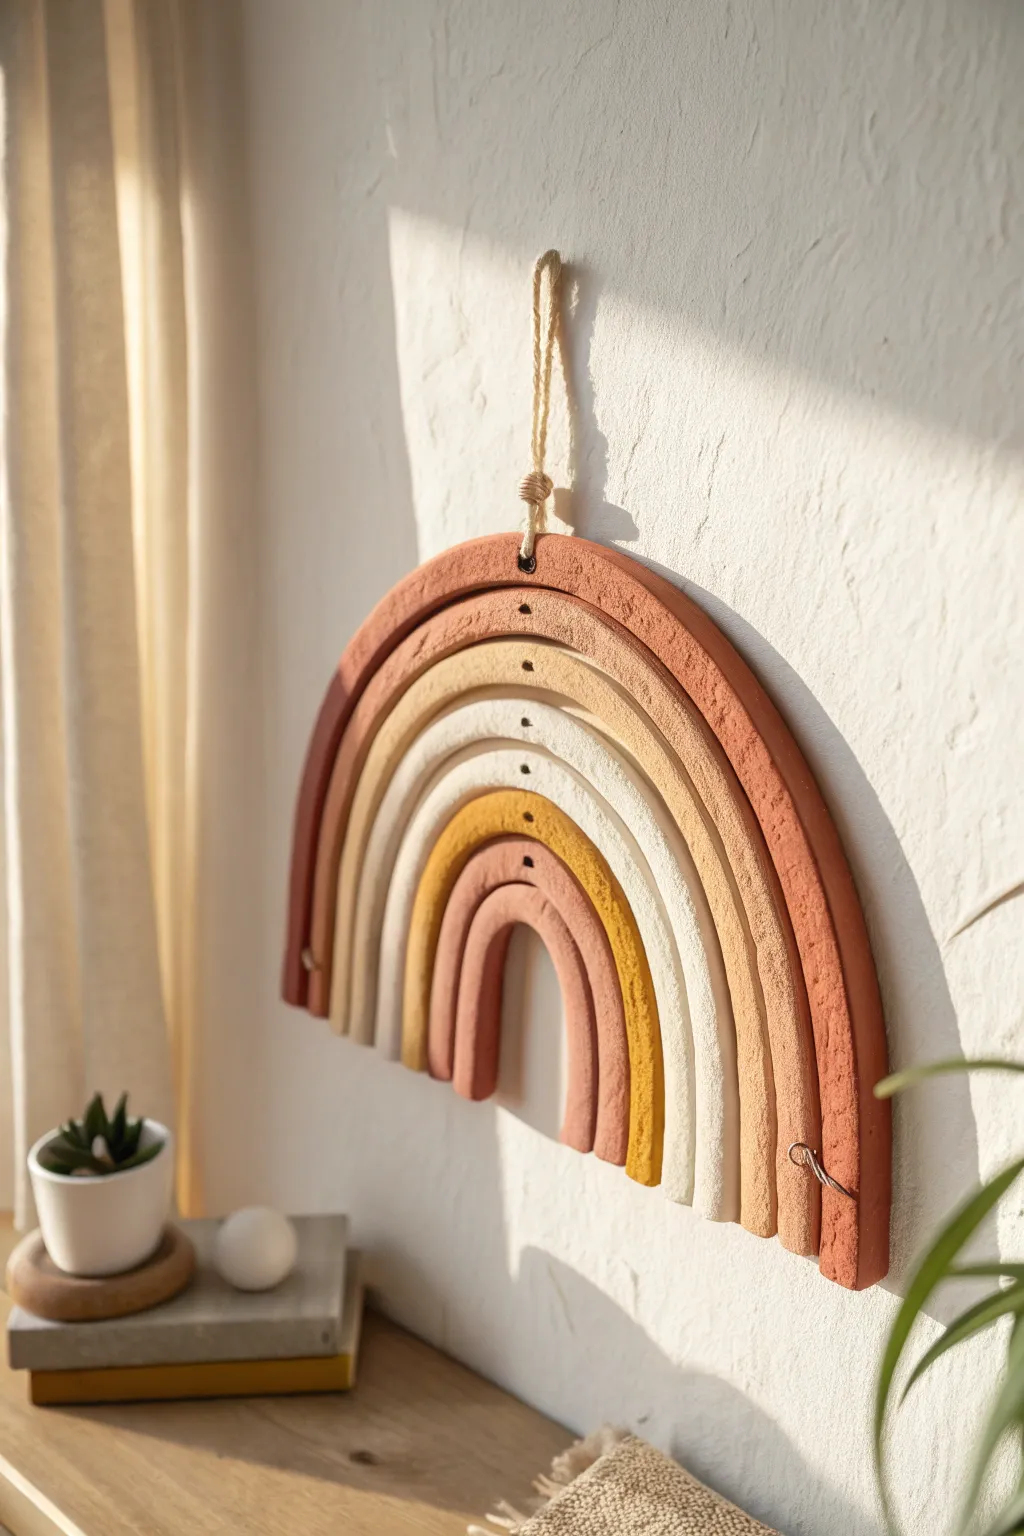
Bring warmth and texture to your walls with this earthy, bohemian-inspired wall hanging. Featuring seven distinct arches in a sunset palette of terracotta, mustard, and cream, this project uses air-dry clay to create a sophisticated yet handmade piece of decor.
Step-by-Step Tutorial
Materials
- Air-dry clay (white or terracotta base)
- Acrylic paints (terracotta, beige, mustard yellow, warm white, dusty pink)
- Rolling pin
- Sharp craft knife or clay slicing tool
- Strong craft glue (E6000 or similar)
- Backing material (thin wood strip, cardboard, or felt sheeting)
- Twine or jute cording for hanging
- Sandpaper (fine grit)
- Parchment paper or silicone mat
- Paintbrushes (flat and detail)
- Awl or small drill bit
Step 1: Shaping the Arches
-
Prepare your workspace:
Lay down parchment paper or a silicone mat to prevent sticking. Taking a large chunk of clay, knead it thoroughly until it is pliable and smooth. -
Roll the base slab:
Roll your clay out into a large, even slab approximately 1/4 inch thick. Aim for a consistent thickness so all your arches sit flush against the wall. -
Cut the largest arch:
Use a round object (like a dinner plate) as a guide or freehand a large semi-circle. Cut this out with your craft knife. This will be your outermost, largest arch. -
Create the nesting arches:
The easiest way to get the fit right is to work inwards. Lie the large arch down and use it as a template to cut the next arch that fits snugly inside it. Remove a thin strip between them to create the gap seen in the photo. -
Continue forming layers:
Repeat this process until you have seven concentric arches. You’ll need to remove about 1/8 to 1/4 inch of clay between each layer to ensure they don’t touch when assembled. -
Refine the edges:
Once cut, smooth the rough edges of each arch with a little water on your finger. If you want that slightly rustic texture shown in the image, don’t over-smooth the surface itself. -
Make the hanging hole:
Using an awl or a straw, punch a hole directly in the top center of the outermost (largest) arch. This is where your twine will go. -
Dry the pieces:
Lay all arches flat on a wire rack or parchment paper. Let them dry completely according to package directions—usually 24 to 48 hours. Using a wire rack helps air circulate underneath, preventing warping.
Crack Control
If small cracks appear as the clay dries, don’t panic. Mix a tiny bit of fresh wet clay with water to make a paste and fill the cracks, then sand smooth once dry
Step 2: Painting and Assembly
-
Sand imperfections:
Once fully dry, lightly sand any sharp edges or uneven spots on the sides. Wipe away the dust with a dry cloth. -
Mix your palette:
Prepare your acrylic paints. You want a gradient of earth tones: darkest terracotta on the outside, fading into light tans, creams, mustard yellow, and finishing with a dusty pink in the center. -
Paint the arches:
Paint each arch individually. Paint the front and the sides for a professional finish. It may take two coats to get solid, opaque coverage on the clay. -
Detail the inner arch:
For the smallest, innermost arch, paint it a dusty pink-brown tone to anchor the center of the design. -
Prepare the backing:
While the paint dries, cut a piece of stiff felt or thin cardboard into a fan shape. This piece needs to be smaller than the rainbow so it won’t be visible from the front. -
Arrange the layout:
Lay your painted arches face down on a soft surface, arranging them with the desired spacing between each curve. -
Glue the structure:
Apply strong craft glue to your backing material and press it firmly onto the back of the arches. This hidden spine will hold all the separate pieces together in formation. -
Add the hanger:
Cut a length of jute twine. Thread it through the hole you made in the top arch in the first phase. Create a knot at the front (as seen in the photo) or loop it through and knot at the back for a cleaner look. -
Final touches:
Inspect the painting one last time. If you got any paint on the neighboring colors during handling, now is the time for tiny touch-ups with a detail brush.
Texture Twist
Before drying, gently press a coarse fabric or sandpaper onto the damp clay surface. This adds a lovely stone-like texture that catches the light beautifully
Now hang your beautiful handmade rainbow in a spot where it can catch the afternoon sun
House Silhouette Village Hanging
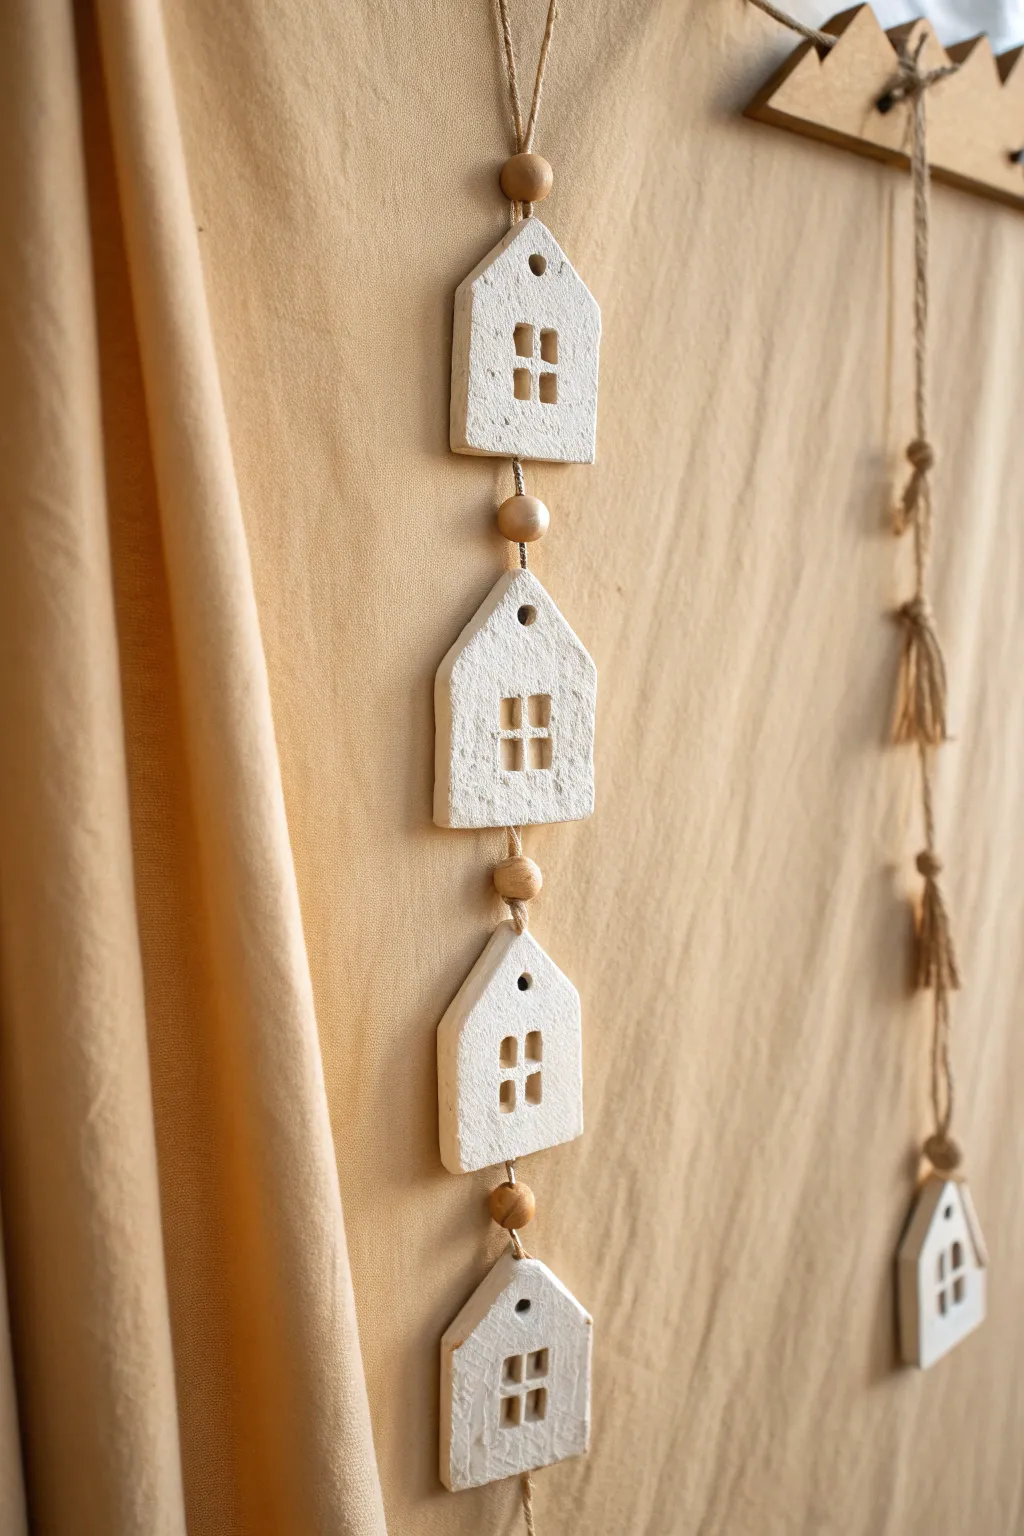
Create a charming vertical village with this simple yet beautiful air-dry clay project. The clean white houses, paired with natural wooden beads and jute twine, bring a cozy, minimalist Scandinavian vibe to any nursery or corner of your home.
Detailed Instructions
Materials
- White polymer clay or air-dry clay (smooth texture)
- Rolling pin
- Parchment paper or silicone baking mat
- House-shaped cookie cutter (approx. 2-3 inches)
- Square plunger cutter or small square clay tool (for windows)
- Small round cutter or straw (for hanging holes and attic windows)
- Sandpaper (fine grit)
- Natural jute twine
- Wooden beads (unpainted, approx. 12mm)
- Large eyed needle
- Scissors
Step 1: Shaping the Houses
-
Prepare your workspace:
Lay down your parchment paper or silicone mat on a flat surface to prevent sticking. Take a handful of clay and knead it in your hands until it is pliable and warm to the touch. -
Roll out the slab:
Using your rolling pin, roll the clay out to a consistent thickness of about 1/4 inch (6mm). Try to keep it as even as possible so the houses hang straight. -
Cut the shapes:
Press your house-shaped cookie cutter firmly into the slab. Gently wiggle it slightly to ensure a clean cut, then lift. Repeat this to create four or five individual house silhouettes. -
Clean up edges:
Carefully remove the excess clay from around your shapes. Use a finger dipped in a little water to smooth out any rough edges on the perimeter of the houses.
Clay Cracking?
If your clay cracks while drying, mix a tiny bit of fresh clay with water to make a paste (slip) and fill in the cracks. smooth it over with your finger and let dry again.
Step 2: Adding Details
-
Create the windows:
Use a small square cutter or a specialized clay tool to punch out four small squares in the center of each house, arranged to look like a four-pane window. If you don’t have a specific tool, a small knife works, but take your time to keep lines straight. -
Punch the attic window:
Using a small straw or a tiny round cutter, punch a single small hole near the peak of the roof for a decorative attic window detail. -
Create the hanging holes:
This is crucial: With a straw or tool, poke a hole through the very top tip of the roof for the string to go through later. Then, poke a matching hole directly centered at the bottom edge of the house. -
Add texture:
For that rustic, stone-like look seen in the photo, gently dab the surface of the clay with a crumpled piece of aluminum foil or a stiff paintbrush. I like to do this lightly so it doesn’t distort the shape. -
Let them dry:
Allow the clay houses to dry completely according to your package instructions. For air-dry clay, this usually takes 24-48 hours. Flipping them halfway through helps them dry flat. -
Sand for perfection:
Once fully cured and hard, take your fine-grit sandpaper and gently smooth any sharp burrs on the edges or inside the window cutouts.
Step 3: Assembly
-
Start the string:
Cut a long length of jute twine, about 4 feet long depending on how tall you want your mobile. Thread it onto a large needle. -
Create the top loop:
Fold the top section of the twine to create a hanging loop and tie a sturdy knot at the base of the loop. -
Add the first bead:
Thread one wooden bead onto the twine and push it up to rest against the knot of your hanging loop. Tie another knot tightly underneath the bead to secure it. -
Attach the top house:
Thread the twine down through the top hole of your first house and out through the bottom hole. Leave about an inch of slack inside the house if you want it loose, or pull taut. -
Secure beneath the house:
Tie a knot in the twine immediately after it exits the bottom of the house to keep the house from sliding down. -
Add spacer bead:
Thread on another wooden bead. Tie a knot underneath this bead as well to lock it in place. -
Repeat the pattern:
Continue this sequence—knot, house (threaded top to bottom), knot, bead, knot—until all your houses are attached in a vertical line. -
Tie off the end:
After the final house, you can finish with a simple knot, or add one final bead and a tassel made of extra jute twine for a polished look.
Add Some Sparkle
For a magical winter look, brush a thin layer of glue onto the roofs of the dried houses and sprinkle with clear or iridescent glitter before assembling.
Hang your beautiful clay village near a window where the light can shine through the tiny windows.
Clay And Fiber Tassel Combo
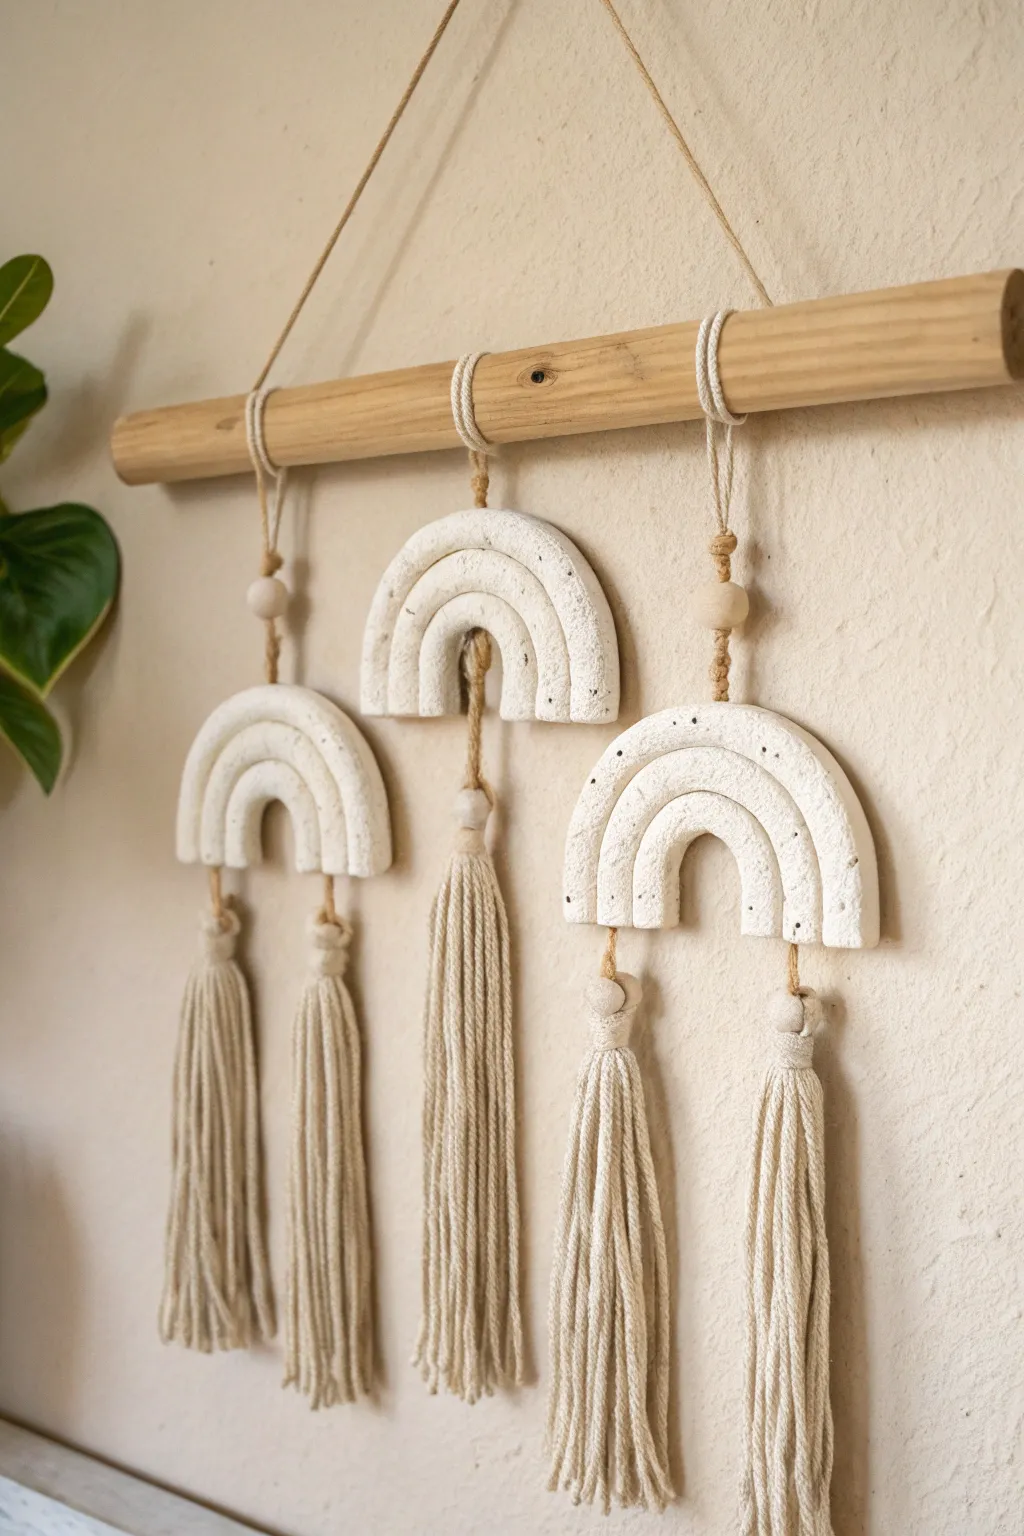
This earthy, minimalist wall hanging combines the raw texture of speckled clay with the softness of natural cotton tassels. It features three charming rainbows suspended from a wooden dowel, creating a serene piece of fiber art perfect for nurseries or living spaces.
Step-by-Step Tutorial
Materials
- White polymer clay or air-dry clay (preferably with speckles or granite effect)
- Wooden dowel or clean driftwood stick (approx. 12-15 inches)
- Natural cotton macrame cord or thick yarn (3mm-4mm)
- Rolling pin or smooth glass jar
- Clay cutting tool or craft knife
- Round cookie cutters or lids (varying sizes)
- Wooden beads (unpainted, approx. 12mm)
- Skewer or toothpick (for making holes)
- Jute twine or thin hemp cord
- Scissors
Step 1: Sculpting the Clay Rainbows
-
Prepare the clay:
Begin by conditioning your clay. If you are using polymer clay, knead it until it’s soft and pliable. If using air-dry clay, knead it briefly to remove large air bubbles. Roll it out into a slab that is approximately 1/4 inch thick. -
Cut the arches:
You will need to create three separate rainbows. For the first rainbow, use your largest round cutter to cut a semi-circle shape. Then, use a slightly smaller cutter to remove the inner portion, leaving a perfect arch. -
Create the inner arch:
Repeat the cutting process with a smaller cutter to create a second, smaller arch that fits inside the first one. You want a distinct gap between the two pieces, as seen in the photo—they are separate pieces, not joined. -
Texture the surface:
To achieve that rustic, stone-like look, gently press a piece of sandpaper or a stiff-bristled toothbrush onto the surface of the clay. This adds organic pitting and texture. -
Add connection holes:
Using a skewer, carefully poke holes for hanging. You need one hole at the very top center of the outer arch for suspension. Then, poke a hole at the bottom of each ‘leg’ of the outer arch, and one hole at the top center of the inner arch. -
Repeat for all units:
Make two more identical sets of rainbows. For the central hanging piece, you might choose to make just a single, solid arch shape with a hole at the top and one at the bottom center, or replicate the double-arch design shown on the sides. -
Dry or bake:
If using polymer clay, bake according to the package instructions (usually 275°F for 15-30 minutes). If using air-dry clay, lay them flat on a piece of parchment paper and let them dry for 24-48 hours, flipping occasionally to prevent warping.
Cracked Clay?
If using air-dry clay, surface cracks can happen while drying. Smooth a tiny bit of fresh, wet clay (mixed with water to make a paste) into the crack and let it dry again.
Step 2: Assembling the Tassels
-
Cut tassel strands:
While the clay cures, cut lengths of your cotton macrame cord. You will need roughly 10-12 strands per tassel, cut to about 10 inches long. -
Form the tassels:
Group your strands together and fold them in half over a piece of jute twine. Tie a piece of cord tightly around the ‘neck’ of the folded bundle to create the tassel head, about 1 inch down from the fold. -
Repeat for all tassels:
Create five distinct tassels total: two for the left rainbow, one large central tassel for the middle rainbow, and two for the right rainbow. Trim the bottoms so they are uniform and neat.
Step 3: Final Assembly
-
Attach tassels to clay:
Thread the jute twine holding a tassel through the bottom holes of a clay arch. Secure it with a knot on the back side of the clay piece. The central rainbow gets one central tassel; the side rainbows get a tassel on each leg. -
Connect arch pieces:
For the multi-piece rainbows, use a small length of jute to tie the inner arch to the outer arch. This creates a floating heavy-over-light effect. -
Prepare suspension cords:
Cut three lengths of jute twine for hanging the clay pieces from the dowel. Thread one end through the top hole of a clay rainbow. Thread a wooden bead onto the twine so it rests just above the clay. -
Attach to dowel:
Tie the top of each suspension cord to your wooden dowel. I find it helpful to use a simple lark’s head knot or just wrap and tie securely. Adjust the lengths so the middle rainbow hangs slightly higher or lower depending on your preference. -
Add the main hanger:
Finally, cut a long piece of jute twine. Tie one end to the far left of the dowel and the other to the far right to create the main triangular hanger for the wall. -
Final trim:
Hang the piece on a wall and give the tassel ends one last trim to ensure everything looks balanced and tidy.
Make It Pop
Add personality by painting simple geometric patterns on the clay using acrylic paint in terracotta or sage green tones after the clay has fully dried or baked.
Now step back and admire the beautiful balance of texture and sleek design you have created
Driftwood Branch With Hanging Charms
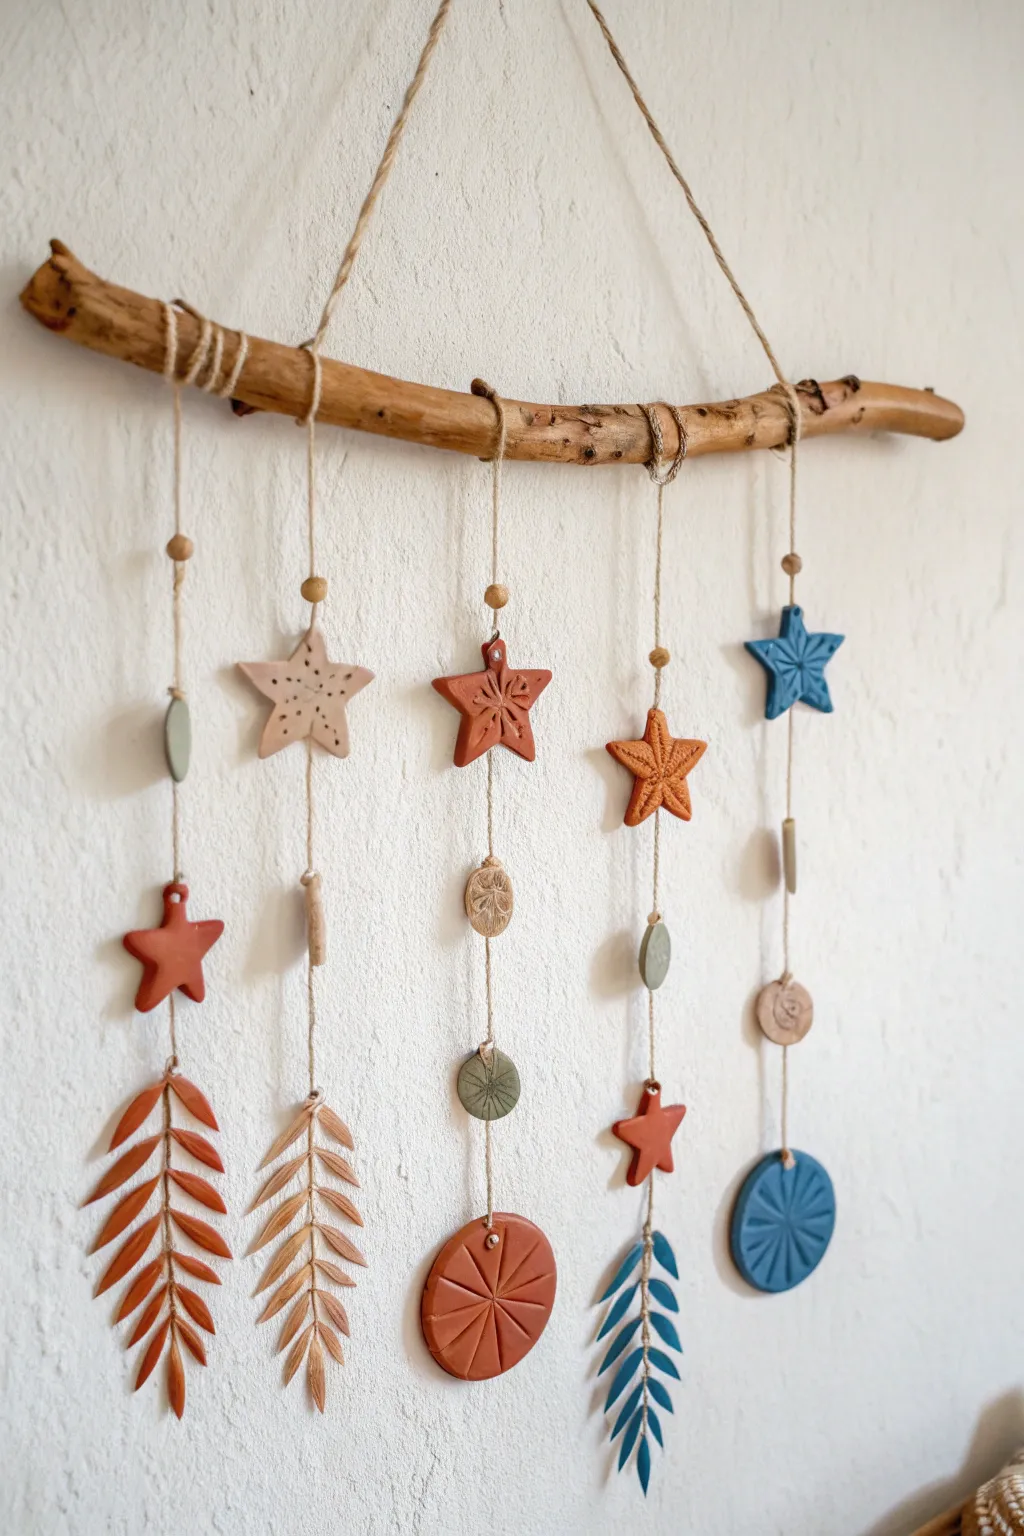
Bring a touch of earthy charm to your walls with this driftwood mobile, featuring handcrafted clay stars, leaves, and textured discs. The combination of terracotta, slate blue, and pale beige tones creates a soothing, natural palette that perfectly complements the rustic wooden branch.
Step-by-Step Guide
Materials
- Air-dry clay or polymer clay (terracotta, beige, deep blue, sage green)
- Driftwood branch (approx. 12-18 inches long)
- Jute twine or hemp cord
- Rolling pin
- Cookie cutters (star shapes in various sizes)
- Clay sculpting tools or a craft knife
- Toothpick or skewers
- Small wooden beads
- Sandpaper
Step 1: Crafting the Clay Charms
-
Prepare the Clay:
Condition your clay by kneading it until soft and pliable. If using polymer clay, mix your colors now to match the terracotta, beige, and blue palette seen in the photo. For air-dry clay, you can either use pre-colored clay or plan to paint the dried pieces later. -
Roll Out the Slabs:
Roll your clay out on a smooth surface to an even thickness of about 1/4 inch. I find using guides or spacers on either side of the rolling pin helps keep the thickness consistent. -
Cut the Stars:
Use star-shaped cookie cutters to press out several stars. You will need roughly 5-6 stars in varied colors like terracotta, beige, and blue. For added interest, lightly texture the surface of some stars with different tools before cutting. -
Sculpt the Leaves:
Freehand cut long, slender leaf shapes using a craft knife. Gently press a central vein down the middle of each leaf, then make angled cuts or indentations on the sides to mimic fern or feather textures. You’ll need three large focal leaves. -
Create Textured Discs:
Cut out circular discs for the bottom weights. Use a clay tool to press a radial ‘sunburst’ pattern into them, radiating from the center to the edge. The blue disc needs a distinct pattern, while the terracotta one can be slightly larger. -
Make Small Bead Accents:
Roll tiny scraps of clay into small, imperfect spheres and oval tube beads. These will act as spacers on your strings later. Don’t worry if they aren’t perfectly round; the organic look works best here. -
Pierce Hanging Holes:
Before the clay hardens, carefully poke a hole through the top of every charm (and the bottom of charms that will connect to another piece below it). Use a toothpick and wiggle it slightly to ensure the hole is wide enough for your twine. -
Dry or Bake:
If using polymer clay, bake according to the manufacturer’s instructions. If using air-dry clay, let the pieces sit on a flat surface for 24-48 hours until completely hard, turning them occasionally to prevent warping.
Stamp It Out
Don’t have texture tools? Use household items like lace, the end of a marker cap, or a piece of burlap to press unique textures into the damp clay before cutting your shapes.
Step 2: Assembling the Mobile
-
Prepare the Driftwood:
Clean your driftwood branch and verify it is dry. If there are sharp snags, lightly sand them down. Decide which side will face forward based on the curve of the wood. -
Plan the Layout:
Lay your branch on a table and arrange your fired/dried clay pieces in five vertical columns below it. Mimic the photo: arrange a mix of stars, small beads, and large terminals (leaves or discs) at the bottom. -
Cut the Twine:
Cut five lengths of jute twine, making them significantly longer than you think you need—about 30 inches each—to allow plenty of room for knotting. -
String the First Column:
Start with the far-left strand. Tie a rustic knot around the branch. Thread a small wooden bead, then tie a knot further down to hold a clay bead. Add a star, securing it with knots above and below if necessary to keep it in place. -
Attach the Bottom Charm:
Finish the strand by tying on the final large leaf or disc. Trim the excess twine below the knot for a tidy look, or leave a short tasseled end if you prefer. -
Repeat for Remaining Strands:
Continue stringing the remaining four columns. Vary the height of the elements so the stars and beads don’t form a perfect straight line across, creating a staggered, rhythmic look. -
Secure the Strands:
Once all strands are hanging and you are happy with the lengths, tighten the knots on the driftwood. You can add a dab of clear craft glue to the knots on the branch to ensure they don’t slide around. -
Add the Hanging Cord:
Cut a final, sturdy piece of twine for the main hanger. Tie each end securely to the far ends of the driftwood branch. Hold it up to check the balance; if it tilts, adjust the position of the knots slightly.
Warped Clay?
If your air-dry clay leaves start curling up while drying, gently weigh them down with a heavy book placed over a sheet of parchment paper once they are partially dry.
Hang your new mobile near a window where the natural light can highlight the textures of the clay
Layered Relief Landscape Hanging
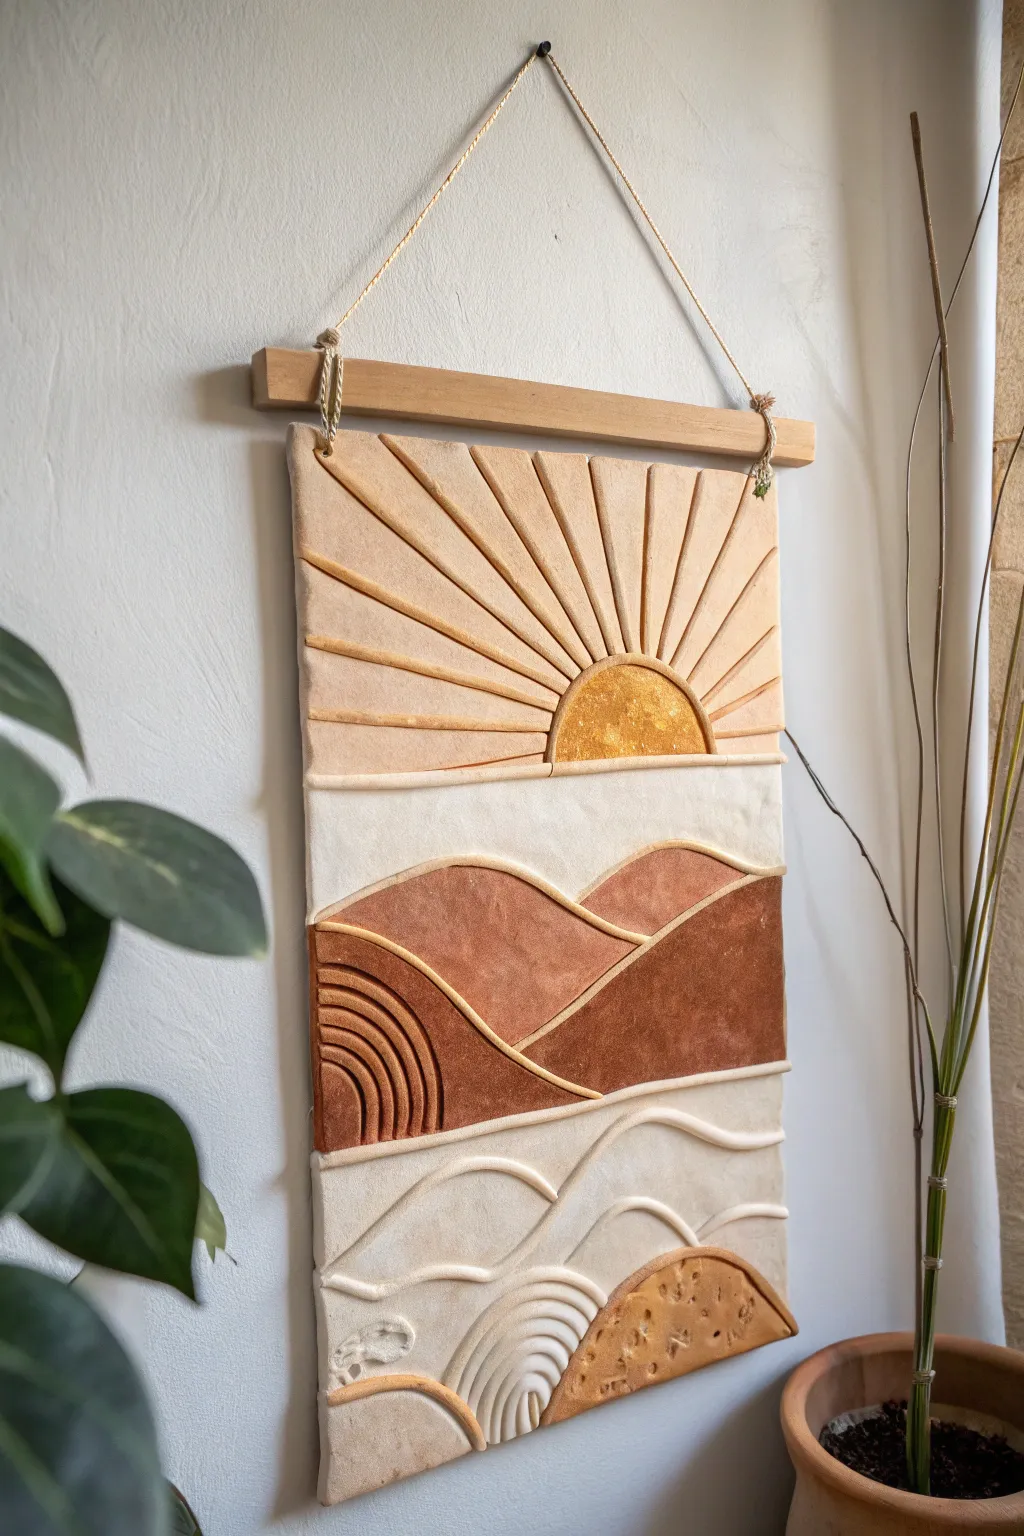
Bring the warmth of a desert sunrise into your home with this stunning polymer clay relief sculpture. By layering textured slabs and utilizing soft earth tones, you’ll create a tactile piece of wall art that feels both modern and organic.
Detailed Instructions
Materials
- Polymer clay (white, beige, terracotta, rust, and translucent/gold effect)
- Wooden dowel or flat slat (approx. 10-12 inches)
- Rolling pin or pasta machine
- Clay knife or X-Acto blade
- Pointed sculpting tool or toothpick
- Textured sponge or sandpaper
- Liquid polymer clay (bake and bond)
- Twine or hemp cord
- Oven and baking sheet
- Parchment paper
Step 1: Preparing the Base
-
Roll the main slab:
Begin by conditioning a large amount of white or light beige clay. Roll it out into a thick, uniform rectangular slab, approximately 1/4 inch thick. This will serve as the canvas for your landscape. -
Trim the edges:
Using a long blade or a ruler and knife, trim the edges of your base slab to create a clean, straight rectangle. Don’t discard the scraps; keep them for mixing later. -
Create the hanging channel:
Fold the top 1 inch of the slab over backward to create a loop for the wooden dowel. Ensure the loop is wide enough for your wood piece, then smooth the seam on the back so it holds securely.
Preventing Air Bubbles
Pierce any trapped air bubbles with a needle before baking. Smooth the hole with your finger to prevent cracking during the cure.
Step 2: Constructing the Sun and Sky
-
Form the sun:
Roll a small ball of gold-flecked or yellow clay and flatten it into a semi-circle. Place this in the center of the upper third of your base slab. -
Add sun rays:
Roll thin snakes of beige clay to act as the rays. Arrange them radiating outward from the sun, pressing them gently onto the base. Use your knife to trim them so they stop at the sun’s edge and the slab’s border. -
Fill the sky sections:
Cut triangular wedges of light peach or beige clay described by the ray lines. Place these flat sections between the raised ray lines to create a smooth, inlaid look.
Level Up: Mixed Media
After baking, paint the sun with a layer of metallic gold leaf size and apply gold leaf for a brilliant, light-catching shine.
Step 3: Layering the Mountains
-
Mix your earth tones:
Blend your terracotta and rust clays to get three distinct shades: a light dusty pink, a medium clay red, and a deep chocolate brown. -
Cut the mountain shapes:
Roll out slabs of your new colors. Hand-cut undulating, organic hill shapes. The pieces should be slightly wider than the base slab so you can trim them perfectly later. -
Apply the layers:
Starting from the ‘furthest’ mountain (the top one), adhere the shapes to the base using a thin layer of liquid clay. Overlap the lower mountains on top of the higher ones to build actual physical depth. -
Add definition:
Roll very thin snakes of a lighter clay color. Press these along the top ridge of each mountain range to create a highlighted contour line that makes the shapes pop.
Step 4: Texturing and Finishing
-
Create the foreground texture:
For the bottom-most section, use a creamy white clay. Instead of a flat slab, add dimension by layering curved strips to mimic rolling dunes or waves. -
Detail the corner elements:
In the bottom left, add a small arch pattern using concentric clay snakes. In the bottom right, add a textured mound; I like using a stiff brush or a rock to stipple the surface for a rugged look. -
Final trim:
Once all layers are applied, use your long blade to re-trim the left, right, and bottom edges of the entire piece, cutting through all the new layers to ensure a perfectly flush, straight side profile. -
Bake the piece:
Place the sculpture on parchment paper. Bake according to your clay manufacturer’s instructions (usually 275°F for 15-30 minutes), noting that the thickness requires a full cure. -
Assembly:
Once cooled, slide your wooden slat through the top channel. Tie your twine to both ends of the wood using a secure knot to create the hanger.
Hang your relief art near a window where natural light can play across the textured ridges throughout the day