
Clay wall pockets are one of my favorite ways to mix wall decor with real-life usefulness—because it’s basically a tiny vessel that gets to live on your wall. Here are my go-to clay wall pocket ideas, starting with the classic shapes and moving into more playful, unexpected designs.
Minimalist Rectangle Pocket With Rounded Top
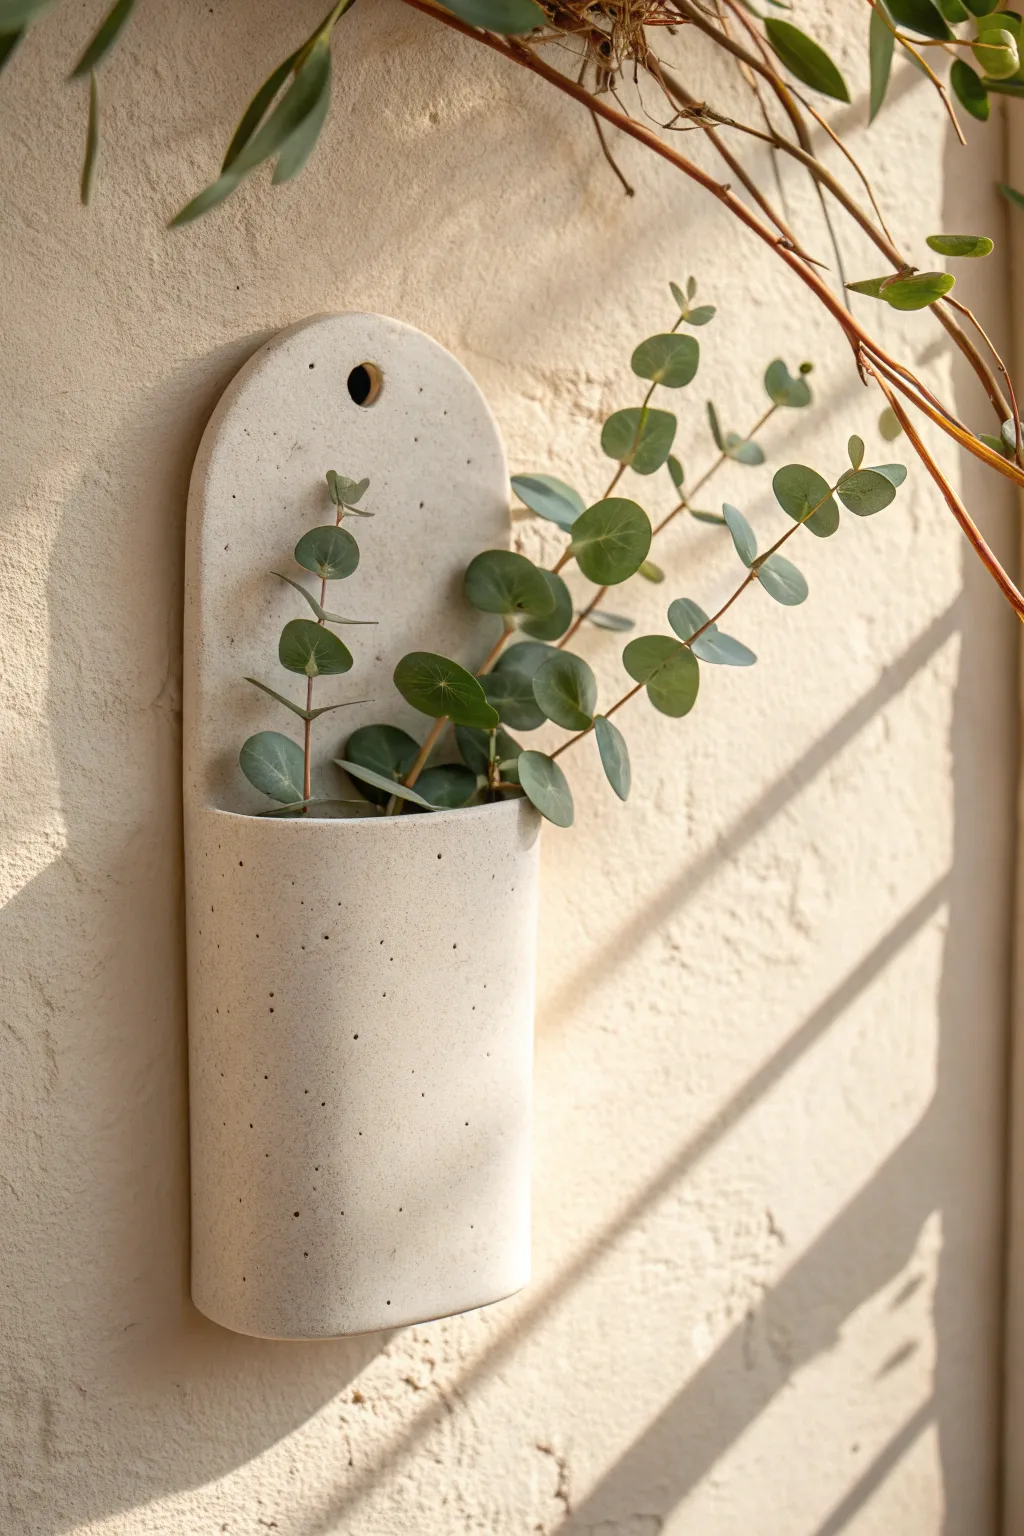
Embrace minimalist design with this sleek, arch-shaped wall pocket that perfectly frames dried botanicals or fresh sprigs. The finished piece features a soothing matte texture and subtle speckling that mimics the look of natural stone.
Step-by-Step Tutorial
Materials
- White polymer clay or air-dry clay (approx. 1lb)
- Black pepper or dried coffee grounds (for speckling effect)
- Rolling pin or acrylic roller
- Paper template (arch shape)
- Craft knife or clay blade
- Small circular cutter or straw (for hanging hole)
- Slip (clay and water mixture) or liquid sculpey
- Smooth work surface or baking mat
- Sandpaper (fine grit)
- Matte varnish (optional)
Step 1: Preparing the Clay Slab
-
Condition the clay:
Begin by kneading your white clay thoroughly until it is soft and malleable. If you are using polymer clay, the warmth of your hands will help condition it to prevent cracking later. -
Add texture:
To achieve that organic, speckled stone look, sprinkle a pinch of ground black pepper or dried coffee grounds into the clay. Fold the clay over and knead again until the speckles are evenly distributed throughout the batch. -
Roll the slab:
Place the clay on your work surface and roll it out into an even slab. Aim for a thickness of about 1/4 inch (6mm) to ensure the pocket is sturdy enough to hold water or heavy stems without being too heavy itself. -
Checking thickness:
Ensure the thickness is consistent across the entire slab. I usually run my fingers lightly over the surface to feel for any high or low spots that need leveling.
Uneven Seams?
If your seams look lumpy after blending, wait until the clay is leather-hard (partially dry). You can then carve or shave the edges smooth with a knife.
Step 2: Cutting and Constructing
-
Create a template:
Sketch a long U-shaped arch on a piece of paper. The total height should be roughly 8-9 inches. Cut this out to use as your guide. -
Cut the back panel:
Lay the template on your clay slab and carefully trace around it with your craft knife to cut out the full back shape. -
Cut the front panel:
Cut your paper template roughly in half horizontally. Use the bottom half to cut a second piece of clay; this shorter U-shape will become the front pocket. -
Create the spacer strip:
Roll out a long, thin snake of clay and flatten it slightly to create a spacer strip (about 1/4 inch wide). This will go between the front and back panels to create room for the stems. -
Score the edges:
Use a needle tool or knife to cross-hatch (scratch) the outer rim of the back panel where the pocket will attach, as well as the side and bottom edges of the front panel. -
Attach the spacer:
Apply a little slip or liquid clay to the scored edges of the back panel. Lay the spacer strip along the U-curve of the back panel (not the top arch) and press gently. -
Mount the front:
Apply slip to the top of the spacer strip. Carefully align the front panel on top, sandwiching the spacer between the back and front pieces.
Level Up: Glazed Interior
For holding fresh flowers with water, apply waterproof sealant or resin ONLY to the inside pocket. Keep the outside matte for that natural stone aesthetic.
Step 3: Finishing and Refining
-
Blend the seams:
Using a modeling tool or your finger, smooth the seams along the sides and bottom where the three layers meet. Blend the clay until the join is invisible and looks like one solid piece. -
Punch the hole:
Use a small circular cutter or a sturdy straw to punch a hole near the top of the arch. Make sure it is centered, as this is how you will hang the finished piece. -
Smooth the surfaces:
Dip your finger in a little water (or baby oil for polymer clay) and run it over the entire piece to smooth out fingerprints and sharp edges. -
Dry or bake:
If using air-dry clay, let it dry flat for 24-48 hours, flipping occasionally. If using polymer clay, bake according to the package instructions, usually around 275°F (130°C). -
Sand for perfection:
Once fully cured and cool, take a piece of fine-grit sandpaper and gently buff the edges and surface. This enhances the matte finish and removes any tiny burrs.
Hang your new creation on a sunny wall and enjoy the calm, organic vibe it brings to your space


Cone-Shaped Wall Pocket Planter

This elegant, minimalist wall pocket brings a clean, modern aesthetic to any vertical garden space. Its elongated conical shape and textured, stone-like finish provide the perfect neutral backdrop for trailing greenery like creeping thyme or string of pearls.
Step-by-Step Guide
Materials
- Air-dry clay or white polymer clay (approx. 1-2 lbs)
- Rolling pin
- Cone-shaped form (cardboard, heavy cardstock, or a Styrofoam cone)
- Parchment paper or cling wrap
- Sponge or texturing tool
- Small straw or awl (for hanging hole)
- Craft knife
- Water bowl
- Small terracotta pot (that fits inside your desired cone size)
- Sandpaper (fine grit)
- Clear matte sealant spray
Step 1: Creating the Form
-
Prepare the template:
Begin by creating a cone template using stiff cardstock. Roll the cardstock into a tight, elongated cone shape that is wide enough at the top to hold your small terracotta pot. Tape securely in place. -
Wrap the form:
Cover your cardstock cone completely with parchment paper or cling wrap. This is crucial as it prevents the clay from sticking to the cardboard and allows for easy removal later. -
Prep the clay:
Take a generous amount of white clay and knead it until soft and pliable. Use your rolling pin to roll it out into a flat slab, aiming for a consistent thickness of about 1/4 inch.
Natural Texture Hack
Add used coffee grounds or coarse sand into your clay while kneading. This adds embedded specks that look like real stone once dry.
Step 2: Shaping the Pocket
-
Cut the shape:
Lay your wrapped cone form onto the clay slab to estimate the size needed. Use a craft knife to cut a fan shape (like a pie slice with the tip cut off) that will wrap fully around the cone with a slight overlap. -
Wrap the clay:
Carefully lift the clay slab and wrap it around your parchment-covered cone form. Gently press the overlapping edges together where they meet. -
Seal the seam:
Dip your finger in a little water and smooth the seam down until it disappears completely. The goal is to make the cone look like one continuous piece of material. -
Refine the rim:
Trim the top edge with your craft knife to ensure it is level. You can smooth the cut edge with a damp sponge for a softer, more finished look. -
Add the hanging hole:
Decide where the back of your planter is. Use a small straw or an awl to punch a clean hole near the top rim on the back side. Ensure it’s centered so the cone hangs straight. -
Check the fit:
Before the clay hardens, briefly test the fit by gently inserting your terracotta pot to ensure the opening is wide enough. Remove it immediately.
Slumping Issues?
If the cone slumps while drying, prop it upright in a tall glass filled with rice or beans to support the weight evenly without denting.
Step 3: Texturing and Finishing
-
Create texture:
To mimic the stone-like, pockmarked surface seen in the image, take a coarse sponge or a stiff brush and dab it randomly over the wet clay. I sometimes use a needle tool to create deeper, specific little pits. -
Initial drying:
Allow the clay to dry on the form for several hours until it is leather-hard—firm enough to hold its shape but not fully rigid. -
Remove form:
Gently slide the cardboard form out from the inside of the cone. Be very careful not to distort the shape. -
Smooth the interior:
If the inside seam is rough, dampen your fingers and smooth it out now that the form is removed. -
Full cure:
Set the cone aside in a safe place to dry completely. Depending on your clay type and humidity, this could take 24 to 48 hours. -
Sanding:
Once bone dry, lightly sand any sharp edges or unwanted bumps with fine-grit sandpaper. Leave the intentional texture marks alone. -
Sealing:
Spray the entire planter, inside and out, with a clear matte sealant. This protects the clay from moisture, which is especially important for a planter. -
Assembly:
Place your plant inside the terracotta pot, and nest the pot into your new clay cone. Hang it up using a sturdy nail or hook through the hole you created.
Now you have a stylish, custom hanging planter ready to bring life to your wall


Scalloped Rim Wall Pocket
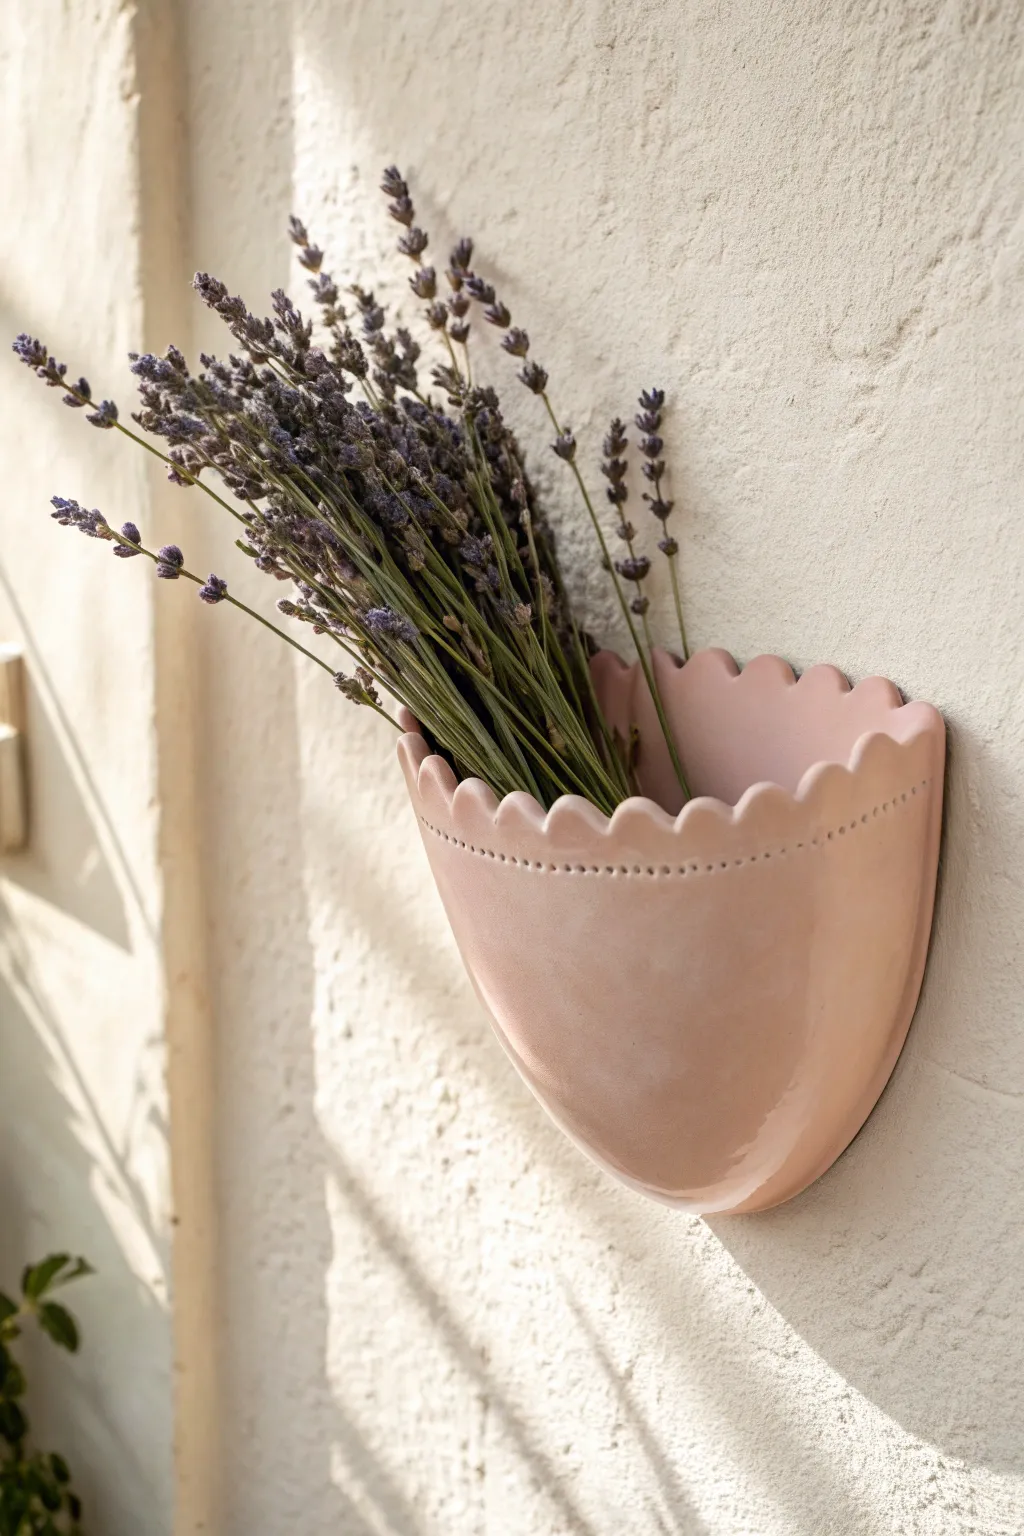
Bring a touch of cottage romance to your walls with this delightful clay pocket featuring a delicate scalloped edge and simple dotted detailing. Once finished with a soft blush glaze, it serves as the perfect vessel for dried lavender or preserved florals.
How-To Guide
Materials
- White earthenware or stoneware clay (approx. 2 lbs)
- Rolling pin
- Canvas mat or cloth for rolling
- Paper template (half-circle shape)
- Needle tool or fettling knife
- Small round cookie cutter (approx. 1 inch)
- Slip (clay and water mixture)
- scoring tool (or a serrated rib)
- Wooden modeling tool or popsicle stick
- Small drill bit tool or toothpick
- Sponge
- Glossy blush pink glaze
- Kiln (or oven, if using polymer/air-dry clay equivalents)
Step 1: Forming the Body
-
Prepare the slab:
Begin by wedging your clay to remove air bubbles, then roll it out on your canvas mat to a consistent thickness of about 1/4 inch. Smooth the surface with a rubber rib to remove any canvas texture. -
Cut the shapes:
Using a paper template, cut out a large semi-circle for the front pocket. You will also need a flat back piece; cut a slightly taller, matching shape that extends about an inch higher than where the rim of the pocket will sit. -
Shape the pocket:
Gently curve the front semi-circle piece to create volume. Check the fit against the flat back piece to ensure the sides align correctly before joining. -
Score and slip:
Score the curved edges of the front piece and the corresponding areas on the flat back piece. Apply a generous amount of slip to these rough areas. -
Join the pieces:
Press the front pocket firmly onto the back slab. Use a wooden tool to blend the seam on the outside, then reach inside to reinforce the inner seam with a small coil of clay if necessary. -
Trim the back:
Once joined, trim any excess clay from the flat back piece so it aligns perfectly with the outer curve of the pocket, leaving the top open.
Even Scallops Trick
Use the edge of a spoon or a specific ‘scallop tool’ rib instead of cutting individually. Pressing a curved tool into the soft rim creates uniform humps instantly.
Step 2: Adding the Scalloped Detail
-
Create the scallops:
Roll a small coil or a thin strip of clay and attach it to the top rim of the pocket. Alternatively, if your walls are thick enough, you can carve directly into the rim. Use a small round cutter or your fingers to press indentations along the top edge, forming even semi-circles. -
Refine the edges:
Smooth the peaks of the scallops with a damp sponge or your finger to ensure they are rounded and soft, rather than sharp. -
Add texture:
Just below the scalloped rim, use a small tool or a blunt toothpick to press a horizontal line of tiny, evenly spaced dots. This subtle detail adds a professional finish. -
Create the hanging hole:
On the flat back panel, poke a clean hole near the top center (hidden behind where the flowers will go) to allow for hanging on a nail or hook.
Warping Walls?
If the pocket opening starts to slump or close while working, gently stuff the inside with crumpled newspaper or plastic wrap to support the shape while it stiffens.
Step 3: Finishing and Glazing
-
Slow drying:
Loosely cover the piece with plastic and let it dry slowly to the leather-hard stage, then uncover it to dry completely to greenware. This prevents warping. -
Bisque fire:
Fire the completely dry piece in the kiln to cone 04 (or according to your clay’s specific bisque temperature). -
Apply glaze:
Dip the piece or brush on three even coats of a glossy blush pink glaze. I find that brushing in alternating directions helps achieve an opaque, streak-free finish. -
Wipe the back:
Use a damp sponge to wipe any glaze off the very back surface (if you are firing it flat) or ensure it is stilted properly so it doesn’t fuse to the kiln shelf. -
Glaze fire:
Fire the piece again to the maturation temperature of your glaze (typically cone 05/06 for earthenware).
Hang your finished pocket on a sunny wall and fill it with fragrant dried blooms for a permanent reminder of spring


Leaf-Imprint Textured Wall Pocket
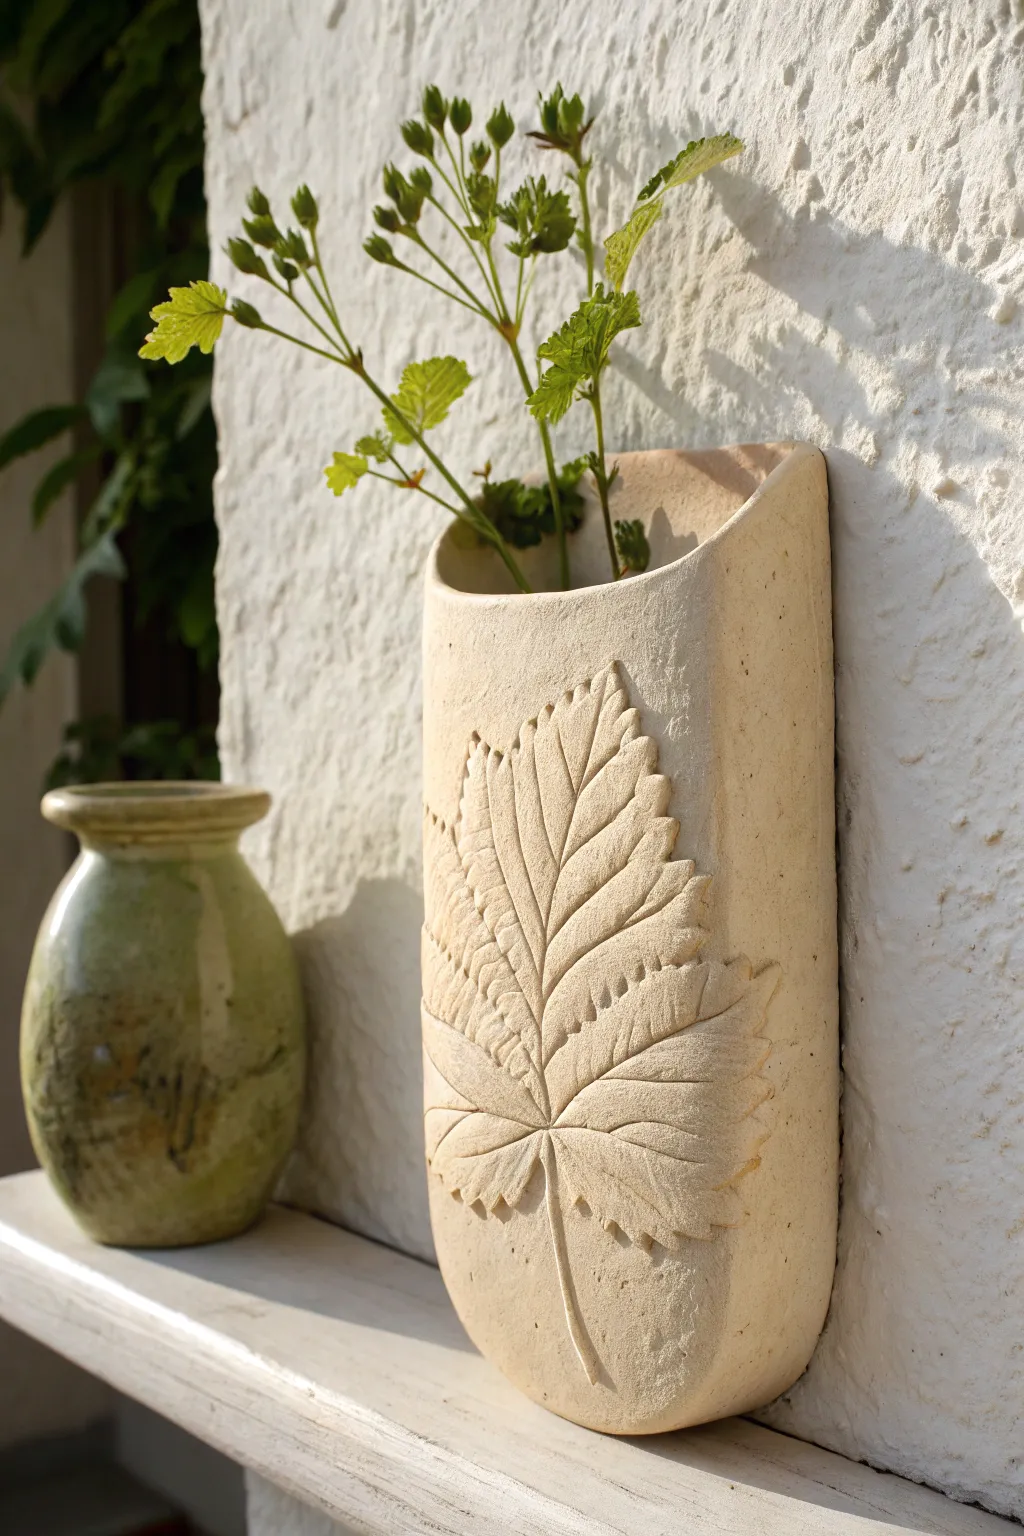
This elegant wall pocket brings the garden indoors with a stunningly detailed leaf relief press-molded directly into the clay surface. The natural, unglazed finish highlights the delicate veins and organic texture, creating a sophisticated vessel for dried stems or fresh sprigs.
Step-by-Step Guide
Materials
- Light-colored stoneware clay (with fine grog)
- Rolling pin
- Canvas mat or cloth-covered board
- Large, fresh leaf with prominent veins (e.g., grape leaf, hydrate, or maple)
- Fettling knife or needle tool
- Cardboard shipping tube or rolling pin (for forming)
- Slip (clay mixed with water)
- Scoring tool or serrated rib
- Sponge
- Matte clear glaze (optional)
- Small hole punch or straw (for hanging)
Step 1: Preparing the Slab
-
Roll the clay:
Begin by wedging your clay to remove air bubbles, then roll it out on your canvas mat to an even thickness of about 1/4 inch. Ensure the slab is large enough to accommodate your chosen leaf plus a border. -
Smooth the surface:
Use a soft rib tool or a slightly damp sponge to compress and smooth the surface of the clay slab. This removes canvas texture and prepares a pristine canvas for your imprint. -
Position the leaf:
Place your fresh leaf vein-side down onto the center of the slab. I prefer to place it slightly off-center or angled to create a dynamic composition. -
Create the impression:
Gently roll over the leaf with your rolling pin. Apply firm, even pressure to embed the veins deeply into the clay without making the slab too thin. The leaf should become flush with the clay surface. -
Reveal the texture:
Carefully lift and peel away the leaf to reveal the detailed impression underneath. If any small bits of leaf stick, leave them for now; they will burn off in the kiln.
Step 2: Forming the Pocket
-
Cut the shape:
Using a needle tool, cut a long rectangle around the leaf imprint. The top edge can be curved or dipped to follow the leaf’s contour, creating a more organic silhouette. -
Bevel the edges:
Bevel the two vertical side edges at a 45-degree angle. This will create a stronger, cleaner seam when you fold the clay into a cylinder. -
Form the cylinder:
Wrap the clay slab loosely around a cardboard tube or just gently by hand to form a tall, flattened cylinder shape. The leaf imprint should be facing outward. -
Score and slip:
Score the beveled edges thoroughly and apply a generous amount of slip. Press the edges together firmly to create a vertical seam down the back of the pocket. -
Reinforce the back seam:
Use a modeling tool to smooth the seam on the outside and run a small coil of clay along the inside seam for added strength. Smooth everything down so the join is invisible.
Vein Definition Tip
For deeper, more dramatic veins, choose leaves from plants like hydrangea or rhubarb. Thick, woody veins displace more clay, creating stronger shadows in the final relief.
Step 3: Adding the Base & Finishing
-
Create the bottom:
Stand your cylinder on a spare piece of rolled clay and trace around the base. Cut out this shape to serve as the floor of your pocket. -
Attach the base:
Score and slip the bottom edge of the cylinder and the new base piece. Press them together firmly and blend the clay upwards on the exterior to seal the bottom completely. -
Shape the rim:
Smooth the top rim with a damp chamois or sponge. You can gently push the rim inward slightly to create a tapered look at the opening if desired. -
Add hanging hole:
On the back of the pocket, near the top edge, punch a small hole using a straw or hole punch tool so the piece can be hung on a wall hook later. -
Slow drying:
Cover the piece loosely with plastic to let it dry slowly and evenly. This prevents warping, especially around the rim. -
Bisque fire:
Once bone dry, fire the piece to bisque temperature (usually cone 04). -
Glazing (Optional):
For the look in the photo, leave the exterior unglazed to show off the clay’s natural texture. You can apply a clear matte glaze to the interior to make it water-tight. -
Final firing:
Fire the piece a final time to the maturity temperature of your clay body.
Preventing Cracks
If tiny cracks appear while bending the slab, your clay creates too dry. Mist it lightly with water, cover with plastic for 30 minutes, and try bending again very gently.
Hang your finished pocket on a sunlit wall and fill it with dried herbs or wildflowers for a touch of rustic charm

The Complete Guide to Pottery Troubleshooting
Uncover the most common ceramic mistakes—from cracking clay to failed glazes—and learn how to fix them fast.
Lace-Pressed Vintage Texture Pocket
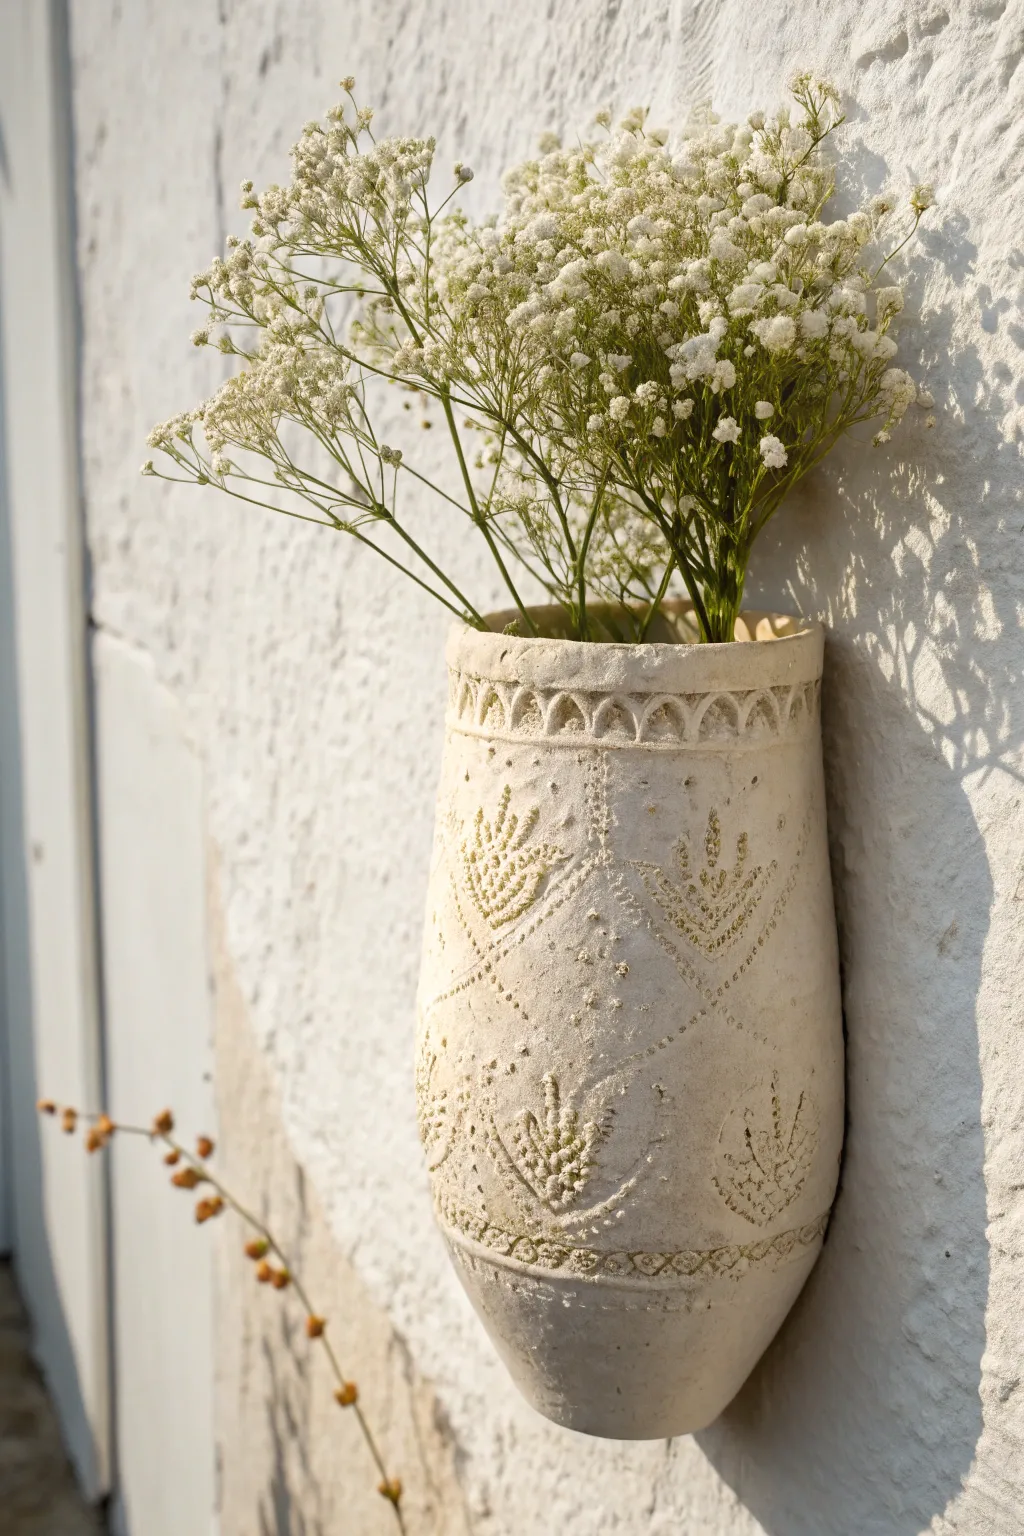
Bring a touch of old-world charm to your walls with this textured wall pocket that mimics the look of carved stone. Using basic clay techniques and common household items for texture, you’ll create a functional vessel perfect for holding dried floral arrangements.
Step-by-Step
Materials
- Air-dry clay (white or stone color)
- Rolling pin
- Parchment paper or canvas mat
- Vintage lace or doily (for texture)
- Clay knife or craft knife
- Slip (water and clay mixture) or scoring tool
- Round cylindrical form (like a sturdy bottle or tube) for shaping
- Sponge
- Sandpaper (fine grit)
- Cardboard (for creating the back template)
Step 1: Preparation & Texturing
-
Roll the slab:
Begin by working your clay in your hands to warm it up, then roll it out on parchment paper or a canvas mat. You want a consistent slab about 1/4 inch thick to ensure it’s sturdy enough for wall mounting. -
Apply the lace texture:
Lay your vintage lace or doily gently over the center of the clay slab where the front of the pocket will be. Press it firmly into the clay using the rolling pin with a single, even pass. Peel the lace back carefully to reveal the imprinted pattern. -
Add secondary patterns:
To mimic the ‘carved’ rim seen in the photo, use a small sculpting tool or the end of a paintbrush to press a repeating arch or scalloped pattern near the top edge. You can also lightly scratch cross-hatch lines to enhance the vintage feel.
Cracking Seams?
If seams crack while drying, mix a thick paste of clay dust and white vinegar (magic mud!). Fill the crack, smooth it over, and cover with plastic to dry slowly.
Step 2: Shaping & Construction
-
Cut the forms:
Cut a rectangular piece (roughly 6×8 inches, depending on your desired size) which will curve to become the front. Then, cut a D-shaped piece of clay for the bottom base and a long, flat slab for the back wall. -
Shape the curve:
Drape the textured rectangular piece over your cylindrical form (like a bottle) to give it a nice, even curve. Let it sit for about 20 minutes so it holds the shape but is still workable. -
Prepare the joins:
Score the edges of the back slab and the curved front piece where they will meet. Apply a generous amount of slip (clay mixed with water) to these scored areas to act as glue. -
Assemble the body:
Press the curved front piece onto the back slab. Use your fingers or a modeling tool to smooth the seam on the inside and outside, blending the clay so it becomes one solid unit. Be careful not to smudge your beautiful lace texture on the front. -
Attach the base:
Score and slip the bottom edge of your cylinder. Attach the D-shaped base piece, smoothing the clay upwards to seal the bottom completely so it can hold stems securely. -
Refine the shape:
Support the inside with your hand and gently tap the bottom on the table to flatten it slightly. Taper the bottom section by gently pressing the clay inward, mimicking the amphora shape in the photo.
Step 3: Finishing Touches
-
Create the hanging hole:
Using a straw or a small circular cutter, punch a hole near the top of the back slab. This is crucial for mounting the pocket to the wall later. -
Smooth the rim:
Dip a sponge in a little water and run it along the top rim to soften any sharp cutting marks. I like to leave it slightly uneven to maintain that handmade, rustic character. -
Dry thoroughly:
Allow the pocket to dry upright in a cool, dry place. This usually takes 24-48 hours. Don’t rush this step with heat, or the clay might crack at the seams. -
Sand imperfections:
Once bone dry, take fine-grit sandpaper and gently smooth any rough edges on the back or rim. Be very gentle over the textured areas to avoid sanding away the lace details. -
Optional patina:
For a truly aged look, you can brush on a diluted wash of brown or beige acrylic paint and wipe it off immediately with a damp cloth. The paint will stay in the lace crevices, highlighting the pattern.
Level Up: Nature’s Texture
Instead of lace, press real dried lavender stalks or fern leaves into the clay before rolling. It creates a stunning, organic fossil-like impression.
Now you have a timeless vessel ready to display your favorite dried blooms on any wall
Geometric Stamp Pattern Wall Pocket
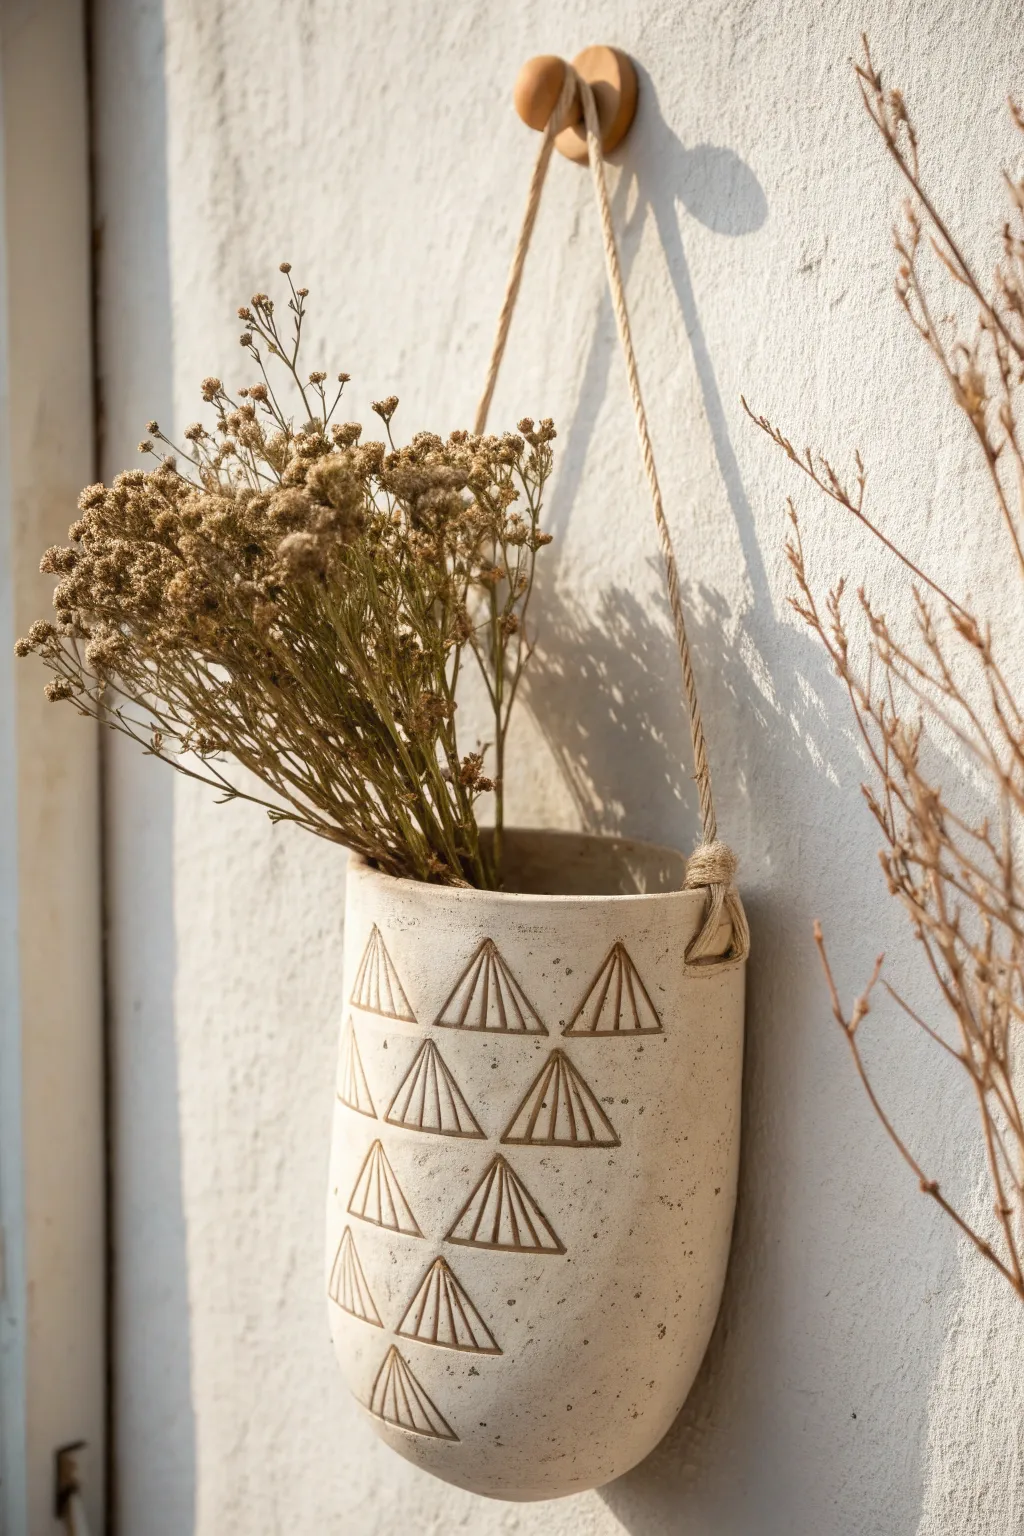
This rustic planter features a warm, speckled cream finish and a charming geometric relief pattern, perfect for displaying dried botanicals. The simple hanging design adds effortless texture and organic style to any empty wall space.
Step-by-Step Tutorial
Materials
- Speckled stoneware clay (white or buff)
- Can of soda or cylindrical form (approx. 3-4 inches diameter)
- Newsprint or paper
- Rolling pin
- Clay knife or needle tool
- Triangle stamp tool (or carving tool to make one)
- Score and slip tool (or fork and water)
- Sponge
- Jute twine or rope
- Matte cream glaze (transparent if using speckled clay)
Step 1: Forming the Body
-
Prepare the slab:
Roll out a slab of speckled stoneware clay to an even thickness of about 1/4 inch. If you want that natural, earthy look shown in the photo, don’t smooth the surface too perfectly. -
Template setup:
Prepare your cylindrical form by wrapping it in a sheet of newsprint. This crucial step prevents the clay from sticking to the form later. -
Cut the rectangle:
Measure and cut a rectangle from your slab tall enough to be your desired pocket height (around 6-7 inches) and wide enough to wrap fully around your form with a slight overlap. -
Shape the cylinder:
Wrap the clay rectangle around the paper-covered form. Score and slip the overlapping edges, pressing them firmly together to create a seamless vertical join. Smooth the seam with your finger or a rib tool. -
Create the bottom:
While the clay is still on the form, cut a circle of clay slightly larger than the cylinder’s diameter. Score the bottom edge of your cylinder. -
Attach the base:
Press the clay circle onto the bottom. To get the rounded, convex shape seen in the image, gently paddle the bottom edges upward with a wooden spoon or your palm, rounding off the sharp corner where the wall meets the floor. -
Make the loops:
Roll a small coil of clay. Cut two 2-inch segments and fold them into ‘U’ shapes to act as the rope handles. -
Attach the hardware:
Score and slip the sides of the pocket near the top rim. Press the ‘U’ shapes securely onto the exterior, blending the attachment points thoroughly so they can support the weight of the planter.
Stamp Sinking In?
If the cylinder walls warp when you press the stamp, place a heavy jar or your hand inside the vessel to provide counter-pressure and support while stamping.
Step 2: Stamping and Finishing
-
Stiffen the form:
Allow the piece to dry slightly to a soft leather-hard stage. It needs to be firm enough to resist the pressure of stamping without collapsing. -
Plan the pattern:
Using a needle tool, lightly mark faint horizontal guidelines where you want your rows of triangles to sit. The image shows an alternating brick-lay pattern. -
Stamp the design:
Press your triangle stamp firmly into the clay wall. If you don’t have a stamp, I find carving the triangles individually with a small loop tool works just as well for a handmade feel. -
Detail the triangles:
If your stamp is solid, use a needle tool to carve the inner vertical lines within each impressed triangle to mimic the ‘tent’ look shown in the reference. -
Clean up:
Once the clay is bone dry, gently sponge away any sharp burrs created during the stamping process. -
Bisque fire:
Fire the piece in a kiln to cone 04 (or your clay body’s specifications). -
Glaze application:
Dip or brush the piece with a matte cream glaze. If your clay has natural speckles, use a slightly translucent glaze so the iron spots show through. -
Glaze wiping:
After glazing, gently wipe a damp sponge over the stamped triangles. This removes some glaze from the high points, highlighting the reddish-brown geometric lines. -
Final firing:
Fire the piece again to the final temperature required for your glaze (typically cone 5 or 6). -
Assembly:
Cut a length of thick jute rope. Thread the ends through the ceramic loops and tie sturdy knots on the outside to secure the hanger.
Creating the Stamp
Carve the master triangle pattern into a small block of plaster or bisqued clay. This creates a custom tool you can reuse for consistent impressions.
Hang your new pocket near a window and fill it with dried wildflowers for an instant touch of nature


What Really Happens Inside the Kiln
Learn how time and temperature work together inside the kiln to transform clay into durable ceramic.
Carved Linework Boho Wall Pocket
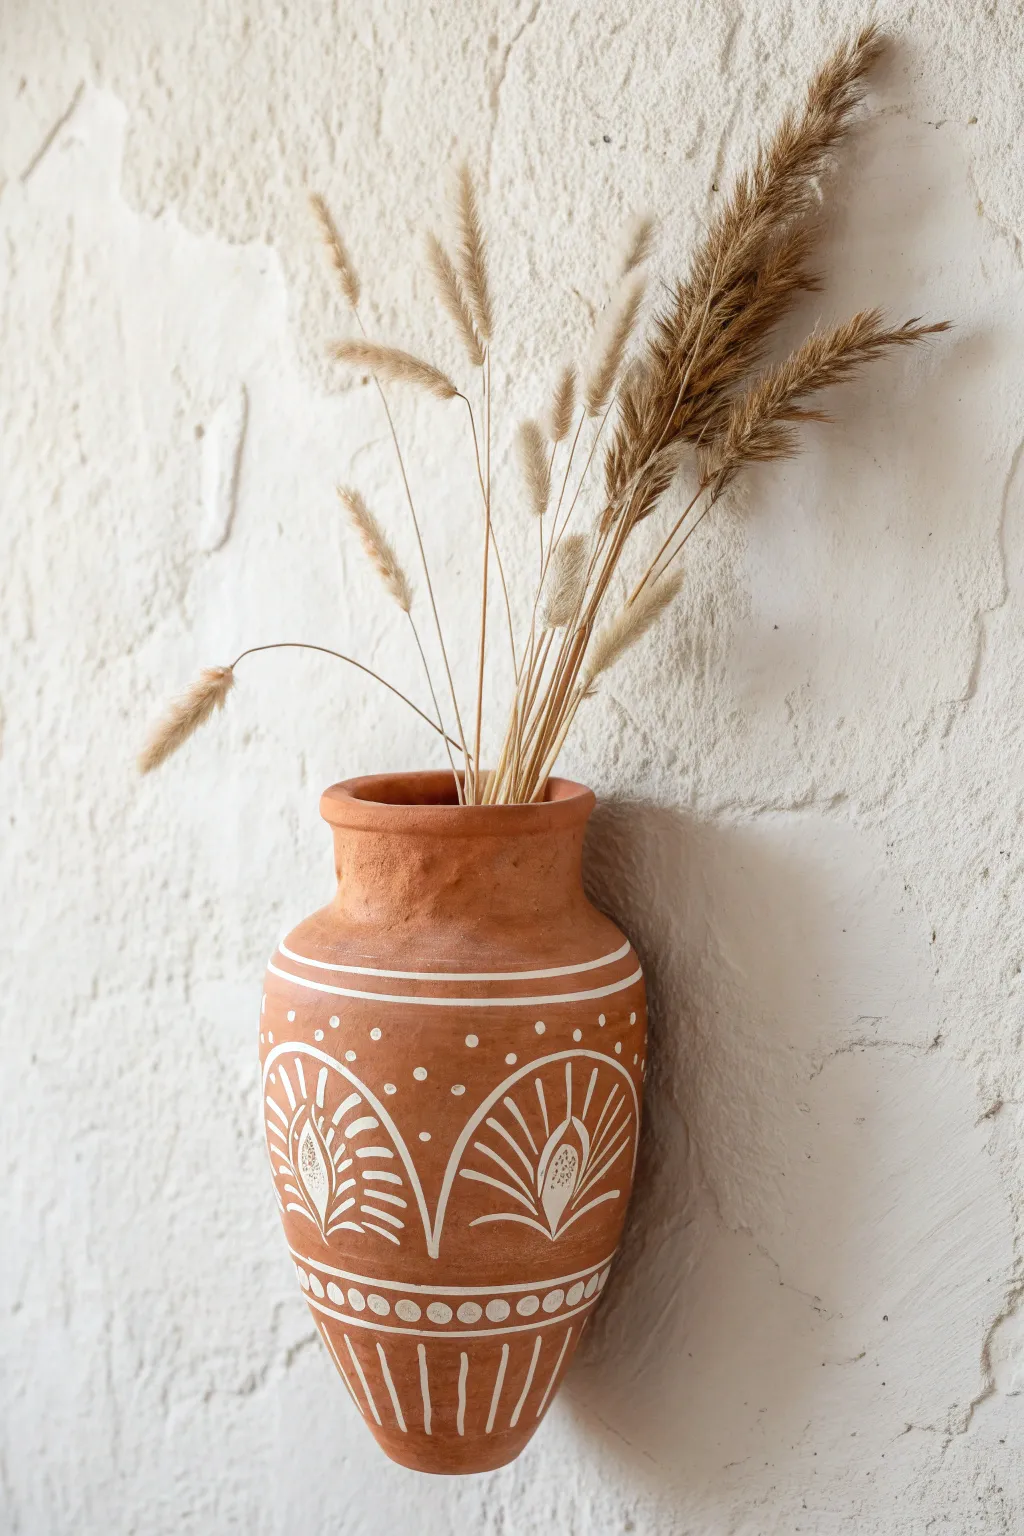
This rustic terracotta wall pocket brings earthy warmth to any vertical space with its rich clay tones and striking white motifs. The design features a faux-carved look created with precise linework, perfect for displaying dried grasses or faux botanicals.
Step-by-Step Guide
Materials
- Air-dry clay (terracotta color) or polymer clay
- Rolling pin
- Clay carving tools or a needle tool
- Cardboard or cardstock (for templates)
- Craft knife
- Water and a small sponge (for smoothing)
- White acrylic paint
- Fine detail paintbrush (size 0 or 00)
- Sandpaper (fine grit)
- Small D-ring hanger or wire for the back
- Strong craft glue (e.g., E6000)
Step 1: Shaping the Clay Base
-
Create the Back Panel Template:
Cut a piece of cardstock into an elongated teardrop or vase shape with a flat top. This will be the back of your wall pocket that sits flush against the wall. -
Roll Out the Clay Slab:
Roll your terracotta clay out on a smooth surface to an even thickness of about 1/4 inch. Ensure it’s large enough to cut both the back and the front pieces. -
Cut the Back Panel:
Place your cardstock template onto the clay and trace around it with a craft knife to cut out the back panel. Smooth the edges with a damp finger to remove any roughness. -
Form the Front Pocket:
Use the same template to cut a second piece, but trim off the bottom third and slightly flare the top edge to create a 3D pocket effect. Gently curve this piece over a rolling pin or bunched-up paper towel to give it a rounded, convex shape. -
Score and Slip:
If using air-dry clay, score (scratch) the edges of the back panel and the corresponding edges of the front pocket. Apply a little water or liquid clay (slip) to these scratched areas to act as glue. -
Assemble the Pocket:
Press the curved front piece onto the back panel, sealing the sides and bottom. Leave the top open. Use a smoothing tool or your finger to blend the seam completely so it looks like one solid piece. -
Refine the Lip:
Add a small coil of clay around the top rim of the pocket to create a thickened lip, blending it downwards into the body for a seamless transition.
Uneven Paint Lines?
If your brushstrokes look shaky, don’t stress. Once the white paint is dry, use a toothpick to gently scrape away excess paint and neaten the edges for a crisp look.
Step 2: Designing and Drying
-
Map Out the Pattern:
While the clay is still slightly pliable but firm (leather hard), lightly sketch your design using a needle tool. Draw two horizontal bands near the top and one near the bottom to frame the main design area. -
Sketch the Central Motif:
Between the bands, lightly outline two large semi-circles or fan shapes. Inside these, sketch a central vertical leaf shape surrounded by radiating lines to mimic the boho pattern shown. -
Add Decorative Details:
Mark spots for dots along the horizontal bands and inside the fan shapes. Don’t worry about perfection; distinct hand-drawn lines add character. -
Dry or Bake:
Follow the instructions for your specific clay. If using air-dry clay, let it dry for 24-48 hours until completely hard and light in color. If using polymer, bake according to package directions. -
Sand for Smoothness:
Once fully cured, gently sand any rough edges or fingerprints with fine-grit sandpaper. I prefer to wipe it down with a slightly damp cloth afterwards to remove dust.
Pro Tip: Faux Stone
To get that aged, chalky texture seen in the photo, mix a teaspoon of baking soda into your terracotta clay before rolling, or dust the wet paint with cornstarch.
Step 3: Painting and Finishing
-
Prepare the Paint:
Thin your white acrylic paint slightly with water. You want a fluid consistency that flows visibly off the brush but is opaque enough to cover the terracotta color. -
Paint the Horizontal Bands:
Using your fine detail brush, paint over the horizontal lines you sketched earlier. Go slowly to consistent line thickness. -
Fill the Fan Shapes:
Paint the curved arches of the fan shapes. Then, carefully paint the radiating lines inside, ensuring they don’t touch the outer arch. -
Detail the Central Leaf:
Paint the outline of the central leaf shape within the fans. Add small dots or dashes inside the leaf for texture, mimicking the stamen of a flower. -
Add the Dots:
Using the back end of your paintbrush dipped in paint, stamp dots along the horizontal bands and in the negative space between the fans. This creates uniform, perfect circles. -
Add Vertical Stripes:
Paint vertical stripes on the bottom section of the vase, tapered slightly as they go down toward the base. -
Attach the Hanger:
Flip the vase over. Use strong craft glue to attach a D-ring or a loop of wire to the back panel. Let the glue cure fully before hanging.
Fill your new pocket with dried pampas grass or bunny tails to complete that effortless bohemian aesthetic.
Two-Tone Dip-Painted Wall Pocket
Bring earthy warmth to your walls with this simple yet sophisticated clay wall pocket. Featuring distinct color block sections with a raw, matte finish, it perfectly houses dried grasses for a touch of natural modernism.
How-To Guide
Materials
- Air-dry clay (white or light grey)
- Rolling pin
- Clay knife or craft knife
- Small bowl (for water)
- Sponge
- Sandpaper (medium and fine grit)
- Acrylic paint (warm white/cream)
- Acrylic paint (terracotta/rust)
- Painter’s tape
- Matte sealant spray or varnish
- Rolling guide sticks (optional)
- Cardstock for template making
Step 1: Shaping the Clay Body
-
Create a template:
Before touching the clay, sketch a teardrop or elongated U-shape on cardstock to serve as your template. You will need a back piece and a front piece that is slightly shorter than the back. -
Roll out the clay:
Take a large chunk of air-dry clay and knead it until pliable. Roll it out on a clean surface achieving a consistent thickness of about 1/4 inch. -
Cut the shapes:
Place your cardstock templates onto the rolled clay. Using your craft knife, carefully cut out one back piece and one front piece. -
Curve the front:
Gently curve the front piece so it bulges outward slightly; this volume creates the ‘pocket’ space for the stems. -
Score the edges:
Use your knife to make small hatched marks (scoring) along the side and bottom edges of both the back piece and the front piece where they will connect. -
Apply slip:
Dab a little water onto the scored areas to create a slip paste, acting as the glue for your clay seams. -
Join the pieces:
Press the front piece onto the back piece firmly along the seams. Leave the top edge open. -
Create the hanging hole:
Use a straw or a small tool to punch a hole near the top center of the back piece for mounting. -
Smooth the seams:
Dip your finger or a sponge in water and run it over the joined seams until they disappear completely and the sides look like one continuous piece. -
Let it dry:
Allow the clay to dry fully for 24-48 hours. I usually flip it over halfway through to ensure the back dries evenly.
Clean Lines
Burnish the edge of your painter’s tape with a spoon or fingernail before painting. This seals the tape to the texture of the clay and prevents fuzzy paint lines.
Step 2: Finishing and Painting
-
Sand for texture:
Once bone dry, use medium-grit sandpaper to remove any sharp bumps, then switch to fine grit. Don’t make it perfectly smooth; a little texture adds to the rustic look. -
Tape the first line:
Apply a strip of painter’s tape horizontally across the top third of the pocket. Press the edges down firmly to prevent paint bleed. -
Paint the middle section:
Apply the warm white acrylic paint below the tape line, covering the middle section of the pocket. You may need two coats for opaque coverage. -
Tape the bottom line:
Once the white paint is completely dry, remove the first tape. Apply a new line of tape across the lower portion of the white section. -
Apply the base color:
Paint the bottom section with your terracotta or rust-colored paint. Carry the paint around the sides and onto the bottom curve. -
Remove tape and touch up:
Peel off the tape while the paint is still slightly tacky to get a crisp line. Use a small detail brush to fix any jagged edges. -
Leave the top raw:
Keep the top section unpainted to show the natural clay color, creating that beautiful tri-tone effect shown in the image. -
Seal the piece:
Spray the entire pocket with a matte sealant to protect the clay and paint without adding unwanted shine. -
Add nature:
Finish by arranging a bundle of dried wheat or grasses in the pocket and hanging it on your wall.
Texture Twist
Mix a teaspoon of baking soda into your acrylic paint. This creates a grainy, ceramic-like texture that mimics the look of authentic stoneware pottery.
This charming pocket makes a perfect understated focal point for any empty wall space

TRACK YOUR CERAMIC JOURNEY
Capture glaze tests, firing details, and creative progress—all in one simple printable. Make your projects easier to repeat and improve.
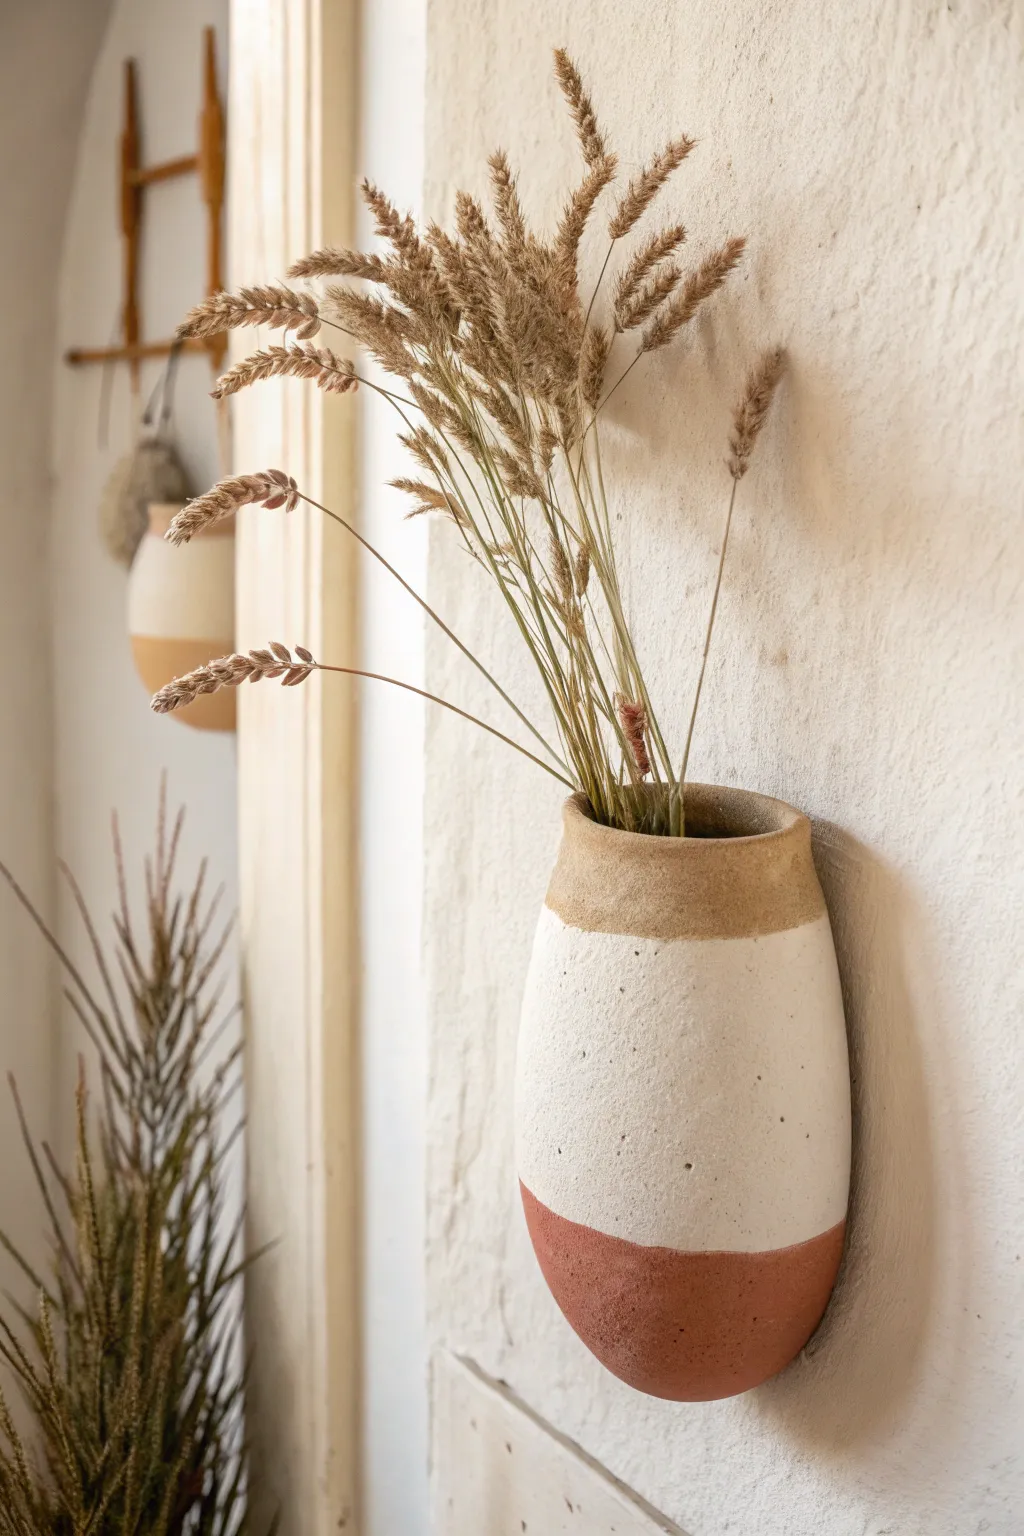
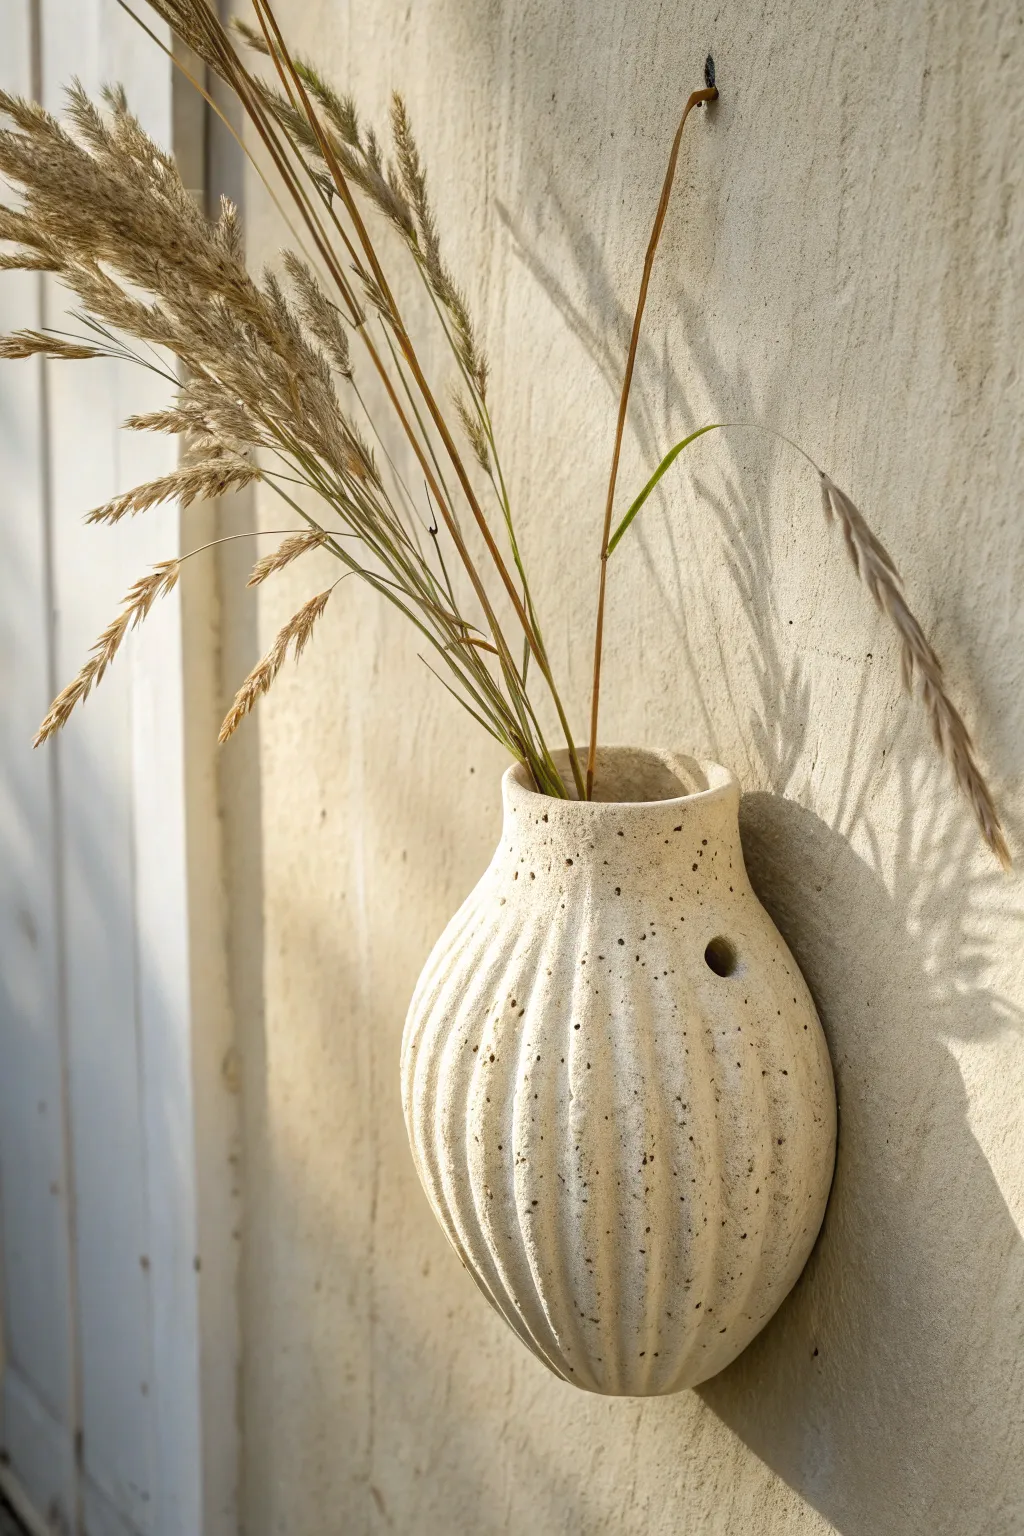
Speckled Clay Wall Pocket With Clear Finish
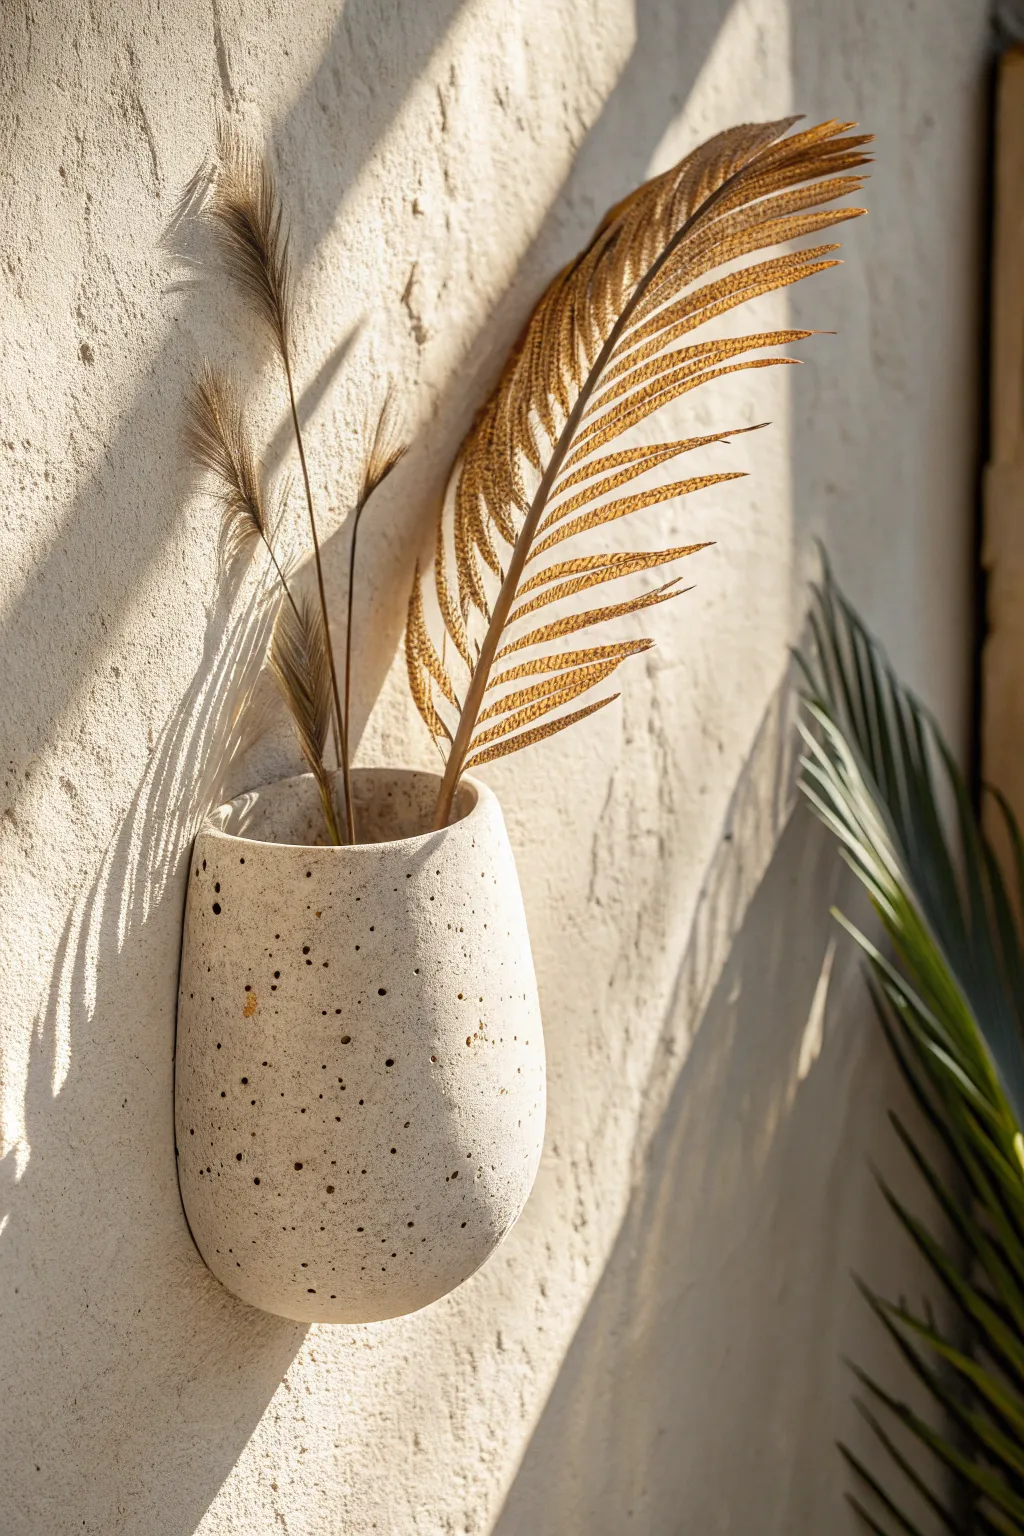
Bring an earthy, organic touch to your wall decor with this handcrafted clay pocket. Its speckled texture mimics natural stone, providing a warm, minimalist vessel perfect for displaying dried grasses or faux feathers.
Step-by-Step
Materials
- Speckled pottery clay (stoneware) or polymer clay with granite effect
- Rolling pin
- Cardstock or paper for template
- Clay knife or needle tool
- Water and slip (if using pottery clay) or liquid clay (for polymer)
- Small sponge
- Sandpaper (fine grit)
- Clear matte varnish or glaze
- Rolling guides or wooden slats (approx 1/4 inch thick)
- Drill bit or hole cutter (for mounting hole)
Step 1: Preparation and Template
-
Design your template:
Sketch a simple U-shape on cardstock that is slightly narrower at the top than the middle. This will be the front of your pocket. Cut it out. -
Create the back panel:
Using the front template as a guide, trace a second shape that is identical but slightly taller at the top edge to accommodate a hanging hole. Cut this out as well. -
Prepare your workspace:
Lay down a canvas cloth or non-stick mat. If using polymer clay, condition it by kneading until pliable. For pottery clay, wedge it briefly to remove air bubbles.
Step 2: Forming the Pocket
-
Roll out the slab:
Place your clay between two wooden guide slats to ensure even thickness. Roll the clay out into a smooth slab, roughly 1/4 inch thick. -
Cut the shapes:
Place your cardstock templates onto the clay slab. Carefully trace around them with a needle tool or clay knife to cut out one front piece and one back piece. -
create a spacer strip:
Cut a long, thin strip of clay—about 1/4 inch wide—from the remaining slab. This will act as a spacer between the front and back to create the pocket’s volume. -
Score the edges:
Using your needle tool or a serrated rib, rough up the edges of the back piece where the front will attach. Do the same to the edges of the front piece and the spacer strip. -
Apply adhesive:
If using pottery clay, dab water or slip onto the scored areas. For polymer clay, use a thin line of liquid clay. -
Assemble the perimeter:
Lay the spacer strip along the scored edge of the back piece, pressing it down gently. Then, place the front piece on top of the spacer, aligning the edges carefully. -
Seal the seams:
Gently press the edges together to bond the layers. Use your fingers or a modeling tool to smooth the seam completely so the spacer strip disappears and the sides become one solid unit. -
Add volume:
Insert a crumpled ball of paper towel or plastic wrap inside the pocket. This gently pushes the front wall outward, giving it that rounded, organic belly shape while it dries or bakes.
Pro Tip: Custom Speckles
Can’t find speckled clay? Mix black pepper or decorative sand into white clay. Knead thoroughly to distribute the particles evenly for a faux-stone look.
Step 3: Finishing Details
-
Create the mounting hole:
On the back panel that extends slightly above the pocket opening, use a hole cutter or a drinking straw to punch a clean hole for hanging. -
Refine the surface:
Dip a small sponge in water (or baby oil for polymer) and wipe down the entire piece to smooth out fingerprints and soften any sharp edges. -
Curing or firing:
If using polymer clay, bake according to the package instructions (usually around 275°F). For pottery clay, let it dry slowly under loose plastic before bisque firing. -
Sanding:
Once fired or baked and cooled, gently sand any rough spots or sharp edges on the rim with fine-grit sandpaper for a professional finish. -
Apply the finish:
Coat the exterior with a clear matte varnish or glaze. This seals the surface and enhances the contrast of the speckles without making it overly shiny. -
Final cure:
Allow the varnish to dry completely or fire the glaze in the kiln. Once set, your organic wall pocket is ready to be hung and filled with dry botanicals.
Troubleshooting: Sagging
If the front wall sags during drying, keep the paper stuffing inside until the clay is leather-hard (pottery) or fully baked (polymer) to maintain the curve.
Hang your new creation in a spot that receives soft cross-light to highlight the beautiful texture
Rope-Hung Wall Pocket With Side Holes
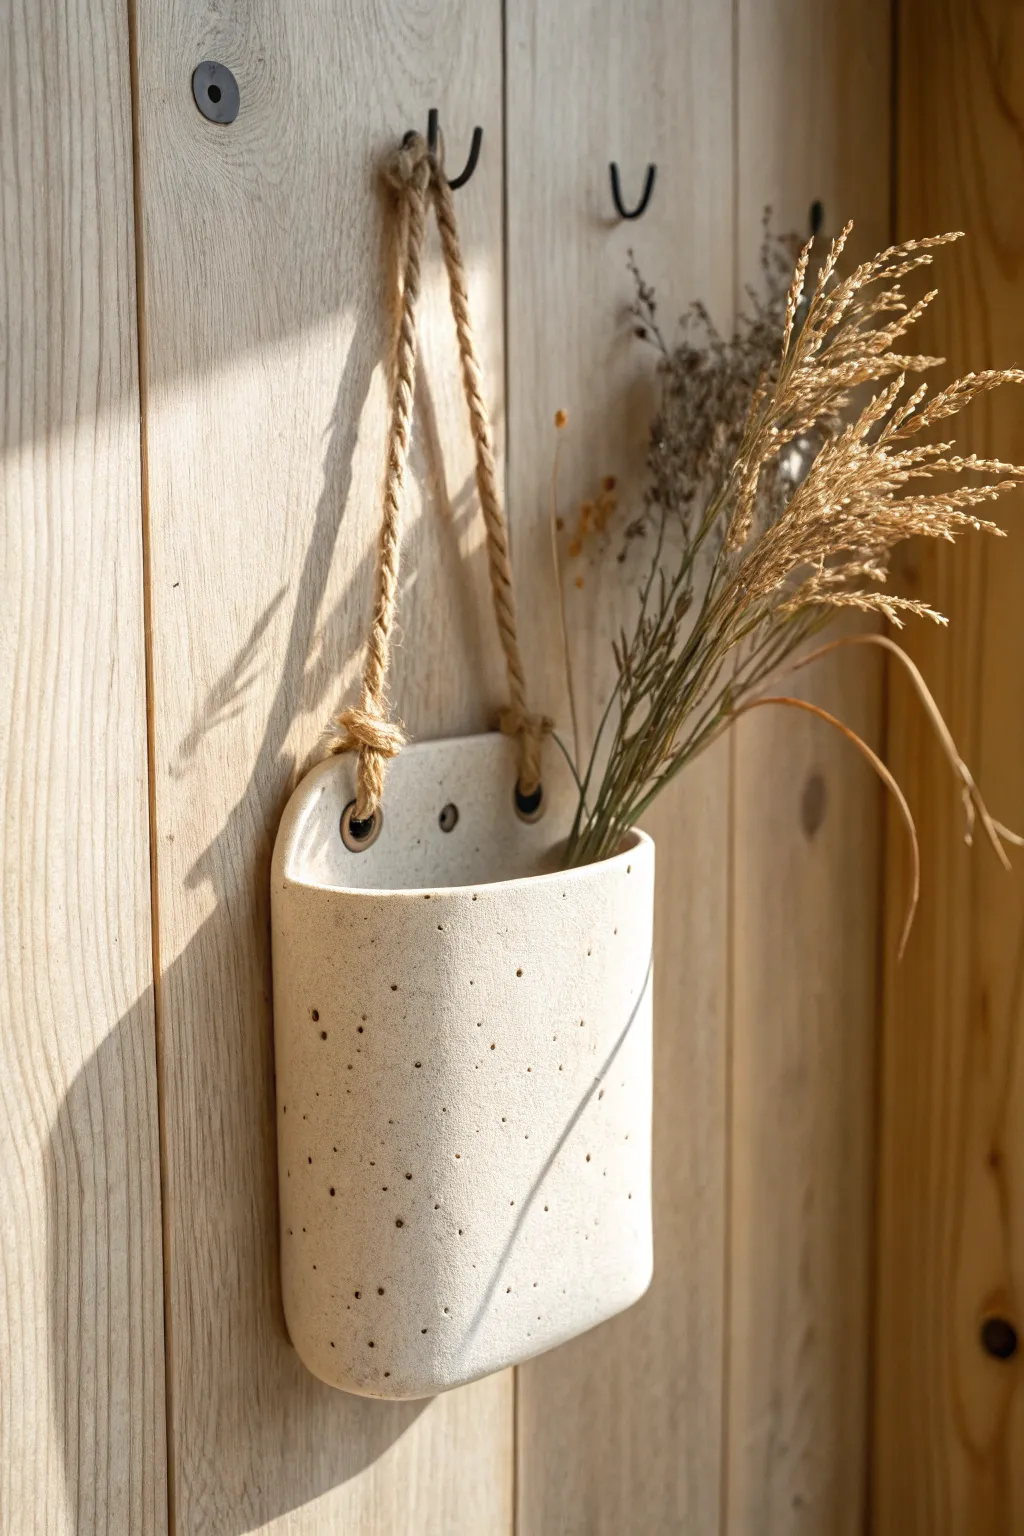
Bring a touch of organic warmth to your walls with this textured ceramic pocket. Featuring rustic rope handles and a lovely speckled finish, this piece is perfect for displaying dried grasses or small air plants.
Step-by-Step Tutorial
Materials
- Speckled stoneware clay (white or light beige)
- Rolling pin
- Canvas work surface
- Fettling knife or needle tool
- Sponge
- Water slip or magic water
- Scoring tool (or fork)
- Hole punch tool (approx. 1/4 inch)
- Small metal grommets (optional)
- Thick jute or hemp rope
- Cardboard for template
- Matte clear glaze (optional)
Step 1: Shaping the Clay
-
Create a Template:
Before touching clay, sketch a template on cardboard. You’ll need a long ‘U’ shape that is about 12 inches long and 5 inches wide. This will fold to become the front and back of your pocket. -
Roll the Slab:
Roll out a slab of speckled clay to an even thickness of about 1/4 inch. I like to flip the slab over halfway through rolling to ensure the clay particles are compressed evenly on both sides. -
Cut Out the Shape:
Lay your cardboard template onto the slab. Using your fettling knife, carefully cut around the template. Keep your knife perpendicular to the table for clean, straight edges. -
Smooth the Texture:
Take a slightly damp sponge and run it over the surface of the clay slab. This compresses the edges and smooths out any canvas marks from your work surface.
Fixing Cracks
If you see hairline cracks developing at the folded seams while drying, compress immediately with a damp sponge and slow down the drying process with plastic.
Step 2: Assembling the Pocket
-
Fold the Form:
Gently lift the bottom of your ‘U’ shape and fold it upwards so it almost meets the top edge, leaving about 2-3 inches of the back panel exposed at the top. Don’t press it down yet. -
Score the Edges:
Where the front flap will meet the back panel along the side seams, use your scoring tool to scratch up the clay surface aggressively. Do this on both contact points. -
Apply Slip:
Dab a generous amount of slip or magic water onto the scored areas. This acts as the glue for your ceramic piece. -
Seal the Seams:
Press the front flap firmly against the back panel along the sides to close the pocket. Use your thumb or a modeling tool to blend the clay together so the seam becomes invisible. -
Create Volume:
To ensure the pocket isn’t too flat, gently push your hand inside the pouch to round out the front face slightly. You can loosely stuff it with scrunched newspaper to hold the shape while it dries to leather-hard.
Step 3: Refining Details
-
Punch Hanging Holes:
Use a circular hole punch tool to create two holes near the top corners of the front flap. Ensure they go through both the front and back layers if you want side hanging, or just through the extended back panel for a different look. The image shows holes through the top sides of the joined pocket. -
Add Decorative Holes:
Use a needle tool to create tiny, random piercings all over the front surface if you want extra texture, or simply rely on the natural speckles of the clay. -
Dry Slowly:
Loosely cover the piece with plastic and let it dry slowly over a few days to reach the bone-dry stage. This prevents warping. -
Bisque Fire:
Fire the piece in a kiln to cone 04 (or your clay’s specific bisque temperature). -
Glaze Application:
For the natural look in the photo, leave the exterior unglazed to show off the raw clay texture. Apply a clear matte glaze to the interior if you plan to hold water over a saucer, though this shape is best for dried florals. -
Final Firing:
Fire the piece again to the maturity temperature of your clay body (likely cone 5 or 6 for stoneware).
Clean Lines
Use a cornstarch dusting on your tool before punching holes. This prevents the tool from sticking and pulling the clay, giving you a crisp, clean circle.
Step 4: Finishing Touches
-
Add Grommets (Optional):
If you want a polished look, superglue small metal grommets into the hanging holes you created. -
Thread the Rope:
Cut a length of thick jute rope. Feed one end through the left hole from front to back and tie a sturdy overhand knot on the inside. Repeat on the right side. -
Hang and Style:
Adjust the knot positions until the pocket hangs level. Fill with dried wheat, lavender, or feathery grasses.
Hang your new pocket near a window where the light can catch the subtle texture of the stoneware clay
Driftwood Bar Wall Pocket Display
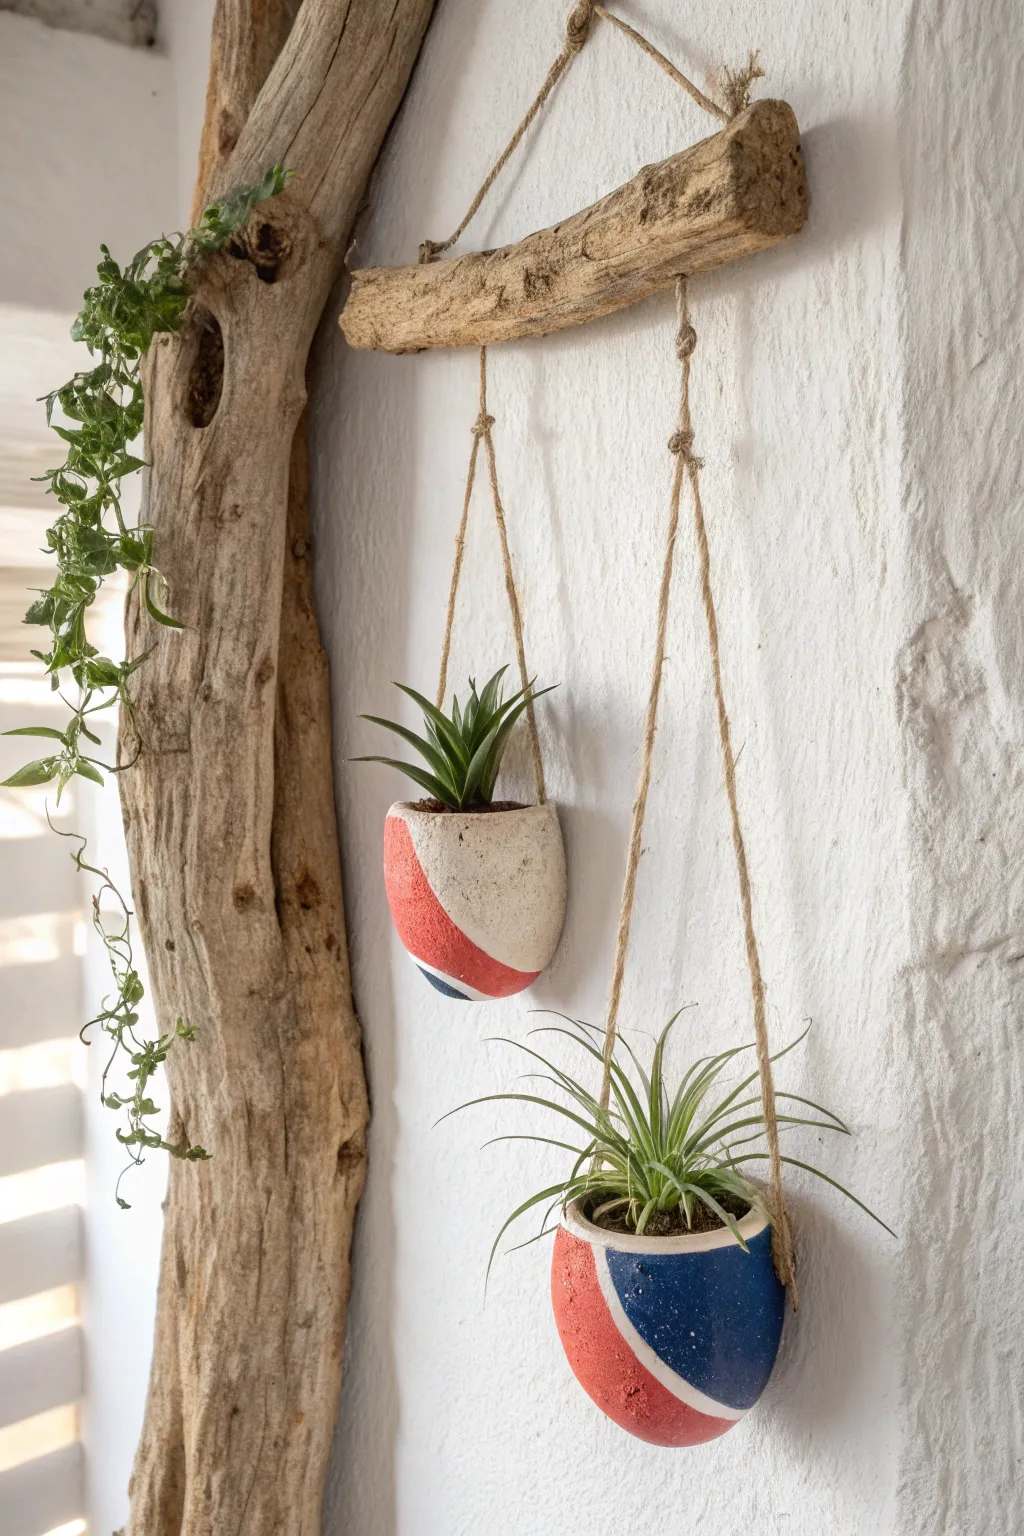
Bring a touch of coastal charm to your walls with this rustic hanging display. By combining scavenged driftwood with hand-painted clay pockets, you create a tiered vertical garden perfect for small succulents or air plants.
Step-by-Step
Materials
- Air-dry clay (white or terracotta)
- Small balloon or styrofoam ball (for shaping)
- Rolling pin
- Craft knife or clay cutter
- Driftwood branch (approx. 12-16 inches)
- Jute twine or hemp cord
- Acrylic paints (Red, White, Navy Blue)
- Painter’s tape
- Paintbrushes (flat and fine tip)
- Sandpaper (fine grit)
- Clear matte sealant spray
- Drill with small bit (optional)
Step 1: Sculpting the Clay Pockets
-
Prepare the Clay:
Knead a generous handful of air-dry clay until it is warm and pliable. This conditioning step is crucial to prevent cracks later on. -
Roll and Cut:
Roll the clay out on a flat surface to about a 1/4-inch thickness. You are looking for a sturdy slab that isn’t too heavy. -
Form the Pocket Shape:
Drape the clay sheet over the bottom half of a small balloon or styrofoam ball to create a rounded cup shape. Smooth the clay gently with water on your fingers to eliminate creases. -
Create the Opening:
Use your craft knife to trim the top edge into a clean, even rim or a slightly organic, wavy edge if you prefer a rougher look. -
Add Hanger Holes:
While the clay is still wet, use a straw or a skewer to poke two holes on opposite sides of the rim, about half an inch down from the top edge. -
Dry Completely:
Let the pockets dry fully for 24-48 hours. I like to rotate them occasionally to ensure air reaches the inside bottom.
Knot Security
Driftwood can be slippery. Wrap the twine around the wood twice before knotting, or carve shallow grooves where the string sits to keep the planters from sliding inward.
Step 2: Painting and Finishing
-
Sand for Smoothness:
Once bone dry, lightly sand any rough edges or bumps on the surface of your clay pockets. -
Tape the Design:
Apply painter’s tape diagonally across the rounded surface to section off areas for your color blocking. Press the edges down firmly. -
Apply the Base Colors:
Paint the exposed sections with your chosen acrylics. For the top pocket, use mostly white with a red stripe; for the bottom, use navy blue with red and white accents. -
Add Details:
Peel off the tape carefully. Use a fine brush to touch up any bleeding lines or add thin separating stripes if desired. -
Seal the Clay:
Spray the interior and exterior of the dry pockets with a clear matte sealant to protect the paint and make the clay somewhat water-resistant.
Step 3: Assembly and Hanging
-
Prepare the Driftwood:
Clean your driftwood piece thoroughly. If it doesn’t have natural crevices, drill two small holes near the ends for the main hanging rope. -
Attach Main Hanger:
Cut a length of jute twine and tie it securely to both ends of the driftwood to create the triangle hanger for the wall. -
String the Pockets:
Cut two long pieces of twine for the planters. Thread one end through a hole in the planter, knot it securely on the inside, and repeat for the other side. -
Suspend the Planters:
Tie the tops of the planter strings around the driftwood bar. Adjust the lengths so one hangs lower than the other for a staggered effect. -
Secure the Knots:
Once you are happy with the height, tighten the knots on the driftwood. A drop of superglue on the knot can ensure it doesn’t slip later. -
Add Greenery:
Place small pots of succulents or loose air plants into your new clay pockets to complete the look.
Texture Play
Before the clay dries, press a piece of coarse linen or sandpaper against the exterior. This adds a subtle, stone-like texture that looks great once painted.
Hang your new creation near a window to let your plants thrive in the sunlight
Pocket With Built-In Keyhole Hanger
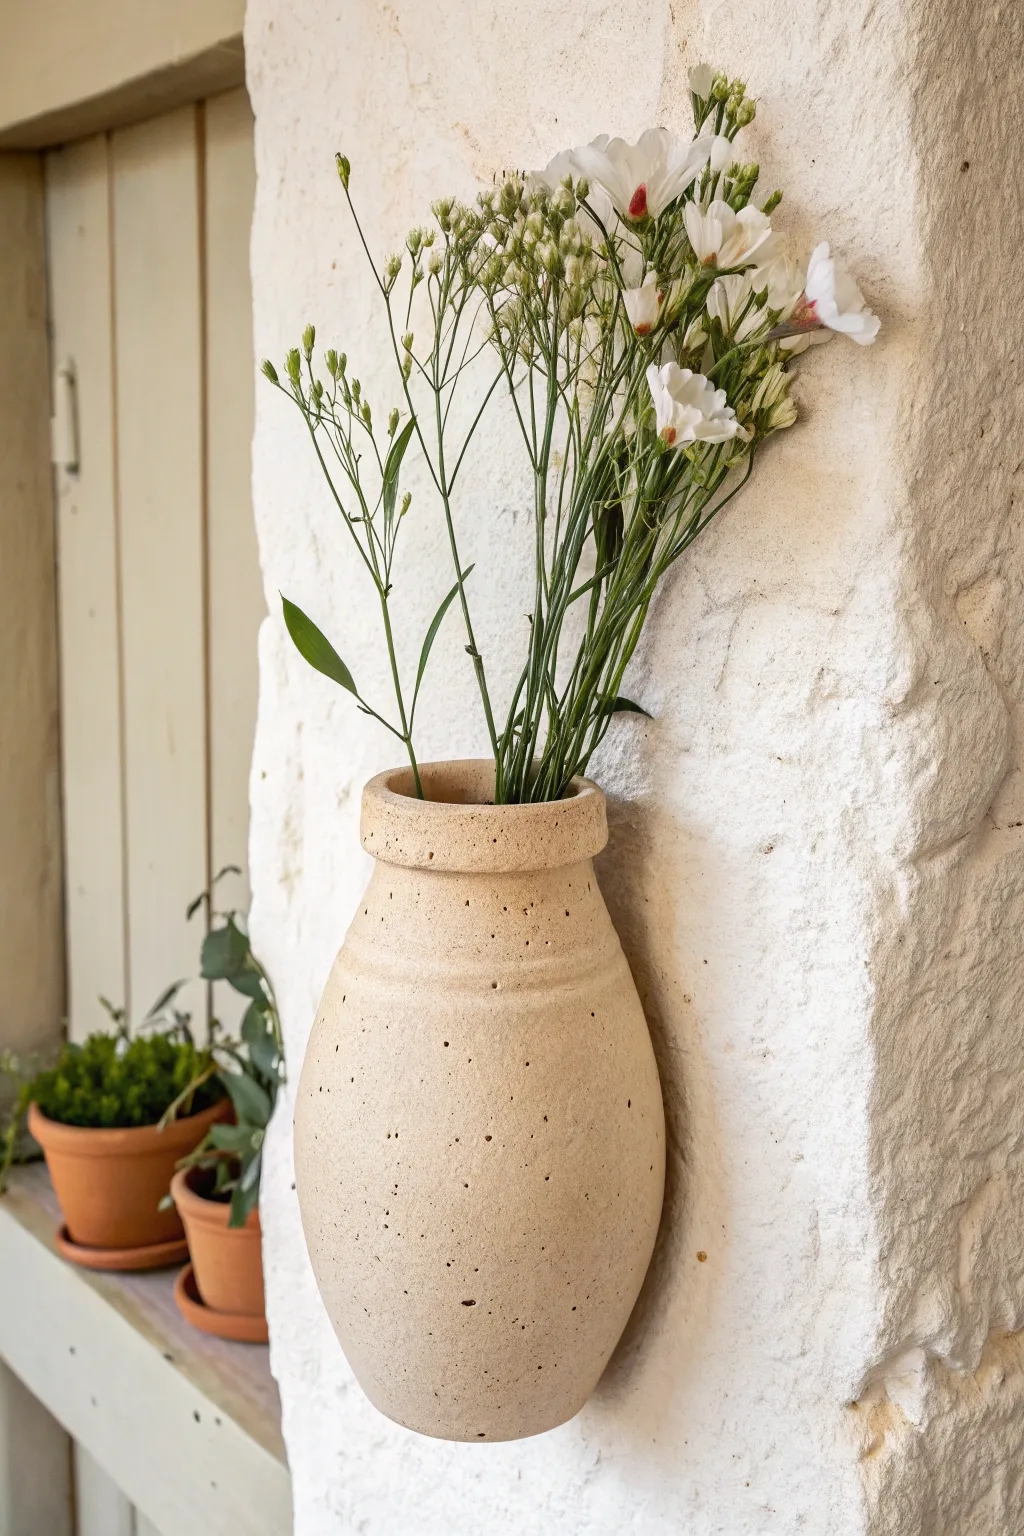
This charming wall pocket mimics the look of ancient wheel-thrown pottery with a lovely, imperfect texture and warm beige glaze. Its simple, bulbous form is designed to sit flush against the wall, creating a floating vessel for dried botanicals or fresh blooms.
Step-by-Step Guide
Materials
- Stoneware clay (smooth or with fine grog)
- Rolling pin
- Pottery knife or needle tool
- Rib tool (kidney)
- Scoring tool (or fork)
- Slip (clay mixed with water)
- Sponge
- Clay carving loop tool (for hollowing keyhole)
- Speckled beige glaze (food safe if using fresh flowers)
- Kiln access
Step 1: Forming the Body
-
Prepare the slab:
Roll out a slab of clay to approximately 1/4 inch thickness. Ensure the clay is evenly compressed to prevent warping later. -
Cut the back plate:
Cut a long oval or pill shape from your slab. This flat piece will sit against the wall, so keep it straight and smooth. -
Create the front volume:
Roll a second slab, slightly thinner than the first. Gently drape this over a form (like a bunch of crumpled newspaper or a plastic mold) to create a curved, bulbous “belly” shape that matches the width of your back plate. -
trim the belly:
Trim the curved slab into a half-vase silhouette. It should taper at the top for the neck and round out at the bottom. -
Score and slip:
Score the edges of both the back plate and the curved front piece thoroughly. Apply a generous amount of slip to the scored areas. -
Join the halves:
Press the curved front onto the flat back plate. Use your fingers or a small wooden tool to meld the seams together until the join is invisible. -
Refine the shape:
Once joined, use a rib tool to smooth the exterior, blending the curve into the flat back. I like to gently tap the bottom on the table to flatten it slightly so it doesn’t look too pointy.
Newspaper Trick
Stuff newspaper inside the pocket while joining seams to keep the belly from collapsing. Remove it/burn it out later.
Step 2: Adding Details & The Hanger
-
Form the rim:
Roll a thick coil of clay. Attach this coil to the top opening of your pocket to create the heavy, rounded rim seen in the photo. -
Blend the rim underside:
Blend the clay from the bottom of the coil downward into the neck of the vase, but leave the top edge distinct and rounded. -
Add the decorative ridge:
Lightly press a horizontal indentation just below the rim to define the neck area, giving it that traditional amphora feel. -
Create the keyhole:
On the back of the completely flat side, carve the keyhole slot. Use a loop tool to hollow out a small cavern *inside* the clay wall without poking through to the front. -
Test the hole:
Carefully check that a screw head can fit into the wider part of your keyhole and slide up into the narrow slot. -
Texture the surface:
Use a rough sponge or a stiff brush to stipple the exterior surface. This creates the subtle pitting and rustic texture seen in the reference.
Step 3: Finishing
-
Bisque fire:
Allow the piece to dry slowly and completely before firing it in the kiln to bisque temperature (usually vertically to prevent warping). -
Glaze application:
Apply a matte, speckled beige glaze. If your glaze doesn’t have specks, you can flick iron oxide or a darker glaze onto the surface with a toothbrush. -
Wipe the back:
Ensure the flat back is completely free of glaze so it doesn’t fuse to the kiln shelf or sit unevenly on the wall. -
Glaze fire:
Fire the piece a second time to the maturation temperature of your specific clay and glaze.
Warping Walls?
If the back plate curves during drying, weigh it down gently with a sandbag or dry it slowly under plastic.
Once fired, simply hang your new pocket on a sturdy screw and fill with seasonal stems.
Triple Mini Wall Pockets Set

Bring a touch of rustic charm to your walls with this vertical hanging planter set. Using simple air-dry clay or traditional pottery techniques, you’ll craft three identical cone-shaped pockets that nestle perfectly against a textured wall.
Detailed Instructions
Materials
- Air-dry clay (terra cotta color) or kiln-fire earthenware clay
- Rolling pin
- Paper cone template (DIY)
- Clay knife or craft knife
- Scoring tool or old fork
- Slip (clay mixed with water)
- Smooth work surface or canvas mat
- Sponge
- Medium-gauge rustic wire or dark twine
- Clear matte sealant (optional)
Step 1: Shaping the Cones
-
Create a template:
Before touching the clay, make a paper template. Draw a large circle (about 6-7 inches in diameter) and cut out a wedge shape—roughly a third of the circle—to form a wide cone shape when rolled. -
Roll the clay:
Roll out your terra cotta clay on a canvas mat until it is an even 1/4 inch thickness. Try to keep the pressure consistent so the walls of your pockets aren’t lopsided. -
Cut the shapes:
Place your paper template onto the slab and cut around it three times with your knife to get the base shapes for all three pockets. -
Score the edges:
On one straight edge of your wedge, score the clay by making cross-hatch marks. Flip the wedge over and do the same on the opposite straight edge’s back side. -
Form the cone:
Gently curb the clay around your hand to bring the two scored edges together. Apply a little slip (clay paste) to the roughened areas. -
Seal the seam:
Overlap the edges slightly and press them firmly together. Use your thumb or a modeling tool to smooth the seam on the inside, ensuring a strong bond. -
Refine the seam feature:
Unlike most pottery where you hide the seam, this design celebrates it. Leave the exterior flap visible as a decorative triangular overlap, just like the reference photo. I prefer to gently press it flat but leave the line visible.
Step 2: Adding Details & Assembly
-
Texture the flap:
Use a needle tool or a stiff brush to stipple small dots onto the visible triangular flap for added texture. -
Punch holes:
While the clay is still wet, use a straw or a hole punch tool to create two parallel holes near the top back rim of each cone. This is for the hanging wire. -
Smooth the rims:
Run a damp sponge along the top rim of each cone to soften any sharp edges created during cutting. -
Dry completely:
Let the pockets dry slowly, away from direct heat, for 24-48 hours. If you are using kiln clay, fire it now according to manufacturer instructions. -
Seal (Optional):
If using air-dry clay, apply a matte sealant to protect the finish. This is crucial if you plan to put real plants with moisture inside. -
Prepare the wire:
Cut a long length of rustic wire, approximately 3-4 feet depending on how much spacing you want between tiers. -
String the bottom cone:
Thread the wire through the back holes of the first cone, centering it so the cone sits at the bottom of a ‘U’ shape in the wire. -
Add the middle cone:
Feed the two wire ends up through the holes of the second cone. Determine your spacing, then twist the wire slightly behind the hole or knot it if using twine to keep the cone in place. -
Add the top cone:
Repeat the process for the final top cone, ensuring the spacing is consistent. -
Finish the hanger:
Bring the two remaining ends of wire together at the top and twist them into a sturdy loop for hanging.
Keep the Shape
Crumple a small ball of newspaper and stuff it gently inside each wet clay cone. This supports the walls and prevents them from collapsing while they dry.
Make it Waterproof
Coat the *inside* with two layers of liquid beeswax or epoxy resin. This allows you to hold damp soil or fresh flowers without ruining the clay.
Now you have a stunning vertical garden feature ready to display dried botanicals or notes
Rippled Pinch-Texture Wall Pocket
Embrace the natural beauty of textured clay with this organic, stone-inspired wall pocket. Its gentle vertical ridges and speckled finish create a rustic vessel perfect for displaying dried grasses or wildflowers.
Step-by-Step Guide
Materials
- White or speckled stoneware clay (groggy texture preferred)
- Pottery tools (needle tool, rib tool)
- Rolling pin
- Cornstarch or canvas mat (for rolling)
- Circular cookie cutter or template (approx. 4-5 inches)
- Wooden modeling tool or spoon handle
- Slip (clay mixed with water)
- Scoring tool or fork
- Small hole punch or straw
- Rough sponge or abrasive pad
- Matte white or speckled glaze (optional)
- Kiln (or air-dry clay alternative instructions)
Step 1: Forming the Base
-
Prepare the Clay:
Begin by wedging a baseball-sized amount of clay until it is pliable and free of air bubbles. For that authentic stone look, choose a clay body with grog (sand) inclusion. -
Roll the Slabs:
Roll out two slabs of clay to approximately 1/4 inch thickness. Ensure the thickness is even, as this helps the piece dry uniformly without cracking. -
Cut the Shape:
Using a needle tool, cut two elongated teardrop or tapered oval shapes. They should be identical, about 6-7 inches tall and 4 inches at the widest point. -
Create the Volume:
Take the front slab and gently gently cup it in your hand or press it over a curved mold (like a small ball or bowl) to give it a convex, belly-like shape. Leave the back slab flat.
Clean Edges
When punching the hanging hole, support the clay from behind with a scrap piece of wood or your finger to prevent the clay from tearing or deforming.
Step 2: Assembly and Texture
-
Score the Edges:
Use a scoring tool or fork to scratch up the outer edges of both the flat back piece and the curved front piece where they will connect. -
Apply Slip:
Dab a generous amount of clay slip onto the scored areas to act as glue. -
Join the Halves:
Press the curved front onto the flat back, starting from the bottom and working up. Leave the top open for the mouth of the vase. Smooth the seam with a wooden tool until the join is invisible. -
Refine the Form:
Once joined, gently tap the bottom on your work surface to flatten it slightly if you want it to stand, though this design is primarily for hanging. -
Add the Hanging Hole:
Before the clay hardens, use a straw or small hole cutter to punch a clean hole in the upper back panel. Ensure it is centered and at least half an inch from the edge for structural integrity. -
Create the Ridges:
This is the defining step. Use a wooden modeling tool or the handle of a spoon to vertically drag or press indentations into the clay. Start from the bottom and curve upwards, following the rounded shape of the ‘belly’. -
Deepen the Texture:
Go back over the ridges to define them. I find that varying the pressure slightly creates a more organic, time-worn appearance rather than perfect geometric stripes.
Step 3: Finishing Touches
-
Surface Distressing:
Once leather hard, dab the surface with a rough, slightly damp sponge. This exposes the grog (sand) in the clay, mimicking the pitted texture of natural stone seen in the reference photo. -
Add Speckles (Optional):
If your clay is plain white but you want the speckled look, flick a toothbrush loaded with iron oxide wash or brown underglaze lightly over the surface. -
Drying:
Let the piece dry slowly under loose plastic for a day, then uncover it to dry completely. This slow drying prevents the seams from splitting. -
Bisque Fire:
Fire the piece to bisque temperature (usually Cone 04) in a kiln. -
Glazing:
Apply a very thin, matte white glaze, or simply leave the exterior raw and only glaze the interior to make it waterproof. Wipe back any glaze that settles too thickly in the ridges to keep the texture sharp. -
Final Firing:
Fire again to the maturity temperature of your specific clay body.
Go Faux-Stone
Using air-dry clay? Mix in dried coffee grounds or sand before sculpting to get that authentic speckled, gritty texture without needing a kiln.
Hang your new textured vessel on a sunlit wall and arrange a few dried stems to complete the look
Floral Appliqué Wall Pocket
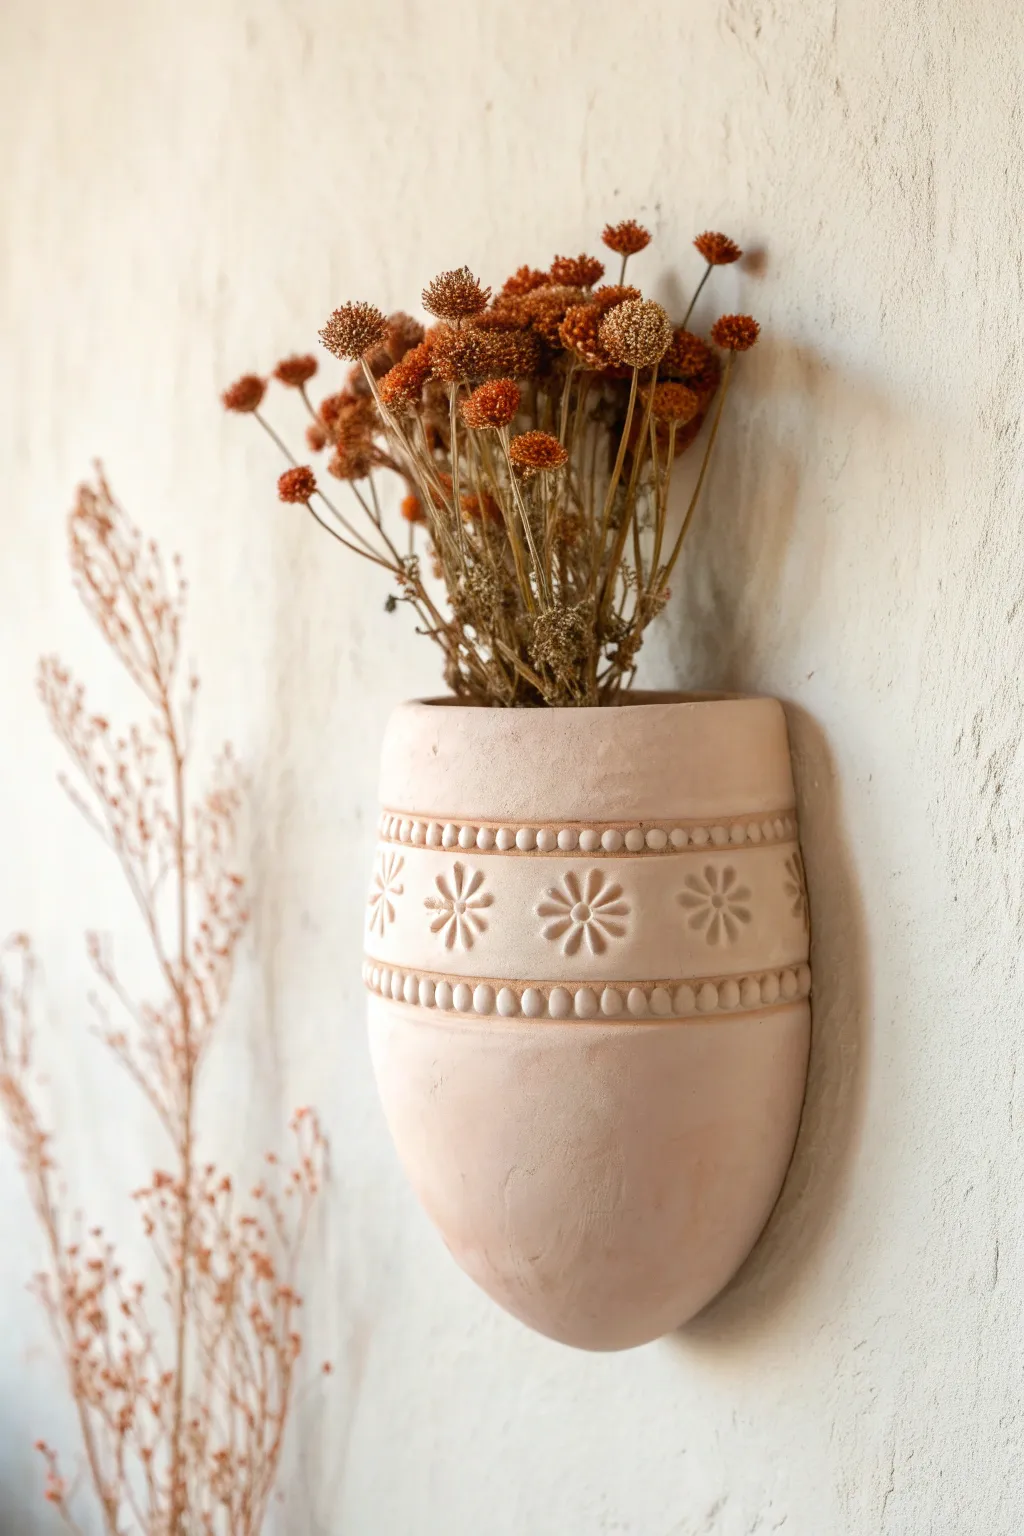
This rustic, earth-toned wall pocket brings a bit of garden charm indoors with its stamped flower motifs and delicate beaded trim. The natural finish mimics the look of raw terracotta, creating a warm and organic vessel perfect for dried wildflower stems.
Detailed Instructions
Materials
- Air-dry clay (terra cotta color or white painted later)
- Rolling pin
- Clay knife or craft knife
- Small circle cutter or piping tip (for beads)
- Flower stamp or small fondant cutter
- Slip (clay mixed with water)
- Small paintbrush
- Sponge
- Fine-grit sandpaper
- Cardboard or scrap paper (for template)
- Mounting hardware (adhesive hanging strip or wire)
Step 1: Shaping the Vessel Body
-
Draft the template:
Begin by sketching a template on cardboard. You need a back panel (a tall rectangle with a rounded bottom) and a front panel (slightly wider than the back to create the pocket volume, also with a rounded bottom). -
Roll the slab:
Roll out a substantial slab of air-dry clay to an even thickness of about 1/4 inch. If you want a smoother surface, roll firmly in multiple directions to compress the clay fibers. -
Cut the forms:
Place your templates onto the clay slab passing a needle tool or clay knife around the edges to cut out both the back and front panels. Save your excess clay for the decorative details. -
Create the pocket:
Score the edges of both pieces where they will join (leave the top edge open). Apply a generous amount of slip to the scored areas. -
Join the seams:
Gently press the front panel onto the back panel. Because the front is wider, you’ll need to slightly bow it outward to make the edges meet, creating that nice pocket space inside. Smooth the seams together using your thumb or a modeling tool until the join is invisible.
Cracking Seams?
If the seams pull apart while drying, mix a paste of clay and vinegar (instead of water). Fill the crack with this potent ‘glue’ and smooth it over.
Step 2: Adding Decorative Details
-
Make the bead trim:
Roll a long, thin coil of clay. Use a small circle cutter, a straw, or just roll tiny balls by hand to create about 30-40 small, uniform beads. -
Attach the upper border:
Score and slip a horizontal line about an inch down from the top rim. Attach a row of your clay beads here, pressing them firmly so they adhere but stay round. -
Attach the lower border:
Repeat the previous step to add a second row of beads approximately two inches below the first row. Use a ruler to ensure the distance is consistent around the curve. -
Stamp the motif:
Between your two beaded rows, press your flower stamp into the clay. Space them evenly apart. If you don’t have a stamp, I find using the end of a marker cap or modeling tools can create lovely custom flower impressions. -
Smooth the surface:
Dip a sponge in a little water and very gently wipe over the main body of the pocket to remove fingerprints, being careful not to erase your stamped textures. -
Add a hanging hole:
Before the clay dries, use a straw or tool to poke a hole in the centered top of the back panel if you plan to hang it on a nail. Alternatively, ignore this if using adhesive strips.
Step 3: Finishing Touches
-
Dry slowly:
Place the pocket on a wire rack to dry. To prevent warping, loosely cover it with plastic wrap for the first 24 hours, then uncover to let it fully harden for another day or two. -
Sand imperfections:
Once bone dry, take your fine-grit sandpaper and gently smooth the rim and any rough spots on the seams. -
Seal or paint:
If you used white clay, now is the time to paint it with a terra cotta acrylic shade. If used colored clay, simply seal it with a matte varnish to protect it from humidity. -
Arrange and hang:
Fill your pocket with dried floral stems like bunny tails or dried daisies, then mount it on your wall to enjoy the view.
Instant Vintage Look
After painting, assist the texture by rubbing a tiny bit of white paint or flour over the raised beads and stamped areas to mimic an aged, dusty patina.
Now you have a charming piece of wall decor that looks like it was found in an old pottery shop
Cactus-Shaped Wall Pocket
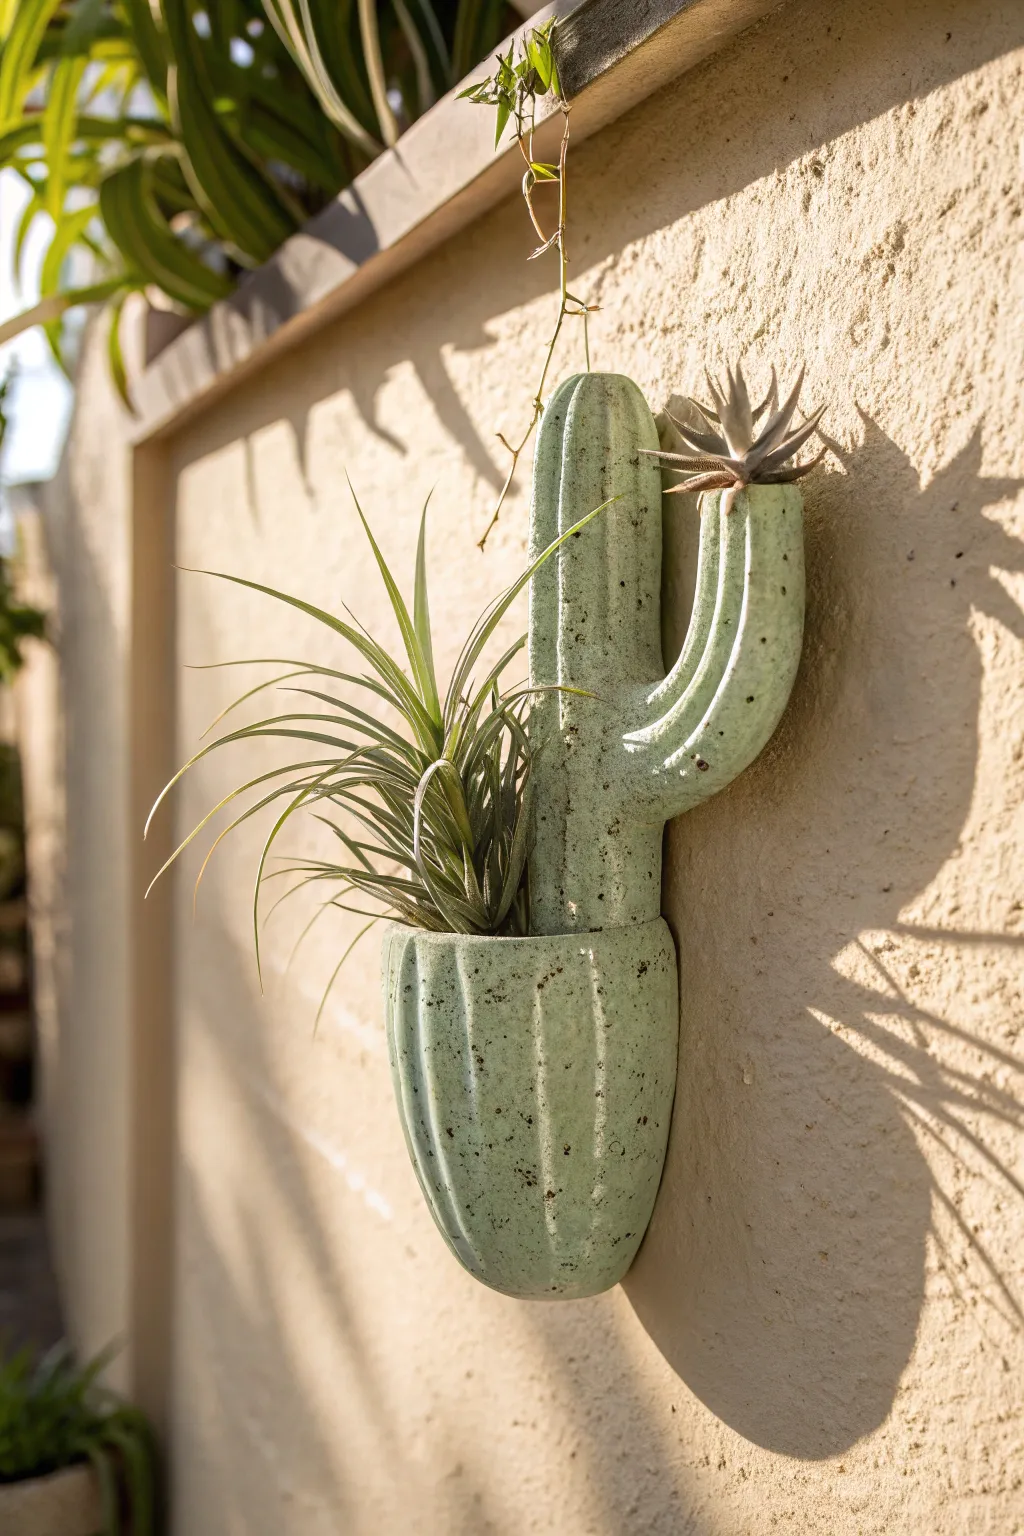
Bring a touch of the arid outdoors to your vertical spaces with this charming cactus-shaped wall pocket. Featuring a speckled green glaze and ribbed texture, this sturdy planter is perfect for holding air plants or succulents without taking up shelf space.
Step-by-Step Guide
Materials
- Stoneware clay (smooth or with grog)
- Rolling pin
- Canvas mat or slab roller
- Paper template (cactus shape)
- Fettling knife or needle tool
- Scoring tool (serrated rib)
- Slip (clay mixed with water)
- Wooden modeling tools
- Sponge
- Speckled green glaze (e.g., Celadon or Mayco)
- Clear glaze (optional overcoat)
- Kiln access
Step 1: Forming the Base Structure
-
Roll the slab:
Begin by rolling out a slab of clay to a uniform thickness of about 1/4 inch. If you are rolling by hand, use guided slats on either side to ensure the thickness is even across the entire surface. -
Cut the back panel:
Lay your paper template onto the slab. Trace and cut out the full cactus shape, including the main column and the curved arm. This flat piece will serve as the back of the wall pocket that rests against the wall. -
Create the front pocket section:
Using the bottom half of your template, cut a second piece of clay that mirrors the bottom curve of the cactus. This piece needs to be slightly wider than the back piece to create a bowed-out ‘pocket’ volume. -
Form the curved arm pocket:
Cut a small, separate curved piece for the cactus arm if you want a second planting pocket there. Gently curve this piece in your hands to establish its rounded volume.
Reinforce the Pocket
Place a wad of crumpled newspaper inside the main pocket while joining the seams. This supports the clay curve and prevents it from collapsing inward while you work.
Step 2: Assembly and Detailing
-
Score the edges:
On the back panel, thoroughly score the outer perimeter where the pocket pieces will attach. Do the same to the corresponding edges of your front pocket pieces. -
Apply slip:
Generously apply slip to the scored areas. This acts as the glue that bonds the clay bodies together permanently during firing. -
Attach the main pocket:
Press the front pocket piece onto the back panel. Because it is slightly distinct in width, you will need to gently bow the center outward, adhering only the edges. Seal the seam firmly with a wooden tool. -
Attach the arm pocket:
Repeat the process for the small arm pocket, ensuring the top is open for a tiny plant. Smooth the seams until they are invisible, blending the clay so it looks like one continuous unit. -
Add the ribs:
To create the signature cactus texture, use a wooden modeling tool to press vertical vertical grooves into the damp clay. Run these lines from the base up to the top, curving along with the arm shape as well. -
Refine the top edges:
Smooth the opening rims with a damp sponge. The clay should be rounded and soft, not sharp, to prevent chipping later. -
Create the hanging hole:
Flip the piece over carefully. Use a needle tool or hole punch to create a hole in the upper back section of the main column. Ensure it is centered for balance and large enough to account for clay shrinkage.
Textured Detail
Before glazing, tap the dried clay with a stiff toothbrush dipped in iron oxide wash. This adds extra dark speckles that pop through the light green glaze.
Step 3: Bisque and Glazing
-
Slow drying:
Loosely cover the piece with plastic to let it dry slowly for several days. This prevents warping, especially where the pocket joins the back slab. -
Bisque fire:
Once bone dry, fire the piece to bisque temperature (usually cone 04 or 06) to prepare it for glazing. -
Wipe down:
After the kiln cools, use a slightly damp sponge to wipe any dust off the bisque ware. This ensures the glaze adheres properly without crawling. -
Apply the glaze:
Brush on 2-3 coats of a speckled green glaze. Look for a ‘mint’ or ‘desert sage’ tone with iron speckles to mimic the natural look in the photo. Allow each coat to dry to the touch before adding the next. -
Wipe the back:
Carefully wipe any glaze off the back surface or use wax resist beforehand to prevent the piece from sticking to the kiln shelf. -
Final fire:
Fire the piece to the maturity temperature of your clay and glaze (often cone 5 or 6 for stoneware). After cooling, fill your pockets with air plants or slow-growing succulents.
Hang your new ceramic creation on a sun-drenched wall and enjoy the low-maintenance greenery
Sunburst Motif Wall Pocket
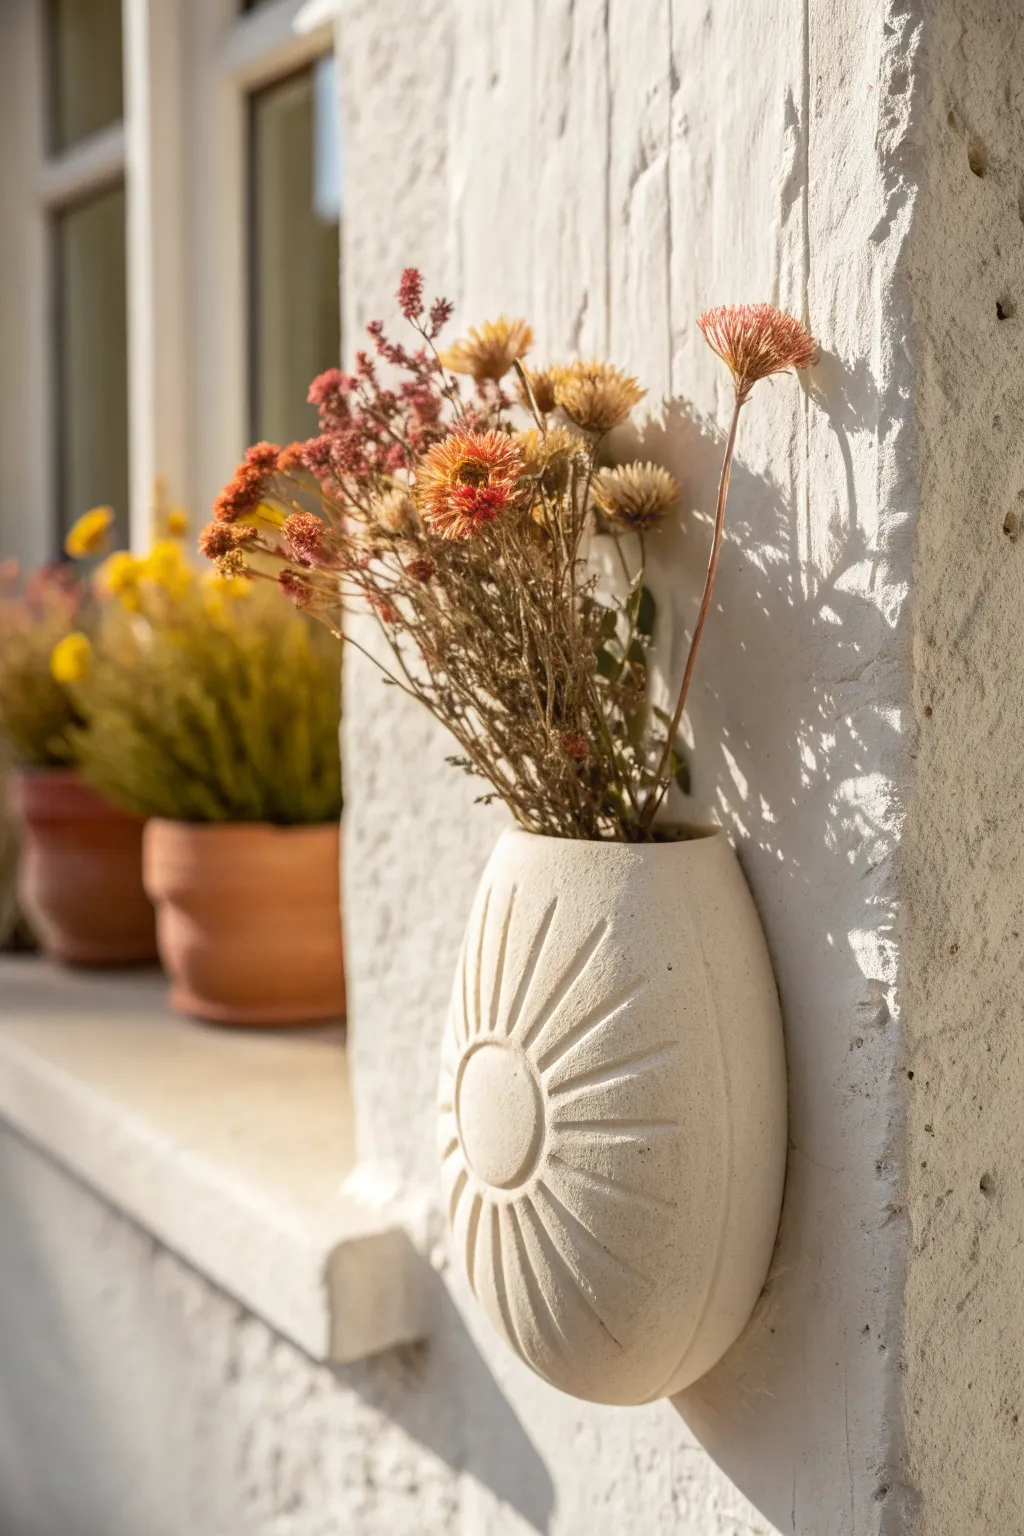
Capture the warmth of the sun with this charming ceramic wall pocket, featuring a simple yet striking carved sunburst motif. The matte, stone-like finish and organic shape make it the perfect vessel for displaying dried wildflowers or grasses on an exterior wall or sunroom.
How-To Guide
Materials
- White or speckled stoneware clay (approx. 2-3 lbs)
- Slab roller or rolling pin with guide strips
- Large circular template (paper or flexible plastic, approx. 6-7 inches diameter)
- Needle tool
- Scoring tool (serrated rib or fork)
- Slip (clay mixed with water)
- Small sponge
- Loop tool or carving gouge
- Cookie cutter or small lid (approx. 1.5 inches diameter)
- Newspaper or bubble wrap
- Matte white or cream glaze
- Nail or wire for hanging
Step 1: Forming the Body
-
Roll the Slab:
Begin by wedging your clay to remove air bubbles. Roll out a consistent slab about 1/4 to 3/8 inch thick. If you’re hand-rolling, using wooden guide strips on either side will ensure an even thickness. -
Cut the Shapes:
Using your large circular template and a needle tool, cut out two identical circles. These will form the front and back of your pocket. -
Trim the Front:
Take one of the circles and trim off the top third in a gentle curve. This shorter piece will become the front pocket, allowing the flowers to be easily arranged. -
Create Volume:
To give the pocket its puffed shape, gently stretch the clay of the front piece from the inside out using a smooth rib or your thumb. Be careful not to thin it too much in the center. -
Prepare the Edges:
Score the outer curved edge of the front piece and the corresponding matching area on the back circle. Apply a generous amount of slip to these scored areas. -
Assemble the Pocket:
Press the front piece onto the back circle, aligning the edges carefully. Leave the top open. Firmly pinch the seams together to ensure a strong bond. -
Add Support:
Stuff the pocket loosely with crumpled newspaper or bubble wrap. This supports the shape and prevents the clay from sagging while you work on the exterior. -
Refine the Seam:
Use a wooden modeling tool or your finger to smooth the seam where the two pieces join. I prefer to use a slightly damp sponge afterwards to erase any tool marks and create that seamless, stone-like look.
Step 2: Carving the Sunburst
-
Position the Center:
Locate a point slightly below the center of the front pocket face. Use your small circular cutter or lid to lightly impress a circle. Don’t cut through; just mark the outline. -
Define the Sun Core:
Using a loop tool, gently carve out a shallow groove around the inner edge of that circle mark, creating a slightly raised button effect in the center. -
Mark the Rays:
Lightly sketch radiating lines extending from the center circle to the outer edges of the pocket using a needle tool. Spacing them somewhat unevenly adds to the organic, handmade aesthetic. -
Carve the Rays:
Select a medium-sized carving gouge or loop tool. Carve along your sketched lines, starting shallow near the center circle and deepening the cut slightly as you move outward toward the edge. -
Clean the Edges:
Once the clay is leather hard, go over your carved lines with a slightly damp brush or sponge to soften any sharp burrs or crumbs of clay left from carving. -
Create the Hanging Hole:
Flip the pocket over. On the back slab, near the top, use a hole punch tool or drill bit to create a clean hole for mounting. Reinforce the area around the hole by compressing the clay with your finger.
Slumping Shapes?
If the front of your pocket starts to collapse before it’s leather hard, re-stuff it with fresh newspaper. Ensure the seam is completely sealed so trapped air can help support the form.
Step 3: Finishing
-
Drying:
Remove the stuffing material once the clay is firm enough to hold its shape. Allow the piece to dry slowly under loose plastic to prevent the rim from warping. -
Bisque Fire:
Fire the piece to cone 04 (or according to your clay body’s instructions) for the initial bisque firing. -
Glazing:
Dip or brush the entire piece with a matte white or stone-textured glaze. A matte finish is crucial to mimic the natural, plaster-like appearance seen in the image. -
Final Fire:
Glaze fire the piece to the appropriate temperature for your clay and glaze (typically cone 5 or 6 for stoneware).
Texturize It
To get that gritty, stucco-like surface texture shown in the photo, add a small handful of fine sand or grog into your slip before smoothing the final surface, or choose a stoneware clay with high grog content.
Now you have a stunning, sun-soaked vessel ready to brighten up any vertical space
Face Planter Wall Pocket
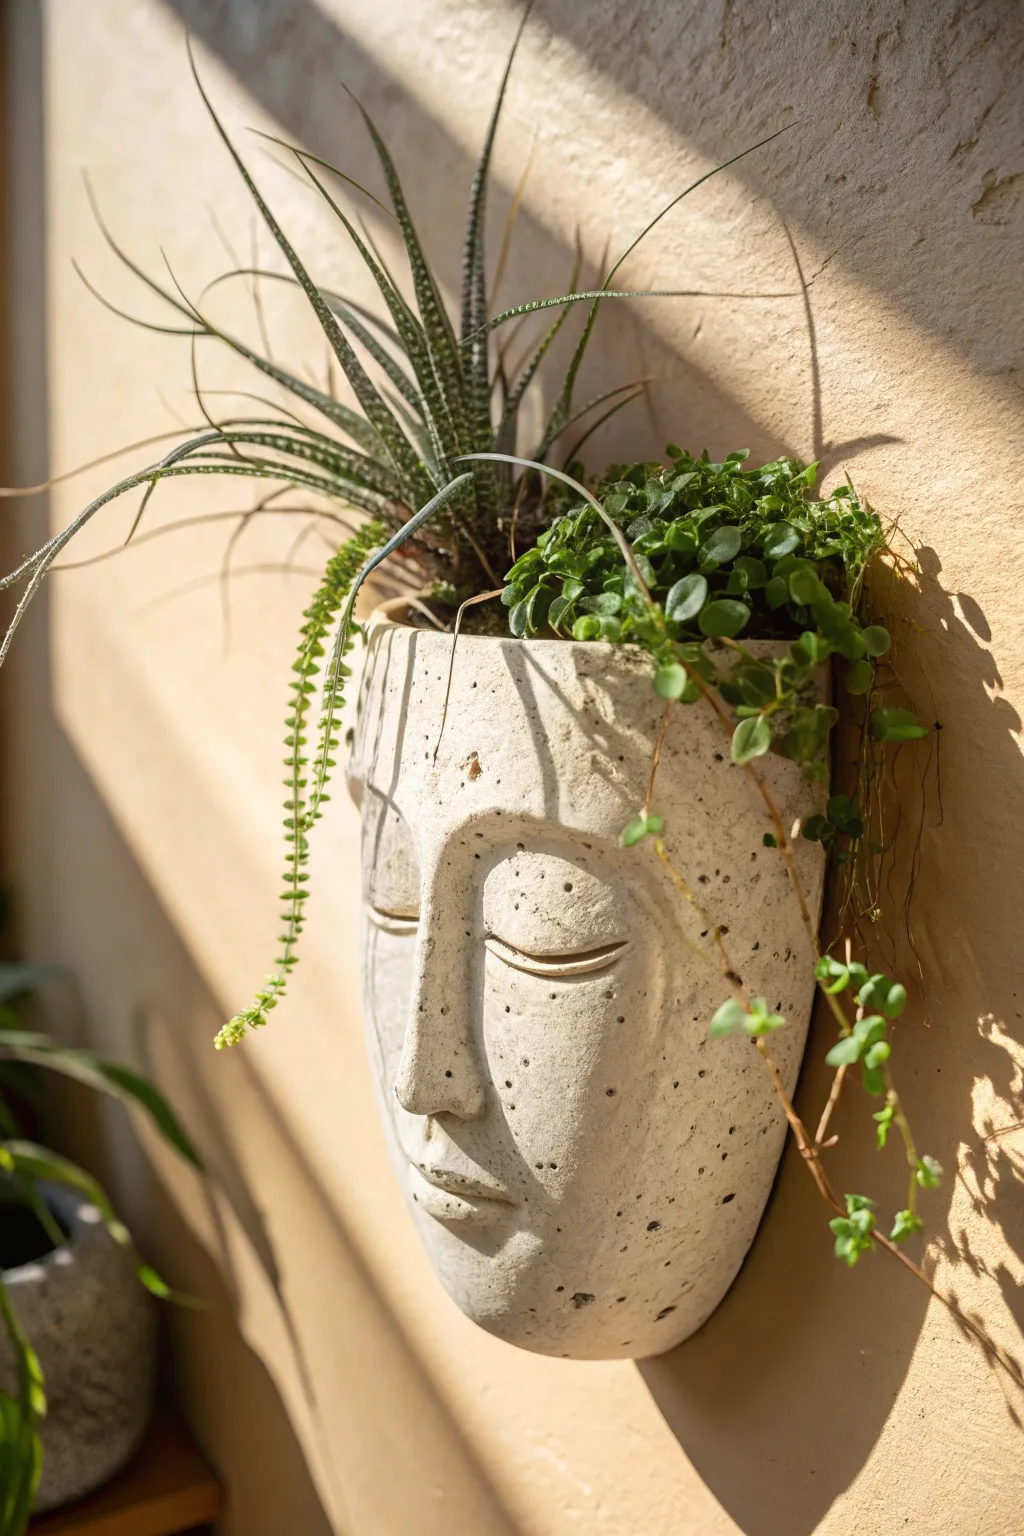
Sculpt a moment of calm for your garden wall with this peaceful face planter that mimics the look of aged stone. The gentle, closed-eye expression brings a meditative quality to your space, while the cleverly designed flat back ensures it sits flush against your wall to cradle your favorite succulents.
Step-by-Step
Materials
- Air-dry clay or polymer clay (stone or white color)
- Rolling pin
- Clay sculpting tools (needle tool, loop tool, smoothing rib)
- Aluminum foil
- Masking tape
- Heavy-duty craft glue
- Sponge or textured foam block
- Acrylic paints (black, white, raw umber)
- Matte sealant spray
- Wall hook hardware or wire
- Sandpaper (fine grit)
Step 1: Building the Armature
-
Shape the core:
Begin by crumpling aluminum foil into a large, elongated half-oval shape. The back should be completely flat to rest against the wall, while the front curves outward to form the volume of the head. -
Secure the form:
Wrap the foil tightly with masking tape. This compresses the foil and gives the clay a better surface to stick to. Ensure the top is open or flattened enough to serve as the planter opening later. -
Roll out the slab:
Roll your clay out to a consistent 1/4-inch thickness. You want it sturdy enough to hold soil but not so heavy that it pulls away from the wall. -
Cover the form:
Drape the clay slab over the rounded side of your foil armature. Gently smooth it down properly, trimming away excess clay at the back edges so they wrap around slightly but leave the back open for now.
Natural Imperfections
Don’t over-smooth the clay surface. Leaving small bumps or asymmetry adds to the organic, hand-carved stone aesthetic.
Step 2: Sculpting the Features
-
Define the nose:
Add a wedge of clay to the center of the face for the nose. Blend the edges seamlessly into the cheeks using a smoothing tool or your thumb. -
Shape the nostrils:
Use a small loop tool to carve out the curves of the nostrils, and shape the bridge so it flows naturally into the brow bone area. -
Create the eye sockets:
Gently press your thumbs into the clay on either side of the nose to create shallow indentations for the eye sockets. -
Add the eyelids:
Roll two small, flattened crescents of clay. Place them in the sockets to form the prominent closed eyelids. Smooth the top edge into the brow, but leave the bottom edge crisp to define the lid. -
Refine the expression:
Use a needle tool to etch a soft, curved line at the bottom of the eyelid to mimic the lash line. This is key to achieving that sleeping, meditative look. -
Form the mouth:
Add a small mound of clay below the nose. Scuplt the upper and lower lips, using a needle tool to separate them slightly. Keep the expression neutral or slightly upturned. -
Smooth the skin:
Dip a sponge or your finger in a little water (if using air-dry clay) and gently smooth out any fingerprints or harsh tool marks across the forehead, cheeks, and chin.
Hair Choices
Plant trailing succulents like ‘String of Pearls’ or ‘Burro’s Tail’ to create the look of cascading hair or a living headdress.
Step 3: Finishing and Texturing
-
Add stone texture:
Before the clay dries, gently press a coarse sponge or a crumpled ball of foil against the surface. This creates subtle pitting that mimics real stone or concrete. -
Create the pocket:
Once the front has stiffened slightly, carefully remove the foil armature from the back. Use fresh clay coils to build up a back wall and seal the bottom, creating a watertight pocket. -
Install hanging hardware:
While the back supports are still wet, embed a sturdy wire loop or create a reinforced hole near the top rim for hanging. -
Dry thoroughly:
Allow the sculpture to dry completely according to package instructions. I usually rotate it every few hours to ensure even drying. -
Speckle effect:
Dilute black acrylic paint with water. Dip an old toothbrush into the mixture and flick the bristles with your thumb to spray fine speckles across the white face. -
Seal the piece:
Apply two coats of matte sealant spray inside and out to protect the clay from moisture when you water your plants.
Now mount your serene sculpture on a sunlit wall and watch as your plants breathe life into their new home