Clay whistles are one of those magical little projects where a simple hollow form turns into an actual sound you made with your own hands. I love them because you can keep the build beginner-friendly and still end up with something wildly charming and totally giftable.
Simple Face Whistle With Nose Mouthpiece
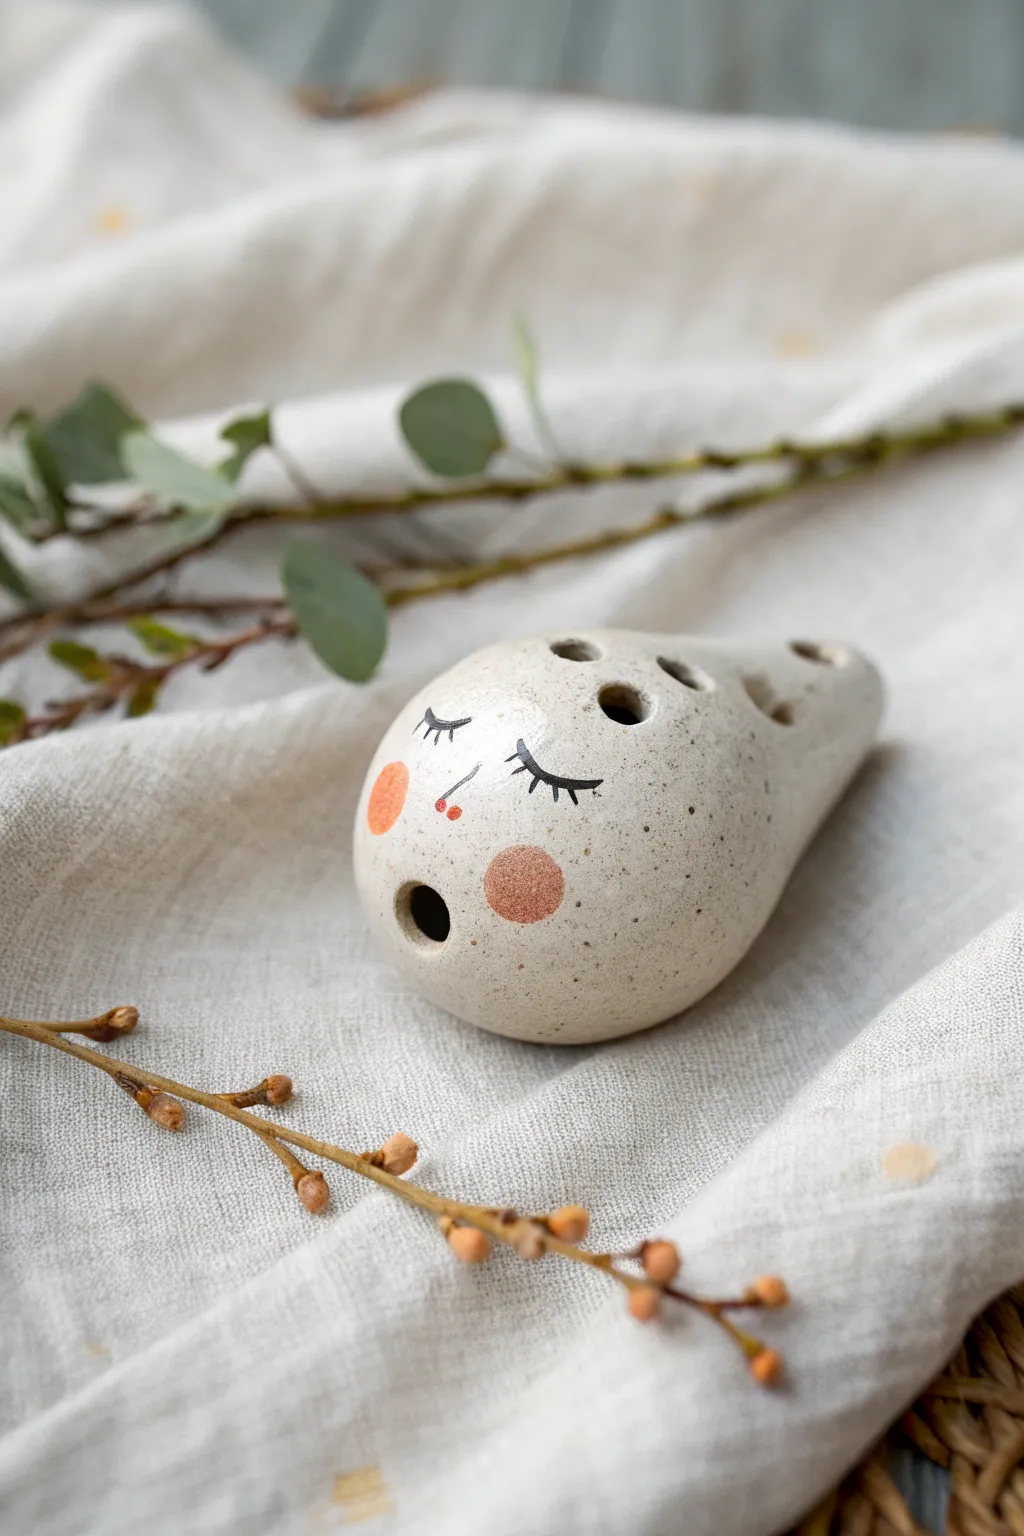
Sculpt a sweet, serene companion with this simple ceramic ocarina project, featuring a soothing speckled finish and a delicate, sleeping expression. This handheld clay whistle combines functional instrument making with charming character design.
Step-by-Step
Materials
- White speckled stoneware clay (or smooth white clay with grog)
- Wooden modeling tools
- Popsicle stick or flat sculpting tool (for the airway)
- Needle tool
- Small spherical object (like a marble) or pinching technique
- Sponge and water
- Black underglaze
- Pink or coral underglaze
- Fine detail paintbrush
- Clear glossy glaze (optional)
Step 1: Forming the Body
-
Prepare the Clay:
Start with a ball of clay about the size of a lemon or large egg. Wedge it thoroughly to remove air bubbles, which is crucial for a hollow instrument. -
Pinch Pot Method:
Create a pinch pot to form the main cavity. Gently press your thumb into the center of the ball and pinch the walls evenly as you rotate the clay, aiming for a thickness of about 1/4 inch. -
Close the Form:
Instead of leaving it as an open bowl, gently curve the walls inward until they meet, sealing the air inside to create a hollow enclosed sphere or egg shape. -
Shape the Drop:
Refine the shape into a tear-drop or pear form. One end should be more bulbous (the head/face area) and the other slightly tapered (the tail/mouthpiece area). -
Smooth the Surface:
Use a damp sponge or a flexible rib to smooth out any bumps or fingerprints. The surface should be as sleek as a river stone for the best visual result.
Clear Airway Trick
Keep the popsicle stick inside the airway while you carve the window and smooth the surrounding clay. This prevents the delicate air channel from collapsing.
Step 2: Creating the Whistle Mechanism
-
Form the Mouthpiece:
On the tapered end of your drop shape, flatten the tip slightly. This will become the area you blow into. -
Insert the Airway Stick:
Insert a flat tool, like a sharpened popsicle stick, into the tapered end to create the windway. Push it straight in parallel to the top surface. -
Cut the Window:
On the underside of the ocarina (what will be the back of the head), use your needle tool to cut a small square hole (the window) that meets the end of your airway stick. -
Create the Fipple:
This is the trickiest part: create a sharp angled edge (the labium) on the side of the window furthest from the mouthpiece. The air stream must split against this sharp edge to make sound. -
Test the Sound:
Before adding finger holes, gently blow into the mouthpiece. If it doesn’t whistle, adjust the angle of the sharp edge or clear debris from the airway.
Step 3: Adding Features & Details
-
Drill Finger Holes:
Using a hole cutter or the back of a drill bit, create the main sound holes. Place two prominent holes towards the top of the ‘forehead’ area, spaced evenly. -
Clean the Edges:
Carefully smooth the rims of these holes with a damp brush or finger so they are comfortable to touch and play. -
Create the Mouth Hole:
Carve a small, round hole near the bottom center of the face area. I like to make this deep and dark to serve as the character’s singing ‘mouth’. -
Dry to Leather Hard:
Let the piece dry slowly until it reaches the leather-hard stage. This makes the surface perfect for painting without smudging the clay texture.
Make it Wearable
Before drying, pierce a horizontal channel through the solid clay at the very top (back of the head) so you can thread a cord through and wear it as a pendant.
Step 4: Decoration & Glazing
-
Paint the Cheeks:
Using a soft round brush, apply circular dabs of pink or coral underglaze to create rosy cheeks on either side of the mouth hole. -
Paint the Nose:
Add a tiny dot of red or darker pink right between the eyes for a cute button nose. -
Detail the Eyes:
With a very fine liner brush and black underglaze, paint two curved lines for sleeping eyelids. Add three or four delicate lashes extending from the outer corners. -
Final Bisque Fire:
Fire the piece to bisque temperature according to your clay’s specifications. -
Glaze and Finish:
Apply a clear glossy glaze over the entire piece to make it shine and protect the paint, or leave the clay raw if it’s high-vitrification stoneware. Fire a final time.
Once fired, you will have a beautiful little instrument that looks as peaceful as the melody it plays


One-Eyed Monster Whistle With Bumpy Texture
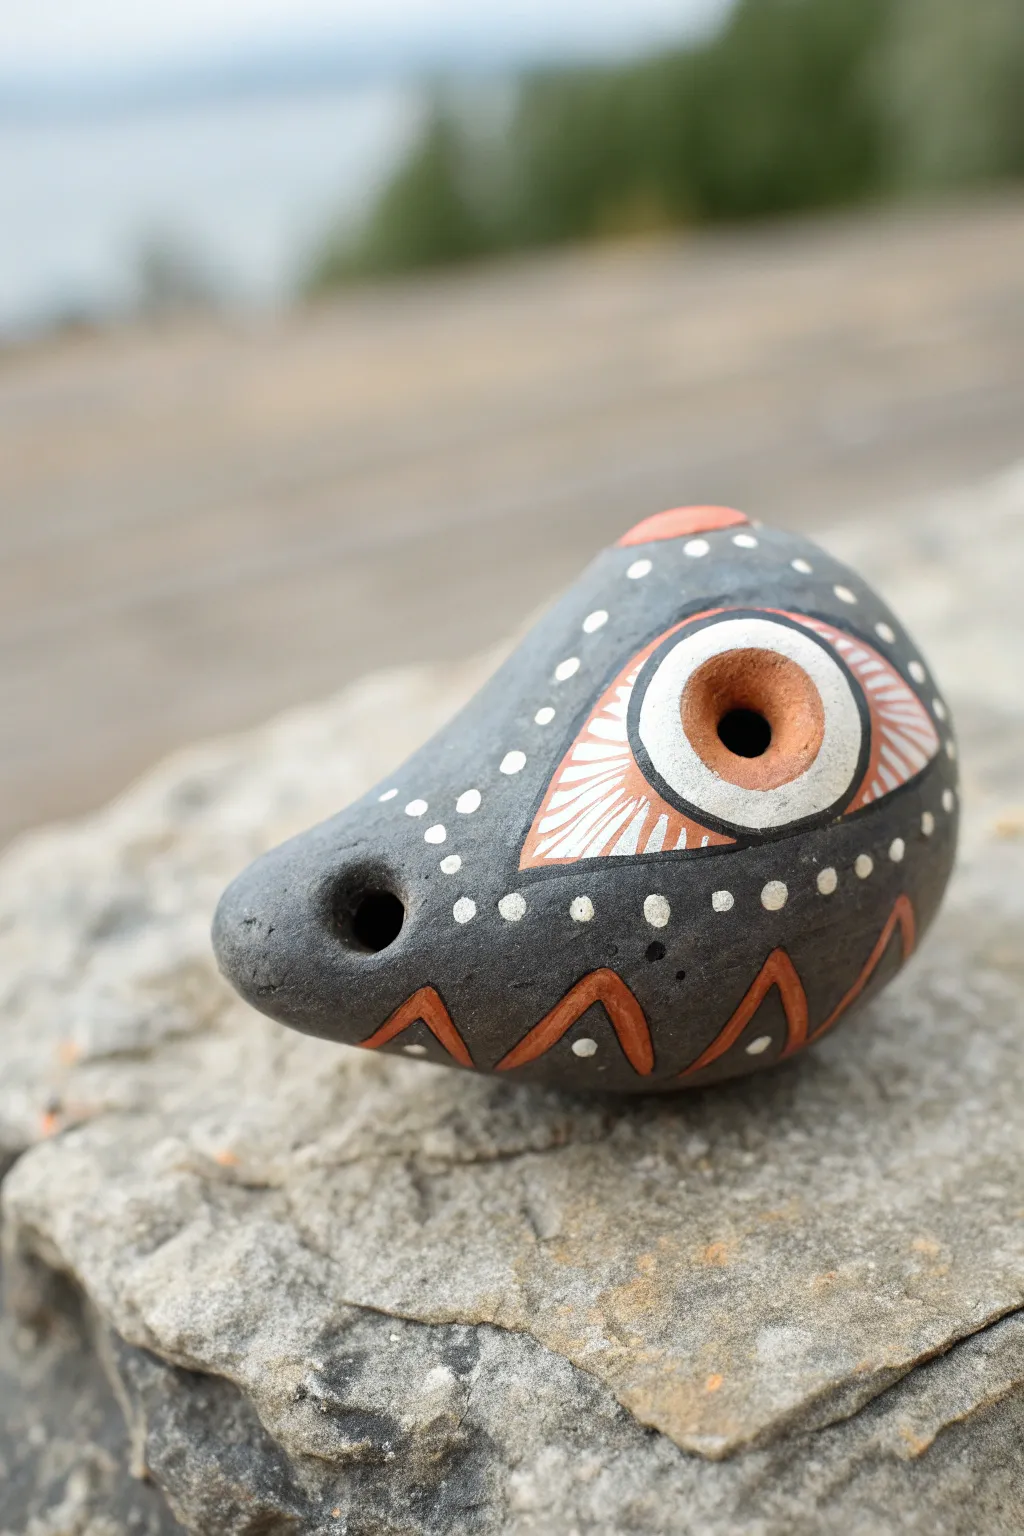
This striking one-eyed monster whistle combines a smooth, dark stone-like finish with bold tribal patterns. Its handheld, teardrop shape features a prominent central eye that doubles as a sound hole, creating a functional piece of art that looks ancient and mysterious.
Step-by-Step Guide
Materials
- Polymer clay or air-dry clay (grey or black)
- Clay carving tools (needle tool, small loop tool)
- Popsicle stick or flat modeling tool
- Acrylic paints (terracotta/orange, white, black)
- Fine detail paintbrushes
- Matte varnish or sealant
- Sandpaper (fine grit)
- Water container (for smoothing)
Step 1: Shaping the Clay Body
-
Form the base:
Start with a ball of clay about the size of a plum. Roll it in your palms until smooth, then gently taper one side to create a teardrop shape. This tapered end will become the mouthpiece. -
Hollow the form:
If working with a solid lump, slice it in half lengthwise. Carefully hollow out both sides with a loop tool, leaving a wall thickness of about 1/4 inch. Making the walls consistent is key for good sound. -
Rejoin the halves:
Score the edges of both hollow halves and apply a little water (slip) or liquid clay. Press them back together firmly and smooth the seam completely so the join is invisible. -
Create the mouthpiece:
On the tapered end, gently flatten the very tip. Insert a popsicle stick or flat tool straight into the end to create the air channel. This channel should aim towards the main chamber. -
Cut the fipple window:
On the underside (or top, depending on preference) of the tapered end, cut a small rectangular or oval hole called the fipple slightly further down from the mouthpiece opening. The angled edge of this hole splits the air to make the sound. -
Test the sound:
Before adding decorative features, blow gently into the mouthpiece. Adjust the angle of the fipple edge (the sharp ramp) until you get a clear whistle tone.
Clear The Airway
Keep a needle tool handy while sculpting. As you manipulate the clay, the air channel can accidentally close up, so re-insert your tool often to keep it clear.
Step 2: Sculpting the Eye and Texture
-
Add the main eye:
Roll a small snake of clay and form a ring on the widest part of the body. Blend the outer edges of the ring into the main body, leaving the inner circle distinct and raised. -
Create the pupil:
Use a round tool or the back of a paintbrush to press a deep indentation into the center of your eye ring. This adds depth but don’t punch all the way through into the air chamber unless intended for tuning. -
Refine the surface:
Smooth the entire surface with a damp sponge or finger. The reference image has a very smooth, stone-like finish, so take time to remove fingerprints. -
Dry or bake:
Follow the manufacturer’s instructions for your specific clay. Ensure it is bone dry or fully baked and cooled before painting.
Step 3: Painting and Finishing
-
Base coat:
Paint the entire whistle with a matte dark charcoal or black acrylic paint. You might need two coats for full opacity. -
Paint the eye iris:
Once the black is dry, paint the raised ring of the eye with a terracotta or rusty orange color. Let it dry completely. -
Outline the eye:
Paint a thick white almond shape around the terracotta ring to create the sclera (the white of the eye). Add a thin black line around the terracotta ring to separate it. -
Add eye details:
Using a very fine brush, paint delicate white radiating lines inside the white almond shape, extending from the orange iris outward. -
Create the tribal triangles:
Along the bottom curve of the whistle, paint a sawtooth pattern of triangles using the orange paint. Ensure the points face upward. -
Outline the triangles:
Outline these orange triangles with a thin black line to sharpen the edges, then add white accents if desired. -
Dot mapping:
I like to plan my spacing first with barely visible pencil marks. Using a dotting tool or the back of a small paintbrush, add rows of white dots along the spine of the creature and around the eye shape. -
Varnish:
Finish with a matte varnish to protect the paint without making it too shiny, preserving the stone look.
Make It A Pendant
Before drying, pierce a horizontal hole through the top ridge of the whistle. Thread a leather cord through the finished piece to wear your monster.
Now you have a unique, pocket-sized creature that can sing its own tune


Flower Bud Whistle With Petal Carving
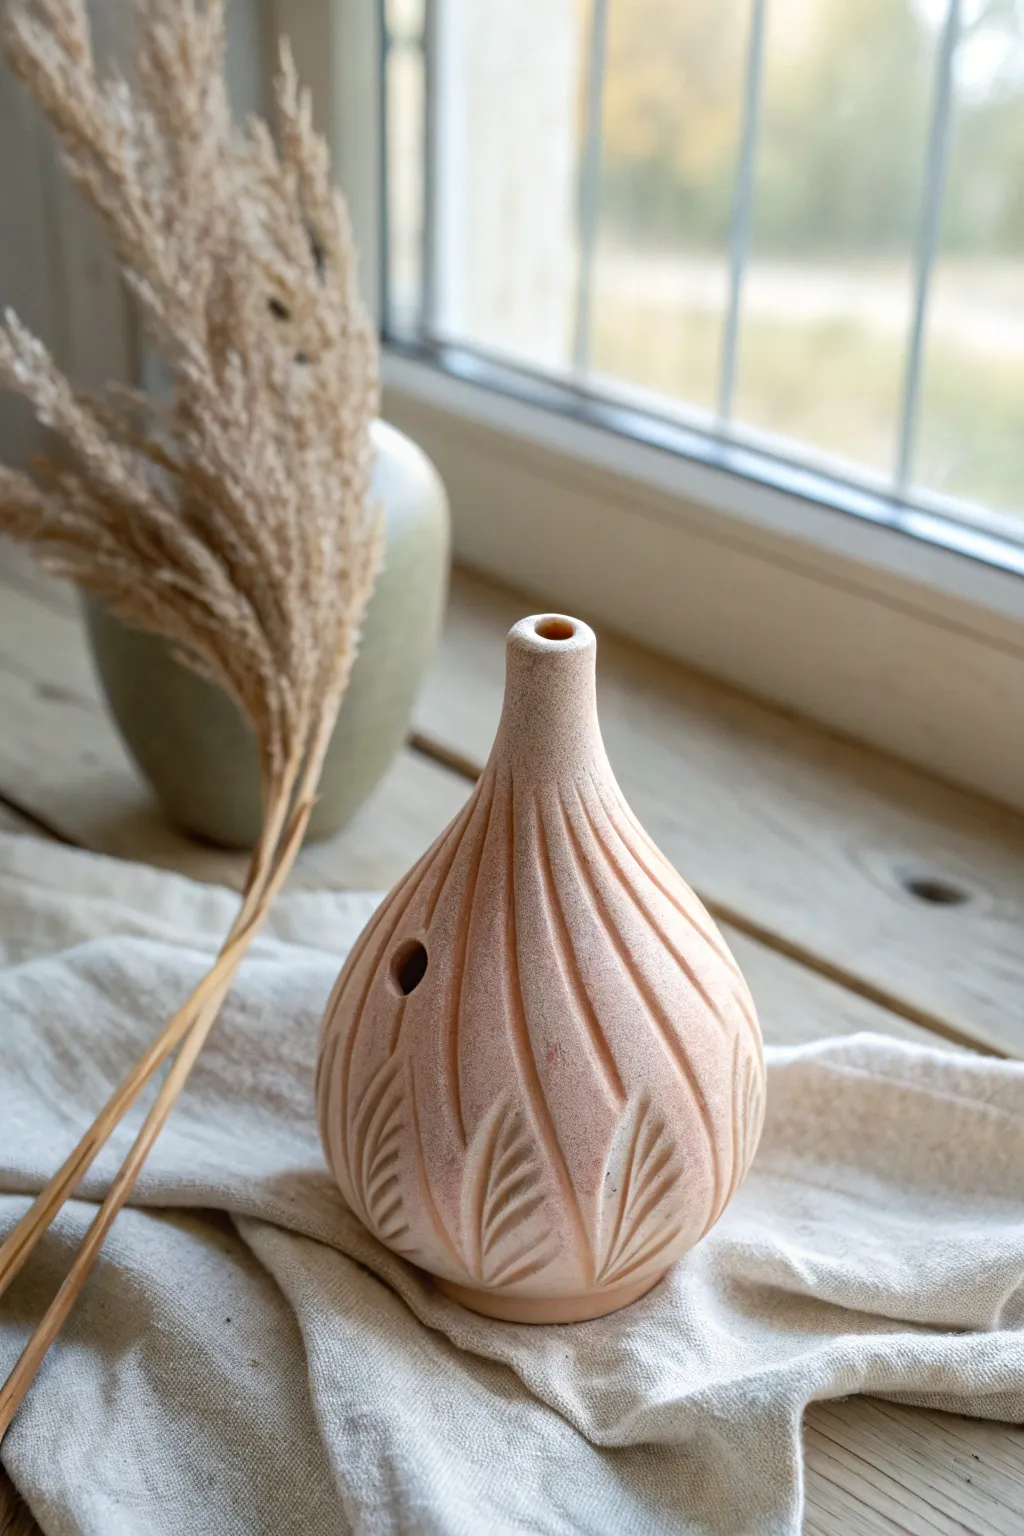
This elegant clay whistle takes the graceful form of an unopened flower bud, featuring deep vertical carvings that mimic overlapping petals. Its bulbous base and slender neck create a sophisticated silhouette that doubles as both an instrument and a sculptural object.
How-To Guide
Materials
- Stoneware or earthenware clay (plastic consistency)
- Popsicle stick or flat modeling tool (for the airway)
- Needle tool
- Loop tool or wire carving tool
- Smooth wooden rib
- Small paintbrush
- Sponge
- Water
- Optional: Speckled matte glaze or underglaze
Step 1: Forming the Base Body
-
Prepare the Clay:
Begin with a lump of smooth, well-wedged clay about the size of a tennis ball. Roll it firmly in your hands to create a uniform sphere free of air bubbles or cracks. -
Create the Pinch Pot:
Insert your thumb into the center of the sphere and gently pinch the walls while rotating the clay. Aim for an even wall thickness of about 1/4 inch throughout the pot. -
Close the Form:
Instead of leaving the pot open like a bowl, gently collar the rim inwards. Gradually pinch the opening closed until you have a trapped hollow sphere of air. -
Shape the Bud:
Roll the hollow sphere gently on your work surface to elongate it slightly into a teardrop or bulb shape. Smooth the surface with a flexible rib to remove any finger marks. -
Form the Neck:
Gently pull and pinch the top of the tapered end to create a distinct, narrow neck for the mouthpiece. Keep the airway inside hollow as you extend it.
Step 2: Constructing the Whistle Mechanism
-
Make the Mouthpiece Slot:
Insert a flat tool (like a sharpened popsicle stick) into the tip of the neck to create a rectangular airway channel. This channel should go straight into the neck but stop before hitting the main chamber. -
Cut the Sound Hole:
On the underside of the neck (where the curve begins to swell into the body), use a needle tool or small knife to cut a square window. The edge of this window closest to the mouthpiece is the “blade.” -
Create the Splitting Edge:
Carefully angle the blade edge of your window so it is sharp and splits the air stream. The air coming from the mouthpiece channel needs to hit this sharp edge directly to create sound. -
Test the Sound:
Blow gently through the mouthpiece. If you hear a clear whistle, the angle is correct. If it sounds like rushing wind, adjust the sharpness and angle of the splitting edge until the tone is crisp.
Clean Sounds Only
Keep the ‘splitting edge’ (the sharp ramp inside the sound hole) extremely clean. Even a tiny burr of clay here can kill the sound completely.
Step 3: Carving the Petal Details
-
Plan the Design:
Using a needle tool, lightly sketch vertical curved lines running from the neck down to the base to indicate where the petal separations will be. -
Carve Main Grooves:
I like to use a small loop tool to carve out the deep channels along your sketched lines. These should curve elegantly around the form, giving the impression of distinct segments. -
Add Leaf Details:
At the base of the bud, carve smaller, inverted V-shapes inside the main petal forms. These represent the leafy sepals or texture at the bottom of the flower. -
Refine the Edges:
Use a damp sponge or your fingertip to soften the sharp ridges left by the carving tool. The transition between the carved groove and the smooth surface should feel organic. -
Create Texture:
If desired, tap a stiff-bristled brush against the surface to create a subtle, speckled texture that mimics natural plant matter.
No Sound?
If it doesn’t whistle, re-insert your stick tool into the airway. It should point EXACTLY at the sharp edge of the window. Adjust the angle up or down slightly.
Step 4: Finishing Touches
-
Clear Airway:
Double-check that your carving process hasn’t pushed any clay crumbs into the airway or sound hole. Clear them carefully with a needle tool. -
Dry Slowly:
Cover the whistle loosely with plastic and let it dry slowly to the leather-hard stage, then uncover to bone dry to prevent cracking. -
Fire and Glaze:
Bisque fire the piece. For the finish shown in the image, apply a thin coat of matte pink or coral glaze that breaks over texture, allowing the clay body to show through the carved lines.
Once fired, this ceramic bud will be a beautiful conversation piece that sits gracefully on any shelf until someone discovers its musical secret


Fruit Whistle Ideas: Lemon, Strawberry, or Pear
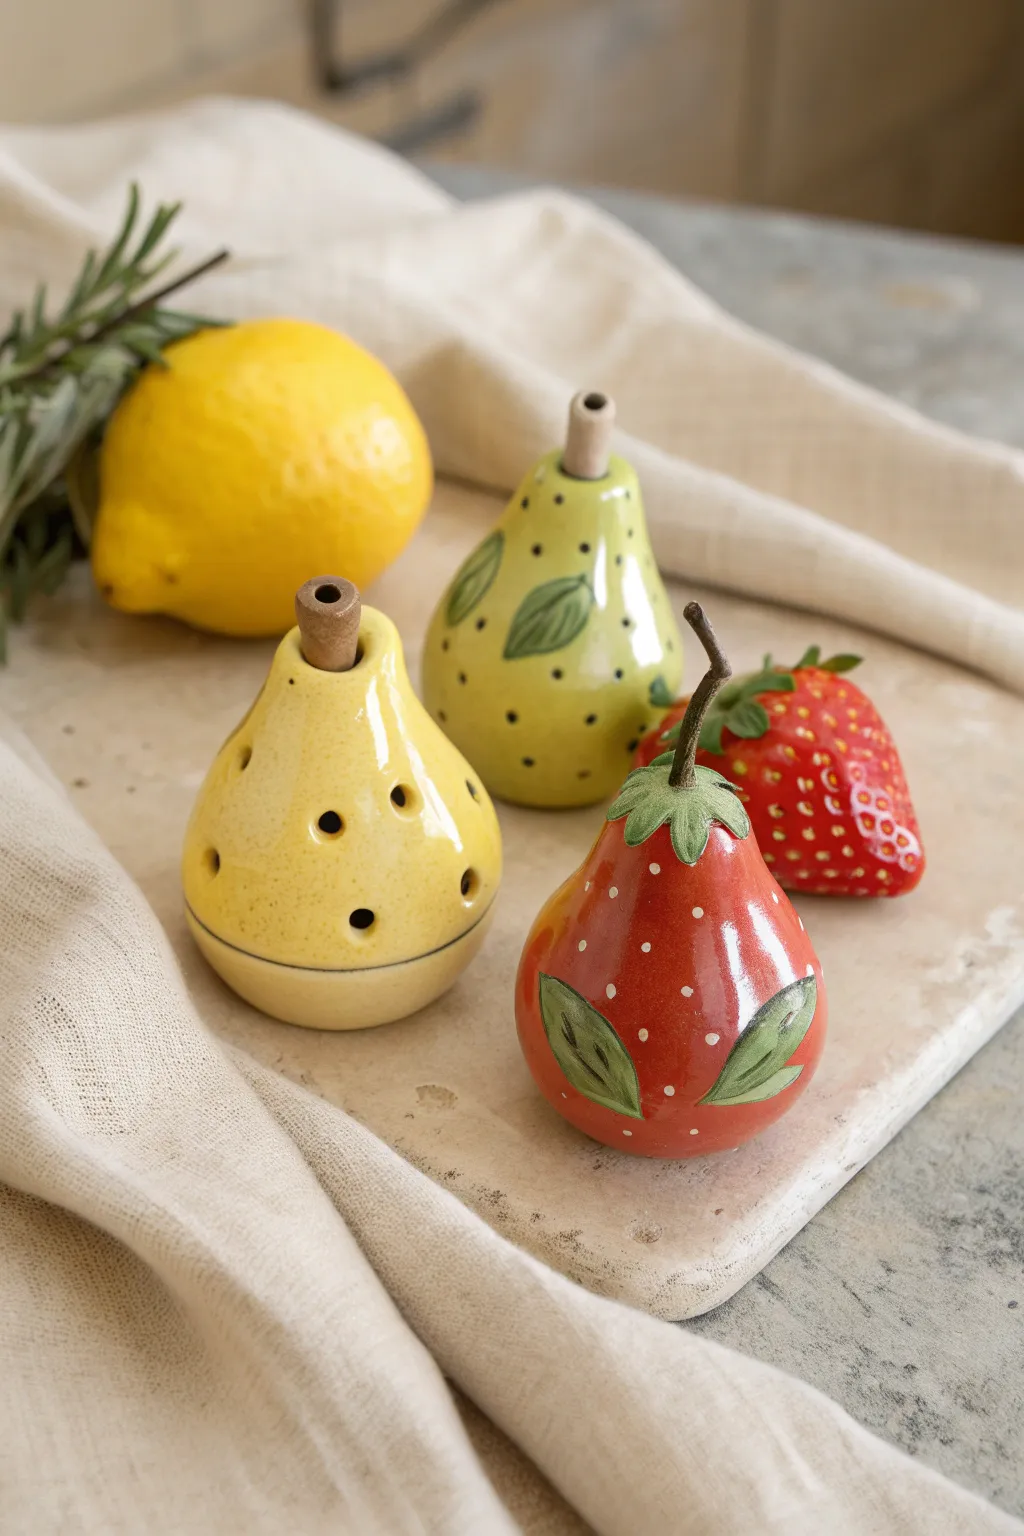
Transform humble clay into a charming orchard trio with these delightful fruit-shaped whistles. Featuring a sunny lemon drop, a speckled green pear, and a vibrant strawberry, each piece combines whimsical folk art aesthetics with a functional musical surprise.
Step-by-Step Guide
Materials
- Fireable clay (earthenware or stoneware)
- Small rolling pin
- Wooden popsicle sticks or craft sticks (for the airway)
- Fettling knife or needle tool
- Slip (clay mixed with water)
- Underglazes (lemon yellow, lime green, strawberry red, leaf green, brown, black)
- Clear transparent glaze
- Small paintbrushes (detail and shader)
- Sponge
- Water bowl
- Wait-free kiln access
Step 1: Forming the Fruit Base
-
Create a pinch pot:
Start with a ball of clay about the size of a tangerine. Insert your thumb into the center and pinch the walls evenly while rotating the ball to create a hollow sphere. -
Close the form:
Gently collar the opening of your pinch pot until it closes completely. Trapping the air inside helps maintain the shape while you work. Roll it gently on your work surface to smooth out any seams. -
Shape the specific fruit:
For the lemon, gently taper the top into a rounded point. For the pear, elongate the top neck and widen the bottom. For the strawberry, create a wider shoulder that tapers down to a soft point at the base. -
Flatten the base:
Tap the bottom of your fruit form on the table to create a flat, stable surface so the whistle stands upright.
Silent Whistle?
If no sound comes out, the splitting edge (bevel) is likely not sharp enough or misaligned. Re-insert the stick and ensure the air hits exactly on the sharp edge of the hole.
Step 2: Creating the Whistle Mechanism
-
Mock up the mouthpiece:
Add a small rectangular block of clay to the side or top of the fruit (depending on your design preference), but for these vertical designs, we will build the mouthpiece directly into the fruit’s stem or upper body wall. -
Create the airway:
Insert a flat popsicle stick horizontally into the clay wall to create the windway. Then, measure about an inch down from the entrance and cut a small 45-degree angle bevel (the fipple) towards the stick. -
Clear the chamber:
Remove the wedge of clay from the bevel cut. Carefully pull the stick out slightly and blow gently to test the sound. Adjust the angle of the splitting edge until you get a clear whistle tone. -
Refine the mouthpiece:
For the lemon and pear, shape the mouthpiece to look like a thick fruit stem. Use a damp sponge to smooth the connection point so it looks seamless.
Step 3: Adding Decorative Details
-
Sculpt the strawberry cap:
For the strawberry whistle, roll a small coil and flatten distinct leaf shapes. Score and slip these onto the top of the berry form, radiating outward from the stem/mouthpiece. -
Smooth the surfaces:
Before painting, use a barely damp sponge to wipe down the entire piece, removing fingerprints or rough textures. This ensures a clean canvas for your folk art painting. -
Let it dry leather-hard:
Allow the clay to stiffen to leather-hard. This is the perfect stage for carving or drilling sound holes if you want to turn the whistle into an ocarina. -
Drill tuning holes (optional):
If creating the multi-hole lemon ocarina shown, use a drill bit or hole cutter to create four small holes on the front body and two on the back. Tune them by varying the hole sizes if you feel adventurous.
Level Up: Texture Play
Before the clay hardens, gently press a real lemon peel or a textured fabric against the clay surface to give the fruit realistic skin texture before painting.
Step 4: Painting and Glazing
-
Base coat application:
Apply three coats of underglaze to each fruit: bright yellow for the lemon, lime green for the pear, and red for the strawberry. Let each coat dry to the touch before adding the next. -
Paint the leaves:
Use a darker leaf green underglaze to paint simple, stylized almond-shaped leaves on the sides of the fruit. Outline them in thin black or brown underglaze for that illustrated look. -
Add texture details:
I like to use the back of a paintbrush to dot the strawberry with white ‘seeds’ and the pear with small black speckles. This adds that crucial depth and character. -
Leave the mouthpiece bare:
Leave the very tip of the stem (mouthpiece) unglazed or apply a wax resist to it, as glaze can clog the airway during firing. -
Bisque fire:
Fire the pieces to cone 04 (or your clay’s specific bisque temperature). This sets the shape and underglaze. -
Clear glaze and final fire:
Dip or brush a clear transparent glaze over the entire piece. Fire again to cone 05/06 to achieve that glossy, finished ceramic shine.
Now you have a trio of musical fruits ready to brighten up any kitchen shelf or play a cheerful tune