
I love how an easy clay whistle starts as a simple hollow pinch pot and suddenly turns into something you can actually play. These beginner-friendly ideas keep the shape simple and the mouthpiece/sound hole easy to understand, so you can spend more time decorating and less time stressing.
Classic Pinch-Pot Bird Whistle

This charming ceramic whistle combines the simplicity of a pinch pot with the elegance of a glossy, speckled green glaze. Its rounded belly and smooth, flowing lines make it a delight to hold, while the hidden air chamber produces a clear, bright sound.
How-To Guide
Materials
- Earthenware or stoneware clay (wedge well)
- Popsicle stick or fettling knife
- Wooden modeling tool
- Small sponge
- Slip (clay mixed with water)
- Scoring tool (or needle tool)
- Speckled Celadon or glossy green glaze
- Soft fan brush
Step 1: Forming the Body
-
Create the pinch pot:
Start with a ball of clay about the size of a plum. Push your thumb into the center and gently pinch the walls while rotating the ball until you have an even, cup-like shape. -
Close the form:
Gently curve the rim of your pot inward, bringing the edges together to close the hollow sphere completely. Smooth over the join so no seam is visible, trapping the air inside. -
Shape the bird:
Hold the hollow sphere and gently coax it into a pear shape. Pull one end slightly to form the tail, and gently squeeze the other end upwards to suggest the head and neck. -
Refine the silhouette:
Smooth the surface with a slightly damp sponge or your fingers, ensuring a rounded, organic belly similar to the reference photo.
Clear Sound Tip
The sharp edge (labium) must remain sharp! Avoid rounding it off when smoothing the clay, or the whistle will sound breathy.
Step 2: Constructing the Whistle Mechanism
-
Create the mouthpiece:
Flatten the tail end slightly into a rectangle. Insert a flat popsicle stick horizontally into the end of the tail to create the windway. -
Cut the window:
On the underside of the tail (or the top, depending on your preference, though the reference shows a side approach), cut a small square hole ‘window’ just past where the stick ends inside the clay. -
Create the bevel:
This is crucial: Using your knife, angle the edge of the window closest to the body downward at a sharp 45-degree angle. This sharp edge splits the air to create sound. -
Align the airway:
Reinsert the stick through the mouthpiece. Look through the window; the stick should aim directly at the sharp bevel edge you just cut. Adjust carefully until you get a clear whistle sound when blowing gently.
Step 3: Adding Details
-
Sculpt the head:
Pinch the front of the form to define a small, pointed beak. Use your fingers to smooth the transition from the neck to the head. -
Carve the wings:
Taking a loop tool or wooden modeling tool, carve a curved line along the side of the body to suggest a folded wing. Deepen the line slightly to catch the glaze later. -
Add the eye:
Press a small hollow tube or the end of a paintbrush into the head area to create a circular impression for the eye. Add a tiny dot of black underglaze or slip in the center if desired. -
Add finger holes (Optional):
The image shows a hole on the side/back. If you want it to be an ocarina, carefully drill a small hole on the side into the hollow chamber, ensuring no clay debris falls inside. -
Final smoothing:
Run a damp sponge over the entire piece to remove fingerprints and burrs, especially around the mouthpiece.
No Sound?
If it doesn’t whistle, the air isn’t hitting the bevel. Adjust the angle of the mouthpiece stick slightly up or down until it hits the edge.
Step 4: Glazing & Firing
-
Bisque fire:
Allow the bird to dry slowly and completely before bisque firing it to cone 04 (or your clay’s specification). -
Apply glaze:
Brush on 2-3 coats of a speckled green celadon glaze. I find that flowing glazes like this look best when they pool slightly in the carved wing lines. -
Clear the airway:
Before the glaze dries, double-check the airway and window. Use a needle tool to remove any glaze that might clog the whistle mechanism. -
Glaze fire:
Fire the piece to the temperature recommended for your specific glaze (typically Cone 5 or 6 for stoneware).
Once cooled, you’ll have a beautiful little songbird ready to sit on your shelf or play a tune


Chubby Owl Whistle With Big Eyes
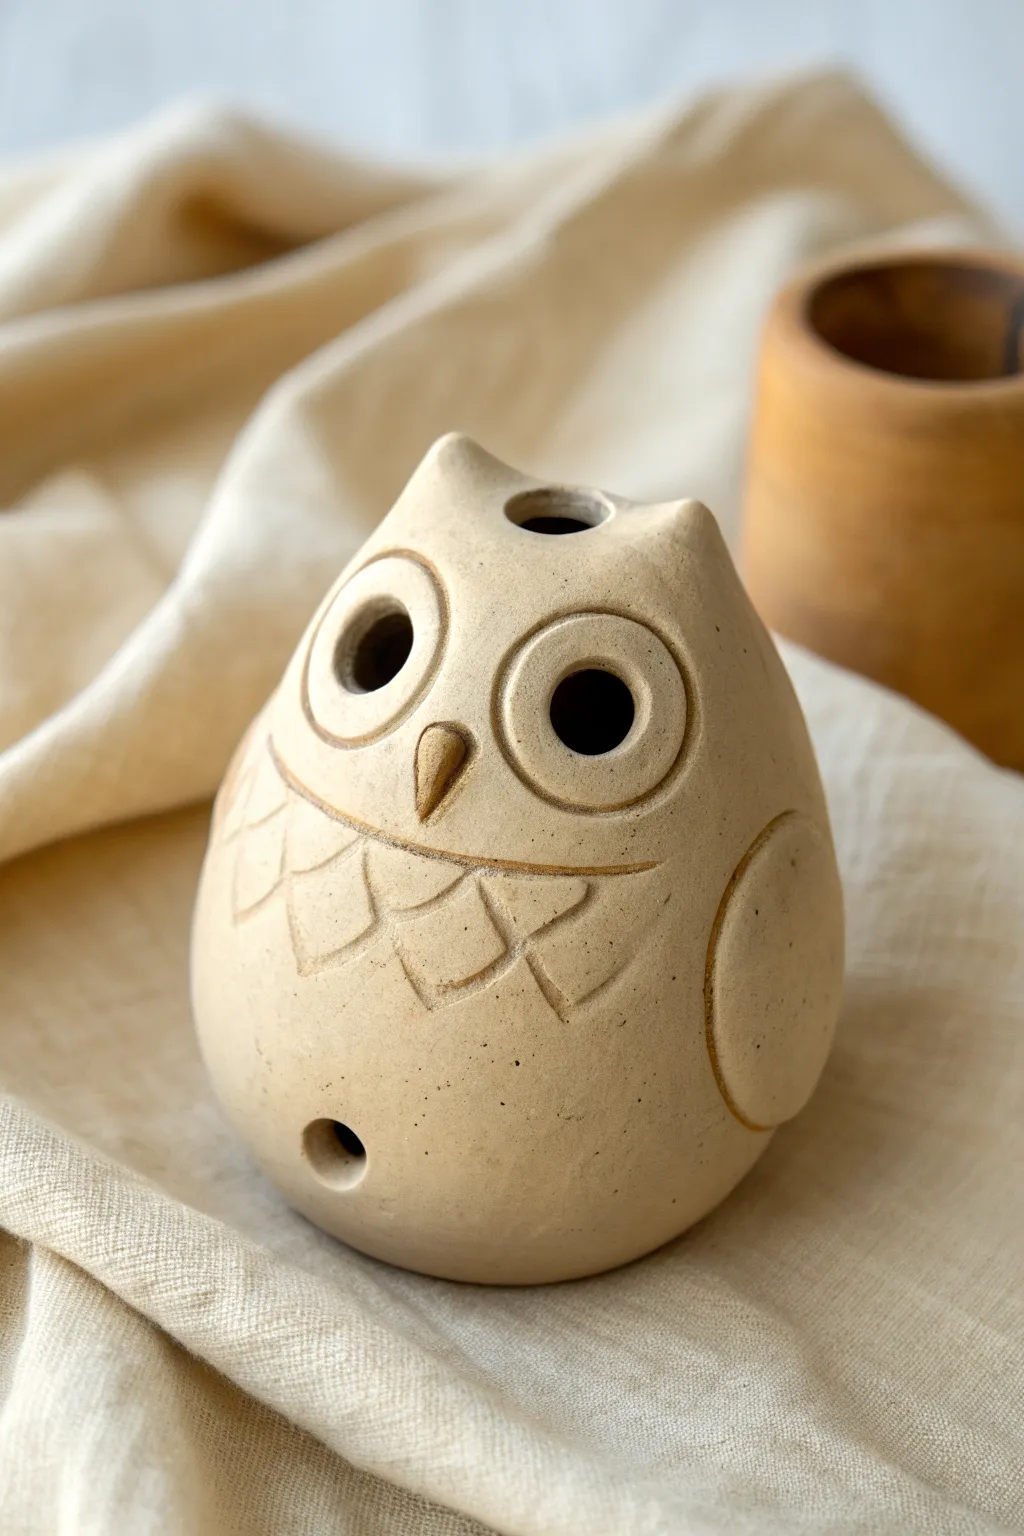
This adorable, rotund owl whistle features wide, curious eyes and a textured belly that adds charm to its musical capabilities. Crafted from simple stoneware clay, its minimalist, unglazed finish highlights the natural earthy tones and precise carving details.
Detailed Instructions
Materials
- Stoneware or earthenware clay (grog-free works best for smooth burnishing)
- Popsicle stick or wooden modeling tool
- Pin tool or needle tool
- Loop tool for hollowing (optional)
- Small sponge
- Bowl of water
- Drinking straw or piercing tool
Step 1: Forming the Body
-
Create pinch pots:
Start by rolling two balls of clay, one slightly larger than the other. Press your thumb into the center of each to create two pinch pots of equal wall thickness. -
Join the sphere:
Score the rims of both pinch pots and add a dab of slip/water. Press the openings together to form a hollow sphere, trapping air inside. -
Seal and smooth:
Drag clay across the seam with your thumb to seal the two halves. Paddle the ball gently against your work surface to shape the bottom so it sits flat, then smooth the sphere into an egg-like shape.
Clear the Airway
If the whistle stops working while you sculpt, re-insert your stick or tool into the air passage to clear out any clay crumbs that may have gotten pushed inside.
Step 2: Creating the Whistle Mechanism
-
Form the mouthpiece:
Mold a small rectangular block of clay and attach it to what will be the back of the owl (or use the curved back itself). I find it easier to add a dedicated block for the mouthpiece to ensure a clean airway. -
Insert the airway:
Insert a popsicle stick horizontally into the mouthpiece to create the windway. Push it in until it just barely breaches the hollow interior. -
Cut the bevel:
On the owl’s body, just below where the mouthpiece stick enters, cut a 45-degree angle notch (the bevel) using a sharp knife. This sharp edge is what splits the air to create sound. -
Align the airway:
Carefully adjust the stick so the air stream hits the sharp edge of the bevel exactly. Blow gently to test the sound before proceeding.
Dual-Tone Feathers
Before firing, brush a darker iron oxide slip into the carved feather lines and wipe away the excess with a sponge to make the texture pop.
Step 3: Sculpting the Features
-
Define the ears:
Pinch the top two corners of your egg shape upward to create small, pointed ear tufts. Keep the top center slightly depressed. -
Add the eye discs:
Roll two small balls of clay and flatten them into discs. Score and slip the area on the face, then press these discs firmly onto the upper half of the body. -
Carve the eyes:
Use a large straw or a loop tool to press concentric circles into the eye discs. Use a smaller tool to press deep hollows for the pupils. -
Attach the beak:
Form a tiny cone of clay for the beak. Attach it right between the two eyes, pointing downward, ensuring it is securely adhered. -
Detail the feathers:
Using a needle tool, lightly draw a curved line horizontally below the face. Under this line, carve overlapping ‘U’ shapes to create the look of breast feathers. -
Add wing details:
Roll thin coils or cut semi-circles from a clay slab. Attach these to the sides of the body to suggest folded wings, blending the edges smoothly.
Step 4: Finishing Touches
-
Create the top vent:
Use a straw to punch a clean hole in the very top of the head, between the ears. This can alter the pitch or act as a fingering hole. -
Create the finger hole:
Punch a second hole near the bottom front of the owl. In a larger ocarina, this would change the note when covered. -
Smooth the surface:
Wait until the clay is leather hard. Use a slightly damp sponge or your finger to burnish the surface, removing any fingerprints or rough crumbs. -
Final drying:
Let the owl dry slowly away from drafts to prevent cracking. Once bone dry, fire it in a kiln according to your clay’s specifications.
Give your little owl a gentle blow to test its voice before sending it off to the kiln


Simple Fish Whistle With Stamped Scales
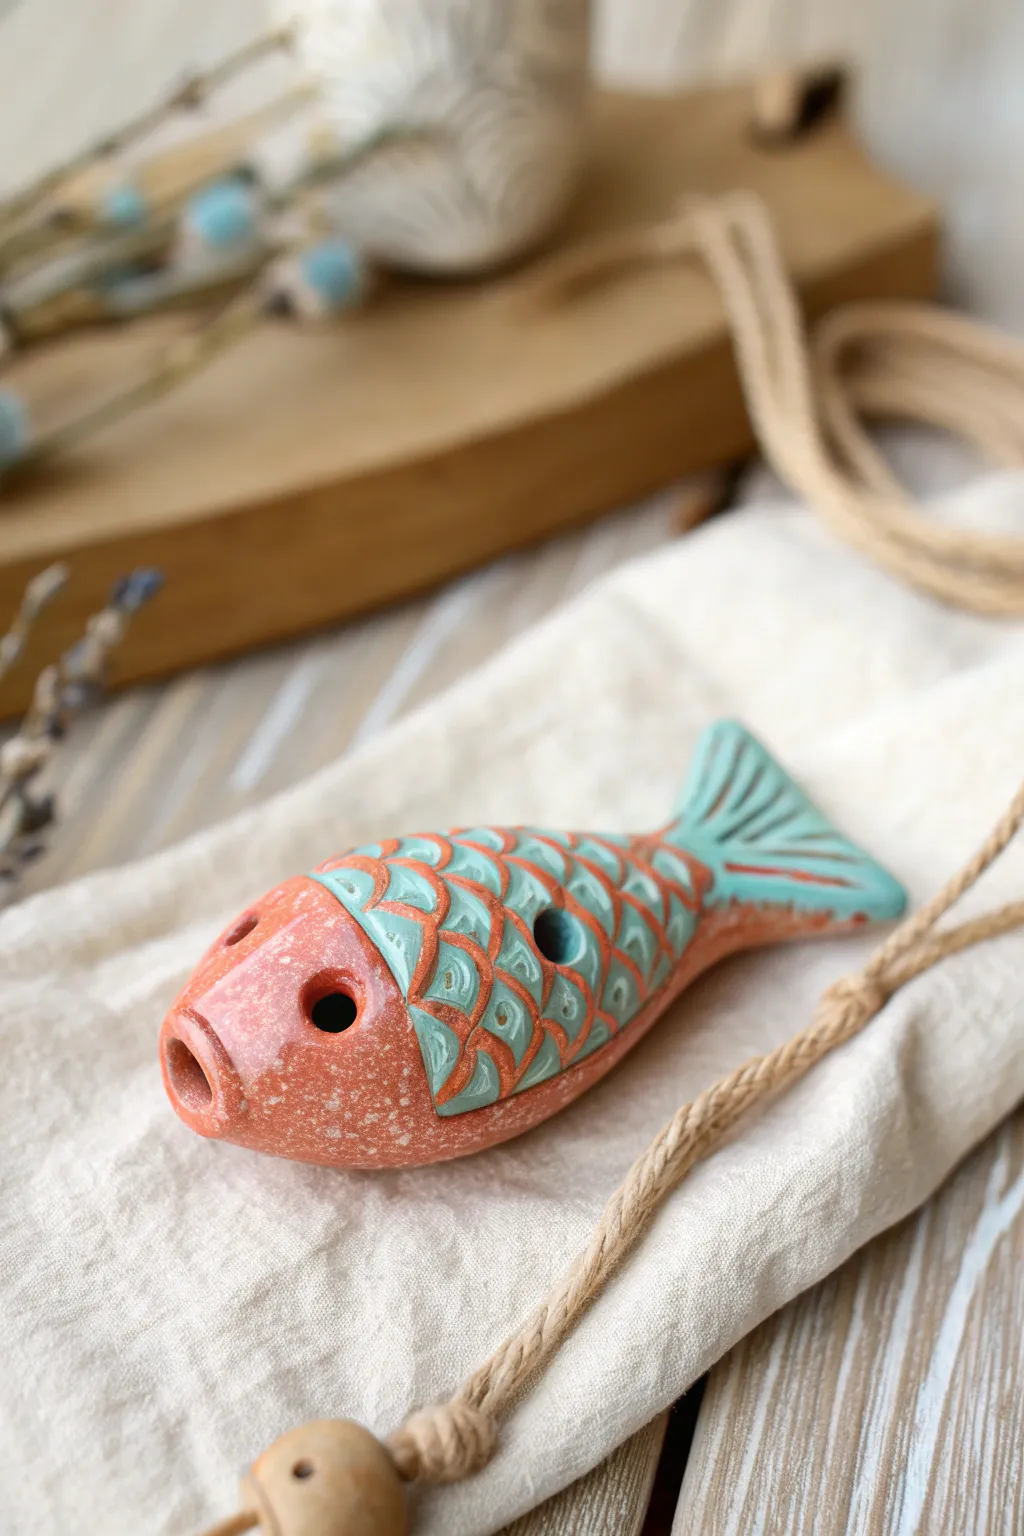
This charming fish whistle features a warm terracotta body contrasted with vibrant turquoise scales, creating a delightful folk-art aesthetic. The design relies on simple pinch pot construction and stamping techniques to create a functional musical instrument that looks as good as it sounds.
Step-by-Step Tutorial
Materials
- Red earthenware or terracotta clay
- Underglaze (Turquoise/Teal)
- Clear glaze (optional, for shine)
- Wooden modeling tools
- Popsicle stick or fettling knife
- Small semi-circle loop tool or U-shaped stamp
- Skewer or needle tool
- Sponge breakdown
- Water slip
- Kiln accessibility
Step 1: Forming the Body
-
Prepare the Clay:
Start with a ball of well-wedged terracotta clay about the size of a lemon. Ensure there are no air bubbles, as these can be problematic during firing. -
Create a Pinch Pot:
Press your thumb into the center of the ball and gently pinch the walls while rotating the clay. Aim for an even thickness of about 1/4 inch all around. -
Close the Shape:
Instead of leaving it as a bowl, gently collar the rim inwards until the clay meets, closing the sphere completely. Smooth the seam thoroughly so trapped air is sealed inside. -
Shape the Fish:
Roll the closed sphere between your palms to elongate it into a torpedo or oval shape. Taper one end slightly more to form the tail section.
Clean Sound Tip
Make the splitting edge (the ramp inside the window) as sharp as a knife blade. A dull edge creates a windy, whispery sound rather than a crisp whistle.
Step 2: Creating the Whistle Mechanism
-
Form the Mouthpiece:
At the wider end (the head), flatten a small area slightly. Use a rectangular wooden stick or popsicle stick to press a blowing channel into the clay. -
Cut the Window:
About an inch back from the mouthpiece, use a sharp fettling knife to cut a small, rectangular hole (the window) intersecting with your air channel. The blade should meet the air channel at a sharp 45-degree angle (the splitting edge). -
Clear the Airway:
Carefully re-insert your stick into the mouthpiece to ensure the airway is clear and directs air exactly onto the sharp splitting edge of the window. -
Test the Sound:
Give a gentle blow to test the whistle. Adjust the angle of the splitting edge or the airway until you get a clear, sharp tone. I find small adjustments here make the biggest difference.
Lost Your Sound?
If the whistle stops working after adding scales, you might have deformed the body. Re-insert your shaping stick into the airway to gently push the shape back open.
Step 3: Sculpting and Detailing
-
Add the Tail:
Pinch the tapered rear end flat to create a fin. Use a modeling tool to press lines into the flattened clay to simulate fin rays. -
Define the Head:
Use a needle tool or modeling stick to lightly scribe a curved line separating the head from the body. -
Create the Scales:
Using a small U-shaped loop tool or a homemade U-stamp, press into the clay body behind the head. Creating rows of these semi-circles gives the impression of overlapping scales. -
Add Eyes and Details:
Poke two deep holes near the front for eyes using a round tool. You can also add tuning holes along the side of the body if you want to change the pitch, though the image shows just the main window. -
Dry and Bisque Fire:
Allow the fish to dry slowly under plastic to prevent cracking. Once bone dry, bisque fire the whistle in a kiln according to your clay’s specifications.
Step 4: Glazing and Finishing
-
Apply Underglaze:
Paint a turquoise or teal underglaze heavily over the scale section and the tail. -
Wipe Back Technique:
Once the underglaze is semi-dry, use a damp sponge to wipe the surface. The color will remain in the recessed stamped scales and grooves, while the raised clay reveals the terracotta color. -
Detail the Head:
You can leave the head unglazed raw clay for texture, or add a light wash of diluted white or orange underglaze for a speckled effect as seen in the photo. -
Final Fire:
Apply a clear glaze if a glossy finish is desired, or leave it matte. Fire the piece a second time to the glaze temperature appropriate for your materials.
String a leather cord through the tail or a dedicated loop to wear your musical creation


Round Frog Whistle With Wide Mouth
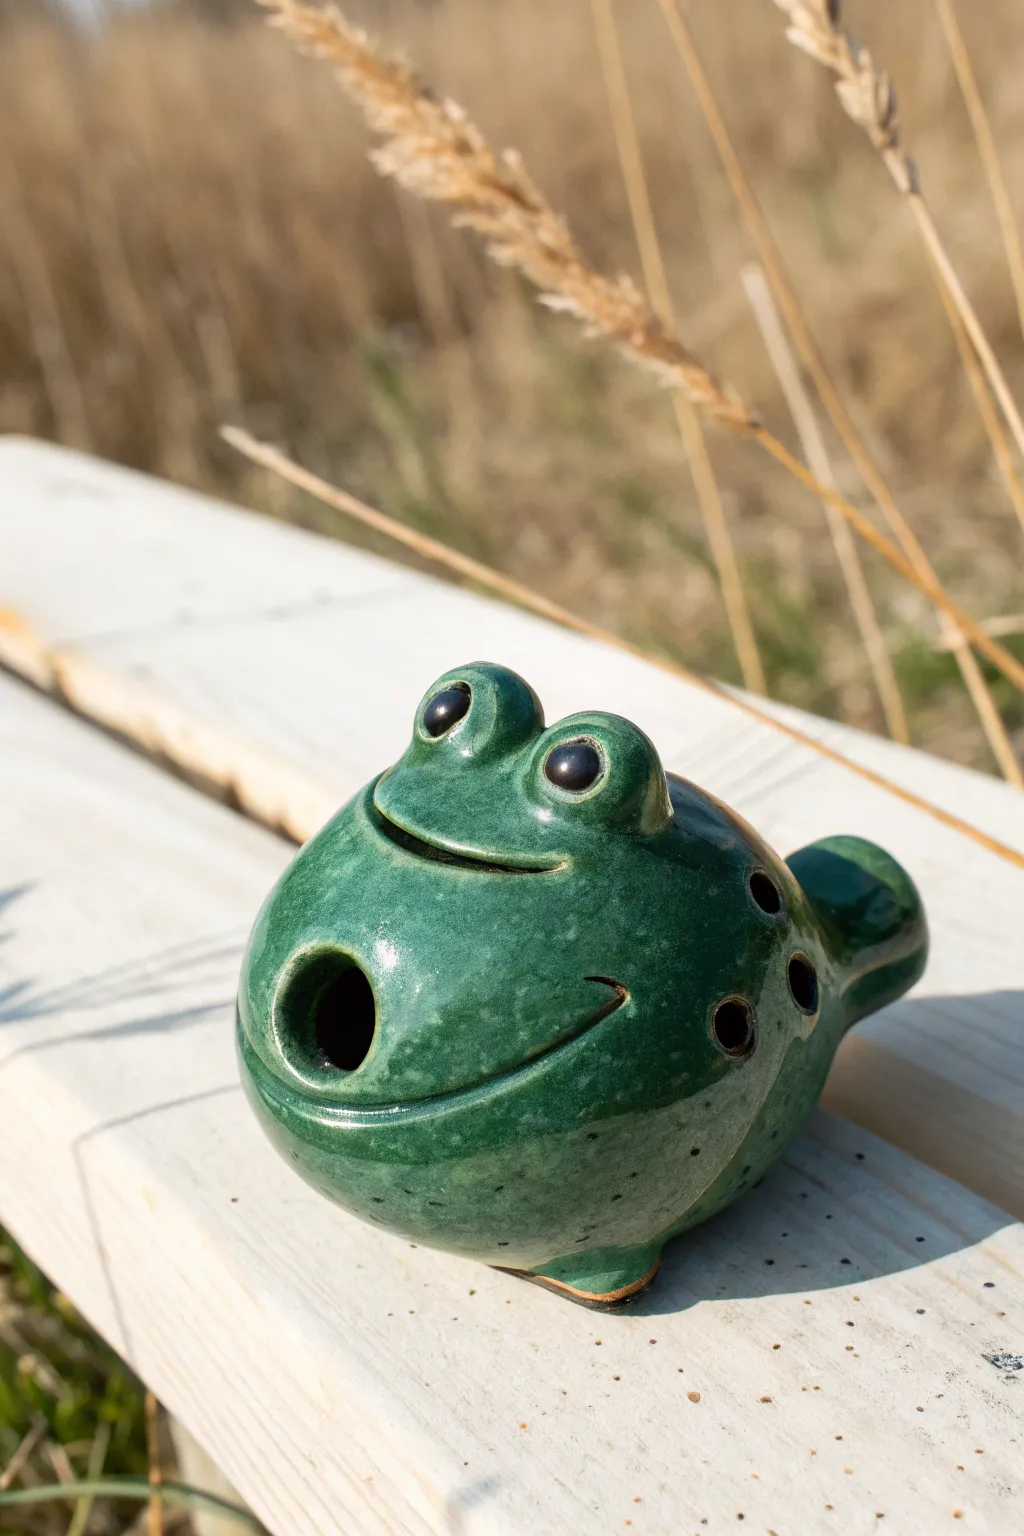
This charming, wide-mouthed frog isn’t just a garden decoration; it’s a functional musical instrument with a deep, earthy tone. The glossy dark green glaze and simple, bulbous shape make it an approachable project for beginners ready to try their hand at crafting ceramic ocarinas.
Detailed Instructions
Materials
- Earthenware or stoneware clay body
- Popsicle stick or flat modeling tool (the distinct whistle-maker)
- Needle tool
- Sponge
- Water slip
- Green glaze (cone 04-06 or appropriate for your clay)
- Black underglaze
- Small round paintbrush
- Wooden spoon or paddle
Step 1: Forming the Body
-
Roll a sphere:
Start with a lump of clay about the size of a tennis ball. Roll it firmly between your palms until it is a smooth, even sphere. -
Create a pinch pot:
Push your thumb into the center of the sphere and gently pinch the walls while rotating the clay, aiming for an even thickness of about a quarter-inch. -
Close the form:
Gently shape the pinch pot specifically into an enclosed hollow egg shape. Paddle the outside gently with a wooden spoon to close the opening and trap the air inside, smoothing over any seams. -
Refine the shape:
Tap the bottom of the form lightly on your table to create a flat base so the frog sits upright without rolling.
Before You Fire
If you hear a windy sound instead of a crisp whistle, the splitting edge is likely blunt. Re-sharpen the 45-degree angle on the window’s edge while the clay is still leather hard.
Step 2: Creating the Whistle Mechanism
-
Form the mouthpiece:
Pull a small knob of clay from the back of the sphere to create the mouthpiece, or attach a small coil and smooth it in completely. This will become the tail section. -
Insert the air channel:
Take your flat modeling tool or popsicle stick. Push it into the tail piece horizontally, aiming straight toward the center of the hollow sphere. -
Cut the fipple window:
On the underside of the frog’s body, measure where the stick ends inside the clay. Use a needle tool to cut a small rectangular window, beveling the edge farthest from the mouthpiece at a sharp 45-degree angle (the splitting edge). -
Clear and test:
Carefully remove the stick and clear out any debris from the window. Blow gently through the mouthpiece; adjust the angel of the bevel until you get a clear, clean whistling sound.
Level Up: Texture
Before the clay dries, gently roll a textured fabric or utilize a stiff brush against the back of the frog to create bumpy ‘wart’ textures that will break nicely under the green glaze.
Step 3: Sculpting the Frog Details
-
Add the mouth:
Instead of cutting open the mouth, score a deep, wide curved line across the front of the body to simulate a smile without puncturing the air chamber. -
Shape the eyes:
Roll two small balls of clay. Score and slip the top of the head, then press these balls firmly in place. Use a modeling tool to hollow out slight sockets around them for a bulging effect. -
Refine features:
Use a damp sponge to smooth all transition points, especially where the eyes attach and around the mouthpiece tail. -
Drill tuning holes:
Once the clay is leather hard, use a circular hole cutter or drill bit to create 3-4 holes on the side of the body. Test the sound after each hole to ensure the pitch changes pleasantly. -
Add pupils:
Press a small indentation into the center of each eye ball using the back of a needle tool or a small dowel.
Step 4: Glazing and Finishing
-
Bisque fire:
Allow the clay to dry completely (bone dry) before firing it to bisque temperature in a kiln. -
Detail the eyes and mouth:
Paint the pupils and the deep score line of the mouth with black underglaze to make the features pop. -
Apply base glaze:
Dip or brush a glossy, semi-translucent green glaze over the entire frog, being extremely careful not to clog the airway or the window on the underside. -
Clear the holes:
I always double-check the fingering holes and the whistle airway for glaze drips before firing, cleaning them out with a dry brush if needed. -
Final firing:
Fire the piece again to the recommended temperature for your specific glaze.
Enjoy the deep, earthy tunes your new amphibian friend creates

The Complete Guide to Pottery Troubleshooting
Uncover the most common ceramic mistakes—from cracking clay to failed glazes—and learn how to fix them fast.
Little Turtle Whistle With Textured Shell
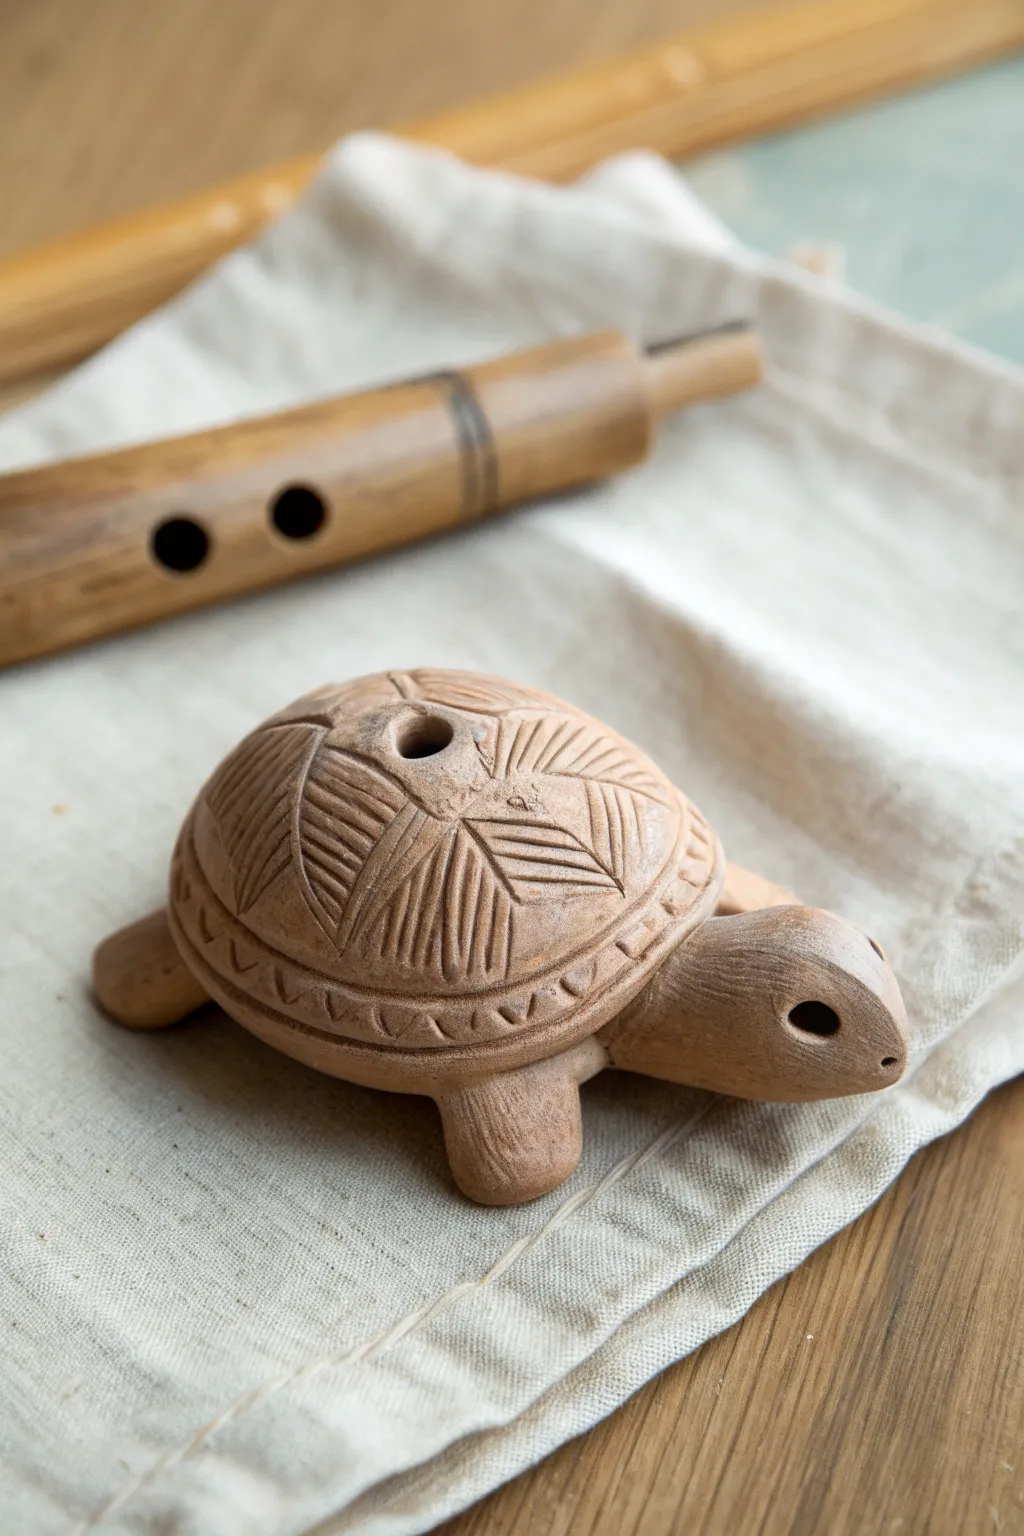
This charming little turtle does double duty as an adorable figurine and a functional musical instrument. With its geometrically patterned shell and sturdy little flippers, this clay whistle is a perfect project for getting comfortable with carving and constructing hollow forms.
Step-by-Step
Materials
- White or terracotta earthenware clay
- Popsicle stick or wooden modeling tool
- Needle tool
- Water and slip container
- Sponge
- Small carving loop tool (for shell patterns)
- Wooden dowel or drill bit (approx. 1/8 inch for eyes)
Step 1: Forming the Body
-
Shape the pinch pots:
Start with two balls of clay, roughly the size of golf balls. Press your thumb into the center of each to create two equal-sized pinch pots. These will form the main cavity of the shell. -
Join the halves:
Score the rims of both pinch pots with your needle tool and apply a little slip. Press them together firmly to create a sealed, hollow sphere. -
Smooth the seam:
Gently paddle the sphere into a slightly flattened oval shape to mimic a turtle shell. Use your thumb or a rib tool to drag clay across the seam until it is completely invisible and smooth. -
Construct the whistle mechanism:
Form a rectangular mouthpiece out of a small lump of clay and attach it to the back of the shell. Insert a popsicle stick through the mouthpiece and into the hollow shell to create your air channel. -
Create the sound hole:
On the top of the shell, just above where the popsicle stick enters, cut a clean 45-degree angle notch (the bevel) that meets the stick. I find it helpful to leave the stick in while cutting to ensure sharpness. -
Test the sound:
Remove the stick and clear any debris. Blow gently to test the whistle. If it whistles, proceed! If not, adjust the angle of the bevel slightly until you get a clear tone.
Step 2: Adding Turtle Features
-
Form the head:
Roll a slightly tapered cylinder for the head. It should be proportional to the shell, roughly the size of a large grape. -
Attach the head:
Score and slip the wider end of the head and the front of the shell (opposite the whistle mouthpiece). Press firmly to attach, blending the clay onto the shell for a strong bond. -
Create the flippers:
Shape four small, flat triangular pieces of clay for the flippers. Round off the corners so they look organic. -
Attach the flippers:
Attach two flippers near the front and two near the back underside of the shell using the score and slip method. Ensure the turtle sits level on its belly. -
Detail the face:
Use a small dowel or the back of a drill bit to press circular indentations for the eyes. Use a needle tool to poke two tiny nostrils at the very tip of the snout.
Silence is Golden?
If the whistle stops working after you attach the head or legs, you may have accidentally squished the air chamber. Re-insert the stick gently to clear the path.
Step 3: Carving the Texture
-
Define the shell rim:
Use a needle tool or a small carving tool to incise a double line around the circumference of the shell, separating the ‘rim’ from the main dome. -
Divide the dome:
Lightly sketch lines to divide the top dome into sections. The example uses a central shape with radiating panels, almost like slices of a pie. -
Carve the geometric patterns:
Within each section, carve parallel diagonal lines. Alternate the direction of the lines in adjacent sections to create a dynamic, woven look. -
Decorate the rim:
Carve a zigzag pattern or a series of small triangles inside the band you created around the shell’s rim. -
Clean up burrs:
Once the clay is leather hard, gently brush away any little crumbs or sharp burrs created by the carving tools using a soft, dry brush. -
Final smooth:
Run a slightly damp finger over the uncarved areas like the head and flippers to ensure they are perfectly smooth before setting the piece aside to dry slowly.
Sound Clarity Tip
The sharper the edge on your bevel (the 45-degree cut), the crisper the sound. Keep this edge clean and free of glaze later to maintain a clear tone.
Once fired, you’ll have a delightful pocket-sized instrument that looks as good as it sounds
Easy Pig Whistle With Disk Snout
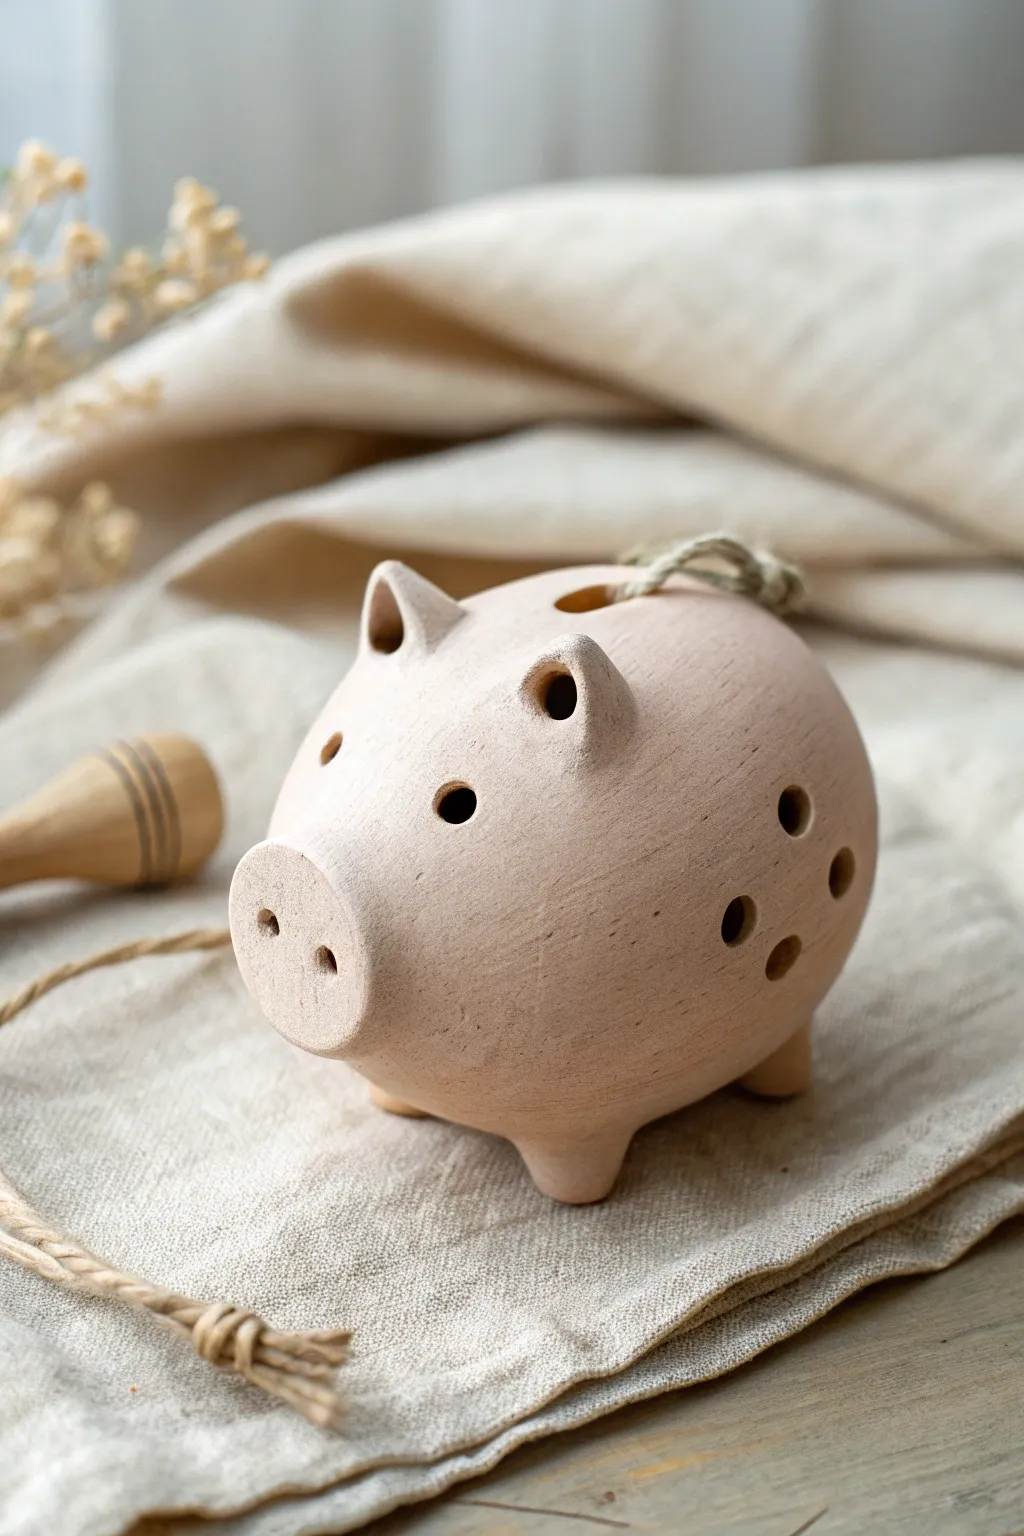
This charming ceramic whistle combines the timeless appeal of a piggy bank with a functional musical instrument. Featuring a simple rounded body and a distinct disk snout, this project is left unglazed to highlight the natural, earthy texture of the clay.
Detailed Instructions
Materials
- Earthenware clay (grogged for strength)
- Pinch pot tools (rib, needle tool)
- Small wooden modeling tool
- Wooden dowel or drill bit (approx. 5mm)
- Small disk cutter or bottle cap
- Slip and scoring tool
- Popsicle stick or flat fettling knife
- Sponge
Step 1: Forming the Body
-
Prepare the Clay:
Start with a ball of clay roughly the size of a tennis ball. Wedge it thoroughly to remove air bubbles, as this is crucial for a hollow form that will be fired. -
Create a Pinch Pot:
Push your thumb into the center of the ball and gently pinch the walls while rotating the clay. Aim for an even thickness of about a quarter-inch throughout the cup shape. -
Close the Form:
Gently curve the rim of your pinch pot inward until the edges meet. Score and slip the edges, then seal them together to create a trapped air pocket, shaping it into a smooth, slightly elongated sphere. -
Attach the Legs:
Roll four small, equal-sized cones of clay. Score and slip the bottom of the body and the wide end of each cone, then attach them firmly so the pig stands stable and level.
Clear The Airway
Tiny clay burrs inside the airway kill the sound. Use a feather or a thin strip of paper to clear debris from the narrow channel after smoothing.
Step 2: Sculpting the Features
-
Make the Snout Disk:
Flatten a small piece of clay into a slab about 4mm thick. Cut out a perfect circle using a small round cutter or a bottle cap to serve as the signature snout. -
Attach the Snout:
Score the front of the pig’s face and the back of the disk. Press the disk firmly onto the body, smoothing the join at the back edge slightly to ensure it doesn’t pop off during drying. -
Add Nostrils and Eyes:
Using a small wooden dowel or the back of a drill bit, press two deep indentations into the snout disk for nostrils. Use the same tool to press two eyes into the face just above the snout. -
Shape the Ears:
Form two small triangles of clay. Gently curve them to give them depth, score the base, and attach them high on the head, blending the clay downwards into the body for a seamless connection.
Tuning It Up
Make the holes different sizes! A larger hole produces a higher pitch when uncovered, while smaller holes create lower pitch shifts.
Step 3: Creating the Whistle Mechanism
-
Construct the Mouthpiece:
Add a small, rectangular block of clay to the rear of the pig (opposite the snout) to act as the mouthpiece. Blend it smoothly into the round body. -
Cut the Airway:
Using a flat popsicle stick or fettling knife, insert it into the mouthpiece block to create the air channel. It must go straight toward where the hole will be cut. -
Cut the Window:
On the underside or lower back of the pig, cut a small square ‘window’ opening with a sharp knife. The blade cutting the airway should exit precisely at the sharp edge of this window (the labium). -
Test the Sound:
Blow gently through the mouthpiece. If it doesn’t whistle, adjust the angle of the splitting edge (the ramp inside the window) until you get a clear tone.
Step 4: Refining and Drying
-
Add Tuning Holes:
Once the main whistle works, punch 3 to 4 holes on the side of the body using the dowel. I find twisting the tool as you pull it out creates cleaner holes. -
Smooth the Surface:
Use a slightly damp sponge to wipe down the entire pig, softening any harsh tooling marks and rounding the edges of the ears and snout. -
Add Texture (Optional):
For the rustic look in the photo, you can lightly dab the surface with a coarse fabric or huge sponge to remove the ‘slick’ look of the smoothed clay. -
Dry Slowly:
Cover the pig loosely with plastic for the first 24 hours to equalize moisture, then uncover and let it dry completely before bisque firing.
Enjoy the simple, melodic charm of your finished clay instrument


What Really Happens Inside the Kiln
Learn how time and temperature work together inside the kiln to transform clay into durable ceramic.
Sleepy Cat Whistle With Triangle Ears
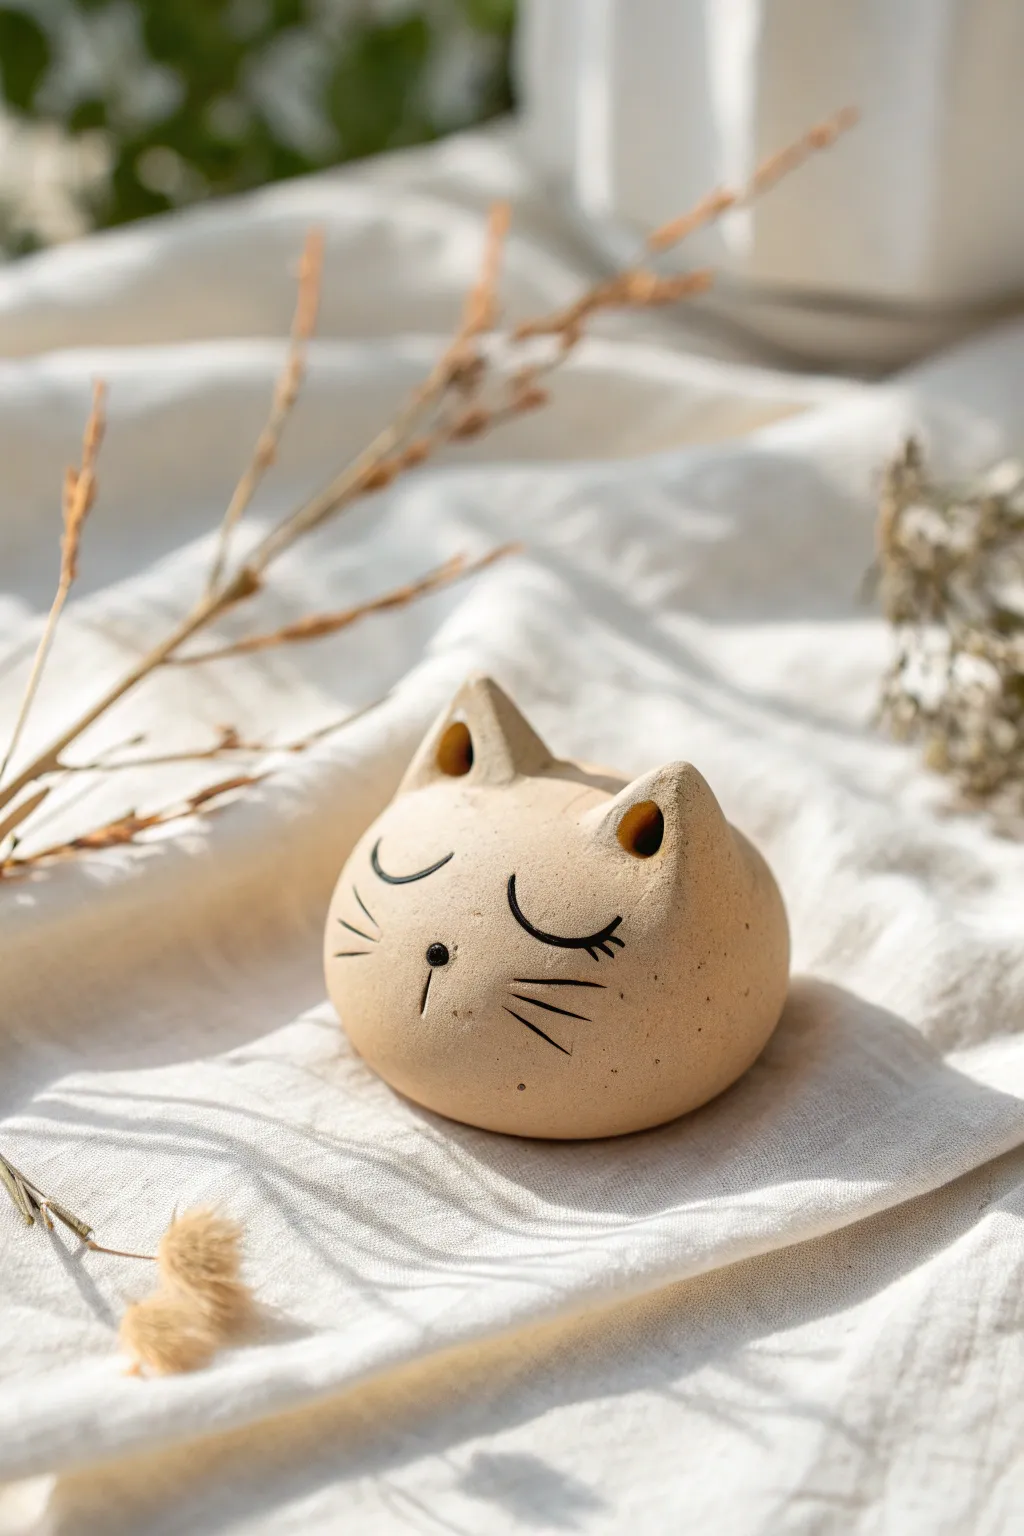
Craft a serene little companion with this easy-to-make sleepy cat clay whistle. Its round, sand-colored body and gently shut eyes give it a peaceful charm, while the triangular ears double as the airway exit for a clear, sweet sound.
Step-by-Step Guide
Materials
- Light stoneware or earthenware clay (buff or sand color)
- Wooden modeling tool or popsicle stick
- Fettling knife or needle tool
- Bowl of water and sponge
- Black underglaze or acrylic paint (post-firing)
- Fine detail paintbrush
- Smooth wooden spoon or rib tool (for burnishing)
Step 1: Forming the Whistle Body
-
Roll the base:
Start by taking a lump of clay about the size of a tangerine and rolling it into a very smooth, uniform ball between your palms. -
Create the pinch pot:
Insert your thumb into the center of the ball and gently pinch the walls while rotating the clay, aiming for an even thickness of about 1/4 inch all around. -
Close the form:
Gently curve the walls inward until they touch, trapping a hollow pocket of air inside. Score and slip the edges to seal them completely, recreating a seamless sphere. -
Smooth the surface:
Use a damp sponge or a flexible rib tool to rub away any seams or fingerprints. The surface should look effortless and round, just like our sleepy friend.
Silent Kitty?
If it won’t whistle, re-check the bevel edge. The air must split exactly in half against the sharp edge of the window. Adjust the angle of your stick slightly up or down.
Step 2: Construction of Key Features
-
Shape the ears:
Pinch two small triangles of clay from your supply. They should be relatively thick at the base and taper slightly toward the top points. -
Attach the ears:
Score the top of the head and the base of your ear triangles. Apply a dab of slip and press them firmly onto the head, smoothing the clay downward to blend the seam invisibly. -
Form the mouthpiece:
Add a small, rectangular block of clay to the back of the sphere (opposite the face). Blend it smoothly into the body to create a slightly raised area for blowing. -
Create the airway slot:
Using a bevel tool or fettling knife, cut a rectangular window (the fipple) on the top/back of the head, just behind the ears. -
Tunnel the airway:
Carefully insert a flat popsicle stick or fettling knife into the mouthpiece. Push it straight through until it emerges into the rectangular window you just cut. -
Align the edge:
This is the crucial part: ensure the sharp edge of the window splits the air coming from the mouthpiece. I usually blow gently into it now to test the sound before detailing.
Add Speckles
To mimic the sandy, speckled look of the image without special clay, dilute some brown paint and flick it onto the finished piece with an old toothbrush.
Step 3: Sculpting and Detailing
-
Refine the ears:
Use a round tool to press shallow indentations into the front of the ears, giving them depth and that classic cat shape. -
Burnish for texture:
Rub the surface with the back of a spoon or a polished stone when the clay is leather-hard to give it a soft, matte sheen akin to the speckled finish in the photo. -
Dry and Fire:
Allow your cat to dry slowly under plastic for a day, then uncovered until bone dry. Bisque fire it according to your clay’s instructions.
Step 4: Painting the Face
-
Draft the features:
Once fired (or dried if using air-dry clay), lightly sketch the closed eyes and whiskers with a pencil. -
Paint the eyes:
Using a fine detail brush and black underglaze (or acrylic), paint two downward curves for the sleeping eyelids. Add three small lashes to the outer corner of each. -
Add the nose:
Paint a very small, solid black dot in the center of the face for the nose. Draw a tiny vertical line extending downward from it. -
Draw whiskers:
Use quick, confident strokes to paint three straight whiskers on each cheek, fanning them out slightly. -
Final clear coat:
If you want the piece to be waterproof or shiny, apply a clear glaze and fire again, or use a matte varnish for a natural look.
Now you have a charming little musical companion to sit on your shelf or gift to a friend
Tiny Bear Whistle With Minimal Paws
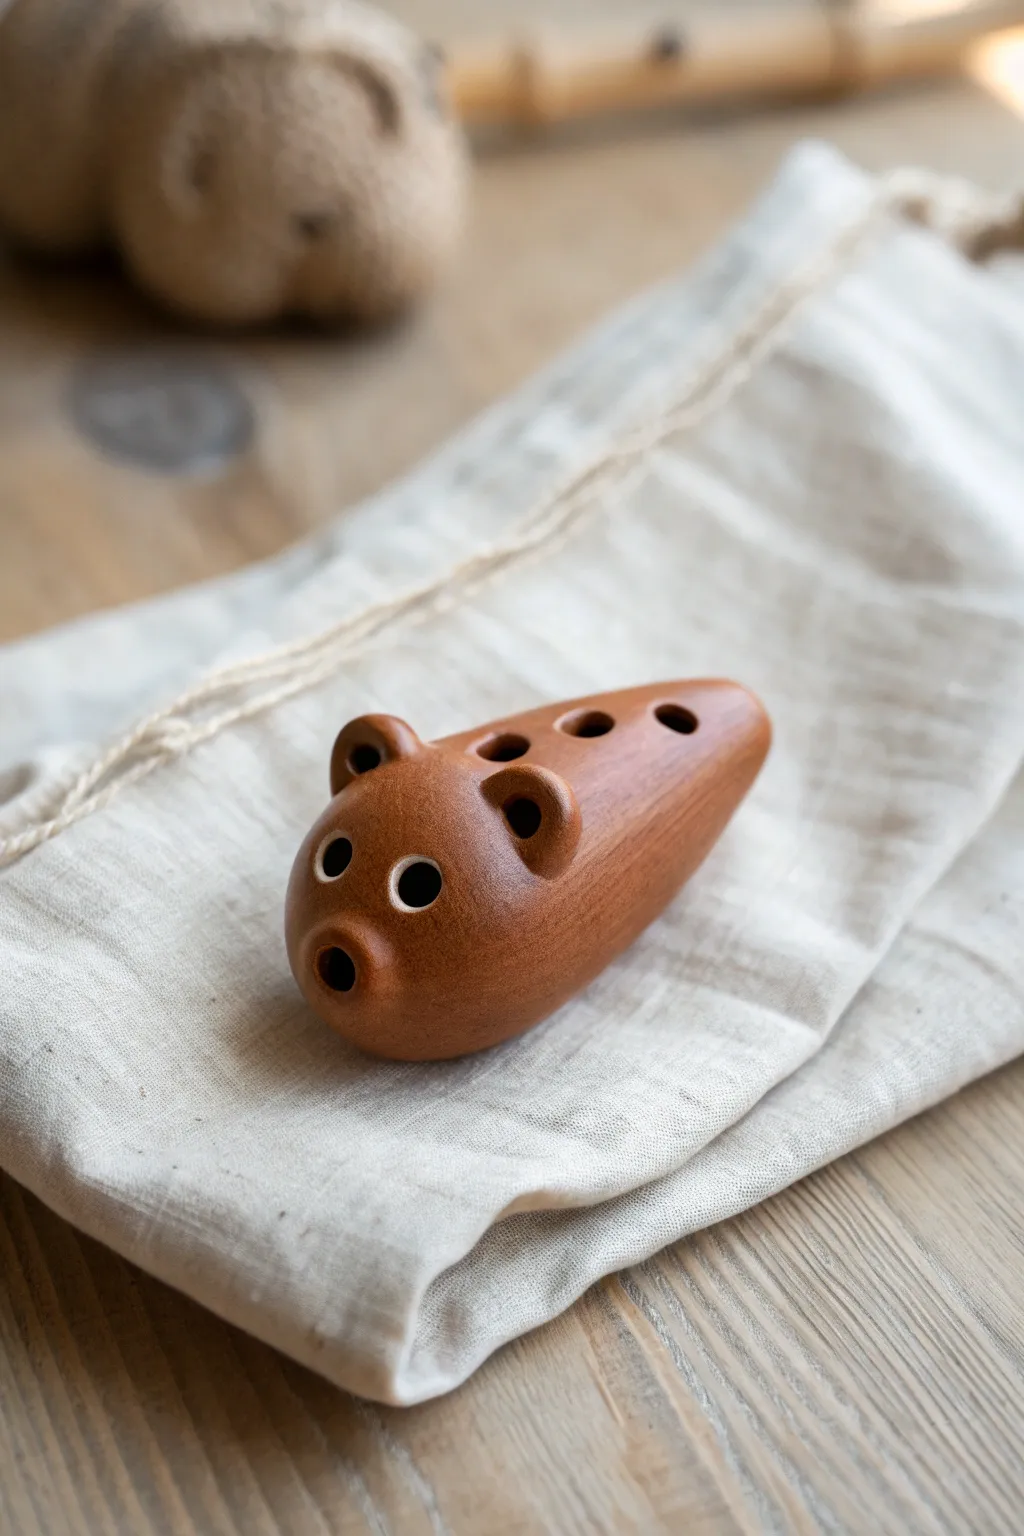
This charming, pocket-sized instrument combines the primitive appeal of unglazed earthenware with a functional windway. Its simple, teardrop shape features stylized bear ears and prominent eye holes, creating a rustic character that fits perfectly in any clay collection.
Detailed Instructions
Materials
- Terracotta or brown earthenware clay
- Popsicle stick or wooden modeling tool
- Round hole cutter or small straw
- Needle tool
- Sponge and water
- Slip (clay mixed with water)
Step 1: Shaping the Base and Whistle Mechanism
-
Prepare the Clay:
Start with a ball of well-wedged terracotta clay about the size of a plum. Ensure there are no air bubbles, as these can cause cracking during firing. -
Form the Body:
Gently roll and taper the ball into a smooth teardrop or pear shape. The rounded end will be the bear’s ace, and the tapered end will form the tail/body section. -
Hollow the Form:
Carefully slice the teardrop in half lengthways or create a pinch pot from the start. If slicing, hollow out the inside to an even thickness of about 1/4 inch, then score and slip the edges to rejoin the halves securely. -
Create the Mouthpiece:
At the rounded front end (the nose), press a popsicle stick horizontally into the clay to create the airway channel. This rectangular slot needs to be clean and sharp. -
Cut the Window:
Use your needle tool to cut a small, rectangular bevel window on the underside or bottom edge, connecting to the airway you just made. The bevel needs to be a sharp 45-degree angle splitting the air stream. -
Test the Sound:
Blow gently through the mouthpiece. If it creates a clear whistle sound, proceed. If it sounds airy, adjust the angle of the bevel until the tone is crisp.
Step 2: Sculpting Features and Refining
-
Add Ears:
Roll two small, pea-sized balls of clay for the ears. Slightly flatten them and use your index finger or a small modeling tool to make an indentation in the center of each. -
Attach Ears:
Score the top of the head and the bottom of your ear pieces. Apply a dab of slip and press the ears firmly onto the head, smoothing the seams so they look integrated rather than just stuck on. -
Create Eye Sockets:
Using a small round cutter or the end of a paintbrush, press circular indentations for the eyes. Don’t punch all the way through to the hollow chamber just yet unless these are tuning holes. -
Drill Finger Holes:
Decide on your tuning. For this simple ocarina style, create four holes along the back (top) of the body using a hole cutter. These holes allow you to change the pitch. -
Clean the Airway:
Check the mouthpiece again. Clay burrs often accumulate during handling. Clear the airway gently with your flat stick one last time to ensure the sound remains pure. -
Refine the Surface:
Use a slightly damp sponge to wipe down the entire surface. This removes fingerprints and smoothes the transition areas around the ears and whistle window. -
Define the Snout:
Beneath the eyes, ensure the snout area is slightly protruding. You can use your thumb to gently push the clay from the inside if possible, or sculpt the exterior to define the nose area around the mouthpiece. -
Burnish (Optional):
For that smooth, slight sheen seen in the finished piece, rub the leather-hard clay with the back of a spoon. This compresses the surface particles. -
Dry Slowly:
Place your bear on a clean cloth or wire rack. Let it dry slowly under loose plastic for the first day to prevent the mouthpiece from warping. -
Fire:
Once bone dry, fire the piece in a kiln according to your clay type’s specifications. This reddish look is typical of earthenware fired to cone 04.
Silent Whistle?
If you lose the sound after attaching the ears, check the airway again. Often, pressing on the external clay body distorts the internal air channel. Re-insert your stick to clear it.
Rattle Time
Before sealing the body halves, place small dried clay balls inside. This turns your whistle into a dual-purpose shaker instrument for added rhythm.
Enjoy the deep, earthy tones of your handmade bear whistle once it emerges from the kiln

TRACK YOUR CERAMIC JOURNEY
Capture glaze tests, firing details, and creative progress—all in one simple printable. Make your projects easier to repeat and improve.
Horse Whistle With Simple Mane Texture
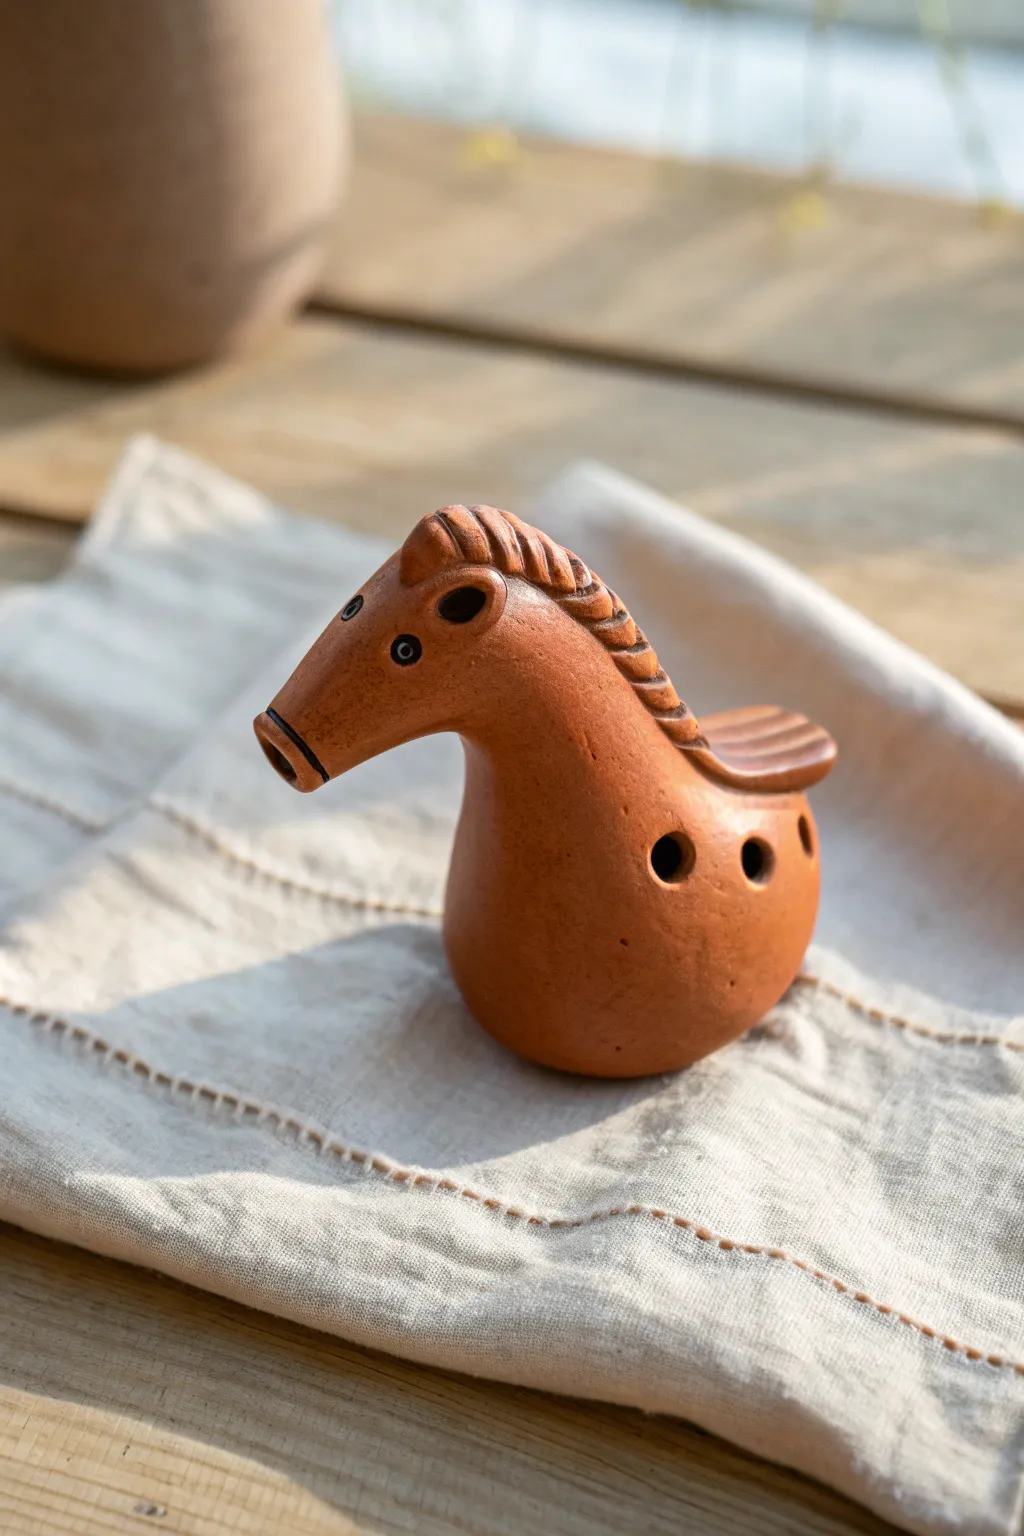
This charming little clay horse isn’t just a figurine; it’s a fully functional musical instrument with a warm, earthy tone. The design features a smooth, rounded body perfect for creating sound, topped with a stylized mane and simple painted details.
Step-by-Step Tutorial
Materials
- Earthenware or stoneware clay (terracotta color recommended)
- Popsicle stick or wooden modeling tool
- Skewers or needle tool
- Small sponge
- Water slip (clay mixed with water)
- Black underglaze or acrylic paint (for details)
- Fine paintbrush
- Sandpaper (optional, for post-drying)
Step 1: Forming the Hollow Body
-
Shape the Base:
Start with a ball of clay roughly the size of a tangerine. This needs to be the resonating chamber, so ensure it is free of air bubbles by wedging it well first. -
Pinch Pot Method:
Insert your thumb into the center of the ball and gently pinch the walls while rotating the clay. Aim for an even thickness of about 1/4 inch all around. -
Close the Form:
Instead of leaving it like a bowl, gently collar the rim inwards until the clay meets, trapping the air inside to form a hollow sphere. Smooth the seam completely so it disappears. -
Shape the Neck:
While the air is trapped inside providing support, gently gently squeeze and pull one side of the sphere upwards to create a thick, tapered neck for the horse.
Step 2: Creating the Sound Mechanism
-
Form the Mouthpiece:
Add a small, rectangular block of clay to the end of the neck to form the snout. Flatten it slightly to make a comfortable mouthpiece shape. -
Create the Airway:
Using a flat popsicle stick, carefully insert it into the mouthpiece to create the windway. Push it straight in towards the hollow body chamber. -
Cut the Window:
Where the stick enters the main body cavity (at the base of the neck), cut a small rectangular window on the underside of the neck. The ramp of the window needs to split the air stream coming from the mouthpiece. -
Refine the Labium:
This is the most critical step: use your tool to sharpen the edge of the window (the labium) so it is perfectly aligned with the airway. Test the sound frequently—it should produce a clear whistle. -
Seal the Connections:
Once the sound works, score and slip the junction between the mouthpiece and neck to ensure it’s solid, being careful not to distort the airway you just made.
Pro Tip: The Sweet Spot
When cutting the sound window, the sharp edge (labium) must be positioned exactly in the center of the air stream coming from the mouthpiece to get a clear tone.
Step 3: Sculpting and Detailing
-
Add Finger Holes:
Using a drill bit or a specialized hole cutter, create three distinct holes along the side of the horse’s body. These will allow you to change the pitch. -
Tune the Whistle:
Test the sound again. If the holes make the sound fuzzy, clean the edges of the holes with a damp sponge to smooth the airflow. -
Add the Mane:
Roll a thin coil of clay and attach it down the back of the neck using slip. Press it down firmly. -
Texture the Mane:
Use a wooden knife tool to press angular diagonal lines into the coil, mimicking the texture of a braided or flowing mane. -
Sculpt the Tail:
Create a small, flat fan shape of clay and attach it to the rear of the body. Add horizontal grooves to match the mane’s texture. -
Smooth the Surface:
I like to take a slightly damp sponge and wipe down the entire body (avoiding the sharp window edge) to remove fingerprints and create that burnished look.
Level Up: Glossy Finish
After firing, apply a clear glaze or a coat of beeswax polish to the unpainted areas to deepen the terracotta color and give it a professional sheen.
Step 4: Finishing Touches
-
Dry Slowly:
Let the clay dry slowly under loose plastic for a day or two to prevent cracking, then uncover to bone dry. -
Fire or dry:
Bisque fire the piece in a kiln according to your clay type. If using air-dry clay, simply wait until it is fully hardened. -
Paint Details:
Using a fine brush and black underglaze (or acrylic if not firing), paint small circles for the eyes with a tiny white dot for reflection, and outline the snout and ears.
Enjoy the simple melody of your handcrafted folk instrument
Llama Whistle With Easy Polka Dots
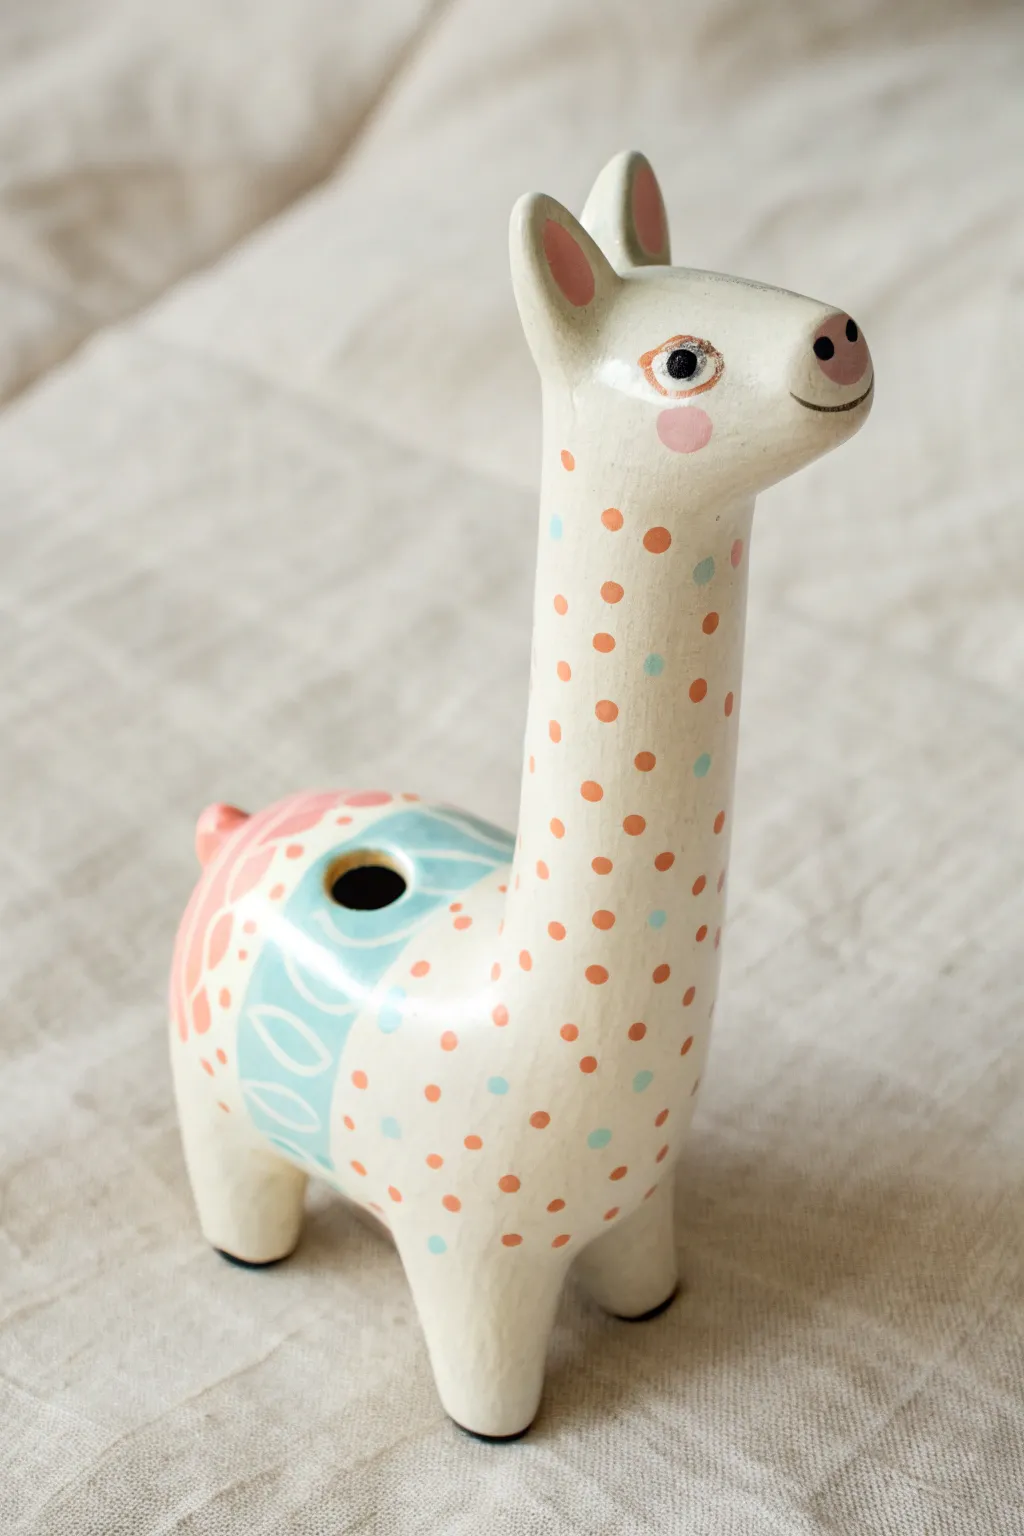
This charming llama whistle combines a sleek, elongated form with a playful pattern of orange dots and pastel accents. Its simplified shape makes it an excellent project for practicing hollow-form construction while creating a functional musical instrument.
How-To Guide
Materials
- White earthenware or polymer clay
- Basic sculpting tools (rib, needle tool)
- Popsicle stick or wooden modeling tool (for whistle mechanism)
- Slip and scoring tool (if using ceramic clay)
- Acrylic paints (White, orange, light blue, pink, black)
- Fine detail paintbrush
- Medium round paintbrush
- Clear gloss varnish or sealant
Step 1: Sculpting the Base Form
-
Form the body:
Start with a ball of clay roughly the size of a tangerine. Shape it into a smooth, oval-shaped hollow form using the pinch pot method. This main cavity will act as the resonance chamber for your whistle. -
Close the form:
Gently pinch the opening of your pot closed until you have a sealed, air-filled egg shape. Smooth the seam completely so it is invisible. -
Sculpt the neck:
Roll a thick coil of clay for the neck. It needs to be sturdy enough to stand upright. Attach this vertically to one end of your egg shape, blending the clay downwards for a seamless transition. -
Add the head:
Shape a smaller, slightly elongated oval for the head. Attach it horizontally to the top of the neck, smoothing the connection point to create a graceful curve rather than a sharp angle. -
Create the legs:
Roll four short, sturdy cylinders for legs. Attach them to the bottom of the body, ensuring they are even so the llama stands level without wobbling. I like to tap the feet gently on the table to flatten the bottoms.
Step 2: Creating the Whistle Mechanism
-
Create the mouthpiece:
The tail area will serve as the mouthpiece. Slightly flatten the rear of the llama’s body and insert a flat tool (like a popsicle stick) horizontally into the clay to create the air duct. -
Cut the sound hole:
On the underside or lower back of the llama (where the air duct ends), use a needle tool to cut a small, sharp rectangular window. The bevel of this window needs to be angled perfectly to split the air stream. -
Test the sound:
Blow gently through the mouthpiece. If it doesn’t whistle, adjust the angle of the bevel edge (the ‘labium’) until you get a clear tone. Once it works, refine the hole’s edges carefully. -
Refine the surface:
Use a damp sponge or finger to smooth out all clay surfaces, removing fingerprints and bumps. Let the clay dry completely (or bake it according to polymer clay instructions).
Clean Lines Pro Tip
For perfectly round polka dots, use a different sized dowel or the back of a drill bit dipped in paint instead of a brush. Stamp straight down.
Step 3: Painting and Decoration
-
Base coat:
Apply two coats of creamy white acrylic paint to the entire sculpture. Ensure the first coat is fully dry before applying the second for a solid, opaque finish. -
Paint the decorative blanket:
On the llama’s back, paint a curved section in pale pink and light blue to represent a saddle blanket. Use curved lines to mimic the rounded shape of the body. -
Add blanket details:
Using a thin brush and white paint (or a lighter shade of blue), add simple oval or leaf-like patterns inside the blue section of the blanket. -
Dot the body:
Dip the handle end of a paintbrush into orange paint to create uniform polka dots. Scatter them across the neck and lower body, leaving some space around the blanket area. -
Add accent dots:
Intersperse a few tiny light blue dots among the orange ones on the neck for color variation. -
Paint facial features:
Paint the inside of the ears pink. Use black paint for the eyes, adding a small white reflection dot in each. Paint the nose tip pink with two small black nostrils and a simple curved line for the mouth. -
Seal the piece:
Once all paint is thoroughly dry, apply a glossy varnish to protect the finish and give the whistle a ceramic-like shine.
Fixing a Silent Whistle
If the sound stops after glazing or painting, check the airway. Paint likely clogged the sharp bevel edge. Carefully clear it with a needle tool.
Now you have a whimsical little companion that looks as sweet as the song it plays
Dinosaur Whistle With a Spike Ridge
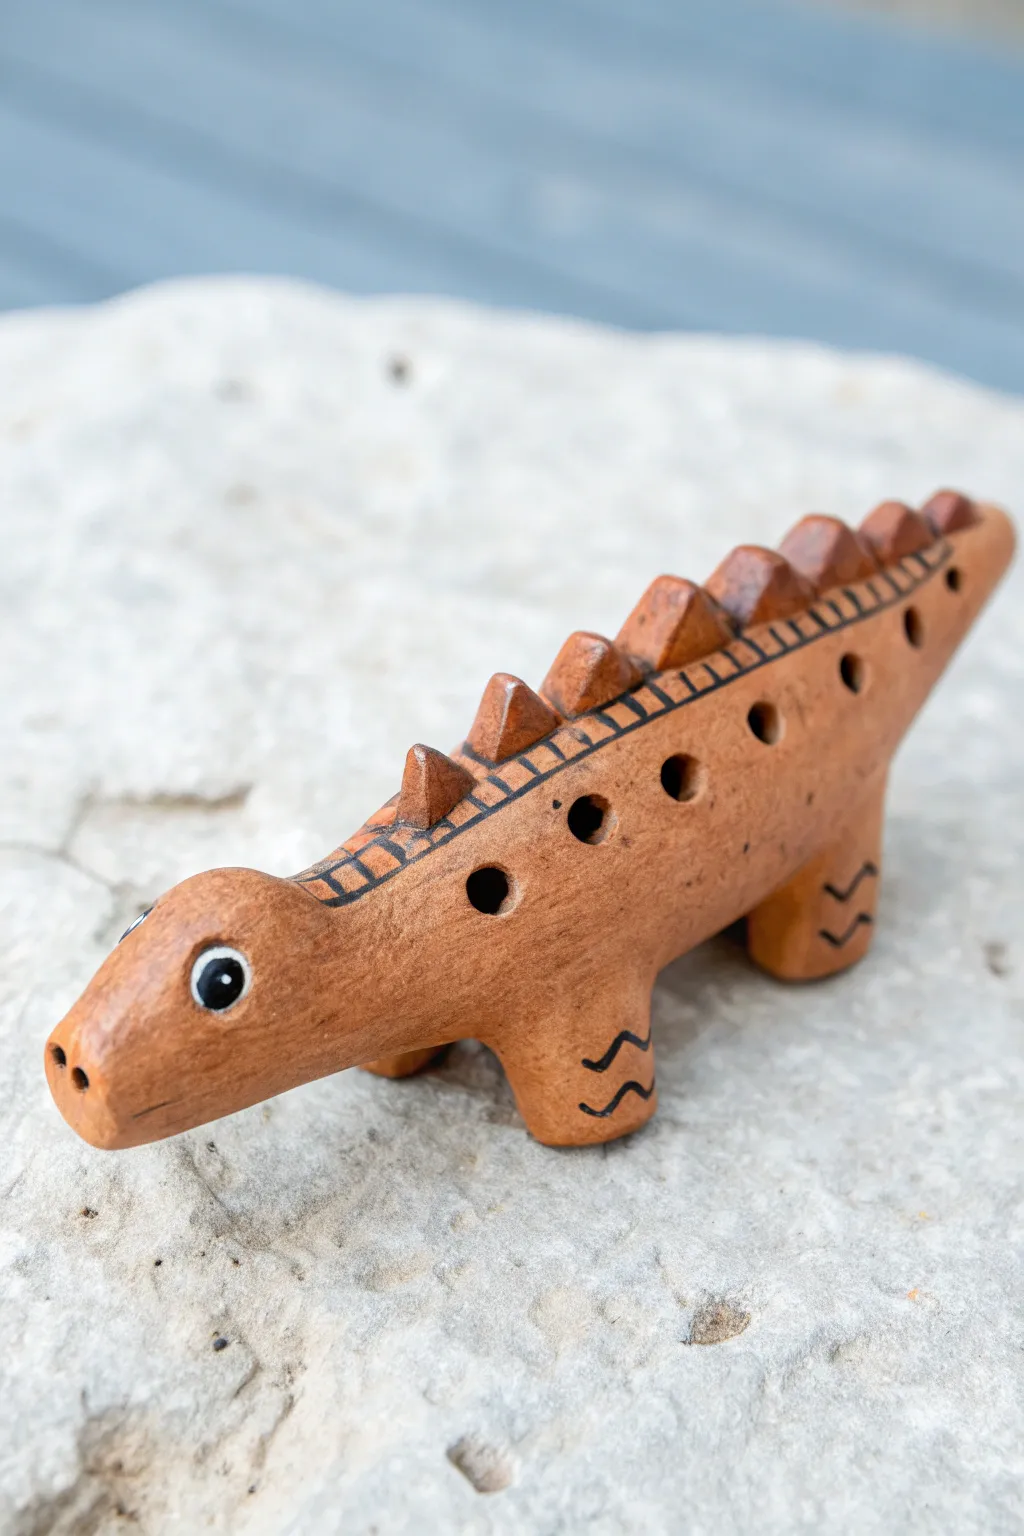
Channel some prehistoric vibes with this charming dinosaur clay whistle, featuring a distinct ridge of triangular spikes along its back. This project combines simple pinch pot techniques with careful detailing to create a functional instrument that looks as delightful as it sounds.
Detailed Instructions
Materials
- Earthenware or polymer clay (terracotta color)
- Wooden modeling tools
- Popsicle stick or fettling knife
- Bysicle spoke or skewer (for air channel)
- Slip (clay mixed with water)
- Black underglaze or acrylic paint
- White underglaze or acrylic paint
- Small fine-point paintbrush
- Clear glaze (optional)
Step 1: Forming the Body
-
Shape the base:
Start with a ball of clay roughly the size of a tangerine. Pinch it into a hollow, elongated oval shape, ensuring the walls are an even thickness of about 1/4 inch. -
Close the form:
Gently pinch the opening of your hollow form closed, smoothing the seam completely so you have a trapped air pocket inside the clay taco shape. -
Pull the neck:
On one end of the oval, gently squeeze and pull the clay to form a distinct, rounded neck and head area. It should curve slightly upward. -
Shape the tail:
On the opposite end, pull the clay into a tapered point to create the tail, giving the body a nice, sweeping curve. -
Add the legs:
Roll four small, equal-sized cylinders of clay. Score and slip these onto the bottom of the body to form sturdy, stubby legs so the dinosaur stands on its own.
Step 2: Creating the Sound Mechanism
-
Create the mouthpiece:
Flatten the end of the tail slightly to create a comfortable mouthpiece area. -
Insert the airway:
Using a flat popsicle stick or specialized voicing tool, carefully insert it into the tail end to create a rectangular airway channel. Aim straight toward the hollow center of the body. -
Cut the fipple window:
On the underside of the tail (or the top, depending on preference, though this dino has holes on top so underneath is safer for mechanics), cut a small square window with a sharp knife. This should intersect with the airway channel you just made. -
Detail the sharp edge:
Using a bevel tool or small knife, carefully sharpen the edge of the window furthest from the mouthpiece. This “splitting edge” is crucial for creating sound. -
Test the sound:
Blow gently through the mouthpiece. If it doesn’t whistle, adjust the angle of the splitting edge slightly until you get a clear tone.
Silent Whistle?
If you hear only air, check the ‘splitting edge’ inside the window. It must be sharp and aligned exactly with the airflow. Clean out any clay crumbs blocking the channel.
Step 3: Adding Spikes and Details
-
Form the spikes:
Roll a small coil of clay and cut it into several triangular segments. These will become the spinal ridge. -
Attach the ridge:
Score and slip along the spine of the dinosaur. Attach the triangular spikes in a line, pressing them firmly to blend the base into the body. -
Drill finger holes:
punch three or four holes along the side of the body using a skewer or hole cutter tool. These will allow you to change the pitch of the whistle. -
Smooth the surface:
Use a slightly damp sponge or your finger to smooth out any fingerprints or rough joining marks on the entire piece. -
Create eyes:
Press a small indentation on each side of the head for the eyes. I like to shape a tiny ball of white clay and press it into the socket, or simple paint it later. -
Add nose vents:
Poke two tiny holes at the very front of the snout to represent nostrils.
Level Up: Texture Time
Before the clay hardens, press a piece of burlap or a rough stone against the dinosaur’s skin to give it a realistic, pebbled reptile texture.
Step 4: Finishing Touches
-
Initial drying:
Let the clay dry to a leather-hard stage. This makes painting cleaner and easier. -
Paint decorative lines:
Using a fine brush and black underglaze (or acrylic if you aren’t firing), paint small zig-zag lines on the legs and a ladder-like pattern along the base of the spine. -
Detail the eyes:
Paint a black pupil in the center of the white eye area to give the dinosaur a focused, friendly expression. -
Final dry and fire:
Allow the piece to bone dry completely before firing in a kiln. If using air-dry clay, simply wait 24-48 hours before sealing.
Once fired or dried, your prehistoric pal is ready to make some music
Mushroom Cap Whistle for an Extra-Easy Shape
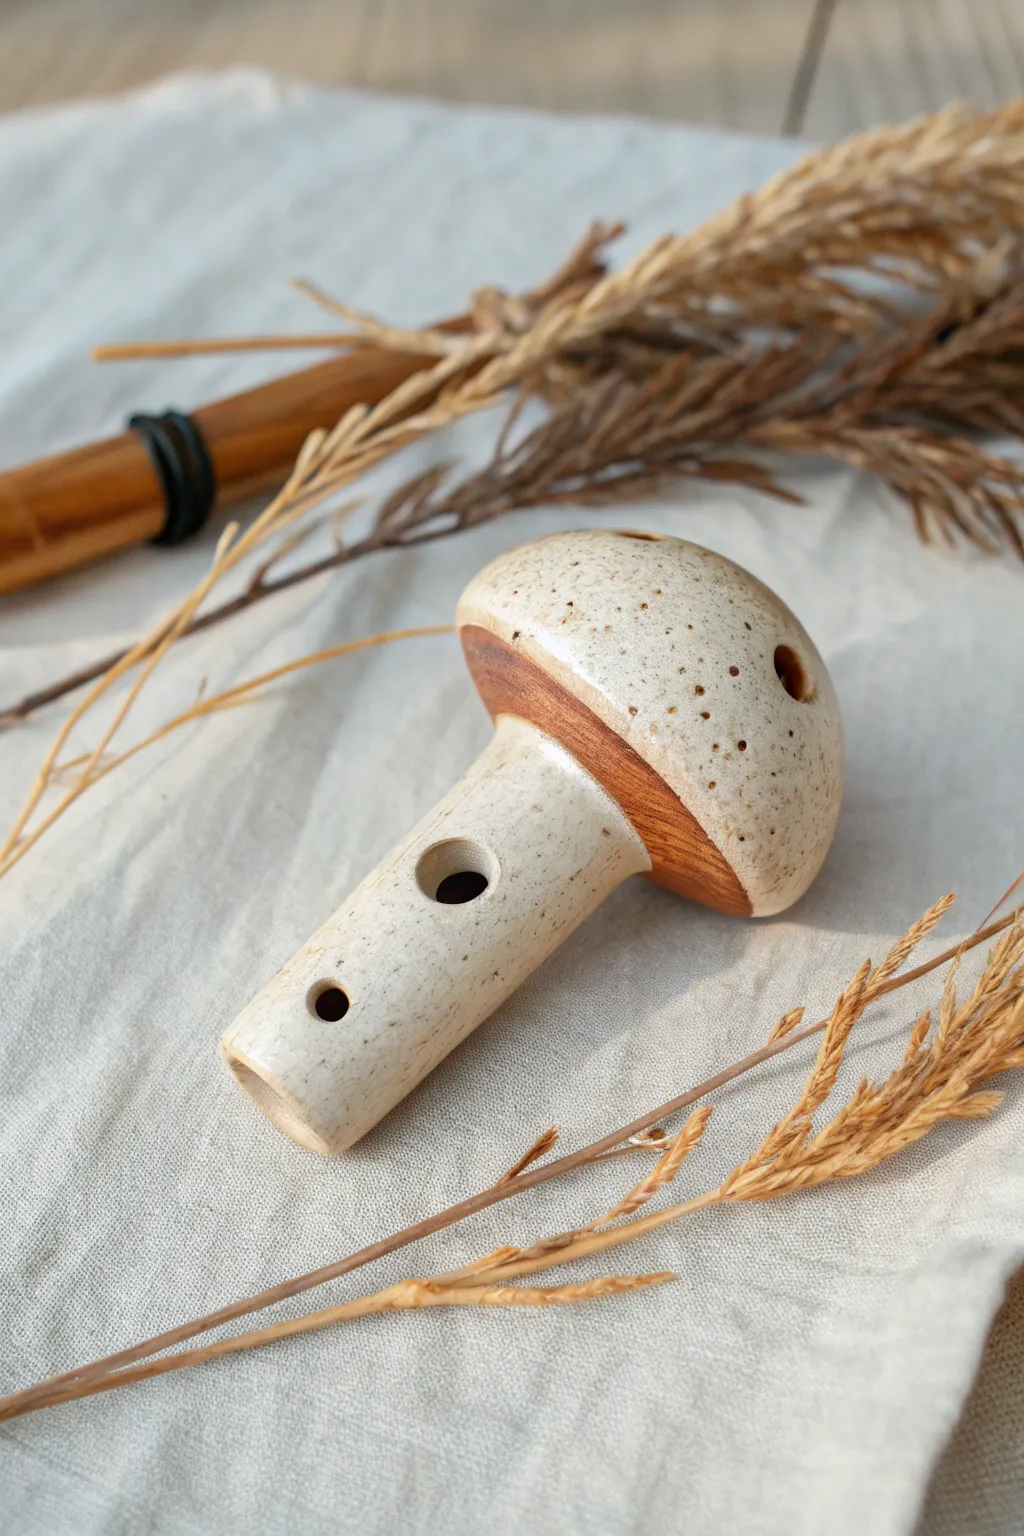
Craft a charming musical instrument disguised as a forest fungus with this mushroom cap whistle project. The speckled creamy glaze contrasts beautifully with the raw clay accents, creating a piece that looks as earthy as it sounds.
Step-by-Step
Materials
- Stoneware clay (smooth body recommended)
- Popsicle stick or flat sculpting tool
- fettling knife
- Needle tool
- Sponge
- Slip (clay mixed with water)
- Speckled cream glaze (food safe)
- Small paintbrush
- Loop tool (optional for hollowing)
Step 1: Forming the Base Structure
-
Shape the Stem:
Roll a coil of clay about 1 inch thick and 3 inches long to form the mushroom stalk. Tap one end flat on your work surface so it stands upright comfortably. -
Hollow the Stalk:
Carefully insert a needle tool or small loop tool into the center of the cylinder to hollow it out, leaving the walls about 1/4 inch thick. Be gentle not to distort the outer shape. -
Create the Cap:
Roll a ball of clay slightly larger than the diameter of your stem. Flatten it slightly into a dome shape and hollow out the underside with your thumb to create a concave space for the whistle chamber. -
Refine the Gills:
Before attaching, smooth the underside rim of the cap—this reddish-brown area will remain unglazed later, so take time to smooth it nicely with a sponge now.
Silent Whistle?
If no sound comes out, the air isn’t hitting the beveled edge (blade) correctly. Re-insert the stick into the mouthpiece and gently angle it until it lines up perfectly with the sharp edge of the window.
Step 2: Constructing the Whistle Mechanism
-
Cut the Airway:
At the top of the hollow stem, cut a 45-degree bevel on the inside edge where the whistle sound will be produced. This is the ‘blade’ or ‘labium’. -
Attach the Cap:
Score and slip the top of the stem and the underside of the cap. Press them firmly together, ensuring an airtight seal around the connection point. -
Create the Mouthpiece:
On the side of the cap, use a popsicle stick to press a rectangular channel leading directly toward your beveled edge inside the stem. -
Form the Window:
Cut a small rectangular window (the sound hole) directly below the bevel on the cap’s surface. Remove the clay cleanly. -
Test and Tune:
Blow gently through the mouthpiece. If it doesn’t whistle, adjust the angle of your bevel or clear any clay debris from the airway. I rarely get this on the first try, so adjustments are normal.
Step 3: Adding Details and Finishing
-
Drill Finger Holes:
Once the whistle works, use a small circular hole punch or drill bit to create two distinct finger holes along the stem. These allow you to change the pitch. -
Smooth the Surface:
Use a damp sponge to wipe away any rough texture or fingerprints from the cap and stem. The smoother the clay now, the better the glaze will sit. -
Bisque Fire:
Allow the mushroom to dry slowly under loose plastic for a few days to prevent cracking. Once bone dry, fire it in the kiln to bisque temperature. -
Apply Wax Resist:
Paint liquid wax resist on the underside of the mushroom cap ‘gills’ and the very bottom ring of the stem. This keeps the glaze off these areas to reveal the raw clay color. -
Glaze Application:
Dip the whistle into a speckled cream glaze or brush on three even coats. Avoid getting thick glaze inside the airway or finger holes, as this can ruin the sound. -
Clean the Airway:
Double-check the airway and holes one last time. If glaze has dripped in, clear it out carefully with a needle tool. -
Final Firing:
Fire the piece again to the recommended temperature for your specific glaze (likely cone 5 or 6 for stoneware).
Adjust the Pitch
Larger finger holes create higher notes, while smaller holes produce deeper tones. Start with small holes and gradually widen them with your tool until you reach the specific musical note you want.
Enjoy the earthy tones of your new woodland instrument once it cools from the kiln
Flower Bloom Whistle With Simple Petal Lines
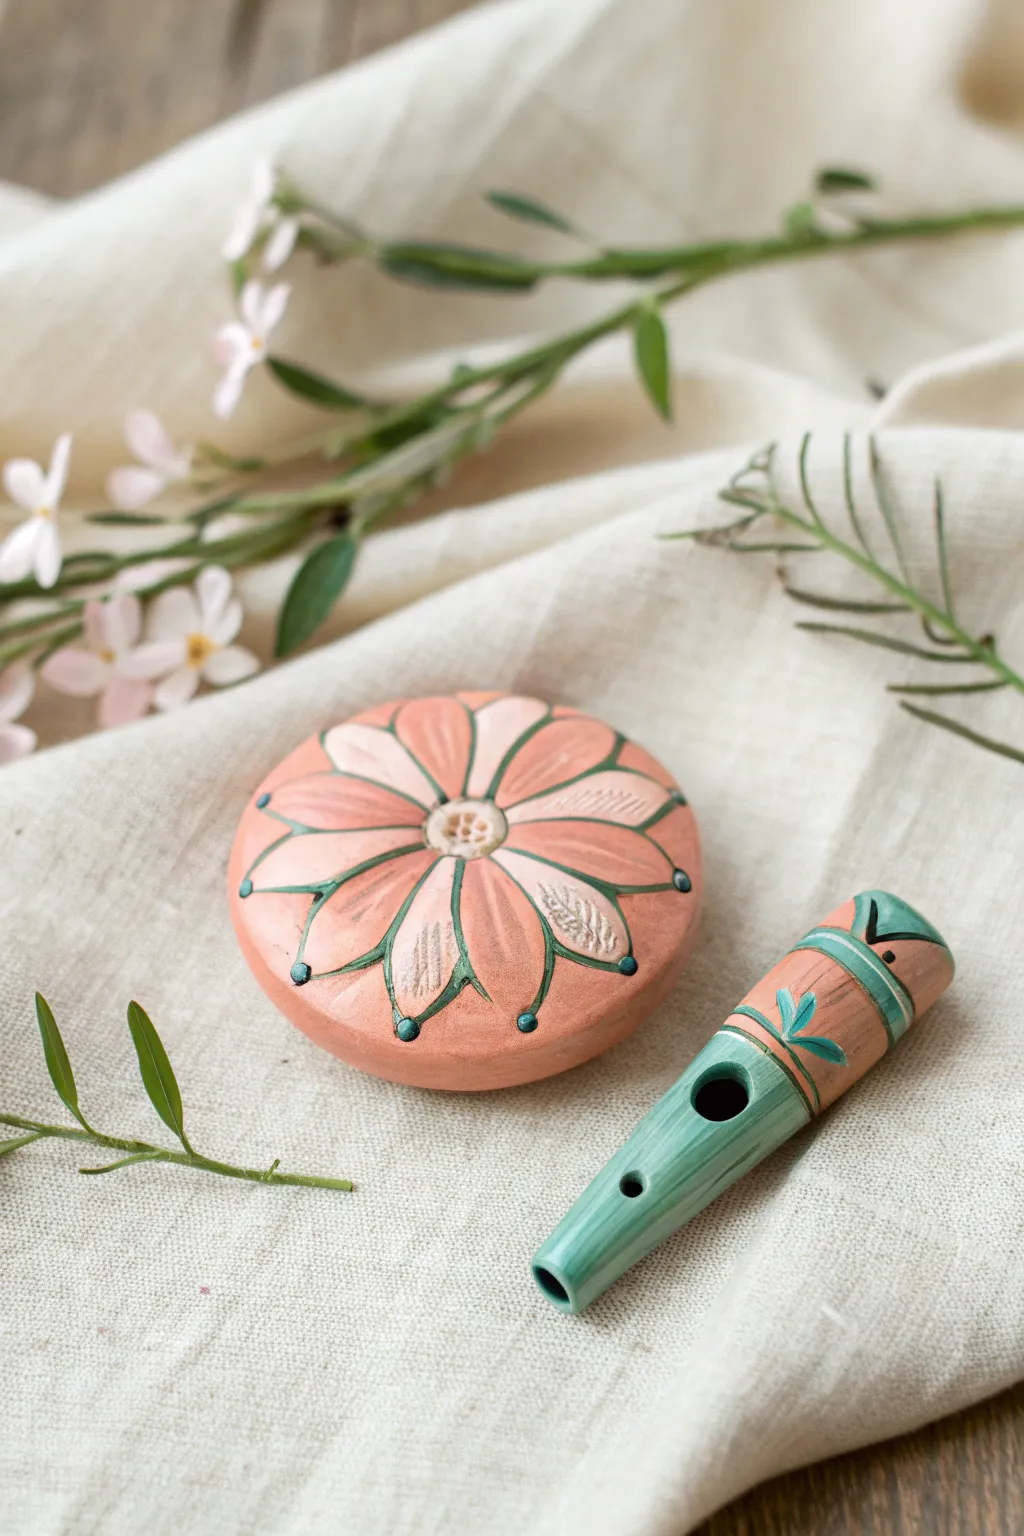
Capture the essence of spring with this delightful two-piece clay whistle set featuring a disc-shaped resonator adorned with petal carvings and a matching tapered mouthpiece. The warm terracotta hues contrasted with cool teal accents create a charming, organic aesthetic perfect for nature lovers.
Step-by-Step Tutorial
Materials
- Polymer clay or air-dry clay (terracotta color)
- Acrylic paints (Teal/Sage Green, White, Black)
- Clay carving tools (needle tool, small loop tool)
- Small paintbrush (detail round size 0 or 1)
- Popsicle stick or flat modeling tool
- Sandpaper (fine grit)
- Satin or matte varnish
Step 1: Forming the Whistle Body
-
Shape the resonator disc:
Begin by rolling a ball of terracotta clay about the size of a tangerine. Flatten it gently between your palms to create a smooth, thick disc shape (like a macaron or a stones). Ensure the edges are rounded and smooth. -
Hollow the interior:
Carefully slice the disc in half horizontally or construct it by pinching two pinch pots together to form a hollow chamber. If using the pinch pot method, score and slip the edges to join them securely, smoothing the seam completely so it disappears. -
Create the mouthpiece tube:
Roll a separate cylinder of clay for the mouthpiece. It should be about 2-3 inches long, slightly thicker at one end and tapering down towards the blowing end. -
Construct the fipple mechanism:
This is the sound-making part. Create a rectangular window on the straight (non-tapered) end of your mouthpiece tube. Insert a popsicle stick into the blowing end to form the airway floor, then add a small wedge of clay (the block) just above the window to split the air. Test the sound ensuring you get a clear tone.
Clean Lines Pro-Tip
If you get paint outside the carved grooves, wait for it to dry completely, then gently scratch the excess off the surface with a craft knife or fine sandpaper.
Step 2: Carving the Floral Design
-
Mark the center:
On the top face of your disc resonator, find the exact center. Use a small loop tool or straw to create a small depressed circle for the flower’s pistil. -
Draft the petal shapes:
Lightly sketch a flower with 8-10 petals radiating from the center using a needle tool. The petals should be teardrop-shaped and extend almost to the edge of the disc. -
Carve the outlines:
Go back over your sketch lines with a carving tool, removing a thin line of clay to create distinct separation between the petals. The grooves should be deep enough to hold paint later. -
Add petal centers:
Inside each petal, carve a simple central line or vein. For added texture, create a small stippled or cross-hatched area near the tip of every other petal, just like in the reference image. -
Detail the mouthpiece:
Carve two parallel ring lines around the wider end of the mouthpiece. Add small leaf shapes between these rings to visually tie it to the main flower piece.
Step 3: Painting and Finishing
-
Base coat the accents:
Once the clay is fully dry (or baked according to package instructions), paint the carved grooves between the petals with a teal or sage green acrylic paint. Use a very fine brush for this. -
Highlight the petals:
Mix a small amount of white paint with water to create a wash. Lightly brush this onto the center of each petal to give it a soft, faded pink appearance, letting the natural terracotta color show through at the edges. -
Define the center:
Paint the small depressed center circle white. Add tiny dots of brown or black inside this white circle to mimic pollen or seeds. -
Add decorative dots:
Using the handle end of a paintbrush, dot a small amount of teal paint at the pointed tip of each petal. -
Paint the mouthpiece:
Paint the bottom half (the tapered end) of the mouthpiece in solid teal. Paint the carved rings and leaf details on the upper section in the same teal color to match. -
Seal the work:
Finish both pieces with a coat of satin or matte varnish. This will protect the paint and give the clay a professional, finished sheen without being overly glossy.
Make It Wearable
Before the clay dries, poke a hole through the side of the disc or the end of the mouthpiece to thread a leather cord, turning your whistle into a necklace.
Now you have a beautiful, handcrafted instrument that looks as lovely on a shelf as it sounds when played
Striped Geometric Whistle With Bold Color Blocks
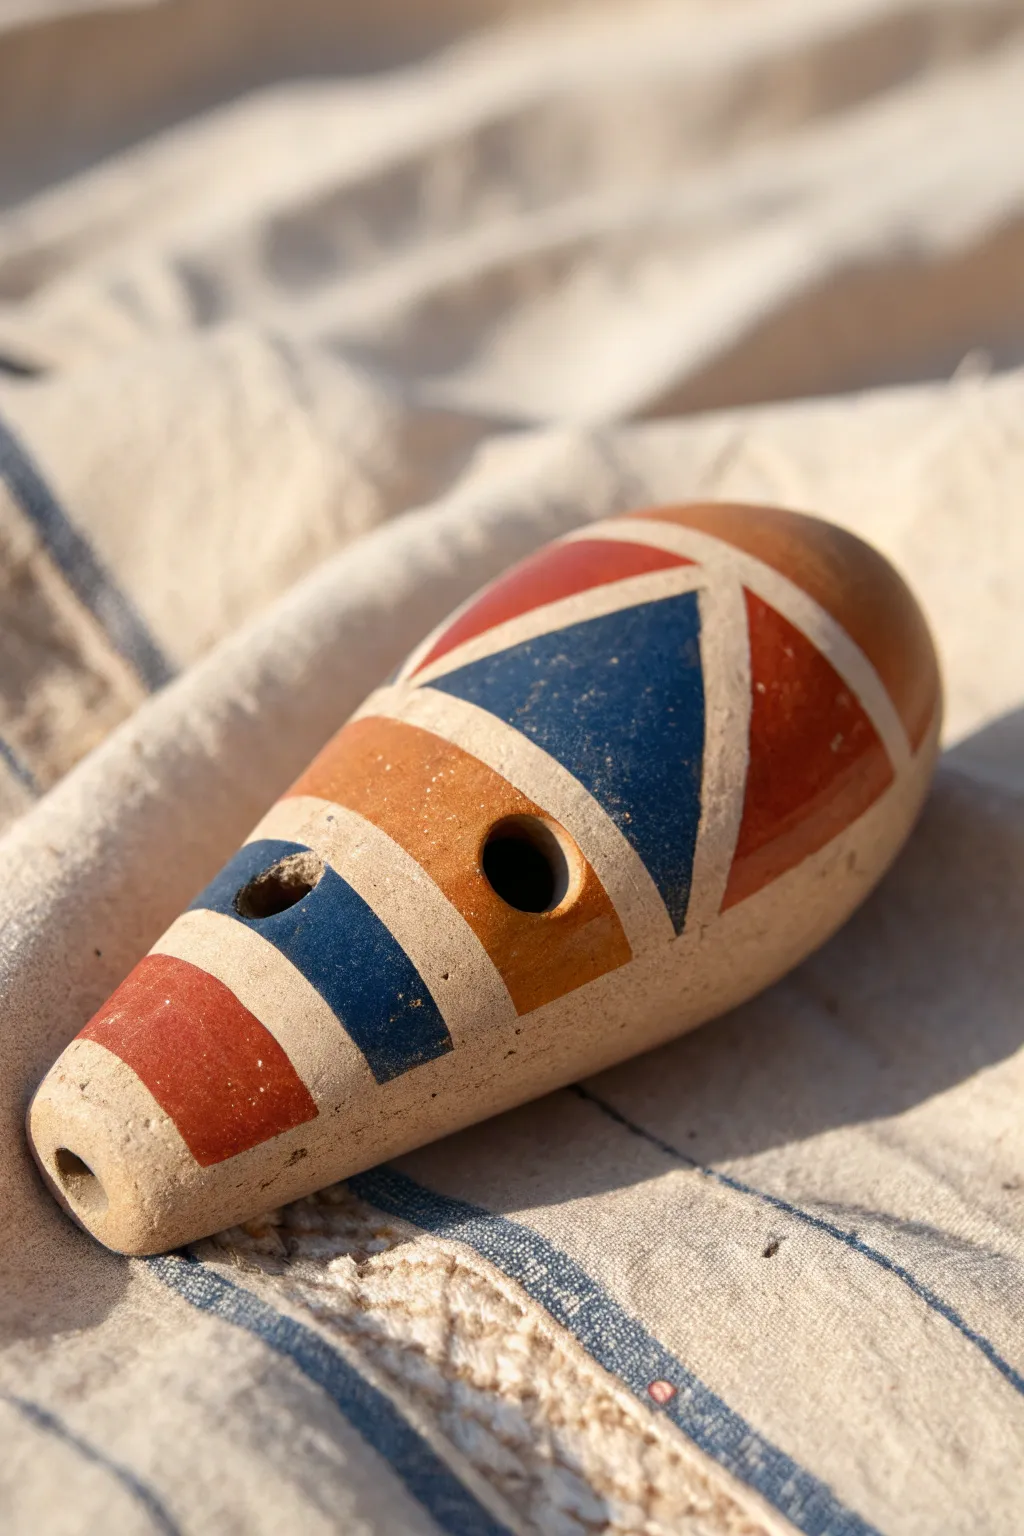
This charming ceramic whistle combines a classic ocarina shape with striking, modern geometric patterns. The bold red and blue color blocks against the natural clay background create a timeless folk-art aesthetic that looks as good as it sounds.
Step-by-Step Tutorial
Materials
- White or buff stoneware clay (low grog for smoothness)
- Popsicle stick or wooden modeling tool
- Fettling knife
- Small loop tool or drill bit (for holes)
- Underglazes (Terracotta Red/Burnt Orange, Navy Blue)
- Small flat synthetic brush
- Clear matte or satin glaze (optional)
- Small bowl of water
- Sponge
Step 1: Forming the Whistle Body
-
Shape the clay:
Start with a ball of clay roughly the size of a lemon. Roll it between your palms to smooth out any cracks, then gently elongate it into a thick teardrop or torpedo shape. One end should be rounded and bulbous, tapering down to a slightly blunted point at the other end. -
Hollow the form:
Instead of pinching, we will make this as a solid form and hollow it out, or use the pinch pot method for the bulbous end. For accuracy, I prefer to slice the shape in half lengthwise with a fettling knife or wire tool. -
Carve the interior:
Use a loop tool to scoop out the clay from both halves, leaving a consistent wall thickness of about 1/4 inch. Leave the narrow tapered end solid for about an inch to accommodate the mouthpiece mechanism. -
Rejoin the halves:
Score the edges of both halves and apply slip. Press them firmly back together to reform your torpedo shape. Smoothen the seam thoroughly with a wooden rib or your thumb so it disappears completely.
Clear Airway Pro Tip
If the whistle stops making sound after glazing, use a pipe cleaner to carefully clear the windway before the glaze dries. A clogged airway kills the sound
Step 2: Creating the Sound Mechanism
-
Create the mouthpiece:
At the narrow tapered end, gently flatten the very tip. Insert a popsicle stick flat into the end to create the windway. Push it straight in towards the hollow chamber. -
Cut the fipple window:
Flip the whistle over. About an inch from the mouthpiece opening, cut a small rectangular window on the underside (or top, depending on your design preference). The blade should cut straight down at a 90-degree angle on the side closest to the mouthpiece. -
Create the ramp:
On the side of the window furthest from the mouthpiece, cut at a 45-degree angle to create a sharp ramp or ‘labium.’ This sharp edge is crucial for splitting the air to make sound. -
Test the sound:
With the popsicle stick still in the windway to clear debris, gently blow through the mouthpiece. Adjust the angle of the ramp until you get a clear, distinct tone. Once it whistles, remove the stick carefully. -
Add finger holes:
Using a small drill bit or hole cutter, create two holes on the top surface of the whistle. Place them where your fingers naturally rest when holding the instrument. Test the sound again after drilling each hole to ensure the pitch changes.
Level Up: Surface Texture
Before painting, try burnishing the unpainted ‘negative space’ areas with a smooth stone or spoon back. The contrast between rough paint and smooth clay is stunning
Step 3: Geometric Decoration
-
Plan the design:
Once the clay is leather hard, lightly sketch your geometric bands using a needle tool or pencil. The design features alternating bands and triangles. -
Outline the first band:
Near the mouthpiece, mark a diagonal band. Moving up the body, draw a wider band, and then majestic triangular shapes near the bulbous end. Use the natural clay lines as boundaries. -
Apply the red ungerglaze:
Using a small flat brush, fill in the bottom band (closest to the mouthpiece) and the large rear triangle sections with the terracotta/burnt orange underglaze. Apply 2-3 coats for opacity. -
Apply the blue underglaze:
Paint the central triangular section or middle diagonal band with the navy blue underglaze. Be careful to keep your edges crisp; a steady hand is key here. -
Leave negative space:
Crucially, leave strips of unpainted clay between your colored sections. These beige lines act as outlines and give the piece its distinctive graphic look. -
Clean up edges:
If any paint smudged into the negative space, use a clean, slightly damp brush or a scratch tool to gently scrape it away, re-exposing the clean clay body. -
Bisque fire:
Let the whistle dry completely (slowly, to prevent cracking). Fire it to cone 04 (or your clay’s specific bisque temperature). -
Final glaze (Optional):
For a sleek finish, dip the whistle in a clear glaze, ensuring you shake out any excess glaze from the inside chamber so it doesn’t clog the airway. Alternatively, leave it bare for a matte finish like the reference. -
Final firing:
Fire the piece a second time to the maturation temperature of your clay and glaze.
Once fired, you will have a durable, pocket-sized instrument ready for impromptu folk tunes
One Finger Hole Upgrade for a Two-Note Whistle

This elegant clay whistle takes a classic bird form and elevates it with a carved wing motif that cleverly houses the tuning holes. The unglazed finish highlights the natural stone-like texture, making it as beautiful to look at as it is to play.
Step-by-Step
Materials
- Light stoneware or earthenware clay (grog-free is smoother)
- Popsicle stick or clay modeling tool
- Fettling knife
- Small drill bit or round stick (approx. 3-4mm)
- Water and slip
- Sponge
Step 1: Forming the Body
-
Roll your pinch pot base:
Start with a ball of clay roughly the size of a tangerine. Holding it in your palm, press your thumb into the center to open up a standard pinch pot shape, keeping the walls even—about 1/4 inch thick is ideal. -
Close the form:
Gently curve the walls inward until they meet at the top, trapping a pocket of air inside. Pinch the seam thoroughly together to seal it completely, creating a hollow sphere. -
Shape the bird:
Hold the hollow sphere and gently coax it into an egg shape. Pinch one side to pull out a small, tapered tail, and mold the opposite side upward to form the head and neck. -
Create the beak:
At the top of the neck, pinch a tiny amount of clay forward to form a small, triangular beak. Use your thumb to smooth the transition from the beak to the forehead.
No Sound?
If you hear rushing air but no whistle, the air isn’t hitting the splitting edge correctly. Re-insert the stick and adjust the angle of the splitting edge up or down slightly.
Step 2: Creating the Whistle Mechanism
-
Make the mouthpiece:
Pinch the tail end into a rectangular shape. Insert a flat popsicle stick into the end of the tail, pushing it straight toward the hollow cavity to create the windway. -
Cut the fipple window:
On the underside of the bird (or the top, depending on your preference, though this design hides it well), cut a small square window about an inch from the mouthpiece end. The bevel should be sharp and angled at 45 degrees to split the air. -
Align and test:
Re-insert your stick into the mouthpiece and ensure it lines up perfectly with the sharp edge of your window. Give a gentle blow to test for a clear whistle sound before moving on.
Step 3: Adding the Wing & Tuning Holes
-
Outline the wing:
Using a needle tool or a dull pencil, lightly sketch a teardrop-shaped wing on the side of the bird’s body. The wing should swoop back toward the tail. -
Carve the relief:
I prefer to use a loop tool here to carve away a shallow layer of clay around the bottom curve of the wing. This makes the wing look slightly raised and gives the bird its distinctive sculpted look. -
Pierce the first tuning hole:
Locate the thickest part of the wing relief. Using your small round tool or drill bit, punch a clean hole through the clay wall into the hollow chamber. -
Add the second hole:
Place a second hole a short distance behind the first one, still within the wing shape. Blowing into the whistle while covering and uncovering these holes should now produce different notes.
Clean Notes Only
After punching your tuning (finger) holes, clean the inside of the hole with a small brush. Any clay burrs or crumbs dangling inside the chamber can interfere with the clear tone.
Step 4: Refining and Finish
-
Add the eye:
Press a small round indent or hole on the head for the eye. Keep it simple to match the minimalist aesthetic. -
Smooth the surface:
Dip your finger or a sponge in a tiny bit of water and smooth over the entire surface. Pay special attention to the beak and the ridge we created around the wing. -
Texture the surface (optional):
For that stone-like appearance seen in the photo, gently pat the surface with a rough sponge or a stiff brush to remove tool marks and add a subtle grain. -
Dry slowly:
Let the bird dry under a loose plastic sheet for a day to equalize moisture, then uncover it to dry completely before firing.
Once fired, this little bird will have a lovely tactile feel and a sweet, multi-note song to share
Mini Ocarina-Style Whistle With a Few Easy Holes

This rustic, handheld wind instrument features a natural terracotta finish and a smooth, organic pod shape. With its simple arrangement of finger holes, it offers a perfect introduction to crafting functional clay whistles without needing complex molds.
Step-by-Step Guide
Materials
- Terracotta clay (or similar earthenware clay)
- Wooden sculpting tool or popsicle stick
- Various sized drill bits or hole cutters (straws work well)
- Small bowl of water
- Sponge
- Wait-free crafting wire or fishing line (for cutting clay)
- Smooth work surface (canvas or ware board)
Step 1: Forming the Body
-
Prepare the Clay:
Start with a ball of terracotta clay roughly the size of a lemon. Knead it well to remove any air bubbles, which is crucial for preventing cracks during firing. -
Shape the Basic Form:
Roll the clay between your palms to create a smooth oval. Gently taper both ends to form an elongated football or seed pod shape, keeping the center thick. -
Hollow the Vessel:
If you are working with a solid piece, slice it in half lengthwise carefully. Use a loop tool or spoon to hollow out the insides, leaving a consistent wall thickness of about 1/4 inch. -
Rejoin the Halves:
Score the edges of both hollowed halves with a needle tool and apply a little water or slip. Press them back together firmly to seal the pod shut again. -
Smooth the Seam:
Using your thumb or a wooden rib, blend the clay across the seam line until it completely disappears. The surface should look continuous and organic.
Step 2: Creating the Sound Mechanism
-
Form the Mouthpiece:
On one of the tapered ends, flatten the tip slightly to create a comfortable place for your lips. This doesn’t need to be perfectly square, just defined enough to blow into. -
Create the Airway:
Insert a flat sculpting tool or a popsicle stick into the mouthpiece end to create the windway. Push it straight in, parallel to the top surface of the pod. -
Cut the Window:
On the top surface of the whistle, measure about an inch down from the mouthpiece. Cut a small square hole (the window) with a sharp knife. -
Create the Bevel:
This is the tricky part: looking into the square window, carve the edge furthest from the mouthpiece into a sharp 45-degree ramp (the labium). The air fro the windway must split against this sharp edge. -
Test the Sound:
Before adding finger holes, clear any debris and blow gently. If it doesn’t whistle, adjust the angle of the splitting edge until you get a clear tone.
No Sound?
If you hear only rushing air, the windway isn’t aligning with the splitting edge. Re-insert your stick and adjust the splitting edge up or down until it perfectly bisects the air stream.
Step 3: Adding Notes & Finish
-
Plan Hole Placement:
Lightly mark where you want your finger holes. As seen in the reference, these can be somewhat irregular for an aesthetic look, varying in size. -
Punch the Holes:
Use different sized hole cutters or straws to punch out the clay. I find that twisting the tool as you remove it helps keep the hole clean. -
Clean the Edges:
Once the clay is leather hard, go back and smooth the rim of every hole with a damp sponge or finger to remove sharp burrs. -
Final Surface Smoothing:
Wipe the entire exterior with a damp sponge to remove fingerprints and bring up the fine clay particles for a smoother finish. -
Drying:
Let the ocarina dry slowly under loose plastic for a day, then uncover it to dry completely before firing. -
Firing:
Fire the piece according to your clay manufacturer’s instructions, typically to cone 04 for earthenware.
Burnished Texture
For the smooth, natural sheen seen in the photo, rub the leather-hard clay with the back of a spoon. This compresses the surface and creates a soft gloss without glaze.
Enjoy the deep, earthy tones of your handmade instrument once it comes out of the kiln