Whenever I want a project that’s equal parts calming and cute, I reach for clay wind chimes—they’re basically little hanging sculptures that get to dance in the breeze. Here are my favorite clay wind chime ideas that feel totally doable, whether you’re using air-dry clay, polymer clay, or traditional ceramic clay.
Hand-Painted Clay Disc Chime
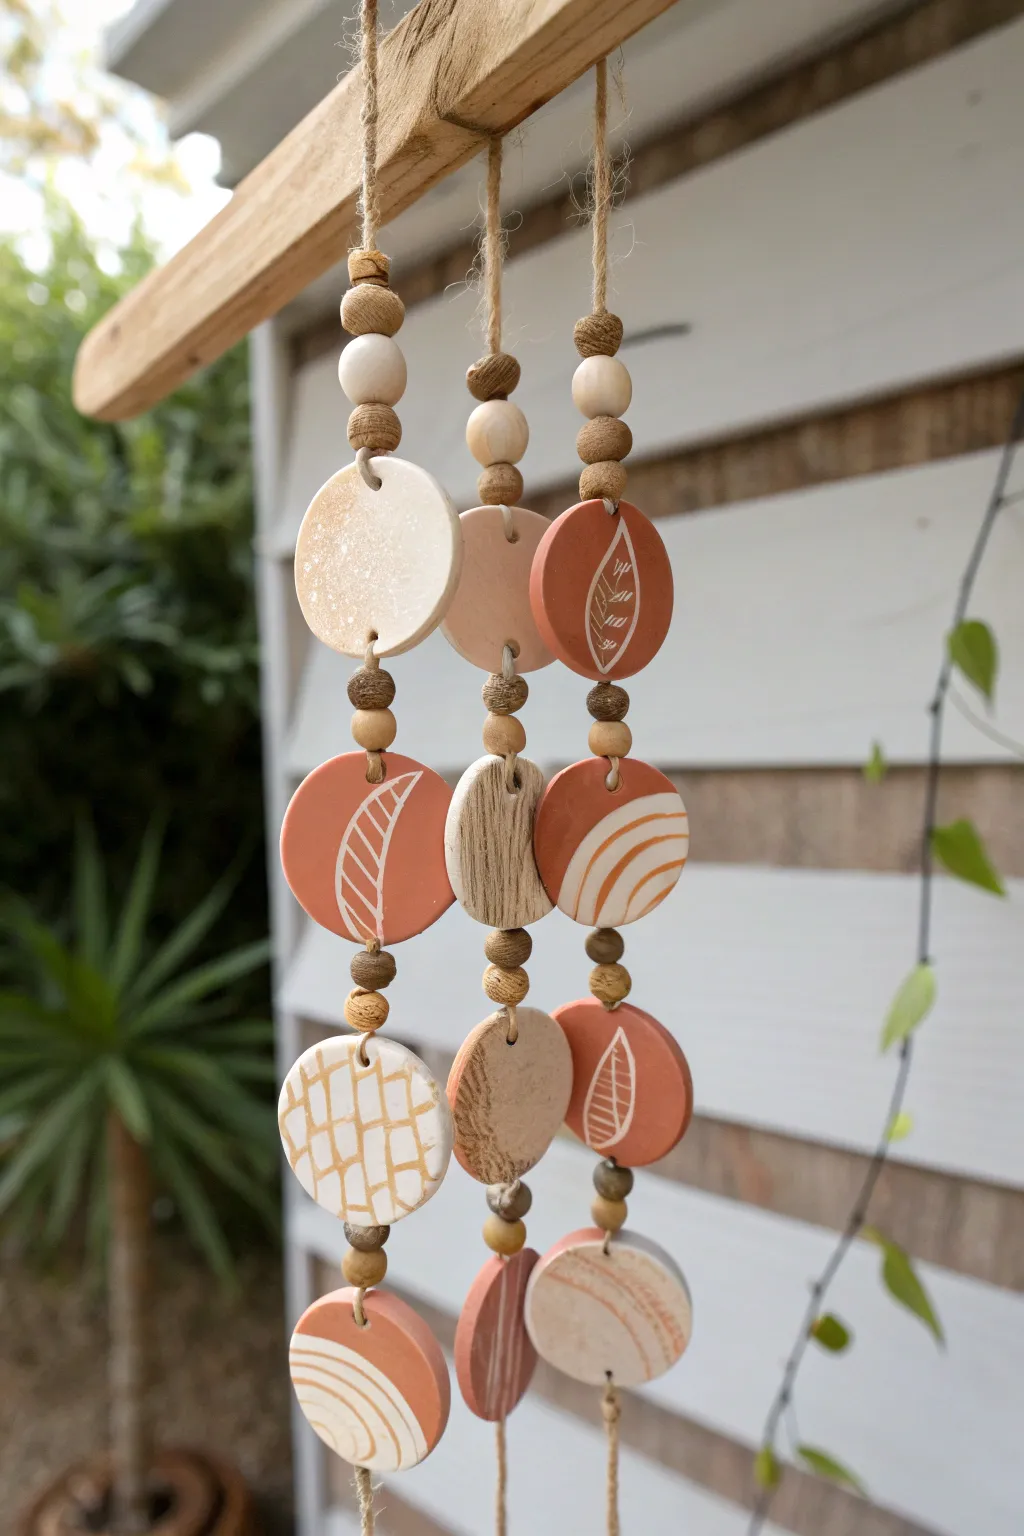
Bring earthy charm to your outdoor or indoor space with this textured wind chime featuring hand-painted clay discs. The warm terracotta and neutral tones create a relaxed, bohemian vibe perfect for swaying in a gentle breeze.
Step-by-Step Guide
Materials
- Air-dry clay (terracotta/white) or polymer clay
- Rolling pin
- Circle cookie cutters (approx. 2-3 inches)
- Wooden dowel or skewer (for holes)
- Acrylic paint (white/cream)
- Fine detail paintbrush
- Wooden beads (assorted sizes/tones)
- Jute twine or hemp cord
- Driftwood branch or wooden hanger
- Sandpaper (fine-grit)
- Clear sealant (optional, for outdoor use)
Step 1: Crafting the Clay Discs
-
Prepare your workspace:
Lay down a clean, non-stick surface like parchment paper or a silicone mat. Gather your clay—using a mix of white and terracotta clay creates that lovely varied look seen in the photo. -
Roll out the clay:
Take a portion of clay and roll it out evenly until it is about 1/4 inch thick. Try not to go too thin, as the discs need weight to hang properly. -
Cut the shapes:
Using your circle cutter, stamp out 12 individual discs. If you want variety, you can use slightly different sized cutters, but uniformity works well here too. -
Create hanging holes:
While the clay is still wet, use a wooden dowel or skewer to poke a hole near the top and bottom of 8 discs. The bottom 4 discs only need a top hole. -
Add texture (optional):
For the textured sandy-looking discs, gently press a piece of rough fabric or sandpaper into the wet clay surface before cutting to create a subtle relief pattern. -
Smooth the edges:
Dip your finger in a little water and gently run it along the cut edges of each circle to smooth out any roughness. -
Let them dry:
Arranging them flat on a drying rack, allow the clay to dry completely according to the package instructions. This usually takes 24-48 hours for air-dry clay.
Uneven Hanging?
If discs tilt forward, the balance is off. Try re-tying knots tighter against the hole or adding a small dab of glue to fix the twine to the back of the disc.
Step 2: Painting and Decorating
-
Sand imperfections:
Once fully dry, lightly sand any sharp edges or bumps with fine-grit sandpaper for a professional finish. -
Plan your designs:
Look at the inspiration image: some discs have leaf veins, others have geometric arches, and some feature a grid pattern. -
Paint the leaf pattern:
Using a fine detail brush and cream acrylic paint, paint a simple vertical line down the center of a terracotta disc. Add small, angled dashes coming off the center line to mimic veins. -
Paint the geometric arches:
On another smooth disc, start at the bottom edge and paint concentric curved lines creating a rainbow or sun arch shape. -
Paint the grid texture:
For the grid look, paint irregular intersecting lines across the face of a white or light-colored disc to mimic a stone or mosaic pattern. -
Seal the artwork:
If hanging outdoors, I recommend applying a coat of matte clear sealant to protect the paint and clay from moisture.
Step 3: Assembly
-
Cut the twine:
Cut three long lengths of jute twine, each about 3-4 feet long, to allow plenty of room for knotting and adjusting. -
Attach to the hanger:
Tie each piece of twine securely onto your driftwood or wooden hanger, spacing them evenly apart. -
Start the top tier:
Thread a wooden bead onto the twine, sliding it up to the hanger. Tie a knot underneath the bead to hold it in place. -
Suspend the first disc:
Thread the twine through the top hole of your first disc, then out through the bottom hole. You may need to secure it with knots above and below the disc to keep it from sliding. -
Add spacer beads:
Thread a small wooden bead, tie a knot, then thread a larger bead and knot again. This spacing creates the visual rhythm between the clay pieces. -
Complete the strand:
Repeat the process until you have 4 discs on each strand, finishing with the discs that only have a top hole. -
Final adjustments:
Hang the chime up and check that the strands look balanced. Trim any excess twine from the bottom knots for a clean look.
Level Up: Audio
Use actual ceramic clay and kiln-fire it for a pleasant tinkling sound, or hang small brass bells at the very bottom of each strand to add music.
Hang your new creation in a sunny spot and enjoy the rustic elegance it brings to your home decor


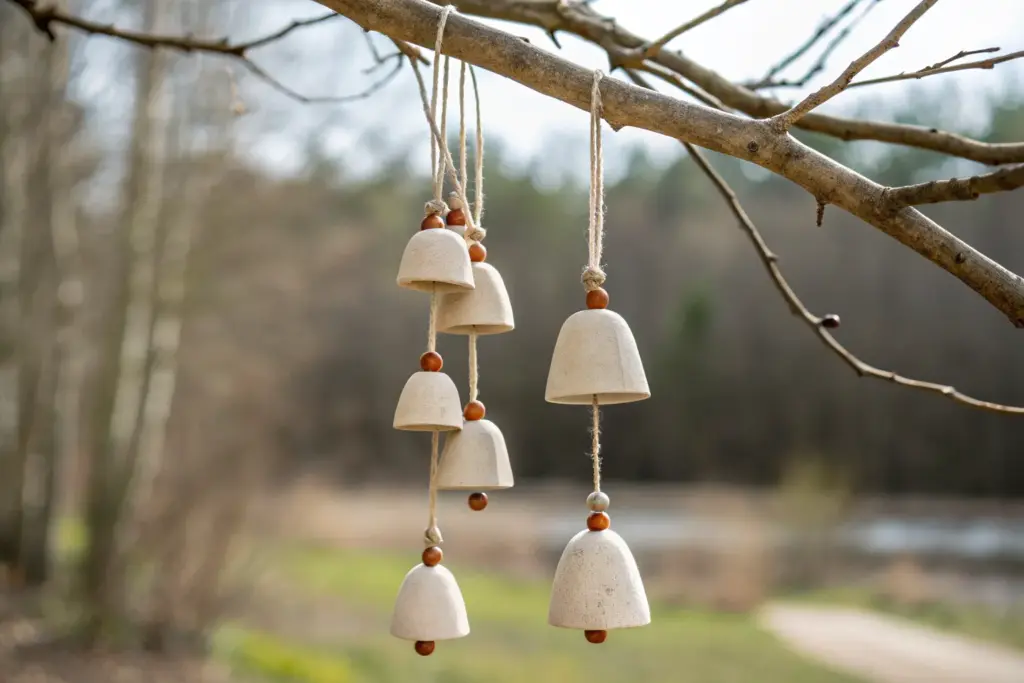
Simple Bell Cups With a Center Clapper
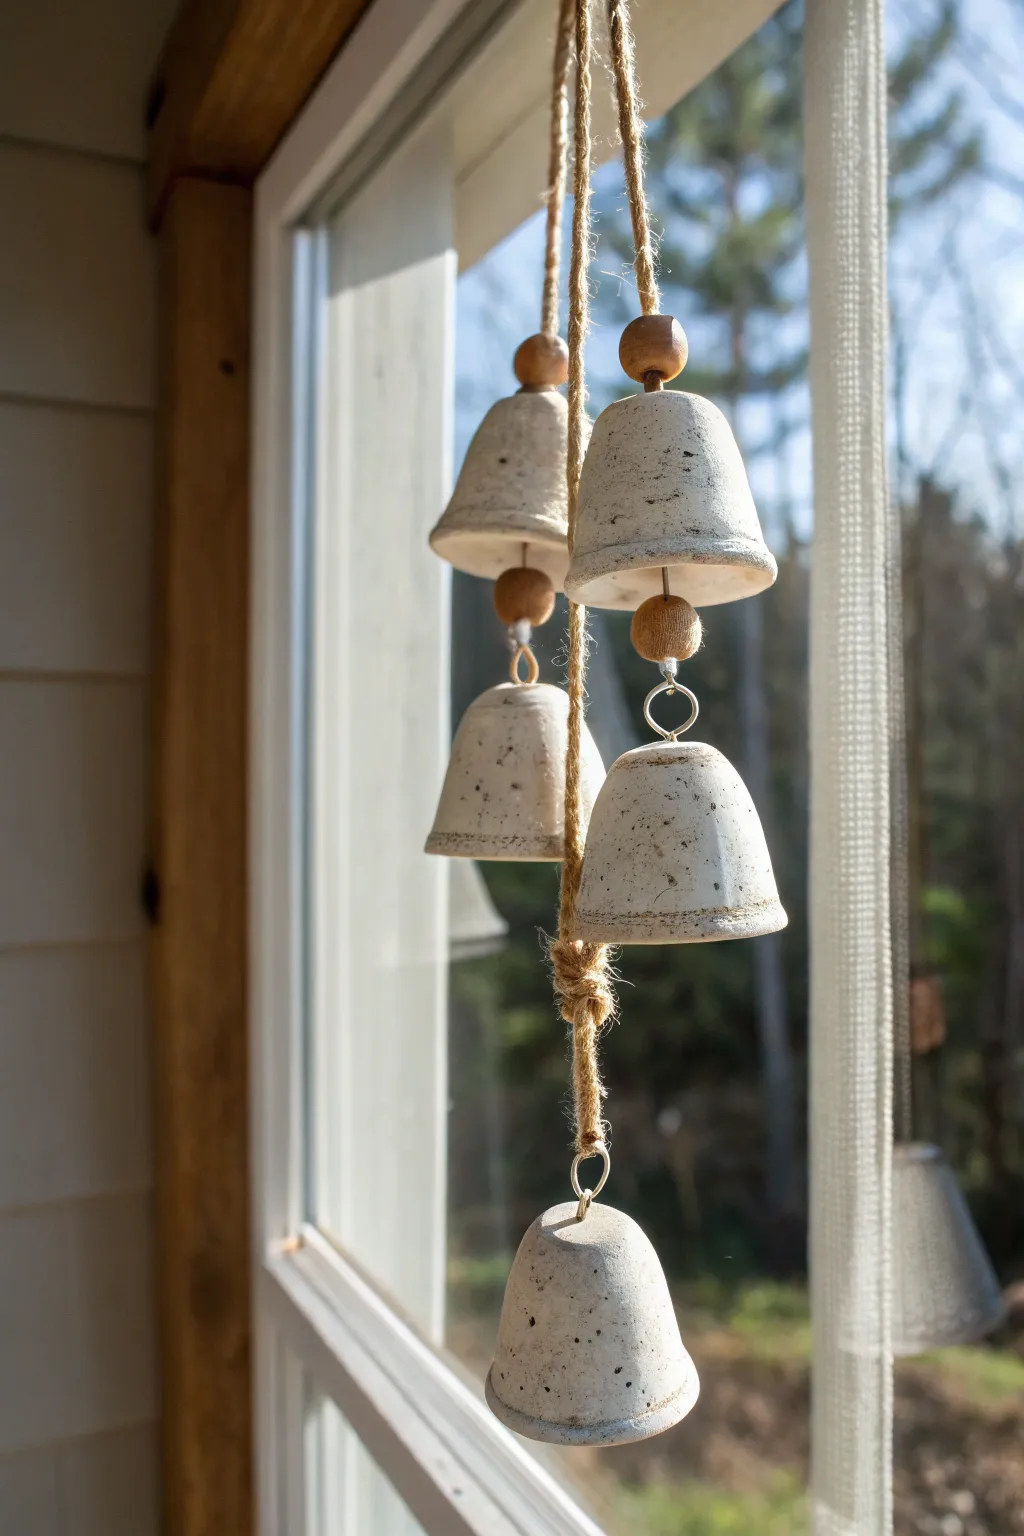
These charming, rustic wind chimes feature simple bell-shaped cups with a lovely speckled finish, strung together with natural jute for an earthy aesthetic. The organic variations in the clay and the gentle clinking sound make them a perfect addition to a cozy window nook or porch.
Step-by-Step Tutorial
Materials
- White polymer clay (or air-dry clay if you prefer not to bake)
- Speckled pottery glaze or acrylic paint mixed with fine sand/glitter
- Rolling pin
- Small cup or cookie cutter (approx. 2-3 inches diameter)
- Small eye hooks or wire loops
- Jute twine or hemp cord
- Wooden beads (various sizes, unvarnished)
- Ceramic sealant or varnish (optional)
- Small paintbrush
- Skewer or toothpick
Step 1: Shaping the Bells
-
Prepare the Clay:
Begin by conditioning your polymer clay until it is soft and pliable. If you want that authentic speckled ceramic look straight from the start, mix in a pinch of cracked black pepper or dried used coffee grounds into the white clay before rolling. -
Roll Out Slabs:
Roll the clay out evenly to a thickness of about 1/4 inch. You want it thick enough to be durable but not too heavy to hang. -
Cut Circles:
Use your cutter or a small cup to cut out five clean circles. These will become your bell forms. -
Form the Dome:
Gently drape a clay circle over your thumb or a rounded object like a small ball or egg cup. Smooth the clay down the sides to create a bell shape. -
Refine the Shape:
While supporting the inside, gently pinch and flare the bottom rim slightly outward to give it that traditional bell silhouette. I like to smooth out any fingerprints with a drop of baby oil. -
Create Hanging Holes:
Using a skewer or toothpick, poke a distinct hole through the very top center of each bell dome. Ensure the hole is large enough for your jute twine to pass through later. -
Baking or Drying:
Follow the manufacturer’s instructions for your specific clay. For polymer clay, bake on a parchment-lined sheet. For air-dry clay, let them sit undisturbed for 24-48 hours until fully hardened.
Step 2: Finishing and Assembly
-
Faux Glaze Technique:
Once cool and hard, paint the bells. To mimic the stoneware look in the photo, use a cream or off-white acrylic paint. If you didn’t mix speckles into the clay earlier, use an old toothbrush to flick tiny droplets of diluted brown or black paint onto the surface. -
Seal the Finish:
Apply a coat of satin or matte varnish to protect the paint and give the bells a finished ceramic sheen. -
Cut the Cord:
Cut a long length of jute twine, approximately 3 to 4 feet, depending on how low you want the chimes to hang. You’ll need a main central cord and two side cords. -
Attach the Top Strand:
Fold your main long loop of twine in half and tie a knot at the top to create a hanging loop. This project uses a thick, braided look at the top, so you might braid three strands of jute together for the upper section. -
Stringing the Top Bells:
Thread a wooden bead onto one strand of the twine, sliding it up to where you want the first bell. Make a knot securely below the bead so it stays in place. -
Adding the Bell:
Thread the twine through the top hole of a bell, resting the bell on top of the wooden bead you just secured. The bead acts as the internal stopper. -
Secure the Bell:
Thread another wooden bead onto the twine immediately below the bell and knot underneath it. This sandwiches the bell in place but allows it some movement. -
Spacing the Second Tier:
Measure about 3-4 inches down the cord and repeat the process with the next bell on a separate strand of twine joined at the main knot. -
Creating the Clappers:
For the clapper mechanism that makes noise, ensure a bead or the bell below hits the rim of the bell above. In this design, the lower bells act as clappers for the ones above, interacting as they sway. -
Final Assembly:
Continue attaching bells at staggered heights. The central strand should hang lowest with a single bell at the bottom. -
Knotting the Bundle:
Gather your strands together at the central point where they diverge. Use a separate piece of jute to wrap a ‘gathering knot’ around all strands, hiding the joins and creating that rustic bundled look seen in the photo. -
Trim and Hang:
Trim any excess twine tails ensuring your knots are tight. Hang your new chimes in a sunny spot and enjoy their gentle movement.
Natural Texture
Add texture to the wet clay by gently pressing a piece of linen or canvas onto the surface before shaping. This subtle fabric weave enhances the rustic, organic feel.
Uneven Hanging?
If a bell tilts too much to one side, the top hole might be off-center. Simply add a small dab of glue or clay inside the top dome to counter-weight the lighter side until it hangs straight.
Listen for that gentle clatter as the breeze catches your new handmade bells


Leaf-Imprint Slab Chime Strands
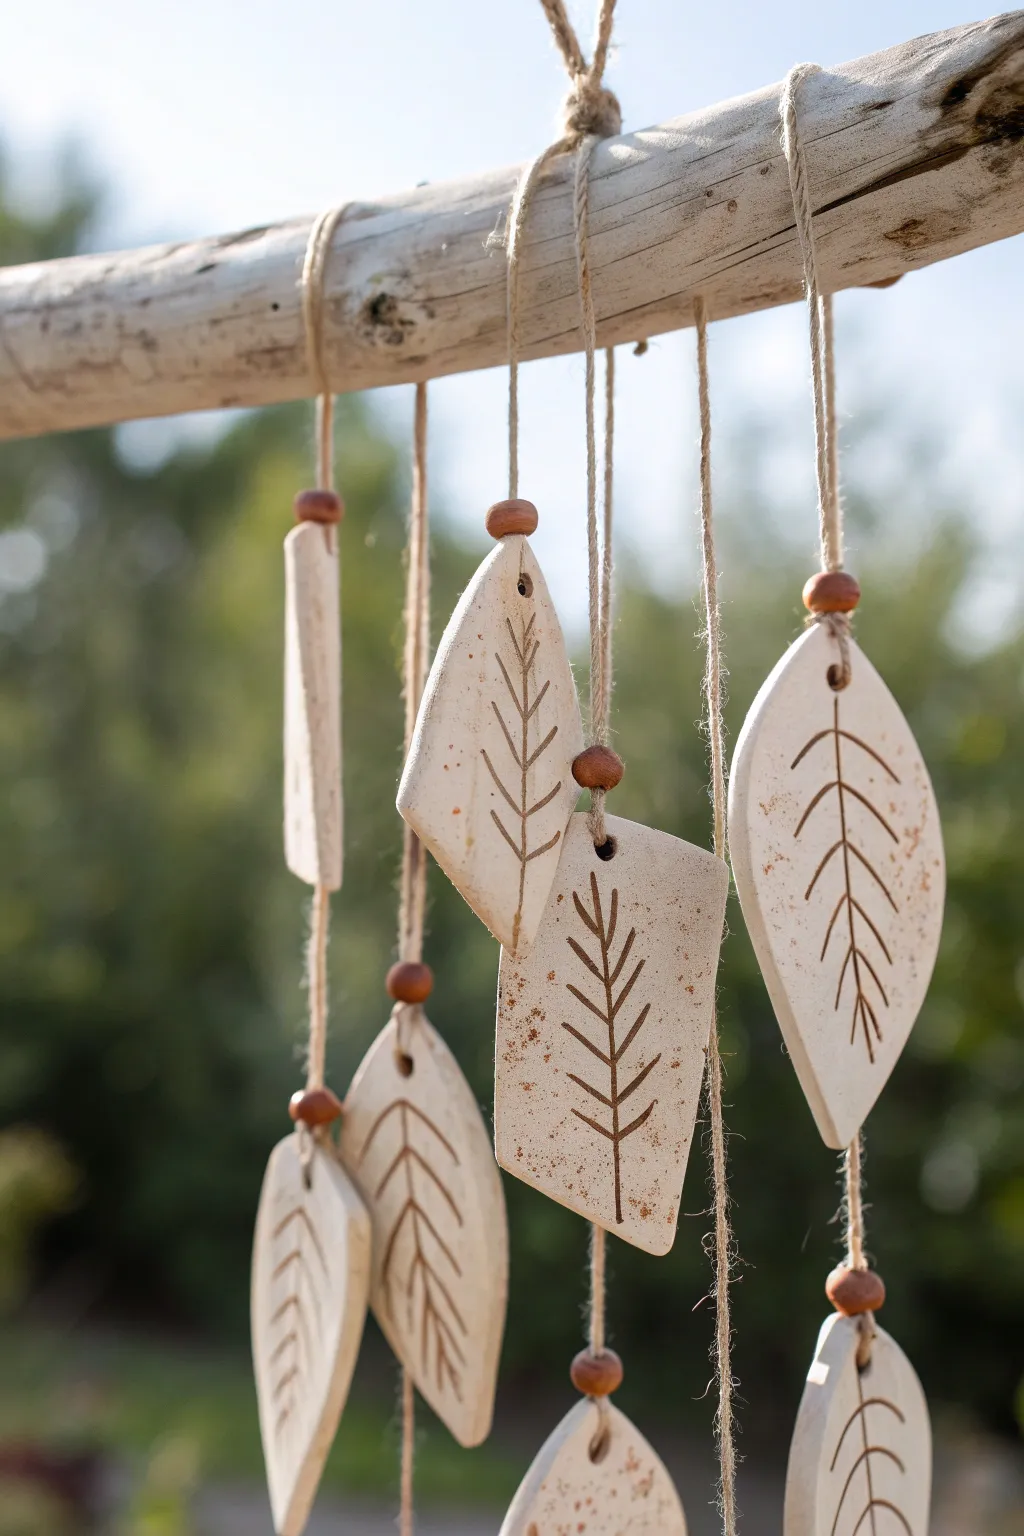
Bring a natural, earthy melody to your garden or porch with these slab-built clay chimes. Featuring hand-carved botanical motifs and rustic twine accents, these durable stoneware pieces sway gently from a weathered driftwood branch.
Step-by-Step
Materials
- White or speckled stoneware clay (low-fire or air-dry, depending on kiln access)
- Rolling pin
- Canvas or heavy cloth (for rolling)
- Needle tool or sharp knife
- Carving tool (or dull pencil) for veins
- Small circular cutter or straw (for holes)
- Driftwood branch or sturdy stick (approx. 12-18 inches)
- Jute twine or hemp cord
- Wooden beads (various sizes, reddish-brown tones)
- Sponge and water
- Clear matte varnish (if using air-dry clay) or clear glaze (if firing)
Step 1: Shaping the Clay Slabs
-
Prepare the workspace:
Lay down your canvas or heavy cloth on a flat table. This prevents the clay from sticking and adds a subtle texture to the back of your pieces. -
Roll out the slab:
Take a manageable chunk of clay and roll it out evenly until it is about 1/4 inch thick. Aim for a consistent thickness so all pieces dry at the same rate. -
Cut the shapes:
Using a needle tool or a sharp knife, freehand cut geometric leaf shapes. Create a mix of elongated ovals, tapered diamonds, and soft rectangles to match the variety seen in the example. -
Smooth the edges:
Dip a small sponge in water and gently run it along the cut edges of each shape to soften any sharp corners or burrs left by the knife. -
Create hanging holes:
Use a straw or a small circular cutter to punch a hole at the very top of each shape. Make sure the hole isn’t too close to the edge to prevent tearing during hanging.
Fixing warped slabs
If your clay shapes curl up while drying, dampen the concave side slightly and place a heavy board or book on top of them overnight to flatten.
Step 2: Etching and Finishing
-
Carve the central vein:
Take your carving tool and draw a straight vertical line down the center of each shape, stopping just before the bottom edge. -
Add side veins:
Etch diagonal lines branching off the central stem. vary the spacing; some leaves look better with sparse veins, while others can be denser. -
Add rustic speckling (optional):
If your clay isn’t naturally speckled, you can flick a toothbrush loaded with diluted brown iron oxide or watered-down brown acrylic paint over the surface for that weathered look. -
Dry the pieces:
Lay the shapes flat on a wire rack or between boards to dry slowly. I prefer to flip them over once a day to prevent warping. -
Protect or fire:
If using stoneware, bisque fire and then glaze (or leave bare for a raw look) and high fire. If using air-dry clay, apply two coats of clear matte varnish to seal them against humidity.
Step 3: Assembly
-
Prepare the drill:
If your driftwood doesn’t have holes, use a small drill bit slightly larger than your twine to drill 5-7 holes spaced evenly along the branch. -
Cut the suspension cords:
Cut lengths of jute twine. You’ll need varying lengths—some short for single leaves, some much longer to hold two or three shapes in a vertical tier. -
String the top section:
Thread a piece of twine through a hole in the driftwood. Tie a sturdy knot on top to secure it. -
Add beads and clay:
Thread a wooden bead onto the hanging twine, followed by your first clay leaf. Tie a knot underneath the leaf to hold it in place, or loop the twine through the leaf hole and back up if you prefer the loop look. -
Create tiers:
For lower tiers, tie a knot further down the same string, add another bead, and attach a second clay shape. Vary the heights so the chimes hit each other gently when the wind blows. -
Create the main hanger:
Cut a thick piece of rope or braided twine. Tie it securely to both ends of the driftwood branch to create the main hanging loop.
Use wax resist
Brush liquid wax into the carved vein lines before glazing. This keeps the lines raw and creates beautiful contrast with the finished surface.
Hang your new handcrafted mobile in a breezy spot and enjoy the soft clinking sound of the ceramics.


Mushroom Toadstool Garden Wind Chime
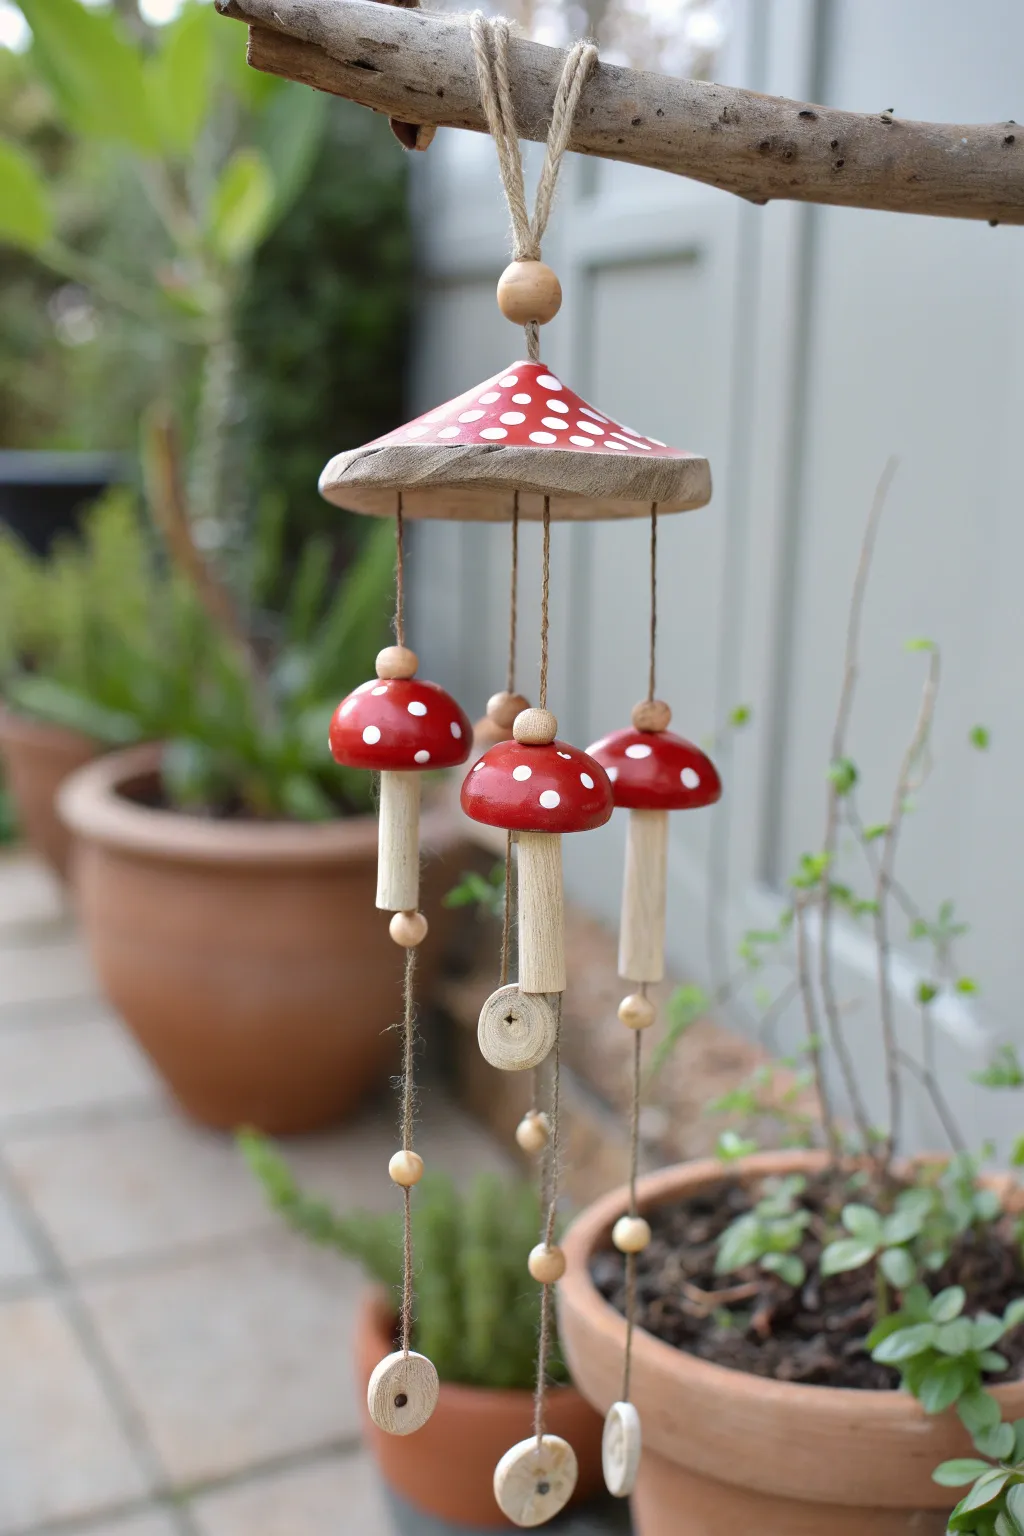
Bring a touch of fairy-tale charm to your patio with this delightful mushroom-themed wind chime. Crafted from wood and painted with classic red-and-white toadstool patterns, it creates a gentle, natural clatter in the breeze.
Step-by-Step Tutorial
Materials
- Lightweight wood pieces (balsa or pine) or air-dry clay
- Jute twine or hemp cord (thin variety)
- Small wooden beads (approx. 10mm, natural finish)
- Red acrylic paint (bright scarlet)
- White acrylic paint
- Matte or satin outdoor varnish
- Small paintbrushes (flat and detail)
- Hand saw or carving knife (if using wood)
- Sandpaper (medium and fine grit)
- Drill with very small bit (2mm)
- Driftwood branch for hanging (optional)
Step 1: Shaping the Mushroom Caps
-
Carve the main canopy:
Start by creating the large top piece. Cut a circular disk from wood about 3-4 inches in diameter. Gently sand the top edges to curve them downward, creating a shallow dome shape similar to a mushroom cap. -
Shape the small caps:
For the three hanging chimes, shape three smaller dome pieces, approximately 1.5 inches wide. These should be more rounded, like buttons. Sand them until smooth to ensure the paint adheres well. -
Create the stems:
Cut three cylinder shapes from wooden dowels or carve them from your wood block. These should be about 2-3 inches long. Taper them slightly if you prefer a more organic look, or keep them straight. -
Make the clappers:
Cut four small flat wooden discs (about 0.75 inch diameter). Three will go at the very bottom of the strings to catch the wind, and one serves as a connector. Drill a center hole in every piece: large cap, small caps, stems, and discs.
Step 2: Painting and Detailing
-
Base coat the caps:
Paint the top surface of the large canopy and the three smaller mushroom caps with bright red acrylic paint. I find two thin coats work better than one thick one to avoid brush strokes. -
Add the spots:
Once the red is fully dry, use a small detail brush or the handle end of a paintbrush to dot on white spots. vary the sizes slightly for a natural look. -
Seal the wood:
Leave the undersides of the caps, the stems, and the beads natural wood. Apply a coat of outdoor varnish over all wooden parts (painted and unpainted) to protect them from weather.
Knot Slipping?
If your knots slip through the drilled holes, simply thread a small seed bead or washer onto the string before making the knot to create a larger stopper.
Step 3: Assembly and Stringing
-
Prep the main hanger:
Cut a length of jute twine about 10 inches long. Thread a large wooden bead onto the middle, then fold the twine in half and knot it above the bead to create a hanging loop. -
Attach the main canopy:
Pass the two loose ends of your hanging loop down through the center hole of the large mushroom cap. Secure it underneath with a knot or another small bead so the cap sits firmly. -
Assemble the chime strands:
Cut three lengths of twine, each about 15-18 inches long. For each strand, start by threading the top end through a hole in the large main canopy (you’ll need to drill three evenly spaced holes near the center). -
Secure the strands:
Knot the twine above the main canopy so it hangs down. Now, string the components in this order: a small wooden bead, the small red mushroom cap, the wooden stem, another bead. -
Add the wind catchers:
Leave about 4-6 inches of string hanging below the mushroom stem. Thread a small wooden bead and then one of the small flat wooden discs at the very bottom. Knot securely below the disc. -
Adjust the lengths:
Before tightening your final knots, hold the chime up. Adjust the string lengths so the mushrooms hang at slightly different heights or strike each other gently if preferred. -
Final check:
Trim any excess twine ends close to the knots. A tiny dab of clear glue on the knots can prevent them from unraveling over time.
Clay Alternative
Make the mushroom shapes from polymer clay instead of wood for easier shaping. Just remember to make the holes before baking the clay.
Hang your new creation in a sheltered spot and enjoy the gentle clatter of your magical garden mushrooms

The Complete Guide to Pottery Troubleshooting
Uncover the most common ceramic mistakes—from cracking clay to failed glazes—and learn how to fix them fast.
Moon Phase Clay Wind Chime
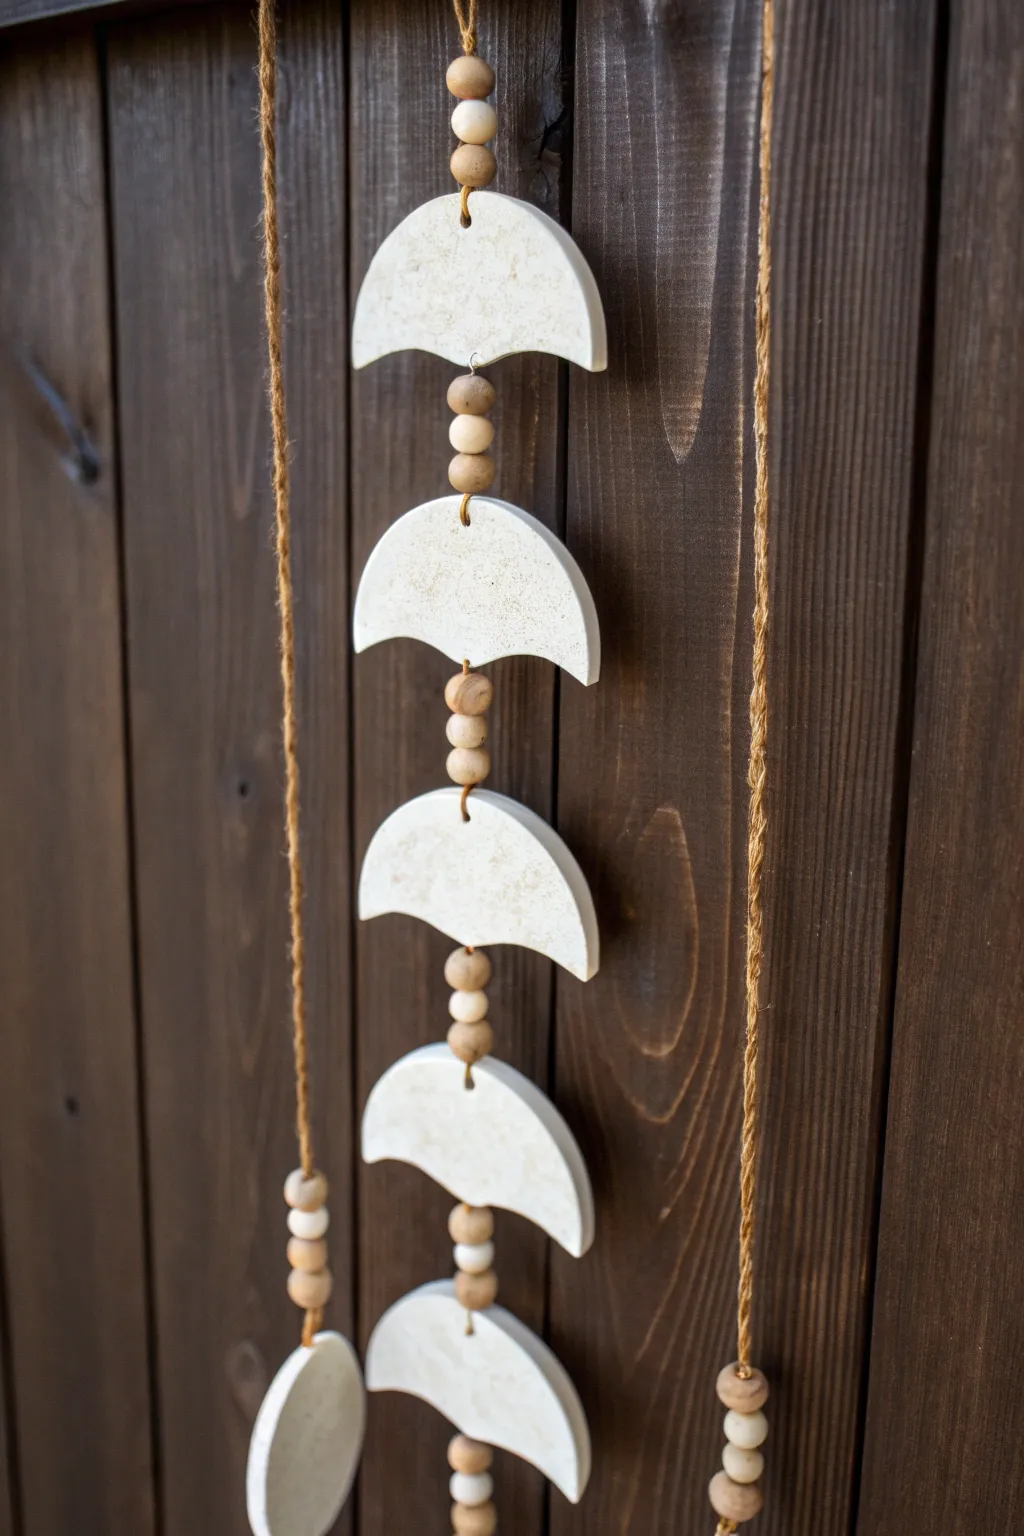
Embrace celestial vibes with this minimalist clay wind chime featuring cascading crescent shapes and natural wood accents. The raw texture of the white clay paired with jute twine creates a calming, earthy aesthetic perfect for any patio or living room wall.
How-To Guide
Materials
- Air-dry clay (white or light grey)
- Rolling pin
- Circle cookie cutters (one large approx. 3-4 inches, one slightly smaller)
- Knife or clay cutting tool
- Wooden beads (assorted sizes: small, medium, large)
- Jute twine
- Straw or skewer (for poking holes)
- Fine-grit sandpaper
- Glossy varnish or sealant (optional)
- Strong scissors
Step 1: Shaping the Crescents
-
Roll the clay slab:
Begin by kneading your air-dry clay to warm it up, then roll it out into an even slab about 1/4 inch thick. Aim for consistent thickness so all pieces dry and hang evenly. -
Cut the base circles:
Using your larger circle cutter, cut out five full circles from the slab. These will form the main bodies of your chime pieces. -
Form the crescent shape:
Take the slightly smaller circle cutter or the same one and overlap it with the bottom half of your cut circles. Press down to remove a curved section from the bottom, creating a thick, downward-facing crescent or arch shape. -
Smooth the edges:
Dip your finger in a little water and gently run it along the cut edges of each clay piece to soften any sharp ridges or burrs.
Cracking Clay?
If you see tiny hairline cracks as the clay dries, mix a small amount of fresh clay with water to make a paste (slip) and fill them in before sanding.
Step 2: Prepping for Assembly
-
Create hanging holes:
Using a straw or skewer, carefully poke a hole directly in the top center and bottom center of four of your crescents. For the bottom-most crescent, you only need one hole at the top. -
Create side accents (optional):
If you want to replicate the full look, cut two simple circle medallions for the side strands and poke a hole through the top and bottom of each. -
Let them dry completely:
Place your clay pieces on a flat surface lined with parchment paper. Allow them to dry for 24-48 hours, flipping them halfway through to ensure even drying and prevent warping. -
Sand for a perfect finish:
Once fully cured and hard, use fine-grit sandpaper to buff away any remaining rough spots or uneven surfaces. Wipe away the dust with a barely damp cloth. -
Seal the clay:
Apply a coat of clear varnish or sealant to protect the clay, especially if you plan to hang this outdoors. I find a matte finish keeps that natural stone look best.
Step 3: Strung Together
-
Cut the main cord:
Cut a long piece of jute twine, approximately 4 feet long, to serve as the central spine of your wind chime. -
Start the sequence:
Tie a sturdy knot at one end of the twine. Thread on three wooden beads—medium, light, medium—to act as the bottom weight. -
Attach the bottom crescent:
Thread the twine through the single top hole of your bottom crescent. Secure it by tying a knot or adding a bead directly inside the curve if needed to hold it in place. -
Add spacing beads:
Thread a sequence of three wooden beads (medium, small, medium) onto the twine. These separate the clay pieces and add visual rhythm. -
Connect the next crescent:
Thread the twine up through the bottom hole of the next crescent and out through the top hole. The clay piece should rest on the beads below it. -
Repeat the pattern:
Continue this alternating pattern—three beads, then a clay crescent—until all five main pieces are strung vertically. -
Secure the top:
After the final top crescent, add a few finishing beads and tie a loop at the top of the twine for hanging. -
Add side strands:
Cut two shorter lengths of twine. Tie beads to the bottom, add your circle medallions, and attach these strands to the main loop or a horizontal dowel if you prefer a wider arrangement.
Add Subtle Color
Knead a drop of tan or terrestrial orange acrylic paint into your white clay before rolling it out to create a marbled, stone-like effect.
Hang your new creation in a spot with good airflow and enjoy the gentle clatter of wood and clay
Bird Silhouette Tile Wind Chime
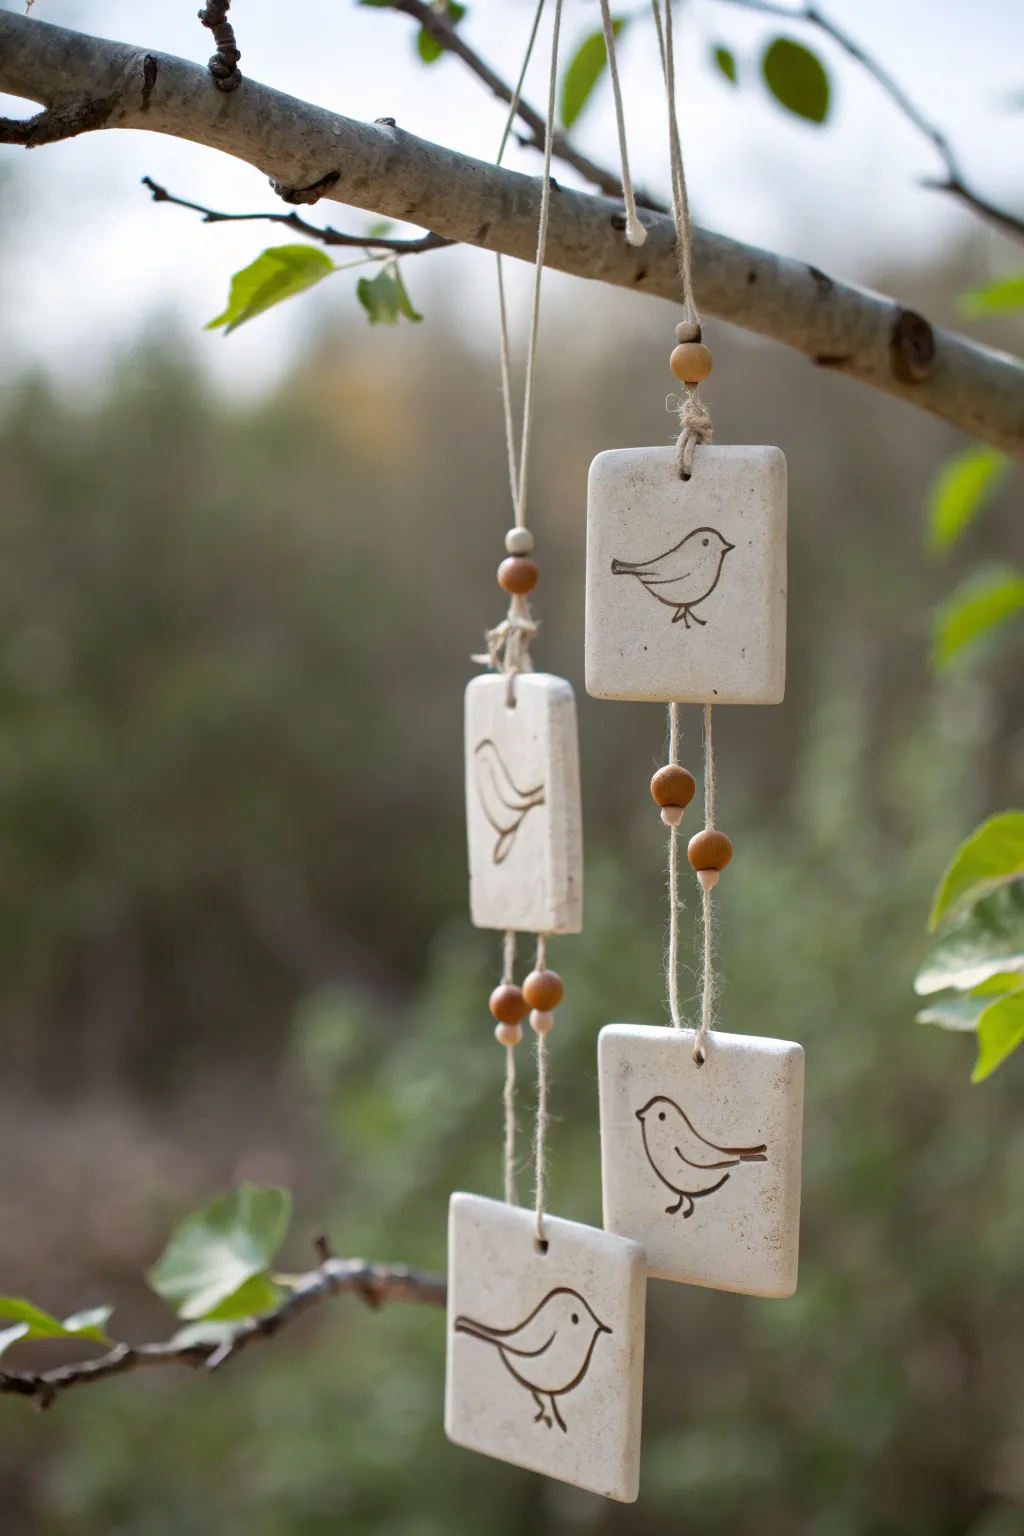
Embrace the simplicity of nature with this charming wind chime featuring hand-stamped clay tiles. Simple line drawings of birds and earthy wooden beads create a serene, minimalist decoration perfect for a garden branch or porch.
Step-by-Step Tutorial
Materials
- Air-dry white clay or polymer clay
- Rolling pin
- Rectangular cookie cutter (approx. 2×3 inches) or craft knife/ruler
- Fine-point stylus tool or toothpick
- Brown acrylic paint or brown permanent marker
- Jute twine or hemp cord
- Small wooden beads (mix of natural and brown)
- Small drinking straw (for making holes)
- Fine-grit sandpaper
- Clear matte sealant spray (optional)
- Small tree branch or driftwood piece
Step 1: Shaping the Clay Tiles
-
Roll out the clay:
Begin by conditioning your clay until it is soft and pliable. Use a rolling pin to flatten it into a smooth slab about 1/4 inch thick. Aim for an even thickness to ensure the tiles hang properly later. -
Cut the rectangles:
Using a rectangular cookie cutter or a ruler and craft knife, cut out four identical rectangles. Smooth the rough edges with a slightly damp finger to remove any burrs. -
Sketch the design:
Lightly trace a simple bird silhouette onto the center of each rectangle using a toothpick. Don’t press too hard yet; just create a faint guide. Vary the poses slightly—one looking left, one right, or one perched—to add character. -
Engrave the lines:
Once you are happy with the faint sketches, use a fine-point stylus tool to firmly press into the lines, creating a deep, clean groove for the bird drawing. Ensure the lines are uniform in depth. -
Create hanging holes:
Use a small drinking straw or a widely tapered tool to poke holes in the clay. For the top and middle tiles, poke a hole centered at the very top and very bottom. For the bottom tile, you only need one hole at the top. -
Allow to dry:
Place the tiles on a flat surface lined with parchment paper. Let them dry completely according to the clay manufacturer’s instructions, flipping them halfway through to prevent warping.
Clean Lines Tip
Wipe your stylus tool with a damp paper towel after every few strokes while engraving. This prevents clay crumbs from building up and keeps your bird outlines crisp.
Step 2: Adding Definition and Finish
-
Sand the edges:
Once bone dry, gently run fine-grit sandpaper over the edges and corners to soften them and give the tiles a weathered, stone-like feel. -
Darken the design:
Carefully trace the engraved bird lines with a fine-tip brown permanent marker or a very thin brush dipped in brown acrylic paint. I find that using a marker offers more control for these fine lines. -
Seal the refined work:
If these will hang outdoors, give each tile a light coat of clear matte sealant spray to protect them from humidity and moisture.
Step 3: Assembly and Hanging
-
Prepare the branch:
Select a sturdy twig or piece of driftwood. Tie two long lengths of twine to the branch, spaced a few inches apart, to serve as the main suspension lines. -
Strand the first tier:
On the first string, thread a wooden bead and tie a knot below it to hold it in place. Then, thread the twine through the top hole of your first clay tile. -
Secure the tile:
Pass the twine out through the bottom hole of the first tile. Add another bead immediately below the tile and knot it securely so the tile sits tight between the beads. -
Attach the lower tier:
Repeat the process for the second tile on this same string, leaving a few inches of visible twine between the bottom of the first tile and the top of the second. -
Create the second strand:
Repeat the entire beading and tying process on the second length of twine with the remaining two tiles. Stagger the height slightly so the two columns of tiles hang at different levels for visual interest. -
Final adjustments:
Trim any excess twine from the bottom knots and hang your new chime to see how it moves.
Fixing Uneven Holes
If a hole closes up during drying, gently re-drill it by twisting a small drill bit or a craft knife tip into the opening by hand. Don’t push too hard or the dry clay might crack.
Enjoy the gentle clatter of your new handcrafted art piece swaying in the breeze


What Really Happens Inside the Kiln
Learn how time and temperature work together inside the kiln to transform clay into durable ceramic.
Minimal Geometric Clay Chime
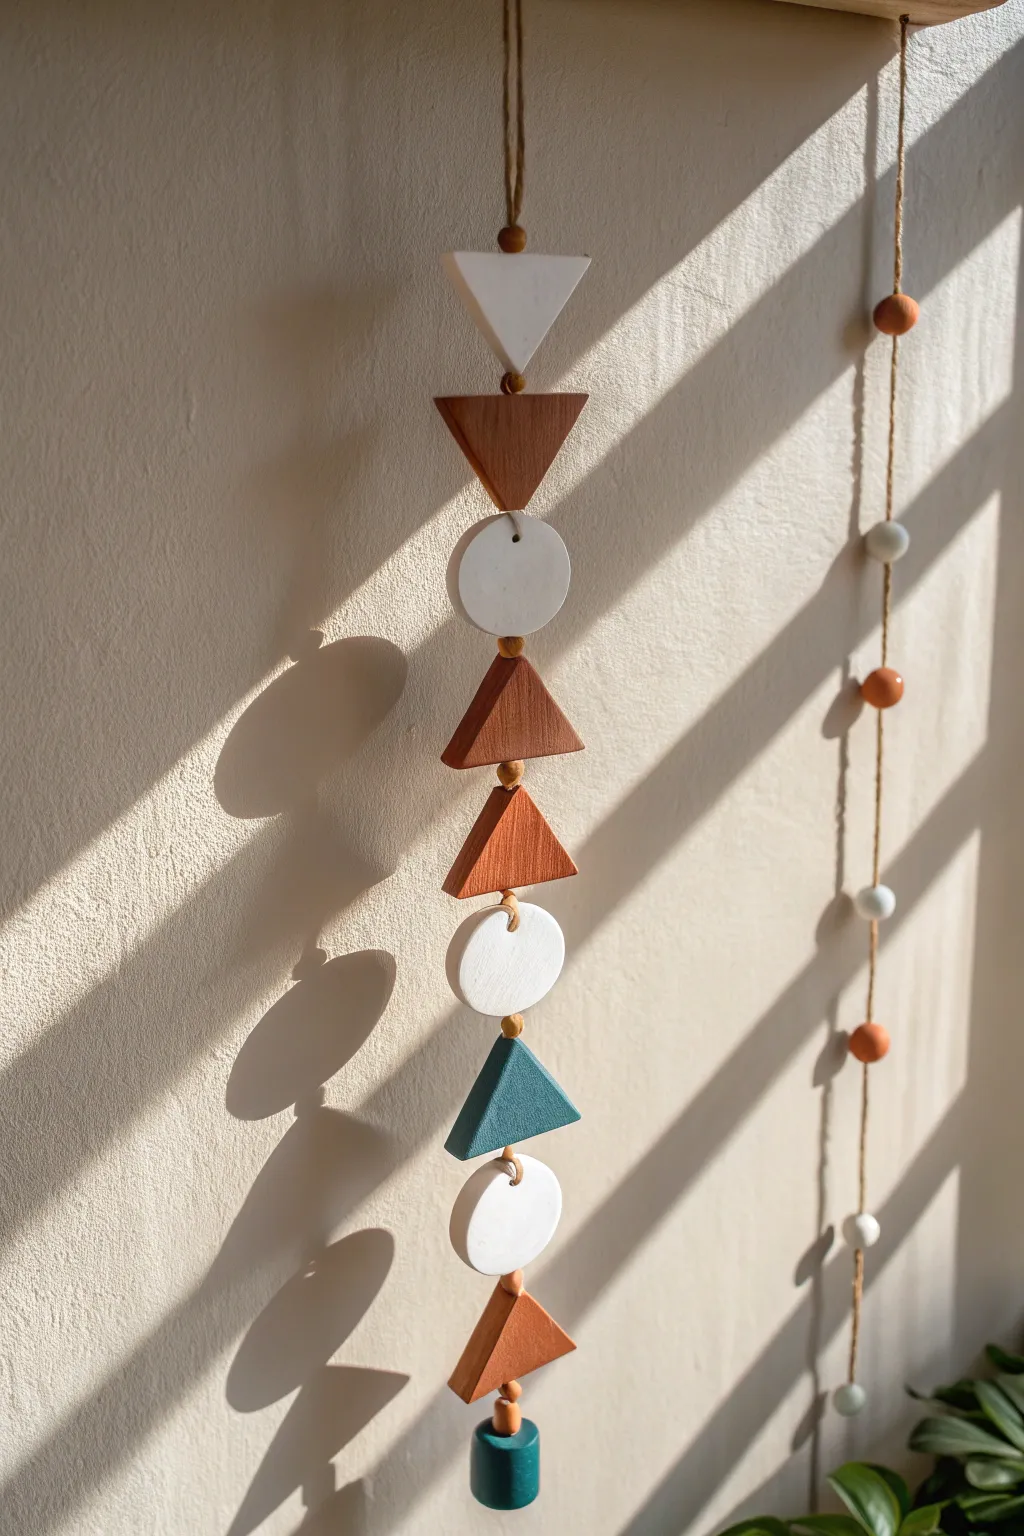
Bring a touch of modern bohemian style to your space with this sleek, vertically aligned wall hanging. Using simple geometric forms and a warm, earthy color palette mixed with teal, this piece plays beautifully with light and shadow.
Step-by-Step
Materials
- Polymer clay or air-dry clay (white, terracotta, teal)
- Acrylic rolling pin
- Geometric clay cutters (triangle, circle)
- Sharp blade or X-Acto knife
- Toothpick or skewer (for making holes)
- Jute twine or hemp cord
- Small wooden beads
- Sandpaper (fine grit)
- Parchment paper
- Baking tray (if using polymer clay)
Step 1: Shaping the Elements
-
Condition the Clay:
Begin by warming up your clay in your hands until it’s pliable. If you are mixing colors to achieve that perfect marbled terracotta or a custom shade, do this kneading now. -
Roll it Out:
Place the clay on a sheet of parchment paper. Use your acrylic roller to flatten the clay to an even thickness of about 1/4 inch (6mm). Using thickness guides or playing cards stacked on either side can ensure perfect uniformity. -
Cut the Triangles:
Firmly press your triangle cutter into the clay. For this specific design, you need approximately four to five triangles. Some will hang pointing up, others pointing down. -
Cut the Circles:
Switch to your circle cutter and create three distinct round discs. Ensure the edges are clean; if the clay drags, dip your cutter in cornstarch before pressing down. -
Form the Cylinder:
For the bottom-most weight, roll a thick snake of teal clay and cut a segment about 1 inch long to form a neat cylinder. -
Pierce Hanging Holes:
This is crucial: while the clay is still wet, use a toothpick to create holes. The triangles and circles need a hole at the very top *and* bottom centers. The bottom cylinder only needs a vertical hole running through its center.
Step 2: Refining and Baking
-
Smooth the Edges:
Dip your finger in a little water (for air-dry clay) or baby oil (for polymer) and gently smooth away any rough burrs on the edges of your cut shapes. -
Bake or Dry:
Follow the manufacturer instructions for your specific clay. If baking polymer clay, tent the tray with foil to prevent scorching the white pieces. If using air-dry, let them sit undisturbed for 24-48 hours. -
Sanding:
Once fully cured, inspect your pieces. Use fine-grit sandpaper to buff out any fingerprints or uneven edges for a professional, matte finish.
Uneven Clay?
If your clay shapes are curling up while drying or baking, try placing a heavy book (on parchment paper) or a ceramic tile on top of them during the drying process to keep them perfectly flat.
Step 3: Assembly
-
Prepare the Cord:
Cut a long length of jute twine, about 3 feet, to give yourself plenty of working room. Fold it in half to create a hanging loop at the top and knot it secure. -
Start from the Top:
Thread the first shape (the white inverted triangle) onto the twine. Secure it by tying a knot directly underneath the hole or by threading through back-to-front if you prefer visible string. -
Add a Spacer:
Thread a small wooden bead onto the twine. This acts as a visual break and helps the shapes hang freely without clinking too tightly against each other. -
Connect the Second Shape:
attach the brown inverted triangle below the spacer bead. I find it easiest to use a simple overhand knot to keep the spacing consistent. -
Continue the Pattern:
Work your way down, alternating shapes (circle, triangle) and colors (white, terracotta, teal) as shown in the image, always separating them with a small wooden bead. -
Attach the Weight:
Finally, thread the teal cylinder beat at the very bottom. Tie a large, sturdy double knot underneath it to hold the entire structure together. -
Trim Excess:
Snip off any extra twine below the final knot, leaving a short tail if desired, and hang your new art piece near a window to catch the light.
Make It Jingle
To turn this from wall art into a functional wind chime, hide small bells inside the hollow of the bottom cylinder or attach tiny brass chimes to the back of the lowest shapes.
Hang your geometeric chime near a window and enjoy the play of shadows throughout the day
Driftwood Top With Mixed Clay Dangles
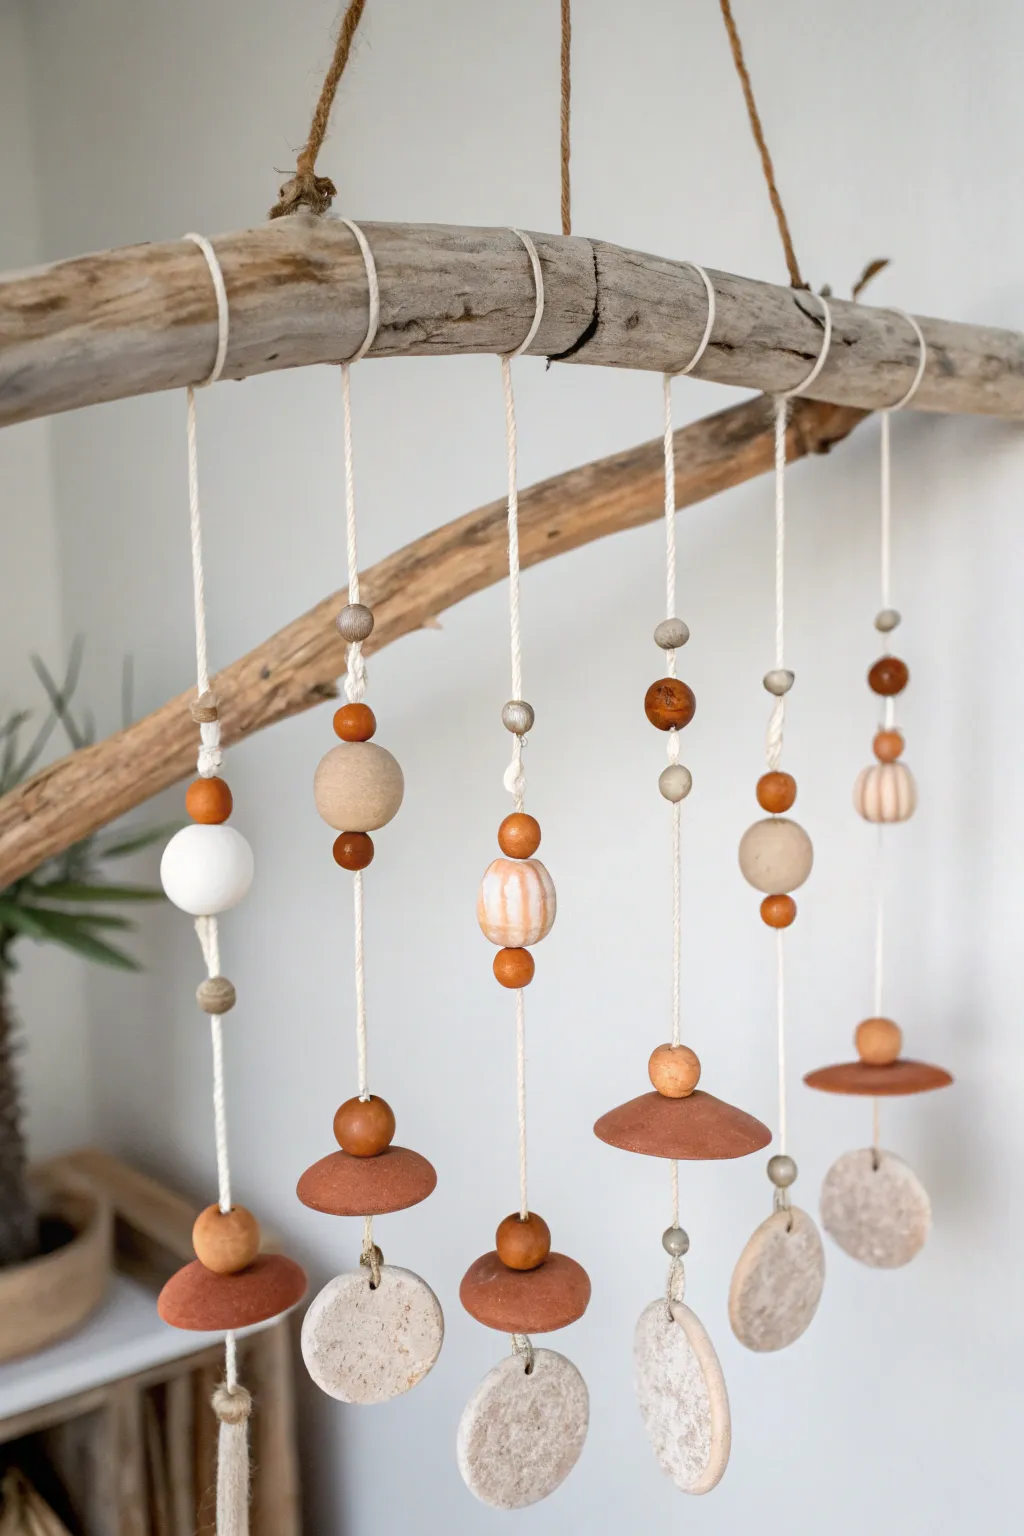
Bring a touch of organic warmth to your space with this stunning mobile featuring a weathered driftwood branch and hand-formed clay dangles. The mix of terracotta tones, speckled cream textures, and natural wood beads creates a harmonious, boho-chic aesthetic.
Step-by-Step Guide
Materials
- Driftwood branch (approx. 12-18 inches)
- Air-dry clay (terracotta color)
- Air-dry clay (white or cream stone effect)
- Wooden beads (various sizes, round)
- Acrylic paint (burnt orange/sienna) – optional if not using colored clay
- Cotton or hemp twine (natural color)
- Rolling pin
- Circle cutters (various sizes) or drinking glasses
- Skewer or toothpick (for poking holes)
- Sandpaper (fine grit)
- Scissors
Step 1: Crafting the Clay Components
-
Prepare the speckled discs:
Roll out your white or stone-effect clay to about 1/4 inch thickness. Using a medium-sized circle cutter (or a glass rim), cut out 6 circles for the bottom weights. -
Add texture and holes:
If your clay isn’t pre-speckled, mix in some dried tea leaves or sand for texture. Poke a hole near the top edge of each disc using a skewer, ensuring it’s large enough for your twine. -
Shape the terracotta discs:
Roll out the terracotta clay. Cut out slightly smaller circles than the white ones. Gently press the edges down or mold them over a rounded object to give them a slight dome or ‘mushroom cap’ shape. -
Create clay beads:
Hand-roll several spheres from both clay types. Vary the sizes from small peas to large marbles. Create at least one large, textured focal bead by marbling the two clay colors together. -
Pierce the beads:
Use your skewer to pierce a hole straight through the center of every bead. Rotate the skewer as you push through to keep the shape round. -
Dry completely:
Lay all pieces on a flat surface to dry. I find turning them over halfway through the drying process helps prevent curling. Let them cure for 24-48 hours until hard.
Smooth Finish Tip
Before the clay dries, dip your finger in water and gently rub the edges of your cut circles. This removes micro-cracks and gives a polished, professional look.
Step 2: Assembling the Strands
-
Cut the twine:
Cut 6 lengths of twine, each about 24-30 inches long. You want extra length for knotting and adjusting. -
Attach the bottom weights:
Take a speckled white disc and tie it to the very end of a twine piece using a secure double knot. Trim the excess tail short or leave a small tassel if preferred. -
Start the stacking pattern:
Thread the other end of the twine through a terracotta saucer shape so it sits atop the white disc. Add a wooden bead immediately above it to hold the saucer in place. -
Spacing the beads:
Tie a simple overhand knot in the twine a few inches above the bottom cluster. Thread a clay bead or wooden bead so it rests on this knot. -
Vary the designs:
Repeat this process for all 6 strands, but vary the pattern. Some strands can have clusters of 3 beads; others might have single beads spaced widely apart. Reference the image to mimic the alternating styles.
Add Sound
Hide small metal bells inside the domed terracotta pieces. When the wind blows, the clay clappers will hit the bells for a gentle tinkling sound.
Step 3: Final Assembly
-
Prepare the driftwood:
Clean your driftwood branch with a brush to remove loose debris. If necessary, sand down any rough snags that might catch the string. -
Attach strands to wood:
Tie each beaded strand onto the driftwood branch using a lark’s head knot or a simple double knot. Space them evenly apart ensuring they hang freely without tangling. -
Secure the knots:
Once you are happy with the length arrangement, tighten the knots on the branch. A tiny drop of superglue on the knot can ensure it never slips. -
Create the hanger:
Cut a thicker piece of jute or double up your twine. Tie it securely to both ends of the driftwood branch to create a triangle for hanging. -
Balance and adjust:
Hang the mobile up temporarily. If it tilts too much to one side, slide the hanging string along the branch until you find the center of gravity.
Hang your new creation near a window or on a covered porch to enjoy the gentle movement and earthy vibes

TRACK YOUR CERAMIC JOURNEY
Capture glaze tests, firing details, and creative progress—all in one simple printable. Make your projects easier to repeat and improve.
Clay and Metal Ring Accent Wind Chime
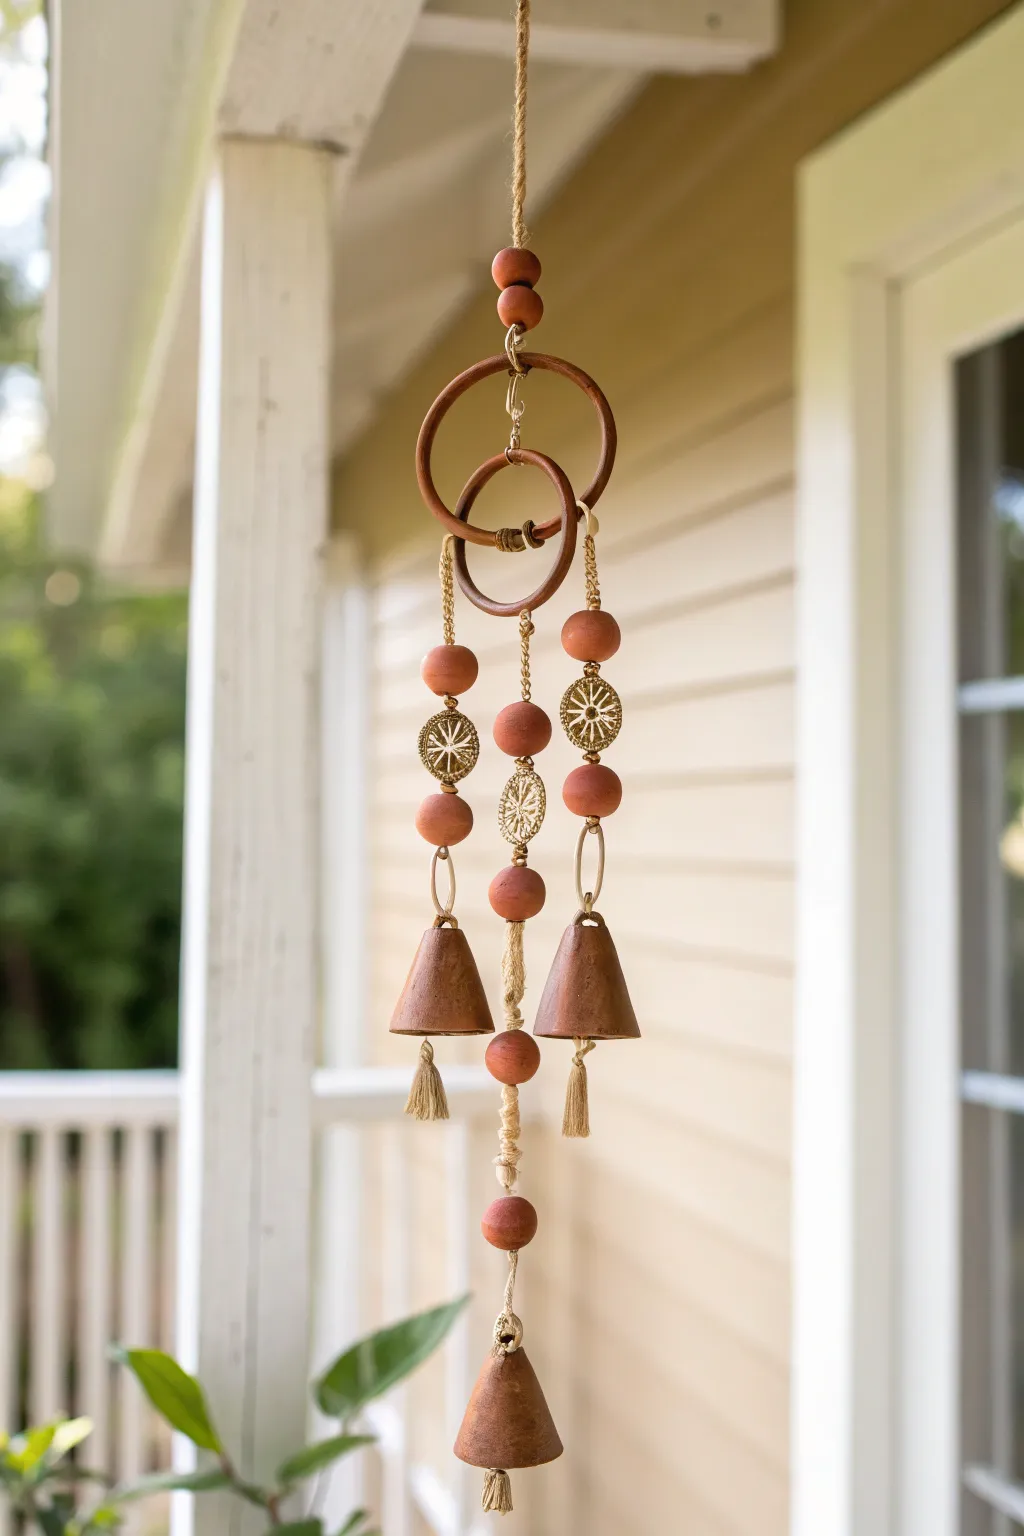
Blend earthy textures with delicate metal accents in this stunning multi-strand wind chime. Featuring terracotta-colored polymer clay bells and vintage-inspired gold details, this piece adds a warm, melodic charm to any porch or sunroom.
How-To Guide
Materials
- Terracotta-colored polymer clay (approx. 8 oz)
- Two wooden rings (one 3-inch, one 2-inch)
- Jute twine or hemp cord
- Gold filigree connectors (circular, approx. 1 inch)
- Gold jump rings (10mm)
- Small wooden beads (optional, for spacing)
- Clay roller or pasta machine
- Circle cutters (various sizes)
- Cone-shaped mold or cardstock to make a cone template
- Awl or toothpick
- Oven for baking clay
- Scissors
Step 1: Sculpting the Clay Elements
-
Condition the clay:
Begin by kneading your terracotta polymer clay until it is soft and pliable. This ensures your beads and bells won’t crack during baking. -
Create the bell shape:
Roll out a slab of clay about 1/4 inch thick. Cut out three half-circle shapes. Gently wrap each half-circle around a cone mold (or a DIY paper cone) to form the bell shape, smoothing the seam with your finger. -
Perforate the bells:
Using an awl or a thick needle, poke a hole through the very top tip of each clay cone. Make sure the hole is large enough for your twine to pass through later. -
Roll the beads:
Take remaining clay and roll approximately 10-12 distinct spheres. Aim for a diameter of about 3/4 inch to match the reference image. -
Drill the beads:
Carefully pierce the center of each clay sphere with your awl to create a bead. I find it helpful to rotate the bead while piecing to keep the hole centered. -
Bake the clay:
Arrange your bells and beads on a parchment-lined baking sheet. Bake according to the manufacturer’s instructions (usually 275°F for 15-30 minutes) and let them cool completely.
Clean Clay Edges
Before baking, smooth your clay fingerprints with a drop of baby oil. Afterward, use fine-grit sandpaper to remove any rough edges on the bell bottoms.
Step 2: Preparing the Support Structure
-
Stain the rings:
If your wooden rings are unfinished, stain them a dark walnut color to contrast with the lighter clay. Let them dry thoroughly. -
Connect the rings:
Place the smaller wooden ring inside the larger one. Join them at the top using a loop of jute twine wrapped tightly around both rims, ensuring they hang freely but securely. -
Create the hanger:
Attach a long length of jute twine to the very top of the outer ring assembly. String two clay beads onto this main hanger line before tying a loop at the top for suspension.
Knot Slipping?
If the jute knots unravel, apply a tiny dot of clear superglue or clear nail polish to the knot center. Hold for 30 seconds to lock it permanently.
Step 3: Assembling the Chime Strands
-
Cut the strand lengths:
Cut three lengths of jute twine. Two should be roughly 18 inches long (for the sides), and one should be about 24 inches long (for the center). -
Start the side strands:
Tie one 18-inch string to the left side of the inner wooden ring and the other to the right side. Secure the knots tightly. -
Add first bead and metal accent:
On a side strand, thread one clay bead. Below it, tie a knot to hold a gold filigree connector in place, or thread the twine through the filigree if the pattern allows. -
Add second bead section:
Thread another clay bead below the metal accent. Secure it with a knot underneath so it doesn’t slide down. -
Attach the metal link:
Attach a large gold jump ring to the twine below your last bead. This metal ring acts as a connector for the bell. -
Hang the side bells:
Thread a short piece of twine through the top of a clay bell. Tie this twine to the gold jump ring you just attached. Finish the bell by tying a small tassel to the string hanging inside the bell. -
Repeat for the other side:
Follow the exact same beading and bell attachment process for the second side strand to ensure symmetry. -
Build the center strand:
Tie the longest string to the bottom center of the inner wooden ring. Add a bead, a filigree connector, another bead, a gold ring, and finally the third bell at the very bottom, following the pattern of the side strands but extending lower. -
Add the bottom accent:
For the center strand, add one final clay bead above the last bell to give it extra length and visual weight. -
Final adjustments:
Trim any excess twine ends near your knots. Gently adjust the spacing of the beads and rings so everything hangs straight and balanced.
Now you have a handcrafted piece of art that sounds as beautiful as it looks swaying in the breeze
Stamped Words and Symbols Chime
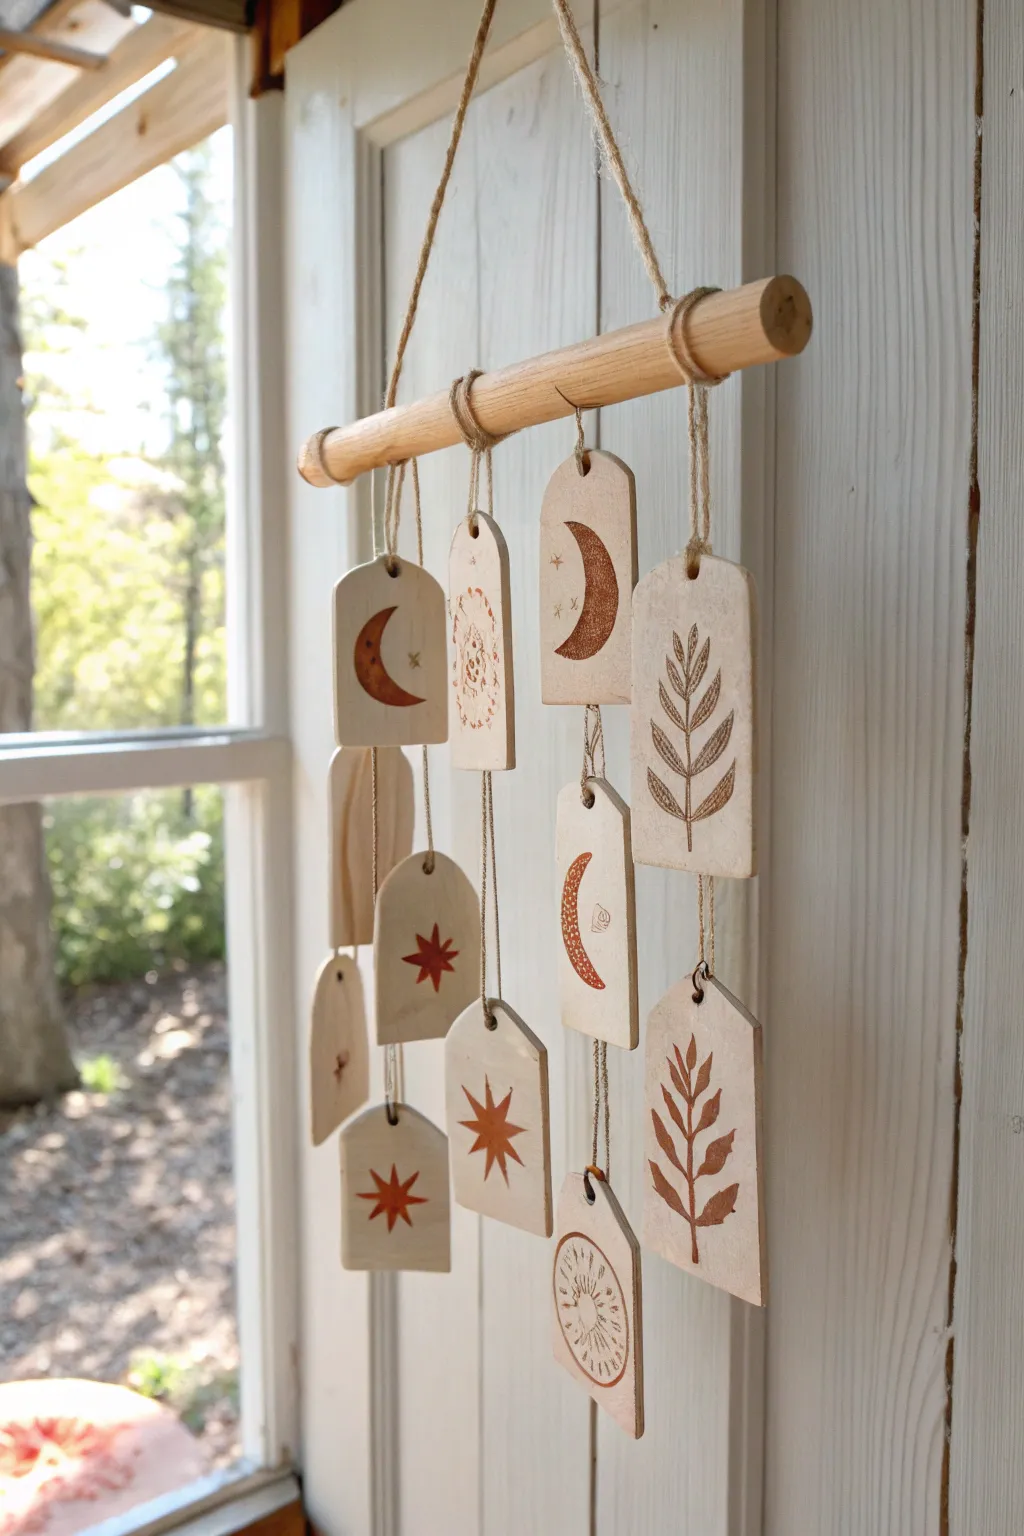
Bring a touch of cosmic charm to your space with this earthy, bohemian-style wall hanging. Featuring stamped moons, stars, and botanical motifs on creamy clay slabs, this project combines natural textures with simple, soothing aesthetics.
Step-by-Step Guide
Materials
- White or cream air-dry clay (or polymer clay)
- Wooden dowel (approx. 12 inches long)
- Jute twine or natural hemp cord
- Rolling pin
- Fettling knife or clay cutter
- Arch-shaped clay cutter (or cardboard template)
- Terra cotta acrylic paint
- Fine detail paintbrush
- Rubber stamps (celestial and botanical themes)
- Straw or small circle tool for punching holes
- Sandpaper (fine grit)
- Clear matte sealant spray (optional)
Step 1: Shaping the Clay Tiles
-
Preparation:
Prepare your workspace by laying down a clean mat or parchment paper to prevent the clay from sticking. Knead the clay slightly to warm it up. -
Rolling:
Roll out the clay to an even thickness of about 1/4 inch. Try to keep the surface smooth and free of air bubbles. -
Cutting shapes:
Use an arch-shaped cutter to create approximately 10-12 uniform tiles. If you don’t have a cutter, trace around a cardboard template with a knife. -
Creating variations:
For visual interest, trim the bottom edge of a few tiles to make them rectangular rather than arched. -
Punching holes:
Use a straw to punch a hole centered at the top of every tile. For pieces that will hang below others, punch a hole at the bottom center as well. -
Smoothing:
Dip your finger in a little water and run it along the cut edges of each tile to smooth out any jagged bits. -
Drying:
Let the tiles dry completely according to package instructions. I like to flip them over halfway through the drying process to prevent curling.
Clean Impressions
Don’t press stamps too deep into wet clay or it warps the shape. Stamping with paint on dry clay yields sharper lines.
Step 2: Adding Designs
-
Sanding:
Once fully dry, lightly sand any rough edges with fine-grit sandpaper for a professional finish. -
Preparing paint:
Squeeze a small amount of terra cotta acrylic paint onto a palette. -
Stamping technique:
Using a sponge or brush, lightly dab paint onto your rubber stamp. Press the stamp firmly onto the center of a clay tile. -
Freehand details:
Use a fine detail brush to paint simple symbols like four-pointed stars or crescent shapes if you don’t have matching stamps. -
Variety:
Create a mix of designs: some tiles with large focal images (like a leaf or moon), and others with smaller accent patterns. -
Sealing:
Allow the paint to dry completely, then spray with a light coat of clear matte sealant to protect the designs.
Curled Edges?
If clay tiles curl while drying, place a heavy book on top of them once they are ‘leather hard’ (firm but not fully dry) to flatten.
Step 3: Assembly
-
Cutting cords:
Cut varied lengths of jute twine. You will need shorter pieces for connecting tiles and longer pieces for attaching to the dowel. -
Connecting tiles:
Thread twine through the bottom hole of an upper tile and the top hole of a lower tile. Knot securely to create a two-tile strand. -
Top loops:
Thread a longer piece of twine through the top hole of each strand (or single tile) and tie a loop for hanging. -
Attaching to dowel:
Slide the loops onto the wooden dowel. Arrange them at different heights to create a staggered, cascading look. -
Securing strands:
Once you are happy with the arrangement, you can add a small dab of glue to the knots on the dowel to keep them from sliding. -
Hanger:
Tie a long piece of twine to both ends of the wooden dowel to serve as the main hanger.
Find a sunny spot near a window to display your beautiful new mobile and enjoy the natural vibes
Coastal Clay Chime With Sea Glass
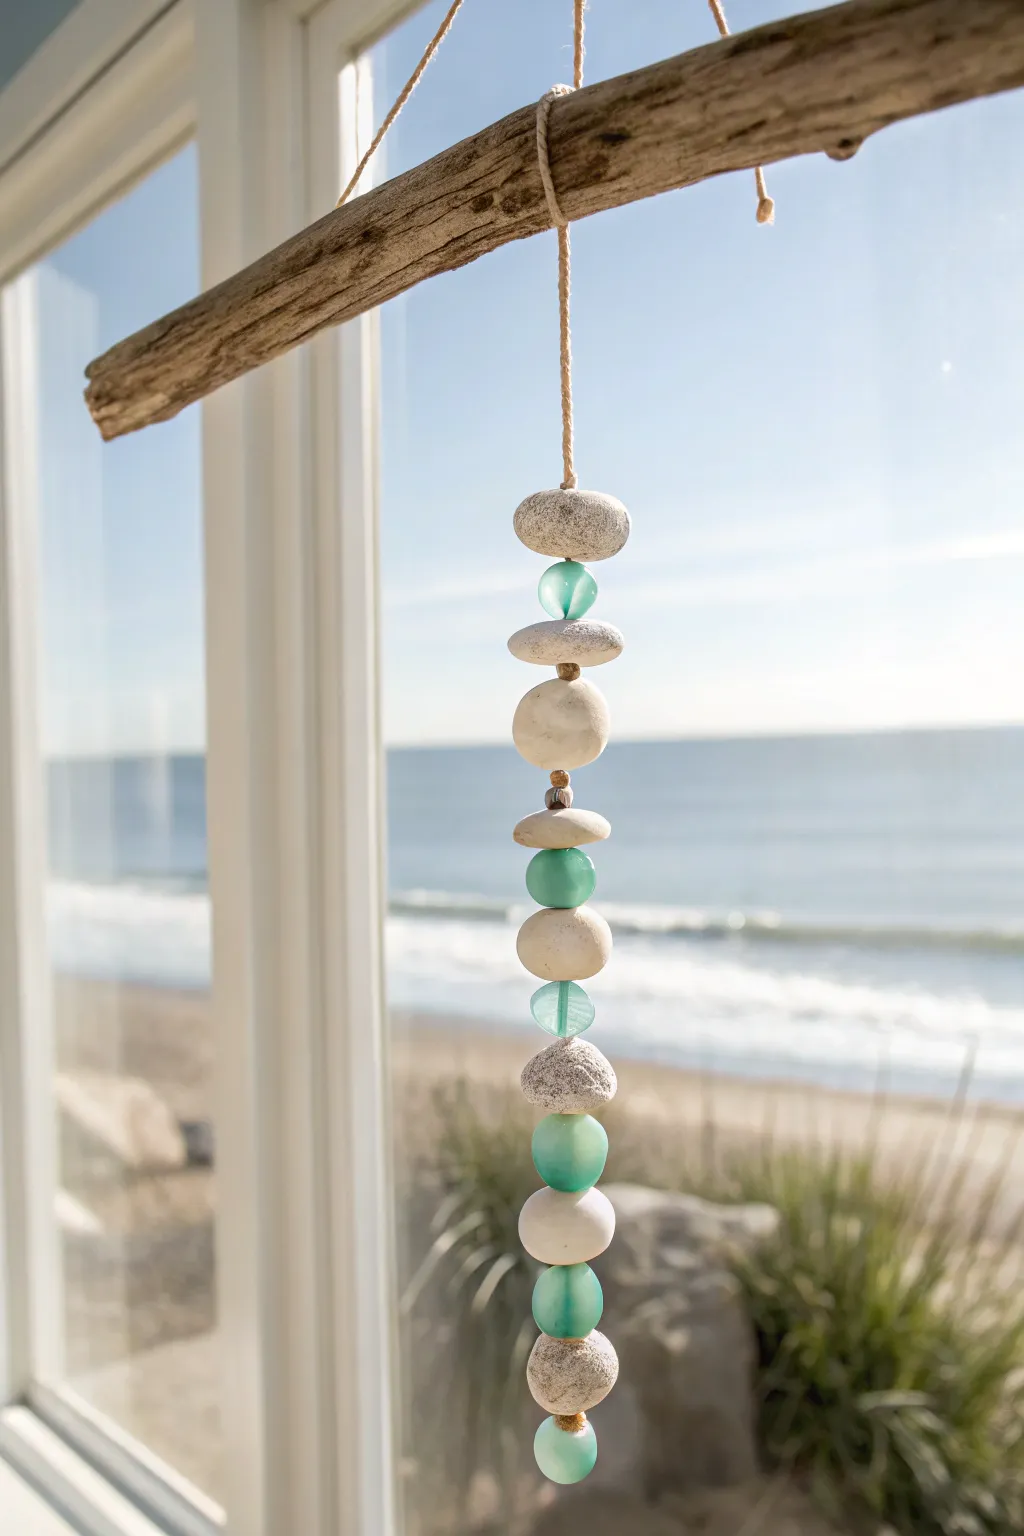
Capture the serenity of the shoreline with this elegant single-strand mobile. By alternating textured white clay “stones” with translucent sea-glass beads, you’ll create a piece that glows beautifully when hung in a sunny window.
Step-by-Step Tutorial
Materials
- White polymer clay or air-dry clay (stone texture effect preferred)
- Faux sea glass beads (teal, aqua, and frosted white)
- Small wooden spacer beads
- Jute twine or hemp cord (natural color)
- Driftwood branch (approx. 10-12 inches)
- Texturing tools (old toothbrush, sandpaper, or real rocks)
- Skewer or toothpick (for piercing holes)
- Scissors
- Sandpaper (fine grit)
- Matte varnish (optional)
Step 1: Crafting the Clay Stones
-
Condition the clay:
Begin by kneading your white clay until it is soft and pliable. If you want a more natural look, you can mix in a tiny pinch of black pepper or grey clay to create a speckled granite effect. -
Form the organic shapes:
Roll the clay into balls of varying sizes, ranging from 1 inch to 1.5 inches in diameter. Slightly flatten them between your palms to create rounded, organic discs rather than perfect spheres. -
Add texture:
To mimic real beach stones, press an old toothbrush or a piece of sandpaper gently into the surface of each clay disc. I like to roll a real rock over the clay to imprint authentic natural divots. -
Pierce the holes:
Using a skewer or toothpick, carefully poke a vertical hole through the center of each stone. Ensure the hole is wide enough to accommodate your jute twine, possibly wiggling the tool slightly to widen it. -
Cure the clay:
Bake your polymer clay according to the package instructions (usually around 275°F/135°C) or let your air-dry clay sit for 24-48 hours until completely hardened. -
Sand and finish:
Once cool and hard, use fine-grit sandpaper to smooth any sharp edges around the holes or rims. You can leave them matte for a natural look or apply a light coat of matte varnish for protection.
Sliding Beads?
If your knots slip through the bead holes, thread a tiny seed bead onto the twine right before the knot. This creates a hidden ‘washer’ that stops heavier beads from sliding down.
Step 2: Assembling the Strand
-
Prepare the driftwood:
Clean your piece of driftwood. Drill a small hole through the center of the branch for the main strand, or simply plan to tie the cord securely around it. -
Cut the cord:
Cut a length of jute twine approximately 3 feet long. This gives you plenty of slack for knotting and hanging. -
Start the sequence:
Tie a sturdy double knot at the bottom of your twine to catch the first bead. String on a decorative turquoise sea-glass bead to act as the bottom anchor. -
Thread the first stone:
Slide your first clay stone down the twine so it rests on top of the bottom bead. -
Add spacing knots:
Tie a simple overhand knot immediately above the clay stone to keep it in place, then add a second knot about an inch higher to create a gap for the next bead. -
Alternate materials:
Thread on a sea-glass bead. Rest it on that second knot. You can place small wooden spacer beads between the glass and clay elements or inside the glass beads if their holes are too large for the knot. -
Build the pattern:
Continue the pattern—knot, clay stone, knot, glass bead—working your way up the twine. Looking at the example, try alternating the shapes and sizes of the clay stones for visual interest. -
Vary the glass colors:
Mix up your glass bead choices, using a teal bead, then a frosted white one, then an aqua one, to replicate the palette of the ocean. -
Secure the top:
Stop threading when you have about 10-12 inches of decorated strand. Tie a final strong knot above the last clay stone.
Step 3: Refining the Display
-
Attach to driftwood:
Thread the remaining top twine through the hole in your driftwood (or wrap it firmly around the branch). adjust the height so the beads hang at your desired level. -
Secure the hanger:
Tie off the twine securely at the top of the driftwood. Trim any excess tail, perhaps leaving a tiny frayed end for a rustic touch. -
Create the hanging loop:
Cut a separate piece of twine, about 18 inches long. Tie each end to the outer edges of the driftwood branch to create a triangle hanger. -
Balance the mobile:
Hold the mobile by the top loop to ensure the driftwood hangs horizontally. If it tilts, slide the knots on the hanging loop slightly left or right until it balances perfectly.
Mix In Texture
For extra coastal flair, press coarse sea salt into the wet clay surface before drying. Once dry, brush the salt away to leave behind deeply pitted, realistic textures.
Hang your finished chime where it can catch the morning light and remind you of the sea
Shell-Texture Fossil Tile Wind Chime
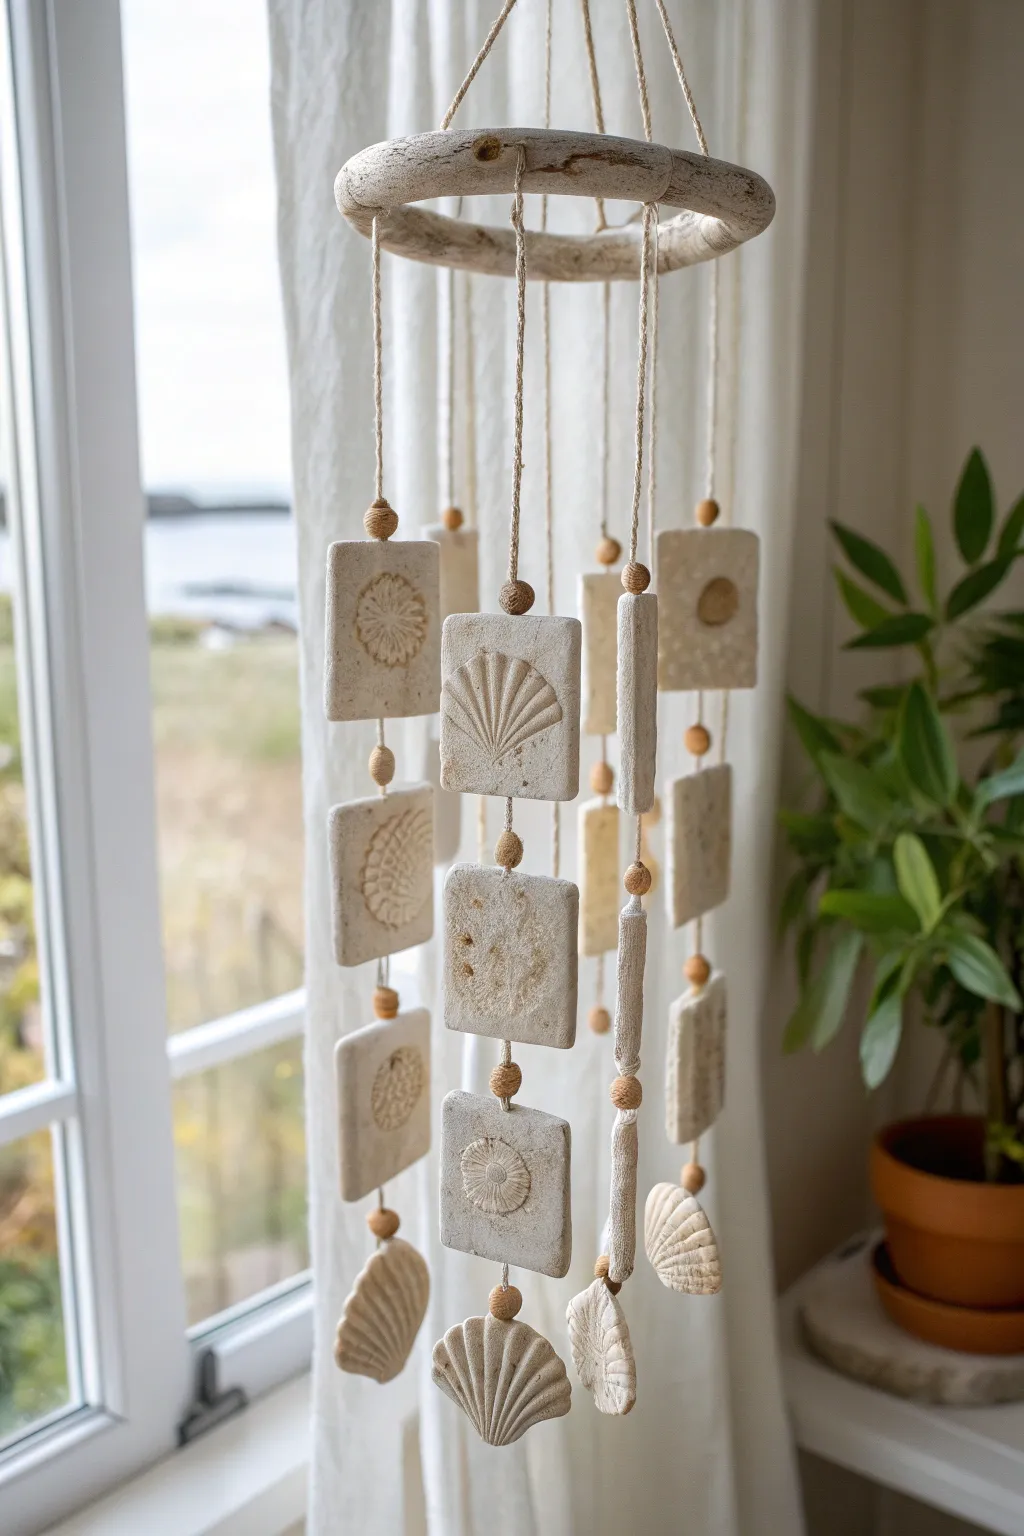
Bring the serene feeling of a beach walk into your home with this textured wind chime featuring fossil-like clay tiles. Suspended from a driftwood ring, these delicate squares capture the impressions of seashells, creating a soft, rhythmic clinking sound when the breeze catches them.
How-To Guide
Materials
- Air-dry clay (stone or white color) or polymer clay
- Rolling pin
- Square cookie cutter (approx. 2 inches)
- Various seashells with distinct ridges
- Driftwood ring or a wooden embroidery hoop (distressed)
- Natural jute twine
- Small wooden beads
- Straw or toothpick (for making holes)
- Fine-grit sandpaper
- Scissors
- Clear matte sealant spray (optional)
Step 1: Creating the Fossil Tiles
-
Roll out the clay:
Start by taking a large chunk of your air-dry clay and kneading it until soft. Roll it out on a smooth surface to an even thickness of about 1/4 inch. If the clay sticks, lay down a piece of parchment paper first. -
Cut the shapes:
Using your square cookie cutter, punch out 12 to 15 squares. You can also freehand cut rectangle shapes if you prefer a more organic look, but the cutter keeps things uniform. -
Texture the surface:
This is the fun part where the magic happens. Take your seashells and gently press them into the center of each clay square to leave an impression. Press deep enough to see the ridges, but not so hard that you warp the square. -
Add varied details:
Don’t make them all identical. Use the edge of a shell for a fan pattern on one, the spiral center for another, and perhaps a piece of rough coral or a textural sponge to create ‘pockmarked’ sandy textures on others. -
Create the hanging holes:
While the clay is still wet, use a straw or a skewer to poke a hole through the top and bottom center of each square. Ensure the hole is wide enough for your jute twine to pass through later. -
Sculpt the bottom shells:
Use the remaining clay to hand-sculpt fan-shaped shell pieces for the very bottom of each strand. Use a craft knife to score vertical lines to mimic the ridges of a scallop shell. Pierce a single hole at the top of these shapes.
Step 2: Drying and Refining
-
Let it dry completely:
Lay all your clay pieces flat on a drying rack or parchment paper. Air-dry clay typically takes 24-48 hours to cure fully. Flip them over halfway through so the bottoms dry evenly. -
Sand edges:
Once fully hard, take fine-grit sandpaper and gently smooth the rough edges of your squares and sculpted shells. You want a weathered, tumbled beach stone feel, not sharp corners. -
Apply sealant:
If you plan to hang this outdoors or in a humid bathroom, I recommend giving the pieces a light coat of clear matte sealant to protect the clay from moisture without making it look glossy.
Clean Impressions
Dust your seashells lightly with cornstarch before pressing them into the clay. This acts as a release agent and prevents the clay from sticking inside the tiny grooves of the shell.
Step 3: Assembly
-
Prepare the hanger:
Take your driftwood ring or wooden hoop. If usng a hoop, you might want to sand it or paint it with a whitish-grey wash to mimic the driftwood look seen in the photo. Tie three or four long strands of twine to the hoop to create a master hanging loop at the top. -
Cut suspension strings:
Cut 4 or 5 lengths of jute twine, each about 3 feet long. You’ll trim the excess later, but it’s better to have too much than too little. -
Start the strands:
Tie a secure knot around the driftwood ring for your first strand. Thread a single wooden bead onto the string and slide it up near the knot. -
Thread the first tile:
Thread the twine through the top hole of your first texturized square. Pull it up to the bead. Now, thread it out through the bottom hole. -
Secure the placement:
Slide on another small wooden bead right underneath the square. Tie a knot in the twine directly under this bead to hold the tile in place. -
Add the next tier:
Measure about 2 or 3 inches down the string (depending on how much gap you want), add another bead, tie a knot to support it, and repeat the threading process with a second clay square. -
Finish the strand:
After your last square, thread on a final wooden bead and then tie your hand-sculpted shell shape to the very bottom. Secure it well and trim any excess tail. -
Repeat and balance:
Repeat this process for the remaining strands. Arrange them evenly around the ring so the chime hangs level.
Sound Variation
Mix materials for a richer sound! Swap one or two clay tiles on each strand for a piece of real sea glass or a flat piece of actual driftwood to create different tones when they chime.
Find a sunny spot near a window to hang your creation and enjoy the visual calm of the seaside in your own home
Stacked Totem Strand Clay Wind Chime

Bring an earthy, tranquil vibe to your porch or garden with this stacked totem wind chime. Combining natural wood beads with handmade clay shapes creates a lovely textural contrast that is perfect for a modern bohemian aesthetic.
Step-by-Step Tutorial
Materials
- Polymer clay or air-dry clay (terracotta, white, sandstone colors)
- Wooden beads (assorted sizes: 20mm, 25mm, 30mm)
- Wooden craft discs or washers (approx. 2-3 inches diameter)
- Jute twine or hemp cord
- Drill with small bit (if using air-dry clay)
- Clay carving tools or a knitting needle (for piercing)
- Fine-grit sandpaper
- Matte acrylic varnish (optional for weatherproofing)
- Small paintbrush
Step 1: Shaping the Clay Elements
-
Condition the Clay:
Begin by kneading your chosen clay colors until they are soft and pliable. If you want a marbled look, try twisting two colors together slightly, though solid earthy tones work best for this specific look. -
Form the Base Disc:
Roll a chunk of terracotta-colored clay into a ball, then flatten it into a thick disc shape about 1.5 inches wide. Smooth the edges with your finger and water (for air-dry) or baby oil (for polymer). -
Create the Bead Shapes:
Mold several additional shapes to mimic the reference: a white rounded bead, a flattened sandstone oval, and a few imperfect spheres. Hand-rolling adds organic charm, so they don’t need to be geometrically perfect. -
Add Texture (Optional):
For the bottom terracotta disc, you can gently press a rough stone or sandpaper against the clay surface while wet to give it a stone-like texture. -
Make the Holes:
While the clay is still wet (or unbaked), use a knitting needle or skewer to poke a hole vertically through the center of each piece. Ensure the hole is wide enough for your jute twine to pass through comfortably. -
Cure the Clay:
Bake your polymer clay pieces according to the package instructions, or let your air-dry clay sit for 24-48 hours until fully hardened and light in color.
Uneven Hanging?
If the chime lists to one side, check that your center holes are truly centered. If not, use a small dab of clear glue inside the bead hole to fix its position on the string.
Step 2: Preparing the Wood & Finish
-
Sand the Wood:
Take your wooden beads and the large top wooden disc. Lightly sand them with fine-grit sandpaper to remove any rough splinters or existing varnish, giving them a raw, matte appearance. -
Drill the Top Disc:
If your large wooden washer doesn’t have a center hole, carefully drill one now. It should be consistent with the size of the holes in your beads. -
Seal the Pieces:
Apply a thin coat of matte outdoor varnish to both the clay and wood pieces if this chime will live outdoors. This prevents the wood from graying and the clay from absorbing moisture.
Step 3: Assembly
-
Prepare the Cord:
Cut a length of jute twine approximately 3 feet long. Fold it in half to create a loop at the top for hanging, and tie a distinct knot about 3 inches down from the fold to secure the loop. -
Start with the Top Disc:
Thread the loose ends of the twine through the large wooden disc, sliding it up until it rests against your top knot. Tie another knot immediately below the disc to lock it in place. -
String the Beads:
Begin threading your diverse collection of beads. Alternate between the smooth wooden spheres and your handmade clay shapes to create visual rhythm. A popular pattern is wood-wood-clay-wood-clay. -
Spacing the Elements:
Unlike a necklace, you don’t need to push every bead tight against the previous one. I like to tie small overhand knots between certain larger beads or groupings to create deliberate gaps that elongate the design. -
Stack the Bottom Feature:
Recreate the distinct bottom ‘weight’ by stacking the flat terracotta disc, the white bead, and the final terracotta disc directly on top of each other without knots in between them. -
Secure the End:
Once your stack is complete, tie a sturdy, bulky knot right underneath the final clay piece. Double or triple knot it if necessary so the bead cannot slip off. -
Fray the Tail:
Trim the excess twine, leaving about 2-3 inches of tail hanging below the bottom knot. Unravel the ply of the jute to create a small tassel effect at the very end.
Level Up: Sound
Add hidden metal washers between the clay and wood beads. The contact will create a soft clinking sound in the breeze without ruining the natural aesthetic.
Hang your new totem in a breezy spot and enjoy the gentle movement of your handmade art
Mini Planter Bell Wind Chime

Transform a simple garden staple into a charming boho-style wind chime that adds a warm, earthy tone to your outdoor space. This project uses a basic terracotta pot and oversized wooden beads to create a minimalist yet striking piece of garden art.
How-To Guide
Materials
- Small terracotta pot (approx. 4-inch diameter)
- Thick twisted cotton or jute rope (approx. 1/2 inch thick)
- Jute twine (thinner, for the bead string)
- Large wooden beads (mix of raw wood and whitewashed/painted)
- Drill with masonry bit (optional, if drain hole is too small)
- Scissors
Step 1: Preparing the Pot Bell
-
Clean and inspect:
Start by wiping down your terracotta pot with a damp cloth to remove any dust or store residue. Ensure there are no cracks, as these will affect the sound quality. -
Check the drainage hole:
Test if your thick twisted rope fits through the drainage hole at the bottom of the pot. It needs to fit snugly but pass through. -
Enlarge the hole (if needed):
If the rope is too thick for the standard hole, carefully use a drill with a masonry bit to widen the opening just enough for the rope to squeeze through.
Weatherproofing
To keep the wood beads from rotting outdoors, spray them with a clear matte sealant before stringing. This preserves the natural look while repelling rain.
Step 2: Creating the Hanger
-
Cut the main rope:
Cut a length of the thick twisted rope, approximately 24 to 30 inches long, depending on how low you want the bell to hang. -
Thread the pot:
Take the two raw ends of your thick rope and feed them through the drainage hole from the outside (top) into the inside of the pot. -
Secure the loop:
Once the ends are inside the pot, tie a large, sturdy overhand knot using both rope ends together. This knot acts as the stopper that holds the pot up. -
Test the hold:
Pull up on the loop from the outside to ensure the knot is large enough so it won’t slip back through the hole. If it looks small, tie a second knot directly over the first. -
Attach the bead string:
Cut a long piece of thinner jute twine—about 3 feet creates plenty of working room. Tie one end of this twine extremely securely around the large knot you just made inside the pot.
Step 3: Assembling the Chime String
-
Add the striker bead:
String your first large bead onto the jute twine. Position it so it hangs right at the rim of the pot—this is crucial for getting a good sound when it swings. -
Secure the striker:
Tie a knot in the jute twine directly underneath this first bead so it stays perfectly positioned at the rim level. -
Create spacing:
Move down the twine about two or three inches. I usually eyeball this, as natural spacing looks best, and tie another simple knot to support the next bead. -
Thread the second bead:
Slide a wooden bead down to rest on your new knot. Alternating between raw wood and whitewashed beads creates that nice textured look seen in the photo. -
Continue the pattern:
Repeat the process of tying a knot, leaving a gap, and adding a bead until you have a decorative tail. The example uses about five or six beads in total. -
Finish the end:
After the final bottom bead, tie a tight double knot to secure everything. -
Trim excess:
Snip off any extra twine hanging below the last knot for a clean finish, or fray the very end slightly for a rustic touch. -
Hang and enjoy:
Find a sturdy branch or hook and hang your new clay bell by the thick rope loop.
Knot Slipping?
If the knot inside the pot keeps pulling through the hole, thread a large metal washer onto the rope before tying the knot to create a wider base.
Listen for the soft, hollow clinking sound as the breeze catches your beautiful new garden accent
Crackle-Glaze Statement Clay Chime
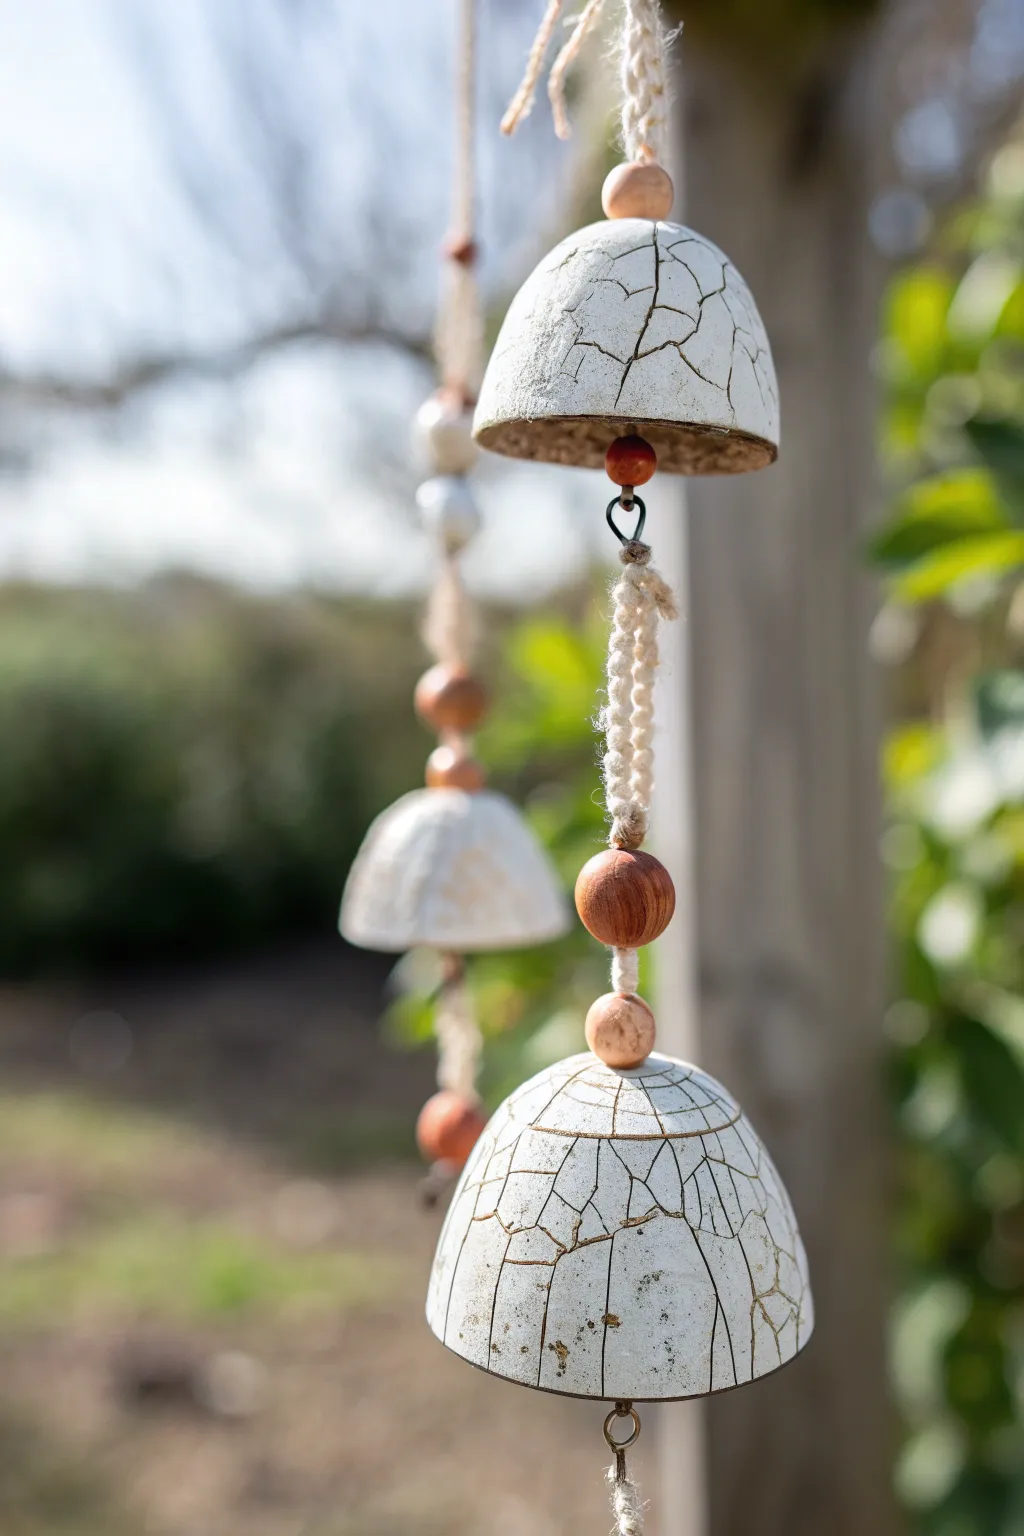
Capture the beauty of aged pottery with these stunning wind chimes featuring a distinctive crackle finish. The contrast between the organic, fissure-lined ceramic bells and the soft, natural fibers creates a rustic yet sophisticated statement piece for your garden or porch.
Step-by-Step Guide
Materials
- White earthenware clay
- Crackle glaze (Raku or store-bought crackle formula)
- India ink or black acrylic wash
- Rolling pin and guide sticks
- Circle templates or bowls (varying sizes)
- Pottery needle tool
- Sponge
- Natural jute or cotton macramé cord (3-4mm)
- Wooden beads (various sizes, natural finish)
- Kiln access (or use air-dry clay with crackle medium for a decorative-only version)
- Metal jump rings or wire
Step 1: Shaping the Bells
-
Prepare the Slabs:
Begin by wedging your white earthenware clay thoroughly to remove air bubbles. Roll it out into a smooth slab about 1/4 inch thick, using guide sticks to ensure even thickness across the entire sheet. -
Cut the Circles:
Using circle templates or masking tape rolls as guides, cut out two or three circles of varying diameters. A standard set might be 4 inches, 3.5 inches, and 3 inches to create a tiered look. -
Form the Domes:
Gently drape each clay circle over a hump mold or the bottom of a small rounded bowl. Smooth the clay downward with a damp sponge to hug the form without stretching it too thin. -
Create Hanging Holes:
While the clay is still leather-hard on the mold, use a needle tool or a small straw to punch a clean hole directly in the center of the top. This is crucial for the assembly phase later. -
Refine the Edges:
Once the clay has stiffened slightly, remove it from the mold. Use a damp sponge to smooth the bottom rim, ensuring there are no sharp burrs or uneven spots. -
Bisque Fire:
Allow the bells to bone dry completely, which usually takes a few days depending on humidity. Fire them in the kiln to the appropriate bisque temperature (usually cone 04) for your specific clay body.
Step 2: The Crackle Effect
-
Apply Glaze:
Brush or dip your bisque-fired bells into a specialized crackle glaze. I find that applying a slightly thicker coat than usual encourages deeper, more dramatic cracks to form. -
Glaze Firing:
Fire the pieces again according to the glaze manufacturer’s instructions. The crackles will form as the glaze cools and shrinks at a different rate than the clay body. -
Highlight the Cracks:
Once the pieces are completely cool, wipe a wash of India ink or watered-down black acrylic paint over the entire surface. The dark pigment will seep into the tiny fissures. -
Wipe Back:
Immediately wipe the surface clean with a damp cloth. The glaze surface will return to white, but the black ink will remain trapped in the cracks, revealing the spiderweb pattern.
Ink Insight
Wear gloves when applying the India ink wash! It stains skin instantly. If the ink dries too fast on the glaze surface, a little rubbing alcohol helps remove the excess without stripping the cracks.
Step 3: Assembly & Macramé
-
Prepare the Top Cord:
Cut a long length of natural jute or cotton cord, roughly 4 feet long. Fold it in half to create a loop at the top for hanging, and tie a secure overhand knot about 2 inches down from the loop. -
Add Top Bead:
Thread a large wooden bead onto both tail ends of the cord, pushing it up against the knot. This acts as the anchor. -
Attach First Bell:
Feed the cord ends through the top of your largest ceramic bell. To secure it, I like to insert a small metal washer or tie a bulky knot inside the bell so it rests against the interior ceiling of the dome. -
Create a Link:
Below the first bell, attach a metal split ring or simple wire loop to the cord hanging down. This allows the lower section to swing independently. -
Macramé Section:
Cut a new 12-inch piece of cord. Fold it through the metal ring and begin a simple braiding or square knot pattern for about 3 inches to create a decorative texture. -
Add Spacer Beads:
Thread a medium-sized wooden bead onto the cord, knotting securely below it to hold it in place. This separates the visual flow between the ceramic pieces. -
Attach Final Bell:
Feed the remaining cord through the smaller ceramic bell. Secure it from the inside just like the first one, ensuring it hangs at a pleasing distance below the top tier. -
Final Weigh-Down:
Finish the bottom by tying on a heavy decorative bead or a small metal washer. This weight acts as the ‘wind catcher’ and helps stabilize the chime in a breeze.
Level Up: Sound Check
Suspend small clay ‘clappers’ or washers inside each bell using thin fishing line. This ensures they make a gentle tinkling sound against the ceramic walls when the wind blows.
Hang your new chimes in a breezy spot and enjoy the rustic elegance they bring to your outdoor space
Balanced Mobile-Style Clay Wind Chime
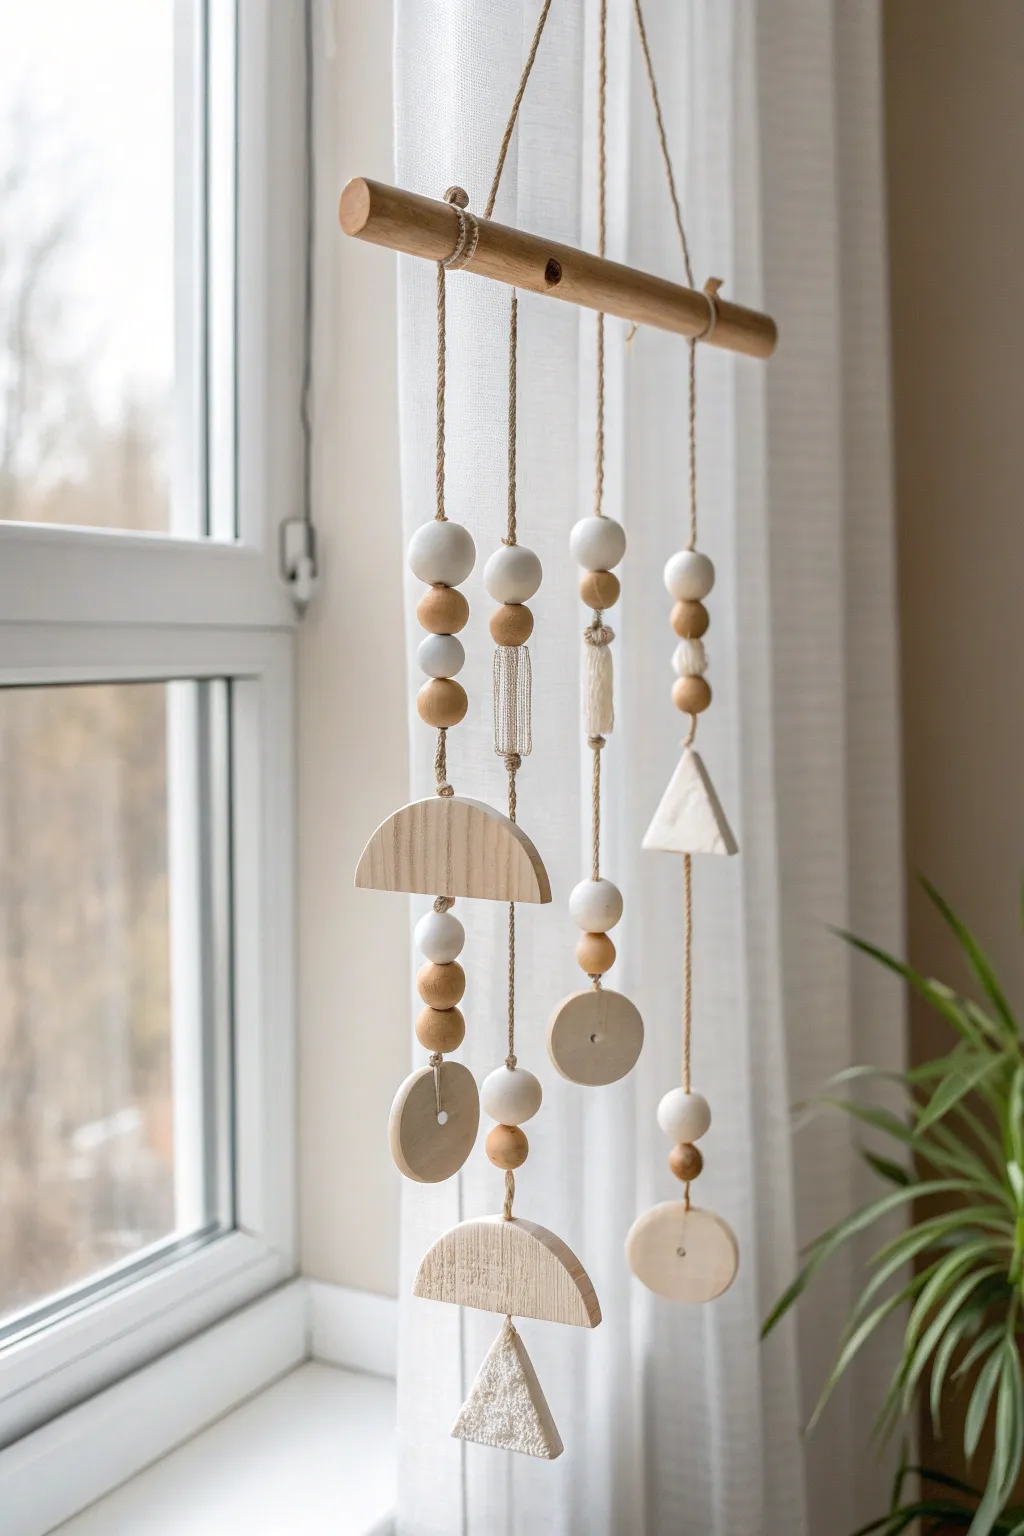
Bring a sense of calm to any corner with this balanced, Scandinavian-style mobile wind chime. Combining the earthy warmth of natural wood beads with sleek, handmade air-dry clay shapes creates a stunning piece of kinetic art.
How-To Guide
Materials
- White polymer or air-dry clay
- Rolling pin
- Cookie cutters (circle, triangle) or craft knife
- Sandpaper (fine grit)
- Wooden dowel (approx. 12 inches)
- Natural wood beads (various sizes: large, medium, small)
- White wooden beads (or white acrylic paint)
- Jute twine or cotton cord
- Macrame cord (for tassels)
- Drill with small bit (if clay doesn’t have holes)
- Scissors
- Ruler
Step 1: Shaping the Clay Elements
-
Prepare your clay:
Start by conditioning your clay until it’s soft and pliable. Roll it out on a clean, flat surface to a consistent thickness of about 1/4 inch. -
Cut the shapes:
You will need several geometric forms: two large semicircles, two flat circles, and two triangles. Use cookie cutters for perfect circles, then slice one circle in half to create the semicircles. Cut the triangles using a template or knife. -
Add texture (optional):
If you want a hint of detail like the photo, gently press a piece of coarse fabric or a textured rolling pin into the wet clay of the bottom triangle or semicircle before it dries. -
Create hanging holes:
Using a toothpick or a small straw, poke holes in the clay pieces. The semicircles need a hole at the top curve and the bottom straight edge. Circles and triangles generally need top and bottom holes, though the bottom-most pendant only needs a top hole. -
Dry and refine:
Allow the clay to dry completely according to package instructions (usually 24-48 hours). Once hard, gently sand the edges with fine-grit sandpaper to remove any roughness.
Fixing Tilt
If the mobile tilts to one side when hung, simply slide the beads or clay shapes slightly up or down on their strings to redistribute the weight until it balances.
Step 2: Preparing the Support
-
Prep the dowel:
Take your wooden dowel and sand off any rough ends. You can leave it natural or stain it a light oak color to match the beads. -
Drill the dowel:
Mark four evenly spaced points along the length of the dowel. Drill small holes through these marks large enough for your twine to pass through. -
Attach the hanger:
Cut a long piece of jute twine. Tie it securely to both ends of the dowel to create a triangle hanger. I usually add a dab of glue to the knots to ensure they don’t slip off.
Add Color
For a pop of color, paint just the geometric clay shapes in soft pastels or earth tones like terracotta and sage green, leaving the wooden beads natural.
Step 3: Assembling the Strands
-
Cut the suspension cords:
Cut four lengths of jute twine, each about 30 inches long. These will form the vertical strands holding your shapes. -
Start the first strand:
Tie a knot at one end of a twine piece. Thread on a large white wooden bead, followed by a natural wood bead and a smaller grey or white bead. -
Add the first clay piece:
Thread the twine through the top hole of a clay semicircle. Tie a knot underneath it to hold it in place, or let it rest on a knot inside the hole if the fit is tight. -
Continue the pattern:
Below the semicircle, add a sequence of three stacked beads (white, wood, wood). Tie a knot, then attach a flat clay circle below that. -
Create the second strand:
For the second strand, try a different rhythm. Start with a white bead and a wood bead, then perhaps add a small handmade tassel. You can make this by folding macrame cord and wrapping the top. -
Assemble remaining strands:
Build the third and fourth strands using your remaining clay triangles and circles. Vary the order of clay shapes and bead clusters to create visual interest. Aim for asymmetry while keeping the visual weight balanced. -
Attach to the dowel:
Thread the top of each finished strand up through the holes in your wooden dowel. Adjust the heights so they hang in a staggered, pleasing formation. -
Secure the strands:
Once you are happy with the length of each strand, knot the twine securely on the top side of the dowel and trim any excess string.
Hang your new creation near a window where the light can catch the different textures and shapes as it gently turns