Whenever I need fresh clay work ideas, I start with projects that feel good in my hands and actually fit into real life—little bowls, small decor, and tiny sculptures that make me smile. Here are my go-to ideas, starting with the classics and drifting into the fun, slightly weird stuff I love making when the studio gets quiet.
Pinch Pot Trinket Dishes
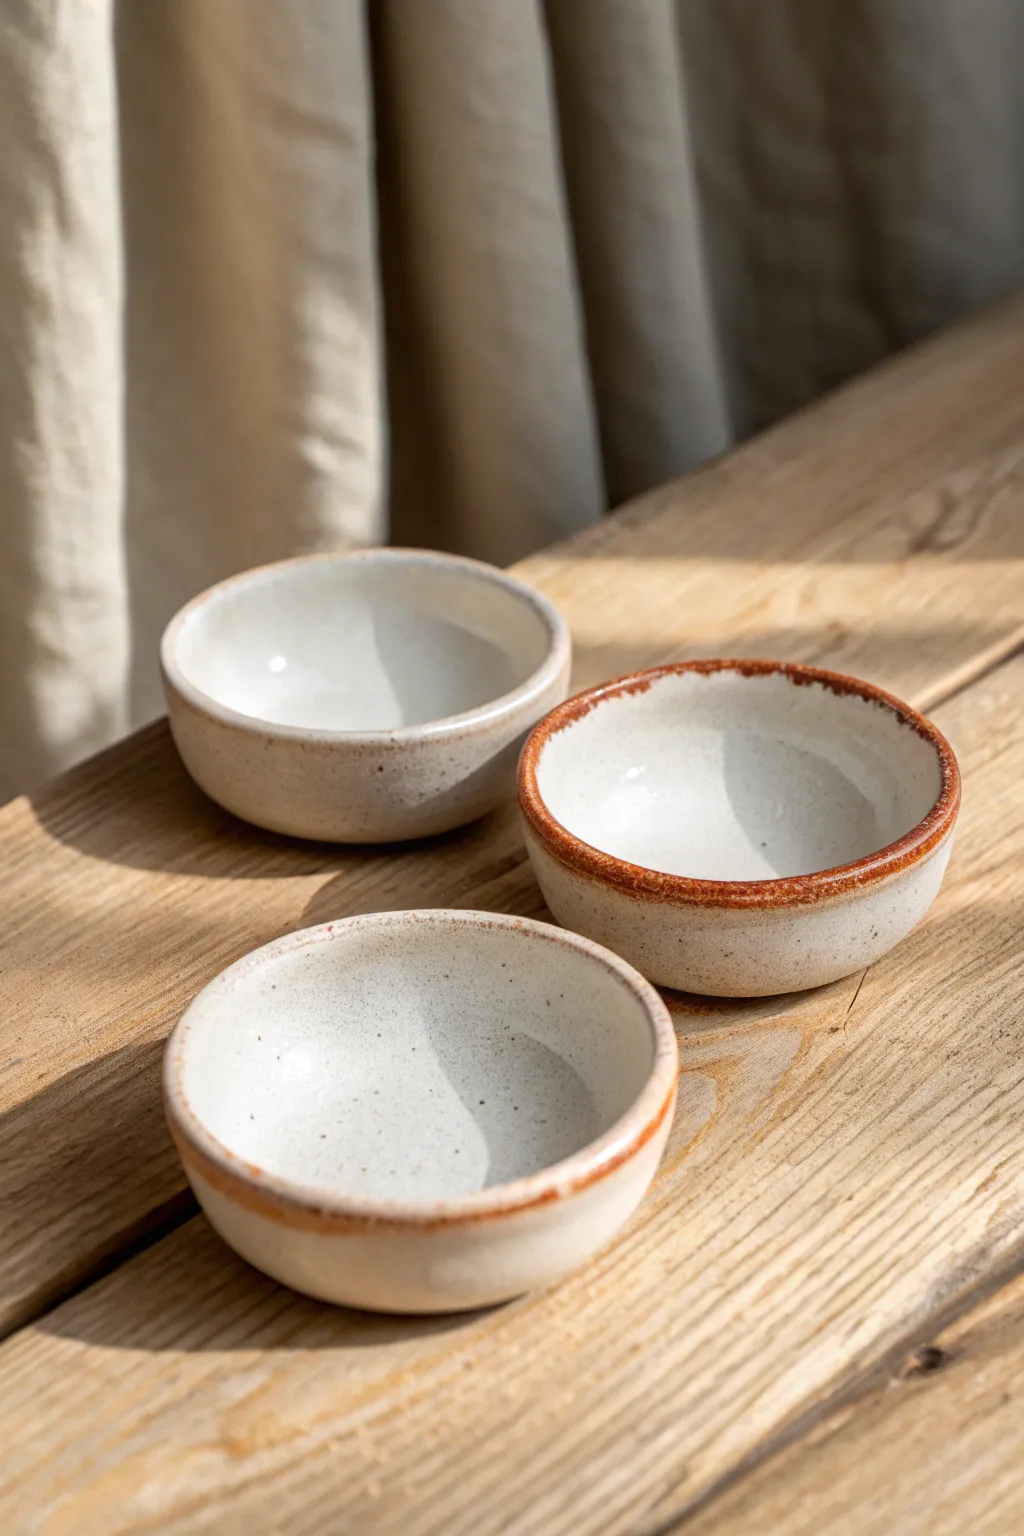
These charming, minimalist trinket dishes showcase the natural beauty of clay with their speckled finish and warm, toasted edges. Perfect for holding rings or sea salt, they are simple to form but offer a refined, artisanal look through careful glazing.
How-To Guide
Materials
- Speckled Stoneware Clay
- Glossy White Glaze (food safe)
- Tenmoku or Iron Oxide Wash
- Sponge
- Bucket of water
- Needle tool or wooden skewer
- Rib tool (optional)
- Small paintbrush
- Kiln (or access to a firing service)
Step 1: Forming the Pots
-
Prepare Clay Balls:
Start with a lump of speckled stoneware clay. Divide it into three equal portions, rolling each piece in your palms until you have smooth, round spheres about the size of a golf ball or slightly larger. -
Open the Center:
Hold a clay ball in one hand. Gently press your thumb into the center, pushing down until you are about a quarter-inch from the bottom. Be careful not to push all the way through. -
Pinch the Walls:
With your thumb inside and fingers on the outside, begin rotating the ball while gently rhythmic pinching. Work from the bottom up to thin the walls evenly. Aim for a consistent thickness of about 1/4 inch. -
Shape the Base:
Gently tap the bottom of the pot against your work surface to create a flat, stable base so the bowl sits level without wobbling. I like to press down firmly once to really set the shape. -
Refine the Rim:
Inspect the rim of your bowl. Use a slightly damp sponge or your finger to smooth out any cracks. Gently compress the rim downward to strengthen it and make it pleasant to touch. -
Smooth the Surfaces:
Use a damp sponge or a flexible rib tool to smooth the interior and exterior walls. Remove any deep fingerprints while leaving some subtle texture if you prefer that hand-thrown look. -
Dry and Bisque Fire:
Allow the pots to dry slowly under loose plastic for a day, then uncover until bone dry. Fire them in a kiln to bisque temperature (usually Cone 04 or 06, depending on your clay body).
Cracks on the Rim?
If you see cracks forming on the rim while pinching, your clay might be too dry. Dip your fingers in water (sparingly!) or compress the rim downward with your thumb to heal the splits immediately.
Step 2: Glazing and Finishing
-
Clean Bisque Ware:
Once fired, wipe the pots down with a damp sponge to remove any kiln dust. This ensures the glaze adheres properly to the ceramic surface. -
Apply Interior Glaze:
Pour a glossy white glaze into the interior of the pot. Swirl it around quickly to coat the entire inside surface, then pour the excess back into your glaze bucket. -
Dip the Exterior:
Hold the pot by the foot or base (or use glazing tongs) and dip the exterior into the white glaze. You can dip the whole pot or stop just short of the bottom rim for a bare-clay foot. -
Clean the Foot:
Use a sponge to wipe away any glaze from the absolute bottom of the pot where it will touch the kiln shelf. This prevents it from fusing to the shelf during firing. -
Detail the Rim:
This is the signature step. Take a small brush and dip it into a Tenmoku glaze or an Iron Oxide wash. Carefully paint a thin line along the rim of the pot. -
Create Variety:
For a varied set like the photo, apply the oxide heavier on one pot for a thick rusty band, and lighter on another for a subtle tan edge. The oxide will interact with the white glaze to create those warm brown tones. -
Final Glaze Firing:
Place your glazed pots back into the kiln for the glaze firing. Follow the temperature guidelines for your specific clay and glaze combination (often Cone 5 or 6 for stoneware). -
Cooling and Unloading:
Allow the kiln to cool completely before opening. Your pots should now have a smooth, milky white surface with the speckled clay showing through slightly, framed by that beautiful toasted rim.
Add a Texture Twist
Before drying, press a piece of lace or a textured fabric into the wet clay on the outside wall. The glaze will break over the texture, highlighting the pattern.
Once cooled, your trio of bowls is ready to organize your tiniest treasures on a bedside table.


Coil-Built Mini Bowls
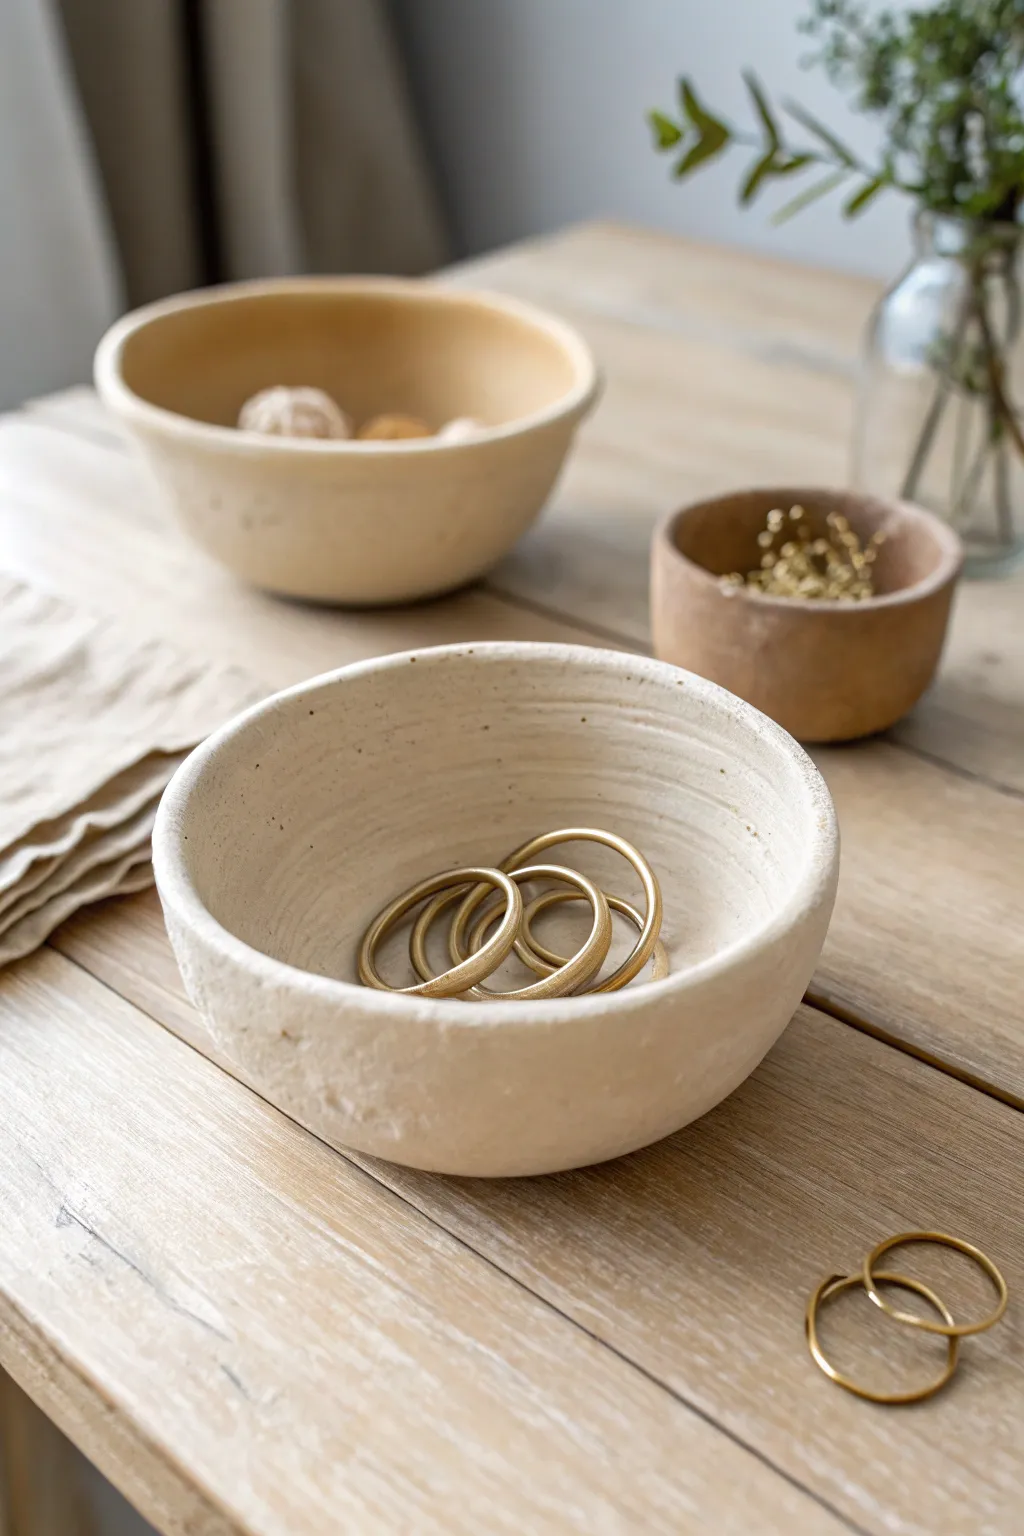
These charming, earthy bowls combine the ancient technique of clay coiling with a modern, minimalist aesthetic. Their organic texture and creamy stoneware finish make them perfect vessels for organizing jewelry or desk treasures.
Step-by-Step Tutorial
Materials
- Light-colored stoneware clay or air-dry clay (cream or beige)
- Clay scoring tool or fork
- Slip (clay mixed with water) or vinegar
- Rolling pin
- Wooden modeling rib or flexible metal kidney
- Sponge
- Canvas mat or wooden board (for working surface)
- Knife or needle tool
Step 1: Base Construction
-
Prepare the Clay:
Begin by wedging a baseball-sized amount of clay to remove air bubbles and ensure an even consistency. -
Create the Floor:
Flatten a small portion of clay into a disc about 1/4 inch thick. You can pat this out by hand for a more organic look or use a rolling pin for precision. -
Cut the Base:
Use a needle tool or knife to cut a perfect circle from your flattened disc. This will be the bottom of your bowl, roughly 3-4 inches in diameter. -
Score the Edges:
Rough up the outer perimeter of your base disc using a scoring tool or fork. Apply a dab of slip or vinegar to this roughened area to act as glue.
Step 2: Building the Walls
-
Roll Coils:
Take a chunk of clay and roll it on your surface into a long, snake-like coil. Aim for a thickness similar to your pinky finger. -
Attach the First Coil:
Place the coil directly on top of the scored edge of the base. Gently press it down to ensure contact. -
Blend the Seams:
Using your thumb or a wooden tool, smear the inside of the coil down into the base so the seam disappears completely. -
Repeat for Outer Seam:
Do the same on the exterior, blending the coil downward into the base edge to create a unified wall. -
Build Upward:
Score the top of the first coil and add a second coil on top. Continue this process, stacking 3-4 layers depending on your desired height.
Uneven Walls?
If one side is rising faster than the other, pinch the thicker/higher side gently to thin it out, or tap the rim lightly with a paddle to level it.
Step 3: Shaping and Refining
-
Smooth the Walls:
Once your coils are stacked, use a wooden rib or kidney tool to smooth the entire surface, blending all remaining coil lines on both the inside and outside. -
Add Texture:
Instead of smoothing it perfectly glass-smooth, I like to leave some faint horizontal drag marks or subtle finger indentations to retain that handmade rusticity seen in the photo. -
Shape the Rim:
Wrap a damp sponge over the rim and gently compress it as you rotate the bowl. This strengthens the edge and prevents cracking. -
Level the Rim:
If the top is uneven, you can slice a thin layer off with your needle tool or gently tap the bowl upside down on the table to level it. -
Refine the Interior:
Use a slightly damp sponge to wipe the interior floor, ensuring there are no sharp bits where the wall meets the base.
Pro Texture Tip
To get that specific rustic stone texture, mix a small amount of fine sand or grog into your clay body before rolling your coils.
Step 4: Finishing
-
Slow Drying:
Loosely cover the bowl with plastic wrap and let it dry slowly for a day or two. This prevents warping. -
Bisque Fire:
If using kiln-fire clay, fire to bisque temperature (usually Cone 04) once fully bone dry. -
Glazing:
Apply a matte cream or ‘oatmeal’ glaze. For that raw stone look, you might choose to leave the outside unglazed or use a very thin wash. -
Final Firing:
Fire the piece again to the maturity temperature of your clay body.
Now fill your bowl with brass clips or rings to complement the warm, earthy tones of the clay


Slab Catchall Tray
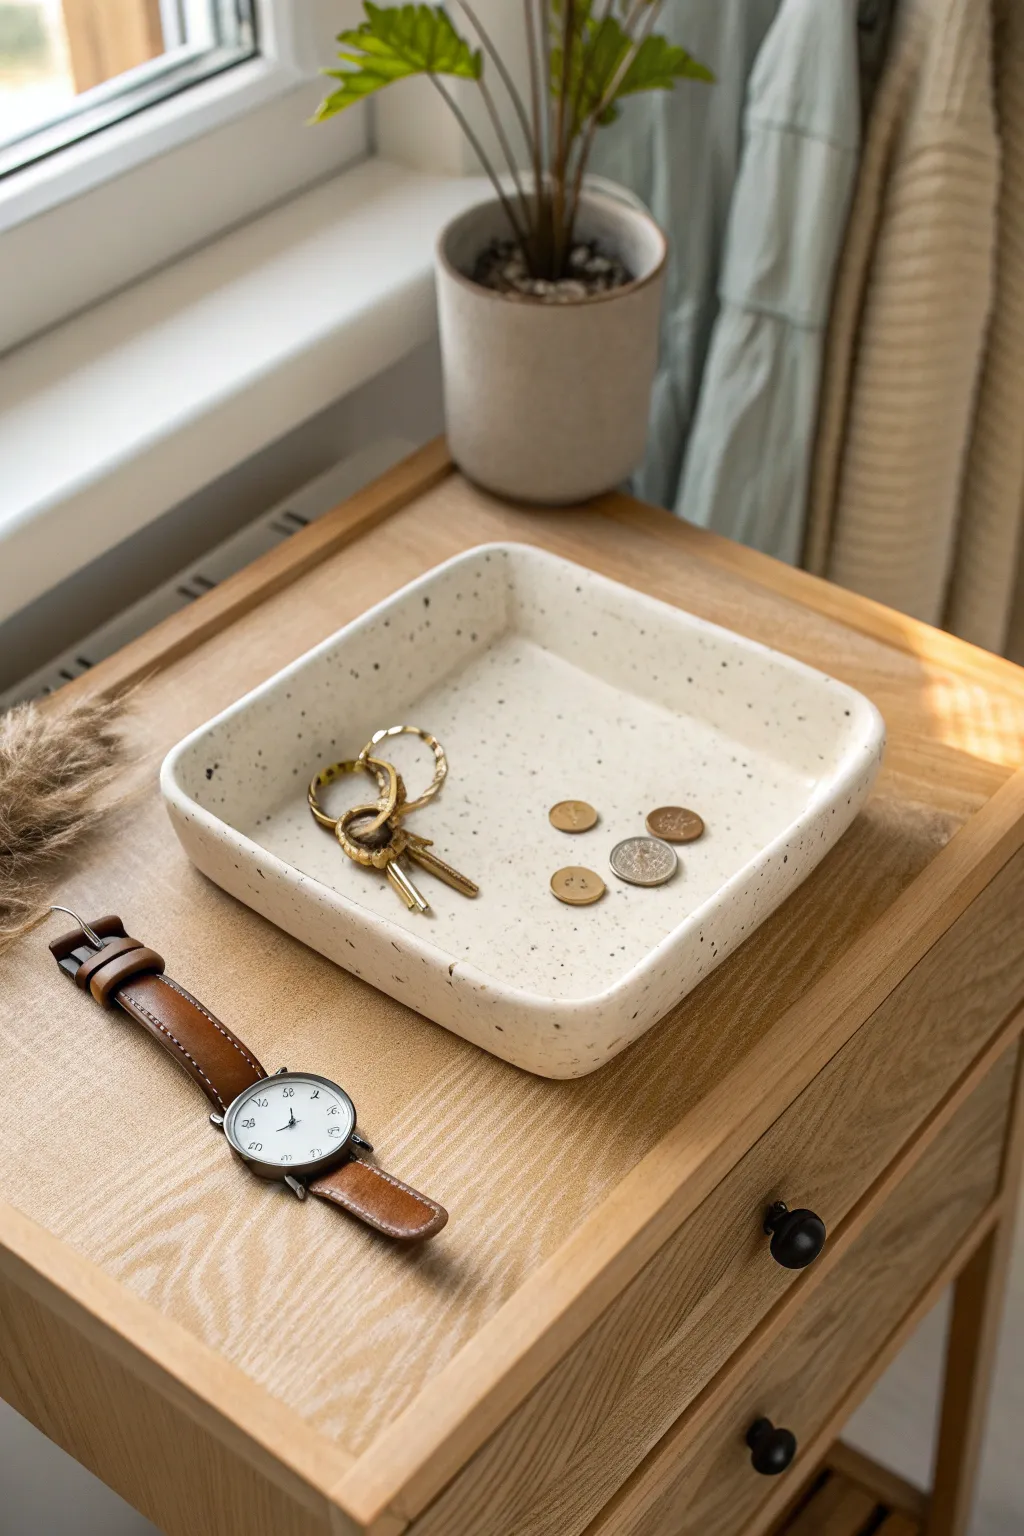
This minimalist catchall tray features gently rounded corners and a soft, organic speckle that fits perfectly into any modern decor. It’s an ideal beginner project for learning precise slab-building techniques while creating functional art for your entryway or dresser.
Detailed Instructions
Materials
- Speckled Stoneware Clay (or white clay with speckles added)
- Rolling pin
- Two wooden guide slats (approx. 1/4 inch thick)
- Square paper template (approx. 8×8 inches)
- Needle tool or fettling knife
- Rib tool (flexible metal or rubber)
- Sponge
- Canvas or slab mat
- Clear or transparent white glaze
- Kiln (or access to firing services)
Step 1: Preparing the Slab
-
Wedge the clay:
Begin with a ball of speckled stoneware clay roughly the size of a large grapefruit. Wedge it thoroughly to remove air bubbles and ensure consistency. -
Flatten initially:
Place the clay on your canvas workspace and give it a preliminary flatten with the palm of your hand to start the shape. -
Set up guides:
Position your wooden guide slats on either side of the clay. These are crucial for keeping your slab an even thickness throughout. -
Roll out the slab:
Using your rolling pin, roll the clay out until the pin rests on the guide slats. Roll in multiple directions to compress the clay particles well. -
Smooth the surface:
Take your rib tool and firmly compress the surface of the slab. This aligns the clay particles and removes any canvas texture.
Warp Watch
Flat objects love to warp. Place a small sandbag or a weighted bag of rice in the center of the tray while it dries to keep the bottom perfectly flat.
Step 2: Forming the Shape
-
Cut the square:
Lay your paper template onto the smooth slab. Using a needle tool, cut straight down around the perimeter to get a clean square shape. -
Soften the edges:
Remove the excess clay. Run a slightly damp sponge or your finger along the sharp cut edges to round them off gently so they aren’t razor sharp. -
Turn up the rim:
Carefully lift one edge of the slab and prop it up slightly. You can use your fingers to pinch and lift the borders to create a rim that is about 1 inch high. -
Create the corners:
As you lift the sides, the corners will naturally gather excess clay. Instead of cutting this away, gently smooth and curve the corners inward to create that rounded, fluid look seen in the photo. I find that using the back of a spoon helps smooth the interior curve here. -
Level the rim:
Check that the rim height is consistent all the way around. Use a ruler if needed, or eye-ball it and gently press down high spots.
Texture Play
Before folding up the sides, press a piece of lace or a textured leaf into the slab to leave a subtle impression that glaze will pool beautifully into.
Step 3: Finishing and Firing
-
Refine the surface:
Once the tray is formed but still soft, use a damp sponge to do a final pass over the entire piece, smoothing out any maker’s marks or fingerprints. -
Slow drying:
Loosely cover the tray with plastic. Allow it to dry very slowly over several days to prevent the flat bottom from warping or bowing upward. -
Bisque fire:
Once bone dry, load the tray into the kiln for a bisque fire (usually Cone 04 or 06, depending on your clay body). -
Glaze application:
Wipe the bisque-fired tray with a damp sponge to remove dust. Pour a clear or semi-transparent white glaze into the tray, swilling it around to coat the interior, then pour out the excess. Brush or dip the exterior. -
Clean the foot:
Whatever glaze touches the kiln shelf will stick, so carefully wipe the bottom of the tray completely clean of glaze. -
Final firing:
Fire the piece to the maturity temperature of your clay (typically Cone 5/6 nor Cone 10 for stoneware).
Once cooled, your durable tray is ready to keep your daily essentials organized in style


Pressed Botanical Coasters
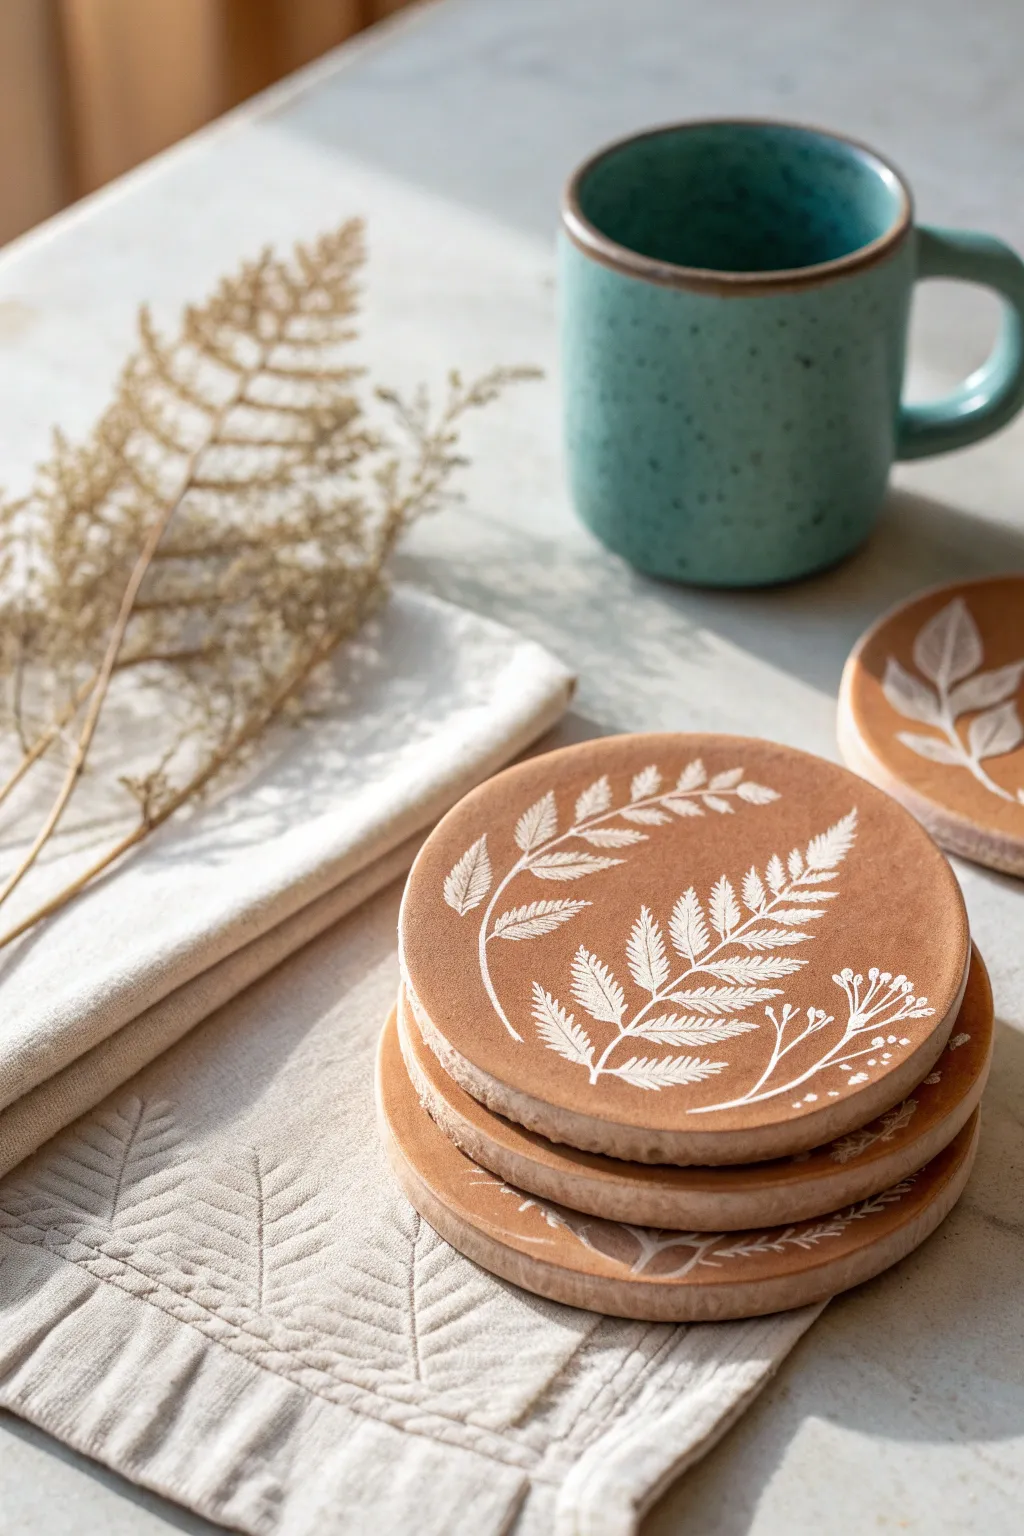
Bring the serene beauty of the forest floor into your home with these warm, terracotta-hued coasters featuring delicate white botanical motifs. This project combines the rustic charm of unglazed clay with crisp nature-inspired illustrations for a functional piece of art.
Step-by-Step
Materials
- Terracotta-colored air-dry clay (or polymer clay)
- White acrylic paint or white ceramic underglaze
- Fine detail paintbrush (size 0 or 00)
- Round cookie cutter (approx. 4 inches)
- Rolling pin
- Two wooden guide strips (1/4 inch thick)
- Fine-grit sandpaper (400 grit)
- Parchment paper or canvas mat
- Matte spray varnish or Mod Podge (matte finish)
- Fresh or dried fern fronds (for reference)
- Carbon paper (optional, for tracing)
- Small bowl of water
Step 1: Prepping and Shaping the Clay
-
Prepare your workspace:
Lay down your parchment paper or canvas mat on a flat, stable surface. This will prevent the clay from sticking and picking up unwanted texture from your table. -
Condition the clay:
Take a generous handful of terracotta air-dry clay. Knead it thoroughly in your hands for several minutes until it becomes warm, pliable, and free of cracks. If it feels too dry, dip your fingers in water and work it in. -
Roll the slab:
Place the two wooden guide strips on either side of your clay ball to ensure an even thickness. Roll the clay out with your rolling pin until it is perfectly flat and level with the guides, about 1/4 inch thick. -
Cut the shapes:
Using your round cookie cutter, press firmly into the smooth clay slab. Give it a gentle wiggle to separate the circle cleanly before lifting the cutter. Make 4-6 coasters depending on your clay amount. -
Smooth the edges:
Dip your finger in a little water and run it gently around the circumference of each cut circle. I like to take a moment here to round off the sharp top edge for a more professional, finished pottery look. -
Initial drying phase:
Place the wet clay rounds on a clean sheet of parchment paper. Let them dry for 24-48 hours, flipping them carefully every few hours to prevent curling as the moisture evaporates.
Fixing Curled Edges
If your clay starts curling up while drying, place a heavy book on top of them (use parchment paper in between) during the last half of the drying process to flatten them back out.
Step 2: Painting the Botanical Designs
-
Refining the surface:
Once the coasters are bone dry, check for any rough spots. Gently sand the top surface and edges with fine-grit sandpaper until they feel smooth to the touch. Wipe away dust with a slightly damp cloth. -
Drafting the design:
You can lightly sketch your fern pattern directly onto the clay with a soft pencil, or use carbon paper to transfer a design if you aren’t confident freehanding. Aim for a mix of large fronds and smaller sprigs. -
Painting the stems:
Load your fine detail brush with white acrylic paint. Start by painting the central curved spine of the fern leaf. Keep the line thin and graceful, allowing it to curve naturally across the circle. -
Adding the leaves:
Starting from the bottom of the stem, paint small, angled dashes or teardrop shapes moving upward to create the leaflets. Keep them denser at the bottom and smaller/sparser near the tip. -
Layering details:
For the specific look in the photo, add a second, lighter fern or small wildflower sprig overlapping the main one. This creates depth and visual interest. -
Refining the paint work:
If the paint looks translucent, wait for the first coat to dry and carefully apply a second layer to the white areas to make the design pop against the terracotta background.
Pro Tip: Textured Look
For a ‘relieved’ look, lightly press a real fern into the wet clay before it dries. Paint inside the indentation later for an embossed effect instead of a flat painting.
Step 3: Sealing and Finishing
-
Let the paint cure:
Allow the painted designs to dry completely. Acrylics dry fast, but giving it an hour ensures you won’t smudge your hard work. -
Applying sealer:
In a well-ventilated area, spray a thin, even coat of matte varnish over the top and sides of the coaster. Avoid heavy coats that might drip. -
Protecting the base:
Once the top is dry, flip the coasters over and seal the bottom as well. This prevents moisture from table condensation from soaking into the porous clay. -
Final cure:
Let the sealer cure for the time recommended on the bottle (usually 24 hours) before testing them with a mug.
Your new coaster set is now ready to add a touch of woodland elegance to your coffee table

The Complete Guide to Pottery Troubleshooting
Uncover the most common ceramic mistakes—from cracking clay to failed glazes—and learn how to fix them fast.
Face Planter Pots
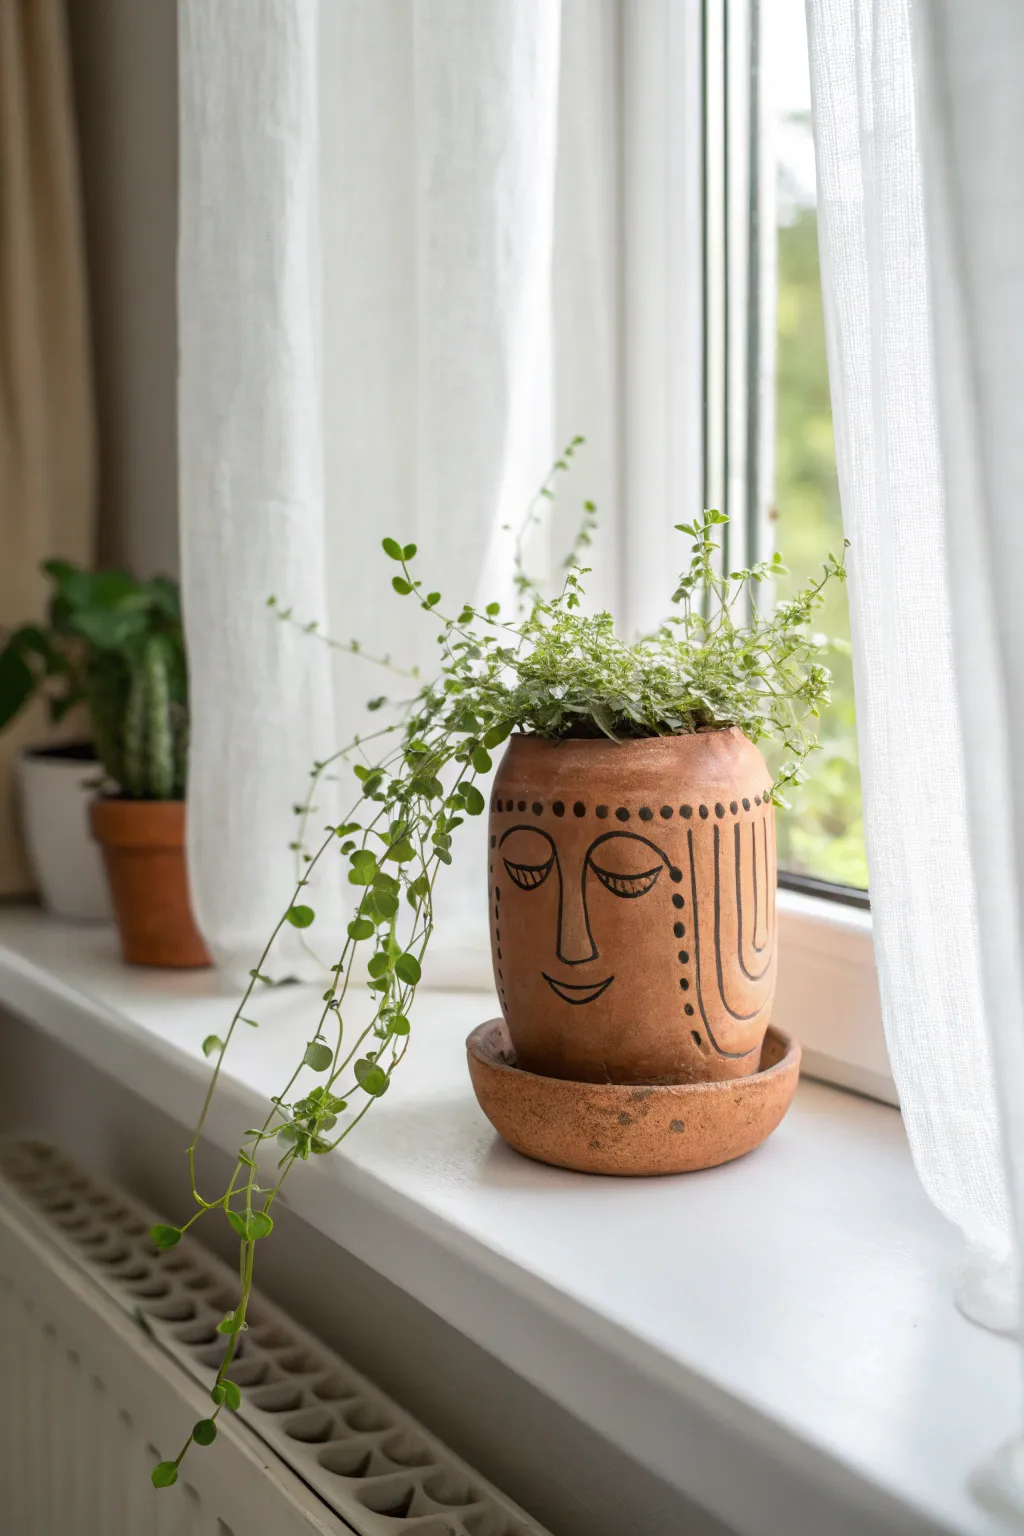
Transform a plain terra cotta pot into a calm, artistic statement piece with just a few simple strokes. This project combines the rustic warmth of natural clay with stylized line art to give your trailing houseplants a peaceful personality.
Step-by-Step Tutorial
Materials
- Standard terra cotta pot (approx. 4-6 inches)
- Matching terra cotta saucer
- Sandpaper (medium grit, around 120-150)
- Damp cloth or sponge
- Pencil (HB or lighter)
- Black acrylic paint or black paint marker (oil-based works well)
- Fine liner paintbrush (size 0 or 1) if using liquid paint
- Matte clear acrylic sealer spray
- Potting soil and a trailing plant (like Creeping Jenny or String of Hearts)
Step 1: Preparation
-
Soak and Scrub:
If you are using a new pot, soak it in water for an hour and scrub off any manufacturing dust. If reusing an old pot, scrub thoroughly with a mix of water and vinegar to remove mineral deposits. -
Dry Completely:
Allow the pot and saucer to dry fully. Terra cotta is porous and holds moisture, so give it distinct time in the sun or overnight to ensure it is bone dry before proceeding. -
Smooth the Surface:
Take your medium-grit sandpaper and gently sand the exterior of the pot. You don’t need to make it glass-smooth, but knocking down the rough grid texture will make drawing clean lines much easier. -
Wipe Down:
Use a slightly damp cloth to wipe away all the reddish dust created by sanding so your paint adheres properly.
Marker vs. Brush
Oil-based black paint markers are much easier to control on rounded surfaces than brushes. Use a medium tip for the main lines and a fine tip for lashes.
Step 2: Sketching the Design
-
Center the Face:
Ideally, find the ‘front’ of the pot. Using your pencil very lightly, draw a long, vertical ‘L’ shape in the center to form the nose. -
Add the Eyes:
Draw two U-shapes on either side of the nose bridge for the closed eyelids. Keep them symmetrical and positioned slightly below the top rim of the pot. -
Sketch the Mouth:
Draw a simple curved smile below the nose. Keep it small and serene to match the sleeping expression. -
Outline the Hair:
Sketch vertical lines down the sides of the face to suggest hair. Curve the lines at the bottom near the chin area to frame the face. -
Refine Details:
Add small arches above the eyelids for eyebrows and a row of small circles or dots across the forehead area to create a decorative headband or hairline.
Step 3: Painting the Lines
-
Test Your Tool:
Whether using a paint marker or brush, test the flow on the bottom of the pot or a scrap piece of paper first to ensure the line width is consistent. -
Trace the Nose:
Start with the central nose line. Apply steady pressure. If you are using a marker, don’t press too hard or the felt tip might snag on the clay texture. -
Define the Eyes:
Trace over your pencil marks for the eyelids. I personally find it helpful to rotate the pot as I draw the curve rather than twisting my wrist. -
Add Lashes:
If desired, add tiny, delicate vertical ticks to the closed eyelid line to represent eyelashes. -
Hair and Decor:
Go over the long vertical hair lines on the sides. Make these bold and confident. Fill in the dots across the forehead carefully. -
Clean Up:
Once the paint is dry, if any pencil marks are still visible, gently erase them with a white eraser.
Aged Patina Look
Before painting the face, whitewash the pot with diluted white acrylic paint (1:1 water to paint) and wipe it back with a rag for a vintage, weathered look.
Step 4: Finishing and Planting
-
Seal the Artwork:
Take the pot outside and spray it with a matte clear acrylic sealer. Apply two light coats rather than one heavy one to prevent drips. -
Dry Time:
Let the sealer cure according to the can’s instructions, usually at least 24 hours, before introducing soil. -
Prepare the Base:
Place the pot on its saucer. Add a small piece of mesh or a coffee filter over the drainage hole to keep soil in. -
Pot the Plant:
Fill with potting soil and plant your trailing greenery. Arrange the vines so they cascade down the sides like wild hair.
Place your new planter on a sunny windowsill where the light can catch the green vines and the peaceful face.
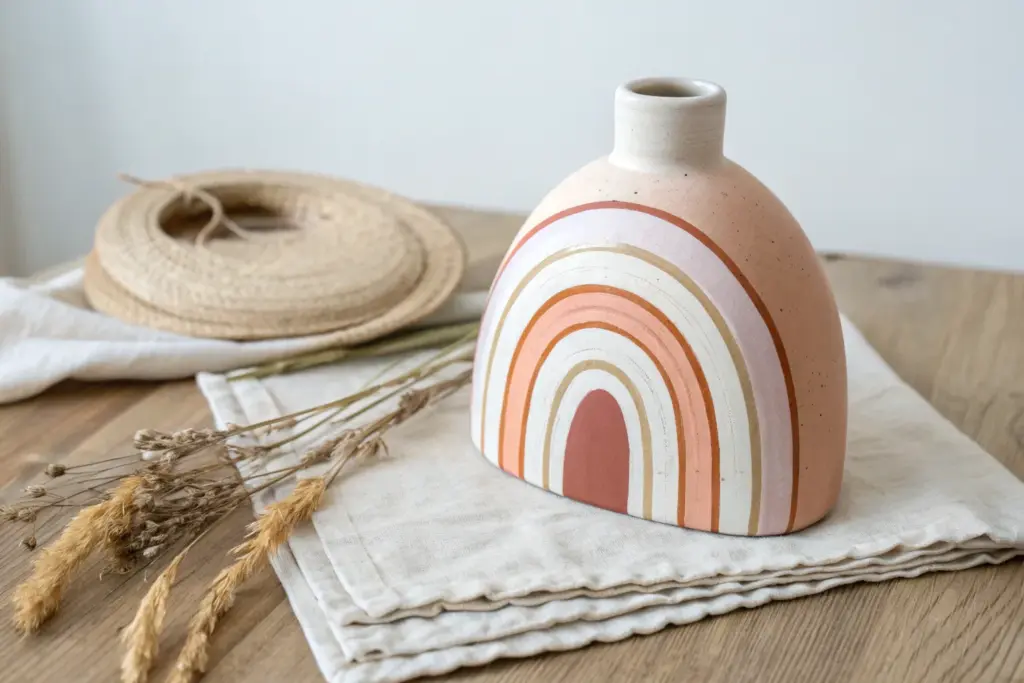
Mini Bud Vases
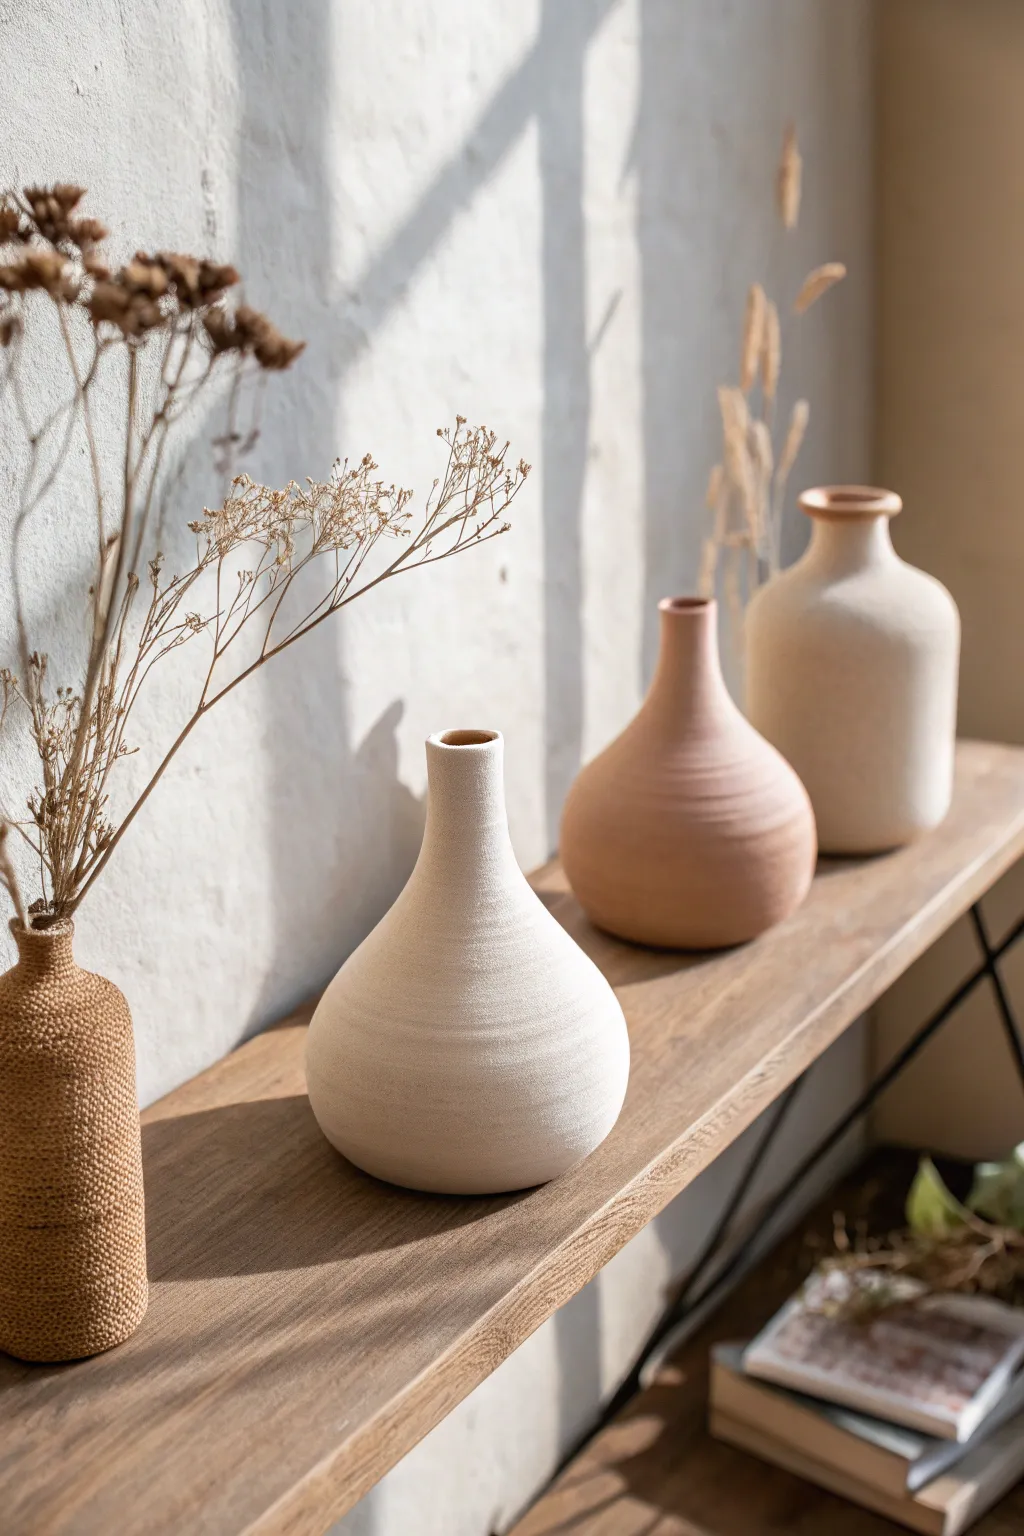
Capture the essence of organic modernism with this trio of pinch-and-coil pots. These vases feature soft, calming curves and varying textures, from smooth matte stoneware to a unique woven-look surface, perfect for displaying dried botanicals.
Step-by-Step Guide
Materials
- High-quality air-dry clay (white or cream)
- Pottery sponge
- Rolling pin
- Wire clay cutter
- Loop tool (for trimming)
- Needle tool or toothpick
- Small bowl of water (slip)
- Hessian fabric or thick rope (for texturing)
- Acrylic paints (sand, terracotta, off-white)
- Matte varnish or sealant
- Fine grit sandpaper
Step 1: The Woven Texture Vase
-
Create the base:
Start by rolling a small ball of clay about the size of a plum. Flatten it gently with your palm to create a stable, circular base for your first vase. -
Build the texture wall:
Roll out long, thin coils of clay, approximately 1/4 inch thick. Before attaching them, enhance the texture by gently pressing a piece of hessian fabric or rolling a textured rope over the coils to imprint a pattern. -
Stack and join:
Score the outer edge of your base and apply a dab of water. Lay your first textured coil around the perimeter. Continue stacking coils upward to build a cylinder, pressing them gently together without smoothing out the exterior texture you just created. -
Shape the neck:
As you reach the top third, use slightly shorter coils to bring the walls inward, creating a narrow neck. Finish with a smooth rim using your fingertips.
Step 2: The Smooth Bulb Vases
-
Pinch the body:
Take a larger lump of clay (grapefruit size) for the white vase. Push your thumb into the center and pinch the walls upward while rotating the clay to form a hollow, bulbous sphere. -
Refine the curve:
Use a wooden spoon or paddle to gently tap the outside of the sphere while it’s still workable. This helps round out any lumpy areas and creates that perfect teardrop shape. -
Add the neck:
Roll a thick coil of clay and attach it to the top opening of your sphere. use your fingers to blend the clay downwards into the body until the seam is invisible. -
Create the tall terracotta vase:
Repeat the previous steps but elongate the form. Instead of a sphere, pinch the clay upwards to form a taller, pear-like shape. Ensure the bottom is flat and stable. -
Smooth the surfaces:
Dip a pottery sponge in water (squeeze it out well so it’s just damp) and wipe down the surfaces of the smooth vases. I find this step crucial for removing fingerprints and achieving that professional matte look.
Cracks Appearing?
If tiny cracks appear while drying, don’t panic. Mix a small amount of clay with water to make a paste (slip) and fill the cracks, then sand smooth once dry.
Step 3: Finishing Touches
-
Dry thoroughly:
Allow all three vases to dry slowly away from direct sunlight for at least 24-48 hours. Turn them occasionally to ensure even drying. -
Sand for perfection:
Once bone dry, take fine-grit sandpaper to the smooth vases. Gently buff away any remaining unevenness, focusing on the rim and the curve of the neck. -
Mix your colors:
Prepare your acrylic palette. You want very subtle, earthy tones. Mix white with a dot of brown for the ‘sand’ look, and mix orange, brown, and white for the muted terracotta. -
Paint the woven vessel:
Using a stiffer brush, dab a brown-gold paint into the textured vase, ensuring the paint gets into the crevices of the coil pattern to accentuate the depth. -
Paint the smooth vessels:
Apply your off-white and terracotta mixtures to the smooth vases. Use broad, horizontal brushstrokes to mimic the turning lines of wheel-thrown pottery. -
Seal:
Finish with a coat of matte varnish. This removes the plastic shine of acrylics and gives the pieces a raw, ceramic feel.
Faux-Ceramic Texture
Mix baking soda into your acrylic paint before applying. It creates a gritty, stoneware texture that looks incredibly realistic and hides minor imperfections.
Now arrange your trio together for a stunning, sculptural display that brings warmth to any corner


What Really Happens Inside the Kiln
Learn how time and temperature work together inside the kiln to transform clay into durable ceramic.
Simple Incense Holders
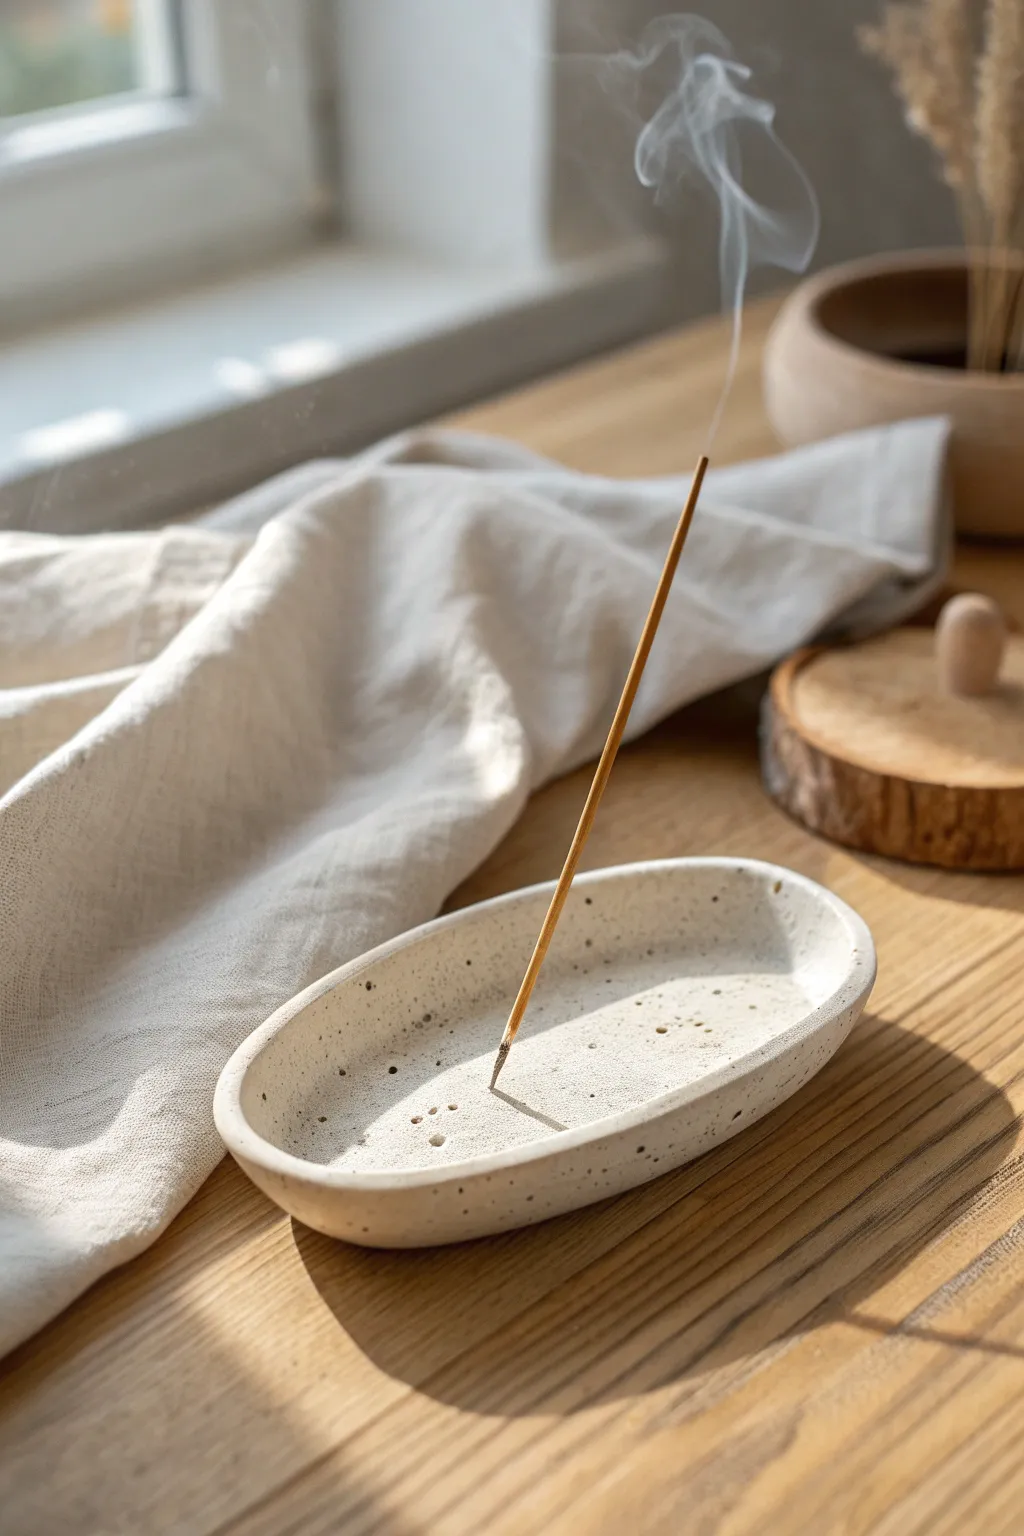
This elegant incense holder combines functionality with organic beauty, featuring a shallow, oblong shape and a subtle speckled finish. It’s an ideal beginner project that brings a calming, modern aesthetic to any room.
How-To Guide
Materials
- White air-dry clay or polymer clay
- Rolling pin
- Dried coffee grounds or coarse black pepper (for speckles)
- Craft knife or clay rib
- Small bowl of water
- Fine-grit sandpaper
- Round toothpick or skewer
- Matte or satin varnish/sealant
- Soft paintbrush
- Sponge
Step 1: Preparing the Clay
-
Condition the clay:
Start by kneading a handful of white clay until it is soft, warm, and pliable. This prevents cracks later on. -
Add texture:
To achieve that natural speckled look without buying special clay, sprinkle a small pinch of dried coffee grounds or coarse pepper onto your clay ball. -
Incorporating the speckles:
Fold the clay over the grounds and knead thoroughly until the specks are evenly distributed throughout the material. Add more if you want a denser texture. -
Roll it out:
Place the clay on a smooth surface and use your rolling pin to flatten it into an even slab, roughly 1/4 inch thick. Don’t go too thin, or the base won’t support the stick.
Cracking Up?
If small cracks appear while the clay dries, mix a tiny bit of fresh clay with water to make a paste (slip) and fill them in, then sand smooth once dry.
Step 2: Shaping the Form
-
Cut the basic shape:
Using a craft knife, freehand cut an oblong or oval shape from your slab. It doesn’t need to be mathematically perfect; an organic shape adds charm. -
Smooth the edges:
Dip your finger in a little water and run it along the cut edge to smooth out any sharpness or jagged bits from the knife. -
Curving the rim:
Gently pinch the edges upward all around the oval to create a shallow lip. This curve is crucial for catching the falling ash. -
Refining the profile:
I like to use a slightly damp sponge to smooth the transition between the base and the raised rim, ensuring a seamless, soft curve. -
Drilling the holder:
Find the general center of your dish. Take your incense stick (or a skewer of similar width) and press it into the clay at a slight angle, not straight up. -
Check the depth:
Ensure the hole goes almost to the bottom but not all the way through to the table. Give the stick a tiny wiggle to make the hole just slightly larger than the stick itself to account for shrinkage.
Step 3: Finishing Touches
-
Initial drying:
Set the piece aside in a safe, dry place away from direct sunlight. Let it air dry for at least 24-48 hours until it’s completely hard and white. -
Sanding:
Once fully dry, take fine-grit sandpaper and gently buff the edges and rim. This removes any fingerprints and gives it that professional stone-like feel. -
Dusting off:
Wipe the entire piece down with a dry cloth or a soft brush to remove the white clay dust generated by sanding. -
Sealing the piece:
Apply a thin coat of matte or satin varnish using a soft paintbrush. This protects the clay from ash marks and makes it easier to wipe clean. -
Final cure:
Let the varnish dry completely according to the manufacturer’s instructions before lighting your first incense stick.
Make it Luxe
After the sealant dries, use gold leaf paint to add a delicate rim around the edge of the dish for a sophisticated, high-end ceramic look.
Enjoy the peaceful atmosphere your new handmade creation brings to your space
Cutout Candle Holders
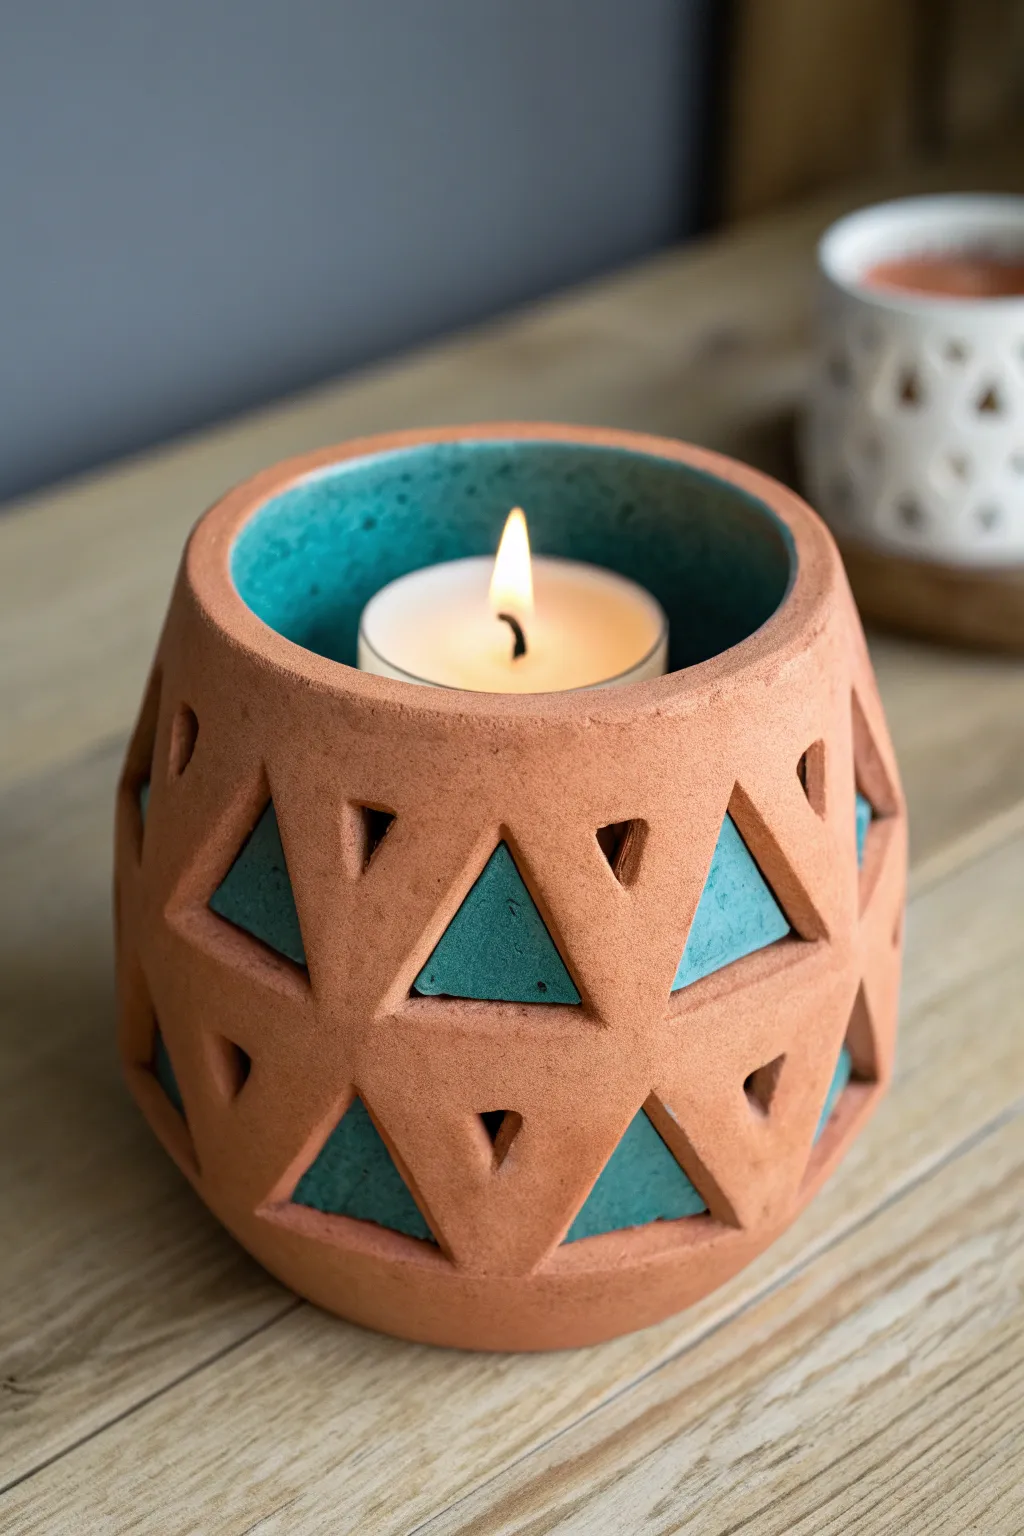
This striking candle holder combines the warmth of natural terracotta with a cooling pop of turquoise. The geometric triangular cutouts create a play of shadow and light, while the inner glaze color peeks through for an elegant two-tone effect.
Step-by-Step
Materials
- Terracotta air-dry clay or kiln-fire clay
- Turquoise acrylic paint or low-fire glaze
- Clear matte sealant (if using air-dry clay)
- Small tealight candle
- Rolling pin
- Clay carving knife or X-Acto blade
- Small triangle cookie cutter (approx. 1 inch)
- Sponge and water
- Smooth work surface or canvas mat
- Sandpaper (fine grit)
- Small paintbrush
Step 1: Forming the Base Shape
-
Prepare the clay:
Begin by wedging a fist-sized ball of terracotta clay to remove air bubbles. Ensure the consistency is smooth and pliable, not sticky. -
Create a pinch pot:
Press your thumb into the center of the ball, stopping about half an inch from the bottom. Slowly pinch and turn the clay to open up the walls. -
Shape the curvature:
As you pinch up the walls, gently curve them inward near the top to create a slightly enclosed, bulbous shape rather than a straight bowl. -
Smooth the surfaces:
Use a damp sponge to smooth out any fingerprints or cracks on both the exterior and interior walls. The walls should be roughly 1/4 inch thick throughout. -
Refine the rim:
Slice the top rim with a wire tool or knife to make it perfectly flat and even, then soften the cut edge with a damp finger.
Slumping Walls?
If the clay sags while cutting, it’s too wet. Stuff the inside with newspaper or plastic wrap to support the shape while you cut, then remove it once firm.
Step 2: Carving the Design
-
Initial firming:
Let the pot sit for roughly 30-60 minutes until it reaches a ‘leather hard’ state. It should be firm enough to cut without collapsing but still hold moisture. -
Mark the grid:
Lightly trace horizontal guidelines around the pot where your triangle rows will go. I find this helps keep the pattern from wandering up or down. -
Cut the first row:
Using your small triangle cutter or a sharp knife, carefully remove triangles from the clay. Position them pointing upwards for the bottom row. -
Cut the second row:
For the upper row, cut triangles pointing downwards, nestling them between the peaks of the bottom row to create a tessellated look. -
Clean the edges:
Once the cuts are made, use a damp brush or your fingertip to smooth the sharp edges inside each cutout window. -
Final drying:
Allow the piece to dry completely. If using air-dry clay, this takes 24-48 hours; if using kiln clay, wait until bone dry before firing.
Step 3: Finishing and Coloring
-
Sand for smoothness:
Once fully dry (or bisque fired), lightly potential rough spots with fine-grit sandpaper, focusing on the rim and cutout edges. -
Paint the interior:
Apply turquoise paint or glaze to the entire interior of the pot. Use a small brush to carefully paint the inner edges of the triangular cutouts so the color is visible from the outside. -
Clean the exterior:
If any turquoise paint got onto the exterior terracotta face, wipe it away immediately with a damp cloth or carefully sand it off after it dries. -
Seal the piece:
For air-dry clay, apply a clear matte sealant to the exterior to protect the clay and enhance the natural terracotta color. If using glaze, fire the piece a second time. -
Add the light:
Place a standard sizing tealight or a battery-operated votive inside to complete the look.
Texture Twist
Before cutting the triangles, gently press a textured sponge or fabric into the exterior clay to give the terracotta a rough, stone-like surface.
Light your candle and enjoy the warm glow contrasting with the cool blue interior

TRACK YOUR CERAMIC JOURNEY
Capture glaze tests, firing details, and creative progress—all in one simple printable. Make your projects easier to repeat and improve.
Ring Cones And Jewelry Stands
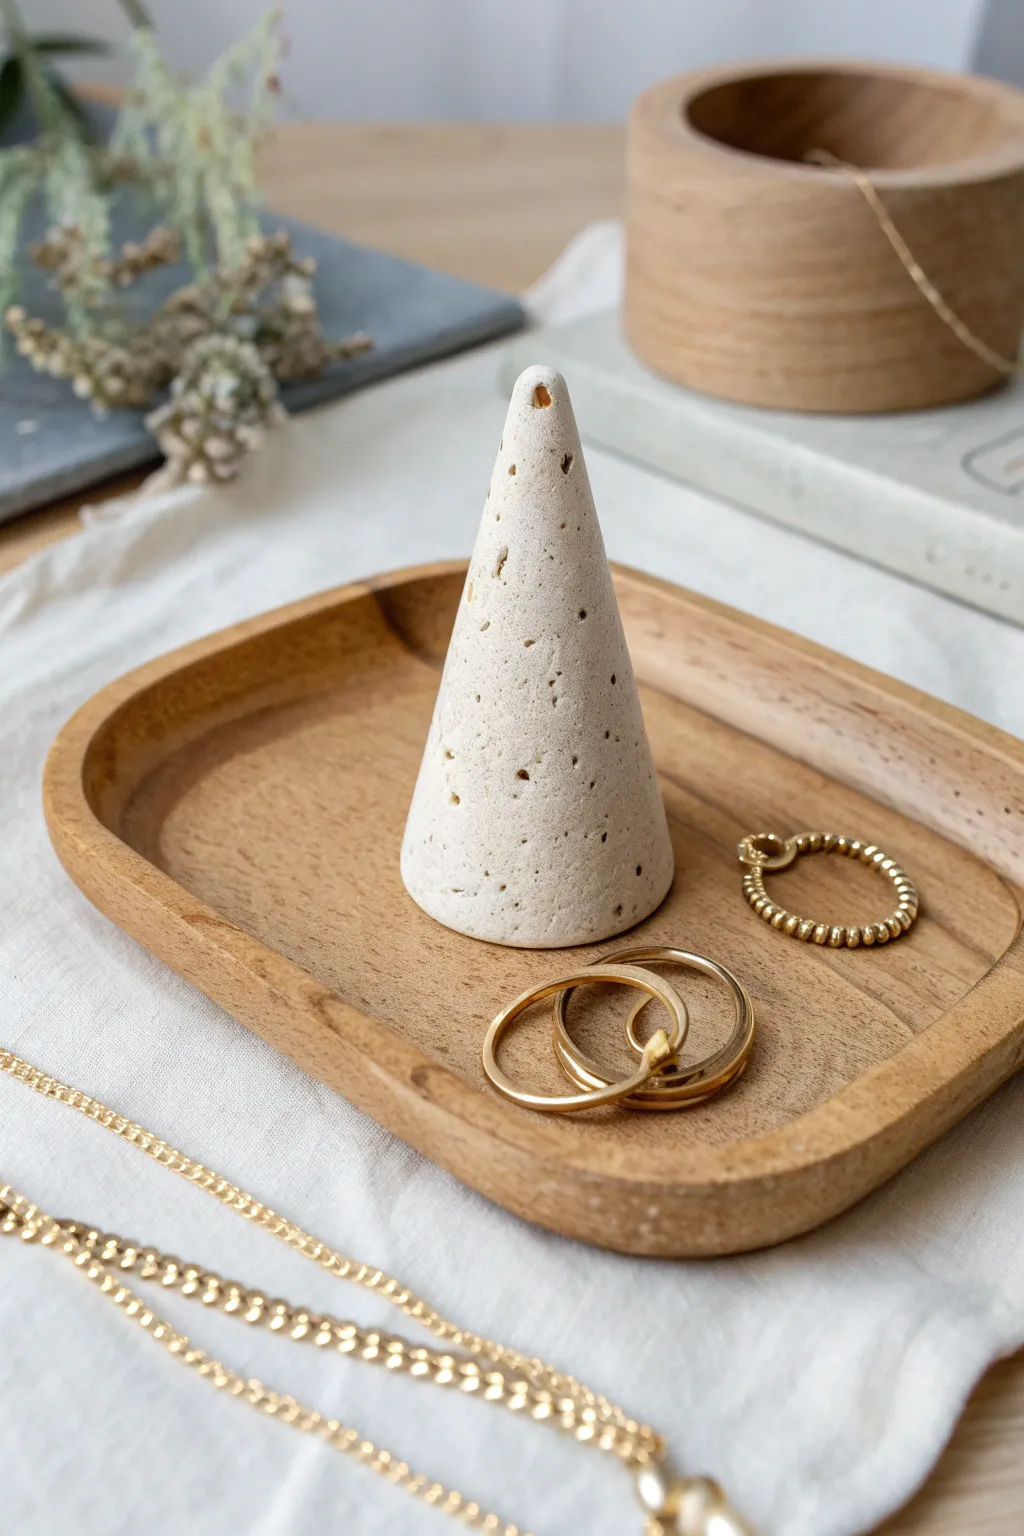
Simple yet effortlessly chic, this minimalist ring holder mimics the texture of natural sandstone or limestone, making it a perfect modern accent for your bedside table. Its tapered shape is ideal for keeping your favorite bands organized while adding an organic touch to your decor.
Step-by-Step Tutorial
Materials
- White polymer clay (curing type) or air-dry clay
- Coarse black pepper or dried coffee grounds (for speckling)
- Tan or beige acrylic paint (optional, for tinting)
- Rolling pin or acrylic roller
- Craft knife or clay blade
- Fine-grit sandpaper (400-600 grit)
- Parchment paper or baking mat
- Clear matte varnish or sealant (optional)
- Flexible smoothing tool or your finger
Step 1: Preparing the Clay Body
-
Condition the clay:
Begin by taking a chunk of white clay roughly the size of a golf ball. Knead it thoroughly in your hands until it becomes soft, pliable, and warm to the touch to prevent cracks later. -
Create the speckles:
Flatten the clay slightly and sprinkle a small pinch of coarse black pepper or dried coffee grounds onto the surface. These organic materials offer a fantastic, natural stone texture that paint rarely achieves on its own. -
Incorporate the inclusions:
Fold the clay over the speckles and knead again. Repeat the folding and rolling process until the particles are evenly distributed throughout the entire ball. -
Optional tinting:
If your clay is stark white and you prefer a warmer, sandy tone like the original photo, mix in a tiny, pin-head-sized drop of tan acrylic paint or a small bit of beige clay. Knead until the color is completely uniform.
Step 2: Shaping the Cone
-
Form a ball:
Roll your speckled clay between your palms to create a smooth, tight sphere. Ensure there are no major seams or air pockets visible. -
Create a teardrop shape:
Place the ball on your work surface. Using the flat of your hand, apply pressure to one side of the ball while rolling back and forth to elongate it into a teardrop or pear shape. -
Flatten the base:
Stand the teardrop up on its wide end. Firmly press it down onto your work surface to create a flat, stable bottom. The cone should stand upright without wobbling. -
Refine the taper:
With the cone standing, use your fingers to gently stroke upward from the base to the tip, refining the angle. You want a tall, fairly narrow profile rather than a short, squat one. -
Enhance the texture:
The charm of this piece is its imperfections. I like to gently press the surface with a piece of coarse sandpaper or a textured sponge to remove fingerprints and add a pitted, stone-like feel. -
Shape the tip:
Round off the very tip of the cone slightly so it isn’t dangerously sharp. A soft, rounded point looks more more like eroded stone.
Stone Texture Secret
For deeper texture, roll the finished cone gently over 80-grit sandpaper before baking. This imitates the rough surface of sandstone perfectly.
Step 3: Finishing Touches
-
Check stability:
Give the cone a gentle tap. If it wobbles, pick it up and tap the base firmly against the table again to truly flatten it. -
Create surface pitting:
To mimic the specific look in the photo, take a needle tool or a toothpick and poke a few random, slightly larger holes or ‘pockmarks’ into the surface. Don’t overdo it; just add a few for character. -
Final smoothing:
Run your finger lightly over the clay one last time to soften the edges of the pockmarks you just made, ensuring they look like natural erosion rather than tool marks. -
Curing or drying:
If using polymer clay, bake according to the package instructions (usually 275°F/135°C for 15-30 minutes). If using air-dry clay, leave it in a dry spot for 24-48 hours. -
Sanding:
Once fully cured and cooled (or dry), use fine-grit sandpaper to lightly buff the surface. This will expose more of the pepper/coffee speckles and give the piece a smooth, matte finish. -
Sealing:
Apply a very thin coat of matte varnish if you want to protect the clay from dirt, though leaving it raw preserves the most authentic stone texture.
Try a Marble Finish
Instead of mixing the beige tint fully, stop kneading halfway. This leaves swirls of white and tan for a faux-marble effect.
Place your new ring cone on a wooden tray or vanity top to enjoy that instant earthy aesthetic.
Abstract Polymer Clay Earrings
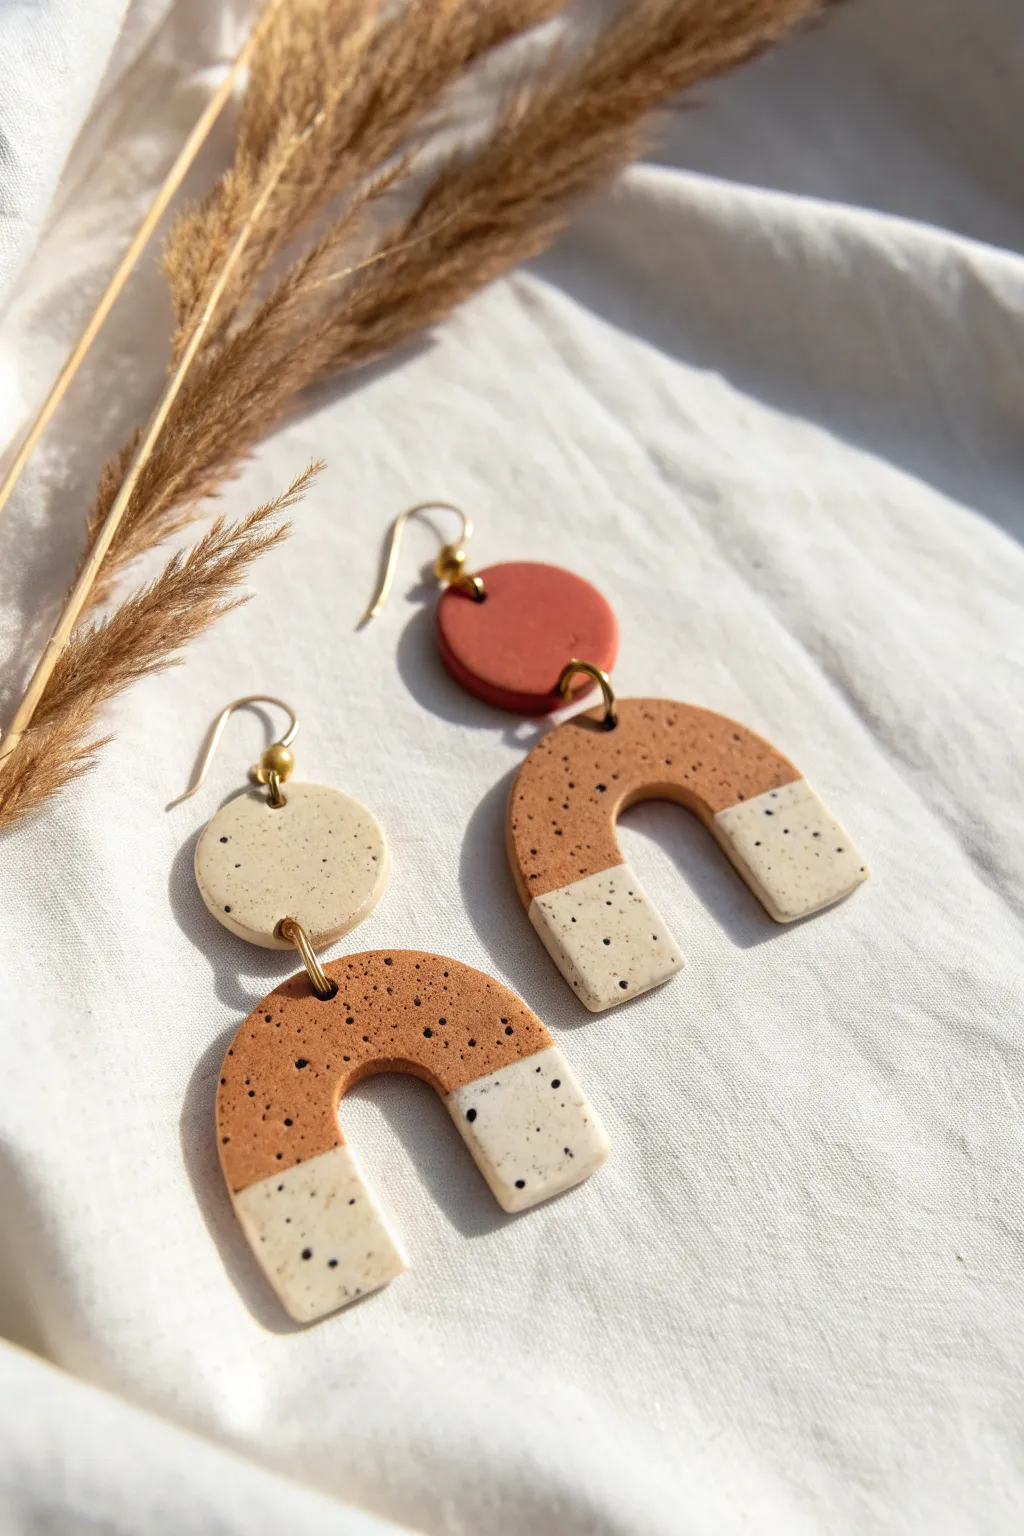
These trend-forward polymer clay earrings combine earthy terracotta tones with a modern speckled finish for a stunning boho aesthetic. The asymmetrical pairing of circle studs and striped arches creates a wearable piece of art that looks professionally made but is surprisingly simple to craft at home.
How-To Guide
Materials
- Polymer clay in terracotta or brick red
- Polymer clay in beige or cream
- Polymer clay in caramel or peanut brown
- Black acrylic paint or black polymer clay (for speckles)
- Clay rolling pin or acrylic roller
- Clay cutter set (circle and U-shape/arch)
- Small craft knife or tissue blade
- Small round piping tip or mini circle cutter (for jump ring holes)
- 4 gold jump rings (6mm or 8mm)
- 2 gold earring hooks (fishhook style)
- Jewelry pliers (needle nose and flat nose)
- Parchment paper or ceramic tile for baking
- Oven
Step 1: Preparing the Speckled Clay
-
Condition the base colors:
Begin by thoroughly kneading your beige and caramel brown polymer clays separately until they are soft and pliable. Conditioning is crucial to prevent cracking later. -
Create the speckles:
To achieve that faux-stone look, take a tiny crumb of black clay and chop it into microscopic dust-like pieces. Alternatively, you can use black pepper or dried coffee grounds for a more organic texture. -
Mix the speckles:
Knead the black specks into both your beige and caramel clay balls. Ensure the specks are distributed evenly throughout the clay body without blending the black into a gray smear. -
Roll out slabs:
Using your acrylic roller or pasta machine, roll the speckled beige, speckled caramel, and solid terracotta clay into flat sheets of even thickness, ideally about 3mm thick.
Step 2: Constructing the Shapes
-
Cut the top circles:
Use a small circle cutter to punch one circle from the solid terracotta slab and one circle from the speckled beige slab. These will form the mismatched top components. -
Prepare the arch slabs:
For the arches, we need a two-tone effect. Use your tissue blade to cut a straight horizontal line across your speckled caramel and speckled beige sheets. -
Join the seams:
Place the cut edge of the caramel clay against the cut edge of the beige clay. Push them gently together so they touch perfectly. -
Smooth the join:
Place a piece of parchment paper over the seam and gently roll over it with your roller to bond the two colors into a single sheet without distorting the straight line too much. -
Cut the arches:
Position your U-shaped cutter over the joined clay slab so the seam sits roughly one-third of the way down the arch legs. Cut out two identical arch shapes. -
Refine the edges:
Gently smooth the cut edges of all your clay pieces with your fingertip to remove any stray crumbs or sharp cutter lines.
Fixing Fingerprints
Before baking, adhere a bit of cornstarch to your finger and gently rub away any visible prints. If baked, use acetone on a Q-tip.
Step 3: Assembly and Baking
-
Pierce the holes:
Using a needle tool or a very small cutter, create holes for the hardware. You’ll need a hole at the very bottom of each circle and the very top center of each arch. Add a hole at the top of the circles for the ear wire. -
Confirm alignment:
Double-check that your holes align so the arch will hang straight. I usually lay the pieces on a flat surface to visualize the final hang before piercing. -
Bake the pieces:
Arrange your shapes on a ceramic tile or parchment-lined baking sheet. Bake according to your clay manufacturer’s instructions (usually around 275°F/135°C for 30 minutes). -
Cool down:
Allow the clay pieces to cool completely in the oven or on a wire rack before handling. Warm clay is fragile. -
Connect the components:
Using two pairs of pliers, twist open a jump ring (twist sideways, don’t pull apart). Thread it through the bottom hole of the circle and the top hole of the arch, then close it securely. -
Attach the hooks:
Open the small loop on your earring hook or use a small jump ring to attach the hook to the top of your circle component. -
Final check:
Ensure all jump rings are fully closed so the clay pieces don’t slip out while wearing them.
Glossy Finish
For a ceramic look, coat the baked pieces with UV resin or a glossy water-based polyurethane varnish to make the speckles pop.
Wear your new creations with a simple linen outfit to let the textures really shine
Desk Organizer Pods
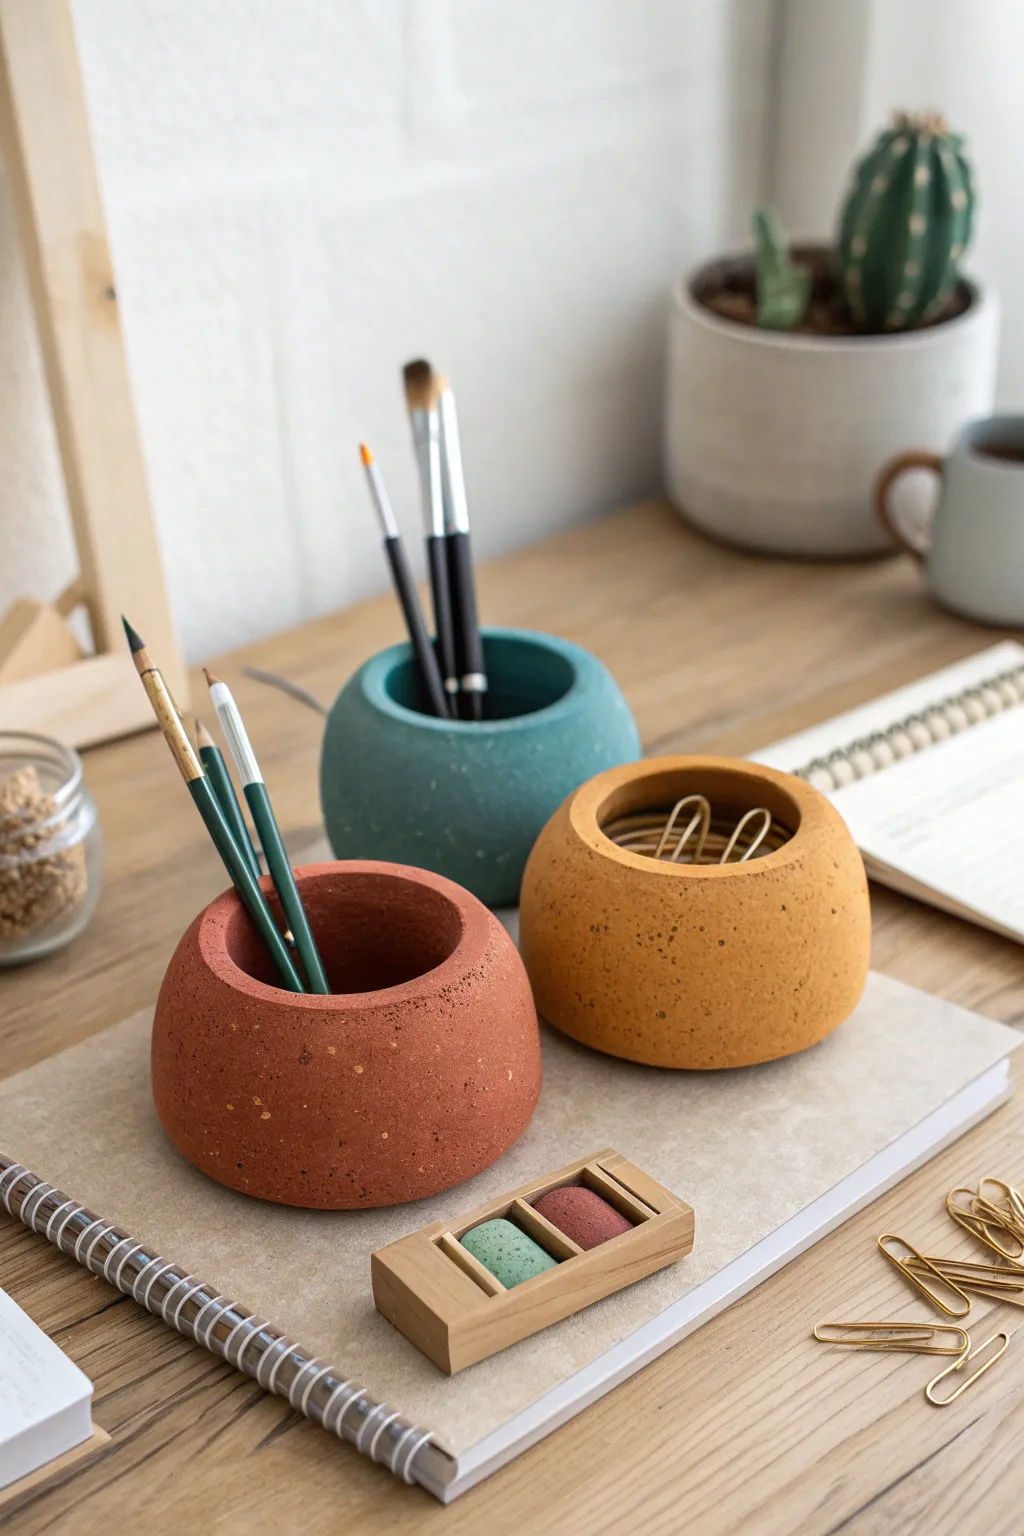
These charming, rounded desk organizers bring a touch of modern minimalism to your workspace with their stone-like texture and earthy tones. Perfect for holding pencils, clips, or brushes, their weighted spherical shape feels satisfyingly sturdy while keeping your desk clutter-free.
Detailed Instructions
Materials
- Air-dry clay or polymer clay (terracotta, mustard yellow, and teal colors)
- Rough sand, crushed dried herbs, or coarse pepper (for speckling)
- Acrylic rolling pin
- Circle cutter or a round glass (approx. 3-4 inches diameter)
- Small balloon or a smooth polystyrene ball (for shaping)
- Craft knife or clay trimming tool
- Fine-grit sandpaper
- Matte varnish or sealant
Step 1: Preparing the Clay
-
Mix your colors:
Start by selecting your base clay colors. If you are using white air-dry clay, knead in acrylic paint to achieve the deep terracotta, muted mustard, and teal shades seen in the image. -
Add texture:
To recreate that lovely speckled stoneware effect, sprinkle a small amount of rough sand or even coarse black pepper onto your flattened clay. Fold the clay over and knead it thoroughly until the speckles are evenly distributed throughout the mass. -
Form a ball:
Roll each colored portion of clay into a smooth, tight sphere. Aim for a ball about the size of a tennis ball or slightly larger, ensuring there are no air pockets trapped inside.
Stone Effect Tip
For realistic faux-stone, mix dried used coffee grounds into your clay. The varying grain sizes create a natural, organic speckled texture.
Step 2: Shaping the Pod
-
Create the hollow:
Hold the clay sphere in one palm. With your other thumb, gently press into the center of the ball to start creating the opening. Don’t go too deep yet; you just want to establish the top hole. -
Pinch the walls:
Using a pinching motion with your thumb inside and fingers outside, slowly rotate the ball while pressing the walls thinner. Aim for a consistent thickness of about 1/4 inch all around. -
Use a form for support:
If the clay is too soft to hold its shape, I like to gently push a small, inflated balloon or a plastic-wrapped polystyrene ball into the cavity. This helps maintain that perfect spherical curve while you work on the exterior. -
Flatten the base:
Once the general hollow shape is formed, gently tap the bottom of the pod onto your work surface. You want a flat, stable base so the organizer won’t roll away. -
Refine the curve:
Smooth out the exterior using a flexible kidney tool or just your wet finger. The goal is a continuous curve from the flat base up to the rim, creating a ‘pebble’ silhouette.
Step 3: Refining the Rim
-
Trim the opening:
If the opening has become uneven during pinching, use a craft knife to carefully slice off a thin layer from the top rim to make it level. -
Smooth the edge:
Dip your finger in a little water (or oil if using polymer clay) and run it around the cut rim. You want to soften the sharp edge into a rounded lip that looks finished and professional. -
Check the interior:
Look inside the pod. Use a modeling tool to smooth out any heavy fingerprints or bumps at the bottom of the interior cavity so your pens will sit nicely.
Make it Weighted
Press a heavy metal washer into the inside bottom of the clay while wet. Cover it with a thin clay disk to hide it. This prevents tipping.
Step 4: Finishing Touches
-
Initial drying:
Let the pods sit undisturbed until leather-hard. If you used a balloon support, carefully pop or remove it now before the clay shrinks and cracks. -
Surface smoothing:
Once fully dry (or cured in the oven for polymer clay), inspect your pods. Use fine-grit sandpaper to gently buff away any fingerprints or sharp ridges on the exterior. -
Seal the surface:
Apply a coat of matte varnish to protect the clay. A matte finish is crucial here to maintain that realistic stone appearance; a glossy finish would make them look like plastic.
Place your new trio of organizational pods on your desk and enjoy the serene, organized vibe they bring to your workspace
Icon Magnets Set
Bring a cheerful, handmade touch to your fridge with these adorable icon magnets in soft, earthy pastels. This project uses oven-bake polymer clay to create a collection of smiling stars, hearts, and flowers that are as fun to make as they are to display.
Step-by-Step
Materials
- Polymer clay (terracotta, mustard yellow, sage green, dusty pink, cream)
- Small rolling pin (acrylic or wooden)
- Small cookie cutters (star, heart, circle, flower)
- Needle tool or toothpick
- Ball stylus tool (small)
- Small round magnets (strong ceramic or neodymium)
- Super glue or E6000 adhesive
- Parchment paper style baking sheet
- Ceramic tile (optional, for working surface)
Step 1: Preparation & Shaping
-
Condition the clay:
Start by warming up your polymer clay in your hands. Knead each color separately until it is soft, pliable, and easy to shape without cracking. -
Roll out the slab:
Place a ball of clay on a smooth surface or ceramic tile. Use your rolling pin to flatten it into a slab that is roughly 1/4 inch thick. You want them chunky enough to hold the magnet firmly. -
Cut the shapes:
Use your mini cookie cutters to punch out your base shapes. Aim for a mix of stars, hearts, circles, and perhaps a few flowers for variety. -
Smooth the edges:
Gently run your finger around the cut edges of each shape to soften the sharp lines left by the cutter, giving the magnets a more organic, handmade pottery look.
Step 2: Adding Personality
-
Mark the eyes:
Using a needle tool or a toothpick, press two small dots into the upper half of the shape to create eyes. Press straight down and pull straight up to keep the holes clean. -
Carve the smiles:
Use the same tool or a very small spoon-shaped tool to carve a simple ‘U’ shape for the mouth. Vary the width and curve to give each magnet a slightly different expression. -
Add cheek details:
For an extra cute touch, use a ball stylus to gently indent small dimples at the ends of the smile on the larger shapes like the yellow circle. -
Create flower centers:
If making flowers, roll a small ball of contrasting clay (like yellow for a pink flower) and press it firmly into the center of the petals. -
Final check:
Look over your batch. If any dust or fingerprints are visible, gently buff them out with a tiny drop of baby oil on your finger before baking.
Sticky Situation
If clay sticks to your cutter, dip the cutter in cornstarch or water before pressing down. This acts as a release agent for clean cuts.
Step 3: Baking & Assembly
-
Bake the batch:
Transfer your clay pieces to a parchment-lined baking sheet. Bake according to your specific brand’s package instructions (usually around 275°F or 135°C for 15-30 minutes). -
Cool down:
Remove the tray from the oven and let the clay cool completely. Don’t touch them while they are hot, as the clay is still slightly soft and vulnerable. -
Prepare the glue:
Flip the cooled shapes face down. Place a small drop of strong adhesive, like E6000 or a gel super glue, onto the center of the back. -
Attach magnets:
Press a magnet firmly into the glue. I like to twist the magnet slightly as I press down to ensure the glue spreads evenly without oozing out the sides. -
Cure time:
Allow the glue to cure fully (check the glue bottle for times, usually 24 hours for maximum strength) before placing them on your fridge.
Glaze Craze
Apply a coat of gloss polyurethane varnish after baking if you want a shiny, ceramic-like finish instead of the matte look shown here.
Enjoy arranging your cheerful new clay friends
Geometric Wall Tile Hangings
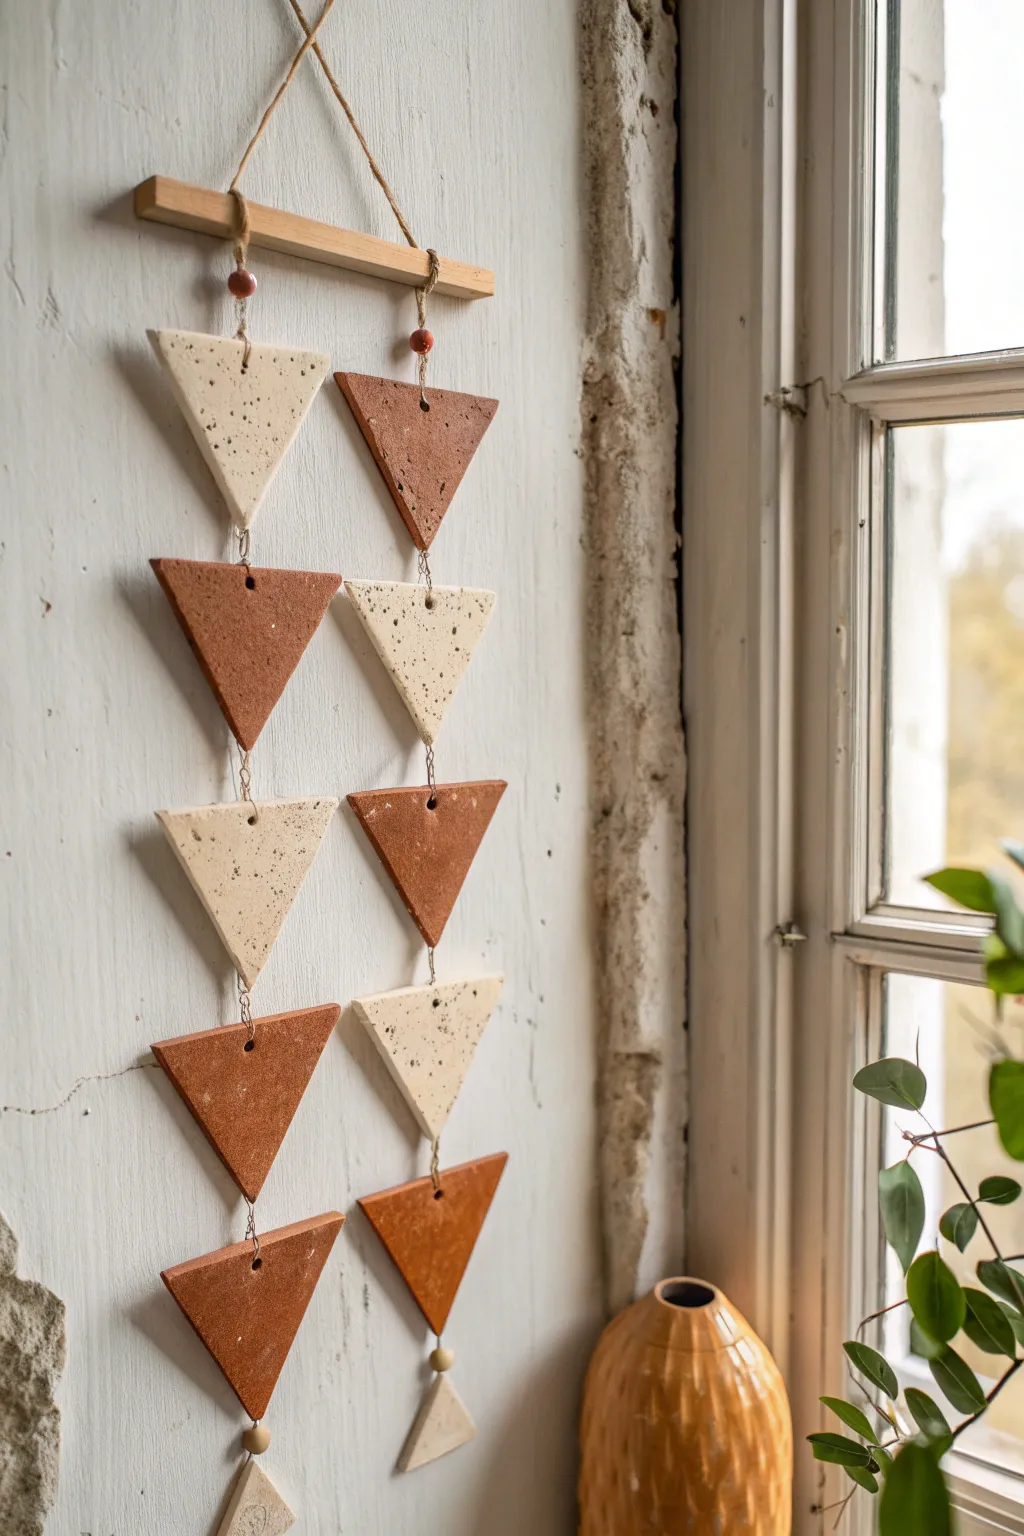
This earthy, geometric wall hanging blends warm terracotta tones with speckled white clay for a piece that feels both rustic and modern. Suspended from a simple wooden mount, the alternating triangles create a rhythmic pattern that adds texture and visual interest to any vertical space.
Detailed Instructions
Materials
- Terracotta air-dry clay or polymer clay
- White or cream air-dry clay (preferably with speckles, or add sand/pepper)
- Rolling pin
- Triangle cookie cutter (or a sharp knife and a cardboard template)
- Wooden dowel or flat rectangular wood piece (approx. 8-10 inches)
- Jute twine or thin hemp cord
- Jump rings (metal connector rings, approx. 6-8mm)
- Small needlenose pliers
- Straw or toothpick (for poking holes)
- Fine-grit sandpaper
- Parchment paper or canvas mat
- 2 small wooden beads (optional, for the hanger)
Step 1: Shaping the Triangles
-
Prepare your workspace:
Lay down parchment paper or a canvas mat to prevent the clay from sticking. Having a clean surface is crucial for a smooth finish. -
Roll the terracotta slab:
Take a chunk of the terracotta clay and knead it briefly to warm it up. Roll it out to an even thickness of about 1/4 inch (6mm). Try to keep the pressure consistent so one side isn’t thinner than the other. -
Cut the shapes:
Using your triangle cutter or template, press firmly into the clay to cut your shapes. For the design shown, you will need at least 5-6 terracotta triangles. -
Roll the speckled clay:
Clean your rolling pin, then repeat the process with the white speckled clay. If you don’t have speckled clay, I like to knead in a tiny pinch of black pepper or craft sand into plain white clay to mimic that stony texture. -
Cut the white triangles:
Cut approximately 4-5 white triangles to match the number needed for your desired length. The photo shows two columns, usually varying between 4 and 5 tiles long. -
Smooth the edges:
Dip your finger in a little water and gently run it along the cut edges of each triangle to smooth out any roughness or burrs left by the cutter.
Curling Corners?
If your air-dry clay curls while drying, place a heavy book on top of the almost-dry pieces (sandwiched between parchment paper) to flatten them out overnight.
Step 2: Prepping for Assembly
-
Pierce the holes:
Using a straw (for larger holes) or a toothpick (for smaller ones), poke holes in the corners of your triangles. Most triangles need a hole at the top center and the bottom tip. However, the top-most tiles need two holes at the top corners for hanging, and the bottom-most tiles only need one hole at the top. -
Let them dry:
Arrange the pieces on a flat surface to dry completely. If using air-dry clay, this takes 24-48 hours. Flip them occasionally to prevent curling. If using polymer clay, bake according to the package instructions. -
Sand for perfection:
Once fully cured and hard, gently sand the edges with fine-grit sandpaper to remove any sharp points or irregularities. -
Arrange your pattern:
Lay out your triangles on a table in two vertical columns to finalize the pattern. The image shows an alternating pattern, swapping colors as you go down.
Step 3: Construction and Hanging
-
Connect with jump rings:
Use your pliers to open the jump rings. Connect the bottom tip of one triangle to the top hole of the one below it. Close the ring securely. Repeat this until both vertical chains are fully linked. -
Prepare the wooden mount:
Take your wooden dowel or flat wood piece. If it doesn’t have holes, drill two small holes corresponding to the width of your clay columns. -
Attach the columns:
Cut two lengths of jute twine. Thread one piece through a hole in the wood mount. Tie a knot underneath or thread a bead to hold it in place. -
Secure the clay strands:
Tie the other end of that twine to the top hole (or jump ring) of your first clay strand. Repeat for the second column so both hang evenly from the wood. -
Add the main hanger:
Cut a final, longer piece of twine. Tie it to both ends of the wooden mount to create the triangular suspension shape for the wall hook. -
Final adjustments:
Hang the piece on a wall and check that the triangles sit flat. Carefully twist the jump rings slightly if needed to make sure all faces are pointing forward.
Level Up: Mixed Media
Try adding a small brass charm or a tassel made of unraveled jute to the very bottom point of the lowest triangle for extra movement and luxury.
Hang your geomeric creation near a window to catch the light and enjoy the organic modern vibe it brings to your room
Cute Animal Figurines
This adorable hedgehog figurine brings a touch of woodland charm to any shelf with its delightful spiky texture and sweet, upturned snout. The project combines smooth sculpting techniques with repetitive detailing to create a piece that feels both rustic and refined.
Step-by-Step
Materials
- Light-colored stoneware or polymer clay (approx. 1 lb)
- Black underglaze or acrylic paint (for details)
- Needle tool or toothpick
- Small loop tool or carving knife
- Modeling tool (rounded end)
- Slip (clay slurry) and scoring tool
- Small paintbrush
- Sponge
- Clear matte glaze (optional)
Step 1: Forming the Base Body
-
Create the main mass:
Start with a baseball-sized lump of clay. Roll it firmly between your palms to compress the clay and form a smooth, tight sphere, ensuring there are no trapped air bubbles inside. -
Shape the teardrop:
Gently begin to taper one side of the sphere to create a teardrop shape. This tapered end will become the hedgehog’s face, while the rounded back remains the body. -
Define the snout:
Pinch and lift the tapered end slightly upwards to give the hedgehog an inquisitive look. Smooth out the transition from the nose to the forehead so it has a gentle slope rather than a sharp angle. -
Flatten the base:
Tap the bottom of your form on your work surface a few times. This creates a stable, flat belly so your hedgehog won’t roll away when placed on a shelf.
Step 2: Detailed Spikes
-
Plan the spiky area:
Lightly trace a curved line with your needle tool on the clay surface, separating the face area from the back. The spikes will only go on the back section. -
Prepare clay coils:
Roll out several thin coils of clay, roughly the thickness of a pencil. I find it easier to make many small coils ahead of time so I can focus on attaching them rhythmically. -
Cut individual spikes:
Slice the coils into small, uniform segments about half an inch long. Taper one end of each segment into a dull point by rolling it between your fingers. -
Attach the first row:
Start at the bottom edge of the back area. Score the body surface and use a dab of slip. Press a row of spikes firmly onto the body, pointing them slightly backward. -
Layering upwards:
Continue adding rows of spikes, moving upward toward the top of the back. Stagger the placement like bricks so the spikes nestle between the ones in the row below. -
Refining the silhouette:
As you reach the top and front near the face, angle the spikes slightly more vertically. Ensure every spike is firmly adhered; give each one a little wiggle test.
Spike Shortcut Idea
Instead of attaching individual spikes, use scissors! Form a smooth hump, then make small, angled snips into the clay, lifting the tips up to create texture from the solid mass.
Step 3: Features and Feet
-
Adding ears:
Form two small, flat triangles of clay. Attach them right at the border where the smooth face meets the spiky textures, curving them slightly forward. -
Sculpting feet:
Roll four small balls of clay. Attach these to the underside of the body using slip and scoring. Shape them into stubby little legs that barely peek out from under the body. -
Creating the eyes:
Use the rounded end of a modeling tool to press two small indentations into the face for the eyes. This creates a socket that adds depth to the expression. -
Refining the surface:
Use a slightly damp sponge to wipe down the smooth face area, removing any fingerprints or rough tool marks. Be careful not to smudge the sharp tips of your spikes.
Spikes Falling Off?
If individual spikes detach while drying, your clay was likely too dry when joining. Score both surfaces deeper and use plenty of slip or ‘bacon bond’ for polymer clay.
Step 4: Finishing Touches
-
Drying (if using ceramic clay):
Allow the piece to dry slowly under plastic for a day or two to prevent the spikes from cracking off as the clay shrinks. Then uncover and let dry completely. -
Painting details:
Once dry (or baked, if using polymer), use a fine brush with black underglaze or acrylic paint to fill in the eye indentations and paint a small, round nose on the tip of the snout. -
Adding the companion piece:
Use leftover clay to form a small, rough sphere or acorn shape. Texture it heavily with your needle tool to contrast with the hedgehog’s smooth face. -
Final protection:
If using ceramic clay, fire the piece. If using polymer, bake according to package instructions. A matte finish looks best to maintain that natural, earthy aesthetic.
Now you have a charming woodland creature ready to guard your windowsill
Marbled Color-Mix Creatures
This charming little critter is built from alternating segments of soft teal and coral clay, giving it a playful, pastel candy-like appearance. With its sweet smile and segmented body, this project is a wonderful introduction to creating uniform shapes and joining clay pieces seamlessly.
Detailed Instructions
Materials
- Polymer clay (coral pink, pastel teal, white/cream, black)
- Small dotting tool or toothpick
- Rolling pin or pasta machine
- Baking sheet with parchment paper
- Clay knife or blade
- needle tool
- Black acrylic paint (optional, for dots)
- Gloss glaze (optional)
Step 1: Prepping the Base Colors
-
Condition the Clay:
Start by kneading your coral pink, pastel teal, and white clay separately until they are soft, pliable, and free of cracks. Warm clay is much easier to shape and blend without crumbling. -
Roll the Logs:
Roll the coral pink and pastel teal clays into two smooth, long logs. Try to make them roughly the same thickness, about 3/4 of an inch in diameter, to ensure your caterpillar’s body segments look uniform. -
Portion the Segments:
Using your clay blade, cut the logs into equal-sized pieces. You will need about five teal pieces and four coral pieces, though you can make your caterpillar longer or shorter if you wish. -
Shape the Spheres:
Roll each cut piece between your palms to form a smooth ball. Then, gently flatten opposite sides of each ball to create thick, disc-like shapes rather than perfect spheres. These will become the body segments.
Clean Lines Tip
To prevent color transfer (smudging pink onto white), clean your hands and tools with a baby wipe or alcohol swab before switching to the white clay for the head.
Step 2: Assembling the Body
-
Start the Stack:
Begin assembling the body by pressing a teal disc against a coral disc. Press them firmly enough to stick, but be gentle so you don’t deform the roundness of the segments. -
Creating the Pattern:
Continue adding segments in an alternating color pattern (Teal, Coral, Teal, Coral…). As you add length, you can slightly curve the body to give it a natural, crawling motion rather than keeping it perfectly straight. -
Forming the Feet:
Create tiny balls of the matching clay colors (coral for coral segments, teal for teal segments). I usually make two for each segment section. -
Attaching the Feet:
Press these tiny balls onto the bottom sides of the main body segments to act as little nubby feet. Ensure they are secure so they don’t fall off during baking. -
Adding Detail Dots:
Using a needle tool, poke three tiny, shallow indentations in a vertical line on the side of each body segment. Alternatively, you can embed tiny specks of black clay here, or wait until after baking to paint them.
Drooping Head?
If the head feels too heavy and droops before baking, prop it up with a small crumpled ball of aluminum foil or a folded piece of parchment paper for support.
Step 3: The Head & Face
-
Shape the Head:
Take a portion of white or cream clay derived from a slightly larger ball than your body segments. Roll it into a smooth, slightly oval shape to serve as the head. -
Connect Head to Body:
Press the white head firmly onto the front of your segmented body. If the clay feels dry, a tiny drop of liquid clay or ‘bake and bond’ can help secure this connection. -
Create Eye Sockets:
Use a ball tool or the rounded end of a paintbrush handle to press two indentations where the eyes will go. This helps seat the eyes so they don’t look like they are bulging out too much. -
Add the Eyes:
Roll two small balls of black clay. Press them gently into the sockets you just created. Add a tiny speck of white clay to each black eye to create a lively reflection highlight. -
Sculpt the Smile:
Use a needle tool or a small blade to gently carve a curved line for the mouth. You can use the tool to slightly open the mouth for a happier expression. -
Refining Differences:
Smooth out any fingerprints using a tiny bit of baby oil on your finger or a soft brush. Check that the connection between the head and the first body segment is clean.
Step 4: Finishing Up
-
Baking:
Place your caterpillar on a parchment-lined baking sheet. Bake according to your polymer clay manufacturer’s instructions (typically around 275°F/135°C for 15-30 minutes depending on thickness). -
Cooling:
Let the sculpture cool completely in the oven or on a wire rack. Polymer clay is fragile when hot, so resist the urge to handle it until it has hardened fully. -
Painting Details (Optional):
If you didn’t use black clay for the side dots, use a toothpick dipped in black acrylic paint to carefully add the three dots on each segment now.
Place your finished caterpillar on a desk or shelf to add a pop of color to your day
Fake Food Charms And Minis
Create a delightful spread of realistic miniature treats including chocolate chip cookies, a layered berry cake slice, and an intricate fruit tart. These tiny polymer clay creations are full of texture and detail, perfect for charms or dollhouse displays.
Step-by-Step
Materials
- Polymer clay (tan/dough color, translucent white, chocolate brown, red, dark red, green)
- Liquid polymer clay (translucent and white)
- Soft pastels (yellow ochre, burnt sienna) for shading
- Small paintbrush for pastels
- Needle tool or toothpick
- Toothbrush or crumpled foil for texturing
- Blade or X-Acto knife
- Round cutter (small)
- Gloss glaze or UV resin
Step 1: Baking the Cookies
-
Mix the Dough Color:
Start by mixing a light tan clay with a tiny amount of translucent clay. This gives the cookies a realistic baked goods depth rather than a flat plastic look. -
Shape the Cookies:
Roll two small balls of the dough mixture and press them flat gently to form thick discs. Soften the edges with your finger so they look like dropped dough. -
Add Texture:
Using an old toothbrush or a ball of crumpled aluminum foil, tap the surface of the clay repeatedly. This creates that classic crumbly cookie texture. -
Make Chocolate Chips:
Roll a very thin snake of dark brown clay. Cut tiny snippets off and roll them into imperfect little balls or points to resemble chocolate chips. -
Embed the Chips:
Press the tiny chocolate chips into the textured cookies. Don’t be afraid to let some sink in deeply while others sit on top. -
Shade for Baking:
I like to scrape some yellow ochre and burnt sienna pastels into a powder. Dust the edges and tops of the raw cookies with a dry brush to mimic golden-brown baking spots.
Sticky Situation?
If your clay gets too soft and fingerprints are showing, pop the pieces in the fridge for 10 minutes before texturing or cutting. Firm clay holds detail much better.
Step 2: Layered Berry Cake Slice
-
Create Cake Layers:
Roll out a sheet of light tan clay (mixed with white for a sponge look) and texture it by poking it with a needle tool to create air bubbles. -
Make the Jam Layer:
Mix translucent clay with a small amount of red clay to create a ‘jam’ filling. Roll this out into a thin sheet. -
Stack and Cut:
Stack your layers: thick sponge, thin jam, thick sponge. Gently press them together. Use a sharp blade to cut a clean triangular wedge shape. -
Glaze the Top:
Mix liquid polymer clay with a bit of red pastel or paint to create a shiny glaze. Carefully apply a thin layer to the top of the triangle slice. -
Add Garnish:
Create tiny raspberries by making a mound of tiny red clay balls. Place two raspberries on the back edge of the slice, adding tiny green clay leaves for contrast.
Step 3: Citrus Tart & Strawberries
-
Form the Tart Base:
Cut a circle of tan dough clay using your round cutter. Indent the center slightly to create a rim, and texture the rim with a needle tool to look like baked pastry. -
Create the Filling Effect:
Fill the indentation with a textured mix of tan and translucent clay to look like crumble or almond cream. -
Pipe the Icing:
Roll a very thin snake of white clay (or use extruded clay) and lay it on top of the tart filling in a segmented wheel pattern, mimicking a slice of citrus or decorative piping. -
Sculpt the Strawberries:
Form several teardrop shapes from red clay for the loose strawberries and the tart topper. Use a needle tool to poke tiny seed indentations all over the surface. -
Gradient Shading:
Dust the tips of the strawberries with lighter red/orange pastel and the tops with darker red to mimic ripeness. -
Add Greenery:
Create tiny stars from green clay and place them on the wide end of the strawberries as calyxes. Gently curl the tips of the leaves upward. -
Final Assembly:
Place one strawberry on the center of the tart. Arrange the loose strawberries near your other items. -
Bake and Finish:
Bake all pieces according to your clay manufacturer’s instructions (usually 275°F for 15-30 mins). Once cool, varnish the fruit parts and the cake glaze with gloss varnish for a wet, juicy look.
Make it Wearable
Before baking, insert tiny screw eye pins into the top of the cake slice, tart, or a large strawberry to easily turn these cute minis into charm bracelets or earrings.
Arrange your freshly baked miniatures on a tiny plate or board to admire your handiwork
Mushroom Fairy House Decor
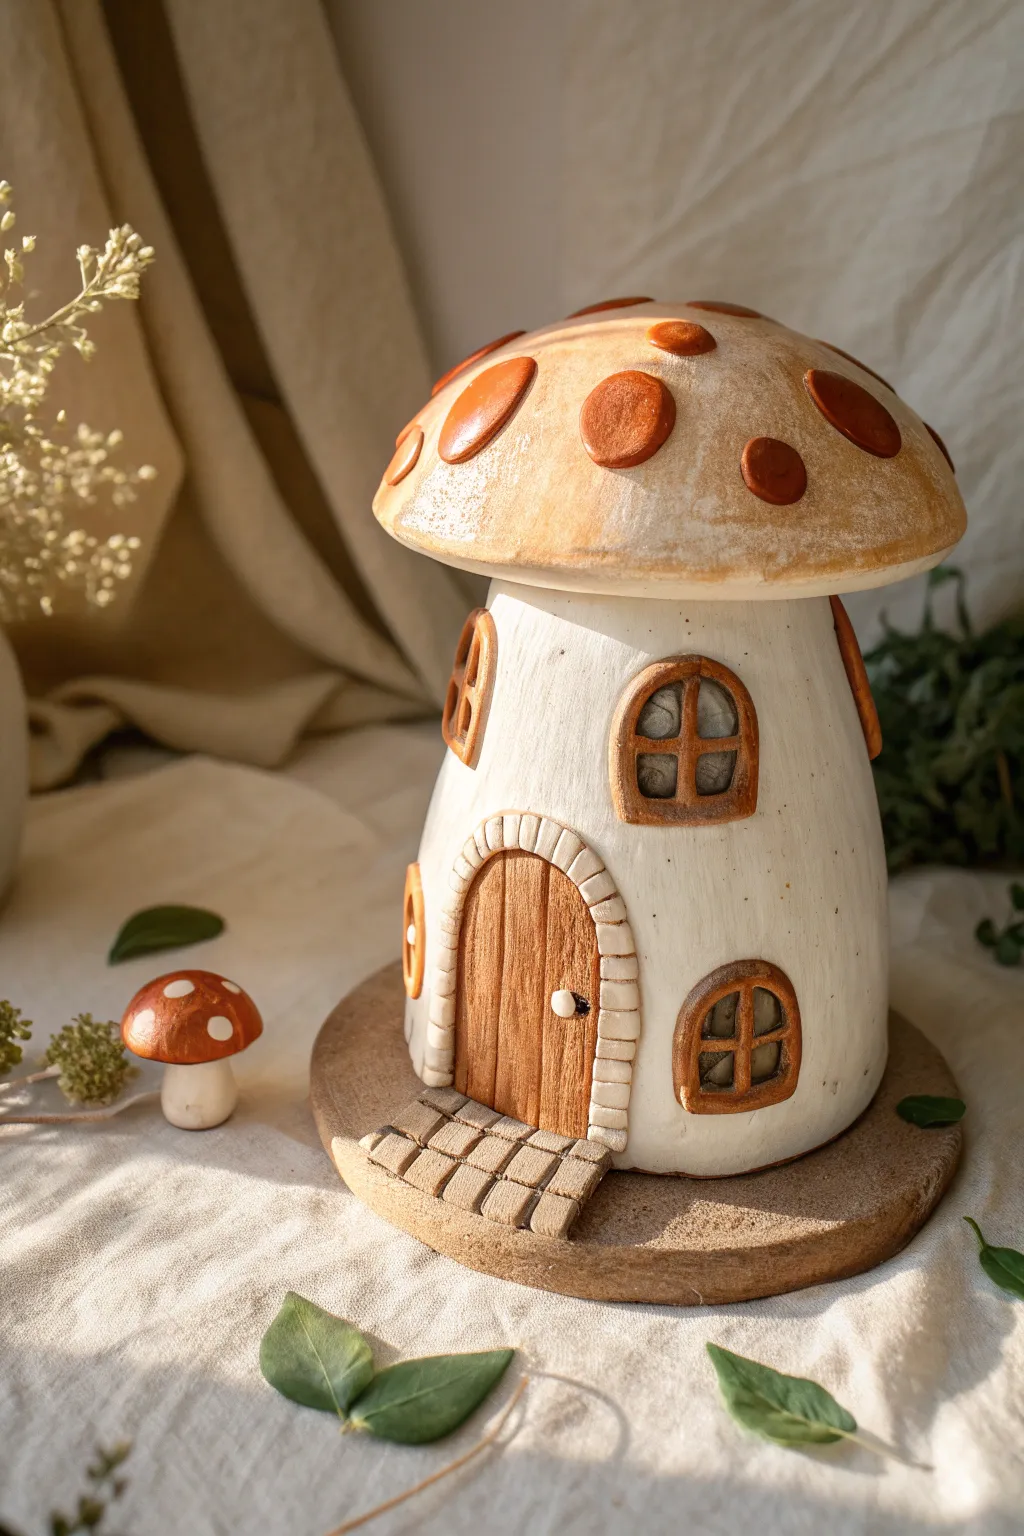
Transport yourself to a fairytale forest by crafting this rustic mushroom fairy house, featuring a charmingly textured stem and a welcoming wooden door. The warm amber and cream tones create a cozy, vintage aesthetic perfect for a shelf or garden display.
How-To Guide
Materials
- White creative paper clay or air-dry clay
- Aluminum foil (for armature)
- Rolling pin
- Clay sculpting tools (needle tool, ball stylus)
- Circular cookie cutter or bowl (approx 4-5 inches)
- Craft knife
- Acrylic paints (burnt sienna, cream/off-white, dark brown, antique gold)
- Paintbrushes (flat brush, fine liner)
- Rough sandpaper or texture sponge
- Water in a spray bottle
- Wooden circular base (optional, for stable display)
Step 1: Sculpting the Base Structure
-
Create the armature:
Crumple aluminum foil into a thick, slightly tapered cylinder for the stem and a wider, flattened dome shape for the cap. This saves clay and keeps the structure lightweight. -
Cover the stem:
Roll out a slab of clay to about 1/4 inch thickness. Wrap it around your cylindrical foil armature, smoothing the seam where the clay meets with a bit of water. -
Add texture:
Before the clay hardens, use rough sandpaper or a stiff dry brush to stipple and scratch the surface of the stem. This gives it a natural, organic weathered look rather than being perfectly smooth. -
Form the cap:
Roll out a circular slab of clay and drape it over your dome-shaped foil armature. Gently press and smooth the edges so it maintains a nice mushroom curve. -
Attach the cap:
Score the top of the stem and the underside of the cap with a needle tool. Add a little water or slip (clay mixed with water) and press the cap firmly onto the stem.
Texturing Tip
For realistic stone texture on the door frame, press a real rock or a ball of crumbled aluminum foil against the wet clay bricks.
Step 2: Adding Architectural Details
-
Create the door:
Cut a small arch shape from a fresh slab of clay using a craft knife. Use a needle tool to drag vertical lines deeply into the clay to mimic wood grain planks. -
Attach the door frame:
Roll small balls of clay into uniform brick shapes. Arrange them in an arch around your door piece, pressing them gently onto the main stem surface to bond them. -
Sculpt the windows:
Form small arched window shapes and attach them to the stem. Roll tiny snakes of clay to create the cross-pane details and a thicker snake for the outer window frame. -
Add cap details:
Roll out thin clay and cut varied organic circles. Press these onto the mushroom cap to create the raised spots. I find arranging them randomly looks more natural than a perfect pattern. -
Build the steps:
Form a small rectangular slab and score a grid pattern into it to resemble paving stones. Attach this directly in front of the door. -
Dry the sculpture:
Allow the entire piece to dry completely. For air-dry clay, this usually takes 24-48 hours depending on thickness and humidity.
Step 3: Painting and Finishing
-
Base coat:
Once dry, paint the entire stem and the underside of the cap with an off-white or cream acrylic paint. Apply two coats for solid coverage. -
Paint the cap:
Use a sponge to dab hues of burnt sienna and antique gold onto the cap. Keep the color uneven for a distressed look, leaving some lighter areas showing through. -
Detail the spots:
Paint the raised spots on the cap a deeper, richer reddish-brown to make them pop against the textured background. -
Wood features:
Paint the door and window frames with a medium brown. Once dry, use a dark brown wash (paint diluted with water) to settle into the wood grain grooves you carved earlier. -
Window panes:
Paint the inside of the windows a dark grey or slate blue to simulate glass reflecting a dark room. -
Weathering wash:
Mix a very watery light brown paint. Brush it over the white stem and immediately wipe it back with a paper towel. This leaves color in the textures and ages the white walls. -
Final assembly:
If desired, glue the finished dried house onto a circular wooden base or slice of wood for stability and a polished presentation.
Cracking Clay?
If small cracks appear as the clay dries, mix a small amount of fresh clay with water to make a paste and fill the cracks, then smooth over.
Place your finished house near a plant or on a windowsill to invite a little magic into your home