
If you’ve ever looked at a plain coffee cup and thought, “I can make this way more me,” you’re in the right headspace. These coffee cup design ideas are the kind of projects I love teaching—simple to start, super satisfying to finish, and full of room for your own style.
Hand-Painted Botanical Sprigs and Wildflowers

Bring the quiet beauty of a wildflower meadow to your morning routine with this hand-painted ceramic mug project. Featuring delicate ferns, berry sprigs, and simple wildflowers on a speckled beige base, this design captures an earthy, artisanal aesthetic.
Step-by-Step
Materials
- Plain white ceramic mug (smooth surface)
- Pebeo Porcelaine 150 paints (or similar high-quality ceramic paint)
- Colors: Warm beige/cream, olive green, deep forest green, rust orange, burnt sienna, brown
- Fine liner or detail paintbrushes (size 00 or 000)
- Small flat brush (size 2-4)
- Old toothbrush (for speckling)
- Rubbing alcohol and cotton pads
- Palette or small plate
- Oven (for baking/curing)
Step 1: Preparation & Base Coat
-
Clean surface:
Begin by thoroughly wiping down the entire exterior of your mug with rubbing alcohol. This removes any oils or fingerprints that could prevent the paint from adhering properly. -
Mix base color:
Create a warm, milky beige base color. If you don’t have a premixed cream, mix a tiny drop of brown or ochre into white paint to warm it up. -
Sponge application:
Instead of brushing, use a damp sponge to dab this beige colour gently over the mug’s surface. This creates a slightly textured, organic background rather than flat coverage. -
Add speckles:
Dip an old toothbrush into diluted brown paint. Run your thumb over the bristles to flick tiny speckles onto the mug. Practice on a paper towel first to control the spray. -
Base drying:
Allow this base layer to dry completely, ideally for at least an hour, before attempting any detailed work.
Paint Beading Up?
If paint separates on the ceramic surface, the mug wasn’t cleaned enough. Wipe that spot with alcohol again and let it dry before repainting.
Step 2: Painting the Botanicals
-
Plan your stems:
Visualize where your five main plant stems will go. They should stand vertically like soldiers but vary slightly in height and spacing. -
First stem: The Fern:
Mix an olive green shade. With your finest liner brush, paint a thin central vertical line. Add small, paired leaves extending upwards and outwards from the stem. -
Second stem: Berry Twig:
Using a dark brown, paint a thin, branching twig structure. It should be delicate and sparse. -
Adding berries:
Dip the tip of a toothpick or the handle end of a brush into burnt sienna or rust orange paint. Dot groups of 2-3 berries onto the ends of the twig branches. -
Third stem: Wildflower:
Mix a forest green for the stem and paint tall, elongated leaves near the base. At the top, use a stippling motion with rust paint to create the textured flower head. -
Fourth stem: Needle Fern:
Create a very faint, washed-out green by adding water or medium. Paint a stem that looks like a pine bough or delicate fern, using tiny, rapid strokes for the needles. -
Fifth stem: Simple Leaf:
Paint a darker green stem with alternating, oval-shaped leaves climbing up the side. Keep the shapes loose and organic.
Pro Tip: Varying Leaves
Mix a tiny bit of yellow or brown into your green paint between stems. Subtle color shifts make the botanical collection look much more natural.
Step 3: Finishing Touches & Curing
-
Refine details:
Use your finest brush to add tiny connection points where leaves meet stems, ensuring everything looks anchored. -
Final speckle pass:
I like to add a very light, final flick of brown speckles over the finished plants to make them look integrated into the ceramic, rather than just sitting on top. -
Rim detail:
Dilute some brown paint and run a very thin wash along the rim of the mug to give it that aged, pottery look. -
Air dry:
Let the mug sit undisturbed for 24 hours. This air-drying time is crucial for the paint to settle before baking. -
Bake to set:
Place the mug in a cold oven. Set temperature to 300°F (150°C) and bake for 35 minutes once it reaches temperature. Turn the oven off and let the mug cool completely inside.
Now you have a charming, dishwasher-safe meadow mug ready for your favorite hot drink


Classic Stripes or Polka Dots That Wrap Cleanly
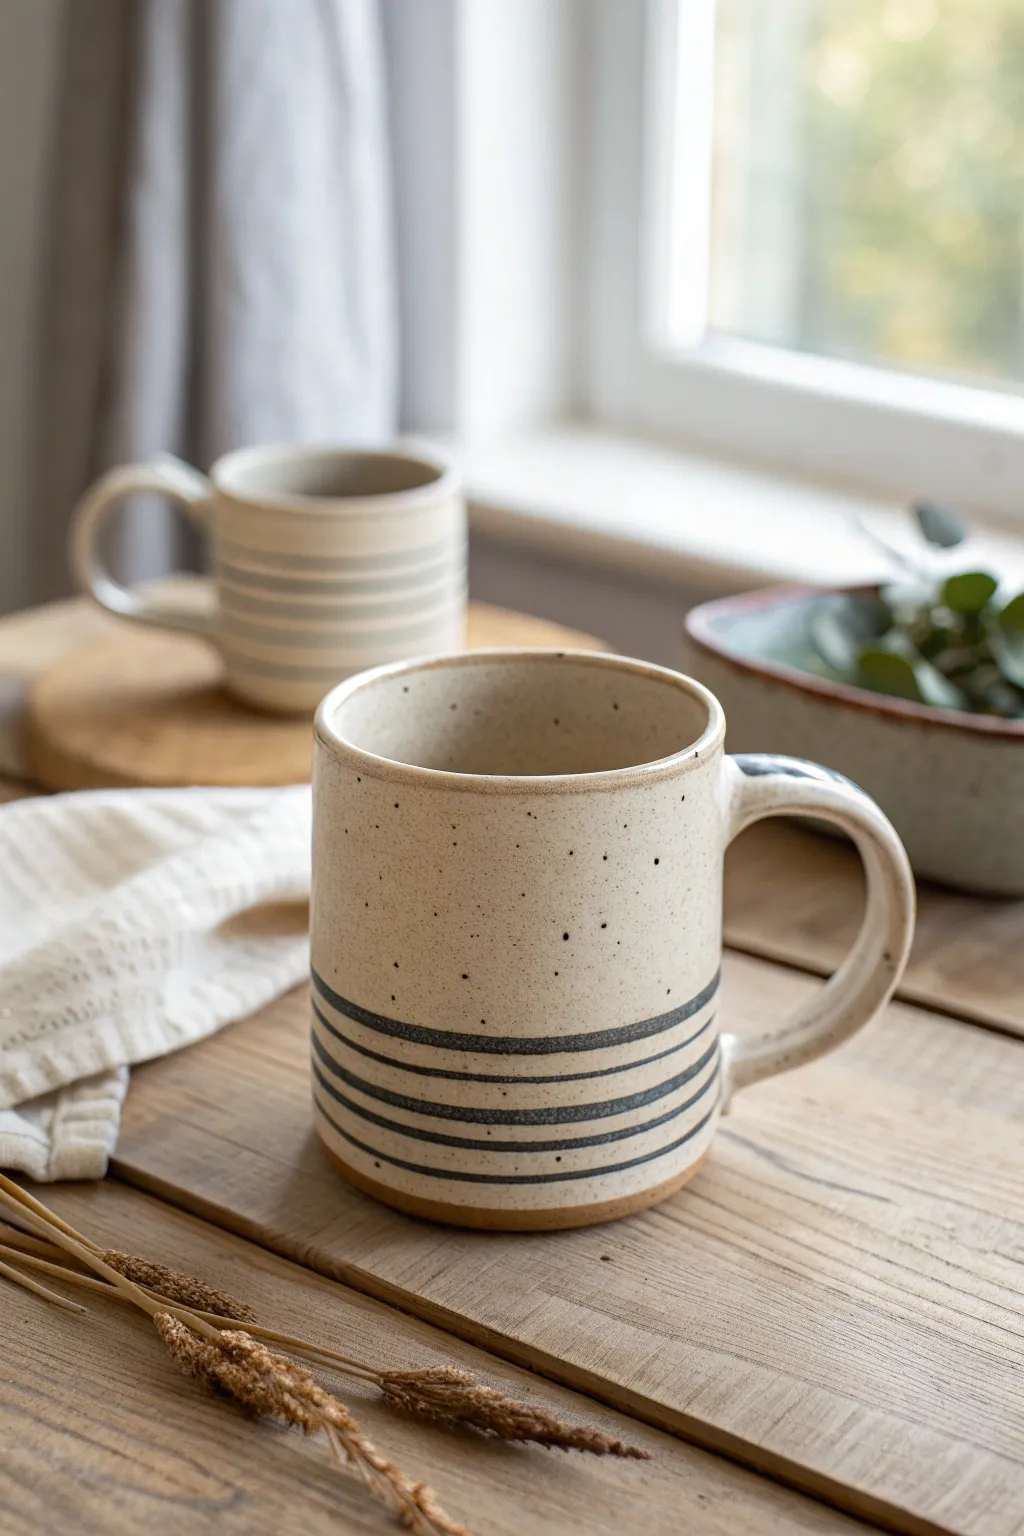
Embrace the understated elegance of modern farmhouse pottery with this hand-painted mug design. The combination of a speckled cream glaze and precise, minimalist stripes creates a timeless look that feels both cozy and sophisticated.
Step-by-Step Tutorial
Materials
- Bisque-fired ceramic mug (wheel-thrown or cast)
- Cream or off-white ceramic glaze (cone 5/6 recommended)
- Speckled underglaze or iron oxide wash
- Navy blue or charcoal underglaze
- Potter’s wheel or banding wheel
- Soft fan brush
- Fine liner brush or rigger brush
- Sponge
- Clear transparent glaze (optional, if cream glaze is matte)
- Small container of water
- Pencil
Step 1: Preparation & Base Coat
-
Clean the bisque:
Begin by wiping down your bisque-fired mug with a slightly damp sponge to remove any kiln dust or oils from handling. -
Apply the base glaze:
Using a soft fan brush, apply three even coats of your cream-colored glaze to the entire mug, inside and out. Allow each coat to dry until it’s no longer shiny before applying the next. -
Check for coverage:
Inspect the mug for any thin spots or pinholes in the glaze. Touch up these areas carefully to ensure a smooth, uniform surface. -
Add the speckles:
If your base glaze doesn’t have pre-mixed speckles, use a stiff bristle brush dipped in iron oxide wash or a dedicated speckled underglaze. Hold the brush about six inches away and flick the bristles to spatter tiny dots across the surface. I like to practice on a piece of paper first to control the density.
Step 2: Creating the Stripes
-
Center specifically:
Place your glazed mug exactly in the center of your banding wheel or potter’s wheel. Centering is crucial for ensuring the stripes meet perfectly on the other side. -
Mark guides:
Lightly hold a pencil against the spinning mug to verify your hand is steady. You can make faint guide marks in the lower third section where the stripes will go. -
Load the liner brush:
Dip your fine liner brush into the navy blue or charcoal underglaze. Ensure the brush is fully loaded but not dripping; the consistency should be like heavy cream. -
Anchor your hand:
Rest your painting arm on a steady surface or use a bracing stick. Your hand needs to be completely still while the wheel does the movement. -
Paint the bottom stripe:
Start with the lowest stripe. Gently touch the brush tip to the spinning mug about half an inch from the bottom edge. Maintain consistent pressure for one full rotation. -
Create the sequence:
Move up slightly and repeat the process to create a series of 4-5 parallel lines. Vary the spacing slightly if you want a more organic feel, or keep them strictly uniform. -
Refine the edges:
If any stripe looks too thin or faint, carefully re-apply glaze over the exact same line while spinning. Be cautious not to widen the line unintentionally. -
Clean the foot:
Use a damp sponge to wipe away any glaze from the very bottom foot ring of the mug. This prevents the mug from fusing to the kiln shelf during firing.
Wobbly Stripes?
If stripes look shaky, your wheel speed might be too slow. A faster spin uses momentum to keep the brush straight. Also, exhale slowly as you touch the brush to the clay.
Step 3: Firing & Finishing
-
Inspect the rim:
Check the rim for any roughness. Lightly smooth it with your finger if necessary the glaze is still powdery but pliable. -
Dry completely:
Let the mug dry for at least 24 hours to ensure all moisture has evaporated from the glaze and bisque. -
Load the kiln:
Place the mug in the kiln, ensuring it doesn’t touch other pieces. Use stilts if you glazed the bottom, though a dry foot is safer. -
Fire the piece:
Fire the mug to the temperature recommended for your specific clay and glaze combination (usually Cone 5 or 6 for stoneware). -
Cool and sand:
Once the kiln has cooled completely, remove the mug. Note any sharp spots on the unglazed foot ring and briefly sand them with wet-dry sandpaper for a professional finish.
Raw Clay Accent
For a rustic touch, leave the bottom 1/4 inch of the mug unglazed completely. The raw, toasted clay body will create a beautiful contrast with the smooth, cool stripes.
Now you have a stunning, handcrafted mug perfect for your morning brew


Two-Tone Dip Line for an Easy Modern Look

Achieve a timeless, artisanal aesthetic with this straightforward glazing technique that creates a clean, modern dip line. The contrast between the creamy speckled upper section and the rich, glossy amber base gives this mug a professional, studio-pottery finish that feels warm and inviting.
Detailed Instructions
Materials
- Bisque-fired ceramic mug (made from speckled clay or standard stoneware)
- Creamy white dipping glaze (opaque)
- Amber or caramel dipping glaze (semi-transparent glossy)
- Wax resist emulsion
- Sponge
- Bucket of clean wait
- Glaze tongs (optional)
- Fine-grit sandpaper (optional)
- Kiln access
Step 1: Preparation and Cleaning
-
Wipe down bisque:
Begin by taking your bisque-fired mug and wiping it down thoroughly with a damp sponge. This removes any kiln dust or oils from your hands that could prevent the glaze from adhering properly. -
Wax the foot:
Apply a coat of wax resist to the very bottom foot of the mug and about 2-3 millimeters up the side. This ensures the mug won’t fuse to the kiln shelf during firing. Let the wax dry completely before moving on.
Step 2: Layer 1: The Creamy Top
-
Prepare the white glaze:
Stir your creamy white glaze thoroughly. You want a consistency similar to heavy cream. If it’s too thick, the dip will be uneven; too thin, and the clay body will show through too much. -
Inside pour:
Pour a generous amount of white glaze into the mug, swirl it around to coat the entire interior, and pour the excess back into the bucket. Rotate the mug as you pour out to ensure an even coating near the rim. I like to quickly wipe any drips off the exterior rim immediately. -
First exterior dip:
Hold the mug by the foot or use glaze tongs. Dip the mug upside down into the white glaze, submerging it past the halfway point—aim for covering about 60% of the mug’s height. Hold for 3 seconds. -
Clean the handle:
Ensure the handle is fully submerged during this dip if you want it to match the top. Lift the mug out straight to avoid drips running sideways. Shake gently to remove excess drips. -
Drying time:
Set the mug down on a clean surface and let this first layer dry until it is powdery to the touch. This usually takes about 20-30 minutes depending on humidity.
Uneven Dip Line?
If your dip line is wavy, try using a wide masking tape to create a resist line before dipping the second color. Peel it off immediately after dipping while the glaze is still wet for a crisp edge.
Step 3: Layer 2: The Amber Dip
-
Prepare the amber glaze:
Mix your amber or caramel glaze well. This glaze should be slightly thinner than the white glaze to ensure transparency and glossiness. -
Strategic holding:
This step requires a steady hand. Hold the mug by the upper white section (ensure your hands are clean and dry, or wear latex gloves to avoid smudge marks). -
The second dip:
Dip the bottom of the mug into the amber glaze. You want the amber glaze to overlap slightly with the white glaze or meet it perfectly, depending on your preference. For the look in the photo, submerge the bottom 40-50%. -
Handle the overlap:
If you want a sharper line, dip quickly and pull out. If you want a bit of interaction where the glazes meet, hold for an extra second. In this project, the amber glaze covers the bottom section, creating that distinct horizon line. -
Wipe the handle base:
Check the lower attachment point of the handle. If glaze has pooled there excessively, dab it gently with your finger or a sponge to prevent running during firing.
Speckle Magic
For more character, use a clay body with iron pyrite speckles (like ‘speckled buff’). The specks will bleed through the creamy white glaze during firing for that rustic look.
Step 4: Finishing Touches
-
Clean the foot ring:
Even with wax resist, small beads of glaze can stick to the bottom. Use a damp sponge to firmly wipe the wax-resisted foot again, ensuring absolutely no glaze remains on the surface that touches the shelf. -
Smooth the pinholes:
Inspect the glaze surface. If you see tiny pinholes, gently rub them with a clean, dry finger to smooth the powder over the hole. This helps prevent pitting in the final fire. -
Check the rim:
Run your finger lightly over the rim to ensure the glaze isn’t sharp or too thick. A smooth rim is crucial for a pleasant drinking experience. -
Final drying:
Let the mug dry completely for at least 24 hours. The moisture from the glaze needs to evaporate fully to prevent steam explosions in the kiln. -
Firing:
Load the mug into the kiln for a glaze firing, typically to Cone 6 (approx. 2232°F / 1222°C) or whatever temperature your clay and glaze are rated for. Ensure it isn’t touching other pots. -
Cooling:
Allow the kiln to cool naturally before opening. Removing the piece too early can cause thermal shock and crack your beautiful new mug. -
Sanding the bottom:
Once cool, check the unglazed clay foot. If it feels rough, wet-sand it lightly with fine-grit sandpaper to make it smooth enough for a coffee table.
Enjoy your morning coffee in a custom mug that combines a cozy, tactile feel with clean modern lines


Soft Speckle Finish for That Cozy Stoneware Vibe
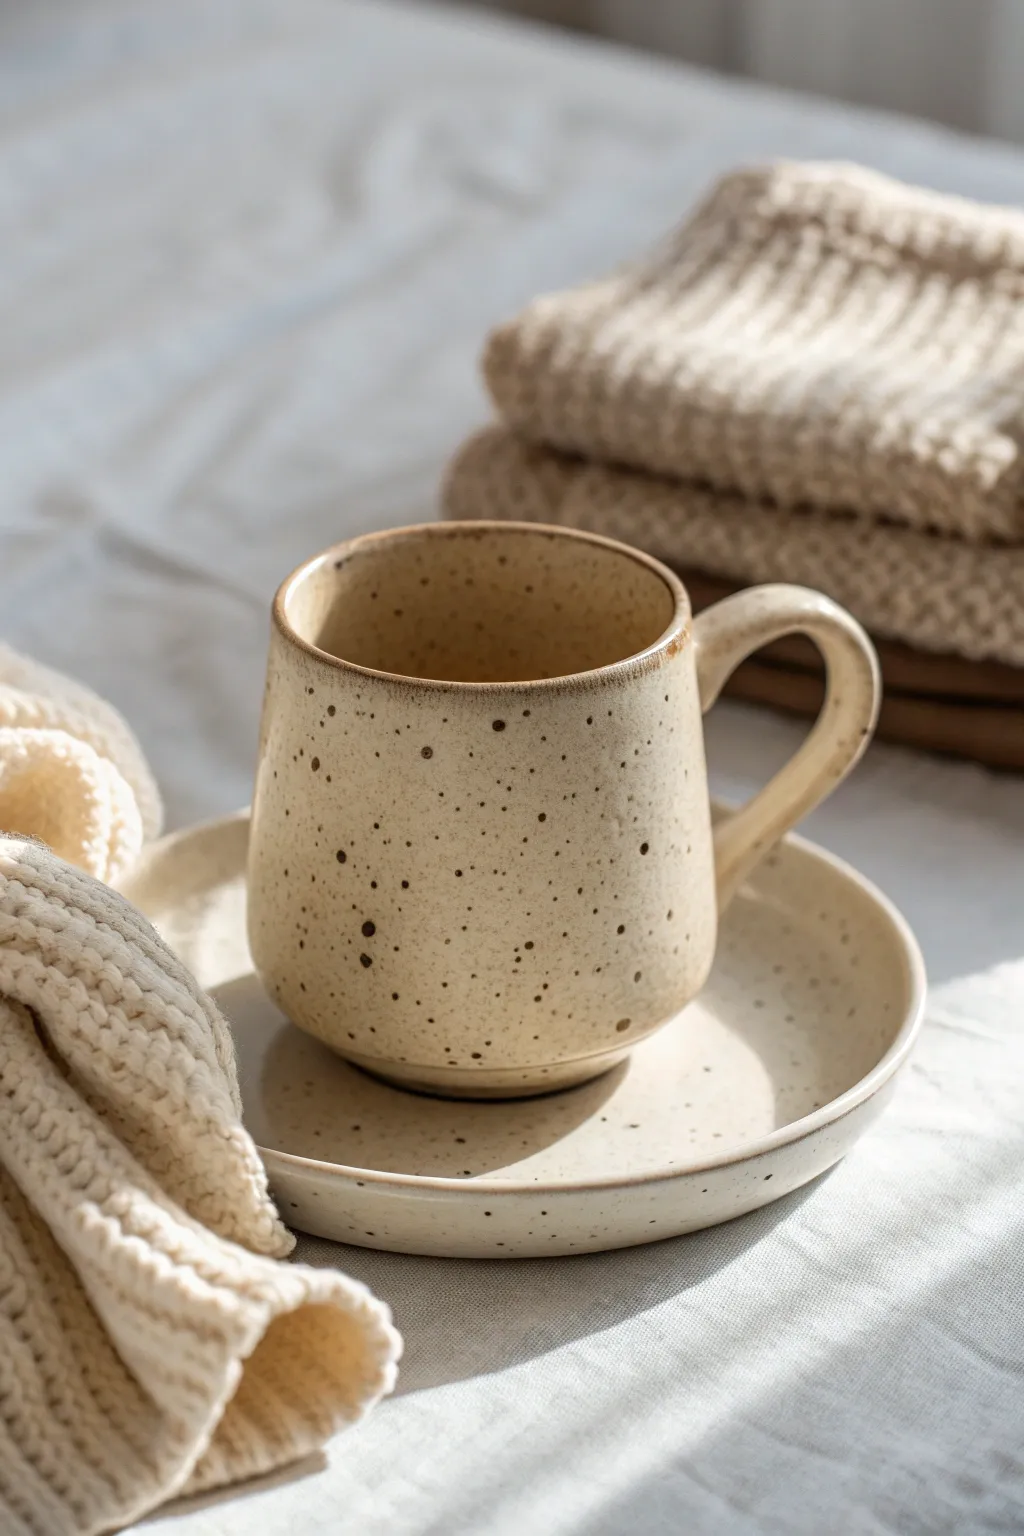
Capture the essence of slow mornings with this handcrafted stoneware set, featuring a warm oatmeal glaze and gentle iron speckles. This project focuses on achieving that beloved rustic, pottery-studio aesthetic through careful clay choice and glazing techniques.
Step-by-Step Guide
Materials
- Speckled stoneware clay body (e.g., Laguna Speckled Buff or similar)
- Pottery wheel
- Throwing tools (sponge, wire cutter, ribs)
- Trimming tools
- Pin tool
- Scoring tool or serrated rib
- Slip
- Soft paintbrush
- Clear or semi-transparent matte cream glaze
- Kiln
Step 1: Throwing and Shaping
-
Preparation:
Begin by thoroughly wedging about 1 to 1.5 pounds of speckled stoneware clay to remove air bubbles and align the particles. -
Centering:
Secure the clay to the wheel head and center it using steady pressure and water for lubrication. -
Opening the Clay:
Open the centered clay mound, creating a floor about a quarter-inch thick, and compress the bottom well to prevent cracking. -
Pulling the Walls:
Pull up the walls into a cylinder first, keeping the thickness consistent from bottom to top. -
Shaping the Belly:
Gently push the walls outward from the inside to create a soft, rounded curve at the base that tapers slightly inward toward the rim. -
Refining the Rim:
Compress and smooth the rim with a damp chamois or sponge for a comfortable drinking edge. -
Throwing the Saucer:
Using a smaller amount of clay, throw a shallow saucer with a slightly raised rim, ensuring the center is flat enough to hold the mug securely.
Natural Speckles
Don’t flick paint! The speckles come from iron pyrite (manganese) naturally found in ‘Speckled Buff’ clay bodies burning through the glaze.
Step 2: Trimming and Handling
-
Drying to Leather Hard:
Allow both pieces to dry slowly until they reach a leather-hard state where they are firm but can still be carved. -
Trimming the Foot:
Invert the mug on the wheel and trim away excess weight from the bottom, creating a neat foot ring that defines the curve. -
Pulling the Handle:
Pull a strap of clay for the handle, tapering it slightly; I usually aim for a comfortable C-shape curve. -
Attaching the Handle:
Score and slip both the mug body and handle attachment points, then press firmly to join them, smoothing the seams with a moist finger or tool. -
Bisque Firing:
Let the greenware dry completely (bone dry) before loading it into the kiln for a bisque fire at Cone 04.
Step 3: Glazing and Final Fire
-
Wiping Down:
Once bisqued, wipe the pieces with a damp sponge to remove dust, which helps the glaze adhere properly. -
Applying Glaze:
Dip the mug and saucer into a semi-transparent cream or oatmeal matte glaze; dipping ensures an even coat. -
Cleaning the Foot:
Immediately wipe the glaze off the bottom foot ring of both the mug and saucer so they don’t fuse to the kiln shelf. -
Revealing the Speckles:
The magic happens in the kiln; the iron spots in the clay body will burn through the semi-transparent glaze. -
Glaze Firing:
Fire the pieces to the temperature appropriate for your clay and glaze combination, typically Cone 5 or Cone 6 for stoneware. -
Cooling:
Let the kiln cool completely before opening to prevent thermal shock and crazing. -
Sanding:
Lightly sand the unglazed foot ring with fine-grit sandpaper to ensure it won’t scratch your table.
Glaze Too Thick?
If the glaze is too opaque, the speckles won’t show. Add water to thin your glaze slightly or dip the piece faster for a thinner coat.
Once cooled, your new favorite mug is ready for a warm pour of coffee on a slow morning

The Complete Guide to Pottery Troubleshooting
Uncover the most common ceramic mistakes—from cracking clay to failed glazes—and learn how to fix them fast.
Simple Sgraffito Line Art Faces or Florals
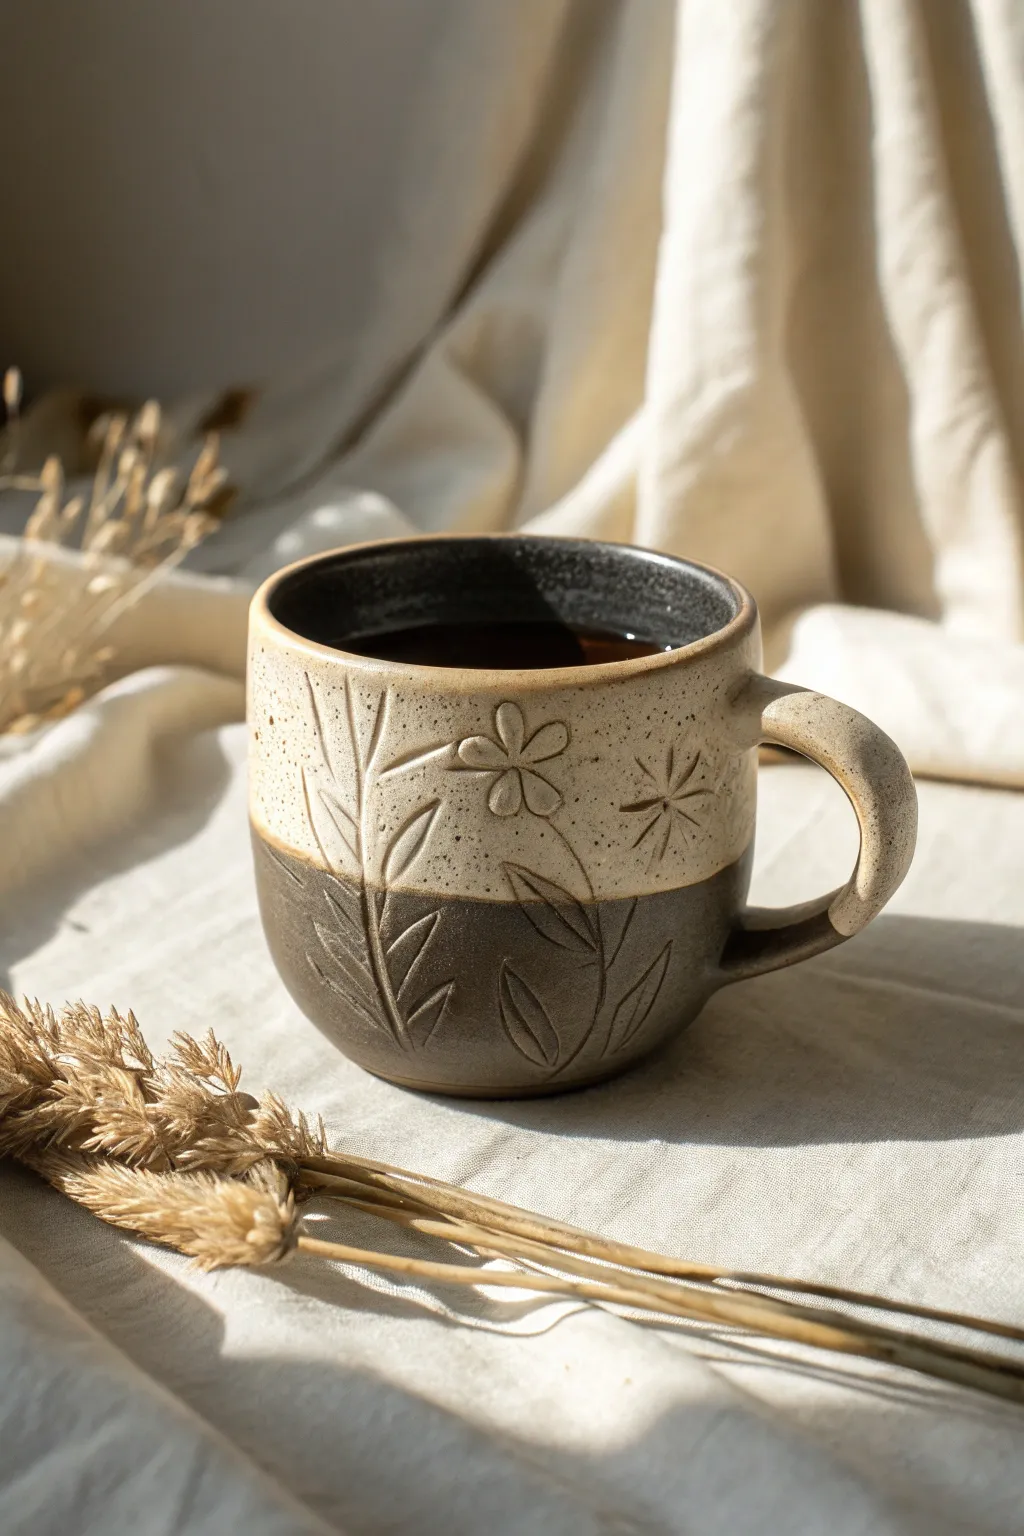
Embrace the beauty of raw clay and simple botanical lines with this stunning two-tone ceramic mug project. The contrast between a speckled oatmeal glaze and deep, iron-rich stoneware creates a warm, rustic canvas for delicate floral carvings.
Step-by-Step Tutorial
Materials
- Dark stoneware clay (chocolate or dark brown body)
- Speckled oatmeal or cream dipping glaze (stoneware safe)
- Clear glaze (optional, for interior)
- Carving tool (needle tool or small loop tool)
- Pottery wheel (or materials for hand-building)
- Rib tool (wood or metal)
- Sponge
- Wire cutter
- Kiln
Step 1: Forming the Mug Body
-
Wedge and Center:
Begin by thoroughly wedging about 1 to 1.5 lbs of dark stoneware clay to remove air bubbles. Center the clay firmly on your wheel head. -
Open and Pull:
Open the clay and gently pull up the walls to form a cylinder. Aim for a slightly rounded bottom curve that transitions into straight vertical walls, keeping the rim slightly thicker for durability. -
Shape the Profile:
Use a rib tool to smooth the outside and refine the shape. You want a classic, comfortable mug silhouette with a smooth surface for your future carving. -
Create the Handle:
Pull a strap of clay for the handle. I prefer to pull it directly from a lump of clay for a tapered look, then attach it to the mug when both the body and handle are leather-hard. -
Initial Drying:
Allow the constructed mug to dry slowly to a leather-hard state. The clay should be firm enough to hold its shape but soft enough to carve into without chipping.
Step 2: Carving the Botanicals
-
Plan Your Design:
Lightly sketch your floral layout directly onto the leather-hard clay using a dull pencil or very light touch with a needle tool. Keep the design simple: a few stems, leaves, and a central bloom. -
Carve the Outlines:
Using a small carving tool or needle tool, press firmly into the clay to trace your lines. You want the grooves to be deep enough to catch glaze but not so deep they weaken the wall. -
Vary Line Depth:
For the petals and leaves, try varying your pressure. Pressing slightly harder at the base of a leaf and lifting up as you reach the tip creates a dynamic, fluid look. -
Clean Up Burrs:
Once carved, let the mug dry a bit more until it’s bone dry. Then, gently rub the surface with a soft, slightly damp sponge or a stiff brush to remove any sharp clay crumbs (burrs) from the carving lines. -
Bisque Fire:
Load your mug into the kiln for the first firing (bisque fire), typically to Cone 04 or 06, depending on your clay body.
Clean Carving Tip
Wait until the clay is a ‘stiff leather-hard’ before carving. If it’s too wet, the tool will drag and create messy edges; too dry, and it will chip.
Step 3: Glazing and Finishing
-
Wax Resist Method:
Apply wax resist to the bottom third of the mug’s exterior and the foot ring. This will keep the dark clay raw and exposed. -
Wax the Interior (Optional):
If you want a dark interior like the reference, you can glaze the inside with a dark liner glaze first, or simply leave the raw clay if it vitrifies fully (though glazing is recommended for hygiene). -
Dip the Top:
Holding the mug by the foot, dip the top two-thirds into your speckled oatmeal glaze. The glaze should cover the carving and stop naturally where the wax resist begins. -
Clean the Line:
Immediately use a damp sponge to wipe back any glaze that dripped onto the waxed bottom area, ensuring a crisp separation line. -
Check the Carvings:
Inspect the carved grooves. Even though the glaze covers them, the -
Glaze Firing:
Load the mug into the kiln for the final glaze firing. Ensure the temperature matches your clay and glaze specifications (usually Cone 5, 6, or 10). -
Cool and Sand:
Once the kiln has cooled significantly, remove the mug. If the exposed raw clay on the bottom feels rough, lightly sand it with wet-dry sandpaper (wet) to make it pleasant to hold.
Make It Pop
After dipping the top glaze, gently rub the carved areas with your finger while the glaze is powdery to thin it slightly on the high points, emphasizing the texture.
Enjoy your morning coffee in a mug that perfectly balances smooth glaze with tactile, earthy texture
Slip-Trailed Doodles for Raised Texture You Can Feel
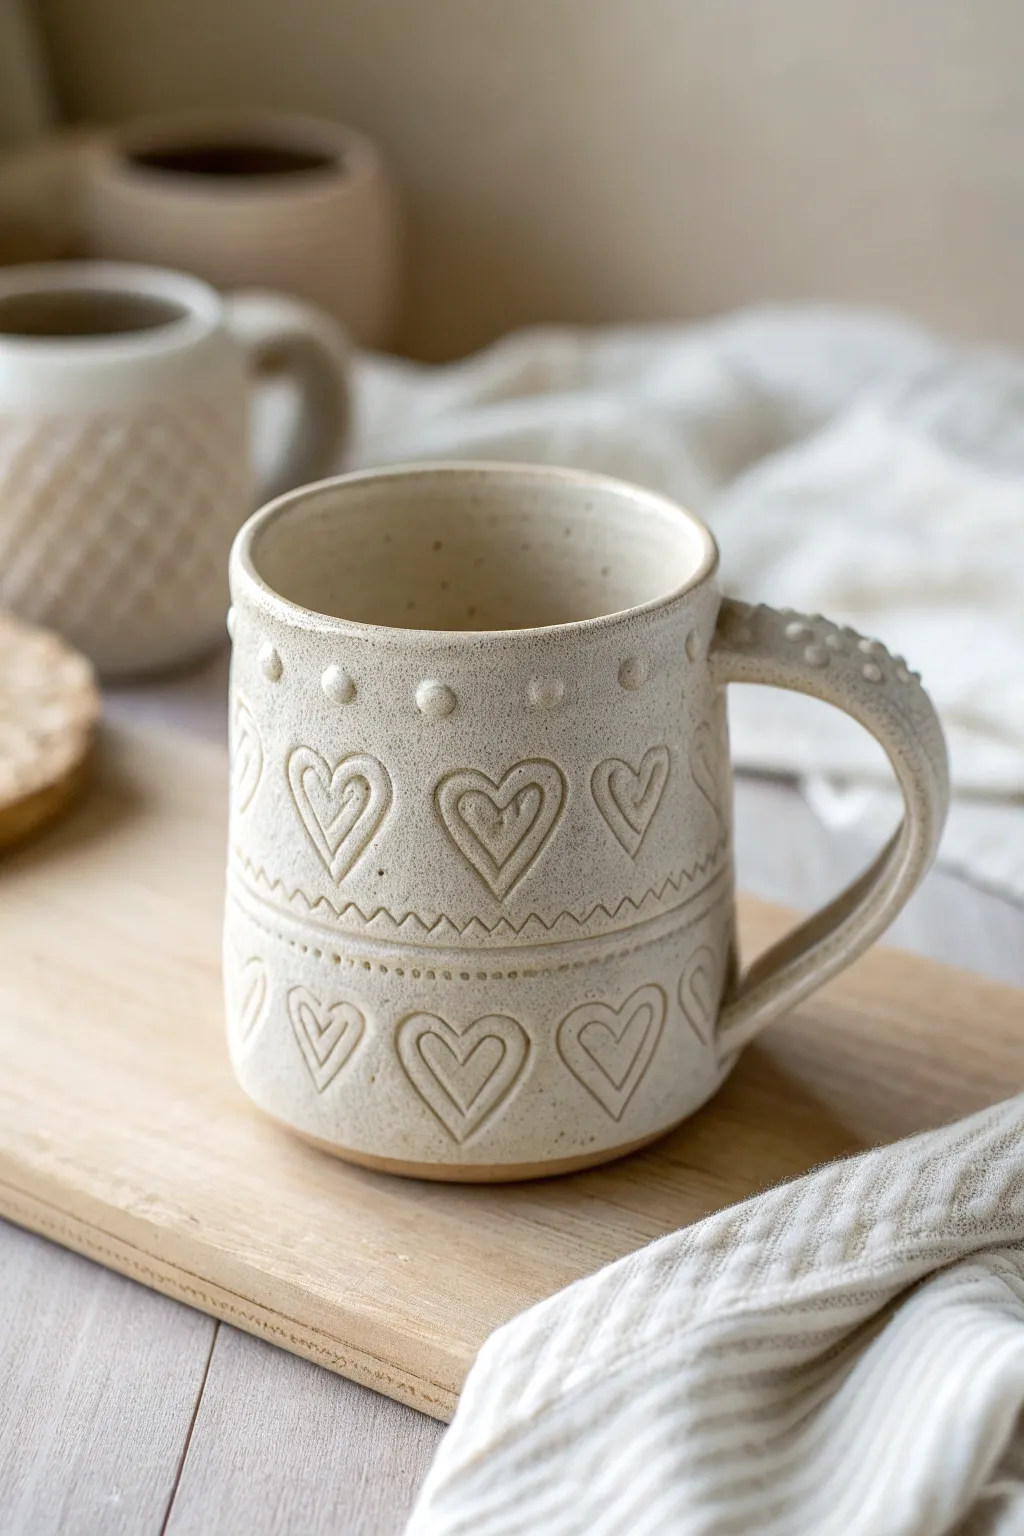
Recreate this cozy, tactile mug that features a classic speckled finish and dimensional heart motifs. The combination of impressed textures and raised slip trailing creates a delightful surface that begs to be held.
Step-by-Step
Materials
- Speckled stoneware clay (approx. 1 lb)
- Slip trailer bottle with fine nozzle
- Thick clay slip (made from the same clay body)
- Potter’s wheel or rolling pin and slab template
- Rib tool (wooden or silicone)
- Needle tool
- Sponge
- Scoring tool
- Carving tool or sgraffito loop tool
- Matte white or clear glaze
Step 1: Forming the Base Vessel
-
Prepare your clay:
Wedge your speckled stoneware clay thoroughly to remove air bubbles. This specific look relies on the natural iron specks in the clay body, so choose a clay that fires to a creamy oat color. -
Form the cylinder:
Throw a straight-sided cylinder on the potter’s wheel, aiming for a height of about 4-5 inches. Alternatively, roll out a slab and hand-build a cylinder using a seam join. Keep walls even, roughly 1/4 inch thick. -
Define the waist:
While the clay is still plastic, use a wooden rib or your finger to gently create a distinct indentation or ‘waist’ around the middle of the mug. This separates the top and bottom design fields. -
Trim and refine:
Once the clay is leather-hard, trim the foot of the mug to give it a slight lift. Smooth the rim with a damp sponge or a piece of chamois for a comfortable drinking edge.
Slip Consistency Tip
Your slip should be the consistency of thick yogurt or frosting. If it’s too runny, the dots will flatten; too thick, and the nozzle will clog.
Step 2: Adding the Handle and Texture
-
Pull the handle:
Pull a strap handle from a lug of clay or roll a coil and flatten it slightly. While the clay is soft, add small dots of raised texture along the top curve of the handle using the slip trailer. -
Dry the handle:
Curve the handle into a C-shape and let it stiffen until it holds its form but is still flexible enough to attach without cracking. -
Attach the handle:
Score the attachment points on both the mug body and the handle ends. Apply slip and press firmly to join. Smooth the connection points with a modeling tool or your finger to ensure a strong bond.
Step 3: Slip Trailing and Decoration
-
Prepare the design canvas:
Wait until the mug is firmly leather-hard. This prevents the pressure of your tools from warping the cylindrical shape. -
Outline the hearts:
Using a needle tool or a fine carving tool, lightly scratch or carve heart shapes into the clay surface. Create two rows—one sitting above the waistline and one below—spacing them evenly around the circumference. -
Add the inner hearts:
Carve a smaller heart inside each larger outline to create the double-heart motif seen in the image. -
Create the zig-zag border:
Just above the indented waistline, use a fine carving tool to incise a zig-zag or chevron pattern that encircles the mug. -
Apply slip dots:
Fill your slip trailer with thick, creamy slip. Apply a row of small, raised dots just under the rim of the mug. Try to keep your hand steady to ensure uniform size. -
Detail the waistline:
Add a line of very tiny slip dots directly into the indented waistline groove. I find it helpful to rotate the banding wheel slowly while holding the trailer still for a straight line. -
Embellish the hearts:
Carefully trail slip over your carved heart lines to raise them, or leave them carved for contrast. In this specific design, the hearts are deeply incised while the dots are raised, creating a tactile push-pull effect.
Level Up: Oxide Wash
Before glazing, apply an iron oxide wash and wipe it back. The dark oxide will stay in the carved heart grooves, making the design pop powerfully.
Step 4: Finishing and Firing
-
Slow drying:
o prevent the handle from cracking or pulling away, cover the mug loosely with plastic and let it dry slowly over several days until it is bone dry. -
Bisque fire:
Fire the piece in a kiln to cone 04 (or your clay body’s bisque temperature). -
Glaze application:
Dip the mug into a satin or matte white glaze. A translucent or breaking white glaze works best here, as it will pool in the carved lines and break over the raised dots, highlighting the texture. -
Final firing:
Glaze fire the mug to cone 5/6 (depending on your clay and glaze specifications). -
Sanding:
Once cool, check the foot of the mug. Use diamond sandpaper to smooth any rough patches on the unglazed bottom so it won’t scratch your table.
Enjoy your morning coffee in a mug that feels as lovely as it looks


What Really Happens Inside the Kiln
Learn how time and temperature work together inside the kiln to transform clay into durable ceramic.
Ombre Gradient From Rim to Base
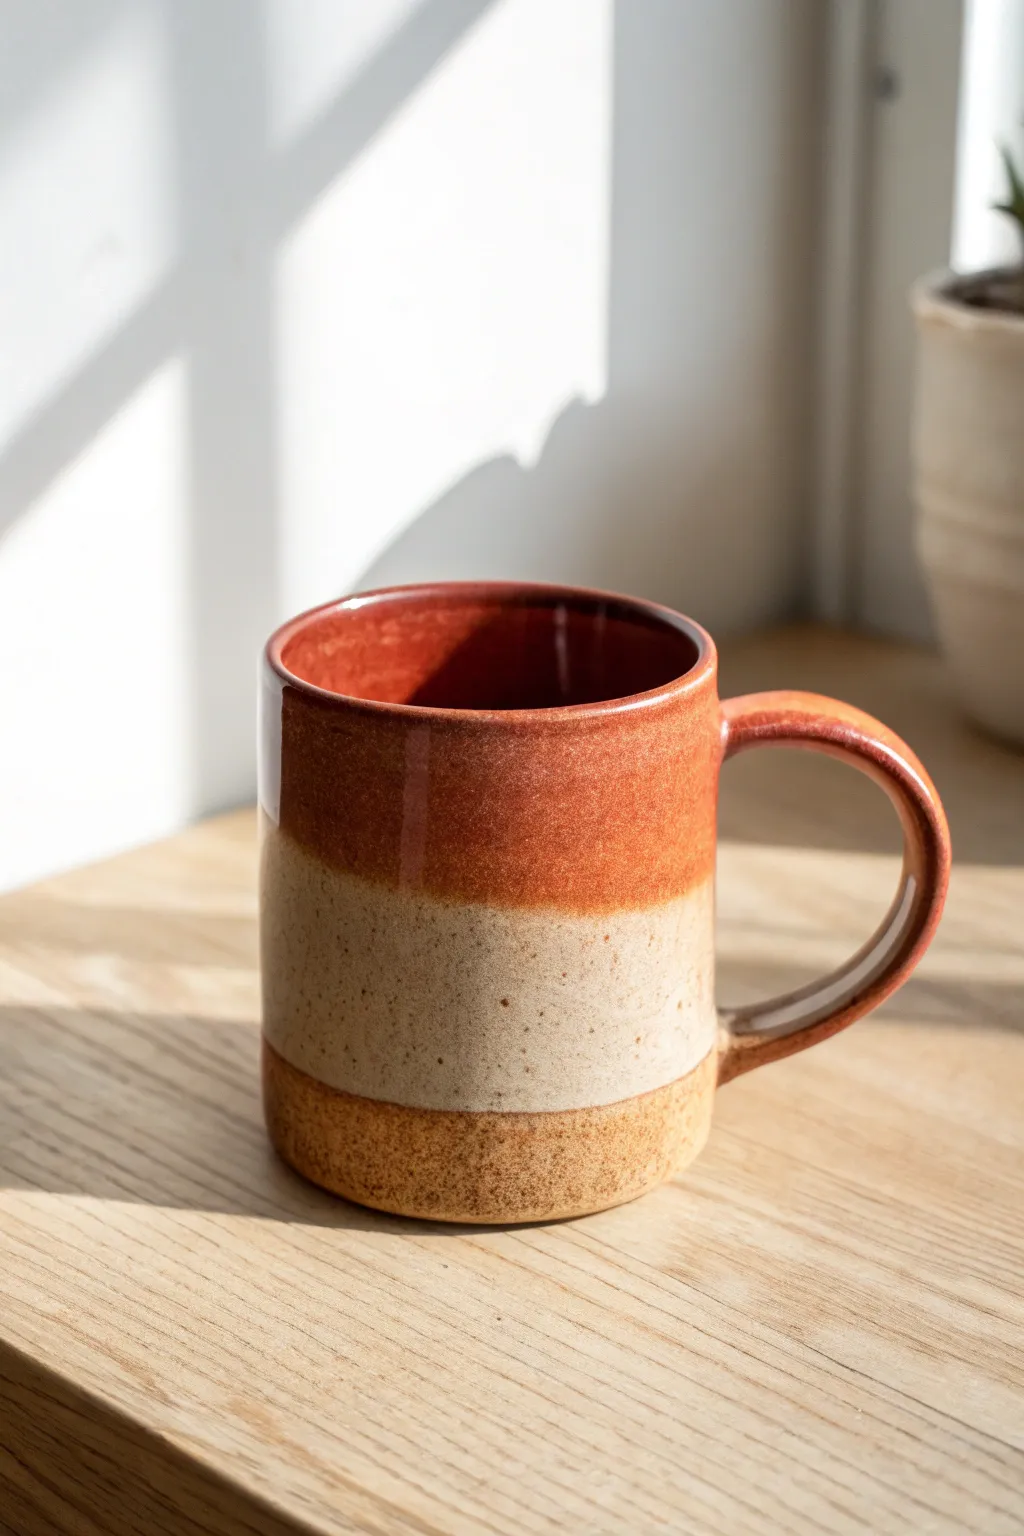
Embrace the warmth of natural clay with this ceramic mug design that features a beautiful gradient transition. This project combines a rich reddish-brown gloss with a creamy, speckled matte texture for a cozy, artisanal feel.
Detailed Instructions
Materials
- Bisque-fired ceramic mug
- Red-brown gloss pottery glaze (cone 5/6)
- Cream or oatmeal speckled matte pottery glaze (cone 5/6)
- Wax resist
- Sponge
- Glaze brushes (fan brush and soft round brush)
- Clean water container
- Kiln for firing
Step 1: Preparation and Base Coat
-
Clean the bisque:
Start by wiping down your bisque-fired mug with a damp sponge. This removes any dust from the shelf or previous firing that could prevent the glaze from adhering properly. -
Wax the foot:
Flip the mug over and carefully apply wax resist to the bottom foot ring and about 2-3mm up the side of the base. This ensures your mug won’t fuse to the kiln shelf during firing. -
Let wax dry:
Allow the wax resist to dry completely, which usually takes about 15-20 minutes. The wax should be dry to the touch before you proceed. -
Mix your glazes:
Stir both your red-brown gloss and cream speckled glazes thoroughly. Ensure all sediment from the bottom is fully incorporated so you get consistent color and texture.
Pro Tip: Feathering
For a smoother blend between colors, dampen the transition line with a wet brush before applying the second glaze. It encourages the minerals to mingle.
Step 2: Glazing the Interior
-
Pour the interior:
Pour a generous amount of the red-brown gloss glaze into the mug. Roll the mug around slowly to coat every inch of the interior surface. -
Drain excess:
In one swift motion, pour the excess glaze back into your container while rotating the mug to ensure the rim is evenly coated. -
Clean the exterior:
If any drips landed on the outside during the pour, wipe them away immediately with a damp sponge so your exterior design remains pristine.
Step 3: Creating the Exterior Ombre
-
Dip the top third:
Holding the mug by the base, dip the top third directly into the red-brown gloss glaze. hold it level for about 3 seconds to get good coverage, then lift straight up. -
Glaze the handle:
Use a soft round brush to apply the same red-brown glaze to the handle. I prefer to do this carefully by hand to ensure the connection points are neat. -
Wipe the transition line:
While the top glaze is still damp, gently feather the bottom edge of the red band with a barely damp sponge or brush to soften the line where it will meet the next color. -
Apply the bottom section:
Using a fan brush, apply the cream speckled matte glaze to the middle and bottom sections of the mug. Start just below the red band and brush downwards. -
Overlap slightly:
Bring the cream glaze up to just barely overlap the bottom edge of the red glaze. This overlap creates that interesting, organic transition area seen in the photo. -
Add texture:
If your cream glaze doesn’t have built-in speckles, gently flick a stiff toothbrush dipped in iron oxide wash or a darker glaze over the cream section to create faux speckling. -
Layer the bottom:
Apply a second coat of cream glaze specifically to the bottom third of the mug. This creates a slightly lighter, denser band at the base, enhancing the gradient effect. -
Clean the foot:
Even with wax resist, glaze can bead up on the bottom. Wipe the waxed foot ring clean with a damp sponge to ensure a perfectly flat sitting surface. -
Final dry:
Let the mug dry completely overnight. The glazes should be dry and powdery to the touch before loading into the kiln. -
Fire the kiln:
Load the mug into your kiln and fire to Cone 5 or 6 (approx. 2200°F), depending on your specific clay and glaze specifications.
Troubleshooting: Crawling Glaze
If you see bare patches of clay after firing, your bisque might have been dusty or greasy. Always wipe bisque with a damp sponge before beginning.
Enjoy your morning coffee in a custom mug that radiates rustic charm and artisanal craftsmanship
All-Over Coffee Bean Motif in a Repeating Pattern
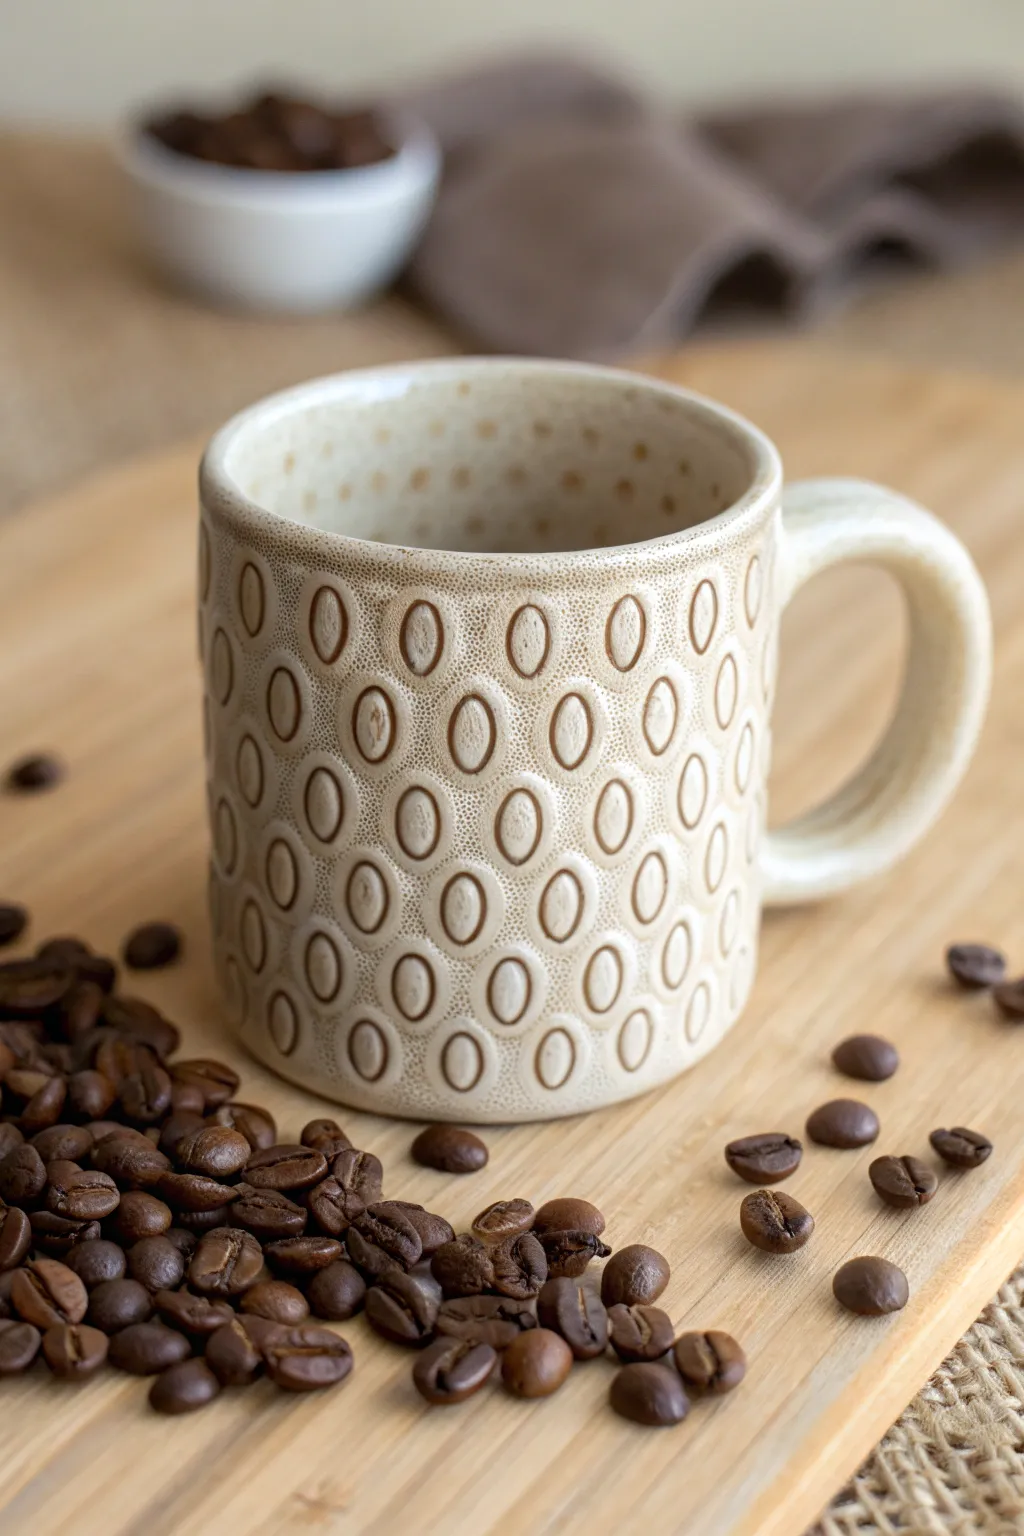
Embrace your love for the brew with this tactile pottery project featuring a repetitive, stamped coffee bean design. The finished piece offers a delightful texture that feels great in your hands and adds an organic warmth to your morning routine.
Step-by-Step Tutorial
Materials
- Stoneware clay (smooth or lightly speckled)
- Small oval-shaped carving tool or custom stamp
- Pottery wheel (or slab roller for hand-building)
- Wooden modeling tool with a thin edge
- Sponge
- Rib tool
- Wire cutter
- Clear or light translucent glaze
- Scoring tool and slip
Step 1: Forming the Base Mug
-
Prepare the Clay:
Begin by wedging about 1 to 1.5 pounds of stoneware clay to remove air bubbles. Ensure the consistency is uniform to prevent cracking later. -
Throw the Cylinder:
Center your clay on the wheel and open it up. Pull the walls to create a straight-sided cylinder approximately 4-5 inches tall. Aim for an even thickness of about 1/4 inch to allow for stamping without piercing the wall. -
Refine the Shape:
Use a rib tool to smooth the exterior and compress the clay particles. Slightly flare the rim if desired for a comfortable drinking edge, then undercut the foot with your wooden tool. -
Dry to Leather Hard:
Wire the pot off the bat and let it dry slowly until it reaches a leather-hard stage. It should be firm enough to handle without deforming but soft enough to take an impression.
Cracked Walls?
If the clay cracks while stamping, it is too dry. Mist the surface lightly and wrap it in plastic for an hour to rehydrate the outer layer before trying again.
Step 2: Creating the Bean Texture
-
Select Your Stamping Tool:
Find an oval-shaped tool, like the end of a paintbrush handle or a small loop tool, that mimics the outline of a coffee bean. Test it on a scrap piece of clay first. -
Mark Guidelines (Optional):
If you struggle with alignment, lightly scratch vertical or horizontal guide lines into the clay surface. I sometimes skip this for a more organic look, but it helps keep rows straight. -
Stamp the Ovals:
Support the wall from the inside with your hand. Press the oval tool firmly into the exterior surface to create an indentation. Repeat this in a vertical column from top to bottom. -
Offset the Pattern:
Start the next column ensuring the new ovals sit in the spaces between the previous column’s ovals (like a honeycomb or brick pattern). Continue this rhythm around the entire mug. -
Add the ‘Bean’ Cleft:
Using a thin wooden modeling tool or a dull knife, press a vertical line into the center of each oval indentation. This small detail transforms the simple oval into a recognizable coffee bean. -
Smooth Rough Edges:
Once the texturing is complete, lightly run a damp sponge or your finger over the surface to soften any sharp ridges created by the stamping process.
Step 3: Handle and Finish
-
Pull a Handle:
Pull a thick strap of clay for the handle. Curve it into a comfortable ear shape and let it stiffen slightly so it holds its form. -
Attach the Handle:
Score and slip the contact points on both the mug body and the handle. Press firmly to attach, blending the seams smoothly with a modeling tool. -
Final Surface Check:
Check the rim and handle for any roughness. Burnish the rim slightly with a piece of plastic or soft leather for a pleasant mouthfeel. -
Bisque Fire:
Allow the mug to dry completely to bone dry. Fire it in the kiln to a bisque temperature (usually cone 04 or 06). -
Glazing:
Dip or brush the mug with a light translucent glaze. This type of glaze naturally pools in the bean indentations, highlighting the texture darker while keeping the high points lighter. -
Final Firing:
Fire the mug again to glaze temperature (typically cone 5 or 6 for stoneware). Let the kiln cool completely before unloading.
Make Your Own Tool
Carve a reverse coffee bean shape into a small plaster block or a piece of bisqued clay. This creates a custom stamp that impresses the full bean shape in one motion.
Enjoy your morning coffee in a mug that celebrates the bean itself

TRACK YOUR CERAMIC JOURNEY
Capture glaze tests, firing details, and creative progress—all in one simple printable. Make your projects easier to repeat and improve.
Cozy Quote Typography That Faces Outward
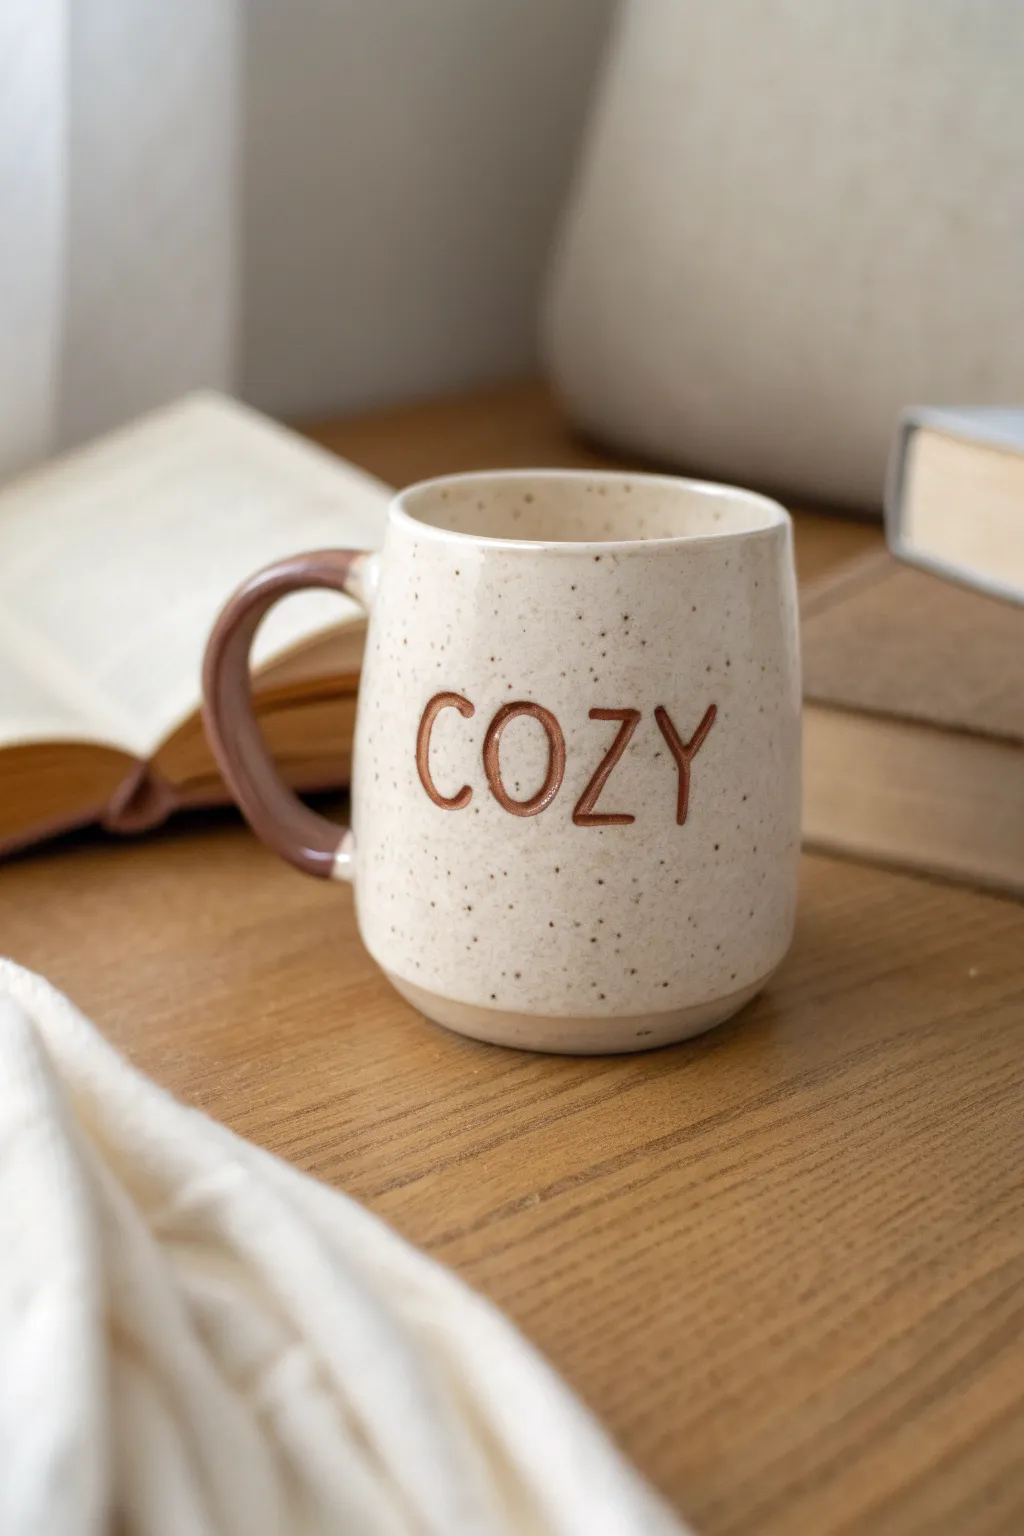
Capture the essence of warmth with this handmade ceramic mug featuring a lovely speckled finish and rust-colored accents. The stamped letters add a tactile charm that makes every sip feel special.
Step-by-Step Guide
Materials
- Speckled stoneware clay body (cone 5-6)
- Pottery wheel
- Throwing tools (sponge, wooden rib, wire cutter)
- Needle tool
- Trimming tools
- Small letter stamps or letter cutters
- Scoring tool or serrated rib
- Slip
- Small paintbrush
- Clear matte or satin glaze
- Iron oxide wash or dark brown underglaze
- Kiln access
Step 1: Forming the Mug Body
-
Prepare the Clay:
Begin by thoroughly wedging about 1 to 1.5 pounds of speckled stoneware clay to remove air bubbles and align the particles. -
Center on the Wheel:
Throw the clay onto the wheel head and center it using firm pressure and water for lubrication. -
Open and Pull:
Open the center and pull up the walls to form a cylinder. Aim for a slightly wider base that tapers gently toward the rim, creating a comforting, huggable shape. -
Refine the Rim:
Compress the rim with a chamois or sponge to ensure it is smooth and pleasant to drink from. -
Initial Drying:
Cut the mug from the bat with a wire tool and set it aside until it reaches ‘leather hard’ consistency.
Stamp Clarity
If stamps are sticking, dust them lightly with cornstarch before pressing into the clay. This acts as a release agent and burns off in the kiln.
Step 2: Trimming and Handle
-
Trim the Foot:
Once leather hard, center the mug upside down on the wheel. Trim away excess weight from the bottom, creating a clean foot ring. -
Pull a Handle:
Using a small lump of the same clay, pull a strip for the handle. Smooth it with water until it feels comfortable in your grip. -
Attach the Handle:
Score the attachment points on both the mug body and the handle ends. Apply slip and press the handle firmly onto the mug. -
Clean the Joint:
Use a small damp sponge or a wooden tool to clean up any excess slip around the handle connection points for a seamless look.
Glaze Consistency
For better speckle visibility, ensure your clear glaze isn’t too thick. A thinner application reveals more of the clay’s natural character.
Step 3: Typography and Coloring
-
Stamp the Text:
While the clay is still leather hard, support the inside wall with one hand. With your other hand, press your letter stamps gently into the surface to spell ‘COZY’. I find it helpful to mark the center point first to keep the word balanced. -
Smooth the Edges:
If the stamping process created any raised ridges or burrs around the letters, gently smooth them down with your finger or a plastic bag. -
Bisque Fire:
Allow the mug to dry completely (bone dry). Load it into the kiln for a bisque firing to roughly Cone 04. -
Apply Oxide to Text:
Mix a small amount of iron oxide wash or use a dark brown underglaze. Paint it into the recessed letters. -
Wipe Back:
Use a damp sponge to wipe the surface clean. The dark color will remain trapped in the stamped letters, highlighting the word. -
Glaze the Handle:
Apply the same iron oxide wash or a reddish-brown glaze specifically to the handle to create a striking two-tone contrast. -
Dip in Clear Glaze:
Dip the entire mug body into a clear matte or satin glaze. This will seal the clay and allow the natural speckles to show through. -
Wipe the Foot:
Use a sponge to remove any glaze from the bottom foot ring to prevent it from sticking to the kiln shelf. -
Final Firing:
Fire the mug in the kiln to the maturity temperature of your clay and glaze (typically Cone 5 or 6).
Now you have a perfectly personalized vessel ready for your favorite warm beverage
Handle Accent Color for a Pop Without Overthinking It
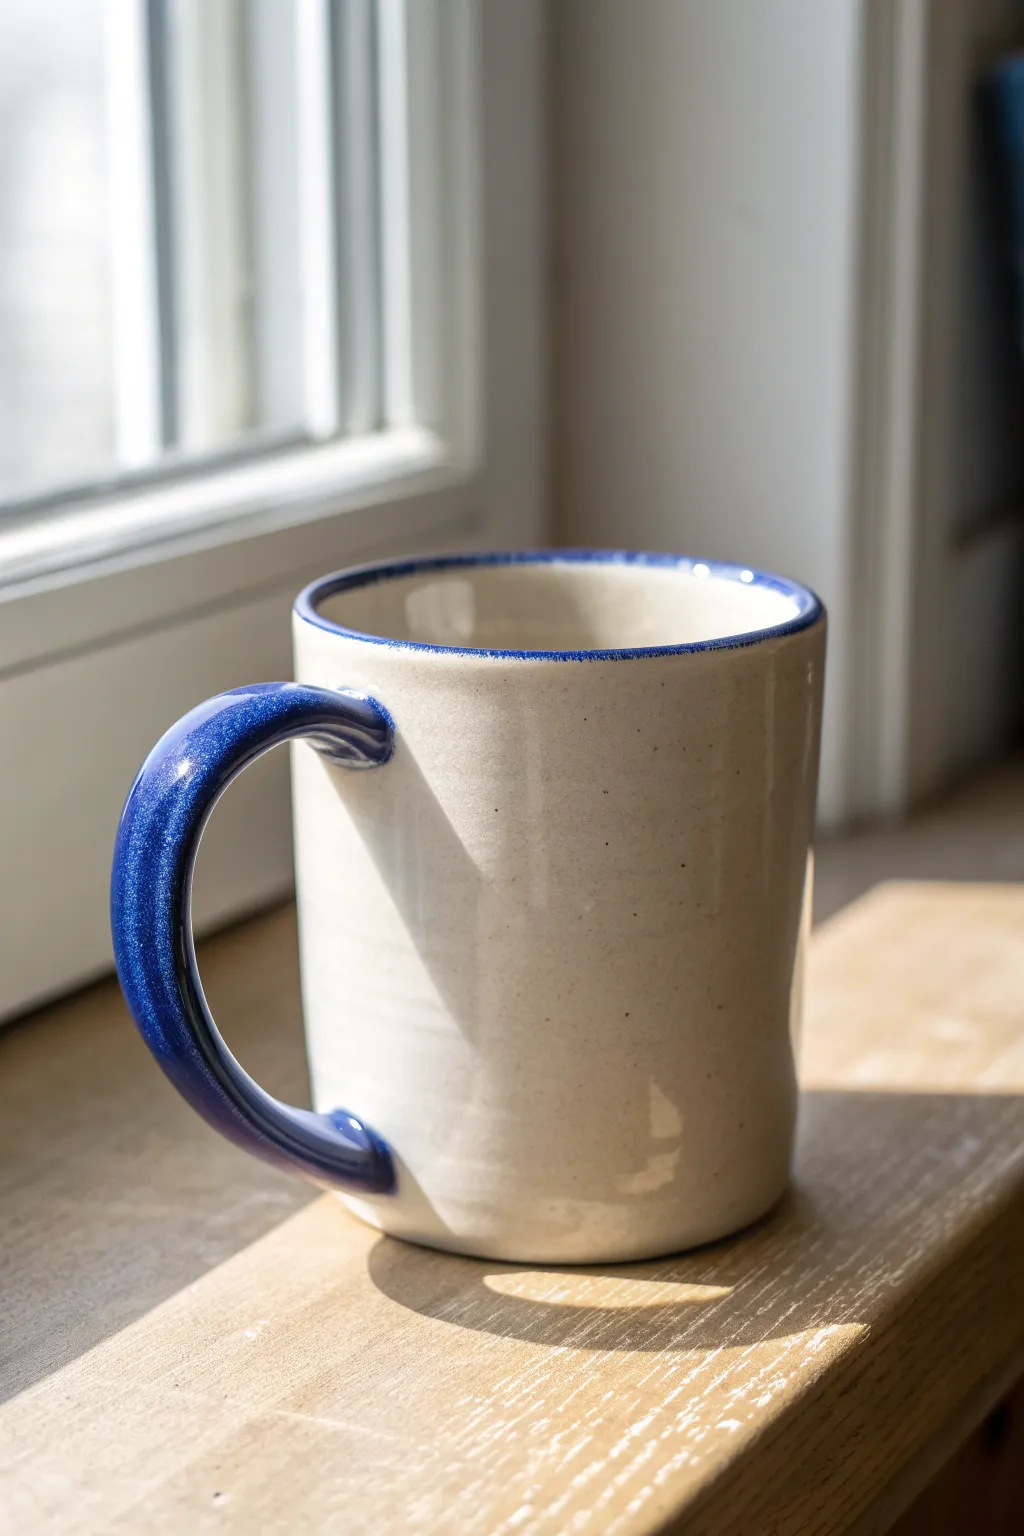
This project transforms a simple ceramic cylinder mug into a modern classic by adding a bold, speckled blue accent to the handle and rim. The contrast between the neutral, speckled cream body and the vibrant cobalt blue creates a sophisticated yet approachable piece perfect for your morning brew.
How-To Guide
Materials
- Bisque-fired ceramic mug (cylinder shape)
- Speckled cream or oatmeal glaze (stoneware safe)
- Cobalt blue fluid glaze
- Soft fan brush
- Small round detail brush (size 2 or 4)
- Sponge
- Bucket of water
- Wax resist (optional)
- Kiln (or access to a firing service)
Step 1: Preparation and Base Glazing
-
Clean the Bisqueware:
Before you begin, wipe down your bisque-fired mug with a damp sponge. This removes any dust or oils from handling that might prevent the glaze from adhering properly. -
Prepare the Base Glaze:
Stir your speckled cream or oatmeal glaze thoroughly. Ensure all the sediment at the bottom is mixed in so the speckles are evenly distributed. -
Glaze the Interior:
Pour a generous amount of the cream glaze inside the mug. Rotate the mug quickly to coat the entire interior surface, then pour the excess back into your glaze container. -
Clean the Rim:
While the interior glaze is still damp, carefully wipe any drips off the very top rim with a sponge. We want this area clean for our accent color later. -
Glaze the Exterior Body:
Using a soft fan brush, apply the first coat of cream glaze to the exterior body of the mug. Avoid the handle completely for now. -
Refine the Handle Connection:
Brush carefully around the attachment points of the handle, getting close but leaving the actual handle bare. I find steadying my hand against the table helps with this precision. -
Apply Second and Third Coats:
Allow the first coat to dry until it’s chalky to the touch. Apply a second and third coat of the cream glaze to the body to ensure full opacity.
Fixing Glaze Drips
If the blue glaze accidentally drips onto the cream body, don’t wipe it while wet as it will smear. Let it dry to a powder, then gently scrape it off with a craft knife.
Step 2: Adding the Cobalt Accent
-
Mix the Blue Glaze:
Shake or stir your cobalt blue glaze vigorously. Since this glaze needs to be opaque on the handle, good consistency is key. -
Paint the Handle Base:
Using the fan brush or a medium round brush, apply the first coat of blue to the entire handle. Be careful where the handle meets the mug body to create a clean line. -
Detailing the Connection Points:
Switch to your small round detail brush. Carefully paint the blue glaze right up to the cream glaze at the handle joints. -
The Rim Accent:
Dip the detail brush into the blue glaze. Hold the brush steady and spin the mug on a banding wheel (or manually) to paint a thin, consistent blue line along the very top edge of the rim. -
Layering the Blue:
Let the blue glaze dry fully. Apply two more coats to both the handle and the rim to achieve that deep, rich cobalt color shown in the image. -
Adding Texture (Optional):
If your blue glaze isn’t naturally speckled, you can flick a toothbrush with a slightly different shade of blue or white glaze over the handle area to mimic the stone-like texture. -
Clean the Foot:
Use a damp sponge to wipe the very bottom of the mug (the foot ring) completely clean of any glaze to prevent it from sticking to the kiln shelf. -
Final Inspection:
Check for any pinholes or thick drips. Smooth them out gently with your finger if necessary before firing. -
Fire the Piece:
Load the mug into the kiln and fire it according to the specific cone rating of your clay and glazes (typically Cone 5 or 6 for stoneware).
Make It a Set
Create a matching set by using the same cream base but changing the handle color for each mug—try forest green, burnt orange, and mustard yellow.
Once cooled, you will have a stunning custom mug ready for your favorite warm beverage.
Thumb Rest or Indent That Becomes Part of the Design
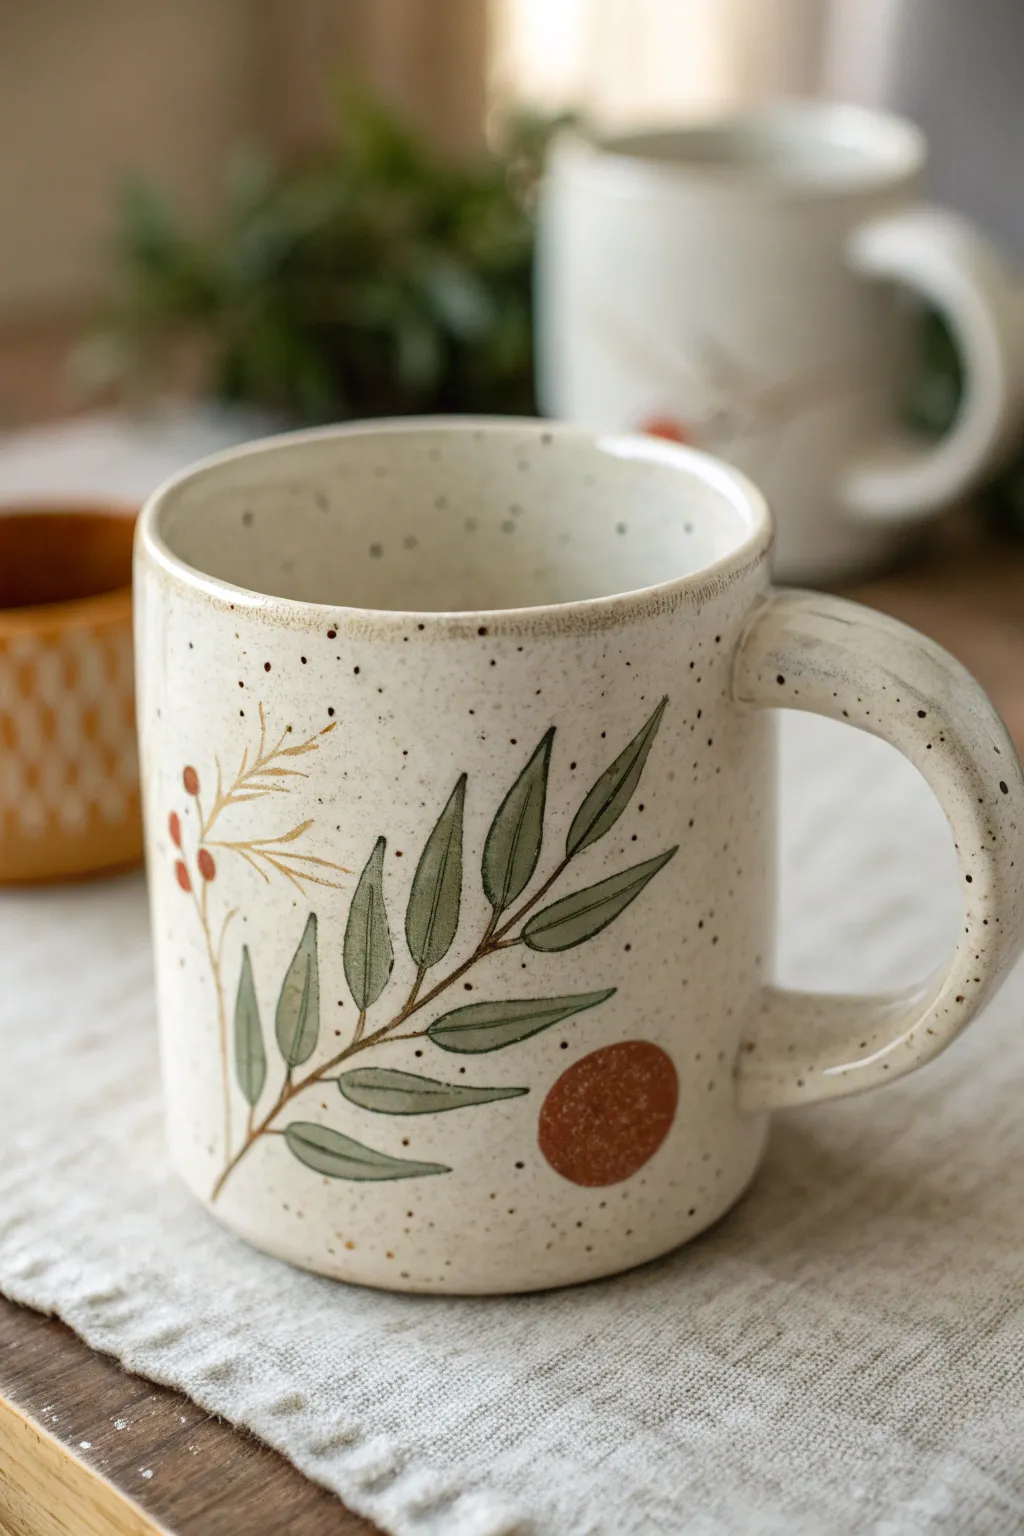
This project combines functional design with botanical artistry, featuring a speckled stoneware mug with a gently flattened thumb rest built directly into the handle. The focal point is a delicate hand-painted olive branch and berry motif that wraps around the form, complemented by a warm, rustic glaze finish.
Step-by-Step Tutorial
Materials
- Speckled stoneware clay (mid-fire)
- Pottery wheel
- Throwing tools (sponge, wire cutter, rib, needle tool)
- Small loop tool or trimming tools
- Serrated rib or scoring tool
- Slip
- Underglaze (olive green, warm rust-orange, deep brown)
- Fine detail brushes (size 0 and 2)
- Clear matte or satin glaze
- Kiln
Step 1: Throwing and Trimming the Body
-
Center the clay:
Start with about 1-1.5 lbs of speckled stoneware clay. Wedge it thoroughly to remove air bubbles, then center it firmly on the wheel head. -
Open and pull the cylinder:
Open the clay and pull up a cylinder with straight, vertical walls. Aim for a consistent thickness of about 1/4 inch, keeping the rim slightly rounded for drinking comfort. -
Shape the profile:
Use a rib tool on the inside to push the walls out slightly, creating a gentle curve. The mug should be slightly wider at the lip than the base, but mostly cylindrical. -
Refine the surface:
While the wheel is spinning slowly, run a metal rib up the outside to remove throwing lines and smooth the surface. The speckles in the clay will provide texture, so the surface itself should be clean. -
Cut and dry:
Wire the mug off the bat and let it dry to a leather-hard state. This usually takes a few hours to overnight, depending on humidity. -
Trim the foot:
Once leather-hard, center the mug upside down on the wheel. Trim a clean, flat foot ring, defining the bottom edge nicely.
Thumb Check
Test the handle immediately after attaching. Hold the mug as you would to drink. If the indent feels too high or low, adjust the clay now while it’s still pliable.
Step 2: Handle Sculpting and Attachment
-
Pull a strap handle:
Pull a handle from a lug of clay, aiming for a flattened oval profile rather than a round coil. The strap should be slightly wider than a standard handle to accommodate the thumb rest. -
Curve and dry:
Curve the pulled handle into an ear shape and let it stiffen up until it holds its form but is still flexible (soft leather-hard). -
Attach the handle:
Score and slip the attachment points on both the mug body and the handle. Press the handle firmly onto the mug, smoothing the clay at the joints for a seamless connection. -
Sculpt the thumb rest:
At the very top of the handle curve, just where it meets the mug, use your thumb to press down firmly and flatten a specific area. This indent should feel natural when holding the mug. -
Refine the indent:
Smooth the edges of your thumb impression so it transitions softly into the rest of the handle. It shouldn’t look like a mistake, but a deliberate design choice.
Step 3: Botanical Illustration and Glazing
-
Sketch the design:
Ensure the mug is bone dry or very stiff leather-hard. Lightly sketch the branch layout with a pencil; the graphite will burn off in the kiln. -
Paint the stems:
Using a size 0 brush and deep brown underglaze, paint the main stem diagonally across the mug, adding thinner branches radiating outward. -
Add the leaves:
Mix a muted olive green underglaze. Using a size 2 brush, paint elongated oval leaves. I prefer to press the brush down and lift at the end to create a natural tapered tip. -
Outline the leaves:
Once the green is dry, go back with your fine liner brush and the deep brown underglaze to carefully outline each leaf and add a central vein line for definition. -
Add berries and geometric accents:
Use a warm rust-orange underglaze to paint small circular berries near the thin stems. Add a larger, singular rust-colored circle near the base of the design for a modern, geometric touch. -
Bisque fire:
Load the mug into the kiln and bisque fire to Cone 04 (or your clay’s specific bisque temperature). -
Glaze application:
Wipe the bisqueware with a damp sponge. Dip the entire mug into a clear matte or satin glaze. This will seal the clay and make the underglaze pop without hiding the speckles. -
Final firing:
Glaze fire the piece to the maturity temperature of your clay body (likely Cone 5 or 6). Let the kiln cool completely before unloading.
Wax Resist Detail
Paint wax resist over your underglaze leaves before dipping in the clear glaze. This leaves the clay raw and textured over the design for a tactile finish.
Your finished mug will offer a cozy, custom fit for your hand with every sip
Carved Fluting or Ribbed Bands for Subtle Shadow Play
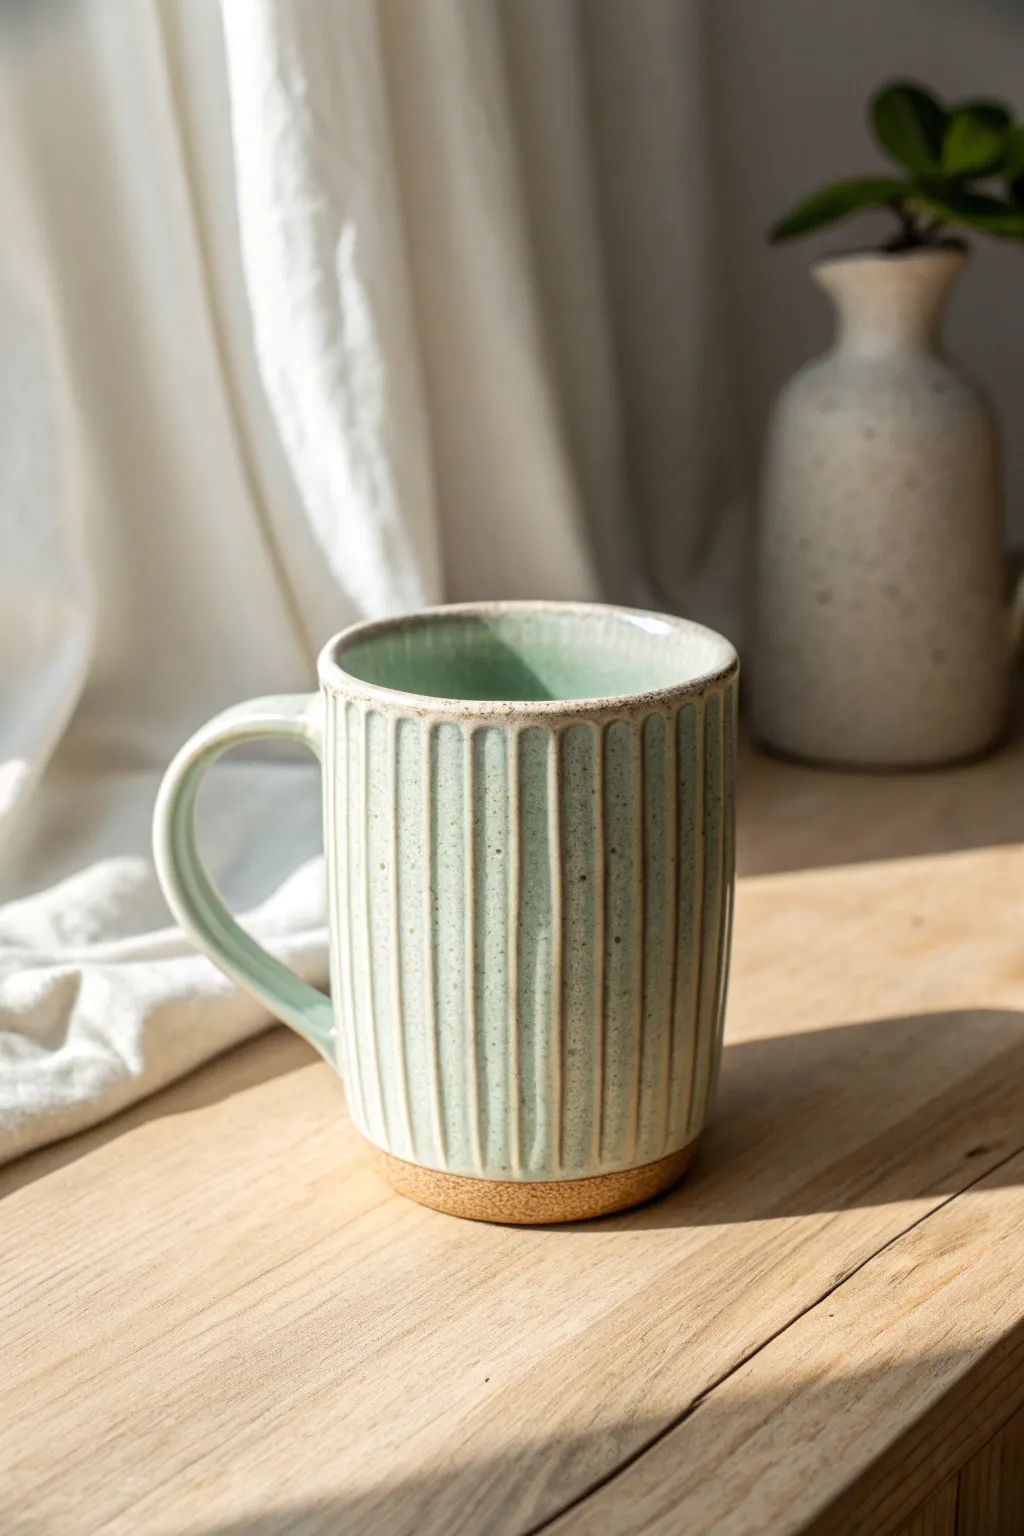
This tutorial guides you through crafting a stunning hand-thrown mug featuring vertical carved fluting that catches the light beautifully. The finished piece boasts a soothing sage green glaze that breaks over the texture to reveal the warm stoneware clay beneath.
Step-by-Step
Materials
- Stoneware clay (buff or speckled)
- Pottery wheel
- Wire cutter
- Sponge
- Rib tool
- Needle tool
- Carving tool (loop tool or fluting tool)
- Trimming tools
- Sage green breaking glaze (cone 5/6 or appropriate for your clay)
- Kiln
Step 1: Throwing the Cylinder
-
Prepare the clay:
Begin by thoroughly wedging about 1 to 1.5 pounds of stoneware clay to remove air bubbles and ensure consistency. -
Center on the wheel:
Secure the clay to the wheel head and center it using steady pressure and water for lubrication. -
Open and pull walls:
Open the centered clay and begin pulling the walls upward to form a cylinder. Aim for a height of about 4-5 inches and a consistent wall thickness. -
Shape the profile:
Use a rib tool on the exterior while supporting the interior to straighten the walls, creating a clean, vertical profile essential for the fluted design. -
Refine the rim:
Compress the rim with a chamois or sponge to ensure it is smooth and pleasant for drinking. -
Cut from wheel:
Run a wire tool under the base to separate it from the wheel head, then set the cylinder aside on a ware board to dry to a leather-hard state.
Fixing Uneven Flutes
If a carved line goes astray, don’t panic. Gently push clay back into the groove with a rib, smooth it over, let it stiffen, and re-carve carefully.
Step 2: Carving and Trimming
-
Trimming the foot:
Once leather-hard, center the cylinder upside down on the wheel. Trim the bottom to create a neat foot ring, leaving a small exposed band near the base. -
Mark vertical guides:
Lightly mark vertical lines at even intervals around the circumference to guide your carving, or trust your eye for a more organic feel. -
Carve the flutes:
Using a loop tool or specialized fluting tool, carve vertical channels from just below the rim to just above the foot. Maintain steady pressure for consistent depth. -
Smooth the edges:
After carving, run a damp sponge or finger gently over the sharp ridges between the flutes to soften them slightly without losing definition.
Dual-Tone Effect
Apply a secondary, darker glaze just to the rim or the deepest parts of the flutes before the main dip to exaggerate the shadow effect.
Step 3: Handle and Finishing
-
Pull a handle:
Pull a strap of clay for the handle, shaping it to complement the scale of your mug. Let it stiffen slightly into a curve. -
Attach the handle:
Score and slip the contact points on both the mug and handle. Press the handle firmly onto the mug, smoothing the joints for a seamless connection. -
Bisque fire:
Allow the mug to dry completely, slowly, to prevent warping. Fire it in the kiln to bisque temperature (usually Cone 06 or 04). -
Wax resist:
Apply wax resist to the bottom foot and the very bottom edge of the unglazed clay band to keep them clean during glazing. -
Glaze application:
Dip the mug into a sage green glaze. I find a quick 3-second dip works best to ensure the glaze pools in the flutes but breaks thinly over the ridges. -
Glaze firing:
Load the glazed mug into the kiln and fire to the maturation temperature of your clay and glaze combination (typically Cone 5 or 6).
Enjoy your morning coffee knowing you created this tactile, beautifully textured vessel yourself
Mishima Inlay for Crisp, Graphic Patterning
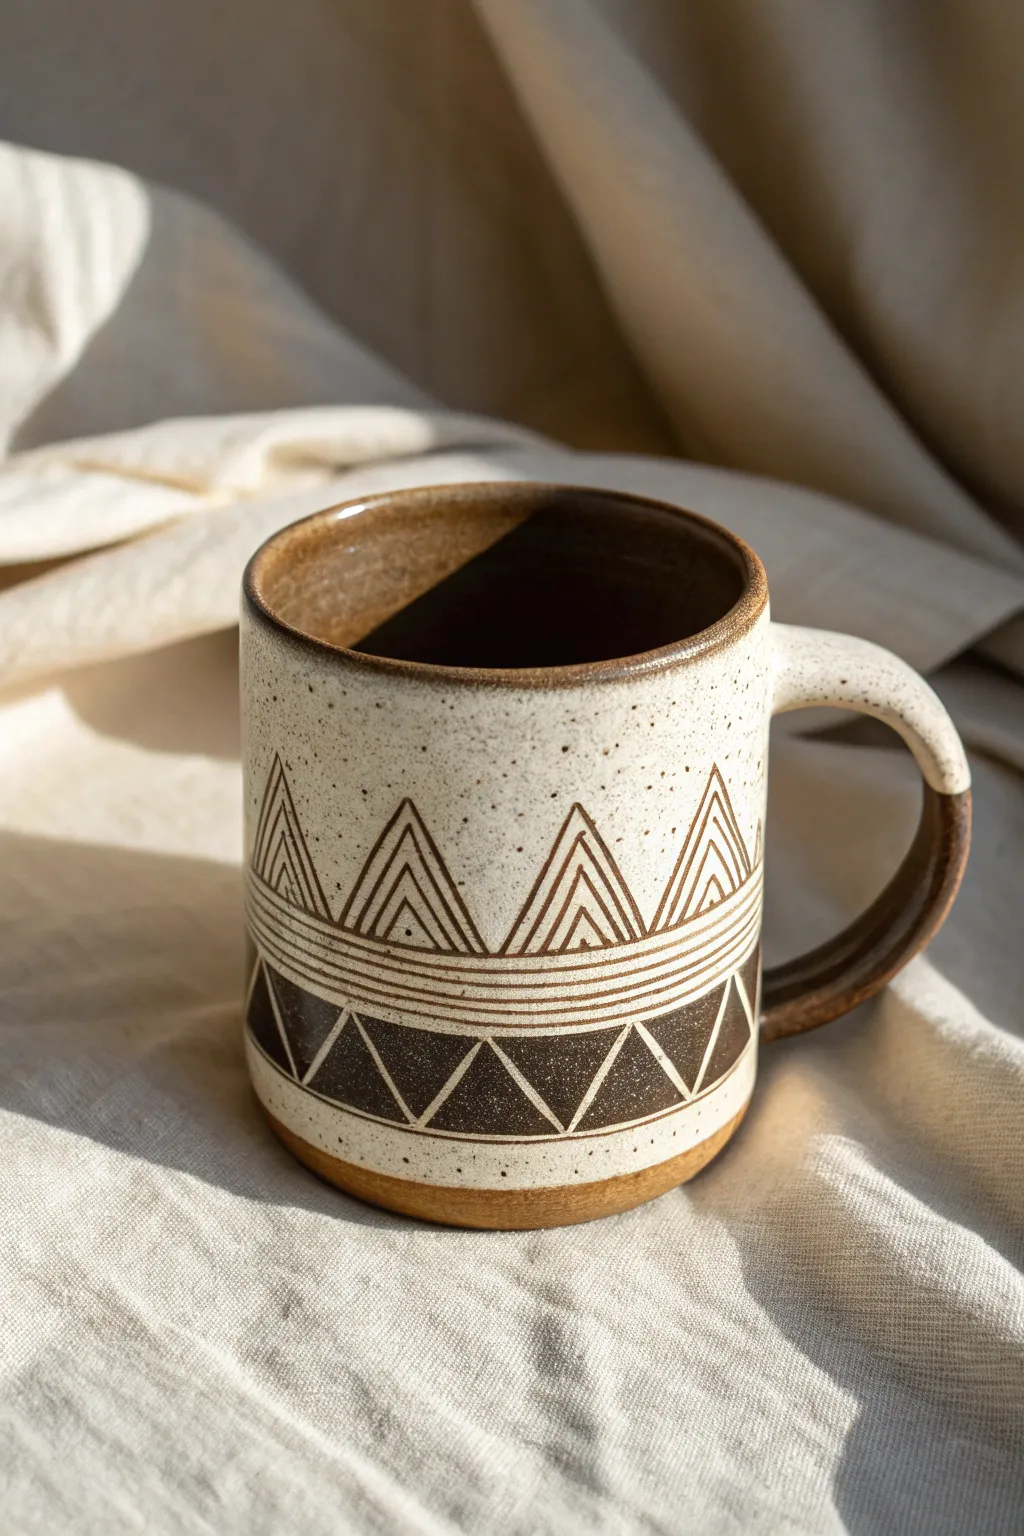
Achieve stunningly crisp lines and bold contrasts on your next wheel-thrown piece using the ancient Korean technique of Mishima. This project combines exposed stoneware with intricate inlaid triangle motifs for a modern, earthy aesthetic.
Step-by-Step Guide
Materials
- Stoneware clay (speckled or iron-rich)
- Black or dark brown underglaze
- Pottery wheel and tools
- Sharp needle tool or X-Acto knife
- Wax resist
- Small carving loop tool
- Metal rib
- Sponge
- Cream or white matte glaze
- Clear glaze (optional for liner)
Step 1: Forming the Canvas
-
Throw the Cylinder:
Begin by throwing a straight-sided cylinder on the potter’s wheel using about 1 lb of clay. Aim for a height of about 4 inches with even walls. -
Shape the Profile:
Refine the shape, keeping the walls relatively flat to make the inlay process easier later. Use a metal rib to compress the surface and ensure it is perfectly smooth. -
Trim the Foot:
Once the piece is leather hard, trim a distinct foot ring at the bottom. Leave an inch of unrefined surface near the base if you want that raw clay look shown in the reference. -
Attach the Handle:
Pull a strap handle and attach it firmly. Position the top attachment near the rim and the bottom attachment curving back toward the body, blending the seams seamlessly.
Clean Lines Pro-Tip
Wait until the clay is ‘chocolate bar hard’—stiffer than usual leather hard—before carving. This prevents the tool from dragging up clay burrs for sharper lines
Step 2: The Mishima Technique
-
Wax the Surface:
Once the mug is at a firm leather-hard stage, apply a thin, even coat of wax resist over the area where you intend to carve the design. This protects the main clay body from staining. -
Map the Geometry:
Using a soft pencil or by eye, lightly mark two parallel horizontal bands around the center of the mug to serve as the borders for your pattern. -
Carve the Foundation Lines:
With a sharp needle tool or fine carving tool, scribe through the wax and into the clay to create the horizontal bands. Apply steady pressure for a consistent depth. -
Create the Triangles:
Carve a row of triangles sitting on the top horizontal band, pointing upward. I like to double or triple outline these to create the nested ‘mountain’ effect. -
Carve the Lower Pattern:
Below the horizontal bands, carve a row of inverted triangles pointing downward. For the solid dark triangles shown in the photo, carve out the entire interior shape rather than just outlining it. -
Inlay the Underglaze:
generously paint black or dark brown underglaze over the entire carved area. Ensure the underglaze fills every incised line and recessed area completely. -
Dry and Reveal:
Let the underglaze dry until it loses its sheen. Then, gently wipe the surface with a clean, slightly damp sponge to remove the excess underglaze on top of the wax, revealing the crisp inlaid lines. -
Bisque Fire:
Allow the mug to dry completely to the bone-dry stage, then load it into the kiln for a bisque firing to chemically harden the clay.
Step 3: Glazing and Finishing
-
Wax the Pattern:
Apply wax resist carefully over the exposed raw clay section at the base and the handle’s lower half if you want to maintain the two-tone effect. -
Dip in Glaze:
Dip the mug into a speckled cream or matte white glaze. The wax will prevent the glaze from adhering to the raw clay base, but the glaze should cover the Mishima pattern. -
Clean the Foot:
Wipe the bottom of the foot ring perfectly clean with a sponge to prevent the pot from sticking to the kiln shelf. -
Glaze Fire:
Fire the mug to the appropriate temperature for your clay body (likely Cone 6 or Cone 10). The glaze will melt over the inlay, sealing the design beneath a smooth surface.
Level Up: Color Pop
Instead of black, use a bright teal or cobalt blue underglaze for the inlay. The pop of color against the toasted clay creates a vibrant modern contrast
Now you have a beautifully tactile mug ready for your morning brew
Night-Sky Splatter or Starry Specks on a Dark Base

Transform a plain ceramic bisque mug into a stunning piece of functional art that captures the deep, mysterious beauty of a starry night skscape. This project uses reactive glazes and a simple splatter technique to create a cosmic effect where no two mugs will ever look exactly the same.
Step-by-Step Tutorial
Materials
- Bisque-fired ceramic mug (ready to glaze)
- Dark Midnight Blue reactive glaze
- White or Cream glaze (for speckling)
- Bronze or Metallic Brown glaze (for the rim)
- Fan brush
- Small round detail brush
- Stiff-bristled toothbrush or splatter tool
- Clean sponge and water
- Wax resist emulsion
- Kiln (or access to a pottery studio for firing)
Step 1: Preparation and Base Coat
-
Clean the bisque:
Begin by wiping down your bisque mug with a slightly damp sponge. This removes any dust that might prevent the glaze from adhering properly. -
Apply wax resist:
Carefully paint a layer of wax resist on the very bottom of the mug and slightly up the foot ring. This crucial step prevents glaze from fusing your mug to the kiln shelf during firing. -
Stir the glaze:
Vigorously stir your Dark Midnight Blue glaze. Reactive glazes settle quickly, so you need to ensure all the chemical elements are well-integrated for that deep color. -
Pour the interior:
Pour a generous amount of the blue glaze inside the mug. Rotate the mug slowly to coat the entire inner surface, then pour the excess back into the container. -
Clean the rim:
Wipe away any drips on the rim immediately with a sponge to keep the top edge clean for later detailing. -
Glaze the exterior:
Using a fan brush, apply the first coat of Dark Midnight Blue to the outside of the mug and the handle. Use long, smooth strokes to ensure even coverage. -
Layering up:
Let the first coat dry until it loses its sheen, then apply a second and finally a third coat. Three coats usually provide that deep, opaque navy color seen in the photo.
Blob Control
If you accidentally splatter a giant blob of white glaze, don’t wipe it! Let it dry for a minute, then gently scratch it off with a needle tool and re-flick that spot.
Step 2: Creating the Galaxy
-
Prepare the speckle:
Dilute a small amount of White or Cream glaze with a few drops of water. You want a consistency slightly thinner than heavy cream so it flicks easily. -
Test your splatter:
Dip a stiff toothbrush into the thinned white glaze. Test the splatter pattern on a piece of paper first by running your thumb over the bristles. -
Apply the stars:
Hold the toothbrush about 6 inches from the mug. Flick the bristles to spray fine white droplets over the dark blue base. I prefer to rotate the mug constantly to get random, natural-looking distribution. -
Vary the density:
For a more realistic galaxy look, concentrate heavier speckles in one or two areas to create ‘clusters’ of stars, leaving other areas sparse. -
Check the handle:
Don’t forget to add a few specks to the outer curve of the handle so the design feels continuous.
Layer for Depth
For 3D depth, splatter a tiny bit of light blue glaze before the white. It creates distant ‘nebula’ gas clouds behind the bright stars.
Step 3: The Halo Rim and Firing
-
Select the rim color:
Shake your Bronze or Metallic Brown glaze well. This color frames the ‘sky’ and adds a warm, earthy contrast. -
Paint the edge:
Using a small round detail brush, carefully paint a strip of bronze glaze along the very top rim of the cup. -
Let it flow:
Allow the bronze glaze to slightly overlap the blue on both the inside and outside edge. During firing, this will create that beautiful melted transition. -
Final cleanup:
Do one last check of the bottom foot. If any blue or bronze glaze has dripped onto the waxed area, wipe it off cleanly with a damp sponge. -
Dry completely:
Allow the mug to dry for at least 24 hours. The glaze should be completely dry to the touch and room temperature. -
Fire the piece:
Load the mug into the kiln. Fire it to Cone 6 (or the specific temperature recommended by your chosen glaze manufacturer). -
Cool down:
Allow the kiln to cool completely before opening. This slow cooling helps set the glossy finish and prevents thermal shock.
Once cooled, your cosmic mug is ready to hold your morning brew and start your day with a little bit of stardust.
Peekaboo Cutout Window With a Glazed Interior Surprise
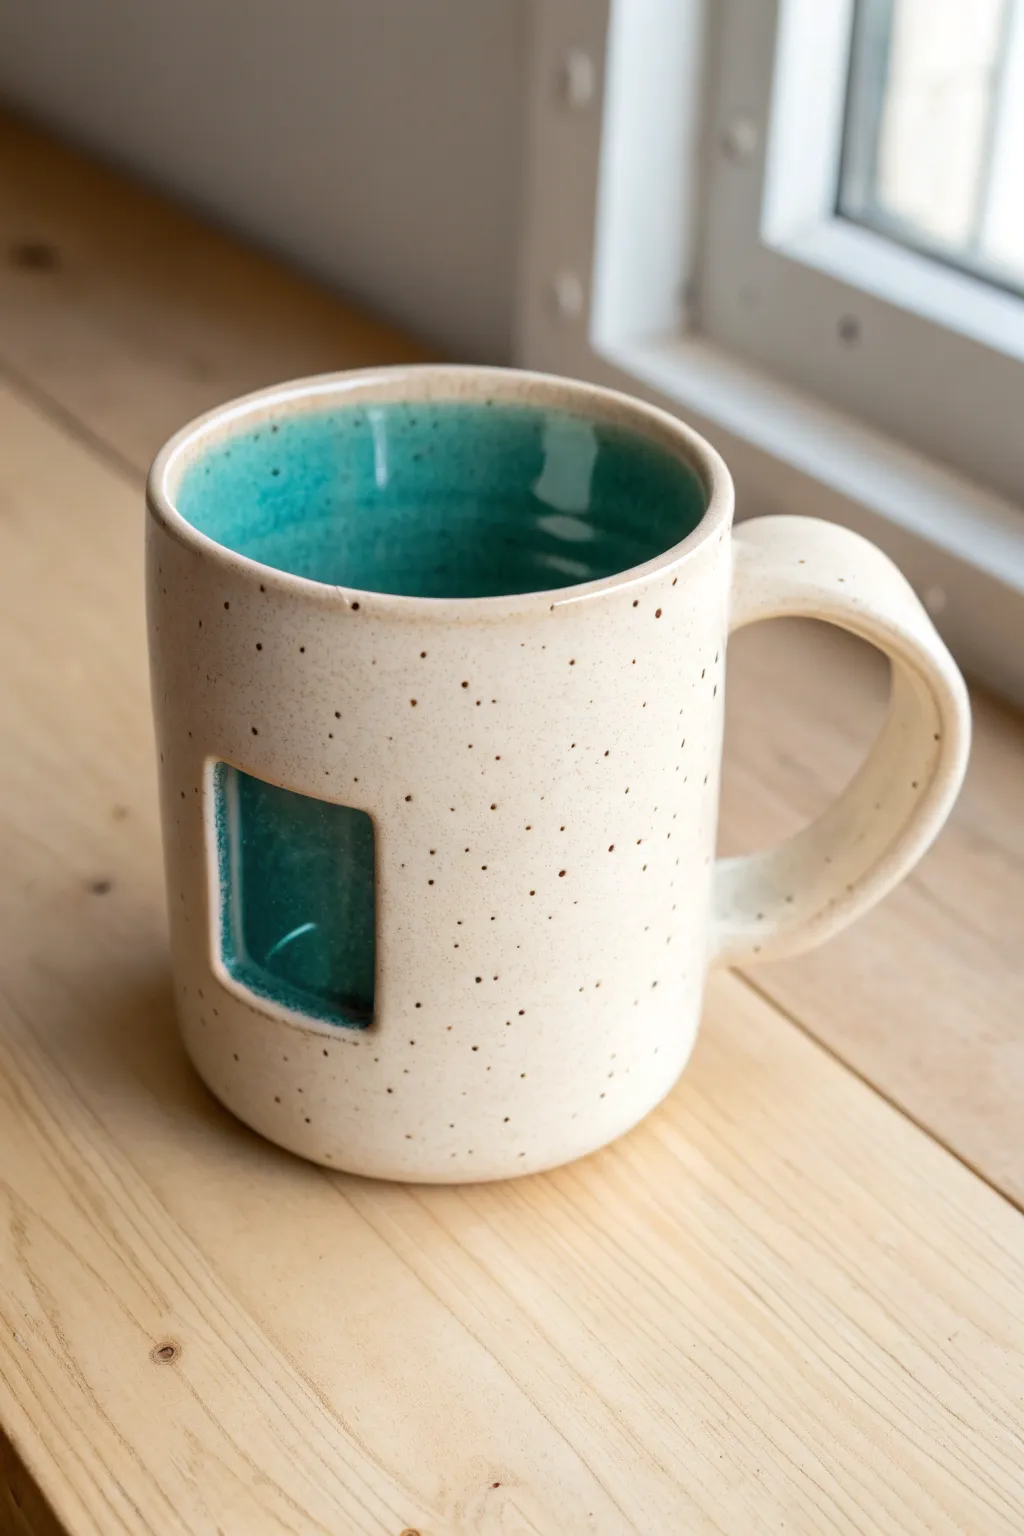
Add a touch of architectural whimsy to your morning brew with this double-walled ceramic mug. The creamy, speckled exterior reveals a delightful pop of teal glaze through a recessed window, creating a playful visual contrast.
How-To Guide
Materials
- Stoneware clay body (speckled or buff)
- Pottery wheel
- Throwing tools (sponge, rib, wire cutter)
- Trimming tools
- Needle tool
- Fettling knife
- Rectangular cookie cutter (optional)
- Small geometric trimming loop tool
- Modeling tool or wooden rib
- Teal or turquoise glaze (cone 6)
- Oatmeal/speckled white glaze (cone 6)
- Small paintbrush for wax resist
- Wax resist emulsion
Step 1: Throwing and Shaping
-
Prepare the Clay:
Start by wedging about 1.5 lbs of speckled stoneware clay to remove any air bubbles. Center the clay firmly on your wheel head. -
Throw a Thick Cylinder:
Open the clay and pull up the walls. For this design, you need to leave the walls significantly thicker than a standard mug—aim for about 1/4 inch to 3/8 inch thickness. This extra width is crucial for carving the window later without breaking through. -
Refine the Shape:
Once you have your height, use a metal rib to smooth the outside and ensure the walls are straight and vertical. Compress the rim with a chamois or your thumb. -
Dry to Leather Hard:
Wire the cylinder off the wheel and set it aside. Wait until the clay reaches a leather-hard state; it should be firm enough to hold its shape perfectly when handled but still soft enough to carve easily.
Wall Thickness
Don’t trim the walls too thin! You need substantial thickness (approx 8mm) to carve out the 4mm deep window without weakening the structure.
Step 2: Carving the Window
-
Mark the Window Placement:
Decide on the placement of your window. Using a needle tool, lightly sketch a rectangle on the side of the mug. Alternatively, lightly press a rectangular cutter against the surface as a guide. -
Initial Excavation:
Using a small loop tool, begin removing clay from inside your marked rectangle. Work slowly. You are creating a niche, not a hole. -
Define the Depth:
Carve deeper until the window recess is about halfway through the wall’s thickness. Be careful not to go too deep and puncture the inner wall. -
Refine the Edges:
Switch to a fine ribbon tool or fettling knife to sharpen the corners of the rectangle. The walls of the ‘window’ should be perpendicular to the mug face. -
Smooth the Recess:
Use a damp sponge or a soft rubber rib to smooth the floor and walls of the recessed window, removing any tool marks or grog that might have been dragged up.
Multiple Windows
Try carving three smaller square windows vertically stacked, or create a ‘grid’ look with four tiny windows for a modern architectural vibe.
Step 3: Handle and Finishing
-
Trim the Foot:
Place the mug upside down on the wheel (secured with lugs) and trim the bottom to create a neat foot ring. -
Pull a Handle:
Pull a generous, C-shaped handle from a separate piece of clay. Let it stiffen slightly until it can hold an arch. -
Attach the Handle:
Score and slip the attachment points on both the mug and the handle. Press firmly to join, placing the handle roughly 90 degrees offset from your window cutout. -
Slow Drying:
Cover the mug loosely with plastic to let it dry slowly and evenly, preventing the handle or the thin window area from cracking. Once bone dry, bisque fire the piece.
Step 4: Glazing
-
Clean and Prep:
After bisque firing, wipe the mug down with a damp sponge to remove dust. Wax the foot ring. -
Interior Glazing:
Pour your bright teal glaze into the inside of the mug, swirl it to coat completely, and pour out the excess. -
Glazing the Window:
Carefully paint the same teal glaze into the recessed window niche. I find a small, soft brush works best here to get into the corners without getting glaze on the ‘frame’. -
Wax the Window:
Once the teal glaze in the window is dry, carefully apply wax resist over the teal area. This protects it from the exterior glaze color. -
Exterior Glazing:
Dip the entire mug quickly into your oatmeal/speckled white glaze. The wax will repel the glaze from the foot and the teal window. -
Cleanup:
Use a sponge to wipe away any stray droplets of oatmeal glaze that might be sitting specifically on top of the waxed window area. -
Final Fire:
Fire the mug to cone 6 (or your clay’s maturation temperature).
Now handle your finished mug with pride, knowing the secret window was carved by your own hands