A good coffee mug isn’t just something you drink from—it’s a tiny daily ritual you get to hold in your hands. Here are my favorite coffee mug design ideas, starting with the classics and moving into the fun, weird, studio-day experiments I can’t stop making.
Simple Hand-Lettered Quote Mug

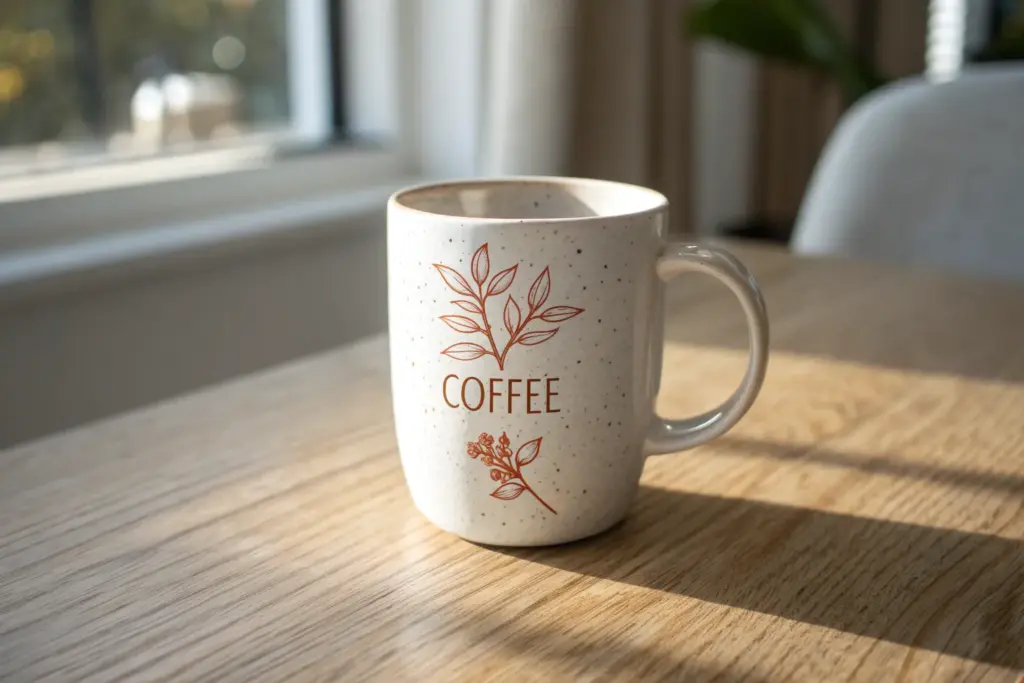
Bring a cozy, artisanal coffee shop vibe into your home with this simple yet elegant mug makeover. Using a standard ceramic mug as your canvas, you’ll learn to create a faux-speckled glaze effect and master delicate hand-lettering for a custom piece that looks professionally fired.
Step-by-Step Tutorial
Materials
- Plain white or cream ceramic mug
- Ceramic paint (Cream/Off-white)
- Ceramic paint (Chocolate Brown)
- Ceramic paint (Black or Dark Grey)
- Medium flat paintbrush
- Old toothbrush or stiff bristle brush
- Fine liner paintbrush (size 0 or 00)
- Rubbing alcohol and cotton pads
- Pencil
- Oven (for curing)
Step 1: Preparation & Base Coat
-
Clean surface:
Begin by thoroughly cleaning your mug with soap and warm water to remove any grease or oils. Dry it completely with a lint-free towel. -
Degrease with alcohol:
Wipe the entire outer surface of the mug with a cotton pad soaked in rubbing alcohol. This crucial step ensures the paint adheres properly to the glossy glaze. -
Mix base color:
If your mug is stark white and you want that warm, creamy tone from the photo, mix a little bit of brown or yellow ochre into your white ceramic paint to create an off-white, oatmeal shade. -
Apply base layer:
Using a medium flat brush, apply a coat of your creamy paint over the exterior. Keep your brushstrokes somewhat loose to mimic a hand-dipped pottery glaze feel. -
Dry and repeat:
Let the first coat dry for about an hour. Apply a second coat if the coverage looks streaky, aiming for a smooth, opaque finish.
Paint Bead Control
If you get big blobs while splattering the speckles, gently dab them with a dry paper towel corner immediately to lift the excess paint without smearing.
Step 2: Creating the Speckle Effect
-
Prepare splatter paint:
Mix a small amount of black or dark grey ceramic paint with a tiny drop of water to thin it slightly. It needs to be fluid enough to flick easily. -
Load the brush:
Dip the tips of an old toothbrush or stiff bristle brush into the thinned dark paint. Test the splatter on a piece of paper first to control the density. -
Flick the paint:
Hold the brush near the mug and run your thumb across the bristles to flick tiny droplets onto the surface. Rotate the mug as you go to ensure even coverage. -
Add variety:
Vary your distance from the mug slightly—closer for larger speckles, further away for a fine mist. This randomness creates that authentic stoneware look. -
Let it set:
Allow the speckles to dry completely, which usually takes at least 2 hours, before attempting to write over them.
Lettering Stability
Rest your pinky finger against the mug surface while painting letters (wait for the base to be totally dry first!) to stabilize your hand and prevent shakes.
Step 3: Lettering & Finishing
-
Sketch the word:
Lightly sketch the word ‘coffee’ onto the mug using a soft pencil. Focus on a relaxed, cursive style with slightly elongated connectors between letters. -
Prepare brown paint:
Pour out a small amount of chocolate brown ceramic paint. If it feels too thick, thin it with a barely-there drop of water for smoother lines. -
Start lettering:
Dip your fine liner brush into the brown paint. I usually start with the ‘c’, using light pressure on the upstrokes and slightly heavier pressure on the downstrokes. -
Connect the letters:
Carefully trace your pencil lines, reloading your brush often to keep the paint flow consistent. Take your time on the loops of the ‘f’s to keep them open and airy. -
Refine the tails:
Add a small flourish to the start of the ‘c’ and the end of the final ‘e’, ensuring the line tapers off gently rather than ending abruptly. -
Double-check density:
Look closely at your lettering. If the brown looks transparent in spots, carefully go over just those areas with a second layer of paint once the first is dry. -
Clean up mistakes:
If you wobble, quickly wipe the mistake away with a damp Q-tip or wait for it to dry and scratch it off gently with a toothpick. -
Cure the paint:
Follow the instructions on your specific ceramic paint bottle for curing. Typically, this involves placing the mug in a cool oven, heating it to 350°F (175°C), baking for 30 minutes, and letting it cool inside the oven.
Once baked and cooled, your custom mug is ready to hold your favorite morning brew and adds a lovely personal touch to your kitchen cabinet


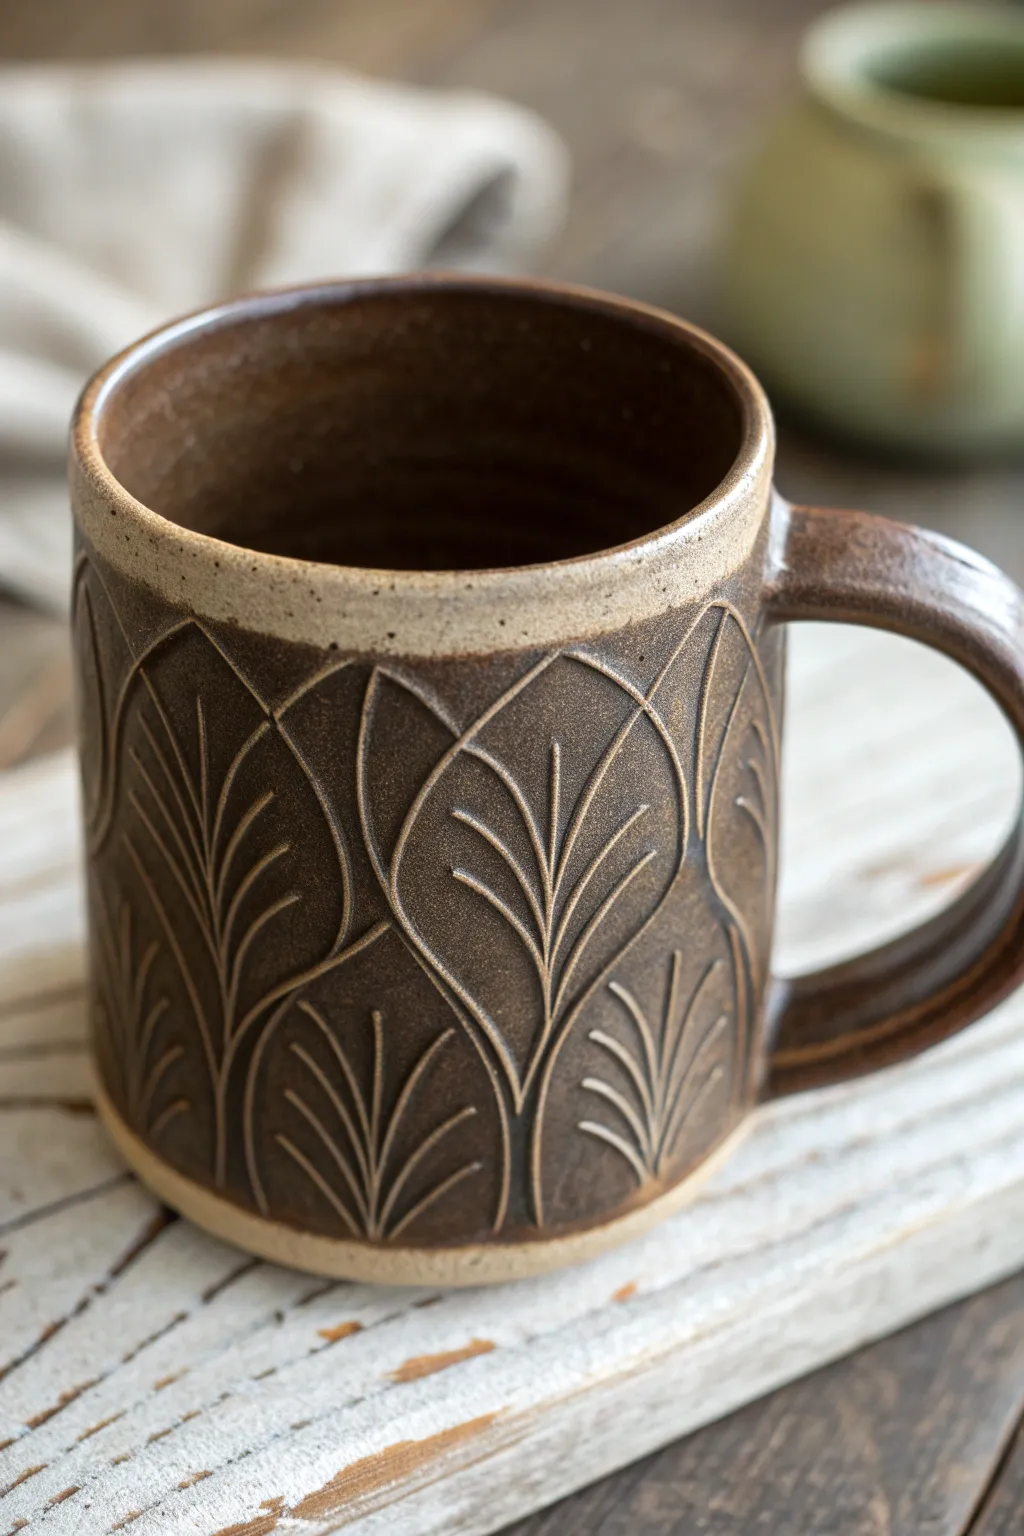
Monogram Medallion Stamp Design
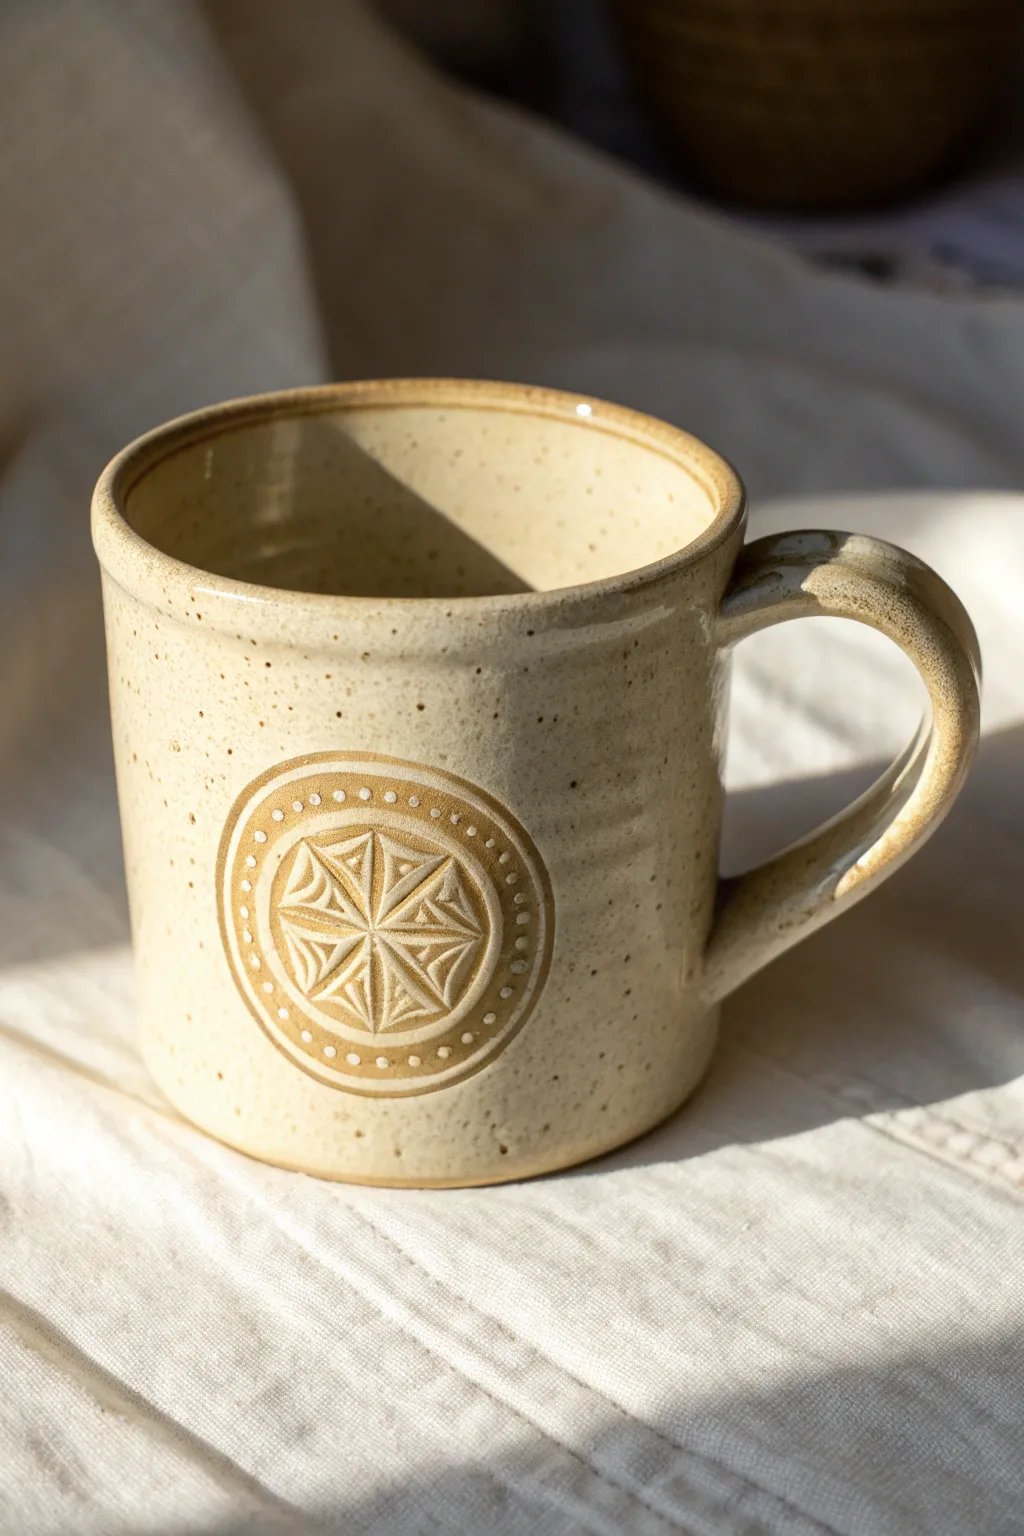
This rustic ceramic mug features a beautifully textured, raw clay medallion that stands out against a creamy speckled glaze. The design combines the tactile warmth of wheel-thrown pottery with a precise, stamped focal point for a truly artisanal finish.
Detailed Instructions
Materials
- Stoneware clay (speckled or buff)
- Pottery wheel
- Rib tool
- Wire cutter
- Sponge
- Trimming tools
- Geometric texture stamp (wood or bisque)
- Small circular cutter (slightly larger than stamp)
- Scoring tool or needle tool
- Slip
- Creamy speckled glaze
- Wax resist
- Kiln
Step 1: Throwing the Body
-
Center the clay:
Start with a well-wedged ball of speckled stoneware clay. Secure it to your wheel head and center it thoroughly, ensuring there is no wobble before you open the clay. -
Open and pull:
Open the clay to create the floor of the mug. Establish a consistent walls thickness as you pull the cylinder up. Aim for a simple, straight-sided cylindrical shape with a slightly defined rim. -
Refine the shape:
Use a rib tool to smooth the exterior walls, removing throwing rings if you want a cleaner look. Compress the rim gently with a sponge to ensure it is smooth for drinking. -
Cut and dry:
Wire the mug off the bat and set it aside to dry until it reaches a leather-hard state. This stage is crucial—it needs to be firm enough to handle but soft enough to accept the attachment.
Stamp Sticking?
If clay sticks to your stamp, dust the clay surface lightly with cornstarch before pressing. The cornstarch burns out in the kiln.
Step 2: Creating the Medallion
-
Roll a slab:
Take a small scrap of the same clay body and roll it into a thin slab, approximately 1/4 inch thick. Make sure the surface is smooth and free of canvas texture if possible. -
Stamp the design:
Firmly press your geometric stamp into the clay slab. Apply even pressure to ensure all the fine details, like the dotted border and the central star, transfer cleanly. -
Cut the medallion:
Center your circular cutter over the stamped impression and press down to cut out the medallion. Clean up any rough edges on the circle with your finger or a soft sponge. -
Curve the back:
Gently curve the medallion against a surface that mimics the curve of your mug to pre-shape it. This helps prevent the edges from pulling away later.
Step 3: Assembly and Handling
-
Score the surfaces:
Hold the medallion up to the leather-hard mug to decide placement. Use a needle tool to score both the back of the medallion and the spot on the mug where it will sit. -
Apply slip:
Dab a generous amount of slip onto the scored area of the mug. The slip acts as the glue for your ceramic join. -
Attach the medallion:
Press the medallion firmly onto the mug body. Work from the center outward to push out any trapped air bubbles, ensuring the edges are completely sealed. -
Pull a handle:
While the medallion sets, pull a strap handle from a lug of clay. I find that wetting my hand frequently helps create a smooth, tapered form that’s comfortable to hold. -
Attach the handle:
Score and slip the attachment points opposite the medallion. Attach the top of the handle near the rim and the bottom curve further down, ensuring it aligns straight vertically. -
Slow drying:
Cover the mug loosely with plastic to let the moisture content equalize effectively. Dry slowly to prevent cracking around the added medallion and handle.
Clean Medallion Edges
After attaching the medallion, run a tiny damp paintbrush around the seam. This smooths the transition and removes excess slip for a finish.
Step 4: Glazing and Firing
-
Bisque fire:
Once bone dry, load the mug into the kiln for a bisque firing (usually to Cone 04 or 06). This prepares the piece for glazing. -
Wax the medallion:
Apply wax resist carefully over the entire medallion design. This will keep the raw clay exposed, creating that beautiful contrast between the stamped texture and the smooth glaze. -
Dip in glaze:
Dip the mug into a bucket of creamy, speckled glaze. Hold it by the foot (or use tongs) and dip for just a few seconds to get an even coat without it getting too thick. -
Clean up:
Wipe any beads of glaze off the waxed medallion with a damp sponge. The wax should repel most of it, but a quick wipe ensures crisp lines. -
Final fire:
Fire the mug to maturity (Cone 5, 6, or 10 depending on your clay). The heat will melt the glaze around your island of raw clay texture.
Once the kiln cools, you will have a stunning custom mug ready for your morning coffee


Two-Tone Dip Glaze Mug
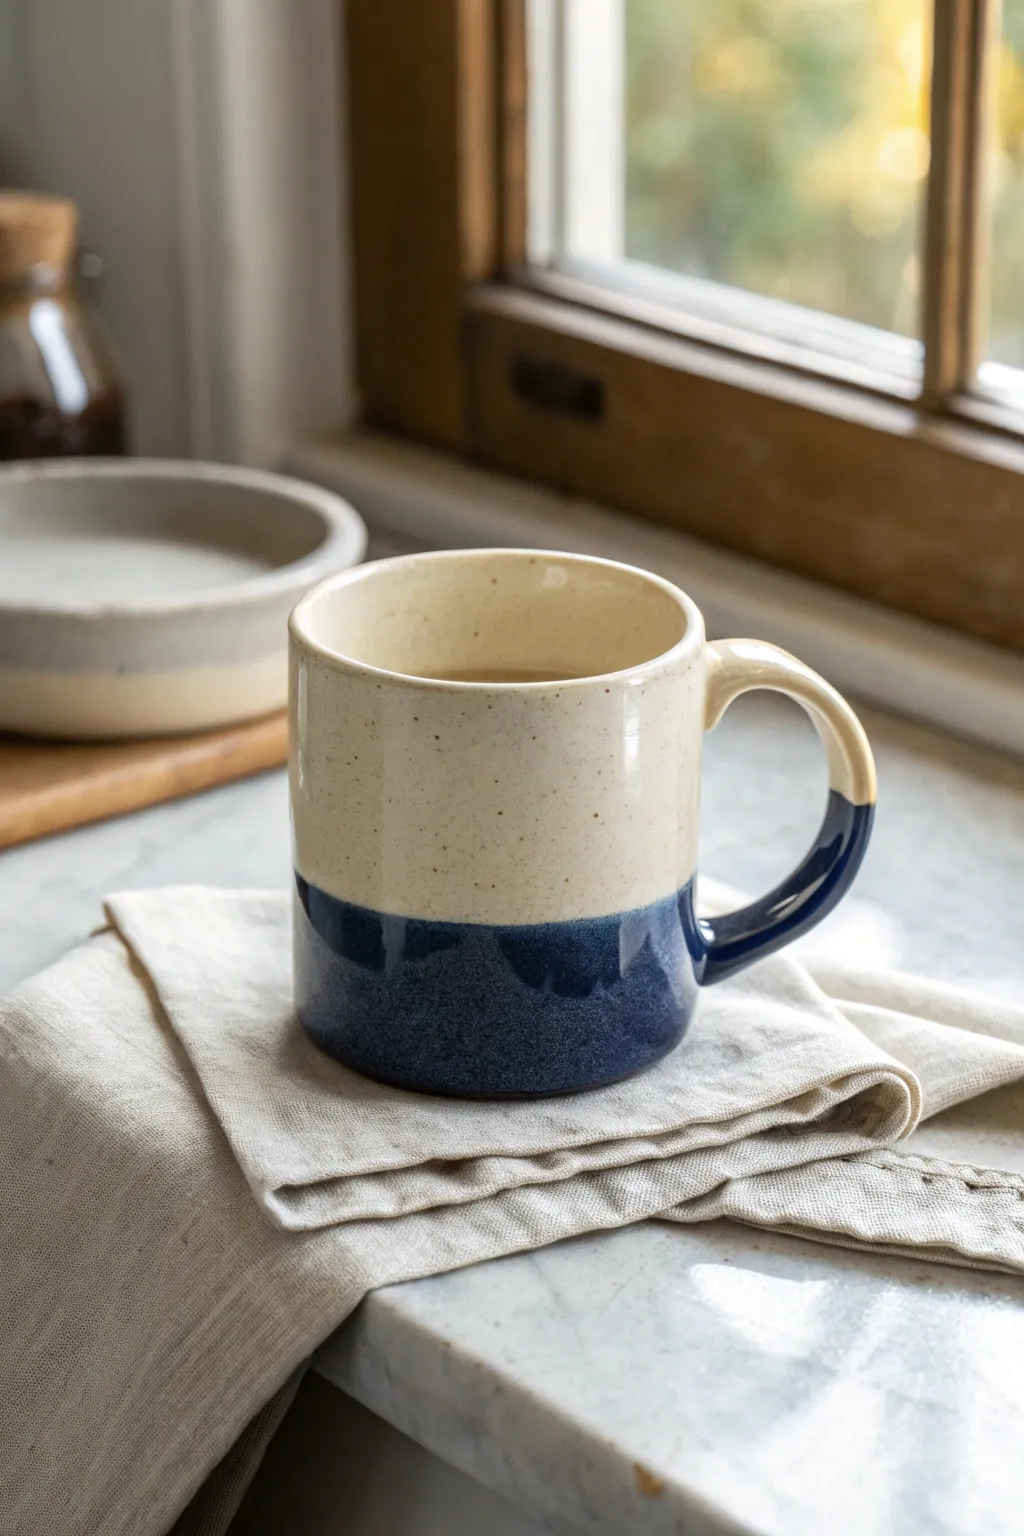
Achieve a modern farmhouse look with this elegant dipping technique that pairs a speckled cream glaze with a deep navy base. The beauty of this project lies in the organic, imperfect line where the two glazes meet, creating a stunning piece that feels both rustic and refined.
Step-by-Step
Materials
- Bisque-fired ceramic mug (stoneware preferred)
- Speckled cream or oatmeal stoneware glaze
- Deep navy blue dipping glaze
- Wax resist emulsion
- Sponge
- Large glaze bucket or container (deep enough to submerge mug)
- Smaller glaze container (for the dip)
- Small paintbrush
- Clean water
- Kiln (or access to a pottery studio)
Step 1: Preparation & First Glaze
-
Clean the bisque:
Start by gently wiping down your bisque-fired mug with a damp sponge to remove any dust or debris from handling. This ensures the glaze adheres perfectly to the clay body without crawling. -
Wax the foot:
Using a small brush, carefully apply wax resist to the very bottom foot of the mug. I like to bring the wax just about 2mm up the side to protect your kiln shelves from any running glaze. -
Mix the base glaze:
Stir your speckled cream glaze thoroughly. You want a consistency similar to heavy cream; if it’s too thick, the layer will be uneven, but too thin and the speckles won’t show through effectively. -
Pour the interior:
Pour the cream glaze inside the mug, filling it about half full. Rotate the mug slowly as you pour the glaze out to coat the entire interior surface evenly. -
Clean the rim:
If any drips formed on the outside rim while pouring the interior, wipe them away immediately with a damp sponge before they dry completely. -
Dip the exterior:
Holding the mug by the foot (or using dipping tongs if you prefer), submerge the entire mug into the cream glaze bucket. Count to three and lift it out in one smooth motion to avoid drip marks. -
Touch up:
Once the glaze is dry to the touch, gently rub out any finger marks near the foot or pinholes with a clean fingertip. Allow this base coat to dry completely for at least 6-8 hours, or overnight if possible.
Step 2: The Navy Dip
-
Prepare the second glaze:
Mix your navy blue glaze very well. Since this is an overlapping coat, the consistency should be slightly thinner than the base coat to prevent the combined layers from running. -
Test the depth:
Check the depth of your navy glaze container. You need enough liquid to submerge the bottom third of the mug without hitting the bottom of the container. -
Align the handle:
Decide where you want the navy line to cross the handle. In the example, the color cuts across the lower curve of the handle, creating a cohesive look. -
Execute the dip:
Hold the mug firmly by the rim (or upper body). Lower it straight down into the navy glaze, ensuring the liquid covers the bottom third and the lower attachment of the handle. -
Create the angle:
Hold it submerged for 3-4 seconds. If you want a perfectly straight line, hold still. For a slightly organic wave, you can gently tilt the mug before lifting it out vertically. -
Drip management:
Hold the mug upside down for a few seconds immediately after dipping to let excess blue glaze drip off away from the clean cream section. -
Clean the distinct line:
Inspect the overlap line. If the blue glaze dripped upward onto the cream section during handling, gently scrape it away with a fettling knife or clean with a damp brush for a crisp edge. -
Final foot cleaning:
Use a damp sponge to wipe the waxed foot again. Even with wax resist, little beads of glaze can sit on top; these must be removed to ensure the mug doesn’t stick to the kiln shelf.
Running Drips?
If the overlapping section runs too much during firing, your second dip was likely too thick. Next time, add a splash of water to thin the navy glaze slightly before dipping.
Step 3: Firing
-
Final drying:
Allow the mug to dry completely for 24 hours. The double layer of glaze at the bottom retains moisture longer, and firing wet glaze can cause boiling or pinholing. -
Fire the kiln:
Load the mug into the kiln and fire to the top temperature required by your specific stoneware clay and glaze combination (typically Cone 5/6 for these earthy results).
Use Tape for Precision
For a razor-sharp, geometric line instead of an organic one, apply automotive masking tape over the fully dry cream base layer before dipping into the blue glaze.
Enjoy your morning coffee in a mug that perfectly balances modern design with handcrafted charm


Colored Interior Surprise
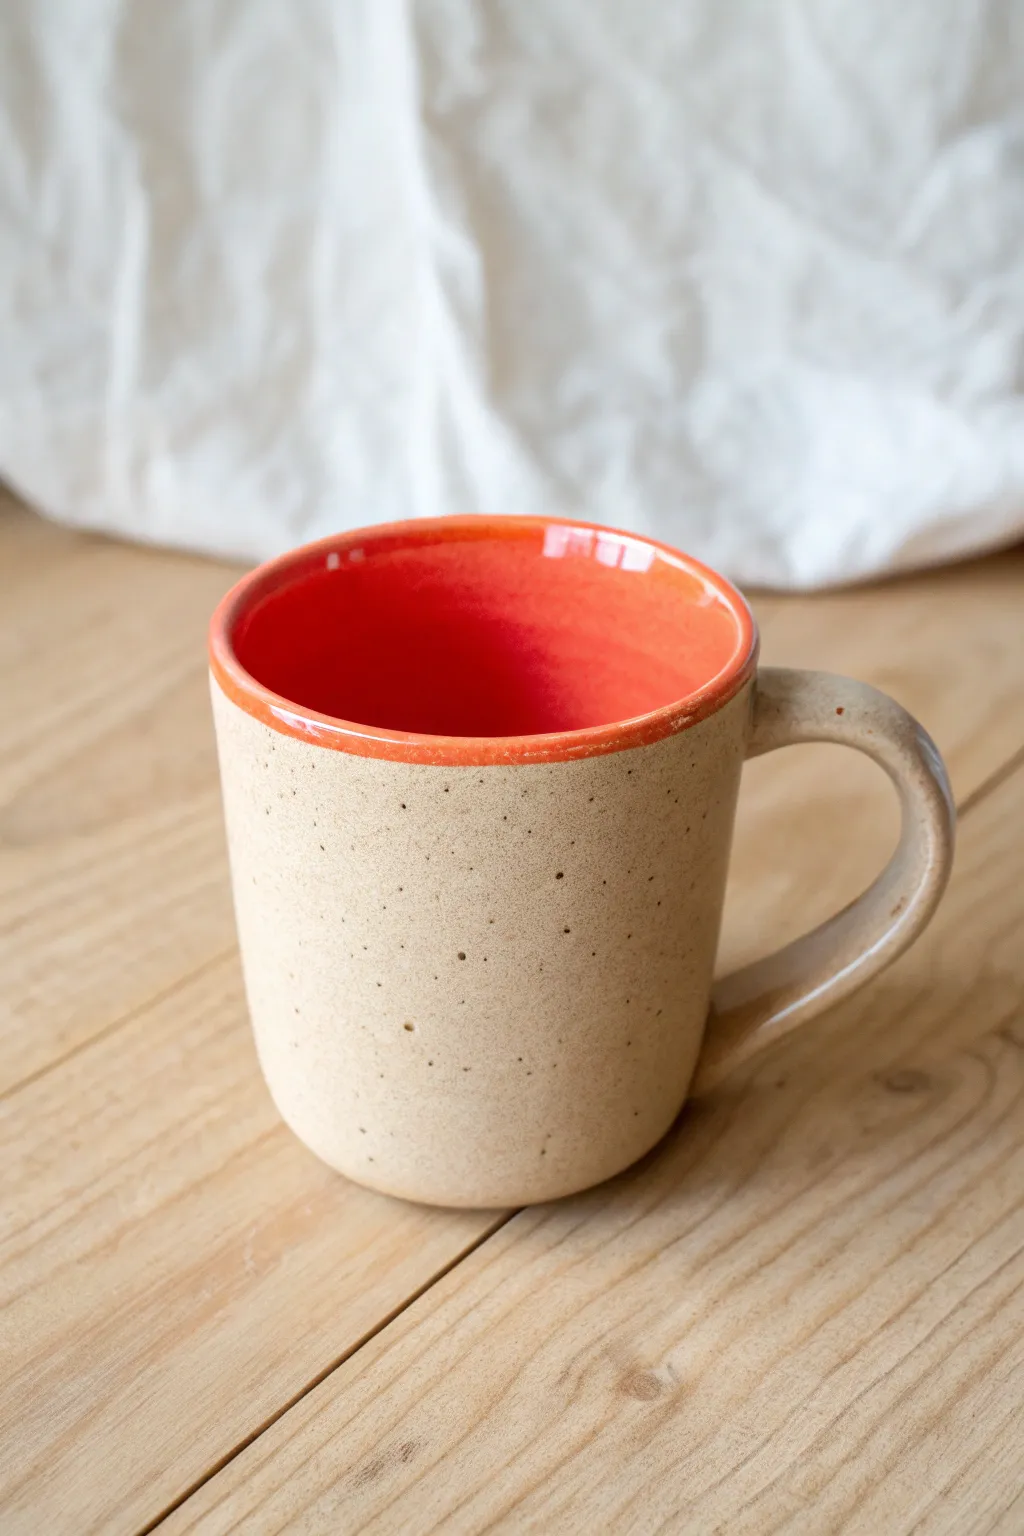
This project combines the rustic charm of speckled tan stoneware with a vibrant, glossy pop of color hidden inside. It’s a delightful tactile experience that surprises you with every sip, blending earthy exterior textures with a warm, energetic interior glaze.
Step-by-Step Tutorial
Materials
- Speckled buff stoneware clay (cone 6)
- Pottery wheel
- Throwing sponge
- Needle tool
- Wire cutter
- Ribs (wooden and metal)
- Trimming tools
- Underglaze (bright orange/red)
- Clear glossy glaze
- Matte or satin oatmeal/tan glaze (optional, if clay isn’t naturally sandy)
- Kiln access
Step 1: Throwing and Shaping
-
Center the clay:
Start by wedging about 1 to 1.5 pounds of speckled buff clay to remove air bubbles. Secure it to your wheel head and use wet hands to center the clay, pushing it up into a cone and back down into a puck. -
Open the vessel:
Press your thumbs into the center of the spinning puck to create the floor. I like to keep the floor slightly thicker than usual to allow for a nice trimming foot later. -
Pull the walls:
Using a steady pull, bring the clay walls up into a cylinder. Aim for straight, vertical walls rather than a tapered bowl shape, keeping the thickness consistent from bottom to top. -
Refine the shape:
Use a metal rib on the exterior while supporting the interior with your hand to smooth out throwing lines and compress the clay particles. This creates that clean, modern silhouette. -
Form the rim:
Carefully compress the rim with a piece of chamois or your sponge. Round it off gently so it will be comfortable to drink from. -
Wire off:
Run a wire cutter underneath the base to separate the mug from the wheel head, then set it aside on a ware board to dry to a leather-hard state.
Uneven Glaze Coat?
If the interior glaze looks streaky, thin it slightly with water. Pour it in, count to three to let the clay absorb it, then pour out for better coverage.
Step 2: Trimming and Handling
-
Trim the foot:
Once leather hard, flip the mug over and center it on the wheel. Trim away excess clay from the bottom to create a defined foot ring, mirroring the cylindrical aesthetic of the body. -
Pull a handle:
Take a small nugget of fresh clay and pull a strap handle. Shape it into a ‘C’ or ear shape that comfortably fits two or three fingers. -
Attach the handle:
Score and slip the attachment points on both the mug body and handle. Press the handle firmly onto the mug, smoothing the joints with a wooden tool until the seam is invisible. -
Bisque fire:
Allow the mug to dry completely, which may take several days depending on humidity. Load it into the kiln for a bisque firing to cone 04.
Step 3: Glazing the Surprise
-
Wax the foot:
Apply wax resist to the bottom foot ring to prevent glaze from sticking to the kiln shelf. -
Pour the interior color:
Mix your bright orange-red glaze thoroughly. Pour a generous amount into the mug, swirl it quickly to coat the entire interior surface up to the rim, and pour the excess back into your bucket. -
Clean the rim:
Immediately wipe any drips off the exterior rim with a damp sponge. You want the interior glaze to come just over the lip edge to create that thin orange ring visible from the outside. -
Glaze the exterior:
For the outside, you can either leave the raw speckled clay bare if it vitrifies nicely, or dip the exterior into a clear matte glaze. Stop the dip just below the rim so the orange interior liner glaze isn’t overlapped awkwardly. -
Check the rim interaction:
Ensure the transition at the rim is clean. The orange interior glaze should -
Glaze fire:
Load the glazed mug into the kiln for the final glaze firing, typically to cone 6 for stoneware. Ensure it doesn’t touch other pots. -
Sand the bottom:
Once cooled and unloaded, check the bottom foot. If the raw clay feels rough, use fine-grit sandpaper wet-sanding to smooth it so it won’t scratch your table.
Go Graphic
Apply masking tape shapes or wax resist dots to the exterior before the final clear glaze dip to create geometric patterns revealing raw clay.
Now brew your favorite roast and enjoy the secret splash of color every morning

The Complete Guide to Pottery Troubleshooting
Uncover the most common ceramic mistakes—from cracking clay to failed glazes—and learn how to fix them fast.
Speckled Clay With Clear Glaze

Embrace the natural beauty of clay with this minimalist mug design that lets the material speak for itself. By using a pre-speckled clay body and a simple clear glaze, you achieve a timeless, rustic aesthetic perfect for your morning brew.
Detailed Instructions
Materials
- Speckled stoneware clay (white or buff)
- Pottery wheel
- Throwing sponge
- Wire cutter
- Rib tool (wooden or metal)
- Pin tool
- Loop tool for trimming
- Clear gloss glaze (cone 5/6)
- Kiln
- Small bowl of water
- Paintbrush for glazing
Step 1: Throwing the Form
-
Center the clay:
Begin with about 1 pound of well-wedged speckled clay on the wheel head. Using medium-high speed and wet hands, apply steady pressure to center the clay into a smooth dome. -
Open the vessel:
Press your thumbs down into the center of the mound, leaving about a half-inch of clay at the bottom for the floor. Gently pull the opening outward to establish the interior width of your mug. -
Pull the walls:
Slow the wheel down slightly. Using a pincer grasp with one hand inside and one outside, gently pull the clay upward to create height. Aim for even wall thickness from bottom to top. -
Shape the profile:
This design features a fairly straight, cylindrical profile. Use a metal or wooden rib against the outside while supporting the inside to smooth the walls and refine the straight shape. I like to leave a very slight curve at the bottom for a softer look. -
Finish the lip:
Compress the rim slightly with a chamois or your sponge to make it smooth and rounded, which ensures comfortable sipping later. -
Cut off:
Run your wire cutter under the base of the mug to separate it from the bat, then set it aside to dry to a leather-hard state.
Uneven Specks?
If your specks aren’t showing through, your glaze application might be too thick. Try dipping for a shorter duration or adding a tiny bit more water to your glaze bucket
Step 2: Trimming and Handle
-
Trim the foot:
Once leather hard, center the mug upside down on the wheel. Use a loop tool to trim away excess weight from the bottom, creating a distinct foot ring. Carve a small notch at the very bottom edge to create the shadow line seen in the photo. -
Pull a handle:
Take a separate lug of wet clay and pull a strip for the handle using water and friction. Aim for a D-shaped cross-section that feels comfortable in the hand. -
Shape the handle:
Let the pulled handle stiffen slightly on a board until it holds its curve but is still flexible. Bend it into a generous loop shape. -
Attach the handle:
Score the attachment points on both the mug body and the handle ends. Apply slip, press the handle firmly onto the mug, and smooth the distinct seams with your thumb or a modeling tool. -
Dry slowly:
Cover the mug loosely with plastic to allow the handle and body to dry at the same rate. This prevents cracking at the connection points. Once bone dry, bisque fire the piece.
Level Up: Rim Dipping
Dip just the top rim into a reddish-brown or iron-rich glaze before the final firing. This creates a stronger, contrasting ‘toasted’ look at the lip while keeping the body minimal
Step 3: Glazing and Firing
-
Clean the bisque:
Wipe the bisque-fired mug with a damp sponge to remove any kiln dust, which helps the glaze adhere properly. -
Wax the foot:
Apply wax resist to the bottom foot ring and the lower 1/8 inch of the exterior wall. This ensures the raw clay body remains exposed near the base, a key distinctive feature of this style. -
Pour the interior:
Pour clear glaze inside the mug, roll it around to coat the entire interior surface, and pour out the excess quickly. -
Dip the exterior:
Holding the mug by the foot (or using glazing tongs), dip the exterior into the clear glaze. Stop just slightly above the waxed foot line to create a natural transition. -
Clean up:
Check the rim for drips. If the glaze is too thick on the lip, gently rub it down with a finger to ensure the brown clay rim will show through slightly after firing. -
Final Fire:
Load the mug into the kiln and glaze fire to cone 5 or 6 (depending on your specific clay and glaze recipe). The heat will make the natural specks in the clay pop through the transparent glaze.
Enjoy your handmade mug with a fresh cup of coffee, admiring how the simple glaze highlights the character of the earth
Hand-Painted Botanical Sprigs
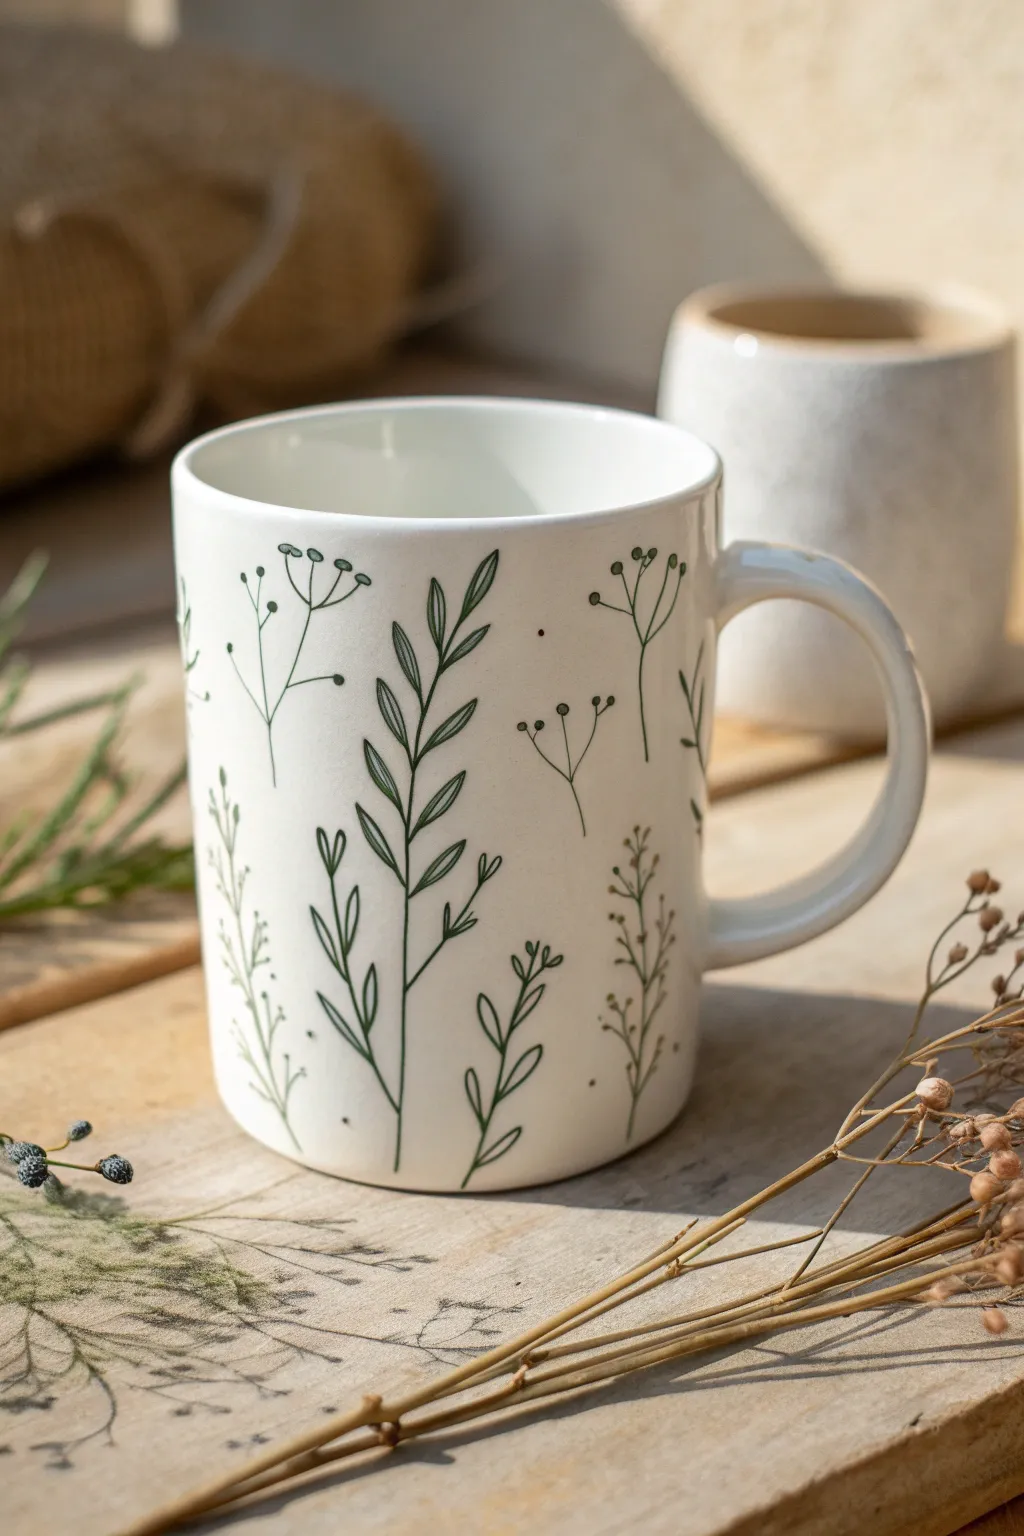
Transform a plain white mug into a garden-inspired piece with these delicate, hand-painted botanical sprigs. This project uses fine lines and organic shapes to create a calm, nature-focused design that feels both modern and timeless.
How-To Guide
Materials
- Plain white ceramic mug (smooth surface)
- Pebeo Porcelaine 150 paint (in Olive Green or a deep Forest Green)
- Fine liner paintbrush (size 0 or 00)
- Rubbing alcohol
- Cotton pads or paper towel
- Pencil (optional)
- Small mixing palette or ceramic tile
- Oven (for curing)
Step 1: Preparation
-
Clean the Surface:
Before you begin, wipe the entire exterior of the mug with rubbing alcohol. This removes any oils or fingerprints that might prevent the paint from adhering properly. -
Prepare Your Paint:
Shake your porcelain paint bottle well. Squeeze a very small amount onto your palette; a little goes a long way with fine line work. -
Practice Makes Perfect:
If you’re nervous about freehanding, practice your sprig shapes on a piece of paper first to get a feel for the curvature of the stems.
Brush Control Pro Tip
For the finest lines, dilute your paint with just a tiny drop of water or matching thinner. This helps the paint flow smoothly off the brush without blobbing.
Step 2: Painting the Main Stems
-
Create a Central Stem:
Dip your fine liner brush into the paint, ensuring it’s not overloaded. Draw a single, slightly curved vertical line starting near the bottom of the mug and reaching about two-thirds up. -
Add Leafy Sprigs:
For the leafy variety shown in the center, paint small, pointed oval leaves extending upwards from the main stem. Keep the leaves alternating on the left and right sides. -
Form the Top Leaves:
Finish this sprig with a single leaf pointing straight up at the tip of the stem. -
Paint Berry Stems:
Move a few inches to the side to start a different variety. Paint a thin, branching stem structure that looks like little ‘Y’ shapes stacked on top of each other. -
Add Small Dots:
At the tip of each branch on this new stem, carefully dab the very tip of your brush to create small, round dots representing berries or buds.
Level Up: Gold Accents
After your green layer has dried (but before baking), add tiny metallic gold dots to the center of the berries or between leaves for a luxury finish.
Step 3: Adding Variety & Filler
-
Incorporate Fern-like Texture:
Create a third type of plant by painting a vertical line, then adding tiny, horizontal dashes or smaller leaves along the sides to mimic a fern or flowering weed. -
Vary the Heights:
As you work around the mug, make sure your plants are different heights. Some should start near the base, while others can ‘float’ slightly higher up. -
Mind the Spacing:
Leave generous white space between each botanical element. The charm of this design lies in its airy, uncluttered layout. -
Fixing Mistakes:
If you make a smudge, I find it easiest to wipe it away immediately with a damp cotton swab before the paint sets. -
Continuing the Pattern:
Rotate the mug and repeat your three or four botanical variations until you reach the handle area. -
Handle Details:
Paint a very small, simple sprig near the handle attachments if space allows, but keep the handle itself clean for a comfortable grip.
Step 4: Curing
-
Dry Time:
Let the mug sit undisturbed for at least 24 hours. The paint needs to be fully dry to the touch before baking. -
Bake to Set:
Place the mug in a cold oven. Set the temperature to 300°F (150°C) locally or according to your paint manufacturer’s specific instructions. -
The Banking Process:
Once the oven reaches temperature, bake for 35 minutes. Crucially, turn the oven off and let the mug cool down completely inside the oven to prevent cracking.
Enjoy your morning coffee knowing you are sipping from a completely unique piece of art


What Really Happens Inside the Kiln
Learn how time and temperature work together inside the kiln to transform clay into durable ceramic.
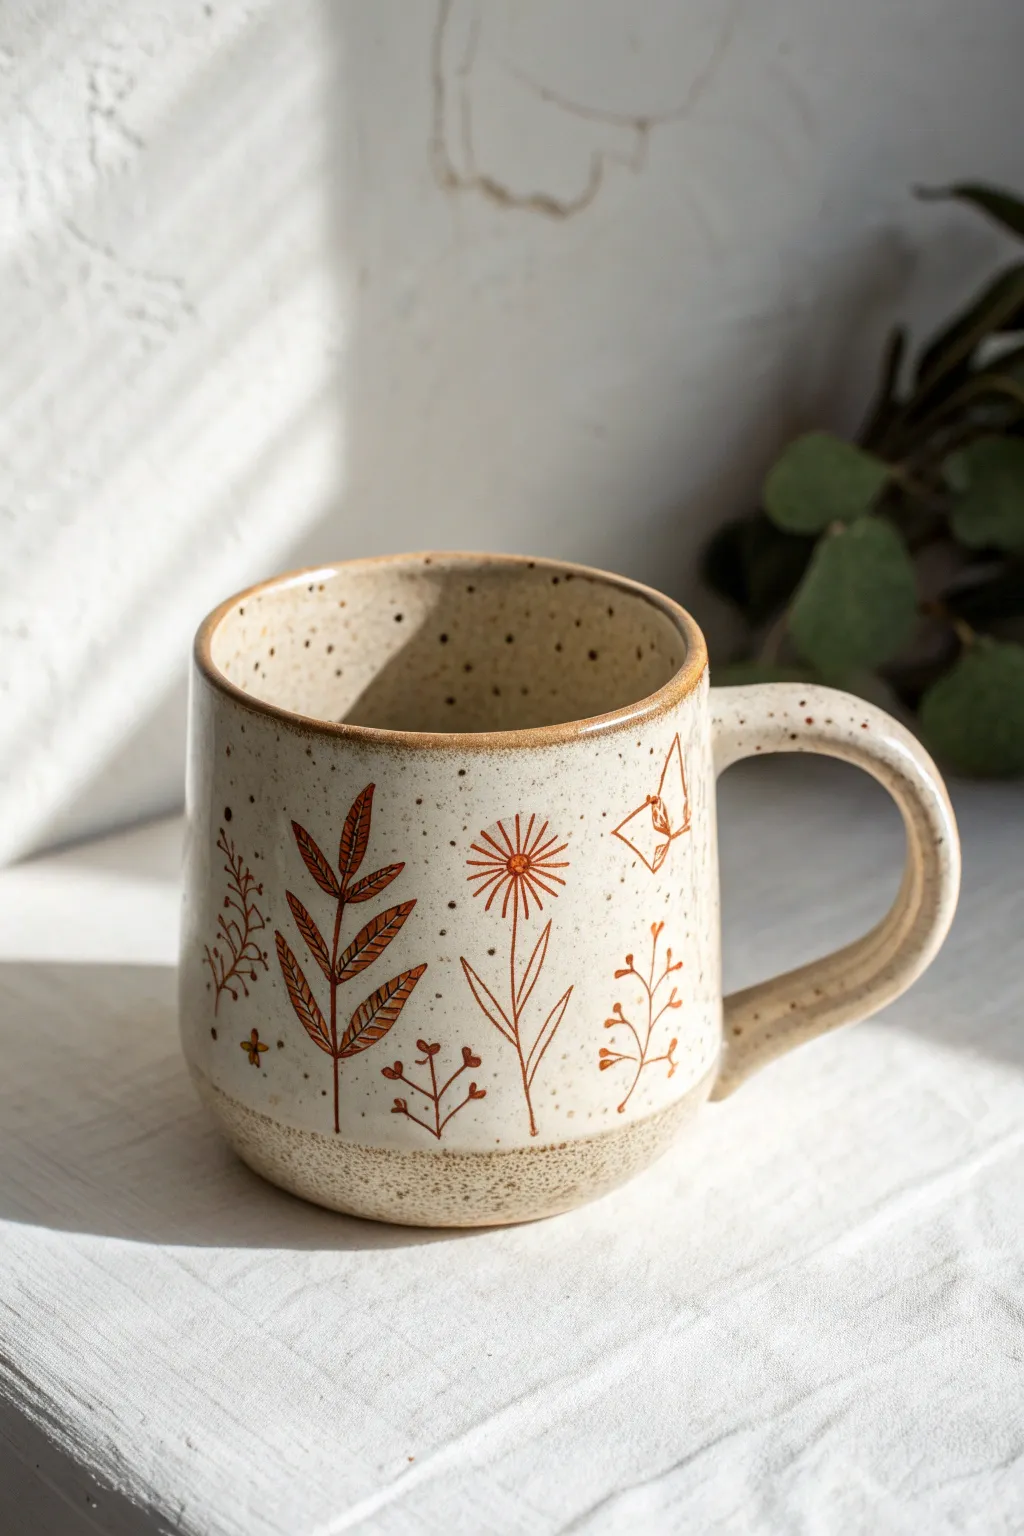
Wraparound Wildflower Meadow Band
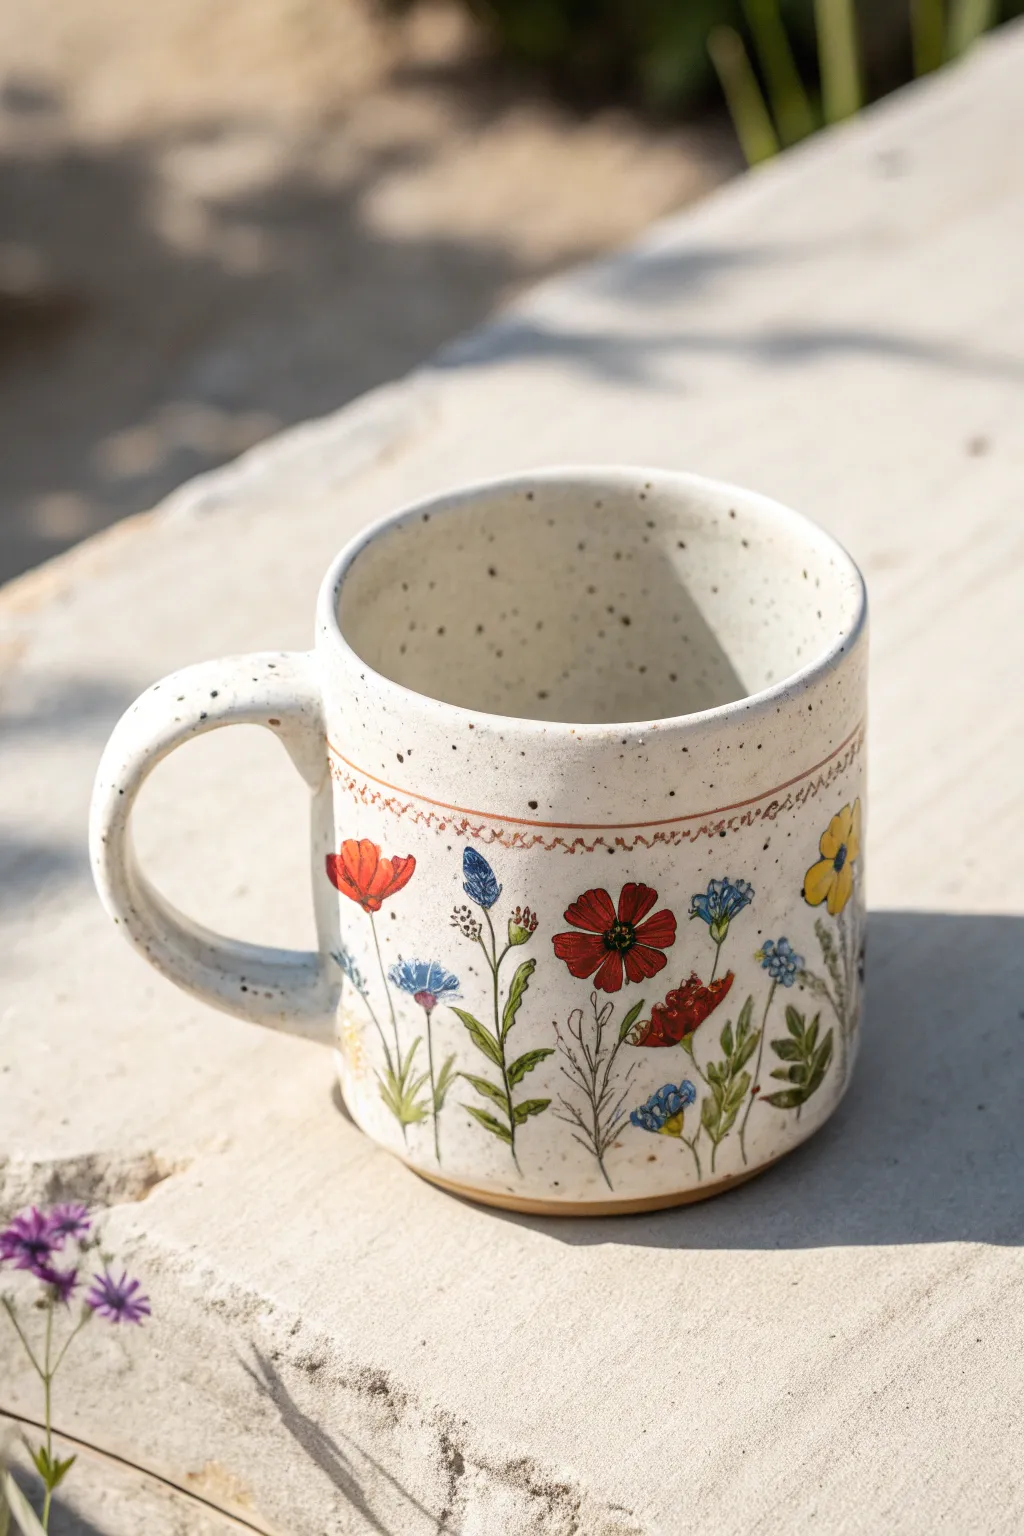
Bring the charm of a sun-drenched meadow to your morning routine with this hand-painted ceramic project. Featuring delicate botanical illustrations on a speckled cream base, this design captures the effortless beauty of wildflowers in a wraparound band.
Step-by-Step Guide
Materials
- Bisque-fired ceramic mug (wheel-thrown or cast)
- Speckled cream stoneware glaze (such as Mayco or Amaco)
- Underglazes in: Red, Yellow, Blue, Green, Brown, White
- Fine liner brush (size 00 or 000)
- Small round brush (size 2)
- Pencil
- Clear dipping glaze (if not using a glossy speckled glaze)
- Kiln access
Step 1: Base Preparation
-
Clean the bisque:
Start by wiping down your bisque-fired mug with a damp sponge to remove any dust or oils from handling. This ensures your glaze adheres perfectly. -
Apply base glaze:
Pour your speckled cream stoneware glaze into the interior of the mug, roll it around to cover every inch, and pour out the excess. Wipe the rim clean. -
Glaze the exterior:
Using a wide fan brush or by dipping, apply two to three even coats of the speckled cream glaze to the exterior of the mug. Allow each coat to dry until it’s no longer cool to the touch before adding the next. -
Pencil sketching:
Once the base glaze is fully dry, lightly sketch your wildflower composition directly onto the glaze surface using a pencil. Don’t worry about mistakes; the graphite will burn off completely in the kiln.
Smudged the glaze?
If you accidentally smudge the base powdery glaze while painting, dab a drop of water on the spot and gently smooth it back over with your fingertip or a soft brush.
Step 2: Painting the Meadow
-
Mix your greens:
On a palette, mix a few shades of green underglaze. I like to have a sap green, an olive tone, and a darker forest green to create depth in the foliage. -
Paint the stems:
Using your fine liner brush and the lighter olive green, paint thin, varying height vertical lines for the stems. Keep your hand loose to mimic the natural sway of grass. -
Add leaves:
Switching between your green shades, add small, teardrop-shaped leaves to the stems. Vary the placement—some low near the base, others climbing higher up. -
The red poppies:
Dip a small round brush into red underglaze. Paint the poppies with open, slightly uneven petals to look like they are fluttering. Leave the center empty for now. -
Yellow blooms:
Paint simple four-petal yellow flowers scattered among the stems. These act as bright highlights against the cream background. -
Blue accent flowers:
Use a deep blue underglaze to paint small cornflowers or bluebells. For cornflowers, use tiny, jagged strokes to create that feathery texture. -
Detailing centers:
Once the petals are dry, use a dark brown or black underglaze with your finest brush to dot the centers of the poppies and yellow flowers. -
Adding texture:
If you want extra depth, mix a tiny bit of white underglaze with your colors to add subtle highlights to the petal tips.
Pro Tip: Watercolor Effect
Thin your underglazes slightly with water. Applying them as semi-transparent washes allows the speckles from the base glaze to show through the flower petals.
Step 3: Finishing Touches
-
The border line:
Above the tallest flowers, paint a thin, horizontal line using a terracotta or brown underglaze. This frames the meadow scene. -
Decorative squiggle:
Just below that straight line, add a delicate, wavy or scalloped line in the same brown tone to mimic traditional embroidery stitching or a rustic hem. -
Double check:
Inspect the mug for any accidental smudges of underglaze. Gently scrape them away with an X-Acto knife or a stiff clean brush if found. -
Final dry:
Allow the entire piece to dry completely overnight to ensure all moisture has evaporated from the glaze layers. -
Fire the kiln:
Load the mug into the kiln and fire to Cone 6 (or whatever temperature your specific stoneware clay and glaze recipe requires). -
Cool and revealing:
Let the kiln cool naturally before opening. The firing process will bring out the speckles in the cream glaze and seal your painted flowers permanently.
Wrap your hands around your warm, custom-made mug and enjoy the blooming garden scene
Classic Polka Dots In Two Sizes
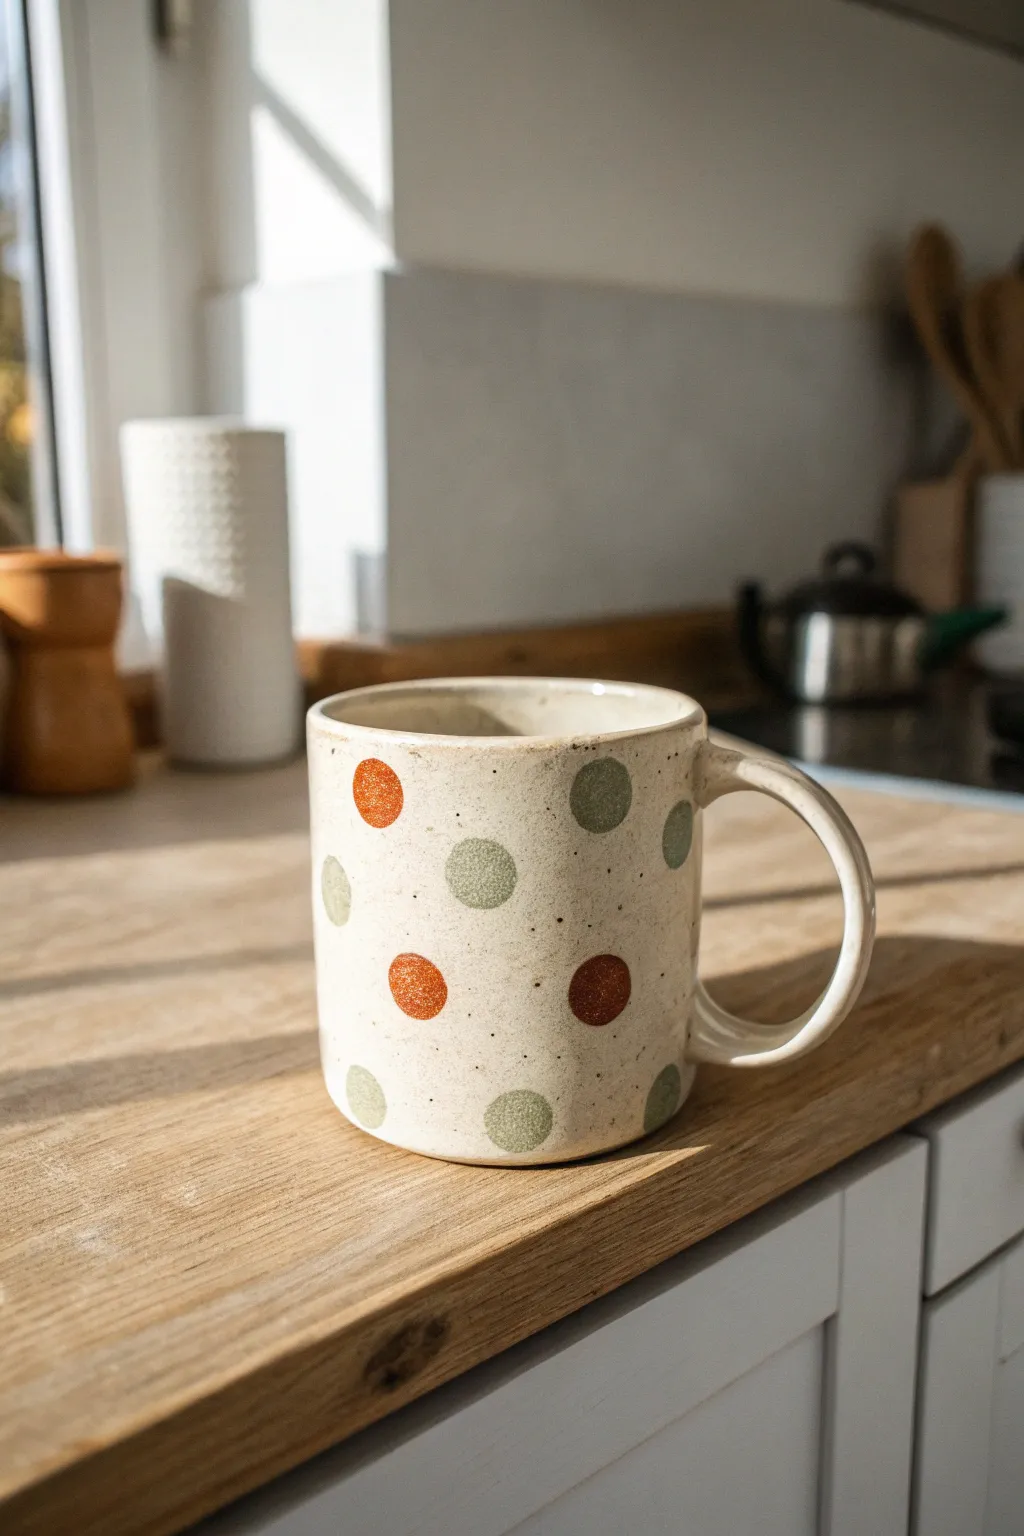
Embrace the charm of imperfection with this handmade-style mug design featuring uneven, earthy polka dots on a speckled cream base. The combination of rust orange, sage green, and light olive creates a cozy, modern-rustic aesthetic perfect for your morning brew.
How-To Guide
Materials
- Blank white ceramic mug (straight or slightly tapered sides)
- Ceramic or porcelain paints (burnt orange/rust, sage green, light olive/tan)
- Cream or off-white ceramic paint (for the base)
- Black or dark brown acrylic speckle paint (or a toothbrush for splattering)
- Round foam pouncers (large and medium sizes)
- Small round synthetic paintbrush (size 4 or 6)
- Rubbing alcohol and cotton pads
- Paper palette or foil
- Oven (for curing, if required by your paint)
Step 1: Preparation & Base Coat
-
Clean surface:
Begin by thoroughly wiping down the outside of your mug with rubbing alcohol on a cotton pad. This removes any invisible oils or fingerprints that could prevent the paint from adhering properly. -
Mix the base color:
Pour a generous amount of cream or off-white ceramic paint onto your palette. If the color looks too flat, I sometimes mix in a tiny drop of brown to warm it up, matching that stoneware clay look. -
Apply first layer:
Using a wide, soft brush, paint the entire exterior of the mug with the cream paint. Apply smooth, even vertical strokes to minimize brush marks. -
Let dry and repeat:
Allow the first coat to dry completely for about an hour. Apply a second coat to ensure opaque coverage so the original white ceramic doesn’t show through. -
Add the speckles:
To achieve the textural look of raw clay, dip the bristles of an old toothbrush into a tiny bit of watered-down black or dark brown paint. Run your thumb over the bristles to flick tiny speckles across the surface. Go lightly—you can always add more.
Uneven Paint?
If pouncers are leaving bubbles or ridges, lightly tap the wet paint with your fingertip to smooth the texture. This adds to the handmade clay aesthetic.
Step 2: Painting the Polka Dots
-
Prepare dot colors:
Squeeze out your rust orange, sage green, and light olive paints onto the palette. Ensure the paints are not too runny; they need body to hold the round shape. -
Start with large green dots:
Dip a large round foam pouncer into the sage green paint. Blot it once on the palette to remove excess, then press it firmly onto the mug. Place these randomly, leaving plenty of space between them. -
Add orange accents:
Clean your pouncer or switch to a new one of the same size. Dip it into the burnt orange paint and add a few large orange dots interspersed among the green ones. The pattern should look scattered, not grid-like. -
Paint medium olive dots:
Switch to a slightly smaller pouncer or a medium round brush. Dip it into the light olive/tan paint. Place these smaller dots in the open gaps, keeping the spacing organic and relaxed. -
Refine the shapes:
Because we want a hand-thrown pottery look, the dots shouldn’t be perfect circles. I like to use a small brush to gently uneven the edges of the dots slightly, giving them a more ‘stamped’ or painterly vibe. -
Check for transparency:
If the dots look streaky once they start to set, carefully dab a second layer of paint directly over the existing dot to build opacity.
Level Up: Texture
Mix a small amount of baking soda into your dot paint colors. This creates a raised, gritty texture that mimics real stoneware glaze when dried.
Step 3: Sealing & Curing
-
Initial drying:
Let the mug sit undisturbed for at least 24 hours. This allows the paint to bond to the surface before any heat is applied. -
Bake to cure:
Place the mug in a cold oven. Set the temperature according to your paint manufacturer’s instructions (usually around 300°F or 150°C). Allow it to heat up with the oven preventing thermal shock. -
Baking duration:
Bake for 30-40 minutes. Once the timer is done, turn the oven off but leave the mug inside until the oven is completely cool. -
Optional glaze:
If you want an extra glossy finish like the inspiration image, brush on a coat of clear, food-safe gloss sealer over the entire design after baking, and cure again if the product requires it.
Now handle those peaceful morning moments with your beautifully custom coffee cup

TRACK YOUR CERAMIC JOURNEY
Capture glaze tests, firing details, and creative progress—all in one simple printable. Make your projects easier to repeat and improve.
Bold Black-and-White Graphic Blocks
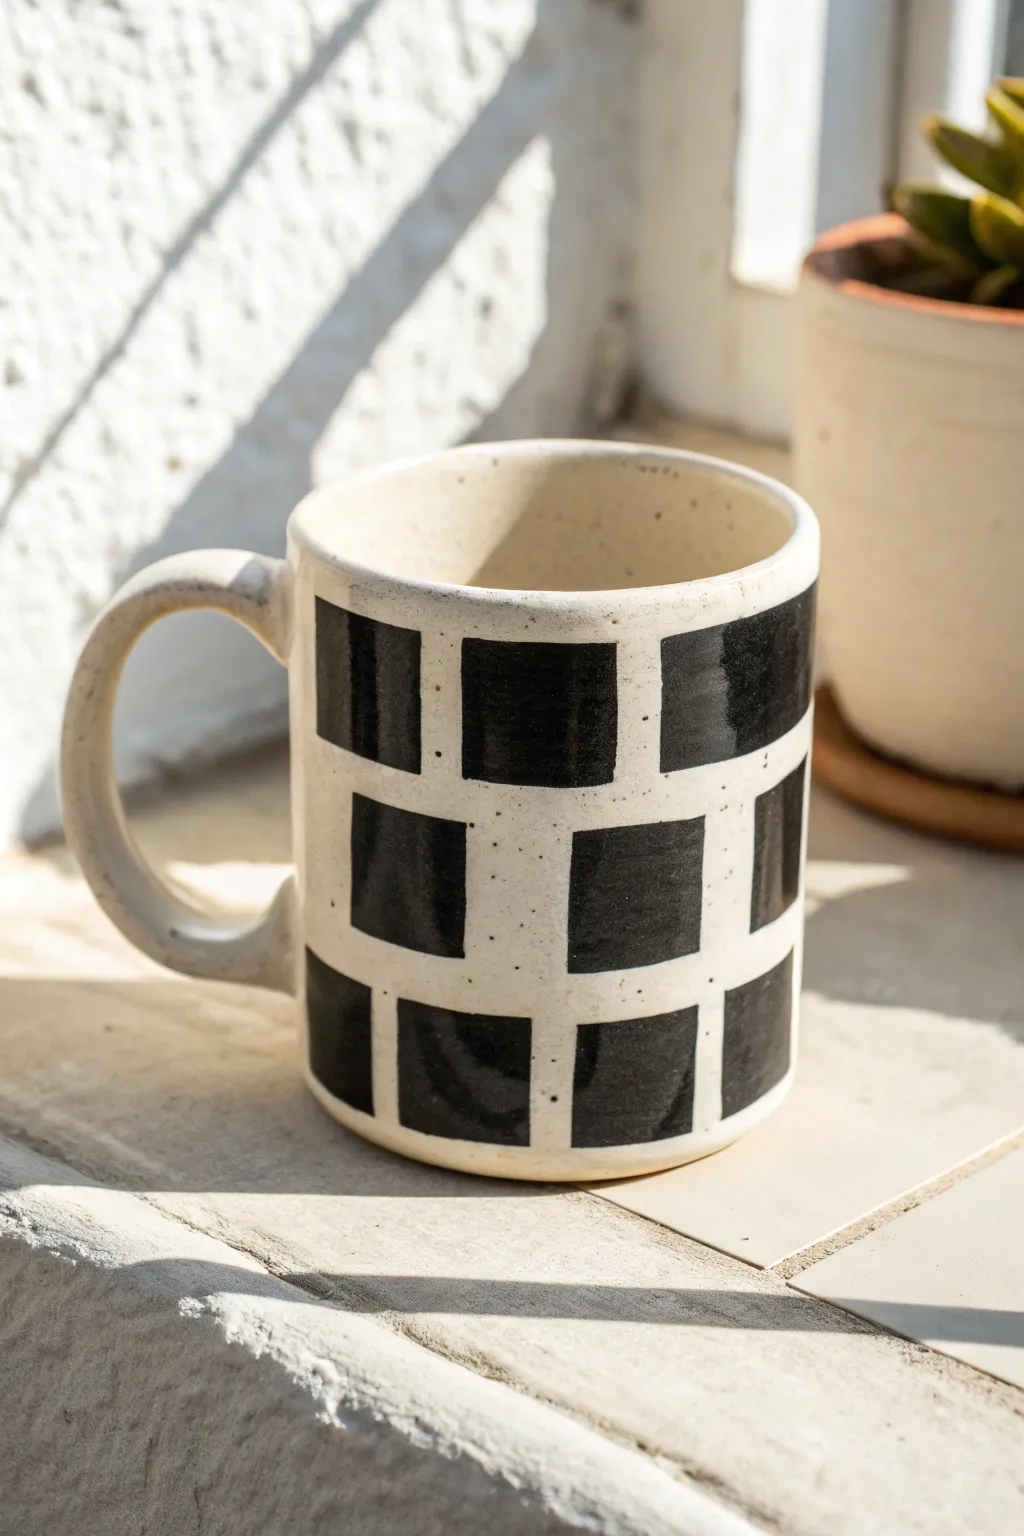
Capture the essence of contemporary ceramics with this bold, geometric design that embraces the beauty of imperfection. The stark contrast between the matte black blocks and the creamy, speckled base creates a sophisticated, hand-crafted feel perfect for your morning brew.
Detailed Instructions
Materials
- Bisque-fired ceramic mug (stoneware preferred)
- Cream or off-white speckled glaze (underglaze or brush-on glaze)
- Black underglaze
- Clear dipping glaze or brush-on clear glaze
- Flat shader brush (size 6 or 8)
- Design pencil or graphite transfer paper
- Ruler or measuring tape
- Damp sponge
Step 1: Preparation & Base Coat
-
Clean surface:
Begin by wiping down your bisque mug with a damp sponge. This removes any kiln dust or oils from your hands that might resist the glaze. -
Apply base color:
If your clay body isn’t naturally cream-colored, apply two coats of a speckled cream underglaze to the entire exterior. Allow the first coat to dry to the touch before adding the second. -
Dry thoroughly:
Let the base coat dry completely. The surface should feel chalky and room temperature, not cool to the touch, before you start mapping out your design.
Clean Lines Pro Tip
For sharper edges, use thin automotive masking tape or fineline tape to mark your grid. Press edges down firmly to prevent underglaze bleeding.
Step 2: Drafting the Grid
-
Measure height:
Measure the height of your mug’s workable surface area. Divide this number by three or four (depending on mug size) to determine the height of your rows. -
Mark horizontal guides:
Using a design pencil or regular pencil, lightly mark horizontal tick marks around the mug at your calculated intervals. -
Connect the lines:
Draw faint horizontal rings around the mug connecting your tick marks. Don’t worry if the lines stick; pencil marks burn off in the kiln. -
Determine vertical spacing:
Measure the circumference and decide on the width of your blocks. Aim for squares that are roughly equal in height and width for a classic look. -
Draw vertical guides:
Mark your vertical lines to create a full grid around the mug. If the spacing doesn’t divide perfectly, hide the slightly larger or smaller column near the handle.
Step 3: Painting the Blocks
-
Load the brush:
Pour a small amount of black underglaze onto a palette. Load your flat shader brush fully but wipe off excess drips. -
Outline first block:
Start with a square in the top row. Use the edge of your flat brush to carefully outline the interior edges of your pencil grid for that specific square. -
Fill the center:
Fill in the center of the outlined square with smooth strokes. I prefer to pull the brush in one direction to minimize texture marks. -
Create the checkerboard:
Skip the adjacent square to the right and paint the next one. Continue this skip-one-paint-one pattern around the entire top row. -
Second row offset:
Move to the second row. Ensure you are painting the squares that sit directly *below* the empty spaces of the top row to create the checkerboard effect. -
Complete the pattern:
Continue down the mug, row by row, maintaining the alternating pattern until the grid is filled. -
Review consistency:
Once the first layer is dry, check for transparency. If the black looks streaky or thin, carefully apply a second coat to make the blocks opaque.
Help! Smudged Black?
Don’t panic! Let the smudge dry completely, then gently scrape it off with an X-Acto knife or needle tool before wiping with a damp sponge.
Step 4: Finishing Touches
-
Clean edges:
If you smudged black outside the lines, use a clean, stiff brush dipped in water to gently scrub away the mistake. Use a corner of a sponge to wipe it clean. -
Fire to bisque (optional):
If you used underglaze on greenware, handle carefully. If on bisque, you can opt for a quick bisque fire to set the design, or move straight to glazing. -
Apply clear glaze:
Dip the entire mug into a clear glaze. If brushing, apply 2-3 coats of clear glaze, ensuring you don’t smear the black blocks by over-brushing. -
Final wipe:
Wipe the bottom of the mug (the foot ring) completely clean of glaze with a damp sponge to prevent it from sticking to the kiln shelf. -
Kiln fire:
Fire the mug to the temperature required by your specific clay and glaze (usually Cone 5/6 for stoneware).
Now you have a stunning, architecturally inspired mug ready for your favorite hot drink
Clean Geometric Stripe Pattern
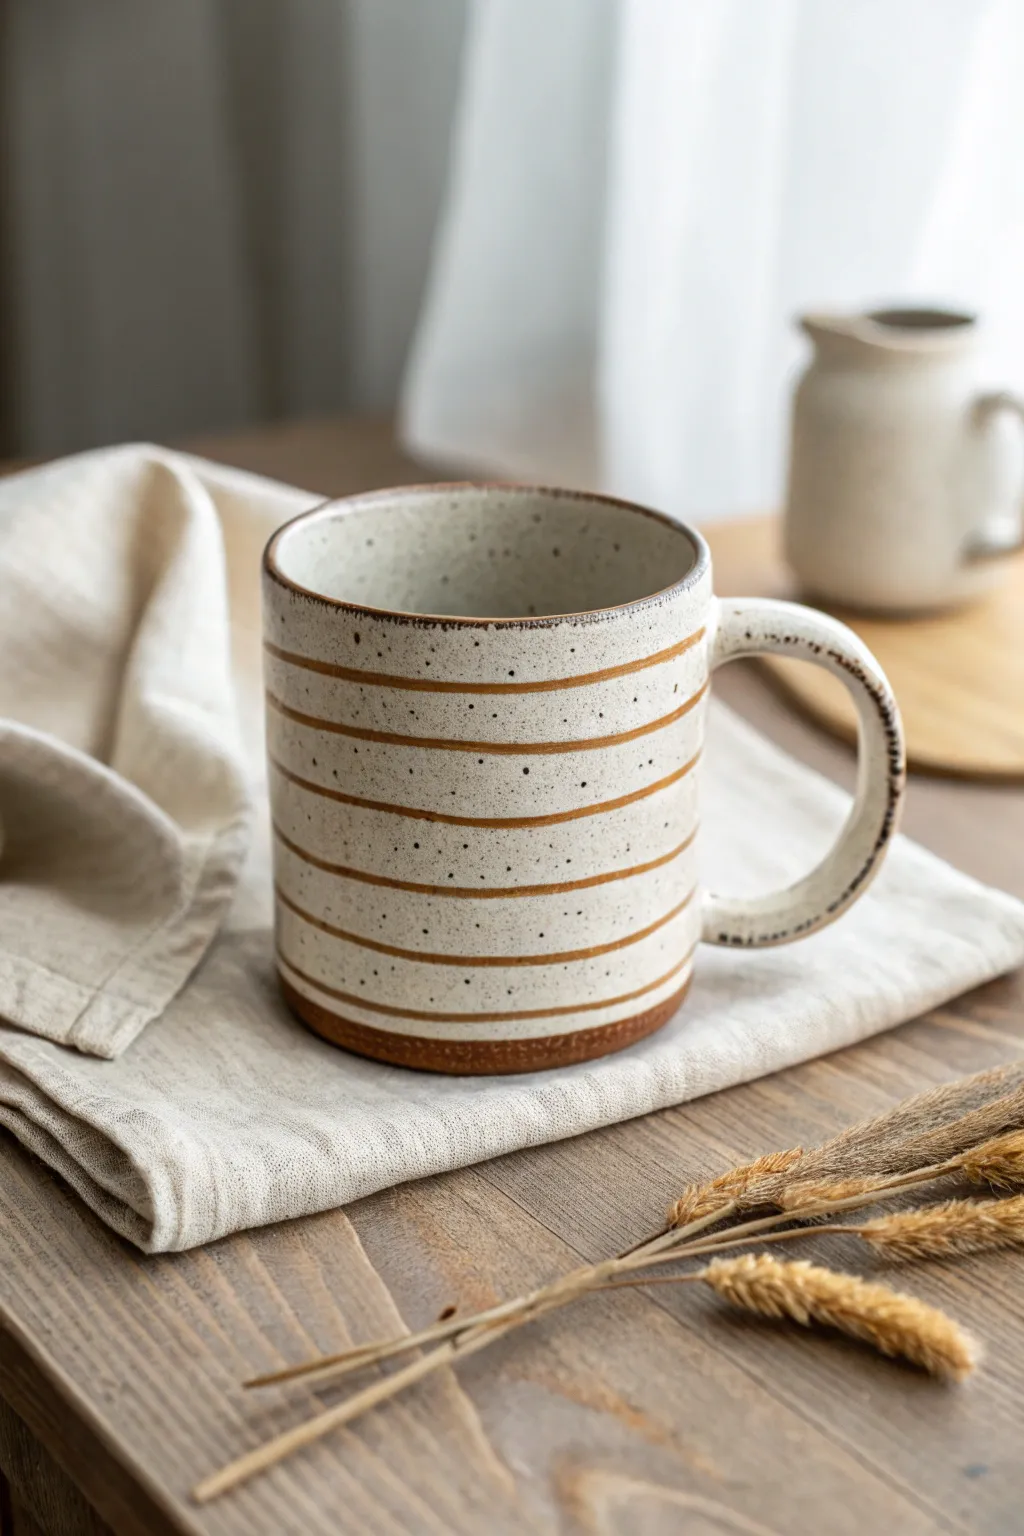
Embrace the beauty of simplicity with this handmade ceramic mug featuring clean, geometric precision. The design combines the rustic warmth of speckled clay with crisp, horizontal banding for a timeless, earthy aesthetic.
How-To Guide
Materials
- Speckled clay body (stoneware recommended)
- Pottery wheel
- Throwing tools (sponge, wire cutter, ribs)
- Trimming tools
- Underglaze pencil (brown/terracotta) or fine liner brush
- Liquid wax resist
- Satin matte white/cream glaze (translucent enough to show speckles)
- Large bucket of water
- Banding wheel
- Kiln
Step 1: Throwing the Form
-
Prepare the Clay:
Begin by thoroughly wedging your speckled stoneware clay to remove air bubbles. Aim for a ball slightly larger than a grapefruit size for a standard mug. -
Center and Open:
Secure the clay on the wheel head and center it using steady pressure. Open the clay to establish the floor, keeping it flat and roughly 3.5 inches wide. -
Pull the Walls:
Pull the walls up into a straight cylinder. Unlike a tapered V-shape, you want vertical sides to make the geometric striping look its best. -
Refine the Rim:
Compress the rim with a chamois or your sponge to ensure it’s smooth and pleasant to drink from. I find spending extra time here makes the final piece feel much more professional. -
Clean the Base:
Use a wood knife tool to undercut the base slightly, removing excess clay where the wall meets the wheel head.
Step 2: Trimming and Handle
-
Leather Hard Stage:
Allow the cylinder to dry to a leather-hard state. It should be firm enough to handle without warping but still cool to the touch. -
Trim the Foot:
Center the mug upside down on the pottery wheel. Trim the bottom to create a neat foot ring, echoing the verticality of the walls. -
Pull a Handle:
Pull a standard strap handle from a fresh lug of clay. Aim for a medium thickness that feels sturdy but not clunky. -
Attach Handle:
Score and slip both the handle ends and the attachment points on the mug body. Press firmly to join and smooth the seams with a damp sponge.
Wobbly Stripes?
Rest your painting hand on a steady object (like a stack of books) while the banding wheel spins. Let the wheel do the moving, not your hand.
Step 3: Decoration and Glazing
-
Prepare the Surface:
Once the mug is bisqued (fired once), wipe it down with a damp sponge to remove any dust. -
Setup for Striping:
Place the bisqued mug on a banding wheel. Centering it perfectly is crucial for even stripes. -
Apply Wax Resist Stripes:
Using a thin brush and liquid wax resist, paint thin horizontal lines around the mug while spinning the banding wheel. The waxed areas will remain unglazed, revealing the raw clay color. -
Alternative: Iron Oxide:
If you prefer the stripes to be painted rather than raw clay, use an iron oxide wash or brown underglaze with a fine brush on the banding wheel instead of wax. -
Wax the Foot and Rim:
Apply a band of wax resist to the bottom half-inch of the mug and the very top edge of the rim to leave these areas unglazed, creating that beautiful raw clay frame. -
Dip Glazing:
Using dipping tongs, submerge the mug into your satin cream glaze for 3-5 seconds. Lift it out and shake gently to remove drips. -
Clean Up:
Allow the glaze to dry, then use a damp sponge to wipe any stray glaze droplets off the waxed stripes and base. -
Final Fire:
Load the mug into the kiln and fire to cone 6 (or whatever temperature your clay and glaze require). The heat will melt the glaze around your stripes.
Level Up: Texture
Before bisque firing, gently carve the stripe lines with a needle tool to create physical grooves that the glaze breaks over.
Once cooled, your mug is ready for a warm brew, showcasing the perfect blend of raw texture and smooth finish
Soft Watercolor Wash Effect
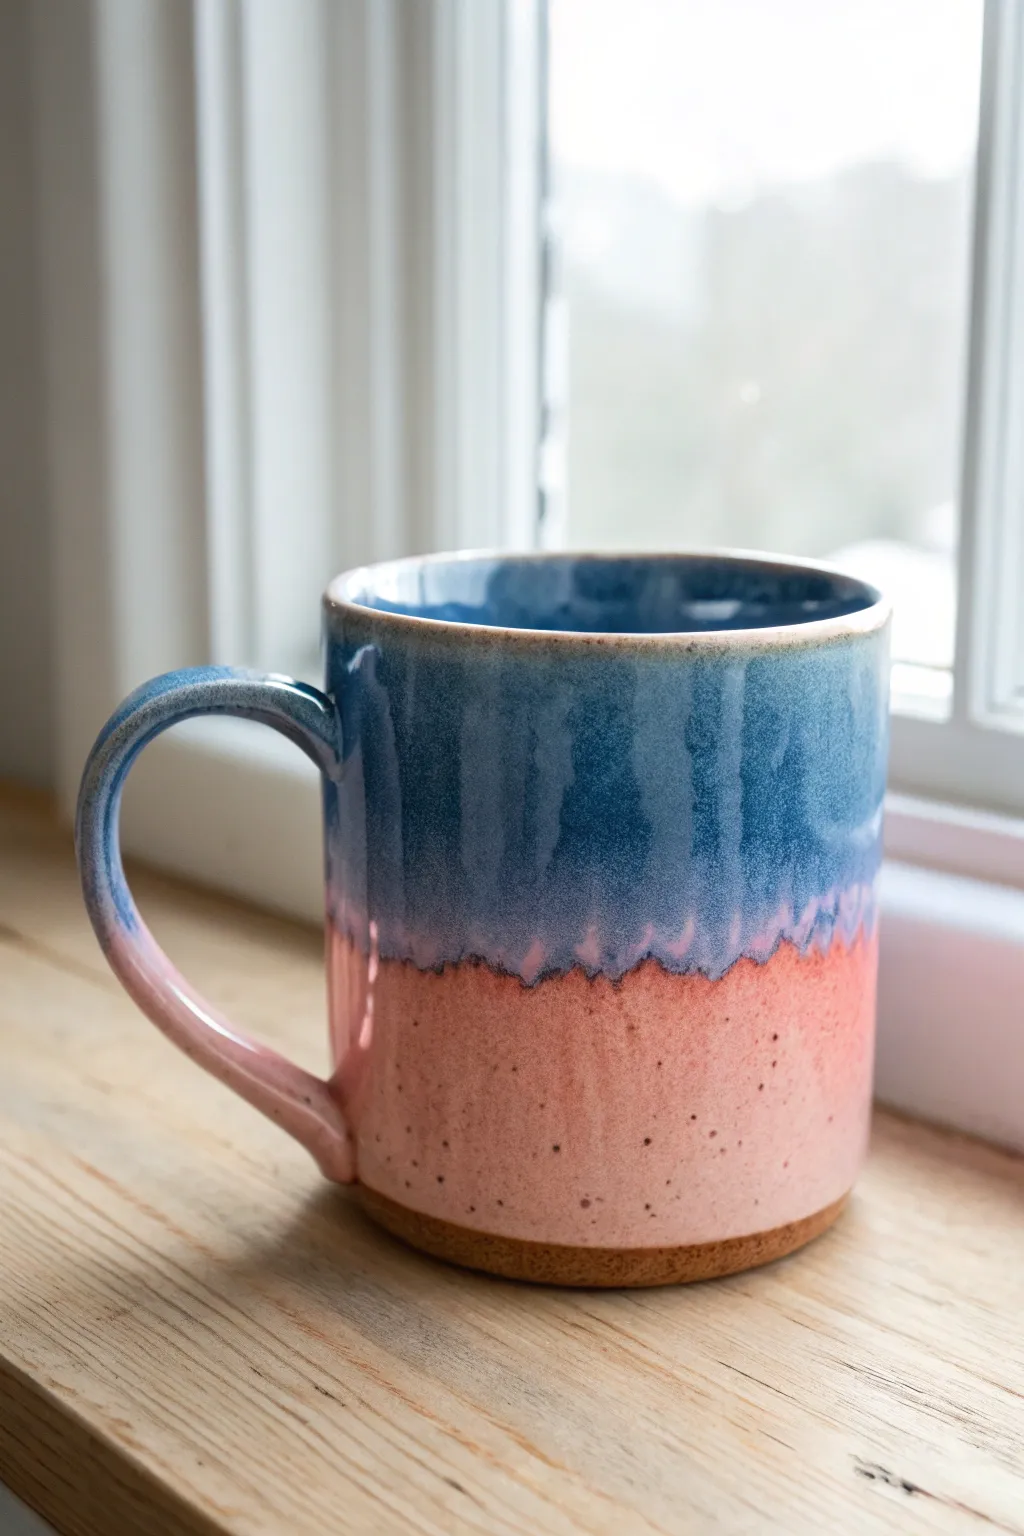
Capture the serene beauty of a sunrise with this hand-glazed ceramic mug project. By layering a deep, fluid blue over a soft speckled pink, you’ll create a gorgeous watercolor-like transition where the colors meet.
Step-by-Step Guide
Materials
- Bisque-fired ceramic mug (speckled clay body recommended)
- Glossy deep blue ceramic glaze (cone 5/6)
- Satin or matte pink ceramic glaze (cone 5/6)
- Large fan brush or soft glaze mop
- Small detail brush
- Wax resist
- Sponge
- Bowl of water
- Turntable or banding wheel (optional)
Step 1: Prep and Base Glaze
-
Clean the bisqueware:
Begin by wiping down your bisque-fired mug with a damp sponge. This removes any kiln dust or oils from your hands that might prevent the glaze from adhering properly. -
Apply wax resist:
Carefully paint a layer of wax resist on the very bottom of the mug and about 1/4 inch up the side (the foot ring). This ensures no glaze runs onto the kiln shelf during firing. -
Prepare the pink glaze:
Stir your pink glaze thoroughly. It should have the consistency of heavy cream. Pour a generous amount into a container deep enough to dip the bottom half of your mug. -
Dip the bottom half:
Holding the mug by the rim, lower it straight down into the pink glaze until the liquid reaches slightly above the halfway point. Hold for 3 seconds, then lift straight up. -
Clean the drips:
As you lift, shake gently to remove excess. Once the glaze is dry to the touch (usually a few minutes), check the foot ring and wipe away any rogue droplets with a damp sponge. -
Glaze the handle lower:
Use a brush to apply the pink glaze to the lower curve of the handle, blending it to meet the dipped line on the body so the transition looks seamless.
Step 2: Layering the Blue
-
Prepare the blue glaze:
Mix your deep blue glaze well. Since this layer goes on top, slightly thinning it with a tiny splash of water can help encourage that beautiful drippy movement later. -
Dip the interior:
Pour blue glaze inside the mug, roll it around to coat the entire interior surface, and pour out the excess. I like to do this before the exterior top dip to keep the rim neat. -
Dip the top exterior:
Hold the mug by the foot (now dry with pink glaze) and dip the top rim into the blue glaze. Overlap the pink layer by about an inch to create that mixing zone. -
Brush the handle upper:
Using a soft brush, apply the blue glaze to the top curve of the handle. Allow the blue to overlap the pink on the handle just like you did on the body. -
Soften the transition:
While the blue layer is still slightly damp, use a clean, slightly moist fan brush to gently feather the bottom edge of the blue glaze where it meets the pink. -
Create drip channels:
load a small detail brush with extra blue glaze and dab small, heavy dots along the transition line. In the kiln, these thicker spots will run down into the pink, creating the ‘watery’ effect.
Glaze Crawling?
If the blue glaze pulls away leaving bare spots, it was likely too thick or applied over a very dusty pink layer. Keep layers thin and wipe bisque before starting.
Step 3: Firing and Finishing
-
Check the foot again:
Before firing, do one final inspection of the waxed foot ring. Any glaze touching the shelf will ruin the piece, so wipe it perfectly clean. -
Allow to dry completely:
Let the mug sit for at least 24 hours. The moisture needs to evaporate fully from the porous bisque before it hits the high heat. -
Fire to temperature:
Load the kiln and fire to Cone 5 or 6 (approx. 2167°F – 2232°F), depending on your specific clay and glaze specifications. -
Cool slowly:
Allow the kiln to cool naturally to room temperature before opening. Opening too early can cause thermal shock and crack your beautiful new mug. -
Sand the bottom:
Once cool, use a diamond sanding pad or wet-dry sandpaper to smooth the unglazed clay foot, ensuring it won’t scratch your table.
Add Texture
Before the bisque fire, carve shallow vertical flutes into the raw clay body. The blue glaze will pool in these grooves, accentuating the waterfall effect.
Enjoy your morning coffee knowing you’ve created a piece of functional art with a lovely tranquil vibe
Sgraffito Carved Pattern Through Slip
This project transforms a standard wheel-thrown mug into an earthy work of art using the sgraffito technique to carve away dark slip, revealing the warm clay body beneath. The design features a rhythmic, repeating pattern of stylized leaves or wheat stalks that flow organically around the form.
How-To Guide
Materials
- Wheel-thrown mug (leather hard)
- Dark brown or black underglaze or slip
- Soft fan brush
- Wire loop carving tool (small U-shape)
- Needle tool or fine point stylist
- Sponge
- Clear glaze (cone 5/6 or compatible with your clay)
Step 1: Preparing the Canvas
-
Assess clay state:
Ensure your mug is at the perfect ‘leather hard’ stage. It should be firm enough to handle without deforming but still hold moisture. If it’s too dry, the carving will chip; too wet, and the lines will be mushy. -
Apply the slip:
Using a soft fan brush, apply a generous coat of dark brown or black slip (or underglaze) to the entire exterior of the mug, avoiding the very bottom rim if you prefer a clean foot. -
Layering:
Allow the first coat to lose its sheen—usually about 5-10 minutes—before applying a second coat. You want a solid, opaque coverage so the clay color doesn’t peek through unintentionally. -
Drying period:
Let the mug sit until the slip is no longer tacky to the touch. I like to test this by lightly touching a hidden spot under the handle; if no color transfers to my finger, it’s ready to carve.
Chipped Lines?
If the clay chips rather than carving smoothly, your pot is too dry. Wrap it in a damp paper towel and plastic for an hour to rehydrate the surface slightly before trying again.
Step 2: Designing the Grid
-
Establish boundaries:
Decide where your pattern will start and stop. Leave a rim of about 1/2 to 3/4 inch at the top and bottom uncarved to frame the design effectively. -
Mark vertical guides:
Using a needle tool, very lightly score vertical lines to divide the mug into even sections. For a standard mug, 4 to 6 sections usually works well for this leaf pattern. -
Initial sketching:
Lightly sketch the main arch shape of the leaves with your needle tool. These should be large, inverted ‘U’ or ogive shapes that touch shoulder-to-shoulder around the mug.
Pro Tip: Depth Control
Keep your wire tool sharp! A dull tool drags and compresses the clay instead of slicing it cleanly. You can sharpen wire loops with very fine sandpaper.
Step 3: Carving the Motif
-
Carve the main outlines:
Take your small U-shaped wire loop tool and carve along your sketched arch lines. Apply steady, even pressure to remove the dark slip and reveal the light clay underneath. -
Add the central vein:
Inside each large leaf shape, carve a central vertical line starting from the bottom point and reaching about two-thirds of the way up. -
Create the ribs:
Carving outwards from that central vein, create curved lines that fan out toward the leaf’s edge. Keep these symmetrical on both sides of the vein. -
Define the negative space:
Look at the triangular spaces between the main leaves at the bottom. Carve a smaller, similar fan pattern here to fill the gap and create visual balance. -
Refine the lines:
Go back over any lines that look shaky or too thin. The contrast relies on clean, confident strokes. -
Creating the rim borders:
Use your loop tool to create a clean horizontal cut at the top and bottom borders of your design, giving the pattern a distinct framed look.
Step 4: Cleanup and Finishing
-
Remove burrs:
Once the mug is bone dry, gently rub the surface with a stiff brush or a scouring pad to remove the little clay crumbs (burrs) created during carving. Don’t do this while wet, or you’ll smear the dark slip back into your clean lines. -
Bisque fire:
Fire the mug to bisque temperature (usually cone 04) to set the shape and the underglaze design. -
Glazing:
Dip the entire mug into a clear glaze. Choose a glaze that is fully transparent to ensure your high-contrast carving shines through clearly. -
Final wipe:
Wipe the foot of the mug clean with a damp sponge to prevent it from sticking to the kiln shelf. -
Glaze fire:
Perform the final glaze firing according to your clay body’s specifications (e.g., cone 6).
Now you have a stunning, textural mug that feels as good in the hand as it looks on the shelf
Mishima Inlay Lines and Doodles
Capture the whimsy of a wildflower field with this delicate Mishima inlay project. Using a wax resist and inlay technique on speckled clay creates crisp, reddish-brown floral illustrations that sit perfectly flush against a creamy, smooth surface.
Step-by-Step Guide
Materials
- Speckled stoneware clay (mid-fire)
- Pottery wheel and throwing tools
- Wax resist (liquid)
- Small paintbrush for wax
- Needle tool or very fine sgraffito tool
- Red iron oxide wash or brown underglaze
- Sponge
- Clear or transparent matte glaze
- Kiln
Step 1: Forming the Canvas
-
Throw the cylinder:
Start by throwing a standard mug cylinder on the wheel using speckled stoneware clay. Aim for a slightly rounded bottom profile to match the cozy aesthetic of the reference image. -
Pull the handle:
Pull a strap handle that is comfortable to hold. Attach it while the clay is leather hard, ensuring a smooth transition where the handle meets the mug body. -
Trim the foot:
Trim the bottom of your mug to create a clean separation between the glazed area and the raw clay foot. Leave the bottom inch or so slightly textured if you want that rustic contrast. -
Dry to leather hard:
Allow the mug to dry slowly until it reaches a firm leather-hard stage. This is the critical window where the clay is firm enough to carve without warping, but soft enough to take clean lines.
Clean Lines Secret
Ensure your clay is truly leather-hard, not soft. If it’s too wet, the needle tool will drag and create jagged, messy edges rather than crisp lines.
Step 2: Applying the Resist
-
Coat with wax:
Apply an even coat of liquid wax resist over the entire exterior surface where you plan to draw. Do not worry about the handle or the very bottom rim. -
Let the wax set:
Wait for the wax to dry completely. It should feel dry to the touch and not tacky. This barrier protects the main surface of the clay from the inlay colorant.
Smudged Oxide?
If the oxide is smearing over the wax, your sponge is too wet. Ring it out thoroughly and change your rinse water frequently to keep the background bright.
Step 3: Carving the Design
-
Draft your layout:
Visualize where your main floral elements will go. The design features a tall leafy fern, a radiating daisy-like flower, smaller sprigs, and a geometric kite shape. -
Carve the fern:
Using a needle tool, scratch through the wax and into the clay to draw the tall central stem. Add pairs of leaves extending outwards, detailing the veins inside each leaf with finer scratches. -
Etch the flower:
Draw a small circle for the flower center and radiate simple lines outward for petals. Extend a long, thin stem down to the base of the design area. -
Add filler elements:
Fill the negative space with smaller botanical doodles—tiny sprigs with three buds, little floating crosses or stars, and the geometric diamond kite shape seen in the image. -
Clean the burrs:
If your carving tool left any substantial clay crumbs or burrs, gently brush them away with a soft, dry brush. Be careful not to smudge the wax edges.
Step 4: Inlay and Finishing
-
Apply the colorant:
Brush a thick layer of red iron oxide wash (or a dark brown underglaze) over all your carved lines. The mixture should fill every groove completely. -
Wipe back:
Take a damp sponge and wipe across the surface of the mug. The wax resist will prevent the oxide from staining the uncarved clay, leaving color trapped only in your etched lines. -
Clean thoroughly:
Continue wiping until the main surface is clean and the lines are crisp. I prefer to use a fresh side of the sponge for the final pass to avoid streaking. -
Bisque fire:
Load the mug into the kiln for a bisque firing. This will burn off the wax resist and set the clay. -
Glaze application:
Dip the mug into a clear or transparent matte glaze. Since the clay is speckled, a transparent glaze will let those beautiful natural spots shine through alongside your drawings. -
Wipe the foot:
Ensure the bottom inch of the mug (the textured sandy area) is wiped free of glaze if you want that exposed clay look shown in the photo. -
Final firing:
Fire the mug to the maturity temperature of your clay body (likely cone 5 or 6). Once cooled, the inlay lines will be permanently fused into the surface.
Pour yourself a hot drink and enjoy the tactile sensation of your custom inlaid garden
Night Sky Constellation Mug
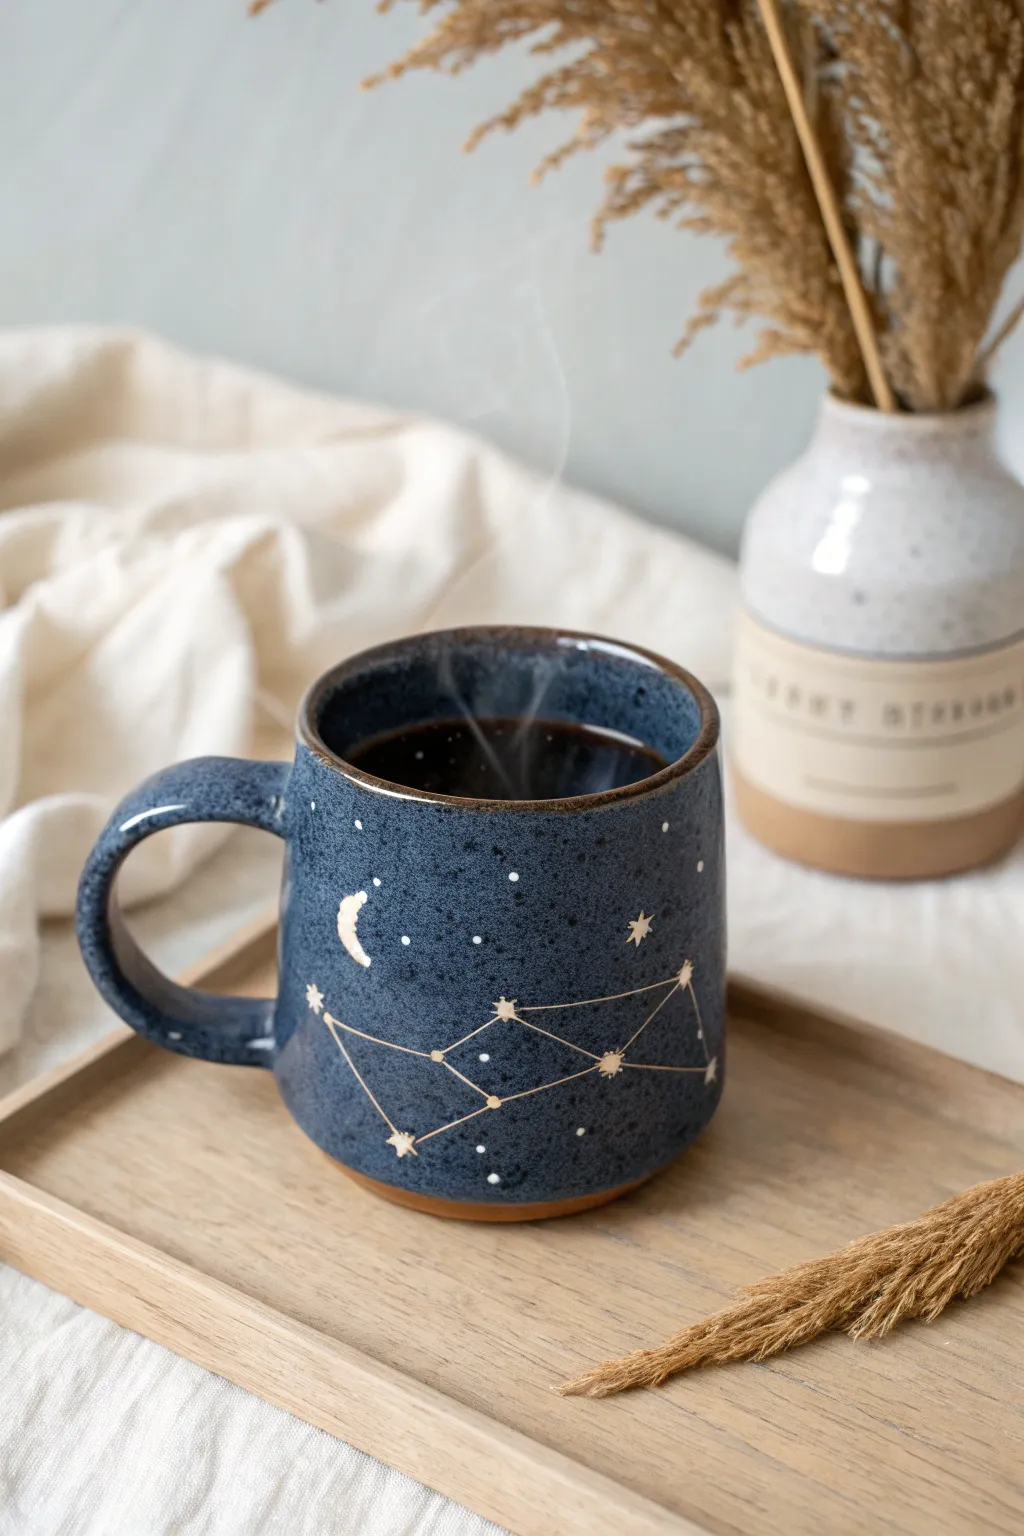
Transform a plain ceramic mug into a piece of the cosmos with this stunning night sky design. Featuring delicate gold constellations and a sliver of moon against a deep midnight blue, this project brings a touch of stardust to your morning coffee routine.
Detailed Instructions
Materials
- Plain ceramic mug (bisque or glazed)
- Pebeo Porcelaine 150 paint (Midnight Blue or Lapis Blue)
- Pebeo Porcelaine 150 paint (Gold/Or)
- Pebeo Porcelaine 150 paint (White)
- Fine point synthetic paintbrushes (Size 0 and 00)
- Old toothbrush (optional for speckling)
- Isopropyl alcohol or glass cleaner
- Paper towels
- Pencil or chalk (for drafting)
- Palette or small dish
- Oven (for curing)
Step 1: Preparation & Base Coat
-
Clean surface:
Begin by thoroughly cleaning your mug with isopropyl alcohol or glass cleaner. This removes any oils or fingerprints that could prevent the paint from adhering properly. -
Dry completely:
Wipe the mug dry with a clean paper towel and avoid touching the main painting area with your bare hands. -
Mix base color:
Pour a small amount of Midnight Blue porcelain paint onto your palette. If you want a slightly speckled ceramic look like the photo, you can mix in a tiny drop of black, but straight blue works beautifully too. -
Apply first coat:
Using a soft, flat brush, apply an even coat of blue paint over the exterior of the mug. Leave the rim unpainted if you want a natural clay contrast, or paint right up to the edge. -
Stipple texture:
While the paint is wet, lightly dab or stipple the surface with a dry sponge or stiff brush. This mimics the stone-like texture seen in the reference image rather than a perfectly smooth glaze. -
Let dry:
Allow this base layer to dry for at least 2 hours. If the coverage looks thin, apply a second coat using the same stippling technique and let dry again.
Starry Precision
If you struggle with painting thin lines for constellations, use a gold oil-based paint marker designed for ceramics instead of a brush.
Step 2: Designing the Cosmos
-
Draft the constellation:
Once the blue base is fully dry, lightly sketch your constellation shape using a soft pencil or a piece of white chalk. The W-shape of Cassiopeia or the Big Dipper are great beginner choices. -
Paint main stars:
Dip a size 00 fine brush into the gold porcelain paint. gentle press down at the vertices of your constellation sketch to create the main stars. -
Draw connectors:
Using the very tip of your finest brush, or even a toothpick, carefully drag thin gold lines to connect the stars according to your drafted pattern. -
Add the moon:
Near the constellation, paint a small crescent moon shape in gold. I usually do this in two strokes, starting from the center and sweeping out to the tips to keep them sharp. -
Highlight stars:
Go back to your main constellation stars. Add tiny radiating lines (forming a cross or starburst shape) to make them twinkle.
Step 3: Details & Curing
-
Add white accents:
Clean your brush thoroughly and switch to white porcelain paint. Add tiny pin-prick dots randomly around the sky to represent distant stars. -
Create depth:
Place a few white dots directly in the center of the larger gold stars. This layering technique adds a glowing effect. -
Speckle effect:
For a true galaxy feel, dip an old toothbrush in white paint, wipe off the excess, and flick the bristles with your thumb to spray a fine mist of stars over the blue background. -
Gold rim (optional):
If you want extra elegance, run a thin line of gold paint along the very edge of the rim. -
Air dry:
Let the finished piece air dry for 24 hours. The paint needs this time to fully set before baking. -
Bake to cure:
Place the mug in a cold oven. Set the temperature to 300°F (150°C). Once the oven hits that temperature, bake for 35 minutes. -
Cool down:
Turn the oven off and leave the mug inside until completely cool. This prevents the ceramic from cracking due to thermal shock.
Custom Zodiac
Personalize this as a gift by looking up the recipient’s zodiac constellation and painting that specific star pattern on the mug.
Now you can enjoy your morning brew while gazing into your own personal galaxy
Sunrise Ombre Gradient
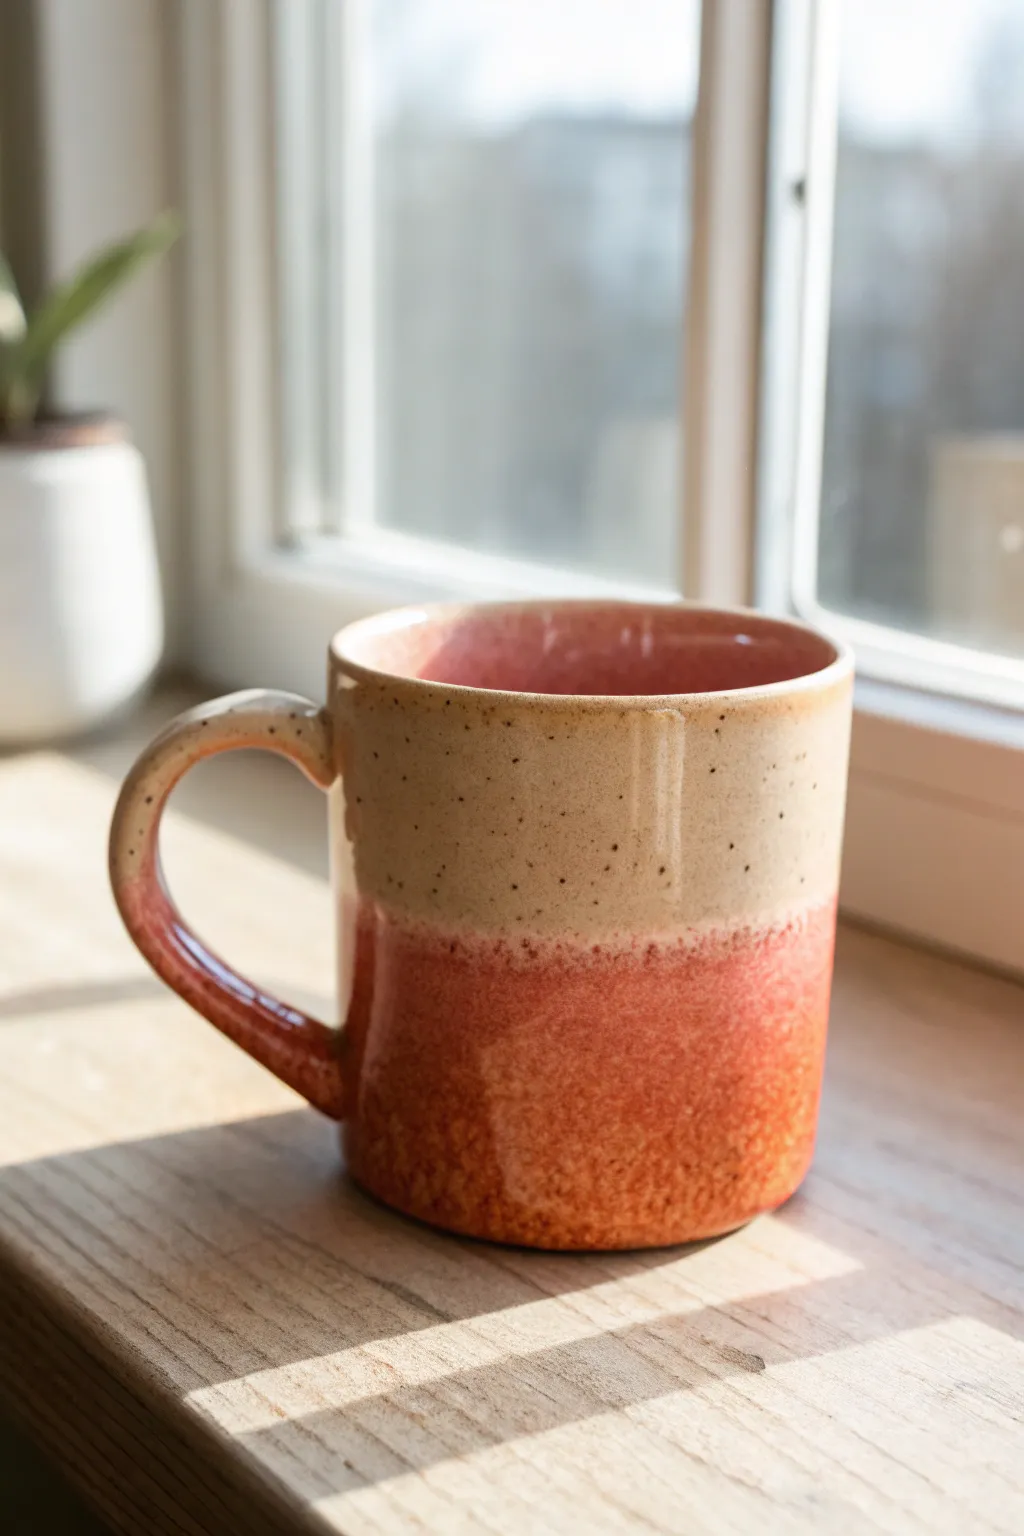
Capture the warmth of early morning light with this stunning two-tone ceramic glaze effect. By layering a creamy speckled beige over a rich terracotta base, you’ll create a seamless, organic gradient that feels both modern and earthy.
How-To Guide
Materials
- Bisque-fired ceramic mug (pre-made or hand-thrown)
- Liquid wax resist
- Cream or oatmeal stoneware glaze (with speckles)
- Terracotta or rust-orange dipping glaze
- Large glazing bucket or tub
- Soft fan brush
- Sponge
- Damp cloth
- Kiln (or access to a firing service)
Step 1: Preparation & Base Coat
-
Clean the bisque:
Before you begin glazing, wipe down your bisque-fired mug with a slightly damp sponge. This removes any dust or oils from handling that might prevent the glaze from adhering properly. -
Wax the foot:
Apply a generous coat of liquid wax resist to the bottom foot of the mug and about 2mm up the side using a dedicated brush. This crucial step prevents glaze from fusing your beautiful mug to the kiln shelf. -
Let the wax set:
Wait for about 15 to 20 minutes until the wax is completely dry to the touch. It should feel slightly tacky but not wet. -
Mix the top glaze:
Stir your cream or oatmeal speckled glaze thoroughly. You want to ensure the heavy speckling agents are suspended evenly throughout the bucket, not sitting at the bottom. -
Dip the interior:
Pour the cream glaze inside the mug, roll it around to coat the entire interior surface, and pour the excess back into the bucket. Give the mug a quick shake upside down to remove drips.
Flux for Flow
Add a tiny dab of flux where the two glaze colors meet. This encourages them to run together during firing, creating a smoother transition.
Step 2: Creating the Ombre Gradient
-
Dip the top half:
Holding the mug by the foot, dip the entire vessel upside down into the cream glaze, stopping just below the foot. This creates the base layer for the whole mug. -
Allow to dry:
Let this first full coat dry until it is chalky and no longer shiny. Touching it too soon can smudge the surface. -
Prepare the sunrise color:
Now, prepare your terracotta or rust-orange glaze. Ensure it is mixed to a slightly thinner consistency than the top glaze to encourage a soft interaction between layers. -
The gradient dip:
Hold the mug right-side up by the rim (carefully!). Dip the bottom half of the mug into the rust glaze rapidly. I like to count ‘one-Mississippi’ and pull it out immediately. -
Feather the line:
While the second layer is still wet, you can slightly tilt the mug to let gravity pull the rust glaze down, creating a natural, uneven overlap line rather than a hard edge. -
Sponge the rim:
If your fingers touched the rim during the dip, use a tiny drop of the cream glaze on a small brush to touch up those spots so the finish remains perfect.
Third Color Pop
Brush a ring of metallic gold luster on the handle or rim for a luxurious third firing that adds a hint of elegance to the rustic design.
Step 3: Firing & Finishing
-
Clean the distinct line:
Check the wax resist area on the foot. If any glaze managed to stick to the wax, wipe it off cleanly with a damp sponge. -
Wait for full drying:
Allow the mug to dry completely. The clay body absorbs water during glazing, and it needs to be bone dry before entering the kiln to prevent cracking. -
Load the kiln:
Place the mug in the kiln. Since we aren’t glazing the very bottom, no stilts are necessary, but ensure it isn’t touching other ware. -
Cone firing:
Fire the mug to the temperature recommended for your stoneware clay and glaze combination—typically Cone 5 or 6 for this type of durable finish. -
Cooling phase:
Let the kiln cool somewhat slowly. Opening it too fast can cause ‘crazing’ or thermal shock to the glaze layers. -
Inspect the gradient:
Once cool, remove your mug. The high heat creates the magic where the rust glaze melts into the cream, revealing the speckled texture underneath.
Now you have a cozy, custom-designed mug perfect for enjoying your morning brew in the sunlight
Tiny Food Illustrations Around the Rim

Transform a plain ceramic mug into a charming display of bakery favorites with these delicate, hand-drawn style illustrations. The speckled clay finish combined with fine brown line work creates a cozy, artisanal look perfect for your morning coffee.
Step-by-Step
Materials
- Bisque-fired ceramic mug (stone or speckled clay body preferred)
- Underglaze pencil or fine liner brush (dark brown or sepia)
- Dark brown underglaze (if using brush)
- Clear transparent glaze (food safe)
- Damp sponge
- Pencil (for sketching)
- Kiln access (local studio or community center)
Step 1: Planning and Sketching
-
Prepare the Surface:
Start with a clean, bisque-fired mug. Wipe it down gently with a damp sponge to remove any dust or oils from handling, as these can resist the underglaze application. -
Sketch the Layout:
Using a regular graphite pencil, lightly map out where your illustrations will go. Don’t worry about mistakes here; graphite burns off completely in the kiln, so you can sketch freely directly on the bisque. -
Balance the Design:
Aim for a random, tossed pattern rather than strict rows. Place larger items like the cupcake and party hat first, then fill gaps with smaller cookies and hearts.
Step 2: Drawing the Treats
-
Select the Tool:
For the specific look in the photo, I find an underglaze pencil works best to mimic that sketch-like texture. Sharpen it to a fine point. -
Draw the Cupcake:
Start with the cupcake wrapper, drawing vertical lines slightly angled inward. Add the frosting swirl on top with a loose, spiraling motion, finishing with a small cherry or dollop shape. -
Illustrate the Party Hat:
Draw a simple triangle shape. Add slightly curved horizontal lines across it relative to the bottom curve to give it volume, and top it with a fluffy pom-pom shape. -
Add the Cookies:
Create a round sandwich cookie by drawing two elongated ovals stacked on top of each other. Add tiny dots on the top oval to represent crumbs or texture. -
Create a Cinnamon Roll:
Draw a tight spiral starting from the center and working outward. Keep the line slightly shaky to give it a handmade, doughy appearance. -
Draw the Lollipop:
Sketch a small stick topped with a circle. Inside the circle, draw petal-like shapes or a grid pattern to represent a textured candy head. -
Include Filler Elements:
Scatter tiny hearts, simple starbursts, and small bread-like ovals in the empty negative spaces to tie the whole composition together.
Smudge Alert
Underglaze pencil smears easily before firing. If you make a mistake, don’t rub it. Sand it off gently with sandpaper or a stiff brush.
Step 3: Glazing and Firing
-
Set the Underglaze:
If you used an underglaze pencil, lightly dab the drawings with a slightly damp sponge to set the powder so it doesn’t smear during dipping. -
Mix the Glaze:
Prepare your clear transparent glaze according to the manufacturer’s instructions. Ensure it is well-mixed to avoid cloudiness. -
Dip the Mug:
Using glazing tongs or a careful hand-dip method, submerge the mug into the clear glaze for about 3 seconds. Pull it out smoothly to ensure an even coat. -
Clean the Foot:
Wipe the bottom rim (the foot) of the mug completely clean with a wet sponge. Any glaze left here will fuse the mug to the kiln shelf. -
Fire the Piece:
Load the mug into the kiln and fire to the temperature specified by your clay and glaze combination (typically Cone 5 or 6 for stoneware). -
Cool Down:
Allow the kiln to cool completely before opening. This patience prevents thermal shock and crazing in your clear glaze.
Color Pop
Before applying the clear glaze, add sheer washes of watered-down colored underglaze to the frosting or hearts for a subtle tint.
Enjoy sipping from your custom bakery-themed mug every morning
Sculpted Character Face Mug (Simple and Cute)
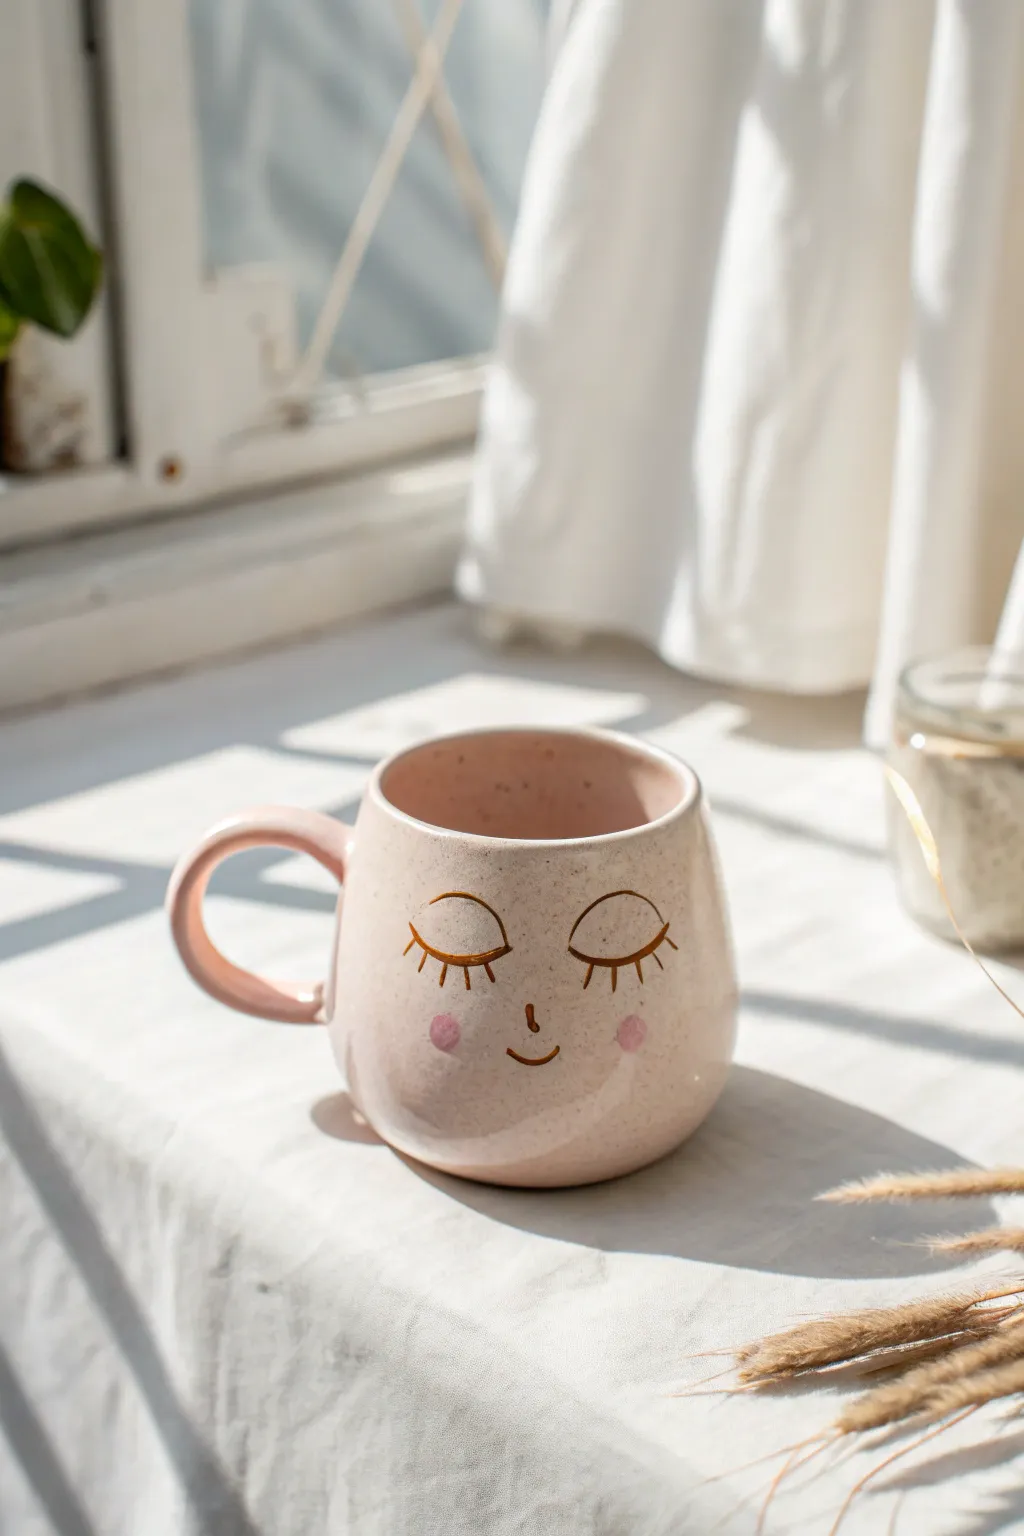
Transform a plain pink ceramic mug into a cozy morning companion with this sweet, sleepy character face design. The minimalist aesthetic combines delicate linework with soft rosy cheeks for a project that feels handmade and heartwarming.
Step-by-Step Tutorial
Materials
- Light pink ceramic mug (round, bulbous shape preferred)
- Pebeo Porcelaine 150 paint marker (Gold or Bronze)
- Pebeo Porcelaine 150 paint marker (Pink or Coral)
- Rubbing alcohol
- Cotton pads
- Soft graphite pencil (6B or 8B)
- Paper for practice sketching
- Cotton swabs (Q-tips)
- Heat-resistant work surface
- Domestic oven
Step 1: Preparation & Planning
-
Sourcing the Mug:
Begin by finding a base mug that matches the vibe. You want a ceramic mug with a soft pink glaze and a rounded, ‘huggable’ bowl shape rather than straight sides. -
Clean Slate:
Wipe the entire surface of the mug down thoroughly with rubbing alcohol on a cotton pad. This removes invisible oils or fingerprints that could prevent the paint from adhering properly. -
Practice Sketching:
On a piece of paper, practice drawing the face design. Focus on the two wide, downward-curved arcs for the closed eyes and the tiny, centered ‘u’ shape for the nose. -
Drafting on Ceramics:
Lightly sketch the placement of the eyes and nose directly onto the mug using your soft graphite pencil. Don’t worry if it looks messy; the graphite will burn off in the oven later.
Placement Pro Tip
When sketching the face, hold the mug in your hand as if you strictly intend to drink from it. This ensures the face isn’t too high or too low relative to the rim.
Step 2: Applying the Design
-
Prime the Marker:
Shake your gold or bronze porcelain marker well. Press the tip down gently on a scrap paper until the ink flows smoothly and consistently. -
Drawing the Eyelids:
Trace over your pencil lines for the eyelids using the gold marker. Use a confident, steady motion to create two smooth, downward-curving semicircles, spaced evenly apart. -
Adding Lashes:
Draw small, straight lines radiating downward from the eyelid curve. Aim for about 5 to 7 lashes per eye. I usually make the center lash slightly longer to create a fanned-out effect. -
Nose Detail:
Place a very small, simple vertical line or tiny hook shape right in the center, slightly lower than the eyes, for the nose. -
The Smile:
Under the nose, draw a gentle, shallow curve for the mouth. Keep it small and subtle to maintain the peaceful expression. -
Cheeky Touches:
Switch to your pink or coral porcelain marker. If you don’t have a marker, you can dab a little ceramic paint on with a round sponge brush. -
Rosy Glow:
apply a small, solid circle of pink on either side of the face, slightly below the outer edges of the eyes. These represent the rosy cheeks. -
Quick Clean-up:
If you make a mistake or smudge a line, dampen a cotton swab with water or alcohol and quickly wipe it away before the paint sets.
Step 3: Curing the Artwork
-
Initial Drying:
Let the mug air dry completely. Most porcelain markers require 24 hours of drying time to ensure the moisture evaporates before baking. -
Oven Loading:
Place your mug into a cool oven. Do not preheat the oven, as the sudden temperature change could crack the ceramic. -
Baking Process:
Set the oven temperature to 300°F (150°C) or whatever specific temperature your paint manufacturer recommends. Once the oven reaches temperature, bake for 30-35 minutes. -
Cool Down:
Turn the oven off but leave the mug inside. Allow it to cool down gradually with the oven door closed to prevent thermal shock. -
Final Inspection:
Once fully cool, remove the mug and gently wipe away any remaining graphite guidelines with a damp cloth.
Level Up: Texture
Use a speckled clay-coloured paint and flick a toothbrush bristles lightly near the bottom of the mug to mimic the natural stoneware speckles seen in the photo.
Fill your new creation with a warm drink and enjoy the serene vibes