Whenever I need a quick project that still feels creative, I reach for a coil mug—it’s basically instant satisfaction with a ton of room to play. Below are my favorite coil mug ideas, from classic shapes and cozy textures to a few wilder “how did you do that?” finishes.
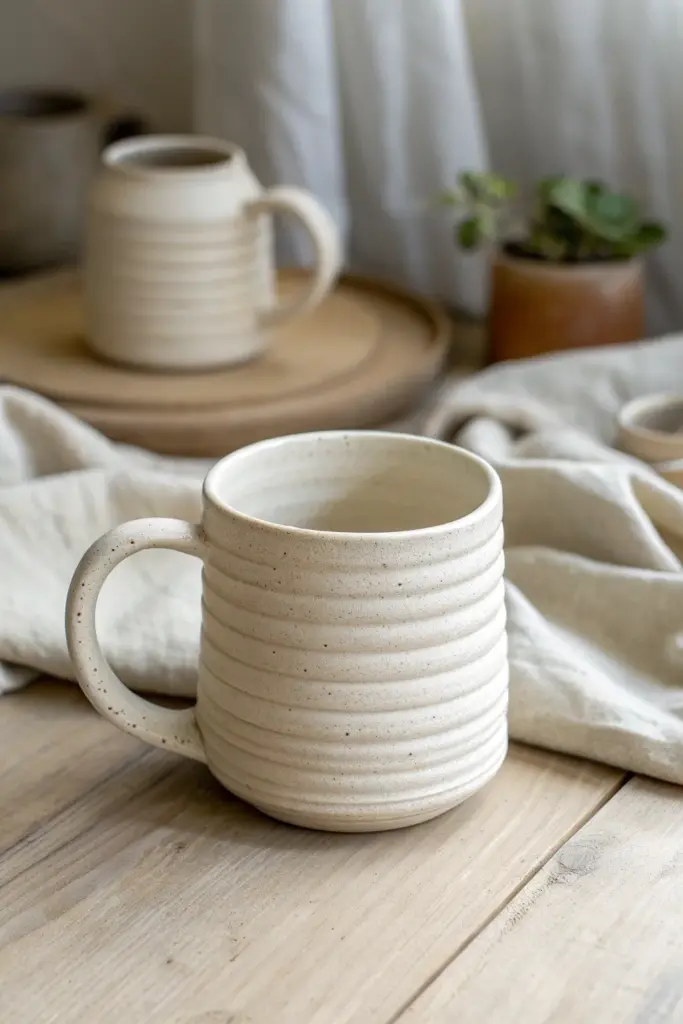
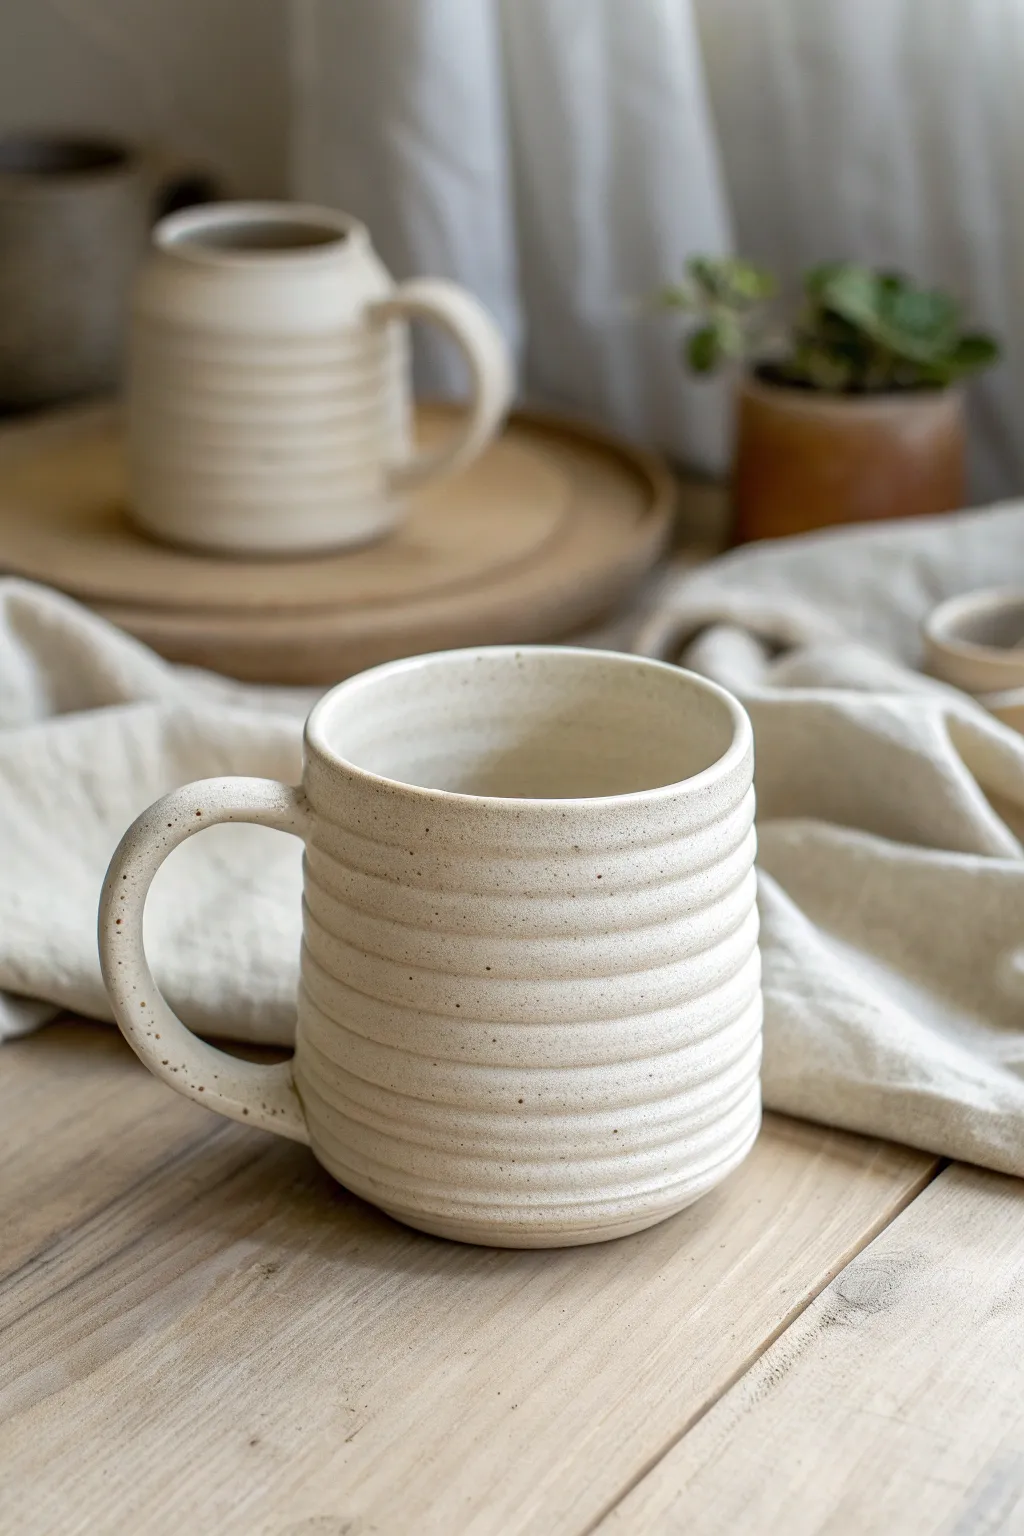
Exposed Coil Ridge Mug
This charming handmade mug highlights the beauty of construction with its visible, rhythmic coil ridges and a soft, speckled creamy white glaze. The design embraces texture, leaving the ridges intact to provide a tactile experience while sipping your morning coffee.
Detailed Instructions
Materials
- Stoneware clay (speckled or buff)
- Scoring tool or serrated rib
- Slip (clay and water mixture)
- Wooden modeling tool
- Medium sponge
- Cutting wire
- Rolling pin (optional)
- Fettling knife
- Creamy matte white glaze
Step 1: Creating the Base and Coils
-
Roll out the base:
Begin by rolling out a slab of clay to about 1/4 inch thickness. Use a round cutter or trace a circle (about 3.5 inches in diameter) to create the floor of your mug. -
Prepare the coils:
Roll out several long, even snakes of clay on your table. Aim for a thickness similar to your pinky finger. Consistency is key here to ensure the ridges look uniform later. -
Score and slip the base:
Take your serrated rib or needle tool and rough up the outer edge of your circular base. Apply a generous dab of slip to the roughened area to act as glue. -
Add the first coil:
Place your first coil directly onto the slipped edge of the base. Cut the ends at an angle where they meet to increase surface area for a strong join. -
Secure the bottom coil:
This is crucial: Using your wooden modeling tool or thumb, smudge the *inside* of the coil down onto the base floor firmly to seal it. Leave the outside un-smudged to keep the ridge visible.
Step 2: Building the Wall
-
Stacking upwards:
Score and slip the top of your first coil. Lay the second coil directly on top. I find it helpful to stagger the vertical seams so they don’t all line up in one weak spot. -
Blending the interior:
Blend the coils together on the *inside* of the mug only. Use your finger or a tool to drag the clay from the upper coil down into the lower one, creating a smooth interior wall. -
Refining the exterior ridges:
As you build, the exterior coils will remain distinct. Gently press them together to ensure adhesion, but don’t smooth them out. You want that ribbed, beehive look. -
Shaping the form:
To create a straight cylinder like the photo, place each coil directly on top of the previous one. If you want a slight curve, adjust placement slightly inward or outward. -
Finishing the rim:
Once you reach the desired height (usually 4-5 inches), add a final coil. Smooth this one more thoroughly to create a comfortable, drinking-friendly lip.
Smooth Interior Trick
Use a damp sponge on a stick or a rib tool to compress the inside walls while supporting the outside with your hand. This ensures a leak-proof mug without ruining the exterior texture.
Step 3: Handle and Glazing
-
Pull or roll a handle:
Create a strap handle from a thicker coil or a strip of slab. Curve it into an ear shape and let it stiffen slightly until it can hold its own weight. -
Attach the handle:
Score and slip the contact points on both the mug body and the handle. Press firmly to attach, blending the clay at the joints for a seamless connection. -
Bisque fire:
Allow the mug to dry slowly to prevent cracking, then bisque fire it in the kiln according to your clay body’s specifications. -
Wax the foot:
Apply wax resist to the bottom half-inch of the exterior. This leaves the raw clay exposed at the base, creating that nice toasted contrast seen in the image. -
Glaze application:
Dip the mug into a creamy, speckled matte glaze. The glaze will pool slightly in the coil grooves, emphasizing the texture. Wipe any drips off the waxed bottom. -
Final firing:
Glaze fire the piece to the appropriate cone temperature (likely Cone 6 or 10 for stoneware). The heat will melt the glaze into the recessed coils beautifully.
Variable Textures
Instead of leaving the coils round, try gently flattening them with a paddle after building. This creates a softer, ‘shingled’ effect while keeping the horizontal lines.
Enjoy the cozy feeling of holding your textured creation on a cold morning


Corrugated Pinch-Textured Coil Mug
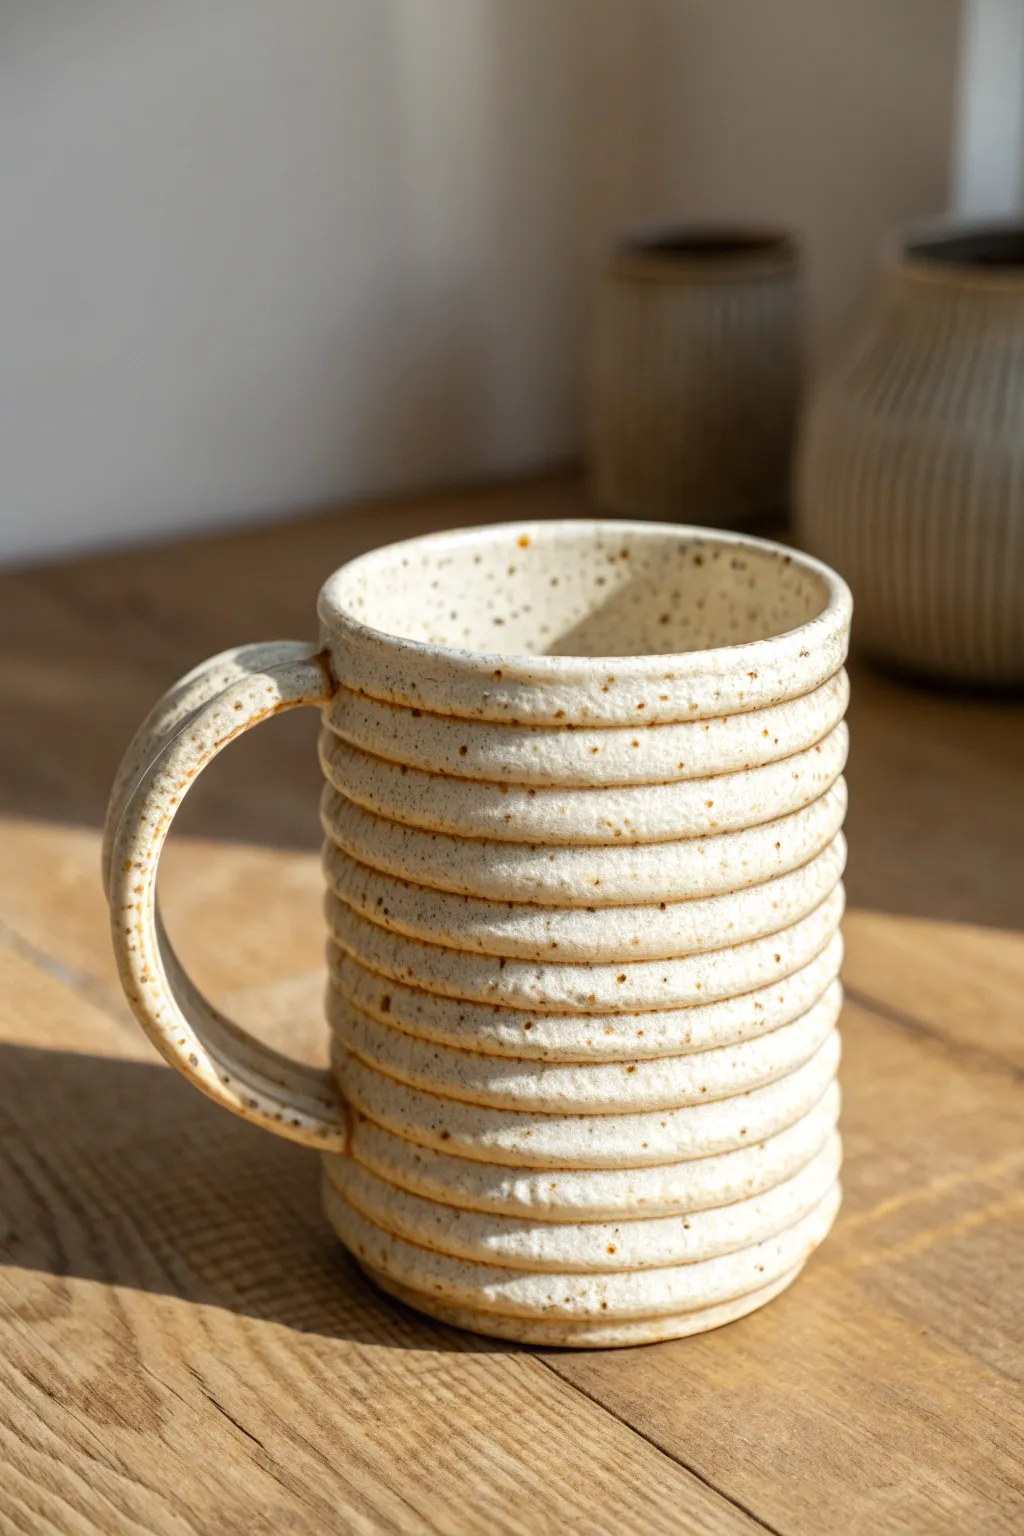
Embrace the tactile beauty of hand-building with this coiled mug project, which features distinct, rounded horizontal bands that resemble corrugated tubing. The result is a piece that feels satisfyingly rhythmic in your hands, highlighted by a subtle speckled glaze that breaks beautifully over the texture.
Detailed Instructions
Materials
- Stoneware clay (speckled or buff)
- Clay scoring tool or serrated rib
- Slip (clay mixed with water)
- Wooden modeling tool
- Sponge
- Fettling knife
- Kiln
- Matte white or transparent glaze
Step 1: Base and Wall Construction
-
Prepare the slab base:
Roll out a small slab of clay to approximately 1/4 inch thickness. Use a large cookie cutter or a needle tool to cut a perfect circle for the base, about 3 to 3.5 inches in diameter. -
Roll consistent coils:
Take a portion of clay and roll it on a table to create long, snake-like coils. Aim for a thickness similar to your pinky finger. Try to keep them extremely consistent in width, as this will determine the evenness of the final texture. -
Score and slip the base:
Rough up the outer edge of your circular base using a scoring tool or fork, then apply a layer of slip to act as glue. -
Attach the first coil:
Place the first coil directly on top of the scored edge of the base. Cut the ends at an angle where they meet to ensure an overlap, then press them together firmly. -
Smooth the interior:
Using your thumb or a wooden tool, smear the clay from the coil downward onto the base on the *inside* of the mug only. This seals the joint. Leave the outside rounded and untouched to preserve the corrugated look. -
Stack subsequent coils:
Score and slip the top of the previous coil. Place your next coil directly on top. I find it helpful to stagger the seams (where the coil ends meet) so they don’t all line up vertically, which adds structural strength. -
Blend the inside seams:
After every 2-3 coils, stop to blend the coils together on the interior wall. Run your thumb or a rib tool vertically to create a smooth, seamless inner surface while being careful not to flatten the exterior ridges. -
Continue building upward:
Repeat the coil stacking process until the mug reaches your desired height, usually about 4 to 5 inches. Ensure the walls go straight up rather than flaring out. -
Refine the rim:
For the final coil at the rim, you may want to gently pinch it a bit thinner or smooth it with a damp chamois or sponge so it feels comfortable against the lip.
Step 2: Handle and Finishing
-
Form the handle coil:
Roll out a slightly thicker coil for the handle. Gently flatten it just a tiny bit so it’s oval in cross-section rather than perfectly round. -
Create the handle curve:
Bend the coil into a ‘C’ shape or ear shape. Hold it up to the leather-hard mug to check proportions; it should look substantial but not overwhelming. -
Attach the handle:
Score and slip the attachment points on both the mug body and the handle ends. Press the handle firmly onto the mug. -
Reinforce the joints:
Use a small, thin coil of clay around the attachment points to reinforce the connection. Smooth this reinforcement into the handle and mug body so it looks seamless. -
Dry slowly:
Loosely cover the mug with plastic to let it dry slowly. Uneven drying between the handle and body can cause cracks. -
Bisque fire:
Once the mug is bone dry, fire the piece in a kiln to bisque temperature (usually cone 04). -
Glaze application:
Dip or brush on a matte white or semi-transparent glaze. This type of glaze is crucial because it settles into the crevices of the coils, accentuating the horizontal lines rather than hiding them. -
Final wipe:
Use a damp sponge to wipe the bottom of the mug clean of any glaze to prevent it from sticking to the kiln shelf. -
Glaze fire:
Fire the mug again to the maturation temperature of your specific clay body and glaze (typically cone 5 or 6 for stoneware).
Keep it Rounded
Don’t press too hard when smoothing the interior. Support the outside wall gently with your cupped hand to ensure the exterior coils stay plump and round.
Fixing Gaps
If you see light through the coils, you haven’t blended the inside enough. add a thin ‘wading’ coil to the interior seam and smooth it down to seal the gap.
Now you have a wonderfully textured mug ready for your favorite warm beverage


Chunky Coil Strap Handle Mug
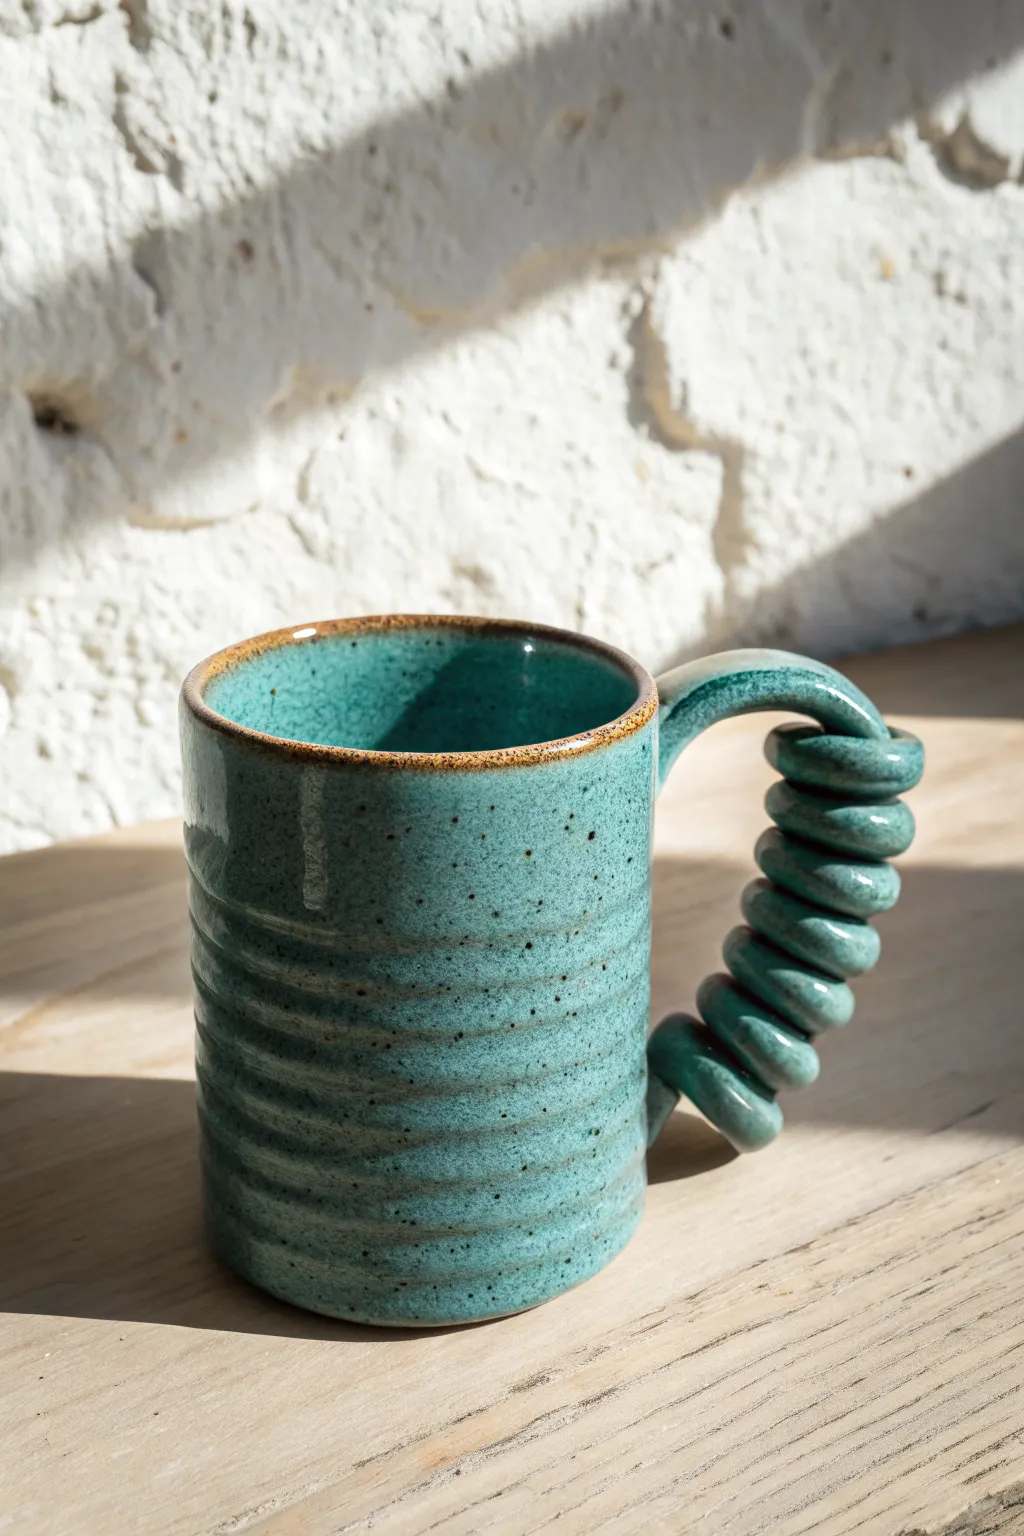
Add a playful, retro twist to your next pottery piece with this distinctive coiled handle design. The contrast between the simple, ribbed mug body and the dense, spring-like handle creates a captivating tactile experience that feels great in the hand.
Step-by-Step
Materials
- Stoneware clay body (speckled buff recommended)
- Pottery wheel
- Throwing tools (sponge, wire cutter, rib)
- Small wooden modeling tool or knitting needle
- Rolling pin or slab roller
- Fettling knife
- Serrated rib or scoring tool
- Slip
- Turquoise/Teal dipping glaze (cone 6 or appropriate for your clay)
- Dowel or smooth rod (approx. 1/2 inch diameter)
Step 1: Throwing the Body
-
Center and open:
Begin with about 1 lb of clay on your wheel. Center it firmly and open the vessel, establishing a flat floor approximately 3 inches wide. Compress the floor well to prevent cracks later. -
Pull the walls:
Pull the cylinder up to a height of about 4-4.5 inches. Aim for vertical walls, keeping the thickness consistent from bottom to top. -
Add texture:
Instead of smoothing the outside with a rib, use your fingers or a notched tool to intentionally spiral up the side as the wheel spins. This creates the gentle, horizontal ridges seen on the body of the mug. -
Finish the rim:
Chamois or gently round the lip with your sponge for a comfortable drinking edge. Wire cut the base and set the cylinder aside to reach leather-hard consistency.
Loose Coils?
If your coil handle keeps unraveling or losing shape, let the initial coil stiffen for 10 minutes *before* wrapping it around the dowel. This reduces sag.
Step 2: Crafting the Coiled Handle
-
Prepare the coil:
Roll out a consistent coil of clay, roughly the thickness of a pencil or slightly thicker (about 1/4 to 3/8 inch). You want it long enough to wrap around your dowel multiple times. -
Wrap the coil:
Take your wooden dowel or rod. Dust it lightly with cornstarch if your clay is sticky. Carefully wrap the clay coil around the dowel in a tight spiral. Ensure the loops touch each other gently but aren’t mashed together. -
Form the curve:
While the clay is still wrapped on the dowel, gently bend the dowel (if flexible) or slide the coil off carefully and bend the coil itself into a ‘C’ shape for the handle. If you slide it off, handle it delicately to maintain the spiral structure. -
Refine the ends:
Leave a small section of un-coiled clay at the top and bottom of your spiral. These straight sections will serve as the attachment points to the mug body. -
Stiffen slightly:
I find it helpful to let the handle sit for 15-20 minutes. It needs to be firm enough to hold its shape without sagging, but still plastic enough to attach.
Step 3: Assembly & Finishing
-
Trim the body:
Once the mug body is leather hard, flip it over and trim the foot ring. Clean up any sharp edges. -
Check fit:
Hold the coiled handle up to the mug to visualize placement. The top attachment should be near the rim, and the bottom should secure near the base. -
Score and slip:
Score the attachment points on both the mug body and the handle ends aggressively. Apply a generous amount of slip to both surfaces. -
Attach firmly:
Press the handle onto the mug with firm pressure. Because the handle is delicate, support the coils while you press the attachment tabs. -
Clean connections:
Use a small modeling tool to blend the clay at the attachment points, ensuring a seamless transition. Wipe away excess slip with a damp brush. -
Dry slowly:
Cover the mug loosely with plastic for at least 24 hours. This allows the moisture levels in the thick handle and thin body to equalize, preventing cracks. -
Bisque fire:
Once bone dry, fire the piece to bisque temperature (usually cone 04).
Level Up: Ombré Effect
Double-dip the top third of the mug in a translucent white or light blue glaze. This creates a drippy, layered effect over the teal base.
Step 4: Glazing
-
Wax the foot:
Apply wax resist to the bottom foot ring to keep it free of glaze. -
Dip the mug:
Using dipping tongs, submerge the entire mug into your turquoise/teal glaze for 3-5 seconds. Shake off excess glaze gently as you pull it out. -
Watch the handle:
Check the coils on the handle. If glaze has bridged the gaps between coils, blow gently or use a pin tool to clear the space so the detail remains sharp. -
Wipe the rim (optional):
To achieve the brown breaking effect seen in the photo, gently sponge a tiny bit of glaze off the very edge of the rim, allowing the clay body’s iron to show through during firing. -
Final fire:
Fire to the maturity temperature of your clay and glaze (typically cone 5 or 6 oxidation for this look).
Enjoy your morning coffee with the satisfying grip of your new textured creation


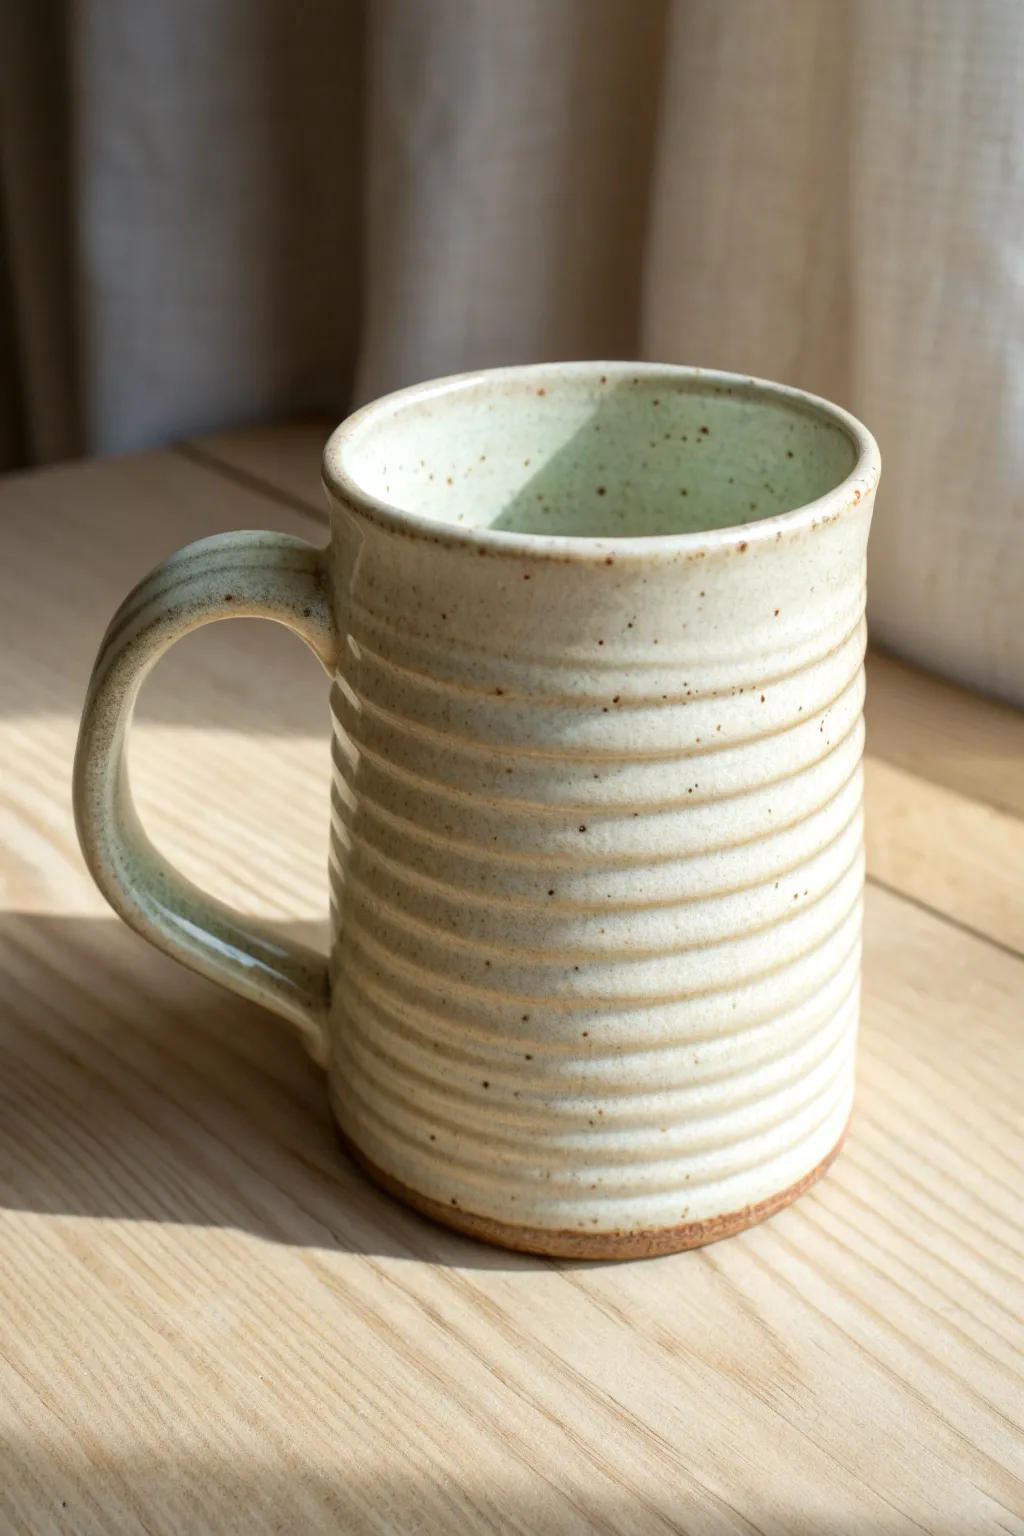
Slip-Highlighted Groove Coil Mug

Embrace the rustic charm of hand-building with this beautifully textured coil mug. The design highlights the natural grooves of the construction process, glazed in a speckled cream finish that pools elegantly in the recesses.
How-To Guide
Materials
- Stoneware clay (speckled or buff)
- Pottery wheel (optional, see phase 1)
- Clay extruder (for consistent coils)
- Scoring tool or serrated rib
- Slip (clay and water slurry)
- Wooden modeling tool
- Sponge
- Cutting wire
- Speckled cream or oatmeal glaze
- Kiln
Step 1: Forming the Base & Body
-
Prepare the base:
Start by rolling out a slab of clay about 1/4 inch thick. Use a round cookie cutter or a needle tool to cut a circle about 3.5 inches in diameter for the base of your mug. -
Create consistent coils:
Roll out several long coils of clay. For the uniform look enhancing this design, use a clay extruder if available, or roll carefully by hand until they are roughly the thickness of your pinky finger. -
Score and slip the base:
Score the outer edge of your circular base thoroughly and apply a generous amount of slip to ensure a strong potential bond. -
Begin coiling:
Lay your first coil onto the slipped edge of the base. Gently press it down to adhere. Cut the end at an angle to join the coil to itself seamlessly. -
Build the height:
Continue stacking coils one on top of another. Instead of smoothing the outside completely flat, which is common, we want to preserve the rounded definition of each coil. -
Blend the interior:
While keeping the outside textured, it is crucial to smooth the inside for functionality. Support the outside with one hand and use your thumb or a wooden tool to smear the clay from the top coil down into the one below on the interior. -
Refine the exterior grooves:
Once you have reached your desired height (about 4-5 inches), use a damp fingertip or a rounded tool to gently smooth the valleys between the exterior coils without erasing them. This creates that specific ribbed look. -
Shape the rim:
Add a final coil for the rim or simply compress the top edge. Smooth it with a chamois or a piece of plastic to ensure it is comfortable for drinking.
Step 2: Handle & Finishing
-
Pull or roll the handle:
Form a thick strip of clay for the handle. I prefer pulling a handle directly from a lump of clay for a more organic curve, but you can also roll a coil and flatten it slightly. -
Shape the ear:
Curve the clay into a question mark or ‘ear’ shape. Hold it up to the leather-hard mug body to check the proportions. -
Attach the handle:
Score and slip the attachment points on both the mug and the handle. Press firmily to attach, blending the clay at the joints with a modeling tool for a seamless connection. -
Dry slowly:
Cover the mug loosely with plastic to let it dry slowly. This is vital to prevent the handle from cracking away from the body as the clay shrinks. -
Bisque fire:
Once bone dry, fire the mug in a kiln to bisque temperature (usually cone 04 or 06).
Uneven Drying?
If the handle pulls away during drying, wrap the body in plastic but leave the handle exposed for an hour to equalize their moisture levels.
Step 3: Glazing
-
Wax the foot:
Apply wax resist to the bottom of the mug and slightly up the side to keep the foot ring clean. -
Mix the glaze:
Prepare a speckled cream or oatmeal glaze. Stir it well to ensure the speckles are evenly distributed throughout the bucket. -
Dip and pour:
Pour glaze inside the mug, swirl, and dump it out. Then, holding the mug by the foot (or using tongs), dip the exterior into the glaze bucket for about 3 seconds. -
Highlight the grooves:
As the glaze dries, it naturally settles thicker in the grooves between the coils. This variation in thickness creates the darker stripes seen in the final piece. -
Clean the rim:
Check the rim for any sharp drips and smooth them with a finger. The glaze often breaks (thins) over the high points of the coils, turning a warm brown. -
Glaze fire:
Fire the mug again to the maturation temperature of your clay and glaze (typically cone 5 or 6). Allow the kiln to cool completely before unloading.
Level Up: Oxide Wash
Before glazing, wipe a diluted iron oxide wash into the grooves and wipe the high points clean for deeper, richer contrast.
Enjoy your morning coffee in a mug that feels as good to hold as it looks on the shelf

The Complete Guide to Pottery Troubleshooting
Uncover the most common ceramic mistakes—from cracking clay to failed glazes—and learn how to fix them fast.
Beehive-Inspired Coil Mug
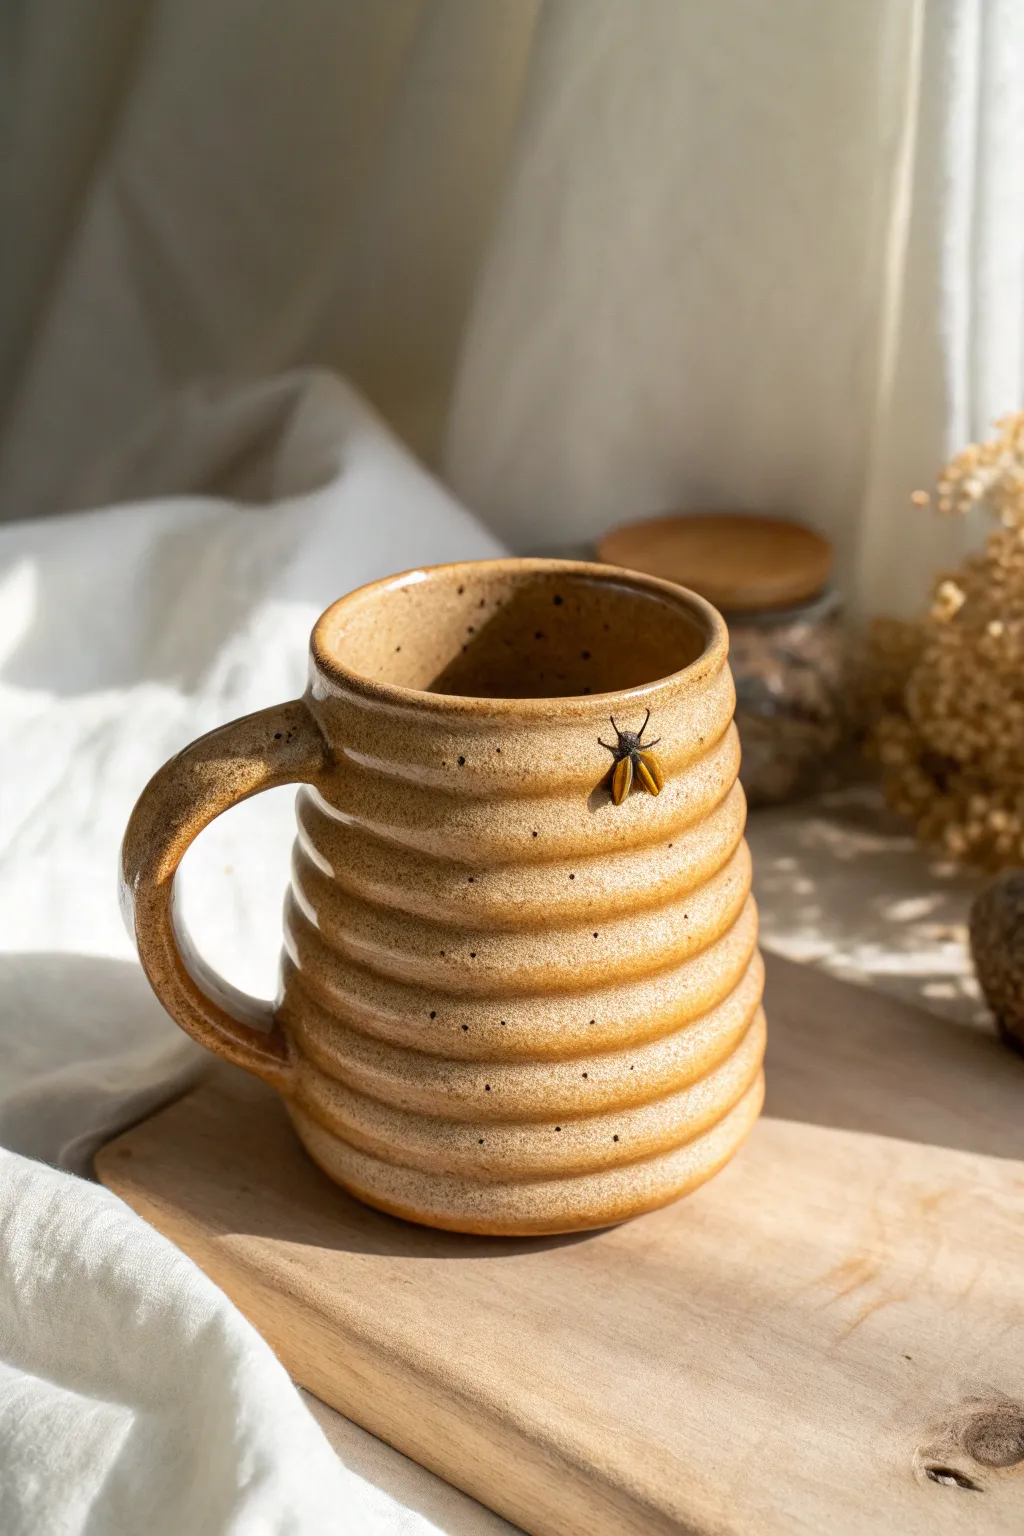
Embrace the warmth of nature with this charming beehive-inspired coil mug, featuring prominent ridges and a golden honey glaze. This project combines classic coil building techniques with whimsical sculptural details, resulting in a cozy vessel perfect for your morning tea.
Step-by-Step
Materials
- Stoneware clay (smooth or speckled)
- Pottery wheel (optional for base, but hand-building tools are primary)
- Clay extruder (optional) or rolling surface
- Scoring tool and slip
- Wooden modeling tools
- Sponge
- Yellow-ochre or honey-colored stoneware glaze
- Small amounts of black underglaze or glaze (for the bee)
- Fine detail paintbrush
- Kiln
Step 1: Building the Hive Base
-
Prepare the Base Slab:
Begin by rolling out a circular slab of clay approximately 1/4 inch thick to serve as the floor of your mug. Cut it to your desired diameter, smoothing the edges with a damp sponge. -
Roll Your Coils:
Roll out several long, even snakes of clay. Aim for a thickness of about 1/2 inch. Try to keep them consistent, as this will determine the uniformity of your beehive ridges. -
Score and Slip:
Score the outer edge of your base slab and apply a liberal amount of slip. Place your first coil on top of the scored area, pressing it down gently but firmly. -
Stacking the Shape:
Continue stacking coils one on top of the other. To create the unique beehive shape, stack each subsequent coil slightly inward as you move up, creating a gentle taper towards the rim. Don’t smooth the outside; distinct ridges are key to this look. -
Internal Smoothing:
While preserving the outer texture, you must blend the coils on the inside to ensure the mug is watertight. Use a wooden tool or your finger to smear the clay downward from the top coil to the one below it, smoothing the interior surface completely.
Step 2: Handle and Details
-
Form the Handle:
Pull or roll a thick coil for the handle. Curve it into a comfortable ‘C’ or ear shape that complements the rounded body of the mug. -
Attach the Handle:
Score and slip the contact points on both the mug body and the handle. Press the handle firmly onto the side of the mug, blending the clay at the joints for a secure bond. I find using a small coil to reinforce the connection point adds extra stability. -
Sculpt the Bee:
Roll a tiny, oval-shaped piece of clay for the bee’s body. Add two smaller teardrop shapes for wings. Attach this small sculpture to the upper section of the mug using a dab of slip. -
Refine the Rim:
Use a damp chamois or sponge to compress and round off the top rim of the mug. This ensures it will be comfortable to drink from. -
Slow Drying:
Cover the mug loosely with plastic to allow it to dry slowly and evenly. This helps prevent the handle from cracking away from the body. -
Bisque Fire:
Once bone dry, fire the piece in the kiln to bisque temperature (usually Cone 04 or 06) to prepare it for glazing.
Cracking Coils?
If coils crack while rolling, your clay is too dry. Spritz the clay with water, wedge it thoroughly, and try again. Keep unused clay covered with plastic.
Step 3: Glazing and Finishing
-
Speckled Effect:
If your clay body isn’t naturally speckled, you can flick iron oxide wash or a speckled underglaze onto the bisque ware before the main glaze application. -
Glaze Application:
Dip or brush your honey-colored glaze over the entire mug, inside and out. Ensure the glaze gets into the deep crevices between the coils but check that it isn’t too thick, or it might run during firing. -
Wipe the Bee:
Carefully wipe the glaze off the small sculpted bee with a damp brush or sponge. You want the raw clay or specific underglaze colors to show here. -
Paint the Bee Details:
Using a fine brush, apply black underglaze or a dark glaze to the bee’s body and tiny lines for legs. You can leave the wings unglazed for contrast or use a transparent glaze. -
Clear Coat the Bee:
Dab a tiny amount of clear glaze over the bee if you used underglaze, just to seal it and give it a slight shine. -
Glaze Fire:
Load the kiln carefully and fire to the maturation temperature of your glaze and clay body (typically Cone 5 or 6 for stoneware).
Make it a Set
Make a matching ‘honey dipper’ spoon rest or a larger pitcher with the same coil technique to create a full breakfast service set.
Once cooled, your mug is ready to hold your favorite warm beverage with a touch of handmade sweetness
Hidden Rattle-Bottom Coil Mug
This rustic, speckled cream mug features calming horizontal ridges and a delightful secret hidden in its base: a gentle rattle that sounds when lifted. The tactile coil texture adds grip while the soothing color palette makes it perfect for slow mornings.
Step-by-Step Tutorial
Materials
- Speckled stoneware clay (approx. 1.5 lbs)
- Pottery wheel (for the base form) OR banding wheel for hand-building
- Small clay beads or dried clay balls (pre-fired or bone dry)
- Needle tool
- Rib tool (metal or wood)
- Sponge
- Scoring tool or serrated rib
- Slip (clay mixed with water)
- Creamy matte white glaze
- Kiln
Step 1: Forming the Rattle Base
-
Prepare the false bottom:
Start by throwing or rolling out two small discs of clay, about 3 inches in diameter. One will be the true bottom, and one will be the interior floor of the mug. -
Create the cavity wall:
On the bottom disc, attach a small ring of clay around the edge, about 1/2 inch high, to create a shallow hollow space. -
Insert the rattle elements:
Place 5-7 small, bone-dry clay balls or pre-fired ceramic beads into this hollow cavity. Ensure they are loose and not touching wet slip. -
Seal the chamber:
Score and slip the top edge of the ring, then carefully place the second clay disc on top. Compress the edges firmly to seal the air pocket. -
Compress and vent:
Smooth the seam perfectly so it looks like a single thick base. Use a needle tool to poke a tiny, inconspicuous hole in the bottom disc to allow air to escape during firing so it doesn’t explode.
Shake Test
Make sure your rattle beads are completely dry clay or already fired. Wet clay balls will stick to the inside of the chamber and won’t rattle after firing.
Step 2: Building the Coiled Body
-
Roll your coils:
Roll out several long, even snakes of clay, roughly the thickness of your pinky finger. Keep them consistent for that uniform ridged look. -
Attach the first coil:
Score and slip the top perimeter of your prepared rattle base. Lay the first coil down, pressing it firmly onto the base. -
Blend the inside only:
To specific key to this design is the visible texture. Blend the coil *downwards* into the base on the *inside* of the mug only, leaving the outside rounded. -
Build upward:
Continue stacking coils one by one. Score and slip between each layer, stacking them directly vertically to create straight walls. -
Smoothing the interior:
After every 2-3 coils, use a wet sponge or rib to thoroughly smooth the inside wall. A smooth interior is essential for cleaning the mug later. -
Refine the exterior ridges:
Once you reach the desired height, use a damp finger to gently run along the exterior grooves. Don’t flatten them; just soften any sharp crumbles. -
Form the rim:
Add a final coil for the rim. I like to compress this one significantly with a chamois or smooth plastic to make it comfortable for drinking.
Break the Uniformity
For a more organic look, vary the thickness of your coils slightly as you build up, or gently pinch the ridges to create subtle undulations.
Step 3: Handle and Finishing
-
Pull a matching handle:
Pull a strap handle from a lump of clay. Aim for a simple C-shape that mimics the roundness of the coils. -
Attach the handle:
Wait for the mug body to act stiff leather-hard. Score and slip the attachment points and press the handle firmly into place. -
Clean connections:
Use a specialized small wooden tool to clean up the excess slip where the handle meets the ridges, maintaining the definition of the coils. -
Bisque fire:
Allow the mug to dry slowly to prevent cracking at the rattle base. Fire to bisque temperature (usually cone 04/06). -
Glaze application:
Dip the mug into a creamy matte white glaze. The glaze should be thin enough to pool slightly in the coil crevices but not obscure the texture. -
Final wipe:
Wipe the bottom of the mug clean with a sponge to prevent it sticking to the kiln shelf. Ensure the tiny vent hole is not clogged with glaze. -
Glaze fire:
Fire to the final temperature required by your clay and glaze (typically cone 5 or 6 for stoneware) to finish the piece.
Enjoy the gentle sound of your hidden rattle every time you take a sip of coffee or tea