If you can roll a clay “snake,” you can make coil pottery—that’s my favorite thing about this technique. Here are beginner-friendly coil-built projects that feel totally doable at a kitchen table, while still giving you that handmade, earthy magic.
Bowl-Mold Coil Bowl
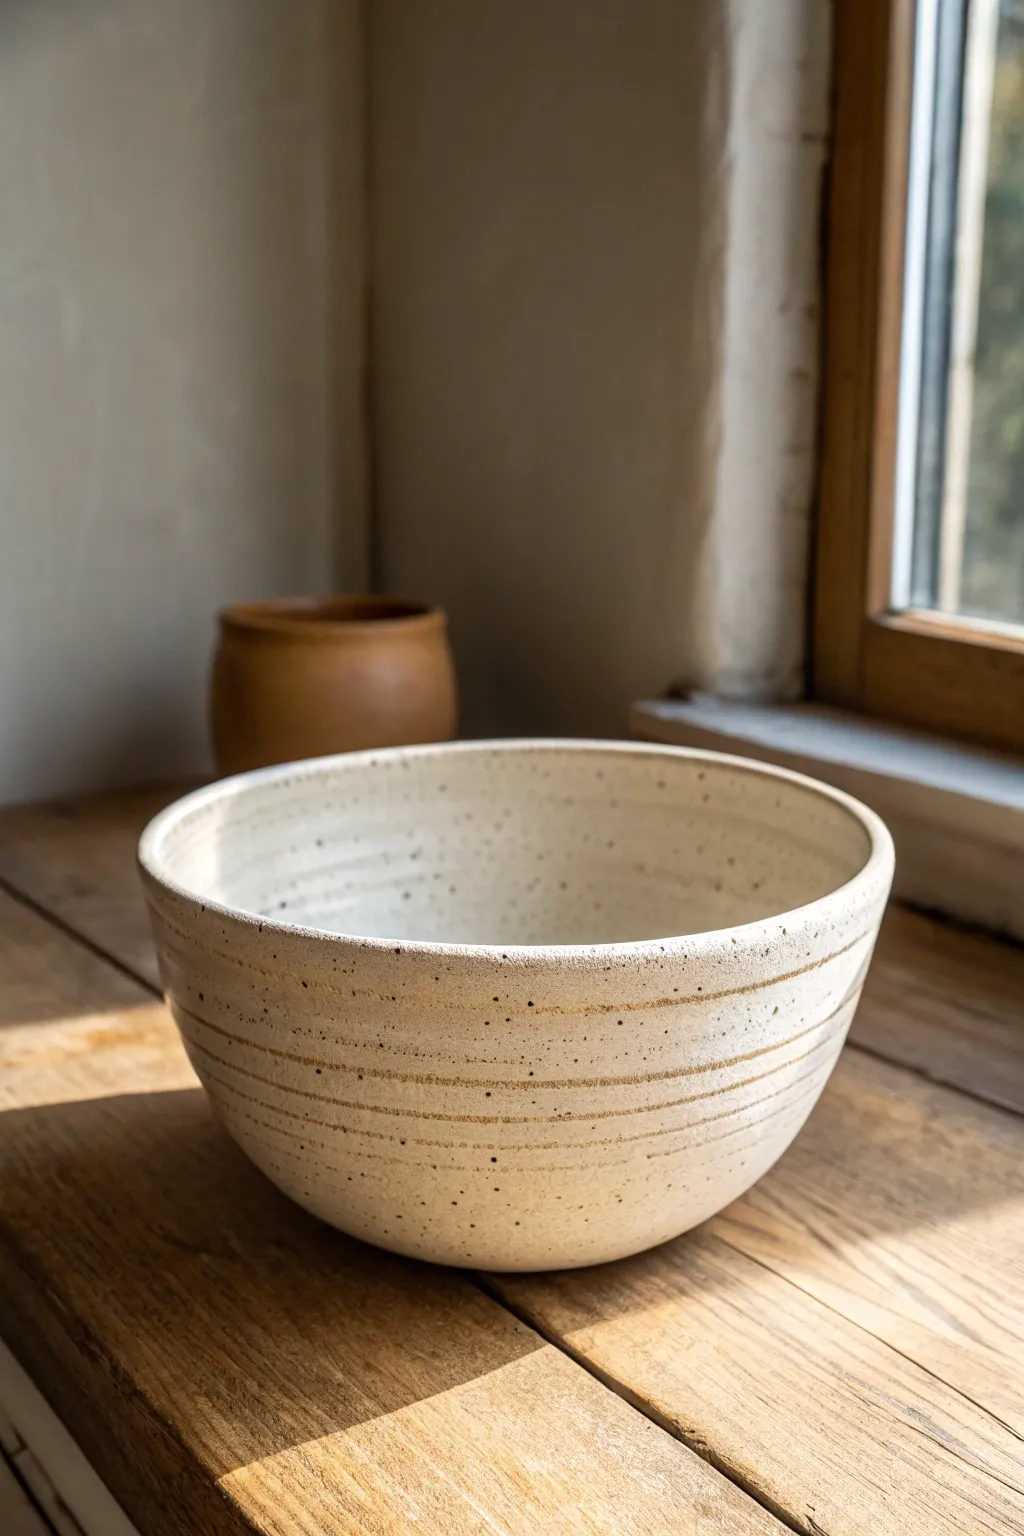
This project uses a simple slump mold technique to create a beautifully symmetrical bowl with a rustic, speckled finish. The final piece features subtle horizontal striations that highlight the handmade coil process, perfected with a classic creamy white glaze that lets the clay’s character shine through.
Step-by-Step Guide
Materials
- Speckled Stoneware Clay (e.g., Laguna Speckled Buff)
- Rib tool (wooden or silicone)
- Serrated rib or scoring tool
- Slip (clay mixed with water)
- Plastic mixing bowl (to use as a mold)
- Newsprint or thin plastic sheet
- Rolling pin
- Canvas mat or wooden board
- Sponge
- Creamy white dipping glaze
Step 1: Preparing the Base
-
Prep the mold:
Begin by selecting a smooth plastic mixing bowl that matches the shape you want. Line the inside of this bowl carefully with newsprint or a thin sheet of plastic; this barrier ensures your clay won’t stick to the mold later. -
Roll a slab:
Roll out a small slab of your speckled clay to about ¼ inch thickness. This will serve as the stable foot and bottom of your bowl. -
Cut the base:
Use a needle tool or knife to cut a perfect circle from your slab. The size should match the flat bottom of your bowl mold. -
Place the base:
Gently gently lift the clay circle and place, centering it at the bottom of your lined mold. Press it down lightly so it sits flat.
Pro Tip: Coil Consistency
When rolling coils, use light pressure and move your hands from the center outward to keep the thickness even. Irregular coils create lumpy walls.
Step 2: Building the Walls
-
Roll the first coils:
Take a chunk of clay and roll it back and forth on your canvas until you have a long, even snake about the thickness of your pinky finger. -
Score and slip:
Score the outer edge of your base circle and apply a generous amount of slip. Lay your first coil along this edge, pressing it firmly into the base. -
Blend the interior:
Use your thumb or a modeling tool to smear the inside of the coil down into the base clay. Complete blending on the inside is crucial for structural integrity, even if we leave the outside textured. -
Continue stacking:
Roll more coils and continue stacking them up the sides of the mold. Remember to score and slip between every single layer to prevent cracking during firing. -
Smoothing the interior:
As you build upward, periodically stop to smooth the interior walls with a flexible rib tool. I find using a slightly damp sponge afterwards helps create that flawless, smooth inside surface seen in the photo. -
Refining the exterior texture:
Once you reach the top of the mold, let the clay firm up to a ‘leather hard’ state. Carefully remove the bowl from the mold and peel away the paper or plastic. -
Enhancing the lines:
While supporting the wall from the inside, gently run a tool or finger along the exterior coil seams. We want to smooth them enough so they are connected, but leave a subtle horizontal groove to mimic the look in the image. -
Rim refinement:
Use a damp sponge to round off the top rim of the bowl. A sharp edge is prone to chipping, so a soft curve is both functional and aesthetic.
Level Up: Exposed Clay
Wipe the exterior with a damp sponge after glazing but before firing. This removes some glaze from the high points, revealing raw speckled clay on the ridges.
Step 3: Finishing and Glazing
-
Dry slowly:
Loosely cover your bowl with plastic and let it dry very slowly over several days. Uneven drying is the enemy of coil pots and can cause warping. -
Bisque fire:
Once bone dry, fire the piece to bisque temperature (usually verify with your specific clay body, commonly Cone 04). -
Wax the foot:
Apply wax resist to the bottom of the bowl to prevent glaze from adhering where it touches the kiln shelf. -
Dip glazing:
Mix your creamy white glaze well. Hold the bowl by the foot and dip it essentially in one smooth motion into the glaze bucket. Hold for 3 seconds and lift. -
Review the surface:
Check that the glaze has settled nicely into the coil grooves. If it’s too thick, it might hide the texture; if too thin, it won’t feel smooth. -
Final wipe:
Use a clean sponge to wipe back any glaze drips on the foot or rim. -
Glaze fire:
Fire the bowl to the final maturity temperature of your clay and glaze (typically Cone 5 or 6 for stoneware).
Now you have a stunning, functional bowl that beautifully displays the rhythmic process of its creation


Classic Spiral-Base Coil Bowl
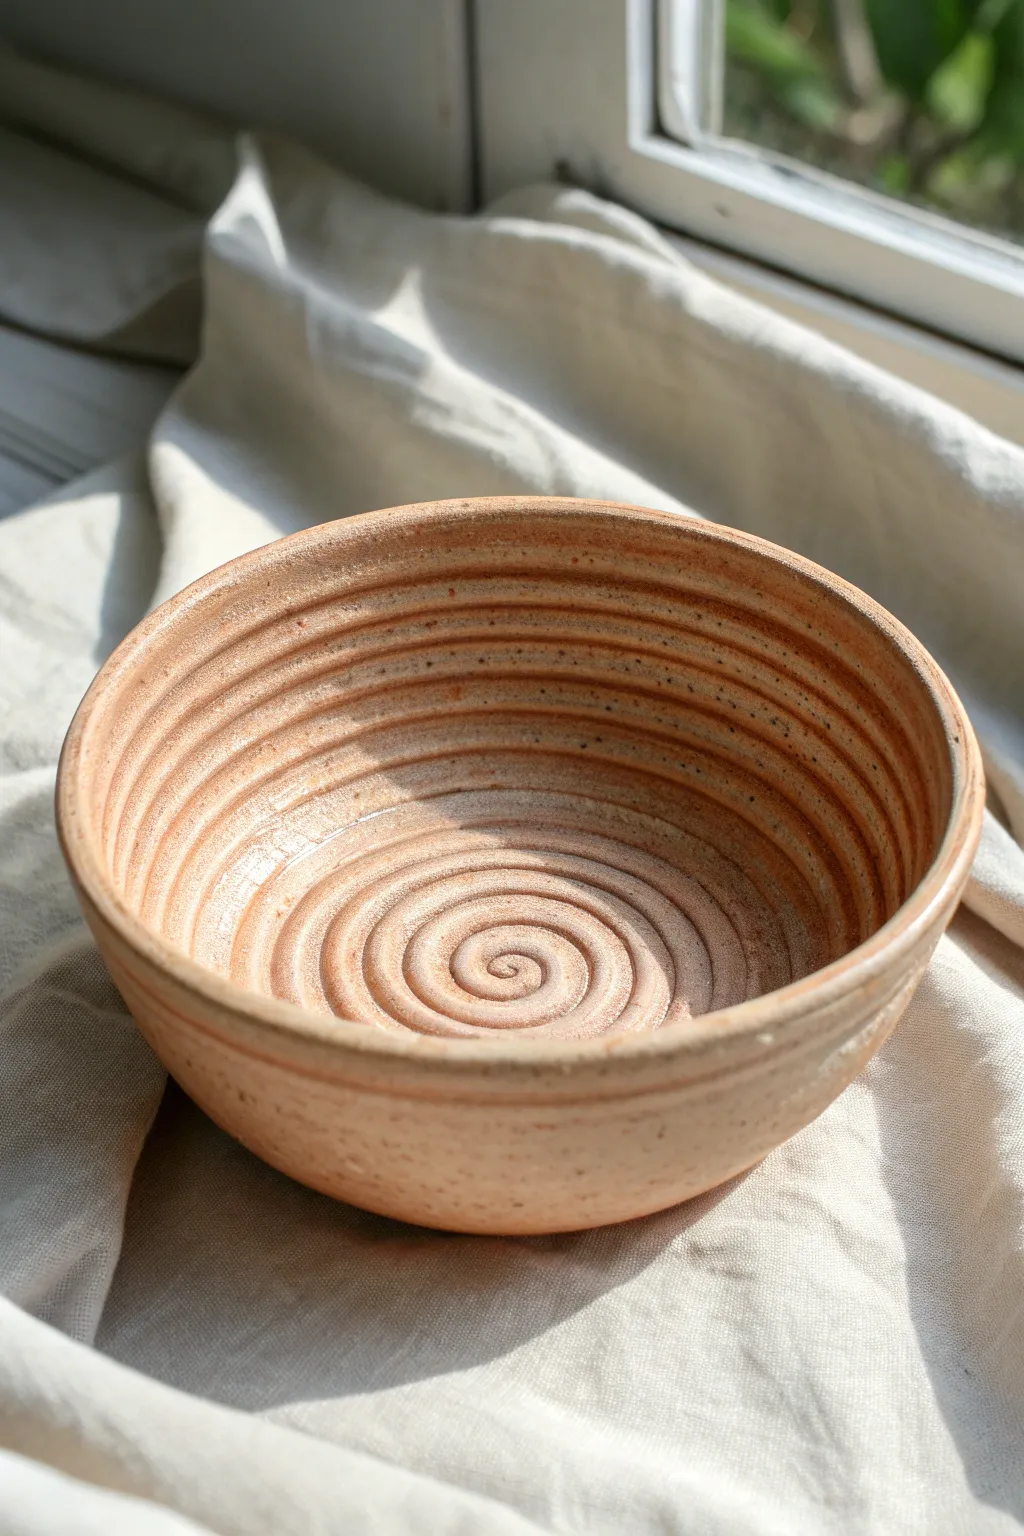
This rustic, charming bowl celebrates the process of construction by leaving the structural coils visible as a design element. The continuous spiral pattern creates a mesmerizing interior texture that draws the eye straight to the center.
Step-by-Step
Materials
- Speckled stoneware clay (buff or light brown)
- Clay scoring tool or fork
- Slip (clay mixed with water)
- Wooden modeling tool or rib
- Sponge
- Cutting wire
- Work board or bat
Step 1: Creating the Base
-
Roll the primary coil:
Begin by taking a chunk of your speckled clay and rolling it out on a table. Aim for a long, even snake that is about the thickness of your ring finger or roughly half an inch. -
Start the spiral:
On your work board, tuck one end of the coil in tight to start a snail-shell shape. This will form the very center button of your bowl. -
Build the floor:
Continue winding the coil tightly around that center button, keeping it flat on the table, until the base is about 3 to 4 inches in diameter. I like to gently press the coils together horizontally as I wind to ensure a tight fit. -
Smooth the exterior:
Carefully flip the spiral base over. Using your thumb or a wooden rib, smudge the coils together completely on this bottom side only. This provides structural integrity while keeping the spiral design visible on the inside.
Step 2: Building the Walls
-
Prepare the first layer:
Flip the base back over so the spiral is visible again. Score the outer edge of the base circle with your tool and apply a dab of slip. -
Stack and lift:
Place a new coil directly on top of that scored outer edge. Instead of placing it squarely on top, set it slightly outward to encourage the bowl to widen. -
Join the seam:
Cut the excess coil and press the two ends together firmly to close the ring. -
Blend the exterior:
Support the inside of the wall with one hand. With your other hand, smudge the clay from the new coil down onto the layer below it on the *outside* surface only. Smooth over the join with a rib. -
Maintain the interior texture:
Be very careful not to smudge the inside. You want those distinct spiral lines to remain crisp. Use a damp sponge to gently wipe the inside coils if they need softening, but don’t erase the grooves.
Seamless Connections
When stacking coils, stagger joints so they don’t line up vertically. This ‘bricklaying’ logic makes the wall much stronger and prevents cracks.
Step 3: Shaping and Refining
-
Build upward:
Continue adding coil rings one by one. Score, slip, and stack each layer, stepping them slightly outward to create a gentle curve. -
Control the height:
Build until the bowl reaches your desired height—usually about 4 to 5 coil layers tall for a small serving bowl like this. -
Smooth the rim:
Once you reach the top, run a damp sponge or a piece of chamois leather over the final rim to soften it. It should be smooth to the touch and slightly rounded. -
Refine the outer form:
Use a metal or wooden rib on the outside of the bowl to scrape away imperfections and ensure a continuous, smooth curve from bottom to top. -
Final interior check:
Inspect the inside spiral. If there are any gaps where light shines through, press a tiny bit of soft clay into them, but try to preserve the rhythmic line pattern. -
Drying:
Loosely cover the bowl with plastic to let it dry slowly. This helps prevent the coils from separating as the clay shrinks.
Cracks Appearing?
If coils are cracking as you roll them, your clay is too dry. Dip your hands in water or wrap the clay in a wet towel for 30 minutes before trying again.
Enjoy using your beautifully textured bowl for fruit or simply as a centerpiece to admire the natural clay tones


Straight-Sided Coil Cup
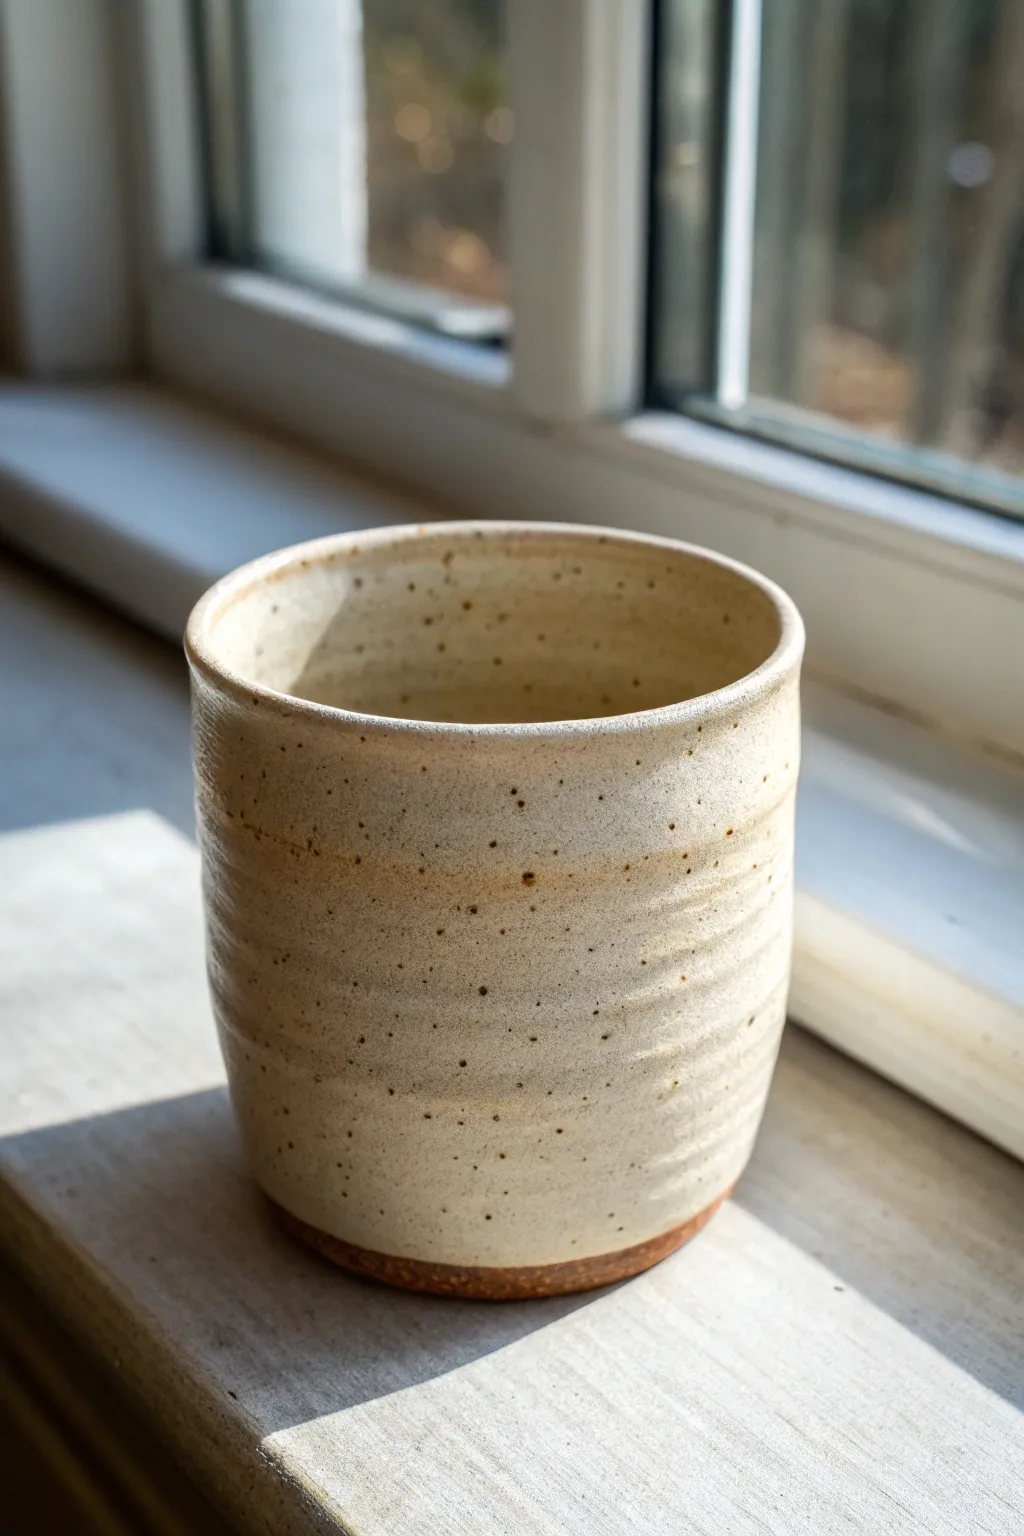
Master the art of creating a perfectly straight cylinder with this simple yet elegant coil project. The finished piece features subtle ridges that catch the light and a cozy, speckled cream glaze that lets the natural clay warmth peek through at the base.
How-To Guide
Materials
- Stoneware clay (preferably speckled or groggy)
- Pottery wheel or banding wheel
- Rolling pin
- Wooden guide slats or dowels (approx. 1/2 inch thick)
- Needle tool
- Serrated kidney tool or scoring tool
- Slip (clay slurry)
- Wooden rib tool
- Sponge
- Cutting wire
- Satin cream or white speckled glaze
Step 1: Creating the Base
-
Roll out a slab:
Begin by taking a handful of your stoneware clay and wedging it briefly to remove air bubbles. Place it on your work surface between two wooden guide slats. Use your rolling pin to flatten the clay into an even slab. -
Cut the circle:
Once your slab is smooth, place a round template or a circular object (like a cookie cutter or lid) about 3-4 inches in diameter onto the clay. Trace around it with your needle tool to cut out a perfect circle. -
Prepare the connection:
Score the outer 1/4 inch of the clay circle’s top surface deeply with your serrated tool. Apply a generous amount of slip to these score marks to act as glue for your first coil.
Smooth Seams
Use a serrated rib tool lightly across the exterior before smoothing. This ‘tooth’ helps grab high spots and fill low spots for straighter walls.
Step 2: Building the Walls
-
Roll coils:
Take a chunk of clay and roll it between your hands or on the table to create a long snake. Aim for a thickness similar to your pinky finger. Try to keep the thickness consistent from end to end. -
Place the first coil:
Lay the coil directly on top of the slipped edge of your base. When the ends meet, cut them at an angle and score/slip them together so the joint is seamless. -
Blend the clay:
With one hand supporting the outside, use your thumb or a wooden tool to smear the clay from the coil down onto the base on the inside. This creates a strong bond. I find smoothing downwards on the inside prevents leaks later. -
Build upward:
Score the top of your first coil and add slip. Place your next coil directly on top. Repeat the blending process, smoothing the clay downward on the inside to join the new coil to the one below it. -
Maintain straight sides:
As you stack more coils, check your profile frequently. Place each coil directly on top of the last one—not flaring out or leaning in—to ensure vertical walls. Build until the cup is about 4-5 inches tall.
Step 3: Refining and Shaping
-
Blend the exterior:
Now, gently blend the coils on the outside. Unlike the inside where you want complete smoothness, here you want to blend just enough to join them while leaving faint horizontal ridges for texture. -
Use a rib:
Take a wooden rib tool and run it vertically up the outside of the pot while rotating your banding wheel. This straightens the walls and compresses the clay but preserves those lovely undulating coil marks. -
Refine the rim:
The rim might be uneven from the last coil. Use a damp sponge or a piece of chamois leather to compress and round the lip, making it comfortable for drinking. -
Clean the foot:
Use a modeling tool to tidy up the bottom edge where the wall meets the table. Create a slight undercut or bevel to give the cup a visual lift. -
Dry slowly:
Cover the cup loosely with plastic and let it dry slowly to the leather-hard stage, then uncover to let it dry completely bone dry. -
Bisque fire:
Fire the piece in a kiln to cone 04 (or your clay’s specific bisque temperature).
Thumb Rest
Before the clay dries, gently press a small indentation near the top rim with your thumb to create a custom ergonomic spot for holding.
Step 4: Glazing
-
Wax the bottom:
Apply wax resist to the bottom of the cup and about 1/4 inch up the side. This creates the unglazed ‘foot’ seen in the photo, revealing the natural clay body. -
Dip into glaze:
Stir your satin cream speckled glaze thoroughly. Holding the cup by the foot, dip it into the bucket for about 3 seconds, ensuring the inside and outside are coated. Shake off excess drips. -
Clean up:
Use a sponge to wipe away any stray glaze beads on the waxed bottom area to prevent it from sticking to the kiln shelf. -
Final firing:
Fire the glazed piece to the maturity temperature of your clay and glaze (typically cone 5 or 6 for stoneware).
Enjoy sipping your morning coffee from a vessel that feels uniquely yours


Tiny Coil Pinch Pot Dish
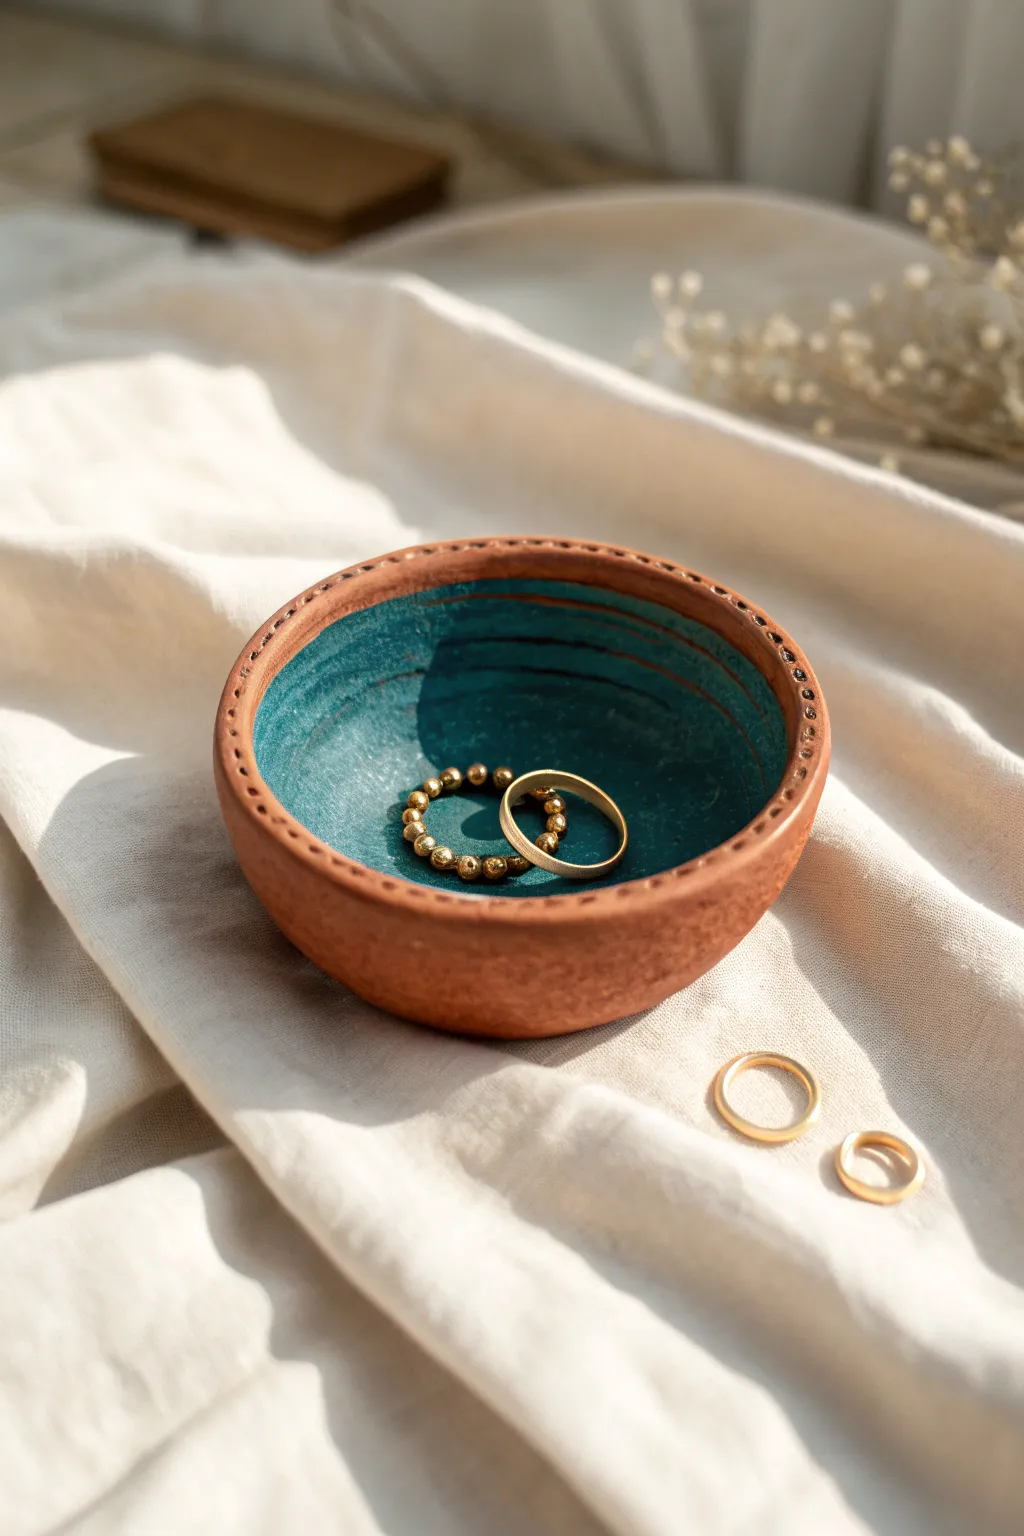
This rustic little jewelry catch-all combines the warmth of raw terracotta with a striking pop of teal glaze. Its textured rim and organic shape make it a perfect beginner project that looks intentionally artisanal rather than just handmade.
Detailed Instructions
Materials
- Terracotta air-dry clay or low-fire earthenware clay
- Rolling pin
- Needle tool or toothpick
- Small sponge
- Teal or turquoise acrylic paint (for air-dry) or glaze (for firing)
- Clear varnish (for air-dry) or clear glaze (for firing)
- Small paintbrush
- Bowl of water
- Canvas mat or cloth to work on
Step 1: Forming the Base
-
Prepare the Clay:
Start with a ball of clay roughly the size of a tangerine. Wedge it well to remove air bubbles, then roll it into a smooth sphere in your palms. -
Open the Pinch Pot:
Push your thumb gently into the center of the sphere, stopping about a half-inch from the bottom. This establishes the floor thickness. -
Pinch the Walls:
Using your thumb and fingers, gently pinch and rotate the clay ball to thin out the walls. Aim for a distinct bowl shape, keeping the walls relatively thick and rustic—about 1/4 inch is ideal. -
Flatten the Bottom:
Tap the pot gently on your work surface to create a flat, stable base so your ring dish won’t wobble.
Clean Dotted Lines
To prevent the clay from bulging when poking the rim holes, support the wall with your finger on the outside directly opposite where you are poking.
Step 2: Adding Detail & Refining
-
Smooth the Interior:
Take a slightly damp sponge and wipe the inside of the bowl. You want to remove deep cracks, but don’t over-smooth; faint tool marks add character. -
Create the Rim Texture:
Using a needle tool or the sharp end of a toothpick, carefully poke a series of small, evenly spaced holes directly into the top of the rim. Go all the way around the circumference. -
Refine the Exterior:
Leave the outside of the bowl relatively untouched. The rougher texture of the clay creates a nice contrast with the smooth interior we will create later. -
Drying:
Let the piece dry completely. If using air-dry clay, this takes 24-48 hours. If using kiln clay, wait until bone dry before the bisque fire.
Step 3: Painting & Finishing
-
Glaze or Paint the Interior:
Load a brush with your teal color. Paint only the interior of the bowl, stopping right at the inner edge of the rim so the dotted texture remains unpainted. -
Layering Color:
I usually verify the opacity after the first coat; you likely need a second or third coat to get that deep, saturated turquoise look seen in the photo. -
Create the Swirl Effect:
While the last layer is slightly wet, use a clean, slightly damp brush to drag faint concentric circles inside the bowl, mimicking wheel-thrown lines. -
Seal the Contrast:
Once the color is dry, apply a clear sealant. If you used air-dry clay, use a matte or satin varnish over the paint to protect it. Leave the exterior raw terracotta for that beautiful textural contrast.
Make it Metallic
For a luxe upgrade, paint the tiny dots on the rim with a fine-tip gold leaf pen after the rest of the dish is sealed and dry.
Place your favorite rings inside and enjoy the earthy charm of your new handmade creation

The Complete Guide to Pottery Troubleshooting
Uncover the most common ceramic mistakes—from cracking clay to failed glazes—and learn how to fix them fast.
Simple Coil Planter With a Rolled Rim
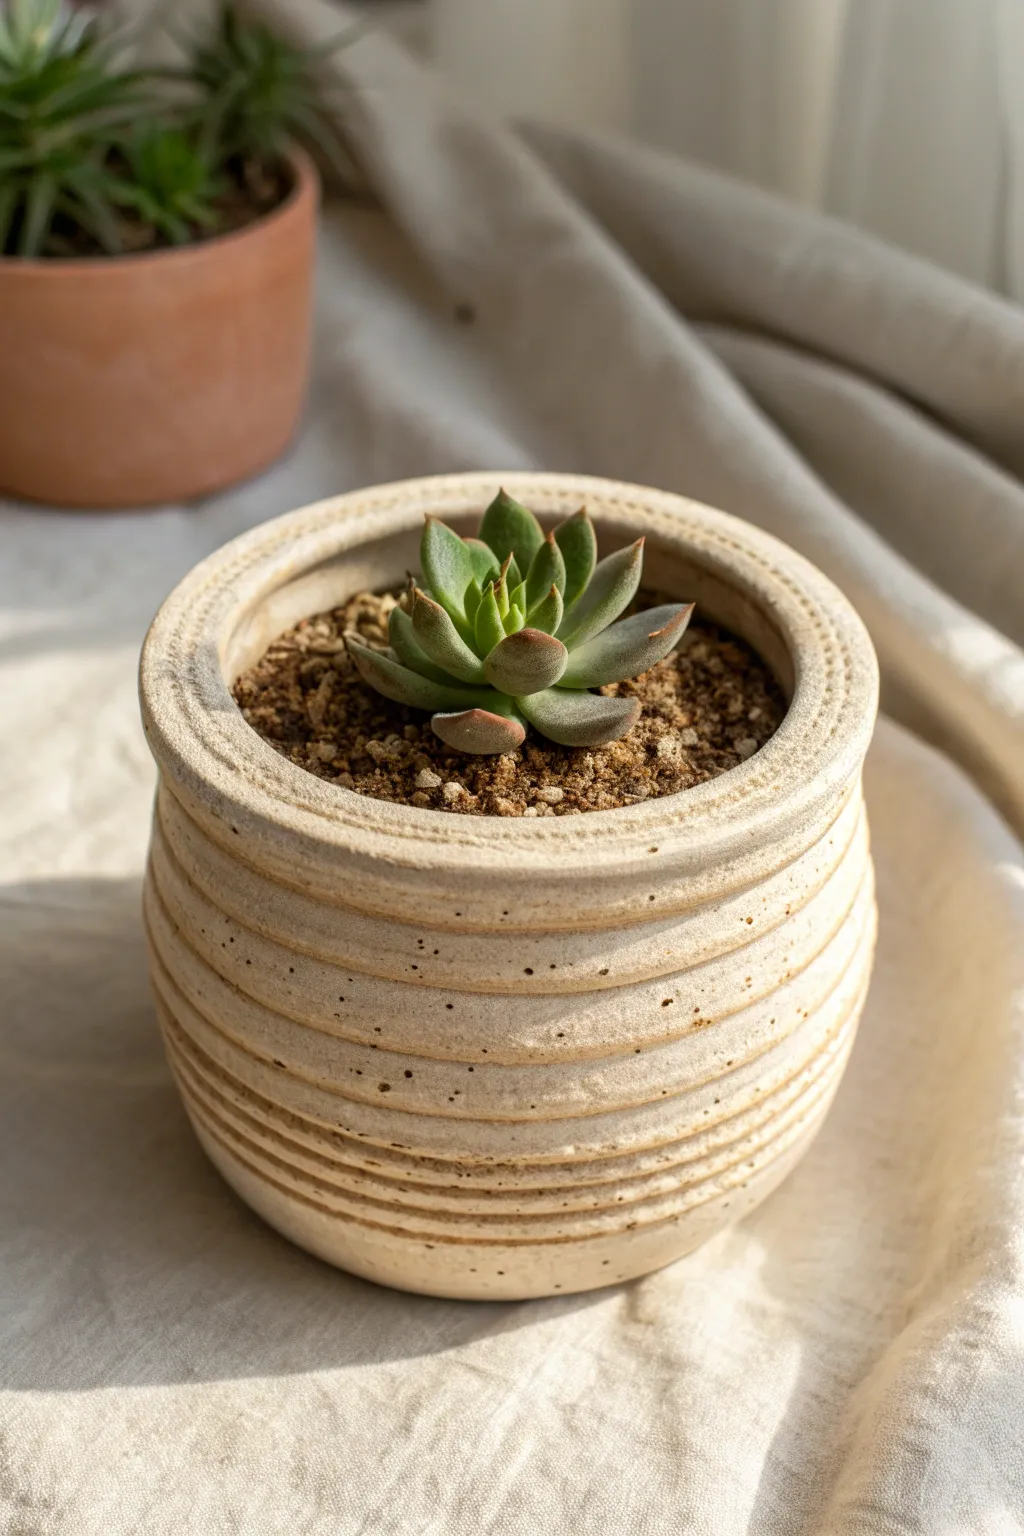
This charming, textured planter celebrates the coil method by leaving its horizontal ridges soft and exposed rather than smoothing them away. The gentle beige clay body and slightly irregular rim give it a warm, handmade feel that beautifully complements small succulents.
Step-by-Step Guide
Materials
- Stoneware clay (buff or speckled beige)
- Pottery wheel or banding wheel (optional but helpful)
- Scoring tool or fork
- Slip (clay and water mixture)
- Wooden modeling tool
- Sponge
- Clay cutting wire
- Rolling pin (optional)
Step 1: Forming the Base
-
Prepare your clay:
Begin by wedging your clay thoroughly to remove air bubbles. This ensures your pot won’t crack during firing and makes the clay easier to work with. -
Create the heavy base:
Roll a ball of clay roughly the size of a tangerine. Flatten it into a disc about 3/8-inch thick to serve as the floor of your pot. -
Check the diameter:
Ensure your base is roughly 3.5 to 4 inches in diameter. You can leave the edges slightly rounded rather than cutting a perfect circle, as this adds to the organic look. -
Score the edge:
Using your needle tool or a fork, scratch up the outer perimeter of the base where your first coil will attach. Apply a generous dab of slip to these scratches.
Keep it clean
Work with a banding wheel if possible. Turning the pot while you work allows you to see the profile from all angles and ensures your coils aren’t leaning to one side.
Step 2: Building the Walls
-
Roll your coils:
Roll out several “snakes” of clay on your table. Aim for a consistent thickness, slightly thicker than a pencil—about 1/2 inch is perfect for this scale. -
Attach the first ring:
Lay your first coil directly on top of the slipped edge of the base. Cut the ends at an angle and overlap them slightly to create a seamless join. -
Blend the inside only:
To keep the exterior texture visible, use your wooden tool or finger to smear the clay of the coil *downward* onto the base on the **interior** of the pot only. Keep the outside distinct. -
Continue stacking:
Score and slip the top of your first coil. Place the second coil on top. I find it helps to offset the joins of the coils so they don’t line up vertically, creating a weak spot. -
Maintain the shape:
As you stack roughly 6-8 coils high, keep them directly vertical or slightly bowing outward to create a gentle belly. Remember to blend the inside seams of every single layer for structural integrity. -
Refine the exterior lines:
The exterior ridges should look soft, not sharp. Run a slightly damp sponge gently over the outside coils to soften the texture without removing the distinct horizontal lines.
Step 3: The Rolled Rim & Finish
-
Add the final coil:
For the rim, roll a slightly thicker coil than the previous ones. Attach it to the top, but position it slightly slightly inward compared to the wall. -
Shape the lip:
Using your thumb and forefinger, pinch the rim gently to round it off. You want a distinct definition between the rim and the wall, almost like a collar. -
Smooth the interior:
Use a damp sponge or a rubber rib to smooth the entire interior wall. This compresses the clay and ensures water won’t seep into invisible cracks between coils. -
Add speckling (optional):
If your clay body isn’t naturally speckled, you can lightly spatter iron oxide or a speckled glaze component onto the raw clay now to mimic the sandy look in the photo. -
Dry slowly:
Loosely cover the pot with plastic to let it dry slowly for a day or two. Rapid drying can cause coil pots to separate at the seams. -
Fire and glaze:
Bisque fire your piece. For the finish shown, apply a matte, transparent or very light beige glaze that breaks over texture, highlighting the coil lines.
Go deeper
Try using two different clay bodies for alternating coils (like white and terracotta) to create a naturally striped effect without needing any glaze at all.
Once fired, fill your new textured creation with a gritty mix and your favorite Echeveria for a perfect sunny windowsill display
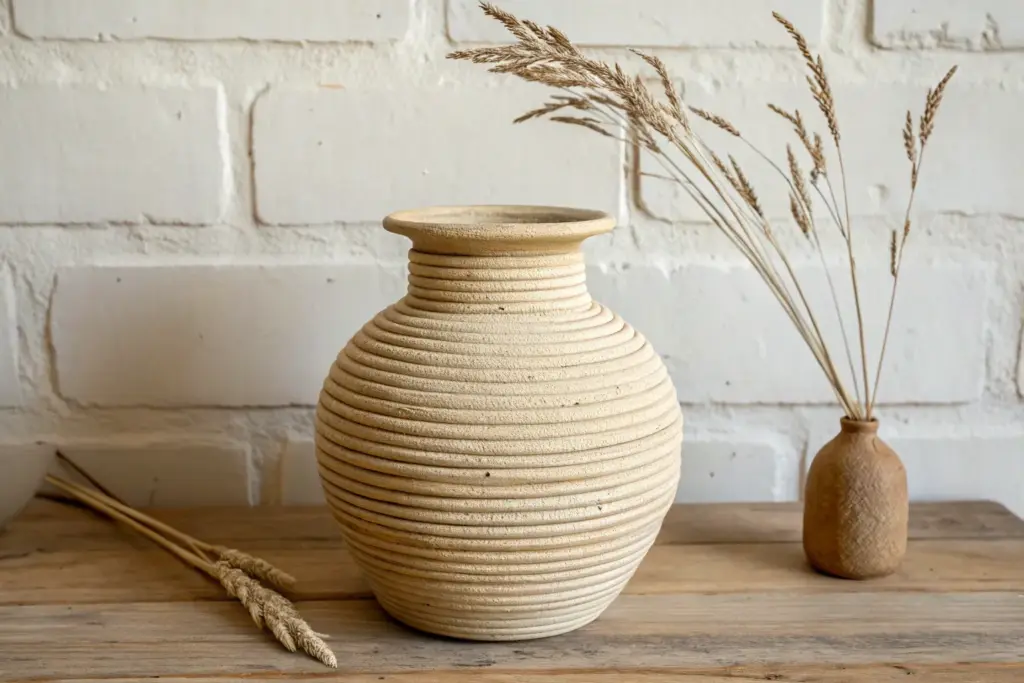
Beginner Coil Bud Vase
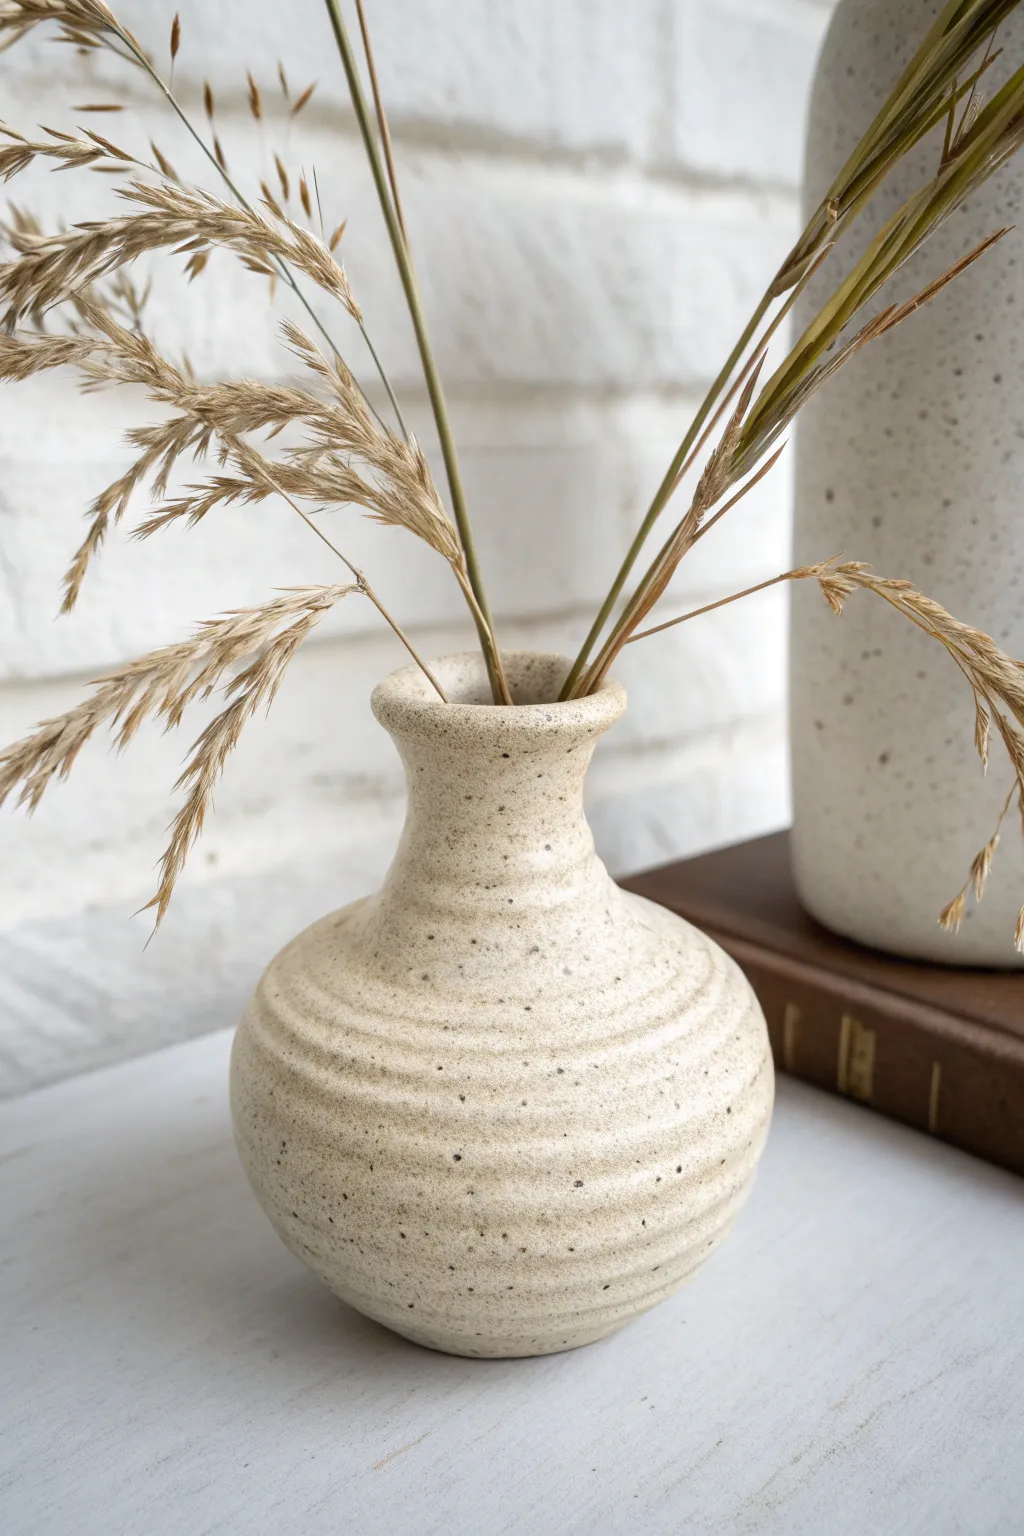
This charming, speckled bud vase combines the tactile nature of coil building with a refined, rounded shape that is perfect for displaying dried grasses or single stems. The beauty of this piece lies in the visible but smoothed coil ridges, giving it a rustic, handcrafted texture that feels modern and organic.
Step-by-Step Tutorial
Materials
- Speckled buff stoneware clay
- Pottery work surface (canvas or wooden bat)
- Fettling knife or needle tool
- Serrated rib or scoring tool
- Vinegar or slip
- Wooden modeling tool
- Flexible metal rib
- Sponge
- Wire cutter
- Clear or matte white glaze
Step 1: Preparation & Base
-
Wedge the clay:
Start by thoroughly wedging your speckled stoneware clay to remove air bubbles and ensure a uniform consistency. This prepares the clay particles for coil rolling. -
Form the base slab:
Pinch off a small ball of clay about the size of a tangerine. Flatten it onto your work surface with your palm to create a circular slab approximately 3 inches in diameter and 1/4 inch thick. -
Trim the base:
Use your needle tool to cut a perfect circle from the slab you just flattened. Remove the excess clay and smooth the edges of the circle with your finger. -
Prepare the coils:
Take a chunk of clay and begin rolling it back and forth on your table to create a long snake. Aim for a thickness similar to your pinky finger. I find rolling from the center outwards helps keep the thickness even. -
Score the foundation:
Rough up the outer rim of your circular base using a serrated rib or scoring tool. Apply a small amount of slip or vinegar to the scored area to act as glue.
Step 2: Building the Belly
-
Attach the first coil:
Lay your first coil directly onto the scored rim of the base. Cut off any excess length so the ends meet perfectly, then blend the ends together. -
Blend the interior:
Use a wooden modeling tool or your thumb to smear the clay from the coil down onto the base on the inside of the pot. This creates a strong seal. -
Layer outward coils:
Add the next 3-4 coils, stacking each one slightly further outward than the last to create the widening ‘belly’ of the vase. Score and slip between every single layer. -
Blend exterior seams gently:
While supporting the inside wall with one hand, gently blend the exterior coils downwards just enough to connect them. Don’t smooth them completely flat; you want to retain that ribbed texture visible in the photo. -
Refine the shape:
Use a flexible metal rib on the inside of the pot to smooth the interior walls and push them outward to round the form.
Cracks Appearing?
If tiny cracks appear between coils while building, your clay might be too dry. Score deeper and use more slip, or spritz your coils with water before attaching.
Step 3: Creating the Neck & Rim
-
Begin tapering in:
Now, place the next few coils slightly inward relative to the previous row. This will start closing the form to create the shoulder of the vase. -
Form the vertical neck:
Once the opening has narrowed to about 1.5 inches, stack the next two coils directly on top of each other vertically to create the straight neck section. -
Flare the rim:
For the final coil, place it slightly outward again to create a gentle flare at the very top, giving the vase its classic silhouette. -
Smooth the lip:
Use a damp sponge or a piece of chamois leather to compress and round off the top rim. It should feel smooth to the touch. -
Refine exterior texture:
Go back over the exterior with a damp sponge. Run it horizontally along the coil grooves to soften sharp edges while keeping the tiered definition distinct.
Even Rolling
To keep your coils perfectly round and non-lumpy, use the full length of your hands from palm to fingertips while rolling, and keep your pressure light and moving.
Step 4: Finishing
-
Dry slowly:
Loosely cover the vase with plastic to let it dry slowly. This prevents the coils from separating or cracking as the clay shrinks. -
Bisque fire:
Once bone dry, fire the piece to bisque temperature (usually cone 04 or 06) in a kiln. -
Apply glaze:
Dip or brush a clear or semi-opaque white glaze over the entire piece. The speckles in the clay body will show through the glaze to create the final look. -
Final firing:
Fire the vase a final time to the maturity temperature of your clay and glaze (often cone 5 or 6).
Fill your new handmade vessel with dried wildflowers to bring a touch of nature indoors


What Really Happens Inside the Kiln
Learn how time and temperature work together inside the kiln to transform clay into durable ceramic.
Coil Utensil Crock
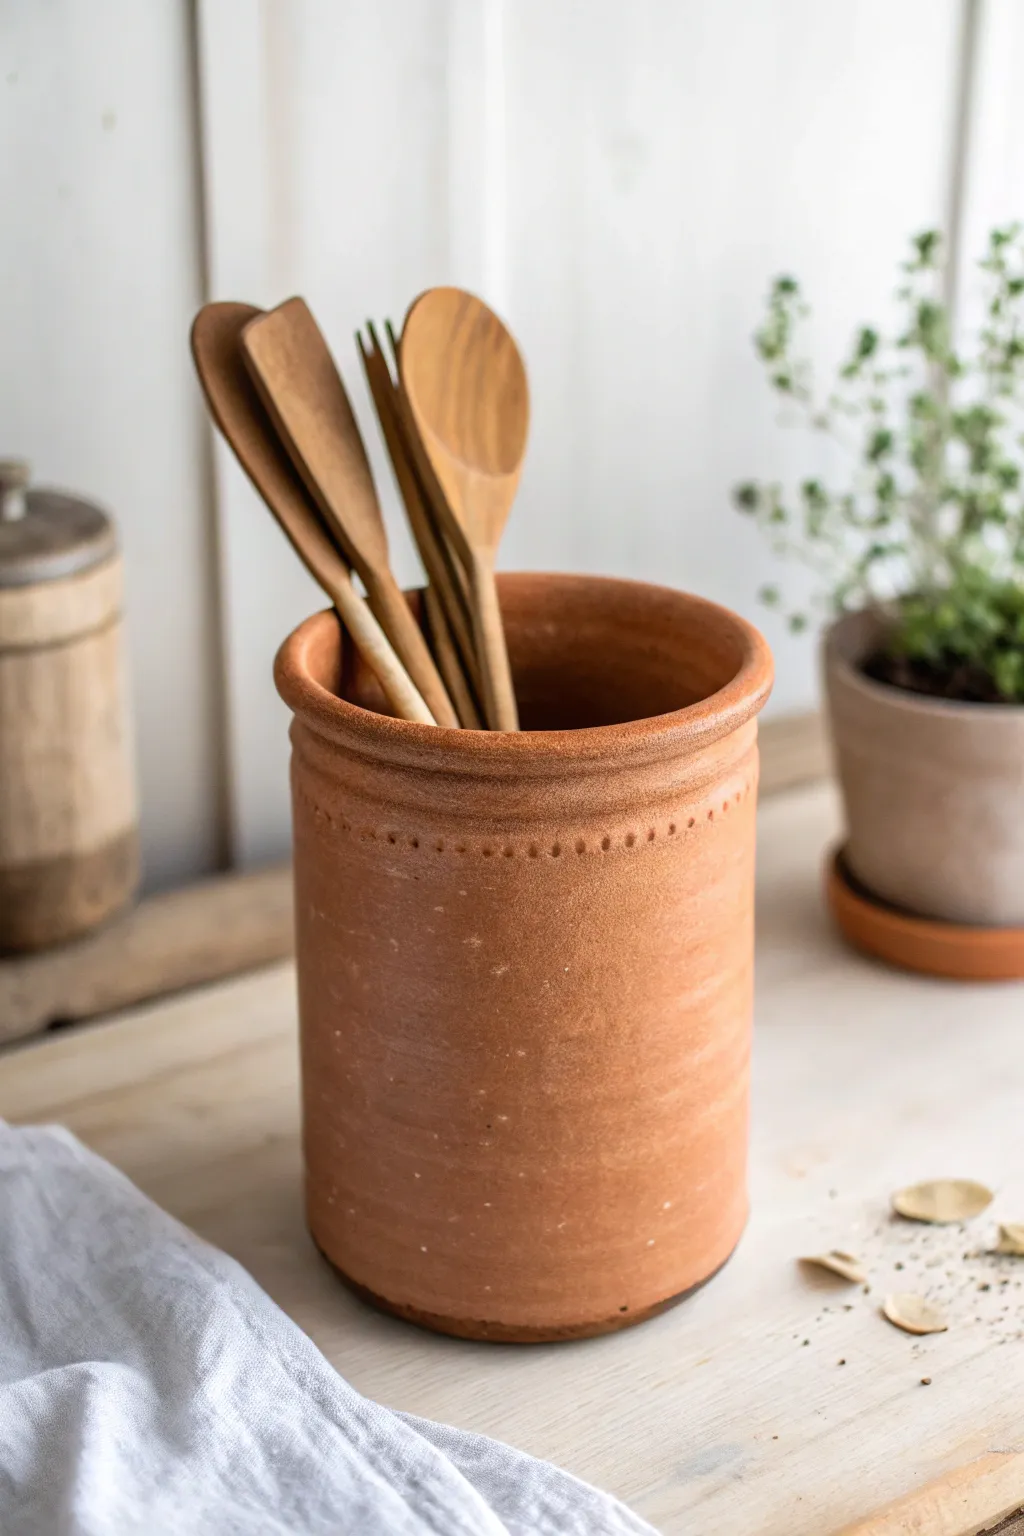
This sturdy, straight-sided cylinder is the perfect project to practice uniform coiling while creating something genuinely useful for your kitchen. With its warm terracotta tone and subtle dotted rim detail, it brings a charming farmhouse aesthetic to any countertop.
Detailed Instructions
Materials
- Terracotta stoneware clay (or groggy red clay)
- Scoring tool or serrated rib
- Slip (clay and water mixture)
- Wooden modeling tool
- Metal or rubber smoothing rib
- Small twist drill bit or round tool (for texture)
- Sponge
- Rolling pin
- Canvas work surface
- Cutting wire
Step 1: Creating the Base
-
Roll the slab base:
Begin by rolling out a slab of clay to approximately 3/8 inch thickness. This needs to be sturdy enough to support the weight of the walls. -
Cut the circle:
Use a needle tool to cut a perfect circle roughly 5 inches in diameter. You can trace around a small bowl or lid to get an even shape. -
Score the foundation:
Thoroughly score the outer 1/4 inch of the top surface of your base where the first coil will sit. Apply a layer of slip to the scored area.
Pro Tip: Straight Edges
Use a straight-edge ruler or a wooden paddle against the side of your pot while building. Rotating against the paddle helps push wayward coils back into a perfect vertical line.
Step 2: Building the Walls
-
Roll your coils:
Roll out several long, even coils of clay. Aim for a thickness similar to your pinky finger. Rolling them all at once helps ensure consistent thickness as you build. -
Attach the first ring:
Lay the first coil directly on the scored edge of the base. Cut the ends at an angle to join them seamlessly, rather than just butt-joining them, which creates a stronger bond. -
Blend downward:
Using your thumb or a wooden modeling tool, blend the clay from the coil down onto the base on the inside. This anchors the wall firmly. -
Stacking upwards:
Score and slip the top of your first ring, then add the next coil directly on top. Repeat this process, stacking coils vertically. -
Regular smoothing:
Every 2-3 coils, stop to blend the coils together. For this specific look, blend the interior completely smooth for hygiene, but only lightly smudge the exterior coils downward to keep that visible ‘ribbed’ texture. -
Check the profile:
Step back occasionally to check your silhouette. The goal is a straight cylinder, so ensure your coils aren’t flaring outward or leaning inward. -
Continue to height:
Keep building until the crock reaches about 6-7 inches tall. This is the ideal height to hold spatulas without them falling out.
Troubleshooting: Cracking Coils
If your coils crack while rolling, your clay is too dry. Spritz the clay block with water and wedge it again, or dip your hands in water before rolling the coil to rehydrate the surface.
Step 3: Finishing and Decoration
-
Refine the surface:
Once built, use a slightly damp sponge to soften the exterior texture. You want the horizontal lines of the coils to remain visible but not sharp or craggy. -
Form the rim:
Add one final coil at the top. Instead of blending this one fully, round it over with a damp sponge to create a thick, substantial lip. -
Smoothing the lip:
Use a chamois leather or a soft piece of plastic to compress the rim, making it smooth and pleasant to touch. -
Add the dotted texture:
Just below the thickened rim, use the non-cutting end of a small drill bit or a small round tool to press a row of evenly spaced dots into the clay. -
Final drying:
Let the piece dry slowly under plastic for a day or two to equalize moisture before uncovering it completely. Uneven drying is the enemy of cylindrical forms. -
Bisque firing:
Fire the piece to bisque temperature once bone dry. -
Glazing considerations:
To match the reference, leave the exterior unglazed (if the clay body is fully vitrified) or apply a matte, transparent glaze. Glaze the interior with a food-safe liner glaze for easy cleaning.
Once fired, fill it with your favorite wooden spoons and enjoy the organized rustic charm it adds to your cooking space.
Coil Ring Holder Cone Dish
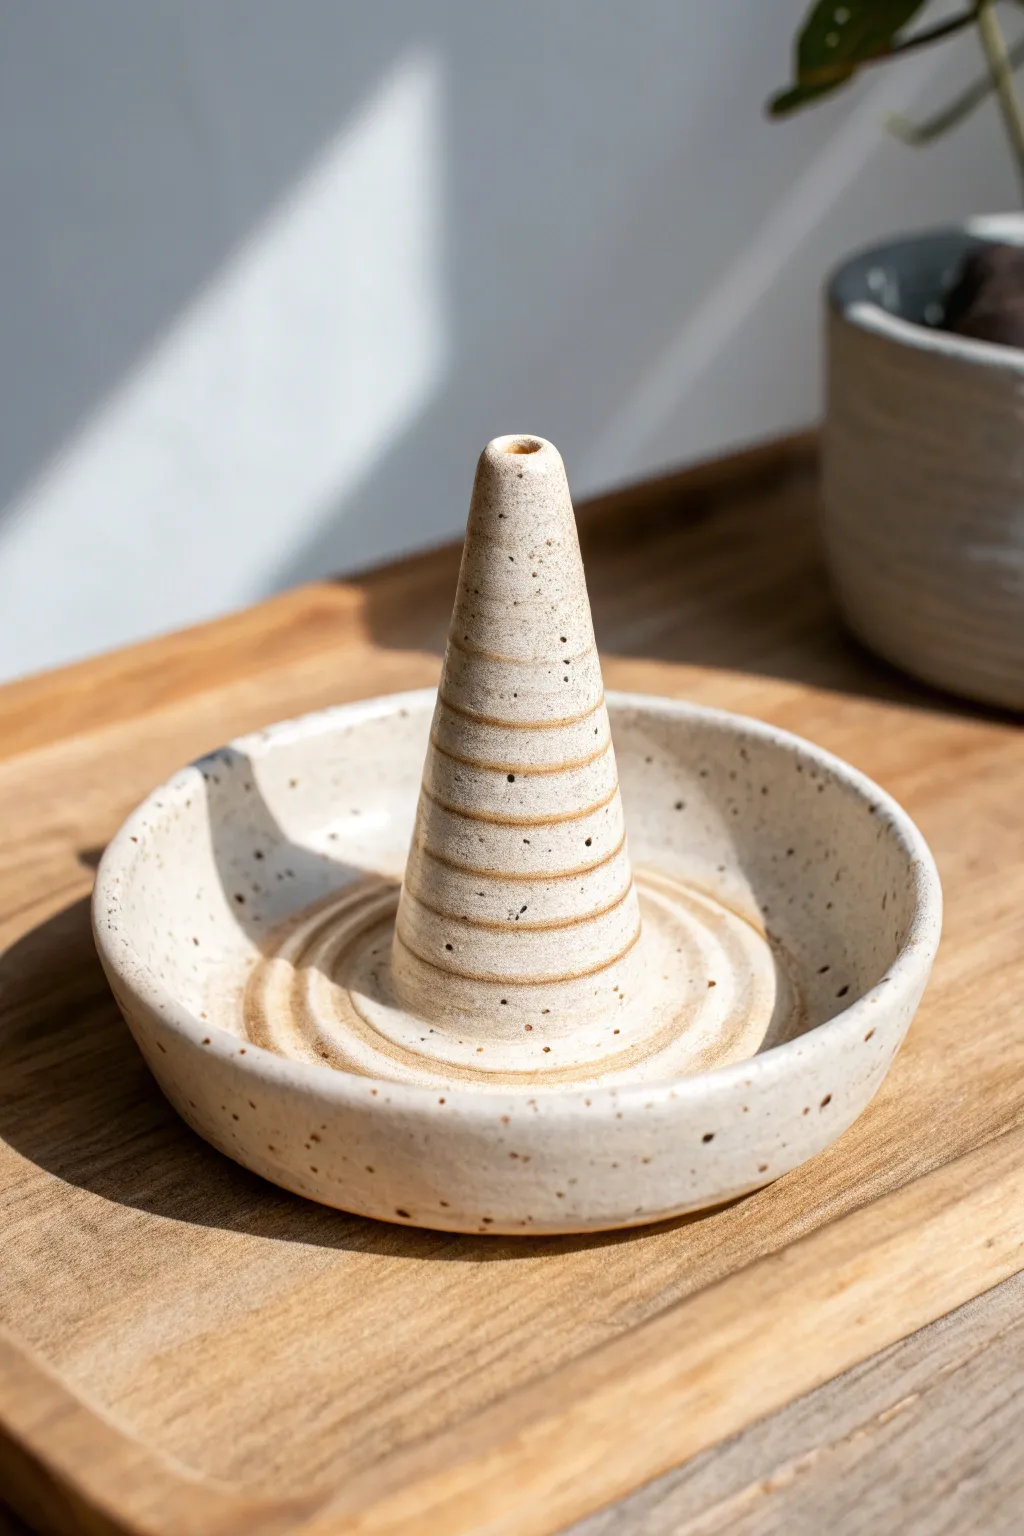
This charming, functional piece combines a classic catch-all dish with a central cone perfect for stacking rings or holding an incense stick. The speckled clay body and exposed coil texture give it a warm, earthy feel that fits beautifully on any bedside table.
Step-by-Step Tutorial
Materials
- Speckled cone 5/6 stoneware clay (e.g., Speckled Buff)
- Pottery wheel (optional, can be hand-built)
- Needle tool
- Scoring tool (or serrated rib)
- Slip (clay and water slurry)
- Wooden modeling tool
- Sponge
- Cutting wire
- Clear glaze (cone 5/6)
- Small kiln
Step 1: Forming the Base Dish
-
Prepare the Clay:
Start with a ball of well-wedged speckled clay about the size of a large orange. Whether throwing on the wheel or hand-building, ensure there are no air bubbles. -
Establish the Base:
If using a wheel, center the clay and open it up to create a flat floor about 4-5 inches wide. Leave the floor slightly thicker than usual to support the cone later. -
Raise the Walls:
Pull up a short wall, roughly 1 inch high. Curve the rim slightly inward to create a shallow bowl shape that will contain small items. -
Smooth the Interior:
Use a damp sponge or a soft rib to smooth the interior curve of the dish, removing any throwing lines if you prefer a cleaner look, though keeping them subtle adds character. -
Refine the Rim:
Compress the rim with a piece of chamois or your sponge to ensure it is rounded and resistant to chipping.
Keep it Clean
Use a makeup sponge to dab away excess glaze that pools in the coil grooves. Too much glaze here will obscure the beautiful spiral texture.
Step 2: Creating the Coil Cone
-
Roll a Coil:
Roll out a consistent snake of clay roughly the thickness of your pinky finger. Keep the coil moist as you work. -
Score the Center:
Using your needle tool or serrated rib, aggressively score a circle in the exact center of your dish floor where the cone will sit. Apply a dab of slip. -
Build the First Layer:
Place one end of your coil on the scored circle and wind it tightly in a spiral to create the base of the cone. Score and slip between the coil layer and the floor. -
Stack the Coils:
Continue winding the coil upward, gradually decreasing the diameter of each circle to form a tapering cone shape. -
Blend the Interior:
As you build up, use a wooden tool or your pinky to blend the coils together on the *inside* of the cone for structural strength. Leave the outside unblended to show those lovely distinct lines. -
Shape the Peak:
Continue coiling until the cone reaches about 3-4 inches tall. Cut the coil and blend the final tip smooth. -
Create the Opening:
Use a needle tool or a small drill bit tool to pierce a vertical hole straight down into the tip of the cone. This allows it to function as an incense holder if desired.
Dual Function
Make the hole at the top slightly wider (about 3mm) to accommodate different types of incense sticks, or leave it solid if used strictly for jewelry.
Step 3: Finishing and Glazing
-
Drying:
Cover the piece loosely with plastic and let it dry slowly to the leather-hard stage. This prevents the cone from detaching from the base. -
Trimming (If Wheel Thrown):
Once leather hard, trim the underside of the dish to create a clean foot ring. If hand-built, verify the bottom is flat and stamp your maker’s mark. -
Texture Enhancement:
I like to gently run a damp sponge over the exterior coils of the cone to soften any sharp edges while keeping the ridge definition intact. -
Bisque Fire:
Let the piece bone dry completely, then load it into the kiln for a bisque fire (usually cone 04). -
Glaze Application:
Dip the entire piece into a transparent or semi-transparent clear glaze. This highlights the natural speckles in the clay and allows the toasted orange color of the coil crevices to show through. -
Wipe the Foot:
Use a wax resist or a wet sponge to completely remove any glaze from the bottom of the dish so it doesn’t stick to the kiln shelf. -
Final Fire:
Fire the piece to the maturity temperature of your clay (likely cone 5 or 6). Allow the kiln to cool naturally before unloading.
Place this on your dresser and enjoy the organized simplicity it brings to your space

TRACK YOUR CERAMIC JOURNEY
Capture glaze tests, firing details, and creative progress—all in one simple printable. Make your projects easier to repeat and improve.
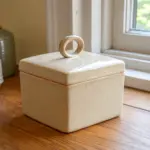
Lidded Coil Jar With a Simple Seat
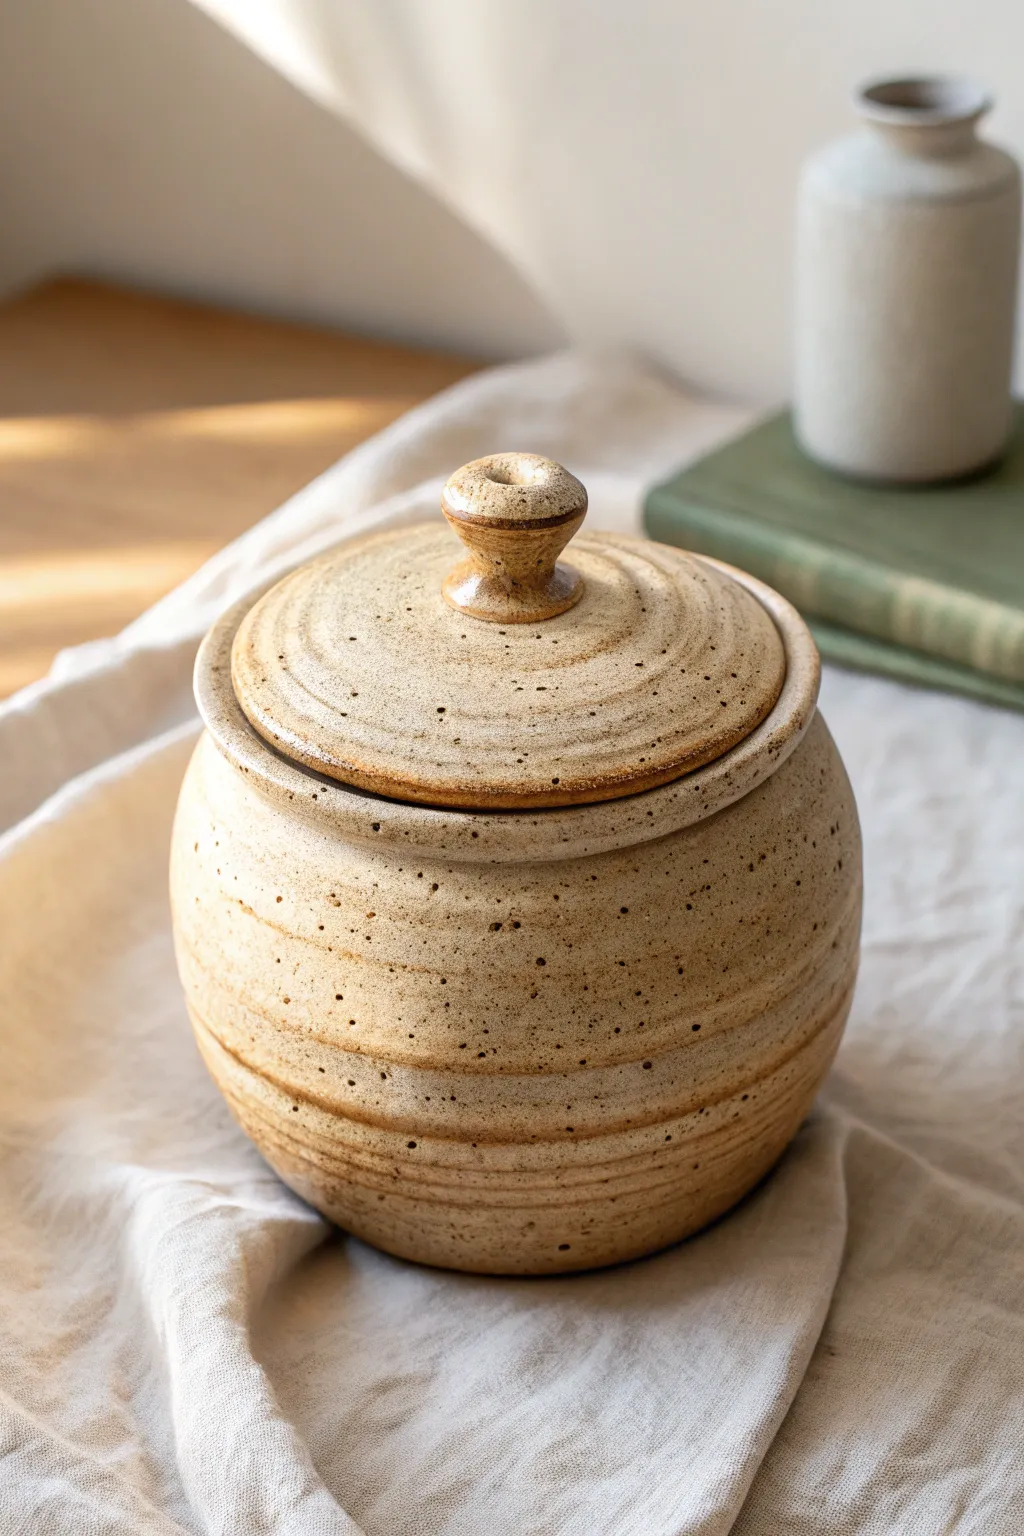
This charming, lidded vessel relies on precise coiling to create subtle, earthy stratifications that mimic wheel-thrown pottery. With its gently rounded belly and snug-fitting lid, it serves as a perfect introduction to creating functional storage that feels both modern and timeless.
Step-by-Step
Materials
- Speckled stoneware clay (buff or tan firing)
- Scoring tool or serrated rib
- Slip (made from your clay body)
- Wooden modeling tool
- Flexible rib (metal or rubber)
- Sponge
- Cutting wire
- Board or bat for working
Step 1: Fomring the Base and Body
-
Rolling the slab base:
Begin by rolling out a small slab of clay, roughly 1/4 inch thick. Use a round cutter or a needle tool to cut a perfect circle roughly 4 inches in diameter to serve as your floor. -
Preparing the first coil:
Roll out several even coils of clay, aiming for the thickness of your pinky finger. Score and slip the outer edge of your base thoroughly to ensure a strong bond. -
Building the first layer:
Place your first coil on the scored edge. I like to blend the clay downward onto the base on the inside only, leaving the outside seam visible for texture, though you can smooth it lightly if you prefer. -
Building the belly:
Continue stacking coils. To create the rounded belly shape seen in the image, place each new coil slightly further outward than the one below it for the first 3-4 inches of height. -
refining the exterior:
As you build, gently run a damp sponge or your finger horizontally along the coil seams. Don’t smooth them away completely; simply soften the connection points to create those gentle, organic ridges. -
Tapering inward:
Once you reach the widest point of the jar, reverse your stacking technique. Place each subsequent coil slightly inward to narrow the opening, creating a shoulder for the vessel. -
Creating the gallery:
For the final rim coil, flatten it slightly. Use your thumb or a wooden tool to create a distinct shelf (or ‘gallery’) on the inside of the rim. This step is crucial, as it is where your lid will eventually sit.
Uneven Lid Fix
If your lid wobbles after firing, apply a dab of grinding paste to the rim and rotate the lid back and forth against the jar. This manual grinding creates a perfect, airtight custom seal.
Step 2: Sculpting the Lid
-
Measuring the opening:
Measure the diameter of the gallery shelf you just created. Roll a new slab for the lid that is slightly wider than this measurement so it overhangs just a tiny bit. -
Shaping the dome:
Place the slab over a slump mold or simply gently press it into a shallow bowl shape with your hands. It should have a slight upward curve, not be perfectly flat. -
Adding the flange:
Flip the lid upside down. Score and slip a small coil of clay in a circle on the underside. This ring needs to fit *inside* the jar’s rim to prevent the lid from sliding off. -
Forming the knob:
Roll a small ball of clay and shape it into a mushroom or spool shape. Score and slip the center of the lid’s top surface and attach the knob firmly. -
Refining the knob shape:
Use a damp sponge to smooth the knob, creating a flared top and a tapered neck, which makes it easy to grip.
Step 3: Finishing Touches
-
Smoothing the interior:
Use a flexible rib to compress and smooth the entire interior of the jar. This ensures it’s watertight and easy to clean later. -
Accent lines:
Using a wooden modeling tool, gently re-define the horizontal grooves between your coils if they got smudged. The deep lines trap glaze beautifully. -
Drying:
Place the lid on the jar with a piece of paper towel in between to prevent sticking. Let them dry slowly together to ensure they shrink at the same rate and maintain their fit. -
Glazing:
Once bisqued, apply a transparent or translucent semi-matte glaze. This will seal the piece while allowing the natural speckles of the clay body to remain the star of the show.
Texture Play
Enhance the earthy look by wiping back the glaze with a damp sponge before firing. This leaves glaze just in the recessed coil lines, highlighting the construction method.
This sturdy little jar will be ready to hold your tea leaves or treasures once it comes out of the kiln
Coil Mug With an Easy Strap Handle
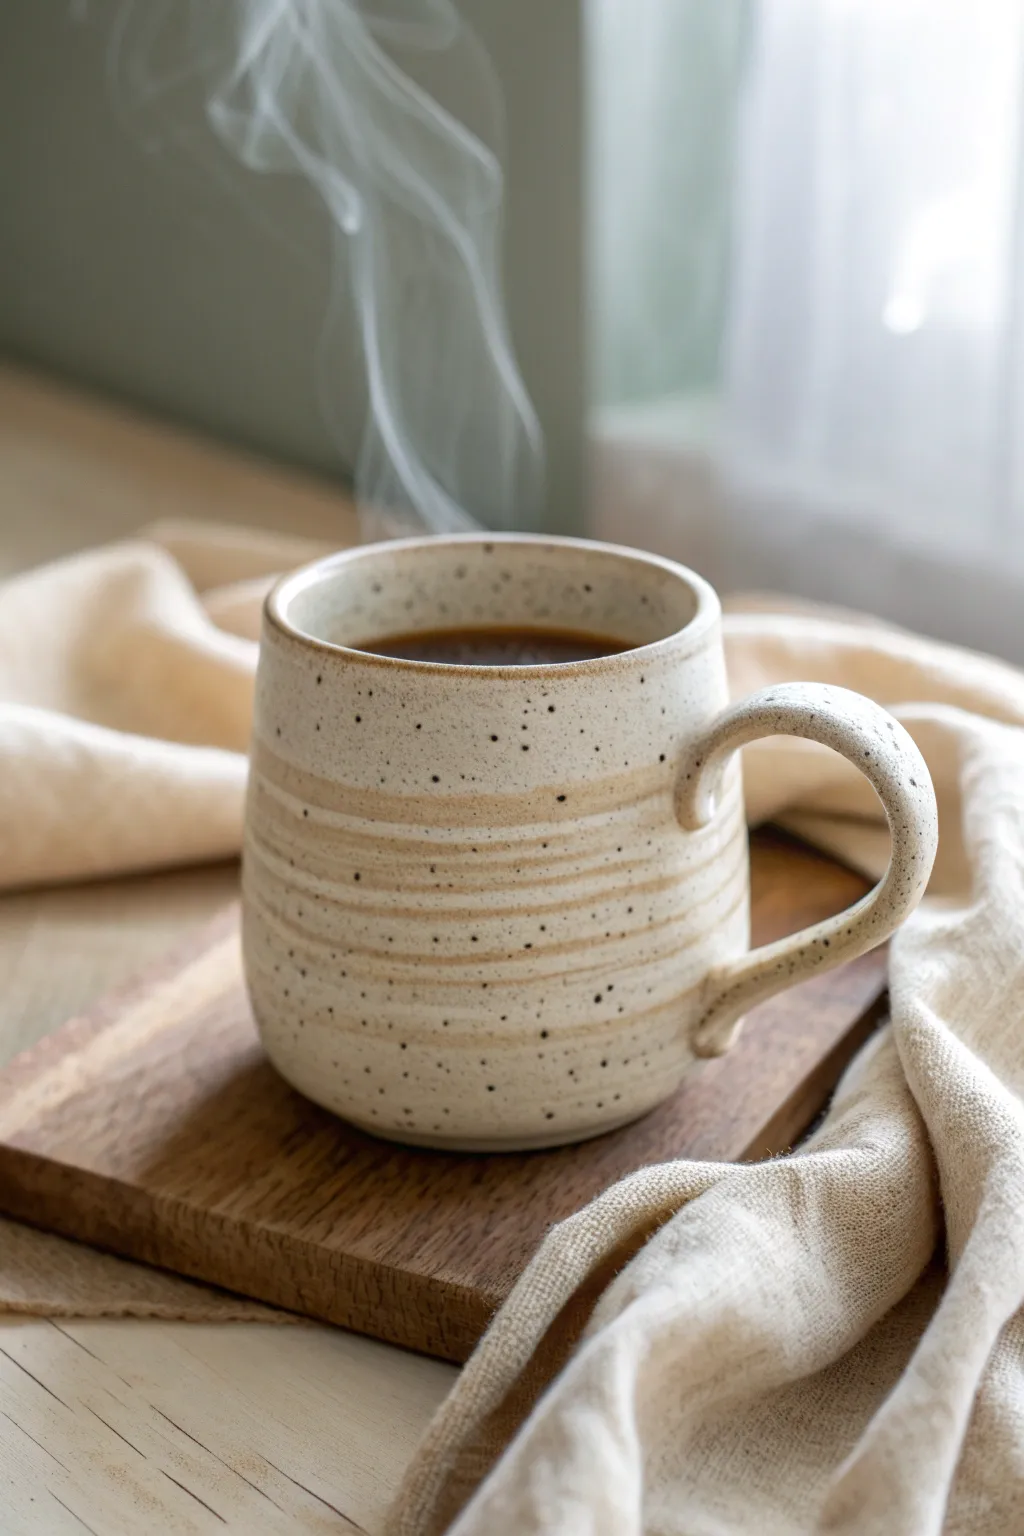
This charming, speckled mug features gentle horizontal ridges that highlight its handmade coil construction, giving it a comforting, tactile quality. Finished in a creamy oatmeal glaze, the strap handle adds a modern touch to a rustic classic that is perfect for your morning coffee.
Step-by-Step Tutorial
Materials
- Speckled stoneware clay (mid-fire)
- Clay scoring tool or fork
- Slip (clay mixed with water)
- Rolling pin
- Wooden guide strips (optional)
- Wooden modeling tool
- Metal rib tool
- Sponge
- Fettling knife
- Cream/Oatmeal dipping glaze
Step 1: Creating the Base and Coils
-
Prepare the base slab:
Start by rolling out a slab of speckled stoneware clay to about 1/4 inch thickness. Use a circular cookie cutter or a needle tool to cut out a circle roughly 3.5 inches in diameter for your mug’s floor. -
Score the foundation:
Take your scoring tool or a simple fork and scratch up the outer rim of your circular base. Dab a little bit of slip or water onto the scored area to act as glue. -
Roll the coils:
Roll out several long, even snakes of clay. Aim for them to be slightly thicker than a pencil. Try to keep the pressure even along the whole length so the coil doesn’t get lumpy. -
Attach the first coil:
Place your first coil directly onto the scored rim of the base. Once it circles all the way around, cut the ends at a slight angle and press them together to create a seamless ring. -
Blend the interior:
Using your thumb or a wooden modeling tool, smear the clay from the coil downward onto the base on the *inside* of the mug only. This seals the bottom so your drink stays inside.
Cracks at the seams?
If coils split apart during drying, you likely didn’t score deeply enough. Use a serrated rib to really roughen the surfaces before adding slip.
Step 2: Building the Walls
-
Stack and score:
Score the top of your first coil and add slip. Place the next coil on top. Repeat this process, stacking coils one by one to build slightly outward for a rounded belly shape, then tapering back in slightly near the rim. -
Blend the structural seams:
As you build, smudge the clay downward on the *interior* only for every single layer. Support the outside with your other hand to keep the shape round. -
Define the exterior ridges:
Instead of smoothing the outside completely, use your finger or a rounded wooden tool to gently press the coils together without losing their individual definition. This preserves those lovely horizontal ridges seen in the photo. -
Refine the rim:
Once you reach your desired height, add a final coil. I like to smooth this top coil completely inside and out to create a comfortable, polished drinking edge. -
Shaping the form:
Gently cup the pot with both hands while the clay is soft to ensure it has that subtle, barrel-like curve. Use a damp sponge to soften—but not erase—the texture of the ridges.
Step 3: Handle and Finish
-
Make the strap handle:
Roll out a small, flat strip of clay about 3/4 inch wide. Smooth the edges with a wet finger so they are rounded, not sharp. -
Shape the ear:
Curve the strip into an ear shape. Hold it up to the mug to check proportions; trim the ends if the handle looks too large for the cup. -
Attach the handle:
Score and slip the attachment points on both the mug and the handle ends. Press the handle firmly onto the mug body, blending the clay where they meet for a strong bond. -
Slow drying:
Cover the mug loosely with plastic to let it dry slowly. This is crucial for handles, as drying too fast can cause cracks where it joins the body. -
Bisque fire:
Once bone dry, fire the piece in a kiln to bisque temperature (usually Cone 04) to prepare it for glazing. -
Glazing:
Dip the mug into a cream or oatmeal-colored glaze. If your clay is speckled, a semi-opaque glaze works best to let those iron spots show through. -
Wipe the foot:
Use a wet sponge to wipe all glaze off the very bottom of the mug so it doesn’t fuse to the kiln shelf. -
Final glaze fire:
Fire the mug again to the maturation temperature of your clay and glaze (typically Cone 5 or 6 for stoneware).
Enhance the texture
Before glazing, lightly wipe the exterior with a damp sponge. This exposes the grit in the clay body and softens the ridges for a worn, vintage feel.
Enjoy the cozy warmth of your handmade mug with your favorite hot beverage
Shallow Coil Scoop Bowl
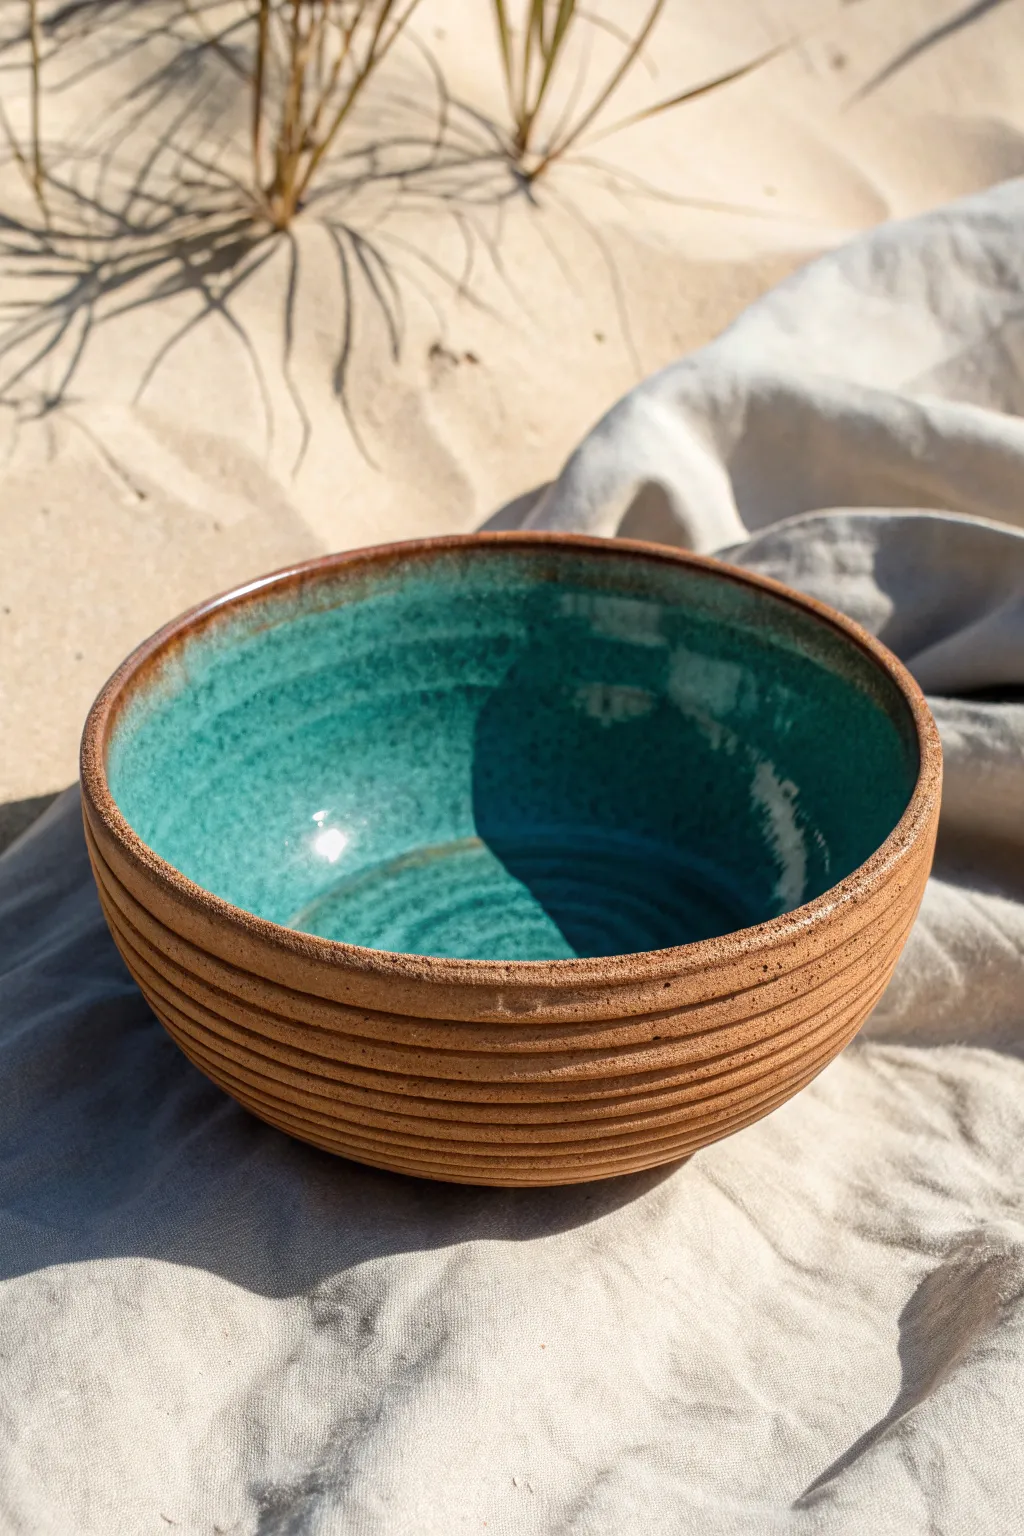
This project embraces the natural beauty of exposed clay coils on the exterior while surprising you with a pop of glossy turquoise on the inside. It’s a fantastic beginner project that balances rustic texture with refined glazing techniques.
Detailed Instructions
Materials
- Stoneware clay (grogged/sandy darker body recommended)
- Pottery wheel or banding wheel
- Wooden modeling tool
- Serrated rib or kidney tool
- Sponge
- Cutting wire
- Turquoise/Teal glossy glaze
- Clear glaze (optional)
Step 1: Building the Base and Walls
-
Prepare the Base:
Start by rolling out a slab of clay about 1/4 inch thick. Cut a circle approximately 4-5 inches in diameter for your base. -
Score and Slip:
Score the outer edge of your base circle thoroughly with a serrated tool and apply a liberal amount of slip. -
Roll the First Coil:
Roll a clay coil to the thickness of your pinky finger. Try to keep it consistent in thickness from end to end. -
Attach the First Layer:
Place the coil onto the slipped edge of the base. Cut the ends at an angle to overlap them slightly for a seamless join. -
Blend the Interior:
Using your thumb or a wooden tool, smear the clay from the coil down onto the base *only on the inside*. This seals the bottom while keeping the outside texture intact. -
Build Upward:
Continue adding coils one on top of the other, scoring and slipping between each layer. As you stack, place each coil slightly outward to create the flared bowl shape. -
Focus on the Exterior:
For this specific look, do not blend the coils on the outside. Instead, press them gently together to ensure adhesion, but leave the horizontal ridges visible. -
Smooth the Interior:
After every 2-3 coils, stop to smooth the interior walls completely. Use a slightly damp sponge to compress the clay and remove any coil lines on the inside surface for a clean bowl.
Step 2: Refining and Drying
-
Refine the Rim:
Once you reach the desired height, add one final coil for the rim. Use a damp sponge or chamois cloth to round over the top edge so it is smooth to the touch. -
Clean Up the Outside:
Inspect the exterior ridges. If any spots look weak or disconnected, gently press them together with your finger, but avoid smudging the distinct line definition. -
Dry Slowly:
Cover the bowl loosely with plastic. Coil pots can crack if they dry unevenly, so let it dry slowly over several days until it reaches the bone-dry stage. -
Bisque Fire:
Fire the piece in a kiln to cone 04 (or according to your clay’s bisque schedule).
Keep Coils Visible
To enhance the exterior ridges, gently run a rounded wooden tool between the coils on the outside to deepen the groove without blending the clay together.
Step 3: Glazing
-
Wax Resist:
Apply wax resist to the bottom of the bowl and carefully paint a line of wax along the very top edge of the rim if you want the raw clay to show there. -
Pour the Interior:
Pour your turquoise glaze into the bowl. Roll it around to coat the entire interior surface evenly, then pour the excess back into your glaze bucket. -
Clean the Exterior:
Check the outside of the bowl. If any glaze dripped onto the textured coils, wipe it away cleanly with a sponge. The outside should remain bare clay. -
Final Fire:
Fire the bowl to the maturity temperature of your clay and glaze (likely Cone 5 or 6 for stoneware).
Uneven Walls?
If your bowl starts getting lopsided, rotate your banding wheel and gently pat the high side down with a flat wooden paddle to level it before continuing.
Enjoy using your stunning turquoise bowl or gifting it to a friend who appreciates handmade crafts
Half-Moon Coil Wall Pocket Planter

This terra cotta wall planter features a satisfying ribbed texture created with exposed coils, offering a modern bohemia vibe to any room. Its semi-circular shape creates a clever pocket for cascading vines like the Creeping Jenny shown here.
Step-by-Step Guide
Materials
- Terra cotta clay (mid-fire or earthenware)
- Rolling pin
- Canvas work surface or slab mat
- Needle tool
- Scoring tool or serrated rib
- Slip (clay mixed with water)
- Wooden modeling tool
- Sponge
- Small circular cookie cutter (approx. 1 inch)
- Jute twine and wooden beads for hanging
Step 1: Creating the Backing Slab
-
Roll the slab:
Begin by rolling out a uniform slab of clay approximately 1/4 inch thick. Make sure it’s large enough to cut a circle about 8-10 inches in diameter. -
Cut the base circle:
Place a round template (like a plate or paper cutout) onto the clay and trace around it with a needle tool to create your perfect circle. Smooth the cut edges with a damp sponge. -
Add texture (optional):
To mimic the ripple effect seen on the back panel in the inspiration image, you can lightly press a concentric circle pattern into the slab using a trimming tool, or leave it smooth for contrast. -
Create the hanging hole:
Using your small circular cutter, punch a hole near the top center of the circle. This reinforced opening will be where the rope eventually goes through. -
Reinforce the hole:
Roll a very thin, small coil. Score and slip around the hole you just cut, attach the coil, and blend it smoothly into the slab to create a raised, finished grommet look.
Crack Prevention
If the pocket creates tension while drying, the back slab might warp. Dry very slowly under plastic for at least 5-7 days before exposing it to air.
Step 2: Building the Coil Pocket
-
Prepare the connection zone:
Identify the bottom half of your circle where the pocket will attach. Score this semi-circular edge aggressively and apply a generous amount of slip. -
Roll your coils:
Roll out several long, even coils of clay. Aim for them to be slightly thicker than a pencil. Consistency is key here for that uniform ribbed look. -
Lay the first coil:
Place your first coil directly onto the scored edge of the backing slab. This acts as the foundation. -
Build upward and outward:
Continue stacking coils on top of each other. As you stack, slightly overlap each coil outward to create the curved ‘belly’ of the pocket, rather than building straight up. -
Blend the interior:
After every 2-3 coils, smooth the *inside* of the pocket downward with a wooden tool or your thumb to bond the coils together. Leave the outside coils exposed to maintain the ribbed texture. -
Shape the rim:
Once the pocket reaches about halfway up the circle, finish with a final coil. Smooth the top rim flat or round it off with a damp sponge for a polished edge. -
Texturize the pocket:
The image shows a subtle stippling effect. Take a stiff-bristled brush or a serrated tool and gently tap the exterior coils to create that sandy, pitted texture. -
Add drainage (optional):
If you plan to plant directly into the pot, carefully poke a small hole in the very bottom of the coil pocket.
Add Color
Before firing, brush a white slip or underglaze into the recessed grooves of the coils, then wipe the surface back to highlight the spiral texture.
Step 3: Finishing Touches
-
Add decorative dangles:
The example features cute wooden beads hanging from the bottom. If you want this look, poke two tiny holes at the base of the pocket before the clay dries. -
Dry slowly:
Cover the piece loosely with plastic. I find drying this shape slowly is crucial to prevent the pocket from pulling away from the back slab as it shrinks. -
Fire the piece:
Bisque fire and then glaze fire your piece. Leaving the exterior unglazed (raw terra cotta) gives it that warm, earthy appearance shown in the photo. -
Assembly:
Once fired, thread a thick jute rope through the top hole for hanging. Attach smaller strings with wooden beads to the bottom holes if you made them.
Hang your new planter in a bright spot and watch your greenery thrive against the warm clay tones
Coil Berry Bowl With Drain Holes
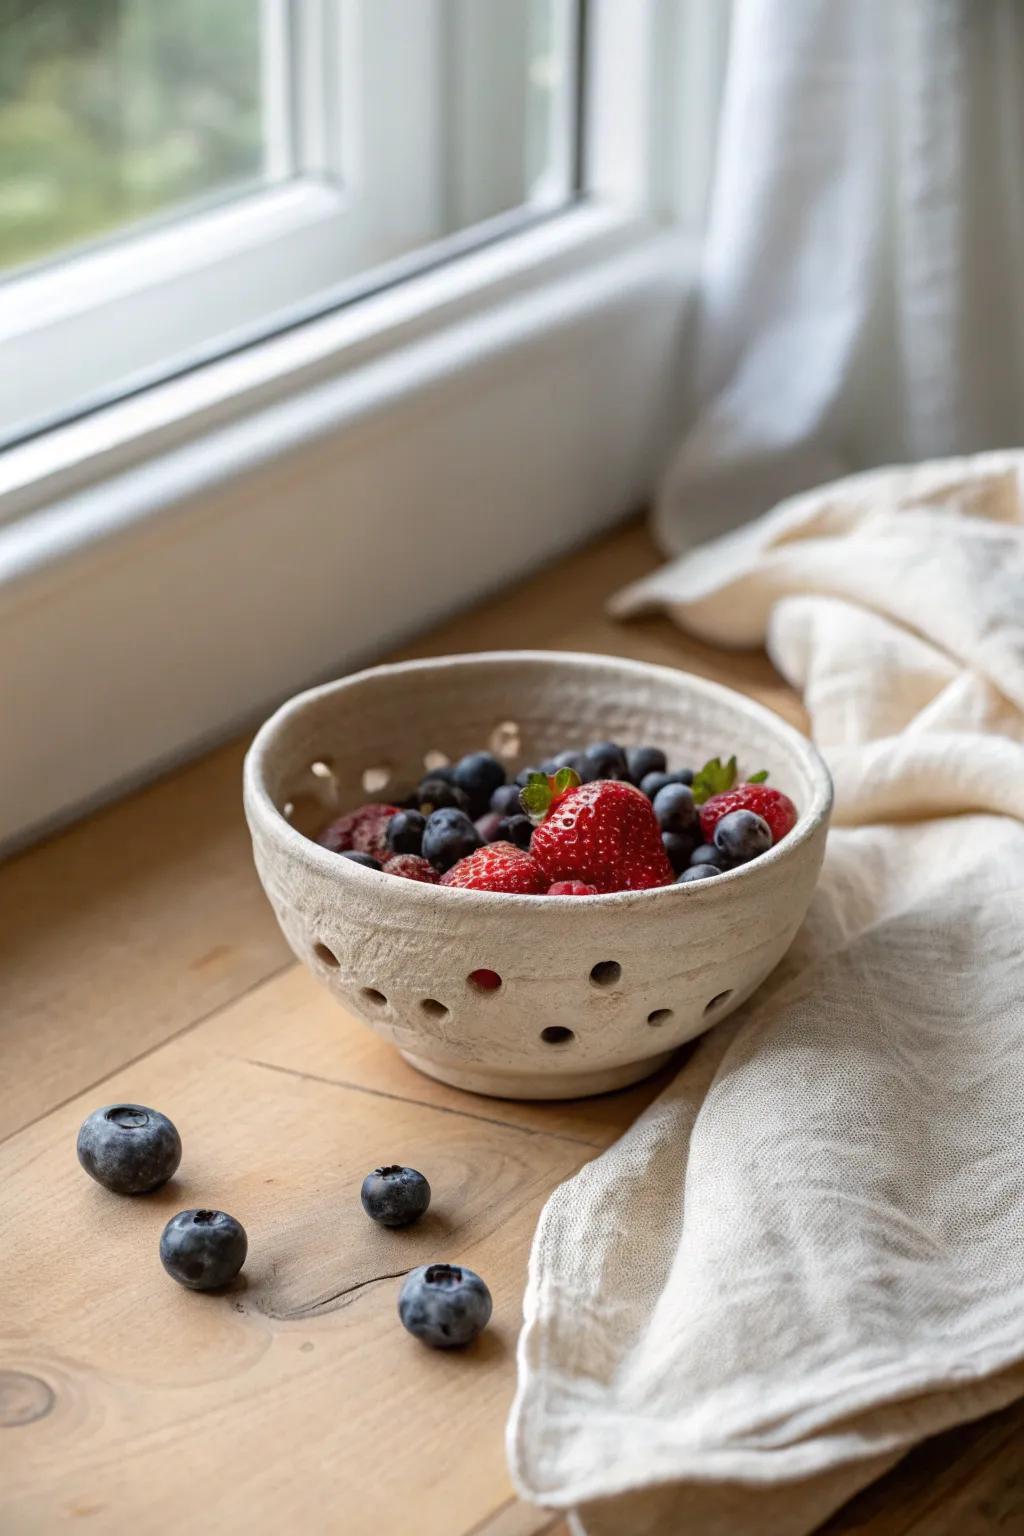
This charming ceramic colander combines the functionality of a strainer with the rustic beauty of handmade pottery. With its gently textured surface and whimsical drainage holes, it’s the perfect vessel for washing and serving fresh summer berries right from the windowsill.
Step-by-Step Tutorial
Materials
- White stoneware or porcelain clay
- Rolling pin
- Canvas or cloth-covered board
- Plastic or wooden ribs (serrated and smooth)
- Small hole cutter tool (approx. 5mm – 8mm)
- Sponge
- Scoring tool or needle tool
- Bowl for water or slip
- Small round bowl or plaster mold (for support)
Step 1: Base Construction
-
Prepare the workspace:
Begin by setting up your canvas board. Wedge your clay thoroughly to remove any air pockets, which is crucial for preventing cracks later on. -
Create the base slab:
Roll out a small ball of clay into a slab about 3/8 inch thick. Use a round cutter or freehand cut a circle approximately 3-4 inches in diameter to serve as the flat bottom of your bowl. -
Form the foot ring:
Roll a small coil about the thickness of a pencil. Score and slip the underside of your base slab, attach the coil in a circle to create a small foot, and smooth it onto the base so the bowl sits slightly elevated.
Step 2: Coiling the Walls
-
Roll your coils:
Take a chunk of clay and roll it back and forth on your table to create long, even snakes. Aim for coils that are roughly the thickness of your pinky finger. -
Attach the first coil:
Score the top edge of your base with a needle tool and apply a little water or slip. Place your first coil on the rim, pressing it down gently but firmly to adhere it. -
Blend the clay:
Using your thumb or a modeling tool, smear the inside of the coil down onto the base to lock it in place. Then, blend the outside of the coil downwards as well. This double-blending ensures a strong wall. -
Build upwards:
Continue stacking coils one on top of another. Remember to score and slip between each layer. For this bowl shape, place each new coil slightly further outward than the last to flare the walls open. -
Shape the curve:
Once you have built up about 2-3 inches of height, start stacking the coils directly on top of each other, or slightly inward, to create a gentle curve rather than a straight cone. -
Smooth the surface:
While many coil pots leave the rings visible, this bowl has a smoother finish. Use a serrated rib to scrape diagonally across the coils to even out the surface and remove bumps. -
Refine the walls:
Follow up with a smooth rubber or metal rib. Support the wall from the inside with one hand while smoothing the outside with the rib to compress the clay and finalize the shape. -
Finish the rim:
I prefer to use a slightly wet sponge or chamois to compress the top rim, ensuring it is rounded and comfortable to the touch.
Hole Distortion Help
If your holes are warping into ovals, your clay is too soft. Let it dry 30 more minutes. If the clay cracks when punching, it’s too dry; mist it lightly and wrap in plastic.
Step 3: Adding the Drain Holes
-
Let it stiffen:
This is a critical step: allow your bowl to dry to a ‘leather hard’ state. It should be firm enough to hold its shape when handled, but soft enough to cut easily. -
Plan your pattern:
Lightly mark where you want your drainage holes with a needle tool. A random, scattered pattern along the lower half of the bowl works beautifully for this rustic look. -
Punch the holes:
Using your hole cutter tool, gently twist and push through the wall at your marked spots. Support the wall from the inside with your hand to prevent the clay from deforming. -
Clean up the edges:
Once the holes are cut, small burrs of clay will remain on the inside. Wait until the bowl is bone dry, then gently sand or sponge these away for a clean finish. -
Final drying:
Loosely cover the bowl with plastic to let it dry very slowly. This helps prevent the rim from warping as the clay shrinks. -
Bisque fire:
Fire the piece in a kiln to cone 04 (or your clay’s specified bisque temperature). This turns the raw clay into ceramic. -
Glazing:
For the look in the photo, apply a matte white or clear glaze. Because this is a food vessel, ensure your glaze is food-safe. Be careful not to clog the small drain holes with thick glaze. -
Final firing:
Fire the piece a second time to the glaze temperature (likely Cone 5 or 6 for stoneware). Once cool, sand the bottom foot if it feels rough.
Pro Tip: Wax Resist
Before glazing, dab a tiny bit of wax resist inside each drainage hole. This prevents the glaze from filling and sealing the holes during the firing process.
Once fired, fill your beautiful new creation with fresh fruit and enjoy the simple pleasure of handmade functional art
Fluted Coil Bowl With Finger Pinches
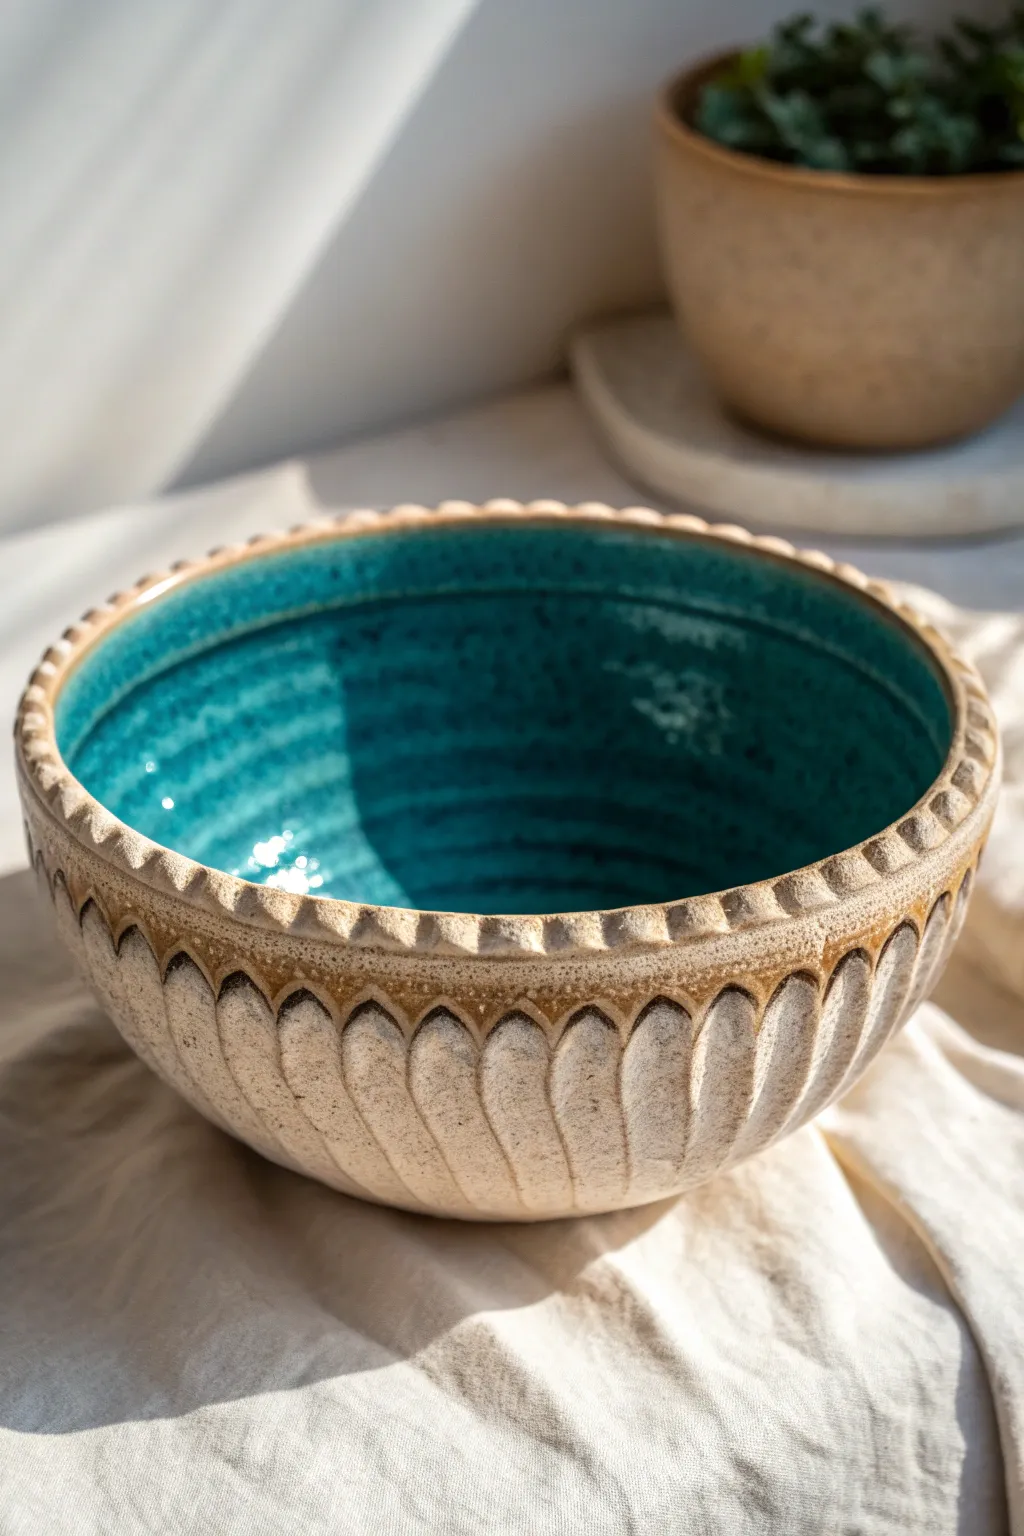
This radiant bowl combines the accessible technique of coil building with decorative carving to create a scalloped, petal-like exterior. The contrast between the raw, earthy clay body on the outside and the deep, glossy turquoise glaze on the inside makes it a stunning centerpiece for any table.
How-To Guide
Materials
- Stoneware clay (groggy or speckled clay recommended)
- Pottery wheel or banding wheel
- Rib tool (kidney shaped, wood or rubber)
- Loop tool (medium round or pear-shaped)
- Needle tool
- Scoring tool or serrated rib
- Sponge and water
- Rolling pin and wooden slats (for base)
- Cutting wire
- Glossy turquoise glaze
- Wax resist (optional)
Step 1: Building the Base Form
-
Roll the base:
Start by rolling out a slab of clay about 1/4 inch thick. Use a circular template or a bowl to cut out a perfect circle, roughly 4-5 inches in diameter, to serve as the foot of your bowl. -
Prepare coils:
Roll out several long, even coils of clay about the thickness of your index finger. Keep these coils covered under plastic so they don’t dry out while you work on the first layers. -
Attach the first coil:
Score the outer edge of your base circle and the underside of your first coil. Apply a little slip or water, then press the coil firmly onto the base. Join the ends of the coil by cutting them at an angle and smoothing them together. -
Build upward:
Continue stacking coils one on top of the other. As you add each layer, use your thumb or a wooden tool to smudge the clay downwards on the inside to fuse the coils completely. Do the same on the outside, smudging the clay upwards. -
Shape the curve:
To get that gentle outward curve, place each new coil slightly further out than the one below it. Once you reach the desired width, begin stacking them directly vertically or slightly inward to bring the rim back in just a touch. -
Smooth the walls:
Once the basic bowl shape is built (aim for about 5-6 inches high), use a rib tool to smooth the interior and exterior walls. The goal is to hide the individual coil lines and create a unified, smooth surface. Support the wall from the inside with one hand while smoothing the outside.
Uneven Drying?
If the rim dries faster than the thick base, the bowl might crack. Cover the rim loosely with plastic while the base catches up, or dry the bowl upside down once the rim is firm.
Step 2: Carving the Fluted Design
-
Let it firm up:
This step is crucial: let the bowl dry to a ‘leather hard’ state. It should be firm enough to hold its shape when carved, but soft enough to cut easily without chipping. -
Mark the spacing:
Lightly mark vertical guidelines around the outside of the bowl using your needle tool to ensure your flutes will be evenly spaced. I usually mark the top rim first to keep things symmetrical. -
Carve the vertical flutes:
Using a pear-shaped loop tool, start from the bottom of the bowl and carve upward in a straight, confident motion. Lift the tool gently as you reach the rim to leave a scalloped edge rather than carving all the way through. -
Refine the ridges:
Repeat this carving motion around the entire bowl. Between each commanded flute, you will naturally create sharp ridges. Use a damp sponge to slightly soften these ridges so they aren’t dangerously sharp. -
Texture the rim:
Using the side of a wooden tool or your thumb, gently press or notch the high points of the rim where the ridges meet the top. This creates that distinct, notched detail seen along the lip of the bowl.
Level Up: Oxide Wash
Before glazing, wipe a dark oxide wash (like black iron oxide) over the exterior, then sponge it off. The dark color will stay in the carved recesses, highlighting the texture.
Step 3: Glazing and Finishing
-
Bisque fire:
Allow the bowl to bone dry completely, which may take several days depending on humidity. Fire the piece in the kiln to bisque temperature (usually Cone 04 or 06). -
Wax the exterior:
Because the exterior relies on the raw texture of the clay, apply wax resist to the entire outside surface and the rim, or simply be very careful when pouring. -
Pour the interior:
Pour a glossy turquoise glaze into the bowl. Rotate the bowl quickly to coat the entire interior surface evenly, then pour the excess glaze back into your bucket. -
Add the rim detail:
Carefully wipe away any glaze that dripped onto the outside. If you want a slight transition effect, you can sponge a tiny bit of iron oxide wash just on the very upper peaks of the fluting near the rim. -
Final firing:
Fire the bowl again to the maturation temperature of your specific clay and glaze (typically Cone 5 or 6 for stoneware). This will melt the turquoise glaze into that deep, glassy pool.
Place your finished bowl in a sunny spot to see the beautiful interplay between the textured shadows and the shimmering blue interior
Braided Coil Rim Bowl
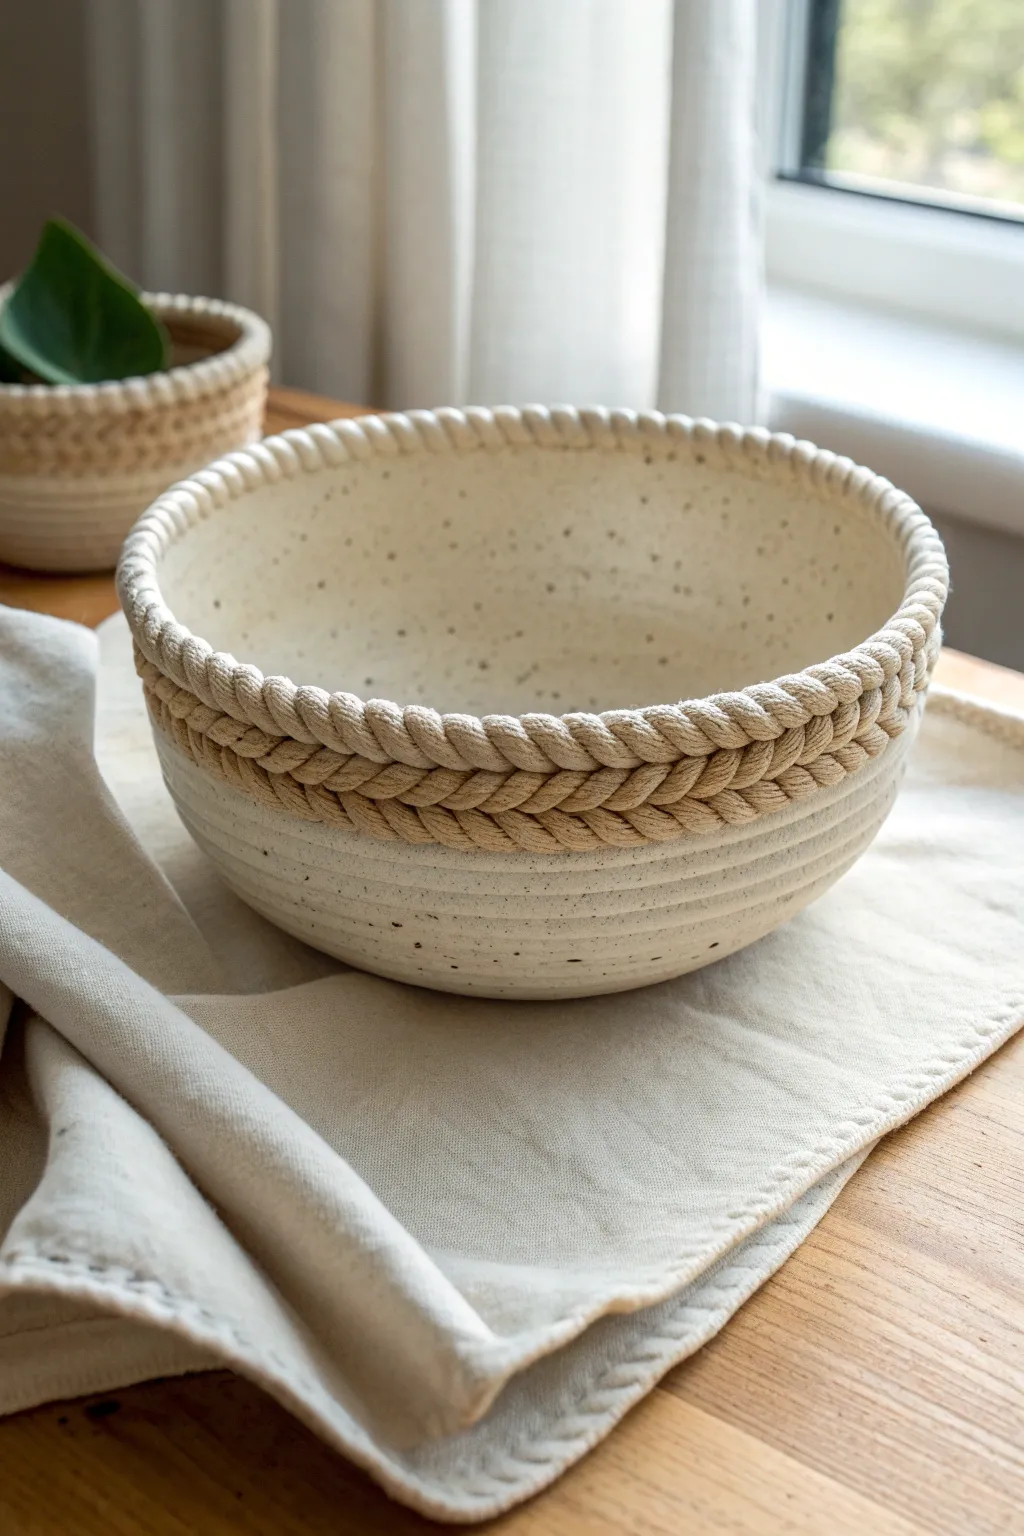
This project combines fundamental coil building with a stunning decorative twisted rim that mimics woven rope. The result is a charming, rustic vessel featuring a speckled clay body and a satisfying textural contrast between smooth coils and intricate braiding.
Step-by-Step Tutorial
Materials
- Speckled Stoneware Clay (e.g., Laguna Speckled Buff)
- Scoring tool (serrated rib or needle tool)
- Slip (clay mixed with water)
- Wooden modeling tool
- Sponge
- Rolling pin or slab roller (optional)
- Clay extruder (optional, but helpful for even coils)
- Canvas work surface
Step 1: Building the Base
-
Create the floor:
Start by rolling out a slab of clay to about 1/4 inch thickness. Cut a circle approximately 4-5 inches in diameter to serve as the sturdy base of your bowl. -
Roll your coils:
Roll out several long, even coils of clay. Aim for a thickness of about half an inch—a little thicker than a pencil. Try to keep them consistent so your walls build up evenly. -
Score and slip foundational layer:
Score the outer edge of your circular base and apply a generous amount of slip. Lay your first coil on top of this roughed-up area to start the wall. -
Build the walls:
Layer 3-4 more coils on top of the first one to build height. For this specific look, do not blend the coils on the outside; leave the horizontal lines visible to create that ribbed texture. -
Smooth the interior:
While the outside remains textured, use a wooden modeling tool or your thumb to blend the coils together on the *inside* of the bowl. This ensures the vessel is watertight and structurally sound. I find using a damp sponge afterwards helps create a seamless interior curve.
Step 2: Crafting the Braided Rim
-
Prepare thin strands:
Roll out two very long, thin coils (snakes) of clay. They should be roughly 1/4 inch thick and nearly double the circumference of your bowl’s rim. -
Twist the pair:
Lay the two strands parallel to each other. Gently twist them together, wrapping one over the other repeatedly to create a simple two-strand rope effect. Keep the twist tight for a high-definition braid. -
Double the detail:
Make a second twisted rope identical to the first one. You will likely need two of these twisted ropes stacked to achieve the thick, intricate braided band seen in the photo. -
Attach the first rope:
Score and slip the current top edge of your bowl. Gently press the first twisted rope onto the rim. Cut the ends at an angle to join them seamlessly where they meet. -
Stack the second rope:
Score the top of the rope you just attached. Place the second twisted rope directly on top of it. Ensure the twists run in the same direction visually for a cohesive look. -
Blend the exterior braid:
Look closely at the photo—the two twisted ropes are blended together slightly to look like a complex fishtail braid. Use a modeling tool to gently press the clay of the top rope into the crevices of the bottom rope.
Crack Control
If the braided rim starts cracking away from the wall during drying, wrap the rim tightly in plastic while leaving the base exposed to balance the moisture content.
Step 3: Refining and Glazing
-
Secure the rim:
On the *inside* of the bowl, lightly blend the bottom of the braided rim into the smooth interior wall. This prevents the heavy rim from cracking off during firing. -
Clean the texture:
Use a small, slightly damp sponge to smooth out any sharp burrs or crumbs on the braid without losing the definition of the twisted strands. -
Slow drying:
Loosely cover the bowl with plastic. Because the rim is thicker than the walls, slow drying is crucial to prevent warping or cracking separation. -
Bisque fire:
Once bone dry, bisque fire the piece according to your clay body’s specifications (usually Cone 04 or 06). -
Glaze application:
Dip or brush the entire bowl in a transparent or semi-transparent white glaze. This ensures the natural speckles of the clay body show through, enhancing the rustic aesthetic. -
Glaze wiping:
If the glaze looks too thick on the braid, gently wipe it back with a sponge. You want the glaze to settle in the crevices to highlight the texture, not obscure it. -
Final Fire:
Glaze fire to maturity (e.g., Cone 5/6). The heat will bring out the iron speckles in the clay, completing the look.
Level Up: Oxide Wash
Before glazing, apply an iron oxide wash to the braided area and wipe it back. This will darken the crevices significantly, making the braid pop visually.
Once fired, you’ll have a sturdy, textured bowl that feels as good in your hands as it looks on your table.
Corrugated Coil Texture Mini Pot
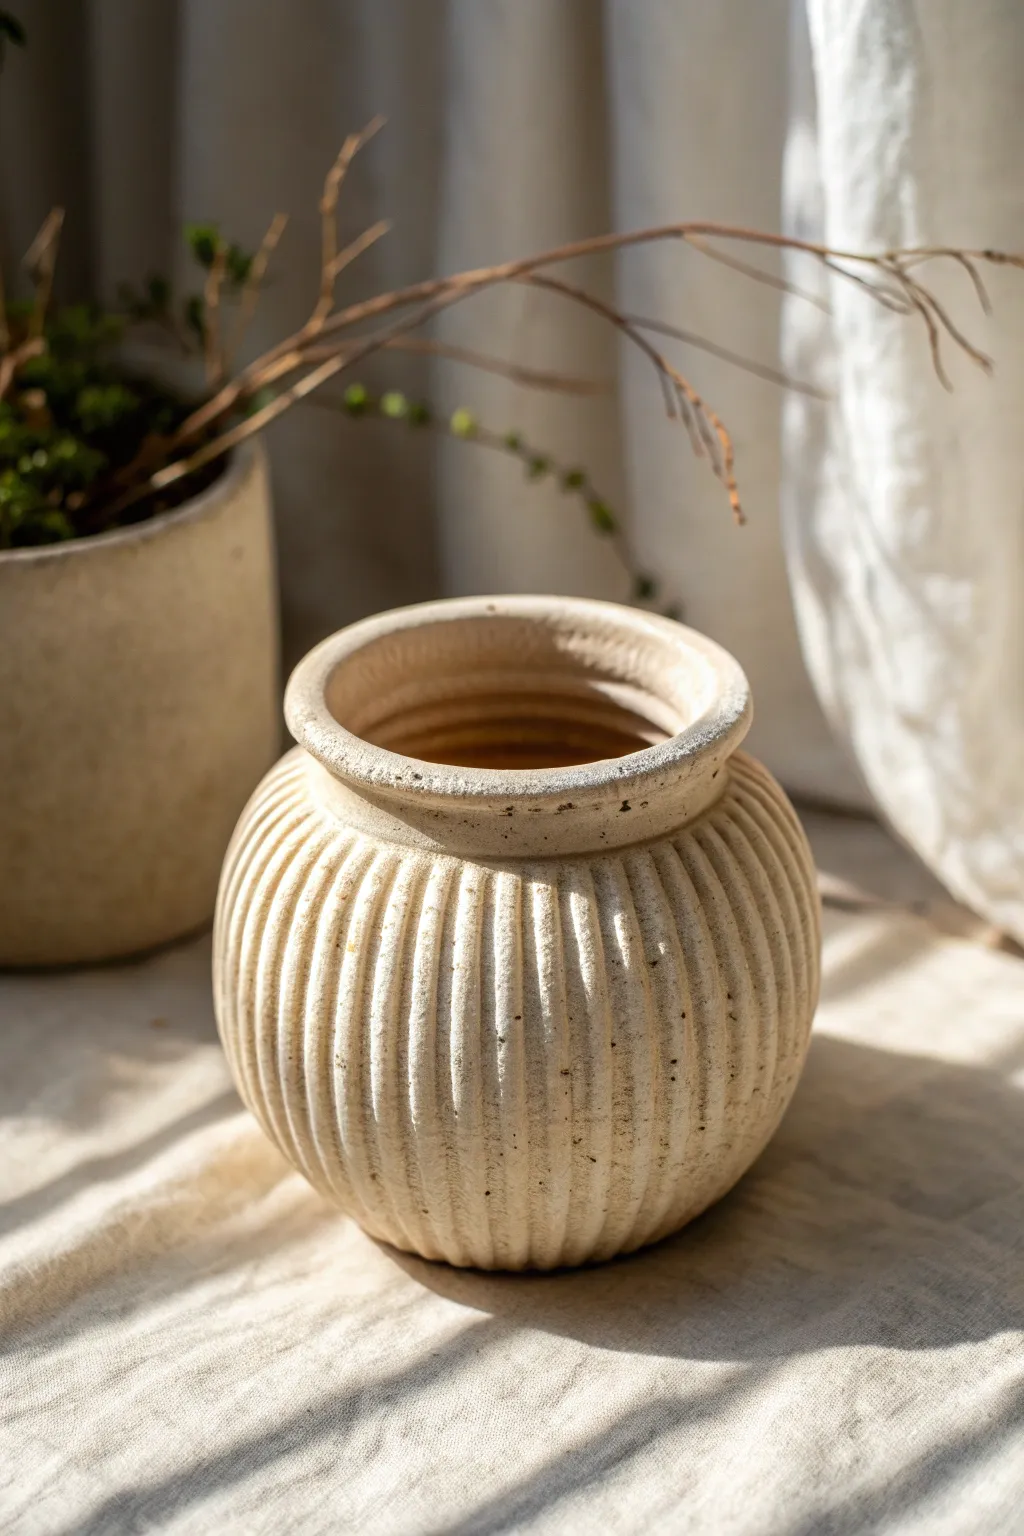
This charming, round-bellied vessel combines the ancient durability of coil building with a modern, ribbed texture that catches the light beautifully. The finished piece has a raw, sandy aesthetic that mimics natural stone, perfect for small succulents or dried floral arrangements.
How-To Guide
Materials
- Stoneware clay (groggy or sandy body preferred)
- Small serrated modeling rib (metal or wood)
- Smooth wooden rib tool
- Basic needle tool
- Sponge
- Scoring tool (or fork)
- Slip (clay and water mixture)
- Banding wheel or turntable
- Paddle tool (optional)
Step 1: Forming the Base
-
Create the floor:
Start by rolling a small ball of clay, roughly the size of a tangerine, and flattening it into a disk about 1/4 inch thick. This will be the sturdy foundation of your pot. -
Prepare the first coil:
Roll out a coil of clay on your work surface until it is about the thickness of your pinky finger. Try to keep the thickness consistent along the entire length. -
Attach the first layer:
Score the outer edge of your base disk and the bottom of your coil. Apply a little slip, then lay the coil on top of the base edge. Gently blend the inside of the coil down onto the base to seal the seam completely.
Pro Tip: Consistent Ribs
For perfectly straight vertical lines, lock your elbow against your body and only move the banding wheel, dragging the tool up in rhythm with the rotation.
Step 2: Building the Belly
-
Coil outward:
As you add the next 3-4 layers of coils, place each one slightly toward the outer edge of the previous coil. This expands the width of the pot to create that round ‘belly’ shape. -
Blend as you go:
After every two layers, pause to smooth the coils together. I like to blend the inside surface smooth with my thumb or a wooden tool so the interior is seamless and strong. -
Coil inward:
Once you’ve reached your desired width (usually about halfway up), start placing the new coils slightly toward the inner edge of the previous ring. This brings the form back in to create the neck. -
Add the rim:
For the final coil at the top, place it directly on top of the previous ring and flare it out just slightly. Use your fingers to compress and round off the lip so it looks finished. -
Initial smoothing:
Use a smooth rib tool on the exterior to blend all the coil lines away. Support the wall from the inside with your other hand while you do this to maintain the round shape.
Step 3: Texturing and Finishing
-
Refine the shape:
With the exterior smooth, spin your banding wheel slowly and use a wooden kidney tool to perfect the curve. If the pot feels wobbly, gently paddle the outside to symmertize it. -
Start the corrugation:
Select a serrated rib or a tool with a notched edge. Starting at the very bottom of the pot, press the tool gently into the clay. -
Drag vertical lines:
While holding the tool steady, pull it vertically from the base up toward the neck. Do this slowly to create deep, consistent furrows. -
Repeat around the circumference:
Continue creating these vertical ribbed lines all the way around the pot. It helps to overlap your strokes slightly or re-trace lines to deepen the texture. -
Define the neck:
Stop your vertical texture lines just under the flared rim. Use a damp sponge or finger to smooth the transition area between the textured body and the smooth rim. -
Clean the rim:
Go back to the rim and give it a final smooth with a damp sponge or a piece of chamois leather to ensure it feels soft to the touch. -
Drying:
Let the pot dry slowly under loose plastic for a day to prevent the distinct texture from causing uneven drying stresses. -
Sanding (optional):
Once bone dry, you can lightly sand any sharp burrs created by the serrated tool, but keep the rustic look intact. -
Firing:
Bisque fire the piece, then glaze the interior if it needs to hold water. For the exterior, leave it unglazed to highlight the stone-like texture, or use a matte wash.
Troubleshooting: Sagging Walls
If the belly starts to slump while building, your clay is too wet. Stop adding coils, use a heat gun or hair dryer briefly to firm up the lower walls, then continue.
Place your finished pot near a window where the sunlight can dance across those beautiful ridges you created
Two-Tone Coil Striped Vessel
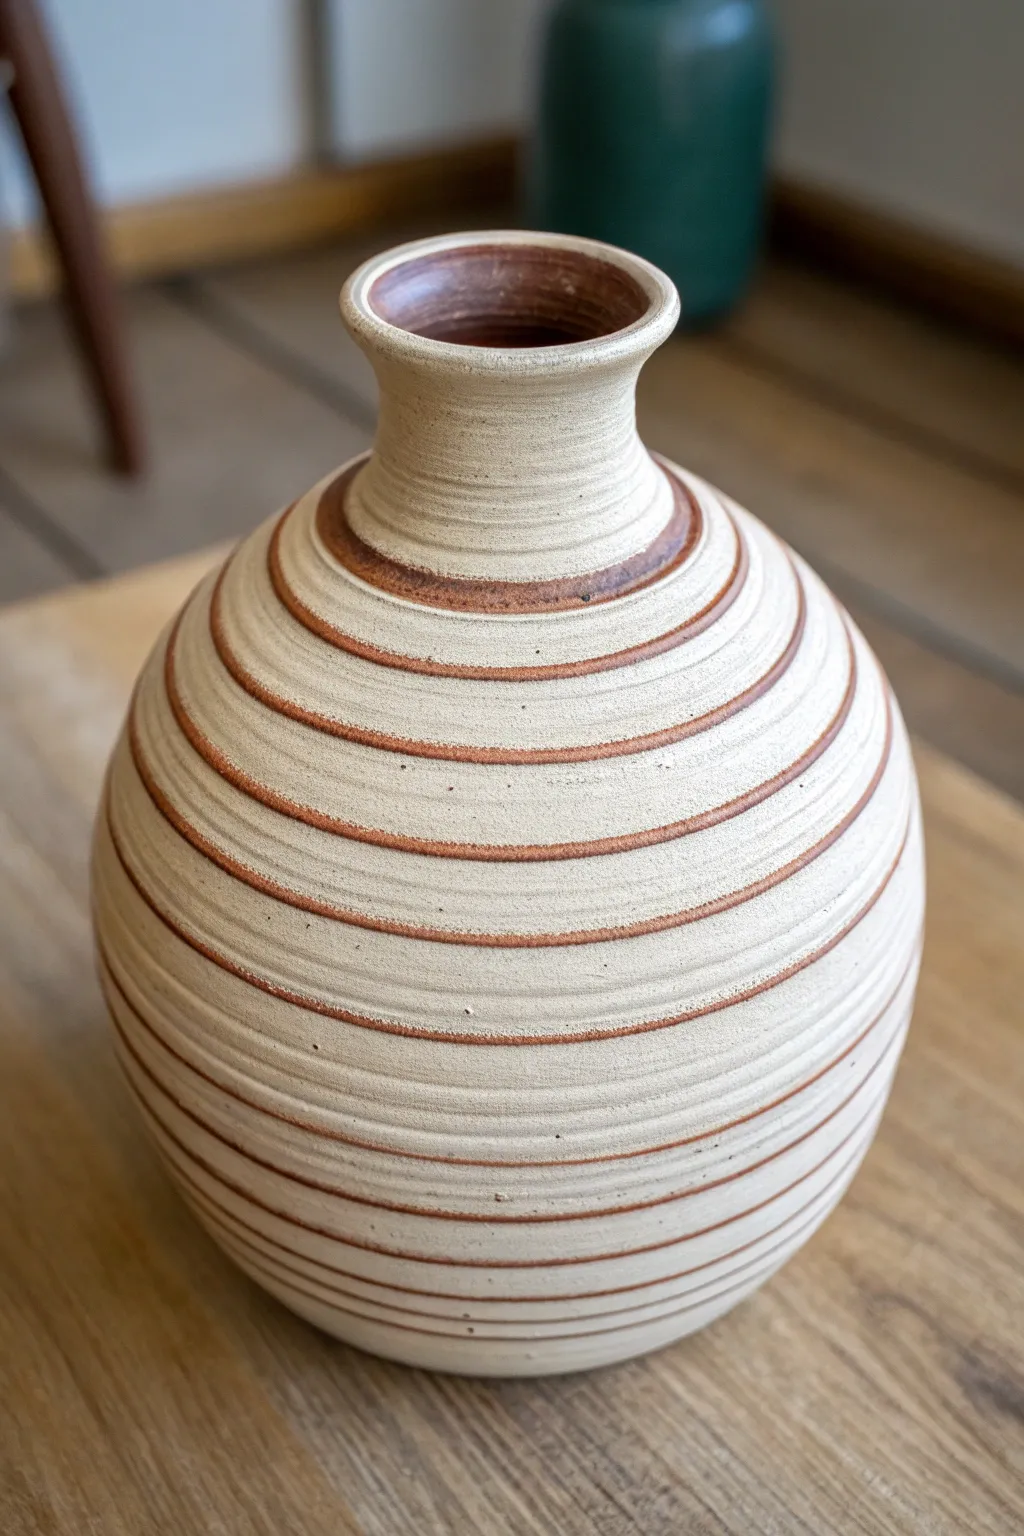
This classic, rounded vessel embraces the natural texture of clay with a satisfyingly rhythmic striped pattern. By layering different clay bodies or using oxide washes, you can achieve this stunning two-tone effect that emphasizes the circular form.
Detailed Instructions
Materials
- Light stoneware clay (cream or beige)
- Red earthenware clay or red iron oxide wash
- Pottery wheel (or banding wheel for hand-building)
- Needle tool
- Rib tool (metal or smooth wood)
- Sponge
- Scoring tool
- Slip
- Loop tool (for trimming)
- Clear matte glaze
Step 1: Forming the Base
-
Prepare the Clay:
Wedge your light stoneware clay thoroughly to remove air bubbles. You want a smooth, consistent consistency before you begin shaping. -
Create the Floor:
Roll out a slab or flatten a ball of clay to create a disk about 4 inches in diameter. accurate circle. This will serve as the strong foundation for your round vessel. -
Score and Slip:
If you are hand-building, score the outer edge of your base disk and apply a generous amount of slip. This ensures your first coil adheres perfectly.
Uneven Stripes?
If your hand shakes while carving lines, rest your elbow firmly on the table or your knee to stabilize your tool hand while the wheel turns.
Step 2: Building the Body
-
Roll Your Coils:
Roll out several long, even ropes of the light stoneware clay. Aim for a thickness of about half an inch for a sturdy wall. -
Start the Curve:
Place your first coil on the base edge. As you add subsequent coils, place them slightly outward from the center to begin creating the belly of the vase. -
Blend the Seams:
After every 2-3 coils, blend the clay downwards on the inside to fuse the layers. Keep the outside distinct if you want a ribbed look, or smooth it for a blank canvas. -
Shape the Belly:
Continue stacking coils, gradually moving outward to create a wide, round sphere shape. Once you reach the widest point, start placing coils slightly inward to close the form. -
Form the Neck:
As the opening narrows, stack the final coils vertically to create a distinct, upright neck. Flare the lip outward slightly for a finished rim.
Go Geometric
Instead of horizontal stripes, try carving vertical flutes or a spiral pattern with the oxide wash for a modern twist.
Step 3: Refining and Adding Stripes
-
Smooth the Surface:
Place your vessel on a banding wheel. While spinning the wheel slowly, hold a rib tool against the exterior to smooth the coil bumps into a uniform, curved wall. -
Carve the Grooves:
With the wheel spinning (or turning smoothly by hand), gently press a loop tool or the rounded end of a wooden tool into the clay to carve shallow, evenly spaced horizontal channels from top to bottom. -
Apply the Contrast:
There are two ways to achieve the brown stripe. I prefer to paint a red iron oxide wash directly into the grooves you just carved. Alternatively, you can inlay soft red clay into the grooves. -
Clean the Excess:
Allow the wash or inlay to set slightly. Then, take a clean, damp rib or sponge and wipe the surface of the pot. This removes the dark color from the raised areas, leaving it only deep inside the grooves. -
Refine the Rim:
Use a chamois or a damp sponge to compress and smooth the rim. You can apply the dark oxide wash to the inside of the rim for a cohesive look. -
Dry Slowly:
Cover the vessel loosely with plastic to let it dry slowly. This is crucial for round forms to prevent cracking as the tension changes.
Step 4: Finishing
-
Bisque Fire:
Once bone dry, fire the piece to bisque temperature (usually Cone 04 or 06 depending on your clay). -
Glaze Application:
Dip the entire vessel into a clear matte or satin glaze. This seals the clay while allowing the natural beige tone and the dark stripes to show through clearly. -
Final Fire:
Fire the piece to the maturity temperature of your stoneware clay (typically Cone 5 or 6) to vitrify the vessel.
Once fired, you’ll have a timeless vessel that balances rustic warmth with precise design