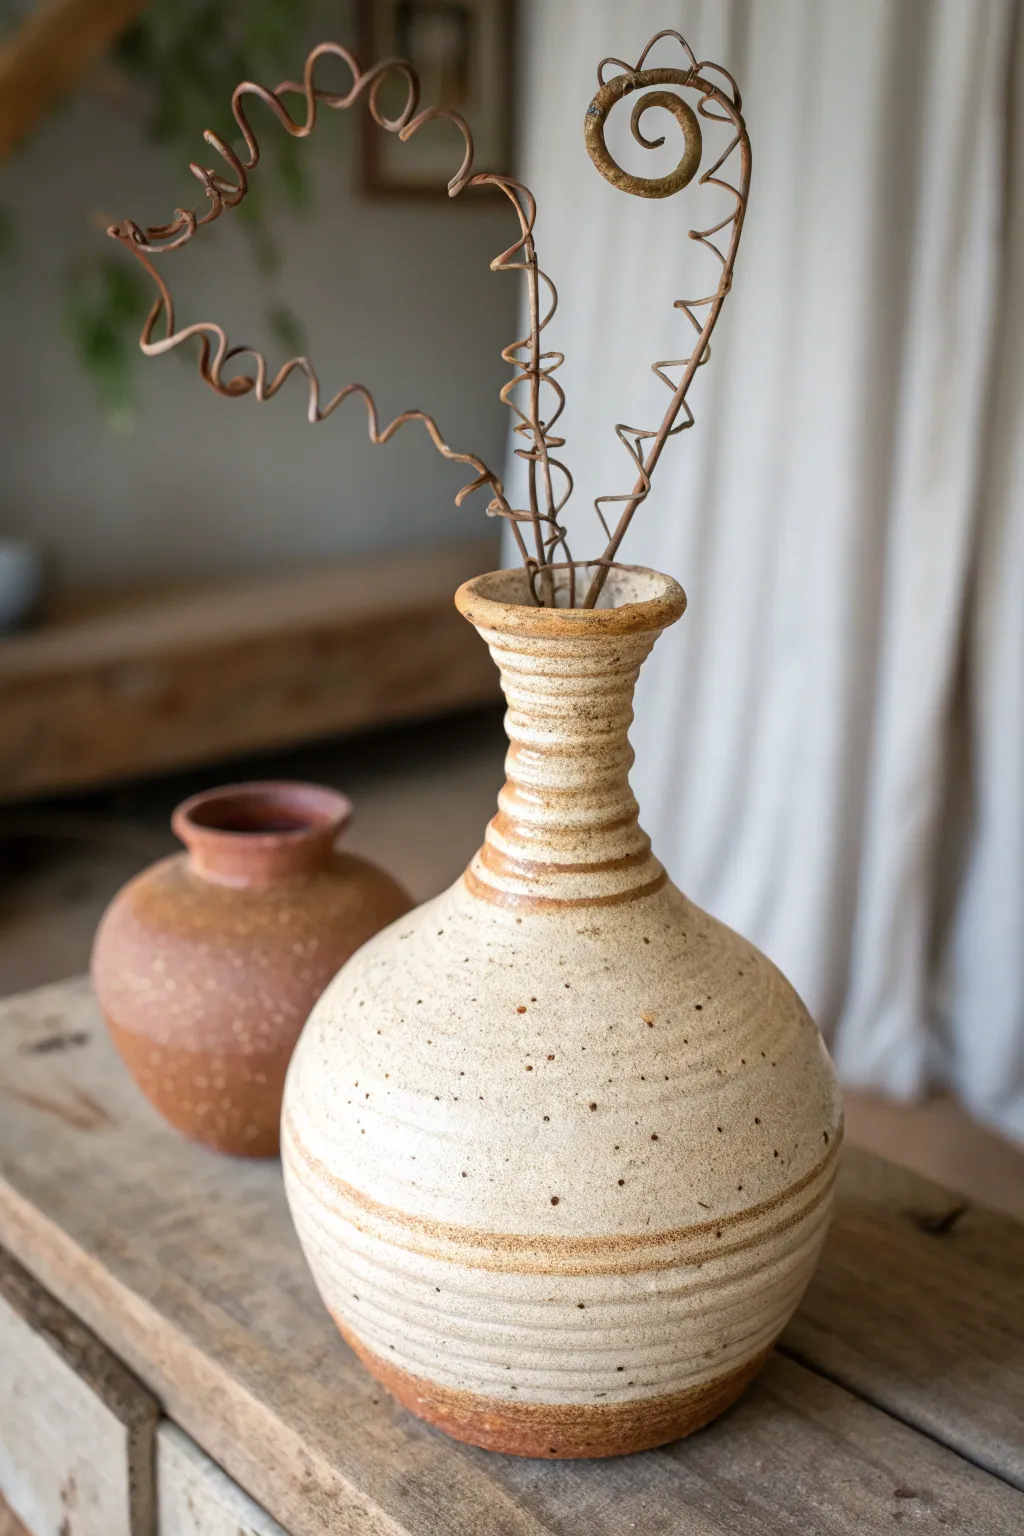
When I’m making a coil vase, I love how the clay can look both handmade and totally intentional at the same time. Here are my go-to coil vase ideas—starting with the classic shapes everyone reaches for, then drifting into the fun, weirder stuff that turns into a real conversation piece.
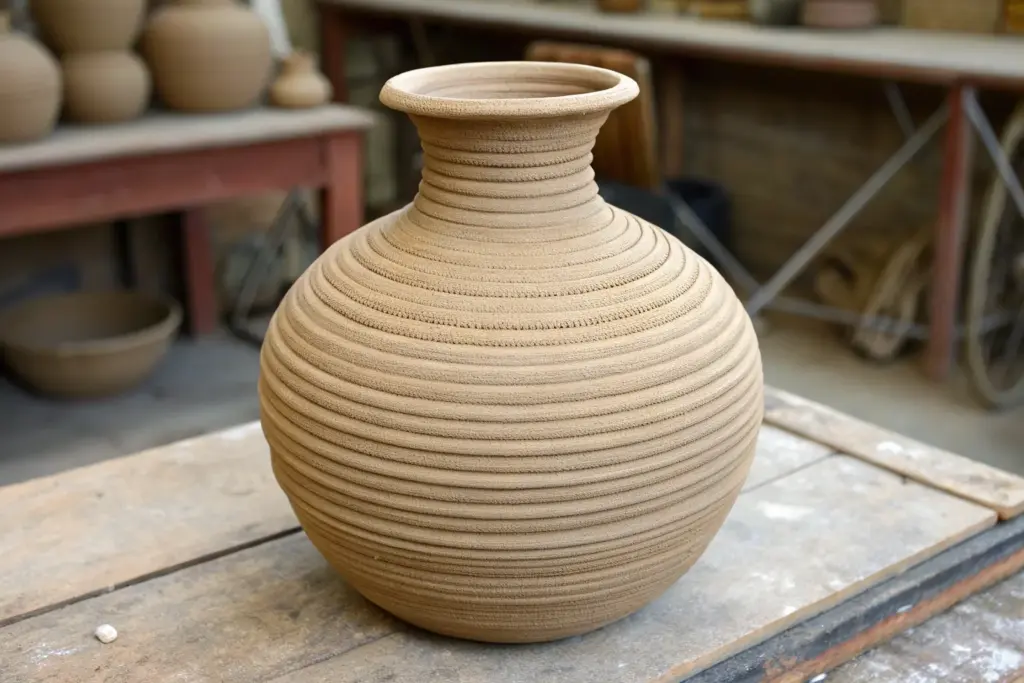
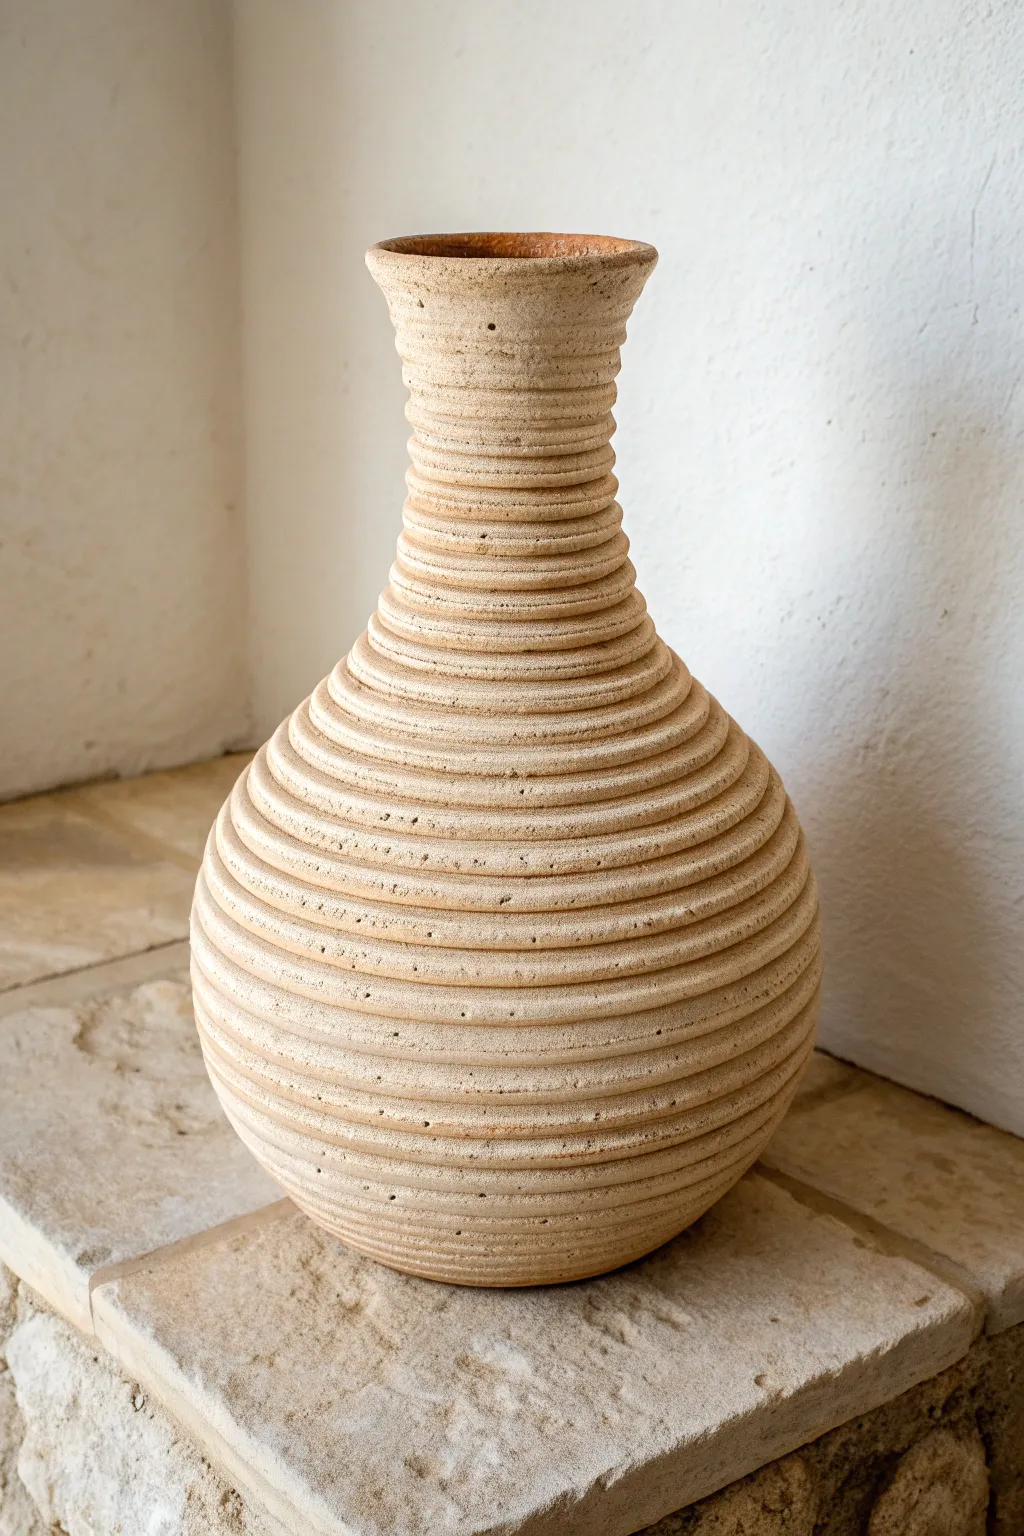
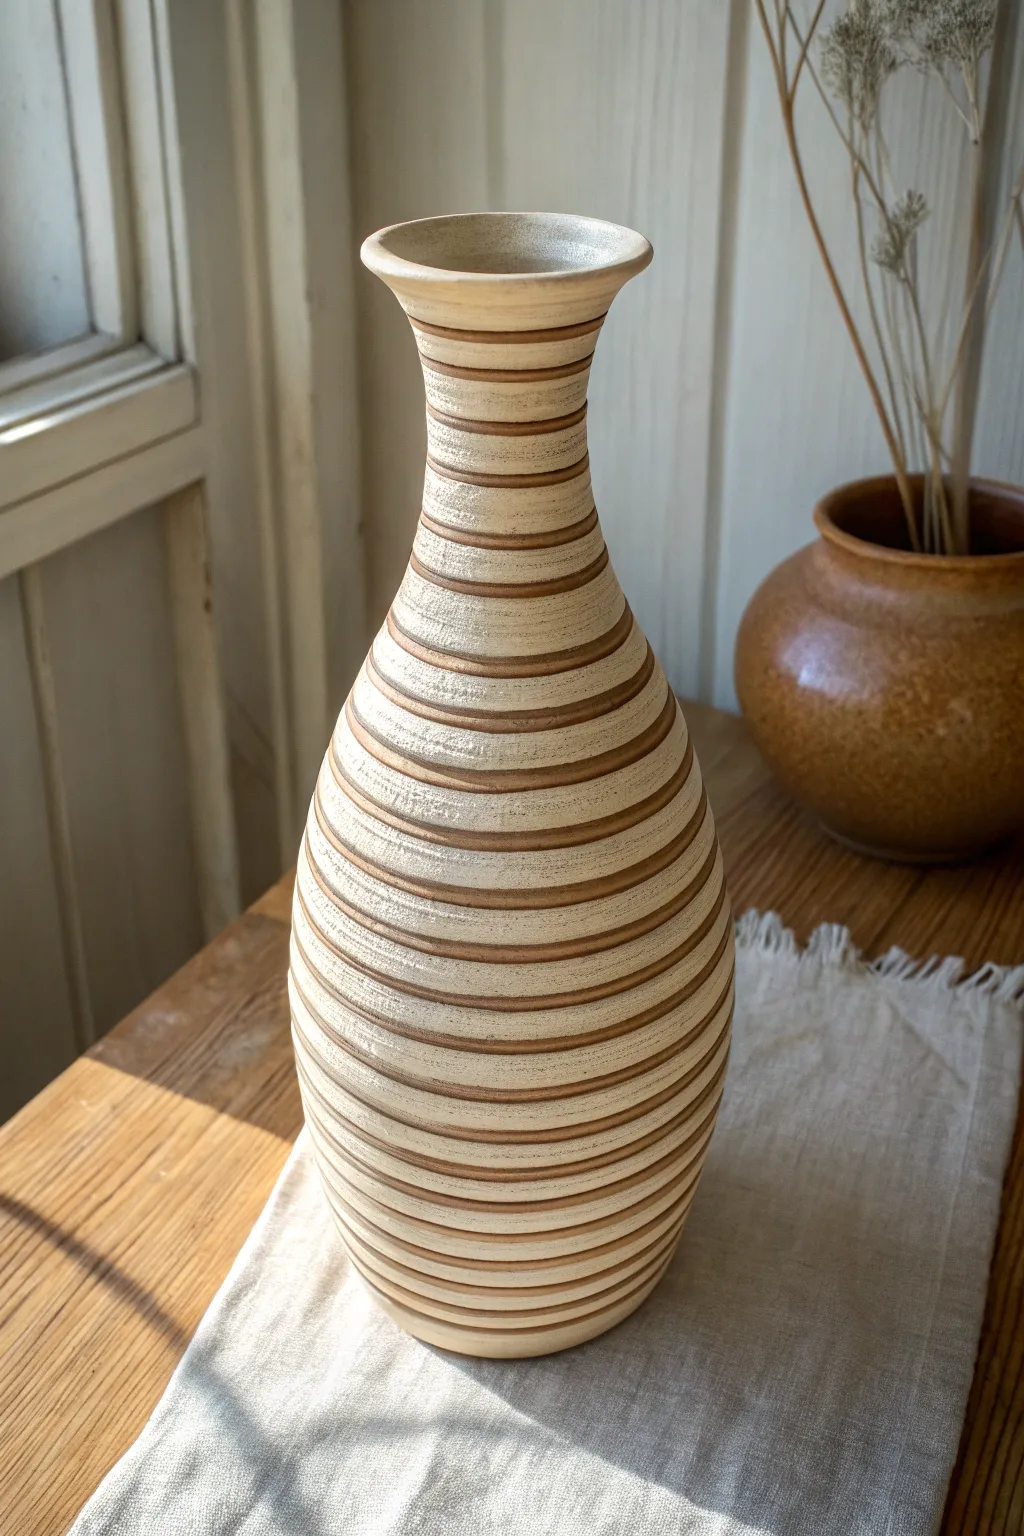
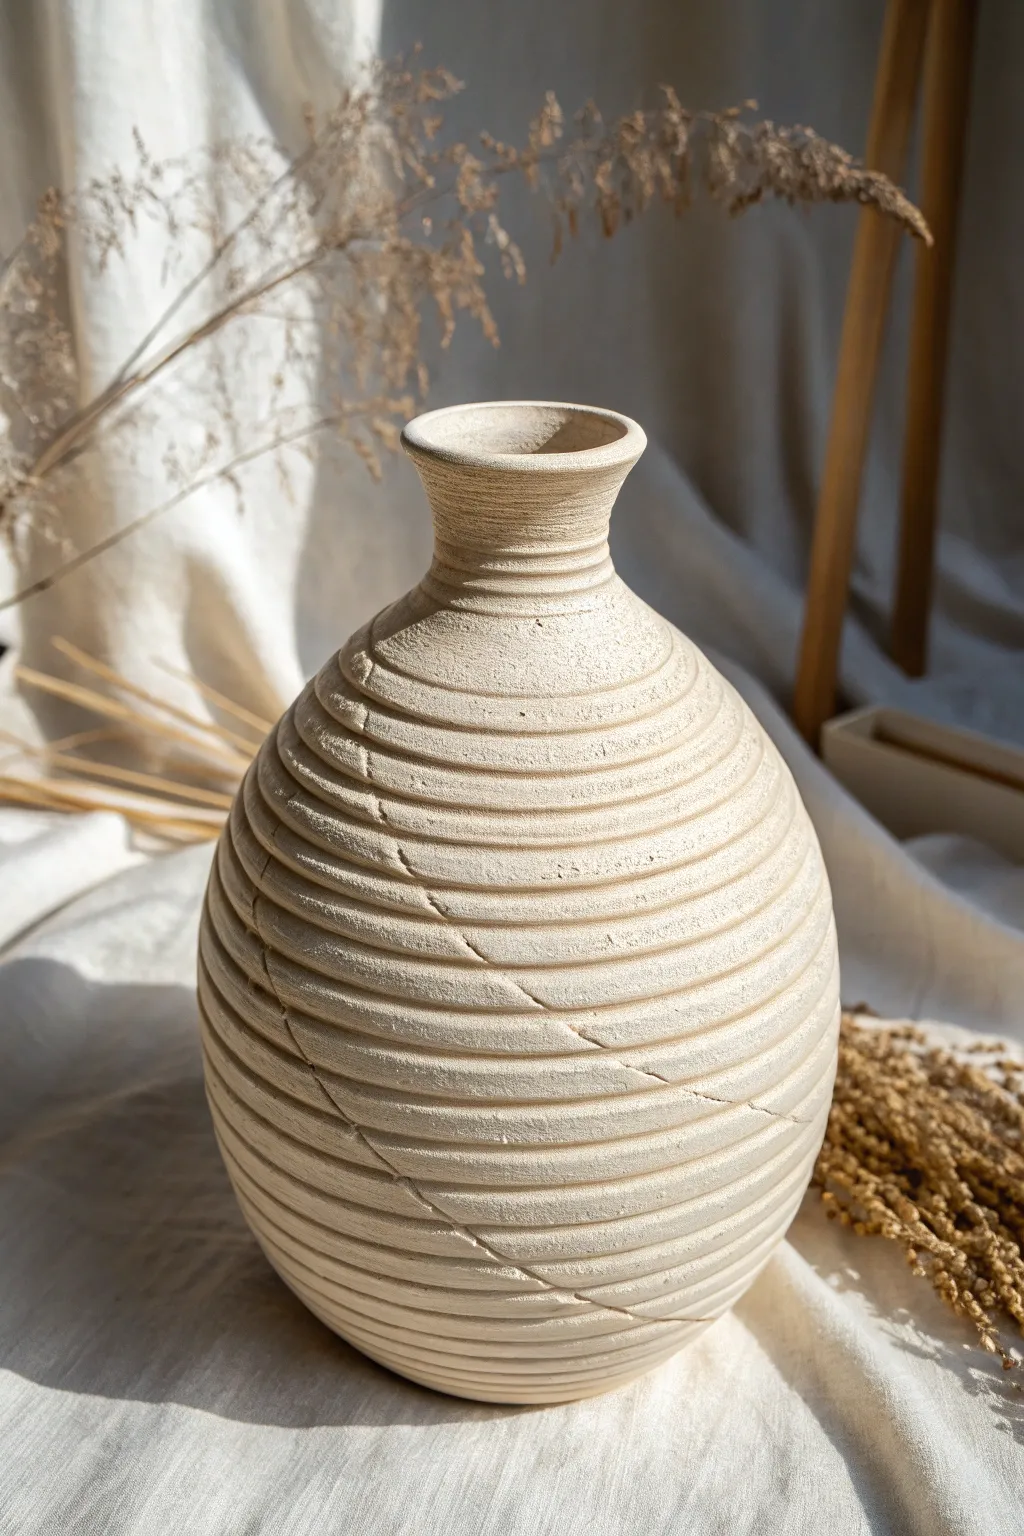
Classic Exposed Coils Cylinder Vase
This elegant vase celebrates the honest beauty of construction with its visible, stacked layers and matte finish. It is a perfect study in rhythm and tension, creating a tall, architectural form that feels both modern and primitive.
How-To Guide
Materials
- Stoneware clay (buff or speckled)
- Pottery wheel (for banding) or banding wheel
- Rolling pin or slab roller (optional for base)
- Clay extruder (optional, for uniform coils)
- Serrated rib tool
- Slip (clay slurry)
- Wooden modeling tool
- Sponge
- Plastic bag
Step 1: Forming the Base
-
Prepare your clay:
Begin by wedging your stoneware clay thoroughly to remove any air bubbles. Consistency is key for a structure this tall, so ensure your clay is plastic but not too soft. -
Roll the foundation:
Roll out a flat slab of clay approximately 1/4 to 3/8 inch thick. This will serve as the heavy bottom to anchor your tall vase. -
Cut the circle:
Use a needle tool or knife to cut a perfect circle roughly 4 inches in diameter. Place this disc onto a banding wheel or a bat. -
Score and slip:
Heavily score the outer perimeter of your base disc and apply a generous amount of slip. This first connection is crucial for stability.
Slumping Walls?
If your cylinder starts to wobble or sag, stop building immediately. Use a heat gun gently on the lower walls to firm them up or let it sit uncovered for 30 minutes before adding more weight.
Step 2: Building the Walls
-
Roll your coils:
Roll out a series of long, even snakes of clay. Aim for a thickness of about 1/2 inch. Using an extruder can save time and ensure perfect uniformity, which gives this vase its tidy look. -
Lay the first ring:
Place your first coil directly onto the scored edge of the base. Gently press it down to adhere it. -
Blend the interior:
I like to use a wooden tool or my thumb to smear the *inside* edge of the coil down into the base. Do not smooth the outside; distinct ridges are the goal here. -
Continue stacking:
Score the top of the first coil, add slip, and stack the next coil on top. Ensure the seam where the coil ends is staggered from the one below it to avoid weak spots. -
Smooth as you go:
After every 2-3 layers, stop to smooth the interior wall completely. You won’t be able to reach the bottom once the cylinder gets tall. -
Check for verticality:
Step back frequently or spin your banding wheel. Use a ruler or straight edge to ensure your walls are going straight up and not flaring out.
Step 3: Gaining Height
-
Pause for stiffness:
Once you have built up about 4-5 inches, pause. Let the clay stiffen slightly to ‘leather hard’ so it can support the weight of the next layers without sagging. -
Correct the profile:
If the clay has bulged, gently paddle the outside with a flat wooden paddle to bring it back into a straight cylinder shape. -
Resume building:
Continue the score-slip-stack process. Keep your coil thickness consistent to maintain the rhythmic horizontal lines. -
Form the shoulder:
When you are about 2 inches from your desired height, slightly taper the coils inward. Lay the coil just slightly inside the center line of the one below it. -
Create the neck:
Add one final, slightly taller coil or a small slab strip for the rim. Flare this very slightly outward to create a delicate lip.
Pro Tip: Seamless Joins
Cut the ends of your coils at a 45-degree angle rather than blunt ends. Overlapping these angled cuts creates a stronger bond and hides the connection point much better.
Step 4: Finishing Touches
-
Refine the lines:
Use a damp sponge or a rounded tool to gently run along the exterior grooves. You want to soften any sharp crumbles of clay without erasing the definition of the coils. -
Slow drying:
Ideally, cover the top half of the vase loosely with plastic while the bottom dries. This helps prevent cracking due to uneven shrinkage in tall forms. -
Bisque fire:
Once bone dry, bisque fire the vase to Cone 04 (or according to your clay body specs). -
Glazing decision:
Glazing inside is essential for water tightness. For the outside, simply wipe a damp sponge over it to leave it raw, or apply a very thin matte wash to highlight the texture, then glaze fire.
Fill your new vase with dried branches or let it stand alone as a piece of sculptural stoneware.


Round-Belly Bud Vase With a Pinched Neck
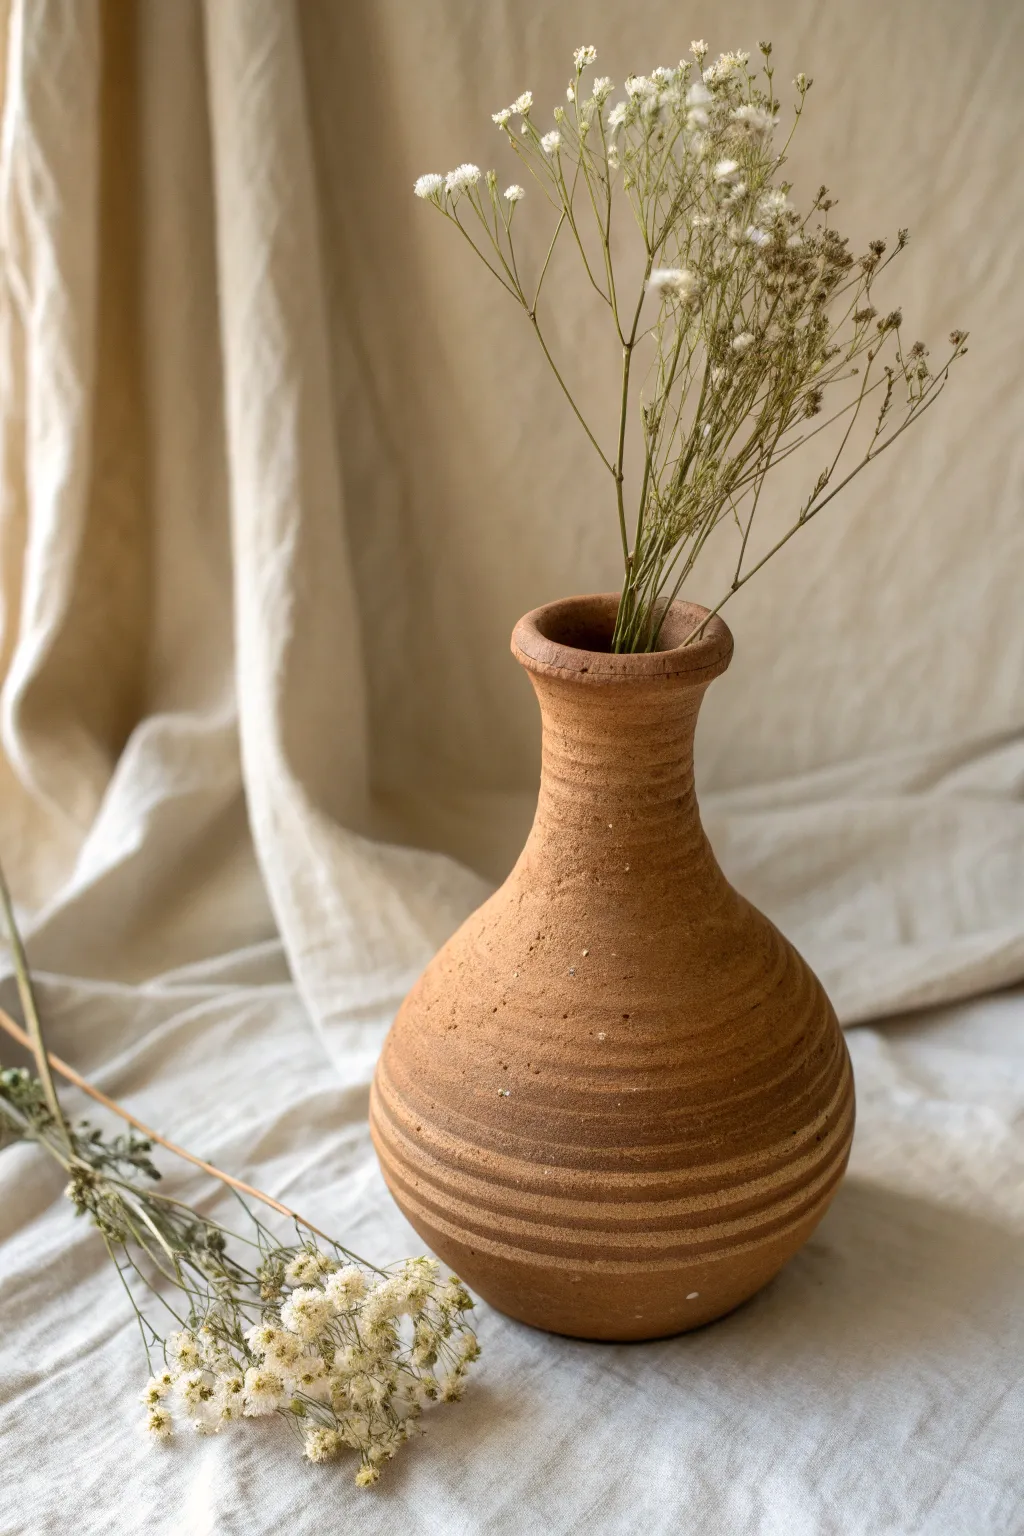
Capture the warmth of raw clay with this round-bellied bud vase, featuring a distinctively pinched neck and subtle horizontal ridges. Its organic form and unglazed finish make it a perfect vessel for showcasing delicate dried botanicals.
Step-by-Step Guide
Materials
- Terracotta or red earthenware clay (approx. 2-3 lbs)
- Small banding wheel (optional but helpful)
- Needle tool
- Wooden rib tool
- Serrated metal kidney rib or scoring tool
- Sponge
- Wooden modeling tool
- Clay cutting wire
Step 1: Forming the Base
-
Create the floor:
Start by rolling a ball of clay roughly the size of a tangerine. Flatten it onto your work surface or banding wheel to create a disk about 3 inches in diameter and 1/4 inch thick. -
Score and slip:
Use your serrated rib or needle tool to scratch up the outer rim of the base disk. Apply a small dab of water or slip to these scratches to act as glue. -
Roll your first coils:
Roll out several long, even snakes of clay, aiming for the thickness of your thumb or slightly thinner. Keep them consistent to ensure an even wall thickness.
Maintain Symmetry
Look at your pot from directly above while working. If the circle looks like an oval, gently push it back into round before adding the next coil.
Step 2: Building the Belly
-
Attach the first ring:
Place your first coil onto the scored edge of the base. Cut the ends at an angle where they meet to ensure a seamless join. -
Blend the clay:
Using your thumb or a wooden modeling tool, smudge the clay from the coil down onto the base on the inside of the pot. Then, do the same on the outside, smoothing downwards to lock it in place. -
Build outward:
Stack the next 3-4 coils slightly outward from the center. Each new ring should sit just a bit further out than the one below it to create that swelling, rounded belly shape. -
Blend as you go:
I find it crucial to blend the coils together after every two layers so the seams don’t become weak points later. Smooth the inside completely, but you can leave the outside slightly rough if you like texture. -
Establish the texture:
Normally coil pots are smoothed, but for this look, lightly run your finger or a soft rib horizontally along the join lines on the exterior. Don’t erase them completely; you want those faint, rhythmic horizontal ridges to remain visible.
Collapsing Walls?
If the belly starts sagging, the clay is too wet or the wall is too thin. Stop building, use a hair dryer briefly to stiffen the lower walls, then continue.
Step 3: Constructing the Neck
-
Bring it inward:
Once the belly reaches its widest point (about 5-6 inches high), begin stacking the next coils slightly inward toward the center. -
Create the taper:
Continue adding coils, stepping them in more aggressively now to form the shoulder of the vase. The opening should narrow down significantly. -
Form the vertical neck:
Once the opening is about 2 inches wide, stack 2-3 coils directly on top of each other vertically to create the straight neck section. -
Refine the surface:
Use a damp sponge to gently wipe the exterior. This will smooth out sharp crumbles but preserve the ‘lines’ of the coils that give this piece its character.
Step 4: Finishing the Rim
-
Add the rim coil:
Roll a slightly thicker coil for the very top rim. Attach it securely to the top of the neck. -
Pinch the flare:
Support the outside of the neck with one hand. With your other hand, gently pinch and flair this top coil outward slightly to create a defined lip. -
Clean up the lip:
Run a damp chamois leather or a smooth piece of plastic over the rim to compress the clay particles and make it smooth against the touch. -
Dry slowly:
Loosely cover the vase with plastic for the first day to let the moisture equalize, then uncover to dry completely before firing.
Once fired, fill your new handmade vessel with dried baby’s breath or wildflowers for a timeless display


Bell-Shaped Coil Vase With a Narrow Mouth
This project focuses on building a classic bell-shaped vessel that celebrates the texture of the coil itself. By leaving the horizontal ridges exposed rather than smoothing them away, you create a rhythmic, tactile surface that feels both rustic and refined.
Step-by-Step Tutorial
Materials
- Stoneware clay (buff or grogged for texture)
- Scoring tool or fork
- Slip (clay and water mixture)
- Wooden modeling tool
- Sponge
- Pottery wheel or banding wheel (optional but helpful)
- Cutting wire
Step 1: Creating the Base
-
Form the slab base:
Start by rolling out a circular slab of clay about 1/2 inch thick and 5 inches in diameter. This will serve as the stable foundation for your vase. -
Prepare the connection:
Score the outer edge of your circular base thoroughly using a scoring tool or a simple kitchen fork. Apply a generous amount of slip to the scored area to ensure a strong bond.
Uneven Walls?
If one side is higher, avoid squashing it down. Instead, pinch the lower side’s coil slightly thinner and taller to level it out without ruining the horizontal lines
Step 2: Building the Belly
-
Roll your first coils:
Roll out several long ropes of clay. Aim for a consistent thickness—about the width of your pinky finger—to ensure the ribbed pattern looks uniform. -
Lay the first ring:
Place your first coil onto the scored edge of the base. Gently press it down to adhere it without squashing the round shape of the coil too much. -
Blend the inside only:
With your thumb or a wooden tool, smear the clay from the *inside* of the coil down onto the base. This locks the structure together while keeping the outside texture pristine. -
Expand outward:
Stack subsequent coils, positioning each one slightly further out than the one below it. This will create the widening ‘belly’ of the vase shape. -
Maintain the curve:
Continue building outward until the vessel reaches your desired width, creating a spherical bottom half. I find stepping back occasionally helps compare the symmetry of the curve. -
Smooth the interior:
As you build, keep smoothing the interior seams vertically. Since the neck will get narrow later, smoothing the inside now is crucial while your hand still fits.
Level Up: Texture Wash
Apply a dark iron oxide wash over the finished bisque and wipe it back. The dark color will stay in the deep coil crevices, emphasizing the 3D ribbed effect
Step 3: Forming the Narrow Neck
-
Begin tapering:
Once the belly is round and full, start placing your coils slightly inward. Make this transition gradual to avoid a sharp, angular shelf. -
Construct the vertical neck:
Stack coils directly on top of one another to build the vertical cylinder of the neck. The diameter should be significantly narrower than the belly. -
Check alignment:
Spin your banding wheel to check that the neck is centered. Adjustment is easy while the clay is soft; just gently nudge the coils into alignment. -
Create the flared rim:
For the final two or three coils, place them slightly outward again to create a subtle lip or flare at the very top opening.
Step 4: Refining the Surface
-
Clean the texture:
Use a damp sponge to gently wipe the exterior coils. This removes any accidental fingerprints or slip drips without erasing the definition of the ridges. -
Define the separation:
If any coils look too merged, use a narrow wooden tool to gently re-trace the horizontal lines between them, enhancing the deeper shadows. -
Dry slowly:
Cover the vase loosely with plastic so it dries slowly. Rapid drying can cause cracks between coils where the tension is highest. -
Bisque fire:
Once completely bone dry, kiln fire the piece to bisque temperature. -
Apply finish:
Glaze the interior to make it waterproof, but consider leaving the exterior raw or applying a matte oxide wash to highlight the natural coil texture.
Now you have a stunning textural piece ready for your favorite dried stems or branches


Textured-Outside, Smooth-Inside Handbuilt Vase
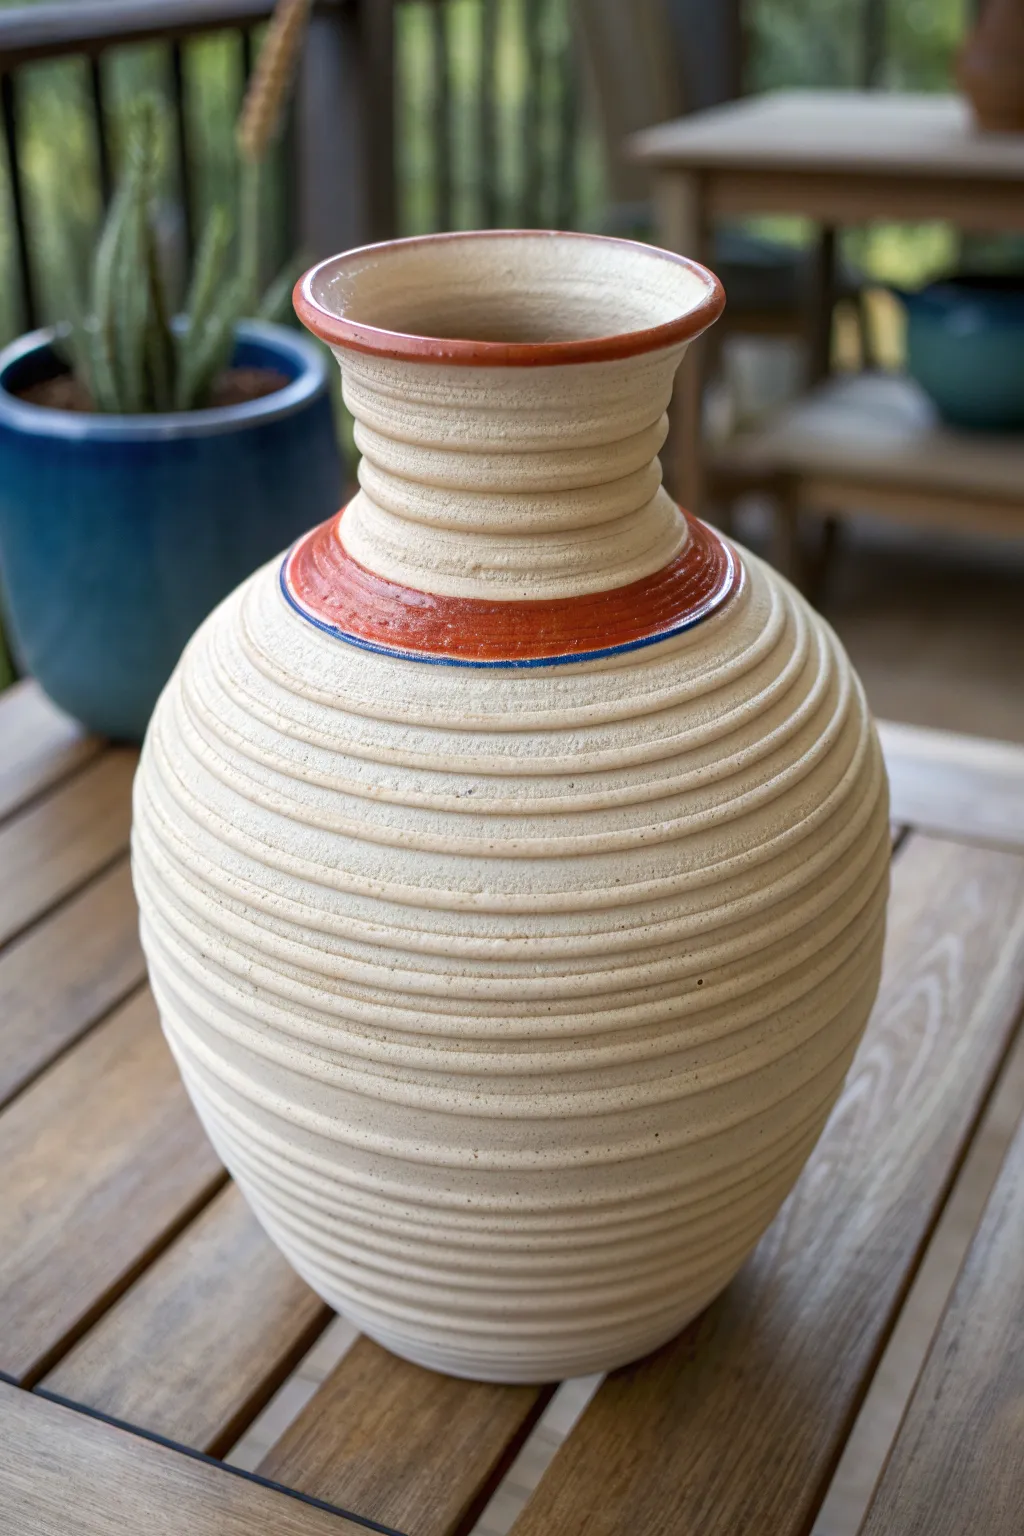
This project combines the rustic charm of horizontal ribbing with the refined silhouette of a classic amphora. The creamy beige body is accentuated by a warm terracotta neckband and a delicate blue accent line, creating a piece that feels both earthy and sophisticated.
Detailed Instructions
Materials
- Light stoneware or earthenware clay (cream/white firing)
- Potter’s wheel (or banding wheel for hand-building)
- Scoring tool and slip
- Underglazes: Terra cotta/Red-orange and Cobalt Blue
- Clear transparent glaze (cone 5/6 or compatible with your clay)
- Rib tool (serrated or custom notched)
- Standard throwing ribs (wood and metal)
- Sponge
- Wire cutter
- Needle tool
- Soft fan brush
- Fine liner brush
Step 1: Throwing and Shaping
-
Center and Open:
Start by centering about 3-4 pounds of clay on your wheel. Open the center and pull the floor out to be relatively wide, as this vase has a generous, round belly. -
Pull the Cylinder:
Begin pulling up your walls. Aim for a cylinder initially, keeping the walls even—about 1/4 inch thick. Don’t worry about the final curves just yet; height is your first goal. -
Belly Out the Form:
Using a rib on the inside and gentle pressure from the outside, push the clay outward to create that voluminous, round bottom half. Keep the movement slow to maintain symmetry. -
Collar the Neck:
Gradually collar in the top third of the vessel using wet hands. This creates the shoulder and the narrow neck section. I like to do this in several passes to avoid buckling the clay. -
Form the Double Flare:
Once the neck is narrowed, gently flare the rim outward again, creating a funnel shape. The profile should transition from the wide belly, in toward the neck, and slightly out at the very top.
Groove Smoothness
After carving the ribs, use a piece of soft plastic (like a grocery bag) wrapped around your finger to burnish the grooves while spinning. It smooths without erasing texture.
Step 2: Texturing and Refining
-
Smooth the Inside:
Before adding exterior texture, use a damp sponge or a smooth rib on the inside of the vase to ensure it is perfectly slick and water-tight. -
Create the Ribs:
With the wheel spinning at a slow-to-medium speed, take a rounded modeling tool or the corner of a wooden rib. Starting from the bottom, press gently to create continuous horizontal grooves. -
Work Upwards:
Continue these grooves all the way up the vessel. Vary the pressure slightly as you navigate the curves—lighter on the belly, slightly firmer near the neck to define the shape. -
Refine the Grooves:
Go back over the grooves with a damp sponge to soften any sharp burrs or jagged edges. The goal is a soft, organic ripple rather than a sharp mechanical cut. -
Undercut and Wire Off:
Use a wooden knife to undercut the foot of the vase for a clean shadow line. Run your wire cutter underneath to release it from the bat, then let it dry to leather hard.
Go Rougher
Instead of smooth clay, try a speckled stoneware or add grog. When the clear glaze melts, the speckles will break through the beige for a fantastic gritty look.
Step 3: Decoration and Glazing
-
Bisque Fire:
Once the piece is bone dry, fire it to bisque temperature (usually cone 04) to prepare it for glazing. -
Apply the Neck Band:
Using a soft brush and the terra cotta underglaze, paint the section where the shoulder transitions into the neck. Follow the horizontal grooves naturally. You may need 2-3 coats for opacity. -
Rim Detail:
Apply the same terra cotta color to the very top rim of the vase. This frames the piece and balances the color on the neck. -
The Blue Accent:
Here comes the tricky part: take a fine liner brush with cobalt blue underglaze. Carefully paint a thin line immediately beneath the terra cotta neck band, nestled into one of the grooves. -
Clean Up:
If any underglaze smudged onto the main body, wipe it away gently with a damp sponge. The main body should remain raw bisque for now. -
Transparent Glaze:
Dip or spray the entire vessel with a clear transparent glaze. This will seal the bare clay to a creamy finish and make the underglaze colors pop. -
Final Firing:
Load the kiln and fire to your clay’s maturity temperature (e.g., cone 5 or 6). Allow the kiln to cool completely before unloading.
Place your finished vase near a window where natural light can play across the ribbed texture to emphasize the form

The Complete Guide to Pottery Troubleshooting
Uncover the most common ceramic mistakes—from cracking clay to failed glazes—and learn how to fix them fast.
Coil Vase With a Braided Rim Finish
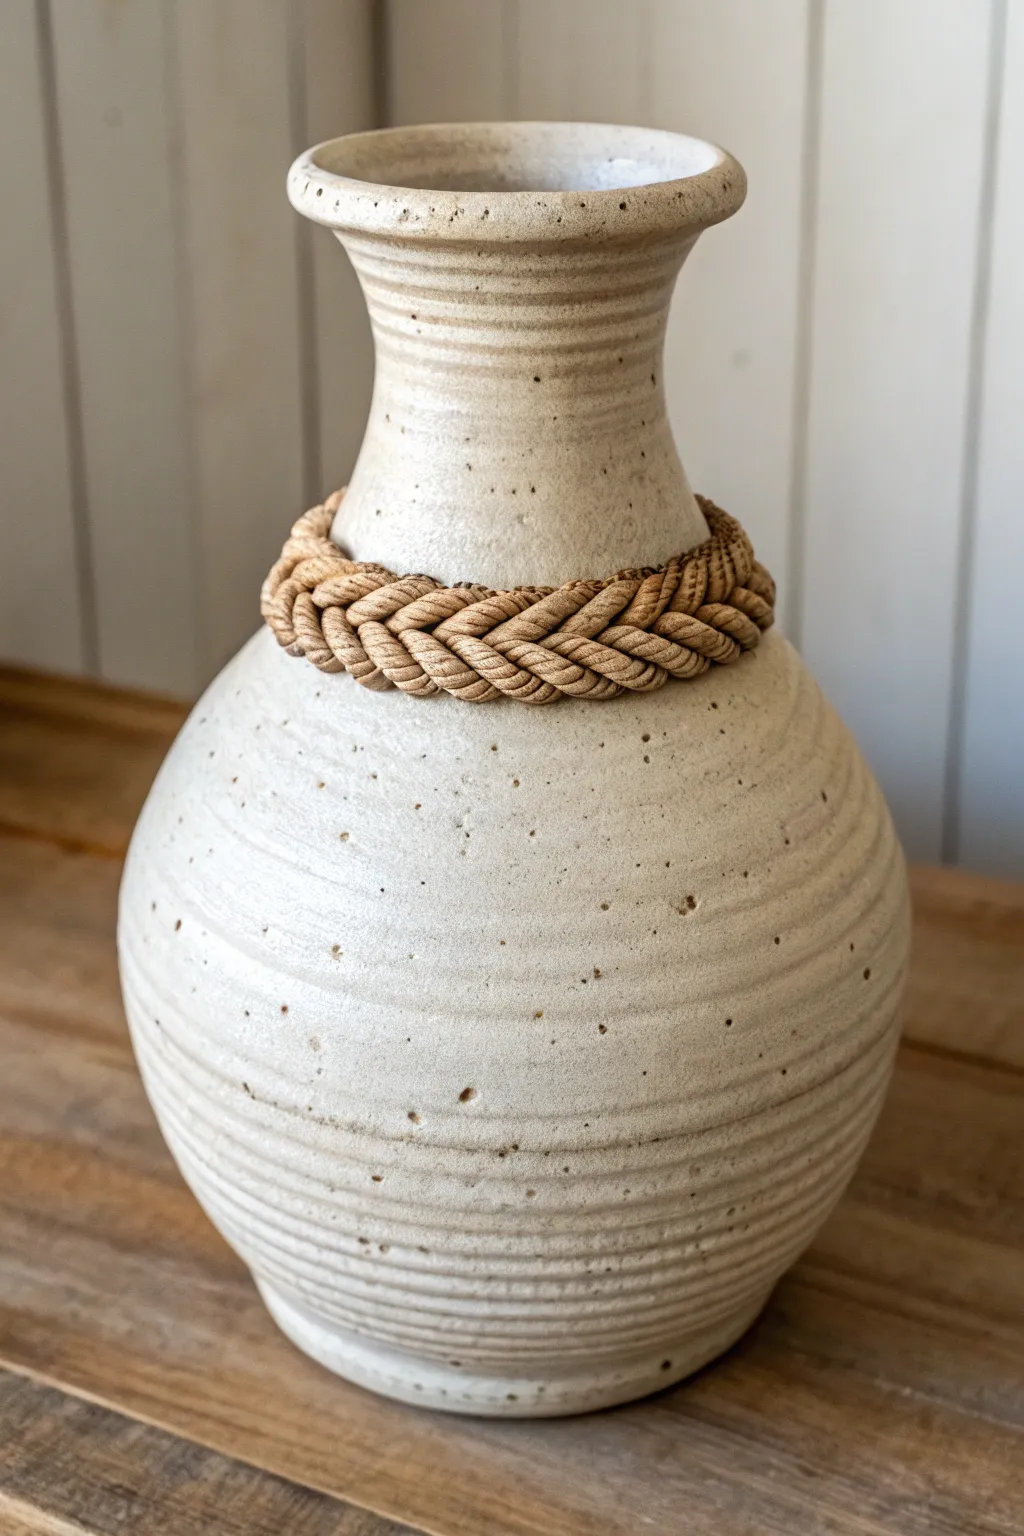
This project combines classic coil-building techniques with a unique decorative twist, featuring a subtly ribbed body and a stunning braided clay accent at the neck. The creamy speckled clay gives it a warm, rustic feel that highlights the texture of the braid.
How-To Guide
Materials
- Stoneware clay (speckled or buff)
- Pottery wheel (optional, can be hand-built)
- Extruder (optional, for even coils)
- Scoring tool
- Slip
- Ribs (wooden and metal)
- Sponge
- Cutting wire
- Matte white or clear glaze
Step 1: F orming the Base Vessel
-
Create the base:
Start by throwing a cylindrical base on the wheel or rolling out a slab circle if hand-building. Aim for a foot that is slightly narrower than the belly to come. -
Build the belly:
Whether throwing or coiling, expand the walls outward to create a rounded, bulbous belly shape. If coiling, blend your coils thoroughly on the inside for strength. -
Texture the surface:
As you form the wall, leave distinct throwing lines or coil ridges on the exterior. I like to use a serrated rib gently against the spinning clay to emphasize horizontal striations. -
Establish the neck:
Collar the clay inward significantly to form the neck. It needs to be narrower than the body to give the braid a resting place. -
Flare the rim:
At the very top, flare the lip outward slightly. This creates a balanced silhouette and hides the visual termination of the neck.
Braid Cracking?
If the braid cracks away from the pot during drying, your slip wasn’t wet enough. Score deeper and use vinegar-based slip for a stronger bond.
Step 2: Creating the Braided Detail
-
Extrude or roll coils:
Roll out long, thin coils of clay. They must be uniform in thickness; using a clay extruder here is a huge timesaver and ensures consistency. -
Assemble the braid:
Lay three coils side-by-side and braid them tightly together on a flat surface. Make a length slightly longer than the circumference of the vase neck. -
Compress the braid:
Gently press down on the finished braid to flatten the back side. This increases the surface area for attachment. -
Prepare the attachment site:
Identify the spot where the shoulder transitions into the neck. Score a strip around the entire circumference of the vase at this join point. -
Attach the braid:
Apply slip to the scored area. Carefully lift your clay braid and wrap it around the neck, pressing firmly to adhere it without squishing the texture. -
Hide the seam:
Cut the ends of the braid at an angle where they meet. Join them with slip and use a modeling tool to blend the strands so the braid looks continuous.
Dual-Tone Effect
Use a dark iron oxide wash on the braid before glazing. Wipe it back so the dark color stays only in the crevices, making the weave pop.
Step 3: Finishing and Glazing
-
Dry slowly:
Because the braid is thicker than the wall, cover the pot loosely with plastic to ensure even drying and prevent cracking at the rim. -
Bisque fire:
Once bone dry, fire the piece to bisque temperature (usually cone 04 or 06) to prepare it for glazing. -
Apply glaze:
Dip or brush a matte white or translucent cream glaze over the entire piece. Avoid thick glaze on the braid, as it can obscure the woven detail. -
Wipe back texture:
If using a thicker glaze, gently wipe the raised areas of the braid with a damp sponge to let the clay body peek through. -
Final firing:
Glaze fire the piece to maturity (cone 5/6 or 10 depending on your clay). Ensure the kiln is well-ventilated for clean results.
Place your finished vase near a window where natural light can catch the beautiful texture of the braid
Corrugated Texture Coil Vase (Pinched, Not Smoothed)
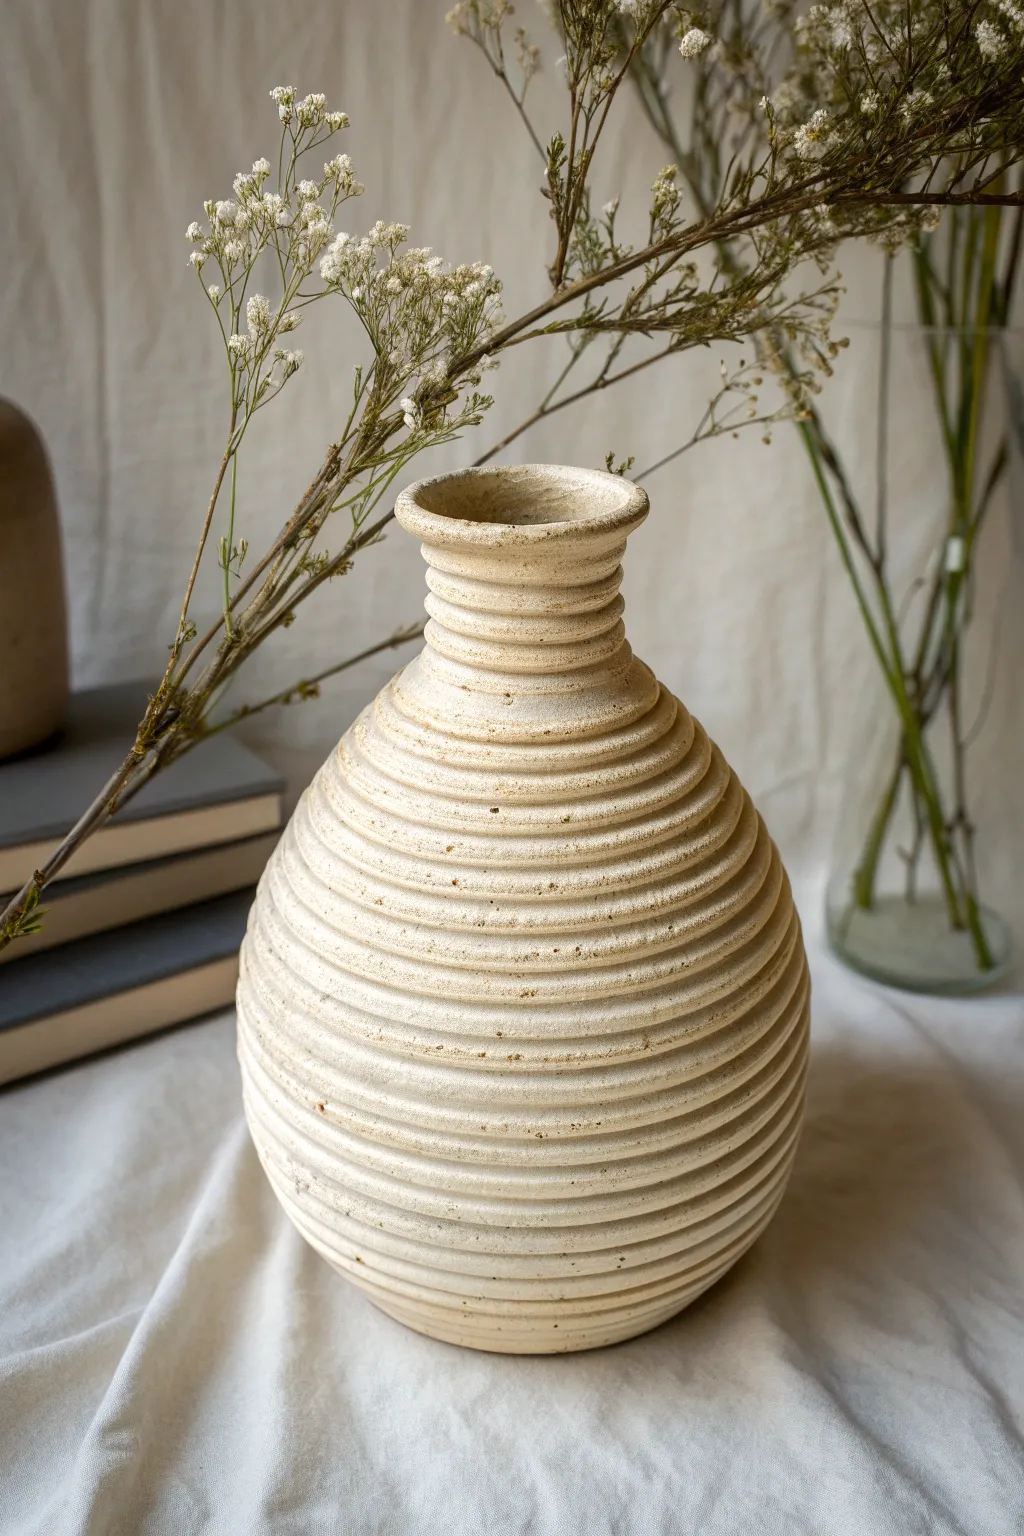
This project embraces the tactile beauty of raw clay with a distinct, corrugated texture that mimics the look of stacked coils while offering a more refined, pottery-wheel aesthetic. The natural, stone-like finish and prominent horizontal ridges create a timeless vessel perfect for dried botanical displays.
Detailed Instructions
Materials
- Stoneware clay (speckled or sand-colored recommended)
- Pottery wheel (or banding wheel for hand-building)
- Wooden rib tool (straight edge)
- Serrated metal rib or texture comb
- Sponge
- Cutting wire
- Needle tool
- Matte white or transparent glaze (optional)
- Kiln
Step 1: Preparing and Centering
-
Wedge the clay:
Begin with about 3-4 pounds of stoneware clay. Wedge it thoroughly to remove air bubbles and ensure an even consistency, which is crucial for maintaining the structural integrity of the ribbed texture later on. -
Center the clay:
Slam the clay onto the center of the wheel head. Using wheel speed and firm pressure, cone the clay up and down until it is perfectly centered and running smooth. -
Open the form:
Drill your thumbs into the center to create the floor, leaving it about a half-inch thick. Pull the clay outward to establish the base width of your bulbous shape.
Step 2: Throwing the Form
-
Pull the first cylinder:
Begin pulling up the walls. Focus on height first rather than shape. Keep the walls slightly thicker than a standard smooth vase (about 3/8 inch) because you will be carving into them to create the deep ridges. -
Shape the belly:
Once you have a cylinder, apply pressure from the inside to push the belly out. Aim for a wide, spherical bottom section. -
Collar the neck:
As you move upward, gently collar (squeeze) the clay inward to create the tapered shoulder and narrower neck. Do this gradually to avoid buckling the clay. -
Flare the rim:
At the very top, apply gentle outward pressure to create a subtle, rolled rim that balances the visual weight of the base. -
Refine the curve:
Use a wooden rib on the outside against your inside hand to smooth the overall silhouette, ensuring a pleasing, continuous curve from base to neck before adding texture.
Fixing Wobbly Walls
If walls buckle while texturing, you’re pressing too hard or the clay is too wet. Use a hair dryer to firm up the surface slightly before carving again.
Step 3: Creating the Corrugated Texture
-
Select your tool:
You can use a specialized texture tool, but I actually prefer using the rounded end of a wooden tool or a thick loop tool to get these specific deep grooves. -
Establish the spiral:
With the wheel spinning at a slow-to-medium speed, start at the very bottom of the vase. Press your tool firmly into the clay wall. -
Carve the ridges:
Slowly move your hand upward while the wheel spins. Unlike a smooth pull, you want to leave a continuous spiral groove. Maintain steady pressure to ensure the ridges are uniform in depth. -
Neck detailing:
Continue the groove pattern all the way up the neck to the rim. The grooves naturally become tighter visually as the form narrows. -
Soften the edges:
Use a damp sponge to very lightly graze over the textured surface while the wheel spins. This knocks down any sharp burrs without erasing the definition of the ridges.
Natural Speckle Finish
Skip the glaze entirely! Use a speckled buff clay and fire to cone 6. The natural iron spots will create a stunning, organic stone look.
Step 4: Finishing and Firing
-
Cut from the wheel:
Run your cutting wire under the base of the vase. Carefully lift it off the wheel head using pot lifters or dry hands and place it on a ware board. -
Slow drying:
Cover the vase loosely with plastic. Because of the variable wall thickness created by the ridges, slow drying is essential to prevent cracking. Let it dry to leather hard, then uncover to reach bone dry. -
Bisque fire:
Load the bone-dry vase into the kiln for a bisque firing (typically cone 04 or 06). This prepares the clay for glazing. -
Glazing technique:
To achieve the look in the photo, wipe a very thin wash of white engobe or matte glaze over the surface, then sponge mostly off so it stays deep in the crevices, highlighting the texture. -
Final firing:
Fire the vase to the maturity temperature of your clay body (likely Cone 5/6 or Cone 10). Allow the kiln to cool completely before unloading.
Place your finished vessel in a sunlit spot where the shadows can play across those beautiful ridges


What Really Happens Inside the Kiln
Learn how time and temperature work together inside the kiln to transform clay into durable ceramic.
Striped Coil Vase Using Colored Coils
Create a stunningly elegant vessel that combines the rustic charm of pottery with rigorous, modern lines. This project focuses on building a tall, bottleneck shape using alternating coils of clay and staining the recessed grooves to create a striking ribbed effect.
How-To Guide
Materials
- Stoneware clay (buff or cream color)
- Slip and scoring tool
- Extruder (optional, but helpful for even coils)
- Wooden modeling tool or paddle
- Metal rib kidney
- Sponge
- Red iron oxide wash or brown underglaze
- Small stiff paintbrush
- Clear satin or matte glaze
- Kiln
Step 1: Base Construction
-
Form the Foundation:
Begin by rolling out a slab of clay about 1/4 inch thick. Cut a perfect circle approximately 4 inches in diameter to serve as the sturdy base for your vase. -
Prepare the First Coils:
Roll out several long, even ropes/coils of clay. If you have an extruder locally available, this is the perfect time to use a medium circle die to ensure every coil is identical in thickness. -
Attach the First Layer:
Score the outer edge of your base and apply a generous amount of slip. Lay your first coil around the perimeter. -
Blend the Interior:
Using your thumb or a wooden tool, firmly smear the clay from the coil downward onto the base on the inside only. This creates a seamless interior seal while leaving the exterior coils distinct.
Step 2: Building the Form
-
Build Upward and Outward:
Continue stacking coils, scoring and slipping between each layer. For the first few inches, place each new coil slightly to the outside of the one below it to widen the belly of the vase. -
Smooth the Inside:
After every 3-4 coils, pause to smooth the interior walls completely. Use a damp sponge or a rib to compress the clay, ensuring strong walls. -
Refine the Exterior Grooves:
Unlike traditional coil pots where you blend both sides, leave the exterior rounded. Use a damp finger or a round-ended tool to gently smooth the deep V-groove between the coils specifically, defining the horizontal stripes. -
Create the Shoulder:
Once you reach the widest point of the vase, begin placing coils slightly inward. This requires patience; if the clay is too soft, let it stiffen slightly so the walls don’t collapse. -
Form the Bottleneck:
Continue bringing the form in drastically until you have a narrow neck. Then, stack coils vertically for several inches to create the tall throat of the vase. -
Flare the Lip:
For the final coil, gently press it outward or pinch it to create a graceful, flared rim that balances the visual weight of the base.
Clean Lines Pro-Tip
Use a flexible metal kidney to gently scrape the exterior surface when leather hard. This flattens the coils slightly for a modern look while keeping the dark grooves deep and distinct.
Step 3: Finishing and Glazing
-
Clean the Surface:
Once the piece is leather-hard, use a slightly damp sponge to wipe over the exterior coils. This smooths any rough texture on the high points while keeping the grooves sharp. -
Apply the Oxide Wash:
Mix red iron oxide with water (or use a dark brown underglaze). Using a small, stiff brush, paint this dark mixture directly into the deep grooves between the coils. -
Wipe Back:
I find it best to let the wash dry for just a moment, then wipe the surface with a clean, damp sponge. You want the dark color to remain trapped in the recessed lines but cleaned off the raised rounded parts of the coils. -
Bisque Fire:
Load the bone-dry vase into the kiln and bisque fire it according to your clay body’s specifications (usually cone 04 or 06). -
Glaze Application:
Apply a clear satin or matte glaze over the entire piece (or dip it). A glossy glaze might distract from the form, whereas a satin finish mimics the natural stone look seen in the example. -
Final Firing:
Fire the vase a second time to the maturation temperature of your clay and glaze (often cone 5/6 for stoneware).
Level Up: Texture
Before firing, burnish the raised areas of the coils with a polished stone or the back of a spoon. This compresses the clay and adds a natural, soft sheen.
Place your finished vase near a window where the light can catch those beautiful ridges and enjoy your work
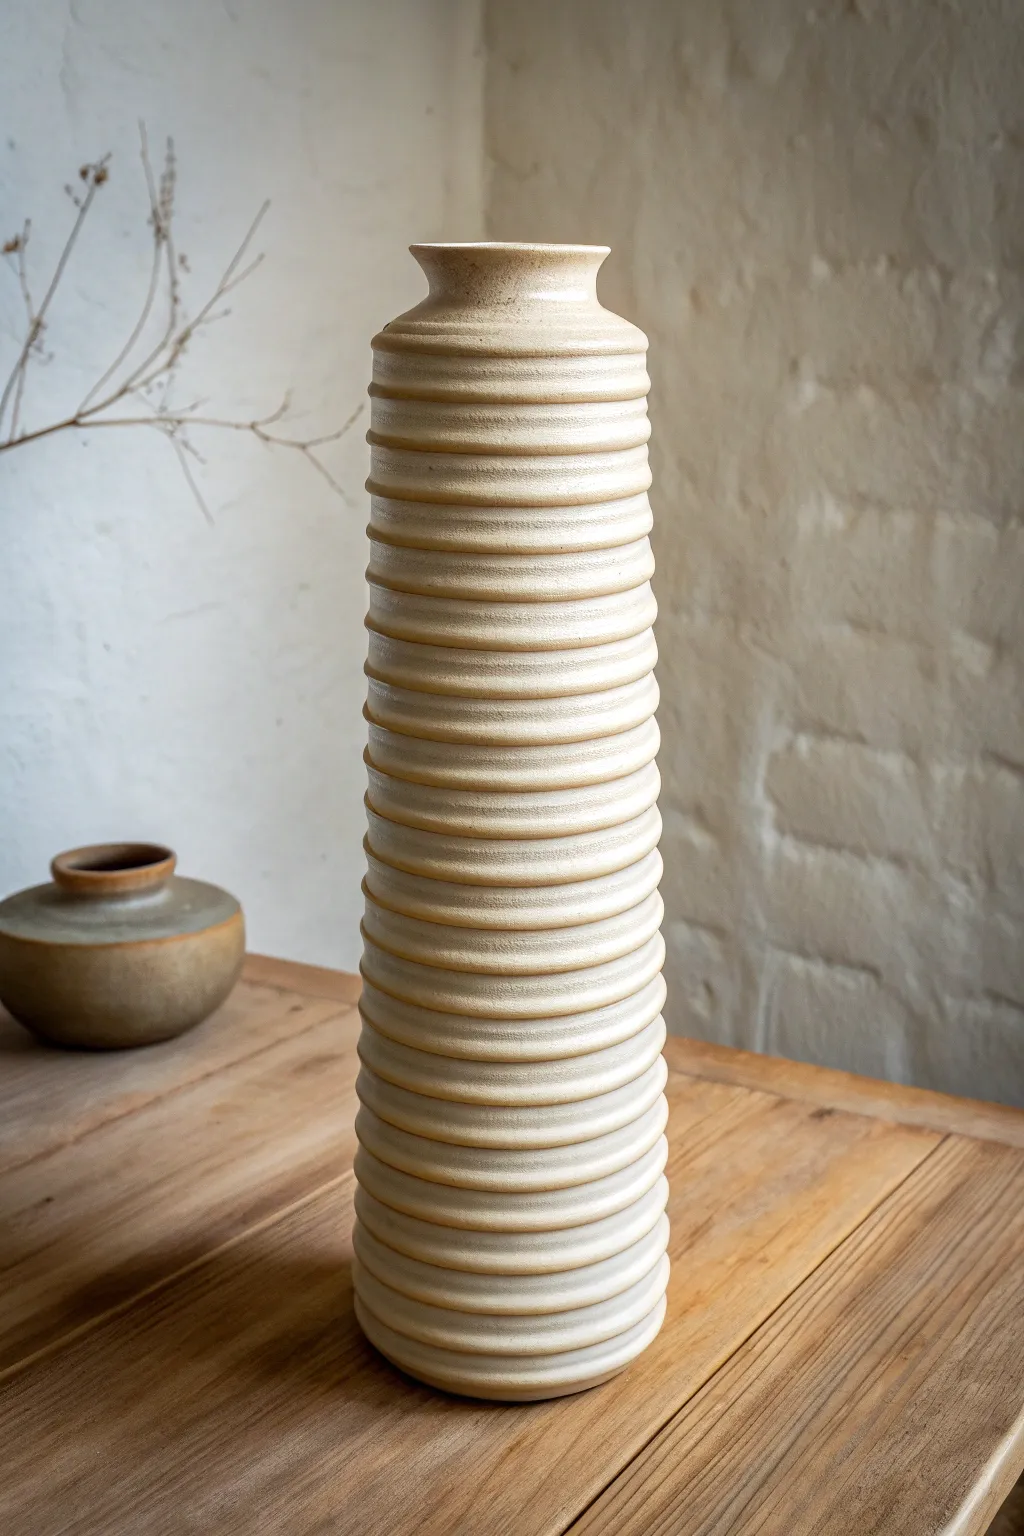
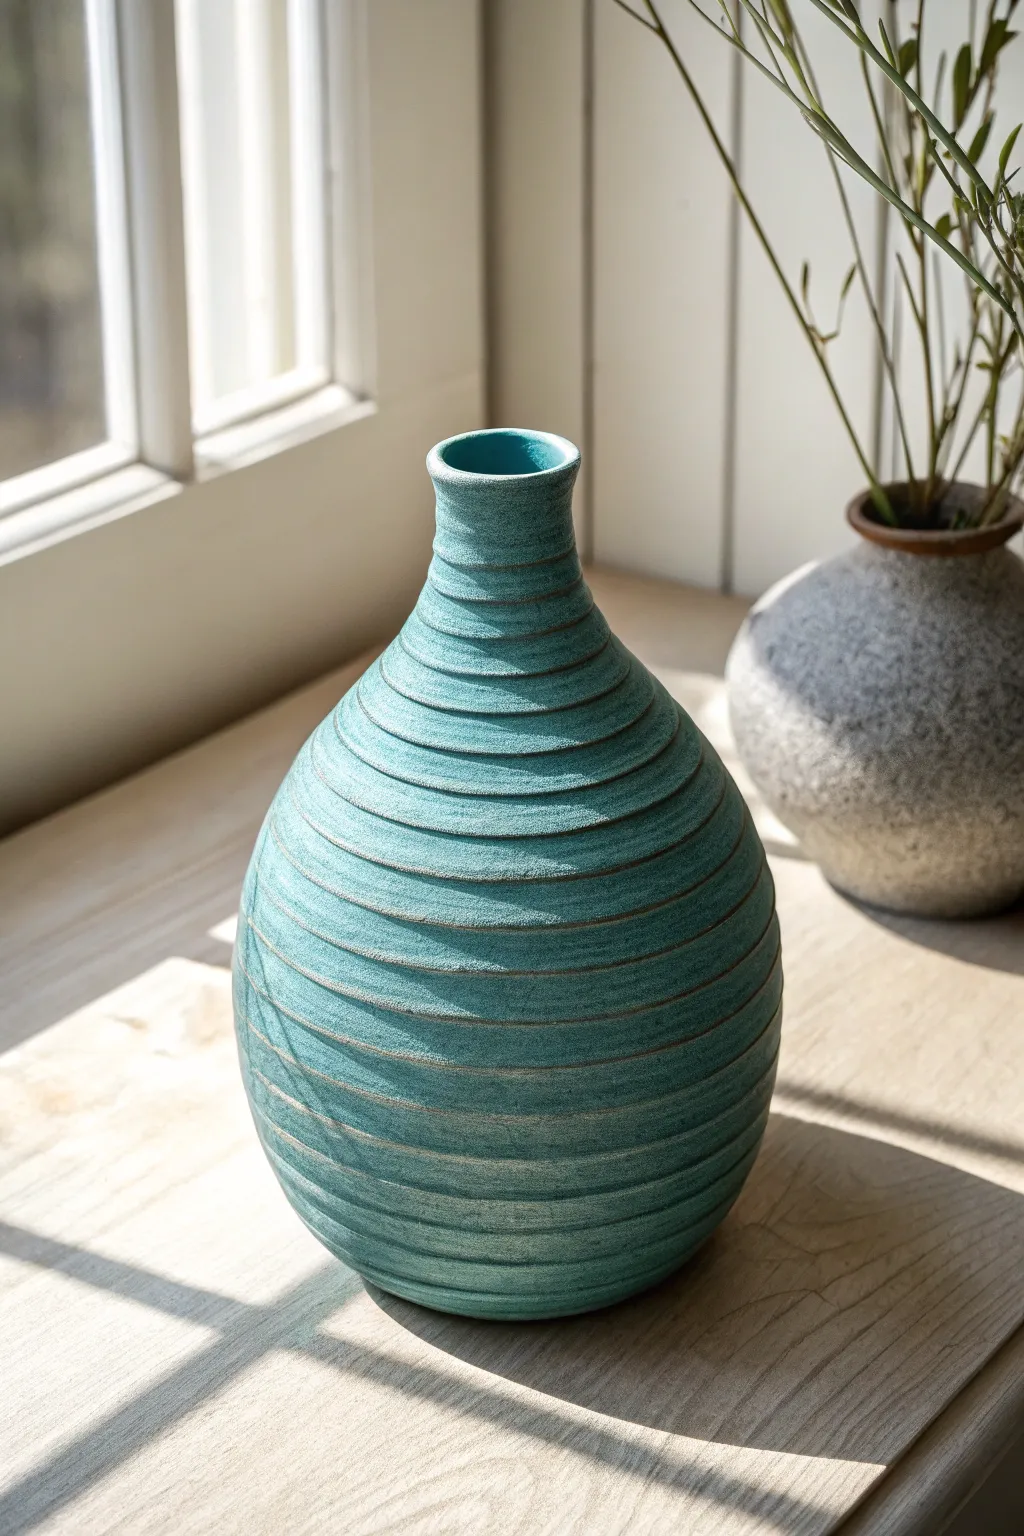
Minimalist Coil Vase With a Glaze Break Over Texture
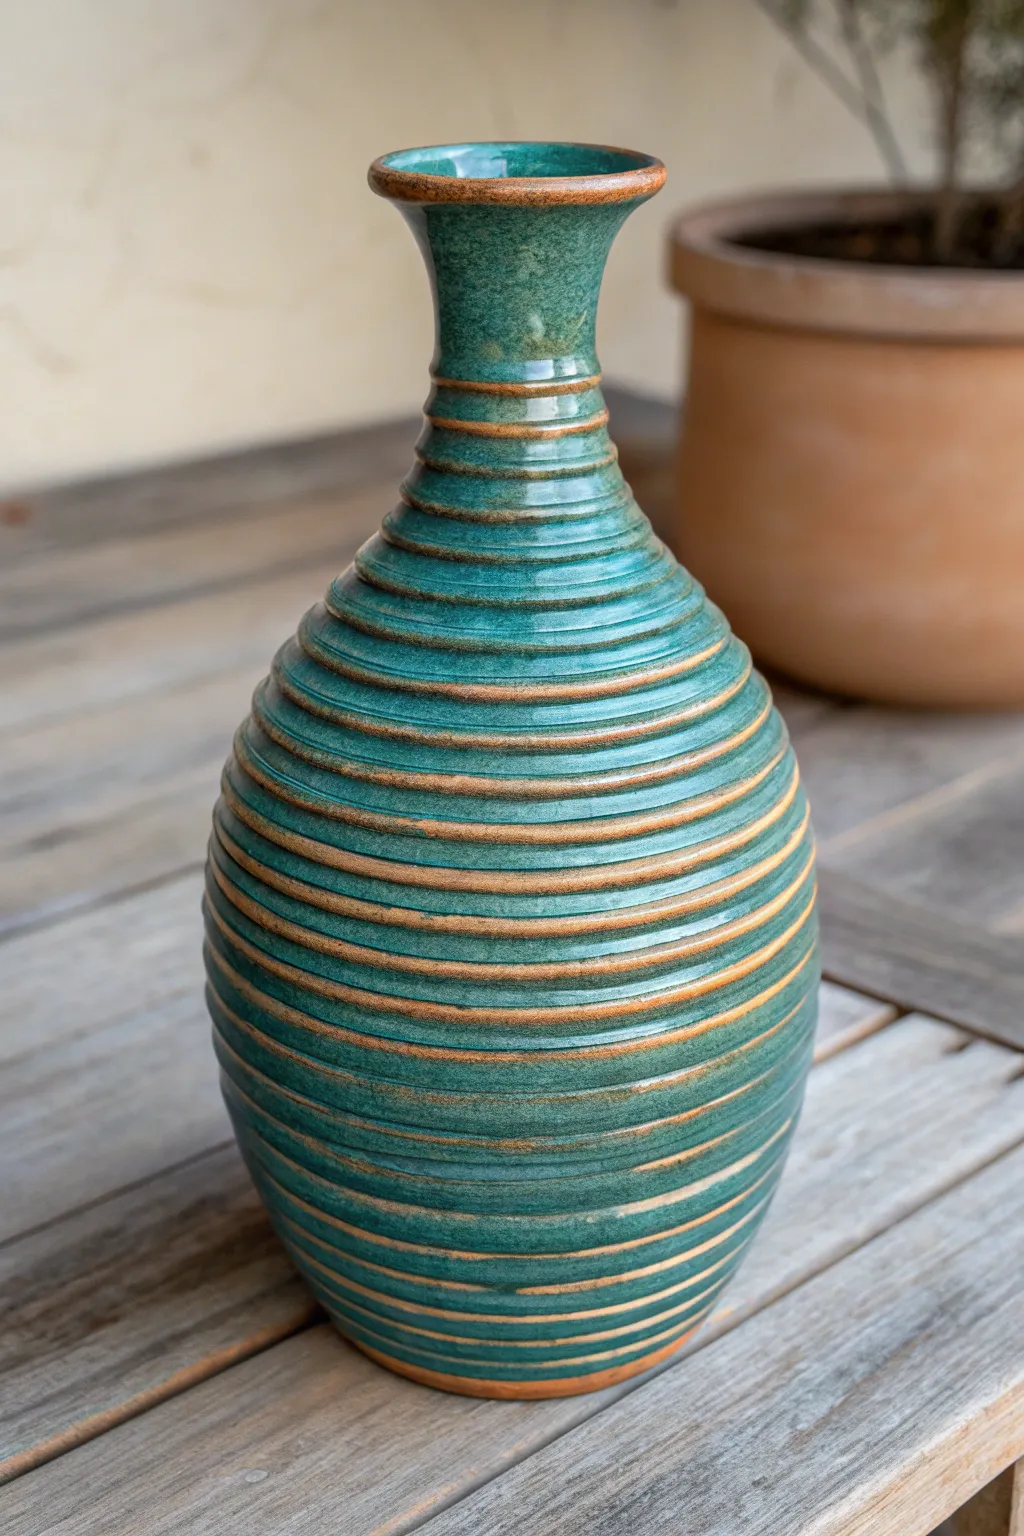
This elegant bottle vase features a mesmerizing ribbed texture created by carefully highlighting individual coils. The translucent teal glazes break beautifully over the high points, revealing the warm, earthy clay body underneath for a striking contrast.
Detailed Instructions
Materials
- Stoneware clay (buff or brown speckle)
- Pottery wheel (or banding wheel for hand-building)
- Small sponge
- Pin tool or needle tool
- Wooden rib tool with a straight edge
- Wire clay cutter
- Teal celadon or breaking glaze
- Kiln
- Slip and scoring tool (if hand-building)
Step 1: Forming the Base
-
Prepare your clay:
Wedge about 2-3 pounds of stoneware clay thoroughly to remove air bubbles. This project benefits from a clay body with some iron content or a darker color, as seen in the brown lines of the finished piece. -
Center and open:
Center your clay on the wheel head. Open up the center hole, leaving about a half-inch of thickness for the floor to prevent cracking. -
Pull the cylinder:
Pull the walls up into a tall, even cylinder. Focus on keeping the walls slightly thicker than usual—around 3/8 of an inch—because you will need that extra clay to form the deep grooves later without cutting through. -
Shape the belly:
Using a shaped rib or your fingers inside the pot, gently push the belly of the vase outward. Aim for a gradual curve that starts widening from the base and tapers back in toward the shoulder.
Grooves disappearing?
If your glaze is filling in the texture too much, try thinning the glaze slightly with water or use a damp sponge to wipe the high points before firing.
Step 2: Creating the Ribbed Texture
-
Collar the neck:
Begin collaring the top third of the cylinder inward to form the bottle neck. Use wet hands and compress the clay frequently to keep the walls from buckling. -
Define the rim:
Once the neck is narrow and tall, use your thumb and forefinger to flair the rim slightly outward, creating a clean, defined lip that mirrors the base. -
Establish the grooves:
This is the signature step. Using the rounded or pointed end of a wooden tool (or a strong finger), press into the spinning clay at the base moving upward. -
Spiral or stacked rings:
You can either create a continuous spiral by slowly moving your hand up while the wheel turns, or create distinct stacked rings by pressing, stopping, and moving up incrementally. The example uses tight, uniform stacked rings. -
Refine the ridges:
I find it helpful to run a damp sponge lightly over the surface while the wheel spins slowly. This softens any sharp burrs on the clay ridges but leaves the deep grooves intact. -
Dry slowly:
Cut the vase from the bat with a wire tool. Let it dry slowly under loose plastic to ensure the neck and thick belly dry at the same rate.
Step 3: Glazing and Firing
-
Bisque fire:
Once bone dry, fire the piece to bisque temperature (usually cone 04 or 06) to prepare it for glazing. -
Wipe down:
Use a clean, damp sponge to wipe any dust off the bisque ware. This prevents glaze crawling and pinholes. -
Apply the glaze:
Select a translucent teal or ‘breaking’ glaze. These glazes are designed to be thinner on high points (ridges) and pool thicker in low points (grooves). -
Control the thickness:
Dip the vase quickly or brush on an even coat. If the glaze is too thick, you’ll lose the definition of the ribs; too thin, and you won’t get that deep blue-green color in the recesses. -
Wipe the rim (optional but nice):
For the look in the photo, gently wipe the very top edge of the rim with a damp sponge to expose a thin line of the raw clay body. -
Check the foot:
Ensure the bottom of the vase is completely free of glaze. Wax the foot ring before dipping if you prefer cleaner lines. -
Glaze fire:
Fire the kiln to the maturity temperature of your clay and glaze (often cone 5 or 6 for stoneware). The heat will cause the glaze to flow slightly, accentuating the ribbed texture.
Try a double dip
Layer a second, lighter glaze just on the upper shoulder and neck. As it melts, it will drip down the ridges, adding movement and visual complexity.
Place your finished vase in a spot with good lighting to really show off the depth of those glazed ridges

TRACK YOUR CERAMIC JOURNEY
Capture glaze tests, firing details, and creative progress—all in one simple printable. Make your projects easier to repeat and improve.
Coil Vase With Carved Sgraffito Between Ridges
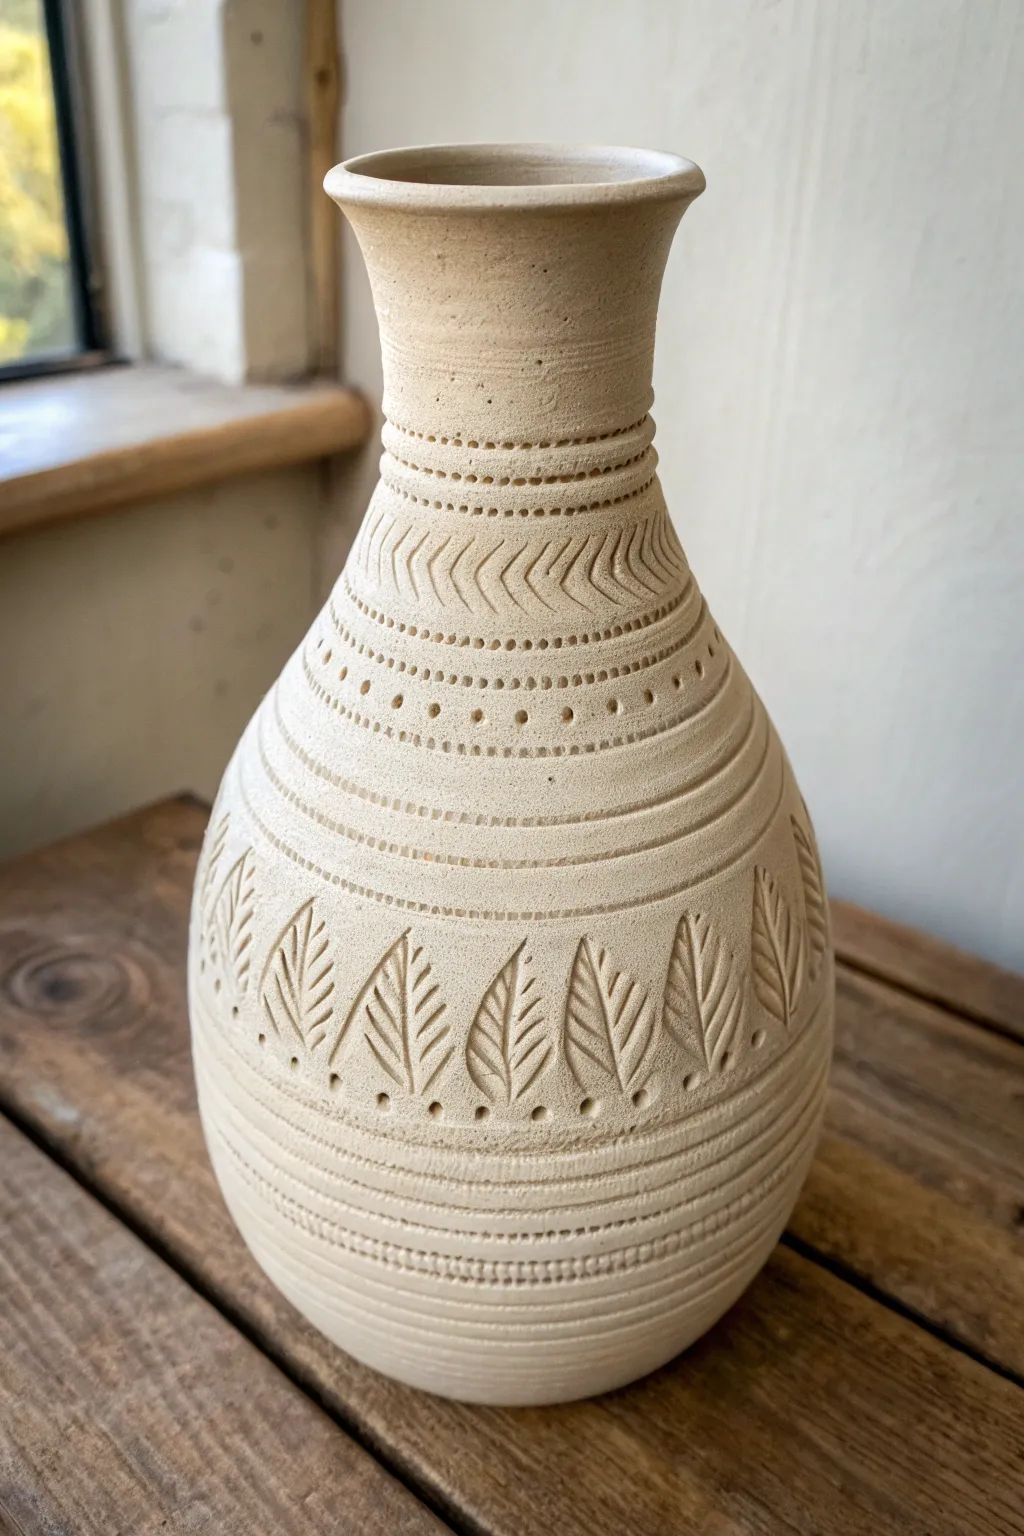
Transform simple clay coils into a stunning vessel featuring intricate sgraffito-style carvings. This project balances the organic feel of hand-building with precise geometric and botanical details for a truly professional finish.
Step-by-Step
Materials
- Stoneware clay (smooth body preferred)
- Scoring tool or serrated rib
- Slip (clay and water slurry)
- Wooden modeling tool
- Metal rib or rubber kidney
- Loop tool (small)
- Needle tool
- Sponge
- Carving tools (various tips)
- Banding wheel (highly recommended)
Step 1: Building the Form
-
Create the base:
Start by rolling out a slab or a flat coil of clay into a circle about 4 inches in diameter. This will serve as the sturdy foundation for your vase. -
Roll your coils:
Roll out several long, even ropes of clay, aiming for the thickness of your thumb or slightly thinner. Keeping them consistent will make building the walls much easier. -
Build the first layer:
Score the outer edge of your base and the underside of your first coil. Apply a little slip, then press the coil onto the base. Join the clay thoroughly by smoothing the clay downwards on the outside and upwards on the inside. -
Stack and shape:
Continue adding coils, scoring and slipping between each layer. As you build, gradually widen the diameter to create the belly of the vase, then bring it back in to form the neck. Smooth the walls completely as you go so the individual coils disappear. -
Refine the surface:
Once the basic shape is built, use a metal rib or rubber kidney to compress and smooth the walls while the wheel spins. You want a blank canvas for your carving, so eliminate any lumpy coil textures now. -
Define the rim:
Flare the top rim slightly outward for a classic silhouette. Smooth it with a damp sponge or chamois to ensure it’s comfortable to the touch.
Clean Lines
Brush sizing liquid or wax resist over areas you want to keep crisp before carving. This helps the clay hold its edge and prevents crumbling.
Step 2: Carving the Design
-
Leather hard stage:
Let the vase dry until it is leather hard. This is crucial—if it’s too soft, the tools will drag; too dry, and it will chip. It should feel like a block of firm cheddar cheese. -
Mark your bands:
Place the vase on a banding wheel. hold a needle tool steady at one height and spin the wheel to score a perfect horizontal ring around the pot. Repeat this to create the various zones for your patterns. -
Carve the main ridges:
Using a small loop tool, carve deeper grooves along some of your guide lines to create raised ridges. This separates your design sections visually. -
Add the leaf motif:
In the widest central band, freehand draw leaf shapes with a needle tool. I find it helpful to lightly sketch the outline before committing to deeper cuts. Use a sharp carving tool to excavate the background or define the veins. -
Detail with chevrons:
In the upper neck section, use a sharp sgraffito tool or knife to carve a repetitive chevron or herringbone pattern. Keep your hand steady and try to maintain consistent spacing. -
Punctuate with dots:
Use a small drill bit tool or the end of a round paintbrush to press a row of small dots into the clay strips between your carved bands. These little indentations add great texture and contrast. -
Create the bottom texture:
For the lower section, use a fine-point tool to carve horizontal lines very close together. You can break these up with another row of pressed dots for visual interest. -
Clean up burrs:
Once you’ve finished carving, let the piece dry slightly more. Then, use a stiff brush or a slightly damp sponge to gently knock off any clay crumbs or sharp burrs left from the carving tools.
Step 3: Refining and Drying
-
Final smooth:
Check the rim and the foot of the vase one last time. Smooth any rough spots with your finger or a rib. Ensure the bottom is flat and won’t wobble. -
Slow drying:
Loosely cover the vase with plastic to let it dry slowly and evenly. This helps prevent cracking, especially where you’ve carved away material and made the walls thinner.
Crumbling Clay?
If the clay crumbles while carving, it’s too dry. Mist it lightly with water and wrap it in plastic for a few hours to rehydrate the surface.
Once fired, the interplay of shadow and light in the carved grooves will make your vase a sophisticated centerpiece.
Wave-Wrapped Coil Vase With Applied Coils
This project features a classic bulbous form with a unique twist—literally. By creating a continuous spiraled texture and subtle diagonal “seams,” this vase achieves a sophisticated, organic look that mimics patterns found in nature.
Step-by-Step Tutorial
Materials
- Buff or sandy stoneware clay
- Pottery wheel (or banding wheel for hand-building)
- Rib tool (metal or wood)
- Needle tool
- Sponge
- Wire cutter
- Modeling tool or dull knife
Step 1: Forming the Base
-
Prepare the Clay:
Begin by thoroughly wedging your clay to remove air bubbles. Center a substantial ball of clay (about 3-4 lbs) on the wheel head. -
Opening and Lifting:
Open center and pull the walls up into a cylinder. Ensure the base is thick enough to support the weight of the belly you are about to form. -
Shaping the Belly:
From the inside, gently push outward while supporting the outside to create a wide, rounded belly. Aim for a gradual curve that tapers significantly toward the top. -
Collaring the Neck:
As you move upward, collar the clay inward to create the narrow neck. Do this gradually to avoid buckling the clay walls. -
Finishing the Rim:
Flare the very top of the neck slightly outward to create a clean, distinct rim. Smooth the lip with a chamois or sponge for a professional finish.
Fixing Wobbly Walls
If the walls start to buckle while collaring the neck, stop immediately. Use a heat gun or blow dryer to stiffen the lower section before continuing to shape the top.
Step 2: Creating the Spiraled Texture
-
Initial Smoothing:
Use a rib tool to smooth the exterior surface, removing throwing lines. Let the piece firm up slightly to leather-hard so it can hold the texture without deforming. -
Generating the Coil Effect:
While the wheel is spinning slowly, take a modeling tool or the corner of a rib and press gently into the clay, starting from the bottom. -
Spiral upwards:
Move your hand slowly up the side of the pot as it rotates to create a continuous, deep groove that spirals all the way to the neck. This mimics the look of exposed coils. -
Refining the Grooves:
I like to go back over the grooves with a damp sponge to soften sharp edges while keeping the distinct ridge pattern intact.
Step 3: Adding the Diagonal Detail
-
Marking the Diagonal:
Identify where you want the diagonal ‘seam’ to run across the belly of the vase. This detail breaks up the symmetry. -
Creating the Seam:
Using a modeling tool, gently press a diagonal line that cuts across the horizontal grooves. Do not cut all the way through; just create an indentation. -
Enhancing the Break:
Use a small tool to slightly offset the horizontal ridges on either side of this diagonal line, making it look as though the vase was pieced together or cracked and healed. -
Final Surface Treatment:
For that stony texture seen in the photo, wipe the surface with a slightly coarse sponge to expose the grog or sand in the clay body.
Level Up: Oxide Wash
After bisque firing, apply a black or brown oxide wash to the exterior and wipe it back with a sponge. This leaves dark color in the deep grooves, popping the texture.
Step 4: Drying and Finishing
-
Slow Drying:
Cover the vase loosely with plastic to allow it to dry slowly. Uneven drying can cause cracks, especially around the neck. -
Bisque Firing:
Once bone dry, fire the piece to bisque temperature (usually Cone 04 or 06). -
Interior Glazing:
Pour a clear or white liner glaze inside the vase and swirl it around to coat the interior, then pour out the excess. This makes the vase functional for holding water. -
Exterior Finish:
Leave the exterior unglazed to maintain the matte, stone-like appearance, or apply a very thin wash of iron oxide to highlight the grooves. -
Final Firing:
Fire the vase to the final temperature appropriate for your clay body (likely Cone 5/6 or Cone 10).
Now you have a stunning, sculptural vessel ready to hold your favorite dried reeds or branches
Spiral Medallion Coil Vase With Coil Rosettes
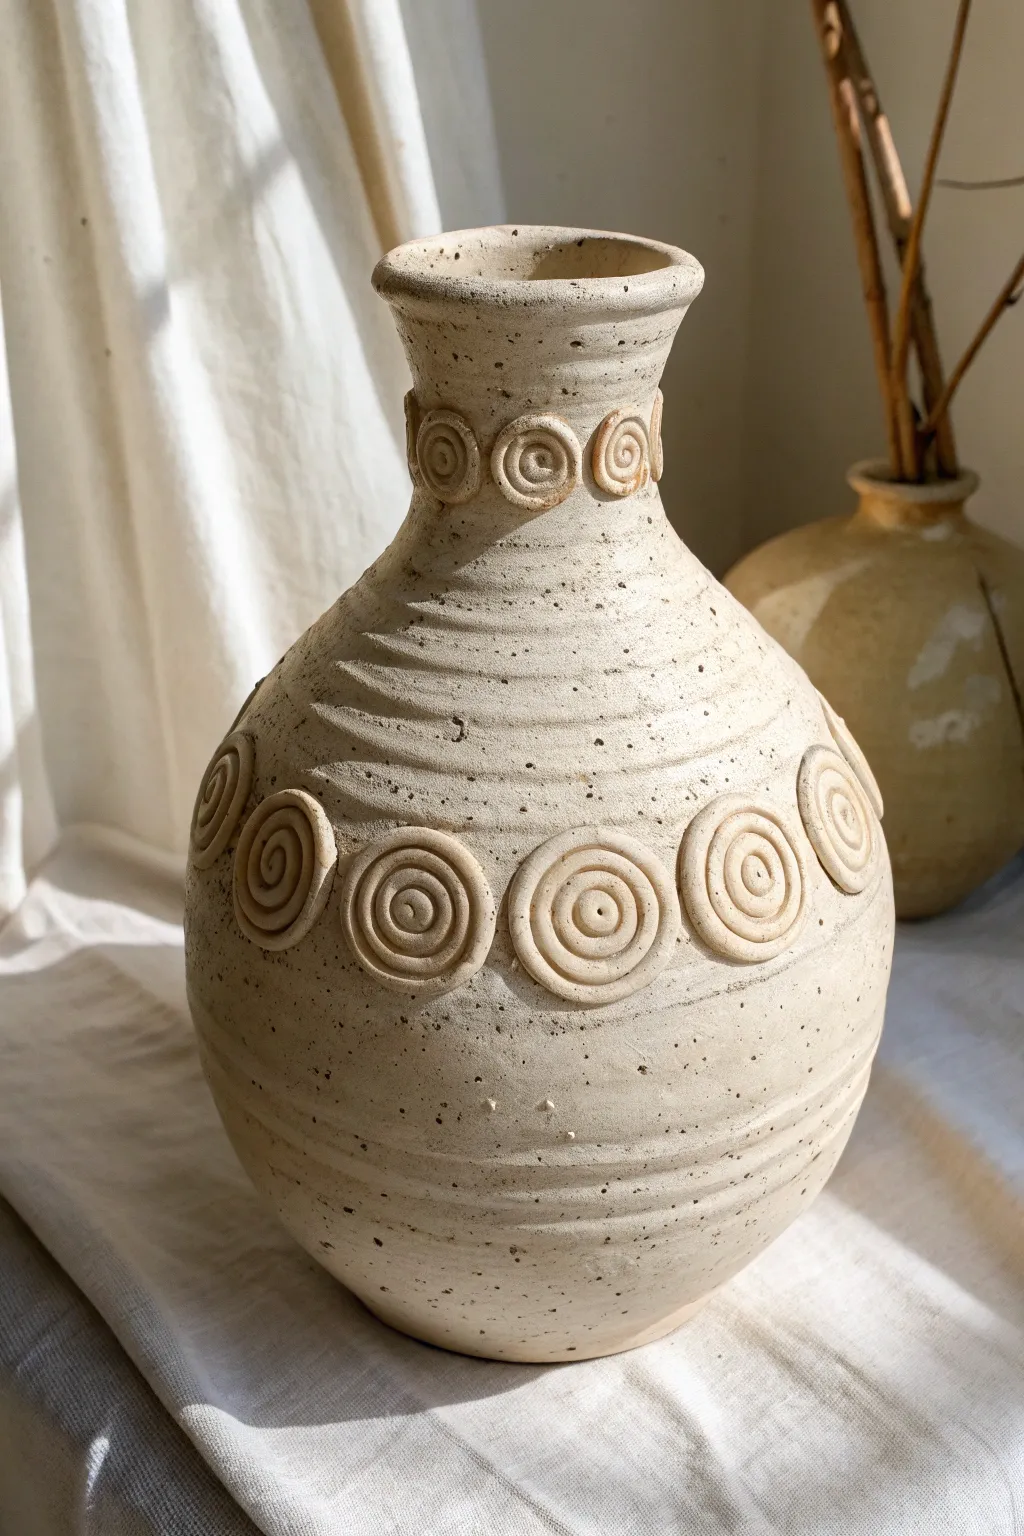
This rustic, speckled vase combines the structural beauty of coil building with decorative appliqué techniques. The earthy clay body is accented by horizontal ridge lines and two distinct bands of hypnotic spiral rosettes.
Step-by-Step
Materials
- Speckled buff stoneware clay (medium grog)
- Pottery wheel (optional, see notes for hand-building)
- Scoring tool or serrated kidney
- Slip (clay mixed with water)
- Wooden modeling tool
- Sponge
- Cutting wire
- Trim tool
- Clear matte glaze
Step 1: Forming the Base Vessel
-
Prepare the clay:
Begin by wedging about 3-4 pounds of speckled stoneware clay to remove air bubbles and ensure a uniform consistency. -
Center and open:
Throw the clay onto the wheel head and center it. Open the clay to create a flat floor, leaving about half an inch of thickness at the bottom. -
Pull the walls:
Pull up the walls of the cylinder. As you pull, gently shape the clay outward to form a bulbous belly, then taper it back in significantly to create a narrow neck. Aim for a height of roughly 10-12 inches. -
Create the texture:
Instead of smoothing the walls perfectly, leave the throwing lines visible or enhance them. Use your fingers or the edge of a wooden rib while the wheel spins slowly to emphasize the horizontal grooves along the belly and neck. -
Refine the rim:
Compress the rim with a chamois or sponge to ensure it is smooth and strong, flaring it out slightly at the very top. -
Dry to leather hard:
Let the vase dry slowly until it reaches a leather-hard state. It needs to be firm enough to handle pressure without warping but soft enough to attach additions.
Step 2: Creating the Spiral Rosettes
-
Roll small coils:
Roll out several thin, even coils of fresh clay, roughly the thickness of a pencil. -
Form the belly spirals:
Take a coil and roll it into a tight spiral flat on your work surface. Make about 8-10 large spirals (approx. 1.5 inches in diameter) for the main body ring. -
Form the neck spirals:
Repeat the process to make smaller spirals (approx. 0.75 inches in diameter) for the neck detail. -
Smooth the backs:
Lightly smudge the clay on the back side of each spiral to bind the coils together so they don’t unravel.
Consistent Coils
To get perfectly matching spirals, extrude your coils first or use a template (like a bottle cap) to measure each spiral’s size before attaching.
Step 3: Assembly and Finishing
-
Mark attachment points:
Lightly trace a guideline around the widest part of the vase and the base of the neck where the medallions will sit. -
Score surfaces:
Thoroughly score (scratch) the back of the spirals and the corresponding areas on the vase. -
Apply slip and attach:
Dab slip onto the scored areas. Press the large spirals firmly onto the belly line and the small spirals onto the neck. -
Secure the edges:
I prefer to use a small wooden tool to gently blend just the very outer edge of the spiral into the vase body to ensure they don’t pop off during firing. -
Refine the details:
Check the centers of the spirals; if they got smushed, re-define the swirl with a needle tool. -
Bisque fire:
Allow the piece to bone dry completely (slowly, to prevent cracking). Bisque fire to Cone 04. -
Glaze application:
Dip the vase into a clear matte glaze to seal the surface while letting the natural speckles of the clay show through. -
Final firing:
Glaze fire to maturity (likely Cone 5 or 6 depending on your clay body).
Prevent Cracking
If medallions crack away from the pot, your slip was too dry or the moisture content differed too much. Attach while the pot is still leather hard.
Place this vase near a window where sunlight can highlight the textural ridges and spiral details
Faceted Coil Vase With Soft Pressed Planes
This striking ceramic vessel features a rhythmic, horizontal ribbed texture that catches the light beautifully, evoking the look of seaglass or weathered stone. It combines a voluminous belly with a sleek, narrow neck, finished in a matte teal glaze that breaks over the texture to reveal warm clay tones beneath.
Step-by-Step Guide
Materials
- Stoneware clay (buff or speckled)
- Pottery wheel (or banding wheel for hand-building)
- Rib tools (smooth metal and serrated)
- Wooden modeling tool
- Wire clay cutter
- Sponge
- Teal matte glaze (breaking/reactive)
- Kemper trimming tool
- Kiln
Step 1: Throwing the Base Form
-
Center the Clay:
Begin with about 3-4 pounds of well-wedged stoneware clay. Slam it onto the center of your wheel head and use firm pressure and water to center the mound perfectly. -
Open the Form:
Drill your thumbs into the center to open the clay, leaving about a half-inch of thickness for the floor. Compress the floor thoroughly with your fingers or a flat tool to prevent S-cracks later. -
Pull the Cylinder:
Slow the wheel speed slightly. Using wet hands, pull the walls of the clay upward into a tall, even cylinder. Focus on maintaining thickness at the rim, as you’ll need that clay to collar in later. -
Shape the Belly:
From the inside, gently push the clay outward to create a rounded, bulbous belly. Start the curve low and let it swell out, supporting the outside with a rib tool to ensure a consistent curve.
Step 2: Creating the Ribbed Texture
-
Refine the Profile:
Use a flexible metal rib on the exterior to smooth the curve of the belly, removing major throwing lines but keeping the wall thickness even. -
Establish the Rings:
While the wheel spins at a medium-slow pace, take the rounded end of a wooden tool. Starting from the bottom, press gently into the clay to create horizontal grooves about 1/4 inch apart. -
Deepen the Texture:
Move slowly up the form, pressing a groove, lifting, and moving to the next section. I like to vary the pressure slightly to give it an organic, hand-carved feel rather than machine perfection. -
Shape the Shoulders:
As you reach the top of the belly, begin to collar the clay inward significantly. Use both hands to squeeze the clay in, keeping the wheel spinning to maintain symmetry.
Collaring Trouble?
If the clay wrinkles while narrowing the neck, increase your wheel speed and use less water. Compress the folds with a rib immediately to smooth them.
Step 3: Forming the Neck and Rim
-
Construct the Neck:
Continue collaring until you have a narrow neck (about 1.5 to 2 inches wide). Pull this section upward to elongate it, ensuring it rises straight from the rounded shoulders. -
Texture the Neck:
Extend the same grooved texture up the neck. Because the clay is thicker here from collaring, you can press a bit deeper to make rings that look like stacked coils. -
Finish the Rim:
Refine the rim by compressing it with a chamois or sponge. Create a slight outward flare at the very top for a finished, professional look. -
Dry and Bisque:
Wire the pot off the wheel and let it dry slowly under plastic to prevent the neck from warping. Once bone dry, bisque fire it to Cone 04.
Pro Tip: Clean Lines
After grooving, run a slightly damp sponge very lightly over the surface while spinning. This softens sharp burrs without erasing the deep texture.
Step 4: Glazing and Firing
-
Wax the Foot:
Apply a coat of liquid wax resist to the bottom foot ring of your bisque-fired vase to prevent glaze from sticking to the kiln shelf. -
Apply Glaze:
Dip the vase into a bucket of reactive matte teal glaze. Hold it submerged for 3-5 seconds to ensure an even coat. -
Highlight the Texture:
Once the glaze is dry carefully wipe the raised edges of the ribs with a damp sponge. This thins the glaze on the high points, encouraging it to break’ and show the clay color during firing. -
Final Fire:
Fire the piece to Cone 6 (or the temperature specific to your clay and glaze). This higher temperature creates the durable stoneware finish and develops the complex glaze interaction.
Place your finished vase near a window where the natural light can play across the beautiful horizontal ridges
Coil-and-Slab Cutout Vase With Window Openings
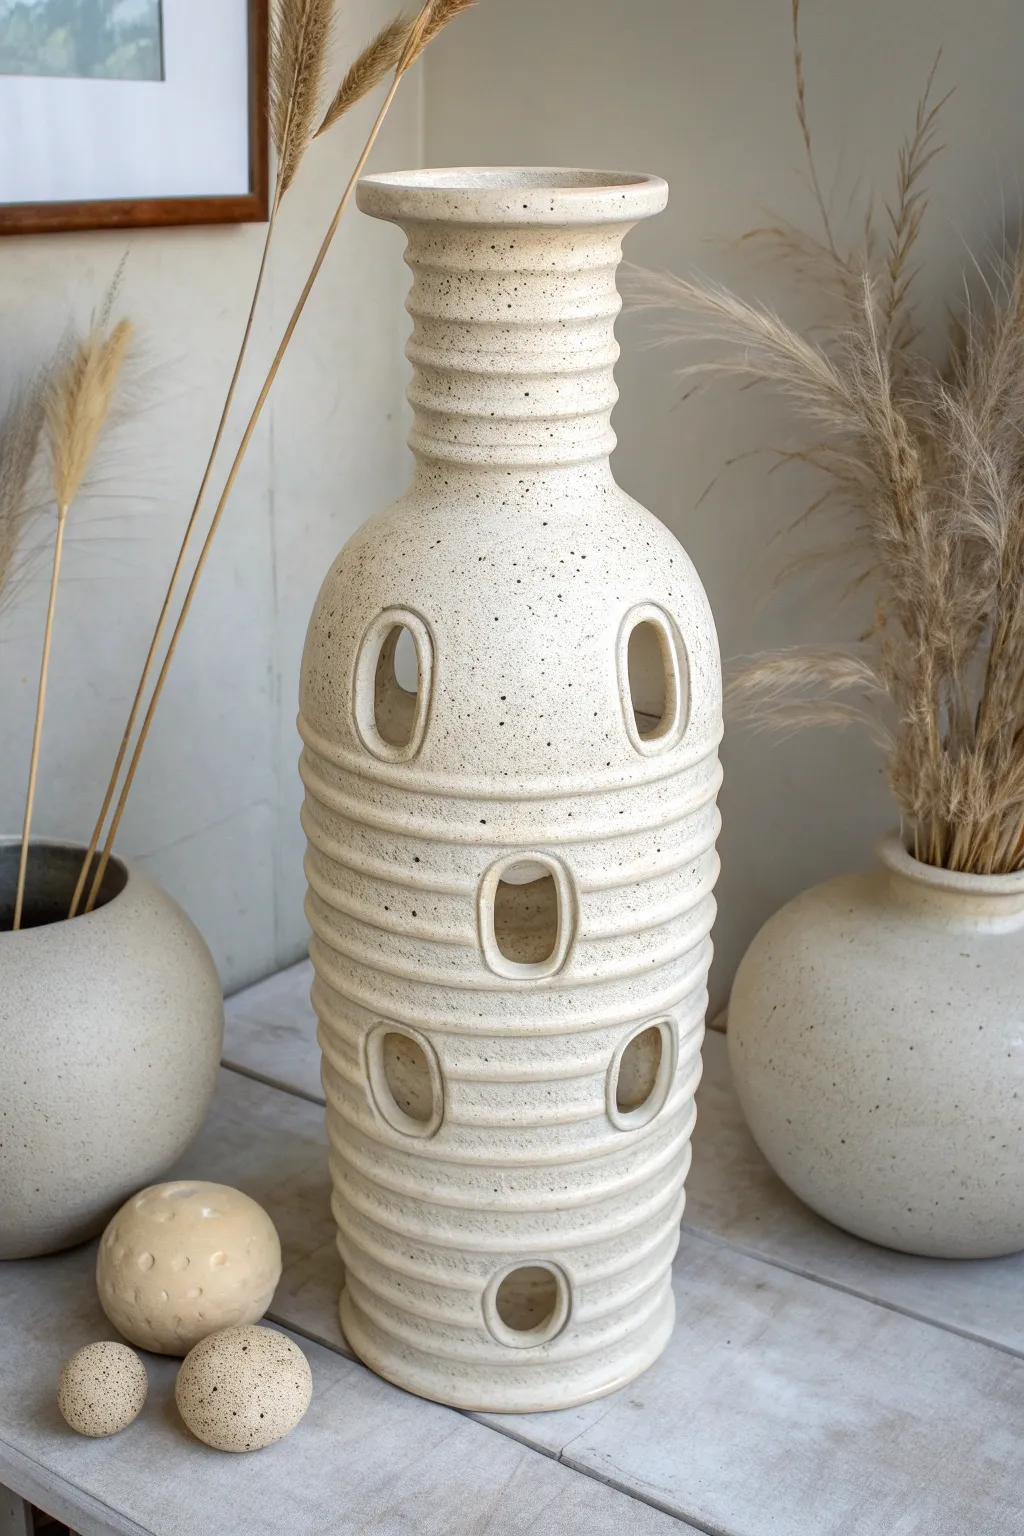
This elegant vessel combines the rhythmic texture of stacked coils with the airy intrigue of negative space. By carefully sculpting window-like apertures into a ribbed form, you create a sophisticated piece that plays with light and shadow while showcasing the natural beauty of speckled clay.
Detailed Instructions
Materials
- Speckled puff stoneware clay (or groggy stoneware)
- Potter’s wheel (optional, for base/neck) or banding wheel
- Rolling pin
- Fettling knife
- Serrated rib tool
- Rubber kidney rib
- Slip (clay and water slurry)
- Needle tool
- Circular or oval clay cutters (approx. 2-inch)
- Sponge
- Chamois leather
Step 1: Building the Foundation
-
Create the base:
Start by rolling out a thick slab of clay, roughly 1/2 inch thick. Cut a perfect circle about 5-6 inches in diameter to serve as the sturdy footprint for your vase. -
Prepare the coils:
Roll out a generous supply of coils. Aim for a consistent thickness—about the size of your thumb (roughly 3/4 inch). Keeping them uniform now will make stacking much easier later. -
Score and slip the first layer:
Deeply score the outer edge of your base slab and apply a generous amount of slip. Lay your first coil down, pressing it firmly onto the base. -
Build the straight cylinder:
Continue stacking coils vertically. For this design, you want a fairly straight cylinder for the main body. Blend the coils on the *inside* of the pot only using a modeling tool or your fingers to ensure structural integrity while keeping the outer ribbed texture intact.
Step 2: Designing the Windows
-
Plan your spacing:
Once your cylinder is about 4-5 inches high, pause adding coils. Decide where your first window openings will go. You generally want to leave a gap in the coil wall rather than cutting it out later, as it preserves the rounded edges. -
Constructing the gaps:
For the window layer, instead of a full circle coil, use shorter segments of clay. Place two vertical, thick slugs of clay where the ‘pillars’ between windows should be, building them up to the height of your intended window opening (about 2-3 inches). -
Bridge the gap:
Once your vertical pillars are built, lay a full circular coil across the top to bridge the openings. This requires careful scoring and slipping to ensure the bridge doesn’t sag. -
Refine the openings:
While the clay is soft, use your fingers or a damp sponge to smooth the inner frames of your windows. They should look intentional and rounded, not jagged.
Coil Consistency
To get perfectly even oval windows, create a cardboard or wood template. Hold it inside the vessel as you build the clay pillars around it, then remove it once the bridge coil is secure.
Step 3: Second Tier and Neck
-
Continue upward:
Build another section of solid coiled wall above the first set of windows. Create roughly 3-4 inches of solid ribbed wall before planning a second, single central window if desired, or continue solid to the neck. -
Refine the exterior ribs:
Take a moment to clean up your exterior coils. I like to run a damp finger or a soft rubber rib gently along the grooves to soften any sharp edges without losing the distinct horizontal lines. -
Taper the shoulder:
As you approach the top, start placing your coils slightly inward with each layer. This creates the gentle slope of the shoulder leading into the neck. -
Construct the neck:
Build a vertical neck section about 3-4 inches high. Keep the coils tight and neat here, as this area draws the eye. -
Flare the rim:
For the finishing touch, add one final thick coil and gently pinch it outward to create a flared lip. Smooth this rim with a chamois cloth for a professional, comfortable finish.
Sagging Bridges?
If the coil bridging the window gap sags, stuff the window opening with crumpled newspaper or a firm sponge. This supports the weight of the upper coils until the clay stiffens.
Step 4: Finishing and Firing
-
Slow drying:
This piece has complex stress points around the windows. Cover it loosely with plastic and let it dry very slowly over several days to prevent cracking at the window corners. -
Bisque fire:
Once bone dry, fire the piece to bisque temperature (usually cone 04 or 06 depending on your clay body). -
Glaze application:
Apply a satin or matte cream glaze. Use a spray gun or dip the pot to get even coverage inside the window cutouts, but be prepared to wipe back glaze that pools too thickly in the coil grooves. -
Final firing:
Fire to the maturity temperature of your stoneware clay. The speckles in the clay body should bleed through the cream glaze beautifully.
Place your finished vase near a light source to fully appreciate the depth created by the cutouts
Organic Coil Vase With Vine-Like Tendrils
Embrace the beauty of imperfection with this handcrafted coil vase, featuring a warm, speckled cream glaze and striking vine-like wire inserts. The distinct horizontal ridges give it a traditional pottery feel, while the whimsical spiraling branches add an organic, sculptural height.
Detailed Instructions
Materials
- Stone-colored stoneware clay with grog (for speckling)
- Pottery wheel (or banding wheel for hand-building)
- Wooden modeling tools
- Metal rib tool
- Sponge
- Cream matte glaze
- Kiln
- Brown florists wire or rustic annealed iron wire (12-14 gauge)
- Pliers (needle-nose and round-nose)
Step 1: Forming the Vessel Body
-
Prepare the base:
Start with a ball of wedged clay, centering it on the wheel or a bat. Compress it down into a puck shape about 4 inches wide to serve as the stable foot of your vase. -
Open and pull:
Open the center of the clay and begin pulling the walls upward. Aim for a bulbous, rounded belly shape that gradually tapers inward as you move higher. -
Create the coil texture:
As you shape the walls, intentionally leave the throwing rings visible rather than smoothing them away perfectly. If hand-building, layer coils on top of each other and blend only the inside seam, leaving the exterior ridges distinct. -
Emphasis on ridges:
To enhance the horizontal lines seen in the reference, take a wooden tool or your thumbnail and gently define the grooves between the throwing rings or coils as the wheel spins slowly. -
Refine the belly:
Use a rib from the inside to push the belly out, giving it that full, rounded volume while maintaining the external texture.
Pro Tip: Better Speckles
If you don’t have speckled clay, mix a teaspoon of granular manganese or iron oxide into your clear glaze for prominent spots.
Step 2: Constructing the Neck
-
Collar the clay:
Gently squeeze or ‘collar’ the clay inward significantly as you move past the shoulder of the vase to create the narrow neck section. -
Elongate the neck:
Pull the clay upward to form a tall, slender neck. This creates a dramatic contrast with the wide base you just formed. -
Deepen neck texture:
The reference photo shows deeper, more pronounced ridges on the neck. Press a bit firmly with a modeling tool to create these distinct horizontal bands. -
Flare the rim:
At the very top, gently flare the clay outward to create a small, soft trumpet shape for the opening. Smooth the lip with a damp chamois or sponge. -
Trim the foot:
Once the piece is leather-hard, trim the bottom to create a neat foot ring. I like to leave a bit of rough texture near the base to match the organic feel.
Step 3: Firing and Glazing
-
Bisque fire:
Allow the vase to bone dry completely, then bisque fire it in the kiln according to your clay body’s specifications. -
Apply the glaze:
Dip or brush on a cream-colored matte glaze. If your clay doesn’t have natural speckles (iron pyrite), choose a glaze that includes iron flecks to get that spotted effect. -
Wipe back texture:
While the glaze is powdery but not fired, gently wipe a damp sponge over the high points of the ridges. This reveals the raw clay color beneath, accentuating the coil lines. -
Leave the base raw:
Wipe the glaze completely off the bottom inch of the vase to create the exposed, toasted clay band shown in the image. -
Glaze fire:
Fire the piece again to the maturation temperature of your glaze and clay.
Level Up: Real Vine Inlay
Wrap real dried vines around the neck while the clay is wet to imprint organic textures before firing.
Step 4: Creating the Wire Tendrils
-
Cut the primary stems:
Snip three pieces of rustic iron wire or brown florists wire, varying lengths between 12 and 18 inches. -
Shape the spirals:
Using round-nose pliers, grab the very tip of a wire strand and curl it tightly inward to create a fiddlehead fern shape. -
Form the wavy structure:
Moving down the wire, use your fingers to bend deep, exaggerated zig-zags and loose curls. Avoid perfect uniformity; make them look like wild vines. -
Add secondary shoots:
Cut shorter 3-inch pieces of wire. Twist one end around the main stem and curl the loose end into tiny tendrils for extra dimension. -
Arrange the display:
Place your finished wire sculptures into the ceramic vessel. You can use a small piece of floral foam or dry moss inside the vase to hold them at the perfect angles.
Place your new sculptural vase on a wood table to let those earth tones truly shine.
Sculptural Ring-Shaped Coil Vase (Donut Form)
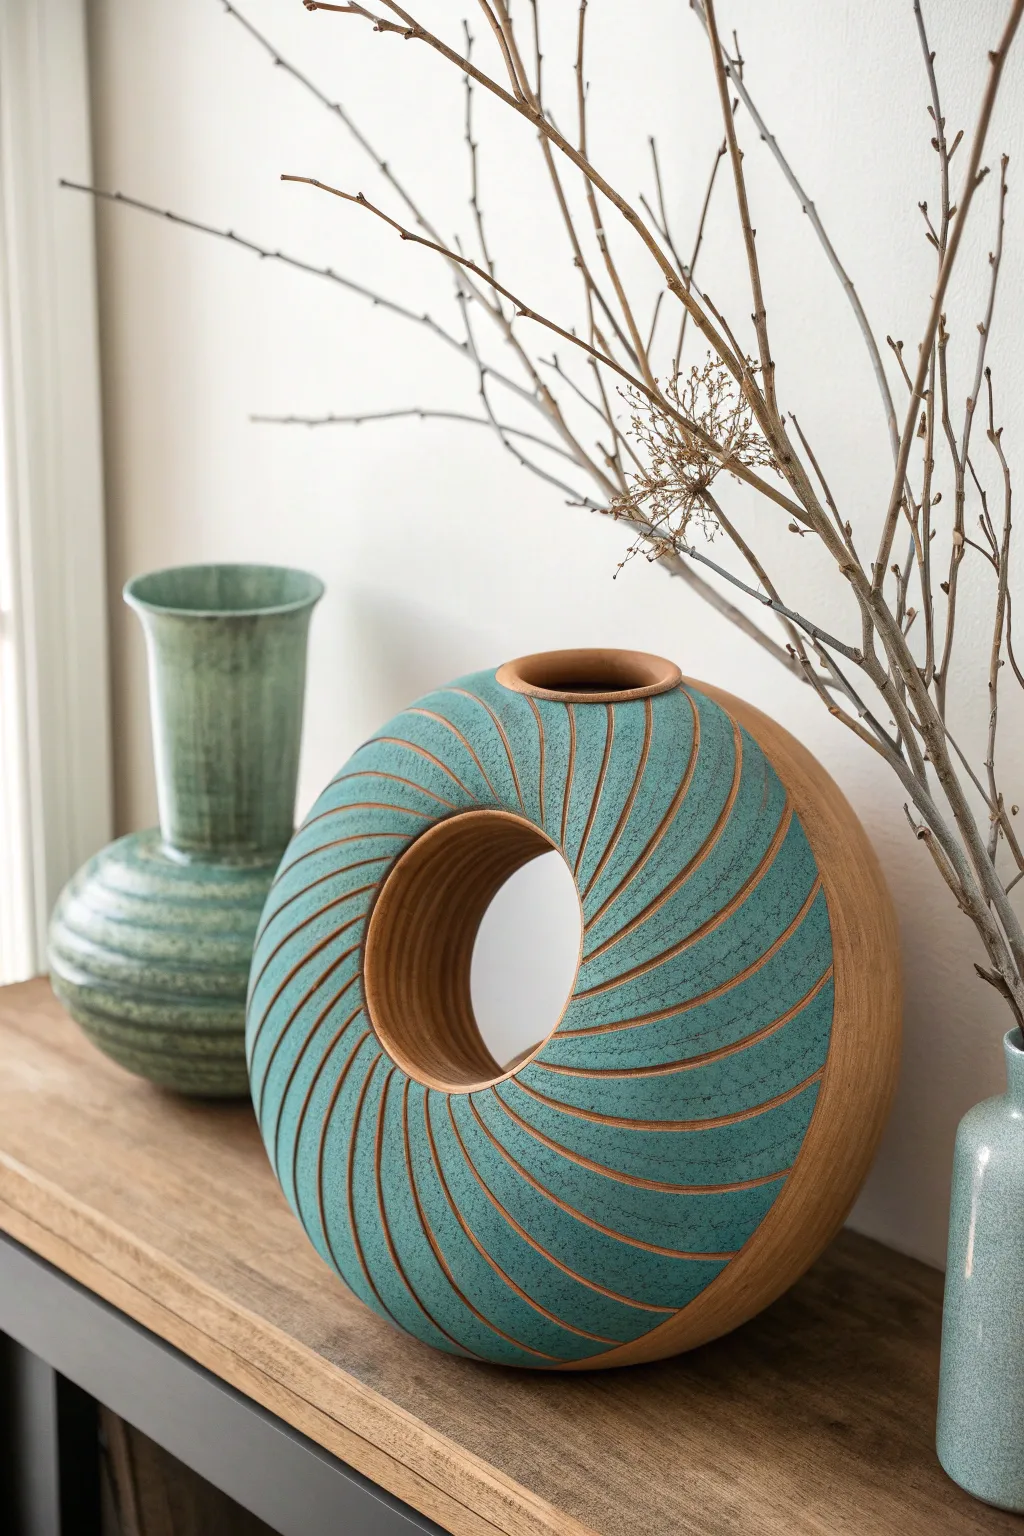
This stunning sculptural vessel combines the modern silhouette of a torus ring with an organic, carved texture. The contrast between the unglazed, earthy clay body and the vibrant teal glaze nestled within the grooves creates a mesmerizing, rhythmic piece perfect for dried botanicals.
Step-by-Step Tutorial
Materials
- Stoneware clay (smooth, sand-colored body)
- Pottery wheel (or slab roller/extruder for hand-building)
- Needle tool
- Ribs (metal and rubber)
- Wooden modeling tool or chamois
- Carving loop tool (medium width)
- Teal or turquoise ceramic glaze
- Wax resist
- Sponge
- Kiln
- Clear glaze (optional for interior)
Step 1: Forming the Hollow Ring
-
Prepare the Clay:
Begin by thoroughly wedging your stoneware clay to remove air bubbles. You will need a significant amount of clay for a piece this size, likely between 5 to 7 pounds depending on your desired wall thickness. -
Center and Open:
Throw the clay on the wheel, but instead of opening a central hole all the way to the bat, flatten the mound into a thick, wide disk. Open a ring in the middle, leaving a donut of clay. -
Pull the Walls:
You are essentially throwing a closed tube in a circle. Pull the inner wall up and outward, and the outer wall up and inward. They need to curve toward each other to meet at the top. -
Seal the Form:
Carefully bring the two walls together at the top crest of the ring. Use a rib to compress the seam thoroughly, ensuring air is trapped inside to support the shape. Smooth the join until it is invisible. -
Refine the Profile:
With the air trapped inside acting as support, use a metal rib to refine the outer curve, creating a perfect, smooth semi-circle profile. -
Add the Neck:
Once the main body is firm (leather hard), attach a small coil to the top edge to create the narrow neck opening. Throw or hand-build this into a small, flared rim.
Collapsing Walls?
If the hollow ring starts to sag while throwing, you may be working too wet or thin. Use a heat gun briefly to stiffen the walls before attempting to close the top seam.
Step 2: Carving the Texture
-
Planning the Spiral:
Waiting for the clay to reach a firm leather-hard stage is crucial here. Use a needle tool to lightly trace curved, radiating lines starting from the center opening and sweeping toward the outer edge to guide your carving. -
Carve the Grooves:
Using a loop tool, carve out the clay following your traced lines. Maintain steady pressure to keep the depth consistent. I find it helpful to pull the tool towards my body for better control. -
Smooth the Edges:
After carving, the edges of the grooves may be sharp or burred. Gently wipe the surface with a damp sponge or run a soft finger over the ridges to soften them without erasing the texture. -
Drying and Bisque:
Allow the vase to dry slowly under plastic to prevent uneven shrinkage or cracking. Once bone dry, fire it to bisque temperature.
Clean Lines
For the crispest separation between clay and color, apply the wax resist, let it dry completely, then wipe the ridges immediately after glazing before the glaze dries hard.
Step 3: Glazing and Finishing
-
Wax Resist Method:
To achieve the specific look where glaze is only in the grooves, apply wax resist carefully to the high points (the ridges) of the texture. You can use a sponge roller or a steady hand with a brush. -
Apply the Glaze:
Brush or pour a vibrant teal glaze over the entire textured area. The glaze will adhere to the unwaxed grooves and bead up on the waxed ridges. -
Wipe Back:
Use a damp sponge to wipe away any glaze beads sitting on the waxed areas. This reveals the raw clay body on the ridges while leaving the color deep in the recesses. -
Interior Glazing:
Pour a liner glaze (clear or white) into the interior of the vase to make it watertight if you plan to use fresh flowers. -
Final Fire:
Fire the piece to the maturity temperature of your clay and glaze (likely Cone 5 or 6). This will fuse the glaze and vitrify the exposed clay body.
Place your finished donut vase near a window where natural light can highlight the delightful rhythm of the carved spirals