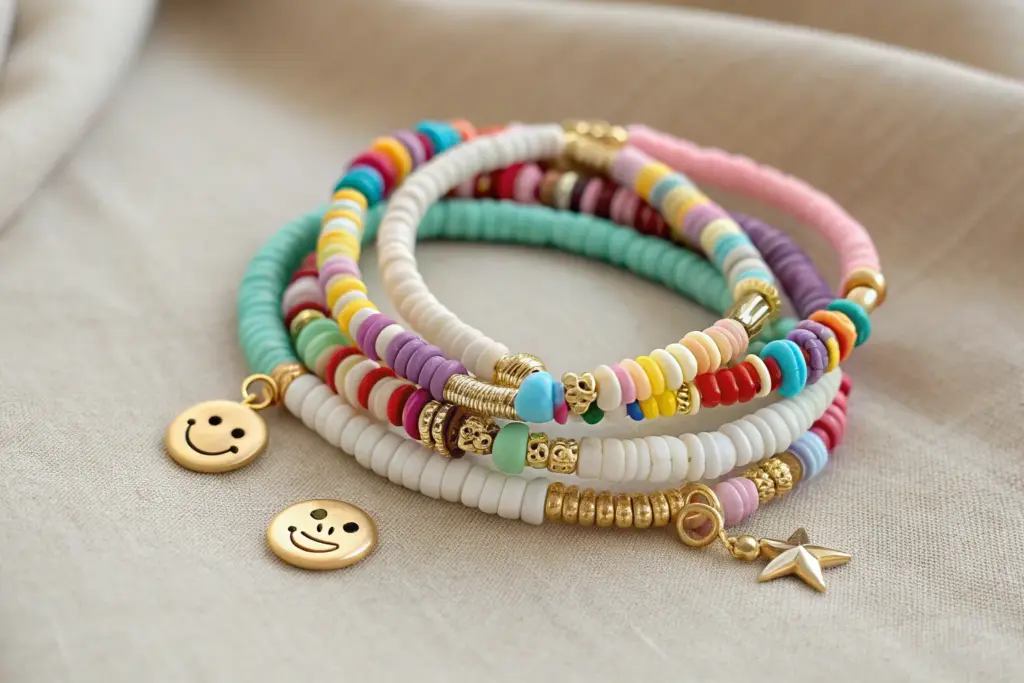
If you’re craving that instantly wearable, mix-and-match look, polymer clay heishi bead bracelets are where it’s at. Here are my favorite cool clay bracelet ideas—from classic stacks you’ll make on repeat to a few unexpected twists that feel extra special.
Random Confetti Mix
Capture the joy of a scattered confetti mix with this playful polymer clay bracelet. By combining hand-rolled textured beads with smooth, painted accents, you’ll create a charming accessory that balances rustic texture with vibrant pops of color.
Detailed Instructions
Materials
- White or cream polymer clay
- Acrylic paints (pastel pink, sky blue, yellow, red, navy blue)
- Fine-grit sandpaper or a stiff bristle brush (for texture)
- Small round paintbrush
- Toothpicks or a bead piercing tool
- Elastic jewelry cord (0.8mm or 1mm)
- Gold spacer beads or heavy jump rings (approx. 4-6mm)
- Gloss varnish or resin (optional)
- Oven for baking
Step 1: Shaping and Texturing
-
Condition the clay:
Start by warming the white polymer clay in your hands until it’s soft and pliable. This prevents cracking later on. -
Roll the base beads:
Pinch off small pieces of clay and roll them into spheres between your palms. Aim for beads that are roughly 10-12mm in diameter. You will need about 16-18 beads for a standard wrist. -
Create the lava texture:
Take half of your rolled beads and gently roll them over fine-grit sandpaper or tap them repeatedly with a stiff bristle brush. This creates a pitted, stone-like surface that mimics lava rock. -
Smooth the remaining beads:
Leave the other half of the beads perfectly smooth. I like to lightly buff them with my finger to remove any fingerprints before piercing. -
Pierce the holes:
Using a toothpick or piercing pin, carefully bore a hole through the center of each bead. Twist the tool as you push through to avoid squishing the bead’s shape. -
Bake the beads:
Arrange your beads on a baking sheet or tile. Bake them according to the manufacturer’s instructions on your package of clay (usually around 275°F/130°C for 15-30 minutes). Let them cool completely.
Hole distortion?
If piercing squishes your bead into an oval, let the clay sit for 15 mins to firm up before piercing, or re-roll gently after making the hole.
Step 2: Painting the Confetti Effect
-
Base coat the textured beads:
Select a few of the rough-textured beads and paint them a solid pastel pink. Leave some of the textured beads natural creamy white. -
Paint the smooth beads:
Paint some of the smooth beads with a solid base of sky blue or cream, ensuring full coverage. -
Add large speckles:
On the smooth cream and blue beads, use the tip of your brush to dab on larger, irregular spots of contrasting colors like orange, red, and navy blue. -
Create fine speckles:
Dip an old toothbrush or stiff brush into thinned acrylic paint. Run your thumb over the bristles to flick tiny mists of paint onto the beads for a true confetti look. -
Seal the design:
Once the paint is fully dry, apply a thin coat of gloss varnish or resin to the smooth, painted beads to make the colors pop and protect the finish.
Mix textures
Add crushed dried herbs or black pepper into the clay before baking the ‘plain’ beads for an organic, speckled granite effect.
Step 3: Assembly
-
Cut the cord:
Cut a piece of elastic cord about 10 inches long to give yourself plenty of room to tie the knot later. -
Plan your pattern:
Lay out your beads on a flat surface. Alternate between the rough lava-style beads and the smooth confetti-painted ones to create visual rhythm. -
Insert gold accents:
Place the gold spacer rings or discs between select beads. In the example, they frame a central focal bead, adding a touch of metallic elegance. -
String the beads:
Thread all your beads onto the elastic cord in your desired order. -
Check the fit:
Wrap the unfinished strand around your wrist to ensure it fits comfortably. Add or remove a bead if necessary. -
Tie the knot:
Tie a strong surgeon’s knot (right over left, left over right) and pull tight. Add a tiny dot of super glue to the knot for extra security. -
Hide the knot:
Once the glue is dry, trim the excess cord and gently tug the elastic so the knot slides inside the hole of a neighboring bead.
Now you have a custom piece of wearable art that adds a festive touch to any outfit


Bold Color-Block Bands
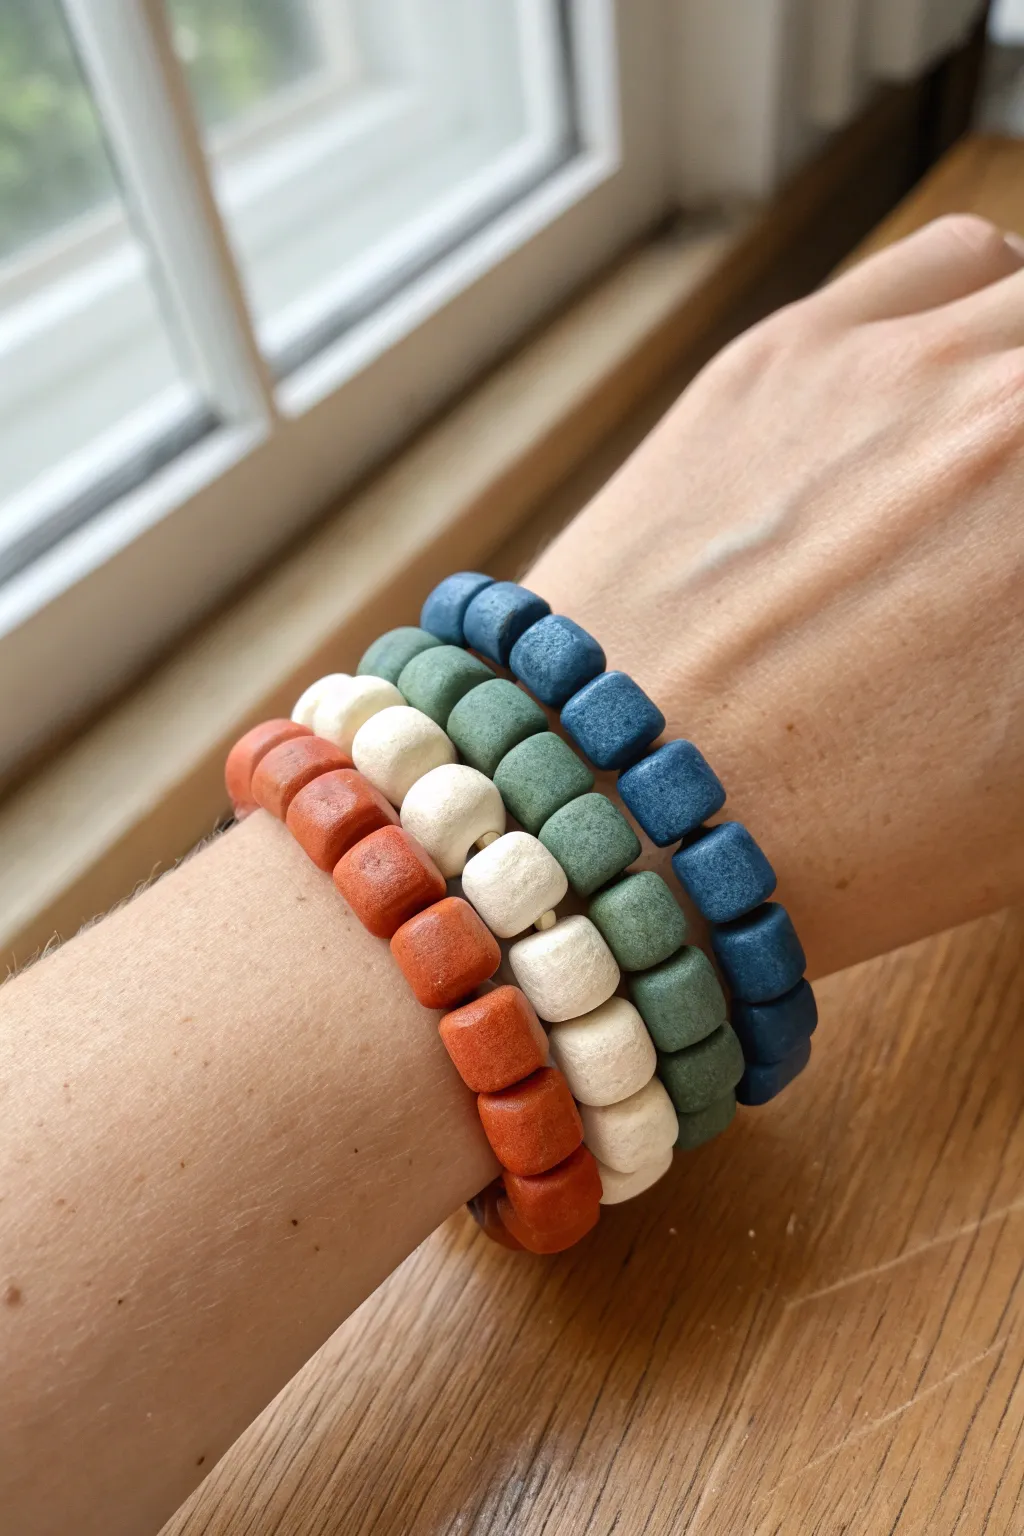
These striking wrist accessories rely on the beauty of simplicity, stacking monochromatic bands to create a modern statement piece. Featuring textured, matte-finish clay beads with a soft, cushion-like shape, they offer a satisfying tactile feel and a pop of color for any outfit.
How-To Guide
Materials
- Polymer clay (Terracotta/Burnt Orange, White/Cream, Sage Green, Denim Blue)
- Elastic cord (0.8mm or 1mm transparent)
- Bead piercing tool or thick needle
- Tissue blade or sharp clay knife
- Acrylic rolling pin
- Cornstarch or baby powder (texture release)
- Baking sheet with parchment paper
- Sandpaper (medium to fine grit)
- Super glue (gel type recommended)
Step 1: Prepping and Shaping
-
Condition the Clay:
Start with your first color, kneading the polymer clay in your hands until it becomes soft, pliable, and free of any air bubbles. I find warming it up for a few minutes makes a huge difference in preventing cracks later. -
Roll a Log:
Place the conditioned clay on your work surface and roll it into a long, even snake or log shape. Aim for a thickness of about 1/4 to 1/3 inch, depending on how chunky you want your final beads. -
Square the edges:
Gently press down on top of the log with your acrylic roller or a flat object to flatten it slightly. Rotate the log 90 degrees and press again. Continue this until your log has a square cross-section rather than a round one. -
Slice Segments:
Using your tissue blade, slice the square log into equal segments. For the cushion shape seen here, cut pieces that are roughly as wide as they are tall, creating little cubes.
Uneven shapes?
If your cubes look squashed after piercing, pierce halfway from one side, then flip and pierce from the other to meet in the middle.
Step 2: Refining the Beads
-
Soften the Corners:
Take one clay cube and gently tap the sharp corners against your work surface or roll them lightly between your fingers. Do not roll it into a ball; you want to maintain the cube structure but lose the sharp, machine-cut look. -
Add Stone Texture:
Lightly dust your beads with a tiny bit of cornstarch. Use coarse sandpaper or a toothbrush to tap the surface of each bead gently. This creates that lovely organic, matte stone finish. -
Pierce the Holes:
Using your bead piercing pin, poke a hole directly through the center of each cube. Twist the tool gently as you push through to avoid squashing the bead’s shape. -
Widen the Channel:
To ensure the elastic knot can hide later, wiggle the tool slightly at the openings to make the hole just a bit larger than the cord thickness. -
Repeat Production:
Continue this process for all four colors—orange, cream, green, and blue. You will need approximately 20-25 beads per bracelet, depending on wrist size.
Try speckled clay!
Mix black pepper or dried herbs into the clay before conditioning to create a natural faux-granite effect for your beads.
Step 3: Baking and Assembly
-
Bake the Beads:
Arrange the beads on a parchment-lined baking sheet, ensuring they aren’t touching. Bake according to your polymer clay manufacturer’s instructions (usually 275°F/135°C for 15-30 minutes). -
Cool Down:
Let the beads cool completely on the tray. They will be slightly soft when hot but will harden fully as they return to room temperature. -
Check for Sharp Edges:
Inspect the bead holes. If there are any sharp bits of clay sticking out, use a fine-grit sandpaper to smooth them down so they don’t fray your elastic. -
Stringing:
Cut a piece of elastic cord about 10-12 inches long. Pre-stretch it by pulling on the ends a few times to prevent sagging later on. Feed your monochromatic beads onto the cord. -
Test Fit:
Wrap the strand around your wrist to check the sizing. The beads should sit comfortably without pinching or leaving large gaps. Add or remove beads as needed. -
Knotting:
Tie a surgeon’s knot (right over left twice, pull tight; left over right once, pull tight). Pull the elastic very taut to secure the knot. -
Secure the Knot:
Place a tiny drop of gel super glue precisely on the knot. Let it dry for a few seconds before trimming the excess cord ends. -
Hide the Evidence:
Gently tug the bracelet so that the knotted section slides inside the hole of the nearest bead, making the connection invisible.
Step 4: Finishing Up
-
Final Inspection:
Give the bracelet a gentle tug test to ensure it’s secure. Repeat the stringing process for the remaining three colors to complete your bold stack.
Enjoy mixing and matching these sturdy, earthy bracelets with your favorite daily looks


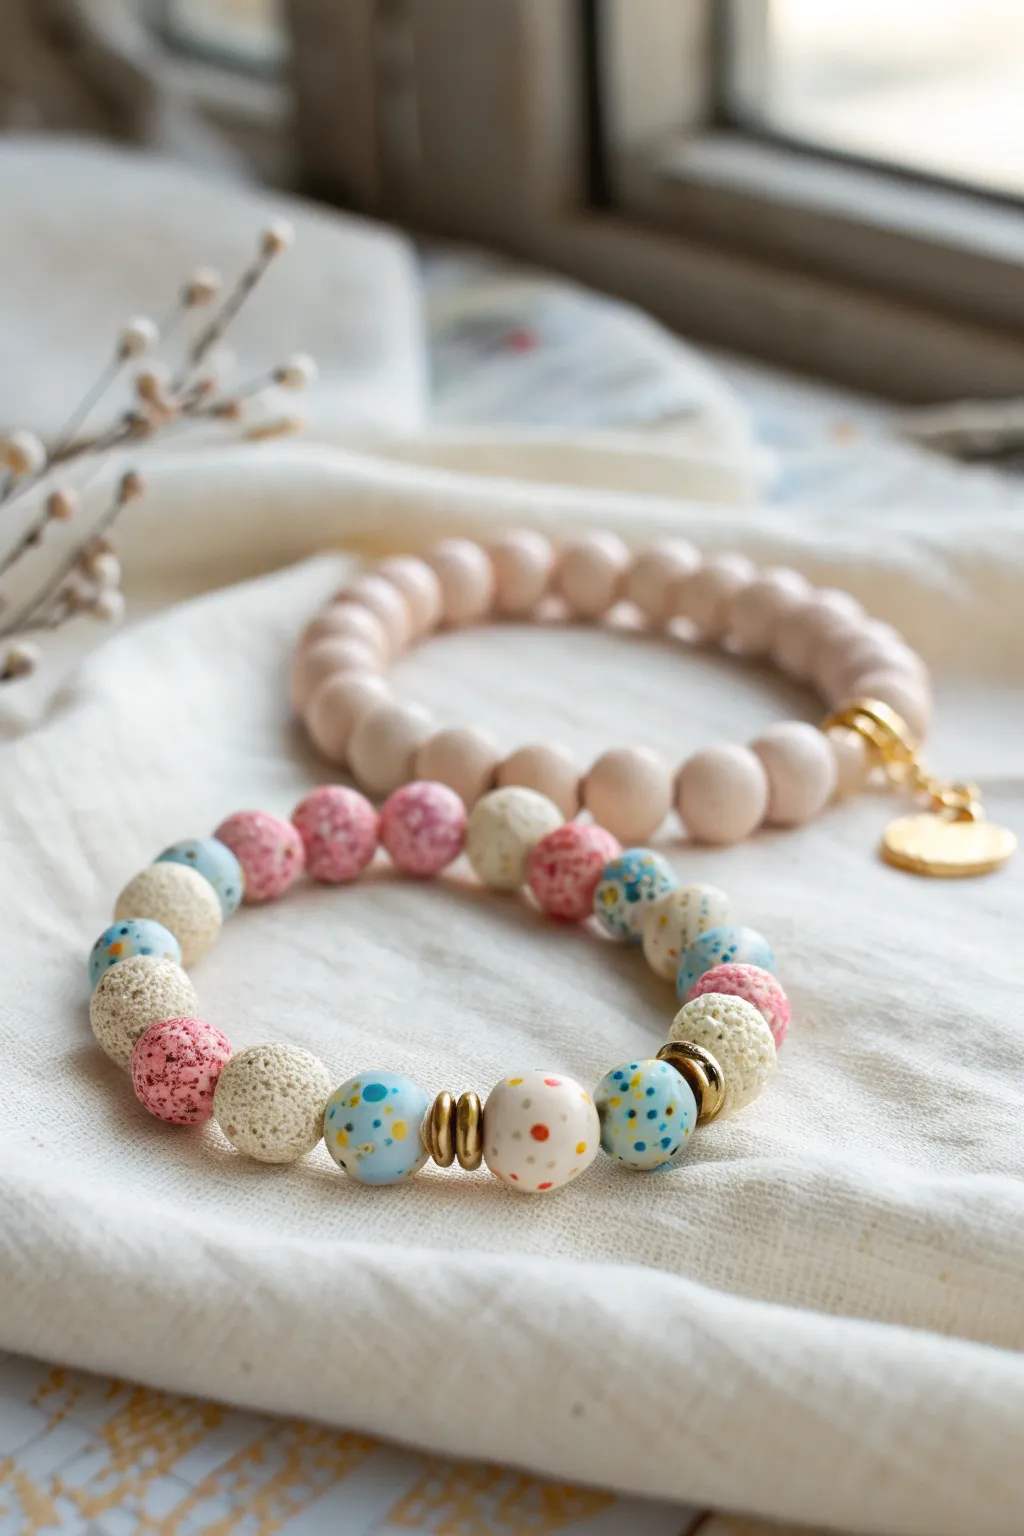
Monochrome Minimal Bracelet
Embrace the warmth of nature with this minimalist duo of bracelets featuring earthy clay beads. The combination of matte rust tones, creamy white accents, and textured gold spacers creates a sophisticated yet relaxed look perfect for everyday wear.
Step-by-Step Guide
Materials
- Terracotta/rust polymer clay heishi disc beads (6mm)
- Cream or off-white round glass or stone beads (4-6mm)
- Gold tone textured spacer beads (metal or metallized plastic)
- Elastic stretch cord (0.8mm or 1mm thickness)
- Super glue or jewelry cement
- Scissors
- Bead stopper or clips
- Measuring tape
- Tray or bead board
Step 1: Planning & Preparation
-
Measure your wrist:
Wrap a measuring tape loosely around your wrist to find your size. Add about 0.5 inches to this measurement to ensure a comfortable fit that isn’t too tight. -
Prepare the cord:
Cut two lengths of elastic cord, each about 10-12 inches long. This extra length makes tying the final knots much easier. -
Pre-stretch the elastic:
Gently pull on both ends of your cord segments several times. This prevents the bracelet from stretching out and becoming loose after the first few wears. -
Secure one end:
Attach a bead stopper or a piece of tape to one end of each cord. This simple step saves you the heartbreak of watching beads slide off while you work.
Sticky Situation
If the clay beads feel slightly tacky or stick together, dust them lightly with cornstarch before stringing. Buff off the excess with a soft cloth for a smooth matte finish.
Step 2: Bracelet One: The Spacer Design
-
Begin the pattern:
For the first bracelet shown on the bottom, start stringing the terracotta heishi beads. Thread on roughly 10-15 clay discs to create a solid block of color. -
Add the focal section:
Create the decorative segment by threading a textured gold spacer, followed by a cream round bead, and another gold spacer. This creates a framed look. -
Build the texture:
Add a small stack of 3-4 terracotta discs, then repeat the gold spacer/cream bead/gold spacer combination. -
Repeat until length is reached:
Continue this pattern—alternating between blocks of terracotta discs and the gold-cream focal sections—until the beaded length matches your wrist measurement. -
Check the fit:
Wrap the unfinished strand around your wrist to verify the size. Add or remove a few clay discs if necessary to get it just right.
Step 3: Bracelet Two: The Subtle Accent
-
Start the second strand:
For the top bracelet, which is more minimal, begin stringing a long section of just the terracotta heishi beads. This bracelet acts as a solid color foundation. -
Create a scatter pattern:
Instead of frequent focal points, add a single cream bead flanked by gold spacers at random intervals, or just place two of these sections opposite each other. -
Fill the rest:
I usually fill the remainder of the cord almost entirely with the clay discs. This keeps the design clean and lets the texture of the clay shine.
Knot Strength
Use a flexible jewelry glue like G-S Hypo Cement rather than standard super glue. It dries clear and remains flexible, preventing the knot from becoming brittle and snapping.
Step 4: Finishing Touches
-
Tie the first knot:
Remove the bead stopper carefully. Bring the two ends of the elastic together and tie a standard overhand knot, pulling it tight so the beads nestle together without gaps. -
Secure with a surgeon’s knot:
Tie a second knot, but this time loop the cord through twice before pulling tight (this is a surgeon’s knot). It adds extra security against slipping. -
Apply adhesive:
Place a tiny dot of super glue or jewelry cement directly onto the knot. Be careful not to get glue on the surrounding beads, as it can discolor the clay. -
Hide the knot:
While the glue is still tacky, gently pull the knot inside the hole of the nearest large bead if possible. If the holes are too small, simply trim the excess cord close to the knot once the glue is fully dry. -
Final cure:
Let the bracelets sit undisturbed for at least 15 minutes to ensure the glue has completely set before trying them on.
Stack these textured beauties with your favorite watch or wear them alone for an effortless earthy touch


Soft Ombre Fade
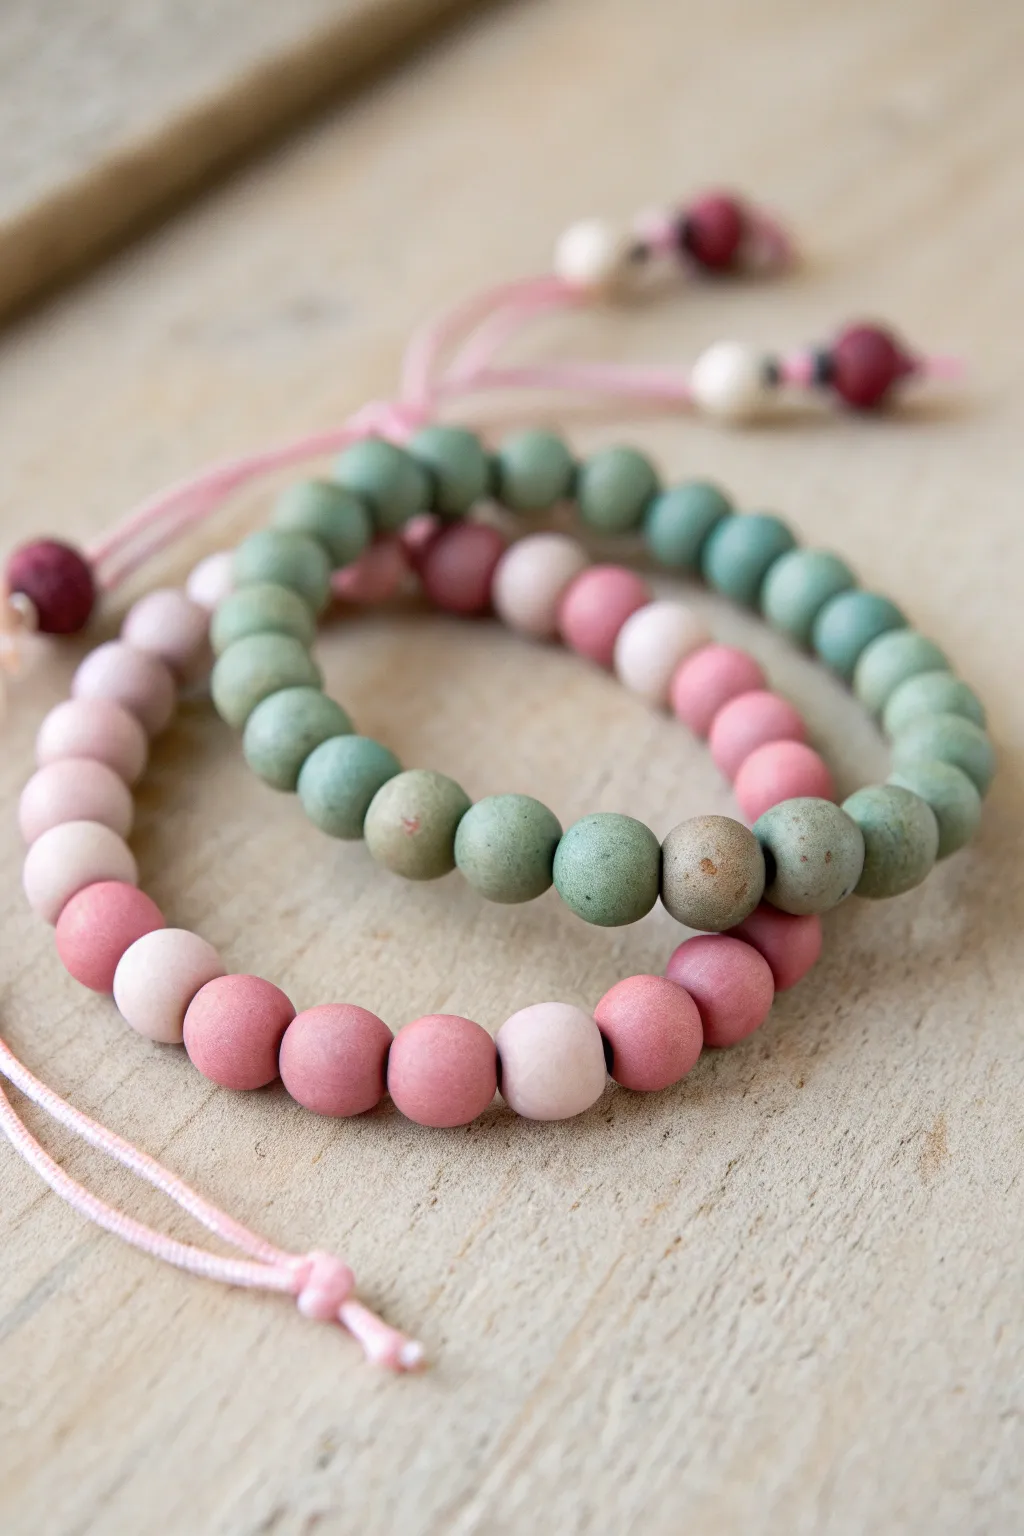
Embrace the soft elegance of these matte clay bead bracelets, featuring a soothing palette of dusty rose, blush pink, and sage green. The gentle ombre transition and simple adjustable cord make these an effortless accessory for everyday wear.
How-To Guide
Materials
- Polymer clay in dusty rose, white, and sage green
- Waxed cotton or nylon jewelry cord (light pink)
- Bead roller or acrylic block
- Needle tool or toothpick
- Baking sheet and parchment paper
- Oven
- Sandpaper (fine grit, optional)
- Scissors
Step 1: Mixing the Colors
-
Condition the Clay:
Begin by warming up your polymer clay in your hands until it becomes soft and pliable. You will need separate manageable balls of dusty rose, sage green, and white. -
Create the Pink Gradient:
To achieve the ombre look, create three shades of pink. Keep one portion pure dusty rose. Mix a second portion with a small amount of white for a medium tone. For the lightest shade, mix a tiny dot of rose into a larger ball of white. -
Prepare the Green Gradient:
Repeat the process for the green beads. Create a pure sage green pile, a medium mix, and a very pale green by blending varying ratios of the green and white clay.
Pro Tip: Hole Size
Make your bead holes slightly larger than you think you need. Clay can swell slightly or contract during baking, and threading cord through a tight fit is frustrating.
Step 2: Forming the Beads
-
Portion Equal Amounts:
Pinch off small, pea-sized pieces of clay from each color pile. Try to keep them as consistent in size as possible for a uniform bracelet. -
Roll Spheres:
Roll each piece between your palms to form a rough ball. For a perfectly round finish, I like to use a bead roller tool here, but rolling them on a flat surface with a clear acrylic block works well too. -
Create the Holes:
Gently pierce the center of each bead using a needle tool or toothpick. Ideally, rotate the bead as you push the tool through to prevent it from squashing out of shape. -
Smooth the Edges:
Once the hole is made, give the bead a gentle roll between your fingers again to smooth out any distortion around the openings. -
Bake the Clay:
Arrange your beads on a baking sheet lined with parchment paper. Bake according to your specific brand of polymer clay’s instructions (usually 275°F/135°C for 15-30 minutes). Let them cool completely.
Step 3: Assembly & Finishing
-
Matte Finish (Optional):
If your beads look too shiny after baking, lightly buff them with fine-grit sandpaper or a denim cloth to achieve that earthy, matte stone look seen in the photo. -
Plan Your Pattern:
Lay out your beads on a table. For the pink bracelet, arrange them in a gradient from dark rose to white and back again. For the green remix, alternate green hues with touches of pink for contrast. -
Pre-Stringing:
Cut a length of light pink cord, approximately 12-14 inches long. Tie a loose knot at one end as a stopper while you work. -
String the Beads:
Thread the beads onto the cord following your laid-out pattern. Ensure the fit is comfortable around your wrist, leaving about 2 inches of cord on either side. -
Create the Sliding Closure:
Cross the two tail ends of the cord over each other. Using a separate short piece of cord, tie a square knot or a series of macramé knots around both overlapping tails to create a sliding mechanism. -
Add End Beads:
Thread one final bead onto each tail end of the cord. Tie a secure overhand knot right after the bead to keep it in place, then trim any excess string close to the knot.
Troubleshooting: Fingerprints
If you see fingerprints on your raw beads, lightly dust your fingers with cornstarch before the final roll, or gently buff them out with baby oil before baking.
Now you have a set of custom, soft-touch bracelets ready to stack or share with a friend

The Complete Guide to Pottery Troubleshooting
Uncover the most common ceramic mistakes—from cracking clay to failed glazes—and learn how to fix them fast.
Black-and-White Graphic Stack
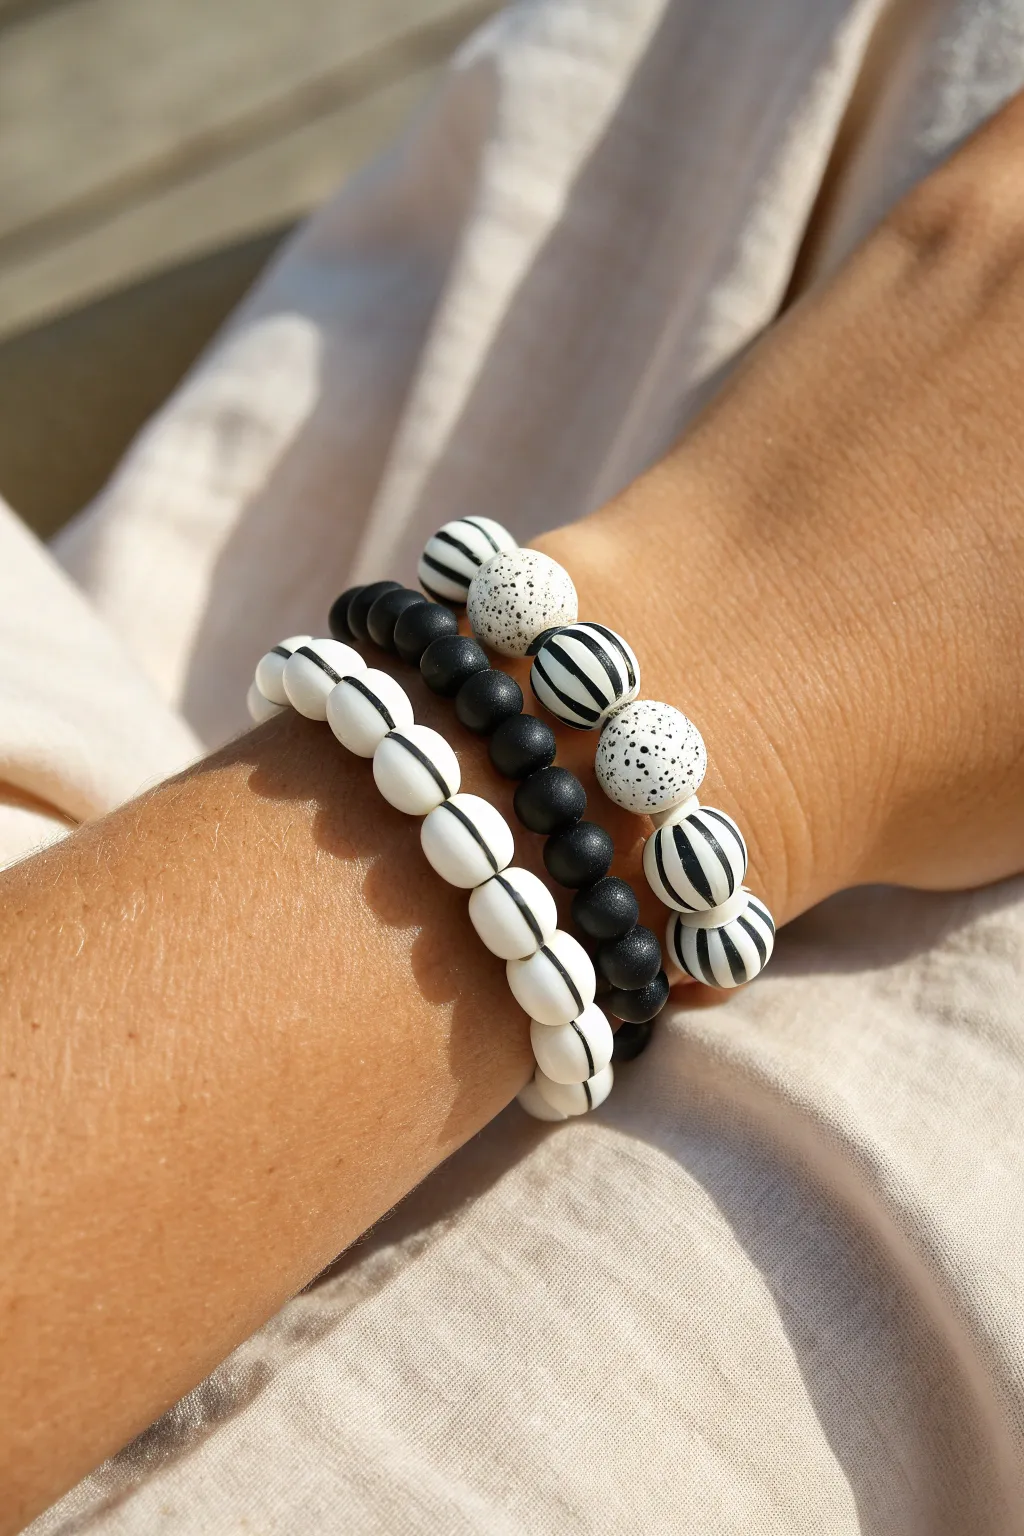
This chic trio combines matte black textures with bold graphic prints for a sophisticated, modern look. The interplay of crisp stripes, chaotic speckles, and soft-touch solids creates a perfectly balanced black-and-white statement piece.
Step-by-Step Guide
Materials
- White polymer clay
- Black polymer clay
- Bead rolling tool (or acrylic block)
- Bamboo skewers or thick needle tool
- Baking tile or parchment paper
- Black acrylic paint
- Toothbrush or stiff bristle brush
- Fine detail paintbrush (size 0 or 00)
- Gloss or satin varnish (optional for print beads)
- Stretch cord (0.8mm or 1mm)
- Jewelry glue or clear nail polish
- Scissors
Step 1: Creating the Solid Black Beads
-
Condition the clay:
Start by thoroughly conditioning your black polymer clay until it is soft and pliable. Since black clay shows fingerprints easily, you might want to wear latex gloves or wash your hands thoroughly before handling. -
Measure equal portions:
Roll the black clay into a uniform log. Cut equal-sized segments to ensure your beads are consistent in size. For the middle bracelet, aim for segments that will roll into 8mm spheres. -
Roll the spheres:
Roll each segment between your palms to create a smooth ball. For a perfectly spherical finish, use a bead roller or gently swirl the ball under a flat acrylic block on your work surface. -
Piercing the beads:
There’s a trick to not squishing them: handle the bead gently and use a twisting motion with your needle tool or skewer to create the hole. Pierce halfway through, then flip the bead and meet the hole from the other side. -
Texture application (optional):
The black beads in the image have a lovely matte, almost rubberized look. To mimic this, you can gently roll the raw beads on fine-grit sandpaper or a piece of denim before baking to remove any shine.
Clean Lines
Clean your white clay with a q-tip dipped in rubbing alcohol/acetone before baking. It removes lint and fingerprints effortlessly.
Step 2: Crafting the Graphic Beads
-
Form the white bases:
Clean your hands and tools completely to avoid transferring black residue. Condition the white clay and form two sizes of beads: larger 12mm spheres for the striped/speckled mix, and slightly flattened 10mm rondelles for the all-striped bracelet. -
Pierce the white beads:
Create the stringing holes in your white bases just as you did with the black ones, ensuring the holes are large enough for your chosen elastic cord. -
Baking the beads:
Arrange all your black and white beads on a baking tile. I prefer to bake them on a bed of cornstarch or accordion-folded paper to prevent flat spots. Bake according to your clay package instructions (usually 275°F/135°C for 15-30 minutes) and let them cool completely.
Step 3: Adding the Painted Details
-
Preparation for painting:
Mount your cooled white beads onto toothpicks or skewers. This gives you a handle so you can paint all sides without touching the bead itself. -
Painting the stripes:
Using black acrylic paint and a fine detail brush, paint vertical stripes around the circumference of the larger beads and the rondelles. Keep your hand steady and rotate the skewer, not the brush. Vary the spacing for an organic, handmade feel. -
Creating the speckled effect:
For the medium-sized focal beads, dilute a small amount of black acrylic paint with water. Dip an old toothbrush into this mixture, aim it at the beads, and run your thumb across the bristles to flick tiny splatters of paint onto the surface. -
Sealing the designs:
Once the paint is fully dry, apply a thin coat of satin or matte varnish to the white beads to protect the design. Leave the black beads unvarnished to maintain that distinct matte contrast.
Mix It Up
Try adding a single gold bead to the black strand or using gold paint for the speckles to add a touch of metallic luxury.
Step 4: Assembly
-
Design the layout:
Lay out your three strands on a bead board or towel. Strand 1: All black beads. Strand 2: All white striped rondelles. Strand 3: A pattern of large striped beads alternating with the speckled beads. -
Stringing:
Cut a piece of stretch cord about 10 inches long for each bracelet. Pre-stretch the cord by pulling on it firmly a few times; this stops the bracelet from sagging later. -
Tying the knots:
Thread your beads onto the cords. Tie a strong surgeon’s knot (right over left, left over right, looped twice) effectively securing the elastic. -
Securing the finish:
Add a tiny drop of jewelry glue or clear nail polish to the knot for extra security. Once dry, trim the excess cord and gently tuck the knot inside the hole of the nearest bead to hide it.
Now you have a striking set of bracelets that look effortlessly cool whether worn together or separately
Pastel Preppy Mix
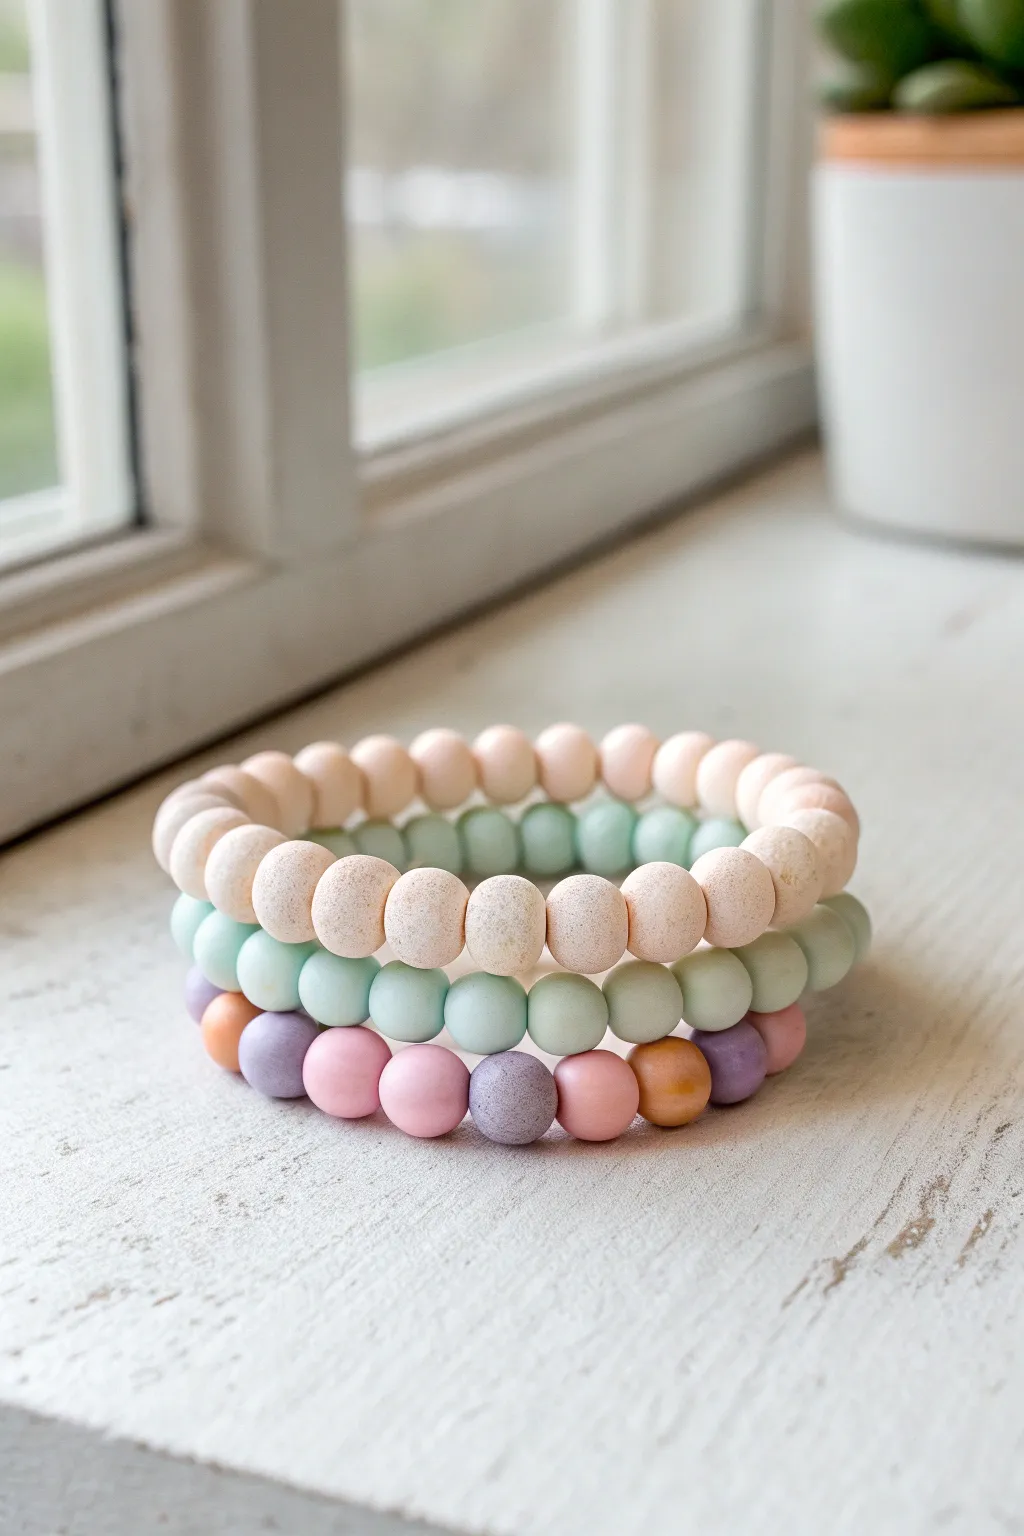
These stacked bracelets combine soft matte textures with a dreamy pastel palette for a look that is equal parts sophisticated and sweet. The speckled clay lends an organic stone-like finish, while the smooth mint and multi-colored strands add a playful pop perfect for spring styling.
Step-by-Step
Materials
- Polymer clay (light peach/beige, white, translucent, mint green, lavender, baby pink, muted orange)
- Black pepper or dried coffee grounds (for speckling effect)
- Bead roller or acrylic rolling pin
- Toothpicks or a bead piercing pin
- Baking sheet with parchment paper
- Medium grit sandpaper (optional)
- Strong elastic cord (0.7mm or 0.8mm)
- Jewelry adhesive or super glue
- Scissors
Step 1: Creating the Speckled Peach Beads
-
Mix the Base Color:
Start by conditioning your light peach or beige polymer clay. If the color is too saturated, mix in some white clay to soften it until you achieve a natural, sandy pebble tone. -
Add Texture:
To get that organic speckled look without buying special granite clay, take a pinch of finely ground black pepper or dried coffee grounds and knead it thoroughly into your peach clay. -
Portion the Clay:
Roll the clay into a log or snake about the thickness of a marker. Slice the log into equal segments to ensure your beads will be roughly the same size. -
Roll the Spheres:
Take each segment and roll it between your palms to form a smooth ball. I like to use a bead rolling tool here for perfect consistency, but hand-rolling works just fine if you take your time. -
Piercing the Holes:
Gently twist a toothpick or piercing pin through the center of each bead. Twist it as you push to prevent the bead from squishing into an oval shape. -
Refine the Hole:
Pull the toothpick out and re-insert it from the opposite side to ensure the hole is clean and open on both ends.
Step 2: Creating the Smooth Pastel Beads
-
Condition the Mint:
Thoroughly condition your mint green clay. This batch should be perfectly smooth with no inclusions, so ensure your hands and work surface are clean of any pepper specks from the previous step. -
Mix the Multi-Color Batch:
Prepare separate small amounts of lavender, baby pink, and muted orange clay. Aim for slightly muted tones rather than neon brights to match the preppy aesthetic. -
Form the Beads:
Just as before, roll logs and slice uniform segments for your mint green beads and your multi-colored assortment. -
Round and Pierce:
Roll the remaining segments into spheres and pierce them carefully. You’ll want enough mint beads for a full bracelet, and enough of the mixed colors for a third bracelet. -
Texture Check:
Before baking, lightly inspect the beads for fingerprints. If you see any, gently buff them out with your finger or roll them lightly on a piece of bright white paper.
Flattened Spheres?
If your beads squish when piercing holes, wait 20 minutes for the clay to firm up (leach), or gently bake them for 5 mins to harden slightly before drilling.
Step 3: Baking and Assembly
-
Bake the Beads:
Arrange all your beads on a parchment-lined baking sheet. Bake according to your clay manufacturer’s instructions—usually around 275°F (135°C) for 30–60 minutes depending on brand and thickness. -
Cool and Finish:
Let the beads cool completely. The matte finish is key to this look, avoiding any glossy varnishes. If there are rough spots around the holes, a quick rub with sandpaper fixes them. -
Stringing the Speckled Bracelet:
Cut a length of elastic cord about 10 inches long. String only the speckled peach beads until the bracelet fits comfortably around your wrist. -
Stringing the Mint Bracelet:
Repeat the process with the solid mint green beads for the second strand. -
Patterning the Mixed Bracelet:
For the third strand, create a random pattern alternating pink, purple, and orange beads. Don’t overthink the order; a random mix looks more organic. -
Tying the Knots:
Tie off each bracelet using a surgeon’s knot (right over left, left over right). Pull the elastic tight to pre-stretch it slightly before securing. -
Secure and Trim:
Add a tiny drop of jewelry glue to each knot. let it dry, then trim the excess cord and gently tuck the knot inside a neighboring bead hole.
Gold Accent Glam
Insert small gold spacer beads or flat gold disc beads between every third or fourth clay bead to elevate the look from casual craft to boutique chic.
Enjoy wearing your new textured stack individually or all together for a soft statement look


What Really Happens Inside the Kiln
Learn how time and temperature work together inside the kiln to transform clay into durable ceramic.
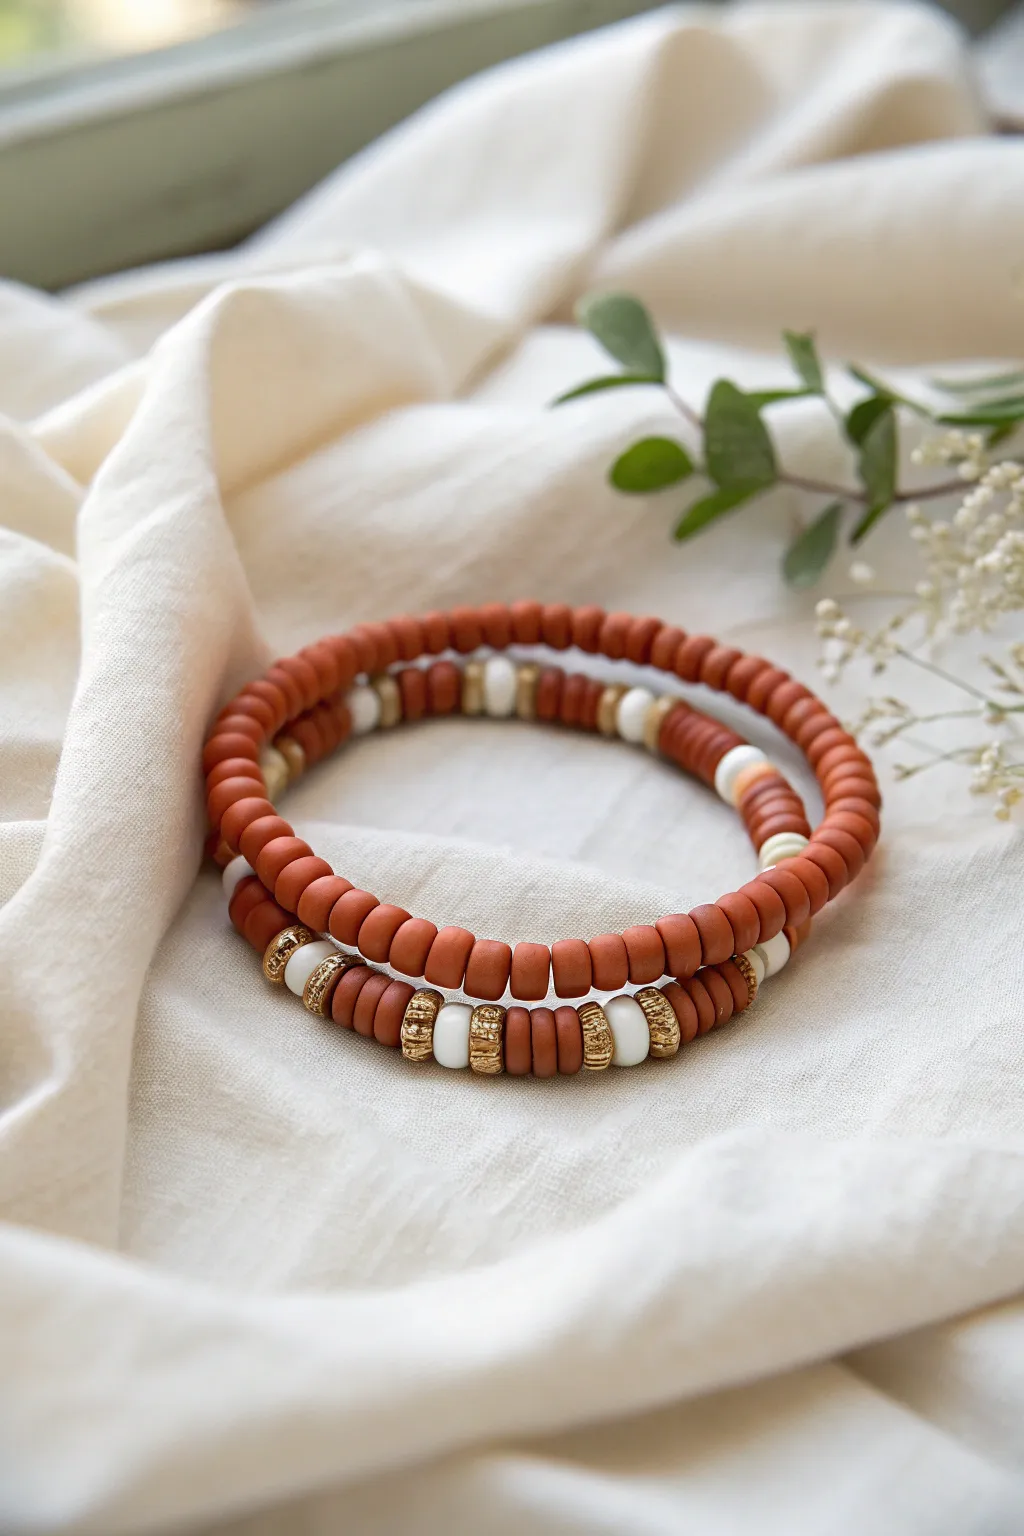
Earthy Neutrals With a Pop
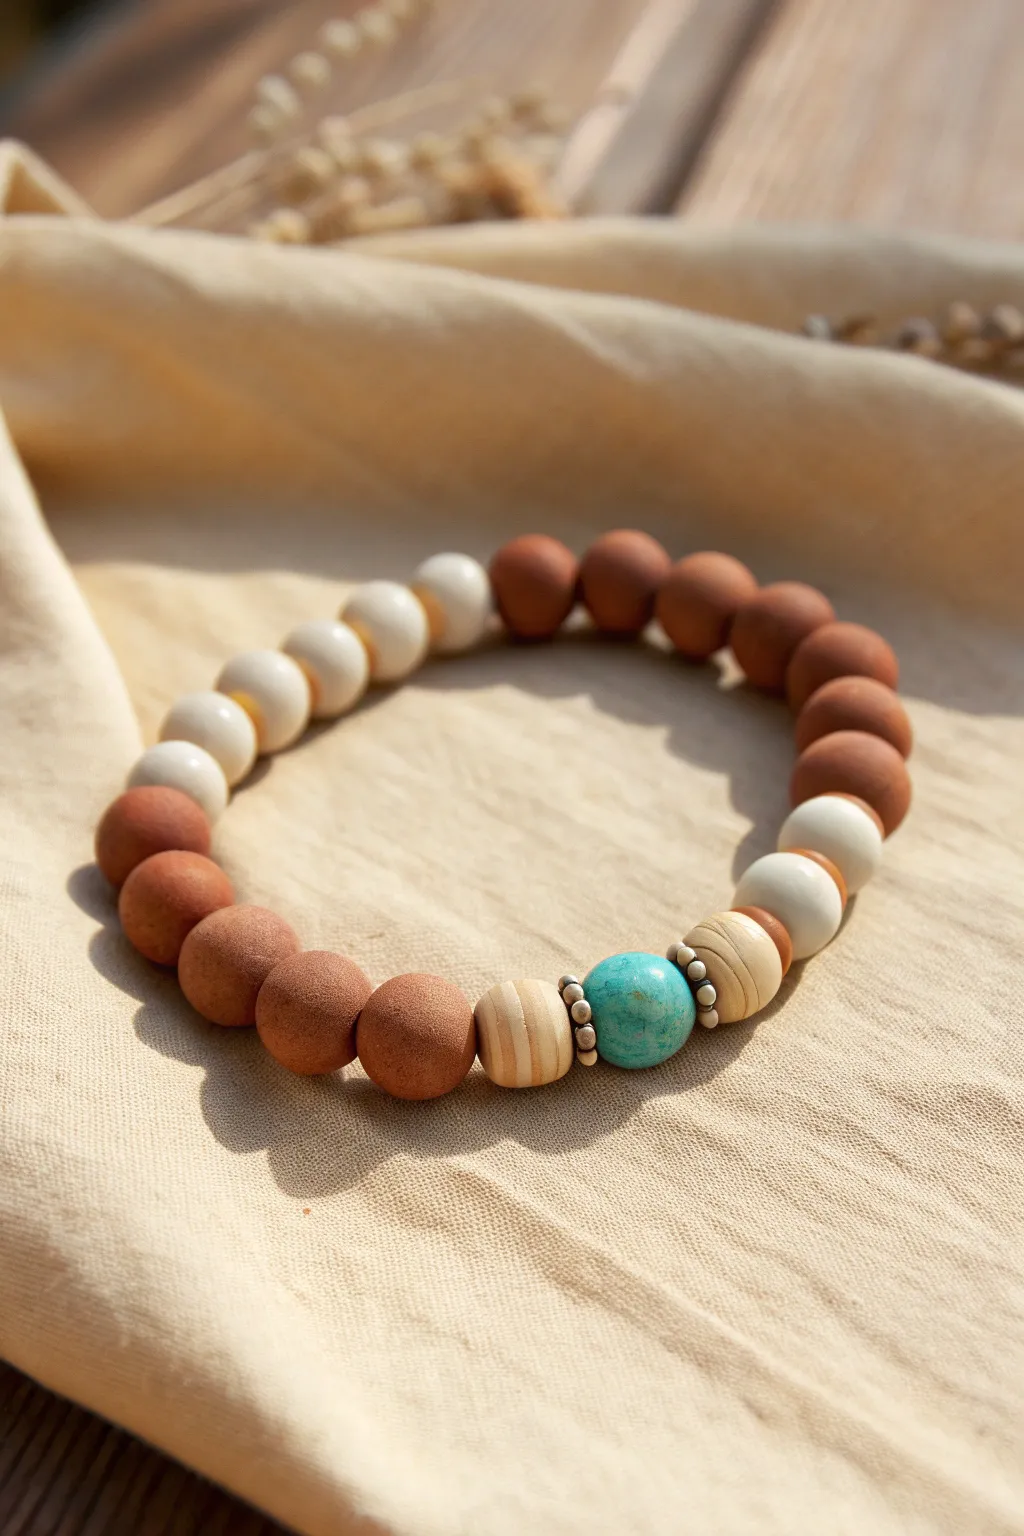
Achieve a grounded yet striking look with this beaded bracelet that combines the raw texture of terracotta polymer clay with the cool, refreshing tone of turquoise. The asymmetrical design balances warmth and coolness, making it a perfect everyday accessory that feels as natural as it looks.
Detailed Instructions
Materials
- Terracotta-colored polymer clay
- Cream or off-white polymer clay
- One large turquoise stone or turquoise-colored bead (approx. 10-12mm)
- Small silver spacer beads (daisy spacers or tiny rounds)
- Elastic beading cord (clear, 0.8mm or 1mm)
- Bead rolling tool or acrylic block
- Toothpick or bead piercing pin
- Oven for baking clay
- Superglue or jewelry adhesive
- Scissors
Step 1: Crafting the Clay Beads
-
Condition the Terra Clay:
Begin by taking a block of terracotta-colored polymer clay. Knead it in your hands until it is soft, pliable, and warm to the touch. This conditioning step prevents cracks during baking. -
Portion the Clay:
Roll the terracotta clay into a long, even snake shape about 1/2 inch in diameter. Use a blade to slice off approximately 18 to 20 equal-sized segments to ensure your beads are uniform. -
Roll Spheres:
Take each segment and roll it between your palms to create a smooth sphere. For a more perfect shape, I like to finish rolling them on a flat surface using an acrylic block in a gentle circular motion. -
Create Cream Beads:
Repeat the conditioning and portioning process with the cream-colored polymer clay. You will need roughly 8 to 10 of these beads, aiming for the same size as your terracotta ones. -
Make the Wood-Grain Accents:
To create the two textured accent beads near the focal point, take a small amount of cream clay and mix in a tiny streak of terracotta. Twist them together but don’t fully blend; leave it marbleized to mimic a light wood grain look. -
Shape Accent Beads:
Roll two slightly flattened barrel shapes or rounded discs from this marbled mixture. These should be slightly larger than your standard round beads to frame the centerpiece. -
Pierce the Holes:
Using a bead piercing pin or a toothpick, carefully poke a hole through the center of every clay bead. Twist the tool gently as you push through to avoid deforming the sphere. -
Bake the Beads:
Arrange your unbaked beads on a parchment-lined baking sheet or a bead rack. Bake them according to the specific temperature and time instructions on your package of polymer clay (usually around 275°F for 15-30 minutes). -
Cool Down:
Once baked, turn off the oven and let the beads cool completely before handling. This hardening phase is crucial for durability.
Step 2: Assembly & Finishing
-
Plan the Layout:
On a bead board or towel, lay out your design. Place the turquoise bead in the center. Flank it with silver spacers, then the wood-grain accent beads, then cream beads, transitioning into the terracotta beads for the back half. -
Prepare the Cord:
Cut a piece of elastic cord about 10-12 inches long. Pre-stretch the elastic by pulling on it gently a few times; this prevents the bracelet from stretching out permanently later. -
String the Centerpiece:
Thread your elastic through the central turquoise bead first. Immediately add a small silver spacer bead on either side of the turquoise stone. -
Add Accent Beads:
Slide one wood-grain/marbled clay bead onto each side, sandwiching the turquoise and silver assembly. -
String the Cream Section:
Add your plain cream clay beads. You can do this symmetrically (4-5 on each side) or create an ombre effect by placing all cream beads on one side of the focal point. -
String the Terracotta Section:
Thread the remaining terracotta beads onto both ends of the cord until the bracelet reaches your desired length (usually about 7 inches for a standard wrist). -
Check fit:
Wrap the unfinished strand around your wrist to verify the size. Add or remove terracotta beads as needed for a comfortable fit. -
Secure the Knot:
Tie the ends of the elastic together using a surgeon’s knot (loop the cord through twice before pulling tight). Pull the cords firmly to secure the tension. -
Seal and Trim:
Apply a tiny drop of superglue or jewelry adhesive to the knot. Let it dry for a minute, then trim the excess cord ends close to the knot. -
Hide the Knot:
Gently pull adjacent beads over the knot to hide it inside one of the bead holes for a seamless, professional finish.
Uneven Bead Holes?
If the hole closes up during baking, use a small hand drill or a heated needle to re-open the channel gently without cracking the hardened clay.
Smooth Surface Trick
Before baking, lightly dust your fingers with cornstarch. This helps smooth out fingerprints on the raw clay spheres for a flawless matte finish.
Now you have a stunning, handcrafted accessory that brings a warm earthly touch to any outfit.
Gold Spacer Rhythm
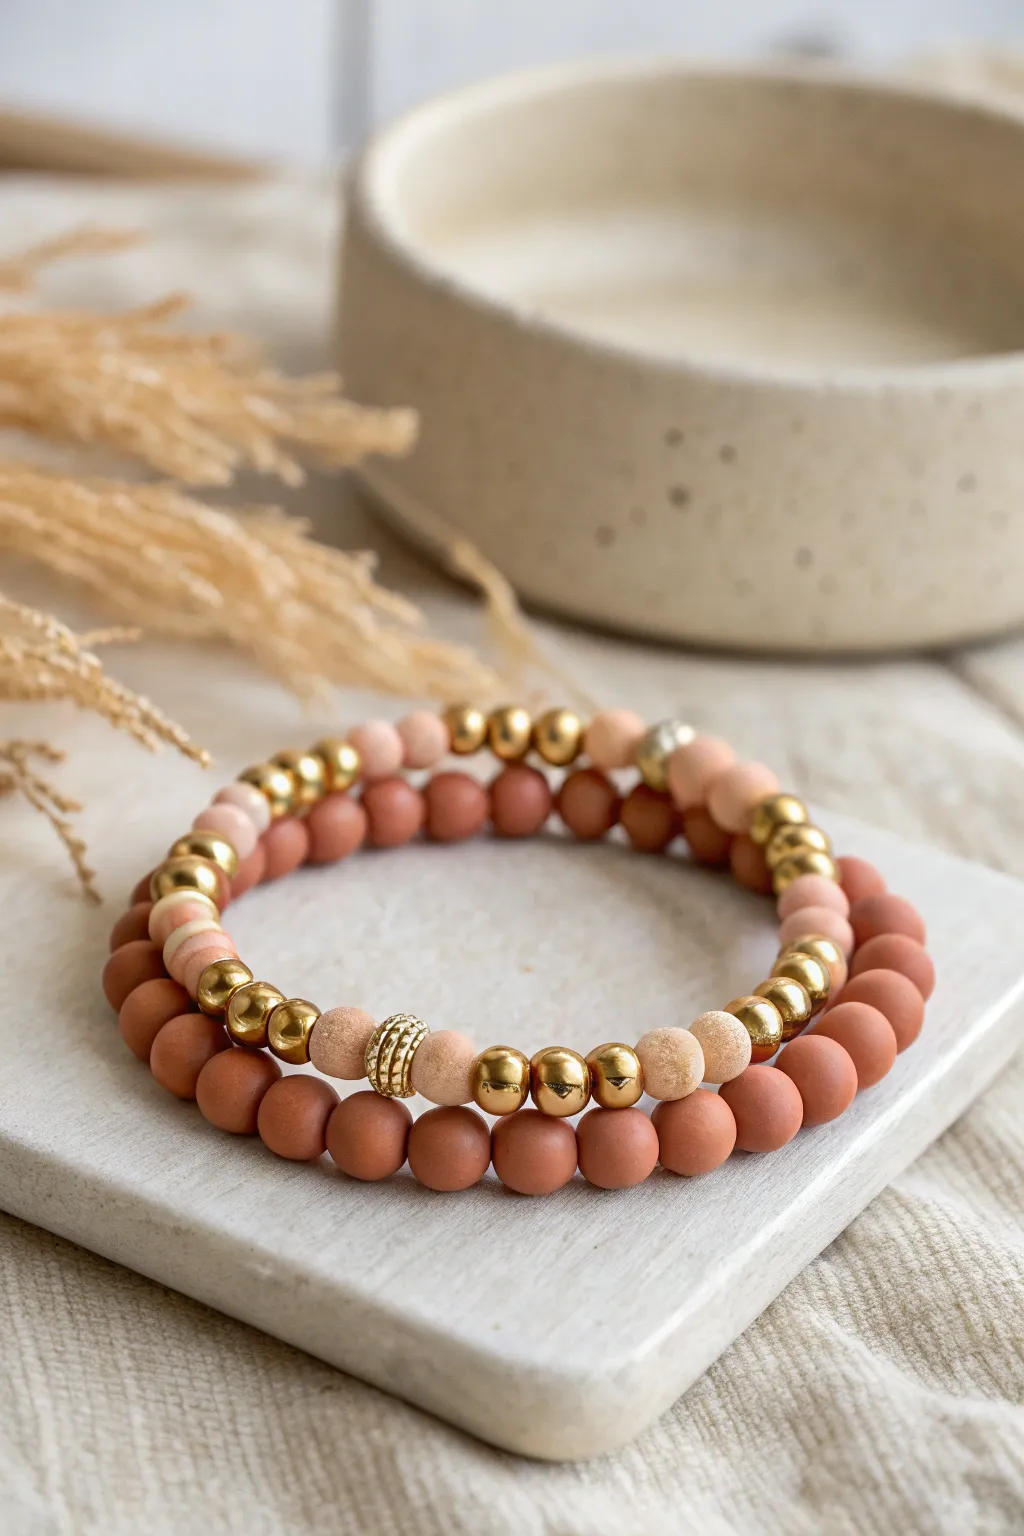
Embrace warm, earthy tones with this duo of beaded bracelets that pairs matte clay textures with the luxe shine of gold. The alternating rhythm of metallic spacers and soft peach accents creates a sophisticated yet bohemian accessory perfect for layering.
Step-by-Step Guide
Materials
- 8mm matte polymer clay beads (terracotta/rust color)
- 8mm matte polymer clay beads (sand/light peach color)
- 6mm gold plated round spacer beads
- 8mm gold plated round beads
- 8mm gold plated textured/filigree bead (focal)
- 0.8mm clear elastic stretch cord
- Super glue or jewelry adhesive
- Scissors
Step 1: The Solid Terracotta Foundation
-
Measure and cut:
Begin by wrapping the elastic cord loosely around your wrist to determine the size. Add about 3-4 inches of extra length on both ends for easier tying, then cut the cord. -
Pre-stretch the cord:
Hold the cut piece of elastic between your hands and give it a few firm tugs. This pre-stretching prevents the bracelet from loosening up significantly after you start wearing it. -
Secure the end:
Attach a piece of tape or a bead stopper to one end of the elastic cord. This simple step saves you from the frustration of beads sliding off while you work. -
String the beads:
Thread the matte terracotta clay beads onto the elastic one by one. Continue adding them until the beaded section wraps comfortably around your wrist without large gaps. -
Tie the knot:
Remove the tape or stopper. Bring the two ends together and tie a surgeon’s knot—this is like a standard overhand knot, but loop the end through twice before pulling tight. -
Secure and hide:
Apply a tiny dab of jewelry glue specifically to the knot. Let it dry for a moment, trim the excess tails close to the knot, and gently pull the knot inside one of the clay beads to hide it.
Loose Elastic?
If your bracelet feels loose quickly, you likely didn’t pre-stretch the cord enough. Give the elastic 3-4 hard tugs before beading to relax the shape memory.
Step 2: The Patterned Gold Accent Strand
-
Prepare the second cord:
Repeat the measuring, cutting, and pre-stretching process with a new piece of 0.8mm elastic cord. Creating a slightly looser fit for this top bracelet often looks better when stacked. -
Start the center sequence:
Locate the center of your design first. Thread one gold plated textured focal bead, flanked by a sand-colored matte bead on either side. -
Add metallic rhythm:
On both sides of your growing strand, add two 6mm gold spacers followed by a larger 8mm gold bead. This creates the shiny sections that catch the light. -
Introduce the color repeats:
Next, add a sand-colored bead, two gold spacers, and then transition into your terracotta beads. I like to lay this out on a bead board first to ensure the symmetry is pleasing. -
Fill the back section:
Complete the rest of the bracelet length using the terracotta matte beads. These will sit at the underside of your wrist, keeping the intricate gold pattern clearly visible on top. -
Check the fit:
Wrap the unfinished strand around your wrist to verify the size. Add or remove terracotta beads from the ends as needed to achieve your perfect fit. -
Final knotting:
Tie off this bracelet using the same surgeon’s knot technique used for the first bracelet. Pull the elastic tight to ensure the beads sit snugly against each other. -
Glue and finish:
Apply a small drop of adhesive to the knot, allow it to set, and trim the excess cord carefully with sharp scissors. -
Wipe clean:
If there is any dust or residue on the matte clay beads from handling, gently wipe them with a slightly damp cloth to restore their soft, velvety appearance.
Pro Tip: Threading
If the clay bead holes are rough or tight, cut the tip of your elastic at a sharp 45-degree angle. This creates a ‘needle’ point that guides through much easier.
Now you have a stunning custom stack that brings a warm, earthy elegance to any outfit

TRACK YOUR CERAMIC JOURNEY
Capture glaze tests, firing details, and creative progress—all in one simple printable. Make your projects easier to repeat and improve.
Pearl-and-Clay Contrast
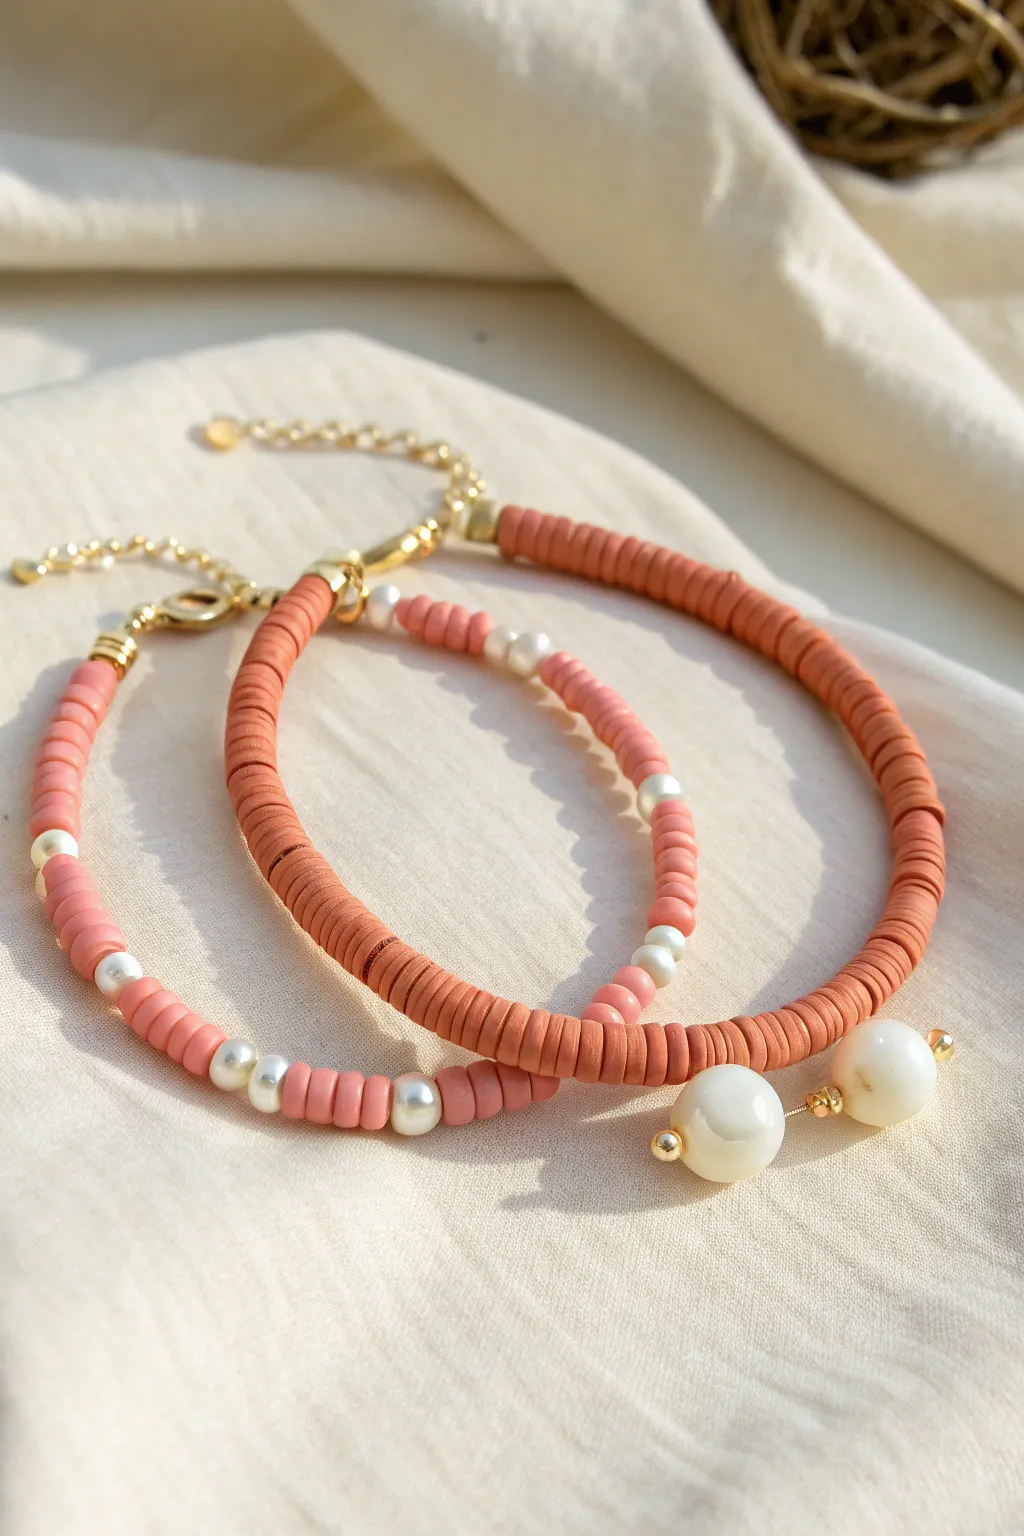
This project combines the rustic warmth of terracotta-colored clay disc beads with the timeless sheen of pearls for a stunning contrast. You’ll create a layered look featuring one simple strand and another adorned with dangling pearl charms, perfect for stacking or wearing solo.
Step-by-Step
Materials
- Terracotta or coral polymer clay disc (heishi) beads (approx. 4-6mm)
- Small white pearl beads (approx. 3-4mm)
- Two large white pearl beads (approx. 8-10mm) for charms
- Gold beading wire or strong stretch cord (0.5mm-0.8mm)
- Gold ball-head pins
- Gold crimp beads and crimp covers
- Gold wire guardians (optional but recommended for durability)
- Gold lobster clasp and jump rings
- Chain extender with a tiny tag (optional)
- Jewelry pliers: round nose, flat nose, and flush cutters
Step 1: Creating the Pearl Charm Bracelet
-
Prepare the Wire:
Cut a length of beading wire approximately 10 inches long. This gives you plenty of room to work with the clasps. Thread a crimp bead onto one end, followed by a wire guardian. -
Secure the Clasp:
Loop the wire through the guardian and back through the crimp bead. Attach your lobster clasp to the loop created by the guardian. Use flat nose pliers to flatten the crimp bead securely, trimming the excess short tail of wire. -
Start Beading:
Begin threading your terracotta clay disc beads. String about 1.5 to 2 inches of solid clay beads to form the side section of the bracelet. -
Prepare the Pearl Charms:
Technically pause your stringing to make the charms. Take your two large pearls and slide each onto a gold ball-head pin. I like adding a tiny gold seed bead before the pearl for extra detail. -
Form the Loops:
Using round nose pliers, bend the pin wire at a 90-degree angle just above the pearl. Create a wrapped loop or simple loop, trimming any excess wire. Set these two charms aside. -
Add the Center Charms:
Resume stringing. Thread the loop of one pearl charm directly onto your main beading wire. Add a few clay disc beads or a small gold spacer, then thread the second pearl charm so they hang close together. -
Finish the Pattern:
Continue adding terracotta clay beads until the bracelet reaches your desired length (usually about 6.5 to 7 inches total). Check the symmetry to ensure the charms sit somewhat centrally or slightly off-center for a casual look. -
Close the Bracelet:
Thread a crimp bead and a wire guardian onto the end. Loop the wire through a jump ring (attached to your extender chain) and back through the crimp. Pull tight, crimp it flat, and cover with a crimp cover for a polished gold ball look.
Smooth Moves
Use a bead reamer or a thick needle to gently widen the holes of any clay discs that seem too tight or jagged before stringing.
Step 2: Creating the Alternating Beaded Bracelet
-
Setup the Second Strand:
Cut another 10-inch piece of wire. Repeat the clasp attachment process: crimp bead, wire guardian, and a jump ring or clasp end. -
Create Sections:
Thread approximately 1 inch of plain terracotta clay beads. This solid block of color at the ends frames the patterned section nicely. -
Interpose the Pearls:
Begin your alternating pattern. Thread one small pearl bead, followed by about 6-8 clay disc beads. Repeat this sequence. -
Rhythm and Flow:
Continue this pattern: one small pearl, followed by a small stack of clay discs. Aim to space the pearls evenly around the wrist. -
Check the Fit:
Wrap the strand around your wrist to verify sizing. The two bracelets look best when they are roughly the same length so they stack neatly without tangling. -
Finalize the Strand:
End the strand with another 1-inch block of solid terracotta beads to match the start. This creates a cohesive, professional finish. -
Secure the End:
Add your final crimp bead and wire guardian. Attach the other half of your clasp or extender chain. Crimp securely and trim the wire flush. -
Optional Gold Accents:
If you want extra sparkle, cover your crimp beads with gold crimp covers. You can also attach a tiny gold charm or tag to the extender chain for a high-end boutique touch.
Loosey Goosey?
If your bracelet is stiff, you’ve strung it too tightly. Leave a tiny gap (about 1mm) of bare wire before crimping to allow the beads to move.
Enjoy styling these warm, textural pieces with your favorite summer outfits
Smiley Bead Accent
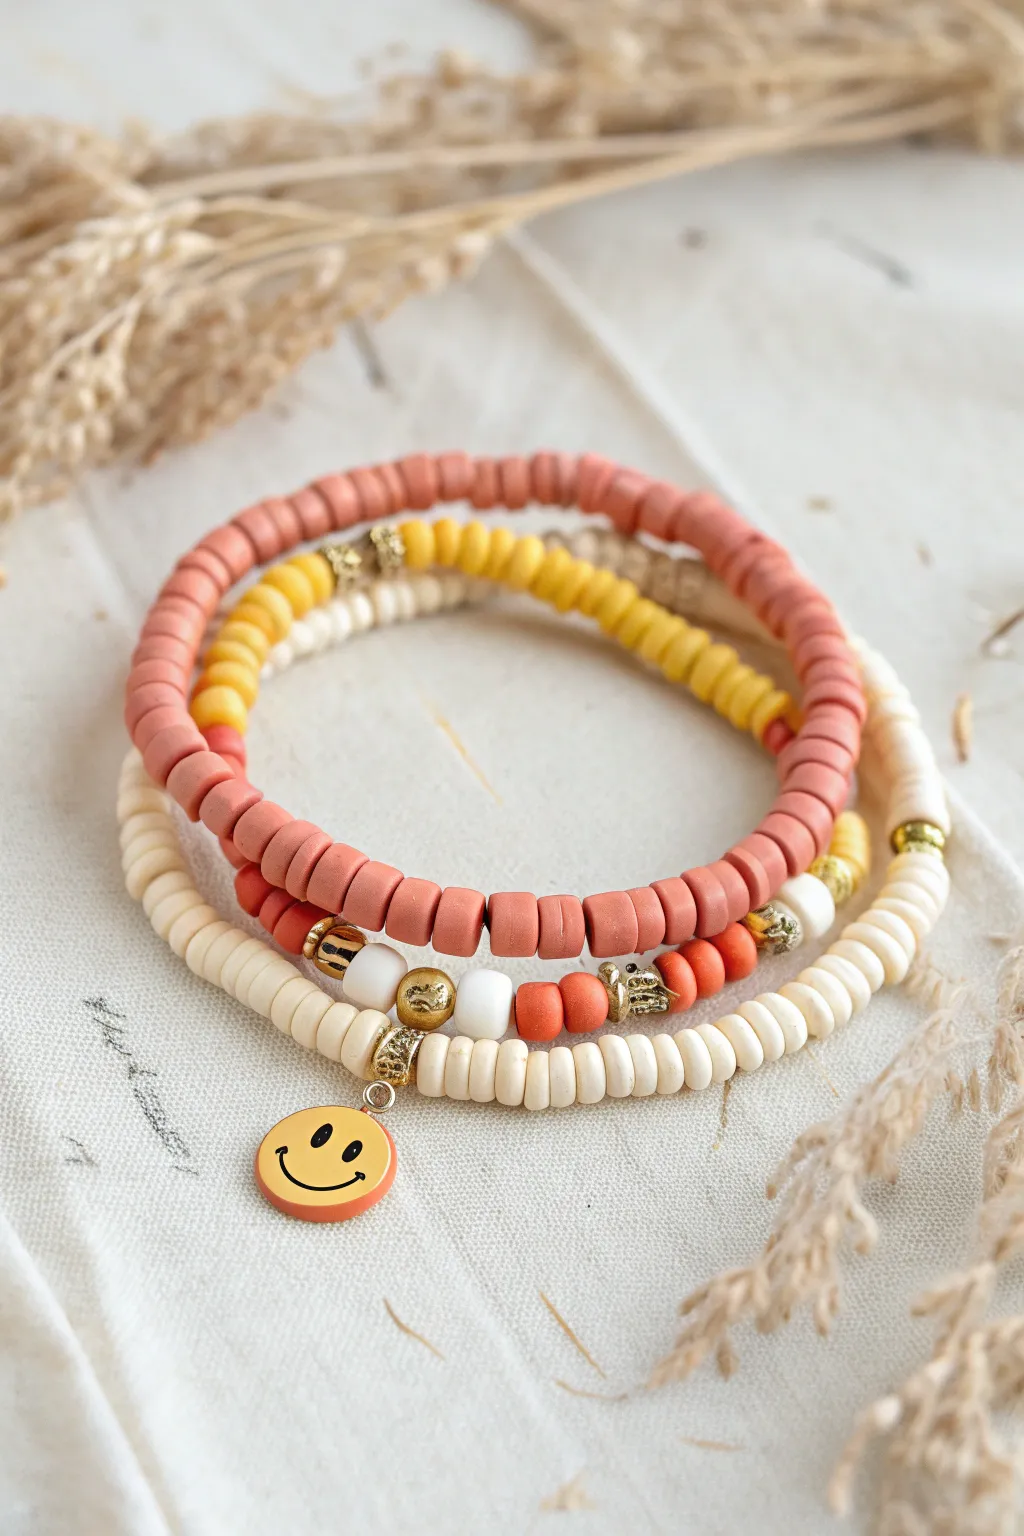
This cheerful tutorial guides you through creating a stack of three beaded bracelets that blend warm earth tones with a pop of sunny happiness. You’ll master the art of mixing clay heishi beads with gold spacers and attaching a cute enamel charm for a finished look that feels both trendy and timeless.
How-To Guide
Materials
- 6mm polymer clay heishi beads (terracotta/dusty rose color)
- 6mm polymer clay heishi beads (cream/off-white color)
- 6mm polymer clay heishi beads (mustard yellow color)
- 6mm polymer clay heishi beads (bright orange color)
- Assorted gold spacer beads (smooth rounds and textured discs)
- Enamel smiley face charm (yellow with gold plating)
- Gold jump ring (4-6mm)
- Elastic stretch cord (0.7mm or 0.8mm)
- Jewelry glue or clear nail polish
- Scissors
Step 1: Planning and Prep
-
Measure your wrist:
Wrap a piece of string around your wrist to find your comfortable size, then add about half an inch for a comfortable fit. Cut three pieces of elastic cord, adding about 3 extra inches to each for ease of tying later. -
Secure the ends:
Place a piece of tape on one end of each cord or clip on a binder clip. This simple trick prevents your beads from sliding right off while you work. -
Layout: The Solid Rose:
For the first bracelet, you’ll be creating a near-solid color block. Lay out enough terracotta/dusty rose heishi beads to cover most of the length. -
Accent the Solid Rose:
Break up the solid color by interspersing 3-4 gold textured disc spacers at random intervals or clustered together near where the knot will be. This adds just a hint of shine.
Step 2: Creating the Mixed Strands
-
Layout: The Yellow Split:
For the second bracelet, plan a design that is half mustard yellow and half cream. Find the center point and transition between the two colors. -
Add gold transitions:
Where the yellow meets the cream, insert a gold spacer bead. I like to use the textured ones here to define the color change sharply. -
Layout: The Smiley Main Event:
The third bracelet is the star. Start with a base of cream beads for about two-thirds of the strand. -
Insert the pattern section:
Create a focal section opposite the simple cream side. Thread on a pattern: gold round bead, white bead, gold textured spacer, two bright orange beads, gold spacer, two orange beads, and finish with a gold round bead. -
String the beads:
Thread all your laid-out designs onto their respective elastic cords. Check the length against your wrist one last time before sealing the deal.
Knot Security
Use a surgeon’s knot (looping twice instead of once on the first pass) for extra security with slippery elastic cord.
Step 3: Charm Assembly & Finishing
-
Prepare the charm:
Open a gold jump ring using two pairs of pliers (or your fingers if the gauge is light enough). Slide the enamel smiley charm onto the ring. -
Attach the charm:
Without closing the jump ring yet, hook it onto the third bracelet (the one with the orange pattern) specifically around a gold spacer bead in the center of your focal section. Close the jump ring securely. -
Pre-stretch the cord:
Give the ends of the elastic a gentle pull. Pre-stretching helps prevent the bracelet from loosening up the first time you wear it. -
Knotting:
Tie a surrealist knot or a square knot firmly on each bracelet. Pull tight enough that the beads are snug against each other but not creating waves in the strand. -
Secure the knots:
Dab a tiny drop of jewelry glue or clear nail polish onto each knot. Let this dry completely before moving on. -
Hide the mechanics:
Once the glue is dry, trim the excess elastic tails close to the knot. If possible, gently tug the knot inside one of the adjacent clay beads to hide it from view.
Level Up: Texture
Mix in a few wooden beads or freshwater pearls alongside the clay heishi beads to create a more organic, eclectic stack.
Stack them all up on your wrist for an instant boost of handmade happiness
Mini Fruit Slice Details
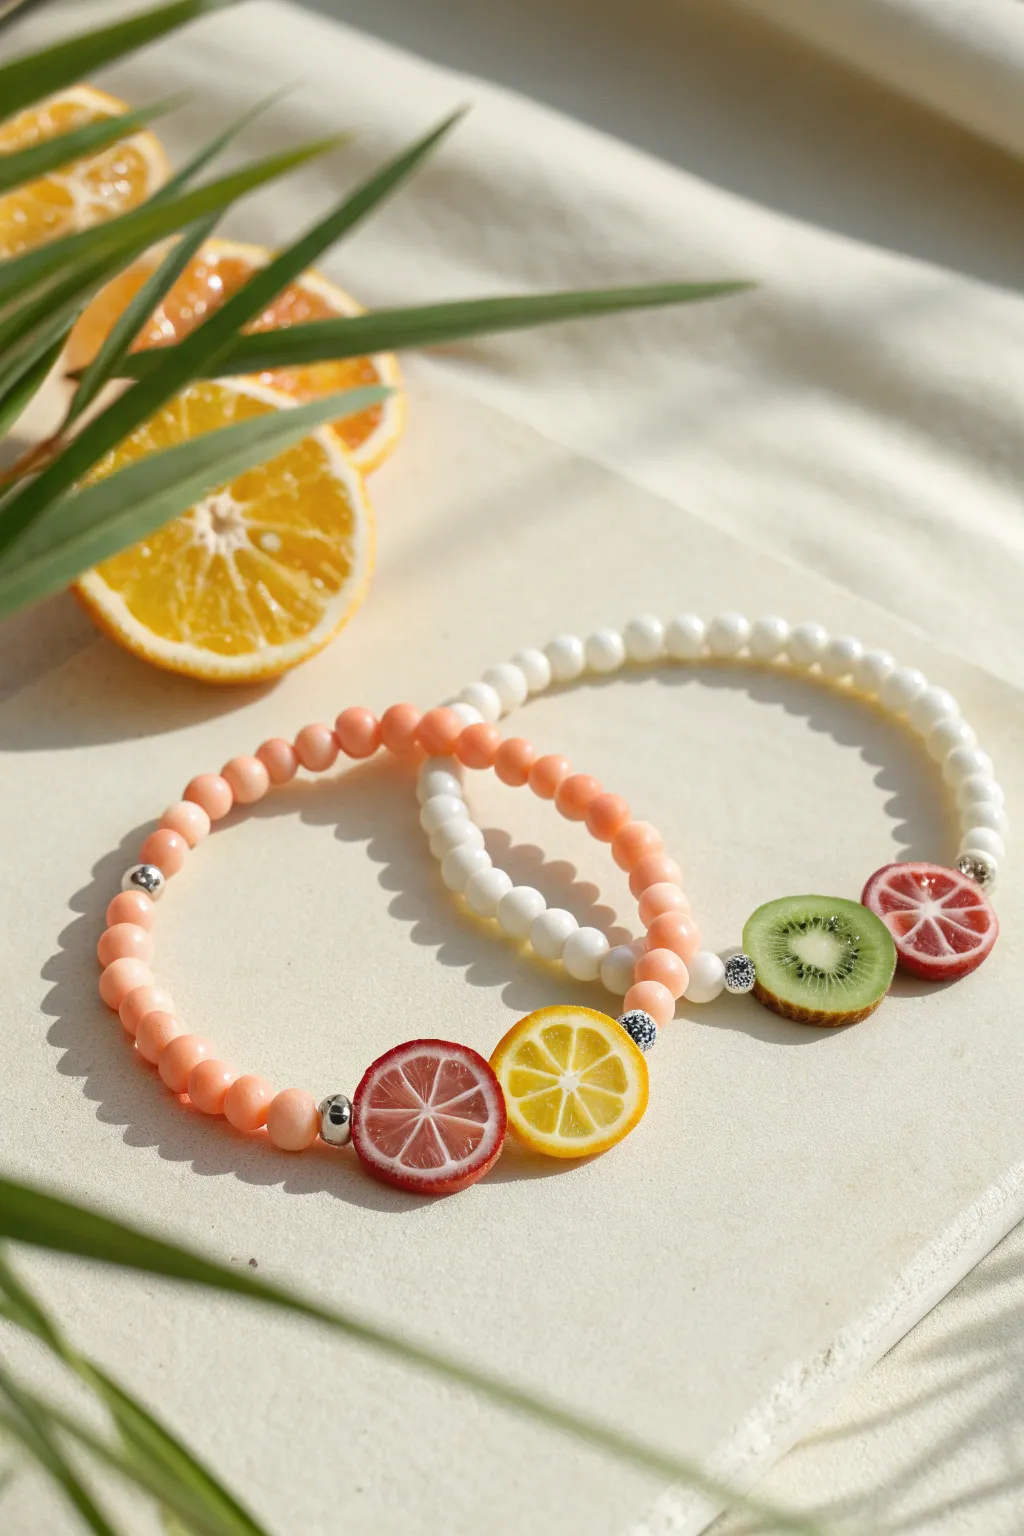
Capture the zest of summer with these delightful beaded bracelets featuring miniature polymer clay fruit slices. The combination of soft pastel beads and vibrant citrus charms creates a playful, refreshing accessory perfect for sunny days.
Step-by-Step Tutorial
Materials
- Polymer clay canes (lemon, grapefruit/blood orange, kiwi)
- Small round beads (approx. 6mm) in peach/coral and white
- Silver spacer beads or crimp covers
- Elastic beading cord (0.8mm or 1mm)
- Sharp tissue blade or X-Acto knife
- Headpins (silver)
- Round nose pliers
- Wire cutters
- Super glue or jewelry adhesive
- Small hand drill or pin vise (optional)
Step 1: Preparing the Fruit Charms
-
Slice the Canes:
Select your pre-made polymer clay fruit canes. Using a very sharp tissue blade, carefully cut slices that are about 3-4mm thick. You want them thick enough to be sturdy but thin enough not to feel heavy on the wrist. -
Create Holes:
Before baking, you need to create a way to string these. Carefully pierce a hole horizontally through the side of the slice using a thick needle or a toothpick. Aim for the middle of the ‘rind’ section for the best stability. -
Bake the Clay:
Arrangement your sliced fruit pieces on a baking tile or parchment-lined tray. Bake them according to the specific temperature and time instructions on your brand of polymer clay packaging. -
Cool and Tes:
Allow the pieces to cool completely. Once hard, check that your stringing hole is clear. If it closed up slightly during baking, use a small hand drill or pin vise to gently reopen it. -
Glazing (Optional):
For a ‘juicy’ look, you can brush a thin layer of gloss glaze over the cut side of the fruit. I like to do this to make the colors really pop, but a matte finish looks great too.
Slices breaking?
If your fruit slices crack when piercing holes, the clay might be too dry or the slice too thin. Try warming the cane in your hands longer before slicing, or cut slightly thicker slices.
Step 2: Assembling the Coral Bracelet
-
Measure the Cord:
Cut a length of elastic cord about 10-12 inches long. This gives you plenty of slack for tying knots later without struggling. -
Pre-stretch:
Gently pull on the elastic cord several times to pre-stretch it. This crucial step prevents the bracelet from sagging out of shape after the first time you wear it. -
Start Beading:
Begin threading your coral-colored beads onto the elastic. You’ll want to string enough to cover about half of your wrist’s circumference. -
Add First Spacer:
Slide on a silver spacer bead. This adds a professional finish and protects the clay slice from rubbing directly against the round beads. -
String the Fruit:
Thread the elastic through the side hole of your red citrus clay slice, followed almost immediately by the yellow lemon slice. Position them so they slightly overlap or sit snugly against each other. -
Finish the Pattern:
Add a second silver spacer bead on the other side of the fruit pair, then continue stringing the rest of your coral beads until you reach the desired wrist size.
Step 3: Assembling the White Bracelet
-
Repeat Base Steps:
Prepare your elastic cord just as before—measuring, cutting, and pre-stretching it to ensure durability. -
String White Beads:
Thread the white beads onto the cord. Since white is a high-contrast color, ensure none of the beads adhere together or have manufacturing defects. -
Insert Spacers and Fruit:
Place a silver spacer bead, then thread on the kiwi slice followed by the red citrus slice. Finish the focal section with another silver spacer. -
Check Sizing:
Wrap the unfinished strand around your wrist to double-check the fit. It should be snug but not tight enough to leave an imprint on your skin.
Pro Tip: Bead Stopper
Put a piece of tape or a binder clip on the end of your elastic cord before you start stringing. This saves you from the frustration of beads sliding off the other end while you work.
Step 4: Finishing Touches
-
Tie the Knot:
Bring the two ends of the elastic together. Tie a surgeon’s knot (right over left, left over right, looping through twice) and pull it tight securely. -
Secure with Glue:
Place a tiny dot of super glue or jewelry adhesive directly onto the knot. Let it dry for a few moments to fuse the elastic strands. -
Hide the Knot:
Trim the excess cord ends close to the knot. Gently tug the beaded strand so the knot slides inside the hole of one of the adjacent beads to hide it.
Now you have a refreshing set of fruit-themed bracelets ready to wear or gift.
Clay “Tile” Pattern Sections
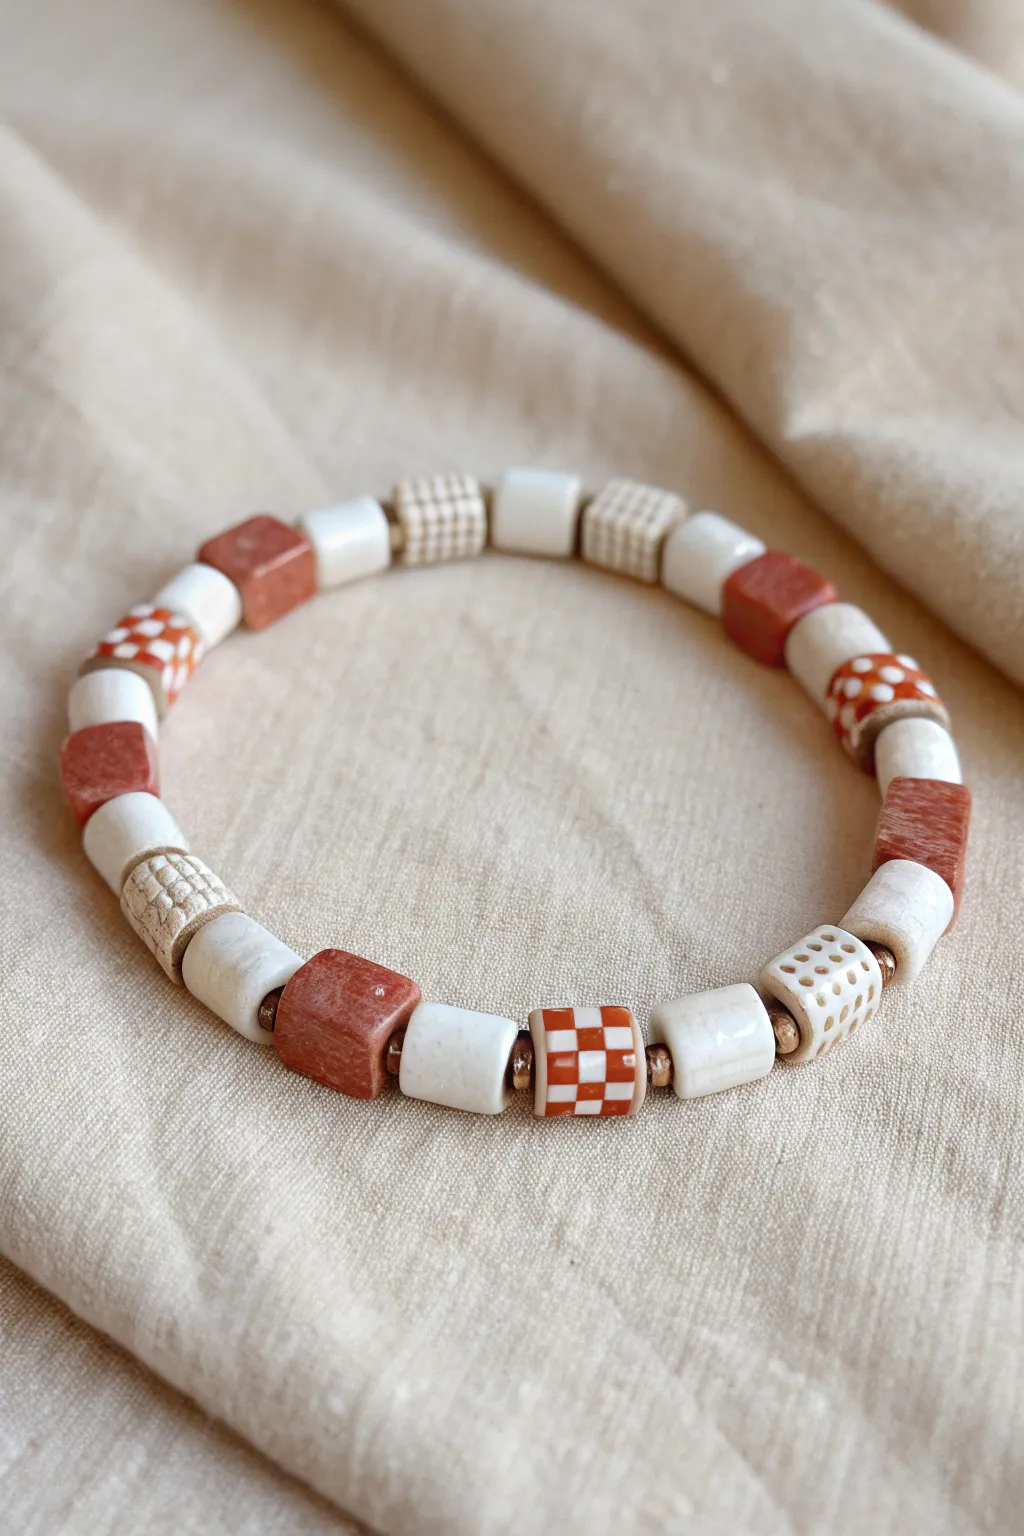
This charming beaded bracelet captures the warmth of earthy ceramics with its mix of solid terracotta cubes and intricately patterned cream tiles. The geometric designs—checkerboards and grids—give it a modern, architectural feel while retaining a handmade touch.
Step-by-Step Guide
Materials
- Polymer clay (Terracotta/Burnt Orange and Cream/White)
- Clay roller or pasta machine
- Tissue blade or sharp craft knife
- Pointed detailing tool or needle tool
- Small square wash cutter (approx. 8-10mm)
- Small round cutter (approx. 8-10mm diam)
- Beading elastic cord (0.8mm)
- Small gold spacer beads (approx. 2-3mm)
- Acrylic roller
- Oven and baking tray
- Bead piercing pins or toothpicks
- Super glue (optional for knot)
Step 1: Creating the Canes and Slabs
-
Condition the clay:
Start by thoroughly kneading both your terracotta and cream polymer clays until they are soft and pliable. This prevents cracking later. -
Roll out slabs:
Using an acrylic roller or pasta machine on a medium setting, roll out a sheet of cream clay and a sheet of terracotta clay. Aim for a thickness of about 3-4mm for the base beads. -
Create a checkerboard cane:
To make the checkerboard beads, form a small square log of cream and a matching log of terracotta. Lay them side by side, then stack two more logs on top in alternating colors. Gently compress this into a square cane. -
Prepare the grid pattern:
For the textured grid beads, you won’t need a cane. Instead, you’ll simply impress the pattern into the cream clay slab before cutting.
Step 2: Forming the Beads
-
Cut the terracotta cubes:
From your thick terracotta slab, use your square cutter or a sharp blade to cut out uniform cube shapes. You will need about 5-6 of these for the full bracelet. -
Refine the cube shape:
Gently tap the sides of each terracotta cube on your work surface to sharpen the edges and ensure they are perfectly square. -
Form the cream cylinders:
From the cream slab, cut small rectangles. Roll these gently between your fingers or on the table to create short, smooth cylinder shapes. Make roughly 8-10 of these. -
Make the checkerboard beads:
Slice your checkerboard cane into bead-sized segments. If they distorted during slicing, gently reshape them back into tidy cubes or rounded squares. -
Create incised grid beads:
Take a few cream cylinder or cube beads. Using the dull side of a blade or a needle tool, gently press a grid pattern into the surface. Don’t cut all the way through; just create indentations. -
Create the ‘dot’ texture:
On 1-2 cream beads, use a needle tool to poke rows of small holes to create a pitted texture, mimicking porous stone. -
Pierce the bead holes:
Carefully insert a bead pin or toothpick through the center of every bead. Rotate the pin as you push to avoid squashing the bead’s shape.
Smudged Colors?
If red clay smears onto white during handling, wipe the unbaked white clay gently with a Q-tip dipped in rubbing alcohol or acetone to clean it instantly.
Step 3: Baking and Assembly
-
Bake the beads:
Arrange your beads on a baking tray lined with cardstock or paper to prevent shiny spots. Bake according to your clay manufacturer’s instructions (usually 275°F/130°C for 15-30 minutes). -
Cool and inspect:
Let the beads cool completely. I like to check the holes at this stage and use a small drill bit or reamer to clear out any baked debris if the fit is tight. -
Plan your design:
Lay out your beads on a bead board. Alternate between the terracotta cubes, plain cylinders, and your various patterned accent beads to create a balanced rhythm. -
Add spacer beads:
Place tiny gold spacer beads between specific transitions, particularly flanking the patterned beads, to add a touch of professional shine. -
String the bracelet:
Cut a length of elastic cord about 10 inches long. Thread your beads onto the cord in your chosen order. -
Tie the knot:
Pre-stretch the elastic slightly, then tie a secure surgeon’s knot. Pull it tight. -
Secure and trim:
Add a tiny drop of super glue to the knot for extra security. Once dry, trim the excess cord and tuck the knot inside one of the larger bead holes.
Stone Effect
Mix some translucent clay and ground black pepper into your white clay before shaping. This adds a realistic ‘speckled ceramic’ look to the cream beads.
Now you have a stunning, artisanal piece of jewelry that looks like it came straight from a boutique ceramic studio
Mixed Shapes for Texture
Embrace warm, earthy tones with this stunning mixed-media bracelet stack that plays with various bead shapes and finishes. By combining flat heishi clay disc beads, matte rounds, and gleaming gold accents, you’ll create a textured, cohesive set perfect for everyday wear.
Step-by-Step
Materials
- Polymer clay (terracotta, peach, rose, and cream colors)
- Clay roller or pasta machine
- Small circle cutter (approx. 6-8mm)
- Needle tool or toothpick
- Elastic stretch cord (0.8mm clear)
- Matte round beads (6mm, terracotta/brown color)
- Round cream/beige spacer beads (6mm)
- Small gold nugget seed beads or spacer beads
- Gold tube beads or small gold accents
- Jewelry glue (e.g., G-S Hypo Cement)
- Scissors
Step 1: Creating the Heishi Clay Beads
-
Condition the clay:
Begin by thoroughly conditioning your terracotta, peach, and rose polymer clay blocks until they are soft and pliable. -
Roll out sheets:
Roll each color into a thin, even sheet. If using a pasta machine, a setting around 3 or 4 is ideal for creating that flat disk look. -
Cut the circles:
Use your small circle cutter to punch out many small discs from each color sheet. You will need roughly 40–50 discs per bracelet depending on your wrist size. -
Pierce the holes:
Carefully poke a hole in the exact center of each disc using a needle tool. I find it easiest to do this while the clay is still on the work surface to avoid distortion. -
Bake the beads:
Arrange the discs on a baking sheet lined with parchment paper and bake according to your polymer clay package instructions (typically 275°F/135°C for 15-30 minutes). Let them cool completely.
Step 2: Assembling the Heishi Stack
-
Cut the elastic:
Cut a piece of elastic cord about 10 inches long. This gives you plenty of room to tie knots later. -
Pre-stretch the cord:
Give the elastic piece a few firm tugs. This pre-stretching step is crucial to prevent the bracelet from sagging after the first wear. -
String the monochromatic strand:
For the thickest bracelet, thread your baked clay heishi beads in a gradient or solid block pattern. In the example, we see a heavy concentration of the peach/rose clay discs stacked tightly together. -
Add mixed texture:
For the second bracelet, alternate small sections of terracotta clay discs with gold nugget spacers to introduce a metallic shine. -
Tie it off:
Once the strand fits your wrist comfortably, tie a strong surgeon’s knot (right over left, left over right). Add a dab of jewelry glue to the knot before trimming the excess cord.
Knot Security
Hide your elastic knot inside one of the larger hole beads (like the clay discs) rather than a metal spacer to keep the finish clean.
Step 3: Assembling the Accent Bracelets
-
Prepare the matte round strand:
String the 6mm matte terracotta round beads onto a new piece of pre-stretched elastic. This strand provides a smooth geometric contrast to the jagged clay discs. -
Create the mixed bead strand:
On another cord, create a pattern mixing textures: try three cream clay discs, one gold nugget, one cream round bead, and repeat. This breaks up the visual weight of the stack. -
Incorporate the gold bars:
If you are recreating the gold-accented strand, thread curved gold tube beads or multiple gold spacers between sections of smaller clay discs. -
Check the fit:
Before tying these accent bracelets, wrap them around your wrist alongside the first heishi bracelet to ensure they all sit at the same tension. -
Finalize the knots:
Tie off each subsequent bracelet with a surgeon’s knot, secure with a drop of glue, and hide the knot inside a bead hole if possible. -
Optional: Add a metal cuff:
To faithfully recreate the full look, add a separate thin gold metal cuff or bangle to the bottom of your stack for a rigid textural contrast.
Level Up: Texture Play
Before baking, press a piece of sandpaper or a textured sponge onto your clay sheets to give the heishi beads a stone-like surface.
Slide your new stack onto your wrist and enjoy the warmth of those custom clay colors