If you’ve been craving cool clay projects that feel grown-up, useful, and actually cute on your shelf, you’re in the right place. These ideas are my go-to picks when I want that sweet spot between beginner-friendly and “I’d totally display this in my home” energy using air-dry clay or polymer clay.
Minimal Trinket Dish
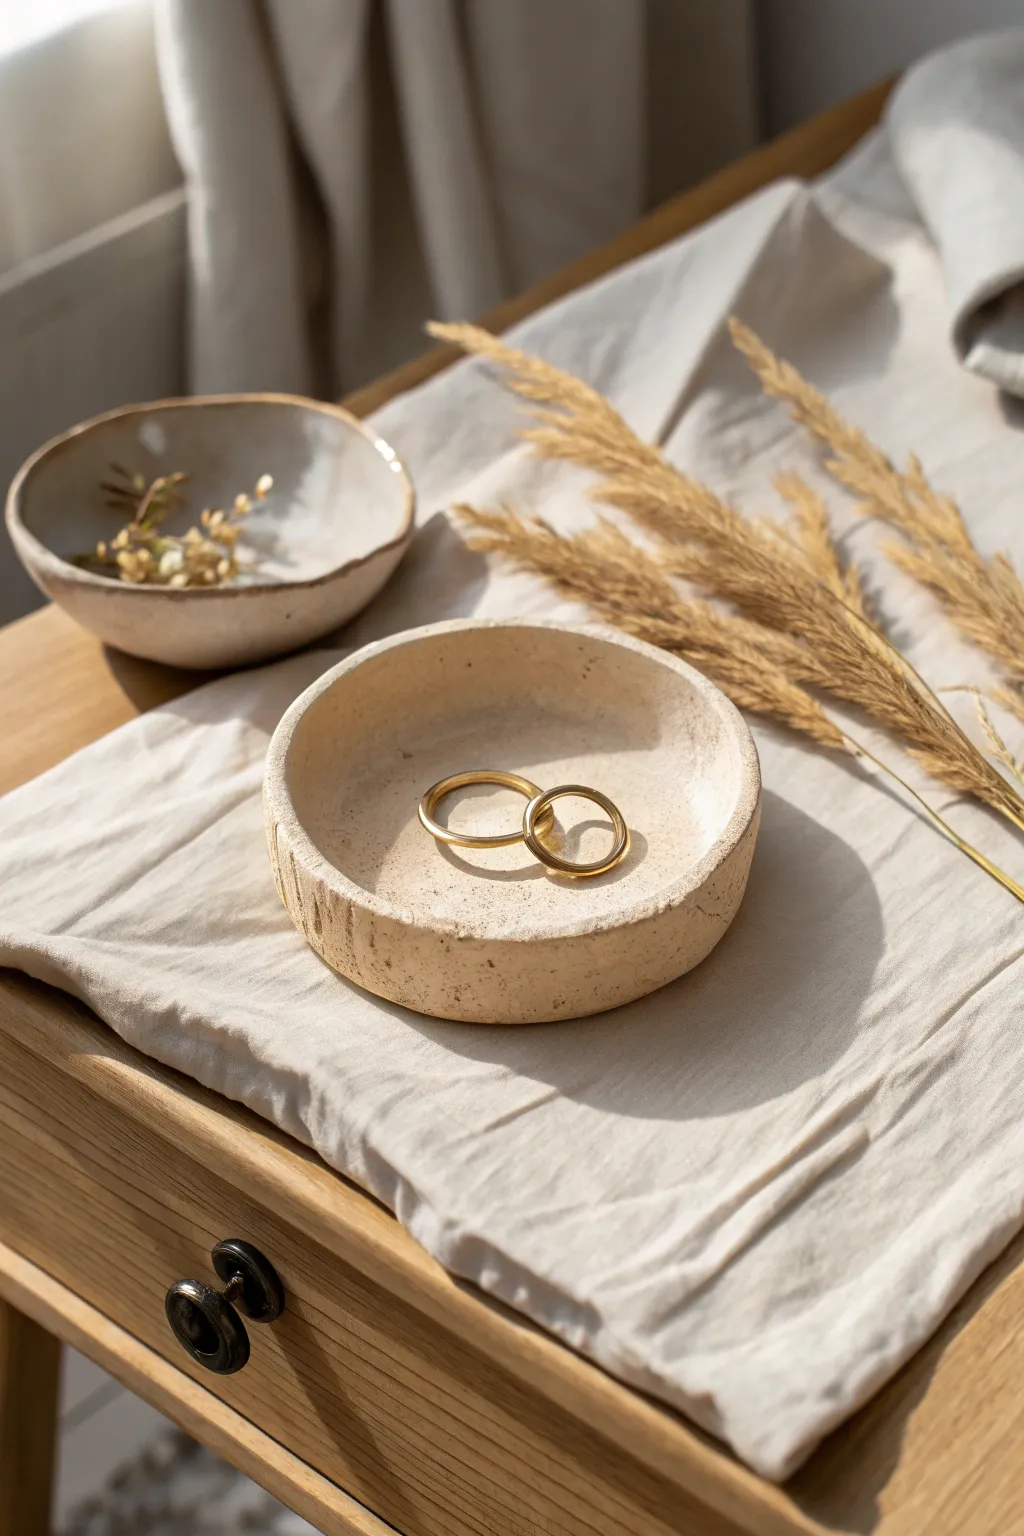
Embrace the beauty of imperfection with this minimalist trinket dish that features a raw, organic texture reminiscent of natural stone. This project focuses on simple hand-building techniques to create a grounded, earthy home for your favorite rings and jewelry.
Step-by-Step
Materials
- Air-dry clay (stone or granite color variant preferred)
- Acrylic rolling pin
- Small circular bowl or cookie cutter (approx. 4 inches)
- Sponge
- Bowl of water
- Sandpaper (medium and fine grit)
- Matte spray varnish or sealant
- Dried coffee grounds or speckled sand (optional, for texture)
Step 1: Preparing the Clay
-
Condition the Clay:
Begin by taking a handful of air-dry clay. Knead it thoroughly in your hands to warm it up and ensure the texture is consistent, eliminating any potential air bubbles. -
Add Texture:
If you are using plain white or grey clay but want that speckled stone look, sprinkle in a pinch of dried coffee grounds or fine sand now. Knead the clay again until the speckles are evenly distributed. -
Roll a Slab:
Place the ball of clay onto a non-stick surface or canvas mat. Use your acrylic rolling pin to flatten it into an even slab, aiming for a thickness of about 1/4 inch to give it that sturdy, stone-like weight. -
Cut the Base:
Place your circular template or cookie cutter onto the slab. Press down firmly to cut out a perfect circle, then peel away the access clay. This will form the bottom of your dish.
Step 2: Building the Rim
-
Roll a Coil:
Take the excess clay you set aside and roll it between your hands or on the table to create a long snake or ‘coil’. It should be thick enough to match the chunky aesthetic of the photo, roughly the width of your finger. -
Score the Edges:
Using a needle tool or a toothpick, gently scratch cross-hatch marks (‘scoring’) along the outer top edge of your circular base. Do the same to one side of your clay coil. -
Apply Slip:
Dab a little water or ‘slip’ (a mixture of clay and water) onto the scored areas. This acts as the glue that bonds your pieces together permanently. -
Attach the Coil:
Place the coil onto the edge of the base circle, pressing it down gently. Cut any excess coil length and blend the two ends of the snake together so the seam disappears. -
Blend the Seams:
Using your thumb or a modeling tool, drag the clay from the coil down onto the base on the inside and outside. Smooth these connection points until you can no longer see where the two pieces met.
Crack Control
If small cracks appear while drying, mix a tiny bit of fresh clay with vinegar to make a paste. Fill the cracks, smooth over, and let dry again.
Step 3: Refining and Shaping
-
Shape the Walls:
Gently pinch the walls of the dish upwards. Unlike a perfectly thrown wheel pot, we want this to look organic, so don’t worry if the rim is slightly uneven or has small indentations. -
Create Vertical Texture:
To mimic the rough texture seen in the image, hold a flat tool or a rough wooden paddle against the outside wall. Press gently to create faint vertical lines and imperfections rather than smoothing it perfectly. -
Finish the Rim:
Use a damp sponge to soften the top edge of the rim just slightly, ensuring there are no sharp bits, but keep the overall profile flat and thick. -
Drying Time:
Set your dish aside in a cool, dry place. Let it dry slowly for 24 to 48 hours. I usually flip it over halfway through the drying process to ensure the bottom dries evenly.
Rustic Texture Tip
For an even rougher stone look, gently tap the exterior of the damp clay with a stiff bristle brush or a crumpled ball of aluminum foil before drying.
Step 4: Finishing Touches
-
Sand the Piece:
Once bone dry, take your medium grit sandpaper and gently go over the entire piece. Focus on the rim to achieve that weathered stone look. -
Enhance Imperfections:
Don’t sand away all the character. Leave some of the vertical tooling marks on the outer wall visible to maintain the rustic aesthetic. -
Dust Off:
Wipe the dish down with a dry cloth or a soft brush to remove all the clay dust accumulated from sanding. -
Seal:
Spray the dish with a matte varnish or sealant. This protects the clay from moisture and gives it a finished look without adding an unnatural glossy shine.
Enjoy styling your new handcrafted piece on a vanity or bedside table knowing you created something beautiful from scratch


Terrazzo-Style Coaster Set
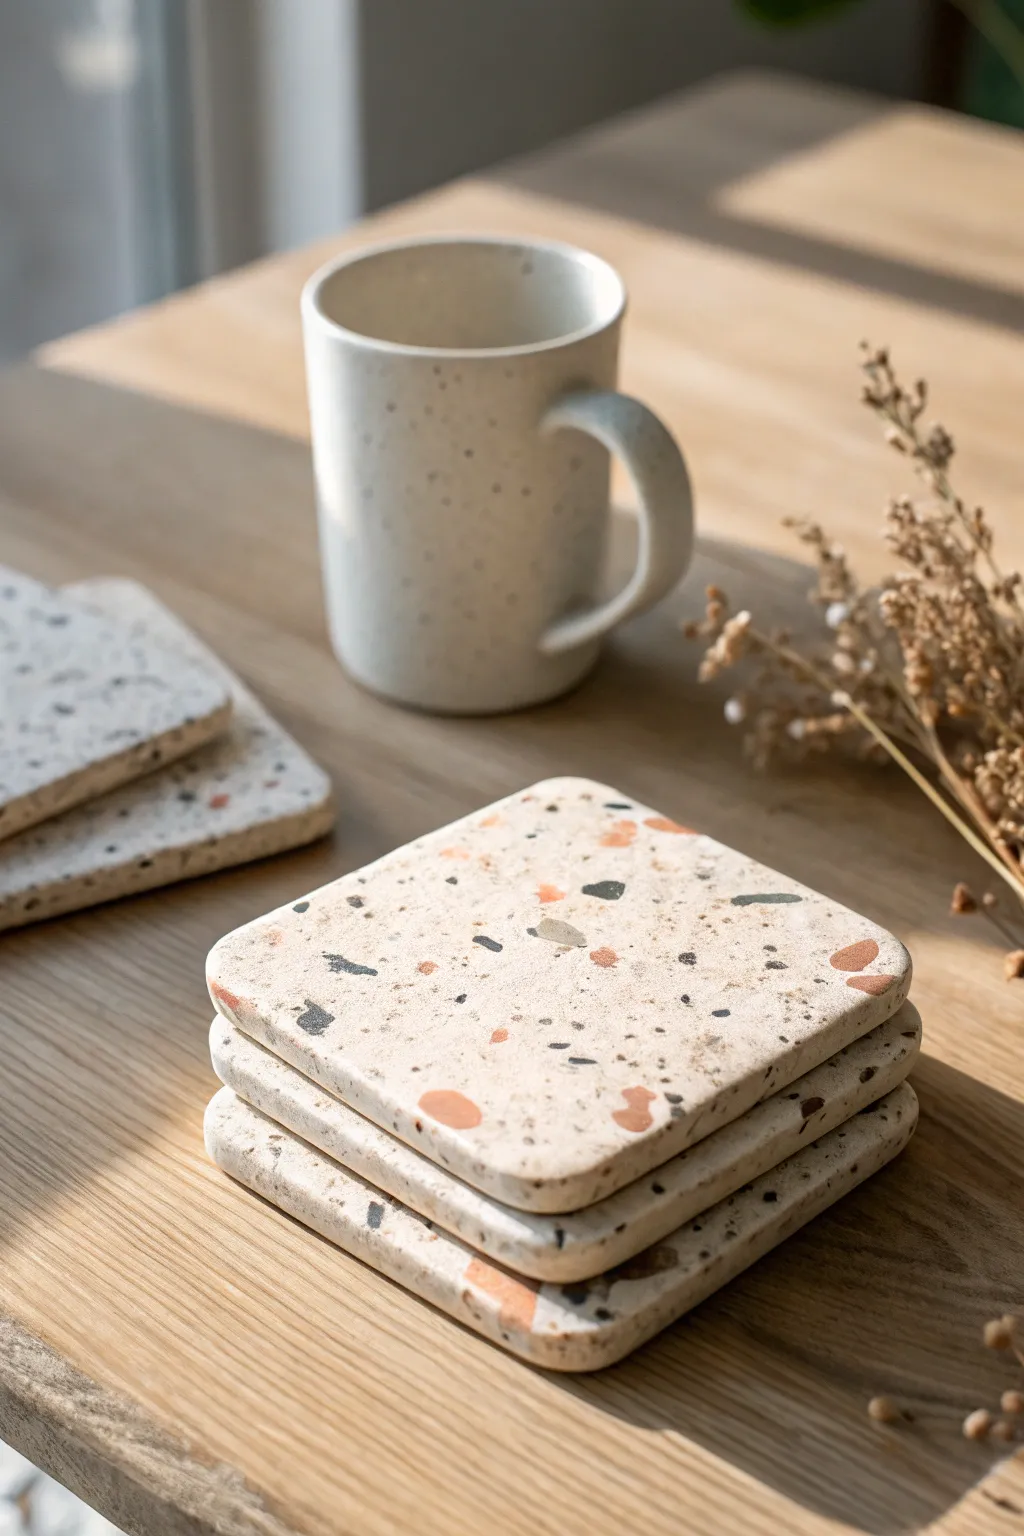
Bring sophisticated texture to your coffee table with these handmade terrazzo-style coasters. Using polymer clay, you’ll create a durable, chic set that mimics the look of real stone with flecks of terracotta, gray, and black.
How-To Guide
Materials
- White or beige polymer clay (large block)
- Small amounts of terracotta, black, and gray polymer clay
- Rolling pin or acrylic roller
- Square cookie cutter (approx. 4 inches) or craft knife and ruler
- Parchment paper or baking tile
- Sandpaper (grits 400, 600, and 1000)
- UV resin or water-based gloss varnish (optional for sealing)
- Felt pads or cork backing (optional)
Step 1: Prepping the ‘Chips’
-
Roll out color sheets:
Begin by rolling out thin sheets of your terracotta, black, and gray polymer clay. These layers should be quite thin, about 1-2mm, as they will become the embedded chips. -
Bake the color sheets:
Place these thin colored sheets on a baking tray lined with parchment paper. Bake them according to the package instructions for a partial time (about 10-15 minutes) just until they are hard enough to snap. -
Create the terrazzo chips:
Once the colored sheets have cooled, break them apart. I prefer to chop them unevenly with a craft blade to get that authentic, varied stone look. Aim for a mix of tiny specks and slightly larger chunks.
Step 2: Forming the Coaster Base
-
Condition the base clay:
Take your large block of white or beige clay and condition it thoroughly by kneading until it is soft and malleable. -
Incorporate the chips:
Flatten the conditioned base clay slightly and sprinkle a generous amount of your prepared baked chips onto it. Fold the clay over to trap the chips inside. -
Distribute the pattern:
Knead the clay gently to distribute the chips throughout the block without crushing the base color too much into the chips. Repeat folding and kneading until the distribution looks even. -
Roll out the slab:
Roll the clay out into a thick slab, approximately 1/4 inch thick. Use spacers or playing cards on either side of your roller to ensure an even thickness across the whole slab. -
Add surface chips:
If the surface looks a bit plain, press a few more loose chips directly onto the top of the slab. Roll over it once more gently to embed them flush with the surface.
Clean Cuts Pro Tip
Chill your rolled-out clay slab in the fridge for 10 minutes before cutting. This firms up the clay, preventing the unique square shape from distorting as you press down with the cutter.
Step 3: Shaping and Baking
-
Cut the shapes:
Use your square cutter to punch out the coaster shapes. If using a knife, measure 4×4 inch squares and cut cleanly. Reuse excess clay to make additional coasters. -
Soften the corners:
Tap the edges gently with your finger or a flat tool to round off the sharp corners, giving the coaster that soft, modern silhouette seen in the photo. -
Smoothen the surface:
Lightly run a finger or a smooth tool over the top surface to ensure there are no fingerprints before baking. -
Final bake:
Place your cut squares on a baking tile or parchment paper. Bake according to the manufacturer’s instructions for the full recommended time to ensure maximum durability.
Level Up: Gold flakes
Mix in a small amount of gold leaf flakes along with your baked chips during the kneading phase. This adds a subtle, luxurious shimmer that glints when the light hits the finished coaster.
Step 4: Finishing Touches
-
Cool down:
Allow the coasters to cool completely inside the oven or on a wire rack. They must be fully hardened before sanding. -
Wet sanding:
Dip your coaster and 400-grit sandpaper in water. Sand the top surface in circular motions to reveal the sharp edges of the chips hidden just below the surface. -
Refining the finish:
Move to 600-grit and then 1000-grit sandpaper, continuing to wet sand until the surface is incredibly smooth and the embedded chips look distinct and clear. -
Clean and dry:
Wash off any milky residue from sanding and pat the coasters dry with a lint-free cloth. -
Sealing (Optional):
For a protective finish that mimics polished stone, apply a thin layer of UV resin or polyurethane varnish. If you prefer a matte, natural stone feel, you can leave them unvarnished. -
Adding feet:
Stick small felt pads or a square of cork to the bottom of each coaster to protect your table surfaces.
Stack your finished set on the coffee table and enjoy the modern, artisanal vibe they bring to your space


Ring Cone Display
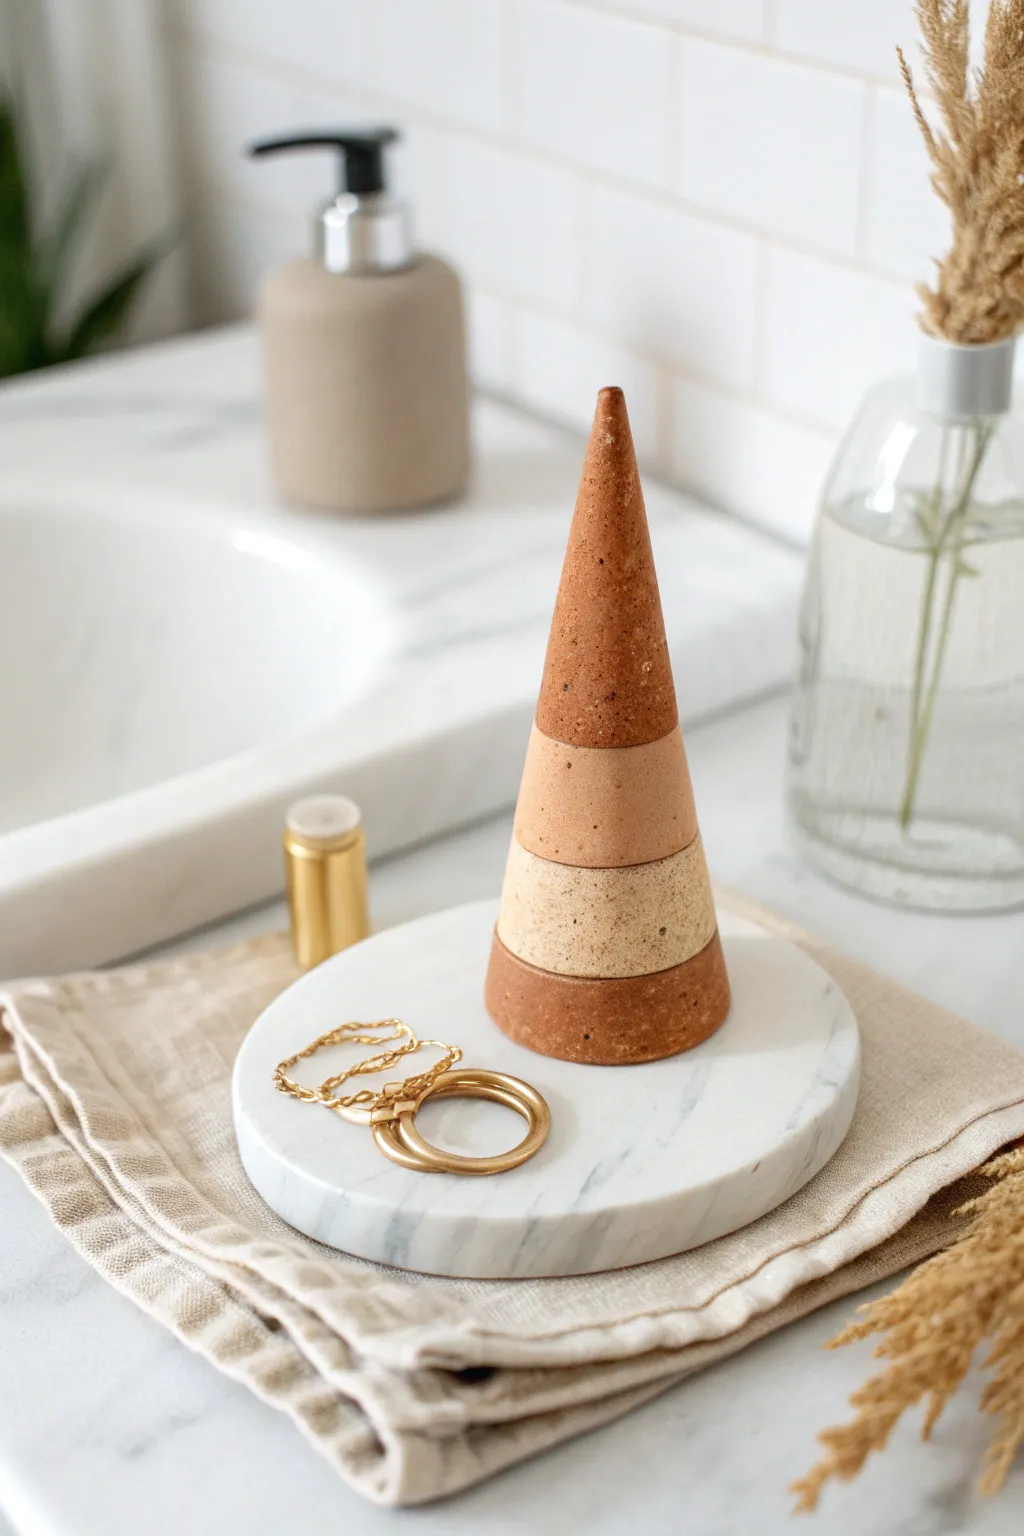
Bring a touch of organic minimalism to your vanity with this layered clay ring traveler. This display features warm earth tones stacked in subtle ombre bands, providing a safe and stylish home for your favorite bands and loops.
Step-by-Step Tutorial
Materials
- Polymer clay (terracotta, beige, white, and brown)
- Acrylic rolling pin or glass jar
- Circle cutters (graduated sizes are helpful but not required)
- Clay blade or sharp craft knife
- Creating mat or parchment paper
- Oven
- Fine-grit wet/dry sandpaper (400-800 grit)
- Matte varnish (optional)
Step 1: Mixing and Prep
-
Condition the clay:
Start by warming up your clay blocks in your hands. Knead the terracotta, beige, and brown clays separately until they are soft and pliable, which prevents cracking later. -
Create custom shades:
To achieve the speckled, organic look, I like to mix a tiny pinch of brown or black clay into the beige to create a stone-like effect. Don’t over-mix; leaving small streaks adds texture. -
Establish the color gradient:
Divide your clay into four distinct balls of varying sizes based on how thick you want each layer. You’ll need a darker terracotta for the top and bottom, a medium tan for the second layer, and a light speckled beige for the third.
Stone Effect Secret
Mix dried coffee grounds or black pepper into your lighter clay colors before rolling. This creates realistic faux-stone speckles.
Step 2: Forming the Layers
-
Roll the base layer:
Take the darkest clay ball intended for the bottom. Roll it into a thick, flat disc about 3/4 inch thick. Use your blade to trim the edges so they are clean and vertical. -
Form the middle sections:
Repeat the flattening process with the lighter beige and tan clays. These discs should be slightly smaller in diameter than the base layer as you build upward. -
Shape the peak:
Take the remaining terracotta clay for the top section. Instead of a disc, roll this into a cone shape with a pointed tip, ensuring the base matches the width of the layer below it. -
Stacking the rough form:
Gently stack your clay discs: dark base, light beige, medium tan, and the cone top. Press them together firmly enough to adhere but not so hard that you squash the layers.
Step 3: Refining the Shape
-
Begin the cone integration:
Now comes the sculpting. Gently roll the entire stacked tower on your work surface perfectly flat. Use smooth, even pressure to blend the seams together. -
Maintain the taper:
Angle your hand as you roll so the top becomes pointier and the bottom stays wide. You want to smooth out the steps between layers until you have one continuous, smooth cone surface. -
Check vertical alignment:
Stand the cone up frequently to ensure it isn’t leaning. If the tip is crooked, gently nudge it back to center. -
Clean the base:
Slice a very thin layer off the bottom of the cone with your blade to ensure it sits perfectly flat on a table without wobbling.
Level It Up
Before baking, gently press genuine crystal chips or small gold beads into the raw clay for a geode-inspired sparkle effect.
Step 4: Finishing Touches
-
Texture the surface:
For that earthy, stone-like appearance seen in the photo, take an old toothbrush or a ball of crinkled aluminum foil and lightly tap it against the clay surface to add subtle texture. -
Bake the project:
Place your cone on a baking sheet lined with parchment paper. Bake according to your polymer clay manufacturer’s instructions (usually 275°F for 15-30 minutes). -
Cool down completely:
Let the cone cool entirely in the oven with the door cracked. Removing it while hot can cause thermal shock or leave fingerprints. -
Sand for smoothness:
Once cool, use a bit of water and your fine-grit sandpaper to buff away any harsh fingerprints or lint. This step gives it that professional, high-end finish. -
Seal the piece:
If you want extra durability, brush on a thin layer of matte varnish. This protects the clay without making it look plasticky.
Now you have a functional piece of art that keeps your jewelry organized


Marbled Vanity Tray

Elevate your dresser with this sophisticated catch-all tray that mimics the look of high-end terrazzo or marble. Using polymer clay, you’ll create a durable, speckled organizer featuring elegant swirls of deep teal and terracotta.
Detailed Instructions
Materials
- White or translucent polymer clay (large block)
- Granite or speckled effect polymer clay
- Teal polymer clay
- Terracotta or copper polymer clay
- Acrylic rolling pin
- Sharp clay blade or craft knife
- Rectangular tray template (paper or cardstock)
- Oven-safe baking sheet
- Parchment paper
- Fine grit sandpaper (400-1000 grit)
- Gloss or matte polyurethane varnish (optional)
Step 1: Prepping the Clay Base
-
Condition the base clay:
Start by thoroughly conditioning your main block of speckled or granite-effect clay. Knead it in your hands until it is warm, pliable, and free of cracks. -
Mix the colors:
Prepare small amounts of the teal and terracotta clays. If the colors feel too bright, you can mute them slightly by mixing in a tiny pinch of the speckled base clay to harmonize the palette. -
Create snakes:
Roll the colored clays (teal and terracotta) into long, thin snakes of varying thicknesses. Do the same with a bit of plain white clay if you want extra contrast. -
Flatten the base:
Roll out your conditioned base clay into a thick slab, roughly 1/4 inch thick. It doesn’t need to be perfect yet, just thick enough to support the marbling process.
Pro Tip: Seamless Walls
To make the rim look perfectly integrated, cut the ends of your wall strip at a 45-degree angle where they meet. Smooth the join tightly so the seam disappears.
Step 2: Marbling and Shaping
-
Apply the colors:
Lay your colored clay snakes onto the base slab in organic, waving patterns. Don’t overthink this placement; random curves often look the most natural. -
Embed the colors:
Gently roll over the slab with your acrylic roller to press the colored snakes flat into the base clay so the surface is level. -
Create the swirl effect:
Pick up the slab and gently twist it like a dishtowel to distort the lines. Fold it in half, then roll it out again. Repeat this twist-and-fold process 2-3 times until you see beautiful, elongated striations. -
Roll final slab:
For the last roll, flatten the clay to a uniform thickness of about 1/4 inch. Ensure the marbled pattern looks pleasing to you. -
Apply the template:
Place your rectangular paper template onto the most attractive section of your clay slab. -
Cut the shape:
Using your sharp clay blade, cut vertically along the edge of the template. Remove the excess clay.
Troubleshooting: Air Bubbles
If you see an air bubble trapped under the surface while rolling, pierce it gently with a needle or craft knife and smooth the air out immediately before baking.
Step 3: Forming the Tray
-
Create the rim strip:
Gather your excess clay scraps and roll them into a long snake. Flatten this into a long strip about 1/2 inch wide to serve as the tray’s wall. -
Attach the rim:
Place the strip along the outer edge of your rectangular base, standing it upright. Gently press the bottom of the strip into the base to join them. -
Smooth the seams:
Use your finger or a clay smoothing tool to blend the seam on the inside and outside of the tray. The join should become seamless so the wall looks like an extension of the base. -
Refine the edges:
I like to run a finger dipped in a tiny bit of baby oil along the top rim to smooth out any fingerprints or jagged edges before baking. -
Bake:
Place the tray on a parchment-lined baking sheet. Bake according to your clay package instructions (usually 275°F for 15-30 minutes).
Step 4: Finishing Touches
-
Cool and sand:
Allow the tray to cool completely in the oven. Once cold, wet-sand the edges under running water using fine-grit sandpaper to remove any sharp bits or imperfections. -
Seal (Optional):
For a glossy, ceramic-like finish similar to the photo, apply a thin coat of polyurethane varnish. Let it dry completely.
Now you have a stunning, modern organizer ready to hold your favorite jewelry or perfumes

The Complete Guide to Pottery Troubleshooting
Uncover the most common ceramic mistakes—from cracking clay to failed glazes—and learn how to fix them fast.
Modern Footed Planter
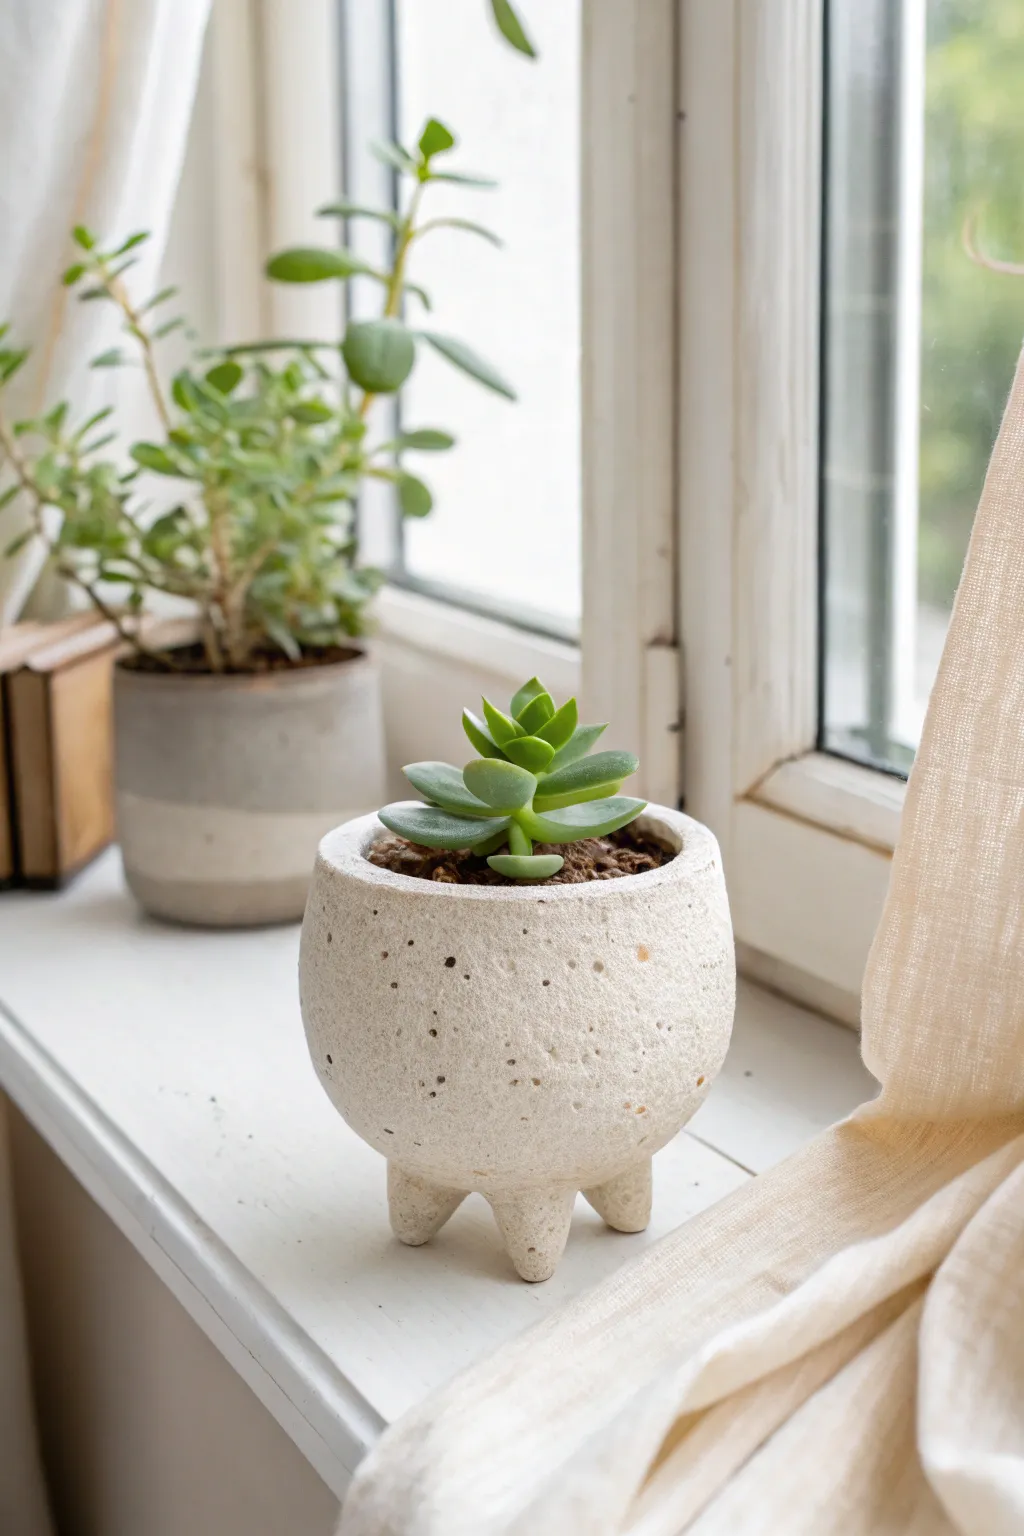
Elevate your indoor garden with this minimalist footed planter, featuring a charmingly rustic texture and a tripod base. This project balances organic, stony aesthetics with clean, modern lines for a piece that looks store-bought but carries the warmth of hand-building.
Step-by-Step Guide
Materials
- White polymer clay or air-dry clay (approx. 1lb)
- Rough sand, crushed dried herbs, or cracked pepper (for speckling)
- Circular cookie cutter or jar lid (approx. 4-inch diameter)
- Rolling pin
- Small bowl or balloon (to use as a mold)
- Needle tool or toothpick
- Sponge
- Water (for smoothing)
- Sandpaper (fine grit)
- Matte sealant or varnish
Step 1: Preparing the Speckled Clay
-
Condition the clay:
Begin by kneading your white clay thoroughly until it is soft, pliable, and free of any air bubbles. -
Add texture:
To achieve that stony, speckled look seen in the photo, flatten your clay slightly and sprinkle in your chosen texturizer—rough sand works beautifully, but black pepper is a great hack for polymer clay. -
Incorporate the speckles:
Fold the clay over the texturizer and continue kneading until the particles are evenly distributed throughout the batch.
Step 2: Forming the Bowl
-
Roll it out:
Roll your speckled clay into a slab that is approximately 1/4 inch thick. Aim for an even thickness to prevent cracking during drying. -
Cut the base circle:
Use your circular cutter or jar lid to cut a perfect circle from the slab. This will determine the size of your planter opening. -
Prepare the mold:
Cover your small bowl or inflated balloon with plastic wrap to prevent sticking, then drape your clay circle over it. -
Shape the curve:
Gently press the clay down around the mold to form a smooth, rounded cup shape. I like to use a damp sponge here to smooth away any fingerprints immediately. -
Refine the rim:
While the clay is still on the mold, gently tap the bottom edge (which will become the top rim) against the table surface to flatten it slightly if you want a lip, or smooth it with your finger for a rounded edge. -
Initial firming:
Let the bowl sit on the mold for about 30 minutes (if polymer) or a few hours (if air-dry) until it is firm enough to hold its shape without collapsing.
Uneven Legs?
If the pot wobbles, gently sand down the bottom of the longer leg. Place sandpaper on a flat table and rub the leg against it for a flat finish.
Step 3: Adding the Legs
-
Shape the feet:
Roll three equal-sized balls of remaining clay, each about the size of a large grape. -
Form blunt cones:
Roll one end of each ball slightly more to create thick, blunt cone shapes. These shouldn’t be sharp; you want sturdy, rounded stubs. -
Score and slip:
Remove the bowl from the mold. Score (scratch) the bottom of the bowl in a triangle formation and the top of each leg. Add a dab of water or liquid clay as glue. -
Attach the legs:
Press the legs firmly onto the scored areas. Wiggle them slightly to create a suction bond and ensure there are no air gaps. -
Blend the seams:
Use a modeling tool or your finger to smooth the clay from the leg upward onto the bowl, making the transition seamless. -
Level check:
Flip the planter right-side up and gently press it down on a flat surface to ensure all three legs sit evenly and the pot is level.
Add Color
Before sealing, mix a tiny drop of brown or grey acrylic paint with water and wash it over the pot, wiping off the excess to highlight the pits.
Step 4: Finishing Touches
-
Create surface texture:
Take a rough stone, a crumpled ball of foil, or a stiff-bristled brush and gently pat the exterior surface to enhance the pitted, stone-like texture shown in the image. -
Final cure:
Bake your piece according to package directions (for polymer clay) or let it air dry completely for 24-48 hours. -
Sand and smooth:
Once fully cured, use fine-grit sandpaper to soften any sharp edges on the rim or the bottom of the feet. -
Seal for protection:
Apply a coat of matte varnish or sealant to protect the finish, especially if you plan to put real plants inside.
Your petite, modern planter is now ready to become the perfect home for a favorite succulent
Taper Candle Holder Trio
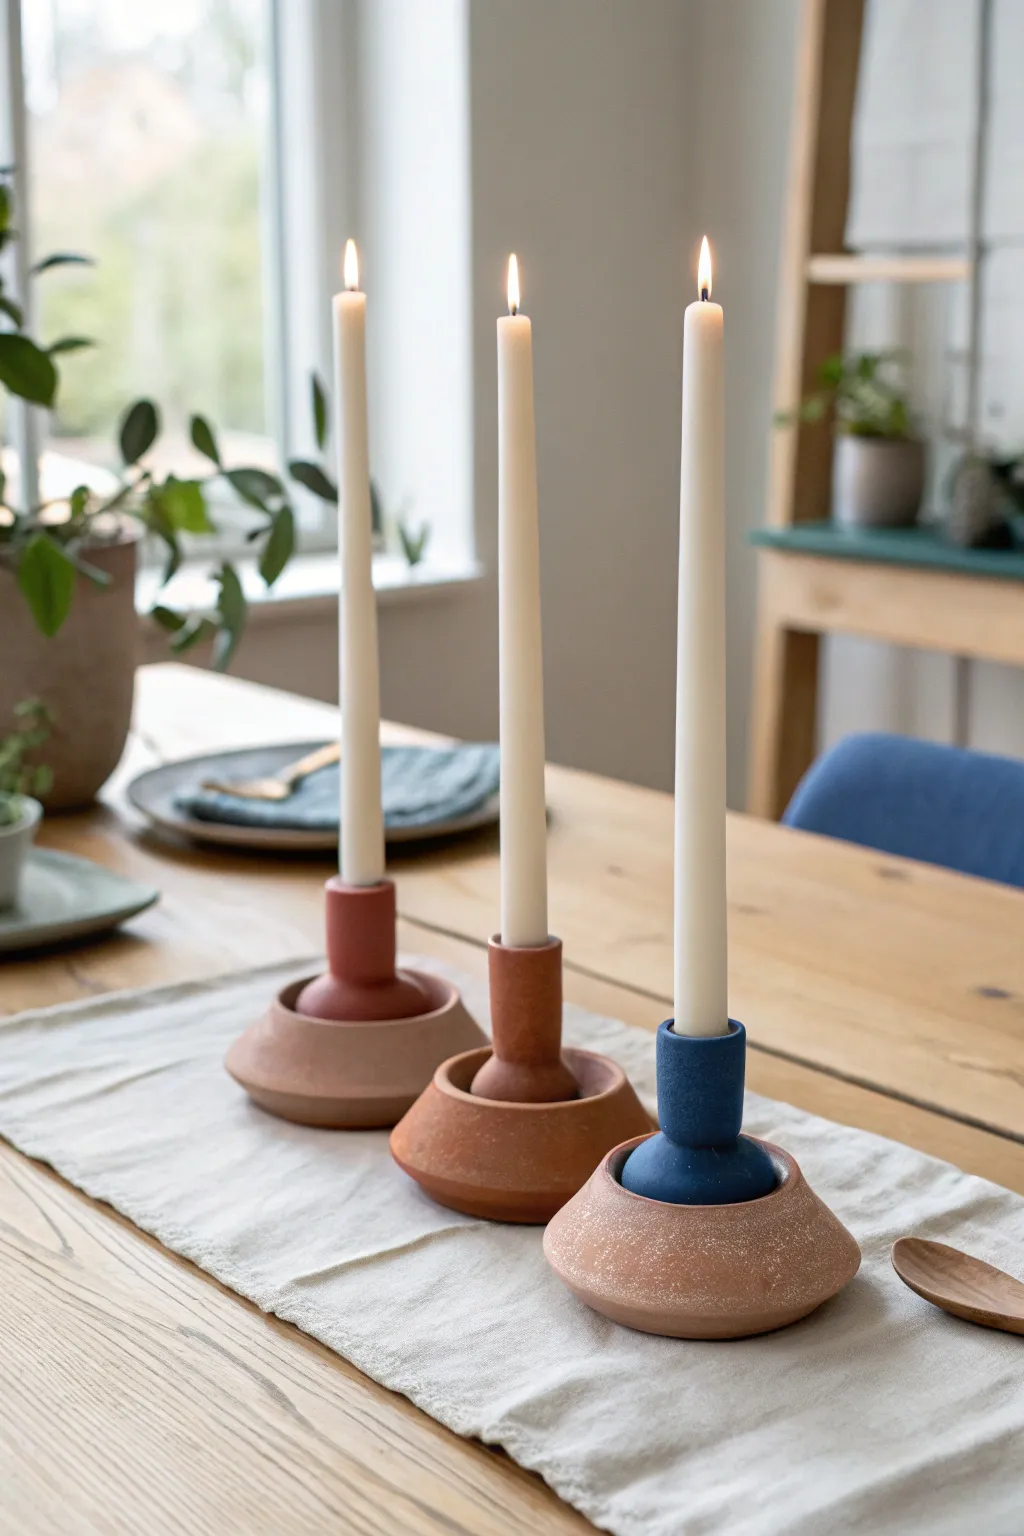
Elevate your dining table with these modern, sculptural taper candle holders that blend rustic textures with bold color blocking. This project combines two distinct clay forms—a wide, earthy base and a sleek, cylindrical neck—creating a striking silhouette perfect for minimalist or bohemian decor.
Step-by-Step
Materials
- Air-dry clay (terra cotta color) or polymer clay
- Rolling pin
- Clay knife or craft knife
- Small bowl or round cookie cutter (approx. 4-5 inches)
- Small cylinder (like a pill bottle or dowel) for sizing the neck
- Water and sponge for smoothing
- Slip (clay mixed with water) or liquid clay adhesive
- Acrylic paints (terracotta orange, deep red, navy blue)
- Standard taper candles for test fitting
- Painter’s tape
- Fine-grit sandpaper
Step 1: Shaping the Geometric Bases
-
Roll the base slabs:
Start by rolling out a substantial chunk of clay to a thickness of about 1/2 inch. You want these bases to have some weight to them for stability. -
Cut the circles:
Using your small bowl or round cutter, cut out three identical circles. These will form the wide, bottom portion of your holders. -
Create the beveled edge:
Instead of leaving the edges flat, use your fingers to gently smooth and slope the outer rim downwards. This creates that truncated cone shape visible in the photo rather than a sharp cylinder. -
Make the indentation:
Press a small round object or your thumbs into the very center of each base to create a shallow well. This is where the neck piece will eventually sit. -
Refine the texture:
I like to use a lightly dampened sponge to go over the surface now, smoothing out any fingerprints while keeping a slightly raw, organic texture on the slope.
Step 2: Forming the Candle Necks
-
Roll the neck cylinders:
Take three smaller balls of clay and roll them into thick sausages. You want these to be substantial enough to hold a candle safely. -
Size the inner hole:
Gently press a taper candle into the top of each cylinder to create the perfect socket size. Twist it slightly to widen it just a hair, accounting for clay shrinkage as it dries. -
Shape the exterior:
Roll the outside of the cylinder on your work surface to ensure the walls are even and smooth. Trim the top and bottom with your knife to create clean, flat edges. -
Curve the bottom connection:
On the bottom of the cylinder (where it will meet the base), use your finger to round the edge inward slightly. This creates the rounded transition point seen in the blue holder.
Wobbly Candle?
If the candle is loose after drying, drip a little melted wax into the bottom of the holder before inserting the candle to secure it instantly.
Step 3: Assembly and Refining
-
Score and slip:
Score (scratch) the bottom of the neck piece and the center well of the base. Apply a generous amount of slip or liquid adhesive to both rough areas. -
Join the pieces:
Press the neck firmly into the center of the base. Give it a gentle wiggle to ensure a tight bond and eliminate trapped air. -
Check vertical alignment:
Before the clay sets, insert a candle temporarily to check that the holder stands perfectly straight. Adjust the neck angle if it’s leaning. -
Clean the seams:
While the join should be visible as a distinct intersection, clean up any excess slip that squeezed out with a small brush or tool. -
Dry thoroughly:
Allow the trio to dry completely. For air-dry clay, this often takes 24-48 hours. Turn them occasionally so the bottom dries evenly.
Pro Tip: Weight it Down
For extra stability, embed a large metal washer inside the bottom base while the clay is wet to lower the center of gravity.
Step 4: Color Blocking Finish
-
Sand for smoothness:
Once bone dry, lightly sand the neck piece to make it ultra-smooth, contrasting with the slightly rougher base. -
Tape off the base:
Apply painter’s tape around the area where the neck meets the base to protect the bottom section, which we want to keep natural. -
Paint the necks:
Apply your acrylic paints to the neck sections only. Use a deep blue for one, a terracotta red for another, and perhaps a muted pink or orange for the third. -
Add a second coat:
Let the first layer dry, then apply a second coat for opaque, matte coverage that hides brushstrokes. -
Reveal the design:
Carefully peel away the tape while the paint is still slightly tacky to ensure a crisp, clean line between the painted neck and the raw clay base. -
Final texture touch:
If you want to emphasize the raw look of the base, you can speckle it lightly with white paint using an old toothbrush, just like the base in the foreground.
Place your finished trio down the center of your table for an instant centerpiece upgrade


What Really Happens Inside the Kiln
Learn how time and temperature work together inside the kiln to transform clay into durable ceramic.
Bud Vase Cluster
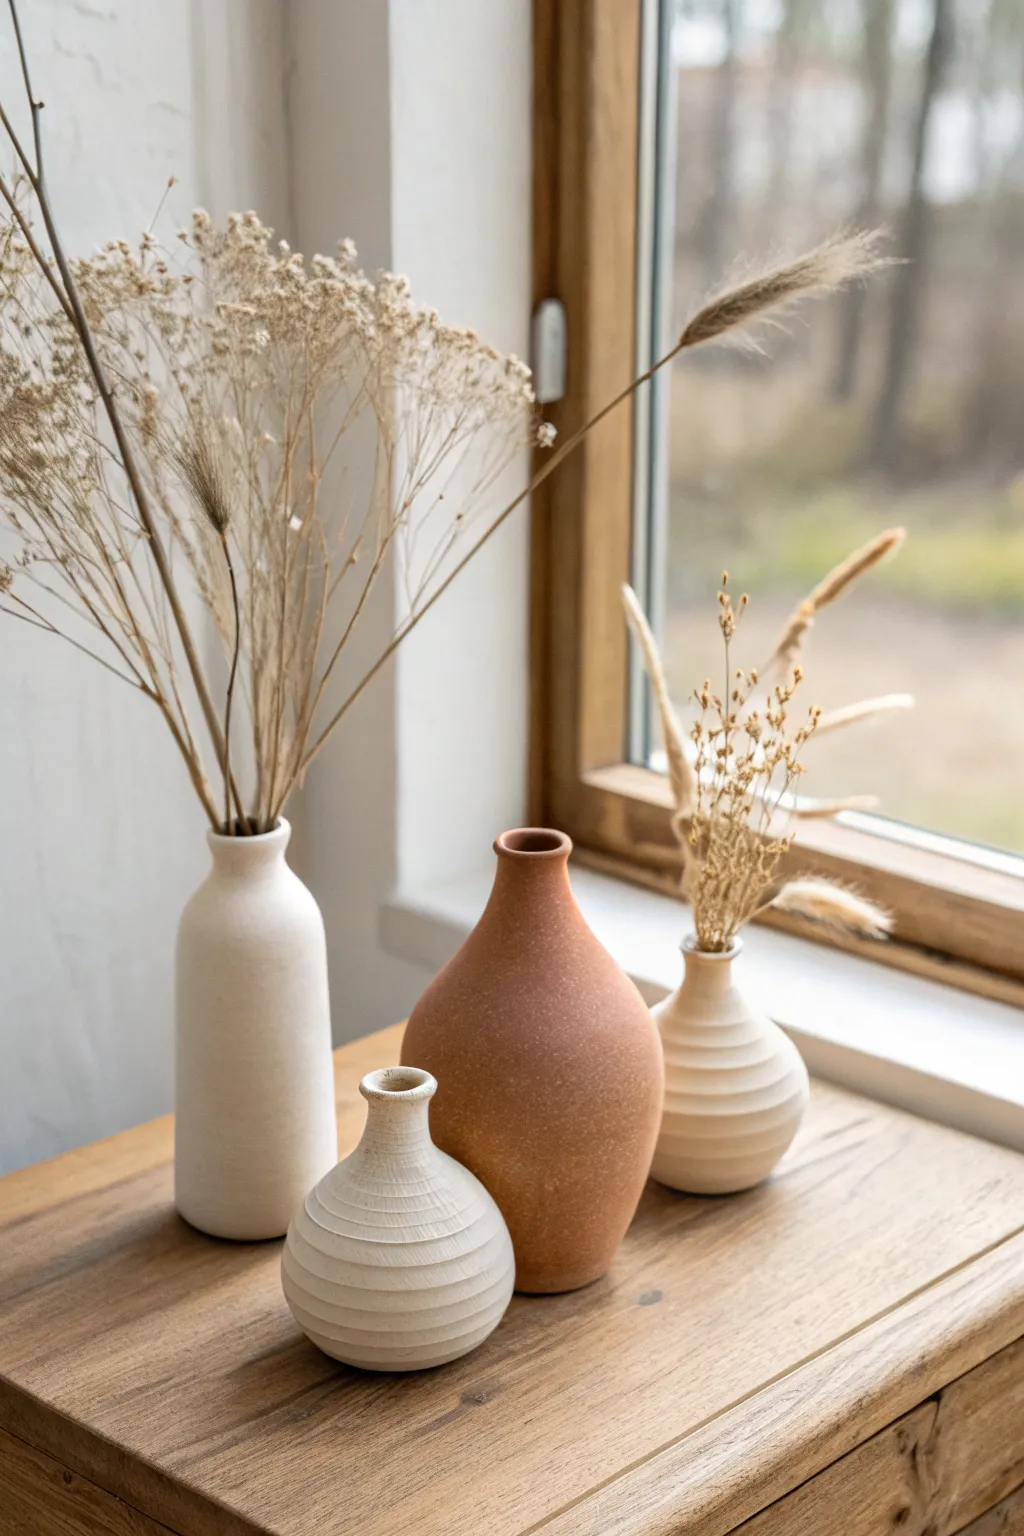
Create a serene, earthy cluster of bud vases that look effortlessly chic on any windowsill. This project guides you through hand-building four distinct yet cohesive vessels using simple pottery techniques to achieve that stunning matte, organic finish.
Step-by-Step Guide
Materials
- Air-dry clay (white or terra cotta)
- Pottery sponge
- Loop tool or clay carving tool
- Needle tool
- Rolling pin
- Smooth wooden work board
- Cup of water
- Fine-grit sandpaper (220 grit)
- Acrylic paints (Cream, Terra Cotta, Beige)
- Baking soda (for texture)
- Matte spray varnish
Step 1: Shaping the Tall Bottle Vase
-
Prepare the base:
Start with a ball of clay roughly the size of a large orange. Flatten the bottom slightly on your work board to create a stable base. -
Pinch the form:
Using your thumb, press into the center of the ball. Begin pinching the walls upwards, rotating the clay as you go to maintain an even thickness. -
Elongate the neck:
As you pinch upward, gently collar perfectly round the top section to narrow it. Keep your hands slightly wet to smooth the clay as you pull it into a bottle shape. -
Refine the silhouette:
Once you have the height, use a damp sponge to smooth the exterior walls, removing distinct fingerprints for a cleaner look.
Smoother Surfaces
Use a damp sponge rather than just fingers during the final shaping. It removes fingerprints and creates that professional, wheel-thrown appearance.
Step 2: Creating the Terra Cotta Tear Drop
-
Form the body:
Take a slightly larger ball of clay. Instead of a cylinder, shape this one into a wide teardrop or pear shape. -
Hollow it out:
Carefully push your thumb into the top center. Gently hollow out the inside without distorting that wide, rounded bottom curve. -
Shape the rim:
Create a short, flared neck. I like to use my pinky finger inside the neck while smoothing the outside with my thumb to get that delicate curve.
Step 3: Sculpting the Ribbed Mini Vases
-
Make the spheres:
Form two smaller balls of clay for the front and right-side vases. Shape them into squat, round spheres with very narrow, short necks. -
Carve the texture:
Using a loop tool or the back of a needle tool, slowly carve horizontal grooves around the circumference of these pots. Keep the lines roughly parallel but organic—perfection isn’t the goal here. -
Soften the edges:
Run a damp finger lightly over the carved ridges to knock down any sharp crumbs of clay.
Functional Waterproofing
Since air-dry clay isn’t waterproof, nest a small glass vial or test tube inside each vase before adding fresh flowers, or stick to dried botanicals.
Step 4: Finishing and Painting
-
Dry thoroughly:
Allow all four vases to dry completely for at least 24-48 hours away from direct sunlight to prevent cracking. -
Sand for smoothness:
Once bone dry, take your fine-grit sandpaper and gently buff the surfaces. Focus on the rims and bases to ensure they sit flat. -
Mix the textured paint:
Mix your cream acrylic paint with a teaspoon of baking soda. This creates that trendy, sandy ceramic look seen in the photo. -
Paint the light vases:
Apply the baking soda mixture to the tall bottle vase and the two small ribbed vases. Two coats usually provide the best coverage. -
Paint the accent vase:
Paint the teardrop vase with a terra cotta or burnt sienna hue. You can add baking soda here too, or keep it smoother for contrast. -
Seal the deal:
Finish with a matte spray varnish to protect the surface without adding unwanted shine.
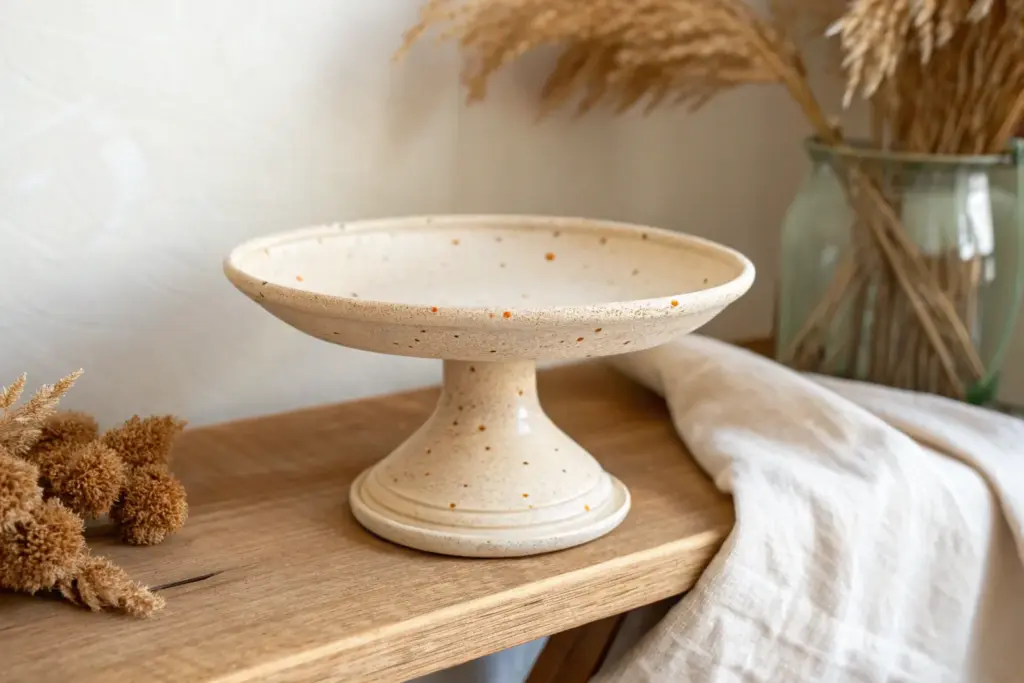
Arrange your beautiful new collection by a window and fill them with dried grasses for an instant decor upgrade
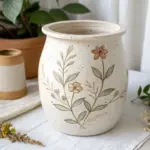
Textured Desk Cup
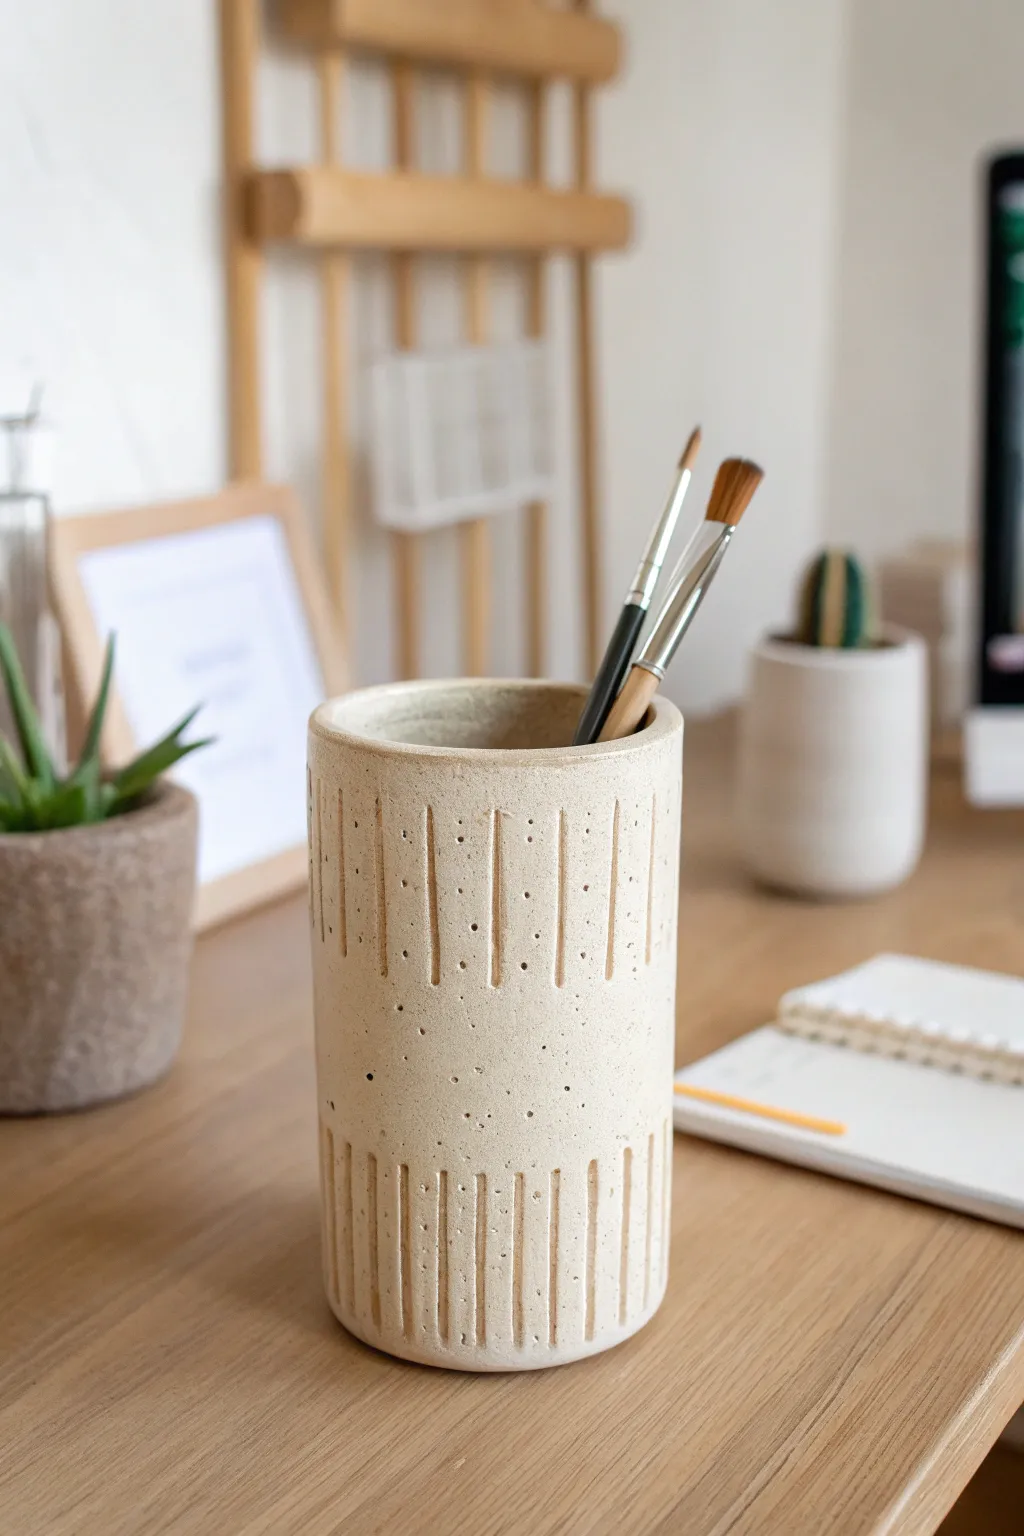
Bring earthy elegance to your workspace with this cylindrical clay vessel, featuring subtle speckles and modern carved details. This project combines simple construction with rhythmic texture for a piece that looks beautifully handmade but professional.
How-To Guide
Materials
- Speckled cream stoneware clay (cone 6) or white air-dry clay with sand added
- Rolling pin
- Canvas mat or cloth for rolling
- Ruler
- Fettling knife or craft knife
- Slip and score tool (needle tool or fork)
- Wooden carving tool or small loop tool
- Cylindrical form (like a PVC pipe or tall can) to support the walls
- Sponge
- Clear matte glaze (for kiln clay) or matte varnish (for air-dry)
Step 1: Forming the Cylinder
-
Prep the clay:
Begin by wedging your speckled clay body thoroughly to remove any air bubbles. If you are using air-dry clay and want that gritty look, knead in a small handful of sanitized sand or coffee grounds before you start rolling. -
Roll the slab:
Roll your clay out into a long rectangular slab. Aim for a thickness of about 1/4 inch (6-7mm). It needs to be uniform, so utilizing guide strips on either side of your rolling pin is a smart move here. -
Cut to size:
Using your ruler and knife, cut the slab into a neat rectangle. A good dimension for a cup like this is roughly 4.5 inches tall by 10 inches long, but check your mold or PVC pipe to ensure the length wraps around completely with a little overlap. -
Prepare the connection:
Score the two short ends of your rectangle heavily. Add a generous amount of slip (liquid clay) to these scored areas. -
Join the seam:
Wrap the clay carefully around your cylindrical form or simply connect the ends to create a tube. Press the scored ends together firmly. I like to use a wooden rib to smooth the seam on the outside until it’s invisible. -
Make the base:
Roll out a small leftover piece of clay to the same thickness. Place your cylinder on top of it and trace around the bottom edge. -
Attach the bottom:
Score and slip both the bottom edge of the cylinder and the circular base you just cut. Press them together firmly and blend the clay upward from the base into the wall so there is no gap.
Step 2: Texturing and Refining
-
Smoothing the surface:
Before adding texture, ensure your cylinder is uniform. Use a slightly damp sponge to wipe away any fingerprints or rough spots on the rim and sides. -
Wait for leather hard:
Allow the cup to dry until it reaches the leather-hard stage. It should be firm to the touch and no longer tacky, but still cool. This is crucial for crisp carving lines. -
Mark vertical guides:
Lightly mark vertical lines around the cylinder where you want your carved texture to go. You don’t need to draw every line, just general spacing guides to keep things straight. -
Carve the top grooves:
Using a small loop tool or a rounded wooden stick, carve vertical grooves starting about an inch from the rim and stopping near the midline. Vary the lengths slightly for an organic feel. -
Add texture dots:
In the negative space between the grooves, use a needle tool or the tip of a small brush to press small, pin-prick dot patterns. Keep these random and sparse. -
Carve the bottom grooves:
Flip the cup carefully or work on the lower half, carving a second set of vertical grooves starting from the bottom and extending up toward the middle, leaving a negative space band in the center. -
Clean up burrs:
After carving, you’ll see little clay burrs on the edges of your lines. Don’t touch them yet! Wait until the piece is bone dry, then gently brush them off with a stiff paintbrush or a scouring pad.
Warped Cylinder?
If your cup looks oval instead of round, let it dry over a rigid cardboard tube or PVC pipe wrapped in newspaper. Remove the support once the clay is stiff enough to stand alone.
Step 3: Finishing
-
Bisque fire:
If using stoneware, fire the piece to bisque temperature (usually cone 04). If using air-dry clay, let it dry completely for 24-48 hours. -
Glazing:
For the pottery version, dip the entire piece in a clear matte glaze. This seals the clay while letting the natural speckles and raw color shine through. Wipe the bottom free of glaze. -
Final fire or seal:
Glaze fire to cone 6. If using air-dry clay, apply two coats of a high-quality matte varnish to protect the surface from dust and moisture.
Clean Lines
Don’t sponge your carved lines while the clay is wet! This softens the edges too much. Instead, carve sharp, let dry completely, then lightly sand the edges for a crisp, professional finish.
Enjoy styling your new desk accessory with your favorite brushes or pens and admire the textural details you created

TRACK YOUR CERAMIC JOURNEY
Capture glaze tests, firing details, and creative progress—all in one simple printable. Make your projects easier to repeat and improve.
Catchall Key Bowl
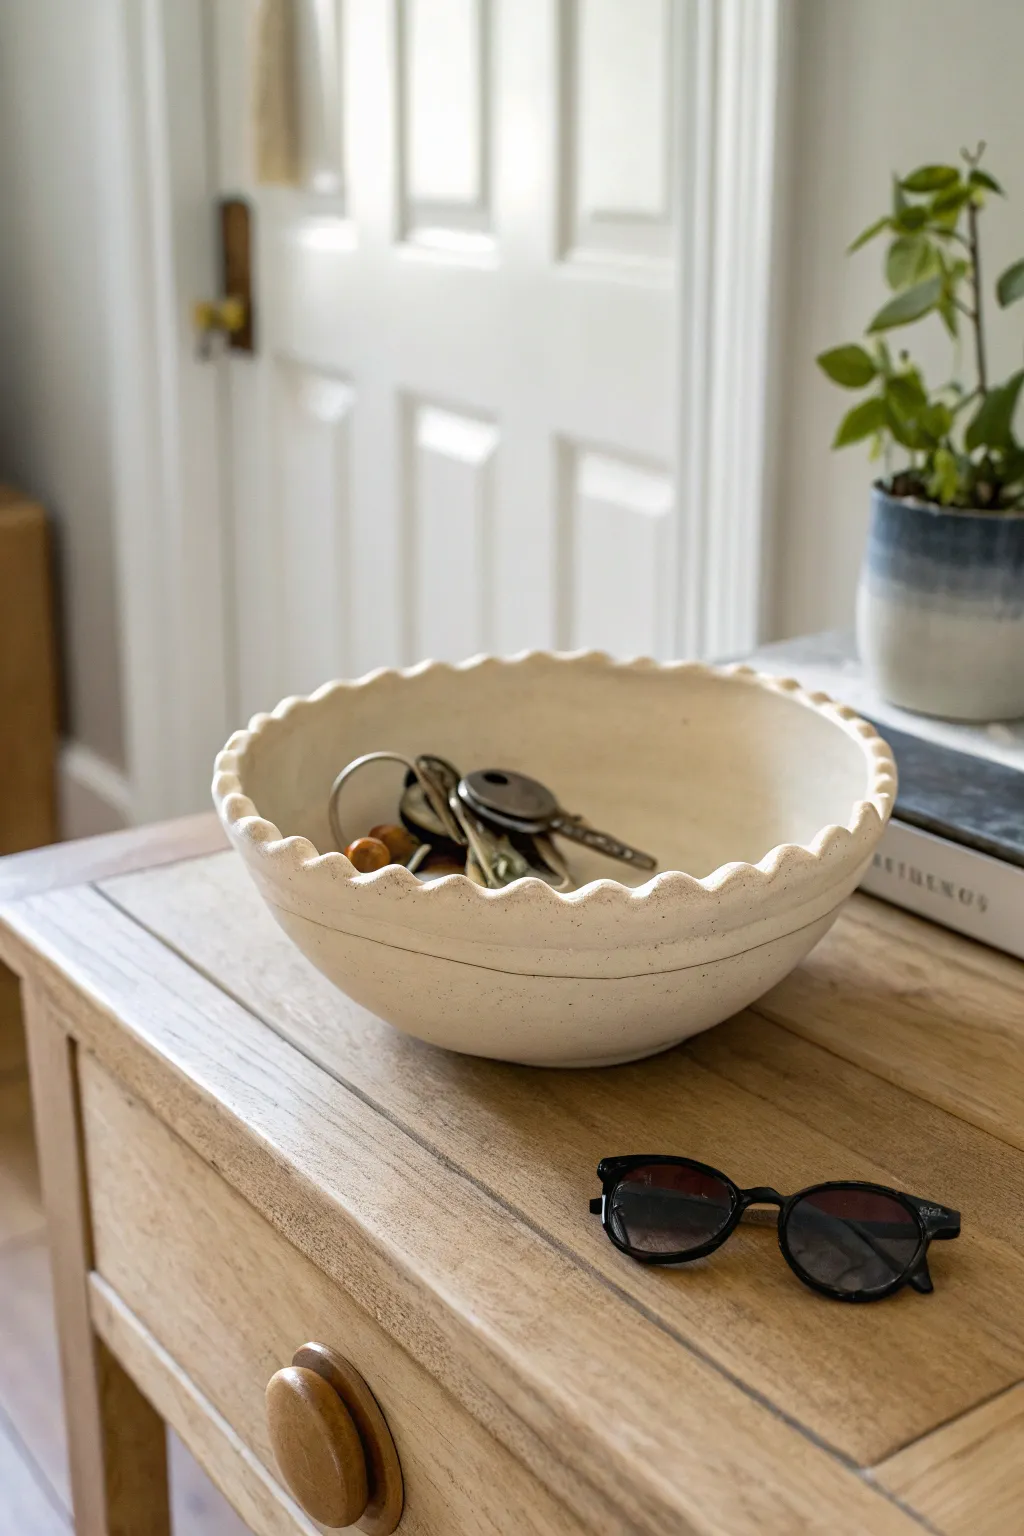
This minimalist catchall bowl combines organic warmth with practical design, featuring a charming wavy rim that adds texture without overwhelming the piece. Finished in a soft, speckled cream glaze, it becomes the perfect home for your daily essentials like keys and sunglasses.
Step-by-Step
Materials
- Air-dry clay or polymer clay (white or cream)
- Rolling pin
- Large mixing bowl (to use as a mold)
- Plastic wrap or parchment paper
- Clay knife or craft blade
- Sponge
- Small round tool (like a marker cap or dowel end)
- Sandpaper (fine grit)
- Cream acrylic paint or ceramic glaze
- Matte or satin sealant
- Small cup of water
Step 1: Forming the Base
-
Prepare the slab:
Begin by kneading your clay until it is pliable and warm. Roll it out on a flat surface into a large, even circle, aiming for a consistent thickness of about 1/4 inch to ensure durability. -
Prepare your mold:
Select a medium-sized kitchen bowl that matches the desired curve of your catchall. Cover the *outside* of the bowl (flipped upside down) with plastic wrap to prevent the clay from sticking during the drying process. -
Drape the clay:
Carefully lift your rolled clay slab and drape it over the covered bowl mold. Gently smooth the clay down the sides with your hands, ensuring it hugs the form without trapping air bubbles underneath. -
Trim the excess:
Using a clay knife, trim the rim of the bowl to make it even. You don’t need it perfect yet, but try to get a mostly level edge where the clay meets the table or stops halfway down the bowl form.
Step 2: Adding the Scalloped Rim
-
Create the wave guide:
Before sculpting, lightly mark even intervals around the rim where you want the peaks of your waves to be. This helps ensure your pattern stays consistent all the way around without awkward spacing at the end. -
Pinch the peaks:
Using your thumb and forefinger, gently pinch the clay upwards at your marked intervals to create the ‘peaks’ of the scallop. -
Round the valleys:
Use a rounded tool like the side of a marker or a dowel to press gently into the spaces between the peaks, smoothing them into U-shaped valleys. I find using a slight rocking motion helps curve the edges nicely. -
Refine the edge:
Dip your finger in a little water and run it along the entire rim. Smooth out any sharp angles on the waves so they look soft and organic rather than jagged. -
Add side detail:
If you want the subtle horizontal line seen on the original bowl, use a needle tool to lightly score a continuous line around the exterior, about an inch below the valleys of the rim.
Smooth Operator
Keep a damp sponge nearby while working. Wiping the clay periodically while shaping removes fingerprints and cracks early, saving you tons of sanding time later.
Step 3: Finishing Touches
-
Initial dry:
Allow the bowl to dry on the mold until it is leather-hard (usually 24 hours for air-dry clay). This ensures it holds its shape when you remove it. -
Release and refine:
Carefully remove the clay bowl from the mold and peel off the plastic. Let it dry completely, usually another 24-48 hours depending on humidity. -
Sand until smooth:
Once fully dry, use fine-grit sandpaper to buff the entire surface. Pay special attention to the scalloped rim to ensure it feels smooth to the touch. -
Paint selection:
Mix a warm cream color using acrylics. To mimic the speckled look of pottery, you can flick a tiny bit of diluted brown paint onto the surface using an old toothbrush before sealing. -
Apply the color:
Paint the inside and outside of the bowl with your cream mixture. Apply two to three thin coats for opaque coverage, letting each layer dry in between. -
Seal for protection:
Finish with a coat of matte or satin sealant. This is crucial for air-dry clay to protect it from moisture and wear, giving it that finished ceramic appearance.
Faux Ceramic Look
Mix a teaspoon of baking soda into your cream acrylic paint. This creates a gritty, textured finish that looks incredibly like real fired stoneware.
Place your finished bowl on an entryway console table and enjoy a stylish, clutter-free space
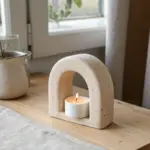
Clean-Lined Earring Stand
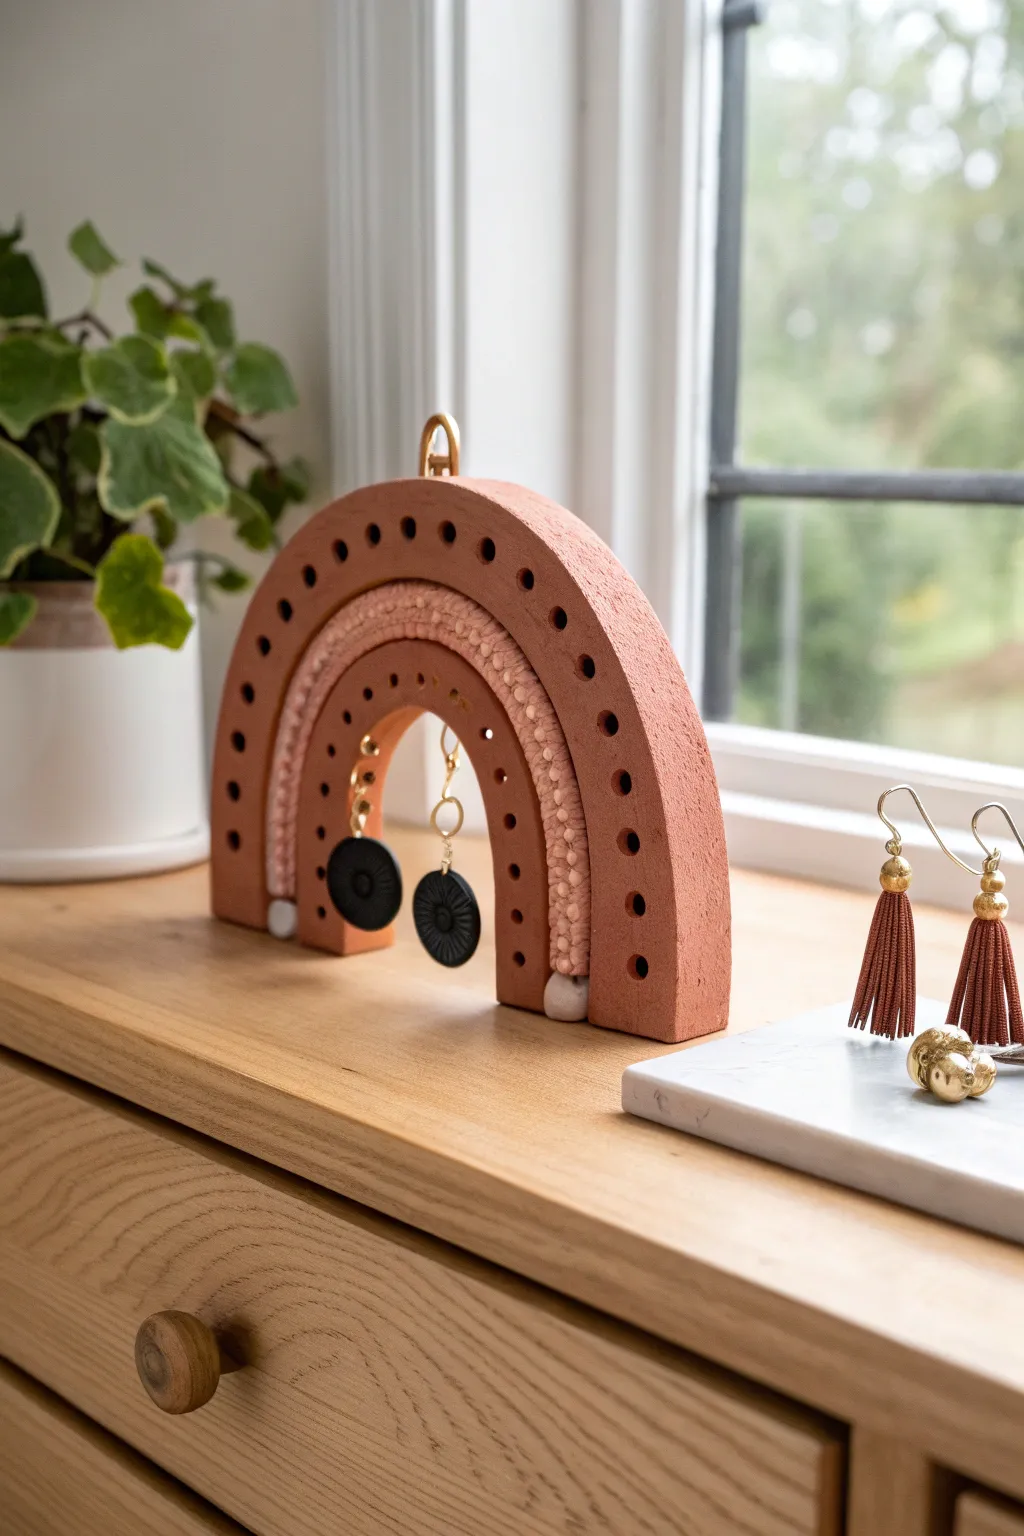
This boho-chic earring display combines the warmth of terracotta clay with soft textile accents for a functional piece of art. Its clean lines and arched shape offer a modern way to organize and showcase your favorite studs and dangles.
Step-by-Step Tutorial
Materials
- Air-dry clay (terracotta color)
- Rolling pin
- Sharp crafting knife or X-Acto blade
- Sandpaper (fine grit)
- Thick cotton rope or macramé cord (approx. 1/2 inch thick)
- Embroidery floss or thin yarn (blush or coral tone)
- Strong craft glue (e.g., E6000) or hot glue gun
- Wooden dowel, straw, or toothpick (for poking holes)
- Small metal hanging loop or jewelry bail (gold)
- Ruler
- Cardboard or cardstock (for templates)
- Two large wooden beads (white or natural)
Step 1: Planning and Cutting the Clay
-
Create templates:
Begin by sketching two arches on cardstock. The larger outer arch should be roughly 6 inches wide at the base. The inner arch needs to be smaller, leaving enough gap between them for your rope and a little breathing room. -
Roll the clay:
Take a large chunk of terracotta air-dry clay and condition it in your hands until it’s pliable. Roll it out on a flat surface to an even thickness of about 1/2 inch. I find using guide sticks on either side helps keep the slab perfectly level. -
Cut the arches:
Place your cardstock templates onto the clay slab. Using your sharp craft knife, carefully trace around them to cut out your two arch shapes. Use a wet finger to smooth down the distinct sharp edges created by the knife. -
Add texture:
For a rustic, stone-like look, you can gently tap the surface with a stiff-bristle toothbrush or a crumpled ball of aluminum foil. This removes the ‘plastic’ sheen of the clay.
Clay Cracking?
If small cracks appear as the clay dries, mix a tiny amount of fresh clay with water to make a paste (slip) and fill them in, then sand smooth once dry.
Step 2: Making Functional Details
-
Poke stud holes:
Take the larger, outer clay arch. Using a toothpick or a small skewer, poke a series of evenly spaced holes along the curve. Make sure to wiggle the tool slightly so the holes don’t shrink too much during drying. -
Create dangle points:
On the smaller, inner arch, create fewer, slightly larger holes specifically for hook earrings or jump rings. Alternatively, you can embed small wire loops into the clay while it’s wet if you prefer permanent hooks. -
Insert the top hardware:
At the very top center of the large outer arch, carefully press your metal hanging loop into the clay edge. Secure it by smoothing a tiny bit of wet clay over the insertion point to lock it in. -
Dry the pieces:
Lay both clay arches flat on a drying rack or a sheet of parchment paper. Let them dry completely, which usually takes 24-48 hours depending on humidity. Flip them halfway through to ensure even drying. -
Sand edges:
Once fully cured, use fine-grit sandpaper to gently smooth any rough burrs on the edges or inside the earring holes.
Step 3: Textile Assembly
-
Prepare the rope:
Cut a length of your thick cotton rope that fits perfectly along the inner curve of the large arch. It should match the length of the arch legs. -
Wrap the rope:
Secure the end of your embroidery floss to the rope with a dab of glue. Begin wrapping the floss tightly around the rope, covering it completely to create a textured, colored coil. -
Secure the ends:
When you reach the other end of the rope, knot the floss and add another dot of glue to prevent unraveling. Trim any excess thread.
Speckled Stone Effect
Knead roughly ground black pepper or dried coffee grounds into the wet clay before rolling perfectly mimics authentic speckled ceramic stoneware.
Step 4: Final Construction
-
Attach the rope:
Apply a strong adhesive to the inner edge of the large clay arch. Press your wrapped rope firmly against it, following the curve. -
Connect the inner arch:
Apply adhesive to the inner side of the rope coil. Now, press the smaller clay arch into place inside the rope, sandwiching the textile element between the two clay pieces. -
Add feet:
To help the stand balance upright, glue one large wooden bead to the bottom of each leg of the inner arch. This acts as a stabilizer and adds a mixed-material detail. -
Let it set:
Lay the entire assembly flat while the glue cures completely to ensure the heavy clay pieces don’t slide out of alignment.
Now you have a stylish, custom-made spot to organize your daily jewelry rotation where every pair is easy to see
Modern Photo Holder Block
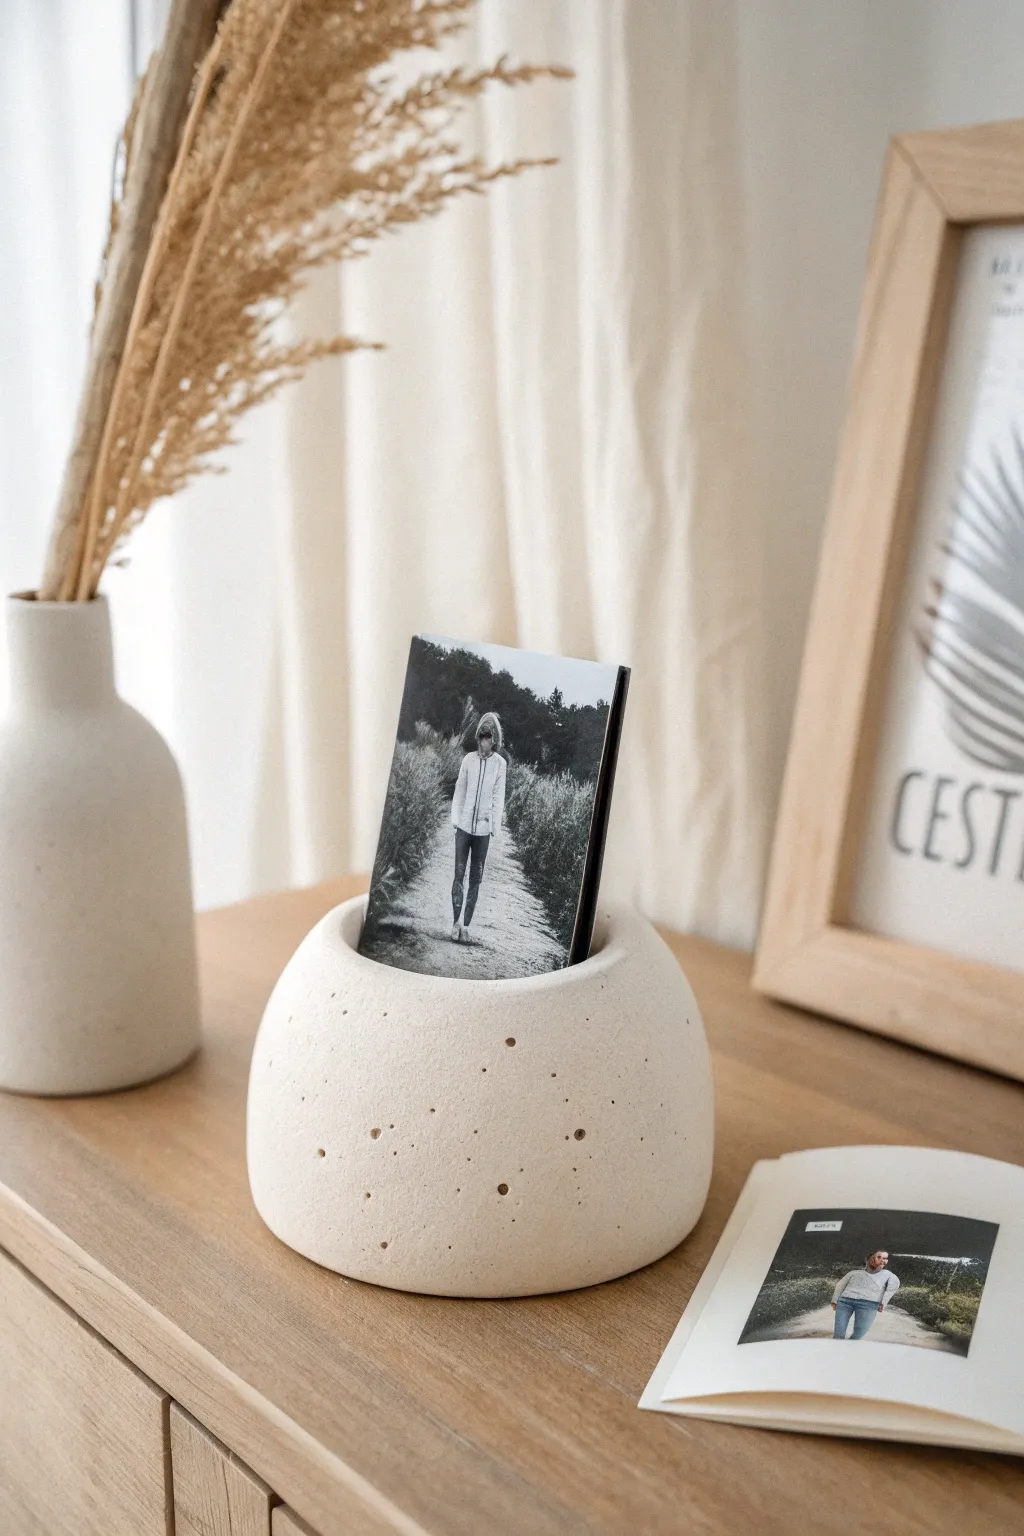
Create a sophisticated, minimalist statement piece for your favorite memories with this cement-look photo holder. Its organic, rounded shape and textured, speckled finish mimic the calming feel of natural stone, making it a perfect addition to a modern shelf display.
How-To Guide
Materials
- Air-dry clay (stone or granite effect) OR white clay mixed with sand
- Rolling pin
- Styrofoam ball or plastic sphere mold (approx. 3-4 inches diameter)
- Craft knife or sturdy plastic card (for creating the slot)
- Fine-grit sandpaper
- Small stiff-bristled brush (like an old toothbrush)
- Acrylic paint (light beige/cream)
- Brown and black acrylic paint (for speckling)
- Matte spray varnish
- Water
- Sponge
Step 1: Forming the Base
-
Prepare your clay:
Start by conditioning your clay. If you are using plain white clay, knead in a small amount of fine sand or dried coffee grounds to create an internal texture that mimics stone. Warm it up in your hands until it is pliable and smooth. -
Roll a smooth ball:
Roll the clay into a large, dense ball. You want this to be solid enough to have weight, so avoid making it hollow unless you are wrapping it around a weighted core. A solid sphere about the size of a large grapefruit works best. -
Shape the sphere:
Gently press the ball onto your work surface to create a flat bottom. This ensures your photo holder won’t roll away. Cup your hands around the sides to maintain the roundness while flattening just the base. -
Smooth the surface:
Dip your fingers in a little water and run them over the clay to smooth out any major cracks or fingerprints. You want a generally smooth shape, but perfect symmetry isn’t necessary for this organic look. -
Create the opening:
Using your thumb, press gently into the top center of the sphere to create a slight indentation or ‘mouth.’ This shouldn’t be a deep hole, but rather a shallow dip where the slit will go.
Weight it Down
If you’re using lightweight clay, embed a heavy stone or a large metal washer into the bottom center of the ball while forming it. This keeps it stable when holding larger photos.
Step 2: Adding Texture & Detail
-
Cut the photo slot:
Take your craft knife or a thick plastic card (like an old credit card) and press it firmly into the center of the indentation you just made. Rock it slightly back and forth to widen the slot just enough to hold a photo or thick cardstock. -
Ensure depth:
Make sure the cut is deep enough—at least half an inch to an inch—so the photograph stands securely upright without flopping over. -
Texturize the surface:
To get that porous, stone-like appearance, take a stiff-bristled brush or a balled-up piece of aluminum foil and gently tap it all over the surface of the wet clay. I find this random stippling really sells the concrete effect. -
Add larger pores:
Use a toothpick or a small needle tool to poke random, slightly larger holes sparingly around the surface. These mimic the air bubbles often found in cast concrete. -
Check the shape:
Look at the holder from all angles. If the texturing process deformed the sphere, gently reshape it with cupped hands without smoothing out your new texture.
Minimalist Dip
For a modern twist, use masking tape to block off the bottom third of the sphere after it’s dry. Paint that section in metallic gold or a bold matte color like navy blue.
Step 3: The Stone Finish
-
Let it dry completely:
Allow the piece to air dry for at least 24-48 hours. Turn it occasionally so the bottom dries evenly. The clay will lighten in color as the moisture evaporates. -
Sand lightly:
Once bone dry, use fine-grit sandpaper to briefly gently sand the surface. You don’t want to remove the texture, just knock down any sharp peaks or jagged bits of clay. -
Apply base color:
Mix a light beige or cream acrylic paint. Apply a wash of this color over the holder using a damp sponge. The sponge application helps keep the coverage uneven and natural looking, rather than opaque and plastic. -
Create the speckled effect:
Dilute a tiny amount of black and brown paint with water until it’s very runny. Dip an old toothbrush into this mixture. -
Splatter paint:
Hold the toothbrush near the holder and run your thumb across the bristles to flick tiny specks of paint onto the surface. Practice on a paper towel first to control the spray. -
Seal the project:
Finish with a coat of matte spray varnish. Avoid glossy finishes, as real concrete or stone usually has a dull, matte surface.
Place your favorite black and white print in the slot and enjoy your chic new decor piece
Moon Phase Wall Hanging
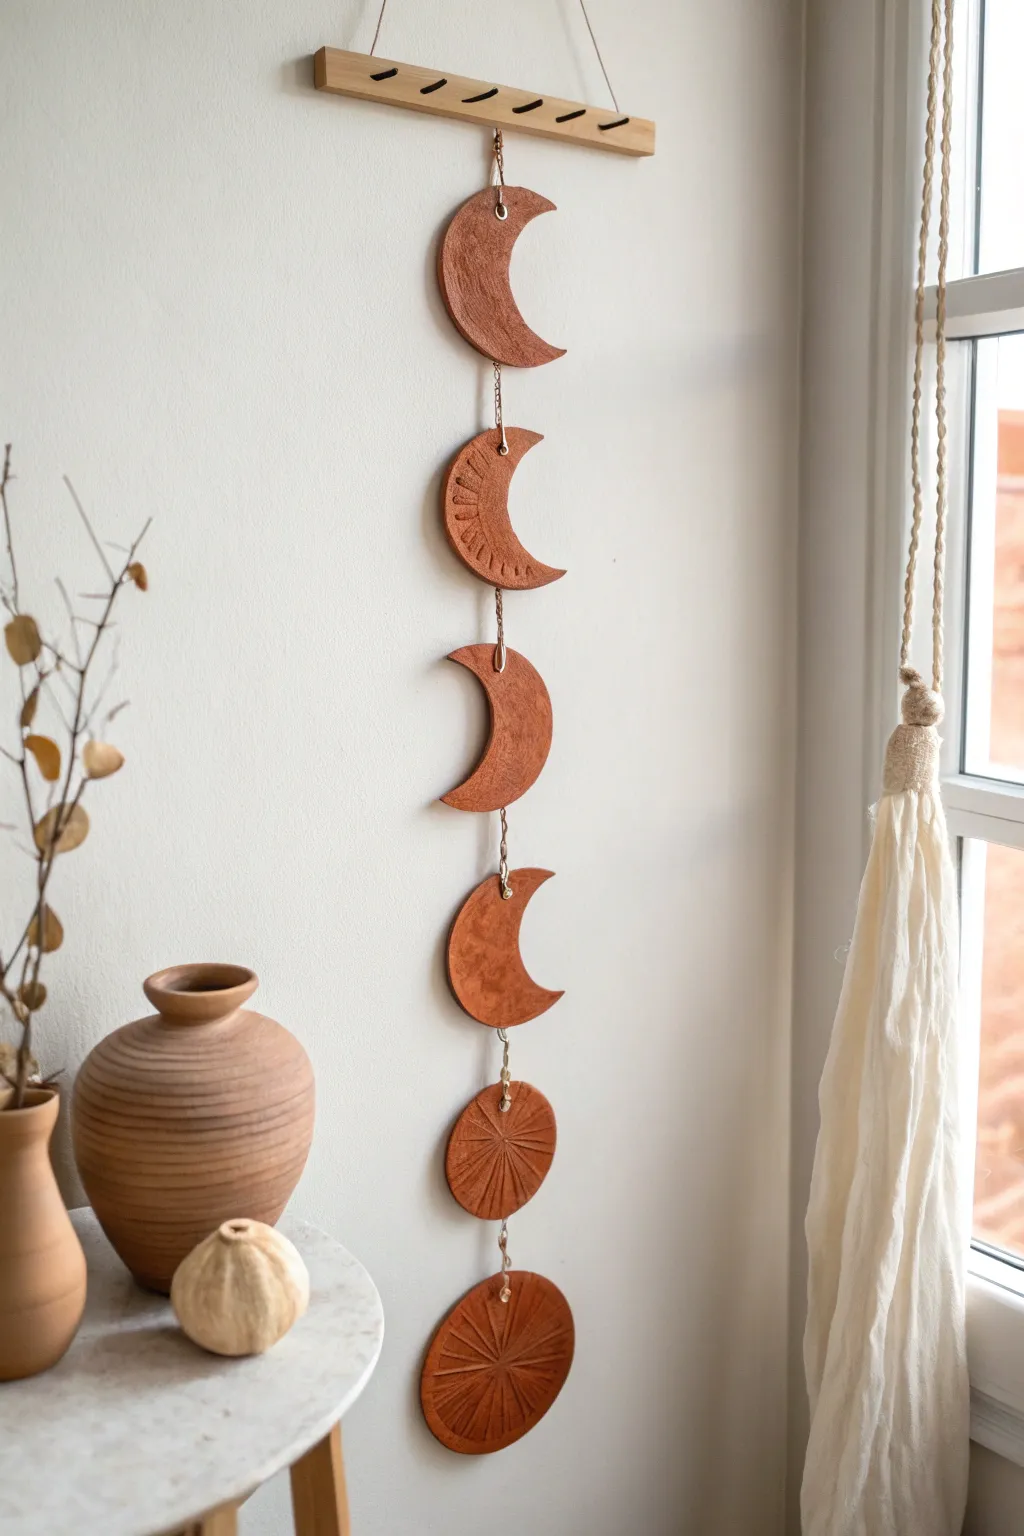
Bring a touch of celestial warmth to your walls with this earthy, bohemian moon phase hanging. Using air-dry clay and simple textures, you’ll create a vertical mobile that captures the quiet beauty of the lunar cycle.
Step-by-Step Guide
Materials
- Terracotta color air-dry clay (approx. 1 kg)
- Rolling pin
- Circle cutters (approx. 3-4 inches diameter) or a drinking glass
- Sharp knife or clay needle tool
- Texture tools (toothpick, small fork, or dull knife)
- Sandpaper (fine grit)
- Golden crafting wire or small jewelry jump rings
- Needle nose pliers
- Small wooden slat or dowel (approx. 10 inches)
- Jute twine or cotton cord for hanging
- Acrylic sealer (matte finish, optional)
Step 1: Shaping the Moons
-
Prepare the Clay:
Begin by kneading a large handful of terracotta air-dry clay to warm it up and remove air bubbles. Roll it out on a flat, non-stick surface until it is an even slab, roughly 1/4 inch thick. -
Cut the Circles:
Use your circle cutter or a glass to cut out six identical circles. These will be the base for all your moon shapes. Remove the excess clay scraps and set them aside. -
Create Crescent Shapes:
Take four of your circles. To make the crescents, position your circle cutter slightly off-center over the existing clay circle and cut again. This will slice away a portion, leaving you with a crescent ‘C’ shape. Vary the thickness slightly if you want a progression of phases. -
Smooth the Edges:
Dip your finger in a tiny bit of water and run it along the cut edges of all your shapes (crescents and the full circles). This smooths out any jagged bits left by the cutter.
Fixing Cracks
If you spot small hairline cracks as the clay dries, don’t panic. Make a ‘slip’ by mixing a little clay with water into a paste, fill the crack, and smooth it over with your finger
Step 2: Adding Texture and Detail
-
Design the Texture:
Look closely at the reference image; some moons have etched ‘sunburst’ lines. On one crescent and the two full circles, use a needle tool or toothpick to gently carve radiating lines coming from the center. -
Create Surface Interest:
For the non-etched moons, you can lightly press a crumpled ball of aluminum foil or a stiff-bristled brush onto the surface. This gives it that organic, crater-like stone texture. -
Pierce the Holes:
This is crucial: before the clay dries, poke a hole at the very top and very bottom of every piece, except the bottom-most full moon (which only needs a top hole). Make sure the holes are big enough for your jump rings. -
Drying Phase:
Lay your clay pieces on a wire rack or a piece of parchment paper to dry. I usually flip them over halfway through the drying process to prevent curling. Let them dry for at least 24-48 hours until completely hard and light in color.
Step 3: Assembly and Hanging
-
Sand and Refine:
Once bone dry, gently sand any rough edges with fine-grit sandpaper. Wipe away the dust with a slightly damp cloth. -
Seal (Optional):
If you want to protect the clay from humidity, brush on a coat of matte acrylic sealer. This will deepen the terracotta color slightly. -
Prepare the Hanger:
Take your wooden slat. If it doesn’t have holes, drill four small holes along the length or simply prepare to tie the string around it. The reference uses a slat with routed slots, but a simple dowel works beautifully too. -
Connect the Moons:
Using needle-nose pliers, open your golden jump rings. Thread a ring through the bottom hole of the top crescent and the top hole of the second crescent. Close the ring securely. -
Continue the Chain:
Repeat this linking process, following the order: crescent, etched crescent, crescent, plain crescent, etched circle, etched circle. Handle the dry clay gently while twisting the pliers. -
Attach to Wood:
Use a small piece of wire or a jump ring to connect the very top moon to the center of your wooden slat. -
Final Stringing:
Cut a length of jute twine. Tie one end to the left side of the wooden slat and the other to the right side to create a triangular hanger.
Level Up: Gold Leaf
To make your mobile truly shine, apply a tiny amount of gold leaf or metallic gold paint into the etched grooves of the sunburst patterns for a magical contrast
Hang your new celestial artwork near a window to watch the changing light play across the textured surfaces
Abstract Sculptural Bookends
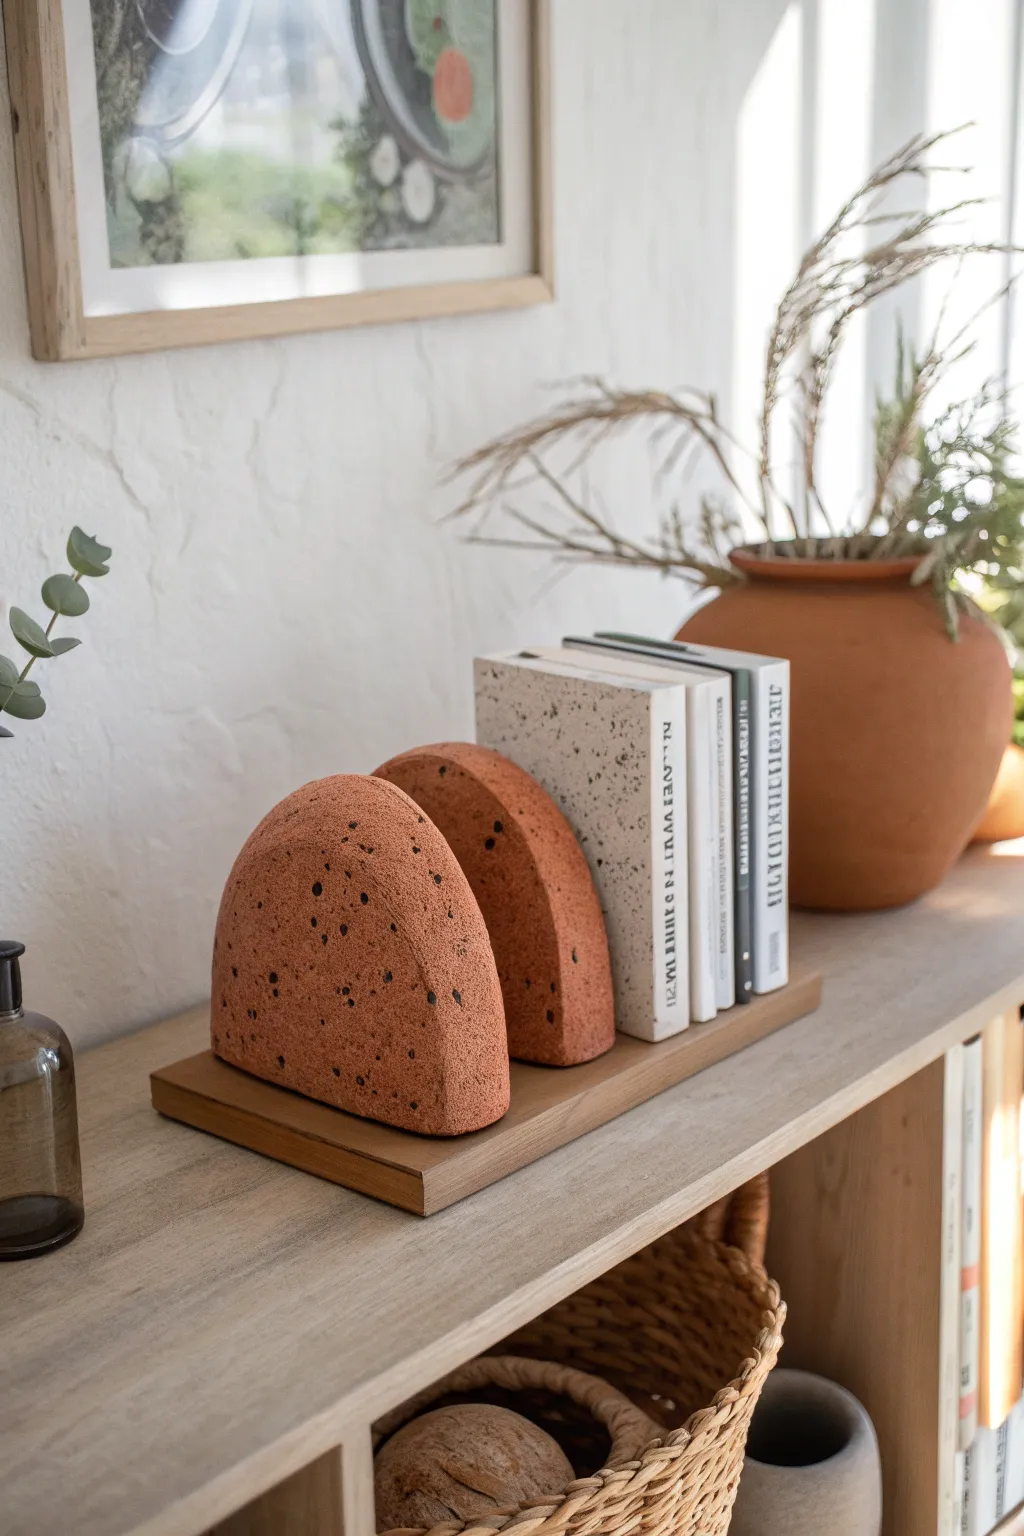
Bring an earthy, modern touch to your bookshelf with these textured clay bookends. Featuring a warm terracotta hue and deliberate black speckling, these semi-circular arches are weighty enough to hold your favorite reads while looking effortlessly chic.
Step-by-Step
Materials
- Air-dry clay (terracotta color)
- Black acrylic paint
- Stiff-bristled toothbrush or chip brush
- Rolling pin
- Sharp clay knife or craft blade
- Medium-grit sandpaper
- Wooden rectangular plaque or board (for the base)
- Strong craft adhesive (E6000 or similar)
- Cardboard (for templates)
- Clear matte sealant spray
- Bowl of water and sponge
Step 1: Shaping the Clay Arches
-
Create a cardboard template:
Sketch a semi-circle arch shape onto a piece of cardboard to determine the size of your bookends. Cut this out carefully to use as your guide. -
Condition the clay:
Take a large chunk of terracotta air-dry clay and knead it thoroughly until it is pliable and smooth. This prevents cracks later on. -
Roll out the slab:
Use your rolling pin to flatten the clay into a thick slab, approximately 1.5 to 2 inches thick. You want significant thickness to provide weight and stability. -
Cut the shapes:
Place your cardboard template onto the slab. Using a sharp clay knife, cut vertically down through the clay, tracing the outline of the arch. Repeat this to create two identical pieces. -
Smooth the edges:
Dip your fingers or a sponge into a little water and smooth out the sharp cut edges, rounding them slightly for a softer, organic look. -
Let them dry slowly:
Stand the arches upright on a flat surface to dry. I like to cover them loosely with plastic wrap for the first 24 hours to slow drying and prevent cracking. Allow 48-72 hours for full drying.
Step 2: Adding Texture and Detail
-
Sand for perfection:
Once completely dry and hard, use medium-grit sandpaper to buff away any major bumps or uneven areas on the flat faces and curved spine. -
Prepare the splatter paint:
Dilute a small dollop of black acrylic paint with a few drops of water until it has a fluid, ink-like consistency. -
Apply the speckles:
Dip an old toothbrush or stiff brush into the diluted paint. Run your thumb across the bristles to flick tiny speckles onto the clay surface. Vary your distance to create different dot sizes. -
Seal the surface:
After the paint dries, spray the entire clay piece with a clear matte sealant. This protects the clay from moisture and gives it a finished, professional sheen.
Weight Hack
If using lightweight air-dry clay, embed a heavy stone or metal washer inside the clay slab while shaping to ensure the bookends are heavy enough.
Step 3: Assembly
-
Prepare the base:
Sand your wooden rectangular base if necessary to ensure it’s smooth and flat. -
Position the arches:
Arrange the clay arches on the wooden base to find your preferred spacing and orientation. -
Glue in place:
Apply a generous amount of strong craft adhesive to the bottom of each clay arch. Press them firmly onto the wood. -
Cure the adhesive:
Allow the glue to cure fully according to the manufacturer’s instructions before placing any heavy books against them.
Terrazzo Twist
Instead of painting speckles, mix small chunks of dried black, white, and grey clay into your wet terracotta clay block before rolling it out.
Now you have a functional piece of art ready to organize your shelves