Anytime I see plain clay pots, my brain immediately starts inventing ways to make them look like something totally new. Here are my favorite cool clay pot ideas that turn basic terracotta into bold decor, quirky characters, and wow-worthy garden pieces.
Painted Color-Block Clay Pots
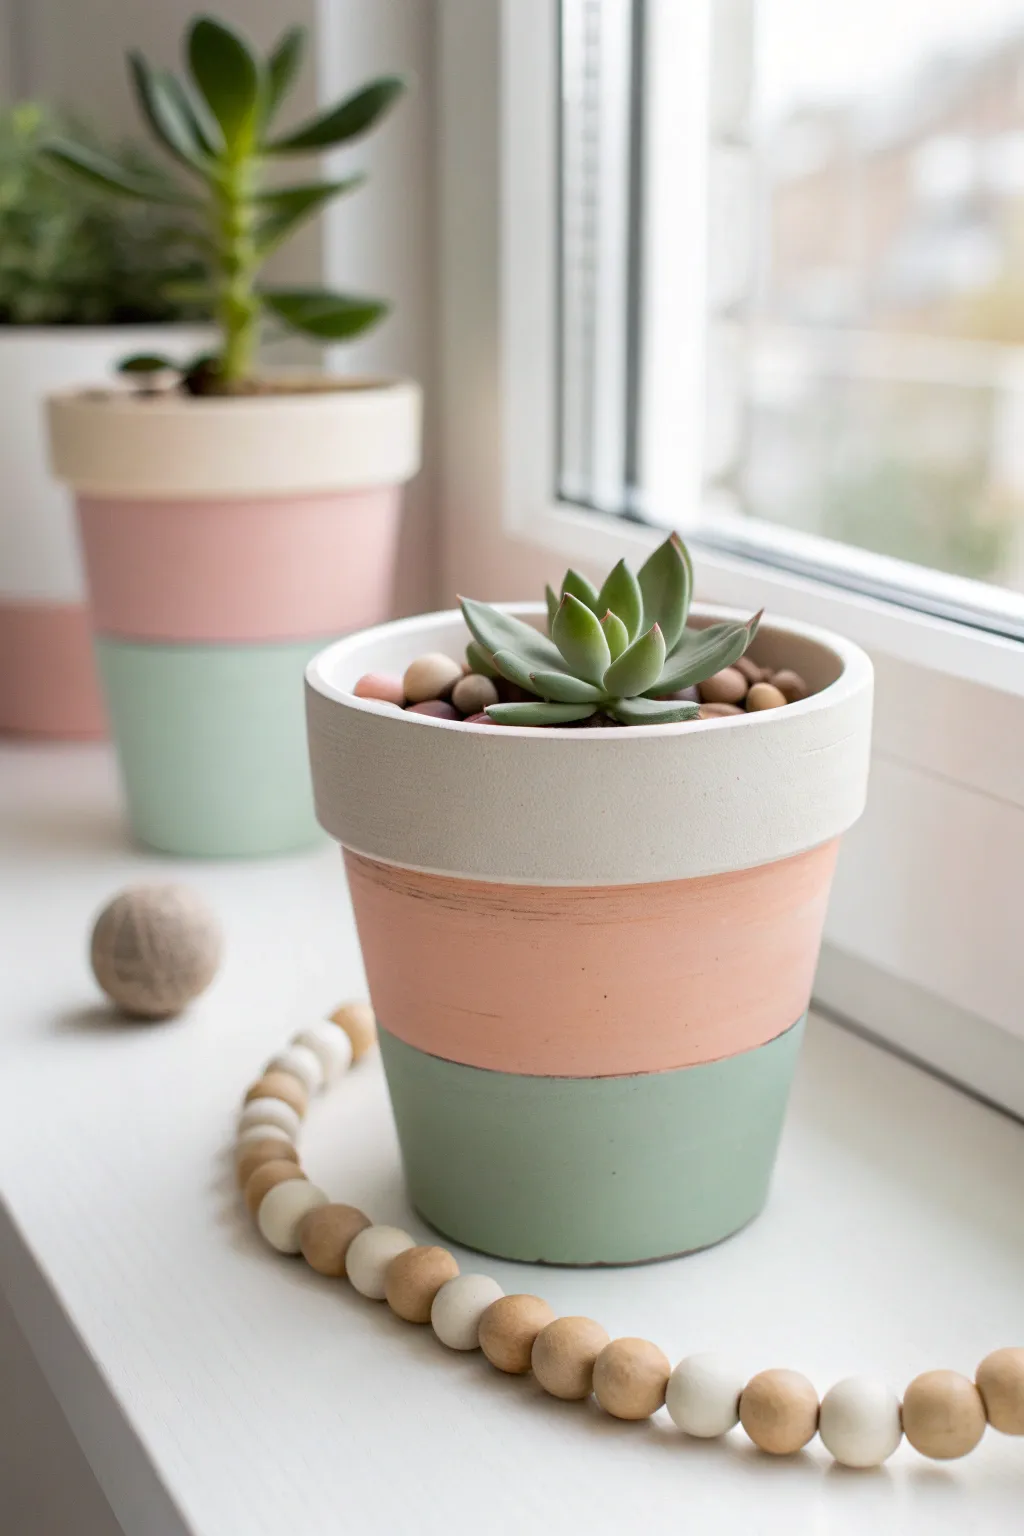
Give your plain terracotta pots a fresh, modern makeover with this soothing pastel color-block design. This project layers soft cream, warm peach, and calming mint green for a clean, geometric look that brightens any windowsill.
Step-by-Step Guide
Materials
- Small to medium terracotta pot with rim
- Jute twine or pencil
- Painter’s tape (optional)
- White or cream acrylic paint (matte finish)
- Peach or salmon acrylic paint (matte finish)
- Sage or mint green acrylic paint (matte finish)
- Flat paintbrush (medium width)
- Small detail brush
- Matte spray sealer
- Small pebbles or potting soil
- Succulent of choice
Step 1: Cleaning and Prep
-
Clean surface:
Begin by thoroughly wiping down your terracotta pot with a damp cloth to remove any dust or manufacturing residue. -
Dry completely:
Allow the clay to dry fully before you start painting; moisture in the clay can prevent the paint from adhering properly.
Clean Lines Hack
To get perfectly straight lines on a tapered pot, use rubber bands instead of tape. Roll the band down to your mark; it hugs the curve perfectly without buckling.
Step 2: Planning the Bands
-
Define the top band:
The pot’s natural rim acts as your first guide. This top protruding section will be your first color zone. -
Measure the body:
Look at the main body of the pot below the rim. You need to divide this remaining space in half visually to create two equal horizontal sections. -
Mark the line:
Gently draw a faint line around the circumference of the pot using a pencil to separate the middle section from the bottom section.
Blotchy Paint?
If the terracotta sucks up paint too fast, priming with a layer of white craft glue mixed with water (50/50 mix) seals the pores before you add color.
Step 3: Painting the Sections
-
Paint the top rim:
Load your flat brush with the cream or white acrylic paint. Apply this to the entire top rim, including the very top edge. -
Refine the inner rim:
Extend the white paint just inside the top of the pot about an inch down, so the clay color doesn’t show when soil is added. -
Paint the bottom section:
Moving to the bottom-most section, apply your sage or mint green paint. Follow the pencil line you drew earlier as your upper boundary. -
Cut in the edge:
Use a steady hand or the painter’s tape to ensure the top edge of the green paint is straight. -
Paint the middle section:
Once the top and bottom sections are dry to the touch, fill in the middle band with your peach or salmon paint. -
Perfect the seams:
Carefully paint up to the bottom of the white rim and down to the top of the green line. I find a smaller detail brush helps get crisp lines here without overlapping.
Step 4: Finishing Touches
-
Apply second coats:
Terracotta is porous and absorbs paint, so you will likely need a second or even third coat for opaque coverage. Let each layer dry completely between applications. -
Texture check:
For the rustic look shown in the photo, don’t worry if faint brushstrokes are visible; the matte finish looks best when it isn’t perfectly plastic-smooth. -
Seal the pot:
Once fully dry, spray the entire exterior with a matte clear sealer to protect the paint from water damage. -
Add drainage:
Place a small shard of broken pottery or mesh over the drainage hole before filling to keep soil in. -
Planting:
Fill the pot with succulent-specific soil and nestle your plant into the center. -
Top dressing:
Finish the look by adding a layer of small, smooth pebbles or expanded clay balls on top of the soil for a polished appearance.
This simple color-blocking technique transforms basic garden supplies into custom decor pieces that look great in groups


Stencil Pattern Pot Makeover
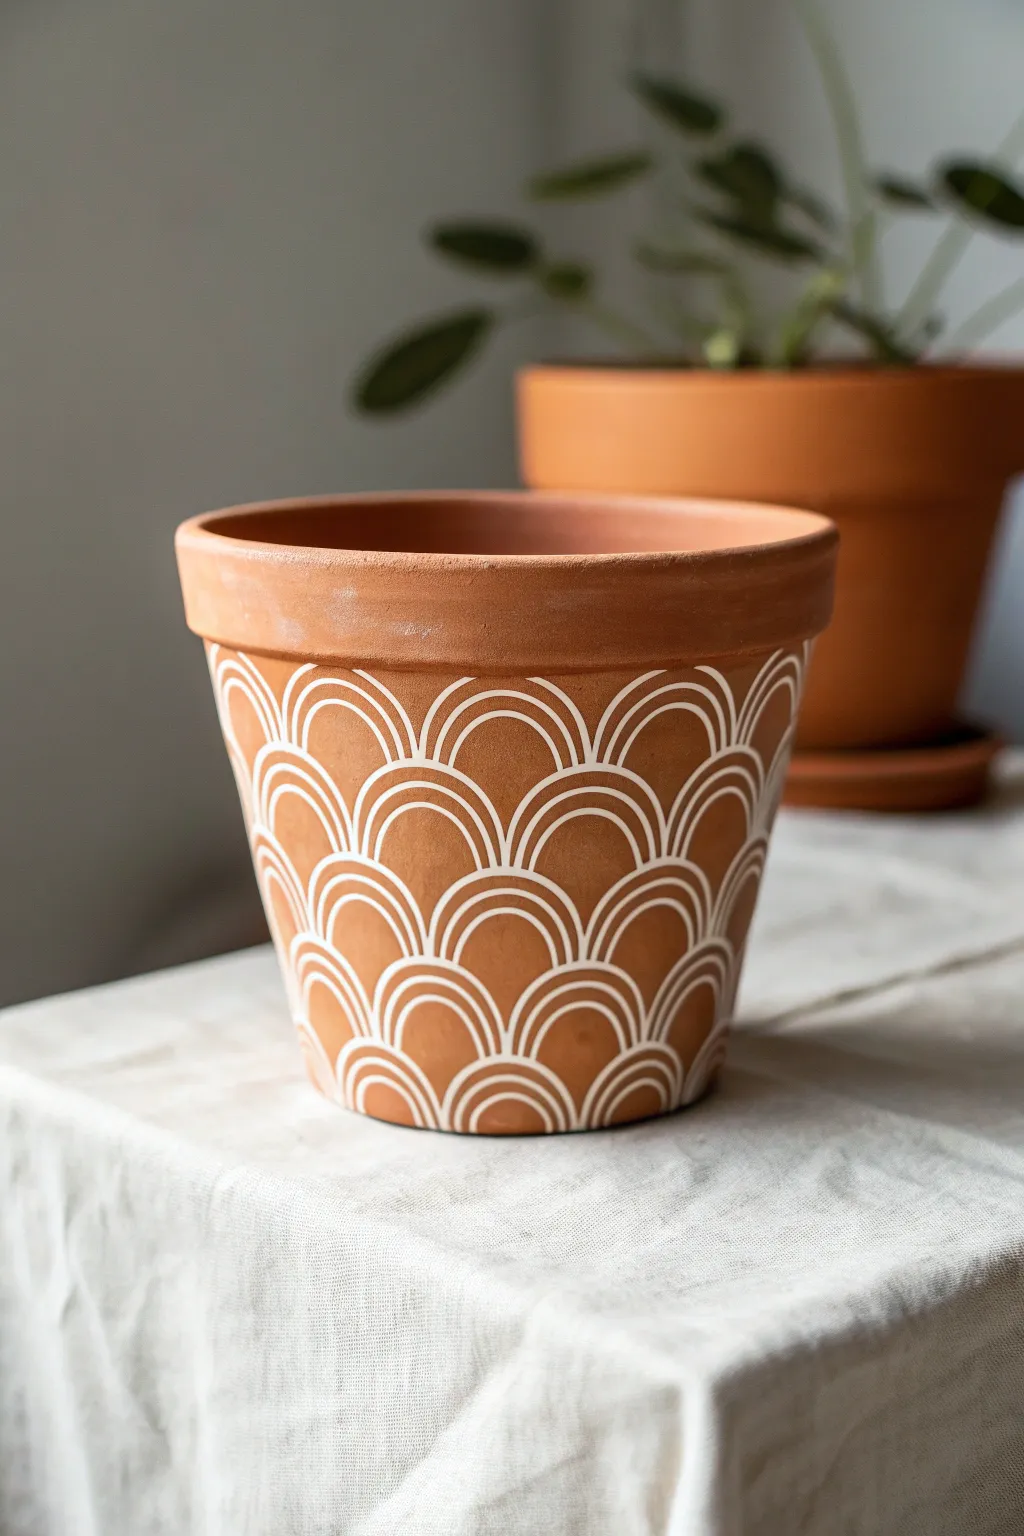
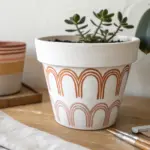
Transform a plain terracotta pot into a modern home accessory with this elegant scalloped line design. The crisp white arches create a satisfying geometric rhythm against the warm clay, giving you a custom-looking planter on a budget.
Step-by-Step
Materials
- Clean terracotta pot (standard rimmed style)
- White acrylic paint (outdoor or multi-surface)
- Small flat paint brush or white paint marker (medium tip)
- Pencil
- Flexible stencil sheet or cardstock
- Scissors
- Painter’s tape or stencil adhesive
- Clear matte sealer spray (optional)
- Damp cloth
Step 1: Prep & Planning
-
Clean surface:
Begin by wiping down your terracotta pot with a damp cloth to remove any warehouse dust or oils. Let it dry completely so the paint adheres properly. -
Create the stencil:
Cut a small piece of flexible stencil plastic or cardstock into a rectangle about 2 inches wide. Sketch a perfect half-circle arch on it, leaving a small border at the bottom. -
Cut the shape:
Carefully cut out the inside of the arch to create a negative space stencil. If you prefer freehanding, you can cut the positive shape to trace around, but a negative stencil works best for painting.
Paint bleeding under tape?
Terracotta is porous and can cause bleed. Use a distinct ‘dry brush’ technique with very little paint on your brush, or switch to a paint pen for sharper control on this rough surface.
Step 2: Drafting the Design
-
Establish the baseline:
Starting at the very bottom edge of the pot, use your pencil to lightly mark where your first row of arches will sit. The curvature of the pot can be tricky, so keep your spacing consistent. -
Trace the first row:
Place your stencil against the bottom edge. Lightly trace the arch with a pencil. Move the stencil directly next to your first tracing—touching the previous line—and trace again. Repeat this all the way around the base. -
Stagger the second row:
For the second row, position the center of your stencil directly above the meeting point of the two arches below it. This ‘brick-lay’ or scale pattern is key to the look. -
Continue tracing:
Work your way up the pot, row by row, ensuring each new arch is centered over the dip in the previous row. Stop when you reach just below the rim of the pot. -
Refine the lines:
Step back and look at your pencil guide. If any arches look lopsided or too widely spaced, gently erase and adjust them now before painting.
Step 3: Painting the Pattern
-
Prepare your tool:
If using a paint marker, shake it well and press the tip on scrap paper to get the flow started. If using a brush, thin your white acrylic paint very slightly with water for smoother lines. -
Outline the first arches:
Starting at the bottom row again, carefully paint over your pencil lines. I find it helpful to anchor my pinky finger on the pot for stability while drawing the curves. -
Add the inner detail:
Creating the double-line effect is what makes this design pop. Paint a second, smaller arch inside each main arch, maintaining an even gap between the two white lines. -
Work in sections:
Rotate the pot as you work to avoid smudging wet paint. Complete the bottom row entirely before moving up to the next staggered layer. -
Check consistency:
As you paint the upper rows, ensure the spacing between the inner and outer arches remains uniform. This consistency creates that satisfying, professional look. -
Clean up edges:
If your lines get a bit wobbly, use a clean, slightly damp brush to gently wipe away mistakes while the paint is still wet, or scratch dried paint off with a toothpick.
Level Up: Color Pop
Instead of leaving the background raw, paint the entire pot a matte sage green or navy blue first. Let it dry fully, then add the white arched lines for a high-contrast, modern look.
Step 4: Finishing Touches
-
Let it cure:
Allow the white paint to dry completely. This usually takes about an hour, but check your specific paint bottle instructions. -
Erase guidelines:
Once fully dry, take a soft eraser and gently remove any visible pencil marks that weren’t covered by the paint. -
Seal the deal:
To protect your design from moisture and soil minerals, spray the entire exterior with a clear matte sealer. Apply 2-3 light coats rather than one heavy one.
Now your ordinary clay pot has a designer touch and is ready to show off your favorite houseplant


Tape-Resist Geometric Line Pots
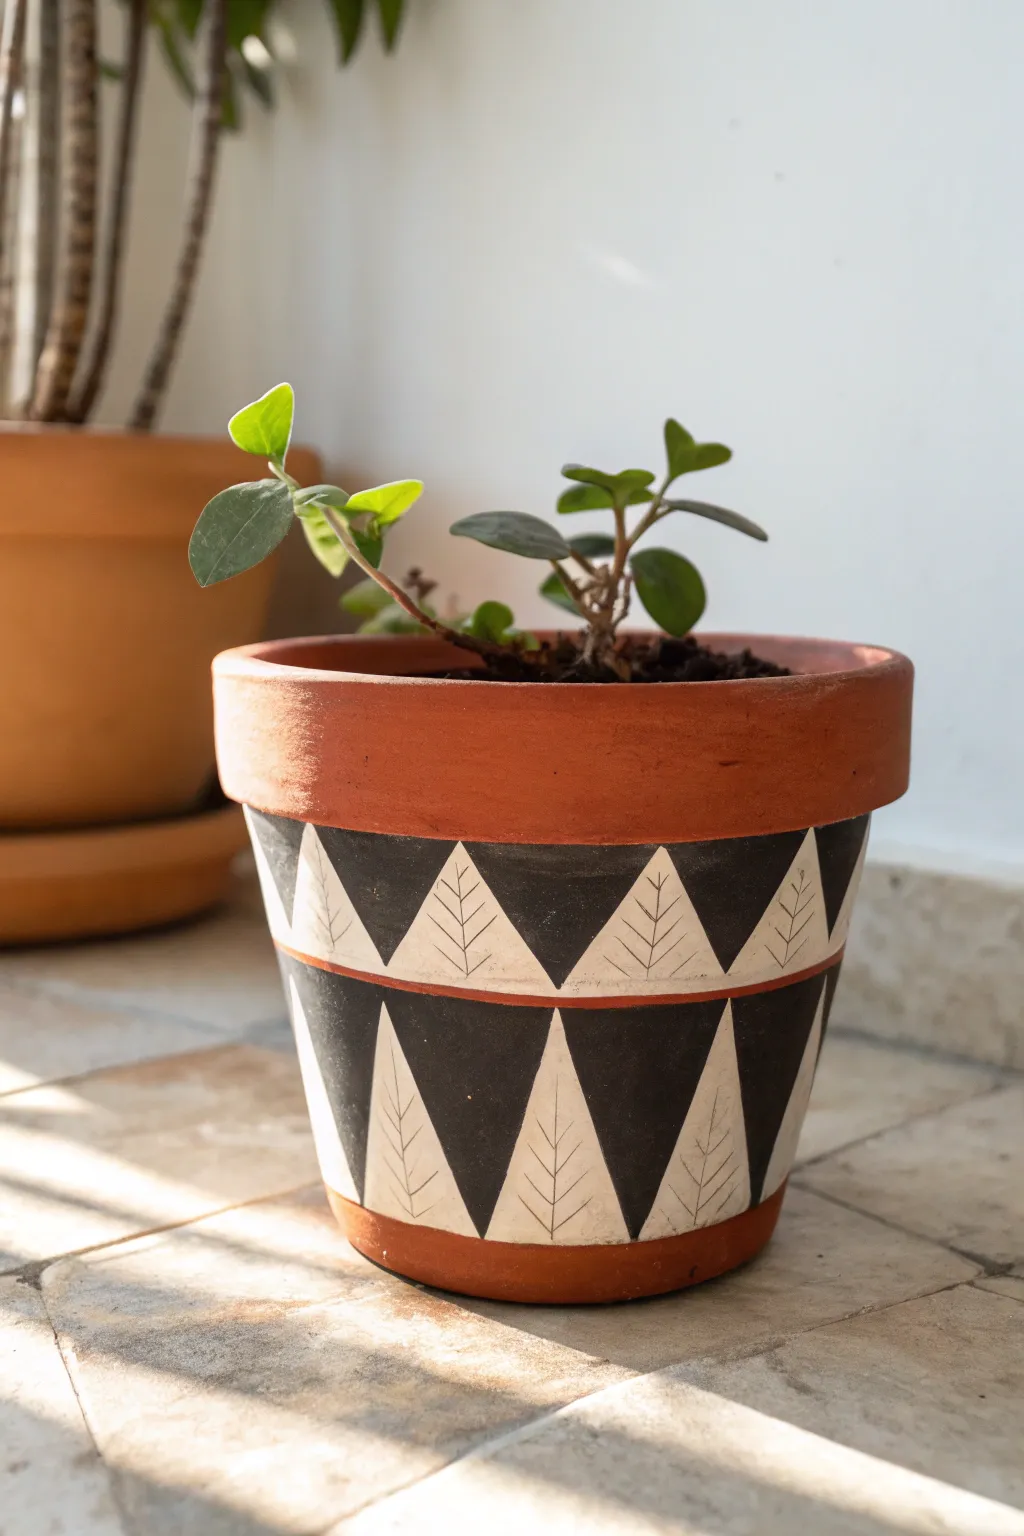
Transform a plain terracotta vessel into a piece of modern art with this high-contrast geometric design. The crisp black and white triangles create a striking pattern, softened by delicate hand-drawn leaf veins that add an organic touch.
Step-by-Step Guide
Materials
- Terracotta pot (clean and dry)
- Black acrylic paint (matte finish)
- White acrylic paint (matte finish)
- Painter’s tape or masking tape (1/2 inch or 1 inch)
- Small flat paintbrush
- Fine-point black permanent marker or paint pen
- Pencil
- Ruler or flexible measuring tape
- Clear sealant spray (matte or satin)
- Palette or paper plate
Step 1: Preparation & Base Taping
-
Clean surface:
Ensure your terracotta pot is completely free of dust and dirt. Wipe it down with a damp cloth and let it dry fully before starting. -
Tape the rim:
Apply a strip of painter’s tape horizontally around the pot, just below the rim. This preserves the natural terracotta color at the top. -
Tape the bottom:
Apply another horizontal strip of tape near the bottom edge of the pot to create a clean border for the base. -
Divide the middle:
Measure the space between your top and bottom tape lines. Use a pencil to mark the halfway point all around the pot to separate the two rows of triangles. -
Create the divider line:
Paint a very thin, horizontal line of terracotta-colored negative space (or simply leave a thin gap of unpainted clay) at your halfway mark. Alternatively, you can place a thin strip of tape here if you have 1/4 inch tape available.
Seal Before You Sketch
Before drawing the leaf veins, verify the white paint is 100% dry. If the paint is tacky, the marker tip might clog or drag the paint, ruining the crisp finish.
Step 2: Painting the Triangles
-
Mark triangle points:
Using your pencil and ruler, mark the peaks and valleys for your triangles. For the top row, the white triangles will point down; for the bottom row, they will point up. -
Paint white triangles:
Using the flat paintbrush, carefully paint the white triangles first. I find it easiest to outline the triangle shape with the brush edge before filling in the center. -
Apply second coat:
Terracotta is porous and absorbs paint quickly. Let the white paint dry for 10-15 minutes, then apply a second coat for solid, opaque coverage. -
Paint black triangles:
Once the white paint is dry to the touch, paint the inverted triangles in black. These fill the negative spaces between your white shapes. -
Refine edges:
Use the edge of your flat brush to neaten up the lines where the black and white triangles meet. Crisp lines are key to this geometric look. -
Let it cure:
Allow all the paint to dry completely. This usually takes about 30-45 minutes depending on humidity.
Step 3: Detailing & Finishing
-
Draw the stems:
Take your fine-point black marker or paint pen. In the center of each white triangle, draw a straight vertical line from the base to the tip to act as the leaf stem. -
Add the veins:
Draw small, angled lines branching off the central stem on both sides. Keep these lines consistently spaced to mimic leaf veins. -
Repeat for all white shapes:
Continue this pattern on every white triangle on both the top and bottom rows. -
Remove tape:
Gently peel off the painter’s tape from the rim and bottom. Pull the tape away at a 45-degree angle to prevent peeling any paint. -
Touch ups:
If any paint bled under the tape, use a damp Q-tip or a small crafting knife to gently scrape or wipe away the excess. -
Seal the pot:
Take the pot to a well-ventilated area and spray it with a clear matte sealant. This protects the design from water damage when you water your plants.
Go Metallic
Swap the white paint for gold or copper leafing paint. The metallic shine against matte black creates a luxurious, high-end look perfect for modern decor.
Place your favorite succulent or leafy plant inside to complete the organic look


Paint-Drip Statement Pots
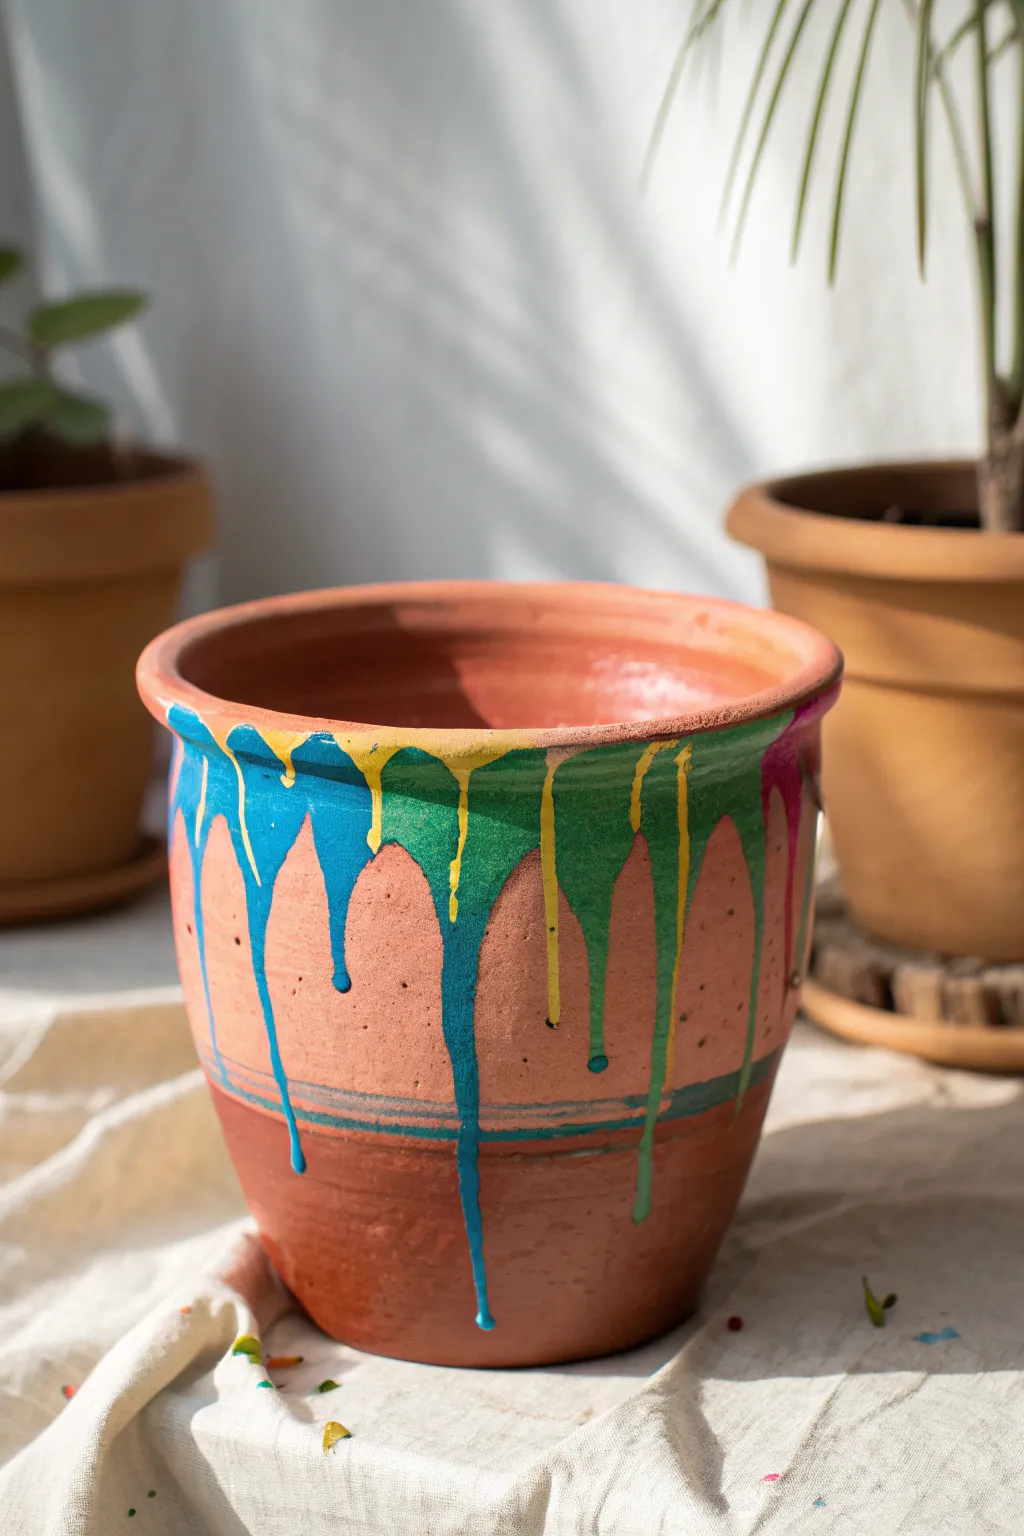
Transform a plain terracotta staple into a vibrant statement piece with this controlled chaos technique. The drips of blue, green, and yellow create a dynamic, fluid look that feels both modern and playful.
Detailed Instructions
Materials
- Medium-sized terracotta pot (8-10 inches)
- Acrylic craft paints (bright blue, teal green, sunshine yellow, magenta)
- Small squeeze bottles or pipettes
- Painter’s tape or masking tape
- Drop cloth or cardboard (for workspace protection)
- Small detail paintbrush
- Clear acrylic sealer spray (matte or gloss)
- Water cup and paper towels
Step 1: Preparation
-
Clean surface:
Begin by wiping down your terracotta pot with a damp cloth to remove any warehouse dust or debris. Let it dry completely so the paint adheres properly. -
Mask the base:
Decide how far down you want your ‘painted zone’ to end. About two-thirds down the pot, wrap a piece of painter’s tape or masking tape horizontally around the circumference to create a crisp boundary line. -
Prepare your workspace:
This project gets messy by design. Lay down cardboard or a drop cloth, and place the pot in the center. I find that elevating the pot on an overturned bowl or large can helps prevent the drips from pooling on the table. -
Dilute the paints:
Squeeze your acrylic paints into small cups or squeeze bottles. Add water drop by drop, mixing until they reach a consistency slightly thinner than heavy cream—moveable, but not watery.
Mix Helper
Add a dedicated pouring medium to your acrylics instead of just water. This improves flow without breaking the pigment, ensuring rich, opaque color in every drip.
Step 2: Creating the Drips
-
Start the first color:
Using a squeeze bottle or pipette, apply your first color (like the bright blue) directly onto the very top rim of the pot. -
Encourage the flow:
Let gravity do the work. Squeeze enough paint so it pools slightly and naturally starts running down the side. -
Vary the lengths:
For some drips, use a little more paint to make them run long; for others, use less so they stop high up. This variation is key to a natural look. -
Introduce the second color:
Before the first color is dry, move on to your next shade, perhaps the teal green. Apply it right next to the blue on the rim. -
Overlap strategically:
Allow the new color to touch the previous one at the rim, maybe even letting them merge slightly as they travel down. -
Add accent colors:
Repeat the process with your yellow and magenta paints, filling in gaps around the rim until the entire circumference is covered in beautiful, running drips. -
Guide stray drips:
If a drip looks like it’s going to stop too soon or veer off course, you can gently nudge it with the tip of a toothpick or a small brush. -
Wait for the paint to set:
Let this top section sit undisturbed. Depending on how thick your paint was applied, this could take a few hours to dry completely.
Step 3: Finishing Touches
-
Remove tape barrier:
Once the drips are tacky dry and no longer flowing, carefully peel away your painter’s tape to reveal the clean line below. -
Paint horizontal accents:
Using a small detail paintbrush and some undiluted paint (blue or green work well), hand-paint two or three thin horizontal lines right where the tape used to be. -
Clean up the bottom:
If any paint seeped under the tape or dripped too far, use a damp Q-tip or a hobby knife to gently scrape or wipe it away from the raw terracotta. -
Seal the artwork:
Terracotta is porous, so sealing is important. Take the pot to a ventilated area and spray the entire exterior with a clear acrylic sealer. -
Final cure:
Allow the sealed pot to cure for 24 hours before filling it with soil and potting your favorite plant.
Layered Look
Wait for the first layer of drips to dry completely, then do a second round with metallic gold or silver paint for a high-contrast, glamorous finish.
Place your color-splashed creation on a sunny windowsill and watch the light catch those vibrant paint trails

What Really Happens Inside the Kiln
Learn how time and temperature work together inside the kiln to transform clay into durable ceramic.
Ombre Fade Terracotta Pots
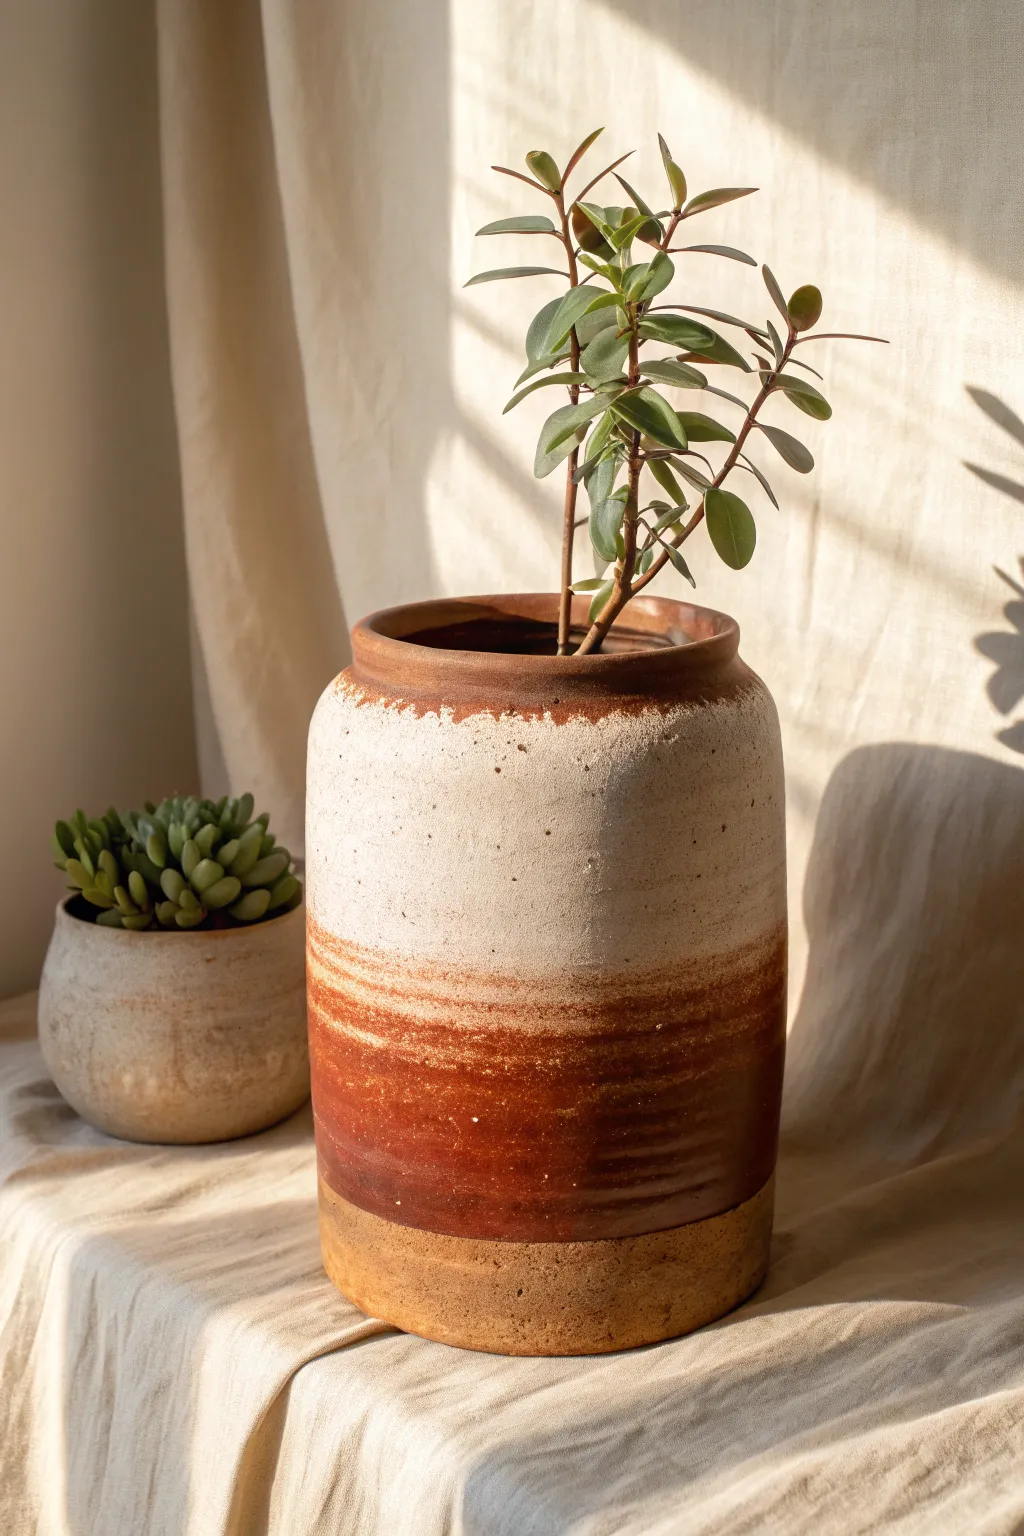
Transform a plain cylinder vase into a stunning piece of modern decor with this textured, three-tone ombre technique. This project mimics the look of high-end studio pottery by combining raw clay textures with rich, glazed-look paints.
Step-by-Step Tutorial
Materials
- Tall cylindrical terracotta or ceramic pot (unglazed is best)
- Stone-effect spray paint or texture medium (cream/sand color)
- High-gloss acrylic paint or glaze (burnt sienna/rust red)
- Matte acrylic paint (warm ochre/tan)
- Painter’s tape
- Sponge applicators or sea sponge
- Medium flat paintbrush
- Clear gloss sealant (brush-on)
- Sandpaper (medium grit)
- Plant for styling
Step 1: Preparation & Base
-
Clean surface:
Begin by wiping down your pot with a damp cloth to remove any dust or oils. If your pot is previously used, give it a good scrub and let it dry completely. -
Tape the base:
Measure about 2-3 inches up from the bottom of the pot. Wrap painter’s tape around the circumference at this height. This will protect the bottom section, preserving the ‘raw clay’ look seen in the inspiration image. -
Seal the bottom:
For the bottom section below the tape, apply a wash of matte warm ochre paint diluted with a little water if your pot isn’t naturally terracotta colored. This mimics the raw stoneware base.
Paint Peeling Off?
Terracotta is porous and can suck moisture from paint fast. If paint peels or cracks, prime the pot with a generic spray sealer first to create a stable surface.
Step 2: Creating the Texture
-
Shield the middle:
Once the bottom area is protected or dry, place a loose piece of paper or plastic wrap around the middle section of the pot where you plan to put the red glaze later, just to keep it somewhat clear of overspray. -
Apply texture top:
Spray the top third of the pot with your stone-effect spray paint. Alternatively, mix baking soda into cream-colored acrylic paint to create a thick, gritty paste and stipple it onto the top section. -
Feather the edge:
While applying the texture layer, let the bottom edge of this cream section fade out naturally. Don’t create a hard line; simply spray lighter or stipple less paint as you move down towards the middle. -
Dry thoroughly:
Let this textured layer dry completely. Stone sprays can sometimes take longer than standard paint, so I check the can instructions to be safe.
Step 3: The Glazed Middle
-
Prepare the glaze color:
Mix your burnt sienna acrylic paint with a gloss medium or use a high-gloss ceramic paint. You want a distinct shine that contrasts with the matte top and bottom. -
Apply the middle color:
Paint the middle section of the pot. Start from just above your bottom tape line and work your way up towards the textured cream section. -
Create the fade:
As you reach the transition zone where the red meets the cream, switch to a slightly drier brush or a sponge. Gently dab the red paint over the lower edge of the dried cream texture. -
Blend the transition:
Use a sea sponge to soften the line. The goal is a blurry, organic horizon line rather than a perfect stripe. The texture from the top layer will help catch the red paint naturally. -
Add depth:
To get that rich, fired-clay look, darker the red slightly at the very bottom of the red band, blending it up. This creates a subtle gradient within the color block itself.
Faking the Fired Look
Mix a tiny drop of metallic copper or bronze into your red ‘glaze’ section. It won’t look sparkly, but it adds a subtle depth that looks like mineral deposits in fired clay.
Step 4: Finishing Touches
-
Remove tape:
Carefully peel off the painter’s tape from the bottom section. If any red paint seeped under, quickly wipe it away with a damp cloth or sand it lightly once dry. -
Enhance the shine:
Once the paint is fully dry, apply a coat of high-gloss clear sealant ONLY over the red middle section. This mimics the partial glazing found on studio pottery. -
Detail the rim:
Don’t forget the inside rim. Paint the very top inner lip with the reddish-brown color to give the illusion that the inside of the vessel is fully glazed. -
Final cure:
Allow the entire pot to cure for at least 24 hours before use. This ensures the varying textures and finishes have set permanently.
Place your favorite structural plant inside and enjoy the warm, earthy vibes of your new custom vessel
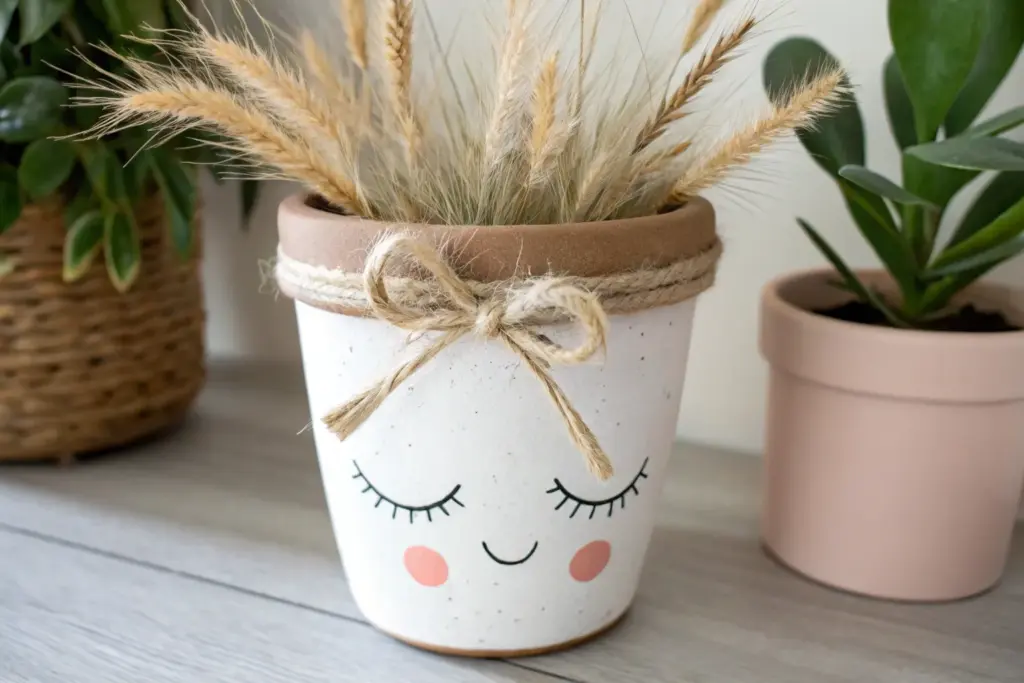
Minimalist Face Planters
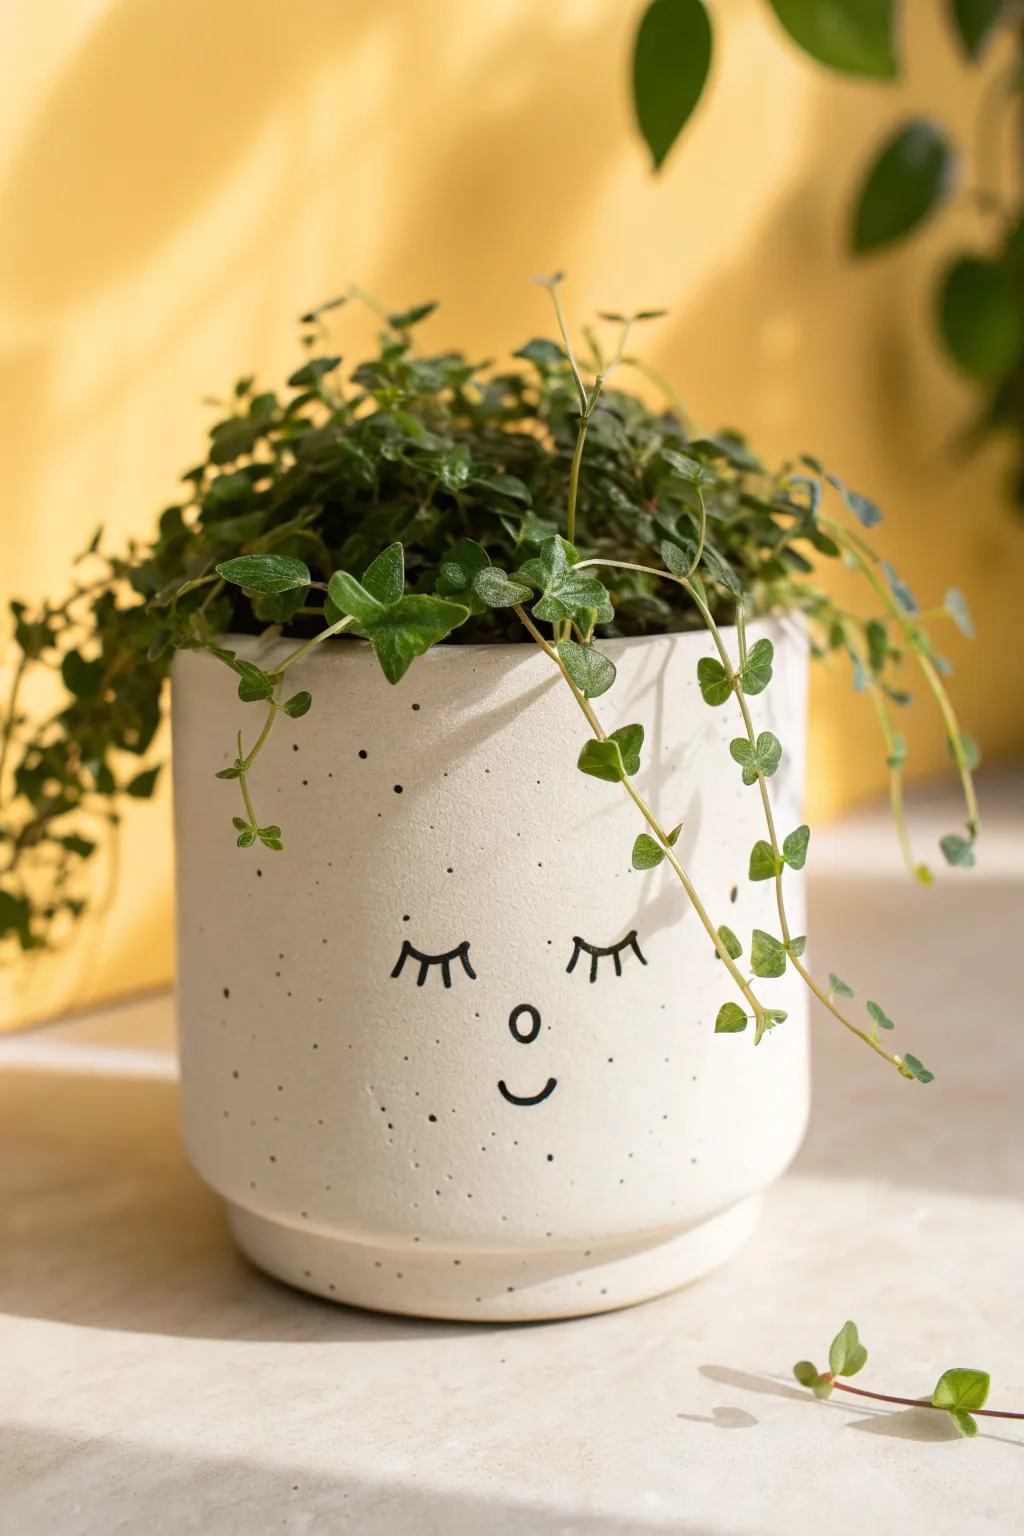
Transform a plain ceramic or clay pot into a charming character with this sweet, sleeping face design. The speckled finish adds a lovely touch of texture, while the simple line art ensures a clean, modern aesthetic perfect for trailing plants.
Step-by-Step
Materials
- Small to medium white ceramic or clay pot (cylinder shape)
- Black acrylic paint or black fluid acrylics
- Fine tip round paintbrush (size 0 or 1)
- Black fine-point permanent marker (optional alternative to paint)
- Wait acrylic paint (for speckling)
- Stiff bristle toothbrush or fan brush
- Matte spray sealer or varnish
- Pencil and eraser
- Paper palette or disposable plate
- Water cup and paper towels
Step 1: Preparation & Planning
-
Clean surface:
Begin by wiping down your ceramic pot with a damp cloth to remove any dust or oils, then let it dry completely to ensure the paint adheres properly. -
Sketch placement:
Lightly sketch the face design onto the center of the pot with a pencil. I usually start with the small circle nose in the middle to anchor the rest of the features. -
Outline eyes:
Sketch two soft, downward curves for the sleeping eyelids on either side of the nose, ensuring they are symmetrical. -
Add lashes:
Draw three small vertical dashes extending upward from each eyelid curve to create the eyelashes. -
Draft the smile:
Place a small, upward-curved semi-circle directly below the nose to form a gentle smile.
Step 2: Painting the Features
-
Load brush:
Squeeze a small amount of black acrylic paint onto your palette. Dip your fine tip brush (size 0 works best) into the paint and twist the bristles slightly on the palette to create a sharp point. -
Paint the nose:
Carefully trace over your pencil circle for the nose. Keep your hand steady and close the loop neatly. -
Trace eyelids:
Using a single fluid motion if possible, paint the downward curves of the eyelids over your pencil lines. -
Detail lashes:
With the very tip of the brush, flick the paint upwards to create the three lashes on each eye. Less pressure makes for finer lines. -
Paint the mouth:
Trace the small smile curve below the nose. If you are nervous about using a brush, a fine-point permanent marker can be used for these steps instead. -
Dry features:
Allow the black paint to dry strictly for about 15-20 minutes before moving to the next phase to avoid smudging. -
Check density:
If the black looks a bit transparent after drying, carefully apply a second thin coat over the lines to make the face bold and crisp.
Uneven Lines?
If your painted lines are shaky, wait for the paint to dry completely. Then, use a toothpick to gently scrape away the jagged edges and refine the shape.
Step 3: Adding Texture & Finishing
-
Prepare speckle mix:
Mix a tiny amount of black paint with a few drops of water on your palette until it reaches an inky, fluid consistency. -
Load splatter tool:
Dip the tips of a stiff toothbrush or a fan brush into the watered-down black paint. -
Test spray:
Test the splatter technique on a piece of scrap paper first by running your thumb across the bristles to flick paint. This helps you gauge the size of the dots. -
Apply speckles:
Hold the brush near the pot and gently flick the bristles to spray fine black dots across the surface. Aim for random, uneven coverage for a natural stone look. -
Protect the face:
Try to avoid clustering too many heavy speckles directly over the face features so the expression remains clear. -
Erase guidelines:
Once the paint is absolutely bone dry, gently erase any visible pencil marks remaining around the black features. -
Seal the art:
Apply a clear matte spray sealer over the entire pot. This protects the delicate paint from water damage when you eventually water your plant. -
Final dry:
Let the sealer cure for the time recommended on the can, usually 24 hours, before potting your plant.
Pro Tip: Masking
Cover the painted face with a scrap of paper or painter’s tape before doing the splatter step. This keeps the eyes and mouth clean while adding texture to the rest.
Pop in a trailing plant like ivy or string of pearls to give your new sleepy friend some beautiful green hair


The Complete Guide to Pottery Troubleshooting
Uncover the most common ceramic mistakes—from cracking clay to failed glazes—and learn how to fix them fast.
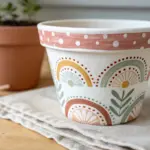
Fabric Decoupage “Wallpaper” Pots
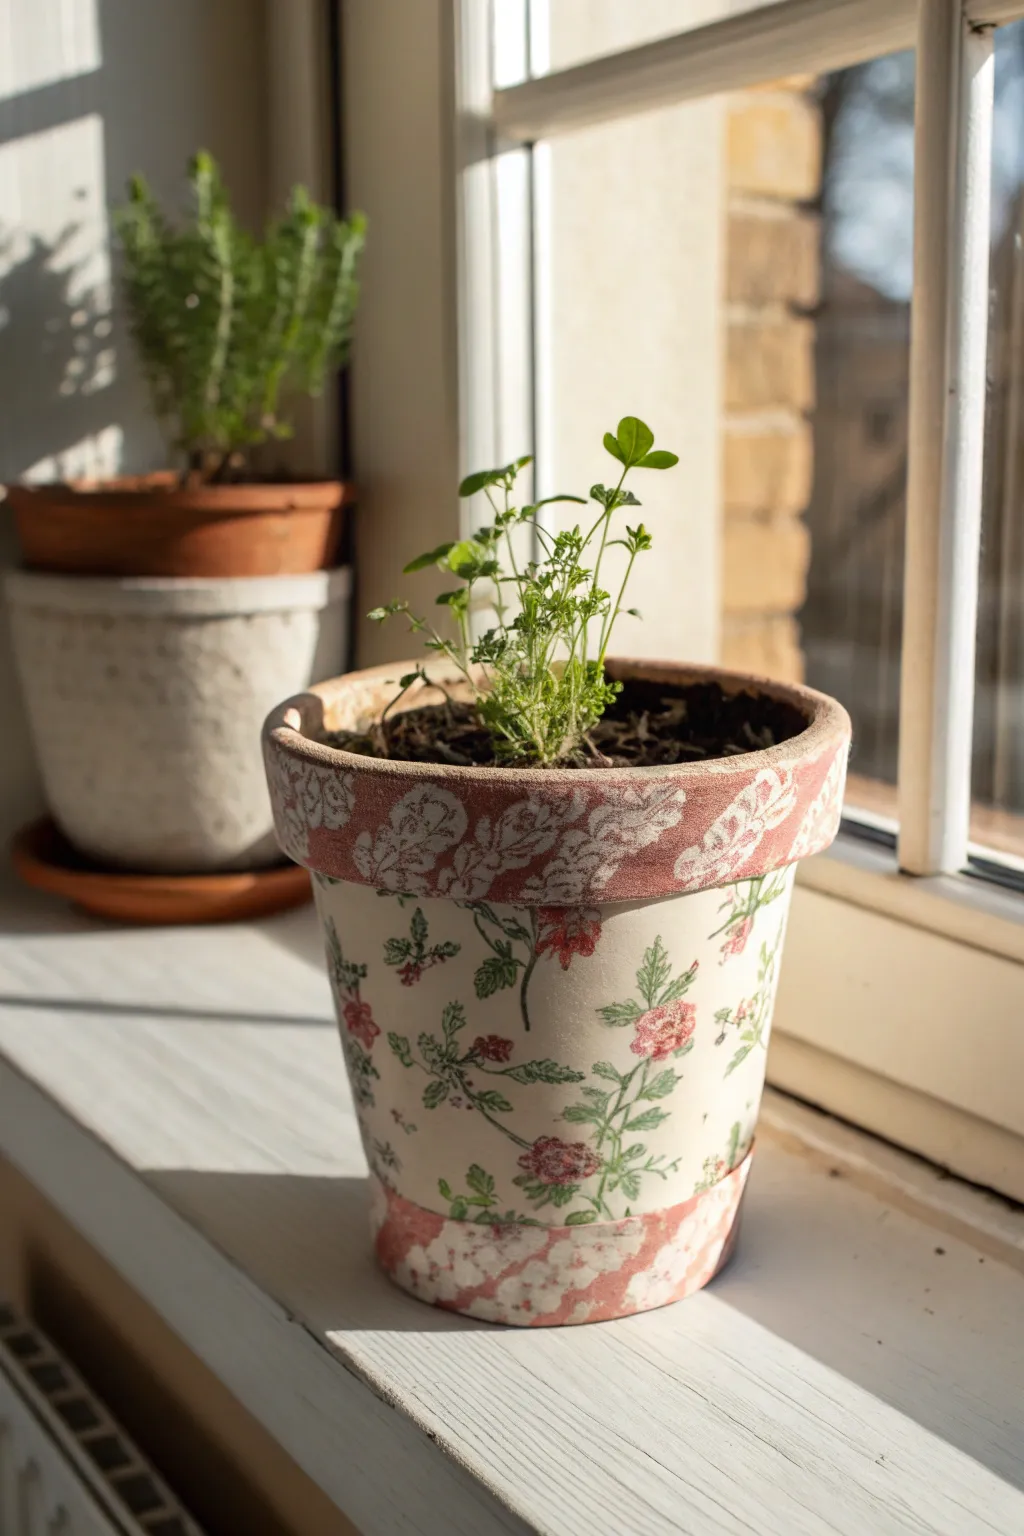
Give your plain terracotta pots a charming vintage makeover using the art of fabric decoupage. This technique creates a seamless, paint-like finish that mimics the look of high-end floral wallpaper, complete with coordinating borders for a polished effect.
Step-by-Step Tutorial
Materials
- Clean terracotta pot (standard size)
- White acrylic primer or gesso
- Cotton fabric with a small floral print (light background)
- Coordinating fabric for trim (solid color or subtle pattern like dusty pink damask)
- Decoupage medium (like Mod Podge Matte or Outdoor)
- Foam brushes or soft bristle brushes
- Fabric scissors (sharp)
- Rotary cutter and cutting mat (optional but helpful)
- Measuring tape
- Pencil
- Waterproofing sealer (spray or brush-on)
- Fine-grit sandpaper (optional)
Step 1: Preparation
-
Clean surface:
Begin by thoroughly cleaning your clay pot to remove any dust or oils. If it’s an old pot, scrub it well and let it dry completely to ensure good adhesion. -
Prime the pot:
Apply a coat of white acrylic primer or gesso over the entire exterior of the pot. Terracotta is porous and dark; painting it white ensures your light-colored fabric print will pop rather than looking muddy. -
Dry and smooth:
Allow the primer to dry fully, usually about 30 minutes. If the surface feels rough, lightly sand it with fine-grit sandpaper for a smoother canvas.
Step 2: Cutting the Fabric
-
Measure the main body:
Measure the height of the main section of the pot where you want the floral pattern to go, leaving space at the top rim and the very bottom for your border trim. -
Calculate circumference:
Measure the circumference of the pot at its widest point and add about an inch for overlap. -
Cut main strip:
Cut a strip of your main floral fabric according to these measurements. Because standard pots are tapered, cutting the fabric on the bias (diagonal) can help it stretch and mold around the curves more easily without pleating. -
Cut border strips:
Cut two strips from your coordinating trim fabric. One should be wide enough to cover the top rim (and wrap slightly inside), and the other should fit the bottom base area. Roughly 1 to 1.5 inches wide usually works well.
Bias Cut Trick
Cutting your fabric strips on the bias (at a 45-degree angle to the grain) gives the fabric stretch, helping it lay flat against the tapered curve of the pot without wrinkling.
Step 3: Application
-
Apply medium to pot:
Working in small sections, brush a generous layer of decoupage medium onto the middle section of the white-primed pot. -
Adhere main fabric:
Press the floral fabric strip onto the wet medium. Use your fingers to smooth it out from the center toward the edges to release air bubbles. I find starting in the middle and working outward prevents warping. -
Wrap and seam:
Continue applying medium and wrapping the fabric until the ends meet. Fold the raw edge of the overlap under slightly for a clean seam, add a bit more medium, and press down firmly. -
Seal main fabric:
Immediately apply a top coat of decoupage medium over the fabric to saturate it, which bonds the fibers to the pot. -
Apply top rim:
Brush medium onto the thick rim of the pot. Apply your coordinating border strip here. Let about half an inch hang over the top edge. -
Wrap rim edge:
Make small vertical snips in the overhanging fabric at the top. This allows you to fold the fabric down inside the pot smoothly without it bunching up. Glue these flaps down on the inner rim. -
Apply bottom border:
Repeat the process for the bottom strip. Apply medium near the base, press on the fabric strip, and ensure it overlaps slightly with the floral section to cover any white gaps. -
Smooth the bottom:
If there is excess fabric hanging off the very bottom, snip it or fold it neatly underneath the pot base and glue it down securely.
Tea Stain Finish
For an antique look, lightly sponge diluted tea or watered-down brown acrylic paint over the dried fabric before sealing to give it an aged, vintage patina.
Step 4: Finishing Touches
-
Final drying:
Allow the entire project to dry for at least 24 hours. The mixture of glue and fabric will turn cloudy at first but dries clear. -
Waterproof sealing:
Since this is a planter, protection is key. Apply two to three coats of a clear, outdoor-rated sealer (acrylic spray or brush-on varnish) to protect the fabric from water damage when you water your plants.
Now your ordinary clay pot is dressed up in its Sunday best and ready for a sunny windowsill.
Leaf-Print Texture Pots
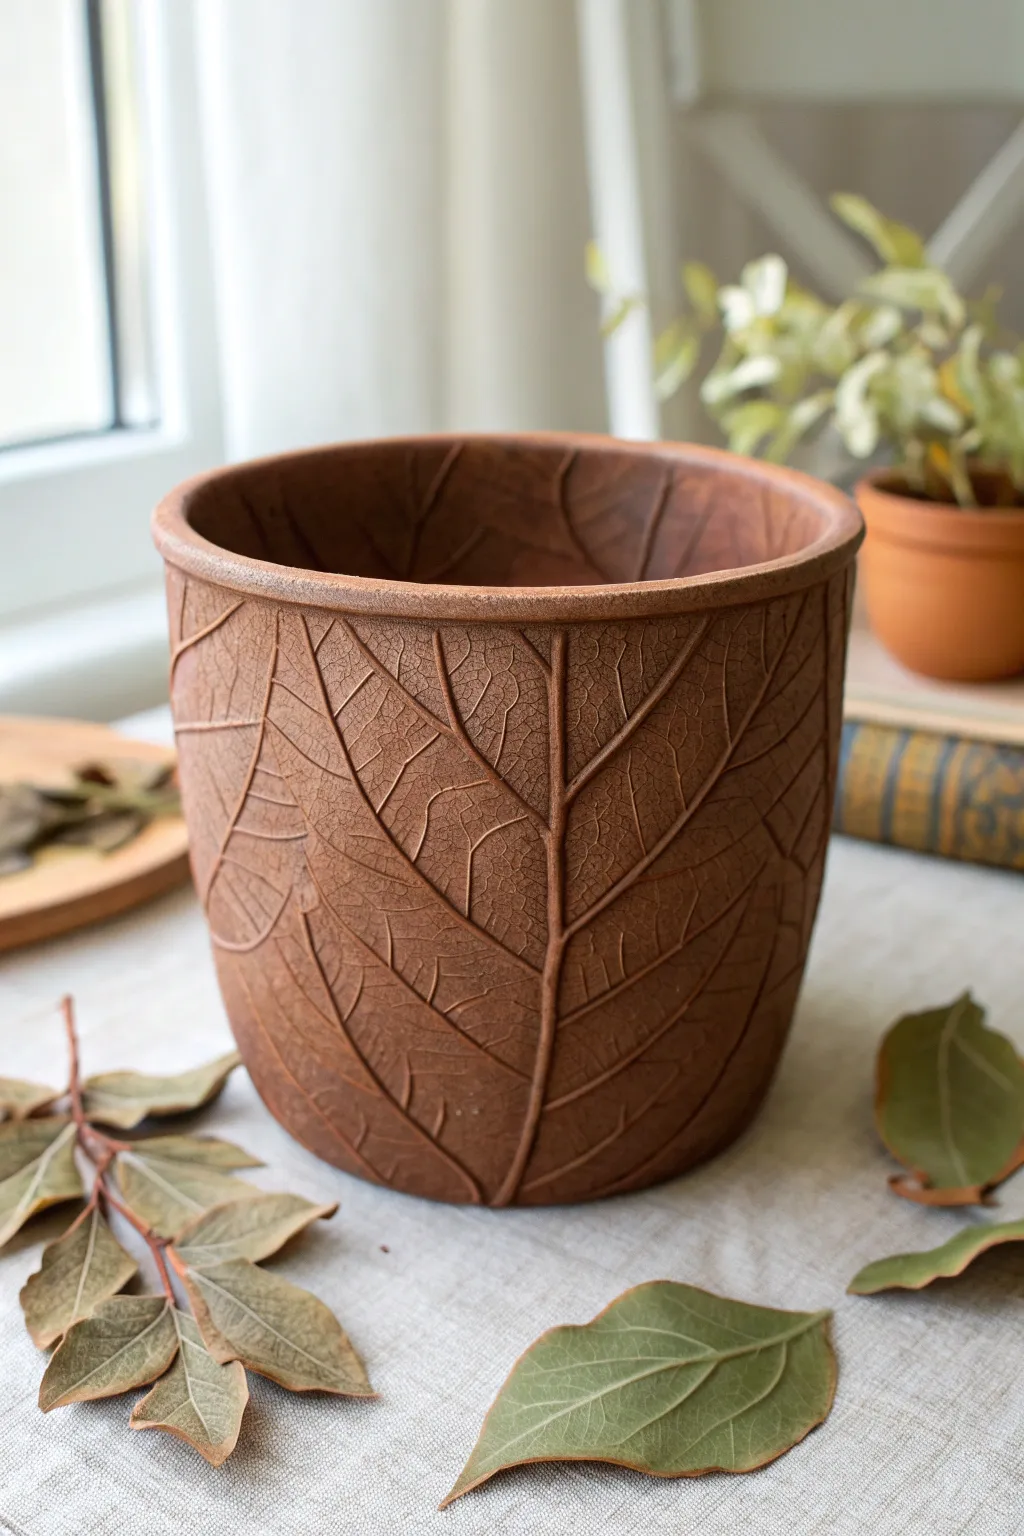
Transform a plain planter into an organic masterpiece with this deep-relief leaf texture project. By utilizing real foliage and air-dry clay, you will create a vessel that looks like it was sculpted straight from the earth, featuring stunningly detailed veins and a warm, natural finish.
Step-by-Step
Materials
- Plastic or ceramic base pot
- Brown air-dry clay (terracotta color)
- Large, heavily veined leaves (like hydrangea or large ficus)
- Rolling pin
- Clay sculpting tools or a dull knife
- Sponge
- Water bowl
- Clear matte acrylic sealer (spray or brush-on)
- Sandpaper (fine grit)
- Dark brown acrylic paint (optional for antiquing)
- Paper towels
Step 1: Preparing the Base
-
Clean surface:
Begin by wiping down your base pot with a damp cloth to remove any dust or oils. This ensures the clay adheres firmly to the surface. -
Score the pot:
If you are using a smooth plastic pot, use coarse sandpaper to roughen the exterior surface significantly. This scratchy texture acts like a ‘tooth’ for the clay to grab onto.
Clay Cracking?
If small cracks appear while drying, mix a tiny amount of fresh clay with water to make a paste and fill the cracks, then smooth with a damp finger.
Step 2: Creating the Leaf Impressions
-
Roll the clay slab:
Take a large chunk of your terracotta-colored air-dry clay and roll it out on a flat surface into a slab about 1/4 inch thick. Aim for a rectangular shape that roughly matches the height of your pot. -
Select your leaves:
Choose fresh leaves with thick, prominent veins on the backside. Dried leaves tend to crumble, so fresh is best for a crisp impression. -
Press the texture:
Arrange the leaves vein-side down onto your rolled clay slab. Using your rolling pin, roll firmly over the leaves to embed them into the clay. You want to press hard enough to capture the tiny capillaries, not just the main stem. -
Remove the foliage:
Carefully peel the leaves off the clay. You should see a beautiful, negative impression of the leaf structure remaining in the slab.
Use Fresh Leaves
Using limp or thin leaves won’t leave a deep impression. Choose stiff leaves like hydrangea, hosta, or rhododendron for the boldest texture.
Step 3: Application and Sculpting
-
Cut to size:
Measure the height of your pot again and trim your clay slab into panels or strips that will fit around it. It’s easier to work in sections rather than one giant sheet. -
Apply adhesive:
Brush a thin layer of slip (clay mixed with water) or clear craft glue onto the pot’s surface where the first panel will go. -
Attach the clay:
Gently lift a textured clay panel and press it onto the pot. Be careful not to squash the leaf texture you just created. Press from the inside rim or smoothing the very edges to secure it. -
Blend the seams:
Repeat with remaining panels until the pot is covered. Where the edges meet, use a sculpting tool or your finger with a little water to blend the clay together, trying to follow the natural lines of the leaf pattern to hide the join. -
Refine the rim:
Fold the excess clay at the top over the rim of the pot and smooth it down inside for a finished look. Use a damp sponge to soften this top edge. -
Deepen the details:
I like to take a sculpting tool at this stage and manually deepen the main vein lines if they got flattened during application. This emphasizes the organic structure.
Step 4: Finishing Touches
-
Dry completely:
Let the pot sit in a dry, room-temperature area for at least 24-48 hours. The clay will lighten in color as it dries. -
Sand edges:
Once fully dry, use fine-grit sandpaper to gently smooth any sharp ridges on the rim or base, being careful to avoid the textured leaf areas. -
Antique wash (optional):
To make the veins pop like in the photo, mix a very watery dark brown paint. Brush it over the texture and immediately wipe the raised areas clean with a damp paper towel. The dark paint stays in the crevices. -
Seal the work:
Finish by applying two coats of matte acrylic sealer. This protects the air-dry clay from moisture and gives the pot a durable, finished quality.
Place your favorite indoor plant inside and enjoy the earthy charm this unique planter brings to your space

TRACK YOUR CERAMIC JOURNEY
Capture glaze tests, firing details, and creative progress—all in one simple printable. Make your projects easier to repeat and improve.
Distressed Vintage Clay Pots
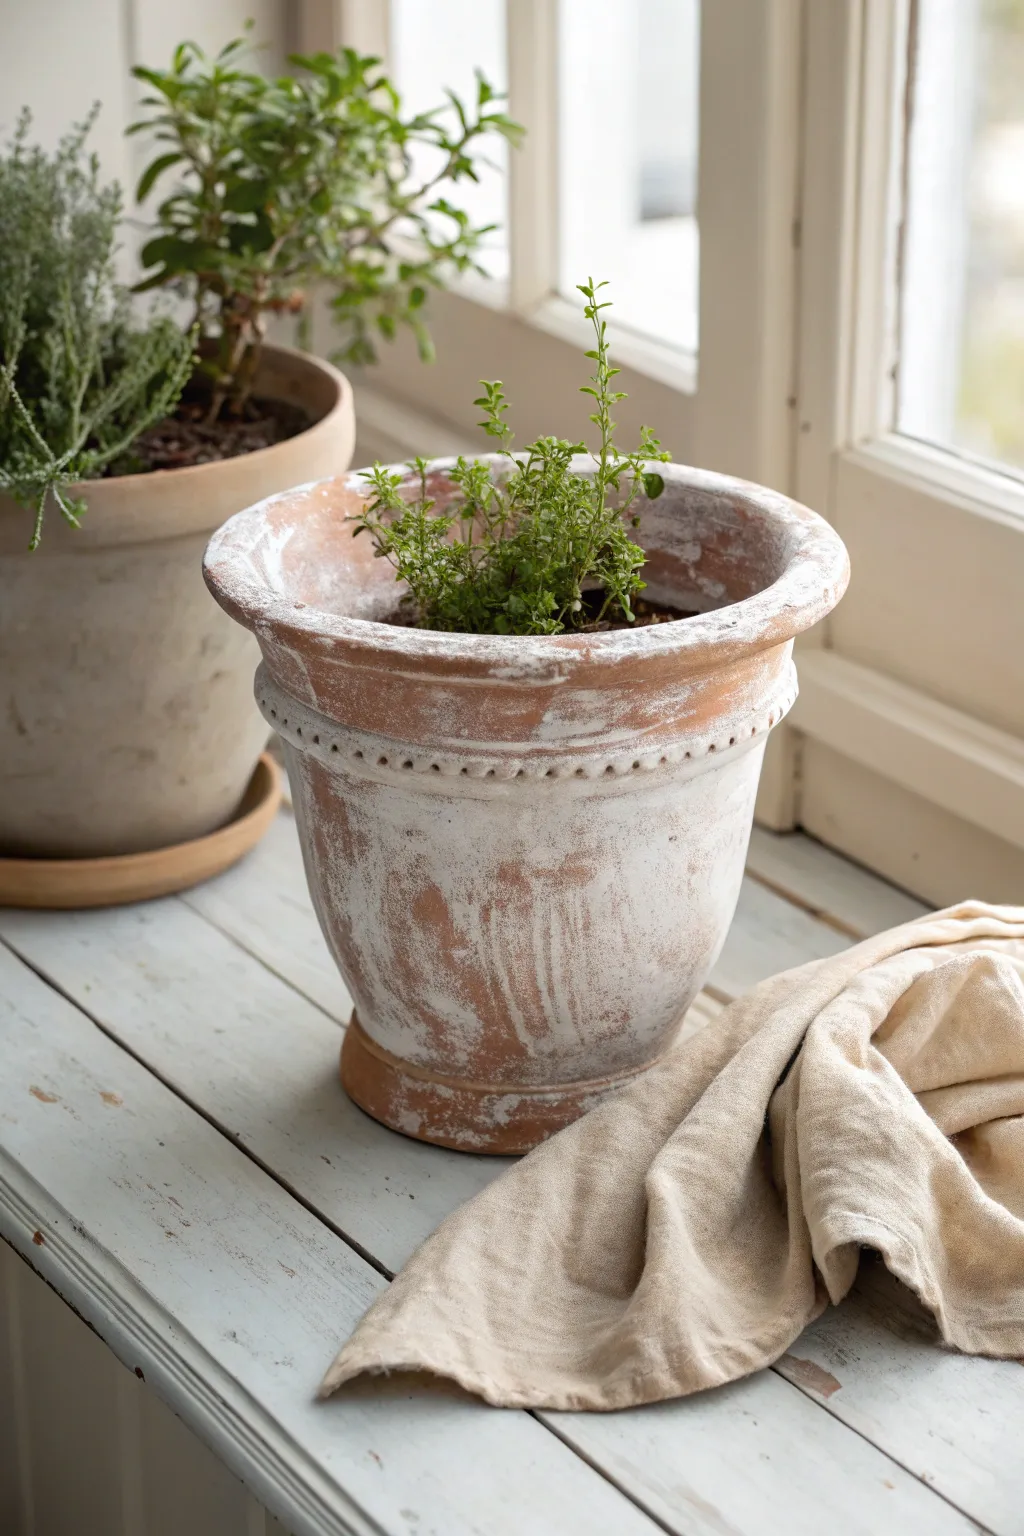
Transform a standard orange terracotta pot into a charming, time-worn relic that looks like it has spent decades in an old French garden. This layering technique creates an authentic dusty white finish that highlights the pot’s natural texture.
How-To Guide
Materials
- Terracotta pot (preferably with rim detailing)
- White matte acrylic paint or chalk paint
- Plaster of Paris powder (optional, for texture)
- Water
- Medium-grit sandpaper (100-150 grit)
- Clean cotton rags or paper towels
- Small plastic container for mixing
- Chip brush or old bristle brush
- Clear matte sealer spray (optional)
Step 1: Preparation and Base Coat
-
Clean surface:
Begin by wiping down your terracotta pot with a damp cloth. You need to remove any dust or sticker residue to ensure the paint adheres properly, but don’t soak the porous clay. -
Mix the wash:
In your small container, combine white paint with water. Aim for a 50/50 ratio initially. The consistency should be like milk—thin enough to drip but opaque enough to change the color. -
Add texture (optional):
For that crusty, mineral-deposit look seen in the photo, stir in a teaspoon of Plaster of Paris powder. This creates a gritty texture that mimics natural salt buildup on old pots. -
Apply the first wash:
Dip your chip brush into the watery mixture and slather it generously over the entire exterior of the pot. Don’t worry about brush strokes; messy application helps the vintage effect. -
Wipe back:
Immediately take a dry cotton rag and wipe off about 70% of the paint you just applied. You want the terracotta orange to show through clearly, leaving white mainly in the pores and crevices.
Step 2: Building the Weathered Layers
-
Dry brush heavy areas:
Once the first layer is dry to the touch (usually 10-15 minutes), dip just the tips of your dry brush into un-thinned white paint. Dab it onto a paper towel until almost no paint comes off. -
Highlight the rim:
Lightly drag this dry brush over the rim and any raised details, like the decorative ridge shown in the example. This highlights the sculpture of the pot. -
Create patchy deposits:
Stipple (pounce) the brush randomly on the body of the pot to create patches of thicker white. I like to focus on the bottom third, where water minerals would naturally collect. -
Smear and blend:
Before these thicker patches dry, use a slightly damp rag to smear the edges. This eliminates harsh brush marks and makes the ‘aging’ look organic rather than painted on. -
Inside rim:
Don’t forget to paint the top 2 inches of the pot’s interior. Soil will cover the rest, but the exposed inner rim needs to match the exterior styling.
Too Much White?
If you accidentally covered too much orange, don’t panic. Wet a rag with warm water and scrub the paint vigorously. Acrylic washes are forgiving and can usually be reactivated and thinned before fully curing.
Step 3: Distressing and Finishing
-
Sanding for exposure:
When completely dry, grab your sandpaper. Aggressively sand areas where the white paint looks too uniform or thick. -
Scuff crucial spots:
Focus sanding heavily on the very top of the rim and the protruding ring detail. In a real vintage pot, these areas would be rubbed clean by handling, so revealing the raw clay here adds realism. -
Vertical distressing:
Run the sandpaper vertically down the sides of the pot a few times. This creates subtle vertical scratches that mimic rain runoff marks. -
Dust off:
Use a dry brush or clean cloth to sweep away all the sanding dust. You’ll see the beautiful contrast between the rusty clay and the chalky white recesses emerge. -
Assessment:
Step back and look at the pot. If it looks too orange, add another very light watery wash over everything. If it looks too white, sand more aggressively. -
Sealing (optional):
If this pot is going outdoors, spray it with a matte clear sealer. However, leaving it unsealed allows the clay to breathe and continue aging naturally over time.
Add Greenery
To mimic moss growth for an even older look, dab tiny spots of watered-down sage green craft paint into the deepest crevices or under the rim before doing your final sanding.
Now you have a beautifully aged vessel ready to house your favorite herbs on a sunny windowsill
Raised Clay Appliqué Details
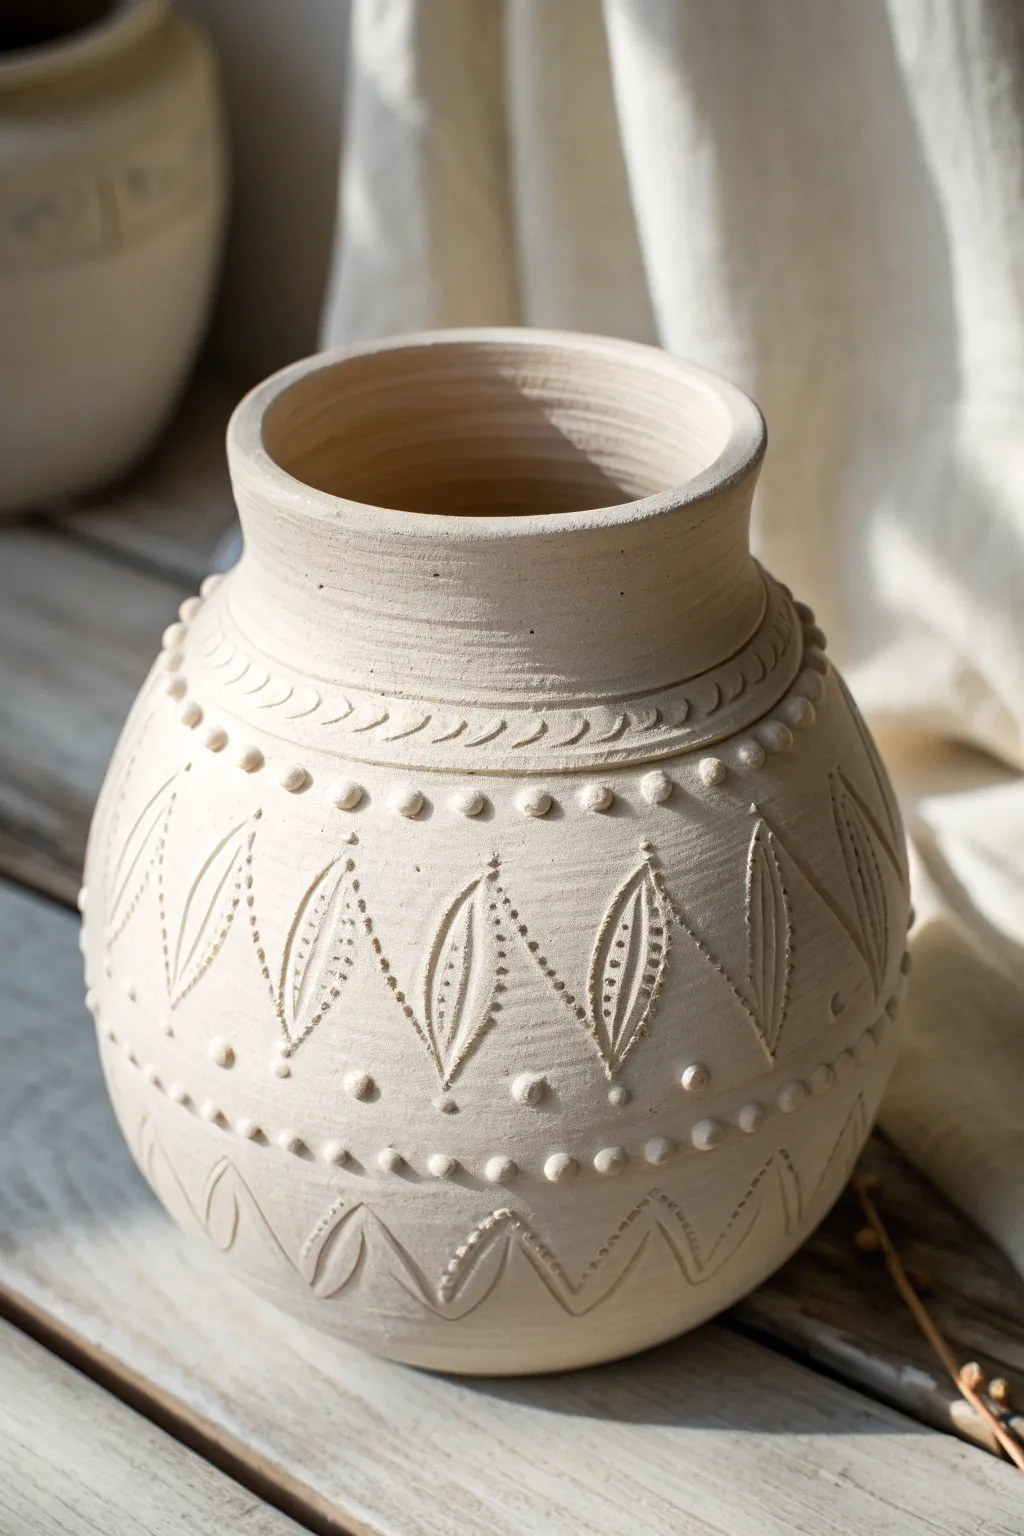
Recreate the raw, earthy beauty of traditional coil-built pottery with this textured vessel project. Featuring tactile raised clay beads and deeply incised leaf patterns, this pot celebrates the contrast between smooth surfaces and rhythmic details.
Detailed Instructions
Materials
- Stoneware clay (smooth body preferred)
- Pottery wheel (or materials for coil building)
- Rib tool (metal or rubber)
- Needle tool
- Loop tool (small)
- Slip (clay slurry)
- Score and slip tool (or serrated rib)
- Sponge
- Wire cutter
- Wooden modeling tool
Step 1: Forming the Vessel
-
Prepare the Clay:
Wedge about 3-4 pounds of stoneware clay thoroughly to remove air bubbles. Center the clay on the pottery wheel head, ensuring it feels stable and even. -
Open and Pull:
Open the centered clay and begin pulling up the walls. Aim for a cylinder first, keeping the walls relatively thick (about 1/4 to 3/8 inch) to support the later texture work. -
Shape the Belly:
Gently push the walls outward from the inside to create a rounded, bulbous belly. Use a flexible rib on the outside to smooth and maintain the curve as you expand the form. -
Collar the Neck:
Gradually collar in the top section to create a distinct, narrower neck. This compression strengthens the rim area and creates a pleasing silhouette. -
Refine the Rim:
Using a chamois or sponge, smooth the rim, allowing it to flair slightly outward. Use a metal rib to scrape the exterior walls smooth, removing throwing lines.
Step 2: Adding the Appliqué Details
-
Map the Horizontal Lines:
While the pot is leather hard, place it back on the wheel (or a banding wheel). Allow it to spin slowly and use a needle tool to lightly scribe horizontal guide rings: one at the base of the neck and two parallel lines around the shoulder. -
Carve the Shoulder Band:
Between the two shoulder lines, use a small loop tool to carve repetitive, crescent-shaped gouges. These should be angled slightly to look like a twisted rope or chevron pattern. -
Roll Clay Spheres:
Roll out dozens of tiny, uniform clay balls (approx. the size of a pea). Keep them under a damp cloth so they don’t dry out while you work. -
Attach the Neck Beads:
Score the area just below the carved shoulder band. Apply a dab of slip to each tiny clay ball and press them firmly onto the pot in a tight, horizontal row. -
Create the Belly Row:
Repeat the bead attachment process around the widest part of the belly to frame the central design area. Ensure the spacing is even.
Clean Beading
When attaching the small clay balls, use a hollow coffee stirrer or straw to press over them. It seats them firmly and leaves a perfect ring detail.
Step 3: Creating the Incised Pattern
-
Mark Vertical Guides:
Lightly mark vertical reference points around the main body to ensure your leaf shapes are evenly spaced. A simple geometric division works best here. -
Outline the Leaves:
Using a needle tool, lightly draw tall, pointed elliptical shapes (leaves) standing upright. Leave space between them for inverted triangles or smaller details. -
Carve the Perimeter:
Go over your outline with a sharper tool or small loop tool to deepen the cut, creating a distinct groove that separates the leaf shape from the background. -
Add Dotted Texture:
On the inside of every other leaf shape (or alternating sides of the zigzag), use the point of a needle tool to poke a vertical row of small holes for texture. -
Inscribe Center Lines:
Draw a central vertical line through each leaf shape using a stylus or modeling tool. I usually like to press slightly harder here to create a valley. -
Add Decorative Beads:
Attach a single clay bead at the top point of each leaf shape and periodically along the bottom border row for added dimension. -
Bottom Border:
Create a final row of simplified triangular carvings near the foot of the pot to mirror the upward energy of the main leaves. -
Final Smoothing:
Once all carving and additions are complete, use a slightly damp sponge to gently soften any sharp burrs or clay crumbs, being careful not to wash away the crisp details.
Oxide Wash Finish
Instead of a heavy glaze, apply an iron oxide wash after bisque firing and wipe it back. This highlights the textures and deepest carvings perfectly.
Let the pot dry slowly under loose plastic to prevent the appliqué details from cracking away from the body
Painted Cactus Illusion Pots
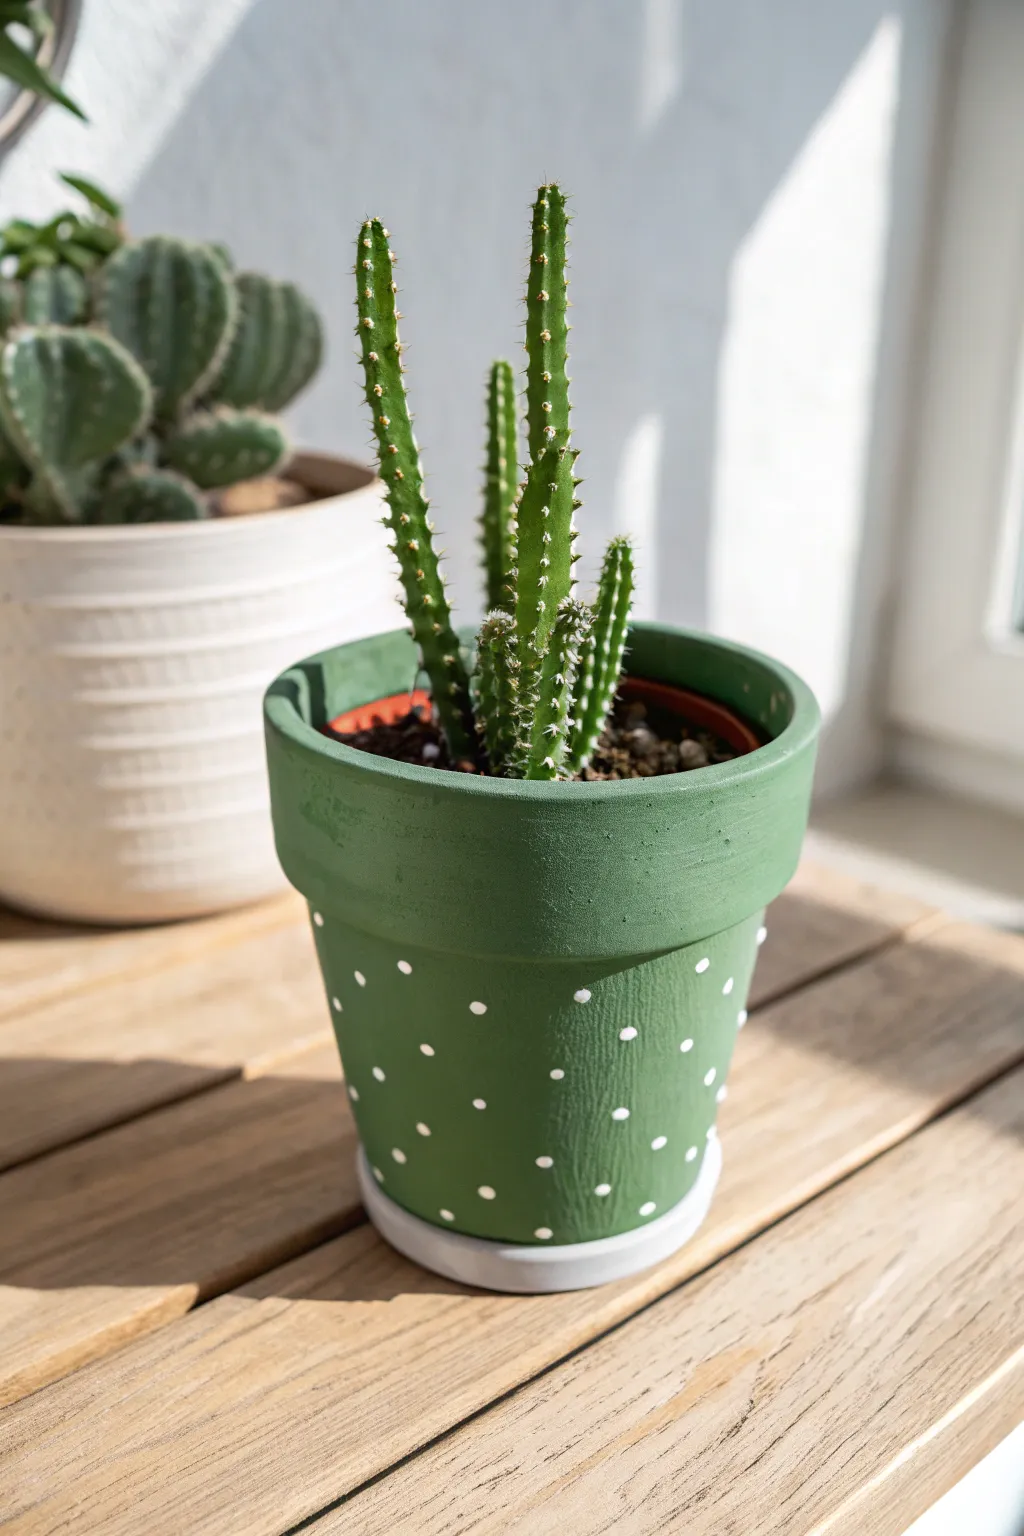
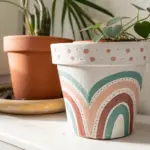
Playfully mimic the look of your prickly plants with this charming green-on-green project. By matching the pot’s base coat to your cactus stems and adding delicate white dots to represent spines, you create a cohesive and stylish home for your succulents.
Step-by-Step Tutorial
Materials
- Small terracotta pot with saucer
- Leaf green acrylic paint (matte finish)
- White acrylic paint
- Foam sponge brush or soft flat brush
- Small round detail brush (size 1 or 2)
- Water container for rinsing
- Paper towels
- Newspaper or drop cloth
- Clear matte acrylic sealer spray (optional)
- Small cactus (like Fairy Castle or similar columnar species)
- Cactus potting mix
Step 1: Base Coat Application
-
Clean surface:
Begin by wiping down your terracotta pot and saucer with a slightly damp cloth to remove any dust or warehouse grit. Let the clay dry completely before opening your paint. -
First layer of green:
Squeeze a generous amount of leaf green acrylic paint onto your palette. Using your foam sponge or flat brush, apply a smooth, even coat over the entire exterior of the pot, including the top rim. -
Cover the saucer:
While the main pot is wet, paint the outer edge of the saucer with your green paint. You can leave the very bottom bare, but ensure the visible lip is fully covered. -
Inner rim detail:
Don’t forget to paint about an inch down into the inside of the pot. Since the soil won’t fill it to the very brim, this ensures perfectly seamless coverage. -
Dry and repeat:
Allow the first coat to dry for about 15-20 minutes. Apply a second coat to ensure the terracotta color doesn’t show through, creating a solid, opaque green finish. -
Inspect coverage:
Check for any brush strokes or thin spots. If needed, a third thin coat can really make the color pop and smooth out the texture.
Step 2: Creating the Polka Dot Pattern
-
Prepare the white paint:
Place a small dollop of white acrylic paint on your palette. For crisp dots, you want the paint to be fluid but not watery. -
Load the detail brush:
Dip just the tip of your small round detail brush into the white paint. You don’t need to overload it; a small amount gives you better control. -
Start the first row:
Begin painting your dots near the top rim. Press the tip gently against the pot to create a small, circular dot. Space them about an inch apart horizontally. -
Establish the pattern:
Move down to start a second row. Position these new dots roughly centered between the dots of the row above, creating a staggered or ‘brick’ layout. -
Maintain consistency:
Continue this alternating pattern down the body of the pot. I find it helpful to rotate the pot slowly as I work to keep my spacing consistent. -
Varying sizes:
Don’t stress about making every dot perfectly identical. Slight variations in size actually make the pattern feel more organic and visually interesting. -
Saucer details:
Add a single row of white dots around the painted rim of the saucer to tie the two pieces together visually. -
Touch-up time:
If any dots look too thin or transparent, carefully dab a tiny bit more white paint on top once the first layer is dry to brighten them up.
Uneven Dots?
If your brush makes messy dots, try dipping the non-brush end of a paintbrush or a Q-tip into the paint and stamping the dots instead for perfect circles.
Step 3: Finishing and Planting
-
Seal the work:
Once all paint is thoroughly dry (give it at least an hour), take the pot outside and spray it with a clear matte acrylic sealer. This protects the paint from water damage when you water your plant. -
Add potting mix:
Fill the bottom third of your dry pot with specific cactus potting mix, which drains better than standard soil. -
Position the cactus:
Gently remove your cactus from its nursery pot (wear gloves!) and center it in your freshly painted creation. -
Top off:
Fill the rest of the space with soil, pressing down gently to secure the plant. The green pot should now perfectly complement the green stems.
Matching Your Plant
Bring your succulent with you when buying paint. Match the green base coat to the plant’s skin and the dot color to its spines for a true ‘illusion’ effect.
Step back and enjoy how your new pot perfectly mimics the texture and color of the life growing inside it
Fairy Door Pot Cottage
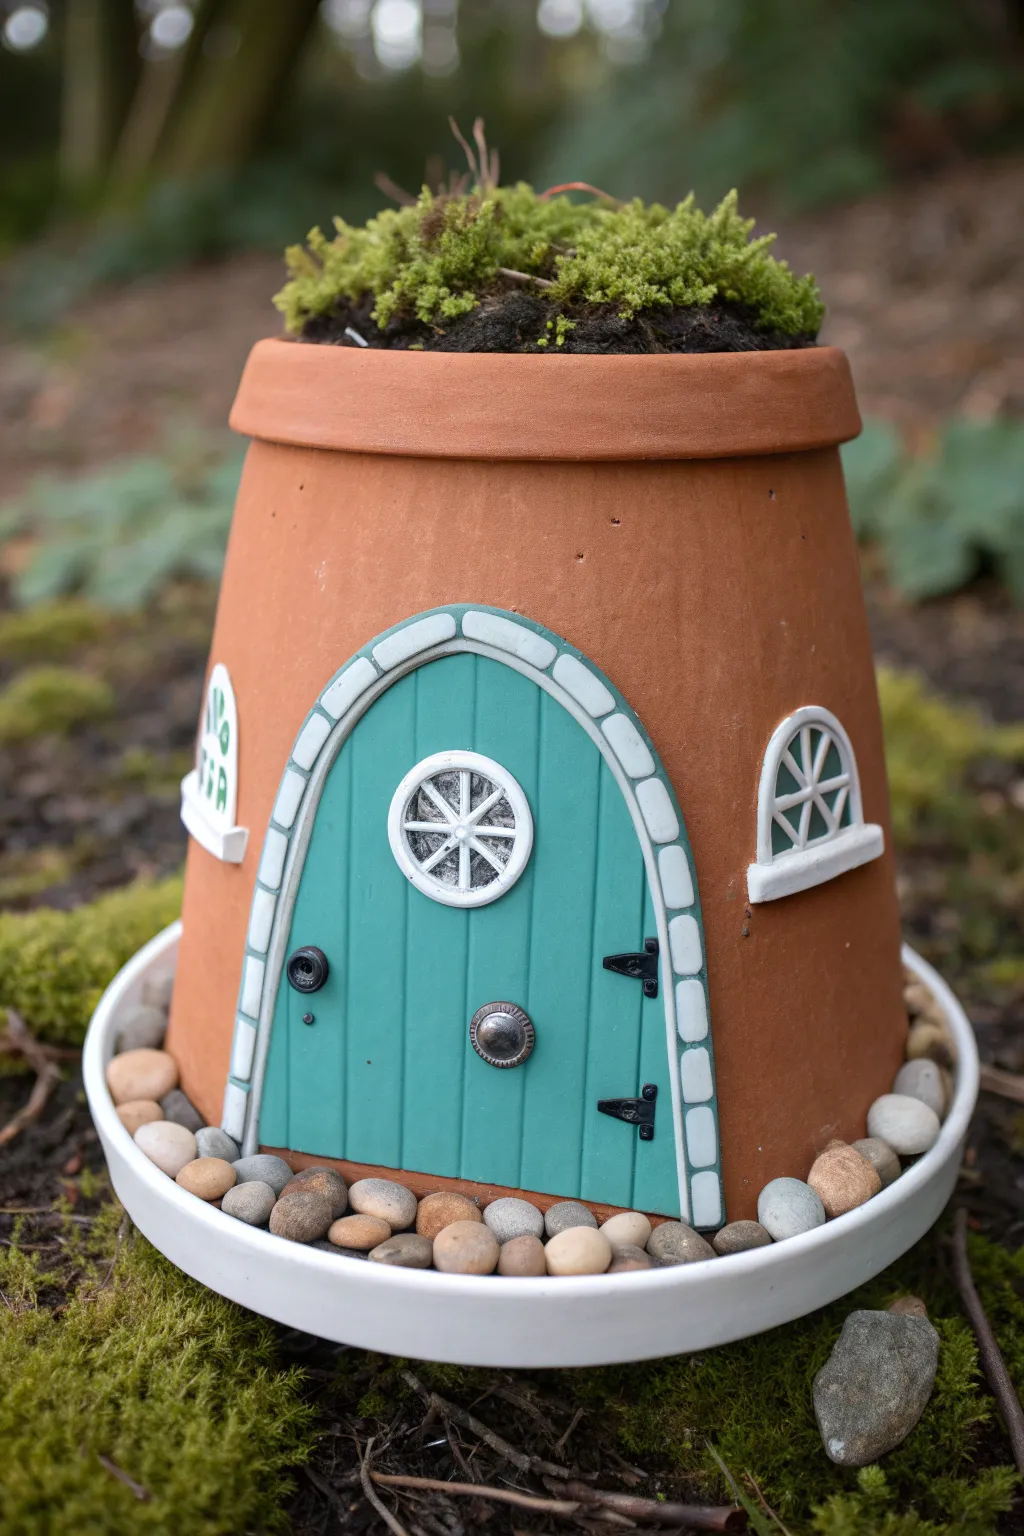
Transform a simple terracotta pot into an enchanting abode for garden fairies with this charming project. By inverting the pot and adding detailed architectural elements, you can create a delightful miniature cottage topped with a living moss roof.
Detailed Instructions
Materials
- Medium-sized terracotta pot (standard shape or azalea pot)
- White or terracotta saucer (slightly larger than the pot’s rim)
- Self-hardening clay or polymer clay (white and terracotta colored)
- Teal or seafoam green acrylic paint
- White acrylic paint
- Silver or metallic grey acrylic paint
- Black acrylic paint
- Strong waterproof adhesive (e.g., E6000 or outdoor craft glue)
- Small pebbles or river rocks
- Potting soil
- Live moss or faux craft moss
- Sculpting tools or a toothpick
- Fine detail paintbrush
- Flat paintbrush
- Matte clear sealant spray
Step 1: Preparing the Base
-
Clean the surface:
Begin by thoroughly cleaning your terracotta pot and saucer to remove any dust or oils. Let them dry completely, as moisture can prevent the clay and glue from adhering properly. -
Plan the layout:
Invert the pot so the wide opening is facing down. This will be the orientation of your cottage. Lightly mark with a pencil where you want your door and windows to sit to ensure they are centered and level.
Sticky Situation?
If clay pieces slide down the curved pot while gluing, use strips of low-tack painter’s tape to strap them in place until the adhesive cures completely.
Step 2: Sculpting the Door
-
Shape the door base:
Roll out a slab of self-hardening clay to about 1/4 inch thickness. Cut out an arched door shape that fits the scale of your pot. -
Add plank details:
Use a sculpting tool or the back of a knife to gently score vertical lines into the wet clay door. This creates the illusion of wooden planks. -
Create the stone arch:
Roll a thin snake of clay and flatten it slightly. Wrap this around the curved top edge of your door to form the arch. Use a tool to press indentations every half-inch to mimic individual stone blocks. -
Sculpt the window:
Cut a small circle out of the upper part of the door. Form a tiny ring of clay to outline this porthole. Then, create thin strips of clay to form the spokes inside the window. -
Add hardware details:
Form two small, flat triangles for hinges and press them onto the right side of the door. Roll a tiny ball and flatten it slightly for the doorknob, placing it centrally or to the side. -
Dry the clay:
Allow your clay door piece to dry fully according to the package instructions. If using polymer clay, bake it now.
Glow Up
Place a battery-operated tea light underneath the inverted pot. The light will shine through the window cutouts at night for a magical glowing effect.
Step 3: Sculpting the Windows
-
Shape window frames:
Create two arched window frames from clay, similar to the door but smaller. I find it helpful to make a paper template first to ensure both windows are the same size. -
Add window panes:
Roll very thin coils of clay to create the grid lines for the window panes inside the arches. -
Add sills:
Form small rectangular blocks of clay to serve as window sills and attach them to the bottom of each window frame. Let these dry or bake along with the door.
Step 4: Painting and Assembly
-
Paint the door:
Paint the main wooden area of the door with your teal or seafoam green acrylic paint. You may need two coats for opaque coverage. -
Detail the stonework:
Carefully paint the stone archway around the door and the window frames in white. For the hinges and doorknob, use silver or metallic grey paint. Add a tiny black dot for a keyhole if desired. -
Attach the features:
Once the paint is dry, apply a strong waterproof adhesive to the back of the door and windows. Press them firmly onto the inverted terracotta pot in your pre-marked positions. Hold them in place for a minute or use painters tape to secure them while the glue sets. -
Seal the cottage:
Spray the entire pot with a matte clear sealant. This protects your paint job from the elements if you plan to keep the cottage outdoors.
Step 5: Landscaping
-
Set the foundation:
Place the saucer on your work surface. Position the inverted pot in the center of the saucer. -
Add the pebble path:
Fill the gap between the pot and the saucer rim with smooth river rocks or pebbles. Arrange them neatly to create a finished walkway around the cottage. -
Prepare the roof:
The bottom of the pot is now the top. This recessed area is perfect for planting. Fill this shallow depression with a small amount of potting soil. -
Plant the moss:
Tuck live moss or faux craft moss firmly into the soil on top of the pot. Ensure it mounds slightly for a lush, overgrown cottage look.
Now your fairy cottage is ready to welcome its tiny magical residents into your garden.
Mushroom House Garden Pots
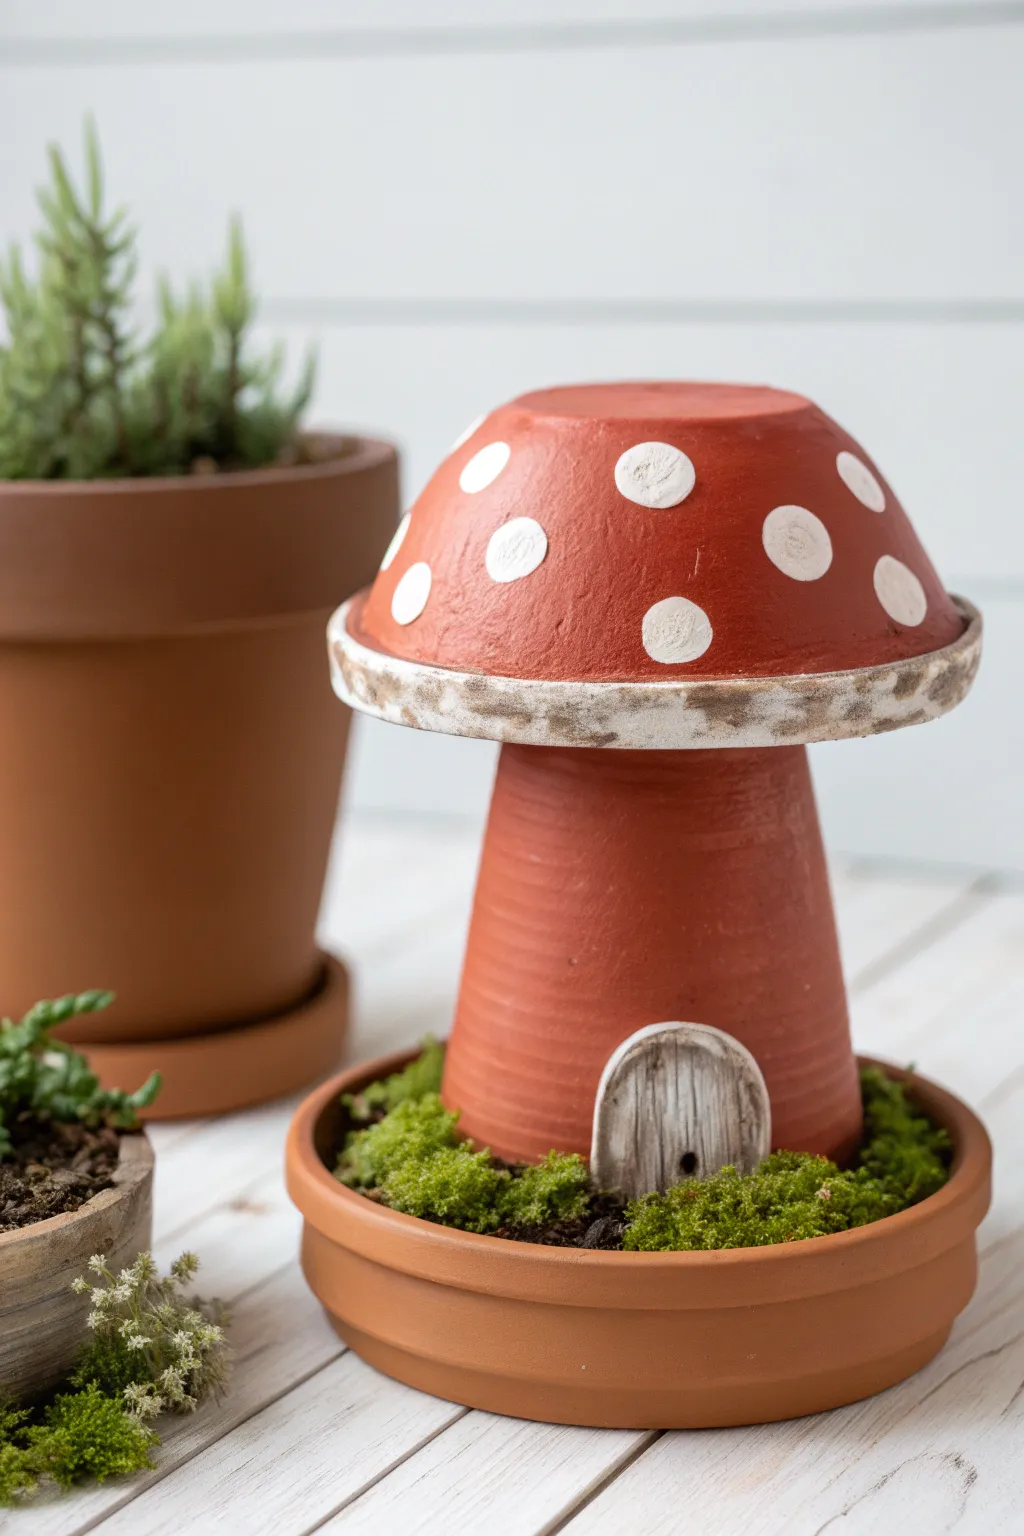
Transform ordinary terra cotta pots into an enchanting fairy abode complete with a classic red spotted roof and a tiny wooden door. This simple yet charming project uses basic garden staples to create a delightful centerpiece that looks perfect nestled in some fresh moss.
How-To Guide
Materials
- One medium terra cotta saucer (base)
- One medium terra cotta pot (stem)
- One terra cotta bowl or saucer (cap) slightly wider than the pot’s base
- Terra cotta colored acrylic paint
- White outdoor acrylic paint
- Small piece of driftwood or craft wood (for the door)
- Strong adhesive (E6000 or heavy-duty construction glue)
- Fresh or preserved moss
- Potting soil
- Paintbrushes (medium flat, small detail)
- Sponge or rag
- Sandpaper (optional)
Step 1: Preparing the Structure
-
Clean the clay:
Begin by thoroughly wiping down all your terra cotta pieces with a damp cloth to remove any dust or nursery grime. Let them dry completely so the paint adheres properly. -
Test the fit:
Invert your medium pot so the wider opening is on the bottom. Place the bowl piece upside down on top of the inverted pot’s base to ensure they sit level and look proportionally like a mushroom. -
Paint the mushroom cap:
Take the bowl piece—which will be the mushroom cap—and paint the exterior surface with a layer of terra cotta or deep red-orange acrylic paint if you want a uniform color, though the natural clay color works beautifully as shown in the photo. If painting, let it dry. -
Add the spots:
Dip a medium round brush into white acrylic paint. Dab creating varying sizes of circles onto the roof of the mushroom cap. I find that leaving the edges slightly rough makes them look more natural and less like perfect polka dots. -
Detail the rim:
Using a sponge or a dry brush with a small amount of white paint, lightly dab around the bottom rim of the mushroom cap. This creates a weathered, textural look that separates the cap from the stem visually.
Step 2: Creating the Door
-
Shape the door:
Find a small, oval-shaped piece of driftwood or craft wood. If you only have square pieces, sand the edges down to create a rounded top that mimics a rustic door frame. -
Add door details:
Using a very small detail brush and black or dark brown paint, add a tiny dot for a doorknob. You can also lightly dry-brush vertical lines to enhance the wood grain texture. -
Attach the door:
Apply a generous dab of strong adhesive to the back of your wooden door. Press it firmly against the side of the inverted pot (the stem), positioning it near the bottom rim. -
Let it set:
Hold the door in place for a few minutes or use a piece of painter’s tape to secure it while the glue cures completely.
Natural Texture
Don’t aim for perfect opacity with the white paint. A slightly translucent or dry-brushed application lets the clay texture peek through for a rustic feel.
Step 3: Assembly and Landscaping
-
Prepare the base:
Take your large saucer which serves as the foundation. Fill it with a layer of potting soil, packing it down firmly. -
Position the stem:
Place the inverted pot (with the door attached) into the center of the soil-filled saucer. Wiggle it slightly to nestle it into the dirt for stability. -
Attach the cap:
Apply adhesive to the top (originally the bottom) of the inverted pot. carefully center the painted mushroom cap on top and press down. -
Allow to dry:
Let the entire structure sit undisturbed for the time recommended on your glue packaging to ensure the heavy cap stays secure. -
Add greenery:
Place clumps of fresh or preserved moss around the base of the stem, covering the exposed soil in the saucer. Tuck it tightly against the clay for a lush look. -
Clean up edges:
Brush away any loose soil from the saucer’s rim to keep the presentation neat.
Fairy Garden Magic
Add tiny pebbles leading up to the door to create a walkway, or glue a small acorn cap next to the door to serve as a porch light.
Now you have an adorable miniature cottage ready for your garden or windowsill display
Fruit Disguise Clay Pots
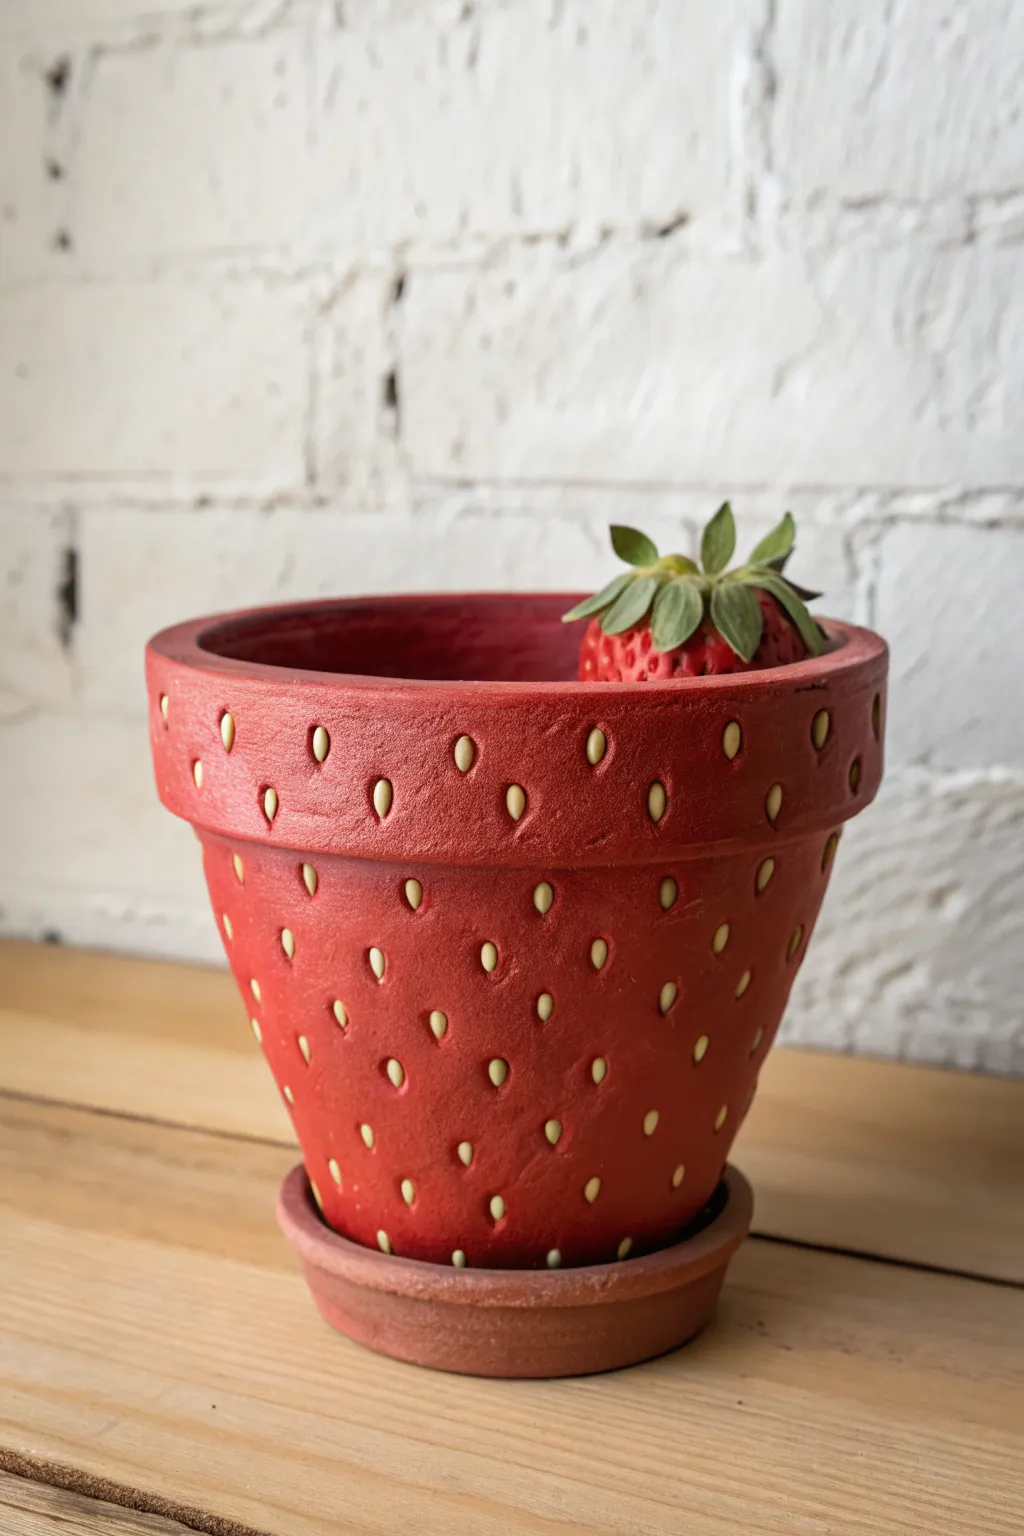
Transform a standard terracotta pot into a sweet summer delight with this charming strawberry makeover. The vivid red hue coupled with hand-painted yellow seeds creates a playful disguise perfect for herbs or succulents.
Step-by-Step Guide
Materials
- Standard terracotta pot (4-6 inch diameter works well)
- Matching terracotta saucer
- Acrylic paint: Bright red
- Acrylic paint: Butter yellow or cream
- Acrylic paint: Dark red (or mix bright red with a tiny drop of black)
- Acrylic paint: Earthy brown (optional, for saucer)
- Medium flat paintbrush
- Small round detail brush (size 1 or 2)
- Very fine detail brush (size 0 or 00)
- Matte finish spray sealant
- Water based primer (optional but recommended)
Step 1: Preparation and Base Coat
-
Clean the surface:
Ensure your terracotta pot is completely clean and dry. Wipe away any dust with a damp cloth and let it air dry so the paint adheres properly. -
Prime the pot:
Apply a thin layer of water-based primer to the exterior of the pot. This stops the porous clay from soaking up all your expensive red paint. -
Apply the first red layer:
Once the primer is dry, use your medium flat brush to apply a coat of bright red acrylic paint. Cover the entire exterior, including the top rim and just inside the lip. -
Let it dry completely:
Wait for the first coat to be dry to the touch. Red pigment can be translucent, so rushing this step might pull up the paint. -
Add a second red coat:
Apply a second layer of red to ensure opaque, vibrant coverage. If I still see streaks, I sometimes add a third thin layer for a perfect finish. -
Paint the saucer:
While the pot dries, paint the saucer. You can paint it red to match, or use an earthy brown to create contrast at the base like the image shows.
Seed Spacing Trick
Use a diamond pattern rather than a grid for the seeds. Offset each row so the seeds sit between the two seeds in the row above it for a natural look.
Step 2: Adding the Berry Details
-
Prepare the seed colors:
Put a small amount of butter yellow paint on your palette. Also prepare a small amount of the darker red shade for shadowing. -
Mark seed placement:
Visualize a grid pattern. Using the very fine detail brush and a tiny dot of yellow, lightly mark where your seeds will go to ensure they are evenly spaced around the pot. -
Create the seed indentations:
This is the trick for realism: Before painting the yellow seed, use your small round brush and the dark red paint to create small, vertical oval shapes where you marked the dots. -
Feather the shadows:
These dark red ovals act as the ‘dimples’ of the strawberry. Ensure the edges aren’t too sharp; you want them to look like slight depressions in the fruit’s surface. -
Paint the seeds:
Once the dark dimples are dry, switch back to the yellow paint. Paint a smaller, teardrop-shaped seed right in the center of each dark oval. -
Check the contrast:
The yellow seed should be surrounded by a thin ring of the dark red shadow. This creates the illusion of depth. -
Detail the rim:
Don’t forget to continue the seed pattern up onto the rim of the pot. The pattern should wrap seamlessly around the curve.
Uneven Paint Coverage?
If your red paint looks streaky, don’t keep brushing wet paint. Let it dry 100% and switch to a sponge brush for the final topcoat to smooth it out.
Step 3: Finishing Touches
-
Dry thoroughly:
Allow the pot to sit for several hours or overnight. The thick layers of acrylic need to cure completely before sealing. -
Seal the artwork:
Take the pot outdoors or to a well-ventilated area. Apply a clear matte spray sealant. This protects the paint from water damage when you water your plants. -
Add the greenery:
While this is a planting step, it completes the look: plant a real strawberry plant or a leafy green herb inside to act as the strawberry’s leaves (calyx).
Now you have a juicy decor piece that looks good enough to eat
Clay Pot Gnome Characters

Transform simple garden ceramics into this charming, rustic guardian for your porch steps. With a tall terracotta cone hat and a textured clay beard, this project blends natural materials for an earthy, whimsical look.
Detailed Instructions
Materials
- 1 tall, narrow terracotta cone (approx. 10-12 inches)
- Small terracotta pot (approx. 4-5 inches diameter, upside down)
- Small terracotta saucer (to fit under the pot base)
- Air-dry clay or epoxy sculpt clay (white)
- Terracotta colored acrylic paint (warm, reddish-brown)
- White acrylic paint
- Black acrylic paint
- Strong craft adhesive (E6000 or similar)
- Sculpting tools or toothpicks
- Texture sponge
- Paintbrushes (medium flat, small detail)
- Clear matte sealant spray
Step 1: Base Assembly
-
Prepare the Base:
Begin by flipping your small terracotta pot upside down. This will serve as the gnome’s body. Test fit the tall cone on top of this inverted pot to ensure the proportions look right. -
Add the Shoe Base:
Glue the rim of your inverted pot onto the terracotta saucer. The saucer acts as the shoes or bottom platform, giving the gnome a finished look and stability. -
Attach the Hat:
Apply a generous ring of strong adhesive to the top (originally the bottom) of the inverted pot. Center your tall terracotta cone over it and press down firmly. Let this cure completely before moving on.
Clay Won’t Stick?
If your air-dry clay isn’t sticking to the smooth terracotta surface, score the pot lightly with sandpaper first or use a dab of PVA glue as a bonding agent.
Step 2: Sculpting the Features
-
Form the Nose:
Roll a small ball of air-dry clay, about the size of a large marble. Press this firmly onto the front of the cone, right where the rim meets the body, flattening the back side slightly to adhere. -
Create the Beard Base:
Take a larger chunk of clay and flatten it into a rough triangular bib shape. Press this onto the body section directly under the nose, smoothing the edges into the pot surface. -
Detail the Beard:
Using a sculpting tool or a toothpick, drag long, wavy lines through the beard clay from top to bottom. I find varying the pressure creates nicer visual depth. -
Sculpt the Mustache:
Roll two small sausage shapes of clay. Attach them extending from under the nose to the left and right, curling the tips slightly upward. Texture these to match the beard. -
Add Sleeve Cuffs:
Roll two thin snakes of clay. Wrap these around the sides of the body pot to simulate the fluffy cuffs of his tunic sleeves. -
Hands:
Add two small oval nubs of clay emerging from the cuffs to represent his hands. Ensure all clay parts are well-adhered and let them dry fully according to package instructions.
Step 3: Painting and Finishing
-
Paint the Hat:
Leave the terracotta cone largely unpainted to keep that dusty, natural texture. You can sponge on a tiny bit of darker brown sporadically to mimic aging spots. -
Base Coat the Body:
Paint the main body area (the inverted pot) with a reddish-brown terracotta acrylic paint. This creates the look of a tunic while blending with the hat material. -
Flesh Tones:
Mix a small amount of white and orange/brown paint to create a peach flesh tone. Paint the nose, the small face area above the beard, and the hands. -
Painting the Hair:
Paint the entire beard, mustache, and sleeve cuffs with white acrylic paint. You may need two coats to get a solid, crisp white coverage. -
Adding Depth:
Once the white is dry, use a very watery grey wash over the beard grooves, then quickly wipe the surface with a paper towel. This leaves shadows in the crevices. -
The Eyes:
Using the back of a small paintbrush dipped in black paint, dot two small eyes onto the flesh-colored face area just above the nose. -
Grey Base:
Paint the saucer at the very bottom a neutral grey or stone color to ground the figure visually. -
Seal the Gnome:
Finish by spraying the entire project with a matte clear coat. This protects the clay and paint from moisture if he’s going to live outdoors.
Seasonal Zwaps
Don’t glue the hat down permanently! Instead, use velcro strips. This lets you swap the plain cone for a painted red Santa hat or a green witch hat seasonally.
Place your new distinctive little friend near some greenery to watch over your garden
Animal Pot Planters
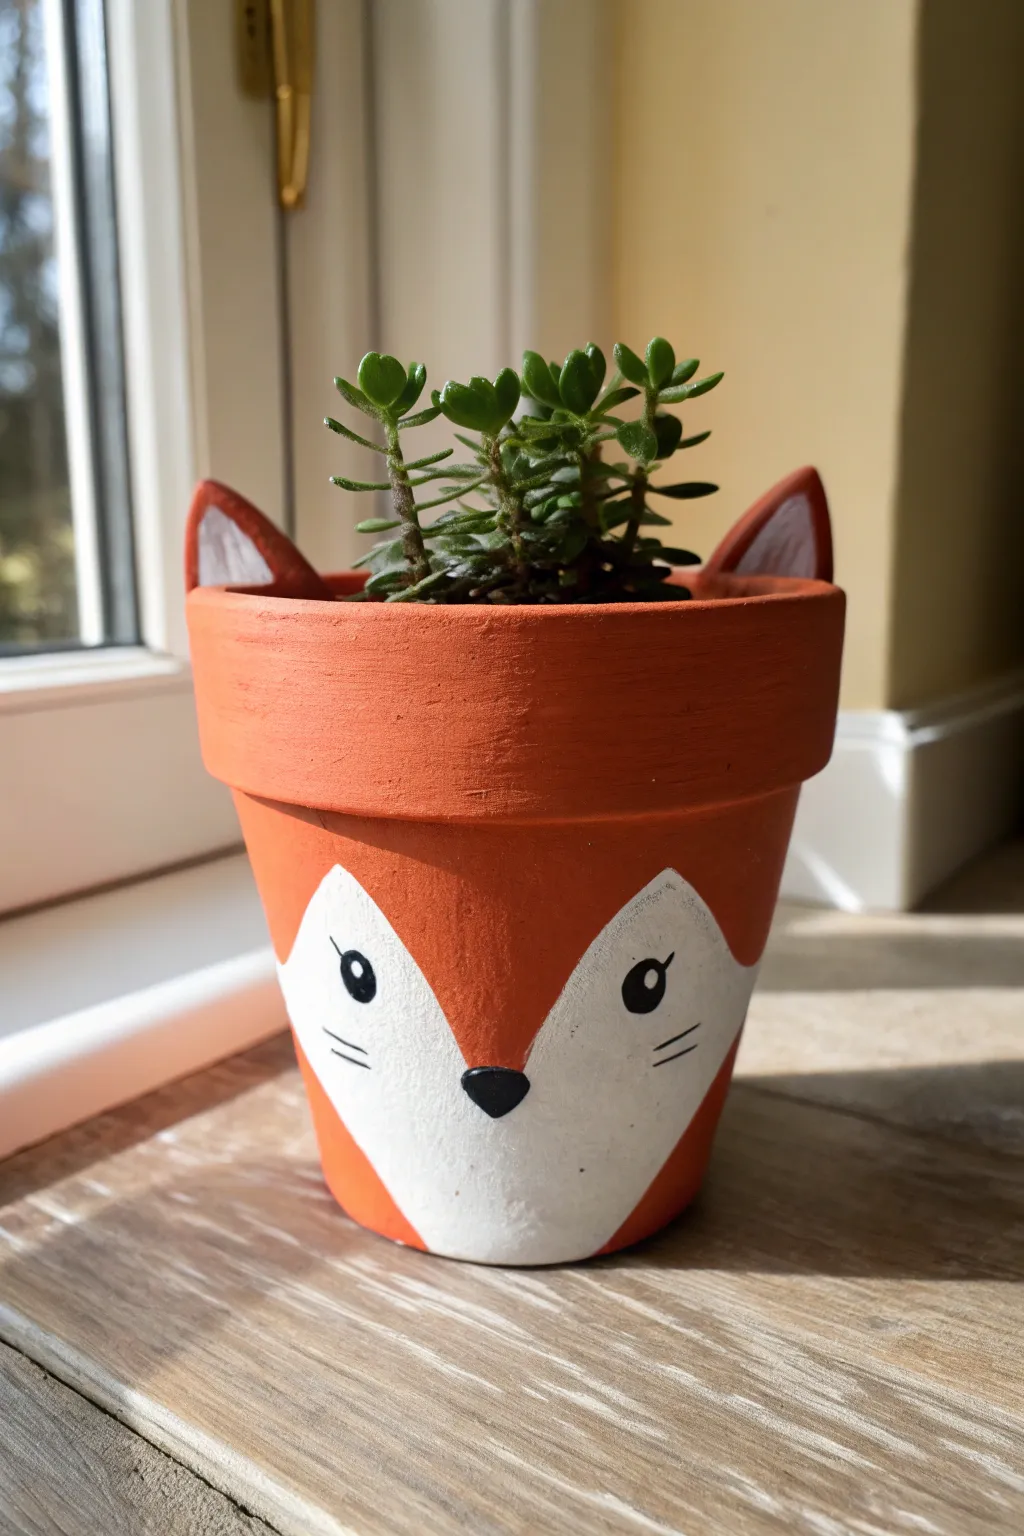
Transform a plain clay pot into an adorable woodland creature with just a bit of paint and some cleverly added ears. This charming fox planter features a characteristic rusty orange coat and sweet, wide-set eyes that bring instant personality to any windowsill.
Step-by-Step Guide
Materials
- Small terracotta pot (3-4 inch diameter)
- Air-dry clay or polymer clay
- Acrylic paints (burnt orange/rust, white, black)
- Paintbrushes (medium flat brush, small detail brush)
- Strong craft glue or E6000
- pencil
- Matte or satin sealant spray (optional)
- Small succulent and potting soil
Step 1: Sculpting the Ears
-
Shape the clay:
Pinch off two small, equal-sized balls of air-dry clay. Flatten them slightly and shape them into sturdy triangles that are about 1 to 1.5 inches tall. -
Check the fit:
Before the clay hardens, press the bottom edge of each triangle against the inner rim of your terracotta pot. This ensures the curve matches perfect for gluing later. -
Let them cure:
Set the ears aside on a piece of parchment paper to dry completely according to your clay’s package instructions. I find waiting overnight is usually safest to prevent breakage. -
Attach the ears:
Once hardened, apply a dab of strong craft glue to the curved bottom of each ear and press them firmly onto the back inner rim of the pot. Hold them in place for a few minutes until the bond is secure.
Clean Lines Hack
To get perfectly sharp edges between the orange and white fur sections, use slender strips of masking tape or washitape as a guide while you paint.
Step 2: Base Coating
-
Mix the orange:
Create a warm fox color by mixing orange acrylic paint with a tiny drop of brown or red if your orange looks too bright; aim for a natural rusty hue. -
Paint the exterior:
Using a flat brush, cover the entire outside of the pot with your orange mixture. Don’t forget to paint the backs and fronts of the attached clay ears. -
Paint the inner rim:
Extend the orange paint down about an inch inside the pot rim so no bare clay shows when the soil is added. -
Second coat:
Allow the first layer to dry for 15-20 minutes. Apply a second coat to ensure the terracotta color doesn’t peek through, giving you a solid, opaque finish.
Make a Forest Family
Use the same technique but different ear shapes and colors to make a whole set: grey paint with rounded ears for a bear, or grey with pointed ears for a wolf.
Step 3: Painting the Face
-
Sketch the outline:
With a light pencil, draw the fox’s face pattern. Start with a curved V-shape or heart-shape coming up from the bottom center, curving out towards the ears to define the white fur area. -
Fill in the white fur:
Use a smaller brush to fill in the bottom section you just outlined with white paint. You might need two or three thin layers here, as white can be translucent over the orange base. -
Add ear details:
Paint a smaller, white triangle inside each clay ear to represent the inner ear fluff. -
Draft the features:
Using your pencil again, lightly mark spots for the eyes and the nose. The nose should sit right at the top point of the white V-shape.
Step 4: Adding Details & Planting
-
Paint the nose:
With a fine detail brush and black paint, fill in a small, inverted triangle for the nose. Round off the corners slightly for a softer look. -
Paint the eyes:
Paint two solid black circles for the eyes. If you make a mistake, let it dry, paint over it with white, and try again. -
Add the sparkle:
Dip the handle end of a small paintbrush into white paint and dot it onto the upper right side of each black eye. This ‘catchlight’ brings the character to life. -
Whiskers and lashes:
Using your thinnest brush (or even a fine-tip black marker), carefully draw three small whiskers on each white cheek and tiny eyelashes on the outer corners of the eyes. -
Seal it:
Once fully dry, you can spray a matte sealant over the pot to protect the paint from water damage. -
Plant:
Fill the pot with soil and add your succulent. A plant that grows upwards, like a jade or crassula, looks like a tuft of fun hair between the ears.
Now you have a clever little companion ready to brighten up your plant collection
Stacked Lighthouse Pot Tower
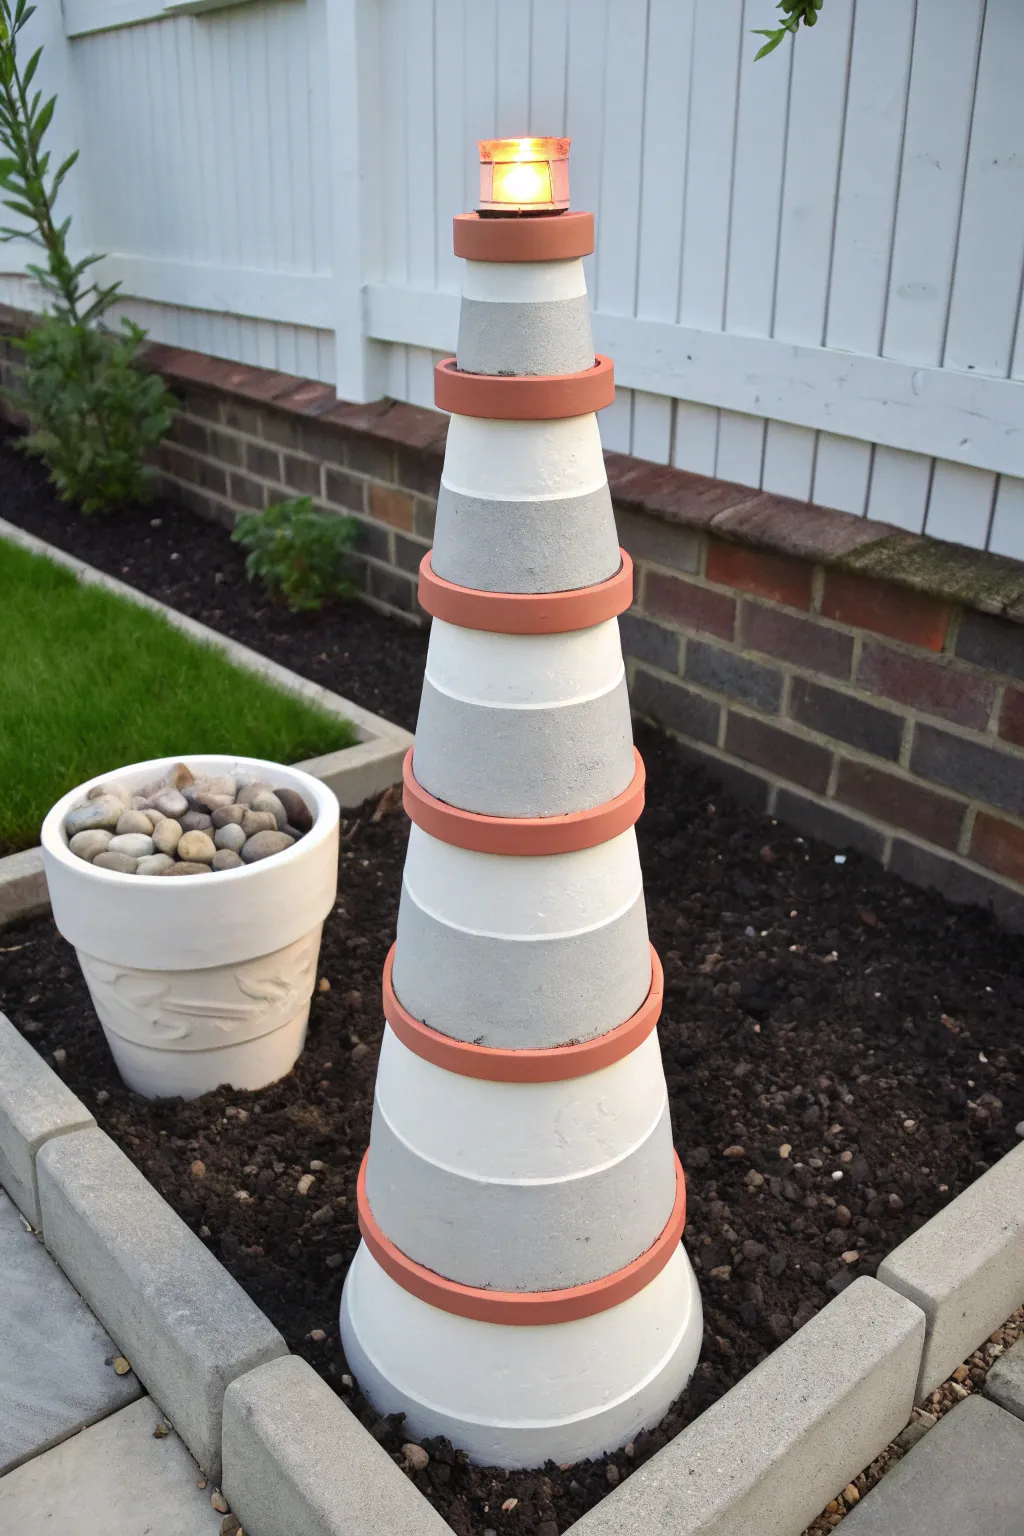
Bring a touch of coastal charm to your garden with this tiered lighthouse sculpture made from simple terracotta pots. The alternating white and grey bands create a classic maritime look, while a solar light on top serves as the perfect beacon at dusk.
Detailed Instructions
Materials
- 4 terracotta pots in graduated sizes (e.g., 10″, 8″, 6″, 4″)
- 4 terracotta saucers in graduated sizes (matching the pots)
- Small glass votive holder or solar pathway light top
- Outdoor acrylic craft paint (White)
- Outdoor acrylic craft paint (Light Grey)
- Outdoor craft sealant (clear matte or satin)
- Strong outdoor adhesive (e.g., E6000 or construction adhesive)
- Painters tape (optional)
- Flat paintbrushes (1-inch and 2-inch)
- Small foam brush
- Battery-operated tea light or candle
Step 1: Preparation and Base Coat
-
Clean the pots:
Before starting, ensure all your terracotta pots and saucers are completely clean and dry. Use a stiff brush to remove any dust or debris, which could prevent the paint from sticking properly. -
Arrangement check:
dry-stack your pots upside down from largest to smallest to ensure the sizing looks correct. The saucers will sit between each inverted pot, so check that they nestle securely without wobbling. -
Paint the rims:
The charm of this specific design relies on the natural terracotta color acting as the ‘trim.’ Leave the thick rim of every pot unpainted. You can apply painter’s tape just below the rim to keep your lines crisp. -
Paint the white bands:
Using your larger flat brush, paint the body of the largest (bottom) pot and the second-smallest pot with the outdoor white acrylic paint. Apply long, smooth horizontal strokes. -
Paint the grey bands:
Now take the second-largest pot and the smallest top pot. Paint the bodies of these two with the light grey paint. This alternating pattern is key to the lighthouse aesthetic. -
Paint the saucers:
For the saucers, paint the outer vertical edge to match the natural terracotta (or leave it unpainted if it’s clean). Paint the underside of the saucers—which will be visible when inverted—in the same color as the pot that will sit *above* it, or keep it uniform with the terracotta rim look. -
Apply second coats:
Terracotta is porous and soaks up paint quickly. I usually find that a second coat is necessary for solid, opaque coverage. Let the first coat dry for about 20 minutes before applying the second.
Pro Tip: Weatherproofing
Spray the insides of the pots with a clear sealer before assembly. Moisture can seep from the soil up through the terracotta, causing paint to bubble from the inside out.
Step 2: Assembly and Detailing
-
Seal the pieces:
Once all paint layers are fully dry, apply a clear outdoor sealant over the entire surface of every pot and saucer. This protects the finish from rain and UV fading. -
Prepare the base:
Place the largest saucer upside down on your work surface. Apply a generous ring of strong outdoor adhesive around the bottom rim of the largest white pot. -
Attach the first tier:
Press the largest white pot (upside down) firmly onto the inverted base saucer. Wipe away any excess glue that squeezes out immediately. -
Add the middle saucer:
Apply adhesive to the flat bottom (now top) of the largest pot. Center the next sized saucer upside down on top of it and press down. -
Stack the grey tier:
Glue the rim of the second-largest (grey) pot onto the saucer you just placed. Ensure it is perfectly centered so your lighthouse doesn’t lean. -
Continue stacking:
Repeat this process—glue, saucer, glue, pot—working your way up with the white pot and finally the smallest grey pot. Let the tower cure for at least 24 hours before moving it. -
Create the lantern room:
Glue the smallest saucer upside down on the very top. This provides a platform for your light. -
Install the light:
Place your glass votive holder or small solar light fixture on top of the final saucer. If you live in a windy area, secure this with a dab of silicone adhesive, but ensure you can still access the candle or battery compartment. -
Lighting up:
Insert a battery-operated tea light into the glass holder for a warm, safe glow that mimics a real lighthouse beam.
Troubleshooting: Lean Tower
If your tower is crooked, standard saucers might have uneven bottoms. Use a level during stacking and shim gaps with tiny washers before the glue sets.
Now you have a charming nautical beacon to guide visitors through your garden path