Whenever I’m stuck in a creative rut, I go hunting for cool clay project ideas that feel both doable and totally display-worthy. Here are some of my favorite go-to projects—starting with the classics and ending with the fun, slightly unexpected ones that make your shelf look like a tiny gallery.
Slab-Built Coasters With Botanical Imprints
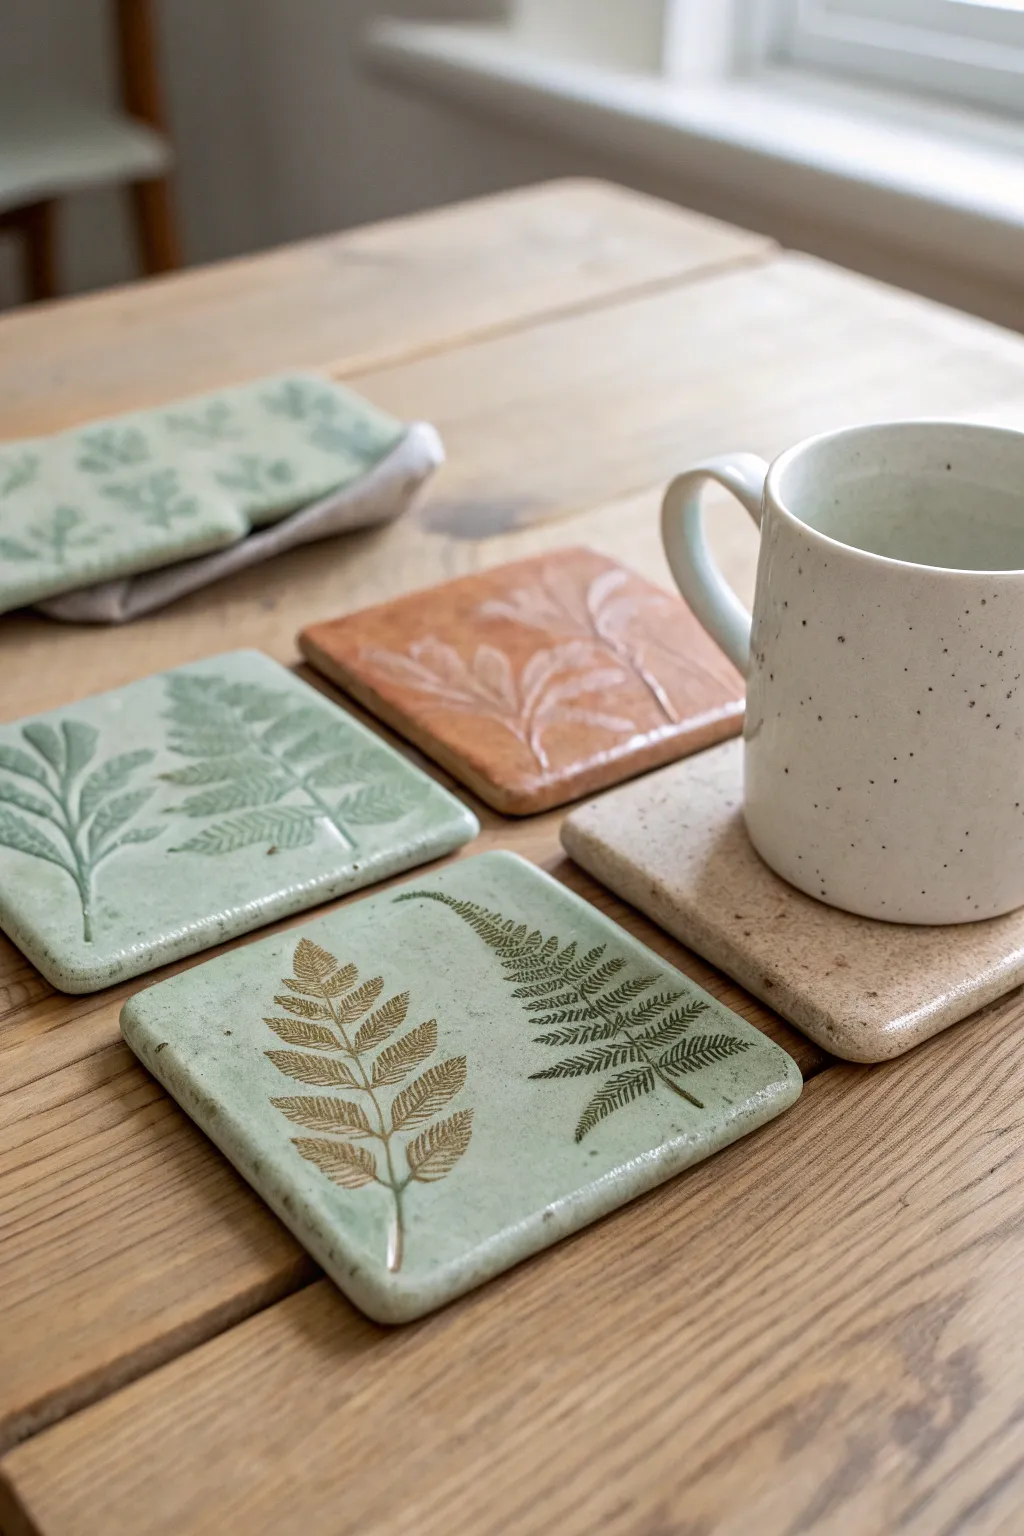
Bring the outdoors in with these understated slab-built coasters, featuring delicate fossil-like impressions of ferns and leaves. By using real plants and gentle glazing techniques, you can capture intricate natural details in durable ceramic form.
Detailed Instructions
Materials
- Stoneware clay (smooth or lightly groggy)
- Fresh or pressed botanical clippings (ferns, leaves)
- Rolling pin
- Two guide sticks or slats (approx. 1/4 inch thick)
- Square cookie cutter or sharp fetling knife
- Canvas or heavy fabric for rolling
- Sponge
- Underglaze (dark brown or green)
- Transparent or semi-transparent glaze (celadon or clear)
- Kiln access
Step 1: Slab Preparation
-
Wedge the Clay:
Begin by thoroughly wedging your clay to remove any air bubbles. A smooth consisitency is crucial here so the surface doesn’t distract from the delicate plant textures later on. -
Set Up Your Workspace:
Lay down a piece of canvas or heavy fabric on your table. This prevents the clay from sticking and adds a nice, subtle texture to the back of your coasters. -
Roll out the Slab:
Place your clay ball between two wooden guide sticks. Roll the clay out with your rolling pin until the pin rides on top of the sticks, ensuring a perfectly even thickness of about 1/4 inch. -
Compress the Surface:
Run a rubber rib or a damp sponge lightly over the clay surface. This compresses the clay particles, preventing future warping, and creates a smooth canvas for your prints.
Step 2: Impressing and Cutting
-
Arrange Botanicals:
Select your leaves or ferns. Place them vein-side down onto the clay slab. I find that the vein side always leaves a much crisper, deeper impression than the smooth top side. -
Roll the Texture:
Gently roll over the leaves with your rolling pin just once or twice. apply firm, even pressure to embed the plant material flush with the clay surface without thinning the slab too much. -
Cut the Shapes:
Using a square cutter or a knife with a ruler, cut your coaster shapes around the botanical designs. Aim for about 4×4 inches to accommodate shrinkage. -
Remove the Plants:
Carefully peel the leaves away to reveal the impression. Use a pin tool to lift the edge if the stem is stuck. -
Smooth the Edges:
Once the coasters are cut, run a damp finger or sponge along the sharp edges to soften them. Sharp clay edges can become razor-sharp once fired.
Leaves Sticking?
If fresh leaves are sticking to the clay and tearing when you peel them, let them dry out for an hour before rolling, or dust them very lightly with cornstarch.
Step 3: Drying and Bisque Firing
-
Slow Drying:
Place the coasters on a ware board. To prevent warping—the enemy of all flatware—gently place a weighted board or sheet of drywall on top of them while they dry to leather hard. -
Bone Dry:
Remove the weights once the clay is rigid and let them air dry completely until they are bone dry and room temperature to the touch. -
Bisque Fire:
Load the coasters into the kiln for a bisque fire (usually Cone 04 or 06). This prepares the ceramic for glazing.
Pro Tip: Vein Definition
For maximum detail, choose plants with thick, woody steps or deep veins (like ferns or sage). Soft, fleshy leaves like basil often create unrecognizable blobs.
Step 4: Glazing and Finishing
-
Apply an Inlay (Optional):
To highlight the veins like the green coaster in the example, paint a dark underglaze directly into the impressed lines. Let it dry for a moment. -
Wipe Back:
Using a damp sponge, wipe away the excess underglaze from the high points of the clay, leaving color trapped only in the deep recesses of the leaf print. -
Dip in Glaze:
Dip the entire coaster into a translucent glaze, such as a pale celadon or clear. If you skipped the inlay, a breaking glaze (one that thins over texture) works beautifully to show the relief. -
Clean the Foot:
Thoroughly wipe any glaze off the bottom of the coaster so it doesn’t fuse to your kiln shelf. -
Glaze Fire:
Fire the kiln to the maturity temperature of your clay and glaze (often Cone 5 or 6 for stoneware). -
Add Protection:
Once cool, attach small felt or cork pads to the bottom corners to protect your wooden furniture surfaces.
Now you have a set of durable, nature-inspired coasters ready for your next cup of coffee


Modern Ring Holder Cones
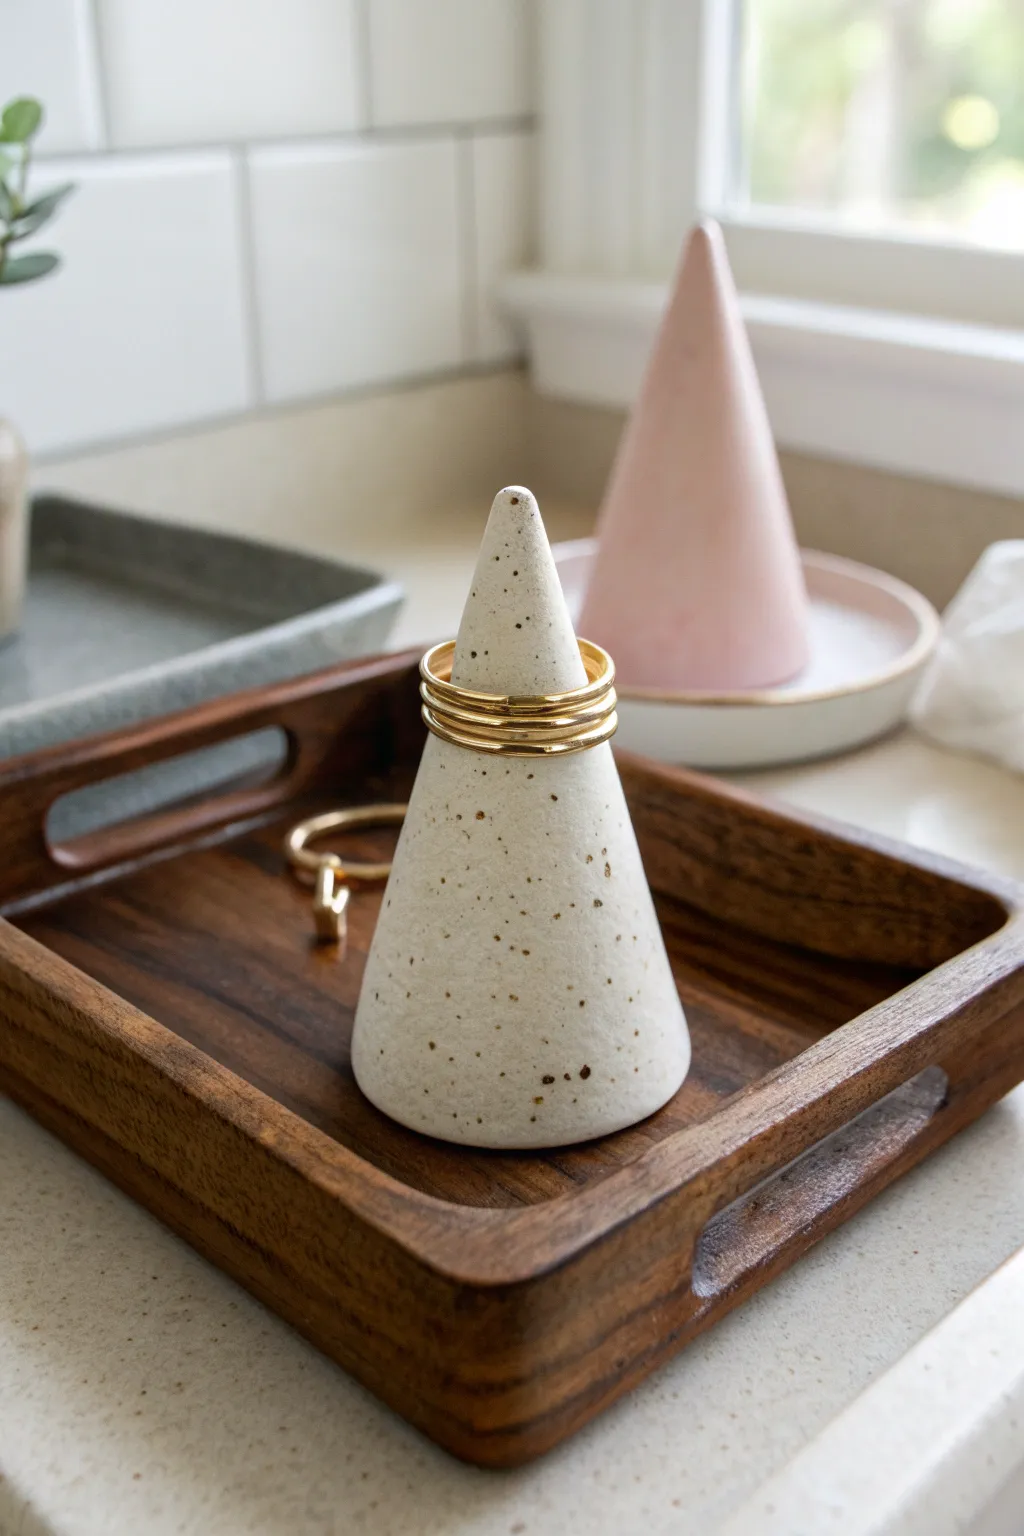
These minimalist ring cones are the perfect blend of modern decor and functional jewelry storage. Their speckled, stone-like finish and clean geometric shape make them a chic addition to any dresser or vanity.
Step-by-Step Guide
Materials
- Polymer clay (white or cream)
- Black acrylic paint or pepper
- Rolling pin or acrylic roller
- Smooth work surface (ceramic tile or glass)
- Craft knife or clay blade
- Cardstock or thin cardboard
- Tape
- Sandpaper (fine grit)
- Matte glaze or sealant (optional)
Step 1: Creating the Speckled Clay
-
Condition the clay:
Begin by warming up your white or cream polymer clay in your hands. Knead and fold it repeatedly until it becomes soft, pliable, and free of any air bubbles. -
Add the speckles:
Flatten your conditioned clay into a pancake shape. Sprinkle a very small amount of coarse black pepper or ground dried tea leaves onto the surface. If you prefer a painted look, you can knead in tiny flecks of dried black acrylic paint later, but pepper is the easiest method for this organic look. -
Mix thoroughly:
Fold the clay over the speckles and continue kneading. Work the material until the black flecks are evenly distributed throughout the entire ball of clay. -
Roll it out:
Place the speckled clay ball on your smooth work surface. Use your rolling pin to flatten it into an even sheet, approximately 1/4 inch thick. Aim for a consistent thickness to ensure the cone stands straight later.
Step 2: Shaping the Cone
-
Make a template:
Cut a quarter-circle wedge shape out of cardstock. This will serve as the template for your cone. -
Cut the clay:
Place the cardstock template onto your rolled-out clay slab. Using your craft knife or clay blade, carefully trace around the template to cut out the wedge shape. -
Form the cone:
Gently lift the clay wedge. Bring the two straight edges together to form a cone shape. I find it helpful to overlap the edges just slightly rather than butting them against each other for a stronger seam. -
Blend the seam:
Use your finger or a clay modeling tool to smooth the seam where the edges meet. Rub gently back and forth until the line disappears and the surface looks seamless. -
Refine the shape:
Stand the cone upright on your work surface. If the tip is too sharp or uneven, gently pat it with your finger to round it off slightly. -
Check the base:
Inspect the bottom of the cone. If it wobbles, gently press the cone down onto the flat surface and rotate it slightly to flatten the base perfectly.
Seamless Seams
To make the seam truly invisible, drag a small amount of clay across the join line with a tool, then smooth it out with a little baby oil on your finger.
Step 3: Baking and Finishing
-
Bake the clay:
Preheat your oven according to the manufacturer’s instructions on your clay package (usually around 275°F or 130°C). Place the cone on a baking sheet lined with parchment paper. -
Cool down:
Once baked, remove the cone from the oven and let it cool completely before handling. The clay is fragile while hot and hardens as it cools. -
Sand for smoothness:
Use fine-grit sandpaper to gently buff the surface of the cone. This removes any fingerprints or tiny imperfections from the shaping process. -
Create the stone texture:
For that authentic faux-stone feel shown in the photo, you can flick a toothbrush loaded with watered-down brown or gold paint onto the surface for extra dimension. -
Seal the surface:
Apply a thin coat of matte glaze or sealant if you want to protect the finish, though leaving it raw often looks more like natural stone.
Gold Dipped Tip
Use masking tape to section off the top inch of the finished cone and paint it with liquid gold leaf for a glamorous, high-contrast accent.
Set your finished cones on a wooden tray or vanity to display your favorite rings with style


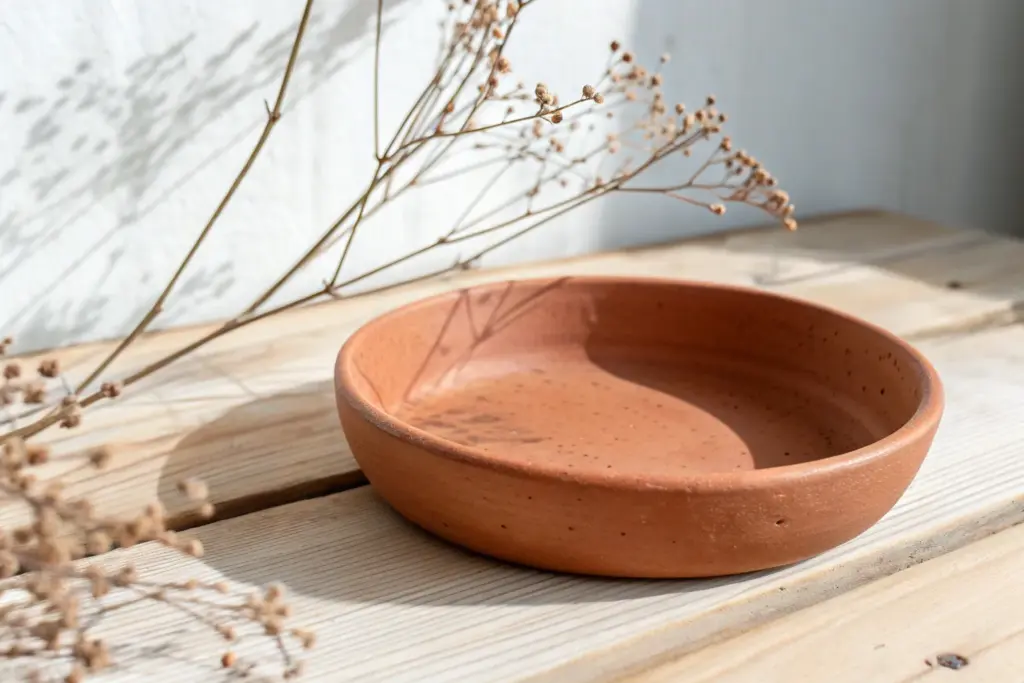
Minimal Bud Vases for Tiny Stems
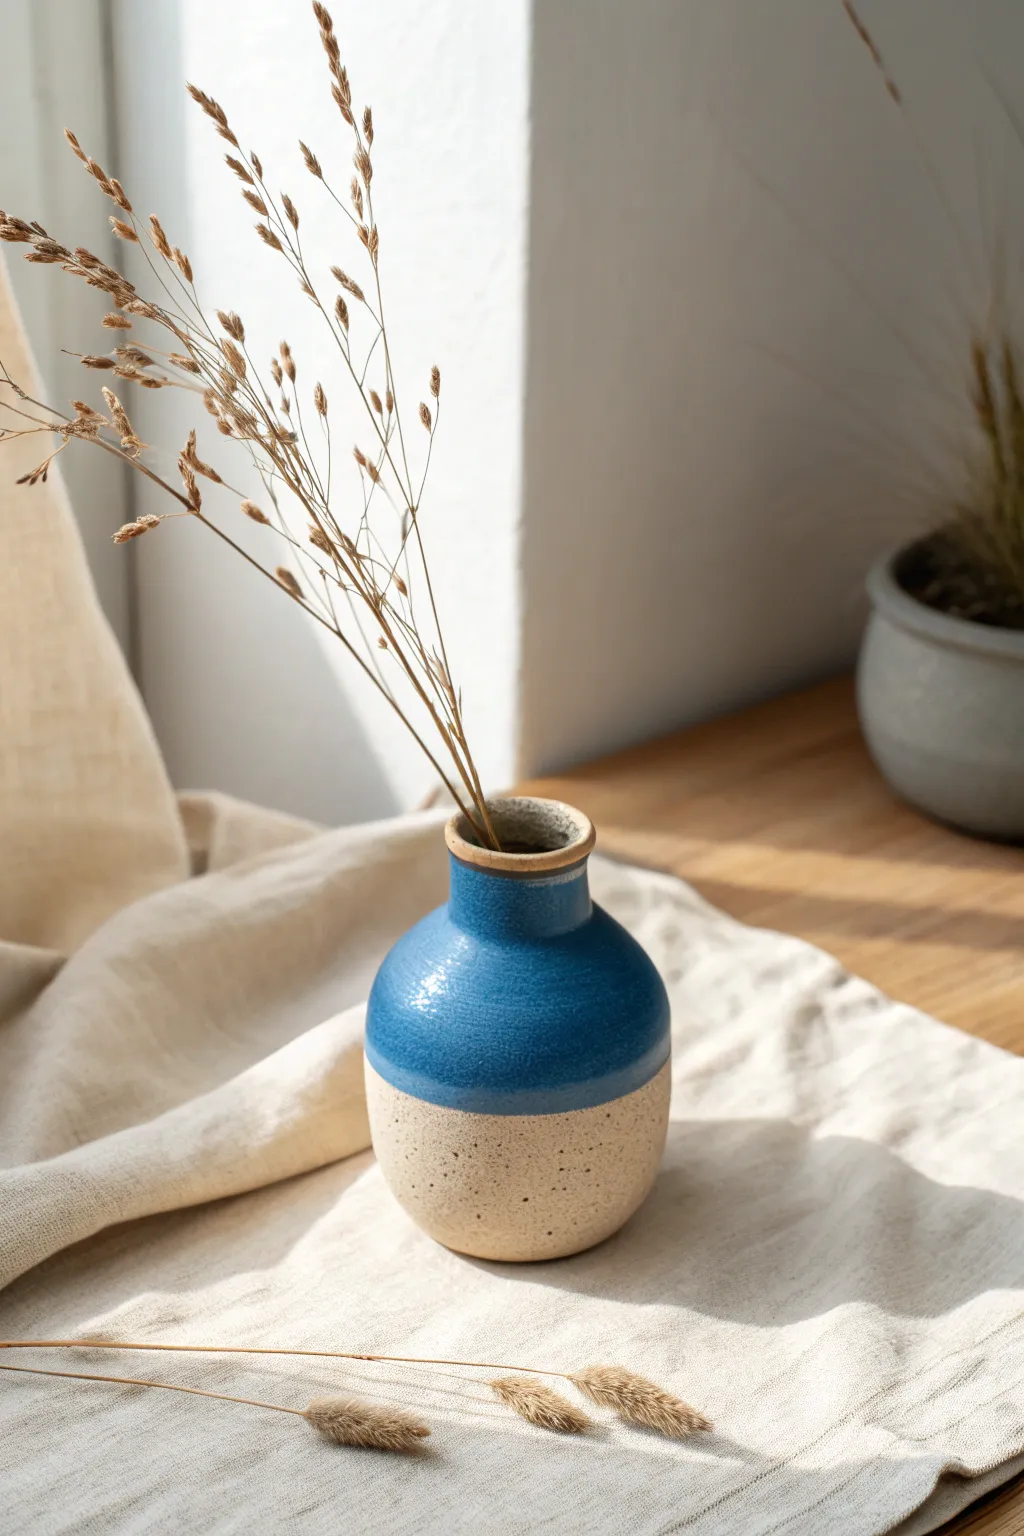
Create a stunningly simple home for delicate dried grasses with this hand-built clay project. The design features a raw, speckled clay base contrasted by a glossy, vibrant blue glaze, perfect for adding a touch of modern rustic charm to any windowsill.
How-To Guide
Materials
- Speckled Stoneware Clay
- Rolling Pin
- Fettling Knife or Needle Tool
- Scoring Tool (or Fork)
- Slip (Clay mixed with water)
- Wooden Modeling Tool
- Sponge
- Glossy Cobalt Blue Glaze
- Paintbrush for Glazing (or dipping tongs)
- Clean Water
Step 1: Forming the Body
-
Prepare the Clay:
Begin by wedging a baseball-sized amount of speckled stoneware clay to remove air bubbles and ensure consistency. -
Roll a Slab:
Flatten a small portion of clay with a rolling pin to a uniform thickness of about 1/4 inch; this will become the base of your vase. -
Cut the Base:
Use a round cookie cutter or trace a small circle (approx. 2.5 inches diameter) and cut it out with your needle tool. -
Create a Pinch Pot:
Take the remaining larger ball of clay and press your thumb into the center, gently pinching the walls upward to form a hollow, rounded vessel shape. -
Refine the Shape:
Ideally, you want the bottom to be slightly wider than the top opening. Keep smoothing the exterior as you work. -
Open the Bottom:
Carefully trim away the rounded bottom of your pinch pot so it sits flat and matches the diameter of your slab base. -
Attach to Base:
Score the bottom edge of the pinch pot and the outer edge of your slab circle. Apply slip to both scored areas and press them firmly together. -
Smooth the Seam:
Use a wooden modeling tool to drag clay across the seam, blending the two pieces until the join is invisible. I always run a damp sponge over this area to ensure it’s perfectly smooth.
Glaze Crawling?
If the glaze pulls away leaving bare spots, it might be due to dust or oil on the bisque. Always wash hands and wipe the pot with a damp sponge before glazing.
Step 2: Adding the Neck
-
Roll a Coil:
Roll out a thick coil of clay, roughly 1/2 inch thick. -
Attach the Coil:
Score and slip the top rim of your vessel body. Place the coil on top to form the neck. -
Blend the Neck:
Using your thumb or tool, blend the clay of the coil downward into the body on the outside, and upward on the inside to secure it. -
Shape the Rim:
Gently pinch the neck to narrow it slightly, creating that distinct bottle shape shown in the image. Smooth the very top rim with a damp sponge so it’s pleasant to touch. -
Dry and Bisque Fire:
Allow the vase to dry slowly under plastic for a day, then fully uncover until bone dry. Fire it in the kiln to bisque temperature (usually Cone 06/04).
Step 3: Glazing
-
Clean the Bisque:
Wipe the fired vase with a damp sponge to remove any kiln dust, which can prevent glaze from sticking. -
Tape the Line (Optional):
For a super crisp line, apply painter’s tape horizontally around the middle of the vase. Alternatively, freehand it for a more organic look. -
Apply Glaze:
Dip the top half of the vase into glossy cobalt blue glaze, or brush on 2-3 even coats. Stop exactly halfway down the body. -
Check the Rim:
Ensure the rim is well-covered, but leave a tiny sliver of raw clay exposed at the very top edge if you like the look in the photo. -
Clean the Bottom:
Wipe any accidental glaze drips off the bottom half or the base of the pot. The bottom must be completely bare clay. -
Glaze Fire:
Fire the piece again to the glaze temperature recommended for your specific clay and glaze combination (often Cone 5/6 for stoneware).
Add Texture
Before the clay dries, gently press sand or grog into the lower, unglazed section to enhance the rough, tactile contrast against the smooth glazed top.
Once fired, pop in a few stems of dried wheat or lagurus grass to complete your serene display


Grooved Incense Holder With an Arch Shape
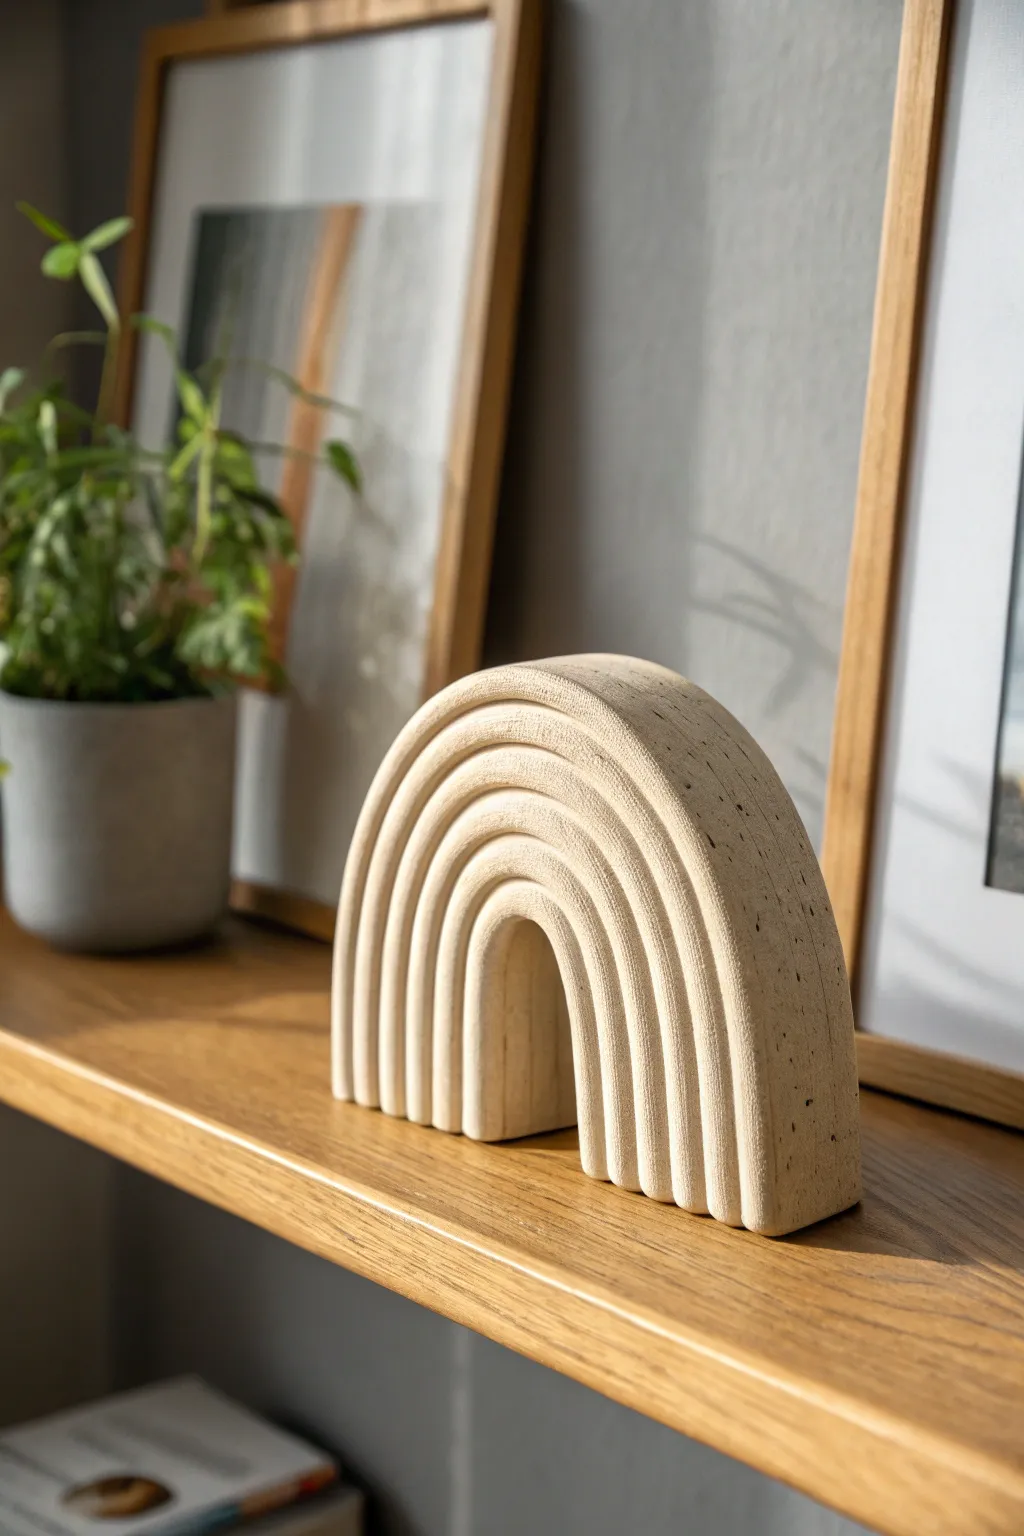
Embrace minimalist design with this sculptural arch that doubles as a functional incense holder. Its calming, neutral tone and satisfying ridge texture bring a touch of architectural elegance to any shelf or nightstand.
Step-by-Step
Materials
- Air-dry clay (white or light beige)
- Non-stick rolling mat or parchment paper
- Rolling pin
- Sharp clay knife or X-Acto blade
- Metal rib or straight edge scraper
- Creating tools (loop tool or U-shaped carving tool)
- Small cup of water
- Fine-grit sandpaper (220 and 400 grit)
- Speckled pottery sealer or clear matte acrylic varnish
- Optional: Toothbrush for texturing
- Bamboo skewer or needle tool
Step 1: Planning and Forming the Base
-
Sketch the template:
Before touching clay, sketch out your arch shape on a piece of cardboard or stiff paper. Aim for a distinct rainbow silhouette about 6-7 inches wide at the base and 5 inches high to match the photo’s proportions. Cut this template out. -
Prep the clay:
Take a substantial block of air-dry clay (about 2 lbs) and knead it well to remove air bubbles. This conditioning makes the clay more pliable and less prone to cracking later. -
Roll the slab:
Roll your clay out onto your non-stick surface. We want this chunky, so aim for a consistent thickness of at least 1.5 to 2 inches. You aren’t making a flat tile; you are making a standing block. -
Cut the arch:
Place your paper template on top of the thick slab. Using a sharp clay knife, slice vertically down through the clay, tracing the outline of your arch. Remove the excess clay. -
Refine the shape:
Stand the arch up. If it leans or wobbles, flatten the bottom edge by gently tapping it against the table. Use a metal rib or a wet finger to smooth the flat front and back faces so they are clean and even. -
Carve the inner arch:
Use your knife to carefully cut out the smaller inner arch space. Go slowly here; I find it helpful to make a rough cut first, then shave away layers until the curve is smooth.
Keep It Clean
Wipe your loop tool clean after every single pass. Built-up clay on the tool drags and ruins the smoothness of your next groove.
Step 2: Adding the Grooves
-
Mark the guidelines:
Lightly trace curved lines across the face of the arch with a needle tool. These will serve as guides for your carving to ensure the ridges stay parallel. -
Start digging:
Using a U-shaped loop tool or carving tool, drag it along your guidelines to create deep, rounded channels. The goal is to create distinct ‘ribs’ that mimic a rainbow. -
Deepen the relief:
Go over your grooves a second time. You want deep valleys and high peaks. The light and shadow play is what makes this piece look expensive. -
Extend the lines:
Continue these grooves over the top curve of the arch and down the other side. The texture should wrap seamlessly around the form. -
Smooth the ridges:
Dip your finger in a little water and gently run it along each groove and ridge to soften any sharp clay crumbs or jagged edges left by the tool. -
Create the incense hole:
Decide where you want the incense stick to rest. Typically, this is a small hole drilled into the top of the outer ridge or the side of the base. Use a bamboo skewer to poke a hole at a slightly angled depth. -
Double-check fit:
Wiggle the skewer slightly to ensure the hole is just wide enough for a standard incense stick to fit without getting stuck, keeping in mind clay shrinks slightly as it dries.
Natural Texture
Mix dried coffee grounds or sand directly into your wet clay before rolling it out. This creates an authentic gritty texture through the whole piece.
Step 3: Finishing Touches
-
Add stone texture:
To mimic the stone-like appearance in the image, take an old toothbrush and gently flick or stipple the surface of the clay. This breaks up the plastic smoothness of the material. -
Slow drying:
Loosely tent a plastic bag over the sculpture to let it dry very slowly over 2-3 days. This prevents warping and cracking in thick pieces. -
Sanding:
Once bone dry, sand the piece lightly. Start with 220 grit to knock down big bumps, then 400 grit for a velvety finish. -
Create the speckled look:
Dilute a tiny amount of black or dark brown acrylic paint with water. Dip a stiff brush (or toothbrush) into it and flick tiny droplets onto the white clay to create a faux-stone speckled effect. -
Seal it up:
Finish with a clear matte varnish or a specialized pottery sealer to protect the surface from ash and moisture.
Place your creation on a sunny shelf and enjoy the peaceful vibe it brings to your space

The Complete Guide to Pottery Troubleshooting
Uncover the most common ceramic mistakes—from cracking clay to failed glazes—and learn how to fix them fast.
Sculptural Tea Light Candle Holders
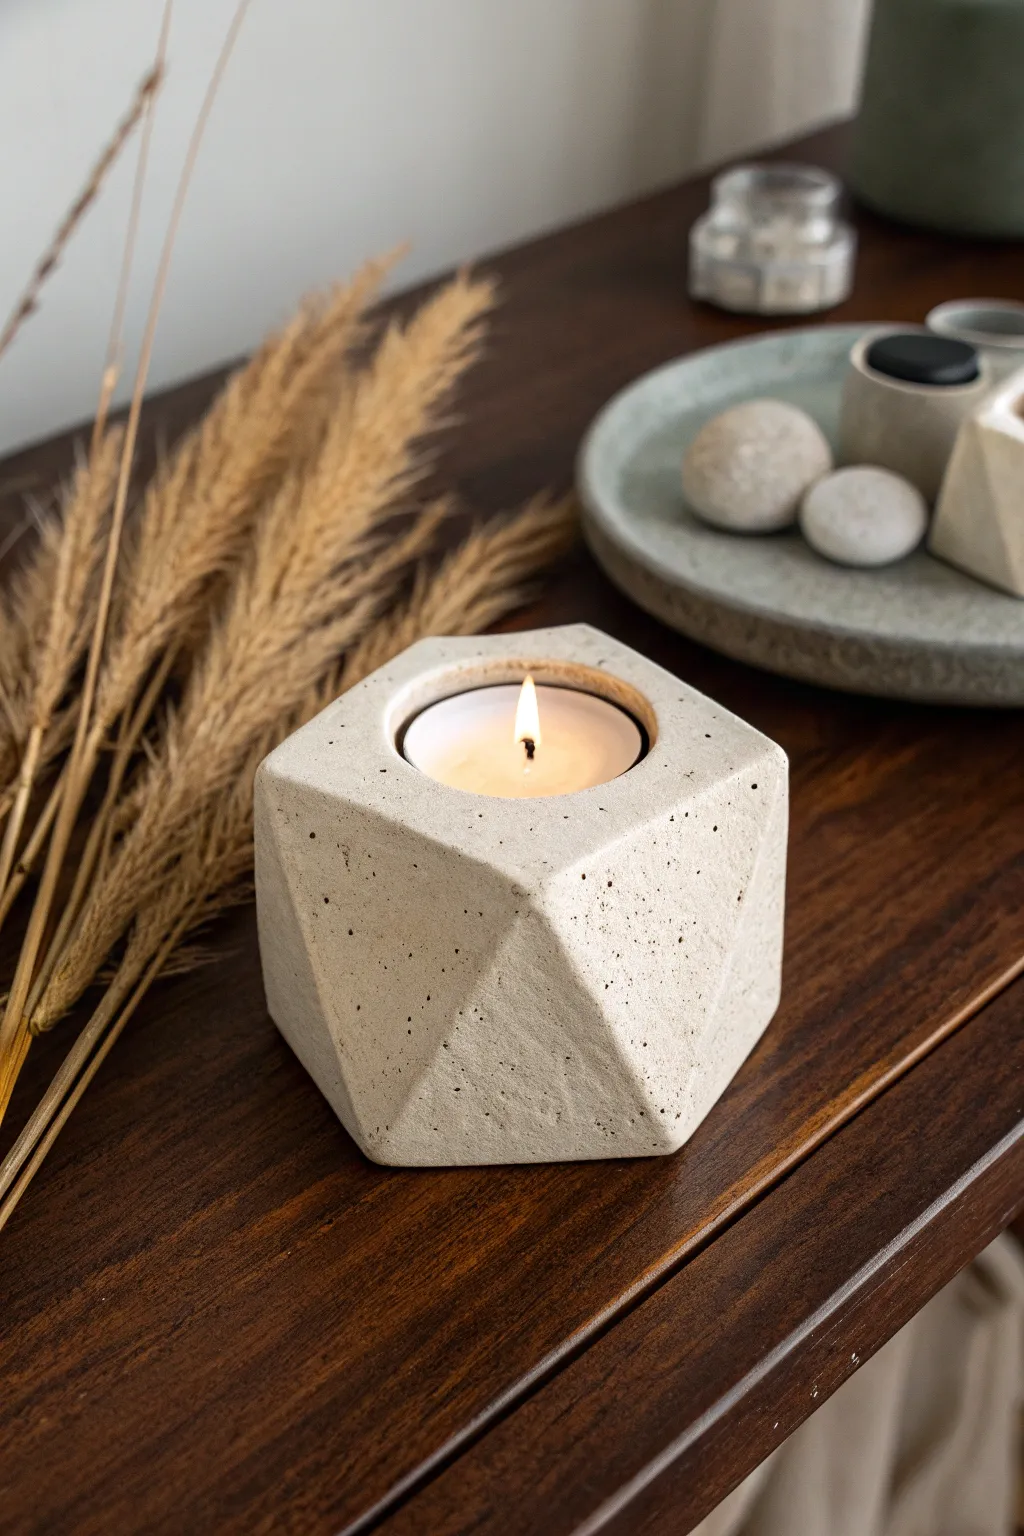
Bring modern, architectural charm to your home decor with this faceted tea light holder that mimics the look of cast stone. Its angular, geometric design catches the light beautifully while providing a sturdy and stylish base for your favorite candles.
Detailed Instructions
Materials
- Air-dry clay (stone or granite effect preferred) or polymer clay
- Rolling pin
- Sharp craft knife or clay blade
- Tealight candle (metal casing)
- Ruler
- Fine-grit sandpaper (220 and 400 grit)
- Small cup of water
- Acrylic sealer (matte finish)
- Parchment paper or work mat
- Optional: Black pepper or dried tea leaves (for texture)
Step 1: Preparing the Base
-
Condition the clay:
Start by taking a generous amount of clay—roughly the size of a tennis ball. Knead it thoroughly in your hands until it is warm, pliable, and free of cracks. If you’re using plain white clay but want the stone effect shown in the image, knead in a pinch of black pepper or crushed dried tea leaves during this stage. -
Form the initial shape:
Roll the clay into a smooth ball. Place it on your work surface and gently press it down to flatten the bottom, creating a thick, rounded mound about 2.5 inches tall. -
Create the tea light well:
Take a standard tea light candle (with its metal casing) and press it firmly into the center of the top of your clay mound. Push it down until the rim of the candle is flush with the clay surface. -
Refine the opening:
Gently wiggle the tea light to slightly widen the hole so the candle won’t get stuck as the clay shrinks during drying. Remove the candle and smooth the inner rim with a drop of water on your finger.
Uneven Drying?
Thick clay projects can crack if the outside dries faster than the inside. Loosely drape cling film over the piece for the first 12 hours to slow the drying process.
Step 2: Sculpting the facets
-
Mark the top hexagon:
Using a ruler or light pressure with your knife, lightly score a hexagon shape around the top opening of the tea light well. -
Cut the top plane:
Slice downwards cleanly along your scored lines to create a flat, hexagonal top surface. Keep the knife blade perpendicular to the table for this initial cut. -
Carve the side angles:
Now for the geometric magic. Position your knife blade at the corner of one of the top hexagon points. Slice downwards and outwards at an angle to create a triangular facet. -
Continue faceting:
Rotate the piece and repeat this angled slice at every other corner. Then, cut inward-sloping facets between them. The goal is to create irregular geometric planes rather than a perfect cylinder. -
Refine the geometry:
Look at the holder from all sides. If a section looks too bulky, slice off thin planar sections. I personally find that asymmetric cuts often look more interesting and organic than perfect symmetry. -
Check stability:
Ensure the bottom remains flat. If your carving has made it wobbly, gently press the base onto the table or slice a thin layer off the bottom to level it.
Step 3: Finishing Touches
-
Smooth the edges:
Dip your finger in water and run it very lightly over the sharpest ridges. You want to keep the geometric definition, but soften any jagged burrs left by the knife. -
Initial texture check:
If you want a pitted concrete look, gently press an old toothbrush or a coarse sponge against random facets of the clay. -
Drying time:
Allow the piece to dry completely. For air-dry clay of this thickness, this usually takes 24 to 48 hours. Turn it over halfway through to let the bottom breathe. -
Sanding:
Once fully cured, use 220-grit sandpaper to smooth any major imperfections. Follow up with 400-grit for a polished stone feel, paying attention to the rim of the candle hole. -
Cleaning:
Wipe away all sanding dust with a slightly damp cloth or a soft brush. -
Sealing:
Apply a coat of matte acrylic sealer to protect the surface. This is especially important for air-dry clay to prevent scorch marks or moisture damage.
Marble Effect
Twist two different colors of clay (grey and white) together before rolling the initial ball. When you slice the facets, you’ll reveal beautiful marble veins inside.
Place your finished holder on a coffee table or shelf to enjoy the warm, modern glow
Earring Organizer With Holes or Pegs
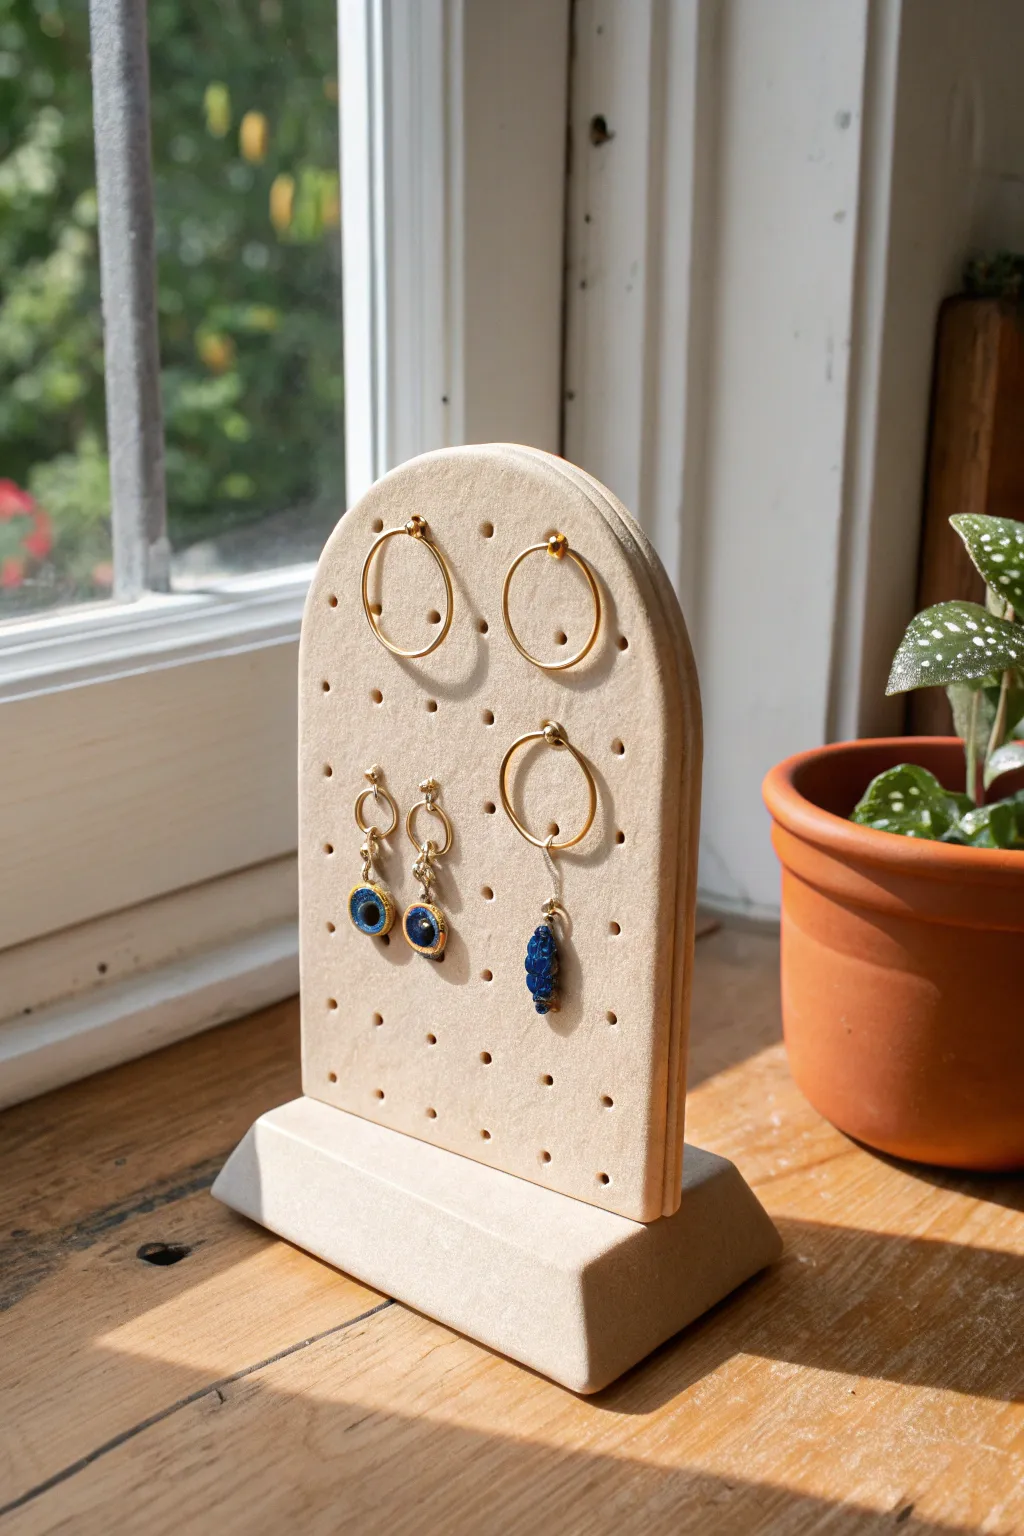
Show off your favorite jewelry with this minimalist, arch-shaped organizer that doubles as decor. The creamy beige tone and clean lines mimic the look of expensive ceramic pieces, but you can easily make it at home with polymer or air-dry clay.
Step-by-Step Tutorial
Materials
- Light beige polymer clay (or air-dry clay)
- Rolling pin or pasta machine
- Sharp clay blade or X-Acto knife
- Paper template (arch shape)
- Ruler
- Small round cutter or stirrer straw (for holes)
- Sandpaper (various grits)
- Strong craft glue (E6000 or similar)
- Oven (if using polymer clay)
- Baking sheet and parchment paper
Step 1: Shaping the Arch
-
Condition the clay:
Begin by warming up your beige clay in your hands, kneading it until it is soft and free of cracks. If you are mixing colors to get this sandy shade, ensure they are fully blended. -
Roll a slab:
Roll your clay out into an even slab, approximately 1/4 inch thick. You want it substantial enough to stand upright without bending. -
Cut the arch:
Place your paper arch template onto the clay slab. Use your sharp blade to cut around the perimeter cleanly. Smooth the cut edges with your fingertip to remove any harsh lines. -
Add texture (optional):
For that matte, stone-like finish seen in the photo, you can gently press a piece of canvas or sandpaper onto the surface, or leave it smooth for a modern look.
Uneven holes?
If your holes distort while punching, try popping the clay piece in the freezer for 10 minutes before punching. The firmer clay holds its shape much better.
Step 2: Creating the Grid
-
Mark hole positions:
Using a ruler and a needle tool, lightly mark a grid pattern on the arch where you want your earring holes to be. Spacing them about 1/2 inch apart usually works well. -
Punch the holes:
Use a small straw or a tiny round cutter to punch out the holes at your marked points. Twist the tool gently as you pull it out to keep the holes clean. -
Clean up debris:
Flip the arch over and gently smooth down any clay that may have pushed through the back during the hole-punching process.
Step 3: Making the Base
-
Form the base block:
Roll a thick block of clay for the base. It should be a rectangular prism, slightly wider than the width of your arch. -
Create the bevel:
Slice the sides of the rectangle at an angle to create a trapeziod shape, giving it a stable, weighted look. -
Make the slot:
Carefully cut a groove or channel down the center of the top of the base. This channel needs to be the same width as your arch thickness so the arch fits snugly. -
Test the fit:
Before hardening, gently test that the arch sits inside the groove. It doesn’t need to stay up on its own yet, but the fit should be close.
Level Up: Terrazzo
Add tiny chopped bits of white, black, or gold clay into your main slab before rolling. This creates a trendy terrazzo stone effect.
Step 4: Finishing and Assembly
-
Bake or dry:
Follow your specific clay’s instructions for baking or drying. If baking, I find that tenting foil over the pieces prevents browning or scorching. -
Sand edges:
Once fully cured and cooled, use fine-grit sandpaper to smooth out any rough edges on the arch perimeter and the corners of the base. -
Check groove alignment:
Double-check the fit of the arch in the base groove. If it’s too tight, sand the bottom of the arch slightly until it slides in. -
Apply glue:
Squeeze a small line of strong adhesive into the groove of the base. -
Secure the arch:
Press the arch firmly into the glued groove. Ensure it is standing perfectly straight at a 90-degree angle. -
Let it set:
Prop the arch up if necessary with books or cups so it dries vertically. Let the glue cure fully according to the bottle directions before adding jewelry.
Place your new stand on a sunny windowsill and enjoy having your jewelry organized and accessible


What Really Happens Inside the Kiln
Learn how time and temperature work together inside the kiln to transform clay into durable ceramic.
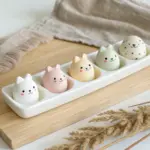
Cute Clay Magnets in a Mini Set
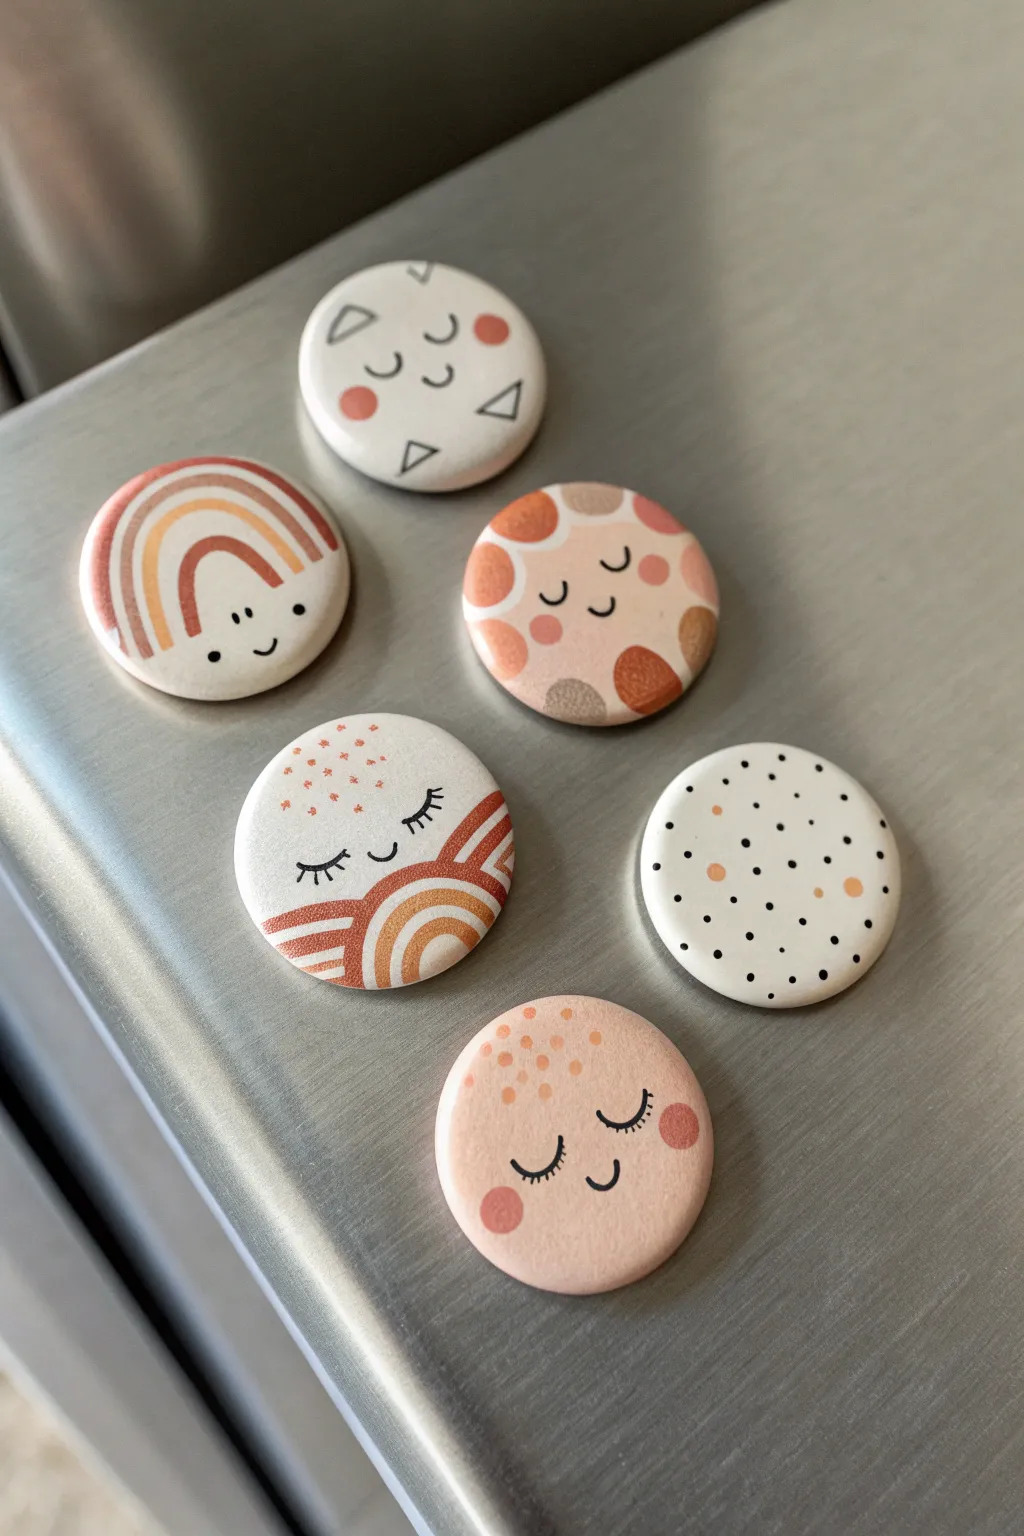
These adorable mini magnets bring a touch of earthy, bohemian charm to your fridge with their soft color palette and whimsical painted faces. Using simple round clay bases, they serve as perfect tiny canvases for practicing fine line work and abstract patterns.
Step-by-Step Guide
Materials
- White polymer clay or air-dry clay
- Rolling pin or smooth glass jar
- Small round cookie cutter (approx. 1.5 inch)
- Sandpaper (fine grit)
- Acrylic paints (terracotta, beige, blush pink, black, white)
- Fine detail paintbrush (size 0 or 00)
- Small dotting tool or toothpick
- Matte or satin varnish
- Strong round craft magnets
- Strong craft glue (like E6000)
Step 1: Shaping the Bases
-
Condition the clay:
Begin by taking a chunk of your white clay and kneading it thoroughly in your hands until it becomes soft, warm, and pliable. This conditioning step prevents cracks later on. -
Roll it out:
Place the clay on a smooth, clean surface and roll it out to an even thickness of about 1/4 inch (6mm). Try to keep the surface as flat and bubble-free as possible. -
Cut the circles:
Use your small round cookie cutter to punch out six circles. If the clay sticks to the cutter, I find dipping the cutter in a little cornstarch helps it release cleanly. -
Smooth the edges:
Gently run your fingertip around the cut edge of each circle to soften any sharp ridges or loose bits of clay. You want a nice, pillowy edge. -
Bake or dry:
If using polymer clay, bake according to the package instructions (usually 275°F/135°C for 15-30 minutes). If using air-dry clay, let them sit in a dry spot for 24-48 hours until fully hardened. -
Sand for smoothness:
Once cool and hard, lightly sand the surface and edges with fine-grit sandpaper to remove any fingerprints or imperfections, then wipe away the dust with a damp cloth.
Step 2: Painting the Designs
-
Base coat (optional):
If you want a colored background, like the pink face magnet, paint the entire circle with a coat of blush pink acrylic paint. For the white backgrounds, you can leave the raw clay or paint a layer of white for a cleaner look. -
Mix your palette:
Prepare your acrylic paints on a palette. You’ll need a terracotta orange, a muted beige, a soft pink, and plain black. Keep them slightly watered down for smoother lines. -
Design 1: The Rainbow:
On a white base, paint a simple arch using the terracotta paint. Once dry, add a beige arch inside it, and finally a tiny terracotta dot in the center. Add a cute face below with two small black dots for eyes and a tiny smile. -
Design 2: The Sleeping Moon:
Paint scattered gray or black triangles and terracotta circles on a white base. Then, using black paint and your finest brush, add several sleeping eye curves (u-shapes with lashes) floating among the shapes. -
Design 3: Large Polka Dots:
Create a pattern of large, organic circles in terracotta, pink, and beige. Once these colored shapes are dry, paint a tiny smiling face (curved eyes and smile) directly over the center of the pattern. -
Design 4: Rain Pattern:
For the sleeping sun design, paint the bottom half with horizontal bands of terracotta and beige segments to look like a setting sun or stylized rainbow. Add a sleeping face with lashes just above the horizon line and tiny pink dots above that. -
Design 5: Confetti:
Take a white base and add tiny dots using black paint and a toothpick. Disperse them randomly but evenly. Add a few larger beige circles for variety. -
Design 6: Pink Cheeks:
On your pink-painted base (or bare clay), paint two large circles of darker pink for cheeks. Between them, add a small smile and two sleeping eyes with long lashes using the fine black liner brush. Add freckles on the forehead with beige paint.
Uneven Surfaces?
If your clay circles warped slightly while drying or baking, glue the magnet onto the concave side (the side that caves in slightly). This ensures the magnet makes contact with the fridge first.
Step 3: Assembly and Finish
-
Seal the art:
Allow the paint to dry completely, ideally for an hour. Apply a thin layer of matte or satin varnish over the front and sides to protect your paint from chipping. -
Attach magnets:
Flip the clay discs over. Apply a small pea-sized amount of strong glue to the center of each back. -
Press and hold:
Press a round magnet firmly into the glue. Let the adhesive cure fully overnight before sticking them to your fridge to ensure the bond is secure.
Crisp Lines Pro-Tip
For the tiny eyelashes and smiles, try using an extra-fine tip permanent marker or a drawing pen instead of a paintbrush. It offers way more control and dries instantly.
Now you have a charming collection of custom magnets ready to hold up your grocery lists and photos
Personalized Alphabet Tags and Ornaments
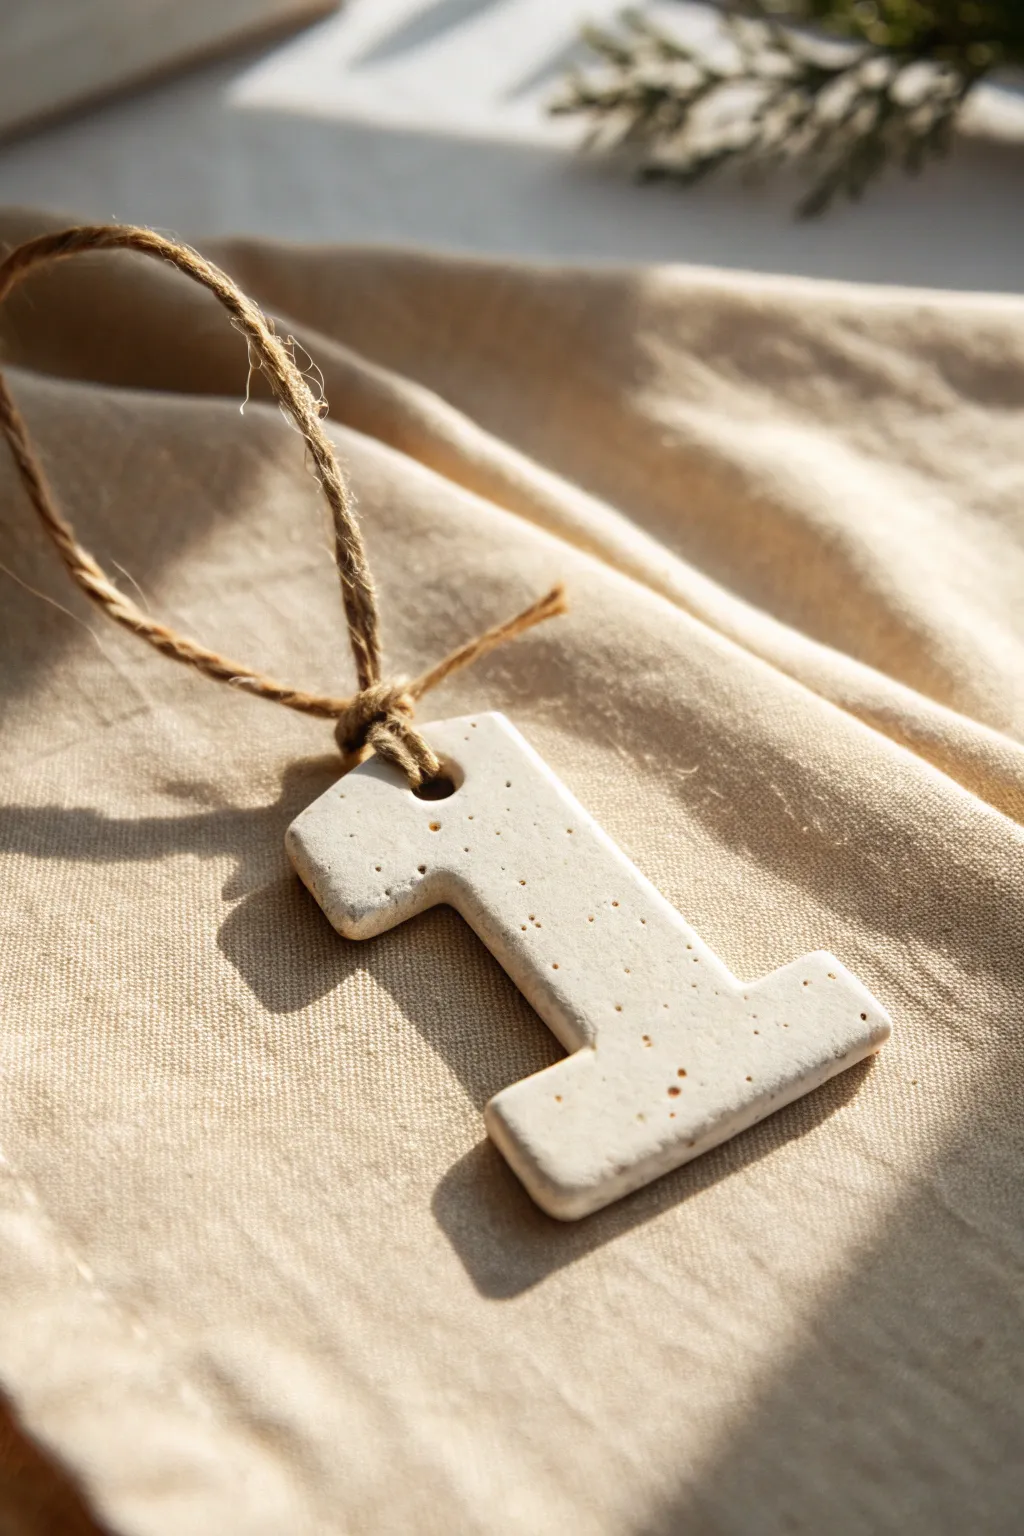
Create rustic, minimalist charm with these faux-stone number tags that look fresh from the kiln. The speckled texture and creamy finish give them a high-end pottery vibe perfect for holiday advent calendars or personalized gift wrapping.
Step-by-Step
Materials
- White polymer clay or air-dry clay
- Fine decorative sand (brown/black mix)
- Ground black pepper or dried tea leaves (for sharper speckles)
- Rolling pin
- Number cookie cutters
- Small straw or cocktail stick
- Fine-grit sandpaper (400-600 grit)
- Hemp twine or jute cord
- Parchment paper
- Matte varnish (optional)
Step 1: Preparing the Clay Body
-
Condition the clay:
Start by taking a chunk of white clay and kneading it thoroughly in your hands until it becomes soft, pliable, and warm to the touch. -
Create the speckles:
Flatten the clay slightly and sprinkle a small pinch of fine decorative sand onto the surface. For that authentic pottery look, I also like to add just a tiny dusting of ground black pepper or loose tea leaves. -
Incorporate texture:
Fold the clay over the inclusions and knead again, ensuring the speckles are distributed evenly throughout the entire lump without clumping in one spot. -
Check density:
Examine the clay. If you want a more noticeable granite effect, repeat the sprinkling process, but be careful not to overload it or the clay may become crumbly.
Crumbly Clay?
If your clay cracks while rolling because of the sand or pepper, add a drop of clay softener (polymer) or water (air-dry) and knead longer to regain elasticity.
Step 2: Shaping and Cutting
-
Roll it out:
Place your clay between two sheets of parchment paper to prevent sticking. Use the rolling pin to flatten it into an even slab, aiming for a thickness of about 4-5mm for durability. -
Check thickness:
Run your finger over the slab to ensure it’s level. An uneven slab will result in a tag that looks lopsided when hanging. -
Cut the shapes:
Press your number cutter firmly into the clay slab. Wiggle it ever so slightly to separate the shape from the surrounding clay before lifting the cutter straight up. -
Release the shape:
Gently peel away the excess clay from around the number. If the number is stuck inside the cutter, push it out very gently using a soft brush handle to avoid leaving dents. -
Smooth the edges:
Dip your finger in a little bit of water (for air dry) or baby oil (for polymer) and gently run it along the cut edges to soften the harsh angles left by the cutter. -
Create the hole:
Using a small straw or a cocktail stick, press a hole through the top of the number. Ensure the hole is centered and not too close to the edge to prevent tearing later. -
Clean the exit point:
Flip the number over and check the back of the hole. If clay pushed out, smooth it flat with your fingertip.
Step 3: Finishing Touches
-
Dry or bake:
If using polymer clay, bake according to the package instructions (usually 275°F/135°C). If using air-dry clay, let it sit on a flat surface away from direct heat for 24-48 hours. -
Sanding:
Once fully cured and hard, take your fine-grit sandpaper and lightly buff the edges and surface. This removes any fingerprints and exposes the speckles further. -
Dust off:
Wipe the piece down with a slightly damp cloth to remove any sanding dust. -
Seal (Optional):
The image shows a very matte, natural finish. However, if you want protection, apply a very thin coat of ultra-matte varnish now. -
Prepare twine:
Cut a length of hemp twine or jute cord, approximately 8-10 inches long. -
Looping:
Fold the twine in half. Push the folded loop through the hole in your tag from front to back. -
Securing:
Feed the loose ends of the twine through the loop and pull tight to create a snug lark’s head knot right at the top of the number.
Stone Effect
Don’t have decorative sand? Crushed dried herbs or even used coffee grounds (dried thoroughly) make amazing, organic-looking speckles that smell great.
Enjoy the simple elegance of your new stoneware-style tags as you begin your decorating

TRACK YOUR CERAMIC JOURNEY
Capture glaze tests, firing details, and creative progress—all in one simple printable. Make your projects easier to repeat and improve.
Sweet Face Planters for Small Plants
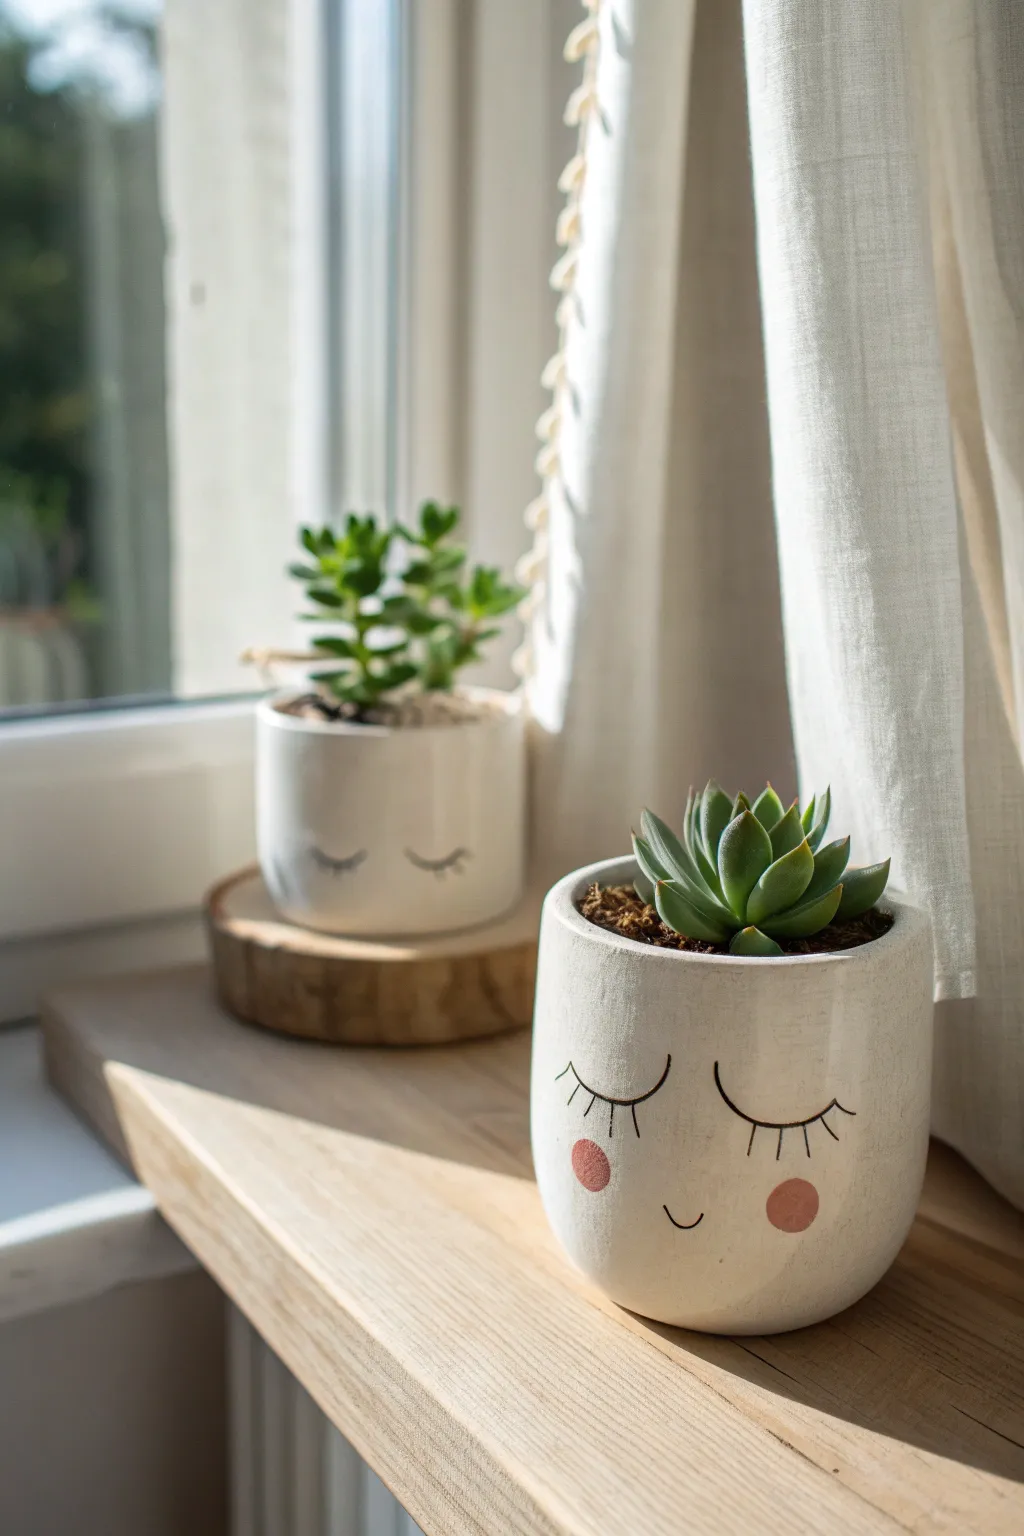
Transform simple white pots into adorable, sleepy characters that bring a touch of whimsy to your windowsill. These minimalist planters feature delicate eyelashes and soft rosy cheeks, perfectly complementing small succulents or cacti.
Step-by-Step Guide
Materials
- Air-dry clay (white) or polymer clay
- Rolling pin
- Empty can or jar (as a mold/armature)
- Clay knife or craft knife
- Small bowl of water (for smoothing)
- Fine-grit sandpaper
- White acrylic paint (matte)
- Black fine-point paint pen or permanent marker
- Pink acrylic paint
- Small round paintbrush or sponge dauber
- Clear matte sealant spray
Step 1: Shaping the Clay Vessel
-
Roll the slab:
Begin by wedging your white clay to remove air bubbles, then roll it out to an even thickness of about 1/4 inch. Making it too thin makes the walls fragile, so aim for sturdy but not chunky. -
Cut the base:
Place your chosen can or jar meant for the mold onto the clay slab and trace around the bottom with your knife to create a perfect circle for the base. -
Measure the walls:
Measure the circumference of your mold (can/jar) and add about half an inch for overlap. Cut a long rectangular strip of clay with this length and your desired height. -
Construct the cylinder:
Wrap the rectangular strip around your can (which should be wrapped in parchment paper to prevent sticking). Score the connecting edges, apply a little water or slip, and press them firmly together to create a seam. -
Attach the base:
Score the bottom edge of your clay cylinder and the outer edge of your circular base. Join them together, using your thumb or a modeling tool to smudge the clay across the seam until it disappears. -
Smooth the surfaces:
Dip your finger in water and gently run it over the entire pot to smooth out fingerprints and seam lines. I find it helps to pay extra attention to the rim to ensure it’s nice and rounded. -
Curing phase:
Allow the clay to dry completely according to the package instructions. If using polymer clay, bake it now; for air-dry clay, let it sit for 24-48 hours until fully hard and white.
Step 2: Finishing and Decorating
-
Sand for perfection:
Once fully cured, take fine-grit sandpaper and lightly buff the surface. This removes any minor bumps or rough textures, creating a smooth canvas for the face. -
Base coat application:
Apply two thin layers of white matte acrylic paint to the entire exterior. This ensures a uniform color and helps seal the clay surface. -
Sketch the face:
Lightly sketch the position of the eyes and mouth using a pencil. Aim for the center-lower portion of the pot to give it that cute ‘chibi’ proportion. -
Draw the lashes:
Using a black fine-point paint pen, trace over your pencil lines. Draw two downward curves for closed eyelids and add three small vertical flicks for the eyelashes. -
Add the smile:
Draw a tiny, subtle ‘u’ shape between the eyes for a small, contented smile. Keep the line thin for a delicate look. -
Create the blush:
Dip a sponge dauber or small brush into pink acrylic paint. Dab off most of the paint onto a paper towel until it’s almost dry, then gently press circle cheeks onto the pot below the eyes. -
Seal the artwork:
In a well-ventilated area, spray the entire pot with a clear matte sealant. This protects the painted details from moisture when you water your plants.
Slip & Score Secret
When joining clay pieces, scratch both surfaces (score) and add water (slip) to make a sticky ‘glue’. This prevents seams from cracking apart as they dry.
Uneven Seams?
If the vertical seam where the wall connects is visible, add a tiny ‘snake’ of fresh clay over the line and blend it outward with a wet finger until smooth.
Pop in your favorite succulent and enjoy your charming new desk companion
Terrazzo-Style Trinket Tray
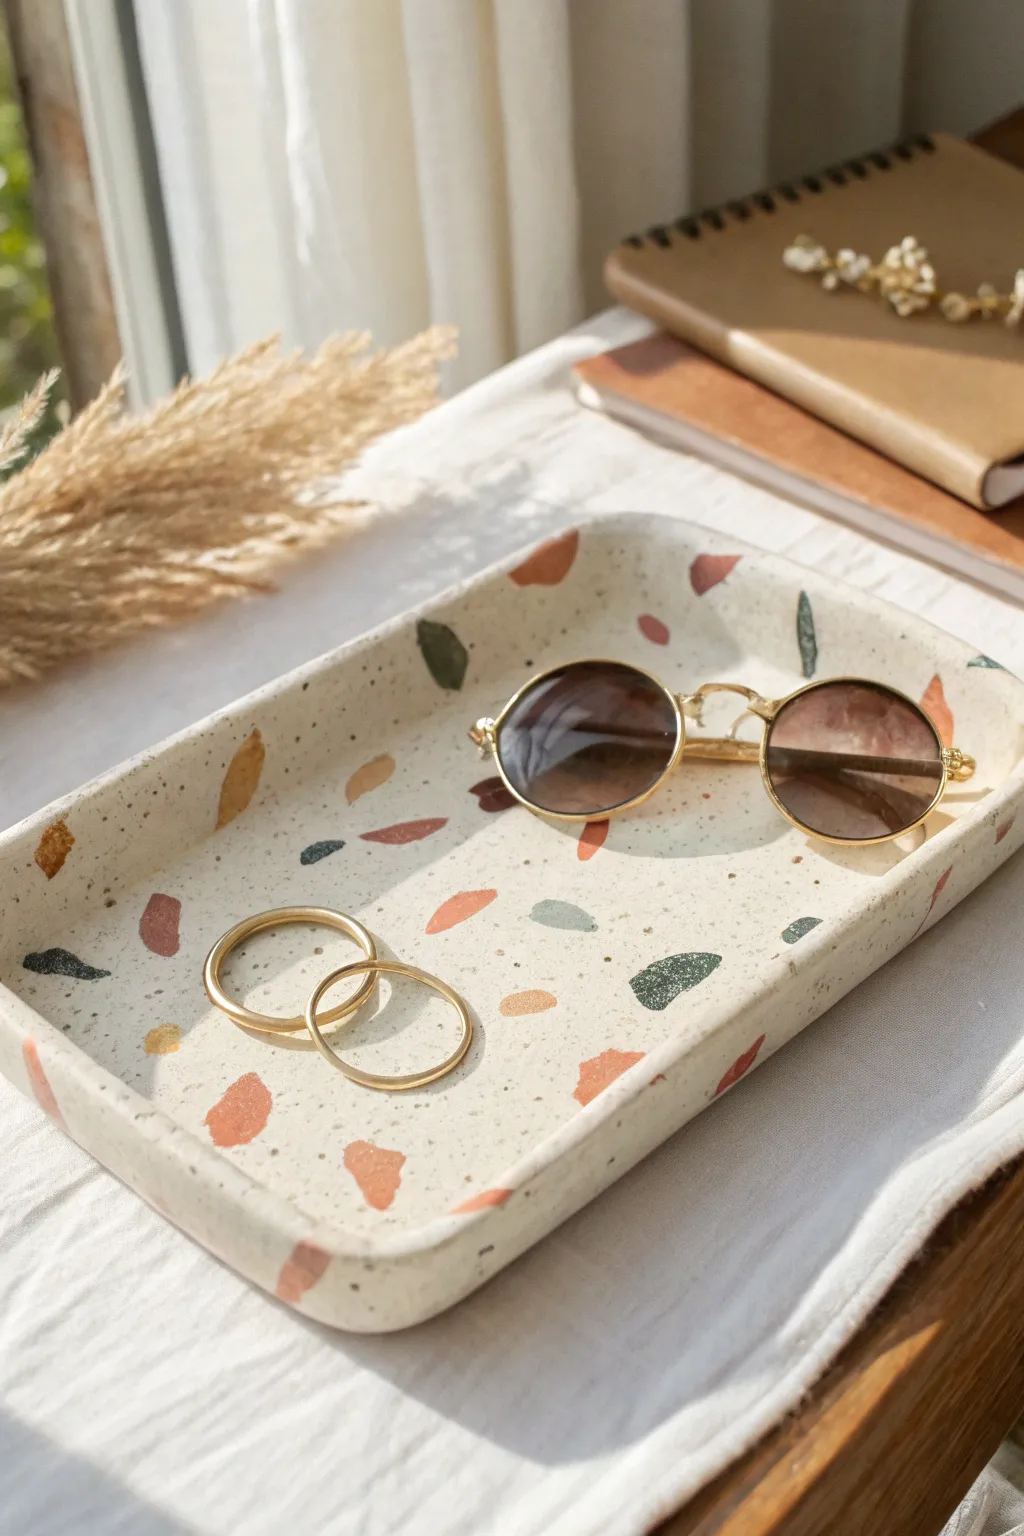
Bring a trendy, speckled aesthetic to your vanity with this chic DIY accessory. By embedding contrasting clay chips into a neutral base, you create a convincing stone-like finish perfect for holding your favorite rings and sunglasses.
Detailed Instructions
Materials
- White or cream polymer clay (base)
- Small amounts of colored polymer clay (terracotta, hunter green, deep yellow, grey/black)
- Acrylic rolling pin
- Sharp craft knife or tissue blade
- Rectangle cookie cutter (or paper template and knife)
- Parchment paper
- Fine-grit sandpaper (400 to 1000 grit)
- Matte or satin glaze (optional)
- Soft paintbrush
Step 1: Preparing the Chips
-
Condition the colors:
Start by manipulating your small amounts of colored clay (terracotta, green, yellow, and grey) until they are soft and pliable. -
Roll thin sheets:
Flatten each colored piece into a very thin, irregular sheet using your rolling pin or fingers. -
Create the chips:
Using your craft knife, chop these thin sheets into random, angular fragments. Aim for a mix of sizes—some tiny specks and some larger, distinctive chunks. -
Separate the pieces:
Gently separate the chopped pieces on your work surface so they don’t clump together while you prepare the base.
Clean Rolling Tip
Keep baby wipes nearby to clean your hands and rolling pin between colors. Polymer clay pigments transfer easily, and you want your white base to stay crisp and bright.
Step 2: Forming the Base
-
Condition the white clay:
Take a large block of white or cream clay and knead it thoroughly until it’s smooth and warm. -
Roll the slab:
Roll the white clay out on parchment paper to a thickness of about 1/4 inch (6mm). This needs to be slightly larger than your final tray size. -
Apply the chips:
Sprinkle your colored clay chips randomly over the white slab. Don’t overthink the placement—terrazzo looks best when it feels spontaneous. -
Embed the pattern:
Place a fresh sheet of parchment paper over the spotted clay. Use your rolling pin to gently press the chips into the base layer until the surface is completely flat and smooth again. -
Repeat if necessary:
I like to check for any large gaps at this stage; if you see bare spots, add a few more chips and roll again.
Step 3: Shaping and Finishing
-
Cut the shape:
Use a rectangular cutter or a paper template with a craft knife to cut out your main tray shape. -
Create the rim:
Take the excess clay scraps (now a marbled mix), roll them into a long snake, and flatten it slightly to create a long strip for the walls. -
Attach the walls:
Wrap this strip around the perimeter of your base rectangle on top of the edge. Use your thumb or a modeling tool to smudge the seam on the inside and outside so the wall attaches firmly to the base. -
Smooth the edges:
With your fingers, gently round off the top lip of the rim and the corners to soften the look. -
Bake the clay:
Bake the tray according to your specific clay manufacturer’s instructions (usually 275°F/135°C for 15-30 minutes). -
Cool down:
Let the tray cool completely before handling it to ensure it hardens fully. -
Sand for stone effect:
Wet sand the tray under a trickle of water using fine-grit sandpaper. This step is crucial as it removes fingerprints and reveals the crisp edges of the colored chips. -
Seal (optional):
For a protective finish, apply a thin layer of matte or satin glaze and let it dry.
Add Metallic Flair
Mix in small flakes of gold or copper leaf along with your clay chips before the final roll. This adds a sophisticated shimmer that catches the light beautifully.
Now you have a stylish, modern spot to organize your daily essentials
Moon Phase Wall Hanging Tiles
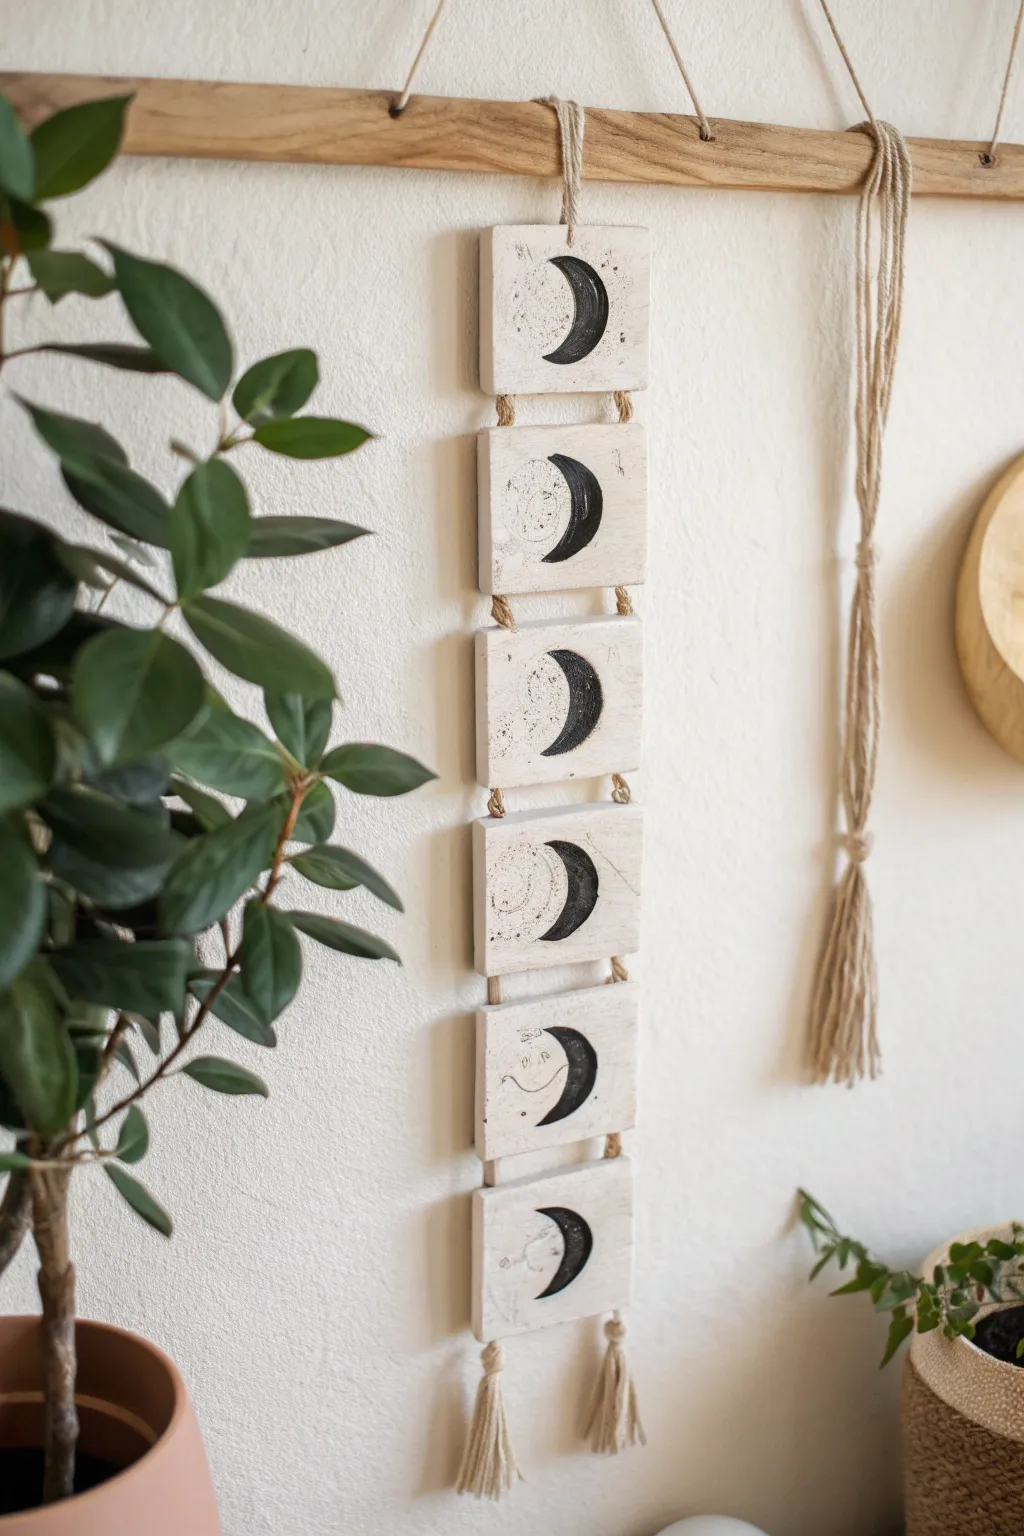
Bring celestial charm to your space with this vertical garland of clay tiles featuring simple, hand-painted crescent moons. The rustic texture of the clay paired with natural jute twine creates an earthy, minimalist aesthetic perfect for any modern home.
How-To Guide
Materials
- Air-dry clay (white) or polymer clay
- Rolling pin
- Square cookie cutter (approx. 3×3 inches) or knife and ruler
- Sandpaper (fine grit)
- Black acrylic paint
- Small round paintbrush
- Jute twine or heavy hemp cord
- Wooden dowel or driftwood branch
- Straw or skewer (for poking holes)
- Ruler
- Parchment paper or canvas mat
Step 1: Shaping the Tiles
-
Prepare your workspace:
Lay down a piece of parchment paper or a canvas mat to prevent the clay from sticking to your table. -
Roll the slab:
Take a large chunk of white air-dry clay and roll it out until it is an even thickness, roughly 1/4 inch thick. Try to keep the surface smooth. -
Cut the squares:
Using a square cookie cutter or a ruler and knife, cut out six identical squares. If the edges are jagged, smooth them gently with a damp finger. -
Create connection holes:
Before the clay dries, use a straw or skewer to poke holes in the tiles. You need two vertical channels running through the tile, or essentially four holes per tile: two on the top edge and two on the bottom edge, spaced symmetrically. -
Check alignment:
Ensure the holes on the bottom of one tile line up relatively well with the holes on the top of the next tile so the twine hangs straight. -
Let them dry:
Place the tiles on a flat surface to dry completely. This usually takes 24-48 hours depending on humidity; turn them over halfway through to prevent warping.
Warp-Free Drying
To keep your flat clay tiles from curling up as they dry, place a heavy book on top of them once they are leather-hard (partially dry but firm).
Step 2: Painting the Moons
-
Sand the surfaces:
Once bone dry, lightly sand the edges and surface of each square to remove any rough texture or unevenness. -
Sketch the crescents:
Lightly sketch a crescent moon shape onto each tile with a pencil. Vary the thickness slightly if you want an organic, hand-drawn look. -
Paint the shapes:
Using black acrylic paint and a small round brush, fill in the crescent shapes. I prefer to use a fairly dry brush technique here to give the moon a slightly weathered, textured edge rather than a perfect line. -
Add texture details:
While the paint is wet, you can dab it with a paper towel or sponge to lift a tiny bit of color, mimicking the cratered surface of the moon. -
Seal (optional):
If you want extra protection, apply a matte varnish over the tiles, though leaving them raw adds to the matte, rustic appeal.
Step 3: Assembly
-
Cut the twine:
Cut two long lengths of jute twine, each about 4-5 feet long to allow plenty of slack for knotting and tassels. -
Attach to the dowel:
Fold each piece of twine in half and loop it onto your wooden dowel or branch using a lark’s head knot. Space the two knots apart to match the width of your tile holes. -
Thread the first tile:
Take the top tile and thread the twine ends through the top holes and out the bottom holes. -
Secure the position:
Tie a simple overhand knot in the twine right underneath the tile holes to hold it in place, or simply let friction hold it if the fit is snug. -
Add remaining tiles:
Continue threading the remaining five tiles, leaving a small gap of exposed twine (about 1 inch) between each square. -
Create tassels:
Once the last tile is threaded, tie a secure knot at the bottom. Unravel the remaining twine ends to create fluffy tassels. -
Trim the ends:
Trim the tassels so they are even and hang at a pleasing length.
Fixing Cracked Holes
If a hole cracks while drying, mix a tiny bit of fresh clay with water to make a paste (slip) and fill the crack. Let it dry and sand smooth.
Hang your new moon phase creation near a window to catch the light and admire your handiwork
Whimsical Animal Head Wall Decor
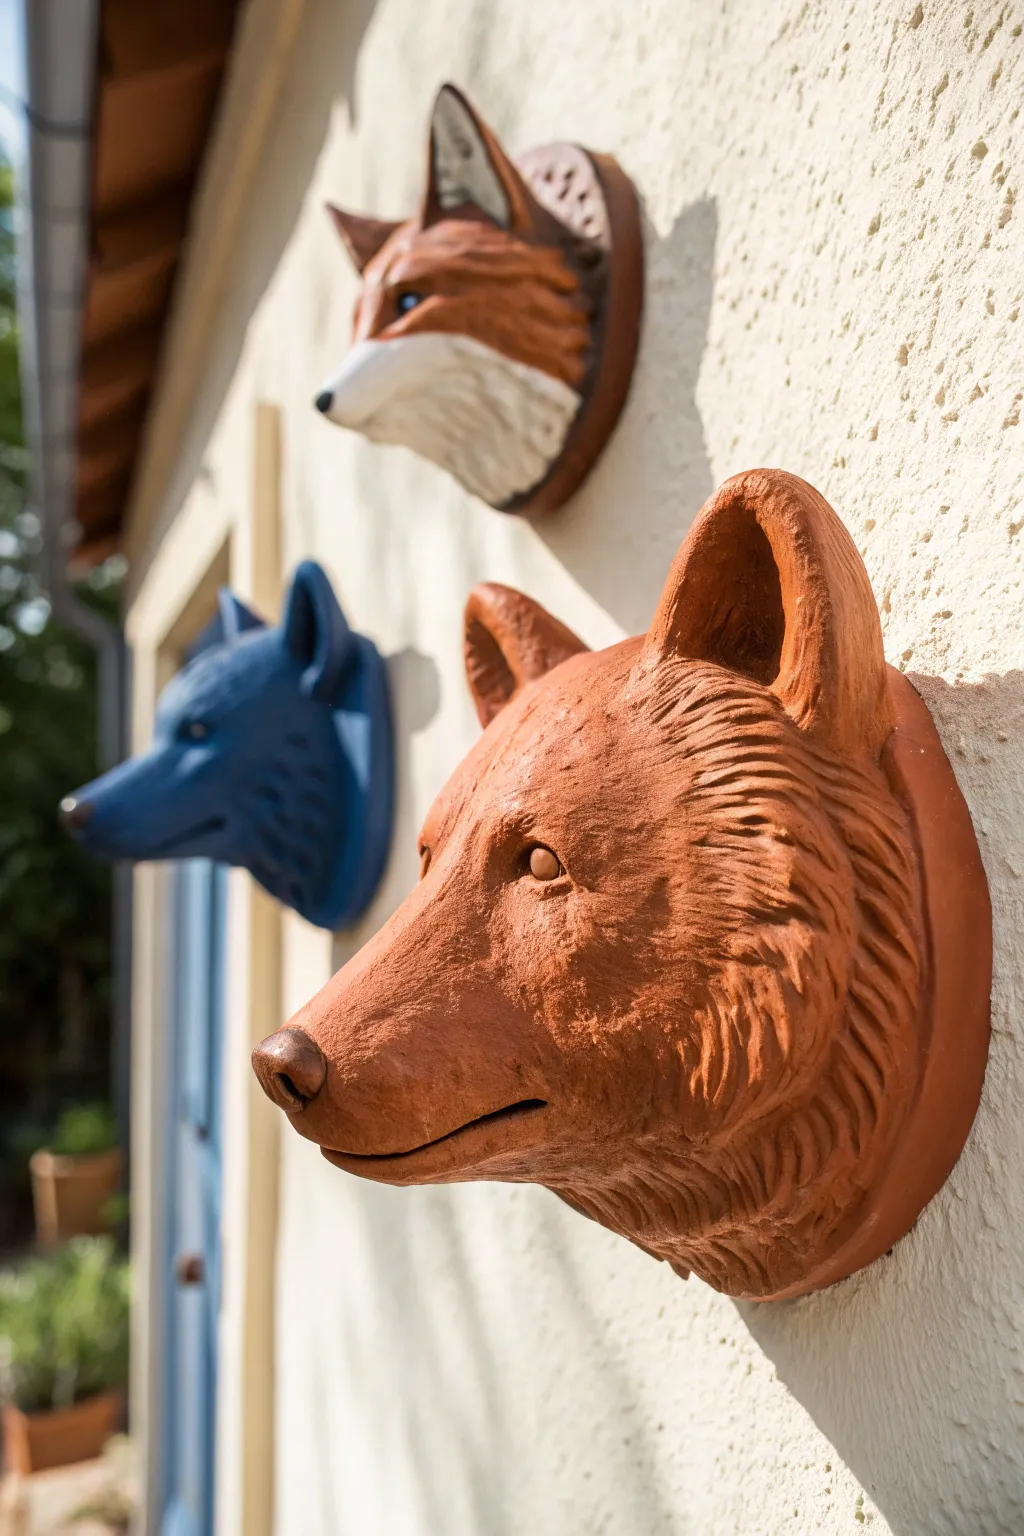
These mounted animal busts add a playful cottage-core touch to your outdoor walls or garden shed. Using terra cotta clay and clever sculpting techniques, you’ll create textured, dimensional fox and wolf heads that seem to emerge right from the stucco.
Step-by-Step
Materials
- Plastilina or air-dry terra cotta clay (approx. 2-3 lbs per head)
- Wooden circular plaque or mounting board (approx. 5-inch diameter)
- Aluminum foil
- Masking tape
- Sculpting tool set (loop tool, needle tool, modeling rib)
- Texture tools (stiff bristle brush, comb tool)
- Slip (clay slurry)
- Scoring tool (or an old fork)
- Acrylic paints (burnt sienna, raw umber, white, black, deep blue)
- Clear matte acrylic sealer (outdoor safe if hanging outside)
- Heavy-duty hanging hardware
Step 1: Armature & Base
-
Prepare the Mounting Base:
Start with your circular wooden plaque or a clay slab cut into a circle. If using wood, drive a few small nails partway into the center to give the clay something to grip onto. -
Form the Core Foil Ball:
Crumple a generous amount of aluminum foil into a tight ball, roughly the size of a grapefruit. This will keep the sculpture lightweight and use less clay. -
Shape the Muzzle Area:
Create a second, smaller cone shape from foil to serve as the snout. Use masking tape to securely attach this cone to the larger foil ball, creating the basic head structure. -
Attach to Base:
Position your foil armature onto the mounting plaque. Tape it down thoroughly or press it firmly if using a clay base, ensuring the angle looks like a head mounting the wall. -
Apply the Base Layer:
Roll out a slab of clay about ¼ inch thick. Drape this over your foil armature, pressing it firmly to conform to the shape without trapping large air pockets.
Step 2: Sculpting Features
-
Refine the Snout Transition:
Add extra clay where the snout meets the forehead to create a smooth, natural transition. Use your thumbs to blend the clay downwards. -
Build the Eye Insets:
Press your thumbs deeply into the sides of the head to create eye sockets. This establishes the animal’s facial structure and intense gaze. -
Add the Ears:
Form two thick triangles of clay. Score the attachment points on the head and apply slip, then press the ears firmly in place, blending the seams completely so they don’t crack off. -
Hollow the Ears:
Use a medium loop tool to gently carve out the inside of the ears, leaving the edges distinct. I find this creates depth and catches shadows nicely in the sunlight. -
Sculpt the Nose:
Roll a small ball of clay and attach it to the tip of the snout. Shape it into a soft triangle or oval, adding small indentations for nostrils. -
Define the Mouth:
Use a needle tool or knife to cut a horizontal line for the mouth, curving slightly upwards at the back to give that distinct animal grin. -
Insert the Eyes:
Roll two small spheres of clay. Place them into the sockets you made earlier and gently smooth the surrounding clay to form eyelids over the top and bottom.
Cracking Ears?
If ears start cracking at the join, your clay might be too dry. Score the join deeply, add generous slip, and coil a tiny “snake” of fresh clay around the seam to reinforce it.
Step 3: Texture & Finish
-
Rough Fur Texture:
Using a metal rake tool or a stiff comb, drag lines through the clay starting from the nose and moving back towards the ears to simulate fur direction. -
Detail the Mane:
For the neck area close to the wall, use a modeling tool to carve deeper, chunky fur strands that flair out, creating a jagged silhouette against the plaque. -
Refine Facial Fur:
Switch to a finer needle tool for the face. Scratch short, delicate lines around the eyes and muzzle for shorter fur. -
Final Smooth:
Check the nose and eyes. Use a slightly damp finger or brush to smooth these specific areas so they contrast with the rough fur texture. -
Natural Fox Painting:
Once fully dry (or fired), paint the majority with burnt sienna. Use white for the chin, inner ears, and cheeks. Use tiny dots of black for the eyes and nose. -
Alternative: The Blue Wolf:
For the stylized wolf, paint the entire sculpture a deep matte blue. While the paint is tacky, wipe raised areas gently with a cloth to let some clay tone peek through. -
Seal for Outdoors:
Apply two coats of clear matte acrylic sealer to protect your work from moisture and UV fading if you plan to hang it outside like in the photo.
Level Up: Painted Highlights
Dry-brush a lighter shade over the raised fur texture (orange over red, light blue over dark) to make the details pop and look more 3-dimensional from a distance.
Hang your trio of woodland guardians together to create a charming storybook focal point on your exterior wall.
Tiny Food Charms for Keychains or Zippers
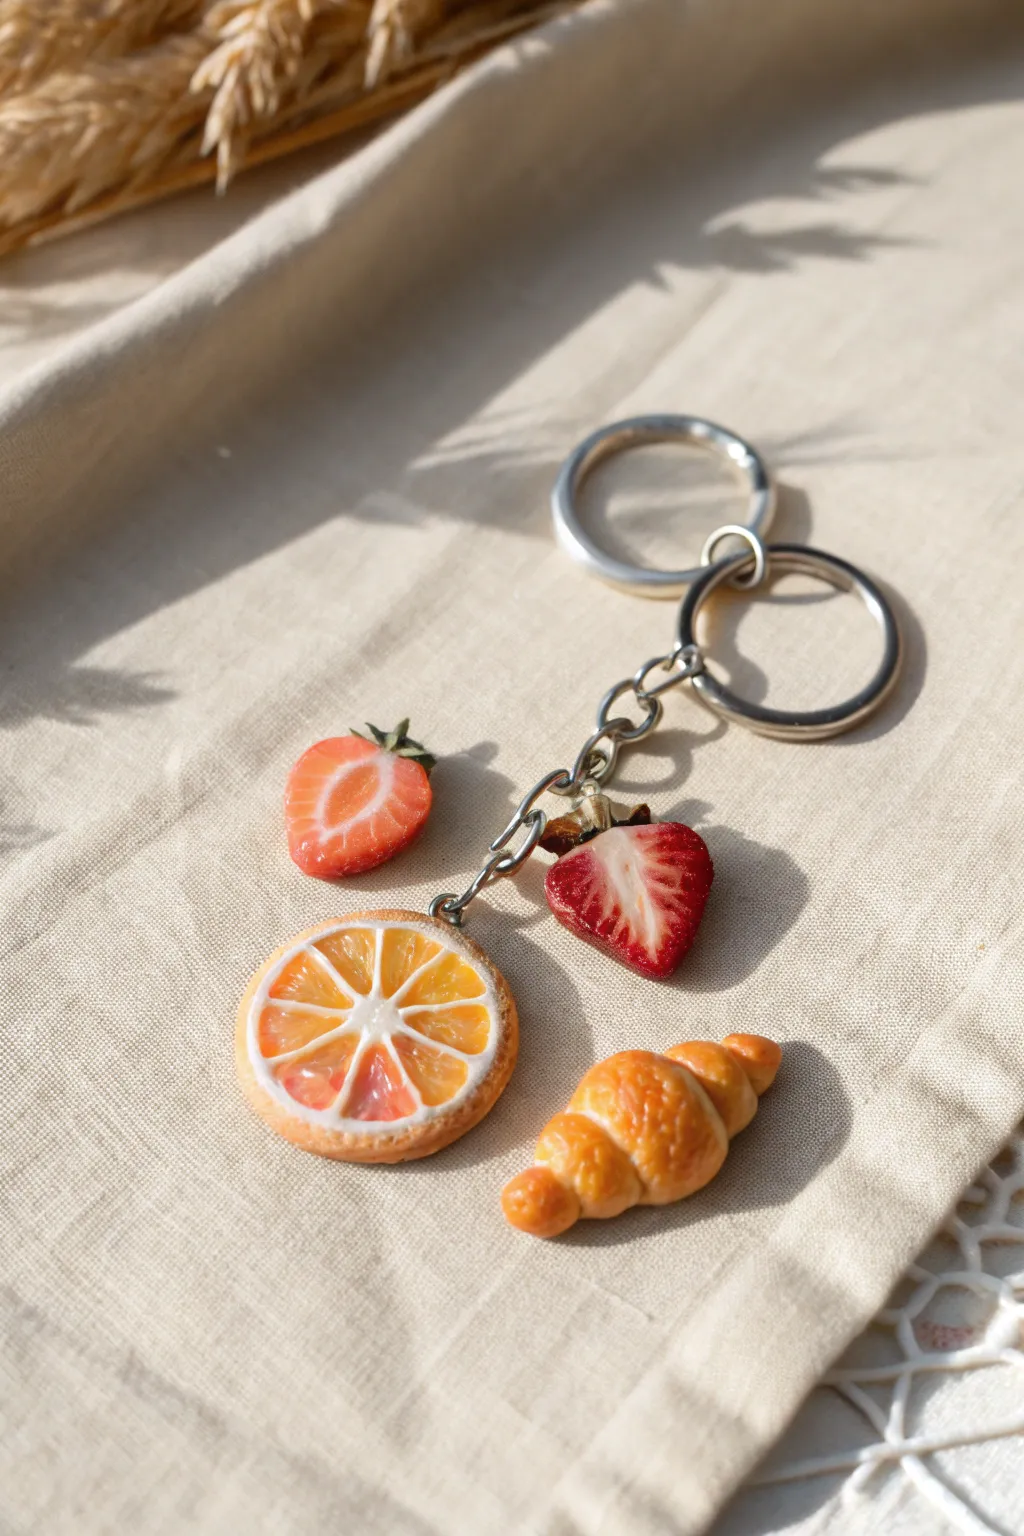
Carry a tiny, delicious breakfast with you everywhere using these realistic polymer clay charms. This project features detailed citrus slices, juicy strawberry halves, and a flaky croissant, all assembled onto a sturdy keychain.
Detailed Instructions
Materials
- Polymer clay (translucent white, orange, red, yellow, tan/beige, green)
- Liquid polymer clay (translucent)
- Chalk pastels (orange, brown, red)
- Gloss glaze or UV resin
- Detailed sculpting tools (needle tool, small ball tool)
- Blade or X-Acto knife
- Eye pins
- Jump rings
- Keyring and chain hardware
- Fine paintbrush
- Sandpaper or toothbrush (for texturing)
Step 1: Sculpting the Citrus Slice
-
Mix the cane colors:
Start by mixing translucent clay with a tiny bit of orange to create a semi-transparent pulp color. You’ll also need a solid white for the pith and a darker orange for the rind. -
Form the segments:
Roll the pulp color into a log, then flatten slightly into a teardrop log shape. Wrap this teardrop log in a very thin sheet of white clay. -
Assemble the cane:
Cut the wrapped teardrop log into 8 equal lengths. Arrange them in a circle with the points facing inward to form the segments of the fruit. -
Add the rind:
Wrap the entire circle of segments with a thin sheet of white clay, followed by a slightly thicker sheet of the dark orange rind color. -
Reduce and slice:
Gently squeeze and roll your cane to reduce its size, ensuring the pattern stays intact. Slice a thick coin (about 4-5mm) from the cane for your charm. -
Texture the surface:
Use a needle tool to gently prick and drag the surface of the pulp sections, giving them a realistic, fibrous texture.
Juicy Realism
Mix a tiny drop of red liquid clay or red chalk dust into your gloss glaze before applying it to the strawberry centers for an extra ripe look.
Step 2: Crafting the Strawberries
-
Shape the base:
Form a small teardrop shape out of red polymer clay. Slice it perfectly in half lengthwise to create two flat-backed components. -
Create the core:
Using a small knife, carefully carve out a shallow triangular depression in the center of the flat side. Fill this with a mix of white and translucent clay. -
Detail the veins:
scratch tiny lines radiating from the white core into the red flesh using a needle tool to simulate the vascular bundles inside the berry. -
Add the leaves:
Create tiny teardrops of green clay, flatten them, and attach them to the top of the strawberry. Use a needle tool to press them in securely.
Sticky Clay?
If your cane is squishing when you try to slice it, pop the clay log in the refrigerator for 15 minutes to firm it up before cutting again.
Step 3: Baking the Croissant
-
Roll the dough:
Roll tan clay into a flat triangle. I prefer to make the base of the triangle slightly wider than the height. -
Roll up:
Starting from the wide base, tightly roll the clay toward the tip. Gently curve the ends inward to create the crescent shape. -
Shading:
Using a soft brush, dust the top of the raw croissant with scraped brown and orange chalk pastels to mimic a golden-baked crust.
Step 4: Assembly and Finishing
-
Insert hardware:
Before baking, trim eye pins to the correct length and dip the ends in liquid clay. Insert one into the top of each charm. -
Bake:
Bake all pieces according to your clay manufacturer’s instructions, usually around 275°F (130°C) for 15-30 minutes. -
Glaze:
Once cool, coat the fruit slices (especially the cut sides) with gloss glaze or UV resin to make them look wet and juicy. Leave the croissant matte or use a satin glaze. -
Attach to chain:
Use jump rings to attach your finished charms to the chain links of the keyring. Vary the heights for a clustered look.
Now you have a refreshing set of accessories ready to brighten up your keys or bag
Mini Diorama Lid Scenes in Polymer Clay
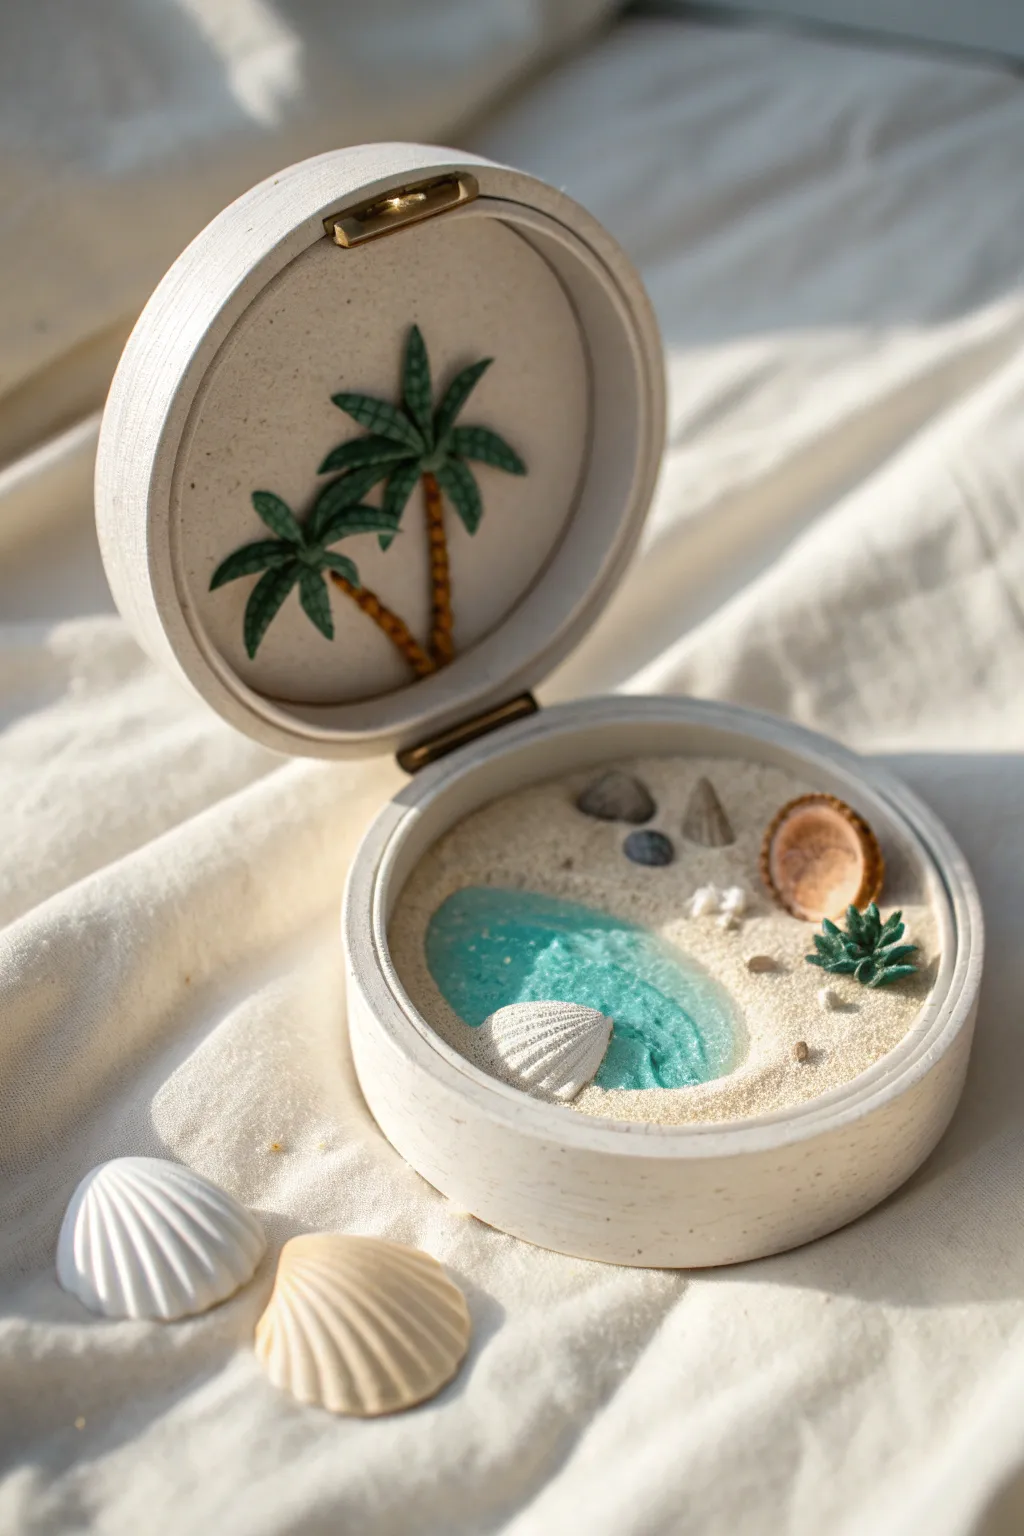
Capture the serenity of a tropical getaway inside a tiny, portable container. This project combines polymer clay sculpting with resin effects to create a delightful keepsake box featuring a textured sandy beach and swaying palm trees.
Step-by-Step Guide
Materials
- Small round wooden box (hinged)
- White acrylic paint
- Polymer clay (white, brown, green, translucent)
- Sand (fine grain)
- UV resin or 2-part epoxy resin
- Blue alcohol ink or resin dye
- Liquid polymer clay or bake and bond
- Sculpting tools (needle tool, ball stylus)
- UV lamp (if using UV resin)
- Gloss varnish
- Sandpaper
Step 1: Preparing the Base
-
Prime the container:
Begin by sanding your small wooden box lightly to create a grip for the paint. Coat the entire exterior and the inside rim with white acrylic paint. You may need two to three coats for a solid, matte finish. Let it dry completely. -
Create the sand base:
Mix a small amount of white polymer clay with real sand to create a textured dough. Press a thin layer of this mixture into the bottom of the box, sloping it slightly to leave an empty depression on one side for the water later. -
Texture the sand:
Use an old toothbrush or a ball of aluminum foil to tap over the clay surface, enhancing the grainy texture. This ensures it looks like loose sand rather than smooth plastic.
Clean Baking
To prevent the white paint on the box from yellowing in the oven, tent a piece of aluminum foil loosely over the project while it bakes.
Step 2: Sculpting the Accessories
-
Form the palm trees:
For the lid interior, roll thin snakes of brown clay for the trunks. Press them gently onto the wood inside the lid. Use a needle tool to scratch horizontal lines up the trunk for bark texture. -
Add palm fronds:
Shape tiny teardrops of green clay. Flatten them slightly and use a blade to cut notches along the edges to mimic leaves. Arrange these in a starburst pattern at the top of your trunks. -
Sculpt tiny shells:
Using white clay, create a miniature fan shell by flattened a teardrop and pressing radiating lines into it with a needle tool. Place one large one in the sand base and make a few tiny ones for decoration. -
Make the coconut:
Roll a tiny ball of brown clay and indent the center to make a hollow half-sphere. Texture the outside with a needle tool to look fibrous. Place this on the sandy area. -
Add the succulent:
Create very small pointed leaves from green clay and assemble them into a rosette shape. Place this near the coconut or rocky area of your beach. -
Create rocks:
Mix scraps of grey, brown, and white clay to form small pebbles. Press these into the sand near where your water line will be. -
First bake:
Once all clay elements are positioned (trees in the lid, sand and accessories in the base), bake the entire wooden box with the clay according to your clay package instructions. Wood can safely go in the oven at polymer clay temperatures.
Hidden Surprise
Before baking the sand layer, bury a tiny clay ‘message in a bottle’ or a minuscule treasure chest halfway deep for a fun hidden detail.
Step 3: Pouring the Ocean
-
Cool down:
Let the box cool completely after baking. If you add resin to hot clay, it can cure prematurely or create unwanted bubbles. -
Prepare the water:
Mix a small amount of resin with a drop of blue alcohol ink. You want a translucent turquoise color, so go easy on the dye. -
Pour the pool:
Carefully pour the blue resin into the depression you left in the sand base. Use a toothpick to guide the resin right up to the edges of the ‘sand’ and around the shell. -
Create waves:
I like to wait until the resin gets slightly tacky, then drag a toothpick through it to create ripples. Or, cure a bottom layer, then add a second layer with wisps of white acrylic paint for foam. -
Cure the resin:
Place under a UV lamp for a few minutes or let sit covered for 24 hours if using epoxy. Ensure the box stays perfectly level during this process.
Step 4: Final Touches
-
Highlight the water:
If you want extra sparkle, dry brush a tiny bit of white paint on the crests of your resin waves to simulate sea foam. -
Secure the decoration:
If any clay pieces loosened during baking, secure them now with a dot of super glue. -
Varnish and seal:
Brush a coat of gloss varnish over the palm tree leaves and the coconut interior to make the colors pop against the matte background.
Now you can close your box and carry a little piece of summer with you wherever you go
Body-Positive Abstract Torso Vase
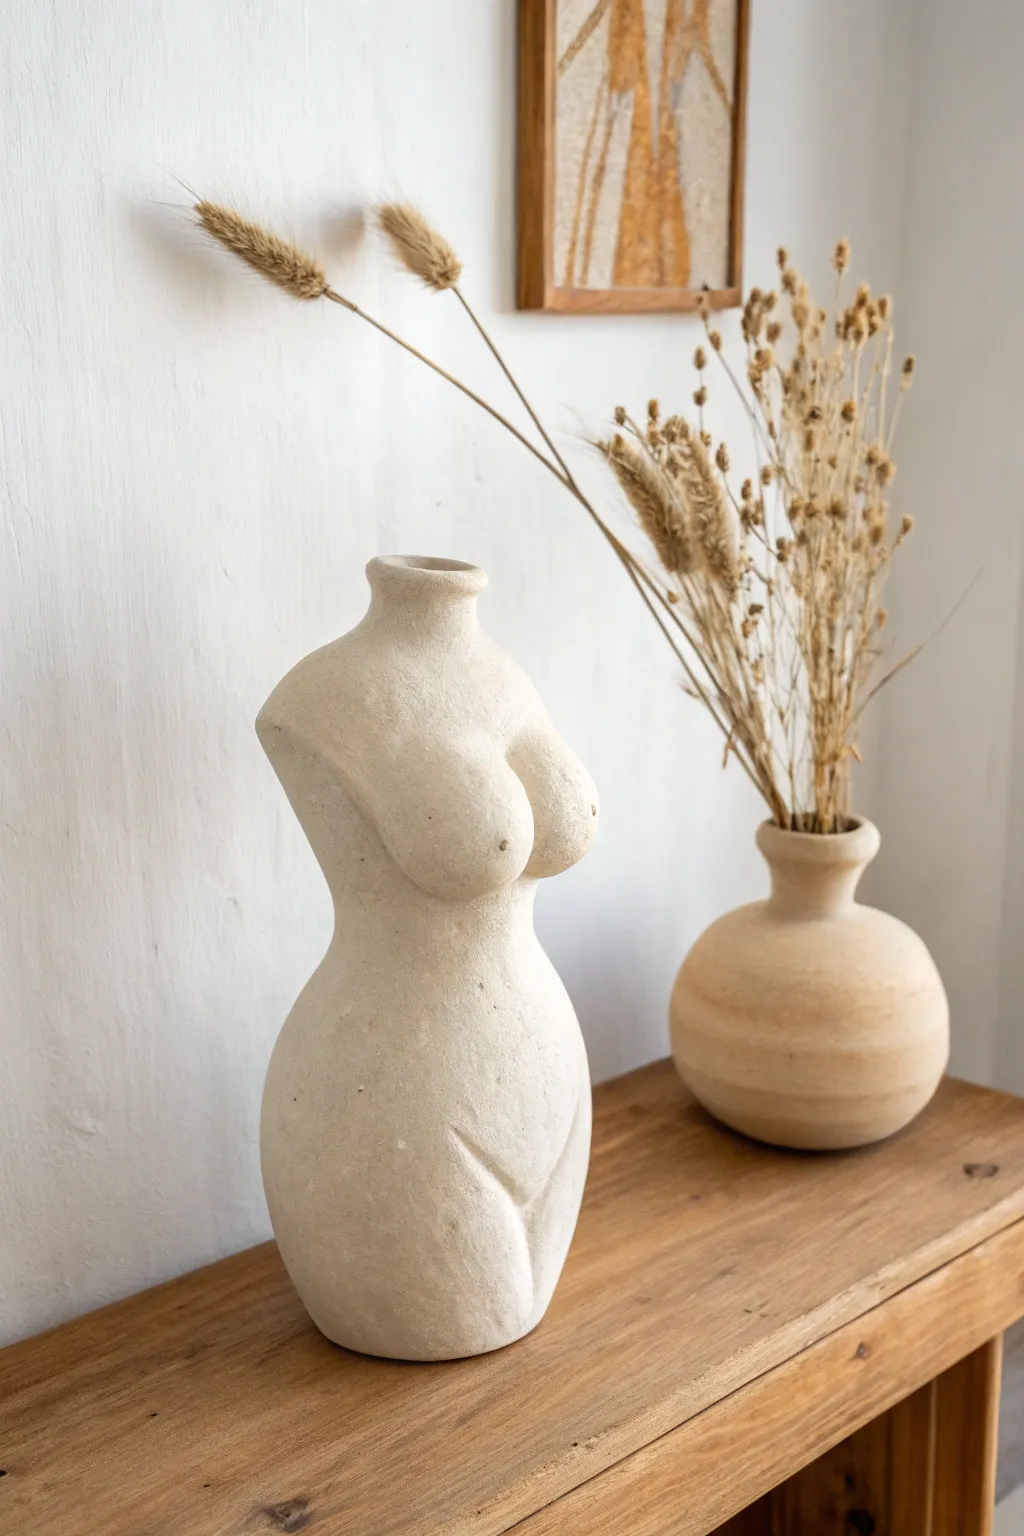
Celebrate the human form with this stunning, body-positive vase that doubles as functional decor. With its rough, natural texture and soft curves, this project mimics the look of carved sandstone while remaining achievable for potters of any skill level.
How-To Guide
Materials
- Stoneware clay (preferably with grog for texture)
- Pottery wheel (optional, can be hand-built)
- Clay carving tools or a sharp knife
- Loop tools (large and small)
- Sponge
- Wooden modeling tool
- Needle tool
- Metal kidney rib
- Textured sponge or stiff brush
Step 1: Forming the Base Structure
-
Throw or Build a Cylinder:
Begin by creating a tall, thick cylinder. If you are throwing on the wheel, pull the walls upward but keep them significantly thicker than usual (about half an inch) to allow for carving later. -
Shape the Waist:
While the clay is still plastic, gently collar the cylinder in the middle to suggest a waistline, flaring slightly at the bottom for hips and the top for shoulders. -
Close the Shoulders:
Bring the clay in at the very top to form the shoulders, leaving a narrow opening in the center for the neck. -
Form the Neck:
Pull a short, sturdy neck from the center opening. Keep the rim distinct and slightly flared, just like a standard vase opening. -
Let it Firm Up:
Allow the piece to dry to a firm leather-hard stage. It needs to be sturdy enough to handle carving without collapsing.
Step 2: Sculpting the Body
-
Outline Anatomy:
Using a needle tool, lightly sketch the placement of the breasts and the V-shape of the lower abdomen directly onto the leather-hard cylinder. -
Push Out Volume:
Reach inside the vase and gently push the clay wall outward where the breasts should be. Support the outside with your other hand to prevent cracking. This creates the initial volume. -
Add Clay for Definition:
Take small balls of plastic clay, score and update the chest area to build up the breast shape further if the pushed-out volume isn’t enough. -
Blend the Seams:
Aggressively blend any added clay into the main body using a wooden modeling tool so there are no visible join lines. -
Refine the Breasts:
Smooth the curves of the chest, ensuring they transition naturally into the torso rather than looking stuck on. -
Carve the Hips:
Use a large loop tool to shave away excess clay from the waist area to accentuate the curve of the hips.
Stone Effect
Mix grog or sand directly into a matte white glaze. This adds literal grit to the surface, making the finished vase feel more like ancient limestone.
Step 3: Surface Detailing and Texture
-
Define the Groin Lines:
Using a smaller loop tool or a modeling tool, carve the deep V-shaped lines at the bottom of the torso to suggest the bikini line and legs. -
Soften the Shoulders:
Check the silhouette from the side. I often use a metal rib to scrape down the shoulders so they slant naturally rather than sitting too square. -
Create the Texture:
This piece relies on a rock-like finish. Use a stiff brush or a textured sponge and dab it all over the surface to create a pitted, stone effect. -
Avoid Smoothing:
Resist the urge to smooth the surface with water. The goal is to keep that raw, earthy tactile quality shown in the photo. -
Dry Slowly:
Cover the piece loosely with plastic to let it dry very slowly. Variations in thickness (like the breasts versus the neck) can cause cracking if dried too fast. -
Bisque Fire:
Once bone dry, fire the piece to bisque temperature. -
Glazing technique:
Apply a matte, stone-colored glaze or a wash of iron oxide to enhance the texture, then wipe back the high points with a sponge before the final firing.
Modern Twist
Before firing, slice the neck off entirely at an angle. This creates a more abstract, ruin-like sculpture rather than a traditional functional vase.
Place your dried florals inside to complete this timeless, organic centerpiece