Whenever I need a quick project that’s equal parts cute and satisfying, I reach for a clay whistle—because it’s sculpture you can actually play. Here are some cool, character-packed ideas that let you hide the mouthpiece and sound hole right inside the design.
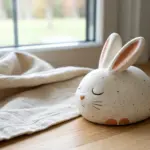
Classic Bird Pinch-Pot Whistle
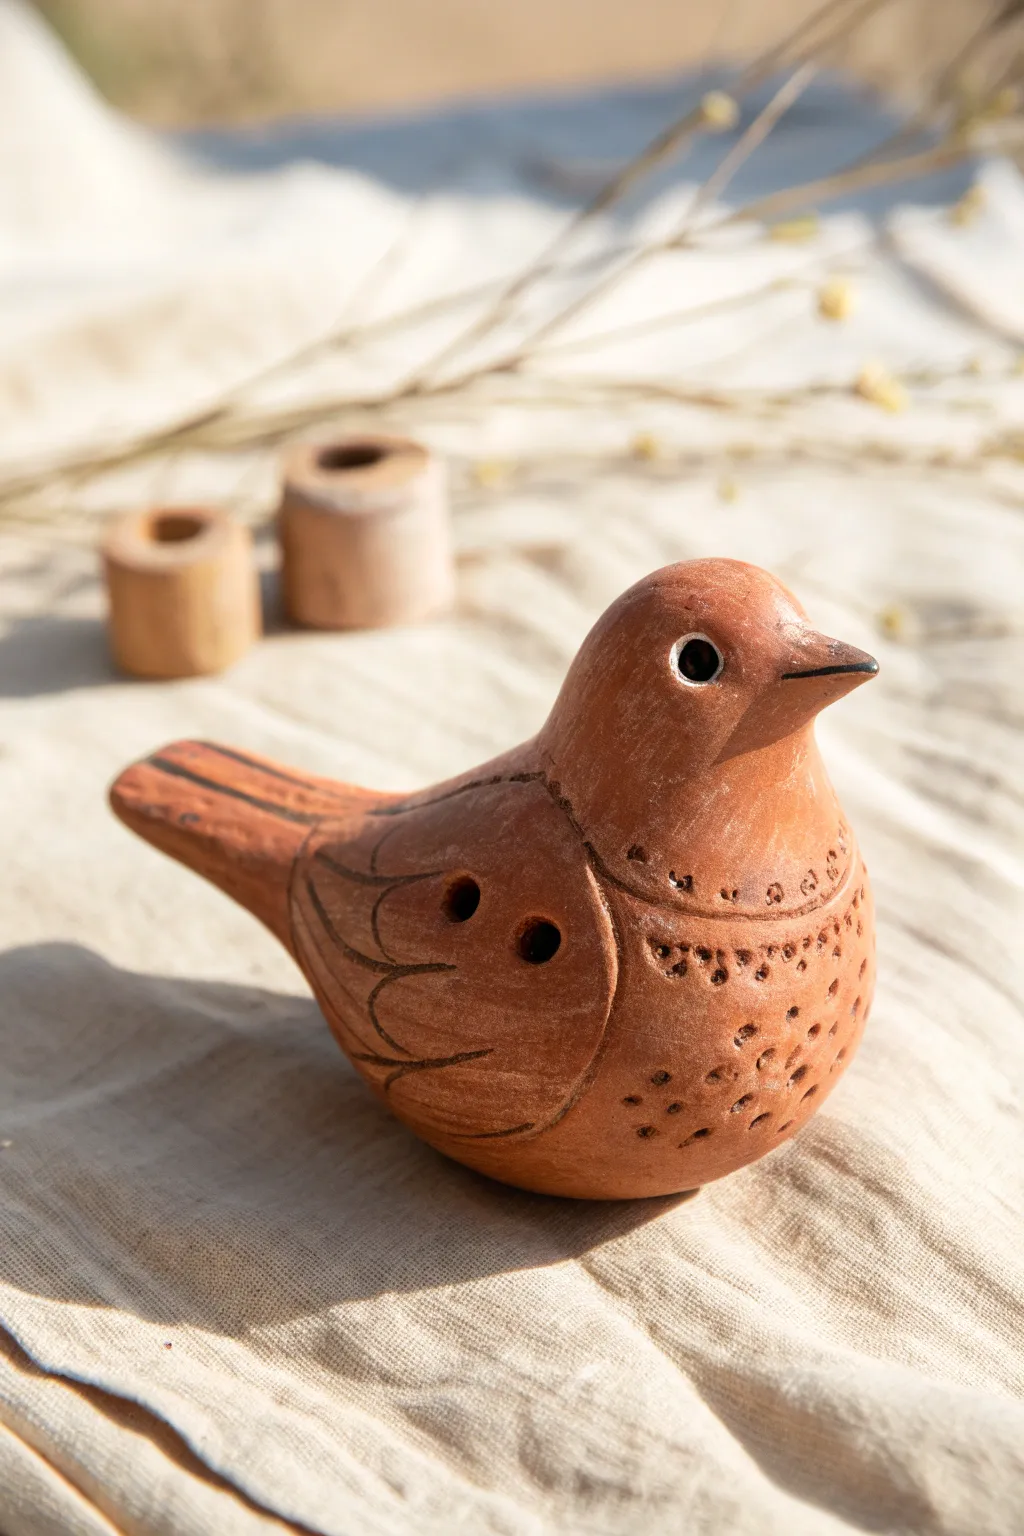
This charming, earthy bird whistle captures the essence of folk art with its warm terracotta hue and simple, etched details. It features a classic pinch-pot body, a precisely angled mouthpiece in the tail, and distinctive black detailing that brings its character to life.
How-To Guide
Materials
- Terracotta air-dry clay or low-fire earthenware clay
- Popsicle stick or flat wooden modeling tool
- Fettling knife or clay knife
- Needle tool or toothpick
- Small sponge
- Water slip (clay mixed with water)
- Black underglaze or acrylic paint (for details)
- Small round paintbrush
- Smooth river stone or spoon (for burnishing)
Step 1: Forming the Body
-
Shape the Pinch Pot:
Start with a ball of clay roughly the size of a tangerine. Insert your thumb and gently pinch the walls while rotating the ball to create a uniform cup shape. -
Close the Form:
Gently curve the walls inward until they meet at the top, trapping air inside to create a hollow sphere. Seal the seam completely so you have an enclosed air pocket. -
Mold the Bird Shape:
Roll the sphere gently between your palms to smooth it into an oval or egg shape. This will be the main body of your bird. -
Pull the Tail:
Pinch one end of the oval and gently pull the clay outward to form a flattened, triangular tail. This area needs to be solid enough to carve the airway later. -
Form the Head:
On the opposite end, gently pinch and pull the clay upward to define the neck and head area. The head should be rounded and flow smoothly into the back.
Clear The Airway
Keep the airway stick in the mouthpiece while you work on the exterior. This prevents you from accidentally crushing the sensitive whistle channel while handling the bird.
Step 2: Creating the Whistle Mechanism
-
Create the Mouthpiece:
Insert your flat wooden stick into the end of the tail to create the airway. Aim straight into the hollow body. -
Cut the Window:
On the underside of the bird (or the top, depending on your preference, though this bird has the mechanism subtly hidden or integrated), cut a small square notch near the base of the tail to intersect with your airway channel. -
Refine the Bevel:
Use your tool to create a sharp 45-degree angle on the side of the notch closest to the body. This splitting edge is crucial for producing sound. -
Test the Sound:
Blow gently through the mouthpiece. If it doesn’t whistle, adjust the angle of the splitting edge or clear debris from the airway.
Step 3: Sculpting and Texturing
-
Define the Beak:
Pinch the front of the head to form a small, pointed beak. Use a little water to smooth out any cracks that form during shaping. -
Smooth the Surface:
Wipe the entire bird with a slightly damp sponge to remove fingerprints. For that beautiful sheen seen in the photo, rub the leather-hard clay with a smooth stone or the back of a spoon. -
Outline the Wings:
Using a needle tool, lightly sketch a teardrop shape on both sides to define the wings. Press firmly enough to create a visible groove. -
Add Decorative Dots:
Poke rows of small holes along the chest and neck area using your needle tool to mimic the texture of feathers. Vary the spacing for an organic look. -
Carve Wing Feathers:
Draw curved lines inside of your wing outline to represent individual long feathers, radiating backward toward the tail. -
Create Sound Holes:
pierce two distinct round holes on the side of the wing area if you want to change the pitch (ocarina style), or leave them decorative like the indentations shown.
Make It Glossy
To get that incredible sheen without glaze, burnish the clay with the back of a spoon when it is ‘leather hard’ (firm but damp). It compresses the particles for a natural shine.
Step 4: Finishing Details
-
Paint the Eyes:
Once dry (or bisque fired if using kiln clay), use a fine brush to paint a solid black circle for the eye. Leave a tiny rim of white paint or raw clay around it for contrast. -
Darken the Grooves:
Dilute a small amount of black paint or underglaze with water. Brush it into the carved wing lines and feather dots, then wipe the surface clean so the dark color remains only in the recesses. -
Blacken the Beak & Tail:
Paint the very tip of the beak and distinct stripes on the tail with your black pigment to match the reference style. -
Final Seal:
If using air-dry clay, apply a matte varnish to protect the surface and deepen the terracotta color.
Enjoy the simple, resonant tones of your handcrafted bird whistle


Chubby Fish Tail-Mouthpiece Whistle
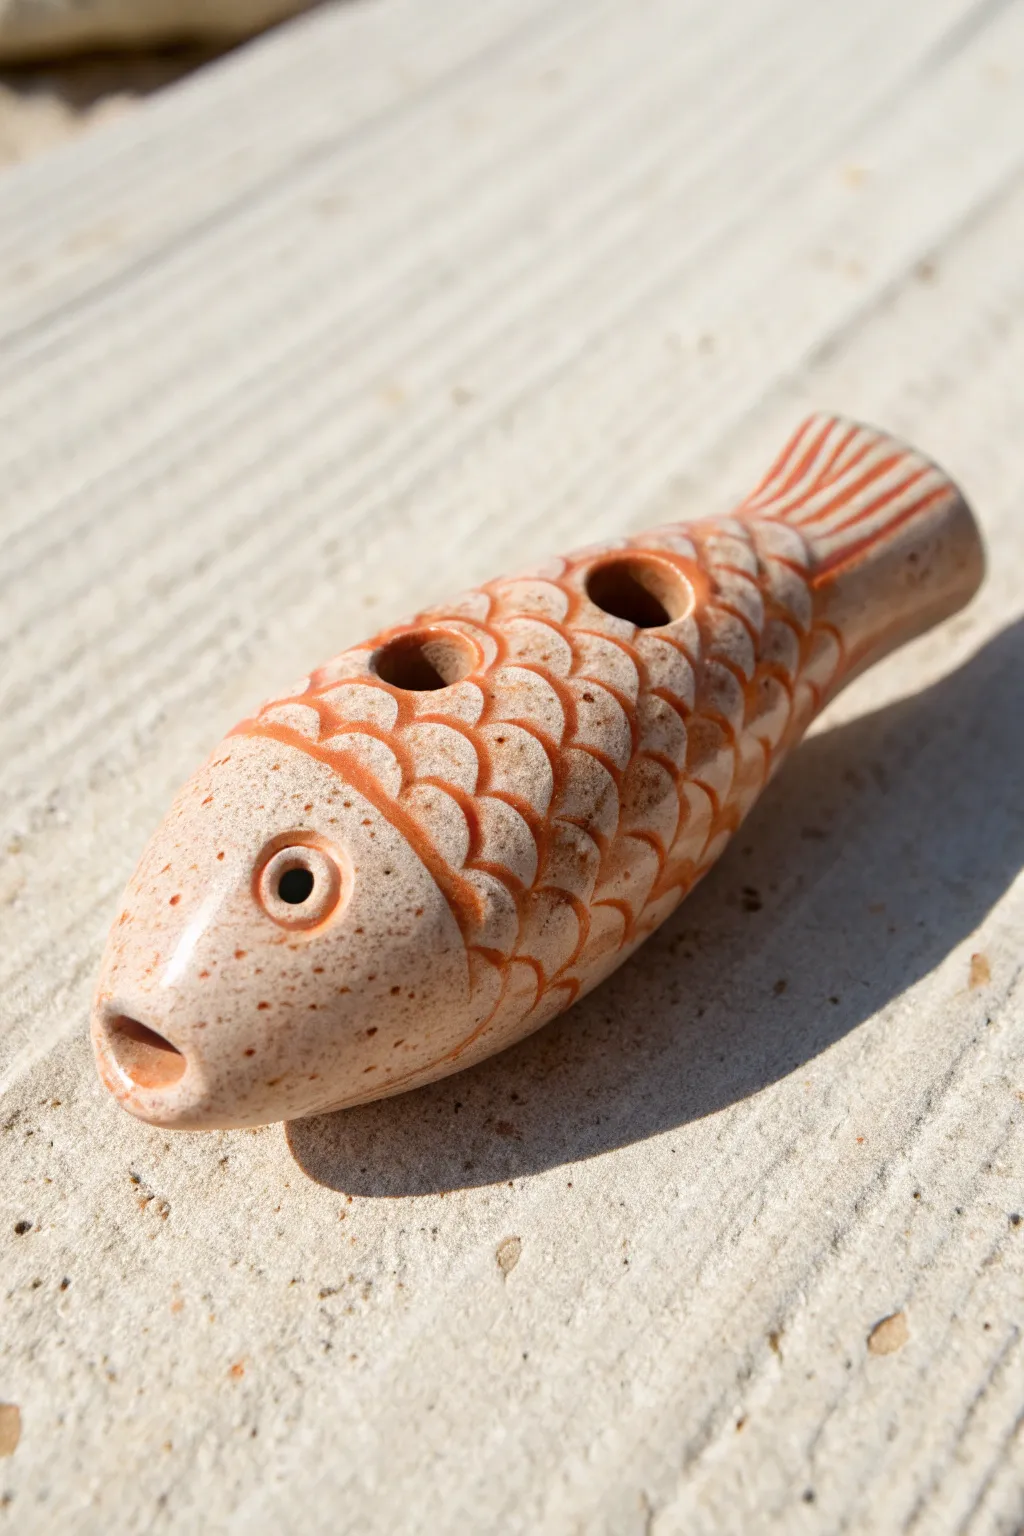
Sculpt a charming, pocket-sized musical companion with this clay fish whistle tutorial. Featuring incised scale details and a rustic, speckled finish, this chubby little fish is as delightful to hold as it is to play.
Detailed Instructions
Materials
- Stoneware clay (speckled or buff)
- Small wooden modeling tool
- Loop tool for hollowing (or pinch pot method)
- Popsicle stick or fettling knife
- Drill bit or hole punch tool (approx. 1/4 inch)
- Sponge
- Water
- Underglaze (terra cotta or rust orange)
- Clear glaze
Step 1: Forming the Body
-
Create the base form:
Start with a ball of well-wedged clay about the size of a lemon. Gently roll it between your palms to elongate it slightly into a fat oval shape. -
Hollow the form:
You can either use the pinch pot method by inserting your thumb and pinching walls evenly, or cut the oval in half, hollow both sides with a loop tool, and score and slip them back together. Aim for walls about 1/4 inch thick. -
Shape the fish profile:
Once hollow and sealed (if using the split method), gently paddle the clay to refine the shape. Taper one end slightly for the head and pinch the other end vertically to define the start of the tail. -
Add the tail fin:
Pinch and pull the clay at the tapered rear end to form a flat, vertical tail fin. Keep it integrated with the body rather than attaching a separate piece for better durability.
No Sound?
If the whistle sound is airy or weak, check the ‘splitting edge.’ It must be sharp and perfectly aligned with the air stream. A tiny bit of clay burr can ruin the tone, so clean it well.
Step 2: Constructing the Whistle Mechanism
-
Form the mouthpiece:
At the head end (the mouth of the fish), press a flat popsicle stick directly into the center of the ‘mouth’ to create the windway. The stick should go in straight, aiming towards the hollow belly. -
Cut the fipple window:
On the underside of the fish (the chin area), measure about an inch back from the mouth opening. Use a sharp knife to cut a small square window. -
Create the splitting edge:
This is the crucial part: carefully bevel the back edge of your window (the side closest to the tail) to a sharp 45-degree angle. This sharp edge splits the air to create sound. -
Align the airway:
Re-insert your popsicle stick into the mouth. Look through the window; the stick should aim directly at the sharp bevel you just cut. Adjust until you get a clear whistle sound when blowing gently.
Step 3: Sculpting Details
-
Drill finger holes:
Once the whistle works, add tuning holes. Drill two holes along the top ridge of the fish’s back. Start small and widen them gradually to tune the notes. -
Define the face:
Use a small loop tool or straw to press circles on either side of the head for eyes. Add a tiny ball of clay inside the circle for a pupil. -
Carve the scales:
Using a U-shaped wire tool or a small loop tool, carve overlapping scallop shapes starting from behind the head and moving toward the tail. I find it easiest to work in rows. -
Detail the tail:
Incise straight lines along the tail fin to mimic the texture of fin rays. -
Refine the surface:
Smooth out any rough burrs from carving with a slightly damp sponge, being careful not to clog the airway or the scale indentations.
Go Bigger
Try making a larger version to create deeper, bass tones. You can add 4-6 holes following a standard ocarina fingering chart to create a fully tuned instrument capable of playing songs.
Step 4: Glazing and Finishing
-
Bisque fire:
Allow the fish to dry slowly to the bone-dry stage, then bisque fire it according to your clay body’s specifications. -
Apply inlay color:
Brush a rust-orange underglaze generously over the scaled area and tail. Ensure the glaze gets deep into the carved lines. -
Wipe back:
Use a damp sponge to wipe away the surface underglaze. The color should remain trapped in the recessed scale lines, highlighting the texture while leaving the ‘skin’ bare. -
Final glazing:
Dip or brush a clear gloss glaze over the entire piece. This will make the speckled clay body pop and give the fish a wet, aquatic look. -
Final firing:
Fire the piece again to glaze temperature (Cone 5 or 6 usually for stoneware).
Once cooled, you’ll have a durable little instrument ready to play a tune by the riverside

Pig Snout Whistle With Big Ears
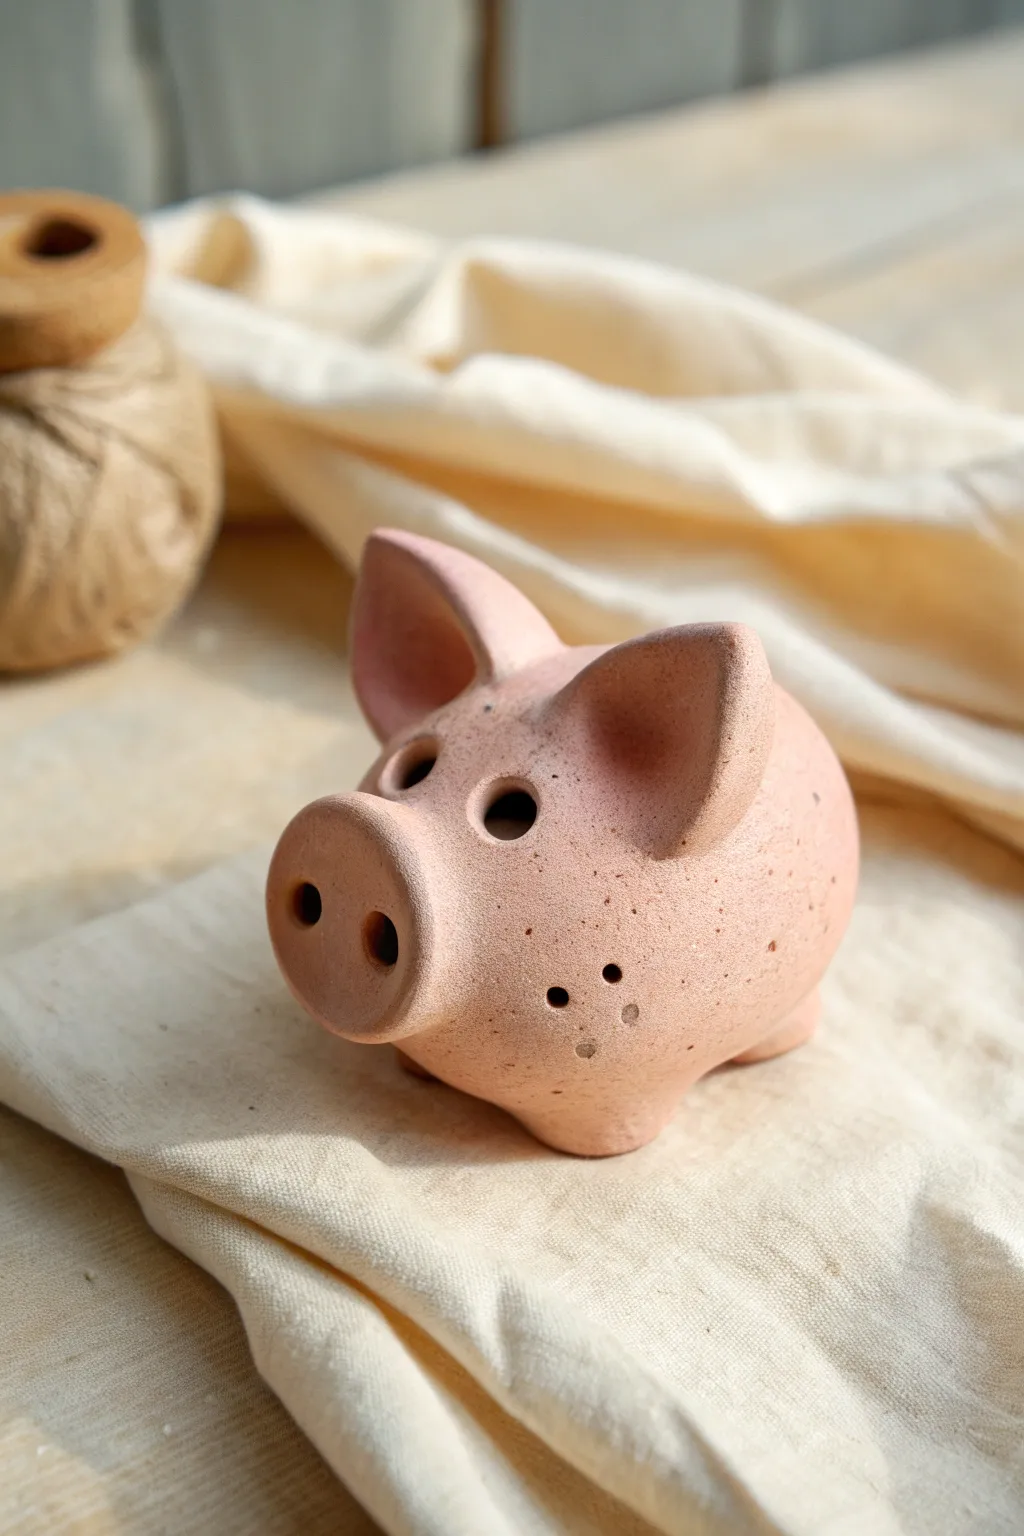
This charming little pig isn’t just a cute figurine; it’s a functional clay whistle with a rustic, speckled pink finish. The design features oversized ears and a prominent snout, making it a delightful project for learning the mechanics of clay instruments.
Step-by-Step Guide
Materials
- Earthenware or stoneware clay (white or light buff)
- Pink underglaze or mason stain
- Speckled clay additive or iron oxide wash (optional for texture)
- Wooden modeling tool
- Popsicle stick or fettling knife
- Sponge
- Water slip
- Needle tool
- Small loop tool
Step 1: Forming the Body and Air Chamber
-
Prepare the Clay:
Start with a ball of clay roughly the size of a tangerine. Wedged it thoroughly to remove air bubbles. If you want that speckled look shown in the photo, knead in a small amount of granular iron or use a speckled clay body. -
Pinch Pot Base:
Insert your thumb into the ball and pinch the walls evenly while rotating to create a classic pinch pot. The walls should be about 1/4 inch thick. Don’t make the opening too wide; you want a contained sphere shape. -
Close the Sphere:
Gently collar the opening of the pinch pot until it closes completely. Trapping the air inside helps maintain the round shape while you smooth the exterior with a rib or your thumb. -
Create the Mouthpiece:
Extend a small portion of the clay at the back (where the tail would be) into a rectangular block shape. This will become the mouthpiece mechanism.
Step 2: Constructing the Whistle Mechanism
-
Cut the Airway:
Using a flat popsicle stick or fettling knife, carefully insert it into the mouthpiece block. Push it straight in until it just barely penetrates the hollow cavity of the sphere. -
Cut the Window:
On the underside of the pig (or wherever you want the sound hole), cut a small square ‘window’ about an inch away from the mouthpiece end. The blade creating the airway should be visible through this hole. -
Create the Bevel:
This is the critical part. Use a tool to angle the clay at the edge of the window opposite the mouthpiece. This sharp edge splits the air stream to create sound. The splitting edge must align perfectly with the air coming from the mouthpiece channel. -
Test the Sound:
Gently blow into the mouthpiece. If it makes a clear whistling sound, stop immediately. If it sounds like rushing air, adjust the bevel angle slightly until you get a crisp tone.
Silent Pig Syndrome
If you hear rushing air but no whistle, the air isn’t hitting the bevel edge correctly. Re-insert the stick into the airway and check inside the window to ensure it lines up exactly with the sharp edge.
Step 3: Sculpting the Pig Features
-
Shape the Snout:
Roll a small coil of clay into a thick oval button. Score and slip the front of the sphere, then attach this button firmly. Press your thumb into the center to create a slight indentation. -
Add Nostrils:
Use the back of a paintbrush or a large dowel to press two deep, symmetrical holes into the snout. These should be exaggerated and large, as seen in the reference. -
Form the Ears:
Shape two triangles from fresh clay. Pinch them to be slightly concave, mimicking a real ear shape. You want them thick at the base and tapering to a softer rounded point at the top. -
Attach the Ears:
Score the top of the head behind the eyes. Attach the ears using slip, blending the clay downwards onto the body so no seam is visible. Position them upright and attentive. -
Create Eye Sockets:
Between the ears and snout, press a round tool into the clay to form deep eye sockets. This pig relies on holes for eyes rather than painted pupils, giving it a stylized look. -
Add Cheek Details:
Use a needle tool or small drill bit to poke three tiny decorative freckles or whisker dimples on the lower cheeks for texture. -
Add Legs:
Roll four small nubs of clay. Attach these to the bottom of the body so the pig sits stable and doesn’t roll over. Tap the pig gently on the table to level the feet.
Tuning the Tone
The size of the internal hollow chamber dictates pitch. A larger internal cavity creates a deeper sound, while a smaller, tighter pinch pot will result in a higher-pitched whistle.
Step 4: Finishing and Firing
-
Smooth the Surface:
Use a barely damp sponge to smooth out any harsh fingerprints, but leave some of the natural clay texture. I like to let this dry briefly to leather hard before the final smoothing. -
Clear the Airway:
Before the clay dries too much, run your tool through the airway and clean up the bevel one last time to ensure no clay crumbs are blocking the sound. -
Apply Color:
Once bisque fired, apply a wash of diluted pink underglaze or a matte pink glaze that breaks over texture to highlight the speckles. -
Final Fire:
Fire the piece according to your clay and glaze specifications. The result should be a matte, stone-like finish.
Once fired, you will have a delightful porcine friend that sings when you blow

Turtle Shell Ocarina-Style Whistle
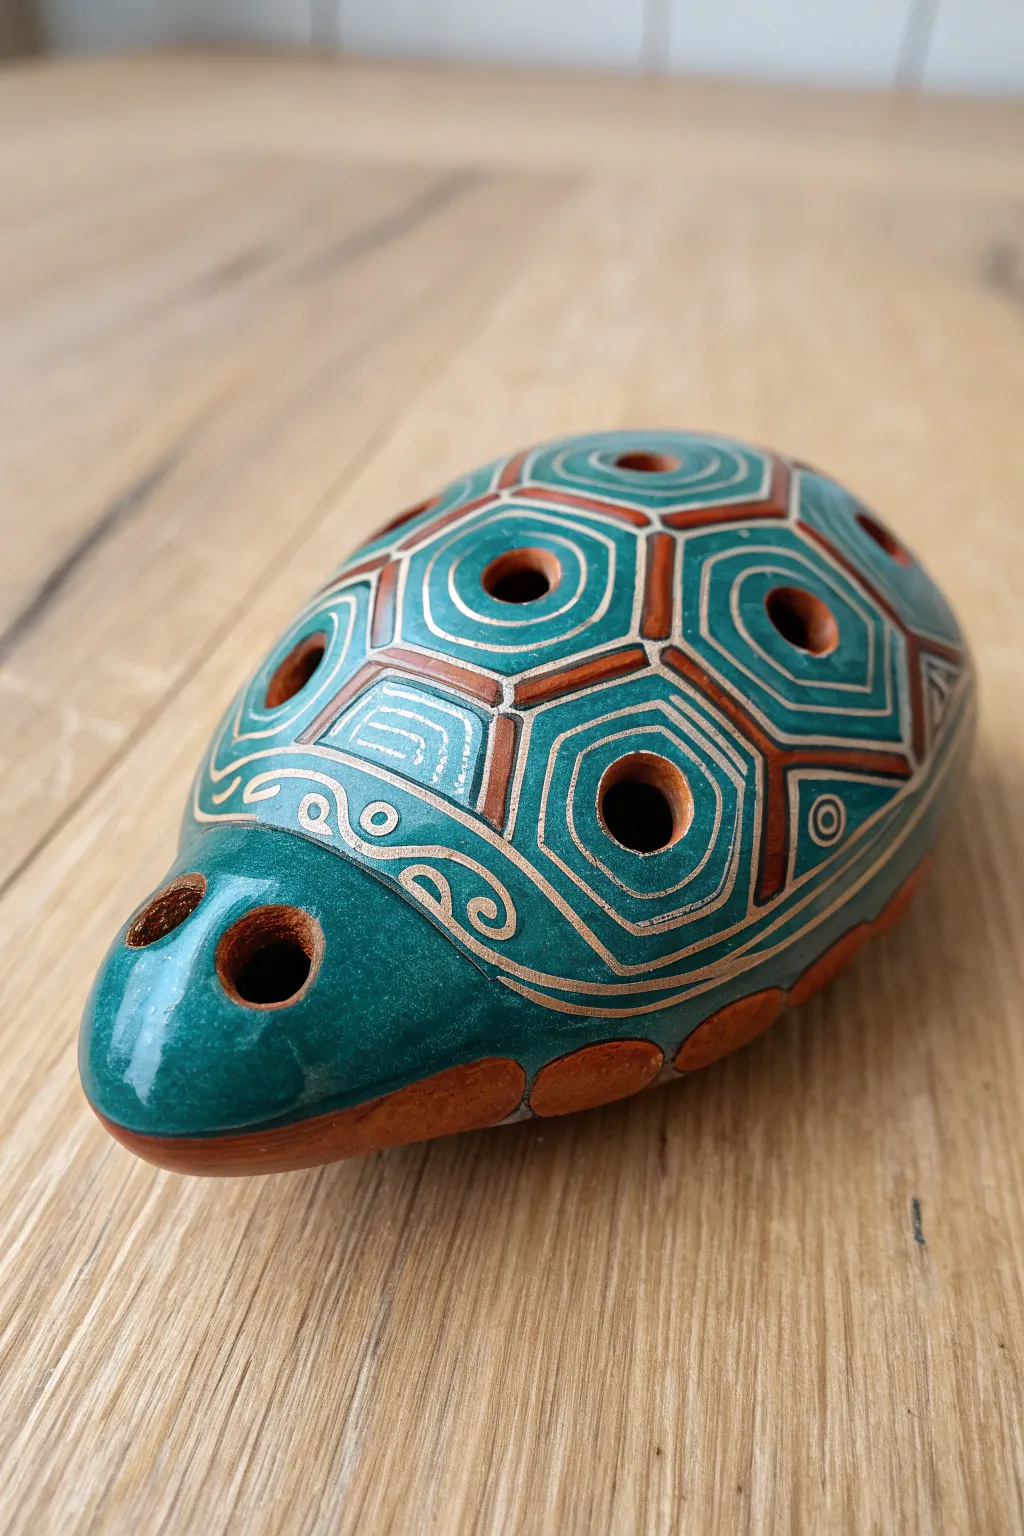
This charming project combines sculptural hand-building with the basics of instrument making. You will transform a simple pinch pot into a decorative, functional four-hole pendant ocarina featuring a classic tortoiseshell glaze pattern.
How-To Guide
Materials
- Fine-grain pottery clay (earthenware or stoneware)
- Popsicle stick or fettling knife
- Loop tool for hollowing
- Small drill bits or hole cutters (various sizes)
- Slip (liquid clay)
- Sponge and water
- Teal-green ceramic glaze
- Reddish-brown underglaze or stain (optional for base)
- Sgraffito tool or needle tool
- Popsicle stick for the airway (sharpened)
Step 1: Forming the Body
-
Create the base form:
Start with a ball of well-wedged clay about the size of a tennis ball. Gently shape it into an elongated oval, slightly flatter on the bottom and domed on top, mimicking a turtle’s carapace. -
Hollow the shell:
Carefully slice the oval in half horizontally. Use a loop tool to hollow out both halves until the walls are an even thickness, roughly 1/4 inch. Leave the ‘head’ area slightly thicker to accommodate the mouthpiece later. -
Join the halves:
Score the rim of both halts with a needle tool and apply a liberal amount of slip. Press the halves firmly back together, smoothing the seam on the outside with your thumb so it disappears completely. -
Shape the head:
Gently pull and model one end of the oval to distinctively form the turtle’s head. It should protrude slightly and slope downwards, creating the area where you will eventually blow air.
Step 2: Creating the Sound Mechanism
-
Form the mouthpiece:
Insert a flattened, sharpened popsicle stick into the back of the turtle’s head to create the windway. Push it straight in, parallel to the bottom of the instrument. -
Cut the voicing window:
On the underside of the turtle (the plastron area), mark a square hole about an inch from the mouthpiece opening. Cut this square out carefully; the side closest to the mouthpiece should be angled sharply like a ramp (the labium) to split the air. -
Align the airway:
Reinsert the popsicle stick and look through the voicing window. Adjust the clay until you can see the stick aiming directly at the sharp edge of the ramp. I find that tweaking this angle is the most critical part for a clear sound. -
Test the whistle:
Once the airway is clear, blow gently through the mouthpiece. You should hear a clear whistle. If it sounds airy, clean up any clay burrs in the airway or window.
Airy or No Sound?
The splitting edge (labium) must be sharp and perfectly aligned with the airway. If sound is weak, press the ramp down slightly to catch more airflow.
Step 3: Tuning and Detailing
-
Drill finger holes:
Using a hole cutter or drill bit, create four holes on the top shell. Place them where your fingers comfortably rest—typically two larger ones in the center and two smaller ones towards the sides. -
Refine the surface:
Once the clay is leather-hard, sponge the entire surface to smooth out any fingerprints or rough spots. The smoother the clay, the cleaner your carving will be later. -
Carve the scutes:
Use a needle tool to map out the hexagonal shell pattern. Draw a central row of hexagons, flanked by pentagons or partial shapes on the sides. Don’t forget the decorative swirls on the rim above the head. -
Double-line detailing:
Go back over your initial lines and carve a second parallel line for each shape, creating a thick border for the ‘scutes’. Carve these lines deeply enough to hold glaze or serve as a resist. -
Bisque fire:
Allow the clay to dry slowly and completely before firing it in a kiln to bisque temperature (usually cone 04).
Make it Wearable
Before drying, add a horizontal clay lug or drill a small hole through the tail end. Thread a leather cord through after firing to wear it as a pending.
Step 4: Glazing and Finishing
-
Wax resist application:
Apply wax resist carefully to the carved recessed lines and the decorative swirls. This will prevent the green glaze from adhering there, leaving the raw clay color exposed as outlines. -
Apply the green glaze:
Brush or dip the top of the shell in a teal-green glaze. The wax will repel the glaze from the lines, creating the crisp separation seen in the example. -
Color the base:
Paint the bottom rim and the underside of the turtle with a reddish-brown underglaze or use a contrasting glaze to mimic the earthy tones of a turtle’s belly. -
Clean the holes:
Before the final firing, ensure no glaze has dripped into the finger holes or the voicing window. Use a small twist drill or fettling knife to clear any blockage. -
Final firing:
Fire the piece again to the maturation temperature of your chosen glaze. The result is a glossy, durable instrument ready
Once cooled, you will have a beautiful ceramic instrument that looks as lovely on a shelf as it sounds when played

The Complete Guide to Pottery Troubleshooting
Uncover the most common ceramic mistakes—from cracking clay to failed glazes—and learn how to fix them fast.
Horse Head Whistle With Side Tone Hole
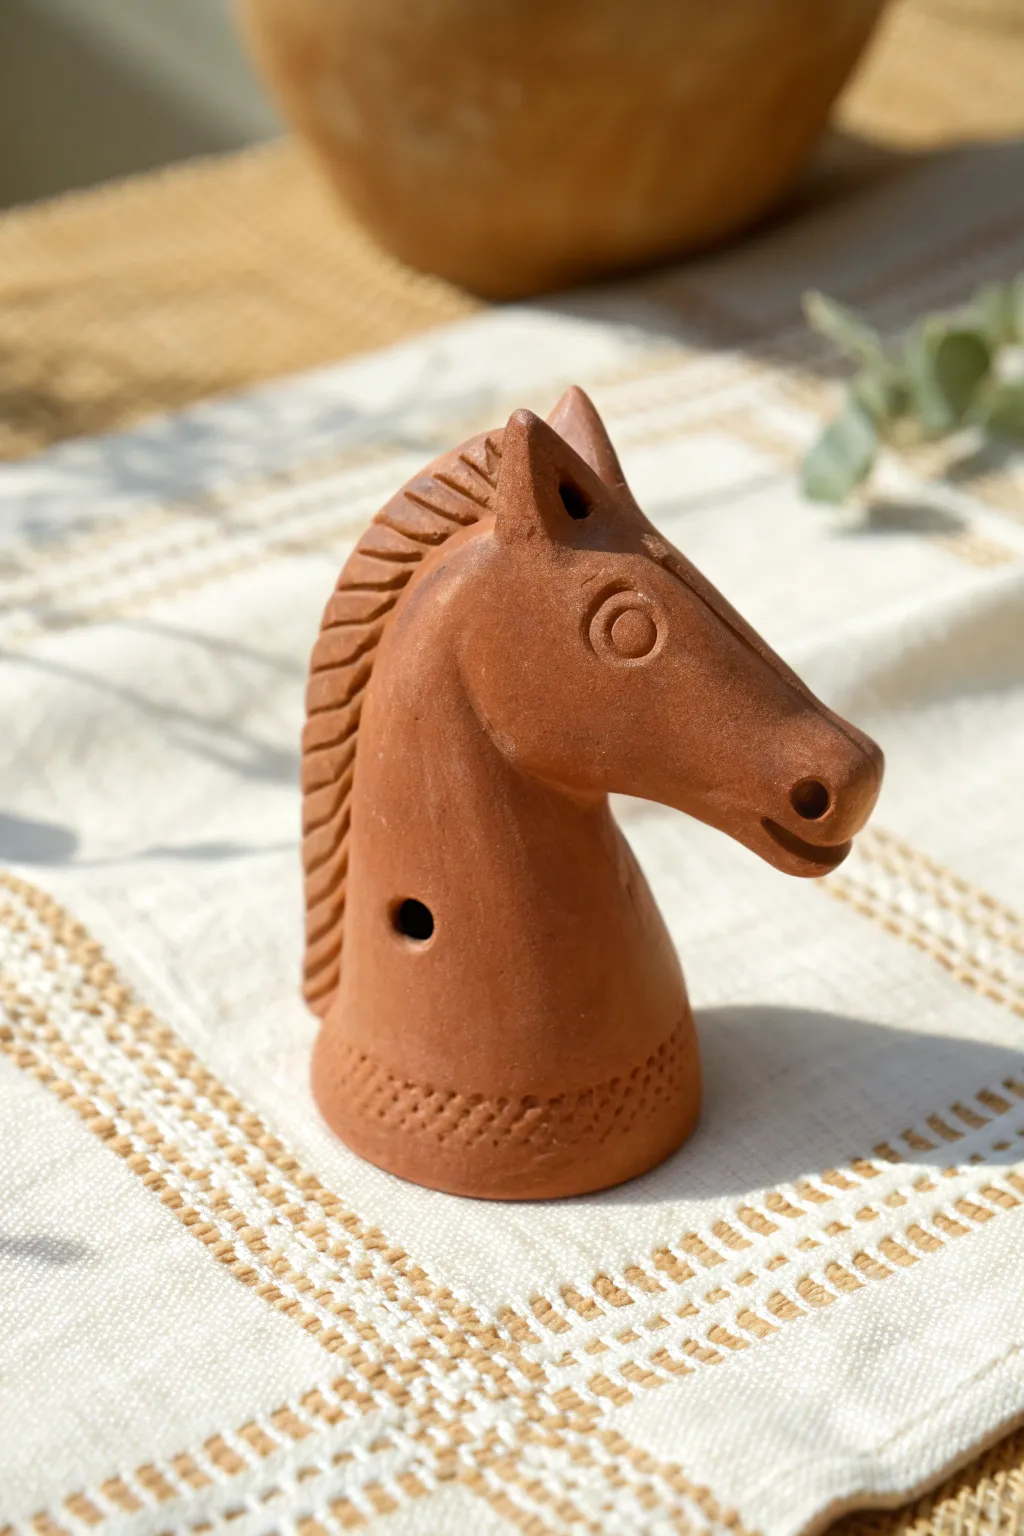
Capture the spirit of the stable with this beautifully stylized horse head whistle, featuring a distinctively carved mane and a rich terracotta finish. This project combines sculptural modeling with the technical challenge of creating a functional side-tone sound mechanism.
How-To Guide
Materials
- Terracotta or red earthenware clay
- Popsicle stick or fiat modeling tool
- Loop tool for hollowing
- Needle tool
- Water and slip for joining
- Small sponge
- Smoother or rib tool
- Beveled wooden whistle voicing tool (optional)
Step 1: Forming the Base Structure
-
Shape the main mass:
Begin with a ball of clay roughly the size of a tangerine. Roll it into a smooth sphere, then elongate it slightly into a thick cylinder to form the neck base. -
Hollow the pinch pot:
Insert your thumb into the bottom of the cylinder and pinch the walls upwards to create a hollow, bell-like shape. Keep the walls evenly thick, about 1/4 inch. -
Create the head profile:
Gather additional clay at the top of your hollow form. Pull and shape this mass forward to create the elongated snout of the horse, ensuring it blends seamlessly into the neck. -
Close the form:
If the clay at the top wasn’t sufficient, you can attach a separate cone of clay for the head. Score and slip well, then smooth the join so the neck flows uninterrupted into the jawline.
Clean Airway Tip
Keep the windway open while smoothing the exterior by leaving your stick inside. Remove it only after you’ve finished handling the wet clay to ensure the passage doesn’t collapse.
Step 2: Sculpting the Details
-
Define the mane:
Roll a thick coil of clay and attach it to the back of the neck, running from the top of the head down to the base. Flatten it slightly to create a raised ridge. -
Carve hair texture:
Using a knife tool or the edge of a popsicle stick, press diagonal indentations into the mane ridge to simulate segmented hair sections. -
Add the ears:
Form two small triangles of clay. Score the top of the head and attach them securely. Use your thumb to create a small depression inside each ear for depth. -
Shape the face:
Refine the snout by flattening the sides slightly. Use a modeling tool to create the nostrils at the very tip and scribe a simple line for the mouth. -
Impress the eyes:
For the stylized look seen in the photo, use a small circular tube or the back of a pen cap to stamp a circle for the eye. Add a smaller dot in the center with a needle tool.
Level Up: Burnishing
Before the clay is bone dry, rub the smooth areas (face and neck) with the back of a spoon to compress the particles. This creates a soft, natural shine without needing glaze.
Step 3: Creating the Whistle Mechanism
-
Locate the mouthpiece:
Identify a spot on the back of the neck, below the mane or integrated into the lower curve, to serve as your blowhole. -
Form the windway:
Insert a flat stick (like a popsicle stick) into the clay at the back to create a rectangular channel. This air passage should aim directly toward the side wall of the whistle. -
Cut the tone hole:
On the side of the neck (as shown in the image), cut a small, sharp-edged hole. This is the aperture. The placement is critical—it must align with where your windway is pointing. -
Bevel the edge:
The edge of the hole furthest from the mouthpiece needs to be sharp. Carefully slice the clay at a 45-degree angle here; this ‘blade’ splits the air to create sound. -
Test and adjust:
Gently blow into the windway. If there is no sound, adjust the angle of the blade or the direction of the windway stick until a clear tone emerges.
Step 4: Refining and Finishing
-
Smooth the surface:
Once the mechanism works, use a slightly damp sponge to wipe away any clay crumbs or sharp burrs, being very careful not to distort the whistle hole. -
Add decorative stamping:
At the very base of the neck, press a pattern of small dots or cross-hatching to create a textured border, grounding the sculpture. -
Dry slowly:
Loosely cover the horse with plastic to let it dry slowly for a day or two. This prevents the delicate whistle mechanism from cracking or warping. -
Bisque fire:
Fire the piece in a kiln to the appropriate temperature for your clay body (usually cone 04 for terracotta) to achieve that classic warm red finish.
Once fired, you will have a timeless piece of folk art that sings as beautifully as it sits on your shelf
Llama Whistle With Blanket Pattern
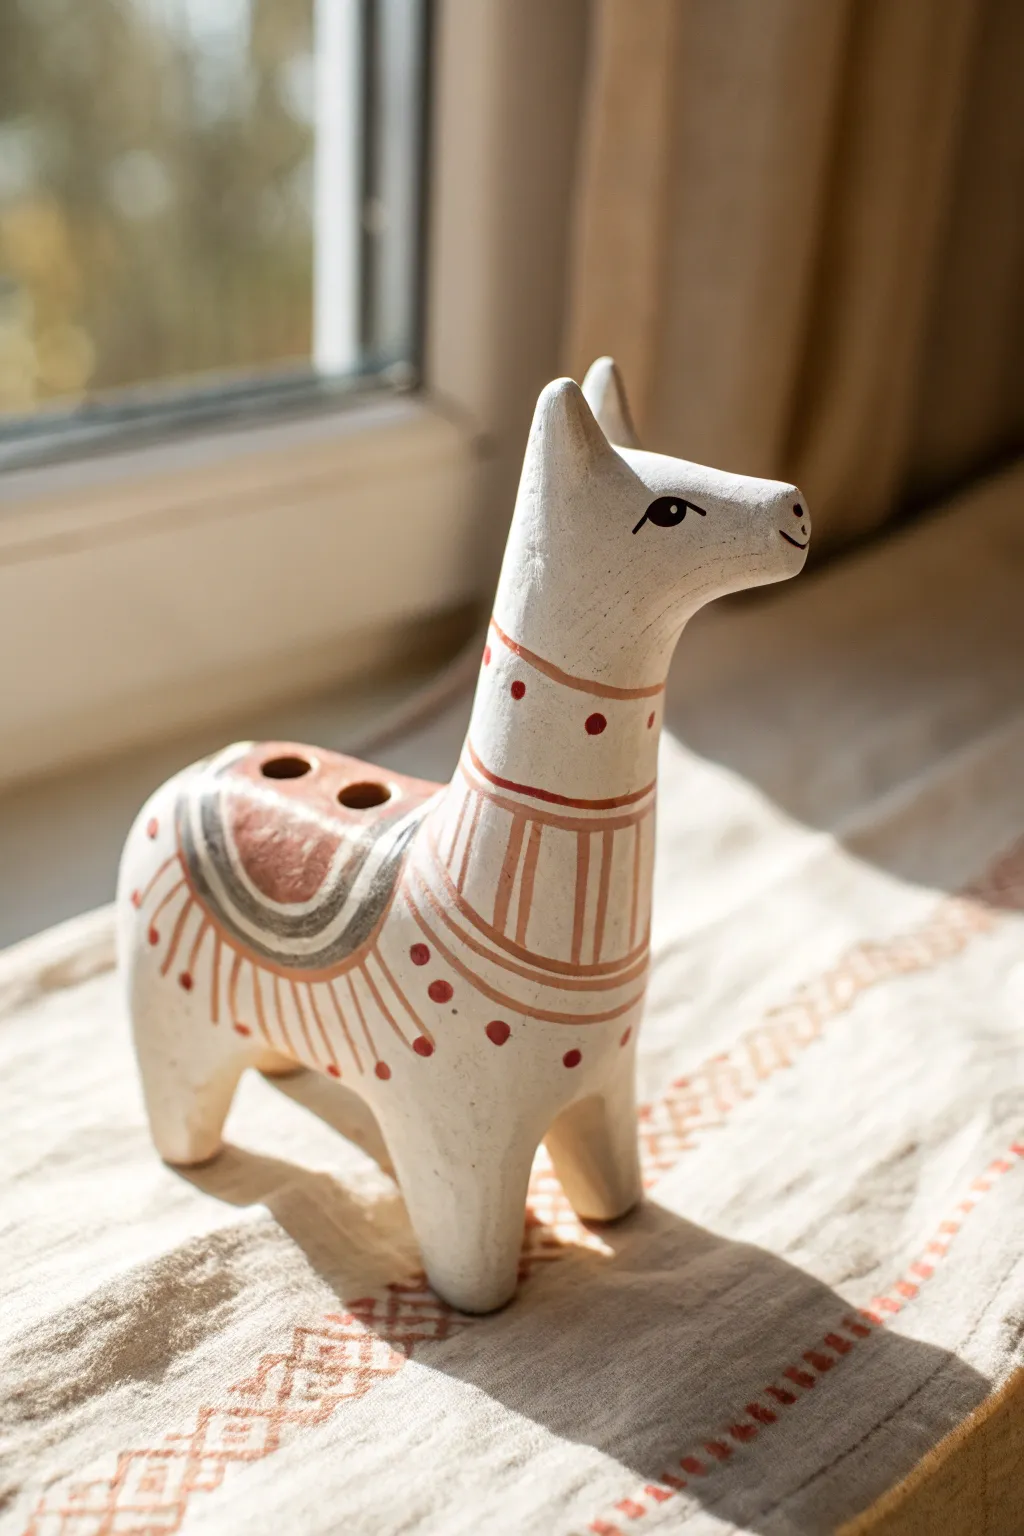
This charming project combines simple hand-building techniques with a functional musical element, resulting in a folk-art style llama. The finished piece features a distinctive saddle blanket pattern and a gentle, upturned expression that brings personality to its simple white form.
Detailed Instructions
Materials
- White earthenware or low-fire white clay
- Wooden modeling tool
- Popsicle stick or flat sculpting tool
- Needle tool
- Slip (clay mixed with water)
- Small sponge
- Underglazes (Reddish-brown, Dark Grey, Black)
- Small detail paintbrush
- Fine-grit sandpaper (optional)
- Clear glaze (optional)
Step 1: Forming the Body and Whistle
-
Shape the base pinch pot:
Start with a ball of white clay about the size of a lemon. Press your thumb into the center to create a pinch pot, keeping the walls even and about 1/4 inch thick. This hollow chamber is essential for the whistle sound. -
Close the form:
Gently pinch the rim of the pot inward until it closes completely, trapping the air inside to form a hollow egg shape. Smooth over the seam so it’s invisible. -
Create the whistle mechanism:
On the top-rear of the ‘egg’ (where the llama’s back will be), press a small rectangular block of clay to create the mouthpiece. Use a popsicle stick to create the air channel, inserting it carefully into the mouthpiece. -
Cut the bevel:
Where the popsicle stick ends inside the clay body, cut a sharp 45-degree angle (the bevel) into the clay wall. The sharp edge splits the air to create sound. Test the sound now before adding more details. -
Add finger holes:
Once you have a clear tone, use a small round tool to pierce two holes on the top of the back section. These will function as the notes for your ocarina-style whistle.
Silent Whistle?
If no sound comes out, the bevel edge is likely dull or misaligned. The edge must be extremely sharp and positioned exactly in the center of the air stream coming from the mouthpiece.
Step 2: Sculpting the Llama
-
Attach the legs:
Roll four short, sturdy coils of clay for the legs. Score and slip the attachment points on the bottom of the body. Press the legs firmly into place and blend the seams upward for a seamless connection. -
Form the neck:
Roll a thicker coil for the neck, slightly tapered at the top. Score and slip the front of the body, then attach the neck, ensuring it stands upright and proud. Smooth the join thoroughly so it doesn’t crack during drying. -
Shape the head:
Model the head directly from the top of the neck coil, or attach a small oval. I like to gently pull the snout forward to give it that characteristic llama profile. -
Add ears and tail:
Form two small leaf shapes for ears and attach them high on the head. Add a tiny nub for a tail at the rear, blending it well. -
Smooth the surface:
Use a slightly damp sponge to wipe down the entire piece, removing fingerprints and smoothing out any bumpy areas. Let the clay dry slowly to the leather-hard stage.
Gloss vs. Matte
For the exact look in the photo, skip the glossy clear glaze. The matte finish of bare ceramic emphasizes the folk-art texture. Rub a little beeswax on after firing for a soft sheen.
Step 3: Painting the Folk Pattern
-
Draw the blanket outline:
Using a reddish-brown underglaze, paint a curved oval shape on the back, surrounding the finger holes. This serves as the base of the saddle blanket. -
Add the inner detail:
Inside the brown oval, paint a thick curved line of dark grey, following the same contour. This creates the striped blanket effect seen in traditional pottery. -
Paint the fringe:
With a fine liner brush and the reddish-brown color, paint small vertical lines hanging down from the edge of the blanket imply tassels or fringe. -
Add decorative dots:
Place small reddish-brown dots between the fringe lines and along the lower neck area to add texture and visual interest. -
Define the neck collar:
Paint a collar around the base of the neck using two horizontal reddish-brown lines. Fill the space between them with vertical stripes to match the blanket style. -
Define the face:
Using black underglaze and your finest brush, paint a simple almond-shaped eye and a small curved line for the mouth. The mouth should curl up slightly at the end for a happy expression. -
Fire the piece:
Allow the clay to dry completely (bone dry). Bisque fire the piece according to your clay’s instructions. You can leave it matte for a rustic look or apply a clear glaze before a second firing.
Once fired, you will have a delightful little companion that looks as sweet as the song it plays


What Really Happens Inside the Kiln
Learn how time and temperature work together inside the kiln to transform clay into durable ceramic.
Elephant Trunk Mouthpiece Whistle
Sculpt a charming musical companion with this elephant-shaped ceramic whistle, featuring a speckled stoneware finish and gentle curves. By cleverly integrating the mouthpiece into the trunk, this piece combines sculptural presence with functional instrument design.
Step-by-Step
Materials
- Speckled buff stoneware clay
- Popsicle stick or flat modeling tool
- Needle tool
- Small loop tool
- Sponge
- Slip (clay mixed with water)
- Scoring tool (or serrated rib)
- Clear matte glaze (optional)
- Whistle voicing tool (or sharpened wooden dowel)
Step 1: Forming the Body
-
Shape the main mass:
Start with a ball of clay roughly the size of a tangerine. Gently roll it between your palms to smooth out any cracks, then elongate one side slightly to create an egg shape for the body. -
Pinch the pot:
Hold the clay egg in one hand and push your thumb into the center to open it up, creating a basic pinch pot. Keep the walls about a quarter-inch thick for structural integrity. -
Close the form:
Gently gently curve the walls inward until the opening closes completely, trapping air inside. This trapped air will help the elephant hold its shape while you sculpt. -
Smooth the exterior:
Use a damp sponge or a flexible rib tool to smooth the surface, erasing any seams where you closed the form.
No Sound?
The most common issue is the airway alignment. The air sticking the sharp edge (labium) must be split exactly in half. Re-insert your tool and check the angle.
Step 2: Sculpting the Features
-
Pull the legs:
From the bottom of the body mass, gently pinch and pull down four short, sturdy stumps to create the legs. Tap the feet on your work surface to flatten them so the elephant stands stable. -
Attach the trunk:
Roll a coil of clay that tapers at one end. Score and slip the thicker end to the front of the ‘head’ area, smoothing the clay downward to integrate it seamlessly. Curve the trunk upwards. -
Create the ears:
Flatten two small balls of clay into teardrop shapes. Score the side of the head and the back of the ears, then press them firmly onto the body using slip. -
Blend the ears:
Use a small modeling tool to blend the back edge of the ear into the body, but leave the front edge distinct to give it dimension. -
Add eyes and texture:
Use the back of a small paintbrush or a rounded tool to press deep indentations for the eyes. Poke a tiny series of holes along the back with a needle tool for decorative texture.
Step 3: Creating the Whistle Mechanism
-
Hollow the trunk:
Carefully insert a thin dowel through the tip of the trunk, aiming straight towards the main hollow cavity of the body. This creates the windway. -
Cut the voicing window:
Where the trunk meets the head, cut a rectangular notch (the window) on the underside or top, depending on your airflow preference. The sharp edge of this window (the labium) is crucial for sound. -
Align the airway:
Insert your stick back into the trunk mouthpiece. Look through the window and ensure the stick aligns perfectly with the sharp edge of the clay cut. Adjust the angle until it splits the air stream effectively. -
Test the sound:
Blow gently through the trunk. If you hear a rushing wind sound but no whistle, adjust the sharpness of the ramp (labium) or the angle of the windway slightly. -
Fine-tune the tone:
I find that widening the window slightly can sometimes clear up a fuzzy tone. Make very small adjustments. -
Add a finger hole:
If you want to change the pitch, punch a hole or two on the back of the elephant (near the decorative dots). Cover and uncover these holes to play the instrument.
Pro Tip: Crisp Sound
Make sure the ramp (the sharp edge in the window) is as clean and sharp as possible. Any burrs or rough clay crumbs in the airway will dampen the whistle’s clarity.
Step 4: Finishing
-
Dry slowly:
Let the piece dry under loose plastic for a day to equalize moisture, then uncover it to dry completely to the bone-dry stage. -
Bisque fire:
Fire the piece in a kiln to cone 04 (or your clay’s specific bisque temperature). -
Glaze application:
Apply a clear satin or matte glaze to preserve the natural speckled look of the clay, or leave the exterior unglazed for a raw, tactile finish. -
Final firing:
Fire the piece a second time to the maturation temperature of your clay body.
Enjoy the playful sounds of your new handmade ceramic instrument
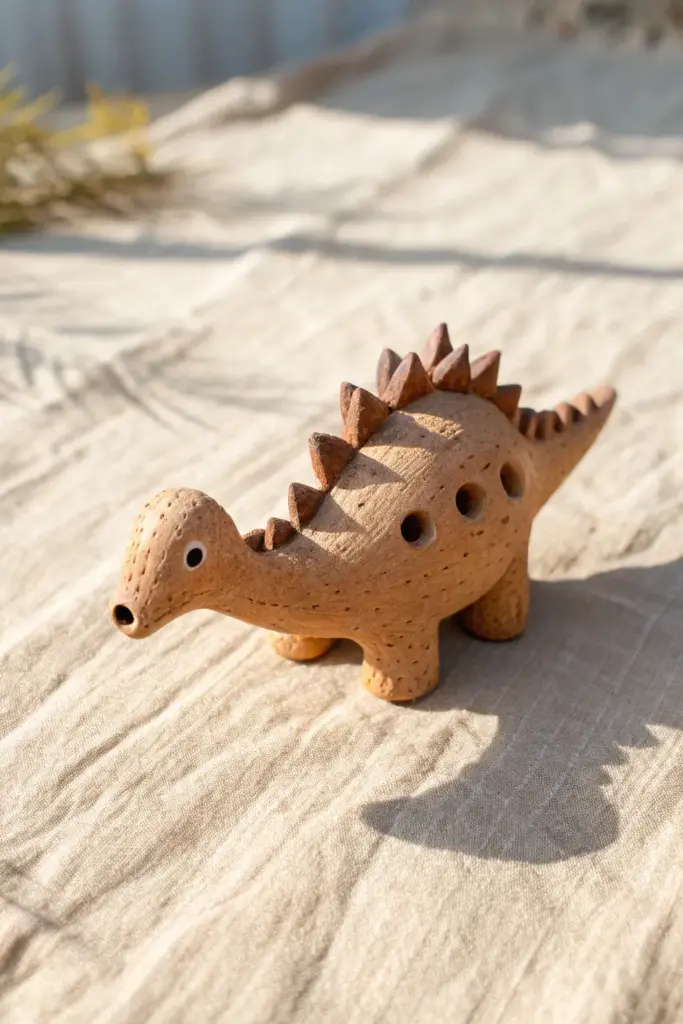
Dinosaur Whistle With Spiky Texture

This charming ceramic whistle combines the prehistoric appeal of a dinosaur with the functional fun of a musical instrument. Creating this Stegosaurus involves basic pinch pot techniques enhanced by detailed texturing and a clever hidden whistle mechanism.
Step-by-Step Tutorial
Materials
- Earthenware or stoneware clay (grogged for strength)
- Wooden modeling tool
- Popsicle stick or fettling knife
- Slip (clay mixed with water)
- Scoring tool or needle tool
- Sponge
- Small drill bit or hole cutter
Step 1: Forming the Hollow Body
-
Create a pinch pot:
Start with a ball of clay roughly the size of a tangerine. Stick your thumb in the center and pinch the walls evenly as you rotate the ball, creating a hollow cup shape. -
Close the form:
Gently pinch the rim of your cup inward until it closes completely, trapping air inside to create a hollow sphere. Roll it gently on the table to smooth it into an oval egg shape. -
Draft the whistle mechanism:
At the tail end, form a small mouthpiece. Use a popsicle stick to create the airway, pushing it into the clay at an angle. Then, cut a small rectangular window (the fipple) on the underside or side where the stick ends to create the sound-producing edge. -
Test the sound:
Before adding any limbs, blow gently into the mouthpiece. If it doesn’t whistle, adjust the angle of your stick or the sharpness of the bevel edge until you get a clear tone.
Step 2: Sculpting the Dinosaur
-
Pull the neck:
On the end opposite the whistle, gently pull and squeeze the clay to elongate a neck. Curve it slightly upward to give the dino an attentive posture. -
Shape the head:
Form a distinct rounded head at the end of the neck. Use your thumb to smooth the transition so the neck flows naturally into the skull. -
Add the legs:
Roll four short, stout cylinders of clay for legs. Score and slip the attachment points on the body belly, then firmly press the legs on, blending the seams with a wooden tool. -
Create the mouth and eyes:
Use a small round tool to press indented sockets for the eyes, then add tiny balls of white slip or clay for the whites and black for pupils. Poke a small hole at the tip of the snout for the mouth.
Clear The Airway
Keep the popsicle stick inside the mouthpiece while you attach legs and spikes. This prevents the airway from collapsing or warping while you handle the clay.
Step 3: Details & Texture
-
Make the spikes:
Roll out a small coil of clay and cut it into triangular segments. These will become the iconic back plates. -
Attach the ridge:
Score the spine of the dinosaur from neck to tail. Apply a thin line of slip, then attach your triangular spikes in a single row, pressing them firmly into place. -
Add texture:
Take a needle tool or stiff brush and gently stipple the entire surface of the dinosaur to create rough, leathery skin texture, avoiding the smooth spikes. -
Tune the instrument:
Drill three or four small holes along the side of the body into the hollow cavity. These will act as finger holes to change the pitch. -
Final drying check:
Ensure the air passage is clear of any debris or crumbs from the texturing process. I always like to give it one final test toot before setting it aside to dry slowly under plastic.
Prehistoric Patina
After bisque firing, rub iron oxide wash into the textured skin and wipe it back with a sponge. This highlights the stippling and gives it an earthy, ancient look.
Once fired, you will have a prehistoric pet that fits in your pocket and sings a stone-age tune