If you’ve got a lump of modeling clay and a little curiosity, you’ve already got everything you need to make something seriously cool. These ideas are my go-to favorites when I want quick wins, cute minis, and pieces you’ll actually use around the house.
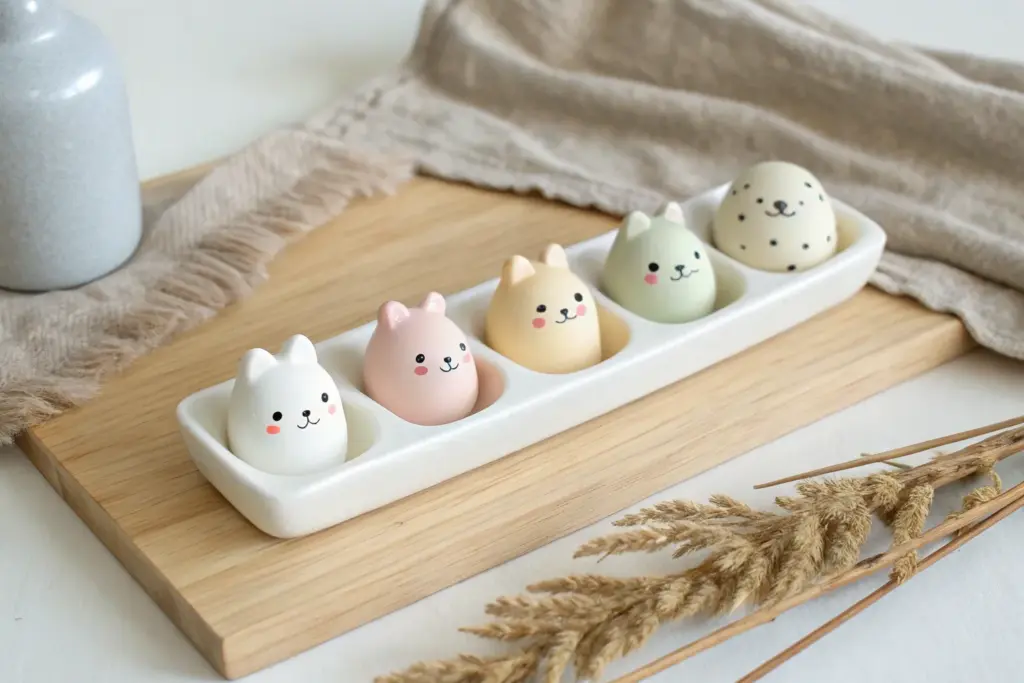
Chubby Animal Figurines
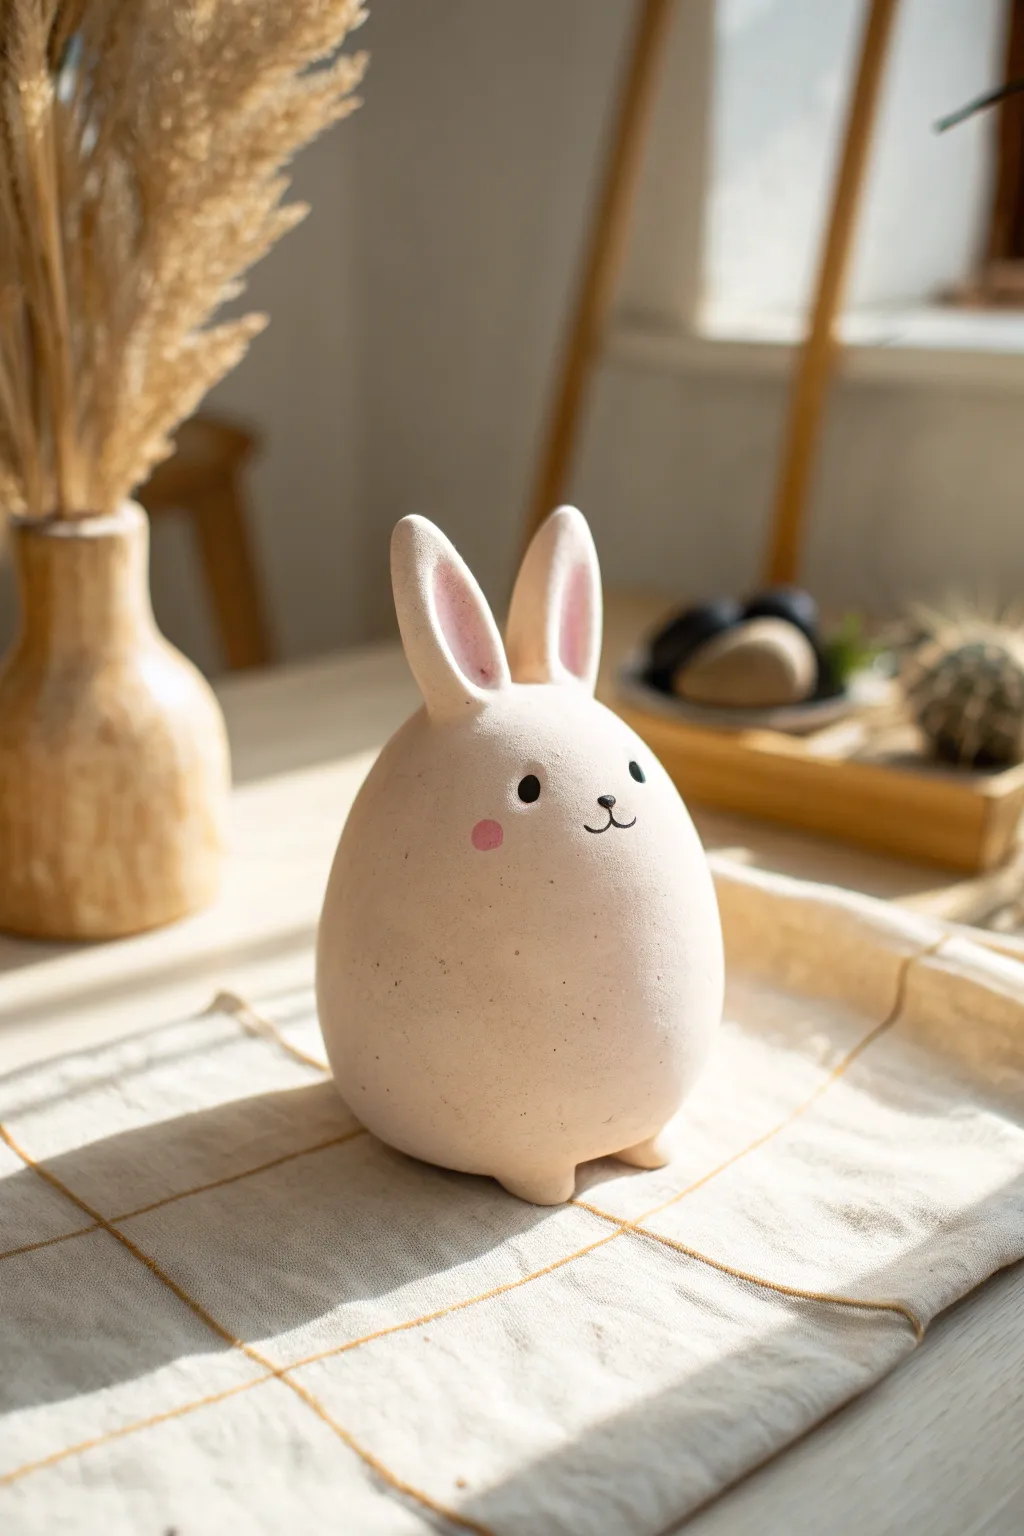
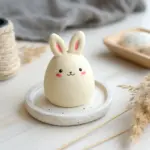
This ridiculously cute bunny figurine starts with the simplest of shapes—an egg—and transforms into a charming desk companion with just a few details. Its smooth, speckled texture gives it a modern ceramic look without needing a kiln.
Step-by-Step Guide
Materials
- White airdry clay or polymer clay
- Acrylic paints (black, pink, white)
- Fine-grit sandpaper
- Small rolling pin
- Detail brush (size 0 or 00)
- Old toothbrush or stiff bristle brush
- Water cup
- Modeling tools (or a toothpick)
- Clear matte varnish (optional)
Step 1: Shaping the Base
-
Create the main body:
Start with a ball of clay roughly the size of a tangerine. Roll it between your palms until smooth, then gently taper the top half to create a distinct egg shape. The bottom should be wider and heavier to keep it stable. -
Flatten the base:
Tap the wider bottom end of your egg gently against your work surface. You want a flat area so the bunny sits upright without wobbling. -
Smooth the surface:
Dip your finger in a tiny bit of water (if using air-dry clay) or baby oil (if using polymer) and smooth out any fingerprints or cracks on the egg’s surface.
Step 2: Adding Features
-
Form the ears:
Roll two smaller logs of clay, about an inch long each. Taper the tops to points and slightly flatten them to create the bunny ear shape. -
Attach the ears:
Score the top of the head and the bottom of the ears with a needle tool or toothpick. Add a dab of water (or slip) and press the ears firmly onto the head, smoothing the seam down with a modeling tool so they look like one continuous piece. -
Create the inner ear:
Use the rounded end of a paintbrush handle or a small ball tool to gently press an indentation inside each ear. This creates depth and a spot for pink paint later. -
Add tiny feet:
Roll two tiny, pea-sized balls of clay. Attach them to the bottom front of the egg body, spacing them slightly apart so the bunny looks like it’s resting on its toes. -
Dry or bake:
If using polymer clay, bake according to the package instructions. For air-dry clay, let it sit for at least 24-48 hours until completely hard and white.
Seamless Smoothness
Before drying, brush the raw clay with a little water using a soft paintbrush. This melts the outer layer slightly, removing fingerprints better than sanding.
Step 3: Finishing Touches
-
Sand for perfection:
Once fully cured, take fine-grit sandpaper and gently buff the surface. This removes any lingering fingerprints and gives it that high-end porcelain texture. -
Paint a base coat:
Mix a tiny drop of brown or beige into white acrylic paint to get a warm, off-white cream color. Paint the entire bunny and let it dry. -
Paint the inner ears:
Mix a soft pastel pink and carefully paint the indentations inside the ears. -
Speckle the surface:
I find this step really transforms the piece: dilute a bit of brown paint with water. Dip an old toothbrush into it, then run your thumb across the bristles to flick tiny speckles all over the bunny. -
Draw the face:
Using your finest detail brush and black paint, add two small circles for wide-set eyes. -
add the nose and mouth:
Paint a tiny ‘Y’ shape or a small anchor shape between the eyes to form the nose and mouth. -
Add blush:
Dilute your pink paint heavily so it acts like a watercolor. Dab a faint circle on the cheek area for a rosy glow. -
Seal:
Finish with a coat of matte spray varnish to protect the paint and give it a finished sheen.
Make it a shaker
Before closing the egg shape, hollow out the center and add dried rice or beads wrapped in foil. Now your decorative figurine doubles as a gentle rattle.
Place your new chubby friend on a shelf or desk for an instant mood booster


Mini Food Charms With Faces
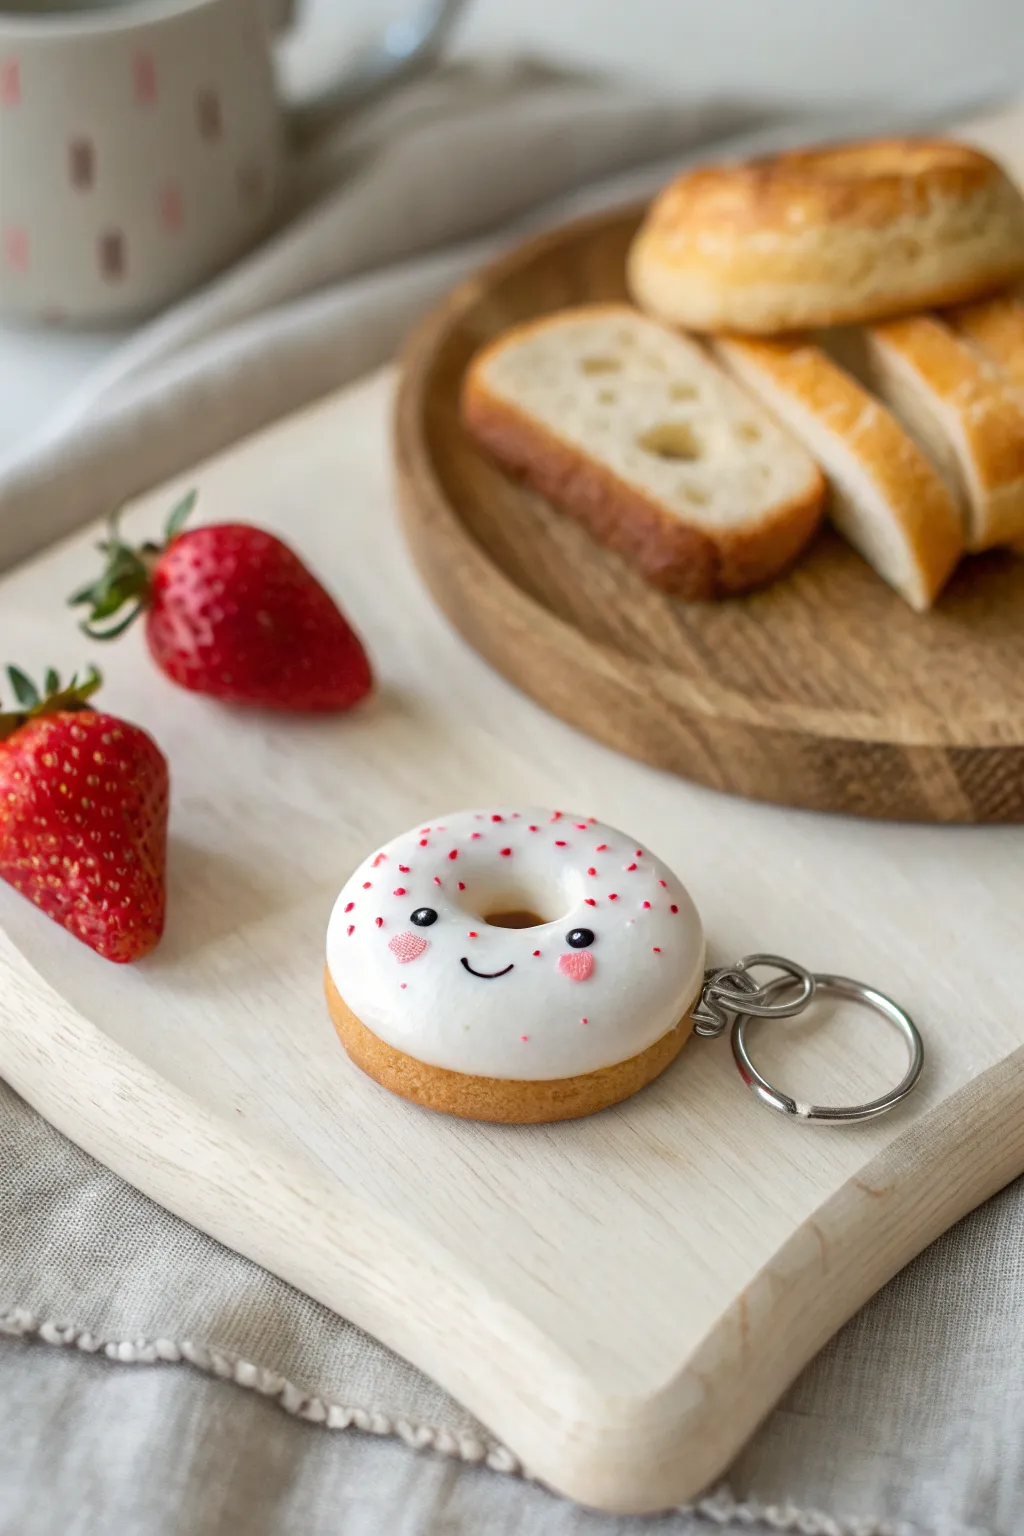
Brighten up your keyring with this impossibly cute, bakery-style donut charm. This polymer clay project features a realistic golden-brown base topped with sweet white icing and a kawaii smiley face that’s sure to bring joy wherever you go.
How-To Guide
Materials
- Tan/beige polymer clay (dough color)
- White liquid polymer clay (or white clay softened with clay softener)
- Black polymer clay (tiny amount)
- Pink polymer clay or chalk pastel
- Red polymer clay (for sprinkles)
- Gloss glaze or UV resin
- Soft artist pastels (yellow ochre, brown, orange)
- Paintbrush for shading
- Dotting tool or toothpick
- Eye screw pin
- Keyring hardware
- Needle tool
Step 1: Baking the Base
-
Mix the dough color:
Start by conditioning your beige or tan clay until it is soft and pliable. If the color looks too flat, I sometimes mix in a tiny pinch of translucent clay to give it that realistic baked-good depth. -
Form the shape:
Roll the clay into a smooth ball about the size of a large marble, then gently flatten it into a thick disc. Smooth out any fingerprints. -
Rounding the edges:
Use your finger to gently curve the top edges downward so the donut looks puffy rather than sharp. -
Create the center hole:
Take a large dotting tool or the back of a paintbrush handle and press directly through the center to create the donut hole. Wiggle it slightly to widen the hole, then smooth the inner edges so they look baked, not cut. -
Texture the dough:
Use a toothbrush or a ball of crinkled aluminum foil to tap lightly over the surface of the clay, creating a realistic, cake-like texture. -
Pre-shading the dough:
Shave some yellow ochre, orange, and light brown chalk pastels into fine dust. Using a soft fluffy brush, dust the edges and the bottom of the donut to simulate a golden-baked crust. Leave the center top slightly lighter.
Step 2: Icing and Decoration
-
Apply the icing:
Using white liquid clay, carefully drip a thick layer over the top of the donut. Guide the liquid with a needle tool so it flows naturally down the sides without covering the whole base. -
Add the sprinkles:
Before the liquid clay sets, take tiny crumbs of red clay (or pre-baked clay bits) and sprinkle them randomly over the white icing. Press them in very gently if needed. -
Make the cheeks:
Take two miniscule balls of pink clay and place them on the icing where you want the cheeks to be. Gently flatten them with a tool so they look painted on rather than sticking out. Alternatively, create a heart shape for extra cuteness like in the photo. -
Insert hardware:
Insert your eye screw pin into the side or top of the donut firmly. If the clay is soft, you might need to support the shape while doing this. -
The first bake:
Bake the piece according to your clay package instructions (usually 275°F/135°C for 15-30 minutes). Let it cool completely.
Icing too runny?
If your liquid clay is dripping too fast, let it sit on a piece of cardboard for 10 minutes to leach out some oil, thickening it up for better control.
Step 3: Bringing it to Life
-
Paint the smile:
Using a very fine detail brush and black acrylic paint, or a tiny rope of black liquid clay, draw a simple ‘U’ shape smile between the cheeks. -
Add the eyes:
Use a black clay ball or black paint to add two small, round eyes just above the cheek level. Set them slightly wide apart for that ‘kawaii’ look. -
Secure the pin:
Unscrew the eye pin, add a dab of superglue to the threads, and screw it back in for a permanent hold. -
Glazing:
Apply a coat of gloss glaze or UV resin specifically over the white icing area to make it look wet and sugary. Keep the dough part matte for realism. -
Final assembly:
Once the glaze is fully dry or cured, attach your split ring and keychain hardware to the eye pin using pliers.
Make it Sparkle
Mix ultrafine iridescent glitter into your white liquid clay before applying. It gives the donut a sugar-glazed shimmer that catches the light beautifully.
Attach your new sweet treat to your keys or backpack and enjoy the smiles it brings


Tiny Trinket Dishes
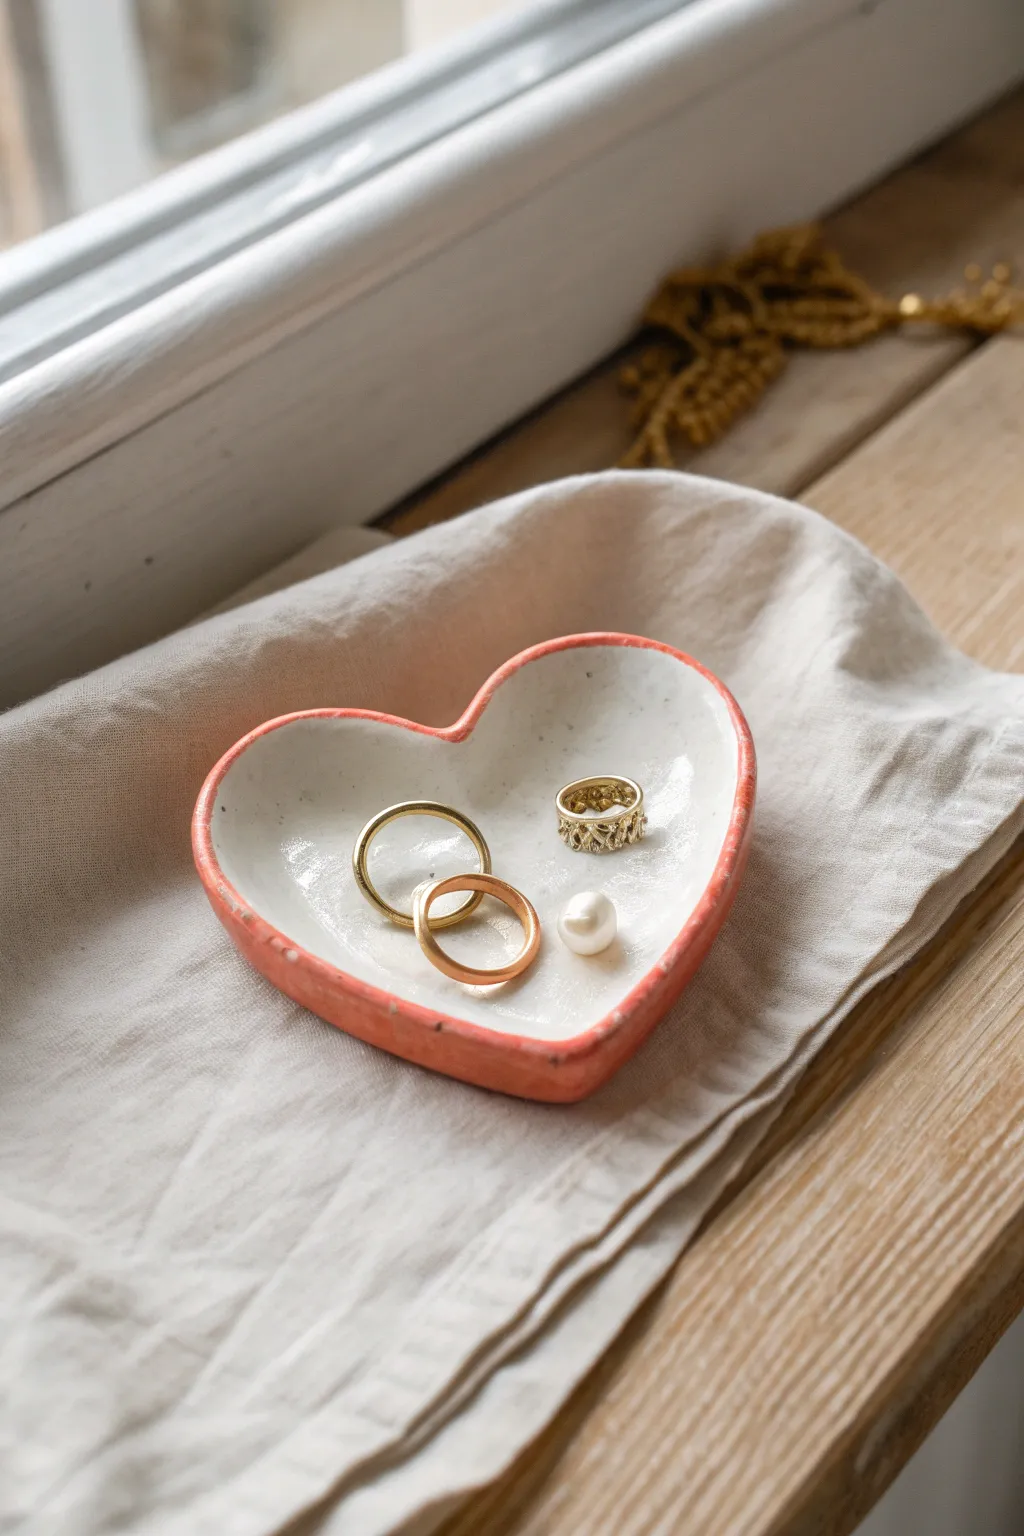
Keep your favorite rings safe in this charming, rustic heart-shaped dish. With its clean white interior and contrasting terracotta-hued rim, this simple pinch pot offers a modern take on handmade ceramics without needing a kiln.
Step-by-Step
Materials
- Air-dry clay (white)
- Small bowl with water
- Rolling pin or smooth glass jar
- Craft knife or clay cutter
- Heart-shaped cookie cutter (optional)
- Fine-grit sandpaper (220 grit or higher)
- Acrylic paint (Light Pink or Coral)
- High-gloss white glaze or varnish (for faux-ceramic look)
- Small artist brushes (flat and detail)
- Palette or wax paper
Step 1: Shaping the Clay
-
Condition the clay:
Begin by taking a golf-ball-sized amount of white air-dry clay. Knead it in your hands for about a minute until it feels warm, pliable, and free of any hidden air bubbles. -
Form the base:
Roll the clay into a smooth ball between your palms. Then, gently flatten it on your work surface until it is a thick disc, roughly 1/4 inch thick. -
Create the heart shape:
You can use a large heart-shaped cookie cutter to stamp out the shape. Alternatively, use a craft knife to lightly sketch a heart outline on the clay disc and then cut it out for a more organic feel. -
Build the rim:
Gently pinch the edges of the heart upwards to create a raised rim. Use your thumb to press the center down slightly while your index finger supports the outer edge. -
Smooth the surfaces:
Dip your finger into a little water—just a drop or two—and run it along the rim and the interior of the dish to smooth out any cracks or fingerprints. The goal is a uniform, soft texture. -
Refine the edges:
Pay special attention to the top edge of the rim. I like to gently run a damp sponge or finger along it to ensure it isn’t sharp or jagged. -
Dry completely:
Set the dish aside in a cool, dry place. Let it dry for at least 24-48 hours. Turn it over halfway through to ensure the bottom dries evenly.
Cracked Clay?
If small cracks appear while drying, mix a tiny bit of fresh clay with water to make a paste (slip) and fill them in before sanding.
Step 2: Sanding and Refining
-
Check for dryness:
Touch the clay to your cheek; if it feels cold or clammy, it needs more time. It should be room temperature and chalky white. -
Sand the imperfections:
Using fine-grit sandpaper, gently buff the rim and the outside of the dish. Remove any sharp ridges or bumps left from the shaping process. -
Dust off:
Use a dry, soft brush or a cloth to wipe away all the clay dust. This is crucial for smooth paint application.
Step 3: Painting and Glazing
-
Paint the rim:
Mix a small amount of coral or light terracotta acrylic paint. Using a small detail brush, carefully paint just the top edge and the outer wall of the heart dish. -
Create a rustic edge:
Don’t worry about a perfectly straight line on the rim. A slightly uneven, hand-painted look adds character to the piece. -
Paint the interior (Optional):
If your clay dried a nice bright white, you can leave the inside raw. If it looks grey, apply a coat of white acrylic paint to the interior bowl shape. -
Let the paint dry:
Allow the acrylic paint to dry completely, which usually takes about 20 minutes. -
Apply the first coat of glaze:
Apply a layer of high-gloss varnish or glaze over the entire interior of the dish. This mimics the look of fired ceramic. -
Glaze the rim:
Continue painting the glaze over the painted coral rim. This seals the paint and gives it that shiny, finished quality seen in the photo. -
Layering for shine:
Once the first coat is dry to the touch, apply a second coat of gloss. This depth makes the ‘ceramic’ illusion much more convincing. -
Final cure:
Let the dish cure fully according to your varnish bottle’s instructions before placing any jewelry inside.
Add a Golden Touch
For an extra fancy finish, paint a very thin line of gold leaf or metallic gold paint right along the top ridge of the rim.
Place this sweet little dish on your windowsill to catch the light and your favorite treasures


Cactus Ring Holder
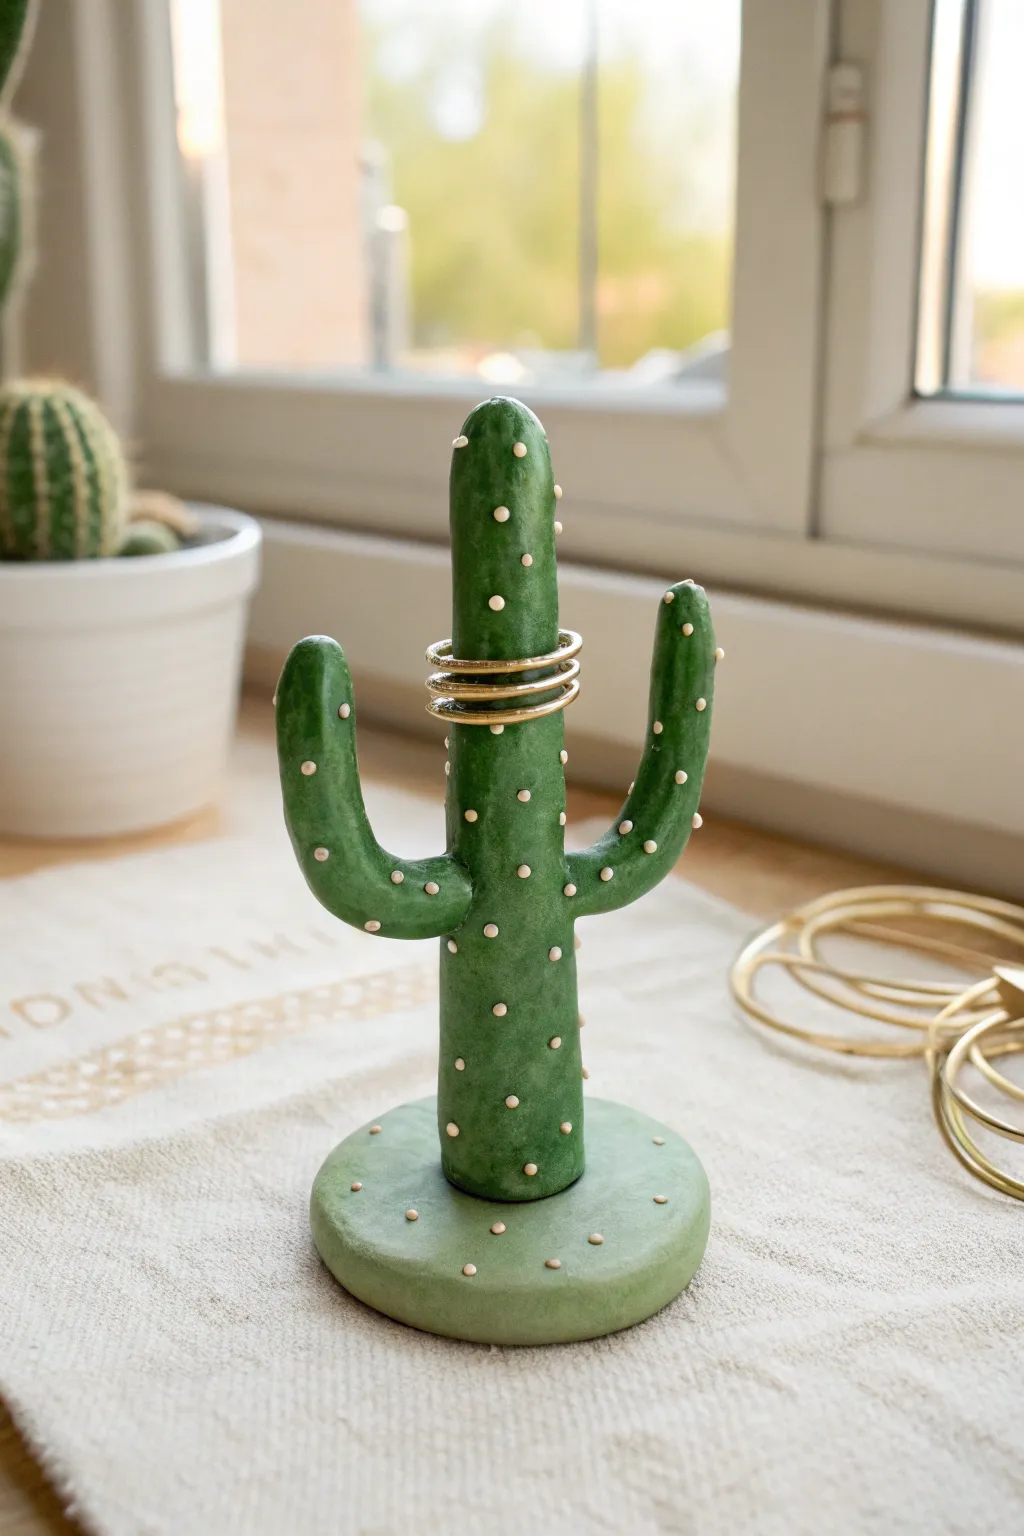
This charming, saguaro-style cactus acts as a functional sculpture for your favorite jewelry pieces. With its earthy green tones and delicate white spikes, it adds a touch of playful southwestern flair to any dressing table.
Step-by-Step Tutorial
Materials
- Green polymer clay (medium shade)
- White or cream liquid clay (or acrylic paint)
- Modeling clay tools (needle tool, smoother)
- Acrylic rolling pin
- Baking sheet and parchment paper
- Oven (if using polymer clay)
- Gloss or matte varnish (optional)
- Toothpicks or wire armature for support
Step 1: Forming the Base
-
Condition the clay:
Begin by warming up a generous chunk of green clay in your hands. Knead it thoroughly until it is soft, pliable, and free of any air bubbles. -
Roll the base:
Take about one-third of your clay and roll it into a smooth ball. Place it on your work surface and flatten it gently with your palm or a rolling pin until you have a thick disc about 3 inches in diameter and 0.5 inches tall. -
Smooth the edges:
Run your finger or a smoothing tool around the circumference of the disc to round off the edges, giving it a soft, stone-like appearance rather than a sharp cylinder.
Step 2: Sculpting the Cactus
-
Shape the main trunk:
Roll a cylinder of green clay for the main body of the cactus. It should be slightly taller than you want the finished piece to be, approximately 4-5 inches high. -
Round the top:
Gently taper and round the top of the cylinder so it looks organic and domed, similar to a real cactus tip. -
Add internal support:
Insert a toothpick or a short piece of wire halfway into the center of the base disc. Push the main trunk down onto the support to ensure it stands upright without leaning. -
Blend the trunk seam:
Use a modeling tool or your fingertip to drag the clay from the bottom of the trunk down onto the base, smoothing the seam completely so the two pieces become one solid unit. -
Form the arms:
Roll two smaller cylinders of green clay for the cactus arms. Bend each one slightly into an ‘L’ shape or a gentle curve. -
Attach the arms:
Press one arm onto the left side of the trunk and the other slightly higher on the right side. I find scoring the attachment points first helps them stick better. -
Blend the arm seams:
Just like with the base, use a tool to seamlessly blend the clay from the arms into the main trunk. Smooth out any fingerprints. -
Check balance:
Look at the sculpture from all angles to ensure it is symmetrical and balanced so it won’t tip over when holding heavy rings.
Drooping Arms?
If the clay arms sag before baking, support them with small props of crumpled foil or cardboard underneath until they are cured hard.
Step 3: Texturing and Detailing
-
Create texture:
Using an old toothbrush or a stiff bristle brush, gently tap the surface of the green clay all over to give it a realistic, slightly porous texture. -
Bake the structure:
Preheat your oven according to the clay manufacturer’s instructions. Place the sculpture on parchment paper and bake. Let it cool completely before moving to the next step. -
Prepare the spikes:
If using liquid clay, you can mix in a tiny bit of white paint if needed. Alternatively, prepare a fine brush with white acrylic paint. -
Dot the spikes:
Carefully apply small, raised dots in vertical columns down the trunk and arms. Keep the spacing somewhat irregular to mimic nature. -
Detail the base:
Don’t forget to add a few scattered dots on the base disc as well to tie the design together. -
Second bake or dry:
If you used liquid clay for the dots, bake the piece again for a short duration to set them. If using paint, allow it to dry fully in a dust-free area. -
Seal the piece:
Apply a thin layer of matte or satin varnish to protect the clay and give it a finished, professional look.
Make it Bloom
Add a small pink or yellow clay flower to the very top of the cactus before baking for an extra pop of color and cuteness.
Now you have a sturdy and stylish little succulent to keep your rings safe and organized

The Complete Guide to Pottery Troubleshooting
Uncover the most common ceramic mistakes—from cracking clay to failed glazes—and learn how to fix them fast.
Little Turtle Ring Dish
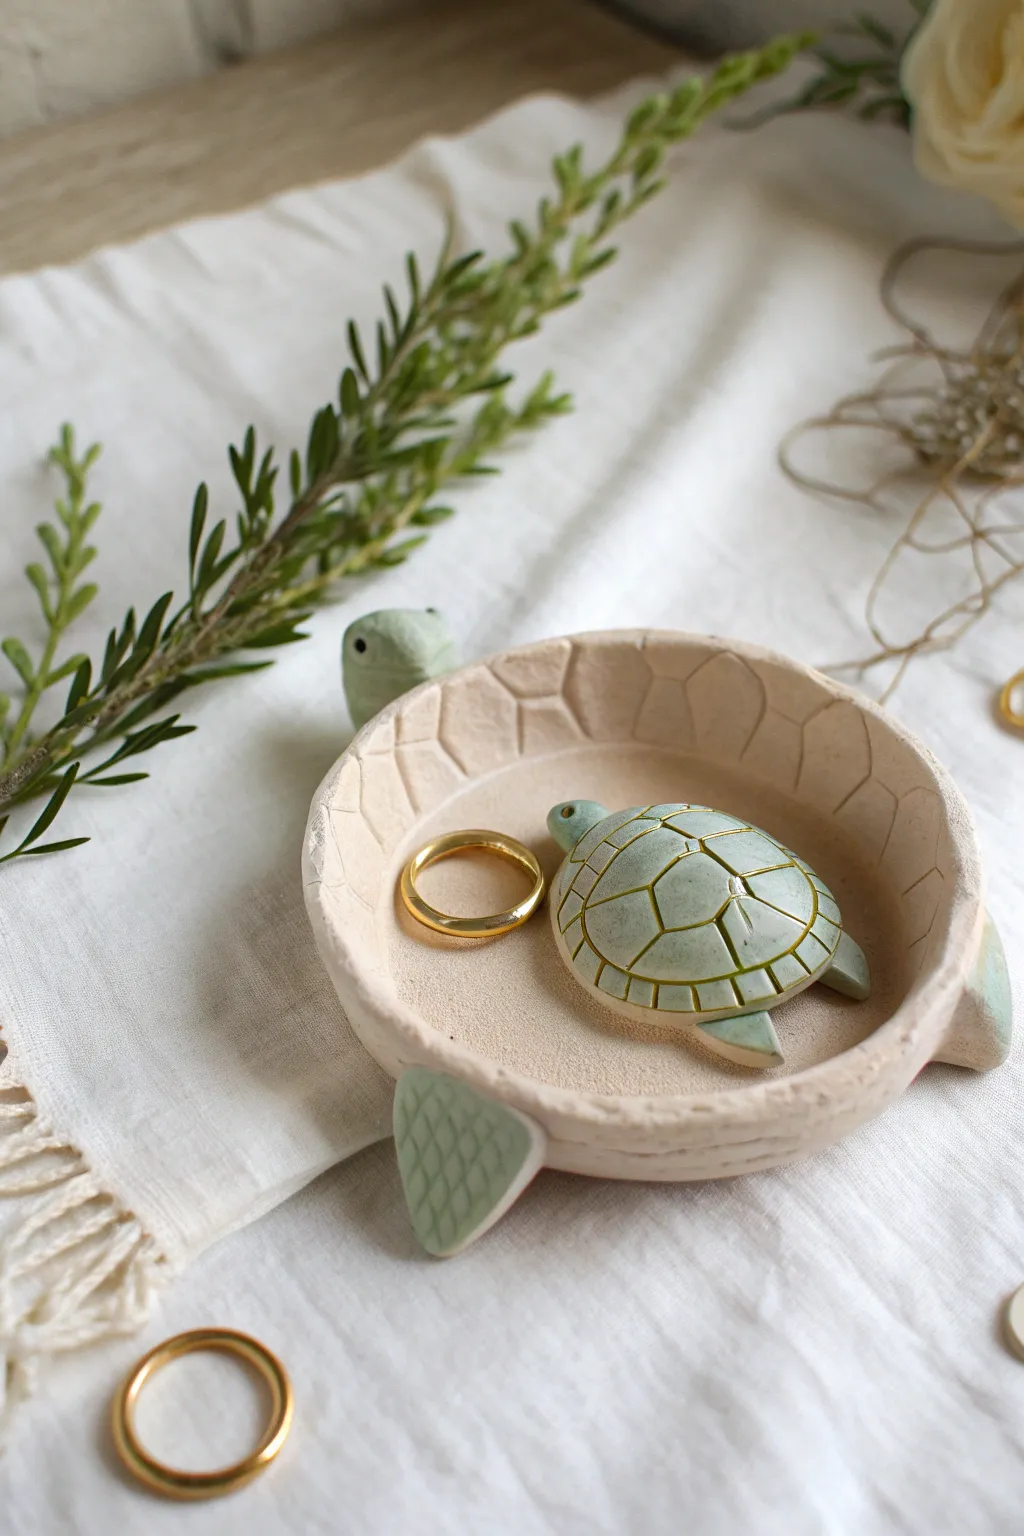
Keep your favorite jewelry safe with this adorable, handmade turtle dish that features a charming sculpted rim and a tiny turtle friend nestled inside. It is a sweet, functional piece of art perfect for a bedside table.
Step-by-Step
Materials
- Air-dry clay or polymer clay (white or beige)
- Acrylic paints (pale sage green, white, gold)
- Clay rolling pin
- Clay knife or scalpel tool
- Small bowl (to use as a mold)
- Small paintbrush
- Fine-grit sandpaper
- Water (for smoothing)
- Varnish or sealant (matte or semi-gloss)
Step 1: Forming the Main Shell Dish
-
Roll the base:
Start by conditioning your clay until it is soft and pliable. Roll it out into a smooth, even slab about 1/4 inch thick. -
Cut the circle:
Find a circular cutter or a small bowl (approx. 3-4 inches wide) and cut a perfect circle from your clay slab. -
Shape the dish:
Gently press this clay circle into your small bowl mold to give it a curved, concave shape. Press lightly so you don’t thin the bottom too much. -
Create the rim texture:
Using your clay knife, lightly score lines around the inner rim of the dish to mimic the segments of a turtle shell. Make vertical lines spaced about an inch apart. -
Detail the segments:
Connect these vertical lines with slightly curved horizontal lines to create the scute pattern found on the edge of a turtle’s shell.
Step 2: Sculpting the Appendages & Mini Turtle
-
Form the flippers:
Shape four flattened teardrops from fresh clay for the large turtle’s legs. Use your knife to score a cross-hatch or diamond pattern onto them for texture. -
Create the head and tail:
Roll a small ball specifically for the head, pinching it slightly to form a neck, and a tiny triangle for the tail. Poke two small holes for eyes on the head using a needle tool. -
Attach the parts:
Score and slip (cross-hatch and add water) the attachment points, then press the head, tail, and legs firmly onto the underside or rim of your main dish. -
Make the baby turtle body:
Roll a small ball of clay (about the size of a marble) and flatten the bottom to create a dome shape. -
Carve the shell:
On this small dome, use your needle tool or knife to carve a classic hexagonal turtle shell pattern. -
Finish the baby turtle:
Add tiny flippers and a small head to the mini dome, smoothing the seams so it looks like one cohesive piece. -
Dry completely:
Place the baby turtle inside the dish (do not attach it yet if you want to paint easily) and let everything air dry for 24-48 hours until hard.
Cracks happen!
If small cracks appear as the clay dries, mix a tiny bit of fresh clay with water to make a paste (slip) and fill the cracks, then smooth over.
Step 3: Painting and Finishing
-
Sand imperfections:
Once fully dry, use fine-grit sandpaper to gently smooth any rough edges on the rim or the bottom of the dish. -
Base coat the green:
Mix a very pale sage paint. Paint the baby turtle’s body and the flippers/head of the main dish. I like to keep the main bowl interior unpainted or natural. -
Highlight the shell:
Use a finer brush to paint the carved shell pattern on the baby turtle, perhaps using a slightly lighter green or white to make the texture pop. -
Add gold accents:
Using a tiny detail brush, paint thin gold lines into the grooves of the baby turtle’s shell for a touch of elegance. -
Secure the baby turtle:
If you want the baby turtle permanently attached, use a dab of strong superglue to fix it to the center of the dish. -
Seal the piece:
Apply a coat of matte or semi-gloss varnish over the entire project to protect the clay and paint from scratches.
Make it glitter
Instead of plain gold paint, fill the shell grooves with gold leaf or a metallic wax rub for a more antique, high-end jewelry store finish.
Now you have a specialized spot for your rings that adds a bit of woodland charm to your dresser
Cute Phone Stand Buddy
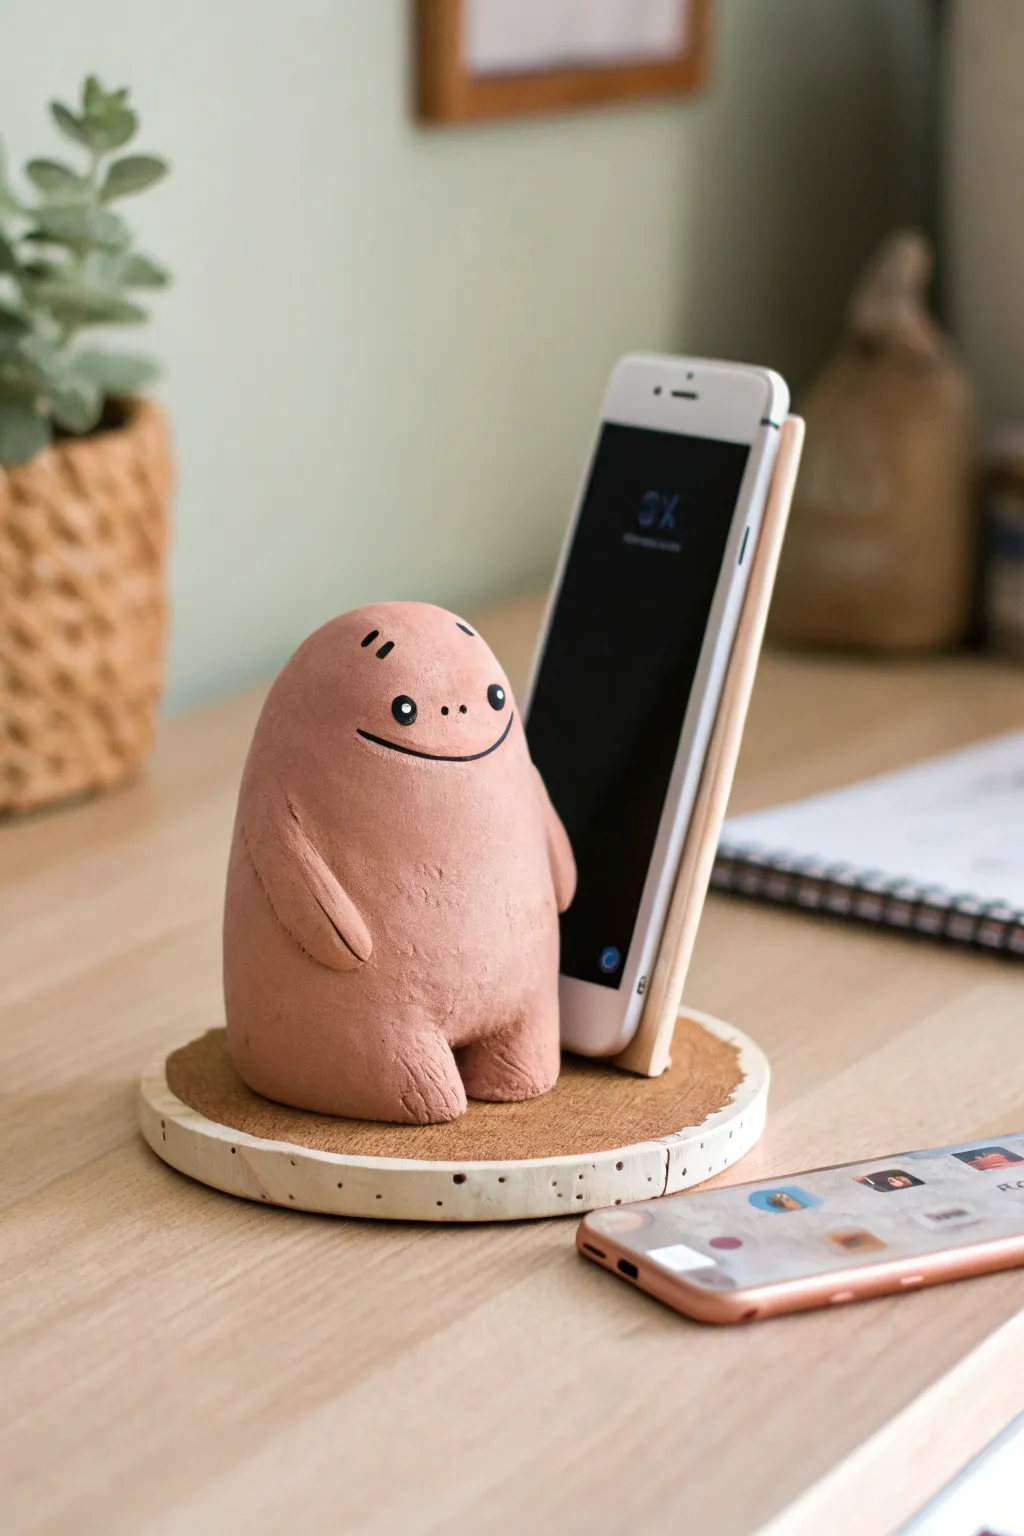
Brighten up your desk with this adorable, minimalistic phone holder that looks like a friendly little creature. Combining organic clay textures with a structured wood base creates a sturdy and charming spot for your device to rest.
Detailed Instructions
Materials
- Air-dry clay (terracotta or pink color)
- Wooden circular coaster or plaque (approx. 4-5 inches diameter)
- Thin rectangular balsa wood or craft wood strip (for back support)
- Strong craft glue or E6000
- Black acrylic paint
- Fine tip paintbrush
- Pencil and ruler
- Clay sculpting tools
- Sandpaper (fine grit)
- Matte sealant spray
Step 1: Shaping the Buddy
-
Form the main body:
Start with a baseball-sized amount of air-dry clay. Roll it into a smooth ball, then gently elongate it into a hefty oval shape, slightly wider at the bottom for stability. -
Flatten the base:
Tap the bottom of your oval firmly against your work surface. You need a completely flat bottom so the figure sits flush against the wooden stand later. -
Sculpt the legs:
Using a modeling tool or your fingers, pinch out two small, stubby mounds at the bottom front of the body to form the feet. Keep them integrated with the main form rather than attaching separate pieces. -
Add the arms:
Roll two small sausage shapes for arms. Score the sides of the body where you want them to go, apply a dab of water, and blend the clay to attach them. Angle them downward naturally at the creature’s sides. -
Smooth the surface:
Dip your finger in a little water and run it over the entire figure to remove fingerprints and cracks. Aim for a mostly smooth, matte finish, though a little texture adds character. -
Create the back angle:
This is crucial: Press the back of the figure gently against a flat object (like a book) to create a subtle vertical plane. This ensures the phone will have a flat surface to lean against, even though the wood strip does the heavy lifting.
Step 2: Building the Stand
-
Prepare the wooden back:
Cut your craft wood strip to be slightly shorter than your phone. Sand the edges so they are smooth. -
Test the fit:
Place your clay buddy on the wooden coaster base. Position the wood strip behind it. Lean your phone against the setup to find the perfect angle before gluing anything. -
Secure the back support:
Once you are happy with the angle, mark the spot on the base. Use strong craft glue to attach the wooden strip to the circular base. Hold it in place until the glue grabs. -
Dry the clay:
Let your clay creature dry completely. Air-dry clay usually takes 24-48 hours depending on thickness. I find rotating it every few hours helps it dry evenly.
Uneven Drying?
If your clay cracks while drying, mix a tiny bit of fresh clay with water to make a paste and fill the cracks. Smooth it over with a wet finger.
Step 3: Assembly and Details
-
Sand the figure:
Once fully bone-dry, lightly sand any rough patches on the clay figure, especially around where the arms connect. -
Paint the face:
Using a very fine brush and black acrylic paint, add two small dots for eyes. Add tiny eyebrows above them and a long, curved line for a smile. Keep the features simple for that distinct minimalist look. -
Add base details:
While the face dries, you can add decorative dots to the rim of your wooden base using the back end of a paintbrush dipped in black or white paint. -
Mount the figure:
Apply a generous amount of strong glue to the bottom of your clay friend. Press it firmly onto the wooden base, seated snugly against the vertical wood support you installed earlier. -
Seal the project:
Spray the entire piece with a matte sealant to protect the clay from moisture and prevent the paint from chipping over time.
Make it Functional
Carve a small channel or groove into the bottom of the wooden base before assembly to allow a charging cable to pass through neatly underneath.
Now you have a helpful little buddy to keep your phone secure and your desk looking stylish


What Really Happens Inside the Kiln
Learn how time and temperature work together inside the kiln to transform clay into durable ceramic.
Photo Holder Critter
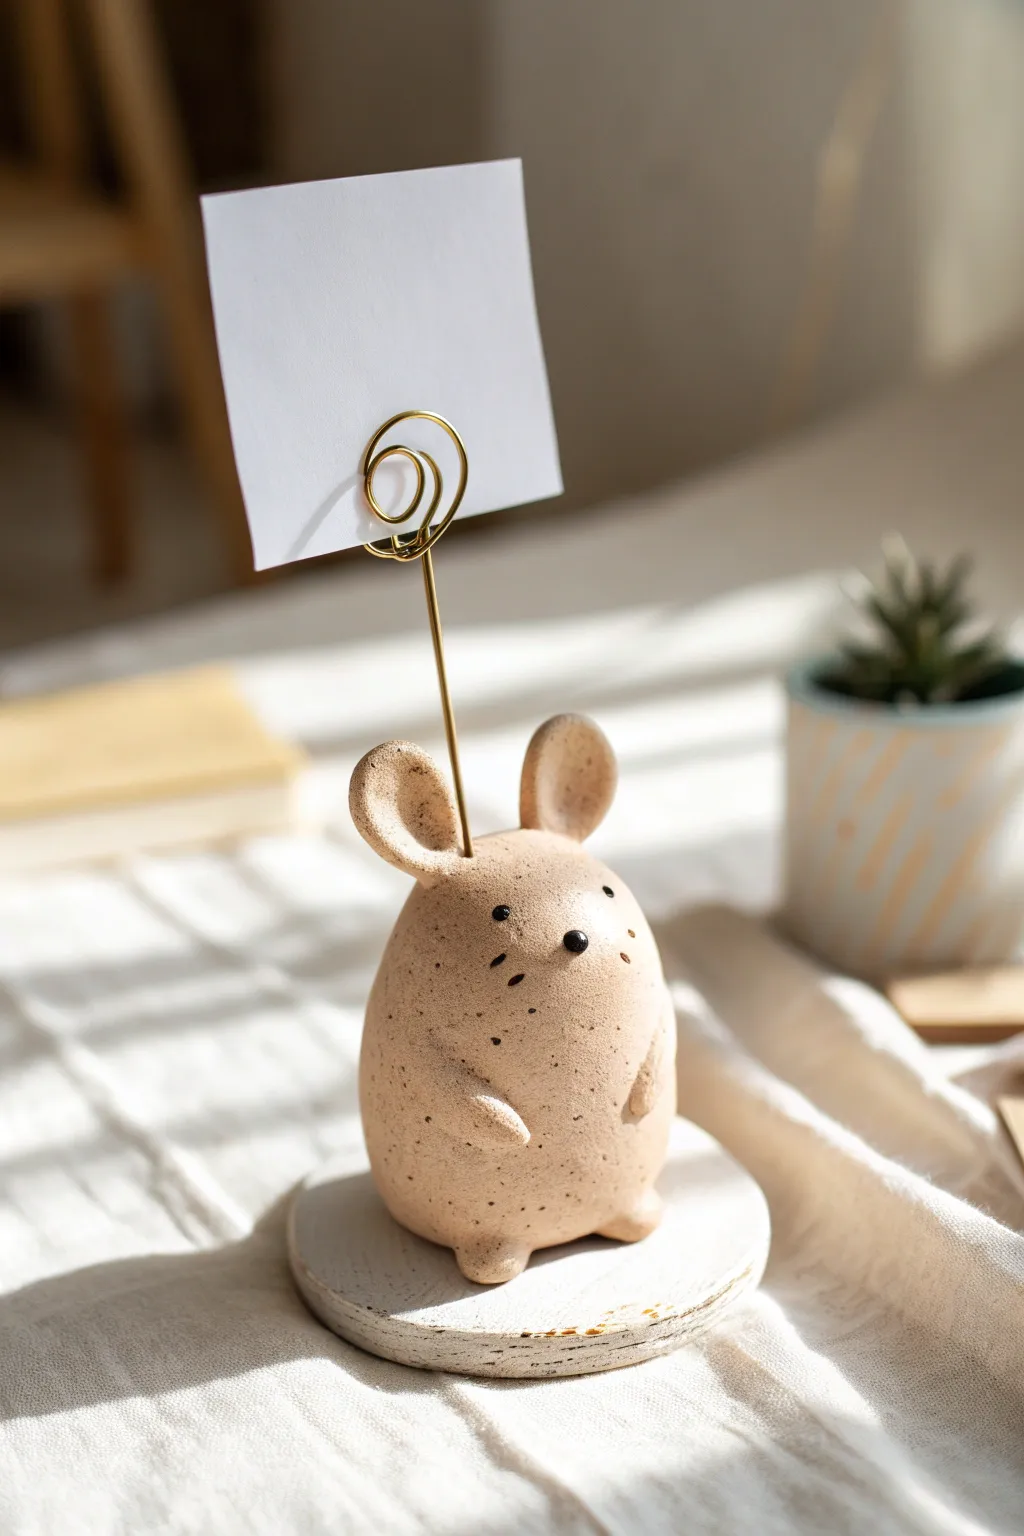
Keep your favorite snapshot or to-do list front and center with this charming speckled clay critter. This simple mouse figurine combines organic textures with functional design, making it a perfect desk companion or thoughtful handmade gift.
Step-by-Step Guide
Materials
- Polymer clay (beige or sand color)
- Faux speckled clay (or ground black pepper)
- Gold craft wire (18-20 gauge)
- Wire cutters
- Pliers (round-nose and flat-nose)
- Round wooden disc base (approx. 3 inches)
- Black acrylic paint
- Fine-point paintbrush or toothpick
- Clear matte varnish (optional)
- Modeling tools (or household items like spoons/toothpicks)
- Superglue or strong craft adhesive
- Oven (for baking polymer clay)
Step 1: Prepping the Clay and Wire
-
Mix the Speckles:
If you don’t have pre-speckled clay, knead a small pinch of ground black pepper or brown clay shavings into your beige clay. Fold and roll repeatedly until the specks are evenly distributed for that organic, stoneware look. -
Form the Body:
Roll a generous amount of clay into a smooth ball about the size of a tangerine. Gently taper the top slightly to form a very subtle egg shape, keeping the bottom wide and stable. -
Create the Spiral Clip:
Cut a 6-inch length of gold wire. Using round-nose pliers, grip one end and twist the wire around the pliers to start a small circle. Continue bending the wire by hand into a flat spiral, leaving a 3-4 inch straight tail extending downwards. -
Insert the Wire:
Push the straight end of your wire spiral vertically into the top center of the clay body. Insert it deep enough to be stable (about halfway down), then carefully pull it back out for now—we’ll glue it in after baking to ensure a strong hold.
Uneven Spiral?
If your wire spiral looks messy, try wrapping the wire around a marker or dowel instead of pliers. This creates consistent, perfectly round loops.
Step 2: Sculpting the Mouse Features
-
Shape the Ears:
Roll two hazelnut-sized balls of clay. Flatten them slightly into thick discs and gently pinch the bottom of each to create a teardrop shape. -
Attach the Ears:
Press the pinched ends of the ears onto the top of the body, just slightly forward of where the wire hole is. Blend the seams downward into the head using a modeling tool or your fingertip so they are securely attached. -
Indent the Inner Ear:
Use the rounded end of a paintbrush handle or a ball tool to press a soft indentation into the center of each ear, giving them dimension and character. -
Add Tiny Arms:
Form two small, worm-like shapes for the arms. Press them onto the lower mid-section of the body, curving them slightly upward as if the mouse is holding its belly. -
Create Little Feet:
Roll two small balls for feet. Place the body on top of these balls near the front bottom edge and press down gently so the mouse looks like it’s sitting comfortably. This helps stabilize the figure too. -
Smooth Everything Out:
Check the entire surface for fingerprints. Dip your finger in a tiny bit of water (or baby oil if using polymer clay) and lightly rub over the clay to smooth out any unwanted texture.
Texture Twist
Before baking, gently roll a clean toothbrush over the clay surface. This creates a subtle pitted texture that mimics real stone or unglazed pottery.
Step 3: Baking and Assembly
-
Bake the Clay:
Place your mouse on a baking sheet lined with parchment paper. Bake according to the manufacturer’s instructions on your specific package of clay (usually around 275°F or 135°C for 15-30 minutes). -
Cool Down:
Let the figurine cool completely inside the oven with the door open. This prevents thermal shock and cracking. -
Paint the Face:
Using a fine paintbrush or a toothpick dipped in black acrylic paint, dot two small eyes wide apart on the face. Add a slightly larger dot for the nose centered below them, and paint three tiny whiskers on each cheek. -
Secure the Wire:
Put a dab of superglue on the bottom inch of your wire tail and insert it back into the pre-made hole on top of the head. -
Prepare the Base:
While the glue sets, you can paint your wooden disc if desired, though a raw wood look complements the natural clay well. I like using a bit of watered-down white paint for a whitewashed effect. -
Final Assembly:
Apply a strong adhesive to the bottom of the mouse and press it firmly onto the center of the wooden disc. Let it dry completely before sliding your first photo into the spiral clip.
Now your little desk buddy is ready to hold your most precious memories or urgent reminders
Pencil Cup With a Hugging Character
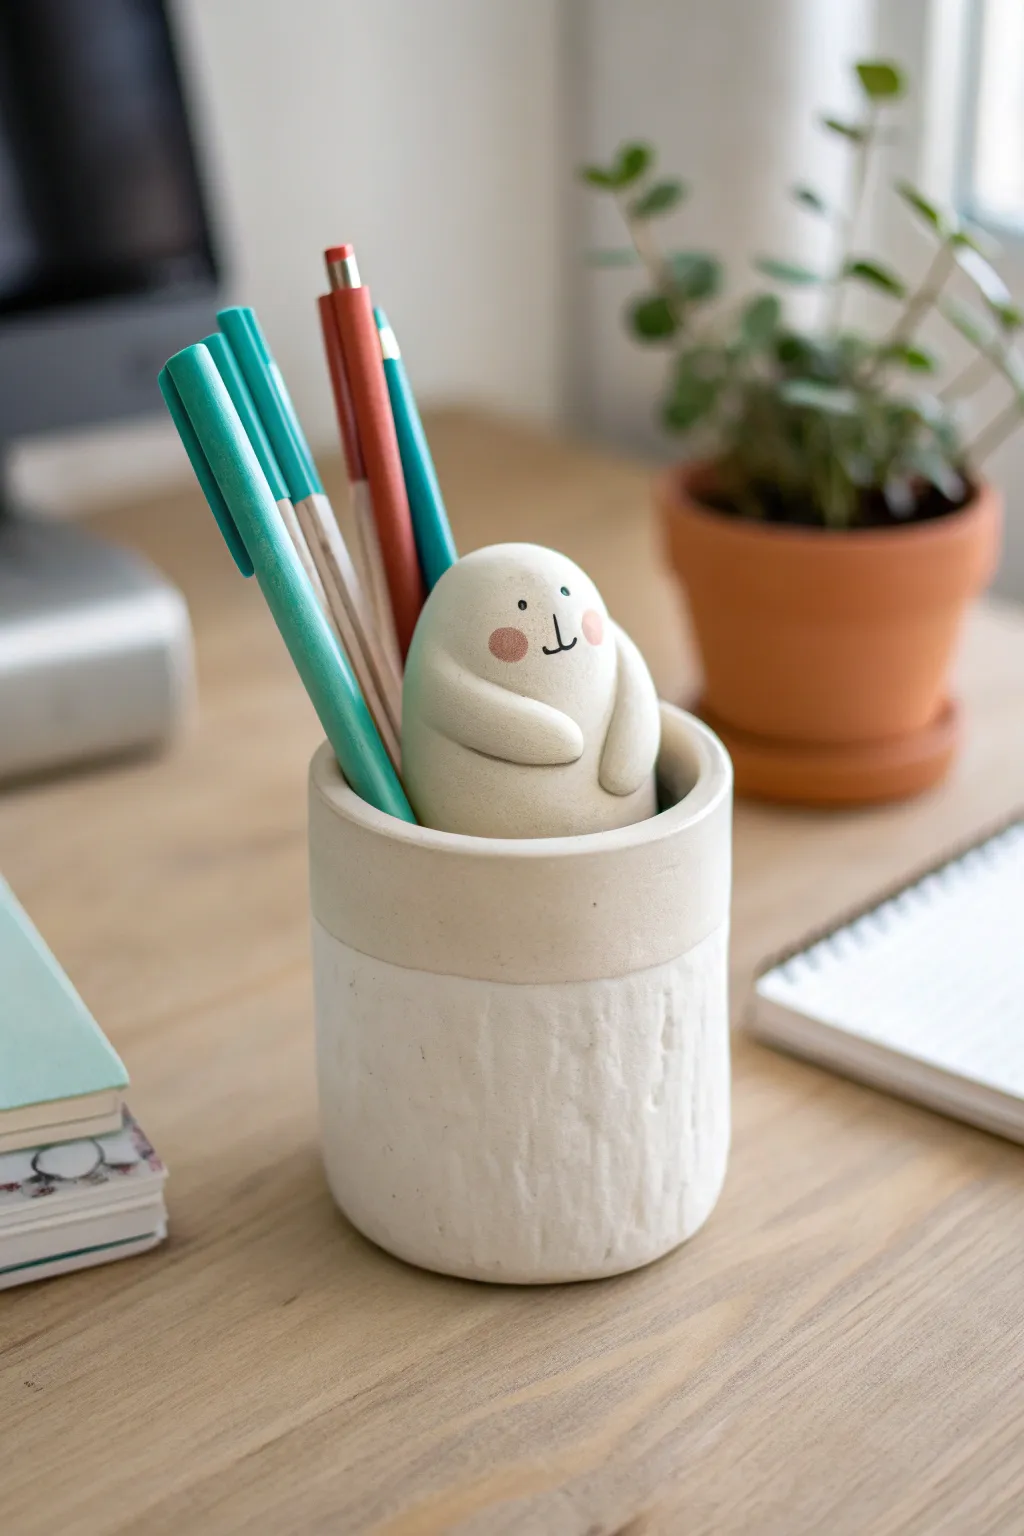
Brighten up your desk with this adorable pencil holder featuring a sweet, hugging creature perched on the rim. The contrast between the textured base and the smooth, creamy top gives it a modern ceramic look that’s surprisingly easy to achieve with modeling clay.
How-To Guide
Materials
- White air-dry clay or polymer clay
- Rolling pin
- Craft knife
- Empty can or glass jar (as a mold)
- Parchment paper
- Texturing tool (old toothbrush or stiff bristle brush)
- Water and a small sponge (for smoothing)
- Slip (clay mixed with water)
- Black fine-point marker or acrylic paint
- Pink acrylic paint or blush
- Clear matte varnish
Step 1: Creating the Base Cylinder
-
Prepare your mold:
Wrap your chosen mold (can or jar) in parchment paper so the clay won’t stick to it later. -
Roll out the slab:
Roll your clay into a long, rectangular slab about 1/4 inch thick. It needs to be long enough to wrap fully around your mold. -
Add texture:
Before cutting the slab to size, dampen the bottom two-thirds of the clay slightly. Use a stiff bristle brush or a dedicated texturing tool to tap and drag vertically, creating a rough, bark-like finish. -
Cut to size:
Trim your textured slab into a clean rectangle. The height should be the desired height of your cup, and the length should equal the circumference of your mold plus a tiny bit for overlap. -
Form the cylinder:
Carefully wrap the slab around your parchment-covered mold. I find it helpful to score the overlapping edges with a knife, add a dab of water or slip, and press them firmly together to join. -
Smooth the seam:
Blend the vertical seam with a damp finger or clay tool until invisible. Be careful not to smudge your beautiful texture on the bottom half. -
Add the base:
Roll a circle of clay for the bottom, slightly larger than the cylinder. Score and slip the bottom edge of your cylinder, place it on the circle, and trim away the excess clay.
Step 2: Sculpting the Hugging Friend
-
Shape the body:
Roll a smooth, egg-shaped ball of clay for the character’s body. It should be substantial enough to peek over the rim but not so heavy it tips the cup. -
Create the notch:
To make it look like the creature is inside the cup, cut a notch or flatten the bottom front of the egg shape where it will press against the inside of the rim. -
Attach the body:
Score the inside rim of your cup and the contact point on the creature. Apply slip and press the body firmly onto the rim, blending the clay at the back for a strong bond. -
Make the arms:
Roll two small sausage shapes for the arms. Flatten one end of each slightly. -
Attach the arms:
Attach the arms to the sides of the creature’s body, curving them forward so they rest over the rim of the cup. This creates the ‘hugging’ effect and helps secure the figure. -
Final smoothing:
Use a damp sponge to smooth out any fingerprints on the plain upper band of the cup and the character’s body. The contrast between this smoothness and the textured base is key.
Slumping Clay?
If the character is too heavy and drags the rim down while wet, prop it up with a folded piece of cardboard or a sponge until the clay stiffens enough to support itself.
Step 3: Finishing Touches
-
Let it dry:
Allow the project to dry completely. For air-dry clay, this usually takes 24-48 hours. Keep it on the mold for the first few hours to hold its shape, then carefully remove the mold. -
Draw the face:
Once bone dry, use a fine-point black marker or a tiny paintbrush to add two small dots for eyes and a simple anchor shape for the nose and mouth. -
Add rosy cheeks:
Dilute a tiny drop of pink paint or use actual makeup blush to dab on soft, rosy cheeks. -
Seal the piece:
Apply a coat of clear matte varnish to protect your work, especially if you plan to use it for pens that might mark the clay.
Make it a Bear
Add two tiny semi-circles of clay to the top of the creature’s head before drying to turn this generic blob creature into a cute polar bear.
Now you have a charming new desk companion ready to keep your supplies organized

TRACK YOUR CERAMIC JOURNEY
Capture glaze tests, firing details, and creative progress—all in one simple printable. Make your projects easier to repeat and improve.
Animal Toothbrush Holder
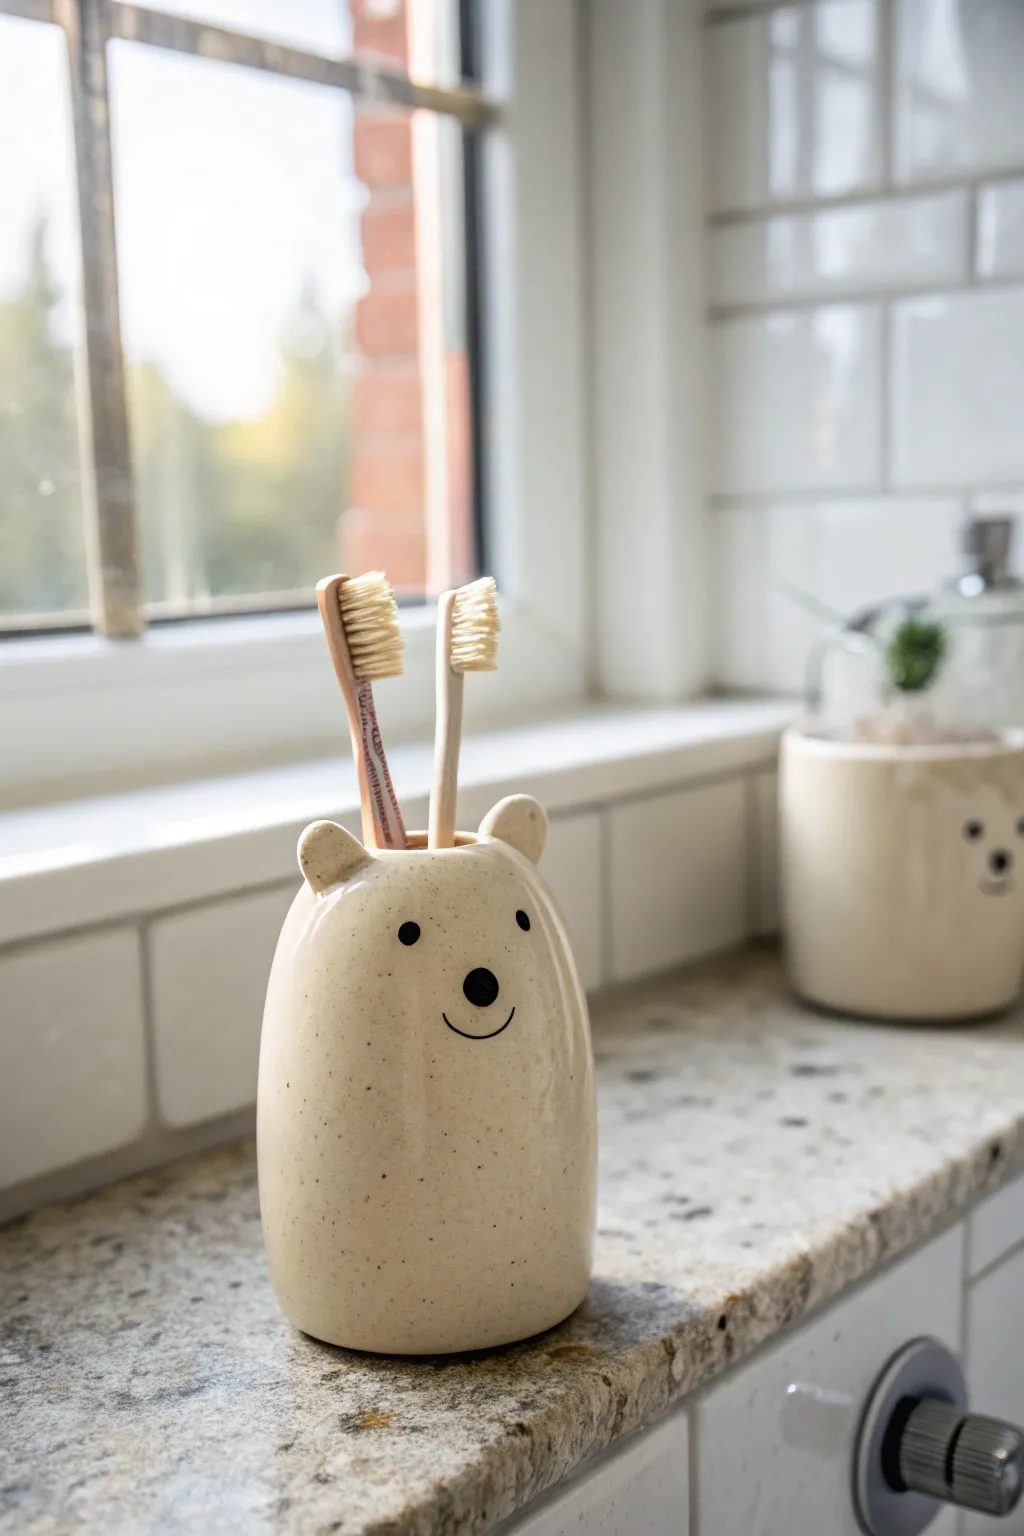
Bring a touch of whimsical charm to your bathroom sink with this adorable bear-shaped toothbrush holder. With its speckled cream finish and minimalist face, this project combines functional storage with sweet, modern design.
Step-by-Step
Materials
- White or cream air-dry clay (or polymer clay)
- Acrylic rolling pin
- Modeling tools (or a butter knife and toothpick)
- Water in a small cup
- Fine-grit sandpaper
- Acrylic paints (black and beige/tan)
- Stiff bristle toothbrush (for texturing)
- Waterproof varnish or sealant (essential for bathroom use)
- Paintbrushes (fine detail and medium flat)
Step 1: Shaping the Body
-
Condition the clay:
Start by taking a large handful of clay and kneading it thoroughly until it is soft, warm, and pliable. This prevents cracks later on. -
Form the base cylinder:
Roll the clay into a smooth ball, then gently shape it into a thick, tall cylinder. It needs to be stable enough to stand on its own. -
Refine the shape:
Tap the bottom against your work surface to create a flat base. Gently smooth the sides upwards so it tapers slightly toward the top, creating a soft dome shape for the head. -
Create the holes:
Use the handle of a paintbrush or a large dowel to press two deep vertical holes into the top of the head. Make them wide enough to fit toothbrush handles loosely. -
Add the ears:
Roll two small balls of clay for the ears. Press your thumb into the center of each to create concave shapes, then attach them to the ‘head’ area. -
Blend the seams:
I always take extra time here to dip a finger in water and smooth the clay where the ears meet the body until the seam completely disappears.
Uneven Base?
If your bear wobbles, gently sand the bottom in a circular motion on a flat piece of sandpaper until it sits perfectly flush.
Step 2: Texturing and Drying
-
Smooth the surface:
Go over the entire piece with a little water on your finger to remove any fingerprints or bumps. -
Create the speckled texture:
Dip an old toothbrush into watered-down tan or brown acrylic paint. While the clay is still damp (or dry, depending on your preference), flick the bristles to splatter tiny specks all over the bear’s body. -
Let it dry completely:
Allow the sculpture to dry for at least 24-48 hours. Turn it occasionally so the bottom dries evenly. If using polymer clay, bake according to the package instructions now. -
Sand imperfections:
Once fully cured, use fine-grit sandpaper to gently smooth out any rough patches, especially around the rim of the toothbrush holes.
Step 3: Painting and Sealing
-
Paint the base color:
If your clay isn’t the desired cream color, apply two coats of cream acrylic paint, letting it dry between layers. -
Draw the face features:
Using a very fine detail brush and black acrylic paint, create two small solid circles for eyes. -
Add the nose:
Paint a slightly larger oval for the nose, positioned centrally below the eyes. -
Create the smile:
Carefully paint a thin, curved line extending downward from the nose to form the mouth smile. -
Apply the first coat of varnish:
This is crucial for water resistance. Apply a layer of waterproof sealant over the entire piece, including inside the holes. -
Seal fully:
Once the first coat is dry, apply two more coats of varnish to ensure the clay is completely protected from bathroom humidity.
Make it a Family
Create different sized bears for each family member, or vary the ear shapes to make a cat or bunny version.
Place your new bear on the counter and enjoy a cheerful start to your morning brushing routine
Mini Magnet Bud Vases
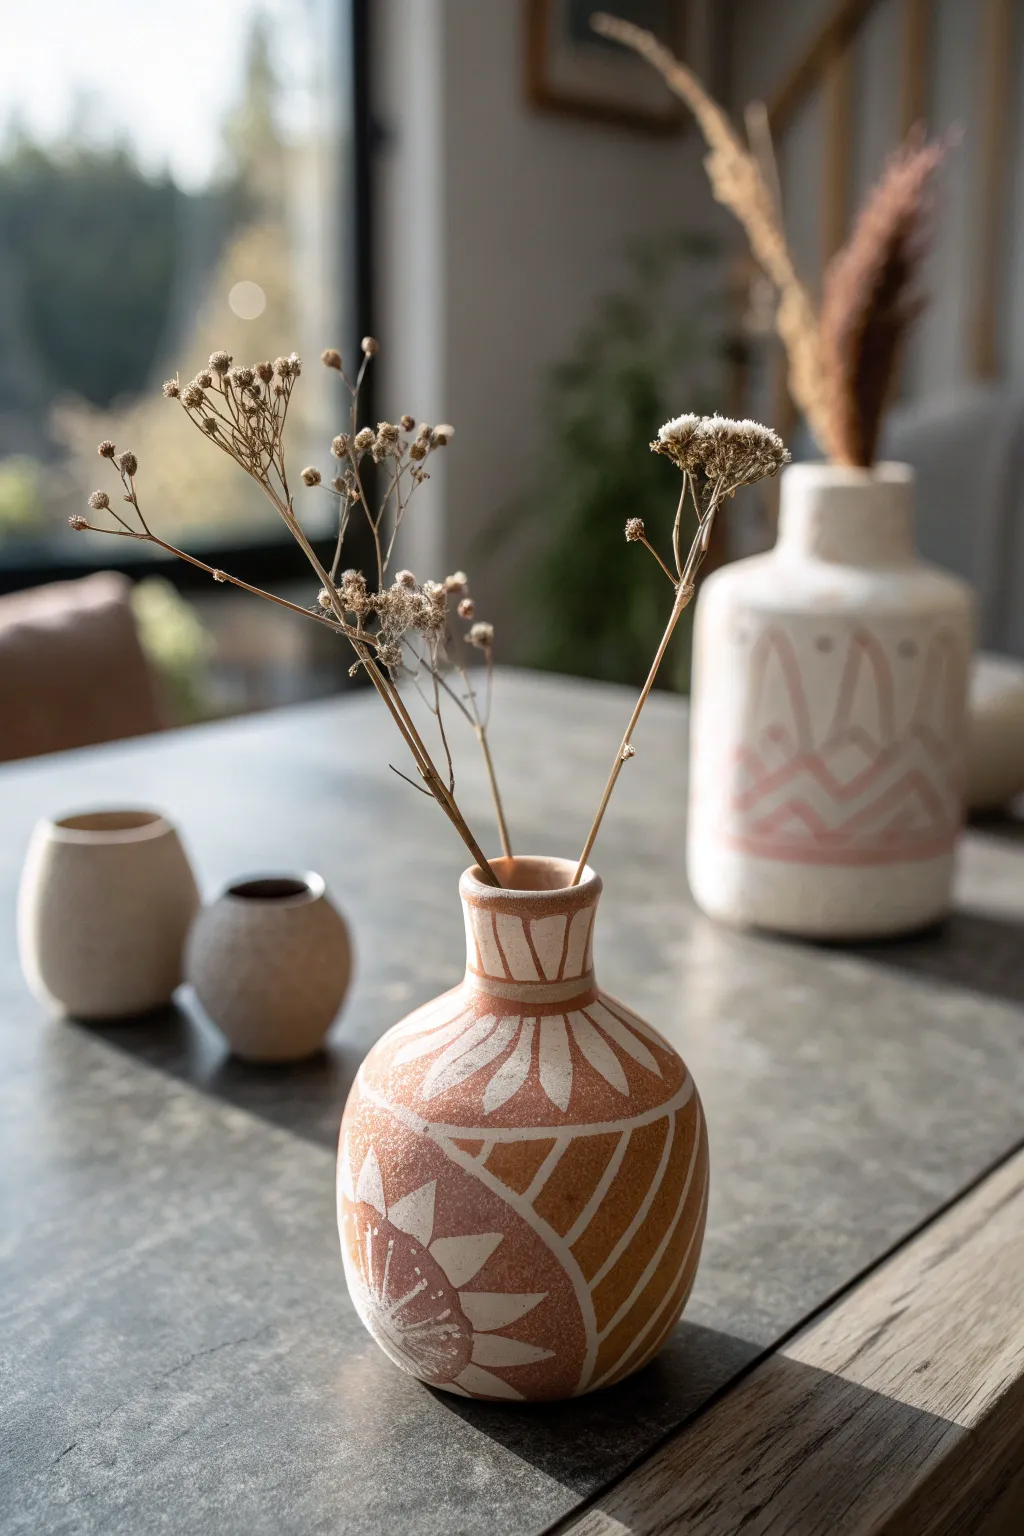
Capture the earthy elegance of traditional pottery without a kiln using this clever modeling clay technique. This mini vase features a warm terracotta base overlaid with intricate white geometric carvings for a sophisticated, bohemian look.
Step-by-Step Guide
Materials
- Terracotta-colored air-dry clay (or white clay + terracotta acrylic paint)
- Small glass bottle or jar (as an armature)
- White acrylic paint or white clay slip
- Fine-point carving tool or needle tool
- Rolling pin
- Small sponge
- Water bowl
- Matte varnish or sealant
- Fine grit sandpaper
- Strong craft magnets (optional, for fridge mounting)
Step 1: Forming the Base
-
Prepare the Armature:
Clean and dry your small glass bottle thoroughly. This will serve as the internal structure, ensuring your vase is waterproof and holds its shape. -
Roll the Clay:
Take a generous amount of terracotta-colored air-dry clay and condition it until pliable. Roll it out into a slab approximately 1/4 inch thick. -
Wrap the Bottle:
Carefully drape the clay slab over your glass bottle. Trim away the excess clay at the bottom and seam, pressing the edges together firmly to seal the glass inside. -
Shape the Neck:
Gently gently mold the clay up towards the neck of the bottle. Create a slightly flared rim at the top to mimic a traditional pottery opening. -
Smooth the Surface:
Dip your finger in a little water and run it over the entire surface to erase any fingerprints or seam lines. The goal is a uniform, smooth rounded shape.
Step 2: Creating the Design
-
Initial Drying:
Let the clay vase sit for about 30-60 minutes. It should be firm to the touch but still slightly workable—what potters call ‘leather hard.’ -
Apply White Contrast:
Paint a somewhat thick layer of white acrylic paint (or white clay slip if you are advanced) over the areas where you plan to carve. Let this surface layer dry completely while keeping the clay underneath slightly damp. -
Draft the Pattern:
Lightly scratch your geometric design into the surface with a pencil. Aim for a mix of vertical lines on the neck, leaf-like rays on the body, and angled hatching on the sides. -
Carve the Sunburst:
Using your carving tool, gently scrape away the terracotta clay *around* your white painted shapes, or conversely, carve through a white layer to reveal terracotta. For the look in the image, I find it easiest to paint the white, then scrape clean lines through it to reveal the terracotta base color. -
Detailing the Neck:
Carve vertical, slightly angled lines around the neck of the vase, creating a collar effect. -
Refining the Lines:
Go back over your carved grooves. Use a slightly damp brush to clean up any jagged clay crumbs from the carving process.
Cracking Clay?
If small cracks appear while drying, mix a tiny bit of fresh clay with water to make a paste and fill them in gently.
Step 3: Finishing Touches
-
Full Cure:
Allow the vase to dry completely. This usually takes 24 to 48 hours depending on humidity and clay thickness. -
Sand for Texture:
Once bone dry, take fine-grit sandpaper and lightly distress the surface. This softens the paint lines and gives it that aged, weathered ceramic feel. -
Seal the piece:
Apply a coat of matte varnish to protect the clay and paint. Avoid glossy finishes if you want to maintain the natural, earthen aesthetic. -
Magnetize (Optional):
If turning this into a fridge magnet, glue a strong neodymium magnet to the flattest side of the vase using industrial-strength adhesive. -
Add Florals:
Arrange dried baby’s breath or small dried twigs inside your new vessel.
Add Dimension
Mix baking soda into your white paint before applying. This creates a gritty, stone-like texture that looks amazing.
Now you have a stunning, faux-ceramic bud vase ready to bring a touch of nature indoors
Smiley Fridge Magnets
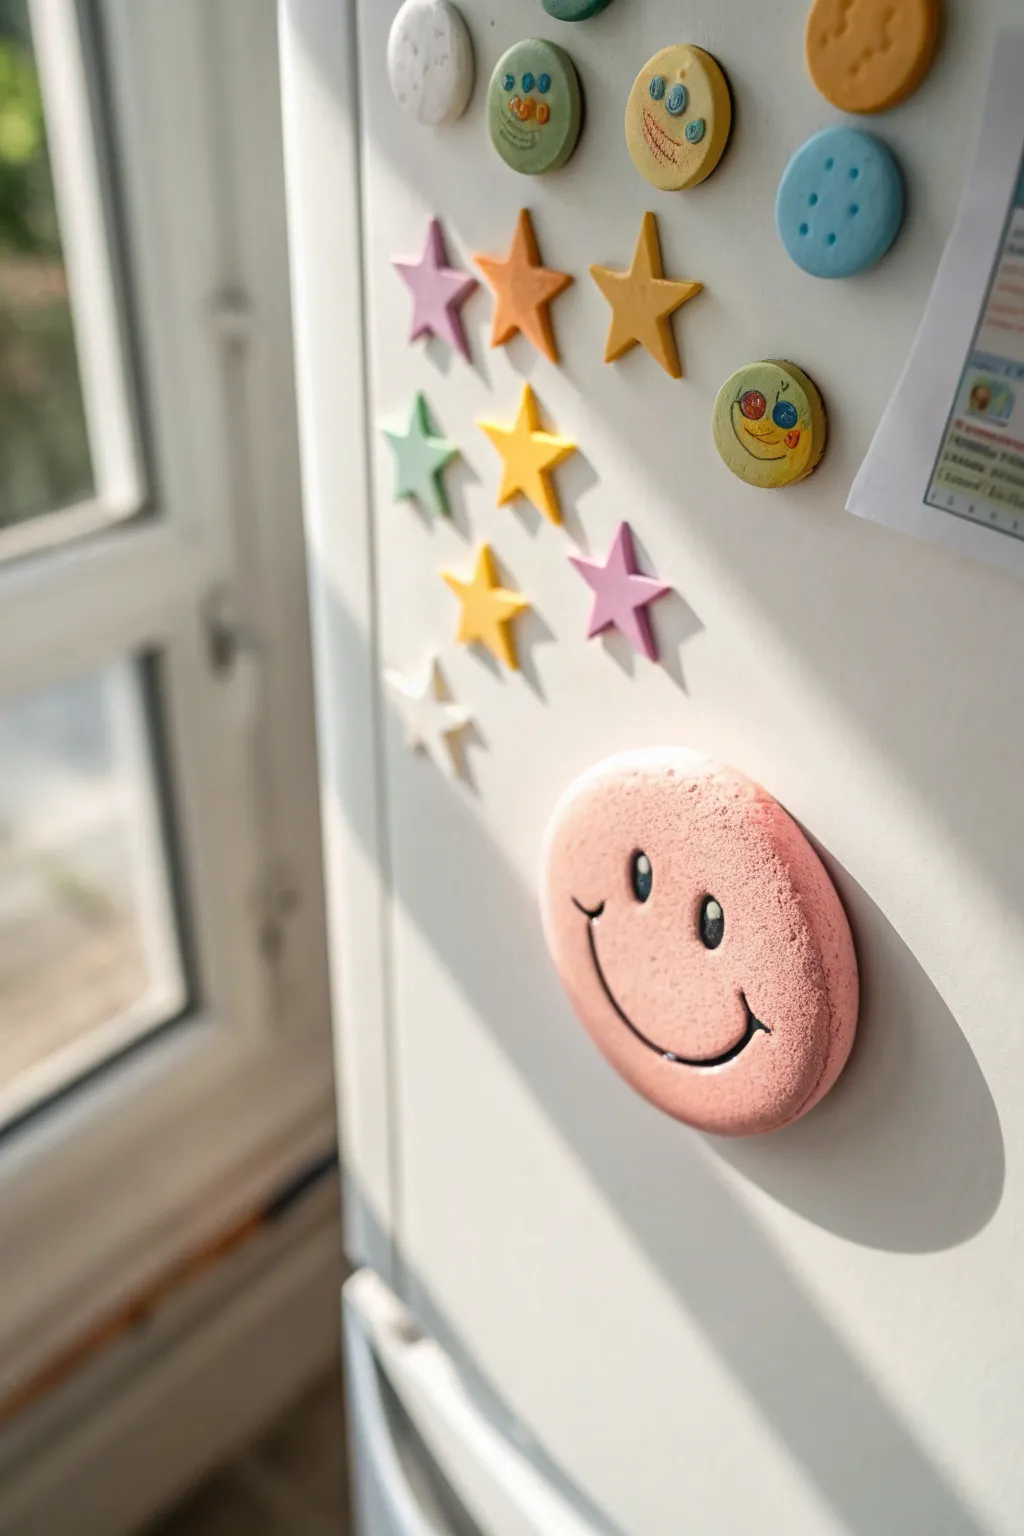
Brighten up your kitchen with these charming, textured clay magnets that add a dose of personality to any appliance. The star of the show is a large, porous pink smiley face, accompanied by a constellation of pastel stars and quirky mini-characters.
Step-by-Step Tutorial
Materials
- Air-dry clay or polymer clay (white)
- Acrylic paints (pastel pink, yellow, orange, blue, green)
- Texturing tools (toothbrush, sandpaper, old sponge)
- Basic sculpting tools (knife, rolling pin)
- Circle cookie cutters (various sizes)
- Star cookie cutters (small)
- Strong craft magnets
- Strong craft glue (E6000 or super glue)
- Black fine-point marker or black acrylic paint
- Matte varnish (optional)
Step 1: Sculpting the Shapes
-
Condition the Clay:
Begin by kneading your white clay until it is soft, pliable, and free of cracks. If using polymer clay, warm it up in your hands first. -
Roll out the Slab:
Use a rolling pin to flatten the clay into a sheet about 1/4 inch thick. You want it substantial enough to hold a magnet but not too heavy. -
Cut the Main Circle:
Start with the main attraction. Use your largest circle cutter (or a drinking glass) to punch out a large circle for the big pink face. -
Texture the Surface:
This is crucial for that specific look in the photo. Gently press a coarse sponge, a ball of foil, or an old clean toothbrush over the entire surface of the large circle to create a pitted, porous texture. -
Create the Star Constellation:
Roll out more clay, perhaps slightly thinner this time. Cut out several stars using a small star-shaped cutter. -
Make Mini Faces:
Cut out smaller circles for the secondary characters shown in the image. You can keep these smooth or texture them lightly. -
Add Facial Features:
For the mini faces, you can add 3D details now. Roll tiny balls of clay for eyes and press them onto the circles. Use a tool to carve small smiles. -
Drying or Baking:
If using air-dry clay, let the pieces sit for 24-48 hours until fully hard. If using polymer clay, bake according to the package instructions and let cool completely.
Sponge Tactics
For the best texture on the pink face, use a natural sea sponge. If you only have synthetic sponges, tear pieces off to create a rougher, uneven stamping surface.
Step 2: Painting and Finishing
-
Base Coat the Big Face:
Mix a soft, fleshy pink color. Paint the large textured circle entirely, ensuring the paint gets into all those little aesthetic pits and textured spots. -
Paint the Stars:
Select a palette of pastel yellow, lilac, orange, and pink. Paint each star a solid, flat color. I find two thin coats cover better than one thick one. -
Paint the Mini Faces:
Paint the smaller circles in contrasting colors like mustard yellow, sage green, or bright blue. -
Draw the Big Smile:
Once the pink base is bone dry, use a fine brush with black paint or a Posca marker to draw the wide, U-shaped smile and two oval eyes on the large face. -
Detail the Mini Faces:
Add quirky details to the smaller circles. Use markers or fine brushes to draw stitches, goofy grins, or dilated pupils on the raised 3D eyes you sculpted earlier. -
Seal the Work:
To protect the paint from kitchen grease or fading, coat everything with a layer of matte varnish. Avoid glossy finishes to keep that natural, stone-like look. -
Attach the Magnets:
Flip all your dried pieces over. Apply a clear, strong adhesive to the back. -
Final Press:
Press a magnet firmly into the glue on each piece. Let the glue cure completely (usually 24 hours) before testing them on the fridge.
Button Look
Recreate the blue magnet by using a toothpick to poke four symmetrical holes in a clay circle before drying, making it look like a giant sewing button.
Now your fridge is ready to greet you with a smile every time you reach for a snack
Sea Creature Keychain Charms
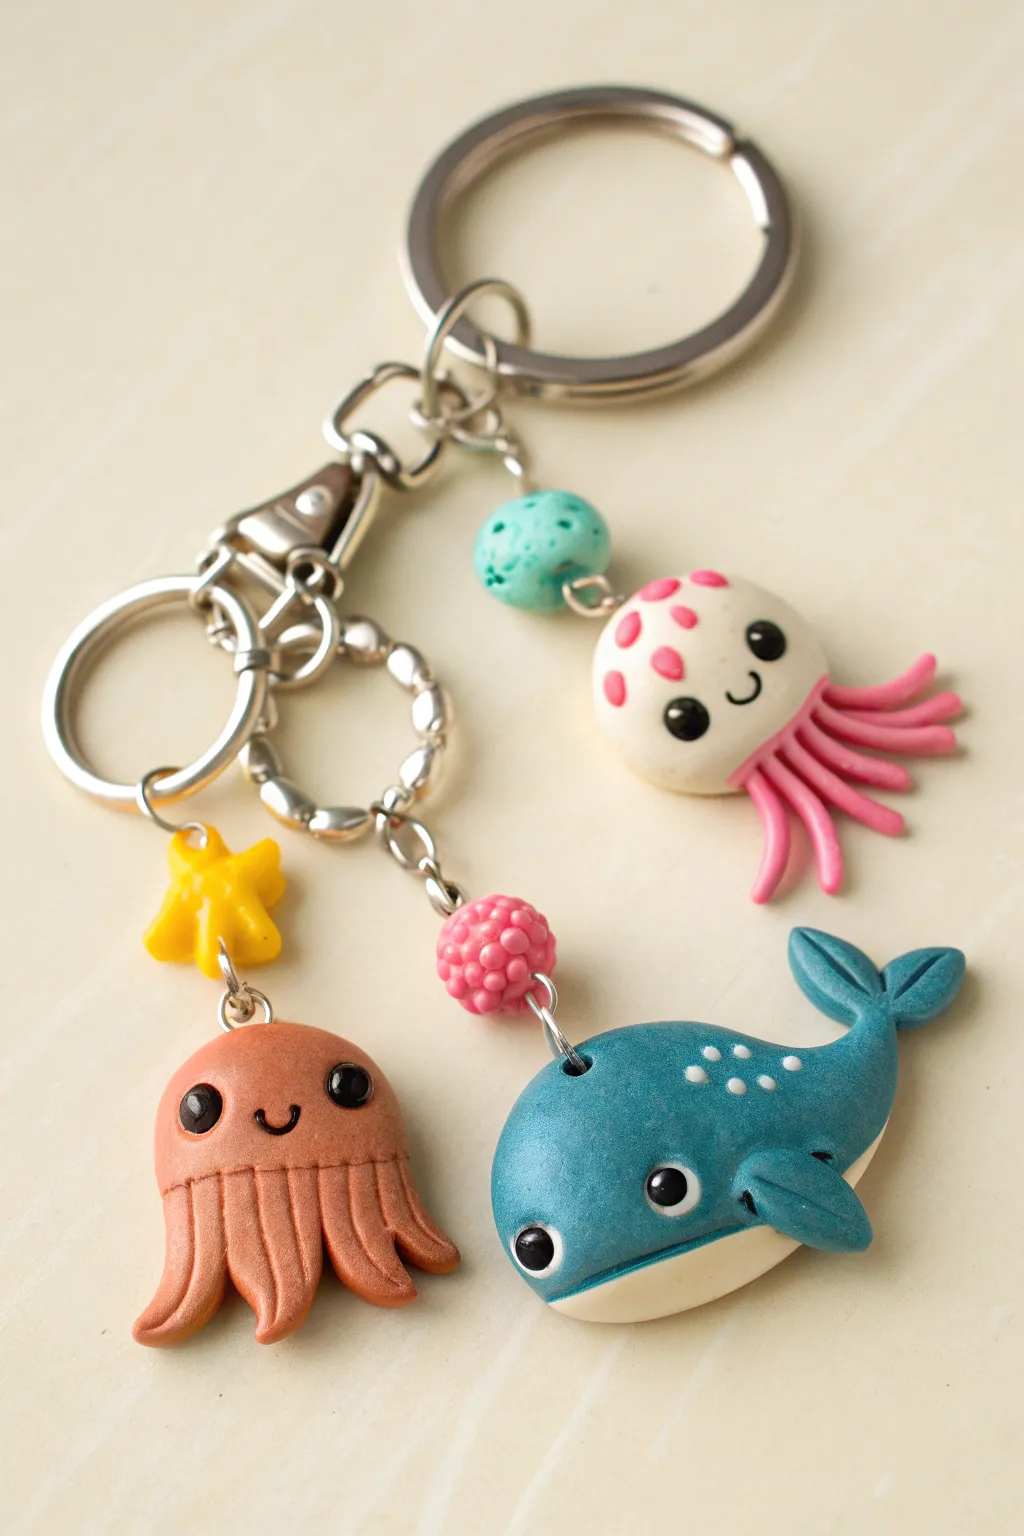
Bring the wonders of the deep sea to your keys with these adorable polymer clay charms. This project features a cheerful blue whale, a quirky orange octopus, and a sweet spotted jellyfish, all dangling together for a fun nautical accessory.
Detailed Instructions
Materials
- Polymer clay (Teal blue, white, bright orange, pastel pink, and bright yellow)
- Black glass bead eyes (very small) or black clay
- Headpins and eye pins (silver tone)
- Jump rings (4mm and 6mm)
- Keychain ring with clasp assembly and chain extender
- Textured beads (teal porous bead, pink berry bead)
- Clay sculpting tools (needle tool, ball tool)
- X-acto knife or clay blade
- Needle nose pliers and wire cutters
- Gloss glaze (optional)
Step 1: Sculpting the Blue Whale
-
Form the body:
Start with a ball of teal blue clay about the size of a large grape. Pinch one side and gently elongation it to taper into a tail shape, keeping the body rounded and plump. -
Add the belly:
Roll a thin sheet of white clay. Cut an oval shape slightly smaller than the bottom of your teal body and press it underneath to create the whale’s belly. Smooth the seams gently with your finger. -
Create the tail flukes:
Fashion two small teardrops from teal clay. Flatten them slightly and attach them to the tapered end of the body, curving them upward to look like a swimming tail. -
Attach fins:
Make two smaller flattened teardrops for the side fins. Press one onto each side of the body, angling them backwards. -
Face details:
Use a small ball tool to make indentations for the eyes. Insert small black glass beads or tiny balls of black clay. Use a needle tool to slice a horizontal smile right where the teal meets the white belly. -
Add spots:
Roll tiny specks of white clay into balls and press three onto the top of the head for blowhole details or decoration. -
Insert hardware:
Carefully insert an eye pin into the top center of the whale’s back. Smooth the clay around the metal to secure it.
Secure That Pin!
For extra durability, bend the end of your eye pin into a zigzag or ‘L’ shape before inserting it into the raw clay. This acts as an anchor so it won’t pull out after baking.
Step 2: Crafting the Jellyfish & Octopus
-
Pink Jellyfish Head:
Roll a sphere of white clay. Flatten the bottom slightly to create a dome shape for the jellyfish cap. -
Jellyfish Tentacles:
Roll out several thin snakes of bright pink clay. Cut them into equal lengths (about 1cm) and attach them individually to the flat bottom of the white dome. -
Jellyfish Decoration:
Add small, flat discs of pink clay to the top of the dome for spots. Add the eye beads and use a needle tool to press in a small, curved smile. -
Orange Octopus Body:
Form a dome shape using orange clay, similar to the jellyfish but slightly taller. Flatten the bottom edge with your finger. -
Octopus Legs:
Instead of individual snakes, use a knife to slice vertical cuts into the bottom half of the dome to create thick tentacles. Gently separate them and curl the tips upward. -
Texturing:
Use a needle tool to press vertical lines into the top of the orange tentacles for texture. Add eyes and a smile to the smooth upper face area. -
Star Charm:
Mold a very small yellow star shape. Poke a hole through the top point using a needle tool so it can be hung later. -
Baking:
Insert eye pins into the top of the jellyfish and octopus. Bake all clay pieces according to your package instructions (usually 275°F for 15-30 minutes).
Step 3: Assembly & Finishing
-
Prepare the accents:
Take your textured teal bead and pink berry bead. Thread each onto a headpin. Use wire cutters to trim the excess wire to about 1cm, then use round nose pliers to curl the end into a loop. -
Connect the Whale:
Attach the pink berry bead connector to the whale’s eye pin using a jump ring. Then, connect the top of the berry bead to the main keychain loop. -
Connect the Jellyfish:
Attach the teal textured bead to the top of the white jellyfish charm using a jump ring. Connect this assembly to a different link on the keychain. -
Connect the Octopus:
Use jump rings to attach the yellow star charm and the orange octopus to the decorative chain extender on the keychain. -
Final touches:
Check all jump rings to ensure they are fully closed. I like to add a coat of gloss glaze to the eyes to make them shine before calling it done.
Fingerprint Fixer
If you see fingerprints on your smooth whale or jellyfish heads before baking, lightly brush them with a little baby oil or cornstarch to smooth the surface perfectly.
Now you have a charming set of sea creatures ready to accompany you on your daily adventures
Chunky Bead Bracelets
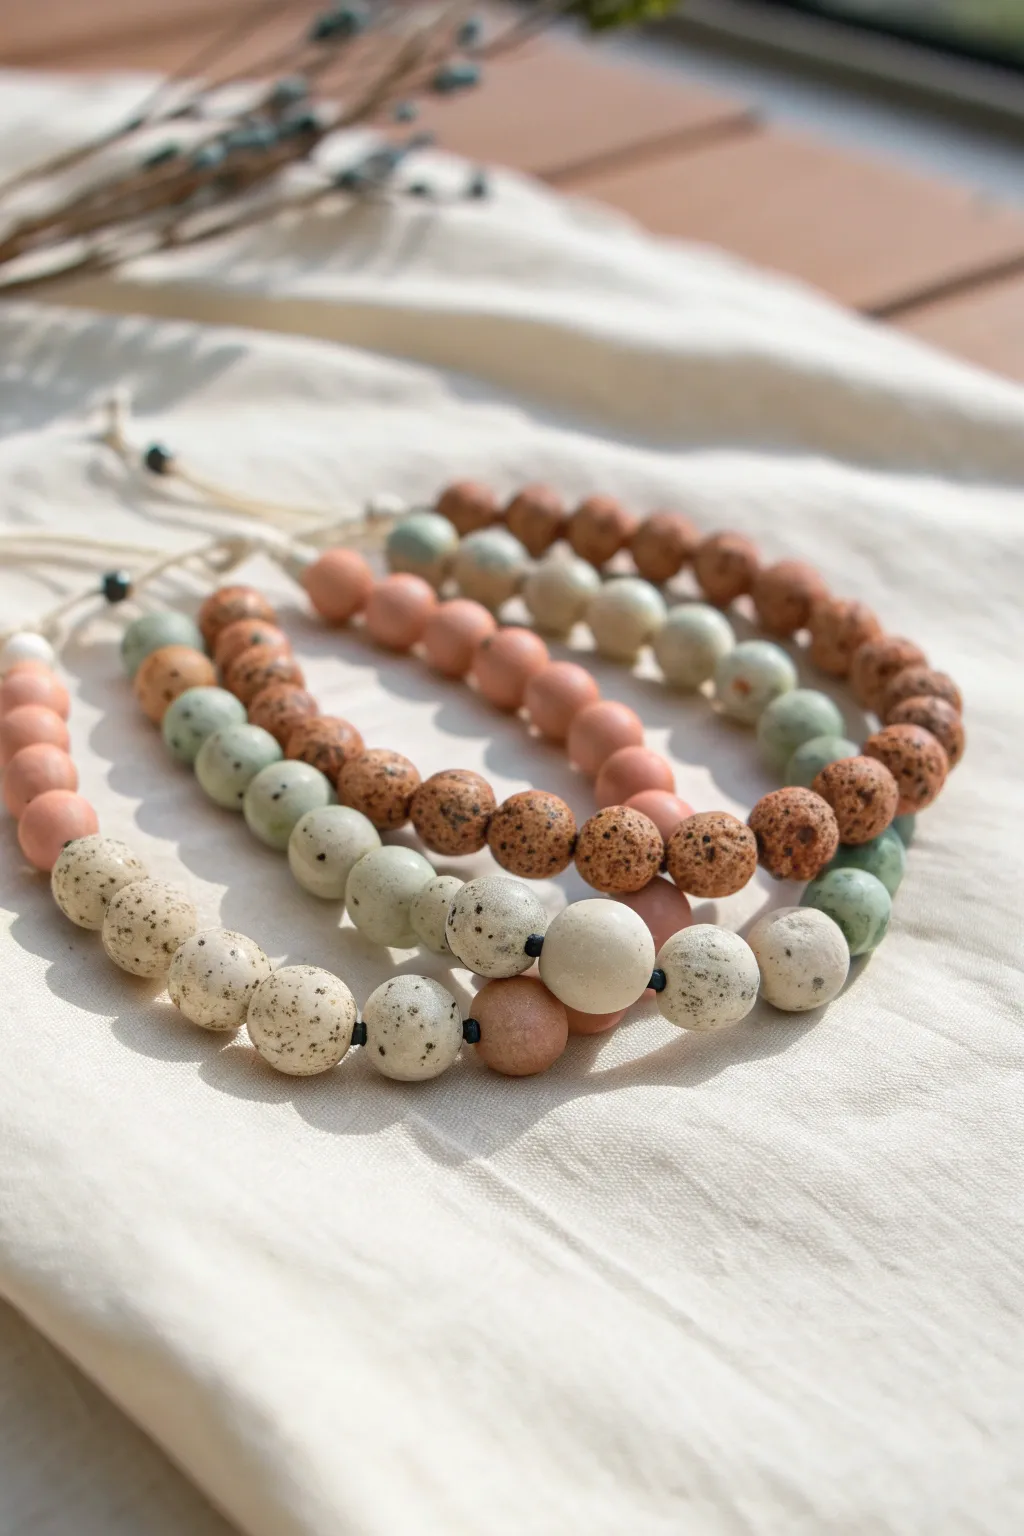
These stylish, chunky bracelets mimic the look of natural pottery and stone using simple modeling clay techniques. With their organic speckles and muted palette of sage, terracotta, and cream, they make perfect bohemian accessories.
Step-by-Step
Materials
- Polymer clay (colors: white, translucent, terracotta/light brick, sage green, black)
- Black pepper or dried coffee grounds (for speckling)
- Acrylic roller or pasta machine
- Circle cutters (small, approx. 1/2 inch) or a bead roller
- Toothpick or bead piercing pin
- Medium grit sandpaper (optional)
- Elastic cord or waxed cotton cord
- Jewelry glue (optional)
Step 1: Mixing the Clay Body
-
Create the Base Colors:
Start by conditioning your white, terracotta, and sage green clays separately until they are soft and pliable. -
Soften the Palette:
If your colors are too vibrant, mix in a small amount of white or beige clay to achieve the muted, earthy tones seen in the photo. -
Prepare the Speckle Mix:
To create the ‘stone’ effect, take a small pinch of black clay and chop it into microscopic crumbs using a craft blade. Alternatively, get ready your black pepper. -
Incorporate Texture:
Flatten your conditioned clay patties. Sprinkle the chopped black clay bits or black pepper onto each color. -
Blend the Inclusions:
Fold the clay over the speckles and roll it through your pasta machine or with a hand roller. Repeat the folding and rolling process until the specks are evenly distributed but visible. -
Add Translucency (Optional):
For a more realistic stone look, I sometimes mix in about 20% translucent clay to the white and green batches to give them depth.
Use Cornstarch
Lightly dust your hands with cornstarch before rolling. This prevents fingerprints and keeps the clay from getting sticky.
Step 2: Forming the Beads
-
Measure Uniform Portions:
Roll your mixed clays into thick logs of equal diameter. Slice the logs into even segments to ensure your beads will be roughly the same size. -
Roll Spheres:
Take each segment and roll it between your palms to create a smooth ball. Don’t worry if they aren’t mechanically perfect; a little irregularity adds to the handmade charm. -
Texture the Surface:
For the terracotta-colored beads that look like lava stone, gently tap the surface with a stiff toothbrush or a ball of aluminum foil to add subtle pitting. -
Pierce the Holes:
While holding the bead gently (to avoid flattening it), push a toothpick or bead pin through the center. twist the pin as you go to create a clean hole. -
Refine the Holes:
It helps to poke the hole from one side, stop halfway, and then poke through from the other side to prevent the clay from blowing out the back.
Step 3: Baking and Assembly
-
Arrange for Baking:
Place your beads on a ceramic tile or a baking sheet lined with parchment paper. If possible, string them on a wire engaged in an accordion-folded foil rack to keep them round. -
Bake the Clay:
Bake according to your clay manufacturer’s instructions (usually 275°F/135°C for 15-30 minutes). Let them cool completely before handling. -
Sand for Matte Finish:
Since we want a natural pottery look, avoid glazing. Instead, lightly sand the cured beads under running water to remove fingerprints and create a soft, matte texture. -
Plan Your Pattern:
Layout the beads on a bead board or towel. Try color-blocking like the photo (all sage, all cream) or mix them for a confetti look. -
String the Bracelet:
Thread your elastic or waxed cord through the beads, checking the fit around your wrist as you go. -
Secure the Knot:
Tie a sturdy surgeon’s knot. If using elastic, stretch the cord slightly before tying. Add a tiny drop of jewelry glue to the knot and tuck it inside a bead hole to hide it.
Aromatic Additions
Add a drop of essential oil to the porous ‘lava’ style beads after baking to turn your bracelet into a personalized diffuser.
Enjoy wearing your stack of earthy, handmade bracelets or gift a set to a friend
Bold Shape Statement Earrings
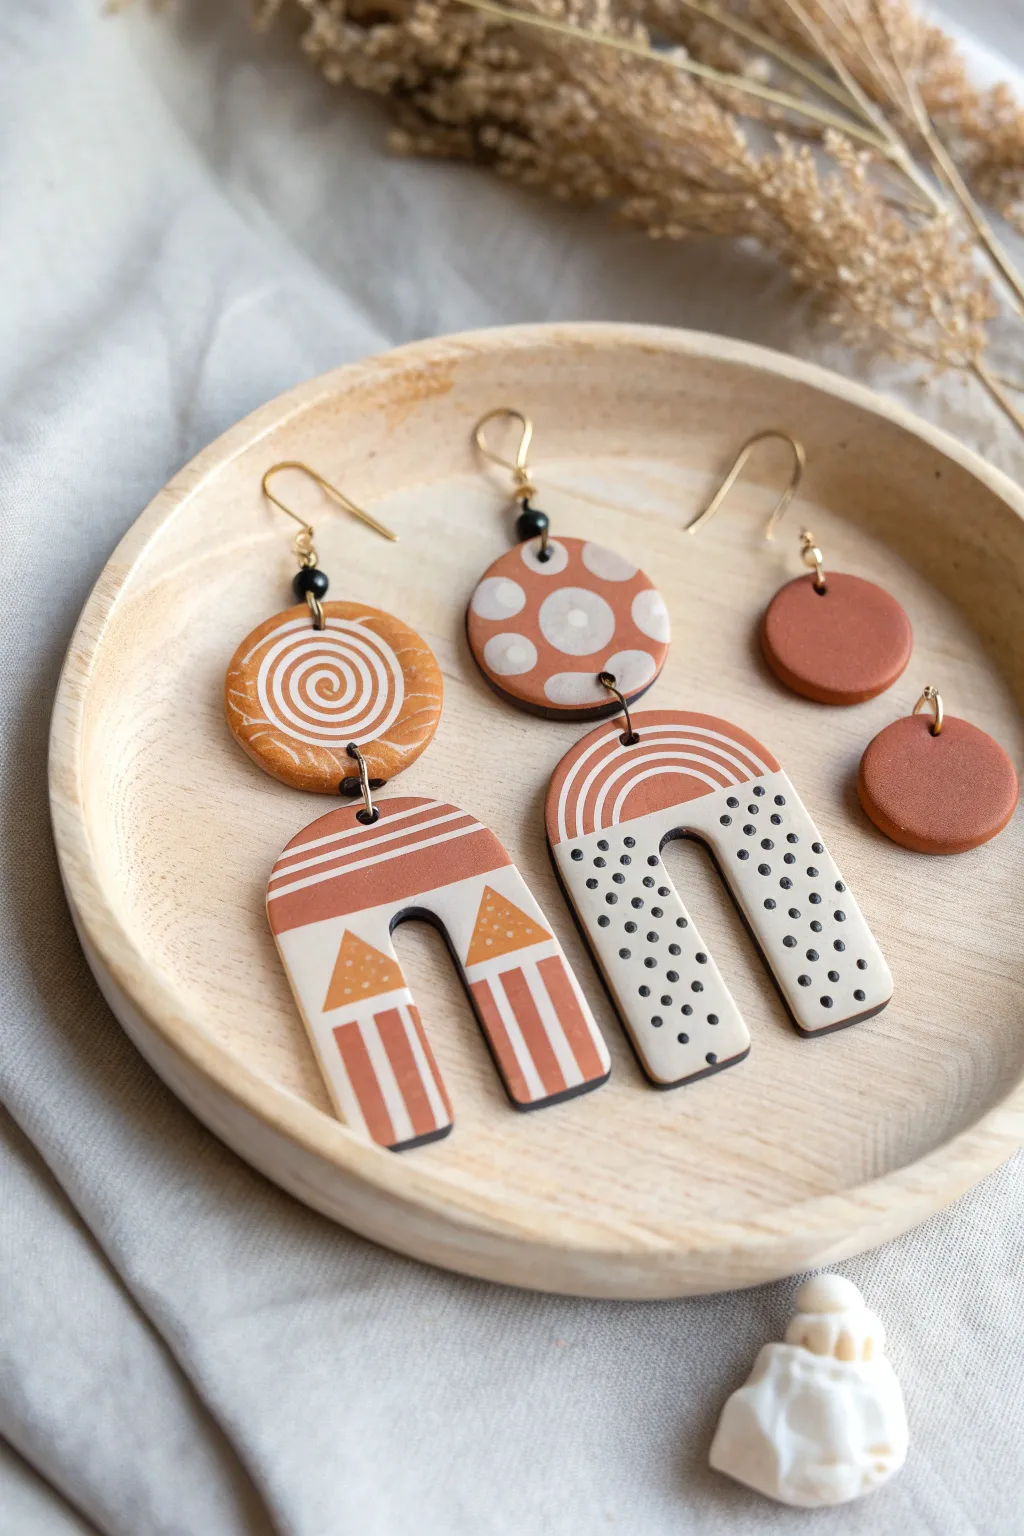
These striking polymer clay earrings combine earthy terracotta tones with bold geometric patterns and architectural arch shapes. The set features a mix of techniques, including slab building, texture work, and hand-painted details, resulting in wearable modern art.
Step-by-Step Tutorial
Materials
- Polymer clay (terracotta/burnt orange, white/cream, black)
- Acrylic rolling pin or pasta machine
- X-Acto knife or clay blade
- Arch-shaped clay cutters (large)
- Circle cutters (various sizes)
- Small dotting tool or toothpick
- Needle tool
- Super glue or liquid polymer clay (optional)
- Jump rings (gold finish)
- Earring hooks (gold finish)
- Jewelry pliers (round nose and flat nose)
- Oven for baking
- Sandpaper (fine grit)
- Black acrylic paint (optional, if not using black clay for dots)
Step 1: Creating the Spirited Swirl Pair
-
Prepare the Clay:
Condition your terracotta and white clay by kneading them until soft. Roll the terracotta out into a medium-thick slab, about 3-4mm thickness. -
Add the Swirl:
Roll a very thin ‘snake’ of white clay. Gently press it onto the terracotta slab in a spiral pattern. Use your acrylic roller to flatten the snake into the base slab so the surface becomes smooth and seamless. -
Cut the Tops:
Using a medium circle cutter, cut out two circles centered on your spiral patterns. These will be the top studs. -
Form the Arches:
Roll a fresh slab of white clay. Cut out two large arch shapes. Creating the geometric pattern requires precision; use your blade to cut strips of terracotta clay and triangles for the orange details. -
Assemble the Pattern:
Layer the terracotta strips and triangles onto the white arch base to mimic the photo’s design: a top stripe, two triangles, and vertical stripes on the legs. Gently roll over the assembly to bond the pieces. -
Add Texture:
For the sandy texture seen on the triangles, gently press a piece of coarse sandpaper or a texture sponge onto just those orange sections.
Step 2: Crafting the Polka Dot Pair
-
Make the Cane (Top Piece):
To make the polka dot circles, roll a log of white clay and wrap it in a thick sheet of terracotta clay. Reduce the cane by rolling it until it’s small, then slice it into discs. -
Create the Spotted Slab:
Arrange these sliced discs onto a fresh sheet of terracotta clay. Roll over them until flat to create a polka-dot pattern slab, then cut two medium circles for the tops. -
Construct the Arch Base:
Cut two large arches from a plain white clay slab. Cut a separate, smaller arch shape from terracotta clay to place at the very top of each white arch. -
Detail the Top Arch:
Roll extremely thin threads of white clay. Carefully lay them in concentric arches over the terracotta section. I find using a needle tool helps nudge these tiny curves into perfect position. -
Apply the Dots:
For the black dots on the white legs, you have two options: roll tiny balls of black clay and press them in before baking, or use a dotting tool with black acrylic paint after baking. -
Piercing Holes:
Before baking, use a needle tool or small straw to create holes at the bottom of the circle pieces and the top of the arch pieces connecting them.
Clean Edges
If your clay cutters leave ragged edges, place a piece of plastic cling wrap over the clay before pressing the cutter down. This creates a beautifully domed, smooth edge.
Step 3: Finishing Touches
-
Baking:
Place all pieces on a ceramic tile or baking sheet lined with parchment paper. Bake according to your clay package instructions (usually 275°F/135°C for 15-30 minutes). -
Cooling and Sanding:
Let the pieces cool completely inside the oven to prevent cracking. Once cool, lightly sand the edges with fine-grit sandpaper to remove any lint or fingerprints. -
Attach Hardware:
Using two pairs of pliers, twist open a jump ring. Thread it through the hole in the arch and the corresponding hole in the circle stud. -
Final Assembly:
Close the jump ring securely. Finally, attach your earring hooks to the top of the circle pieces using smaller jump rings if necessary, or embed posts on the back with super glue for a stud style.
Make it Shine
After baking, seal the terracotta sections with a matte varnish and the white sections with a high-gloss glaze. This contrast in finishes adds a professional, high-end look.
Now you have a stunning set of geometric statement earrings ready to wear or gift.
Tiny Incense Holder Pebbles
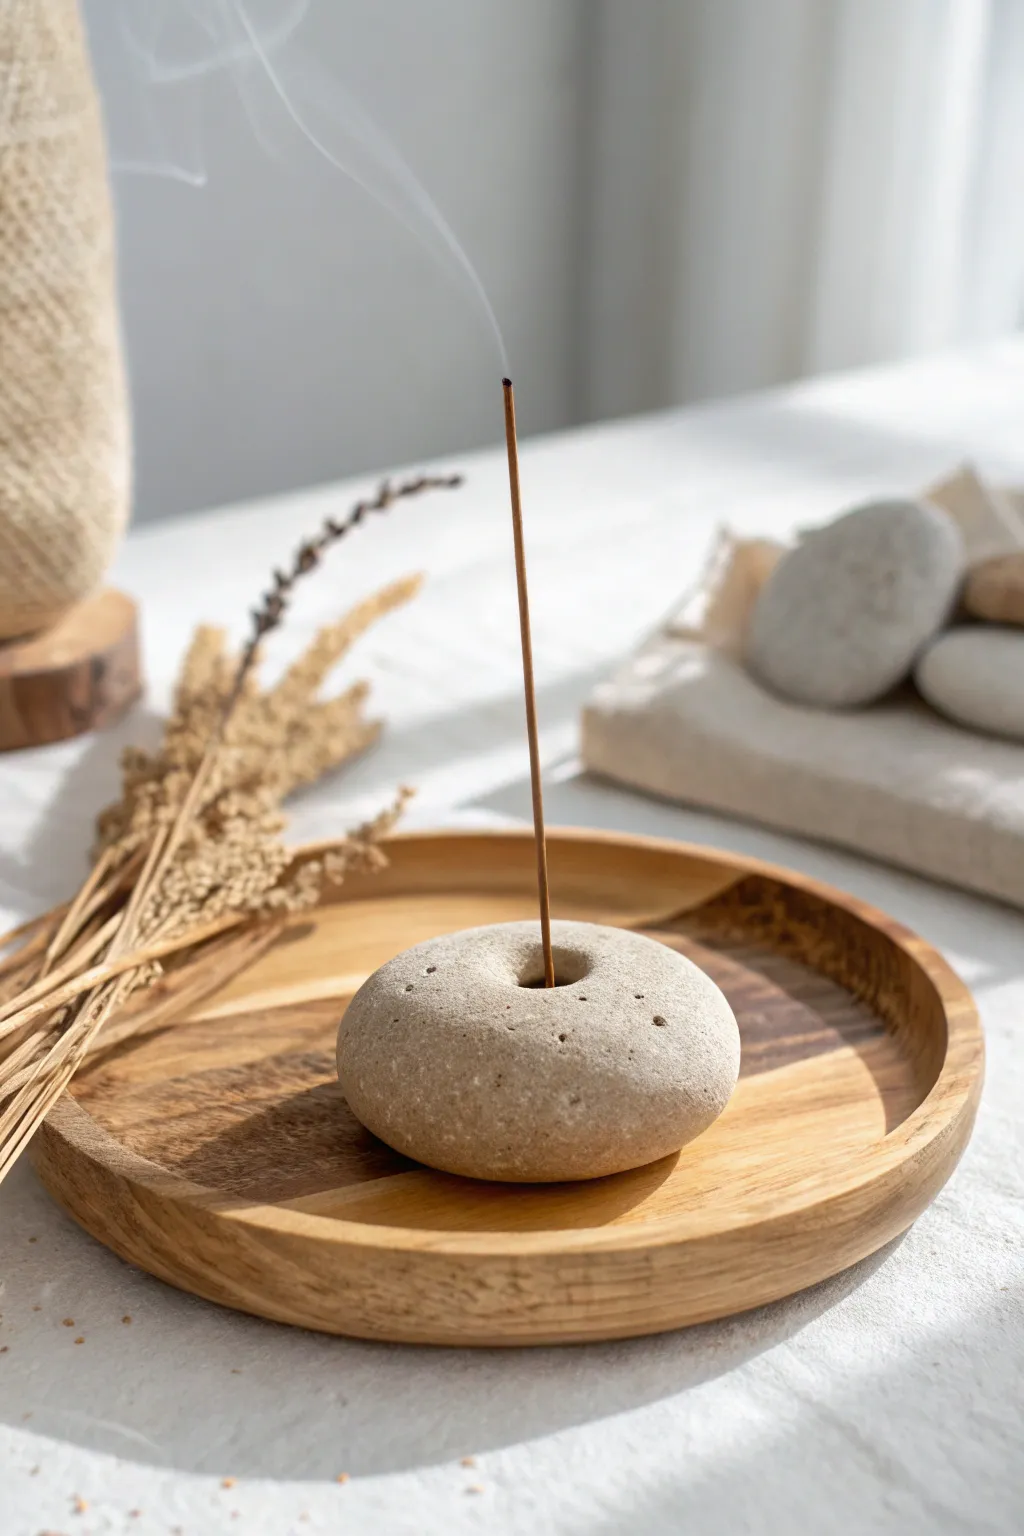
Transform simple modeling clay into a realistic, serene beach pebble that doubles as a minimalist incense holder. This project captures the raw, organic texture of real stone and adds a calming touch to any meditation space.
Step-by-Step
Materials
- Air-dry modeling clay (specifically white or stone-colored)
- Acrylic paints (beige, light grey, white, raw umber)
- Fine-grit sandpaper
- Incense stick (for sizing)
- Old toothbrush or stiff bristle brush
- Toothpick or needle tool
- Sponge
- Matte varnish spray (optional)
Step 1: Shaping the Stone
-
Condition the clay:
Start by taking a chunk of air-dry clay roughly the size of a tangerine. Knead it in your hands until it becomes warm, pliable, and free of any stubborn cracks. -
Form the basic shape:
Roll the clay into a smooth ball between your palms, then gently press it down onto your work surface. -
Flatten and smooth:
Flatten the ball into a thick disc shape, about 1 inch high. Use a bit of water on your finger to smooth out the edges, aiming for a rounded, organic “river rock” silhouette rather than a perfect circle. -
Create the dimple:
Using your thumb, press gently into the very center of the stone to create a subtle, shallow depression. This catches stray ash and adds to the natural look. -
Poke the holder hole:
Take an actual incense stick (or a tool of the same diameter) and press it vertically into the center of the depression. -
Check the depth:
Ensure the hole goes about halfway through the stone so the incense will stand stable, but don’t poke all the way through to the bottom. -
Wiggle for fit:
Give the stick a tiny, gentle wiggle to widen the hole just a fraction—clay shrinks as it dries, and you don’t want the incense to get stuck later.
Step 2: Texturing and Drying
-
Add surface texture:
Real stones aren’t perfectly smooth. Gently tap the surface of the clay with an old toothbrush or a crumpled ball of aluminum foil to give it a porous, stone-like texture. -
Create imperfections:
Use a needle tool or toothpick to poke a few tiny, random pinholes or scratch faint lines near the edges for realism. -
Let it dry completely:
Set your stone aside in a dry area. Depending on the thickness and your climate, this typically takes 24 to 48 hours. Wait until it is cool to the touch and fully hardened. -
Sand the harsh spots:
Once dry, lightly run fine-grit sandpaper over the bottom edges or any areas that look too ‘manufactured’ to soften them up.
Natural Speckles
Mix dried tea leaves or used coffee grounds directly into the white clay before shaping. This creates built-in texture and speckles without needing complex painting.
Step 3: Painting the Faux Stone Look
-
Mix the base color:
Mix a warm beige acrylic paint. I usually add a tiny drop of grey to knock back the brightness and keep it earthly. -
Apply the base coat:
Paint the entire stone, including the inside of the hole. Let this layer dry completely. -
Spatter technique:
Dilute some raw umber or dark grey paint with water until it’s inky. Load a stiff brush or toothbrush, aim it at the stone, and flick the bristles with your thumb to spray tiny speckles across the surface. -
Dry brushing highlights:
Dip a dry brush into a tiny amount of white paint, wipe almost all of it off on a paper towel, and gently dust the top of the stone to highlight the textures. -
Seal the piece:
Finish with a light coat of matte varnish spray to protect the paint and give it a finished feel without adding unnatural gloss.
Make a Set
Create a ‘stacking stones’ set by making 3 stones of descending sizes. Only put the incense hole in the top, smallest stone for a cairn sculpture look.
Now light your favorite scent and enjoy the peaceful atmosphere created by your handmade stone
Mini Candle Holder Totems
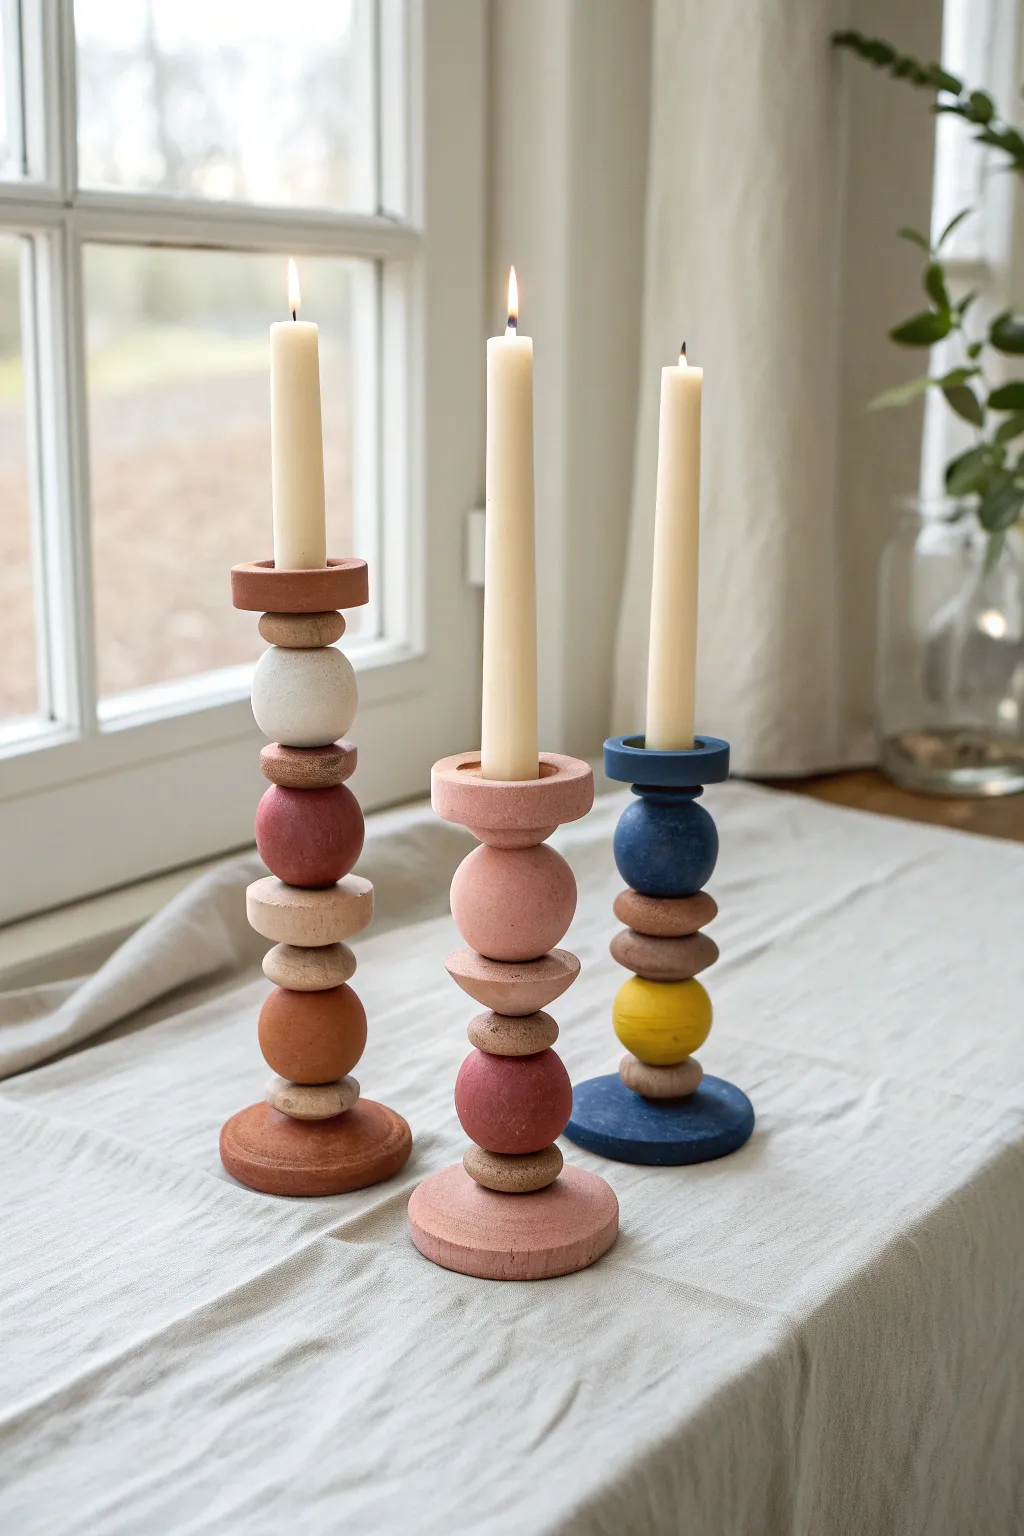
Elevate your dining table with these sculptural candle holders that blend playful geometry with sophisticated earthy tones. Resembling modern art totems, their modular design allows for endless customization of shapes and colors.
Step-by-Step Tutorial
Materials
- Polymer clay or air-dry clay in assorted colors (terracotta, white, navy, pink, ochre)
- Acrylic rolling pin
- Circle clay cutters (various sizes)
- Scalpel or craft knife
- Wooden skewers or metal rod (for structural support)
- Strong craft glue (e.g., E6000) or liquid clay
- Taper candle (for sizing)
- Fine-grit sandpaper (400-800 grit)
- Baking sheet and parchment paper (if using polymer clay)
- Optional: Matte varnish for sealing
Step 1: Shaping the Components
-
Condition the clay:
Begin by warming the clay in your hands, kneading it until it is soft and pliable. This prevents cracks from forming later during shaping or baking. -
Form the spheres:
Roll balls of clay in your palms to create the spherical components. Aim for sizes ranging from 2cm to 4cm in diameter. -
Create the heavy bases:
For the bottom-most piece of each holder, create a larger, flattened disc shape. This needs to be wide and heavy enough to ensure the final candlestick doesn’t tip over. -
Roll out discs and donuts:
Using your acrylic roller, flatten some clay to about 1cm thickness. Use circle cutters to create uniform discs. For variety, hand-flatten some spheres slightly to create organic ‘pebble’ shapes. -
Make the candle cup:
For the very top piece, form a thick disc or cylinder. Press the base of your actual taper candle into the center to create a perfectly sized indentation. Wiggle it slightly so the fit isn’t too tight. -
Create the central channel:
Before the clay hardens or is baked, carefully pierce a hole through the vertical center of every single component using your skewer or rod to ensure they aid alignment later.
Step 2: Texturing and Refining
-
Add stone texture:
For an organic look similar to the photo, use a toothbrush or a ball of crinkled aluminum foil to gently dab texture onto the surface of specific beads, like the sandy-colored ones. -
Check symmetry:
Inspect your spheres and discs from all angles. Smooth out any fingerprints with a drop of baby oil or water, depending on your clay type. -
Bake or dry:
Follow the manufacturer’s instructions for your specific clay. If baking polymer clay, tent it with foil to prevent scorching the lighter colors.
Hidden Weights
For extra stability, embed a heavy metal washer inside the clay of the bottom-most base disc. This lowers the center of gravity significantly.
Step 3: Assembly and Finishing
-
Sand the edges:
Once fully cured and cooled, use fine-grit sandpaper to smooth any rough edges on the discs or flat spots on the spheres. -
Do a dry run:
Stack your pieces onto the skewer without glue first. Play with different arrangements—mixing colors and forms—until you find a totem design that feels balanced. -
Begin gluing:
Start from the base. Apply a small dot of strong glue (or liquid clay if you plan to re-bake) between the bottom disc and the first shape. -
Insert the core:
I prefer to use a metal rod or wooden skewer cut to size as a central spine. Coat it lightly in glue and thread your beads onto it one by one to add significant strength. -
Secure the candle cup:
Glue the final top piece in place. Ensure it sits perfectly level; otherwise, your candle will burn unevenly and drip wax. -
Final cure:
Let the glue set completely according to the package time. If you used liquid clay for the bond, return the piece to the oven for a final short bake. -
Seal (Optional):
If you used air-dry clay or want extra durability, apply a coat of matte varnish. This protects the finish while keeping that natural, earthy aesthetic.
Leaning Tower?
If your beads aren’t sitting flat, the holes might be crooked. Drill the holes slightly larger after baking to allow wiggle room for straightening during gluing.
Enjoy the warm glow of your handcrafted centerpiece at your next dinner gathering
Stamp-Textured Coasters
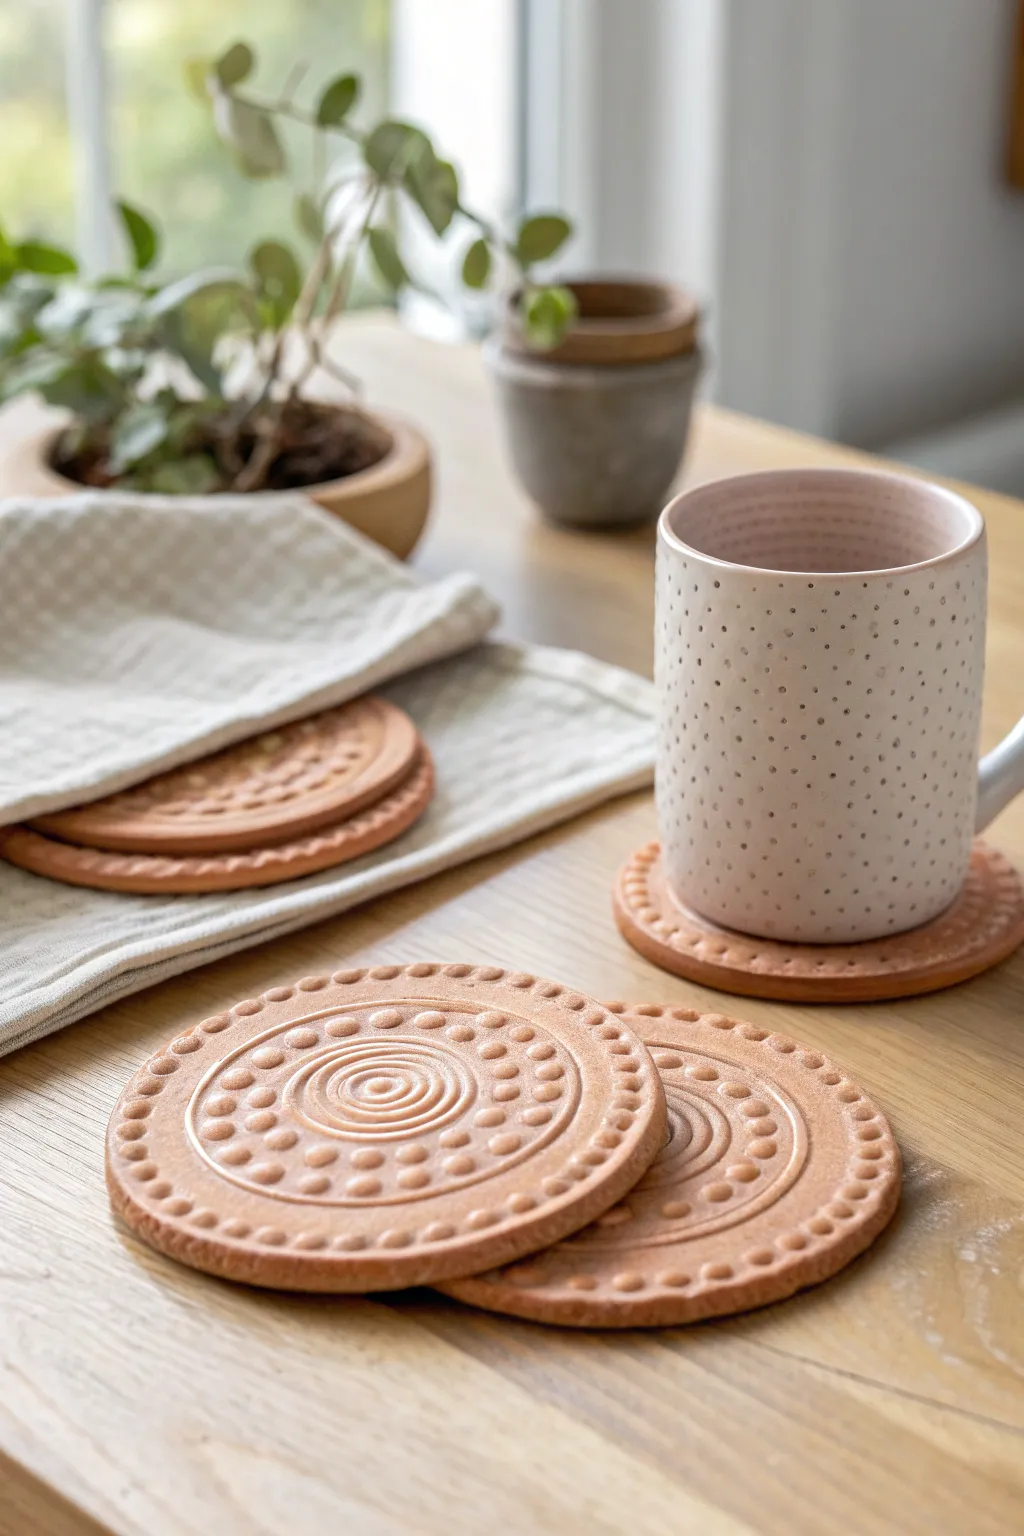
Bring an earthy, handmade touch to your coffee table with these stunning terracotta-colored clay coasters. They feature mesmerizing spiral and dot patterns created with simple tools, resulting in a project that looks professionally crafted yet is surprisingly easy to make.
How-To Guide
Materials
- Terracotta air-dry clay (or polymer clay in a terracotta shade)
- Circular cookie cutter (approx. 4 inches diameter)
- Rolling pin
- Parchment paper or non-stick craft mat
- Fine-grit sandpaper
- Small wooden dowels or blunt pencils (various sizes for dots)
- Clean, texture-free stamps or found objects (like buttons or pen caps)
- Matte spray varnish or sealant
- Sponge or craft knife for smoothing edges
Step 1: Preparation & Rolling
-
Prepare your workspace:
Lay down a sheet of parchment paper or a non-stick silicone mat on a flat surface. This prevents the clay from sticking and makes it easier to move the coasters later without warping them. -
Condition the clay:
Take a handful of terracotta air-dry clay and knead it thoroughly in your hands. You want it to be warm, pliable, and free of any air bubbles before you start working. -
Roll out the slab:
Place the clay on your mat and use the rolling pin to flatten it into an even slab. Aim for a thickness of about 1/4 inch (6mm)—too thin and they might crack, too thick and they take forever to dry. -
Cut the shapes:
Press your circular cookie cutter firmly into the clay slab to cut out your coaster shapes. Create as many circles as you need; usually, a set of four is a good starting point. -
Remove excess clay:
Carefully peel away the excess clay from around your cut circles. I like to ball this up immediately and put it back in the bag to keep it from drying out. -
Smooth the edges:
Dip your finger in a little bit of water and gently run it along the cut edges of the circles to smooth out any roughness or sharp ridges left by the cutter.
Uneven Impressions?
If your stamp depth varies too much, try rocking the tool slightly in a circular motion before lifting it. This widens the impression and ensures a consistent, visible mark every time.
Step 2: Adding Texture & Detail
-
Create the center spiral:
Using a small, blunt tool (a stylus or even the end of a paintbrush handle), gently press into the exact center of a coaster. Slowly begin to drag the tool in a tight, expanding spiral motion to create the coiled center design shown in the image. -
Add the first ring of dots:
Select a small round tool, like the back of a thin paintbrush or a small dowel. Press straight down into the clay a short distance from your center spiral to encircle it with a ring of small, indented dots. -
Make the larger dots:
Switch to a slightly larger round tool (or press harder with the previous one). Create a second, wider ring of dots outside the first one. Try to space them evenly to maintain that symmetrical mandala look. -
Form the outer border:
For the distinctive rim seen in the photo, use a small tool to press a dense row of dots right along the very edge of the circle. This frames the design beautifully. -
Check for flatness:
Stamping and pressing can sometimes distort the overall shape. Gently pat the surface with a flat object (like a hardcover book protected by parchment) to ensure the top remains level enough for a mug.
Step 3: Drying & Finishing
-
Initial drying phase:
Let the coasters sit undisturbed on the parchment paper for about 24 hours. Keep them away from direct heat sources to prevent cracking. -
Flip for even drying:
After the first day, carefully flip the coasters over. This allows the bottom side to dry evenly and helps prevent the clay from curling upwards at the edges. -
Wait for full cure:
Allow another 24-48 hours for the clay to dry completely. The color will lighten slightly as the moisture evaporates, turning into a pale terracotta tone. -
Sand the imperfections:
Once fully bone-dry, take a piece of fine-grit sandpaper and lightly buff the edges. You can also very briefly pass over the top patterns if there are any sharp peaks of clay sticking up. -
Remove dust:
Wipe the coasters down with a dry cloth or a soft brush to remove all the sanding dust from the crevices of your pattern. -
Seal the coasters:
Since these will hold drinks, protection is key. Apply two light coats of a matte spray varnish or sealant. This keeps moisture out without making the coaster look shiny and plastic. -
Add protective backing:
For a final professional touch, you can glue a circle of felt or cork to the bottom to protect your furniture.
Level Up: Glossy Contrast
Instead of a full matte spray, carefully paint high-gloss varnish ONLY inside the indented dots and spirals. This creates a subtle gem-like effect against the matte clay surface.
Place these beautiful textured coasters on your coffee table and enjoy a stylish spot for your morning brew
Tiny Trinket Box With a Surprise Lid
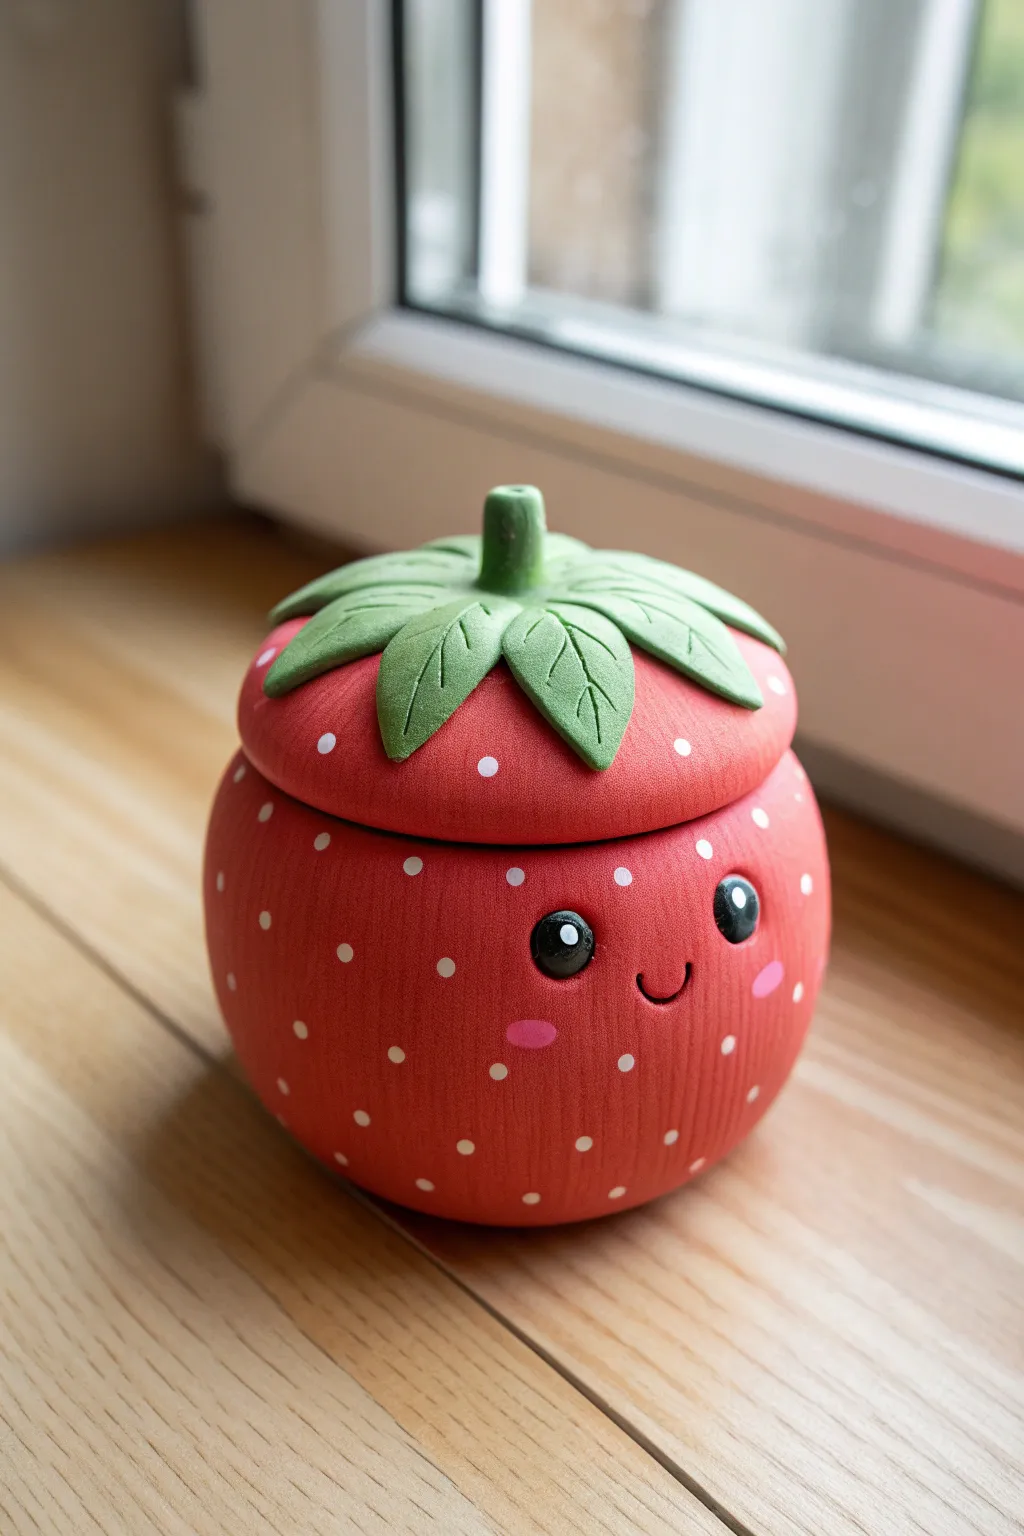
This adorable strawberry-shaped trinket box serves as the perfect hiding spot for your tiniest treasures. With its smiling face and leafy lid, this charming clay creation brings a touch of whimsy to any desk or shelf.
Step-by-Step
Materials
- Red polymer clay
- Green polymer clay
- White acrylic paint
- Black acrylic paint
- Pink acrylic paint
- Small ball stylus tool
- Needle tool or toothpick
- Aluminum foil
- Glass jar or round cookie cutter (for sizing)
- Fine detail paintbrush
- Glaze or varnish (optional)
Step 1: Forming the Base
-
Create a foil core:
Crumple a piece of aluminum foil into a tight ball, slightly flattened on the bottom so it sits stable. This saves clay and keeps the project lightweight. -
Prepare the red clay:
Condition a large block of red polymer clay until it is soft and pliable. Roll it out into a thick sheet, about 1/4 inch thick. -
Cover the core:
Wrap the red clay sheet around your foil ball. Smooth the seams securely so no foil is visible, creating a smooth, round apple-like shape. -
Slice the opening:
Using a sharp blade, carefully slice off the top quarter of the sphere. This top piece will become the lid base, and the bottom is the container. -
Hollow it out:
Gently remove the foil core from inside both halves. Smooth the interior walls with your fingers or a modeling tool to remove any foil texture. -
Create the lip:
Roll a thin snake of red clay. Press this onto the inner rim of the *bottom* piece to create a recessed lip that will hold the lid in place.
Uneven Lid?
If the lid wobbles, place a piece of sandpaper on a flat surface and gently rub the bottom of the lid or top of the jar in circles to level it before baking.
Step 2: Sculpting the Leafy Lid
-
Shape the leaves:
Take the green clay and form 5-6 teardrop shapes. Flatten them slightly with your thumb to create leaves. -
Add texture:
Use a needle tool or toothpick to gently score a central vein and small side veins onto each green leaf for realistic detail. -
Attach to lid:
Arrange the leaves in a star pattern on top of the red lid piece, pressing them down firmly so they adhere to the curve. -
Add the stem:
Roll a short, thick cylinder of green clay. Attach it to the very center where the leaves meet, blending the clay at the base for a secure join.
Step 3: Adding the Face and Details
-
Indent eye sockets:
Use a ball stylus to press two distinct, round indentations into the front of the pot where the eyes will sit. -
Insert the eyes:
Roll two small balls of black clay and press them into the sockets. Flatten them until they are flush with the red surface. -
Add the sparkles:
Place tiny flecks of white clay onto the black eyes—one large dot and one smaller dot—to create a lively reflection effect. -
Carve the smile:
Use a small curved tool or a straw cut in half to impress a gentle U-shaped smile right between the eyes. -
Bake the clay:
Place both pieces on a baking sheet and bake according to your clay package instructions. I usually tent foil over red clay to prevent it from darkening too much.
Texture Twist
Before baking, gently tap a clean toothbrush over the red clay surface. This adds a subtle, realistic skin texture to the fruit instead of leaving it perfectly smooth.
Step 4: Painting and Finishing
-
Paint the seeds:
Once cool, use a fine detail brush or a toothpick dipped in white paint to add small polka dots all over the red surface to mimic strawberry seeds. -
Flush the cheeks:
Paint two soft, oval pink spots just under the eyes for rosy cheeks. -
Seal the work:
Apply a coat of satin or matte varnish to protect the paint and give the strawberry a finished, professional look.
Now you have a charming little container to brighten up your windowsill or gift to a friend
Pocket-Sized Diorama Globe

Create a serene, pocket-sized world inside a unique spherical shell that looks just like a carved moon. This project combines structural clay modeling with delicate miniature landscaping for a display piece that feels both modern and organic.
Step-by-Step Tutorial
Materials
- Air-dry clay (white)
- Balloon (small, round water balloon size)
- Fine white decorative sand
- Assorted small pebbles or aquarium gravel
- Artificial moss or dried reindeer moss
- Tiny artificial succulent sprigs and grass tufts
- Green floral wire and red clay (for custom flowers)
- Craft glue or hot glue gun
- Texture tool (toothbrush or stiff bristle brush)
- Rolling pin
- Small bowl (for support)
Step 1: Sculpting the Globe
-
Prepare the base:
Inflate a small balloon to your desired globe size—aim for about the size of a grapefruit or large orange. Knot it securely and place it knot-side down in a small bowl to keep it stable while you work. -
Roll the clay:
Roll out a slab of white air-dry clay to a consistent thickness of about 1/4 inch. If the clay is sticky, you can lightly dust your surface with cornstarch. -
Cover the form:
Drape the clay sheet over the balloon, gently smoothing it down the sides. You don’t need to cover the entire balloon; leave the bottom third open or create a flat base so it stands on its own later. -
Trim the opening:
While the clay is still wet, use a knife or a round cookie cutter to slice a clean, circular opening on the front face. This is the window into your diorama. -
Texturize the surface:
To achieve that stony, moon-like appearance seen in the photo, take a stiff toothbrush or a crumpled ball of aluminum foil and gently tap it all over the wet clay exterior. I like to press a little harder in some spots to create ‘craters’. -
Create the base:
Gently press the bottom of the covered balloon onto a flat surface to create a stable foot for the globe to sit on. Smooth out any harsh edges around the rim of your front opening using a wet finger. -
Dry and remove:
Allow the shell to dry completely (likely 24-48 hours depending on humidity). Once hard, pop the balloon and peel away the rubber remnants from the inside.
Cracking Clay?
If hairline cracks appear while drying, don’t panic. Mix a tiny bit of fresh clay with water to make a paste (slip) and smooth it over the crack with your finger.
Step 2: Landscaping the Interior
-
Fill the terrain:
Apply a generous layer of craft glue to the bottom interior curve of the globe. Pour in your fine white sand, pressing it down to create a firm ‘ground’ layer. Shake out excess loose sand once the glue grabs hold. -
Position the hardscape:
Select a few small, interesting pebbles. Glue two or three larger ones near the back or center to create varying heights, and scatter tiny pebbles near the front for detail. -
Plant the greenery:
Using tweezers, glue tiny tufts of artificial grass and miniature succulent tips into the sand. Place taller grasses in the back and shorter clumps near the front opening to create depth. -
Craft tiny blooms:
To replicate the red flowers, take tiny bits of red clay and shape them into petals. Attach them to short lengths of green floral wire or simply pinch them onto the tops of your green plastic stems. -
Final arrangement:
Tuck small bits of dried moss into gaps between the rocks to soften the look. Ensure your main focal points are visible through the porthole opening. -
Create accessories (Optional):
Use leftover clay and pebbles to make matching external elements. Glue a tiny clay flower or air plant to a smooth stone to sit outside the globe as a companion piece.
Depth Perception
Make the scene look bigger by piling extra clay or foil under the sand in the BACK of the globe. Raising the rear terrain creates a forced perspective effect.
Now you have a peaceful, secluded garden scene captured forever inside its own little world
Mix-and-Match Character Parts Set
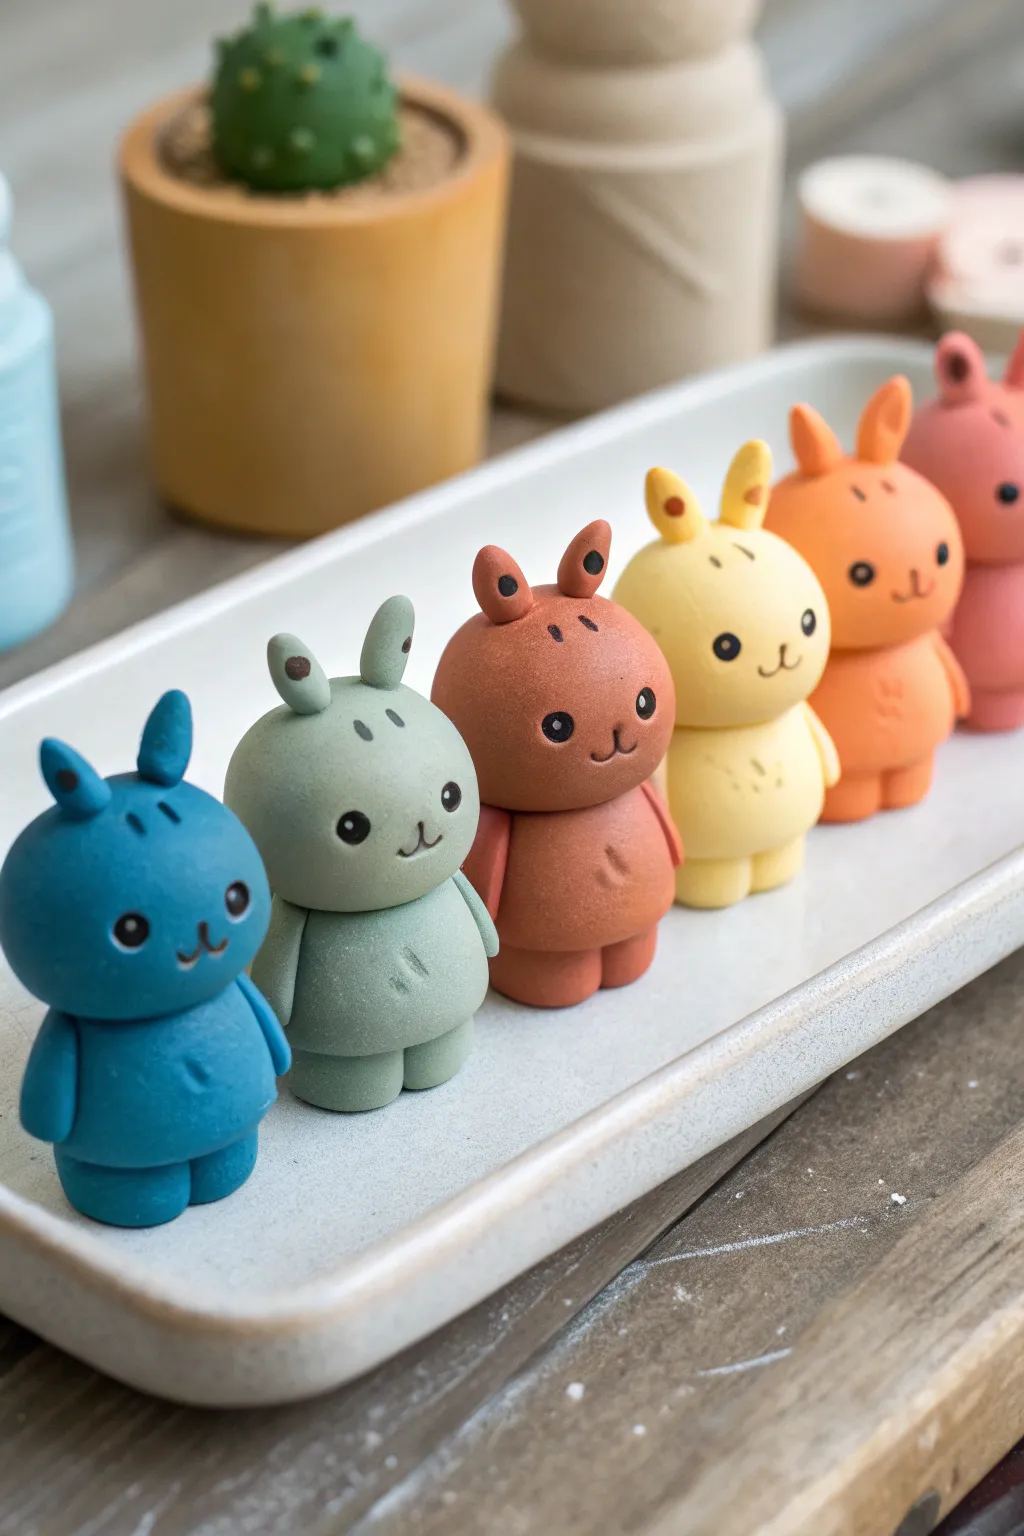
These adorable, matte-finish bunny figurines make for a delightful desktop army or a charming homemade gift set. With their simple spherical bodies and interchangeable colors, they are the perfect project for practicing basic clay shaping and consistent sizing.
How-To Guide
Materials
- Polymer clay (Blue, Sage Green, Terracotta, Pale Yellow, Orange, Salmon Pink)
- Black acrylic paint
- Fine-point detail brush or dotting tool
- Clay sculpting tools (needle tool, small ball tool)
- Baking sheet and parchment paper
- Oven (if using oven-bake clay)
- Matte varnish (optional)
Step 1: Basic Body Construction
-
Portion the clay:
Start by conditioning each color of clay until it’s soft and pliable. For each bunny, separate two lumps of clay: a larger one for the head (about the size of a walnut) and a slightly smaller one for the body. -
Roll the heads:
Roll the larger lumps into smooth, perfect spheres. Place them gently on your work surface and press down very slightly to create a flat base so the head will sit securely on the body later. -
Shape the bodies:
Roll the smaller lumps into cylinders. Gently round off the top and bottom edges so they look like soft pellets or rounded marshmallows rather than sharp-edged tubes. -
Connect head and body:
Press the spherical head firmly onto the cylindrical body. I find that inserting a small piece of wire or a toothpick cut to size helps reinforce this connection so the head doesn’t droop during baking. -
Add feet:
Create two tiny, flattened ovals for feet using the same color clay. Press these onto the bottom front of the body cylinder so the bunny can stand stably. -
Attach the arms:
Roll two small teardrop shapes for arms. Flatten them slightly and press them against the sides of the body, angling them downwards.
Clean Clay Pro-Tip
Keep baby wipes handy! Wipe your hands thoroughly when switching colors (especially from dark to light) to keep your pastel bunnies looking bright and smudge-free.
Step 2: Ears and Expressions
-
Sculpt the ears:
Form two small, elongated ovals for each bunny. Flatten them gently. You can pinch the tips slightly for a sharper look or leave them rounded. -
Add ear details:
For added character, use a small dotting tool to impress a darker colored clay (like brown or black) into the ear tips or centers, or simply use a needle tool to scratch in a little texture. -
Mount the ears:
Attach the ears to the top of the head. Smooth the clay at the join point with a silicone tool to make the seam invisible. -
Add tummy texture:
Using a needle tool or a small knife, gently scratch a few vertical hash marks or a small ‘x’ on the bunny’s tummy to simulate fur texture or a belly button. -
Create the face indentations:
Before baking, use a small ball tool to gently press indentations where the eyes will go. This helps the paint sit better later. -
Bake the figures:
Arrangement the bunnies on parchment paper. Bake according to your customized clay package instructions (usually 275°F/135°C for 15-30 minutes per 1/4 inch thickness). Let them cool completely.
Step 3: Finishing Touches
-
Paint the eyes:
Using a very fine brush and black acrylic paint, fill in the eye indentations. Add tiny white dots for highlights if you want extra sparkle. -
Draw the mouth:
With the finest brush tip possible, paint a tiny ‘w’ shape or a simple curved line between the eyes for the nose and mouth. -
Add distinct markings:
Paint small details like eyebrows above the eyes or little hash marks on the forehead to give each bunny a unique expression. -
Apply varnish:
Once the paint is fully dry, apply a coat of matte varnish to protect the surface and unify the sheen of the clay.
Level Up: Accessories
Don’t stop at just bunnies. Create tiny accessories like carrots, backpacks, or little hats to give each character a specific ‘job’ or personality.
Line them up on your shelf and enjoy the colorful cheer they bring to your space