If you’re craving that soft, storybook cottagecore vibe, clay is basically the coziest way to make it real on your shelves. These cottagecore clay ideas lean into mushrooms, garden goodness, and tiny handmade details that feel like they belong in a little countryside daydream.
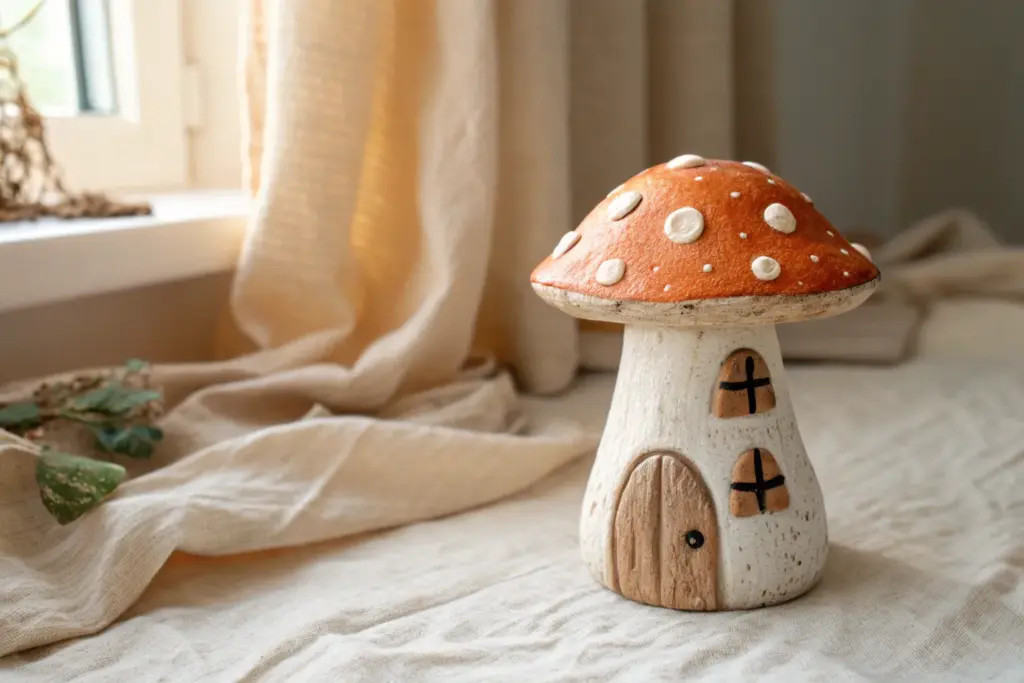
Toadstool Trinket Jars
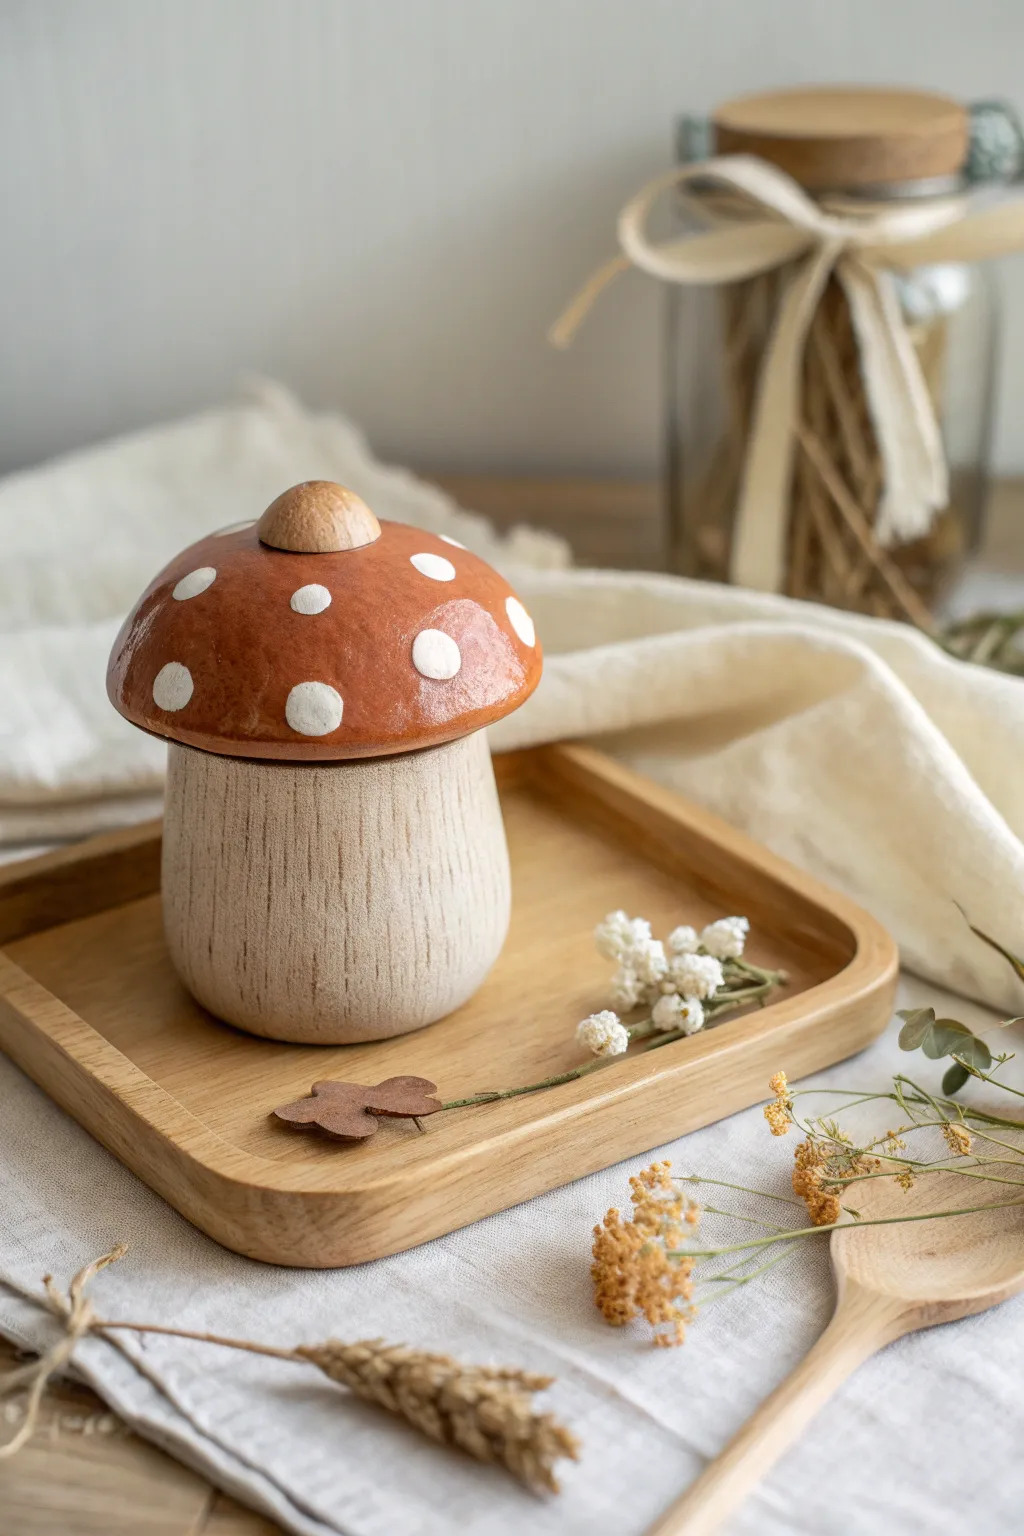
Capture the essence of the forest floor with this charming toadstool trinket jar, perfect for storing tiny treasures. Featuring a textured stoneware-style base and a glossy, polka-dotted cap, this piece brings a cozy cottagecore vibe to any shelf.
Step-by-Step Guide
Materials
- Air-dry clay (white or natural stone color)
- Wooden bead or small wooden cabinet knob (unfinished)
- Acrylic paints (burnt sienna/terracotta, white, cream/beige)
- Gloss varnish or clear glaze
- Pottery tools (needle tool, sponge, rib tool)
- Rolling pin
- Sandpaper (fine grit)
- Paintbrushes (flat shader and fine detail)
- Small bowl of water
- Plastic wrap
Step 1: Sculpting the Base
-
Prepare the Clay:
Start by conditioning a fist-sized ball of air-dry clay. Knead it until it’s pliable and smooth, removing any large air bubbles that could cause cracks later. -
Form the Cylinder:
Roll the clay into a thick cylinder shape. I find it helpful to tap the bottom flat against your work surface to establish a sturdy base. -
Hollow the Stem:
Using your thumb, press into the center of the cylinder to begin opening it up. Pinch the walls gently while rotating the piece to create a cup shape, keeping the walls about 1/4 inch thick. -
Shape the Belly:
Gently push the walls outward from the inside to give the mushroom stem a slightly bulbous, organic look. It shouldn’t be perfectly straight; a little curve adds character. -
Add Texture:
Take a needle tool or a coarse brush and drag vertical lines down the exterior of the stem. This mimics the fibrous texture of a real mushroom stalk. -
Smooth the Rim:
Use a slightly damp sponge or your finger to smooth the top rim of the jar base so the lid will sit flush.
Step 2: Creating the Cap
-
Roll a Slab:
Roll out a fresh piece of clay to about 1/4 inch thickness. Use a bowl or circle cutter slightly larger than your jar’s opening to cut a circle. -
Dome the Lid:
Place the clay circle over a sphere mold (like a smooth ball or the bottom of a small bowl covered in plastic wrap) to create a gentle dome shape. -
Fit the Flange:
Roll a small coil of clay and attach it to the underside of the dome. Measure against your base jar to ensure this inner ring fits snugly inside the rim to keep the lid from sliding off. -
Add the Handle:
Press the wooden bead or knob into the very center of the damp clay dome to create an indentation, but remove it for now—we will glue it on after painting. -
Refine Edges:
Smooth the outer edge of the mushroom cap with water, rounding it off so it looks soft rather than sharp. -
Dry Completely:
Set both the base and lid aside to dry for 24-48 hours. Rotate them occasionally to ensure even airflow.
Cracked Lid Issue?
If hairline cracks appear while drying, mix a tiny bit of clay with water to make a paste (slip) and fill the cracks. Smooth over and let dry again.
Step 3: Painting and Finishing
-
Sand Imperfections:
Once fully bone dry, lightly sand any rough spots, particularly around the rim where the two pieces meet. -
Paint the Stem:
Mix a diluted wash of cream or beige acrylic paint. Brush it over the textured base, then wipe off the excess with a paper towel so the paint settles into the grooves, highlighting the texture. -
Base Coat the Cap:
Paint the top of the lid with a rich burnt sienna or terracotta color. Apply two coats for full opacity, letting each layer dry in between. -
Add Polka Dots:
Dip the handle end of a paintbrush into white acrylic paint. Dot the paint onto the terracotta lid in a random pattern to create the classic toadstool spots. -
Attach the Knob:
Use a strong craft glue to attach the unpainted wooden knob to the center of the lid. -
Seal for Shine:
Apply a high-gloss varnish only to the painted mushroom cap to make it look wet and ceramic-like. Leave the stem matte for a natural wood contrast.
Glow-in-the-Dark Magic
Mix glow powder into your white paint for the spots. By day it looks classic, but at night your mushroom will softly glow on your nightstand.
Now you have a delightful little hiding spot for your jewelry or herbs that looks straight out of a fairytale book.


Frog on a Lily Pad Dish
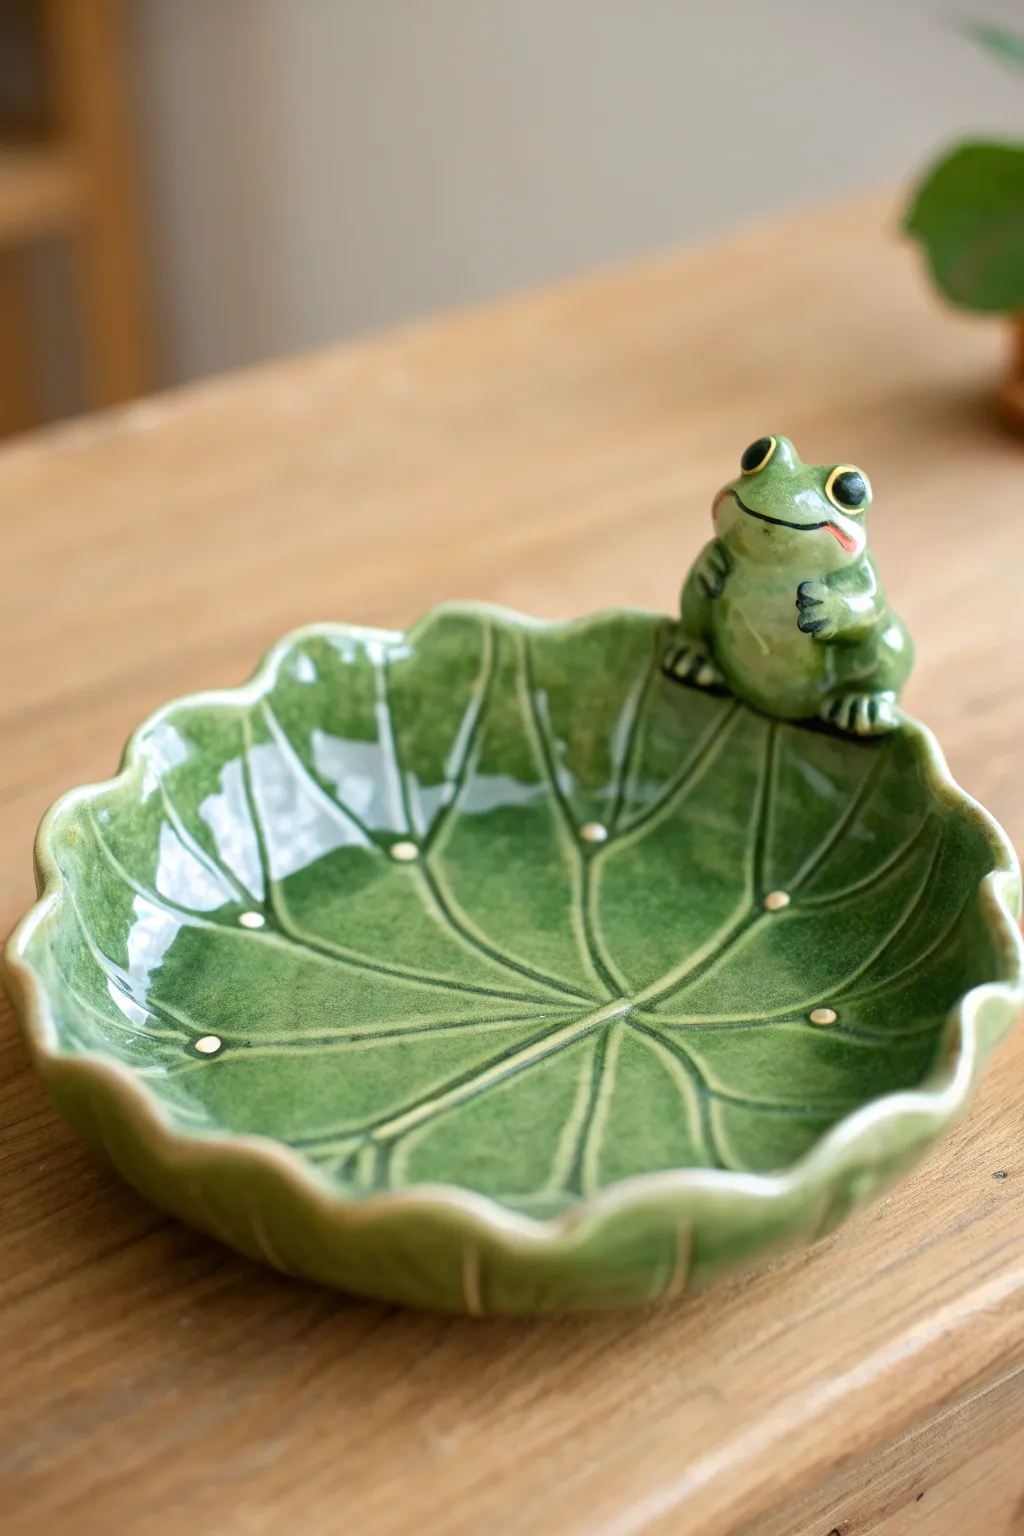
This charming ceramic piece blends functionality with cottagecore aesthetics, featuring a glossy, vein-textured lily pad bowl guarded by a cheerful little frog. It’s the perfect size for holding rings, soap, or small treasures while adding a splash of pond-life magic to your decor.
Step-by-Step Guide
Materials
- Light-colored stoneware clay or polymer clay (if not firing)
- Rolling pin
- Canvas mat or non-stick silicone mat
- Needle tool or X-Acto knife
- Sponge
- Bowl for shaping (slump mold) and plastic wrap
- Scoring tool (or an old toothbrush)
- Slip (liquid clay)
- Small ball tool
- Underglazes: Leaf Green, Dark Green, Pale Yellow, Black, Red
- Clear glossy glaze
- Kiln (if using ceramics) or oven (if polymer)
Step 1: Creating the Lily Pad Base
-
Roll the slab:
Begin by rolling out a smooth slab of clay to an even thickness of about 1/4 inch. Ensure there are no air bubbles trapped inside by compressing the clay well beforehand. -
Cut the rough shape:
Using a needle tool, cut out a large circle. It doesn’t need to be perfect; for a natural look, a slightly irregular oval works beautifully. -
Sculpt the edges:
Gently push the edges of the circle inward at varying intervals to create the scalloped, wavy perimeter typical of a lily pad. Use your thumb to smooth and round these edges so they aren’t sharp. -
Detail the veins:
Starting from the center of the dish, use a needle tool or a blunt modeling tool to draw radiating lines outward toward the scallops. Add smaller, branching veins off the main lines for realistic texture. -
Form the bowl:
Place plastic wrap inside a shallow bowl. Then, gently lay your clay lily pad inside, pressing it softly so it takes on the curved, cupped shape. Let it stiffen to leather-hard in this position so it holds its form.
Keep it Clean
Wipe a damp sponge lightly over the carve lines after carving the veins. This softens the sharp burrs of clay without erasing the line definition.
Step 2: Sculpting the Frog Companion
-
Form the body:
Roll a ping-pong ball sized piece of clay for the body, slightly tapering the top for the head area. It should look like a stout pear. -
Shape the legs:
Roll two small coils for the back legs. Bend them into a ‘V’ shape and attach them to the sides of the body, blending the clay smoothly so no seams show. -
Add feet and hands:
Attach small flattened balls for feet at the base of the legs and use a knife to cut toe indentations. Add tiny arms to the front of the body, positioning the hands so they look like they are resting on the frog’s belly. -
Sculpt the face:
Roll two tiny balls for eyes and attach them to the top of the head. Use a needle tool to carve a wide, happy smile across the face. Smooth out any fingerprints with a slightly damp sponge.
Step 3: Assembly and Finishing
-
Attach the frog:
Once both pieces are leather hard, score the rim of the lily pad and the bottom of the frog aggressively. Apply slip to both scored areas. -
Secure the bond:
Press the frog firmly onto the edge of the lily pad. You want it to look like he is peering into the bowl. Blend the clay at the attachment point underneath to ensure he doesn’t pop off during firing. -
Initial bisque fire:
Allow the entire piece to bone dry completely, which may take several days. Once dry, bisque fire the piece according to your clay body’s instructions. -
Apply base colors:
Paint the entire lily pad with a translucent green underglaze. For the frog, use a slightly lighter, yellow-green mix to help him stand out against the leaf. -
Add depth and details:
Use a darker green to shade inside the vein lines of the leaf and the crevices of the frog’s legs. I find painting distinct yellow slip dots on the leaf and frog really brings the texture to life. -
Paint facial features:
Carefully paint the pupils black with yellow rims for the eyes, and add a tiny line of red for the mouth or tongue. -
Glaze and final fire:
Once the underglaze is dry, coat the entire piece (except the bottom foot ring) in a clear glossy glaze. Fire the piece for the final time to achieve that wet, pond-like shine.
Dew Drop Effect
Add small blobs of clear glass frit or extra thick clear glaze in the center of the leaf before the final firing to create permanent, realistic water droplets.
Now you have an adorable, glossy green friend ready to keep your trinkets safe


Leaf-Shaped Trinket Bowl
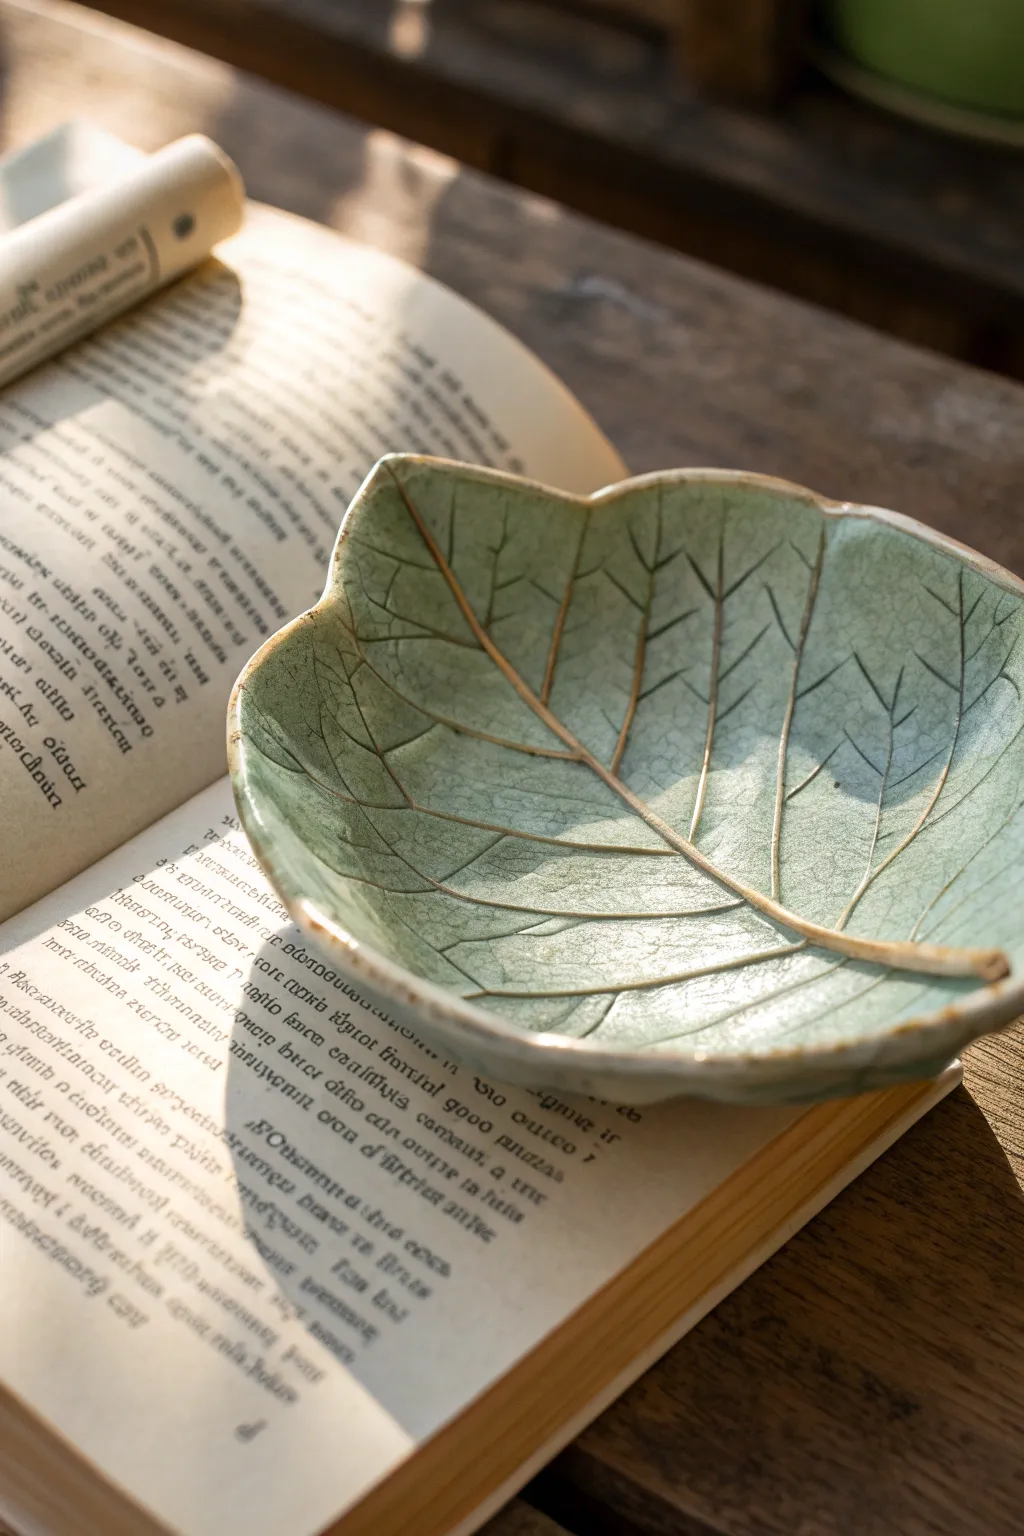
Capture the essence of a forest walk with this delicate, nature-inspired trinket dish. Featuring deep, realistic veins and a soft crackle finish, this bowl brings a touch of vintage botanical charm to any tabletop.
Step-by-Step
Materials
- White stoneware or polymer clay (oven-bake)
- Real leaf for impression (large, deeply veined like hydrangea or grape)
- Rolling pin
- Fettling knife or craft knife
- Needle tool
- Small bowl (for shaping)
- Celadon glaze (soft green)
- Dark oxide wash or brown acrylic paint (for veins)
- Sponge
- Clear crackle glaze (optional, if using kiln-fire clay)
Step 1: Shaping the Clay
-
Prepare the slab:
Begin by rolling out your clay on a canvas or non-stick mat until it is an even thickness, approximately 1/4 inch thick. Smooth out any initial air bubbles or imperfections with your fingers. -
Position the leaf:
Place your chosen fresh leaf vein-side down onto the clay slab. This side has the most texture, ensuring a crisp, detailed impression. -
Make the impression:
Gently roll over the back of the leaf with your rolling pin. Apply firm, even pressure to push the veins deep into the clay without flattening the slab too much. -
Cut the shape:
Using a needle tool or fettling knife, trace around the outer edge of the leaf. I find leaving a tiny border of clay around the leaf edge helps protect the fragile tips. -
Refine the edges:
Carefully peel the leaf away to reveal the texture. Use a slightly damp sponge or your fingertip to smooth the cut edges of the clay, softening any sharp burrs while keeping the organic outline. -
Enhance the stem:
If the leaf stem didn’t imprint deeply enough, roll a very thin coil of clay. Score and slip it along the central vein line, smoothing it down so it looks like a natural extension of the leaf structure. -
Initial curving:
Gently lift the clay leaf and place it into a shallow bowl lined with plastic wrap or a smooth cloth. Press the clay gently to conform to the bowl’s curve, lifting the edges to create a concave dish shape. -
Dry or Bake:
For potter’s clay, allow the piece to dry slowly to the leather-hard stage before firing. If using polymer clay, bake according to the manufacturer’s instructions while it is still supported in the bowl shape.
Sticky Leaf Situation?
If the leaf sticks to the clay, dust the back of the leaf lightly with cornstarch (for polymer) or bisque powder (for ceramic) before rolling.
Step 2: Detaling and Glazing
-
Apply the base color:
Once your piece is bisqued (or cooled if polymer), apply your base green color. For ceramics, dip or brush on a celadon glaze. For polymer, paint the whole surface with a muted sage green acrylic. -
Highlight the veins:
To get that striking contrast seen in the photo, apply a dark brown oxide wash or thinned brown acrylic paint directly into the recessed veins. -
Wipe back:
Before the dark wash dries completely, take a damp sponge and gently wipe across the surface. This removes the dark color from the high points of the leaf but leaves it settled deep in the crevices. -
Add rim definition:
Use a small brush to dab a little of the brown wash along the very edge of the rim. This creates a weathered, vintage look. -
Final glaze application:
For ceramics, apply a transparent crackle glaze over the top if your celadon isn’t already glossy. This mimics the aged pottery look. -
Final firing or sealing:
Fire the piece in the kiln to the glaze’s verified temperature. For polymer clay, seal the paint work with a high-gloss varnish to simulate the look of glazed ceramic.
Gilded Edges
Once fully finished, paint the very rim of the leaf with a gold leaf pen or liquid gold leaf for a touch of elegance that catches the light.
Now you have a serene little vessel ready to hold your rings or gathered forest treasures


Wildflower Pressed-Imprint Tiles
Capture the delicate beauty of a meadow on a durable keepsake with this botanical relief project. The finished tile features soft, vintage-inspired imprints of ferns and wildflowers pressed directly into clay, creating a fossilized look that brings a touch of nature indoors.
Step-by-Step Guide
Materials
- Air-dry clay (white or pale terracotta)
- Fresh or pressed wildflowers and ferns (Queen Anne’s lace, small fern fronds, leafy sprigs)
- Rolling pin
- Parchment paper or canvas cloth
- Square cookie cutter or craft knife
- Acrylic paints (sage green, forest green, muted rose, ochre)
- Fine detail paintbrushes
- Matte spray varnish or sealant
- Sandpaper (fine grit)
- Water cup and paper towels
Step 1: Preparing the Clay Base
-
Condition the Clay:
Begin by taking a handful of air-dry clay and kneading it in your hands to warm it up. Work it until it is pliable and smooth, removing any air bubbles that could cause cracks later. -
Roll the Slab:
Place your clay on a piece of parchment paper or a canvas cloth to prevent sticking. Use your rolling pin to flatten the clay into an even slab, aiming for a thickness of about 1/4 to 1/2 inch. -
Cut the Shape:
Using a square cookie cutter or a ruler and craft knife, cut a clean square from the center of your rolled slab. If the edges are rough, dip your finger in a little water and smooth them down gently.
Pro Tip: Texture Transfer
For deeper veining, use fresh leaves rather than dried ones. Fresh plants are more flexible and won’t crumble into the clay when rolled over.
Step 2: Creating the Impressions
-
Select Botanicals:
Arrange your chosen plant materials on top of the clay square. Create a composition you love; for this look, try a central flowering stem flanked by a fern on one side and leafy sprigs on the other. -
Press the Plants:
Once your design is set, place a sheet of parchment paper carefully over the botanicals. Take your rolling pin and roll firmly over the paper once or twice. You want to press the plants flush into the clay without distorting the square shape too much. -
Reveal the Design:
Gently peel back the parchment paper. Using tweezers or a needle tool, carefully lift the plant material out of the clay. Take your time here to ensure the delicate impressions remain sharp. -
Refine the Surface:
Inspect the tile for any stray bits of plant matter or rough edges. You can smooth tiny imperfections with a slightly damp brush, but avoid erasing the texture of the imprint.
Step 3: Drying and Coloring
-
Allow to Dry:
Move the tile (still on its parchment paper) to a flat wire rack. Let it dry completely for 24-48 hours. I usually flip it over halfway through the drying process to ensure the bottom dries evenly and prevents warping. -
Sand the Edges:
Once bone dry, take fine-grit sandpaper and lightly sand the edges of the tile to soften them. Wipe away all dust with a dry cloth or soft brush. -
Mix Your Palette:
Prepare watery washes of your acrylic paints. You want the consistency of watercolor rather than thick acrylic, as the goal is to stain the recessed areas without obscuring the texture. -
Paint the Stems:
Using your finest brush, carefully paint the stem impressions with a mix of ochre and sap green. Let the watery paint pool slightly in the deepest parts of the imprint. -
Add Leaf Details:
Switch to your varying shades of green for the leaves and fern fronds. A darker forest green works well for the fern to create contrast, while a lighter sage suits the broader leaves. -
Color the Blooms:
Dab a muted rose or dusty pink wash into the flower heads. Because the paint is thin, it will naturally settle into the tiny textures of the petals, highlighting the fossilized effect. -
Clean Up Edges:
If any paint strayed outside the impressions onto the flat surface of the tile, you can lightly sand it off or wipe it with a very slightly damp cloth before it fully cures. -
Seal the Work:
After the paint is completely dry, take the tile to a well-ventilated area and apply a light coat of matte spray varnish. This protects the clay from moisture and preserves the colors without adding an unnatural shine.
Troubleshooting: Curling Corners
If your tile edges curl up while drying, gently weigh them down with a heavy book placed over a paper towel once the clay is leather-hard but not fully dry.
Display your finished tile on a small wooden stand or use it as a coaster for your favorite mug

The Complete Guide to Pottery Troubleshooting
Uncover the most common ceramic mistakes—from cracking clay to failed glazes—and learn how to fix them fast.
Scalloped Rim Cottage Planters
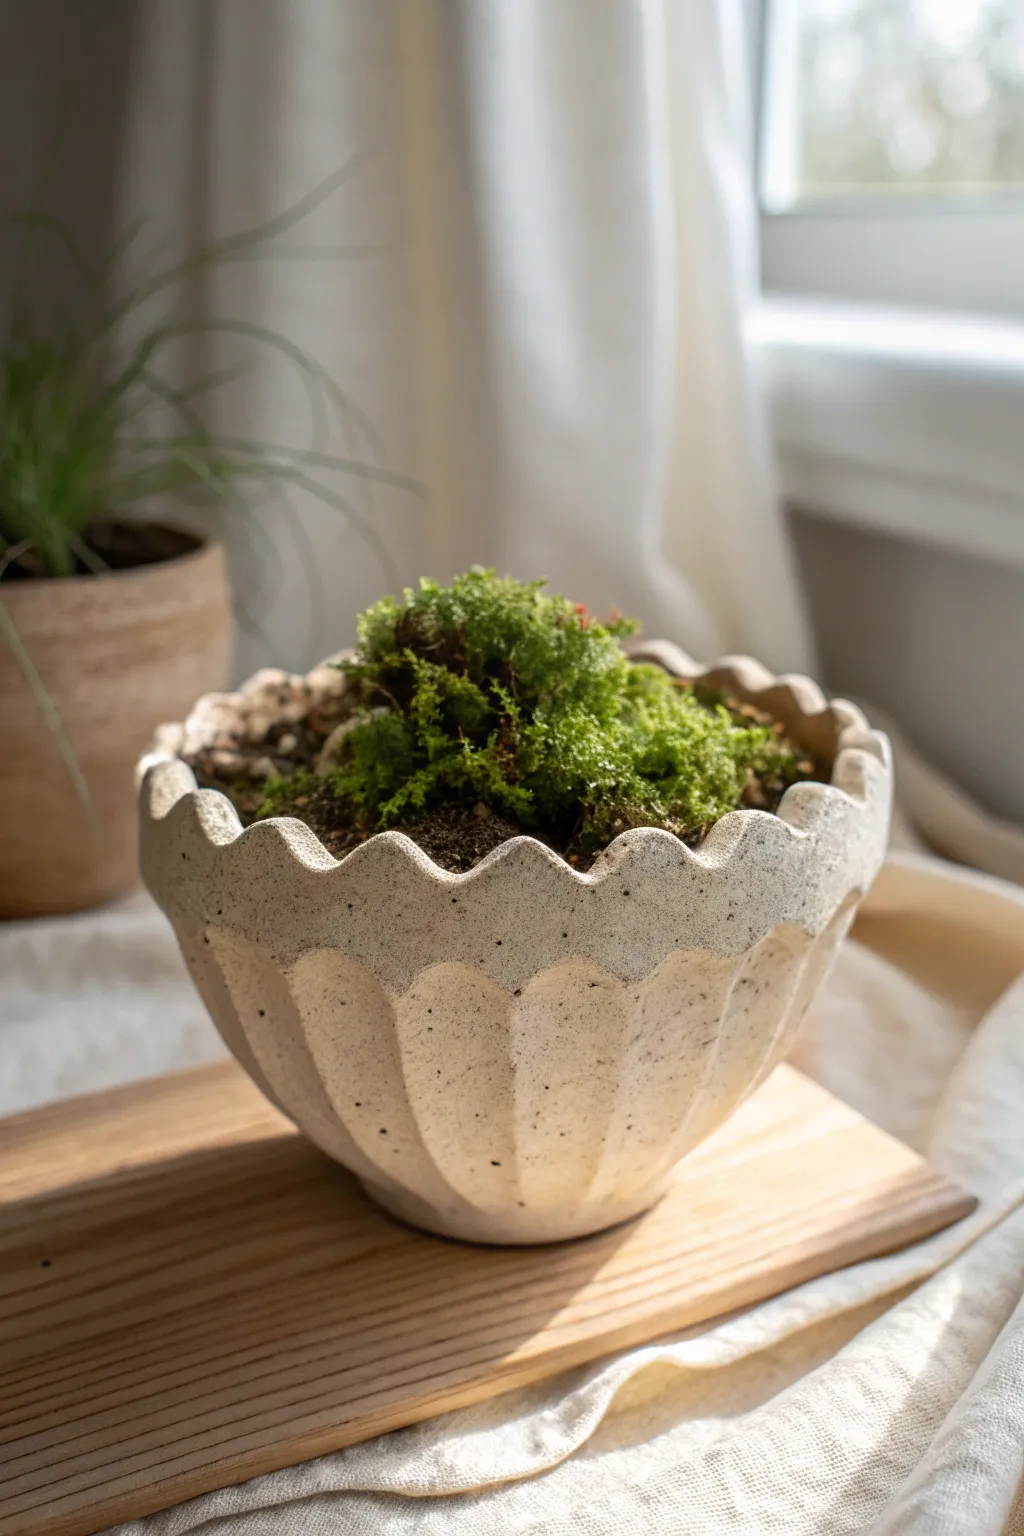
Bring the softness of the forest floor into your home with this textured, hand-built clay vessel. Its gentle scalloped rim and vertical ridges create an organic, handmade feel perfect for showcasing a mound of vibrant green moss.
Step-by-Step Tutorial
Materials
- Air-dry clay (stone or white color) or stoneware clay
- Rolling pin
- Clay knife or fettling knife
- Small bowl or sphere mold (for draping)
- Modeling tool or old toothbrush (for texture)
- Sponge and water
- Potting soil and fresh sheet moss
- Wooden sculpting rib (optional)
Step 1: Shaping the Base
-
Prepare your clay:
Start by wedging your clay to remove any air bubbles. Roll it out on a canvas cloth or non-stick surface until you have a smooth slab about 1/4 inch thick. Aim for a consistent thickness to ensure even drying later. -
Cut the primary shape:
Place your bowl mold upside down on the slab and cut a circle roughly 2 inches wider than the mold’s rim. This extra width allows the clay to drape down the sides to create the bowl depth. -
Drape the clay:
Gently lift your clay circle and drape it over the upside-down mold. Smooth it down the sides with your hands, pressing firmly to eliminate air pockets between the clay and the mold. -
Create the flat bottom:
While the clay is still on the mold, gently tap the very center with a flat board or just press it flat with your palm. This creates a stable foot for your planter to sit on without tipping.
Natural Speckle Hack
Mix dried coffee grounds or black pepper into your wet clay before rolling it out. This creates an authentic, built-in speckled stone texture without needing to paint it later.
Step 2: Adding Texture and Detail
-
Form the vertical ridges:
Using your thumb or the side of a wooden modeling tool, press vertical indentations starting from the base and moving up toward the rim. Space them evenly to create a ‘fluted’ pumpkin-like effect around the entire circumference. -
Cut the scallops:
Once the clay has stiffened slightly but is still workable, remove the mold if possible, or work directly on it. Use your knife to cut a wavy, scalloped pattern along the top edge. Try to align the peaks of the waves with the ridges you created for a cohesive look. -
Refine the edges:
Dip a sponge in a little water and smooth the sharp cut edges of your scallops. You want them to look soft and worn, like a seashell, rather than sharp and freshly cut. -
Add speckling texture:
To mimic the stone look in the photo, create a splatter texture. Dip an old toothbrush in watered-down dark acrylic paint or clay slip (if firing) and flick tiny speckles onto the exterior. I find less is more here—start sparse and build up.
Step 3: Finishing and Planting
-
Drying process:
Let the bowl dry slowly away from direct sunlight. If you used air-dry clay, wait 24-48 hours until fully bone dry. If using kiln clay, proceed with your bisque and glaze firing schedule according to the manufacturer’s instructions. -
Sealing (for air-dry clay):
Apply a waterproof varnish to the inside of the bowl. This is crucial if you plan to put real soil and moisture inside, as air-dry clay will dissolve if it gets wet. -
Prepare the substrate:
Once your sealant is dry, fill the bottom of the bowl with a small layer of gravel for drainage, followed by potting soil suitable for moisture-loving plants. -
Arrange the moss:
Take clumps of fresh cushion moss and press them firmly into the soil, creating a mounded, hill-like shape. Tuck the edges of the moss slightly below the scalloped rim for a seamless transition. -
Final touches:
Mist the moss heavily with water. Wipe down the exterior of the bowl with a dry cloth to remove any stray soil particles and place your creation in bright, indirect light.
Level Up: Footed Base
Add three small balls of clay to the bottom before drying to create tiny feet. This elevates the bowl slightly and adds an extra touch of vintage charm to the silhouette.
Now you have a charming piece of handmade decor that perfectly captures the cottagecore aesthetic
Mini Teapot Shelf Trinket
Bring a touch of cozy cottage charm to your shelves with this hand-built clay teapot. Featuring delicate carved daisy motifs and a speckled oatmeal finish, this miniature vessel is perfect for holding trinkets or simply admiring.
Step-by-Step Tutorial
Materials
- Speckled buff stoneware clay (or polymer clay with faux speckles)
- Pottery wheel or slab roller (optional, can be hand-built)
- Needle tool
- Loop carving tools (small)
- Rib tool (kidney)
- Scoring tool (or serrated rib)
- Slip (clay mixed with water)
- Sponge
- Rolling pin
- Clear matte glaze
- Kiln (if using stoneware)
Step 1: Forming the Body
-
Prepare the Clay:
Begin by wedging your speckled clay thoroughly to remove air bubbles. This ensures a smooth surface for carving later. -
Shape the Main Vessel:
If throwing on a wheel, center a medium ball of clay and open it up. Pull the walls into a rounded, bulbous shape, keeping the opening at the top wide enough for a lid. -
Alternative Pinch Method:
For hand-building, create two equal pinch pots. Score and slip the rims, then join them together to form a hollow sphere. Paddle gently to smooth the seam. -
Refine the Shape:
Use a rib tool to smooth the exterior walls, creating a continuous curve from the base to the shoulder of the pot. -
Create the Opening:
If using the pinch pot method, cut a circular opening at the top for the lid. Smooth the rim with a damp sponge.
Cracking Handles?
If your handle cracks while drying, wrap the joint in plastic while leaving the rest exposed. This slows drying at the connection point, allowing moisture levels to equalize.
Step 2: Constructing Appendages
-
Pull the Handle:
Roll a coil or pull a strap of clay for the handle. Shape it into a ‘C’ curve that mimics the roundness of the pot’s body. -
Attach the Handle:
Score the attachment points on both the handle and the pot body. Apply slip generously and press firmly to join. Smooth the connection points with a modeling tool. -
Form the Spout:
Hand-build a small conical shape or throw a tiny spout on the wheel. Ensure the base of the spout matches the curvature of the pot. -
Attach the Spout:
Cut a hole in the pot body where the spout will sit. Score and slip the spout into place, ensuring the tip is level with the top rim. -
Make the Lid:
Create a small domed lid that fits snugly into the gallery or rim of your teapot. Add a tiny knob on top for easy lifting.
Make it Bloom
Before the final clear glaze, dab a tiny bit of white underglaze into the carved petal lines and wipe back the surface. This makes the daisy pattern pop!
Step 3: Carving and Details
-
Leather Hard Stage:
Cover the piece loosely with plastic and let it dry to a ‘leather hard’ state. This is crucial for crisp carving lines. -
Sketch the Daisies:
Lightly trace your floral design onto the surface using a needle tool. I like to place one large daisy centrally and scatter smaller ones around. -
Carve the Outlines:
Using a sharp needle tool or fine v-gouge, carve deep outlines for the petals and flower centers. -
Add Vine Details:
Carve sweeping, curved lines for stems and vines connecting the flowers, adding small spirals for a whimsical touch. -
Texture the Petals:
Inside each petal outline, carve very faint vertical lines to suggest texture and depth. -
Clean Up Burrs:
Once the carving crumbs are dry, gently brush them away with a soft brush. Don’t wipe with a wet sponge, or you re-fill the lines.
Step 4: Firing and Glazing
-
Bisque Fire:
Fire the completely dry piece in a kiln to bisque temperature (usually cone 04). -
Apply Glaze:
Dip or brush a clear matte glaze over the entire piece. The clear glaze will allow the natural speckles of the clay to show through. -
Clean the Foot:
Wipe the bottom of the teapot clean of any glaze to prevent it from sticking to the kiln shelf. -
Final Fire:
Fire the piece again to the maturity temperature of your clay (e.g., cone 5 or 6 for stoneware).
Now you have a charming, rustic teapot ready to act as a sweet shelf accent


What Really Happens Inside the Kiln
Learn how time and temperature work together inside the kiln to transform clay into durable ceramic.
Forest Floor Diorama Box
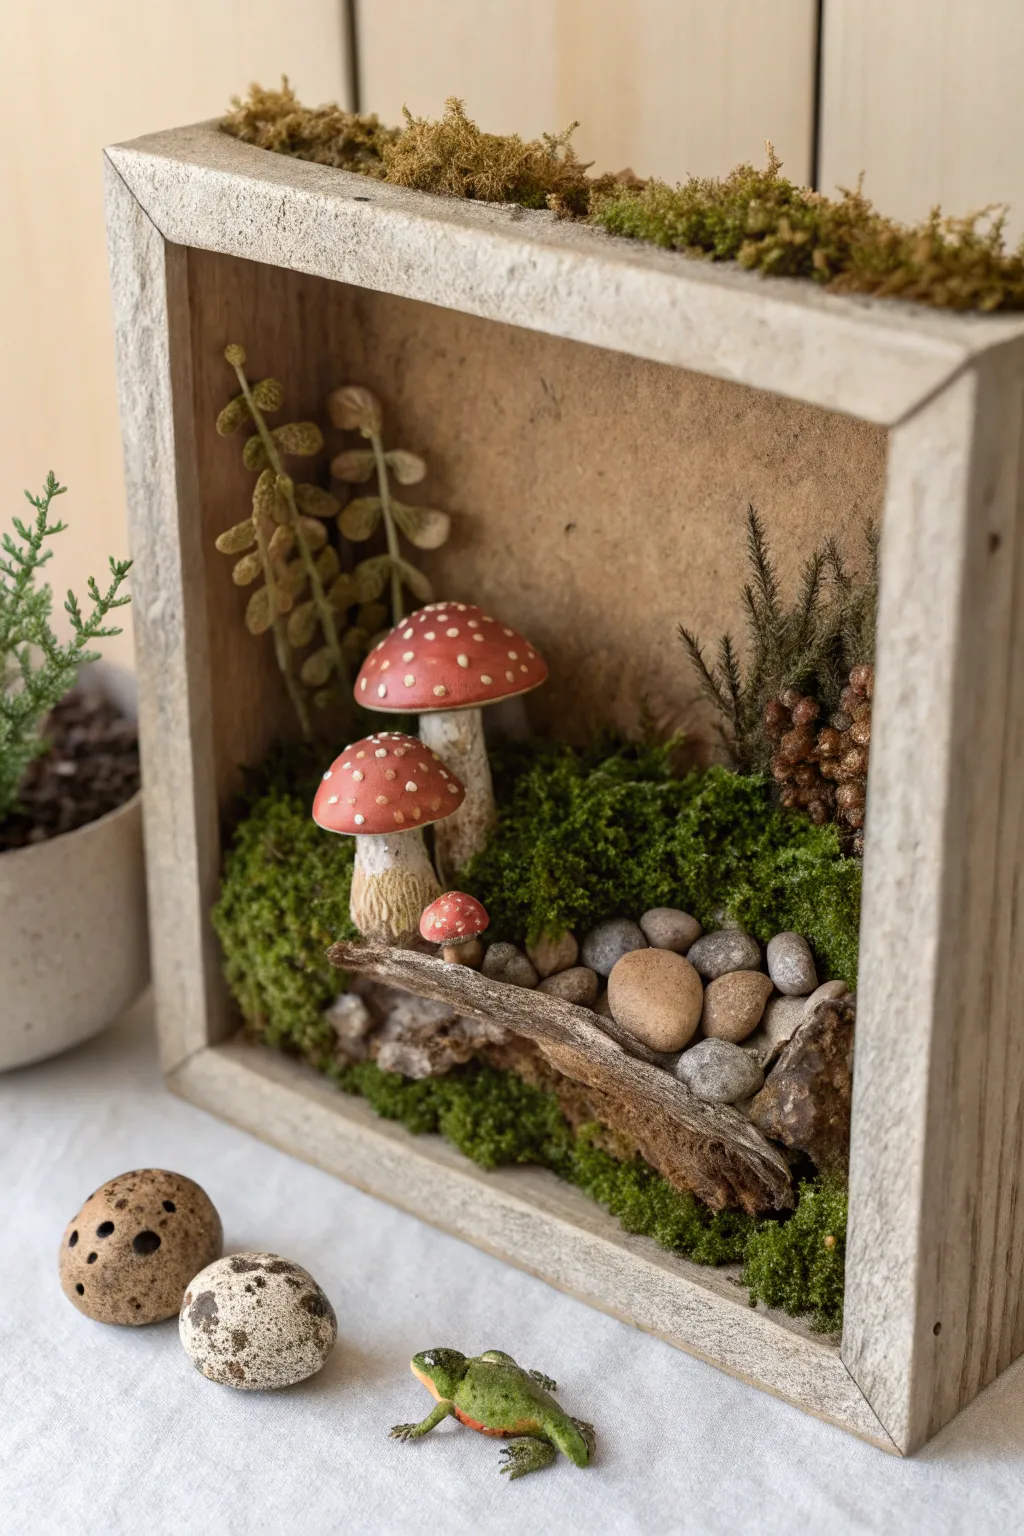
Capture the enchanting stillness of a woodland walk with this mixed-media shadow box featuring hand-sculpted clay mushrooms. This charming diorama brings a tiny slice of nature indoors, perfect for adding a touch of cottagecore magic to any shelf or mantel.
Step-by-Step Guide
Materials
- Rectangle wooden shadow box or deep frame
- Polymer clay (white, red, green, brown, black)
- Acrylic paints (various earth tones, cream, white)
- Detail paintbrushes
- Dried moss (sheet moss and reindeer moss)
- Small smooth river stones or pebbles
- Faux fern fronds or dried botanicals
- Small piece of driftwood or bark
- Hot glue gun and glue sticks
- Tacky craft glue
- Texture tool or toothbrush
- Sculpting tools (ball stylus, needle tool)
- Aluminum foil
Step 1: Sculpting the Mushrooms
-
Form the Stalks:
Condition your white polymer clay until pliable. Roll three cylinders of varying sizes to act as the mushroom stalks: one tall, one medium, and one tiny budding stalk. Widen the bases slightly so they stand independently. -
Add Texture:
Using a needle tool or an old toothbrush, gently scratch vertical lines and stippling into the lower half of the stalks to mimic the rough texture of a real fungus stem. -
Cap Creation:
Roll three balls of red clay corresponding to your stalk sizes. Flatten them gently into domes. For a more realistic look, press your thumb into the underside to create a concave space where the stalk will connect. -
Assembly and Bake:
Press the red caps firmly onto the white stalks. If the clay feels slippery, a tiny drop of liquid clay or ‘Bake and Bond’ helps. Bake the mushrooms according to your clay package’s temperature instructions (usually 275°F/135°C for 15-30 minutes).
Unruly Moss?
If your sheet moss keeps lifting up at the edges, use T-pins or small sewing pins to hold it in place while the glue sets. The moss will grow over and hide the pinheads.
Step 2: Creating the Frog & Eggs
-
Shape the Eggs:
While the mushrooms bake, roll two egg shapes from scrap clay or beige clay. These should be roughly the size of quail eggs. Smooth out any fingerprints. -
Sculpt the Frog:
Form a small green oval for the body. Attach tiny coils for the back legs, bending them at the knee, and smaller coils for the front legs. Use a small ball tool to indent eye sockets. -
Bake Accessories:
Bake the eggs and frog once the mushrooms are done. Let everything cool completely before painting.
Step 3: Painting & Detailing
-
Wash the Stalks:
Mix a watery wash of brown acrylic paint. Brush it over the white stalks and immediately wipe most of it off with a paper towel. This leaves dark pigment in the textured crevices. -
Paint the Spots:
Using a fine-point brush or a toothpick, dot cream or white paint onto the red mushroom caps. Vary the size of the dots for a natural appearance. -
Detail the Eggs:
Paint the clay eggs with a base of cream or beige. Once dry, splatter or dot them with dark brown and black paint to mimic speckles. -
Little Frog Details:
Paint the frog’s belly a lighter green or yellow. Add tiny black dots for eyes and subtle texture on the back.
Level Up: Lit from Within
Hide a tiny battery-operated fairy light pack behind the moss in the back corner. Thread one or two LEDs up behind the mushrooms to give the forest floor a magical evening glow.
Step 4: Assembling the Diorama
-
Prepare the Box:
If your wooden box is unfinished, you might want to give the exterior a light whitewash to match the rustic aesthetic. Glue a thin layer of moss to the top exterior rim for extra texture. -
Set the Groundwork:
Apply a generous amount of hot glue to the bottom interior of the box. Press down a layer of sheet moss, ensuring it covers the wood completely. -
Position the Wood:
Glue your piece of driftwood or bark diagonally across the bottom foreground. This creates a natural ‘ledge’ for your scene. -
Lay the Stone Path:
Arrange your small river stones behind the driftwood, nestled into the moss. I like to glue them in a loose pile to suggest a dried riverbed or rocky outcrop. -
Plant the Flora:
Glue taller faux fern fronds or dried weeds into the back corners of the box. They should tower slightly over where your mushrooms will sit. -
Place the Mushrooms:
Apply glue to the base of your clay mushrooms. Nest the two larger ones behind the driftwood but in front of the ferns. Place the tiny mushroom directly on the driftwood or nestled in the stones. -
Final Touches:
Fill any visible gaps with small tufts of reindeer moss. Arrange the speckled eggs and the tiny frog outside the box as interactive styling elements.
Display your beautiful forest creation on a sunlit table where the shadows can play across the textures