Whenever I want a project that feels extra meaningful, I reach for couple clay ideas—they’re sweet, personal, and honestly just fun to make side by side. These are my favorite pair-themed designs that turn polymer clay or air-dry clay into little keepsakes you’ll actually want to display or carry around.
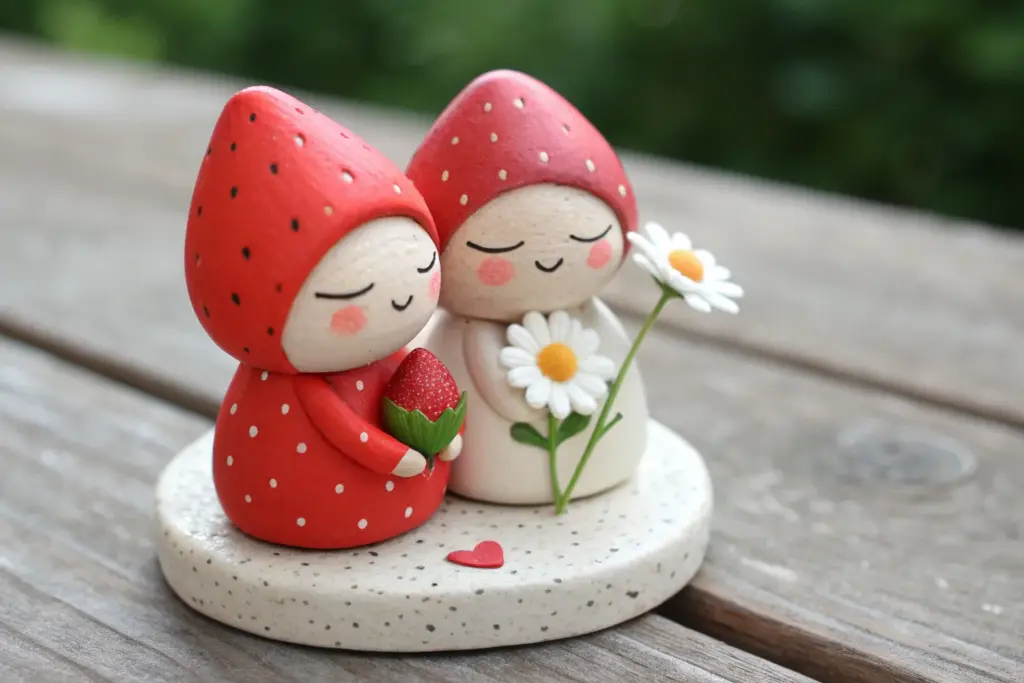
Mini Couple Figurines Hugging
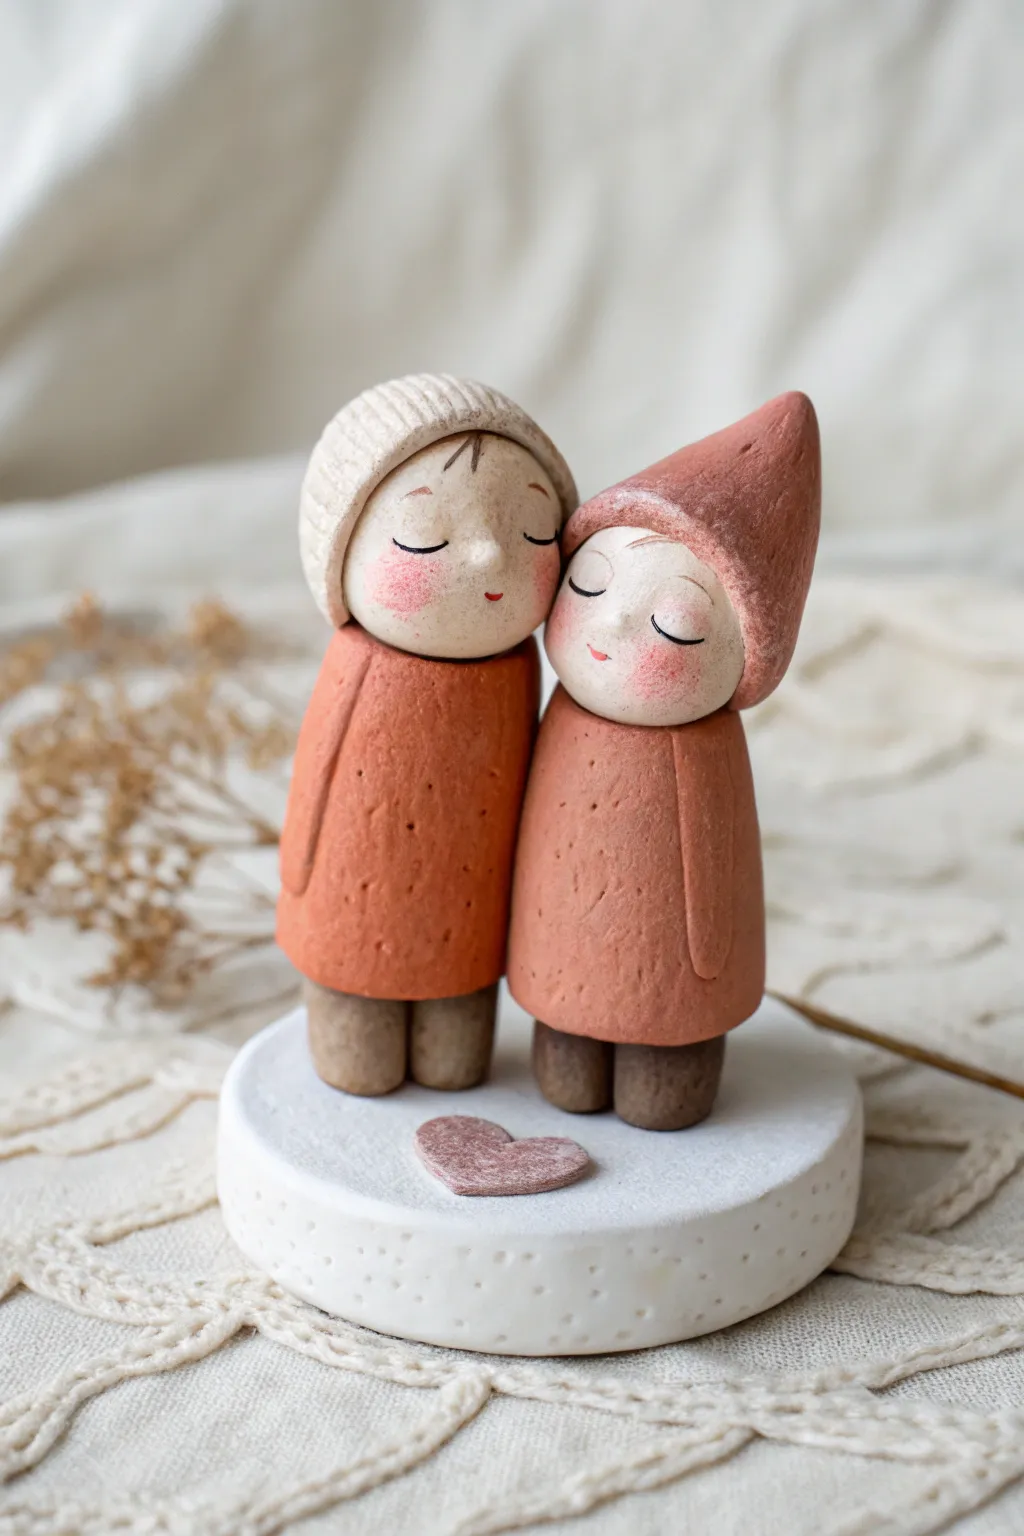
Capture the warmth of a gentle embrace with these adorable miniature figurines standing on a snowy white base. With their textured outfits and sweet, sleepy expressions, this project is perfect for adding a touch of romance to your shelf or gifting to a loved one.
Step-by-Step Tutorial
Materials
- Polymer clay (white, terracotta/rust orange, beige/skin tone, brown)
- Circular clay cutter (approx. 3 inches)
- Modeling tools (needle tool, ball stylus)
- Texture tools (coarse sponge, toothbrush, or crumpled foil)
- Acrylic paints (black, pink, white)
- Fine detail paintbrush
- Rolling pin
- Oven for baking (as per clay instructions)
- Strong craft glue or liquid clay
Step 1: Fearsome Foundation
-
Prepare the Base:
Condition a large ball of white polymer clay and flatten it into a thick pancake, about 0.5 inches high. Use your circular cutter to create a clean, perfect round base for your figures. -
Texture the Snow:
Using a needle tool, poke random small holes into the side of the white base to simulate porous stone or snow. For the top surface, gently tap a crumpled ball of foil or a stiff toothbrush over the clay to give it a subtle, realistic texture. -
Add the Heart:
Create a tiny, flat heart from a pinch of terracotta clay mixed with a bit of white. Place it gently on the front center of the base, pressing it down lightly so it bonds.
Step 2: Shaping the Bodies
-
Create the Torsos:
Roll two cylinders of terracotta clay. One should be slightly taller (about 2 inches) and the other slightly shorter (about 1.75 inches). Taper them slightly toward the top to form a gentle cone shape for the bodies. -
Texture the Coats:
To mimic the look of felted wool or heavy fabric, gently press a coarse sponge or a piece of sandpaper against the entire surface of the coats. This rough texture adds so much character compared to smooth clay. -
Form the Arms:
Roll thin snakes of the same terracotta clay for arms. Attach them to the sides of the bodies. Since they are ‘hugging’ (or standing close), position the inner arms so they look like they disappear between the figures, and the outer arms resting gently at their sides. -
Add the Shoes:
Roll four small balls of brown clay for the feet. Flatten them slightly into ovals and attach two to the bottom of each body coat. I find it helps to pre-bake these body sections for 10 minutes to firm them up before adding heads, but that’s optional.
Fixing “Fingerprint” Texture
If you accidentally smooth out your textured coats while handling them, don’t worry. Just re-tap the area with your toothbrush or foil ball right before baking to restore that cozy fabric look.
Step 3: Heads and Hats
-
Roll the Heads:
Use the beige skin-tone clay to roll two smooth, equal-sized spheres. Place them onto the necks of your prepared bodies. -
Make the Beanie:
For the taller figure, flatten a ball of white clay into a disc. Drape it over the head. Use a needle tool to press vertical lines all around the rim to simulate a rib-knit texture. -
Sculpt the Pointy Hat:
For the shorter figure, shape a cone of terracotta clay. Use your thumb to hollow out the bottom slightly so it fits snugly over the head. Curve the tip just a little for a whimsical look. -
Texture the Hats:
Just like the coats, add a light texture to the hats using your sponge or foil tool, avoiding the skin areas. -
Position the Couple:
Place the two figures onto the white base. Use a dab of liquid clay or scratch the surfaces to ensure they stick. Tilt their heads slightly inward so they are touching affectionately.
Level Up: Seasonal Vibes
Customize them for Christmas by painting the hats red and adding tiny white clay pom-poms, or make them a wedding topper by using white clay for the outfits and adding a tiny veil.
Step 4: Finishing Touches
-
Bake the Piece:
Bake the entire sculpture according to your polymer clay package directions (usually 275°F/135°C for 15-30 minutes). Let it cool completely before moving to paint. -
Paint the Faces:
Using your finest brush and diluted black acrylic paint, carefully paint two crescents for closed, sleeping eyes on each face. Add tiny eyebrows above them. -
Add Rosy Cheeks:
Dip a dry brush into a tiny amount of pink paint (or use soft pastel shavings). Dab most of it off on a paper towel, then gently stipple the paint onto the cheeks for a blushing effect. -
Final Details:
Add a tiny dot of red or pink for the mouth on each figure. If you want a slight shine, you can glaze just the heart on the base, leaving the rest of the sculpture matte for a rustic feel.
Now you have a heartwarming keepsake that freezes a tender moment in time forever


Hand-Holding Couple Figurines
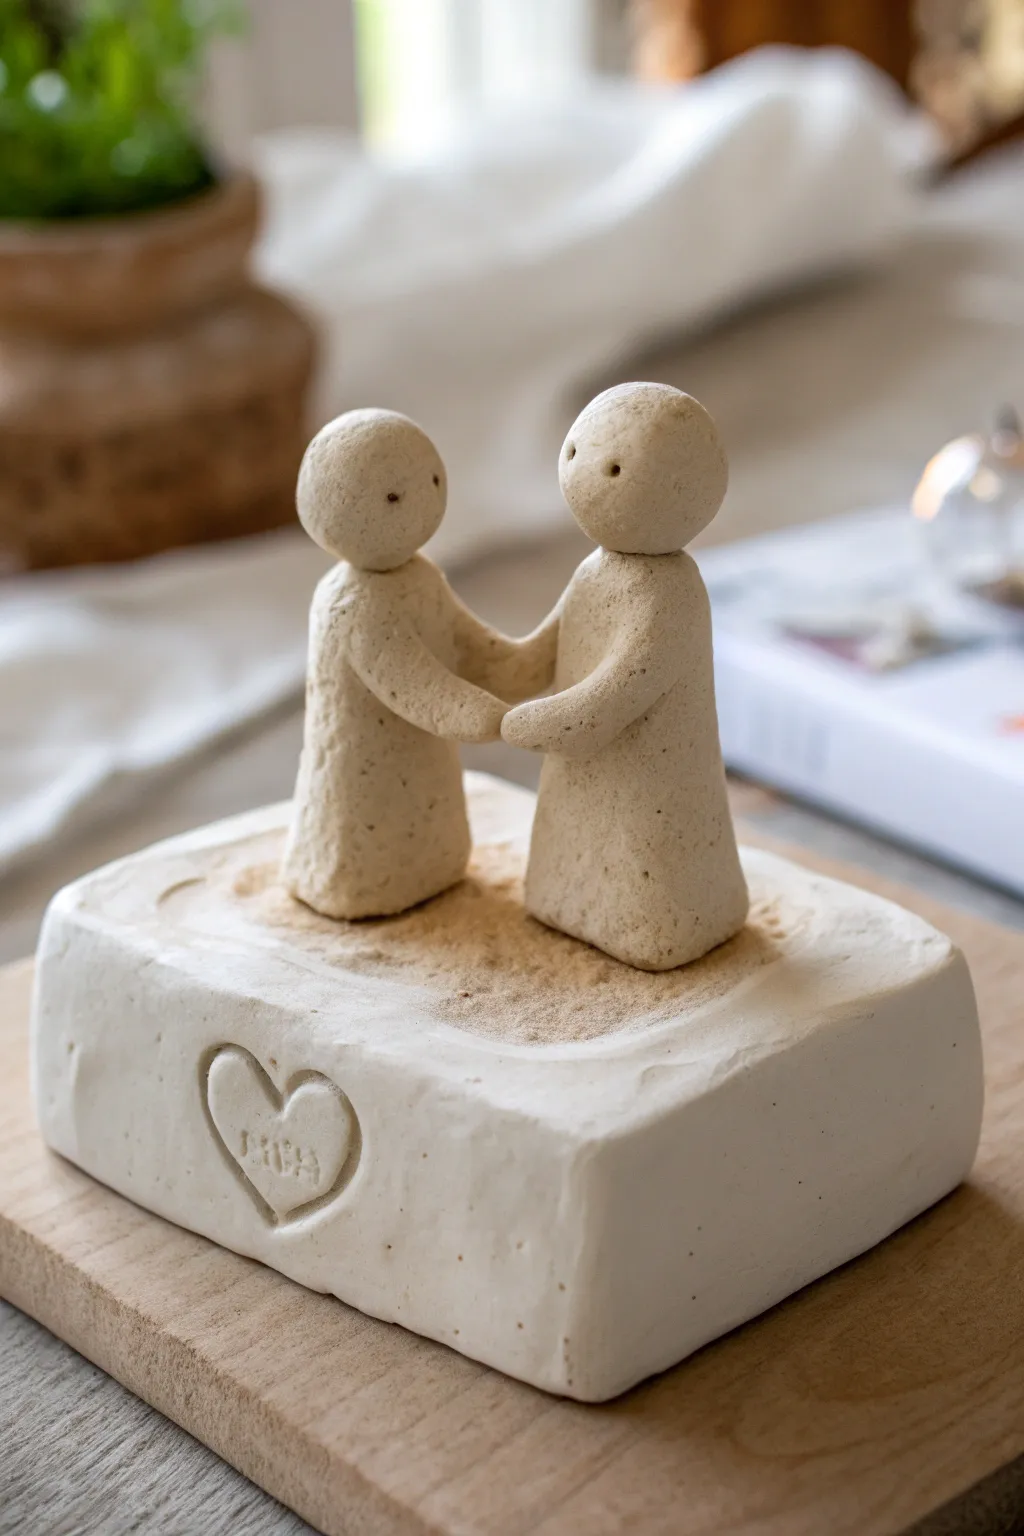
Create a heartwarming tribute to connection with this minimalist sculpture featuring two stylized figures holding hands. The piece uses a natural, textured clay finish for a rustic, heartfelt look that captures a quiet moment of togetherness.
Step-by-Step
Materials
- Stone-effect air-dry clay (or natural unbleached polymer clay)
- Small rolling pin
- Modeling tool with a small ball end
- Needle tool or toothpick
- Smoothing sponge
- Water slip (for joining)
- Small heart-shaped stamp (optional)
- Rectangle cookie cutter (or knife)
Step 1: Forming the Base
-
Prepare the slab:
Begin by wedging a large ball of clay to remove air bubbles. Roll it out into a thick slab, approximately 1 inch deep, to serve as a substantial foundation for your figurines. -
Cut the shape:
Use a rectangular cutter or a craft knife to cut a clean rectangle measuring roughly 3 inches by 4 inches. Gently soften the four corners with your fingertips so they are rounded rather than sharp. -
Add texture:
While the clay is still fresh, gently dab the surface with a coarse sponge or crumpled foil to give it a slightly organic, stony texture. -
Imprint the heart:
On the front vertical face of the base, press a small heart shape into the clay. If you don’t have a stamp, carefully carve the outline with a needle tool.
Step 2: Creating the Bodies
-
Roll the cones:
Take two pieces of clay of equal size. Roll each piece into a smooth cone shape with a flattened bottom. These should stand firmly on their own, roughly 2.5 to 3 inches tall. -
Shape the robes:
Gently tap the base of each cone on your work surface to flatten it. Smooth the sides upward with your fingers to create a seamless, robe-like silhouette. -
Check proportions:
Place the two cones side-by-side on your work surface to ensure they are proportionate to each other and fit comfortably on the base you made earlier.
Pro Tip: Hidden Strength
Insert a short piece of toothpick or wire into the neck connection before adding the head. This acts as an internal spine and prevents the head from falling off.
Step 3: heads and Arms
-
Form the heads:
Roll two spheres of clay, approximately 0.75 inches in diameter. I find it helpful to roll them in my palm until completely crack-free. -
Attach the heads:
Score the top of the body cones and the bottom of the head spheres. Apply a dab of water or slip, then press the heads firmly onto the bodies. Blend the clay at the neck seam slightly for a stronger bond. -
Add facial features:
Using a toothpick or a small needle tool, poke two tiny holes for eyes on each face. Keep them simple and small to maintain the minimalist aesthetic. -
Create the arms:
Roll two small sausage shapes for the arms. These should be long enough to reach from the shoulder area to meet in the middle between the figures. -
Position the reach:
Attach one arm to each figure’s shoulder area using the score-and-slip method. Blend the shoulder seam into the body so it looks like one continuous piece.
Level Up: Personalized Initials
Before the clay dries, gently carve the couple’s initials or a significant date inside the heart symbol on the base for a truly custom gift.
Step 4: Assembly & Finishing
-
Position on base:
Score the bottom of both figures and the top surface of the base where they will stand. Apply slip and press the figures down firmly, ensuring they are facing each other. -
Connect the hands:
Gently bend the arms forward until the ends touch. Mash the clay at the ‘hands’ together slightly to form a single joined mass, symbolizing holding hands. -
Dust the surface:
To mimic the sandy look in the photo, you can lightly dust the base around their feet with dry clay powder or a bit of brown pastel dust before the clay dries. -
Final smoothing:
Dip your finger in water and smooth out any accidental fingerprints or rough seams, paying special attention to the neck and shoulder areas. -
Dry slowly:
Let the piece dry slowly away from direct heat or sunlight to prevent cracking, especially at the delicate arm connection points.
Once fully dry, you will have a timeless keepsake that celebrates simple connection


Split Heart Keychain Pair
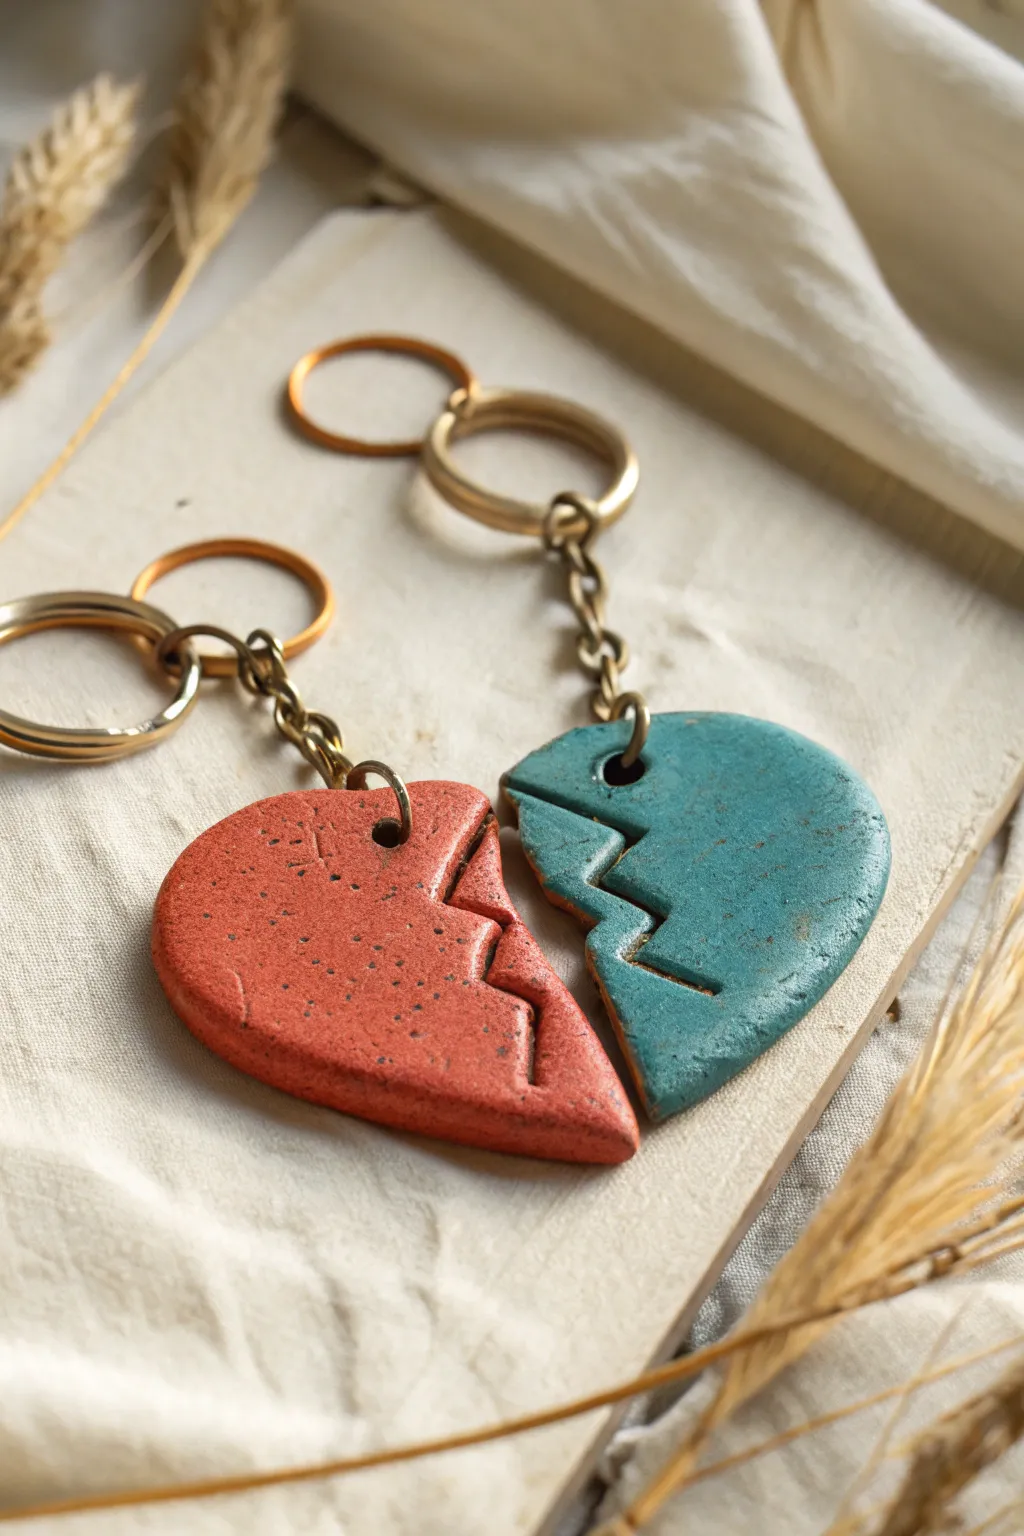
These charming keychains symbolize connection with a rustic, handmade aesthetic featuring distinct terracotta and teal halves. The textured, speckled finish gives them an organic, earthy feel perfect for a meaningful couple’s gift.
Detailed Instructions
Materials
- Polymer clay (terracotta or brick red)
- Polymer clay (teal or turquoise)
- Black pepper or dried coffee grounds (for speckling)
- Rolling pin or clay machine
- Heart-shaped cookie cutter (medium size)
- X-Acto knife or sharp clay blade
- Small circular cutter or straw (for jump ring holes)
- Gloss glaze or polyurethane varnish (optional)
- 2 Gold keyrings with chains and screw eyes
- 2 Gold jump rings
- Needle-nose pliers
- Oven and baking sheet
Step 1: Clay Preparation
-
Mix the Speckles:
Begin by conditioning your terracotta and teal clays separately. To achieve that organic, stone-like texture seen in the photo, knead a pinch of ground black pepper or used loose coffee grounds into each ball of clay until evenly distributed. -
Roll to Thickness:
Roll out both clay colors to a uniform thickness, ideally around 1/4 inch (6mm). You want them thick enough to be durable as keychains but not too heavy. -
Texture the Surface:
For that slightly weathered look, lightly press a piece of sandpaper or a crumpled ball of aluminum foil onto the surface of the clay sheets. This removes the synthetic smoothness of the polymer.
Step 2: Shaping the Hearts
-
Cut the Main Shape:
Use your heart-shaped cutter to punch out one heart from the red clay and one from the teal clay. If you don’t have a cutter, you can trace a paper template and cut it out with your blade. -
Create the Jagged Split:
This is the crucial matching step. Take your blade and cut a zig-zag line down the center of the red heart. Try to make sharp, deliberate angles rather than curves. -
Use the Template:
To ensure the teal half fits perfectly, separate the red halves. Place one red half gently on top of your teal heart to use as a cutting guide, then trace that jagged line with your knife carefully. -
Separate and Pair:
Remove the excess clay. You should now have two split hearts. For this project, we are keeping one red half and the opposite teal half to create two complete, multi-colored sets if desired, or just use one half of each color for a single mixed pair. -
Pierce the Holes:
Using a small straw or a dedicated clay hole cutter, punch a hole near the top outer lobe of each heart half. Make sure the hole is not too close to the edge to prevent breakage later. -
Smooth the Edges:
Gently run your finger along the cut edges. I prefer to soften the sharpness just slightly so it feels comfortable in the hand, but keep the jagged visual crisp.
Clean Cuts Pro Tip
Before cutting your zig-zag line, dip your blade in a little cornstarch or water. This prevents dragging and keeps those jagged edges sharp and distinct.
Step 3: Baking and Finishing
-
Bake the Clay:
Place your clay pieces on a parchment-lined baking sheet. Bake according to your specific brand’s package instructions (usually 275°F/135°C for 15-30 minutes). -
Cool Down:
Let the pieces cool completely on the baking sheet. They will be slightly soft when hot and harden as they cool. -
Optional Glazing:
If you want a slight sheen like the photo, apply a very thin layer of satin or gloss varnish. However, the matte, textured look is also very appealing without glaze. -
Prepare Hardware:
Open your gold jump rings using two pairs of pliers. Twist the ends away from each other (front to back) rather than pulling them apart horizontally to maintain the circle shape. -
Attach the Jump Rings:
Thread the open jump ring through the hole in your clay piece. -
Connect the Chain:
Before closing the jump ring, slide on the bottom link of the keychain chain. Close the jump ring securely by twisting it back into place. -
Final Check:
Wiggle the hardware to ensure everything is secure and the clay moves freely on the ring. Your rustic bond is now ready to be shared.
Level Up: Initials
Use tiny letter stamps to impress your partner’s initial into your half of the heart before baking for a truly personalized touch.
Give one half to your favorite person and keep the other as a reminder of your bond whenever you grab your keys


Matching Ring Dish Set for Two

Create a sweet, unifying set of ring dishes that feature complementary symbols—a star and a heart—pressed into dreamy speckled clay. Their organic, handmade rims and warm beige tones make them a perfect bedside accessory for couples.
Step-by-Step Guide
Materials
- Speckled stoneware clay (beige/cream firing)
- Small rolling pin
- Circle cutter or bowl (approx. 4-5 inches diameter)
- Smoothing sponge
- Carving tool or needle tool
- Small heart and star stamps (or create paper stencils)
- Clear matte glaze
- Gold luster or brown underglaze (optional for inlay)
- Small paintbrush
- Canvas working surface
Step 1: Forming the Base
-
Prepare the Clay:
Cut a manageable block of speckled stoneware clay. Knead it wedging style to remove air bubbles, ensuring the speckles are evenly distributed throughout the mass. -
Roll the Slabs:
Roll out the clay onto your canvas surface until it is an even thickness, roughly 1/4 inch thick. I like to flip the slab over halfway through rolling to prevent it from sticking to the canvas. -
Cut the Circles:
Using a circle cutter or a small bowl as a template, cut out two identical circles. Remove the excess clay and set it aside. -
Smooth the Edges:
Dip your finger or a small sponge in water and run it gently along the cut edge of the circle to soften the sharp angle created by the cutter. -
Shape the Rim:
Gently pinch the edges of the circle upward to create a shallow rim. You want an organic look, so it doesn’t need to be perfectly mechanically straight, but try to keep the height consistent around the perimeter. -
Refine the Form:
Use a slightly damp sponge to smooth out any fingerprints left from pinching the rim. Ensure the transition from the flat bottom to the raised wall is a smooth curve.
Warped Rims?
If your rims warp while drying, weight the center of the dish down with a small bean bag or sandbag during the drying phase to keep the floor perfectly flat.
Step 2: Detaling & Decoration
-
Center the Design:
Locate the exact center of each dish visually. You can mark a tiny dot with a needle tool if it helps you align your stamps. -
Imprint the Heart:
For the ‘Hers’ dish, gently press a heart-shaped stamp into the center. If you don’t have a stamp, use a needle tool to lightly scratch the outline closer to the surface, then deepen the line carefully. -
Create the Star:
For the ‘His’ dish, press a star stamp into the center. Alternatively, use your needle tool to carve a five-point star matching the style of the heart. -
Clean Up Burrs:
Once the clay has stiffened slightly (leather hard), use a soft brush or fingertip to gently rub away any little crumbs of clay displaced by the stamping or carving. -
Dry Slowly:
Place both dishes on a flat board. Cover them loosely with plastic for the first day to let humidity equalize, then uncover to let them dry completely bone dry.
Step 3: Firing & Glazing
-
Bisque Fire:
Load the bone-dry dishes into the kiln and fire to your clay body’s bisque temperature (usually cone 04 or 06). -
Inlay Color (Optional):
To make the symbols pop like in the image, paint a small amount of brown underglaze or a touch of gold luster into the recessed lines of the star and heart. -
Wipe Back Excess:
If using underglaze, use a damp sponge to wipe the surface clean, leaving the color trapped only inside the engraved lines. -
Apply Clear Glaze:
Dip the entire dish into a clear matte or satin glaze. This will seal the clay and make the natural speckles shine without obscuring the clay body color. -
Final Firing:
Fire the pieces a second time to the glaze temperature recommended for your stoneware (often Cone 5 or 6). Allow the kiln to cool completely before removing your matching set.
Rim Dips
Use your thumb to gently press down one section of the rim intentionally. This ‘thumb dent’ acts as a perfect resting spot for a ring band or small spoon handle.
Place these lovely matching dishes on your nightstands to keep your treasures safe and sound

The Complete Guide to Pottery Troubleshooting
Uncover the most common ceramic mistakes—from cracking clay to failed glazes—and learn how to fix them fast.
Bear Couple Holding One Heart
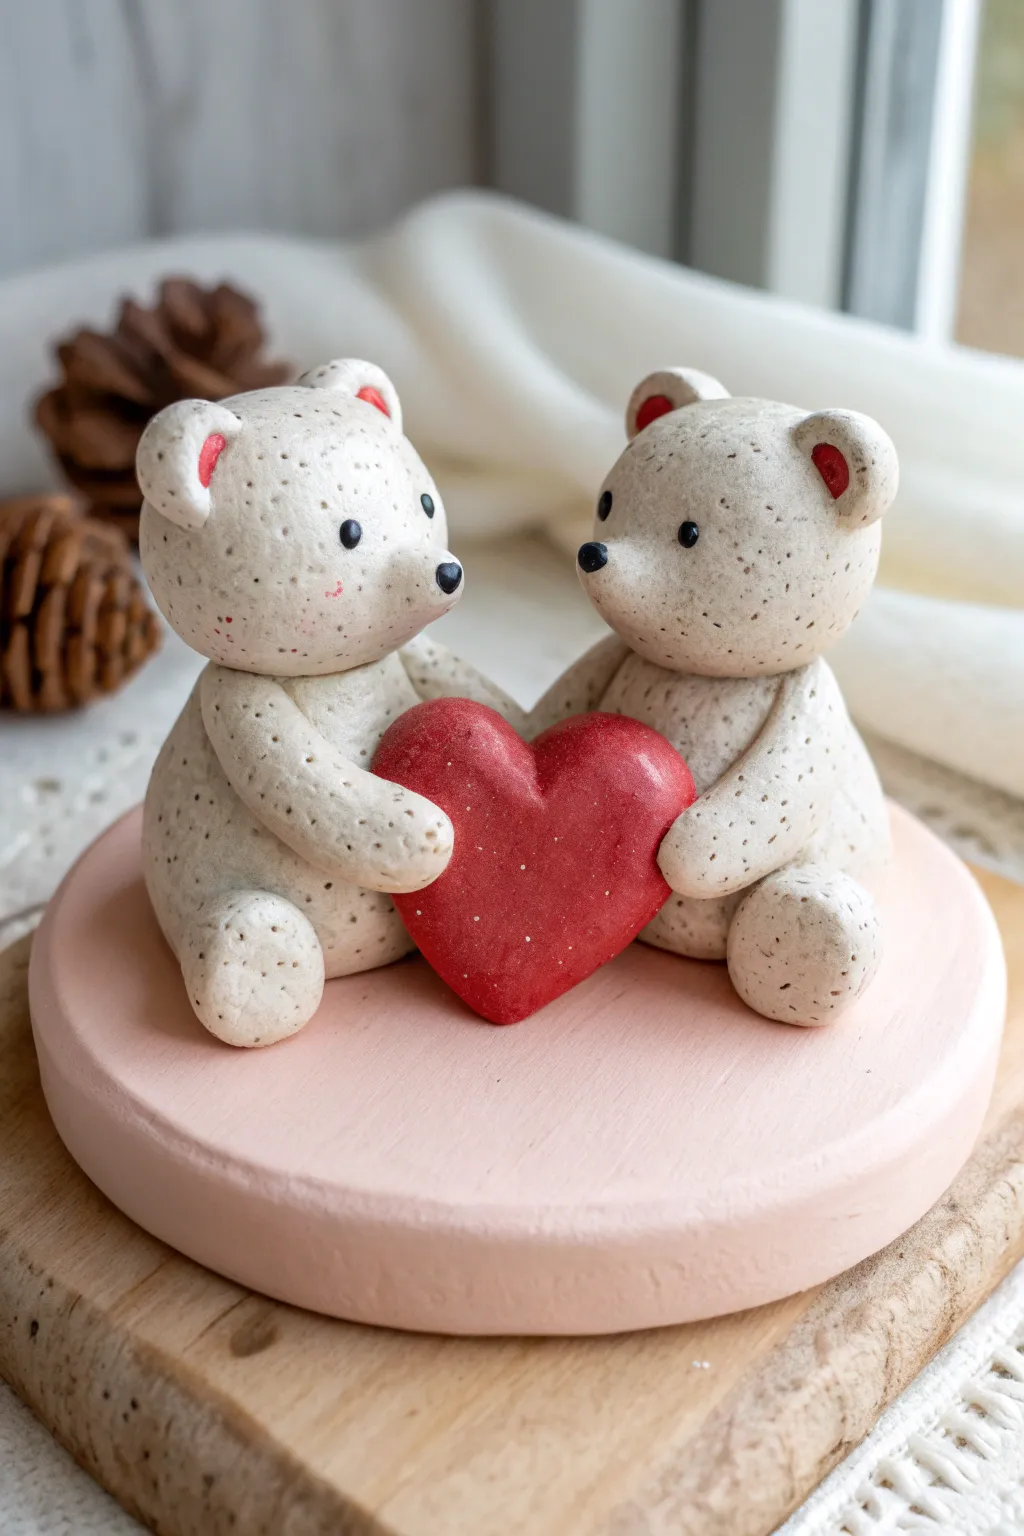
These two adorable bears share a single red heart, making for a perfect symbol of togetherness. The speckled ‘cookies and cream’ clay texture adds a cozy, rustic charm to this simple yet heartwarming figurine.
Detailed Instructions
Materials
- Polymer clay (Stone/Granite effect for bears, Red for heart, Pink for base)
- Black polymer clay or acrylic paint for eyes/noses
- Rolling pin
- Circle cutter (approx. 3-4 inches)
- Needle tool or toothpick
- Ball stylus tool
- Liquid clay (TLS) or strong craft glue
- Soft pastel chalks (pink)
- Small paintbrush
- Oven (for baking)
Step 1: Setting the Scene
-
Prepare the base:
Start by conditioning your pale pink clay until it’s soft and pliable. Use a rolling pin to flatten it to a thickness of about 1/4 inch. -
Cut the disc:
Use your large circle cutter to stamp out a clean round base. Smooth the edges with your finger to remove any sharp cuts from the tool. -
Texture the bears:
If you don’t have pre-speckled stone effect clay, take white clay and mix in a generous amount of ground black pepper or dried vanilla bean specks. Knead thoroughly until the specks are evenly distributed.
Clean Clay Tip
White clay picks up dust instantly. Keep a pack of baby wipes nearby and clean your hands and tools thoroughly before handling lighter colors.
Step 2: Forming the Bears
-
Create the bodies:
Roll two equal-sized balls of the speckled clay into teardrop shapes. These should be plump at the bottom for stability. -
Position the bodies:
Place the two teardrops onto the pink base, facing slightly toward each other but leaving a small gap in the center for the heart. Press them down gently to adhere. -
Shape the heads:
Roll two slightly smaller spheres for the heads. Gently press them onto the top of the body shapes. I find it helpful to insert a small piece of toothpick or wire between the head and body for extra structural support. -
Add snoots:
Form two tiny flattened ovals from the speckled clay and press them onto the face area to create muzzles. -
Attach ears:
Roll four tiny balls of speckled clay. Press them onto the sides of the heads using a ball tool to create the inner ear indentation. -
Add red details:
Take tiny dabs of red clay and press them into the ear indentations for a pop of color.
Step 3: The Heart of the Matter
-
Shape the heart:
Condition a piece of red clay and shape it into a puffy heart. Ensure it is sized proportionally to fit between the two bears. -
Place the heart:
Position the heart directly between the bears’ chests. Use a tiny dab of liquid clay on the back of the heart to help it stick to the bodies.
Fingerprint Fixer
If you see fingerprints on your raw clay, lightly brush the surface with a little baby oil or cornstarch before baking to smooth them out completely.
Step 4: Limbs and Details
-
Form the legs:
Create four chubby logs for legs. Attach the bottom legs extending outward from the base of the bodies. -
Attach the arms:
Create two arm shapes. Attach one arm to each bear, curving them inward so their paws rest gently on the sides of the red heart, as if holding it together. -
Facial features:
Roll incredibly tiny balls of black clay for the eyes and noses. Press them gently onto the faces. Alternatively, you can paint these on after baking. -
Blushing cheeks:
Scrape a little pink pastel chalk into a powder. Use a soft brush to gently dust rosy cheeks onto both bears. -
Add freckles:
If your clay texture isn’t distinct enough, use a toothbrush with thinned brown or black acrylic paint to gently flick speckles onto the unbaked clay.
Step 5: Finishing Up
-
Bake:
Preheat your oven according to your clay manufacturer’s instructions (usually around 275°F or 130°C). Bake the piece for 30 minutes per 1/4 inch of thickness. -
Cool down:
Allow the piece to cool completely in the oven with the door cracked open to prevent thermal shock cracks. -
Seal:
Once cool, apply a matte varnish to the bears and a gloss varnish to the heart and eyes for contrast.
Now you have a charming keepsake that celebrates love in the sweetest way possible
Cat Couple Cuddle Sculpture
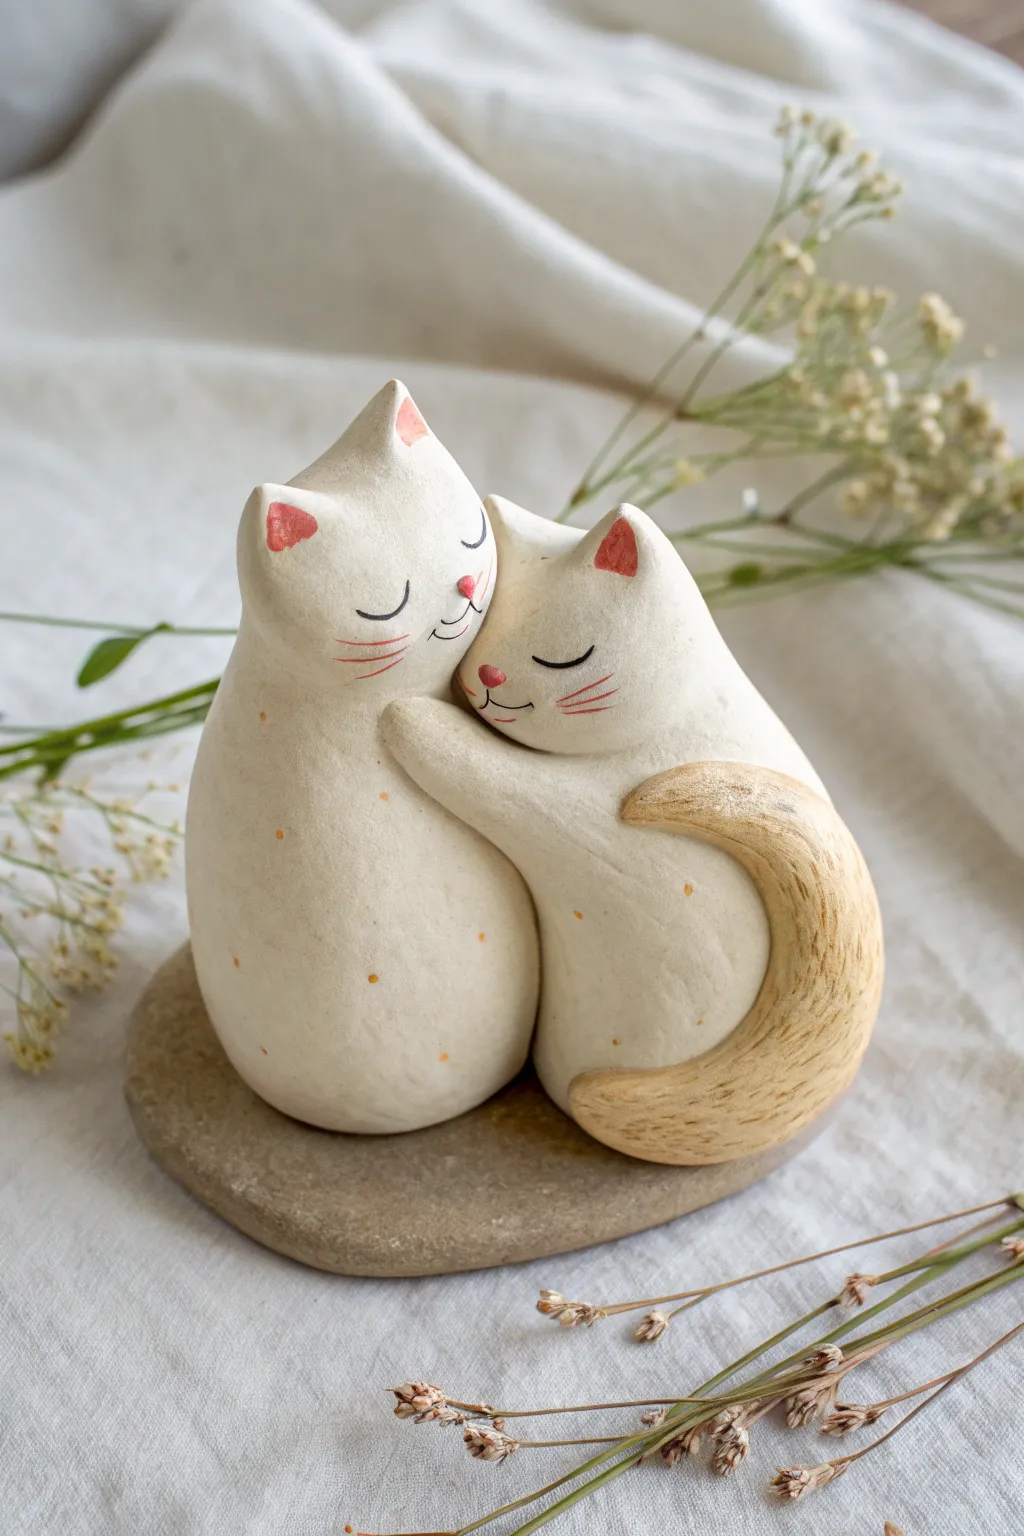
These charming, rustic clay cats share a warm embrace, creating a heartwarming sculpture perfect for a wedding gift or shelf decor. With their simplified forms and textured creamy finish, they offer a forgiving project for sculptors of any skill level.
How-To Guide
Materials
- Air-dry clay or polymer clay (white or cream)
- Small round river stone (flat top)
- Sculpting tools (needle tool, smoothing tool)
- Acrylic paints (black, soft pink, burnt orange)
- Fine detail paintbrush
- Textured sponge or old toothbrush
- Water cup (for smoothing)
- Matte varnish or sealant
- Strong craft glue (e.g., E6000)
Step 1: Shaping the Bodies
-
Prepare the base forms:
Start with two balls of clay, one slightly larger than the other. Roll them into smooth, elongated teardrop or pear shapes. The taller pear will be the left cat, and the shorter, rounder one will be the right cat. -
Create the flat bottoms:
Press the wide bottom of each pear shape firmly against your work surface. They need to stand independently but also nestle closely together. -
Position the embrace:
Place the two forms side-by-side on your stone base to check the fit. Lean the shorter cat slightly into the taller one, so their ‘cheeks’ will eventually touch. This creates the intimacy of the cuddle. -
Refine the heads:
Pinch the top of each pear shape gently to define the ear areas. Unlike realistic cats, these have simple triangular points integrated directly into the head shape, rather than separate attached ears.
Seamless Connections
When attaching arm clay to body clay, always score (scratch) both surfaces and add a dab of water or slip. This ‘velcro’ effect ensures parts don’t pop off later.
Step 2: Sculpting the Arms and Tail
-
Form the hugging arm:
Roll a small snake of clay for the right cat’s arm. Flatten it slightly and attach it across the front of the taller cat’s chest. Blend the shoulder seam smoothly into the shorter cat’s body so it looks like one continuous piece. -
Make the tail:
Create a thicker, tapered snake for the tail. Attach it to the lower back of the right cat, curving it upwards along the side. It should curl nicely around the hip area. -
Add texture to the tail:
Using a needle tool or stiff comb, scratch fine lines along the length of the tail to simulate fur texture. This contrasts beautifully with the smooth bodies. -
Refine the surface:
Dip your finger in a little water and smooth out any fingerprints or unwanted bumps on the main bodies. I aim for a matte, slightly organic finish rather than perfect porcelain smoothness.
Step 3: Painting and Assembly
-
Initial drying:
Allow your clay figures to dry completely according to the package instructions. This usually takes 24-48 hours for air-dry clay. -
Base coat (optional):
If your clay isn’t already a warm cream color, paint the entire sculpture (except the tail) with a mix of white and a tiny drop of yellow ochre acrylic. -
Detail the faces:
Using your finest brush and black paint, draw two downward-curving crescents for closed, sleeping eyes on each cat. Add faint whiskers and a tiny smile line. -
Add pink accents:
Dilute some pink paint with water to make a glaze. Gently dab it inside the triangular ears and on the tiny nose area for a soft, blushed look. -
Paint the tail:
Paint the textured tail with a light brown or sandy beige color. While the paint is wet, wipe a little off the top ridges to highlight the fur texture. -
Speckle effect:
Dip an old toothbrush or stiff brush into diluted orange paint. Run your thumb across the bristles to flick tiny speckles onto the cats’ bodies. This gives them a ceramic, stoneware appearance. -
Seal the piece:
Once all paint is dry, coat the cats with a matte varnish to protect the surface and unify the finish. -
Final mounting:
Apply a strong adhesive to the bottom of the cats and press them firmly onto the flat river stone base. Hold in place until the glue begins to set.
Personalize the Pair
Customize the cats to match real pets by changing the speckle color to grey or black, or paint specific patch patterns instead of the general speckling.
Now you have a sweet, permanent embrace to display on your shelf or give to a loved one


What Really Happens Inside the Kiln
Learn how time and temperature work together inside the kiln to transform clay into durable ceramic.
Penguin Pair on a Shared Base

Create this heartwarming scene of two huddled penguins sharing a frosty blue base, perfect for winter decor or a handmade gift. These charming figures feature textured scarves and delicate heart details that make them an ideal project for couples or Valentine’s Day.
Step-by-Step Guide
Materials
- White or cream polymer clay
- Light brown/beige polymer clay (for scarves)
- Dark grey or taupe polymer clay (for heads/wings)
- Light blue polymer clay
- Small heart cutter
- Snowflake plunger cutter or mold
- Needle tool or toothpick
- Small ball tool
- Texture sheet (knitted pattern) or fabric scrap
- Black glass beads or black clay for eyes
- Acrylic roller
- Oven for baking
Step 1: Creating the Base
-
Condition and Roll the Base:
Begin by conditioning the light blue clay until it is soft and pliable. Roll it out into a thick, even slab, approximately 1/4 inch thick. You want it substantial enough to support the figures. -
Shape the Oval:
Use a large oval cutter or hand-cut an oval shape to serve as the ‘ice’ platform. Smooth the edges with your finger to remove any sharp cutting lines. -
Add Decorative Details:
Cut out a tiny white snowflake and a few miniature white hearts. Gently press them onto the blue base in the foreground. I like to add a slightly larger textural heart in the center made from scrap clay.
Texturing Trick
Don’t have a texture sheet? Press a clean piece of actual denim or a coarse kitchen sponge into the scarf clay to mimic wool instantly.
Step 2: Forming the Penguins
-
Shape the Bodies:
Roll two balls of white or cream clay, making one slightly larger than the other. Shape them into tall, smooth gumdrops or tapered cylinders to form the main bodies. -
Create the Heads:
Take the dark grey or taupe clay and roll it thinly. Cut two round pieces and gently drape them over the top of the white bodies, smoothing the seams downward to create the ‘hood’ look of the penguin’s head markings. -
Attach the Wings:
Shape two teardrops from the same dark clay for each penguin. Flatten them slightly and attach them to the sides of the bodies, blending the top seam into the shoulder area so they lay naturally. -
Add Facial Features:
Use a needle tool or small ball tool to make tiny indentations for the eyes. Insert small black glass beads or tiny balls of black clay. Add a tiny cone of brown clay for the beak.
Step 3: The Scarf Accessories
-
Texture the Scarf Clay:
Roll out a strip of light brown or beige clay. Before cutting, press a piece of coarse fabric or a sweater texture sheet firmly into the clay to create a realistic knitted look. -
Cut the Strips:
Slice the textured clay into four strips: two long ones for wrapping around the necks and two shorter ones for the hanging tails of the scarves. -
Wrap the Necks:
Take the longer strips and wrap them snugly around the neck of each penguin, covering the join between the grey head and white body. -
Attach the Tails:
Attach the shorter strip vertically to the front of the wrapped scarf. Blend the clay slightly underneath the wrap so it looks like it’s tucked in.
Keeping White Clay Clean
White clay picks up dust easily. Always wash your hands or use baby wipes before handling the white body parts, especially after touching the dark grey clay.
Step 4: Assembly and Baking
-
Position the Couple:
Place the two penguins onto the blue base, positioning them close together so they look like they are cuddling. -
Secure the Figures:
Press them down firmly but gently to ensure a good bond with the base. If needed, a drop of liquid polymer clay or ‘bake and bond’ can be used for extra security. -
Final Texturing:
Use a toothbrush or a ball of aluminum foil to gently tap texture onto the white parts of the penguin bodies to simulate fluffy feathers or snow. -
Baker’s Check:
Check for any fingerprints and smooth them out with a drop of baby oil. -
Bake:
Bake the entire piece according to your specific clay manufacturer’s instructions, usually around 275°F (130°C) for 30 minutes. Let it cool completely before handling.
Enjoy displaying your adorable winter couple as a charming handmade centerpiece
Sun and Moon Couple Wall Charms
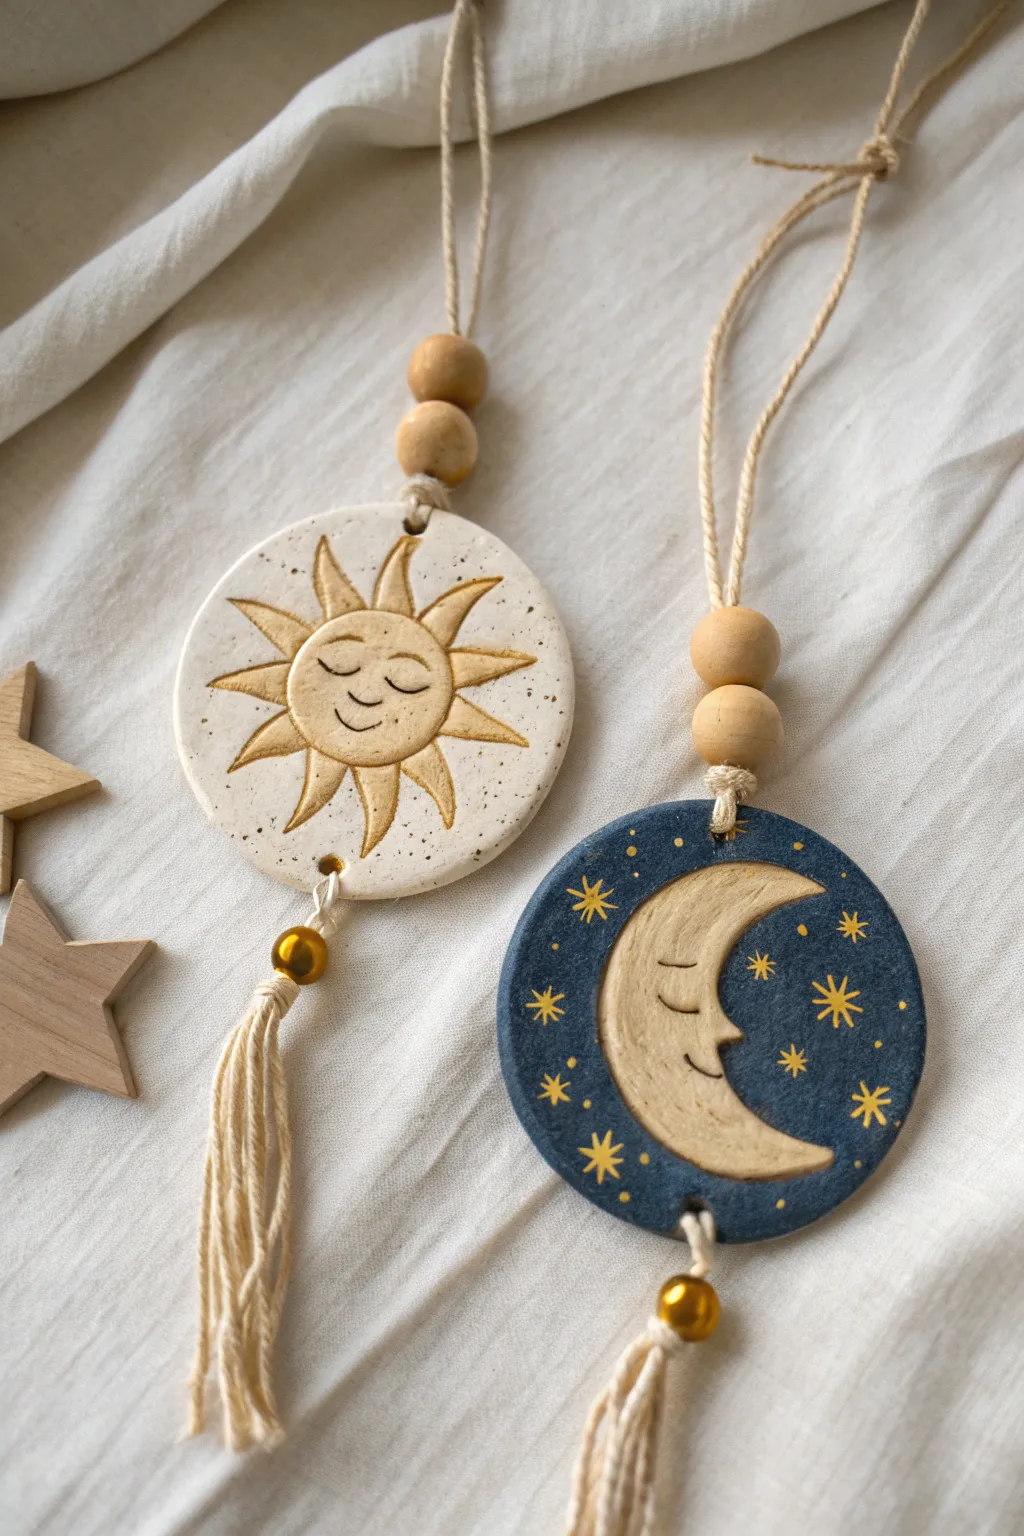
Craft a harmonious pair of hanging ornaments featuring a rustic smiling sun and a serene sleeping moon. These kiln-less clay charms combine earthy textures with gold accents and macramé tassels for a whimsical, bohemian touch perfect for gifting to a partner.
Step-by-Step Tutorial
Materials
- Air-dry clay (white)
- Circle cookie cutter (approx. 3 inches)
- Rolling pin
- Parchment paper or craft mat
- Carving tools (needle tool, small loop tool)
- Sandpaper (fine grit)
- Acrylic paints: Cream/Off-white, Navy Blue, Gold
- Detail paintbrushes
- Gloss varnish or sealant
- Jute twine or macramé cord (natural color)
- Wooden beads (natural finish, approx. 12-15mm)
- Gold metallic beads (small)
- Scissors
Step 1: Shaping the celestial bodies
-
Prepare the clay:
Begin by conditioning a chunk of air-dry clay in your hands until it is smooth and pliable. Roll it out on parchment paper to an even thickness of about 1/4 inch. -
Cut the bases:
Use your circle cookie cutter to punch out two identical discs. Smooth the edges with a finger dipped in a little water to remove any rough burrs. -
Pierce the holes:
Before the clay dries, use a straw or a needle tool to poke a hole at the very top and very bottom of each circle. Make sure the holes are wide enough to thread your twine through later. -
Sketch the designs:
Lightly trace your designs into the wet clay using a needle tool. For the sun, draw a central face with radiating triangular rays. For the moon, draw a large crescent profile on the right side. -
Carve the relief:
Using a small loop tool or needle, gently carve into the clay to create depth. For the sun, outline the rays and press down the clay around the face to make it slightly raised. For the moon, carve out the negative space around the crescent so the moon face stands out. -
Add facial details:
Use the needle tool to impress the sleepy eyes, tiny noses, and smiling mouths onto both faces. Keep the lines clean and simple. -
Dry thoroughly:
Let the discs air dry completely on a flat surface for 24-48 hours. Flip them occasionally to ensure even drying and prevent curling.
Step 2: Painting and finishing
-
Sand imperfections:
Once fully dry, lightly sand any rough edges or uneven textures on the surface with fine-grit sandpaper. Wipe away the dust with a dry cloth. -
Base coat – Sun:
Paint the entire sun disc with an off-white or creamy speckled paint. I sometimes flick a stiff brush with diluted brown paint to create a subtle speckled pottery effect. -
Base coat – Moon:
Paint the background of the moon disc a deep navy blue, carefully painting around the raised crescent shape. Paint the crescent moon itself with a light cream or natural wood tone. -
Highlight the sun:
Using a thin brush and gold paint mixed with a little brown, carefully fill in the carved lines of the sun rays and facial features to make them pop against the cream background. -
Embellish the moon:
Paint small gold stars and dots on the navy background. Use a fine liner brush to paint the moon’s sleeping eye and smile in dark brown or black. -
Seal the work:
Apply a coat of gloss varnish or sealant to both sides of the ornaments to protect the paint and give them a finished ceramic look.
Smooth Moves
To get perfectly smooth clay without fingerprints, lightly dampen your fingertip with water and glide it over the surface before the clay begins to dry.
Step 3: Assembly
-
Create the top hanger:
Cut a length of jute twine (about 12 inches). Fold it in half and thread the loop end through the top hole of the ornament. -
Add wooden beads:
Thread two natural wooden beads onto the double strand of twine sitting just above the clay disc. Tie a knot further up to create the hanging loop. -
Make the tassels:
Cut 6-8 shorter pieces of macramé cord (about 5 inches long). Take a separate piece of twine and thread it through the bottom hole of the ornament. -
Attach the tassel:
Bundle the macramé cords and tie them securely to the bottom loop. Slide a gold metallic bead over the knot if possible, or wrap the top of the tassel with gold wire or string for a finished look. -
Comb and trim:
Use a comb to brush out the macramé cord ends so they become fluffy, then trim them straight across with scissors for a neat finish.
Starry Night Effect
For the moon charm, mix a tiny amount of fine glitter into your navy blue paint or varnish to give the night sky a subtle, magical shimmer.
Hang your celestial pair together to bring a sense of balance and cosmic charm to your space

TRACK YOUR CERAMIC JOURNEY
Capture glaze tests, firing details, and creative progress—all in one simple printable. Make your projects easier to repeat and improve.
Yin-Yang Couple Trinket Plate
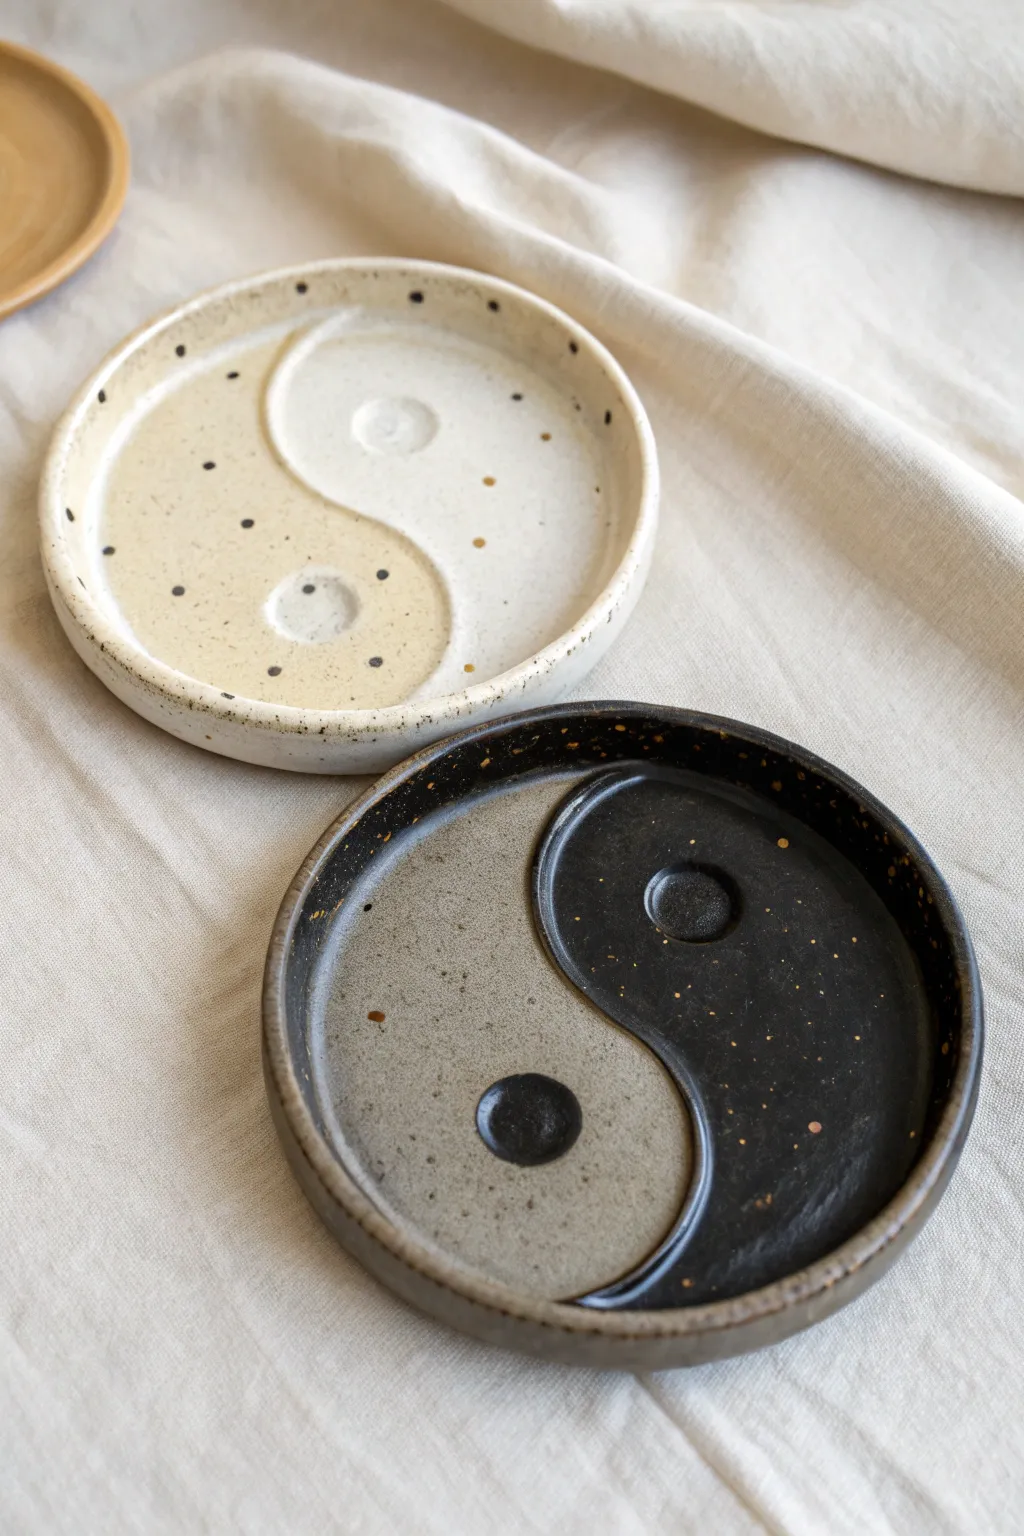
Celebrate balance and connection with this stunning pair of yin-yang trinket dishes, perfect for holding rings or small treasures. The speckled cream and deep charcoal glazes create a beautiful contrast, symbolizing how opposing forces can create a harmonious whole.
How-To Guide
Materials
- Light-colored stoneware clay (smooth body)
- Rolling pin
- Two guide sticks (approx. 5-7mm thickness)
- Circular template or cookie cutter (approx. 10-12cm diameter)
- S-shaped paper template (for the yin-yang curve)
- Needle tool or fettling knife
- Modeling tool (curved rib or wooden spoon)
- Small circle cutter (approx. 1cm) or bottle cap
- Sponge and water
- Cream/White speckled glaze
- Black/Charcoal speckled glaze
- Clear glaze (optional)
Step 1: Prepping the Forms
-
Roll the Slabs:
Begin by wedging your clay to remove any air bubbles. Roll out a slab of clay between your guide sticks to ensure an even thickness of about 5-7mm across the entire surface. -
Cut the Circles:
Place your circular template or large cookie cutter onto the slab. Cut out two identical circles using your needle tool. These will become the bases for your yin and yang dishes. -
Smooth the Rims:
Use a damp sponge to gently smooth the cut edges of both circles. Run your finger along the rim to round it off slightly, removing any sharp angles left by the cutter. -
Create the Lip:
Gently pinch up the edges of each circle to create a shallow rim. You can do this by rotating the clay on a banding wheel or simply turning it in your hand, pressing upwards with your thumb while supporting the underside with your fingers.
Step 2: Sculpting the Design
-
Trace the Curve:
Lay your S-shaped paper template lightly across the center of the first dish. Using a needle tool, very lightly trace the curve onto the clay surface. Don’t cut through; just make a guideline. -
Define the Relief:
Using a modeling tool or the back of a spoon, gently press down on one side of the S-curve to lower that section’s surface level slightly. This creates a raised relief effect where the two halves meet. -
Refine the Swoop:
Smooth the transition area where you pressed down so it looks like a soft, flowing wave rather than a sharp cliff. Repeat this process for the second dish, perhaps pressing down the opposite side to make them mirror images. -
Add the Dots:
Using your small circle cutter or a bottle cap, gently press a small circle impression into the center of the wider part of each teardrop shape. Don’t punch all the way through—just create a defined indentation. -
Final Smoothing:
Take your damp sponge again and wipe the entire surface to remove any crumbly bits of clay or rough tool marks. Let the dishes dry slowly to leather hard, then adhere to your clay body’s specific firing schedule for the bisque fire.
Use a Foam Sponge
When pressing the indentation for the ‘dot’ of the yin-yang, press through a thin piece of plastic wrap or foam. This rounds the edges of the impression instantly.
Step 3: Glazing and Finishing
-
Wax Resist:
Once bisque fired, apply wax resist to the bottom of both dishes to prevent glaze from sticking to the kiln shelf. I also like to wipe the dust off with a damp sponge before beginning. -
Glazing the Light Dish:
For the ‘Yang’ (light) dish, pour a cream or almond-colored speckled glaze over the entire interior. Ensure the glaze pools slightly in the small impressed dot for emphasis, but not so much that it obscures the shape. -
Glazing the Dark Dish:
For the ‘Yin’ (dark) dish, apply a charcoal or deep grey glaze. This glaze should ideally be matte or satin to contrast nicely with the lighter one. -
The Detail Work – Light Dish:
Dip a small brush into the dark glaze and carefully paint inside the small impressed circle on the light dish. This creates the classic contrasting ‘eye’ of the symbol. -
The Detail Work – Dark Dish:
Clean your brush thoroughly, then use the light cream glaze to paint the impressed circle on the dark dish. -
Rim Cleanup:
Check the rims of your dishes. If you want an exposed clay rim like the example, wipe the glaze off the very edge with a sponge. -
Final Fire:
Load the pieces into the kiln for the glaze firing, making sure they don’t touch each other. Fire according to your glaze manufacturer’s instructions.
Add Gold Luster
For an elegant upgrade, apply real gold luster to the small dots or the rim after the glaze firing, then fire again at a lower temperature for a metallic pop.
Place these side-by-side on your dresser to symbolize how perfect opposites attract and complete one another
Interlocking Couple Coaster Set
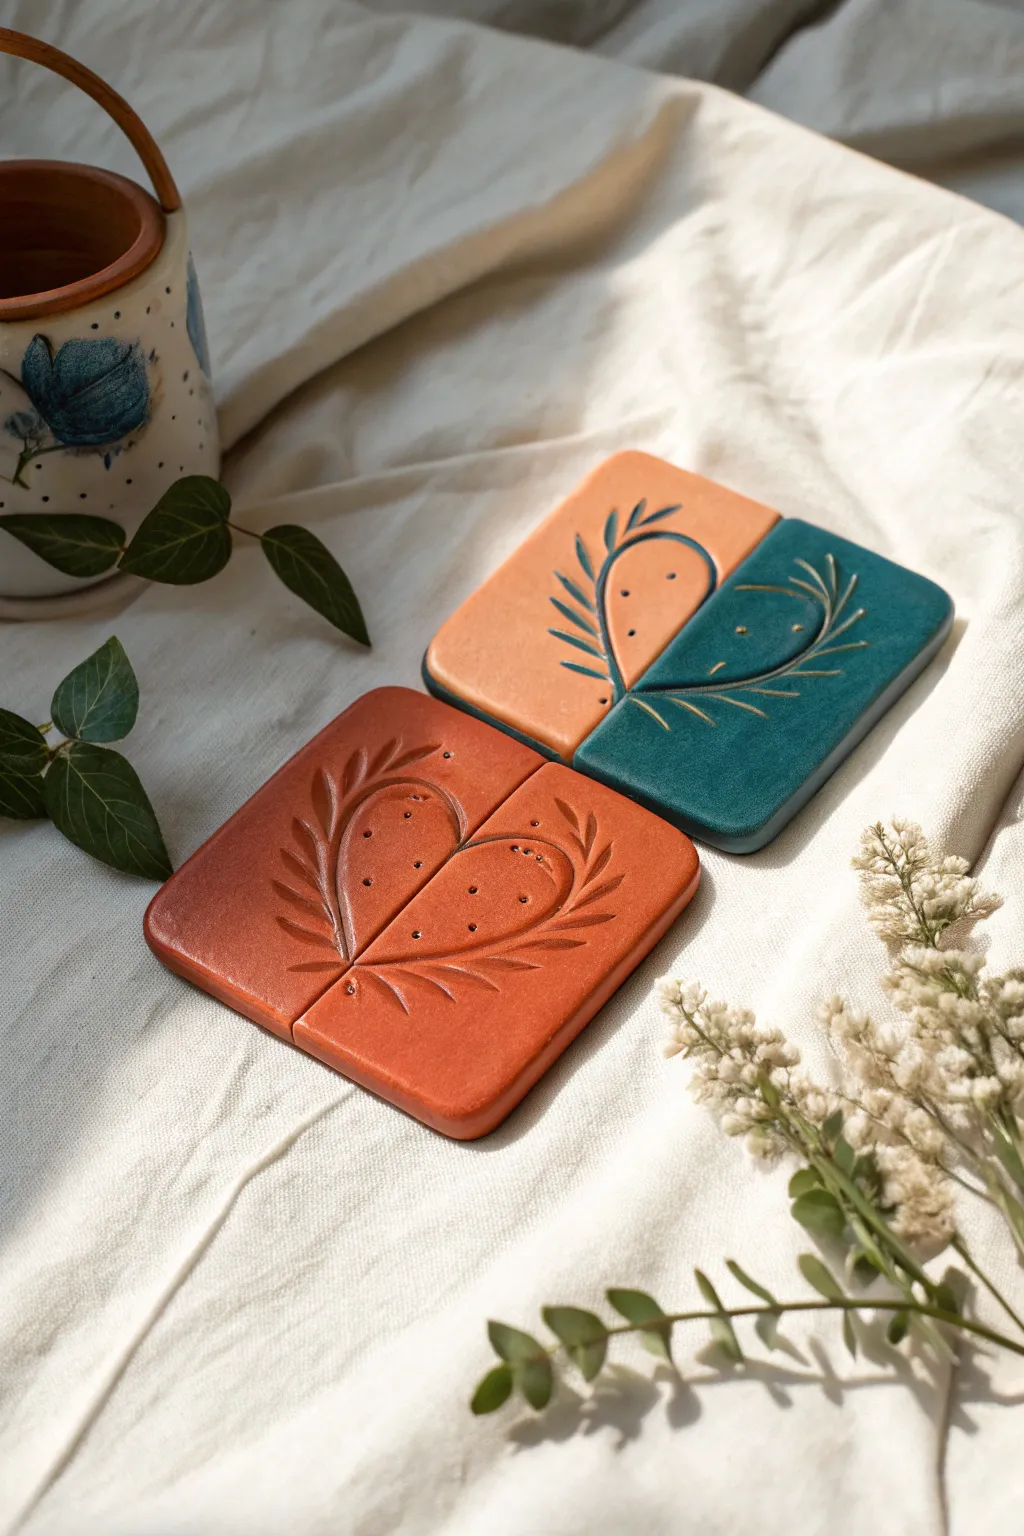
Create a meaningful and functional piece of home decor with these interlocking coaster sets. Featuring a split-heart design etched into smooth clay, these coasters act as a puzzle that symbolizes connection, available in both monochromatic terracotta and a striking two-tone finish.
Step-by-Step Tutorial
Materials
- Polymer clay (terracotta, teal/emerald green)
- Acrylic rolling pin
- Square clay cutter (approx. 3.5 – 4 inches)
- Flexible blade or craft knife
- Clean work surface or silicone mat
- needle tool or sharp toothpick
- Ball stylus tool (small)
- Fine-grit sandpaper (400-800 grit)
- Matte spray varnish or clay sealant
- Oven and baking tray
Step 1: Shaping the Base
-
Condition the clay:
Begin by thoroughly conditioning your terracotta clay until it is soft and pliable. If you are making the two-tone set, condition the teal clay separately, making sure to wash your hands between colors to avoid staining. -
Roll out the slab:
Roll the clay out on a flat surface to an even thickness of about 1/4 inch (6mm). Use depth guides or stacked playing cards on either side of your roller to ensure the slab is perfectly level. -
Cut the squares:
Press your square cutter firmly into the slab to create two distinct squares. If you don’t have a cutter, use a ruler and a craft knife to measure and cut precise 4×4 inch squares. -
Round the corners:
Gently tap the corners of your squares with your finger or a smoothing tool to create a soft, rounded edge rather than a sharp point. This makes the final coaster more durable and pleasant to hold.
Sticky Situation?
If clay sticks to your work surface, roll it out on a piece of parchment paper or a silicone mat. This allows you to lift the pieces easily without distorting their shape.
Step 2: Creating the Split and Design
-
Mark the center:
Lightly mark the exact vertical center of each square. Using your flexible blade, make a straight cut down the middle to divide each coaster into two rectangular halves. -
Outline the heart:
Push the two halves of one square together. Using a needle tool, lightly sketch half of a heart shape on the left piece and the mirrored half on the right piece. The point of the heart should meet at the bottom center seam. -
Deepen the lines:
Once you are happy with the symmetry, go back over your sketched heart outline with the needle tool, pressing deeper to create a distinct groove. I find a steady, slow hand works best here to avoid ragged edges. -
Add the leaf details:
Carve fern-like fronds extending outwards from the heart outline. Make short, curved strokes that radiate away from the center heart toward the outer edges of the coaster. -
Add texture with the stylus:
Using a small ball stylus, press tiny dots into the interior area of the heart shape. Space them somewhat randomly but evenly to create a stippled texture that contrasts with the smooth exterior. -
Repeat for the second set:
Repeat the carving process for your second coaster. If doing the two-tone version, swap one half of a terracotta square with a half from a teal square before carving, so the design bridges the two colors seamlessly.
Step 3: Finishing and Baking
-
Smooth the edges:
Before baking, run your finger dipped in a little cornstarch or water (depending on clay type) along all cut edges to smooth out any burrs or roughness. -
Bake the pieces:
Place all the rectangular halves on a baking sheet lined with parchment paper. Bake according to your clay manufacturer’s specific instructions (usually around 275°F/130°C for 15-30 minutes). -
Cool down:
Allow the pieces to cool completely in the oven with the door slightly ajar. This gradual cooling helps prevent cracks from thermal shock. -
Sand for perfection:
Once cool, use fine-grit sandpaper to buff the bottoms and sides of the coasters. Wet-sanding (dipping the paper in water) keeps clay dust out of the air and produces an ultra-smooth finish. -
Seal the surface:
Spray the tops of the coasters with a matte varnish or brush on a thin layer of clay sealant. This protects the clay from moisture and stains during daily use.
Color Swap Trick
For the two-tone set, cut both a teal and a terracotta square, slice them down the middle, and then simply swap the halves. This guarantees the puzzle fit is exact.
Set your table with these beautiful handmade pieces and enjoy the warm, connection they bring to your space