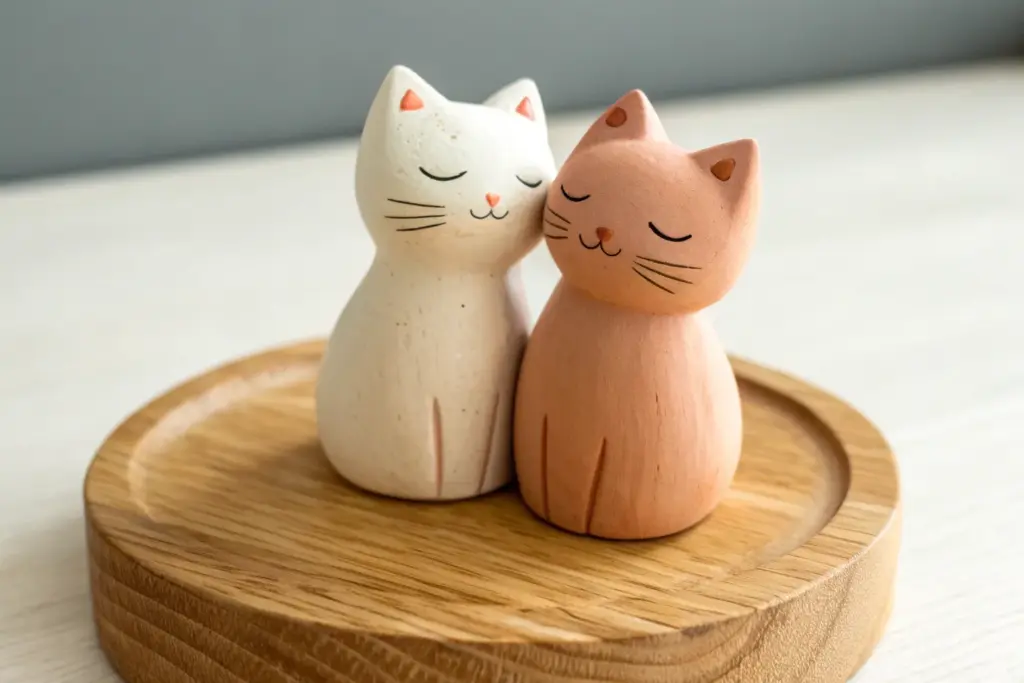
Anytime I’m planning a creative date night, couples clay challenges are my go-to because they’re equal parts sweet and hilarious. Pick one idea, set a tiny timer if you want, and let the his and hers versions tell their own story.
His and Hers Matching Mugs
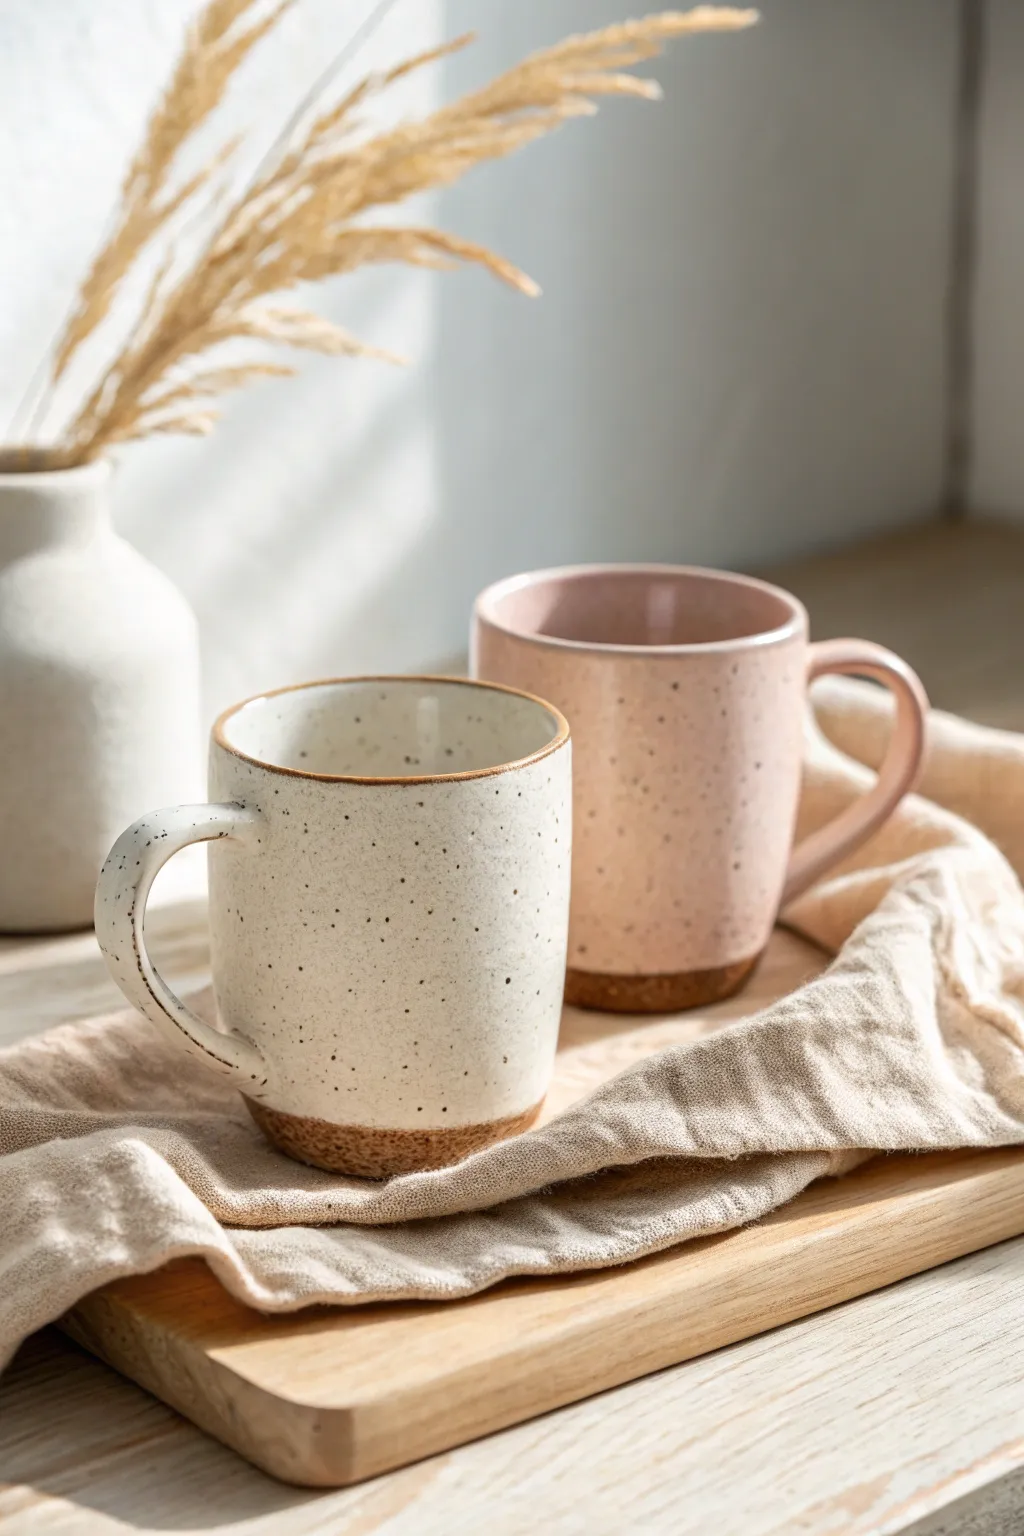
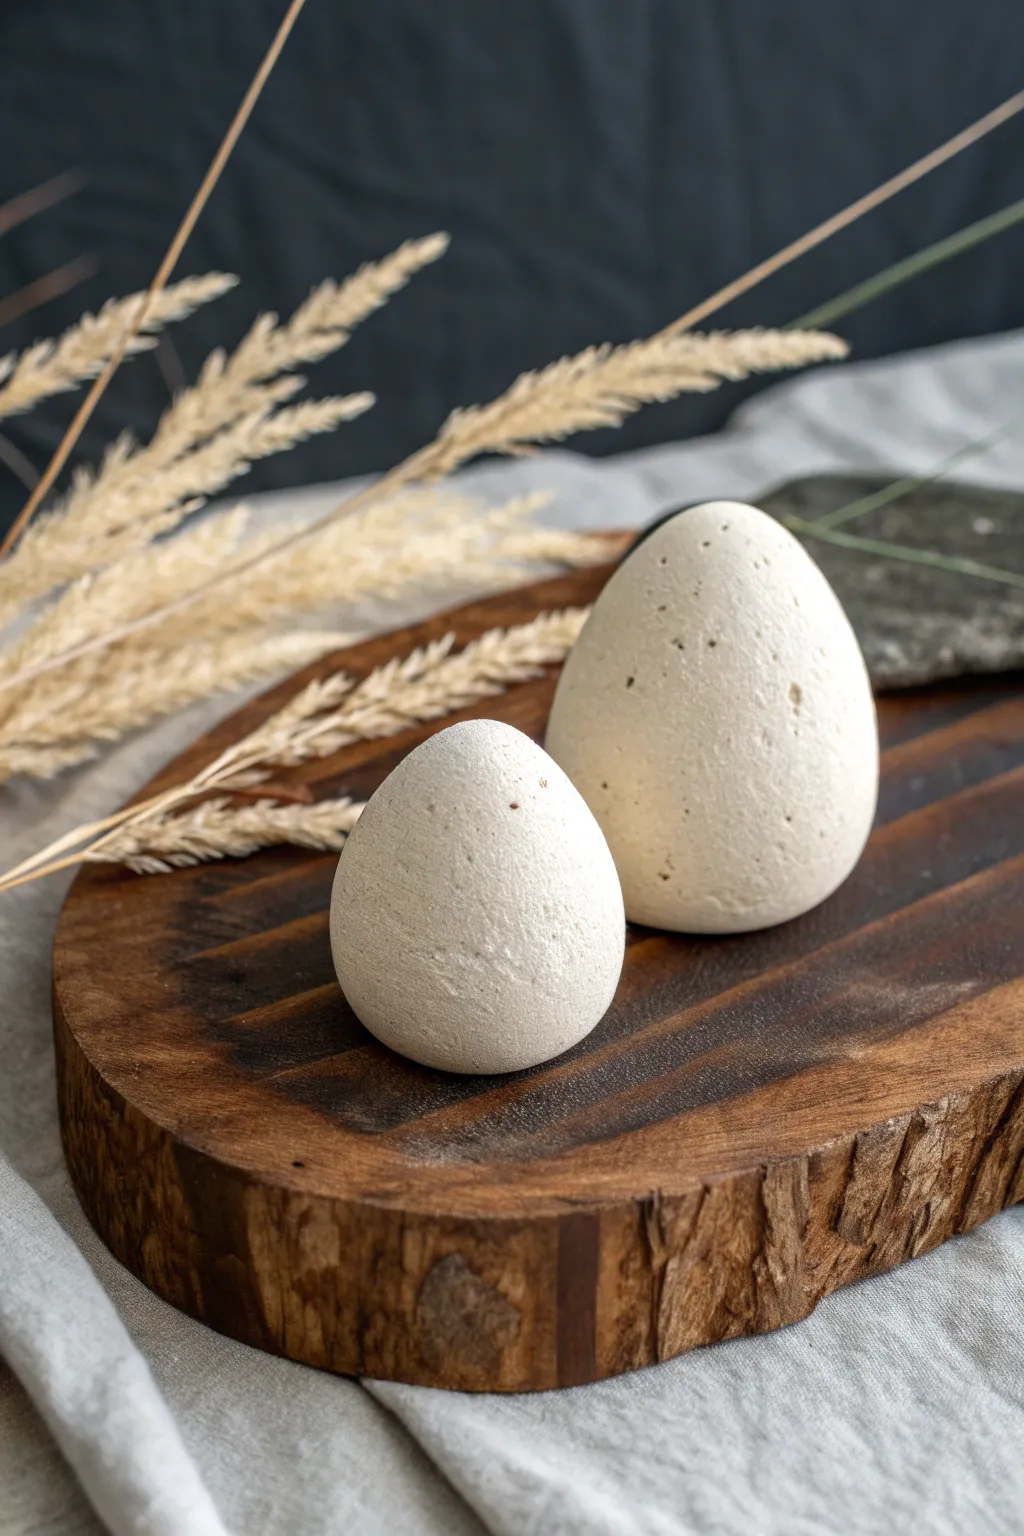
Create a cozy set of complementary mugs that celebrate individuality while clearly belonging together. These hand-built or wheel-thrown vessels feature a charming speckled glaze finish and raw, exposed clay bases for a modern rustic aesthetic.
Step-by-Step Tutorial
Materials
- Stoneware clay (buff or speckled)
- Pottery wheel (or rolling pin for hand-building)
- Rib tool
- Loop tool for trimming
- Sponge
- Wire cutter
- Needle tool
- Kiln
- Speckled cream glaze
- Speckled dusty pink glaze
- Wax resist
- Paintbrush
Step 1: Forming the Bodies
-
Prepare the clay:
Begin by wedging two equal balls of stoneware clay, roughly 1 to 1.5 lbs each, ensuring all air bubbles are removed for consistent throwing. -
Center and open:
Center the first ball on your wheel head. Open the clay and pull up the walls to form a cylinder, aiming for a consistent vertical shape with slightly straight sides. -
Shape the silhouette:
Using a rib tool, smooth the outside walls. Keep the shape simple and cylindrical, perhaps tapering in just slightly at the very top for heat retention. -
Finish the rim:
Compress the rim with a chamois or your sponge to make it smooth and pleasant for drinking. -
Repeat for the second mug:
Create the second mug using the same steps. Don’t worry about them being identical twins; siblings in size and shape is perfect for a hand-crafted look. -
Wire off and dry:
Cut the mugs from the bat with a wire tool and set them aside until they reach a leather-hard state.
Step 2: Trimming and Handling
-
Trim the base:
Once leather hard, center the mugs upside down on the wheel. Trim the bottom 1/2 inch to create a defined foot, leaving this area slightly rougher if you want to emphasize the raw clay texture later. -
Pull the handles:
Pull two handles from a fresh lug of clay. Aim for a comfortable ‘C’ or ear shape that allows for a three-finger grip. -
Attach handles:
Score the mug body and the handle attachment points. Apply slip and firmly press the handle onto the mug, smoothing the seams with a modeling tool or wet finger. -
Refine the connection:
Check alignment to ensure the handle is straight vertically. I like to smooth the connection point so it looks like the handle is growing out of the mug. -
Bisque fire:
Allow the mugs to dry completely (bone dry) before loading them into the kiln for a bisque firing to cone 04.
Glaze Running?
If your glaze runs onto the raw clay band during firing, your dip was too thick. Add a “safety catch” groove when trimming the foot to stop drips.
Step 3: Glazing and Finishing
-
Wax the feet:
Apply wax resist to the bottom 3/4 inch of the exterior of both mugs. This is crucial for creating that exposed raw clay band shown in the image. -
Clean the bisque:
Wipe down the bisque ware with a damp sponge to remove any dust that might interfere with glaze adhesion. -
Glaze the interior:
Pour your chosen glaze inside each mug, swirl to coat, and pour out the excess. Use the cream glaze for the ‘His’ mug and pink for the ‘Hers’ (or vice versa). -
Dip the exterior:
Hold the mug by the foot and dip it straight down into the glaze bucket, stopping right where the wax resist line begins. Hold for 3 seconds and lift. -
Touch up:
Once the glaze is dry to the touch, use a sponge to carefully wipe any glaze bead that may have sat on top of the wax line to ensure a crisp transition. -
Glaze fire:
Load the mugs into the kiln for the final glaze firing, typically to cone 5 or 6 depending on your clay and glaze specifications. -
Sand the bottoms:
After firing, sand the unglazed clay bottoms with fine-grit sandpaper to ensure they won’t scratch your table.
Stamp It
Before the clay dries, stamp your initials or a special date near the handle attachment. It adds a secret personal touch only the drinker sees.
Enjoy your morning coffee together with these beautiful, tactile reminders of your shared creativity


Salt and Pepper Shaker Duo
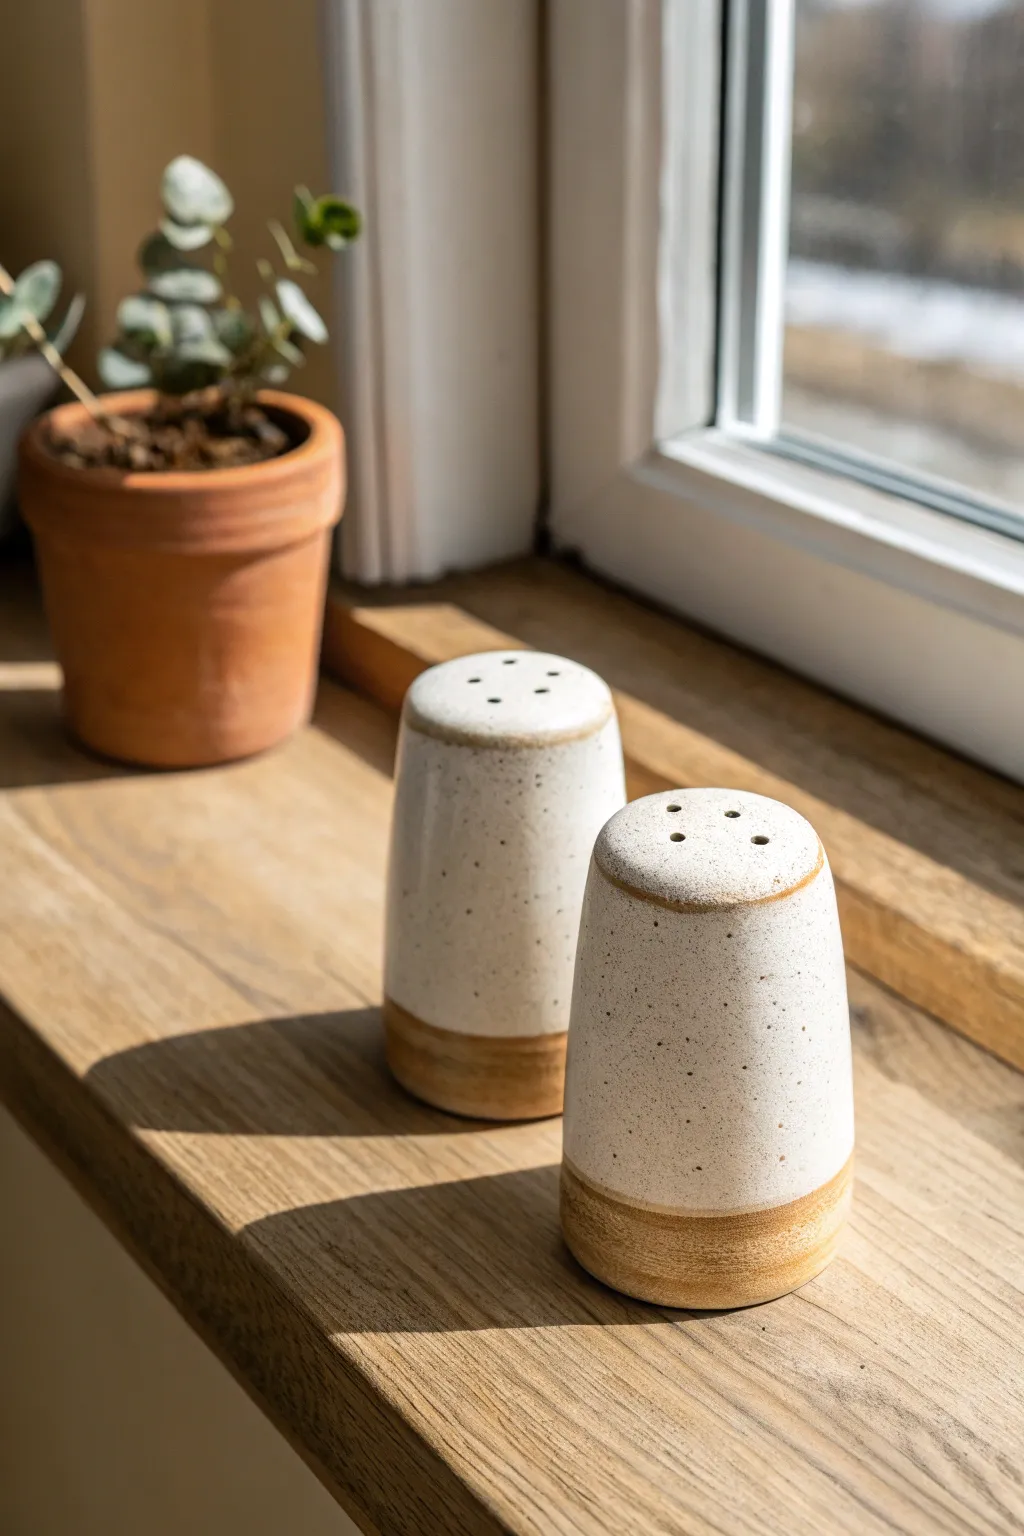
This charming duo features a minimalist, cylindrical design with a rustic touch, thanks to the speckled white glaze and exposed clay details. It’s a perfect beginner-friendly wheel project that looks right at home on a sunlit windowsill.
Step-by-Step Guide
Materials
- Speckled sandstone or buff stoneware clay (approx. 1lb per shaker)
- Pottery wheel
- Throwing sponge
- Needle tool
- Wire cutter
- Ribs (metal and wooden)
- Trimming tools
- Drill bit or small hole cutter tool
- Rubber stopper/cork for the bottom
- Glossy white glaze
- Wax resist
- Kiln
Step 1: Throwing the Forms
-
Center the clay:
Start by wedging your clay well to remove air bubbles. Thump a ball of clay onto the wheel head and center it using firm pressure and water. -
Open the form:
Create an opening in the center, leaving the floor slightly thicker than a standard mug to accommodate trimming later. Compress the floor with a flat rib to prevent S-cracks during drying. -
Pull the walls:
Pull the walls up into a tall, consistent cylinder. Aim for a height of about 4-5 inches, keeping the walls relatively thick at the top for shaping. -
Collar the neck:
Gently collar (squeeze in) the top inch of the cylinder to create a tapered shoulder. Do this slowly with wet hands to avoid buckling the clay. -
Close the top:
Continue collaring until the top is almost completely closed. Unlike a bottle, you want a slightly flattened, domed top rather than a spout. Use a rib to smooth the closure into a gentle curve. -
Refine the profile:
Use a metal rib on the outside while supporting the inside with a stick or your finger to smooth the vertical walls, ensuring they are straight or have a very subtle convex curve. -
Remove from wheel:
Undercut the base with a wooden knife, use your wire tool to slice under the pot, and carefully transfer it to a ware board. Let them dry to a leather-hard state.
Hole Size Matters
Make shaker holes slightly larger than you think you need. Glaze thickness shrinks the opening significantly during firing.
Step 2: Trimming and Drilling
-
Trim the foot:
Once leather hard, center the shaker upside down on the wheel. Trim excess clay from the bottom to create a clean, distinct foot ring, mirroring the width shown in the reference image. -
Create the fill hole:
I usually prefer to cut the fill hole directly in the center of the bottom now. Use a hole cutter sized to fit your specific rubber stoppers. -
Drill shaker holes:
Turn the pot right-side up. Using a small drill bit or needle tool, carefully poke holes in the top dome. Create a pattern (like a cross or circle) and use a different number of holes (e.g., 3 and 5) to distinguish salt from pepper. -
Clean up burrs:
Gently smooth around the drilled holes with a damp sponge or soft brush to remove any sharp clay burrs.
Step 3: Glazing and Finishing
-
Bisque fire:
Load the bone-dry shakers into the kiln and bisque fire them according to your clay body’s specifications (usually Cone 04). -
Wax resist application:
Apply wax resist to the bottom half-inch of the shaker (the foot area) and a thin band around the very top rim where the clay meets the dome. This creates the exposed clay look. -
Glaze the interior:
Pour a small amount of liquid glaze inside, swirl it to coat the interior walls, and pour the excess out immediately. -
Dip the exterior:
Hold the shaker by the foot (or use tongs) and dip it into your speckled white glaze for 3 seconds. The wax will repel the glaze on the foot and top rim. -
Clean up:
Use a damp sponge to wipe away any glaze beads that might have stuck to the waxed areas to ensure clean lines. -
Clear the holes:
Check the shaker holes on top; if glaze has filled them, gently clear them out with a needle tool or twist a small piece of sandpaper through them. -
Final firing:
Glaze fire the pieces to mid-range temperature (Cone 5 or 6). Once cool, add your rubber stoppers to the bottom and fill them up.
Clogged Shakers?
If holes fuse shut in the kiln, use a small diamond drill bit with water to carefully re-open them after firing.
Enjoy seasoning your next meal with these beautiful handmade pieces tailored to your own table style


Heart-Shaped Trinket Dishes Set
These charming nesting dishes combine a modern speckled clay aesthetic with sweet hand-painted details in warm terracotta tones. Perfect for holding everyday jewelry, this couples’ project results in a matching yet distinct set of heart-shaped trays.
Detailed Instructions
Materials
- Speckled stoneware clay (finely grogged)
- Heart-shaped cookie cutters (two sizes) or paper templates
- Rolling pin
- Canvas work surface or slab mat
- Pottery sponge
- Modeling tool or butter knife
- Score and slip tool (needle tool or serrated rib)
- Underglaze (terracotta or rust orange)
- Small round paintbrush
- Detail liner brush
- Clear transparent glaze (food safe)
- Kiln access (or use air-dry clay alternatives with varnish)
Step 1: Shaping the Clay Base
-
Roll the slab:
Begin by wedging your speckled clay to remove air bubbles. Roll it out on your canvas surface into a smooth, even slab about 1/4 inch thick. Aim for consistent thickness to prevent warping later. -
Cut the hearts:
Press your heart-shaped cutters vertically into the clay. If you don’t have cutters, trace around a paper template with a needle tool. You need two distinct sizes to create the nesting look shown. -
Smooth the edges:
Once cut, run a slightly damp sponge along the raw edges of the hearts. This compression step is crucial for preventing sharp edges after firing and gives that professional finish. -
Lift the walls:
Gently pinch the edges of the clay upward to create a shallow rim. I like to support the outside with one hand while smoothing the inside curve with my thumb, lifting the wall about half an inch high. -
Refine the shape:
Use a damp sponge to smooth out any fingerprint marks from the pinching process. Ensure the point of the heart is crisp and the dip at the top is defined.
Step 2: Decorative Painting
-
Leather hard drying:
Allow the dishes to dry to a ‘leather hard’ state. The clay should be firm enough to handle without bending but still cool to the touch. -
Paint the rim:
Dip a small round brush into your terracotta underglaze. Paint a consistent line along the very top edge of the rim. It doesn’t need to be mechanically perfect; a little waviness adds handmade character. -
Dot the interior:
For the front dish, use the tip of your brush to dab small dots along the inner curve of the heart. Follow the shape of the wall, keeping the spacing relatively even. -
Pattern variations:
For the second dish, switch up the pattern by painting speckles all over the interior surface rather than just the rim, creating a coordinating but non-identical look. -
exterior details:
On the outside wall of the main dish, use a liner brush to paint a simple cross-hatch or grid pattern. This unexpected detail adds visual interest from side angles. -
Bisque firing:
Once fully bone dry, load the pieces into the kiln for a bisque fire (usually Cone 04). This hardens the clay and prepares it for the glazing stage.
Clean Lines Pro-Tip
If your hand shakes while painting the rim, rest your pinky finger on the table or the center of the dish to anchor your hand for a smoother, steadier line.
Step 3: Glazing and Finishing
-
Clean the bisque:
Wipe the fired pieces with a damp sponge to remove any kiln dust, which can cause pinholes in your final glaze. -
Apply clear glaze:
Dip the entire dish into a bucket of clear transparent glaze, or brush on three even coats. The clear coat will make the speckled clay body pop and seal the underglaze. -
Wipe the foot:
Flip the dish over and thoroughly sponge off any glaze from the bottom surface properly. If glaze is left here, the dish will fuse permanently to the kiln shelf. -
Final smooth check:
Rub down any drips on the rim with your finger to ensure a smooth melt. The glaze should sit flat against your painted designs. -
Glaze fire:
Fire the kiln to the maturity temperature of your clay and glaze (often Cone 5 or 6 for stoneware). Allow the kiln to cool completely before opening.
Level Up: Texture
Before drying, press a piece of lace or linen into the wet clay slab. This leaves a subtle fabric texture that looks incredible under the clear glaze.
Enjoy styling these lovely dishes on your bedside table or gifting one to your partner


Bacon and Eggs Mini Sculpt-Off
Whip up a delightful morning meal that never goes bad with this adorable polymer clay bacon and eggs set. Featuring charming kawaii faces, these miniature breakfast staples have a smooth, semi-gloss finish that makes them look almost edible.
Step-by-Step
Materials
- White polymer clay
- Translucent polymer clay
- Yellow polymer clay (egg yolk color)
- Red polymer clay
- Brown polymer clay
- Black liquid clay or acrylic paint
- Rolling pin or pasta machine
- Clay knife or craft blade
- Dotting tool or toothpick
- Satin glaze or varnish
Step 1: Cooking the Bacon
-
Mix the meat colors:
Start by conditioning your clay. You’ll need four distinct shades for the bacon: a deep reddish-brown, a lighter meaty red, a pale pink, and a white mixed with a tiny bit of translucent clay for the fat. -
Create the stripes:
Roll each color into several thin snakes. Alternate them in a random pattern—fat, meat, fat, meat—to mimic natural bacon marbling. Don’t worry about them being perfectly even; irregularity looks more realistic. -
Form the slab:
Squish the snakes together side-by-side and flatten them gently with your roller. Fold the sheet in half and roll again to help the seams merge, creating a solid striped sheet about 2-3mm thick. -
Cut the slice:
Using your craft blade, cut a wavy, rectangular strip from your striped sheet. I prefer to hand-cut a gentle wave pattern on the long edges rather than straight lines to give it that crispy, cooked look. -
Add texture:
Gently ripple the bacon strip by placing it on your work surface and pushing the ends slightly toward the center, creating a few 3D bumps and valleys.
Sticky Situation?
If your clay gets too soft and sticky while rolling the thin bacon stripes, pop it in the fridge for 10 minutes. This firms it up, making it easier to slice cleanly without distorting the lines.
Step 2: Frying the Eggs
-
Shape the whites:
Take a ball of white clay and flattened it into an organic, irregular oval shape. Keep the edges rounded and slightly thicker than paper to avoid fragility. -
Add dimension:
Gently press down the outer edges of the white shapes to make them thinner than the center, mimicking how egg whites spread in a pan. -
Form the yolks:
Roll two balls of yellow clay. Flatten the bottoms slightly so they sit flush, then press one gently into the center of each white base. -
Blend the seam:
Use a smooth tool or your finger to very gently smooth the transition where the bottom of the yellow yolk meets the white, ensuring they are securely bonded.
Pro Shader Tip
Brush a tiny amount of brown pastel chalk dust onto the edges of the bacon and the ‘crispy’ edges of the egg whites before baking. This adds a realistic cooked effect.
Step 3: Bringing Them to Life
-
Add the eyes:
Using a small dotting tool dipped in black liquid clay or acrylic paint, place two wide-set eyes on the yolk of each egg and on the center of the bacon strip. -
Draw the smiles:
With a very fine needle tool or a thin liner brush, carefully draw a tiny, curved smile between the eyes. Keep the line thin for maximum cuteness. -
Bake the batch:
Arrange your breakfast items on a baking tile. Bake according to your specific brand’s temperature instructions, usually for about 15-20 minutes. -
Cool and finish:
Let the pieces cool completely. Once cool, apply a coat of satin glaze to the entire surface. This seals the paint and gives the ‘food’ a slightly glistening, freshly cooked appearance.
You now have a charming breakfast set ready to display or turn into cute magnets

The Complete Guide to Pottery Troubleshooting
Uncover the most common ceramic mistakes—from cracking clay to failed glazes—and learn how to fix them fast.
Better Together Planter Pair
These charming matching planters feature a modern, minimalist aesthetic perfect for housing small succulents. The design highlights the contrast between raw, earthen texture and glossy, speckled glaze, creating a set that feels cohesive yet unique.
Step-by-Step Guide
Materials
- Red stoneware or terracotta clay (approx. 2 lbs)
- Speckled white glaze (cone 5/6 compatible)
- Pottery wheel (or rolling pin for hand-building)
- Needle tool
- Rib tool (kidney shaped)
- Wire cutter
- Sponge
- Small basin of water
- Modeling tool or wooden knife
- Loop tool for trimming
- Kiln access
Step 1: Shaping the Clay
-
Prepare the Clay:
Begin by wedging your red stoneware or terracotta clay thoroughly to remove air pockets. Divide the clay into two equal balls, weighing about 1 pound each to ensure your planters end up roughly the same size. -
Center on the Wheel:
Throw the first ball of clay firmly onto the center of your wheel head. Using wet hands and steady pressure, cone the clay up and down until it is perfectly centered and spinning without a wobble. -
Open the Form:
Press your thumbs into the center of the spinning clay to open a well, leaving about a half-inch of thickness at the bottom for the base. Pull the floor out to determine the interior width of your planter. -
Pull the Walls:
Slowly pull the walls upward using your fingertips, maintaining an even thickness. For this specific shape, you want a slightly rounded, bowl-like curve that tapers in ever so slightly at the rim—classic and organic. -
Refine the Shape:
Use a kidney-shaped rib tool on the inside and outside to smooth the walls and refine that gentle curve. I like to compress the rim with a small piece of chamois or a sponge to make it soft and durable. -
Repeat for the Second Pot:
Wire the first pot off the wheel and set it aside. Repeat the throwing process with your second ball of clay, using rulers or calipers to match the height and width of your first creation as closely as possible.
Step 2: Trimming and Drying
-
Dry to Leather Hard:
Allow both pots to dry slowly until they reach a leather-hard state. They should be firm enough to handle without deforming but still cool to the touch and able to be carved. -
Trim the Base:
Place the pot upside down on the wheel (centered and secured with clay lugs). Use a loop tool to trim away excess weight from the bottom and crave a neat, defined foot ring. -
Smooth the Surface:
Once trimmed, use a slightly damp sponge to wipe down the exterior, erasing any tool marks and bringing the grog (texture) of the clay slightly to the surface for that rustic look. -
Create Drainage:
Don’t forget the drainage hole. Use a small hole cutter or drill bit to create a central hole in the bottom of each pot, which is essential for succulent health. -
Bisque Fire:
Let the pots dry completely—this can take several days depending on humidity. Once bone dry, fire them in the kiln to bisque temperature (usually cone 04) to prepare them for glazing.
Wobbly Walls?
If your walls are collapsing or getting uneven during throwing, you might be using too much water. Sponge out the excess liquid from the bottom of the pot frequently to keep the clay strong.
Step 3: Glazing and Finishing
-
Mask the Bottom:
To achieve the two-tone look, use wax resist or painter’s tape to cover the bottom third of the pot’s exterior. The line doesn’t have to be geographically perfect; a slightly organic wave looks great. -
Apply the Glaze:
Stir your speckled white glaze thoroughly to ensure the darker specks are suspended evenly. Dip the top two-thirds of the pot into the glaze, holding it upside down, or brush on 2-3 even coats. -
Clean Up:
If any glaze dripped onto the waxed bottom section or the foot ring, wipe it away cleanly with a sponge. The bottom must be completely bare clay so it doesn’t fuse to the kiln shelf. -
Final Fire:
Load the pots into the kiln for the final glaze firing (follow the temperature instructions on your specific glaze bottle, likely cone 5 or 6). This will melt the glass and reveal the speckles. -
Planting:
Once cool, fill your new planters with a gritty cactus soil mix and your favorite succulents, adding top dressing gravel if desired to complete the look.
DIY Speckles
If you don’t have pre-speckled glaze, mix a tiny amount of granular ilmenite or manganese into a plain white glaze. Test on a shard first, as a little goes a long way.
Enjoy the satisfaction of seeing your matching clay creations come to life on the windowsill
Couple Thumbprint Keepsake Bowls
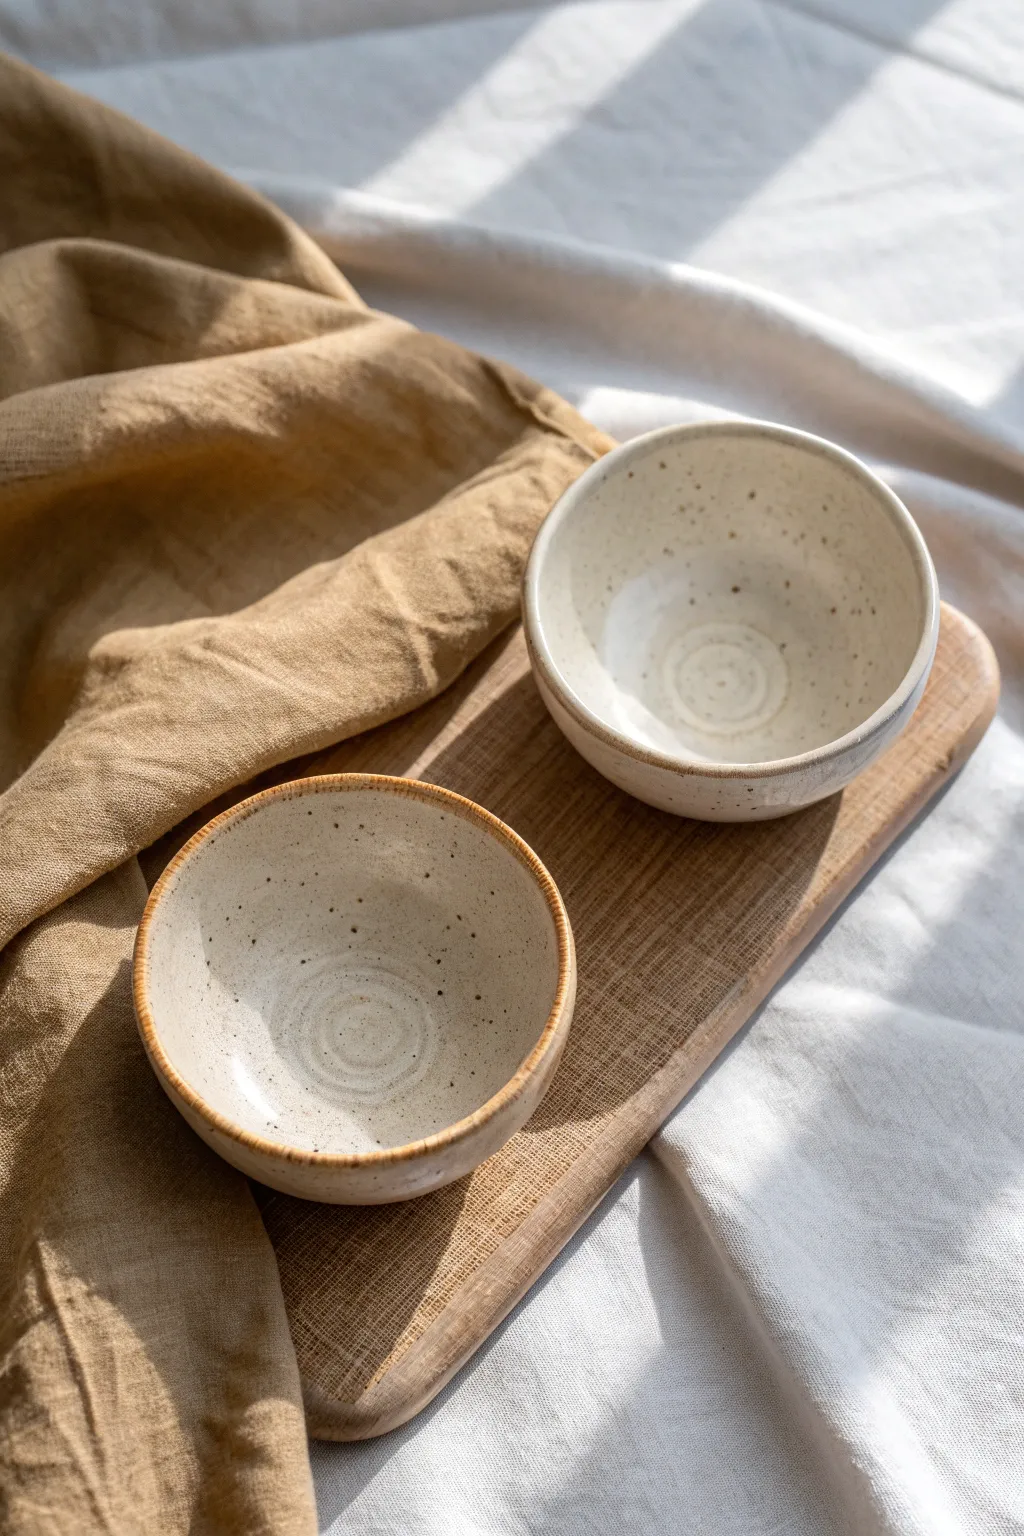
These simple yet deeply sentimental bowls are formed from speckled clay and feature a subtle, hidden detail: the makers’ thumbprints spiral into one another at the base. The finished look is rustic and modern, with a glossy, creamy-white glaze that lets the clay’s natural speckles shine through.
Detailed Instructions
Materials
- Speckled Stoneware Clay (2 lbs)
- Pottery Wheel
- Wooden Modeling Rib
- Wire Clay Cutter
- Sponge
- Bucket of water
- Trimming Tools (loop tool)
- Clear or Milky White Transparent Glaze (Cone 5/6 recommended)
- Kiln access
Step 1: Throwing the Forms
-
Wedge the clay:
Begin by separating your clay into two equal 1-pound balls. Wedge them thoroughly to remove air bubbles and ensure the clay is homogenous, which makes throwing much easier. -
Center on the wheel:
Slam your first ball of clay onto the center of the wheel head. With the wheel spinning at a medium-fast speed, use wet hands to cone the clay up and push it back down until it runs perfectly smooth without wobbling. -
Open the clay:
Drill your thumbs into the center of the mound, leaving about a half-inch of clay at the bottom for the foot ring later. Ideally, open the floor flat rather than rounded to create space for your imprint design. -
Pull the walls:
Slow the wheel down slightly. Pinch the clay between your inside and outside fingers and gently lift upwards to create the walls. Aim for a gentle curve that mimics a cereal bowl shape. -
Refine the rim:
Use a small piece of soft leather (chamois) or a damp sponge to compress and smooth the rim. This makes the bowl pleasant to drink or eat from later. -
Rib the interior:
Take your wooden rib tool and gently press it against the inside curve while the wheel spins. This removes excess slurry and defines that nice, smooth bowl shape. -
Create the signature spiral:
Stop the wheel completely. This is the ‘couples’ moment. One partner presses their thumb into the very center of the floor. The second partner presses their thumb partially overlapping the first, and you continue pressing in a spiral pattern outward until the floor has a textured, swirled indentation.
Step 2: Trimming and Finishing
-
Dry to leather hard:
Wire the bowls off the wheel and let them dry slowly. They are ready to trim when the clay feels like a block of cheddar cheese—firm but still carveable. -
Secure the bowl:
Place the bowl upside down on the wheel head. Center it perfectly, then use small coils of clay to gently secure it in place so it doesn’t fly off while trimming. -
Establish the foot:
Using a loop tool, carve away the excess clay from the bottom ‘skirt’ of the bowl. Sculpt a defined foot ring that lifts the bowl slightly off the table, mirroring the curved profile in the photo. -
Smooth the exterior:
Once the shape is refined, run a smooth, damp sponge over the trimmed areas to erase any harsh tool marks and expose the grog (speckles) in the clay body. -
Bisque fire:
Allow the bowls to dry completely until they are bone dry (room temperature). Load them into the kiln for a bisque firing to chemically set the form.
Pro Tip: Highlight the Spiral
To make the thumbprint spiral pop, wipe a dark stain or wash into the texture and sponge it off the high points before applying the clear glaze.
Step 3: Glazing
-
Wax the foot:
Before glazing, paint liquid wax resist onto the bottom foot ring. This prevents glaze from sticking to the kiln shelf during the final firing. -
Dip the glaze:
Stir your milky clear glaze thoroughly. Holding the bowl by the foot, dip it quickly but smoothly into the bucket for about 3 seconds. Pull it out and give it a quick shake to remove drips. -
Check the rim:
The rim often has thinner glaze coverage due to gravity. If you want that toasted rim effect seen in the photo, wipe just a tiny bit of glaze off the very edge with a damp sponge. -
Clean up:
I always do a final check of the foot ring. Even with wax, ensure no stray droplets of glaze remain on the bottom, or the bowl will fuse to the shelf. -
Final glaze fire:
Fire the bowls to the maturity temperature of your clay and glaze (usually Cone 5 or 6). Let the kiln cool naturally before opening to reveal the glossy finish.
Level Up: Rim Variation
Dip just the rim in a second, different glaze (like an oatmeal or iron-rich brown) to create a beautiful, dripping halo effect along the edge.
Enjoy using these custom bowls during your next shared meal, knowing your personal touch is hidden inside


What Really Happens Inside the Kiln
Learn how time and temperature work together inside the kiln to transform clay into durable ceramic.
Tiny Animal Desk Buddy Challenge
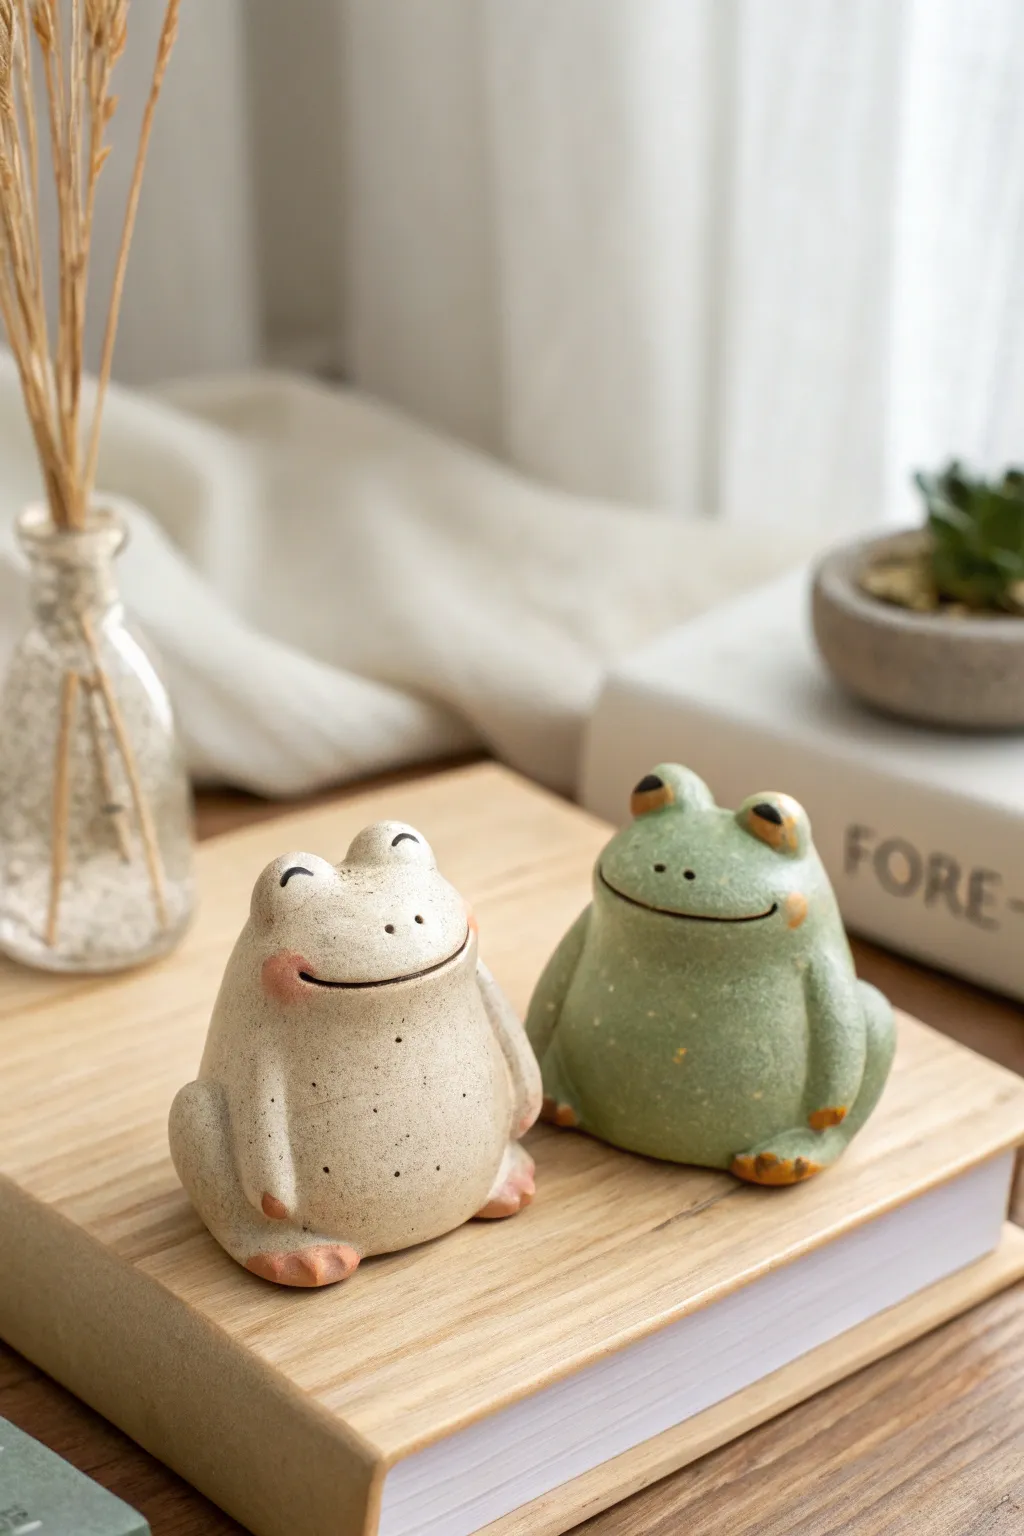
Create a pair of charmingly plump frog friends to keep you company at your desk. These ceramic-style companions feature varied expressions, speckled textures, and a rounded, organic shape that is perfect for a relaxing couples clay date.
How-To Guide
Materials
- Air-dry clay or polymer clay (white or beige)
- Acrylic paints (olive green, cream/beige, burnt orange, black)
- Matte varnish or sealant
- Sculpting tools (needle tool, ball stylus)
- Small bowl of water
- Aluminum foil (optional, for core)
- Old toothbrush or stiff bristle brush
- Fine grit sandpaper
Step 1: Shaping the Bodies
-
Prepare the base form:
Start with a ball of clay roughly the size of a tangerine for each frog. If you want to save clay or reduce weight, you can create a tight ball of aluminum foil first and cover it with a layer of clay about 1/4 inch thick. -
Create the pear shape:
Roll the clay into a smooth ball, then gently taper the top half slightly to create a very subtle pear shape. The bottom needs to be significantly wider and heavier than the top to give them that ‘sat-down’ look. -
Flatten the base:
Tap the bottom of your pear shape firmly against your work surface. This ensures the frog will sit flat and stable without rocking. -
Smooth the surface:
Dip your finger in a little water and run it over the clay to remove any fingerprints or cracks. The goal is a very smooth, stone-like finish.
Step 2: Adding Features
-
Form the eyes:
Roll two small, pea-sized balls of clay. Attach these to the very top of the head using the score-and-slip method (scratching both surfaces and adding a drop of water) so they don’t fall off. -
Blend the eyes:
Use a sculpting tool or your thumb to blend the bottom seam of the eyes into the head, making them look like bumps protruding from the skull rather than balls just stuck on top. -
Sculpt the arms:
Roll two sausage shapes for the arms. They should be long enough to reach from the ‘shoulder’ area down to the belly. Gently flatten them against the sides of the body. -
Create the feet:
Make two small, flattened ovals for feet. Tuck these slightly under the belly bulge at the front, pressing them securely into the base. -
Add gentle definition:
Use a needle tool or knife to make tiny indentations on the hands and feet to suggest toes, though keep this minimal for a stylized look.
Keep it Clean
If your clay starts cracking while smoothing, it’s too dry. keep a spray bottle handy to mist your clay periodically, or dip your tools in water more frequently.
Step 3: Surface & Expression
-
Carve the mouth:
Use a needle tool or a thin blade to slice a wide, curved smile into the face. For the beige frog, curve slightly upward at the ends; for the green frog, a straighter, satisfied line works well. -
Add texture:
Take an old toothbrush and gently tap it randomly over the skin of the green frog to give it a porous, natural texture. Keep the beige frog smoother. -
Dry completely:
Let the figures dry fully. Depending on your clay type and thickness, this could take 24 to 48 hours. Don’t rush this, or painting will be difficult. -
Sand imperfections:
Once dry, use fine-grit sandpaper to briefly smooth out any unintentional sharp ridges or rough fingerprints.
Make it Functional
Need a purpose for your new friend? Before the clay dries, create a vertical slot in the frog’s back. Now you have a cute holder for business cards or photos.
Step 4: Painting & Finishing
-
Base coat:
Paint one frog entirely in a soft cream or beige. Paint the other in a muted olive green. You may need two coats for full opacity. -
Speckling technique:
Dilute a tiny bit of dark brown or black paint with water. Load a toothbrush, aim it at the clay, and run your thumb over the bristles to flick tiny speckles onto the surface. -
Blushing cheeks:
Mix a diluted wash of burnt orange or rust paint. Dab this gently onto the cheeks, the tips of the hands, and the feet. -
Define the face:
Use a fine liner brush and black paint to fill in the mouth line and add small nostrils. Paint the eye bumps: simple arches for one, and black ovals for the other. -
Seal:
Finish with a coat of matte varnish to protect the paint and give it that fired ceramic appearance.
Place your new ceramic-style buddies side by side on a shelf or desk where they can always look happy to see you
Peas in a Pod Shared Sculpture
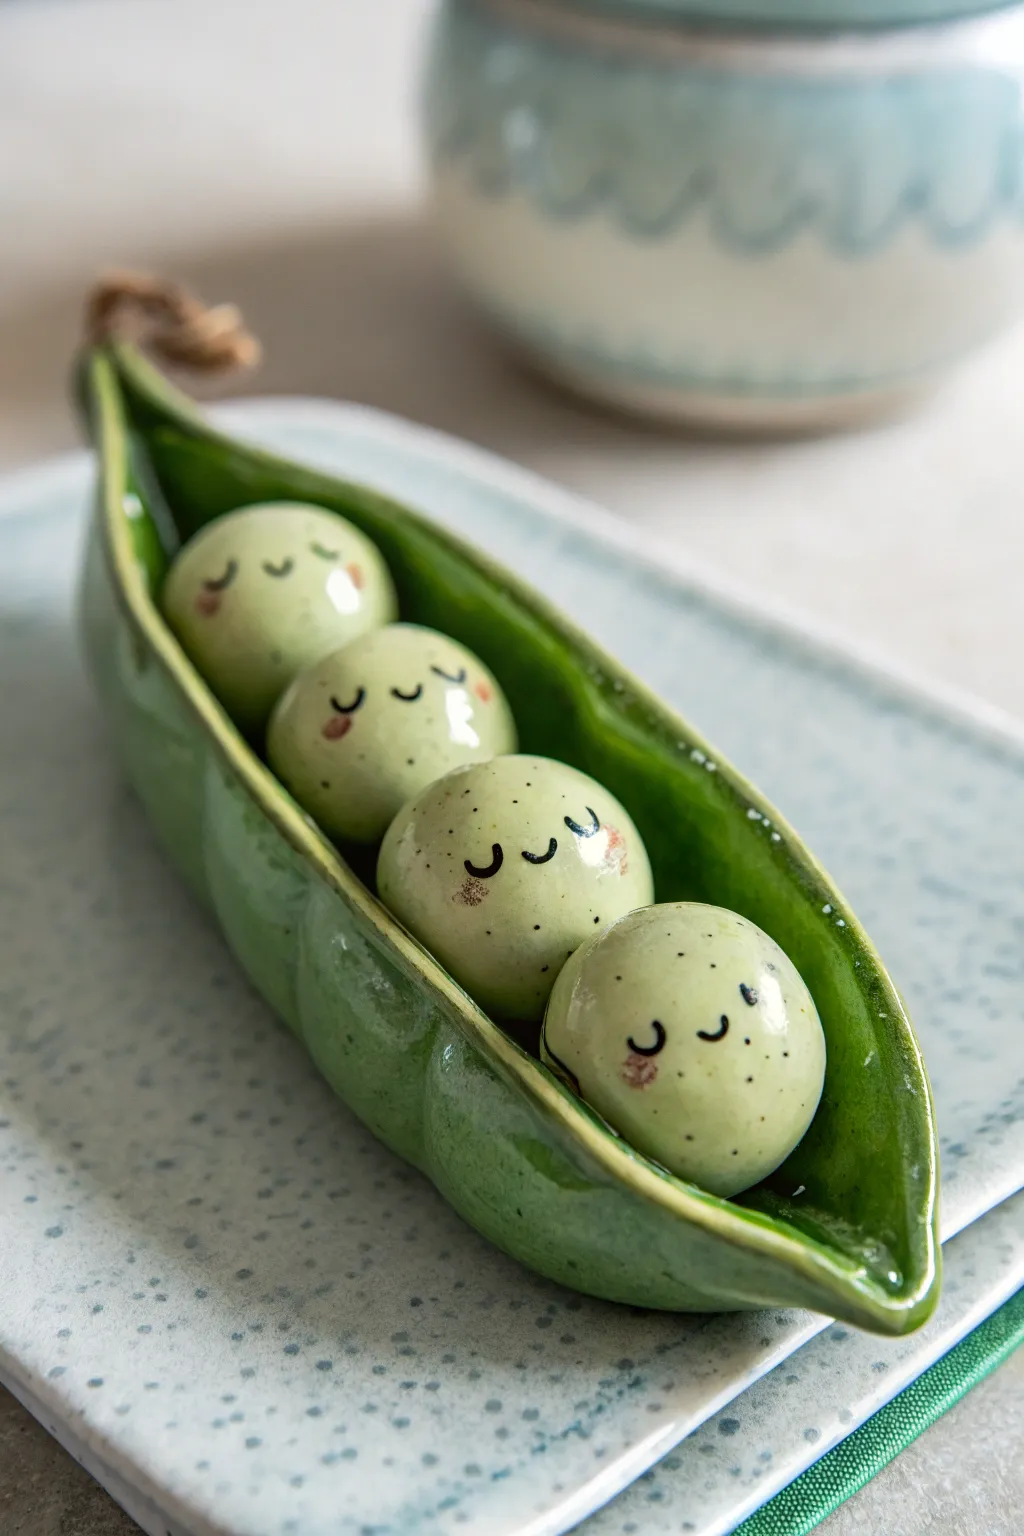
Sculpt a heartwarming symbol of closeness with this adorable ceramic-style pea pod. These four sleepy little peas nestled in a glossy green shell make for a perfect shared project that results in a charming keepsake.
Detailed Instructions
Materials
- Polymer clay (white and green)
- Glossy glaze or UV resin
- Fine-point black acrylic marker or paint pen
- Blush pink acrylic paint or pastel chalk
- Sculpting tool with a ball end
- Modeling tool (needle or knife)
- Rolling pin
- Aluminum foil
- Soft paintbrush
Step 1: Forming the Pod base
-
Condition the green clay:
Start by warming up a significant chunk of darker green clay in your hands until it’s pliable and smooth, ensuring no cracks appear when you bend it. -
Create the main log:
Roll the green clay into a thick log shape, tapering it to a point at both ends. It should look like a thick cigar at this stage, about 4-5 inches long. -
Flatten and hollow:
Gently press down on the center of the log to flatten it slightly. Using your thumbs or a ball tool, press into the center to create a canoe-like hollow, leaving the walls thick enough to hold their shape. -
Refine the edges:
Pinch the edges of your ‘canoe’ walls to induce a slight wave or irregularity, making it look organic rather than manufactured. Keep the ends pointy and sharp. -
Add a stem detail:
Roll a tiny snake of brown or mixed green clay. Attach it to one of the tapered ends in a little loop to mimic a dried stem connection.
Step 2: Creating the Peas
-
Mix the pea color:
Take your white clay and mix in a very small amount of green to achieve a pale, minty pastel shade. The peas should be significantly lighter than the pod. -
Roll spheres:
Divide the mint clay into four equal portions. Roll them between your palms into perfect, smooth spheres. I like to check them against the pod size frequently to ensure a snug fit. -
Test the fit:
Place the spheres gently into the pod. They should touch each other and sit comfortably within the walls without disappearing completely. -
Create the bump effect:
With the peas inside, carefully press the green pod walls against the spheres from the outside. This creates that realistic ‘lumpy’ look where the pod conforms to the peas. -
Secure the peas:
Once you are happy with the arrangement, you can gently press the peas down to bond them to the pod, or use a tiny dab of liquid clay for extra security, then bake according to your clay package instructions.
Uneven Glaze?
If your glaze pools at the bottom of the pod, apply it in two thin coats rather than one thick one. Let the first coat dry completely before adding the second for a smooth finish.
Step 3: Painting and Glazing
-
Cool down completely:
Allow the sculpture to cool fully after baking. Painting on warm clay can make the paint dry too fast and clump up. -
Draw the faces:
Using a fine-point black marker, draw simple ‘U’ shapes for sleeping eyes on each pea. Add tiny, smiling mouths right below the eyes. -
Add blush cheeks:
Dip a small brush (or a q-tip) into a tiny amount of pink paint or crushed pastel chalk. Dab it gently onto the ‘cheeks’ of the peas for a rosy glow. -
Add textural speckles:
For that organic ceramic look, flick a very sparse amount of diluted brown or black paint onto the peas using an old toothbrush, or dot tiny freckles manually. -
Apply the glaze:
Coat the entire piece—pod and peas—in a thick layer of high-gloss glaze or UV resin. This is crucial for mimicking the shiny, wet look of glazed ceramic. -
Final cure:
Let the glaze dry (or cure under UV light) until it is hard and glass-like to the touch, protecting those sweet little faces.
Make it Functional
Before baking, flatten the bottom slightly and add a strong magnet. Now your adorable peas can hold up photos or notes on your refrigerator!
Display your glossy pod on a desk or shelf to remind you of your sculpting partner

TRACK YOUR CERAMIC JOURNEY
Capture glaze tests, firing details, and creative progress—all in one simple printable. Make your projects easier to repeat and improve.
Sun and Moon Matching Hanging Tiles
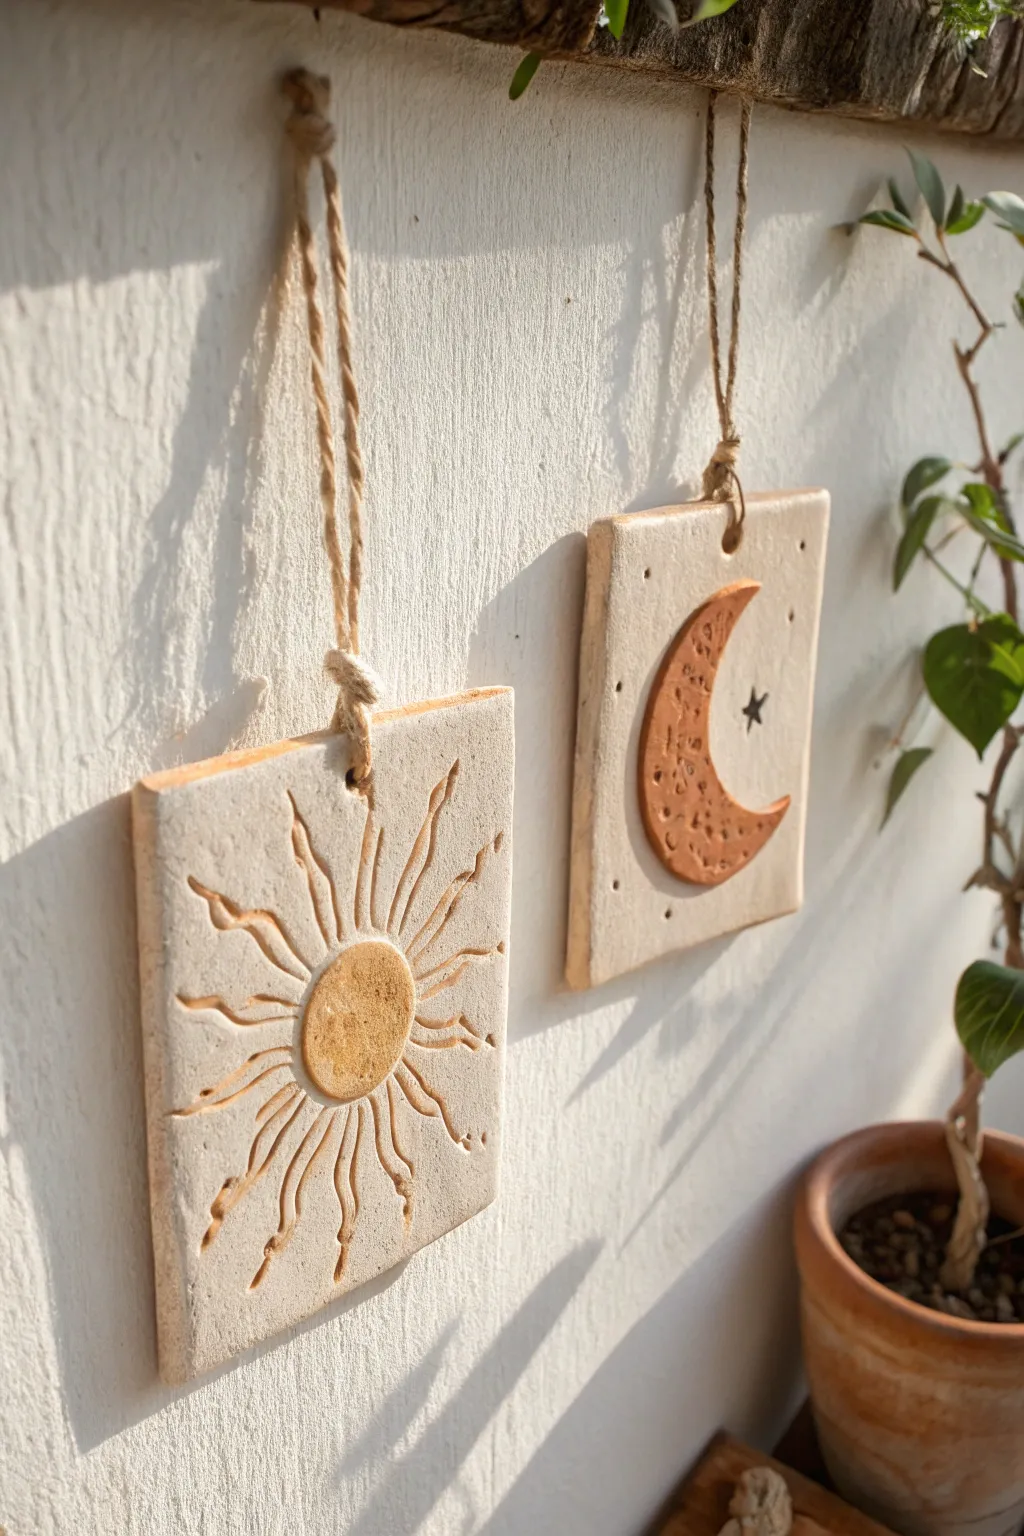
Celebrate your connection with these complementary sun and moon wall hangings that capture a rustic, earthen charm. With their carved details and warm terracotta accents, they create a dreamy focal point for any shared space.
Step-by-Step Guide
Materials
- White sculpting clay (air-dry or polymer)
- Small block of terracotta-colored clay (or acrylic paint)
- Rolling pin
- Square cookie cutter or knife with ruler
- Needle tool or toothpick
- Modeling tools (or household items like spoons/stamps)
- Jute twine
- Straw (for making holes)
- Fine-grit sandpaper
- Matte sealant or varnish
Step 1: Shaping the Base
-
Prepare the workspace:
Lay down a clean, flat surface or wax paper to prevent the clay from sticking. Knead your white clay until it is pliable and smooth. -
Roll the slabs:
Roll out a slab of white clay to an even thickness of about 1/4 inch. Try to keep the pressure consistent so the final tile doesn’t warp while drying. -
Cut the forms:
Using a square cutter or a ruler and knife, cut two identical squares. Smooth the rough edges with a slightly damp finger or a sponge to soften the look. -
Create hanging holes:
Take a plastic drinking straw and punch a hole near the top center of each square. Position it about half an inch down from the edge to ensure the clay remains strong enough to hold weight.
Step 2: Designing the Moon
-
Form the crescent:
Using the terracotta-colored clay, roll a small coil and flatten it into a crescent shape, or cut a moon shape from a small rolled slab. -
Attach the moon:
Score the back of the moon and the spot on the white tile where it will sit. Add a tiny dab of water or liquid clay (slip) to join them securely. -
Texture the surface:
Gently press varied divots into the moon shape using the round end of a paintbrush or a stylus to mimic craters. -
Add starry details:
With a needle tool, poke tiny holes around the remaining white space of the tile. You can even carve a small five-point star or two for added whimsy.
Warping Worries?
If tile corners lift while drying, gently weigh them down with a heavy book placed over a piece of parchment paper.
Step 3: Sculpting the Sun
-
Add the center:
Create a flat circle from your terracotta clay. Attach this to the center of your second white square using the scoring and slipping method. -
Carve the rays:
Using a carving tool or a toothpick, draw wavy, radial lines extending from the sun’s center to the edges of the tile. Vary the length and depth for an organic, handmade feel. -
Detail the perimeter:
I like to go back over the carved lines and slightly widen them at the tips, creating a deeper relief that will catch shadows beautifully. -
Texture the background:
If desired, lightly stipple the white space between sun rays with a toothbrush or sponge to contrast against the smooth sun center.
Golden Glow
Mix a tiny amount of gold mica powder into your varnish for the sun’s rays to give it a subtle, magical shimmer.
Step 4: Finishing Touches
-
Dry properly:
Allow both tiles to dry flat for at least 24-48 hours. Flip them occasionally to ensure even drying and prevent curling corners. -
Sand edges:
Once bone dry, gently sand away any sharp burrs or rough spots on the edges with fine-grit sandpaper. -
Seal the work:
Apply a coat of matte varnish or sealant to protect the clay from moisture and dust. This also deepens the terracotta color slightly. -
String the twine:
Cut two equal lengths of jute twine. Fold each piece in half, feed the loop through the hole from the front, and pull the tails through the loop to create a lark’s head knot. -
Secure the knot:
Tie the loose ends of the twine together at your desired hanging length, trimming any excess for a tidy finish.
Hang these charming tiles side by side to bring a sense of balance and warmth to your home
Initials Keychain Tag Challenge
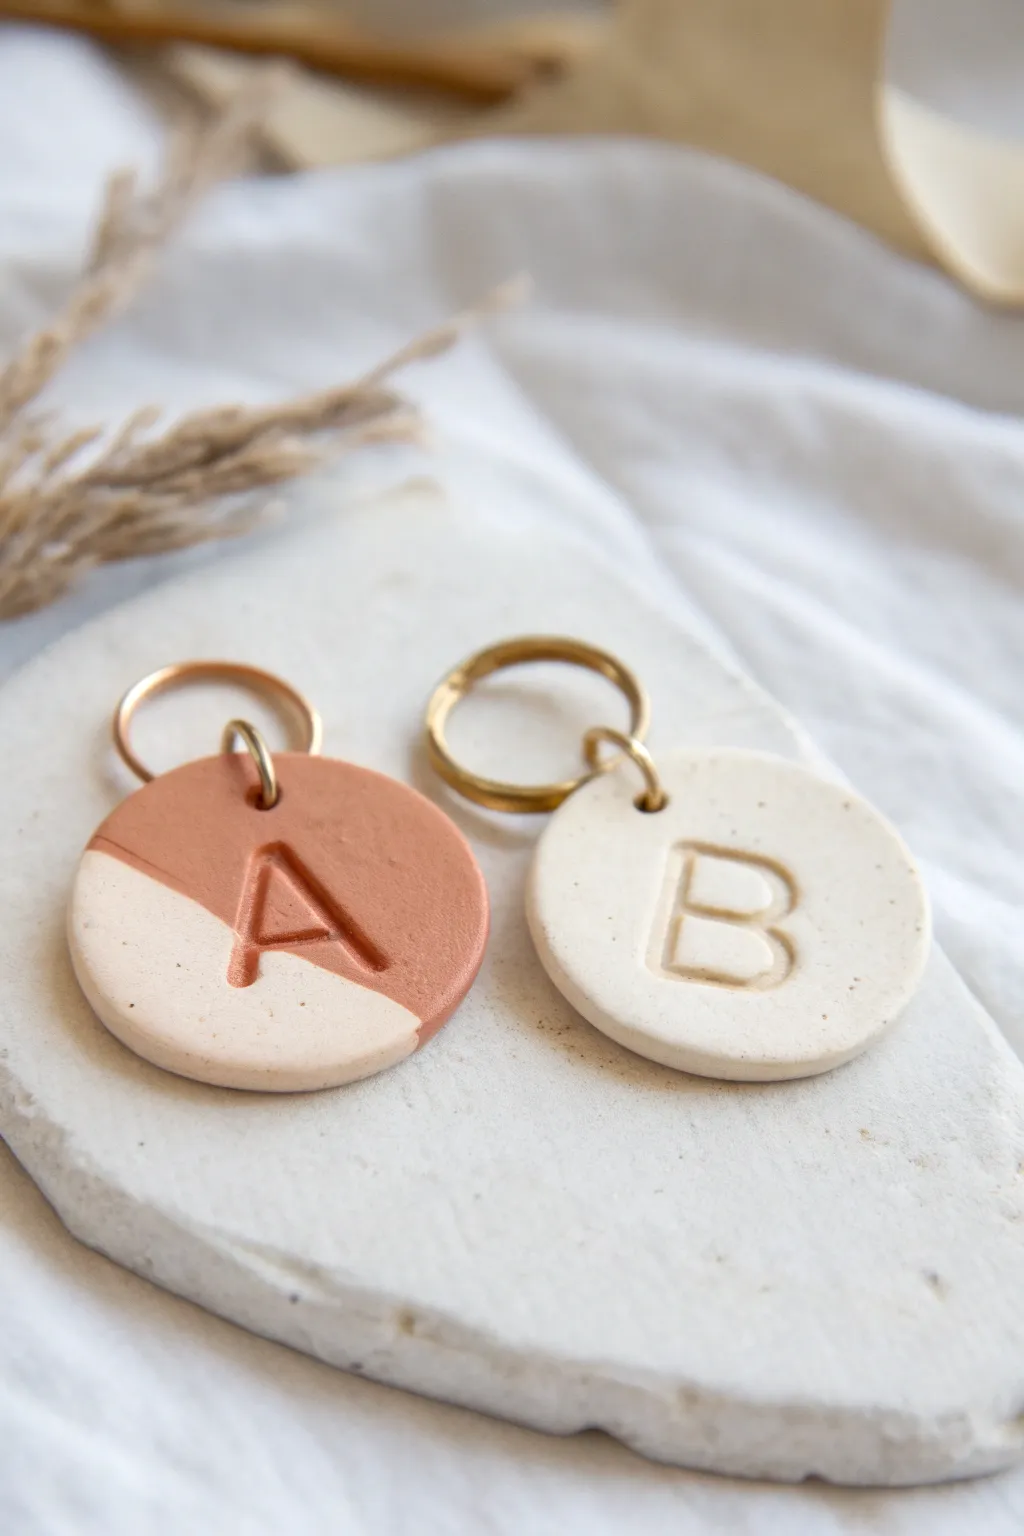
These sleek, minimalist keychains feature a chic speckled finish and deeply impressed typography for a professional look. The contrasting terracotta and cream design adds a modern touch, making them the perfect customized gift for your favorite couple or a fun weekend project to tackle together.
How-To Guide
Materials
- Polymer clay (white or cream)
- Polymer clay (terracotta or reddish-brown)
- Faux stone clay inclusions (optional: black pepper or dried coffee grounds if not using pre-speckled clay)
- Rolling pin or acrylic roller
- Circle cookie cutter (approx. 1.5 – 2 inches)
- Alphabet stamp set
- Small jump rings
- Keyring hardware (gold or brass tone)
- Needle tool or toothpick
- Sandpaper (fine grit)
- Parchment paper
- Oven
Step 1: Planning & Mixing
-
Prepare the Speckled Clay:
Start by conditioning your white or cream polymer clay in your hands until it’s soft and pliable. If you aren’t using pre-speckled clay, knead in a tiny pinch of ground black pepper or dried coffee grounds to achieve that organic, stoneware look. -
Create the Terracotta Shade:
Condition your terracotta clay separately. If the color feels too flat, mixing in a very small amount of the speckled white clay can help harmonize the tones between the two sections. -
Roll Out the Base:
Roll your conditioned clay out on a sheet of parchment paper. Aim for a thickness of about 1/4 inch (4-5mm). You want these to be sturdy enough to survive being tossed in a bag.
Clean Impressions Pro-Tip
Dust the face of your alphabet stamp with cornstarch or dip it in water before pressing into the clay. This prevents the stamp from sticking and pulling up clay.
Step 2: Shaping the Design
-
Cut the Solid Tag:
For the solid cream tag (like example B), simply press your circle cutter firmly into the rolled-out speckled slab and lift away the excess. -
Create the Color Block:
For the two-tone tag (example A), use a blade to cut a straight line through a rolled piece of cream clay and a rolled piece of terracotta clay. -
Join the Seams:
Press the straight cut edge of the cream clay against the straight cut edge of the terracotta clay. Gently push them together so they fuse. -
Smoothing the Join:
Place a piece of parchment paper over the seam and gently roll over it with your roller to level the surface and ensure a strong bond between colors. -
Cut the Two-Tone Tag:
Position your circle cutter over the joined clay so the seam runs diagonally across the shape, then press down to cut.
Step 3: Adding Details & Baking
-
Smooth the Edges:
Dip your finger in a little water (or baby oil) and gently run it around the cut edges of your circles to remove any jagged bits or fingerprints. -
Stamp the Initials:
Take your alphabet stamp and position it in the center. Press straight down firmly to create a deep, clear impression, but be careful not to push all the way through the clay. -
Create the Hole:
Use a needle tool or a straw to punch a hole near the top edge. Make sure the hole is big enough to fit your jump ring comfortably. -
Bake:
Transfer the parchment paper with the tags onto a baking sheet. Bake according to your clay package instructions (usually 275°F for 15-30 minutes depending on thickness). -
Cool Down:
Let the pieces cool completely inside the oven with the door cracked, or on a wire rack. This helps prevent cracking from thermal shock.
Fixing Fingerprints
If you notice fingerprints on your raw clay right before baking, a light brush of acetone or rubbing alcohol will melt the top layer just enough to smooth them away.
Step 4: Final Assembly
-
Sand for Perfection:
Once fully cool, inspect the edges. If there are any sharp spots, lightly buff them with fine-grit sandpaper under running water for a buttery smooth finish. -
Open the Jump Ring:
Use two pairs of pliers to twist your jump ring open (twist sideways, don’t pull apart). -
Attach Hardware:
Slide the jump ring through the clay hole and loop your main keyring hardware onto it. -
Secure the Ring:
Twist the jump ring closed again, ensuring the ends meet perfectly flush so the keychain doesn’t slip off.
Attach your keys and enjoy looking at your beautiful, handmade initials every time you leave the house
Two-Piece Puzzle Couple Tiles
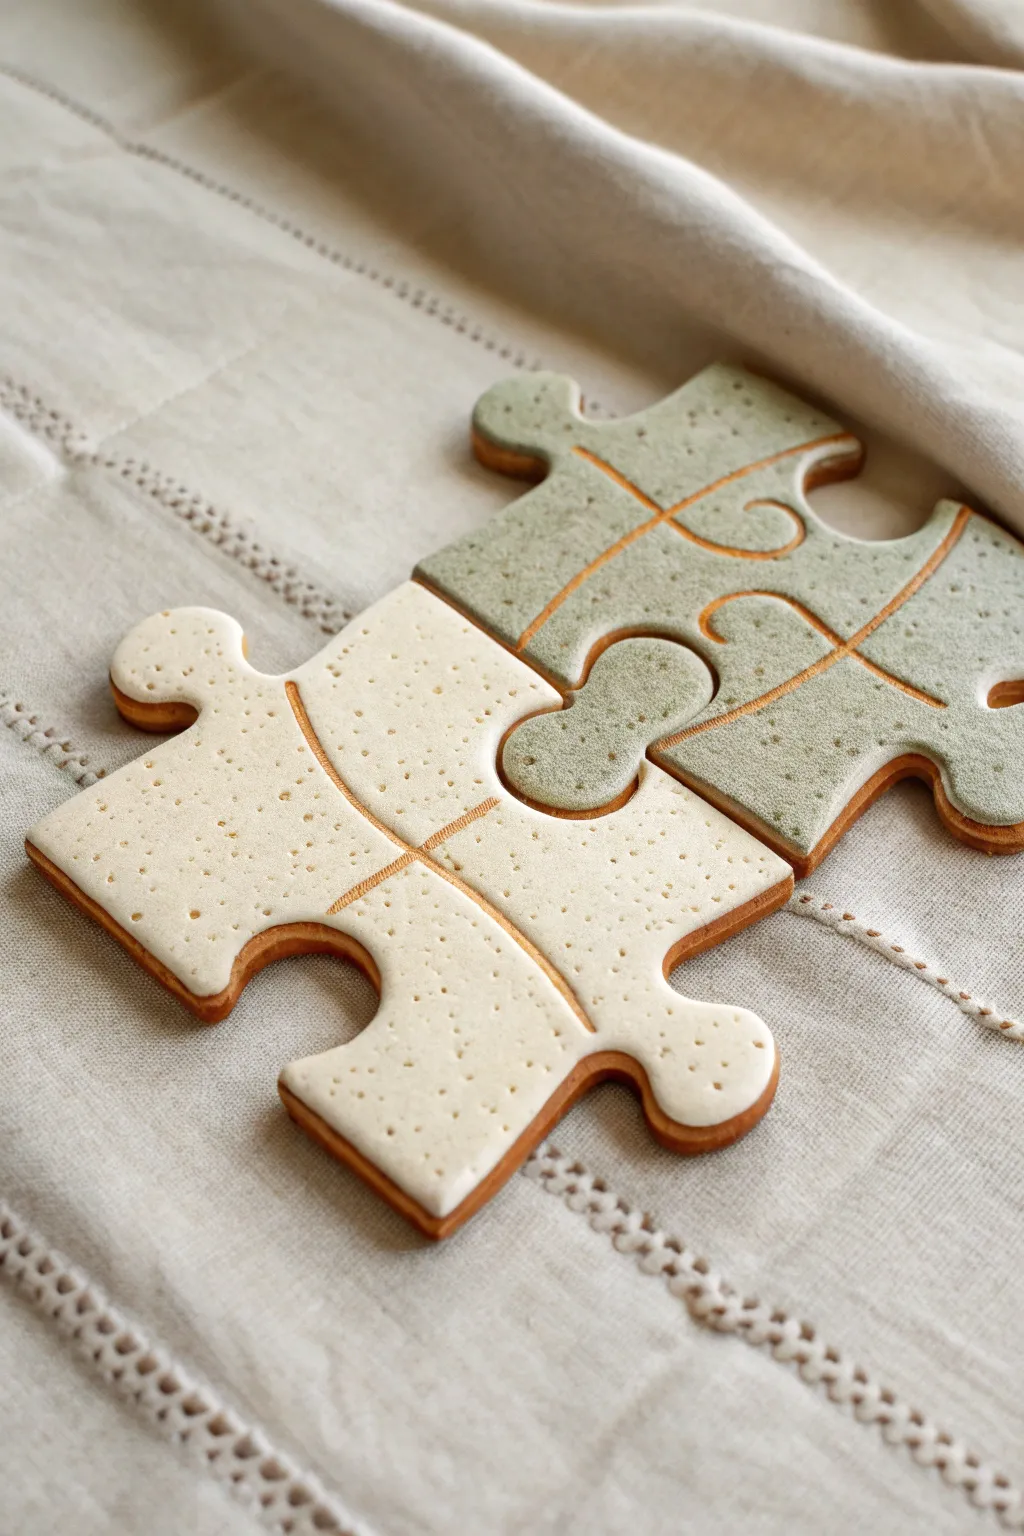
These charming puzzle piece tiles serve as a perfect metaphor for connection, fitting together seamlessly while retaining their own unique character. Crafted from warm terracotta clay and finished with speckled glazes in cream and sage, they make for beautiful, functional decor or meaningful coasters.
Step-by-Step Tutorial
Materials
- Terracotta-colored polymer clay or air-dry clay (if not firing)
- Rolling pin
- Clean work surface or silicone mat
- Puzzle piece template (printed cardstock or hand-drawn)
- Craft knife or clay needle tool
- Small bowl of water
- Medium-grit sandpaper
- Mod Podge or gloss varnish (for air-dry/polymer)
- Acrylic paints (Cream and Sage Green)
- Old toothbrush (for speckling)
- Brown acrylic paint (for speckles)
- Fine liner brush for detailing
- Ruler
Step 1: Shaping the Clay
-
Prepare the workspace:
Begin by clearing a flat surface and laying down your silicone mat or parchment paper to prevent sticking. If using polymer clay, knead it in your hands until it becomes soft and pliable. -
Roll the slab:
Use your rolling pin to flatten the clay into an even slab. Aim for a thickness of about 1/4 inch (6mm). Consistency is key here so the pieces lie flat when finished. -
Trace the shapes:
Place your puzzle piece templates onto the clay slab. Ensure they interlock correctly before you start cutting. You can lightly trace the outline with a needle tool first to guide your hand. -
Cut out the pieces:
Using a sharp craft knife, carefully cut along your traced lines. Keep the knife vertical to ensure square edges rather than beveled ones, which helps them fit together better. -
Smooth the edges:
Dip your finger in a little water and gently run it along the cut edges to soften any harsh sharpness or loose clay bits.
Step 2: Adding Texture & Detail
-
Carve decorative lines:
With a needle tool or a dull pencil, gently carve curved lines across the face of the puzzle pieces. I like to make these lines flow from one piece to the other to emphasize their connection. -
Create the speckle texture:
Before baking or drying, you can roll a textured sponge lightly over the surface if you want physical texture, though the painted speckles later will do most of the work. -
Cure or dry the clay:
Follow the manufacturer instructions for your specific clay. For polymer, bake at the recommended temperature. For air-dry clay, let it sit for 24-48 hours until fully hardened. -
Sand for smoothness:
Once fully cured and cooled, use medium-grit sandpaper to lightly sand the edges and the flat surface, ensuring a professional, even finish.
Warping Woes?
If your clay curls up while drying, gently flip the pieces every few hours to ensure even airflow on both sides. Placing a light book on top helps keep them flat.
Step 3: Glazing & Finishing
-
Apply base color:
Paint the top surface of the first piece with cream acrylic paint and the second with sage green. Be careful to leave the side edges unpainted to mimic the exposed terracotta look in the photo. -
Highlight the carved lines:
Using a mixture of orange-brown paint diluted with water, paint into the carved crevices. Wipe away the excess on the surface immediately with a damp paper towel, leaving the color only deep in the lines. -
Add speckled details:
Dip an old toothbrush into slightly watered-down brown paint. Run your thumb across the bristles to flick tiny speckles onto the painted surfaces. Practice on paper first to control the spray. -
Seal the artwork:
Once the paint is completely dry, apply a coat of gloss varnish or Mod Podge. This gives the ‘ceramic glaze’ shine and protects the surface from moisture. -
Final fit check:
Bring the two halves together to ensure they still interlock smoothly after the layers of paint and varnish.
Make Them Magnetic
Turn these into oversized fridge decor by gluing strong ceramic magnets to the back. They can hold photos or significant notes between the interlocking joint.
Display your connected creation on a coffee table or use them individually as personalized coasters to celebrate your bond
Me vs. You Mini Portrait Sculpt
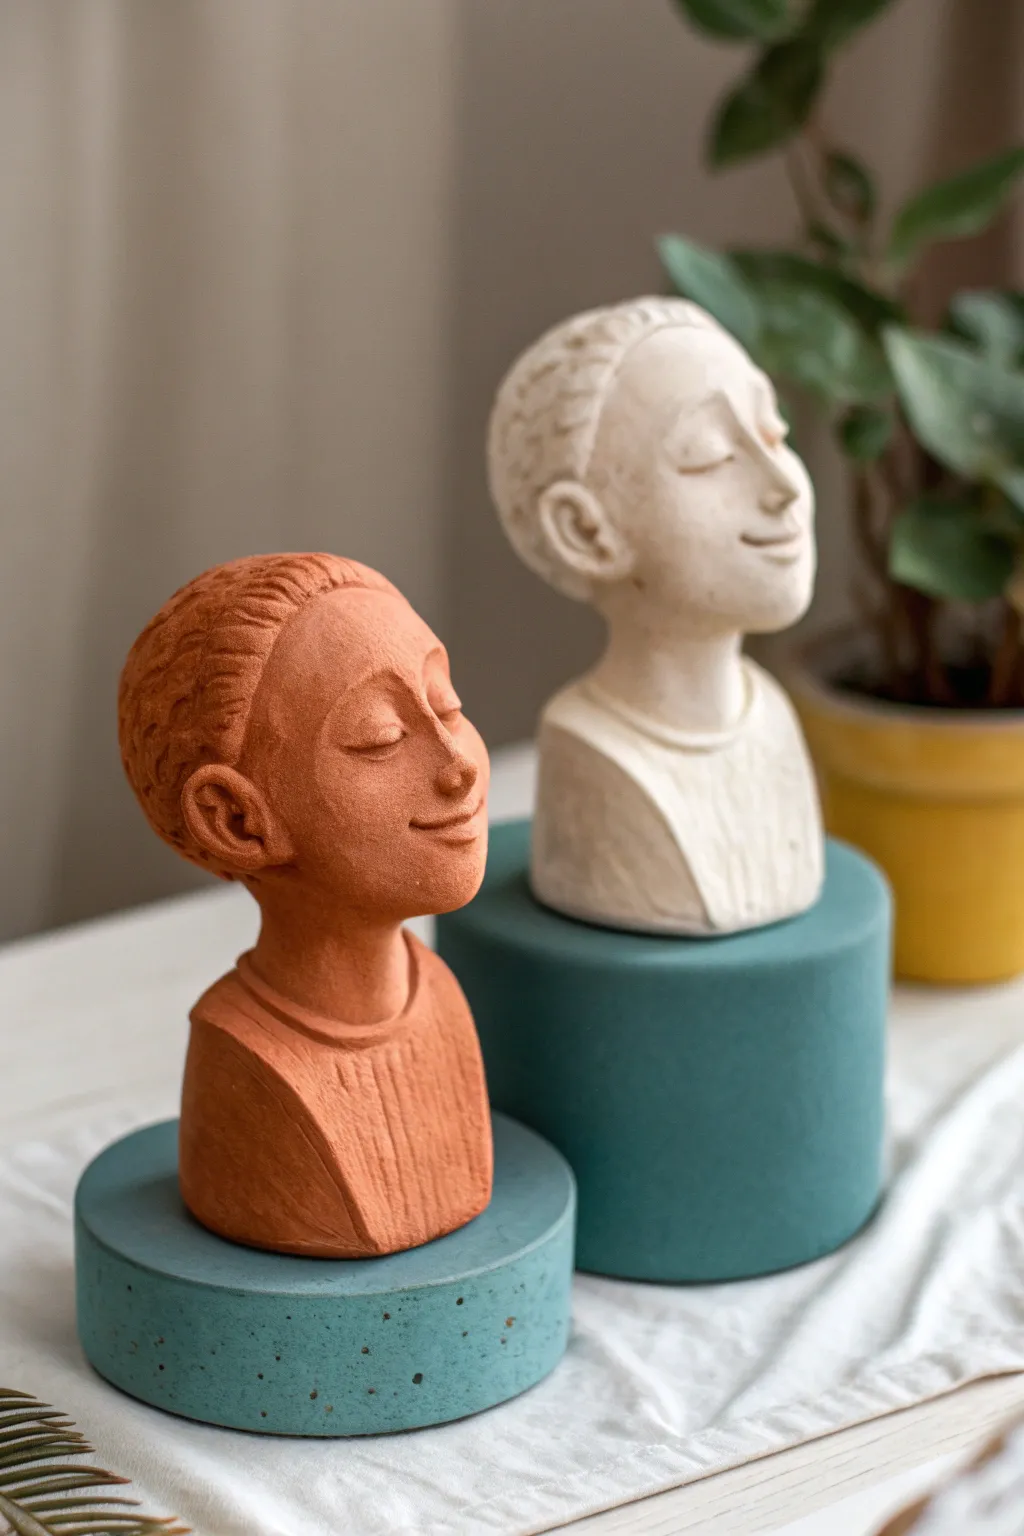
Embrace the tranquil beauty of these stylized mini portrait sculptures, designed to capture a moment of pure serenity. This ‘Me vs. You’ challenge involves creating two harmonious busts using contrasting clay bodies—terracotta red and creamy white—each resting on its own colorful pedestal.
Step-by-Step Guide
Materials
- Terracotta air-dry clay (or red earthenware)
- White air-dry clay (or white stoneware)
- Sculpting tool set (loop tool, needle tool, wooden knife)
- Wire clay cutter
- Sponge and small water cup
- Rolling pin
- Ruler
- Acrylic paints (teal, dusty green)
- Small round or cylindrical molds (for pedestals)
- Fine-grit sandpaper
Step 1: Sculpting the Base Forms
-
Prepare the clay:
Begin by dividing your clay blocks. You will need a larger lump for the head and a slightly smaller lump for the shoulders and chest for each color. -
Form the torso block:
Shape the smaller lump into a rough trapezoidal block that will serve as the bust’s base. Flatten the bottom so it sits stable on your work surface. -
Create the head armature:
Roll the larger lump into a smooth egg shape. This ovoid will become the head. It should be proportional to the torso block you just made. -
Join the pieces:
Score the top of the torso and the bottom of the head piece with your needle tool. Apply a little water or slip (liquid clay) and press them firmly together to create a neckless stylistic bond initially, then pinch clay upwards to form a thick, sturdy neck.
Step 2: Refining Features
-
Define the facial plane:
Gently flatten the front of the egg shape to create a plane for the face. Use your thumbs to press in slight indentations where the eye sockets will go. -
Build the nose:
Add a small triangle of clay to the center of the face. Blend the edges seamlessly into the cheeks and forehead until a defined nose emerges. -
Sculpt the mouth:
Use a wooden knife tool to carve a gentle, curved slit for the mouth. Soften the edges to create a serene, slight smile. -
Add the ears:
Roll two small balls of clay and attach them to the sides of the head, aligned roughly with the nose. Use a small loop tool to carve out the inner ear detail. -
Create the heavy eyelids:
For the closed-eye look, roll tiny crescents of clay and blend them onto the eye area. Use a damp sponge to smooth them until they look like relaxed eyelids.
Cracking Up?
If cracks appear while drying, don’t panic. Mix a tiny bit of fresh clay with water to make a paste (slip) and fill the crack. Smooth it over and let dry again.
Step 3: Adding Texture & Detail
-
Texture the hair:
Using a needle tool or a small rake tool, scratch fine, short lines all over the scalp area to mimic short, cropped hair texture. -
Carve clothing details:
On the torso section, use a carving tool to create vertical ridges to suggest a ribbed sweater or shirt texture. -
Smooth the skin:
I like to take a slightly damp sponge at this stage and very gently wipe the face area to remove fingerprints and harsh tool marks, leaving the skin looking soft. -
Create the pedestals:
Separately, pack leftover clay or plaster into cylindrical molds to create the round bases. If using clay, ensure they are solid and flat-topped. -
Drying time:
Allow all pieces to dry completely. For air-dry clay, this usually takes 24-48 hours depending on thickness and humidity.
Smooth Operator
For a hyper-smooth finish on the face before drying, lightly brush the clay with a soft makeup brush dipped in a tiny amount of baby oil or water.
Step 4: Finishing Touches
-
Sand for perfection:
Once fully dry, lightly sand any rough spots on the chin or nose with fine-grit sandpaper. -
Paint the pedestals:
Paint the cylindrical bases with matte acrylics. Use a deep teal for one and a dusty sage green for the other to complement the clay tones. -
Add speckles (optional):
Flick a toothbrush dipped in black paint over the painted pedestals to create a trendy speckled stone effect. -
Assembly:
Place your finished busts atop their respective pedestals. You can glue them down for permanence or leave them loose for rearrangement.
Step back and admire the calm presence your twin sculptures bring to the room
Inspo vs. Our Version Speed Sculpt
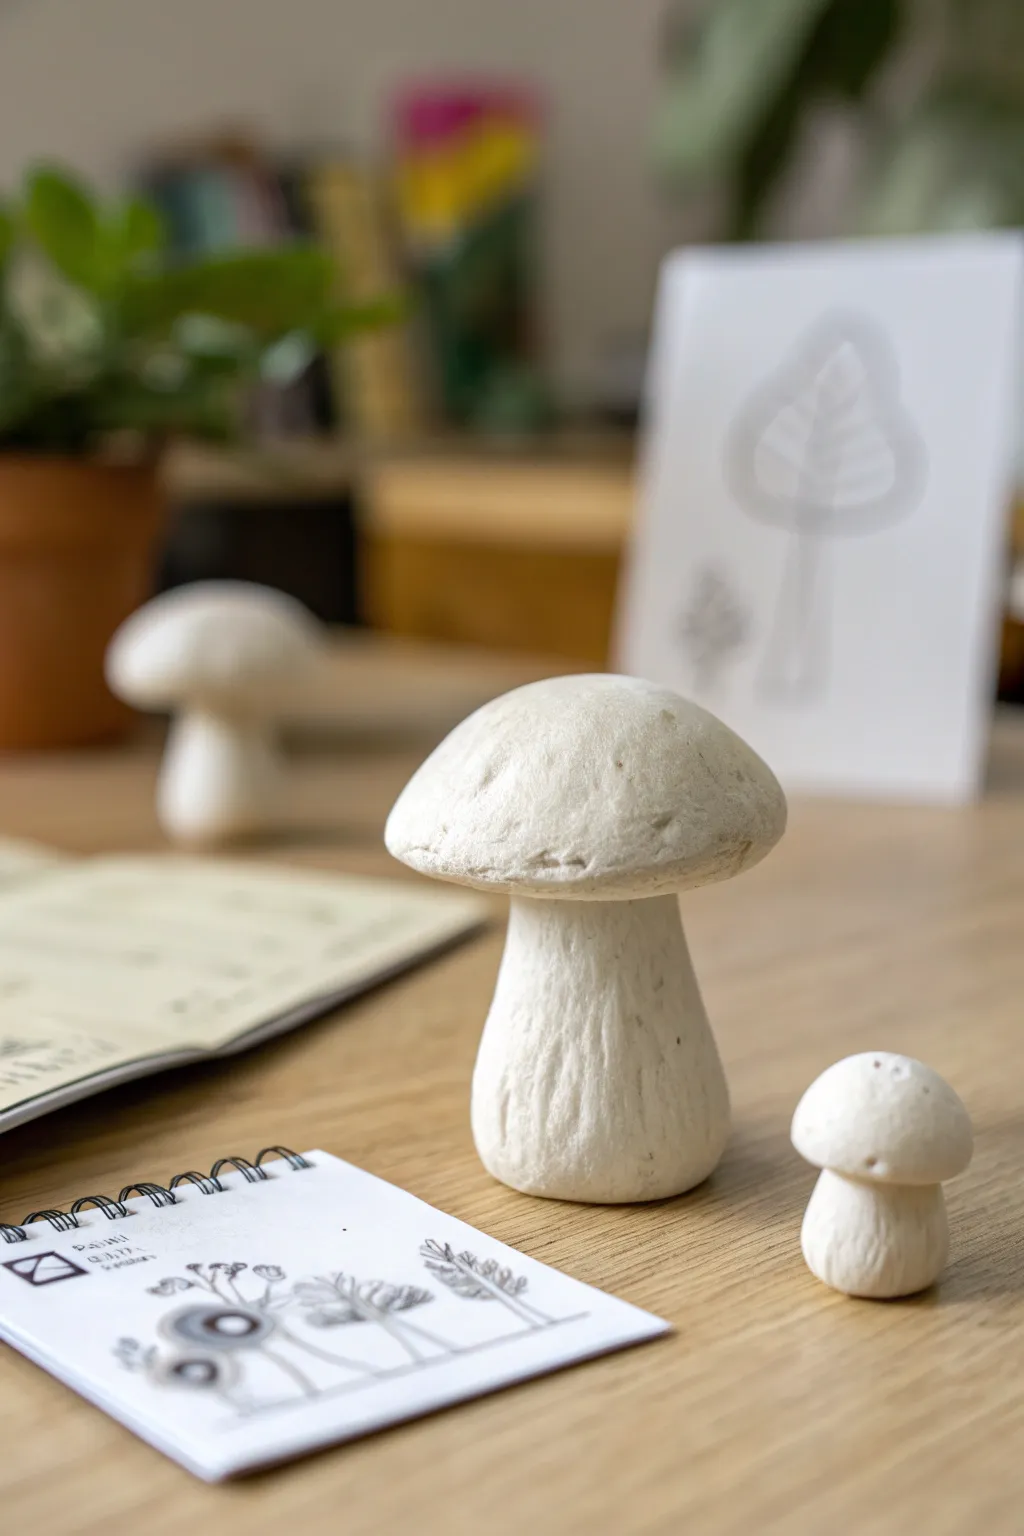
Embrace the imperfect charm of nature with these simple, textured clay mushrooms. This project focuses on capturing the organic feel of a real forest floor, using clean white clay for a modern, minimalistic finish.
Step-by-Step
Materials
- White air-dry clay (e.g., DAS or Crayola)
- Small cup of water
- Sculpting tools (or a toothpick/skewer)
- Sandpaper (fine grit)
- Clear matte varnish (optional)
- Rolling pin (optional)
Step 1: Shaping the Stems
-
Portion the clay:
Start by grabbing a chunk of white air-dry clay. For the large mushroom, you’ll need a piece roughly the size of a golf ball for the stem. -
Roll a cylinder:
Warm the clay in your hands to make it pliable, then roll it into a thick cylinder on your work surface. -
Create the base:
Gently tap the bottom of the cylinder against the table to flatten it so the mushroom will stand upright on its own. -
Taper the top:
Refine the shape by rolling just the top third of the cylinder between your fingers, creating a slight taper where the cap will eventually sit. -
Repeat for smaller sizes:
Follow the same process to create stems for the medium and mini mushrooms, adjusting your clay amount accordingly to create variety in height and girth.
Smooth Operator
Keep a small sponge or piece of foam handy. Dampen it slightly and use it to smooth out harsh tool marks while the clay is wet for a softer finish.
Step 2: Creating the Caps
-
Form a ball:
Take a fresh piece of clay—slightly more than you used for the corresponding stem—and roll it into a smooth sphere. -
Flatten into a dome:
Press the sphere gently into your palm with your thumb to create a dome shape. The underside should be flat or slightly concave. -
Smooth the edges:
Run a damp finger along the rim of the cap to smooth out any major cracks, but keep the edge soft and rounded rather than sharp. -
Attach cap to stem:
Score the top of the stem and the underside of the cap with a toothpick (scratching the clay helps it grip). Dab a little water on the scored areas. -
Secure the join:
Press the cap firmly onto the stem. Use a modeling tool or your finger to smooth the clay slightly underneath the cap to ensure a strong bond.
Forest Floor Vignette
Create a display base! Sculpt a flat, mossy-textured clay disk and glue your dried mushrooms to it for a permanent mini-scene.
Step 3: Texturing and Refining
-
Add vertical grooves:
Using a needle tool or toothpick, gently drag vertical lines down the stem. Vary the pressure to create natural-looking ridges and grooves like real bark or fibers. -
Detail the cap:
For the cap, add subtle imperfections. I like to press the side of a tool gently into the surface to create small dents or organic bumps. -
Texturize the rim:
Run your tool lightly around the rim of the cap to create faint vertical nicks, mimicking the gills showing through. -
Initial drying check:
Look over the mushrooms for any fingerprints. Smooth them away with a barely damp finger before setting the pieces aside. -
Let them cure:
Allow the mushrooms to dry completely in a safe spot for 24-48 hours. Turn them over occasionally to ensure the bottoms dry evenly. -
Sand for finish:
Once fully hard, use fine-grit sandpaper to gently buff the tops of the caps for a matte, stone-like appearance. -
Seal (optional):
To protect your work, brush on a thin layer of clear matte varnish, especially if you plan to display them near plants.
Group your finished mushrooms together on a shelf for an instant touch of woodland magic
Swap-and-Finish Clay Challenge
These elegant, stone-like sculptures capture the simple beauty of organic forms with a surprising amount of tactile detail. The speckled, matte finish mimics natural limestone or granite, creating a sophisticated decor piece perfect for minimalist styling.
Detailed Instructions
Materials
- White polymer clay or air-dry stone clay
- Coarse black pepper or dried coffee grounds
- Fine grit sandpaper (400-600 grit)
- Medium grit sandpaper (220 grit)
- Old toothbrush or stiff bristle brush
- Aluminum foil
- Rolling pin or pasta machine
- Needle tool or toothpick
- Matte varnish (optional)
Step 1: Preparing the Core and Clay
-
Condition the clay:
Start by warming up your white clay in your hands until it is pliable and soft. If you are doing this as a couple, split the block in half so you each have a portion to work with. -
Add texture agents:
To achieve that realistic stone look, flattening the clay slightly and sprinkle in a pinch of coarse black pepper or dried used coffee grounds. Fold the clay over and knead it thoroughly until the flecks are evenly distributed throughout the white mass. -
Form the foil core:
Crumple a piece of aluminum foil into a tight egg shape. This saves clay, reduces weight, and helps the object bake or dry more evenly. Aim for a core that is about 1/2 inch smaller than your desired final size. -
Compact the foil:
Press the foil firmly against a hard surface to smooth out sharp ridges. A smoother core makes for a smoother final surface.
Stone Effect Secrets
Mix a tiny amount of translucent clay into your white base. This adds visual depth and makes the ‘stone’ look less like plastic and more like true mineral.
Step 2: Shaping the Form
-
Sheet the clay:
Roll your speckled clay out into a sheet approximately 1/4 inch thick. It should be large enough to completely wrap around your foil egg. -
Wrap the core:
Place the foil egg in the center of the sheet and gently wrap the clay around it. Pinch the seams together tightly to seal them, ensuring no air is trapped between the foil and the clay. -
Smooth the seams:
Roll the clay egg between your palms to blend the seams completely. The heat from your hands will help the clay merge. -
Refine the shape:
Gently tap the wider bottom on your work surface to create a stable base so it stands upright. Use your fingers to taper the top into a soft, natural curve.
Fixing Cracks
If small cracks appear after baking or drying, mix a slurry of clay and water (or liquid clay) to fill the gap, then sand smooth once it sets.
Step 3: Texturing and Finishing
-
Add surface pits:
Using a stiff toothbrush or a crumpled ball of aluminum foil, gently press texture into the surface of the clay. You don’t want deep gouges, just a varied, organic surface. -
Create distinct craters:
Take a needle tool or the end of a paintbrush and make a few larger, random indentations. This mimics the natural pitting found in real stones. -
Swap and critique:
Since this is a swap challenge, trade eggs with your partner now. Look for any lumpy areas that deviate from a smooth egg curve and gently massage them out before the final cure. -
Cure the clay:
Bake (for polymer) or let dry (for air-dry) according to the manufacturer’s specific instructions. If baking, I prefer to tent them with foil to prevent whites from yellowing. -
Initial roast sanding:
Once fully cooled or dry, use the medium grit sandpaper to knock back the highest texture points. This reveals the ‘stone’ texture without leaving it sharp. -
Refining the surface:
Switch to fine grit sandpaper and polish the surface. This step effectively blends the pepper or coffee flecks into the surface, making them look like embedded minerals. -
Enhance the texture:
If significant dust has settled into the pits, use a dry, clean toothbrush to whisk it out, ensuring the depth of the texture remains visible. -
Final touches:
Wipe the eggs down with a slightly damp cloth to remove residual dust. Leave natural for that raw stone look, or add a very light coat of ultra-matte varnish for protection.
Place your finished stone eggs on a wooden board or near some dried botanicals to enjoy the serene, natural aesthetic you’ve created together
Blindfold and Coach Sculpt Game
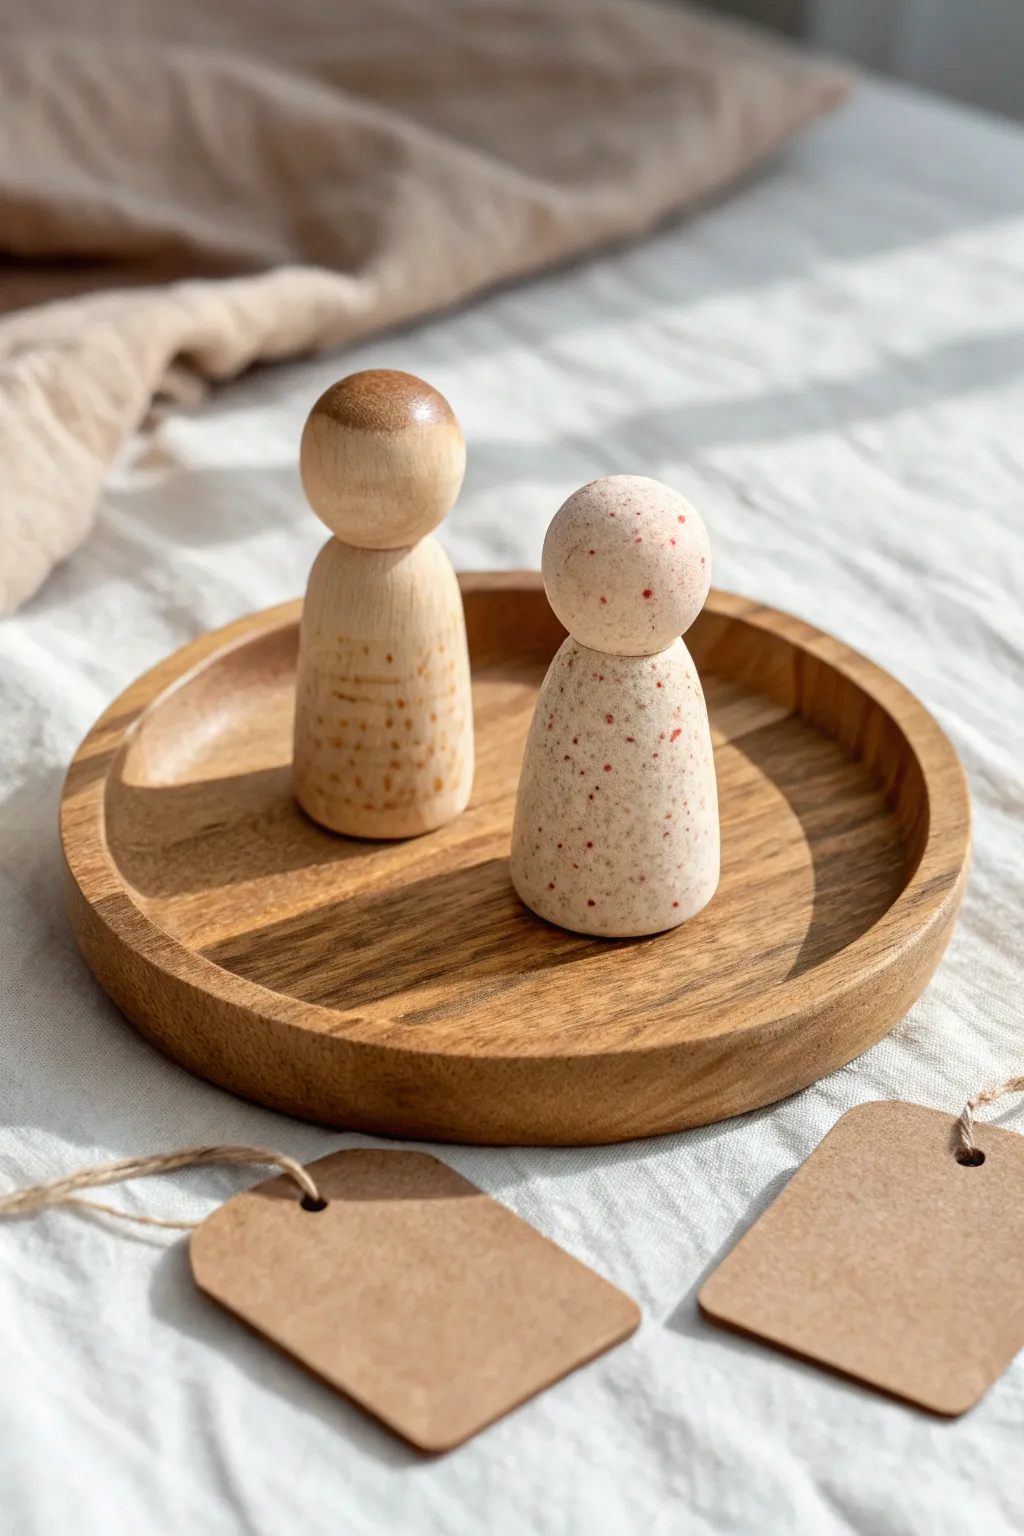
These charming wooden peg dolls embrace a natural aesthetic with subtle artistic touches, featuring one figure in a warm wood stain and another with a playful, speckled terrazzo-style finish. Perfect for open-ended play or rustic nursery decor, this project celebrates the beauty of raw materials while adding just enough character to make them unique.
Step-by-Step
Materials
- 2 unfinished wooden peg doll bodies (standard shape)
- Fine-grit sandpaper (220 grit)
- Wood stain (light oak or honey tone)
- Matte cream or off-white acrylic paint
- Rust-colored acrylic paint (for speckles)
- Small lint-free cloth or staining sponge
- Old toothbrush or stiff bristle brush
- Matte spray sealant or beeswax polish
- Scrap paper or cardboard
- Cardstock for tags (optional)
- Twine (optional)
Step 1: Preparation & Natural Doll
-
Sand for smoothness:
Begin by lightly sanding both wooden peg dolls with fine-grit sandpaper. Focus on any rough patches around the neck or base to ensure a perfectly smooth surface for our finishes. -
Wipe clean:
Use a dry cloth to wipe away all sawdust. Any dust left behind will create a gritty texture under the stain or paint. -
Apply stain to first doll:
Take your first doll—this will be the ‘natural’ figure. Dip a small corner of your staining sponge or cloth into the wood stain. Apply it in long, even strokes following the grain of the wood, covering the entire body and head. -
Wipe excess stain:
Let the stain sit for about 2-3 minutes to penetrate the wood fibers. Then, use a clean part of your cloth to wipe away any excess liquid. This reveals the beautiful wood grain while keeping the color translucent. -
Stain the second head:
For the second doll (the speckled one), apply the stain ONLY to the head sphere. We want the face to remain natural wood while the body gets painted. Wipe off the excess stain gently.
Clean Necklines
Make the neck line crisp by wrapping a thin strip of washi tape around the neck groove before painting the body. This functions as a stencil for a perfect edge.
Step 2: Painting & Speckling
-
Base coat fitting:
Once the stain on the second doll’s head is dry to touch, paint the body section with your matte cream acrylic paint. I find using a flat brush helps get a clean line right at the neck joint without getting paint on the stained head. -
Second coat coverage:
Let the first coat dry completely, then apply a second coat of cream paint to ensure solid, opaque coverage where no wood grain shows through the body. -
Prepare splatter station:
While the base coat dries, set up a ‘splatter station’ by placing the painted doll inside a small cardboard box or on a large sheet of scrap paper to catch mess. -
protect the head:
Wrap a small piece of painter’s tape or paper around the stained wooden head of the second doll to protect it from the paint speckles we are about to create. -
Load the splatter tool:
Dilute a pea-sized amount of rust-colored acrylic paint with a few drops of water until it’s inky. Dip the tips of an old toothbrush into this mixture. -
Create the speckles:
Hold the toothbrush about 3-4 inches away from the doll’s body. Run your thumb firmly across the bristles to flick tiny droplets of paint onto the cream surface. Rotate the doll to get even coverage all around. -
Add gentle texture (optional):
If you want the stained doll to match the texture slightly, you can do an extremely subtle splatter on its body using a slightly darker stain color, but keep it very minimal to maintain the natural look shown in the inspiration.
Step 3: Finishing Touches
-
Remove protection:
Carefully peel away the tape from the speckled doll’s head once the paint flecks are completely dry. -
Seal the work:
To protect the paint and stain from oils and dirt, apply a thin layer of matte spray sealant or a natural beeswax polish over both dolls. A matte finish is key to keeping that organic, earthy feel. -
Buff to shine:
If using beeswax, wait 15 minutes and then buff the dolls vigorously with a soft cloth to create a soft, satin sheen. -
Create matching tags:
Cut two small rectangles from brown cardstock and punch a hole in the corner of each. These are great for writing names or dates if these are gifts. -
Attach twine:
Thread a small length of natural twine through the tags to complete the rustic presentation set.
Adding Tiny Details
Use a toothpick dipped in black paint to add minuscule eyes or buttons to the figures for a bit more personality without losing the minimal style.
Place your finished duo on a wooden tray or shelf to enjoy their simple, handcrafted charm
One Color Each Couple Creature Duo
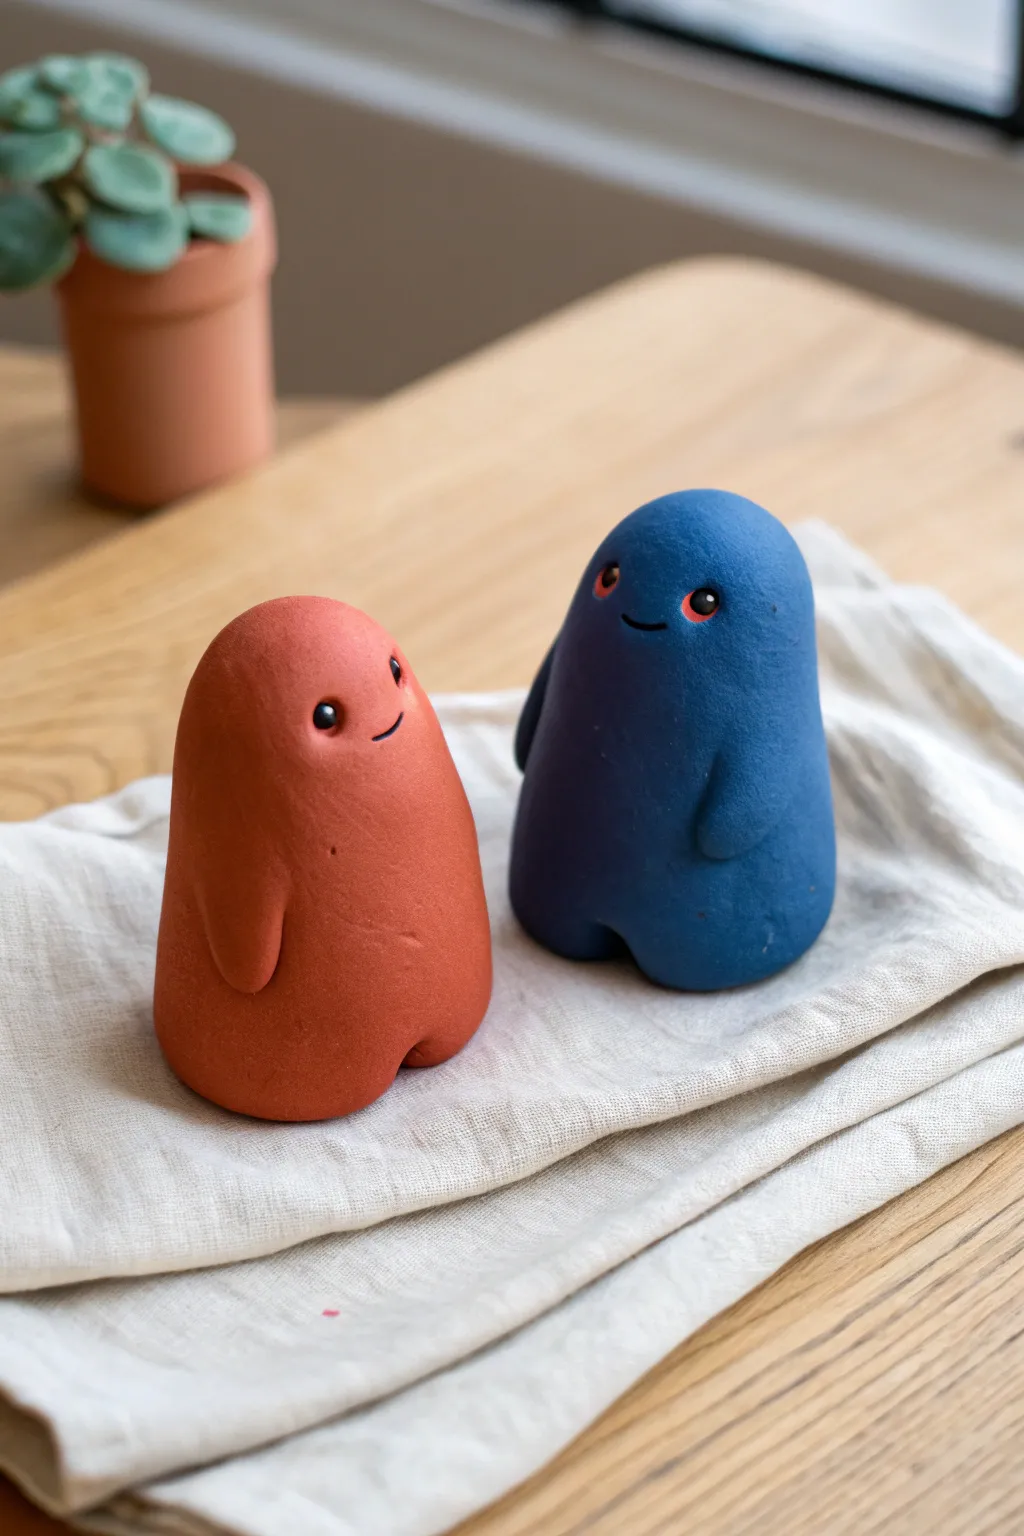
These charming, minimalist clay creatures prove that simple shapes can hold enormous personality. Perfect for a couple’s challenge, each partner works with a single bold color to sculpt a rounded, expressive character that pairs distinctly with the other.
Step-by-Step Guide
Materials
- Polymer clay (one block of terracotta red, one block of navy blue)
- Small black glass beads (for eyes) or black clay
- Sculpting tools (needle tool and a blending tool)
- Black acrylic paint (optional, if painting smiles)
- Fine detail brush (00 size)
- Parchment paper or baking tile
- Alcohol wipes (for smoothing)
Step 1: Shaping the Bodies
-
Prepare the Clay:
Start by deeply conditioning your chosen color of polymer clay. Knead it in your hands until it is warm, pliable, and free of any crumbly texture. -
Form the Base Shape:
Roll your clay into a smooth ball about the size of a golf ball or slightly larger, depending on how big you want your final buddy to be. -
Elongate the Form:
Gently roll the ball on your work surface to create a short, thick cylinder. Round off the top to create a dome shape for the head. -
Flatten the Bottom:
Tap the cylinder gently on your table to create a flat, stable base so the figure stands up straight without wobbling. -
Refine the Silhouette:
Use your fingers to smooth out the sides. The red character should have slightly straighter sides, while the blue one can taper slightly inward toward the top for character variety.
Step 2: Sculpting the Limbs
-
Create Arm Indentations:
Decide where the arms will rest. Instead of adding clay, we will pull the existing clay to form shapes. Make a small mark on the side of the body. -
Pull the Arms:
Using a blending tool or your thumb, gently drag a small section of clay downwards from the shoulder area to form a subtle, relief-style arm that lays flat against the body. -
Round the Hands:
Smooth the bottom of this dragged clay into a rounded nub so it looks like a hand resting by the creature’s side. -
Form the Feet:
At the very bottom front of the figure, use a modeling tool to make a small vertical indentation in the center. -
Define the Legs:
Gently press on either side of that indentation to create two rounded nubs that serve as stubby little legs. -
Smooth Transitions:
I like to take a moment here to rub the seams where the legs meet the body, ensuring everything flows organically without sharp lines.
Fingerprint Fix
Are fingerprints ruining the smooth finish? Lightly brush the raw clay with cornstarch or baby oil before that final smooth-over to erase ridges instantly.
Step 3: Adding the Feature
-
Position the Eyes:
Use a needle tool or dotting tool to press two small divots into the face area. Make them wide-set for a cuter, more innocent look. -
Insert the Beads:
Press a small black glass bead into each divot. Ensure they are pushed in securely so they don’t pop out after baking. -
Alternative: Clay Eyes:
If you don’t have beads, roll extremely tiny balls of black clay and press them into the sockets instead. -
Create the Smile:
Use a needle tool to carve a very shallow, small curved line for the mouth. Keep it simple and slightly asymmetrical for charm. -
Optional Painting:
If you prefer a drawn-on look, skip the carving providing you plan to paint the mouth on after baking. -
Final Smoothing:
Check the entire surface for fingerprints. Gently wipe the figure with a little baby oil or an alcohol wipe to make it pristine.
Level Up: Accessories
Give them personality by sculpting tiny accessories in opposing colors! Give the red figure a tiny blue hat, or the blue figure a red flower to hold.
Step 4: Baking and Finishing
-
Bake the Figures:
Place your duo on parchment paper and bake according to your polymer clay package instructions (usually 275°F/135°C for 15-30 minutes per 1/4 inch thickness). -
Cool Down:
Let the figures cool completely in the oven with the door cracked to prevent cracking from thermal shock. -
Paint Details:
If you carved the mouths, use a tiny amount of black acrylic paint to fill the groove, then wipe away the excess so the black only remains in the recess.
Place your finished duo side-by-side on your desk for a permanent reminder of your creative collaboration
Opposites Attract Monster Pair
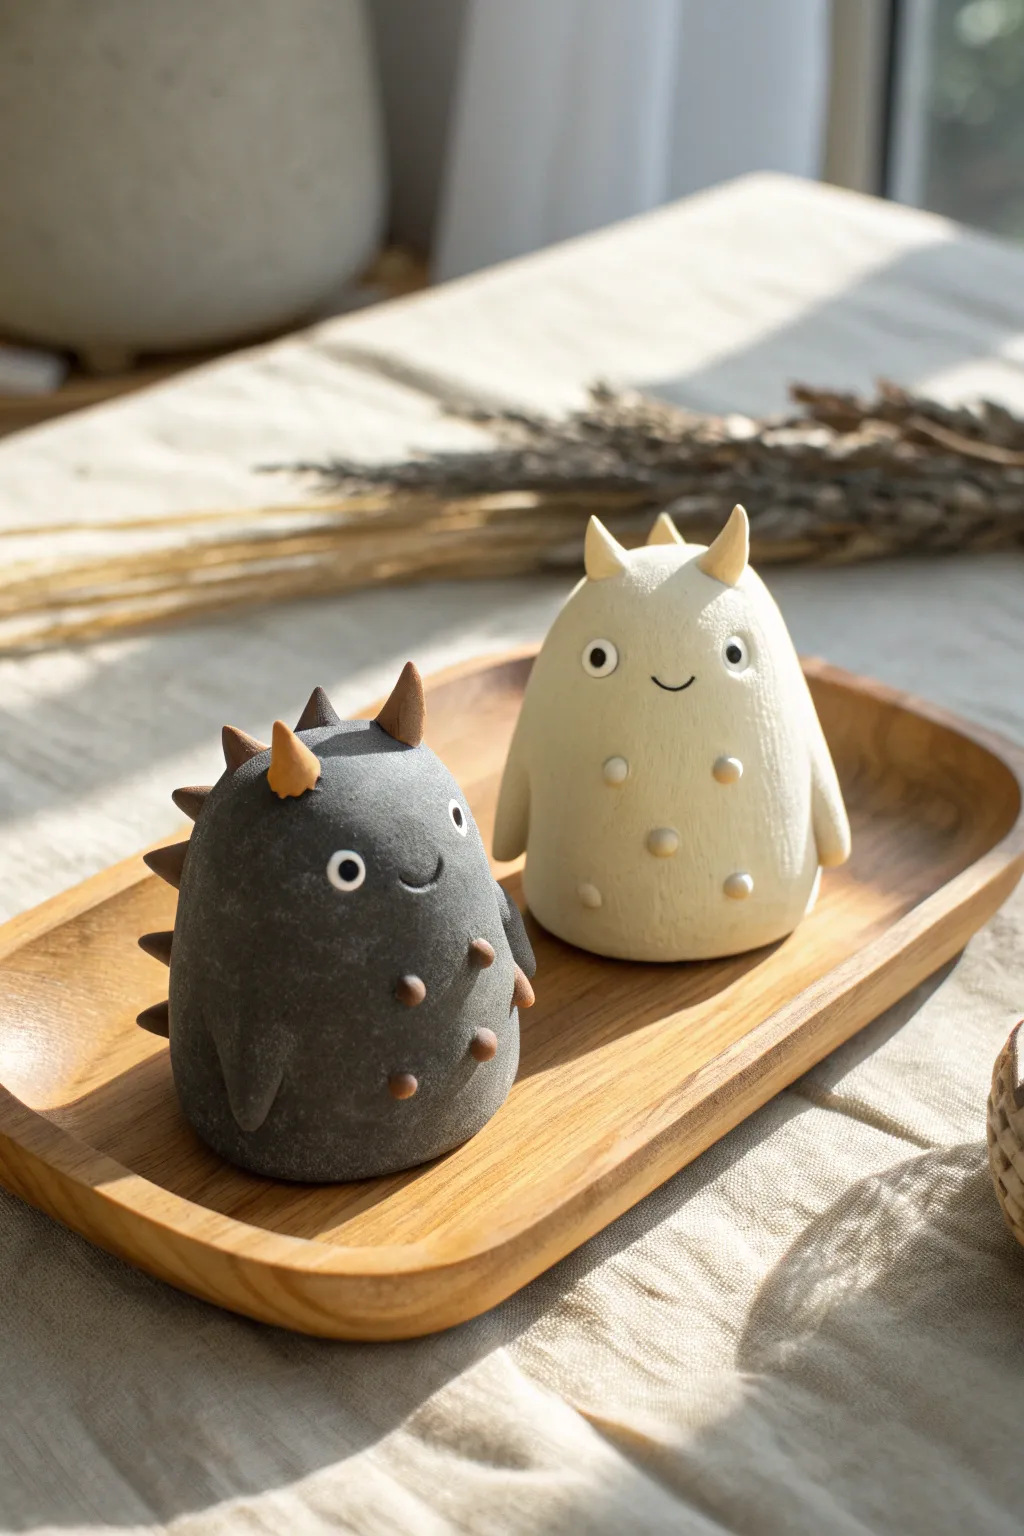
These adorable contrasting critters are the perfect project for a couples’ crafting night, balancing dark and light elements in a harmonious set. With their rounded bodies, spiky details, and textured finish, they create a whimsical display of friendship or romance.
Step-by-Step
Materials
- Polymer clay (Black or Dark Grey)
- Polymer clay (Cream or Off-White)
- Polymer clay (Light Brown or Tan for spikes)
- Clay sculpting tools (needle tool, ball stylus)
- Texturing tool (stiff bristle brush or toothbrush)
- Black and white acrylic paint (for eyes)
- Small detail paintbrush
- Baking sheet and parchment paper
- Oven
Step 1: Shaping the Bodies
-
Form the base:
Start by conditioning your dark grey and cream clay separately until pliable. Roll each into a smooth ball about the size of a lemon. -
Create the egg shape:
Gently roll the top half of each ball to taper it slightly, creating a rounded egg-like shape with a flatter bottom so they stand stably. -
Texture the surface:
Before adding details, take a stiff bristle brush or a dedicated texture sponge and gently tap it all over both bodies. This creates that lovely stone-like matte finish visible in the photo.
Keep it clean
Work with the lighter clay first, or wash your hands thoroughly between colors. Dark pigment transfers easily and will ruin the immaculate look of the cream monster.
Step 2: Adding the Dark Monster’s Details
-
Make the back spikes:
Using the dark grey clay, form 5-7 small cone shapes. Attach them in a line running down the center back of the dark monster, blending the clay at the base to secure them. -
Form the head horns:
Switch to your tan or light brown clay. Roll two small cones for the top horns and two smaller ones. -
Attach the horns:
Place the two tan horns on top of the head. I like to use a tiny drop of liquid clay here for extra grip. Add a small grey spike in between them for variety. -
Add belly bumps:
Create six tiny balls of tan/brown clay. Press them gently onto the front of the dark monster’s belly in two distinct rows. -
Sculpt the arms:
Roll two tear-drop shapes from grey clay and flatten them slightly. press these against the sides of the body, blending the upper edge so they look integrated.
Make them functional
Before baking, cut a slot in the top or back to turn these into photo holders, or add holes in the bottom to use them as salt and pepper shakers.
Step 3: Crafting the Light Monster
-
Form the ears:
Using the cream clay, shape two curved, pointed cones for the ears/horns. Attach them to the top of the head. -
Add the central horn:
Roll a small cone of the tan clay and place it right in the center of the head, between the ears. -
Create belly buttons:
Make six small balls using the cream clay (or a very light beige for subtle contrast). Press them onto the belly area, just like you did for the dark monster. -
Attach simple arms:
Form simple, long ovals for arms using the cream clay and attach them flush against the sides of the body.
Step 4: Faces and Finishing
-
Inset the eyes:
Use a ball stylus to press small indentations where the eyes will go on both monsters. This helps the paint sit better later. -
Carve the smiles:
Use a needle tool or a small curved blade to gently press a small, simple smile into the clay between the eye sockets. -
Refine the texture:
Go back over any areas where your fingerprints might have smoothed out the texture, specifically around the new attachments. -
Bake the clay:
Place both figures on a parchment-lined baking sheet. Bake according to your specific brand of polymer clay’s instructions (usually 275°F/135°C for 15-30 minutes). -
Paint the eyes:
Once completely cool, use a fine detail brush to paint white circles in the eye sockets, followed by tiny black dots for pupils. Let the paint dry completely.
Set your finished pair on a desk or shelf to remind you that two different halves make a perfect whole
Our First Date Mini Scene Split
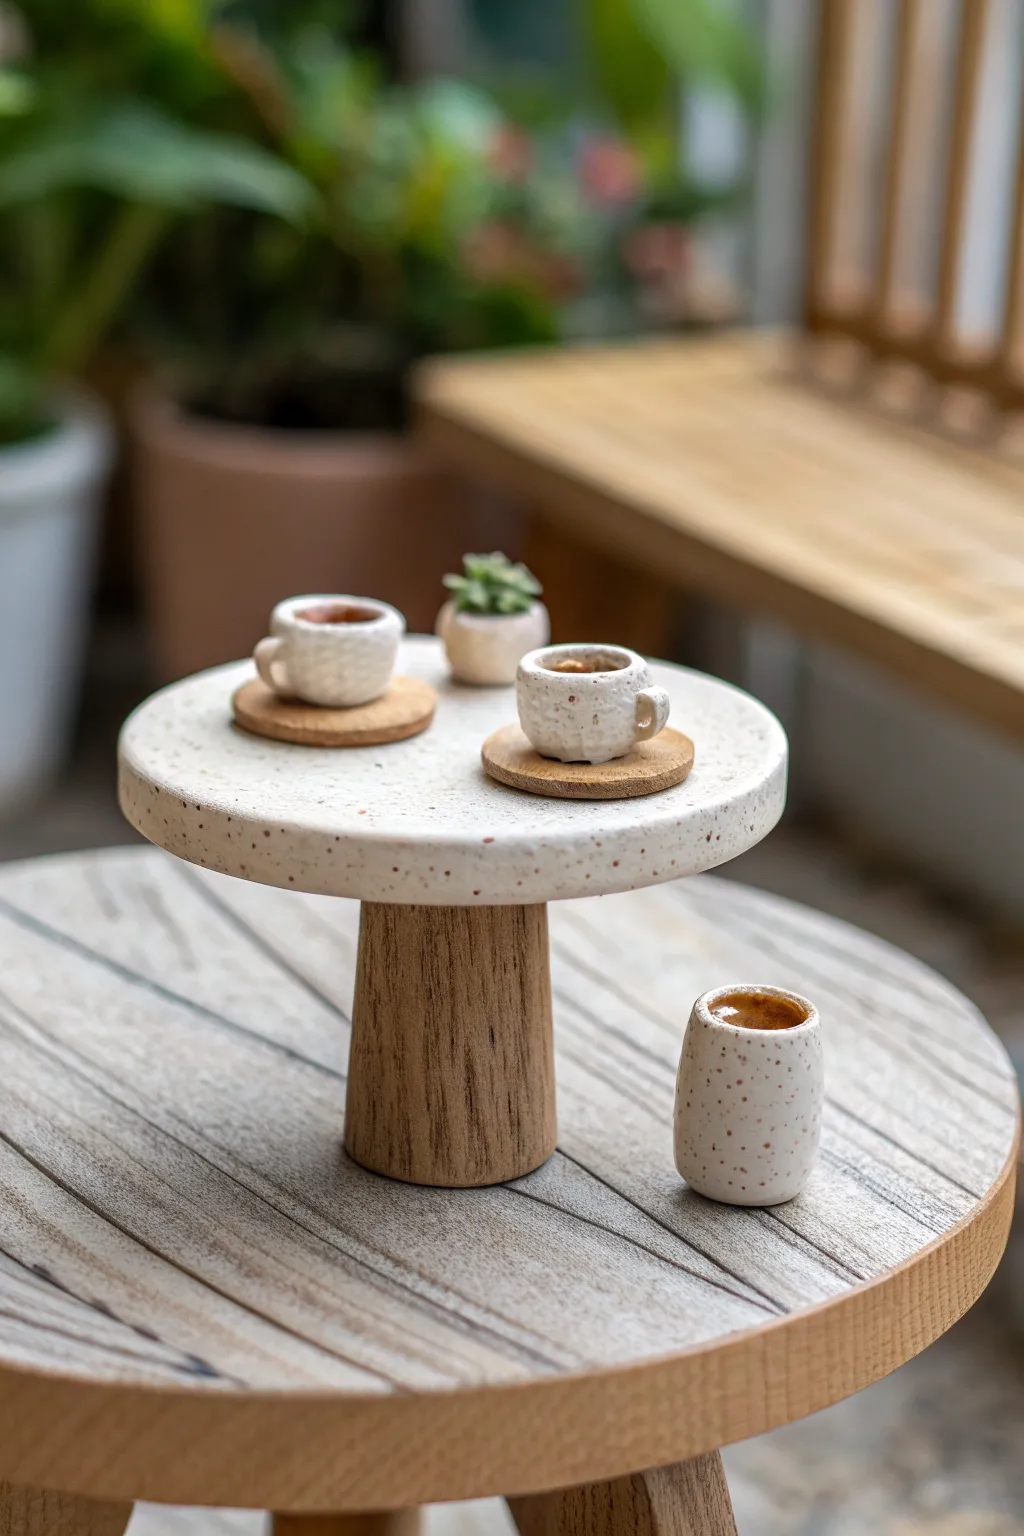
Immortalize that perfect first coffee date with this adorable split-level miniature scene. Featuring a speckled clay table, tiny ceramic-style mugs, and realistic wood textures, this project captures the cozy atmosphere of a café for two.
How-To Guide
Materials
- White polymer clay
- Translucent polymer clay
- Speckled granite or beige polymer clay
- Balsa wood dowel (1 inch thick)
- Thin balsa wood sheet
- Acrylic paints (browns, tan, coffee color)
- Liquid polymer clay (brown and translucent)
- High-gloss varnish
- Detail brushes
- Texture tool or toothbrush
- Circle cutters (various sizes)
- Super glue
- Sandpaper
Step 1: Sculpting the Ceramics
-
Prepare the speckled clay:
Start by conditioning your speckled granite clay until it’s pliable. If you don’t have pre-speckled clay, mix tiny amounts of black pepper or brown paint flecks into white clay for an organic ceramic look. -
Form the table top:
Roll out a thick slab of the speckled clay, about 1/4 inch thick. Use a medium circle cutter (about 2 inches in diameter) to punch out the main tabletop. -
Texture the edges:
Gently tap the vertical edges of the clay circle with a toothbrush or crumpled foil to give it a rough, stone-like texture, softening that sharp machined cut. -
Shape the mugs:
Roll two small balls of the same speckled clay. Press your pinky or a rounded sculpting tool into the center to create the cup hollowing, keeping the walls slightly thick for that rustic pottery vibe. -
Add handles:
Roll a tiny snake of clay, cut small segments, and gently press them onto the sides of the cups. Use a rubber tip tool to blend the seams so they don’t pop off during baking. -
Make the tall vase:
Create a cylinder shape for the floor vase. Hollow it out slightly at the top, ensuring it’s taller than your mugs but keeps that same speckled aesthetic. -
Create coasters:
Roll out a very thin sheet of tan or wood-colored clay. Cut small circles that are just slightly larger than the base of your mugs to serve as geometric coasters. -
Bake the clay:
Arrange all your clay pieces on a tile or baking sheet. Bake according to your clay manufacturer’s specific temperature and time instructions, then let them cool completely.
Natural Texture
For realistic wood grain on the dowel, drag a wire brush or stiff comb down the sides before painting. The paint will settle into the grooves.
Step 2: Woodwork & Assembly
-
Cut the table base:
Take your thick balsa wood dowel and cut a segment about 1.5 inches long. Sand the top and bottom flat to ensure the table stands perfectly straight. -
Prepare the floor base:
Cut a large circle from the balsa wood sheet (about 4 inches wide) or use a pre-cut wooden coaster as your base. -
Score the wood planks:
Using a craft knife or a needle tool, firmly score parallel lines into the floor base to mimic wooden floorboards. I like to add a few diagonal cuts to simulate a herringbone or modern pattern. -
Stain the wood:
Water down brown acrylic paint to create a wash. Brush it over the wooden base and the dowel leg, wiping away excess immediately so the wood grain shows through. -
Assemble the table:
Use a dot of super glue to attach the baked clay tabletop to the wooden dowel leg. Hold it firm for 30 seconds to set. -
Glue the coasters:
Secure the tiny clay coasters onto the tabletop with a dab of glue.
Step 3: Liquid Details
-
Brew the coffee:
Mix brown liquid polymer clay with a tiny drop of translucent liquid clay. Carefully fill the cups and the tall vase almost to the brim. -
Add foam details:
If you want a latte look, drop a tiny speck of white liquid clay into the brown mixture and swirl it gently with a needle tool. -
Final bake:
Carefully place the table (if the wood is oven-safe) or just the mugs back into the oven for 10-15 minutes to set the liquid clay. If you can’t bake the wood, use a heat gun on the liquid clay instead. -
Varnish touches:
Once cool, paint a layer of high-gloss varnish over the ‘coffee’ liquid to make it look wet. You can also varnish the outside of the mugs if you prefer a glazed ceramic finish. -
Final arrangement:
Glue the cups onto the coasters and place the tall vase on the floor base to complete your scene.
Level Up: Greenery
Make a tiny succulent for the table using different shades of green clay. Create teeny teardrop shapes and cluster them on a small clay pot.
Now you have a charming miniature keepsake that celebrates the simple joy of coffee and conversation
Mystery Prompt Couples Clay Draw
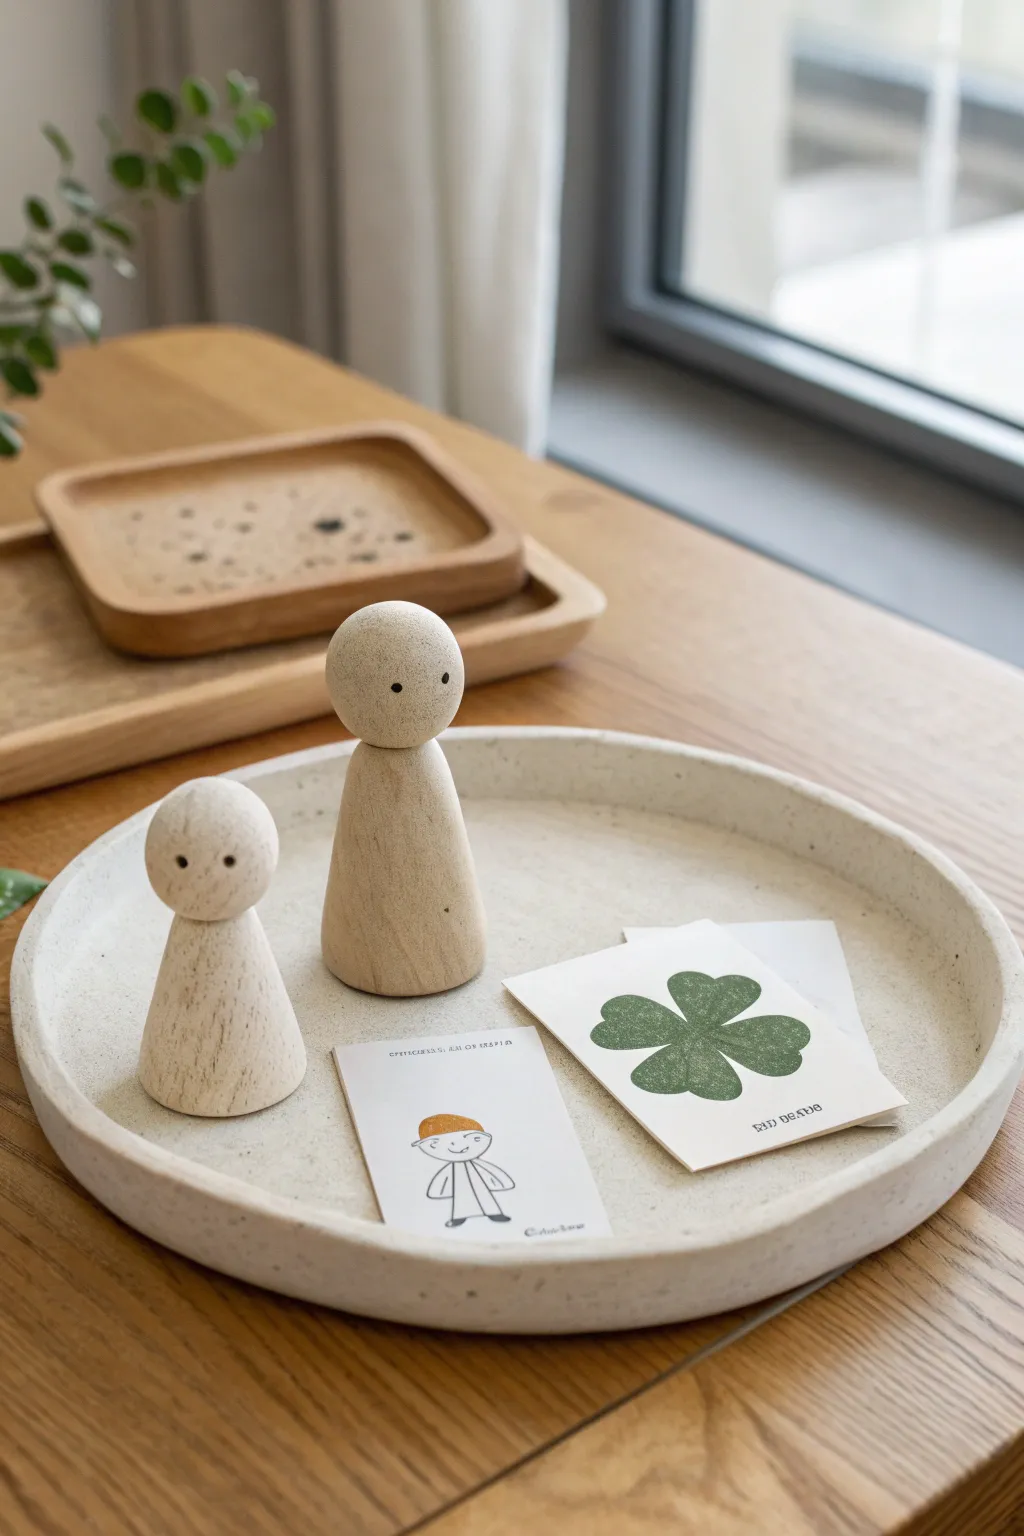
Embrace simplicity with this charming couples’ activity featuring hand-finished wooden peg dolls and custom prompt cards. The result is a clean, modern display set perfect for sitting on a shelf or desk as a reminder of your creative time together.
Detailed Instructions
Materials
- Unfinished wooden peg dolls (2 sizes)
- Fine-grit sandpaper (220 grit)
- Black fine-point permanent marker or acrylic paint pen
- Heavyweight cream cardstock or watercolor paper
- Green block printing ink or acrylic paint
- Rubber stamp (shamrock design) or linoleum block for carving
- Colored pencils or markers
- Matte spray sealant (optional)
- Round concrete or terrazzo tray for display
Step 1: Preparing the Peg Dolls
-
Smooth the Surface:
Begin by lightly sanding your unfinished wooden peg dolls. Even if they look smooth, a quick pass with 220-grit sandpaper ensures the grain is perfectly receptive to ink and prevents any ink bleeding later. -
Wipe Clean:
Use a dry microfiber cloth or a tack cloth to remove every speck of sawdust. This is crucial for keeping that raw wood finish looking intentional rather than dusty. -
Plan the Faces:
These figures rely on extreme minimalism. Visualize exactly where the eyes should sit—usually slightly lower than the vertical center of the head creates a sweeter, more youthful expression. -
Add the Eyes:
Using a fine-point black permanent marker or a paint pen, gently dot the eyes onto the wood. Press lightly to keep the dots small and sharp; you can always make them slightly bigger, but you can’t make them smaller. -
Seal the Wood:
To protect the raw wood from oils and dust over time, give the figures a very light coat of matte spray sealant. Keep the can 12 inches away to avoid any glossy buildup.
Ink Bleeding?
If the marker ink feathers into the wood grain, apply a thin coat of clear matte sealer *before* drawing the eyes. Let it dry completely, then draw.
Step 2: Creating the Mystery Cards
-
Cut the Cardstock:
Cut your heavy cream cardstock into small rectangles, approximately 2.5 x 3.5 inches. These will serve as your ‘mystery prompt’ canvases or keepsakes. -
Prepare the Stamp:
If you are carving your own stamp, sketch a simple four-leaf clover onto a small block of soft linoleum. Carve away the negative space using a V-gouge tool. -
Ink the Design:
Roll a thin layer of sage green block printing ink onto your stamp using a brayer. If you don’t have printing supplies, dab green acrylic paint onto the stamp with a sponge. -
Print the Motif:
Press the stamp firmly onto the center of one cardstock rectangle. Apply even pressure without wiggling to get that nice, textured imprint seen in the example. -
Add Text:
Once the ink is fully dry, use a small alphabet stamp set or your neatest handwriting to label the card (e.g., ‘Green Peace’ or a personal date) in the bottom right corner.
Level Up: Accessories
Make tiny accessories for your peg dolls using polymer clay, like a small scarf or hat, that can be added or removed seasonally.
Step 3: The Character Sketch
-
Draw the Outline:
On a second card, use a thin black pen to sketch a whimsical character. Keep the lines loose and simple—draw a round head, a basic tunic shape, and simple straight legs. -
Add Color Accents:
Take a colored pencil or marker—orange or mustard yellow works well—and color in just the hat or hair. Leaving the rest of the outfit white maintains that modern, airy aesthetic. -
Final Assembly:
Arrange your two finished wooden figures and your drying art cards on a neutral tray. Group them closely to emphasize the connection between the objects.
Display your minimalist creations in a spot with good natural light to highlight the wood grain and texture