If you’re craving something cute and easy, cow clay ideas are the perfect little project to roll, squish, and bring to life in one sitting. I’m sharing my favorite cow-themed makes—from classic mini clay cows to playful pieces you can actually use around the house.
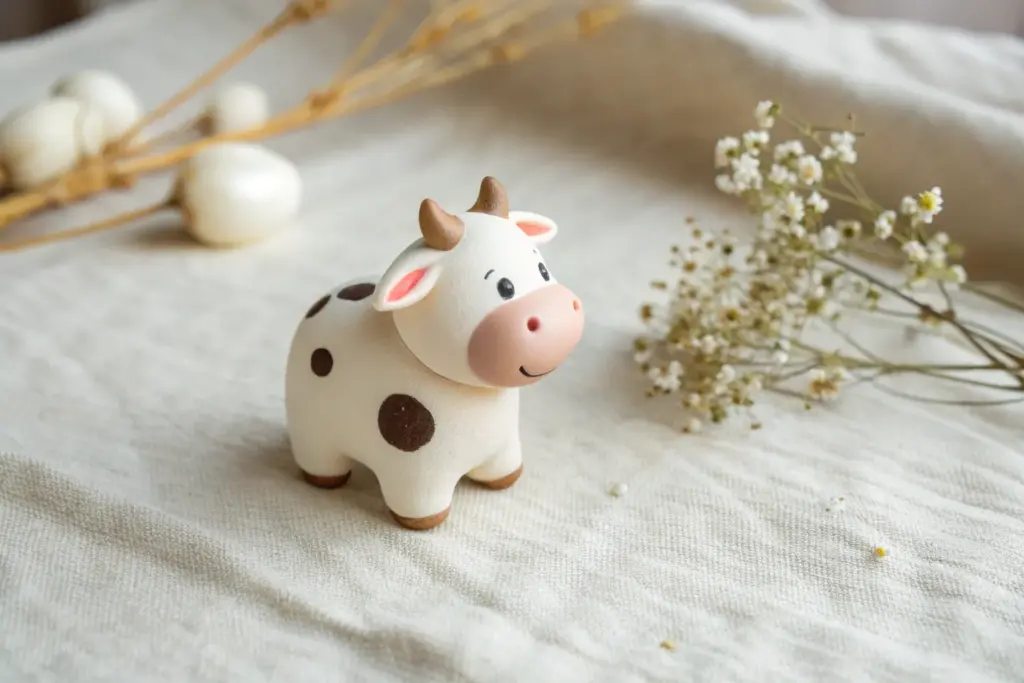
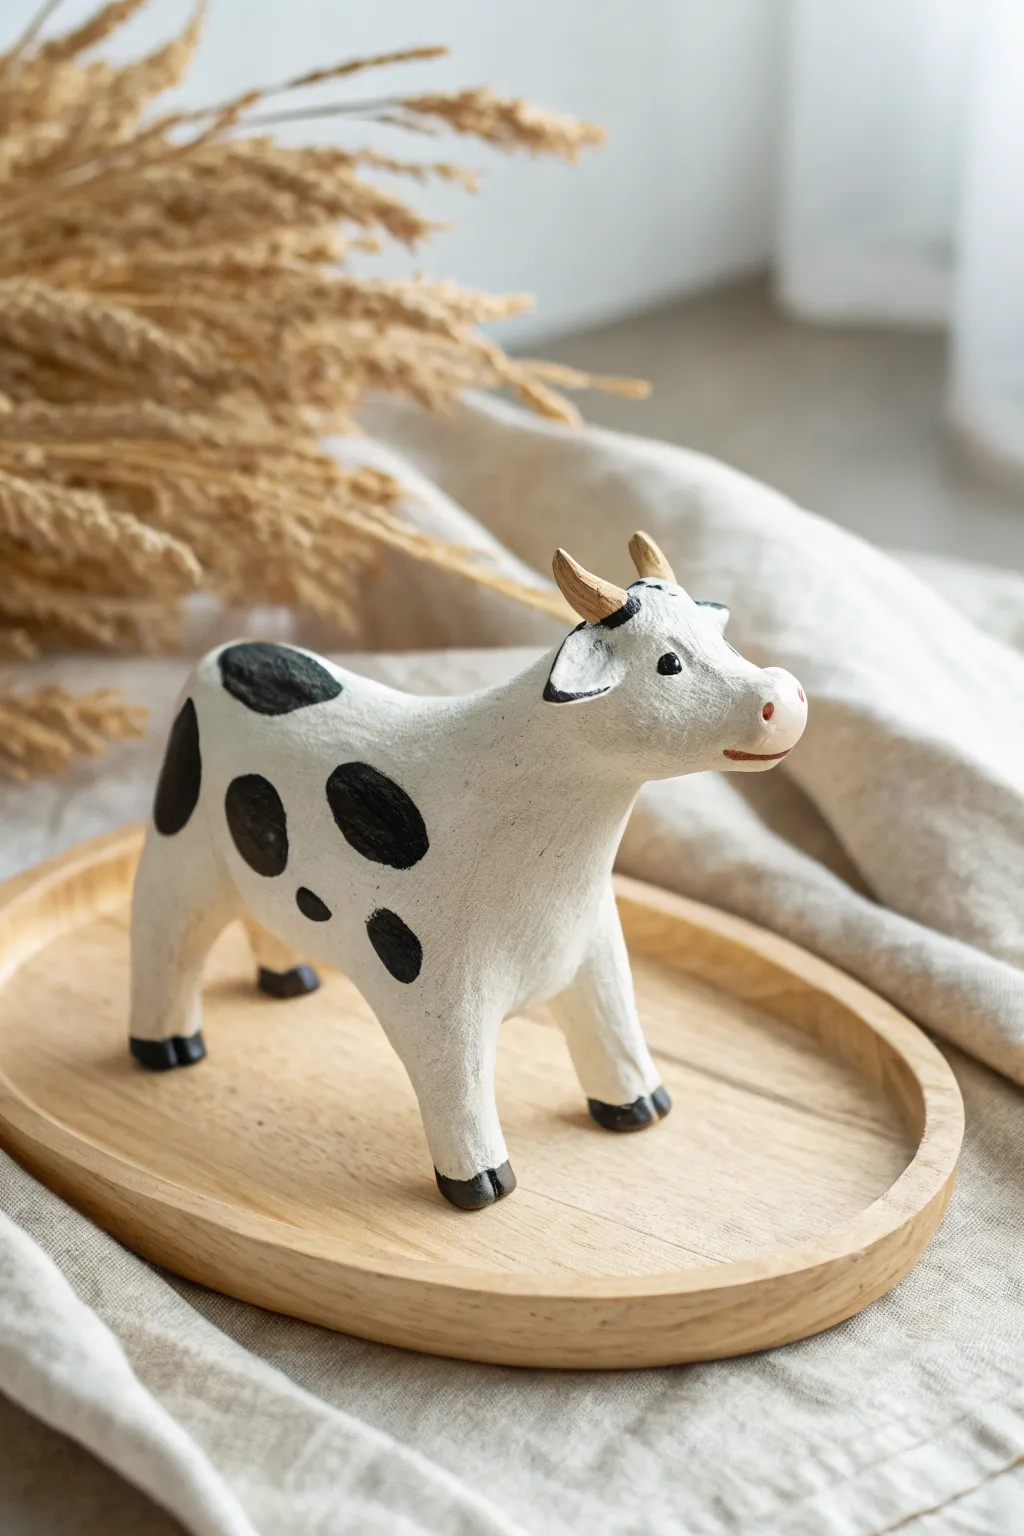
Mini Clay Cow Figurine
Sculpt a farmyard friend that captures hearts with its sweet expression and chubby design. This stylized mini cow features smooth curves, a soft pink snout, and tiny horns, making it a perfect beginner-friendly clay project.
Step-by-Step Tutorial
Materials
- White polymer clay or air-dry clay
- Pink polymer clay (or acrylic paint)
- Black polymer clay (or acrylic paint)
- Brown polymer clay (or acrylic paint)
- Clay sculpting tools (dotting tool, needle tool)
- Rolling pin
- Aluminum foil (optional for core)
- Matte varnish or sealant
Step 1: Shaping the Body and Legs
-
Form the main body:
Start with a generous amount of white clay. Roll it into a smooth ball, then gently elongate it into a thick oval or egg shape to serve as the cow’s torso. -
Create the legs:
Roll four small, equal-sized cylinders of white clay. These should be short and sturdy to support the body’s weight. -
Attach the legs:
Position the four legs underneath the body. Press them firmly to join the clay, smoothing the seams with your finger or a blending tool so the transition is seamless. -
Add hooves:
Take tiny bits of brown clay (or paint them later) and flatten them into small discs. Attach these to the bottom of each leg to create adorable little hooves.
Cracking Clay?
If using air-dry clay, smooth water over cracks before drying. For polymer, condition (knead) clay longer before shaping to prevent fissures.
Step 2: Sculpting the Head
-
Shape the head:
Roll a second ball of white clay, slightly smaller than the body. Flatten the back slightly where it will attach to the neck area later. -
Make the snout:
Take a piece of pale pink clay and shape it into a wide, flattened oval. Press this onto the lower front half of the head to create the snout area. -
Detail the nose:
Using a small dotting tool or the end of a paintbrush, gently press two small indentations into the pink snout for nostrils. -
Form the ears:
Shape two small teardrops of white clay. Press a smaller pink teardrop into the center of each, then pinch the pointed end slightly to curve them. -
Attach the ears:
Place the ears on either side of the top of the head ensuring they stick out horizontally for that cute, curious look. -
Add the horns:
Roll two very small cones of brown clay. Attach these to the top of the head, just inside where the ears are positioned. -
Connect head to body:
Place the finished head onto the front top section of the body. You may need to insert a small piece of toothpick or wire to keep it secure while drying or baking.
Bell Accessory
Use gold clay or a tiny real metal cowbell on a painted string around the cow’s neck for an extra touch of farmyard charm.
Step 3: Adding Details and Finishing
-
Create the spots:
Roll out very thin, irregular shapes of black clay. Press these flat onto the white body in random places to create the classic cow print pattern. -
Create the tail:
Roll a tiny snake of black or white clay for the tail. Attach it to the rear of the cow, curling it slightly against the body so it doesn’t break off easily. -
Bake or dry:
If using polymer clay, bake according to package instructions. If using air-dry clay, let it sit undisturbed for 24-48 hours until fully hardened. -
Paint the face:
Once dry or cooled, use black acrylic paint and a fine liner brush to paint two small vertical ovals for eyes and thin eyebrows. Add a tiny smile line on the snout. -
Add blush:
I like to use a dry brush with a tiny amount of pink chalk pastel or diluted paint to add rosy cheeks just under the eyes. -
Seal the figurine:
Finish by applying a coat of matte varnish over the entire piece to protect the paint and clay from dust and moisture.
Place your little moo-cow on a desk or shelf where its friendly face can brighten your day


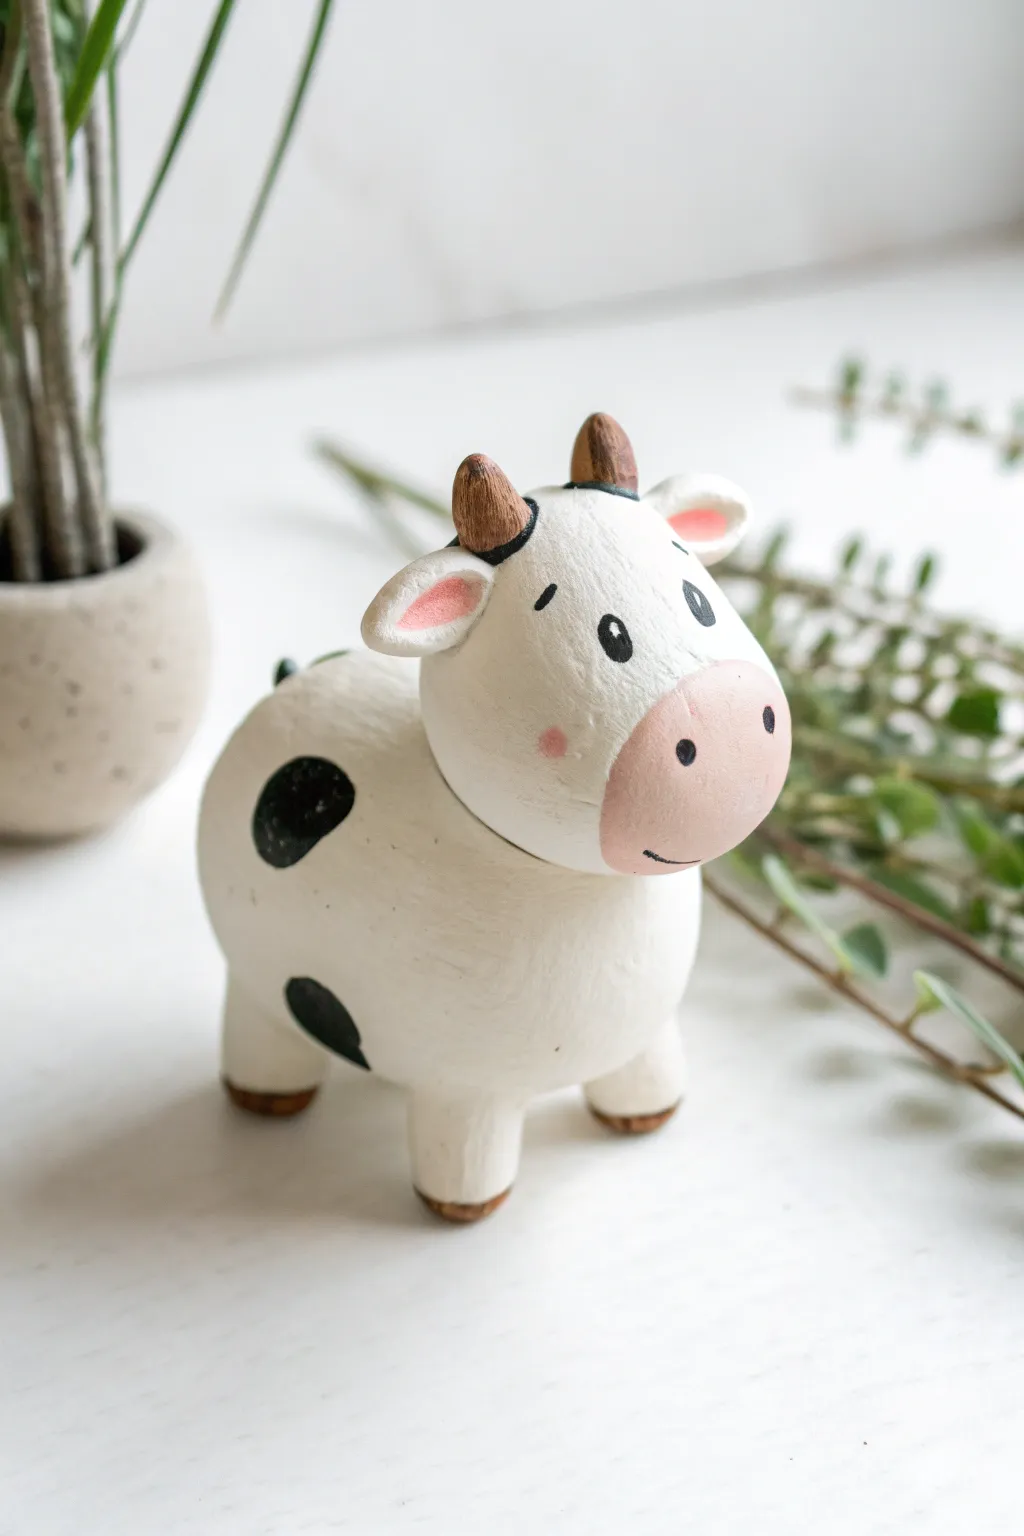
Holstein Cow Spot Patterns
Embrace the charm of classic farm decor with this handcrafted Holstein cow figurine, characterized by its smooth white finish and iconic black patches. Its naive, rounded shape and folk-art style make it a delightful addition to any shelf or tray display.
Detailed Instructions
Materials
- Air-dry clay (white)
- Small rolling pin
- Sculpting tools (needle tool, smoother)
- Wire armature wire or sturdy toothpicks (for legs/neck)
- Acrylic paints: White, Carbon Black, pink, light brown/gold
- Fine detail paintbrushes (round size 0 and 2)
- Gloss or matte varnish (optional)
- Cup of water
- Sandpaper (fine grit)
Step 1: Sculpting the Base Form
-
Prepare the armature:
Cut four equal lengths of thick wire or use four sturdy toothpicks to act as the core structure for the legs. This prevents the heavy body from sagging. -
Shape the body:
Roll a generous ball of white air-dry clay into an oblong potato shape. This will be the main torso. Keep it slightly thicker at the chest end. -
Attach the legs:
Insert your wire pieces or toothpicks into the underside of the body. Wrap small sausages of clay around each wire, smoothing them upwards into the torso to create seamless joints. The legs should be sturdy and slightly tapered. -
Form the head and neck:
Create a smaller, rounded cone shape for the head. Attach it to the upper front of the body, adding a little extra clay to build up the neck thickness. I find blending the clay downwards with my thumb secures the head firmly. -
Refine the snout:
Gentle press the front of the face to flatten it slightly for the muzzle. Use a sculpting tool to create a subtle mouth line.
Legs Buckling?
If the legs start to squat under the weight while sculpting, rest the cow’s belly on a sponge or crumpled foil support to uphold the body until the clay hardens.
Step 2: Adding Features and Drying
-
Add the ears:
Shape two small, leaf-shaped pieces of clay. Press them onto the sides of the head near the top, angling them slightly downwards for a relaxed look. -
Sculpt the horns:
Roll two tiny cones of clay. Attach these to the very top of the head ensuring they curve slightly inward or upward, depending on your preference. Smooth the connection points carefully. -
Smoothing:
Dip your finger in water and run it over the entire figure to remove fingerprints and bumps. The goal is a matte, stone-like texture. -
Drying time:
Allow the figure to dry completely. For a piece this thick, it will take at least 24-48 hours. Turn it occasionally so the belly dries evenly. -
Sanding:
Once fully dry, lightly sand any rough patches or uneven leg bottoms with fine-grit sandpaper so the cow stands flat.
Add Texture
Before drying, gently dab the wet clay with a stiff-bristled brush or old toothbrush. This creates a subtle fur-like texture that catches a dark antique wax beautifully later.
Step 3: Painting the Pattern
-
Base coat:
Paint the entire cow with two coats of white acrylic paint to ensure a bright, opaque finish. Let the first coat dry before applying the second. -
Outline the spots:
Using a small round brush and black acrylic, lightly outline irregular oval and kidney-bean shapes scattered across the body. Don’t worry about symmetry; randomness looks more natural. -
Fill the spots:
Fill in your outlined shapes with solid black paint. Make sure to wrap a spot or two over the spine or down onto a leg for continuity. -
Paint the hooves:
Carefully paint the bottom half-centimeter of each leg black to create the hooves. A steady hand is key here. -
Detail the face:
Use a toothpick or fine brush to dot two black eyes. Add a tiny touch of pink to the nose area and use a light brown or gold shade for the horns.
Once sealed, this charming little bovine is ready to graze peacefully on your mantelpiece
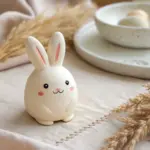


Air-Dry Cow Magnet
Brighten up your kitchen with this adorable, chunky cow magnet made from simple air-dry clay. Its cheerful face and classic black-and-white spots are sure to make reaching for the milk a little more fun.
How-To Guide
Materials
- White Air-dry clay
- Rolling pin
- Clay sculpting tools (or a toothpick and plastic knife)
- Acrylic paints: white, black, peach, and pink
- Paintbrushes (fine and medium)
- Strong craft magnet (round or button style)
- Strong craft glue (e.g., E6000)
- Gloss varnish or Mod Podge
- Cup of water
- Parchment paper
Step 1: Sculpting the Base
-
Prepare your workspace:
Lay down a sheet of parchment paper to prevent sticking. Take a handful of air-dry clay and knead it until it’s soft and pliable. -
Form the body:
Roll a ball of clay roughly the size of a golf ball. Flatten it gently with your palm or a rolling pin until it’s about 1/4 inch thick. -
Shape the rectangle:
Cut or mold this flattened piece into a rounded rectangle shape to serve as the cow’s main body. Smooth the edges with a wet finger to remove any cracks. -
Create the head:
Form a second, slightly smaller flattened oval for the head. Press this securely onto the top third of the body rectangle, blending the clay at the seam on the back to ensure they stick together. -
Add the snout:
Roll a small oval of clay and flatten it. Attach this to the lower half of the face area to create a distinct muzzle. This adds nice dimension to the face.
Smooth Operator
Keep a small bowl of water nearby. Wetting your fingertips slightly is the best way to smooth out cracks or seams while the clay is still wet.
Step 2: Adding Details
-
Attach the ears:
Roll two small teardrop shapes. Flatten them slightly and press them onto the sides of the head. Use your tool to make a small indentation in the center of each ear. -
Form the horns:
Roll two tiny cones of clay for the horns. Attach them to the top of the head, just inside the ears, curving them slightly inward if you like. -
Make the limbs:
Create four small rectangular tabs. Attach two sticking out from the side of the body for arms, and two at the bottom for legs. -
Define the hooves:
Use a knife or clay tool to press a small line into the end of each arm and leg tab to create the look of a cloven hoof. -
Refine the surface:
Dip your finger in a little water and smooth out the entire surface of the cow, erasing any fingerprints or rough textures. -
Dry completely:
Let the cow sit undisturbed on the parchment paper for at least 24-48 hours. I find flipping it over halfway through the drying time helps the back dry evenly.
Step 3: Painting and Finishing
-
Base coat:
Paint the entire cow white. You may need two thin coats to get a solid, opaque finish. Let this dry completely. -
Paint the muzzle:
Mix a soft peach color and carefully paint the oval muzzle area. -
Add pink accents:
Paint the tips of the hooves and the insides of the ears with a cheerful pink paint. -
Paint the features:
Using your finest brush and black paint, fill in the horns and add the classic cow spots randomly across the body. -
Face details:
Paint two small black ovals for eyes, two dots on the snout for nostrils, and a small curved line for a smile. Add thin eyebrows above the eyes for expression. -
Seal the project:
Once the paint is fully dry, apply a coat of gloss varnish. This protects the paint and gives it that finished ceramic look. -
Attach the magnet:
Using strong craft glue, secure the magnet to the center of the cow’s back. Let the glue cure according to the package instructions before placing it on the fridge.
Customize Your Herd
Try adding a tiny clay bell around the neck or painting the spots brown instead of black for a different breed of cow.
Now you have a charming bovine buddy ready to hold up your grocery lists and family photos


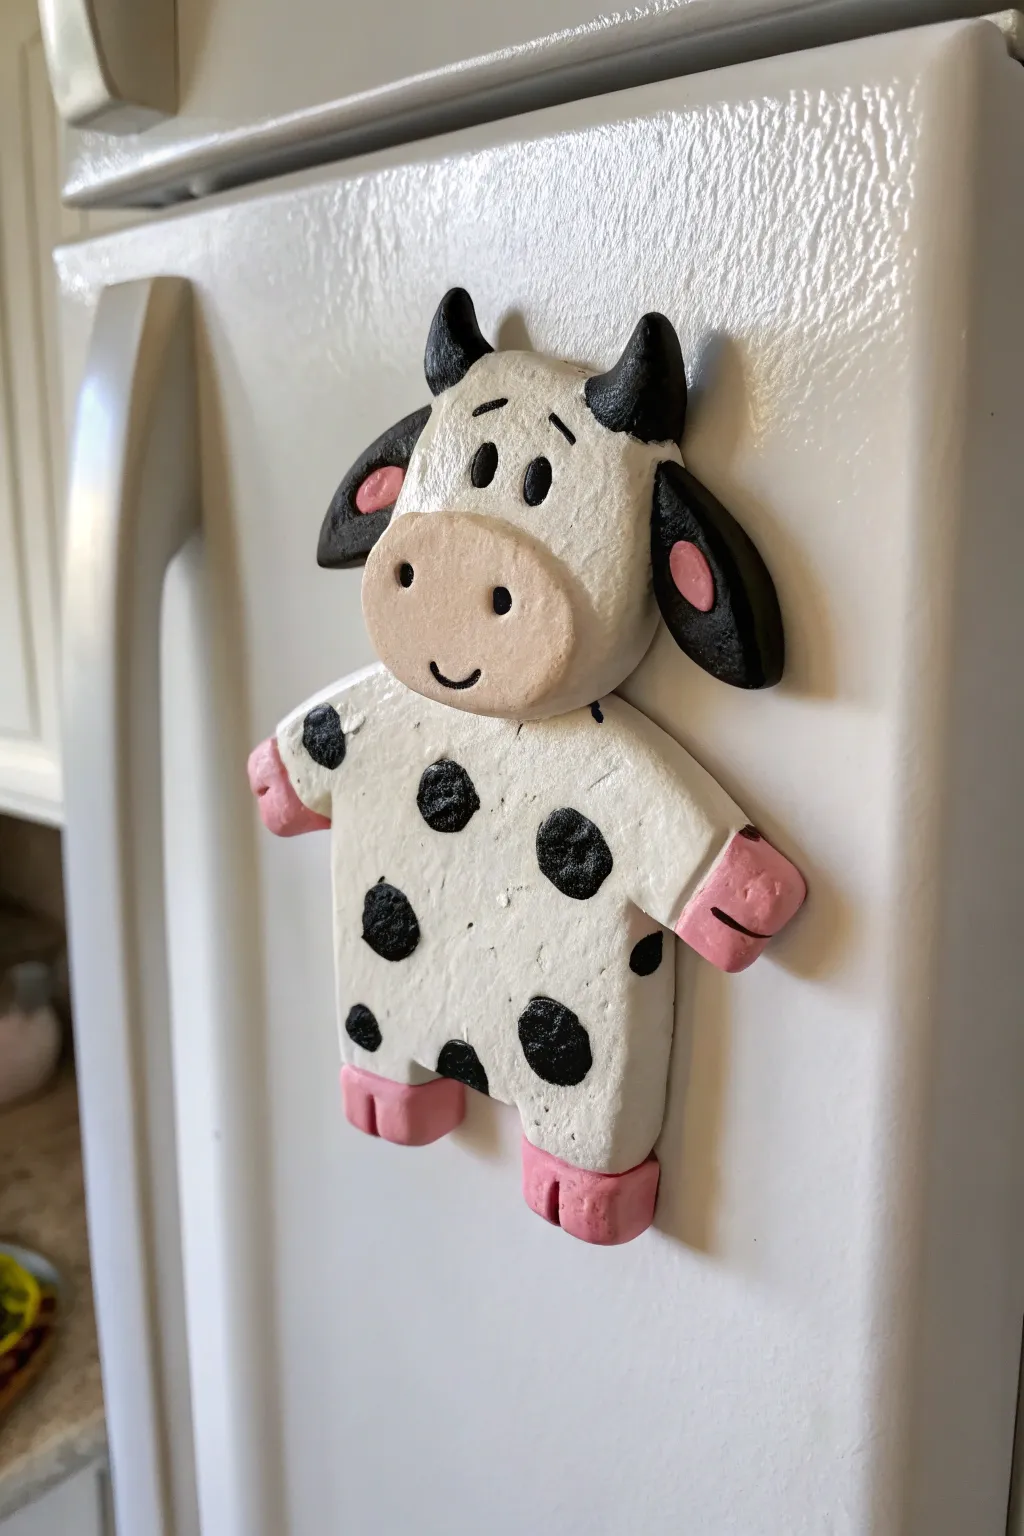
Cow Earrings (Simple Stud Style)
These adorable cow earrings are the perfect beginner-friendly project, featuring a simple flat stud design that is both lightweight and charming. The clean white base with tiny pink snouts and black horns adds a touch of farmyard whimsy to any outfit.
How-To Guide
Materials
- White polymer clay
- Bubblegum pink polymer clay
- Black polymer clay
- Two earring posts (stainless steel or sterling silver)
- Small dotting tool or toothpick
- Rolling pin or pasta machine
- Small circle cutter (approx. 10-12mm)
- Super glue or E6000
- X-acto knife or clay blade
- Oven for baking
Step 1: Shaping the Head
-
Condition the clay:
Begin by kneading your white polymer clay until it is soft and pliable. This prevents cracks and makes it easier to shape. -
Roll out the base:
Roll the white clay into a slab that is approximately 3mm thick. You want it substantial enough to hold the post but light enough for ears. -
Cut the circles:
Using your small circle cutter, punch out two identical white circles. These will be the main heads of your cows. -
Smooth the edges:
Gently rub the edges of the circles with your fingertip to soften any harsh cut lines left by the cutter.
Step 2: Creating the Features
-
Form the snout:
Pinch off two tiny pieces of pink clay and roll them into small balls. Flatten these balls into ovals that are slightly wider than they are tall. -
Attach the snout:
Place the pink oval onto the lower half of the white circle. Press it down effectively so it bonds without distorting the shape. -
Indent nostrils:
Using a small dotting tool, press two indentations into the pink oval to create the nostrils. This adds immediate character to the face. -
Make the ears:
Roll two minuscule balls of white clay and two even smaller balls of pink clay for each cow (four white, four pink total). -
Assemble ears:
Flatten the white balls slightly, then press the tiny pink balls into the center of them. Pinch one end to create a teardrop shape. -
Attach ears:
Press the pinched end of the ears onto the sides of the cow’s head, just above the midline.
Sticky Situation?
If your white clay picks up dust or lint, use a cotton swab dipped in a tiny bit of rubbing alcohol or acetone to gently wipe the uncooked clay surface clean.
Step 3: Adding Details & Baking
-
Shape the horns:
Roll tiny amounts of black clay into very small, thin cone shapes. You’ll need two for each cow. -
Attach horns:
Place the horns on the top of the head, just inboard from the ears. I find using a needle tool helps position these tiny pieces accurately. -
Add the eyes:
Roll two extremely small black spheres for eyes. Place them on the white face, right above the pink snout, spaced evenly apart. -
Double check:
Look at both earrings side-by-side to ensure the features are symmetrical before baking. -
Bake:
Bake in a preheated oven according to your polymer clay package instructions (usually around 275°F or 130°C for 15-30 minutes). -
Cool down:
Let the clay cool completely before handling. It creates a stronger bond and prevents warping. -
Attach posts:
Apply a dab of strong glue (like E6000) to the flat pad of your earring post and press it firmly onto the back of the cow head. -
Final cure:
Allow the glue to cure fully (usually 24 hours) before wearing your new accessories.
Pro Tip: Eye Placement
To keep the eyes perfectly round, use a needle tool to make a tiny pilot hole first, then drop the black clay ball into the indentation so it sits snug.
Enjoy showing off your herd of miniature cows to all your friends

The Complete Guide to Pottery Troubleshooting
Uncover the most common ceramic mistakes—from cracking clay to failed glazes—and learn how to fix them fast.
Cow Pinch Pot Trinket Bowl
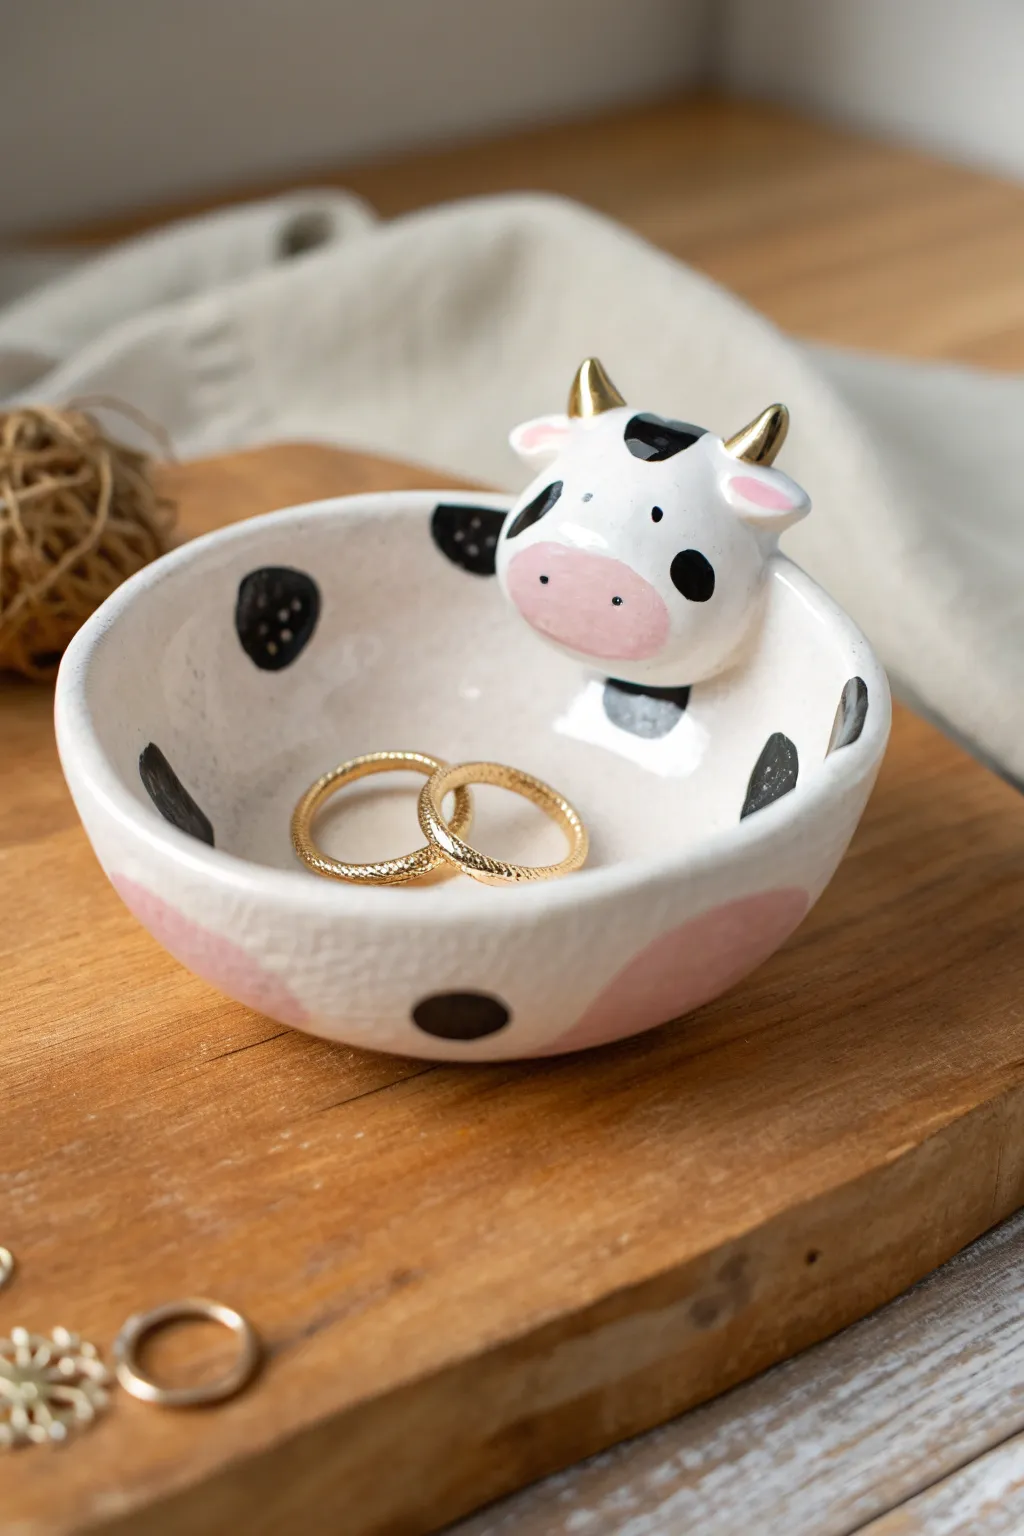
This whimsical little trinket dish combines a classic pinch pot technique with charming sculptural details. Featuring golden horns and a sweet cow face peeking over the rim, it is the perfect spot to keep your favorite rings safe.
Step-by-Step Guide
Materials
- Air-dry clay or polymer clay (white)
- Clay sculpting tools (needle tool, smoothing tool)
- Small bowl of water (for smoothing)
- Acrylic paints (White, Black, Baby Pink, Metallic Gold)
- Small paintbrushes (detail rounds and a small flat brush)
- Gloss varnish or clay sealer
- Rolling pin (optional)
- Sandpaper (fine grit)
Step 1: Forming the Base
-
Prepare your clay:
Start with a ball of clay roughly the size of a tangerine. Knead it well until it is pliable and free of cracks. -
Create the pinch pot:
Press your thumb into the center of the ball, leaving about a half-inch of thickness at the bottom. Gently pinch and rotate the clay between your thumb and fingers to thin out the walls and form a bowl shape. -
Refine the shape:
Continue pinching until the walls are an even thickness. Gently tap the bottom of the bowl on your work surface to create a flat, stable base so it won’t wobble. -
Smooth the surface:
Dip your finger in a tiny bit of water and rub it over the clay to smooth out any fingerprints or small cracks. I like to spend a little extra time here to ensure a professional finish.
Smooth Seams
Use a wet paintbrush instead of your finger to smooth tight areas, like around the ears and horns, for a seamless look.
Step 2: Sculpting the Cow
-
Shape the head:
Roll a smaller ball of clay, slightly flattened, for the head. It should be proportional to the bowl, roughly the size of a large grape. -
Attach the head:
Score (scratch) the back of the head and the rim of the bowl where you want it to sit. Add a dab of water or liquid clay (slip) and press the head firmly onto the rim, blending the clay at the seam to secure it. -
Add the snout:
Create a small, flat oval of clay and attach it to the lower half of the face to define the snout area. -
Sculpt the ears:
Form two small teardrop shapes. Flatten them slightly and press them onto the sides of the head, blending the back edges into the main head shape. -
Form the horns:
Roll two tiny cones of clay for the horns. Attach these to the top of the head, right between the ears. Curve them slightly inward for character. -
Dry the piece:
Let your sculpture dry completely according to your clay’s package instructions. This usually takes 24-48 hours for air-dry clay.
Step 3: Painting and Finishing
-
Sand imperfections:
Once fully dry, lightly sand any rough edges or bumps with fine-grit sandpaper. Wipe away the dust with a dry brush or cloth. -
Base coat:
Apply two coats of white acrylic paint to the entire bowl and head to create a bright, even canvas. Let each coat dry fully. -
Paint the details:
Mix a soft baby pink and paint the oval snout and the insides of the ears. Use this same pink to paint large, soft patches on the outside bottom of the bowl. -
Add the spots:
Using black paint and a small round brush, paint organic, irregular spots inside the bowl and on the cow’s face. Make the eye patches slightly larger. -
Facial features:
Use the tip of a toothpick or a very fine brush to add two tiny black dots for eyes and two smaller dots on the pink snout for nostrils. -
Gild the horns:
Carefully paint the horns with metallic gold paint. This adds a lovely touch of elegance to the design. -
Seal the project:
Finish by applying a glossy varnish over the entire piece. This protects the paint and gives the ceramic-like shine shown in the photo.
Add Texture
Before the clay dries, gently press a textured sponge onto the ‘skin’ areas to give the cow a realistic, matte texture contrast.
Now you have a charming little guardian for your jewelry collection
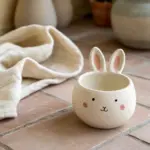
Cow Planter for a Tiny Succulent
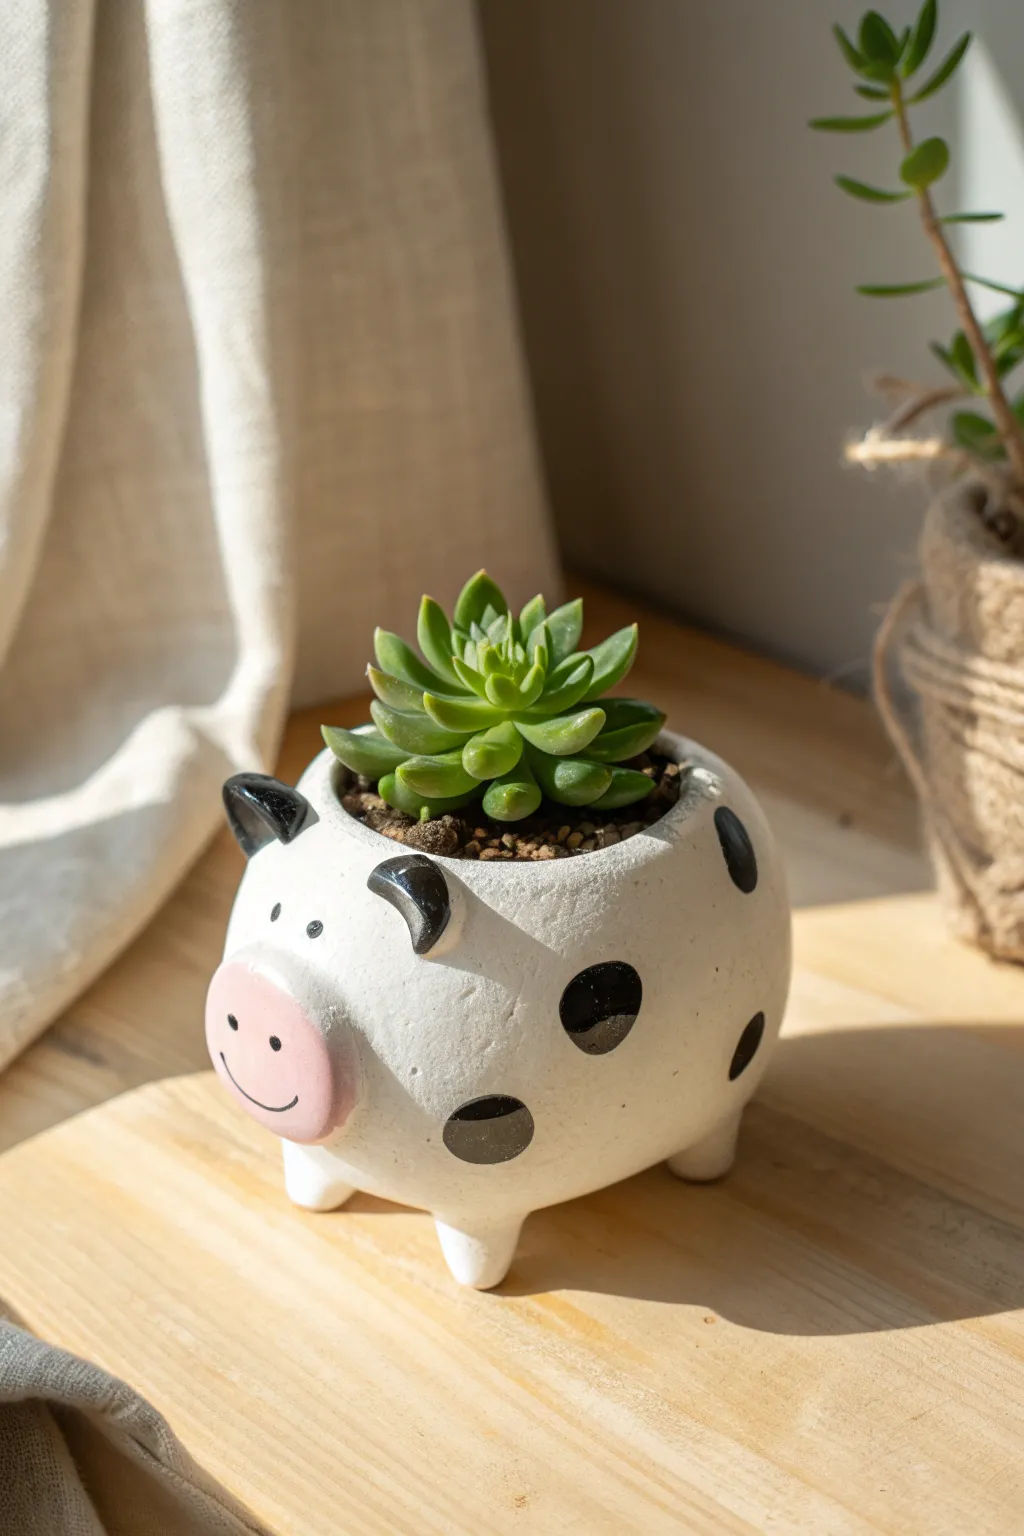
This adorable little cow planter is the perfect home for a tiny succulent, adding a touch of whimsy to any windowsill. Its round, white body is speckled with black spots and features a sweet pink snout, all crafted from simple clay.
Step-by-Step
Materials
- Air-dry clay or polymer clay (white)
- Acrylic paints (black, pale pink)
- Clay sculpting tools (or a toothpick)
- Small rolling pin
- Fine-grit sandpaper
- Paintbrushes (small detail brush and medium flat brush)
- Clear matte or satin varnish (water-resistant)
- Small bowl or sphere (for molding shape, optional)
- Water (for smoothing)
Step 1: Shaping the Cow Body
-
Form the base:
Start by rolling a large ball of clay, roughly the size of a tennis ball. This will be the main body of your cow. -
Create the hollow:
Gently press your thumbs into the center of the ball and pinch the sides to create a pot shape. Aim for walls about a quarter-inch thick so the planter is sturdy. -
Smooth the surface:
Use a little bit of water on your fingertips to smooth out any cracks or fingerprints on the outside of the pot. You want a nice, round, egg-like shape.
Step 2: Adding Features
-
Establish the legs:
Roll four small, equal-sized cones of clay. Turn your pot upside down and score (scratch) the bottom where the legs will go. Attach the cones firmly, blending the clay seams so the legs look integrated, not just stuck on. Flip it back over to ensure it stands level. -
Make the snout:
Roll a flattened oval of clay and attach it to the front of the pot, slightly lower than center. Smooth the edges onto the main body so it transitions seamlessly. -
Form the ears:
Shape two small triangles of clay. Gently pinch them to give them a slight curve. Attach one to the left and one to the right, near the top rim of the planter, blending the clay at the base. -
Add the horns:
Roll two very tiny, curved cones for the horns. Attach them just inside the ears. I find it helpful to use a dab of slip (clay mixed with water) here to act as glue. -
Refine the surface:
Give the entire piece one final smoothing with a damp sponge or finger. Let the clay dry completely according to package instructions (usually 24-48 hours).
Drainage Hole Tip
Before drying, use a straw to punch a hole in the bottom center. This allows excess water to escape, keeping your succulent roots healthy and rot-free.
Step 3: Painting and Finishing
-
Sand imperfections:
Once fully dry, lightly sand any rough patches with fine-grit sandpaper to get that smooth ceramic look. -
Base coat:
Although the clay is white, painting a layer of white acrylic paint helps seal the clay and provides an even canvas. -
Paint the snout:
Mix a soft pale pink color and carefully paint the oval snout area. -
Add the spots:
Using black acrylic paint, paint organic, circular shapes around the body. Make them different sizes for a natural cow pattern. -
Paint the details:
Paint the ears black (or just the tips) and color the horns black as well. Use a fine detail brush or a toothpick to add two small dots for eyes above the snout. -
Create the face:
Using the finest brush or a black paint pen, draw a thin, curved smile on the pink snout and two tiny dots for nostrils. -
Seal the planter:
Because this will hold a plant, apply 2-3 coats of water-resistant varnish inside and out. This is crucial to prevent the clay from getting mushy when you water your succulent.
Tail Variation
Add a tiny coil of clay to the back for a tail! Fray the end with a needle tool to look like hair, then paint the tip black to match the spots.
Pop your favorite rosette succulent inside and enjoy your new little farm friend


What Really Happens Inside the Kiln
Learn how time and temperature work together inside the kiln to transform clay into durable ceramic.
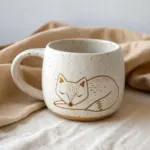
Cow Mug With a Simple Face
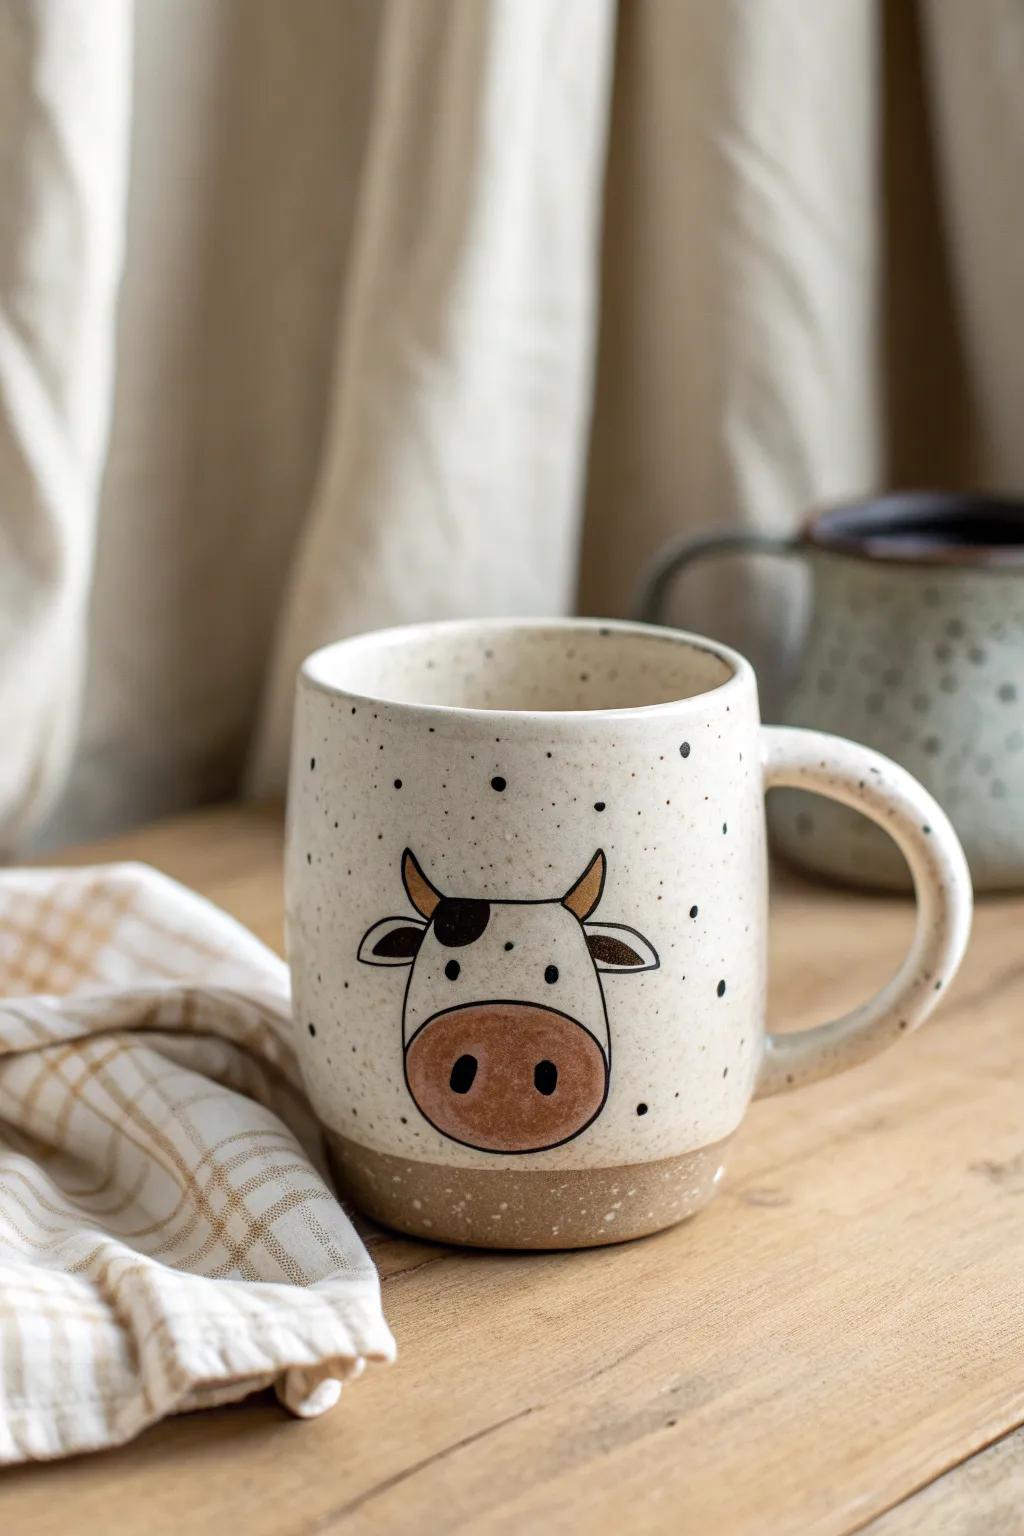
Bring farmhouse charm to your morning routine with this speckled ceramic mug featuring a simple, hand-painted cow face. The combination of creamy speckled glaze, raw clay base, and whimsical line art creates a cozy piece that feels modern yet rustic.
Step-by-Step Tutorial
Materials
- Stoneware clay (speckled or buff)
- Pottery wheel (or rolling pin for hand-building)
- Rib tool
- Wire cutter
- Sponge
- Underglaze (black, brown, darker yellow/ochre)
- Fine detail paintbrush
- Clear or transparent cream glaze (speckled option preferable)
- Wax resist
- Loop tool for trimming
- Kiln access
Step 1: Forming the Mug Body
-
Throw the cylinder:
Begin by centering about 1 pound of clay on the wheel. Open the center and pull up the walls to form a straight-sided cylinder, aiming for about 4 inches in height. -
Shape the belly:
From the inside, gently push the belly of the mug outward to create a slight curve, ensuring the rim stays slightly narrower than the body for that classic mug silhouette. -
Create the raw base:
Leave the bottom half-inch of the wall slightly thicker or define a visual line where the glaze will stop. This design relies on an exposed raw clay foot. -
Smooth and refine:
Use a rib tool to compress the walls and remove throwing lines, creating a smooth canvas for your cow illustration later on. -
Attach the handle:
Once the body is leather hard, pull a C-shaped handle and attach it securely. Smooth the connection points so it looks seamless and organic.
Smudged Lines?
If you smudge the black underglaze while painting, let it dry completely, then gently scratch the mistake away with a needle tool before repainting.
Step 2: Painting the Cow Design
-
Sketch the outline:
On the smooth side of the mug (opposite the handle), lightly sketch the cow’s head shape using a pencil. The graphite will burn off in the kiln. -
Paint the muzzle:
Mix a warm brown underglaze. Paint a wide oval at the bottom of your sketch for the nose area. I like to do two thin coats here for solid coverage. -
Outline the head:
Using a fine liner brush and black underglaze, carefully paint the u-shaped outline of the head, connecting it to the top of the brown muzzle. -
Add the ears and horns:
Draw small, leaf-shaped ears extending from the sides. Above them, paint two small, curved horns using an ochre or yellow-brown underglaze. -
Detail the face:
With your black underglaze, add two widely spaced dots for eyes. Add two larger oval nostrils inside the brown muzzle area. -
Create the signature spot:
Paint a black patch over one eye or near the ear to give your cow its distinctive personality. -
Add speckled texture:
f your clay or glaze isn’t naturally speckled, use a toothbrush to flick tiny dots of diluted black or brown underglaze across the entire exterior of the mug.
Add More Character
Try painting the handle with the same brown black pattern to make it look like a cow’s tail wrapped around the mug.
Step 3: Glazing and Firing
-
Bisque fire:
Place the bone-dry mug into the kiln for a bisque firing (usually Cone 04) to harden the clay and set the underglaze. -
Apply wax resist:
Paint wax resist over the bottom inch of the mug, covering the foot and a small band of the body. This creates the two-tone effect seen in the photo. -
Protect the cow:
Some potters wax over the painted cow design to keep it raw, but for this glossy look, leave the underglaze exposed so it accepts the clear glaze. -
Dip in glaze:
Dip the entire mug into a transparent cream or clear glaze. The wax bottom will repel the glaze, keeping that section bare. -
Clean the foot:
Use a damp sponge to wipe any stray droplets of glaze off the waxed bottom section to prevent it from sticking to the kiln shelf. -
Glaze fire:
Fire the mug to maturity (Cone 5 or 6 depending on your clay body). This final firing melts the glaze into a glass-like finish.
Once cooled, your charming cow mug is ready for a warm beverage and a cozy morning start
Cow Spoon Rest (Flat and Easy)
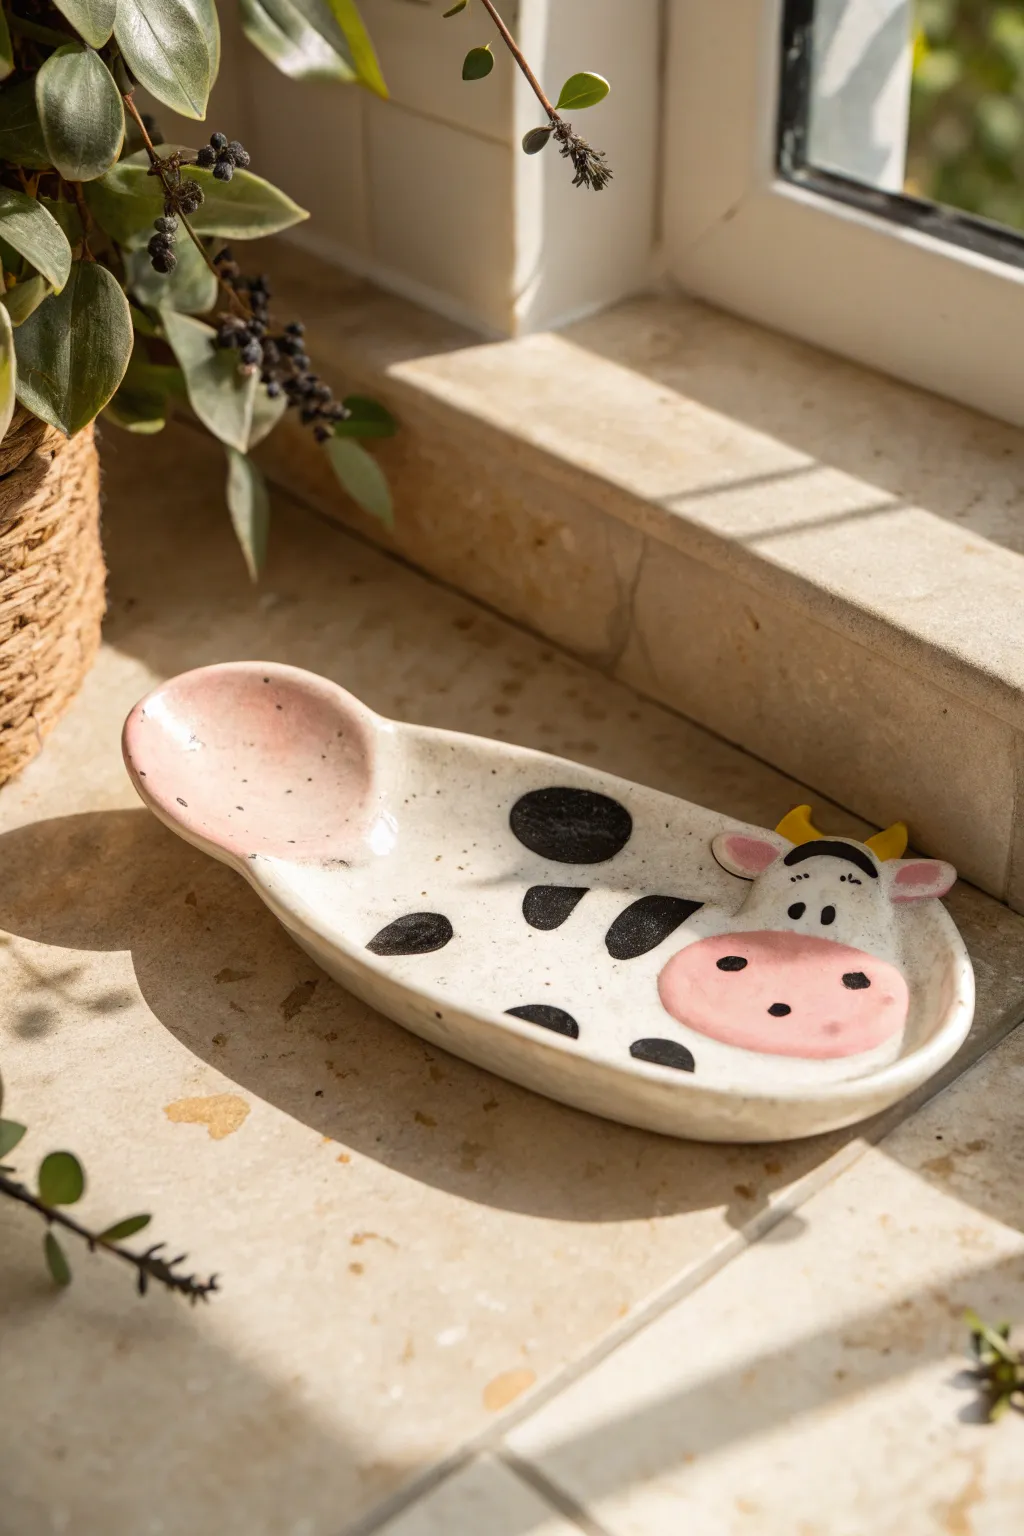
Brighten up your stovetop with this charming, speckled cow spoon rest that combines functionality with farmhouse whimsy. Modeled from a single slab of clay, its elongated shape and gentle curves are perfect for keeping messy utensils off your counters.
Detailed Instructions
Materials
- White stoneware or polymer clay (approx. 1 lb)
- Rolling pin
- Canvas mat or slab roller
- Needle tool or fettling knife
- Small bowl (for water)
- Sponge
- Modelling tools (smoother, rib)
- Underglazes: Black, Bubblegum Pink, Pastel Yellow
- Clear transparent glaze
- Small paintbrushes (various sizes)
- Kiln (if using ceramic clay)
Step 1: Shaping the Base
-
Roll the slab:
Begin by rolling out your clay into an even slab, approximately 1/4 inch thick. A consistent thickness prevents warping during drying. -
Cut the outline:
Using a needle tool, cut out a long oval shape that’s slightly wider at the top and bottom. It should look a bit like a peanut or a shoe sole, roughly 8-10 inches long. -
Smooth the edges:
Dip your finger or a small sponge in water and run it along the cut edges to round them off and compress the clay, removing any sharp burrs.
Make It Glossy
For the pink spoon indentation, apply the clear glaze slightly thicker. This creates a pool of glass that looks lovely and is extra easy to clean.
Step 2: Sculpting the Features
-
Form the spoon well:
At the narrower end of the oval, gently press your thumb into the center to create a shallow depression. This concave area will cradle your spoon handle. -
Create the face rise:
Move to the wider end of the oval. Instead of pressing down, gently curl the edges upward slightly to create a rim, giving the head area some subtle dimension. -
Sculpt the snout:
Roll a small, flattened oval of clay and slip-and-score it onto the bottom of the face area. Smooth the edges down so it transitions seamlessly into the main slab. -
Add the ears:
Shape two small teardrops of clay. Attach them to the sides of the head area, pressing the center of each ear with a tool to make a small indentation. -
Attach the horns:
Roll two tiny cones for the horns. Score the attachment points at the very top of the head and secure them firmly, blending the clay at the base. -
Refine the surface:
Use a damp sponge to wipe down the entire piece again, ensuring all attachments are secure and the surface is perfectly smooth for painting.
Step 3: Painting and Finishing
-
Apply pink accents:
Using a soft brush, paint the snout area, the inside of the ears, and the spoon indentation at the tail end with a soft bubblegum pink underglaze. -
Paint the horns:
Carefully paint the two small horns with a pastel yellow underglaze. I find a very small detail brush works best here to avoid getting yellow on the white clay. -
Create the spots:
Paint organic, rounded blotches of black underglaze randomly across the white body of the spoon rest to mimic cow patterns. -
Detail the face:
Using a fine liner brush and black underglaze, paint two nostrils on the pink snout, two small eyes above it, and two curved eyebrows near the horns. -
Add speckling:
Dilute a tiny bit of black underglaze with water on a stiff brush. Run your finger across the bristles to flick tiny speckles over the entire piece for a rustic stone look. -
Bisque fire:
Allow the piece to dry slowly and completely before firing it to bisque temperature (usually Cone 04) according to your clay’s instructions. -
Glaze application:
Once bisqued, dip the entire spoon rest into a clear transparent glaze to seal the clay and make the colors pop. -
Final firing:
Fire the piece a second time to the glaze maturity temperature (often Cone 5 or 6) to achieve a glossy, food-safe finish.
Ear Attachment
If ears fall off during drying, you likely didn’t score deep enough. Make deep distinct scratches on both surfaces before adding slip and pressing together.
Now you have an adorable kitchen helper ready to hold your sauciest spoons

TRACK YOUR CERAMIC JOURNEY
Capture glaze tests, firing details, and creative progress—all in one simple printable. Make your projects easier to repeat and improve.
Cow Tile Wall Decor
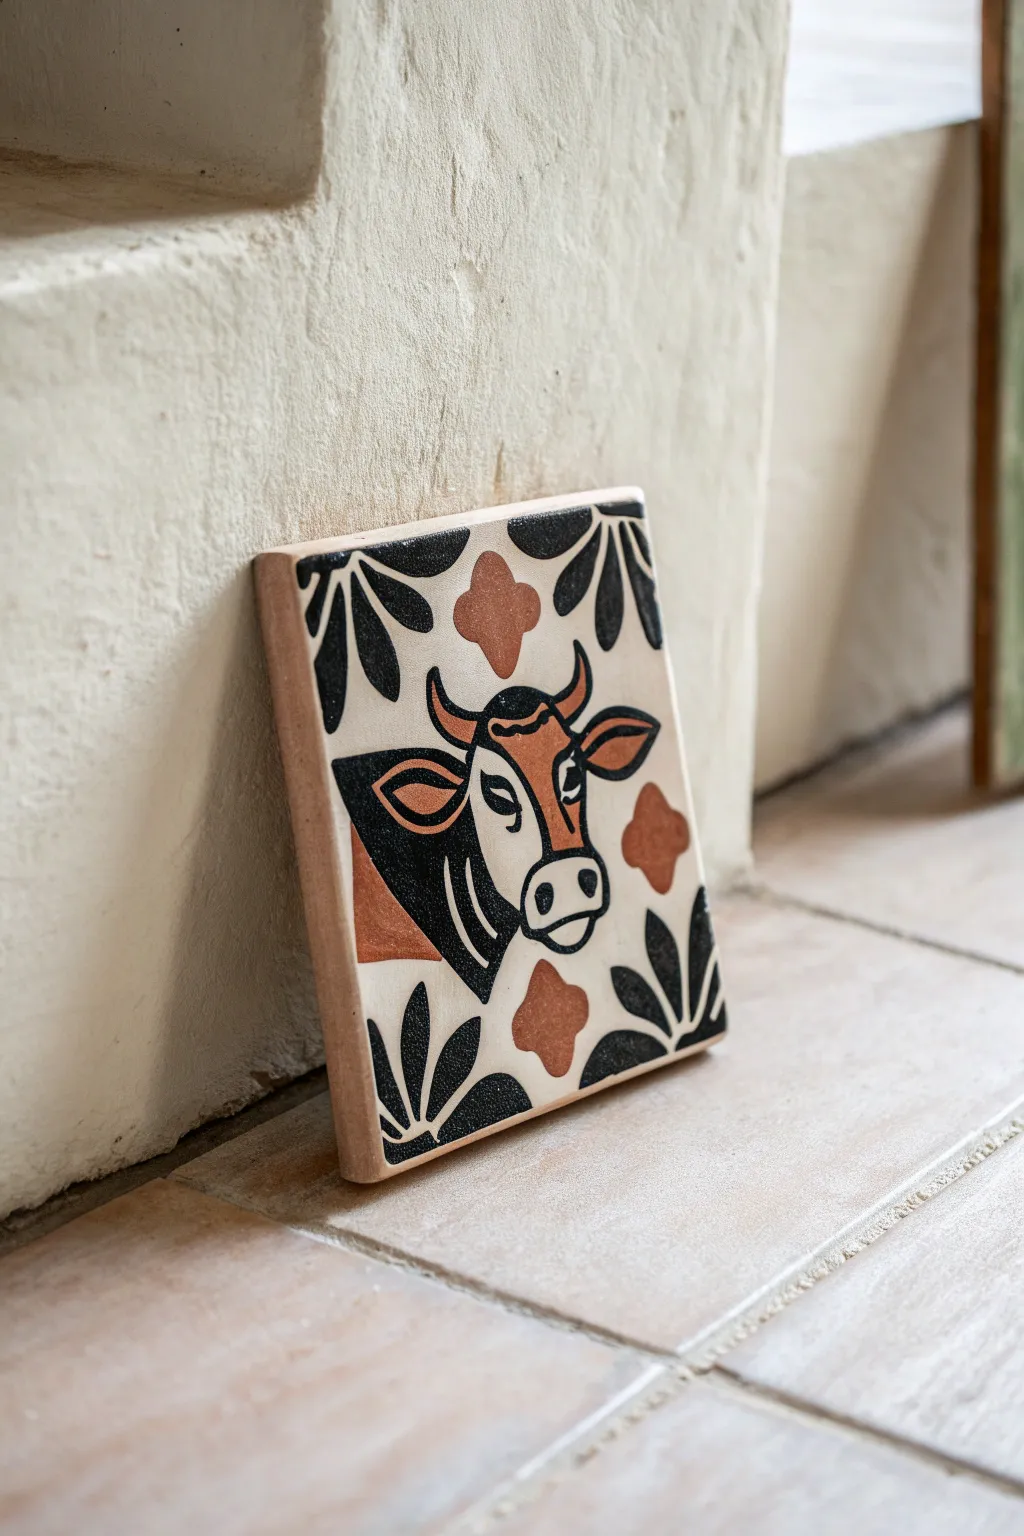
Bring a touch of farmhouse charm to your space with this hand-painted ceramic tile, featuring a stylized cow portrait surrounded by classic floral motifs. The warmth of the terracotta tones combined with bold black lines creates a striking piece that looks equally good propped on a shelf or mounted as part of a backsplash.
Step-by-Step Guide
Materials
- Bisque ceramic tile (4×4 or 6×6 inch)
- Underglaze paints (Jet Black, Terracotta/Rust, soft Cream/White)
- Pencil for sketching
- Fine liner brush (size 0 or 00)
- Small round brush (size 2 or 4)
- Clear dipping glaze or brush-on clear glaze
- Kiln (or access to a firing service)
Step 1: Preparation and Sketching
-
Clean surface:
Begin by wiping down your bisque tile with a slightly damp sponge to remove any dust or ceramic particles that could interfere with the glaze adhesion. -
Center the design:
Using a pencil, lightly mark the vertical center of the tile. This axis will help you keep the cow’s face symmetrical. -
Outline the head:
Sketch the cow’s head shape in the center. Start with a U-shape for the muzzle, move up to the eyes, and cap it off with curved horns. -
Add floral corners:
In the top right and bottom left corners, sketch a simple three-petal flower shape or leaf cluster that radiates inward. -
Place filler motifs:
Draw small four-point diamond or cross shapes in the remaining empty spaces to balance the composition, just like in traditional folk patterns.
Smudge Control
If you make a mistake with the black underglaze, let it dry completely, then gently scratch the error away with a craft knife or needle tool before glazing.
Step 2: Painting the Design
-
Apply base cream:
If your tile isn’t already the desired cream color, paint the open background areas and the cow’s face with a soft cream underglaze. I like to apply two to three coats for solid opacity. -
Block in terracotta areas:
Using your round brush, fill in the decorative cross shapes and specific patches on the cow’s face (the forehead patch and the inner ears) with the terracotta underglaze. -
Paint the neck:
Fill in the large triangular shape of the cow’s neck on the left side with the terracotta color as well. -
Start the black details:
Switch to the Jet Black underglaze. Carefully paint the floral leaf clusters in the corners, ensuring the edges are crisp. -
Fill the cow’s coat:
Paint the black sections of the cow’s body, specifically the neck area behind the terracotta triangle, creating a sense of depth. -
Outline the features:
Using your fine liner brush, carefully trace the outlines of the cow’s face, ears, and horns in black. Keep your hand steady for smooth, confident lines. -
Detail the eyes:
Paint the almond-shaped eyes. Leave a tiny speck of white/cream unpainted or add a dot of white later for a highlight, which brings the cow to life. -
Finish the muzzle:
Outline the muzzle and paint the two nostrils using solid black ovals. -
Add pattern texture:
If there are large white or cream areas that feel too empty, you can add very thin, subtle lines or texture marks, though the clean look works beautifully too.
Make a Set
Create a series of 4 tiles by rotating the corner floral motifs or changing the central animal to a pig, sheep, or chicken for a full barnyard collection.
Step 3: Glazing and Firing
-
Dry completely:
Allow the underglaze to dry completely, preferably overnight, so the colors don’t smudge during glazing. -
Apply clear glaze:
Apply a coat of clear glaze over the entire tile. Dipping works best for an even finish, but careful brushing works too. -
Clean the back:
Wipe the back and edges of the tile clean with a sponge to prevent it from sticking to the kiln shelf. -
Fire the tile:
Fire the piece in a kiln according to the specific instructions for your clay and glaze types (usually cone 06 or 04 for low-fire earthenware).
Now you have a charming piece of handmade art ready to display
Cow Totem Stack Figurine
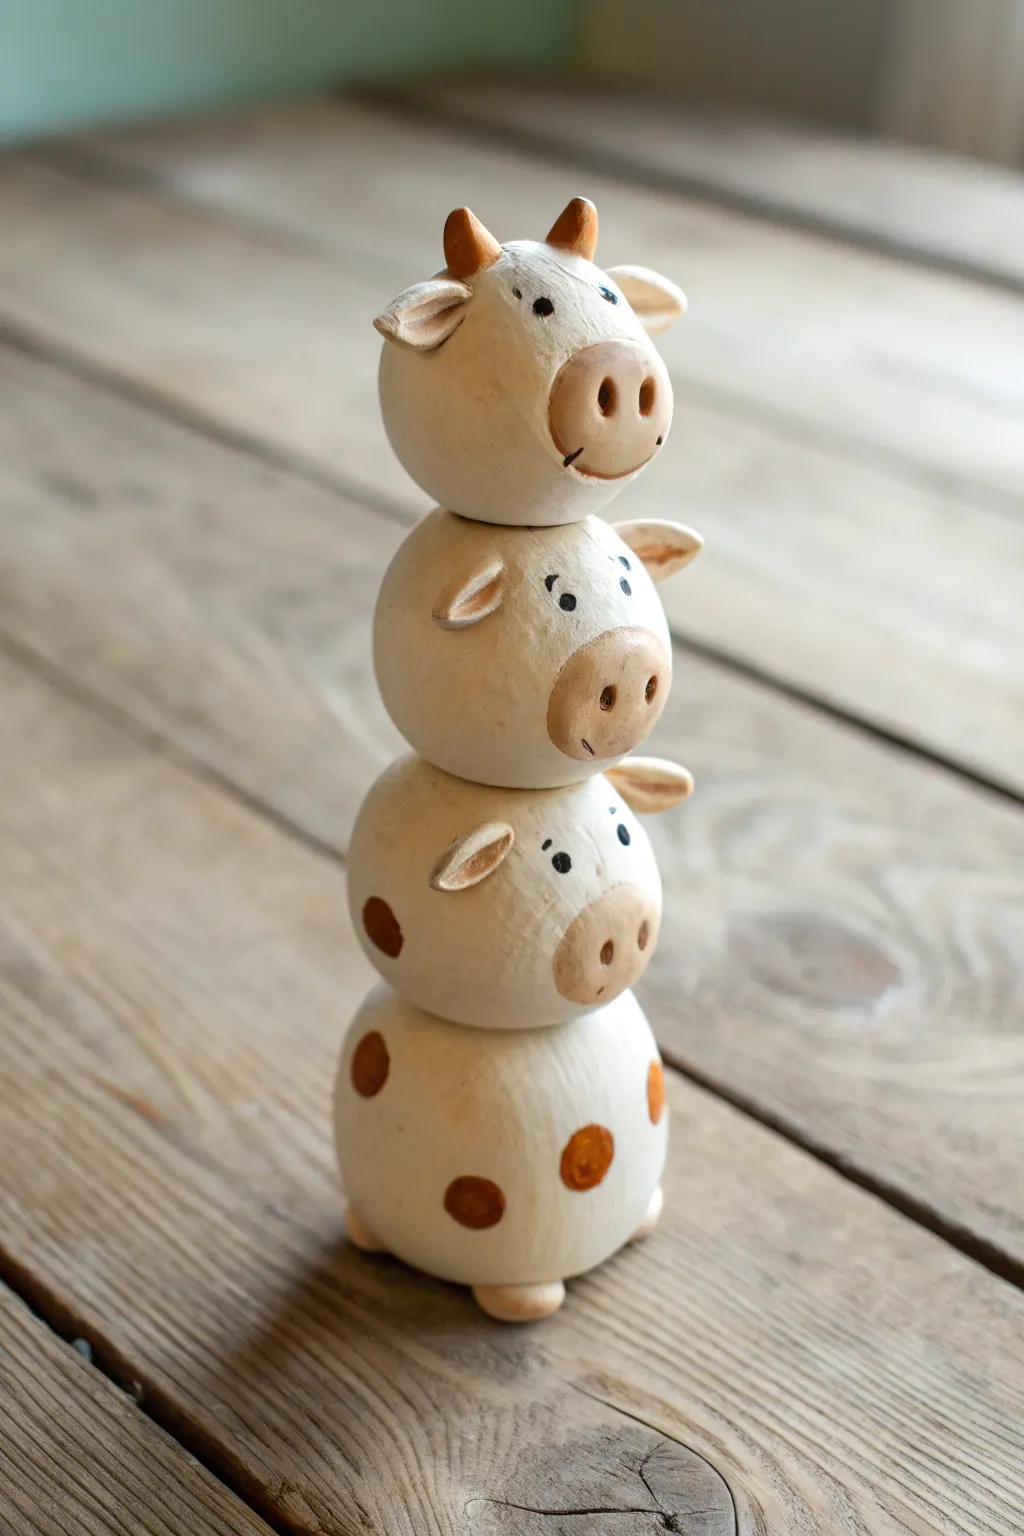
Create a charming rustic figurine featuring a playful stack of spherical cow characters. This vertical sculpture combines simple geometric shapes with expressive details for a delightful desk ornament or shelf decor piece.
Step-by-Step Tutorial
Materials
- Air-dry clay or polymer clay (white or light beige)
- Acrylic paints (brown, black, pink/flesh tone)
- Small clay sculpting tools
- Rolling pin
- Water cup and sponge (for smoothing)
- Strong craft glue or liquid clay (if using polymer)
- Toothpicks or a thin wooden dowel (for internal structure)
- Fine-grit sandpaper
- Matte varnish
- Detail paintbrushes
Step 1: Forming the Core Structure
-
Establish the Base:
Begin by rolling a large ball of clay, slightly flattening the bottom so it sits stable on your work surface. This will be the body of the bottom cow and needs to be the largest sphere to support the stack. -
Create the Heads:
Roll three slightly smaller spheres. These should graduate very slightly in size, or be uniform, to represent the heads of the three cows. Test stack them to ensure they aren’t too heavy for the base. -
Add Internal Support:
To keep your totem upright, insert a toothpick or a thin wooden dowel into the center of the base sphere. Carefully slide the next two spheres onto this support, leaving the top sphere for last so you can work on the ears more easily.
Leaning Tower of Cow?
If your stack keeps tilting while working, keep the dowel long initially and stick the bottom into a block of foam. Trim the excess dowel only after the clay has begun to firm up.
Step 2: Sculpting the Features
-
Attach the Snouts:
For each of the three head spheres, roll a small, flattened oval of clay. Press this onto the front center of each face area to create the distinct snout. -
Define Nostrils and Mouths:
Using a small ball tool or the end of a paintbrush, indent two distinct nostril holes into each snout. Use a knife tool to carve a gentle, curved smile line underneath or to the side of the snout. -
Add the Ears:
Shape pairs of small, tear-drop shaped pieces of clay for the ears. Attach them to the sides of each head sphere. I like to use a sculpting tool to press an indentation into the center of each ear for depth. -
Top Cow Horns:
On the very top sphere, add two small cones of clay between the ears to form the little horns. Blend the seams at the base of the horns smoothly into the head. -
Feet for the Base:
Roll four tiny balls of clay and slightly flatten them. attach these to the bottom of the base sphere as feet, ensuring the whole stack remains level. -
Smooth and Refine:
Dip your finger or a sponge in a little water and gently smooth out any fingerprints or rough join lines. Ensure the connection points between the stacked spheres look seamless relative to the stack.
Natural Texture
For a rustic look, don’t over-smooth the clay. Leave slight surface variations and apply a thin brown wash (paint diluted with water) into the crevices, wiping it off to age the piece.
Step 3: Painting and Finishing
-
Dry or Bake:
Follow the instructions for your specific clay. If using air-dry clay, allow at least 24-48 hours for complete drying. If polymer, bake according to package directions and let cool completely. -
Initial Sanding:
Once hardened, gently sand any rough patches or sharp edges with fine-grit sandpaper to achieve that smooth, ceramic-like finish visible in the photo. -
Base Coat (Optional):
If your clay isn’t naturally the cream color shown, paint the entire sculpture with a wash of cream or off-white acrylic paint. Let this dry fully. -
Paint the Snouts and Horns:
Mix a light brown or dusty pink color. Paint the snout ovals on all three cows, and carefully paint the inside indentations of the ears. Use a darker brown for the horns on top. -
Add the Spots:
Using a medium brown tone, paint random circular spots. Focus these on the lowest sphere (the body) and the middle sphere. The uneven, hand-painted look adds to the charm. -
Detail the Face:
With a very fine brush or a black paint pen, draw small dots for the eyes just above the snouts. Add tiny eyebrows or extra expression lines if desired. -
Seal the Project:
Protect your paint job with a coat of matte varnish. This unifies the surface sheen and prevents the paint from chipping over time.
Place your adorable cow stack on a shelf where its cheerful faces can brighten your day
Sleepy Cow Desk Pet
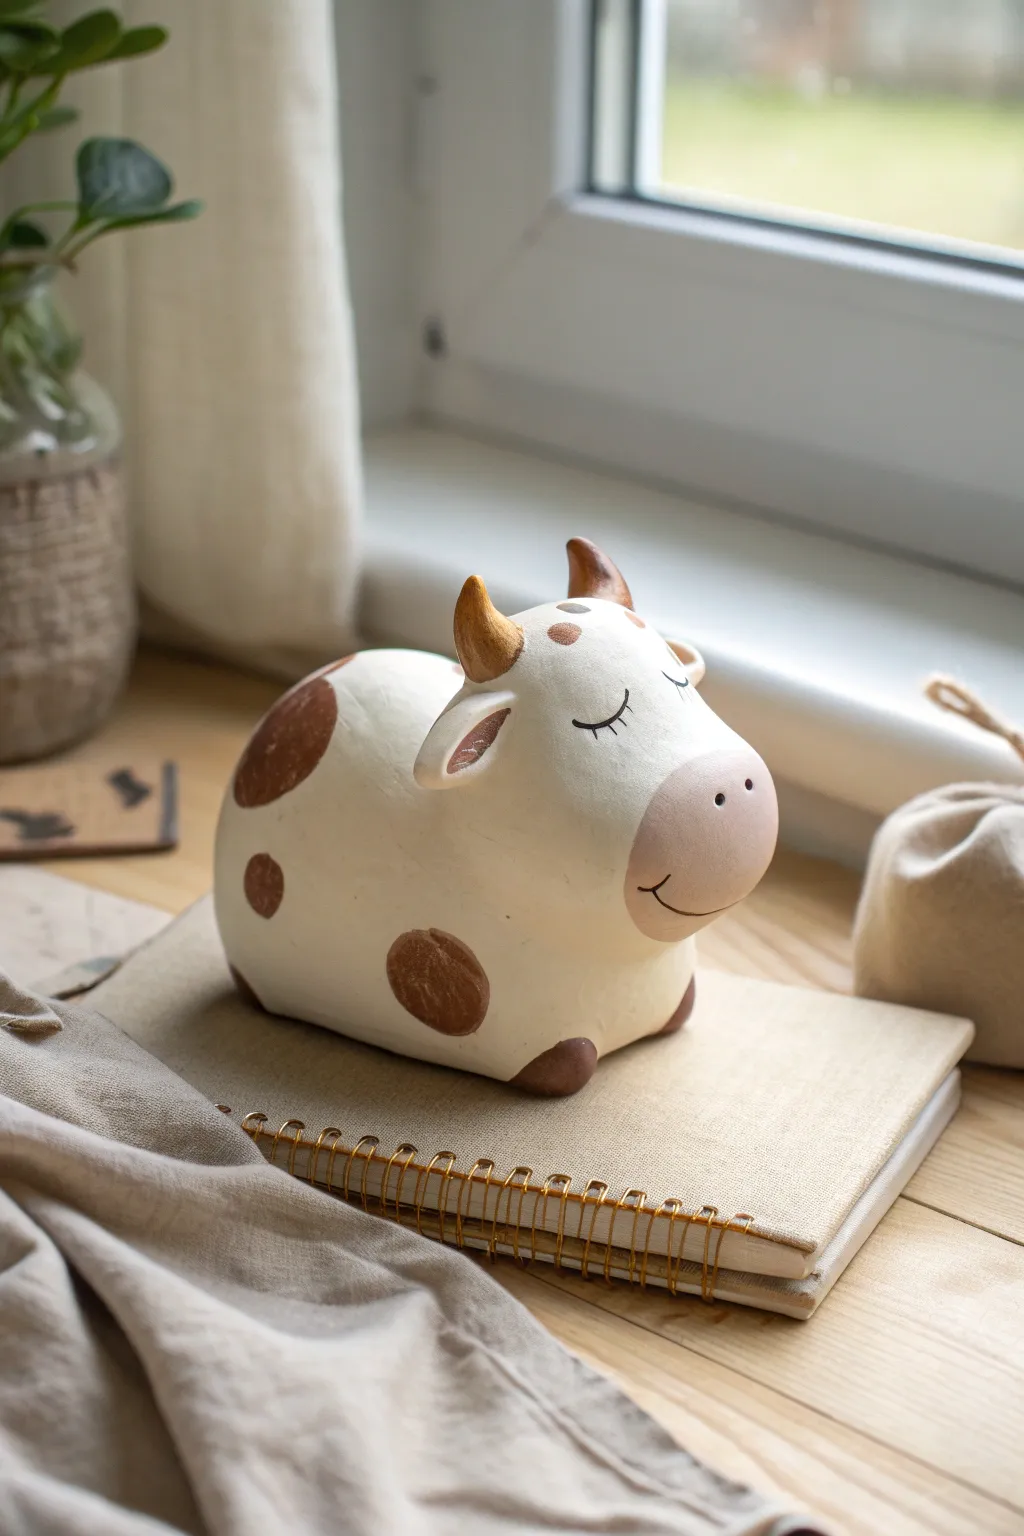
Create your own peaceful companion with this delightful sleeping cow project, perfect for adding a touch of calm to any workspace. This sturdy, spotted figurine features a rounded form and serene expression that makes it especially beginner-friendly to sculpt.
Step-by-Step Guide
Materials
- Air-dry clay or polymer clay (white)
- Acrylic paints (dark brown, light pink/beige, gold)
- Fine-grit sandpaper
- Sculpting tools (needle tool, smoothing tool)
- Rolling pin
- Aluminum foil (for armature core)
- Water cup and sponge (if using air-dry clay)
- Fine detail paintbrush
- Matte varnish or sealant
Step 1: Forming the Body Base
-
Create the core:
Crumple a piece of aluminum foil into a smooth, oval potato shape. This saves clay and keeps the figurine lightweight. -
Cover with clay:
Roll out a thick sheet of white clay and wrap it fully around your foil core. Smooth the seams until you have a solid, seamless oval shape. -
Shape the head:
Slightly taper one end of the oval to distinguish the head area, but keep the transition very subtle; the charm of this cow is its loaf-like shape. -
Flatten the base:
Gently tap the bottom of the oval against your work surface. This creates a flat area so the cow sits stably without rolling over.
Weighted Base Trick
If you want your desk pet to double as a paperweight, push a heavy stone or a fishing weight into the bottom of the foil core before wrapping it in clay.
Step 2: Sculpting the Features
-
Add the muzzle:
Roll a smaller ball of clay and flatten it slightly into an oval. Press this onto the front lower section of the face to create a distinct muzzle area, blending the edges smoothly into the main body. -
Attach the ears:
Shape two small teardrops of clay. Press the rounded end onto the sides of the head, just behind the muzzle line, effectively blending the connection points. -
Mold the horns:
Roll two small cones and curve them slightly. Attach these to the top of the head, positioning them just inside the ears. -
Form the hooves:
Instead of full legs, make four small, flattened half-circles. Attach these to the bottom corners of the body to suggest feet tucked underneath. -
Refine the surface:
Dip your finger in a little water (or clay softener/baby oil for polymer) and smooth out any fingerprints or bumps. Let the piece dry or bake according to your clay package instructions.
Step 3: Painting and Finishing
-
Sand for smoothness:
Once fully cured or dry, use fine-grit sandpaper to gently buff the surface, focusing on the main body curve to get that ceramic-like finish. -
Base coat touches:
If your clay isn’t perfectly white, give the whole body a coat of white acrylic paint. Otherwise, proceed to the details. -
Paint the spots:
Using dark brown paint, add large, organic circular spots. Place a big one on the flank and a smaller one near the rear. I prefer keeping the edges slightly soft rather than perfectly sharp. -
Detail the muzzle and hooves:
Mix a very soft pinkish-beige color and paint the entire muzzle area. Use the dark brown or a deep tan for the small hooves peaking out at the bottom. -
Gild the horns:
Carefully paint the horns with a metallic gold or bronze paint for a touch of elegance. -
Add the face:
Using a very fine liner brush or a fine-tip marker, draw two U-shaped curves for the sleeping eyes. Add small eyelashes for character and a simple curved line for the smile. -
Final touches:
Using the tip of a toothpick, add two tiny brown dots on the pink muzzle for nostrils. -
Seal the piece:
Finish with a coat of matte varnish to protect the paint and give it a professional, unglazed ceramic look.
Cracking Clay?
If using air-dry clay, cracks often happen if the outside dries faster than the inside. Drape a slightly damp paper towel over the cow while it dries to slow things down.
Enjoy the peaceful presence of your new little desk pet as it keeps you company during your workday
Strawberry Cow Color Palette
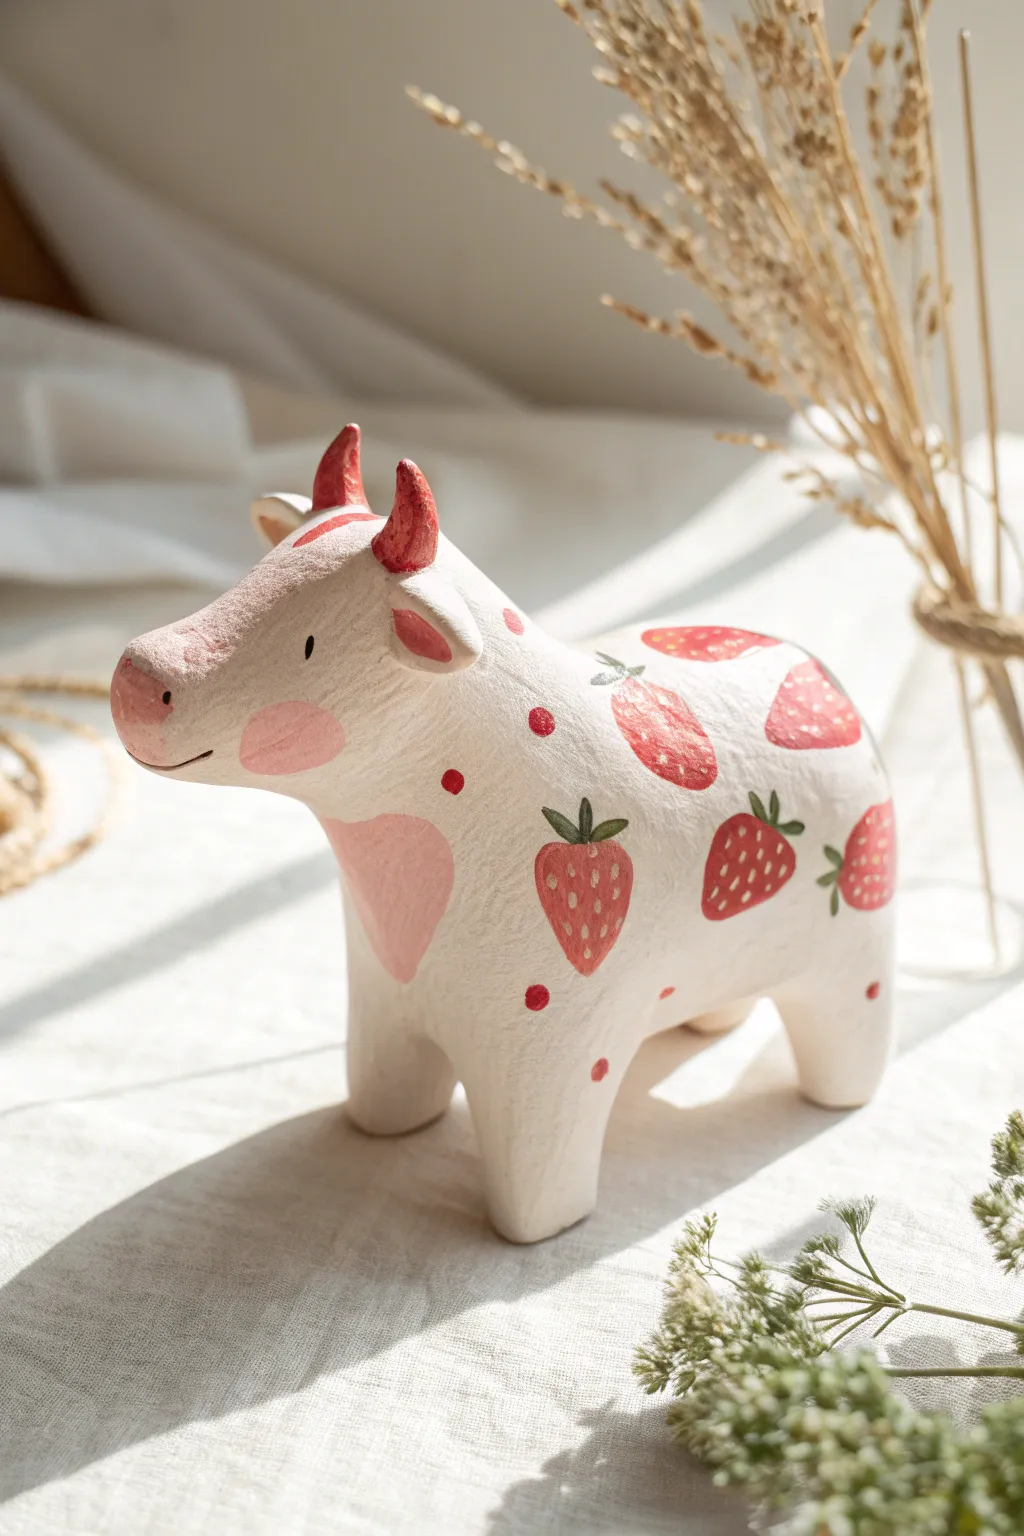
This adorable little bovine captures the sweetness of summer with its charming strawberry-spotted coat and soft pastel blush. Crafted from air-dry clay, its delightful hand-painted details create a whimsical farm friend that is perfect for brightening up any shelf.
How-To Guide
Materials
- Air-dry clay (white)
- Sculpting tools (or a toothpick and spoon)
- Sandpaper (fine grit)
- Acrylic paints (Titanium White, Primary Red, Baby Pink, Leaf Green, Dark Brown)
- Paintbrushes (medium flat brush, small detail round brush)
- Palette for mixing
- Water cup and paper towels
- Matte varnish or sealant
Step 1: Sculpting the Base Form
-
Form the Body:
Start by conditioning a fist-sized ball of air-dry clay until it’s pliable and smooth. Roll it into a thick, elongated oval shape, slightly tapering one end to form the neck area. Flatten the bottom gently so the cow will eventually stand on its own, though we will add legs next. -
Create the Head:
Roll a smaller ball of clay, about a third of the body size, into a rounded teardrop shape. Score the top of the neck and the back of the head, wipe with a little water, and press them firmly together. Smooth the seam with your finger or a tool until the neck transition looks seamless. -
Add Sturdy Legs:
Roll four equal-sized cylinders for the legs. They should be quite thick and stumpy for stability. Attach them to the underbelly using the score-and-slip method (scratching both surfaces and adding water). Blend the clay of the legs upwards into the body so they look integral, not just stuck on. -
Refine the Face:
Gently press indentations on the sides of the head where ears will go. Shape the snout area to be slightly flatter and wider. Poke two small nostrils into the front of the snout using a small round tool. -
Ears and Horns:
Shape two small, flattened leaf shapes for ears and attach them to the sides of the head. For the horns, roll two tiny cones and attach them to the top of the head, curving them slightly inward. I like to smooth the base of the horns thoroughly so they don’t pop off later. -
Dry and Sand:
Let your cow dry completely. Depending on the brand of clay and humidity, this can take 24-48 hours. Once bone dry, use fine-grit sandpaper to smooth out any fingerprints, bumps, or rough seams, dusting it off with a dry brush afterward.
Leg Stability Fix
If the legs keep splaying specific while wet, prop the cow’s belly up on a small object (like a matchbox) so the legs just touch the table without bearing full weight while they dry.
Step 2: Painting the Strawberry Details
-
Base Coat:
Paint the entire cow with Titanium White acrylic paint. This creates a bright, even canvas and seals the porous clay slightly. You may need two thin coats for full opacity. -
Blushing Up:
Mix a soft, pale pink using white and a tiny dot of red. Paint the snout area, the insides of the ears, and a large, soft oval on the chest using the medium flat brush. Add rosy circles on the cheeks. -
Horn Details:
Using a brighter red, carefully paint the horns. If the red is too harsh, mix in a tiny bit of orange or brown to warm it up so it matches the strawberry theme. -
Painting Strawberry Silhouettes:
With the red paint and a detail brush, paint scattered strawberry shapes all over the body. Think of them as rounded, inverted triangles or plump heart shapes without the deep cleft. Vary their sizes slightly for visual interest. -
Adding Leaves:
Once the red paint is dry to the touch, mix a muted forest green. Use your smallest brush to paint three or four little leafy spikes on top of each strawberry. -
Seeds and Specs:
Using a creamy yellow or very pale pink, dot tiny seeds onto the red strawberries. Then, to fill empty white space on the body, add small red polka dots scattered between the berries. -
Final Expressions:
Using dark brown or black paint and a very steady hand (or a fine-tip paint marker), add two small eyes just above the pink cheek patches and a small smile line on the side of the snout. -
Seal:
Finish by applying a coat of matte varnish to protect your paint job and give the figurine a professional, finished look.
Level Up: Texture
Before the clay dries, gently press a real strawberry leaf or piece of textured fabric into the ‘skin’ to create a subtle texture that catches the paint later.
Now you have a berry sweet companion to sit on your desk and keep you company
Highland Cow Clay Sculpture
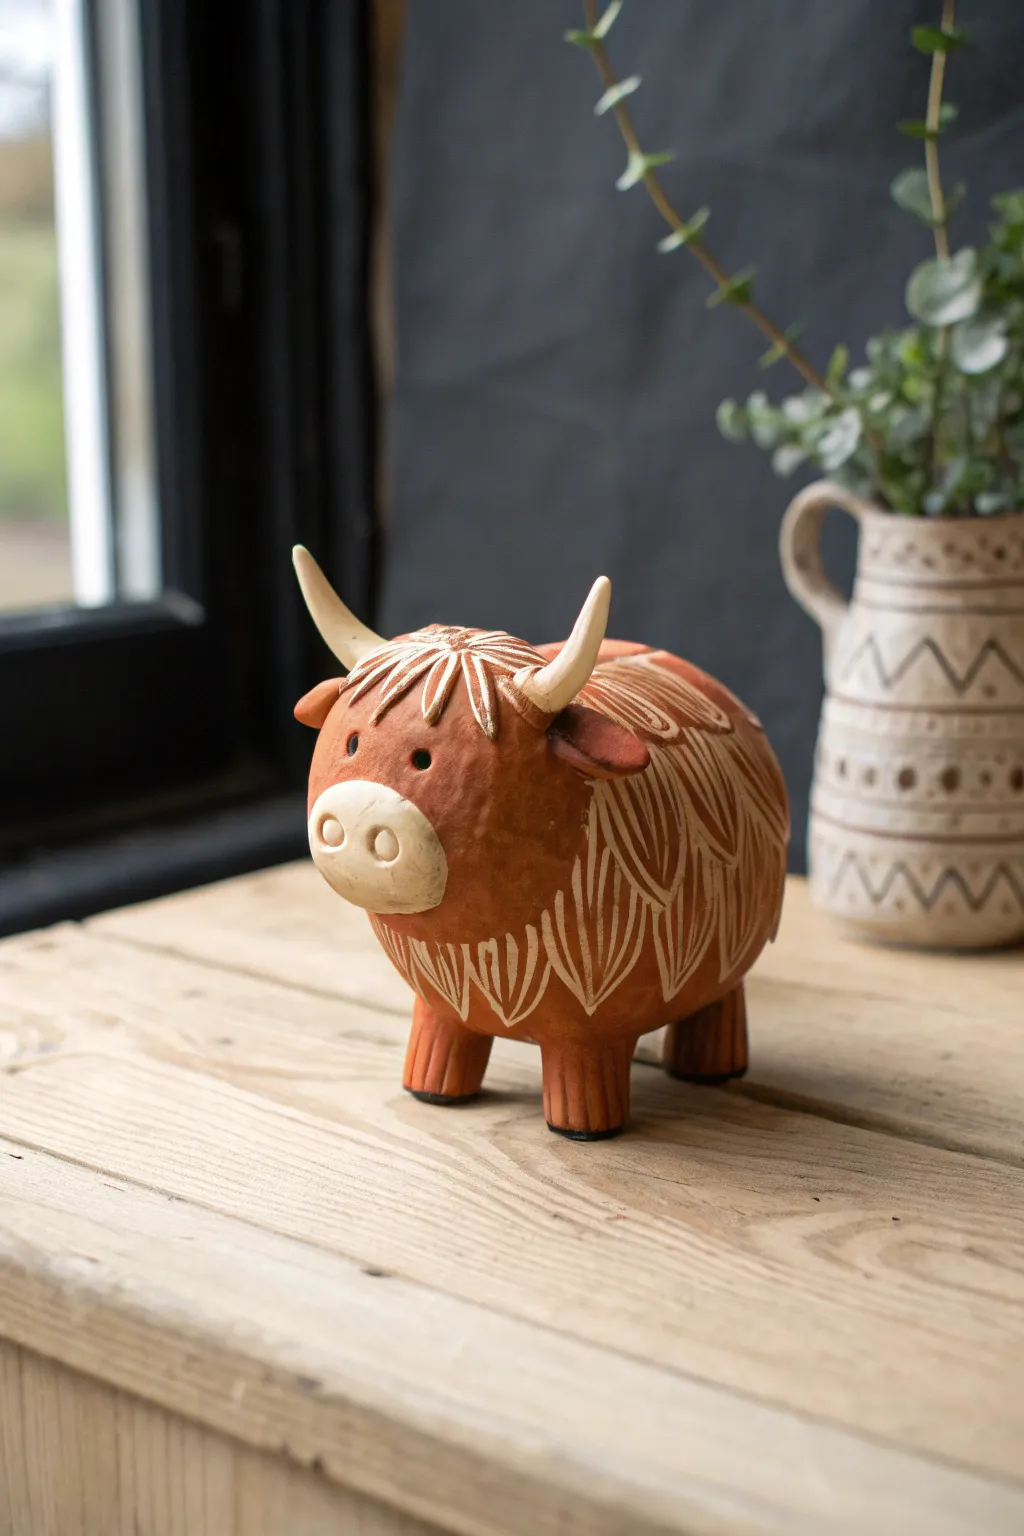
Capture the shaggy charm of a Highland cow with this delightful clay sculpture, characterized by its etched fur texture and gentle, rounded form. The earthy terracotta tones and stylized markings make this a perfect rustic piece for any shelf or windowsill.
Step-by-Step
Materials
- Terracotta-colored polymer clay or air-dry clay
- Cream or off-white clay (for horns and snout)
- Black clay or acrylic paint (for eyes)
- Clay sculpting tools (needle tool, small loop tool)
- Acrylic roller or pasta machine
- Texture tool or toothbrush (optional)
- White acrylic paint (for the etched details)
- Small detail paintbrush
- Damp sponge or cloth
- Fine grit sandpaper
Step 1: Forming the Body Structure
-
Create the core:
Begin with a large ball of terracotta clay, slightly larger than a tennis ball. Roll it until it is smooth, then gently manipulate it into a rounded oval shape to form the main body. -
Flatten the base:
Tap the bottom of the oval gently against your work surface. This creates a stable, flat belly so your cow won’t roll away. -
Shape the legs:
Roll four short, sturdy cylinders from the terracotta clay for legs. Keep them thick and slightly tapered at the bottom to support the body’s weight. -
Attach the limbs:
Score the connection points on both the body and the legs to roughen the surface. Press the legs firmly onto the underside of the body, blending the seams with your thumb or a modeling tool until smooth.
Step 2: Adding Facial Features
-
Sculpt the snout:
Take a piece of cream-colored clay and form a flattened, wide oval. Press this firmly onto the front face of the terracotta body to create the muzzle. -
Detail the nose:
Using a small ball tool or the end of a paintbrush, make two deep indentations in the cream snout for nostrils. You can also lightly press a curve below them for a mouth. -
Make the ears:
Shape two small teardrops of terracotta clay. Flatten them slightly and attach them to the sides of the head area, positioning them just behind where the horns will go. -
Form the eyes:
Use a small dotting tool to create two sockets on the terracotta face. Press tiny balls of black clay into these spots, or leave them indented to paint black later. -
Attach the horns:
Roll two tapered cones from the cream clay, curving them slightly upwards. Attach these to the top of the head, ensuring they curve inward toward each other like a classic Highland cow.
Clean Lines
For sharper fur lines, chill your clay slightly in the fridge for 10 minutes before carving; harder clay holds fine detail better without dragging.
Step 3: Texturing and Finishing
-
Plan the hair pattern:
Before carving, customize the flow of the hair. Imagine a center part along the spine and forehead, with hair draping down the sides. -
Carve the fur:
Using a needle tool or specialized carving gouge, incise long, leaf-shaped outlines all over the body. Group them in tufts that point downward, mimicking shaggy layers. -
Detail the tufts:
Inside each leaf-shaped outline, carve fine, parallel lines to simulate individual strands of hair. I like to vary the pressure here to give the coat more depth and character. -
Refine the hooves:
Add vertical lines to the bottom of the legs to suggest hooves and hair falling over the feet. -
Bake or dry:
Follow the manufacturer instructions for your specific clay. If baking polymer clay, tent it with foil to prevent scorching the cream parts. -
Apply the wash:
Once hardened and cool, mix a watery wash of cream or white acrylic paint. Brush this over the entire textured area, ensuring the paint gets deep into the carved grooves. -
Wipe back:
Before the paint fully dries, take a damp cloth and gently wipe the surface of the clay. This removes paint from the raised areas while leaving it in the recesses, highlighting the carved fur pattern. -
Final touches:
If needed, touch up the eyes with a dab of black paint and add a tiny white reflection dot for life.
Make it a Bank
Turn this sculpture into a functional piggy bank by hollow-building the body and cutting a coin slot in the top before etching the fur texture.
Place your little Highland cow near a window or plant to give your room a touch of the Scottish countryside