If you’ve got a stack of old china plates hiding in a cabinet (or a sad pile of broken china you can’t bear to toss), you’re sitting on seriously good craft material. I love turning those patterns and gold rims into pieces you’ll actually use and display—no perfection required.
Plate Wall Gallery With Mixed Old China Plates
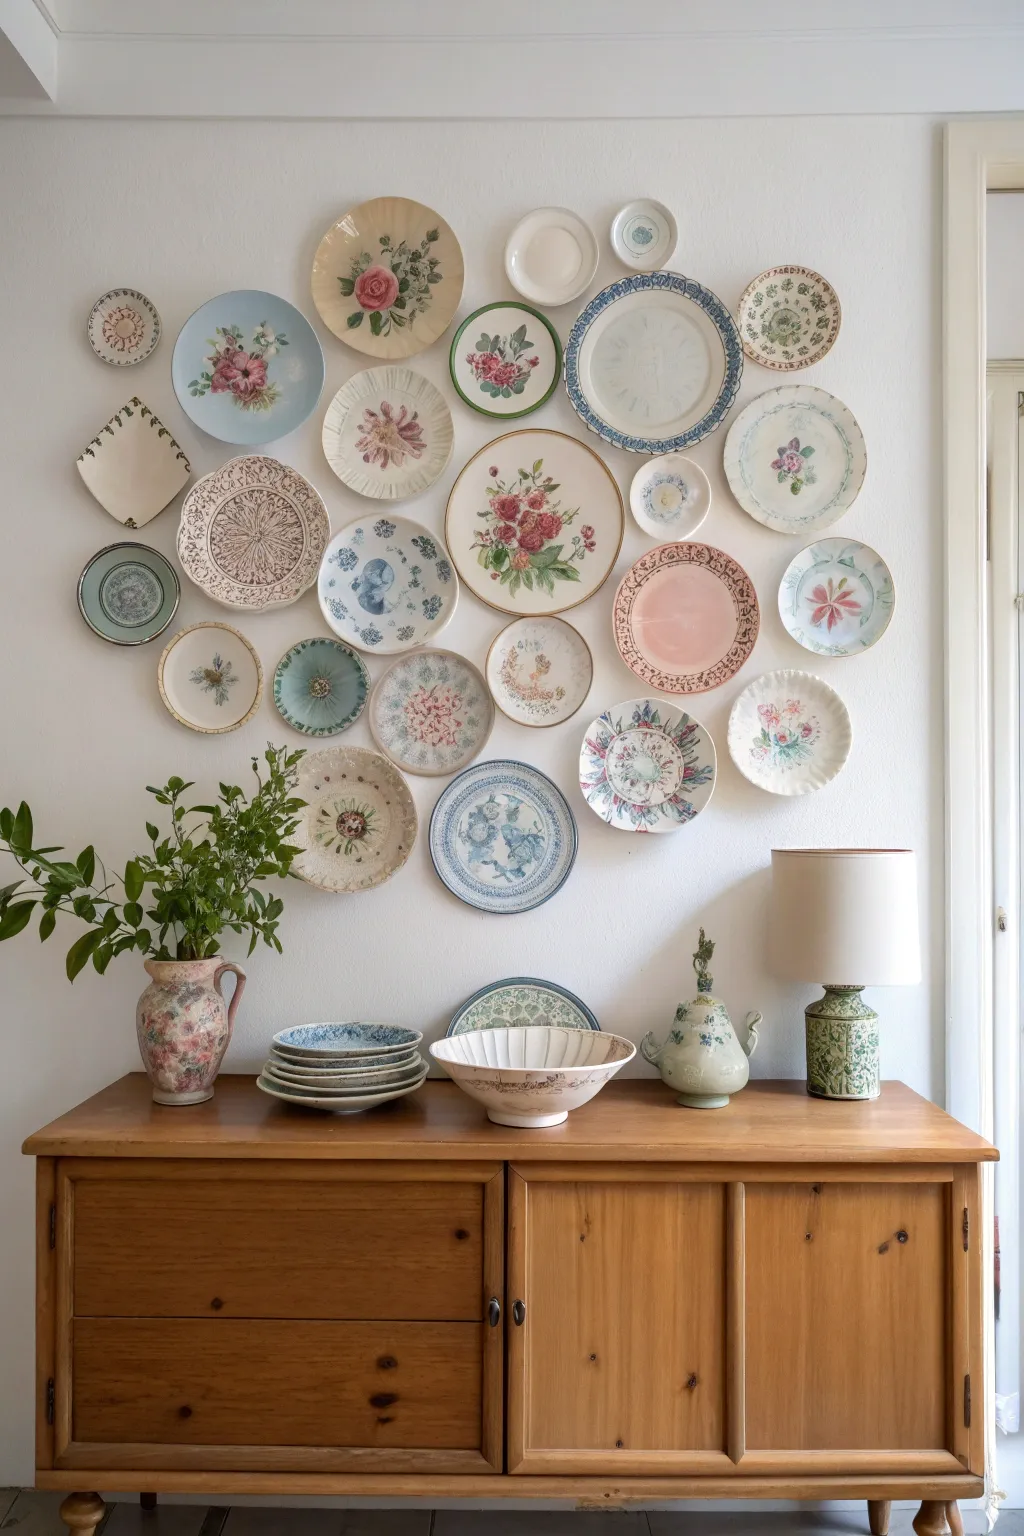
Transform a blank wall into a charming focal point by curating an eclectic mix of vintage china plates. This project balances colors, sizes, and floral patterns to create a cohesive yet whimsical gallery that adds character to any dining or living space.
Step-by-Step
Materials
- 20-25 assorted vintage china plates (various sizes and patterns)
- Adhesive plate hangers (disc style) or spring wire hangers
- Kraft paper or newspaper
- Painter’s tape
- Pencil
- Scissors
- Hammer
- Picture hanging nails or hooks
- Tape measure
- Level
- Mild dish soap and water
- Clean microfiber cloth
Step 1: Preparation & Layout
-
Clean and test plates:
Begin by thoroughly washing the back of every plate with mild dish soap and water to remove any grease or dust. Dry them completely with a microfiber cloth; a clean surface is crucial for adhesive hangers to stick properly. -
Apply hangers:
Following the manufacturer’s instructions for your specific hangers, adhere the discs to the back of each plate. Let the adhesive cure fully (often overnight) before attempting to hang anything heavy. -
Trace templates:
While the hangers are curing, lay your kraft paper or newspaper on the floor. Place each plate face down on the paper and trace its outline with a pencil. -
Cut out shapes:
Cut out each paper circle (or square/oval) you just traced. Mark the location of the hanger hook on the paper template so you know exactly where the nail needs to go later. -
Floor arrangement:
Clear a large space on the floor roughly the size of your wall area. Start experimenting with your layout here first. I like to start with the largest platter in the center or slightly off-center and work outward. -
Balance the composition:
As you arrange, aim for balance rather than symmetry. Distribute colors evenly—don’t clump all the blue plates or all the floral patterns in one corner. Mix small saucers in between larger dinner plates to fill gaps.
Step 2: Installation
-
Transfer to wall:
Using painter’s tape, stick your paper templates onto the wall, replicating the design you created on the floor. Take a step back frequently to check the overall flow. -
Adjust and refine:
Move the paper templates around until you are perfectly happy with the spacing. Aim for roughly 2-3 inches between plates to keep the collection looking unified but not crowded. -
Verify positioning:
Use a level on any clearly horizontal or vertical elements, though most round plates are forgiving. Ensure the overall cloud shape of the arrangement feels centered over your furniture piece. -
Install hardware:
Hammer your nails or picture hooks directly through the paper templates at the marks you made earlier. This ensures the nail is exactly where the hanger loop will sit. -
Remove paper:
Gently tear the paper templates away from the wall, leaving just the nails in place. Remove any leftover bits of painter’s tape. -
Hang the plates:
Start hanging your actual plates on the nails. Work from the center outwards to avoid bumping into plates you’ve already placed. -
Secure positioning:
Once a plate is hooked, check that it hangs flat against the wall. You may need to slightly bend the hook or use a small bit of museum putty at the bottom edge to keep them from shifting or rattling. -
Final check:
Step back and view the entire composition. If a specific spot feels empty, don’t hesitate to add a tiny butter pat plate or saucer to fill the void.
Loose Hanger?
If a disc hanger peels off, the plate likely had residue. Remove the old adhesive, clean with rubbing alcohol, and apply a new disc, waiting 24 hours to cure.
Mix Your Media
Incorporate non-plate items into the gallery wall to break up the ceramic texture. Try adding a small vintage mirror, a wooden trivet, or flat silverware art.
Now you have a stunning, personalized display that showcases your beautiful porcelain collection


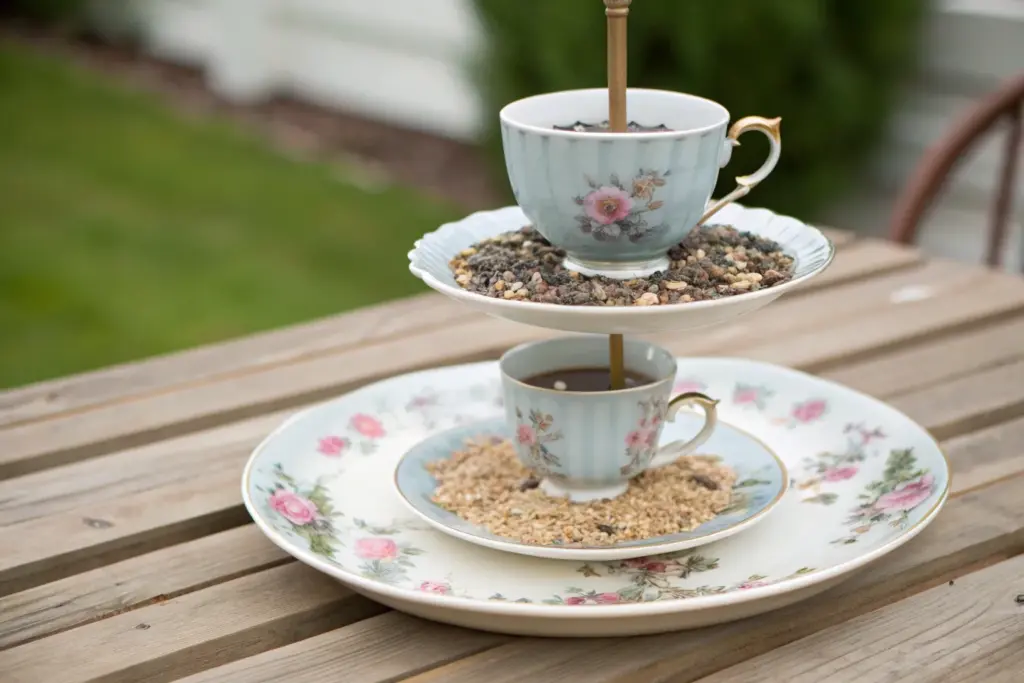
Tiered Dessert Stand From Stacked China Plates
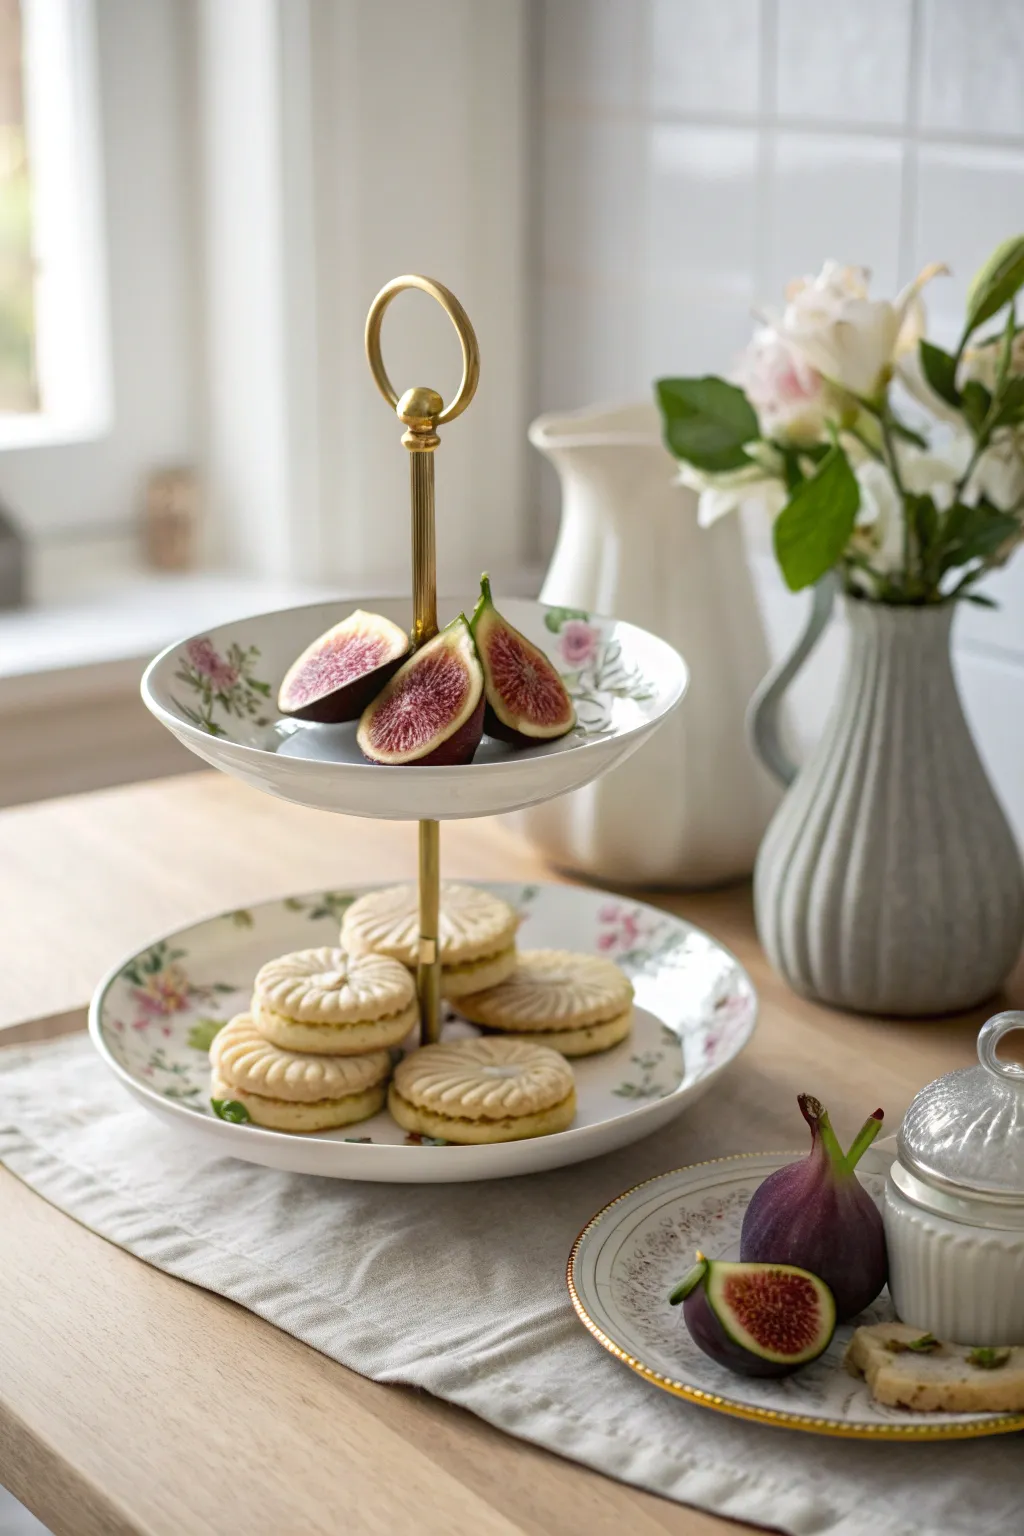
Transform mismatched or heirloom china into a stunning centerpiece perfect for afternoon tea. This elegant two-tiered stand combines delicate floral plates with gold hardware to create a functional piece of art for serving pastries and fruit.
Detailed Instructions
Materials
- One large china dinner plate (bottom tier)
- One smaller china salad or dessert plate (top tier)
- Tiered cake stand hardware kit (gold finish, 2-tier rod)
- Power drill
- Diamond-tipped drill bit or ceramic/glass drill bit (6mm or size matching hardware)
- Masking tape or painter’s tape
- Ruler or tape measure
- Fine-tip permanent marker
- Scrap wood board
- Water spray bottle or small cup of water
- Safety goggles
- Screwdriver (usually Phillips head)
Step 1: Preparation & Marking
-
Selecting Your China:
Choose two plates that coordinate well. They don’t need to match perfectly, but look for complementary floral patterns or rim colors like the soft pinks and greens shown here. -
Find the Center (Bottom Plate):
Turn the larger plate upside down. Use a ruler to measure across the diameter in several directions to pinpoint the exact center. -
Mark the Spot:
Place a small square of masking tape over the estimated center on the back of the plate. Mark the precise center point on the tape with your marker. -
Find the Center (Top Plate):
Repeat the measuring and taping process for the smaller top plate. Accuracy is key here so your stand doesn’t lean. -
Secure the Workspace:
Place a piece of scrap wood on your work surface. This will catch the drill bit once it passes through the ceramic and protect your table.
Drilling Tip
If your drill bit skids on the smooth glaze, start your hole by holding the drill at a 45-degree angle to create a notch, then slowly move it upright to 90 degrees.
Step 2: Drilling the Ceramic
-
Safety check:
Put on your safety goggles. Drilled ceramic produces fine dust and occasional shards. -
Position the Drill:
Place the plate right-side up (or down, depending on your preference, though drilling from the back is often easier to control) on the wood. Position your diamond-tipped bit perpendicular to the marked center dot. -
Add Lubricant:
Pour a small puddle of water over the tape mark. This keeps the drill bit cool and prevents the china from cracking due to heat friction. -
Start Drilling:
Begin drilling at a very slow speed with light pressure. Let the diamond bit grind away the glaze rather than forcing it through. -
Maintain Speed:
Once you’ve created a small divot, you can increase speed slightly, but keep the pressure light. Add more water if the puddle dries up. -
Break Through:
As you near the other side, reduce pressure significantly to avoid blowing out a large chip of ceramic upon exit. You’ll feel the bit drop when it hits the wood. -
Clean Up:
Remove the tape and wash the plates thoroughly to remove any ceramic dust and marker residue.
Mix & Match Magic
Don’t stop at plates! Try using a shallow teacup or a vintage saucer as the very top tier to hold jams, cream, or jewelry for a whimsical three-tier variation.
Step 3: Assembly
-
Organize Hardware:
Lay out your hardware kit components. You should have a metal screw, several washers (metal and foam/rubber), two metal rods, and a handle. -
Base Installation:
Thread a metal washer then a foam washer onto the base screw. Insert this screw upward through the bottom of the large plate. -
Attach Bottom Rod:
Place a foam washer over the screw protruding on the top side of the large plate. Screw the bottom metal rod onto the screw, hand-tightening until snug. -
Add Top Plate:
Place a foam washer on top of the installed bottom rod. Slide the smaller plate onto the assembly through its center hole. -
Secure Top Rod:
Place the final foam washer on the top surface of the small plate. Screw the top handle rod (the one with the loop) down through the plate and into the bottom rod. -
Final Tightening:
Use a screwdriver on the bottom screw while holding the top handle steady to gently tighten everything. Don’t over-tighten, or you risk cracking the plates.
Now you have a charming, bespoke display piece ready for your next gathering or quiet afternoon tea


Vintage Plate Clock That Shows Off the Pattern
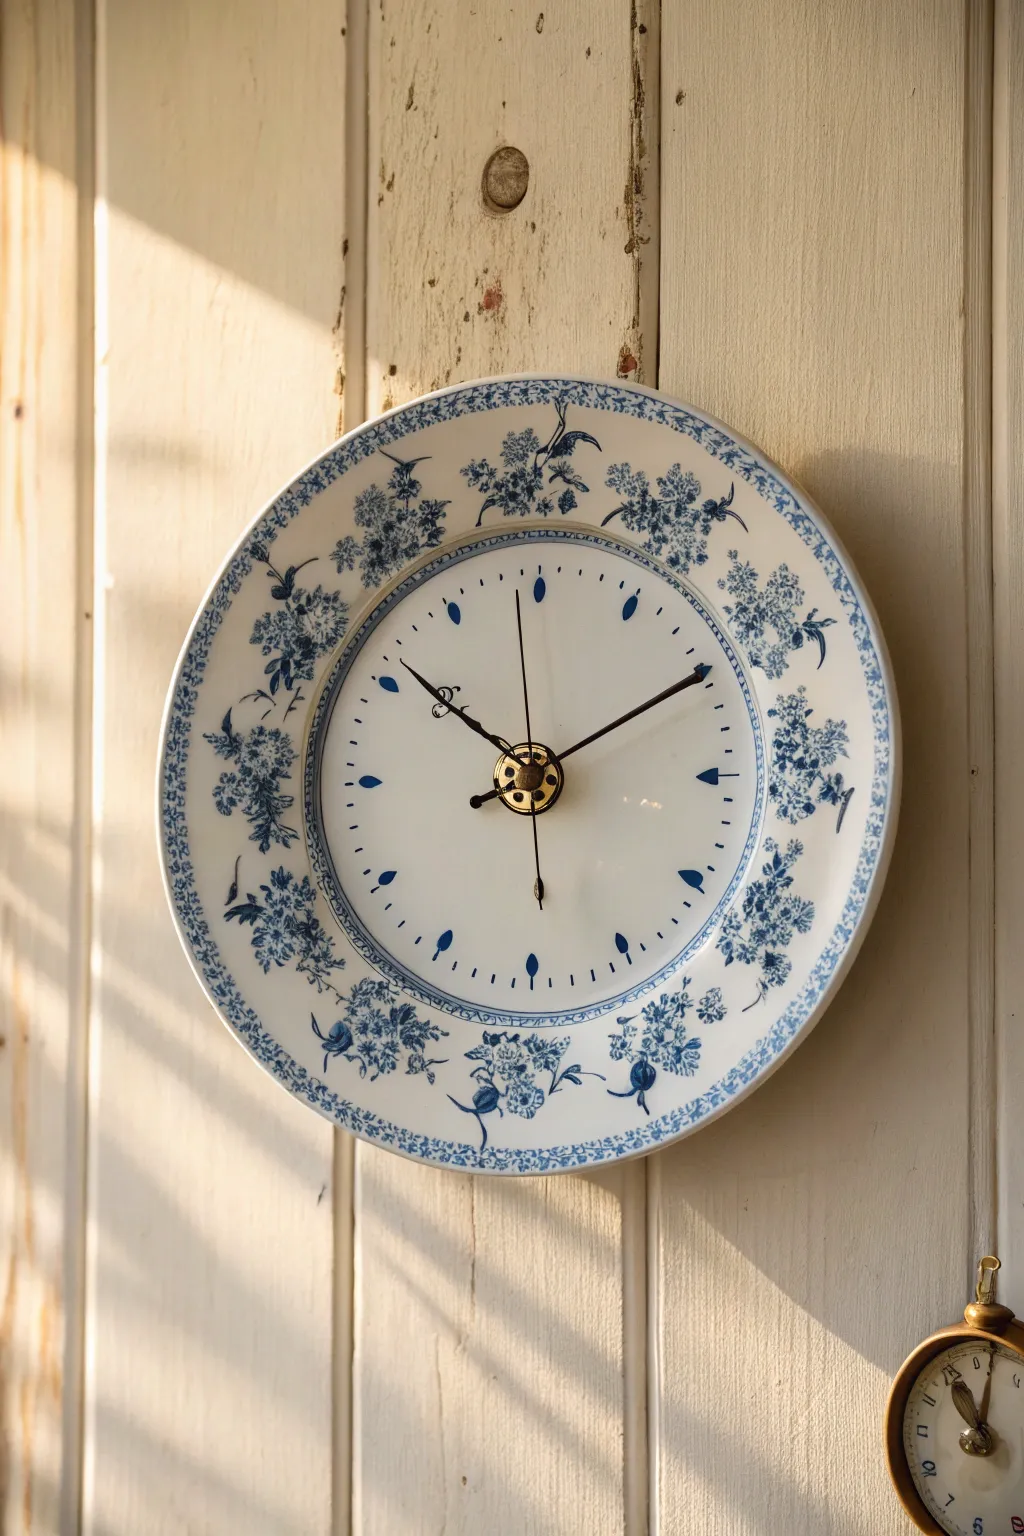
Transform a beloved or orphaned vintage plate into a functional piece of timekeeping art. This project beautifully highlights the intricate blue and white patterns of fine china while giving it a practical new purpose on your wall.
Step-by-Step
Materials
- Vintage china plate (flat center preferred)
- High-torque clock movement kit (with hands)
- AA battery
- Power drill
- Diamond-tipped drill bit (specifically for tile/glass)
- Masking tape
- Permanent marker
- Ruler or tape measure
- Safety glasses
- Water spray bottle or small cup of water
- Scrap wood board
- Fine-grit sandpaper (optional)
- Small wrench or pliers
Step 1: Preparation & Marking
-
Select your plate:
Choose a plate that is relatively flat in the center. While curved plates can work, flat surfaces make mounting the clock mechanism much easier and ensure the hands won’t scrape the rim. -
Locate the center:
Turn the plate upside down. Use your ruler to measure across the diameter in several directions to find the exact geometric center. -
Protect and mark:
Place a square of masking tape over the center point on the back of the plate. This prevents the drill bit from wandering (skating) on the smooth glaze. -
Mark the drill pill:
Re-measure on top of the tape and use your permanent marker to make a clear dot exactly where the shaft needs to go.
Pro Tip: Bit Selection
Use a hollow, tube-style diamond core bit rather than a spade-shaped bit. They grind a cleaner hole with much less risk of shattering delicate vintage glazing.
Step 2: Drilling the Hole
-
Set up the workspace:
Place the scrap wood board on a stable table. Lay the plate upside down on the wood; the wood will support the plate when the drill breaks through. -
Safety check:
Don your safety glasses. Ceramic shards can be sharp and unpredictable, so eye protection is non-negotiable. -
Lubricate the site:
Pour a small puddle of water directly onto the masking tape or spritz it heavily. This keeps the diamond bit cool and prevents the ceramic from cracking due to heat stress. -
Start drilling:
Hold the drill vertically. Start at a slow speed with light pressure to create a small dimple in the glaze. -
Drill through:
Increase speed slightly but maintain gentle pressure. Let the diamond bit do the work. I prefer to stop every 15 seconds to add more water and check progress. -
Clean the hole:
Once the bit punches through to the wood, carefully remove the tape and rinse the plate to remove ceramic dust. Dry completely.
Troubleshooting: Short Shaft
If the threads don’t stick out enough, your plate’s ceramic is too thick. Buy a ‘high-torque’ movement with an extra-long shaft designed for thick materials.
Step 3: Assembly
-
Check fitment:
Insert the clock movement shaft through the hole from the back. Ensure the threaded portion extends far enough through the front to attach the nut. -
Secure the mechanism:
Place the rubber washer and brass washer over the shaft on the front side. Thread the hex nut on and tighten it gently with pliers until snug, but don’t overtighten or you risk cracking the china. -
Attach the hour hand:
Press the hour hand onto the shaft first. It usually requires a firm push to friction-fit onto the collar. -
Attach the minute hand:
Place the minute hand on the shaft. It will likely sit on a different shaped section of the shaft (often rectangular or oval) to keep it oriented. -
Cap it off:
Depending on your kit, attach the second hand or the small cap nut to secure everything in place. -
Final alignment:
Use the dial on the back of the movement (not your fingers) to spin the hands and ensure they don’t touch each other or the plate’s rim. -
Power up:
Insert the AA battery and hang your new timepiece.
Now you have a functional heirloom ready to tell time with elegant style


Handled Serving Tray Made From an Old China Plate
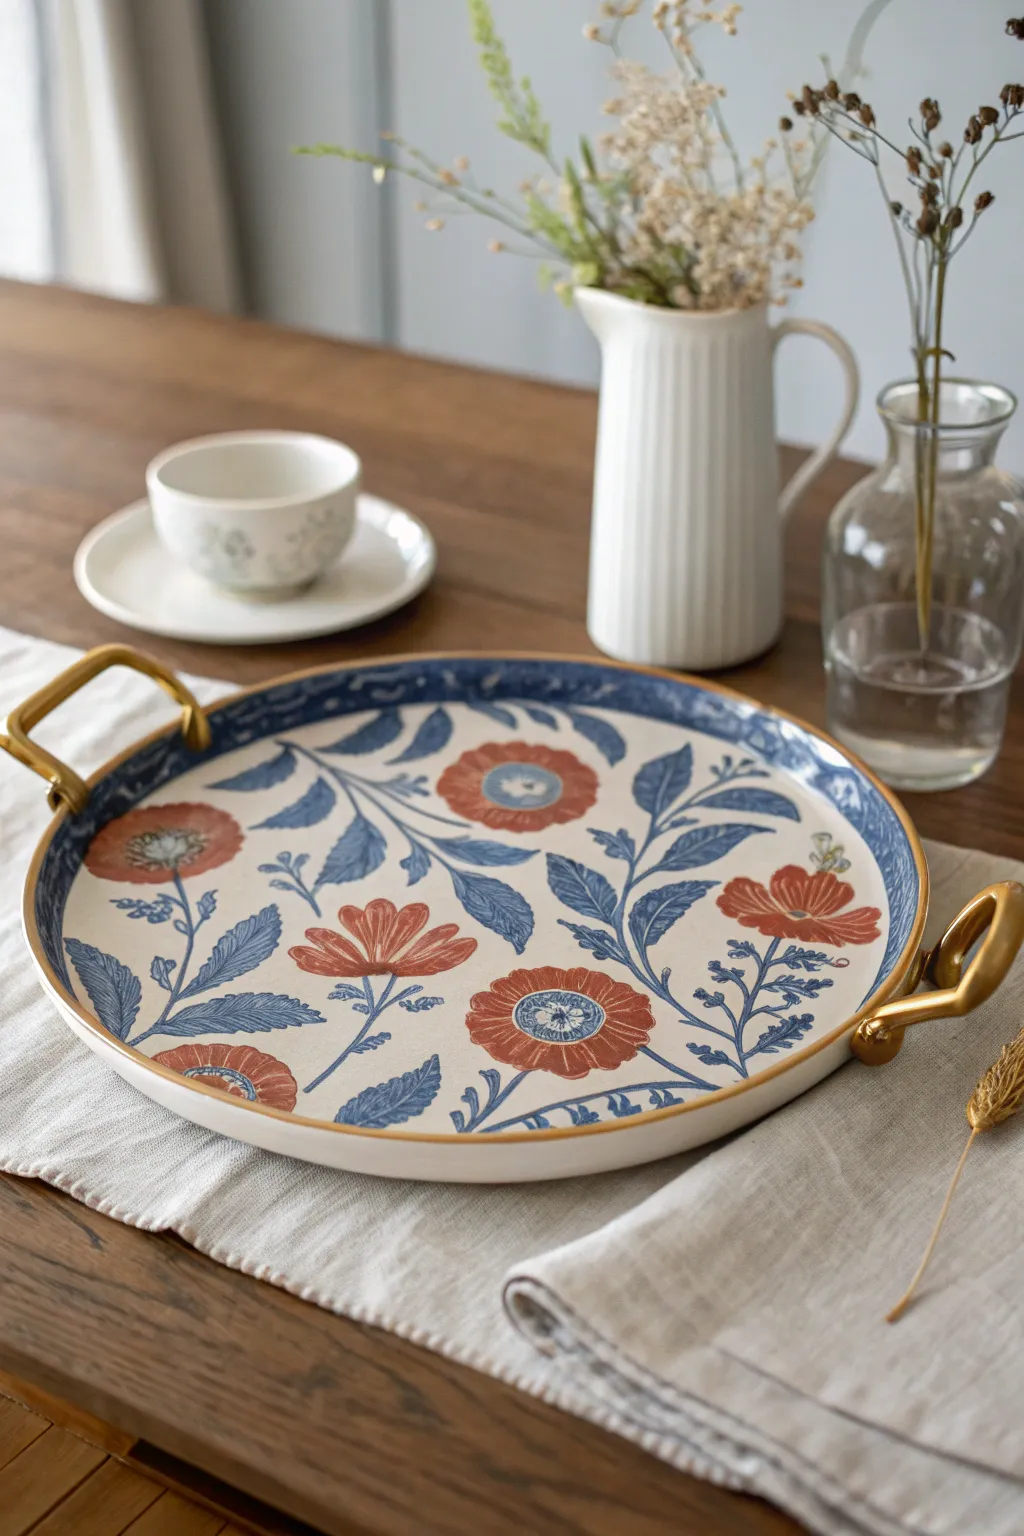
Transform a beautiful but unused large china plate or platter into a functional serving piece that demands attention. By attaching elegant gold handles, you can elevate a simple thrift store find into a stunning tray perfect for serving tea or displaying decor.
How-To Guide
Materials
- Large, flat china plate or round platter (approx. 10-12 inches)
- Two gold-tone cabinet pulls or drawer handles (u-shaped)
- Ceramic drill bit (diamond-tipped is best)
- Masking tape or painter’s tape
- Permanent marker
- Ruler or measuring tape
- Cordless drill
- Water spray bottle or small cup of water
- Safety glasses
- Scrap wood board
- Screwdriver
- Epoxy adhesive (optional, for extra stability)
Step 1: Preparation & Marking
-
Select your plate:
Choose a large china plate that is relatively flat. Deep soup bowls won’t work well; you need a flatter surface like a dinner plate or a charger. The floral pattern in the example works beautifully, so look for something with a distinct rim design. -
Clean the surface:
Wash the plate thoroughly with warm soapy water to remove any grease or dust, then dry it completely with a lint-free cloth. -
Position the handles:
Place your gold handles on opposite sides of the plate’s rim. Move them around until you find a placement that feels balanced and doesn’t obscure too much of the pattern. -
Protect with tape:
Once you know roughly where the handles will go, place a strip of masking tape over those areas on the rim. The tape prevents the drill bit from slipping on the smooth glaze. -
Measure and mark:
Using your ruler, measure the distance between the screw holes on your handles extremely accurately. Mark these two points onto the masking tape with your permanent marker. Double-check the alignment to ensure the handles will be directly across from each other.
Drilling Success
Start your drill at a 45-degree angle to create a starter divot in the glaze. Once the bit bites into the ceramic, slowly raise the drill to 90 degrees.
Step 2: Drilling
-
Set up your station:
Place the scrap wood board on a flat, sturdy table. Lay your plate on top of the wood. The wood provides a backstop so you don’t drill into your table once the bit goes through. -
Prepare the drill:
Insert your diamond-tipped ceramic drill bit into the drill. Put on your safety glasses—ceramic shards can fly unexpectedly. -
Start drilling:
Position the drill bit perpendicular to the plate surface at your first mark. Start drilling at a very slow speed with light pressure. The key here is patience; let the tool do the work. -
Keep it cool:
As you drill, friction will create heat which can crack the plate. I like to keep a spray bottle handy and mist the drilling spot every few seconds. Alternatively, build a small ‘dam’ of putty around the hole and fill it with a little pool of water. -
Break through:
Continue drilling with steady, light pressure. You will feel a change in resistance when the bit breaks through the china. Pull the bit out gently. -
Repeat:
Repeat this process for the remaining three holes, ensuring you keep the bit cool and the pressure light for each one. -
Remove tape:
Peel off the masking tape and wipe away any ceramic dust or marker lines.
Step 3: Assembly
-
Check screw length:
Test if the screws that came with your handles fit. China plates vary in thickness; if the screws are too long, you may need washers or shorter screws from the hardware store. -
Apply optional adhesive:
For a permanent bond that prevents the handles from wiggling over time, create a tiny mix of epoxy. Dab a small amount onto the bottom feet of the handles. -
Attach handles:
Insert the screws from the bottom of the plate up through the holes. Align the handle over the screws on top. -
Tighten securely:
Using a manual screwdriver, tighten the screws into the handle. Hand-tightening is safer than using a power drill here, as overtightening can crack the porcelain. -
Final inspection:
Wipe down the entire tray to remove fingerprints and ensure the handles feel solid and secure before use.
Create a Set
Drill matching teacups and glue them onto small candlesticks to create elevated condiment servers that perfectly match your new serving tray.
Now you have a stunning, bespoke serving piece ready for your next gathering

The Complete Guide to Pottery Troubleshooting
Uncover the most common ceramic mistakes—from cracking clay to failed glazes—and learn how to fix them fast.
Jewelry Catchall From a Single China Plate

Transform a solitary vintage saucer into a luxurious jewelry catchall by adding a chic metallic edge. This project breathes new life into mismatched china patterns, highlighting their classic beauty with a touch of modern gold leaf elegance.
Detailed Instructions
Materials
- Small vintage china plate or saucer (blue and white floral pattern ideally)
- Liquid gold leaf or high-quality gold enamel paint
- Small, soft paintbrush (round size 2 or 4)
- Rubbing alcohol
- Cotton pads or soft cloth
- Painter’s tape (optional)
- Clear gloss sealant (brush-on or spray, appropriate for ceramics)
- Disposable cup or palette
- Dish soap and water
Step 1: Preparation
-
Clean the surface:
Begin by thoroughly washing your vintage plate with warm water and dish soap to remove any dust or grime. -
Degrease the rim:
Once dried, wipe the rim of the plate with rubbing alcohol on a cotton pad. This removes invisible oils from fingerprints and ensures the gold adheres perfectly. -
Inspect the edge:
Check the rim for any sharp chips. If you find rough spots, lightly sand them down with fine-grit sandpaper, then wipe clean again.
Clean Lines Pro-Tip
For a perfectly crisp edge instead of an organic one, use flexible detailing tape to mask off the inner circle of the plate before painting the rim.
Step 2: Applying the Gilded Edge
-
Prepare the gold:
Shake your liquid gold leaf bottle vigorously. Pour a small amount into a disposable cup or palette—it dries quickly, so don’t pour too much at once. -
Load the brush:
Dip your small, soft paintbrush into the gold. You want the brush saturated but not dripping. -
Start the application:
Hold the plate steady with one hand. With the other, gently touch the brush to the very edge of the rim. -
Paint the rim:
Drag the brush along the rim using smooth, short strokes. Allow the natural texture of the plate’s edge to guide your brush. -
Create the organic look:
For the specific look in the photo, allow the gold line to vary slightly in thickness. Let the paint naturally ‘wobble’ a tiny bit onto the inner curve of the plate rather than trying for a ruler-straight line. -
Check coverage:
Rotate the plate as you work until the entire circumference is covered. Look for any thin spots where the white china shows through. -
Touch up:
Dab a little extra gold on any translucent areas. I find a second light coat on the very peak of the rim makes it pop beautifully. -
Clean spills immediately:
If you accidentally drip gold into the center pattern, quickly wipe it away with a cotton swab dipped in rubbing alcohol or turpentine before it sets.
Level Up: Tiered Stand
Make three of these in graduating sizes and glue candlesticks between them to create a custom jewelry tower.
Step 3: Finishing
-
Initial drying:
Set the plate on a completely flat surface in a dust-free area. Let the gold leaf dry according to the manufacturer’s instructions, usually at least one hour to the touch. -
Curing time:
Allow the piece to cure fully for 24 hours. Liquid gold leaf can remain tacky if handled too soon. -
Seal the edge:
To prevent the gold from tarnishing or flaking over time, carefully brush a thin layer of clear gloss sealant over just the gold painted area. -
Final dry:
Let the sealant dry completely before placing any jewelry inside. -
Style and display:
Place your favorite rings or dainty chains into the dish to see how the gold rim complements the metals of your jewelry.
Enjoy the refined new home for your daily treasures
Earring Holder Display Using an Upright China Plate
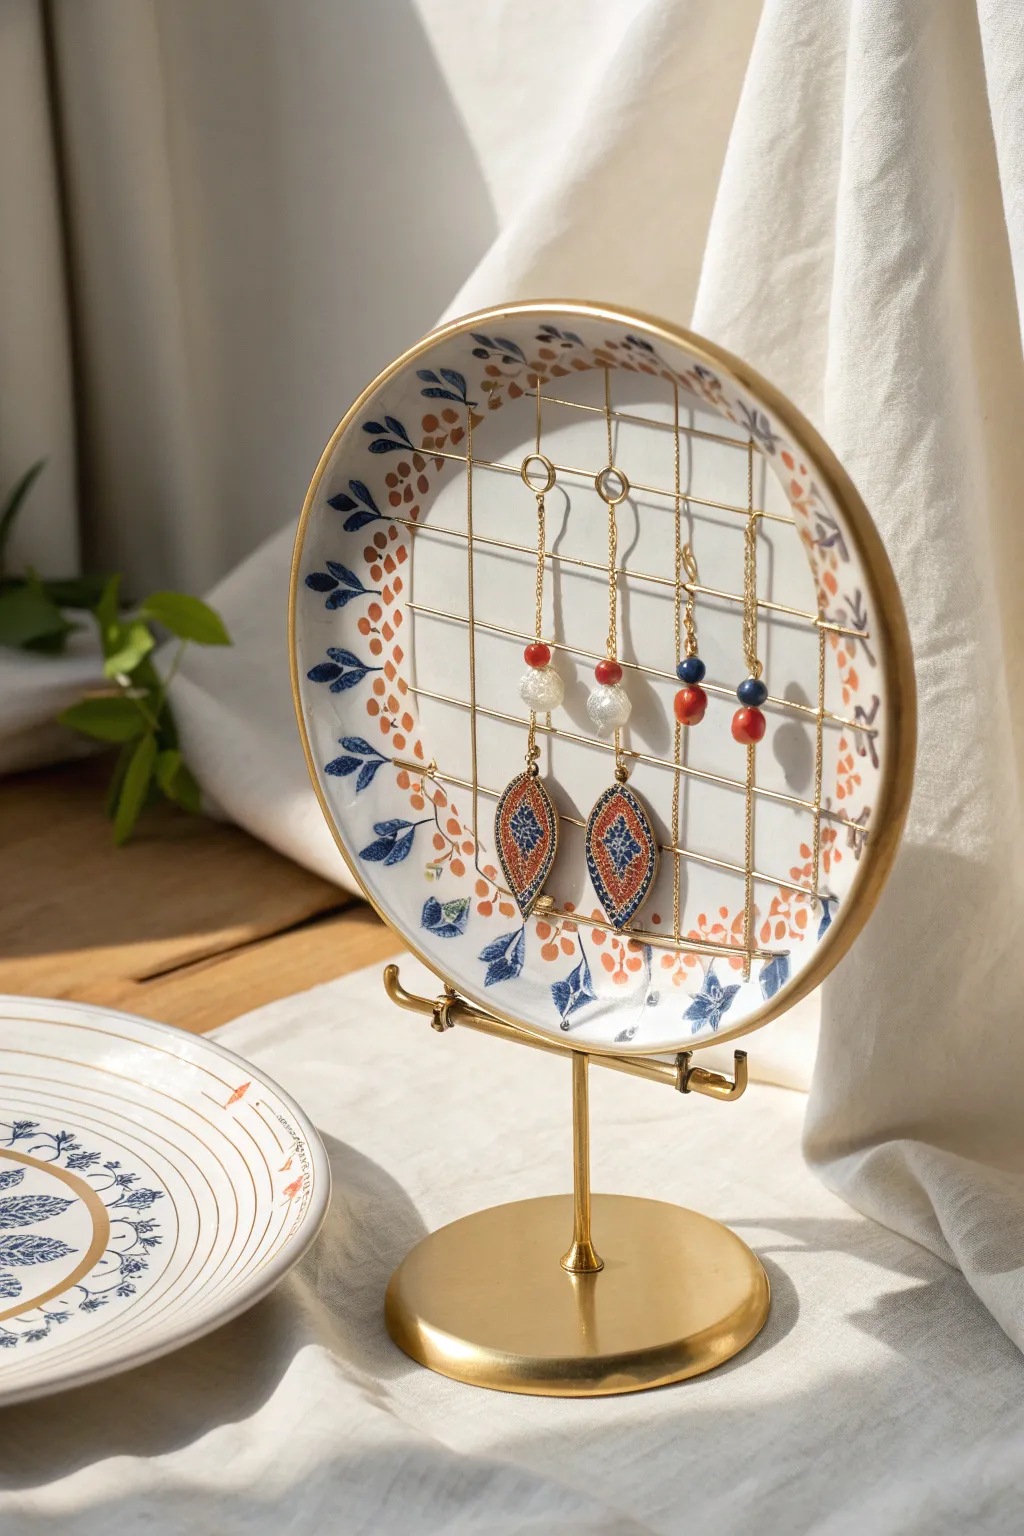
Transform a beloved or patterned china plate into a functional piece of vanity decor with this elegant earring holder. By adding a sleek wire grid to the face of a plate, you create the perfect spot to hang drop earrings while showcasing the ceramic’s original beauty.
How-To Guide
Materials
- Decorative china plate (approx. 6-8 inches diameter)
- Gold craft wire (18-20 gauge for strength)
- Wire cutters
- Gold plate display stand or easel
- E-6000 adhesive or strong epoxy
- Needle-nose pliers
- Painter’s tape or masking tape
- Gold finish spray paint (optional, if stand doesn’t match wire)
Step 1: Planning the Grid
-
Measure and mark:
Begin by deciding where your grid will sit on the plate. Use small pieces of painter’s tape to mark four equidistant points on the rim of the plate—top, bottom, left, and right—where the main anchor wires will go. -
Establish the vertical lines:
Measure the distance from the top rim to the bottom rim. Cut two or three vertical lengths of gold wire, leaving about an extra inch on each end for bending later. -
Establish the horizontal lines:
Measure the width of the plate across the center. Cut three to four horizontal lengths of wire, again adding an extra inch to each for adjustments. -
Test fitting:
Lay your cut wires across the surface of the plate to visualize the grid spacing. Adjust the number of wires based on the size of your earrings; you want enough space so they hang freely without overlapping too much.
Grid Stability Secret
Work-harden your wire by pulling it through a nylon jaw plier or a cloth before cutting. This straightens kinks and makes the grid stiffer.
Step 2: Assembling the Wire Structure
-
Create the outer rim frame:
Cut a long piece of wire that is slightly larger than the circumference of your grid area (not the whole plate, just where the grid touches). Form it into a rough circle or oval that will sit just inside the plate’s lip. -
Secure the verticals:
Take your vertical wires and wrap the ends tightly around the top and bottom of your circular rim frame. Use needle-nose pliers to crimp the ends closed so they don’t slide. -
Attach the horizontals:
Position the horizontal wires across the verticals. Where they intersect, you can either wrap the horizontal wire once around the vertical wire for stability or simply weave them over and under for a sleeker look. -
Finalize the grid connection:
Wrap the ends of the horizontal wires around the side edges of your rim frame. Crimp tightly with pliers. You should now have a removable wire ‘net’ shaped like the inside of your plate. -
Check stability:
Gently wiggle the grid. If the intersections feel too loose, apply a tiny dot of clear superglue at each crossing point to lock the grid squares in place.
Step 3: Mounting and Finishing
-
Clean the surface:
Wipe the surface of the china plate with rubbing alcohol to remove any dust or oils, ensuring a strong bond for the adhesive. -
Prepare the adhesive:
Mix a small amount of epoxy or squeeze out your E-6000 glue. I find using a toothpick helps apply the glue more precisely than using the tube nozzle. -
Glue the grid:
Apply small dabs of glue to the back of the wire rim frame (the part that will touch the plate). Carefully press the grid onto the plate. -
Secure while drying:
Use strips of painter’s tape to hold the wire grid firmly against the ceramic surface while the glue cures. Let it sit undisturbed for at least 24 hours. -
Clean up:
Once fully dry, remove the tape. Check for any stray glue strings and gently scrape them away with a craft knife or fingernail. -
Mount the plate:
Place your finished plate into the gold display easel. Ensure the stand is sturdy enough to hold the weight of the plate plus your jewelry. -
Add jewelry:
Hook your favorite dangling earrings onto the horizontal wires, arranging them by length or color for a pleasing visual effect.
Make it Modular
Instead of gluing, shape the wire ends into clips that hook over the plate edge. This lets you swap plates seasonally without remaking the grid.
Enjoy admiring your jewelry collection artfully displayed on your new custom stand


What Really Happens Inside the Kiln
Learn how time and temperature work together inside the kiln to transform clay into durable ceramic.
Broken China Magnet Set From Plate Shards
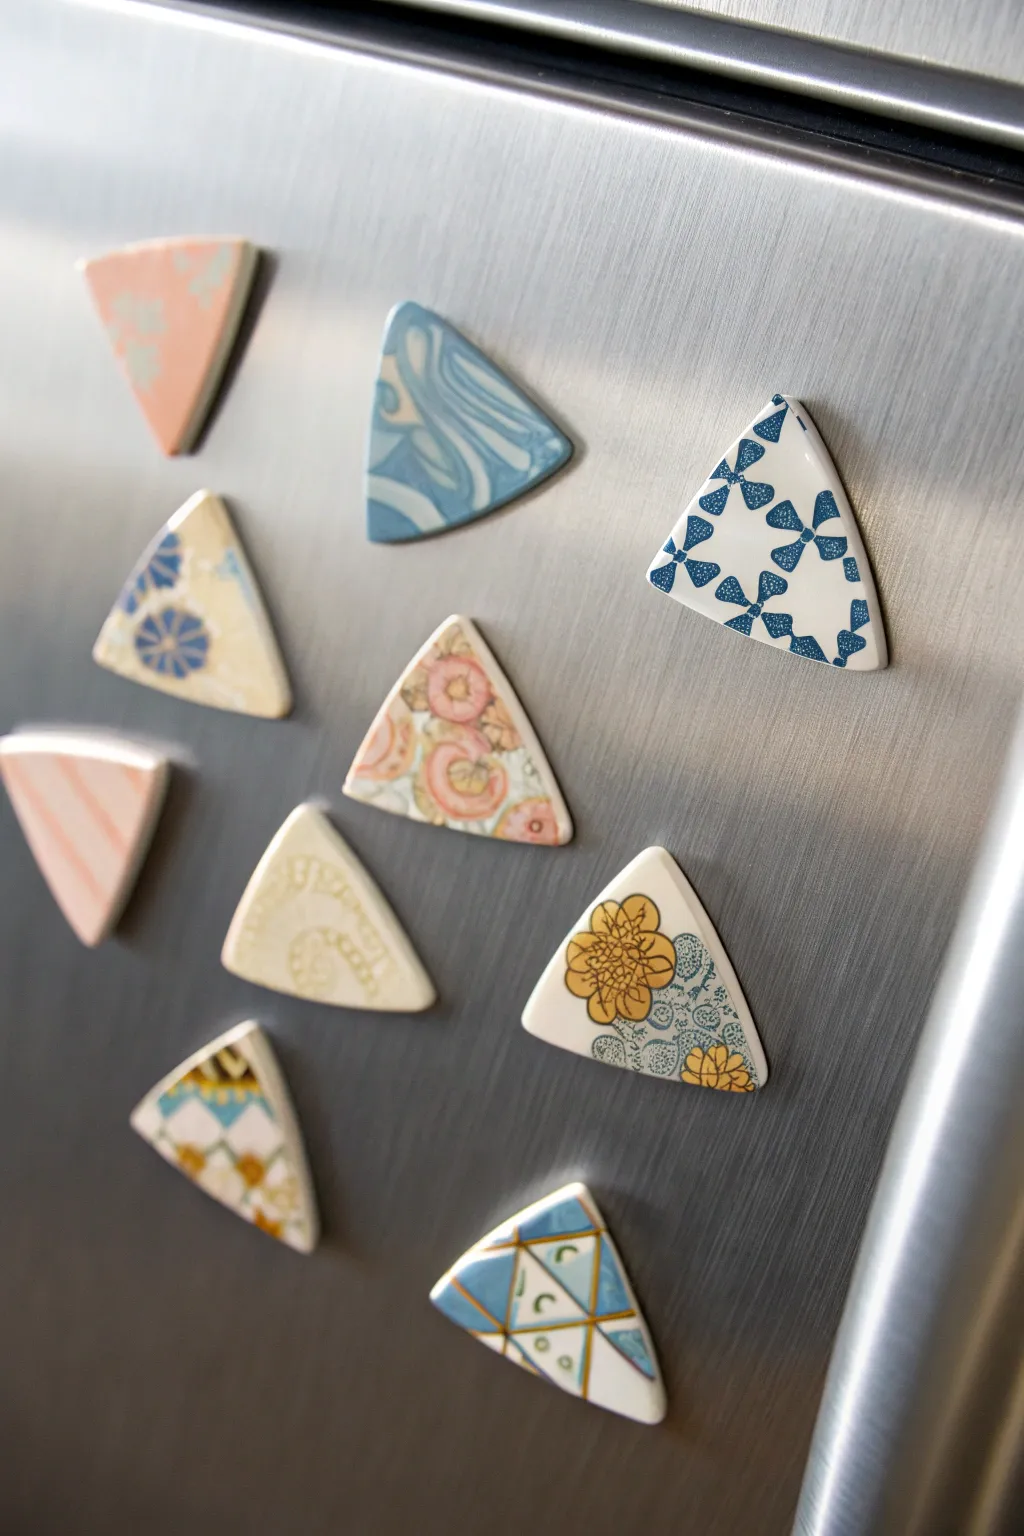
Transform accidental breaks or thrift store finds into a charming set of geometric refrigerator magnets. These polished triangular gems preserve the beautiful patterns of vintage china in a modern, functional form.
Step-by-Step
Materials
- Old china or ceramic plates (broken or whole)
- Tile nippers or wheeled glass cutters
- Permanent marker
- Safety goggles and work gloves
- Dremel tool with diamond cutting wheel and sanding bits
- Alternatively: Wet/dry sandpaper (various grits from 80 to 400)
- Strong adhesive (E6000 or two-part epoxy)
- Small neodymium magnets
- Respirator or dust mask
- Water container for dipping
Step 1: Preparation & Planning
-
Select your patterns:
Examine your china plates and identify the most interesting floral motifs, borders, or abstract patterns you want to feature. Look for flat sections of the plate, as curved rims can make the magnet sit awkwardly. -
Safety gear up:
Before breaking anything, put on your safety goggles, gloves, and a dust mask. Ceramic shards can be extremely sharp and create fine dust. -
Create initial breaks:
If working with a whole plate, place it inside a heavy towel or pillowcase and strike the center gently with a hammer to create larger manageable shards. -
Mark your shapes:
Take your chosen shards and use a permanent marker to draw equilateral or isosceles triangles around the patterns you want to preserve. Aim for triangles about 1.5 to 2 inches per side.
Step 2: Cutting & Shaping
-
Rough cutting:
Using tile nippers or a wheeled glass cutter, carefully trim away the excess ceramic around your drawn triangle lines. Don’t try to cut right on the line yet; leave about an eighth of an inch of breathing room. -
Refine the shape:
Continue nipping closer to your guide lines with smaller bites. It is better to make many small cuts than one large one that might crack your design. -
Grind the edges:
Using a rotary tool with a sanding drum or diamond bit, grind the rough edges down precisely to your marker lines. Keep the tool moving to avoid heat buildup. -
Smooth the corners:
Pay special attention to the three points of the triangle. Gently round them off so they aren’t sharp to the touch. -
Wet sanding:
Dip the ceramic piece in water frequently while sanding by hand or with the tool to keep dust down and prevent the ceramic from heating up.
Clean The Slate
Use a little rubbing alcohol or acetone to wipe the back of the ceramic shard before gluing. This removes oils and ceramic dust, ensuring a much stronger bond.
Step 3: Finishing & Assembly
-
Polish the edges:
Switch to a finer grit sandpaper (like 400 grit) and wet-sand the edges until they feel smooth and porcelain-like, matching the texture of the front glaze. -
Clean the surface:
Wipe away any marker residue with rubbing alcohol or nail polish remover. Wash the entire piece with soap and water and let it dry completely. -
Prepare the adhesive:
In a well-ventilated area, mix a small amount of two-part epoxy or squeeze out a dot of E6000 glue onto a scrap piece of cardboard. -
Attach the magnet:
Apply a pea-sized amount of glue to the back center of the ceramic triangle. Press a neodymium magnet firmly into the glue. -
Let it cure:
Place the magnets face down and allow the adhesive to cure fully according to the manufacturer’s instructions—usually 24 hours—before sticking them to your fridge.
Grout Style Edges
For a finished look without endless sanding, coat the rough edges with liquid gold leaf or silver paint. It creates a mock-kintsugi effect.
Now you have a unique gallery of vintage patterns brightening up your kitchen
Picture Frame Inlaid With Broken China Plate Pieces
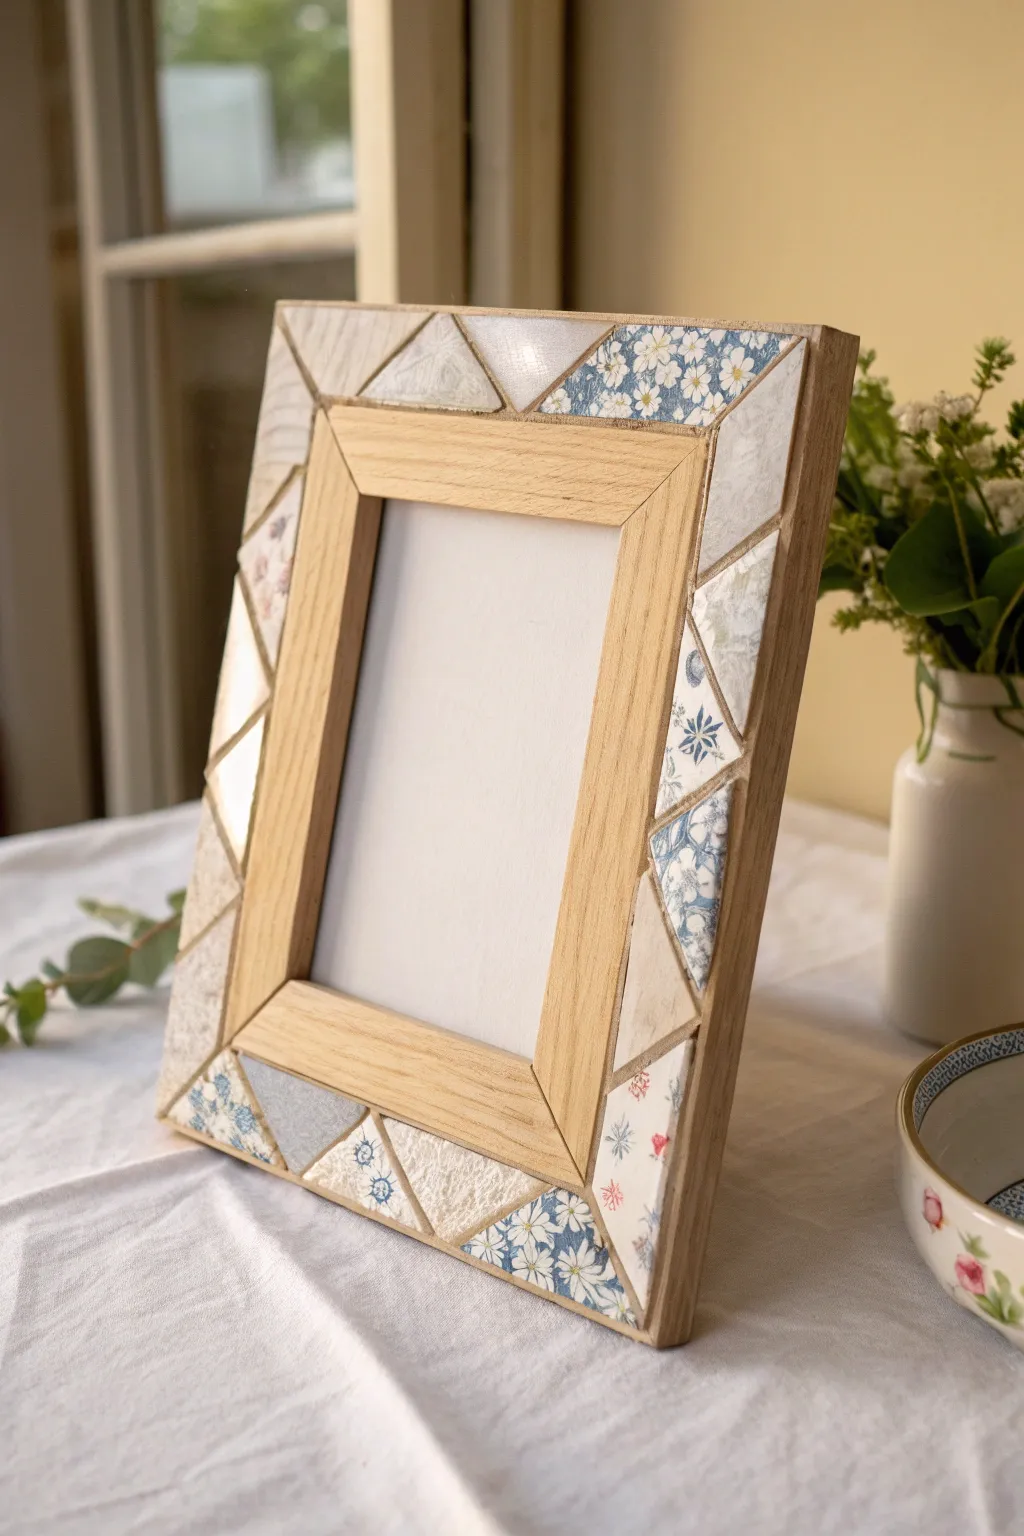
Transform mismatched or chipped china into a stunning home accent with this mosaic picture frame project. The geometric interplay of triangular shards creates a sophisticated border that beautifully frames your favorite memories while preserving patterns from vintage plates.
Step-by-Step Tutorial
Materials
- Wide-rimmed wooden picture frame (unfinished wood works best)
- Assorted old china plates (blue/white floral patterns, plain white, textured cream)
- Tile nippers or wheeled glass cutters
- Safety glasses
- Protective gloves
- Strong craft glue (Weldbond) or tile adhesive
- Unsanded grout (white or light grey)
- Rubber grout float or spatula
- Sponge and bucket of water
- Soft cloth for polishing
- Masking tape
- Hammer and heavy cloth (for initial breaking)
Step 1: Preparation & Breaking
-
Select your frame:
Choose a frame with a wide, flat surface area to give you plenty of room for your mosaic design. Remove the glass and backing before starting. -
Protect the inner edge:
Apply a strip of masking tape along the inner wooden bevel (the part that holds the glass) to keep it clean from glue and grout later on. -
Safety gear up:
Before breaking any china, put on your safety glasses and protective gloves to shield yourself from sharp shards and flying ceramic dust. -
Initial crack:
Wrap a china plate in a heavy cloth or towel. Strike the center gently but firmly with a hammer to create large initial pieces. -
Cut geometric shapes:
Use your tile nippers to shape the larger shards into relatively uniform triangles. I find aiming for triangles with 1-inch sides works perfectly for standard frames. -
Sort by pattern:
Separate your cut triangles into piles: floral patterns, solid whites, and textured pieces. This makes the design process much faster.
Nipping Tip
When nipping china, hold the piece deep in the jaws of the nippers, not at the very tip. This gives you more leverage and cleaner cuts.
Step 2: Adhering the Mosaic
-
Dry run layout:
Place your triangles onto the wood frame without glue first. Experiment with alternating floral pieces and solid pieces to create a balanced rhythm. -
Check the fit:
Ensure the pieces don’t overhang the outer or inner edges of the frame. The points of the triangles should nestle together, leaving small, even gaps for grout. -
Apply adhesive:
Lift one piece at a time, apply a dollop of strong craft glue to the back, and press it firmly onto the wood. Alternatively, spread a thin layer of tile adhesive directly on the frame in small sections. -
Complete the border:
Continue gluing pieces around the entire perimeter. If you have awkward corner gaps, simple use your nippers to trim a custom-sized triangle to fit. -
Let it cure:
Allow the adhesive to dry completely. This usually takes at least 24 hours, ensuring the heavy china pieces won’t shift during the grouting process.
Step 3: Grouting & Finishing
-
Mix the grout:
Mix your unsanded grout with water according to the package instructions until it reaches a peanut-butter consistency. -
Apply grout:
Spread the grout over the mosaic using a rubber float or spatula. Push the mixture firmly into all the crevices between the china triangles. -
Fill the edges:
Pay special attention to the outer and inner edges of the mosaic, ensuring the grout creates a smooth transition from the china to the wood. -
Wipe away excess:
Let the grout set for about 10-15 minutes until it becomes slightly hazy. Dampen a sponge (wring it out very well) and gently wipe across the surface to remove excess grout. -
Final clean:
Once the remaining haze has dried completely, use a soft, dry cloth to buff the china pieces until they shine. -
Reassemble:
Remove the masking tape from the inner edge. Place the glass, your chosen photo, and the backing board back into the frame.
Color Coordination
Instead of blue and white, try mixing solid pastel china with gold-rimmed plate edges for a delicate, glamorous look suitable for wedding photos.
Now you have a unique, durable keepsake that gives new life to old ceramics

TRACK YOUR CERAMIC JOURNEY
Capture glaze tests, firing details, and creative progress—all in one simple printable. Make your projects easier to repeat and improve.
Mosaic Stepping Stone Made From Broken China Plates
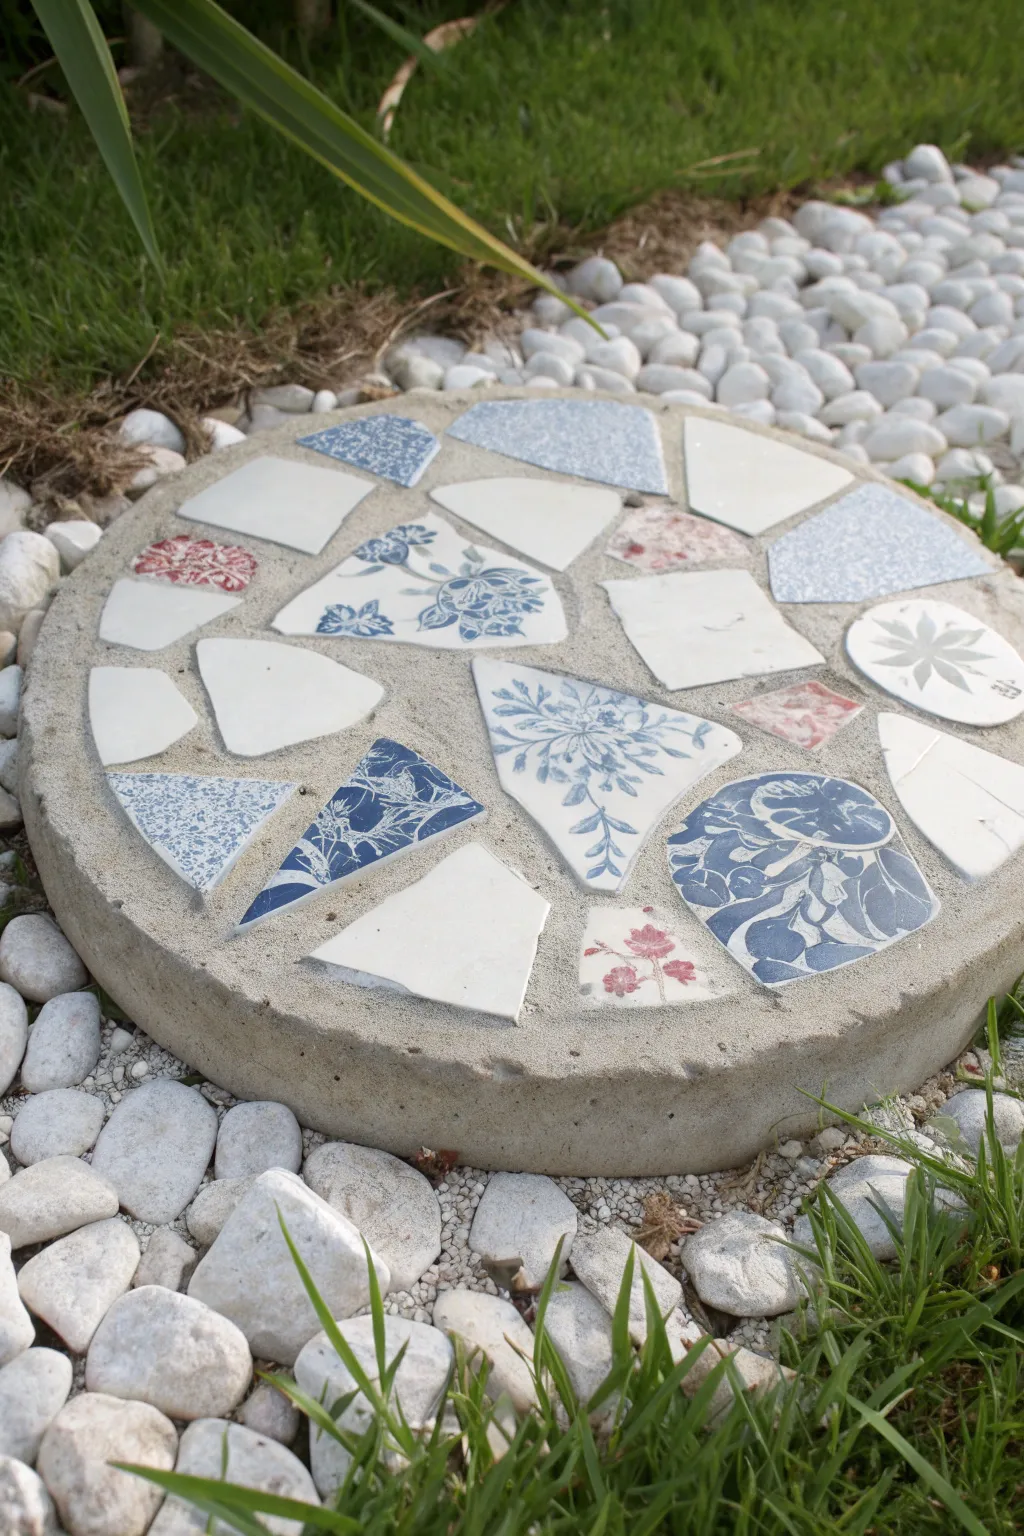
Transform chipped or vintage china plates into a stunning garden feature with this durable concrete stepping stone. The blue and white floral shards create a classic cottage-garden look that adds instant charm to any pathway.
Detailed Instructions
Materials
- Old china plates (blue/white patterns, florals, and plain white)
- Round cake pan or plastic mold (approx. 10-12 inches diameter)
- Vaseline or mold release spray
- Pre-mixed concrete or mortar mix
- Water
- Bucket for mixing
- Trowel or large spoon
- Hammer
- Old towel or heavy cloth
- Safety glasses and gloves
- Chicken wire or hardware cloth (optional for reinforcement)
- Contact paper or clear shelving liner
Step 1: Preparing the China Shards
-
Safety check:
Before you begin breaking anything, put on your safety glasses and gloves to protect against flying ceramic splinters. -
Wrap the plates:
Place your china plate inside an old towel or heavy cloth. Fold the fabric over completely so no part of the plate is exposed. -
Break into pieces:
Using a hammer, gently tap the center and rim of the plate through the cloth. You want medium-sized shards (about 1-3 inches), not dust, so don’t strike too hard. -
Sort the treasure:
Carefully unwrap the towel and sort your pieces. Separate rim curved pieces from flat center pieces, and group them by pattern (blue florals, plain white, red accents).
Step 2: Designing the Mosaic
-
Prep the contact paper:
Cut a circle of contact paper or clear sticky shelf liner that fits exactly inside the bottom of your mold. -
Place paper in mold:
Place the paper into your mold, sticky side facing UP. This is the crucial trick for the ‘indirect method’ which ensures a flat top surface. -
Arrange face down:
Press your china shards onto the sticky paper, placing them *good side down*. Remember, you are working in reverse; what you see now is the bottom of the design. -
Mind the gaps:
Leave about 1/4 to 1/2 inch of space between each shard. This space allows the concrete to flow between them, acting as the grout later. -
Mix patterns:
Try to balance the design by interspersing the detailed blue willow patterns with quieter plain white pieces, just like in the example photo.
Sticky Situation?
If shards shift on the contact paper, use a tiny dab of water-soluble glue stick on the face of the shard to hold it temporarily in place.
Step 3: Casting the Stone
-
Grease the mold:
Lightly coat the sides of your cake pan or plastic mold with Vaseline or cooking spray to ensure easy removal later. -
Mix the concrete:
In a bucket, mix your concrete with water according to the package directions. Aim for a consistency like thick peanut butter or oatmeal—pourable but not soupy. -
First pour:
Gently scoop a layer of concrete over your arranged shards. Press down carefully with the trowel to force the mix into the gaps between the china without disturbing their placement. -
Reinforce (optional):
If you want extra durability, cut a circle of chicken wire slightly smaller than the mold and press it into the wet concrete at the halfway point. -
Fill the mold:
Pour the remaining concrete until you reach the desired thickness (at least 2 inches is best for stepping stones). -
Level and tap:
Smooth the top surface with your trowel. Then, lift the mold slightly and tap it on the table several times to release trapped air bubbles.
Smooth Surface Secret
Vibrate the mold vigorously after pouring! This brings air bubbles up and forces the concrete deeply into the gaps for a smoother finish.
Step 4: Curing and Finishing
-
Let it cure:
Cover the mold with plastic wrap to keep moisture in and let it sit undisturbed. I usually wait at least 48 hours to ensure it’s fully hardened. -
Unmold the stone:
Flip the mold over and gently tap the sides until the stone slides out. It should come out easily thanks to the lubrication. -
Reveal the design:
Peel off the contact paper from the surface. This is the magic moment where you see your china pattern embedded flush with the concrete. -
Clean the face:
Use a damp sponge to wipe away any concrete film or residue on the china shards. If some concrete has seeped over the edges, carefully scrape it back with a plastic tool. -
Final cure:
Let the stone sit in a shaded area for another few days to fully cure before stepping on it or placing it in the damp ground.
Place your new creation among white pebbles or lush grass to let the vintage patterns shine.
Mosaic Tabletop Accent Using Old China Plate Shards
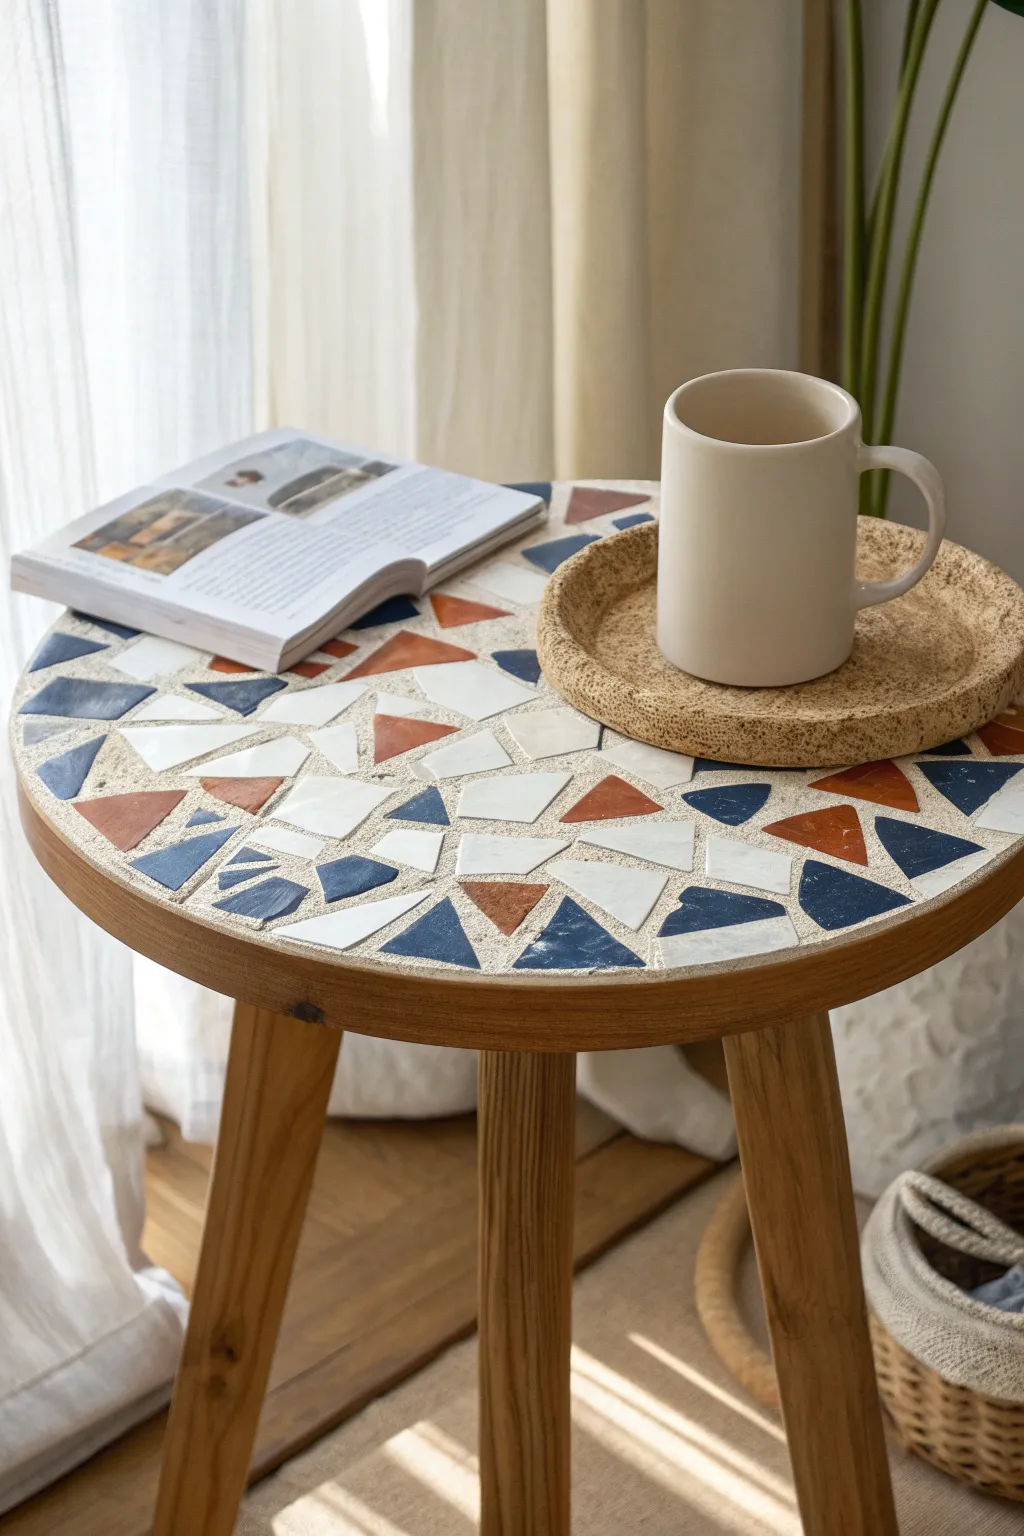
Transform mismatched or chipped china into a stunning, Mediterranean-inspired accent piece for your living room. This project revitalizes a simple wooden side table with a geometric mosaic of terracotta, slate blue, and creamy white shards.
Step-by-Step Guide
Materials
- Small round wooden side table (with a rimmed edge is ideal)
- Collection of old china plates (white, terracotta/rust, dark blue)
- Tile nippers or wheeled glass nippers
- Safety glasses
- Hammer
- Old towel or heavy canvas bag
- Tile adhesive or mastic
- Sanded grout (light beige or sand color)
- Notched trowel or palette knife
- Rubber grout float
- Sponge and bucket of water
- Clean, soft rags
- Protective gloves
- Grout sealer (optional but recommended)
Step 1: Preparing the Tiles
-
Safety First:
Before breaking anything, put on your safety glasses to protect your eyes from flying ceramic splinters. -
Initial Breakage:
Wrap your first china plate inside an old towel or heavy canvas bag. Gently strike the center with a hammer to break it into large, manageable chunks. -
Sorting Through Shards:
Unwrap the towel and pick out the flatter pieces. Curved rim pieces can be tricky to lay flat, so save those for edges or discard them if they are too domed. -
Refining with Nippers:
Use your tile nippers to shape the larger chunks into triangles and irregular polygons. I aim for pieces roughly 1-2 inches in size to match the look in the photo. -
Color Separation:
Repeat this process for all your colored plates. Separate your piles into whites, rust/terracotta tones, and distinct blues so you can easily grab what you need later.
Uneven Surface?
If shards are different thicknesses, apply more adhesive under thin pieces (called ‘buttering the back’) to raise them level with thicker shards.
Step 2: Laying the Mosaic
-
Surface Prep:
Ensure the wooden tabletop is clean, dry, and free of dust. If the surface is very smooth or varnished, rough it up slightly with sandpaper to help the adhesive grip. -
Dry Fitting:
Before gluing, arrange your shards on the table without adhesive. This dry run lets you verify you have enough pieces and helps you visualize the spacing. -
Applying Adhesive:
Spread a layer of tile adhesive onto a small section of the table using a notched trowel or palette knife. You want a consistent bed about 1/8 inch thick. -
Placing the First Pieces:
Press your ceramic shards firmly into the adhesive. Start from the outer edge to ensure a clean perimeter and work your way inward. -
Mind the Gaps:
Leave a gap of approximately 1/8 to 1/4 inch between each piece. These spaces will be filled with grout later, creating the distinct veins seen in the finished table. -
Checking for Level:
As you work, occasionally run your hand or a flat board gently over the tiles to ensure they are all sitting at the same height. -
Curing Time:
Once the entire table is covered, let the adhesive dry completely. This usually takes 24 hours depending on the brand, so be patient.
Step 3: Grouting and Finishing
-
Mixing Grout:
Mix your sanded grout with water according to the package instructions until it resembles the consistency of peanut butter. -
Applying Grout:
Using a rubber float, spread the grout over the mosaic. Push it firmly into the gaps at a 45-degree angle to ensure no air pockets remain. -
Clearing Excess:
Scrape off the majority of the excess grout with the edge of the rubber float, moving diagonally across the shards. -
First Sponge Pass:
Wait about 10-20 minutes for the grout to set slightly. Then, use a damp (not soaking) sponge to gently wipe the surface in circular motions, effectively cleaning the tile faces. -
Haze Removal:
After another hour or two, a dusty haze will appear. Buff the tiles with a clean, dry rag until they shine. -
Sealing Up:
After the grout has cured for a few days, apply a grout sealer to protect the surface from coffee stains and moisture.
Create a Pattern
Instead of random placement, arrange the colored shards to create a subtle spiral or sunburst pattern radiating from the center for added artistic flair.
Now you have a durable, custom piece of furniture that tells a story through recycled pottery
Key Holder Wall Plaque With Embedded China Plate Shards

Transform broken blue and white china into a charming functional art piece with this rustic key holder. The project combines woodworking with mosaic techniques to create a sturdy, vintage-inspired organizer perfect for an entryway.
Step-by-Step Tutorial
Materials
- One solid oak board (approx. 12″ x 6″ x 3/4″) for the base
- One smaller oak strip (approx. 10″ x 2″ x 1/2″) for the mosaic shelf
- Thin oak trim pieces (beading) to frame the mosaic area
- Broken blue and white china shards (flat pieces work best)
- White tile adhesive or grout
- 5-6 brass screw-in cup hooks
- Wood glue
- Sandpaper (120 and 220 grit)
- Clear polyurethane varnish or wax
- Tile nippers (optional)
- Drill with small pilot bit
- Sponge and cloth
- 2 Keyhole hangers for mounting
Step 1: Preparing the Wood Base
-
Cut the base board:
Begin by cutting your main oak board to size. A rectangle of roughly 12 inches by 6 inches works well, but you can adjust this based on your available wall space. -
Sand the edges:
Use 120-grit sandpaper to smooth all saw cuts. I prefer to slightly round over the corners and edges to give the wood a worn, aged look rather than leaving them sharp. -
Create the mosaic tray:
Take your smaller oak strip and attach thin beading or trim around the front and side edges using wood glue. This creates a shallow ‘tray’ or recess that will hold your china and grout. -
Angle the ends:
For the specific look in the photo, you can cut the side pieces of your tray trim at a 45-degree angle flaring outward, though straight sides work just fine too.
Pro Tip: Masking Off
Before grouting, apply painters tape to the wood trim surrounding the china. This prevents the white grout from getting stuck in the wood grain, which is very hard to clean out later.
Step 2: Creating the China Mosaic
-
Select your shards:
Sort through your broken china. Look for flat pieces specifically, as curved rim pieces will stick out too far. Select sections with the most interesting floral or geometric patterns. -
Trim the pieces:
If your shards are too large, carefully use tile nippers to bite off small sections until they fit nicely within the recessed tray you created. -
Arrange the layout:
Dry fit the china pieces into the wooden recess first without glue. Arrange them like a puzzle, leaving small uniform gaps between them for the grout lines. -
Adhere the shards:
Apply a thin layer of tile adhesive to the back of each shard and press them firmly into the wood tray. Let this set for at least an hour. -
Apply the grout:
Spread white grout over the entire mosaic area, pushing it into the gaps between the china shards. Ensure all voids are filled. -
Clean the surface:
Wait about 15 minutes for the grout to haze over, then use a damp sponge to wipe away the excess grout from the surface of the china, rinsing the sponge frequently. -
Final polish:
Once dry, buff the china pieces with a soft, dry cloth to remove any remaining haze and make the blue glaze shine.
Level Up: Pattern Play
Instead of random shards, try cutting a single large plate specifically to reconstruct a ‘exploded’ version of its central scene across the width of the display shelf.
Step 3: Assembly and Finishing
-
Attach the mosaic shelf:
Using wood glue and perhaps a couple of screws from the back side of the main board, attach the mosaic shelf to the upper portion of the main base board. -
Seal the wood:
Apply a clear wax or polyurethane varnish to all exposed wood surfaces. This protects the oak and brings out the beautiful grain pattern. -
Mark hook positions:
Measure and mark equal spacing for your brass hooks along the bottom half of the board. Aim for about 2 inches between each hook. -
Drill pilot holes:
Drill small pilot holes at your marks to prevent the oak from splitting when you insert the hooks. -
Install hardware:
Screw the brass cup hooks into the pilot holes by hand until they are snug and facing upright. -
Add mounting hardware:
Flip the board over and install two keyhole hangers on the back. This ensures the plaque will sit flush against the wall when hung.
Hang your new organizer near the door and enjoy a piece of history every time you grab your keys
Decorative Wreath Form Covered in Broken China Plate Pieces
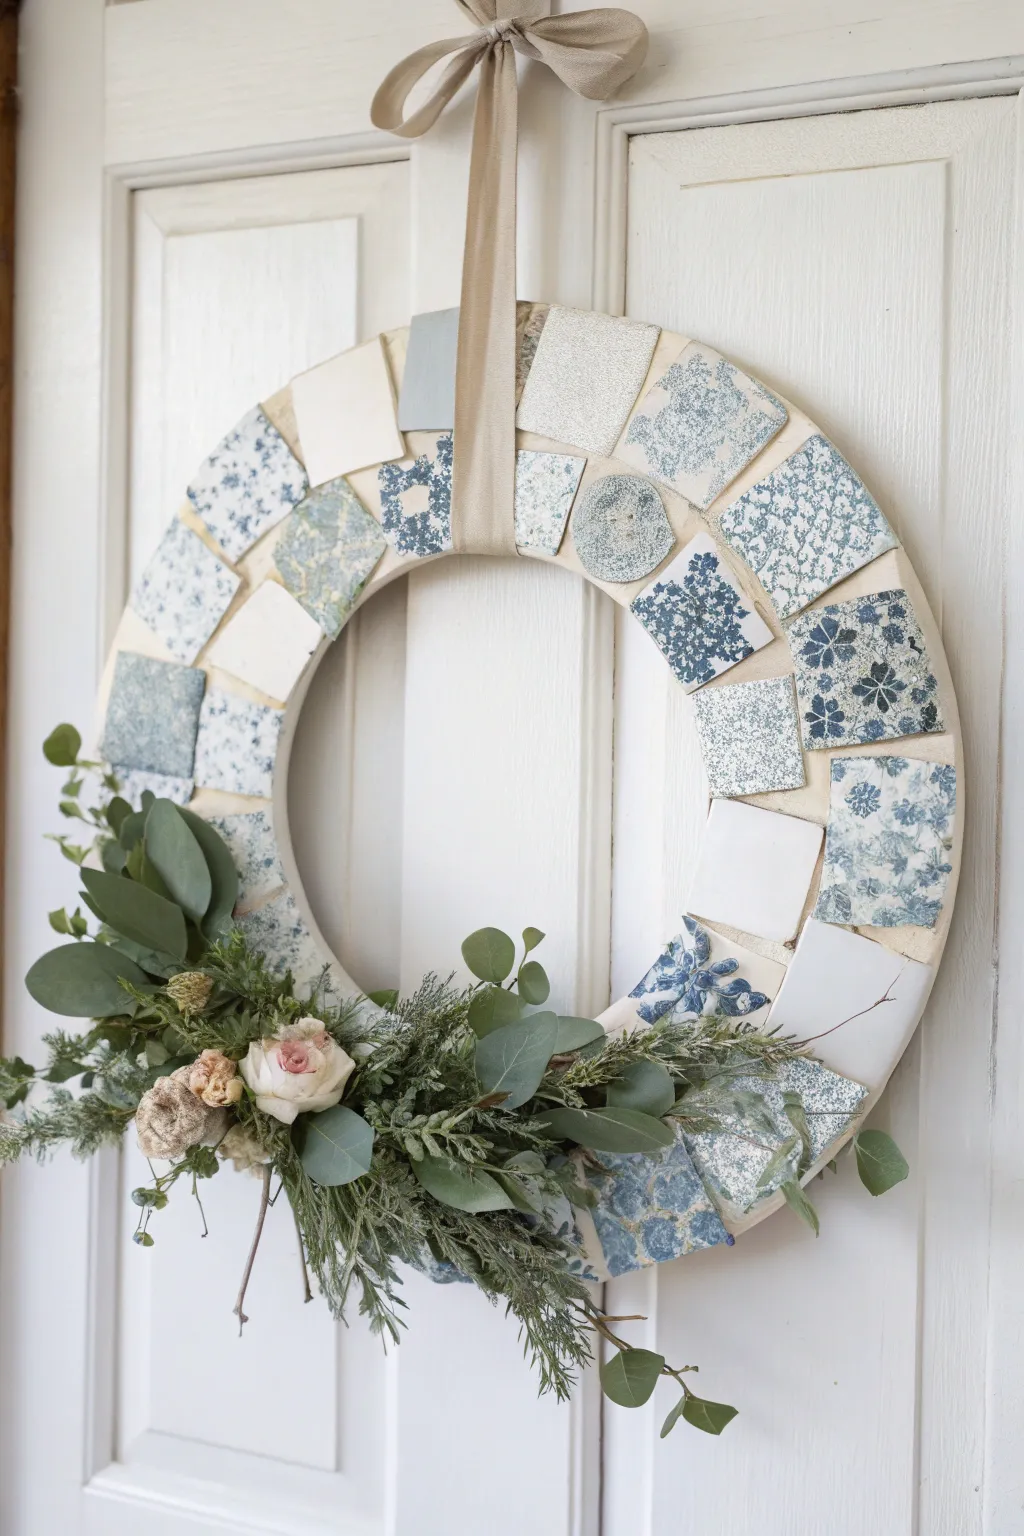
Transform broken blue and white china into a stunning farmhouse-style wreath that doubles as a unique piece of wall art. This project combines the charm of vintage porcelain with fresh greenery to create a welcoming accent for any door or interior wall.
Detailed Instructions
Materials
- Flat wreath form (wood or MDF, approx. 14-16 inches)
- Blue and white china plates (broken or whole to break)
- Tile nippers or wheeled mosaic cutters
- Safety glasses and heavy gloves
- Strong craft adhesive (like E6000) or mastic
- Sanded grout (white or ivory)
- Rubber float or spatula
- Sponge and bucket of water
- Soft cloth
- Faux or dried greenery (eucalyptus, cedar)
- Dried rosebuds or faux flowers
- Floral wire and wire cutters
- Hot glue gun and glue sticks
- Wide beige or oatmeal-colored ribbon (1.5 – 2 inches wide)
Step 1: Preparing the China
-
Safety First:
Before you handle any broken china, put on your safety glasses and heavy duty work gloves to protect yourself from flying shards and sharp edges. -
Breaking the Plates:
Place your china plates inside an old pillowcase or wrap them in a tea towel. Gently tap the center with a hammer to create large initial breaks without sending pieces flying. -
Refining Shapes:
Remove the pieces from the cloth. Use your tile nippers to carefully trim jagged edges and shape the shards into roughly square or rectangular tiles, aiming for pieces about 1.5 to 2 inches wide. -
Sorting:
Sort your cut pieces into piles based on pattern density—keep solid whites, heavy floral patterns, and border designs separate so you can balance the look later.
Clean Cuts
When cutting china with nippers, hold the tool near the very edge of the plate shard. This gives you more leverage and creates cleaner, straighter breaks.
Step 2: Creating the Mosaic
-
Dry Fitting:
Lay your flat wreath form on a work surface. Arrange the china pieces onto the form without glue first to puzzle-piece them together, leaving about 1/8 to 1/4 inch of space between each tile for grout. -
Adhering Tiles:
Once you are happy with the layout, lift one piece at a time, apply a generous dab of strong adhesive or mastic to the back, and press it firmly back onto the wreath form. -
Pattern Balance:
As you glue, try to alternate between solid white pieces and patterned blue pieces to keep the visual weight balanced around the circle. -
Curing Time:
Allow the adhesive to dry completely according to the manufacturer’s instructions—usually at least 24 hours—before moving to the grouting stage.
Step 3: Grouting
-
Mixing Grout:
Mix your sanded grout with water in a disposable container until it reaches the consistency of peanut butter. I find it’s better to add water slowly so it doesn’t get too soupy. -
Applying Grout:
Spread the grout over the china tiles using a rubber float or spatula, pressing it firmly into the crevices between the shards to fill all gaps. -
Wiping Down:
Let the grout set for about 15-20 minutes until a haze forms. Dampen your sponge (wring it out well!) and gently wipe away the excess grout from the surface of the china, rinsing the sponge frequently. -
Polishing:
Once the grout is fully dry (another hour or so), take a soft, dry cloth and buff the china tiles to remove the remaining haze and make them shine.
Color Pop
Add a few pieces of pale yellow or sage green pottery into the mosaic mix. These subtle color shifts will highlight the blue patterns beautifully.
Step 4: Assembly and Decoration
-
Attaching the Ribbon:
Cut a long length of beige ribbon. Loop it around the top of the wreath and tie a secure knot or bow at the top for hanging. -
Arranging Greenery:
Create a spray of greenery by layering sprigs of eucalyptus and cedar. Twist floral wire around the stems to secure the bundle together. -
Adding Blooms:
Tuck a few dried rosebuds or small faux flowers into the center of your greenery bundle and secure them with a dab of hot glue. -
Securing the Swag:
Position the floral swag on the lower left quadrant of the wreath. Use hot glue specifically on the grout lines or backs of the stems to attach it securely to the mosaic surface.
Hang your new masterpiece on a sturdy hook and enjoy the timeless elegance it brings to your home decor
Wind Chime Suncatcher From Drilled China Plate Pieces
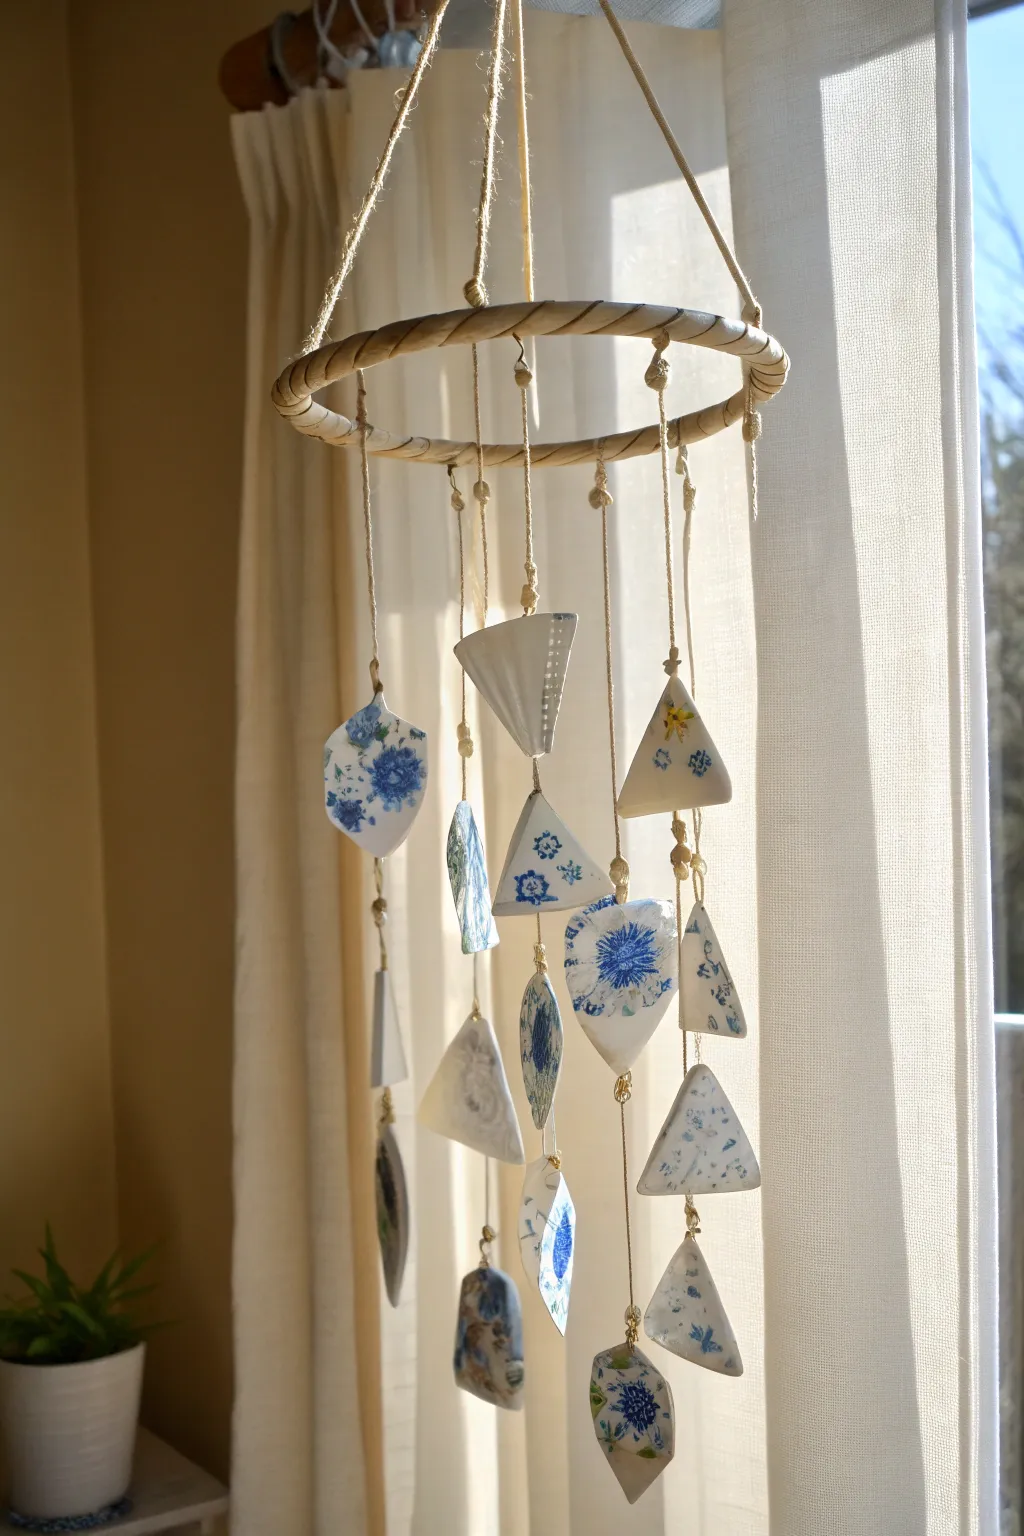
Transform chipped or broken china plates into a stunning mobile that catches the light and creates a gentle tinkling sound. This rustic-chic wind chime combines the delicate beauty of vintage floral patterns with natural twine and wood for a timeless window display.
Step-by-Step Guide
Materials
- Old china plates (blue and white pattern recommended)
- Tile nippers or wheeled glass cutters
- Safety goggles and gloves
- Sandpaper (medium and fine grit) or a Dremel with sanding bit
- Bucket of water
- Power drill
- Diamond-tipped drill bits (3mm or 1/8 inch)
- Wooden block (scrap wood)
- Wooden embroidery hoop (inner ring only) or bamboo ring (approx. 6-8 inches)
- Jute twine or heavy hemp cord
- Scissors
Step 1: Preparing the China Shards
-
Safety check:
Before breaking anything, put on your safety goggles and heavy gloves. Ceramic shards are incredibly sharp, and safety should always be the priority. -
Initial breaking:
Wrap your china plate in an old towel or heavy cloth. Gently tap the center with a hammer to break it into large, manageable sections without sending pieces flying. -
Nipping into shapes:
Using tile nippers or wheeled glass cutters, shape the larger shards into geometric forms. Aim for a mix of triangles, diamonds, and irregular polygons, roughly 2-3 inches in size. -
Smoothing edges:
The fresh breaks will be razor-sharp. Use medium grit sandpaper or a Dremel tool to grind down every sharp edge until smooth to the touch. This can take time, but it’s crucial for a safe finished project. -
Refining the finish:
Go over the edges once more with fine-grit sandpaper to give them a polished, professional look. Wipe away all ceramic dust with a damp cloth.
Step 2: Drilling the Holes
-
Setup the drilling station:
Place a scrap wooden block inside a shallow plastic container. Fill the container with water until it just covers the top of the wood block. This water will keep your drill bit cool and prevent the china from cracking. -
Positioning the piece:
Place a china shard on the submerged wooden block. Mark your drilling spot with a permanent marker, ensuring it’s at least 1/4 inch away from the edge. -
Drilling technique:
Hold the shard firmly. With your diamond-tipped bit, approach the mark at a 45-degree angle to create a starting groove. Once the groove is established, slowly move the drill to a vertical 90-degree position. -
Completing the hole:
Apply light pressure and let the drill do the work. Drill all the way through into the wood backing. Repeat this process for the top and bottom of pieces that will be in the middle of a strand, and just the top for the bottom-most pendant.
Crack Prevention
Keep the drill bit wet! If the ceramic dust turns into a dry powder, stop immediately and add more water. Heat friction causes cracks.
Step 3: Wrapping the Hoop
-
Start the wrap:
Take your wooden hoop and tie the end of your jute twine to it with a tight double knot. You can add a dab of glue to secure the start. -
Covering the wood:
Wrap the twine tightly around the hoop, pushing the loops explicitly close together so no wood shows through. Continue until the entire ring is covered in a rustic texture. -
Secure the end:
Once the hoop is fully covered, knot the twine securely and tuck the tail end under the wrapping. Dab a little glue to keep it from unraveling.
Add Sparkle
Intersperse crystal beads or sea glass pieces between the china shards for extra light refraction and a softer chime sound.
Step 4: Assembly
-
Cut strand lengths:
Cut five to seven lengths of jute twine, varying them slightly if you want a staggered look. These will be the vertical lines holding your china. -
Tying the first piece:
Thread the twine through the top hole of your first china shard. Tie a sturdy knot. I prefer to use a simple overhand knot, ensuring it’s large enough not to slip through the hole. -
Creating the chain:
If adding a second piece below the first, tie a knot in the twine a few inches down to act as a stopper. Then thread the next shard and let it rest on that knot. -
Attaching to the hoop:
Tie the top of each loaded strand onto the twine-wrapped hoop. Space them evenly around the circumference. Vary the heights of the shards to create visual interest. -
Creating the hanger:
Cut three or four long pieces of twine of equal length. Tie them at equidistant points on the hoop. Gather the loose ends at the top, ensuring the hoop hangs level, and knot them together into a hanging Ioop.
Now hang your beautiful creation in a sunny spot and enjoy the gentle music it makes
Garden Edging Markers From Half Old China Plates
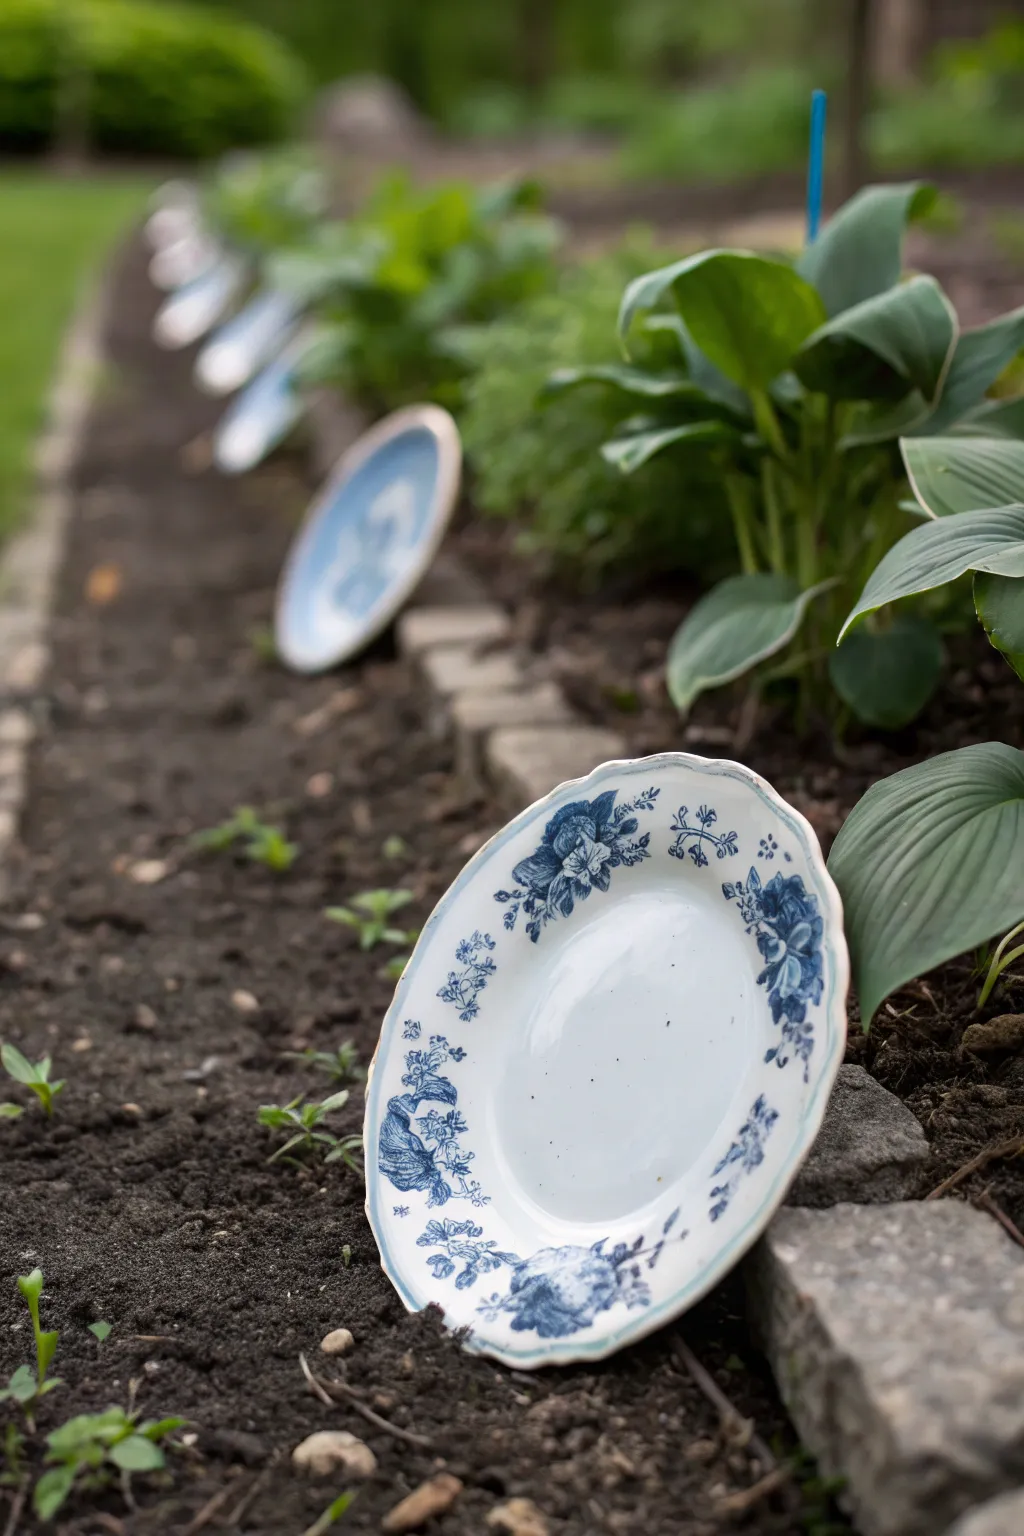
Transform mismatched or chipped china into a whimsical garden border that adds a touch of nostalgia to your flower beds. This project creates a unique, decorative barrier using half-buried plates to define walkways while showcasing beautiful ceramic patterns.
Detailed Instructions
Materials
- Old china plates (blue and white transferware works beautifully)
- Garden spade or edging tool
- Hand trowel
- String line and stakes (optional)
- Small rubber mallet
- Gardening gloves
- Soil or mulch for backfilling
Step 1: Planning and Preparation
-
Select your plates:
Gather a collection of china plates. They don’t need to match perfectly; a mix of similar color families, like the classic blue and white shown here, creates a cohesive yet eclectic look. Dinner plates provide a good height, but salad plates can work for smaller borders. -
Establish the line:
Decide where you want your border to run. For a straight edge like the one in the photo, runs a string line between two stakes to guide you. If you prefer a curved organic look, lay a garden hose down to visualize the shape. -
Clear the area:
Remove any weeds, large rocks, or debris from the soil line where the plates will go. The ground needs to be relatively soft to accept the china without breaking it. -
Assess soil moisture:
If the ground is rock-hard and dry, water the area thoroughly the day before you start. Moist soil is much easier to trench and poses less risk of cracking your vintage finds.
Cracked Plate Crisis
If you encounter a root and a plate cracks during installation, don’t toss it. Use outdoor-grade clear epoxy to glue it, then bury the cracked portion underground.
Step 2: Creating the Trench
-
Dig the initial trench:
Using a garden spade or edging tool, dig a narrow trench along your guide line. You are aiming for a V-shaped groove rather than a wide hole. -
Determine depth:
Dig deep enough so that approximately 40-50% of the plate will be submerged. This ensures stability so they don’t tip over in the wind or rain. -
Loosen the bottom:
Take a hand trowel and run it through the bottom of your trench to ensure the soil is loose and free of small pebbles that could create pressure points on the porcelain.
Light Up The Night
Place small solar spotlights or string lights directly behind the plates. At night, the translucent porcelain will glow, highlighting the patterns beautifully.
Step 3: Installing the Plates
-
Place the first plate:
Insert your first plate into the trench vertically. I like to angle them just slightly backward toward the garden bed, but straight up and down works perfectly fine too. -
Adjust the height:
Wiggle the plate down until it sits at your desired height. The rim should be clearly visible, showing off the floral scrollwork. -
Backfill securely:
Pack soil tightly against both the front and back of the submerged portion of the plate using your hands or the trowel handle. -
Overlap or spacing:
Position the next plate. You can butt the edges right up against partially touching the first one for a solid wall, or leave a tiny gap between them. Just ensure the tops remain level with each other. -
Check alignment:
Step back frequently to look down your line. Adjust any plates that are leaning too far forward or backward before the soil settles. -
Secure the row:
Continue placing plates down the line. Once a section is placed, firmly tamp down the soil on both sides with your foot or a small block of wood to lock them in place. -
Clean the china:
Once installed, the plates will likely be muddy from the process. Gently wipe the exposed rims with a damp cloth or spray them lightly with a hose on a mist setting. -
Mulch the bed:
Add your garden mulch behind the plates. This helps hide the disturbed soil line and adds extra support to the back of the china.
Enjoy the timeless elegance these upcycled markers bring to your garden path