
When I need a quick creative win, I grab air dry clay or polymer clay and make something small, cute, and genuinely useful. These crafty clay ideas are my go-to projects for fast satisfaction, easy gifting, and that “I can’t believe I made this” feeling.
Air Dry Clay Trinket Dishes
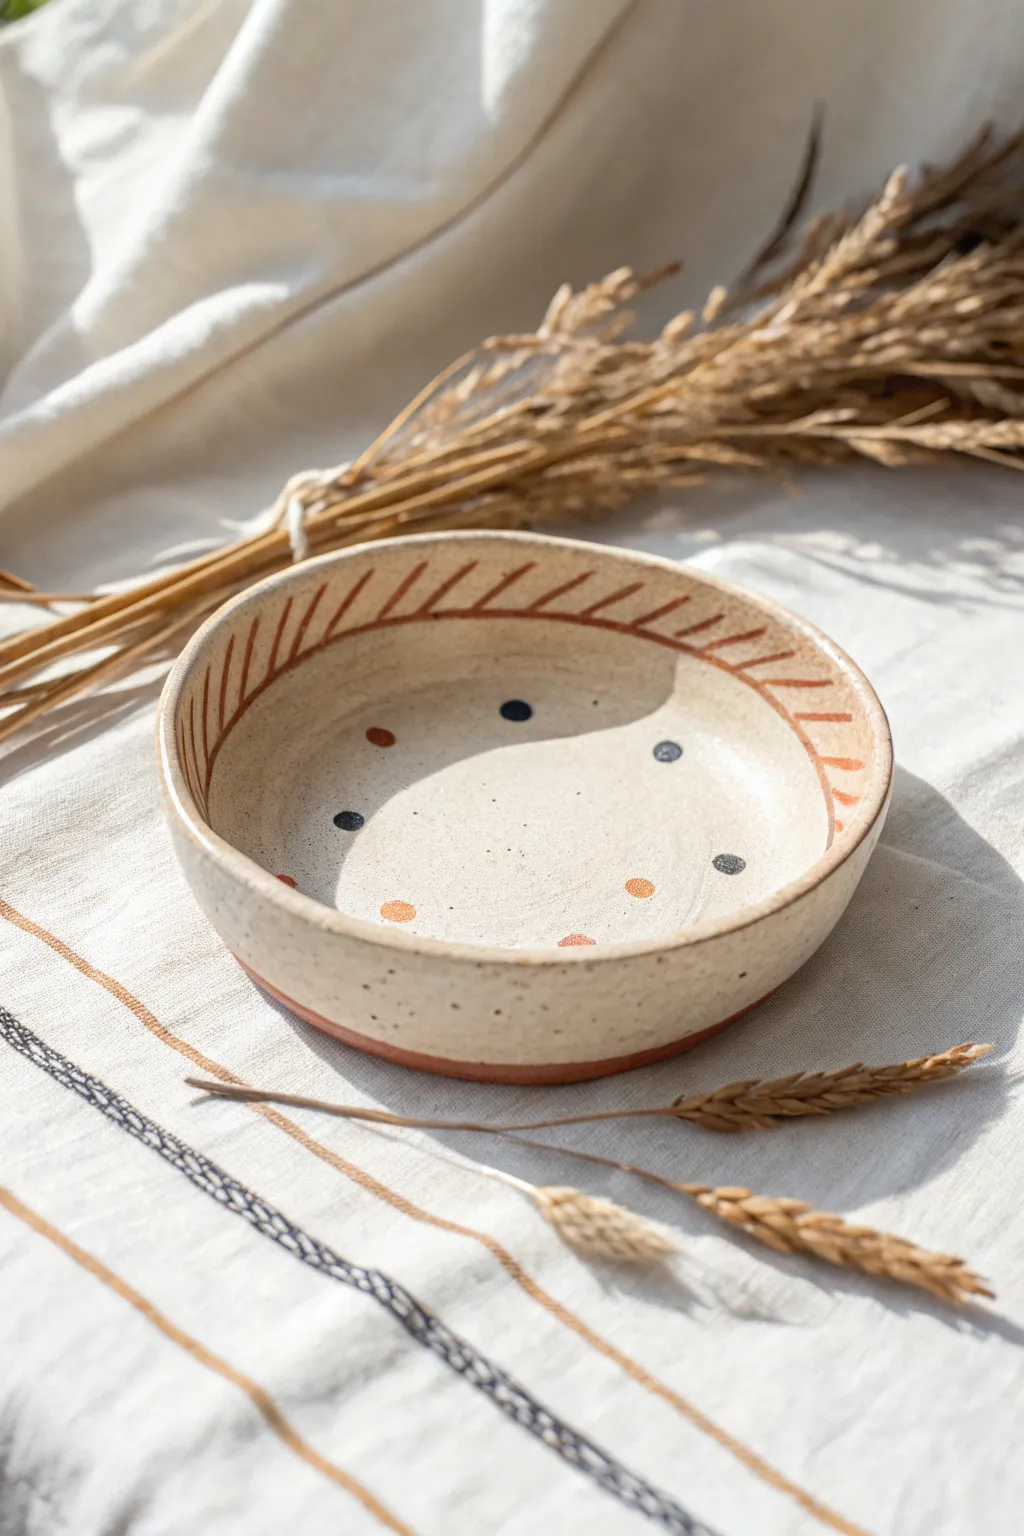
This charming, rustic trinket dish combines a natural speckled finish with warm terracotta tones and simple geometric patterns. It’s the perfect size for holding rings or keys and brings an earthy, handmade aesthetic to any side table.
How-To Guide
Materials
- Air dry clay (white or light beige)
- Acrylic rolling pin
- Circle template (pot lid or bowl)
- Craft knife or clay tool
- Small bowl (for molding)
- Sandpaper (fine grit)
- Acrylic paints (terracotta/rust orange, deep navy blue)
- Fine detail paintbrush
- Matte varnish or sealant
- Old toothbrush (optional for speckling)
- Water and sponge
Step 1: Shaping the Clay
-
Prepare the workspace:
Lay down a canvas mat or wax paper to prevent sticking. Take a large handful of air dry clay and knead it until it’s pliable and warm. -
Roll the slab:
Using your acrylic rolling pin, roll the clay out into a slab about 1/4 inch thick. Try to keep the thickness consistent across the entire piece for even drying. -
Cut the circle:
Place your circle template (like a small bowl or pot lid) onto the clay slab. Use your craft knife to cut closely around the edge to create a perfect circle. -
Form the sides:
Gently lift the clay circle. To create the dish shape shown, you can drape the clay *inside* a small bowl lined with plastic wrap, pressing it gently to take the form. -
Smooth the edges:
Dip your finger in a little bit of water and run it along the rim of the dish to smooth out any sharp cuts or rough textures. -
Dry the form:
Let the clay sit in the mold for about 24 hours until it holds its shape, then remove it carefully to let it dry completely from all sides for another 1-2 days. -
Sand for perfection:
Once fully bone dry, take fine-grit sandpaper and gently sand the rim and any uneven spots on the surface to get that smooth, professional finish.
Faux Ceramic Look
Mix dried coffee grounds or cracked black pepper into your white clay before rolling. This creates an authentic speckle texture inside the clay body itself, saving painting time.
Step 2: Decoration & Painting
-
Create the base texture:
To mimic the speckled clay look in the photo, dilute a tiny drop of brown or black paint with water. Dip a toothbrush in it and flick the bristles to spray fine speckles over the inside of the dish. -
Paint the rim line:
Using your terracotta-colored paint and a fine brush, carefully paint a thin line that circles the interior wall of the dish, just below the rim edge. -
Add the diagonal dashes:
Paint a series of diagonal lines extending from that inner circle up to the top edge of the rim. Keep the spacing roughly even, but embrace the slight variations of a handmade look. -
Dot the interior:
Using the same terracotta color, paint small, random circles inside the bowl. I like to keep them somewhat sparse to let the ‘clay’ show through. -
Add contrast dots:
Switch to your deep navy blue paint. Add a few smaller, darker dots interspersed among the orange ones to create visual depth and interest. -
Paint the exterior base:
Turn the bowl over or carefully lift it to paint the bottom edge and the underside rim in a solid band of the terracotta color, giving it a dipped-pottery effect. -
Seal the piece:
Allow all paint to dry completely. Apply a coat of matte varnish over the entire dish to protect the paint and give it a finished sheen. Add a second coat if desired.
Uneven Rim?
If your rim feels too wobbly after sanding, flip the bone-dry dish upside down onto sandpaper on a flat surface. Rotate the dish in circles to sand the top perfectly flat.
Place your new dish on a sunny windowsill and enjoy that warm, handcrafted vibe


Ring Cones and Ring Dishes
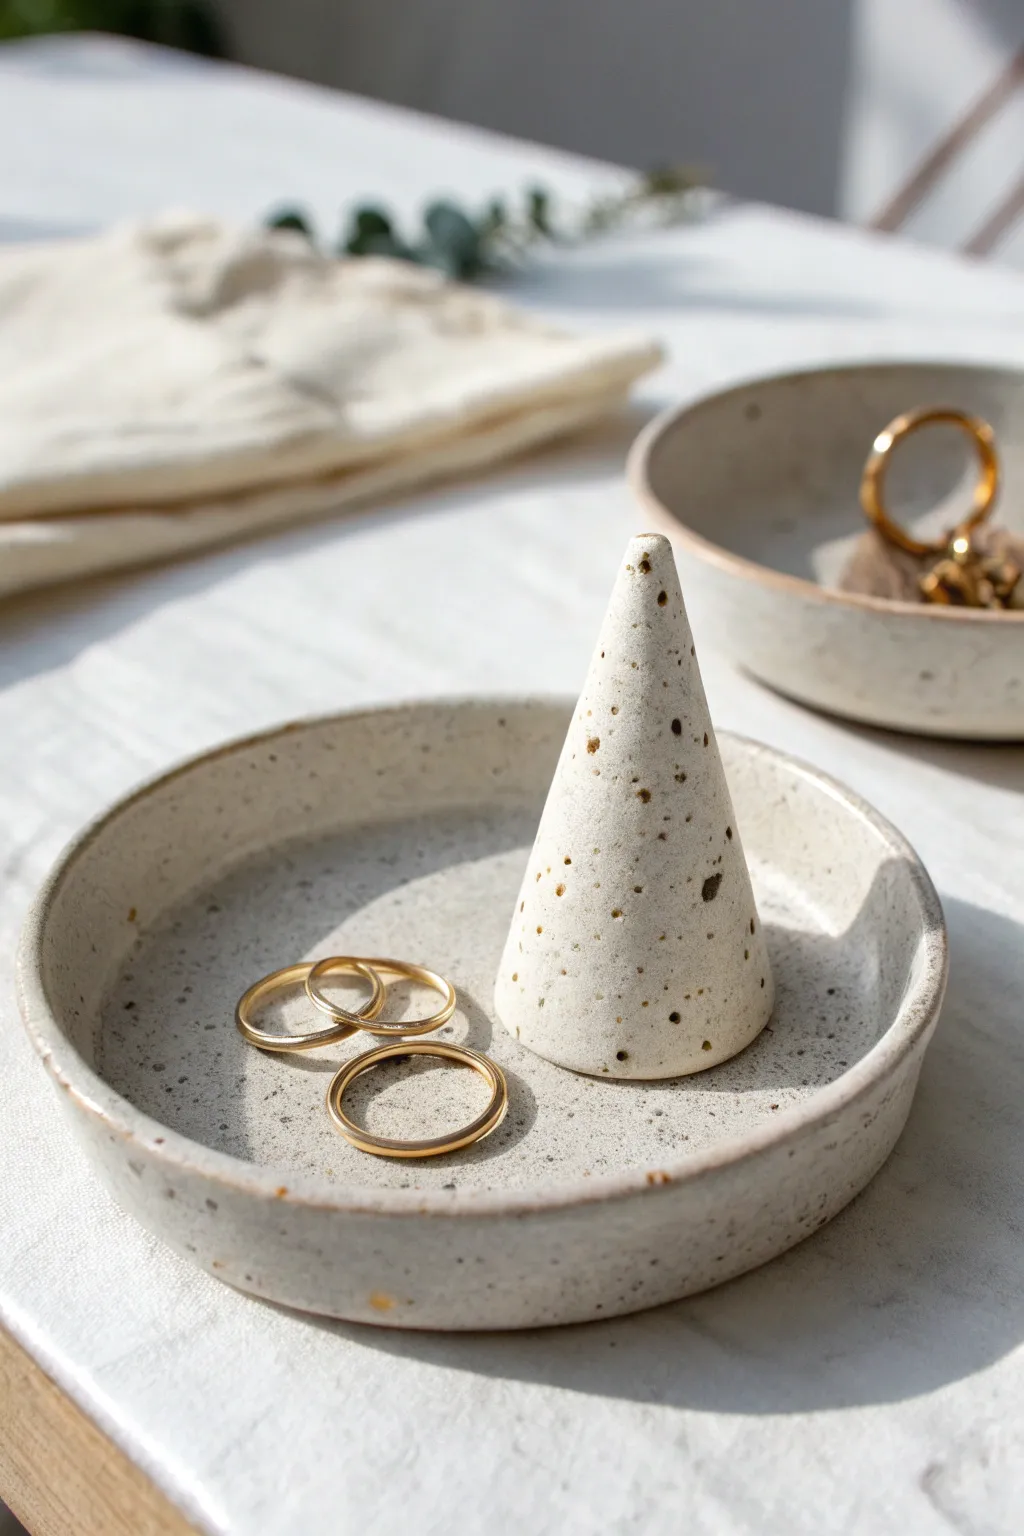
Embrace the elegance of simplicity with this two-piece ring holder set, featuring a shallow basin and a matching geometric cone. The speckled finish mimics the look of high-end stoneware, providing a modern, earthy home for your favorite delicate jewelry pieces.
Step-by-Step
Materials
- Polymer clay (white or cream)
- Course black pepper or finely ground dried coffee (for speckles)
- Acrylic rolling pin
- Circle cutter (approx. 4 inches)
- Cone mold (paper or cardstock) or just free-hand shaping
- Sandpaper (fine grit)
- Sponge or texture tool
- Gloss glaze or polyurethane varnish
- Oven and baking sheet
- Small paintbrush
- Craft knife
Step 1: Preparing the Clay
-
Mix the Speckles:
Begin by conditioning your block of white or cream polymer clay until it is soft and pliable. Flatten it out and sprinkle a generous pinch of coarse black pepper or dried coffee grounds onto the surface. -
Knead Thoroughly:
Fold the clay over the speckles and knead repeatedly to distribute them evenly. You want the particles to look like natural mineral inclusions, so avoid clumping in one spot. -
Roll the Slab:
Once mixed, use your acrylic rolling pin to roll the clay out into an even slab. Aim for a thickness of about 1/4 inch (6mm) to ensure the dish feels substantial and not flimsy.
Uneven Speckles?
If your pepper or coffee grounds are clumping, flatten the clay very thin, sprinkle, stack it, and roll it again. This ‘laminating’ technique spreads texture better than just kneading.
Step 2: Forming the Dish
-
Cut the Base:
Press your 4-inch circle cutter firmly into the rolled clay slab. If you don’t have a cutter that size, trace around a small bowl with a craft knife to get a clean circle. -
Create the Lip:
Gently lift the edges of the clay circle upwards with your fingertips. Pinch and smooth the clay to create a vertical rim that stands about half an inch high, containing the dish. -
Smooth the Edges:
Dip your finger in a tiny bit of water or baby oil and run it along the rim to smooth out any fingerprints or cracks. The goal is a uniform, organic curve.
Gold Rim Accent
Use a gold leaf or liquid gilding pen to paint just the very top edge of the dish rim after glazing. This adds a luxurious contrast to the rustic speckled clay.
Step 3: Creating the Cone
-
Form the Shape:
Take a remaining ball of your speckled clay (about the size of a walnut) and roll it into a smooth sphere. -
Refine the Point:
Use the palm of your hand to roll one side of the sphere against your work surface, applying more pressure on one end to elongate it into a cone shape. I like to keep the base flat and wide for stability. -
Check the Height:
Stand the cone next to your dish to ensure the proportions look right. The cone should be slightly taller than the rim of the dish but not overwhelming. -
Flatten the Base:
Press the cone gently down onto your work surface to ensure the bottom is perfectly flat. This ensures it won’t wobble when holding rings later on.
Step 4: Finishing Touches
-
Bake the Pieces:
Place both the dish and the cone on a lined baking sheet. Bake according to your polymer clay package instructions—usually around 275°F (130°C) for 15-30 minutes per 1/4 inch of thickness. -
Cool Completely:
Remove the pieces from the oven and let them cool fully. They will be slightly soft when hot but will harden as they return to room temperature. -
Sand for Smoothness:
Once cool, use fine-grit sandpaper to buff away any uneven spots on the rim of the dish or the tip of the cone. This gives it that professional ceramic feel. -
Apply Glaze:
Using a soft brush, apply a thin coat of gloss glaze or polyurethane varnish to the entire surface of both pieces. This brings out the ‘speckles’ and mimics fired pottery. -
Second Coat:
Allow the first coat to dry, then apply a second coat for extra durability and shine. Ensure no bubbles form in the glaze for a glass-like finish.
Place the cone inside the dish and style it with your favorite gold bands for an instant vanity upgrade


Mini Animal Charms and Keychains
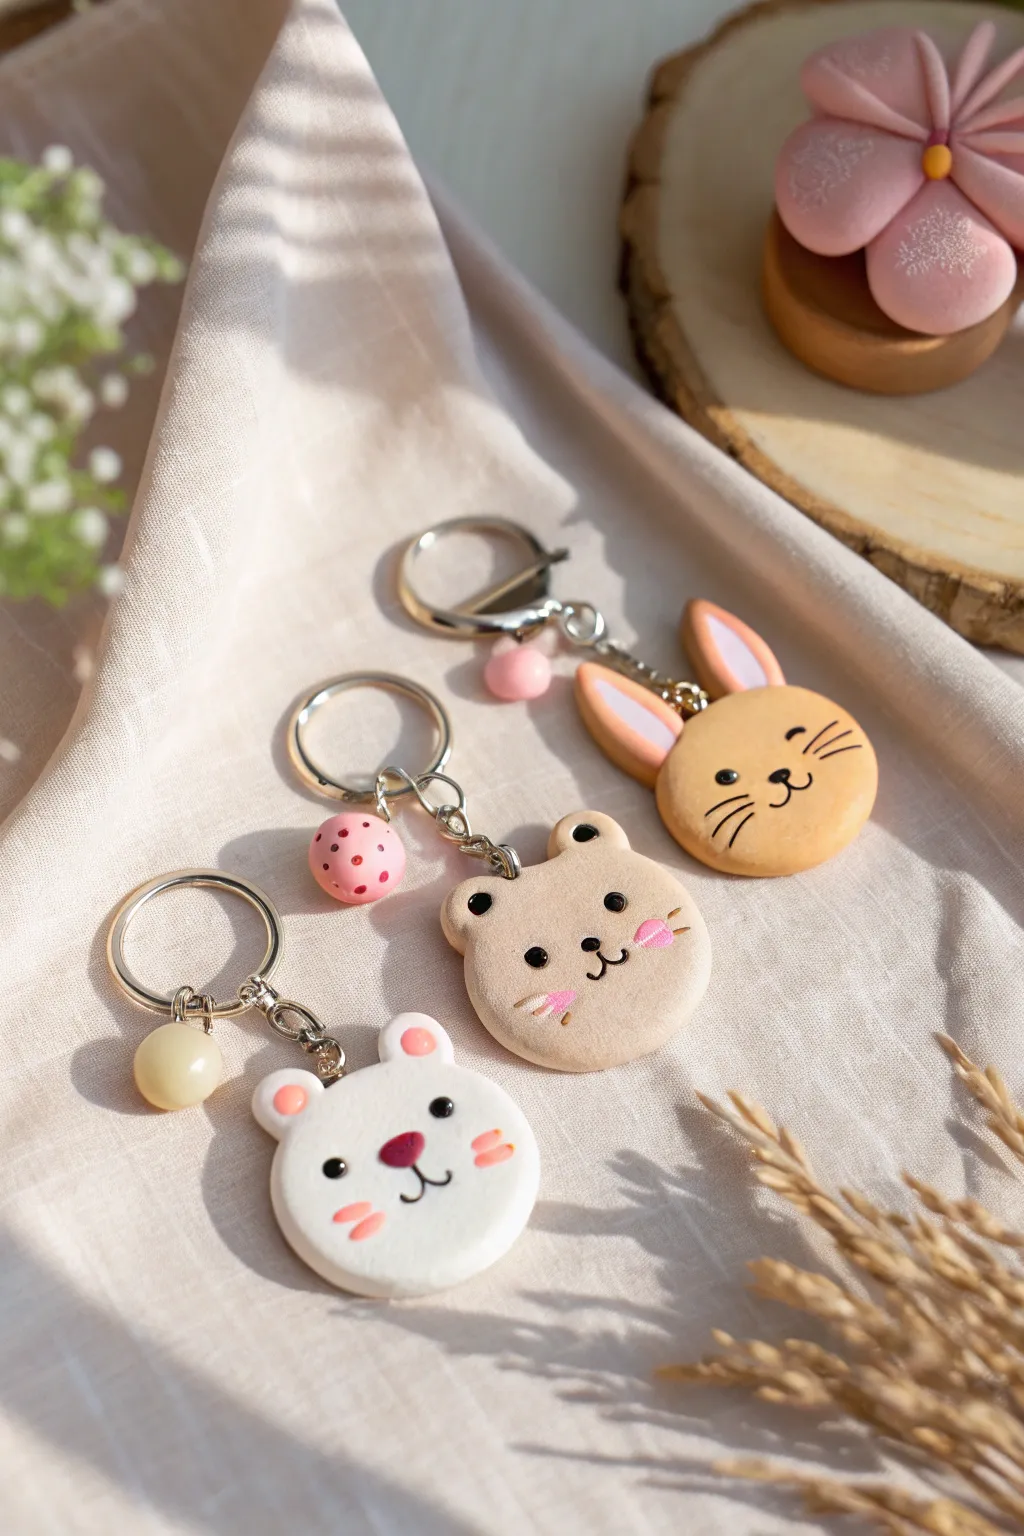
Create a charming trio of pocket-sized companions with these adorable clay animal keychains. Featuring a white bear, a tan bear, and a sunny bunny, this project uses simple clay shaping and painted details to bring sweet, minimalist faces to life.
How-To Guide
Materials
- Polymer clay (white, beige/tan, golden yellow, pink)
- Acrylic paint (black, pink, dark brown)
- Fine detail paintbrush or dotting tools
- Rolling pin or pasta machine
- Circle cookie cutter (approx. 1.5 – 2 inches)
- Keychains with jump rings and small chains
- Small eye pins or screw eyes
- Beads for accents (pink, yellow)
- Modeling tools (ball tool, needle tool)
- Parchment paper and baking sheet
- Oven
- Gloss glaze (optional)
Step 1: Shaping the Base Faces
-
Condition the clay:
Start by kneading your white, beige, and golden yellow polymer clay separately until each is soft, warm, and pliable to prevent cracking. -
Roll the slabs:
Roll out each color of clay on parchment paper to a uniform thickness, about 1/4 inch. You want them thick enough to be sturdy but not too heavy. -
Cut the circles:
Use your circle cutter to punch out one clean disc from each color: white for the polar bear, beige for the brown bear, and yellow for the bunny. -
Smooth the edges:
Gently rub the edges of the circles with your fingertip to soften the sharp cut lines, creating a smoother, more finished look like a cookie.
Step 2: Adding Ears and Hardware
-
Form bear ears:
Roll four tiny balls of clay (two white, two beige). Press them gently onto the top edges of their matching colored discs to form rounded ears. -
Blend the seams:
Using a blending tool or your finger, carefully smooth the back of the ears into the main circle so they represent a single solid piece and won’t pop off later. -
Shape bunny ears:
For the yellow bunny, shape two slightly larger elongated teardrops. Flatten them slightly and attach them to the top of the yellow disc. -
Detail the ears:
Take tiny bits of pink clay to create the inner ear details. Press small flattened balls into the bear ears and elongated strips into the bunny ears. -
Insert hardware:
Carefully insert a slightly trimmed eye pin or screw eye into the very top center of each head. I sometimes add a touch of liquid clay here for extra security. -
Create matching beads:
Roll three small spheres from remaining clay (pink or yellow) to create the charm beads shown in the photo. Poke a hole through them or insert an eye pin, and add decorative dots if desired.
Fingerprint Freedom
To remove pesky fingerprints before baking, lightly brush the raw clay surface with a little baby oil or cornstarch.
Step 3: Baking and Painting
-
Bake the batch:
Place all your animal faces and beads on a baking sheet lined with parchment. Bake according to your specific clay package instructions, usually around 275°F (135°C). -
Cool completely:
Allow the pieces to cool fully before handling. The clay is fragile when hot and hardens as it returns to room temperature. -
Paint facial features:
Using a very fine brush or a dotting tool dipped in black acrylic paint, add two small eyes and a nose/mouth combo to each animal. -
Add whiskers and cheeks:
Paint sensitive whiskers on the bunny and beige bear. Use pink paint for the white bear’s cheeks and nose shading. -
Protect the work:
Once the paint is bone dry, you can apply a thin coat of matte or gloss varnish to seal the paint and protect the piece from daily wear.
Pro Tip: Durable Connection
Instead of straight pins, bend the bottom of the eye pin into a zigzag or ‘L’ shape before inserting it into the raw clay so it can’t pull out.
Step 4: Assembly
-
Prepare the rings:
Open your jump rings using two pairs of pliers to twist them sideways, rather than pulling them apart, to maintain their strength. -
Attach the charms:
Thread the main animal charm and your handmade bead onto the keychain ring using the jump rings. -
Final check:
Close the jump rings securely, ensuring there are no gaps where the charms could slip off.
Now you have a set of adorable friends ready to keep your keys organized


Polymer Clay Earrings in Simple Shapes
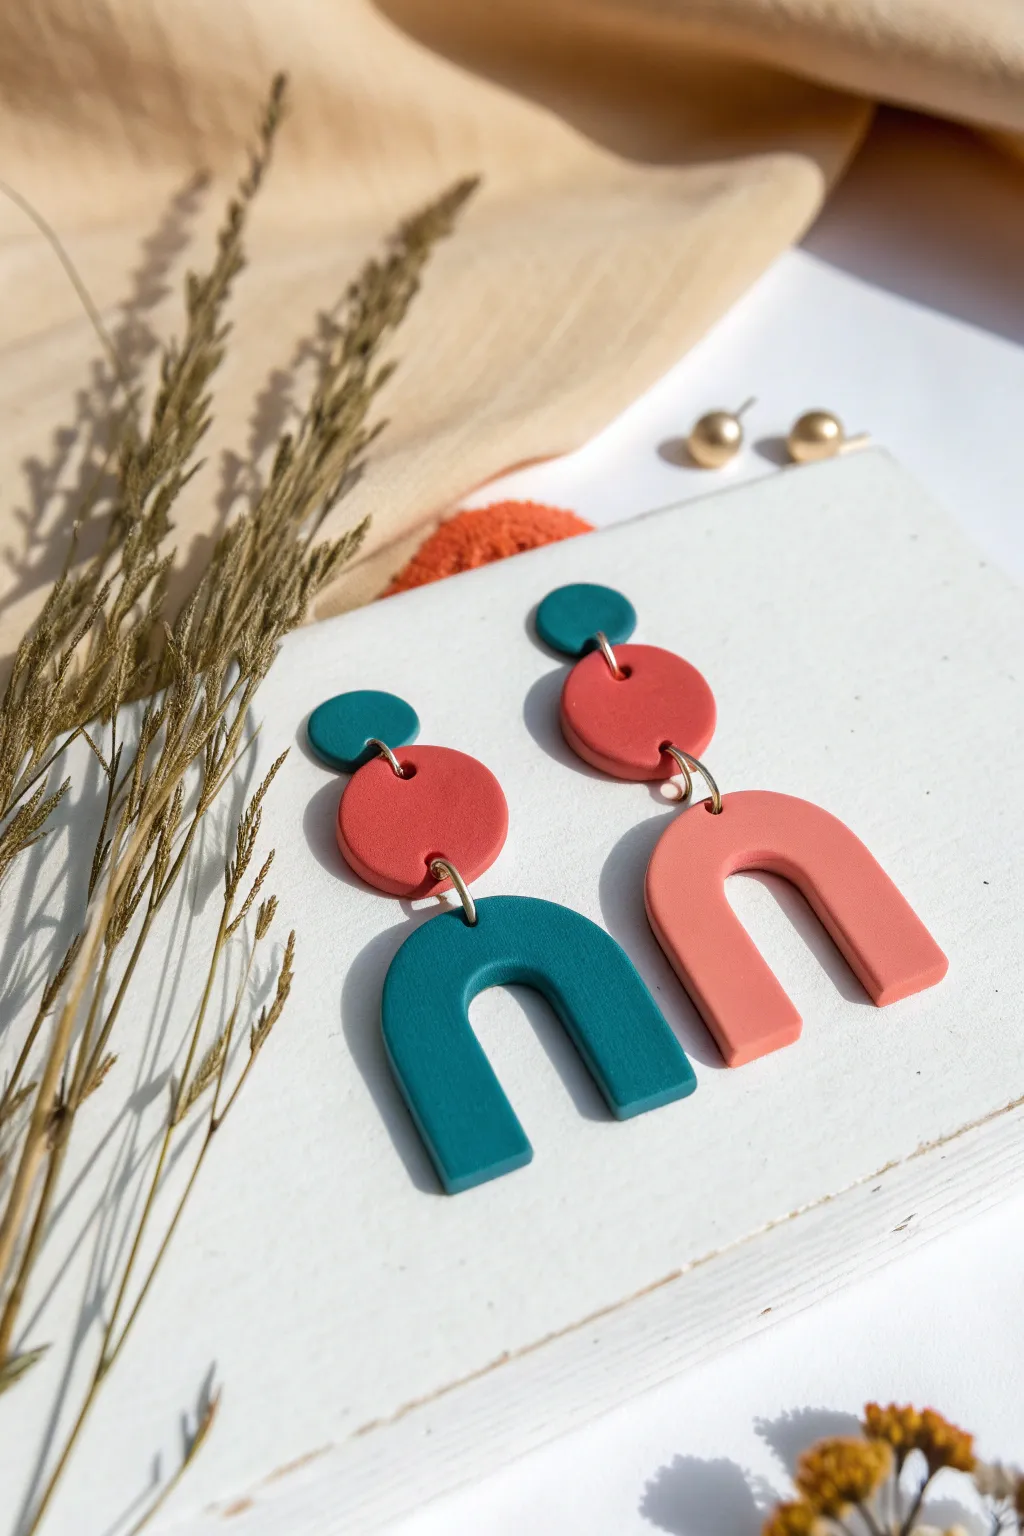
Embrace a contemporary aesthetic with these striking statement earrings featuring a playful mix of geometric shapes and a bold color palette. The combination of teal and coral tones creates a sophisticated yet fun accessory perfect for everyday wear.
Step-by-Step Tutorial
Materials
- Polymer clay in teal, dark coral/terracotta, and light coral/peach
- Rolling pin or pasta machine
- Circle cutters (approx. 1cm and 2cm diameters)
- U-shape or arch cutter
- Sharp craft blade or tissue blade
- Hand drill or pin vibe
- Jump rings (gold or silver, 6-8mm)
- Earring posts and backs
- Super glue or jewelry glue
- Jewelry pliers (round nose and flat nose)
- Parchment paper or ceramic tile
Step 1: Preparation & Color Mixing
-
Condition the Clay:
Begin by conditioning each color of polymer clay separately. Knead the teal, terracotta, and light coral clays in your hands until they are soft, pliable, and free of cracks. -
Roll the Slabs:
Using a rolling pin or a pasta machine, roll out each color into a flat, even slab. Aim for a thickness of about 3mm to ensure the earrings are sturdy but not too heavy. -
Check for Bubbles:
Inspect your slabs for any air bubbles. If you spot one, gently pierce it with a needle and smooth over the area with your finger.
Step 2: Cutting the Shapes
-
Cut the Small Circles:
Using the smallest circle cutter (approx. 1cm), cut out two circles from the teal clay slab. These will form the top studs of the earrings. -
Cut the Medium Circles:
Switch to a slightly larger circle cutter (approx. 2cm) and cut two circles from the terracotta clay. These will serve as the connector pieces. -
Create the First Arch:
Press your arch cutter firmly into the teal clay slab to create the first U-shape component. -
Create the Second Arch:
Repeat the process with the light coral clay to make the second U-shape. If you don’t have an arch cutter, you can hand-cut a rectangle and use circle cutters to round off the top and remove the inner negative space. -
Smooth the Edges:
Before baking, take a moment to gently smooth the raw edges of all cut pieces with your finger or a little cornstarch to remove any sharp burrs left by the cutters.
Smooth Operator
Before baking, gently wipe your raw clay shapes with a baby wipe or a Q-tip dipped in rubbing alcohol. This removes fingerprints and surface lint instantly.
Step 3: Piercing & Baking
-
Mark Hole Placements:
Use a needle tool or toothpick to gently mark where the holes will go. The small top circles need one hole at the bottom; the middle circles need holes at the top and bottom; the arches need one centered hole at the apex of the curve. -
Pierce the Clay:
Carefully create the holes using your tool. Make sure they are wide enough to accommodate your jump rings but not so close to the edge that the clay might tear. -
Arrange for Baking:
Place all your cut pieces on a ceramic tile or a baking sheet lined with parchment paper. -
Bake the Pieces:
Bake the clay according to the manufacturer’s instructions on the package—usually around 275°F (135°C) for 30 minutes, though brands vary. -
Cooling Down:
Once baked, remove from the oven and allow the pieces to cool completely before handling. This ensures the clay hardens fully.
Texture Twist
Press a piece of coarse sandpaper or heavy fabric onto the raw clay slab before cutting. This adds a cool, stone-like texture to your geometric shapes.
Step 4: Assembly
-
Sand for Finish:
If there are any remaining rough edges after baking, lightly sand them with fine-grit sandpaper for a professional finish. -
Open Jump Rings:
Using two pairs of pliers, twist your jump rings open sideways (never pull them apart outward) to preserve their round shape. -
Connect Top and Middle:
Thread an open jump ring through the bottom hole of a teal stud circle and the top hole of a terracotta middle circle, then close the ring securely. -
Attach the Arches:
Use another jump ring to connect the bottom of the terracotta circle to the top of the corresponding arch (teal arch for one earring, coral for the asymmetric pair shown). -
Secure Earring Posts:
Apply a small dab of strong jewelry glue or super glue to the back of the top teal circles and press the earring posts firmly into place. -
Final Set Time:
Let the glue cure completely according to the adhesive’s instructions before trying on your new creations.
Enjoy styling these versatile geometric shapes that add a pop of modern art to any outfit

The Complete Guide to Pottery Troubleshooting
Uncover the most common ceramic mistakes—from cracking clay to failed glazes—and learn how to fix them fast.
Leaf Imprint Bowls and Tiles
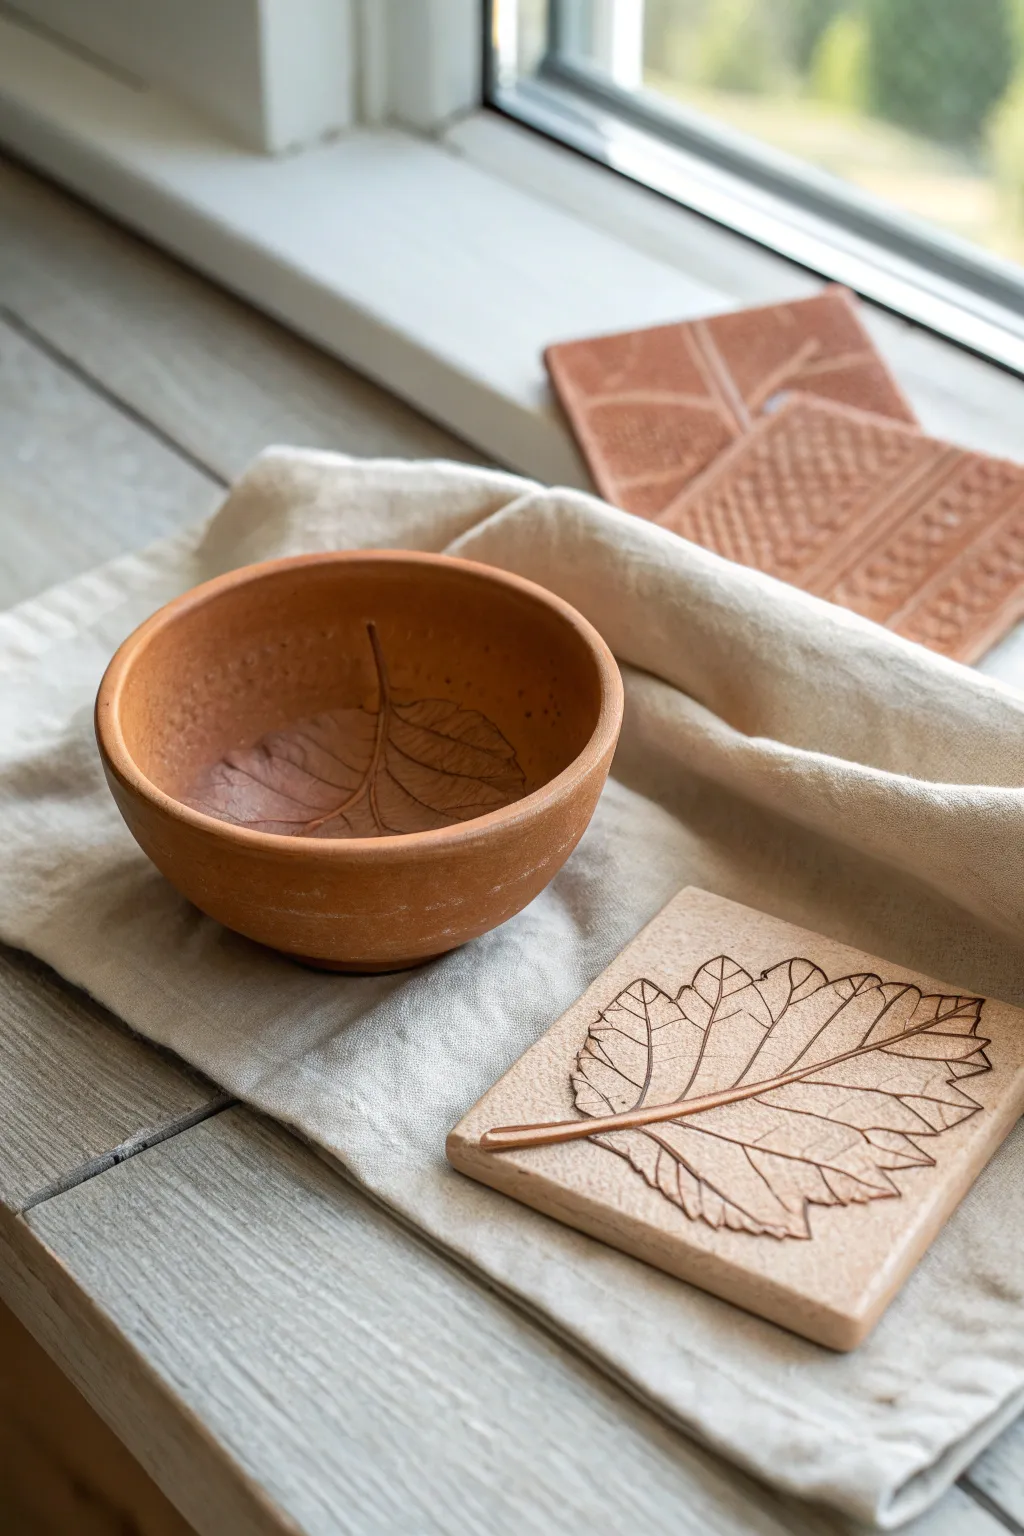
Bring the texture of the outdoors inside with this simple yet stunning clay project. By pressing fresh leaves into soft terracotta-colored clay, you’ll create functional bowls and decorative tiles that capture nature’s intricate veins forever.
How-To Guide
Materials
- Air-dry clay (terracotta color)
- Fresh leaves with prominent veins (beech, hydrangea, or oak)
- Rolling pin
- Small bowl (to use as a mold)
- Sharp crafting knife or needle tool
- Sponge
- Canvas or cotton cloth (for rolling)
- Fine-grit sandpaper
- Matte varnish or sealant (optional)
Step 1: Preparing the Clay
-
Condition the clay:
Start by taking a generous chunk of terracotta air-dry clay and kneading it in your hands. You want it warm and pliable without any cracks, ensuring a smooth surface for your imprint. -
Set up your workspace:
Lay down a piece of canvas or cotton cloth on your table. This prevents the clay from sticking to your work surface and adds a nice, subtle texture to the back of your pieces. -
Roll out a slab:
Using a rolling pin, flatten the clay into an even slab. Aim for a thickness of about 1/4 inch (6mm)—too thin and it might crack; too thick and it will take ages to dry. -
Smooth the surface:
Before imprinting, take a barely damp sponge and gently wipe the surface of the clay slab to remove any rolling pin marks or imperfections.
Step 2: Creating the Leaf Imprint
-
Select and place leaves:
Choose a leaf with a thick central stem and prominent veins. Place it vein-side down onto the clay slab, positioning it exactly where you want the design to be. -
Roll the impression:
Gently roll your rolling pin over the leaf. Apply firm, even pressure to push the veins deep into the clay, but be careful not to distort the leaf shape too much. -
Reveal the texture:
Carefully peel the leaf away by lifting the stem first. This is the most satisfying part, as you’ll see the intricate details transferred perfectly into the clay surface.
Cracked Edges?
If you see tiny hairline cracks on the rim while shaping the bowl, dampen your finger with a clay slip (water mixed with clay dust) and smooth them over immediately.
Step 3: Shaping the Bowl
-
Cut the circle:
Place a bowl or circular template over the imprinted section. Use a sharp craft knife to cut a clean circle around the leaf design, creating the disc that will become your bowl. -
Form the curve:
Gently lift the clay circle and place it inside a small bowl lined with cling film or a dry cloth. I prefer using a cloth because it helps the clay dry more evenly. -
Press into shape:
Lightly press the clay against the interior of the mold bowl to established the curved shape. Ensure the leaf imprint remains centered at the bottom. -
Smooth the rim:
Dip your finger in a little water and run it along the rim of the clay bowl to smooth out any sharp edges left by the knife cut.
Go Geometric
Instead of square tiles, try cutting hexagonal shapes for a modern honeycomb look that tiles together perfectly on a table.
Step 4: Making the Tiles
-
Cut square shapes:
For the tiles shown in the background, roll out a fresh slab and imprint another leaf. Use a ruler and knife to cut precise square shapes around the leaf design. -
Create decorative borders:
To mimic the textured tile in the photo, use a tool or the edge of a credit card to press geometric patterns or cross-hatching into the clay alongside the leaf veins. -
Dry flat:
Place the tiles on a flat board to dry. Flip them over every few hours during the first day to prevent the corners from curling up as the moisture evaporates.
Step 5: Finishing Touches
-
Allow to dry:
Let all your pieces dry completely for 24-48 hours. The color will lighten and the clay will become hard to the touch. -
Sand edges:
Once bone dry, take fine-grit sandpaper and gently buff the rims of the bowl and the edges of the tiles to ensure a professional, smooth finish. -
Seal the work:
Apply a clear matte varnish or acrylic sealant to protect the surface. This deepens the terracotta color slightly and helps preserve the delicate imprinted details.
Once sealed and dried, these natural beauties are ready to hold trinkets or serve as charming coasters
Cute Face Magnets for the Fridge
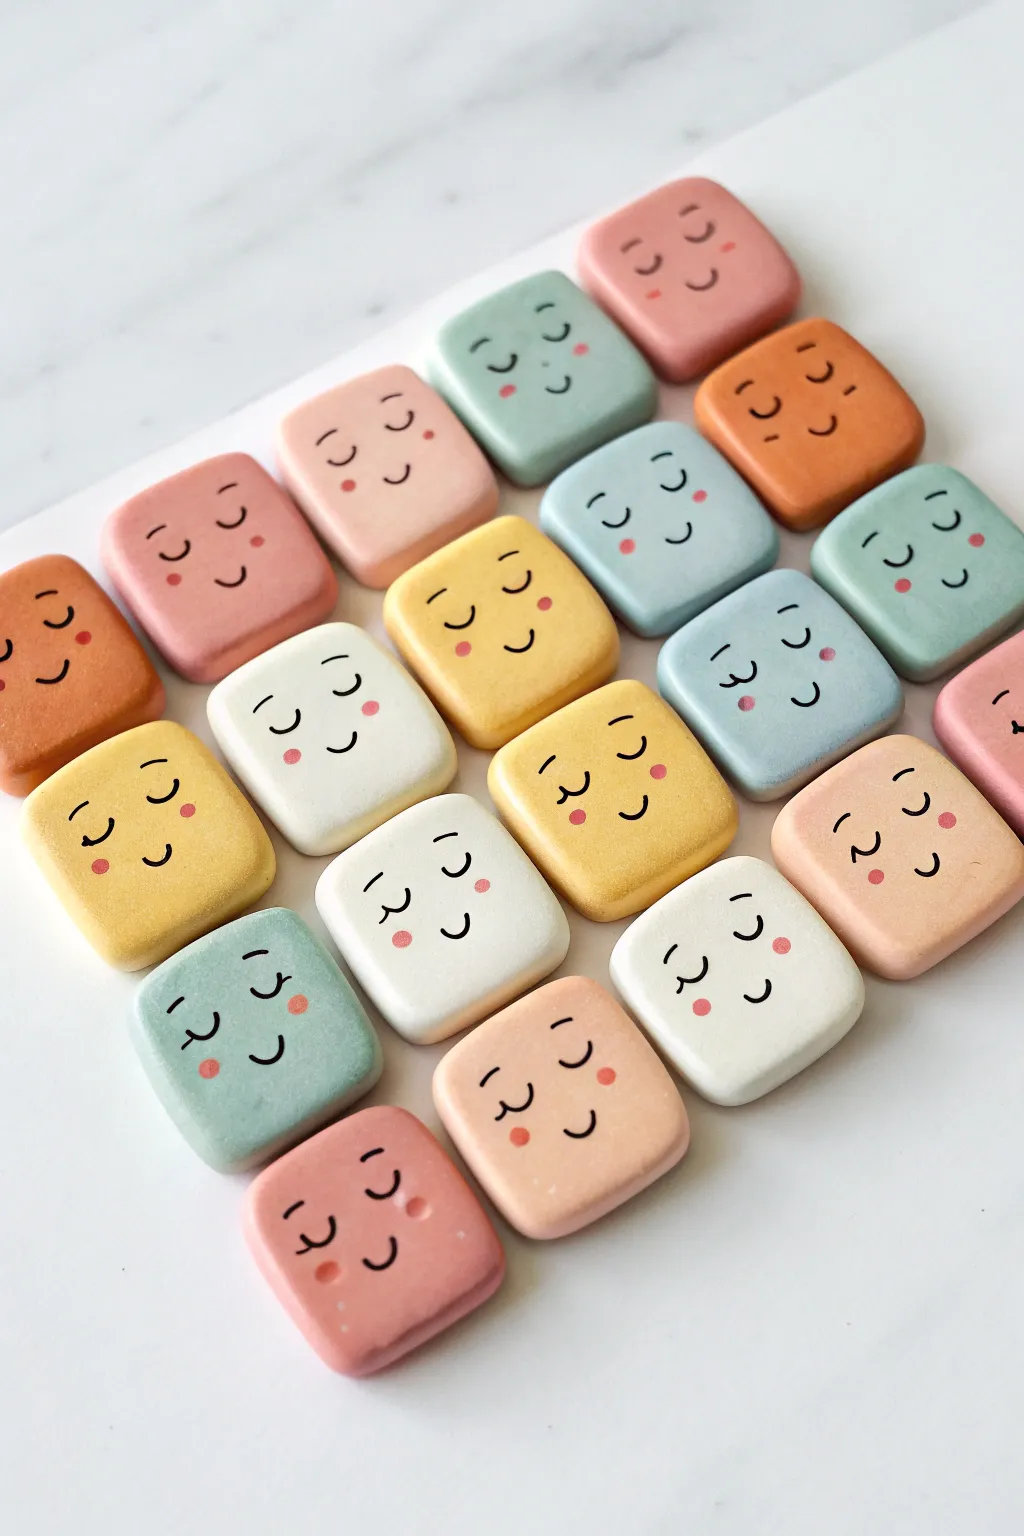
Brighten up your refrigerator door with this delightful grid of pastel personality. These smooth, rounded clay squares feature sweet, minimal faces that are surprisingly simple to make but pack a huge punch of charm.
Detailed Instructions
Materials
- Polymer clay (white, beige, pink, yellow, blue, teal, terracotta)
- Acrylic rolling pin
- Square cookie cutter (approx. 1 inch width)
- Baking sheet
- Parchment paper
- Fine-grit sandpaper (400-600 grit)
- Black fine-point permanent marker or acrylic paint pen
- Small round paintbrush or dotting tool
- Pink acrylic paint
- Matte sealant or varnish (optional)
- Strong round magnets
- Superglue or E6000 adhesive
Step 1: Shaping the Base
-
Condition the clay:
Start by kneading your polymer clay until it’s soft and pliable. You’ll want a variety of colors, so mix white into your brighter colors to achieve those soft, milky pastel tones shown in the photo. -
Roll it out:
Using an acrylic rolling pin, roll a sheet of clay to a uniform thickness of about 1/4 inch. If you have a pasta machine dedicated to clay, a medium setting works perfect here. -
Cut the clear:
Press your square cookie cutter firmly into the clay sheet to cut out your shapes. Lift the cutter straight up to keep the edges clean. -
Soften the edges:
The charm of these magnets is in their softness. Gently tap the corners of each square against your work surface or use your finger to round them off slightly so they aren’t sharp. -
Smooth the surface:
Before baking, give each square a quick rub with a tiny bit of baby oil on your finger to remove any fingerprints or dust. This leaves a flawless canvas for the faces. -
Bake the tiles:
Arrange the squares on a parchment-lined baking sheet. Bake according to your specific clay brand’s package directions (usually around 275°F for 15-30 minutes). -
Cool down:
Let the tiles cool completely on the baking sheet before handling them. They harden as they cool.
Step 2: Adding Personality
-
Sand for perfection:
Once cool, lightly sand the edges with fine-grit sandpaper if you notice any rough spots or cutter marks. Wipe away the dust with a damp cloth. -
Practice your expressions:
Before marking the clay, sketch a few faces on paper. The style here uses wide-set eyes—simple curved arches for closed happy eyes—and a tiny u-shaped mouth right in the center. -
Draw the features:
Using a fine-point black marker or paint pen, carefully draw the eyes and mouth. Keep the lines thin and confident. I find resting my wrist on the table helps keep the lines steady. -
Add the blush:
Dip the very end of a paintbrush handle or a dotting tool into pink acrylic paint. Dab off the excess on a paper towel first. -
Apply the cheeks:
Gently press two small pink dots just outside the corners of the mouth. The placement makes them look extra cheerful. -
Let the paint set:
Allow the ink and paint to dry completely. If you used a marker, wait at least an hour to ensure it won’t smudge during sealing. -
Seal the deal:
Apply a thin coat of matte varnish to protect the surface from kitchen grease and wear. This step is optional but helps them last longer.
Smudged Ink?
If your marker smudges on the baked clay, dip a Q-tip in rubbing alcohol and gently wipe the error away. It cleans up perfectly so you can try again.
Step 3: Final Assembly
-
Flip and glue:
Turn all your decorated tiles face down. Place a small drop of superglue or E6000 in the center of the back of each tile. -
Attach magnets:
Press a strong magnet into the glue. Let them cure undisturbed for the time recommended on your glue bottle before sticking them to the fridge.
Blush Technique
For softer, less graphic cheeks, use a dry brush with a tiny amount of pink chalk pastel dust instead of acrylic paint dots.
Now you have a whole crowd of friendly faces ready to hold up your grocery lists and photos


What Really Happens Inside the Kiln
Learn how time and temperature work together inside the kiln to transform clay into durable ceramic.
Flower Coasters and Citrus Slice Coasters
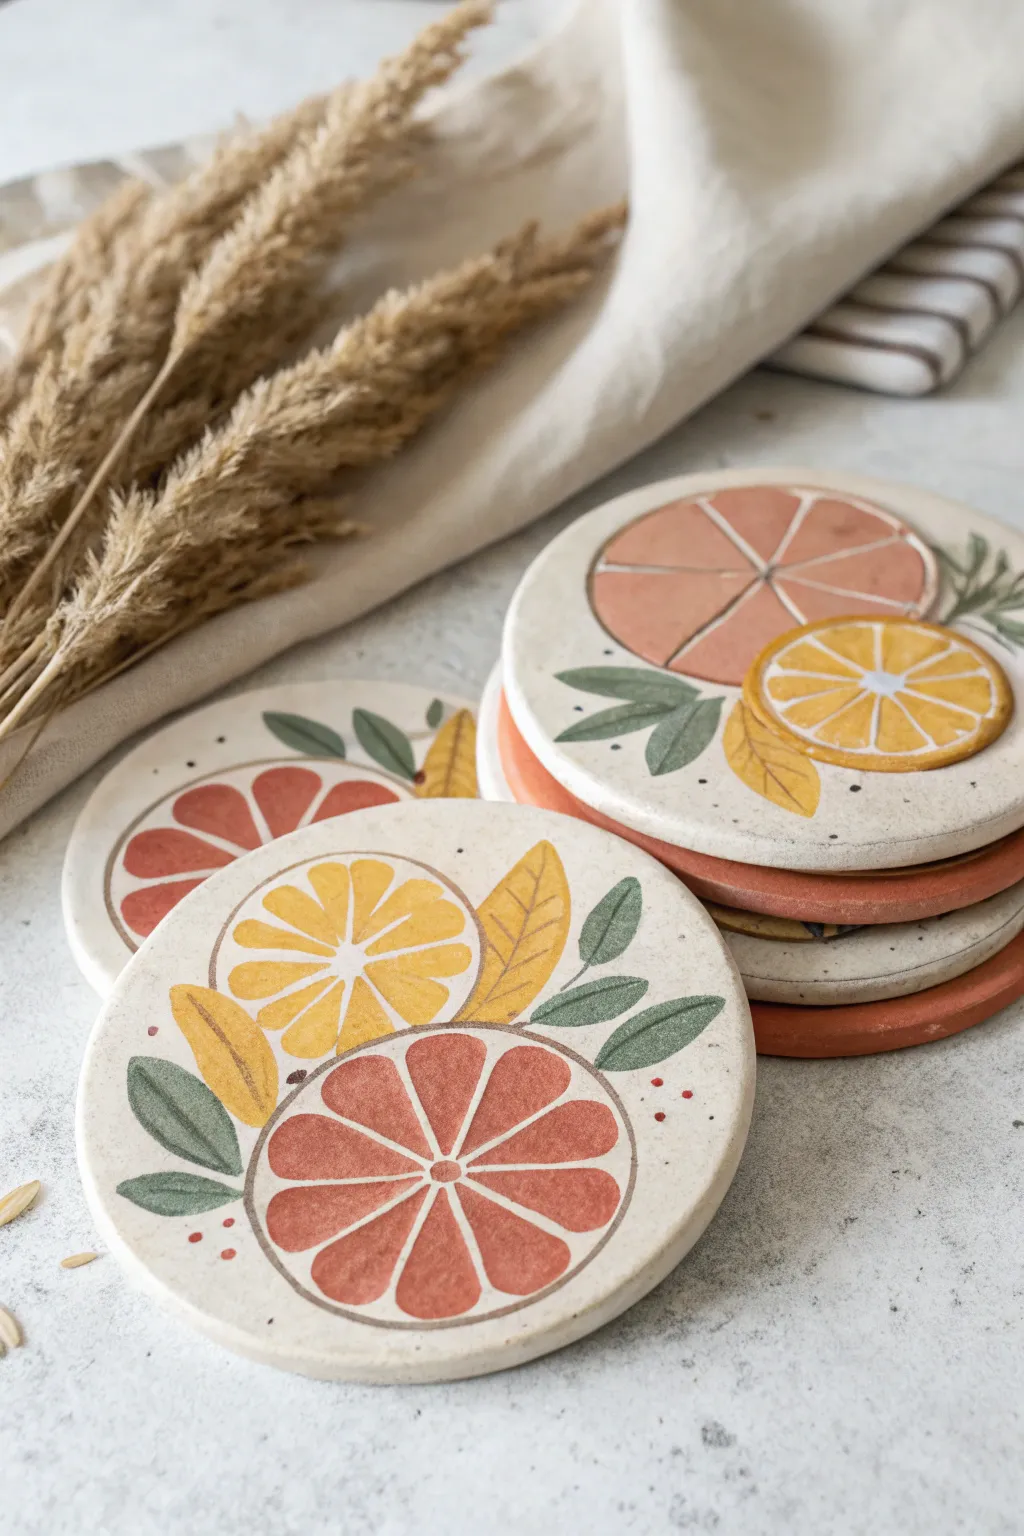
Brighten up your coffee table with these refreshing, nature-inspired coasters featuring stylized grapefruit and lemon slices. The matte finish and earthy tones give them a sophisticated handmade look perfect for summer sipping.
Step-by-Step
Materials
- White air-dry clay or polymer clay
- Rolling pin
- Round cookie cutter (approx. 4 inches)
- Sandpaper (fine grit)
- Acrylic paints (terracotta, mustard yellow, sage green, dark green)
- Small flat paintbrushes and liner brushes
- Matte spray sealant or Mod Podge Matte
- Old toothbrush (optional for speckling)
- Pencil
Step 1: Shaping the Base
-
Roll the clay:
Begin by conditioning your clay until it’s pliable. Roll it out on a smooth surface to an even thickness of about 1/4 inch. If you want a super smooth finish, I like to roll the clay between two wooden dowels to ensure the thickness is perfectly uniform. -
Cut the shapes:
Use your large round cookie cutter to punch out clean circles. If you don’t have a cutter that size, trace around a wide mouthed jar with a craft knife. -
Smooth the edges:
Dip your finger in a little water and run it gently around the rim of each circle to smooth out any rough cuts or sharp edges before the clay starts to set. -
Allow to dry:
Place your clay circles on a flat surface to dry completely. For air-dry clay, flip them over every few hours to prevent curling. This usually takes 24-48 hours depending on humidity. -
Sand for perfection:
Once fully cured, use fine-grit sandpaper to buff out any bumps on the surface and refine the edges until they feel stone-smooth.
Step 2: Painting the Design
-
Sketch the layout:
Lightly sketch your design onto the dry clay with a pencil. Draw two overlapping circles for the citrus slices—one large, one slightly smaller—and sketch simple leaf shapes tucked around them. -
Base coat the citrus:
Paint the larger circle with a terracotta or grapefruit pink shade. Paint the smaller circle with a mustard yellow. Don’t worry about the segments yet; just block in the solid circles. -
Add the segments:
Mix a very pale cream or off-white color. Using a fine liner brush, paint a rim around the colored circles and draw straight lines intersecting in the middle like a wheel effectively creating the citrus segments. -
Paint the leaves:
Fill in your leaf outlines with sage green and mustard yellow. Alternating colors creates a nice visual rhythm. -
Add details:
Once the base layers are dry, use a darker green to paint a simple center vein line on the green leaves, and a thin brown line for the yellow leaves. -
Apply the speckle effect:
To mimic the earthy texture in the photo, dip an old toothbrush into watered-down brown or grey paint. Run your thumb over the bristles to flick tiny speckles across the coaster surface.
Uneven Drying?
If your air-dry clay starts warping as it dries, place a heavy book on top of the circles once they are semi-dry to press them flat again.
Step 3: Finishing Up
-
Add red accents:
With the tip of a small brush or a toothpick, add three tiny red dots near the bottom edge of the design for a pop of color. -
Seal the artwork:
Once all paint is completely dry, apply a coat of matte sealant. This protects your work from moisture from cold drinks. -
Attach backing (optional):
Glue a felt circle or small cork feet to the bottom of the coaster to protect your table surfaces.
Decoupage Method
Not confident in your painting? Print citrus illustrations on tissue paper and decoupage them onto the clay for an identical look with zero drawing required.
Set your table with these lovely handmade accents and enjoy a fresh squeeze of style with every drink
Tiny Bud Vases (Plus Mini Magnetic Vases)

Capture the beauty of simplicity with this handmade ceramic bud vase, featuring a gently swelling form and a natural, speckled finish. Its organic shape and earthy texture make it the perfect vessel for showcasing a single, delicate stem of baby’s breath or dried florals.
Step-by-Step Tutorial
Materials
- Speckled stoneware clay (mid-fire)
- Potter’s wheel (or hand-building tools for pinch method)
- Comparison calipers
- Throwing sponge
- Modeling tool (wooden knife)
- Wire clay cutter
- Rib tool (wooden or silicone)
- Clear matte glaze
- Small kiln
- Needle tool
Step 1: Shaping the Form
-
Preparing the clay:
Begin with a small ball of speckled stoneware clay, roughly the size of a tennis ball. Wedge it thoroughly to remove air bubbles, as pockets of air can cause the piece to crack during firing. -
Centering:
Throw the ball firmly onto the center of your wheel head. Using wet hands and steady pressure, cone the clay up and down until it spins perfectly smooth and centered without any wobble. -
Opening the vessel:
Find the center with your thumbs and press down gently to open the clay, leaving about a half-inch of thickness at the base. Pull the floor out slightly—remember, this is a bud vase, so the interior cavity doesn’t need to be wide. -
Pulling the cylinder:
Slow the wheel speed down. With one hand inside and one outside, pinch gently and pull the walls upward. I usually aim for a cylinder that is slightly taller than the final desired height, keeping the walls even. -
Creating the belly:
Now for the shaping. Apply pressure from the inside hand to push the clay wall outward near the base, creating a rounded, bulbous ‘belly’ for the vase. Support the clay from the outside to keep the curve controlled. -
Collaring the neck:
As you move up the form, gently squeeze typically using both hands (thumbs and forefingers) to narrow the cylinder into a neck. This acts as a collar, contrasting the wide bottom. -
Refining the curve:
Use a rib tool on the exterior to smooth the transition from the round belly to the narrow neck. This also compresses the clay particles and creates those subtle horizontal throwing lines seen in the image. -
Finishing the rim:
At the very top, gently flare the rim outward ever so slightly to create a soft lip. Use a chamois or a wet sponge strip over the rim to make it perfectly smooth and rounded. -
Trimming the base:
Use a wooden knife tool to undercut the base of the vase while it is still on the wheel, creating a clean line where the pot meets the surface.
Collaring Woes
If the clay buckles while narrowing the neck, you are forcing it too quickly. Slow down the wheel, keep the clay well-lubricated, and compress the wall slightly thicker before narrowing.
Step 2: Finishing and Firing
-
Wire cutting:
Run a wire cutter underneath the vase to separate it from the wheel head. Carefully lift it off using pot lifters or dry hands and set it on a ware board. -
Drying:
Allow the vase to dry slowly to a leather-hard state. If you handle it too soon, you’ll warp that delicate neck. -
Trimming the foot:
Once leather hard, center the vase upside down on the wheel. Trim the bottom to create a small foot ring, mirroring the neatness of the top rim. -
Bisque fire:
Let the vase become bone dry before loading it into the kiln for the first firing (bisque fire), typically to cone 04. This hardens the clay and prepares it for glazing. -
Glazing:
For the look in the photo, wipe the bisqued piece with a damp sponge to remove dust. Dip the vase quickly into a clear matte glaze. The clear glaze will seal the piece while allowing the natural speckles of the clay body to show through. -
Final wipe:
Clean the foot ring of any glaze using a sponge so it doesn’t stick to the kiln shelf. -
Glaze fire:
Fire the piece a second time to the maturity temperature of your specific clay body (usually Cone 5 or 6 for mid-fire stoneware).
Textural Twist
Before the clay dries, gently press a piece of coarse linen or burlap against the belly of the vase. This adds a subtle fabric texture that catches the glaze beautifully.
Place a single sprig of dried gypsophila in your new vase to complete this serene, minimalist aesthetic

TRACK YOUR CERAMIC JOURNEY
Capture glaze tests, firing details, and creative progress—all in one simple printable. Make your projects easier to repeat and improve.
Modern Photo Holders and Place Card Stands
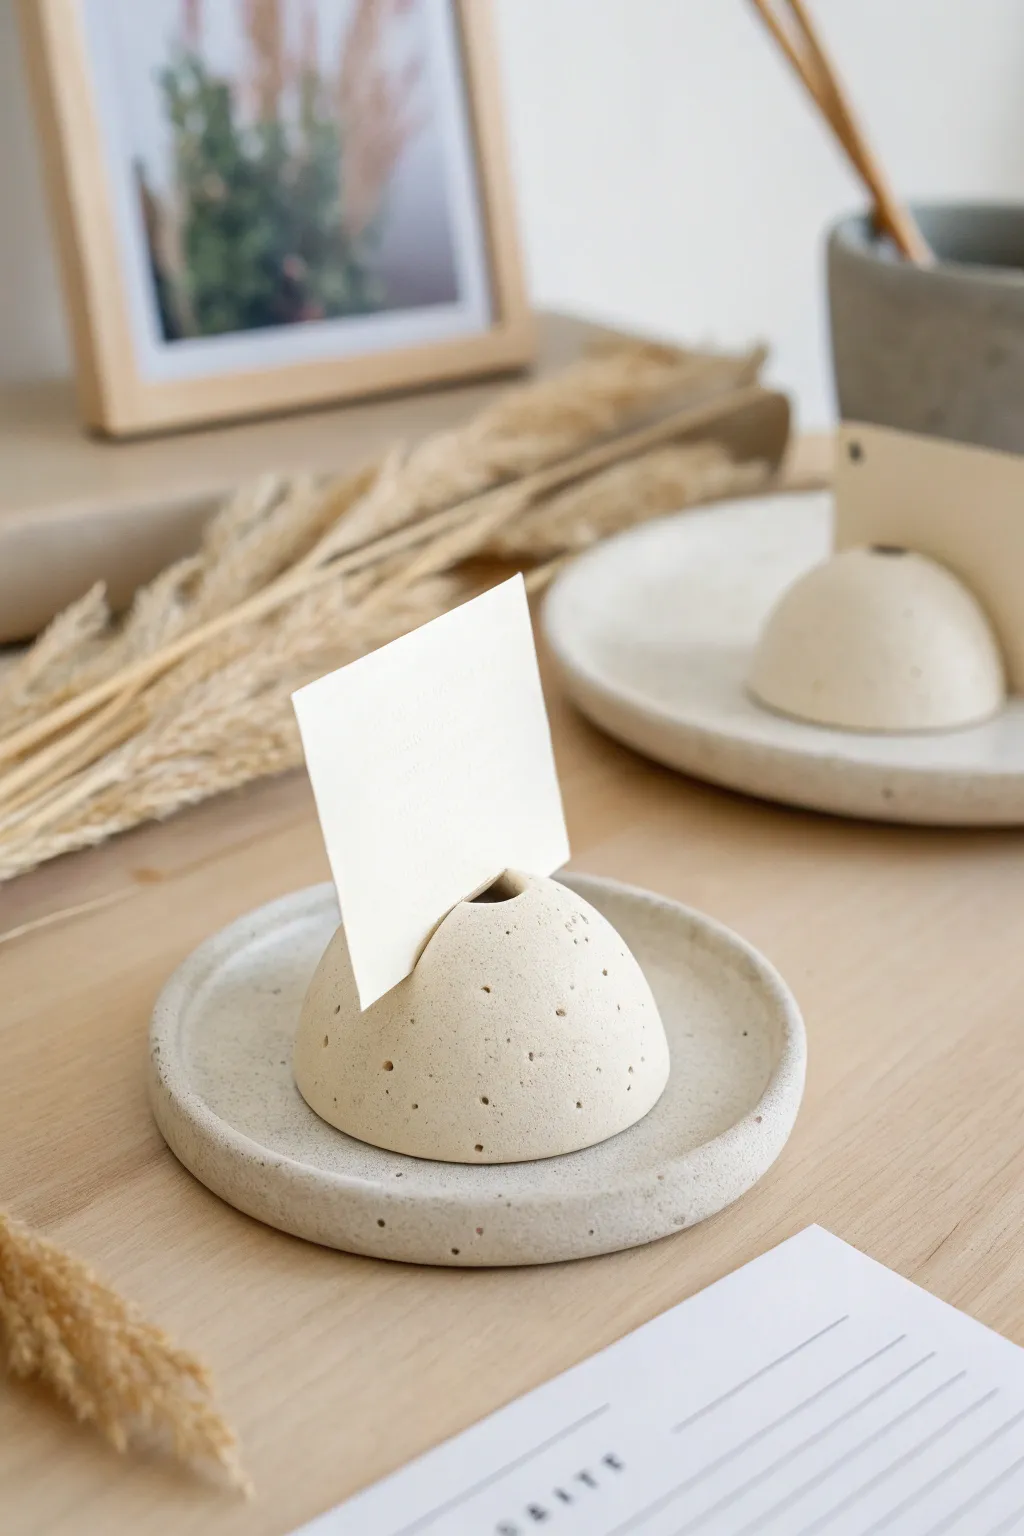
Minimalist and organic, these dome-shaped clay stands add a modern touch to any desk or dining table. The subtle speckled texture mimics natural stone, making them perfect for displaying photos, notes, or elegant place cards.
How-To Guide
Materials
- White beautiful air-dry clay or polymer clay
- Used coffee grounds or fine black pepper (for speckling)
- Small rolling pin
- Circle cutter or a small glass (approx. 2-3 inches diameter)
- Craft knife or thin blade
- Small wooden dowel or a pencil
- Fine-grit sandpaper (400-600 grit)
- Small bowl of water
- Acrylic sealer (matte finish)
- Smooth work surface or clay mat
Step 1: Preparing the Speckled Clay
-
Condition the clay:
Start with a chunk of white clay about the size of a tangerine. Knead it thoroughly in your hands until it becomes warm, soft, and pliable. This prevents cracks later on. -
Add texture:
Flatten the clay slightly and sprinkle a pinch of dried coffee grounds or black pepper onto surface. I prefer coffee grounds because they offer a slightly earthier tone. -
Mix thoroughly:
Fold the clay over the grounds and knead repeatedly. Continue folding and rolling until the specks are evenly distributed throughout the entire ball. -
Portion the clay:
Divide your clay into equal portions depending on how many stands you want to make. A ping-pong ball size is usually perfect for a single stand.
Slit Too Tight?
If the card slot shrinks during drying, gently run a folded piece of sandpaper back and forth inside the groove to widen it without cracking the dome.
Step 2: Shaping the Dome
-
Roll a sphere:
Take one portion and roll it between your palms to create a perfectly smooth ball. Check for any seams or cracks and smooth them out with a little water if using air-dry clay. -
Flatten the base:
Place the ball on your work surface. Gently press down on the top with the palm of your hand to flatten the bottom, creating a stable base while keeping the top rounded. -
Refine the dome:
Cup your hands around the clay and gently shape the sides to ensure a nice, even curve. The shape should resemble a halved egg or a smooth hill. -
Cut the slot:
Using your craft knife or a thin blade, carefully press straight down into the center of the dome’s top. Rock the blade slightly to create a slit wide enough for cardstock. -
Create the hole:
Just behind or in front of your slit, use a small dowel or the non-writing end of a small paintbrush to poke a shallow hole. This adds visual interest and can hold small dried flowers. -
Smooth the edges:
Dip your finger in water and gently run it around the slit and the hole to soften any sharp clay ridges created by the tools.
Try Terracotta
Experiment with mixing white and terracotta-colored clay before adding the coffee grounds for a warmer, marbled stone effect.
Step 3: Creating the Tray Base
-
Roll a slab:
Take a separate piece of your speckled clay mixture and roll it out with your rolling pin until it is about 1/4 inch thick. -
Cut the circle:
Use your circle cutter or a glass to cut out a round base. This disk will serve as the tray that sits underneath the dome. -
Lift the rim:
Gently pinch the edges of the circle upward to create a slight lip. Rotate the piece as you go to ensure the rim is even all the way around. -
Refine the tray shape:
Place the tray on the table and run your finger along the inside of the rim to smooth the transition from the base to the edge. -
Test the fit:
Carefully place your dome onto the wet tray just to check for size. The dome should sit comfortably in the center with a rim of tray visible around it.
Step 4: Finishing Touches
-
Add surface details:
If you want extra texture on the dome like in the photo, use a needle tool or toothpick to gently poke tiny, random shallow dots over the surface. -
Dry thoroughly:
Set both pieces aside in a cool, dry place. Let them air dry for at least 24-48 hours. Flip them occasionally so the bottoms dry evenly. -
Sand for smoothness:
Once bone dry, use fine-grit sandpaper to gently buff out any fingerprints or rough edges on the rim of the tray or base of the dome. -
Seal the project:
Apply a thin coat of matte acrylic sealer to protect the clay from moisture and dust, ensuring it keeps that raw, stone-like appearance.
Once dry, place your favorite photo or a handwritten note in the slot to complete your stylish display
Textured Incense Holders
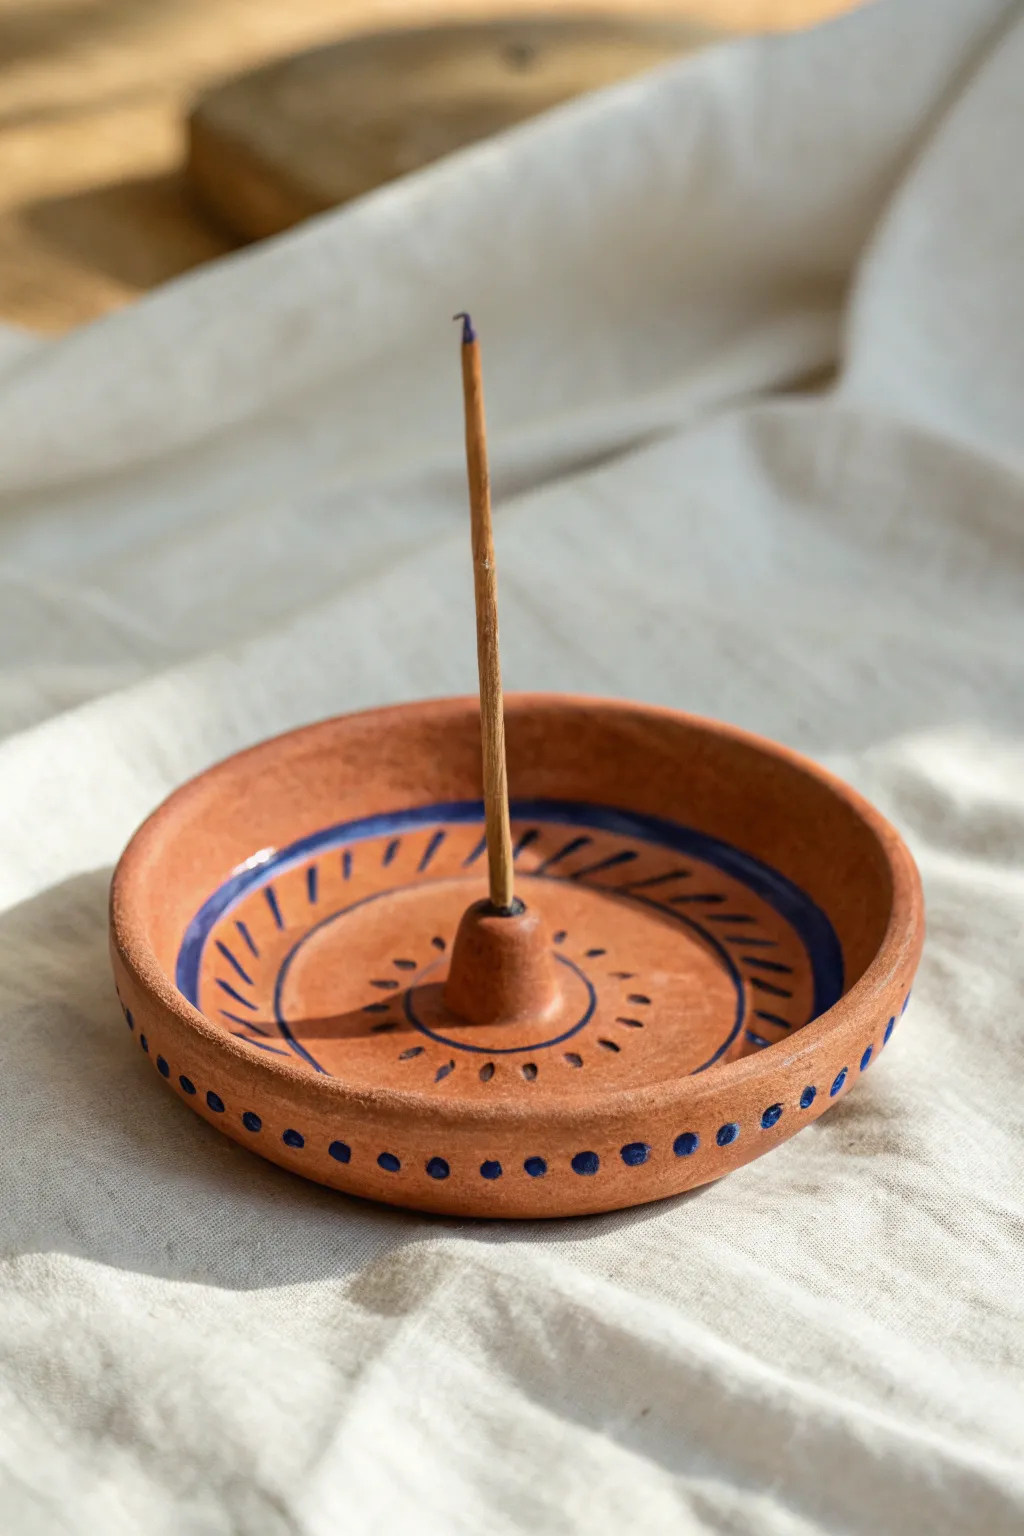
Bring a touch of artisan warmth to your space with this terracotta-style incense holder, featuring charming hand-painted blue detailing. The simple construction creates a rustic, earthy base that perfectly catches falling ash while holding your favorite scents secure.
Step-by-Step
Materials
- Air-dry clay (terracotta color)
- Small rolling pin
- Circle cutter or small bowl (approx. 4-5 inches)
- Small bowl relative to cutter (for shaping)
- Clay sculpting tool or dull knife
- Water and sponge
- Paintbrush (fine tip)
- Cobalt blue acrylic paint
- Sealant or varnish (matte finish)
- Incense stick (for sizing)
Step 1: Shaping the Clay Base
-
Conditioning:
Start by taking a handful of terracotta air-dry clay and kneading it in your hands. You want it to be warm, pliable, and free of any air bubbles before you start rolling. -
Rolling:
Roll the clay out on a smooth work surface or canvas mat. Aim for an even thickness of about 1/4 inch; too thin and it might crack, too thick and it will take forever to dry. -
Cutting the Circle:
Place your circle cutter or a small bowl (upside down) onto the slab. Press down firmly to cut out a clean circle, then peel away the excess clay. -
Smoothing Edges:
Dip your finger in a tiny bit of water and run it along the cut edge of the circle. This smooths out any harsh angles or rough bits left by the cutter. -
Creating the Rim:
Gently lift the edges of the circle upwards to create a shallow lip. You can do this by pinching it lightly between your thumb and forefinger while rotating the piece. -
Refining the Shape:
If you want a very uniform curve, you can gently press the clay circle into a shallow bowl to help it hold its form during the initial drying phase.
Clean Lines Hack
To get perfectly steady concentric circles, place the dish on a lazy Susan or banding wheel. Hold your brush steady in one spot and slowly rotate the wheel.
Step 2: Adding the Holder Component
-
Forming the Center:
Take a small leftover piece of clay and roll it into a ball about the size of a large marble. Slightly flatten the bottom so it sits flush. -
Scoring and Slipping:
Use a needle tool or toothpick to scratch up the center of the dish and the bottom of the small ball. Add a drop of water to create ‘slip’ and press the ball firmly into the center. -
Blending:
Use a sculpting tool to smooth the clay from the base of the ball onto the dish floor, ensuring they are seamlessly joined as one piece. -
Creating the Hole:
Take an incense stick (or a tool of similar diameter) and press it straight down into the center mound. Go deep enough to hold a stick securely, but don’t poke all the way through the bottom. -
Final Polish:
Give the entire piece one last smooth-over with a slightly damp sponge to remove fingerprints. Let the clay dry completely according to the package instructions, usually 24-48 hours.
Step 3: Painting the Design
-
Prepping Paint:
Pour a small amount of cobalt blue acrylic paint onto a palette. Ensure your brush has a fine tip for detailed line work. -
Painting the Rings:
Carefully paint a thin ring around the base of the center mound. Paint a second, larger ring halfway between the center and the outer rim. -
Adding Dashes:
In the space between your two painted rings, add short, angled dash marks. They should radiate outward like sun rays, spacing them evenly around the circle. -
Inner Details:
Paint very small dashes or dots radiating immediately from the base of the center mound, creating a smaller sunburst effect. -
Rim Decoration:
Along the thick, vertical edge of the outer rim, paint evenly spaced dots all the way around the circumference. -
Sealing:
I usually wait for the paint to be bone dry before applying a matte varnish. This protects the clay from ash stains and gives the piece a finished, professional look.
Fixing Wobbly Holes
If the incense stick leans too much, the hole is too wide. Add a tiny drop of wet clay or glue into the hole after drying to narrow the opening slightly.
Place this on your coffee table and enjoy the customized artisan vibe it brings to your relaxation rituals
Cutout Tea Light Holders
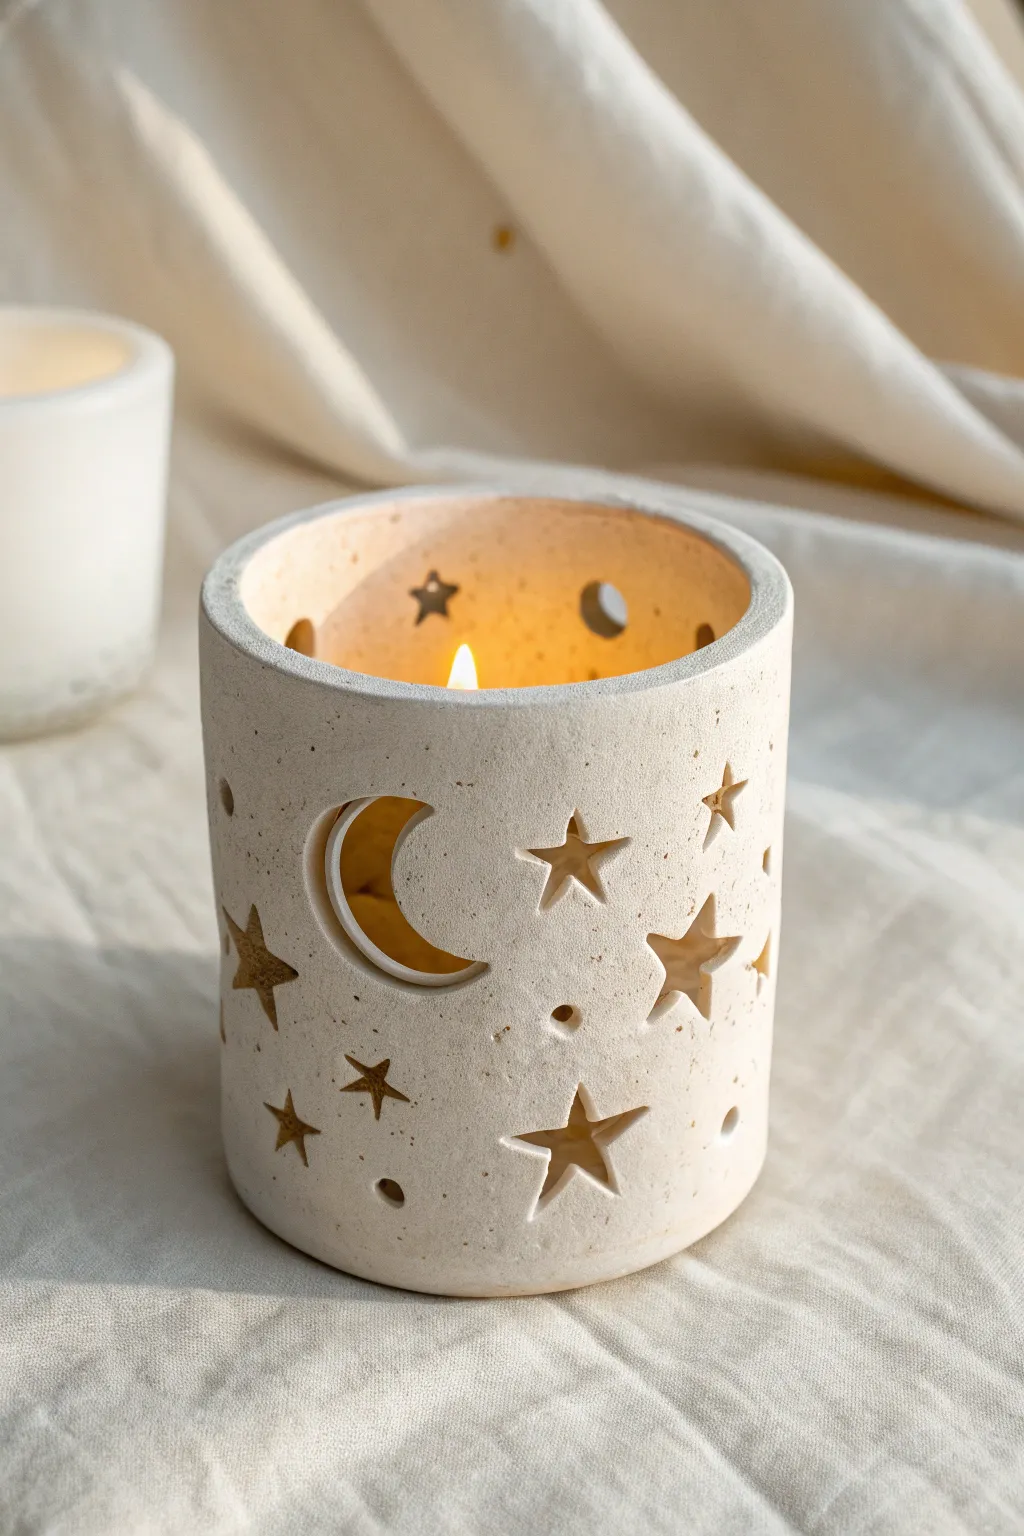
Bring the magic of the night sky indoors with these charming starry tea light holders. The warm cream clay and whimsical moon and star cutouts create a cozy, flickering glow perfect for any bedside table or mantlepiece.
How-To Guide
Materials
- Air-dry clay (stone or white with speckles)
- Rolling pin
- Drinking glass or jar (to use as a mold)
- Craft knife or scalpel
- Small star-shaped cookie cutters (optional)
- Drinking straw (for small circles)
- Sandpaper (fine grit)
- Water and sponge
- Ruler
- Parchment paper
Step 1: Preparing the Clay Base
-
Roll out the slab:
Begin by taking a generous handful of air-dry clay and kneading it until pliable. Roll it out on a piece of parchment paper to an even thickness of about 1/4 inch. Try to keep the slab consistent so your candle holder walls are sturdy. -
Measure and cut:
Measure the circumference and height of the glass or jar you are using as a mold. Add a half-inch to the length for the distinctive overlap seam. Use your ruler and craft knife to cut a precise, clean rectangle from your clay slab based on these measurements. -
Cut the base:
Place your jar directly onto the remaining clay slab and cut around the bottom to create a perfect circle. This will serve as the floor of your tea light holder.
Clean Cuts Hack
If your clay drags when cutting stars, wait 15 minutes for the slab to stiffen slightly. Clean your knife blade often.
Step 2: Designing the Night Sky
-
Plan your placement:
Before assembling, lay your clay rectangle flat. Lightly sketch the positions of your moon and stars with a toothpick to ensure a balanced design, keeping them at least an inch away from the edges where you will join the clay. -
Carve the moon:
carefully use your craft knife to cut out a crescent moon shape. Work slowly, removing the clay piece gently so you don’t warp the surrounding slab. I find it helpful to smooth the inner edge of the cut immediately with a slightly damp finger. -
Punch the stars:
If you have tiny star cutters, press them firmly into the clay and remove the shapes. If working freehand, use the very tip of your craft knife to cut 5-point stars. Vary the sizes for visual interest. -
Add detail holes:
Take a drinking straw and punch random small circles throughout the empty spaces of your design to mimic distant planets or stardust. Twist the straw as you pull it out to get a clean hole.
Golden Glow Upgrade
Paint the interior with gold acrylic paint after drying. When lit, the gold will reflect a warmer, brighter light through the holes.
Step 3: Assembly and Refining
-
Form the cylinder:
Wrap your parchment paper around your jar mold first to prevent sticking. Then, gently lift your decorated clay rectangle and wrap it around the mold. -
Join the seam:
Score the overlapping edges with a hatching pattern using your knife, apply a little water, and press the ends together firmly. Smooth the seam with your finger or a modelling tool until it completely disappears. -
Attach the base:
Score the bottom edge of your cylinder and the outer edge of your circular base. Press the cylinder onto the base. Use a small coil of clay on the inside seam to reinforce the join, blending it smooth with a tool. -
Remove the mold:
carefully slide the glass jar out of the clay cylinder. If it feels too floppy, let it firm up for 30 minutes before removing the support. -
Smooth the rim:
Dip your finger in water and run it along the top rim of the holder to soften any sharp edges created during cutting. Do the same for your cutout shapes if they look rough.
Step 4: Finishing Touches
-
Dry slowly:
Place your holder in a cool, dry spot away from direct sunlight. Let it dry slowly for 24-48 hours. Rushing this step can lead to cracking. -
Sand for perfection:
Once bone dry, take fine-grit sandpaper and gently buff the exterior. Pay special attention to the rim and the seam area to ensure a seamless, professional finish. -
Seal (Optional):
For a bit more durability, you can brush on a matte acrylic varnish. This also helps seal the clay against soot, though the raw matte finish looks very natural as is.
Enjoy the peaceful ambiance of your handcrafted night sky as the candlelight dances through the stars
Beaded-Edge Trinket Bowls
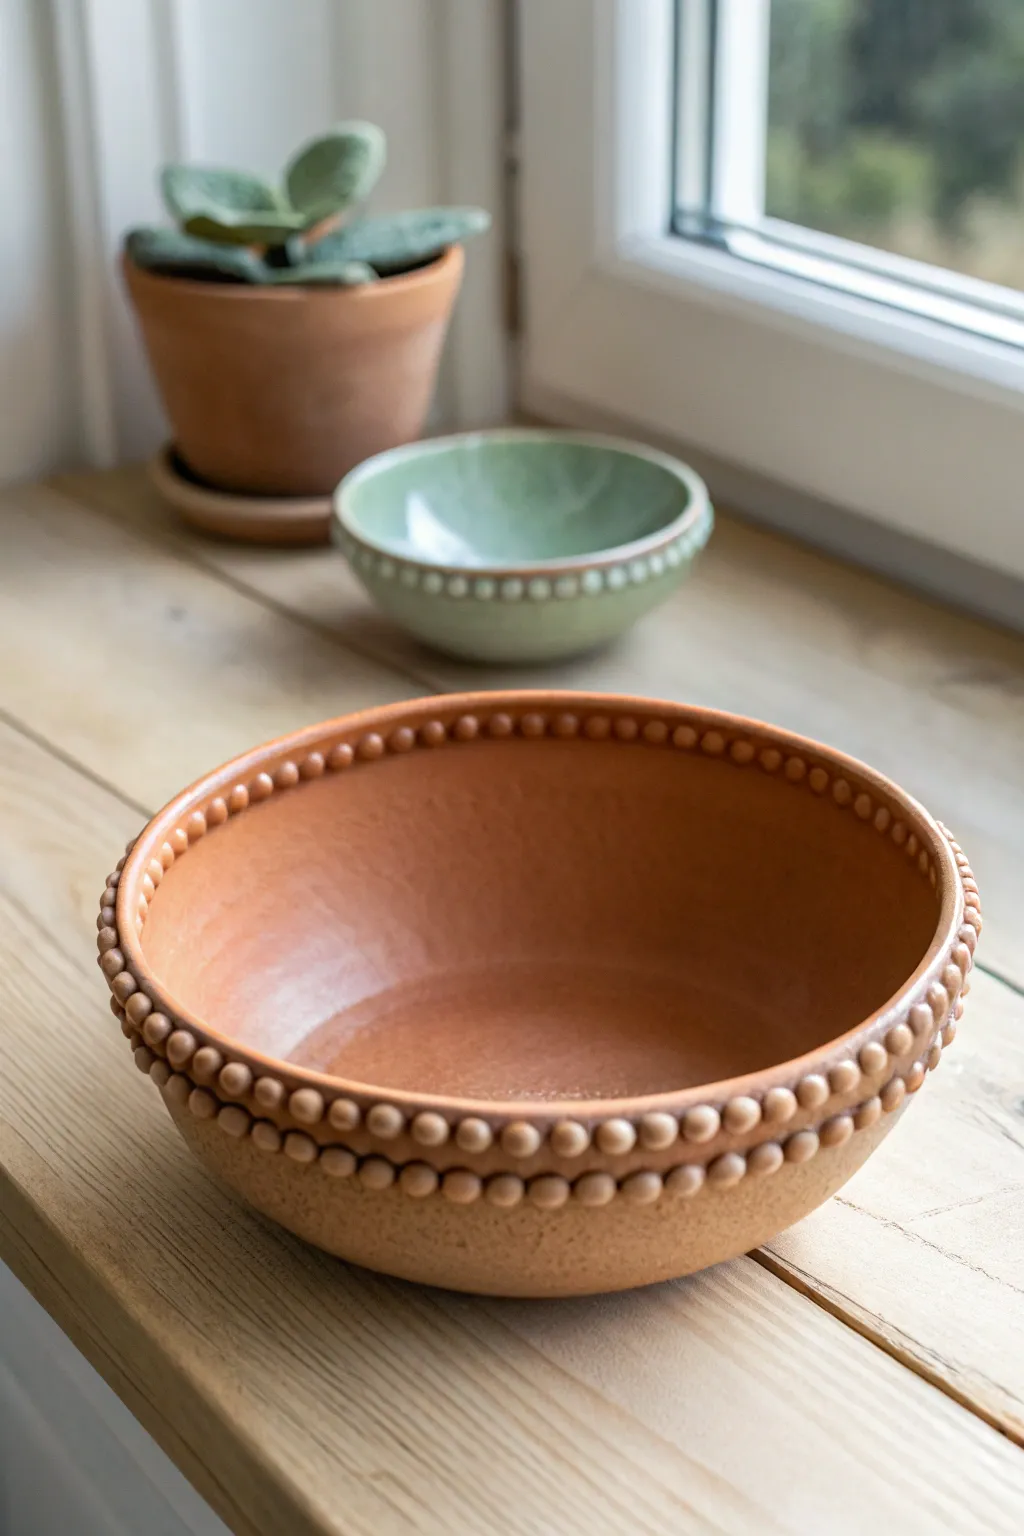
This rustic, warm terracotta bowl features a stunning double row of beads along its rim, adding intricate detail to a classic silhouette. The natural finish and tactile beaded edge make it a perfect centerpiece or catch-all dish for any room.
Step-by-Step Guide
Materials
- Terracotta air-dry clay or kiln-fire clay
- Rolling pin
- Large mixing bowl (to use as a slump mold)
- Small bowl with water (slip)
- Scoring tool or fork
- Sponge
- Potter’s needle or sharp knife
- Smooth wooden work surface
Step 1: Forming the Base
-
Prepare the Clay:
Start by wedging a large ball of terracotta clay to remove air bubbles and ensure an even consistency. -
Roll the Slab:
Use your rolling pin to roll the clay into a large, even slab. Aim for a thickness of about 1/4 inch or roughly 6mm. -
Check for Imperfections:
Run a damp sponge lightly over the surface to smooth out any canvas textures or cracks before cutting. -
Prepare the Mold:
Taking your large kitchen mixing bowl, place a layer of cling film or a paper towel inside to prevent sticking if you are pressing inside, or drape it over the upside-down bowl if using it as a hump mold. For this shape, pressing inside a mold (slump method) works very well. -
Shape the Bowl:
Gently lift your clay slab and press it into your chosen mold. Smooth the clay from the center upward to ensure it takes the shape of the bowl without trapping air underneath. -
Trim the Excess:
Using a needle tool or sharp knife, trim the excess clay around the rim of the bowl to create a clean, even edge. -
Smooth the Rim:
Dip your finger in a little water and run it along the cut edge to round it off slightly.
Uneven Beads?
If your beads vary wildly in size, roll a long ‘snake’ of clay first. Cut it into equal-length segments before rolling them into balls. This ensures every bead starts with the same amount of clay.
Step 2: Creating the Beaded Edge
-
Roll Tiny Spheres:
Pull small pieces of clay and roll them between your palms to create approximately 50-70 small, pea-sized spheres. Try to keep them consistent in size. -
First Row Preparation:
Score the outside rim of your clay bowl using a fork or scoring tool. Apply a small amount of water or slip to the scored area. -
Attach the Upper Row:
Place the clay beads one by one along the very top edge of the rim. Press each one gently to adhere it without flattening the spherical shape too much. -
Secure the Beads:
I find it helpful to use the back of a small paintbrush or a modeling tool to gently smudge the bottom of each bead into the bowl wall for a stronger bond. -
Close the Loop:
Continue until the entire top circumference is beaded. Adjust spacing slightly on the last few beads if necessary to make them fit perfectly. -
Second Row Preparation:
Score a second line directly beneath the first row of beads. Add a little slip to this new line. -
Attach the Lower Row:
Place a second row of clay beads directly underneath the first. Align them so each bottom bead sits directly below a top bead for a stacked look. -
Blend the Rows:
Gently press the bottom row against the wall of the bowl. Be careful not to smudge the nice round surface facing outward. -
Refine the Shape:
Look at the bowl from a distance to ensure the bead lines are straight. Nudge any wandering beads back into line while the clay is still workable.
Step 3: Finishing Touches
-
Smooth the Interior:
Give the inside of the bowl one final pass with a damp sponge to ensure a flawlessly smooth finish suitable for holding trinkets. -
Slow Drying:
Let the bowl dry slowly inside the mold for at least 24 hours. Cover it loosely with plastic to prevent the rim from drying too fast and cracking. -
Release and Dry:
Once the clay is leather-hard, carefully remove it from the mold and let it air dry completely for another day or two. -
Final Step:
If using air-dry clay, seal with a matte varnish. If using ceramic clay, fire according to your clay body’s instructions.
Level Up: Glaze Effects
Apply a transparent glaze over the terracotta, but wipe it back with a sponge before firing. The glaze will stay in the crevices between the beads, highlighting the texture beautifully.
Enjoy displaying your handmade terracotta creation on a shelf or filling it with your favorite small treasures
Hanging Clay Mobiles and Garlands
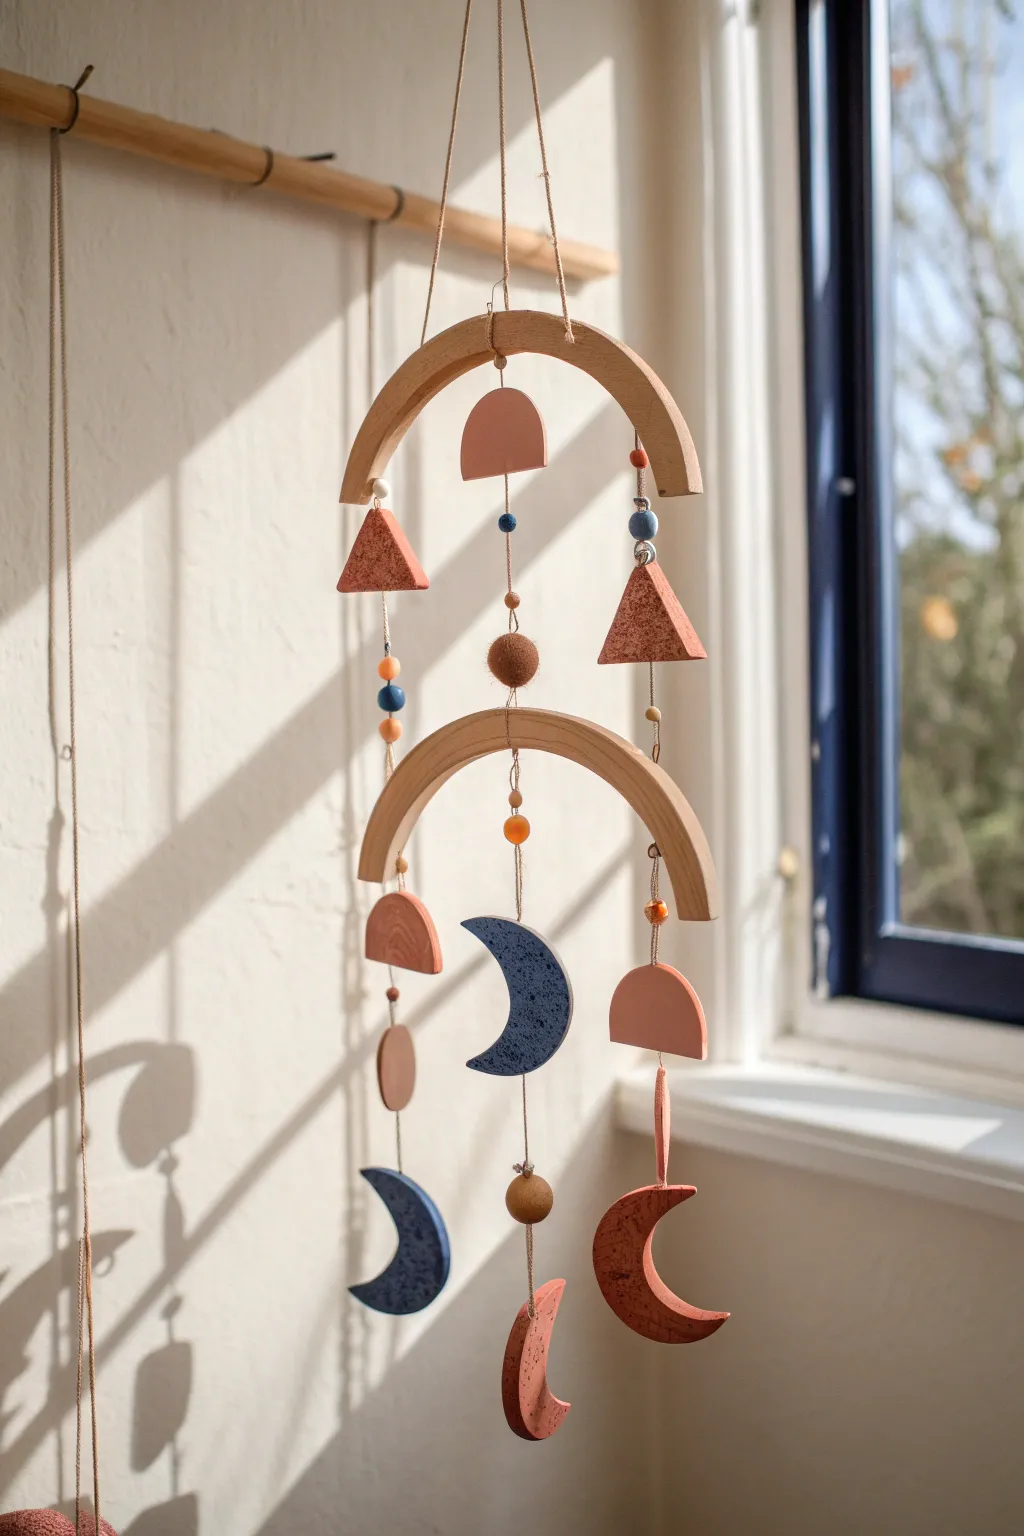
Bring celestial charm to any corner of your home with this earthy, bohemian-inspired mobile. Combining textured polymer clay in warm terracotta and deep navy hues with natural wood arches creates a balanced, peaceful piece of kinetic art.
How-To Guide
Materials
- Polymer clay (terracotta, rust orange, navy blue, and white/granite)
- Acrylic rolling pin
- Clay cutters (circle, crescent moon, triangle)
- Craft knife or clay blade
- Two wooden arches (approx. 6-8 inches wide)
- Strong hemp cord or thin jute twine
- Wooden beads (assorted sizes)
- Needle tool or toothpick
- Baking sheet and parchment paper
- Sandpaper (fine grit)
- Oven
Step 1: Preparing the Clay Components
-
Mix your colors:
Begin by conditioning your polymer clay blocks. For the navy blue pieces, I like to mix in a tiny amount of granite or white clay to create a subtle speckled, stone-like effect that adds depth. -
Roll out the slabs:
Roll each color of clay out to an even thickness of about 1/4 inch (6mm). Using a consistent thickness ensures all pieces are weighted similarly, which helps the mobile hang straight later. -
Cut the shapes:
Cut out your shapes: two textured triangles (terracotta), several semicircles (rust and terracotta), and multiple crescent moons in both terracotta and navy. Use your circle cutter to make small connector discs. -
Add texture:
Before the clay hardens, press a coarse sponge or a crumpled ball of aluminum foil gently onto the surface of the triangle and crescent pieces to give them an organic, pitted texture. -
Create hanging holes:
Using a needle tool, pierce holes in each piece. Most pieces need a hole at the top and bottom for connecting vertical strands, but the bottom-most pieces (like the lowest crescent moons) only need one hole at the top. -
Bake carefully:
Arrange all clay pieces on a parchment-lined baking sheet. Bake according to the manufacturer’s instructions for your specific brand of clay, usually at 275°F (135°C) for 15-30 minutes.
Unbalanced Mobile?
If one side dips lower, add a small, hidden weight (like a washer or extra bead) to the back of the lighter side’s clay piece using a dab of strong glue.
Step 2: Drilling the Wood
-
Mark the arches:
While the clay cools, prepare your wooden arches. Mark three distinct points along the bottom edge of the top arch, and three corresponding points on the top edge of the lower arch to align the strands. -
Drill pilot holes:
Use a small drill bit corresponding to the thickness of your hemp cord to drill through the marked spots. You’ll also need a central hole at the very top of the upper arch for the main hanging loop.
Smooth Edges
After baking, dip fine-grit sandpaper in water and gently sand the edges of your clay pieces. This removes sharp burrs and gives the mobile a truly professional finish.
Step 3: Assembly
-
Cut the cord:
Cut three long lengths of hemp cord. These will form the three vertical ‘drops’ of the mobile. -
Start the center strand:
Tie a secure knot at one end of a cord. Thread on the bottom-most crescent moon, followed by a wooden bead or felt ball, then thread up through the bottom of the lower wooden arch. -
Add middle components:
Continue threading upward, adding a navy crescent moon and a bead, then pass the cord through the center hole of the top wooden arch. -
Secure the decorative top:
Finish the center strand by adding a decorative semicile piece or bead above the top arch and tying a loop for hanging. -
Assemble side strands:
Repeat the threading process for the left and right strands. Thread the bottom crescent, add beads and small clay discs, and pull the cord up through the side holes of the arches. -
Balance the tiers:
As you knot the cords to secure the wooden arches in place, lift the mobile frequently to check the balance. Adjust the knots up or down so the arches hang parallel to the floor. -
Knot and trim:
Once you are satisfied with the spacing and balance, double-knot all connections securely. Trim any excess twine tails close to the knots for a clean finish. -
Final adjustment:
Rotate the beads and clay pieces gently so they face forward. The friction of the twine should hold them in the correct orientation.
Find a sunny window or a quiet corner to hang your creation and watch the shadows dance
Keepsake Handprint or Pawprint Plaques
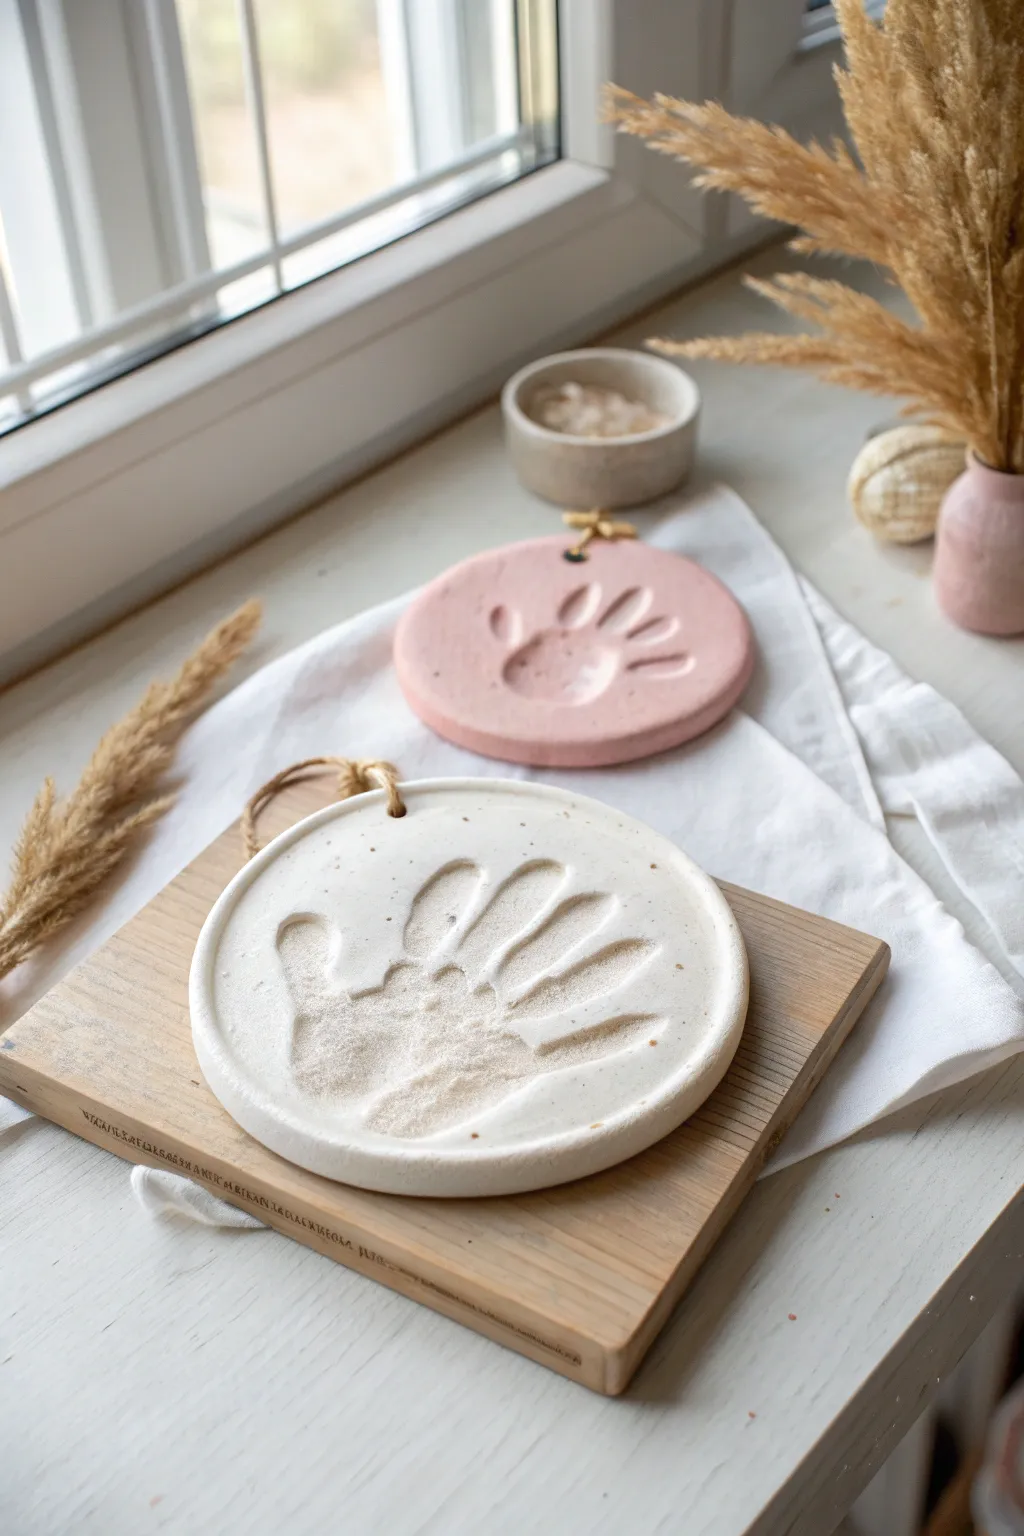
Capture a fleeting moment in time with these sweet, rustic clay plaques that turn a simple handprint into a piece of art. The gentle, matte finish of the clay combined with the organic shape creates a modern heirloom perfect for hanging in a nursery or gifting to grandparents.
Step-by-Step Tutorial
Materials
- Air-dry clay (white and terracotta/pink)
- Small wooden board or rolling surface
- Rolling pin
- Circular cookie cutter or large bowl (approx. 5-6 inches)
- Parchment paper
- Drinking straw or skewer
- Fine-grit sandpaper
- Jute twine or leather cord
- Scissors
- Small bowl of water
- Clear matte sealant spray (optional)
Step 1: Preparation & Shaping
-
Prepare the workspace:
Lay down a sheet of parchment paper over your wooden board or work surface. This prevents sticking and makes it easier to move the clay later without warping the shape. -
Condition the clay:
Take a generous handful of air-dry clay. Knead it in your hands for a minute or two to warm it up and make it pliable. I find this helps eliminate potential cracks during drying. -
Roll it out:
Place the clay ball on the parchment and use your rolling pin to flatten it. Aim for a thickness of about 1/2 inch (1.2 cm). It needs to be thick enough to take a deep impression without breaking. -
Cut the circle:
Press your large circular cutter or bowl firmly into the rolled clay. If using a bowl, use a clean knife to trace around the edge. -
Smooth the edges:
Remove the excess clay from around the circle. Dip your finger in a little water and run it gently around the cut edge to smooth out any roughness or sharp angles.
Smooth Surface Secret
Before printing, lightly glide a barely damp sponge over the clay surface. It removes rolling pin textures and makes the clay more receptive to fine skin details.
Step 2: Creating the Impression
-
Position the hand:
Place the child’s hand (or paw) gently onto the center of the clay disc. Make sure the fingers are spread comfortably. -
Press firmly:
Press down on the palm first, then press each finger individually. You need firm, even pressure to get a clear print, but be gentle enough not to push all the way through. -
Lift carefully:
Hold the edge of the clay down with one hand while quickly but gently lifting the hand straight up to avoid smudging the print. -
Create the hanging hole:
Using a straw or a skewer, poke a hole near the top edge of the circle. Wiggle it slightly to ensure the hole is large enough for your twine. -
Check for imperfections:
Look closely at the print. If there are any stray fingernail marks or unwanted dents, smooth them carefully with a damp fingertip.
Level Up: Color Wash
Dilute acrylic paint with water and brush it into the handprint indentations, then wipe the surface clean. The color stays in the crevices, highlighting the print details.
Step 3: Drying & Finishing
-
Initial drying:
Leave the plaque on the parchment paper in a cool, dry place. Avoid direct sunlight or heat sources, as drying too fast causes cracking. -
Flip the clay:
After about 24 hours, when the top feels dry to the touch, gently flip the disc over carefully to let the underside dry evenly. -
Sand the surface:
Once fully cured (usually 48-72 hours), use fine-grit sandpaper to buff the edges and surface lightly. This gives it that professional, stone-like texture shown in the photo. -
Clean dust:
Wipe away the sanding dust with a slightly damp cloth or a dry soft brush. -
Seal (Optional):
If you want to protect the keepsake from humidity, apply a light coat of clear matte sealant spray. -
Add the hanger:
Cut a length of jute twine or leather cord. Thread it through the hole you made earlier. -
Secure the knot:
Tie a simple overhand knot or a slip knot at the top to create a secure loop for hanging.
Hang these charming plaques in a sunny window or group them on a gallery wall to cherish those tiny hands forever