When you’re in the mood to make something totally unhinged (in the best way), crazy clay projects are the fastest route to big laughs and big personality. These ideas lean hard into weird faces, wonky proportions, and surreal little stories you can sculpt without stressing about realism.
Goofy Monster Pinch Pots
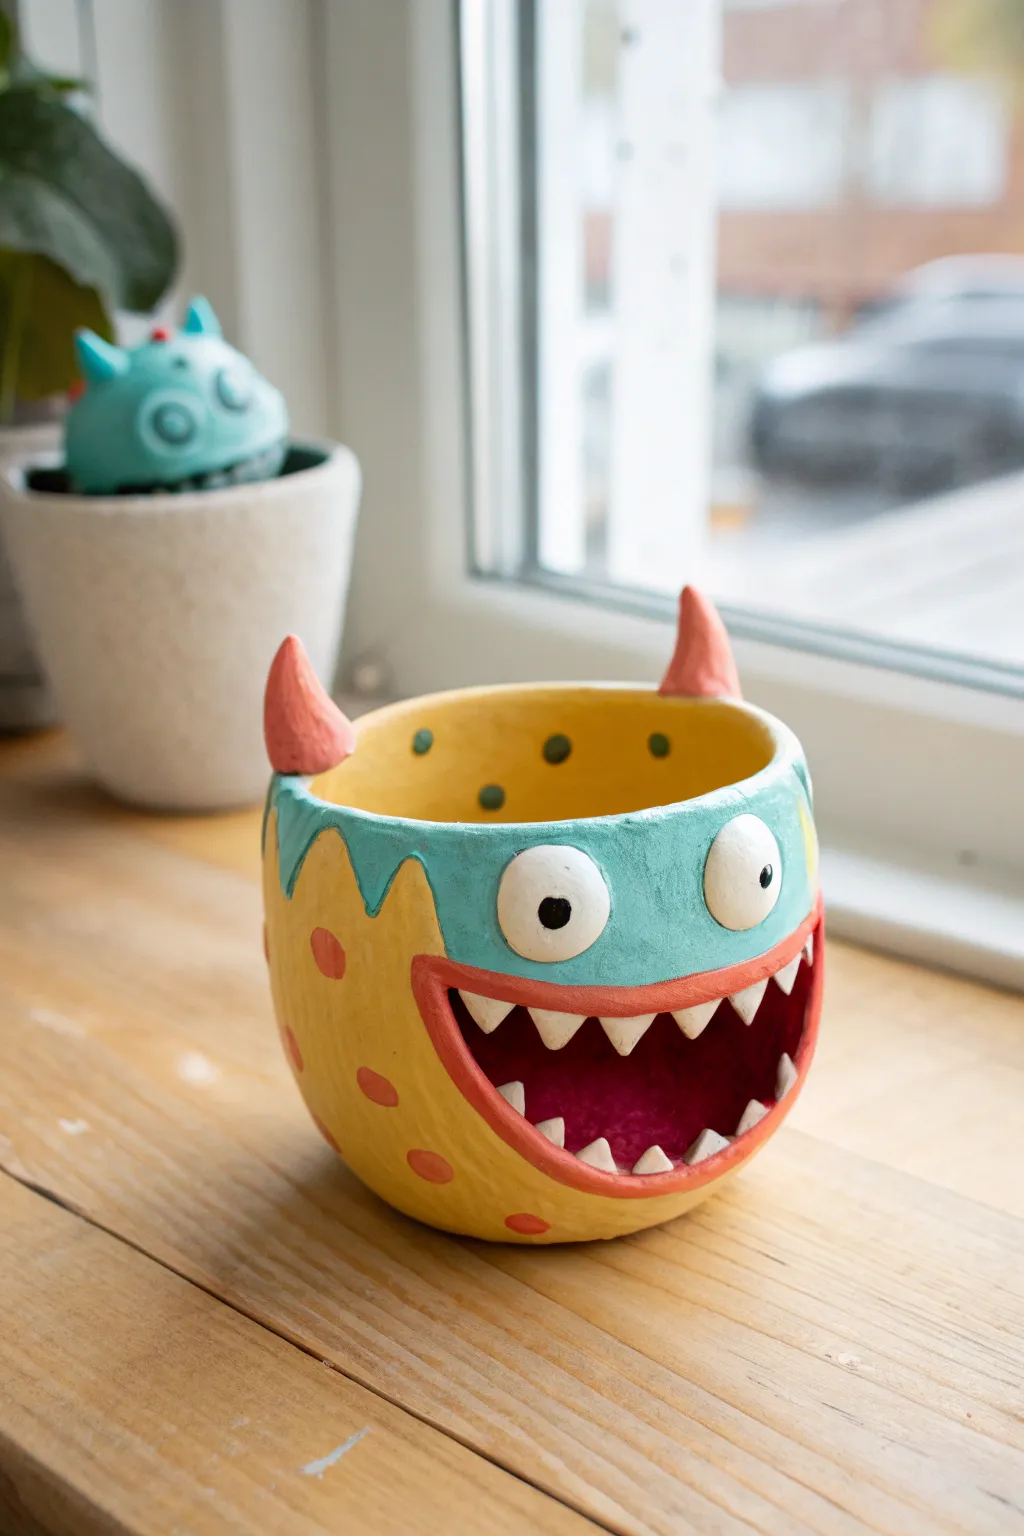
This cheerful little desktop buddy features a wide, toothy grin and playful horns, making it the perfect home for a small succulent or pencil stash. Using simple hand-building techniques, you’ll sculpt a quirky creature with a sunny yellow body and teal accents that brings immediate character to any windowsill.
Step-by-Step Tutorial
Materials
- Air-dry clay or polymer clay (white or terracotta)
- Acrylic paints (Yellow ochre, Teal/turquoise, Coral/salmon, White, Black, Dark red)
- Small rolling pin
- Sculpting tools (needle tool, blending tool)
- Small bowl of water (for smoothing)
- Paintbrushes (medium flat brush, small detail brush)
- Sponge (for texture)
- Clear matte varnish or sealant
Step 1: Forming the Base
-
Create the pinch pot:
Start with a ball of clay about the size of a large orange. Push your thumb into the center and gently pinch and rotate the clay between your thumb and fingers to open it up. -
Shape the walls:
Continue pinching until you have an even bowl shape. Aim for walls about a quarter-inch thick. Gently tap the bottom on your work surface to create a flat, stable base so your monster won’t wobble. -
Refine the surface:
Dip your finger in a little water and smooth out any cracks on the outside and inside of the pot. Ideally, you want a relatively smooth canvas, but slight bumpiness adds to the organic monster feel.
Smoother Seams
Use a soft, slightly damp paintbrush like a miniature mop to blend clay attachments (like the eyes and lips) without leaving harsh fingerprints.
Step 2: Sculpting the Monster Features
-
Cut the mouth:
Using a needle tool or a small knife, carve a wide, semi-circle shape out of the side of the pot. This negative space will become the yawning mouth. Smooth the cut edges with a damp finger. -
Add the lips:
Roll a thin coil of clay. Score and slip (scratch the surface and add water) around the mouth opening, then attach the coil as a lip border. Blend the outer edge of the coil into the pot body so it looks seamless. -
Form the teeth:
Shape several small triangles of clay. Attach these to the inside of the lip border—some pointing down from the top, others pointing up from the bottom. Vary their sizes for a goofy look. -
Make the eyes:
Roll two balls of clay and slightly flatten them. Score and slip the area above the mouth, then press the eyes firmly into place. They should bulge out slightly. -
Add the horns:
Create two cone shapes for the horns. Attach them to the rim on opposite sides of the head. I find bending the tips slightly outward gives the monster a bit more attitude. -
Detail the interior:
If you plan to use this as a planter, poke a drainage hole in the bottom now. Smooth all your attachments one last time before letting the clay dry completely according to package instructions.
Make it a Planter
Sculpt small clay feet and attach them to the base before drying. This lifts the pot up and allows for better drainage if you use a saucer underneath.
Step 3: Painting and Finishing
-
Base coat the body:
Once fully dry, paint the lower two-thirds of the pot with a warm yellow ochre. You may need two coats for opaque coverage. -
Paint the upper section:
Paint the top third of the pot (the ‘head’) and around the eyes with a teal or bright turquoise paint. Create a jagged, zigzag line where the teal meets the yellow to mimic hair or scales. -
Color the details:
Paint the lips and horns in a coral or salmon pink color. Paint the interior of the mouth area a dark red or maroon to create depth behind the teeth. -
Highlight the face:
Paint the eyeballs and the teeth bright white. Add tiny black pupils to the eyes; making one pupil slightly larger than the other enhances the crazy expression. -
Add the pattern:
Using the handle end of a paintbrush or a dotting tool, dab coral-colored polka dots randomly over the yellow section of the body. -
Inner dots:
Don’t forget the inside! Add small teal or dark green dots to the interior back wall of the pot if it’s visible. -
Seal the work:
Protect your paint job with a coat of clear matte varnish, paying special attention to the inside if you plan to put soil in it.
Set your new monster friend on a sunny sill and enjoy the pop of color it brings to the room


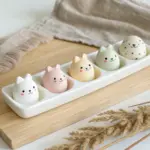
Three-Eyed Pocket Creatures
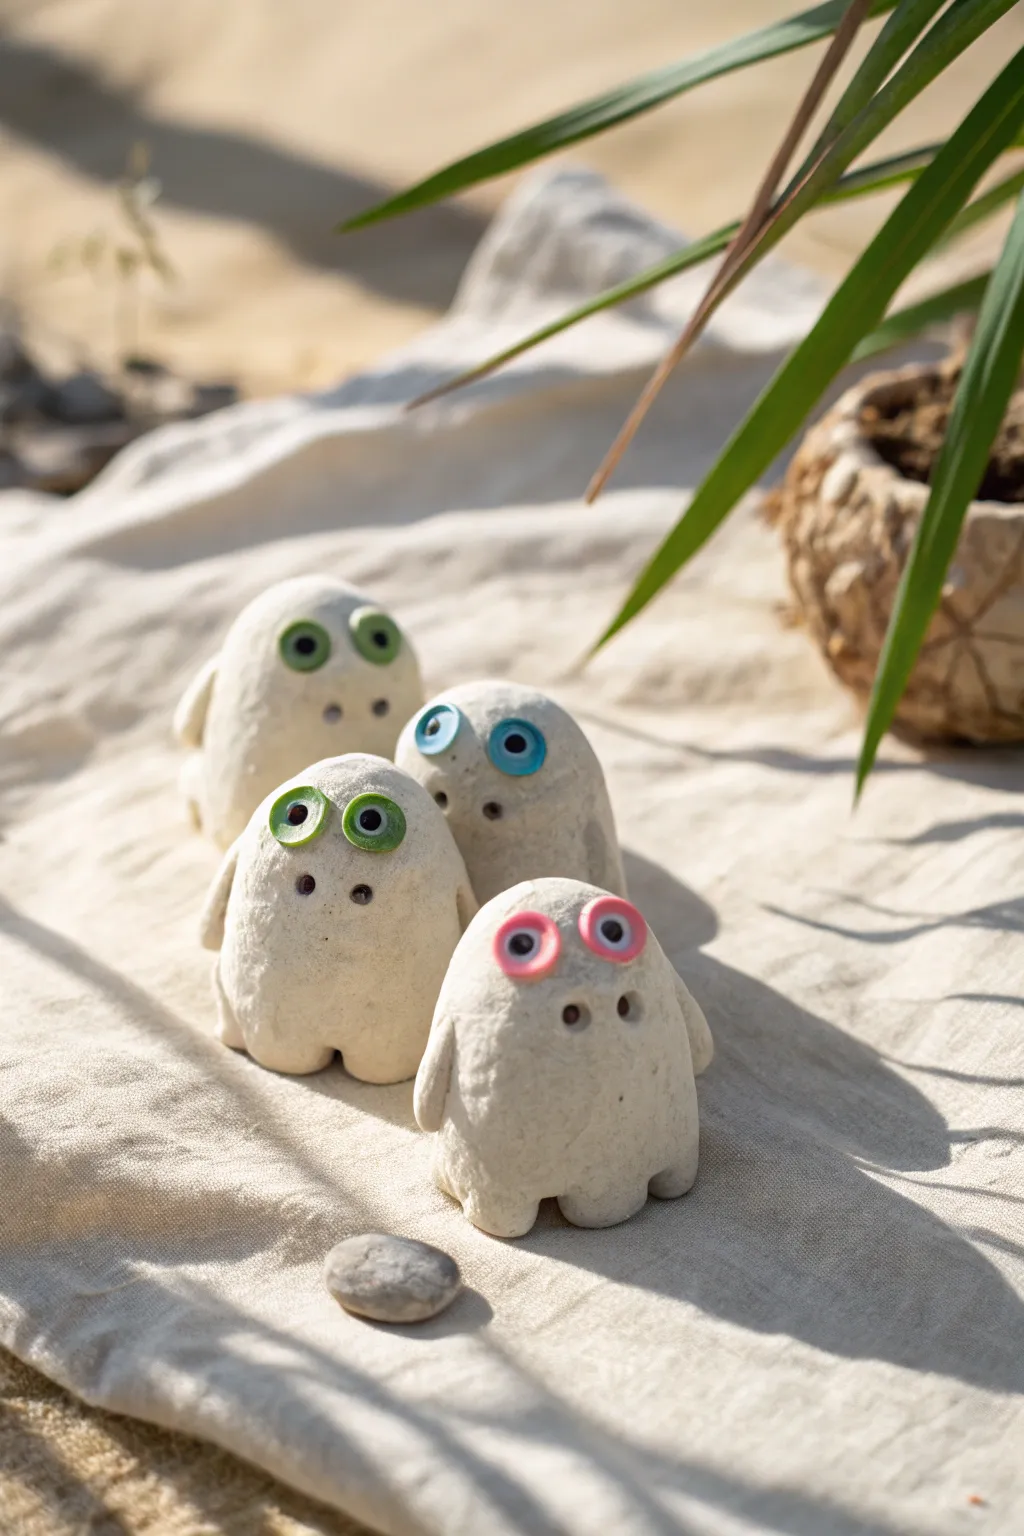
These adorable, ghost-like pocket creatures are sculpted from white clay and sport charming button eyes for personality. Their simple, nubby shapes make them a perfect beginner project with a quirky, handmade finish.
How-To Guide
Materials
- Air-dry clay (white or cream)
- Small plastic buttons (various colors like pink, blue, green)
- Black acrylic paint
- Fine-point paintbrush or toothpick
- Small bowl of water
- Modeling tool or dull knife
- Sandpaper (optional)
Step 1: Basic Shape Formation
-
Prepare the clay:
Start by grabbing a chunk of air-dry clay about the size of a golf ball. Knead it in your hands until it is pliable and smooth. -
Roll a sphere:
Roll the clay between your palms to form a smooth, round ball, ensuring there are no major cracks on the surface. -
Shape the body:
Gently gently lengthen the ball into a rounded, oblong shape, slightly wider at the bottom to give it a sturdy base to stand on. -
Refine the surface:
Dip your finger in a little water and smooth out the exterior of the clay shape to remove fingerprints or bumps. I usually spend an extra minute here to get a nice, stone-like finish. -
Form the feet:
Use your thumbs to gently press into the bottom edge of the shape, creating two small, nubby protrusions that will serve as feet. -
Define the separation:
Use a modeling tool to deepen the groove between the two feet, separating them clearly so the creature stands upright on them.
Loose Eyes?
If buttons pop out after the clay dries, simply glue them back into their indents with a dot of strong clear craft glue or superglue.
Step 2: Adding Details
-
Create arms:
Pinch a small amount of clay on the left side of the body and pull it slightly downwards to form a simple arm that merges back into the torso. -
Mirror the arms:
Repeat the pinching and pulling process on the right side, trying to keep the arms symmetrical and tucked close to the body. -
Select the eyes:
Choose two matching buttons for the eyes. Green, blue, or pink pop nicely against the white clay. -
Embed the eyes:
Press the buttons firmly into the upper third of the face. Push them deep enough so the clay slightly hugs the rim of the button, securing them in place. -
Secure the hold:
If the clay feels dry, dab a tiny bit of water or slip (clay mixed with water) onto the back of the buttons before pressing them back in. -
Poke nostrils:
Using the back of a paintbrush or a small round tool, poke two distinct holes right below the eyes to create the nostrils.
Texture Time
Before drying, gently press a piece of rough fabric or a stiff brush against the clay skin to create a stony, organic texture.
Step 3: Finishing Touches
-
Final smoothing:
Do one last inspection of the clay, smoothing any accidental nail marks with a damp finger before setting it aside. -
Drying time:
Let the figure dry completely according to your clay package’s instructions, usually 24 to 48 hours for this thickness. -
Paint the pupils:
Once fully dry and hard, dip a toothpick or fine brush into black acrylic paint. -
Adding life:
Carefully dab a black dot into the center of each button hole to create the pupils. This instantly gives them focus and character. -
Darken the nostrils:
Use the same black paint to lightly fill the inside of the nostril holes you poked earlier, adding depth to the face. -
Seal (Optional):
If desired, apply a matte varnish over the clay body to protect it, being careful not to gloss over the button eyes.
Line them up on a shelf or tuck them into a plant pot for a surprising little discovery


Toothy Mini Planter Heads
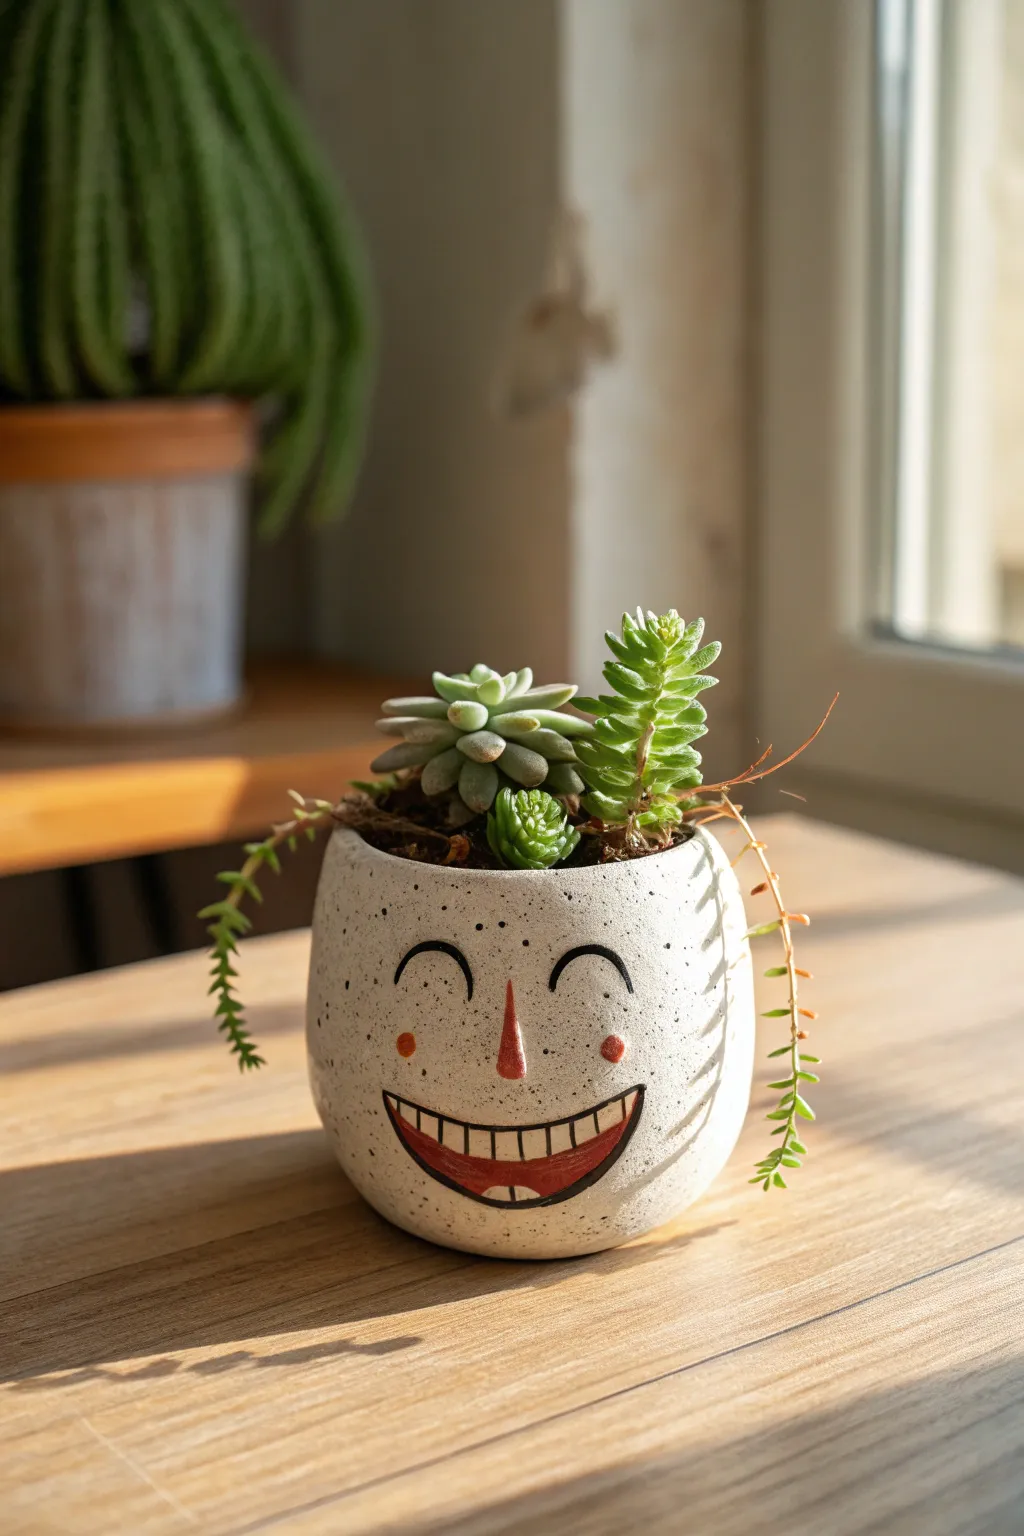
Brighten up your windowsill with this cheerful, speckled succulent planter that’s guaranteed to smile back at you. Its charmingly goofy open-toothed grin and earthy texture make it the perfect home for your favorite tiny succulents.
Step-by-Step Tutorial
Materials
- White or speckled stoneware clay (approx. 1 lb)
- Pottery wheel (optional) or rolling pin and slab guide
- Loop tools for trimming
- Needle tool
- Underglazes: Black, Bright Red, White
- Fine-point detail brush (0 or 00 size)
- Flat shader brush (small)
- Sponge
- Clear matte or satin glaze
- Kiln access
Step 1: Forming the Vessel
-
Prepare your clay:
Begin by wedging your speckled stoneware clay thoroughly to remove any air bubbles. The speckles in the clay body are crucial for achieving that natural, stone-like texture seen in the final piece. -
Shape the base form:
If throwing on a wheel, center your clay and pull a cylinder that is slightly wider at the bottom, gently curving inward toward the rim to create a rounded, egg-like shape. Aim for walls about 1/4 inch thick. -
Hand-building alternative:
If you don’t have a wheel, you can pinch a rounded pot or build it with coils. Smooth the exterior aggressively with a rib tool to ensure a seamless, rounded surface that mimics a thrown pot. -
Refine the rim:
While the clay is still workable, compress the rim with a chamois or sponge. It should be smooth and slightly rounded, not sharp. -
Create a drainage hole:
Using a hole cutter or your needle tool, create a small drainage hole in the center of the bottom base. This is essential for succulent health. -
Let it firm up:
Allow the pot to dry to a leather-hard state. It should be firm enough to handle without deforming but still cool to the touch. This provides the perfect canvas for painting.
Step 2: Painting the Personality
-
Map out the features:
Lightly sketch the face onto the leather-hard clay using a pencil. Draw two arched lines for the happy eyes, a central oval for the nose, two small circles for cheeks, and a wide U-shape for the mouth. -
Outline the mouth:
Using your fine-point brush and black underglaze, carefully paint the outline of the smiling mouth. Keep your hand steady to get a crisp line. -
Add the teeth:
Paint a horizontal line through the middle of the mouth, following the curve of the smile. Then, add small vertical lines to create the individual teeth. -
Fill the lip separation:
The key to this design is the contrast. Paint the bottom section of the lip—below the teeth—solid red. Leave the teeth the natural color of the clay (or paint them white if your clay is dark). -
Paint the nose:
Fill in the long, teardrop-shaped nose with the same red underglaze. I like to do two thin coats here to ensure the red pops against the speckled clay. -
Add cheeks and eyes:
Paint two small red dots for the rosy cheeks. Then, using the black underglaze again, trace over your pencil lines for the arched, sleeping eyes and eyebrows. -
Clean up edges:
If you smudge any underglaze, gently scratch it off with a needle tool or wipe it with a barely damp sponge corner once it’s dry.
Clean Lines Hack
Use liquid wax resist over your underglazed face design before dipping into the clear overglaze. This prevents the black lines from blurring or running during the glaze firing.
Step 3: Firing and Finishing
-
Bisque fire:
Load your bone-dry piece into the kiln for a bisque firing (usually Cone 04). This sets the shape and prepares the clay for the final glaze. -
Apply clear glaze:
Once the pot is out of the bisque fire, wipe it down with a damp sponge to remove dust. Dip the entire pot into a clear matte or satin glaze. Avoid glossy glaze if you want to keep that organic, stone-like feel. -
Wipe the foot:
Ensure the bottom of the pot is completely free of glaze so it doesn’t stick to the kiln shelf. -
Glaze fire:
Fire the piece again to the maturation temperature of your specific clay body (often Cone 5 or 6 for stoneware). -
Planting time:
Once cool, fill your new buddy with succulent potting mix. Arrange a rosette succulent (like an Echeveria) in the center and a trailing one (like a classic Sedum burrito) spilling over the side.
Hair Stylist
Make a ‘hair’ rim! Before firing, score the top edge and attach small clay balls or coils. After firing, plant specific succulents to match the texture you created.
Enjoy the whimsical charm this little character brings to your space


Eyeball Trinket Dishes
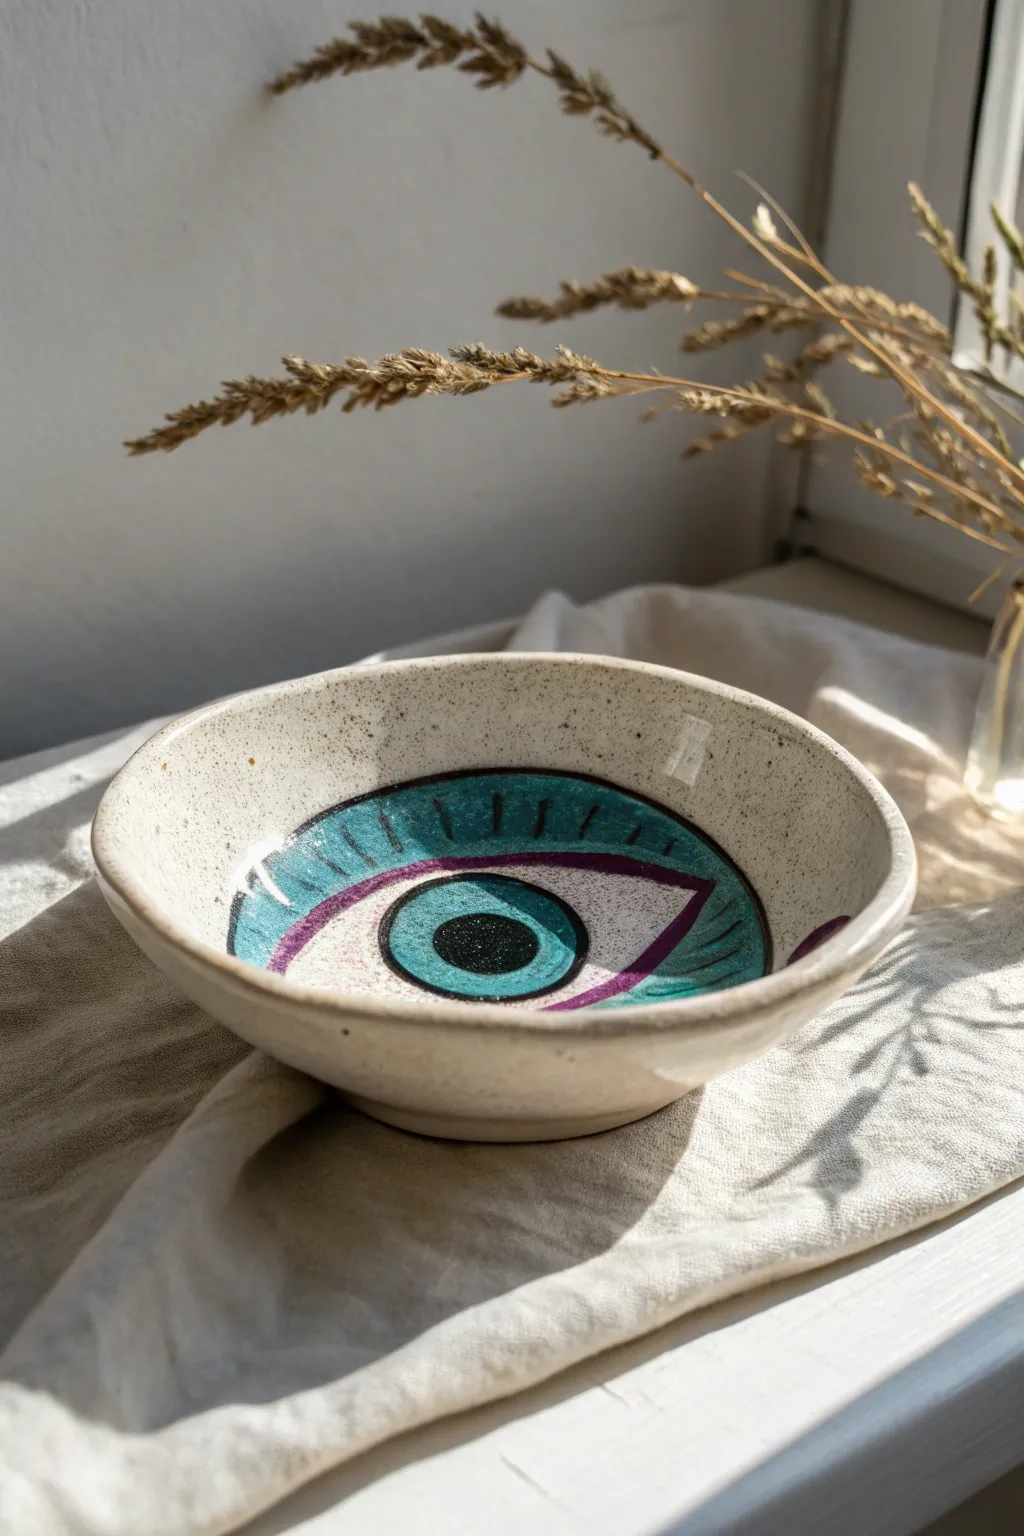
This whimsical trinket dish combines classic pottery techniques with bold, illustrative glazing. Featuring a speckled clay body and a striking, stylized eye motif in teal and purple, it’s the perfect size for holding rings, crystals, or sage bundles.
Detailed Instructions
Materials
- Speckled Stoneware Clay (e.g., Laguna Speckled Buff)
- Slab roller or rolling pin
- Wooden guide strips (1/4 inch thick)
- Rib tool (rubber or silicone)
- Needle tool
- Small bowl mold or plaster hump mold (approx 4-5 inches diameter)
- Sponge
- Underglaze (Teal/Turquoise, Dark Purple/Magenta, Black, White)
- Small detail brushes (liners and rounds)
- Clear Gloss Glaze
- Kiln (or access to a firing service)
Step 1: Forming the Bowl
-
Prepare the slab:
Begin by wedging a softball-sized amount of speckled stoneware clay to remove air bubbles. Roll it out into a smooth slab using a rolling pin and guide strips to ensure an even thickness of about 1/4 inch throughout. -
Compress the clay:
Take a rubber rib tool and gently drag it across the surface of your slab. This aligns the clay particles, preventing warping later, and creates a pristine canvas for your future glazing. -
Cut the circle:
Place your mold or a circular template onto the clay. Using a needle tool held vertically, trace around the edge to cut out a perfect circle. -
Shape the curve:
Gently lift the clay circle and drape it into your slump mold (or over a hump mold). Press the clay softly against the mold surface, working from the center outward, to ensure it takes the shape without trapping air pockets. -
Refine the rim:
While the clay is still in the mold, use a slightly damp sponge to smooth the rim. Round off any sharp edges left by the needle tool for a professional, finished look. -
Add a foot ring:
Roll a small coil of clay and attach it to the bottom center of the bowl using the score and slip method. Smooth it down to create a stable foot that lifts the bowl slightly off the table. -
Bisque fire:
Allow the clay to dry slowly to the bone-dry stage, which usually takes a few days. Once completely dry, fire the piece in the kiln to bisque temperature (usually Cone 04) to prepare it for glazing.
Clean Lines Pro-Tip
If your hand feels shaky while painting the fine lines, stabilize your painting hand by resting your pinky finger on the dry rim of the bowl while you work.
Step 2: Painting the Eye Motif
-
Sketch the outline:
Using a regular pencil, lightly sketch the large almond eye shape directly onto the bisqueware. Don’t worry about mistakes; the graphite will burn off completely in the kiln. -
Base layer: The Sclera:
Paint the inner white part of the eye using white underglaze. Apply 2-3 coats for solid opacity, letting each coat dry briefly in between. I find a flat shader brush works best here to get clean edges. -
Paint the Iris:
Using a vibrant teal or turquoise underglaze, paint a large circle in the center of the white area. Leave a surrounding ring of white visible. Again, apply 2-3 coats for rich color depth. -
Define the Pupil:
once the teal is dry, paint a smaller black circle in the direct center. For that distinctive ‘shiny’ look, leave a tiny dot of the teal showing through, or add a dot of white on top of the black later. -
The upper eyelid:
Paint the area above the eye white/teal almond shape with the same teal color used for the iris. This creates the heavy-lidded, stylized look seen in the photo. -
Purple accents:
Take a thin liner brush and dark purple/magenta underglaze. Carefully outline the entire almond shape of the eye and add a curved line above the iris to suggest the crease of the eyelid. -
Lashes and details:
Using black underglaze and a very fine detail brush, paint vertical dashes along the top teal section to represent eyelashes. Keep them loose and slightly irregular for a hand-drawn feel. -
Outline the iris:
Add a thin black ring around the teal iris to make the color pop against the white sclera. -
Clear Glaze Application:
Once all underglaze is bone dry, apply a coat of clear gloss glaze over the entire interior of the bowl. This seals the design and makes the dish food-safe and shiny. -
Final Firing:
Fire the piece again to the maturation temperature of your clay and glaze (typically Cone 5 or 6 for stoneware). Let the kiln cool completely before opening to reveal your glossy eye bowl.
Level Up: Gold Luster
For a magical touch, apply real gold luster to the pupil or the rim after the glaze firing and refire at a very low temperature (Cone 018) for metallic shine.
Place your finished eye bowl on a sunny windowsill where the light can catch the glossy glaze

The Complete Guide to Pottery Troubleshooting
Uncover the most common ceramic mistakes—from cracking clay to failed glazes—and learn how to fix them fast.
Tongue-Out Wall Hangers
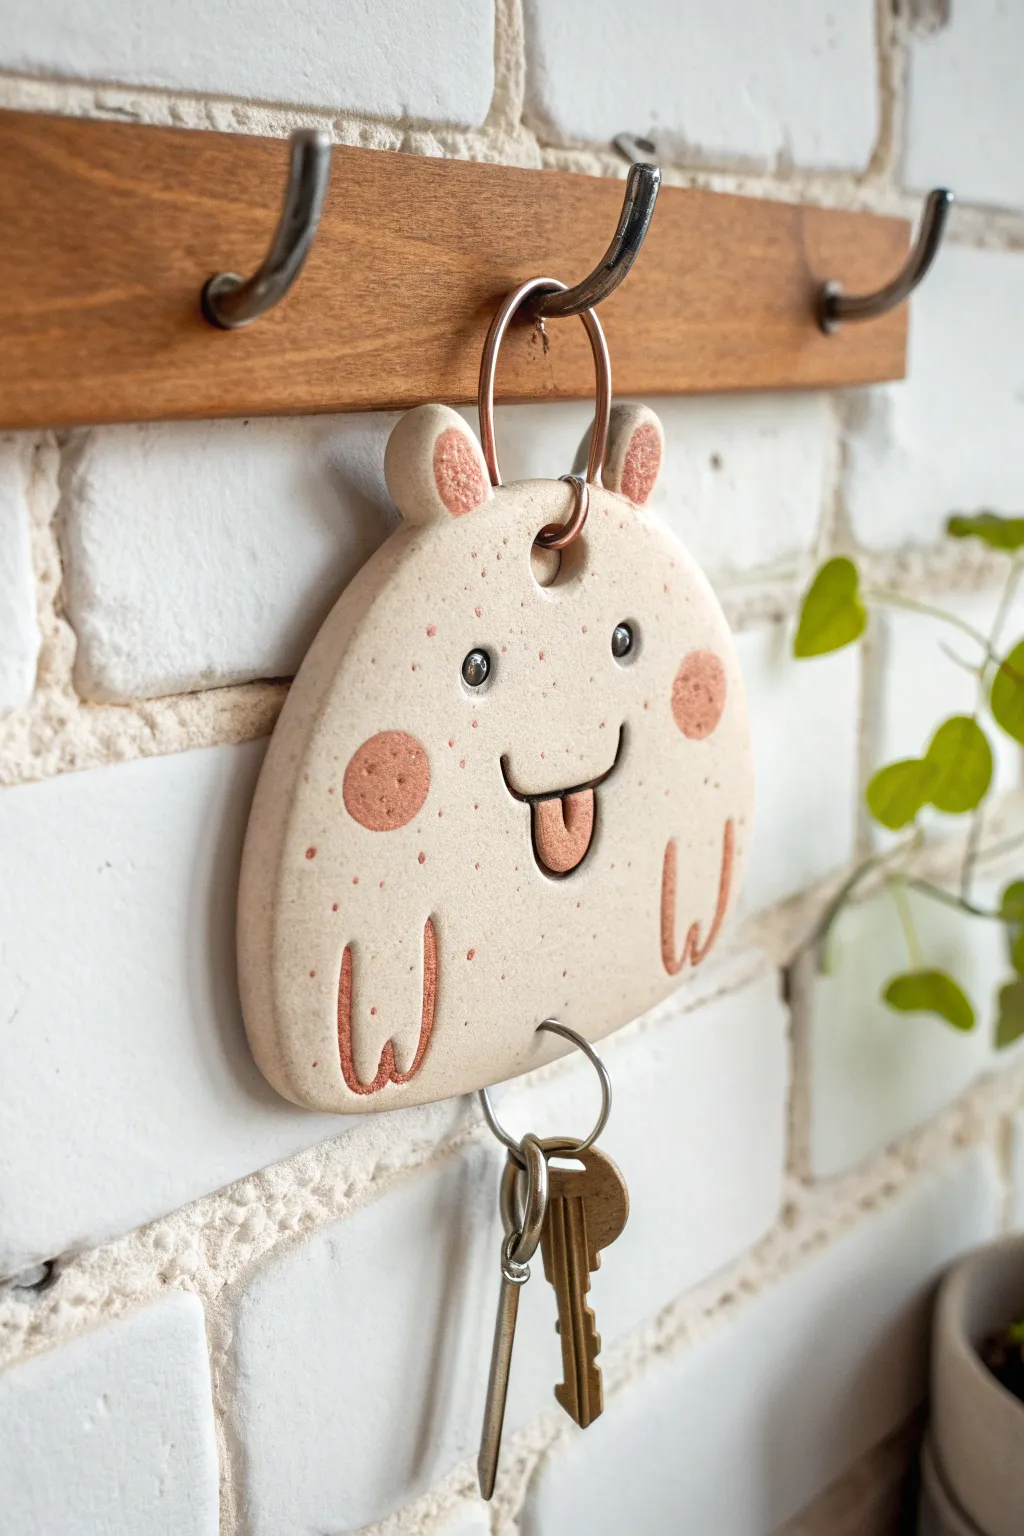
This adorable ceramic wall hanger features a minimalist creature with rosy cheeks and a playful tongue sticking out. Its sturdy stoneware body is perfect for holding your keys while greeting you with a goofy smile every time you walk through the door.
Step-by-Step Guide
Materials
- White stoneware clay (speckled or plain)
- Rolling pin
- Fettling knife or needle tool
- Small circle cutter (approx. 1 inch)
- Tiny circle cutter or straw (for hanging hole)
- Slip and scoring tool
- Underglaze (pink/coral)
- Black underglaze or oxide wash (for eyes)
- Clear transparent glaze
- Metal jump rings (large and small)
- Sponge and water
- Kiln
Step 1: Shaping the Base
-
Roll the slab:
Start by rolling out a wedge of stoneware clay to a uniform thickness of about 1/4 inch. Smooth the surface with a rib tool to remove any canvas texture. -
Cut the main shape:
Using a needle tool, cut out a soft, rounded mound shape. It should look like a flattened gumdrop or a very chubby mountain. Smooth the rough cut edges with a damp sponge. -
Create the ears:
Cut two small semicircles from your remaining clay slab. Attach these to the top of the head using the score and slip method, blending the clay slightly at the back for a strong bond. -
Make the hanging hole:
Punch a clean hole directly in the center top of the head using a small circle cutter or a sturdy straw. Ensure it’s not too close to the edge to prevent cracking. -
Drill the key ring hole:
At the very bottom center of the creature, punch a second, smaller hole. This is where the hardware for the keys will eventually hang.
Step 2: Adding Personality
-
Form the tongue:
Roll a very small ball of clay and flatten it into a U-shape tongue. Score and slip it onto the center of the face, pressing it down firmly so it becomes part of the main slab. -
Carve the mouth:
Use a needle tool to carve a simple, curved smile line connected to the top of the tongue. I like to retrace this line once the clay stiffens slightly for a cleaner look. -
Induct the eyes:
Press the rounded end of a paintbrush handle into the clay to create two small indents for the eyes. This creates a physical socket for the glaze later. -
Sculpt the paws:
Carve two ‘W’ shapes near the bottom corners of the body to represent paws. You can also roll thin coils and attach them if you prefer a raised relief look.
Smooth Operator
After cutting your shape, run a damp finger along all sharp edges until they are perfectly rounded. Glaze pulls away from sharp corners, leaving them rough.
Step 3: Glazing and Finishing
-
Bisque fire:
Allow the piece to dry slowly and completely before loading it into the kiln for a bisque firing (usually cone 04). -
Apply cheek color:
Paint perfect circles of pink or coral underglaze onto the cheeks. Use the same color to fill in the ears, the tongue, and inside the carved paw lines. -
Detail the eyes:
Carefully dab a dot of black underglaze into the eye indentations to bring the character to life. -
Clear glaze application:
Dip the entire piece into a clear transparent glaze. If you used speckled clay, this will allow the natural flecks to show through beautifully. -
Glaze fire:
Fire the piece again to the maturity temperature of your clay body (typically cone 5 or 6 for stoneware). -
Attach hardware:
Once cool, thread a large metal jump ring through the top hole for hanging. Attach a second jump ring and your key assembly to the bottom hole.
Make it specific
Personalize the shape of the ears to change the animal! Pointy ears for a cat, long floppy ones for a bunny, or round ones for a bear.
Hang your new ceramic friend by the door and enjoy a smile while grabbing your keys
Wormy Candle Holders
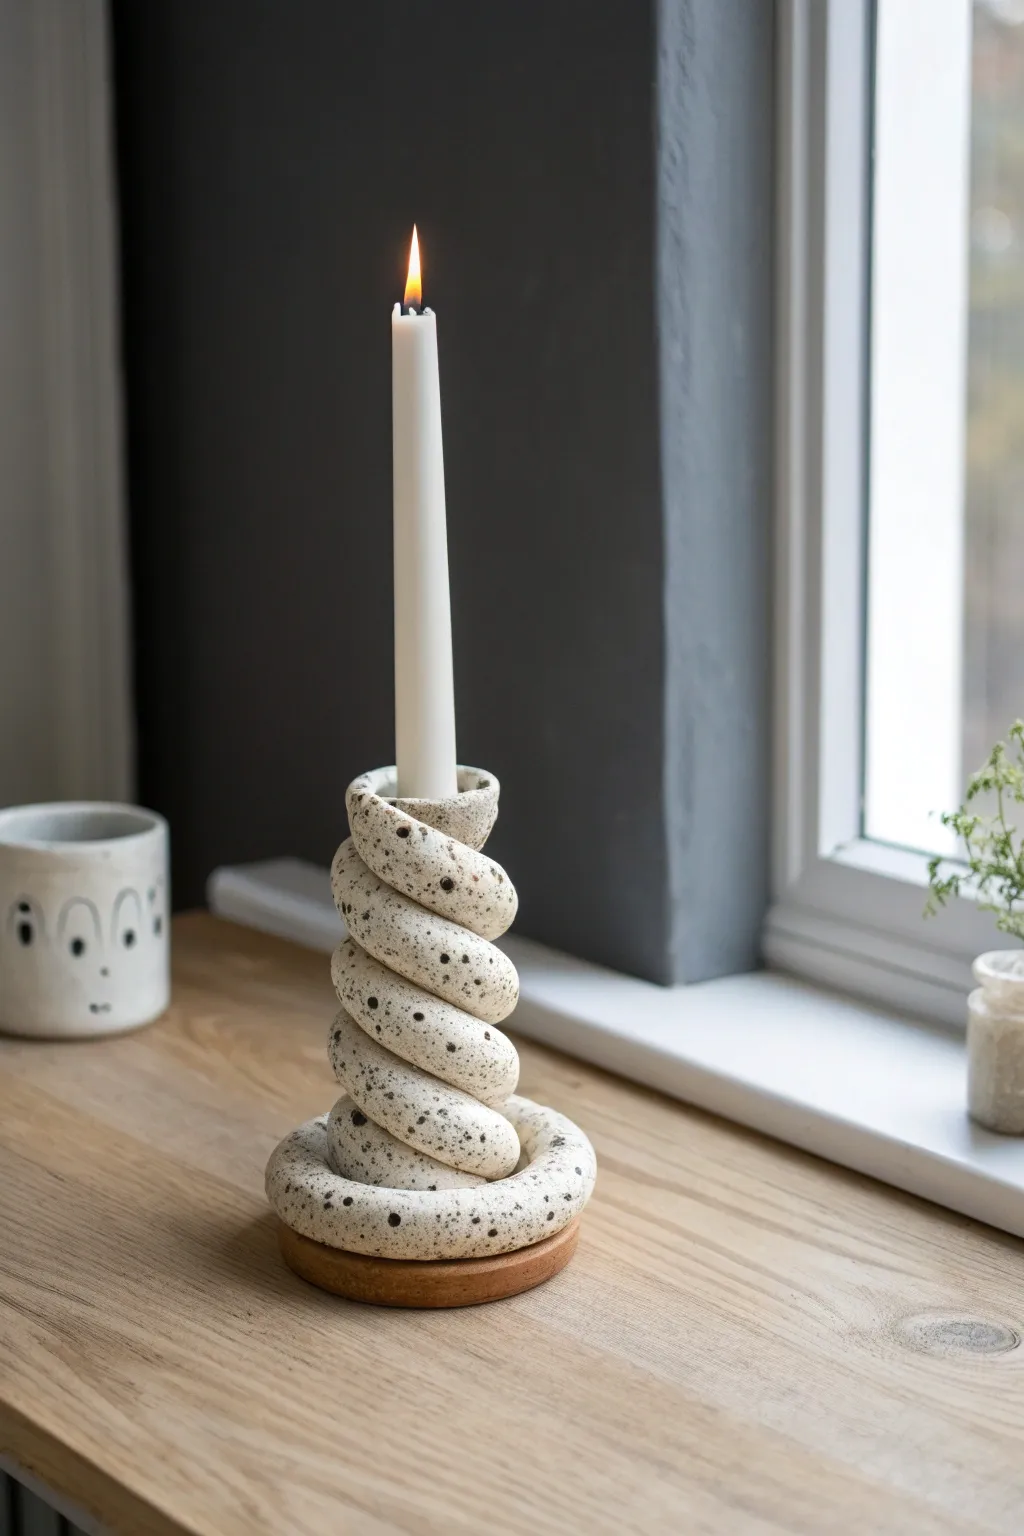
Embrace the playful side of pottery with this sculpted candle holder that mimics a coiled worm rising from the ground. Using speckled stoneware clay creates a natural, modern aesthetic that turns a simple coil pot technique into a functional piece of art.
How-To Guide
Materials
- Speckled stoneware clay (e.g., Laguna Speckled Buff)
- Wooden rolling pin
- Canvas or wooden work board
- Needle tool
- Scoring tool (or serrated rib)
- Slip (clay and water mixture)
- Sponge
- Standard taper candle (for sizing)
- Clear matte glaze
- Wooden coaster base (optional, for display)
Step 1: Shaping the Base and Body
-
Prepare your clay:
Start by wedging a softball-sized amount of speckled clay to remove any air bubbles. This ensures your coil won’t crack during firing. -
Roll the main coil:
Begin rolling the clay on your canvas into a long snake. Aim for a consistent thickness of about 3/4 inch to 1 inch thick. You need a very long coil, so you may need to join multiple segments together smoothly. -
Create the foundation:
Take one end of your coil and form a flat circle on your work surface. This will be the base. Unlike a normal coil pot where you build up immediately, lay this first loop flat to provide stability. -
Begin the spiral:
Start guiding the coil upwards on top of the base ring. Instead of stacking directly vertically, you want to spiral slightly inward to create a tapered, conical shape. -
Score and slip:
Before committing to the shape, unwind the first upward loop slightly. Score the top of the base ring and the bottom of the coil that will sit on it. Apply slip generously. -
Attach the first layer:
Press the scored surfaces together firmly. Wiggle the clay slightly to lock it in place. I like to smooth the connection just a tiny bit on the inside to ensure it holds, though we want to keep the ‘worm’ texture visible on the outside.
Shrinkage Warning
Clay shrinks about 10-15% during firing! Make the candle hole slightly larger than your actual candle. If it’s too loose later, you can secure the candle with melted wax.
Step 2: Building Height and Finishing
-
Continue coiling:
Repeat the scoring and slipping process for every rotation. As you build higher, tighten the spiral’s diameter gradually. The goal is to create a structure that narrows as it goes up. -
Check the fit:
When you have built up about 4 or 5 inches of height, grab your taper candle. Insert it into the central opening to check the width. The clay should be snug around the candle but not tight, as clay shrinks when drying. -
Form the top rim:
Once you reach the desired height where the candle fits perfectly, cut the coil. Smooth the end of the ‘worm’ so it blends into the rim or simply rounds off neatly for an organic look. -
Refine the surface:
Take a slightly damp sponge and gently wipe the coils. You aren’t trying to erase the defined rings, but rather to smooth out any sharp fingerprints or rough texture from the canvas. -
Level the bottom:
Turn the piece over carefully. If the bottom feels uneven, gently tap it against the table or use a rasp tool once it’s leather-hard to ensure it sits perfectly flat. -
Slow drying:
Cover the piece loosely with plastic. Let it dry slowly over several days to ‘leather hard’ and then to ‘bone dry’. This prevents the coils from separating. -
Bisque fire:
Load the bone-dry piece into the kiln for a bisque firing (usually around Cone 04). This prepares the clay for glazing. -
Glazing:
Dip the fired piece into a clear matte glaze. A clear glaze is crucial here because it allows the beautiful natural speckles of the clay body to show through. -
Final wipe:
Sponge off any glaze that got onto the very bottom of the piece so it doesn’t stick to the kiln shelf. -
Glaze fire:
Fire the piece again to the maturation temperature of your specific clay and glaze (often Cone 5 or 6 for stoneware).
Double Trouble
Make a second, slightly smaller version using the leftover clay. These wormy holders look fantastic as an asymmetrical pair on a dining table.
Place your finished ceramic twist on a wooden round or directly on your mantle for a cozy, handcrafted glow


What Really Happens Inside the Kiln
Learn how time and temperature work together inside the kiln to transform clay into durable ceramic.
Derpy Face Mugs
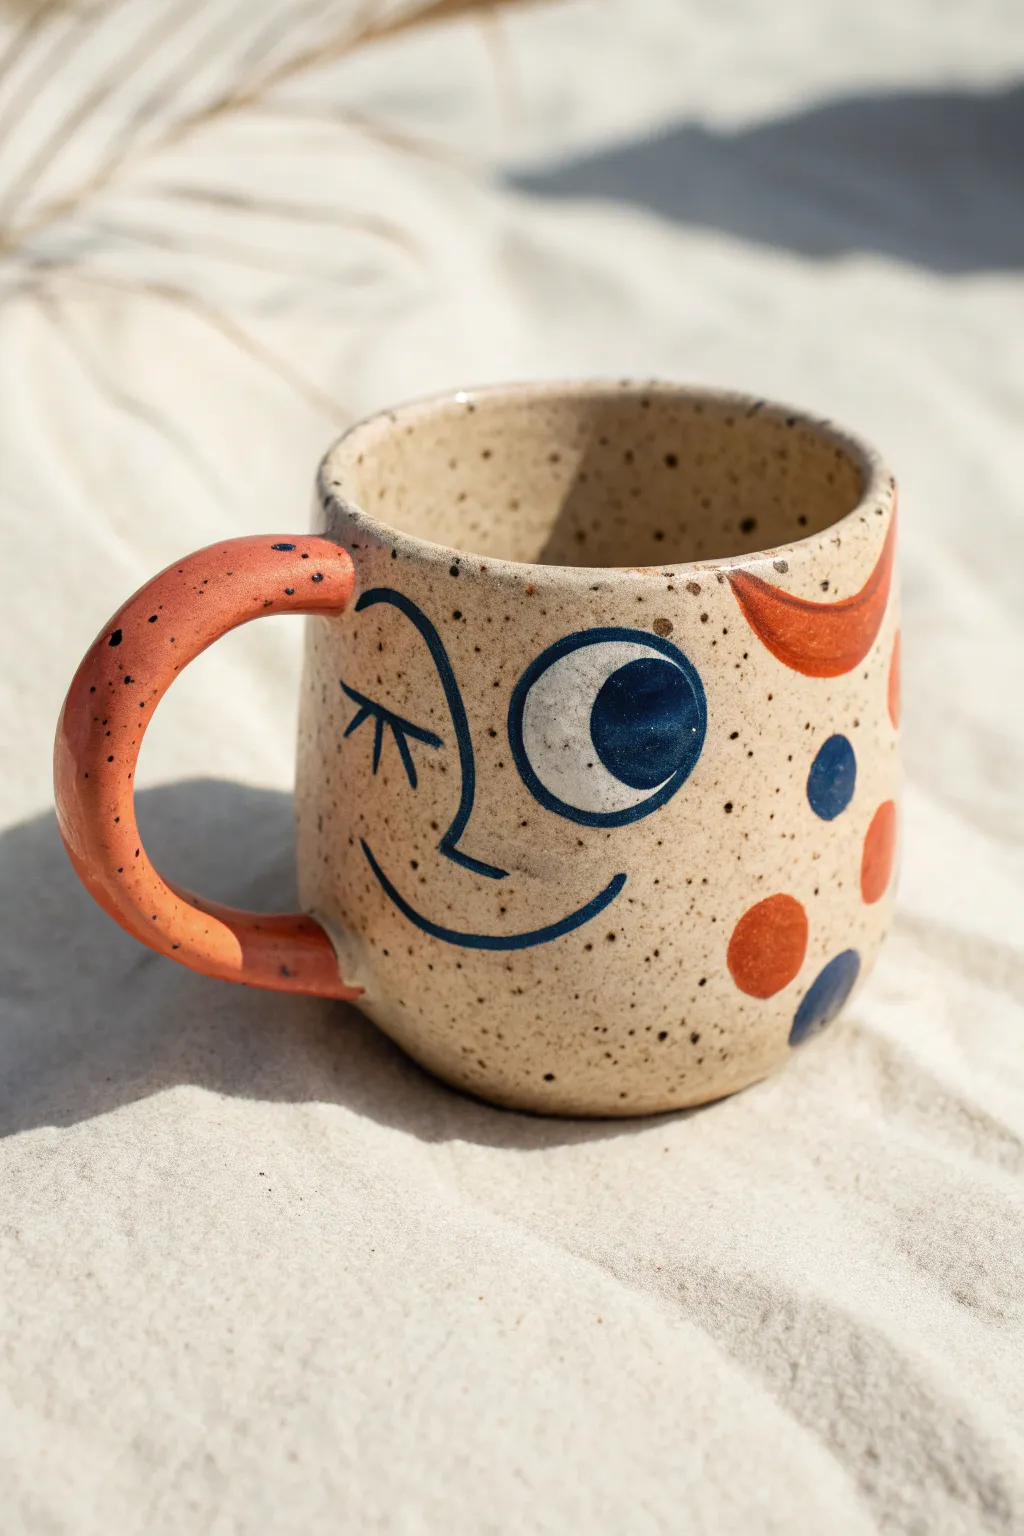
This charming, speckled stoneware mug features a playful, asymmetrical face that adds personality to every sip. With its winking blue eye and scattered polka dots, it strikes the perfect balance between modern art and whimsical pottery.
How-To Guide
Materials
- Speckled buff stoneware clay
- Pottery wheel (or rolling pin for hand-building)
- Needle tool
- Sponge
- Rib tool
- Scoring tool
- Slip
- Underglazes: Navy Blue, Burnt Orange
- Small round paintbrush
- Fine liner brush
- Clear transparent glaze
- Kiln
Step 1: Forming the Body
-
Prepare the Clay:
Wedge about 1 pound of speckled buff clay to remove air bubbles. This specific clay body gives the final piece that lovely ‘cookies and cream’ texture. -
Center and Open:
Center the clay on your wheel. Open the mound and pull the floor flat, establishing a base about 3 inches wide to ensure stability. -
Pulling the Walls:
Pull the walls up into a cylinder. Aim for a slightly rounded, bulbous bottom that tapers gently inward toward the rim. This hugging shape feels great in the hands. -
Refining the Shape:
Use a rib tool on the outside while supporting the inside with your hand to smooth the surface and define that gentle curve. Compress the rim with a chamois or sponge. -
Drying to Leather Hard:
Cut the mug from the bat using a wire tool and set it aside. Wait until the clay reaches a leather-hard state—firm enough to handle but still cool to the touch.
Smudged Lines?
If you smudge the blue underglaze while painting lines, don’t wipe it while wet! Let it dry completely, then gently scratch the mistake off with a needle tool.
Step 2: Handle and Assembly
-
Pulling the Handle:
Pull a strap of clay for the handle. For this design, you want a medium-thickness handle that loops comfortably. -
Curve and Dry:
Curve the pulled strap into a ‘C’ shape and let it stiffen slightly on a board until it can hold its own weight without drooping. -
Attaching the Handle:
Score the attachment points on both the mug body and the handle ends. Apply slip generously. -
Securing the Bond:
Press the handle firmly onto the mug. Use a modeling tool or your finger to smooth the seams, ensuring a seamless transition between handle and body. I like to wipe away excess slip with a damp sponge.
Step 3: Decoration and Glazing
-
Sketching the Face:
Once the mug is bone dry (or slightly before), lightly sketch the winking face design with a pencil. The graphite will burn off in the kiln, so don’t worry about mistakes. -
Underglazing the Handle:
Paint the entire handle with two to three coats of Burnt Orange underglaze to get that solid, vibrant pop of color. -
Painting the Eye:
Using a small round brush and Navy Blue underglaze, paint the large open eye. Leave a negative space circle in the pupil for the ‘sparkle’ or paint it white if your clay is dark. -
Adding Line Work:
Switch to a fine liner brush. Carefully paint the winking eye (a curved line with lashes), the simple nose curve, and the wide, quirky smile in Navy Blue. -
Adding Polka Dots:
Using the Burnt Orange and Navy Blue underglazes, paint large, carefree polka dots around the sides and back of the mug. Vary the spacing to keep it playful. -
Bisque Fire:
Load the bone-dry mug into the kiln and bisque fire it to Cone 04 (or your clay’s specific bisque temperature). -
Clear Glazing:
Dip the entire bisque-fired mug into a clear transparent glaze. This will make the clay speckles pop and seal the underglaze decoration. -
Final Firing:
Fire the mug again to glaze temperature (typically Cone 5 or 6 for stoneware). Allow the kiln to cool completely before unloading.
Level Up: Texture
Before the clay dries, gently press the handle with a textured sponge or fabric to give the orange section a tactile grip contrast against the smooth glazed body.
Now you have a cheerful companion for your morning coffee that is sure to make everyone smile
Stacked Totem Weirdos
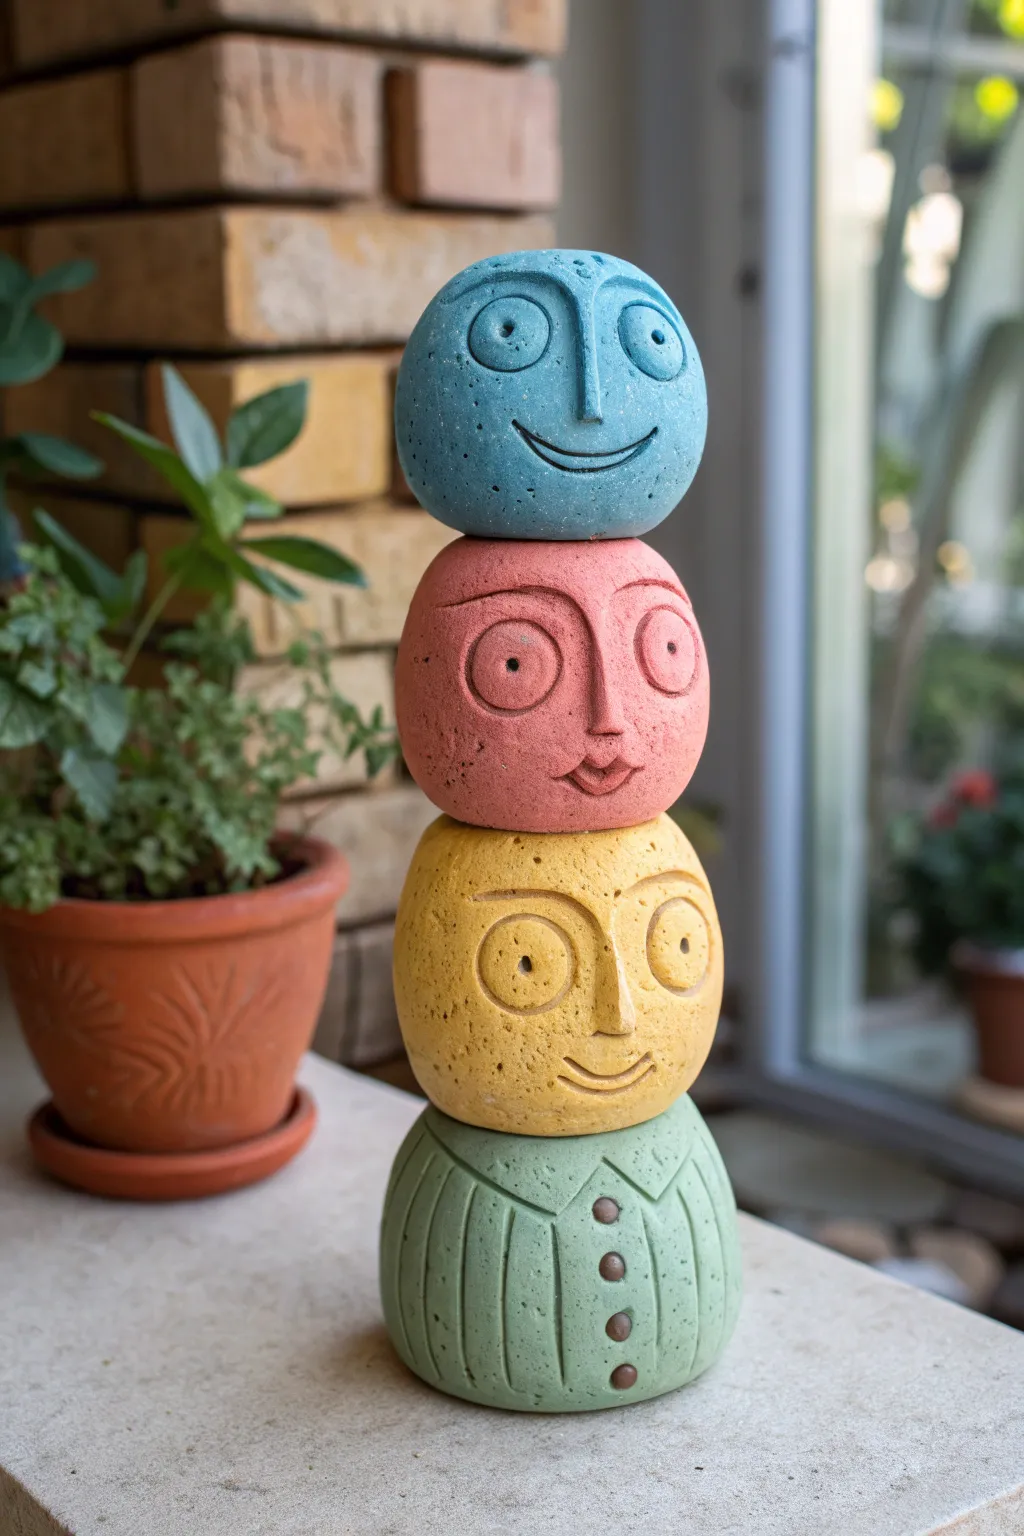
Create a whimsical conversation piece with this stackable sculpture featuring three quirky faces and a dapper torso. These charming, stone-textured characters bring a pop of personality to any shelf or garden corner.
Detailed Instructions
Materials
- Air-dry clay (stone effect or standard white)
- Faux stone textured spray paint (optional, if using white clay)
- Acrylic paints (light blue, coral pink, mustard yellow, sage green, brown)
- Sculpting tools (loop tool, needle tool)
- Rolling pin
- Water and sponge for smoothing
- Wooden dowel (approx. 1/4 inch diameter)
- Sandpaper (medium grit)
- Matte spray sealer
Step 1: Shaping the Base Forms
-
Form the Spheres:
Begin by dividing your clay into four equal portions. Roll each portion into a smooth, tight ball between your palms to remove air pockets. -
Flatten the Shapes:
Gently press each ball onto your work surface to flatten the top and bottom slightly, creating a stable, bun-like shape rather than a perfect sphere. These flattened areas will help them stack securely later. -
Create the Core Hole:
While the clay is still soft, carefully push your wooden dowel vertically through the center of each piece to create a channel. Remove the dowel; this ensures your pieces can be stacked on a rod for stability.
Step 2: Sculpting the Faces
-
Draft the Features:
Lightly sketch the position of the eyes and nose on three of the spheres using a needle tool. Keep the style naive and simple—large circles for eyes work best. -
Carve the Eyes:
Use a small loop tool to carve out circular shallow depressions for the eyes. Leave a small raised dot in the center for the pupil, or carve the pupil deeper; I personally like to press a bead into the clay to make a perfect negative impression for the pupil. -
Add Nose and Mouth:
Roll a small coil of additional clay for the nose and score/slip it onto the face, blending the edges seamlessly. Use a blade or needle tool to incise a simple curved line for the smile. -
Refine the Expressions:
Add extra details like eyebrows by carving shallow arched lines above the eyes. Give each face a slightly different expression—maybe one is surprised and one is calm. -
Distress the Surface:
To achieve that weathered stone look, gently tap the surface with a coarse brush or a ball of crumpled foil to add texture before the clay dries.
Wobbly Heads?
If the pieces don’t stack perfectly flat, use a small ring of spare clay or sticky tack between layers as a hidden ‘washer’ to level them out.
Step 3: Sculpting the Torso
-
Carve the Collar:
On the fourth piece (the bottom one), use your needle tool to draw a V-neck collar shape near the top edge. -
Detail the Shirt:
Carve vertical lines all around the shape to simulate a ribbed sweater or shirt texture. Be careful not to warp the central hole while adding pressure. -
Add Buttons:
Roll three tiny balls of clay, flatten them slightly, and attach them vertically down the center front of the shirt using slip. Press a tiny hole in the center of each button.
Pro Tip: Texture
Mix sand or used coffee grounds directly into your acrylic paint. This creates a grainy, authentic stone feel painted right onto the smooth clay.
Step 4: Finishing and Assembly
-
Dry Completely:
Allow all pieces to dry fully according to your clay package instructions. This usually takes 24–48 hours depending on thickness. -
Sand and Smooth:
Once bone dry, lightly sand any sharp ridges or rough areas on the bottom or top stacking surfaces to ensure they sit flush against each other. -
Apply Base Color:
Paint each piece a solid matte color: light blue for the top, coral pink for the middle, mustard yellow for the third, and sage green for the torso. You may need two coats for full opacity. -
Inking the Details:
Mix a watery wash of dark brown acrylic paint. Paint this into the carved lines of the eyes, mouth, and shirt ribs. -
Wipe Back:
Immediately wipe the surface with a slightly damp paper towel. This leaves the dark paint in the crevices while revealing the bright color on the surface, emphasizing the carving. -
Paint the Buttons:
Carefully paint the buttons on the torso with neat brown paint to make them pop against the green shirt. -
Final Assembly:
Insert your wooden dowel into a base (or just lean the stack if stable). Slide the torso on first, followed by the yellow, pink, and blue heads.
Arrange your colorful totem near a sunny window and enjoy the quirky charm of your new roommates

TRACK YOUR CERAMIC JOURNEY
Capture glaze tests, firing details, and creative progress—all in one simple printable. Make your projects easier to repeat and improve.
Antenna Critters With Found Bits
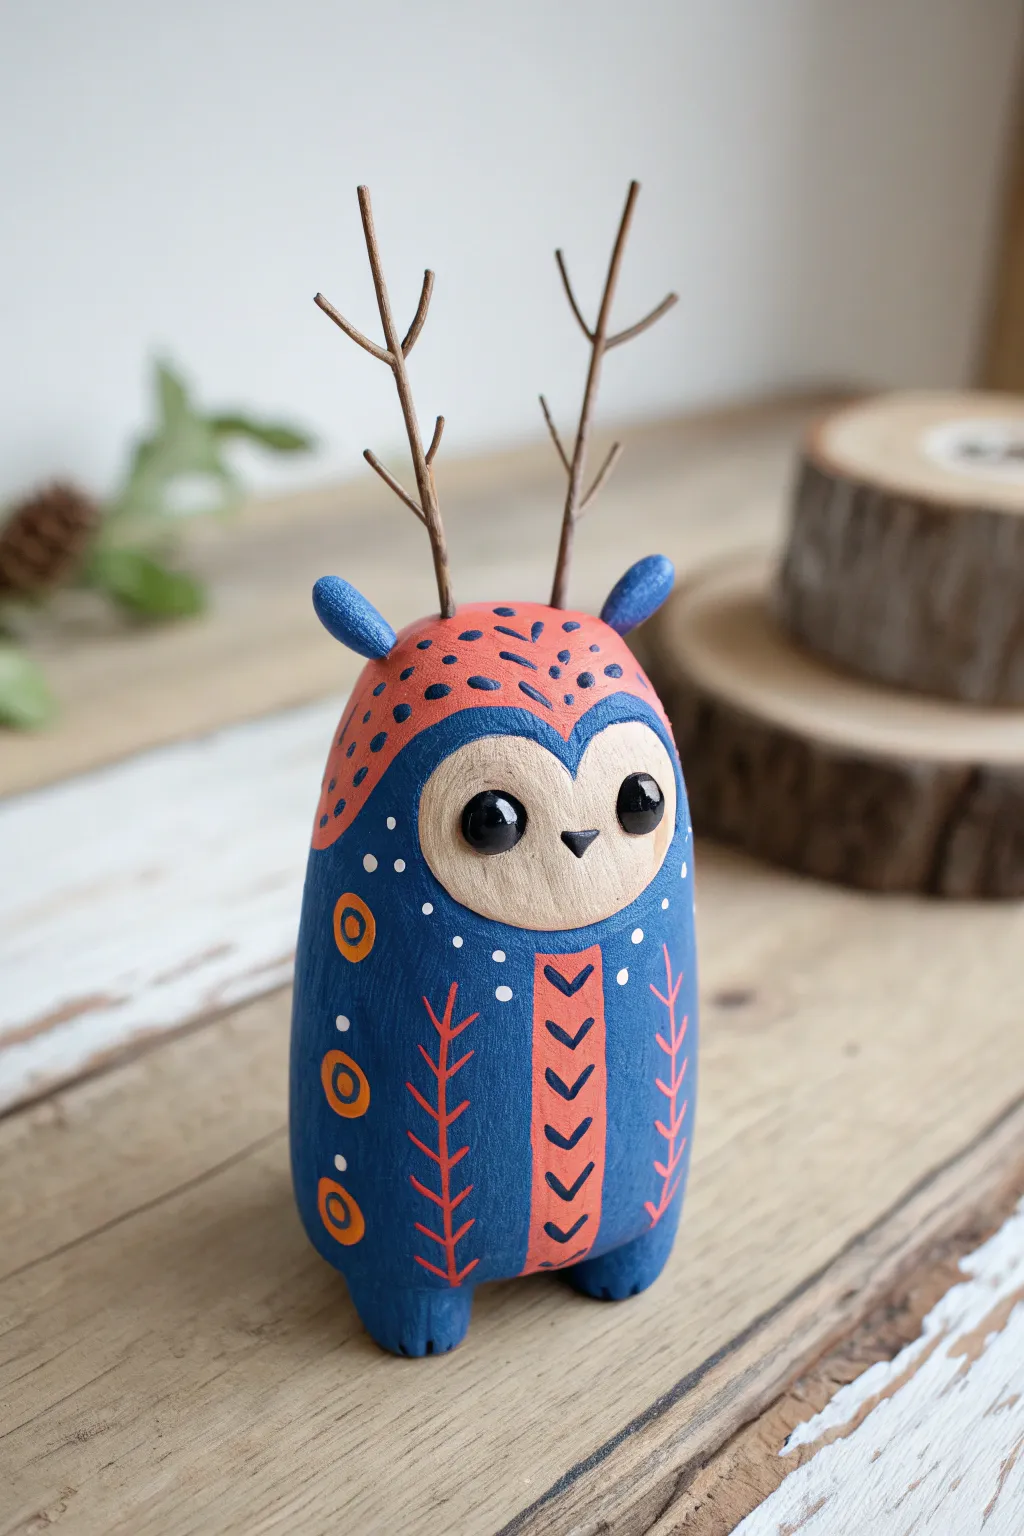
Blend the earthy charm of natural twigs with bright, folk-art inspired painting in this delightful clay project. This round little creature features a stylized owl face, decorative patterns, and whimsical branch antlers for a touch of forest magic.
Step-by-Step Guide
Materials
- Polymer clay (blue, or white to paint later)
- Acrylic paints (navy blue, coral/salmon, light beige, white, black)
- Two small, dry twigs (branched)
- Sculpting tools (needle tool, smoothing tool)
- Fine detail paintbrushes (0 or 00 size)
- Matte varnish or sealant
- Aluminum foil (for the core)
- Gloss glaze (for the eyes)
- Super glue (optional, for securing twigs)
Step 1: Sculpting the Base
-
Form the foil core:
ball up a piece of aluminum foil into an oblong, egg-like shape about the size of a lemon. Compress it tightly so it creates a solid armature for your clay. -
Condition the clay:
Take your main body color clay (blue is easiest, though white works if you plan to paint everything) and knead it until it’s soft and pliable. -
Cover the core:
Flatten the clay into a sheet about 1/4 inch thick and wrap it completely around your foil egg. Smooth the seams together so the surface is seamless and uniform. -
Shape the body:
Gently roll the clay form on your work surface to create a smooth, rounded cylinder that tapers slightly at the top, giving it a sturdy, standing posture. -
Create the feet:
Pinch the bottom two corners of the form to create two small, nubby feet. Use a tool to make slight indentations between them so the creature stands upright comfortably. -
Add the ears:
Roll two small, rice-sized logs of blue clay. Attach them to the top corners of the head and smooth the connection points so they look integrated, not just stuck on. -
Insert the antlers:
Take your two dry twigs and press them gently into the top of the head between the ears to create deep pilot holes. Remove the twigs before baking so they don’t burn.
Step 2: Painting & Details
-
Bake the form:
Bake your clay piece according to the manufacturer’s instructions. Usually, this is around 275°F (135°C) for 15-30 minutes depending on thickness. Let it cool completely. -
Base coat the body:
If you used white clay, paint the entire body a deep, matte blue. If you used blue clay, you might still want a quick coat of paint to create an even, matte texture for the details. -
Paint the face mask:
Using a light beige or oatmeal color, paint a heart-shaped mask on the upper front of the face. It should resemble a barn owl’s facial disc. -
Add the head cap:
Mix a coral or salmon pink color. Paint a rounded ‘cap’ area on top of the head, coming down to meet the top of the beige face mask. -
Define the eyes:
Paint two large, round black circles inside the beige mask area. Space them widely for a cute, innocent look. -
Add the beak:
Paint a tiny, dark blue or black triangle right between the eyes for the beak. -
Detail the head patterns:
Using navy blue paint and your finest brush, add small dash marks across the coral head cap to simulate feathers or fur texture. -
Draw the chest stripe:
Paint a vertical strip of coral running down the center of the blue body. Once dry, add navy blue chevrons (V-shapes) going down inside this stripe. -
Add side decorations:
On the blue sides of the body, paint coral vertical lines with small angled branches, like stylized wheat or fern patterns. -
Finish with dots and circles:
Add small white dots around the edge of the face mask and scattered on the body. Paint three orange circles with darker centers vertically down the left and right sides. -
Final assembly:
Add a drop of super glue into the holes on top of the head and re-insert your twigs. Coat the black eyes with gloss glaze to make them shine, and seal the rest with a matte varnish.
Twig Selection Tip
Look for twigs that are totally dry and brittle. Green wood shrinks as it dries, which might make your antlers fall out later.
Make It a Rattle
Before wrapping the foil core in clay, put a few dried beans or beads inside a hollow foil ball to make your critter rattle when shaken.
Place your finished creature on a shelf or windowsill where its natural elements can bring the outdoors inside
Melting Blob Sculptures
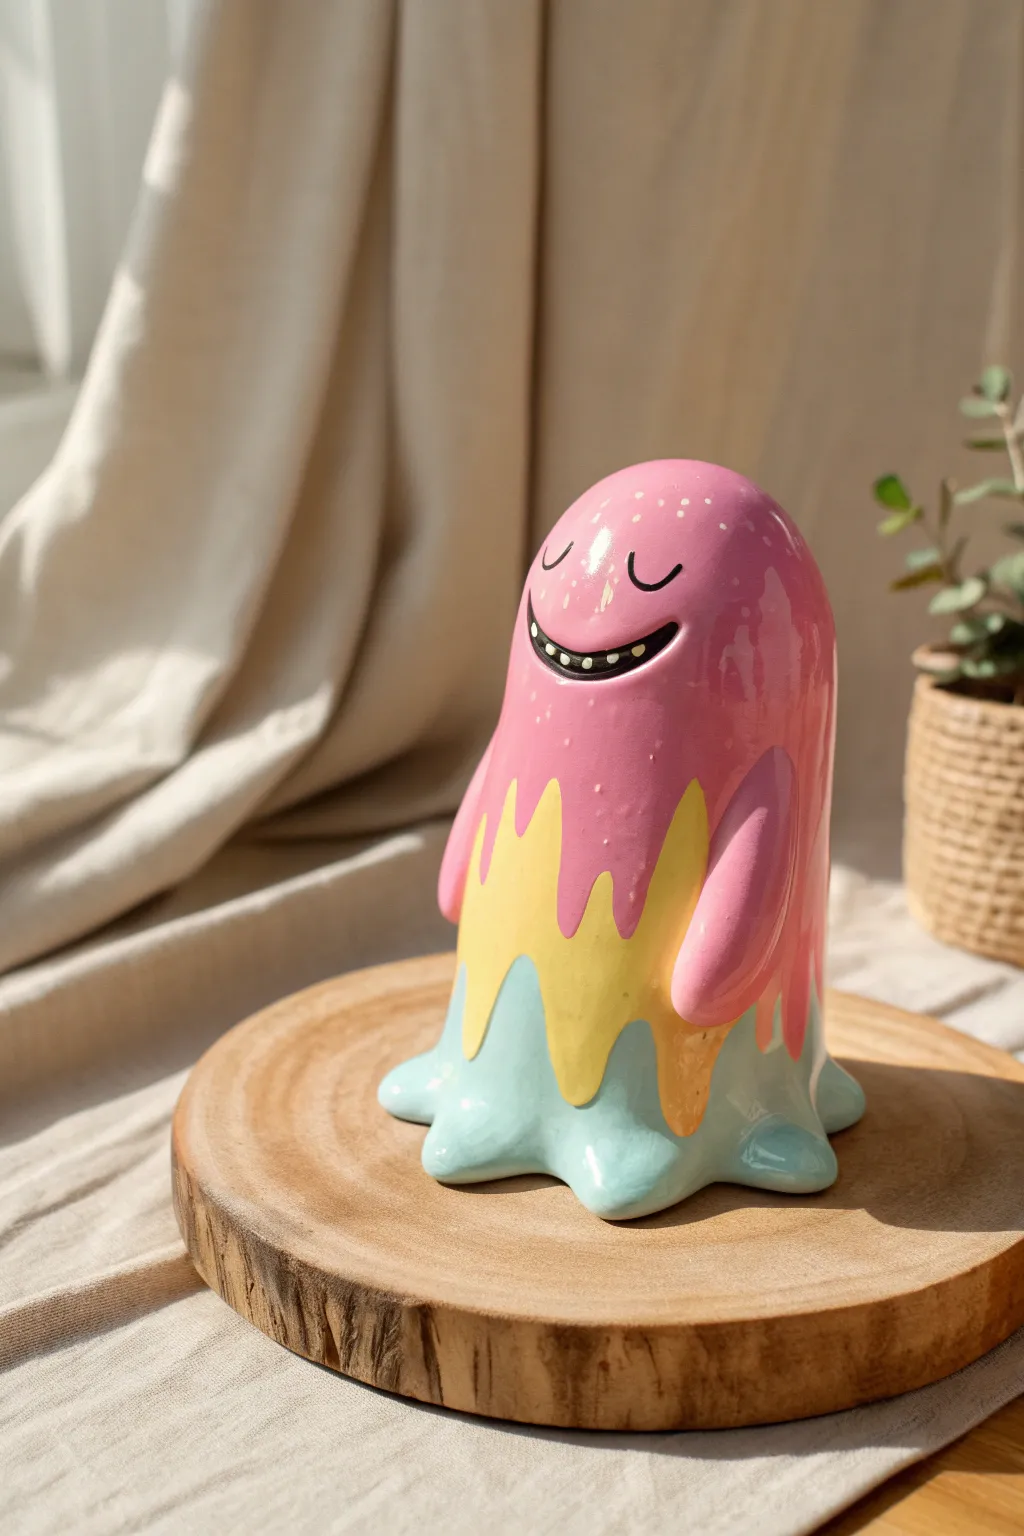
This cheerful little sculpture brings a pop of color to any shelf with its tri-color melting effect and happy expression. Using smooth clay transitions and a high-gloss finish, you’ll create a character that looks like it’s made of shiny, colorful sludge.
Detailed Instructions
Materials
- White or light-colored polymer clay (approx. 3-4 oz)
- Acrylic paints (bubblegum pink, pastel yellow, light blue, black, white)
- High-gloss varnish or UV resin
- Sculpting tools (needle tool, ball stylus)
- Rolling pin or pasta machine
- Aluminum foil (for armature)
- Painting brushes (fine detail and flat)
- Oven for baking polymer clay
- Sandpaper (fine grit)
Step 1: Sculpting the Base Form
-
Form the Core:
Crumple a piece of aluminum foil into a rough dome or gumdrop shape about 3-4 inches tall. This saves clay and keeps the sculpture lightweight. -
Prepare the Clay:
Condition your polymer clay until it is soft and pliable, then roll it into a sheet about 1/4 inch thick. -
Cover the Armature:
Drape the clay sheet over your foil core, smoothing it down the sides. Gently press out any air bubbles trapped between the foil and the clay. -
Create the Puddle:
At the bottom, allow the excess clay to flare out slightly onto your work surface. Use your thumb to push the edges into irregular, rounded puddle shapes to simulate a melting pool.
Paint Peeling?
If acrylic paint peels off the baked clay, light sanding before painting helps adhesion. Also, washing the baked clay with soapy water removes oily residues.
Step 2: Adding Details & Texture
-
Sculpting the Arms:
Roll two small snakes of clay, keeping them thicker at one end. Attach these to the sides of the body, blending the upper seams completely so they look like they are emerging from the goop. -
Defining the Drips:
While we will paint the color layers later, it helps to sculpt slight varying thicknesses now. Use a modeling tool to create subtle raised areas where the ‘pink’ layer will drip over the ‘yellow’ area. -
Creating the Face:
Use a needle tool or small ball stylus to gently carve the mouth line. It should be a long, curved smile. -
Finishing the Surface:
Smooth the entire surface with your finger or a little bit of baby oil to remove fingerprints. The smoother the clay now, the glossier the final finish will look. -
Bake the Clay:
Bake the sculpture according to your clay package instructions (usually 275°F/135°C for 15-30 minutes per 1/4 inch of thickness). Let it cool completely.
Pro Tip: Seamless Drips
When painting the drip layers, slightly thicken your paint with a gel medium. This physically raises the paint level, making the drips look 3D and tangible.
Step 3: Painting the Layers
-
Base Coat:
Paint the bottom third of the sculpture (the puddle area) with light blue acrylic paint. You may need two coats for opacity. Create rounded, upward-curving ‘drip’ shapes at the top edge of the blue. -
Middle Layer:
Paint the middle section with pastel yellow. Carefully paint downwards in rounded drip shapes that overlap the blue section. I like to use a small filbert brush here to get those rounded edges just right. -
Top Layer:
Paint the top section, including the head and arms, with bubblegum pink. Paint long, exaggerated drips that flow down over the yellow layer. -
Adding Speckles:
For extra texture, use a toothpick or very fine brush to add tiny dots of white and lighter pink on the pink section, mostly focused on the forehead area.
Step 4: Facial Features & Finish
-
Painting the Eyes:
Using a very fine liner brush and black paint, draw two ‘U’ shapes for the closed, happy eyes. Add small eyelashes if desired. -
Detailing the Mouth:
Fill the carved mouth area with black paint. Once dry, use a white paint pen or fine brush to add a row of small, rounded teeth along the bottom lip line. -
Glazing:
Once all paint is perfectly dry, apply 2-3 coats of high-gloss polyurethane varnish. Alternatively, apply a layer of UV resin and cure it under a UV lamp for a glass-like, wet finish.
Place your shiny new friend near a window where the light can catch those glossy curves
Monster Toothbrush Holders
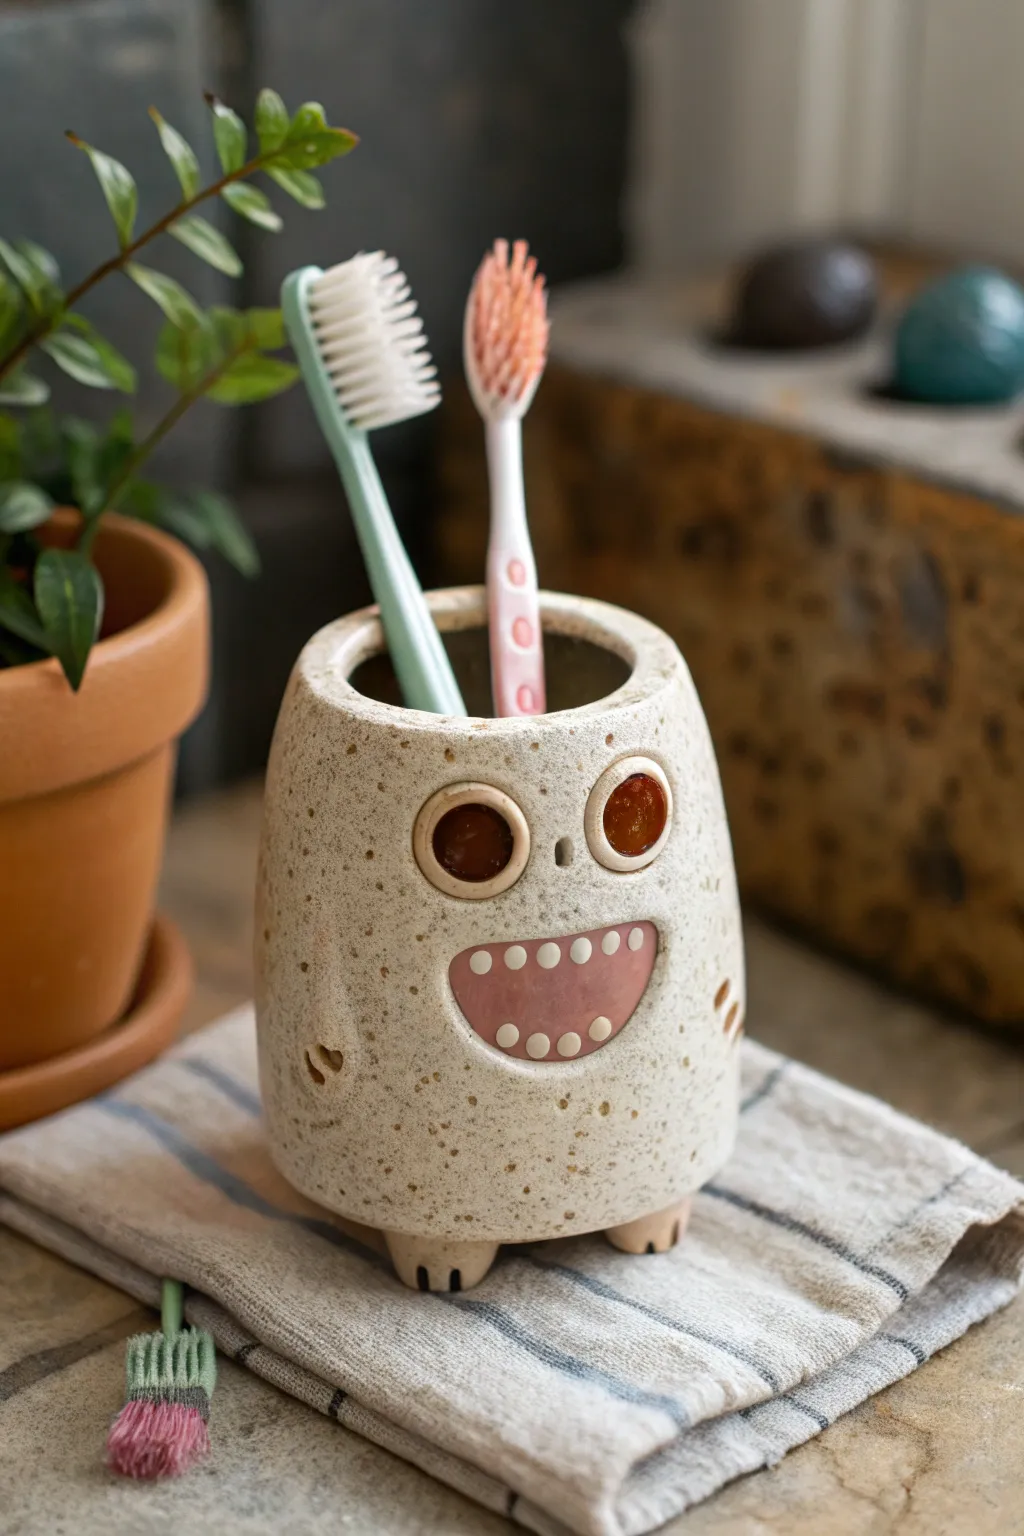
Brighten up your bathroom routine with this adorable, speckled ceramic monster that happily holds your dental tools. With its warm oatmeal clay body, glossy amber eyes, and a sweet, toothy grin, this little guy brings a dose of character to any sink.
How-To Guide
Materials
- Speckled oatmeal stoneware clay
- Pottery wheel (or tools for coil building)
- Small loop tool or carving tool
- Needle tool
- Slip and scoring tool
- Underglaze (pink/mauve, white)
- Glossy amber glaze (for eyes)
- Clear matte or satin glaze (optional for body)
- Sponge
- Kiln
Step 1: Forming the Body
-
Throwing the Cylinder:
Center about 1.5 lbs of speckled clay on your wheel. Pull up a cylinder that is approximately 4-5 inches tall with a slightly wider base than the rim. -
Shaping the Taper:
Collar the clay gently inward as you move up the form, creating a tapered shape that mimics a rounded cone or an elongated egg minus the top. -
Refining the Rim:
Compress the rim with a chamois or sponge to make it smooth and rounded, ensuring it’s comfortable for storing toothbrushes. -
Trimming the Bottom:
Once leather hard, trim the excess clay from the bottom to create a clean, distinct foot ring or flat base before moving on to sculpting.
Glaze Running?
If the amber eye glaze is runny, leave the socket slightly shallower or use a specific stable glaze to prevent festive monster tears.
Step 2: Sculpting the Features
-
Adding the Feet:
Hand-build two small, flattened nub shapes from clay scraps. Score and slip them onto the bottom front edge for feet. -
Detailing the Toes:
Use your needle tool or a small knife to gently press two or three lines into each foot to give the impression of tiny claws or toes. -
Forming the Eye Sockets:
Roll two small balls of clay and flatten them slightly. Secure them high up on the monster’s face using slip and scoring. -
Defining the Eyes:
Press a rounded tool or your thumb firmly into the center of each eye mound to create deep, cup-like sockets that will eventually hold pool of glaze. -
Creating the Mouth:
Carve a wide, bean-shaped oval lower down on the face using a loop tool. You want this area slightly recessed to frame the teeth. -
Adding the Teeth:
Paint a layer of white slip or underglaze inside the mouth recess. Then, shape tiny tic-tac sized pieces of clay and attach them in a row along the top and bottom edges of the mouth.
Make it a Family
Create different heights and widths to make a whole monster family, varying the number of eyes for extra quirky personality styling.
Step 3: Glazing and Firing
-
Bisque Fire:
Once the piece is bone dry, load it into the kiln for a bisque fire (usually Cone 04) to prepare it for glazing. -
Glazing the Mouth Area:
Apply a soft pink or mauve underglaze to the recessed area around the teeth. Be careful to wipe away any stray marks on the teeth themselves. -
Glazing the Eyes:
Fill the eye sockets generously with a glossy amber or honey-colored glaze. This high-gloss finish contrasts beautifully with the matte body. -
Finishing the Body:
Leave the main body unglazed to show off the natural speckled clay texture, or apply a very thin wash of matte clear glaze if you prefer a sealed surface. -
Final Fire:
Fire the piece to maturity (Cone 5 or 6 depending on your clay body). Allow the kiln to cool completely before meeting your new bathroom buddy.
Place your brushes inside and enjoy the whimsical charm added to your countertop
Emotional Monsters Hugging Hearts
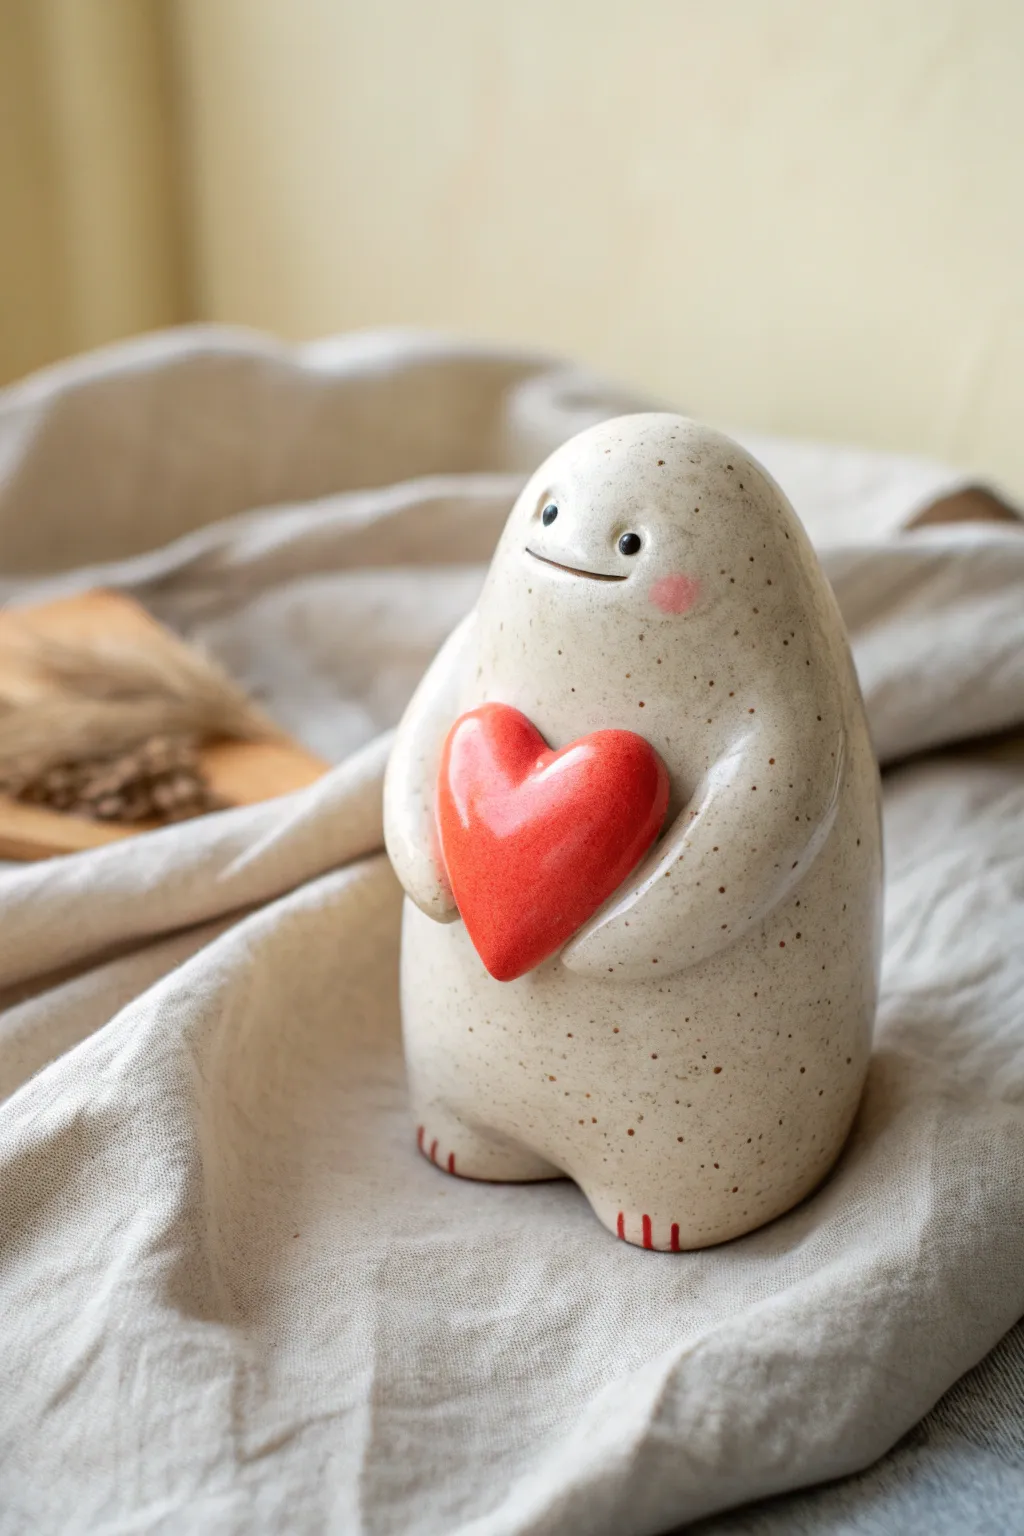
This endearing little ceramic monster captures the essence of love with its speckled stoneware body and bright red heart. With its soft, rounded form and sweet expression, this project is perfect for beginners looking to experiment with hand-building techniques.
Step-by-Step Tutorial
Materials
- Speckled stoneware clay (white or light beige)
- Red underglaze
- Clear glossy glaze
- Pottery tools (needle tool, rib tool, modeling tool)
- Small paintbrush
- Scoring tool or serrated kidney
- Slip (clay water slurry)
- Sponge
- Kiln (or access to a firing service)
Step 1: Sculpting the Body
-
Form the Base:
Start with a ball of speckled clay roughly the size of a large orange. Pat and shape it into a smooth, upright oval or egg shape, ensuring the bottom is flattened so it stands securely. -
Refine the Shape:
Use a rib tool or your fingers to smooth out the surface, tapering the top slightly to create a head area that merges seamlessly into the body. -
Create the Legs:
At the base of the form, gently press two indentations to suggest where legs might be, or simply pinch out two small, stubby feet at the bottom front to help with stability and cuteness. -
Smooth the Surface:
Take a damp sponge and gently wipe the entire surface to remove fingerprints and ensure the clay is perfectly smooth before adding features.
Smooth Operator
Burnish the clay with a soft rib or back of a spoon when leather hard. This compresses the particles for an ultra-smooth finish under the clear glaze.
Step 2: Creating the Arms and Heart
-
Shape the Heart:
Roll a small ball of clay and flatten it slightly. Indent the top center and pinch the bottom to form a classic heart shape that fits proportionally on the monster’s belly. -
Make the Arms:
Roll two small coils of clay for the arms. They should be thick enough to look chubby but thin enough to wrap around the heart. -
Score and Slip:
Score the belly area where the heart will go, and the back of the heart itself. Apply slip to both scored areas. -
Attach the Heart:
Press the heart firmly onto the belly, wiggling it slightly to create a suction bond. Smooth the edges where the heart meets the body if desired, or leave it distinct. -
Attach the Arms:
Score and slip the shoulder area and the sides of the heart. Attach the arms so they curve from the sides of the body and rest their hands gently on the front of the heart. -
Blend the Seams:
Use a modeling tool to blend the clay at the shoulders into the main body so the arms look like they are growing out of the form, while keeping the hands distinct on the heart.
Make it a Set
Create a family of monsters in different sizes. Vary the object they hold—try a star, a flower, or a tiny moon to represent different emotions.
Step 3: Adding Details & Refining
-
Sculpt the Face:
Use a needle tool or small loop tool to gently carve a simple, wide smile. I find slightly curving up the corners adds a lot of personality. -
Detail the Feet:
Using the needle tool, press three small lines into each foot stub to create simplified toes. -
Dry Slowly:
Cover the piece loosely with plastic and let it dry slowly to the leather-hard stage to prevent cracking. -
Bisque Fire:
Once fully bone dry, fire the piece in the kiln to bisque temperature (usually cone 04 or 06).
Step 4: Glazing & Finishing
-
Paint the Heart:
Apply 2-3 coats of bright red underglaze specifically to the heart. Be careful to keep the edges crisp against the raw clay body. -
Paint the Details:
Use a fine brush to dot the eyes black and add a tiny dab of white for a highlight. Add soft pink blush marks to the cheeks and paint the little toe lines red. -
Apply Clear Glaze:
Once the underglaze is dry, dip the entire piece in a clear glossy glaze. This will make the speckled clay body shine and pop. -
Wipe the Foot:
Use a damp sponge to wipe all glaze off the very bottom of the piece so it doesn’t stick to the kiln shelf. -
Final Fire:
Fire the piece again to the maturity temperature of your clay and glaze (often cone 5 or 6 for stoneware).
Now you have a charming little keepsake that is ready to spread some love on your shelf or as a gift