
Whenever I’m stuck, I grab a lump of clay and let my hands talk first. These creative clay ideas are the kind of projects you can actually finish in an afternoon, whether you’re into air dry clay, polymer clay, or handbuilt pottery.
Pinch Pot Trinket Bowls
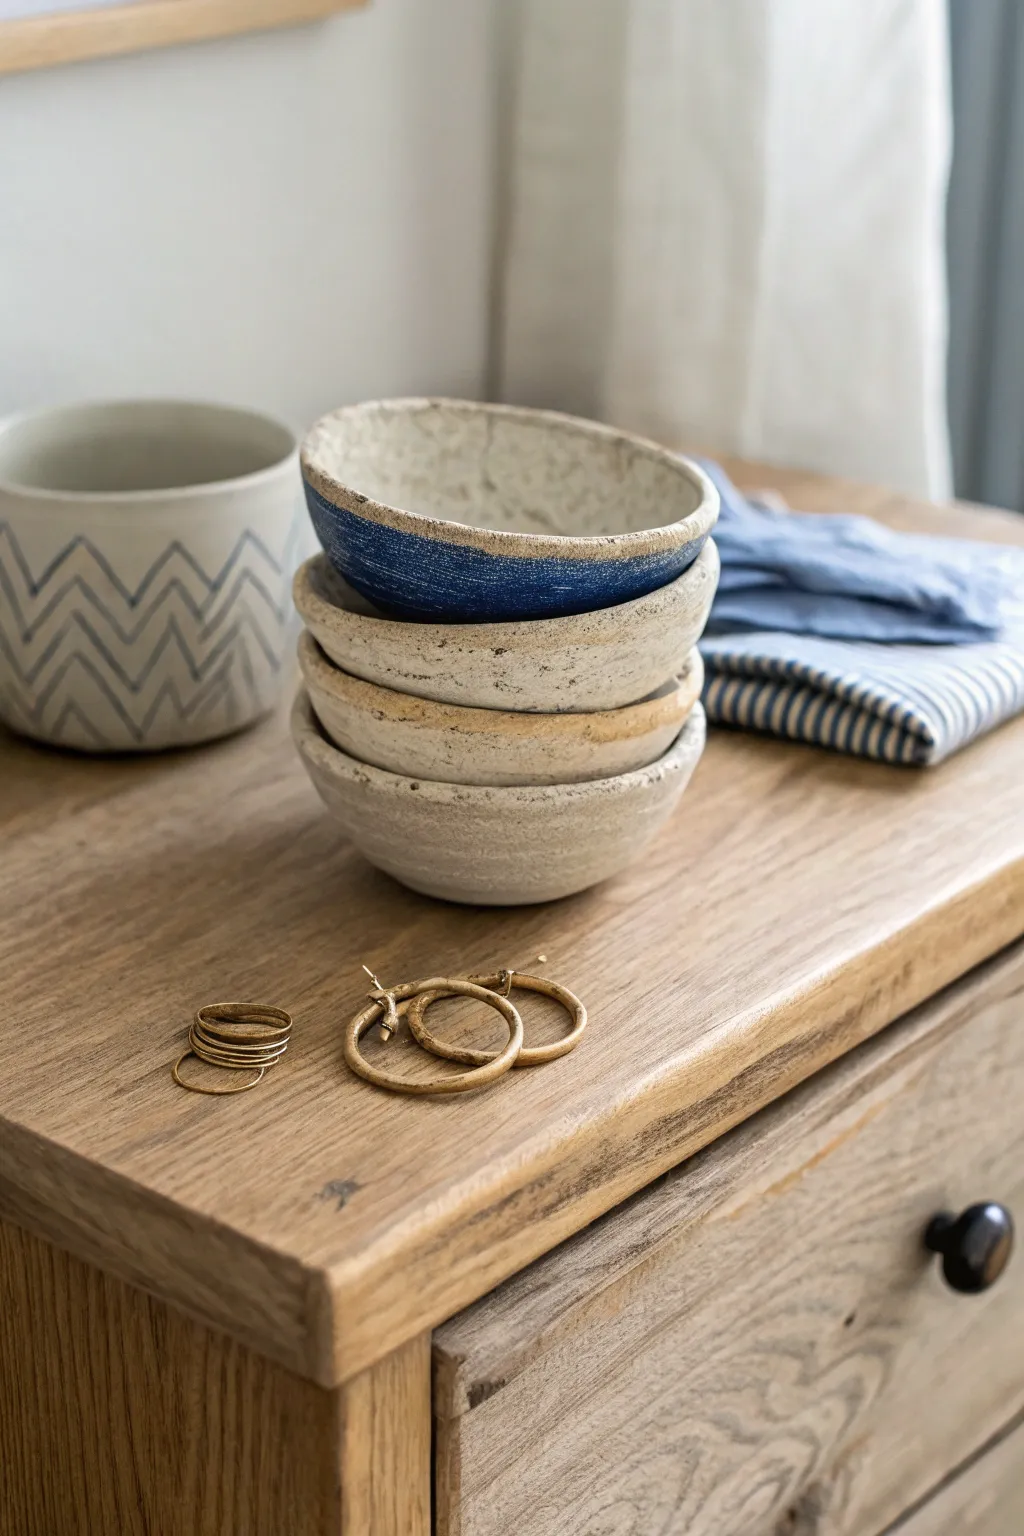
Create a charming set of nested pottery bowls perfect for holding your favorite rings and earrings. These handmade pinch pots feature an organic, textured surface and a beautiful contrast between the raw clay body and deep blue glaze.
How-To Guide
Materials
- Stoneware clay (speckled or buff)
- Small bowl of water
- Sponge
- Needle tool or toothpick
- Rib tool (optional)
- Deep cobalt blue glaze
- Clear matte or satin glaze (optional)
- Paintbrushes
- Kiln access (or oven if using oven-bake clay)
Step 1: Forming the Pinch Pots
-
Prepare the Clay:
Begin by wedging your clay to remove any air bubbles. Separate the clay into four balls of graduated sizes, ranging from a golf ball to a tangerine. -
Create the First Hole:
Take the largest ball of clay and hold it in your non-dominant hand. Gently press your thumb into the center, stopping about a quarter-inch from the bottom. -
Pinch the Walls:
Using your thumb on the inside and fingers on the outside, gently pinch the clay while rotating the ball. Work from the bottom up to thin out the walls. -
Shape the Curve:
Continue pinching until the walls are an even thickness, roughly 1/4 inch. Aim for a wide, open curve rather than a straight cylinder to match the photo’s profile. -
Smooth the Rim:
Run a slightly damp sponge or your finger along the rim to soften any sharp edges. It doesn’t need to be perfectly level; the organic wave adds character. -
Refine the Surface:
While holding the bowl, gently smooth the exterior with your fingers or a rib tool to remove major fingerprints, but leave some of the natural clay texture visible. -
Check the Base:
Tap the bottom of the pot gently on your work surface to create a small flat spot so it sits stably. -
Repeat the Process:
Repeat these steps for the remaining three balls of clay. Test stack them as you go to ensure they nestle inside each other comfortably.
Uneven Rims are Okay
Don’t stress about a wobbly rim. The charm of these bowls lies in their varied, handmade quality. Gently tap the rim with a wooden paddle if it gets unparalleled.
Step 2: Drying and Bisque Fire
-
Slow Drying:
Place your finished bowls on a ware board. Loosely cover them with plastic for the first day to dry slowly and prevent cracking. -
Bone Dry:
Remove the plastic and let the clay dry completely until it is bone dry. The clay will become lighter in color and room temperature to the touch. -
Bisque Fire:
Fire the bowls in a kiln to the appropriate cone for your specific clay body (usually Cone 04 or 06). This prepares them for glazing.
Cracks While Drying?
If you spot tiny hairline cracks on the rim while drying, score the area slightly, add a drop of vinegar or slip, and smooth it over immediately with your finger.
Step 3: Glazing and Finishing
-
Prepare for Glazing:
Once cool, wipe the bisque-fired bowls with a damp sponge to remove any kiln dust. This helps the glaze adhere properly. -
Apply the Accent Color:
Select the bowl you want to feature as the pop of color. I usually choose the top bowl for the most visual impact. Dip a brush into your deep cobalt blue glaze. -
Glaze the Exterior:
Apply the blue glaze to the lower half or two-thirds of the exterior of that specific bowl, leaving the rim raw for a nice textural contrast. -
Glaze the Interior (Optional):
You can leave the interiors unglazed for a truly raw look, or apply a clear matte glaze to the inside of all bowls to make them easier to clean. -
Wipe the Feet:
Ensure the bottom of every bowl is completely free of glaze. Wipe off any drips with a clean, wet sponge so they don’t fuse to the kiln shelf. -
Final Firing:
Load the kiln again for the glaze firing. Make sure the bowls are not touching each other during this firing. -
Cool and Display:
Allow the kiln to cool naturally before removing your new ceramic stack. Arrange them in a casual tower on your dresser.
Enjoy styling your vanity with these wonderfully tactile little dishes


Thumb-Pressed Bubble Coasters
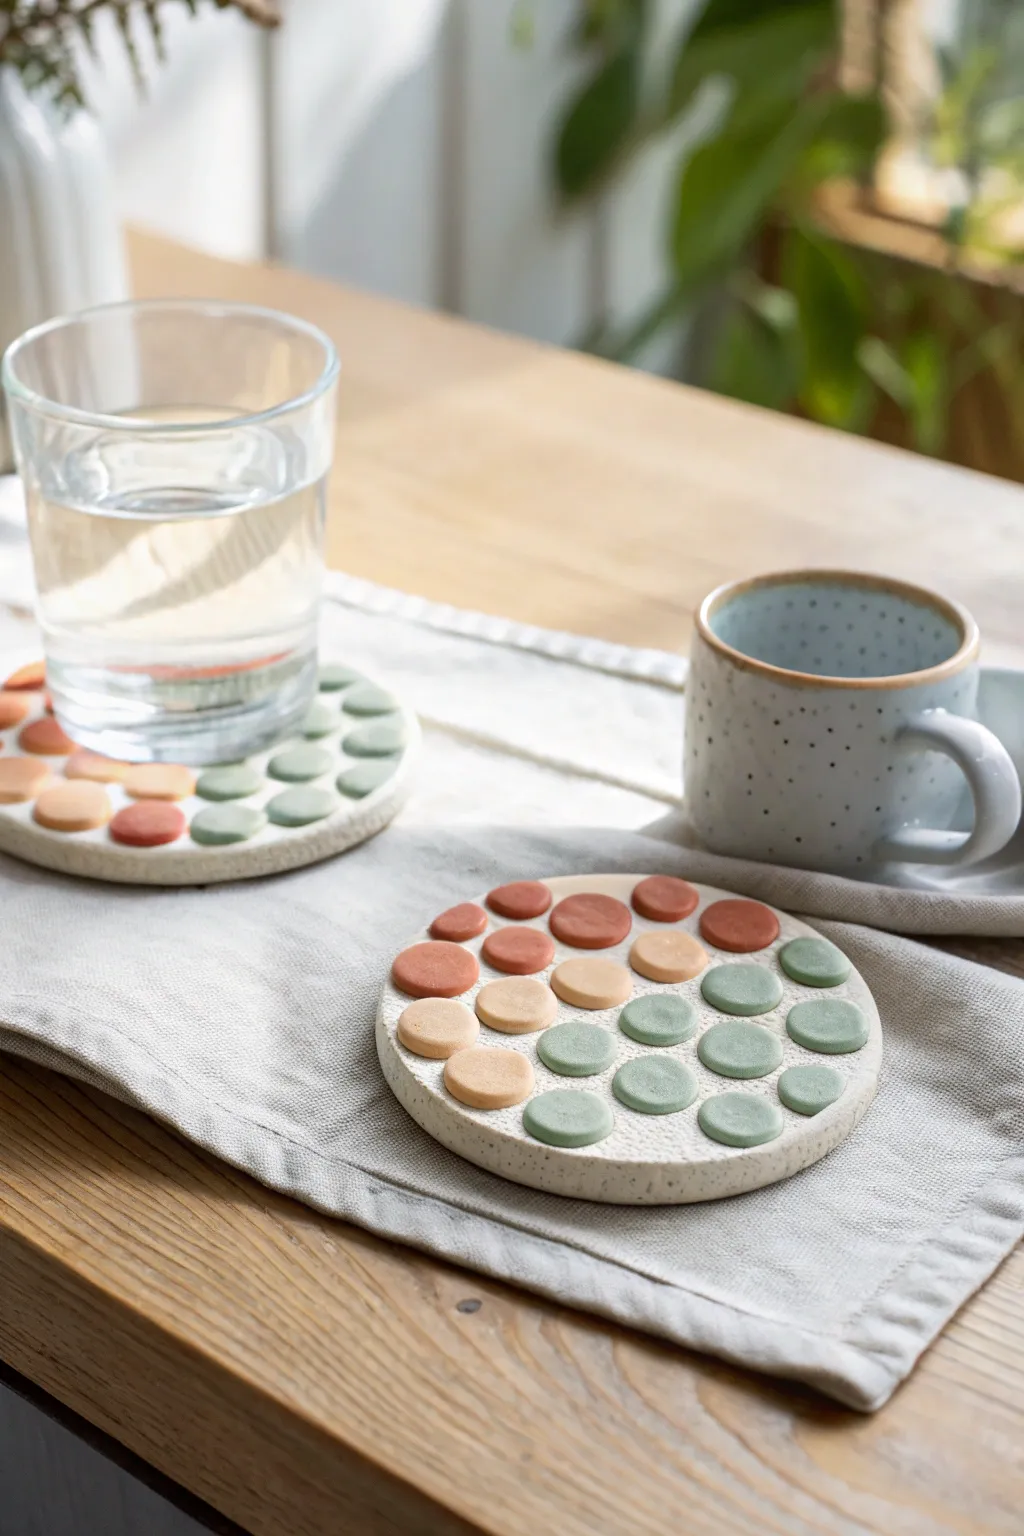
These simple yet striking coasters combine soft, organic textures with a playful geometric pattern. By pressing small discs of colored clay into a speckled base, you’ll create a durable and stylish resting spot for your favorite mug.
Step-by-Step Guide
Materials
- White or light beige polymer clay with speckles (granitex style)
- Polymer clay in terracotta, warm beige, and sage green tones
- Rolling pin or acrylic roller
- Round cookie cutter (approx. 3.5 – 4 inches diameter)
- Small round cutter (approx. 0.5 inch diameter) or wide straw
- Parchment paper or ceramic tile for baking
- Oven
- Sandpaper (fine grit, optional)
- Matte varnish (optional)
Step 1: Preparing the Clay Base
-
Condition the base clay:
Start by warming up your speckled white clay in your hands. Knead it thoroughly until it is soft, pliable, and free of cracks. -
Roll out the slab:
Place the clay on a clean, flat surface or parchment paper. Use your roller to flatten it into an even slab. Aim for a thickness of about 1/4 inch (6mm) to ensure the coaster is sturdy. -
Cut the coaster shape:
Using your large round cookie cutter, press firmly into the speckled slab to cut out the base circle. Peel away the excess clay. -
Smooth the edges:
Gently run your finger around the rim of the circle to soften any sharp cutting lines or imperfections.
Sticky Situation?
If the clay sticks to your cutter, dip the cutter in cornstarch or water before slicing. This acts as a release agent for clean edges.
Step 2: Creating the Bubble Dots
-
Mix your colors:
Condition your colored clays—terracotta, beige, and sage green. If you want custom shades, mix small amounts of white or brown into them until you achieve that soft, earthy palette seen in the photo. -
Roll thin sheets:
Roll out each color of clay separately. These sheets should be thinner than your base, roughly 1/8 inch (3mm) thick. -
Cut small circles:
Use the small round cutter (or a wide straw) to punch out multiple small dots from each color. You’ll need about 15-20 dots per coaster. -
Plan your arrangement:
Before attaching them, lay the dots loosely on top of your base to find a pleasing arrangement. I usually group similar colors together for a gradient effect, transitioning from warm reds to cool greens.
Step 3: Assembly and Baking
-
Attach the first dot:
Pick up a dot and gently press it onto the speckled base. Don’t squash it completely flat yet; just ensure it sticks. -
Complete the grid:
Place the remaining dots in a grid-like pattern, leaving a small gap of exposed speckled clay between each one. -
The thumb-press technique:
Once all dots are positioned, use your thumb or forefinger to press down firmly on each colored circle. This flattens them slightly and bonds them securely to the base, creating that signature organic texture. -
Double-check adhesion:
Look at the coaster from the side to make sure all the dots are flush and securely connected. If any edges are lifting, smooth them down gently. -
Prepare for baking:
Transfer the coaster onto a parchment-lined baking sheet or a ceramic tile. -
Bake:
Bake in a preheated oven according to the manufacturer’s instructions for your specific brand of polymer clay (typically around 275°F / 135°C for 15-30 minutes).
Smoother Surfaces
Wipe the unbaked clay with a little baby oil or rubbing alcohol on your finger. This removes distinct fingerprints for a cleaner look.
Step 4: Finishing Touches
-
Cool down:
Allow the coasters to cool completely inside the oven or on a wire rack before handling them, as hot clay is fragile. -
Sand edges:
If the edges feel rough, use a fine-grit sandpaper to lightly buff the rim of the coaster for a professional finish. -
Seal (optional):
For extra durability against moisture, apply a thin coat of matte varnish. This will protect the clay without altering the natural, stony look. -
Add gentle feet:
Stick small felt or cork pads to the bottom of the coaster to prevent it from scratching your table surfaces.
Now you have a set of modern, textural coasters ready for your next coffee break


Easy Slab-Built Soap Dishes
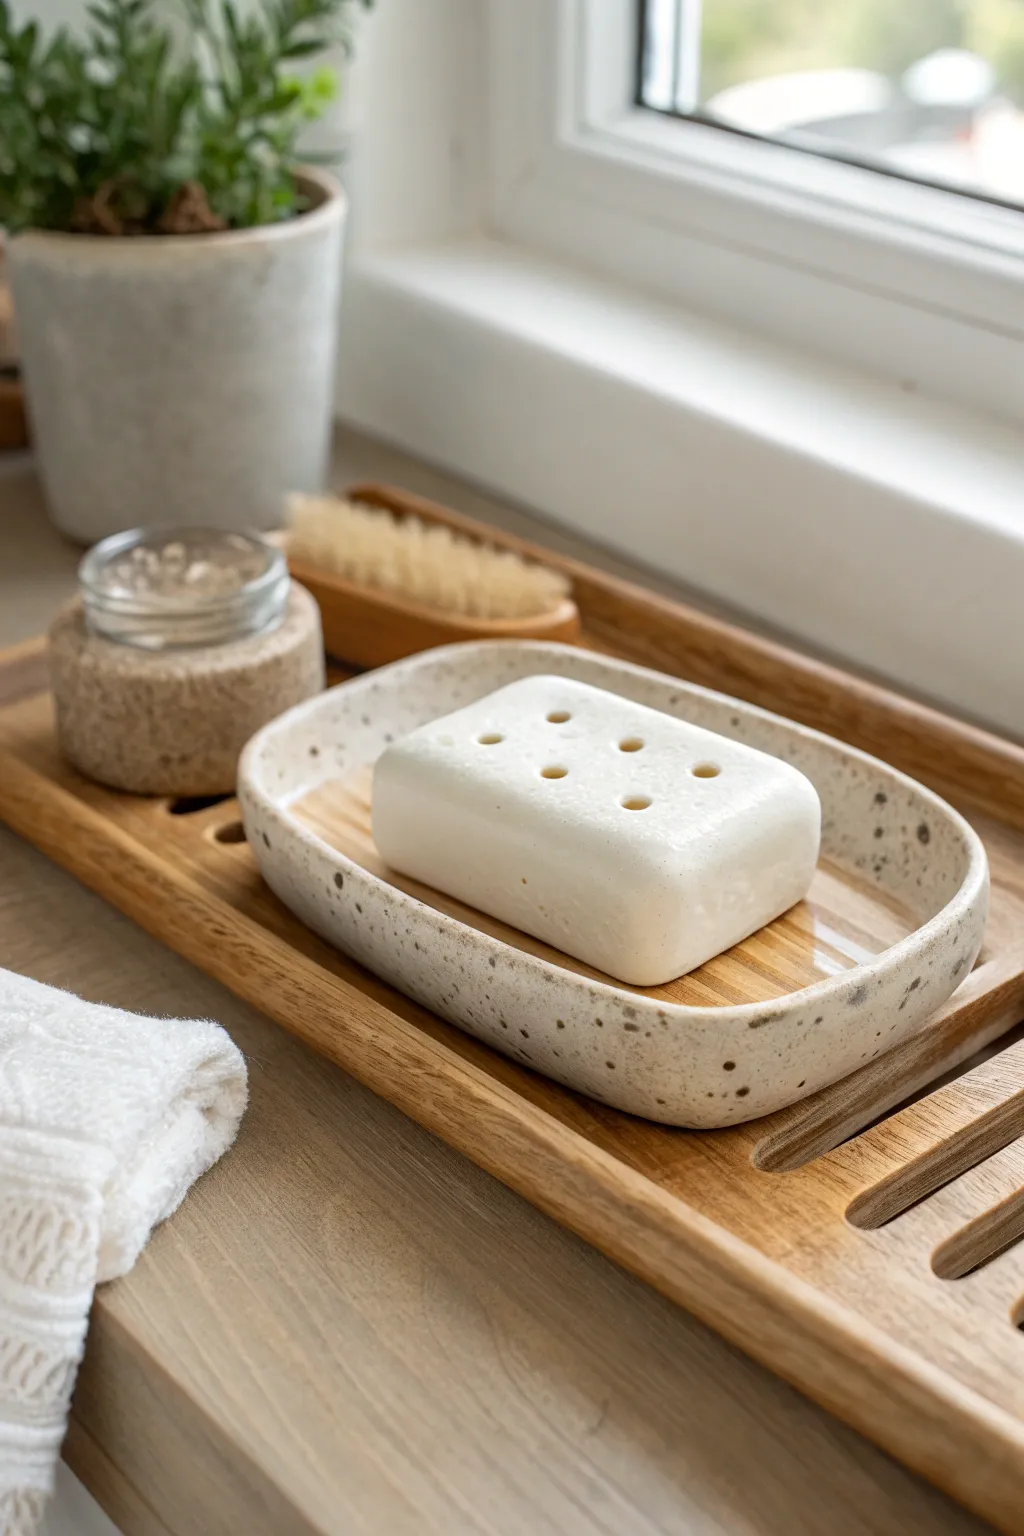
This minimalist soap dish features a softly curved oval shape made from beautiful speckled stoneware. Its understated design highlights the clay’s natural texture, providing a serene and functional resting place for your favorite bar of soap.
Detailed Instructions
Materials
- Speckled white stoneware clay
- Rolling pin
- Canvas work surface or slab mat
- Oval paper template (approx. 4″ x 6″)
- Needle tool or fettling knife
- A soft yellow rib (rubber or silicone)
- Small bowl of water
- Sponge
- Wooden modeling tool
- Clear or transparent gloss glaze
Step 1: Preparing the Slab
-
Roll the clay:
Start with a ball of wedged speckled stoneware clay. Using your rolling pin, roll it out onto your canvas or mat until it’s an even slab, approximately 1/4 inch thick. Rotate the clay occasionally to ensure it doesn’t stick. -
Compress the slab:
Take your flexible rib and gently drag it across the surface of the clay in multiple directions. This compression aligns the clay particles, preventing warping later, and smooths out the canvas texture. -
Cut the shape:
Place your oval paper template onto the smooth slab. Using a needle tool or fettling knife, trace around the template to cut out your base shape. -
Smooth the edges:
After removing the excess clay, run a damp finger or a slightly moist sponge along the cut rim to soften the sharp square edge left by the knife.
Clean Those Crumbs
When smoothing the rim with a sponge, be careful not to drag ‘grog’ (gritty bits) across the surface. Patting gently with the sponge often works better than wiping.
Step 2: Forming the Walls
-
Create a coil:
Roll a separate piece of clay into a long, even coil, roughly the thickness of a pencil or pinky finger. This will become the raised wall of the dish. -
Score the base:
Using a serrated rib or needle tool, rough up (score) the outer perimeter of your oval base where the coil will sit. Apply a small amount of water or slip to the scored area. -
Attach the coil:
Gently lay the coil onto the scored edge of the base. When the ends meet, cut them at an angle and join them together seamlessly. -
Blend the coil:
Support the outside of the wall with one hand. With your other hand, use a wooden modeling tool or your thumb to smear the clay from the coil down onto the base floor, blending them completely. -
Refine the connection:
Do the same on the outside, blending the coil down to the base slab so no seam is visible. I find using a rib here helps keep the curve consistent.
Add Drainage
Before drying, use a small circular hole cutter to punch 3-4 holes in the center of the base. This turns the dish into a self-draining soap saver.
Step 3: Shaping and Drying
-
Shape the curve:
Using your thumb and fingers, gently pinch the wall to thin it slightly and guide it upwards. You want a low, gentle wall rather than a tall cup shape. -
Final smoothing:
Take a damp sponge and do a final pass over the rim and entire surface to remove any finger marks and expose those lovely speckles. -
Slow drying:
Place the finished dish on a board and cover it loosely with plastic. Let it dry slowly to the leather-hard stage before uncovering it to dry completely.
Step 4: Glazing and Firing
-
Bisque fire:
Once bone dry, fire the piece to bisque temperature (usually cone 04) based on your clay specifications. -
Apply clear glaze:
Wipe the bisque piece with a damp sponge to remove dust. I recommend dipping or painting 2-3 coats of a transparent gloss glaze to make the speckles pop without hiding them. -
Wipe the foot:
Ensure the bottom of the dish is completely free of glaze so it doesn’t fuse to the kiln shelf. -
Glaze fire:
Fire the piece to the final temperature required for your stoneware (often cone 5 or 6). Let the kiln cool completely before unloading.
Enjoy the simple elegance of your handmade pottery piece in the bathroom or kitchen


Ring Cones and Jewelry Catchalls
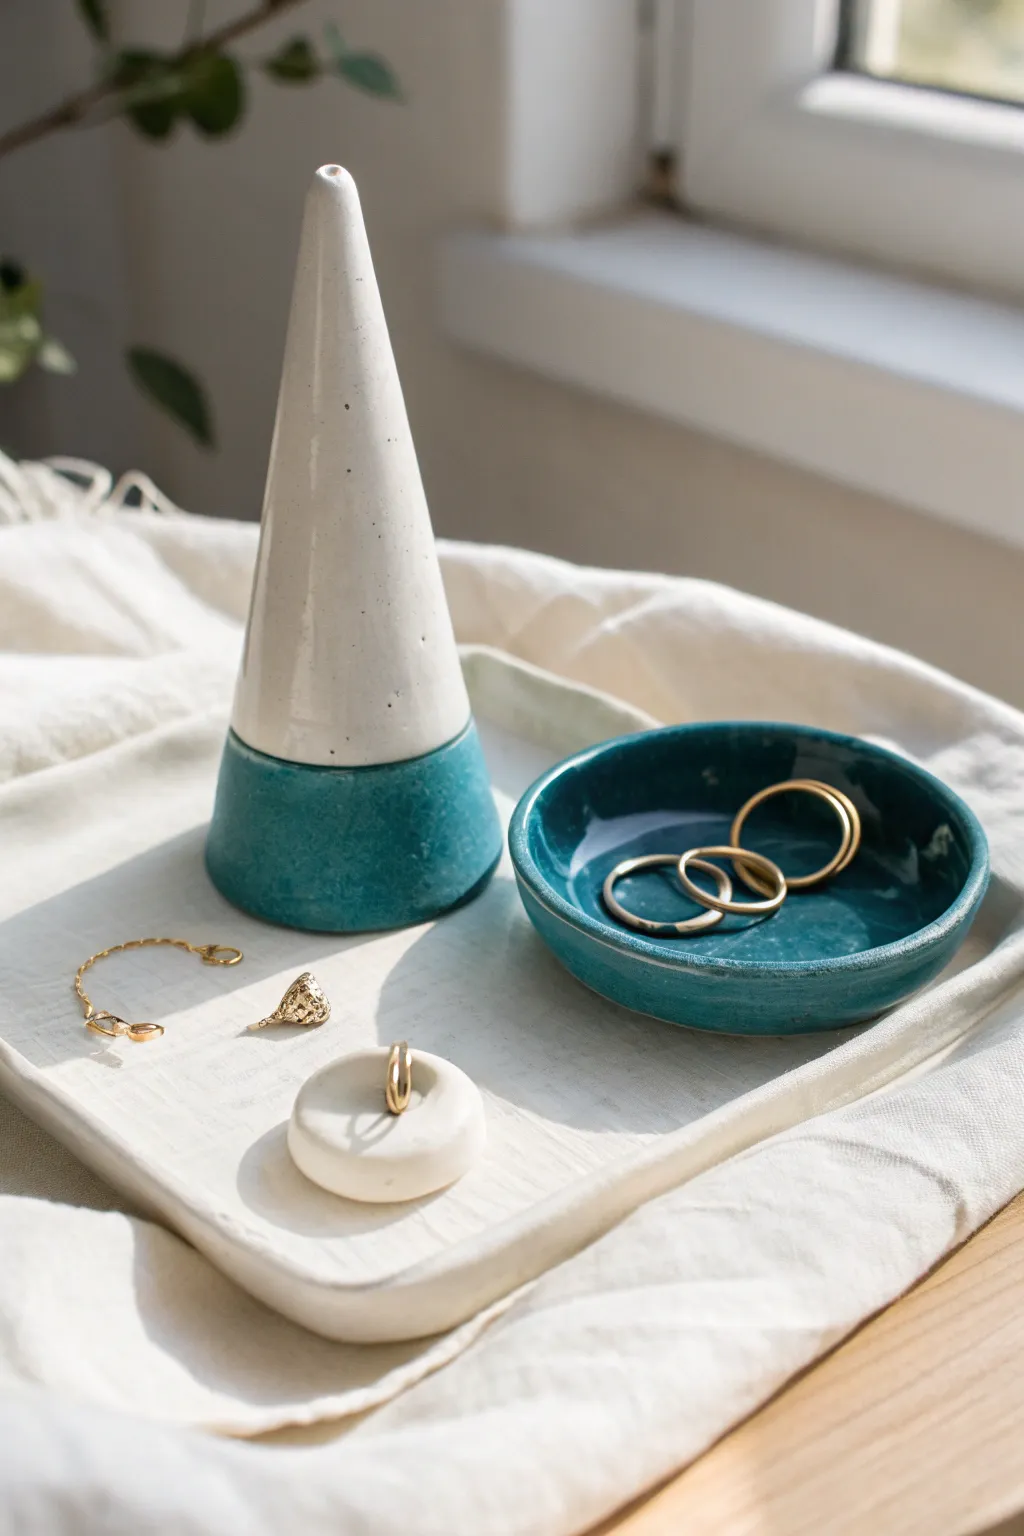
This elegant set combines a modern ring cone with a matching catchall dish, featuring a beautiful contrast between raw speckled clay and a deep teal glaze. The minimalist design is perfect for displaying your favorite rings while keeping small treasures safe.
Step-by-Step
Materials
- Speckled stoneware clay (or white clay with speckles added)
- Fettling knife or clay cutter
- Rolling pin
- Small bowl or circle template (approx. 3-4 inches)
- Slip and scoring tool
- Sponge
- Deep teal or turquoise ceramic glaze
- Clear or white glossy glaze (optional for top of cone)
- Paintbrushes
- Kiln (or oven if using polymer clay – adjust materials accordingly)
Step 1: Creating the Ring Cone
-
Form the base shape:
Begin with a ball of clay about the size of a golf ball. Using your palms, roll it on a flat surface into a thick coil. -
Taper the cone:
Concentrate your rolling pressure on one end of the coil to begin tapering it into a point. Keep the base wide and flat for stability. -
Refine the surface:
Stand the cone up on your work surface. Use your fingers or a smoothing rib to create straight, even sides, ensuring the cone is symmetrical. -
Flatten the bottom:
Tap the base firmly against the table to make it perfectly flat so it won’t wobble. Smooth out any bulging edges. -
Add the hole detail:
Using a small needle tool or toothpick, gently pierce the very tip of the cone if you want the hollow look shown in the image, or simply smooth the tip for a solid finish. -
Smoothing:
Use a slightly damp sponge to wipe away any fingerprints or ridges, creating a pristine surface for the glaze later.
Step 2: Crafting the Catchall Dish
-
Roll out the slab:
Take a separate piece of clay and roll it out to a uniform thickness, roughly 1/4 inch thick. -
Cut the circle:
Place your small bowl or template onto the slab and use your fettling knife to cut out a clean circle. -
Form the rim:
Gently lift the edges of the clay circle. Use your thumbs to pinch and press the rim upwards to create a shallow dish shape. -
Smooth the lip:
Run a damp sponge or your finger along the rim to round it off and prevent sharp edges. I find this step crucial for a professional feel. -
Create the mini ring holder:
Roll a very small ball of clay and flatten it into a thick ‘donut’ shape. Smooth the edges so it looks soft and pebble-like. -
Drying:
Allow all three pieces—cone, dish, and mini holder—to dry slowly under plastic until bone dry, then bisque fire them according to your clay’s instructions.
Clean Lines
For the sharpest line on your ring cone, use automotive detailing tape. It stretches around curves better than standard masking tape without buckling.
Step 3: Glazing and Finishing
-
Masking the cone:
For the crisp two-tone line on the cone, use masking tape or wax resist. Apply it horizontally around the cone, about one-third of the way up from the base. -
Glazing the cone base:
Dip the bottom section of the cone into your teal glaze, or paint it on carefully up to the masked line. Remove the tape immediately if using it. -
Glazing the top:
Depending on your clay body, you can either leave the top unglazed to show the raw speckles or apply a clear glossy glaze for a shine. -
Glazing the dish:
Pour a small amount of teal glaze inside the dish, swirl it to coat just the interior, and pour out the excess. Or, brush it on for a textured look. -
Coloring the exterior:
Paint the exterior of the dish with the same teal color to match the set perfectly, leaving just the bottom rim unglazed so it doesn’t stick to the kiln shelf. -
Final Fire:
Fire the pieces a second time (glaze firing) to the temperature recommended for your glaze and clay body.
Wobbly Cone?
If your cone wobbles after drying, gently sand the bottom in a figure-eight motion on a piece of sandpaper before the first firing to flatten it.
Once cooled, arrange your new jewelry set on your dresser and enjoy the handmade charm alongside your favorite accessories

The Complete Guide to Pottery Troubleshooting
Uncover the most common ceramic mistakes—from cracking clay to failed glazes—and learn how to fix them fast.
Texture-Stamped Clay Earrings
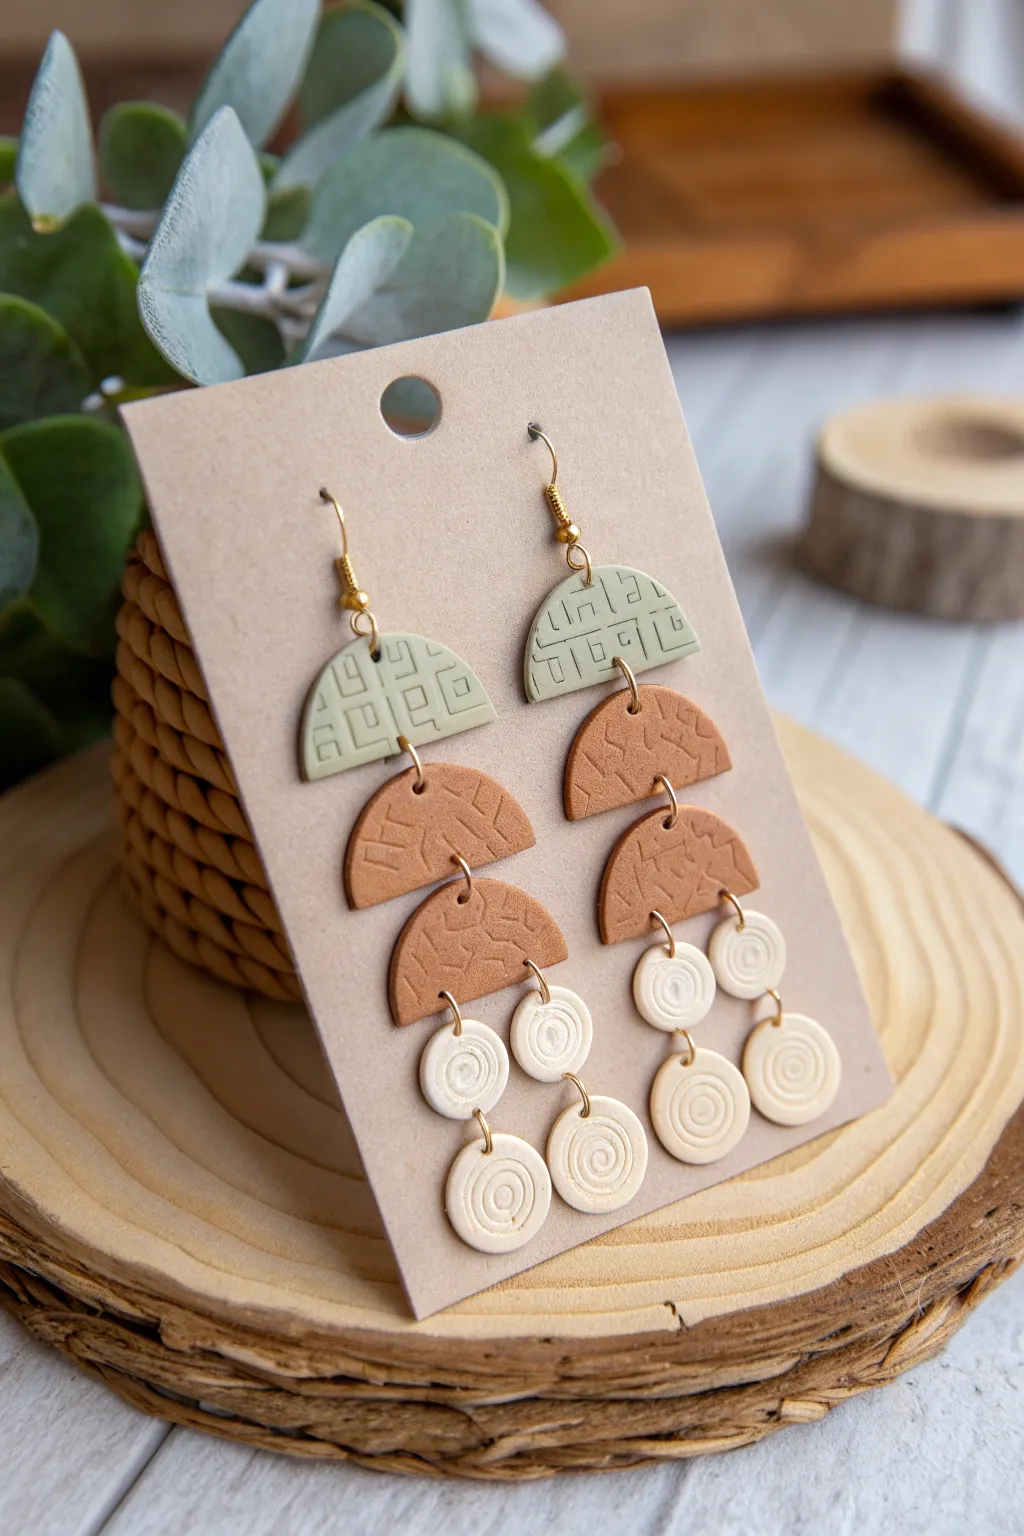
These stunning tiered earrings combine earthy terracotta and sage tones with intricate stamped textures for a modern boho look. The cascading design features geometric semicircles and delicate spirals that create beautiful movement when worn.
How-To Guide
Materials
- Polymer clay in olive green, terracotta/rust, and cream/off-white
- Texture stamps or mats (geometric square pattern and organic dash pattern)
- Small spiral texture stamp or finding
- Circle cutters (various sizes: approx. 2.5cm, 2cm, and 1cm)
- Sharp clay blade or tissue blade
- Acrylic roller or pasta machine
- Hand drill or pin vibe
- Jump rings (gold finish, 6mm and 4mm)
- Earring hooks (gold finish)
- Needle nose pliers
- Parchment paper and baking tray
Step 1: Preparing and Texturing the Clay
-
Condition the colors:
Begin by kneading each color of polymer clay—olive green, terracotta, and cream—separately until they are soft and pliable. This conditioning step is crucial to prevent cracking later. -
Roll out slabs:
Using an acrylic roller or a pasta machine on a medium setting (around 2-3mm thick), roll out a slab for each color. Keep the thickness consistent for a professional finish. -
Texture the green clay:
Place your geometric square/line texture mat onto the green clay slab. Press down firmly and evenly with your roller to imprint the design, then carefully peel the mat away. -
Texture the terracotta clay:
Repeat the process with the terracotta slab using the organic dashed-line texture mat. Ensure the impression is deep enough to be visible after baking but not so deep it cuts through. -
Create the cream spirals:
For the cream clay, use a small spiral stamp. Press it repeatedly into the slab to create individual spiral motifs, spacing them out enough so you can cut circles around them later.
Step 2: Cutting and Shaping
-
Cut the top semicircles:
Select a circle cutter approx. 2.5cm in diameter. Cut two circles from the textured green clay. Use your blade to slice each circle in half to create semicircles; you will need two identical halves for the top pieces. -
Cut the middle tiers:
Using the same texturing technique on the terracotta clay, cut four semicircles. If you want a graduated look like the photo, you can use slightly smaller cutters for the tiered effect, or slice large circles in halves. You need two terracotta semicircles per earring. -
Cut the bottom drops:
Take a small round cutter (approx. 1cm) and center it over your stamped spiral motifs on the cream clay. Cut out eight small circles total—four for each earring. -
Refine the edges:
I like to gently smooth the cut edges with my fingertip to remove any stray bits of clay or sharp ridges before baking. -
Pierce the holes:
Before baking, use a needle tool or toothpick to poke holes for the jump rings. For the semicircles, punch a hole in the center top and center bottom of the straight edge. For the cream circles, punch a hole near the top edge.
Sticky Situation?
If clay sticks to your texture mat or cutters, dust the clay surface lightly with cornstarch or dip your cutters in water before pressing down.
Step 3: Baking and Assembly
-
Bake the pieces:
Arrange all your clay pieces on a parchment-lined baking sheet. Bake according to the manufacturer’s instructions for your specific brand of clay—usually around 275°F (135°C) for 30-45 minutes. -
Cool and inspect:
Allow the pieces to cool completely on the baking tray. Once cool, they will reach their final hardness. Lightly sand any rough edges with high-grit sandpaper if needed. -
Drill if necessary:
If your pre-punched holes closed up slightly during baking, use a small hand drill to reopen or clean them up carefully. -
Connect the main body:
Using two pairs of pliers, open a 6mm jump ring. Connect the bottom of the green semicircle to the top of the first terracotta semicircle. Repeat to attach the second terracotta semicircle below the first. -
Attach the cream drops:
This design features a cluster of drops. Use smaller jump rings to attach two cream circles to the bottom of the lowest terracotta piece. You can chain them slightly or hang them side-by-side depending on the movement you want. -
Add the ear wires:
Finally, open the loop on your earring hook (or use a small jump ring) and attach it to the top hole of the green semicircle. Ensure the hook faces the correct direction. -
Final check:
Repeat the assembly for the second earring. Hold them up to ensure the lengths match and all jump rings are securely closed.
Clean Lines Tip
Wipe your clay blade with rubbing alcohol between cuts. This prevents color transfer and dragging, ensuring crisp geometric edges every time.
Now you have a gorgeous pair of statement earrings ready to wear or gift.
Initial Keychains and Bag Charms
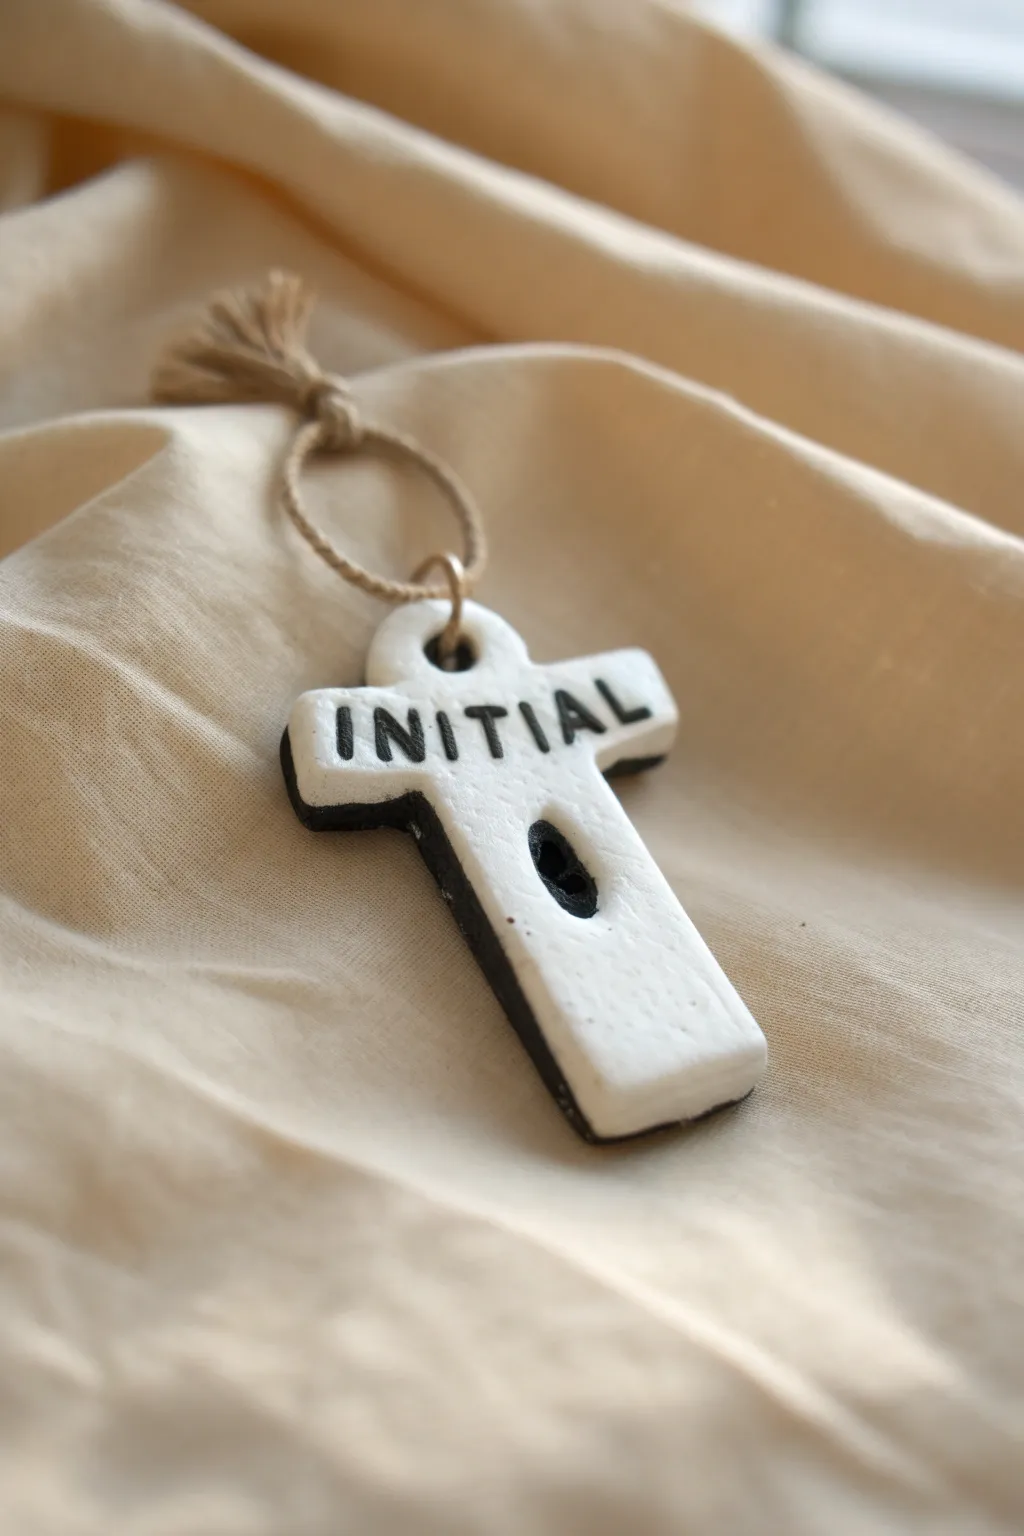
This minimalist clay charm features a striking black-and-white contrast that gives it a modern, graphic edge. The rustic twine loop adds just the right amount of natural texture to balance the bold lettering.
Step-by-Step Tutorial
Materials
- White polymer clay or air-dry clay
- Rolling pin or acrylic roller
- Cross-shaped cookie cutter (approximately 2-3 inches)
- Small alphabet stamps
- Black acrylic paint
- Fine-grit sandpaper
- Small detail paintbrush
- Two sizes of drinking straws or circle cutters (one small for the top loop, one slightly larger for the center)
- Jute twine or hemp cord
- Gloss or matte varnish (optional)
Step 1: Shaping the Clay
-
Condition the clay:
Start by kneading your white clay until it is soft, pliable, and free of air bubbles. This ensures a smooth surface without cracks later on. -
Roll it out:
Roll the clay onto a smooth work surface to a thickness of about 1/4 inch. If you want a chunkier look like the photo, avoid rolling it too thin. -
Cut the shape:
Press your cross-shaped cookie cutter firmly into the rolled clay. Wiggle it slightly to ensure a clean cut, then lift the cutter. If the clay sticks, gently push it out. -
Smooth the edges:
Run your finger dipped in a little water (for air-dry clay) or baby oil (for polymer clay) along the raw edges to soften any harsh cutter marks. -
Create the holes:
Use the smaller straw to punch a hole at the very top of the cross for the hanger. Then, take the slightly larger straw or tool and create an aperture in the center of the vertical bar, just below the crossbar.
Uneven Stamping?
If your stamps aren’t making deep enough impressions, lightly dust the clay with cornstarch before stamping to prevent sticking, or practice on scrap clay first.
Step 2: Adding Details
-
Stamp the text:
Arrange your alphabet stamps to spell ‘INITIAL’ (or your chosen word). Press them gently but firmly into the horizontal crossbar. Be careful not to press so hard that you distort the shape of the cross. -
Check alignment:
Ensure the letters are centered. I usually like to start with the middle letter and work outward to keep the spacing even. -
Clean up imperfections:
If the stamping caused any clay to displace upwards, gently smooth the surface again with your fingertip without filling in the letters. -
Dry or Bake:
If using polymer clay, bake according to the package instructions (usually 275°F for 15-30 minutes). If using air-dry clay, let it sit for 24-48 hours until completely hard.
Step 3: Painting and Assembling
-
Sand the surface:
Once fully cured, use fine-grit sandpaper to briefly buff the face and back of the cross. This removes fingerprints and creates a professional matte finish. -
Paint the letters:
Load a small brush with black acrylic paint. Fill in the stamped letters completely. Don’t worry if you get paint outside the lines for now. -
Wipe the excess:
Immediately wipe the surface with a damp paper towel or baby wipe. The paint will stay inside the impressed letters but wipe off the high points, leaving crisp text. -
Paint the edges:
Carefully paint the entire side edge of the cross black. Extend this paint to the back surface as well if you want a fully two-toned look. -
Darken the center hole:
Use a very fine brush to paint the inside walls of the central hole black to match the edges, giving it depth. -
Seal the piece:
Allow the paint to dry completely. Apply a coat of varnish if you want extra durability, or leave it bare for a raw texture. -
Prepare the twine:
Cut a length of jute twine, roughly 8 inches long. Fold it in half to create a loop. -
Attach the hanger:
Thread the folded end of the twine through the top hole from front to back. Pull the loose ends through the loop created by the fold (a lark’s head knot) and tighten it securely. -
Knot the top:
Tie an overhand knot near the ends of the twine strings to close the loop, trimming any uneven fraying for a tidy finish.
Bead It Up
Thread a large wooden bead onto the jute twine just above the knot for an extra rustic-boho detail that complements the organic clay texture.
Hang your new personalized charm on a bag or gift it to a friend for a simple, handmade gesture


What Really Happens Inside the Kiln
Learn how time and temperature work together inside the kiln to transform clay into durable ceramic.
Cute Face Magnets That Pop
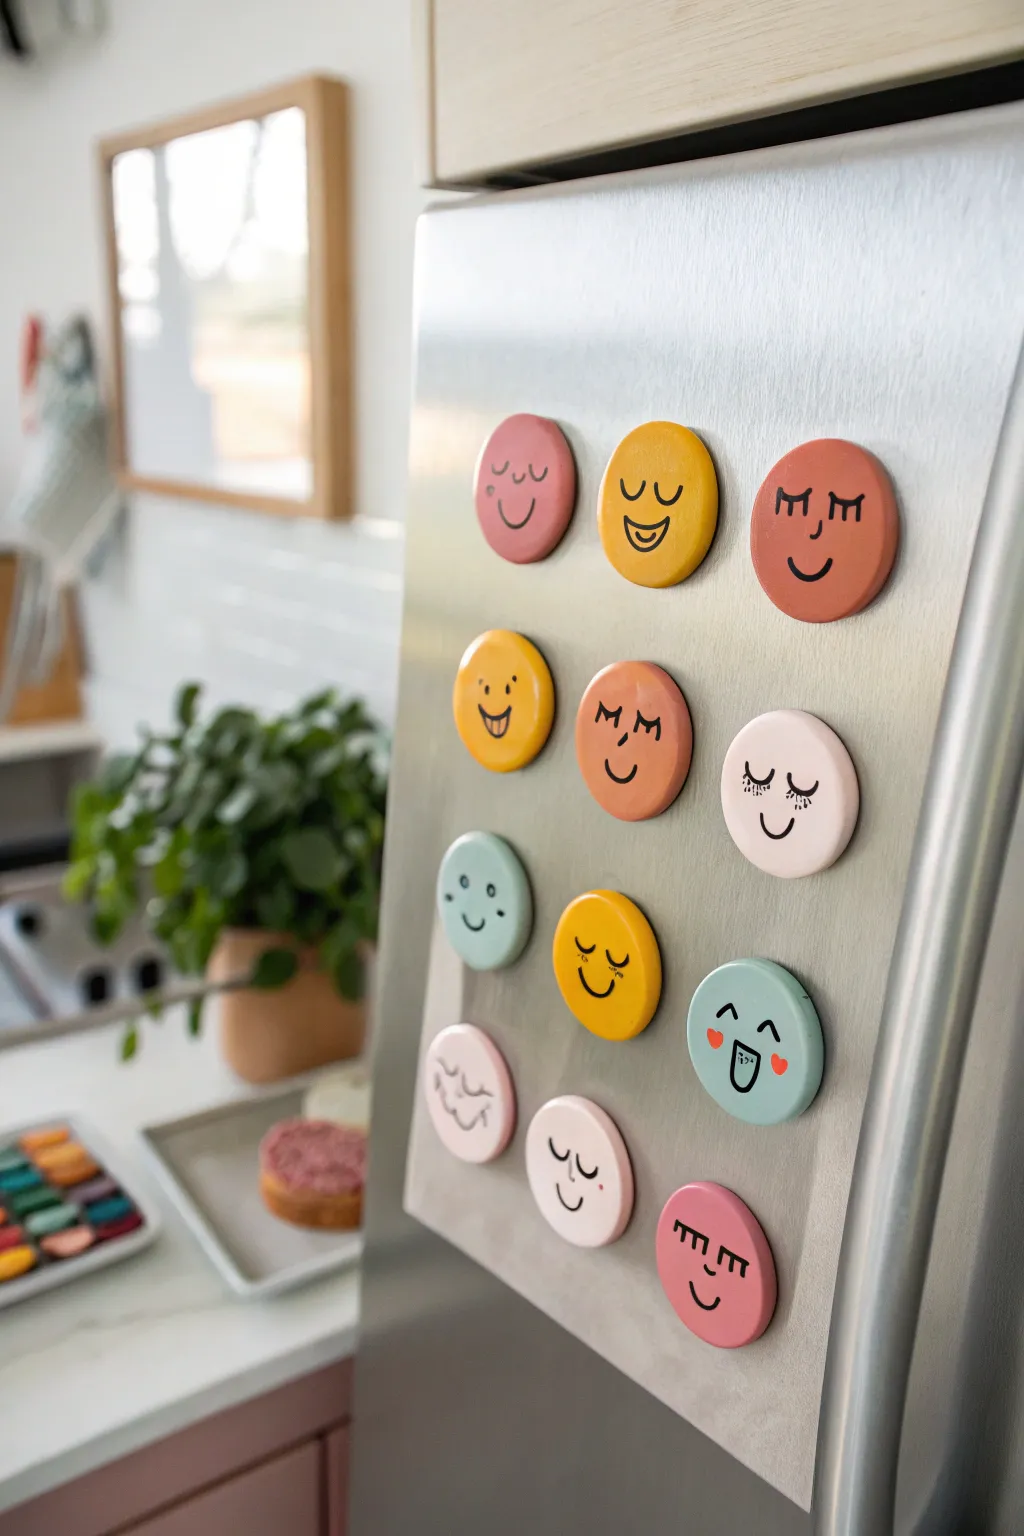
Brighten up your kitchen with these charmingly simple clay face magnets that add personality to any appliance. With their soft matte finish and playful expressions, they turn a plain refrigerator door into a gallery of happy emotions.
Detailed Instructions
Materials
- Polymer clay or air-dry clay (colors: light pink, deep rose, mustard yellow, orange-terracotta, cream, pale teal)
- Acrylic rolling pin
- Round cookie cutter (approx. 1.5 – 2 inches diameter)
- Parchment paper
- Baking sheet
- Fine-point black paint pen or permanent marker
- Red or pink paint pen (for cheek details)
- Strong round ceramic or neodymium magnets
- Strong craft glue (like E6000) or hot glue gun
- Sandpaper (fine grit)
- Matte varnish (optional)
Step 1: Shaping the Base
-
Condition the clay:
Start by taking a chunk of your first clay color (e.g., the mustard yellow). Knead it in your hands until it becomes soft, pliable, and warm to the touch to prevent cracking later. -
Roll it out:
Place the conditioned clay on a sheet of parchment paper to prevent sticking. Use your acrylic rolling pin to flatten the clay into a sheet about 1/4 inch thick. Aim for an even thickness so the magnets sit flat. -
Cut the circles:
Press your round cookie cutter firmly into the clay sheet. Wiggle it slightly and lift to cut out perfect circles. Repeat this process for each color of clay you possess—creating a variety of pinks, creams, and teals. -
Smooth the edges:
Once cuts are made, gently run your finger around the circumference of each disc to smooth down any sharp ridges or burrs left by the cutter. This gives them that professional, polished look.
Smooth Surface Secret
Before baking, lightly dust your clay with cornstarch and rub gently with a finger. This removes fingerprints and creates a buttery-smooth canvas for your drawings later.
Step 2: Baking and Prep
-
Prepare for baking:
Transfer your clay circles onto a baking sheet lined with clean parchment paper. Space them out so they aren’t touching. -
Bake the clay:
Follow the specific instructions on your polymer clay package for temperature and timing (usually around 275°F for 15-30 minutes). If using air-dry clay, simply let them sit undisturbed for 24-48 hours until fully hard. -
Cool down completely:
Remove the endless from the oven and let them cool completely on the tray. I like to let them sit for at least an hour to ensure the surface is ready for drawing. -
Light sanding:
If there are any lingering rough spots or fingerprints on the surface, gently buff them away with fine-grit sandpaper. Wipe away any dust with a slightly damp cloth.
Step 3: Designing the Faces
-
Sketch mentally or lightly:
Plan your expressions. Look at the reference photo for inspiration: sleepy eyes, winking faces, big smiles, and quirky sideways glances. -
Draw the eyes:
Using your fine-point black paint pen, draw the eyes first. Try simple U-shapes for sleeping eyes, dots for open eyes, or little crescents for happy squinting eyes. Add eyelashes to some for extra character. -
Add the mouth and nose:
Draw simple curved lines for smiles. Include small U-shapes for noses on some faces, or skip the nose entirely for a more minimalistic kawaii style. -
Create personality details:
Add quirky details like a tongue sticking out or little eyebrows. Vary the placement—some faces look cuter with features lower down on the circle. -
Blush it up:
Using a pink or red paint pen (or even a tiny dab of real paint), add small hearts, dots, or oval patches to the cheeks. This little pop of color brings the characters to life. -
Seal the design (optional):
If you want extra protection against kitchen grease, brush a thin layer of matte varnish over the face side and let it dry.
Ink Smearing?
If your paint pen ink bleeds into the clay, the surface might be too porous. Seal the baked clay with a thin layer of matte varnish first, let dry, and then draw on top.
Step 4: Assembly
-
Prepare the glue:
Flip all your finished faces over so the back side is facing up. Prepare your strong adhesive in a well-ventilated area. -
Attach the magnet:
Squeeze a pea-sized dot of glue onto the center of the clay disc’s back. Press a magnet firmly into the glue. -
Final dry time:
Allow the glue to cure fully according to the manufacturer’s instructions (usually overnight for maximum strength) before placing them on your fridge.
Now you have a whole squad of cheerful characters ready to hold up your grocery lists and family photos
Mini Bud Vases for Tiny Flowers
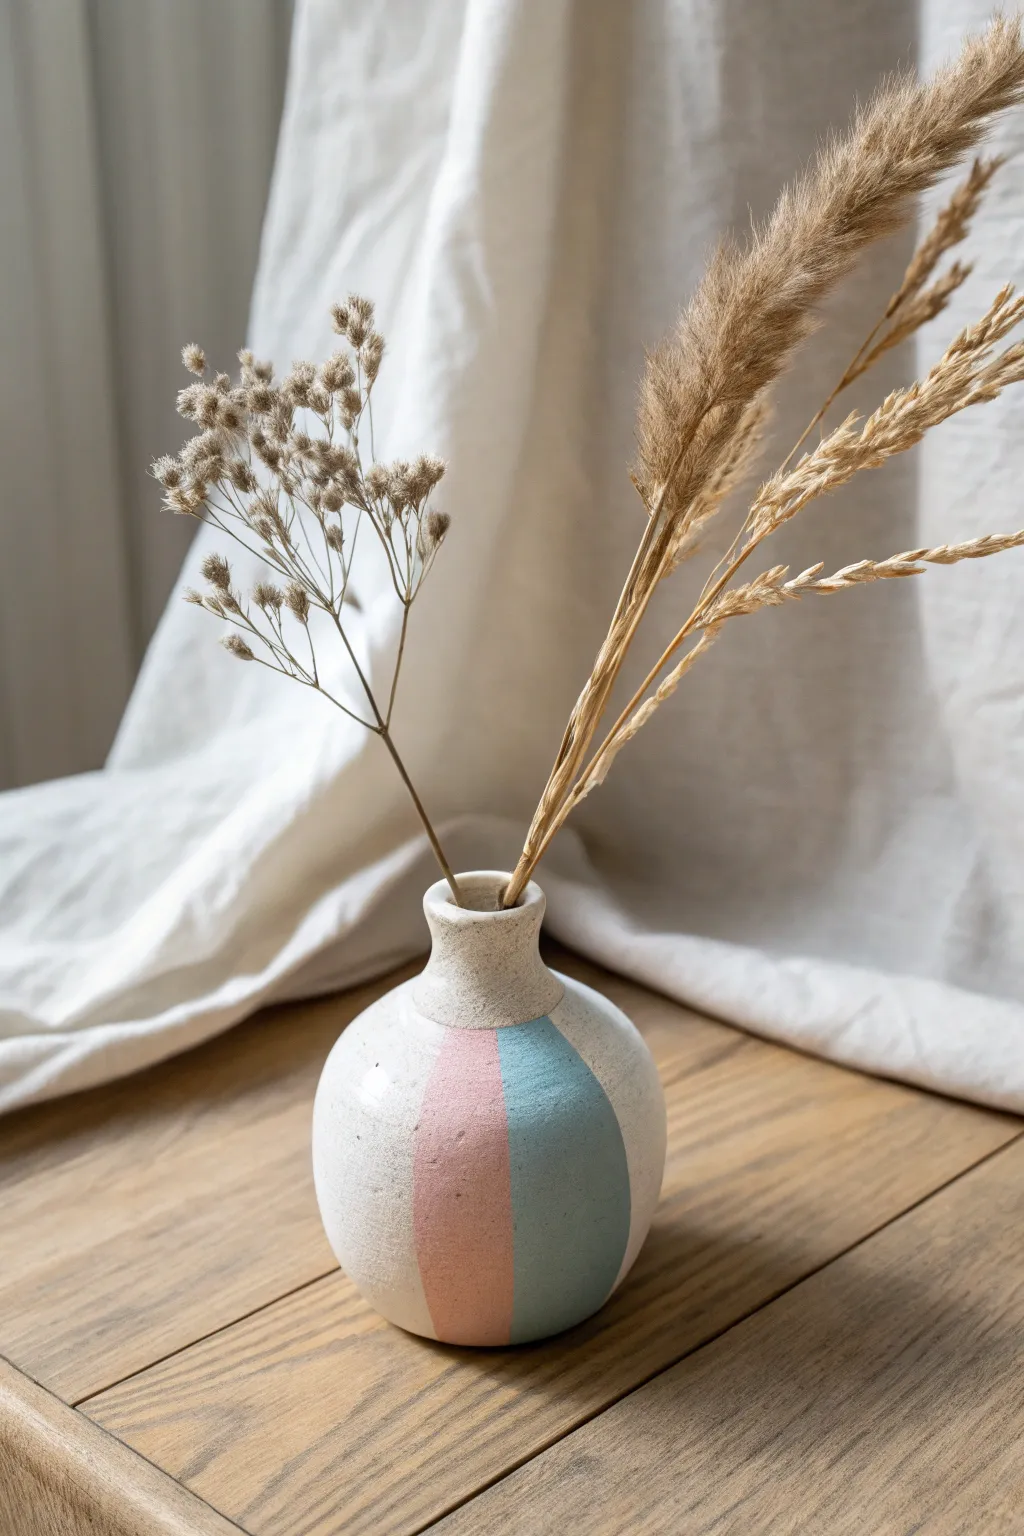
This charming mini bud vase combines a rustic, speckled texture with a modern color-blocked design. Its small, globular form is perfectly scaled to hold delicate dried grasses and tiny floral sprigs, adding a soft, contemporary touch to any tabletop.
Step-by-Step
Materials
- Speckled stoneware clay (white or buff)
- Pottery wheel (or hand-building tools for pinch method)
- Ribs (metal and wood)
- Sponge
- Cutting wire
- Underglazes: Pastel Pink and Muted Teal/Blue
- Soft synthetic brushes (flat and round)
- Masking tape or painter’s tape (optional)
- Clear matte glaze
- Kiln
Step 1: Forming the Body
-
Prepare the Clay:
Begin by wedging a small ball of speckled stoneware clay, roughly the size of a tennis ball. This amount is perfect for a miniature vase and ensures you won’t have too much excess material to trim away. -
Center and Open:
Throw the ball onto your wheel head and center it. Open the clay gently, keeping the floor relatively narrow to support the round shape we are aiming for. -
Pull the Cylinder:
Pull up a short, thick cylinder. You don’t need significant height here; focus on keeping the walls even in thickness. -
Belly Out the Form:
Use a wooden rib inside the vessel to gently push the walls outward, creating a spherical, bulbous belly. Allow the clay to curve naturally, supporting the outside with your sponge or fingers to prevent collapse. -
Collar the Neck:
Gently collar the top rim inward to create a distinct transition between the round body and the neck. This creates that classic bottleneck silhouette. -
Refine the Rim:
Use a chamois or a wet sponge to compress and smooth the rim. I like to leave it slightly thick and rounded for a softer, organic look that complements the rustic clay body. -
Trim the Foot:
Once leather hard, trim away excess weight from the bottom. Define a small foot ring or simply create a flat, stable base that follows the curve of the pot.
Clean Lines Pro-Tip
If free-handing stripes, rest your pinky finger on the pottery surface to stabilize your hand. This helps maintain a consistent pressure and straight line on the curved surface.
Step 2: Applying the Design
-
Clean the Surface:
Wipe the bisque-fired (or bone dry, if using underglaze on greenware) pot with a slightly damp sponge to remove any dust that might interfere with adhesion. -
Plan Your Stripes:
Visualize two vertical stripes running down the front of the belly. You are aiming for a wide pink stripe right next to a teal stripe, leaving the rest of the white speckled clay exposed. -
Tape Off the Design (Optional):
For crisp, straight lines, apply painter’s tape vertically to mask off the areas you want to keep bare. Alternatively, sketch the lines lightly with a pencil. -
Apply the Pink Underglaze:
Using a flat brush, paint the left stripe with the pastel pink underglaze. Apply 2-3 coats, letting each layer dry to the touch in between, to ensure opacity. -
Apply the Teal Underglaze:
Paint the adjacent stripe with the muted teal underglaze. Be careful where the two colors meet; they should touch perfectly without overlapping too heavily. -
Tidy the Edges:
If you free-handed the stripes, use a clean, stiff brush dipped in water to clean up any ragged edges, or peel away your tape while the underglaze is still slightly damp to avoid chipping. -
Bisque Fire:
If you applied underglaze to greenware, fire the piece to bisque temperature (usually cone 04/06). If you applied it to bisque, skip to the glazing step.
Level Up: Texture
Before the clay dries, gently press a piece of coarse linen against the ‘stripe’ areas. The underglaze will pool in the subtle fabric texture for added depth.
Step 3: Glazing and Finishing
-
Apply Clear Glaze:
Dip the entire vase into a clear matte glaze. A matte finish is crucial here as it enhances the stoniness of the speckled clay and keeps the pastel colors looking soft rather than shiny. -
Wipe the Foot:
Ensure the bottom of the vase is completely free of glaze. Use a sponge to wipe back a millimeter or two up the side to prevent the glaze from running onto the kiln shelf. -
Final Firing:
Load the kiln and fire to the maturation temperature of your specific clay body (likely cone 5 or 6 for stoneware).
Once cooled, arrange a few stems of dried pampas grass or bunny tails to complete the serene, minimalist aesthetic

TRACK YOUR CERAMIC JOURNEY
Capture glaze tests, firing details, and creative progress—all in one simple printable. Make your projects easier to repeat and improve.
Whimsical Animal Planters
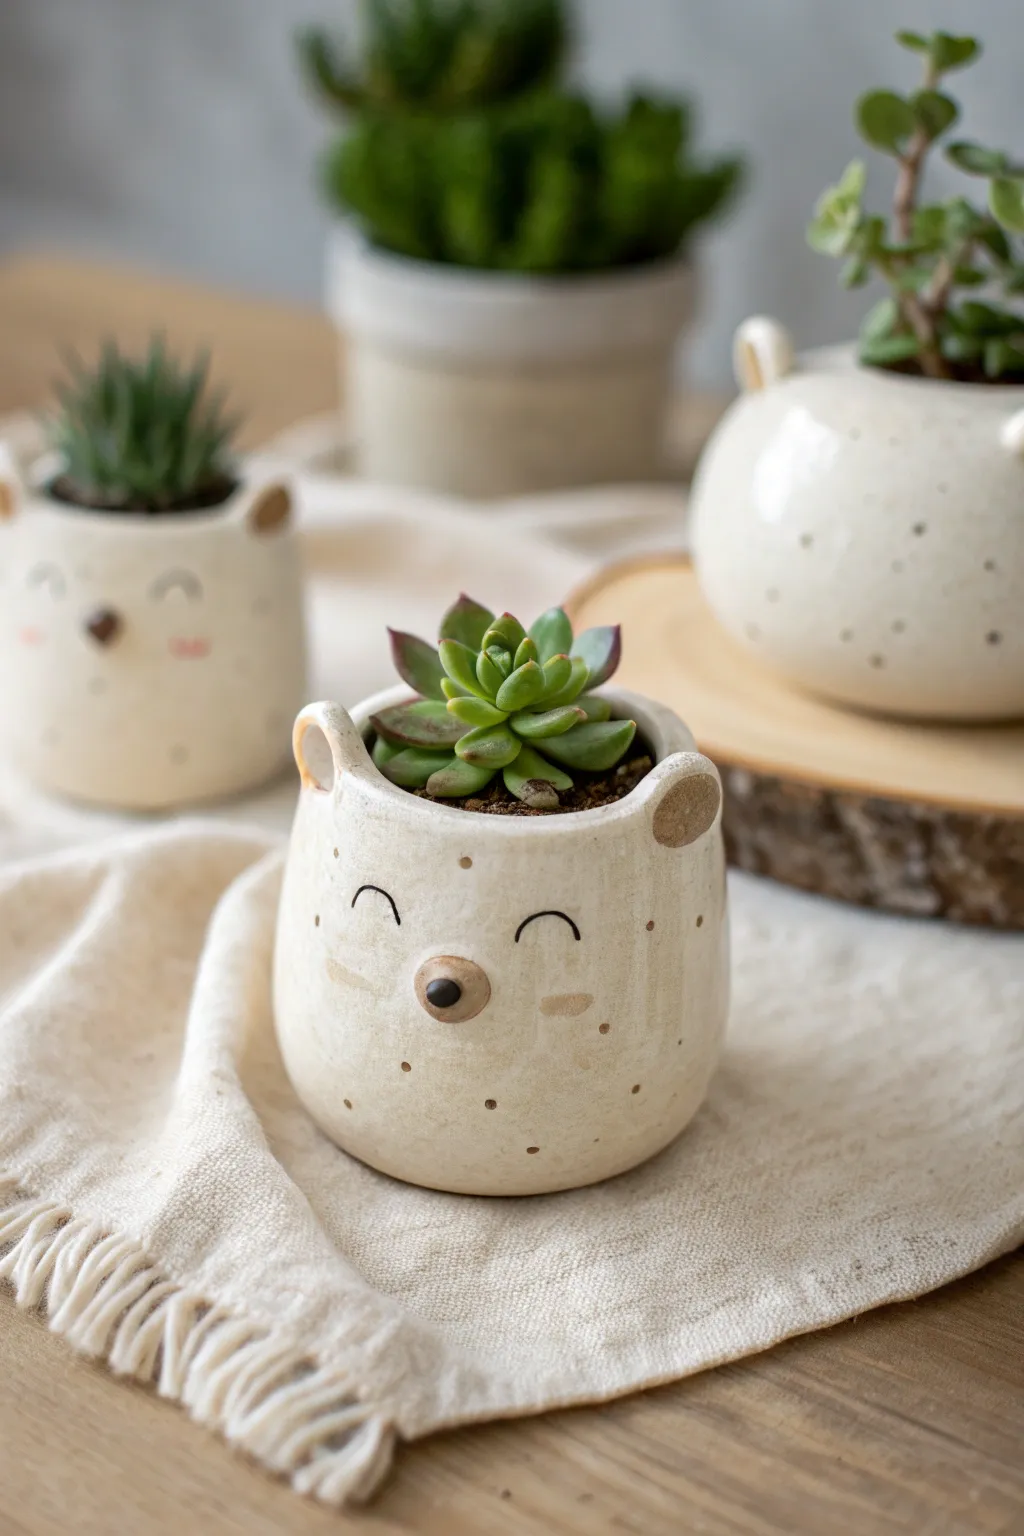
Bring a touch of charm to your indoor garden with this adorable, hand-built bear planter. Featuring a creamy speckled glaze and a sweet, minimalist face, this pinch pot project is perfect for housing small succulents.
Step-by-Step Tutorial
Materials
- White stoneware or polymer clay (speckled clay recommended)
- Small rolling pin
- Basic clay tools (needle tool, rib tool)
- Slip and scoring tool (if using ceramic clay)
- Small bowl for water
- Creamy white glaze (or acrylic paint)
- Black underglaze or fine-tip brush
- Clear matte varnish (if using polymer clay)
Step 1: Forming the Base
-
Condition the Clay:
Begin by taking a ball of clay roughly the size of a large orange. Condition it by wedging or kneading until it is smooth and free of air bubbles, ensuring a consistent texture throughout. -
Start the Pinch Pot:
Push your thumb gently into the center of the ball, stopping about half an inch from the bottom. This thickness is crucial for the pot’s stability. -
Shape the Walls:
Slowly pinch the clay between your thumb and fingers, rotating the ball as you go. Work your way from the bottom up, aiming for an even wall thickness of about 1/4 inch. -
Create the Belly:
As you pinch upward, gently push the walls outward to create a rounded, bulbous shape that narrows slightly at the rim. This gives the bear its cute, chubby appearance. -
Flatten the Base:
Tap the bottom of your pot firmly against your work surface. A flat, stable base is essential so your planter doesn’t tip over once filled with soil. -
Smooth the Surface:
Use a flexible rib tool or a slightly damp sponge to smooth out any fingerprints or uneven textures on the exterior. I like to spend extra time here to get a really clean canvas for the face.
Step 2: Adding Features
-
Shape the Ears:
Roll two small balls of clay, roughly the size of marbles. Flatten them slightly into thick discs and pinch one side to create a straight edge for attachment. -
Attach the Ears:
Score the straight edge of the ears and the corresponding spots on the pot rim. Apply a dab of slip (or water for polymer clay) and press the ears firmly onto the rim, leaning them slightly forward. -
Blend the Seams:
Use a modeling tool to smooth the clay from the back of the ears down onto the pot body, ensuring a seamless and strong bond. -
Create the Snout:
Roll a tiny ball of clay and flatten it into a small oval. Attach this to the lower center of the face using the score and slip method to create a slightly raised snout area. -
Add the Nose:
Form a very small, dark bead of clay (or paint it distinctively later) and press it into the center of the raised snout oval. This creates the bear’s nose button. -
Make the Inner Ears:
For added detail, press a small, rounded tool into the center of each ear to create a subtle depression, mimicking the inner ear structure.
Smooth Seams
When attaching ears, use a damp paintbrush to smooth the join line. This erases tool marks and makes the ears look like they grew naturally from the pot.
Step 3: Finishing Touches
-
Dry or Bake:
If using ceramic clay, allow the piece to dry slowly to the leather-hard stage. If using polymer clay, bake according to the manufacturer’s instructions. -
Initial Decoration:
For ceramics, apply a speckled white glaze. If you used polymer clay, you can paint the base a creamy white now, or leave it if you used colored clay. -
Paint the Face:
Using a fine brush and black paint or underglaze, carefully draw two small, curved arches for the smiling eyes. Keep them symmetrical and centered above the snout. -
Add Cheeks:
Dip a brush or a Q-tip into a soft pink or light brown paint. Dab two faint, small circles on either side of the snout to effectively give the bear a blushing look. -
Apply Speckles:
To mimic the stoneware look on polymer clay or plain ceramic, flick a stiff toothbrush loaded with watered-down brown paint lightly over the surface. -
Final Seal:
Once all paint is dry, fire the ceramic piece or seal your polymer creation with a matte varnish to protect it from moisture.
Add Texture
Before baking or drying, press actual seeds or coarse sand into the clay surface. This adds organic, tactile bumps that look great under a glossy glaze.
Pop in your favorite succulent and enjoy your new friendly desk companion
Modern Photo and Card Holders
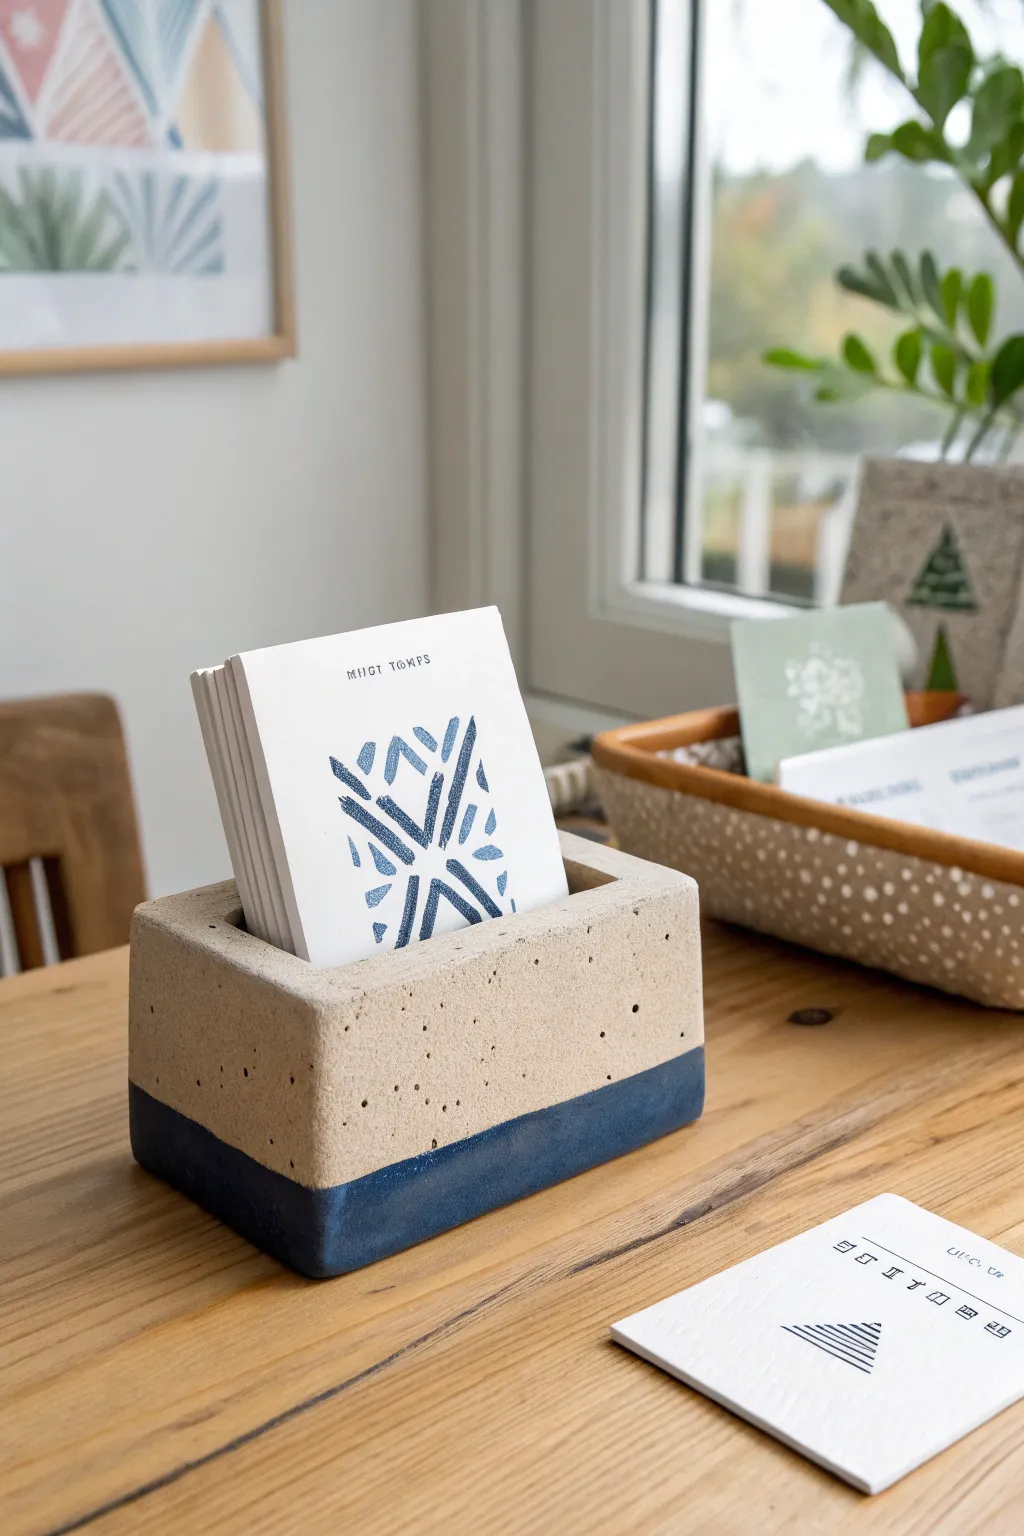
This minimalist card holder combines the raw, stone-like texture of speckled clay with a bold dip of navy blue. It’s a sturdy, functional piece perfect for displaying greeting cards, photos, or even holding your mail on an entryway table.
How-To Guide
Materials
- Speckled stoneware clay (or polymer clay with granite effect)
- Rectangular items for molding (blocks of wood or sturdy cardboard boxes)
- Clay roller or rolling pin
- Fettling knife or craft blade
- Ruler
- Scoring tool (or fork)
- Slip (clay and water mixture)
- Sponge
- Navy blue underglaze (or acrylic paint if using air-dry clay)
- Small paintbrush
- Matte spray sealant (if using air-dry/acrylics)
Step 1: Forming the Base Structure
-
Prepare your clay slab:
Begin by rolling out a thick slab of your speckled clay. You want this to be substantial, about 1/4 to 1/2 inch thick, to provide enough weight and stability for the holder. -
Measure the components:
Using a ruler, measure out the five pieces you will need: a rectangular base, two long side walls, and two shorter end walls. The dimensions depend on how large you want the opening, but a standard size is a base of 2×5 inches. -
Cut the shapes:
Carefully slice along your measured lines using a fettling knife or craft blade. Keep your knife vertical to ensure straight, 90-degree edges for cleaner seams later. -
Check for rough edges:
Before assembling, run your finger along the cut edges to smooth down any loose crumbs of clay, but keep the joining surfaces sharp.
Straight Edges Trick
Use a wooden block wrapped in plastic as an internal mold while building. Build the clay walls directly against the wood block to ensure perfect 90-degree corners.
Step 2: Assembly
-
Score the connection points:
Take your scoring tool or a simple fork and rough up the edges of the base slab where the walls will sit. Do the same to the bottom edges of the four wall pieces. -
Apply slip:
Dab a generous amount of slip onto the roughed-up areas. This mixture acts as the glue that will bond your clay pieces together permanently. -
Attach the long walls:
Press the two long side walls onto the base slab first. Apply firm, even pressure to seat them into the slip without warping the walls. -
Secure the end caps:
Fit the two shorter end pieces between the long walls. Wiggle them slightly to create a suction bond with the slip. -
Reinforce the seams inside:
Roll a very thin ‘snake’ of clay and press it into the interior corners where the walls meet the base. Smooth this out with your finger to strengthen the joint. -
Smooth the exterior:
On the outside, use a rib tool or your thumb to drag a little clay across the seams to blend them invisible. I like to spend extra time here ensuring the box looks monolithic.
Step 3: Refining and Detail
-
Shape the lip:
The top edge of the holder should look intentional. Use a slightly damp sponge to round over the sharp corners and soften the rim for a finished stone look. -
Add surface texture:
If your rolling pin smoothed out too much of the natural texture, gently press a rough sponge or piece of sandpaper against the outside to revive that stone-like grit. -
Slow drying:
Cover the piece loosely with plastic and let it dry slowly over a few days. This prevents the box shape from warping or cracking at the corners. -
Initial firing or drying:
If using ceramic clay, bisque fire the piece now. If using air-dry clay, wait until it is bone dry and light in color.
Make it Weighted
If you plan to hold heavy books or tablets, make the base slab twice as thick as the walls. This lowers the center of gravity and prevents tipping.
Step 4: Adding the Color Block
-
Tape the line:
To get that crisp horizon line, apply painter’s tape or masking tape straight around the bottom third of the holder. Press the edge of the tape down firmly. -
Apply the color:
Paint the bottom section navy blue. If using ceramic glaze, apply 2-3 coats for opacity. -
Remove tape:
Peel the tape off before the paint or glaze is 100% dry to avoid chipping the edge. -
Final steps:
Fire the piece again for ceramics, or seal with a matte spray if using air-dry clay.
Place your new holder on a desk or shelf to keep your favorite memories organized and visible
Mix-and-Match Desk Organizer Pods
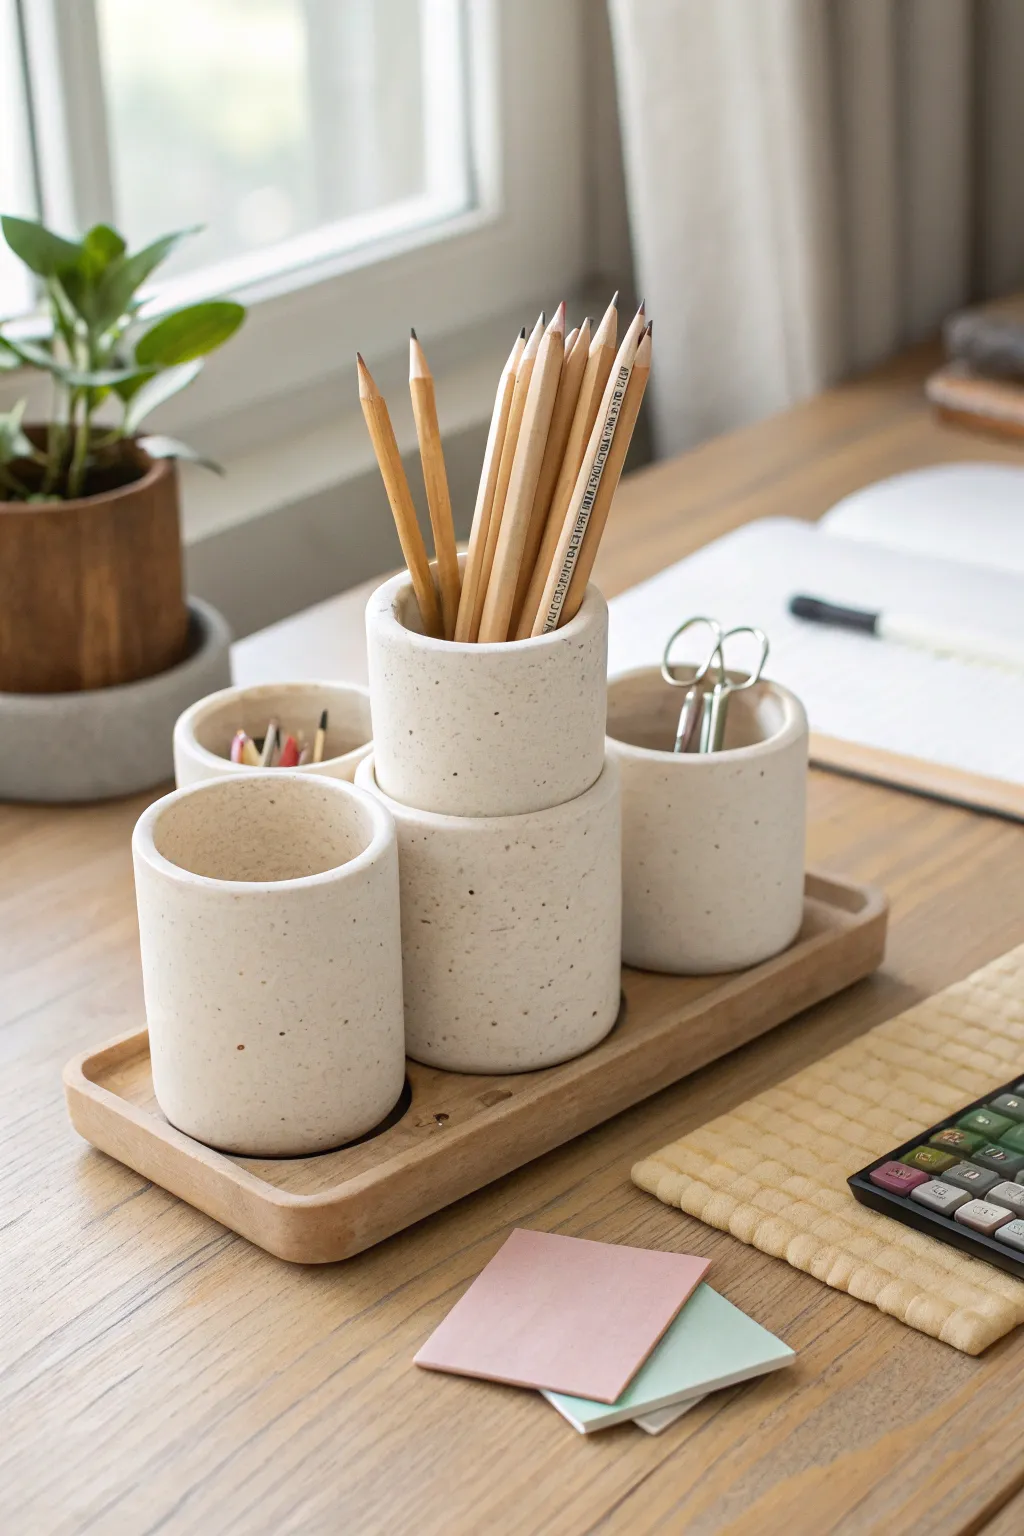
Streamline your workspace with these modular, minimalist organizer pods that mimic the look of speckled stoneware. This project combines the warmth of a custom wooden tray with the clean, modern lines of handmade clay cylinders.
Step-by-Step Tutorial
Materials
- White air-dry clay or polymer clay (approx. 2-3 lbs)
- Dried coffee grounds or black pepper (for speckling)
- Rolling pin
- Cylindrical molds (PVC pipe, sturdy cardboard tubes, or glass jars of uniform width)
- Craft knife
- Slip (clay and water mixture) or liquid clay adhesive
- Sandpaper (various grits)
- Matte sealant or varnish
- Balsa wood or basswood plank (for the tray)
- Wood glue
- Wood stain and sealant
- Ruler
Step 1: Preparing the Clay Body
-
Condition the clay:
Begin by kneading your white clay until it is soft, pliable, and free of air bubbles. If using polymer clay, the warmth of your hands will make it easier to work with. -
Add texture:
Create the signature speckled look by sprinkling a small amount of dried coffee grounds or coarse black pepper onto the flattened clay. Fold and knead the clay repeatedly to distribute the specks evenly throughout the block. -
Create a slab:
Roll the clay out onto a clean surface to an even thickness of about 1/4 inch. I like to use guide sticks or a rolling pin with depth guides to ensure the walls of all pods are perfectly consistent. -
Measure and cut:
Determine the circumference of your cylindrical mold. Cut rectangular strips of clay to match this length (plus a tiny overlap) and the desired height for each pod. You’ll need varying heights for visual interest.
Clean Release Tip
Dust your rolling pin and work surface lightly with cornstarch before rolling. This prevents sticking without adding moisture like water would.
Step 2: Forming the Pods
-
Wrap the molds:
Wrap your clay strips around your chosen cylindrical molds. If using a rigid mold like PVC, you might want to wrap it in parchment paper first for easier release. -
Seal the seam:
Butt the ends of the clay together. Score the edges (make small scratches), apply a little slip or liquid clay, and press them firmly together. Smooth the seam with a modeling tool or your finger until it disappears. -
Create the bases:
Cut circles of rolled clay using the mold as a cookie cutter. Attach these circles to the bottom of your clay tubes using the same score-and-slip method, blending the clay upwards to seal the join. -
Refine the rims:
Use a damp sponge or finger to smooth the top rim of each pod. Gently round the edges so they aren’t sharp or square, giving them that soft, cast-stone appearance. -
Drying or baking:
If using air-dry clay, let the pods sit for 24-48 hours until fully cured. If using polymer clay, bake according to the manufacturer’s instructions, usually at 275°F (135°C).
Stacking Upgrade
Create a lipped lid for one of the short pods. This allows you to stack another pod on top securely, maximizing vertical storage space.
Step 3: Sanding and Finishing
-
Initial sanding:
Once fully cured, sand the outside of the pods. Start with a medium grit to remove any fingerprints or uneven seams, paying special attention to the rims. -
Fine smoothing:
Move to a fine-grit sandpaper to create a velvety smooth surface. Wipe away all dust with a tack cloth or slightly damp rag. -
Seal the pods:
Apply a coat of matte spray varnish or sealant. This protects the clay from graphite marks and preserves the natural, stone-like finish without making it glossy.
Step 4: Crafting the Wooden Tray
-
Measure the arrangement:
Arrange your finished pods in a row to determine the necessary length for your tray. Leave about half an inch of space between each pod and around the edges. -
Cut the base:
Cut your basswood or balsa wood plank to the measured size. Sand the edges smooth. -
Create the recessed rim:
To mimic the routed tray look without power tools, glue thin strips of wood trim around the top edge of your base piece, creating a shallow lip that will hold the pods in place. -
Round the corners:
Sand the outer corners of the wooden tray aggressively to achieve a soft, rounded profile that matches the curvature of the clay pods. -
Stain and seal:
Apply a light, natural wood stain to the tray. Once dry, finish with a clear wood sealer to protect the surface. -
Final assembly:
Place the pods onto the tray. You can leave them loose for modular rearranging, or use a dab of strong adhesive to fix them permanently in position.
Enjoy arranging your new minimalist set and filling it with your favorite pens and tools
Cartoon Critters From Basic Shapes
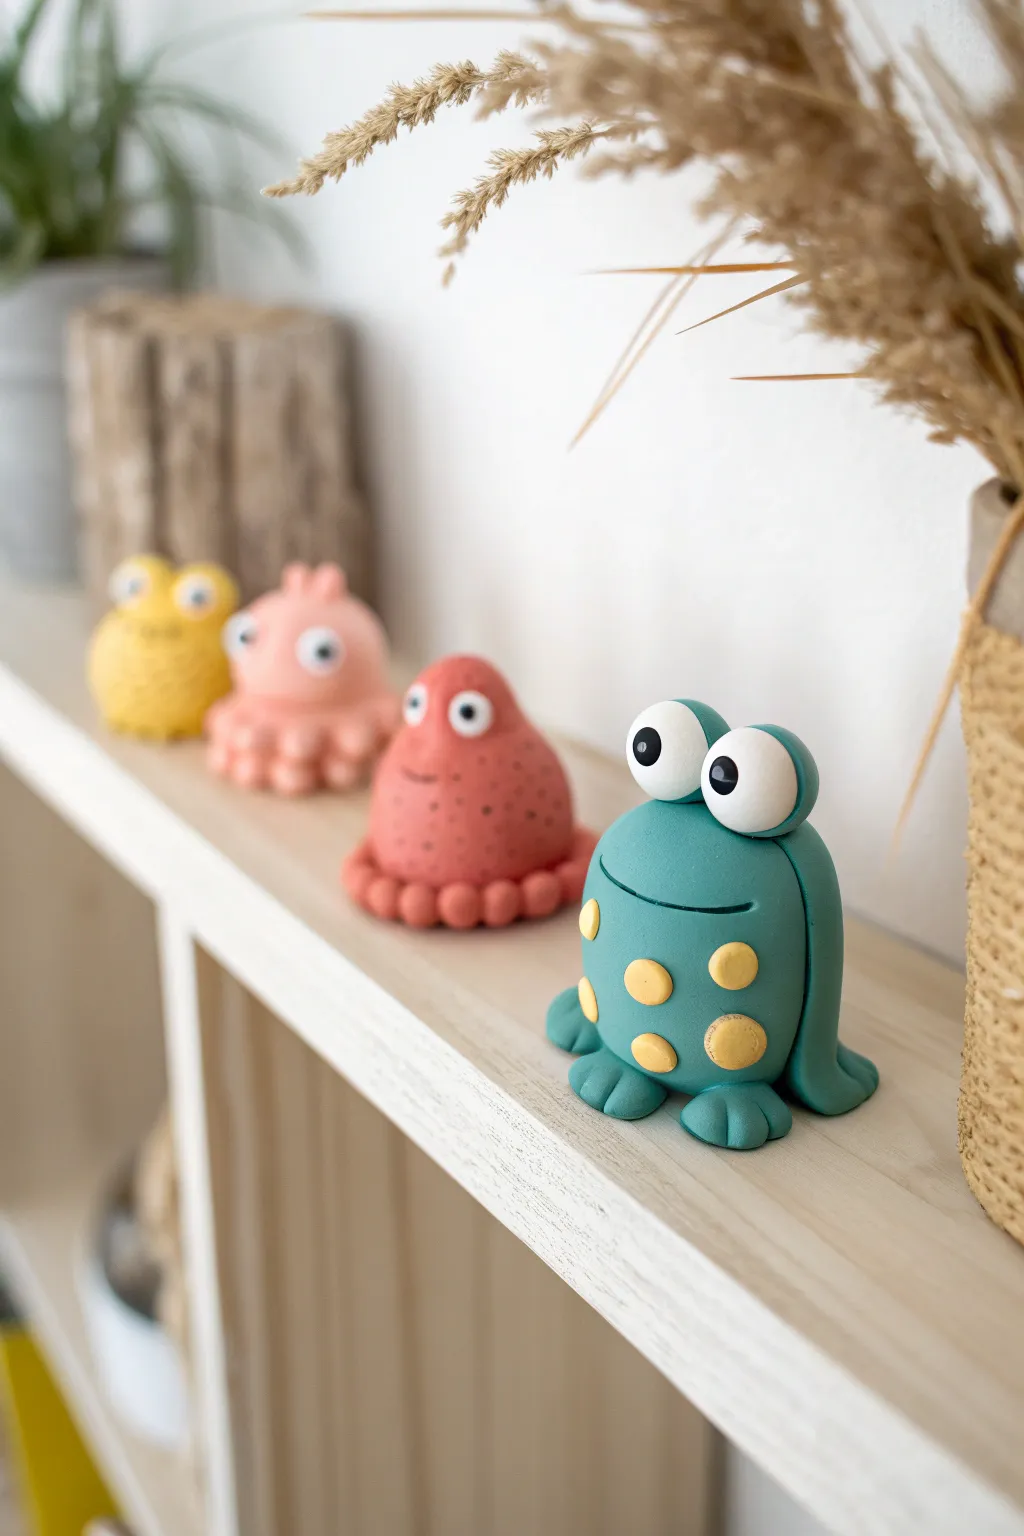
Transform simple lumps of clay into a lineup of charming shelf-sitters, starting with a lovable teal frog and his spotted ocean friends. These cartoonish figurines rely on basic rounded shapes and expressive clay eyes to create a cohesive and delightful collection.
Detailed Instructions
Materials
- Polymer clay (Teal, Dusty Red, Pastel Pink, Golden Yellow, White, Black)
- Clay sculpting tools (ball stylus, needle tool)
- Acrylic roller or pasta machine
- Baking sheet and parchment paper
- Wet wipes (for cleaning hands between colors)
- Oven (for curing)
Step 1: Sculpting the Teal Frog
-
Form the body:
Start with a generous amount of teal clay, conditioning it until soft. Roll it into a smooth ball, then gently taper the top third slightly to create a very subtle pear shape with a flat bottom for stability. -
Add frog legs:
Roll two thick logs of teal clay for legs. Flatten them slightly and press them vertically against the sides of the body, bending the bottom outwards to form the feet. -
Define the toes:
Using a needle tool or a dull knife, gently press indentations into the flattened feet to create three distinct toes on each side. -
Create the mouth:
Use a curved modeling tool or the edge of a spoon to press a wide, gentle smile into the middle of the face. -
Attach the spots:
Roll tiny balls of golden yellow clay and flatten them into discs. Press these randomly onto the frog’s belly and lower sides. -
Make the eyes pop:
Roll two large balls of white clay and place them right on top of the frog’s head, touching each other. Add small black pupils to the center of each white ball. -
Add eyelids:
Roll a thin snake of teal clay. Drape it over the top half of the white eyeballs to create eyelids, blending the back edge into the head for a seamless look.
Eye Alignment Pro Tip
To make the characters look goofy and cute, deliberately place the black pupils slightly off-center or different sizes. Perfect symmetry can look too serious for these critters.
Step 2: Crafting the Spotted Jellyfish
-
Shape the dome:
Condition your dusty red clay and roll it into a large ball. Flatten the bottom completely so it creates a distinct dome shape. -
Create the tentacle rim:
Roll many small, uniform balls of the same red clay. Attach these in a ring all the way around the bottom edge of the dome. -
Blend the tentacles:
I find it helpful to gently press the top of each small ball into the main body using a blending tool so they don’t fall off during baking. -
Apply texture spots:
Using a small ball stylus or toothpick, poke tiny, random indentations all over the dome to create a speckled texture. -
Add the face:
Just like the frog, create eyes using white balls with black pupils. Place these lower on the dome rather than on top. -
Give it a smile:
Use a needle tool to etch a tiny, simple curved line for a mouth right between the eyes.
Dust Trouble?
If white clay picks up dust or lint, use a cotton swab dipped in rubbing alcohol or acetone to gently wipe the impurities off the raw clay before baking.
Step 3: Creating the Background Buddies
-
Repeat for the pink friend:
Repeat the jellyfish steps using pastel pink clay. For this one, try making the eyes slightly farther apart for a different expression. -
Make the yellow critter:
Use the golden yellow clay to make the final figure. You can texturize this one by pressing a piece of coarse sponge or sandpaper against the clay before baking. -
Final inspection:
Check all your figures for fingerprints. A little baby oil on your finger can smooth these out beautifully. -
Bake and cool:
Arrange your squad on a parchment-lined baking sheet. Bake according to your polymer clay package instructions (usually 275°F/135°C for 15-30 minutes) and let them cool completely before handling.
Arranging your new colorful squad on a shelf will bring an instant smile to anyone who spots them
Tiny Food Minis and Veggie Friends
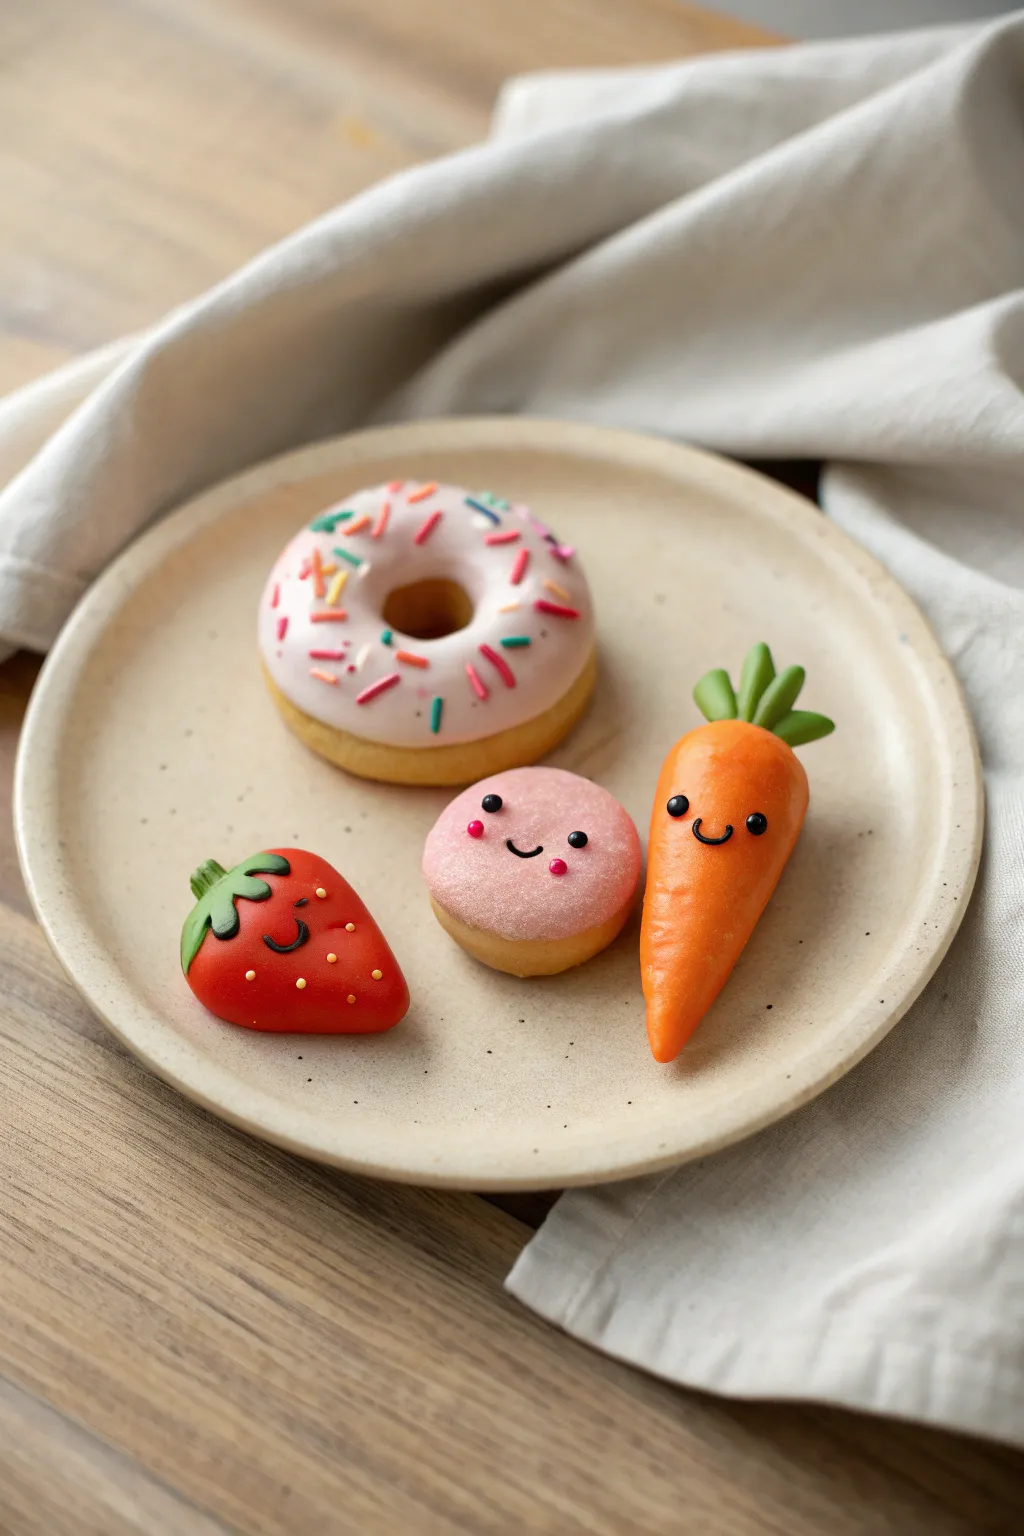
Bring a touch of sweetness to your crafts with this adorable set of polymer clay miniatures featuring smiling snacks and veggies. These charming little characters, from the sprinkled donut to the grinning carrot, are perfect for beginner sculptors looking to practice simple shapes and kawaii expressions.
Step-by-Step Tutorial
Materials
- Polymer clay (white, beige/tan, orange, red, pink, green, chocolate brown)
- Clay tools (needle tool, ball stylus, blending tool)
- Liquid polymer clay (translucent or white)
- Polymer clay sprinkles or colored clay scraps
- Soft pastel chalks (pink, orange, brown)
- Small paintbrush
- Clear gloss glaze or UV resin (optional)
- Baking sheet/tile
Step 1: Sculpting the Classic Donut
-
Base Shape:
Start by conditioning the beige clay and rolling it into a chubby snake, then join the ends to form a ring. Smooth the seam carefully with your finger or a blending tool so it disappears completely. -
Shading for Realism:
Use a small brush to apply a light dusting of brown soft pastel chalk around the edges and bottom of the donut base. This gives it that perfectly baked, golden-brown appearance. -
Adding the Glaze:
Roll out a thin sheet of light pink clay and cut a circle slightly smaller than your donut. Use a scalloped cutter or freehand wavy edges to mimic dripping icing. Place this over the beige ring and gently press down so it hugs the curves. -
Sprinkle Time:
Take tiny scraps of various colored clays (blue, red, yellow, green) and roll them into extremely thin strands. Cut them into tiny ‘jimmies’ and press them gently into the pink icing layer.
Step 2: Making the Mini Face Donut
-
Forming the Bun:
Roll a smaller ball of beige clay and flatten it slightly into a thick disc shape, rounding the edges to keep it puffy. -
Adding Pink Icing:
Create a small, thin circle of pink clay and drape it over the top of the bun. I prefer to texture this slightly with a toothbrush or foil ball for a sugary look. -
Creating the Face:
Roll two minuscule balls of black clay for eyes and a tiny thin snake for a smile. Position the eyes wide apart and the smile centered between them, pressing them gently into the pink clay. -
Rosy Cheeks:
Add two tiny dots of darker pink clay under the eyes for cheeks, or dust with a bit of pink pastel chalk.
Clean Clay Secrets
Keep separate baby wipes nearby or wash hands between colors. Red and orange pigments transfer easily and can ruin white or light pink clay.
Step 3: Crafting the Friendly Carrot
-
Tapered Body:
Roll orange clay into a ball, then elongate one side into a cone shape. Round off the thicker top end. -
Adding Texture:
Use a needle tool or the back of a craft knife to create shallow horizontal indentations randomly across the carrot body for a realistic root vegetable texture. -
Leafy Greens:
Form short, tear-drop shapes from green clay. Attach three or four of these to the center of the carrot top, pressing them together at the base. -
Carrot Face:
Add the signature kawaii face using tiny black clay balls for eyes and a curved black snake for the mouth. Place them about halfway down the thickest part of the carrot.
Make Them Wearable
Before baking, insert an eyepin into the top of each charm. Once baked and cooled, you can attach them to earring hooks or a charm bracelet.
Step 4: Sculpting the Sweet Strawberry
-
Berry Shape:
Mold red clay into a rounded triangle or heart-like shape, keeping it plump and dimensional. -
Seed Details:
Using a needle tool, poke shallow holes all over the surface. Then, roll tiny bits of beige or yellow clay into teardrops and press them into these indents for seeds. -
Strawberry Leaves:
Cut a small star or flower shape from green clay. Place it on top of the berry, curling the tips slightly downward to hug the fruit. -
Stem and Face:
Add a small green stalk to the center of the leaves. Finish by applying the eyes and smiling mouth near the bottom third of the strawberry for a cute, low set expression. -
Baking:
Arrange all your friends on a baking tile. Bake according to your clay manufacturer’s instructions (usually 275°F/130°C for 15-30 minutes).
Once cooled, you can add a coat of glaze to the eyes to make them sparkle, bringing your little clay family to life
Layered Relief Art Clay Plaques
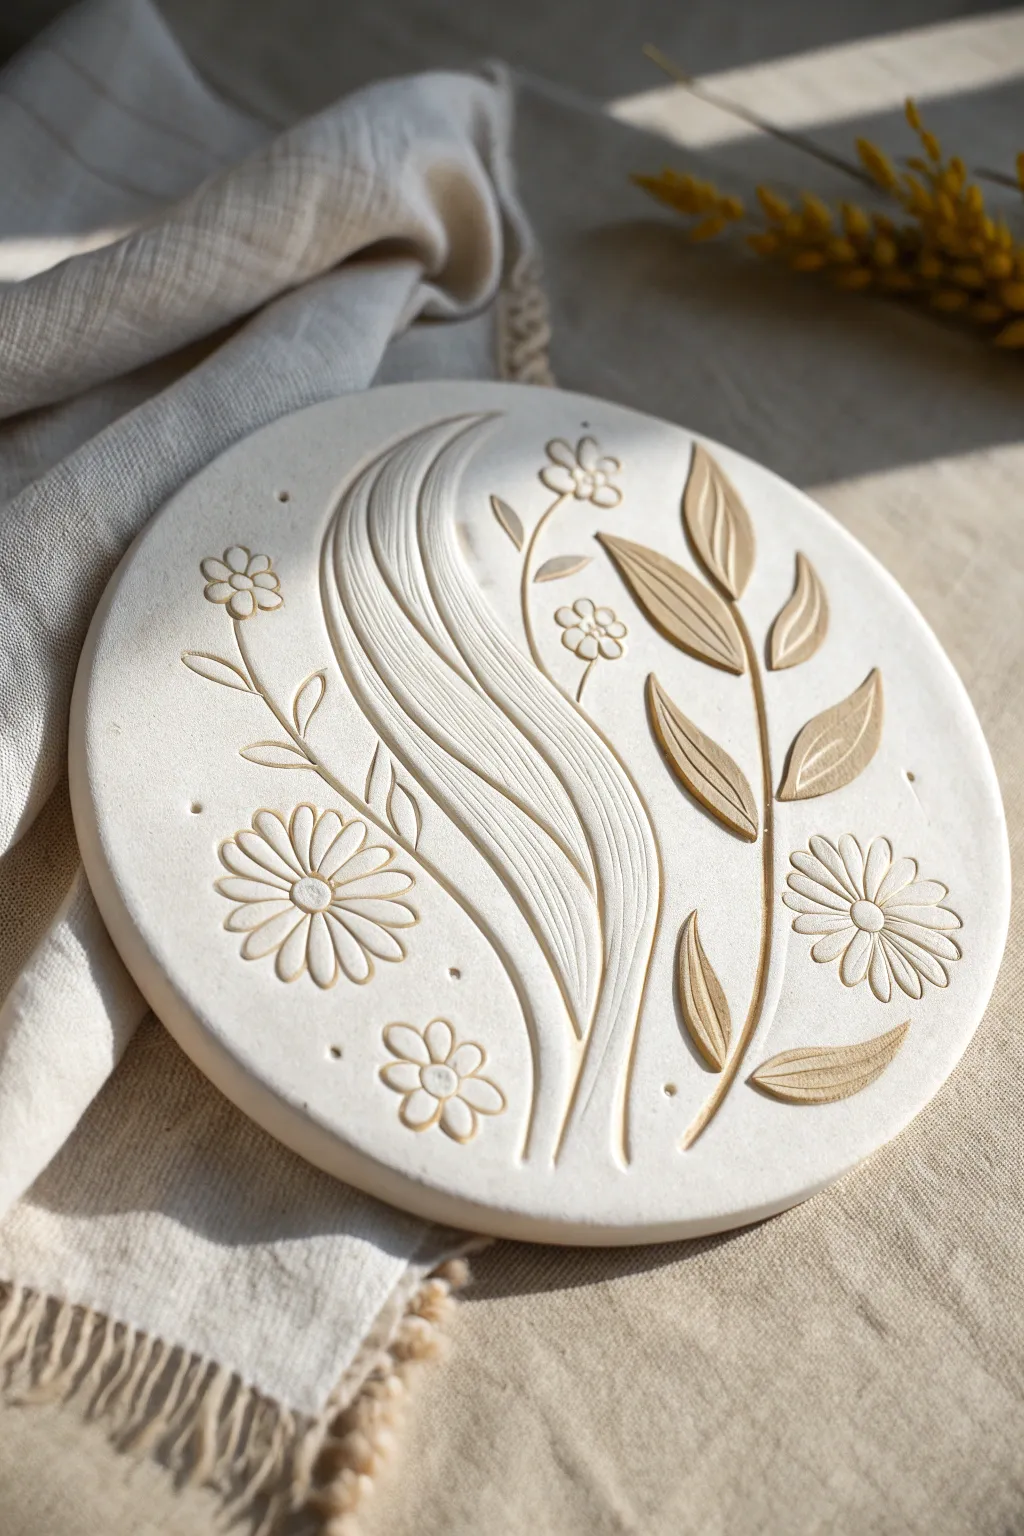
Capture the serenity of a sunlit garden with this elegant layered relief clay plaque. By combining carving techniques with subtle additive layers, you will create a beautifully textured piece that plays with light and shadow.
Step-by-Step
Materials
- White creative paper clay or air-dry clay
- Rolling pin
- Circle cutter or a round bowl (approx. 6-8 inches)
- Clay carving tools (needle tool, loop tool, small ribbon tool)
- Rubber-tipped clay shapers
- Small cup of water
- Fine grit sandpaper (220 or higher)
- Canvas mat or non-stick work surface
- Design template (optional)
Step 1: Preparation and Base
-
Prepare the Clay:
Begin by conditioning your clay. Knead a generous handful until it is pliable and smooth, ensuring there are no air bubbles trapped inside. -
Roll the Slab:
Place the clay on your canvas mat. Use the rolling pin to flatten it into an even slab, aiming for a thickness of about 1/4 to 1/2 inch. Consistent thickness is key for preventing warping. -
Cut the Circle:
Press your circle cutter or place a bowl upside down on the slab and cut around it with a needle tool to create the round plaque base. Smoothing the edges with a wet finger helps refine the shape.
Fixing Cracks
If hairline cracks appear while drying, mix a tiny bit of fresh clay with water to make a paste (slip) and fill the crack. Smooth it over and let it dry again.
Step 2: Creating the Central Flow
-
Sketch the Flow:
Lightly trace a curved, swooping S-shape down the center of the plaque using a needle tool. This will be the main ‘grassy’ flowing element. -
Define the Strands:
Within that S-shape, carve deep parallel lines to mimic long blades of grass or flowing hair. I like to use a small loop tool here to actually remove strips of clay, creating distinct valleys. -
Refine the Edges:
Use a rubber shaper to smooth the ridges of your carved lines, ensuring they look organic and soft rather than jagged.
Clean Lines
Keep a damp sponge nearby to constantly wipe your carving tools. Clay buildup on the tool tip causes dragging and messy lines.
Step 3: Adding Floral Relief
-
Outline the Leaves:
On the right side of the plaque, lightly sketch a vertical stem with alternating leaves. Press a loop tool into the clay to carve out the leaf shapes, making them slightly recessed. -
Detail the Leaves:
Inside each recessed leaf shape, use a needle tool to draw a central vein and small diagonal veins. This creates a contrasting texture against the smooth background. -
Add Large Daisies:
On the bottom left and bottom right, sketch large daisy shapes. Instead of carving these out completely, carve around the petals to leave them slightly raised, or press a specific petal-shaped tool into the clay. -
Center the Flowers:
Press a small circular tool or the back of a paintbrush into the center of each daisy to create the flower’s eye. Add tiny dots inside the center for texture.
Step 4: Finishing Details
-
Tiny Filler Flowers:
Fill in the empty spaces near the top with smaller, simple five-petal flowers. These can be drawn simply with a needle tool for a lighter touch. -
Stem Connections:
Connect your large daisies and small filler flowers to the main design with thin, delicate stem lines carved shallowly into the surface. -
Stippling Accents:
Using the very tip of your needle tool, add tiny poked holes (stippling) randomly around the flowers and near the edges to add whimsy and break up the negative space. -
Final Smoothing:
Dip your finger in a little water and very gently rub over any rough carvings to soften burrs. Be careful not to erase your fine details. -
Drying:
Allow the plaque to dry slowly on a wire rack away from direct heat. Flip it occasionally to ensure even drying and prevent curling. -
Sanding:
Once bone dry (usually 24-48 hours), use fine-grit sandpaper to buff the surface and edges for a professional, matte finish.
Display your finished relief on a small easel or install a hook on the back to bring a touch of nature indoors
Cutout Candle Holders With Cozy Glow
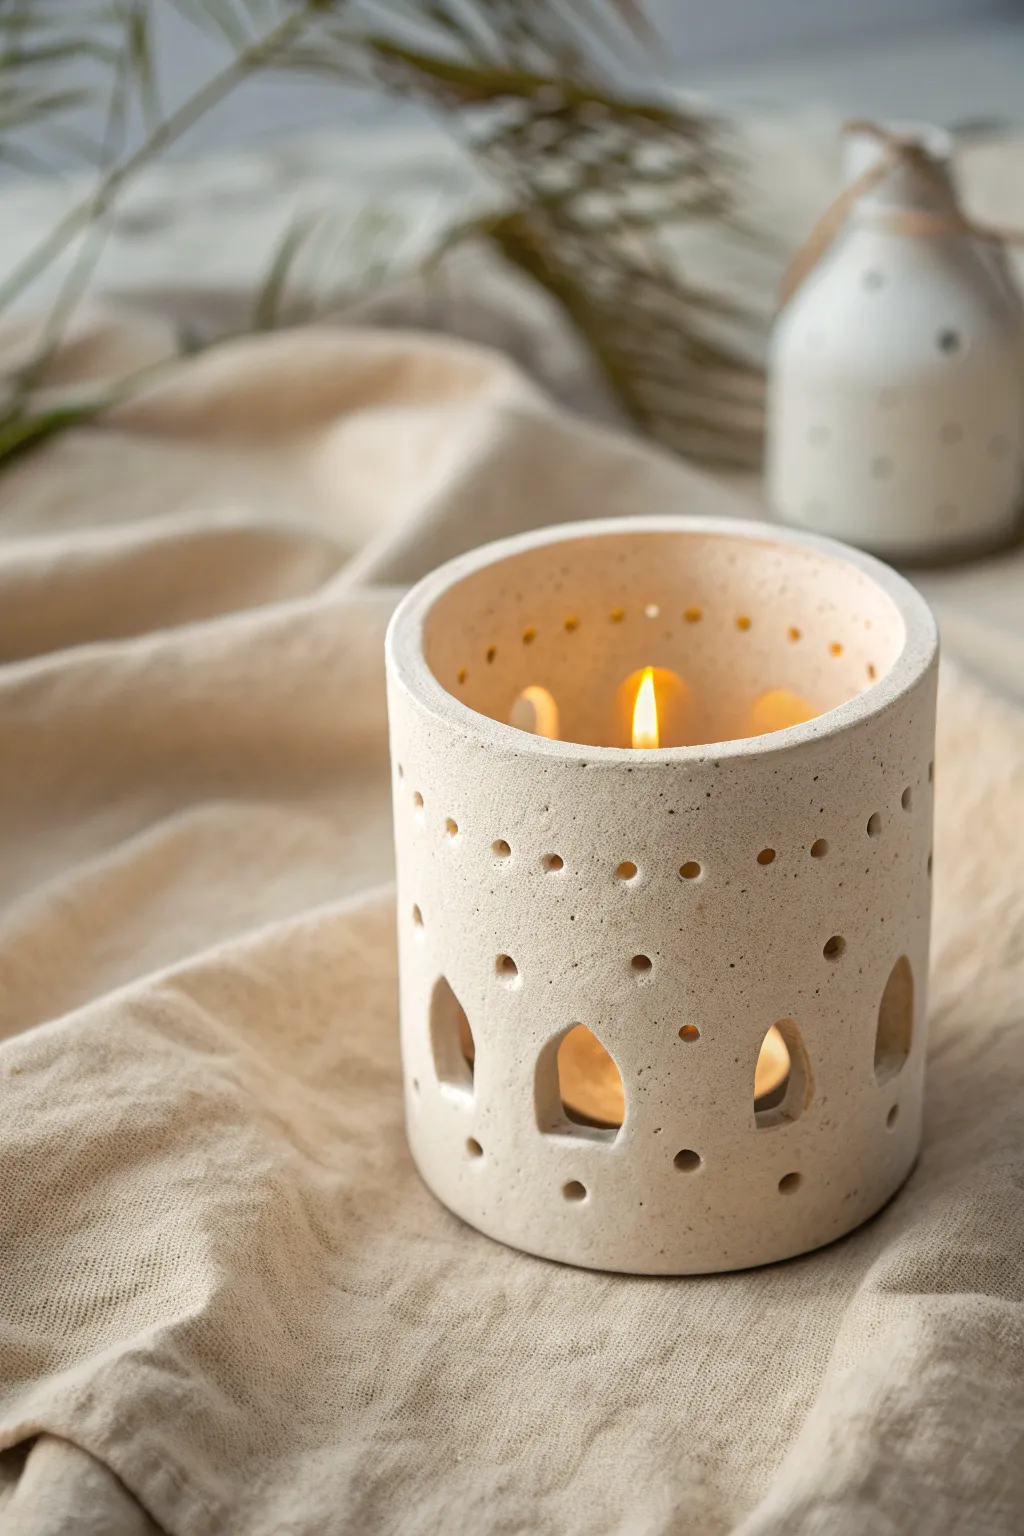
This charming cylindrical candle holder brings instant warmth to any room with its rustic texture and whimsical light patterns. The combination of simple drilled dots and hand-cut arches creates a beautiful interplay of shadows when a tea light is placed inside.
Step-by-Step Guide
Materials
- White stoneware or polymer clay (speckled or with added sand)
- Rolling pin
- Canvas or non-stick work surface
- Rectangle template (approx. 4″ x 10″)
- Craft knife or scalpel
- Slip and scoring tool (if using ceramic clay)
- Small circle cutter or straw
- Medium teardrop cutter (optional)
- Sponge and water
- Sandpaper (fine grit)
Step 1: Preparing the Cylinder
-
Roll the slab:
Begin by rolling out your clay on a flat canvas surface. You want a consistent thickness of about 1/4 inch to ensure the walls are sturdy enough to stand but thin enough to look delicate. -
Add texture:
If your clay isn’t pre-speckled, sprinkle some coarse sand or dried coffee grounds onto the slab and gently roll over it once more to press the texture into the surface. -
Cut the rectangle:
Place your paper template onto the clay slab. Using a sharp craft knife, cut out a clean rectangle. This will form the body of your cylinder. -
Form the connection:
Save a scrap piece of clay to create a base later. Carefully lift the rectangle and bring the two short ends together to form a tube. Be gentle to avoid warping the straight edges. -
Join the seam:
If using ceramic clay, score and slip the joining edges before pressing them together. If using polymer clay, blend the seam smooth with your thumb or a rubber shaping tool until it disappears. -
Attach the base:
Place your cylinder onto the reserved clay scrap. Cut a circle around the base of the cylinder, score and slip (or blend) the connection so the bottom is sealed tight.
Clean Cuts Pro Tip
Let the clay stiffen to a ‘leather hard’ state before cutting the arches. If the clay is too soft, the walls will buckle under the pressure of the knife.
Step 2: Carving and Refining
-
Smooth the surfaces:
Before cutting your designs, use a slightly damp sponge or your finger to smooth out the top rim. I like to round the edges slightly so it doesn’t look too sharp or mechanical. -
Mark hole placement:
Lightly mark where you want your top and bottom row of dots to go. Spacing them somewhat irregularly adds to the organic, handmade feel of this specific piece. -
Punch the top holes:
Using a straw or a small circular clay cutter, punch a row of holes about half an inch below the top rim. Twist the tool as you pull it out to get a clean hole. -
Punch the bottom holes:
Repeat the punching process near the bottom of the cylinder, creating a similar row of small dots just above where the base joins the wall. -
Sketch the arches:
very lightly sketch small arch or window shapes between the bottom holes using a needle tool. Spacing them out evenly ensures the structure remains strong. -
Cut the arches:
Use a sharp scalpel or small cutter to remove the clay for the arches. Work slowly and clean up any ragged edges immediately with a soft brush or fingertip. -
Add detail holes:
Add a few stray, scattered dots in the middle section of the cylinder to break up the empty space, just like in the example photo. -
Final smooth:
Check inside the cutouts for any clay burrs. Smooth these down gently. Let the piece dry slowly (if ceramic) or bake according to package instructions (if polymer). -
Finishing touch:
Once fully cured or fired, lightly sand the bottom to ensure it sits perfectly flat on your table.
Level Up: Glazing
Leave the outside unglazed for a raw stone texture, but apply a glossy white glaze to the inside. This will reflect the candlelight and make the glow much brighter.
Light a tea light inside and enjoy the soft patterns casting across your table
Swirl-and-Twist Statement Vases
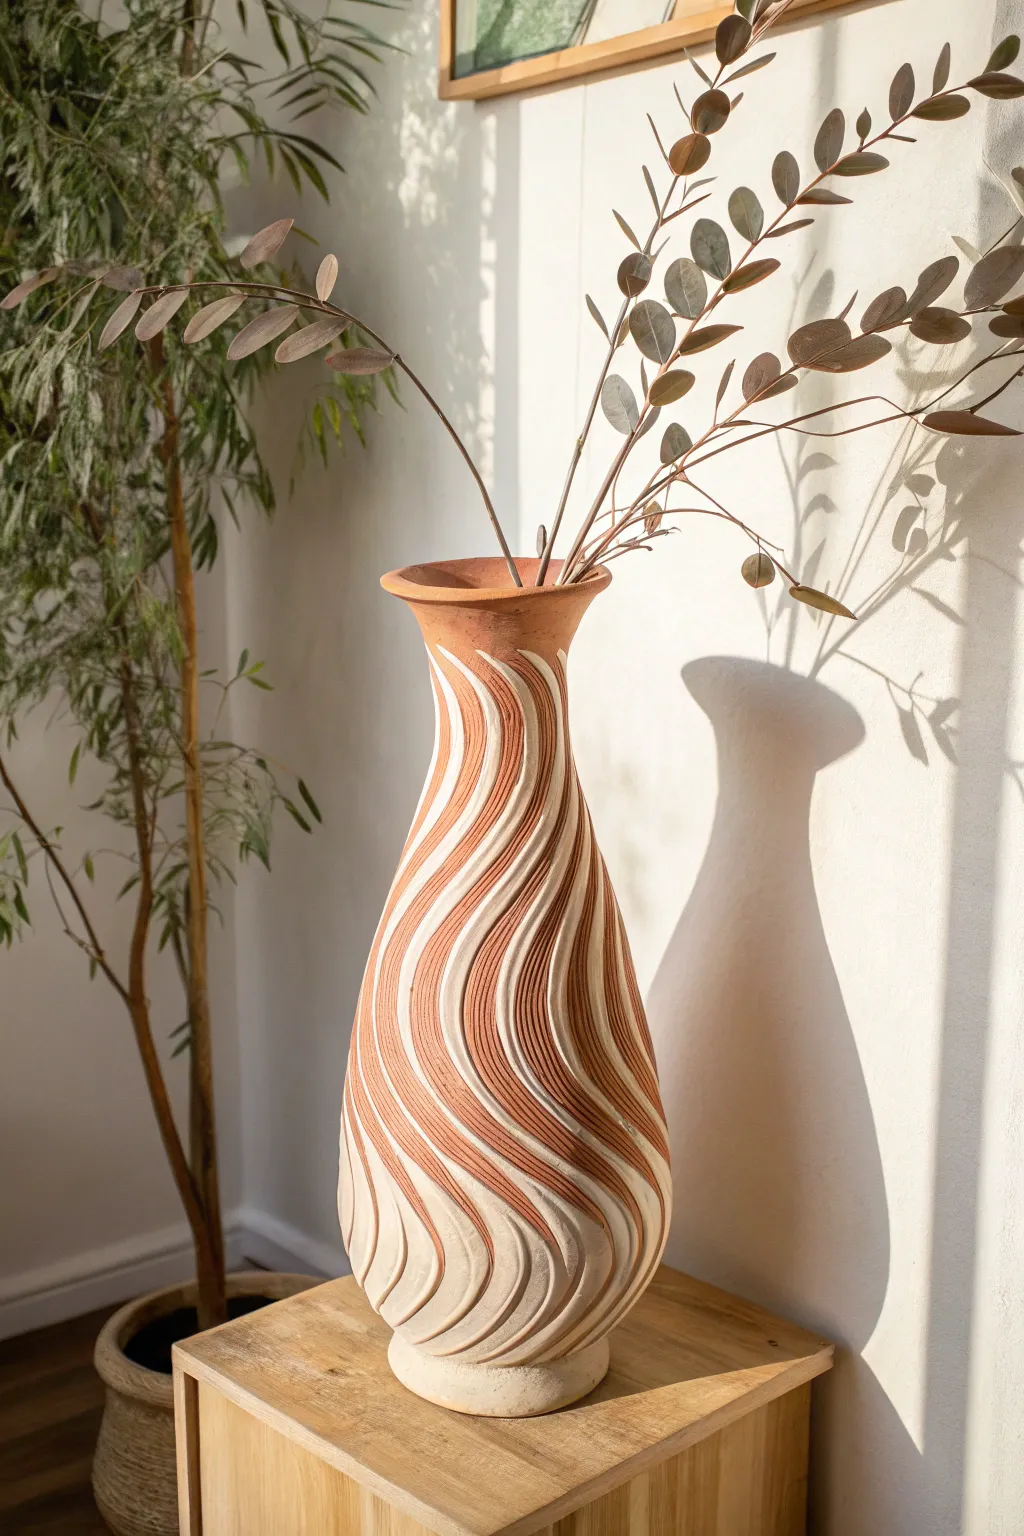
This striking vase combines the warmth of earthy terracotta with the crisp contrast of white slip, creating a mesmerizing visual rhythm. The deep, undulating grooves guide the eye upward, mimicking the flow of water or shifting sands.
Detailed Instructions
Materials
- Terracotta stoneware clay (approx. 4-5 lbs)
- White ceramic slip (engobe) or white underglaze
- Pottery wheel
- Rib tools (metal and wooden)
- Wire clay cutter
- Sponge
- Large loop trimming tool (sharp)
- Small carving loop or fluting tool
- Clean-up tool or soft brush
- Sgraffito tool (optional)
- Clear matte glaze (optional)
- Kiln
Step 1: Throwing the Form
-
Center the clay:
Begin by firmly throwing a 4-5 pound ball of terracotta clay onto the center of your wheel head. Use your palms to cone the clay up and down until it is perfectly centered and running smooth. -
Open the vessel:
Press your thumbs into the center to open the clay, stopping about a half-inch from the bottom. Pull the floor outward to establish the width of the base, keeping it relatively narrow for this tall form. -
Pull the cylinder:
Perform your initial pulls to gain height. Focus on pulling the walls upward evenly. Don’t worry about the curves yet; just aim for a tall, straight cylinder with a consistent wall thickness of about 3/8 inch to allow for later carving. -
Shape the belly:
Once you have height, use a rib tool on the inside to push the clay outward gently near the bottom third, creating a bulbous ‘belly’ that tapers upward. -
Collar the neck:
Gently collar (squeeze) the upper section of the cylinder inward to create a long, slender neck. Keep the wheel speed steady but not too fast to prevent the tall clay from wobbling. -
Flare the rim:
At the very top, use your fingers to flare the rim outward slightly, creating a soft, welcoming lip. Smooth the rim with a chamois or sponge. -
Refine the curve:
Use a flexible metal rib on the exterior to smooth out any throwing lines and perfect that continuous S-curve silhouette. I find this step crucial for a clean carving surface later.
Step 2: Slip Application & Carving
-
Leather hard stage:
Allow the vase to dry to a firm leather-hard state. It should be sturdy enough to handle but still hold moisture. Trim the foot ring at this stage if necessary. -
Apply the slip:
Brush or pour a thick, even coat of white slip (or underglaze) over the entire exterior of the vase. You want good opacity, so two coats might be necessary. Let this coating dry until it’s no longer tacky to the touch. -
Map the swirls:
Using a needle tool or a dull pencil, very lightly sketch the path of your swirls. Start from the bottom and draw elongated S-curves that twist up towards the neck to guide your cuts. -
Begin carving:
Select a sharp, medium-sized loop tool. Starting at the base, carve into the clay following your guidelines. You want to cut *through* the white slip and deep into the terracotta body. -
Vary the depth:
To get that dimensional look, alternate your pressure. Deeper cuts will reveal more red clay and create stronger shadows. Aim for fluid, continuous motions rather than short, choppy strokes. -
Create ridges:
Leave strips of the uncarved white surface between your carved terracotta valleys. These high points create the striking two-tone contrast. -
Refine the texture:
Go back with a smaller loop tool or a textured rib to add fine striations inside the terracotta grooves. This ribbed texture adds visual interest and catches the light differently than smooth clay. -
Clean up burrs:
Once the carving is complete, let the pot dry a bit more. Then, use a stiff brush or a scouring pad to gently knock off any clay crumbs or sharp burrs left from the carving tools, being careful not to smudge the white slip.
Uneven Carving Lines?
If your hand shakes during long carving strokes, stabilize your carving arm against your body or leg. Use your whole arm to move the tool, not just your wrist.
Step 3: Firing and Finishing
-
Slow dry:
Cover the vase loosely with plastic to let it dry very slowly. Because the walls vary in thickness due to carving, uneven drying can cause cracks. -
Bisque fire:
Load the bone-dry vase into the kiln and bisque fire to roughly Cone 04 to harden the clay and set the slip. -
Glazing:
For this natural look, you may choose to leave the exterior unglazed or apply a thin coat of clear matte glaze to protect the surface without adding shine. Glaze the interior with a liner glaze to make it watertight. -
Final firing:
Fire the piece to the maturation temperature of your specific clay body (e.g., Cone 5 or 6 for stoneware). Once cooled, sand the bottom smooth.
Add Subtle Texture
For extra depth, try using a serrated rib tool inside the carved grooves. This creates tiny parallel lines that contrast beautifully with the smooth white ridges.
Place your finished vase in a spot with side lighting to really accentuate those dramatic carved curves