If you’re itching to make a mug that feels like a tiny sculpture you can actually drink from, you’re in the right place. I pulled together my favorite creative clay mug ideas that you can totally tackle at home—whether you’re handbuilding, wheel-throwing, or somewhere in between.
Stamped Botanical Texture Mug

Bring the calming beauty of the forest into your morning routine with this beautifully textured mug. By pressing real or synthetic botanical elements into clay, you’ll create a stunning, tactile surface where every vein and leaf is captured in elegant relief.
Step-by-Step Guide
Materials
- Stoneware clay w/ fine grog
- Real fern fronds or leaves (fresh, not dried)
- Rolling pin
- Canvas work surface
- Pottery knife or needle tool
- Rib tool (metal or rubber)
- Sponge
- Scoring tool (or serrated rib)
- Slip
- Paintbrush (soft)
- Clear or light cream glaze
Step 1: Preparing the Slab
-
Wedge the clay:
Start by thoroughly wedging a ball of stoneware clay to remove air bubbles and ensure an even consistency. -
Roll out the slab:
On a canvas-covered surface, roll your clay out into a long rectangle. Aim for a thickness of about 1/4 inch (6mm) to ensure the mug is sturdy but not heavy. -
Smooth the surface:
Use a damp sponge or a soft rib tool to smooth the surface of the clay, removing any canvas texture marks. -
Arrange the botanicals:
Place your fern fronds and leaves onto the clay slab. Think about your composition now—maybe have a large fern wrapping diagonally and smaller leaves filling the gaps. -
Impress the texture:
Gently roll your rolling pin over the leaves. Apply firm, even pressure to push the plant material into the clay so it’s flush with the surface. -
Remove the plants:
carefully peel the leaves away using a needle tool or your fingernail to lift the stems. I find this reveal moment incredibly satisfying as the intricate veins appear in the clay.
Leaves sticking?
If plant matter gets stuck in the clay, let the mug dry until bone dry. The organic material will shrink and pop out, or simply burn away completely in the kiln.
Step 2: Assembling the Cylinder
-
Cut to size:
Using a ruler and a needle tool, cut a clean rectangle from the textured slab. The length should be the circumference of your desired mug plus a little overlap, and the height is up to you. -
Bevel the edges:
Cut a 45-degree angle on the two short vertical edges of your slab—one bevel facing up, one facing down. This creates a stronger, seamless join. -
Score the edges:
Rough up the beveled surfaces nicely with your scoring tool or a serrated rib. -
Apply slip:
Paint a generous amount of slip onto the scored areas. -
Form the cylinder:
Curve the slab into a cylinder and press the beveled edges together firmly. Gently support the wall from the inside while pressing to avoid distorting your fern texture. -
Secure the seam:
Smooth the seam on the *inside* of the mug completely. On the outside, carefully blend the seam, trying to preserve the pattern or touching it up if needed.
Oxide Wash Effect
After bisque firing, brush an iron oxide wash into the leaf depressions and wipe away the excess with a sponge before glazing. This adds dramatic, antique contrast.
Step 3: Adding the Base and Handle
-
Attach the base:
Roll a small slab for the floor. Score and slip the bottom rim of your cylinder and press it onto this slab. Cut away the excess clay around the base. -
Pull a handle:
Pull a handle from a slug of clay, tapering it slightly. Curve it into an ear shape and let it set up until it’s firm enough to hold its arch. -
Attach handle:
Score and slip the attachment points on both the mug body and the handle ends. Press firmly to attach, blending the clay with a small wooden tool. -
Clean up:
Wipe the rim with a damp sponge to maximize comfort for drinking. Check the interior for any stray slip marks. -
Bisque fire:
Allow the mug to dry slowly under loose plastic to prevent warping, then bisque fire it according to your clay body’s specifications. -
Glaze and fire:
Dip or brush a light, translucent glaze over the piece. This type of glaze creates a ‘break’ over the textured ledges, highlighting the brown clay body underneath the fern design.
Now you have a piece of functional art that captures the delicate details of nature forever


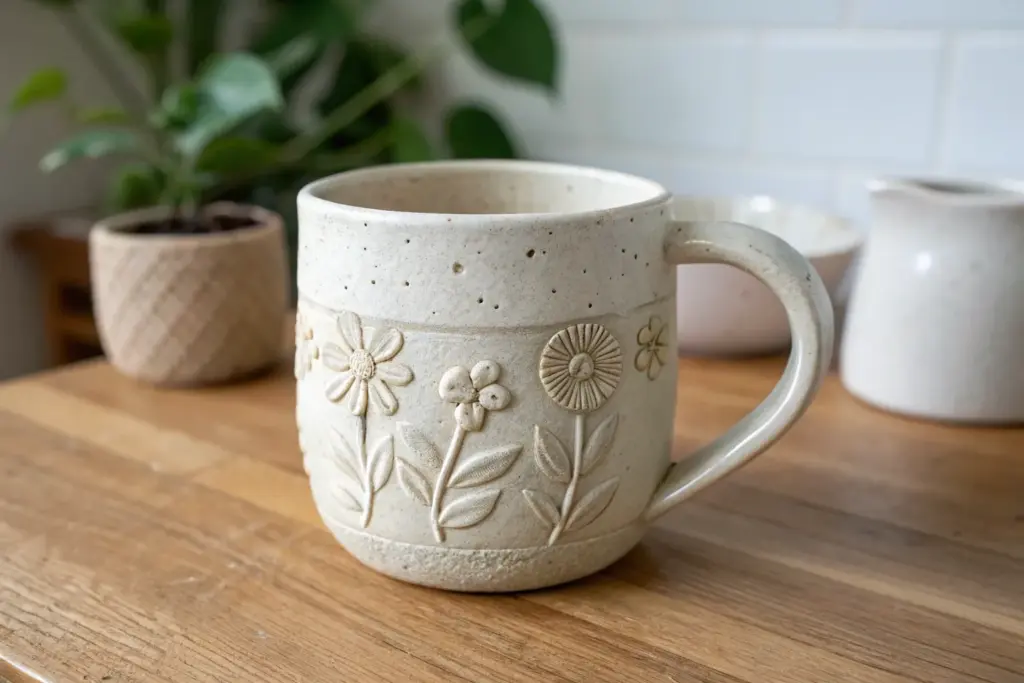
Carved Floral Wrap Relief Mug
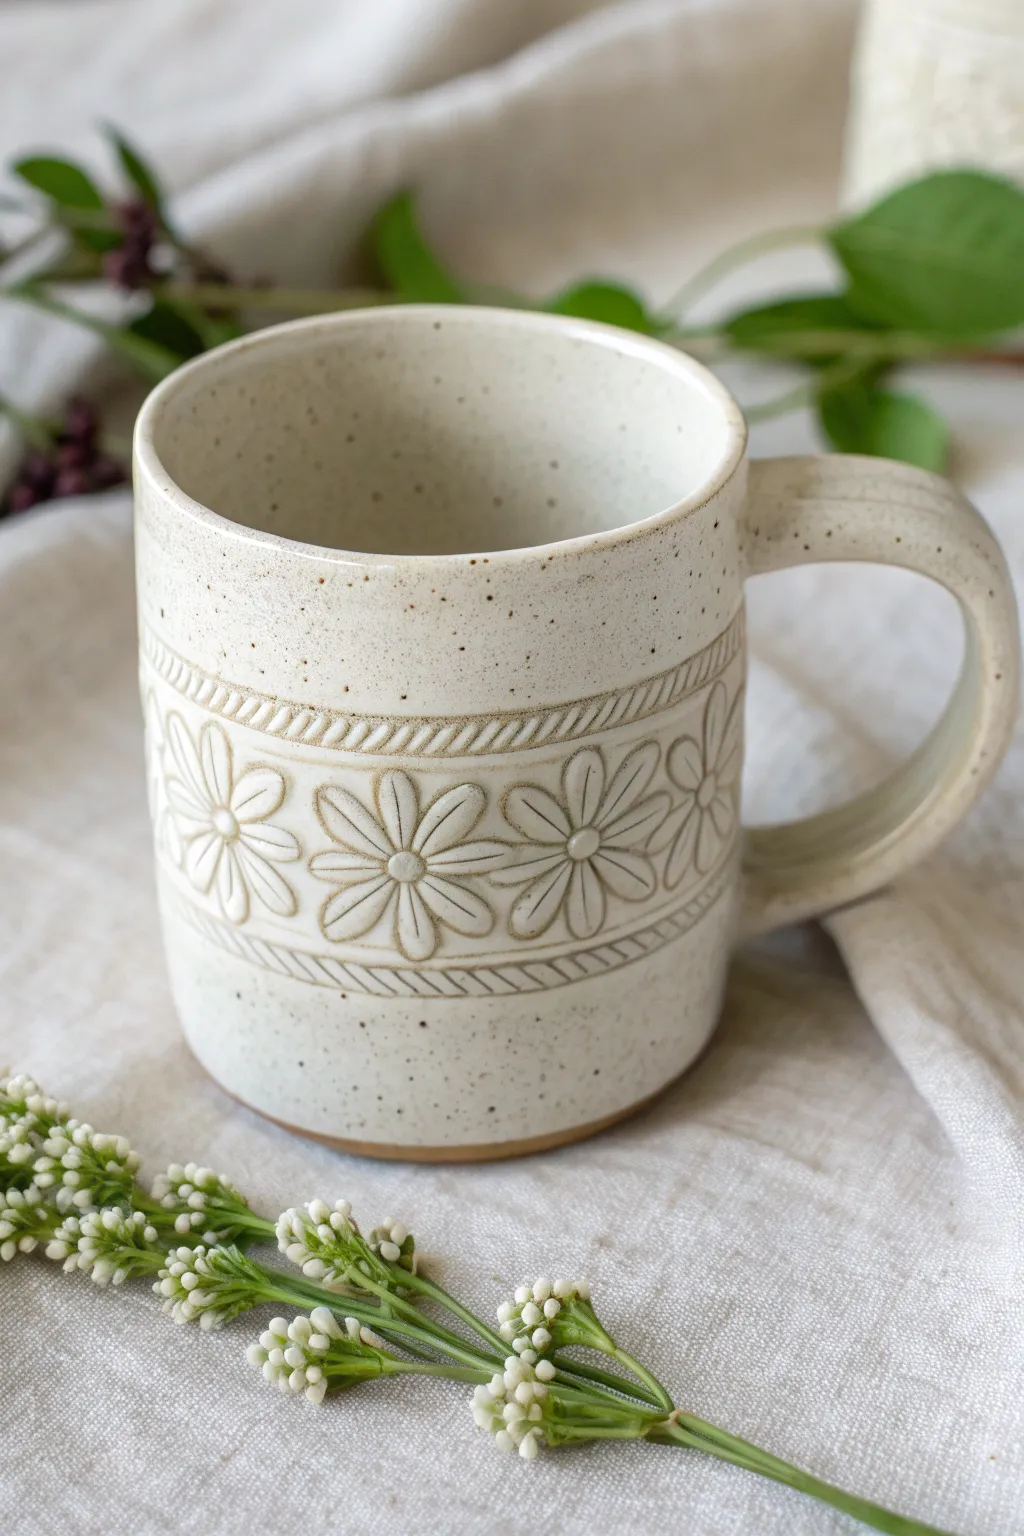
This charming mug features a band of raised floral motifs bordered by delicate rope textures, all unified under a creamy, speckled glaze. The tactile surface invites you to hold it with both hands, making it a perfect vessel for cozy mornings.
Step-by-Step
Materials
- Stoneware clay (speckled or buff)
- Pottery wheel (or slab roller/rolling pin)
- Rib tool (metal and rubber)
- Needle tool
- Carving tools (loop tool and sgraffito tool)
- Sponge
- Wire cutter
- Scoring tool
- Slip
- Satin white speckled glaze
- Kiln for bisque and glaze firing
Step 1: Forming the Body
-
Throw the cylinder:
Center your clay on the wheel and throw a straight-sided cylinder. Aim for walls slightly thicker than your usual ware (about 1/4 inch) to allow depth for the carving later without piercing through. -
Define the rim and foot:
Compress the rim with a chamois or sponge for a smooth drinking edge. Before cutting it off the bat, use a wood modeling tool to undercut the foot lightly, giving the mug a slight lift. -
Dry to leather hard:
Wire the cylinder off the bat and let it dry slowly until it reaches a sturdy leather-hard stage. The clay should be firm enough to handle without warping but soft enough to carve easily. -
Trim the base:
Place the mug upside down on the wheel (centering it carefully) and trim the excess clay from the bottom to create a defined foot ring. Keep the walls consistent.
Uneven Carving Depth?
If you cut too deep, don’t patch it! Instead, sponge the area smooth and turn it into a ‘window’ or intentionally deeper recess. It adds character rather than looking like a mistake.
Step 2: Pulling and Attaching the Handle
-
Pull a handle:
Using a separate lump of clay, pull a strip for the handle. Aim for a comfortable C-shape curve. I like to taper it slightly so it’s wider at the top attachment point. -
Set the handle:
Let the handle stiffen slightly on a board until it holds its curve. While it dries, mark the attachment points on your mug body opposite where you plan to carve (or simply center the carving later). -
Attach the handle:
Score and slip both the handle ends and the attachment points on the mug. Press the handle firmly onto the mug, smoothing the seams with a small tool or your finger for a seamless transition.
Add Color Depth
Before glazing, brush an iron oxide wash into the carved grooves and sponge off the high points. This will make the floral pattern pop dramatically under a semi-transparent glaze.
Step 3: Carving the Relief Pattern
-
Mark the boundaries:
Use a needle tool or a banding wheel to lightly incise two horizontal parallel lines around the middle of the mug. This 2-inch wide band will house your floral design. -
Sketch the flowers:
Lightly scratch or draw your daisy shapes within the band. Space them evenly. Don’t worry about perfection; the handmade look is part of the charm. -
Carve the background:
Using a small loop tool, carve away the negative space between the flower petals. You want the flowers to remain raised while the background recedes. Go slow to keep the depths consistent. -
Refine the petals:
Use a finer tool to define the individual petals. Make shallow cuts in the center of each petal to give them a concave shape, enhancing the 3D relief effect. -
Add the center detail:
Press a small round tool or the back of a paintbrush into the center of each flower to make the pollen disk. -
Create the rope borders:
Just above and below the floral band, carve diagonal hash marks closely together within a narrow channel. This mimics a twisted rope texture framing the flowers. -
Cleanup:
Once the carving is done, use a soft brush or a barely damp sponge to smooth away any sharp burrs or clay crumbs.
Step 4: Glazing and Finishing
-
Bisque fire:
Allow the mug to bone dry completely, which might take a few days depending on humidity. Load it into the kiln for a bisque firing (usually cone 04 or 06). -
Wax resist (optional):
If you want the raw clay to show through on the foot, apply wax resist to the bottom and slightly up the side of the foot ring. -
Apply glaze:
Dip the mug into a satin white glaze. Choose a glaze that ‘breaks’ well over texture; this means it thins out on raised edges (showing the clay color) and pools in the recesses, highlighting your carving. -
Wipe the foot:
Even if you waxed, wipe the foot with a damp sponge to remember to ensure no glaze touches the kiln shelf. -
Glaze fire:
Fire the mug to maturity (likely cone 5 or 6 for stoneware). Let the kiln cool naturally before unloading.
Once fired, fill your new favorite mug with coffee or tea and enjoy the way the relief texture feels in your hands


Fluted Rib Mug With Finger Grooves
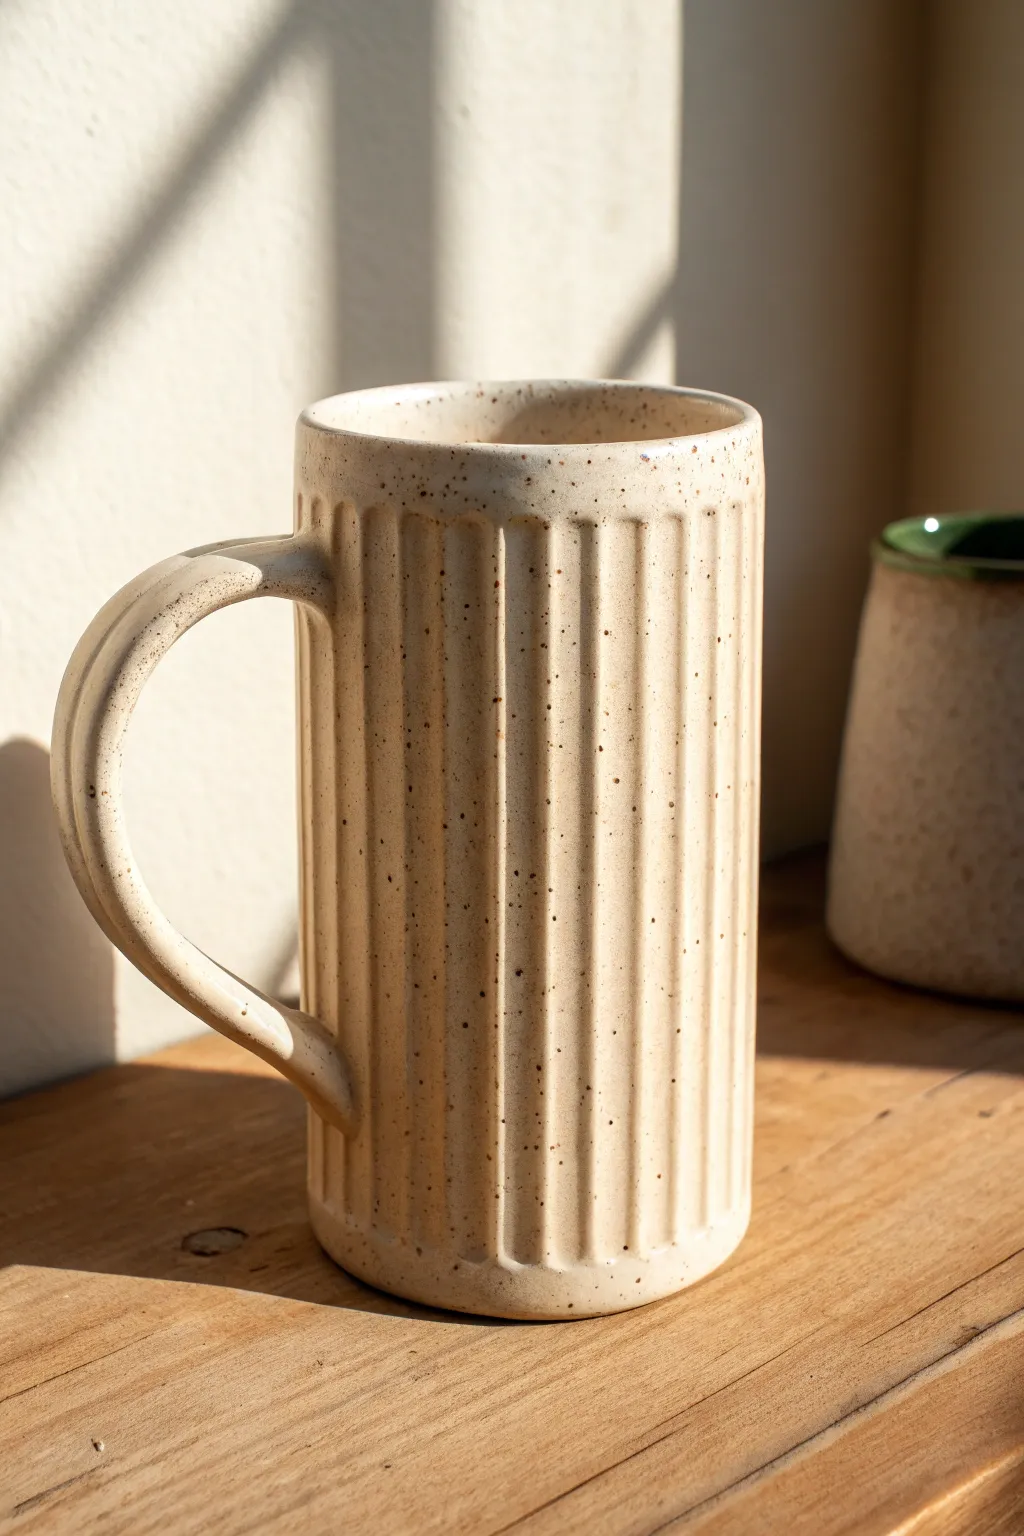
This elegant mug combines a classic straight-sided cylinder shape with modern, structured fluting for a tactile drinking experience. The speckled cream glaze highlights the vertical grooves perfectly, creating a piece that feels both cozy and sophisticated.
How-To Guide
Materials
- Stoneware clay (speckled or buff)
- Pottery wheel
- Throwing sponge
- Wire cutter
- Fluting tool or carving rib
- Needle tool
- Trimming tools
- Handle pulling water bucket
- Scoring tool and slip
- Speckled oatmeal or cream glaze
- Kiln
Step 1: Throwing and Shaping
-
Center the Clay:
Begin with about 1 to 1.5 pounds of wedged speckled stoneware clay. Secure it firmly to the wheel head and center it using steady pressure and water. -
Open and Pull:
Open the clay to create a flat, even floor. Pull the walls up into a tall, straight cylinder. Aim for a height of about 5-6 inches, keeping the walls relatively thick—about 1/4 inch—to accommodate the carving later. -
Refine the Lip:
Use a chamois or your fingertips to compress and round the rim. A comfortable lip is crucial for a mug. -
Define the Cylinder:
Use a straight metal or wooden rib on the exterior while pushing gently from the inside to ensure the walls are perfectly vertical and the surface is smooth, removing throwing lines.
Uneven Flutes?
If your vertical lines are wobbling, try resting your carving hand against a steady object (or your other hand) while rotating the banding wheel slowly, rather than moving the tool.
Step 2: Carving the Flutes
-
Leather Hard Stage:
Allow the cylinder to dry to a leather-hard state. It should be firm enough to handle without deforming but soft enough to carve cleanly. -
Mark Vertical Guidelines:
Lightly mark vertical lines around the rim to space your flutes evenly, or trust your eye for a more organic look. -
Carve the Flutes:
Using a fluting tool or a loop tool with a rounded profile, carve vertical channels from the base up to just below the rim. Maintain consistent pressure to keep the depth uniform. -
Smooth the Edges:
Once carved, use a damp sponge or a soft rubber rib to gently soften the sharp edges created by the fluting tool. You want distinct ridges, but nothing sharp to the touch.
Step 3: Handle and Assembly
-
Pull a Strap Handle:
Pull a strap handle from a lump of clay. Aim for a width that complements the height of the mug. I like to curve it while it’s still wet to set the arch shape. -
Dry the Handle:
Let the handle stiffen up until it matches the moisture content of the mug body. -
Attach the Handle:
Score the attachment points on the mug and the handle ends. Apply slip and press the handle firmly onto the mug body. Ensure the top attachment is just below the smooth rim area. -
Blend the Seams:
Smooth out the connection points so the handle looks like it grows out of the mug. Use a small modeling tool to tidy up any clay displaced into the flutes. -
Create the Thumb Rest:
At the top of the handle arch, press gently with your thumb to create a subtle depression or flattening, which helps with grip comfort.
Pro Tip: Break Effect
Choose a ‘breaking’ glaze—one that becomes translucent on high points. This specifically highlights the fluted ridges while darker pigment settles in the grooves for depth.
Step 4: Makers Mark and Firing
-
Final Cleanup:
Check the foot of the mug and trim away any excess weight if you haven’t already. Smooth any final rough spots with a barely damp sponge. -
Bisque Fire:
Slowly dry the mug completely before loading it into the kiln for a bisque firing (usually cone 04 or 06). -
Glazing:
Dip the mug into a speckled cream or oatmeal glaze. The glaze should be fluid enough to break over the sharp edges of the fluting, highlighting the texture. -
Wipe the Foot:
Clean off any glaze from the bottom of the mug to prevent it from sticking to the kiln shelf. -
Glaze Fire:
Fire the mug to maturity (typically cone 6 or cone 10, depending on your clay body). Allow the kiln to cool naturally before unloading.
Fill your new mug with coffee or tea and enjoy the comfortable grip of those ridges


Faceted Geometric Mug
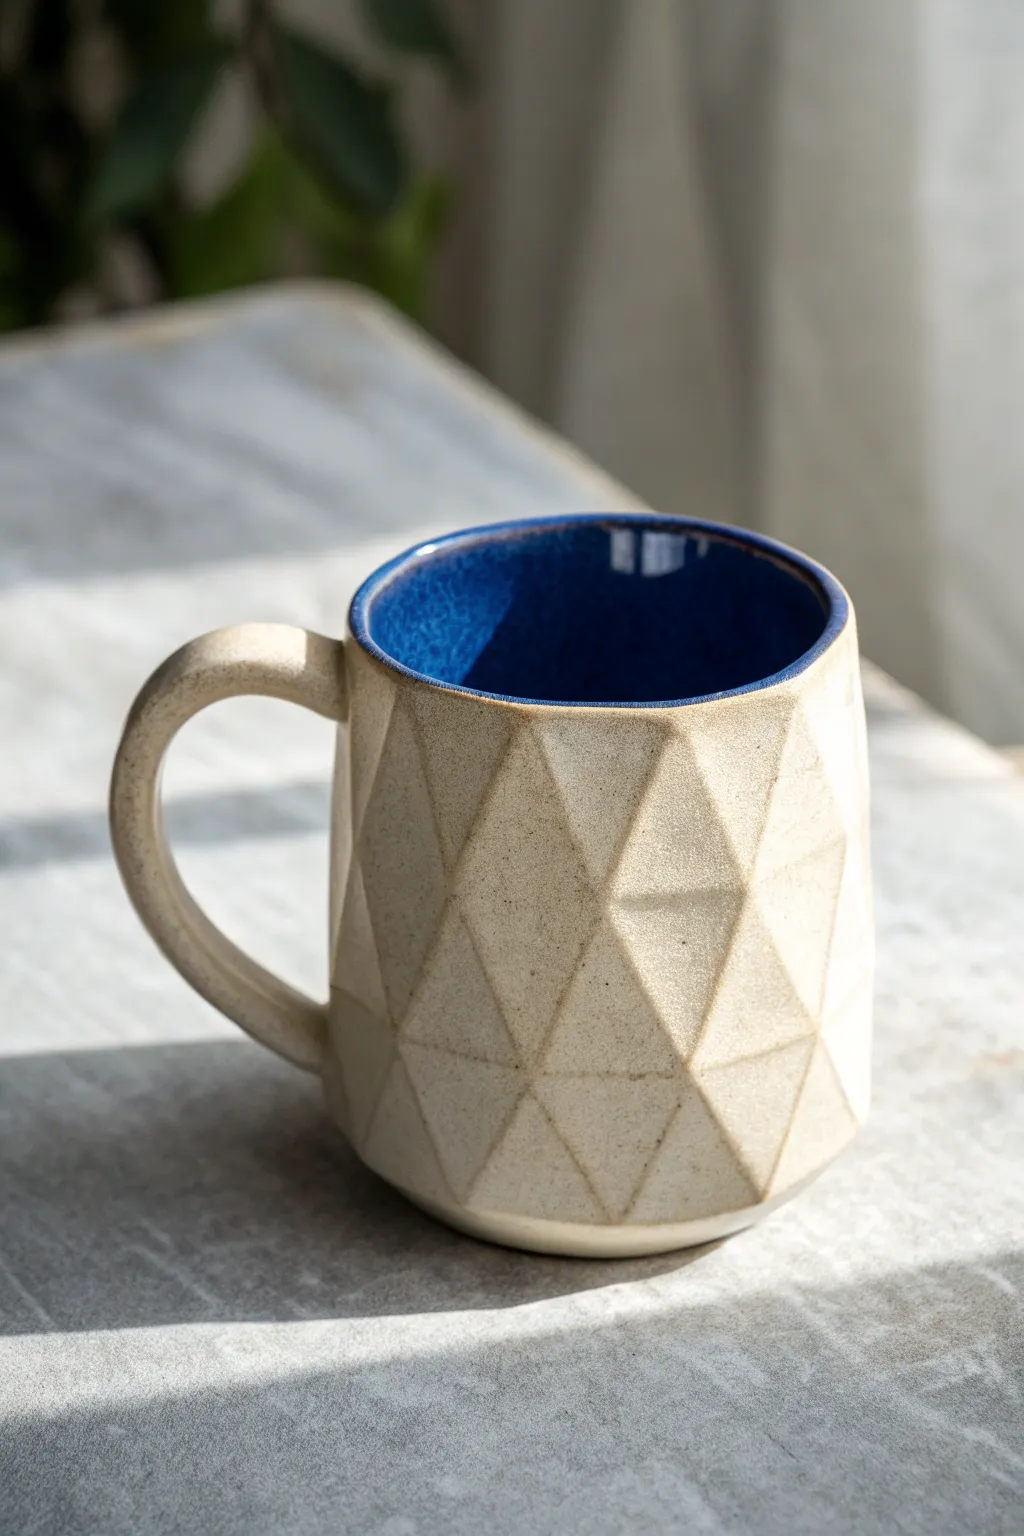
This project combines sharp, modern lines with an organic, earthy feel. By carving facets into a simple cylinder, you create a tactile surface that feels wonderful in the hands, contrasted beautifully by a deep cobalt interior glaze against raw, speckled clay.
Step-by-Step Guide
Materials
- Speckled stoneware clay (mid-fire)
- Pottery wheel and tools
- Wire cutter
- Sharp trimming tool or cheese cutter
- Sponge
- Deep blue glossy glaze
- Matte clear or white glaze (optional)
- Small paintbrush
- Kiln
Step 1: Throwing the Cylinder
-
Center and open:
Begin by centering about 1-1.5 lbs of speckled stoneware clay on your wheel. Create your opening, ensuring the floor is flat and about a half-inch thick to account for later trimming. -
Pull the walls:
Pull the walls up into a straight cylinder. Aim for walls slightly thicker than a standard mug—about 1/3 inch—because you will be carving away material later. You need that extra thickness for structure. -
Refine the shape:
Use a rib tool to smooth the outside and compress the clay particles. Keep the form relatively vertical, perhaps slightly tapering in at the mouth to hold heat. -
Dry to leather hard:
Wire the pot off the wheel bat and let it dry slowly to a leather-hard stage. It should be firm enough to handle without deforming but soft enough to carve easily.
Step 2: Carving the Facets
-
Mark your guidelines:
Lightly trace a grid around the cylinder if you want perfect symmetry, or trust your eye for a more organic look. The facets in the example are triangular. -
Slice the first row:
Using a sharp wire tool or a dedicated faceting tool, make swift, decisive cuts at the top rim, angling downward to create triangular planes. -
Create the geometry:
Move down the mug, making the next row of cuts. Place the point of your new triangle between the bases of the two triangles above it. This offset pattern creates the diamond and geometric effect. -
Refine the surface:
Continue carving until you reach the foot. Use a damp sponge to very gently smooth any sharp burrs on the edges of your cuts, but be careful not to wash away the crisp lines you just created.
Uneven Facets?
If your cuts look messy, wait for the clay to get slightly harder. Mushy clay drags against the wire. Sharpen your tool or use a thinner wire for cleaner slices.
Step 3: Handle and Bisque
-
Pull a handle:
Pull a handle from a small nugget of clay. I find a simple C-curve works best to balance the busy texture of the mug body. -
Attach firmly:
Score and slip both the handle ends and the attachment points on the mug. Press the handle on firmly and smooth the connection points with a modeling tool. -
Slow drying:
Cover the mug loosely with plastic to let the moisture equalize between the handle and the body. Dry completely before bisque firing to cone 04.
Pro Tip: Texture Pop
After carving but before firing, gently rub the facet edges with a smooth stone or the back of a spoon. This burnishing makes the geometric lines catch the light better.
Step 4: Glazing and Finishing
-
Wax the foot:
Apply wax resist to the bottom of the mug and slightly up the side of the foot to prevent glaze from running onto the kiln shelf. -
Glaze the interior:
Pour a deep, glossy cobalt blue glaze into the interior. Swirl it around to coat every surface evenly, then pour out the excess immediately. -
Clean the rim:
Use a damp sponge to wipe any blue glaze drips off the exterior rim. You want a crisp line where the blue stops. -
Glaze the exterior:
Dip the exterior into a thin matte clear glaze, or leave it raw if your clay is fully vitrified at high temperatures. The example shows a very thin application that allows the clay speckles to shine through. -
Final wipe:
Do a final check to ensure the rim is clean and the foot is free of glaze. -
Final firing:
Fire the mug to maturity (usually Cone 5 or 6 depending on your clay body). Allow the kiln to cool completely before removing your finished faceted mug.
Enjoy your morning coffee with the satisfying texture of your new handmade mug

The Complete Guide to Pottery Troubleshooting
Uncover the most common ceramic mistakes—from cracking clay to failed glazes—and learn how to fix them fast.
Raised Band and Slip-Dipped Mug
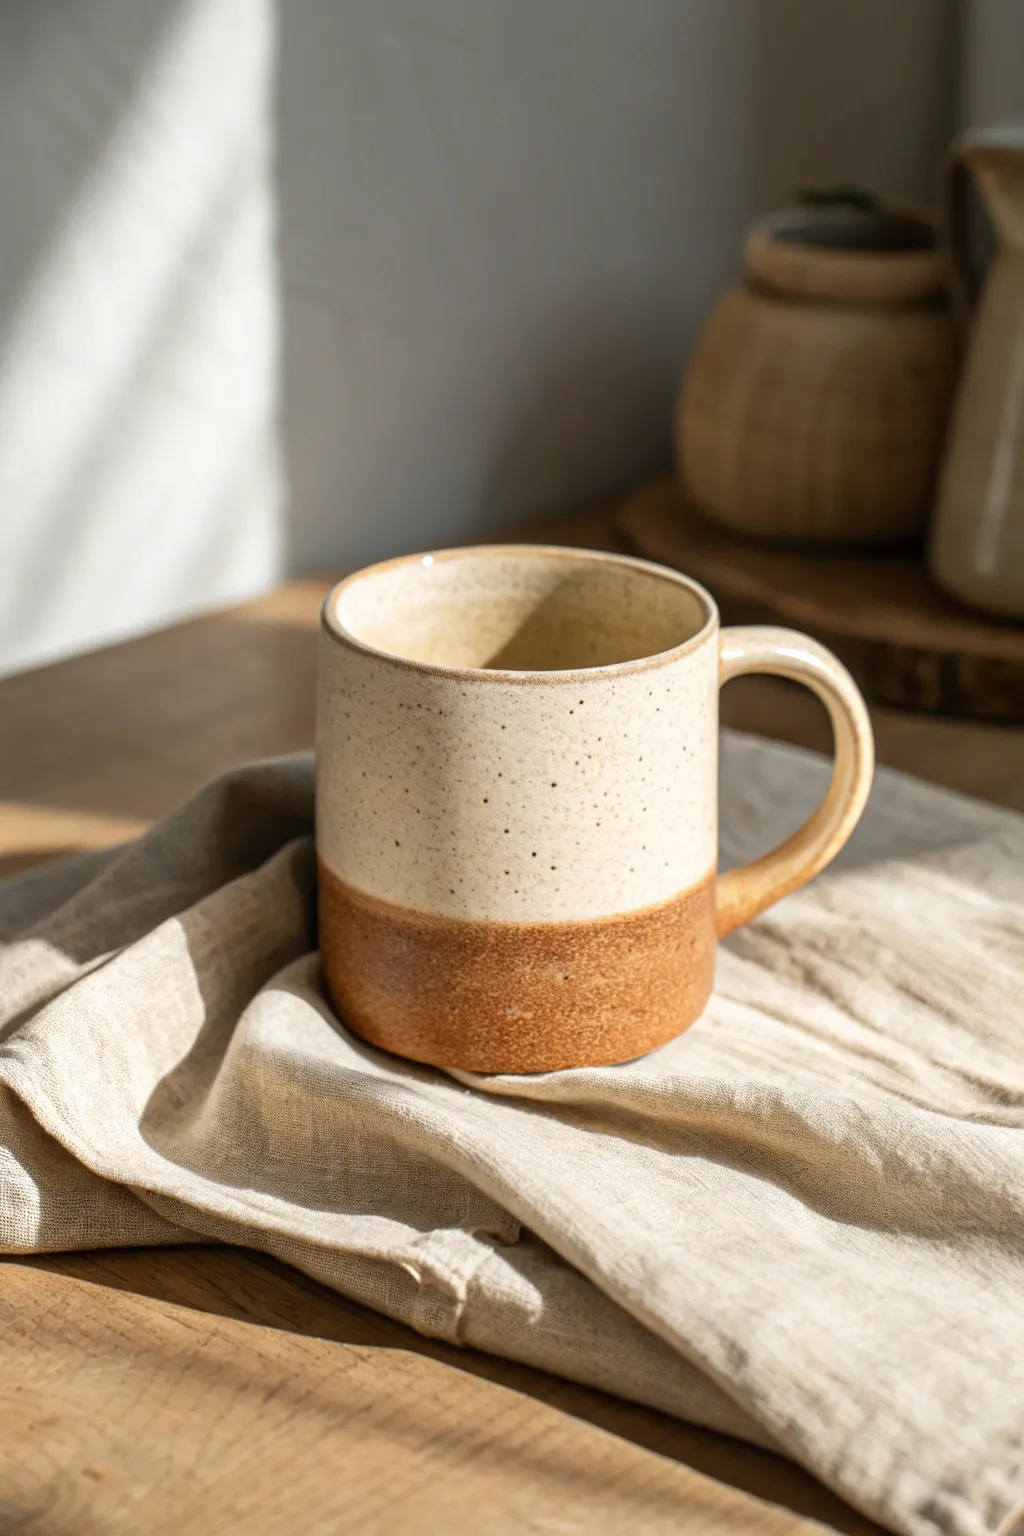
Embrace the natural beauty of clay with this minimalist dual-texture mug. Featuring a smooth, creamy speckled glaze on top and raw, toasted stoneware at the base, this project highlights the contrast between finished and unfinished surfaces.
Step-by-Step
Materials
- Speckled buff stoneware clay (or similar cone 6 clay body)
- Pottery wheel
- Throwing tools (sponge, needle tool, rib, wire cutter)
- Trimming tools
- Bucket of water
- Creamy satin-matte or glossy white glaze (food safe)
- Wax resist (optional)
- Glazing tongs (optional)
- Kiln
Step 1: Throwing the Form
-
Prepare the Clay:
Wedge about 1 lb (450g) of speckled buff clay thoroughly to remove air bubbles. This clay body is crucial for achieving that warm, sandy bottom color. -
Center on the Wheel:
Secure the clay to the wheel head and center it. This mug has a fairly wide footprint, so don’t cone it up too high or narrow. -
Open the Cylinder:
Open the centered clay to create the floor. Aim for a flat interior floor rather than a curved bowl shape to give it that modern cylindrical feel. -
Pull the Walls:
Pull the walls straight up. Keep the cylinder uniform in width from bottom to top. It should be slightly shorter and stouter than a standard coffee mug. -
Smooth the Rim:
Use a chamois or a wet sponge to compress and round the rim. A comfortable drinking lip is essential for a functional mug. -
Refine the Shape:
Use a straight metal or wooden rib on the exterior while the wheel spins to remove finger marks and ensure the sides are perfectly straight and vertical.
Uneven Glaze Line?
If your hand shakes during the dip, don’t worry. Use a fettling knife or clean sponge on the wheel to sharpen the line while the glaze is powdery dry before firing.
Step 2: Trimming and Handle Attachment
-
Drying to Leather Hard:
Allow the cylinder to dry to a leather-hard state. It should be firm enough to handle without deforming but still cool to the touch. -
Trim the Base:
Invert the mug on the wheel. Trim away excess weight from the bottom, creating a clean, flat foot. I like to define the transition where the glaze line will eventually stop, ensuring the wall is smooth. -
Pull a Handle:
Using a small pug of clay, pull a handle that is roughly the same thickness as the mug rim. Create a classic ‘ear’ shape slightly longer than you need. -
Attach the Handle:
Score and slip the attachment points on both the mug and the handle. Press the handle firmly onto the side, blending the clay smoothly for a seamless connection. -
Slow Drying:
Cover the mug loosely with plastic to let it dry slowly. This prevents the handle from cracking as it shrinks at a different rate than the body. -
Bisque Fire:
Once bone dry, load the mug into the kiln for a bisque firing (typically Cone 04 or 06, depending on your clay).
Level Up: Texture Contrast
Sand the raw clay bottom after the final firing with fine-grit sandpaper. This creates an ultra-smooth, tactile contrast against the glossy glazed upper.
Step 3: Glazing technique
-
Clean the Bisque:
Wipe the bisque-fired mug with a damp sponge to remove any dust, which can prevent glaze adherence. -
Measure the Dip Line:
Decide where you want the glaze to stop—about one-third up from the bottom works best for this look. You can lightly mark this with a pencil if helpful. -
Wax Resist Method (Option A):
Paint liquid wax resist on the bottom third of the mug, including the underside. Let it dry completely. This is the safest way to get a crisp line. -
The Dip:
Using glazing tongs or your hand (gripping the waxed bottom), dip the mug upside down into the cream speckled glaze. Submerge it until the glaze reaches your desired line or the wax edge. -
Clean Up:
If you didn’t use wax, wipe away the glaze from the bottom third immediately with a wet sponge. The line doesn’t have to be laser-perfect; a slightly organic edge adds character. -
Glaze Fire:
Load the mug into the kiln for the final glaze firing (Cone 6 for most stoneware). Make sure the unglazed bottom sits directly on the kiln shelf.
Brew your favorite coffee and enjoy the warmth of the raw clay in your hands
Thumbprint Dimple Hug Mug
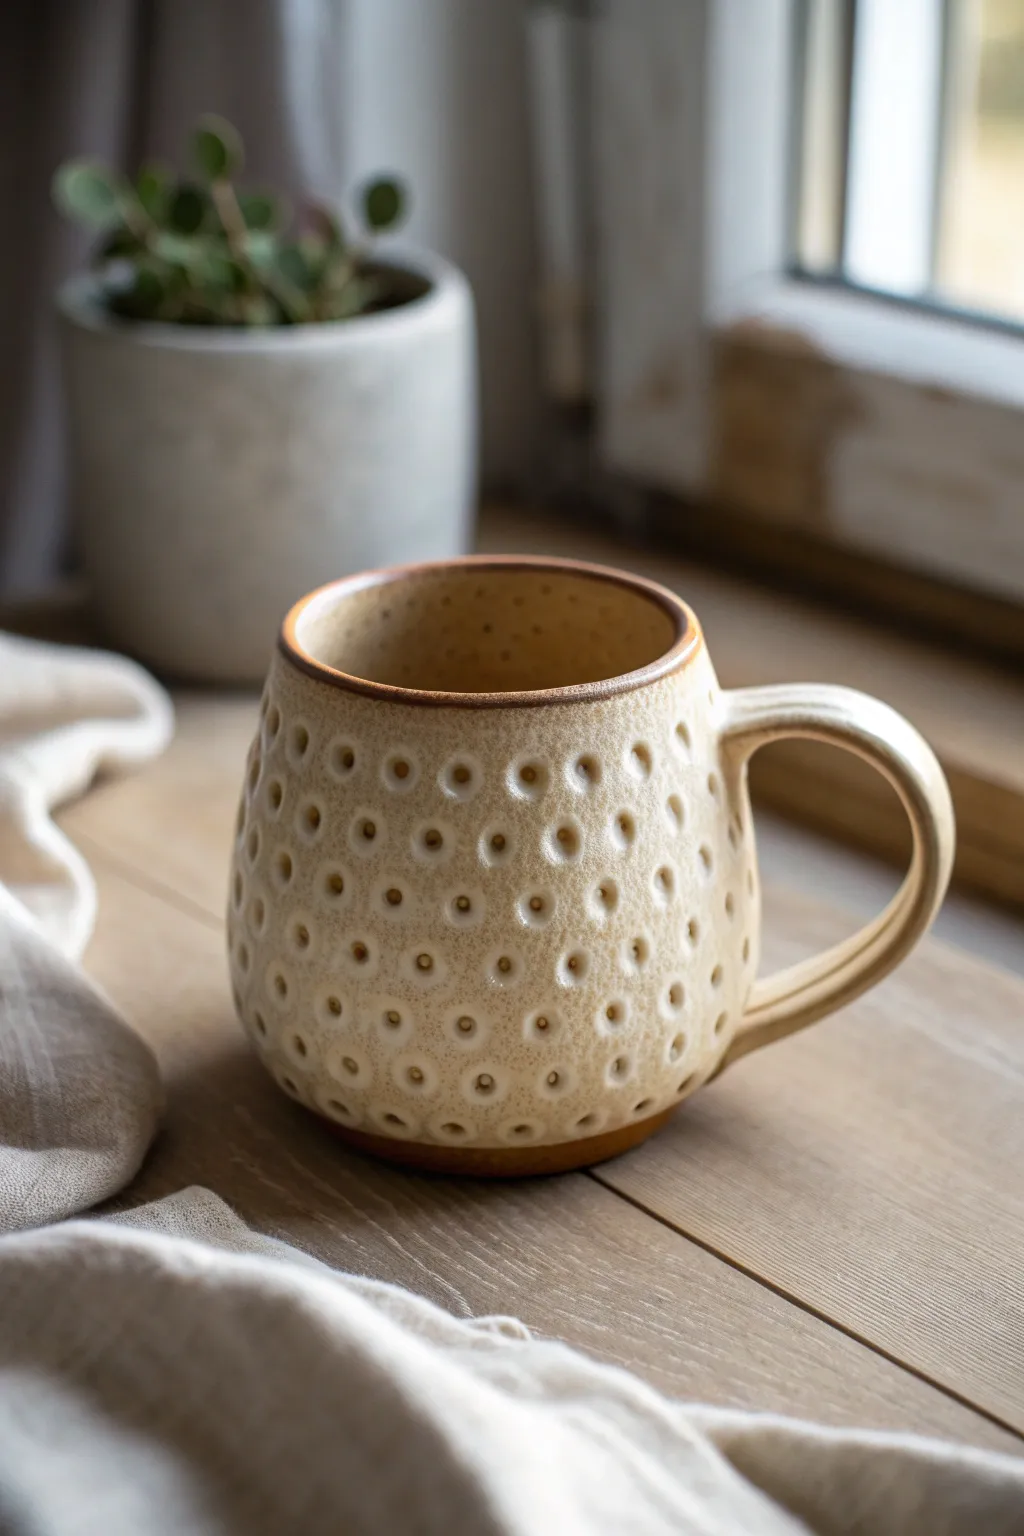
This charmingly tactile mug invites you to wrap your hands around it thanks to its all-over dimpled texture. Using regular pottery clay and a simple indentation technique, you’ll create a comforting vessel that feels as good to hold as it looks.
Step-by-Step Tutorial
Materials
- Stoneware clay (approx. 1 lb)
- Pottery wheel (or slab roller for hand-building)
- Wooden modeling tool
- Sponge
- Cutting wire
- Rib tool (kidney)
- Needle tool
- Scoring tool or fork
- Slip (clay and water slurry)
- Clear or cream dipping glaze
- Iron oxide wash or dark stain
Step 1: Throwing the Base Form
-
Center the Clay:
Begin by wedging your clay thoroughly to remove air bubbles. Place it on the wheel head and center it using strong, consistent pressure until the mound spins without wobbling. -
Open the Form:
Drill your thumb into the center to create the floor, leaving it about a quarter-inch thick. Pull the floor outward to establish the width of your mug’s interior. -
Pull the Cylinder:
Slowly pull the walls upward. I like to keep the walls slightly thicker than a standard mug—around 3/8 of an inch—because you will be pressing into them later, which thins the clay. -
Shape the Belly:
Once you have height, use a rib tool on the inside to push the walls outward gently, creating a convex, rounded ‘belly’ shape. Narrow the rim slightly to create that cozy, enclosed feeling. -
Refine the Rim:
Compress the rim with a piece of chamois or your sponge to make it smooth and rounded for drinking. -
Dry to Leather Hard:
Cut the mug from the batt and let it dry until it reaches the leather-hard stage. It needs to be firm enough to handle but soft enough to accept impressions without cracking.
Dimples cracking?
If the clay creates tiny cracks around the dimple edges when you press, your pot is too dry. Spray it with a fine mist of water and wrap it in plastic for an hour to rehydrate before trying again.
Step 2: Texturing and Handle
-
Map the Dimples:
Before pressing, lightly mark a grid or pattern on the outside if you want perfect symmetry. Alternatively, go freestyle for a more organic look. -
Create the Dimples:
Place one hand inside the mug to support the wall. With your other hand, use a rounded tool handle or your thumb to press gently into the exterior clay. Repeat this in rows around the entire mug. -
Smooth the Transitions:
Use a damp sponge to slightly soften the edges of your dimples. You want defined shadows, but no sharp ridges. -
Pull a Handle:
Pull a strap of clay for the handle. For this mug style, a slightly thicker, medium-width strap works best visually with the textured body. -
Attach the Handle:
Score the attachment points on the mug and the handle ends. Apply slip generously. Press the handle firmly onto the mug, ensuring a strong bond. -
Clean Up:
Wipe away excess slip with a damp brush and ensure the transition between the handle and mug is seamless. Let the mug dry completely before bisque firing.
Gradient Effect
Overlap a second, runnier glaze just on the top inch of the rim. As it melts, it will drip down into the upper dimples, creating variation and pooling effects distinct from the bottom section.
Step 3: Glazing and Finishing
-
Bisque Fire:
Fire the mug to cone 04 (or your clay’s specific bisque temperature). -
Apply Oxide Wash:
Mix iron oxide with water. Brush this wash over the textured areas, ensuring it gets into all the dimples. -
Wipe Back:
Using a damp sponge, wipe the oxide off the raised surfaces. The dark color should remain only in the recesses of the dimples, highlighting the texture. -
Dip in Glaze:
Dip the entire mug into a semi-opaque cream or light beige glaze. The oxide underneath will bleed through slightly during firing, creating that toasted look. -
Clean the Foot:
Wipe the bottom of the mug clean of glaze to prevent it from sticking to the kiln shelf. -
Glaze Fire:
Fire the mug to maturity (likely cone 6 or 10 depending on your stoneware). Allow the kiln to cool completely before determining if adjustments are needed for future batches.
Enjoy your morning coffee with the extra warmth of your handmade creation


What Really Happens Inside the Kiln
Learn how time and temperature work together inside the kiln to transform clay into durable ceramic.
Wavy Rim Ocean Mug
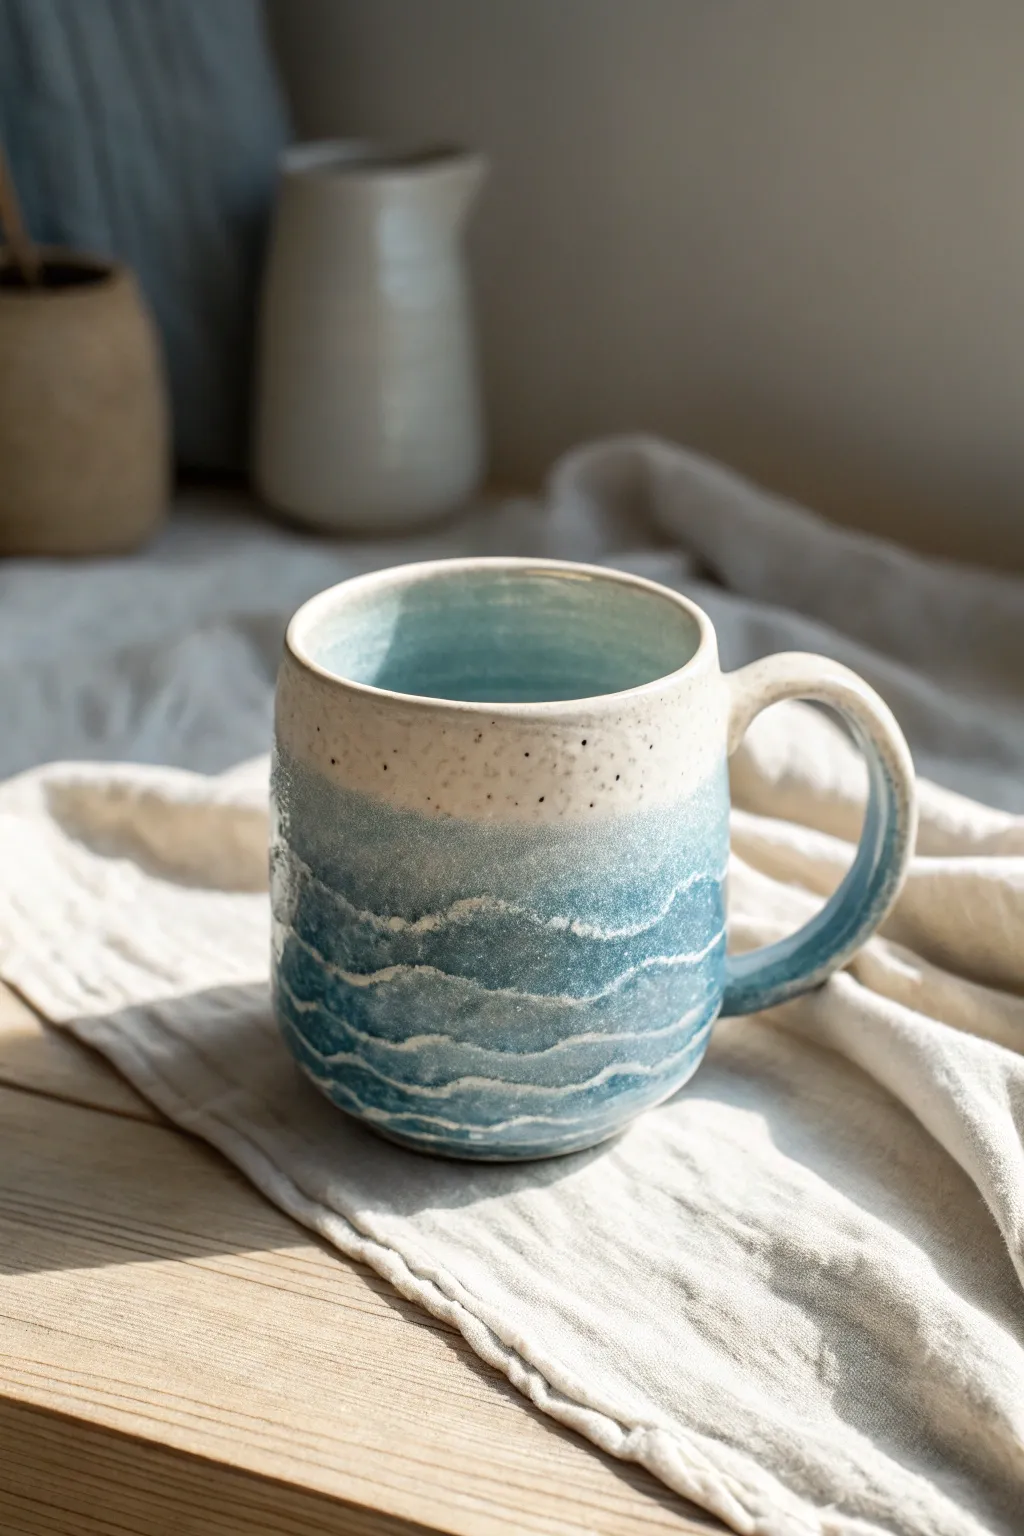
Capture the serene motion of the sea with this beautiful handmade ceramic mug, featuring a dreamy gradient of blues and white. The textural wave pattern, achieved through careful carving and layering, makes every sip feel like a morning at the beach.
Step-by-Step Guide
Materials
- Stoneware clay (speckled or white)
- Pottery wheel (or slab roller for hand-building)
- Rib tool
- Wire cutter
- Trimming tools
- Needle tool
- Small carving loop tool (sgraffito tool)
- Sponge
- Wax resist
- Glazes: Glossy White, Light Blue, Deep Teal/Navy
- Glaze brushes
- Kiln for bisque and glaze firing
Step 1: Forming the Body
-
Prepare the Clay:
Start by wedging about 1 to 1.5 pounds of speckled stoneware clay to remove air bubbles. This speckled clay adds a lovely sand-like texture to the final piece. -
Center and Throw:
Center your clay on the pottery wheel. Open it up and pull the walls to form a cylinder about 4 inches tall. Aim for a slightly rounded bottom curve rather than straight vertical walls to give it a cozy feel. -
Refine the Shape:
Using a rib tool, smooth the exterior and slightly bow out the belly of the mug. Compress the rim with a sponge or chamois to ensure it’s comfortable for drinking. -
Attach the Handle:
Once the body is leather-hard, pull a handle from a separate piece of clay. Score and slip the attachment points on both the handle and mug body, then firmly attach the handle in a C-shape. -
Bisque Fire:
Allow the mug to dry completely slowly to prevent cracking. Once bone-dry, fire it in the kiln to bisque temperature (usually cone 04).
Glaze Timing
Carve your wave lines when the glaze is “leather hard”—dry to the eye but cold to the touch. If it’s too dry, it will chip; too wet, it will slime back over.
Step 2: Creating the Ocean Design
-
Wipe Down:
After the bisque firing, use a slightly damp sponge to wipe any dust off the mug so the glaze adheres properly. -
Wax the Bottom:
Apply wax resist to the foot of the mug and up about 1/4 inch from the bottom to prevent glaze from running onto the kiln shelf. -
Base Glaze Layer:
Pour a glossy white glaze inside the mug and pour it out immediately to coat the interior. For the exterior top third, dip or brush the same snowy white glaze. -
Ombré Effect:
Dip the bottom two-thirds of the mug into a light blue glaze. Let it dry for a moment. Then, dip just the bottom third into a deeper teal or navy blue to create a gradient ocean effect. -
Carving the Waves:
This is the crucial step. Before the glaze is completely powdery dry (when it’s still slightly damp/cool to the touch), use a fine sgraffito tool or needle tool to gently carve wavy horizontal lines through the blue layers. -
Exposing the Clay:
Vary your pressure. I like to carve deep enough to just reveal the white base glaze underneath or even the raw clay body, creating those frothy whitecaps. -
Adding Texture:
Don’t make the lines perfectly parallel. Let them undulate and cross over slightly to mimicking rolling surf. -
Cleaning Up:
Gently brush away any glaze crumbs created by the carving with a soft, dry brush. Be careful not to smudge your crisp lines. -
Final Fire:
Load the mug into the kiln for the final glaze firing (typically cone 5 or 6 depending on your clay and glaze). The heat will melt the blue glazes and soften the carved lines into fluid waves.
Foam Accents
Dab a tiny bit of white crater glaze or thick white slip on the peaks of your carved waves before firing for a 3D bubbly seafoam texture.
Enjoy your morning coffee with a reminder of the calming rhythm of the ocean
Twisting Vine Handle Mug
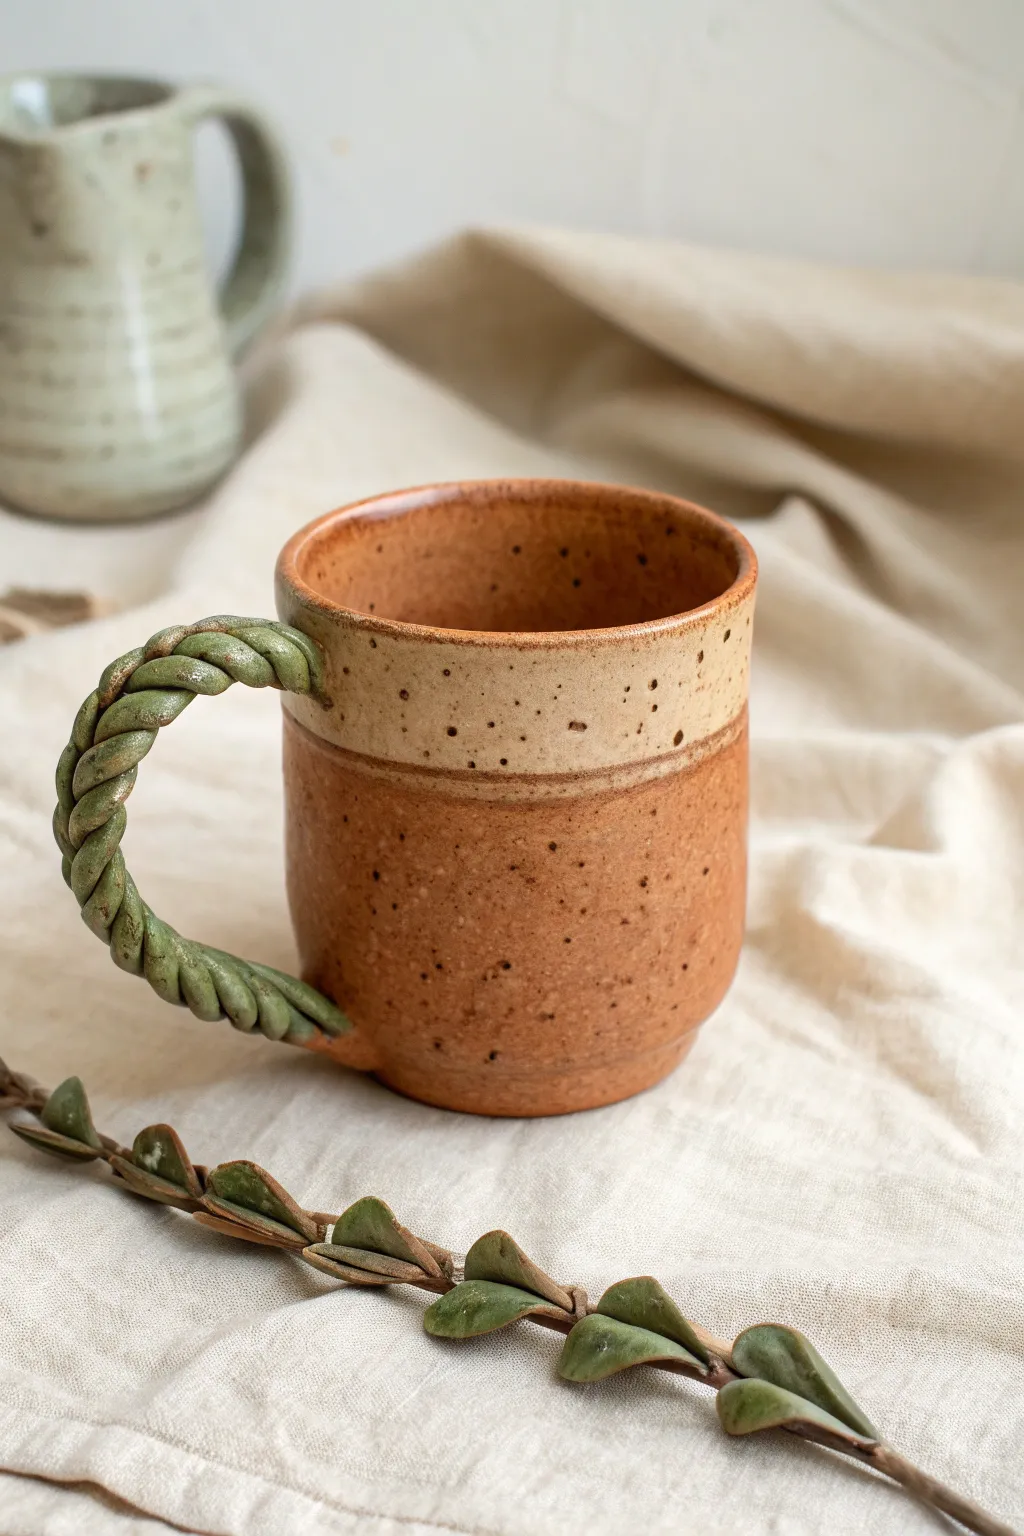
This earthy mug combines warm, speckled desert tones with a beautifully textured, twisted handle painted to look like verdant vines. It’s a fantastic project for intermediate potters looking to add organic flair to their functional ware.
Step-by-Step
Materials
- Speckled stoneware clay (mid-fire)
- Pottery wheel (or slab roller/rolling pin for hand-building)
- Needle tool
- Rib tool (wooden or metal)
- Scoring tool (serrated rib or needle)
- Slip (clay mixed with water)
- Sponge
- Underglaze (Sage Green or Moss Green)
- Clear glaze (transparent)
- Small paintbrush
- Kiln
Step 1: Forming the Mug Body
-
Throw the Cylinder:
Begin by wedging about 1 pound of speckled stoneware clay. Center it on the wheel and open it up, pulling the walls to create a straight-sided cylinder approximately 4 inches tall. -
Shape the Belly:
Using a rib tool from the inside, gently push the clay outward near the bottom third to create a slightly wider base, giving the mug a grounded, sturdy silhouette. -
Define the Rim:
Compress the lip with a chamois or sponge. I like to leave the rim slightly thicker than the walls to prevent chipping later on. -
Trim and Finish:
Once leather hard, trim the bottom to create a neat foot ring. Smooth out any finger marks on the outside, but don’t over-refine; the natural speckles look great on a slightly organic surface.
Cracking at the seams?
If the handle cracks away from the body during drying, you likely didn’t score enough or the clays had different moisture levels. Wrap the join tightly in plastic to equalize moisture.
Step 2: Creating the Twisted Handle
-
Roll the Coils:
Roll out two even coils of clay, each about the thickness of a pencil and roughly 6 inches long. Keep them consistently round. -
Twist the Strands:
Place the two coils side-by-side. Gently twist them around each other, working from one end to the other, to create a rope-like effect. -
Secure the Twist:
Lightly tap the twisted coil on your work surface to flatten the back side slightly—this increases the surface area for attachment. -
Cut to Size:
Curve the twisted coil into a ‘C’ shape or ear shape to check the proportions against your mug body. Cut the ends at an angle to match the slope of the mug wall.
Smoother Twisting
When twisting your coils, keep your hands slightly damp but not wet. This prevents the clay from cracking or creating micro-fissures in the ‘rope’ texture as it bends.
Step 3: Assembly and Decoration
-
Score the Attachment Points:
Hold the handle up to the mug and mark where it touches. Heavily score (scratch) these areas on the mug and the ends of the handle. -
Apply Slip:
Generously dab thick slip onto the scored areas. This acts as the glue for your ceramic join. -
Attach the Handle:
Press the handle firmly onto the mug body. Wiggle it slightly to lock the clay particles together. -
Cleanup:
Use a small, damp brush or a modeling tool to smooth the seam where the handle meets the cup. Clean up any excess slip that squeezed out. -
Dry Slowly:
Cover the mug loosely with plastic to let it dry slowly. This is crucial for handles to prevent cracking as they shrink. -
Bisque Fire:
Once bone dry, fire the piece to bisque temperature (usually Cone 04) to prepare it for glazing.
Step 4: Glazing
-
Paint the Handle:
Apply 2-3 coats of green underglaze specifically to the twisted handle. Wipe away any stray marks on the mug body with a clean sponge. -
Dip the Interior:
Pour clear glaze inside the mug, roll it around to coat the entire interior, and pour out the excess. -
Glaze the Top Exterior:
Dip just the top inch of the mug (the rim area) into a cream or clear glaze if you want the two-tone effect, or apply a wax resist to the bottom section to keep it raw clay. -
Final Clear Coat:
Dip the entire mug quickly into a clear matte or satin glaze to seal the clay while letting the natural speckles show through. -
Final Fire:
Fire the mug to maturity (Cone 5 or 6 depending on your clay body). Ensure the bottom is wiped clean of glaze before loading the kiln.
Enjoy sipping from your woodland-inspired creation once it has cooled from the kiln

TRACK YOUR CERAMIC JOURNEY
Capture glaze tests, firing details, and creative progress—all in one simple printable. Make your projects easier to repeat and improve.
Mushroom Cluster Mug
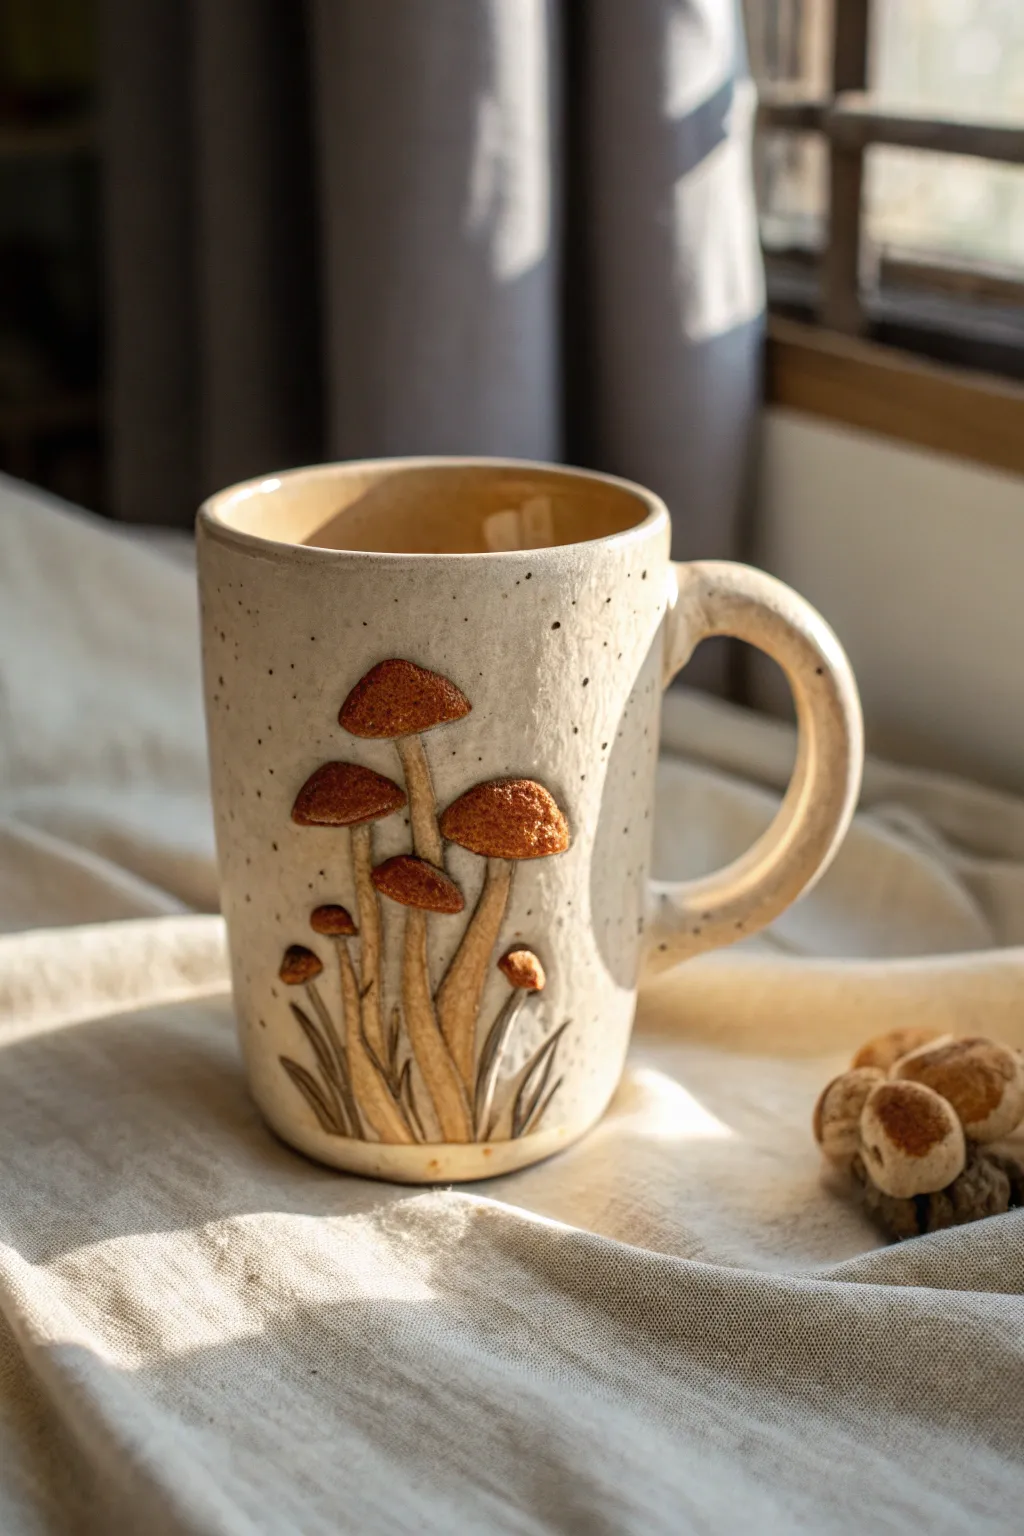
Embrace cottagecore vibes with this charming handmade mug, featuring a tactile cluster of relief-sculpted mushrooms sprouting from its side. The natural speckled clay body contrasts beautifully with the warm, toasted brown glaze of the mushroom caps, making it a perfect vessel for your morning coffee.
Step-by-Step Tutorial
Materials
- Speckled stoneware clay (mid-fire)
- Pottery wheel (or slab roller/rolling pin for handbuilding)
- Needle tool
- Scoring rib or serrated kidney tool
- Slip (clay and water mixture)
- Small modeling tools (wood or metal)
- Sponges
- Clear glaze (food safe)
- Iron oxide wash or brown underglaze
- Small glaze brushes
Step 1: Forming the Base
-
Prepare your clay:
Start by wedging about 1.5 lbs of speckled stoneware clay to remove air bubbles. This ensures your mug won’t crack during firing and gives you a smooth canvas for the mushroom additions. -
Throw the cylinder:
Center your clay on the wheel and open it up. Pull the walls to create a straight-sided cylinder roughly 4 inches tall. Aim for an even thickness, but leave the walls slightly thicker than usual to support the weight of the appliqué. -
Shape the body:
Once you have your height, gently belly out the form slightly if you want a softer look, then compress the rim with a shammy or sponge to make it comfortable for drinking. -
Trim the foot:
Let the cylinder dry to leather-hard. Flip it over and trim a clean foot ring. This defines the bottom and lifts the mug slightly off the table. -
Pull and attach the handle:
Pull a sturdy handle from a carrot-shaped piece of clay. Let it stiffen into a curve, then score and slip the attachment points. Press it firmly onto the mug opposite where you plan to place the mushrooms, smoothing the seams seamlessly.
Score Like You Mean It
For added pieces like mushrooms, scoring needs to be aggressive. Create a deep hatched texture on both surfaces before slipping to prevent them from falling off as the clay shrinks.
Step 2: Sculpting the Mushrooms
-
Roll the stems:
Take small bits of fresh clay and roll them into thin, tapered coils of varying lengths. You’ll want about 5-7 stems, some taller and curving, others short and stubby. -
Attach the stem cluster:
Score the surface of the mug deeply where the cluster will go. Apply slip, then press your stems onto the mug. Use a small wooden tool to meld the edges of the stems onto the mug wall so they don’t pop off. -
Form the caps:
Roll small balls of clay and flatten them into dome shapes. Vary the sizes—make one or two large ‘hero’ caps and several smaller ones. -
Secure the caps:
Score the tops of your attached stems and the undersides of the caps. Slip and press them together firmly. I like to give them a little wiggle to ensure the suction holds tight. -
Add texture and grass:
Using a needle tool, gently etch lines onto the stems for texture. Roll tiny, sharpened snakes of clay to create blades of grass at the base of the cluster, blending them into the mug surface. -
Refine the sculpt:
Smooth out any fingerprints with a slightly damp brush. Use a needle tool to poke small dots or pores onto the mushroom caps for extra realism.
Step 3: Glazing and Finishing
-
Bisque fire:
Allow the mug to dry very slowly under plastic to prevent the handle or mushrooms from cracking away. Once bone dry, bisque fire to cone 04. -
Apply oxide wash:
Mix iron oxide with water. Paint this wash specifically onto the mushroom caps and the grass blades. Sponge quite a bit of it back off so the color stays mostly in the textures and pores. -
Wax resist:
If you want the raw clay feel, apply wax resist to the mushroom stems and the main body of the mug if you plan to leave the exterior unglazed, or prepare to dip the whole thing. -
Dip in clear:
Hold the mug by the foot (or use tongs) and dip it into a clear, glossy glaze. This will amplify the speckles in the clay body and seal the oxide decoration. If you waxed the outside, just pour clear glaze inside the liner. -
Clean the foot:
Wipe the foot ring completely clean with a sponge to ensure it doesn’t fuse to your kiln shelf. -
Glaze fire:
Fire the mug to maturity (usually cone 5 or 6 for stoneware). The heat will interact with the iron oxide to create that toasted, autumnal brown on the caps.
Is The Glaze Too Thick?
If your clear glaze looks cloudy or milky over the mushrooms after firing, the application was too thick. Use a thinner dip or brush application next time so the clay speckles show through.
Now you have a cozy, woodland-inspired mug ready for your favorite hot beverage
Wildflower Bouquet Appliqué Mug
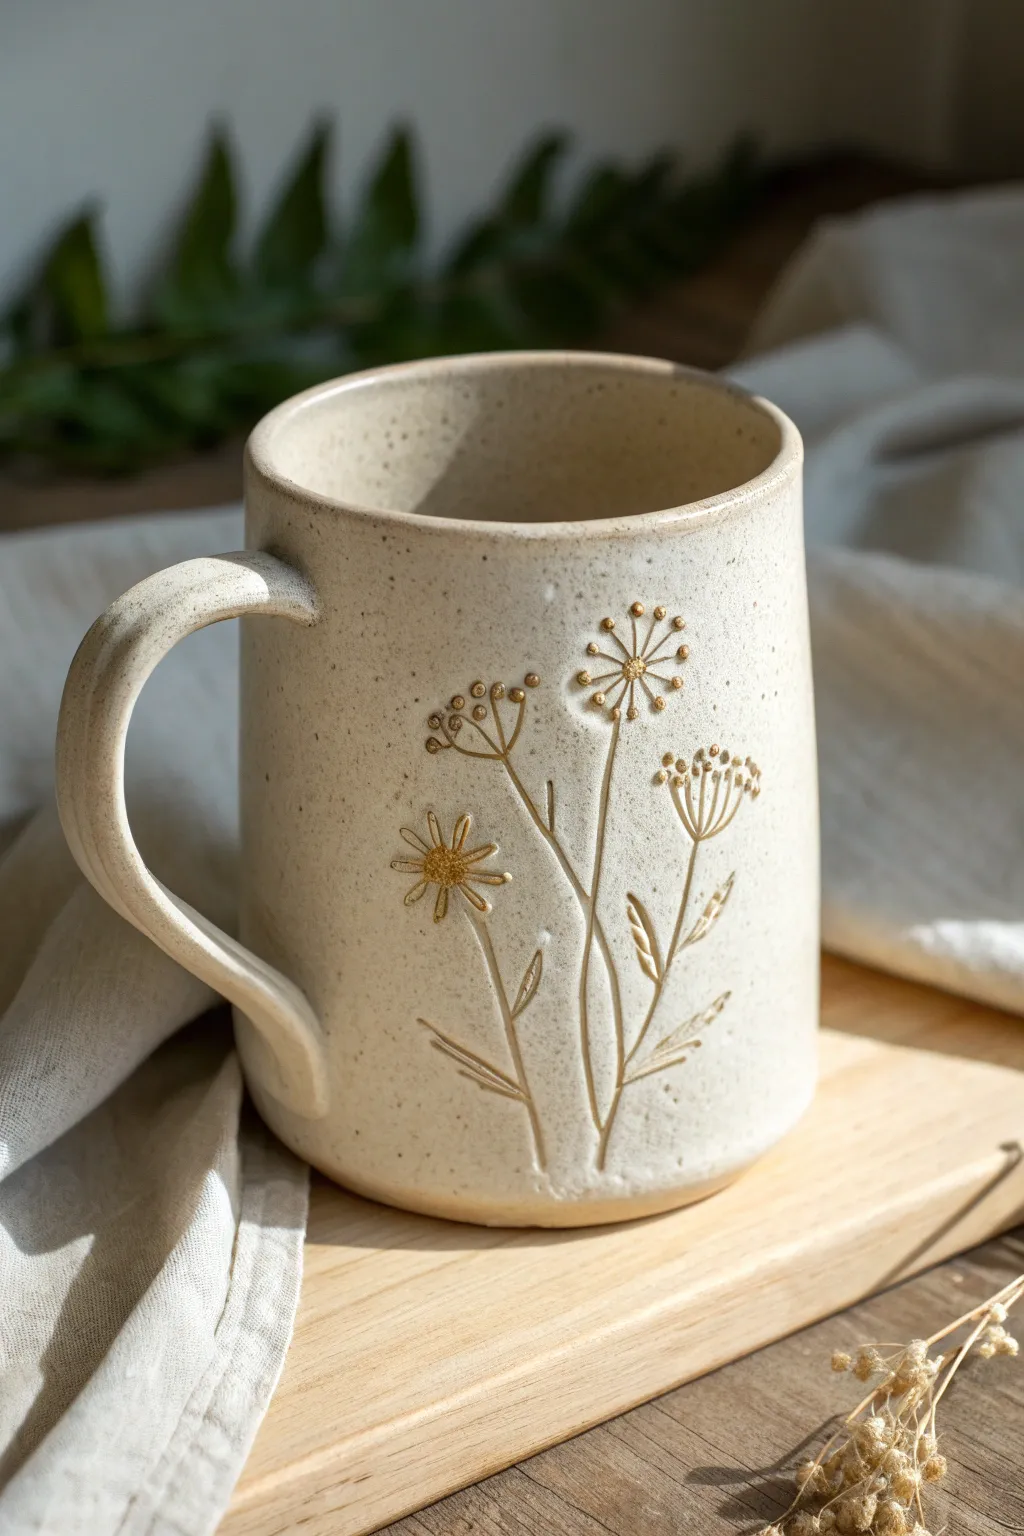
This rustic yet elegant mug captures the simple beauty of a meadow with delicate wildflower carvings accented in gold. The speckled clay body provides a warm, organic canvas for the botanical design, making every sip feel grounded in nature.
Step-by-Step
Materials
- Speckled stoneware clay (approx. 1 lb)
- Pottery wheel or rolling pin and slab mat
- Rib tool (kidney)
- Needle tool
- Sponge
- Fettling knife
- Scoring tool (or serrated rib)
- Slip (clay slurry)
- Carving tools (small loops and sgraffito tools)
- Gold luster overglaze
- Matte white or oatmeal glaze
- Small fine-tip paintbrush
- Kiln
Step 1: Forming the Mug Body
-
Prepare the Clay:
Begin by wedging your speckled stoneware clay thoroughly to remove air bubbles. This clay body is essential for achieving that sandy, textured background seen in the photo. -
Throw or Build the Cylinder:
For wheel throwers, center about 1 lb of clay and pull a cylinder with straight, vertical walls. If hand-building, roll a slab to 1/4 inch thickness and form a cylinder around a template, joining the seam securely. -
Refine the Shape:
Use a rib tool to smooth the exterior walls and compress the clay. Aim for a slightly tapered bottom edge for a gentle lift, but keep the overall profile cylindrical and classic. -
Trim and Clean:
Once the clay is leather hard, trim away excess clay from the foot. I like to sponge the rim smooth at this stage to ensure comfortable drinking later.
Step 2: Adding the Handle
-
Pull the Handle:
Pull a strap of clay or extrude a coil for the handle. Keep it relatively thick and sturdy, matching the chunky, rustic aesthetic of the mug. -
Shape the Curve:
Curve the handle into a ‘C’ or ‘ear’ shape. Let it stiffen slightly so it holds its arch without collapsing. -
Attach to Body:
Score and slip the contact points on both the mug body and handle. Press firmly to attach, blending the clay seams seamlessly with your thumb or a wooden tool.
Burr Patrol
Wait until the mug is bone dry before brushing off little carving crumbs. Brushing them while damp smears the clay back into your crisp lines.
Step 3: Carving the Botanicals
-
Sketch the Design:
Lightly trace your stem placement onto the leather-hard clay using a needle tool. Create three main vertical stems that radiate slightly outward, mimicking a gathered bouquet. -
Carve the Stems:
Using a small loop tool or V-tip sgraffito tool, gently carve over your traced lines. Vary the pressure to create organic, non-uniform swells in the stems. -
Add Leaves:
Carve simple, elongated leaf shapes branching off the lower stems. Keep strokes fluid and minimal. -
Create Seed Heads:
For the taller plants, press small dots or circles at the ends of radiating lines to form seed pods (like Queen Anne’s Lace). The impression should be deep enough to catch glaze but distinct. -
Detail the Daisy:
Carve the central daisy-like flower with distinct petals radiating from a textured center. Clean away any clay burrs with a soft brush or your finger.
Mishim-Oh!
Try inlaying a dark slip into the carved lines before the first firing (Mishima technique) for higher contrast before adding the gold accents.
Step 4: Firing and Glazing
-
Bisque Fire:
Slowly dry the mug to prevent cracking, then load it into the kiln for a bisque fire (typically cone 04 or 06). -
Apply Base Glaze:
Dip the mug into a matte white or oatmeal glaze. This translucency is key; you want the speckles of the clay to show through. -
Glaze Fire:
Fire the mug to maturity (Cone 5, 6, or 10 depending on your clay). Let the kiln cool completely. -
Apply Gold Luster:
Using a dedicated brush, carefully paint gold luster overglaze onto the carved flower heads and specific details like the daisy center. -
Final Firing:
Fire the piece one last time at a much lower temperature (usually cone 018) to set the gold.
Now you have a stunning, nature-inspired vessel ready for your morning coffee routine
Citrus Slice Relief Mug
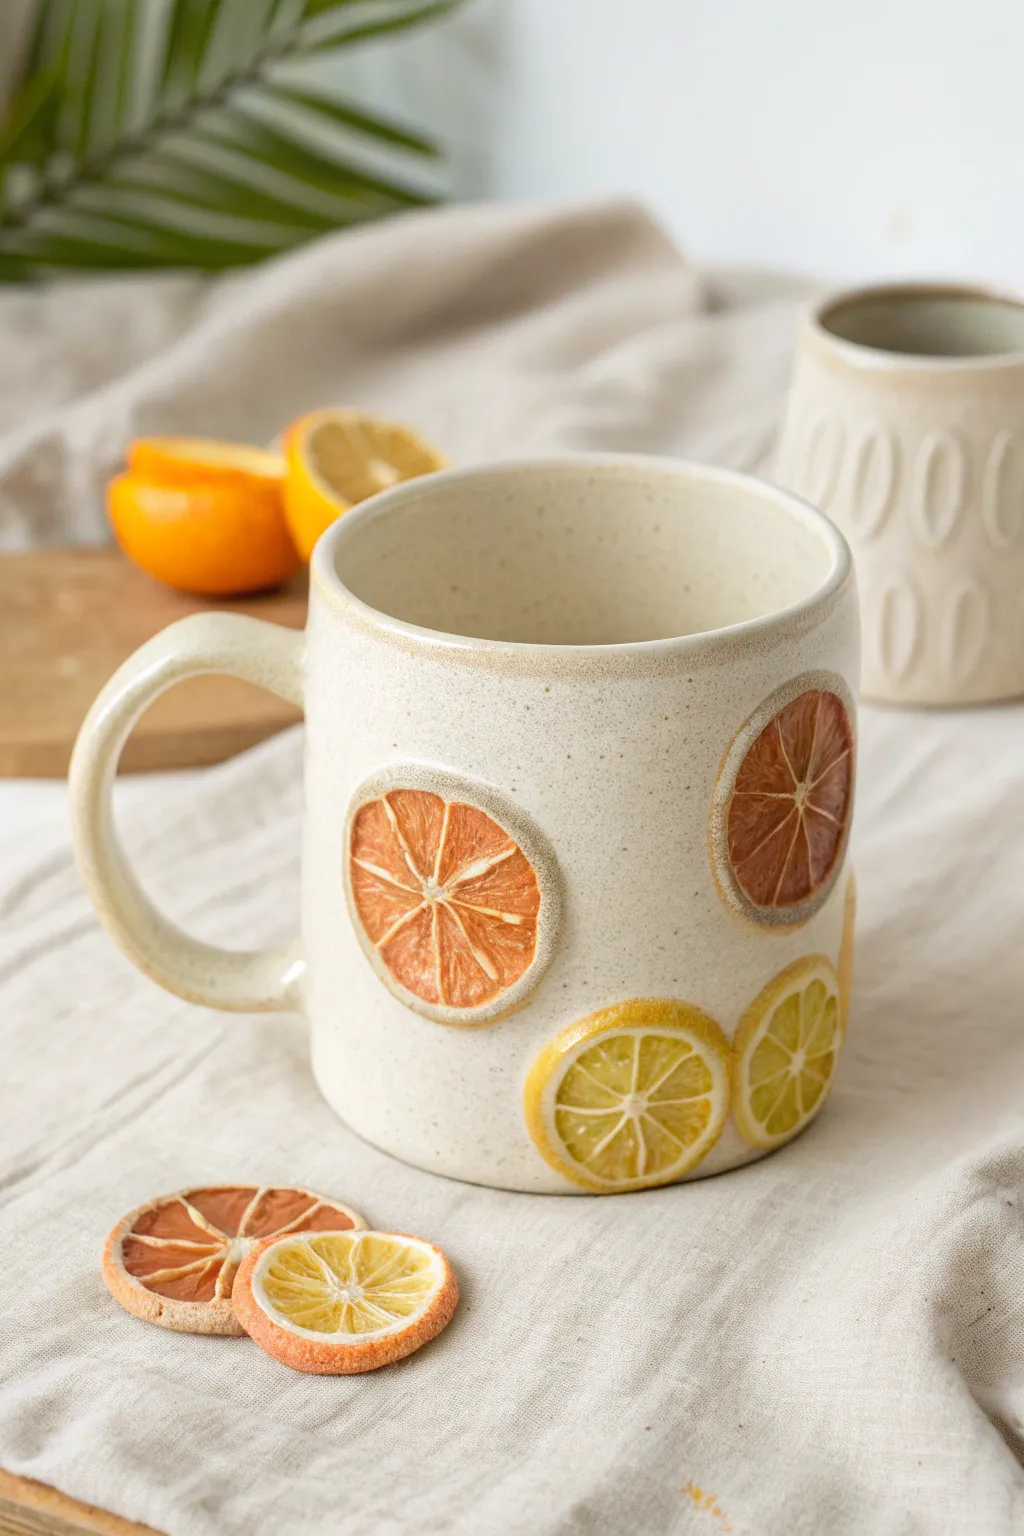
Brighten your morning coffee routine with this tactile ceramic mug featuring vibrant, realistic citrus slices. The natural creamy speckle of the stoneware combined with the hand-painted fruit reliefs creates a fresh, organic aesthetic that feels wonderful to hold.
Detailed Instructions
Materials
- Speckled stoneware clay (mid-fire)
- Real citrus fruit (orange and lemon for templates)
- Pottery wheel (or slab roller/rolling pin for hand-building)
- Needle tool
- Metal kidney rib
- Scoring tool or serrated rib
- Slip (liquid clay)
- Underglazes (bright orange, yellow, white)
- Clear glaze (food safe)
- Small fine-point paintbrush
- Sponge
- Wire cutter
- Ware board
Step 1: Forming the Mug Body
-
Prepare your clay:
Begin by wedging about 1 to 1.5 lbs of speckled stoneware clay to remove air bubbles. This clay body adds that lovely natural texture seen in the photo. -
Throw the cylinder:
Center your clay on the wheel and open it up. Pull the walls to create a straight-sided cylinder, approximately 4 inches tall and 3 inches wide. Aim for even wall thickness throughout. -
Refine the shape:
Use a metal kidney rib to smooth the outside and compress the clay particles. Create a slight curve at the bottom for a comfortable hold. -
Trim the lip:
Use a chamois or your sponge to gently round over the rim of the mug so it will be pleasant to drink from. -
Wire off and dry:
Wire the mug off the wheel head and set it on a ware board. Let it dry to a soft leather-hard stage—firm enough to handle without warping but soft enough to attach additions.
Too thick?
If your relief slices stick out too far, they might get knocked off. Keep your initial slab very thin and bevel the edges down to meld flush with the mug wall for better durability.
Step 2: Creating the Handle
-
Pull a strap:
Pull a handle directly from a lug of clay or roll a coil and flatten it slightly. The handle should be sturdy but proportional to the mug. -
Form the curve:
Let the handle stiffen slightly, then curve it into a ‘C’ or ear shape. Cut the attachment points at a 45-degree angle to match the curve of the mug wall. -
Attach the handle:
Score the attachment points on both the handle and the mug body aggressively. Apply slip to both surfaces and press the handle firmly into place. -
Clean connections:
Smooth out the seams with a small modeling tool or your finger. Ensure there are no cracks where the handle meets the body.
Try This Twist
Mix a tiny amount of mason stain directly into the clay for the citrus slices before attaching. This creates colored clay body that won’t fade if the glaze chips.
Step 3: Sculpting the Citrus Slices
-
Prepare thin slabs:
Roll out a small amount of clay very thinly (about 3-4mm). This will form the base for your citrus decorations. -
Cut the circles:
Use a round cutter or trace around a real lemon slice to cut imperfect circles from your slab. Keep them slightly irregular for an organic look. -
Add the rind:
Roll a very thin coil of clay and attach it around the perimeter of your clay circle. Smooth the seam so it looks like a continuous piece of rind. -
Define the segments:
Using a needle tool, gently press radial lines into the clay circle to simulate the segments of the fruit. Don’t cut all the way through; just create indentations. -
Texture the pulp:
Lightly stipple the area inside the segments with a stiff bristled brush or a needle tool to mimic the juicy texture of citrus pulp.
Step 4: Attachment and Decoration
-
Score and slip fruit:
Determine where you want your slices on the mug. Score the back of each clay slice and the corresponding spot on the mug body. -
Press onto mug:
Apply slip and press the slices onto the mug wall. Use a sponge to gently seal the edges, ensuring no air is trapped behind the slice. -
Slow drying:
Cover the mug loosely with plastic to let it dry slowly to the bone-dry stage. This prevents the added clay pieces from cracking off due to uneven shrinkage. -
Bisque fire:
Fire the bone-dry mug in the kiln to cone 04 (or your clay’s specific bisque temperature). -
Paint the details:
Using underglazes, paint the rind and segment divisors in white/cream. Paint the pulp areas with vibrant orange or translucent yellow. I prefer to wipe back a little underglaze on the raised areas to let the speckles show through. -
Glaze and final fire:
Dip the entire mug into a clear, food-safe glaze. Fire to the final temperature (likely cone 5 or 6). The clear glaze will seal the underglaze and make the colors pop.
Enjoy your refreshing new handmade mug, perfectly suited for hot tea or fresh juice.
Honeycomb and Bee Mug
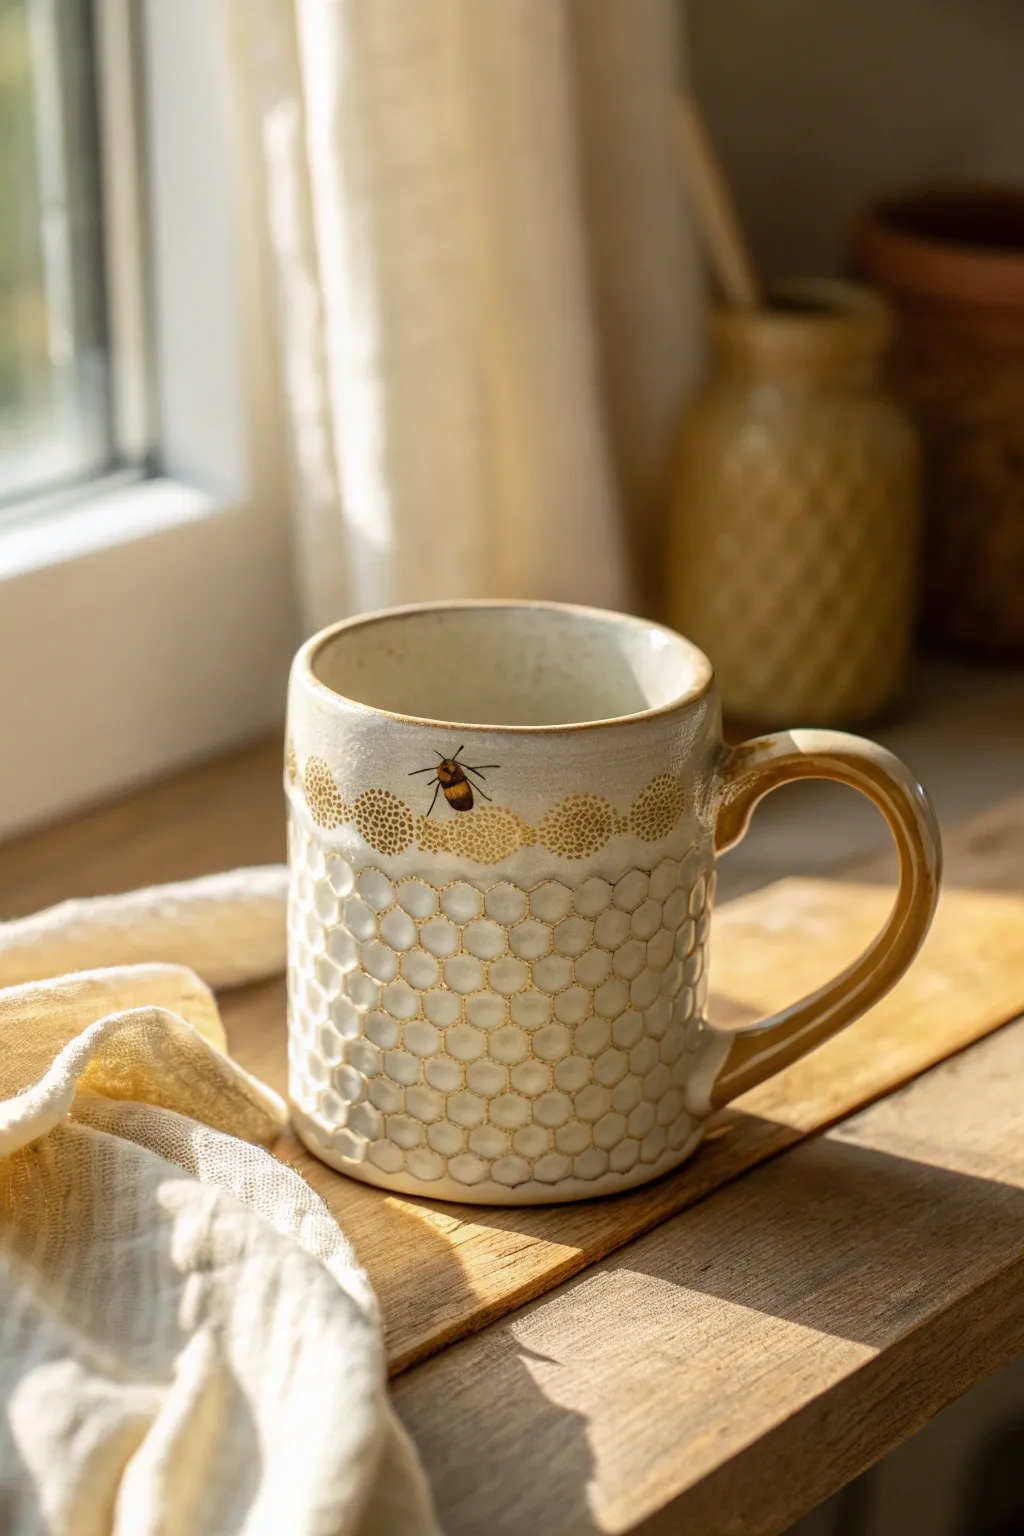
Bring the warmth of a summer garden to your morning coffee with this delightful handmade ceramic mug. Featuring a tactile honeycomb texture, a charming hand-painted bee, and elegant gold accents, this piece balances rustic charm with a touch of refinement.
Step-by-Step Tutorial
Materials
- Stoneware clay (buff or white speckle works best)
- Pottery wheel (or slab roller/rolling pin for hand-building)
- Honeycomb texture mat or hexagon cutter
- Trimming tools
- Needle tool
- Slip and scoring tool
- Sponge
- White or cream dipping glaze
- Underglaze (black, yellow, brown) for the bee
- Wax resist
- Fine detail brush
- Gold luster overglaze
- Kiln
Step 1: Forming the Mug Body
-
Prepare the Clay:
Begin by wedging about 1 to 1.5 lbs of stoneware clay to remove air bubbles. This ensures a smooth throwing or rolling experience. -
Throw the Cylinder:
Throw a standard cylinder on the wheel, aiming for a consistent wall thickness. If you prefer hand-building, roll out a slab and form a cylinder around a template, joining the seam securely. -
Create the Texture:
While the clay is still somewhat soft but holding its shape (soft leather hard), apply your honeycomb texture. You can gently roll a texture mat over the surface or press a hexagon cutter repeatedly into the lower two-thirds of the mug to create the deep relief pattern. -
Smooth the Rim:
Leave the top inch or so of the mug smooth. Use a damp sponge or a chamois cloth to compress and round the lip, making it pleasant to drink from. -
Trim the Foot:
Once leather hard, flip the mug and trim a clean foot ring. This elevates the form and gives the honeycomb pattern a defined stopping point.
Step 2: Handle and Assembly
-
Pull the Handle:
Pull a strap of clay for the handle. For this design, a slightly flattened oval cross-section works well. Curve it into a comfortable ear shape. -
Attach the Handle:
Score and slip the attachment points on both the mug and the handle. Attach the handle firmly, blending the clay at the joints for a seamless connection. Check the alignment to ensure it’s straight. -
Dry Slowly:
Cover the mug loosely with plastic to let it dry slowly. This prevents the handle from cracking as it shrinks at a different rate than the body. Once bone dry, bisque fire the mug to cone 04.
Clean Lines
When painting the bee over the fired glaze, use a steady hand or a ‘maulstick’ to stabilize your wrist. Any mistake with luster must be wiped off with alcohol immediately.
Step 3: Glazing and Decoration
-
Apply Base Glaze:
Dip the entire mug into a creamy white or soft oatmeal glaze. Make sure the glaze breaks nicely over the honeycomb texture to highlight the relief. -
Clean the Foot:
Wipe the foot ring completely clean of glaze to prevent it from sticking to the kiln shelf. -
Fire the Glaze:
Fire the mug to maturity (typically cone 5 or 6) depending on your clay and glaze specifications.
Glaze Crawling?
If the white glaze pools too thickly in the honeycombs, it might obscure the pattern. Blow gently into the texture right after dipping to pop bubbles and clear excess glaze.
Step 4: Applying Overglaze Details
-
Paint the Bee Body:
Once the glaze firing is complete and the mug is cool, use china paints or overglaze enamels to paint the bee. Start with a yellow oval for the abdomen and a brownish-black for the thorax and stripes. -
Add Fine Details:
Using your finest brush, add delicate black legs and antennae. I like to keep the wings slightly translucent or outline them very faintly. -
Apply Gold Accents:
Using real gold luster, carefully paint the handle to give it that luxurious metallic finish. Add small gold dots in a cluster around the bee and along the transition line between the smooth rim and honeycomb texture. -
Bee Highlights:
Add a tiny touch of gold to the bee’s stripes or wings for extra shimmer. -
Luster Firing:
Place the mug back in the kiln for a final low-temperature firing (usually cone 018 to 020) to set the china paint and gold luster. Ensure good ventilation during this firing.
Once the kiln cools, your golden honeycomb mug is ready to be filled with your favorite warm beverage
Cozy Sweater Knit Texture Mug
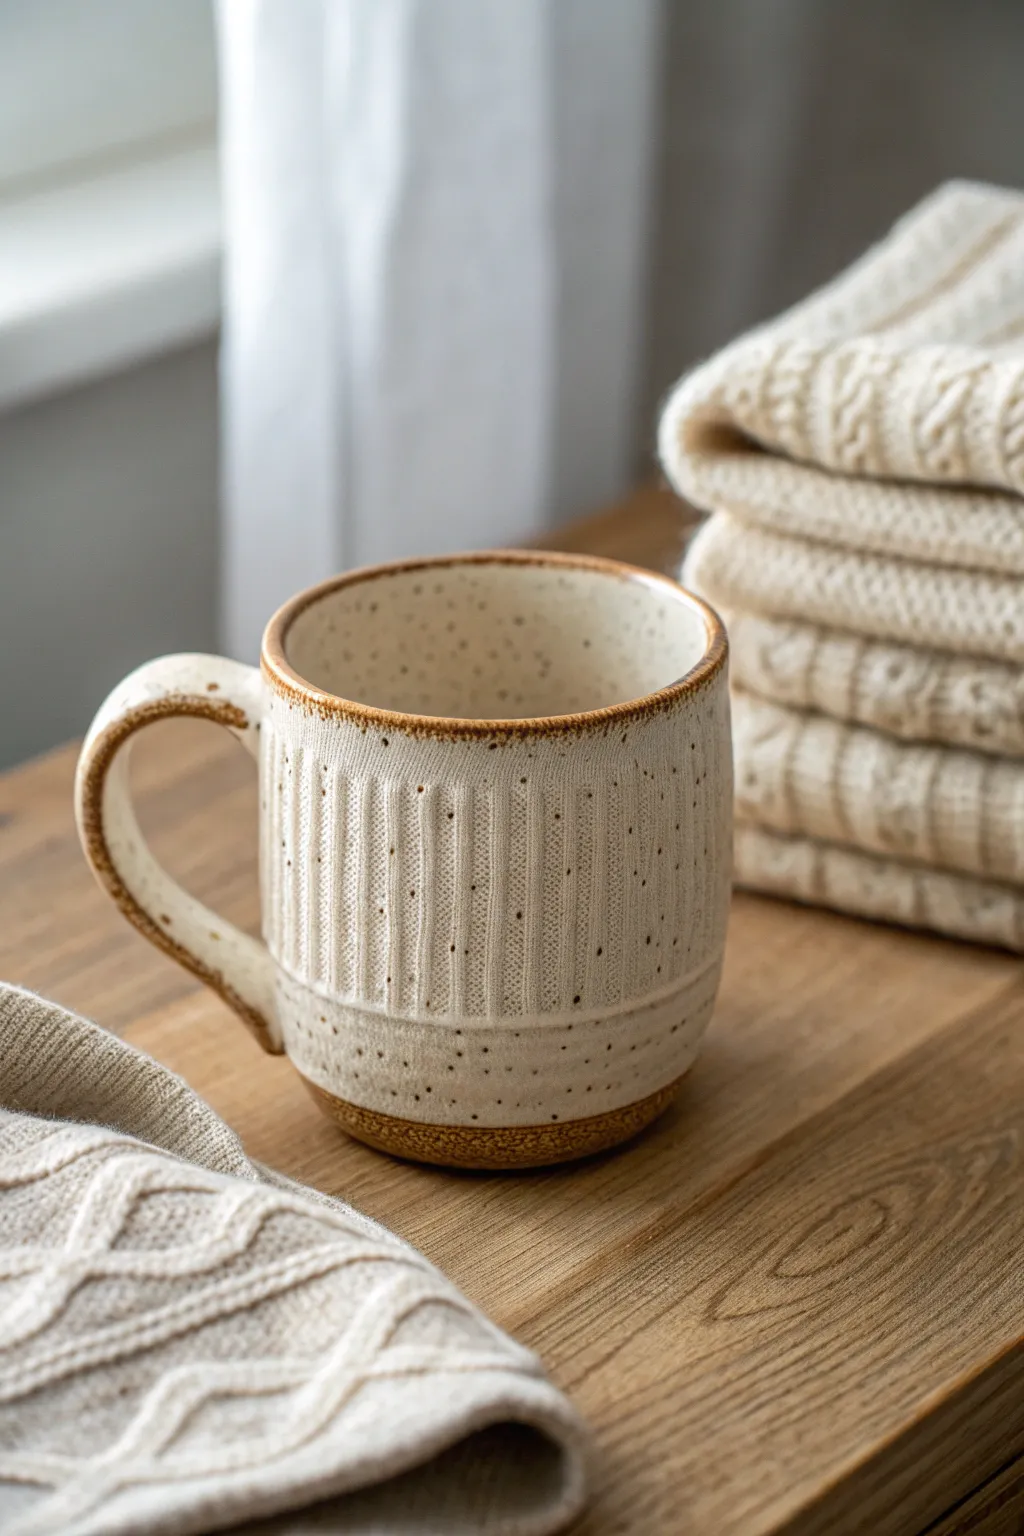
Wrap your hands around the coziest mug imaginable with this ceramic project that mimics the comforting texture of a chunky knit sweater. The creamy, speckled clay body features subtle ribbing details and a warm, toasted rim, creating the perfect vessel for your morning coffee or tea.
Step-by-Step
Materials
- Speckled buff stoneware clay (or white clay with speckles added)
- Pottery wheel (or slab roller/rolling pin for hand-building)
- Ribbed texture tool or fork
- Modeling tool or dull knife
- Sponge
- Wire cutter
- Loop trimming tool
- Needle tool
- Clear or translucent white matte glaze
- Iron oxide wash or dark brown underglaze
- Kiln
Step 1: Throwing and Shaping
-
Center the clay:
Start with about 1-1.5 lbs of speckled stoneware clay. Center it firmly on the wheel head, ensuring it feels stable before opening. -
Open and pull:
Open the clay and pull the walls into a cylinder. Aim for a slightly thicker wall than a standard mug (about 1/4 inch) to allow depth for the carving without compromising structure. -
Shape the belly:
Gently belly out the form slightly, keeping the top rim and base vertical. This subtle curve adds to the soft, fabric-like appearance we’re aiming for. -
Refine the rim:
Compress the rim well with a shammy or sponge. I like to leave it slightly rounded rather than sharp to mimic the rolled hem of a sweater. -
Define the texture zone:
Use a wooden modeling tool to create a slight indentation or groove about an inch from the bottom. This separates the ‘hem’ of the sweater from the main body.
Use Real Fabric
Instead of carving by hand, press a piece of coarse burlap or an actual old sweater into the wet clay slab before building to get an authentic instant texture.
Step 2: Adding the Knit Texture
-
Dry to leather hard:
Let the cylinder dry until it is firm leather hard. This is crucial; if it’s too soft, the texture will look mushy, but too dry and it will chip. -
Create vertical ribs:
Using a dull knife or a specialized ribbing tool, gently press vertical lines into the main body of the mug. Space them evenly, leaving small gaps between pairs of lines to simulate the rib of a knit. -
Add the ‘knit’ detail:
Between your vertical rib lines, make tiny, angled hash marks. Alternate the angle (like little ‘v’ shapes) going up the column to mimic the purl and knit stitches of fabric. -
Texture the hem:
Below the groove you made earlier, leave the clay relatively smooth or add a different, simpler texture like horizontal distinct lines to represent a cuff or hem. -
Smooth the rough bits:
Once the texture is carved, lightly brush over the surface with a soft, dry brush to remove clay burrs. Don’t use water here, or you’ll wash away the crispness.
Step 3: Handle and Trim
-
Trim the foot:
Flip the mug over and trim a clean foot ring. Define the bottom edge clearly so the glaze has a natural stopping point. -
Pull a handle:
Pull a handle from the same clay body. Keep it relatively simple and smooth to contrast with the textured body, or add a very subtle line down the center. -
Attach the handle:
Score and slip the attachment points. Attach the handle so the top curve sits just below the rim and the bottom attaches near the texture transition line. Clean up any excess slip immediately.
Button Accents
Add tiny clay ‘buttons’ near the handle attachment or along the rim for an extra cute cardigan-style detail before bisque firing.
Step 4: Glazing and Firing
-
Bisque fire:
Slowly dry the mug to avoid cracking, then bisque fire to cone 04 (or your clay’s specific bisque temperature). -
Apply rim detail:
Mix a small amount of iron oxide wash or dark brown underglaze. Carefully sponge or paint this onto the very edge of the rim and the handle attachment points for that ‘toasted’ look seen in the image. -
Wipe back detail:
If the rim color is too heavy, wipe it back slightly with a damp sponge so it just stains the clay rather than sitting on top. -
Glaze application:
Dip or brush the entire mug in a translucent white or clear matte glaze. A glossy glaze tends to hide texture, so matte is best to let the speckles and carving shine through. -
Glaze the base:
For the bottom ‘hem’ area, you can either leave it raw clay or apply a slightly darker transparent glaze to ground the design. -
Final fire:
Glaze fire to cone 6 (or your clay’s maturity temperature). Ensure the foot is wiped clean so it doesn’t stick to the kiln shelf.
Now you have a mug that feels just as warm and comforting to hold as your favorite winter sweater.
Cat Face and Ears Mug
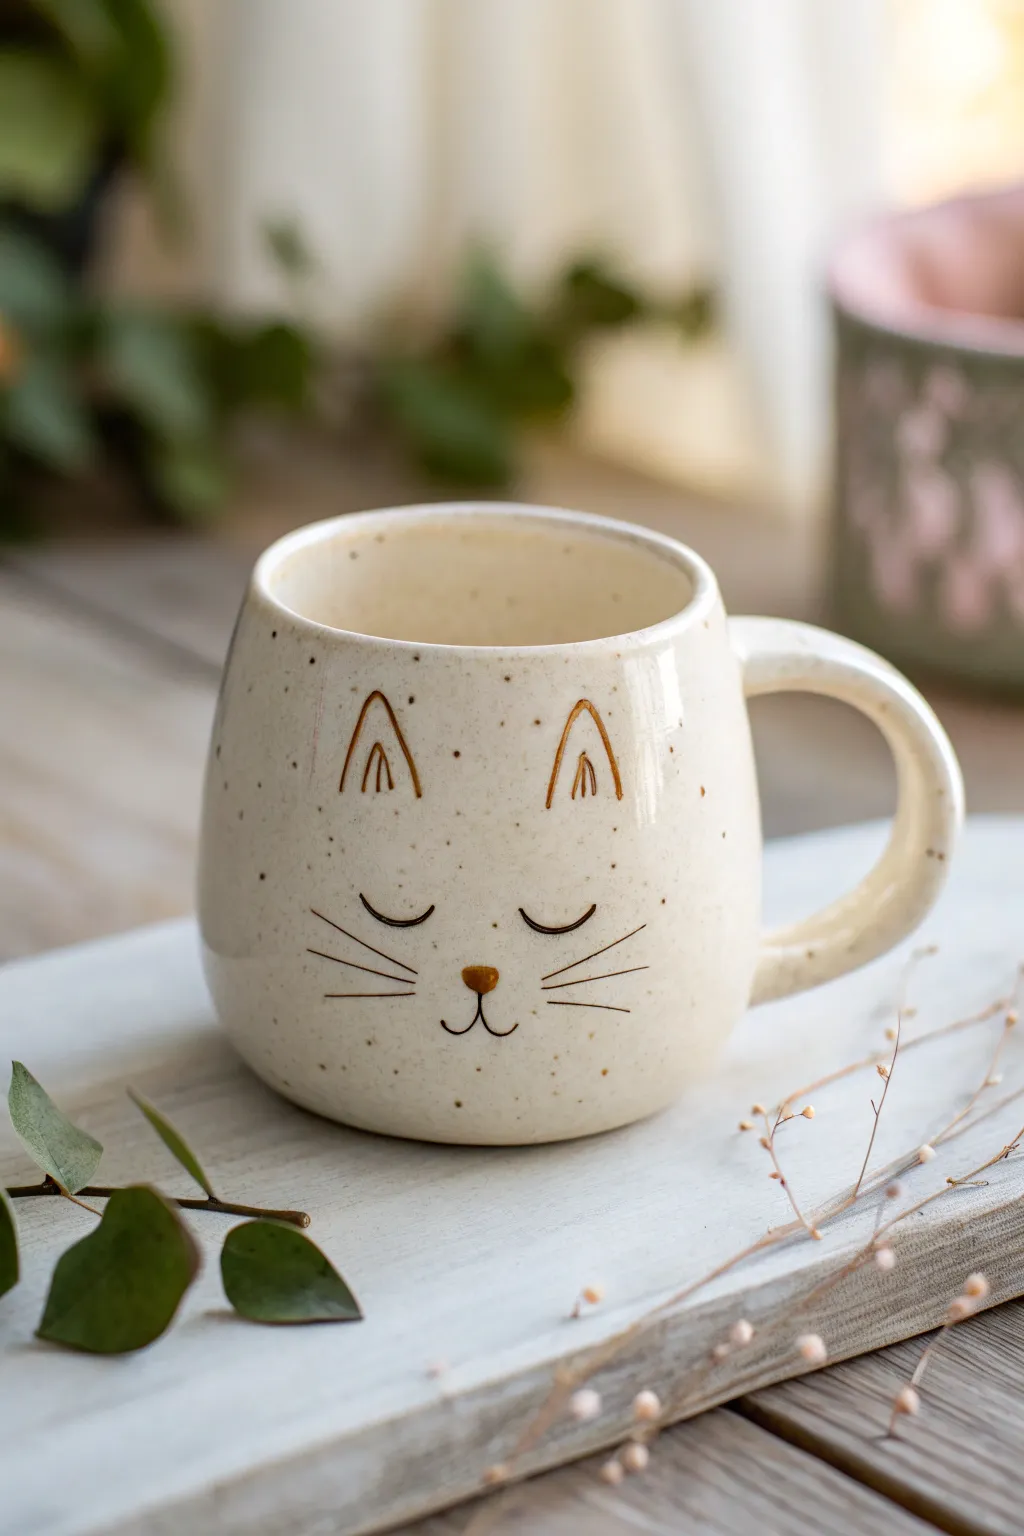
Embrace a touch of whimsy with this ceramic mug featuring a minimalist, hand-painted cat face on a speckled cream glaze. Its rounded belly and large handle make it the perfect cozy companion for your morning coffee or evening tea.
Step-by-Step Guide
Materials
- Light-colored stoneware clay (speckled variety preferred)
- Pottery wheel (or materials for hand-building: rolling pin, slab mat)
- Rib tool
- Needle tool
- Sponge
- Wire cutter
- Scoring tool (serrated rib)
- Trim tools
- Slip (clay water slurry)
- Underglaze pencil or fine brush
- Brown iron oxide or dark brown underglaze
- Gold luster (optional for ears/nose)
- Glossy clear glaze or semi-transparent cream glaze
Step 1: Throwing the Form
-
Center the clay:
Start with a ball of speckled stoneware clay on your wheel head. Center it firmly, ensuring there’s no wobble before you begin to open it. -
Open and pull:
Open the clay and pull up the walls to form a cylinder. Aim for an even thickness of about a quarter-inch throughout the wall. -
Shape the belly:
Using a rib tool on the inside, gently push the clay outward while supporting the outside to create a rounded, bulbous shape near the bottom. -
Collar the rim:
Slowly collar the rim inward slightly so it’s narrower than the belly. This traps heat better and gives the mug its cozy silhouette. -
Refine and smooth:
Use a sponge to smooth the lip of the mug so it’s comfortable to drink from. Run a rib up the exterior to remove throwing lines for a smooth canvas. -
Cut off:
Run your wire cutter underneath the pot and set it aside on a ware board until it is leather hard.
Steady Hand Trick
When painting the fine whisker lines, rest your pinky finger on the mug surface to stabilize your hand. Breath out slowly as you make the stroke.
Step 2: Trimming and Handle
-
Trim the foot:
Once leather hard, center the mug upside down on the wheel. Trim away excess clay from the bottom to create a defined foot ring. -
Pull a handle:
Pull a strap of clay for the handle. For this design, you want a medium-thickness handle with a generous C-curve. -
Attach the handle:
Score the attachment points on both the mug body and the handle. Apply slip and press the handle firmly onto the mug. -
Blend the seams:
Use a small tool or your thumb to smooth the clay where the handle meets the mug, ensuring a seamless transition. -
Dry slowly:
Cover the mug loosely with plastic to let the handle and body dry evenly to the bone-dry stage.
Step 3: Decorating and Glazing
-
Bisque fire:
Fire the bone-dry mug in the kiln to bisque temperature (usually Cone 06 or 04). -
Sketch the face:
Wipe away any dust with a damp sponge. Lightly sketch the ear triangles, sleepy eyes, nose, and whiskers with a pencil (the graphite will burn off). -
Paint the details:
Using a very fine liner brush and dark brown underglaze or iron oxide wash, carefully paint over your sketch lines. Keep the strokes thin and deliberate. -
Add fill color:
I like to fill in the nose and the inner triangles of the ears with a slightly thicker application of the brown underglaze or a touch of gold luster later. -
Glaze application:
Dip the entire mug into a clear glossy glaze or a semi-transparent cream glaze. If your clay isn’t naturally speckled, use a glaze that includes speckles. -
Glaze firing:
Fire the mug to maturity (Cone 5, 6, or 10 depending on your clay body). -
Optional gold accent:
If adding gold luster to the ears or nose, apply it now over the fired glaze and fire one last time to Cone 018.
Make it 3D
Instead of painting the ears flat, attach two small triangles of clay to the rim before bisque firing for structural cat ears that peek over the top.
Once cooled, your charming cat mug is ready to be filled with your favorite warm beverage
Frog on the Rim Mug
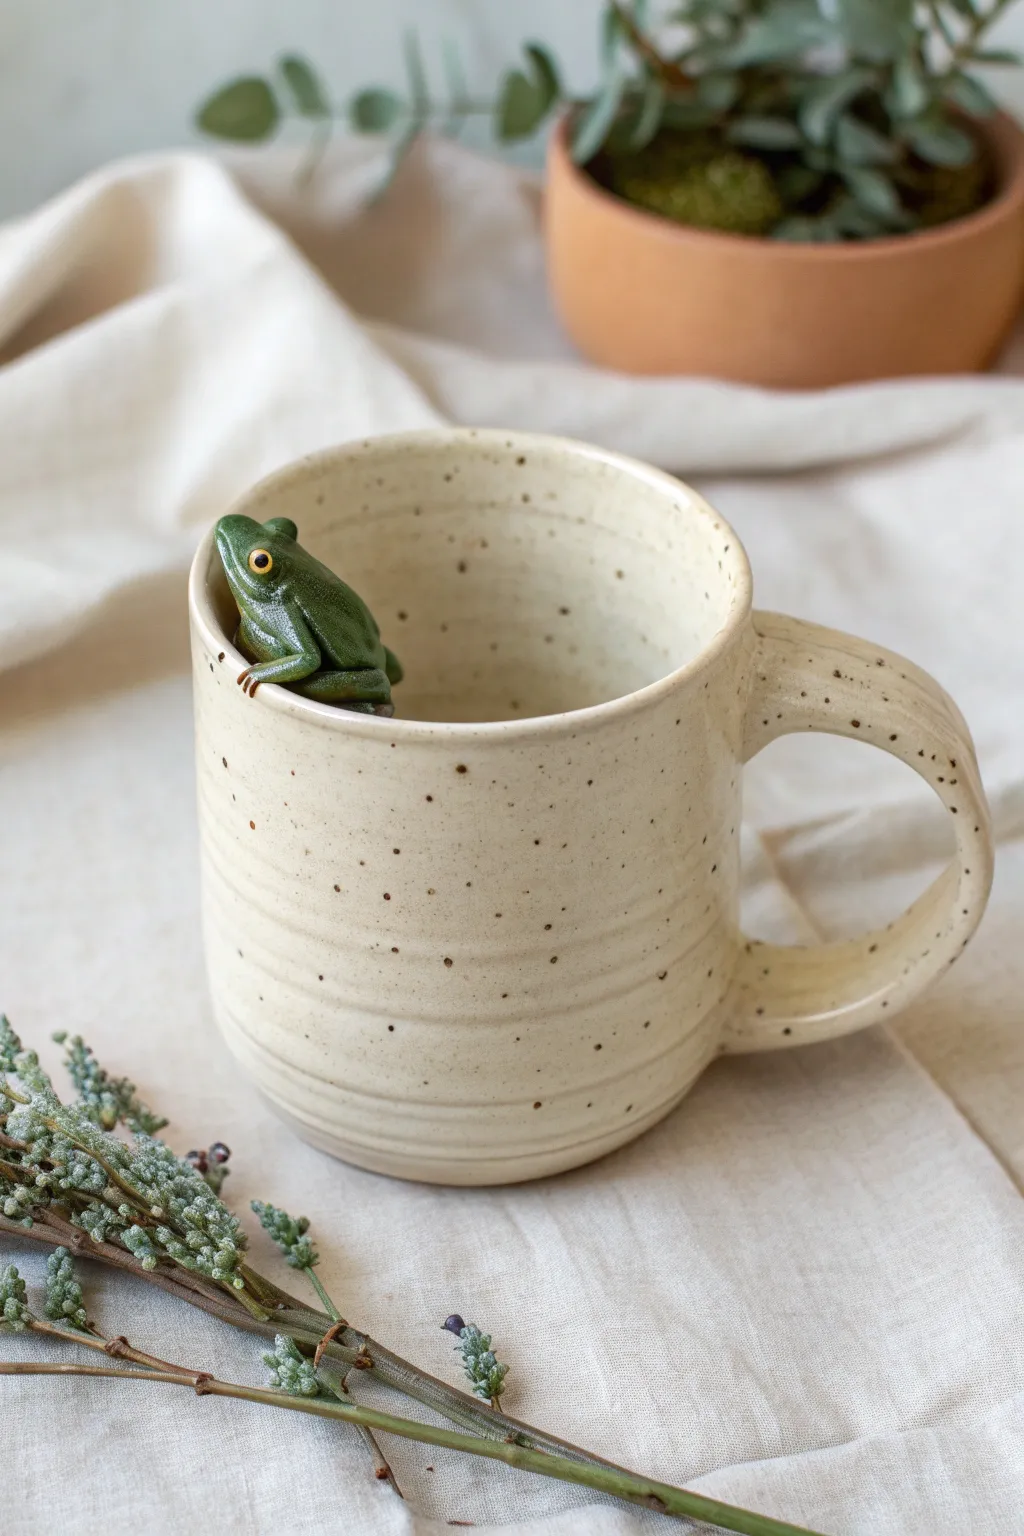
Add a touch of whimsy to your morning coffee with this delightful speckled mug featuring a tiny green amphibian companion. This project combines classic hand-building or wheel-throwing techniques with sculptural detailing to create a functional piece of art that looks like it belongs in a fairy garden.
Step-by-Step Tutorial
Materials
- Stoneware clay (speckled or buff)
- Pottery wheel (optional, or slab rolling equipment)
- Rib tool
- Needle tool
- Scoring tool or serrated rib
- Slip
- Modeling tools (small aesthetic spatulas/shapers)
- Clear or white glaze
- Underglazes: Leaf Green, Deep Green, Yellow, Black
- Fine detail paintbrush
- Sponge
Step 1: Forming the Mug Body
-
Prepare the clay:
Begin by wedging about 1 to 1.5 lbs of speckled stoneware clay to remove air bubbles. This clay body is crucial for achieving that natural, earthy look visible in the final piece. -
Throw or build the cylinder:
Throw a standard cylinder on the pottery wheel, aiming for straight walls and a flat bottom. Alternatively, if hand-building, roll out a slab, cut a rectangle, and join the seam to create a cylinder. -
Shape the rim:
While the wheel is spinning slowly, gently compress the rim with a chamois or sponge to ensure it is smooth and comfortable for drinking. -
Create the ridges:
While the clay is still plastic, use a wooden modeling tool or the corner of a rib to press distinct horizontal grooves into the lower two-thirds of the mug. I like to vary the pressure slightly to give it that organic feel. -
Attach the handle:
Pull a strap handle or roll a coil, shaping it into a ‘C’ curve. Once the mug is leather-hard, score and slip the attachment points and firmly press the handle onto the side opposite where you plan to put the frog.
Sculpting Secret
Make the frog’s fingers slightly longer than necessary, wrap them over the rim, then trim or smooth them back. This creates a much stronger bond than just pressing them flat.
Step 2: Sculpting the Frog
-
Shape the body:
Roll a small ball of clay, roughly the size of a grape. Gently pinch and elongate it slightly to form the frog’s main body, creating a hunchback shape. -
Form the limbs:
Roll four tiny coils for the legs. Fold the back legs into a ‘Z’ shape to mimic the crouching posture and create simple bent tubes for the front arms. -
Attach to the rim:
Score the rim of the mug thoroughly. Add a dab of slip and press the frog body onto the rim so the head peeks over the edge. The frog should look like it is climbing out. -
Connect the limbs:
Score and slip the legs onto the body and the mug wall. Position the front hands hooks over the rim’s edge for a realistic grip. -
Detail the face:
Use a small ball tool to press indentations for the eyes. Add two tiny balls of clay into these sockets. Use a needle tool to softly define the mouth line. -
Smooth the seams:
With a slightly damp brush (not dripping), smooth all connection points between the frog and the mug so they appear seamless and integrated.
Cracked Frogs?
If the frog cracks away from the rim during drying, your mug was likely too dry when you attached it. Wrap the whole piece in damp plastic for 2 days to re-homogenize moisture.
Step 3: Glazing and Finishing
-
Bisque fire:
Allow the mug to dry slowly and completely, covered loosely with plastic to prevent the handle or frog from cracking. Fire to cone 04 (or your clay’s specific bisque temperature). -
Underglaze the frog:
Using a fine brush, paint the frog body with 2-3 coats of Leaf Green. Add subtle shading with Deep Green in the creases of the legs and back for dimension. -
Paint the eyes:
Carefully dot the eyes with Yellow underglaze. Once dry, add a tiny pinprick of Black for the pupil. -
Wax resist (optional):
If you want the frog to remain matte or have a different texture, apply wax resist over the painted frog. However, usually, a glossy frog looks best. -
Dip into glaze:
Dip the entire mug into a clear or transparent white glaze. This will seal the underglaze and allow the natural speckles of the clay body to show through. -
Clean the foot:
Wipe the bottom of the mug clean with a sponge to prevent it from sticking to the kiln shelf. -
Glaze fire:
Fire the mug to the maturity temperature of your clay and glaze (typically cone 5 or 6 for stoneware).
Enjoy your customized creature cup, perfect for holding tea while you watch the rain
Monster Mouth Mug
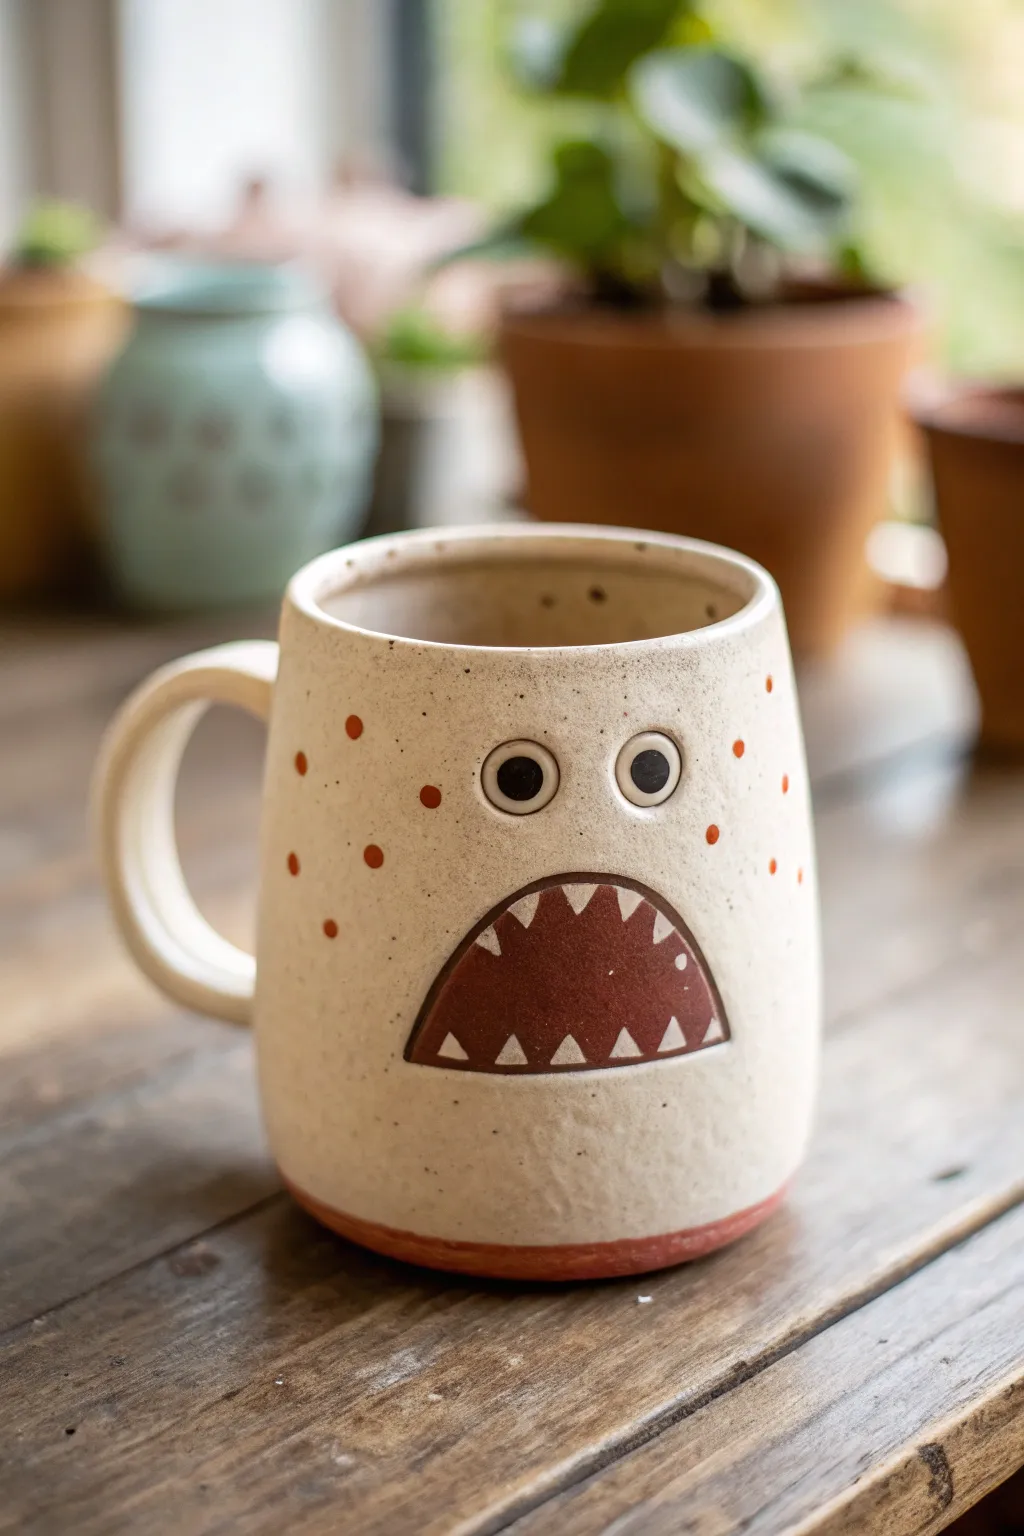
Transform a simple slab of clay into this charmingly quirky creature featuring expressive eyes and a wide, triangular mouth. The natural speckled finish combined with bold red accents gives this mug a delightful handmade personality perfect for your morning coffee.
Step-by-Step
Materials
- Stoneware clay (speckled or light beige)
- Rolling pin
- Guide strips or dowels (1/4 inch thickness)
- Pottery knife or needle tool
- Scoring tool or serrated rib
- Slip (clay and water slurry)
- Wooden sculpting tool
- Small sponges
- Underglaze (Red/Brown and Black)
- Clear glaze
- Paintbrushes
- Clay extruder (optional for handle)
Step 1: Forming the Body
-
Prepare the slab:
Begin by rolling out your speckled stoneware clay into a smooth, even slab. Use your guide strips to ensure a uniform 1/4 inch thickness, rolling in multiple directions to compress the clay platelets. -
Cut to size:
Measure and cut a rectangle approximately 12 inches long by 4.5 inches tall. This size will shrink during firing, resulting in a standard-sized mug. -
Create the cylinder:
Bevel the short edges of your rectangle at a 45-degree angle. Score these edges thoroughly and apply slip, then bring them together to form a cylinder. -
Join the seam:
Press the seam firmly together. Using a wooden tool or your thumb, smooth the clay across the join line both inside and out so the seam disappears completely. -
Add the base:
Roll a small separate slab for the base. Place your cylinder on top, trace around it, and then score and slip both contact surfaces before pressing them together. Trim away any excess clay.
Clean Teeth Tip
Use liquid wax resist over your painted teeth triangles before applying the red background color. This keeps lines crisp.
Step 2: Sculpting the Monster Face
-
Outline the mouth:
Lightly sketch a wide, soft triangular shape for the mouth using a needle tool on the lower half of the mug face. This will be the monster’s main feature. -
Carve the mouth cavity:
Gently carve out a very shallow recess within your sketched line, creating a slight depression where the mouth colors will go. Smooth the edges with a damp sponge. -
Form the eyes:
Roll two small balls of clay and flatten them into discs. Score and slip the back of each disc and attach them above the mouth, spacing them slightly apart. -
Detail the pupils:
Press a smaller tool or end of a paintbrush into the center of each eye disc to create a recess for the pupil. Use a tiny coil of clay to create a raised rim around the eyes if you want extra depth. -
Add the handle:
Pull or extrude a C-shaped handle. Score and slip the attachment points on the back of the mug, opposite the face, and firmly attach the handle. Smooth the joins blending the clay seamlessly.
Step 3: Decoration and Glazing
-
Paint the mouth interior:
Apply 2-3 coats of deep red-brown underglaze inside the mouth shape. I like to let this dry briefly between coats to ensure the color is opaque. -
Add the teeth:
Using a fine brush and white underglaze (or just leaving the raw clay if it fires white), carefully paint small triangular teeth along the top and bottom ridges of the mouth interior. -
Detail the eyes and spots:
Paint the pupils black with underglaze. Using the red-brown color again, add randomly spaced polka dots around the face and sides of the mug for texture. -
Bisque fire:
Allow the mug to dry slowly and completely before loading it into the kiln for a bisque firing (usually Cone 04 to 06). -
Apply clear glaze:
Once bisque fired, wipe the mug down with a damp sponge to remove dust. Dip the entire mug into a clear glossy glaze or brush it on evenly. -
Final firing:
Load the glazed mug into the kiln for the final glaze firing (temperature depends on your specific clay body, likely Cone 5 or 6). Ensure the bottom is wiped clean of glaze.
Mouth Slumping?
If the wall caves in while carving the mouth, stuff the mug with newspaper or a sponge to support the wall from the inside.
Enjoy sipping from your friendly new monster mug once it has cooled completely from the kiln
Octopus Tentacle Handle Mug
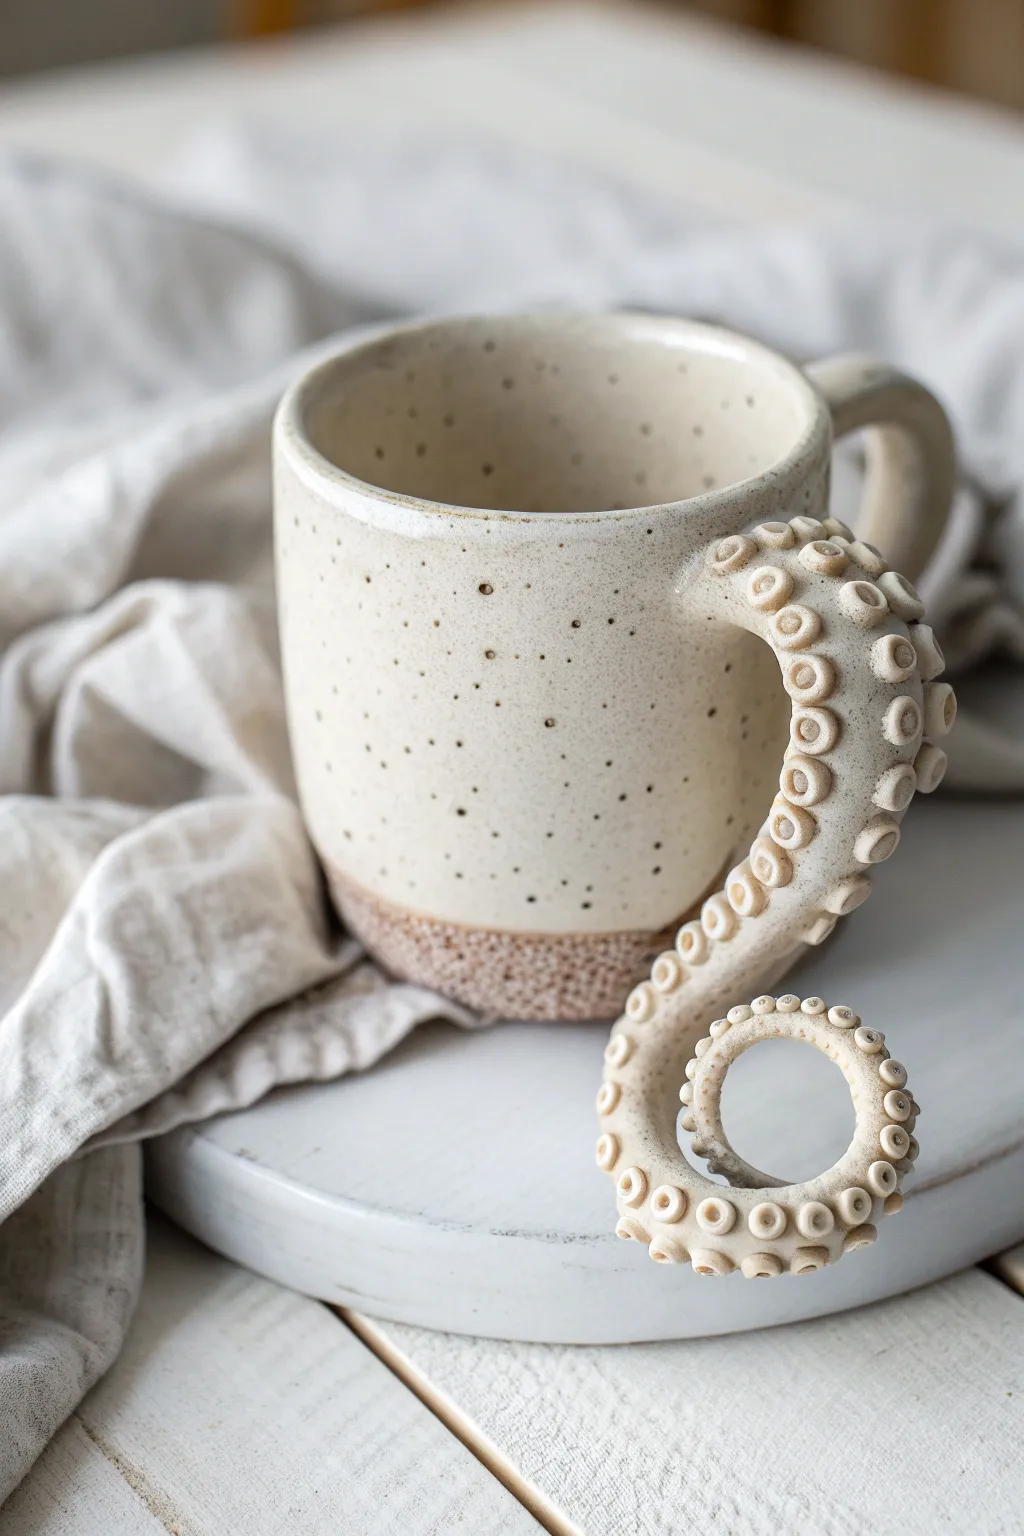
Bring a touch of the deep sea to your morning coffee with this sculptural ceramic mug. Featuring a handle that morphs into a detailed octopus tentacle curling onto the table surface, this project combines functional pottery with whimsical sculpting in a lovely speckled cream finish.
Step-by-Step Guide
Materials
- Speckled buff stoneware clay
- Pottery wheel (optional, can be hand-built)
- Throwing tools (sponge, rib, wire cutter)
- Needle tool
- Small loop tool or ball stylus tool
- Scoring tool (serrated rib)
- Slip (clay mixed with water)
- Sponge
- Clear or creamy white glaze (translucent)
- Small paintbrush
- Kiln
Step 1: Forming the Mug Body
-
Prepare the Clay:
Begin by wedging about 1 to 1.5 lbs of speckled buff clay to remove air bubbles. This clay body is crucial for achieving that natural, sandy look visible in the final piece. -
Throw the Cylinder:
Center your clay on the wheel and open it up. Pull the walls to create a simple, straight-sided cylinder or slightly tapered cup shape. Aim for a height of about 4-5 inches. -
Shape and Refine:
Use a rib to smooth the outside walls and define the shape. I prefer to leave the rim slightly rounded rather than sharp for comfortable drinking. -
Trim the Base:
Once leather-hard, trim the bottom of the mug to create a clean foot ring. This gives the mug a visual lift and a professional finish. -
Unfinished Base Texture:
Leave the very bottom 1/2 inch of the exterior slightly rougher or unburnished if you want that raw clay texture shown in the reference photo.
Supporting the Curl
If the bottom tentacle curl sags while wet, prop it up with a small piece of foam or a wad of newspaper/clay until it stiffens to leather-hard.
Step 2: Sculpting the Tentacle Handle
-
Roll a Coil:
Roll a thick coil of clay between your hands. It should be thicker at one end (where it attaches to the top) and taper gradually toward the other end. -
Test the Curve:
Bend the coil into a ‘?’ shape or an ‘S’ curve. Hold it up to the mug to check proportions. The handle needs to be large enough for fingers but sculptural enough to look like a tentacle. -
Attach the Top:
Score the top attachment point on the mug and the thick end of your coil. Apply slip generously and press the coil firmly onto the mug wall. -
Attach the Bottom:
Curve the handle down and attach the lower section to the mug wall. However, extend the tail of the coil past the mug so it curls outward into empty space. -
Create the Curl:
Take the tapered end that is hanging free and curl it into a tight spiral. This spiral should sit level with the bottom of the mug so it acts as a decorative stabilizer or third leg. -
Smooth the Connection:
Use a modeling tool or your finger to blend the seams where the handle meets the cup, ensuring a seamless transition that looks like the clay is growing out of the wall.
Step 3: Detailing the Suckers
-
Roll Tiny Spheres:
Make dozens of tiny clay balls in varying sizes. You will need larger ones for the thick part of the handle and tiny ones for the tapered tip. -
Attach the Suckers:
Score and slip the underside of the handle curve (the side facing outward/downward). Press the clay balls in two parallel rows along the length of the tentacle. -
Indent the Centers:
Using the back of a small paintbrush, a ball stylus, or a loop tool, press into the center of each flattened ball. This creates the classic ‘donut’ shape of a sucker. -
Refine the Edges:
Go back over any rough edges on the suckers with a slightly damp brush to smooth them out so they aren’t sharp after firing. -
Dry Slowly:
Cover the mug loosely with plastic. Because the handle varies in thickness and extends into space, it needs to dry very slowly to prevent cracking or warping.
Even Sucker Spacing
Mark the path for your suckers with a needle tool before attaching balls. This ensures your rows stay parallel and don’t spiral unintentionally.
Step 4: Glazing and Firing
-
Bisque Fire:
Fire the bone-dry mug to cone 04 (or your clay’s bisque temperature). -
Wax Resist:
Apply wax resist to the bottom foot ring and the raw clay band at the base of the mug to keep that beautiful gritty texture unglazed. -
Glaze Application:
Dip the mug into a creamy, semi-opaque white glaze. A glaze that breaks over high points is ideal, as it will highlight the texture of the suckers and let the clay speckles show through. -
Check the Suckers:
Ensure glaze hasn’t pooled too thickly inside the sucker depressions, which would hide the detail. Dab excess out with a brush if needed. -
Final Fire:
Glaze fire to cone 5/6 (oxidation) to mature the clay and melt the glaze into that glossy, smooth finish.
Enjoy using your new aquatic creation for your daily beverage rituals
Tiny House Mug With Roof Lid
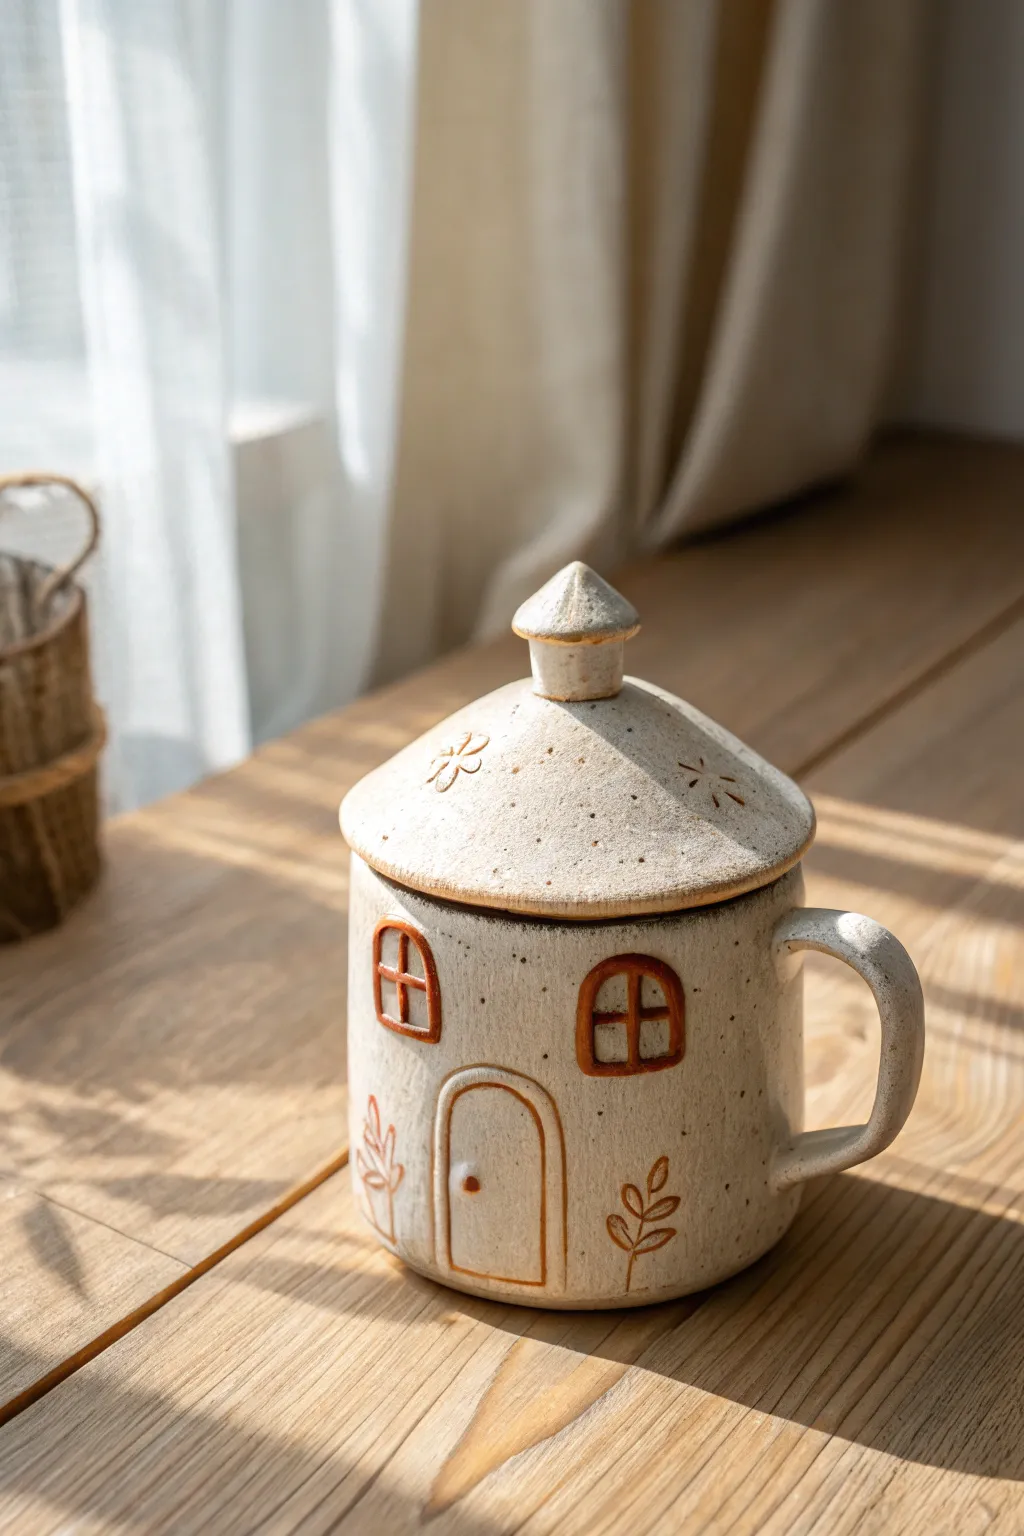
Bring a touch of fairytale whimsy to your morning coffee with this charming ceramic house mug. Featuring a speckled finish, hand-carved windows, and a delightful removable roof lid, this piece works as both functional drinkware and adorable decor.
How-To Guide
Materials
- Stoneware clay (speckled or buff)
- Pottery wheel (or slab roller for hand-building)
- Clay carving tools (needle tool, loop tool)
- Sponge
- Slip and scoring tool
- Rolling pin
- Underglazes (terracotta/brown)
- Clear matte glaze
- Fine paintbrush
- Kiln
Step 1: Forming the Mug Body
-
Throw the Cylinder:
Begin with a ball of wedged speckled clay on the wheel. Center it and pull a cylinder with straight, vertical walls. Aim for a medium thickness to allow for carving later without piercing through. -
Refine the Rim:
Use a chamois or sponge to smooth the rim completely. This needs to be flat and even so the lid will eventually sit flush. -
Trim and Add Handle:
Once the cylinder is leather hard, trim the bottom. Pull a simple handle from a coil of clay and attach it to the side using the score and slip method. Smooth the joins blending the clay seamlessly.
Lid Fit Secret
Make the lid gallery slightly smaller than the mug rim to account for shrinkage variations. A loose lid is better than one that doesn’t fit.
Step 2: Sculpting the Roof Lid
-
Measure the Opening:
Measure the inner and outer diameter of your mug’s rim precisely. You will need these measurements to ensure a snug fit. -
Create the Cone Shape:
Roll out a slab of clay or throw a shallow cone shape on the wheel. It should be wide enough to overhang the mug’s rim slightly, mimicking eaves. -
Add the Gallery:
Create a flange (or gallery) on the underside of the roof. This is a ring of clay attached to the bottom that fits *inside* the mug rim to keep the lid from sliding off. -
Sculpt the Chimney:
Shape a small knob resembling a chimney or spire. Attach this securely to the center peak of your roof cone using slip.
Smoke Effect
Make the chimney functional! Poke a hole through the knob into the lid so steam can escape, making it look like a smoking chimney.
Step 3: Adding the Cottage Details
-
Sketch the Design:
With the mug at a leather-hard stage, lightly scratch the outline of the door, two windows, and small botanical stems using a needle tool. -
Carve Relief Elements:
Use a small loop tool to gently carve out the window panes, leaving the ‘frames’ raised. Outline the door frame with a coil of clay if you want extra dimension, or simply carve deep lines to define it. -
Add Roof Texture:
On the lid, use a stamp or needle tool to press in subtle flower shapes or starburst patterns, just like the image shows. -
Smoothing:
Go over all your carved edges with a damp brush or fingertip to remove any sharp burrs or clay crumbs.
Step 4: Glazing and Finishing
-
Bisque Fire:
Place both pieces in the kiln for a bisque firing. -
Paint the Details:
Using a fine brush and terracotta-colored underglaze, carefully paint the window frames, the door frame, and the small leaf sprigs. I like to keep the lines slightly organic rather than perfectly straight. -
Highlight the Roof:
Dab a little of the same underglaze into the stamped textures on the roof lid to make them pop. -
Apply Clear Glaze:
Dip or brush the entire mug and lid (except the bottom foot and the touching surfaces of the rim/lid gallery) in a clear matte glaze. The matte finish enhances the rustic, earthy feel. -
Final Fire:
Fire the piece one last time according to your clay and glaze temperature requirements.
Now you have a whimsical vessel perfect for steeping your favorite teas or keeping your coffee warm