If you’re craving projects that are quick, sweet, and totally doable, air dry clay animals are my go-to. I’m sharing my favorite cute animal ideas that stick to simple shapes, cozy colors, and that irresistible big-head, tiny-body vibe.
Chubby Cat Figurines
These delightfully round and chubby cat figurines rely on simple shapes and clean lines to create a serene, minimalist look. With their smooth, egg-like bodies and understated painted details, they make a perfect trio of windowsill companions.
Step-by-Step Guide
Materials
- Air dry clay (white)
- Small cup of water
- Rolling pin
- Wooden modeling tools (or a toothpick)
- Fine grit sandpaper
- Acrylic paints (black, white, tan/beige, light pink)
- Fine detail paintbrush
- Matte finish varnish
Step 1: Shaping the Base
-
Prepare the clay:
Start by conditioning a handful of air dry clay. Knead it thoroughly in your hands until it feels warm, pliable, and free of any cracks. -
Form the main shape:
Roll the clay into a smooth ball between your palms. Once round, gently taper the top just slightly to create a very subtle egg shape. -
Flatten the base:
Tap the bottom of your egg shape onto your work surface firmly. You want a distinct flat bottom so the figurine stands up straight without wobbling. -
Refine the surface:
Dip your finger in a tiny bit of water and rub it over the entire surface of the clay egg. Smooth out any fingerprints or tiny imperfections until it’s glass-smooth.
Cracks while drying?
Mix a small amount of clay with water to create a paste (slip). Fill the cracks with this paste, let it dry again, and then sand it smooth before painting.
Step 2: Adding Features
-
Form the ears:
Pinch off two very small, pea-sized pieces of clay. Roll them into balls and then flatten them into small triangles. -
Attach the ears:
Score the top of the head (scratch little hatch marks) where the ears will go, and do the same to the bottom of the ear triangles. Apply a tiny dab of water as ‘glue’ and press the ears firmly into place. -
Blend the seams:
Using a modeling tool or your wet finger, gently drag the clay from the base of the ear down onto the head to blend the seam completely. The ears should look like they grew out of the head, not just stuck on top. -
Refine ear shape:
Once attached, gently pinch the tips of the ears to sharpen them. Use a small rounded tool to make a shallow indentation inside each ear for depth. -
Dry thoroughly:
Set your cats aside in a cool, dry place. Let them dry for at least 24-48 hours. Turn them occasionally so the bottom dries evenly.
Make it a set
Create varying sizes—a large ‘mama’ cat and smaller kittens. You can also tilt the heads slightly while shaping so they look like they are gazing at each other.
Step 3: Finishing Touches
-
Sand for smoothness:
Once bone dry, take fine-grit sandpaper and gently buff the surface. Focus on any bumps or rough spots, especially where the ears join the head. -
Paint the base colors:
Paint the entire body of each cat. For the white cat, use a creamy off-white. For the tan cat, mix beige with a touch of white. For the black cat, use a dark matte charcoal or black. -
Add stripes (Optional):
If making the black shadowy cat, mix a slightly lighter brown-grey tone. Carefully paint vertical, imperfect stripes starting from the bottom and fading as they go up the belly. -
Paint facial features:
Using your finest brush, dot two small circles for eyes. Use white paint for the eyes on the black cat, and black paint for the lighter cats. -
Add whiskers and nose:
Paint three very thin, straight lines on each cheek for whiskers. Add a tiny inverted pink triangle for the nose on all three cats. -
Paint inner ears:
Mix a warm terracotta or soft pink color and paint the little indentations inside the ears to bring them to life. -
Protect the piece:
Finish by applying a coat of matte varnish. This seals the paint and gives the clay a lovely finished ceramic texture without being too shiny.
Enjoy arranging your serene little clay family on a sunny shelf or desk


Tiny Panda With Bamboo Sprig
Bring a touch of nature to your workspace with this adorable panda figurine that’s specifically designed to hold a tiny sprig of greenery. The matte finish and simple geometric shapes give it a modern, clean look that highlights the sweet expression.
Step-by-Step
Materials
- White air dry clay
- Black air dry clay
- Pink acrylic paint or pastel chalk (soft pink)
- Clay tools (needle tool, ball tool)
- Water for smoothing
- Real plant cutting or faux greenery stem
- Toothpick (for structural support)
- Matte varnish (optional)
Step 1: Sculpting the Body
-
Form the torso:
Start with a chunk of white clay roughly the size of a walnut. Roll it into a smooth ball, then gently taper the top just slightly to create a subtle pear shape for the panda’s body. -
Flatten the base:
Tap the bottom of your pear shape against your work surface. You want a flat, stable base so the panda stands upright without wobbling. -
Insert support:
Push a toothpick halfway into the center of the neck area. This internal armature will keep the heavy head from falling off while the clay is wet. -
Create the head:
Roll a second, slightly larger ball of white clay. Press this firmly onto the toothpick sticking out of the body. I like to blend the seam slightly at the back of the neck for extra strength. -
Add texture:
Take a stiff bristle brush or a crumpled ball of aluminum foil and gently tap it all over the white clay surfaces. This creates a subtle fur-like texture instead of a perfectly smooth plastic look.
Step 2: Adding Black Details
-
Make the legs:
Roll two small balls of black clay. Flatten them slightly into stout cylinders and press them onto the bottom front of the white body for the feet. -
Form the arms:
Create two elongated teardrop shapes from black clay. Attach these to the sides of the body just below the neck. Curve them forward as if the panda is reaching out to hold something. -
Sculpt the ears:
Roll two tiny black spheres and flatten them into thick discs. Press these onto the top sides of the head using a drop of water to secure them. -
Create eye patches:
Make two flat, oval shapes from black clay. Press these onto the face, angling them slightly downward towards the nose area to create that classic sad-panda look. -
Add the nose:
Roll a tiny speck of black clay into a triangle with rounded corners. Place this right in the center of the face, slightly below the eyes. -
Draw the mouth:
Using a needle tool or a fine blade, gently etch a small ‘w’ shape extending down from the nose to form the mouth.
Arms Won’t Stay Up?
If the black clay arms sag while drying, prop them up with small pieces of folded paper or sponge placed underneath until the clay stiffens.
Step 3: Finishing Touches
-
Add eye highlights:
Roll two extremely tiny balls of white clay. Press one into the upper corner of each black eye patch to bring the character to life. -
Blush the cheeks:
If using chalk, scrape a little pink powder and brush it onto the cheeks with a soft dry brush. If using paint, dab a tiny amount of watered-down pink paint onto the cheeks for a rosy glow. -
Prepare the hold:
While the arm clay is still pliable, find a skewer or stick that is the same thickness as the plant stem you intend to use. Press it gently between the panda’s paws to create the perfect gap. -
Dry properly:
Let the figurine air dry completely for 24-48 hours. Keep it away from direct heat to prevent cracking. -
Insert the plant:
Once fully dry, slide your fresh plant stem or faux bamboo sprig into the gap between the arms. The tension of the dried clay arms will hold it in place.
Clean Seams
Wash your hands thoroughly before switching from black clay back to white to avoid transferring dark smudges onto the pristine white body.
Place your new friend on a windowsill where the light can catch the texture and the fresh greenery.


Bunny Buddies With Carrots
These adorable twin bunnies, one blushing pink and one soft grey, make the perfect spring pair. With their tall ears and tiny carrots, they have a charming, rustic texture that adds warmth to any shelf.
Detailed Instructions
Materials
- Air dry clay (white)
- Acrylic paints (pale pink, light grey, orange, green, black)
- Sculpting tools (needle tool, ball tool)
- Water cup and sponge
- Paintbrushes (soft bristle and fine detail)
- Sandpaper (fine grit)
- Texturing tool (old toothbrush or stiff bristle brush)
- Matte varnish (optional)
Step 1: Sculpting the Base
-
Form the bodies:
Start by rolling two large balls of white air dry clay. Shape them into pear-like forms, with a wider bottom for stability and a slightly narrower top for the head area. Keep them plump and rounded. -
Define the head:
Use your thumb to gently press an indentation about two-thirds of the way up the pear shape. This creates a subtle neck definition, distinguishing the head from the body without separating the clay. -
Add texture:
While the clay is still soft, gently tap the entire surface with an old toothbrush or a stiff bristle brush. This stippling effect mimics the rough, stone-like texture seen in the photo.
Seamless Ears
If ears droop while drying, prop them up with crumpled foil or toothpicks until the clay hardens to keep them perky.
Step 2: Creating Features
-
Shape the ears:
Roll four medium-sized logs of clay, tapering them at the ends to look like long teardrops. Flatten them slightly so they aren’t perfect cylinders. -
Attach the ears:
Score the top of the head and the base of the ears with a needle tool. Add a dab of water or slip, then press the ears firmly onto the heads. Smooth the seams with a modeling tool so they look like one continuous piece. -
Make the paws:
Roll four small sausage shapes for the arms. Attach two to each bunny’s body, positioning them so they curve forward as if holding something against their bellies. -
Add the feet:
Creat four small, flattened sphere shapes for the feet. Attach them at the very bottom front of the body so the bunny looks like it is sitting comfortably.
Cracks happen
Small cracks during drying are normal. Use a ‘slip’ paste made of clay and water to fill them in, then smooth over with a damp finger.
Step 3: The Carrot Accessory
-
Form the carrots:
Roll two small cones of clay. Gently flatten the wider end and keep the tip pointed. -
Texture the vegetables:
Use a needle tool or knife to press horizontal lines across the carrot cones to create their characteristic ridges. -
Add carrot greens:
Roll tiny bits of clay into three small teardrops per carrot. Attach these to the wide top of the carrot to form the leafy greens. -
Place the carrots:
Position a carrot between the paws of each bunny. Use a little water to adhere it securely to both the stomach area and the inside of the paws. -
Dry completely:
Let your sculptures dry for at least 24-48 hours. I find that turning them upside down halfway through helps the bottom dry evenly.
Step 4: Painting and Finishing
-
Base coat colors:
Mix a very pale pink and a soft grey acrylic paint. Paint one bunny entirely pink and the other grey. Keep the paint somewhat thin so the texture shows through. -
Paint the carrots:
Paint the carrots a bright orange and the tops a leafy green. Use a small brush to avoid getting orange paint on the bunny’s paws. -
Dry styling:
Once the base coats are dry, take a dry brush with a tiny amount of white paint and lightly brush over the textured surface. This highlights the ‘fur’ texture we created earlier. -
Add faces:
Use the handle end of a paintbrush dipped in black paint to dot two eyes wide apart. Use a fine liner brush to paint a tiny nose and mouth. -
Rosy cheeks:
Dip a cotton swab or a dry brush into pink paint. Blot almost all of it off on a paper towel, then gently dab circular blushing cheeks onto the face. -
Seal the work:
Finish with a coat of matte varnish to protect the paint and reinforce that soft, non-glossy finish.
Now you have a charming pair of bunnies ready to greet the spring season


Puppy Face Magnets

Capture the sweetness of man’s best friend with this adorable, semi-relief puppy face sculpture. With its soft, floppy ears and textured muzzle, this clay project makes for a charming fridge magnet or a cute decorative accent for a shelf.
Step-by-Step
Materials
- Air dry clay (stone or light grey color)
- Small black beads (for eyes)
- Black acrylic paint or black clay (for nose)
- Sculpting tools (needle tool, small ball tool)
- Water in a small cup
- Rolling pin
- Strong round magnet based
- Super glue or E6000
- Fine grit sandpaper (optional)
Step 1: Shaping the Base
-
Prepare the clay:
Begin by conditioning a golf-ball-sized amount of air dry clay. Knead it in your hands until it’s warm, pliable, and free of cracks. -
Form the head shape:
Roll the clay into a smooth sphere, then gently flatten the back side against your work surface so it becomes a dome shape. This will be the main structure of the head. -
Refine the outline:
Gently press the sides of the dome to slightly elongate it, giving it a soft oval shape rather than a perfect circle. Smoothing the surface with a tiny bit of water on your finger helps remove fingerprints.
Fixing Cracks
If small hairline cracks appear as the clay dries, mix a tiny bit of fresh clay with water to create a ‘slip’ paste. Rub this into the cracks and smooth it out with your finger.
Step 2: Adding Facial Features
-
Create the muzzle:
Take a smaller piece of clay, roughly grape-sized, and flatten it into a thick oval. Press this onto the lower half of the face dome to create the snout. -
Blend the seams:
Use a modeling tool or your finger to smooth the edges of the muzzle into the main head shape. The connection should look seamless, though the muzzle should still protrude. -
Define the mouth:
Using a needle tool or a thin blade, scribe an inverted ‘Y’ shape into the bottom center of the muzzle to define the puppy’s mouth and jowls. -
Add whisker spots:
Use the tip of a needle tool to gently poke three small holes on each side of the muzzle. Keep these shallow; they just add a bit of texture. -
Create the nose:
Roll a tiny, pea-sized ball of black clay (or grey clay to be painted later). Press it into a rounded triangular shape and attach it to the top center of the muzzle with a dab of water. -
Texture the nose:
Take a stippling sponge or the tip of a stiff brush and tap it gently against the damp nose clay to give it that realistic, bumpy ‘leather’ texture. -
Position the eyes:
Use a small ball tool to make two indentations above the muzzle where the eyes will go. Spacing them slightly wider apart adds cuteness. -
Insert the eyes:
Press two small black beads into the indentations. Push them in deep enough so they look embedded, not just resting on the surface. Adding a tiny drop of glue into the socket beforehand ensures they stay put.
Texture Twist
Before the clay dries, press a clean toothbrush gently over the head (avoiding the nose and eyes) to create a subtle fur-like texture instead of a smooth finish.
Step 3: Ears and Finishing
-
Shape the ears:
Roll two equal-sized balls of clay and flatten them into teardrop shapes. These should be roughly the length of the head itself. -
Attach the ears:
Press the wider, rounded end of the teardrop onto the side of the head, near the top. Fold the ear slightly downward so it flops naturally along the cheek. -
Blend the connections:
Smooth the clay where the ear meets the head using a clay tool, ensuring a strong bond. I like to leave the bottom of the ear unattached so it looks like it’s hanging freely. -
Add eyebrow expression:
Use a modeling tool to gently press curved indentations above the eyes. This creates a sweet, slightly pleading expression typical of puppies. -
Dry the piece:
Let the sculpture dry completely for 24-48 hours. Keep it away from direct heat to prevent cracking. -
Paint the nose:
If you didn’t use colored clay, paint the nose black now. You can also add a tiny white dot of paint to the black bead eyes for a ‘catchlight’ creating life. -
Attach the magnet:
Once fully dry, flip the puppy over. Use a strong adhesive like E6000 to glue a round magnet to the flat back of the head.
Now put your new little friend on the fridge to guard your groceries with its adorable stare

The Complete Guide to Pottery Troubleshooting
Uncover the most common ceramic mistakes—from cracking clay to failed glazes—and learn how to fix them fast.
Mini Cows With Simple Spots
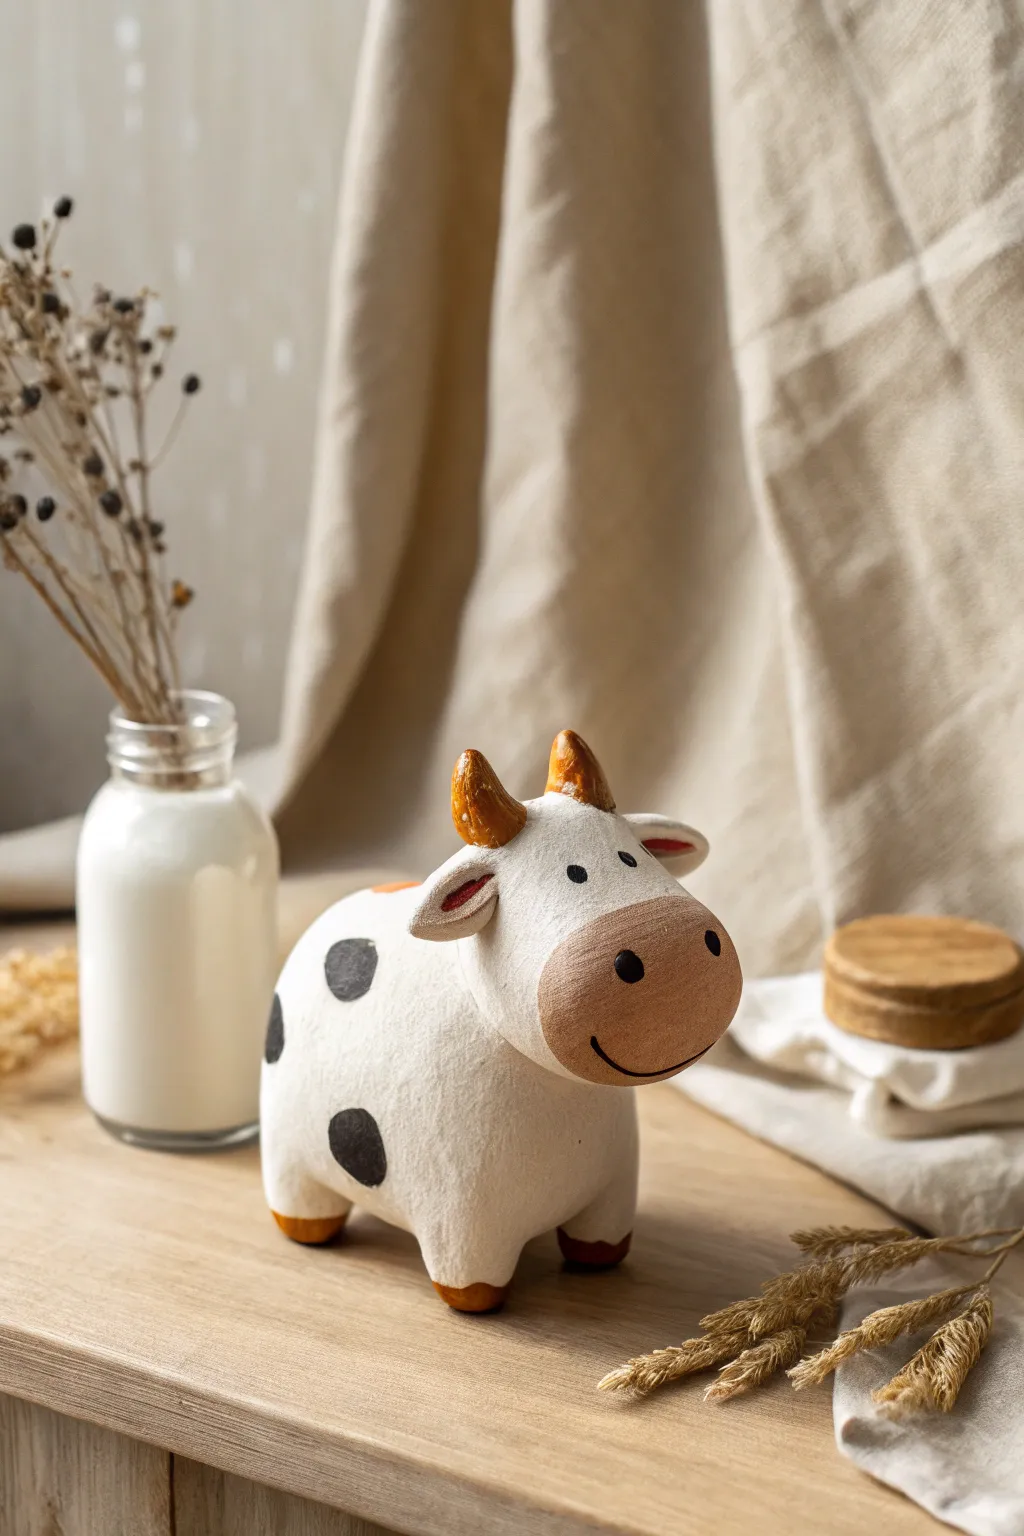
This charming little figurine captures the essence of farm life with its stylized, rounded body and simple painted details. It’s a perfect beginner project that results in a sturdy, cheerful cow with a distinctively gentle expression.
Step-by-Step Tutorial
Materials
- White air-dry clay
- Acrylic paints (black, warm brown, white)
- Small paintbrush
- Dotting tool or toothpick
- Cup of water
- Sculpting tools (or a butter knife)
- Matte varnish (optional)
Step 1: Shaping the Base
-
Form the body:
Start with a large chunk of white clay about the size of a tangerine. Roll it into a smooth ball, then gently elongate it slightly into a thick, rounded oval shape to form the main body. -
Create the legs:
Roll four smaller balls of clay of equal size. Attach these to the bottom of the body to act as legs. They should be short and stout to give the cow a cute, chubby appearance. -
Blend the seams:
Use a sculpting tool or your thumb to smooth the clay where the legs meet the body. Use a tiny bit of water on your finger to make the transition seamless and strong. -
Shape the head:
Roll another ball of clay for the head, slightly smaller than the body. Press it gently onto the front top of the body. -
Secure the head:
Just like the legs, blend the clay at the neck area so the head is firmly attached. You can insert a small piece of toothpick between the head and body for internal support if the clay feels heavy.
Smooth Operator
To get that perfectly smooth, stone-like texture, use a damp sponge to gently wipe the clay before it dries. This removes detailed fingerprints better than just water.
Step 2: Adding Details
-
Sculpt the muzzle:
Take a smaller piece of clay and flatten it into a thick oval. Press this onto the lower front of the face to create a distinct muzzle area that sticks out slightly. -
Make the ears:
Form two small teardrop shapes. Flatten them gently and press them onto the sides of the head. Use a tool to make a small indentation inside each ear for depth. -
Add the horns:
Roll two tiny cones for the horns. Attach them to the very top of the head, between the ears, angling them slightly inward or straight up. -
Final smoothing:
Before letting it dry, run a damp finger over the entire sculpture to remove any fingerprints or cracks. Let the figurine dry completely for 24-48 hours until hard.
Step 3: Painting the Character
-
Paint the muzzle:
Once dry, mix a warm, light brown acrylic paint. Carefully paint the entire oval muzzle area, keeping the edges clean. -
Color the horns and hooves:
Use a darker brown (or mix a little black into your brown) to paint the horns and the very tips of the feet for hooves. -
Add the spots:
Using black paint, add round or oval spots randomly across the white body. Try to vary the sizes, with some larger spots on the flank and smaller ones near the neck. -
Detail the ears:
Paint a thin line of reddish-brown or dark pink inside the ear indentations to give them a bit of life. -
Paint the face:
Using a dotting tool or the back of a paintbrush dipped in black paint, create two small eyes above the muzzle. Add two larger dots on the muzzle for nostrils. -
The finishing smile:
With a very fine liner brush or a toothpick, paint a thin, curved black line connecting the nostrils to create a wide, happy smile. -
Seal the work:
If desired, brush on a coat of matte varnish to protect the paint and give the cow a finished, professional look without making it too shiny.
Barnyard Bell
Before baking or drying, poke a small hole under the neck. After painting, thread a tiny real bell on a piece of twine and tie it around the cow’s neck.
Your new farm friend is ready to graze on your bookshelf or desk
Penguin Pals With Tiny Accessories
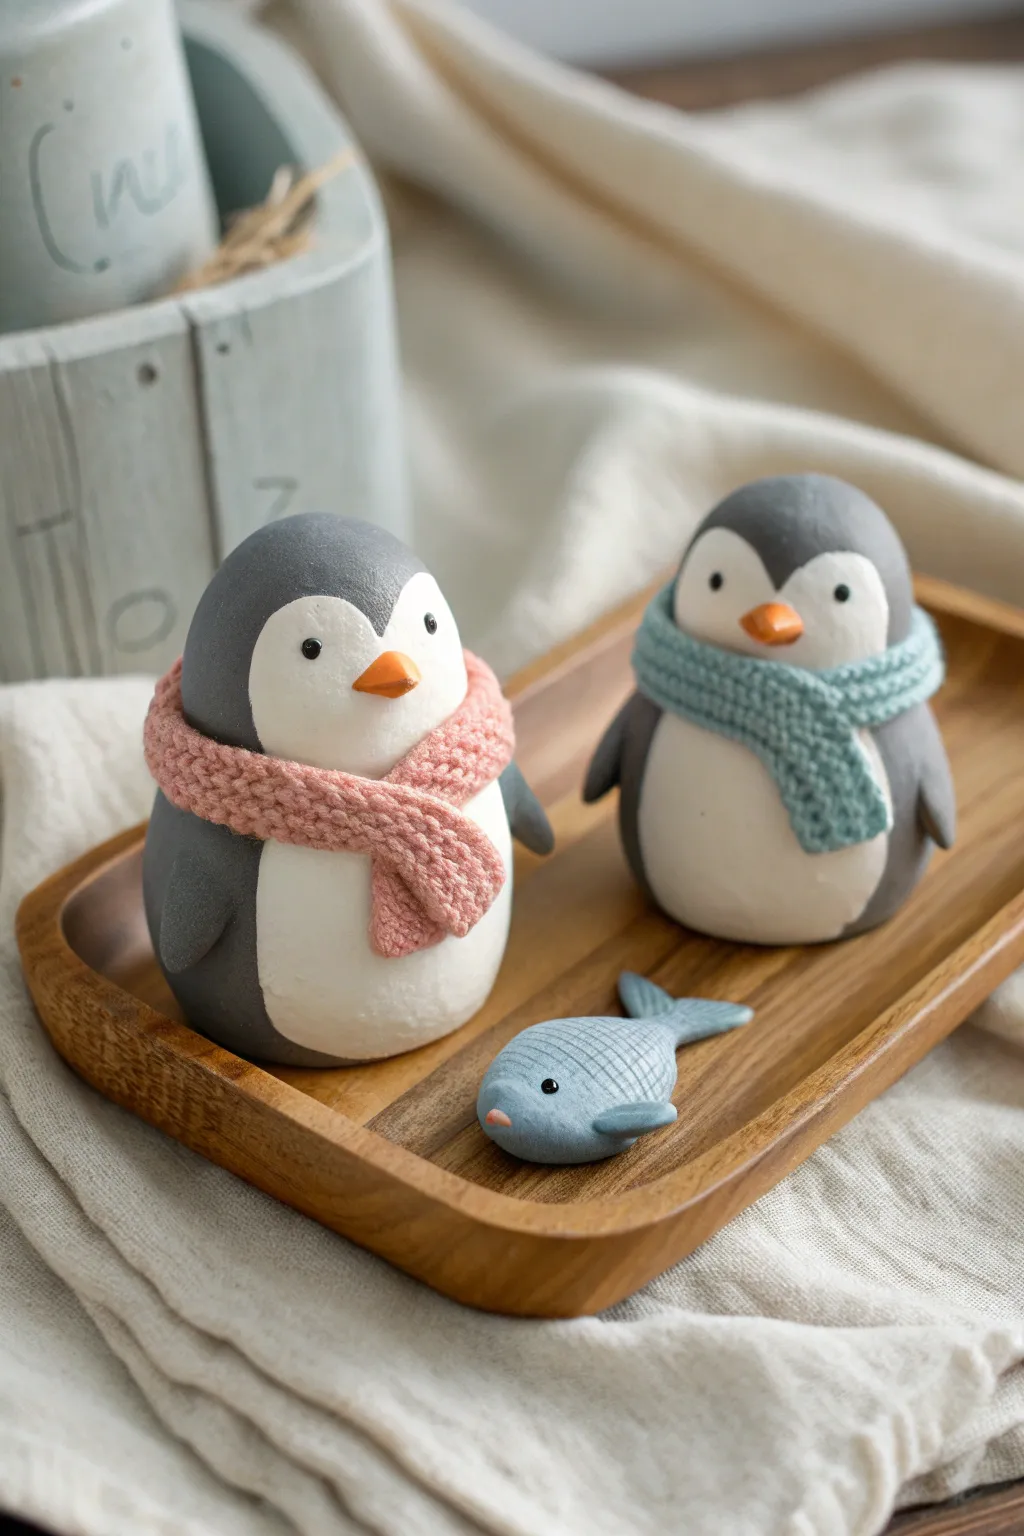
Create a heartwarming duo of winter-ready penguins complete with incredibly realistic knit-textured scarves and a tiny fish friend. These smooth, matte-finish figures make for adorable desk companions or holiday décor.
Detailed Instructions
Materials
- Air dry clay (white)
- Acrylic paints (dark grey, white, orange, soft pink, light blue, black)
- Clay sculpting tools (needle tool, ball tool)
- Fine grit sandpaper
- Water and a small brush for smoothing
- Texture tool (small comb or piece of fabric for scarf texture)
Step 1: Sculpting the Base Forms
-
Form the bodies:
Start with two balls of white clay, roughly the size of a tangerine. Roll them between your palms until smooth, then gently shape them into rounded egg shapes, flattening the bottom so they stand sturdily on their own. -
Create the wings:
Roll four small teardrop shapes of clay. Press them flat to create wings and attach two to the sides of each body using a little water to help them bond seamlessy. -
Add the beaks:
Shape two tiny triangles of clay for the beaks. Press them gently into the center of what will be the face area, keeping the point slightly downward. Smooth the connection points carefully with a small tool. -
Sculpt the fish accessory:
For the tiny fish, roll a small oval and pinch one end to form a tail fin. Use a needle tool to press cross-hatch patterns onto the body for scales and poke a tiny hole for the eye. -
Smooth and dry:
Go over your figures with a slightly damp finger to remove any fingerprints. Let the bodies and the fish dry completely for 24-48 hours until they are hard and white.
Fixing Crack
If small cracks appear as the clay dries, mix a tiny amount of clay with water to make a paste (slip) and fill the cracks. Smooth over with a damp brush.
Step 2: Painting the Details
-
Draft the markings:
Once fully dry, use a pencil to very lightly sketch the heart-shaped outline of the white face area on the front of the belly. -
Base coat the grey:
Mix a smooth, matte dark grey paint. Paint the back, sides, and top of the head, carefully following your pencil line to leave the belly and face pristine white. You may need two coats for opacity. -
Refresh the white:
If any grey paint strayed, or if the clay isn’t bright enough, paint the belly and face area with opaque white acrylic for a clean, crisp look. -
Paint the beaks:
Using a fine brush, paint the beaks a bright tangerine orange. Be careful to keep the edges sharp against the white face. -
Add the eyes:
Dip the end of a paintbrush handle or a large ball tool into black paint. Dot the eyes onto the white face area, spacing them wide apart for a cute expression. -
Paint the fish:
Paint the fish accessory a muted blue-grey. Once dry, add a tiny black dot for the eye and a tiny pink accent for the mouth.
Level Up: Icy Base
Make a flat, irregular oval of clay and paint it pale blue-white. Glue the penguins to it to create an ‘ice floe’ display base for your duo.
Step 3: Crafting the Scarves
-
Prepare scarf strips:
Roll out a fresh thin sheet of white clay. Cut two long, rectangular strips—one for each penguin—wide enough to look cozy but proportional to the bodies. -
Create the knit texture:
Before attaching, press a texture tool, a piece of coarse fabric, or even a real knit sweater onto the clay strips to imprint a realistic wool pattern. This is the secret to that cozy look. -
Color the scarves:
Paint one strip a soft dusty pink and the other a muted teal blue. I find it easier to paint them before wrapping to avoid getting color on the white bellies. -
Wrap and drape:
Once the paint is dry to the touch but the clay is still flexible, wrap the scarves around the penguins’ necks. Cross one end over the other to simulate a tied knot. -
Secure the position:
Use a tiny dab of glue or water on the underside of the scarf to secure it to the penguin’s body so it doesn’t slide off as it dries. -
Final touches:
Check for any paint touch-ups needed after handling. Allow the scarves to dry completely in position.
Arranging these two on a wooden tray creates an instantly cozy winter vignette for your home


What Really Happens Inside the Kiln
Learn how time and temperature work together inside the kiln to transform clay into durable ceramic.
Little Chick Hatchlings
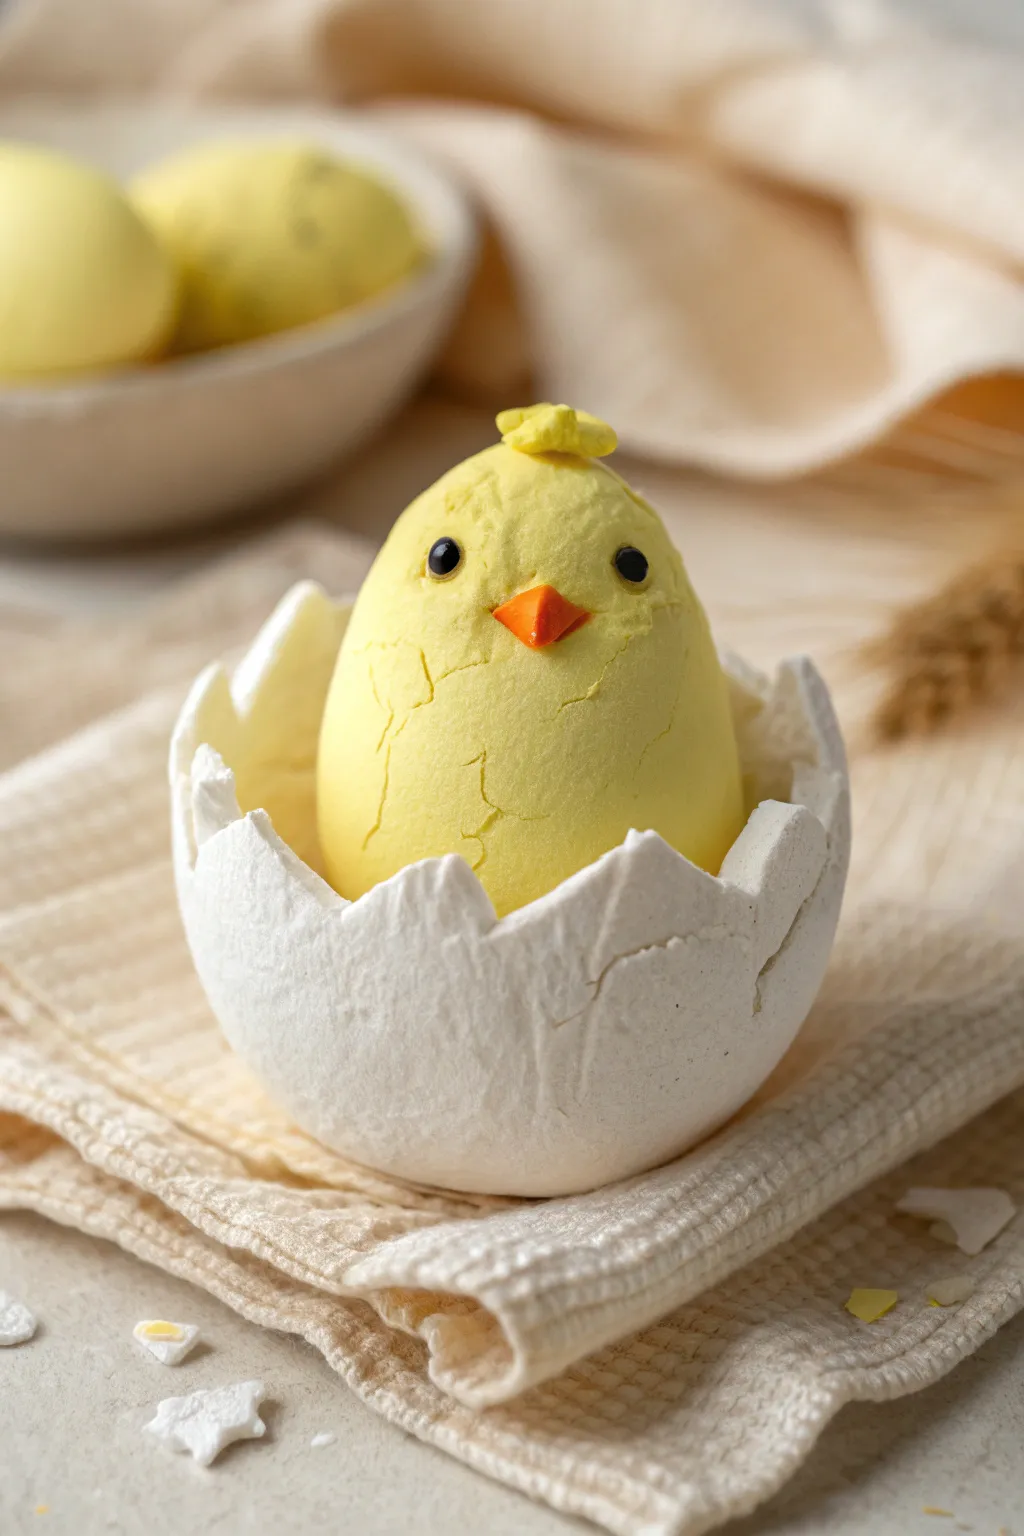
Capture the magic of new life with this adorable hatching chick sculpture made from air dry clay. This little yellow friend peeks out from a jagged white eggshell, creating a charming centerpiece for your spring decor.
Step-by-Step Tutorial
Materials
- White air dry clay
- Yellow air dry clay (or white clay mixed with yellow acrylic paint)
- Orange air dry clay (tiny amount for the beak)
- Black beads or small round black brads for eyes
- Sculpting tools (needle tool or toothpick, ball tool)
- Rolling pin
- Small bowl for water
- Aluminum foil (optional, for weighing down the core)
Step 1: Forming the Chick
-
Prepare the yellow clay:
Start by kneading your yellow clay until it is soft and pliable. If you are tinting white clay yourself, mix in a small drop of yellow acrylic paint and knead until the color is uniform and pale lemon yellow. -
Shape the body:
Roll a handful of yellow clay into a smooth ball about the size of a large egg. Gently taper the top slightly to form an egg-like teardrop shape, but keep it plump and rounded. -
Add texture:
For a natural, slightly fluffy look, you can gently tap the surface with a stiff toothbrush or a ball of crumpled foil. Alternatively, leave it smooth but allow slight natural creases to remain for character. -
Create the crest:
Take a tiny pinch of yellow clay and flatten it into a small, irregular ‘flower’ shape. Press this onto the very top of the chick’s head to create a little feather crest. -
Position the eyes:
While the clay is still wet, press two small black beads into the face area. Place them wide apart to enhance the cute factor. Sink them slightly so they look embedded rather than just stuck on. -
Attach the beak:
Roll a tiny piece of orange clay into a cone or diamond shape. Press it horizontally between and slightly below the eyes. Use a needle tool to gently indent the center if you want an open beak look.
Cracking Up?
If accidental cracks appear as the clay dries, mix a tiny bit of fresh clay with water to make a paste (slip) and fill in the cracks, then smooth it over.
Step 2: Creating the Eggshell
-
Roll out white clay:
Take a portion of white air dry clay and roll it out into a flat sheet, approximately 3-4mm thick. It shouldn’t be paper-thin, as it needs to support the chick. -
Cut the jagged edge:
Use a craft knife or a plastic sculpting tool to cut distinct zigzag patterns across the top of your clay strip. Vary the height and sharpness of the triangles to mimic a naturally broken shell. -
Form the base cup:
Find a small bowl or rounded object roughly the same size as your chick’s bottom to use as a temporary mold. Drape the white clay strip around the base creating a cup shape, joining the seams by smoothing them with a wet finger. -
Add cracks:
Use a needle tool or the back of a knife to gently score ‘crack’ lines radiating from the jagged edge down the side of the shell. Don’t cut all the way through; just create surface indentations. -
Texture the shell:
I like to gently press a piece of sandpaper or a rough stone against the white clay to give it that matte, calcium-like texture of a real eggshell. -
Insert the chick:
Carefully place your yellow chick inside the white shell cup while both are still slightly pliable. Gently mold the shell around the base of the chick so they fit together snugly. -
Adjust the shell points:
Gently pull some of the white jagged points outward or push them inward. This irregularity makes the hatching process look more dynamic and realistic.
Level Up: Fuzzy Texture
Before the yellow clay dries, lightly brush it with water and sprinkle yellow flocking powder over the body for a truly fuzzy, soft chick feel.
Step 3: Finishing Touches
-
Add shell fragments:
With leftover white clay, create tiny triangular shards. Scatter these around the base of your sculpture or attach one loosely to the chick’s head or body to look like fallen pieces. -
Refine the surface:
Check for any unwanted fingerprints. You can smooth these out with a tiny bit of water on your finger, but be careful not to erase the intentional textures. -
Let it dry:
Place the sculpture in a safe, dry spot away from direct sunlight. Depending on humidity and brand, it may take 24-48 hours to fully harden.
Enjoy displaying your sweet little hatchling as a reminder of spring sunshine
Round Frog Desk Buddy
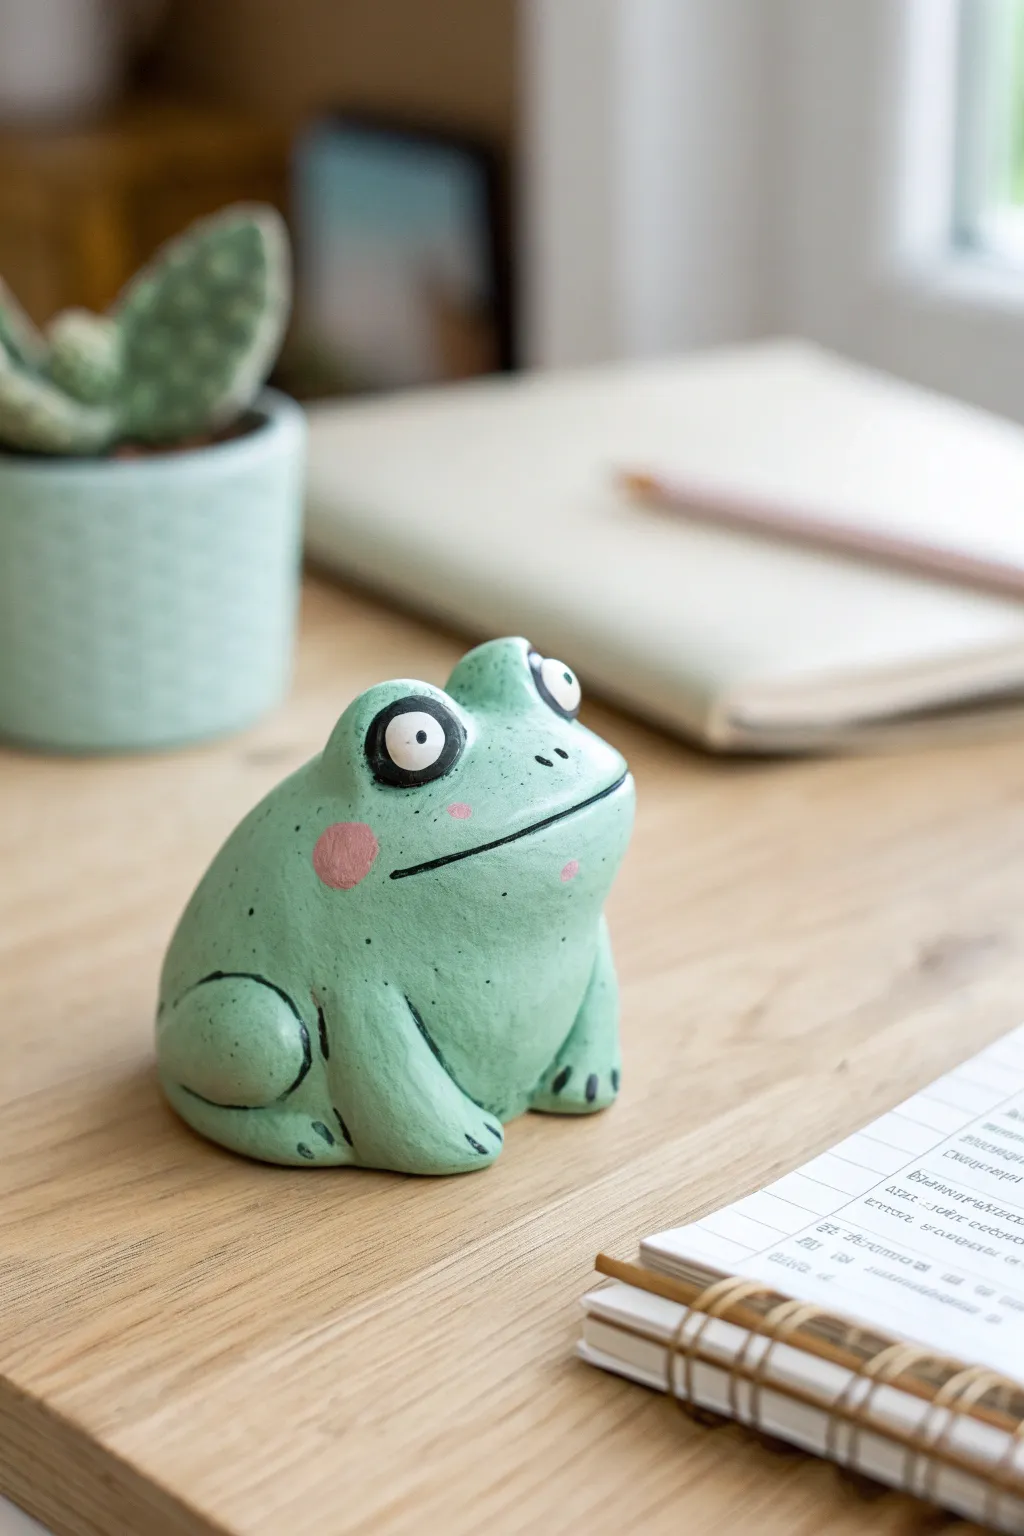
Bring a touch of whimsical charm to your workspace with this delightful, rotund frog figurine. Its simple, rounded shape and expressive painted details make it a perfect beginner-friendly project that radiates personality.
How-To Guide
Materials
- Air dry clay (white or pre-colored green)
- Acrylic paints (mint green, black, pink, white)
- Small paintbrush (detail round)
- Medium paintbrush (flat)
- Sculpting tools (or a toothpick)
- Water cup
- Aluminum foil (optional core)
- Varnish or sealant (matte or gloss based on preference)
Step 1: Sculpting the Base Shape
-
Create the body:
Start by taking a fist-sized ball of clay and rolling it into a smooth, slightly flattened sphere. If you want to save clay or reduce weight, you can create a tight ball of aluminum foil first and wrap the clay around it. -
Shape the posture:
Gently tap the bottom of your sphere against your work surface to create a flat base so the frog sits securely without wobbling. The overall shape should look like a smooth gumdrop. -
Form the eye sockets:
Roll two small marble-sized balls of clay for the eyes. Stick them onto the top of the head, spacing them slightly apart. Use your thumb or a sculpting tool to blend the seams where the eyes meet the head so they look integrated, not just stuck on. -
Add the legs:
For the hind legs, roll two sausage shapes that are thicker at one end. Press the thick ends onto the sides of the body towards the back. -
Shape the thighs:
Blend the upper part of the leg into the body using a little water on your finger, leaving the rounded thigh shape distinct so it looks folded against the body. -
Create the front feet:
Roll two smaller tear-drop shapes for the front arms. Attach them to the front of the body, just below the ‘chin’ area, blending the top seams so the arms appear to support the frog’s weight. -
Refine the surface:
Dip your finger in a tiny bit of water and smooth over the entire sculpture to remove any fingerprints or cracks. Ensure the transition between the eyes and head is completely seamless.
Step 2: Painting and Details
-
Let it dry completely:
Allow the frog to dry for 24-48 hours. The clay must be bone dry before painting; if it feels cold to the touch, it still holds moisture. -
Base coat:
Paint the entire frog with a mint green acrylic paint. You may need two thin coats for opaque coverage. Let the first coat dry fully before applying the second to avoid lifting the paint. -
Paint the eyes:
Using a smaller brush, carefully paint large white circles inside the raised eye bumps you sculpted earlier. -
Add pupils:
Once the white is dry, paint a smaller black circle in the center of each white eye. I like to make the black circles slightly different sizes to give him a goofy, lovable expression. -
Draw the mouth:
Using a very fine liner brush or even a black paint pen, draw a wide, slightly wavy line across the face for the mouth. Extend it almost to the sides of the head to emphasize the roundness. -
Rosy cheeks:
Dip a round brush or a cotton swab into pink paint. Dab two soft pink circles on the cheeks, just below the eyes. -
Define the limbs:
Use a fine detail brush with black paint to outline the curve of the back leg and define the toes on the front feet. Three little black dashes on each foot work perfectly for toes. -
Add skin texture:
To mimic the speckled look in the photo, dilute a little black or dark green paint with water. Use an old toothbrush or stiff brush to flick tiny speckles onto the body, or simply dot them on randomly with a fine brush tip. -
Seal the project:
Once all paint is perfectly dry, apply a coat of varnish. A matte finish looks very natural, but a gloss finish will make your frog look perpetually wet and shiny.
Cracks Appearing?
Mix a tiny amount of fresh clay with water to create a ‘slip’ paste. Fill any cracks with this paste and smooth it over before painting.
Make it Functional
Before drying, press a pencil vertically into the frog’s back to create a pen holder, or add a slit to the mouth to hold business cards or photos.
Now you have a loyal, silent companion ready to keep you company during your work sessions

TRACK YOUR CERAMIC JOURNEY
Capture glaze tests, firing details, and creative progress—all in one simple printable. Make your projects easier to repeat and improve.
Sleepy Turtle Trinket Dish
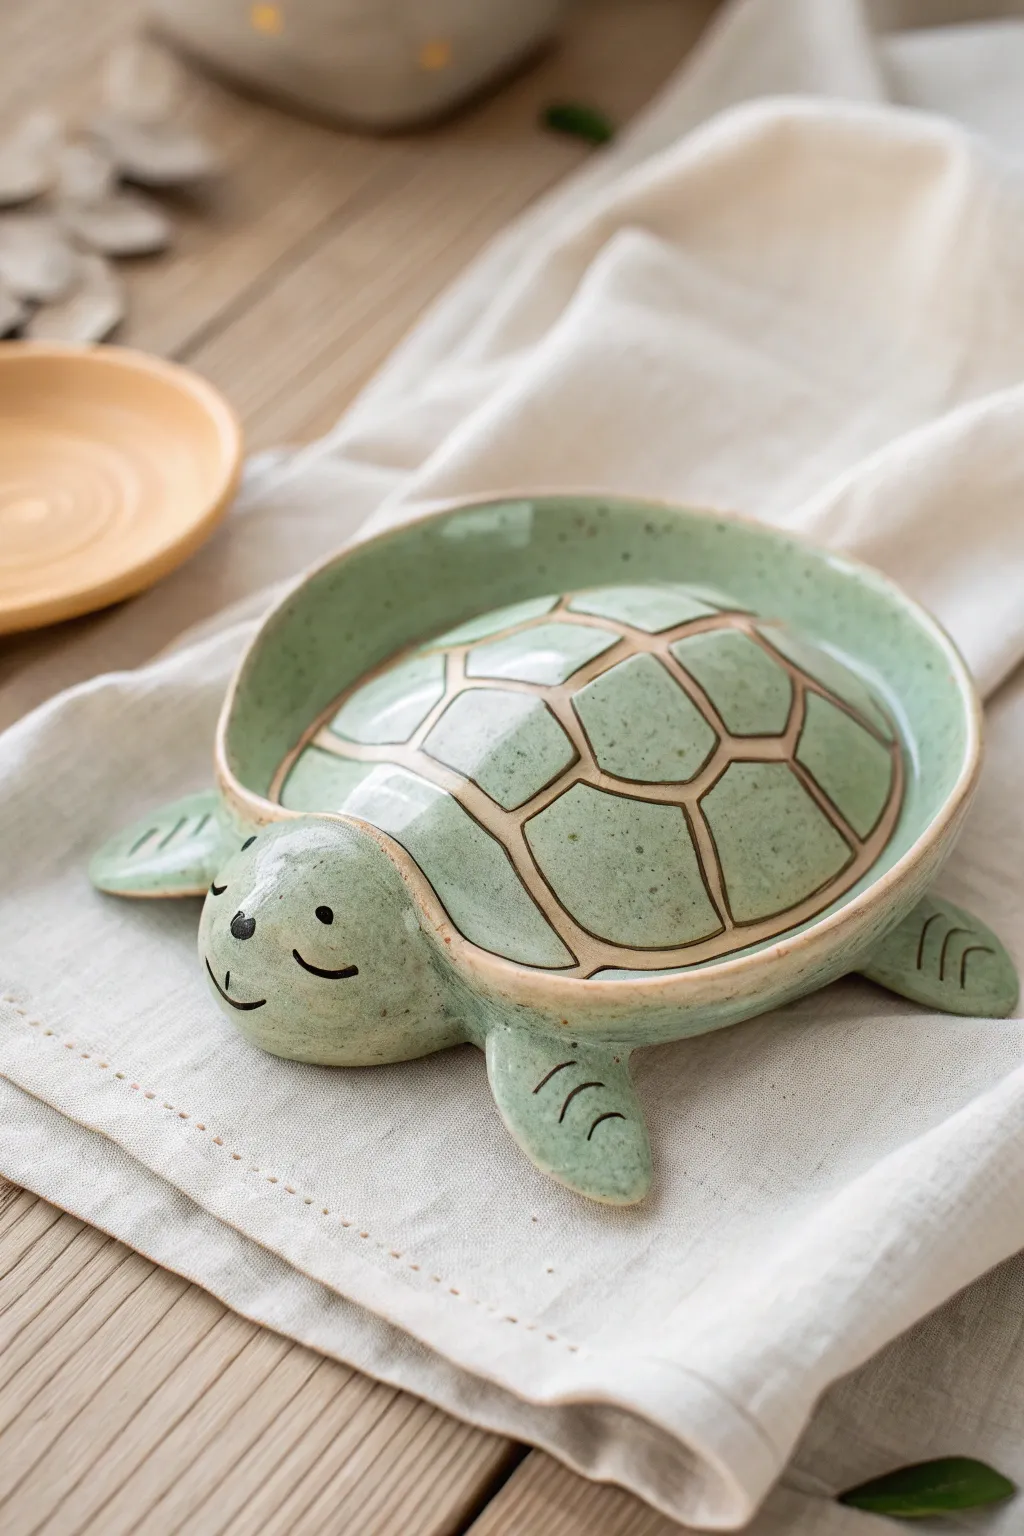
This adorable turtle trinket dish mimics the look of high-end glazed stoneware with its speckled green finish and glossy sheen. It functions as a clever two-piece container, where the turtle’s shell acts as a removable lid for the shallow bowl body beneath.
Detailed Instructions
Materials
- White air dry clay
- Rolling pin
- Small bowl (for use as a mold)
- Plastic wrap
- Modeling tools (needle tool, smooth edging tool)
- Water and sponge
- Sandpaper (fine grit)
- Acrylic paints: Sage green, cream/beige, black, brown
- Old toothbrush (for speckling)
- High-gloss varnish or resin (essential for the ceramic look)
- Small round brushes
Step 1: Shaping the Base Bowl
-
Prepare your mold:
Find a small, shallow bowl to use as a slump mold. Line the inside of this bowl with plastic wrap to prevent the clay from sticking. -
Roll out the clay:
Roll your air dry clay into a smooth sheet, approximately 1/4 inch thick. Aim for an even thickness to ensure uniform drying. -
Form the body dish:
Cut a circle from the clay sheet that is slightly larger than the diameter of your mold. Gently press this clay circle into the lined bowl, smoothing it against the sides to create a concave dish shape. -
Refine the rim:
Trim any excess clay from the rim to create a clean, flat edge. Use a little water on your finger to smooth this edge perfectly round.
Faux Ceramic Tip
To mimic the exposed clay rim seen in the photo, wipe away the green paint from the very edge of the bowl before sealing, revealing the natural clay color.
Step 2: Sculpting the Turtle Features
-
Create the head:
Roll a ping-pong ball sized sphere of clay for the head. Slightly flatten the side that will attach to the bowl rim, and gently pull the front to form a rounded snout. -
Shape the flippers:
Create four teardrop shapes for the flippers—two larger for the front and two smaller for the back. Flatten them slightly and use a knife tool to press three small indentations into the end of each for toes. -
Attach the appendages:
Score the clay (scratch the surface) on both the rim of the bowl and the attachment points of the head and flippers. Add a dab of water or clay slip, then press the parts firmly onto the rim of the dish. -
Blend the seams:
Use a modeling tool to smooth the clay where the limbs meet the bowl, ensuring a seamless transition that looks like one solid piece. -
Add facial details:
Using a small dotting tool, press indentation for the eyes. Use a needle tool to carve a gentle, curved smile and a small nose.
Cracking Issues?
If small cracks appear during drying, make a paste of clay and water (slip) to fill them. Let it dry again, then sand smooth before painting.
Step 3: Creating the Shell Lid
-
Form the dome:
Roll a ball of clay and press it into a convex dome shape. Test the fit frequently—it needs to rest comfortably on top of the bowl rim you just made, covering the opening. -
Carve the scutes:
Lightly sketch a hexagon pattern on the shell dome. Once you are happy with the spacing, use a carving tool to deepen these lines, creating the distinct segments of the turtle’s shell. -
Dry completely:
Let both pieces dry for 24-48 hours. I find turning the pieces over halfway through prevents warping. -
Sand smooth:
Once bone dry, sand any rough edges or fingerprints with fine-grit sandpaper to achieve a porcelain-smooth surface.
Step 4: Painting and Glazing
-
Base coat:
Paint the entire turtle (body and shell) with a muted sage green acrylic paint. You may need two coats for full opacity. -
Highlight the shell lines:
Mix a cream or light beige paint. Carefully paint inside the carved grooves of the shell to make the segments pop. -
Paint the face:
Using a fine liner brush and black paint, carefully fill in the eyes, nose, and mouth lines. -
Create the speckled effect:
Dilute a small amount of dark brown paint with water. Dip an old toothbrush into it, and flick the bristles with your thumb to spray tiny speckles over the green areas. This mimics stoneware clay. -
Apply the ‘glaze’:
Finish with a thick coat of high-gloss varnish or UV resin. This is the most important step to make the air dry clay look like fired ceramic.
Now you have a charming little spot to hide away your rings or coins
Hedgehog With Easy Texture
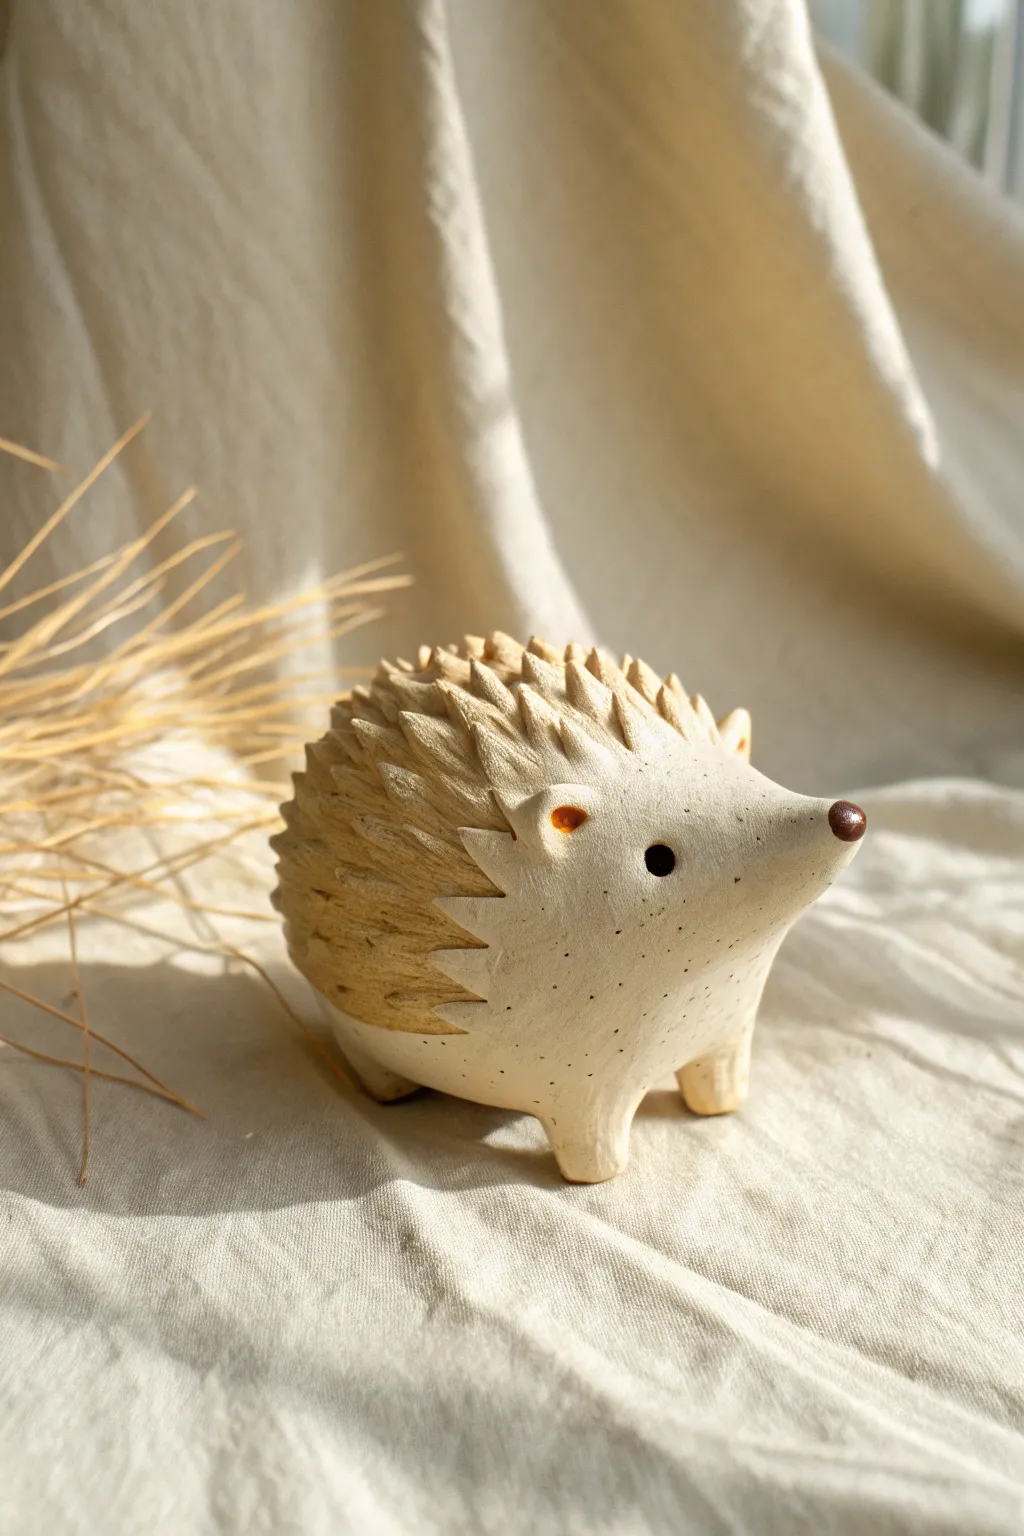
Capture the charm of woodland creatures with this delightful hedgehog figurine, featuring a clever textured back that looks impressive but is surprisingly simple to achieve. This project balances an earthy, natural look with adorable, tiny details like perky ears and a shiny little nose.
Step-by-Step Guide
Materials
- White or cream-colored air dry clay
- Small cup of water
- Clay sculpting tools (needle tool, small knife)
- Small scissors or nail scissors
- Brown acrylic paint
- Black acrylic paint
- Fine detail paintbrush
- Gloss varnish or clear nail polish
Step 1: Shaping the Base
-
Form the main body:
Start with a ball of clay roughly the size of a tangerine. Roll it between your palms until it is smooth and free of cracks. -
Create the teardrop shape:
Gently narrow one end of the ball to create a rounded teardrop shape. This tapered end will become the hedgehog’s face. -
Tilt the snout:
Slightly wet your finger and smooth the tapered end upwards just a bit, giving the nose a cute, inquisitive lift. -
Flatten the bottom:
Press the clay body gently onto your work surface to flatten the belly area, ensuring the figurine sits stable and won’t roll over.
Clean Snipping
Wipe your scissor blades with a damp cloth every few cuts. Sticky clay residue on the blades can cause the spines to drag or clump rather than standing up crisp and sharp.
Step 2: Refining Features
-
Pull out the legs:
Turn the hedgehog over. Pinch four small sections of clay from the bottom corners of the body and gently pull them downwards to form short, stubby legs. -
Smooth the stance:
Flip the hedgehog back onto its feet. Press down gently to level the legs, blending the clay where the legs meet the body using a little water if needed. -
Add the ears:
Roll two tiny, lentil-sized balls of clay. Press them onto the head area, just behind where the face texture will start. Use a rounded tool to create a small indentation in each ear. -
Create eye sockets:
Use a ball-stylus or the rounded end of a paintbrush to press shallow indentations where you want the eyes to sit.
Fuzzy Texture
Instead of painted spines, glue short snips of beige yarn or sisal twine onto the back for a mixed-media hedgehog that is actually soft to the touch!
Step 3: Texturing the Spines
-
Map the spine area:
Using a needle tool, lightly sketch a faint line curving from behind the ears and down the sides. This marks where the smooth face ends and the spiky texture begins. -
Snip the first row:
Take your small scissors. Starting at the very back of the hedgehog, make small snips into the clay surface. Angle the scissors so the points of the clay lift slightly upwards. -
Work in rows:
Continue snipping rows moving forward towards the head. I find it helpful to offset each row slightly, creating a brick-like pattern that looks like natural fur or spines. -
Detail the forehead:
As you reach the forehead area, make your snips smaller and more delicate to frame the face without overwhelming it. -
Refine the points:
If any clay points look too square from the scissors, gently pinch the tips with your fingers to sharpen them. -
Let it dry completely:
Set your hedgehog in a dry, safe place. Allow it to air dry for at least 24-48 hours until it is hard and opaque white.
Step 4: Painting & Finishing
-
Paint the spines:
Water down some light brown acrylic paint to create a wash. Paint specifically over the spiky area, letting the color settle into the crevices to create depth. -
Wipe back excess:
Before the wash dries, use a damp paper towel to gently wipe the tops of the spines. This reveals the lighter clay color on the tips while keeping the shadows dark. -
Add facial details:
Dip your fine brush into black paint for the eyes. Paint small circles in the indentations you made earlier. Paint a small round nose on the tip of the snout using brown paint. -
Gloss the nose:
Once the paint is fully dry, add a tiny dot of gloss varnish or clear nail polish strictly to the nose and eyes to make them look wet and lively. -
Paint speckles (Optional):
For a rustic pottery look, dip an old toothbrush in watered-down brown paint and flick tiny speckles across the smooth sections of the body.
Place your new prickly friend on a shelf or desk where its sweet face can greet you daily
Fox With Oversized Tail
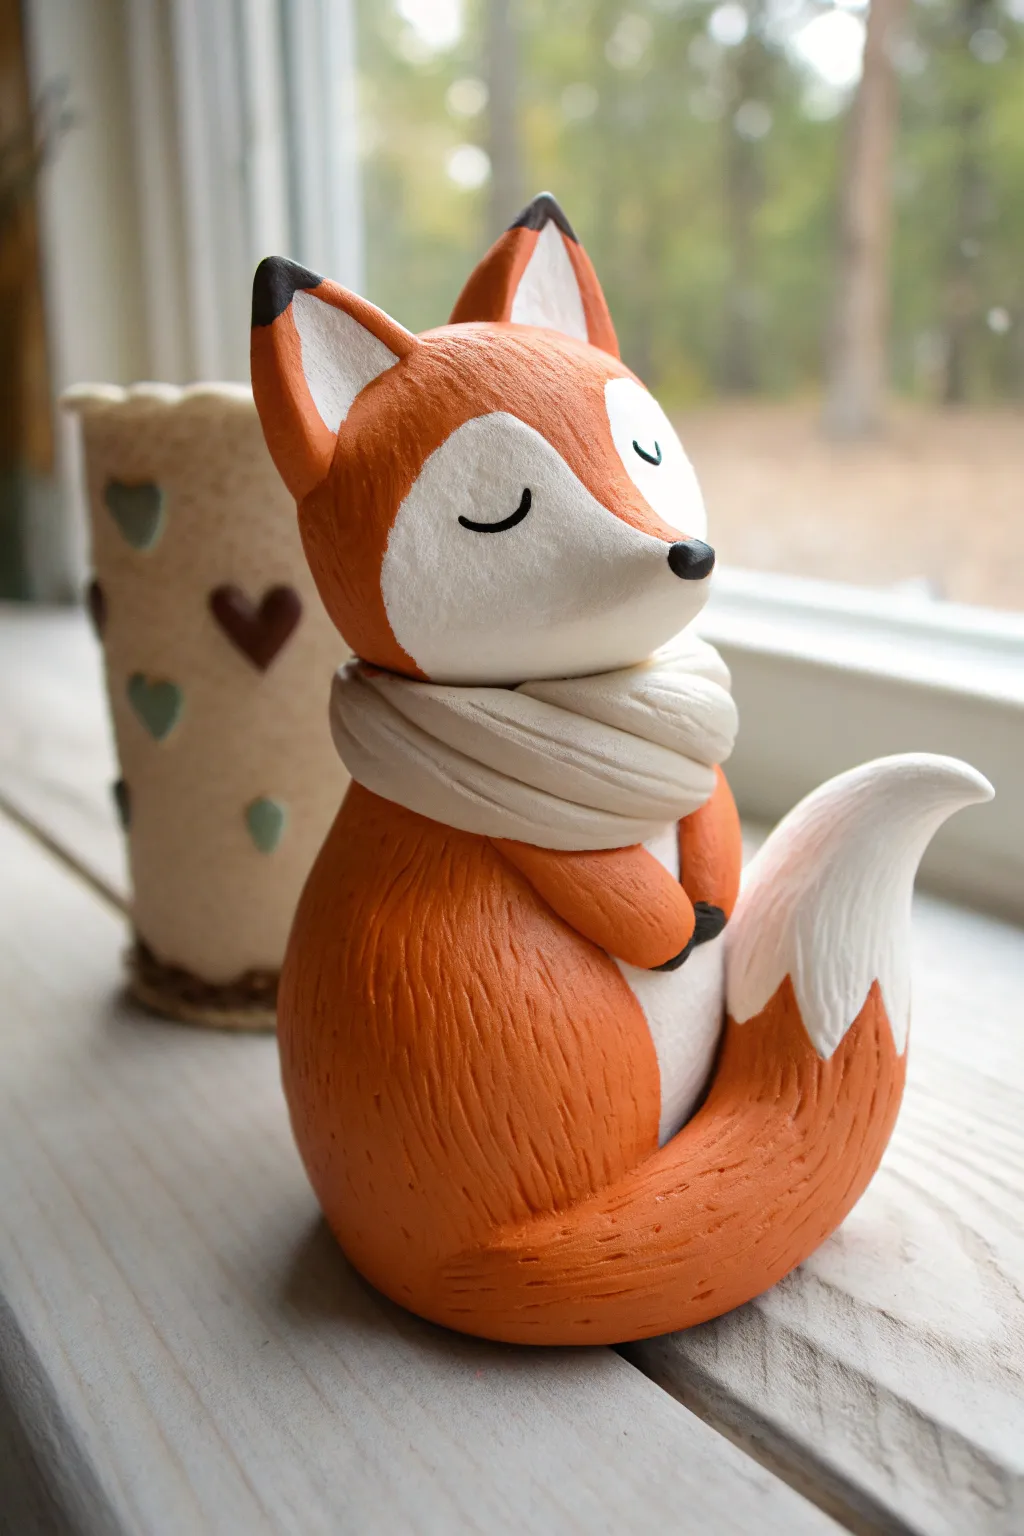
This adorable woodland friend captures the peaceful spirit of autumn with its oversized tail and warm, wrapped-up look. You’ll create a charming air-dry clay fox featuring a textured orange coat and a sweet, sleeping expression that’s perfect for any windowsill.
Detailed Instructions
Materials
- White air-dry clay
- Acrylic paints (orange, white, black, light beige)
- Fine grit sandpaper
- Clay sculpting tools (needle tool, modeling tool)
- Needle or texture brush
- Water cup and small sponge
- Foil (for armature)
- Fine liner paintbrush
- Flat shader paintbrush
- Matte varnish or sealant
Step 1: Sculpting the Body & Head
-
Create the core:
Begin by crumpling a piece of aluminum foil into a teardrop shape. This will be the armature for the main body, helping the figure stay light and dry evenly. It should be roughly the size of a lemon. -
Wrap the body:
Roll out a slab of white air-dry clay about 1/4 inch thick. Wrap this completely around your foil teardrop, smoothing the seams together with a bit of water until you have a seamless, egg-like shape with a flat bottom for stability. -
Form the head:
Roll a smaller ball of clay for the head. Shape it slightly into a rounded triangle to suggest a snout. attach this to the top of the body using the score-and-slip method: scratch both connecting surfaces, add a dab of water, and press firmly together. -
Add the ears:
Shape two small triangles for the ears. Attach them to the top of the head, blending the clay at the base downwards into the skull so they look seamless and perky.
Fur Texture Tip
Work in rows from bottom to top when scratching fur texture. This mimics how real fur layers naturally and hides your tool marks.
Step 2: Adding the Tail & Limbs
-
The oversized tail:
Create a large, curved sausage shape of clay. It should be nearly as big as the body itself. Taper one end to a point. Attach the thicker end to the lower back of the body, curving it around the side so the tip points upward. -
Sculpt the paws:
Roll two small sausage shapes for arms. Attach them to the upper chest area, angling them inward as if the fox is tucking its paws into a muff or just resting them politely. -
Refine the snout:
Smooth the face area. Add a tiny rounded triangle of clay to the very tip of the snout for the nose.
Step 3: Texturing & Accessories
-
Create the fur texture:
Using a needle tool or a stiff texture brush, gently scratch short, directional lines all over the orange parts of the fox (body, ears, outer tail). Leave the face mask, tummy area, and tail tip smooth. -
Fashion the scarf:
Roll a long, thin snake of clay. Flatten it slightly to create a ribbon shape. Wrap this loosely around the fox’s neck, stacking the coils to look like a thick, cozy woolen scarf. -
Detail the scarf:
Use a modeling tool to press indentations into the scarf coils, mimicking the folds of fabric. -
Let it dry:
Allow your sculpture to dry completely. Depending on the thickness and your climate, this usually takes 24-48 hours. Turn it occasionally to ensure even airflow.
Cracking Clay?
If small cracks appear while drying, mix a tiny bit of fresh clay with water to make a paste and smooth it into the gaps.
Step 4: Painting & Finishing
-
Base coat:
Once fully dry, paint the body, ears, and main part of the tail with a bright, warm orange acrylic paint. I find that two thin coats give better coverage than one thick one. -
White accents:
Paint the face mask, the inner ears, and the tip of the tail white. Use a smaller brush to create the curved ‘mask’ line on the face. -
Painting the scarf:
Paint the scarf a soft beige or cream color. If you want depth, you can add a very watered-down brown wash into the crevices and wipe the surface clean. -
Facial features:
Using your finest brush or a black paint pen, carefully draw two closed eyelids in a ‘U’ shape. Paint the nose black and add black tips to the ears. -
Seal the work:
Finish by applying a coat of matte varnish to protect the paint and detailed texture.
Place your sleeping fox near a window to enjoy the cozy vibes all season long
Baby Elephant With Big Ears
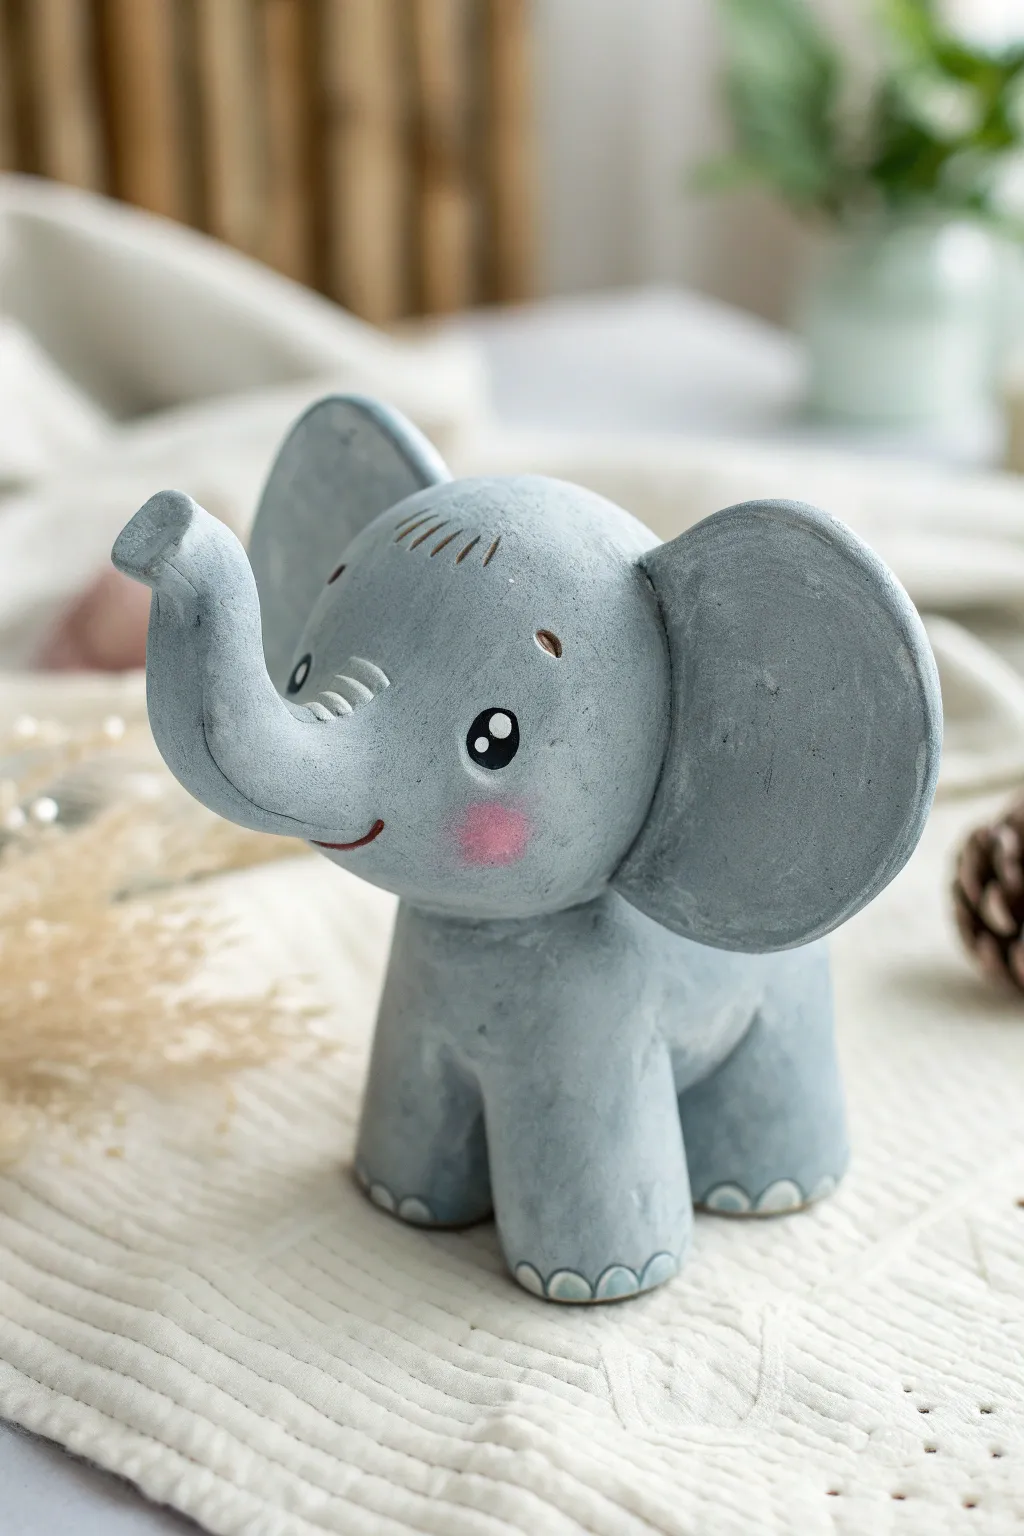
Sculpt a gentle giant with oversized ears and a sweet expression using soft grey air-dry clay. This charming figurine features delicately etched details, rosy cheeks, and sturdy feet, making it a perfect decorative piece for a nursery or desk.
Step-by-Step Guide
Materials
- Grey air-dry clay (or white clay + black acrylic paint)
- Small amount of pink pastel chalk or blush
- Rolling pin
- Modeling tools (needle tool, ball tool, clay knife)
- Black acrylic paint
- White acrylic paint
- Fine detail paintbrush
- Small sponge or cotton swab
- Wire or toothpicks (for internal support)
- Water and a small brush (for smoothing)
Step 1: Forming the Body and Head
-
Prepare the clay:
Begin by conditioning your grey clay until it is soft and free of cracks. If you don’t have grey clay, knead a very small drop of black paint into white clay until you achieve a uniform light grey tone. -
Shape the body:
Roll a smooth ball of clay about the size of a tangerine. Gently flatten the bottom against your work surface so it stands upright, and slightly elongate the top where the neck will connect. -
Create the legs:
Roll four thick, equal-sized logs of clay for the legs. They should be sturdy and slightly wider at the bottom. -
Attach the legs:
Score the attachment points on both the body and the tops of the legs with a needle tool. Apply a tiny bit of water and press the legs firmly onto the four corners of the body’s base. -
Smooth the seams:
Use a modeling tool or your finger to blend the clay from the legs upward into the body until the seams disappear completely. This ensures structural integrity. -
Detail the toes:
Press small, semi-circle indentations around the bottom front edge of each foot to mimic nails. You can paint these white later or leave them as texture. -
Shape the head:
Roll a second ball of clay, slightly smaller than the body. Insert a toothpick or small piece of wire into the body’s neck area, then press the head onto the support.
Droopy Ear Fix
If the large ears act heavy and won’t stay upright, prop them up with crumpled paper towels or small sponges. Leave these props in place for at least 6 hours until the clay hardens.
Step 2: Adding Features and Ears
-
Sculpt the trunk:
Roll a tapered rope of clay. Attach the thicker end to the center of the face, blending the seams thoroughly. Curl the trunk upwards in a ‘J’ shape. -
Refine the trunk tip:
Press the very end of the trunk flat and use a tool to create a small indentation for the nostril opening. -
Add trunk wrinkles:
Use a knife tool to gently press horizontal lines across the top curve of the trunk for realistic texture. -
Create the big ears:
Flatten two large circles of clay. They should be quite thick (about 4-5mm) to hold their shape. Pinch one side of each circle to create a flat attachment tab. -
Attach the ears:
Score the sides of the head and the ear tabs. Press the ears firmly onto the head, positioning them wide and slightly cupped forward. Support them with small props while they dry if they droop. -
Add hair details:
Using a sharp needle tool or knife, etch three or four small hair lines on the very top of the head.
Step 3: Painting and Finishing
-
Dry partially:
Allow the figure to dry for a few hours until the surface is firm enough to paint without denting. -
Paint the eyes:
Using black acrylic paint and a fine brush, paint two large oval eyes. Once dry, add a small white dot near the top of each oval for a ‘sparkle’ effect. -
Add the smile:
Paint a very thin, curved line in black or dark brown just under the trunk for the mouth, adding a tiny tick mark at the corner. -
Detail the eyebrows:
Paint small, floating eyebrows above the eyes using a watered-down brown or grey paint. -
Apply rosy cheeks:
Take a cotton swab or a dry brush and dab it into pink pastel chalk dust or blush. Gently buff circular pink spots onto the cheeks below the eyes. -
Final drying:
Let the entire project dry completely for 24-48 hours before handling.
Make it a Bank
Before attaching the head, verify the body is hollow or sculpted around a foil core. Cut a coin slot in the back and add a removable stopper underneath to turn this cute figure into a custom piggy bank.
Now you have an adorable elephant companion ready to brighten up your shelf
Axolotl With Frilly Gills
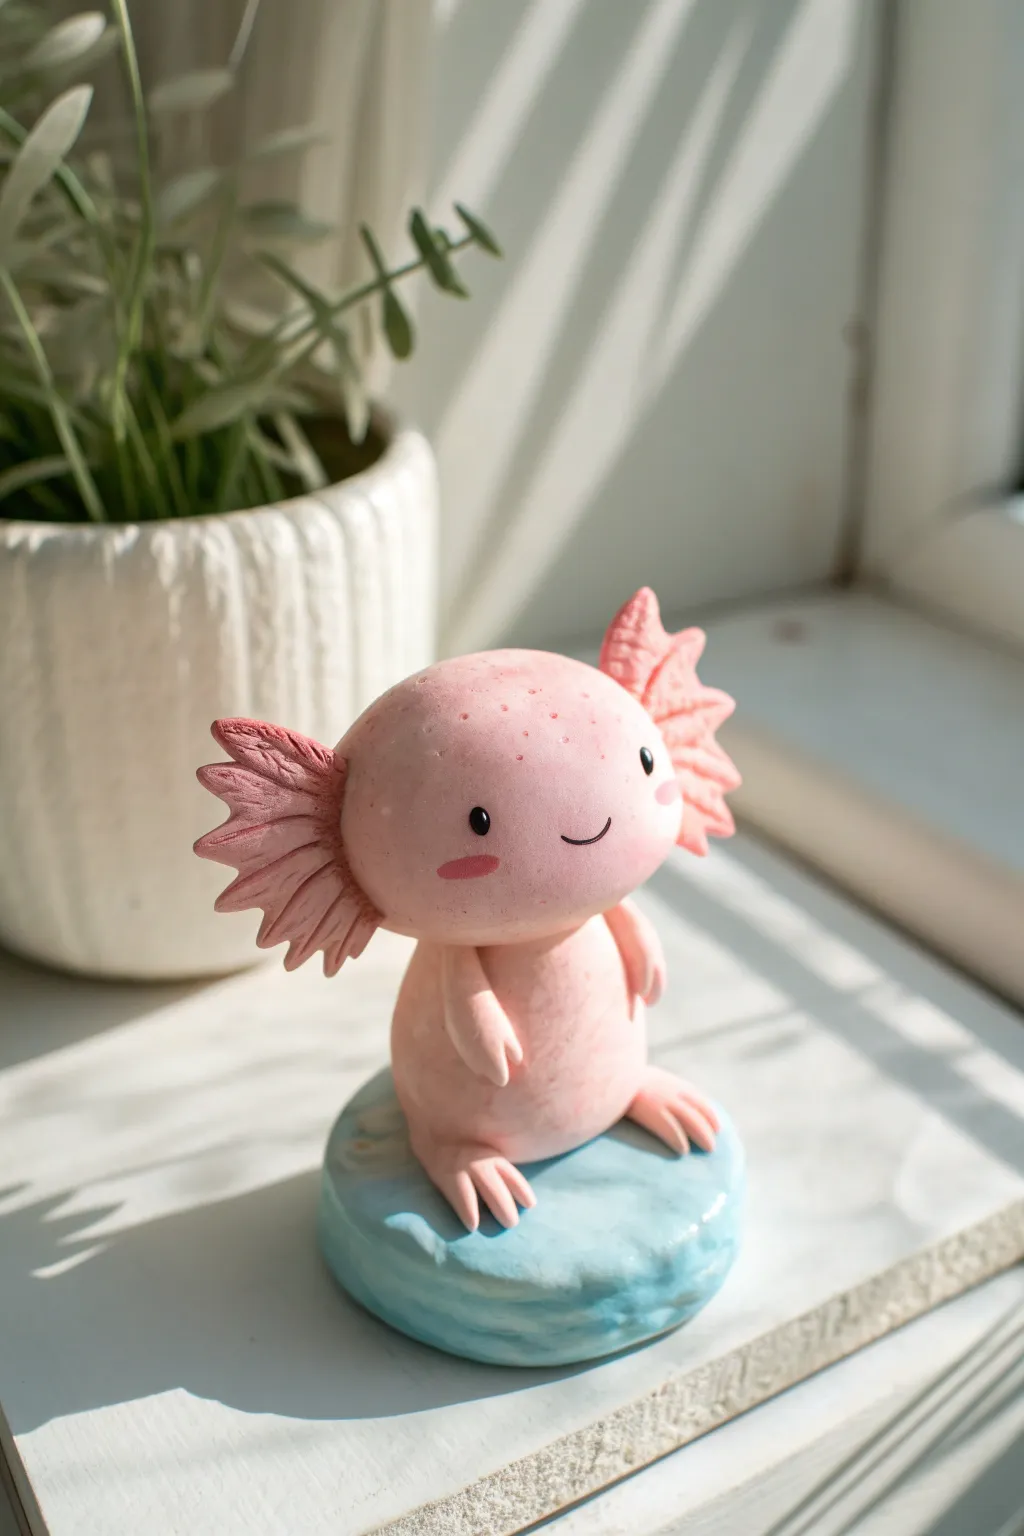
Capture the charm of this beloved aquatic creature with a project that focuses on soft curves and delicate details. This standing axolotl figure, with its signature frilly gills and sweet smile, sits proudly on a custom water-themed base.
Detailed Instructions
Materials
- Air dry clay (white)
- Acrylic paints (light pink, dark pink, blue, white, black)
- Clay sculpting tools (needle tool, small ball tool)
- Water for smoothing
- Paintbrushes (fine detail and flat)
- Cardboard or foil for armature (optional)
- Varnish or sealant (matte or satin)
Step 1: Basic Forms
-
Mix your pink:
Start by tinting a large ball of white air dry clay with a very small amount of pink acrylic paint. Knead it thoroughly until the color is a consistent, pale pastel pink. It’s better to start lighter; the clay often dries darker. -
Shape the body:
Pinch off about a third of your pink clay. Roll it into a smooth ball, then gently elongate it into a pear shape. Tap the bottom flat on your work surface so it stands upright securely. -
Form the head:
Use the remaining larger portion of pink clay for the head. Roll a clean sphere, pressing it gently between your palms to flatten it just slightly into a rounded oval shape. It should look a bit oversized compared to the body for that cute factor. -
Connect the pieces:
Score the top of the body and the bottom of the head with a needle tool to create rough textures. Add a dab of water or liquid clay (slip) to these areas and press them firmly together. I like to blend the clay slightly at the neck seam to ensure a strong bond.
Head Too Heavy?
If the head keeps drooping or looking unstable, insert a toothpick or a short piece of wire into the body and neck before attaching the head. This acts as an internal spine while the clay dries.
Step 2: Limbs and Gills
-
Create the arms:
Roll two small, equal-sized logs of pink clay. Attaching them to the upper torso, smooth the shoulder joint into the body. Use a small tool to press indentations for fingers at the ends. -
Add the feet:
Form two slightly flatter ovals for the feet. Attach them to the bottom front of the body. Use a knife tool to cut two small notches in each foot, creating three distinct toes. -
Shape the gill stalks:
For the signature external gills, create six flattened, leaf-shaped pieces of pink clay. You’ll need three for each side of the head. -
Detail the frills:
Before attaching, use a needle tool or knife to score small horizontal lines or notches along the edges of these leaf shapes to mimic the feathery gill texture shown in the photo. -
Attach the gills:
Score and slip the contact points on the side of the head. Press three gills onto each side, arranging them in a fan shape behind the cheeks. Smooth the connection points carefully.
Step 3: The Water Base
-
Form the base:
Take a fresh lump of white clay and color it light blue, or leave it white to paint later. Flatten it into a thick, irregular disc shape, roughly the width of a coaster. -
Texture the water:
While the clay is soft, use your fingers to create gentle waves and ripples on the surface. Ensure there is a flat spot in the center for the axolotl to stand. -
Mount the figure:
Place your assembled axolotl onto the flat spot on the base. Apply a little water or slip underneath the figure and press down gently to adhere it permanently as it dries. -
Dry thoroughly:
Allow the entire sculpture to dry completely. This usually takes 24-48 hours depending on humidity and thickness.
Transparent Water Effect
Instead of a clay base, dry your axolotl separately. Create a base using clear UV resin dyed with a drop of blue ink. Cure the resin, then glue your figure on top for a realistic ‘water’ look.
Step 4: Painting and Finishing
-
Paint the gills and cheeks:
Mix a slightly darker shade of pink acrylic paint. Carefully paint the feathery gills and dry brush two soft oval blushes onto the cheeks below the eyes. Add some tiny speckles on the forehead for texture. -
Paint the face:
Using a very fine brush and black paint, add two wide-set eyes and a simple, small curved smile right between them. Add tiny white dots to the eyes for a reflective sparkle. -
Enhance the base:
If you used white clay for the base, paint it light blue now. Mix a little white into the blue and highlight the raised ridges of the ‘water’ to give it depth. -
Seal the work:
Once all paint is dry, apply a coat of satin or matte varnish. This protects the clay and gives the axolotl distinct smooth finish.
Now you have a charming little amphibious friend to brighten up your desk
Snails With Swirly Shells
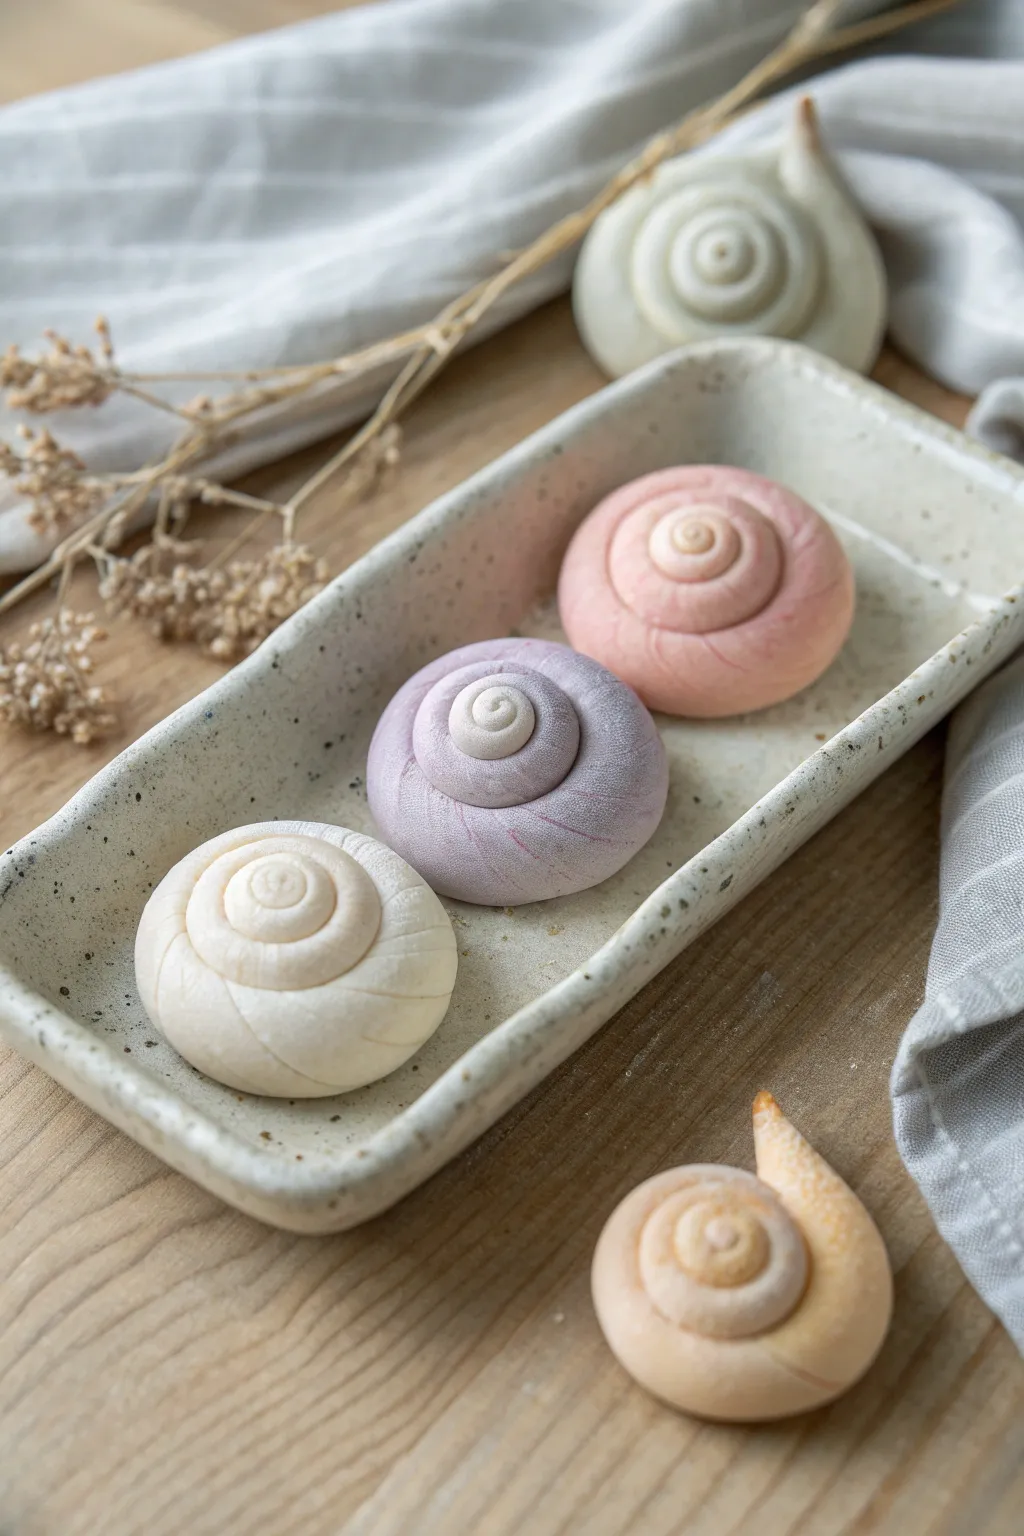
These elegant, minimalist snail shells bring a touch of seaside charm to your desk or shelf with their soft pastel hues and perfectly coiled spirals. The smooth, matte finish gives them a sophisticated ceramic look without the need for a kiln.
Step-by-Step
Materials
- High-quality white air dry clay (smooth, fine grain)
- Acrylic paints (pastel pink, purple, light orange)
- Rolling pin or smooth glass bottle
- Clay knife or plastic sculpting tool
- Small sponge for smoothing
- Needle tool or toothpick
- Fine-grit sandpaper (optional)
- Small bowl of water
Step 1: Preparing the Colors
-
Mixing the Clay:
Begin by separating your white clay into three equal portions. Keep one portion white. -
Creating Pastels:
Take a tiny dot of pastel pink paint and knead it thoroughly into the second portion until the color is uniform. Repeat this with the purple paint for the third portion, aiming for very soft, muted tones. -
Conditioning:
Roll each ball of clay in your hands for a few minutes to warm it up and ensure it is free of cracks.
Step 2: Forming the Spirals
-
Rolling a Coil:
Starting with the pink clay, roll it on a clean surface into a long, tapered snake. One end should be thicker (about 3/4 inch) and gradually taper to a thin point. -
Flattening the Strip:
Gently press down along the length of the coil with your finger or a roller just enough to flatten it slightly, creating a ribbon shape that is thicker on one edge than the other. -
Starting the Center:
Take the thinnest end of your clay ribbon and begin curling it tightly inward to create the center ‘eye’ of the shell. -
Winding the Shell:
Continue winding the clay strip around the center point. As you wind, overlap the previous layer slightly so the shell builds outward and upward in a dome shape. -
Finishing the Shape:
Once you reach the thickest end, tuck the tail underneath the shell body and blend it smoothly into the base so it disappears.
Smooth Operator
Keep a wet wipe nearby to clean your hands between colors. Any pink residue on your fingers will stain the pristine white clay instantly.
Step 3: Texturing and Refining
-
Smoothing the Seams:
Dip your finger or a small sponge in water and very lightly run it over the surface to bond the coils together while keeping the spiral definition visible. -
Adding Texture Lines:
Using the back of a knife or a sculpting tool, gently impress curved lines radiating from the center outward to mimic natural growth ridges. -
Defining the Center:
I find it helpful to use a small ball tool or a rounded chopstick end to gently press the very center spiral down, giving the shell more dimension. -
Creating the White and Purple Shells:
Repeat the rolling and winding process with your white and purple clay batches. -
Making the Pointed Variant:
For the solitary shell outside the dish, roll a shorter, thicker cone shape first, then wrap a thin clay snake purely around the surface to create ridges, pulling the tip into a sharper point.
Cracking Up?
If you see tiny hairline cracks forming as you coil the clay, your clay is too dry. Dip your finger in water and smooth the crack immediately to reseal it.
Step 4: Drying and Finishing
-
Initial Drying:
Place the finished shells on a piece of parchment paper or a drying rack in a cool, dry place. -
Rotating:
After about two hours, gently turn the shells over to let the underside breathe and dry evenly. -
Final Cure:
Allow the shells to dry completely for 24 to 48 hours, depending on humidity. -
Sanding:
Once fully hard, inspect for any rough fingerprints. Lightly buff them away with fine-grit sandpaper for that pristine ceramic look. -
Optional Wash:
If you want to highlight the ridges, brush on a very diluted darker paint wash and wipe it off immediately, leaving pigment only in the crevices.
Now you have a collection of serene, beach-inspired treasures to display
Stubby Dino Mini Set

These delightfully chunky dinosaur figures bring a soft, prehistoric charm to any windowsill with their marshmallow-like shapes and pastel hues. With just a few simple forms and some gentle sculpting, you can create your own gentle herd of stubby-legged friends.
Step-by-Step Tutorial
Materials
- Air dry clay (white)
- Acrylic paints (pastel mint green, butter yellow, soft pink, deep rose, white, black)
- Sculpting tools (needle tool, ball tool, or a toothpick)
- Water in a small cup
- Palette or small plate for mixing
- Small synthetic paintbrushes
- Fine-grit sandpaper (optional)
- Matte varnish or sealant (optional)
Step 1: Sculpting the Base Forms
-
Condition the clay:
Start by taking a golf-ball-sized amount of air dry clay for one dinosaur. Knead it thoroughly in your hands until it feels warm, pliable, and free of cracks. -
Form the body:
Roll the clay into a smooth ball first, then gently roll one side against your work surface to create a teardrop or pear shape. The fat end will be the body, and the tapered end will become the tail. -
Define the head:
Instead of attaching a separate head, gently pinch and pull the wider part of your pear shape upwards to distinguish a head area. It should look like a smooth, seamless lump rather than a distinct neck and head. -
Create the legs:
Roll two small, pea-sized balls for the feet. Flatten the bottoms slightly against the table, then press them onto the bottom front of the body to form stubby legs. Use a little water to blend the clay seams until invisible. -
Shape the tail:
Refine the tail by gently curving it upwards or to the side. Smooth it out so it flows naturally from the back of the body.
Step 2: Adding Spikes and Details
-
Make the spikes:
Roll a series of tiny clay triangular pyramids or cones. You will need about roughly 6-8 per dinosaur, graduating in size from larger for the back to tiny for the tail tip. -
Attach the spine:
Score the back of the dinosaur lightly with your needle tool where the spikes will go. Dab a tiny amount of water on the base of each spike and press them firmly along the spine. -
Blend the seams:
Use a rubber sculpting tool or just your finger dipped in water to smooth the base of each spike into the body so they don’t pop off later. -
Drying time:
Let your sculpted dinos dry completely. This usually takes 24-48 hours depending on humidity. I like to rotate them occasionally so the bottom dries evenly. -
Sanding (Optional):
Once fully dry, if you see any rough fingerprints or bumps, gently buff them away with fine-grit sandpaper for a professional matte finish.
Cracks Appearing?
If you see tiny cracks forming while the clay dries, mix a small amount of clay with water to make a ‘slip’ paste. Paint this into the cracks and smooth it over with your finger.
Step 3: Painting and Finishing
-
Apply base color:
Choose your pastel shade (mint, yellow, or pink). Paint the entire body, avoiding the belly area if you can, though it’s okay to paint over it and layer later. Apply 2-3 thin coats for opacity. -
Paint the belly:
Mix a creamy off-white color. Paint a rounded oval shape on the chest/belly area. This might need two coats to look solid against the body color. -
Add texture dots:
Using the same off-white belly color, use a fine brush or a dotting tool to add scattered speckles on the back and sides. Keep them irregular and organic. -
Detail the face:
Dip the very end of a toothpick or a tiny detail brush into black paint. Dot two small eyes wide apart on the face. -
Create the smile:
With the finest brush you have (or a fine-tip black marker), draw a tiny, curved smile line just below the eyes. -
Final protection:
To protect your paint job, apply a coat of matte varnish. This keeps the soft, chalky look while sealing the clay against moisture.
Glittery Scales
Mix a tiny pinch of iridescent glitter into your final varnish coat, but only apply it to the spikes. This gives them a magical, shimmering effect in the sunlight.
Arrange your colorful herd on a shelf and enjoy the prehistoric cuteness
Stacked Animal Totem Sculptures
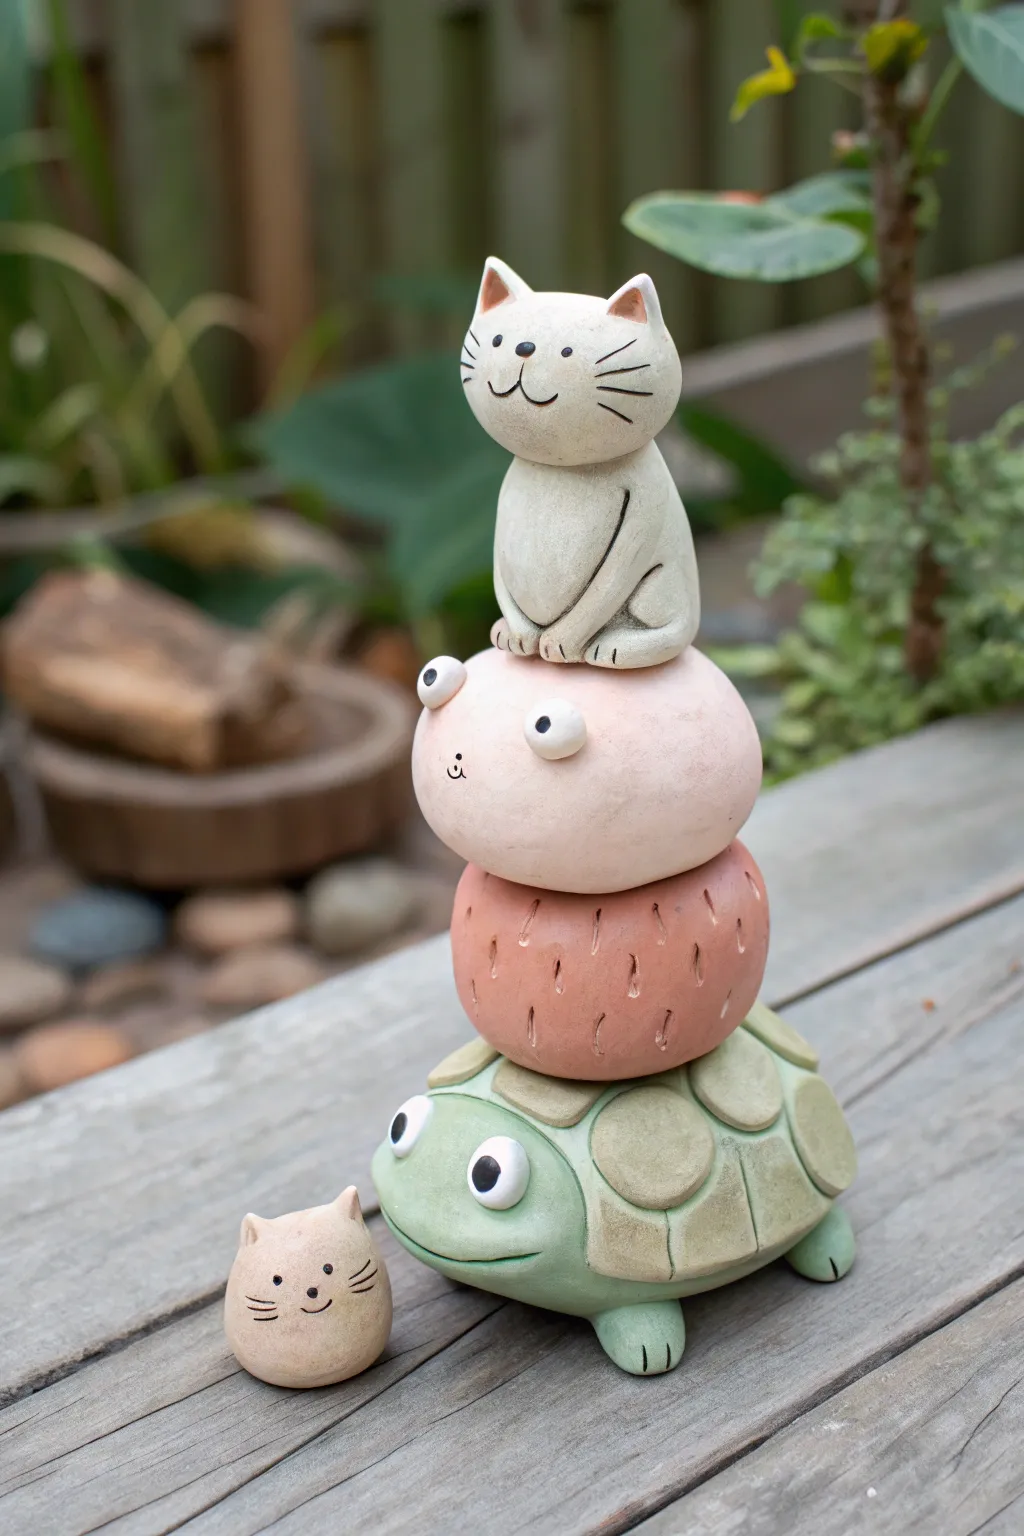
Bring a touch of charm to your garden or desk with this adorable stacked sculpture featuring a sturdy turtle, quirky round critters, and a triumphant cat on top. The soft pastel colors and simple shapes make this project approachable for beginners while offering plenty of personality.
Step-by-Step
Materials
- Air dry clay (white)
- Acrylic paints (sage green, pastel pink, soft coral, cream/off-white, black)
- Clay sculpting tools (needle tool, ball stylus)
- Water cup and sponge
- Paintbrushes (detail and flat)
- Sandpaper (fine grit)
- Matte varnish or sealant
- Aluminum foil (for armature core)
Step 1: Sculpting the Turtle Base
-
Form the shell:
Start by creating a crumpled ball of aluminum foil about the size of a tangerine to use as a core; cover this with an even layer of clay, smoothing it into a dome shape for the turtle’s shell. -
Add the head and limbs:
Roll a medium ball of clay for the head and attach it to the front of the shell, blending the seams with a little water. Create four small, flattened ovals for legs and attach them underneath the shell so they peek out. -
Create shell texture:
Roll out a thin sheet of clay and use a small circular cookie cutter or bottle cap to cut out circles. Attach these to the shell’s surface in a slightly overlapping pattern to mimic scutes. -
Sculpt the face:
Use a sculpting tool to carve a wide, gentle smile. Roll two tiny white balls for eyes, press them onto the face, and add even tinier black clay pupils (or paint them later).
Help, My Tower Is Leaning!
If the stack feels unstable, insert a wooden skewer or toothpick through the center of the wet clay pieces (like a shish kebab) while building to act as an internal spine.
Step 2: Building the Totem Stack
-
Mold the middle tiers:
Form two slightly flattened spheres for the middle sections. One should be slightly larger (the coral ‘strawberry’ layer) and one slightly smaller (the pink ‘marshmallow’ blob). -
Texture the tiers:
For the coral layer, use a needle tool to press small, vertical indentations all around the surface to give it a seed-like texture. Keep the pink layer smooth, but add a tiny, simple face with small clay eyes and a carved mouth. -
Sculpt the top cat:
Shape a pear-like form for the cat’s body and head. Pull up two triangles for ears at the top. Use a tool to carve lines separating the front legs from the body to make it look like it is sitting. -
Refine the cat’s details:
Press a needle tool into the cheeks to create whisker markings. Add a tiny triangle nose and a curved mouth. I like to smooth the ears gently with a damp finger to ensure they aren’t too sharp. -
Create the mini companion:
With leftover clay, roll a small ball to make the separate cat head visible at the bottom. Pinch ears at the top and carve a matching face. -
Stack and dry:
Ideally, let the pieces dry separately so you can paint them easily. If you want a permanent bond now, score and slip the contact points (turtle shell, middle blobs, cat bottom) and press them gently together. Let everything dry for 24-48 hours.
Pro Tip: Seamless Seams
Use a wet paintbrush instead of your finger to smooth out the joints where limbs attach. It reaches crevices better and leaves no fingerprints behind.
Step 3: Painting and Finishing
-
Smooth the surface:
Once fully dry, gently sand any rough fingerprints or bumps with fine-grit sandpaper. Wipe away the dust with a slightly damp cloth. -
Paint the turtle:
Mix a soft sage green and paint the turtle’s head and legs. Use a slightly lighter, creamy green for the shell scutes to create dimension. -
Color the middle layers:
Paint the bottom stacked blob a muted coral or terracotta color. Paint the blob above it a very pale pastel pink. -
Paint the cats:
Use an off-white or cream color for the top cat and the small companion head. This gives them a natural, ceramic look compared to stark white. -
Add fine details:
Using a very fine brush and black paint, carefully fill in the eyes, noses, mouths, and whisker lines on all creatures. Add the ‘seed’ details on the coral layer in a darker shade or brown. -
Seal the project:
Protect your work with a coat of matte varnish. This will unify the sheen and keep the paint from chipping over time.
Place your totems on a shelf or in a planter to enjoy their sturdy, silent company