If you’ve got a block of blue clay sitting on your table, you’re already halfway to something adorable. I love how blue-toned clay instantly turns simple shapes into sweet little sea friends, chubby birds, and dreamy mini keepsakes.
Chubby Blue Octopus Charm
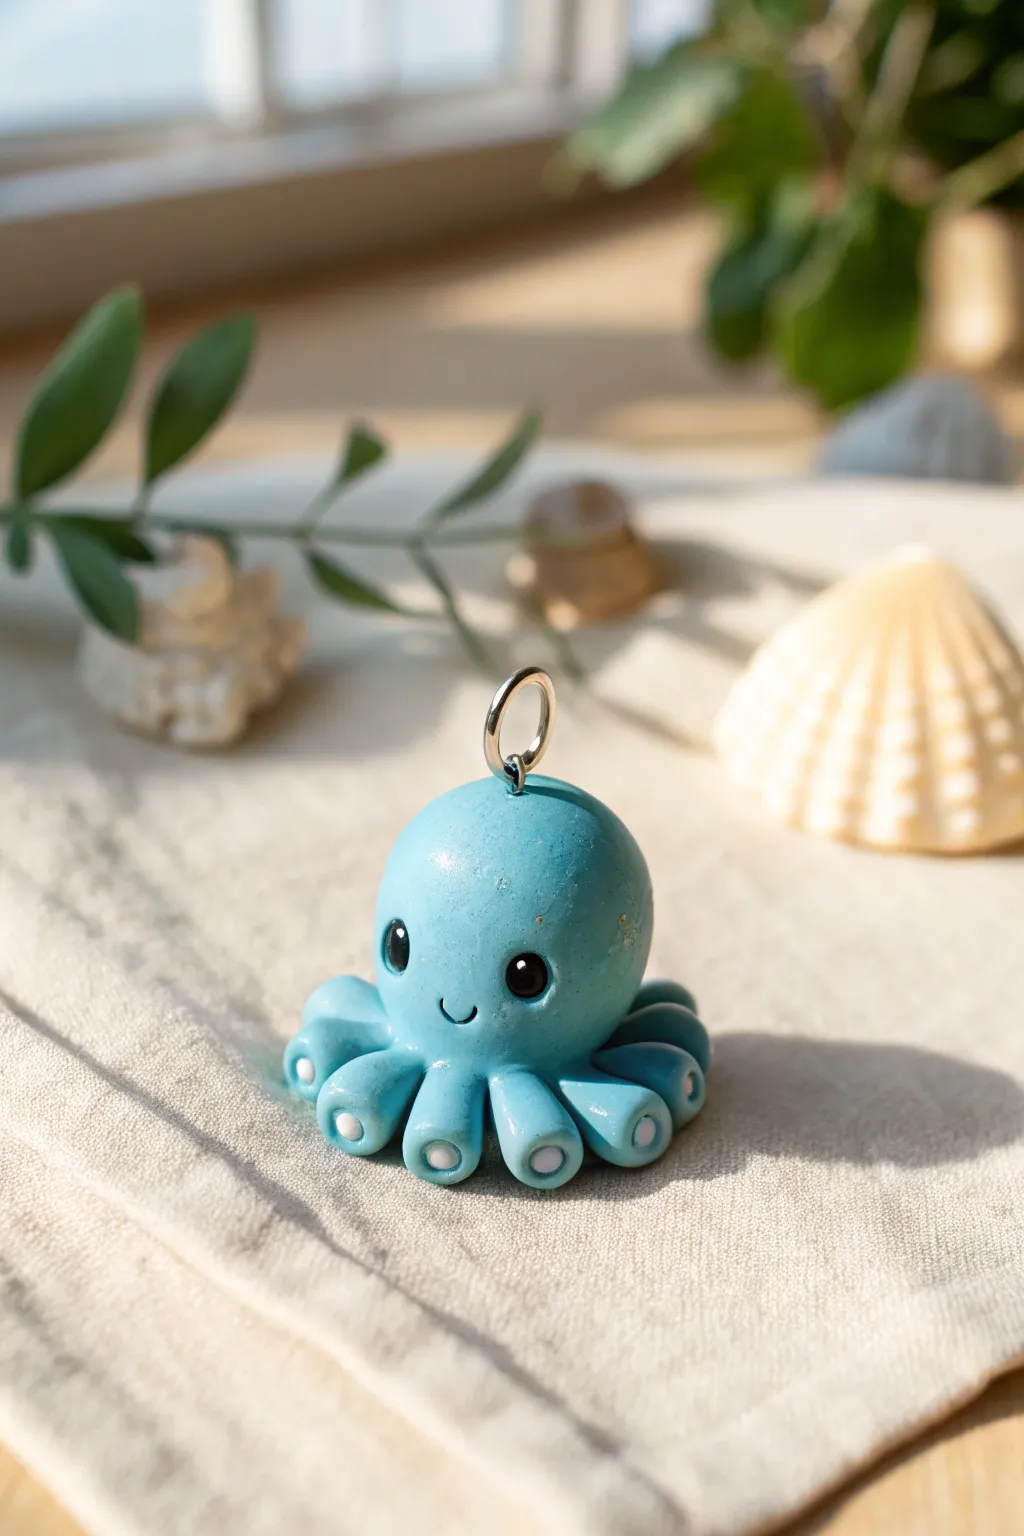
This adorable little sea creature features smooth, rounded forms and a friendly expression that practically guarantees a smile. With its curled tentacles and petite size, it makes for a perfect keychain or necklace pendant.
Step-by-Step Tutorial
Materials
- Light blue polymer clay
- White polymer clay
- Black polymer clay
- Ball stylus tool (small)
- Needle tool or toothpick
- Silver screw eye pin or jump ring
- Gloss glaze or polyurethane varnish
- Soft paintbrush
- Oven for baking
Step 1: Forming the Body
-
Condition the clay:
Start by kneading your light blue polymer clay until it is soft and free of cracks. Warm hands help this process go faster. -
Roll the main sphere:
Roll a smooth ball of blue clay about the size of a walnut or large gumball. This will be the main head and body. -
Shape the head:
Gently press the ball onto your work surface to flatten the bottom slightly so it sits upright, but keep the top perfectly round and dome-like. -
Create tentacle logs:
Take a new piece of blue clay and roll it into a long, thin snake, roughly 1/4 inch thick. Try to keep the thickness consistent. -
Section the legs:
Cut the snake into eight equal segments, each about 3/4 inch long. -
Taper the ends:
Roll one end of each segment gently between your fingers to create slightly tapered, rounded points.
Clean Clay Pro-Tip
Work with the lightest colors first (white, then blue, then black). Black clay residue stains fingers easily and can ruin your pristine blue body.
Step 2: Assembly and Detail
-
Attach the legs:
Press the thicker end of each tentacle segment onto the underside of the main body ball. Arrange them in a circle so they radiate outward. -
Curl the tips:
Gently curl the tapered end of each tentacle upward against the body. This gives the octopus its characteristic ‘chubby’ gathered look. -
Blend the seams:
flip the octopus over gently and use a smoothing tool or your finger to blend the clay where the legs meet the body base, ensuring they won’t fall off. -
Indent for suckers:
Using the small end of your ball stylus, press two small indentations into the curled-up front face of each tentacle. -
Add white suckers:
Roll tiny specks of white clay into balls. Place one into each indentation on the tentacles and flatten them slightly with the tool. -
Create eye sockets:
On the main head, use a larger ball tool to press two eye sockets in the middle of the face area, spaced widely apart for cuteness. -
Insert the eyes:
Roll two small balls of black clay. Press them into the sockets. I like to add a tiny pinprick of white clay to the black eyes for reflection, though plain black works too. -
Carve the smile:
Use a needle tool or the edge of a small circle cutter to impress a tiny, U-shaped mouth right between the eyes.
Hardware Troubleshooting
If the eye pin pulls out after baking, unscrew it, put a drop of superglue on the threads, and screw it back into the hole for a secure fix.
Step 3: Finishing Touches
-
Clean up prints:
Check the smooth head for any fingerprints. Gently buff them away with a drop of baby oil on your finger if needed. -
Insert hardware:
Twist the silver screw eye pin into the very top center of the head. Removing it, adding a dab of liquid clay or glue, and re-inserting it ensures a permanent hold. -
Bake:
Bake in your oven according to the manufacturer’s instructions for your specific brand of clay—usually 275°F (135°C) for 15–30 minutes. -
Glaze:
Once fully cooled, brush a coat of gloss glaze over the entire piece to give it that wet, shiny aquatic look seen in the photo.
Hang your shiny new friend on a bag or necklace to show off your clay modeling skills


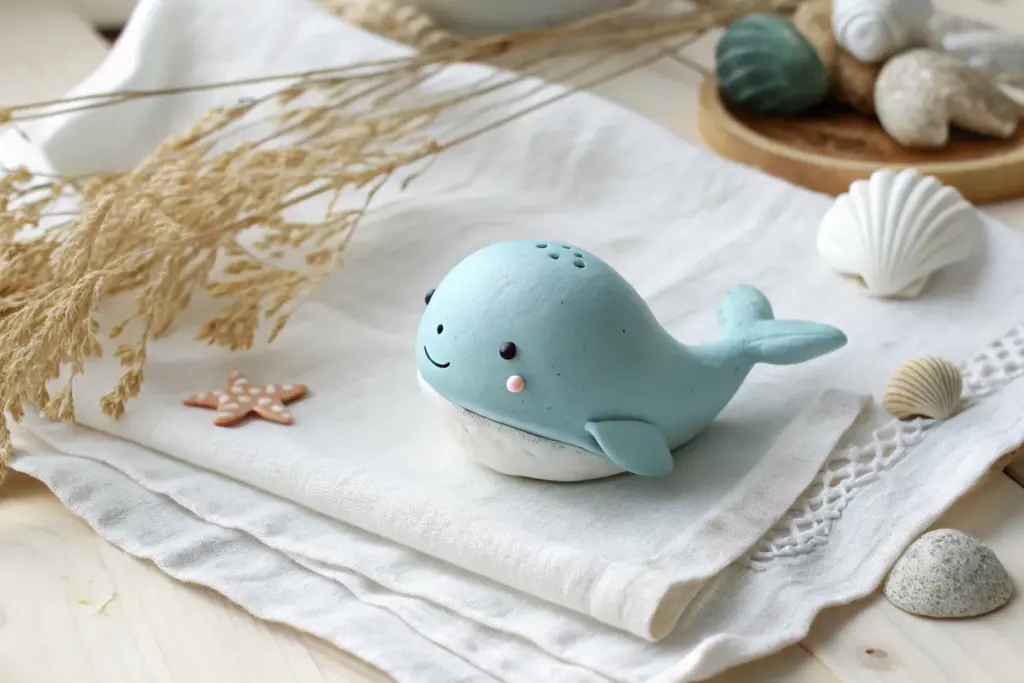
Tiny Blue Whale Desk Buddy
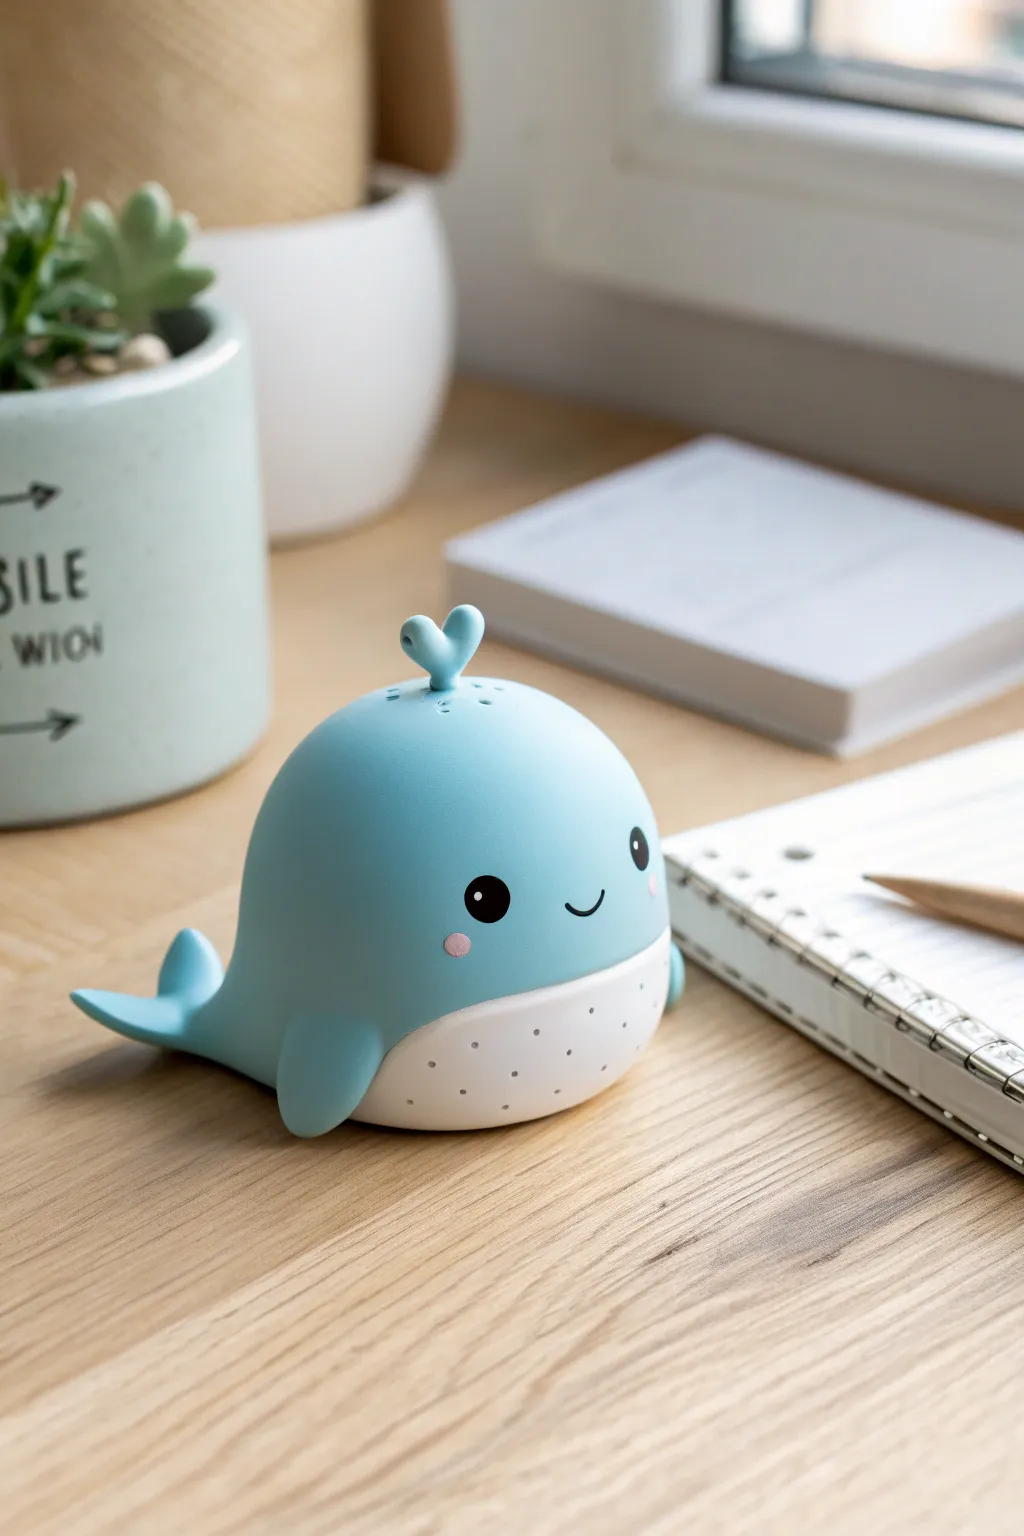
Bring the ocean to your workspace with this irresistibly cute blue whale figurine. With its smooth matte finish, heart-shaped spout, and speckled belly, it’s the perfect little companion to keep you company while you study or work.
Step-by-Step
Materials
- Light blue polymer clay (pastel or baby blue)
- White polymer clay
- Black polymer clay (tiny amount)
- Pink polymer clay or soft pastel (for blushing)
- Needle tool or toothpick
- Ball stylus tool (small)
- Clay roller
- Flexible cutting blade
- Oven for baking
- Matte varnish (optional)
Step 1: Shaping the Whale Body
-
Condition the clay:
Start by taking a generous amount of light blue clay and kneading it in your hands until it becomes soft, warm, and pliable. This conditioning step prevents cracks later on. -
Form the main shape:
Roll the blue clay into a smooth ball about the size of a tangerine. Then, gently roll it on your work surface to create a slight dome shape, flattening the bottom so it sits stable. -
Refine the dome:
Smooth out the dome with your fingers to ensure there are no fingerprints. The body should be round and plump, tapering slightly towards where the tail will attach. -
Create the belly:
Roll out a piece of white clay into a thin sheet. Use a circular cutter or your blade to cut a wide oval shape that will fit the bottom front of the whale. -
Attach the belly:
Gently press the white oval onto the lower front section of the blue dome. Use your thumbs to blend the edges slightly or just ensure it adheres seamlessly without trapping air. -
Add texture:
Using a needle tool or toothpick, gently poke small, shallow holes all over the white belly section to create a speckled texture. Keep the holes random but evenly spaced.
Smooth Sailing Tip
To get that ultra-smooth, matte finish like in the photo, wipe your unbaked clay gently with a baby wipe or a finger dipped in cornstarch to remove all lint and prints.
Step 2: Flippers and Tail
-
Make the flippers:
Roll two small pea-sized balls of blue clay. Flatten them slightly and shape them into rounded triangles or teardrops. -
Attach the flippers:
Press one flipper onto each side of the whale’s body, near the bottom edge. Curve the tips slightly upward or backward to give the whale a sense of movement. -
Form the tail:
Create a slightly larger flattened teardrop shape from blue clay. Use your blade to make a cut down the center of the wide end, then gently pull the two sides apart to form the flukes. -
Attach the tail:
Attach the tail to the back of the whale body. Seamlessly blend the clay where the pieces join using a sculpting tool so it looks like one solid piece. -
Shape the spout:
Roll a tiny bit of blue clay into a ‘V’ shape or a small heart. This will mimic the water spray coming from the blowhole. -
Position the spout:
Use a needle tool to poke a small indentation on the very top of the head. Place your heart-shaped spout into this indentation, securing it firmly.
Step 3: The Cute Face
-
Eye sockets:
I prefer to use a ball stylus to make two small indentations where the eyes will go. This helps the black clay sit flush against the face. -
Place the eyes:
Roll two tiny specks of black clay into balls. Press them into the eye sockets you just created. Add an even tinier speck of white clay to each eye for a highlight if you want extra sparkle. -
The smile:
Roll a microscopic snake of black clay. Curve it into a ‘U’ shape and gently press it into the clay between the eyes to create a simple, happy smile. -
Add rosy cheeks:
You can either use two tiny flattened circles of pink clay below the eyes, or brush on a little pink soft pastel powder with a brush for a softer blush effect. -
Final smoothing:
Give the entire piece one last look. Smooth away any accidental fingerprints with a drop of baby oil on your finger if needed. -
Bake carefully:
Bake the figurine according to your clay manufacturer’s instructions (usually 230°F – 275°F for 15-30 minutes). Let it cool completely before moving.
Falling Spout Fix
If the little heart spout keeps drooping or falling off during the sculpting process, use a tiny piece of wire or a cut paperclip as an internal armature pin to hold it upright.
Place your new aquatic friend on your desk and enjoy the serene vibes


Smiling Blue Dolphin Figurine
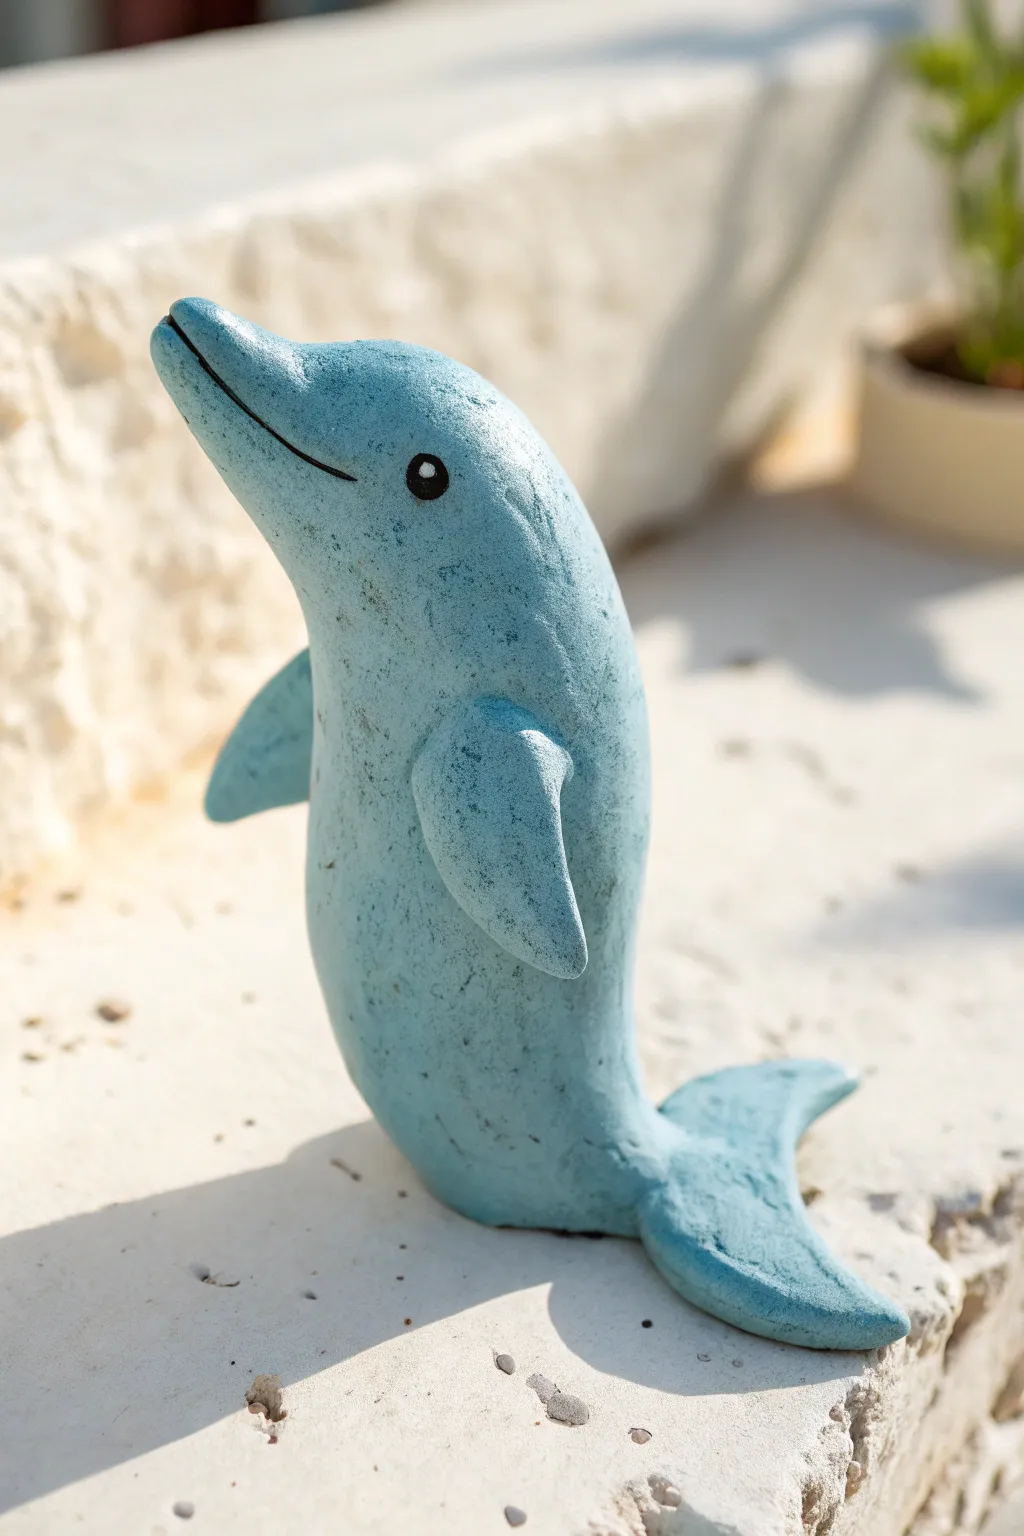
This cheerful dolphin figurine captures the playful spirit of the ocean in a charming, standing pose. With its textured, stone-like blue finish and simple, expressive face, it makes for a delightful desk companion or coastal decor piece.
Detailed Instructions
Materials
- Air-dry clay (white or grey)
- Acrylic paints: Light blue, teal, white, black
- Sculpting tools (needle tool, smoothing tool)
- Aluminum foil (for armature)
- Fine-grit sandpaper
- Texturing sponge or toothbrush
- Matte varnish or sealant
- Small paintbrushes (flat and fine liner)
Step 1: Forming the Core
-
Create a foil armature:
Crumple a piece of aluminum foil into a slightly curved, elongated cone shape. The wider bottom will be the base of the tail, tapering up to the head. This saves clay and keeps the figurine lightweight. -
Prepare the clay:
Knead your air-dry clay until it is soft and pliable. If it feels too dry, mist it lightly with water. -
Cover the armature:
Flatten a sheet of clay to about 1/4 inch thickness. Wrap this around your foil core, pressing it firmly to remove air pockets. Smooth the seams with a little water on your finger. -
Shape the body:
Refine the shape into a smooth, standing ‘S’ curve. The dolphin should look like it is balancing on its tail, with the chest protruding slightly forward.
Bumpy Surface?
If the clay dries with unwanted cracks, fill them with a slurry of clay and water (slip), let dry again, and sand smooth before painting.
Step 2: Sculpting Features
-
Form the head and snout:
At the top of the body, pinch and pull the clay gently to form a rounded snout (rostrum). Smooth the transition from the forehead to the nose so it looks organic. -
Add dorsal fin:
Roll a small triangle of clay. Score the back of the dolphin and the base of the fin, add a dab of water or slip, and attach the fin midway down the back. Blend the edges seamlessly into the body. -
Attach pectoral flippers:
Shape two smaller, flattened teardrop pieces for the flippers. Attach one on each side of the body, just below the neck area. Angle them slightly backward or outward for a lively gesture. -
Sculpt the tail flukes:
At the base, flatten the clay out into a horizontal tail shape. Split the end slightly to create the two flukes. Curve the tips upward to give the impression of movement and help balance the standing figure. -
Add facial details:
I find using a needle tool or a dull knife works best to carve a long, curving mouth line that gives the dolphin its signature smile. Mark small indentations where the eyes will be painted later. -
Create texture:
To mimic the stone-like finish in the photo, gently dab the surface with a coarse sponge or an old toothbrush. Avoid smoothing it perfectly; a little roughness adds character. -
Let it dry:
Allow the sculpture to dry completely. This usually takes 24-48 hours depending on humidity. Rotate it occasionally for even drying.
Step 3: Painting and Finishing
-
Sand imperfections:
Once fully dry, lightly sand any sharp ridges or unwanted bumps, but be careful not to remove the texture you created earlier. -
Base coat:
Mix a soft, stony blue using light blue and a touch of white. Paint the entire dolphin. It may need two coats for full opacity. -
Add depth:
While the blue is dry, use a very dry brush with a tiny amount of darker teal or grey paint. Lightly whisk this over the textured areas to highlight the ‘stone’ effect. -
Paint the eyes:
Using a fine liner brush and black paint, fill in the eye indentations with small, solid black circles. Add a tiny white dot in the upper corner of each eye for a reflective glint. -
Define the smile:
Carefully run a thin line of black paint or a fine waterproof marker along the carved mouth line to make the smile pop. -
Seal the piece:
Protect your work with a matte varnish. Avoid glossy finishes if you want to maintain that natural, earthy look shown in the reference image.
Pro Tip: Balanced Base
Make the tail flukes slightly larger and flat on the bottom to ensure the dolphin stands upright securely without tipping over.
Place your finished dolphin on a shelf where its friendly smile can greet you every day


Baby Blue Turtle With Textured Shell
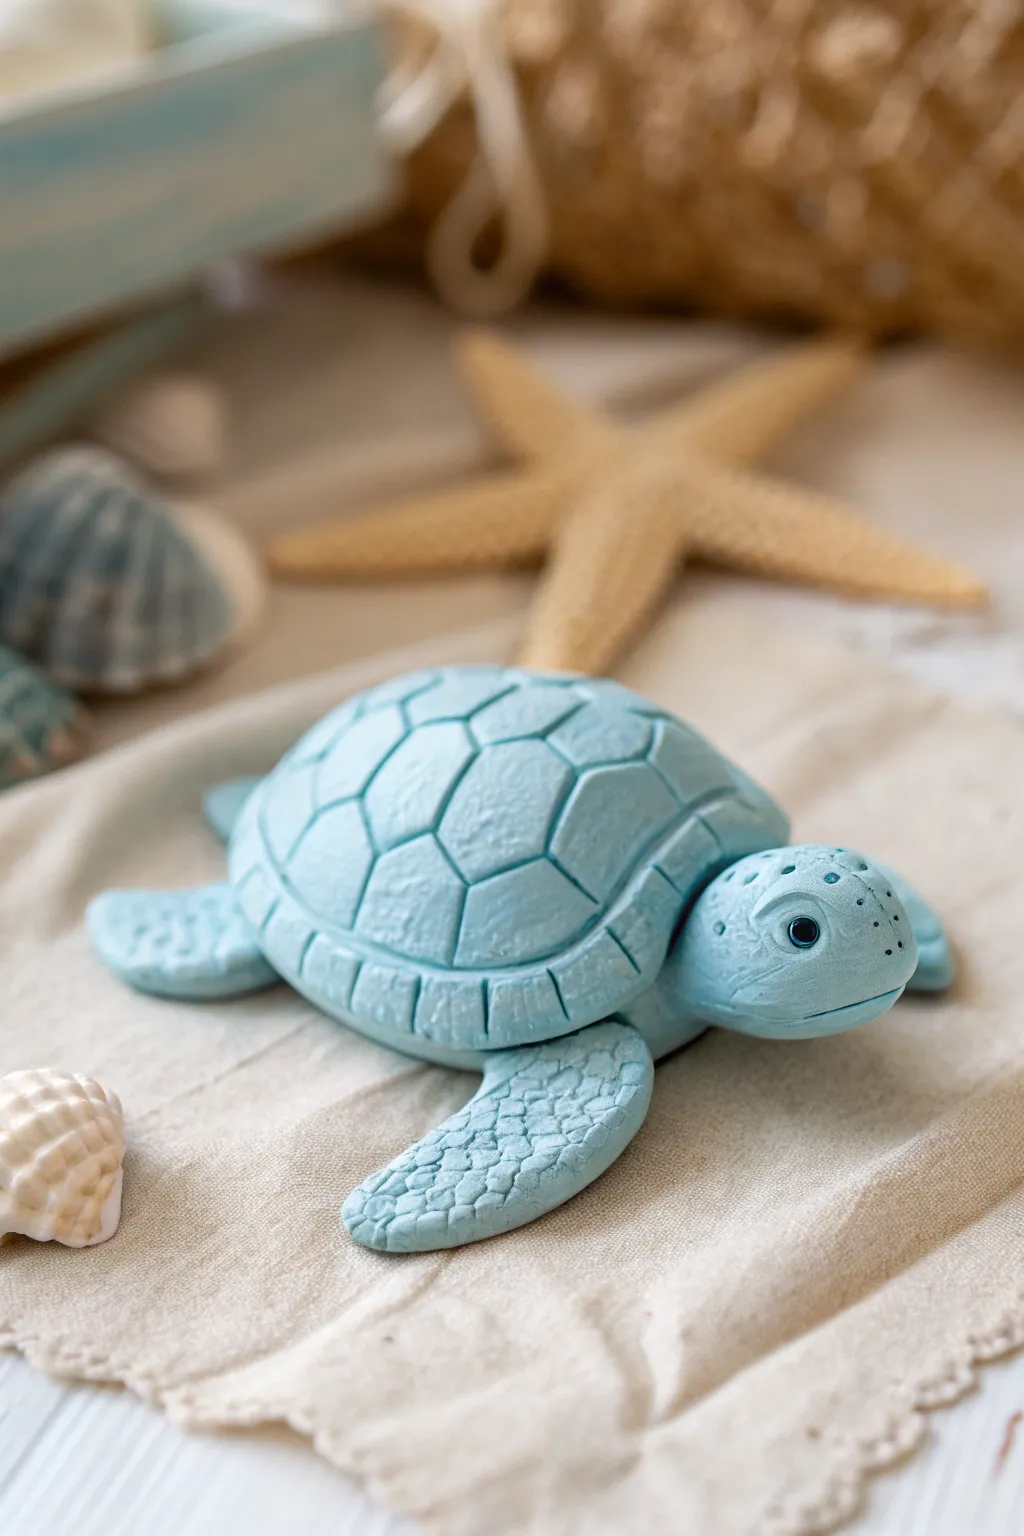
Capture the essence of the ocean with this charming baby blue turtle, featuring a wonderful tactile quality. The standout detail is the deeply etched shell and pebbled skin texture, giving this little swimmer a realistic yet whimsical personality.
Step-by-Step Tutorial
Materials
- Baby blue polymer clay
- Small amount of black clay (for eyes)
- Small amount of white clay (for eye highlights)
- Needle sculpting tool or toothpick
- Ball stylus tool (small)
- Flat blade or craft knife
- Acrylic roller
- Soft brush (optional for smoothing)
Step 1: Forming the Body
-
Prepare the clay:
Begin by conditioning your baby blue clay until it is soft and pliable. If the color feels too saturated, I sometimes mix in a tiny bit of white to get that perfect pastel shade. -
Shape the shell base:
Roll a large portion of the clay into a ball, then flatten the bottom gently against your work surface to create a dome shape. This will be the main carapace. -
Create the head:
Roll a smaller ball of blue clay for the head. Gently pinch one side to form a slight neck area where it will attach to the shell. -
Attach head to shell:
Press the neck end of the head firmly under the front rim of the shell dome. Blend the clay on the underside so the two pieces are joined securely.
Step 2: Sculpting the Flippers
-
Shape the front flippers:
Roll two medium-sized balls of blue clay. Flatten them into elongated teardrop or paddle shapes. Curve the tips slightly backward to mimic a swimming motion. -
Shape the rear flippers:
Create two smaller paddle shapes for the back legs. These should be shorter and slightly more rounded than the front pair. -
Attach the limbs:
Position the front flippers emerging from under the front sides of the shell. Place the rear flippers at the back. Blend the connection points underneath the body so they don’t fall off during baking. -
Texture the skin:
Using a small ball stylus or a blunt needle tool, gently press tiny dimples all over the flippers and the top of the head. Vary the pressure to create a natural, pebbled skin look.
Uneven shell lines?
If your etched lines look messy, lay a piece of plastic wrap over the clay before pressing your tool in. This softens the edges and prevents clay crumbs.
Step 3: Detailing the Shell and Face
-
Outline the shell rim:
Use your needle tool to draw a line around the circumference of the shell, creating a distinct rim or border separates the top dome from the edge. -
Etch the central scutes:
Draw a hexagon in the very center of the shell dome. From the points of this hexagon, draw lines extending outward to create the surrounding polygon shapes. -
Complete the shell pattern:
Continue drawing lines down to the rim border to finish the classic turtle shell pattern. Go over these lines twice to deepen the grooves for better definition. -
Texture the scutes:
Lightly tap the flat surfaces of the shell plates with a piece of sandpaper or a textured sponge to give the shell a slightly rough, natural matte finish. -
Create eye sockets:
Use a medium ball tool to press deep indentations on either side of the head for the eyes. Add a subtle arched brow line above each socket with a modeling tool. -
Add the eyes:
Roll two tiny balls of black clay and press them into the sockets. Add an even tinier speck of white clay to the upper corner of each eye for a lifelike reflection. -
Add facial details:
Use a needle tool to poke small dots on the muzzle for ‘freckles’ or sensory pores. Carve a gentle horizontal line for the mouth, curving it up slightly at the ends. -
Final inspection:
Check the entire sculpture for fingerprints. Smooth them out gently with your finger or a soft brush before baking. -
Bake carefully:
Bake the turtle according to your clay manufacturer’s instructions, usually at 275°F (130°C) for about 30 minutes. Let it cool completely before handling.
Make it shimmer
Brush a tiny amount of pearl mica powder over the textured shell plates before baking. It catches in the grooves and adds a magical, wet-look shine.
Once cooled, your little blue turtle is ready to swim across your desk or shelf as a delightful ocean companion

The Complete Guide to Pottery Troubleshooting
Uncover the most common ceramic mistakes—from cracking clay to failed glazes—and learn how to fix them fast.
Sleepy Blue Penguin Buddy
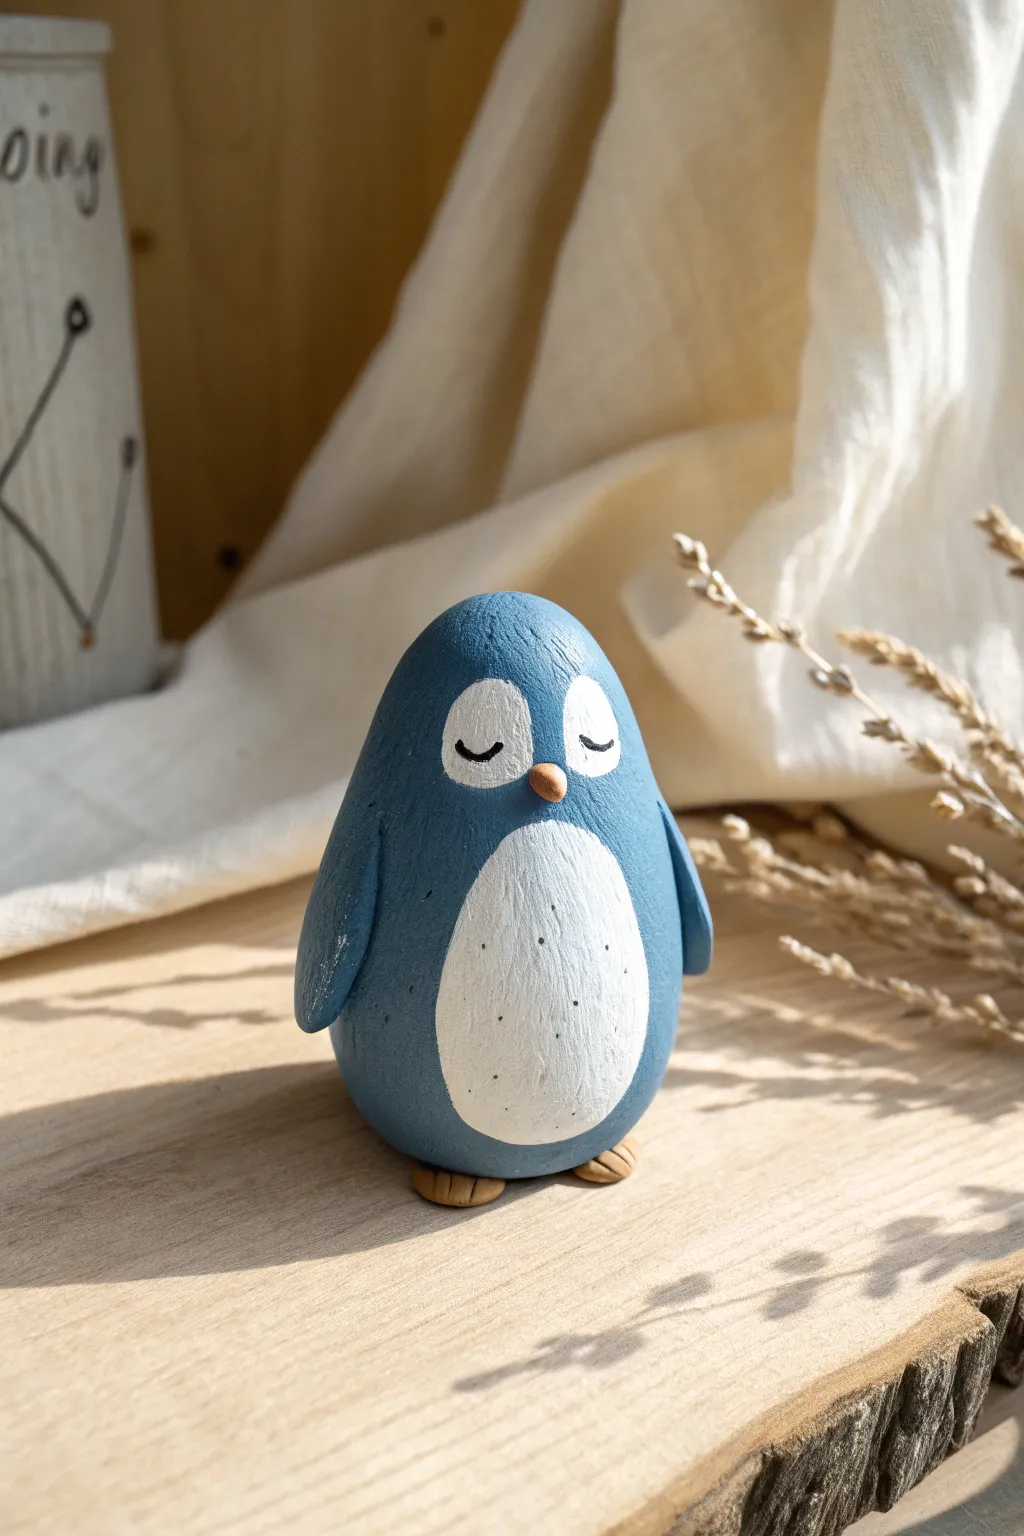
Create a soothing desk companion with this adorable sleepy penguin project. Modeled from polymer clay and finished with matte paint, this little friend features a calming blue hue and a textured, hand-carved look that adds rustic charm.
Step-by-Step Guide
Materials
- Polymer clay (white or light grey)
- Acrylic paints (dusty blue, white, black, tan/beige)
- Small flat paintbrush
- Fine detail paintbrush or toothpick
- Sculpting tools (or a simple butter knife)
- Aluminum foil (optional, for the core)
- Oven for baking
- Matte varnish or sealant
Step 1: Shaping the Base
-
Create the core shape:
Start by conditioning your clay until it is soft and malleable. Roll a substantial ball of clay, roughly the size of a large egg. If you want to save clay, you can crumple a small ball of aluminum foil and wrap the clay around it. -
Form the tapered body:
Gently roll the clay ball between your palms, applying slightly more pressure at the top to create a teardrop or egg shape. The bottom needs to be wider than the head. -
Flatten the base:
Tap the wider bottom end of your teardrop firmly against your work surface. This ensures the penguin will stand upright on its own without wobbling. -
Adding texture:
Instead of smoothing it perfectly, use your fingers or a modeling tool to leave slight, uneven vertical ridges. I find this gives the finished piece a lovely ‘carved wood’ aesthetic rather than looking like plastic.
Step 2: Adding Details
-
Make the wings:
Roll two small, equal-sized logs of clay, about an inch long. Flatten them into long ovals that taper at one end. -
Attach the wings:
Press the wings onto the sides of the body, blending the top shoulder area into the main body while leaving the tips slightly raised and separate. -
Create the beak:
Take a tiny pinch of clay and roll it into a very small cone. Press this onto the center of the face area, slightly below where the eyes will go. -
Form the feet:
Roll two small balls of clay and flatten them into discs. Use a knife tool to press two indentations into each disc to suggest toes. -
Attach the feet:
Place the feet under the flattened bottom of the penguin body so just the toes peek out from the front edge. -
Bake the figurine:
Bake your clay creation according to the manufacturer’s instructions on the package. Let it cool completely before painting.
Wobbly Penguin?
If your penguin keeps tipping over while sculpting, tap the base on the table firmly again. You can also bake it onto a small tile to keep the bottom perfectly flat.
Step 3: Painting and Finishing
-
Base coat:
Paint the entire body, except for the feet and beak, with a nice coat of dusty blue acrylic paint. You may need two coats for full opacity. -
Paint the tummy:
Using white paint, carefully create a large oval shape on the belly. Allow the edges to be slightly rough or dry-brushed to maintain the rustic texture. -
Paint the eye patches:
Paint two smaller white oval shapes on the face area for the eye patches. They should sit right above the beak. -
Color the details:
Paint the beak and the little feet peeking out with a soft tan or beige color. -
Add the face:
Using a very fine liner brush or a toothpick dipped in black paint, draw two small ‘U’ shapes on the white eye patches for sleepy eyelids. -
Draw tummy speckles:
With the same fine tool, add tiny, scattered grey or black dots onto the white belly area to mimic feathers. -
Seal the work:
Once the paint is fully dry, apply a coat of matte varnish. This protects the paint and unifies the sheen without making it look glossy.
Textured Brush Trick
To enhance the ‘carved’ look, use a stiff brush and very little paint (dry brushing) when adding the white belly. It catches the clay’s texture beautifully.
Place your new sleepy friend on a shelf or desk where he can nap peacefully
Little Blue Jellyfish With Dangly Tentacles
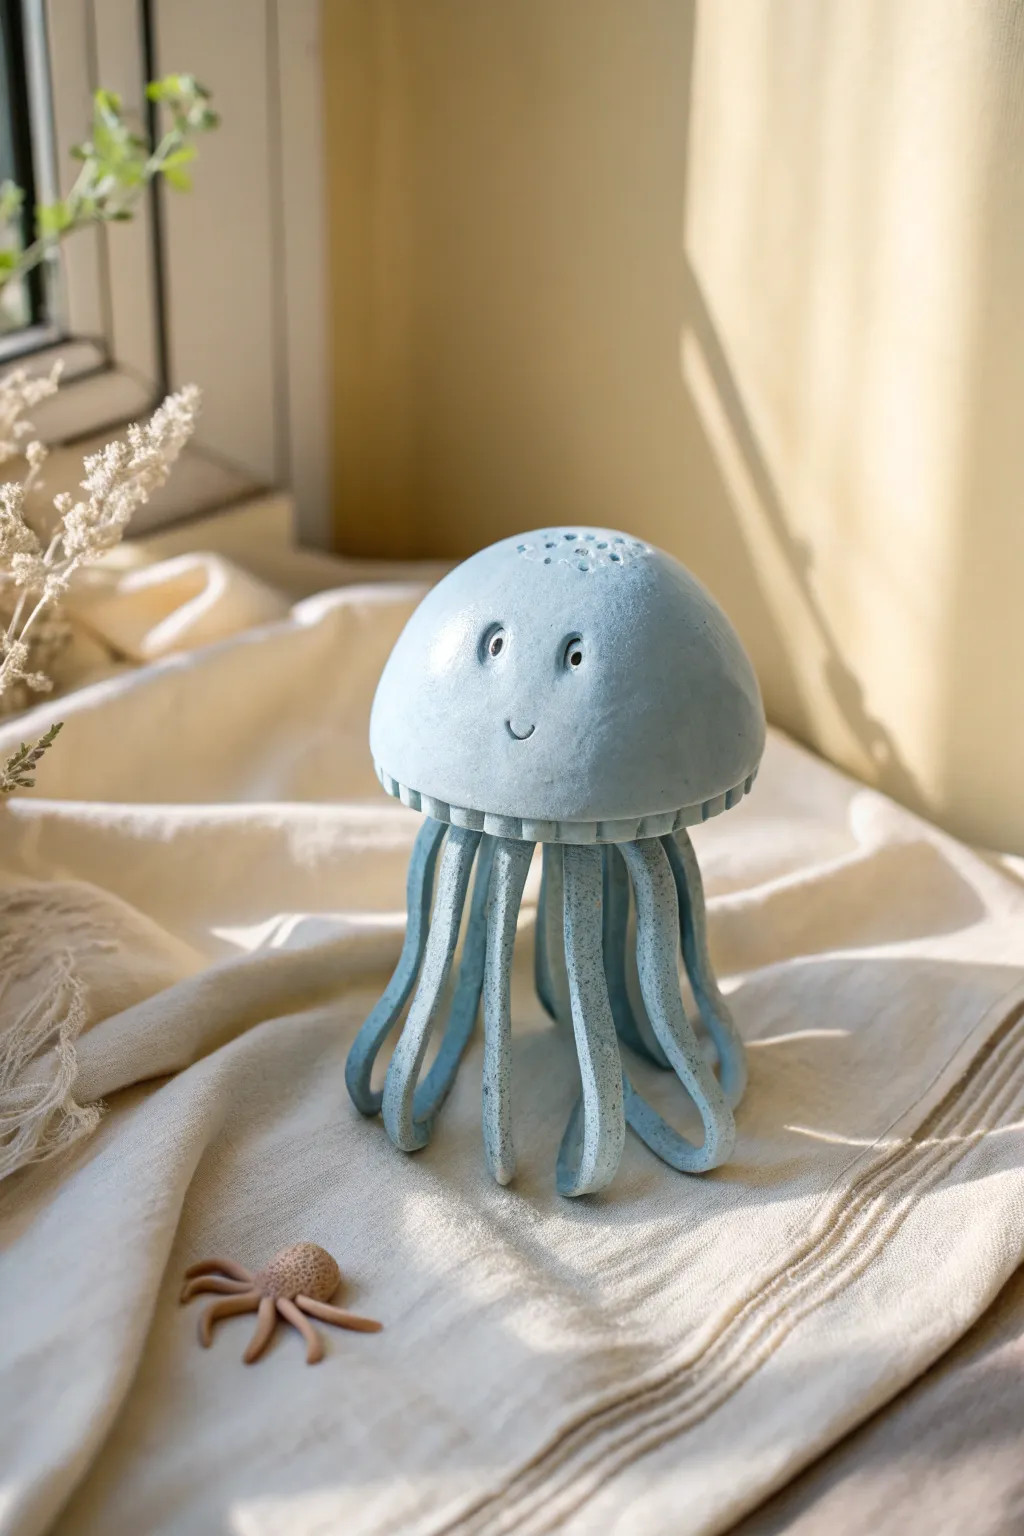
Bring the ocean to your windowsill with this adorable pastel blue jellyfish sculpture. Its charming, simple face and curling ribbon-like tentacles make it a delightful, self-standing creature perfect for clay enthusiasts.
Detailed Instructions
Materials
- Light blue polymer clay or air-dry clay
- Acrylic rolling pin
- Clay knife or scalpel tool
- Needle tool or toothpick
- Small ball stylus tool
- Aluminum foil
- Smoothing sponge or soft brush
- Gloss varnish or glaze (optional)
Step 1: Forming the Bell Head
-
Create a foil core:
Crumple aluminum foil into a tight ball, slightly flattened at the bottom, about the size of a tangerine. This creates a lightweight structure and saves clay. -
Roll out the clay:
Condition your light blue clay until soft, then roll it into a sheet approximately 1/4 inch thick. It needs to be sturdy enough to hold its shape. -
Cover the core:
Drape the clay sheet over your foil ball. Gently smooth it down properly, trimming excess clay at the bottom but leaving a slight overhang. -
Smooth the surface:
Use your fingers or a slightly damp sponge to buff out any fingerprints or seams on the dome, ensuring a flawless, matte finish. -
Add the ruffled rim:
Roll a thin snake of clay and flatten it into a narrow ribbon. Wrap this around the bottom edge of the dome. -
Texture the rim:
Use a dull knife tool to press vertical indentations all along that ribbon, creating the jellyfish’s characteristic scalloped edge.
Step 2: Creating the Face
-
Indent eye sockets:
Using a medium-sized ball tool, press two shallow indentations into the center of the dome for the eyes. -
Add eyeballs:
Roll two tiny balls of white clay (or paint them later) and press them into the sockets. Poke a tiny hole in the center of each for pupils. -
Carve the smile:
With a needle tool, carefully etch a small, U-shaped mouth just below and between the eyes. Keep it simple for that cute look. -
Detail the top:
I like to add a cluster of tiny pinpricks at the very top of the head with a needle tool for a naturally porous texture.
Slumping Tentacles?
If the legs sag while wet, prop them up with crumped paper towels or foil balls. Let them stiffen in that position during the drying or baking process.
Step 3: Tentacles and Assembly
-
Prepare strips:
Roll out a fresh slab of blue clay, slightly thicker than the head covering. Cut about 6-8 long, rectangular strips. -
Shape the tentacles:
Smooth the cut edges of each strip with water or baby oil so they look organic, not sharp. -
Attach the legs:
Flip the head upside down. Score and slip (or use liquid clay) the top of each strip to the underside of the bell. -
Curl the ends:
Gently curl the bottom of each tentacle upward. Position them so they curve outward and create a stable base for the jellyfish to stand on. -
Reinforce connections:
Use a blending tool to smooth the clay where the tentacles meet the body, ensuring a strong bond. -
Final drying/baking check:
Stand the jellyfish up to ensure balance. If using polymer, bake according to package instructions (usually 275°F for 15-30 mins). If air-dry, let sit for 24-48 hours. -
Finishing touches:
Once fully cured or dry, you can lightly sand any rough spots. A touch of gloss varnish on the eyes makes them look lively.
Glow Up
Mix glow-in-the-dark powder into your blue clay before sculpting. Your jellyfish will look bioluminescent when the lights go out.
Place your new ceramic friend near a window to let the light play off its smooth curves


What Really Happens Inside the Kiln
Learn how time and temperature work together inside the kiln to transform clay into durable ceramic.
Tiny Blue Narwhal With Spiral Horn
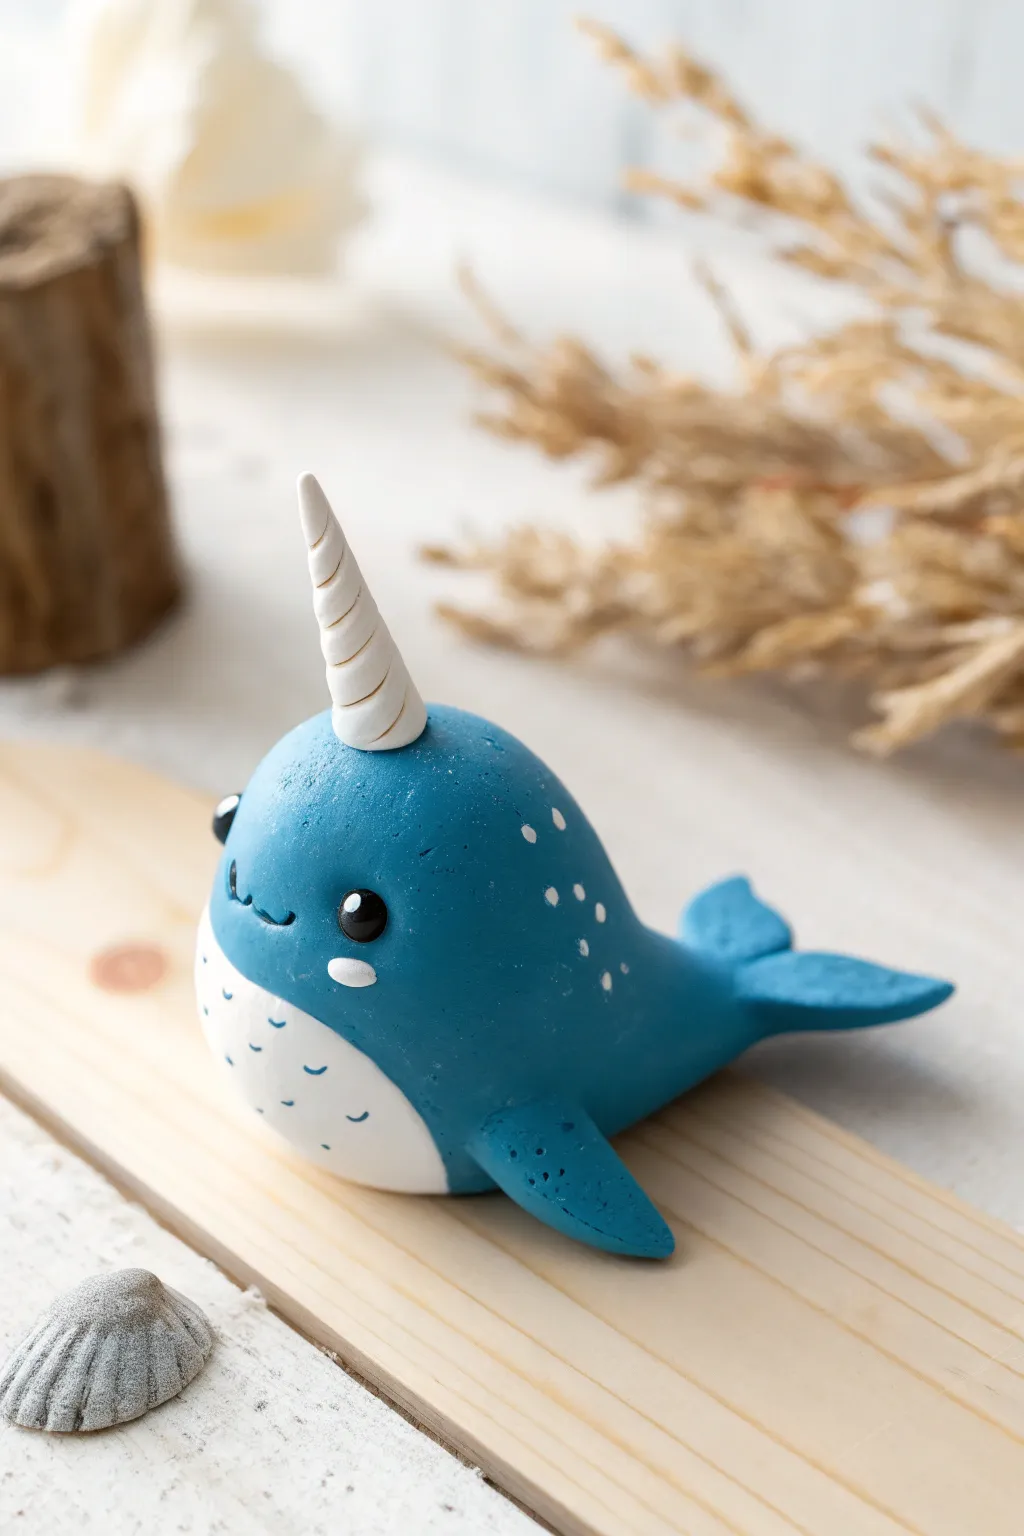
Bring a splash of ocean magic to your desk with this adorable clay narwhal, featuring a classic spiraled horn and tiny speckled details. The rich blue body contrasts beautifully with a crisp white belly, creating a charming little character perfect for beginners.
Step-by-Step
Materials
- Polymer clay (Deep blue, White, Black)
- Needle tool or toothpick
- Ball stylus tool (small)
- Small blade or clay knife
- Acrylic rolling pin
- Oven for baking
- Parchment paper or baking tile
- Fine-grit sandpaper (optional, for smoothing)
Step 1: Sculpting the Body
-
Condition the clay:
Start by kneading your deep blue clay until it is soft and pliable. This prevents cracks later on. -
Form the main shape:
Roll the blue clay into a smooth ball about the size of a ping pong ball. Then, gently roll one side between your palms to taper it into a large teardrop shape. -
Refine the curve:
Gently bend the thinner tail end upwards slightly to give the narwhal a swimming posture. Flatten the bottom just enough so it sits stably without rolling over. -
Prepare the belly:
Take a portion of white clay and roll it into a thin sheet. Cut out an oval shape that is proportional to fit on the underside of your blue teardrop. -
Attach the belly:
Gently press the white oval onto the bottom front of the blue body. Smooth the edges with your finger so the white clay seems to merge seamlessly into the blue, covering the chest area.
Step 2: Adding Fins and Tail
-
Create the tail flukes:
Make two small, flattened triangles from blue clay. pinch the corners to round them slightly. -
Attach the tail:
Press these triangles onto the very tip of the tapered tail section. Blend the seam where they connect to the body using a modeling tool or your finger to ensure a strong bond. -
Shape the side fins:
Form two smaller teardrop shapes from blue clay and flatten them. These will be the flippers. -
Attach the fins:
Press one fin onto each side of the body, fairly low down near the white belly line. Angle them slightly backward for a streamlined look. -
Add texture:
Using a needle tool, poke a few tiny, shallow holes into the tips of the flippers to mimic skin texture.
Horn Drooping?
If the horn won’t stay straight while sculpting, bake the horn separately first for 10 minutes. Once hard, press it into the raw body clay before baking the whole piece.
Step 3: Face and Details
-
Create the horn:
Take a small piece of white clay and roll it into a very thin, long snake. Determine the length you want for the horn. -
Twist the horn:
I like to carefully twist this snake around itself or simply twist a tapered cone of white clay to create that signature spiral texture. Trim the bottom flat. -
Mount the horn:
Press the horn firmly onto the top center of the head. You can insert a small piece of wire inside for extra stability if desired. -
Add the eyes:
Roll two tiny balls of black clay. Press them onto the face area, spacing them widely apart for maximum cuteness. Add an even tinier speck of white clay to the top right of each eye for a highlight. -
Sculpt the mouth:
Use a needle tool to gently impress a small smiley curve right between the eyes. -
Add cheek blushes:
Flatten two minuscule ovals of white or very light pink clay and place them directly under the eyes.
Make it a Charm
Before baking, insert unbaked eye screw pin into the top of the head behind the horn. Once baked, you can attach it to a keychain or necklace.
Step 4: Finishing Touches
-
Create back spots:
Roll incredibly tiny balls of white clay. Press them randomly onto the narwhal’s back and sides to create a speckled pattern. -
Draw belly details:
Using a needle tool, scratch tiny ‘u’ shapes or crescent marks onto the white belly patch to give it a feathered texture. -
Final smooth:
Check the entire piece for fingerprints. Gently rub them away with a drop of baby oil on your finger if needed. -
Bake:
Bake the clay according to the manufacturer’s instructions on your package (usually 275°F/135°C for 15-30 minutes). Let it cool completely before handling.
Now you have a charming little sea creature ready to swim across your shelf
Pastel Blue Nessie Mini
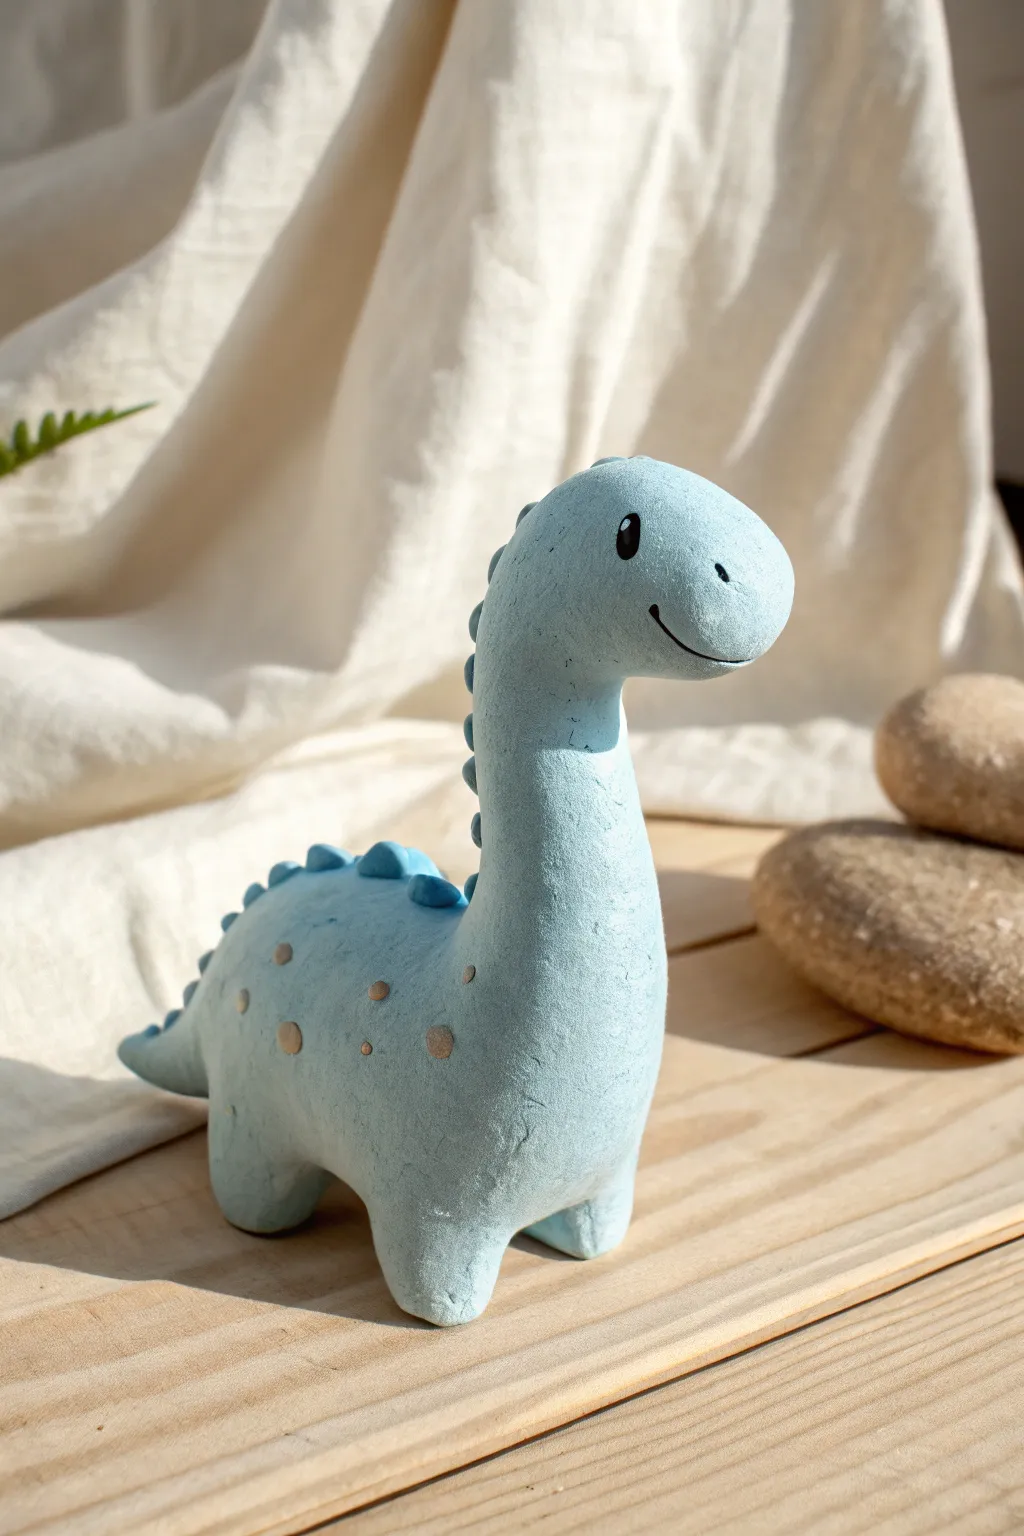
Sculpt your very own prehistoric pal with this adorable pastel blue dinosaur project. This mini brontosaurus features a charming matte texture and sweet painted details that make it a perfect desk companion.
Detailed Instructions
Materials
- Air-dry clay (white or pre-colored blue)
- Acrylic paint (pastel blue, beige, black, white)
- Sculpting tools (needle tool, smoothing tool)
- Water and a small bowl
- Fine-grit sandpaper
- Small paintbrush
- Matte varnish or sealant
Step 1: Forming the Base
-
Prepare the Clay:
Start by conditioning a fist-sized ball of clay. If you are using white clay, mix in your pastel blue acrylic paint now by kneading it thoroughly until the color is uniform, or plan to paint the entire figure later. -
Shape the Body:
Separate a large portion of clay and roll it into a thick, smooth egg shape. This will be the main body of the dinosaur. -
Create the Neck:
Take a smaller piece of clay and roll it into a thick log. Gently curve it upwards to create the long neck, blending the bottom of the log seamlessly into the front of the egg-shaped body. -
Form the Head:
Mold a rounded, oval shape for the head. Attach this to the top of the neck, smoothing the clay downward with your thumb or a tool so there are no visible seams. -
Add Legs:
Roll four short, stout cylinders for the legs. Press the body onto them gently so the figure stands stable, then blend the clay at the joints to secure them permanently. -
Sculpt the Tail:
Pinch the back of the body and pull the clay gently outward to form a short, pointed tail. You can also add a small cone of clay if pulling doesn’t provide enough length, blending the seam carefully.
Cracks happen!
If small cracks appear as the clay dries, mix a tiny bit of fresh clay with water to make a paste and fill in the gaps. Smooth over with a finger.
Step 2: Adding Details
-
Make the Spikes:
Roll several tiny balls of clay, decreasing in size. Flatten the bottom of each slightly and pinch the top to create triangular spikes. -
Attach the Spikes:
Using a tiny dab of water as glue, arrange the spikes in a row starting from the back of the head, going down the neck, over the back, and onto the tail. -
Blend the Spikes:
Use a small sculpting tool or the back of a paintbrush to gently press the base of each spike into the body so they don’t fall off during drying. -
Surface Texture:
To mimic the stone-like texture in the photo, lightly tap the surface of the clay with a stiff-bristled brush or a crumpled ball of aluminum foil. I like to do this before the clay hardens completely. -
Drying Time:
Set your figure aside in a cool, dry place. Let it cure for at least 24-48 hours depending on the thickness of the clay.
Step 3: Painting and Finishing
-
Sand Improfections:
Once fully dry, check for any rough fingerprints or sharp edges. Gently smooth them away with fine-grit sandpaper. -
Base Coat:
If you started with white clay, paint the entire figure with two coats of pastel blue acrylic paint, letting the first coat dry before applying the second. -
Paint the Spots:
Using a small detail brush, dab small, irregular circles of beige or light metallic gold paint onto the side of the body. -
Facial Features:
Paint a simple black oval for the eye, adding a tiny white dot for a highlight. Use a thin liner brush to paint a curved black line for the smile and a small dot for the nostril. -
Seal the Project:
Protect your hard work by applying a layer of matte varnish over the entire figure. This preserves the color and gives it that soft, finished look.
Seamless joins
When attaching legs or the neck, score both surfaces (scratch hatch marks) with a needle tool and add water before pressing them together for a strong bond.
Now you have a charming little dinosaur to keep you company on your desk or shelf

TRACK YOUR CERAMIC JOURNEY
Capture glaze tests, firing details, and creative progress—all in one simple printable. Make your projects easier to repeat and improve.
Blue Dragon Egg With Speckles
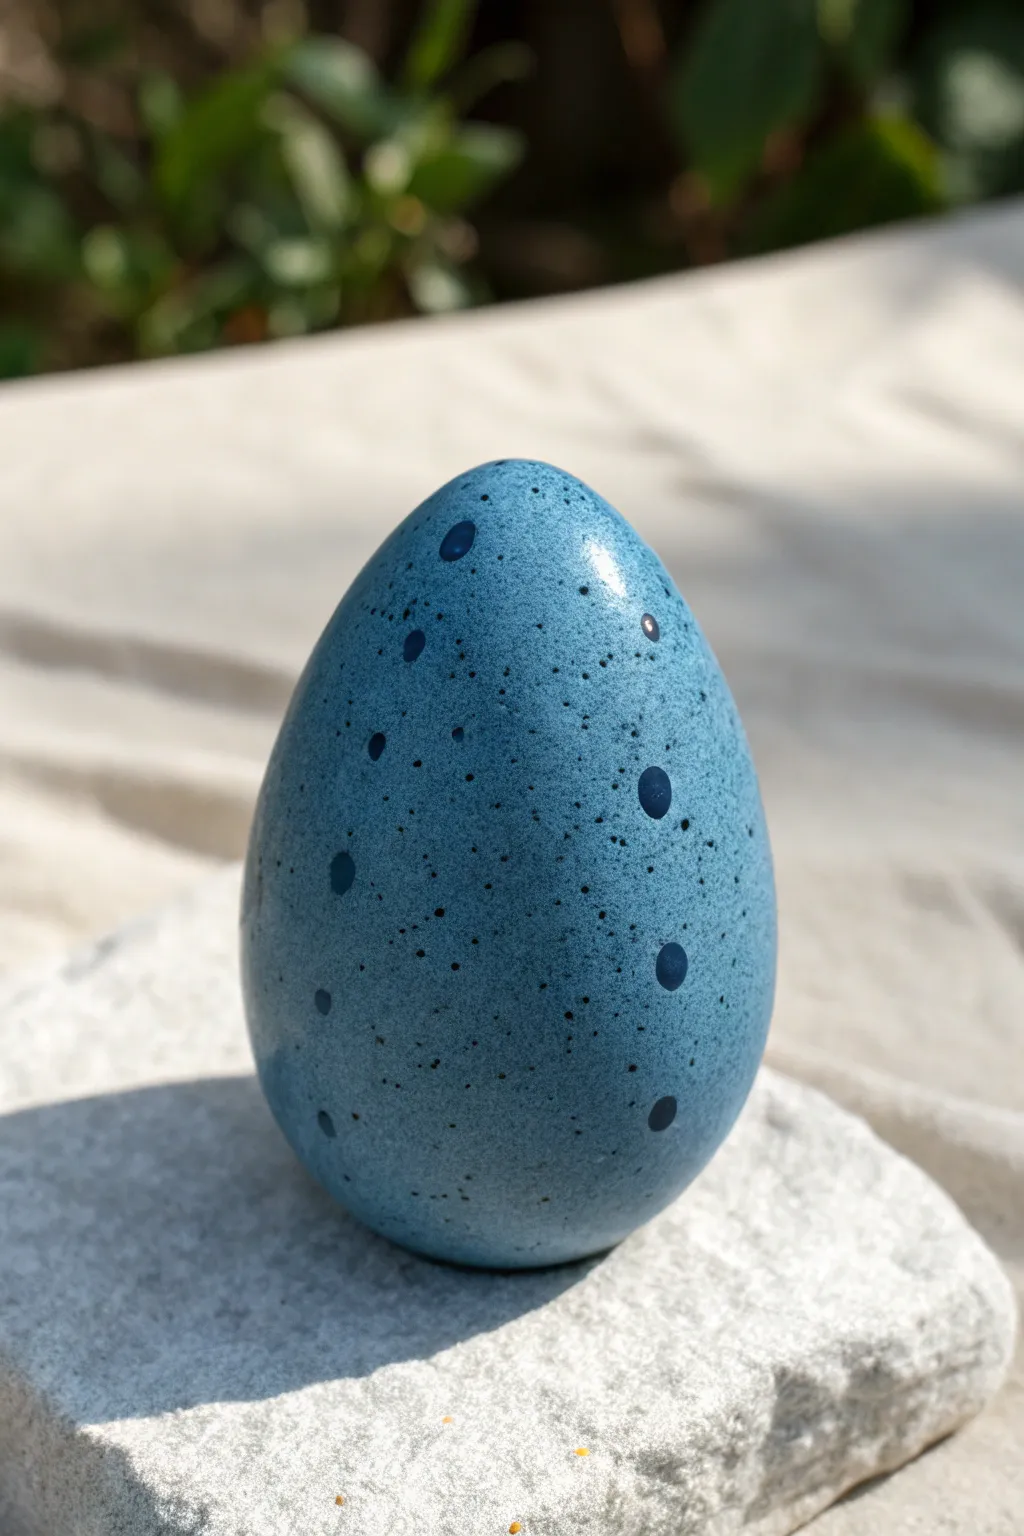
Create a smooth, mystical dragon egg with a serene blue gradient and natural speckling. This project uses polymer clay to achieve a polished, stone-like finish that feels wonderful in the hand.
How-To Guide
Materials
- Polymer clay (medium blue)
- Polymer clay (dark navy blue)
- Tiny amount of black polymer clay
- Rolling pin or acrylic roller
- Aluminum foil
- Clay sculpting tools (optional)
- Sandpaper (various grits from 400 to 1200)
- Gloss glaze (optional, for extra shine)
- Soft cloth or denim for buffing
- Toothbrush or stiffness bristle brush
Step 1: Forming the Core
-
Prepare the foil core:
Crumple a piece of aluminum foil into a tight egg shape. This saves clay and keeps the egg lightweight. -
Compress the foil:
Roll the foil ball firmly on your work surface to compress any sharp ridges and ensure the egg shape is symmetrical. -
Condition the base clay:
Take your medium blue polymer clay and knead it thoroughly until it is soft and pliable. -
Sheet the clay:
Roll the medium blue clay into a sheet about 1/4 inch thick, large enough to cover your foil core.
Uneven Seams?
If seams won’t blend, apply a tiny drop of clay softener or baby oil to the seam line and rub gently in circles until the clay merges.
Step 2: Creating the Speckled Effect
-
Prepare the speckles:
Take tiny pinches of dark navy blue clay and roll them into very small balls of varying sizes. -
Add micro-speckles:
Grate a tiny amount of black clay or dried black clay crumbs to create fine dust-like particles. -
Apply the spots:
Randomly press the navy clay balls onto your blue clay sheet. I like to scatter them unevenly for a more organic look. -
Apply the dust:
Sprinkle the black clay dust or crumbs over the entire blue sheet. -
Embed the texture:
Using your roller, gently roll over the sheet again to press the dots and dust flat into the blue surface.
Make it shimmer
Mix a pinch of pearl mica powder or translucent clay into your medium blue base before starting for a magical, iridescent dragon scale effect.
Step 3: Shaping and Finishing
-
Wrap the core:
Carefully wrap the speckled clay sheet around your foil egg, trimming away excess clay with a blade. -
Blend the seams:
Use your thumbs to smooth the seams together until they disappear completely. The warmth of your hands helps here. -
Refine the shape:
Roll the egg gently between your palms to smooth out any bumps and perfect the oval dragon egg silhouette. -
Pre-bake texture (optional):
If you want a slight stoniness, tap the surface very lightly with a stiff toothbrush, but keep it mostly smooth. -
Bake the egg:
Bake the egg according to your clay manufacturer’s instructions, usually around 275°F (130°C) for 30-45 minutes. -
Cool down:
Let the egg cool completely before handling. -
Sand for smoothness:
Wet sand the egg starting with 400 grit sandpaper and working your way up to 1200 grit for a silky touch. -
Buff to a shine:
Rub the egg vigorously with a piece of denim or a soft cloth to bring out a natural satin sheen. -
Glaze (optional):
Apply a thin coat of gloss glaze if you prefer a ‘wet’ or highly polished look like the reference photo.
Display your new dragon egg on a stone or nest to add a touch of fantasy to your room
Blue Cloud and Raindrop Charms
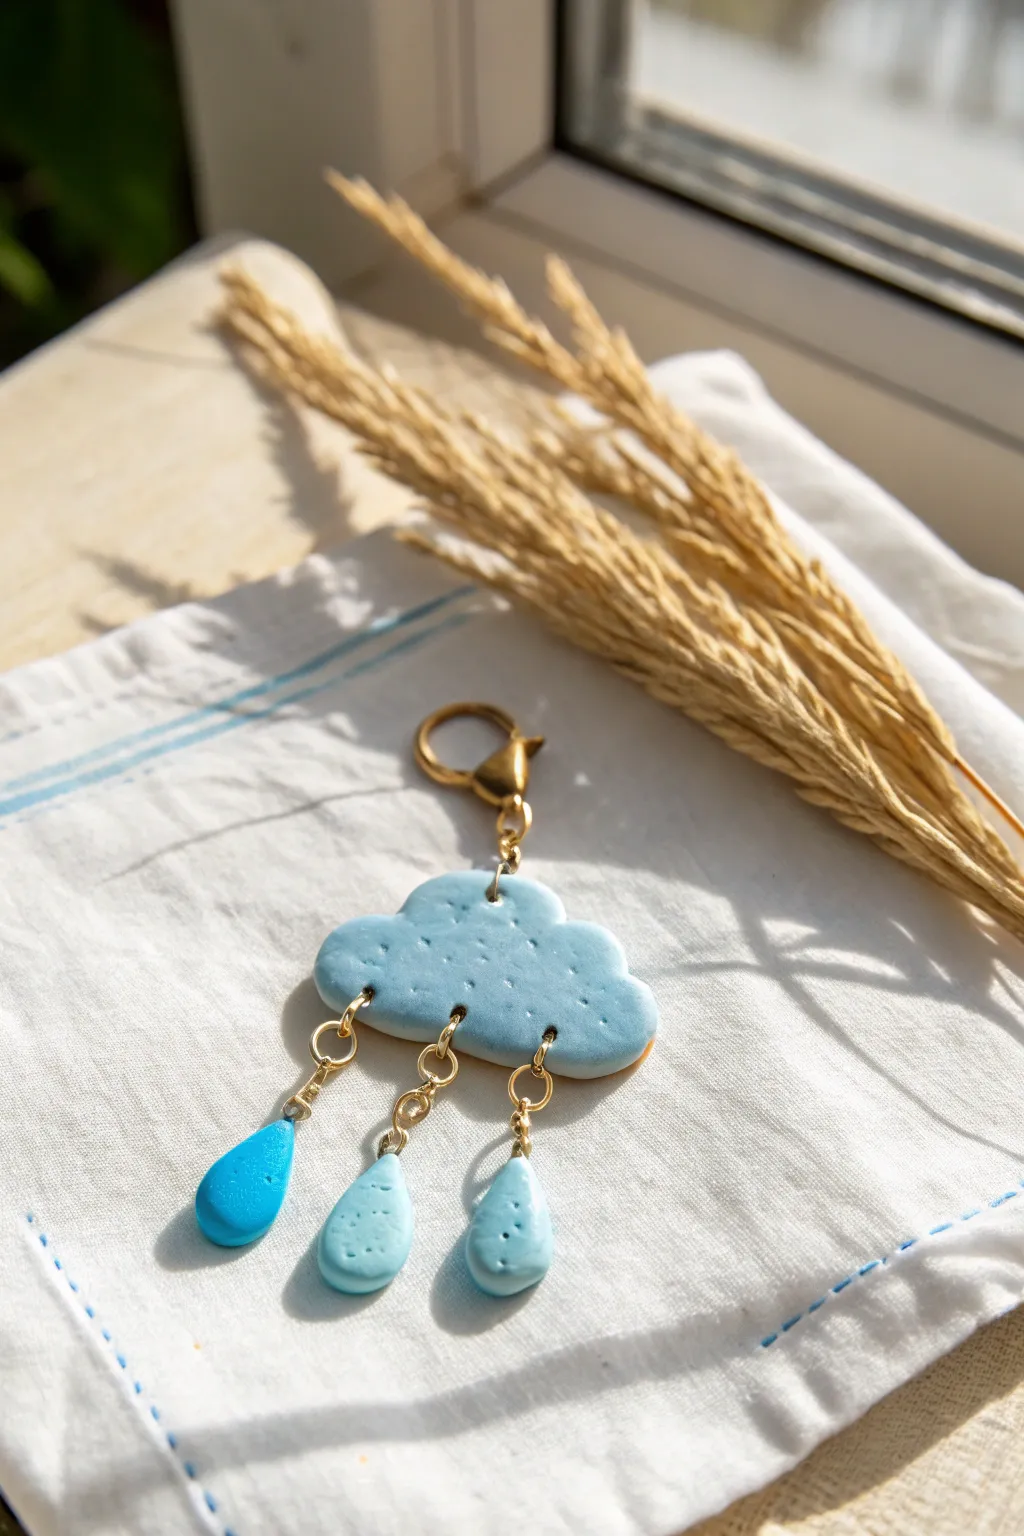
Capture the cozy feeling of a spring shower with this adorable polymer clay charm featuring a textured blue cloud and dangling raindrops. Perfect as a keychain, bag pull, or even a statement earring, this project combines soft pastel hues with golden hardware for a polished finish.
Detailed Instructions
Materials
- Light blue polymer clay
- Medium blue polymer clay (optional, for variation)
- Gold-colored headpins (at least 4)
- Gold-colored jump rings (4 small, 1 large)
- Gold-colored lobster clasp
- Needle tool or toothpick
- Round nose pliers
- Wire cutters
- Rolling pin or pasta machine
- Small round cutter or cloud-shaped cutter (optional)
- Sandpaper (fine grit)
- Oven for baking
Step 1: Sculpting the Cloud
-
Condition the clay:
Start by taking a chunk of your light blue polymer clay and kneading it in your hands until it becomes soft, pliable, and warm to the touch. -
Form the base shape:
Roll the clay into a smooth ball, then flatten it gently with your rolling pin or palm until it is about 1/4 inch thick. -
Shape the cloud:
If you have a cloud cutter, press it into the clay now. Otherwise, use your needle tool to sketch a fluffy cloud outline and carefully cut it out, smoothing the edges with your fingertip. -
Add texture:
To give the cloud that soft, organic look, gently poke the surface repeatedly with a needle tool or a toothbrush to create small dimples and indentations. -
Insert eye pins:
Take three headpins. Cut off the flat heads and use your round nose pliers to create a small loop on one end of each wire. Push the straight end into the bottom of the cloud so only the loops are visible. -
Add the top loop:
Create one more eye pin loop and insert it into the very top center of the cloud. This will connect to the clasp later.
Clean Texture Tip
Use a piece of plastic wrap over the clay before texture-poking. It creates softer, pillowy dimples rather than sharp, jagged holes.
Step 2: Creating the Raindrops
-
Divide the clay:
Pinch off three small balls of clay. I like to make one slightly darker blue for visual interest, as seen in the photo, but keeping them all uniform works too. -
Shape the drops:
Roll each small ball into a smooth sphere, then pinch and pull one side to elongate it into a classic teardrop shape. -
Texture the drops:
Lightly texture the surface of the raindrops with your needle tool to match the finish of the main cloud. -
Insert hardware:
Take three more headpins. Insert the pin through the bottom of the teardrop up through the pointed top. If the head of the pin is too small, add a tiny seed bead first. -
Create loops:
Trim the wire coming out of the top of each raindrop to about 1 cm, then use your round nose pliers to curl the wire into a closed loop.
Step 3: Baking and Assembly
-
Bake the pieces:
Place your cloud and three raindrops on a baking sheet or ceramic tile. Bake according to your clay package instructions (usually around 275°F or 135°C for 15-30 minutes). -
Cool and finish:
Let the pieces cool completely. If there are any fingerprints or rough edges, lightly buff them away with fine-grit sandpaper. -
Attach the drops:
Open a small jump ring with your pliers. Slide on one raindrop and hook it onto one of the bottom loops of the cloud. -
Secure the jump ring:
Close the jump ring securely using two pairs of pliers to twist it shut without distorting the circle. Repeat for the other two raindrops. -
Attach the clasp:
Take your large lobster clasp. Open its bottom ring (or use a separate jump ring if needed) and attach it to the loop at the top of the cloud. -
Final check:
Everything should dangle freely. Give the charm a little shake to make sure all connections are tight and the raindrops swing nicely.
Pins Falling Out?
If a pin slides out after baking, put a drop of superglue or E6000 on the wire shaft and slide it back into the hole for a permanent bond.
Now you have a charming little piece of blue sky to brighten up your accessories collection
Blue Tea Cup Mini Planter With Face
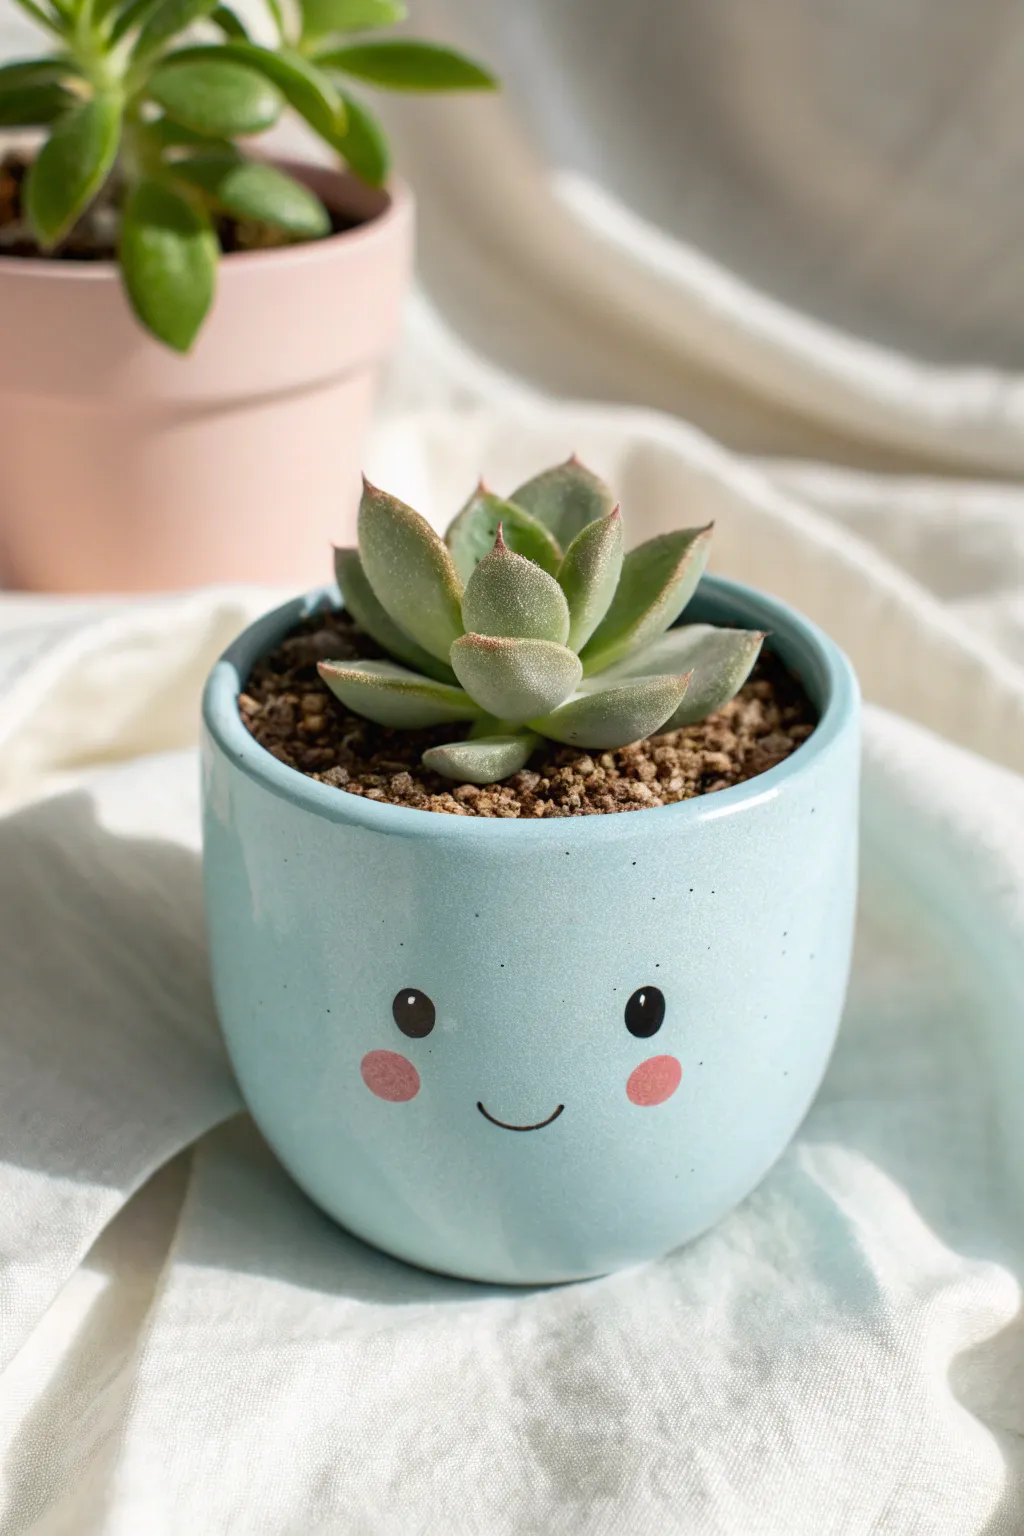
This adorable mini planter brings a dash of personality to any windowsill with its soft blue hue and sweetly painted expression. Perfect for holding small succulents, this project transforms simple clay into a charming character that smiles back at you.
Step-by-Step Tutorial
Materials
- Light blue polymer clay (or white clay + sky blue acrylic paint)
- Small rolling pin
- Circle cutter (approx. 3-4 inches diameter)
- Craft knife
- Small bowl or tea cup (to use as a mold)
- Black acrylic paint
- Pink acrylic paint
- Fine detail paintbrush (size 0 or 00)
- Dotting tool or toothpick
- Gloss varnish or glaze (optional)
- Oven (for baking polymer clay)
Step 1: Shaping the Clay Base
-
Condition the Clay:
Begin by taking your block of light blue polymer clay and working it in your hands until it becomes soft and pliable. If the clay feels too stiff, warm it up by rolling it between your palms for a few minutes. -
Roll It Out:
Place the clay on a clean, smooth surface. Using your rolling pin, flatten the clay into an even sheet about 1/4 inch thick. Aim for a consistent thickness to ensure the pot bakes evenly. -
Cut the Base:
Use your circle cutter to punch out a round base for your planter. If you don’t have a cutter, trace around a small jar lid with a craft knife. -
Create the Wall Strip:
Roll out a long, rectangular strip of clay from the remaining material. This strip needs to be long enough to wrap around the circumference of your circle base and tall enough to form the sides of the cup. -
Check the Measurements:
Test the length by wrapping the strip loosely around your base circle. Trim off any excess clay with your craft knife so the edges meet perfectly without overlapping too much.
Uneven Seams?
If smoothing seams with fingers isn’t working, roll a textured brush handle inside the cup against the wall while supporting the outside to effectively blend the clay.
Step 2: Assembling the Cup
-
Join the Base and Wall:
Carefully stand the rectangular strip on its edge, wrapping it around the circle base. Gently press the bottom edge of the wall into the side of the base circle. -
Blend the Seams:
Using your thumb or a clay modeling tool, smooth the clay where the wall meets the base. I like to use a downward dragging motion on the outside to pull the clay together, then smooth it back upwards. -
Seal the Vertical Seam:
Where the two ends of the wall meet on the side, pinch them gently together. Smooth this vertical seam inside and out until it is completely invisible and the wall looks continuous. -
Refine the Shape:
If the cup looks a bit wonky, place a small, smooth spherical object or just your fingers inside to gently push the walls outward, creating that rounded, tea-cup-like curve shown in the photo. -
Smooth the Rim:
Run your finger dipped in a tiny bit of water (or baby oil if the clay is sticky) along the top rim to round off any sharp edges for a polished look. -
Poke Drainage Hole:
Don’t forget to use a straw or a chopstick to poke a hole in the very center of the bottom. Succulents need good drainage to stay healthy. -
Bake the Clay:
Place your creation on a baking sheet lined with parchment paper. Bake according to the specific temperature and time instructions on your package of polymer clay. Let it cool completely before moving to the next phase.
Creating Texture
Before baking, gently lightly tap the surface with a toothbrush. This creates a subtle ‘stone’ texture that looks great under the glaze compared to perfect smoothness.
Step 3: Painting the Personality
-
Prepare the Paints:
Squirt a tiny dot of black acrylic paint and pink acrylic paint onto a palette or scrap piece of cardboard. -
Dot the Eyes:
Dip the larger end of a dotting tool (or the back end of a paintbrush) into the black paint. Press firmly onto the cup face to create two solid black circles for eyes. -
Add Key Highlights:
Once the black eyes are slightly dry, use a toothpick with a speck of white paint to add a tiny ‘glint’ dot near the top of each eye. This brings the character to life. -
Paint the Rosy Cheeks:
Using a slightly larger dotting tool or your finger, dab pink paint just below and to the outside of the eyes to create soft, round blushing cheeks. -
Draw the Smile:
With your finest detail brush (size 00), carefully paint a thin, U-shaped line between the cheeks for the smile. Keep the line weight delicate. -
Seal the Artwork:
After the paint is fully dry, apply a coat of gloss varnish or glaze over the entire outside of the pot. This protects the face paint and gives the planter that shiny ceramic look.
Now you have a cheerful home ready for your favorite little succulent friend
Blue Trinket Dish With Fish Imprint
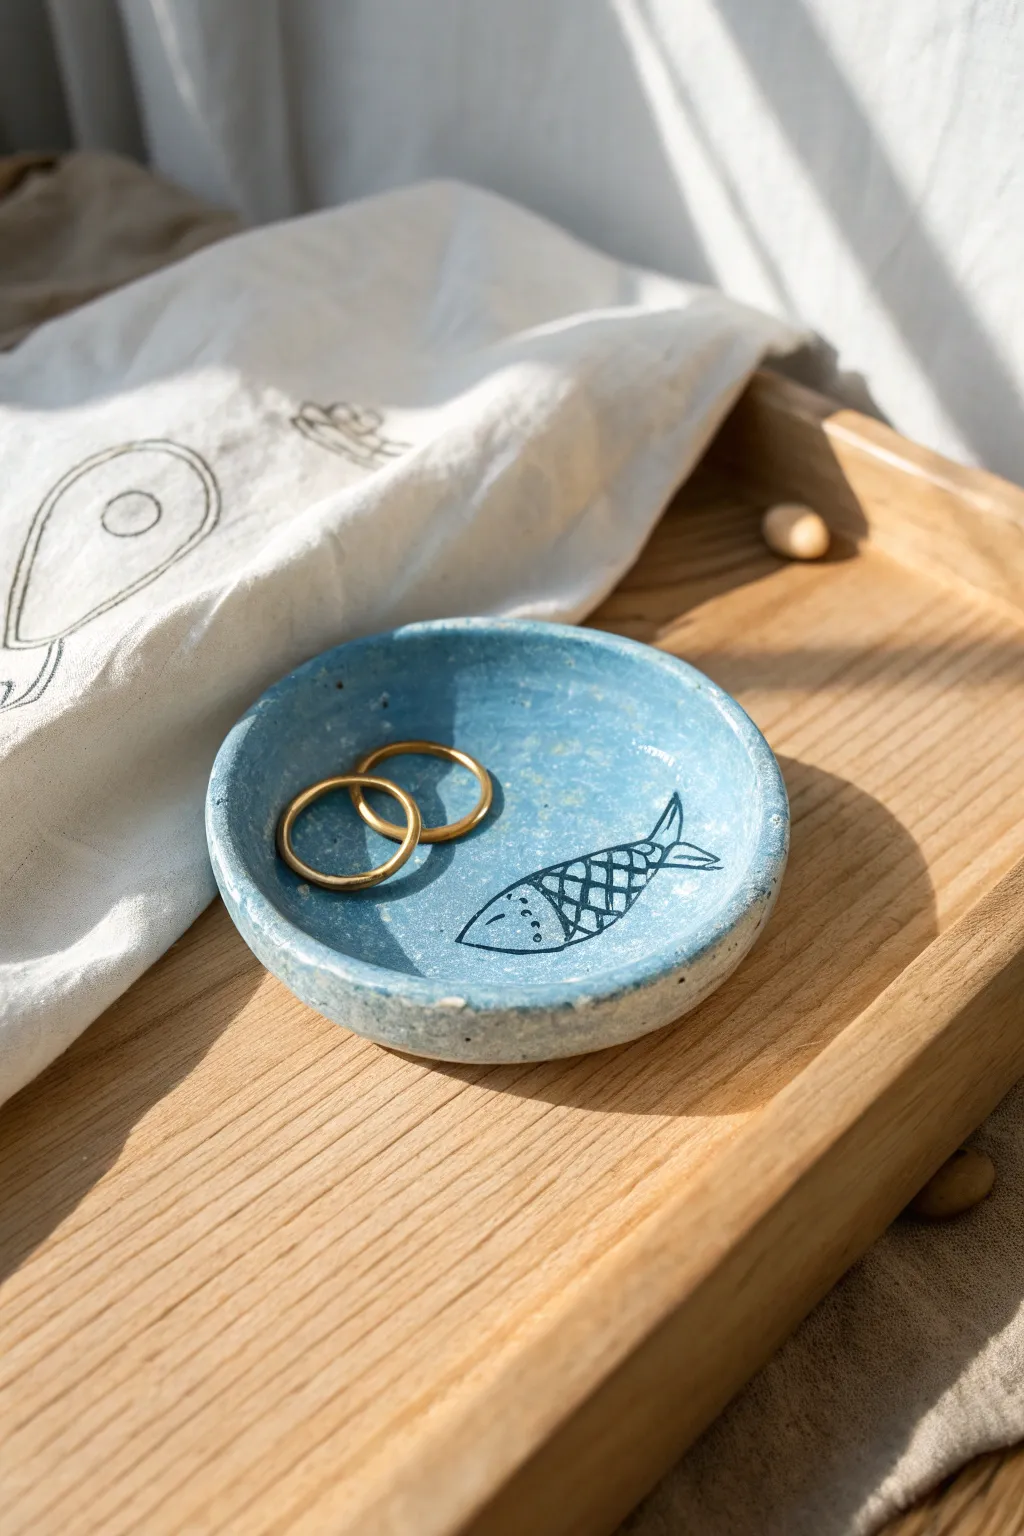
Capture the essence of the seaside with this charming, rustic trinket dish perfect for holding your favorite rings. The speckled blue finish and whimsical hand-drawn fish give it an organic, handmade feel that adds character to any bedside table.
How-To Guide
Materials
- Air-dry clay or polymer clay (white)
- Acrylic rolling pin
- Small bowl or round cookie cutter (approx. 4 inches)
- Sponge or sandpaper
- Light blue acrylic paint (matte finish)
- White acrylic paint (for mixing)
- Salt or coarse sand (optional for texture)
- Fine-point permanent marker or black acrylic paint pen
- Gloss or matte varnish/sealer
- Small softwood board or textured surface (optional)
Step 1: Shaping the Clay
-
Condition the clay:
Start by taking a handful of white clay and kneading it in your hands until it becomes soft, pliable, and free of cracks. -
Roll it out:
Use your acrylic rolling pin to flatten the clay into an even slab, approximately 1/4 inch thick. Aim for a consistent thickness to prevent cracking during drying. -
Cut the circle:
Press a round cookie cutter or trace around a small bowl onto the clay slab to cut out a perfect circle. Remove the excess clay from around the edges. -
Create the texture (optional):
If you want that slightly pitted, rustic look shown in the photo, gently press a piece of coarse sandpaper or a rough stone into the surface of the wet clay. -
Form the rim:
Gently curve the edges of the circle upward with your fingertips to create a shallow bowl shape. Smooth out any fingerprints with a tiny bit of water. -
Refine the shape:
While the clay is still workable, pinch the rim slightly to give it an organic, handmade feel rather than a perfectly manufactured look. -
Dry thoroughly:
Set the dish aside to dry completely according to your clay package instructions. This usually takes 24-48 hours for air-dry clay. I like to flip it gently halfway through to ensure the bottom dries evenly. -
Sand edges:
Once bone dry, use fine-grit sandpaper to smooth out any sharp or jagged edges on the rim.
Sponge Tactics
Use a natural sea sponge instead of a synthetic kitchen sponge to apply paint. The irregular holes create a much more realistic ceramic-glaze texture.
Step 2: Painting and Illustrating
-
Mix the base color:
Combine light blue acrylic paint with a small amount of white to achieve a soft, powdery blue hue. You can add a tiny speck of grey to mute the color for a more natural look. -
Apply the textured wash:
Dip a damp sponge into your paint mixture and dab it onto the dish. Using a sponge rather than a brush creates that mottled, stone-like texture visible in the image. -
Add speckles:
While the blue paint is still wet, you can flick a toothbrush with slightly darker blue or white paint over the dish to enhance the speckled ceramic effect. -
Let the base dry:
Allow the blue paint layer to dry completely before attempting to draw on top of it. This prevents the ink from bleeding. -
Outline the fish:
Using a fine-point permanent marker or a black paint pen, draw a simple fish outline in the center right of the bowl. Start with the pointed nose and curved body. -
Add details:
Draw the tail fins and the dorsal fin. Create the scales by drawing cross-hatched lines (a grid pattern) inside the body of the fish. -
Final touches:
Add a small dot for the eye and three or four tiny dots near the nose for a little extra personality. -
Seal the piece:
Protect your work by applying a coat of varnish. A matte varnish keeps it looking natural, while gloss mimics a ceramic glaze. Ensure you cover the ink drawing gently so it doesn’t smear.
Smudged Ink?
If your marker smears when applying varnish, switch to a spray-on sealer for the first coat. This sets the ink without the friction of a brush dragging across it.
Now you have a delightful spot to keep your treasures safe and sound
Ombre Blue Galaxy Beads
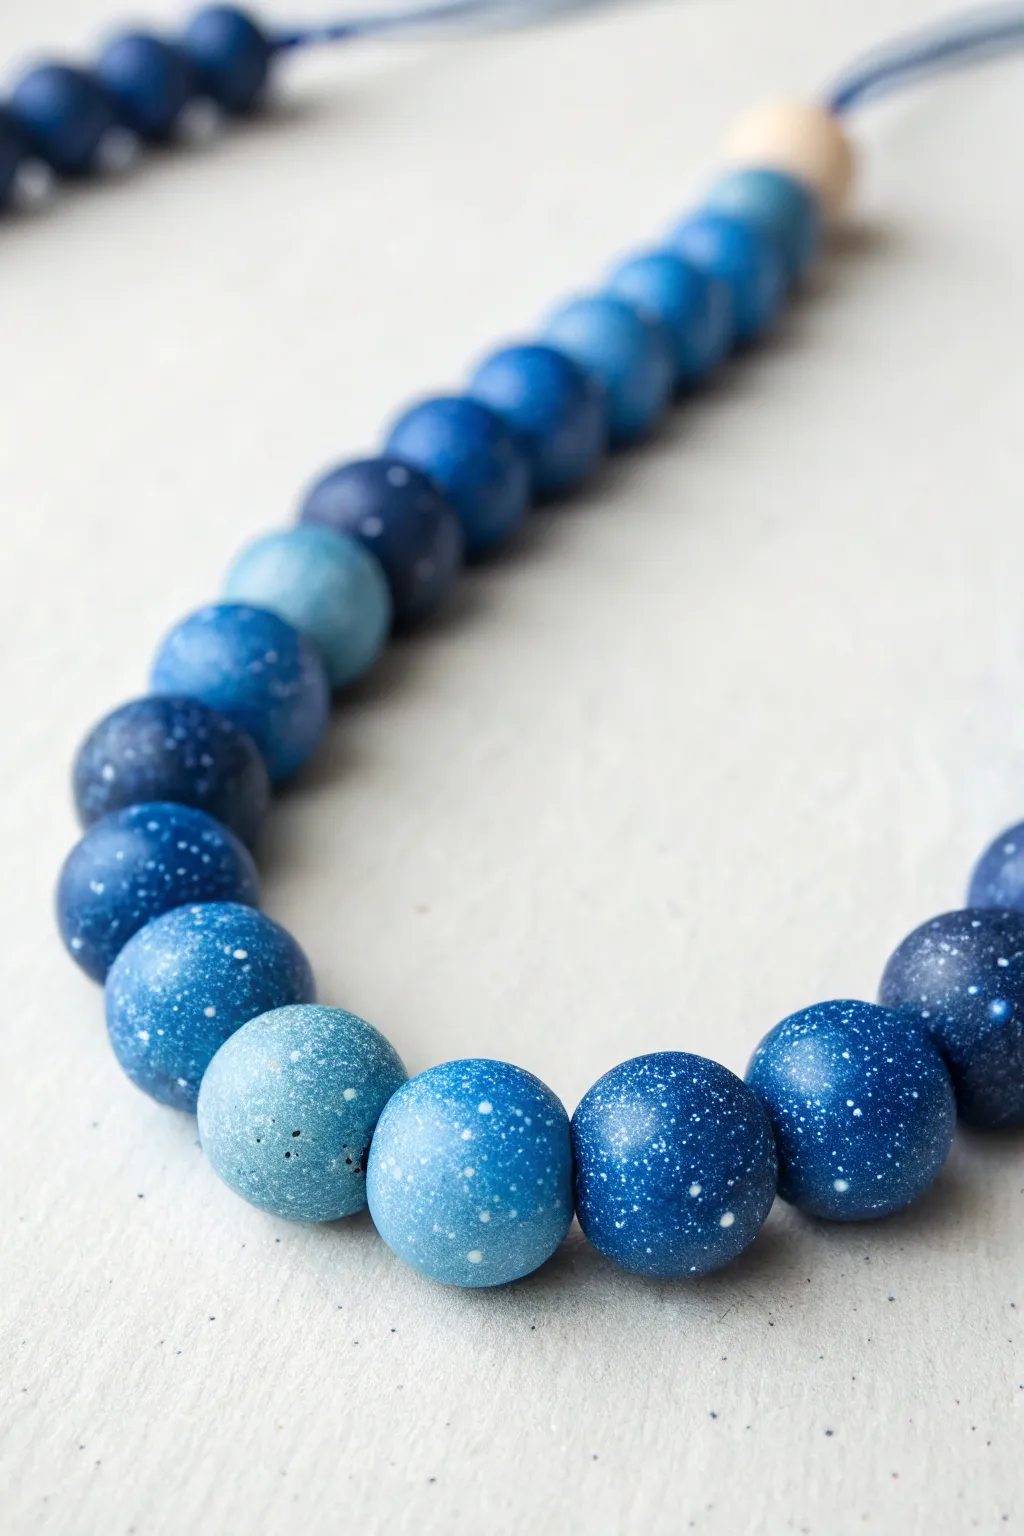
Capture the magic of a starry night sky with these mesmerizing galaxy-inspired beads. Using a simple ombre technique and a clever spattering method, you’ll create a wearable piece of art that shifts beautifully from deep midnight to soft twilight blues.
Step-by-Step Tutorial
Materials
- Polymer clay (Dark Blue/Navy, Light Blue, White, Translucent)
- White acrylic paint
- Old toothbrush or stiff bristle brush
- Bead piercing pins or toothpicks
- Baking sheet and parchment paper
- Drying rack or foam block
- Gloss glaze or polyurethane varnish
- Waxed cotton cord or silk thread
- Wooden spacer bead (natural finish)
- Wet wipes
- Rolling pin or acrylic roller
Step 1: Mixing the Ombre Palaette
-
Condition the clay:
Start by warming up your navy blue, light blue, and translucent polymer clays in your hands until they are soft and pliable. This conditioning step is crucial to prevent cracks later on. -
Create base colors:
Divide your navy blue clay into five equal portions. Set the first portion aside as your darkest shade. -
Start the gradient:
Take the second portion of navy blue and mix in a pea-sized amount of light blue clay. Knead thoroughly until the color is solid and streak-free. -
Lighten the subsequent shades:
For the third portion, mix in a marble-sized amount of light blue. For the fourth, use equal parts navy and light blue. -
Create the lightest tone:
For final, lightest shade, mix a small amount of navy into a larger ball of light blue clay. You should now have a distinct gradient from dark to light. -
Add depth:
To give the beads that deep clear-sky look, I like to mix a tiny pinch of translucent clay into every shade. It adds a subtle depth that makes the finish look less like plastic.
Starry Night Tip
For realistic galaxies, vary your flicking pressure. Soft flicks make tiny mist-like stars, while harder flicks create larger planets. Don’t overdo it; negative space is key.
Step 2: Forming and Piercing
-
Roll the spheres:
pinch off equal amounts of clay from each color mix. Roll them between your palms to create perfectly smooth, round spheres about 15mm in diameter. -
Arrange the layout:
Lay your rolled beads out on your work surface in their gradient order to ensure you have enough of each shade to complete the necklace length. -
Refrigerate briefly:
Place the spheres in the fridge for about 10 minutes. Hardening them slightly makes piercing them without squishing the round shape much easier. -
Pierce the holes:
Gently twist a bead piercing pin or toothpick through the center of each bead. Rotate the bead as you push to keep the hole centered. -
Smooth the edges:
Check the exit hole of the bead; if the clay pushed out slightly, smooth it back down with your finger to keep the bead round.
Cosmic Shimmer
Before baking, brush a tiny amount of pearl mica powder or silver eyeshadow onto just the darkest navy beads. It adds a mysterious iridescent glow behind the white stars.
Step 3: Creating the Galaxy Effect
-
Prepare the workspace:
Set up a splatter station by placing a cardboard box on its side to catch stray paint. Place your unbaked beads on pins stuck into a foam block or crumpled foil inside the box. -
Load the brush:
Dip an old toothbrush into white acrylic paint. If the paint is very thick, water it down just slightly until it’s the consistency of heavy cream. -
Flick the paint:
Hold the brush near the beads (but not touching) and run your thumb across the bristles. This releases a fine mist of white speckles onto the clay. -
Rotate and repeat:
Rotate the pins so you can splatter the undersides of the beads. Aim for a random, organic distribution of ‘stars’ rather than perfect coverage. -
Clean connections:
Use a wet wipe to gently clean any paint that got directly into the bead holes, as this can flake off later. -
Bake the beads:
Once the paint is dry to the touch, bake the beads according to your specific clay package’s temperature and time instructions. Usually, this is around 275°F (130°C) for 30 minutes.
Step 4: Assembly
-
Seal the surface:
After the beads have cooled completely, apply a thin coat of satin or gloss glaze to protect the paint speckles and enhance colors. -
String the beads:
Thread your cord through the beads, following your gradient pattern. You can create a symmetric design (light in the middle, dark on ends) or a linear ombre. -
Add natural elements:
Finish the design by adding a single raw wooden bead at the end of the strand to create a lovely textural contrast with the smooth blue clay.
Now you have a stunning, handmade accessory that mimics the boundless beauty of the night sky
Blue Little Monster Pencil Topper
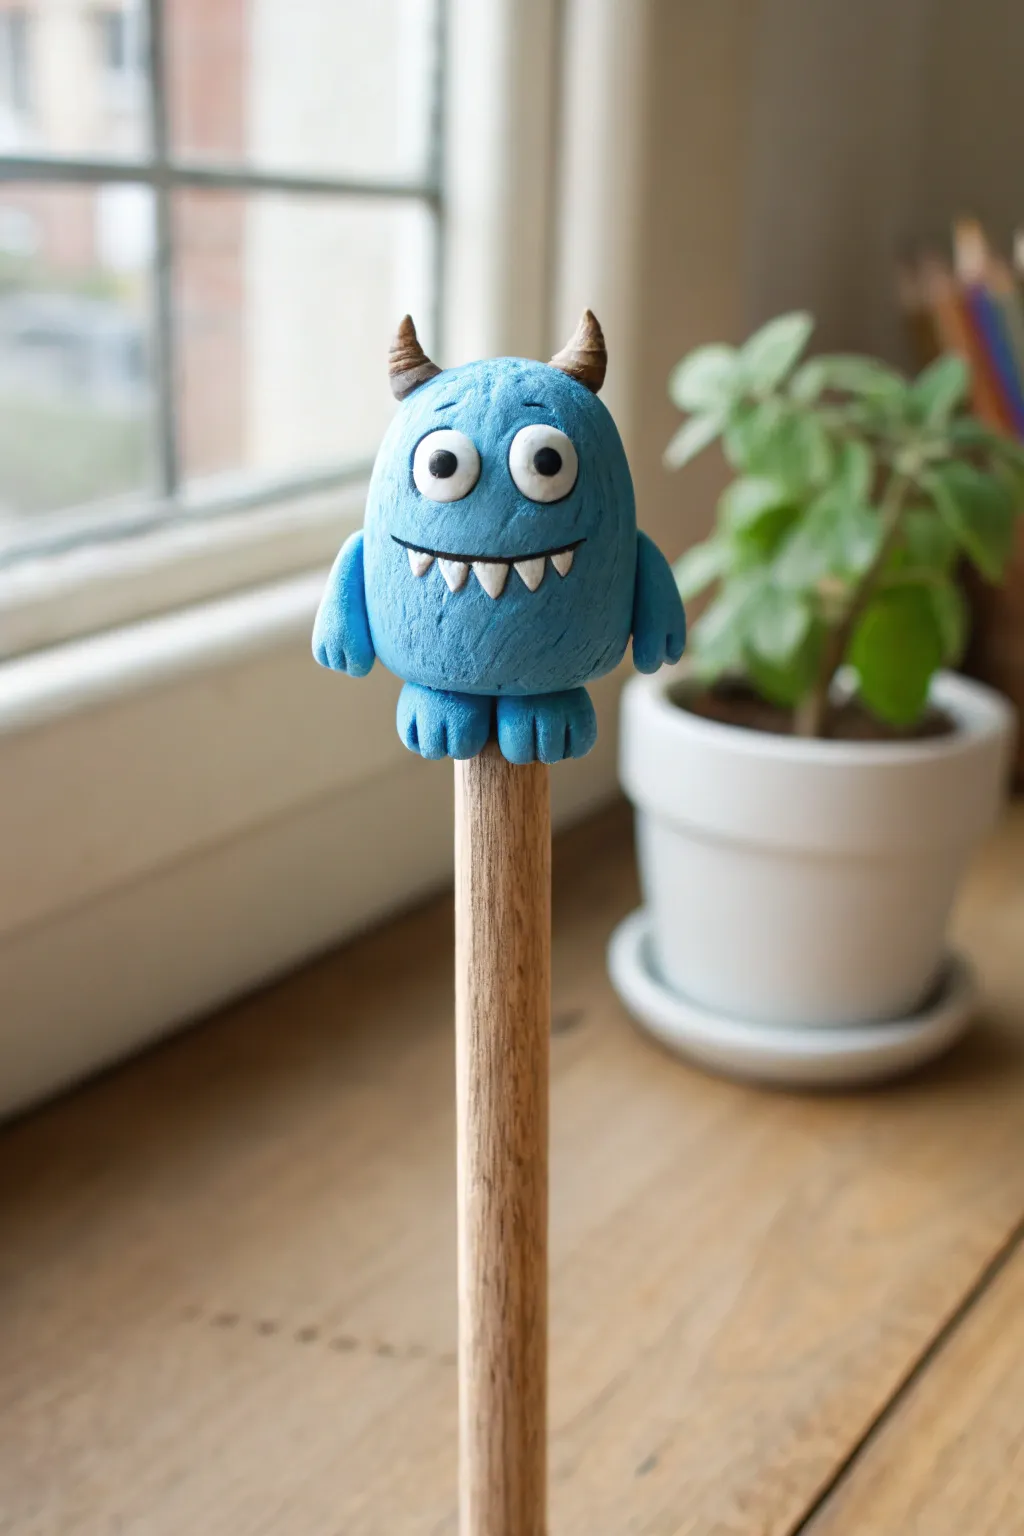
Transform a plain pencil into a friendly writing buddy with this adorable blue monster topper. With his goofy grin, stubby horns, and textured fur, this little guy adds a touch of whimsy to any desk.
Detailed Instructions
Materials
- Light blue polymer clay
- White polymer clay
- Black polymer clay
- Brown polymer clay
- Wooden pencil (standard size)
- Needle tool or toothpick
- Ball stylus tool
- Texture sponge or stiff toothbrush
- Craft knife
- Oven (for baking)
- Baking sheet
Step 1: Shaping the Base
-
Prepare the Body:
Condition a golf-ball-sized amount of light blue clay until it’s soft and pliable. Roll it into a smooth sphere, then gently elongate it into a pill or oval shape. -
Create the Opening:
Hold the pencil you intend to use and gently push the bottom of your blue oval onto the eraser end. Twist slightly to create an indentation about half an inch deep, ensuring a snug fit without making the walls too thin. -
Add Texture:
Remove the clay from the pencil to prevent it from getting stuck during detailing. Use a stiff toothbrush or a texture sponge to dab all over the surface of the blue clay, creating a rough, fur-like appearance.
Step 2: Adding Features
-
Form the Arms:
Roll two small, bean-sized pieces of blue clay. Flatten one end of each slightly to attach to the body, and use your craft knife to cut two small slits in the other end to suggest fingers. -
Attach the Arms:
Press the arms onto the sides of the body, positioned slightly lower than the midpoint. Blend the seams at the shoulder area with a tool so they stick securely. -
Sculpt the Feet:
Create two small ovals of blue clay for the feet. Use a needle tool to press three vertical lines into the front of each oval to define the toes. -
Attach the Feet:
Press the feet onto the bottom front edge of the body. They should stick out just enough to be visible when looking straight at the monster. -
Make the Mouth:
Use a ball stylus or the back of a paintbrush to press a curved horizontal indent into the face area. This creates a recessed space for the teeth. -
Add Teeth:
Roll teeny-tiny triangles of white clay. Carefully place them into the mouth indentation, arranging 5-6 teeth pointing downwards and upwards for a jagged grin. -
Outline the Smile:
Roll a very thin ‘snake’ of black clay. Gently press this line along the center of the mouth, separating the top and bottom teeth and defining the smile.
Stay Clean
White clay picks up dust easily. Clean your hands or use baby wipes specifically before rolling the eyes and teeth to keep them bright white.
Step 3: Eyes and Horns
-
Create Eyeballs:
Roll two small balls of white clay and flatten them slightly into discs. Press these onto the upper face, side by side so they are touching. -
Add Pupils:
Take two minuscule dots of black clay and press them into the center of the white eyes. I like to sometimes place pupils slightly off-center to give him a goofier expression. -
Highlight the Eyes:
For extra life, add a tiny speck of white clay to the upper corner of each black pupil as a reflection. -
Shape the Horns:
Form two small cones using brown clay. Gently curve the tips inward slightly. -
Texture the Horns:
Use a needle tool or craft knife to score horizontal rings around the horns, giving them a rigid, organic texture. -
Attach Horns:
Press the horns firmly onto the top of the monster’s head. Re-texture the blue clay around the base of the horns to hide the attachment seam.
Make it a Set
Create a whole monster squad by using different base colors like green or purple, and vary the number of eyes or horn shapes for each one.
Step 4: Finishing Up
-
Final Check:
Place the monster back onto the pencil gently to ensure the hole hasn’t warped. Reshape if necessary, then remove the pencil before baking. -
Bake:
Place your monster upright on a baking sheet. Bake according to your clay manufacturer’s instructions (usually around 275°F for 15-20 minutes). -
Cool and Assemble:
Let the topper cool completely. Once hard, slide it onto your pencil. If it feels loose, a drop of superglue inside the hole will keep him permanently attached.
Now you have a charming little desk companion to make homework or drawing time more fun