If you’re in the mood for something festive and wearable, Christmas clay bead bracelets are the sweetest little project to throw on your craft table. I love how heishi-style clay beads let you go classic with holiday colors or get delightfully extra with charms and tiny details.
Candy Cane Stripe Bracelet
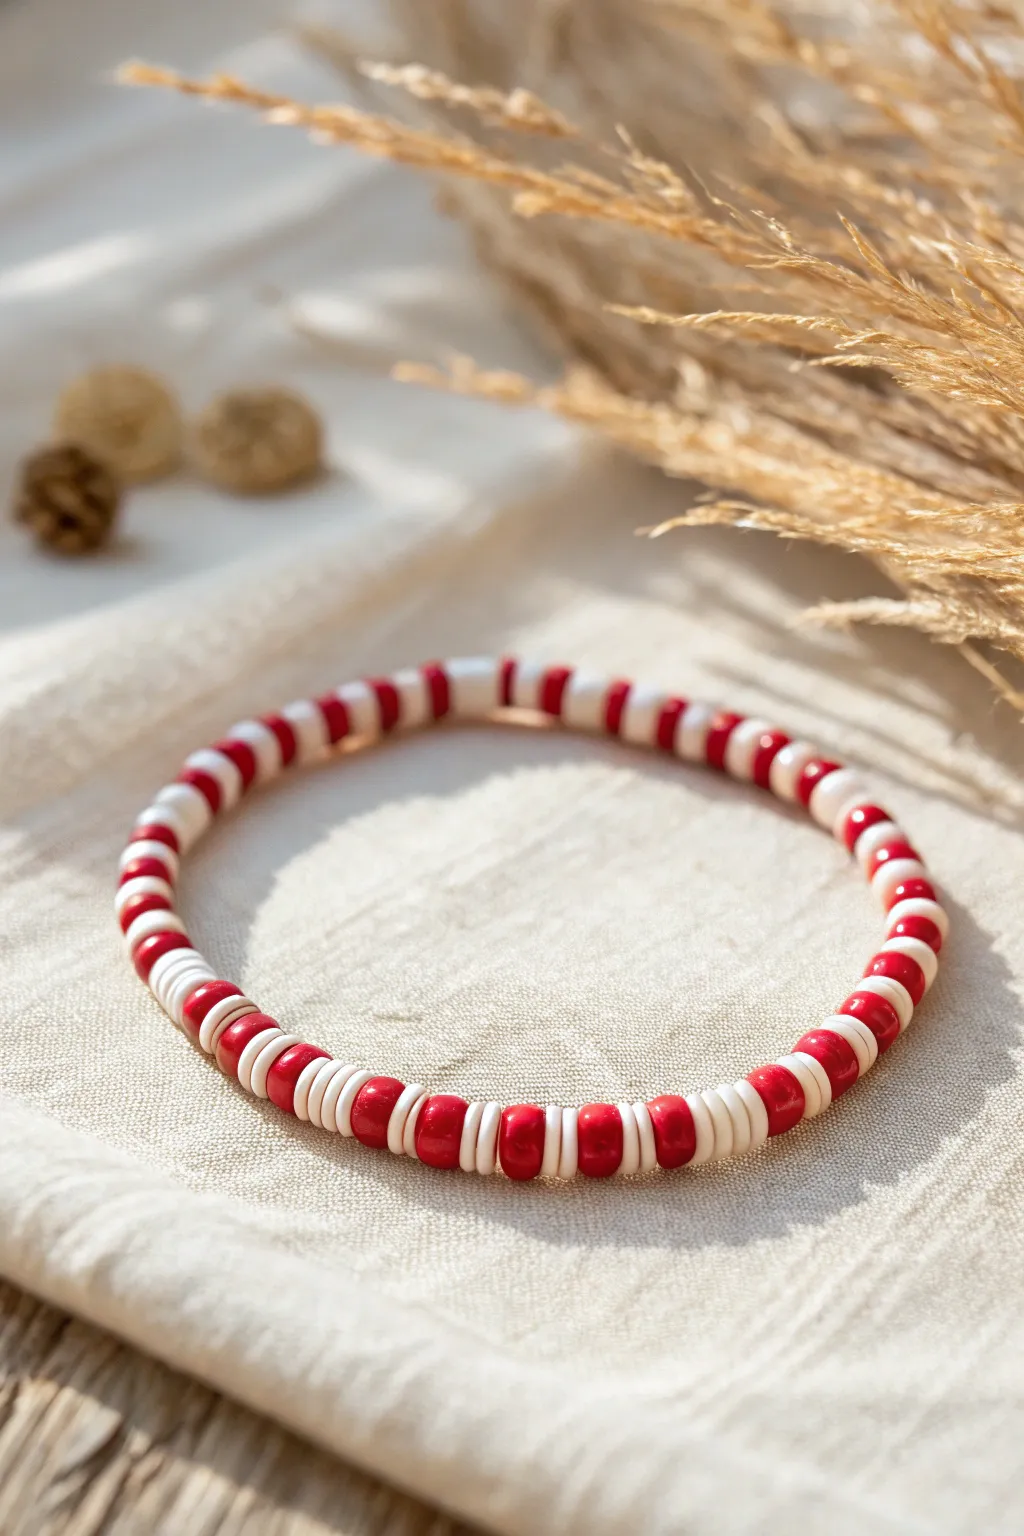
Capture the sweetness of the holidays with this simple yet striking candy cane-inspired accessory. Using polymer clay disc beads in alternating vibrant red and creamy white creates a classic stripe pattern that pairs perfectly with any winter outfit.
Step-by-Step Tutorial
Materials
- Red polymer clay heishi beads (6mm or 8mm)
- White or cream polymer clay heishi beads (6mm or 8mm)
- Elastic stretch cord (0.8mm or 1.0mm recommended)
- Beading glue or clear nail polish
- Scissors
Step 1: Preparation
-
Measure your wrist:
Wrap a piece of string or a soft measuring tape loosely around your wrist to find your comfortable size. Add about half an inch to this measurement to account for the thickness of the beads. -
Cut the cord:
Cut a length of elastic cord about 10-12 inches long. Having plenty of extra cord on both ends makes the final knot-tying process much less frustrating. -
Pre-stretch the elastic:
Give your cut piece of elastic a few gentle tugs. This pre-stretching helps prevent the bracelet from sagging or loosening up immediately after you finish making it. -
Secure the end:
Place a piece of tape or a bead stopper clip on one end of the cord so your beads don’t slide right off while you are working.
Knot Slipping?
If the elastic feels too slick, rough up the ends slightly with an emery board before tying. This texture gives the knot more ‘grip’ and stability.
Step 2: Creating the Pattern
-
Start with red:
Begin your pattern by threading on a small group of red clay beads. Looking closely at the example, groups of three to four beads work best to create distinct blocks of color. -
Add the white stripe:
Follow the red section with an equal number of white or cream beads. If you used three red beads, use three white beads to keep the striping symmetrical. -
Check the thickness:
Clay beads can vary slightly in thickness. I find it helpful to compare the stack heights visually rather than just counting; if one color’s beads are thinner, you might need to add an extra one to make the stripes look equal. -
Continue the sequence:
Repeat this alternating pattern—red block, white block, red block, white block—until you have substantial length on the string. -
Monitor the length:
Periodically wrap the beaded cord around your wrist to check the fit. You want the ends to meet comfortably without stretching the elastic tight. -
Finish the pattern:
Try to end your pattern on the opposite color from which you started (e.g., if you started with red, end with white) so the pattern flows seamlessly when connected.
Make It Sparkle
Swap every third white stripe section for gold spacer beads or a single gold heishi bead to add a touch of festive elegance to the casual clay look.
Step 3: Finishing Touches
-
Prepare to knot:
Remove the tape or stop-bead from the end carefully, holding both ends of the elastic firmly. -
Tie the first knot:
Cross the ends and make a simple overhand knot. Pull it taut to bring the beads together into a circle, ensuring there are no gaps. -
Secure with a surgeon’s knot:
For the second knot, wrap one end of the cord through the loop twice instead of once before pulling tight. This extra pass creates friction that holds slippery elastic much better. -
Apply adhesive:
Place a tiny drop of jewelry glue or clear nail polish directly onto the knot. This seals the knot and prevents it from unraveling over time. -
Let it cure:
Allow the glue to dry completely according to the package instructions before trimming anything. -
Trim the excess:
Use your scissors to trim the excess cord ends close to the knot, but leave about 1-2mm just to be safe so the knot doesn’t slip through. -
Hide the knot:
Gently pull adjacent beads over the knot to hide it inside one of the bead holes for a seamless, professional finish.
Slip on your festive new accessory and enjoy the holiday cheer it brings to your wrist


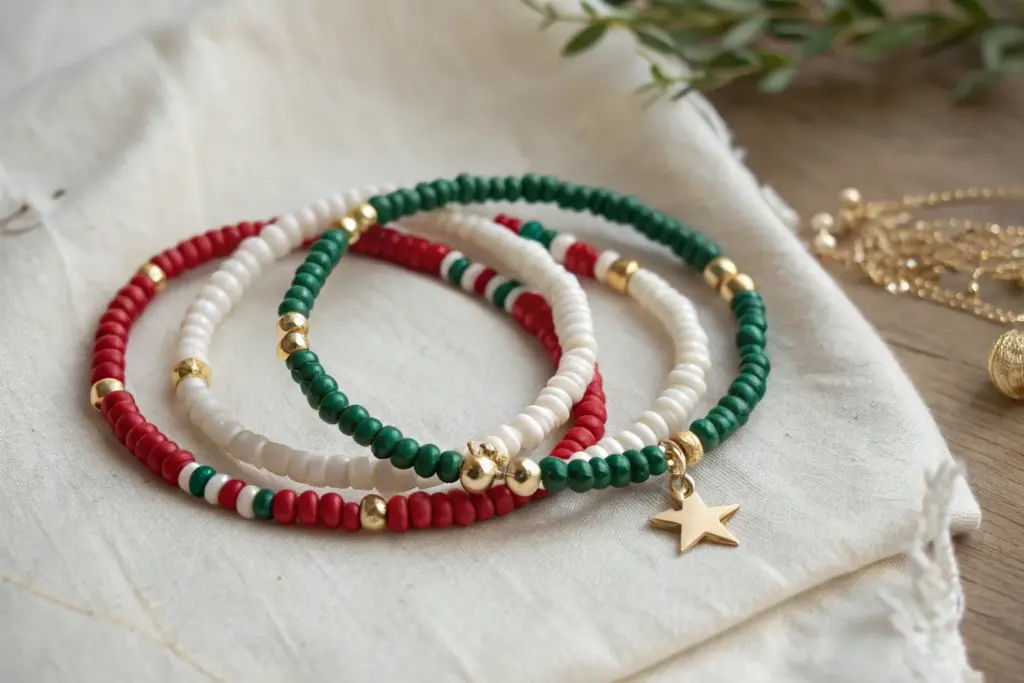
Classic Red, Green, and Gold Spacers

Capture the spirit of the season with this elegant, matte-finish bracelet that alternates festive red and forest green polymer clay beads. Detailed with tiny gold spacer beads and a secure lobster clasp, it’s a timeless accessory that pairs perfectly with warm winter sweaters.
Step-by-Step
Materials
- Red polymer clay rounds (approx. 8mm, matte finish)
- Forest green polymer clay rounds (approx. 8mm, matte finish)
- Small gold seed beads or hematite metallic spacers (approx. 2-3mm)
- Gold beading wire or strong nylon cord
- 2 Gold crimp beads
- 2 Gold crimp covers (optional but recommended for a polished look)
- Gold wire guards (2)
- Gold jump rings (open)
- Gold lobster claw clasp
- Gold extender chain
- Crimping tool or chain-nose pliers
- Wire cutters
- Bead stoppers or masking tape
Step 1: Planning and Stringing
-
Measure your wrist:
Wrap a flexible measuring tape around your wrist to determine your desired length. Standard bracelets are usually about 7 inches, but add an extra half-inch for the bulk of the larger clay beads. -
Prepare the wire:
Cut a length of beading wire approximately 10-12 inches long. This extra length gives you plenty of wiggle room to work with the clasp attachment later. -
Secure one end:
Place a bead stopper or a piece of masking tape on one end of the wire to prevent your beads from sliding off while you design your pattern. -
Create the central pattern:
Begin stringing the beads in the center section. Referring to the image, the pattern alternates one red matte bead, a tiny gold spacer, one green matte bead, and another gold spacer. -
Check the bead texture:
As you string, ensure you are using clay beads with that distinct frosted or matte texture; shiny plastic beads won’t give the same sophisticated look. -
Vary the side sections:
Notice how the pattern shifts slightly near the clasp ends. In the image, the gold spacers stop appearing between every bead towards the very ends. String 2-3 green or red beads consecutively without spacers as you approach the closure point. -
Verify the length:
Wrap the strung wire around your wrist. The ends of the bead strand should almost touch, leaving about half an inch gap for the clasp hardware.
Clean Matte Finish
If your polymer clay beads look dusty or have fingerprints, wipe them gently with a baby wipe or a dab of rubbing alcohol before stringing to restore that rich, velvety color.
Step 2: Attaching the Hardware
-
Thread the crimp bead:
Remove the bead stopper from one end. Slide on a gold crimp bead followed by a wire guard. -
Loop the clasp:
Thread the wire up through one side of the wire guard and down the other. Before pulling tight, hook the loop of your lobster clasp onto the wire guard. -
Secure the wire:
Feed the tail end of the wire back down through the crimp bead and into the first 1-2 clay beads on your strand. -
Crimp firmly:
Use your crimping tool to flatten the crimp bead securely. I generally like to give it a gentle tug to ensure it won’t slip. -
Add a crimp cover:
Place a gold crimp cover over the flattened crimp bead and gently close it with pliers until it looks like a round gold bead. -
Prepare the other end:
Push all your beads down towards the finished clasp end so there are no gaps. Repeat the crimp bead and wire guard process on the open end. -
Attach the extender:
Instead of a clasp, attach the loop of your gold extender chain to the wire guard on this second end. -
Final crimping:
Feed the wire back through the crimp bead and the adjacent clay beads. Pull everything taut so the design is fluid but not stiff, then crimp the bead shut. -
Trim excess wire:
Using flush cutters, trim away the excess wire tail as close to the beads as possible so no sharp ends poke out. -
Attach charm to chain:
If your extender chain is plain, use a small jump ring to attach a tiny gold charm or bead to the very end of the chain for a decorative dangling finish.
Stiff Bracelet?
If the bracelet feels too rigid, you likely crimped it too tightly. beads need a tiny bit of space to rotate. Leave a 1mm gap of exposed wire before the final crimp.
Now you have a stunning, festive accessory ready to wear to your next holiday gathering


Merry Word Bracelet
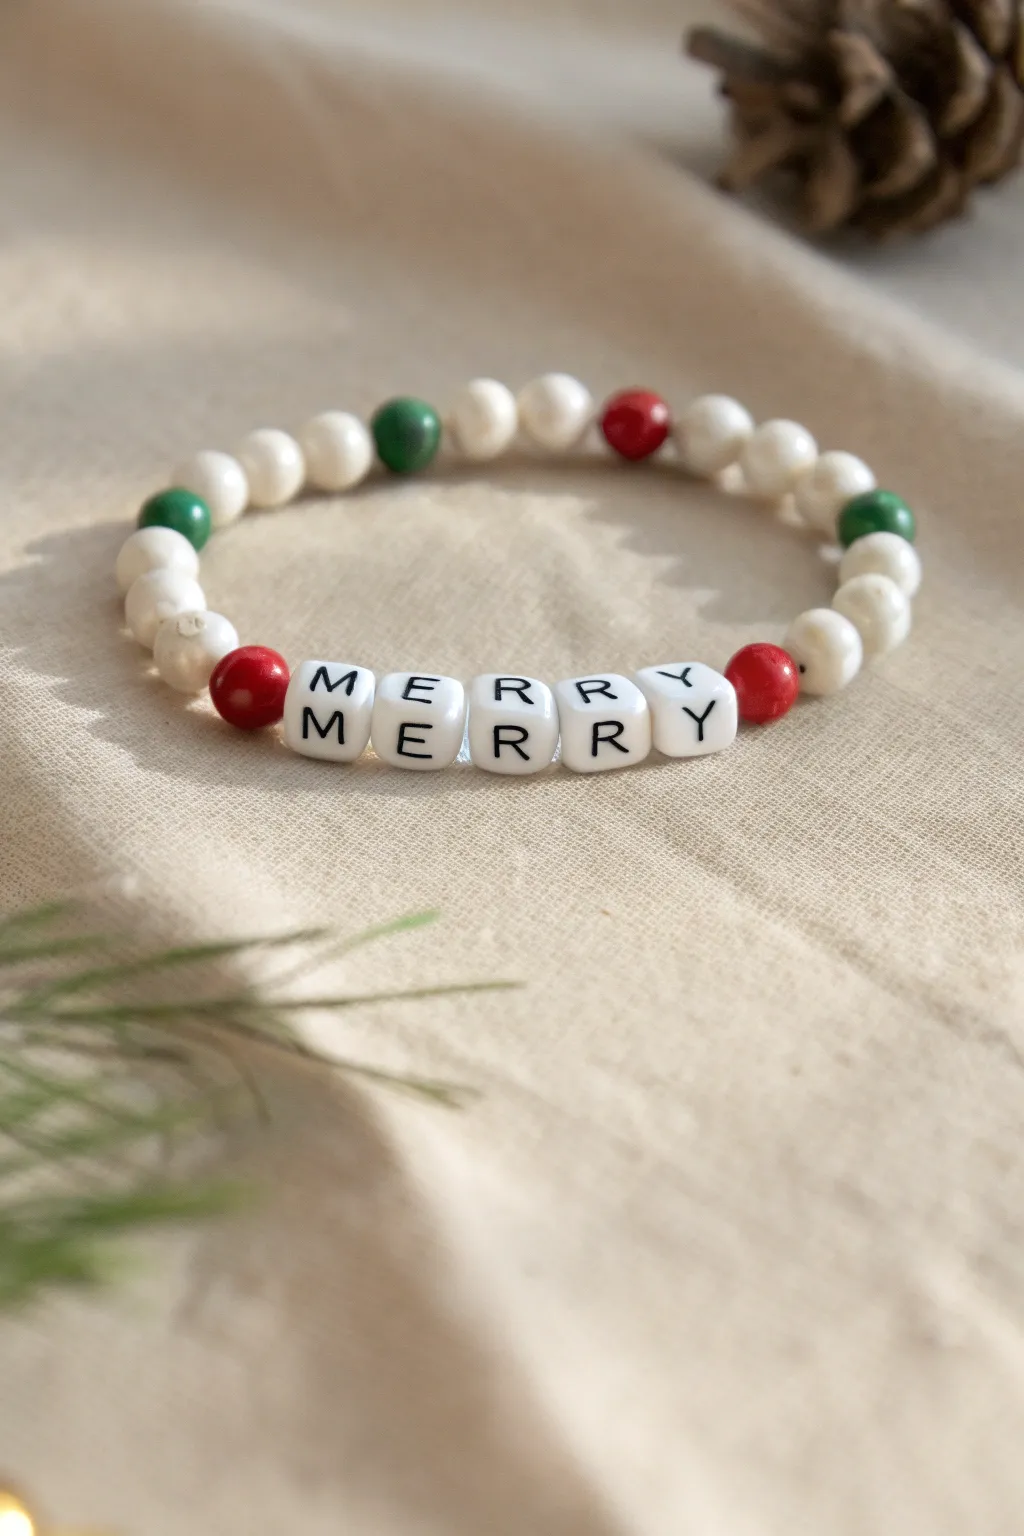
Capture the spirit of the season with this elegantly simple stretch bracelet featuring white, red, and green accents. The centerpiece is the word “MERRY” spelled out in bold black-and-white letter beads, flanked by festive pops of color for a perfect holiday accessory.
Step-by-Step Tutorial
Materials
- Stretch cord (0.8mm or 1mm thickness)
- White round beads (approx. 6-8mm, can use wood, stone, or acrylic)
- Red round beads (approx. 6-8mm)
- Green round beads (approx. 6-8mm)
- Square white letter beads spelling “MERRY”
- Scissors
- Hypo-cement or jewelry glue (optional)
- Bead stopper or tape
Step 1: Preparation & Centerpiece
-
Measure and cut:
Cut a piece of stretch cord about 10-12 inches long. This extra length makes tying the final knot much easier than working with a short piece. -
Secure the end:
Place a bead stopper or a piece of tape on one end of your cord so your beads don’t slide off while you work. -
Start the center:
Thread on one red round bead. This will act as the left-side frame for your word. -
Spell it out:
String the letter beads M, E, R, R, and Y in order. Double-check that all letters are facing the correct way up before moving on. -
Finish the frame:
Add the second red round bead immediately after the ‘Y’. Your colorful central focal point is now complete.
Step 2: Creating the Pattern
-
Begin the right side:
On the right side of your centerpiece (after the red bead), thread on two white round beads. -
Green accent:
Add one green round bead. -
White sequence:
Thread on four white round beads to create a longer section of neutral color. -
Red accent:
Add one red round bead. -
White sequence again:
String another set of four white round beads. -
Green accent on left:
Now, switch your attention to the other side of the bracelet (before the first red framing bead). Thread on two white round beads. -
Add color:
Add one green round bead here. -
Continue the pattern:
Add four white round beads. -
Final accent:
Finish this side with a red round bead followed by enough white beads to fit your wrist size. Typically, you’ll need about 2-3 more depending on the circumference needed.
Knot Security Tip
When tying off elastic, pull the cords specifically ‘tight-loose-tight’ repeatedly. This seats the knot layers firmly against each other.
Step 3: Finishing Touches
-
Check the fit:
Carefully wrap the unfinished bracelet around your wrist to ensure it fits comfortably. It should be snug but not tight. Add or remove white beads from the ends if necessary to adjust the size. -
Pre-stretch the cord:
Gently pull tightly on both ends of the cord a few times. This pre-stretching step helps prevent the elastic from sagging or loosening after you’ve tied it. -
Tie the knot:
Tie a surgical knot or a square knot. Pull the cords firmly to tighten the knot as much as possible without snapping the elastic. -
Secure the knot:
Dab a tiny amount of jewelry glue or Hypo-cement onto the knot. This is a small detail I always include to ensure longevity. -
Hide the knot:
If one of the adjacent white bead holes is large enough, gently tug the cord so the knot slides inside the bead, hiding it from view. -
Trim excess:
Once the glue is dry, trim the excess cord ends close to the knot using your scissors.
Upgrade Your Beads
Swap the plain white beads for frosted quartz or white jade gemstones. The semi-translucent finish adds a frosty, high-end winter look.
Now you have a festive, custom-fit accessory ready to wear for the holidays


Tiny Tree Charm Bracelet
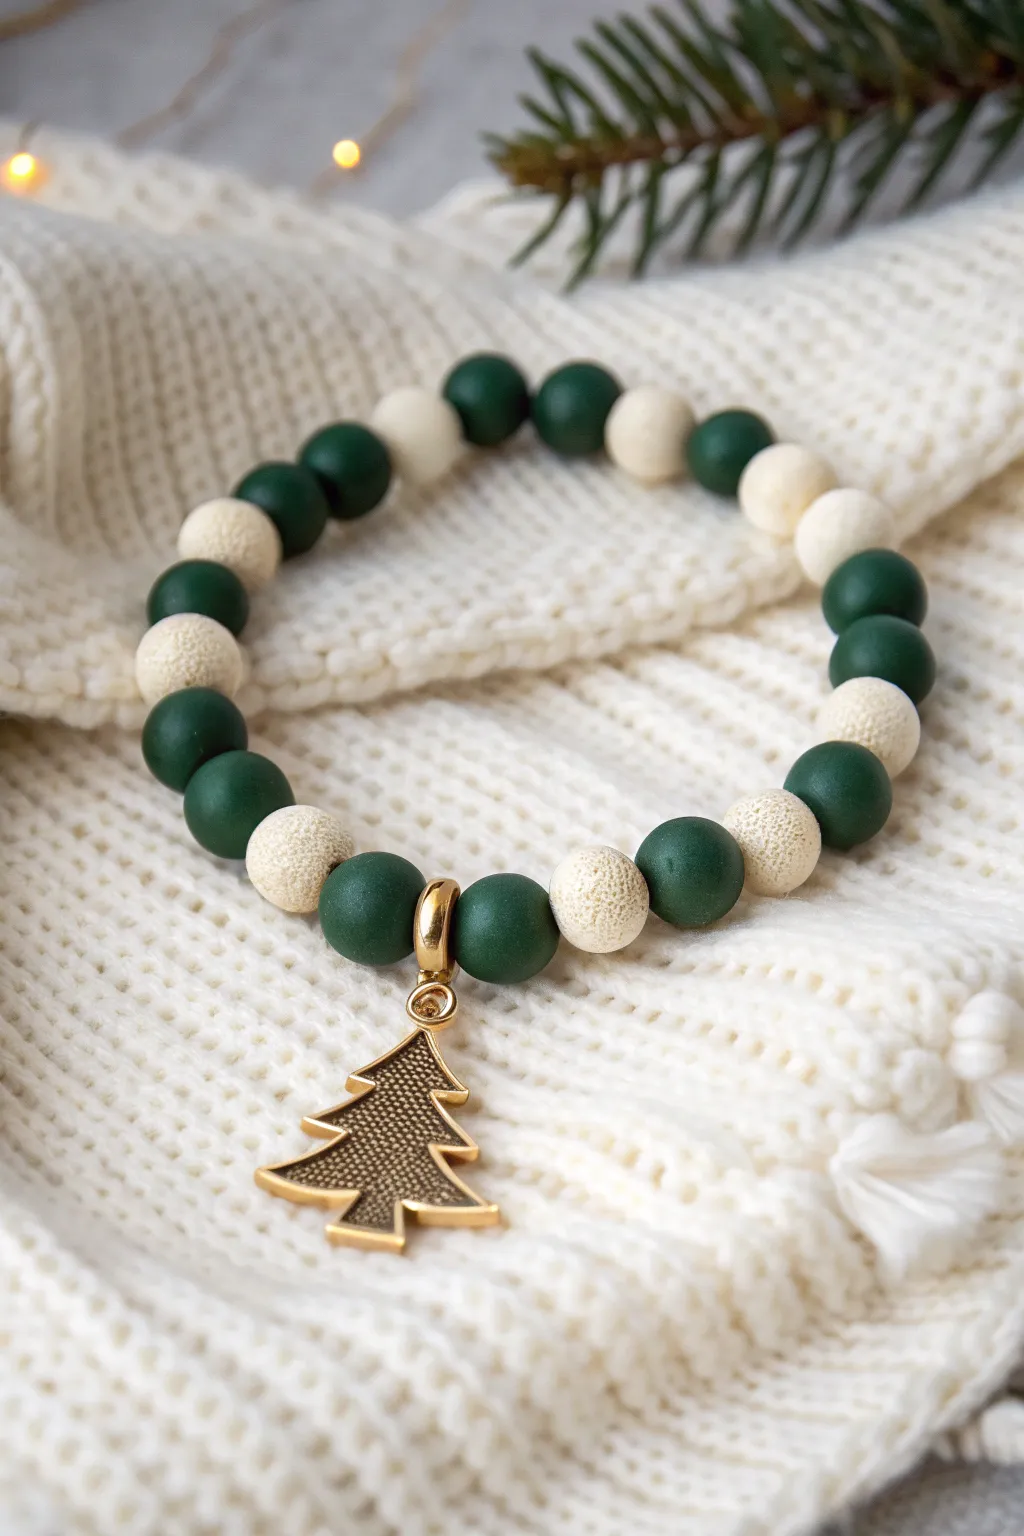
Coordinate your cozy winter wardrobe with this elegant stretch bracelet featuring deep evergreen tones and snowy white textures. The centerpiece is a simple gold tree charm that adds just the right amount of festive sparkle to the matte finish beads.
Step-by-Step Guide
Materials
- Green matte round beads (approx. 8mm or 10mm, matte agate or polymer clay)
- White or cream textured beads (approx. 8mm or 10mm, lava stone or sponge coral)
- Gold-tone Christmas tree charm
- Gold-tone charm bail (slide-on style)
- Gold-tone jump ring (open, 6mm)
- Clear elastic jewelry cord (0.8mm or 1mm)
- Jewelry adhesve (E6000 or G-S Hypo Cement)
- Scissors
- Flat nose pliers
- Tape or bead stopper
Step 1: Preparation & Planning
-
Measure the cord:
Cut a piece of elastic jewelry cord approximately 10 to 12 inches long. This generous length gives you plenty of room to tie a secure knot later without struggling. -
Pre-stretch the elastic:
Before stringing a single bead, hold the cord ends firmly and give the elastic a few gentle tugs. This “pre-stretching” helps prevent the bracelet from loosening up and sagging after you wear it a few times. -
Secure the end:
Place a piece of tape over one end of the cord or attach a bead stopper to keep your beads from sliding off while you design.
Knot Slipping?
If your elastic knot keeps coming undone before you can glue it, try dabbing the knot with a little clear nail polish. It sets faster than some glues and holds it while you work.
Step 2: Designing the Pattern
-
Establish the rhythm:
Examine the reference image carefully. The pattern isn’t a simple one-to-one alternation. Notice the groupings: it often features two green beads followed by one white bead, though there are variations. -
Build the first section:
Start by stringing your beads to match the image’s flow. Thread on two green matte beads. -
Add texture:
Follow the green pair with a single white textured bead. This contrast between the smooth green and the pitted white surface creates that lovely tactile finish. -
Create variation:
Continue the pattern. You might choose to do a ‘2 green, 1 white’ pattern for the whole length, or mix it up like the photo which has sections of ‘1 green, 1 white’ near the charm. -
Check the fit:
Once you have strung about 6.5 to 7 inches of beads (or your specific wrist measurement), wrap the strand around your wrist to check the size. Ideally, the ends should touch comfortably without gaps.
Step 3: Adding the Charm
-
Prepare the bail:
Locate the center point of your design where you want the charm to hang. You’ll want to add the bail carrier bead here. -
Attach the bail:
Thread the elastic through the gold charm bail so it sits snugly between two beads—in the original image, it sits between two green beads. -
Prep the charm:
Using your flat nose pliers, gently twist open the gold jump ring sideways (never pull it apart outwards). -
Connect the tree:
Slide the loop of the Christmas tree charm onto the open jump ring, then hook the jump ring onto the loop of the bail you just strung. -
Close the hardware:
Use the pliers to twist the jump ring back into a closed circle, ensuring the cut ends meet perfectly flush so the charm doesn’t slip off.
Scent Your Style
Use actual lava stone beads for the white sections. You can add a drop of pine or cinnamon essential oil to them, turning this accessory into a fragrant holiday diffuser.
Step 4: Finishing Touches
-
Tie the knot:
Remove the tape or plain bead stopper. Bring the two ends of the elastic together and tie a surgeon’s knot (loop left over right twice, then right over left once) and pull it tight. -
Secure with glue:
While holding tension on the knot, apply a tiny dab of jewelry adhesive directly onto the knot. I prefer to let this dry briefly for about a minute before moving on. -
Hide the mechanics:
Once the glue is tacky but not fully hard, slide the nearest large-hole bead over the knot to conceal it inside. -
Trim the excess:
Carefully trim away the remaining elastic tails with your scissors, being extremely careful not to snip the main cord of the bracelet. -
Final cure:
Let the bracelet sit undisturbed for at least 24 hours to allow the glue to cure completely before wearing it.
Enjoy wearing your handcrafted piece of winter charm all season long

The Complete Guide to Pottery Troubleshooting
Uncover the most common ceramic mistakes—from cracking clay to failed glazes—and learn how to fix them fast.
Wreath-Inspired Green Circle Center
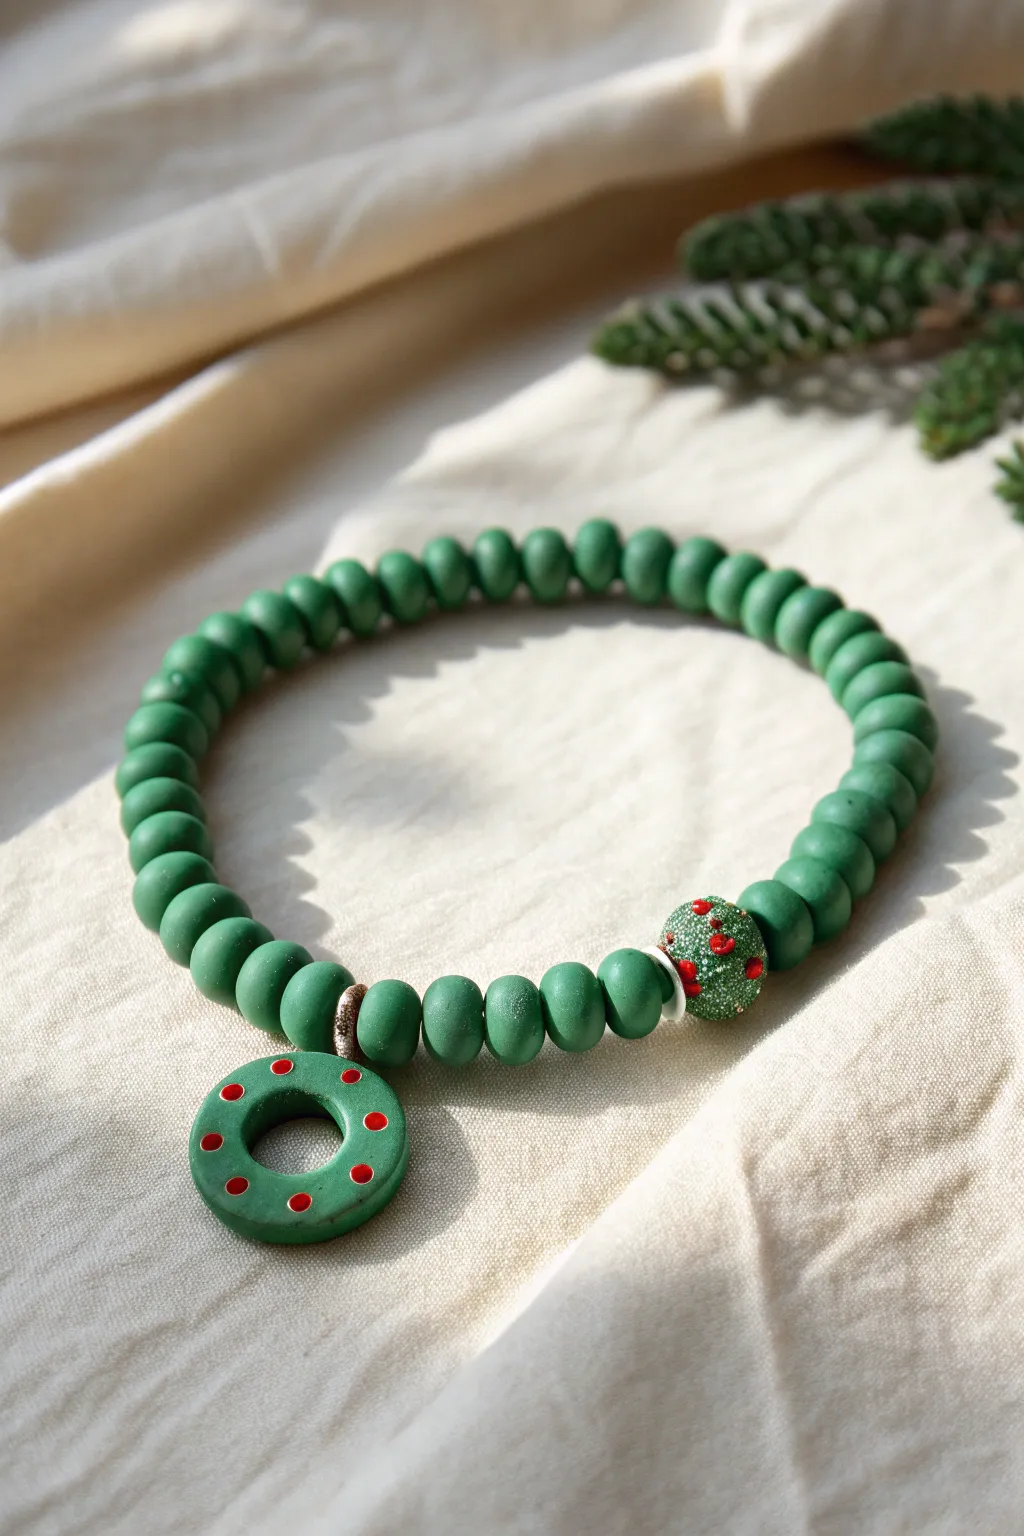
Embrace the classic colors of the season with this festive bracelet featuring matte green beads and a charming wreath pendant. The standout element is the handmade donut charm dotted with red berries, perfectly complemented by a matching textured accent bead.
How-To Guide
Materials
- Green polymer clay (matte forest green shade)
- Red polymer clay (bright berry shade)
- Clear or white texture paste (or coarse embossing powder)
- Strong elastic bead cord (0.8mm Recommended)
- Small circle cutters (two sizes for the wreath)
- Needle tool or toothpick
- Silver spacer beads (optional)
- Clay roller or pasta machine
- Baking sheet and parchment paper
- Gloss glaze (optional for berries)
- Superglue
Step 1: Creating the Clay Components
-
Condition the clay:
Begin by warming and kneading your forest green polymer clay until it is soft and pliable. This prevents cracks during baking. -
Form the base beads:
Roll the green clay into a long, even log about 1cm thick. Slice the log into equal segments to ensure your beads are uniform in size. -
Shape the rounds:
Roll each green segment between your palms to create smooth, round spheres. You will need about 25-30 beads for a standard wrist, but make a few extras just in case. -
Create the hole:
Using a needle tool, carefully pierce the center of each green sphere. Twist the tool gently as you push through to avoid squashing the bead shape. -
Make the wreath charm:
Flatten a piece of green clay to about 4mm thickness. Use a larger circle cutter (approx. 2cm) to cut the outer shape, and a smaller cutter to remove the center, creating a donut shape. -
Pierce the charm:
Use your needle tool to create a hole at the top of the wreath charm for stringing. Ensure the hole is wide enough for your elastic cord. -
Add wreath berries:
Roll tiny specks of red clay into miniature balls. Press these gently onto the surface of your green wreath donut in a random pattern. Use your finger to flatten them slightly so they adhere well. -
Create the textured accent bead:
Take one of your green round beads and roll it lightly in coarse texture paste or embossing powder to give it a frosty, sugary look. If you don’t have paste, stipple the surface with a toothpick for texture. -
Decorate the accent bead:
Add small clusters of red clay berries to this textured bead, mimicking the look of a holly berry ornament.
Step 2: Baking and Assembly
-
Bake the clay:
Arrange all your beads and the charm on a parchment-lined baking sheet. Bake according to your clay package instructions (usually 275°F/135°C for 15-30 minutes). -
Cool down:
Allow the clay to cool completely inside the oven or on a wire rack. The clay hardens fully as it cools. -
Pre-stretch the cord:
Cut a piece of elastic cord about 10 inches long. Give it a few firm tugs to pre-stretch it; this helps prevent the bracelet from loosening over time. -
Start stringing:
Thread your green round beads onto the elastic. Stop when you have filled about half the length needed for your wrist. -
Add the focal points:
String the textured holly bead first. I like to add a thin silver spacer bead on either side of the charm to help it hang correctly, then thread on the wreath charm. -
Finish the pattern:
Continue adding the remaining green round beads until the bracelet fits comfortably around your wrist. -
Tie the knot:
Tie a surgical knot (left over right, right over left) or a strong square knot. Pull it tight, ensuring there are no gaps between the beads. -
Secure and trim:
Add a tiny drop of superglue to the knot for extra security. Once dry, trim the excess cord ends close to the knot and tuck the knot inside a bead hole if possible.
Pro Tip: Bead Piercing
To keep beads perfectly round, let them rest in the fridge for 10 minutes before piercing. The firmer clay resists fingerprint indentations while you work.
Level Up: Glossy Finish
After baking, apply a tiny dot of UV resin or glossy glaze specifically to the red berries. It makes them shine like real holly berries against the matte green.
Wear your handmade wreath bracelet to your next holiday party or wrap it up as a thoughtful festive gift
Holly Berry Color Pop Bracelet
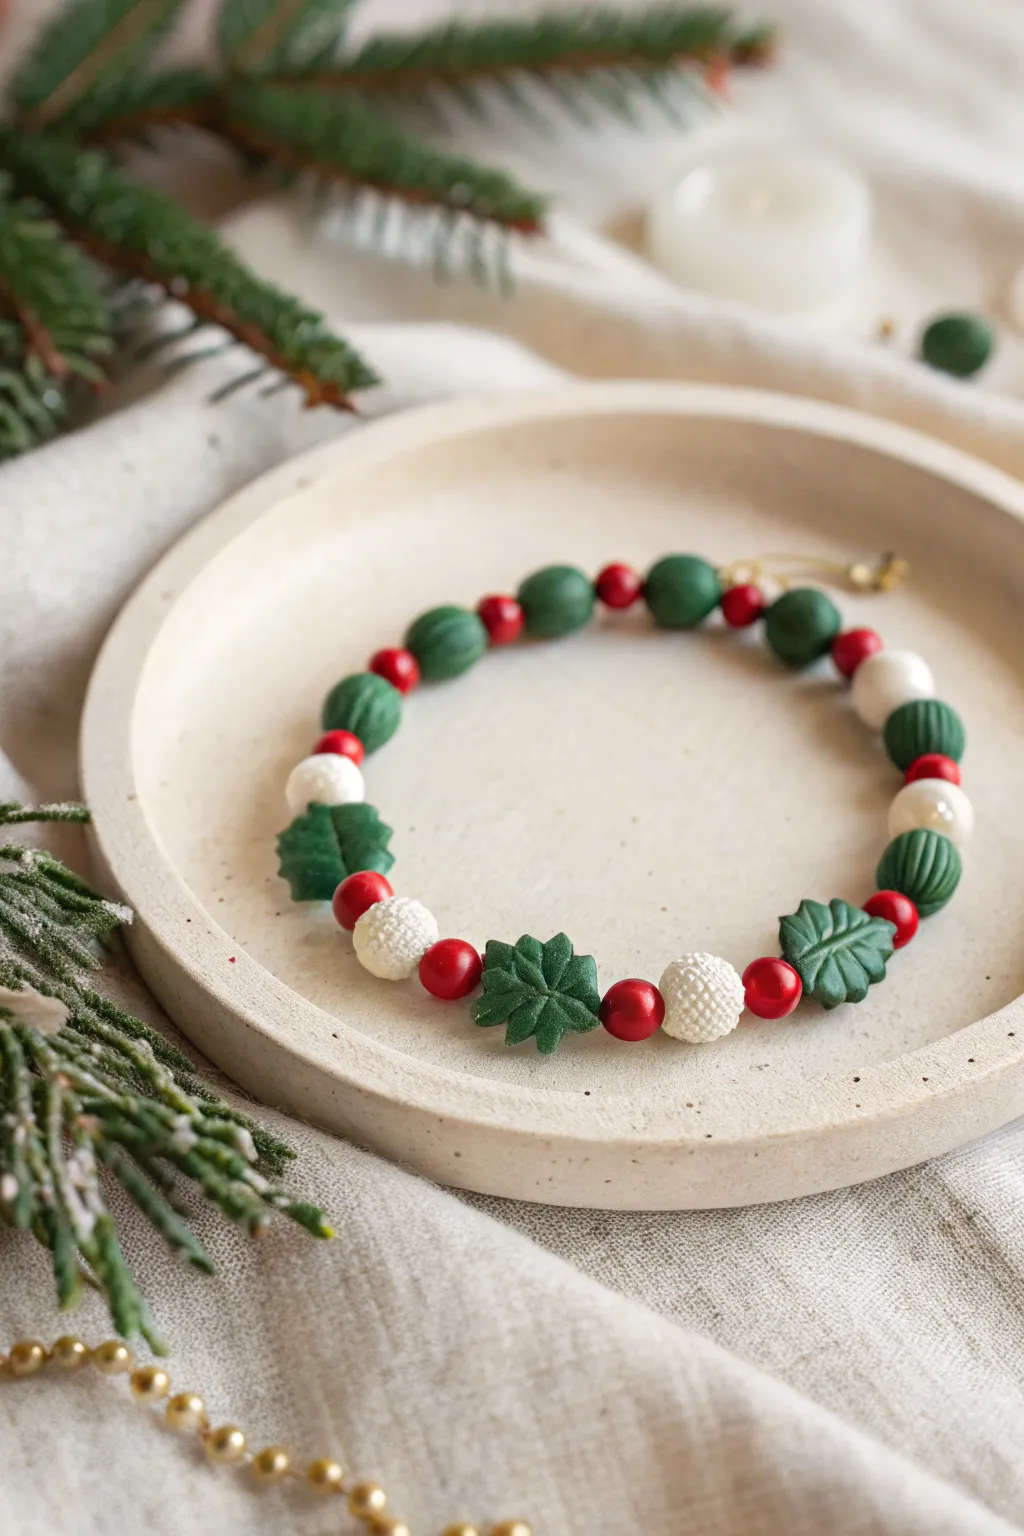
Embrace the festive spirit with this delightful clay bead bracelet featuring handmade holly leaf charms and textured snowballs. The classic red, green, and white palette makes it a perfect accessory for holiday gatherings or a thoughtful handmade gift.
Step-by-Step
Materials
- Polymer clay in deep pine green, bright red, and pearl white
- Elastic beading cord (0.7mm or 0.8mm)
- Clay texture tool or fine sandpaper (for white beads)
- Needle tool or toothpick
- X-Acto knife or clay blade
- Rolling pin or pasta machine
- Small leaf cutter (optional, can freehand)
- Super glue or jewelry cement
- Oven for baking
- Parchment paper
Step 1: Crafting the Clay Beads
-
Condition the Green Clay:
Start by warming up your deep pine green polymer clay in your hands until it is soft and malleable. Roll about half of the green clay into small, uniform spheres approximately 6-8mm in diameter to create the simple round spacer beads. -
Create Textured Green Beads:
With the remaining green clay, roll slightly larger spheres. Use your needle tool to gently press vertical lines down the sides of these beads, giving them a ribbed, pumpkin-like texture reminiscent of evergreen cones. -
Form the Red Berries:
Condition the bright red clay and roll it into small, smooth spheres about 4-5mm wide. These will act as the vibrant holly berries in your design. Try to keep them as round and polished as possible to catch the light. -
Make the Snowball Beads:
Using the pearl white clay, roll medium-sized spheres. To achieve the textured ‘snowball’ look shown in the photo, gently roll the unbaked bead over a piece of fine sandpaper or tap it repeatedly with a stiff-bristled toothbrush. -
Sculpt Holly Leaves:
Flatten a small piece of green clay. Use a small leaf cutter or cut small diamond shapes freehand with your blade. Gently pinch the edges to create points and use the needle tool to draw a central vein down the middle of each leaf. -
Pierce the Beads:
Carefully pierce a hole through the center of every bead using your needle tool. For the holly leaves, pierce them horizontally through the thickest part of the base so they lie flat against the wrist when strung.
Smooth Surface Secret
Before baking, lightly brush your untextured beads with a tiny amount of baby oil or cornstarch. This smoothes out fingerprints and gives the clay a professional finish.
Step 2: Baking & Assembly
-
Bake the Clay:
Arrange all your clay pieces on a parchment-lined baking sheet. Bake according to the manufacturer’s instructions for your specific brand of polymer clay—usually around 275°F (135°C) for 15-30 minutes. -
Cool Down:
Allow the beads to cool completely inside the oven with the door slightly ajar. This gradual cooling helps preventing cracking, especially for the delicate holly leaves. -
Prepare the Cord:
Cut a length of elastic cord about 10 inches long. Pre-stretch the elastic by pulling it gently a few times; this prevents the bracelet from stretching out and becoming loose later on. -
Plan the Pattern:
Lay out your beads on a soft cloth to finalize the pattern. The design in the image alternates between textured green beads, red berries, and white snowballs, with the special holly leaves acting as focal points. -
String the Beads:
Thread the beads onto the elastic cord. I find it easiest to start with a standard round bead rather than a detailed charm to make hiding the knot easier later. -
Add the Focal Points:
When threading the holly leaves, place a red berry bead immediately next to it on one or both sides to mimic the look of natural holly clusters. -
Tie the Knot:
Once all beads are strung, check the size against your wrist. Tie the ends together using a surgeon’s knot (loop the elastic through twice on the first pass) for extra security. -
Secure and Finish:
Place a tiny drop of super glue or jewelry cement on the knot. Let it dry for a minute, then pull the knot inside the hole of a neighboring bead to hide it. Trim the excess cord.
Leaf Breakage?
If leaves snap after baking, they were likely too thin. Next time, keep the clay slightly thicker (2-3mm) where the hole is pierced to ensure structural integrity.
Now you have a charming winter accessory ready to wear or gift for the holidays


What Really Happens Inside the Kiln
Learn how time and temperature work together inside the kiln to transform clay into durable ceramic.
Peppermint Swirl Focal Bead
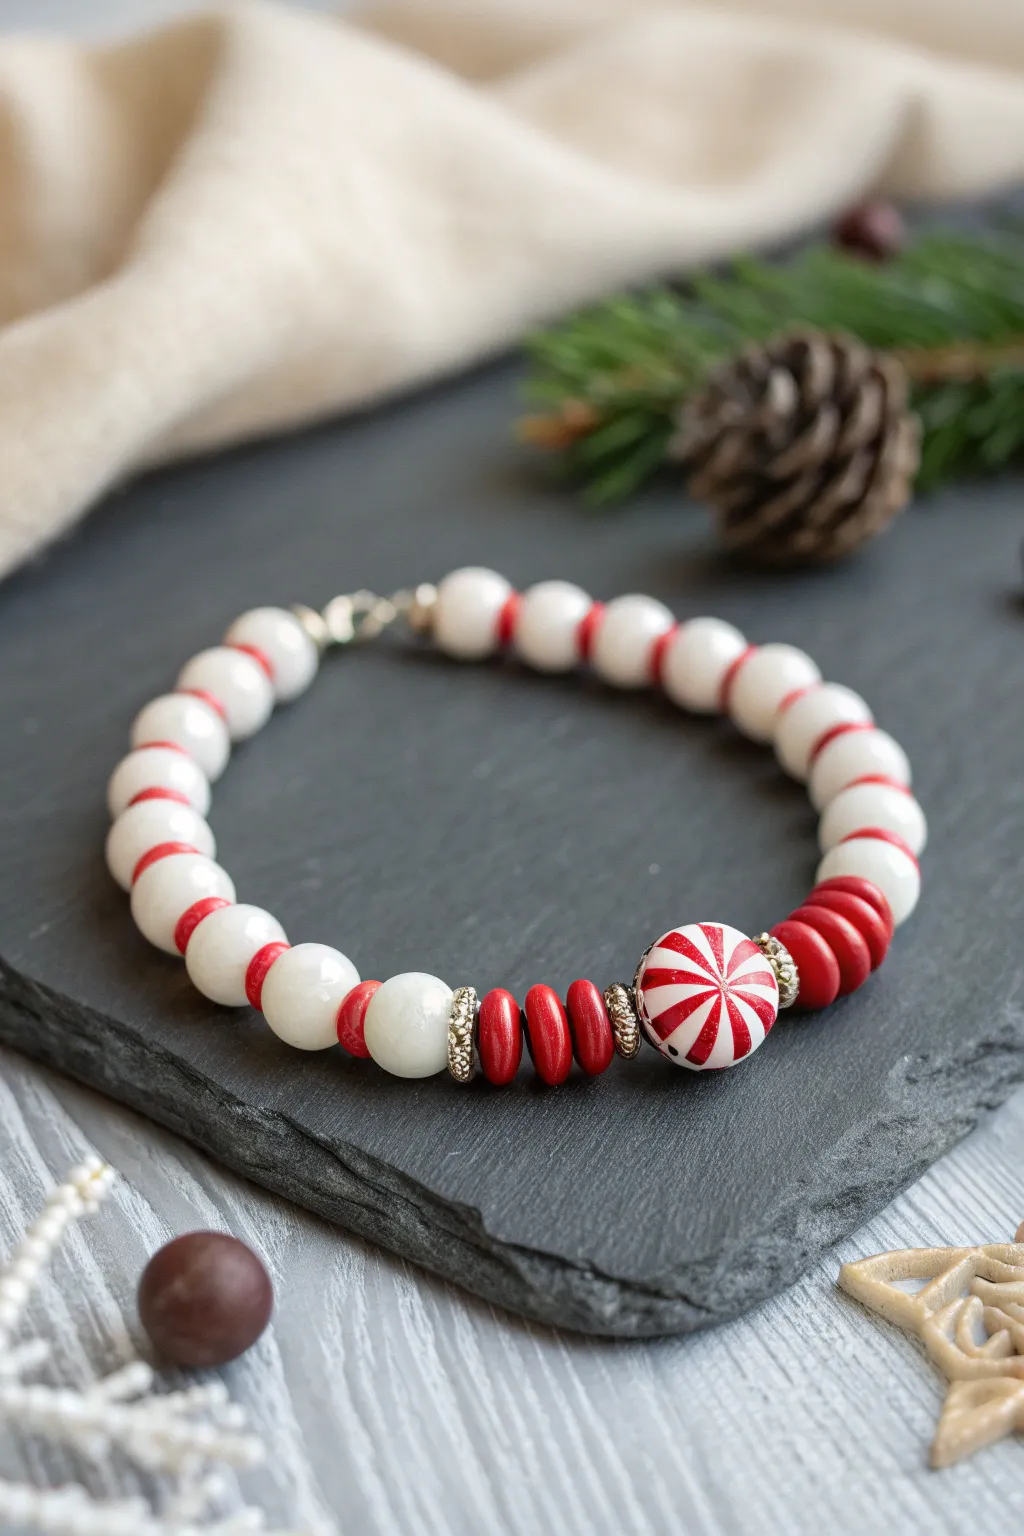
Capture the sweetness of the season with this elegant yet playful bracelet design. Featuring a delightful peppermint swirl centerpiece flanked by vibrant red discs and creamy white rounds, it’s the perfect accessory for holiday gatherings.
Step-by-Step Tutorial
Materials
- 1 large white round bead (approx. 12-14mm) for the focal point
- Red acrylic paint
- Fine detail paintbrush (00 or 000 size)
- Polymer clay sealant or clear gloss varnish
- 14-16 white round stone or glass beads (8mm or 10mm)
- Small red heishi or disc spacer beads (approx. 6mm)
- 4 silver rhinestone spacer rings
- Strong elastic beading cord (0.8mm or 1mm)
- Jewelry glue or clear nail polish
- Beading needle (optional)
- Scissors
Step 1: Creating the Peppermint Focal Bead
-
Prepare the Base:
Select your largest white bead to serve as the peppermint candy. Wipe it clean with a soft cloth to remove any oils or dust that might prevent paint adhesion. -
Paint the Stripes:
Using your fine detail brush and red acrylic paint, carefully paint lines radiating from the center hole outward, curving them slightly to create a ‘swirl’ effect. -
Refine the Pattern:
Alternate the thickness of your red stripes—some thick, some thin—to mimic the look of a real starlight mint candy. I find looking at a reference photo of actual candy helps get the spacing right. -
Seal the Design:
Allow the paint to dry completely for at least 30 minutes. Once dry, coat the bead with a thin layer of gloss varnish or sealant to protect the design and give it a candy-like shine.
Master the Swirl
To get cleaner lines on your peppermint bead, rest your pinky finger against the bead for stability while painting the curved strokes.
Step 2: Designing the Center Section
-
Start the Strand:
Cut a length of elastic cord about 10-12 inches long. Pre-stretch the cord by pulling it firmly a few times to prevent the bracelet from stretching out later. -
Thread the Center:
Thread your custom peppermint focal bead onto the middle of the cord. -
Add Sparkle:
Immediately on either side of the peppermint bead, slide on one silver rhinestone spacer ring. This frames the focal piece beautifully. -
Layer the Color:
On the right side, thread on three red heishi disc beads. Repeat this on the left side with three more red discs. -
Add More Sparkle:
Place a second silver rhinestone spacer ring after the red discs on both the left and right sides.
Step 3: Completing the Bracelet Body
-
Transition to White:
Add one large white round bead next to the rhinestone spacer on both sides. -
Create the Pattern:
Begin your main pattern: thread a single thin red heishi spacer, followed by a white round bead. -
Continue Beading:
Repeat this pattern (red spacer, white bead) alternately on both ends of the string until the bracelet reaches your desired wrist size. Standard size is usually about 7 inches. -
Check the Fit:
Wrap the unfinished strand around your wrist to check the fit. It should be snug but comfortable, with no large gaps between beads.
Variation Idea
Swap the red paint and discs for green to create a spearmint version, or use both red and green on the focal bead for a classic holiday mix.
Step 4: Finishing Touches
-
Tie the Knot:
Bring the two ends of the elastic cord together. Tie a surgeon’s knot (loop the right cord over the left twice, then pull tight) to secure the bracelet. -
Secure the Knot:
Apply a tiny dab of jewelry glue directly onto the knot. Let it dry for a few minutes to ensure it won’t slip. -
Hide the Evidence:
Trim the excess cord close to the knot, leaving about 2mm. Gently tug the drilled hole of the nearest white bead over the knot to hide it inside.
Slip on your festive new creation and enjoy the holiday sparkle right on your wrist
Santa Hat Smiley Centerpiece
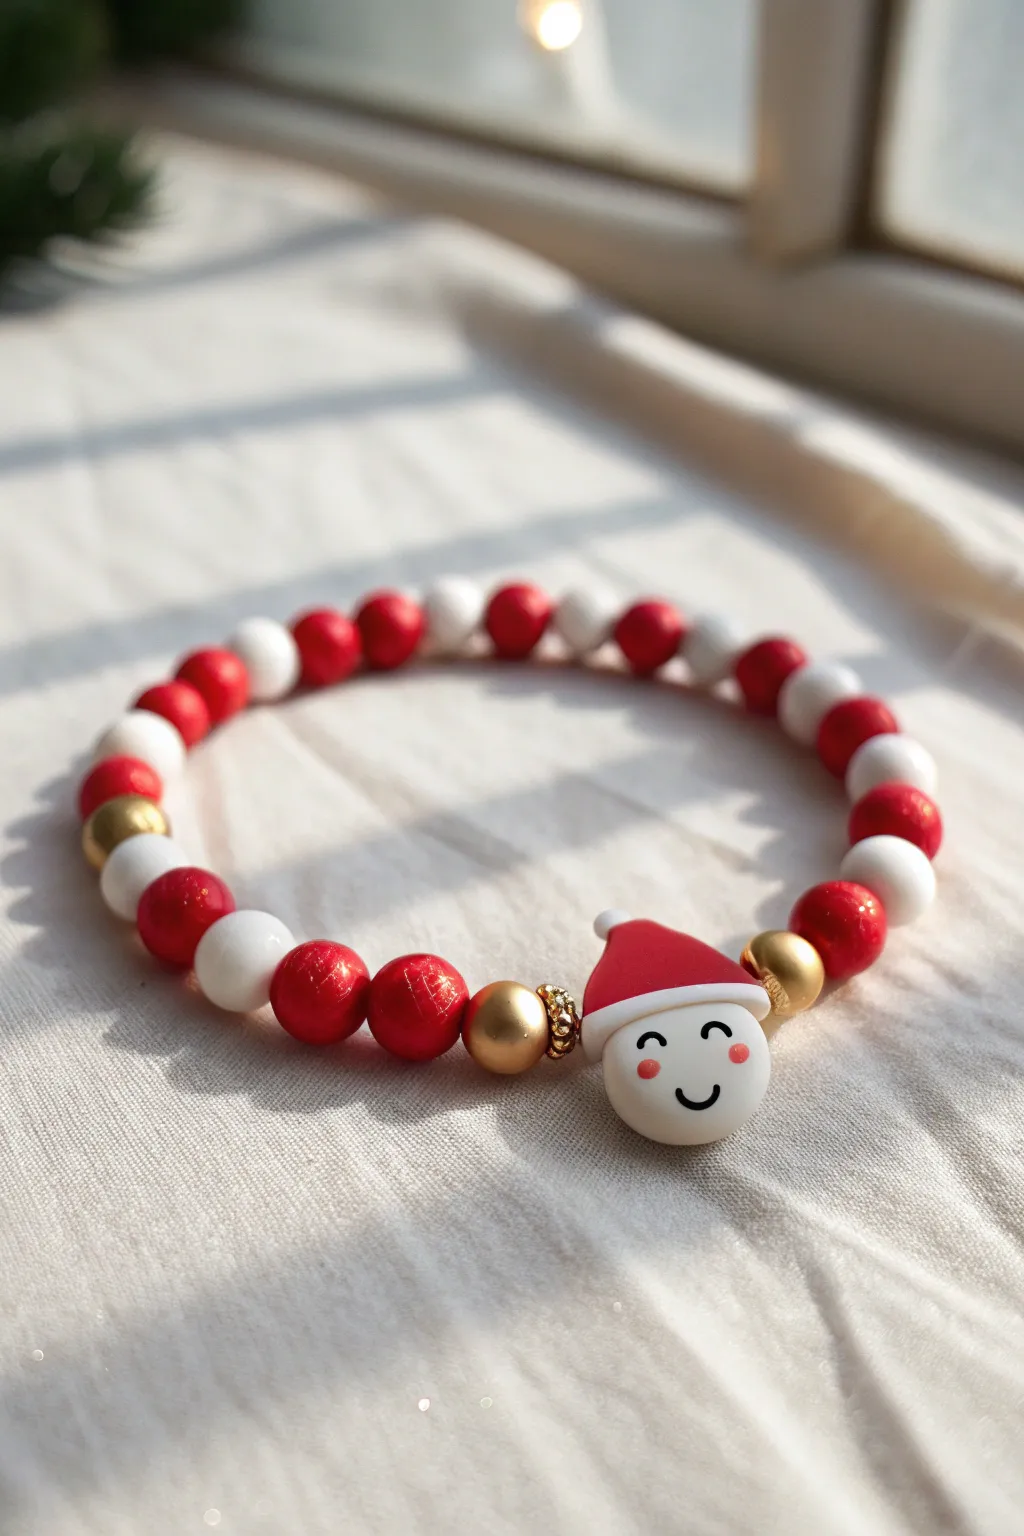
Spread holiday cheer with this charming beaded bracelet centered around an adorable smiling Santa face. The combination of shimmering red beads, classic white rounds, and touches of gold creates a festive accessory perfect for stacking or wearing solo.
Step-by-Step Guide
Materials
- Polymer clay (white, red, black, pink)
- Gluten-free oven or toaster oven for clay
- Red shimmer round beads (8mm or 10mm)
- White smooth round beads (8mm or 10mm)
- Gold metallic spacer beads
- Gold faceted rondelle spacer beads
- Elastic stretch cord (0.8mm or 1mm)
- Superglue or jewelry knot cement
- Needle tool or toothpick
- Clay sculpting tools
- Scissors
Step 1: Sculpting the Santa Charm
-
Form the face:
Start by conditioning a small ball of white polymer clay until it’s soft and pliable. Roll it into a smooth, slightly flattened sphere to create the base for Santa’s head. -
Add the hat base:
Take a piece of red clay and shape it into a small cone. Flatten the bottom slightly and press it gently onto the top of the white sphere, curving the tip over to one side if desired for a playful look. -
Create the hat brim:
Roll a very thin snake of white clay. Wrap this around the base of the red hat where it meets the white face to form the fluffy brim, blending the seam gently at the back. -
Add the pom-pom:
Roll a tiny ball of white clay and attach it to the tip of the red hat. You can texture it slightly with a needle tool to make it look fluffy. -
Detail the face:
Use a needle tool or the smallest dotting tool to gently press indentations for the eyes. Roll two minuscule balls of black clay and press them into these sockets. Alternatively, create two small curved crescents for squinting, happy eyes. -
Add the smile:
Roll a whisper-thin thread of black clay and curve it into a small ‘U’ shape. Press this gently onto the face below the eyes to form the smile. -
Apply rosy cheeks:
Take two tiny specks of pink clay, flatten them, and apply them on either side of the smile for a blushing effect. -
Create the bead channel:
Carefully run a needle tool or thick wire horizontally through the middle of the head (from ear to ear position) to create the hole for stringing. Ensure the hole is wide enough for your elastic cord. -
Bake the charm:
Bake the clay piece according to the manufacturer’s instructions (usually 275°F/135°C for 15-30 minutes). I prefer to tent foil over it to prevent scorching the white clay. Let it cool completely.
Sticky Clay Fix
If your white clay is picking up lint or red pigment, clean your hands with baby wipes or use hand sanitizer before handling white clay pieces.
Step 2: Assembling the Bracelet
-
Measure and cut cord:
Measure your wrist and add about 3-4 inches to determine the length of elastic cord needed. Cut the cord, but keep it generous to make tying knots easier later. -
Pre-stretch the elastic:
Give the elastic cord a few firm tugs. This pre-stretching step helps prevent the bracelet from loosening up after you wear it a few times. -
String the centerpiece:
Thread your cooled Santa charm onto the middle of the cord. It will serve as the focal point of your design. -
Add gold accents:
On the immediate left and right of the Santa head, slide on a gold metallic spacer bead. Next to those, add a gold faceted rondelle bead for extra sparkle. -
Begin the bead pattern:
Start your main pattern on one side: add a shimmering red bead, then a white bead. Continue this alternating pattern for about half the length of that side. -
Continue the pattern:
Repeat the same alternating red-white pattern on the other side of the cord. Check the length frequently by wrapping it around your wrist to ensure a comfortable fit. -
Add side accents:
About halfway around the bracelet on each side, you can replace a regular bead with a gold spacer bead to break up the pattern and add visual interest, just like the image shows near the sides. -
Check the symmetry:
Ensure that both ends of your beaded strand end with the same color bead so the pattern flows seamlessly when joined, or adjust so the join is hidden between two matching beads. -
Tie the knot:
Bring the two ends of the elastic together. Tie a surgeon’s knot (right over left twice, then left over right) and pull tight. -
Secure the knot:
Add a tiny drop of superglue or jewelry cement to the knot. Let it dry for a few seconds before trimming the excess cord close to the knot. Ideally, hide the knot inside one of the adjacent beads.
Make It Glossy
After baking, brush a coat of water-based gloss glaze or UV resin over the Santa charm. It seals the paint and gives it a professional, ceramic-like shine.
Slip on your cheerful creation and enjoy the festive spirit it brings to every outfit

TRACK YOUR CERAMIC JOURNEY
Capture glaze tests, firing details, and creative progress—all in one simple printable. Make your projects easier to repeat and improve.
Gingerbread Cookie Bead Mix
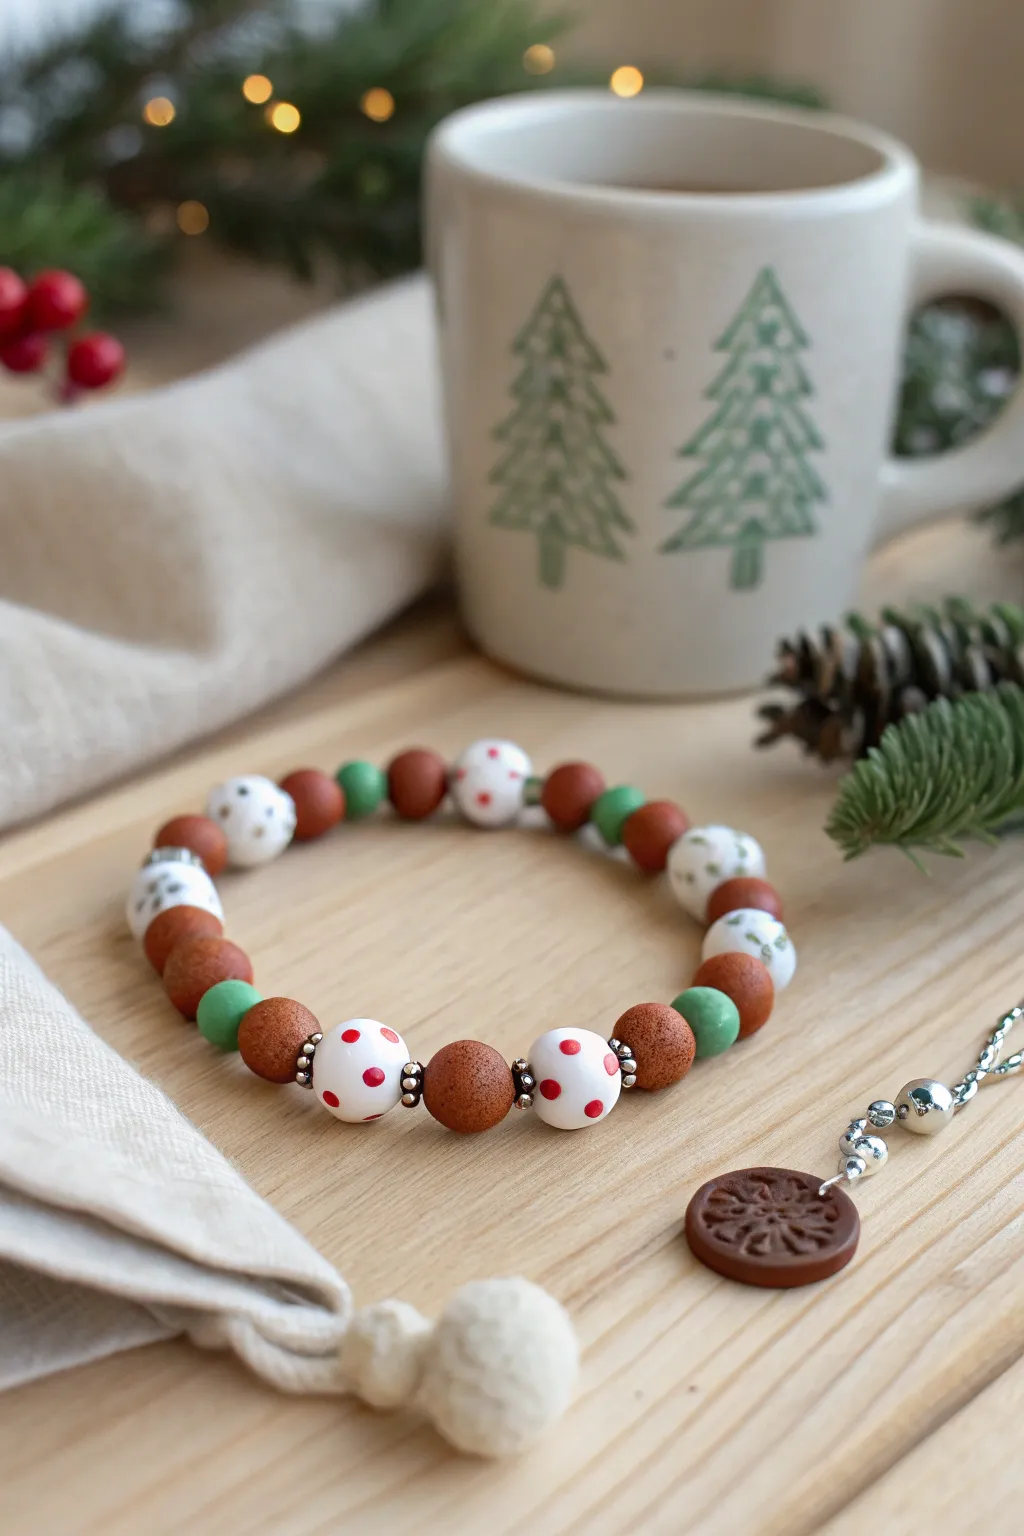
Bring the cozy warmth of holiday baking to your wardrobe with this charming gingerbread-inspired bracelet. Featuring textured clay beads that mimic spiced cookies paired with festive polka dots and woodland greens, this accessory is a sweet treat that requires no baking.
Detailed Instructions
Materials
- Polymer clay in Terracotta (gingerbread color)
- Polymer clay in White
- Polymer clay in Forest Green
- Polymer clay in Ruby Red
- Silver daisy spacer beads (approx. 4mm)
- Stretch cord (0.8mm or 1mm thickness)
- Bead reamer or toothpick
- Rough sandpaper or a clean toothbrush (for texturing)
- Acrylic roller
- Super glue or jewelry cement
Step 1: Creating the Gingerbread Beads
-
Condition the Clay:
Begin by thoroughly kneading the Terracotta polymer clay until it is soft and pliable. This prevents cracking and ensures a smooth finished bead. -
Form the Base Spheres:
Roll the conditioned clay into a snake and cut equal segments. Roll each segment between your palms to create uniform spheres, aiming for about 10-12mm in diameter. -
Add Cookie Texture:
To mimic the look of a baked cookie, gently roll each terracotta sphere over a piece of rough sandpaper or tap the surface lightly with the bristles of a clean toothbrush. You want a subtle, pitted surface, not deep gouges. -
Create the Bead Holes:
Before curing, carefully twist a toothpick or bead reamer through the center of each bead. Rotate the bead as you push to keep the hole centered and prevent squashing the shape.
Sticky Situation?
If your white clay picks up lint or red pigment, use a cotton swab dipped in rubbing alcohol or acetone to gently wipe the unbaked bead clean before curing.
Step 2: Crafting the Accent Beads
-
Make the White Dot Beads:
Roll white polymer clay into spheres slightly smaller than your gingerbread beads. Smooth them perfectly so no fingerprints remain. -
Apply Red Dots:
Take tiny pinches of Ruby Red clay and roll them into minuscule balls. Press these gently onto half of your white beads to create a polka-dot pattern. Roll the bead gently in your hand again to flatten the dots flush with the surface. -
Create Green Accent Beads:
Form your Forest Green clay into small, smooth spheres for the spacer accents. These should be about 8mm—smaller than both the gingerbread and white beads. -
Pierce and Prepare:
Create holes in all your accent beads using your toothpick tool, ensuring the size matches the holes in your gingerbread beads.
Sweet Scent Trick
Mix a tiny pinch of real cinnamon or nutmeg into your terracotta clay during the conditioning phase. Your beads will faintly smell like actual cookies!
Step 3: Baking and Assembly
-
Bake the Components:
Arrange all your clay beads on a parchment-lined baking sheet or a bead rack. Bake according to your specific clay brand’s package instructions (usually 275°F/135°C for 15-30 minutes). -
Cool and Inspect:
Allow the beads to cool completely. Check the holes to ensure they are clear; if any clay has shifted during baking, use a small drill bit or reamer to clean them up. -
Prepare the Cord:
Cut a length of stretch cord about 10 inches long. I always like to pre-stretch the cord by pulling on it gently a few times; this prevents the bracelet from sagging later. -
Begin the Pattern:
Start stringing your beads. The central motif is a pattern of: one gingerbread bead, a silver spacer, a white polka-dot bead, a silver spacer, and another gingerbread bead. -
Continue the Sequence:
Between the main motifs, add a single green bead to separate the sections. Continue this alternating pattern until the strand reaches your desired wrist length (usually 6.5 to 7 inches). -
Check the Fit:
Wrap the unfinished strand around your wrist to verify the size. Add or remove a bead sequence if necessary for a comfortable fit. -
Tie the Knot:
Bring the ends of the cord together and tie a surgeon’s knot (a square knot with an extra loop through). Pull tight. -
Secure and Trim:
Apply a tiny drop of super glue or jewelry cement to the knot for security. Let it dry for a minute, then trim the excess cord close to the knot. Ideally, hide the knot inside the hole of a larger gingerbread bead.
Enjoy wearing your festive creation or wrap it up as a thoughtful handmade gift for a friend
Snowy White and Icy Blue Bracelet
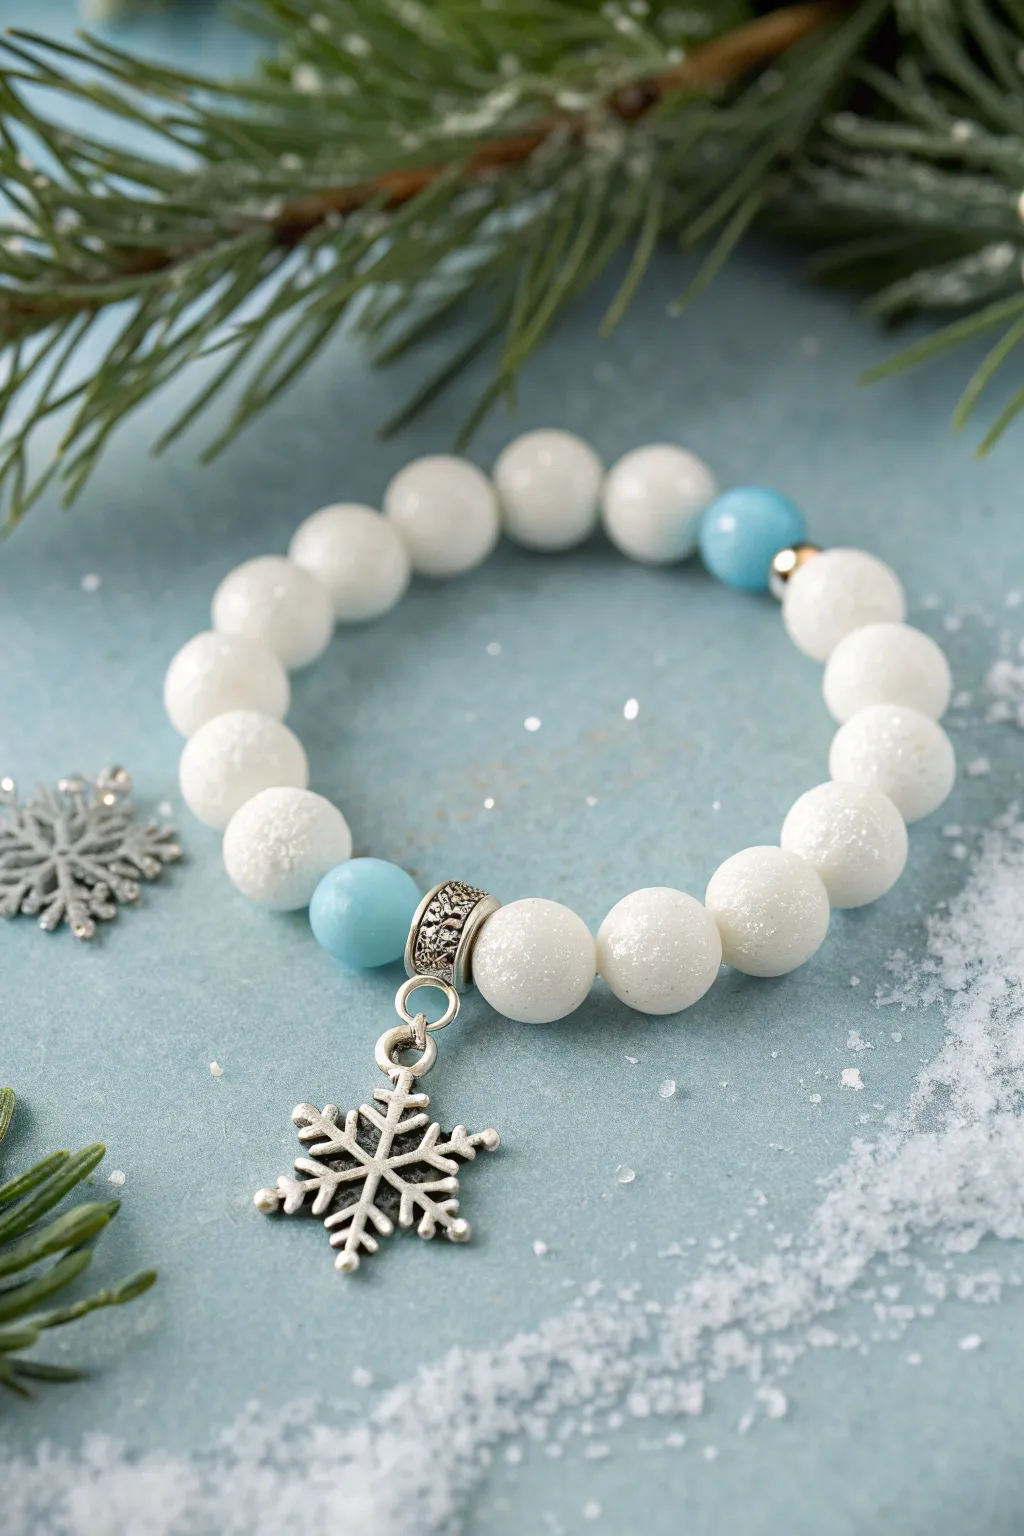
Capture the magic of a winter wonderland with this elegant beaded bracelet featuring icy white and soft blue tones. The mix of smooth and sugar-textured beads creates a beautiful snowy effect that perfectly complements the dangling silver snowflake charm.
Step-by-Step Guide
Materials
- 10mm white jade or glass beads (round)
- 10mm white stardust or ‘sugar’ beads (round)
- 10mm light blue jade or turquoise beads (round)
- Silver snowflake charm
- Silver ornate bail bead (large hole slider)
- Small silver spacer beads (approx. 3-4mm)
- Strong elastic cord (0.8mm or 1mm)
- Jewelry adhesive (e.g., E6000 or GS Hypo Cement)
- Scissors
Step 1: Preparation
-
Cut the Cord:
Cut a piece of elastic cord about 10-12 inches long. This generous length makes tying the final knot much easier than struggling with short ends. -
Pre-stretch the Elastic:
Hold the cord firmly at both ends and give it several gentle tugs. Pre-stretching prevents the bracelet from loosening and sagging after the first time you wear it. -
Secure the End:
Place a piece of tape or a binder clip on one end of the string to stop your beads from sliding off while you design your pattern.
Snowy Texture Tip
Can’t find ‘sugar’ beads? Use white crackle glass beads or even frosted quartz instead. They catch the light differently but still give that essential icy, winter vibe.
Step 2: Designing the Pattern
-
Establish the Center:
Slide the large silver bail onto the middle of the cord. The loop of the bail should be facing downward. -
Add the Snowflake:
Using a jump ring, attach your snowflake charm to the loop on the bail if it isn’t already attached. It helps to visualize the finished look as you bead. -
Create the Focal Point:
On the left side of the bail, thread on one light blue bead. Do the same on the right side. This frames your charm with a pop of icy color. -
Begin the White Section:
On the left side, thread one textured ‘sugar’ bead. Follow this immediately with a smooth white bead. -
Mirror the Pattern:
Repeat the previous step on the right side: one textured sugar bead, followed by one smooth white bead. Keeping the design symmetrical creates a balanced, professional look. -
Continue Beading:
Continue adding white beads to both sides, alternating between the textured and smooth finishes. This subtle contrast mimics the look of fresh snow. -
Insert the Accents:
About halfway around the bracelet length, I like to slide a small silver spacer bead onto one side, then layer a blue bead next to it to break up the white. -
Check the Fit:
Wrap the strand around your wrist. The ends should touch comfortably without stretching the cord, but not be too loose. Add or remove white beads until the size is perfect.
Step 3: Finishing Touches
-
Prepare to Tie:
Remove the tape or clip from the end. Bring both ends of the elastic together carefully. -
Tie the Knot:
Tie a surgeon’s knot. This is like a standard overhand knot, but you loop the cord through twice before pulling tight. Pull the elastic taut to secure the beads tightly together. -
Secure with Glue:
Dab a tiny amount of jewelry glue directly onto the knot. You only need a droplet; too much glue can make the cord brittle. -
Hide the Knot:
While the glue is still tacky, gently pull the cord so the knot slides inside the hole of the nearest large bead. This creates a seamless finish. -
Trim Excess:
Once the glue has fully dried (check your glue’s instructions, usually 15-20 minutes), trim the excess cord ends close to the bead.
Knot Slipping?
If your elastic knot keeps coming undone before you can glue it, try dabbing the knot with clear nail polish immediately after tying. It holds it in place quickly.
Slip on your frosty creation and enjoy the winter sparkle on your wrist
Ornament Color Block Bracelet
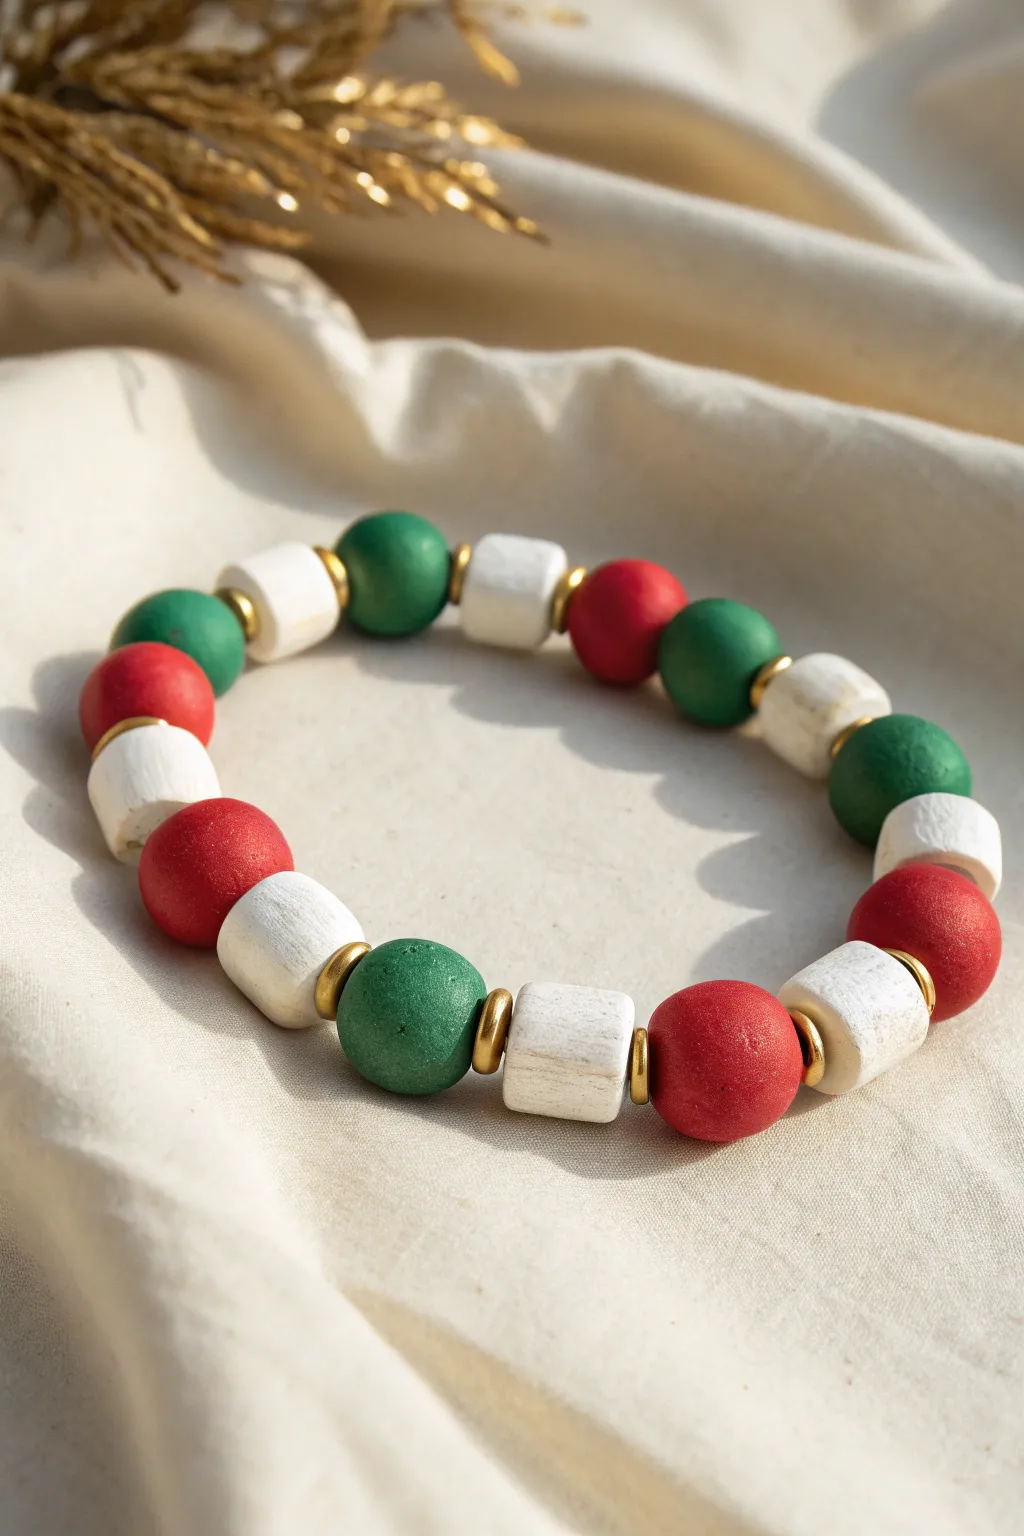
Capture the festive spirit with this chunky, tactile bracelet that mimics the classic colors of vintage Christmas ornaments. The combination of matte clay textures with gleaming gold accents creates a sophisticated yet playful accessory perfect for holiday stacking.
Detailed Instructions
Materials
- Polymer clay (white, deep red, forest green)
- Roller or acrylic brayer
- Small round cutter (approx. 10mm)
- Small square cutter (optional) or blade
- Toothpick or bead piercing pin
- Gold spacer beads (thin discs or tiny rondelles)
- Fine-grit sandpaper (400-600 grit)
- Stretch cord (0.8mm or 1mm)
- Jewelry glue or clear nail polish
- Baking sheet and oven (for polymer clay)
Step 1: Shaping the Clay Beads
-
Condition the clay:
Begin by warming up your polymer clay in your hands. Knead the red, green, and white chunks separately until they are soft, pliable, and free of cracks. -
Form the round beads:
Pinch off small pieces of the red and green clay. Roll them vigorously between your palms to create smooth, round spheres approximately 10-12mm in diameter. -
Create uniform sizes:
To ensure your spheres are the same size, you can roll the clay into a log first and cut equal segments before rolling into balls. -
Form the cylindrical beads:
For the white accent beads, roll a thick log of white clay. Instead of a sphere, use your fingers to gently flatten the sides to create a short cylinder or ‘marshmallow’ shape. -
Refine the white shapes:
You can also gently tap the ends of the white cylinders on your work surface to make them flat and distinct from the round colored beads. -
Check the quantity:
Lay out your beads in a circle to estimate the bracelet size. A standard 7-inch bracelet usually requires about 16-18 of these chunky focal beads.
Hole Distortion?
If your beads squish when piercing, let the formed raw clay utilize the fridge for 10 minutes. The slight chill hardens them just enough to pierce without deforming the shape.
Step 2: Piercing and Baking
-
Pierce the holes:
Carefully insert a toothpick or bead pin through the center of each bead. Rotate the bead as you push to prevent squishing the shape. -
Enlarge the opening:
Wiggle the tool slightly to ensure the hole is wide enough for your stretch cord, especially since these are heavier beads. -
Double check alignment:
Make sure the hole goes straight through the center, particularly on the white cylinders, so they sit flat on the wrist later. -
Bake the clay:
Arrange your beads on a baking sheet. Bake according to the manufacturer’s instructions on your clay package (usually around 275°F for 15-30 minutes per 1/4 inch of thickness). -
Cool down:
I always let the beads cool completely inside the oven with the door cracked open to prevent any thermal shock or cracking.
Step 3: Finishing and Assembly
-
Sand for texture:
Once cool, lightly sand the surface of the beads with fine-grit sandpaper. This removes fingerprints and mimics the organic, matte look seen in the photo. -
Cut the cord:
Cut a piece of stretch cord about 10 inches long. Pre-stretch it by pulling firmly on both ends amazing a few times; this prevents the bracelet from loosening later. -
Plan your pattern:
Lay out your pattern. The sequence in the image generally follows: Red sphere, White cylinder, Green sphere, White cylinder. -
Add gold spacers:
Begin stringing your beads. Place a gold spacer bead between every single clay bead. These gold accents are crucial for that ‘ornament’ aesthetic. -
Check the fit:
Wrap the strand around your wrist to check the fit before tying perfectly. Add or remove a bead sequence if necessary. -
Tie the knot:
Tie a secure surgeon’s knot (right over left twice, then left over right). Pull tight to secure. -
Secure the bond:
Place a tiny dot of jewelry glue on the knot. Let it dry, then trim the excess cord and carefully tuck the knot inside one of the white cylinder beads.
Texture Twist
Before baking, roll your raw clay beads over a piece of canvas fabric or coarse sandpaper. This imitates a stone-like texture instead of the standard smooth plastic finish.
Now you have a charming, handmade accessory that brings a touch of classic holiday warmth to any outfit
Mini Present Bead Feature
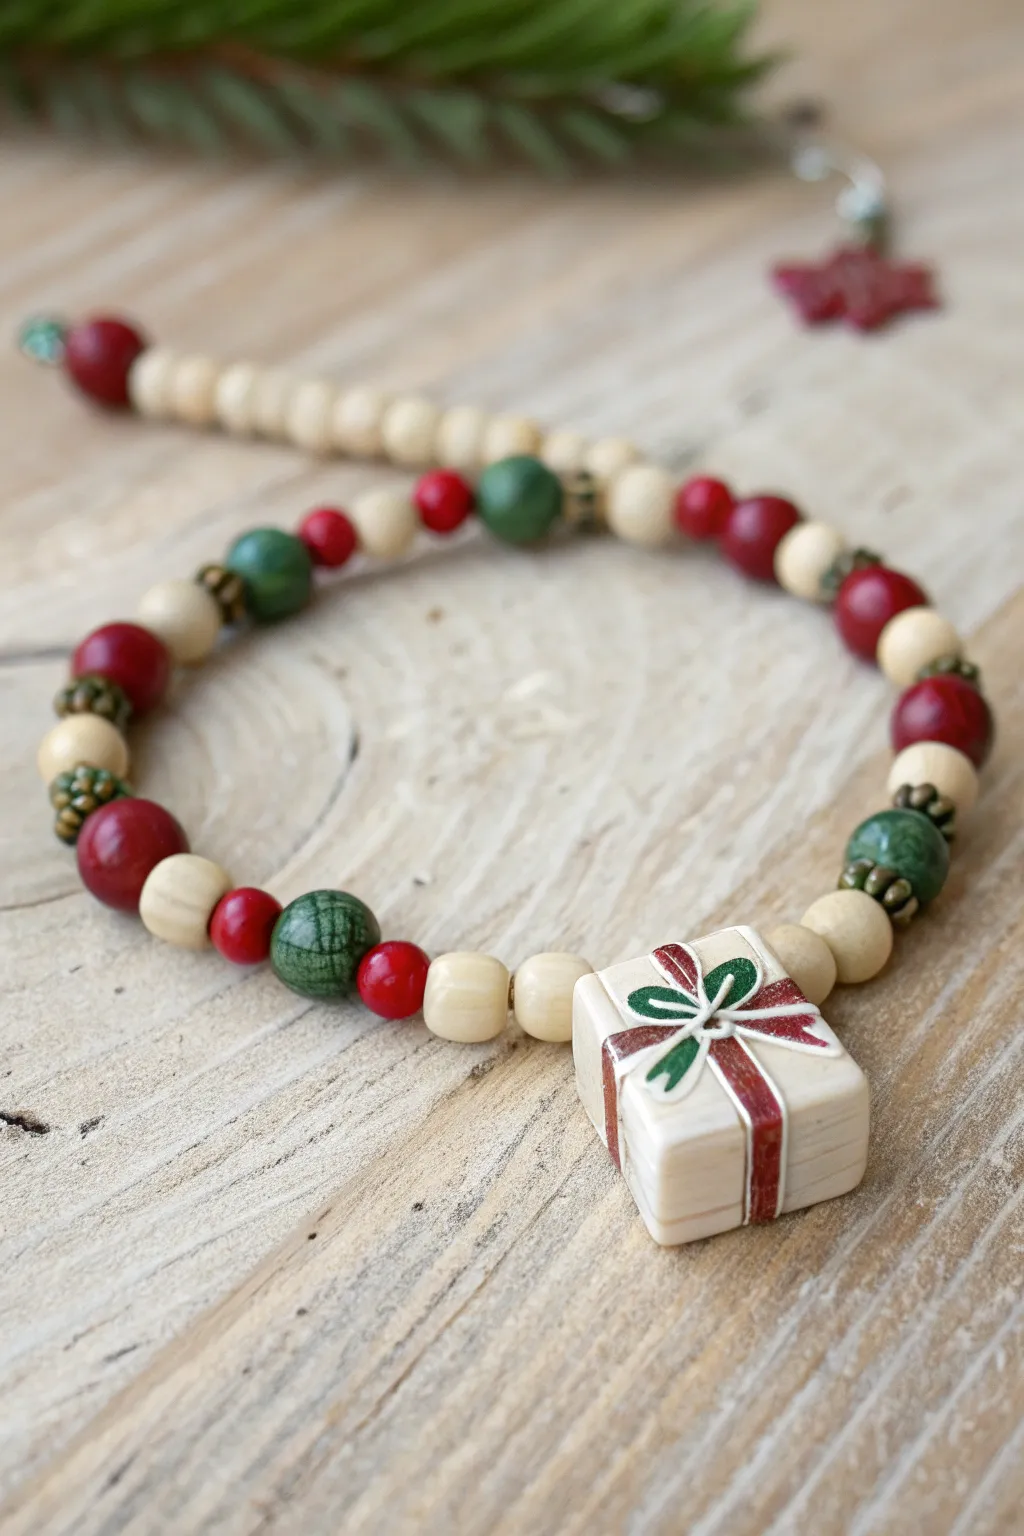
This festive bracelet centers around a charming, hand-sculpted gift box bead that looks almost too cute to open. With a classic palette of deep reds, forest greens, and natural creamy tones, it brings a cozy, handcrafted feel to your holiday jewelry stack.
How-To Guide
Materials
- Polymer clay (Cream/White for base, Red, Green)
- Small square clay cutter (approx. 1.5 cm)
- Needle tool or toothpick
- Headpin or thick wire for piercing
- Red round wooden or ceramic beads (6mm & 8mm)
- Green round crackle or wooden beads (8mm)
- Cream/natural wood beads (6mm & 8mm)
- Tiny antique brass spacer beads
- Strong elastic beading cord (0.8mm)
- Jewelry glue
- Gloss varnish (optional)
Step 1: Sculpting the Gift Box Feature
-
Shape the base:
Condition a chunk of cream or white polymer clay until soft. Roll it into a thick sheet (about 1 cm tall) and use a square cutter to punch out a clean cube shape. Soften the sharp cut edges slightly with your finger. -
Imprint the finish:
If you want a rustic look like the example, gently press the sides of your cube against a piece of fabric or wood texture to give it subtle surface interest before baking. -
Create the ribbon strips:
Roll out a very thin sheet of red clay. Use a craft knife to cut thin, uniform strips for the ribbon. Carefully wrap one strip vertically around the cube and one horizontally, crossing them at the top center. -
Paint the ribbon details:
Alternatively, if you find clay strips too fiddly, you can sculpt the plain cube first and use red acrylic paint to draw the ribbon lines after baking. The example shows painted details with a slight shimmer. -
Add the bow:
Form four tiny teardrop shapes—two from green clay and two from red. Press them onto the top center where the ribbons cross, arranging them like flower petals to mimic loop bows. -
Outline the bow:
For that distinct illustrated look seen in the photo, use a very fine brush with white acrylic paint (after baking) to outline the bow loops and add the ‘string’ details on the bow center. -
Pierce the bead hole:
Using a needle tool or thick wire, carefully pierce a hole horizontally through the center of the gift box. Rotate the tool as you push to avoid squashing the square shape. -
Bake the charm:
Bake the clay gift box according to your manufacturer’s instructions. Usually, this is around 275°F (130°C) for 15-30 minutes. Let it cool completely.
Keep it Square
When piercing the hole through your square gift bead, twist the needle constantly. Pushing straight through without twisting will squash your perfect cube into a rectangle.
Step 2: Beading the Bracelet
-
Prepare the cord:
Cut a length of elastic cord about 10-12 inches long. I always pre-stretch the elastic by pulling it firmly a few times; this prevents the bracelet from sagging later. -
Secure one end:
Place a bead stopper or a piece of tape on one end of the cord so your beads don’t slide off while you work. -
Start the pattern:
Begin threading beads on one side. Based on the photo, start with two cream wood beads, followed by a small brass spacer, then a large green bead. -
Create color blocks:
Continue the pattern by adding a small brass spacer, a cream wood bead, a small red bead, and another cream bead. This asymmetry gives the strand a playful rhythm. -
Establish the repeating motif:
The main repeating visual unit seems to be: Bead -> Spacer -> Bead. Use the brass spacers to separate the colorful red and green feature beads from the neutral cream ones. -
Add the focal bead:
Once you have beaded about half the length needed for your wrist, thread on your handmade gift box bead. Ensure it sits right in the center. -
Mirror the design:
Continue beading the other side of the elastic, mirroring the pattern you created on the first side so the gift box remains the symmetrical focal point. -
Check the fit:
Wrap the strand around your wrist to check the size. Add or remove cream spacer beads at the very ends (near the knot site) to adjust the fit without disrupting the main pattern. -
Tie the knot:
Tie a surgeon’s knot (right over left, left over right, loop through twice). Pull the elastic tight so there are no gaps between beads. -
Secure and hide:
Add a tiny drop of jewelry glue to the knot. once dry, trim the excess cord and gently pull the knot inside one of the larger wood bead holes to hide it.
Paint vs. Clay
If your clay ribbon strips look bulky or uneven, bake the plain white cube first. Then, use fine-tip paint pens for the red ribbon and green bow details for a crisp finish.
Now you have a wonderful reminder of the giving season right on your wrist
Nutcracker-Inspired Stripe Colors

Capture the regal elegance of a toy soldier’s uniform with this sophisticated beaded bracelet. Featuring a repeating pattern of matte red, navy blue, and crisp white beads accented by sleek gold spacers, this design brings a subtle nod to the Nutcracker ballet to your wrist stack.
Step-by-Step Tutorial
Materials
- Matte round polymer clay or acrylic beads (8mm or 10mm): Deep Red, Navy Blue, and White
- Gold hematite or plated disc spacer beads (flat rondelle shape)
- Strong elastic stretch cord (0.8mm or 1mm thickness)
- Jewelry glue (e.g., G-S Hypo Cement)
- Scissors or bead snips
- Bead stopper or a piece of masking tape
- Measuring tape
Step 1: Preparation & Planning
-
Measure your wrist:
Wrap a measuring tape comfortably around your wrist to find your size. Add about 1/2 inch to this measurement to ensure the bracelet fits comfortably without pinching once the bulky beads are added. -
Cut the cord:
Cut a piece of elastic cord approximately 10-12 inches long. Having this extra length makes tying the final knots much easier than struggling with short ends. -
Pre-stretch the elastic:
Give your cut piece of elastic a few firm tugs. This pre-stretching method helps prevent the bracelet from sagging or loosening shortly after you start wearing it. -
Secure the end:
Place a bead stopper or simply fold a piece of masking tape over one end of the cord. This creates a safety barrier so your beads don’t slide right off while you work.
Knot Security
Don’t trim the ends immediately after gluing! Let it dry completely first, or the elastic might snap back and undo your knot before it sets.
Step 2: Creating the Pattern
-
Start with a gold spacer:
Threading a gold spacer bead first is a good trick; the hole creates a perfect nesting spot to hide your knot later on. -
Begin the sequence:
Slide on your first colored bead. Looking at the design, we are working with a repeating trio pattern, but the order shifts slightly to create movement. -
The Nutcracker sequence:
Thread the following sequence: Red Bead first, followed immediately by a gold spacer disc. -
Add the contrast:
Next, add a White Bead, followed by another gold spacer disc. The gold spacers are essential as they act as the ‘buttons’ on the soldier’s jacket. -
Complete the trio:
Finish the first block with a Navy Blue Bead, followed by a gold spacer. I like to double-check the bead quality here to ensure none have chipped paint. -
Varying the repeat:
Continue adding beads. You can stick to a rigid Red-White-Blue pattern, or as seen in the inspiration piece, create variety by sometimes placing two reds or two blues separated by spacers before switching to white. -
Check the length:
Periodically wrap the strand around your wrist. Stop adding beads when the ends touch comfortably against your skin without gaps.
Level Up: Charm It
Attach a small gold soldier charm or a tiny drum charm to one of the gold spacer areas using a jump ring for a literal Nutcracker reference.
Step 3: Finishing Touches
-
Prepare to tie off:
Remove the bead stopper or tape carefully, ensuring you hold both ends of the elastic firmly so the tension remains even. -
The surgeon’s knot:
Cross the ends like a standard shoelace knot. Then, loop one end through the circle a second time before pulling tight. This extra loop adds significant security. -
Secure with glue:
Add a tiny drop of jewelry glue directly onto the knot. This prevents the slick elastic from slowly untying itself over time. -
Hide the knot:
While the glue is still tacky, pull the elastic firmly so the knot slides inside the hole of the adjacent bead (ideally that first gold spacer or a larger colored bead). -
Trim the excess:
Once the glue has fully dried (wait at least 15 minutes), use your sharp scissors to trim the excess cord as close to the bead hole as possible without nipping the main knot.
Slip on your new bracelet and enjoy the festive, yet classic, color combination all season long.
Ugly Sweater Pattern Bead Combo

This festive bracelet channels the charm of a classic Christmas sweater with its delightful mix of patterned polymer clay beads and shiny accents. The combination of intricate snowflake designs, textured green rounds, and bold reds creates a cozy, nostalgic accessory perfect for holiday parties.
Step-by-Step
Materials
- White polymer clay cylinder beads with red snowflake transfer/print
- Round white beads with red/green sweater knit patterns
- Solid glossy red round beads (approx. 8-10mm)
- Textured green round beads (stippled/bumpy surface, approx. 8-10mm)
- Small silver spacer beads (daisy or textured ring style)
- Elastic beading cord (clear, 0.8mm or 1.0mm)
- Beading needle (optional but helpful)
- Super glue or jewelry adhesive
- Scissors
Step 1: Planning and Prep
-
Measure your wrist:
Before you start stringing, wrap a piece of string around your wrist to find your comfortable size, then add about an inch for the knot. -
Cut the cord:
Cut a length of elastic cord about 10-12 inches long. Having extra length makes tying the final knot much easier than struggling with short ends. -
Stretch the elastic:
Give your elastic cord a few firm tugs before you begin. This pre-stretching step helps prevent the bracelet from sagging or loosening up immediately after you wear it. -
Sort your beads:
Lay out your beads on a bead mat or towel. Group them by type: red solids, green textured, white cylinders, and patterned rounds so you can easily grab what you need.
Step 2: Creating the Pattern
-
Start the sequence:
Begin by threading a glossy red round bead onto the cord. This will act as our anchor point for the repeating pattern. -
Add texture and shine:
Slide on a silver spacer bead, followed by one of the textured green round beads. The silver spacer helps separate the colors and adds a touch of holiday sparkle. -
Insert the first patterned bead:
Thread on another silver spacer, then add a white cylinder bead featuring the red snowflake design. This is one of the ‘sweater’ elements. -
Continue the pattern:
Follow the cylinder with a silver spacer, then a glossy red round bead. Notice how the silver spacers frame the focal beads. -
Introduce the round knit bead:
Add a silver spacer, then thread on one of the round white beads with the red or green knit/zigzag pattern. -
Complete the first segment:
Finish this pattern block with a silver spacer, a red round bead, a silver spacer, and finally a textured green bead.
Knot Slipping?
If your elastic knot keeps coming undone before you can glue it, try clamping the first loop of the knot with a small binder clip or designated bead stopper while you prepare the second loop.
Step 3: Building the Wrap
-
Repeat the sequence:
Continue repeating the basic sequence: solid red -> spacer -> textured green -> spacer -> patterned bead -> spacer. Alternate which patterned bead you use (cylinder vs. round knit) to keep the ‘ugly sweater’ look eclectic. -
Check the length:
Wrap the strung beads around your wrist periodically. You want the ends to touch comfortably without gaps, but not so tight that it pinches. -
Adjust the pattern:
If you are near the end but the pattern isn’t complete, it’s okay to end with two solid colors next to each other. The eclectic style hides imperfections well. -
Verify the fit:
I usually hold the two ends together and slide it over my hand just to ensure it’s not too tight passing over the knuckles.
Level Up: Charms
Add a silver snowflake or tiny reindeer charm to one of the silver spacer sections. Use a jump ring to attach it securely for an extra dangling bit of holiday cheer.
Step 4: Securing the Design
-
Tie the first knot:
Once you have the correct length, bring the two ends together and tie a simple overhand knot, pulling it tight against the beads. -
Tie a surgeon’s knot:
For extra security, tie a surgeon’s knot next. Loop the cord through twice before pulling tight. This prevents the elastic from slipping. -
Add adhesive:
Put a tiny dab of super glue or jewelry adhesive right on the knot. Be careful not to get glue on the neighboring beads. -
Hide the knot:
While the glue is still slightly wet, pull the knot gently inside the hole of one of the larger beads (like the white cylinder or red round) to conceal it. -
Trim the ends:
Once the glue is fully dry, trim the excess elastic cord close to the bead hole with sharp scissors.
Slip on your cozy new bracelet and enjoy the holiday cheer it brings to your outfit
Gift-Ready Stocking Stuffer Bracelet Cards
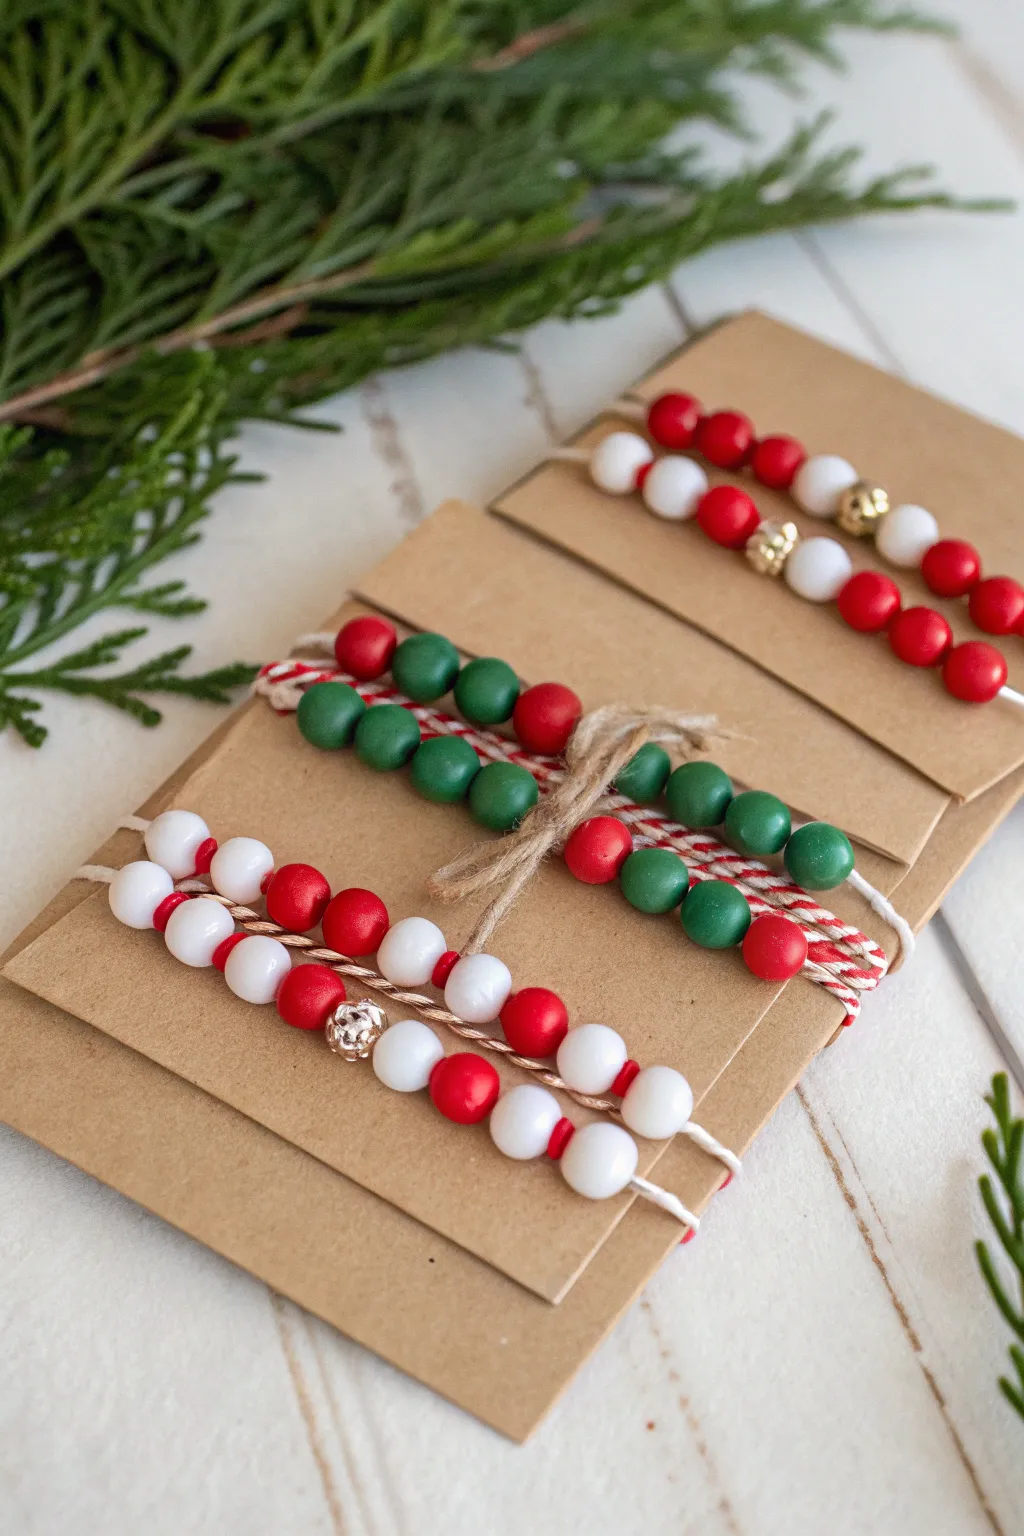
These charming beaded bracelets mounted on kraft cards make the perfect handmade stocking stuffer or festive party favor. The combination of red, green, and white clay beads with gold accents creates a classic holiday look that is simple to assemble and delightful to gift.
Step-by-Step Guide
Materials
- Round polymer clay beads (8mm or 10mm) in red, white, dark green, and bright green
- Gold tone accent beads (round or textured)
- Elastic beading cord (0.8mm crystal string)
- Red and white baker’s twine
- Gold embroidery floss or thin twine
- Kraft cardstock paper
- Scissors
Step 1: Designing the Bracelets
-
Cut your cord:
Start by cutting a piece of elastic cord about 9-10 inches long. This gives you plenty of room to string beads and tie a secure knot without struggling with short ends. -
Pattern one: The Candy Cane:
For the first style, alternate red and white clay beads. To add a bit of sparkle, insert a small gold accent bead every four or five clay beads. -
Pattern two: The Holly Berry:
Create a pattern using mostly white beads interspersed with clusters of red. I like to secure these onto a twisted gold cord or thin twine for a different texture compared to the plain elastic. -
Pattern three: The Evergreen:
Mix shades of dark and light green beads with contrasting red beads. Use red and white baker’s twine as your stringing material here for a cozy, rustic look that complements the green tones. -
Check the fit:
Wrap the unfinished strand around your wrist to check the size. For a general gift size, aim for about 6.5 to 7 inches of beaded length.
Knot Security
If your elastic knots feel slippery, add a tiny drop of super glue or clear nail polish to the knot before pulling it inside a bead.
Step 2: Finishing the Jewelry
-
Tie the elastic knots:
For the elastic bracelets, tie a surgeon’s knot (right over left, left over right) and pull tight. Stretch the cord slightly and tie one more overhand knot to secure it. -
Hide the knot:
Trim the excess elastic close to the knot. If possible, gently tug the knot inside the hole of a neighboring bead to hide it. -
Finish twine bracelets:
For bracelets strung on baker’s twine or gold cord, you can finish them with adjustable sliding knots or simple tie closures, leaving small tails for a decorative touch.
Step 3: Creating the Display Cards
-
Measure the cardstock:
Cut your kraft cardstock into rectangles approximately 3 inches wide by 4-5 inches tall. The width should be slightly wider than the resting diameter of your bracelets. -
Add side notches:
Using scissors, cut small angled slits or notches on both long sides of the cardstock, about one-third of the way down from the top. Do this again about an inch or two lower depending on if you want to stack multiple bracelets. -
Mount the bracelets:
Gently stretch your finished bracelets over the cardstock so they rest in the notches. The card keeps them flat and displays the pattern clearly. -
Secure with twine:
For a final flourish, wrap a piece of natural jute or extra baker’s twine around the center of the bracelets and card. Tie it in a small bow on top to hold everything in place. -
Customize the card:
The blank space at the bottom of the kraft card is perfect for writing ‘Merry Christmas’ or a personalized ‘To/From’ message with a nice pen.
Pro Tip: Layering
Mix bead sizes! Using 8mm primary beads with smaller 4mm gold spacers adds visual rhythm and makes the bracelets look more professional.
Now you have a set of adorable, boutique-style gifts ready to slide into a stocking or hand out to friends