If you’ve got a little pile of polymer clay disc beads and some elastic cord, you’re already halfway to the cutest bracelet stack. Here are my favorite easy, repeatable patterns that look super put-together without any complicated techniques.
Color-Blocked Pastel Stripes
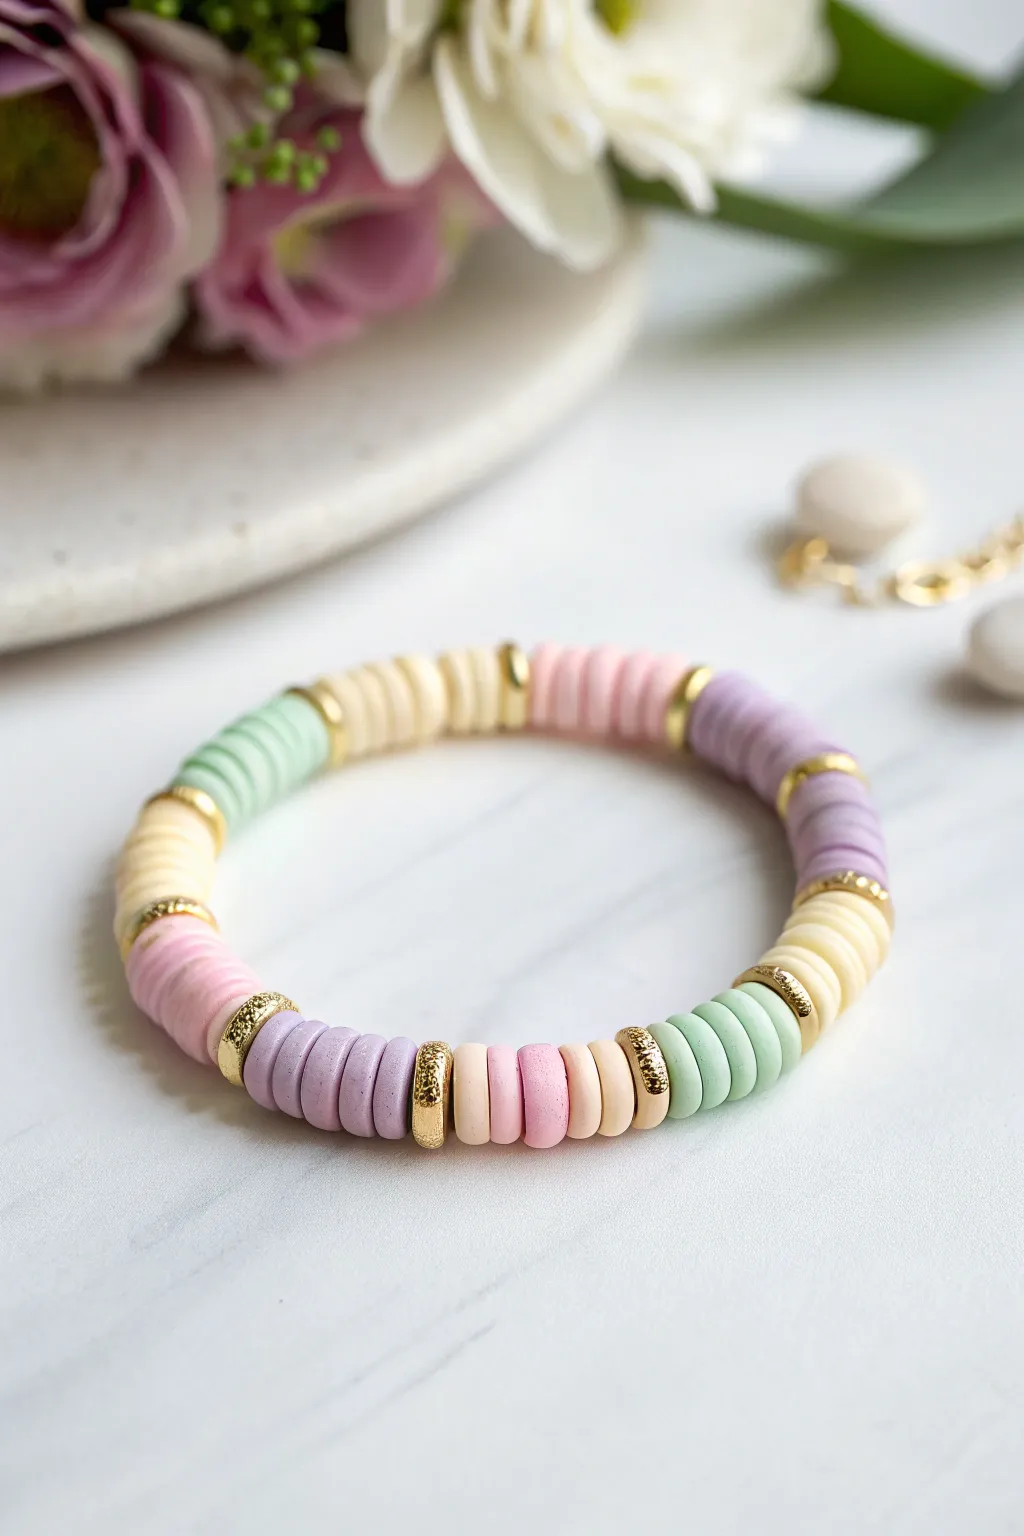
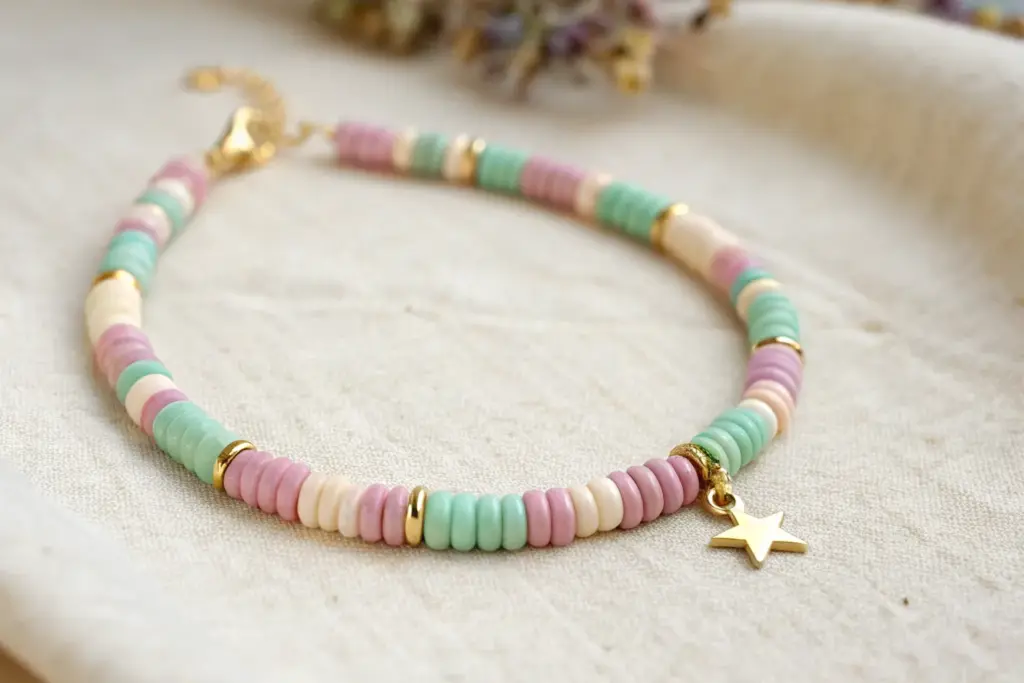
Embrace soft, dreamy hues with this elegant color-blocked bracelet featuring polymer clay disc beads. The combination of mint, cream, pink, and lavender separated by textured gold accents creates a sophisticated yet playful accessory perfect for stacking.
Step-by-Step
Materials
- 6mm polymer clay disc beads (Heishi beads) in pastel mint green
- 6mm polymer clay disc beads in cream or light yellow
- 6mm polymer clay disc beads in pastel pink
- 6mm polymer clay disc beads in pastel lavender
- 6mm gold spacer beads (textured or stardust finish)
- 0.8mm clear elastic stretch cord
- Jewelry glue or clear nail polish
- Scissors
- Bead stopper or masking tape
- Ruler or measuring tape
Step 1: Preparation & Planning
-
Measure your wrist:
Wrap a measuring tape comfortably around your wrist to determine the circumference. Add about 0.5 to 1 inch to this measurement depending on how loose you want the fit. -
Cut the cord:
Cut a piece of elastic cord roughly 10-12 inches long. Having extra length makes tying the final knot much easier without fumbling. -
Stretch the elastic:
Give the cut piece of elastic a few gentle tugs. This ‘pre-stretching’ helps prevent the bracelet from loosening up immediately after you wear it. -
Secure the end:
Place a bead stopper on one end of the cord, or tape it down to your work surface with masking tape so your beads don’t slide off while you work.
Keep it Straight
Use a bead design board or a piece of felt on your table. It stops round beads from rolling away and helps you visualize the color pattern before stringing.
Step 2: Creating the Color Blocks
-
Start with the first block:
Beginning simply, thread approximately 5 to 7 cream-colored clay disc beads onto the cord. The exact number depends on how long you want each color segment to be, but keeping them consistent is key. -
Add a gold accent:
Slide on one textured gold spacer bead. This metallic element acts as a beautiful divider between your pastel sections. -
Thread the mint section:
Add your next color block using about 6 to 8 mint green beads. I find that varying the section lengths slightly (just by one or two beads) can actually look quite organic, but keeping them identical is classic. -
Insert another spacer:
Place another gold spacer bead after the mint section to frame the color. -
Create the pink segment:
Thread on your pastel pink beads, aiming for a similar length to your previous blocks, roughly a half-inch of color. -
Add gold separation:
Slide on another gold spacer bead. -
Add the lavender block:
String the lavender or light purple beads to complete your four-color palette rotation. -
Complete the pattern cycle:
Finish this sequence with a gold spacer bead.
Step 3: Finishing the Bracelet
-
Repeat the pattern:
Continue repeating the color sequence (Cream > Gold > Mint > Gold > Pink > Gold > Lavender > Gold) until the beaded length matches your wrist measurement. -
Check the fit:
Wrap the beaded cord around your wrist to check the size. Ideally, the two ends should meet comfortably with no large gaps in the pattern. -
Prepare to knot:
Remove the bead stopper or tape carefully, holding both ends of the elastic securely. -
Tie a surgeon’s knot:
Cross the ends over each other like a regular knot, but loop the top strand through the bottom loop twice instead of once. Pull tight. -
Secure the knot:
To ensure durability, dab a tiny drop of jewelry glue or clear nail polish directly onto the knot. Let it dry for a minute. -
Hide the mechanism:
Trim the excess elastic ends close to the knot, leaving about 2mm. If the hole of the gold bead is large enough, gently tug the knot inside a gold bead to hide it seamlessly.
Change the Tone
Swap the textured gold spacers for smooth silver or rose gold discs to completely change the metal tone and match your other jewelry.
Slip on your new pastel creation and enjoy the customized pop of color on your wrist


Rainbow Gradient Order
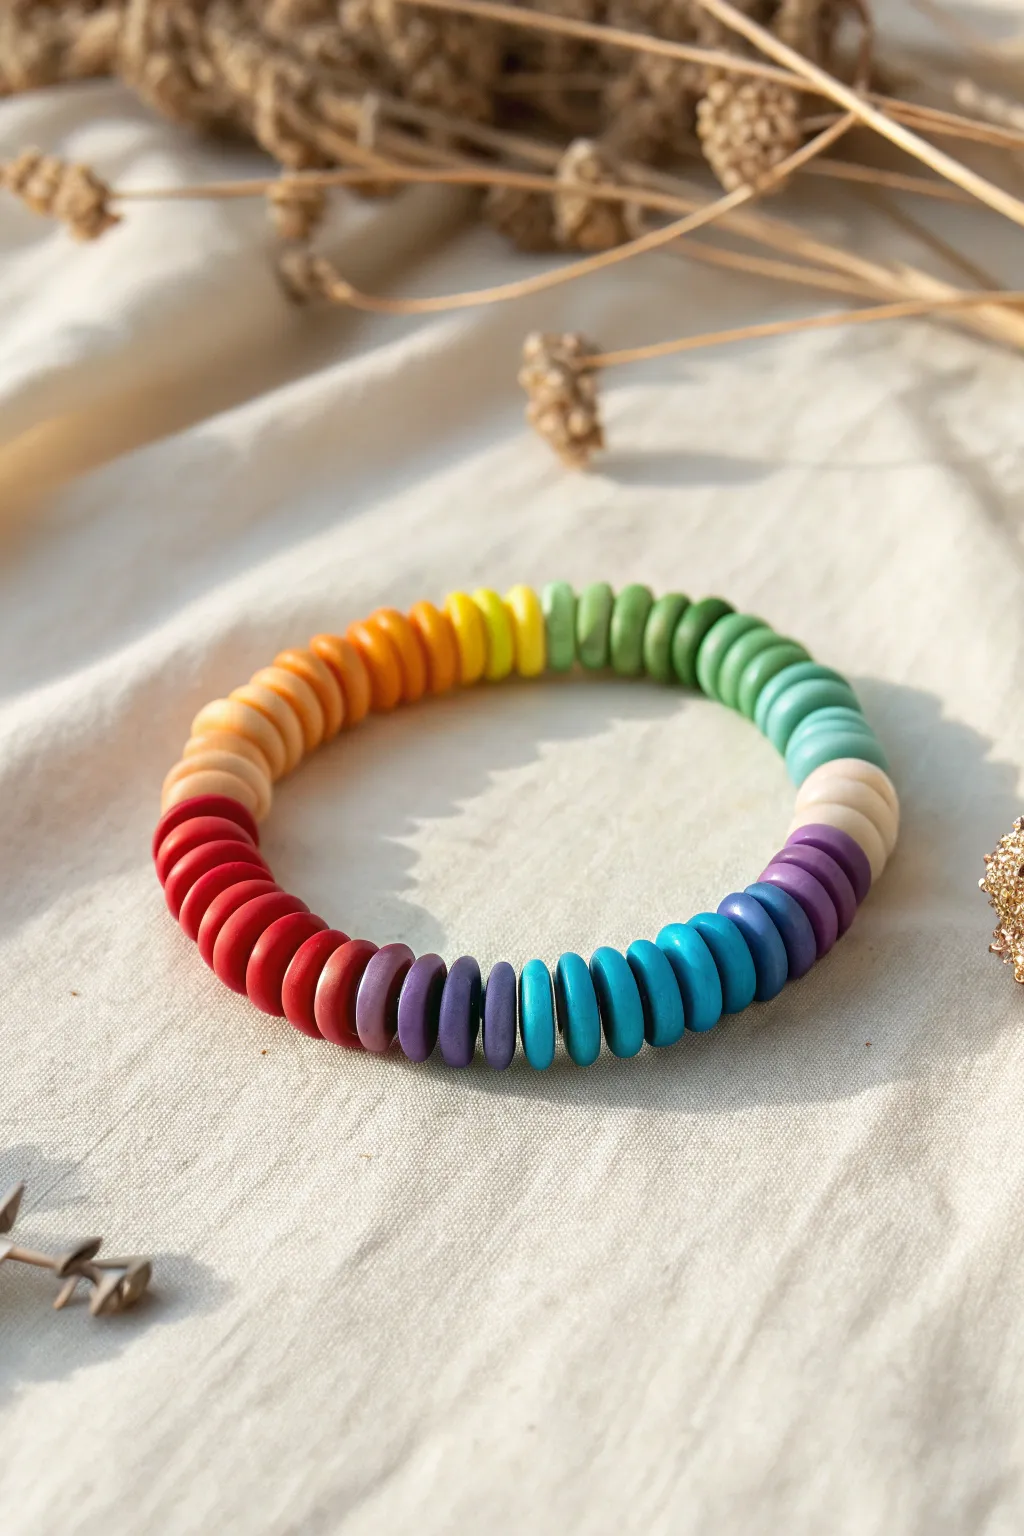
This project showcases a mesmerizing gradient effect using flat clay disc beads, transitioning smoothly through the entire color spectrum. The result is a vibrant yet sophisticated accessory that feels great on the wrist and adds a pop of joy to any outfit.
Step-by-Step Guide
Materials
- Polymer clay Heishi beads (disc beads) in a full rainbow spectrum: red, dark orange, light orange, yellow, lime green, grass green, forest green, teal, sky blue, dark blue, royal blue, purple, violet, beige/cream
- Elastic jewerly cord (0.8mm usually works best)
- Scissors
- Super glue or jewelry glue
- Bead stopper or tape
- Ruler
Step 1: Preparation and Planning
-
Measure your wrist:
Before cutting anything, measure your wrist with a flexible tape measure. Add about 0.5 to 1 inch to this measurement depending on how loose you want the fit. -
Cut the cord:
Cut a piece of elastic cord roughly 10-12 inches long. Having this extra length makes tying the knot at the end much easier. -
Secure the end:
Attach a bead stopper to one end of the cord, or tape it firmly to your workspace so your beads don’t slide off while you work. -
Sort your gradient:
Lay out your clay bead strands. To achieve the seamless gradient shown, arrange your colors in order: Red -> Orange -> Yellow -> Green -> Teal -> Blue -> Purple -> Beige/Cream -> Red.
Uneven Color Blocks?
If your color sections look uneven on the wrist, try counting exact bead numbers (e.g., 5 beads per color) rather than eyeballing the length of the section.
Step 2: Stringing the Spectrum
-
Start with the reds:
Begin stringing with your deep red beads. I find that using about 6-8 beads per color block creates a nice structural rhythm. -
Transition to orange:
Add your dark orange beads next, followed immediately by a lighter orange shade if you have it. This subtle shift smooths out the gradient. -
Add the sunshine:
String on the yellow beads. Keep the count consistent with your previous sections to maintain symmetry. -
Go green:
Move into the greens, starting with a lime or yellow-green, then a standard grass green, and finishing this section with a darker forest green. -
Cool tones:
Thread your teal or aqua beads, followed by sky blue beads. The transition from green to blue should feel very natural. -
Deep blues:
Add the darker royal blue or indigo beads. Ensure the discs are sitting flat against one another. -
Purple phase:
String on the purple beads, followed by a lighter violet or lilac shade. -
Neutral break:
Add a small section of beige, cream, or off-white beads. In the reference photo, this neutral spacer breaks up the rainbow loop and adds a modern touch. -
Check the length:
Wrap the beaded cord around your wrist to check the fit. If gaps remain, continue adding beads following the color cycle (back to red) until it fits perfectly.
Add Some sparkle
Insert a single flat gold or brass spacer bead between every major color transition (like between yellow and green) for a luxe, metallic upgrade.
Step 3: Finishing the Loop
-
Pre-stretch the cord:
Gently pull tightly on both ends of the elastic. This ‘pre-stretching’ helps prevent the bracelet from loosening up securely after you wear it. -
Tie the knot:
Remove the bead stopper and tie a square knot (right over left, left over right). Pull the strands tight. -
Secure with glue:
Place a tiny drop of super glue or jewelry glue specifically on the knot. Let it dry for a minute. -
Hide the knot:
Trim the excess cord close to the knot, then carefully slide the nearest bead over the knot to hide it inside.
Enjoy the satisfying splash of color on your wrist as you wear your new creation


Smiley Face Center Focus
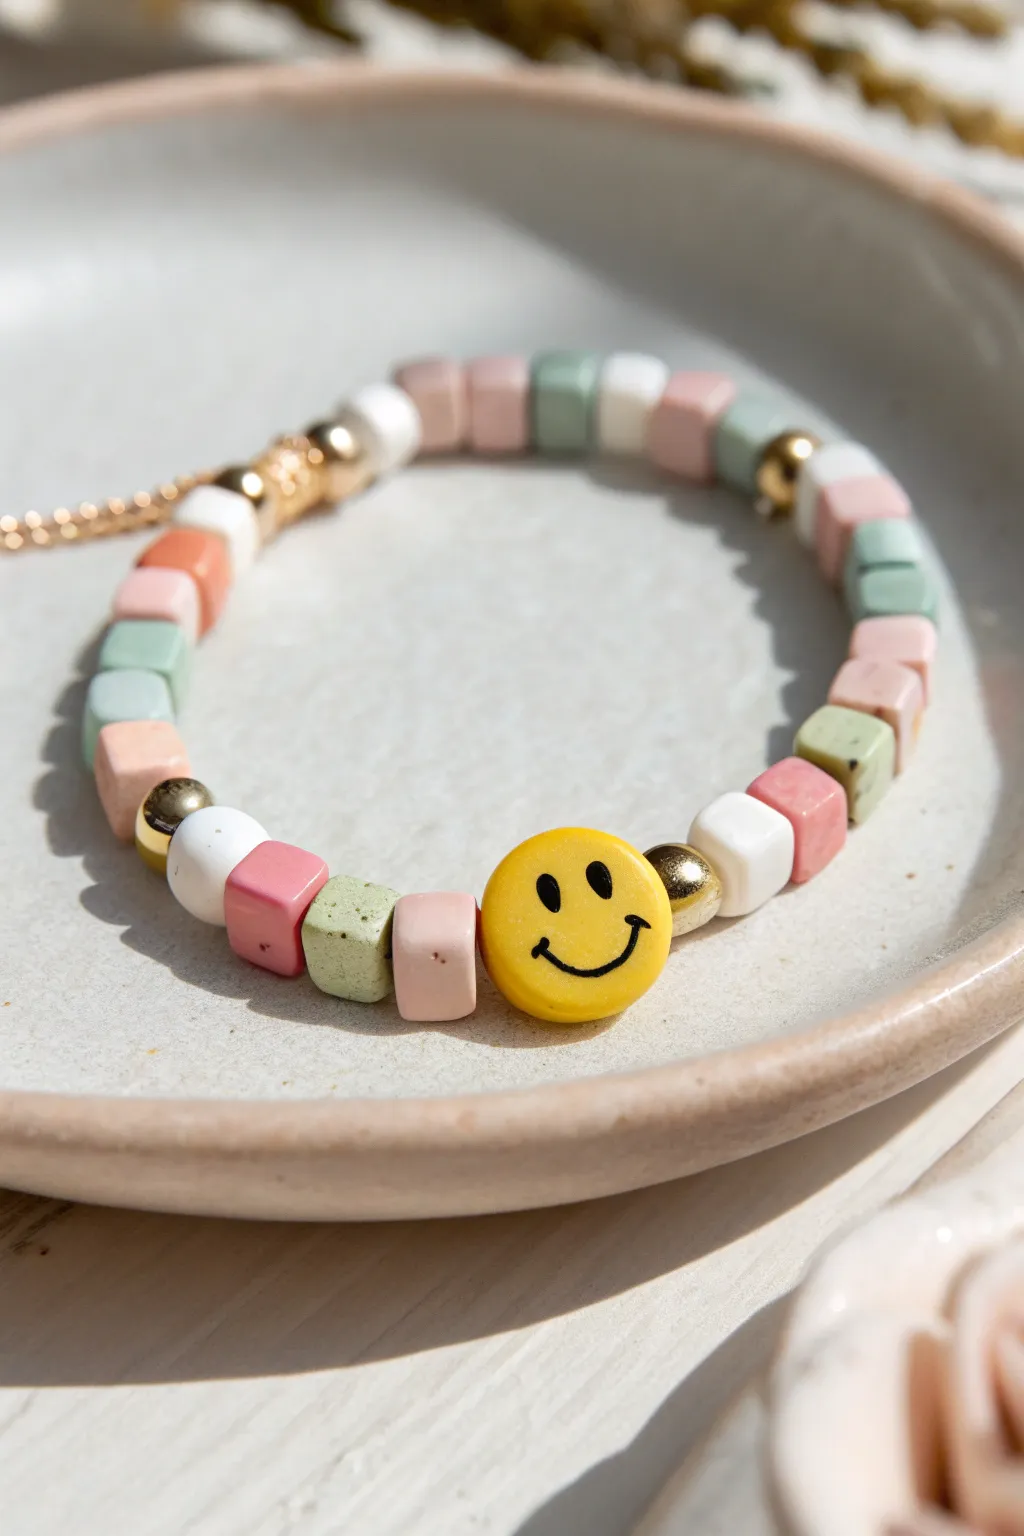
Bring a little sunshine to your wrist with this cheerful clay bead bracelet featuring a classic yellow smiley face as the star. The combination of matte pastel stone beads and touches of gold creates a sophisticated yet playful accessory perfect for stacking or wearing solo.
Step-by-Step
Materials
- Matte square stone or clay beads (approx. 4-6mm) in: pastel pink, sage green, cream/white, and dark salmon/terracotta
- 1 Large yellow flat round smiley face bead (approx. 8-10mm)
- Small gold round spacer beads (approx. 3-4mm)
- Elastic beading cord (0.5mm to 0.8mm depending on bead hole size)
- Jewelry glue or clear nail polish
- Scissors
- Tape or a bead stopper
- Optional: Crimp beads and crimping pliers (if not tying a knot)
Step 1: Planning and Preparation
-
Measure your wrist:
Wrap a piece of string around your wrist to find your comfortable size, then add about half an inch for a comfortable fit. Cut a piece of elastic cord about 3-4 inches longer than this measurement to give yourself plenty of room for tying knots later. -
Secure the cord end:
Place a piece of tape or a bead stopper on one end of your elastic cord. This simple step saves so much frustration by preventing your beads from sliding right off while you work. -
Plan your color palette:
Lay out your square beads to visualize the pattern. The bracelet shown uses a random mix rather than a strict repeating pattern, alternating between pastel pink, sage green, cream, and terracotta. Aim for a balanced look where no two identical colors are right next to each other.
Step 2: Stringing the Beads
-
Start with the focal point:
Since the smiley face is the center focus, it helps to build outwards from it, but for simple stringing, we will position it in the middle. Thread on about half of your square beads first, maintaining that random pastel color mix. -
Add first gold accents:
Once you have roughly half the bracelet length formed with square beads, slide on one small gold round spacer bead. -
Add the smiley face:
Thread your yellow smiley face bead onto the cord. Ensure the face is oriented correctly relative to how you want it to sit on your wrist, though for round beads this is less critical. -
Complete the center section:
Immediately follow the smiley face with a second gold round spacer bead. These gold accents verify the smiley face as the centerpiece and add a touch of shine. -
Finish the bead strand:
Continue stringing the remaining square beads in your random color pattern until the beaded section reaches your desired bracelet length. Periodically wrap it around your wrist to check the fit. -
Check symmetry:
Look at the beads near the ‘back’ of the bracelet (the ends of your strand). If you want to add a visual clasp illusion, you can add a few extra gold spacers at the very end where the knot will be, similar to the metallic cluster seen in the reference photo.
Knot Slipping?
If your elastic knot feels insecure, try the ‘Surgeon’s Knot.’ Wrap the threads around each other twice before pulling tight. It adds extra friction and grip.
Step 3: Finishing Touches
-
Pre-stretch the elastic:
Before tying, give the ends of the elastic a gentle tug. This pre-stretches the material so the bracelet won’t sag or loosen immediately after you start wearing it. -
Remove the stopper:
Carefully remove the tape or bead stopper from the end, holding both ends of the cord firmly so no beads escape. -
Tie the knot:
Tie a surgeon’s knot (loop the cord through twice instead of once on the first pass of a square knot) or a strong square knot. Pull it tight, ensuring there are no gaps between the beads. -
Secure the knot:
Apply a tiny dab of jewelry glue or clear nail polish directly onto the knot. Wait for it to become tacky or dry slightly before moving on. -
Hide the knot:
If one of your beads has a large enough hole, gently pull the elastic so the knot slides inside a bead to hide it. If using the gold ‘clasp’ beads at the back, try to hide the knot inside one of them. -
Trim excess cord:
Using sharp scissors, trim the excess elastic cord close to the knot (or the bead hiding the knot), being careful not to cut the main knot itself.
Matte bead magic
To get the exact look in the photo, search specifically for “matte finish” or “frosted” square beads. Glossy beads will reflect too much light and change the vibe.
Now you have a happy reminder on your wrist to keep smiling all day long


Name Bracelet With Letter Beads
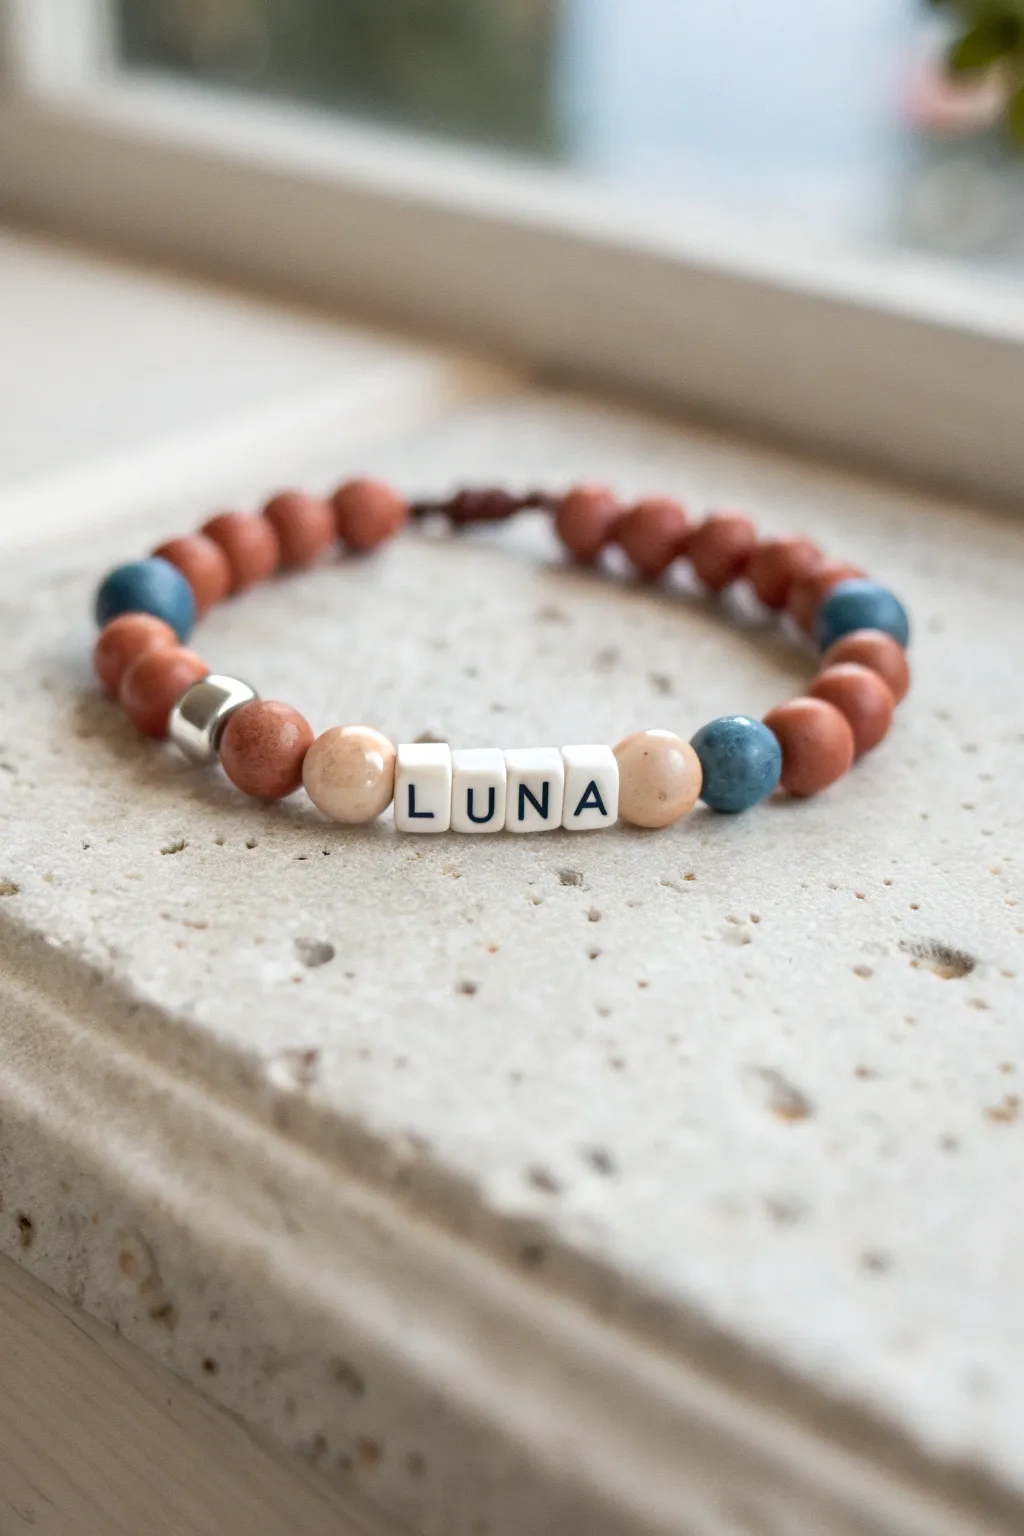
Create a personalized touch with this earthy, minimalist name bracelet. Featuring warm terracotta tones mixed with pops of teal and crisp white letter beads, it makes a thoughtful gift or a stylish addition to your own stack.
How-To Guide
Materials
- Red-brown terracotta round beads (6mm or 8mm)
- Blue-teal round beads (6mm or 8mm)
- Beige or light tan round beads (6mm or 8mm)
- White square letter beads spelling ‘LUNA’
- One silver metal spacer bead (large hole)
- Elastic stretch cord (0.7mm or 0.8mm)
- Super glue or jewelry cement
- Scissors
- Beading needle (optional but helpful)
- Small piece of tape
Step 1: Planning and Prep
-
Measure your cord:
Cut a piece of elastic cord about 10-12 inches long. This gives you plenty of extra room to tie the knot later without struggling. -
Pre-stretch the elastic:
Hold the ends of the cord and give it a few firm tugs. This pre-stretching step helps prevent the bracelet from loosening up after you wear it a few times. -
Secure one end:
Place a small piece of tape over one end of the cord or clip a binder clip to it. This acts as a ‘bead stopper’ so your beads don’t slide right off while you work. -
Layout your design:
Lay your beads out on a flat surface or bead board first. Start with the ‘LUNA’ letters in the center, flanked by two light tan beads.
Knot Security
Hide your knot inside a bead with a slightly larger hole (like the silver spacer) for a professional finish that also protects the knot from wear.
Step 2: Stringing the Beads
-
Start with the focal point:
Thread your letter beads onto the cord first. Ensure they are all facing the correct direction so the name is readable. -
Add the accent beads:
Add one light tan bead to each side of the name block. This lighter color frames the white letters beautifully. -
Begin the pattern on the right:
On the right side of the tan bead, add one blue-teal bead, followed by three red-brown terracotta beads. -
Continue the right side:
Add another blue-teal bead, then fill the rest of this side with about 6-8 red-brown beads, depending on your wrist size. -
Start the left side:
Moving to the left of the name, add one red-brown bead next to the tan bead. -
Insert the metal accent:
Slide on the silver metal spacer bead next. This adds a nice shine and breaks up the matte texture of the clay beads. -
Finish the left pattern:
Add three red-brown beads, then one blue-teal bead. Finish the strand with more red-brown beads until the bracelet reaches your desired length (usually about 6.5 to 7 inches).
Weird Gaps?
If you see string showing between beads, pull the knot tighter before gluing. Elastic stretches, so stringing it slightly tighter than you think helps.
Step 3: Finishing Touches
-
Check the fit:
Wrap the strand around your wrist to check the sizing. It should be snug but comfortable, not leaving deep indentations on your skin. -
Remove the tape:
Carefully remove the tape or clip from the end of the cord, holding both ends securely. -
Tie the first knot:
Cross the two ends and tie a simple overhand knot. Pull it tight, bringing the beads close together to remove any gaps. -
Tie a surgeon’s knot:
For the second knot, loop the cord through twice instead of once before pulling tight. This creates a much stronger hold. -
Add adhesive:
I like to place a tiny drop of jewelry glue or super glue right onto the knot. Let it dry for a minute to ensure it never slips undone. -
Hide the knot:
If one of your beads has a larger hole (like the metal spacer or a letter bead), you can gently tug the cord to slide the knot inside it. -
Trim excess cord:
Use your scissors to snip off the excess elastic, getting as close to the knot as possible without cutting the knot itself.
Enjoy your customized, earthy bracelet.

The Complete Guide to Pottery Troubleshooting
Uncover the most common ceramic mistakes—from cracking clay to failed glazes—and learn how to fix them fast.
Gold Spacer Bead Rhythm

Embrace earthy elegance with this simple yet sophisticated beading project featuring a warm palette of terracotta, cream, and taupe flat clay beads. The textured gold spacer beads add a rhythmic shimmer that elevates this from a simple craft to a wearable piece of art.
Step-by-Step Guide
Materials
- 6mm flat polymer clay heishi beads (terracotta/rust color)
- 6mm flat polymer clay heishi beads (cream/off-white color)
- 6mm flat polymer clay heishi beads (taupe/sand color)
- 6-8mm textured gold spacer beads (preferably stardust or pave style)
- Smaller gold smooth spacer beads (optional)
- Beading wire (0.38mm or 0.45mm)
- 2 Gold crimp beads
- 2 Gold crimp covers (optional but recommended for a polished look)
- 2 Gold wire guardians
- Gold lobster clasp
- Gold extender chain with jump ring
- Jewelry pliers (flat nose and cutting pliers)
Step 1: Planning and Preparation
-
Measure your wrist:
Before cutting any wire, measure your wrist and add about 1 inch to determine your ideal bracelet length. This particular design looks great fitting slightly loose. -
Cut the beading wire:
Cut a piece of beading wire roughly 8-9 inches long to give yourself plenty of room to work with the clasps comfortably. -
Layout the pattern:
This bracelet relies on an asymmetrical ‘rhythm’ rather than a strict pattern. Lay out small piles of your three clay colors (terracotta, cream, taupe) and your gold accents to visualize the flow before stringing.
Stiff Bracelet Syndrome?
If your finished bracelet feels rigid or kinks, you crimped it too tightly. Always leave a tiny bit of slack (about 1mm) before the final crimp to allow beads to rotate and drape naturally.
Step 2: Starting the Strand
-
Attach the first clasp hardware:
Thread a crimp bead onto one end of your wire, followed by a wire guardian. Loop the wire through the guardian and back down through the crimp bead. -
Secure the loop:
Use your flat nose pliers to squash the crimp bead firmly. Attach your lobster clasp to the wire guardian loop using a jump ring if needed, or string it directly onto the guardian before crimping. -
Cover the crimp:
If you are using crimp covers, gently close one over the flattened crimp bead to make it look like a smooth gold bead.
Make It a Stack
Create two companion bracelets to wear with this one: one made entirely of the textured gold beads, and another solid color strand using just the terracotta heishi beads.
Step 3: Creating the Bead Rhythm
-
Begin with neutrals:
Start stringing with a section of neutral clay beads. Try a sequence like 5 taupe beads followed by a small smooth gold spacer. -
Add a pop of color:
Transition into the rust color. String about 4-6 terracotta beads. Notice how the variation in number keeps the design organic. -
Insert the feature bead:
Slide on one of the larger, textured gold stardust beads. These act as the focal points that break up the matte clay texture. -
Building the cream section:
Follow the gold bead with a lighter section. Add 2 cream beads, 3 taupe beads, and then maybe another cream bead to mix the neutrals. -
Intermediate gold accents:
String a small cluster of gold. I like to use a small smooth spacer, a textured bead, and another smooth spacer to create a dense metallic section. -
Repeat the color block:
Return to your terracotta beads. String a longer section here, perhaps 8-10 beads, to create a solid block of color. -
Continuing the pattern:
Continue adding beads, alternating between mixed neutral sections, solid color blocks, and gold interruptions. Don’t worry about symmetry; the goal is a balanced random look. -
Check length frequently:
Wrap the strand around your wrist occasionally. Stop adding beads when you are about 0.5 inches short of your total desired length to account for the clasp assembly.
Step 4: Finishing Touches
-
Prepare the end crimp:
Thread on your second crimp bead and wire guardian. -
Attach the extender chain:
Loop the wire through the guardian, hooking onto the jump ring of your extender chain, and pass the wire back down through the crimp bead and into the first few clay beads. -
Pull and crimp:
Pull the wire taut so there are no gaps between beads, but not so tight that the bracelet becomes stiff. Flatten the crimp bead securely. -
Trim excess wire:
Use your flush cutters to trim the remaining tail of beading wire close to the beads so it doesn’t poke the wearer. -
Final polish:
Add the final crimp cover if using one, and gently manipulate the beads to ensure the strand curves smoothly.
Now you have a stunning, warm-toned accessory perfect for layering or wearing solo.
Confetti Random Mix
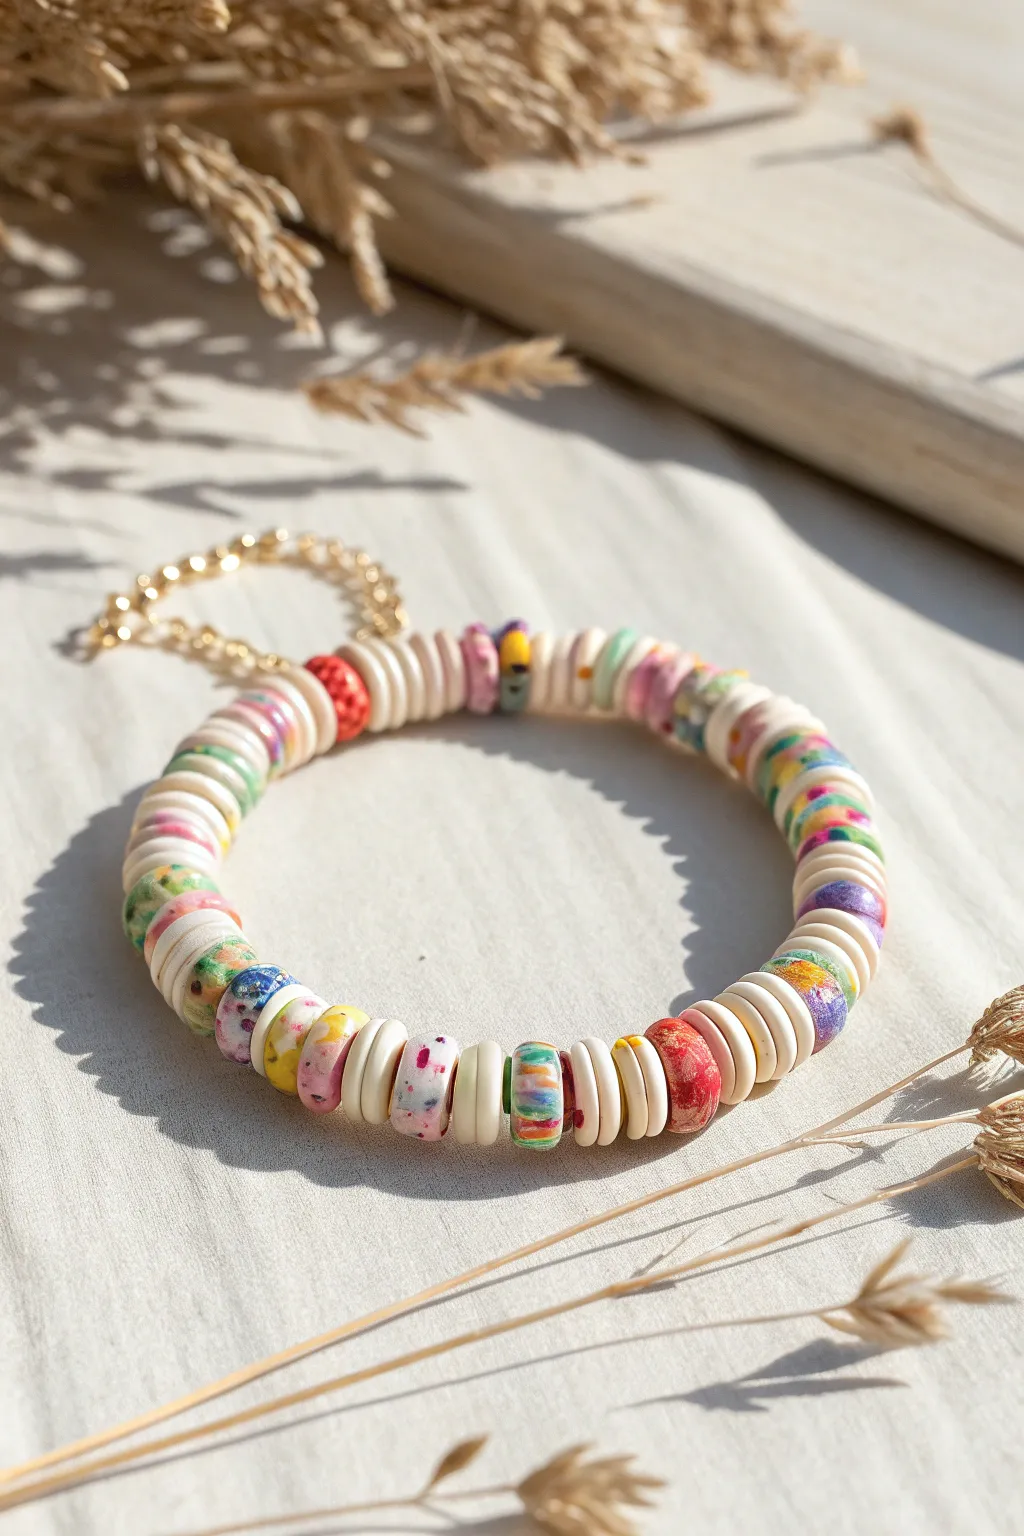
This lightweight accessory perfectly balances minimalism with playful pops of color by mixing creamy neutrals and vibrant splatter patterns. The asymmetrical, random arrangement gives it a carefree, artsy vibe that looks great stacked or worn solo.
Step-by-Step
Materials
- Polymer clay heishi beads (6mm or 8mm, in Cream/Bone White)
- Patterened polymer clay heishi beads (mixed ‘confetti’, speckled, or tie-dye designs)
- Gold plated crimp beads (2mm)
- Gold plated wire guards (or jump rings)
- Gold plated lobster clasp
- Gold extension chain (with small teardrop charm optional)
- Beading wire (flexible, 0.38mm or 0.45mm)
- Flat nose pliers
- Wire cutters
- Bead stopper or tape
Step 1: Planning the Pattern
-
Sort your beads:
Before stringing, separate your cream-colored spacer beads from your colorful pattern beads. Having two distinct piles makes the random selection process much smoother. -
Establish the rhythm:
The charm of this design lies in its irregularity. Instead of a strict pattern, aim for a ‘cluster’ effect. Decide generally that you will use groups of 2-4 plain cream beads to separate singular colorful beads. -
Cut the wire:
Cut a piece of beading wire approximately 9-10 inches long. This gives you plenty of slack for finishing the ends without struggling. -
Secure the end:
Place a bead stopper or a piece of masking tape on one end of the wire to prevent your beads from sliding off while you work.
Loose Beads?
If your beads are spinning too freely or showing gaps, your crimping wasn’t tight enough. Ensure beads are pushed snugly together before flattening the final crimp.
Step 2: Stringing the Beads
-
Start neutral:
Begin by threading 3 or 4 cream beads. Starting with neutrals near the clasp creates a professional, finished look. -
Add first color pop:
Select a colorful bead—perhaps a speckled pink or a tie-dye blue—and slide it on. -
Create spacing:
Add a small stack of cream beads. I usually vary this number between 2 and 5 to keep the design looking organic and not mass-produced. -
Introduce texture:
Add another patterned bead. Look for beads with ‘terrazzo’ or ‘splatter’ effects, like the ones shown with multicolored flecks on a white base. -
Mix solid colors:
Occasionally, insert a solid-colored bead (like the textured red bead in the example) to break up the busy patterns. -
Continue the flow:
Repeat this random process—stack of cream, single color, stack of cream—until the beaded section reaches about 6 to 6.5 inches, or your desired wrist size. -
Check the fit:
Wrap the unfinished strand around your wrist. Remember the clasp will add about half an inch of length, so aim slightly shorter than the final size.
Add Sparkle
Replace one of the cream spacer sections with 2-3 tiny gold disc beads or a singular gold ball bead to add a hint of metallic luxury to the mix.
Step 3: Attaching the Hardware
-
Prepare the first crimp:
Remove the bead stopper. Thread a gold crimp bead onto the wire, followed by a wire guard. -
Loop the clasp:
Loop the wire through the guard and hook on your lobster clasp. Thread the wire back down through the crimp bead and the first 1-2 clay beads. -
Secure the crimp:
Use your flat nose pliers to squash the crimp bead flat, securing the wire tightly. Trim the excess tail close to the bead. -
Prepare the second end:
Move to the other end of the bracelet. Slide on a crimp bead and then a wire guard. -
Attach the chain:
Loop this end through the final link of your extension chain. Pass the wire back through the crimp bead and pull everything taut, ensuring no gaps between beads. -
Final crimp:
Flatten the crimp bead securely with your pliers. Give it a gentle tug to test the strength. -
Clean finish:
Trim the remaining wire tail as close as possible without cutting the main strand.
Now you have a charming, gallery-worthy bracelet ready to wear with your favorite casual outfits


What Really Happens Inside the Kiln
Learn how time and temperature work together inside the kiln to transform clay into durable ceramic.
Monochrome Ombre Fade
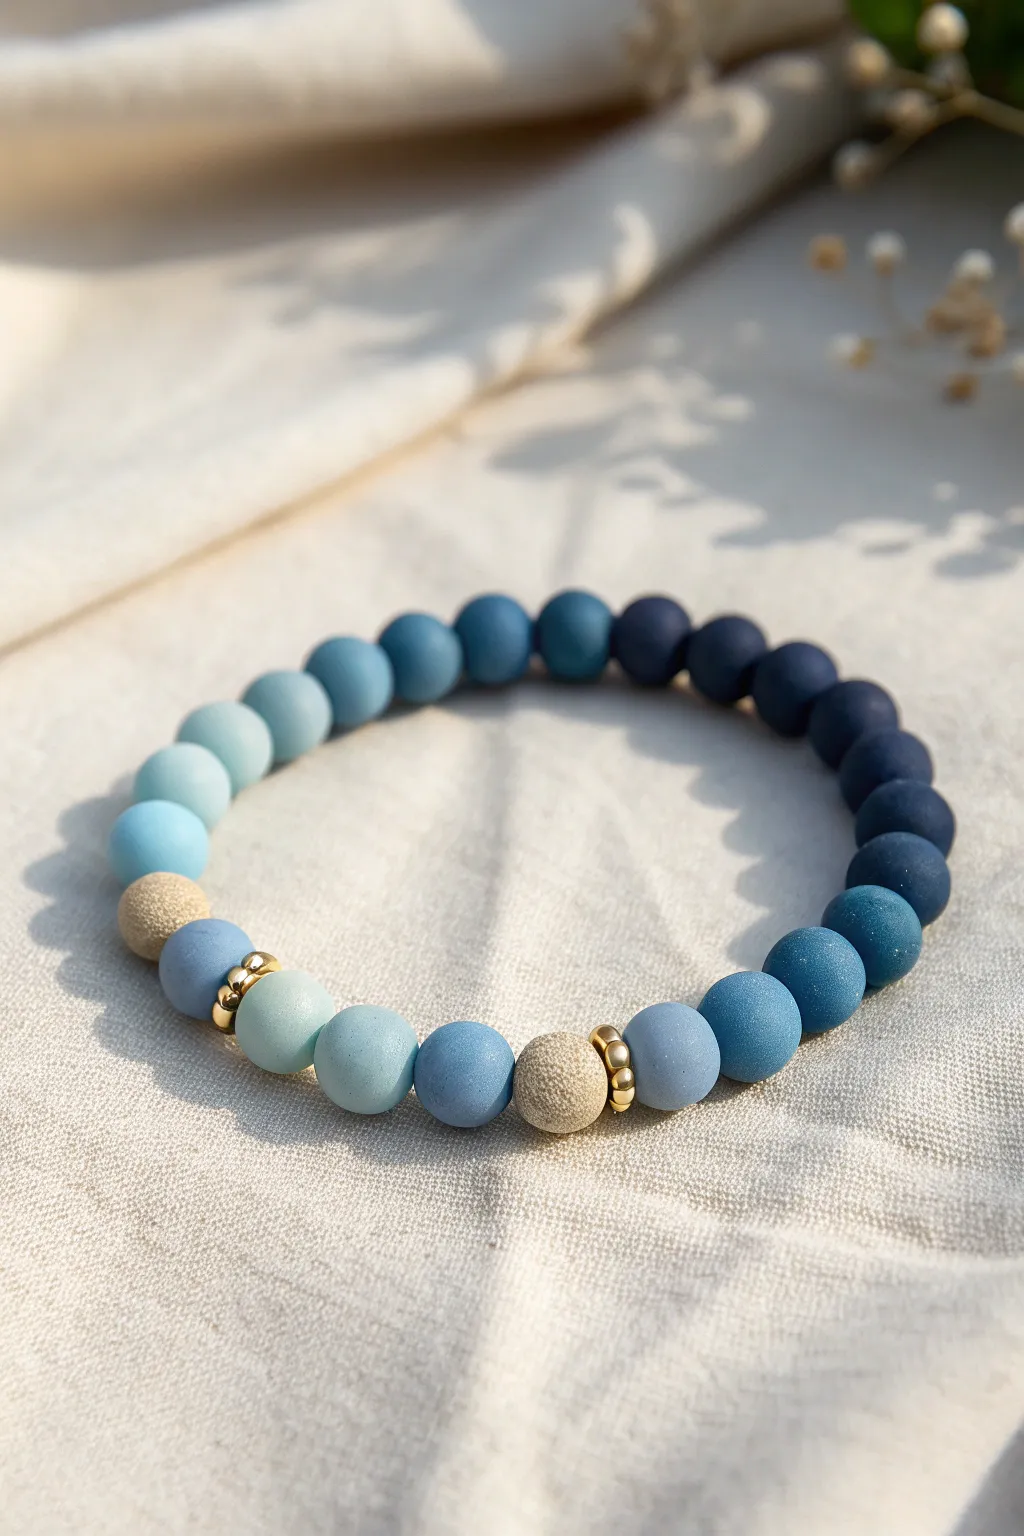
Embrace the calming hues of the ocean with this sophisticated monochrome ombre bracelet. Featuring a seamless gradient from deep navy to soft sky blue, accented by textured sandy beads and gold spacers, it’s a perfect accessory for any coastal-inspired look.
Step-by-Step Tutorial
Materials
- 8mm round polymer clay or matte agate beads in 5 shades of blue (Deep Navy, Midnight Blue, Royal Blue, Slate Blue, Sky Blue)
- 8mm textured round beads in Beige or Sand color (2 pieces)
- Gold tone metal spacer rings or rondelles (4 pieces)
- Strong elastic beading cord (0.8mm or 1.0mm recommended)
- Jewelry adhesive or clear nail polish
- Scissors
Step 1: Planning the Gradient
-
Sort your blues:
Begin by laying out your matte blue beads on a bead board or a soft towel. Organize them strictly by shade, moving from the darkest navy to the lightest sky blue to visualize the palette. -
Establish the pattern:
Create the main gradient sequence. Start with 4-5 beads of your darkest shade, followed by 3 beads of the next lighter shade, and continue this pattern until you reach the lightest blue. -
Mirror the design:
Once you hit the lightest shade, reverse the order if you want a symmetrical look, or continue fading into the textured accent beads for an asymmetrical style like the example shown. -
Position the accents:
Select where your focal points will be. In this design, two textured beige beads act as anchors. Place a gold spacer ring on either side of each beige bead to highlight them.
Matte vs. Glossy
Using matte beads is key here! Their ‘frosted’ surface absorbs light, making the subtle color shifts in the blue gradient much easier to see than with shiny beads.
Step 2: Stringing the Bracelet
-
Prepare the cord:
Cut a piece of elastic cord about 10-12 inches long. This generous length makes tying the final knot much easier than fighting with short ends. -
Pre-stretch the elastic:
Give the elastic cord a few firm tugs before you start. This simple trick helps prevent the bracelet from stretching out and becoming loose after the first few wears. -
Start with the darkest section:
Thread the four darkest navy beads onto the cord first. This solid block of color creates a visual ‘base’ for the bracelet. -
Build the transition:
Move to the next shade lighter. Add three or four beads of this mid-tone blue. -
Complete the fade:
String on the remaining lighter blue shades, watching the ombre effect take shape. Ensure the transition looks smooth to your eye. -
Add the first accent:
Slide on a gold spacer ring, followed by one textured beige bead, and then another gold spacer ring. -
Bridge the gap:
Add a small section of beads—perhaps two or three of a mid-tone blue—to separate the two accent sections. -
Add the second accent:
Repeat the accent assembly: gold spacer, textured beige bead, gold spacer. -
Finish the loop:
Add any remaining beads needed to fit your wrist size. Check the length by wrapping the strand around your wrist; it should sit comfortably without pinching.
Make It Yours
Swap the beige accent beads for white lava rocks. You can add a drop of essential oil to them, turning your ombre accessory into a functional diffuser bracelet.
Step 3: Finishing Touches
-
Tie the knot:
Bring the two ends of the elastic together. Tie a surgeon’s knot (a standard overhand knot, but loop the end through twice before pulling tight) to secure the bracelet. -
Secure the join:
I like to place a tiny drop of jewelry adhesive or clear nail polish on the knot itself. This ensures it won’t slip undone over time. -
Hide the knot:
Allow the glue to dry for a moment, then gently pull on the beads so the knot slides inside the hole of the nearest bead. -
Trim the excess:
Using your scissors, carefully snip off the extra elastic tail as close to the bead as possible without cutting the main cord.
Slip on your new creation and enjoy the subtle, calming gradient on your wrist
Classic Black-and-White Pop
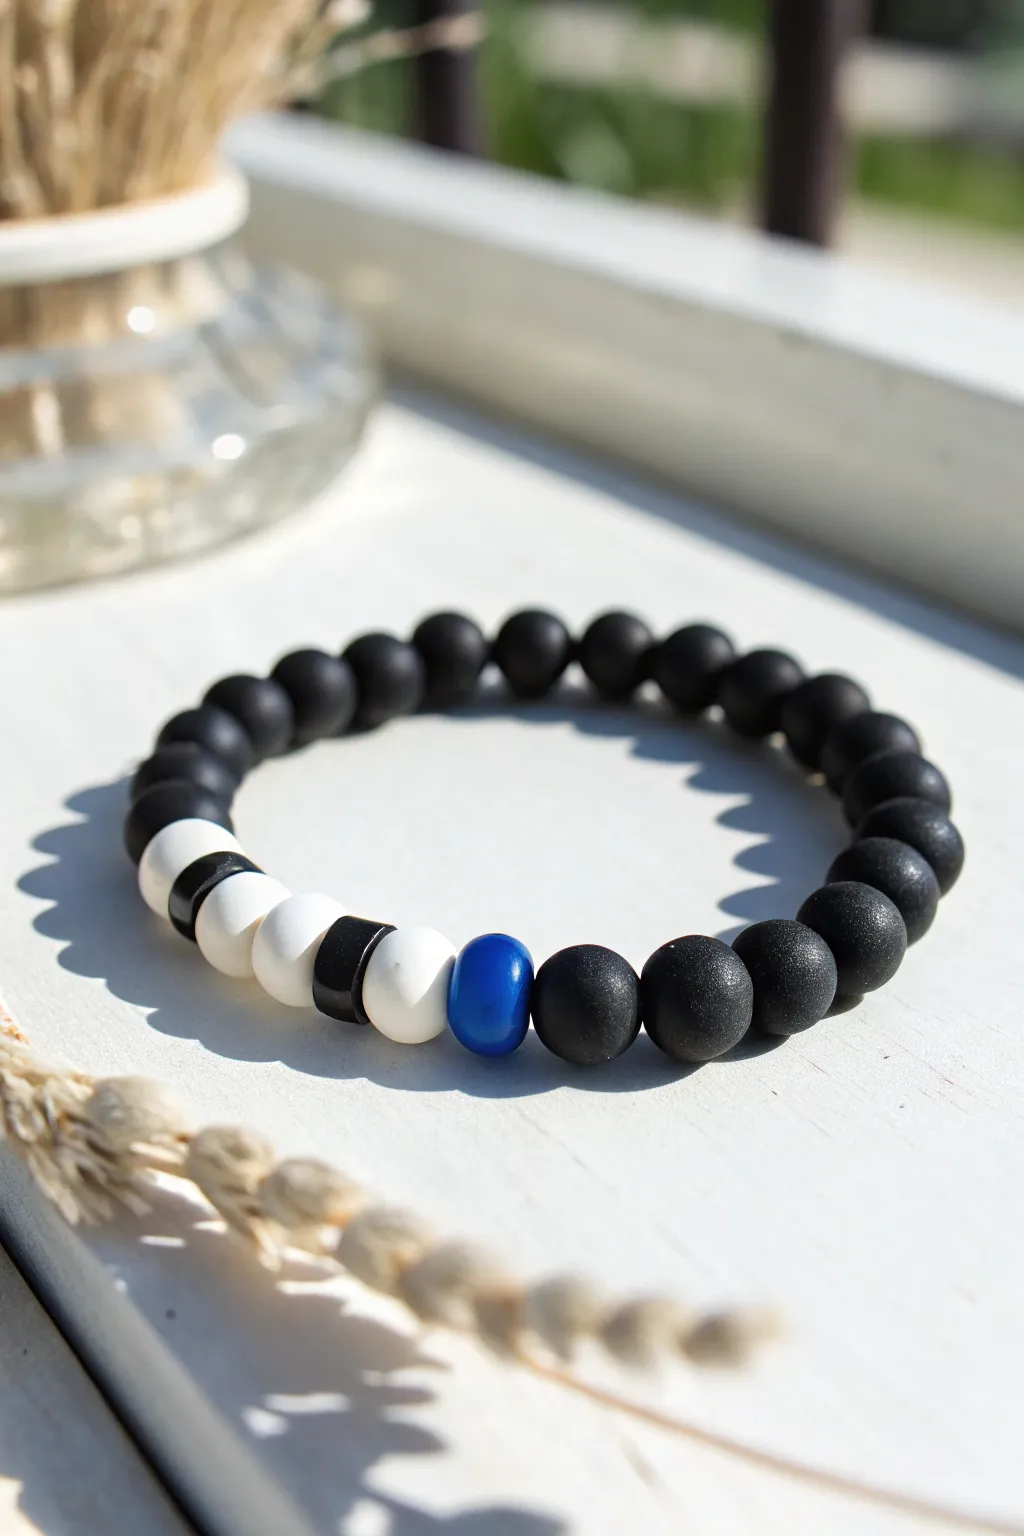
This striking bracelet updates a classic matte black design with a crisp white segment and a solitary pop of electric blue. It is a perfect beginner project that looks high-end thanks to the clever use of flat spacer beads for texture.
Step-by-Step Guide
Materials
- Matte black round gemstone or glass beads (8mm or 10mm)
- Matte white round gemstone or glass beads (same size as the black ones)
- One bright electric blue glass or cat’s eye bead (same size)
- Flat black heishi or disc spacer beads (approx. 6mm-8mm wide)
- Strong elastic cord (0.8mm or 1mm depending on hole size)
- Jewelry glue or clear nail polish
- Scissors
Step 1: Planning and Preparation
-
Measure your wrist:
Before cutting anything, wrap a piece of string or a soft measuring tape around your wrist to find your comfortable size. Add about half an inch to this measurement for a standard fit. -
Prepare the workspace:
Lay out a bead mat or a soft towel to prevent your round beads from rolling away while you design your pattern. -
Cut the elastic:
Cut a piece of elastic cord about 10-12 inches long. Having plenty of excess length makes tying the final knot significantly easier than struggling with short ends. -
Pre-stretch the cord:
Hold both ends of your cut elastic and give it a few firm tugs. This pre-stretching step is crucial because it prevents the bracelet from loosening up and sagging after you wear it a few times. -
Secure the end:
Place a piece of tape or a bead stopper clip on one end of the elastic cord so your beads don’t slide right off as you string them.
Loose Spacers?
If the flat spacers twist or don’t sit straight, check if the hole is too large for your cord. Stringing two strands of elastic can stabilize them.
Step 2: Creating the Pattern
-
Identify the focal point:
This design centers around the color block section. Start by selecting your three best-looking matte white beads, your single blue bead, and three of the flat black spacers. -
Start the sequence:
Thread the single blue bead onto the elastic first. This will act as the colorful anchor for your white section. -
Add the first white segment:
Slide on one matte white round bead next to the blue one. -
Insert a spacer:
Add one flat black disc spacer bead. Ensure it sits flush against the white bead for that clean, modern look. -
Continue the pattern:
Add the second white bead, followed by another flat black spacer. Repeat this once more: add the third white bead and then the final flat black spacer. -
Check the sequence:
Your distinctive section should now look like this: Blue bead -> White -> Spacer -> White -> Spacer -> White -> Spacer. I usually double-check at this stage to make sure the spacers are facing the right way.
Switch It Up
Replace the blue bead with a metallic gold or silver bead for a luxe look, or swap the white beads for natural wood beads for an earthy vibe.
Step 3: Completing the Bracelet
-
Fill the rest:
Now, begin threading your matte black round beads onto the cord. Continue adding them until the bracelet reaches your desired total length. -
Test the fit:
Carefully wrap the strand around your wrist to check the size. Remember the knot will take up a tiny bit of space, so a precise fit now is perfect. -
Prepare for tying:
Remove the tape or bead stopper from the end. Hold both ends of the elastic securely so the beads remain tight against each other. -
Tie the knot:
Tie a surgeon’s knot. This is just a standard square knot, but loop the elastic through twice on the first pass before tightening. Pull it tight firmly but gently. -
Secure the knot:
Apply a tiny dab of jewelry glue to the knot itself. Be careful not to get glue on the visible parts of the beads. -
Hide the knot:
Once the glue is tacky but starting to set, pull the knot gently inside the hole of the nearest black bead to hide it completely. -
Trim excess cord:
After the glue has fully dried, use your scissors to trim the remaining tails of the elastic cord as close to the bead hole as possible.
Now you have a stylish, custom-designed accessory ready to wear with any outfit

TRACK YOUR CERAMIC JOURNEY
Capture glaze tests, firing details, and creative progress—all in one simple printable. Make your projects easier to repeat and improve.
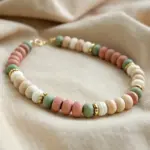
Candy Stripe Two-Color Repeat
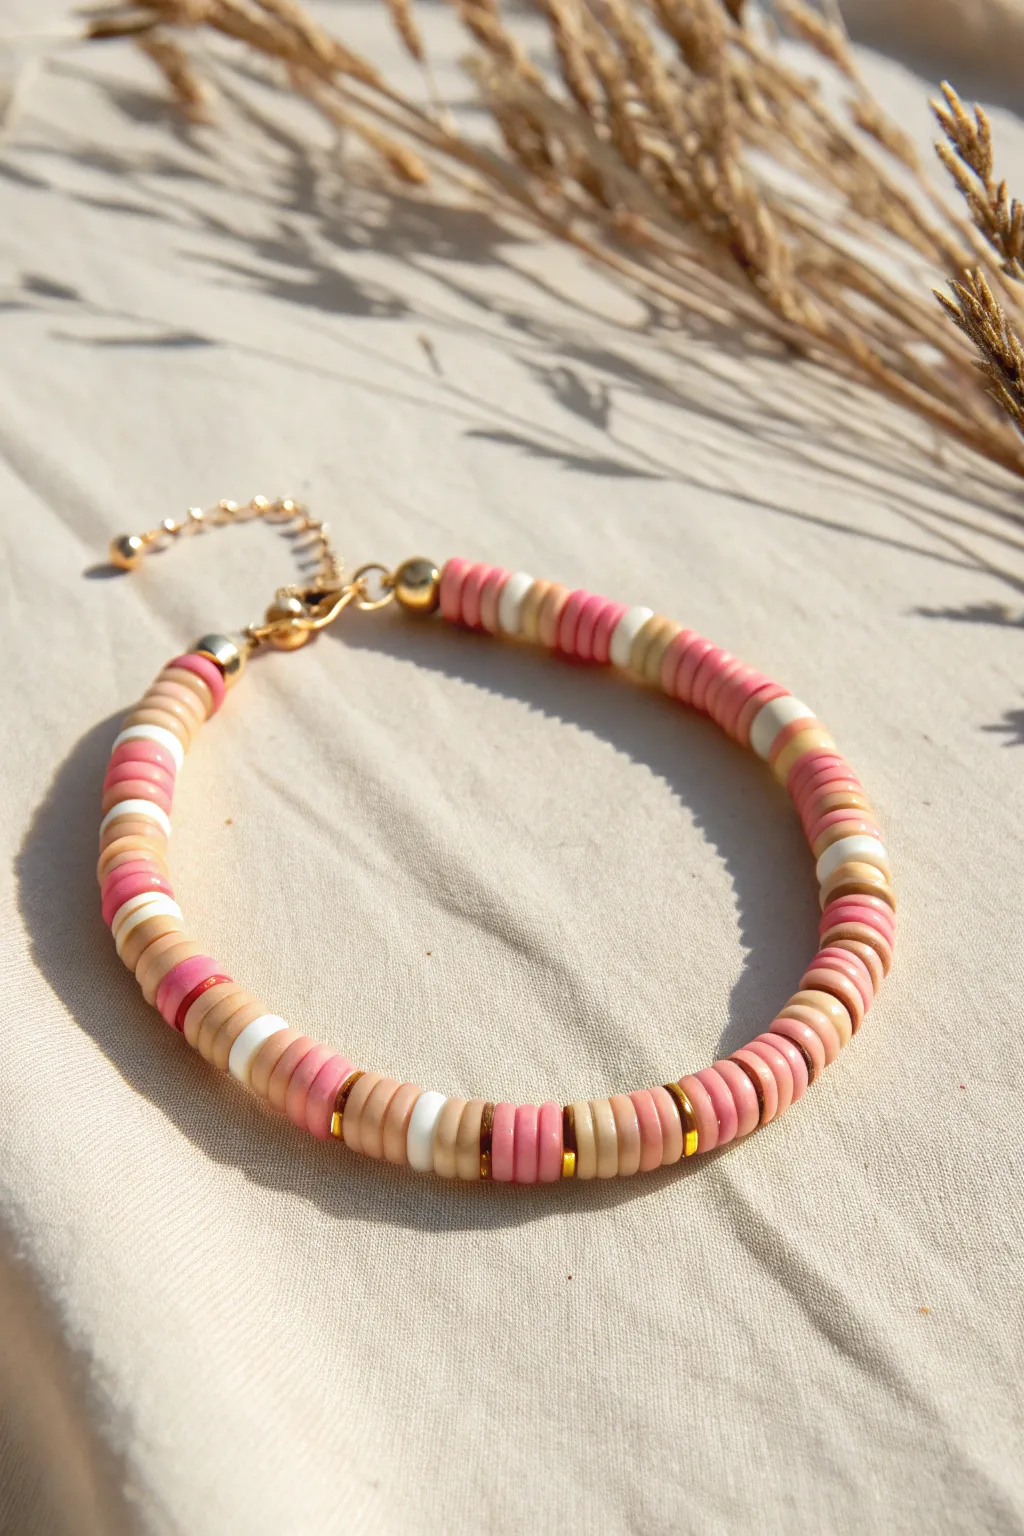
Capture the soft, warm hues of a summer evening with this delightful clay bead bracelet. The pattern mixes bands of rose pink, soft peach, and crisp white, interspersed with elegant gold accents for a sophisticated finish.
Detailed Instructions
Materials
- Polymer clay heishi disc beads (Rose Pink)
- Polymer clay heishi disc beads (Peach/Beige)
- Polymer clay heishi disc beads (White)
- Gold tone heishi spacer beads (flat disc)
- Gold tone crimp beads
- Gold tone lobster clasp
- Gold tone jump rings
- Gold tone extension chain
- Elastic beading cord (0.8mm transparent)
- Jewelry pliers (flat nose)
- Small scissors
Step 1: Planning and Preparation
-
Measure your wrist:
Wrap a piece of string around your wrist to determine the desired length, adding about half an inch for a comfortable fit. -
Cut the cord:
Snip a length of elastic cord about 10-12 inches long. Having extra length makes tying the final knots much easier than struggling with short ends. -
Prepare the workspace:
Lay out your bead colors in small piles or dishes. This helps you visualize the pattern before you start threading. -
Secure the end:
Attach a temporary stopper bead or use a piece of tape on one end of the cord so your beads don’t slide off while you work.
Pattern Consistency
Count your discs! Using exactly 5 or 6 beads for every color block creates a much more professional, high-end look than eyeballing the thickness.
Step 2: Creating the Pattern
-
Start the sequence:
Begin threading your beads. The core pattern consists of blocks of color separated by single distinct beads. -
First color block:
Thread approximately 5-6 Rose Pink clay discs onto the cord. -
Add a spacer:
Slide on a single gold heishi spacer bead. This metallic flash elevates the design from simple to chic. -
Second color block:
Add 5-6 Peach/Beige clay discs next. Try to keep the number of beads consistent with the first block for symmetry. -
The highlight bead:
Thread one single White clay disc. This acts as a bright ‘palate cleanser’ between the warmer tones. -
Third color block:
Add another set of 5-6 Peach/Beige clay discs. -
Close the segment:
Finish this pattern segment with another single gold spacer bead. -
Repeat the pattern:
Continue repeating this full sequence—Pink block, Gold, Peach block, White, Peach block, Gold—until you reach your desired length. -
Check the fit:
Wrap the beaded cord around your wrist to ensure it fits comfortably, leaving a little room for the clasp hardware.
Stiff Bracelet?
If the bracelet feels rigid and doesn’t circle the wrist nicely, you’ve strung the beads too tightly. Leave a 1mm gap on the cord before tying the final knot.
Step 3: Finishing Touches
-
Prepare the hardware:
Slide a gold crimp bead onto one end of the elastic cord. -
Attach the clasp:
Thread the cord through the loop of the lobster clasp, then loop it back through the crimp bead. -
Secure the crimp:
Use your flat nose pliers to firmly squash the crimp bead flat, locking the cord in place against the clasp. -
Add the extension chain:
Repeat the crimping process on the other end of the bracelet, this time attaching the jump ring connected to the extension chain. -
Trim excess cord:
Carefully snip off the excess elastic tail close to the crimp beads. I find that dabbing a tiny drop of clear glue on the knot or crimp adds extra security. -
Final adjustment:
Gently stretch the bracelet to ensure the beads settle evenly and the hardware is secure.
Slip on your new creation and enjoy the customized fit and warm colors
Daisy Accent Sprinkle
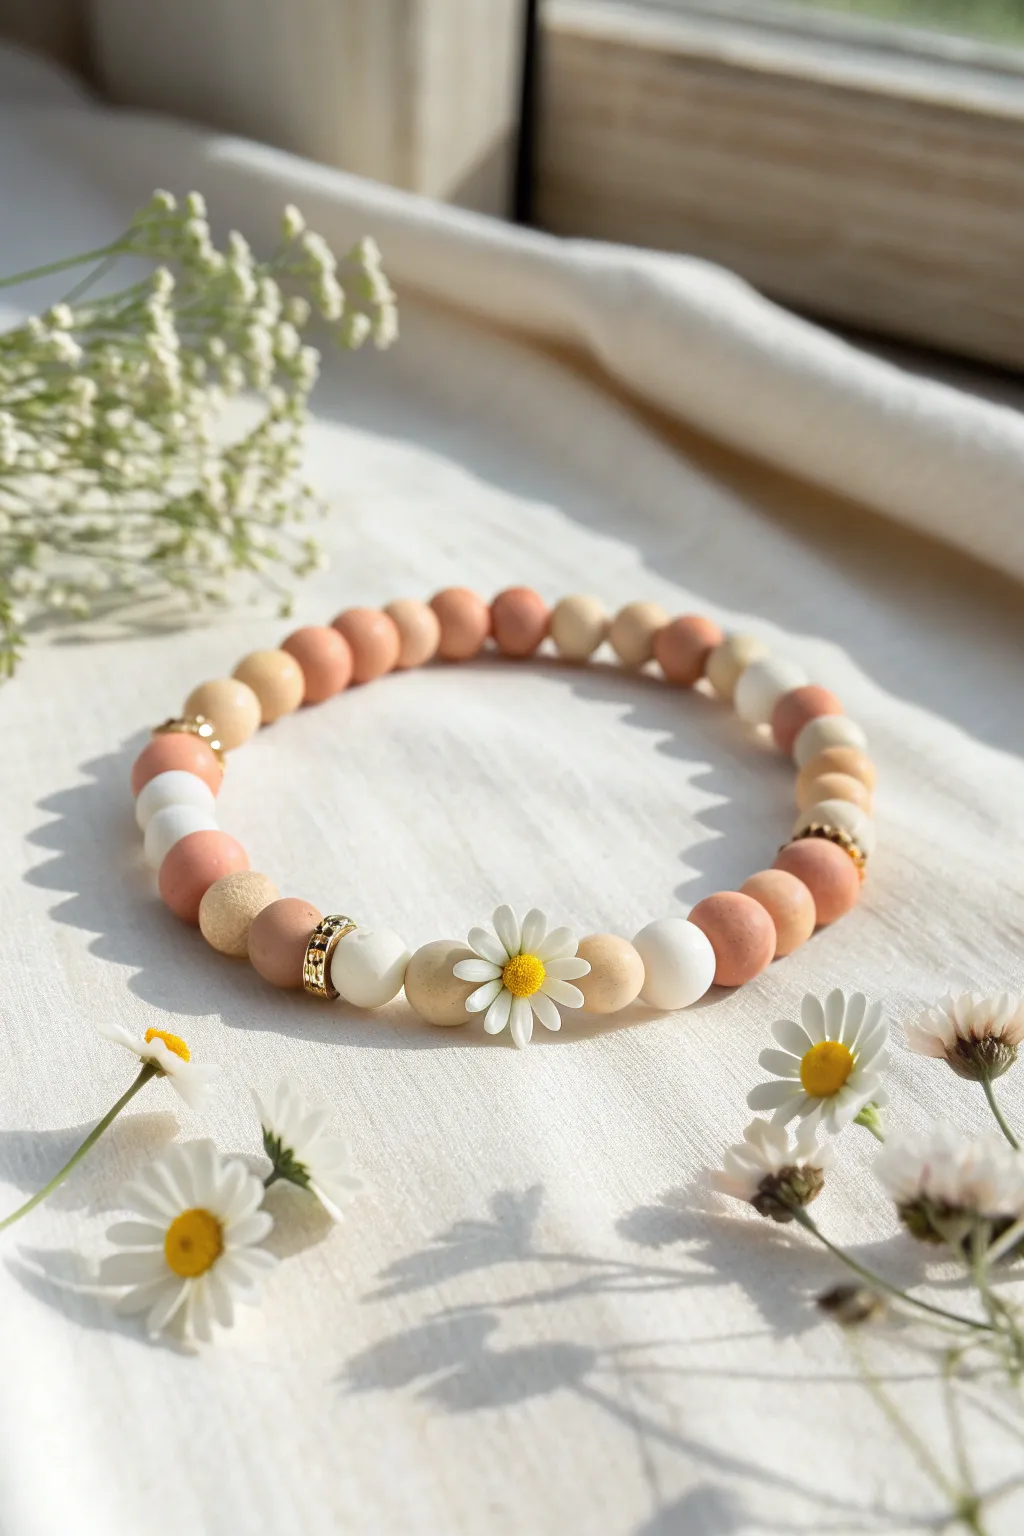
Capture the essence of a sunny meadow with this delicate beaded bracelet featuring warm terracotta and cream tones. The sweet daisy focal bead adds a whimsical touch, making this the perfect accessory for breezy spring days.
Step-by-Step Tutorial
Materials
- Polymer clay round beads (8mm): Terracotta/Peach
- Polymer clay round beads (8mm): Beige/Sand
- Polymer clay round beads (8mm): White
- Daisy flower charm or bead (white petals, yellow center)
- Small gold rhinestone spacer rings (rondelle beads)
- Gold spherical spacer beads (optional)
- Strong elastic stretch cord (0.8mm recommended)
- Super glue or jewelry cement
- Scissors
- Beading needle (optional for threading)
- Tape or bead stopper
Step 1: Preparation & Design
-
Measure your wrist:
Wrap a flexible measuring tape around your wrist where you want the bracelet to sit. Add about half an inch to this measurement to ensure a comfortable fit that isn’t too tight. -
Cut the cord:
Cut a piece of elastic cord roughly 10-12 inches long. Having extra length makes tying the final knot significantly easier than struggling with short ends. -
Pre-stretch the elastic:
Hold both ends of the cord and give it a few firm tugs. This pre-stretching prevents the bracelet from sagging or loosening up immediately after you wear it for the first time. -
Secure the end:
Place a piece of tape or a bead stopper on one end of the elastic cord to prevent your beads from sliding off while you work. -
Plan your pattern:
It helps to lay your beads out on a bead board or a towel first. The pattern shown uses a mix of terracotta, beige, and white, arranged loosely by color sections rather than a strict 1-1-1 pattern.
Step 2: Stringing the Focal Point
-
Start the center:
Since the daisy is the star, we build out from it. If your daisy is a vertical hole bead, thread it onto the cord now to sit in the middle. -
Add flanking beads:
On the immediate right of the daisy, thread a beige bead. On the immediate left, thread a white bead (or vise versa) to soften the transition. -
Insert the sparkle:
Slide a gold rhinestone spacer ring onto the cord on one side, placing it after the first or second clay bead from the daisy. These gold accents frame the focal point beautifully. -
Balance the other side:
Repeat the spacer placement on the other side of your daisy section to create symmetry in the metallic elements, even if the clay bead colors remain asymmetrical.
Hiding the Ends
If your bead holes are too small to hide the knot, thread both elastic ends through the final bead BEFORE tying the knot. This traps the knot on the ‘outside’ but keeps it very flush.
Step 3: Completing the Band
-
String the remaining length:
Continue threading the round clay beads. I like to alternate small groups of 2-3 beads of the same color (like two peaches, then a beige) to create that organic, effortless look seen in the photo. -
Add subtle gold accents:
About halfway around the band, slip in a small gold spherical spacer bead or another rhinestone ring to carry the metallic theme around the wrist without overwhelming the clay texture. -
Check the fit:
Once you think you have enough beads, carefully wrap the strand around your wrist. The ends should meet comfortably with no gaps showing between the beads. -
Close the loop:
Remove the tape or stopper. Bring the two ends of the elastic together, ensuring there is no slack in the line but the beads aren’t bunched up too tightly.
Petal Power
Create a matching stacked set by making two more bracelets: one entirely of the terracotta beads and another using only white beads with gold spacers.
Step 4: Finishing Touches
-
Tie the knot:
Tie a surgeon’s knot: make a standard overhand knot, but loop the end through the circle an extra time before pulling tight. This creates friction that holds the elastic better. -
Secure with glue:
Ideally, place a tiny dab of jewelry cement or super glue directly onto the knot. Let it dry for a few moments to ensure it won’t slip undone. -
Hide the knot:
Trim the excess elastic cord close to the knot, leaving about 1mm. Gently pull the adjacent bead over the knot to hide it inside the bead hole for a seamless finish.
Slip on your new bracelet and enjoy the fresh, floral vibes it brings to your outfit
Fruit Charm Centerpiece
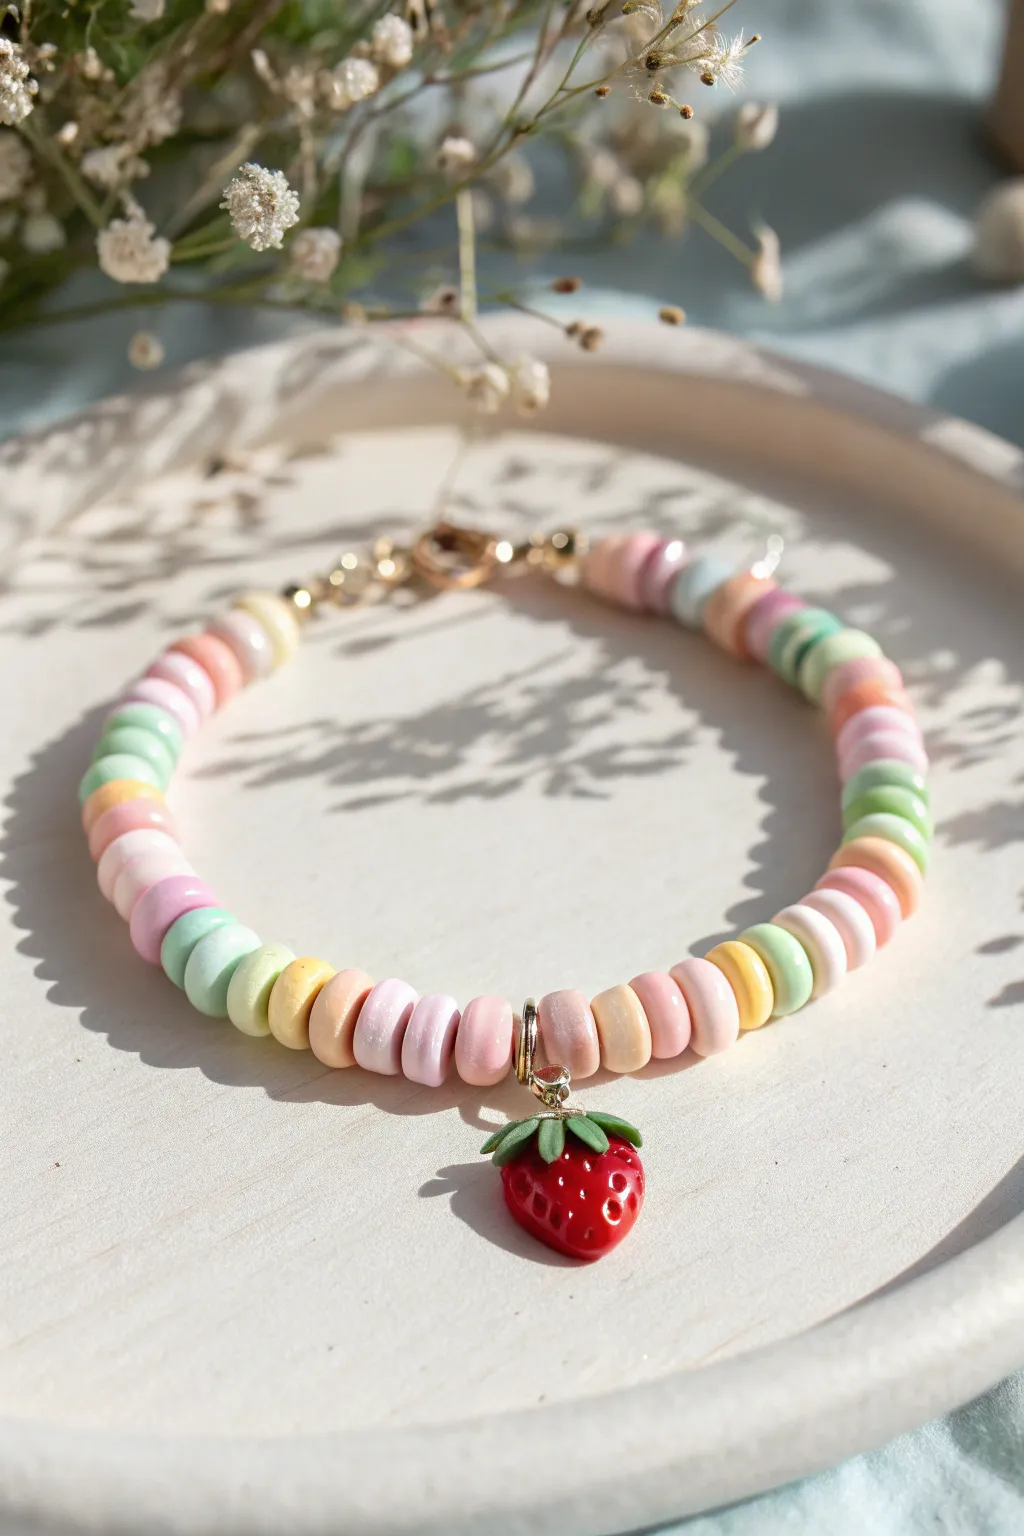
Embrace the cottagecore aesthetic with this charming bracelet that looks good enough to eat. Featuring soft pastel Heishi beads reminiscent of candy necklaces and a juicy red strawberry charm, this accessory adds a sweet pop of color to any outfit.
Step-by-Step
Materials
- Polymer clay Heishi disc beads (pastel pink, cream, mint green, peach, pale yellow)
- Red polymer clay strawberry charm with gold connector loop
- Gold lobster claw clasp
- Gold extension chain (approx. 1-2 inches)
- 2 Gold jump rings (4mm or 5mm)
- 2 Gold crimp beads
- Beading wire (clear or gold-tone flex wire)
- Wire cutters
- Flat nose pliers
- Crimping tool (or flat nose pliers)
Step 1: Planning and Centerpiece
-
Measure your wrist:
Before you begin, wrap a piece of string around your wrist to find your comfortable size, then add about half an inch for wiggle room. Cut a length of beading wire that is at least 3-4 inches longer than this measurement to make finishing easier. -
Sort your palette:
Gather your pastel Heishi beads. The look we want is random but balanced, so create a small pile mixing your pinks, creams, mints, peaches, and yellows together to easily grab them while stringing. -
Attach the charm:
Find the exact center of your wire by folding it gently in half. Thread your strawberry charm onto the wire so it sits right at that midpoint. This ensures your focal point stays centered on the finished piece.
Sticky Clasp?
If your lobster clasp is stiff or doesn’t open smoothly, apply a tiny drop of mineral oil or baby oil to the hinge mechanism and work it back and forth.
Step 2: Stringing the Beads
-
Start the left side:
Begin threading beads onto the left side of the strawberry charm. I like to pick colors randomly to avoid a strict pattern, giving it that playful ‘candy necklace’ vibe. -
Maintain color balance:
As you string, keep an eye on the color distribution. Try not to put three beads of the exact same color right next to each other; aim for a soft, alternating mix of the pastels. -
String the right side:
Once the left side covers about half of your desired wrist circumference, switch to the right side of the charm. Repeat the random stringing process until both sides are equal in length. -
Verify sizing:
Wrap the unfinished strand around your wrist to check the fit. Remember that the clasp and extension chain will add a little extra length, so stop beading just slightly short of the ends touching.
Pro Tip: Wire guards
For a truly professional finish, use gold wire guards (horseshoe-shaped findings) where the wire loops onto the clasp. It prevents abrasion over time.
Step 3: Attaching the Hardware
-
Prepare the first end:
On one end of the beading wire, thread on a gold crimp bead followed by a jump ring attached to your lobster clasp. -
Loop back:
Take the tail end of the wire and thread it back through the crimp bead only, creating a small loop that holds the clasp securely. -
Secure the crimp:
Slide the crimp bead close to the heishi beads (but not too tight, or the bracelet will be stiff). Use your crimping tool or flat nose pliers to flatten the crimp bead firmly, locking the wire in place. -
Trim excess wire:
Snip off the short tail of excess wire close to the crimp bead. If possible, tuck the very tip of the wire into the first adjacent heishi bead for a seamless finish. -
Prepare the second end:
Repeat the process on the other side: thread on a crimp bead, followed by the jump ring attached to your extension chain. -
Thread back and adjust:
Pass the wire back through the crimp bead. Before crimping, pull the wire to remove slack from the bracelet, ensuring the beads sit flush against one another but still have movement. -
Final crimp:
Flatten the second crimp bead securely. Trim the remaining wire tail closely and neatly. -
Check connections:
Give both ends a gentle tug to ensure the crimps are holding tight and the jump rings are fully closed.
Now you have a delightful, berry-sweet accessory ready to wear for your next picnic or sunny day out
Tiny Hearts in the Pattern
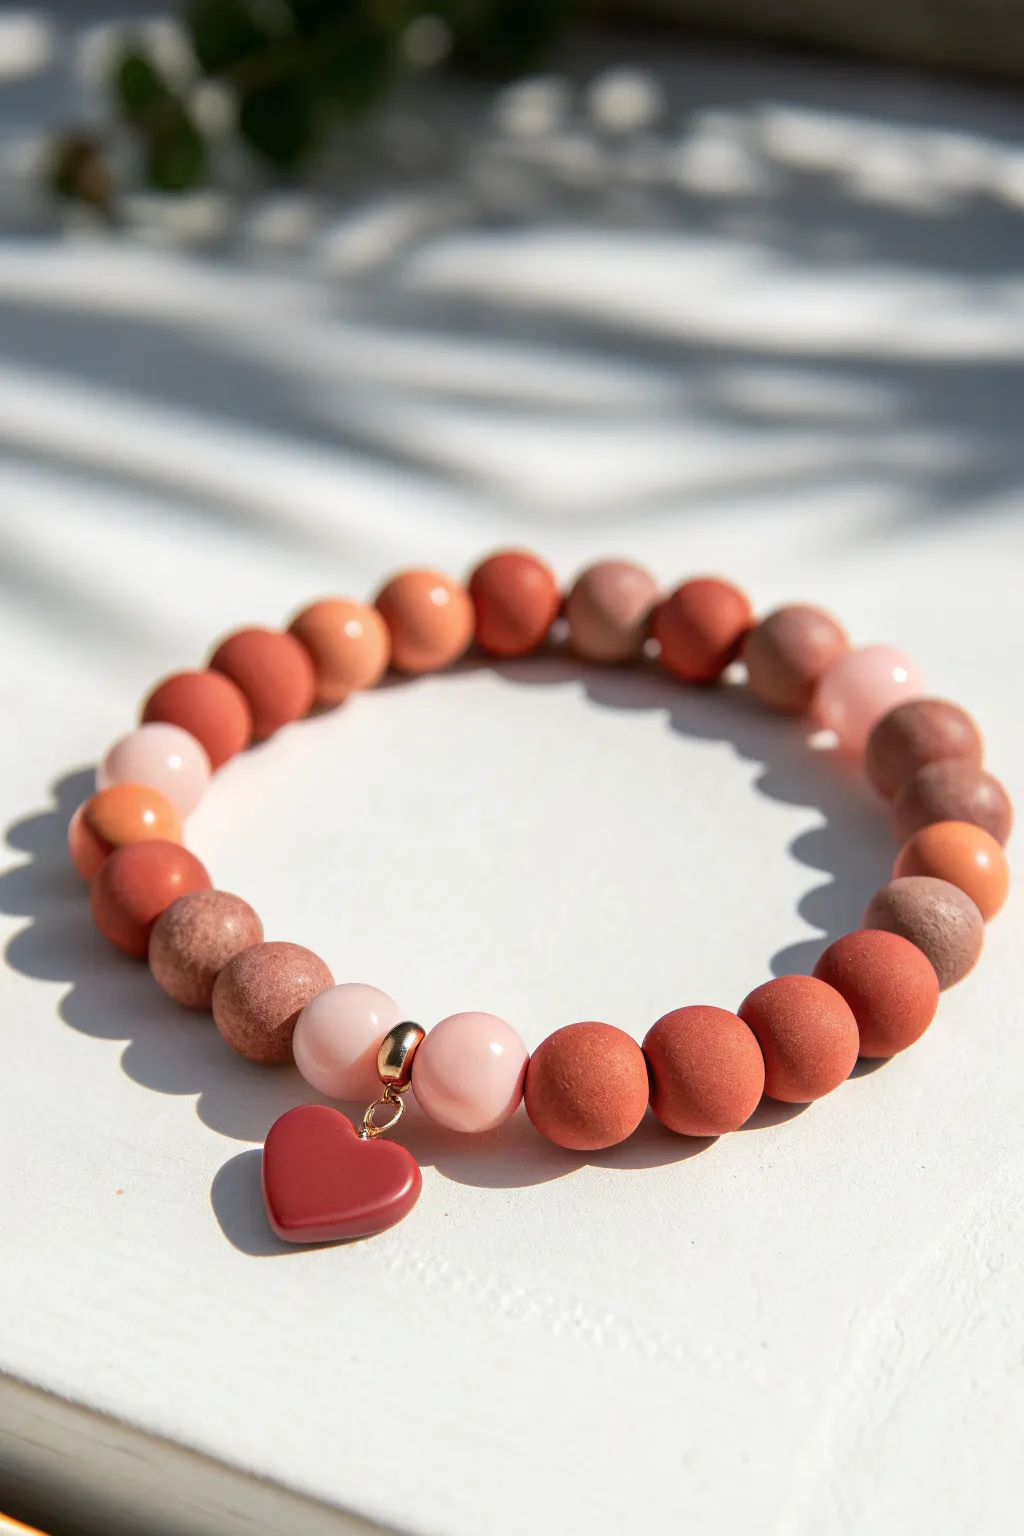
This charming bracelet features a warm, earthy gradient of handmade clay beads, ranging from deep russet to soft blush pink. The matte texture gives it a modern, organic feel, finished perfectly with a dangling heart charm for a touch of sweetness.
How-To Guide
Materials
- Polymer clay in warm earth tones: burnt orange, terracotta, beige, dusky pink, and brown
- Gold heart charm with a top loop
- Gold jump ring (4-6mm)
- Elastic cord (0.8mm clear stretch cord)
- Bead reamer or toothpick
- Jewelry glue (e.g., E6000 or GS Hypo Cement)
- Baking sheet and parchment paper
- Gold spacer beads (optional)
- Scissors
Step 1: Prepping and Shaping Beads
-
Mix Custom Colors:
To achieve the sophisticated gradient shown, don’t just use colors straight from the pack. Mix your burnt orange with a touch of brown for depth, and blend your pinks with a tiny bit of beige to mute them. You want about 5-6 distinct shades total. -
Portion evenly:
Pinch off small pieces of clay for each bead. Aim for a consistent size, roughly the volume of a large pea. Rolling a long snake of clay and slicing it into equal segments is the easiest way to ensure uniformity. -
Roll spheres:
Roll each segment between your palms to create perfectly round spheres. Don’t worry if they have a slight texture; the matte, handmade look is part of the charm. -
Create the holes:
Using a toothpick or a bead piercing tool, carefully poke a hole through the center of each sphere. Gently rotate the tool as you push through to prevent the bead from squishing into an oval shape. -
Smooth the edges:
Inspect the exit hole on each bead. If the clay pushed out creates a jagged edge, gently smooth it back down with your finger for a polished finish. -
Bake the beads:
Arrange your beads on a parchment-lined baking sheet. Bake according to your polymer clay package instructions—usually around 275°F (135°C) for 15-30 minutes. Let them cool completely before handling.
Pro Tip: Matte Finish
To get that ultra-matte, stone-like texture seen in the photo, lightly buff the baked beads with fine-grit sandpaper or a denim cloth before stringing them up.
Step 2: Assembly
-
Plan your pattern:
Before stringing, lay your cooled beads out on a flat surface. Arrange them in color blocks or a random gradient like the photo, mixing the dark terracotta tones with the lighter blush pinks. -
Attach the charm:
Open your gold jump ring using two pairs of pliers (or your fingers if the wire is soft). Slide on the red heart charm and then close the ring securely. We will thread this onto the bracelet as a focal point. -
Thread the beads:
Cut a piece of elastic cord about 10 inches long. Begin threading your beads onto the cord. I like to secure one end with a piece of tape to stop beads from sliding off while I work. -
Add the focal point:
Once you have threaded about half of your beads, it’s time to add the charm. Slide the jump ring onto the cord so the heart dangles freely. -
Optional gold accent:
If you are using the gold spacer bead shown in the image (the small gold bead right next to the heart charm), thread it on immediately after the charm to anchor the centerpiece. -
Finish the strand:
Continue threading the rest of your clay beads until the bracelet reaches your desired length (standard adult size is usually around 7 inches).
Level Up: Scent Diffuser
Use unglazed terracotta clay instead of polymer. The porous beads can then absorb essential oils, turning your accessory into a wearable aromatherapy differ.
Step 3: Finishing Touches
-
Pre-stretch the cord:
Give the ends of the elastic cord a few gentle tugs. This pre-stretching step is crucial as it prevents the bracelet from loosening up the first time you wear it. -
Tie the knot:
Tie a secure surgeon’s knot. This is done by crossing the ends, looping one underneath twice, pulling tight, and then repeating with a standard overhand knot on top. -
Secure with glue:
Place a tiny dot of jewelry glue right on the knot. Let it dry for a few minutes to ensure it won’t unravel. -
Hide the knot:
Trim the excess cord ends close to the knot. If the hole of one bead is large enough, gently tug the elastic so the knot slides inside a bead, hiding it from view.
Now you have a stunning, earthy accessory that looks boutique-bought but was made with your own two hands
Half-and-Half Bestie Set
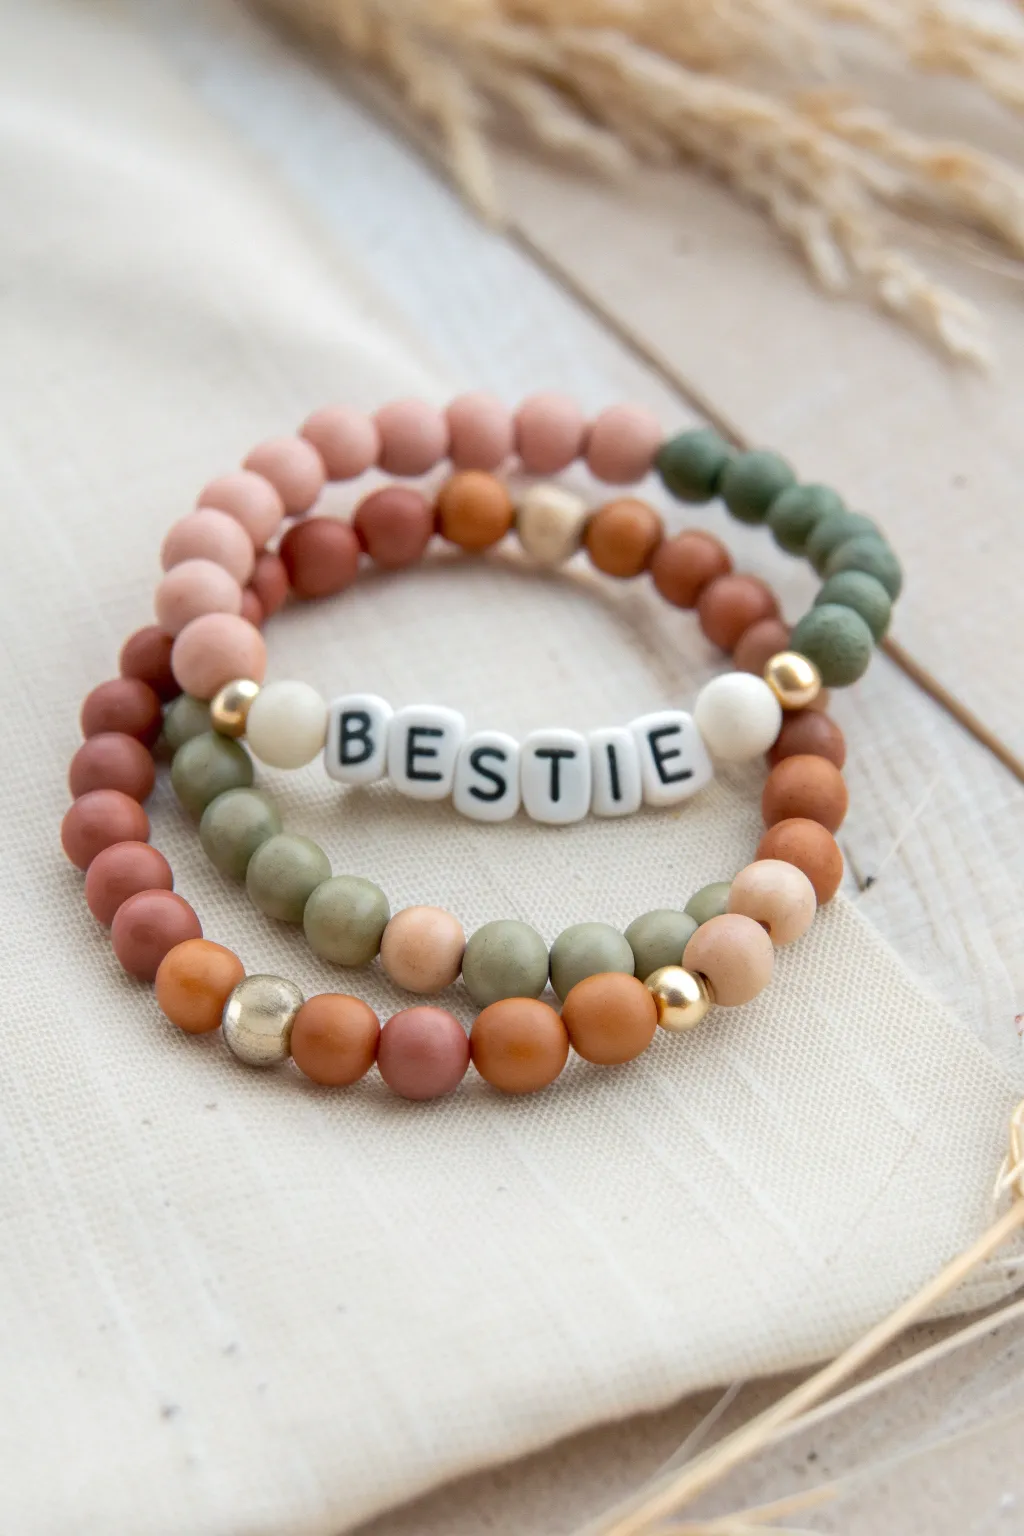
Celebrate friendship with this sophisticated stack of clay bead bracelets, featuring a muted palette of olive, terracotta, and dusty rose. The centerpiece is a personalized ‘BESTIE’ strand, flanked by two complementary designs using gold accents for a touch of shine.
Detailed Instructions
Materials
- Matte round polymer clay beads (6mm or 8mm) in dusty rose, terracotta, olive green, and cream
- Square white letter beads with black text spelling ‘BESTIE’
- Gold spherical spacer beads (metal or hematite, approx 4-6mm)
- Strong elastic cord (0.8mm recommended)
- Scissors
- Bead stopper or masking tape
- Jewelry glue or clear nail polish (optional)
Step 1: Preparation
-
Measure your wrist:
Before you start stringing, wrap a piece of string or the elastic itself loosely around your wrist to determine the comfortable length. Add about an inch to this measurement for the knotting process. -
Sort your palette:
Lay out your clay beads on a tray or fabric mat. Group them by color: dusty rose, terracotta/rust, olive green, and cream accents. This helps visualize the color blocking before stringing. -
Cut the cord:
Cut three lengths of elastic cord, each about 10-12 inches long. This generous length ensures you won’t struggle while tying the final knots. -
Secure the ends:
Attach a bead stopper or simply place a piece of masking tape on one end of each cord to prevent your beads from sliding off as you work.
Knot Security
Hide your knot inside a large-hole bead or the letter bead! If the hole is too small, just ensure the knot is neat and dab it with clear nail polish.
Step 2: Bracelet 1: The Mixed Color Block
-
Start the pattern:
Begin stringing your first bracelet. Start with about 8-10 beads of the dusty rose color to create the first block. -
Transition colors:
Switch to the dark olive green beads. Add a section of about 10-12 beads. These matte clay beads often have slight size variations, which adds organic charm. -
Add a gold accent:
Slide on one gold spherical spacer bead. This acts as a focal point and breaks up the matte texture of the clay. -
Finish the loop:
Complete the strand with a section of terracotta beads and a final small section of tan or dusty rose until you reach your desired wrist size.
Step 3: Bracelet 2: The Bestie Text
-
Center the message:
For the middle bracelet, finding the center is key. Thread your ‘B-E-S-T-I-E’ letter beads onto the cord first. -
Frame the word:
Place one cream-colored clay bead immediately on either side of the word ‘BESTIE’ to make the white letter blocks feel integrated. -
Add gold details:
Add a small gold spacer bead next to each of the cream beads. This brackets your text nicely. -
Fill the sides:
Fill the rest of the cord using a half-and-half pattern. Use terracotta beads for one side of the strap and olive green or dusty rose for the other side to create a split design.
Uneven Strands?
If one bracelet feels tighter than the others despite using the same bead count, check bead thickness. Clay beads vary; measure length by inch, not count.
Step 4: Bracelet 3: The Earthy Solid
-
Create variation:
For the bottom bracelet in the stack, aim for a more random or segmented look. Thread a long section of rust-colored beads. -
Incorporate contrast:
Follow the rust section with a shorter segment of olive green beads. -
Insert metallic focal:
Add a larger gold bead if you have one, or two standard gold spacers, followed by a lighter tan bead to mirror the other bracelets. -
Complete the strand:
Finish with dusty rose beads until it matches the length of your other two creations.
Step 5: Finishing Up
-
Pre-stretch the cord:
Before tying, give each bracelet a gentle tug to pre-stretch the elastic. I find this helps prevent the bracelet from sagging later on. -
Tie the knot:
Remove the tape or stopper. Tie a stuty surgeon’s knot (loop the elastic through twice on the first pass) for extra security. -
Secure and hide:
Apply a tiny dot of jewelry glue to the knot. Once dry, trim the excess cord and gently tuck the knot inside the hole of a neighboring bead if possible.
Wear your new earthy stack together or share the matching set with your best friend for a stylish connection
Beachy Blue-and-Sand Palette
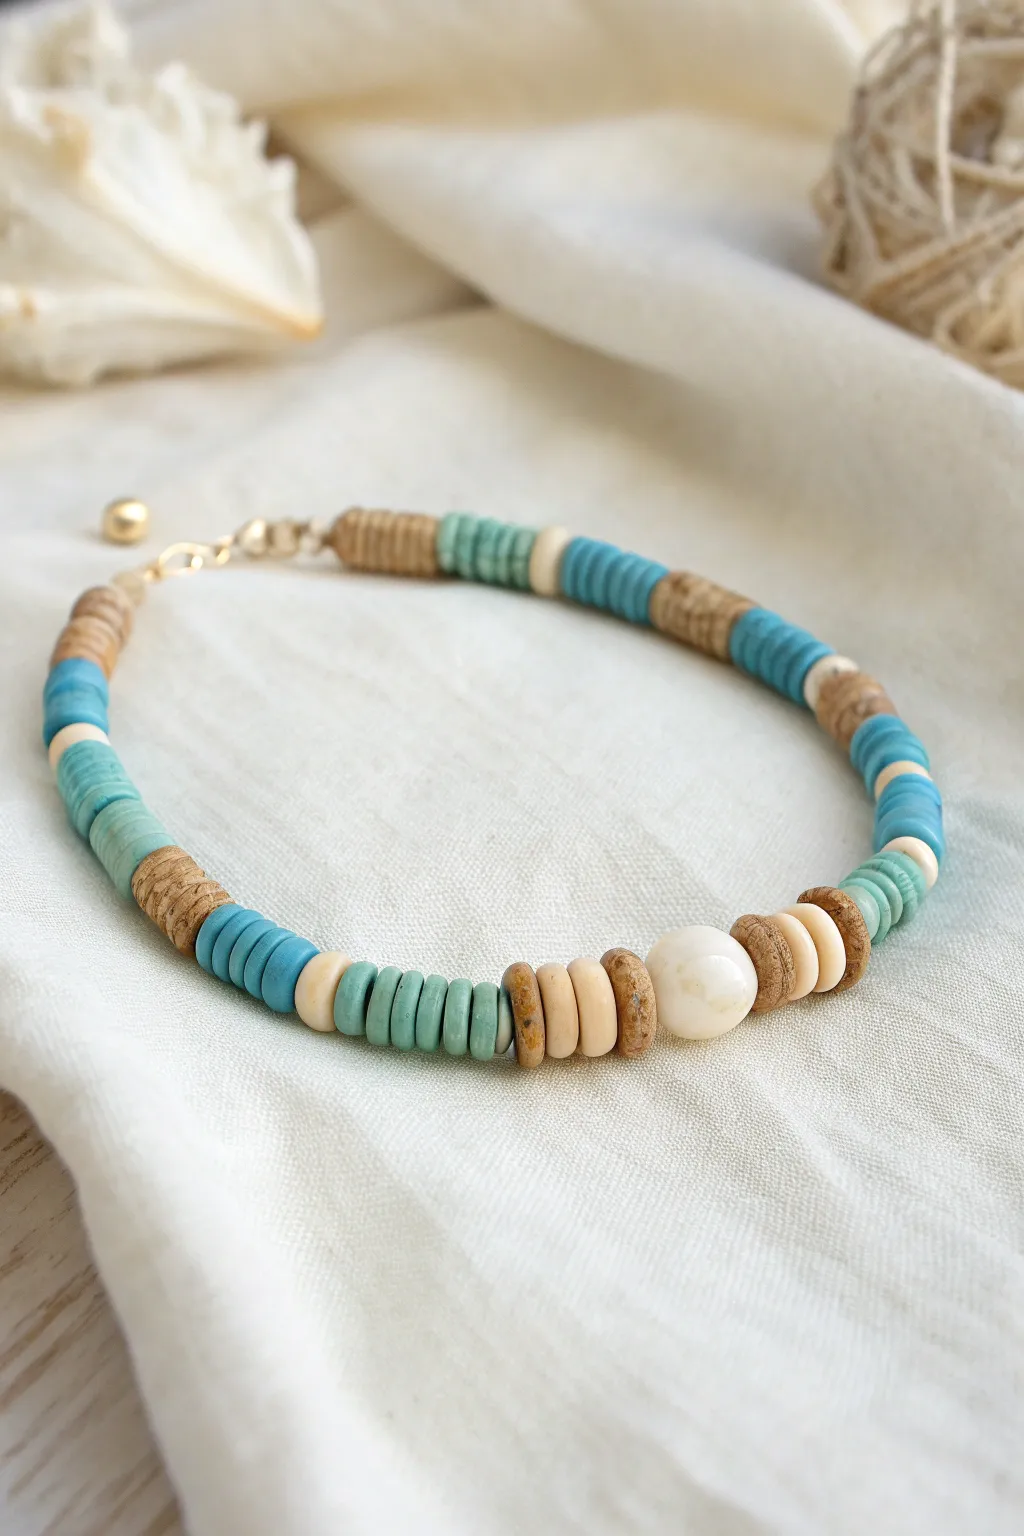
Capture the essence of a tranquil day at the shore with this beach-inspired bracelet featuring a mix of textures and earthy tones. The combination of matte turquoise, sand-colored heishi discs, and a central focal bead creates a relaxed accessory perfect for summer styling.
Step-by-Step
Materials
- Polymer clay heishi beads (6mm or 4mm) in turquoise/teal
- Polymer clay heishi beads in tan/brown (cork texture look)
- Polymer clay heishi beads in cream/off-white
- One large white round bead (stone, bone, or acrylic) approx 8-10mm
- Beading wire (flexible, 7-strand or 19-strand)
- 2 Crimp beads
- 2 Wire guards (gold tone)
- 2 Crimp covers (gold tone)
- Gold tone lobster clasp
- Gold tone jump ring or extension chain
- Flat nose pliers
- Crimping tool
- Wire cutters
Step 1: Preparation & Central Motif
-
Measure the wire:
Cut a piece of beading wire approximately 10 inches long. This gives you plenty of extra room to work with the clasp ends without struggling. -
Secure the first end:
Thread a crimp bead onto one end of the wire, followed by a wire guard. Loop the wire through the guard and back down into the crimp bead. -
Attach the clasp:
Before crimping, slide your lobster clasp into the loop created by the wire guard unless you are using a jump ring later. Use your crimping pliers to flatten the crimp bead securely, then trim the short excess wire tale. -
Start the pattern:
Begin stringing from the clasp end. Thread on about 1 inch of the brown/tan heishi beads to start the sequence. -
Add first color block:
Switch to your turquoise beads. Add roughly 0.5 to 0.75 inches of these blue tones. -
Create a transition:
Add a small spacer section: one cream bead, followed by a small stack (about 3-4 beads) of the brown/tan color. -
Second blue section:
Add another block of turquoise beads, slightly shorter than the first one if you want a varied, organic look, or keep it consistent. -
Approach the center:
Thread on a small section of brown beads, then three cream beads, then a tiny stack of turquoise (about 4-5 beads). -
Build the focal point:
Now, create the frame for the center bead. Slide on three cream beads, followed by three brown beads.
Loose loops?
If your wire guards feel loose, gently pinch the parallel sides together with pliers before stringing the wire. This narrows the channel for a snugger fit.
Step 2: Finishing the Pattern Design
-
Add the center bead:
Slide on your large white round focal bead. This acts as the pearl in your oyster. -
Mirror the frame:
Immediately following the round bead, mirror the previous step: three brown beads, followed by three cream beads. -
Continue the symmetry:
Recreate the pattern in reverse order from the first half. Add your small stack of 4-5 turquoise beads. -
Add spacing elements:
Slide on three cream beads, followed by a small section of brown beads. -
Completing the blue blocks:
Add your main sections of turquoise beads, separated by the small brown/cream spacer combo you used on the first side. -
Final length check:
Finish with a final 1-inch section of brown beads. Wrap the strand around your wrist to check the fit; add or remove a few brown beads at the end to adjust the size perfectly. -
Close the loop:
Thread on a crimp bead and your second wire guard. Loop the wire back through the crimp bead. -
Attach the receiver:
Attach a jump ring or extension chain to the loop you just made. Pull the wire tight so there are no gaps in the beads, but not so tight the bracelet stays stiff. -
Final crimp:
Flatten the crimp bead with your pliers. For a polished look, place gold crimp covers over both flattened crimps and gently squeeze them into round beads.
Textural shift
Replace the tan clay beads with actual thin cork washers or wooden coconut shell spacers to amplify the natural, organic beach feel.
Wear your new bracelet solo or stack it with gold chains for a sophisticated summer vibe
Soft Cottage Garden Mix

Capture the gentle romance of an English garden with this soft, matte-finish clay bracelet. Featuring a sweet daisy focal point surrounded by sage greens and dusty vintage pinks, it’s the perfect accessory for a relaxed cottagecore aesthetic.
Step-by-Step Tutorial
Materials
- Polymer clay (Sage Green, Dusty Rose/Terracotta Pink, Off-White, Yellow)
- Gold seed beads or small spacer beads
- Gold crimp beads and covers
- Gold jump rings
- Gold lobster clasp
- Gold extender chain
- Beading wire (flexible, tiger tail or similar)
- Clay roller or pasta machine
- Round cutters (small circles for beads)
- Needle tool or toothpick
- Jewelry pliers (flat nose and round nose)
- Wire cutters
- Oven for baking clay
Step 1: Sculpting the Clay Beads
-
Condition the Green Clay:
Begin by conditioning your sage green polymer clay until it is soft and pliable. Roll small, uniform spheres between your palms to create approximately 6-8mm round beads. Keep their surface matte and smooth. -
Create the Pink Discs:
Roll out the dusty rose clay into a thick sheet (about 3-4mm). Use a small circle cutter to punch out discs, then gently soften the sharp edges with your fingers so they look organic and pillowy. -
Form the Cream Accents:
Repeat the process with the off-white clay, creating both small round spheres and thick discs to match the pink ones. These will act as bright spacers to break up the color pattern. -
Sculpt the Daisy Charm:
For the focal piece, flatten a small ball of white clay into a thick disc. Use a needle tool to press deep indentations around the edge to define petals. Texture a tiny ball of yellow clay with a needle tip and press it into the center. -
Adding Holes:
Carefully pierce the center of every bead using your needle tool. For the daisy, pierce it laterally through the center so it lies flat on the wrist. I find twisting the needle while pushing helps avoid squashing the shape. -
Bake the Components:
Arrange all your clay pieces on a tile or baking sheet. Bake according to your brand’s specific temperature instructions (usually around 275°F/130°C) for 15-20 minutes, then let them cool completely.
Step 2: Stringing the Design
-
Prepare the Wire:
Cut a length of beading wire about 10 inches long. This gives you plenty of extra room to work with the clasp without things getting tight. -
Secure the First End:
Thread a crimp bead onto one end of the wire, followed by a jump ring attached to your lobster clasp. Loop the wire back through the crimp bead and use flat-nose pliers to squash it firmly. Cover with a crimp cover for a polished look. -
Start the Pattern:
Begin stringing your beads. Start with a pattern like: one green round bead, one gold spacer, one cream round bead, three pink discs. -
Vary the Texture:
Continue adding beads, but don’t feel pressured to keep the pattern rigid. Mix in sections where pink and cream discs alternate to create a striped effect, breaking it up with solid green spheres. -
Position the Daisy:
Once you have beaded approximately halfway down the length of the bracelet, slide on your white daisy charm. Ensure the yellow center is facing up. -
Complete the Pattern:
Finish the second half of the strand, mirroring the general feel of the first side—perhaps ending with a green bead and gold spacer to balance the start. -
Check the Fit:
Wrap the unfinished bracelet around your wrist to check the length. Add or remove a few disc beads near the ends if adjustment is needed.
Smooth Operator
To get rid of fingerprints on your raw clay beads, gently brush them with a tiny amount of cornstarch or baby powder before baking. It leaves a lovely matte texture.
Step 3: Final Assembly
-
Close the Strand:
Thread a crimp bead onto the open wire end, followed by the loop of your extender chain. Pass the wire back down through the crimp bead and the last couple of clay beads. -
Crimp and Trim:
Pull the wire snug (but not too tight, or it won’t drape well) and flatten the crimp bead with pliers. Trim the excess wire tail close to the beads. -
Add Crimp Cover:
Place a gold crimp cover over the flattened crimp bead and gently close it with pliers so it looks like a round gold bead.
Texture Twist
Before baking, lightly roll your round green beads over a piece of sandpaper or a textured sponge to give them a stone-like, speckled surface effect.
Now you have a charming, handmade accessory that brings a touch of softness to any outfit
Mini Checkerboard Color Blocks
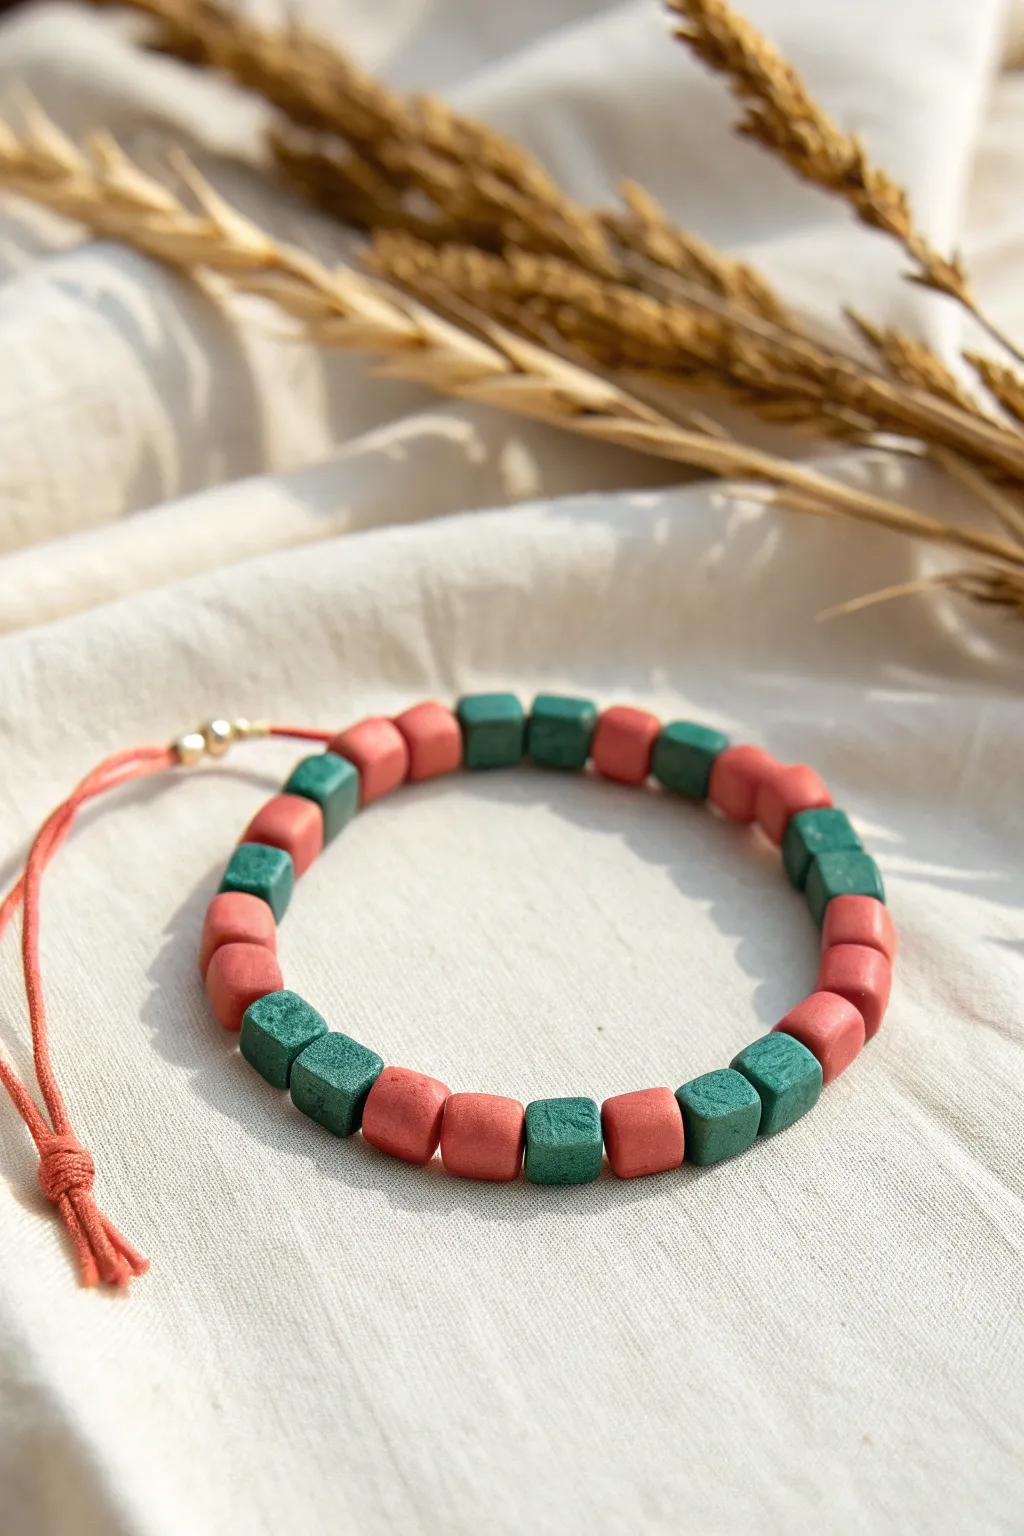
Embrace earthy tones and geometric simplicity with this charming cube bead bracelet. The soft matte finish of these hand-rolled clay beads gives the piece an organic feel, while the alternating teal and coral block pattern creates a modern, playful look perfect for stacking.
Detailed Instructions
Materials
- Polymer clay (Teal or Emerald Green)
- Polymer clay (Terracotta or Coral)
- Thin waxed cord or suede cord (light coral or matching terracotta)
- Clay roller or pasta machine
- Tissue blade or craft knife
- Toothpick or bead piercing pin
- Small square cutter (optional, for uniform size)
- Baking sheet and parchment paper
- 2 small gold crimp beads or knot covers (optional)
- Fine-grit sandpaper (400-600 grit)
Step 1: Creating the Clay Cubes
-
Condition the clay:
Start by warming up your teal and terracotta polymer clay in your hands. Knead each color separately until it is soft, pliable, and free of any air bubbles. -
Form logs:
Roll each color into a long, smooth log or snake on your work surface. Try to keep the diameter consistent, roughly 1/4 inch thick, depending on how chunky you want your final beads. -
Shape into squares:
Gently pinch the sides of the round log to transform it into a square long rectangular prism. Tap the log against your table on all four sides to flatten them and sharpen the corners. -
Slice the cubes:
Use your tissue blade or craft knife to slice the square logs into individual cubes. Aim for even slices so your beads match in size. -
Refine the shape:
Pick up each cube and gently tap the cut sides to square them up again, as slicing can sometimes squish the clay slightly. -
Softening edges:
With your fingertips, very lightly smooth the sharp corners of each cube. You want them to look like tumbled stones rather than sharp mechanical dice. -
Make the holes:
Using a toothpick or piercing pin, carefully twist a hole through the center of each cube. Be gentle to avoid distorting the square shape. -
Double-check holes:
It helps to pierce slightly from one side, stop, flip the bead, and pierce from the other side to ensure a clean exit hole.
Hole Distortion?
If piercing the clay squishes your cube, let the clay rest for 20 minutes to firm up (leach out plasticizer on paper) or refrigerate the cubes briefly before making holes.
Step 2: Baking and Finishing
-
Bake the beads:
Arrange your beads on a baking sheet lined with parchment paper. Follow the temperature and time instructions on your specific package of polymer clay. -
Cool down:
Allow the beads to cool completely on the tray before handling them. They harden fully as they cool. -
Matte finish:
Once cool, lightly sand the surface of the beads with fine-grit sandpaper if needed to remove fingerprints and achieve that stone-like matte texture shown in the image. -
Clean up:
Wipe the beads with a slightly damp cloth or a baby wipe to remove any sanding dust.
Step 3: Assembly
-
Cut the cord:
Cut a length of your waxed or suede cord, measuring about 10-12 inches to allow plenty of room for knotting. -
Start the pattern:
String your beads. Following the photo, create an irregular checkerboard pattern. Try grouping two coral beads, then one teal, then one coral, then one teal. The irregularity adds charm. -
Check the fit:
Wrap the strung beads around your wrist to verify the length. Add or remove beads until the beaded section covers the top and sides of your wrist comfortably. -
Secure the ends:
Push the beads to the center of the cord. Tie a simple overhand knot tightly against the last bead on both sides to keep them in place. -
Add gold accents:
Thread a small gold crimp bead or spacer onto one tail end for a little metallic sparkle near the closure. -
Create the closure:
Finish with a sliding knot closure. Cross your cord ends and tie a square knot or macrame slide knot so the bracelet is adjustable. -
Final knots:
Tie a small knot at the very end of each cord tail to prevent them from slipping through the closure, and trim any excess length.
Texture Swap
Before baking, roll your uncured cubes over a piece of coarse sandpaper or a stone texture mat to give them a pitted, realistic rock surface.
Wear your new bracelet alone for a pop of color or stack it with gold bangles for a sophisticated boho effect
Sunset-to-Night Gradient
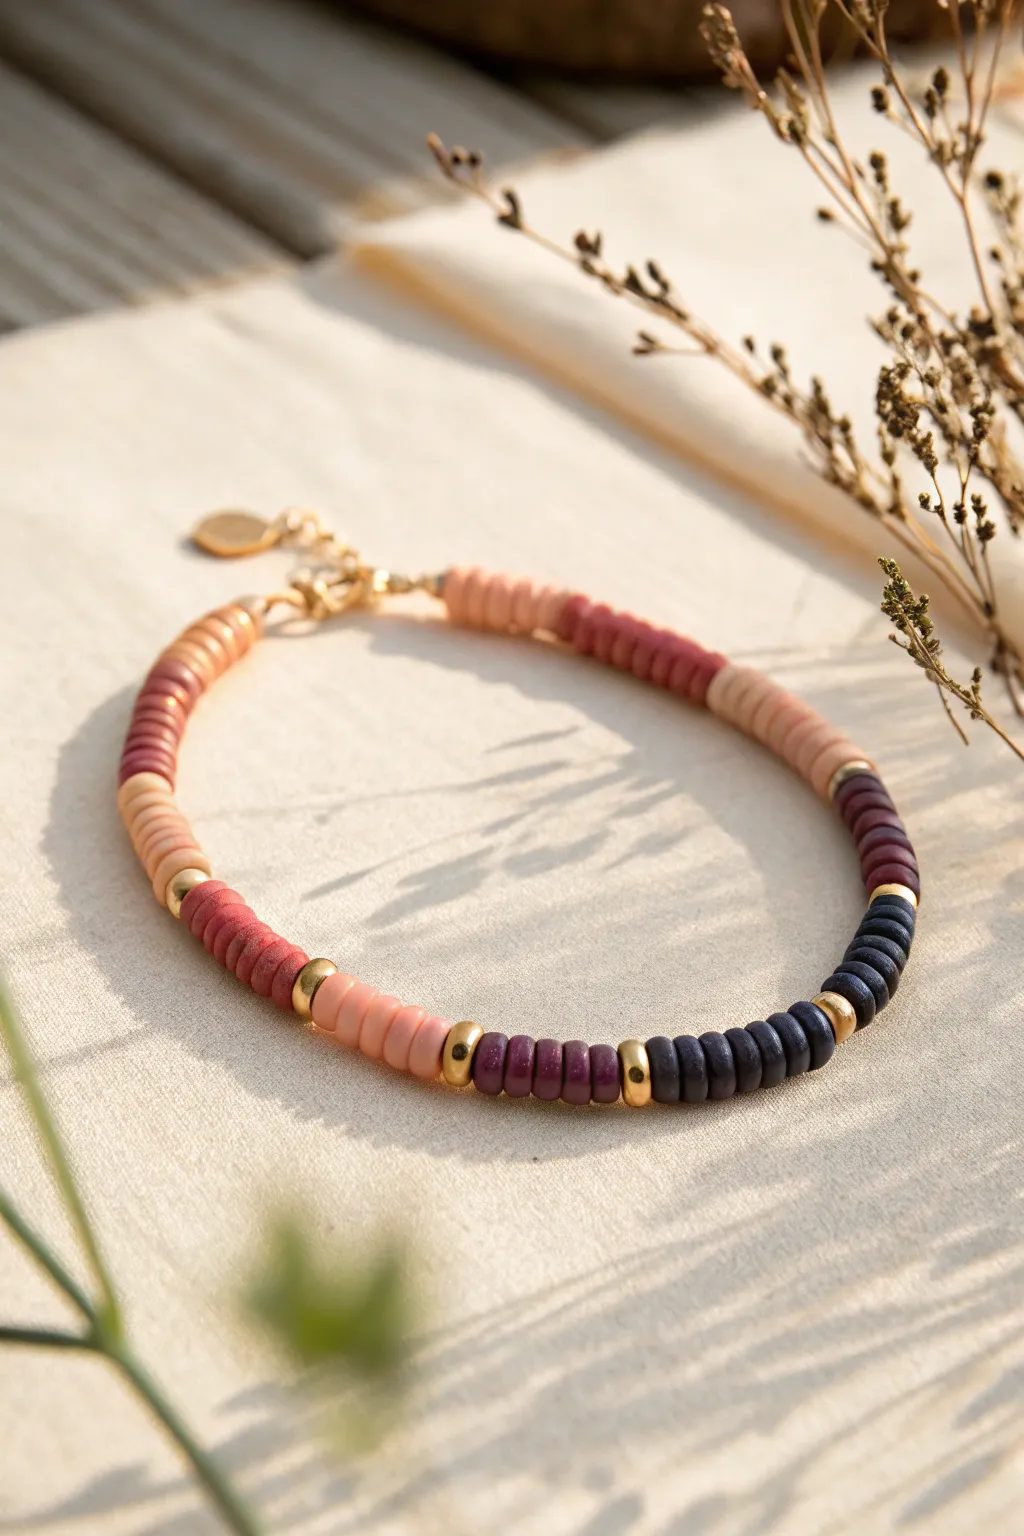
Capture the fleeting beauty of a sunset fading into night with this sophisticated clay bead bracelet. The design features a stunning gradient that transitions from soft blush and terracotta tones into deep plums and midnight blues, punctuated by elegant gold accents.
Step-by-Step
Materials
- Polymer clay heishi beads (6mm or 4mm disc beads) in the following colors: light blush pink, terracotta/dusty rose, deep mauve/plum, dark navy/midnight blue
- Gold tone spacer beads (rounded wheel or disc shape, slightly larger than the clay beads)
- Stretch cord (0.8mm clear elastic or styling appropriate for bead hole size)
- Gold tone crimp covers or knot covers (optional)
- Small gold tone jump rings (4mm)
- Gold tone lobster clasp
- Gold tone extension chain with tag (optional)
- Scissors or precision jewelry cutters
- Jewelry pliers (flat nose)
- Bead stopper or tape
- Beading needle (optional, for easier threading)
Step 1: Preparation & Planning
-
Measure and Cut:
Cut a piece of stretch cord about 10-12 inches long. This generous length gives you plenty of room to work and tie knots without struggling to hold onto tiny ends. -
Secure the End:
Place a bead stopper on one end of your cord to prevent beads from sliding off. If you don’t have a stopper, a piece of masking tape folded over the end works perfectly. -
Sort Your Palette:
Arrange your heishi beads in color groups on your workspace. I find it helpful to lay them out in the gradient order: Blush Pink -> Terracotta -> Plum -> Midnight Blue -> Plum -> Terracotta -> Blush Pink. This visualizes the ‘sunset’ transition.
Step 2: Beading the Gradient
-
Start with Dark Tones:
Begin by threading about 10-12 dark midnight blue beads onto the cord. This dark section will act as the ‘night sky’ anchor of your pattern. -
Add a Gold Accent:
Slide on one gold spacer bead. These metallic breaks add a touch of luxury and clearly define the color sections. -
Transition to Plum:
Thread on approximately 8-10 deep plum or mauve beads. The goal involves creating block sections of color rather than a mixed scramble. -
Second Gold Spacer:
Add another gold spacer bead after the plum section. -
Shift to Terracotta:
Add your next color block: about 8-10 terracotta or dusty rose beads. Notice how the colors are lightening as you move around the loop. -
Another Gold Break:
Place a gold spacer bead to cap off the terracotta section. -
The Lightest Shade:
Thread on your lightest color, the blush pink beads. Use about 8-10 of these. -
Mirror the Pattern:
Now, reverse the gradient to complete the circle. After a gold spacer, add terracotta beads again. Follow with a gold spacer, then the plum beads. -
Check the Length:
Wrap the strand around your wrist to check the fit. If you need more length, add equal amounts of the midnight blue beads to the ends, keeping the gradient symmetrical in the center.
Smooth Transitions
To make the gradient even subtler, mix one or two beads of the next color into the end of the previous color block before switching completely.
Step 3: Finishing Touches
-
Prepare for Closure:
Since this design uses a clasp rather than just a knot, thread a crimp bead (or simply the cord loop if tying directly) through the jump ring attached to one side of your clasp assembly. -
Attaching the Clasp:
Thread one end of the cord through the small loop on the lobster clasp. Loop it back around and tie a sturdy surgical knot (right over left, left over right). -
Secure the Knot:
Pull the knot very tight. For extra security, I like to add a tiny dab of jewelry glue or clear nail polish to the knot and let it dry for a distinct moment before trimming. -
Hide the Ends:
If possible, tuck the tail end of the cord back through the first few beads adjacent to the knot before trimming the excess close. -
Attach the Extension Chain:
On the other side of the bracelet, repeat the tying process to attach the jump ring that holds your extension chain. This allows the bracelet to be adjustable for different wrist sizes. -
Final Adjustments:
Gently stretch the bracelet to ensure the beads sit flush against each other but aren’t bunching up, and that your knots are holding firm under tension.
Make it a Set
Create a matching stack by making solid-color bracelets for each shade in your gradient, wearing them alongside the main patterned piece.
Enjoy wearing this beautiful gradient piece that carries the colors of the evening sky on your wrist
Galaxy Speckle With Metallic Pops
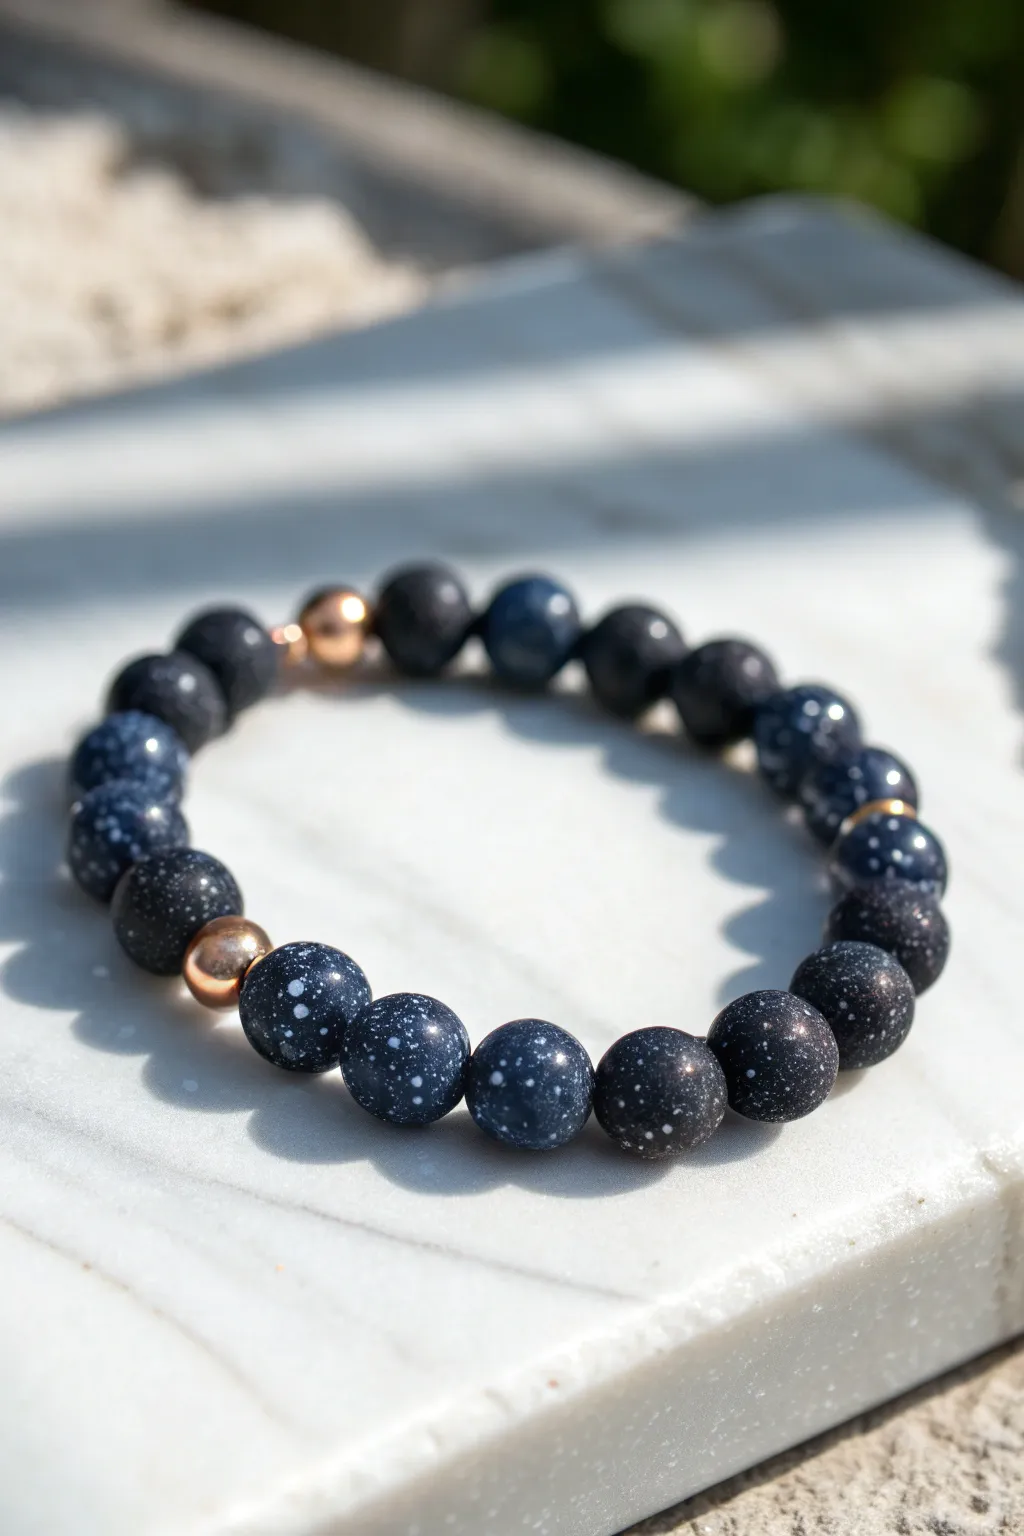
Capture the magic of a starry night on your wrist with this sophisticated polymer clay project. By mixing dark blues and blacks with flecks of white and adding metallic accents, you’ll create a custom accessory that looks far more expensive than it is.
How-To Guide
Materials
- Black polymer clay
- Dark blue polymer clay (navy or midnight blue)
- White acrylic paint
- Stiff bristle brush (like an old toothbrush)
- Rose gold or copper round metal spacer beads (approx. 6mm)
- Elastic beading cord (0.7mm or 0.8mm)
- Bead piercing tool or toothpick
- Glossy polymer clay glaze or resin (optional)
- Clay roller or pasta machine
- Bead rack or baking sheet with parchment paper
- Super glue or jewelry adhesive
- Sandpaper (fine grit)
Step 1: Preparing the Clay Base
-
Condition the clay:
Start by thoroughly conditioning your black and dark blue polymer clay separately until they are soft and pliable. Warm hands help speed this up. -
Create a custom mix:
Mix roughly 70% black clay with 30% dark blue clay. Knead them together until you have a deep, midnight blue color that is almost black but has depth. -
Form a log:
Roll your mixed clay into a long, even snake or log shape. Aim for a thickness of about 1/2 inch, depending on how large you want your beads. -
Cut equal segments:
Using a tissue blade or knife, slice the log into equal segments. Try to make them as uniform as possible so your beads will be the same size. -
Roll the beads:
Take each segment and roll it between your palms to form a smooth, perfect sphere. I find a light touch works best to avoid flattening them.
Clean Hands, Clean Clay
Keep a pack of baby wipes nearby. Dark clay transfers pigment to your hands easily, so wipe them frequently to avoid fingerprints.
Step 2: Creating the Galaxy Effect
-
Prepare the speckling station:
Place your rounded beads on a piece of paper or cardboard to protect your work surface from paint splatter. -
Load the brush:
Put a small amount of white acrylic paint on a palette. Dip the tips of your stiff bristle brush or toothbrush into the paint; you want the paint slightly watered down for better splatter. -
Flick the paint:
Hold the brush near the beads and run your thumb across the bristles to flick tiny specks of white paint onto the clay. Rotate the beads to cover all sides evenly. -
Pierce the holes:
Once the paint is dry to the touch, gently pierce a hole through the center of each bead using a bead piercing tool. Twist gently as you push through to avoid distorting the sphere. -
Bake carefully:
Arrange the beads on a baking sheet or bead rack. Bake according to your clay manufacturer’s instructions, usually around 275°F (135°C) for 30 minutes.
Step 3: Finishing and Assembly
-
Sand for smoothness:
After the beads have cooled completely, check for any rough spots around the holes. Lightly sand them with fine-grit sandpaper if needed. -
Glaze (Optional):
For a polished stone look, coat each bead with a thin layer of glossy glaze or resin. This protects the paint speckles and adds shine. -
Cut the cord:
Cut a piece of elastic cord about 10-12 inches long. Pre-stretch the elastic by pulling on it gently a few times; this prevents the bracelet from stretching out later. -
Plan your pattern:
Lay out your beads on a design board or towel. Decide where you want your metallic accent beads to sit—placing one solitary metal bead or spacing three evenly looks great. -
String the beads:
Thread the galaxy clay beads onto the elastic, interspersing the rose gold metallic beads according to your planned pattern. -
Check fit:
Wrap the strand around your wrist to check the size. Add or remove clay beads until it fits comfortably without gaps. -
Tie the knot:
Tie a strong surgeon’s knot (right over left, left over right). Pull it tight, securing the tension. -
Secure and hide:
Place a tiny drop of super glue on the knot. Once dry, trim the excess cord and gently tuck the knot inside the hole of one of the beads.
Help! My holes are squished.
If piercing distorts the bead shape, let the beads sit in the fridge for 15 minutes before piercing. The firmer clay holds its shape better.
Enjoy wearing your personal piece of the universe on your wrist
Stackable Trio With One Theme
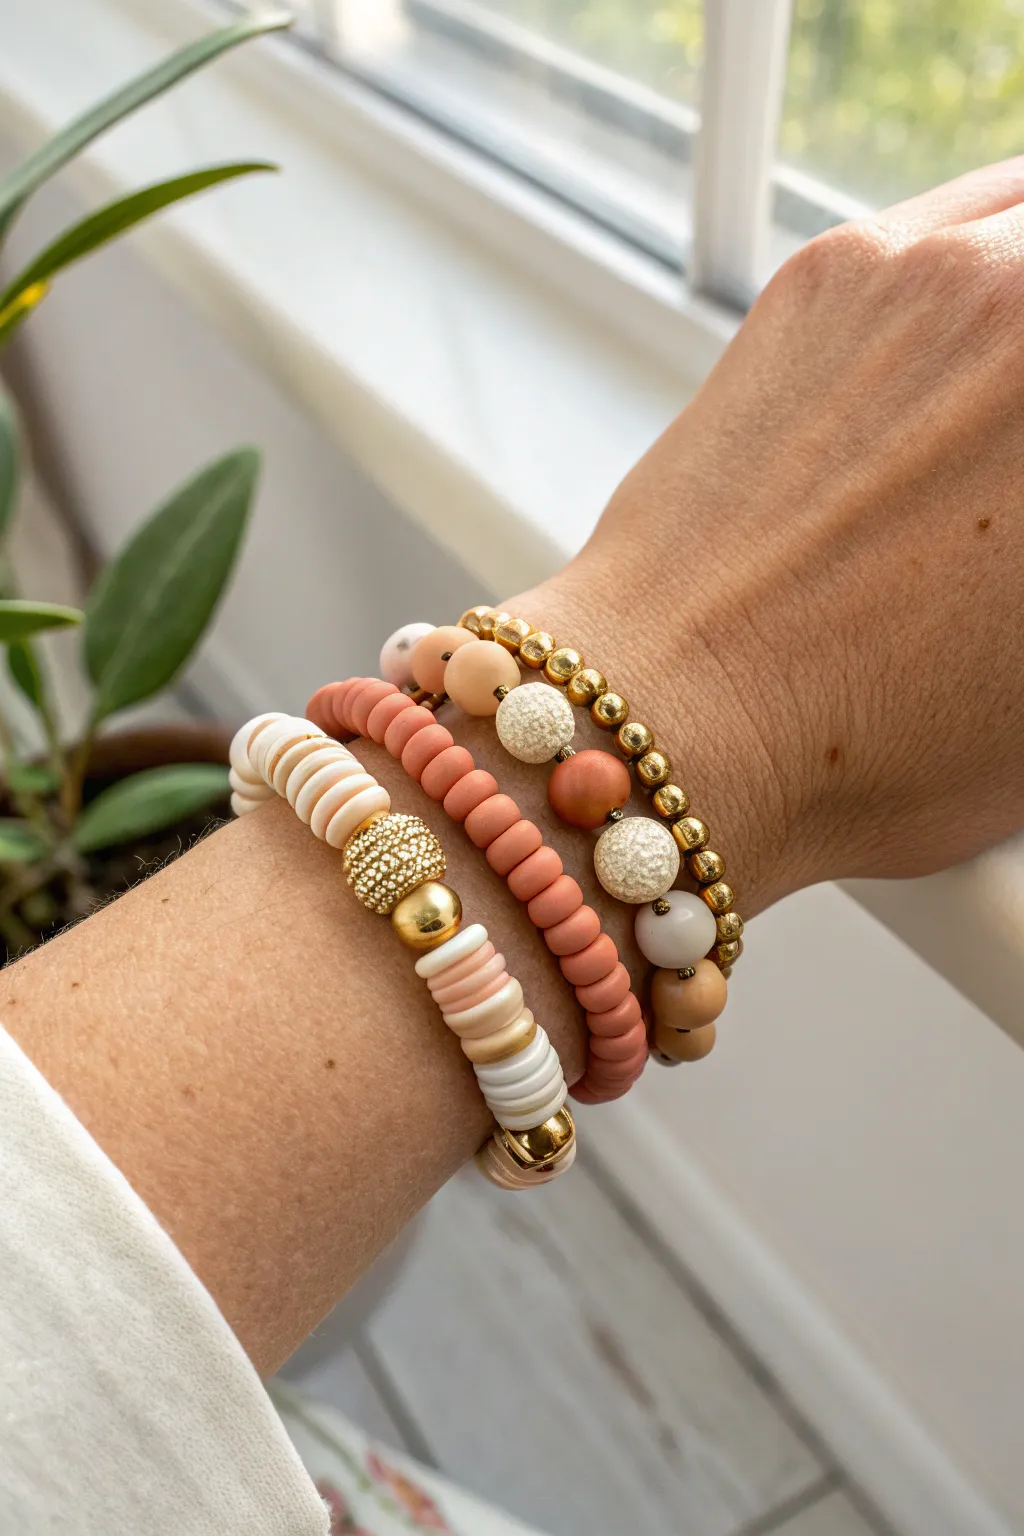
Embrace warm, earthy tones with this chic trio of bracelets that blends textures and shapes for a sophisticated boho look. This stack combines flat clay heishi beads, classic gold spheres, and varied focal beads in peach and cream hues for a perfectly coordinated set.
Detailed Instructions
Materials
- Elastic stretch cord (0.8mm or 1mm thickness)
- White/cream flat clay heishi beads
- Peach/blush flat clay heishi beads
- Small gold spacer beads (spherical, roughly 4mm)
- Medium gold sphere beads (roughly 6mm)
- Large gold focal bead (roughly 8mm)
- Gold rhinestone encrusted pave bead (roughly 8-10mm)
- Assorted round focal beads (matte peach, textured white/cream, reddish-brown/terracotta, beige)
- Beading needle (optional but helpful)
- Jewelry glue or clear nail polish
- Scissors
Step 1: Golden Accent Bracelet
-
Prepare your cord:
Cut a piece of elastic cord about 10-12 inches long. Give it a gentle pre-stretch to prevent your bracelet from sagging later. -
Start the pattern:
Begin threading small gold spacer beads onto the cord. String about 10-12 of these to create the base chain section. -
Add first focal beads:
Thread on a matte beige round bead followed by a textured white sparkle bead. These add visual breaks in the gold chain. -
Continue the metal base:
Add another short section of small gold spacer beads, perhaps 3-4, to separate the larger accent beads. -
Thread main accents:
Add a reddish-brown round bead, followed by another small gold spacer, and then a matte peach round bead. This creates the colorful centerpiece of this specific strand. -
Finish the loop:
Fill the rest of the length with the small gold spacer beads until the bracelet fits comfortably around your wrist (usually 6.5 to 7 inches total length). -
Secure the knot:
Tie a secure surgeon’s knot (right over left, left over right). Pull tight, apply a dab of jewelry glue to the knot, let it dry, and trim the excess cord.
Knot Slipping?
If your elastic knots slip, try a surgeon’s knot: loop the end through twice on the first pass before pulling tight. A dot of G-S Hypo Cement is essential for longevity.
Step 2: Terracotta Heishi Strand
-
Cut the second cord:
Prepare another 10-12 inch length of elastic cord and pre-stretch it just like the first one. -
String the beads:
This bracelet is the simplest of the trio. Thread exclusively peach or terracotta-colored flat clay heishi beads onto the cord. -
Check for consistency:
As you string, ensure the discs are sitting flat against each other. I find rotating the strand occasionally helps them settle uniformly. -
Measure and tie:
check the length against your first bracelet. Once it matches, tie off with a surgeon’s knot, glue, and trim.
Mix It Up
Swap the terracotta heishi beads for raw wood spacers or matte black lava stones to give the stack an essential oil diffuser function and a more organic, earthy vibe.
Step 3: Statement Focal Bracelet
-
Begin the final strand:
Cut your third length of elastic cord. This bracelet features the largest focal beads, so ensure your cord is sturdy. -
Create the white base:
String white or cream flat heishi beads for about one-third of the bracelet’s length. -
Start the focal pattern:
Add a large gold sphere bead, followed by a section of mixed peach and white heishi beads to create a color-blocked transition. -
Add the centerpiece:
Thread on the large gold rhinestone pave ball. This is the main sparkly attraction of the stack. -
Complete the symmetry:
Follow the pave bead with a large gold bead, then finish the rest of the strand with the white heishi beads until it meets your desired length. -
Final assembly:
Tie your final surgeon’s knot securely. Apply a tiny drop of glue, wait for it to dry completely, and snip the ends. Your trio is now ready to wear stacked together.
Enjoy mixing and matching these versatile pieces with your favorite outfits for an effortless touch of style
“Texture Sandwich” Spacer Mix
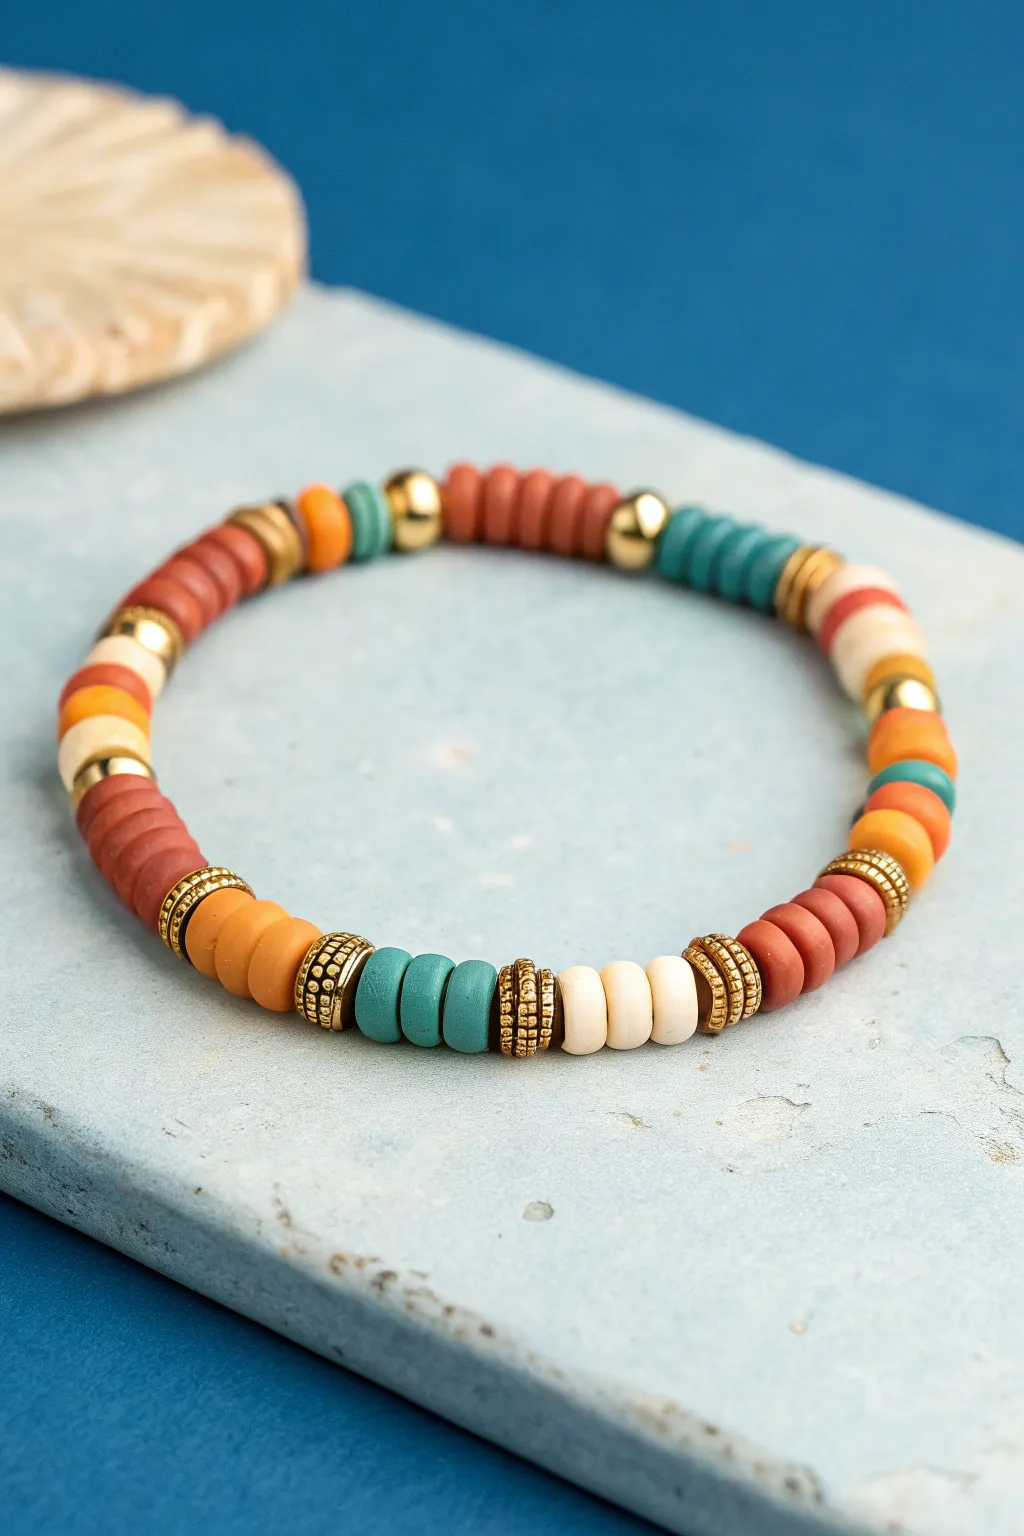
Embrace earthy tones and mixed textures with this stylish clay bead bracelet that elevates the classic heishi look. By sandwiching colorful polymer clay discs between intricate gold spacers, you create a piece that feels both handcrafted and high-end.
How-To Guide
Materials
- Polymer clay heishi beads (6mm or 4mm) in: Terra Cotta (Rust Red), Turquoise/Teal, Cream/Off-White, and Mustard Yellow
- Gold tone textured barrel spacer beads (approx. 4-5mm width)
- Gold tone smooth round spacer beads (3-4mm)
- Elastic beading cord (0.8mm or 1mm thickness, transparent)
- Beading needle (optional but helpful)
- Scissors
- Hypo-cement or strong jewelry glue
- Bead layout board or a simple felt mat
Step 1: Preparation & Planning
-
Measure and Cut:
Cut a piece of elastic cord about 10-12 inches long. This generous length gives you plenty of room to tie knots without struggling to hold onto tiny ends. -
Pre-stretch the Cord:
Hold the ends of your elastic and give it a few firm tugs. Pre-stretching prevents the finished bracelet from sagging or loosening up after you wear it a few times. -
Secure the End:
Attach a bead stopper or simply place a piece of tape on one end of the cord so your beads don’t slide right off while you work.
Spacer Selection
Look for ‘Daisy spacers’ or ‘Tibetan style’ spacers. These have the distinct ridges and bumps that give the texture sandwich look its unique character.
Step 2: Creating the Pattern
-
Start with Structure:
Begin your pattern with one of the textured gold barrel spacers. This thicker metallic element acts as a visual ‘bookend’ for the color sections. -
Build the Teal Section:
Thread on three Turquoise/Teal heishi beads. Ensure they sit flush against the barrel spacer. -
Add Texture Sandwich:
Add a second textured barrel spacer immediately after the teal beads. You now have a small block of color sandwiched between two gold texture beads. -
Transition to Cream:
For the next section, slide on three Cream/Off-White heishi beads. -
Introduce the Next Gold Element:
Add another textured barrel spacer. This establishes the recurring rhythm of gold-color-gold-color. -
Add Rust Red:
Thread on four Terra Cotta (Rust Red) beads. I like to vary the count slightly here, using four instead of three, to make the red section visually stronger. -
Switch to Round Spacers:
Instead of a barrel spacer, add a ribbed or textured thin disc spacer, followed immediately by three Mustard Yellow beads. -
Create a Focal Break:
Add a smooth gold round bead. Follow this with a long run of about 8-10 Terra Cotta beads to create a solid block of color on the opposite side of the bracelet. -
Mix Up the Pattern:
At the end of the long red block, add a smooth gold round bead, followed by three Teal beads, then another smooth gold round bead. -
Continue the Flow:
Repeat the pattern of short color blocks (3-4 beads) separated by your various gold spacers until the bracelet reaches your desired length (usually 6.5 to 7 inches for an average wrist). -
Check the Fit:
Wrap the unfinished strand around your wrist to check the size. Remember the knot will take up a tiny bit of space, so don’t make it too tight.
Step 3: Finishing Touches
-
Prepare to Tie:
Remove the tape or bead stopper carefully. Bring the two ends of the elastic together. -
The Surgeon’s Knot:
Tie a surgeon’s knot: cross right over left and loop it under, then left over right and loop it under twice. Pull all four strands (the two tails and the two loop sides) tight to secure. -
Secure with Glue:
Dab a tiny drop of hypo-cement or super glue directly onto the knot. Let it dry for a few minutes before trimming the tails perfectly flush. -
Hide the Evidence:
If possible, gently tug the knot inside one of the larger-holed gold barrel spacers to hide it completely for a professional finish.
Natural Variations
Swap the solid cream beads for natural coconut shell or wood discs. This adds an organic texture that pairs beautifully with the gold spacers.
Slip on your new bracelet stack or gift it to a friend who loves bohemian style