If you love making cute clay bead keychains, you’re about to have way too much fun mixing color, texture, and those satisfying little stacks of beads. These ideas are the kind you can personalize fast with polymer clay heishi beads and letter beads, then clip onto keys, bags, or zippers like a tiny dose of joy.
Pastel Rainbow Name Stack
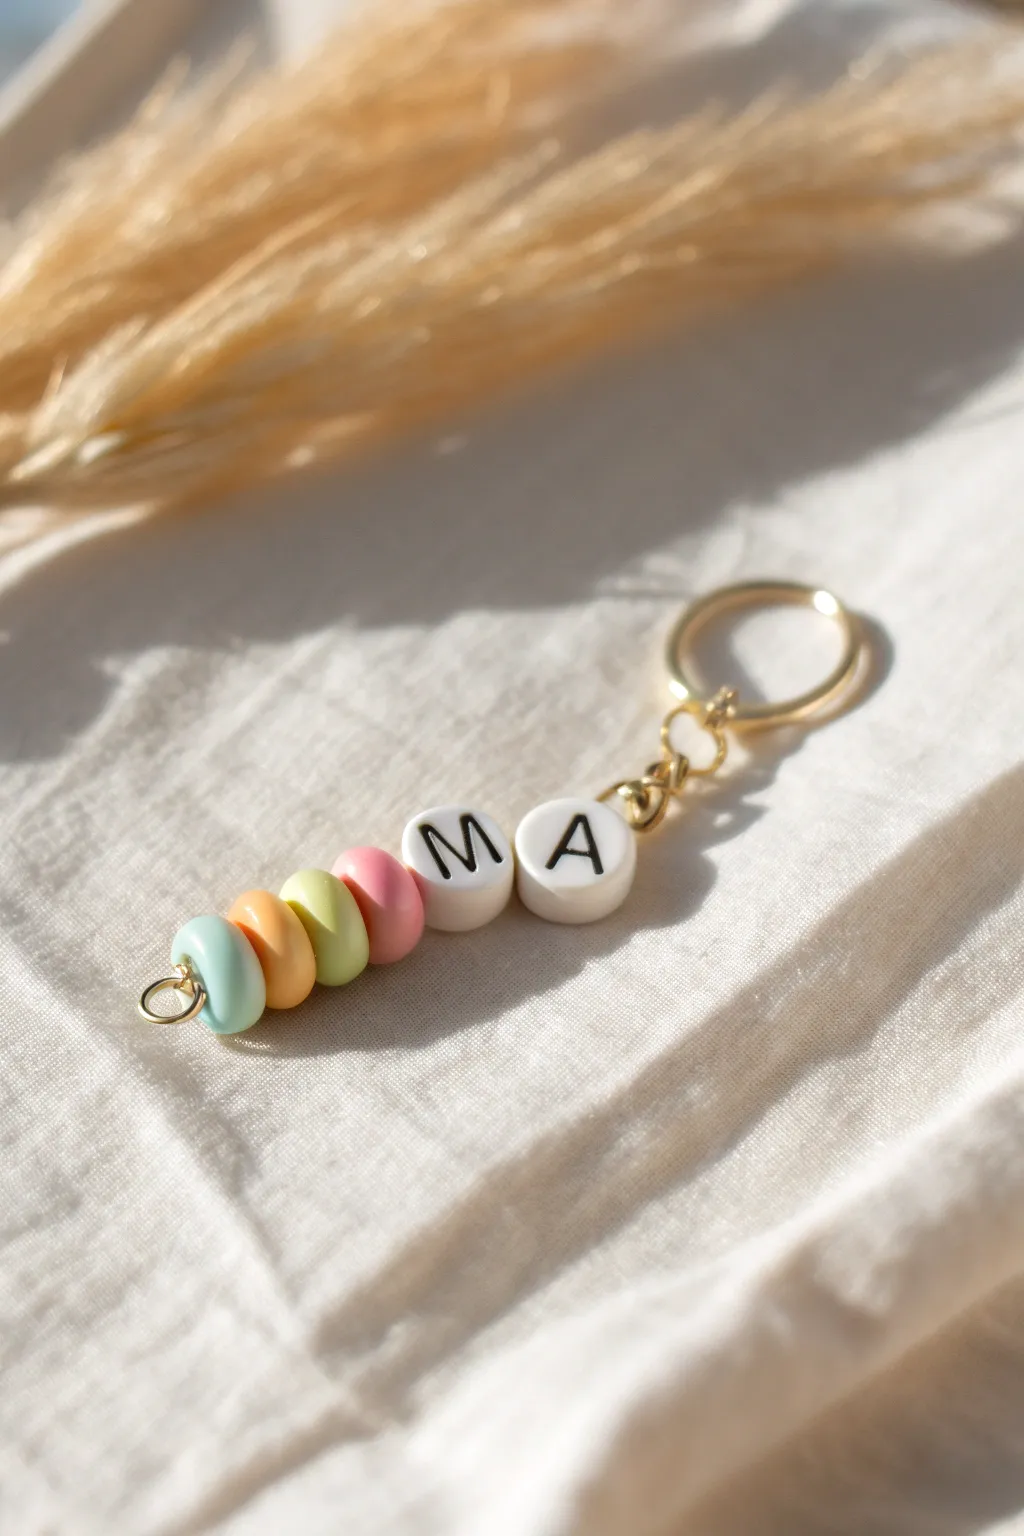
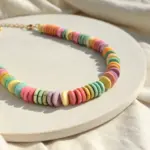
This charming keychain combines soft, candy-colored polymer clay beads with personalized lettering for a minimalist and modern accessory. It’s the perfect beginner-friendly project that results in a high-end boutique look in just minutes.
Step-by-Step Tutorial
Materials
- Polymer clay in pastel shades (baby blue, apricot, lemon yellow, soft pink)
- White round alphabet beads (M and A)
- Gold tone eye pin (about 2 inches long)
- Gold tone split ring or keychain clasp
- Small gold jump ring (optional, for connecting clasp)
- Round nose pliers
- Wire cutters
- Needle tool or toothpick
- Baking sheet and parchment paper
- Oven
Step 1: Crafting the Clay Beads
-
Prepare your clay:
Begin by conditioning small amounts of your blue, apricot, yellow, and pink polymer clay until they are soft and pliable in your hands. -
Portion the clay:
Pinch off a pea-sized amount of each color. Try to keep these portions as equal as possible to ensure your finished stack looks uniform. -
Roll spheres:
Roll each piece of clay between your palms or on a clean work surface to create smooth, perfect spheres. -
Flatten the shapes:
Gently press down on each sphere with your thumb or an acrylic block to flatten them slightly into thick disc shapes, resembling a flattened donut or a thick lending. -
Create center holes:
Using your needle tool or a toothpick, pierce the center of each disc. -
Widen the holes:
Makes sure the holes are wide enough to slide easily onto your eye pin later. I usually give the tool a little wiggle to ensure there’s enough clearance. -
Smooth the edges:
While the clay is still on the tool, lightly tap the edges to smooth out any fingerprints or distortion caused by piercing. -
Bake:
Arrange the beads on a parchment-lined baking sheet and bake according to your clay package instructions (typically around 275°F or 130°C for 15-30 minutes). Let them cool completely.
Uneven Beads?
If your clay beads distort while baking, use a fine grit sandpaper or a nail file to gently buff the edges into perfect rounds after they have fully cooled.
Step 2: Assembly
-
Arrange the stack:
Lay out your cooled clay beads and letter beads on your work surface to confirm the order: blue, orange, yellow, pink, followed by ‘M’ and ‘A’. -
Thread the beads:
Take your gold eye pin and slide the beads on in reverse order if you are holding it upside down, or simply ensure the ‘A’ is closest to the eye loop at the top. -
Check the fit:
Ensure all beads sit snugly together. If there are gaps due to the clay bead holes being uneven, you can re-drill them slightly with a hand drill. -
Trim the wire:
Use your wire cutters to trim the excess wire at the bottom end (the blue bead end), leaving about 1cm or just under half an inch of wire exposed. -
Create the bottom loop:
Using your round nose pliers, grasp the very tip of the exposed wire. -
Roll the loop:
Roll the pliers away from you to create a small, closed loop that sits flush against the bottom blue bead. This secures the stack. -
Prepare the top connection:
Locate the pre-made eye loop at the top of your pin (near the ‘A’ bead). -
Open the ring:
Gently twist open a small jump ring using two pairs of pliers (twist ends away from each other, don’t pull apart). -
Connect the hardware:
Slide the jump ring through the eye loop on your bead stack and then through the loop of the main gold keyring. -
Close the ring:
Twist the jump ring closed securely so there is no gap for the keychain to slip through.
Add a Tassel
For extra flair, attach a small gold tassel or a matching suede leather tassel to the bottom loop of the bead stack for more movement.
Now you have a sweet, personalized accessory ready to brighten up your keys or bag


Initial Bead With Tiny Heart Drop
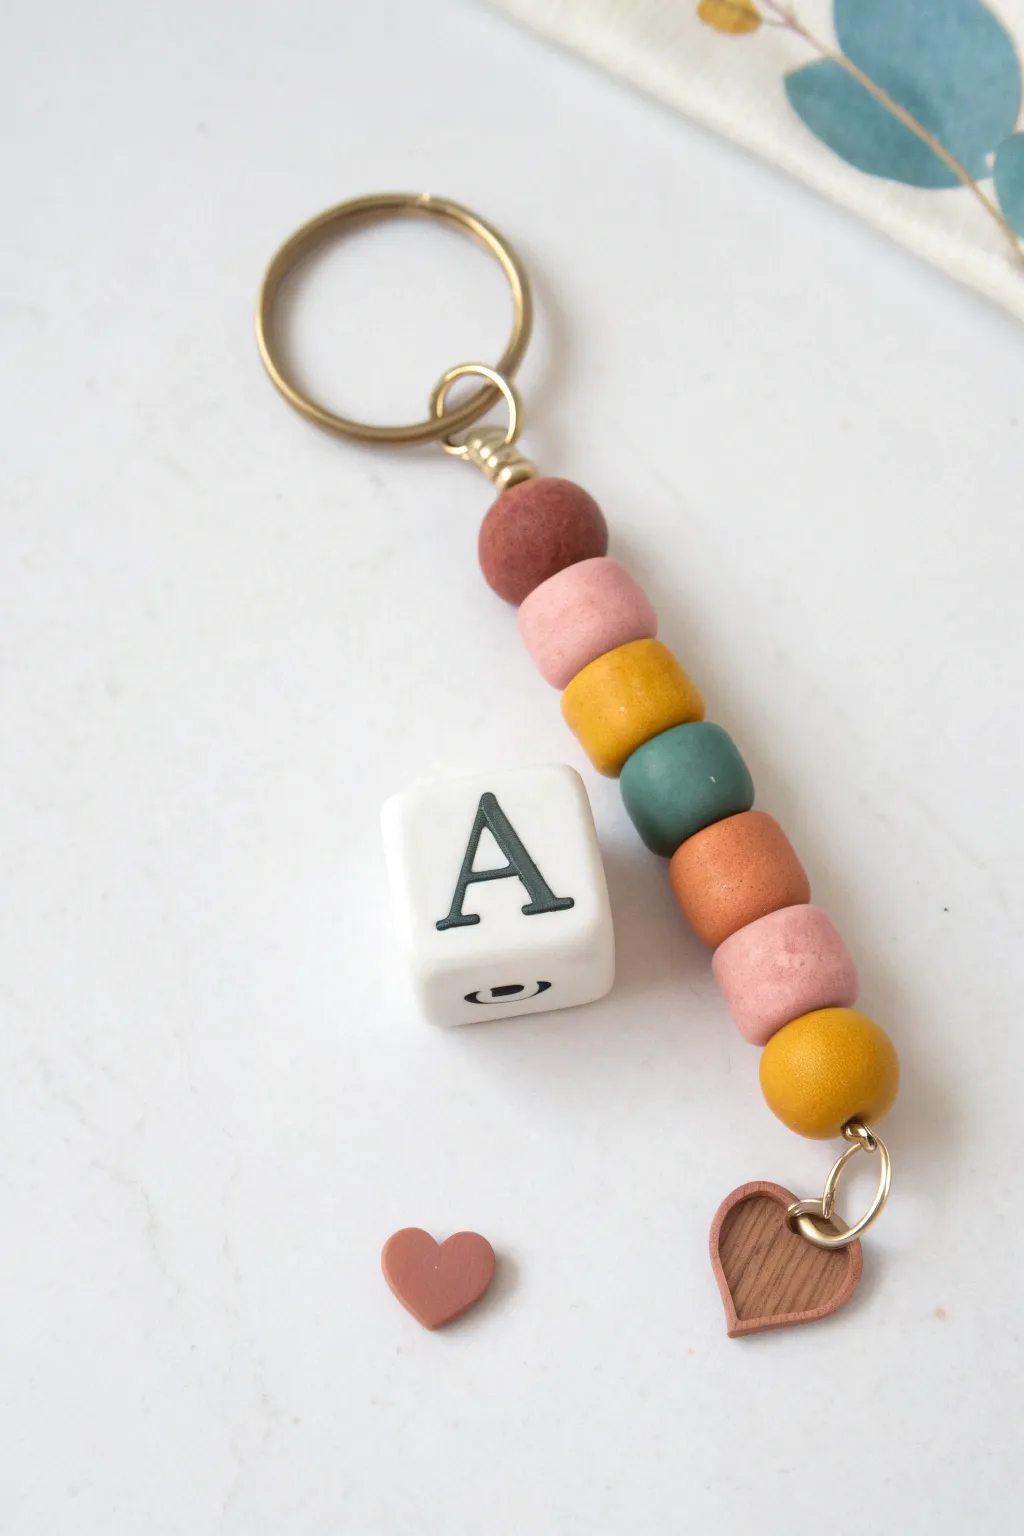
Personalize your keys with this charming combination of matte polymer clay beads and a distinct letter block. The soft, earthy color palette combined with the mixed textures of the initial bead and the tiny heart charm creates a sophisticated yet playful accessory.
How-To Guide
Materials
- Polymer clay (terracotta, mute pink, mustard yellow, teal/slate blue)
- Square initial letter bead (white with black serifs)
- Gold keyring with chain extension
- Gold jump rings (small)
- Small heart-shaped cutter
- Gold eye pin or jewelry wire
- Jewelry pliers (round nose and flat nose)
- Clay roller or pasta machine
- Bead reamer or toothpick
- Oven for baking
- Gloss glaze (optional for the heart)
Step 1: Crafting the Clay Beads
-
Condition the Clay:
Begin by warming up your polymer clay in your hands. Knead each color—terracotta, muted pink, mustard yellow, and teal—separately until they are soft and pliable to prevent cracking later. -
Form the Round Beads:
Pinch off small, equal-sized pieces of clay from your conditioned blocks. You will need about seven beads in total for this specific pattern. -
Roll Smooth:
Roll each piece between your palms to create smooth, uniform spheres. Imperfections add to the handmade look, but try to keep the sizes relatively consistent. -
Create the Barrel Shapes:
Instead of leaving them as perfect spheres, gently tap the top and bottom of each ball against your work surface. This creates a slight barrel or ‘rondelle’ shape, which helps them stack neatly. -
Pierce the Holes:
Using a bead reamer, toothpick, or your needle tool, carefully pierce a hole through the center of each bead. I like to twist the tool while pushing through to keep the shape from distorting. -
Make the Heart Charm:
Roll out a small scrap of the terracotta clay into a thin sheet, about 3mm thick. -
Cut and Pierce the Heart:
Use your tiny heart cutter to stamp out a shape. Pierce a hole near the top of one of the heart’s lobes ensuring there is enough clay above the hole so it won’t break. -
Bake the Pieces:
Arrange all your beads and the heart charm on a baking sheet lined with parchment paper. Bake according to your brand of clay’s instructions—usually around 275°F (135°C) for 15-30 minutes. -
Cool Down:
Allow all the pieces to cool completely before handling. The clay hardens as it cools.
Step 2: Assembling the Keychain
-
Prepare the Eye Pin:
Take your gold eye pin or a piece of wire with a loop at the end. This will form the core of your bead stack. -
Start the Stack:
Thread the beads onto the pin in the pattern shown: terracotta, pink, mustard, teal, lighter terracotta, pink, and mustard. -
Secure the Top:
Once stacked, use your wire cutters to trim the excess wire at the top, leaving about 1cm exposed. -
Loop the Top:
Using round nose pliers, bend the exposed wire piece backward 90 degrees, then roll it towards you to create a secure loop flush against the top bead. -
Attach the Letter Bead:
Since the initial bead likely has a larger hole or different orientation, it’s often easier to attach it separately or simply place it beside the keychain as a prop, though you can thread it if the hole size matches your wire. -
Connect to Keyring:
Open the jump ring attached to your main gold keyring using two pairs of pliers. Slide the top loop of your bead stack onto it and close the jump ring securely. -
Prepare the Heart Drop:
Take a small gold jump ring and carefully thread it through the hole you made in the tiny clay heart. -
Attach the Heart:
Locate the bottom loop of your bead stack (the original eye of the eye pin). Connect the heart charm’s jump ring to this bottom loop. -
Final Adjustments:
Check that all loops are closed tightly so nothing slips off. Give the keychain a little shake to make sure the heart dangles freely.
Uneven Bead Holes?
If your holes closed up slightly during baking, use a small hand drill or a heated needle to gently re-open them without cracking the hardened clay.
Textured Touch
Before baking, gently roll the unbaked beads over a piece of sandpaper or a textured fabric to give them a stone-like, matte finish.
Now you have a custom accessory perfect for gifting or keeping for yourself


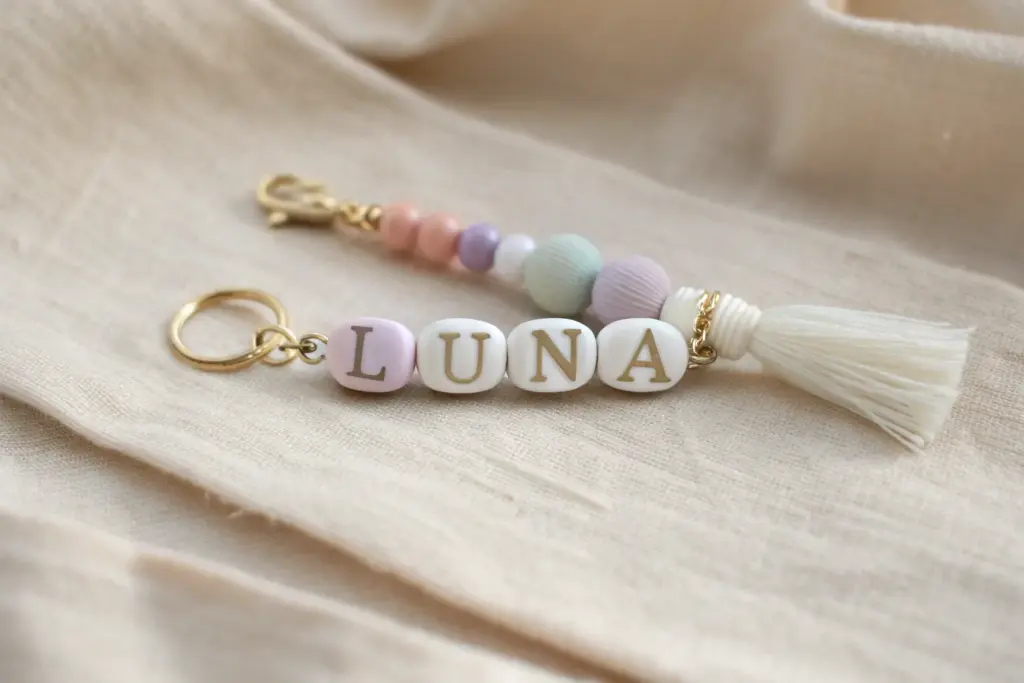
Smiley Flower Focal Bead
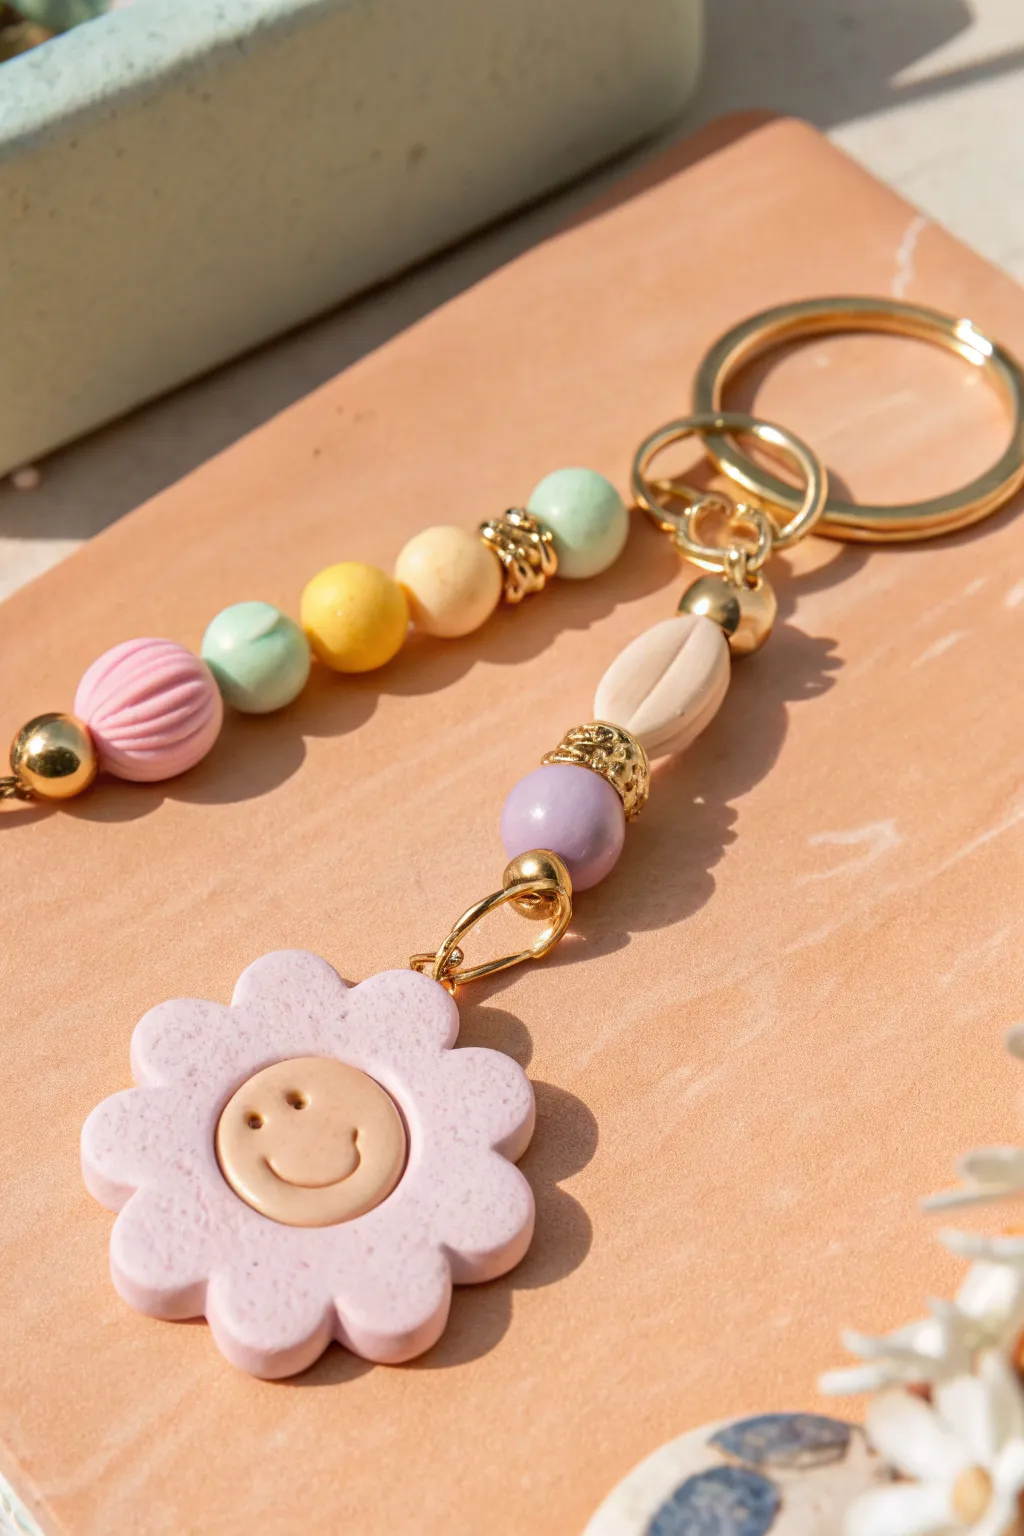
Brighten up your keys with this cheerful, pastel-toned masterpiece featuring a custom smiley flower focal bead. This dual-strand design mixes texture, gold accents, and soft polymer clay colors for a trendy accessory that feels uniquely handmade.
Detailed Instructions
Materials
- Polymer clay in pastel pink, yellow, mint, peach, and lavender
- Gold tone keychain ring with lobster clasp attachment
- Gold metal spherical spacer beads
- Gold rhinestone spacer beads
- Gold eye pins
- Small jump rings (gold)
- Black acrylic paint or fine-tip marker
- Jewelry pliers (round nose and flat nose)
- Clay sculpting tools (needle tool, small ball tool)
- Wire cutters
- Beading needle
- Oven for baking clay
Step 1: Sculpting the Flower Focal Bead
-
Form the petals:
Start by conditioning your pastel pink clay until soft. Roll it into a thick slab, about 1/4 inch thick. Use a scalloped cookie cutter or hand-sculpt 8-10 small balls of clay, flattening them slightly and arranging them in a circle to form the flower shape. -
Smooth the seams:
Gently press the petals together. On the back side, distinct seams are fine, but ensure they are securely bonded. Smooth the front surface so the petals look like one cohesive unit. -
Create the center:
Roll a ball of pale peach or yellow clay. Flatten it slightly into a disc and press it firmly into the center of your pink flower base. -
Add the smile:
Using a small ball tool or the end of a paintbrush, press two indentations for the eyes. Use a needle tool or a small curved carving tool to press a simple ‘U’ shape for the smile. -
Insert the eye pin:
Carefully insert a gold eye pin into the top of one of the petals. Push it deep enough so it’s secure but doesn’t poke out the bottom. I sometimes add a touch of liquid clay to the pin for extra grip. -
Shape the accent beads:
While you have your clay out, roll several small spheres in mint, yellow, peach, and lavender. For variety, create a pink bead and use a needle tool to press vertical ridges into it for a ribbed texture. -
Pierce and Bake:
Use a needle tool or toothpick to create holes in all your handmade beads. Bake the flower and the loose beads according to your polymer clay package instructions (usually 275°F for 15-30 minutes). -
Highlight the face:
Once baked and cooled, use a very fine brush with black acrylic paint to carefully fill in the eye and mouth indentations. Wipe away any excess surface paint immediately with a damp cloth if you slip.
Smooth Surface Trick
Before baking, lightly brush your raw clay beads with a tiny bit of baby oil or cornstarch. This helps remove fingerprints and dust for a professional finish.
Step 2: Assembling the Strands
-
Start the main strand:
Take a long eye pin or a piece of beading wire. At the bottom, attach the loop of your baked smiley flower bead using a small jump ring. -
String the focal strand:
Thread beads onto the wire above the flower in this order: one gold sphere, a lavender clay bead, a gold rhinestone spacer, and a flattened beige/peach geometric bead. -
Finish the focal strand:
Top this section with a gold spherical bead. Create a loop at the top of the wire using your round nose pliers, securing the beads tightly. -
Prepare the second strand:
Cut a second length of wire or use another eye pin. Finish the bottom end with a gold bead or crimp bead so the beads don’t slide off. -
Bead the rainbow strand:
Thread your remaining handmade clay beads onto this strand. Alternate textures and colors—for example: ribbed pink, mint sphere, yellow sphere, peach sphere, and a mint sphere at the top. -
Add metallic accents:
Intersperse gold rhinestone spacers between the clay beads on this second strand to add sparkle and visual separation. -
Close the loop:
Create a secure loop at the top of this second strand using your pliers, trimming any excess wire.
Step 3: Final Construction
-
Attach to ring:
Open the jump ring connecting the main gold keychain hardware. Slip the top loops of both bead strands onto this jump ring. -
Secure everything:
Use two pairs of pliers to twist the jump ring closed securely. Give the strands a gentle tug to ensure everything is locked in place.
Hole Distortion?
If your beads get squashed when you pierce them, wait about 10 minutes for the clay to cool and firm up slightly before piercing, or drill the holes after baking.
Now you have a charming, customized accessory ready to organize your keys in style


Star Charm With Bright Color Blocks
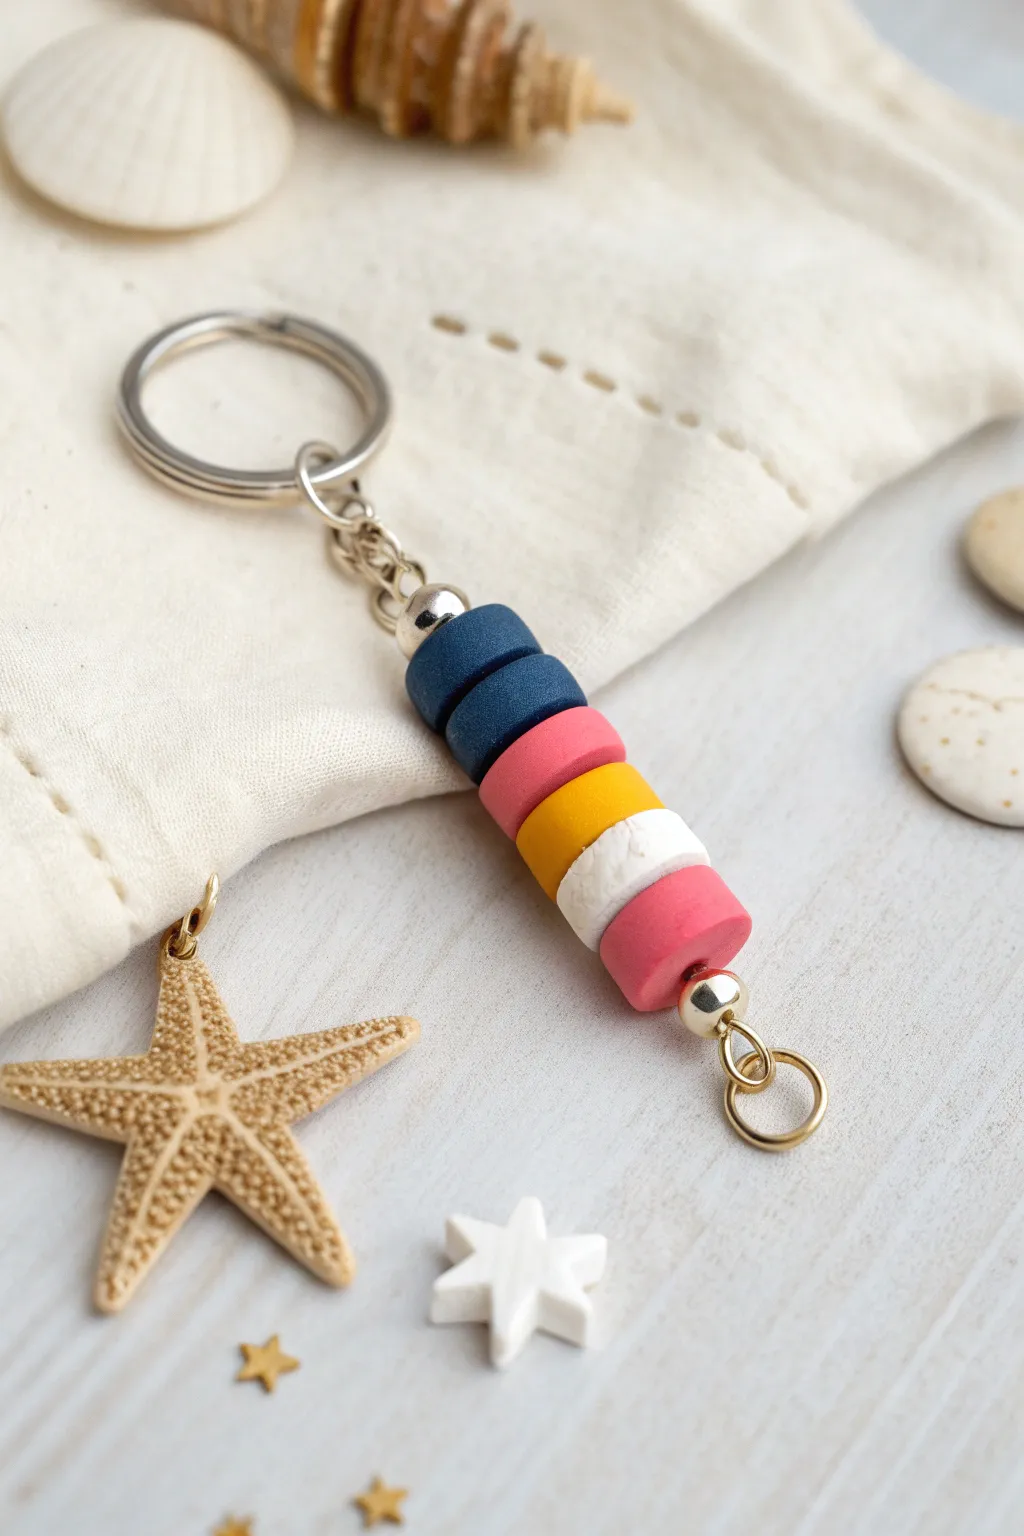
This charming keychain combines a nautical color palette of navy, coral, and mustard with a clean, stacked design. The soft, matte finish of the polymer clay beads gives it a modern, handcrafted look that pairs perfectly with beach-themed accessories like star charms.
Step-by-Step Guide
Materials
- Polymer clay (Navy Blue, Coral, Mustard Yellow, White, Bright Pink)
- Round clay cutter (approx. 1 cm diameter)
- Acrylic roller or pasta machine
- Thick needle tool or toothpick
- Metal keychain split ring with chain
- Headpin or eye pin (gold or silver tone)
- Small metal spacer beads (approx. 4-6mm)
- Small jump ring (approx. 6mm)
- Round nose pliers
- Wire cutters
- Oven for baking
- Sandpaper (fine grit, optional)
- Gloss glaze (optional)
Step 1: Prepping The Clay Beads
-
Condition the clay:
Start by warming up your polymer clay in your hands. Knead each color—navy blue, coral, mustard yellow, white, and bright pink—separately until they are soft and pliable to prevent cracking later. -
Roll out slabs:
Using an acrylic roller, roll each color into a thick slab. Aim for a uniform thickness of about 5-6mm for chunky, durable beads. If you want them perfectly even, use playing cards as depth guides on either side of your roller. -
Cut the shapes:
Use your 1cm round cutter to punch out circles from the conditioned slabs. You will need two navy blue circles, one coral, one mustard yellow, one white, and one bright pink circle. -
Smooth the edges:
Pick up each clay circle and gently roll the edge against your work surface or between your fingers to smooth out any sharp seams from the cutter. Lightly press the flat sides to ensure they look like neat, thick discs. -
Piercing the holes:
Take your needle tool or a toothpick. Carefully pierce the center of each bead. I like to twist the tool gently as I push through to avoid distorting the bead’s round shape. Make sure the hole is wide enough for your headpin.
Fingerprint Fix
To remove fingerprints before baking, lightly brush the raw clay with a little cornstarch or baby oil. If baked, sand gently with fine sandpaper.
Step 2: Baking and Assembly
-
Baking time:
Arrange your beads on a baking sheet lined with parchment paper or a ceramic tile. Bake according to the manufacturer’s instructions on your clay package (usually at 275°F/130°C for 15-30 minutes per 1/4 inch of thickness). -
Cooling down:
Allow the beads to cool completely in the oven or on a wire rack. They will harden fully as they cool. Do not attempt to string them while hot. -
Start the stack:
Take your eye pin. Thread on one metal spacer bead first to act as a decorative cap. -
Layer the colors:
Slide the clay beads onto the pin in this specific order: two navy blue beads, the coral bead, the mustard yellow bead, the white bead, and finally the bright pink bead. -
Cap it off:
Add a second metal spacer bead at the end of the stack, sitting flush against the bright pink clay bead. -
Create a loop:
Using your wire cutters, trim the excess wire from the eye pin, leaving about 1cm exposed. Use your round nose pliers to bend this wire tail into a simple loop to secure the beads tightly. -
Attach the jump ring:
Open a jump ring by twisting it sideways with pliers. Thread it through the loop you just made at the bottom of the bead stack. -
Connect to keychain:
Attach the top loop of your bead stack (the pre-made eye of the eye pin) to the chain links of your keychain ring. Use pliers to close any open links securely.
Charm Addition
Add a gold starfish charm to the bottom jump ring for extra beach vibes, or attach tiny tassels for a boho look.
Clip your new colorful creation onto your keys or a bag for a custom pop of handmade style

The Complete Guide to Pottery Troubleshooting
Uncover the most common ceramic mistakes—from cracking clay to failed glazes—and learn how to fix them fast.
Ombre Sunset Gradient Discs
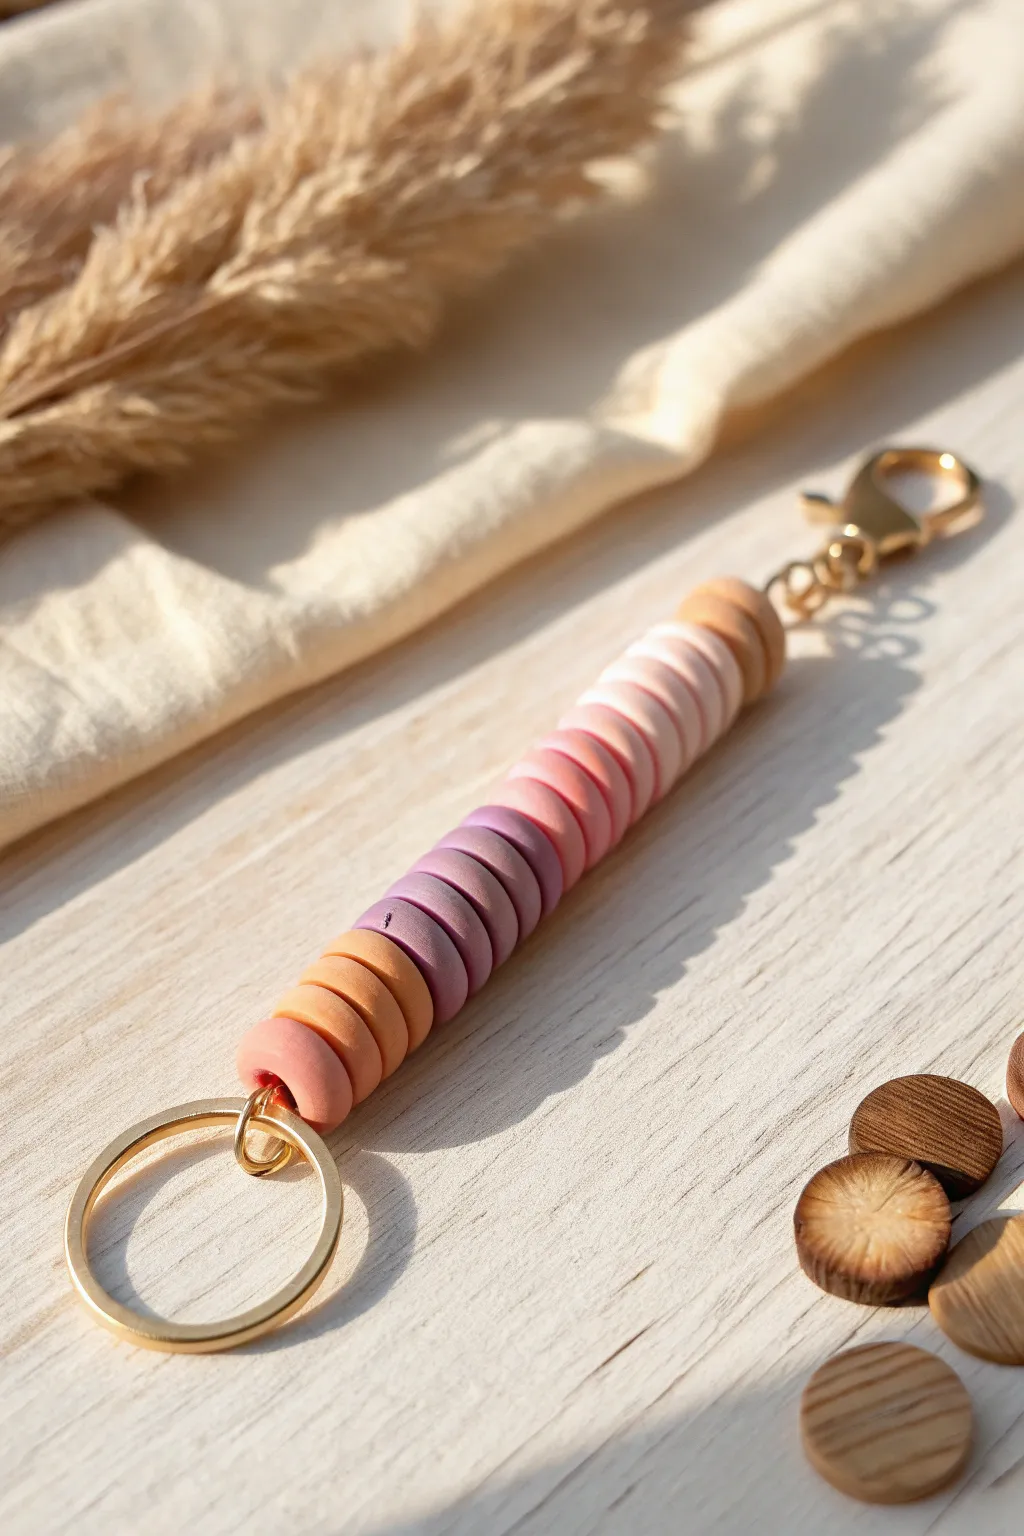
Capture the warmth of a setting sun with this elegant polymer clay keychain featuring a smooth ombre transition. By stacking custom-mixed discs in shades of peach, dusty purple, rose, and cream, you’ll create a sophisticated accessory that looks professionally made.
Detailed Instructions
Materials
- Polymer clay in sunset colors (peach, orange, purple, pink, white)
- Acrylic roller or pasta machine
- Small circular clay cutter (approx. 1/2 inch or 12mm)
- Needle tool or toothpick
- Gold keychain hardware (split ring and lobster clasp)
- Strong beading cord or waxed cotton cord
- Parchment paper-lined baking sheet
- Jewelry pliers
- Wet sandpaper or denim fabric (for finishing)
Step 1: Mixing and Cutting
-
Condition the clay:
Start by kneading each block of polymer clay in your hands until it is warm, soft, and pliable to prevent cracking later. -
Mix custom shades:
Create your gradient palette. For this specific look, you’ll need a burnt orange, a soft peach, a muted purple, a dusty rose, and a creamy white. I like to mix a tiny dot of brown into my orange to tone it down for that earthy vibe. -
Roll out sheets:
Roll each color into a flat sheet of uniform thickness, aiming for about 3-4mm thick. A pasta machine set to a medium-thick setting works best, but an acrylic roller with guide rails is a great alternative. -
Cut the discs:
Using your small circular cutter, punch out your discs. You will need roughly 3-5 discs per color depending on the length you desire. -
Smooth the edges:
Pick up each raw clay disc and gently run your finger around the circumference to smooth out any sharp edges left by the cutter. -
Create the holes:
Use a needle tool or toothpick to pierce a hole directly through the center of each disc. Twist the tool gently as you push through to avoid deforming the circle.
Step 2: Baking and Assembly
-
Bake the beads:
Arrange your discs on a parchment-lined baking sheet and bake according to your specific brand’s temperature instructions (usually 275°F/135°C) for about 30 minutes. -
Cool completely:
Let the beads cool fully on the tray. Polymer clay is slightly soft when hot and hardens as it returns to room temperature. -
Refine the surface:
If fingerprints are visible, lightly sand the beads under water or buff them vigorously with a piece of denim fabric for a matte, professional finish. -
Cut the cord:
Cut a length of cord about 10 inches long. Loop it through the small ring at the base of your lobster clasp hardware. -
Secure the clasp:
Fold the cord in half so you have two tail ends. Tie a secure knot right at the base of the hardware so the cord stays put. -
Plan the gradient:
Lay your beads out on the table to finalize your pattern. Start with cream, fade into pinks, transition to the purples, and end with the deep orange/peach tones. -
String the beads:
Thread both ends of the cord through each bead, following your gradient pattern. The fit should be snug. -
Attach the split ring:
Once all beads are threaded, loop the cord ends around your large gold split ring. -
Knot to finish:
Tie a very tight double knot underneath the split ring, pulling the beads taut so there are no gaps. Trim the excess cord close to the knot and tuck the knot end back into the final bead hole if possible to hide it.
Fixing Wonky Holes
If your holes closed up or shrunk during baking, don’t force the needle. Use a small hand drill or a standard drill bit twisted by hand to gently ream out the opening without cracking the bead.
Texture Twist
Before baking, gently press a piece of coarse sandpaper or a toothbrush onto the surface of the raw clay discs to give them a stone-like, faux-granite texture instead of a smooth finish.
Now you have a stunning, functional piece of art to organize your keys or gift to a friend
Pastel Checkerboard Accent Beads
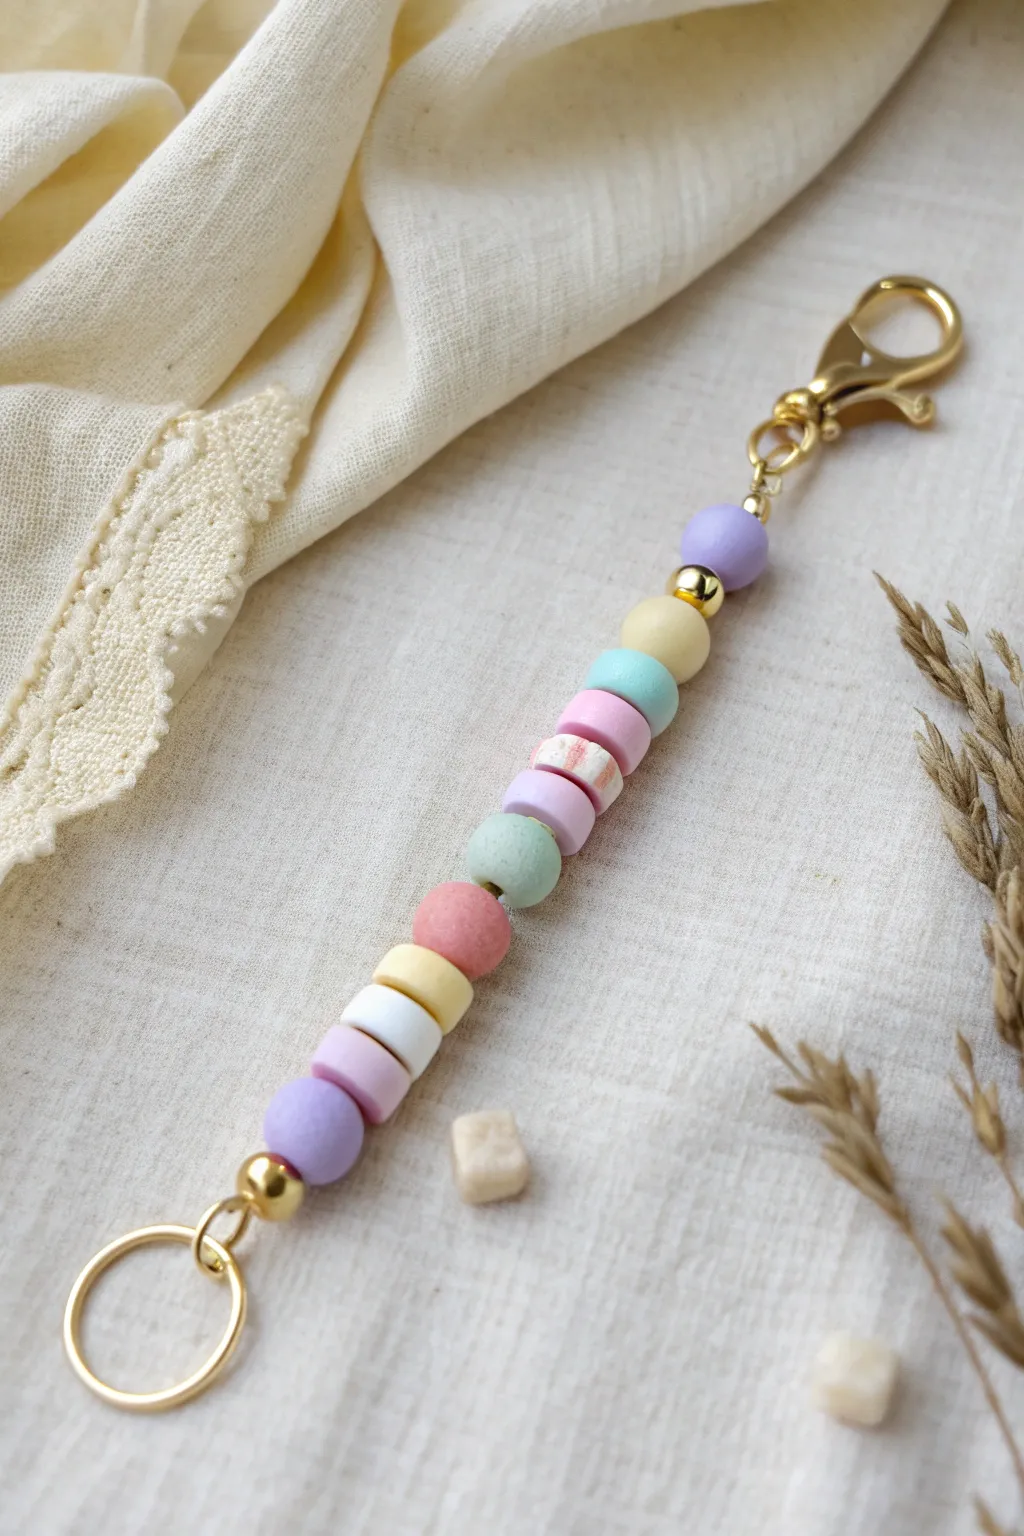
This whimsical keychain combines soft pastel hues with gold accents for a sweet, candy-like accessory. The mix of round and disc beads creates a delightful texture that feels just as good as it looks hanging from your bag.
Step-by-Step Guide
Materials
- Polymer clay in pastel colors (lavender, butter yellow, mint green, baby pink, white)
- Gold lobster clasp
- Large gold jump ring or key ring
- Gold bead stopper crimp (or knotting tool)
- Gold round spacer beads (approx. 4mm)
- Nylon beading cord or strong jewelry wire
- Jewelry pliers (flat nose and round nose)
- Clay roller or pasta machine
- Small circle cutters (approx. 8-10mm)
- Toothpick or bead piercing pin
- Oven for baking clay
- Glaze or varnish (optional)
Step 1: Crafting the Beads
-
Condition the clay:
Start by warming up your polymer clay colors in your hands until they are soft and pliable. You will need small amounts of purple, yellow, teal, pink, and white. -
Roll out the sheets:
Roll each color into a slab of even thickness, about 3-4mm thick. A pasta machine is great for consistency, but a hand roller works perfectly too. -
Cut the shapes:
Use a small circular cutter to punch out your bead shapes. For this design, you’ll need mostly flat disc shapes. -
Form the round beads:
Take two of your purple cutouts and one yellow cutout. Instead of leaving them flat, roll these individually between your palms to create smooth spheres. -
Create the marble accent:
Take a tiny pinch of pink and a pinch of white clay, twist them together gently (don’t overmix!), and roll into a disc shape to create the marbled bead effect. -
Pierce the holes:
Carefully use a toothpick or bead pin to create a hole in the center of each bead. Twist the tool gently as you push through to avoid squishing the shape. -
Bake the clay:
Arrange your beads on a baking sheet lined with parchment paper. Bake according to your customized clay manufacturer’s instructions, usually around 275°F (135°C) for 15-30 minutes. -
Cool down:
Allow the beads to cool completely before handling so they harden fully.
Step 2: Assembly
-
Prepare the cord:
Cut a length of nylon cord or wire, roughly 8 inches long, to give you plenty of room to work. -
Attach the clasp:
Thread one end of your cord through the small loop of the gold lobster clasp. Secure it by tying a tight knot or using a crimp bead folded over with pliers. -
Start the pattern:
String on one gold spacer bead, followed by your round purple bead, and then another gold spacer bead. -
Thread the stack:
Begin threading the flat disc beads. Follow the gradient: yellow, teal, pink, then the marbled pink/white bead. -
Continue the sequence:
Finish the middle section with a purple disc, teal disc, matte pink disc, yellow disc, and white disc. -
Add the final stack:
Add a pink disc, followed by the final round purple bead. -
Secure the end:
Thread on a final gold spacer bead. Loop the cord through a large gold jump ring or keyring. -
Hide the knot:
Tie a secure double knot firmly against the last bead. Thread the excess tail back through the purple bead if possible, add a dab of superglue to the knot, and trim the excess wire close.
Smooth Moves
To remove fingerprints from your raw clay beads before baking, lightly brush them with a little cornstarch or baby oil.
Hole Distortion?
If piercing the bead squishes it into an oval, bake the beads first, then use a small hand drill to make the holes afterward.
Now you have a charming, handmade accessory ready to brighten up your keys or backpack


What Really Happens Inside the Kiln
Learn how time and temperature work together inside the kiln to transform clay into durable ceramic.
Terrazzo Confetti Speckle Stack
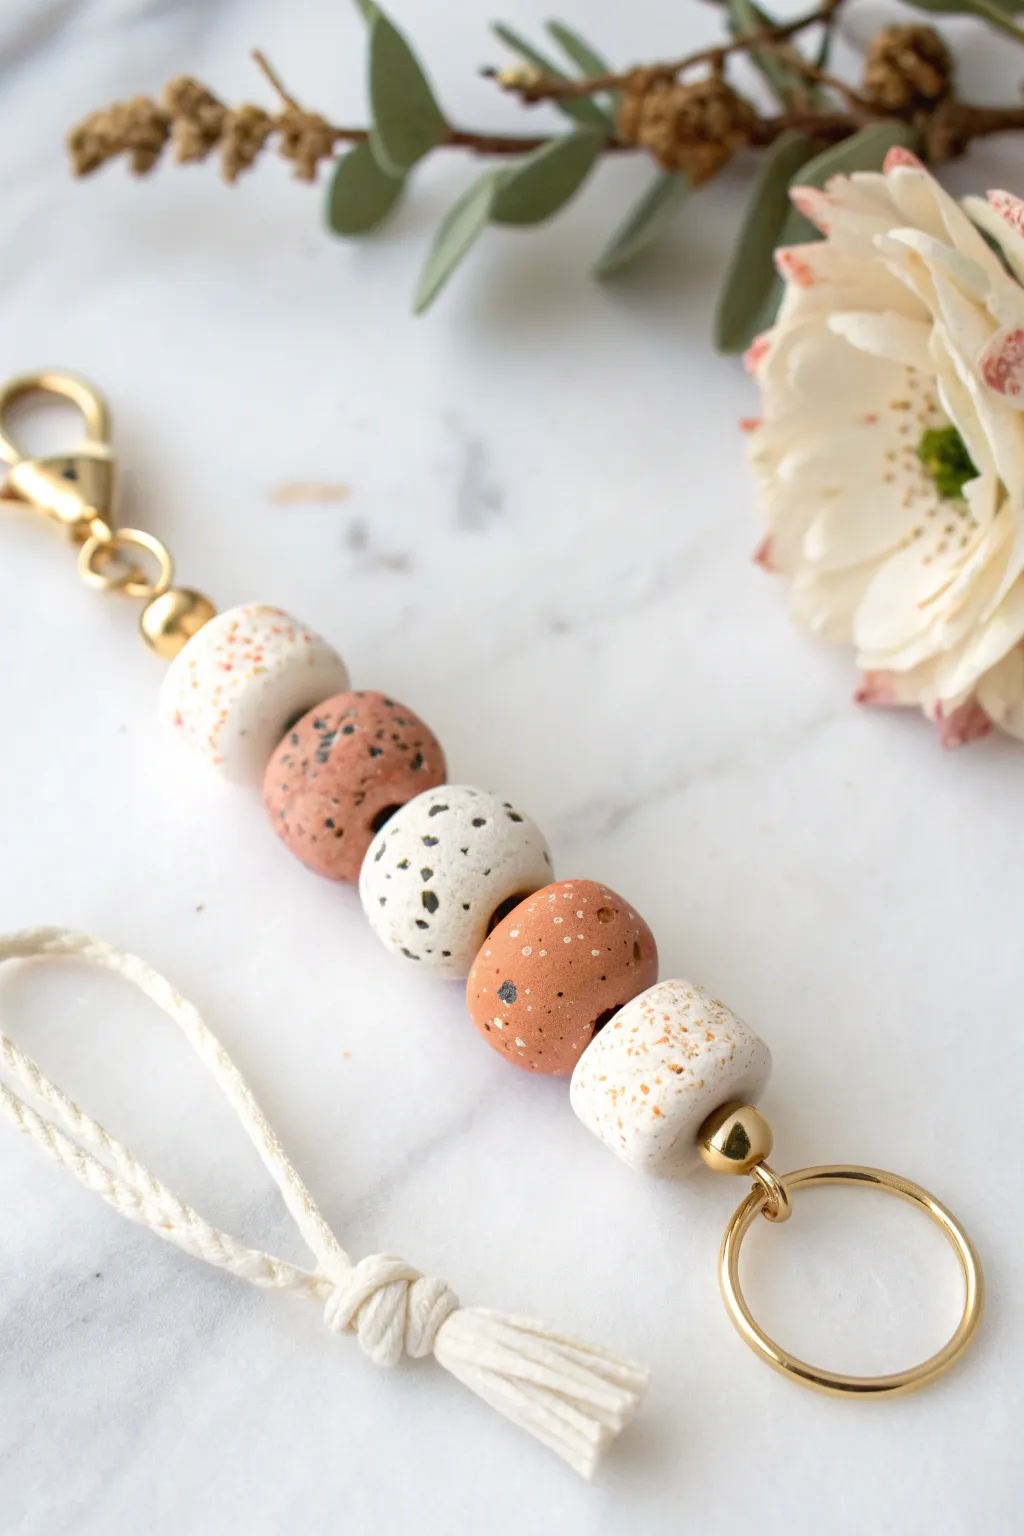
Embrace earthy, organic vibes with this beautifully imperfect polymer clay keychain. Featuring a warm palette of terracotta, cream, and stone speckles, this project layers textures to create a sophisticated terrazzo effect.
Detailed Instructions
Materials
- Polymer clay (white, beige, terracotta, brown, black)
- Acrylic rolling pin
- Gold lobster clasp keychain hardware
- Gold keyring
- Strong beading cord (waxed white cotton or nylon)
- 2 small gold spacer beads (thick/chunky)
- Toothpicks or a bead piercing tool
- Tissue blade or sharp clay knife
- Sandpaper (wet/dry, 400-800 grit)
- Oven and baking sheet
Step 1: Prepping the Clay Colors
-
Condition the Base Colors:
Begin by conditioning your main colors. You will need a creamy beige, a rich terracotta, a pure white, and a deeper reddish-brown. Knead each block separately until soft and pliable. -
Create the Speckles:
To make the ‘confetti’ for your terrazzo, pinch off tiny amounts of contrasting clay colors (terracotta, black, white). Roll these into very thin snakes or flatten them into paper-thin sheets. -
Chop the Bits:
Using your tissue blade, chop the thin clay pieces into random, tiny crumbs and jagged bits. Keep these piles separate by color so you can control your mixes later. -
Mix Bead 1 & 5 (Cream with Orange):
Take your cream-colored clay and sprinkle in the tiny terracotta crumbs. Gently fold the clay over once or twice to adhere the bits, but don’t over-knead or the colors will muddy. -
Mix Bead 2 (Terracotta with Black):
Repeat the process with the terracotta base clay, adding tiny black speckles. This mimics a natural igneous rock look. -
Mix Bead 3 (White with Black):
For the center statement bead, take your white clay and press in slightly larger, jagged black chunks for a dalmatian stone effect. -
Mix Bead 4 (Reddish-Brown with White):
Finally, mix the deep reddish-brown clay with white crumbs to create the fourth variation.
Stone Effect
To get that matte stone look, avoid varnishing these beads. Instead, buff them vigorously with a piece of denim fabric after sanding.
Step 2: Forming and Baking
-
Roll the Balls:
Divide your speckled mixtures into equal portions. Roll them tightly between your palms to form smooth spheres. You want them to be substantial, roughly 1.5 cm to 2 cm in diameter. -
Shape into Cubes:
Instead of leaving them perfectly round, gently tap each side of the sphere against your work surface to square off the edges slightly. Aim for a soft, rounded cube shape (sometimes called a ‘squircle’) rather than a sharp geometric cube. -
Smooth the Surface:
Using your finger, lightly buff the surface of each bead to remove any fingerprints. If speckles are poking out too much, gently roll the bead again to embed them flush with the surface. -
Pierce the Holes:
Using a bead piercing tool or toothpick, carefully drill a hole through the center of each bead. I like to twist the tool as I push through to prevent distortion. -
Bake the Clay:
Place your beads on a baking sheet lined with parchment paper. Bake according to your brand of polymer clay instructions (usually 275°F/135°C for 30 minutes). Let them cool completely before handling. -
Sand for Finish:
Once cool, use wet/dry sandpaper under running water to gently sand the beads. This reveals the terrazzo pattern more clearly and gives the clay a professional, stone-like matte finish.
Step 3: Assembly
-
Cut the Cord:
Cut a length of your thick white cord, roughly 12-14 inches long. -
Attach the Clasp:
Fold the cord in half and loop it onto the bottom ring of the lobster clasp using a lark’s head knot. Pull it tight. -
String Top Elements:
Thread a gold spacer bead onto both strands of the cord, pushing it right up to the knot. -
Stack the Clay Beads:
Thread your clay beads in the following order: Cream, Terracotta, White/Black, Red/Brown, and finally the second Cream bead. -
Add Bottom Hardware:
Slide the second gold spacer bead onto the cord after the last clay bead. -
Tie the Keyring:
Loop the cord around your large gold keyring. Tie a very secure knot against the keyring to hold everything in place. -
Create the Tassel:
With the remaining tail of the cord hanging off the keyring, tie a simple overhand knot about 1.5 inches down. Fray the ends of the cord below this knot to create a cute mini tassel effect.
Hole Distortion
If the bead squishes when you pierce it, let the shaped bead sit in the fridge for 15 minutes first. Cold clay is firmer and holds its shape better.
Clip this trendy accessory onto your bag or keys and enjoy the handmade charm you carry with you every day
Cow-Print Pop Beads
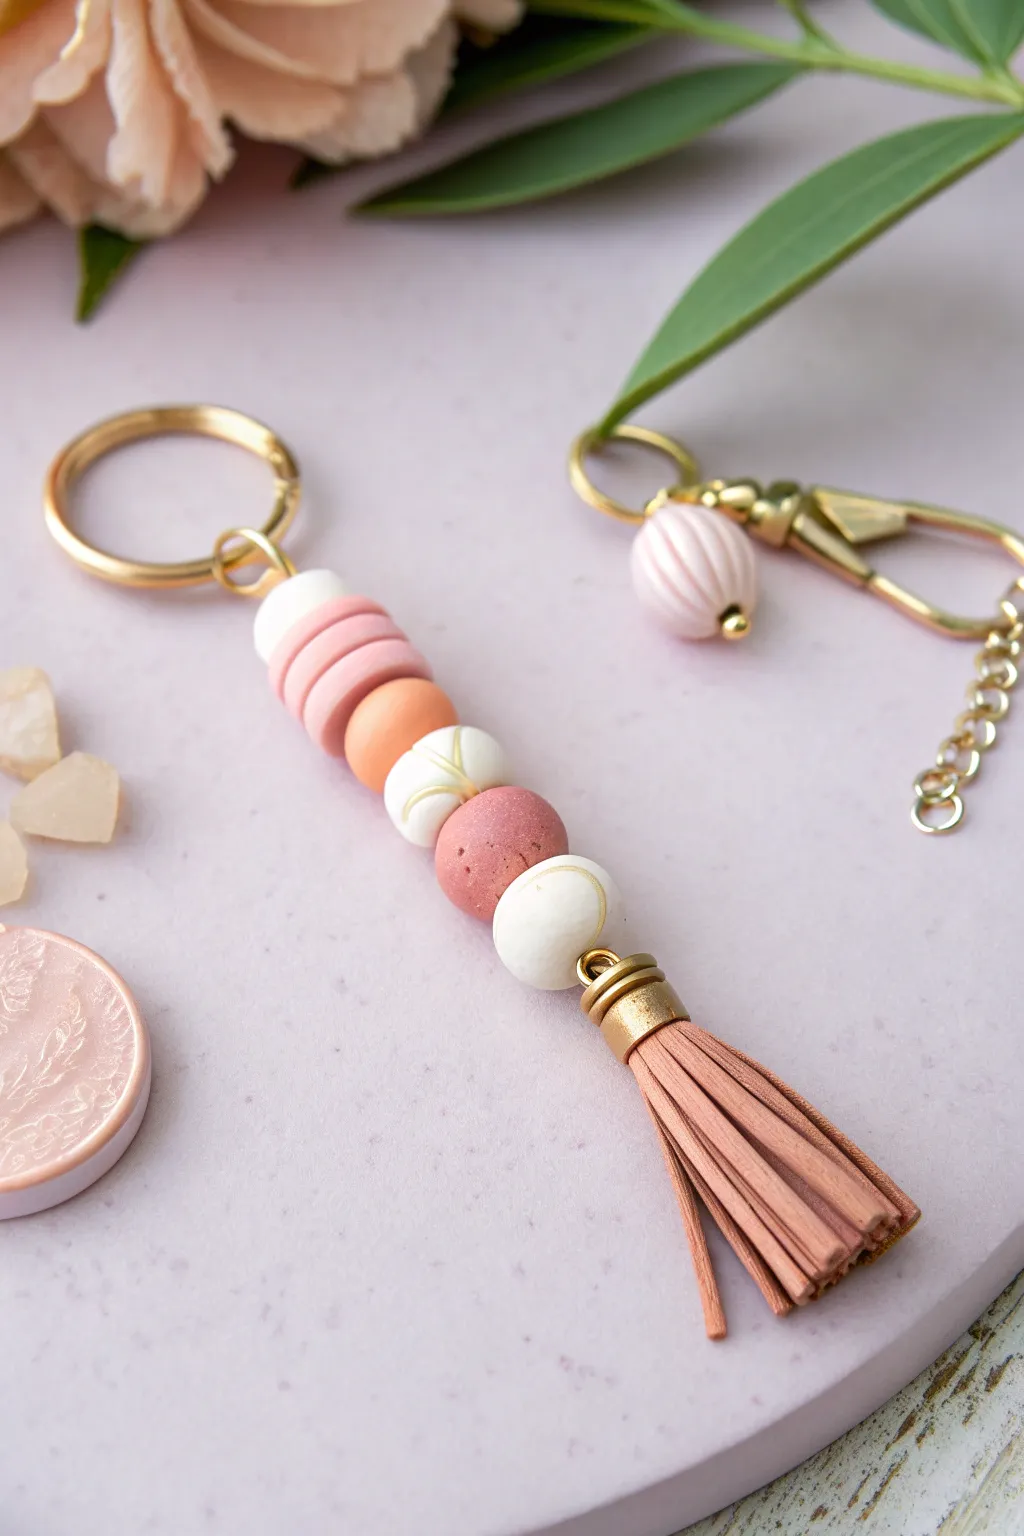
Embrace the trendy animal print aesthetic with this adorable polymer clay keychain. Featuring hand-painted cow print beads and soft pastel accents, this accessory adds a playful touch to your keys or bag.
Step-by-Step Guide
Materials
- White or cream polymer clay
- Soft pink or mauve polymer clay
- Yellow or butter-colored polymer clay (for geometric bead)
- Black acrylic paint
- Fine detail paintbrush or dotting tool
- Gold split ring keychain hardware
- Cream faux suede tassel with gold cap
- Thin gold spacer beads (x2)
- Small gold jump rings (x2)
- Nylon cord or sturdy beading thread
- Bead reamer or toothpick
- Oven for baking clay
- Clear polyurethane varnish (water-based) or UV resin
- Scissors
Step 1: Sculpting the Beads
-
Condition the clay:
Begin by kneading your polymer clay in your hands until it becomes soft and pliable. This conditioning step prevents cracks during baking. -
Form the base spheres:
Roll the white clay into two equal-sized spheres, approximately 15mm in diameter. Ensure they are smooth and free of fingerprints. -
Create the pink accent bead:
Take a portion of your pink or mauve clay and roll it into a sphere slightly smaller than the white ones, aiming for about 12mm. -
Shape the geometric bead:
With the yellow clay, first roll a ball, then gently press it against your work surface on various sides to create flat, angular facets. Aim for a rough gemstone shape. -
Pierce the holes:
Use a toothpick or bead reamer to carefully poke holes through the center of each bead. Rotate the tool as you push through to keep the hole round and wide enough for your cord.
Paint Issues?
If acrylic paint scrapes off easily after drying, lightly sand the baked clay bead before painting to give it ‘tooth’, or ensure your sealer coat is thick enough.
Step 2: Baking and Painting
-
Bake the clay:
Place all formed beads on a baking sheet lined with parchment paper. Bake according to your brand of clay’s package instructions (usually around 275°F/135°C for 15-30 minutes). -
Cool down:
Allow the beads to cool completely before handling them. They harden fully as they cool. -
Paint the cow spots:
Using a fine detail brush and black acrylic paint, dab irregular, organic shapes onto the two white beads. Vary the sizes of the spots for a natural cow-hide look. -
Let the paint dry:
Set the painted beads aside until the black acrylic is fully dry to the touch. -
Seal the beads:
Apply a coat of clear varnish or UV resin to the cow-print beads to protect the paint. I prefer a glossy finish here to make the print pop.
Step 3: Assembly
-
Prepare the cord:
Cut a length of nylon cord, usually about 10-12 inches, and fold it in half. Loop the folded end through the gold split ring using a lark’s head knot. -
Secure the tassel:
Attach a small gold jump ring to the top loop of your cream tassel. Set this aside for the final step. -
Thread the first bead:
Thread both ends of the cord through the yellow geometric bead, pushing it all the way up to the keychain ring. -
Add first cow bead:
Thread on one painted cow-print bead below the geometric one. -
Insert spacer and pink bead:
Slide on a gold spacer bead, followed by the pink spherical bead. -
Finish the pattern:
Add the second gold spacer bead, followed by the final cow-print bead. -
Attach the tassel:
Tie the cord securely to the jump ring holding the tassel. Use a strong knot (like a surgeon’s knot) and trim any excess cord, tucking the ends inside the bottom bead if possible.
Level It Up
Swap the geometric bead for a wooden bead you’ve partially dipped in gold paint for a mixed-media texture that matches the hardware perfectly.
Clip your new handmade accessory onto your keys and enjoy the pop of pattern every time you head out the door

TRACK YOUR CERAMIC JOURNEY
Capture glaze tests, firing details, and creative progress—all in one simple printable. Make your projects easier to repeat and improve.
Marbled Swirl “Taffy” Beads
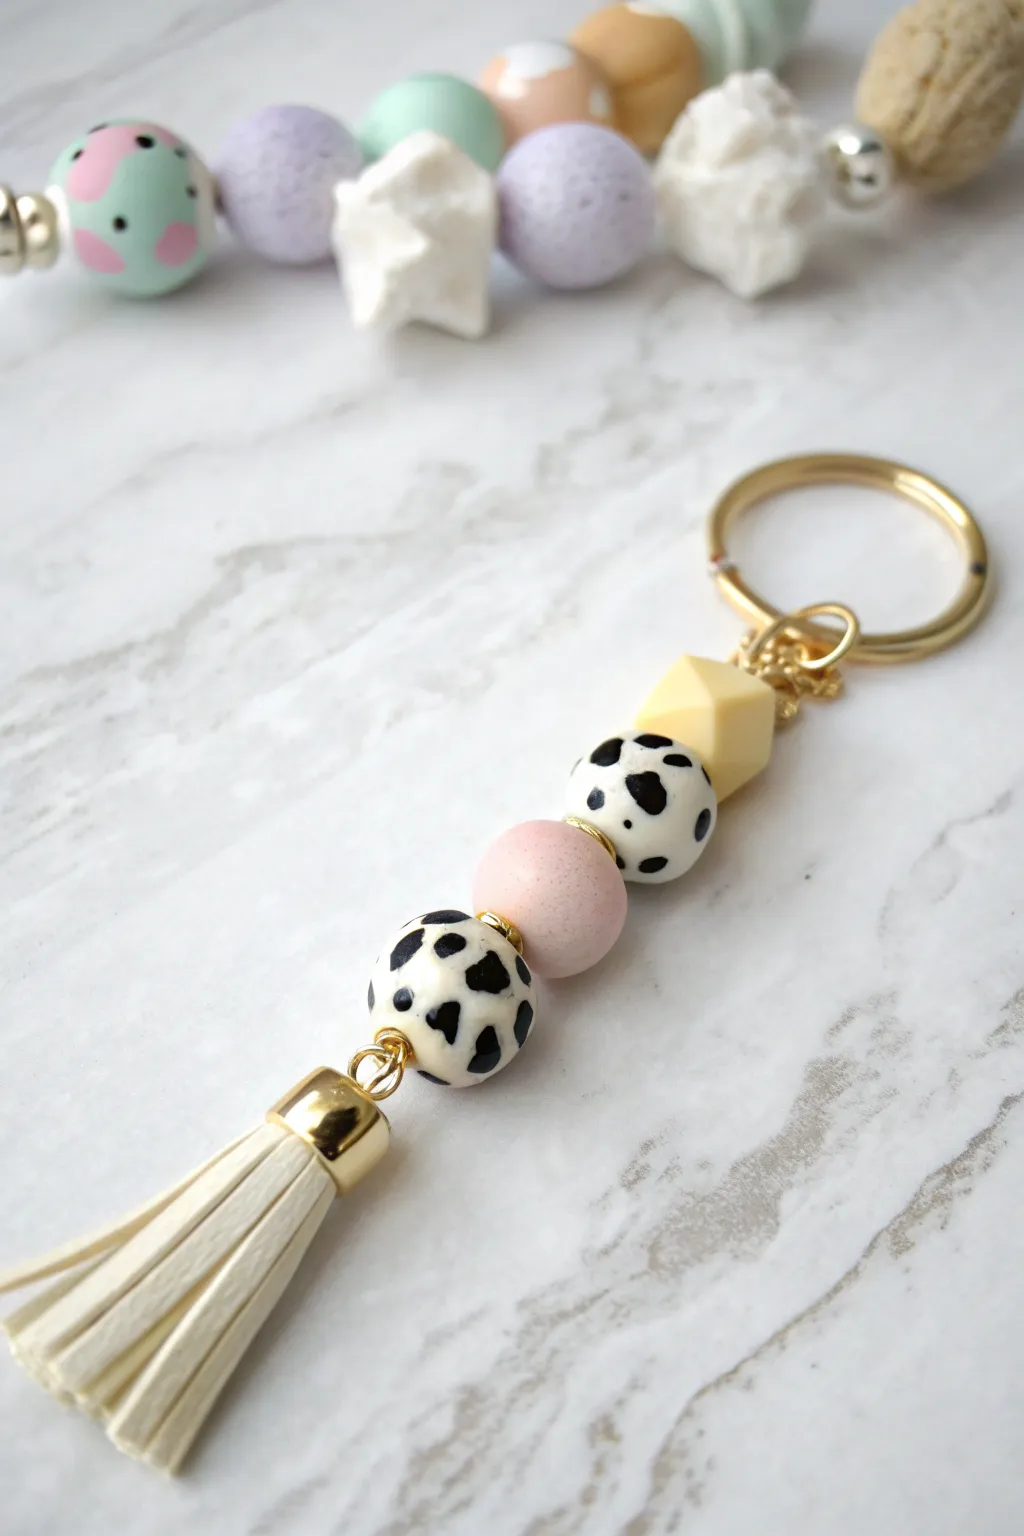
These sweet, textured beads mimic the delightful look of pulled taffy and soft candy. With gold-accented grooves and a soft, warm color palette, this keychain brings a touch of elegant whimsy to your everyday accessories.
How-To Guide
Materials
- Polymer clay (whites, light pinks, peach/terra cotta, optional gold)
- Acrylic rolling pin or clay pasta machine
- Round clay cutters (small diameter)
- Bead piercing pins or toothpicks
- Gold acrylic paint or gold gilding wax
- Fine-tipped paintbrush
- Gold keychain hardware (ring, chain, clasp)
- Leather or suede tassel (dusty pink/terra cotta)
- Jump rings
- Pliers (round nose and flat nose)
- Baking sheet and parchment paper
- Gloss glaze (optional)
Step 1: Preparing the Clay Beads
-
Condition the clay:
Start by thoroughly kneading each color of your polymer clay until it is soft and pliable. You will need white, two shades of pink, and a warm peach or terra cotta color. -
Create disc beads:
Roll out a sheet of white and the two pink clays to a uniform thickness, about 1/4 inch thick. Use a small round cutter to punch out circles. Smooth the edges with your finger to remove any sharp cut marks. -
Form the round bead:
Take a portion of the peach-colored clay and roll it between your palms to form a perfectly smooth sphere. This should be slightly larger than your disc beads. -
Shape the textured beads:
Create a sphere from white clay. Using a clay tool or the back of a knife, gently press vertical indentations around the bead to create a pumpkin or taffy-like shape. Repeat this process with the terra cotta clay for a second textured bead. -
Add detail lines:
For the grooved white and terra cotta beads, deepen the indentations slightly to ensure they will hold paint later. I find twisting the tool slightly as you press helps define the groove without flattening the bead. -
Pierce the beads:
Carefully insert a bead pin or toothpick through the center of each bead. Rotate the pin as you push to avoid distorting the shape. Check that the hole is large enough for your keychain assembly cord or wire.
Smooth Perfection
To remove fingerprints before baking, lightly brush your raw clay beads with a little cornstarch or baby oil. This smooths the surface instantly.
Step 2: Baking and Decorating
-
Bake the clay:
Arrange all your beads on a parchment-lined baking sheet. Bake according to the manufacturer’s instructions for your specific brand of clay—usually around 275°F (135°C) for 15-30 minutes. -
Cool down:
Allow the beads to cool completely before handling. They are fragile while warm. -
Apply gold accents:
Using a fine brush, carefully paint gold acrylic paint into the grooves of your white and terra cotta textured beads. You can also use gilding wax for a more metallic finish. -
Clean up edges:
If any paint gets on the raised surface, quickly wipe it away with a damp paper towel or baby wipe before it dries, leaving the gold only in the recesses. -
Texture the terra cotta bead:
If you want the speckled look shown on the darker bead, you can flick a toothbrush with thinned brown or darker red paint over it, or use a coarse sponge to dab texture before baking.
Step 3: Assembly
-
Prepare the tassel:
Take your leather or suede tassel. Ensure it has a loop or cap at the top suitable for attachment. If needed, attach a jump ring to the top of the tassel cap. -
String the beads:
Cut a length of strong cord or beading wire. Tie it securely to the tassel’s jump ring. Thread your beads onto the cord in your desired order: textured white, terra cotta round, peach round, pink discs, white disc. -
Secure the top:
Once all beads are strung, crate a secure loop at the top of the cord. If using wire, use a crimp bead to secure the loop. If using cord, tie a strong knot and add a drop of superglue for security. -
Attach hardware:
Open the jump ring on your gold keychain ring using pliers. Slide the loop from your bead stack onto the jump ring and close it securely. -
Create the mini charm:
For the bonus charm, take a single grooved bead (perhaps a leftover or a different color), thread it onto a headpin, create a loop with pliers, and attach it to a lobster clasp using a jump ring.
Scented Clay
Knead a drop of essential oil into the clay before baking. Vanilla or lavender adds a hidden sensory element to your beautiful keychain.
Now you have a stunning, custom accessory ready to organize your keys or decorate your favorite bag
Tiny Fruit Charm With Matching Beads
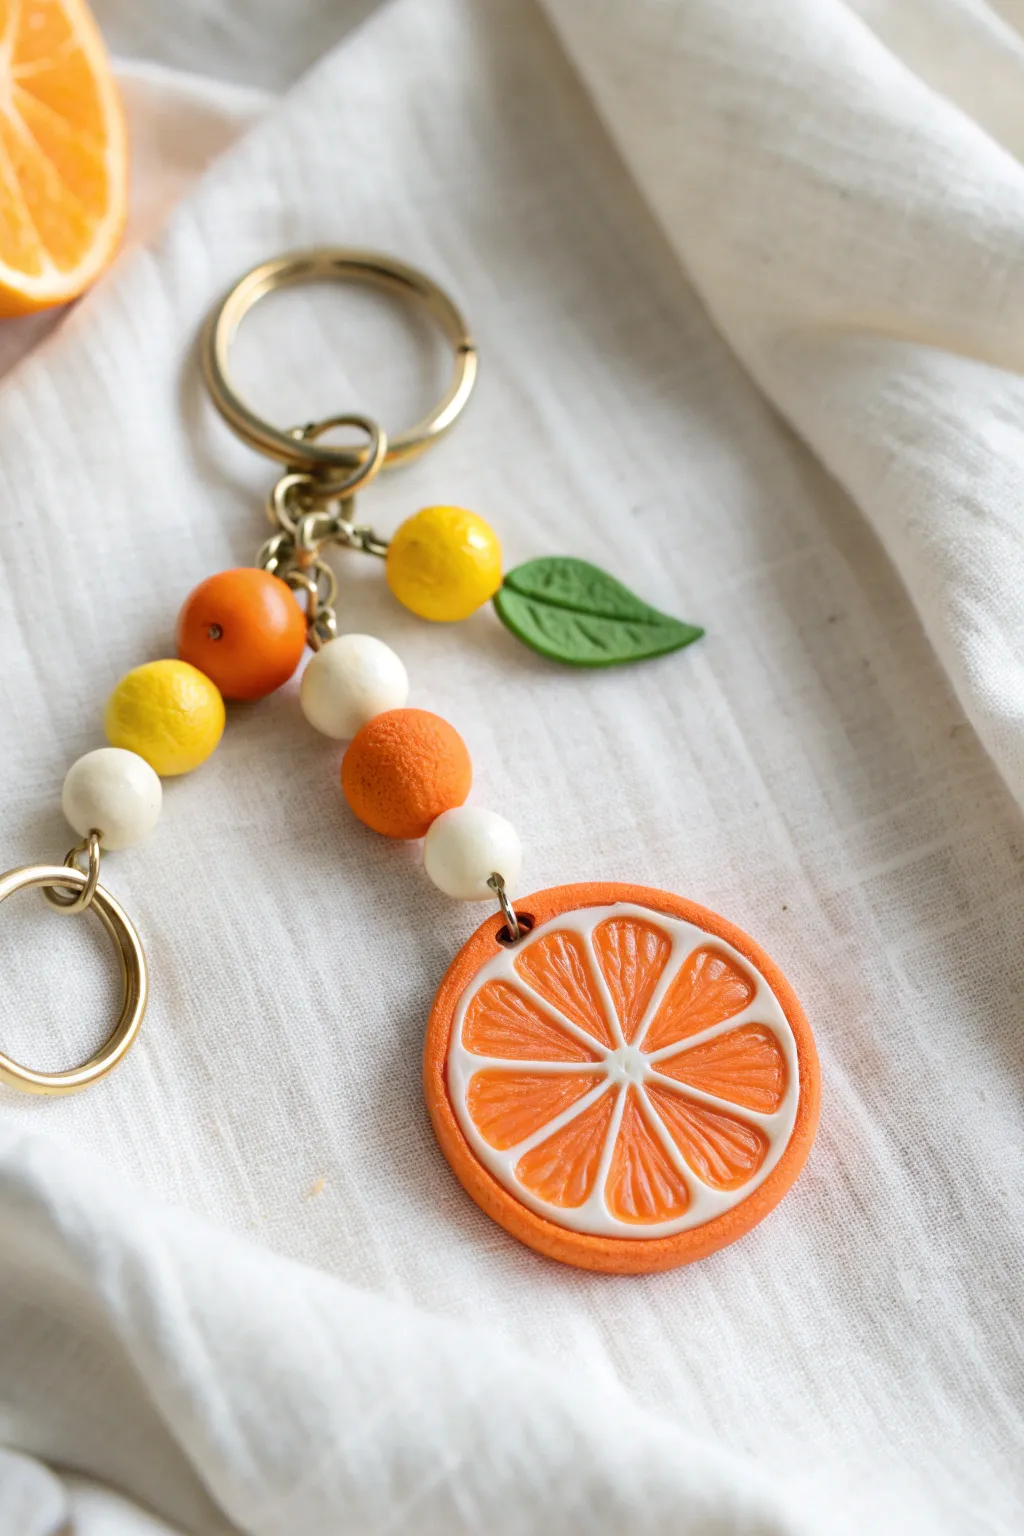
Bring a burst of summer sunshine to your keys with this delightful handcrafted keychain. Featuring a realistic orange slice charm and coordinating handmade beads, this project combines simple sculpting techniques with elegant gold hardware for a fresh, citrusy look.
Detailed Instructions
Materials
- Polymer clay (translucent orange, opaque orange, white, yellow, green)
- Liquid polymer clay (optional, for texture)
- Gold keychain keyring and clasp assembly
- Gold jewelry headpins or eye pins
- Gold jump rings (6mm and 4mm)
- Needle tool or toothpick
- Round cookie cutter (approx. 1.5 inches)
- X-Acto knife or craft blade
- Acrylic rolling pin
- Sandpaper (fine grit)
- UV resin or gloss glaze (optional)
- Jewelry pliers (round nose and flat nose)
- Oven for baking clay
Step 1: Sculpting the Orange Slice
-
Create the segments:
Start by rolling translucent orange clay into a log. Wrap this log in a thin sheet of white clay. Gently stretch and roll the cane until it is thin, then slice it into eight equal wedge-shaped pieces. -
Assemble the center:
Arrange the eight wedges in a circle to form the inner segments of the orange. Place a very thin snake of white clay in the center where the points meet to create the pith core. -
Add the rind:
Wrap the assembled circle in another thin strip of white clay. Finally, wrap a thicker layer of opaque orange clay around the outside to create the skin. -
Texture the surface:
Cut a slice from your cane about 1/4 inch thick. Use a needle tool to gently scratch tiny radiating lines into the translucent orange segments to mimic juicy pulp texture. -
Pre-pierce the hole:
Before baking, use a needle tool to create a hole near the top edge of the slice for the jump ring. Make sure it goes all the way through. -
Texture the skin:
Gently tap the outer orange rim with a toothbrush or a ball of aluminum foil to give it that realistic citrus peel texture.
Sticky Situation?
If your clay is sticking to your fingers and leaving fingerprints, try lightly dusting your hands with cornstarch or popping the clay in the fridge for 10 minutes.
Step 2: Crafting the Beads and Leaf
-
Roll the spherical beads:
Condition your clay and hand-roll several small spheres: two white, one opaque orange, one darker orange, and two yellow. Make them roughly the size of large peas. -
Pierce the beads:
Using your needle tool, carefully pierce a hole directly through the center of each bead. Rotate the bead as you push the tool through to prevent it from squishing. -
Texture the ‘sugared’ beads:
For the orange beads, I like to roll them gently over sandpaper or tap them with a stiff brush to create a matte, almost fuzzy texture that contrasts nicely with the smooth beads. -
Sculpt the leaf:
Shape a small teardrop of green clay. Flatten it slightly and use a blade to press a central vein and smaller side veins into the surface. -
Add hardware connection:
Insert a small eye pin into the top of the leaf charm so it’s secure, or pierce a hole near the stem if you prefer using a jump ring.
Scent-sational Upgrade
Mix a tiny drop of orange essential oil into the clay before baking. While the scent fades over time, it adds a lovely sensory surprise to your fresh keychain.
Step 3: Baking and Assembly
-
Bake the clay:
Arrange all your pieces on a ceramic tile or baking sheet. Bake according to your brand’s instructions (usually 275°F for 15-30 minutes). Let them cool completely. -
Finish the slice:
Once cool, you can lightly sand any rough edges. If you want a wet look for the fruit segments, apply a thin layer of UV resin or glaze just to the inner orange parts. -
Wire wrap the beads:
Thread each bead onto a headpin. Use your round nose pliers to create a wrapped loop at the top of each bead, trimming excess wire as needed. -
Attach the main chain:
Connect the orange slice to the bottom of a short length of chain using a large jump ring. Attach the other end of the chain to your main split keyring. -
Layer the beads:
Using small jump rings, attach your beaded charms at various points along the chain. Alternating colors creates a lively, clustered effect. -
Attach the leaf:
Fasten the green leaf charm near the top of the assembly, close to the keyring, to balance out the larger fruit slice at the bottom.
You now have a vibrant, summer-ready accessory perfect for brightening up your day
Sprinkle-Inspired Candy Colors
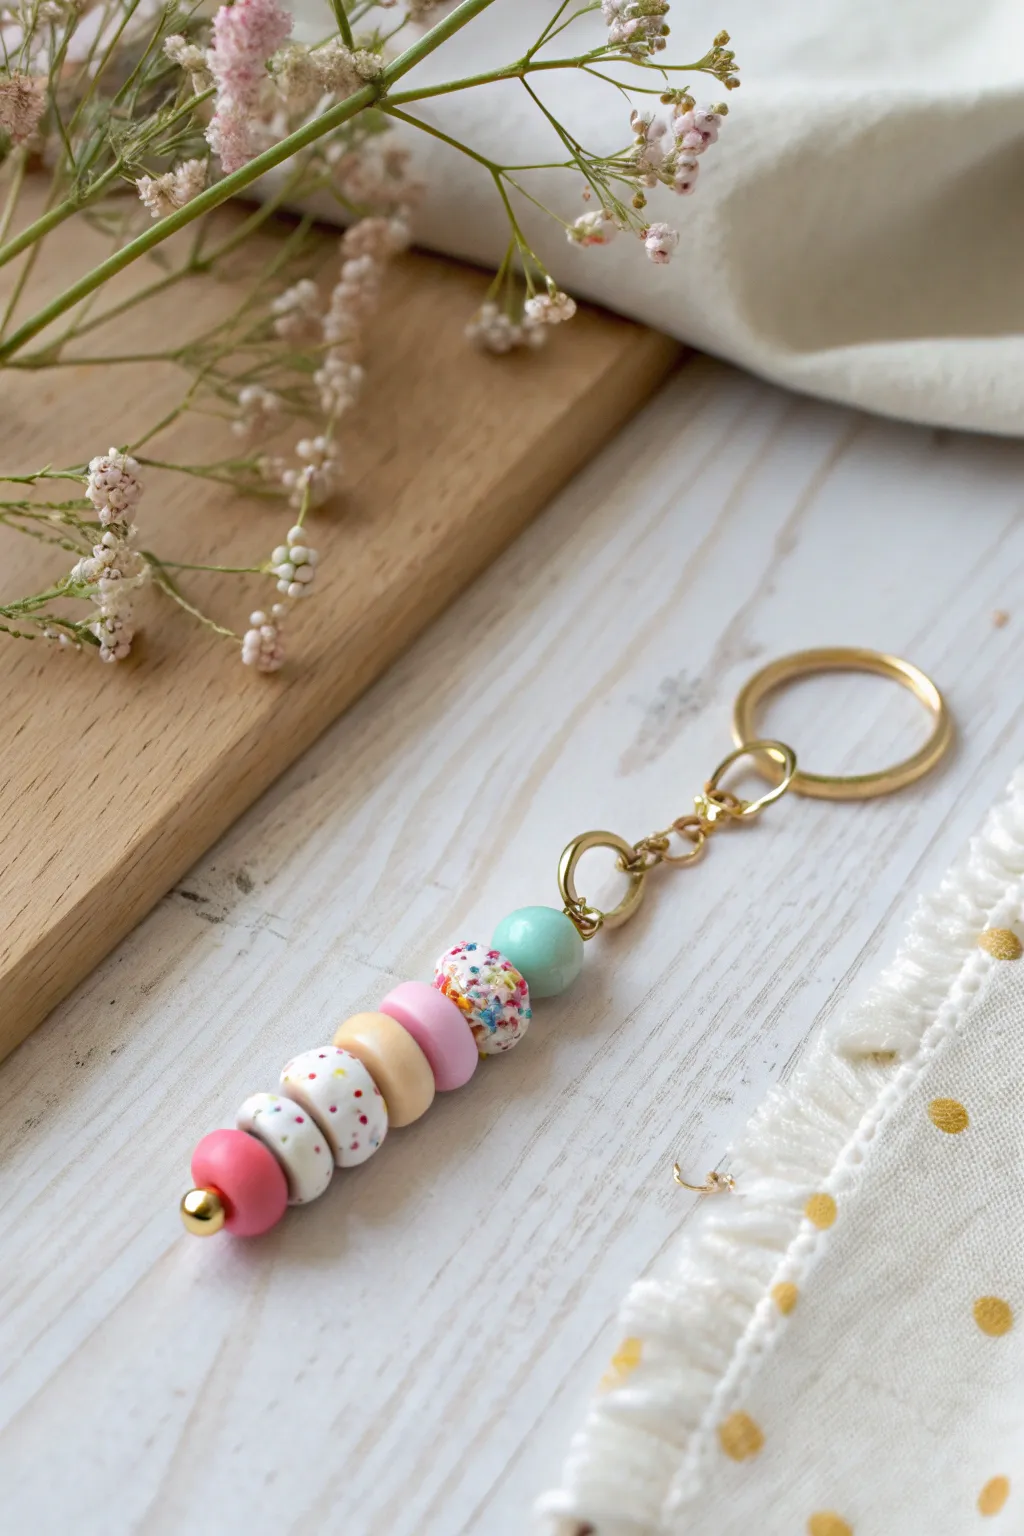
Create a sweet treat for your keys with this delightful stack of donut-shaped polymer clay beads. Featuring a soft palette of mint, pink, and cream with charming sprinkle details, this keychain brings a pop of candy-inspired fun to your everyday carry.
Step-by-Step
Materials
- Polymer clay in pastel pink, mint green, cream/white, and peach
- Gold keychain ring with attached chain
- Gold finish headpin (approx. 2-3 inches long)
- Small gold round bead (spacer)
- Acrylic paints (various bright colors for sprinkles)
- Fine detail paintbrush or toothpick
- Clay roller or pasta machine
- Small circle cutter (approx. 1/2 inch)
- Needle tool or piercing pin
- Round nose pliers
- Wire cutters
- Gloss glaze or varnish (optional)
Step 1: Shaping the Clay Beads
-
Condition the clay:
Begin by kneading each color of polymer clay separately until they are soft and pliable. This prevents cracking later. -
Roll the base shapes:
Roll small portions of each color into smooth spheres. You will need roughly 6-7 beads total for this design. -
Form the donuts:
For the donut-shaped beads (pink, peach, white), gently flatten the spheres into thick discs. -
Create the center holes:
Use a needle tool or toothpick to pierce the center of your beads. Wiggle the tool slightly to widen the hole enough for your headpin to pass through later. -
Keep one sphere round:
Leave the mint green bead as a perfect sphere rather than flattening it, creating visual variety at the top of the stack. -
Smooth the edges:
Gently rub the edges of your donut shapes with your fingertip to round them off, removing any sharp corners or fingerprints. -
Check sizes:
Line up your beads to ensure they are roughly uniform in diameter, though slight variations add to the handmade charm.
Step 2: Adding Details & Baking
-
Add texture (optional):
For the sprinkle beads, you can gently press tiny bits of real clay onto the surface now, or wait to paint them after baking for easier control. -
Bake the beads:
Place your beads on a ceramic tile or baking sheet lined with parchment paper. Bake according to your specific clay brand’s instructions (usually 275°F/130°C for 15-30 minutes). -
Cool down:
Allow the beads to cool completely before handling them. They harden fully as they cool. -
Paint the sprinkles:
Using a very fine brush or the tip of a toothpick, dab tiny dots of acrylic paint onto the white and cream beads to mimic sprinkles. Use red, blue, yellow, and green paints for a confetti look. -
Seal the beads:
Once the paint is dry, apply a coat of gloss glaze to seal the paint and give the beads a candy-like shine. I like to let this dry on a toothpick stand to avoid sticking.
Smooth Operator
To remove pesky fingerprints before baking, lightly brush your raw clay beads with a tiny amount of baby oil or cornstarch.
Step 3: Assembly
-
Start the stack:
Take your gold headpin and slide on the small gold spacer bead first. This acts as a stopper and a decorative finish at the bottom. -
Layer the beads:
Thread your clay beads onto the headpin in your desired order. The image shows: bright pink, white (dotted), white (dotted), peach, pale pink, cream (dotted), and finally the mint sphere. -
Trim the wire:
Use wire cutters to trim the excess headpin wire, leaving about 1cm (approx. 0.4 inches) of wire above the top mint bead. -
Create a loop:
Using round nose pliers, grasp the top of the wire and roll it away from you to create a secure, closed loop. -
Attach the hardware:
Open the bottom jump ring on your keychain chain using pliers. Slide your bead stack’s loop onto it. -
Secure the finish:
Close the jump ring securely so there is no gap for the beads to slip through.
Scented Clay
Mix a tiny drop of vanilla or strawberry essential oil into the clay while conditioning to make your donut beads smell like real sweets.
Enjoy showing off your sweet new accessory or wrap it up as a perfect handmade gift for a friend
Mini Mushroom Cottagecore Dangle
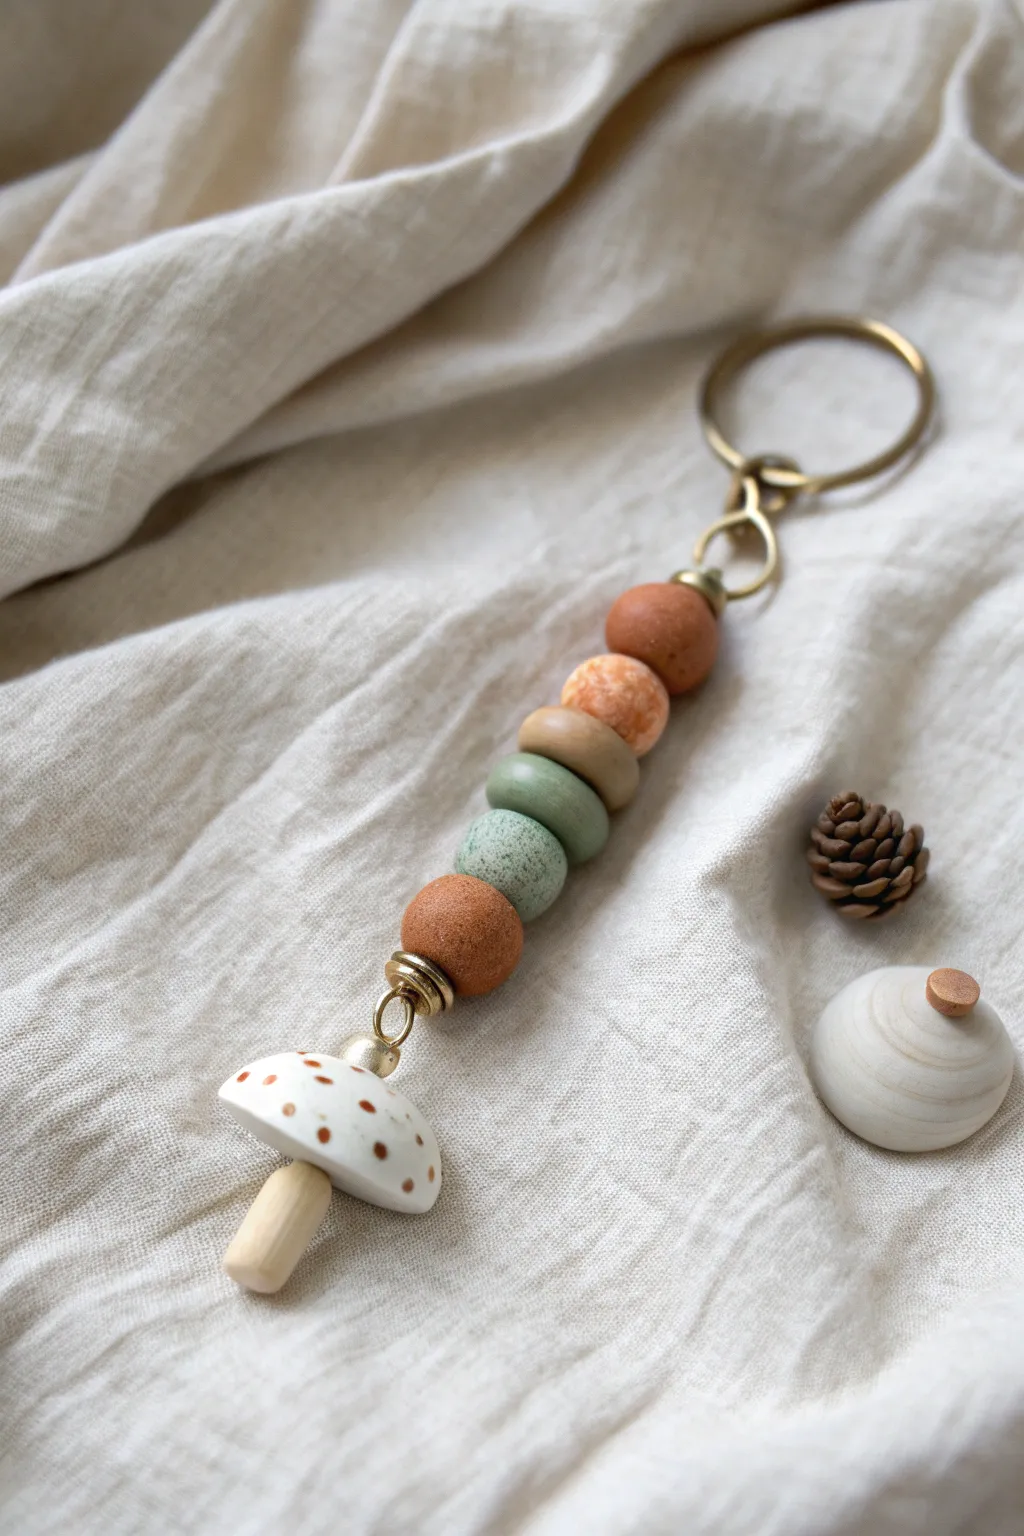
Capture the magic of the forest floor with this adorable, earthy keychain featuring a handcrafted mushroom charm. The mix of muted terracotta, saguaro green, and speckled clay beads creates a cozy, texture-rich accessory perfect for your keys or bag.
How-To Guide
Materials
- Polymer clay (white, terracotta, peach, sage green, beige, speckled/granite effect)
- Small rolling pin or acrylic roller
- Clay cutting blade
- Needle tool or toothpick
- Headpins (gold or bronze finish)
- Bronze keyring with chain extender
- Round nose pliers
- Wire cutters
- Oven and baking sheet
- Gloss glaze (optional for the mushroom cap)
- Medium grit sandpaper
Step 1: Sculpting the Mushroom
-
Form the cap:
Start by conditioning a small ball of white clay about the size of a hazelnut. Roll it into a sphere, then gently press it down on your work surface to flatten the bottom, shaping the top into a smooth dome. -
Create the stem:
Take a smaller amount of beige clay and roll it into a short cylinder. I like to make the top slightly narrower than the base for a natural look. Ensure the top is flat so it connects cleanly with the cap. -
Assemble the mushroom:
Press the stem firmly onto the center of the cap’s flat underside. You can use a tiny drop of liquid clay or translucent Sculpey for a stronger bond, blending the seam slightly with your finger or a tool if necessary. -
Add the spots:
Using tiny pinches of terracotta or brown clay, roll miniature balls and flatten them into discs. Press these randomly onto the white cap to create the classic toadstool pattern. -
Insert the hardware:
Carefully insert a headpin through the top center of the mushroom cap, pushing it all the way down through the stem until the flat head of the pin sits flush against the top of the cap.
Step 2: Creating the Beads
-
Measure the clay:
To keep the bead sizes somewhat consistent, roll out snake-shaped logs of your terracotta, peach, sage green, and speckled clay. Cut equal segments for each bead you intend to make. -
Roll the spheres:
Roll each measured segment between your palms to create smooth, round spheres. For this design, you’ll need roughly 5-6 beads of varying earthy tones. -
Form the rondelles:
Gently press down on the spheres with your finger or an acrylic block to flatten them slightly into disc or ‘rondelle’ shapes, rather than perfect balls. This helps them stack nicely. -
Create the hole:
Using your needle tool, pierce a hole through the center of each bead. Twist the tool gently as you push through to avoid distorting the shape. Make sure the hole is distinct enough for your headpin or cord. -
Bake everything:
Arrange your mushroom charm and loose beads on a baking sheet lined with parchment paper. Bake according to your clay manufacturer’s instructions (usually 275°F/135°C for 15-30 minutes). Let them cool completely.
Smooth Surface
Before baking, give your unbaked beads a quick wipe with a baby wipe or a little rubbing alcohol. This removes fingerprints and dust, saving you sanding time later.
Step 3: Assembly
-
Sand the beads:
Once cool, lightly sand any fingerprints or rough edges off your beads using medium-grit sandpaper for a matte, professional finish. -
Glaze the mushroom (Optional):
If you want the mushroom cap to look dewy, apply a thin coat of gloss glaze to just the cap area and let it dry. -
Stack the design:
Take a long eye pin or a piece of sturdy wire. Thread on the mushroom charm at the bottom first, securing it with a loop or knot if using cord, or attaching to the eye of the pin. -
Arrange the beads:
Thread your beads onto the wire above the mushroom. Follow the pattern in the image: terracotta, speckled green, matte sage, peach, terracotta. -
Create the top loop:
Using your wire cutters, trim the excess wire at the top, leaving about 1cm. Use your round nose pliers to curl this end into a secure loop. -
Attach the keyring:
Open the jump ring on your bronze keyring using two pairs of pliers (twist apart, don’t pull). Hook it through the loop you just made at the top of your bead stack. -
Final closure:
Twist the jump ring back into a closed position, ensuring the ends meet perfectly so the charm doesn’t slip off.
Texture Twist
Add texture to the mushroom stem by gently rolling it over a piece of coarse sandpaper or brushing it with an old toothbrush before baking for a realistic bark effect.
Now you have a charming piece of woodland art to carry with you everywhere you go
Pastel Moon And Star Theme
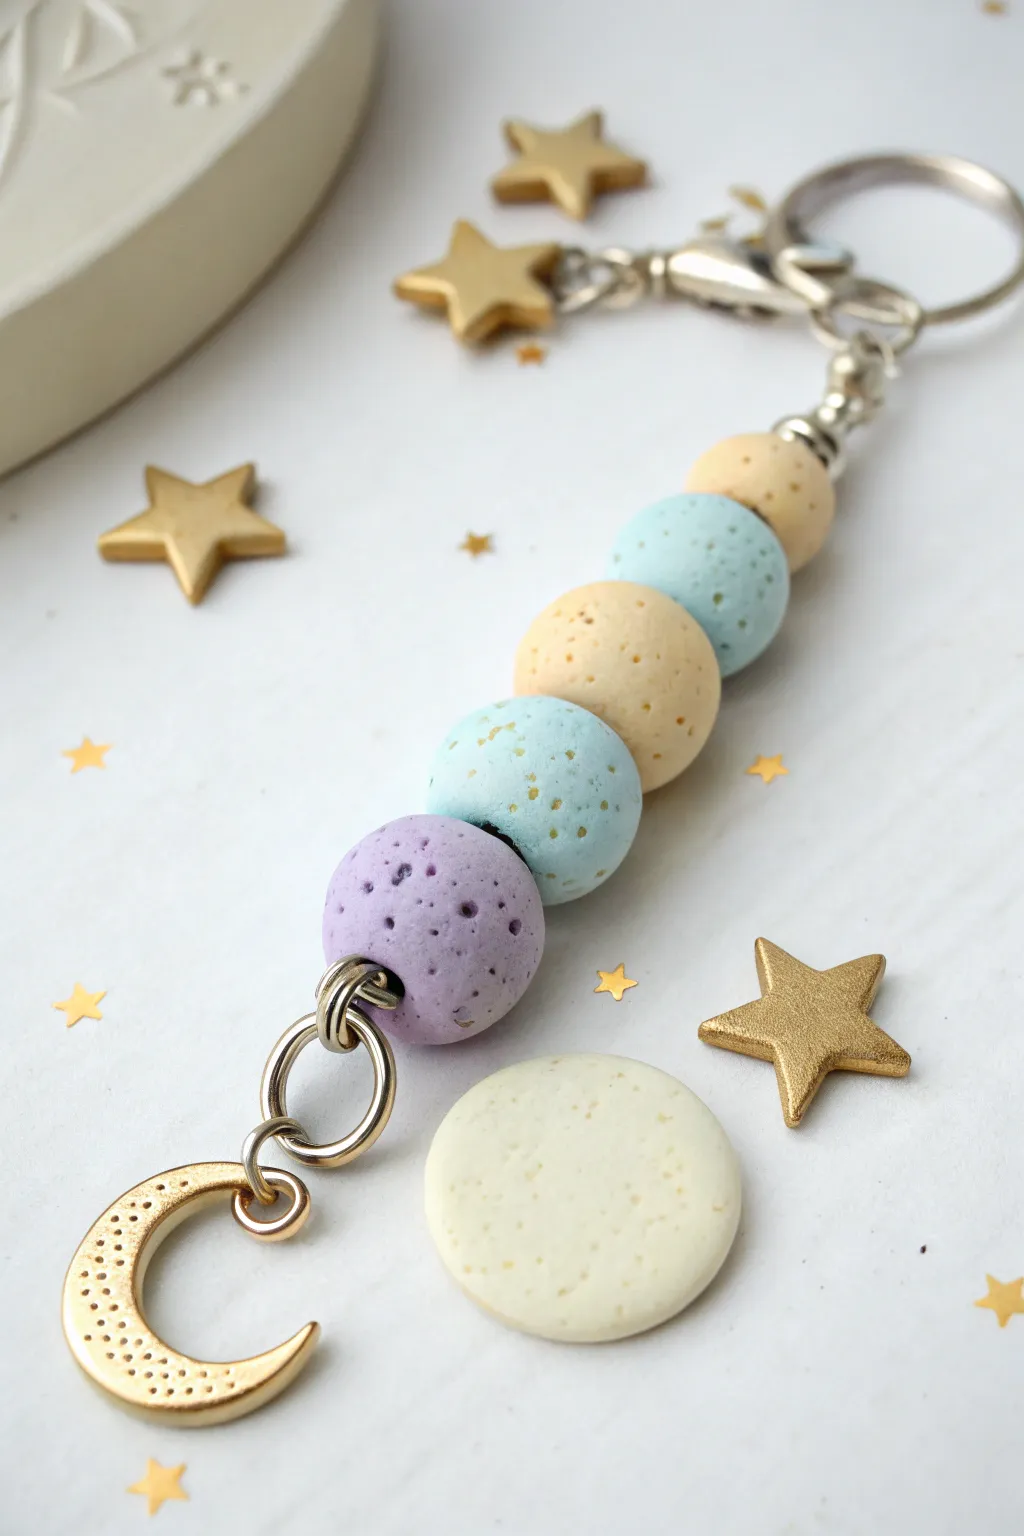
Capture the magic of the night sky with this dreamy pastel keychain featuring handmade textured beads and golden accents. The soft colors combined with a unique porous finish give these beads a moon-rock feel that pairs perfectly with the crescent charm.
Step-by-Step
Materials
- Polymer clay (light purple, pastel blue, pale yellow, cream)
- Small round bead roller (optional)
- Toothbrush or coarse salt (for texturing)
- Gold acrylic paint or gold mica powder
- Gold crescent moon charm
- Gold star charm
- Gold keychain clasp with swivel
- Gold split rings (jump rings)
- Eyepins (gold tone)
- Jewelry pliers (round nose and flat nose)
- Baking sheet and parchment paper
- Gloss or matte varnish (optional)
Step 1: Crafting the Moon Rock Beads
-
Condition the Clay:
Begin by thoroughly conditioning your polymer clay colors—purple, blue, yellow, and cream—until they are soft and pliable. If the colors are too bright, mix in a tiny amount of white to achieve that soft pastel look. -
Portion the Beads:
Pinch off small pieces of clay to form your beads. Aim for a graduated size effect: start with a slightly larger piece for the bottom bead (purple) and make each subsequent bead just a fraction smaller as you go up towards the cream one. -
Roll Smooth Spheres:
Roll each piece of clay between your palms or use a bead roller to create perfectly smooth spheres. Ensure there are no cracks or seams before moving to the texturing phase. -
Create the Moon Texture:
To get that specific porous, moon-rock texture, take a stiff-bristled toothbrush or a texturing tool and gently tap it all over the surface of each bead. You want small indentations, not deep gashes. -
Add Golden Speckles:
For a subtle sparkle, lightly brush a tiny amount of gold mica powder or gold paint onto the textured surface. You can flick the bristles of a brush to create uneven, organic speckles. -
Pierce the Holes:
Use a toothpick or a bead piercing pin to create a central hole in each bead. Gently twist the tool as you push through to avoid deforming your perfect spheres. -
Bake the Clay:
Arrange your beads on a parchment-lined baking sheet. Bake according to your specific clay brand’s instructions—usually around 275°F (130°C) for 15-30 minutes. Let them cool completely before handling.
Step 2: Assembly
-
Prepare the Bottom Bead:
Take your largest bead (the purple one) and thread an eyepin through it. Trim the excess wire, leaving about 1cm exposed. -
Make a Simple Loop:
Using your round nose pliers, bend the exposed wire tail 90 degrees, then roll it back towards the bead to create a closed loop. This will connect to the next bead. -
Link the Beads:
Connect the beads together using eyepins. You can thread one long eyepin through all beads if it’s long enough, creating loops at both ends. Alternatively, connect them individually with jump rings for more flexibility. -
Attach the Charm:
Open a large, sturdy jump ring using two pairs of pliers—twist specifically side-to-side, never pull apart. Slide on your gold crescent moon charm. -
Connect to the Bottom:
Hook this jump ring onto the bottom loop of your purple bead assembly, ensuring the moon hangs freely. -
Attach Top Hardware:
At the very top of your bead stack (the cream bead), attach another jump ring to the loop of the eyepin. -
Embellish the Chain:
Before closing the top jump ring, add a small gold star charm alongside the bead stack for extra celestial flair. -
Final Connection:
Connect the top assembly to your main keychain swivel clasp using a secure jump ring. Double-check all loops are tightly closed so nothing slips off.
Uneven Texture?
If the texture makes your bead misshapen, lightly roll it between your palms again after texturing. This softens the sharp edges while keeping the ‘craters’ intact.
Glow Up Idea
Use glow-in-the-dark polymer clay mixed with the pastels. Your moon beads will charge in the sun and softly glow when the lights go out.
Now you have a dreamy accessory to organize your keys or decorate your bag
Zodiac Color Stack With Symbol Bead
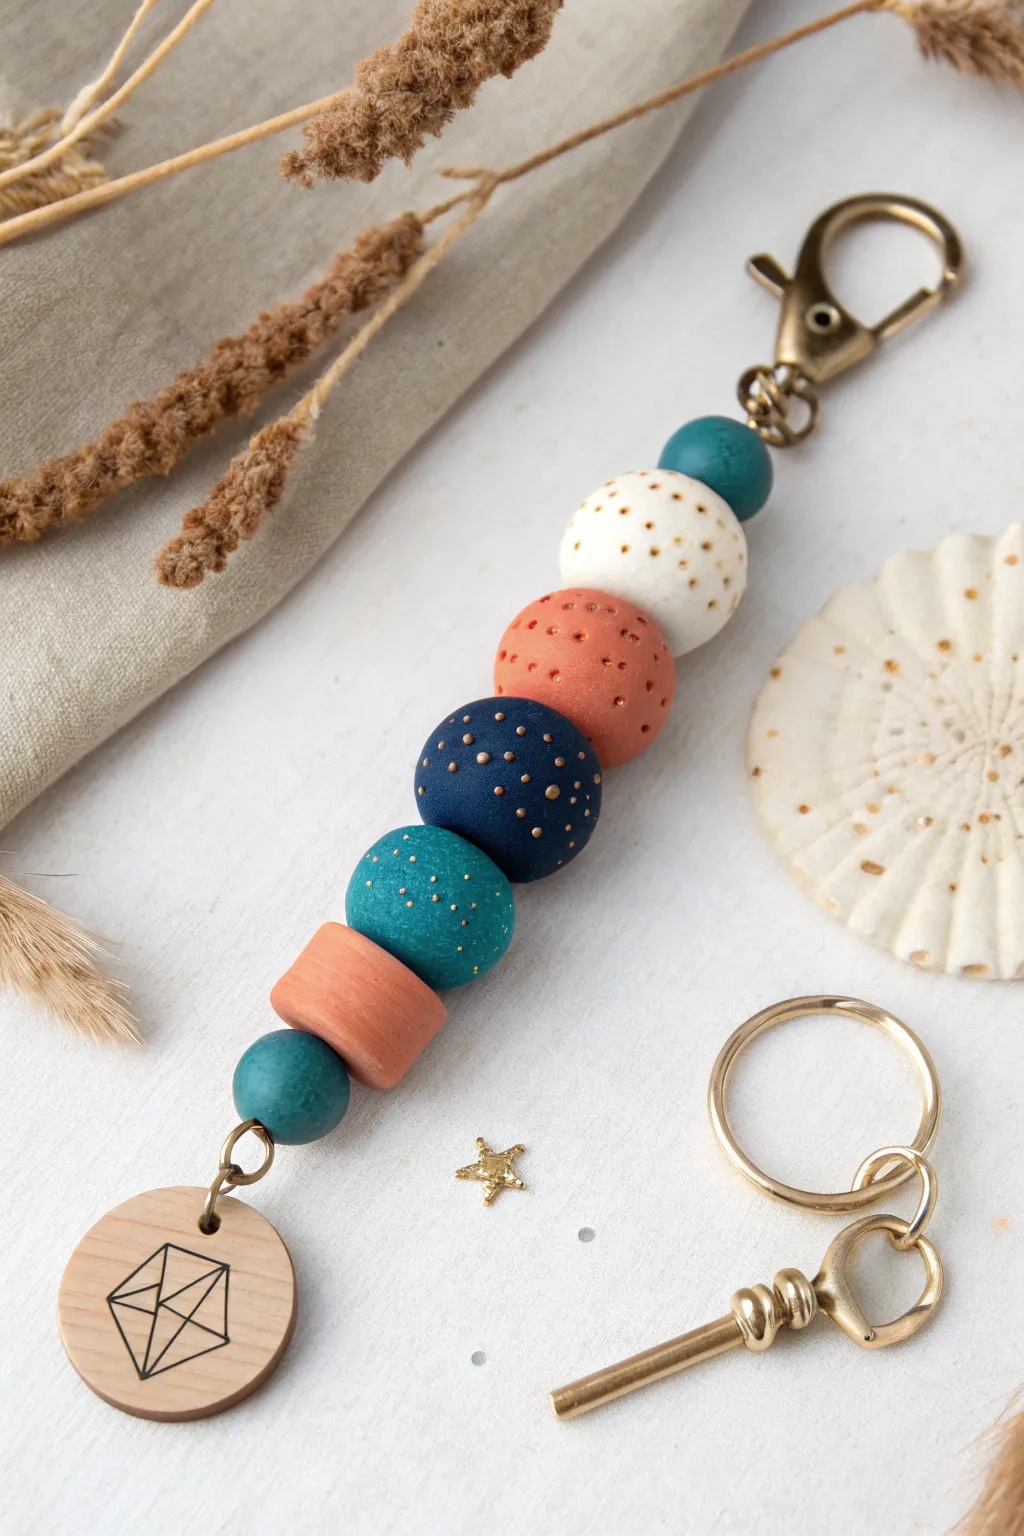
Capture the magic of the cosmos with this stunning polymer clay keychain featuring a custom-stamped wood charm. The speckled bead design mimics starry constellations, while the earthy and deep ocean tones create a sophisticated, grounded palette perfect for gifting.
Step-by-Step Guide
Materials
- Polymer clay (Teal, White, Terracotta, Navy Blue)
- Gold polymer clay or Gold acrylic paint (for speckles)
- Round wooden charm (pre-drilled)
- Black fine-tip permanent pen (e.g., Micron)
- Lobster clasp keychain hardware (brass/antique gold)
- Strong beading cord (waxed cotton or polyester)
- Toothpicks or a bead piercing tool
- Small jump rings (antique gold)
- Needle-nose pliers
- Baking sheet and parchment paper
- Small paintbrush or toothbrush (for speckling)
- Oven
Step 1: Crafting the Clay Beads
-
Condition the Clay:
Begin by kneading each color of polymer clay separately until they are soft and pliable. This prevents cracks and ensures a smooth finish. -
portion the Clay:
Roll your clay into balls to gauge the size. You will need: one medium teal ball, one large white ball, one large terracotta ball, one large navy blue ball, one medium teal ball, and one small teal ball. -
Shape the Rounds:
Roll the white, navy, and two medium/large teal portions into smooth, perfect spheres between your palms. -
Create the Disc Bead:
Take a portion of terracotta clay and roll it into a thick cylinder rather than a sphere. Flatten the ends slightly by pressing them gently against your work surface to create a disc shape. -
Add Texture:
For the terracotta round bead, I like to gently roll it over a piece of sandpaper or use a toothbrush to give it a slight stone-like texture before baking. -
Pierce the Holes:
Carefully insert a toothpick or piercing pin through the center of each bead. Rotate the tool as you push through to avoid distorting the shape.
Step 2: Adding the Starry Details
-
Apply Gold Speckles:
There are two ways to do this. You can embed tiny flecks of gold clay into the raw beads, or bake them first and paint them. For this look, dip a stiff brush or toothbrush into gold metallic paint and flick it over the raw navy, white, and teal beads. -
Use a Dotting Tool:
For more precise ‘stars’ like on the navy bead, use a needle tool to add tiny dots of gold paint in clusters. -
Bake the Beads:
Arrange your beads on a parchment-lined baking sheet. Bake according to your polymer clay package instructions (usually 275°F/135°C for 15-30 minutes). -
Cool Down:
Allow the beads to cool completely before handling. They are fragile when warm.
Uneven Holes?
If your bead holes squish during piercing, try refrigerating the raw clay balls for 10 minutes before piercing to harden them slightly.
Step 3: The Zodiac Charm
-
Prepare the Wood:
Take your round wooden blank and ensure the surface is clean and smooth. -
Draw the Geometric Symbol:
Using a fine-tip permanent marker, carefully draw a geometric diamond or crystal shape. You can sketch it lightly with pencil first if you’re nervous about freehanding. -
Attach the Jump Ring:
Use pliers to open a small jump ring and thread it through the hole in the wooden charm, then close it securely.
Pro Tip: Glossy Finish
For extra durability and shine, coat the cooled beads with a thin layer of water-based polyurethane varnish or UV resin.
Step 4: Assembly
-
Prepare the Cord:
Cut a length of cord (about 12 inches) and fold it in half. Attach it to the lobster clasp using a lark’s head knot. -
Thread the Beads:
String the beads onto the double cord in this order: small teal sphere, white sphere, terracotta sphere, navy sphere, medium teal sphere, terracotta disc, small teal sphere. -
Secure the Bottom:
Thread the wooden charm onto the cord ends at the bottom of the bead stack. -
Knot and Trim:
Tie a secure overhand knot right above the wooden charm to hold everything in place. Trim any excess cord close to the knot.
Clip your new celestial accessory onto your bag or keys to carry a little starlight wherever you go
Boho Multi-Strand “Messy Stack” Keychain
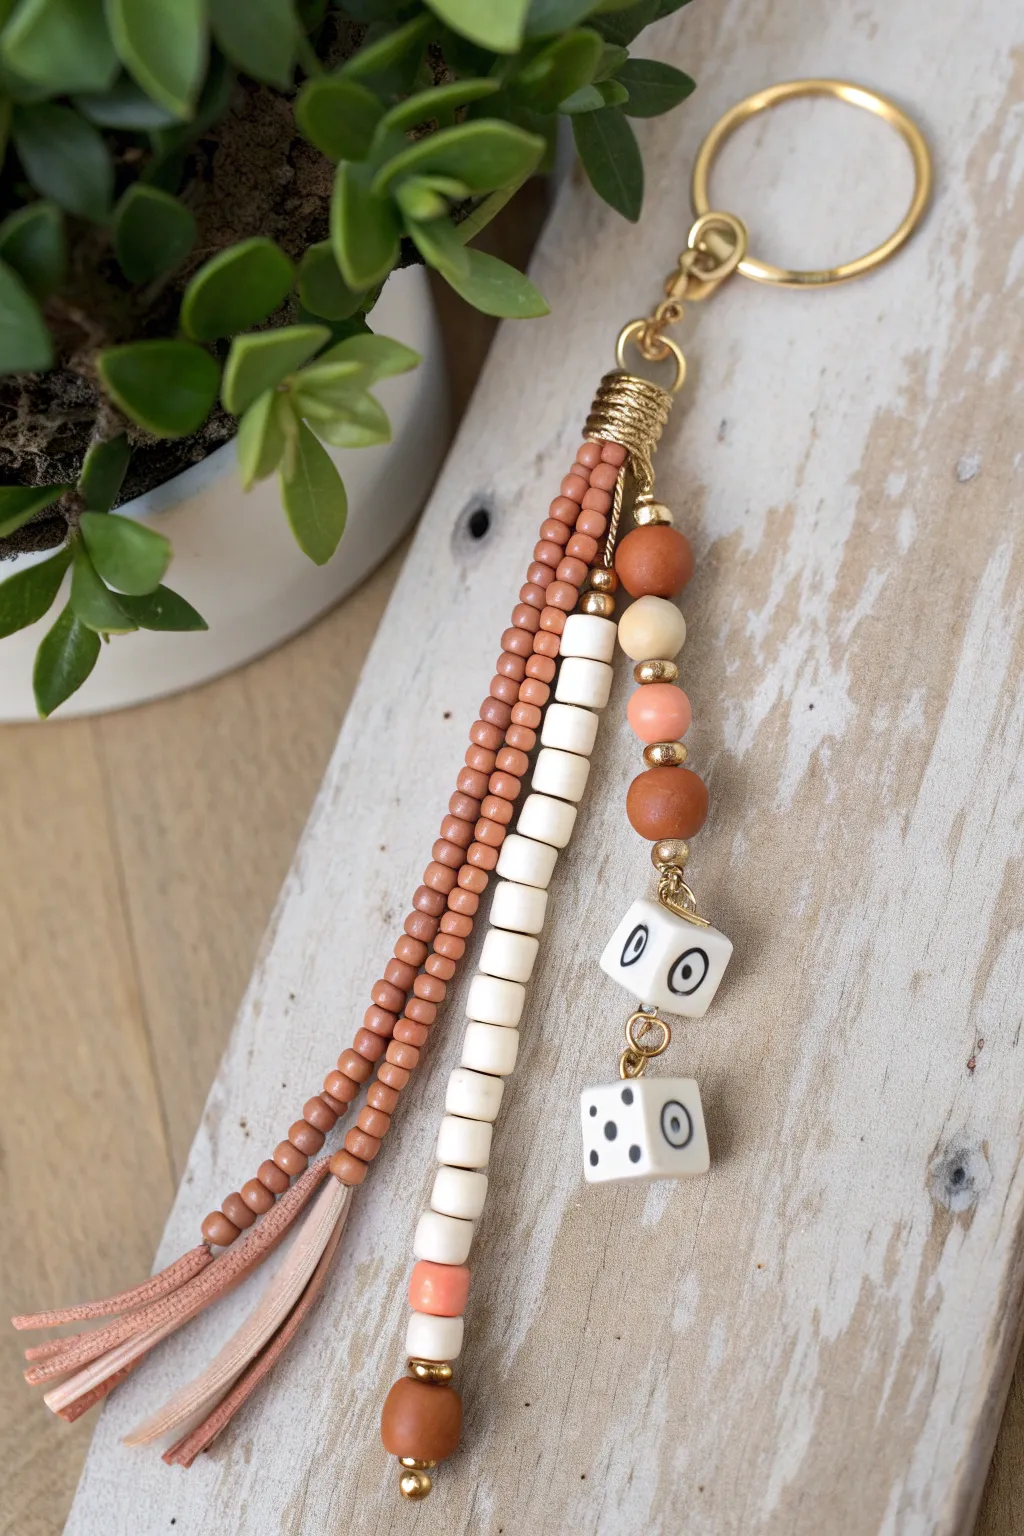
Embrace the perfectly imperfect look with this multi-strand keychain that combines varied textures and playful elements. Featuring earthy clay tones, sleek heishi beads, and whimsical dice charms, this accessory adds a touch of bohemian flair to any set of keys or handbag.
Step-by-Step
Materials
- Gold tone keyring with lobster clasp and jump ring
- Small gold tone wire-wrapped connector or large jump ring (for gathering strands)
- Gold jewelry wire (20-22 gauge) or gold headpins/eyepins
- Suede or faux leather cord (blush pink or light tan)
- Small seed beads (terracotta/dusty rose color)
- White disc beads (likely clay heishi or cylindrical bone beads)
- Round wood or clay beads (terracotta, cream, coral)
- White cube dice beads with black dots/circles
- Small gold spacer beads
- Gold finish cone or wire wrapping for the tassel top
- Jewelry tools: round nose pliers, chain nose pliers, wire cutters
Step 1: The Seed Bead Strands
-
Measure and cut wire:
Cut a length of jewelry wire approximately 5-6 inches long. Create a small loop at one end using your round nose pliers to act as a stopper, or simply start with a long headpin if available. -
String the beads:
Thread your terracotta-colored seed beads onto the wire until you have a strand about 3-4 inches long. I find using a bead spinner speeds this up significantly if you have one, but hand-threading works just fine. -
Create a loop:
Once the strand is full, use your round nose pliers to create a wrapped loop at the top, securing the beads in place. Trim any excess wire. -
Repeat for volume:
Make a second identical strand of seed beads. Having two strands adds visual weight and that signature ‘messy stack’ movement.
Wire Wrap Pro-Tip
When wrapping the suede tassel neck, tuck the start and end of the wire inside the tassel bundle before squeezing tight. This hides sharp edges so they don’t snag your clothes.
Step 2: The Heishi & Accent Strands
-
Build the white strand:
Cut another piece of wire. Start with a gold spacer bead, then thread on your white cylindrical beads (heishi or bone style). Thread enough to match the length of your seed bead strands. -
Finish the white strand:
Add a single coral-colored round bead at the bottom for a pop of color, followed by a small gold spacer. Secure the bottom with a small loop or stopper bead, and create a wrapped loop at the top to attach it later. -
Construct the charm strand:
This strand is built in segments. Using eye pins, create individual links: one link with a terracotta round bead, one with a cream wood bead, and one with a coral round bead. Put gold spacers between them for polish. -
Prepare the dice:
Take two headpins. Thread a white dice bead onto each one. On one, create a simple loop. On the other, you might want to add a small gold bead above the dice before looping. -
Assemble the charm dangle:
Connect your bead links together in a line using jump rings or by opening the eye loops directly. Attach the two dice charms to the bottom of this chain, letting them hang at slightly different lengths for a jagged look.
Step 3: The Tassel & Assembly
-
Cut tassel strips:
Cut several thin strips of your suede or faux leather cord, about 4-5 inches long each. -
Fold and wrap:
Fold the bundle of suede strips in half. Take a piece of gold wire and wrap it tightly around the top folded section (the ‘neck’) 5-6 times to create a decorative gold coil binding. -
Trim the ends:
Trim the bottom of the suede strips at an angle so they hang roughly the same length as your bead strands. -
Gather the components:
Open a large, sturdy jump ring. Slide on the loops of your two seed bead strands, the white heishi strand, the charm strand, and the top loop of your suede tassel. -
Attach to hardware:
Before closing that large jump ring, hook it onto the bottom loop of your main keychain hardware. -
Final secure:
Use two pairs of pliers to twist the jump ring closed securely so no strands can slip out. -
Check movement:
Give the keychain a shake. All strands should move freely and overlap comfortably without tangling too tightly.
Level Up: Lettering
Swap the white dice beads for white alphabet cubes to spell out a name, initials, or a short word like ‘VIBES’ for a personalized gift.
Enjoy the satisfying clinking sound of your new textured boho accessory
Chunky Oversized Clay Disc Beads
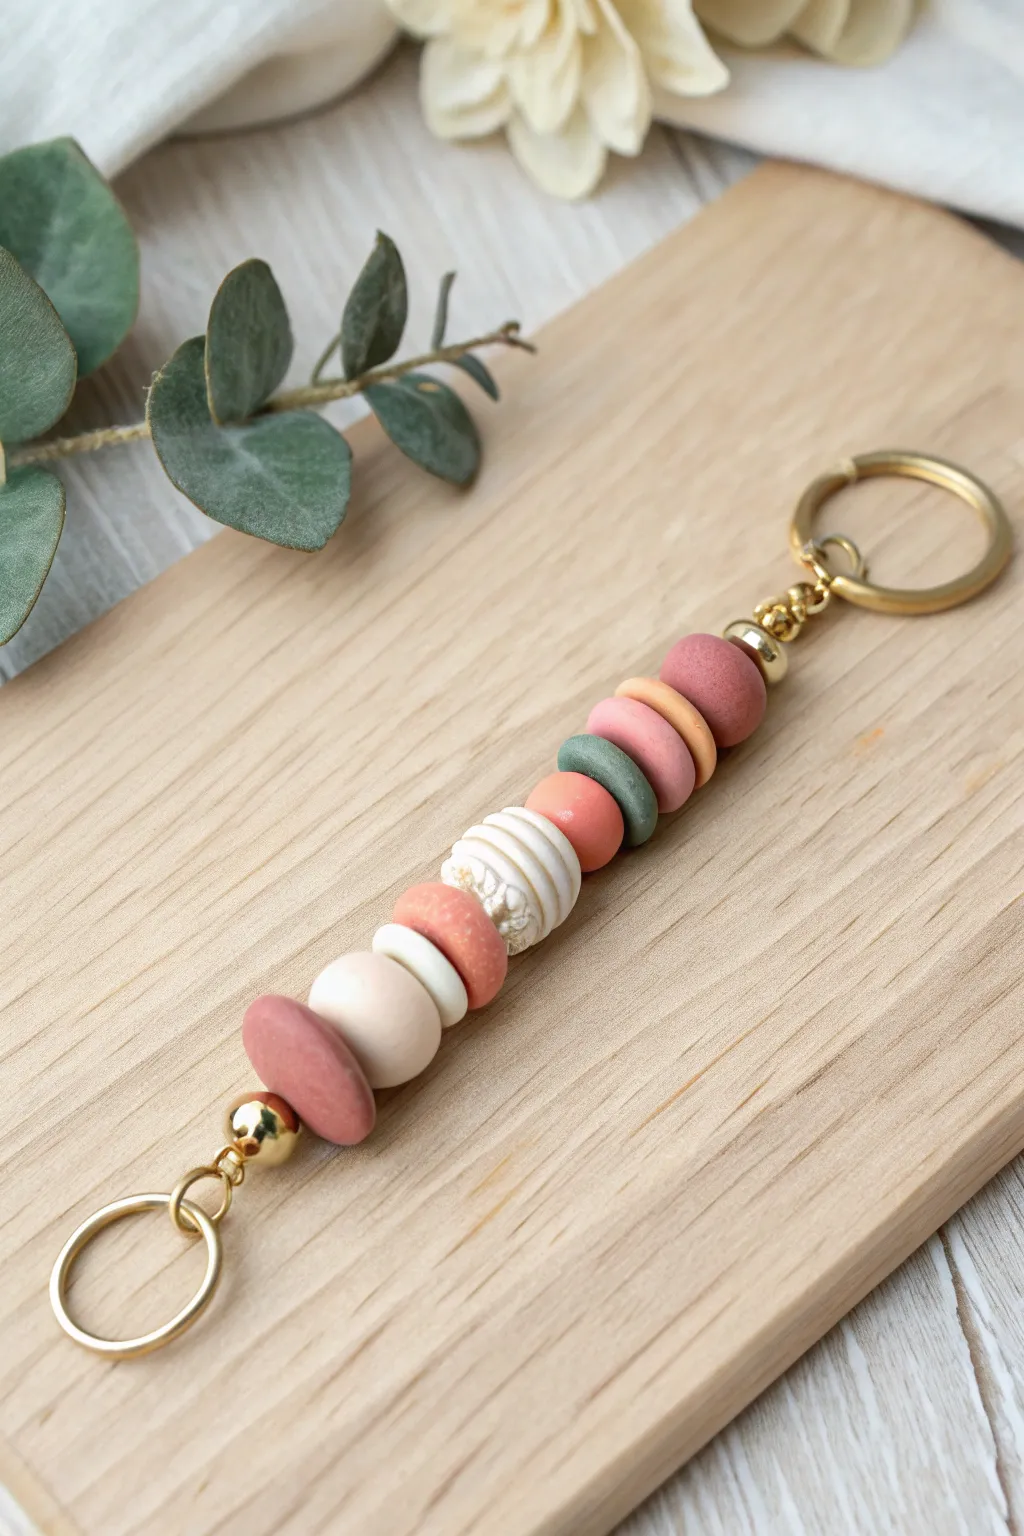
Embrace earthy tones and varied textures with this charming polymer clay keychain featuring chunky, oversized disc beads. The mix of matte solids, speckled finishes, and a unique ribbed focal bead creates a tactile and visually soothing accessory perfect for organizing your keys.
Detailed Instructions
Materials
- Polymer clay in muted colors: terra cotta, sage green, cream, pale peach, sand, rose pink
- Polymer clay rolling pin or pasta machine
- Small round clay cutters (approx. 1.5 cm and 2 cm diameter)
- Needle tool or toothpick
- Beading awl or pin drill (optional)
- Gold keychain hardware (large ring and smaller jump ring)
- Gold finish spacer beads (rondelle style)
- Gold finish end cap bead (bell shape)
- Strong beading cord (waxed cotton or polyester 1mm)
- Jewelry pliers (round nose and flat nose)
- Baking sheet and parchment paper
- Oven
Step 1: Creating the Clay Beads
-
Condition the Clay:
Start by thoroughly kneading each color of polymer clay until soft and pliable. This prevents cracking and ensures a smooth finish later. -
Roll Safe Sheets:
Roll out your clay colors into thick slabs, approximately 4-5mm thick. We want these beads to be chunky and substantial, not thin wafers. -
Cut the Disc Shapes:
Use your round cutters to punch out circles. You will need roughly 10-12 discs in varying sizes. Cut some with the smaller cutter and some with the larger one for visual variety. -
Create the Ribbed Focal Bead:
Take a ball of white or cream clay (about 1.5cm diameter) and roll it into a smooth sphere. Gently flatten it slightly so it becomes an oblate spheroid. -
Add Texture:
Using a needle tool or the side of a toothpick, press vertical indentations all around the circumference of the white bead to create a ribbed, pumpkin-like texture. -
Smooth the Edges:
Pick up each cut disc and gently tap the edges with your finger to smooth out any sharp cut lines or burrs, giving them a soft, rounded look. -
Make the Holes:
Using a needle tool, carefully pierce a hole through the center of each bead. I find twisting the tool as I push through helps prevent the bead from deforming. -
Widen the Channels:
Ensure the holes are large enough to accommodate your specific cord. Wiggle the tool slightly to widen the opening if necessary. -
Bake the Beads:
Arrange all your beads on a baking sheet lined with parchment paper. Follow the baking temperature and time instructions on your specific brand of polymer clay packaging. -
Cool Down:
Let the beads cool completely before handling. They are fragile when hot but will harden as they return to room temperature.
Uneven Bead Holes?
If holes distort during piercing, bake the beads first, then use a small hand drill or pin vise to create perfectly clean, round holes in the hardened clay.
Step 2: Assembly
-
Prepare the Cord:
Cut a length of beading cord approximately 12 inches long. This gives you plenty of slack for knotting. -
Attach the Bottom Ring:
Fold the cord in half and loop it onto the smaller gold ring using a lark’s head knot. -
Secure the Base:
Thread both ends of the cord through a gold metal bead to lock the ring in place and add a metallic accent at the bottom. -
Begin Beading Pattern:
Thread your first large clay disc bead onto both cords. Start with a darker color, like the terra cotta, to anchor the design. -
Layer the Discs:
Continue threading beads, alternating colors and sizes. Create a pleasing gradient or random mix, placing the ribbed white bead near the center as a focal point. -
Add Spacers:
While stacking, you don’t need spacers between every clay bead, but adding one or two near the top adds a nice touch. -
Top Hardware:
Once all clay beads are on, thread a gold end cap or a final gold bead to sit atop the stack. -
Knot the Top:
Tie a very secure overhand knot with both cords right against the top bead to hold everything tight. -
Attach Keyring:
Thread the excess cord through the loop of the main large keyring. -
Final Securement:
Loop the cord back down and tie another secure knot around the base of the keyring loop. Trim any excess cord and add a dab of superglue to the knot for extra security.
Matte Finish Pro Tip
To remove fingerprints before baking, lightly brush your raw clay beads with a little cornstarch or baby powder. This ensures a professional, velvety matte texture.
Enjoy the satisfying clink of your handmade clay beads every time you grab your keys