If you’ve been itching to make something small, sweet, and actually useful, cute clay bowls are my go-to studio obsession. These ideas are perfect for air-dry clay or polymer clay, and they’re all about that happy little “catchall for rings and bits” vibe.
Classic Pinch-Pot Trinket Dish
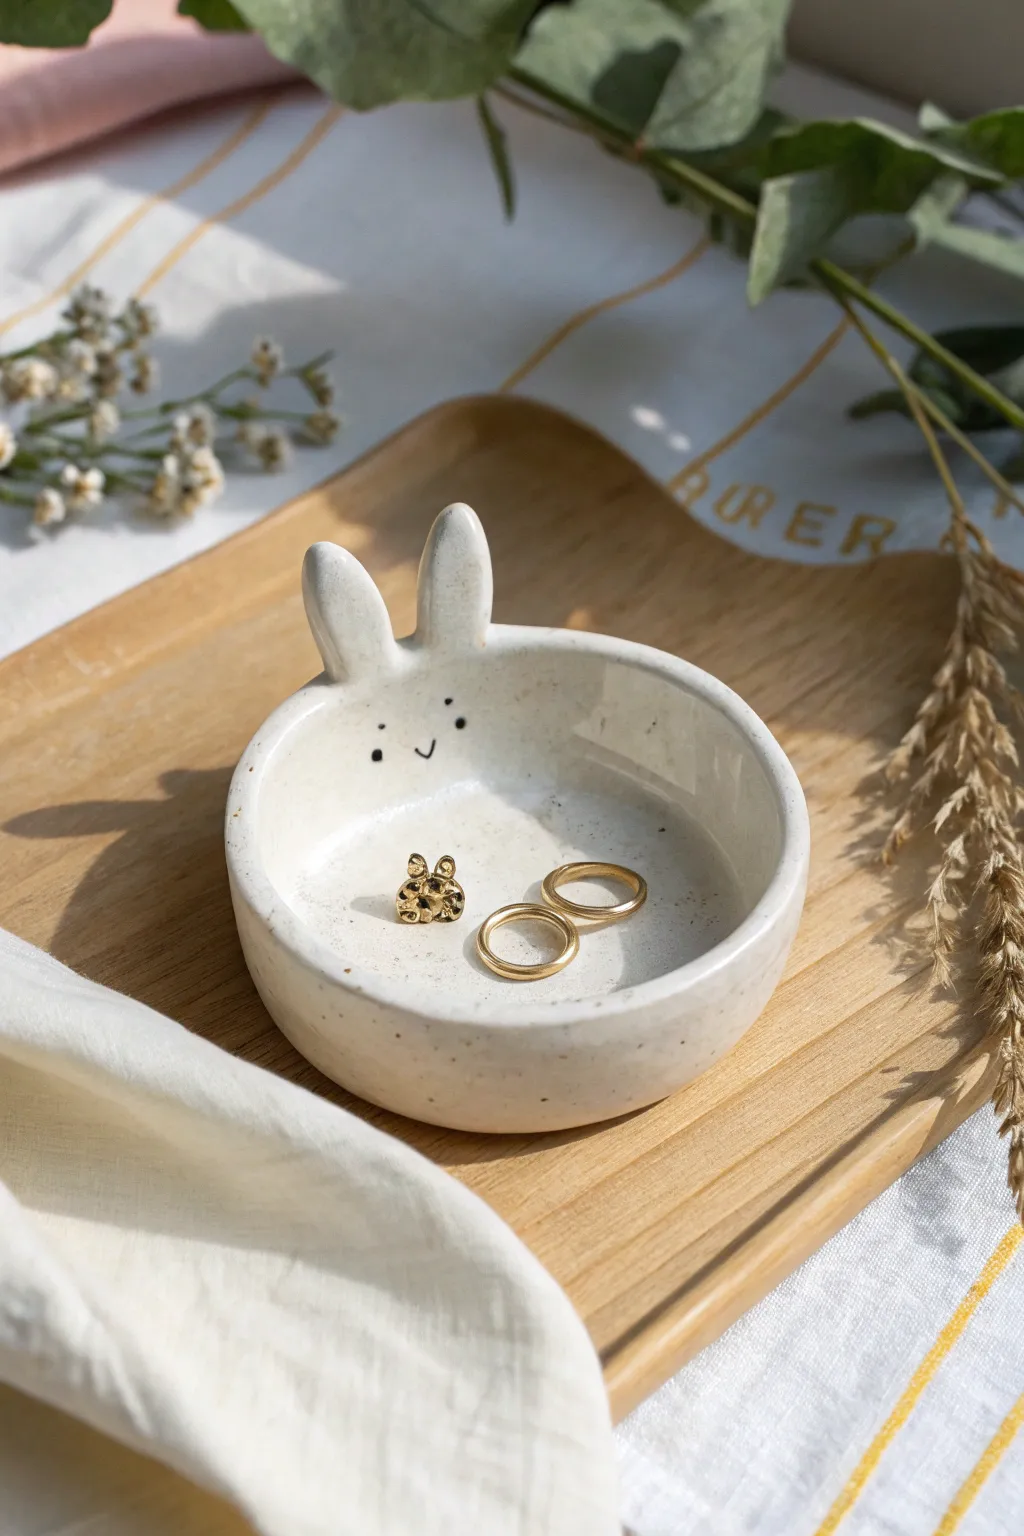
This charming little jewelry holder celebrates organic imperfection with its gentle floral shape and speckled finish. The subtle brown rim adds a rustic definition that makes your gold rings truly pop against the creamy glaze.
Detailed Instructions
Materials
- White polymer clay (or air-dry clay)
- Acrylic rolling pin
- Small bowl or cookie cutter (approx. 4 inches)
- Sculpting tool or toothpick
- Fine-grit sandpaper
- White or cream acrylic paint
- Gloss varnish or glaze
- Brown fluid acrylic paint (burnt sienna or raw umber)
- Small paintbrush
- Speckle medium or diluted black paint (optional)
- Old toothbrush (for speckling)
Step 1: Shaping the Clay
-
Condition the material:
Begin by taking a ball of white polymer clay about the size of a golf ball. Knead it in your hands until it is soft, pliable, and free of any cracks. -
Roll it out:
Place the clay on a clean, flat surface. Using your acrylic rolling pin, flatten the ball into an even slab that is roughly 1/4 inch thick. -
Cut the base circle:
Use a round cookie cutter or place a small bowl upside down on the clay as a template to cut out a perfect circle. Remove the excess clay. -
Form the rim:
Gently lift the edges of the circle upwards to create a shallow bowl shape. Cradle the clay in your palm to help it maintain a curved bottom. -
Create the wave effect:
Using your thumb and forefinger, gently pinch the rim at regular intervals to create an undulating, wavy wall. I like to keep these waves irregular for a more organic, handmade feel. -
Smooth the edges:
Dip your finger in a tiny bit of water (or clay softener) and run it along the rim to smooth out any sharp edges or fingerprints. -
Final shaping check:
Set the bowl down on your work surface and gently press the center down to ensure it has a flat bottom so it won’t wobble.
Rim Technique
For the most natural rim color, slightly dilute your brown paint with water so it flows into the clay’s texture like real glaze.
Step 2: Baking and Refining
-
Bake the piece:
Place your creation on a parchment-lined baking sheet. Bake according to your specific clay package instructions (usually 275°F for 15-30 minutes per 1/4 inch of thickness). -
Cool down:
Allow the bowl to cool completely inside the turned-off oven or on a wire rack before handling it further to prevent cracking. -
Sand for smoothness:
Once cool, use fine-grit sandpaper to buff away any rough spots on the rim or bumps on the surface.
Step 3: Painting and Glazing
-
Base coat:
Paint the entire bowl with two coats of creamy off-white acrylic paint, letting the first coat dry completely before adding the second. -
Add speckles:
Dip an old toothbrush into slightly diluted black or dark brown paint. Run your thumb across the bristles to flick tiny speckles onto the bowl’s interior. Practice on paper first to control the spray. -
Rim detailing:
Load a fine detail brush with burnt sienna or diluted brown paint. Carefully run the side of the brush along the very top edge of the wavy rim to create the rustic brown outline. -
Let the paint set:
Allow all paint layers to dry thoroughly, waiting at least an hour to ensure no moisture is trapped. -
Seal the glaze:
Apply a coat of high-gloss varnish or distinct glaze to the entire piece. This mimics the look of fired ceramic and protects your trinket dish. -
Final cure:
Let the varnish cure for at least 24 hours before placing any jewelry inside.
Add Gold Leaf
Instead of brown paint, use liquid gold leaf on the rim for a luxurious, modern finish that catches the sunlight beautifully.
Now you have a delicate catch-all dish perfect for keeping your favorite rings safe


Scalloped Rim Cute Clay Bowl
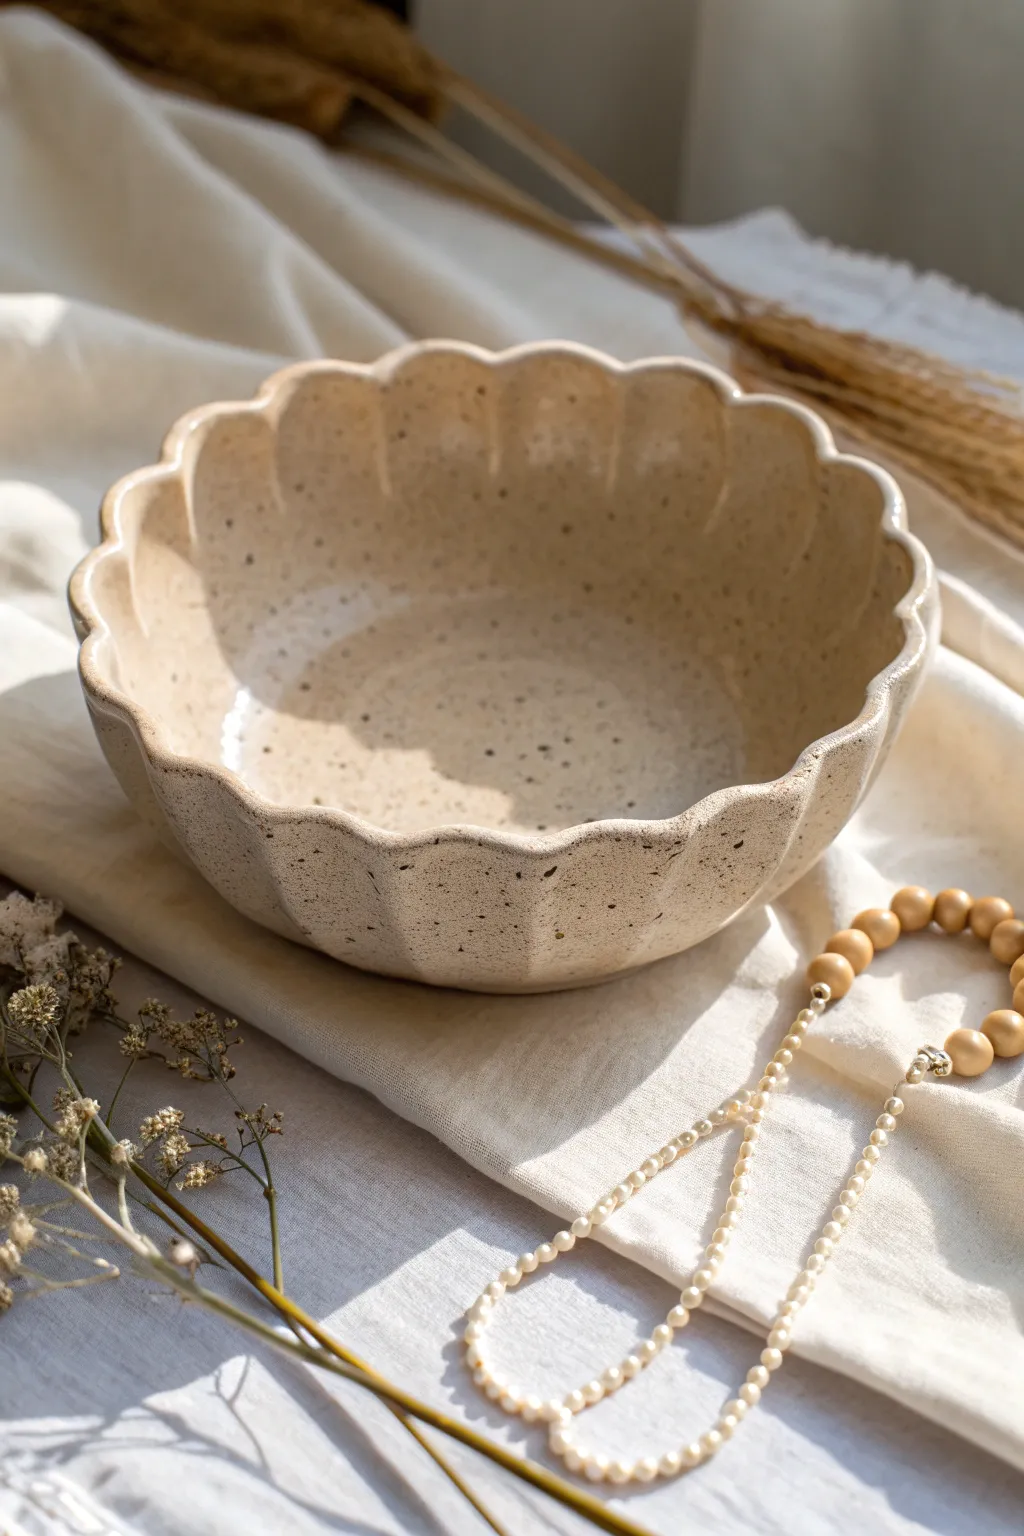
This charming bowl combines a timeless fluted edge with a modern, speckled finish, creating a piece that feels both rustic and refined. Its gentle curves and creamy glaze make it perfect for holding trinkets or serving snacks with style.
How-To Guide
Materials
- Stoneware clay (preferably a speckled variety)
- Rolling pin
- Canvas mat or cloth
- Bowl mold
- Needle tool or fettling knife
- Rib tool (flexible)
- Sponge
- Cream or off-white glaze (glossy)
- Kiln access
- Scoring tool
- Wooden modeling tool
Step 1: Forming the Base
-
Prepare the Clay:
Start by wedging your speckled stoneware clay thoroughly to remove any air bubbles. Wedge until the clay is smooth and pliable. -
Roll the Slab:
Using a rolling pin on a canvas mat, roll the clay out into an even slab. Aim for a consistent thickness of about 1/4 inch across the entire surface. -
Smooth the Surface:
Take a damp sponge or a flexible rib tool and gently compress the surface of the slab. This removes canvas textures and strengthens the clay particles. -
Drape the Clay:
Select a bowl mold that matches the general size you want. Carefully lift your slab and drape it over the mold (for a hump mold) or press it inside (for a slump mold) to establish the basic curve. -
Trim the Excess:
Once the clay is settled against the mold, use a needle tool to trim the excess clay around the rim, leaving a clean, circular edge.
Step 2: Sculpting the Scallops
-
Establish Spacing:
Before removing the bowl from the mold (if possible) or right after, lightly mark even intervals around the rim where the center of each scallop curve will be. -
Shape the inward Curves:
Using your thumb and forefinger, or the handle of a wooden spoon, gently press the rim inward at your marked intervals. This creates the ‘valley’ of the scallop. -
Shape the Outward Curves:
Between each valley, gently push the clay outward from the inside of the bowl to accentuate the rounded ‘peak’ of the scallop shape. -
Deepen the Fluting:
Run your finger or a modeling tool down the side of the bowl from each depression in the rim. This extends the scalloped shape down the wall of the bowl, giving it that ribbed, flower-like appearance. -
Refine the Rim:
Go around the rim with a damp sponge. Smooth any sharp edges created during the shaping process, ensuring the lip is rounded and soft to the touch.
Even Spacing Secret
Use a paper template cut into a circle and folded into 8 or 12 equal wedges. Place this over your clay slab to mark perfect scallop intervals before you start shaping.
Step 3: Finishing and Firing
-
Dry Slowly:
Cover the bowl loosely with plastic and let it dry slowly to the bone-dry stage. This prevents warping, especially around the delicate scalloped edges. -
Bisque Fire:
Once completely dry, fire the piece in the kiln to cone 04 (or your clay’s specific bisque temperature). -
Clean the Bisque:
Wipe the fired bowl with a damp sponge to remove any kiln dust before glazing. -
Apply Glaze:
Dip or brush a creamy, transparent, or semi-opaque gloss glaze over the entire piece. If you used regular clay instead of speckled clay, use a glaze that has speckles suspended in it. -
Wipe the Foot:
Use a sponge to wipe the glaze completely off the bottom foot of the bowl so it doesn’t fuse to the kiln shelf. -
Glaze Fire:
Load the kiln ensuring the bowl doesn’t touch other pots. Fire to the maturity temperature of your clay and glaze (typically Cone 5 or 6 for stoneware).
Gold Luster Accent
After the final glaze firing, paint real gold overglaze or luster along just the very edge of the scalloped rim and fire a third time for a luxurious, gilded finish.
Enjoy using your beautiful new bowl once it has completely cooled from the final firing


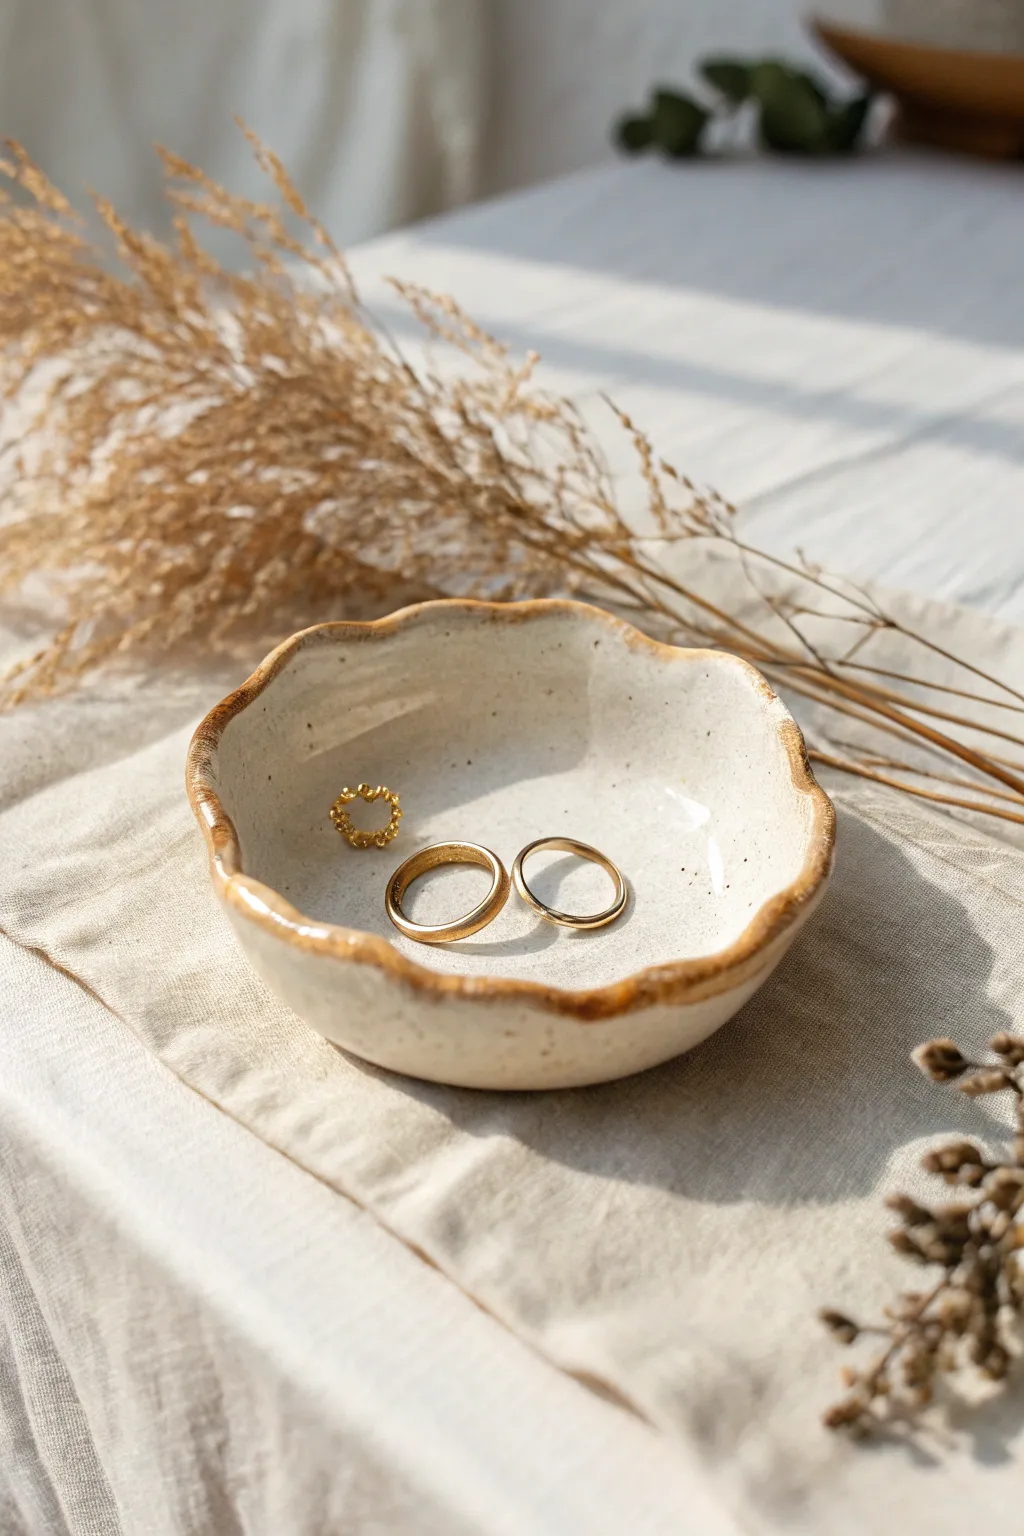
Gold-Trimmed Rim Jewelry Catchall
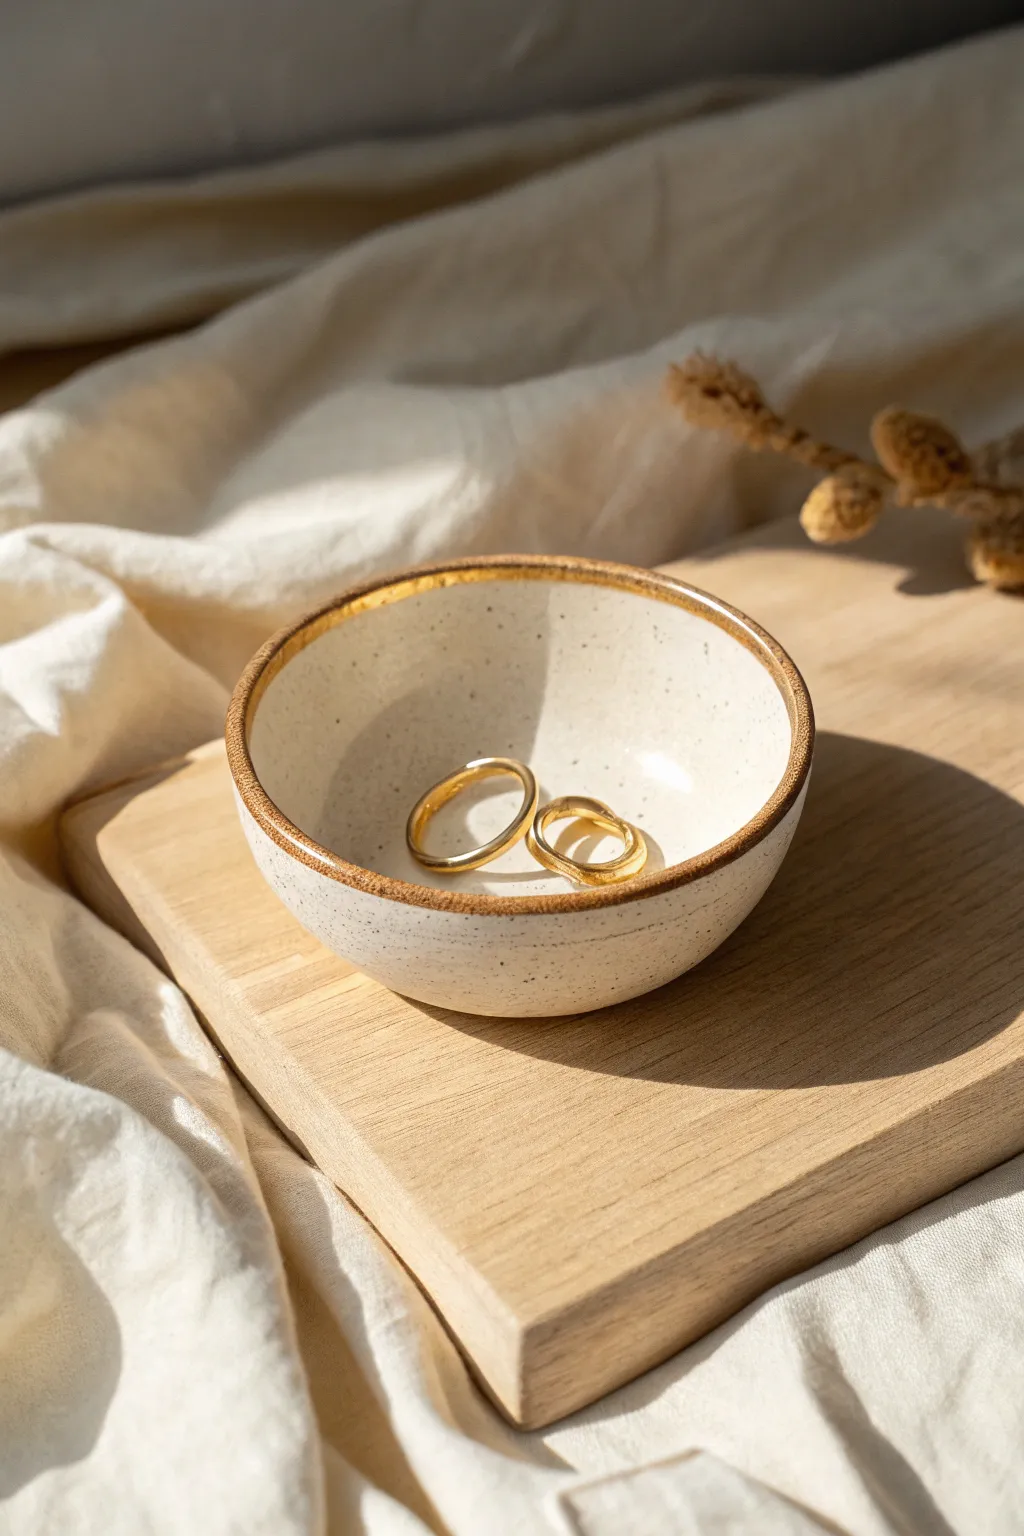
Elevate your nightstand with a ceramic-look catchall that feels effortlessly organic. The combination of speckled clay, a raw textured band, and a luxurious gold rim creates a sophisticated home for your favorite rings.
Step-by-Step
Materials
- White polymer clay (or air-dry clay)
- Black pepper or black coarse sand (for speckling)
- Rolling pin
- Small bowl or circle cutter (approx. 3-4 inch diameter)
- Small kiln-safe bowl (for forming, if baking) or plastic form
- Liquid gold leaf or gold paint pen
- Fine-grit sandpaper
- Gloss varnish (optional)
- Texturing tool (old toothbrush or stiff bristle brush)
- Craft knife
Step 1: Preparing the Speckled Clay
-
Condition the clay:
Start by warming up your white polymer clay in your hands until it becomes soft and pliable. If you are using air-dry clay, knead it briefly to ensure consistent moisture. -
Add the speckles:
To achieve that natural, stoneware pottery look, sprinkle a generous pinch of coarse black pepper or black sand onto the clay. I usually fold the clay over itself multiple times until the speckles are evenly distributed throughout the mass. -
Roll out the slab:
Place the clay on a smooth work surface. Use your rolling pin to flatten it into an even sheet, approximately 1/4 inch thick. Aim for consistent thickness to prevent uneven drying or baking.
Stone Effect
For a truly convincing stone look, mix in small amounts of translucent clay with the white before adding your pepper speckles.
Step 2: Shaping the Bowl
-
Cut the circle:
Press your circle cutter or use a craft knife around a small bowl template to cut a perfect circle from your speckled slab. -
Soften the edges:
Gently run your finger around the cut edge of the circle to smooth out any sharpness or jagged bits left by the cutter. -
Form the curve:
Drape your clay circle inside a small, oven-safe bowl to give it form. Gently press the clay down so it conforms to the bottom curve, but don’t squish it too thin. -
Create the raw texture band:
While the clay is still soft inside the mold, take a stiff bristle brush or a toothbrush. Lightly tap a band around the exterior rim area to create a rough, pitted texture that contrasts with the smooth interior. -
Refine the shape:
Check that the bowl hasn’t warped during texturing. Ensure the rim is generally level, though a slight organic wave adds to the handmade charm.
Level Up: Two-Tone Texture
Mask off the bottom half before texturing. Keep the bottom silky smooth and ‘glaze’ it with high-gloss varnish for a dipped ceramic effect.
Step 3: Curing and Finishing
-
Bake or dry:
Follow the manufacturer instructions for your specific clay. For polymer clay, bake it in the oven (usually at 275°F/135°C) while still in the ceramic form to hold its shape. -
Cool down:
Once baked, turn off the oven and let the clay cool completely before removing it from the mold. This prevents the clay from cracking due to thermal shock. -
Light sanding:
If there are any rough spots on the bottom or sharp edges that bother you, lightly sand them with fine-grit sandpaper. Wipe away all dust with a damp cloth. -
Glaze the interior:
Apply a coat of gloss varnish to the inside of the bowl only. This mimics the look of a glazed ceramic interior while keeping the outside matte and raw.
Step 4: Gilding the Edge
-
Prepare the gold:
Shake your liquid gold leaf or prime your gold paint pen well. You want the metallic pigment to be rich and opaque. -
Paint the rim:
Carefully run the gold paint along the very top edge of the bowl. Allow the brush to naturally overlap slightly onto the textured outer rim and smooth inner rim for an organic line. -
Add detail:
If the gold looks too thin, let the first layer dry for ten minutes and apply a second coat to ensure a solid, shiny metallic finish. -
Final cure:
Let the gold paint and varnish cure fully according to the bottle directions—usually 24 hours—before sitting your jewelry inside.
Now you have a chic, boutique-style dish ready to hold your daily treasures


Terrazzo Confetti Air-Dry Clay Bowl
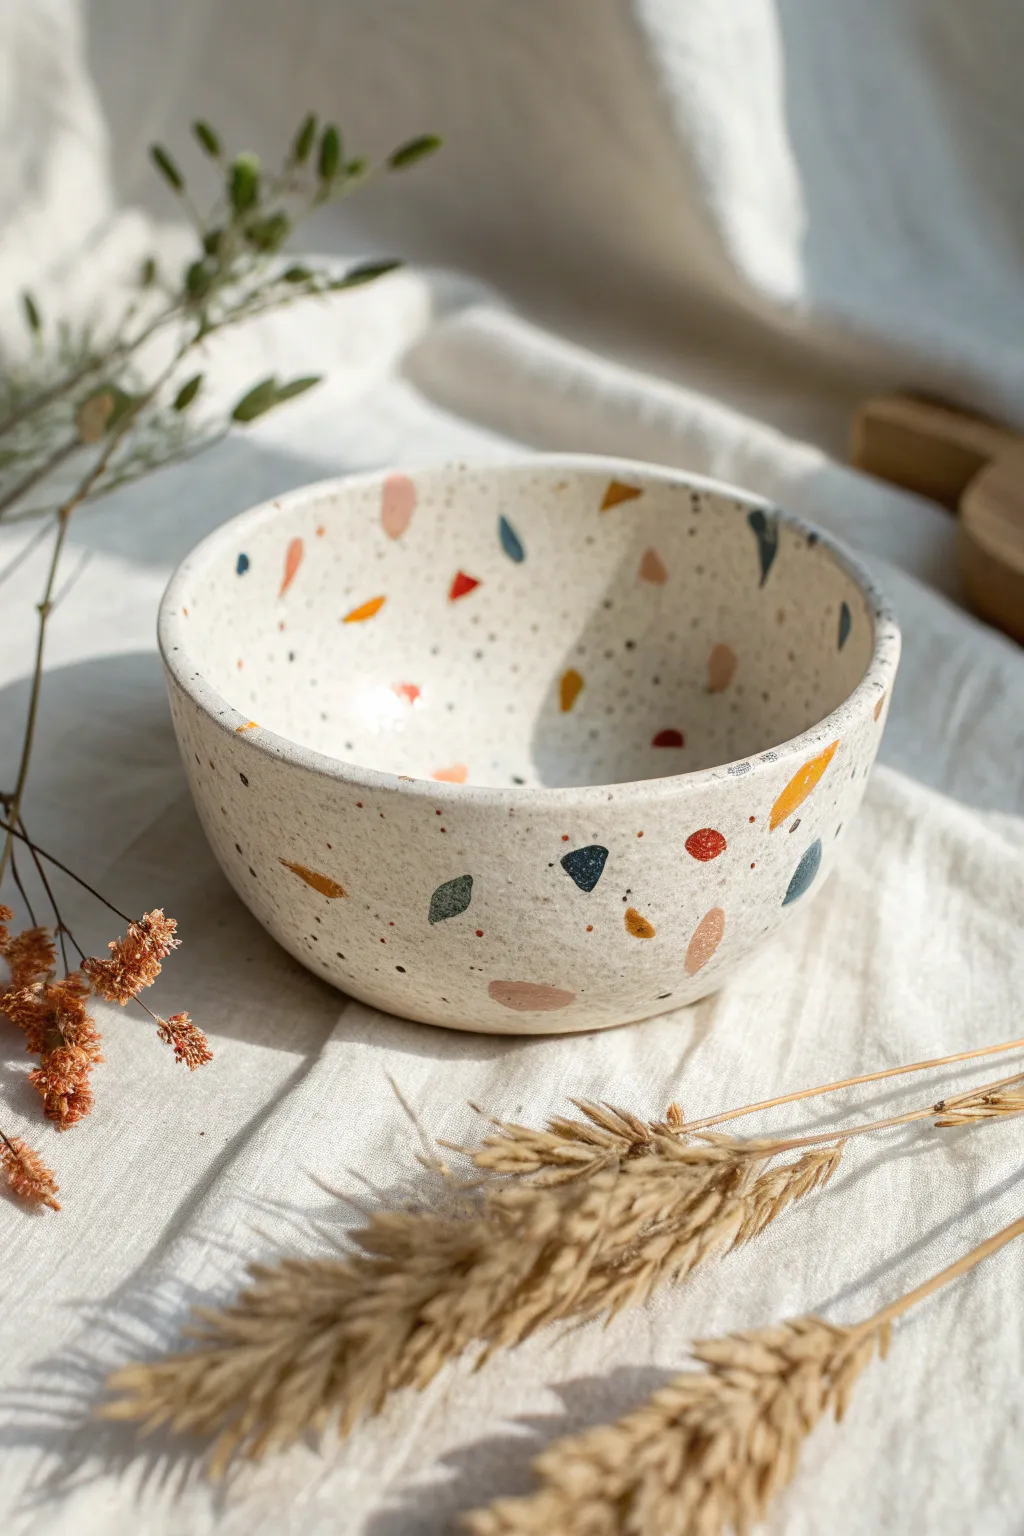
Bring a touch of modern artistry to your table with this faux-ceramic bowl, featuring scattered ‘confetti’ shapes and delicate speckling. Using humble air-dry clay, you’ll achieve a high-end, kiln-fired look that is perfect for holding jewelry or dried botanicals.
Step-by-Step Tutorial
Materials
- White or cream air-dry clay (approx. 500g)
- Acrylic paints (terracotta, mustard yellow, navy blue, forest green, muted pink)
- Fine-grit sandpaper
- Rolling pin
- Medium-sized mixing bowl (to use as a mold)
- Plastic wrap (cling film)
- Sponge or old toothbrush
- A small cup of water
- Clear gloss or satin varnish/sealant
- Detail paintbrush
- Craft knife or clay tool
Step 1: Prepping the Confetti
-
Mix your colors:
Take tiny, pea-sized amounts of white clay and mix a drop of acrylic paint into each to create your colored clay. You’ll want a muted palette: terracotta, mustard, navy, green, and pink. -
Create the chips:
Flatten these colored bits into thin, irregular pancakes. They don’t need to be perfect circles; organic shapes work best for terrazzo. -
Let them firm up:
Set these colored pieces aside for about 10-15 minutes. Allowing them to dry slightly makes them easier to cut into sharp, defined ‘chips’ without smearing later. -
Cut the confetti:
Using your craft knife, cut the colored clay into small, angular shards. Aim for variety—some triangles, some trapezoids, and tiny specks.
Cracks appeared?
Make a ‘slip’ paste by mixing scraping dust or fresh clay with water. Fill the cracks, smooth with a finger, let dry, and sand again. Repeat if needed.
Step 2: Forming the Bowl
-
Roll the base slab:
Take a large ball of white clay and roll it out into a slab about 1/4 inch thick. Try to keep the thickness consistent so it dries evenly. -
Apply the confetti:
Scatter your colored clay chips onto the slab. Press them gently into the white clay surface so they are embedded but not completely flush yet. -
Integrate the pattern:
Gently roll over the slab again with your rolling pin. This forces the colored chips into the white base, creating a smooth, unified surface. -
Prepare the mold:
Take your kitchen mixing bowl and cover the exterior (if using as a hump mold) or interior (if using as a slump mold) with plastic wrap. This prevents sticking. -
Shape the clay:
Lift your terrazzo slab and drape it over your prepared bowl mold. Use your hands to gently smooth it down, ensuring it takes the curve of the bowl without stretching the pattern too much. -
Trim the rim:
Using a craft knife, trim the excess clay around the edge to create an even rim. Smooth the cut edge with a damp finger to remove sharpness. -
Initial dry:
Let the bowl sit on the mold for 24 hours until it holds its own shape, then carefully remove it from the mold. -
Full cure:
Allow the clay to dry completely off the mold for another 24-48 hours. I find turning it upside down halfway through helps the bottom dry properly.
Level Up: Gold Leaf
Before sealing, apply small flecks of gold leaf adhesive and foil to empty white spaces. The metallic shine contrasts beautifully with the matte terrazzo.
Step 3: Finishing Touches
-
Sand for smoothness:
Once fully dry and hard, use fine-grit sandpaper to sand the entire surface. This reveals the crisp edges of your colored chips and smooths out any bumps in the white clay. -
Create the speckle effect:
Dilute a small amount of black or dark brown acrylic paint with water until it’s very runny. -
Flick the paint:
Dip an old toothbrush or stiff brush into the watery paint. Run your thumb across the bristles to flick tiny distinct specks all over the inside and outside of the bowl. -
Let speckles dry:
Give the splatter paint about 20 minutes to dry completely so you don’t smear it during sealing. -
Seal the piece:
Apply a coat of clear gloss or satin varnish. This protects the clay, intensifies the colors, and gives it that authentic ceramic shine.
Display your beautiful new bowl on a sunny windowsill or coffee table to catch the light

The Complete Guide to Pottery Troubleshooting
Uncover the most common ceramic mistakes—from cracking clay to failed glazes—and learn how to fix them fast.
Swirly Marble Coil Polymer Clay Bowl
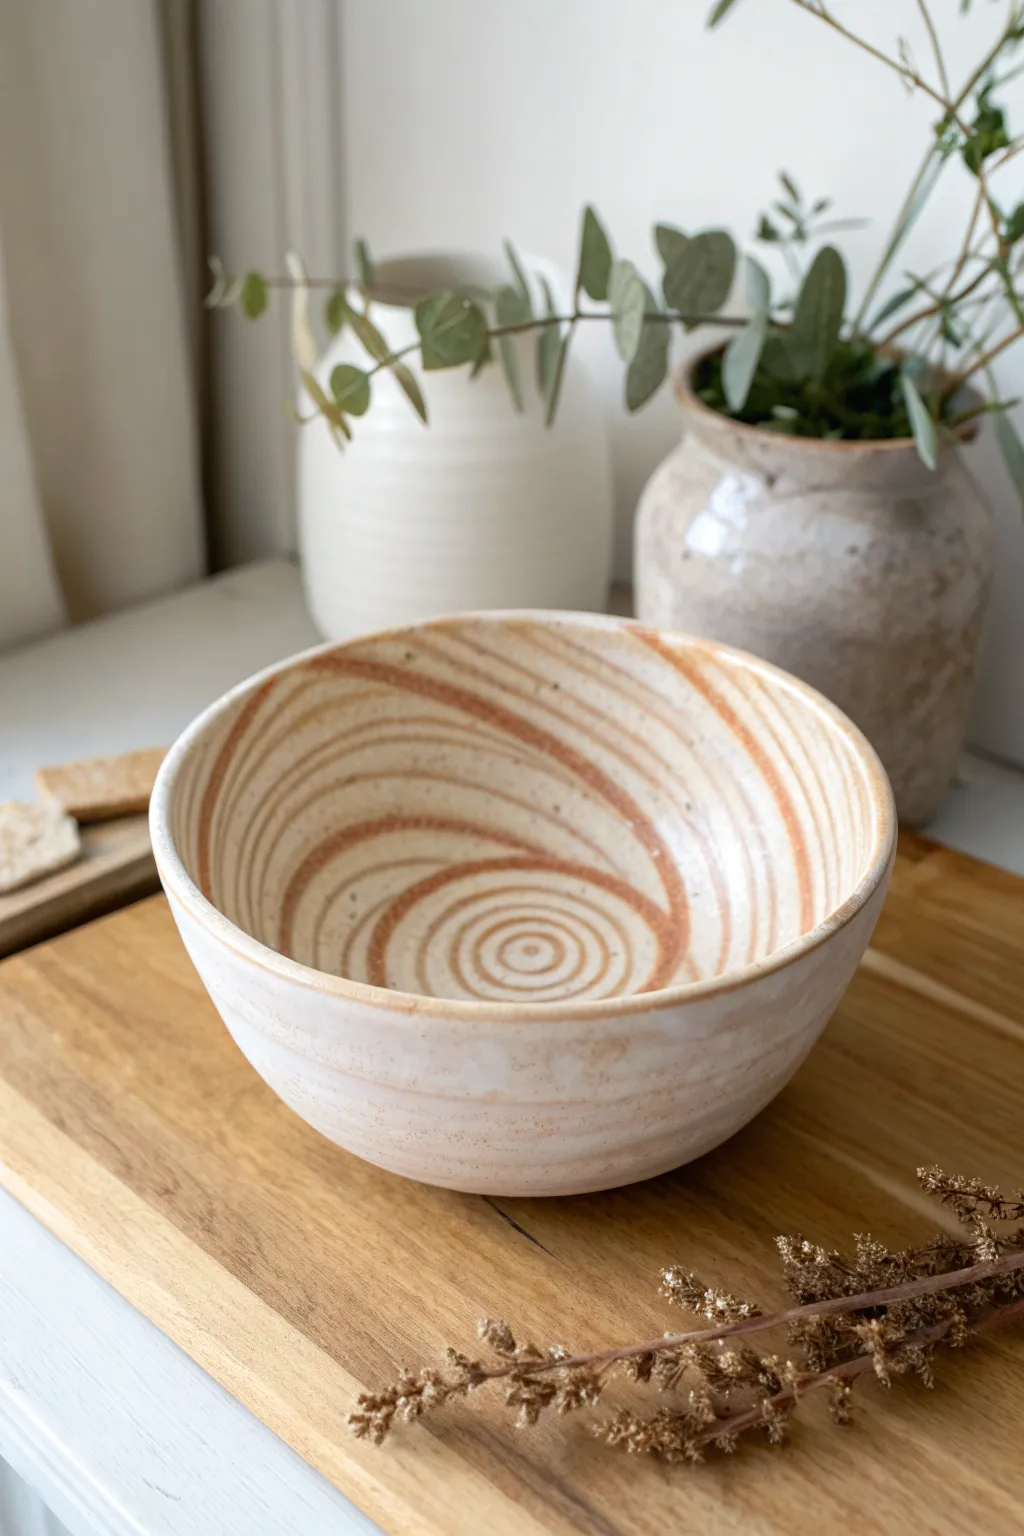
Achieve the high-end look of wheel-thrown pottery using humble polymer clay with this elegant spiraled design. The creamy white base and warm terracotta swirls create a sophisticated, organic vessel perfect for holding trinkets or purely for display.
How-To Guide
Materials
- White or Translucent White polymer clay (approx. 4oz)
- Terracotta or reddish-brown polymer clay (approx. 1oz)
- Oven-safe glass or metal bowl (to use as a form)
- Acrylic roller or pasta machine
- sharp tissue blade or craft knife
- Ceramic tile or glass work surface
- Isopropyl alcohol and baby wipes
- Cornstarch or baby powder (as a release agent)
- Fine-grit sandpaper (400, 600, 800 grit)
- Satin or Gloss water-based varnish (optional)
Step 1: Preparing the Clay Cane
-
Condition the Clay:
Begin by thoroughly kneading your white clay until it is soft and pliable. Do the same for the terracotta clay. Proper conditioning is key to preventing cracks later. -
Create Sheets:
Roll the white clay into a thick sheet (about 1/4 inch). Roll the terracotta clay into a much thinner sheet. -
Layer the Colors:
Place the thin terracotta sheet on top of the thick white sheet. Trim the edges so they align perfectly into a rectangle. -
Roll the Log:
Starting from one short end, tightly roll the stacked sheets into a ‘jelly roll’ log. Ensure there are no air pockets trapped between the layers. -
Elongate the Cane:
Gently squeeze and roll the log on your work surface to lengthen it and reduce its diameter. You want a long snake about 1/2 inch thick. -
Twist (Optional):
For a varied marbled effect, give the snake a gentle twist along its length before flattening it slightly with your roller into a long ribbon.
Step 2: Forming the Bowl
-
Prepare the Form:
Select your oven-safe bowl. Lightly dust the *outside* of the bowl (bottom up) with cornstarch. This prevents the clay from sticking permanently. -
Start the Coil:
Take your long flattened ribbon of clay. Starting at the very center of the bowl’s bottom, coil the clay ribbon around itself to create a tight spiral. -
Secure the Seams:
As you spiral outward, gently press the edges of the ribbon against previous row. You need them to fuse together, not just sit side-by-side. -
Smooth the Inside:
Once the spiral covers enough of the bowl form, use a smoothing tool or your fingers to gently blend the seams on the *back* side (this will become the inside of your bowl). I prefer to do this gently so the spiral pattern remains visible but the surface feels smooth. -
Refine the Rim:
Trim the top edge of your clay bowl with a blade to make it even. Smooth the rim with your finger dipped in a little baby oil or water to round it off. -
Clean Up:
Wipe the surface gently with a little isopropyl alcohol to remove any fingerprints or dust lint before baking.
Seamless Smooth
Use the back of a spoon to burnish the inside of the bowl while it’s still on the form. The curved metal is perfect for melding the coils without leaving unwanted tool marks.
Step 3: Baking and Finishing
-
Bake:
Bake the clay directly on the bowl form according to the clay manufacturer’s instructions (usually 275°F/135°C for 15-30 minutes per 1/4 inch of thickness). -
Cool Down:
Allow the piece to cool completely inside the oven. Removing it while hot can cause warping or cracking. -
Pop it Off:
Once cool, carefully slide a blade or fingernail under the edge to release the suction, then pop your clay bowl off the glass form. -
Sand:
Wet sand the edges and the interior with fine-grit sandpaper under running water. This gives it that professional, polished ceramic feel. -
Seal (Optional):
Apply a thin coat of satin or gloss varnish if you want it to look like glazed pottery. Let it dry fully.
Make it Speckled
Mix cracked black pepper or sand into your white clay before rolling. This creates a convincing stoneware pottery speckle that adds incredible realism.
Place your beautiful new faux-ceramic creation on a side table to add an instant touch of artisanal warmth to your decor
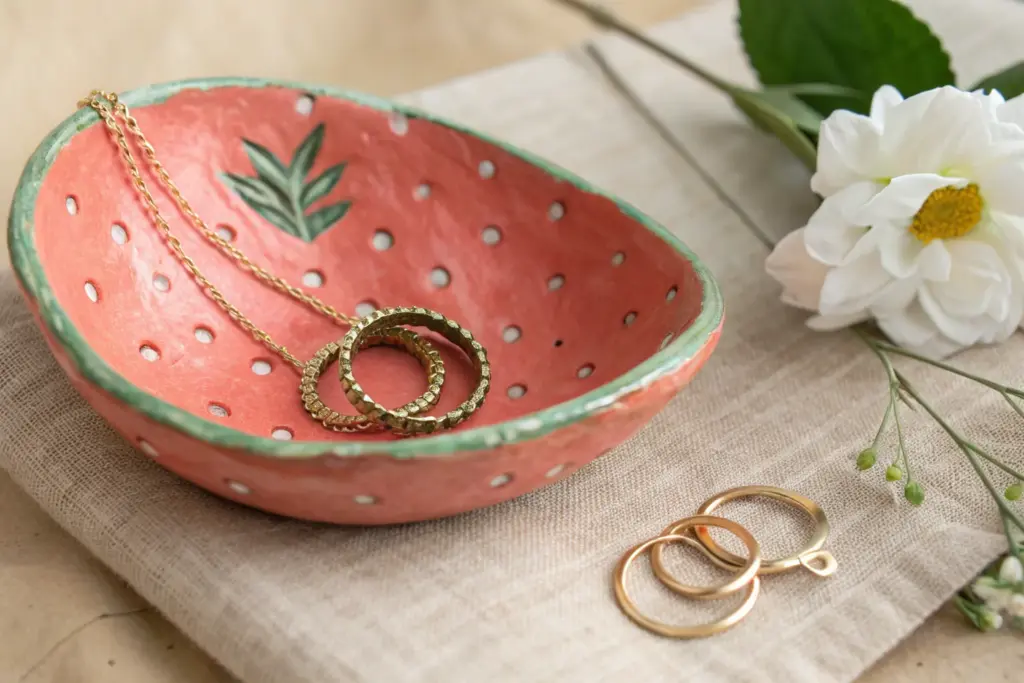
Watermelon Slice Clay Bowl

Capture the essence of summer with this delightful clay dish shaped like a juicy watermelon slice. Its curved form is perfect for holding your favorite rings or trinkets, bringing a pop of playful color to any nightstand.
Step-by-Step Guide
Materials
- Air-dry clay (white)
- Acrylic paints (pink, dark green, light green, black)
- High-gloss varnish or sealant
- Rolling pin
- Clay sculpting tools (or a butter knife)
- Small bowl or sandpaper block (for molding curvature)
- Fine-grit sandpaper
- Water cup
- Paintbrushes (medium flat brush and fine detail brush)
- Parchment paper
Step 1: Shaping the Slice
-
Condition the Clay:
Start by taking a generous handful of white air-dry clay and kneading it in your hands until it becomes soft, warm, and pliable. This prevents cracks later on. -
Roll the Slab:
Place the clay on a sheet of parchment paper and use your rolling pin to flatten it into an even slab, aiming for a consistent thickness of about 1/4 inch. -
Cut the Shape:
Using a needle tool or a butter knife, cut out a large ‘eye’ or ‘leaf’ shape—essentially a pointed oval. This forms the base of your watermelon slice. -
Smooth the Edges:
Dip your finger in a little water and run it along the cut edges of the clay to smooth out any roughness or stray bits from the cutting process. -
Form the Curve:
Gently lift the clay shape and place it inside a shallow bowl or over a curved object to create a gentle, concave dip. The clay needs to dry in this curved position to hold the bowl shape. -
Dry Completely:
Allow the clay to dry undisturbed for 24-48 hours. I like to flip it gently halfway through the drying process to ensure the bottom gets some air too. -
Sand for Perfection:
Once fully hard, take your fine-grit sandpaper and lightly buff the entire surface, paying special attention to the rim to ensure it feels smooth to the touch.
Cracks happen!
If small cracks appear while drying, mix a tiny bit of fresh clay with water to make a paste (slip) and fill them in. Let dry and sand smooth.
Step 2: Painting the Details
-
Paint the Interior:
Using a medium brush, paint the entire inside surface of the bowl with a bright, cheerful pink acrylic paint. You may need two coats for full opacity. -
Paint the Rind Outline:
Carefully paint the very top rim of the bowl white if you painted over it, or leave the natural clay color, creating a thin separation between the pink flesh and the green skin. -
Base Coat the Exterior:
Flip the bowl over and paint the entire outside bottom surface with a medium-light green shade. Let this layer dry completely. -
Add Dark Green Stripes:
Mix a darker forest green and use a flat brush to paint vertical, slightly wavy stripes along the outside green surface to mimic a real watermelon rind pattern. -
Blend the Rind:
While the stripes are still slightly wet, you can softly feather the edges into the lighter green for a more natural look, or keep them graphic and bold depending on your preference. -
Paint the Seeds:
Switch to your smallest fine detail brush and black paint. Dab small teardrop shapes onto the pink interior, scattering them randomly but keeping them pointing generally toward the center. -
Seal the Deal:
Once all paint layers are bone dry, apply a generous coat of high-gloss varnish. This not only protects the paint but gives the ‘fruit’ a permanent, juicy sheen.
Glossy finish tip
Apply the varnish in thin layers rather than one thick glob. This prevents drips and drying bubbles, keeping your finish glass-like.
Now you have a vibrant, handmade accent piece ready to cradle your favorite jewelry essentials


What Really Happens Inside the Kiln
Learn how time and temperature work together inside the kiln to transform clay into durable ceramic.
Monstera Leaf Impression Catchall Bowl
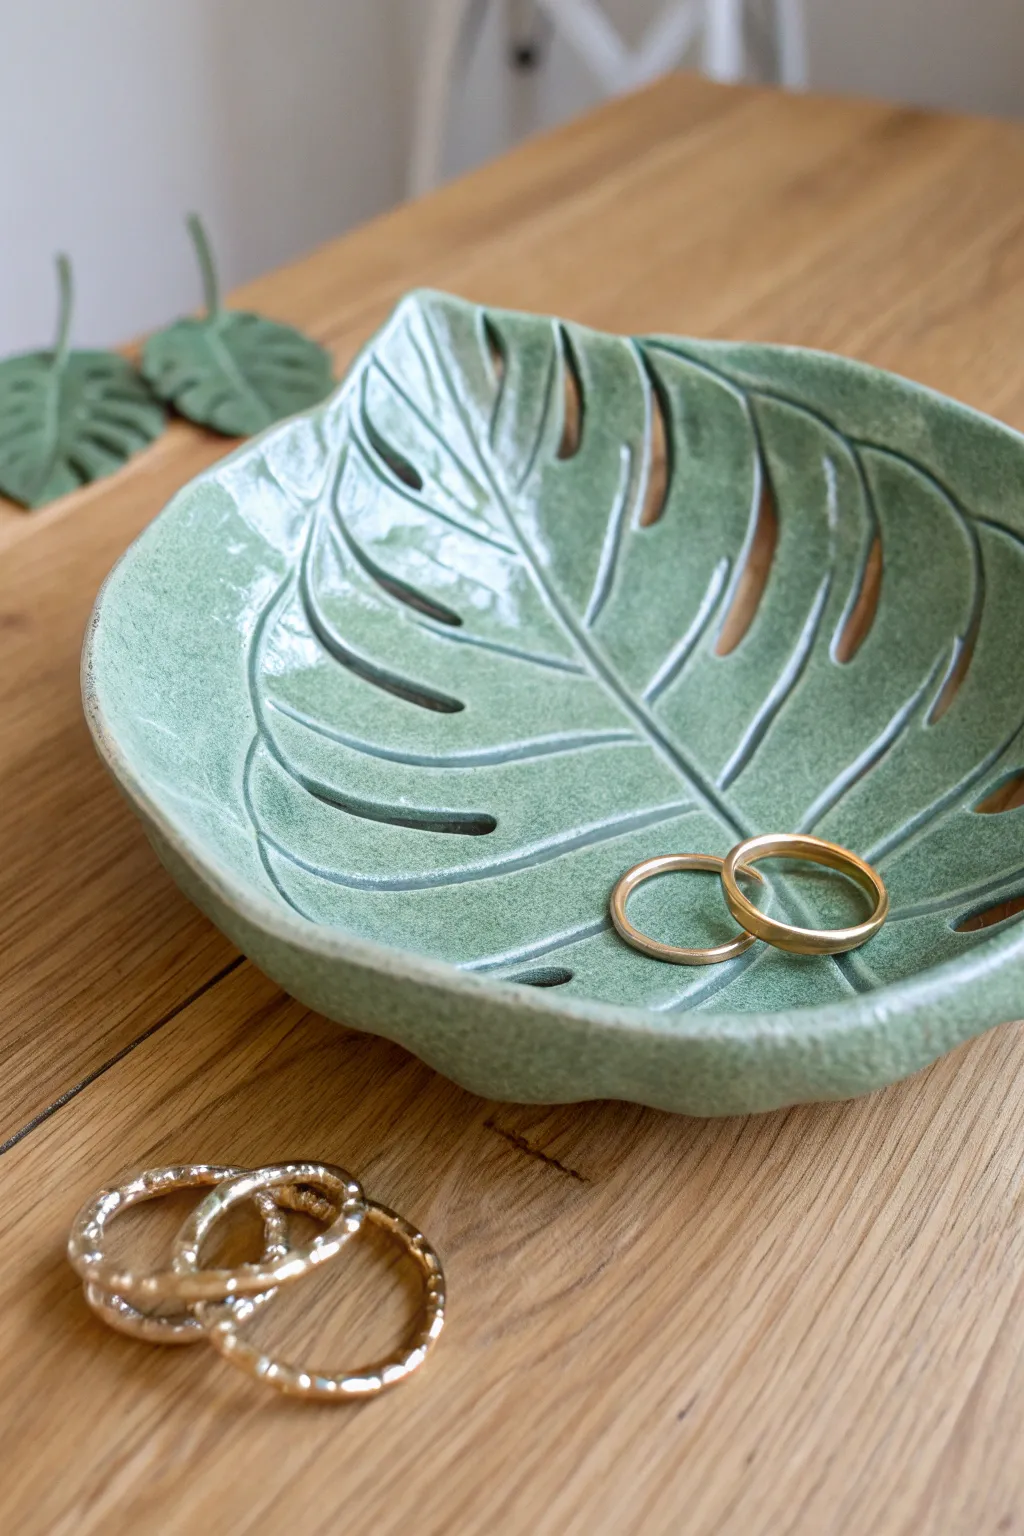
Bring a touch of the botanical indoors with this stunning monstera leaf catchall bowl. The soothing sage green glaze and realistic leaf veins create a functional piece of art perfect for holding your favorite jewelry.
Step-by-Step
Materials
- Air-dry clay or polymer clay (white)
- Real or artificial monstera leaf (for template)
- X-Acto knife or sharp clay tool
- Rolling pin
- Parchment paper or canvas mat
- Small bowl (for shaping)
- Needle tool or toothpick
- Sponge and water
- Fine-grit sandpaper
- Acrylic paints (Sage green, darker forest green)
- Glossy varnish or resin sealant
- Soft paintbrushes
Step 1: Shaping the Leaf
-
Prepare your workspace:
Begin by laying down a sheet of parchment paper or a canvas mat to prevent the clay from sticking to your table. -
Condition the clay:
Take a generous handful of clay and knead it in your hands until it becomes warm, soft, and pliable. -
Roll it out:
Roll the clay into a slab approximately 1/4 inch thick. Aim for an even thickness throughout to prevent cracking during drying. -
Place the template:
Gently press your real or artificial monstera leaf onto the clay slab. If using a real leaf, you can roll over it lightly to imprint the veins. -
Cut the outline:
Using your X-Acto knife, carefully trace around the outer edge of the leaf to cut the basic shape from the clay. -
Refine the edges:
Dip your finger in a little water and smooth out any rough or jagged edges left by the knife.
Smooth Operator
Use a damp sponge to smooth the clay edges *before* drying. Sanding dry clay creates dust, so doing the work while wet is cleaner and easier.
Step 2: Adding Detail and Form
-
Carve the fenestrations:
Referencing the image or your template, use the knife to cut out the characteristic oval holes and slots of the monstera leaf. -
Enhance the veins:
If the leaf impression isn’t deep enough, use a needle tool to gently etch the main central vein and branching veins. I like to keep these lines fluid rather than perfectly straight. -
Create the curvature:
Carefully lift the clay leaf and drape it inside a small bowl. This will give it a concave, bowl-like shape as it dries. -
Adjust the rim:
While it’s in the drying bowl, ensure the edges are slightly lifted and curved naturally, mimicking the organic flow of a real leaf. -
Dry completely:
Allow the clay to dry fully according to the package instructions. This usually takes 24-48 hours for air-dry clay.
Step 3: Finishing Touches
-
Sand imperfections:
Once bone dry, lightly sand any rough spots, especially around the rim and the cutout fenestrations, until smooth. -
Base coat painting:
Paint the entire bowl front and back with a sage green acrylic paint. You may need two coats for opaque coverage. -
Add dimension:
Mix a slightly darker forest green with water to create a wash. Paint this into the etched vein lines and wipe away the excess on the surface to highlight the texture. -
Create the mottled look:
Dip a sponge into a lighter green or white paint, dab off most of it, and gently sponge the surface to create the subtle speckled ceramics texture seen in the photo. -
Apply varnish:
Finish with two coats of high-gloss varnish or a layer of resin. This creates that high-end, glazed ceramic look and protects the paint.
Gilded Edge
For a luxe touch, paint just the very rim of the leaf with liquid gold leaf or metallic gold paint after the green glaze has dried.
Now your beautiful botanical dish is ready to cradle your most precious trinkets
Stamped Wildflower Mini Bowl
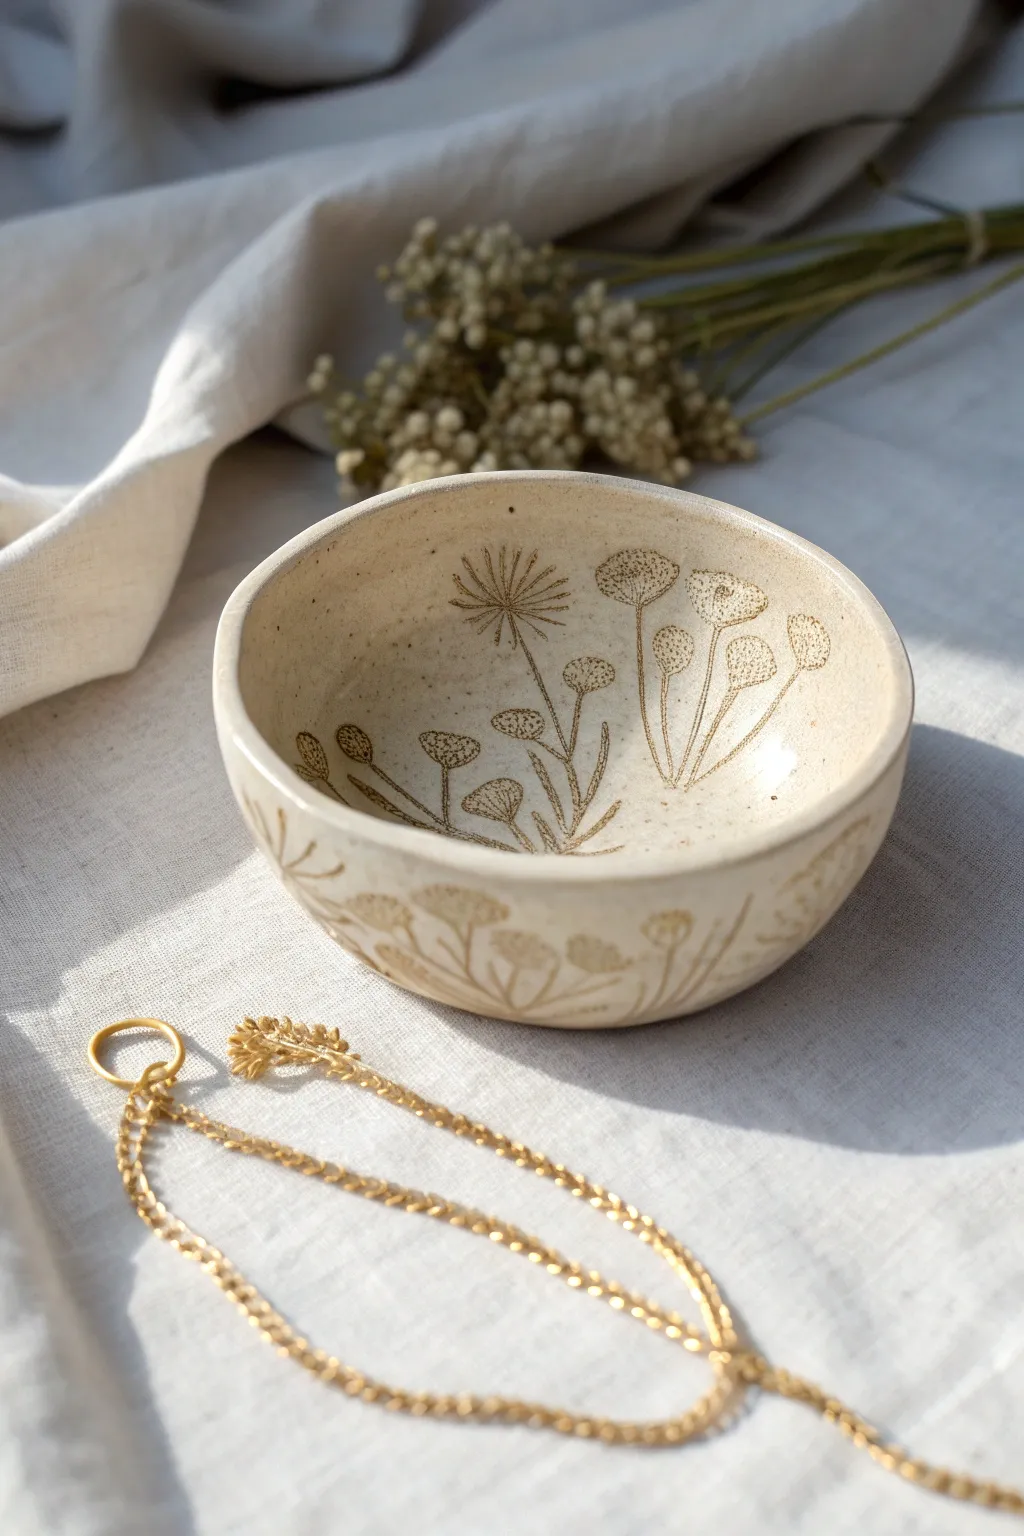
Bring a touch of the meadow to your home with this delicately crafted ceramic bowl featuring prominent wildflower motifs. The natural speckle of the clay pairs beautifully with the simple, etched floral designs for a piece that feels both rustic and refined.
How-To Guide
Materials
- Speckled stoneware clay (mid-fire)
- Wooden rolling pin
- Canvas work surface or mat
- Round slump mold or a small bowl to use as a form
- Needle tool
- Rubber kidney rib
- Wildflower stamps (or carving tools)
- Underglaze pencil or dark stain (optional, for inlay)
- Small sponge
- Clear matte glaze
- Pottery kiln
Step 1: Forming the Base
-
Prepare the Clay:
Start by wedging a baseball-sized ball of speckled stoneware clay to remove air bubbles and ensure consistency. -
Roll out a Slab:
Place the clay on your canvas and roll it out into an even slab, aiming for a consistent thickness of about 1/4 inch. -
Smooth the Surface:
Run a rubber kidney rib gently over the surface of your slab. This compresses the clay particles and creates a smooth canvas for your future texture. -
Cut the Circle:
Place your slump mold or a template upside down on the clay and trace around it with a needle tool to cut a perfect circle. -
Shape the Bowl:
Gently lift the clay circle and drape it into your slump mold. Carefully press the clay against the mold walls to establish the curve, smoothing from the center outward. -
Refine the Rim:
Use a damp sponge or your fingertips to round over the sharp edge of the rim. I find that taking extra time here makes the final piece much pleasant to hold.
Step 2: Adding the Decoration
-
Plan Your Layout:
Visualize where your tallest wildflowers will sit inside the bowl versus the smaller blooms on the exterior. -
Stamp the Interior:
While the clay is leather-hard but still receptive, press your unmounted wildflower stamps firmly into the interior curve. Vary the heights to create a natural, growing effect. -
Hand-Carve Stems:
If your stamps are just flower heads, use a needle tool or a fine stylus to draw the stems connecting the blooms to the base of the bowl. -
Add Exterior Texture:
To match the inside, stamp similar floral motifs around the outside lower edge of the bowl, creating a continuous theme. -
Initial Drying:
Let the bowl dry slowly to the leather-hard stage until it can hold its shape independently, then gently pop it out of the mold. -
Clean Up Edges:
Once removed, check the rim and bottom for any rough spots and smooth them with a slightly damp sponge.
Stamps sticking?
If your rubber or wooden stamps stick to the damp clay, lightly dust the stamp surface with cornstarch before pressing it down. It acts as a release agent.
Step 3: Finishing and Firing
-
Enhance Detail (Optional):
To make the stamped design pop like the photo, you can apply a dark underglaze wash into the grooves and wipe away the excess on the surface. -
Bisque Fire:
Allow the bowl to dry completely (bone dry) before loading it into the kiln for the initial bisque firing. -
Apply Glaze:
Dip or brush a clear matte glaze over the entire piece. This protects the clay while letting the lovely speckles and flower details show through. -
Glaze Fire:
Fire the bowl a second time according to your clay and glaze instructions (typically cone 5 or 6 for stoneware). -
Final Inspection:
Once cooled, check the bottom for any sharp glaze drips and sand them down if necessary.
Gold accents
For an elevated look, apply gold luster overglaze to just the flower heads after the glaze firing. You will need a third, low-temperature kiln firing.
Now you have a charming vessel perfect for holding jewelry or serving small treats

TRACK YOUR CERAMIC JOURNEY
Capture glaze tests, firing details, and creative progress—all in one simple printable. Make your projects easier to repeat and improve.
Speckled Paint Flick Cute Bowl
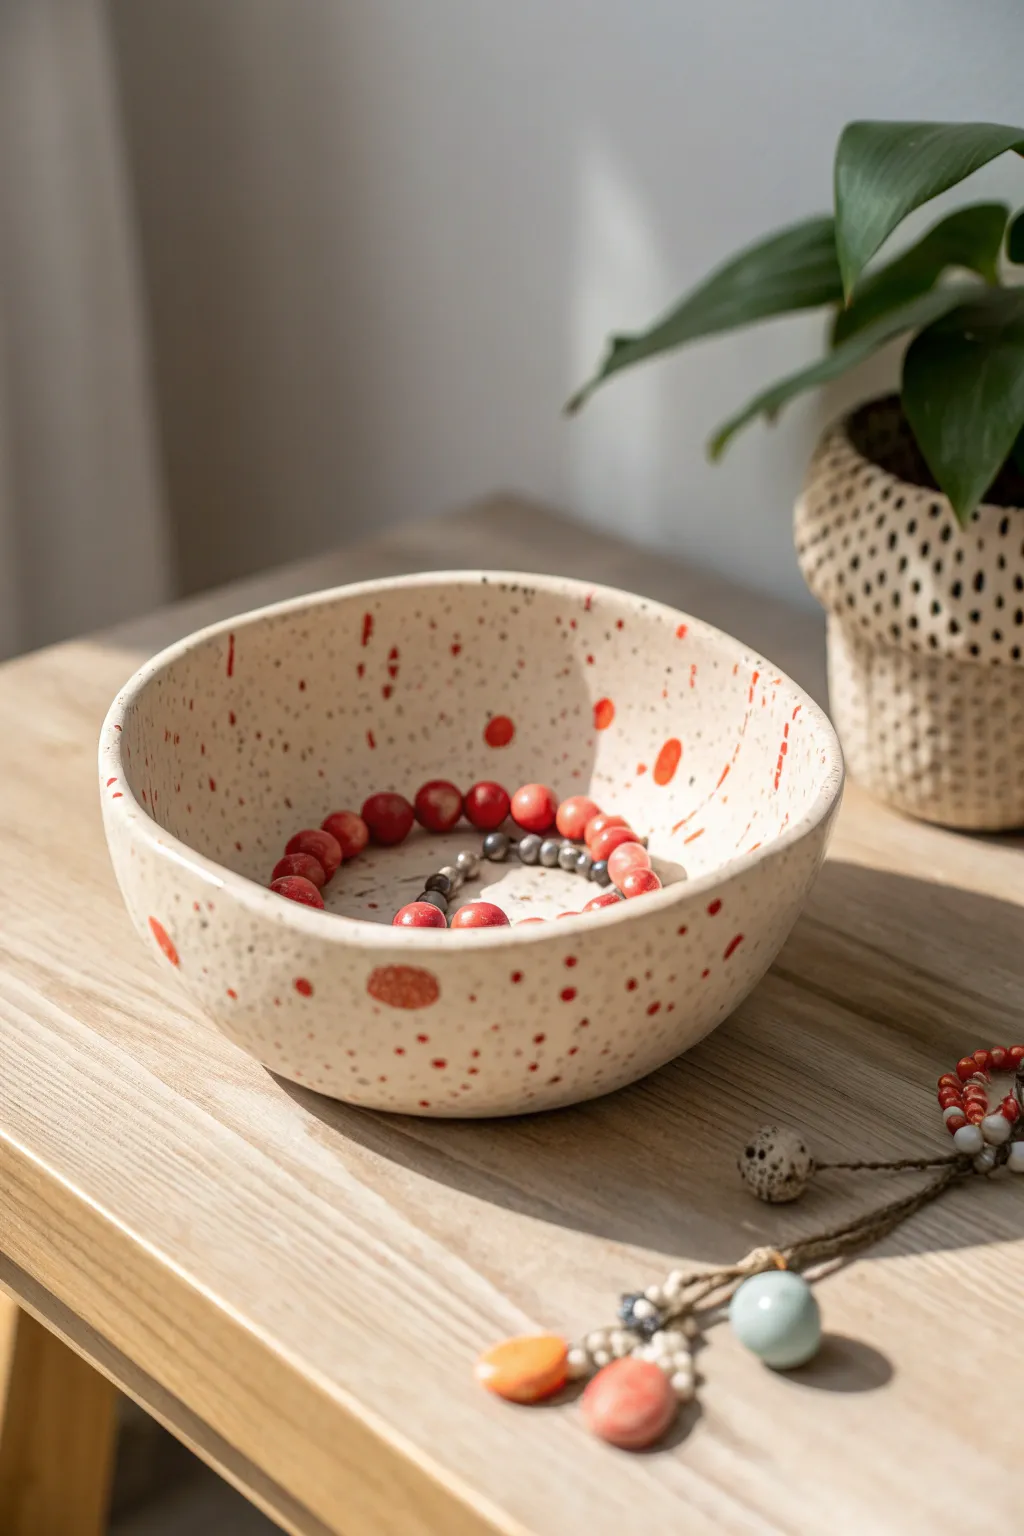
Bring a touch of playful artistry to your home decor with this wonderfully imperfect ceramic bowl. Featuring a creamy base dotted with fine speckles and energetic splashes of coral red, this piece balances organic warmth with modern flair.
Detailed Instructions
Materials
- Speckled clay body (or plain white clay)
- Pottery wheel or slab roller (optional)
- Rib tool
- Sponge
- Bisque firing kiln access
- Creamy white matte glaze
- Coral red underglaze or glaze
- Stiff bristle brush (e.g., toothbrush)
- Small round paintbrush
- Clear transparent glaze (optional, depending on finish desired)
Step 1: Forming the Bowl
-
Prepare your clay:
Begin by wedging your speckled clay thoroughly to remove air bubbles. Even consistency is key for a strong final piece. -
Shape the base:
You can either throw this on a wheel for symmetry or, to match the organic look in the photo, use a pinch or coil method. Start with a ball of clay about the size of a large orange. -
Open the form:
Press your thumb into the center and gently pinch outwards while rotating the clay in your hand. Aim for walls that are approximately 1/4 inch thick. -
Refine the curve:
Use a flexible rib tool on the interior to smooth out finger marks and create a continuous, gentle curve from the bottom to the rim. -
Detail the rim:
I like to leave the rim slightly uneven to enhance the handmade aesthetic. Smooth it with a damp chamois or sponge just enough so it isn’t sharp. -
Dry to leather hard:
Let the bowl dry slowly until it reaches a leather-hard state. It should be firm enough to handle without deforming but still cool to the touch. -
Trim the foot:
Turn the bowl over and trim a shallow foot ring or simply smooth the bottom so it sits flat on a table surface. -
Bisque fire:
Once fully bone dry, fire the piece in a kiln to cone 04 (or your clay’s specific bisque temperature).
Step 2: Glazing and Decorating
-
Apply base glaze:
Dip or brush your bisque-fired bowl with a creamy white matte glaze. Ensure an even coat. If your clay body is naturally speckled, this glaze should be semi-opaque to let the clay’s character show through. -
Simulate speckles (optional):
If you didn’t use speckled clay, mix a tiny amount of black underglaze with water. Flick it onto the white glaze using a toothbrush for that fine, sandy texture. -
Prepare the coral splashes:
Pour a small amount of coral red underglaze or glaze onto a palette. The consistency should be fluid but not watery. -
Create large dots:
Using a small round brush, paint organic, distinct circles of various sizes randomly around the interior and exterior walls. Don’t make them perfect circles; slight wobbles look more natural. -
Flick the red paint:
Load a stiff brush with the coral color. Use your thumb to flick the bristles, sending a spray of red splatters across the bowl. Focus some splatters near the painted dots to integrate them. -
Clean the foot:
Wipe the bottom of the bowl completely clean of any glaze with a damp sponge to prevent it from sticking to the kiln shelf. -
Final smooth:
Check the rim one last time. If any glaze has dripped or pooled too thickly, gently rub it down with your finger. -
Glaze fire:
Load the kiln and fire to the maturity temperature of your glaze (commonly cone 5 or 6 for stoneware).
Splatter Control
Make a “shield” with cardboard to block areas you want to keep clean while flicking paint. This helps direct the spray exactly where you want it.
Metallic Accent
After the final firing, apply a gold luster over a few of the larger red dots and fire again at a low temperature for a luxurious, shiny pop.
Once cooled, your bowl is ready to cradle your favorite jewelry or trinkets with distinct handmade charm
Pastel Ombré Dip-Dyed Mini Bowl
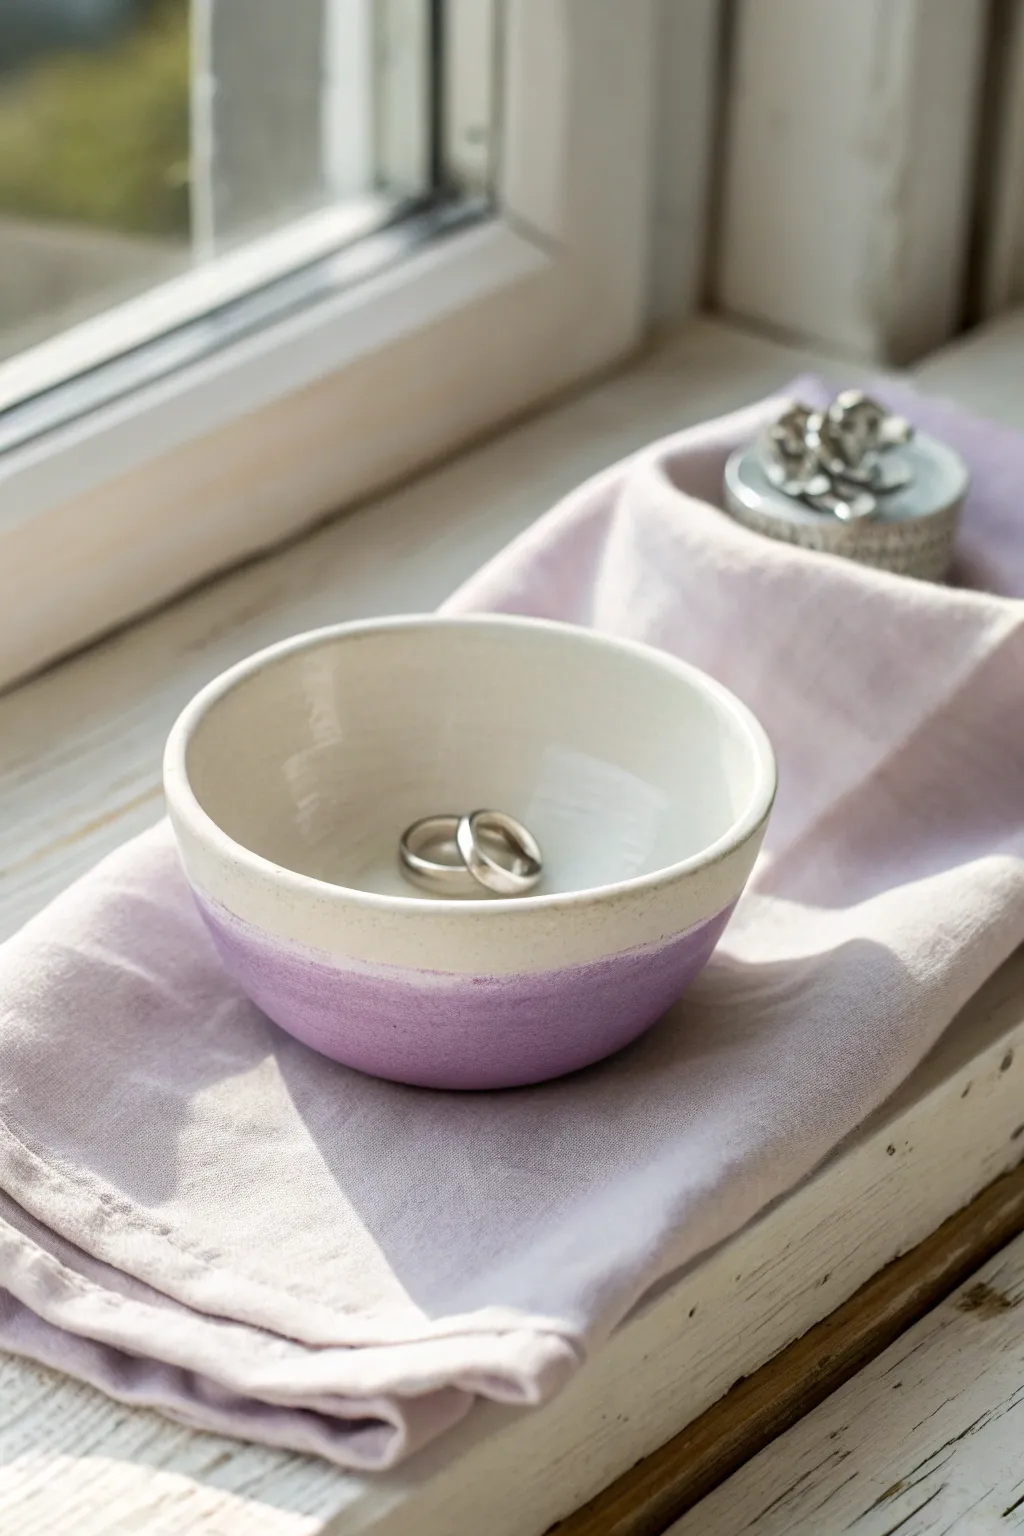
This charming little jewelry dish features a clean white interior and a soft, matte lilac exterior, perfect for holding your most precious rings. The dipped effect creates a lovely, imperfect line that gives it a wonderfully handmade feel.
Step-by-Step Guide
Materials
- Air-dry clay (white) or ceramic clay if you access a kiln
- Rolling pin
- Small bowl or round cookie cutter (approx. 4-5 inches)
- Small balloon or a spherical mold
- Sandpaper (fine grit)
- White acrylic paint (gloss or satin finish)
- Lilac or lavender pastel acrylic paint (matte finish)
- Paintbrushes (soft synthetic)
- Varnish or clear sealant (gloss for inside)
- Masking tape (optional)
Step 1: Shaping the Clay
-
Prepare the clay:
Start by kneading a handful of white air-dry clay until it is soft, pliable, without any cracks. -
Roll it out:
Use your rolling pin to flatten the clay into an even slab, aiming for a thickness of about 1/4 inch. -
Cut the circle:
Place your round cutter or a small overturned bowl onto the clay slab and cut out a perfect circle to serve as the base form. -
Form the curve:
Gently drape your clay circle over a small, inflated balloon or press it into a smooth, cup-shaped mold to create the bowl shape. -
Smooth the edges:
Dip your finger in a little water and run it along the rim of the bowl to smooth out any rough cutting marks or cracks. -
Let it dry:
Allow the clay to dry completely according to the package instructions, which usually takes 24 to 48 hours depending on humidity. -
Sand for smoothness:
Once bone dry, take fine-grit sandpaper and gently buff the entire surface, focusing on the rim and interior to ensure it feels smooth to the touch.
Step 2: Painting the Design
-
Base coat interior:
Paint the entire inside of the bowl with white acrylic paint. I usually apply two coats here to get a solid, opaque finish. -
Base coat rim:
Extend the white paint over the rim and down the outside of the bowl by about half an inch to create the top band. -
Mix your pastel:
If you don’t have a pre-mixed lilac, combine a dab of purple with plenty of white paint and a touch of matte medium to soften the hue. -
Create the dip line:
For that organic dipped look, freehand paint the bottom half of the exterior with your lilac shade, letting the brush create a slightly wavy, natural meeting point with the white. -
Refine the line:
If you prefer a sharper line, you can use masking tape around the circumference, but the charm of this piece often lies in the soft, hand-painted edge. -
Build opaque color:
Apply a second or third gentle coat of the lilac paint to the bottom section until the color is rich and solid.
Smooth Operator
To get that super-smooth professional ceramic look on air-dry clay, wipe the dried piece with a slightly damp sponge before sanding. This creates a slurry that fills tiny pits.
Step 3: Sealing and Finishing
-
Gloss the inside:
Apply a high-gloss varnish to the white interior of the bowl. This not only protects the paint but mimics the look of fired ceramic glaze. -
Matte finish outside:
If you want to keep the exterior looking soft and textured like the photo, leave the paint as-is or apply a very thin ultramatte varnish. -
Final dry:
Let all sealants cure completely for at least 24 hours before placing any jewelry inside.
Gold Rim Upgrade
Add a touch of luxury by painting just the very top edge of the rim with liquid gold leaf or metallic gold paint after the other colors have dried.
Place this lovely dish on your windowsill to catch the light and keep your rings safe
Black Doodle Lines Clay Bowl
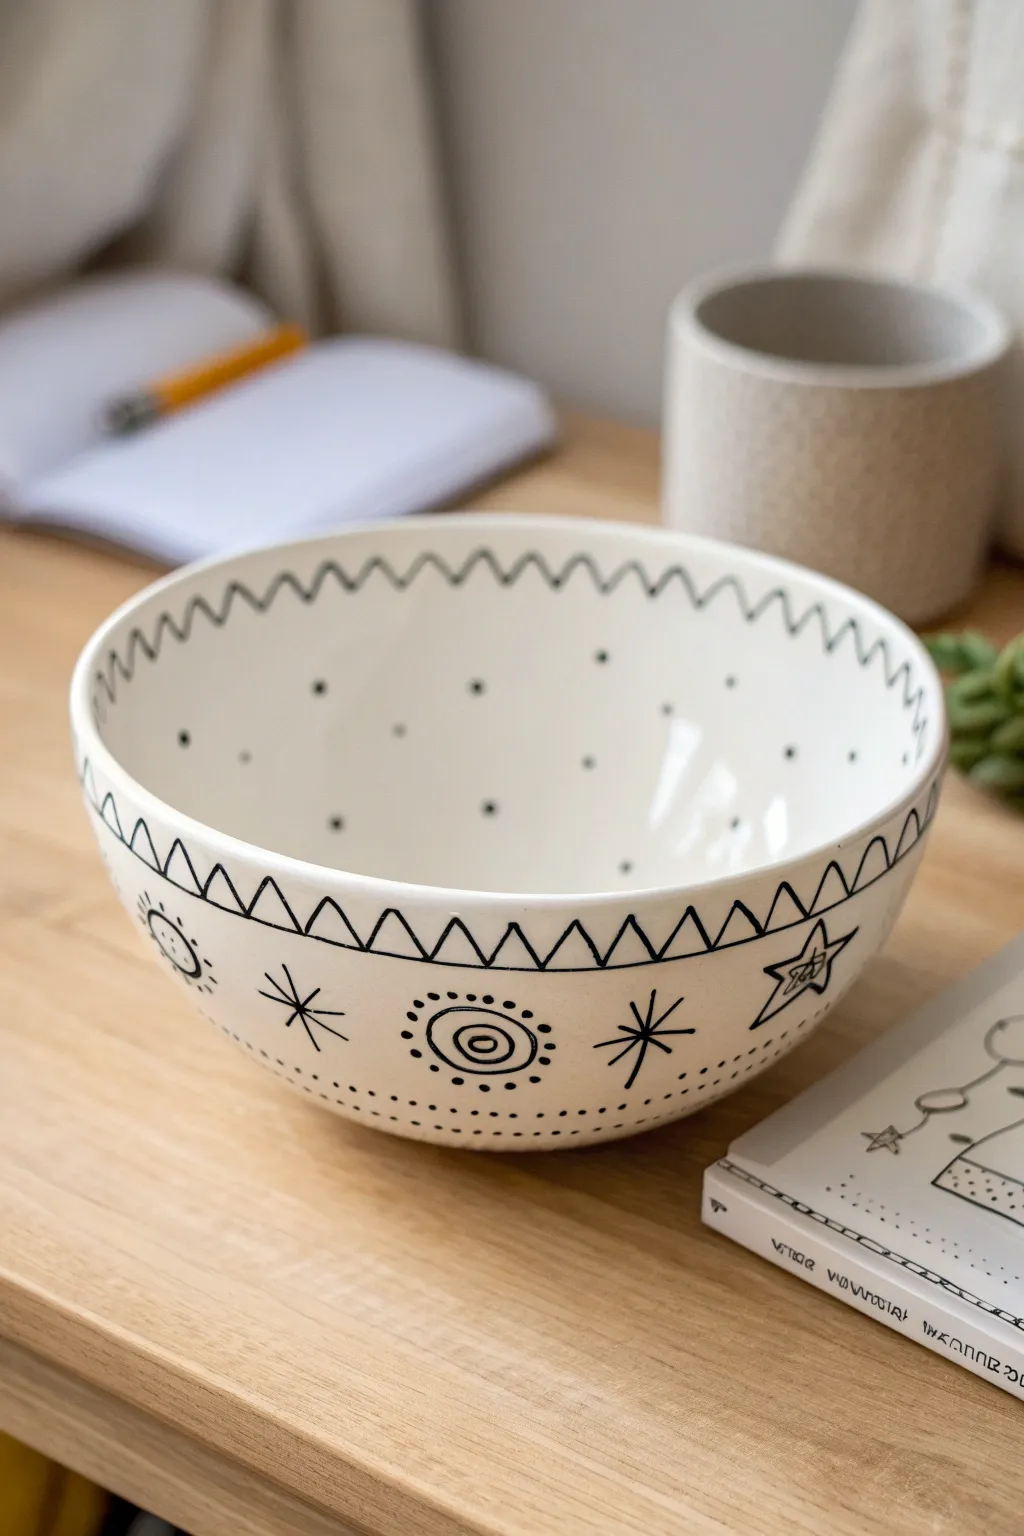
This charming project transforms a simple ceramic vessel into a piece of playful line art, featuring celestial motifs and geometric patterns. The stark contrast between the creamy white glaze and the crisp black ink creates a modern, bohemian feel that fits perfectly on any desk.
Step-by-Step Tutorial
Materials
- Bisque-fired ceramic bowl (white earthenware or stoneware)
- Black underglaze pencil or fine liner bottle
- Clear dipping glaze or brush-on clear glaze
- Pencil (for sketching)
- Damp sponge
- Kiln access (or air-dry clay and acrylic markers for a non-food-safe version)
- Black underglaze (liquid)
- Fine detail brush (size 0 or 00)
Step 1: Preparation & Sketching
-
Clean the surface:
Wipe down your bisque-fired bowl with a damp sponge to remove any dust or oils from handling. This ensures your glaze and lines will adhere properly. -
Determine spacing:
Visualize the bowl in horizontal bands. You will need a rim band, a main drawing band, and a bottom detail band. -
Lightly sketch the zig-zags:
Using a standard pencil, very lightly mark out the zigzag pattern just below the outer rim. Don’t worry about graphite marks; they burn off in the kiln. -
Plan the main motifs:
Mark the positions for your larger symbols—the stars, suns, and concentric circles—around the belly of the bowl to ensure they are evenly spaced.
Step 2: Drawing the Exterior
-
Outline the rim:
Using your black underglaze applicator or fine brush, carefully trace the zigzag line you sketched near the top rim. Keep your hand steady and the line weight consistent. -
Draw the geometric band:
Create a second zigzag line further down, separating the main design area from the top rim. This creates a framed border effect. -
Ink the celestial suns:
Move to your main motifs. Draw small circles with radiating dashes to create simple sun or flower shapes. -
Add the stars:
Draw five-pointed stars within the design band. For a doodle look, outline them loosely and maybe add a second, smaller star inside. -
Create the eye motif:
Draw the concentric circle designs, which look a bit like stylized eyes or targets. Add dots around the outer ring for texture. -
Fill the gaps:
Add asterisks or simple cross-shapes between the larger drawings to balance the negative space. -
Add the bottom details:
Near the base of the bowl, create rows of small dashes or dots. A row of dashes followed by a row of dots adds a nice rhythm to the bottom edge.
Steady Hands
Rest your pinky finger on the bowl’s surface as a stabilizer while drawing. This acts like a kickstand and prevents your hand from shaking during detailed line work.
Step 3: Interior Details & Finishing
-
Decorate the inner rim:
Repeat the zigzag pattern on the inside of the rim, about half an inch down from the top edge. -
Add interior speckles:
Dip your fine brush in black underglaze and gently touch the tip to the inside walls of the bowl to create random, scattered polka dots. -
Check density:
Make sure the interior dots aren’t too crowded; they should look airy and light compared to the exterior density. -
Clean up smudges:
If you made any mistakes with the underglaze, you can often gently scratch them off with a needle tool or stiff brush once dry. -
Apply clear glaze:
Once the black designs are fully dry, apply 2-3 coats of clear brush-on glaze, or dip the bowl in clear glaze. I prefer dipping for a smoother finish. -
Fire the piece:
Load the kiln and fire according to your clay and glaze specifications (usually Cone 06 or Cone 6 depending on your materials).
Gold Accents
After the final glaze firing, apply touch-ups of gold overglaze or gold luster to the centers of the stars and suns for a luxurious, shimmering finish.
Now you have a custom, hand-illustrated bowl ready to hold your morning cereal or desk treasures
Sea Shell-Inspired Cute Bowl
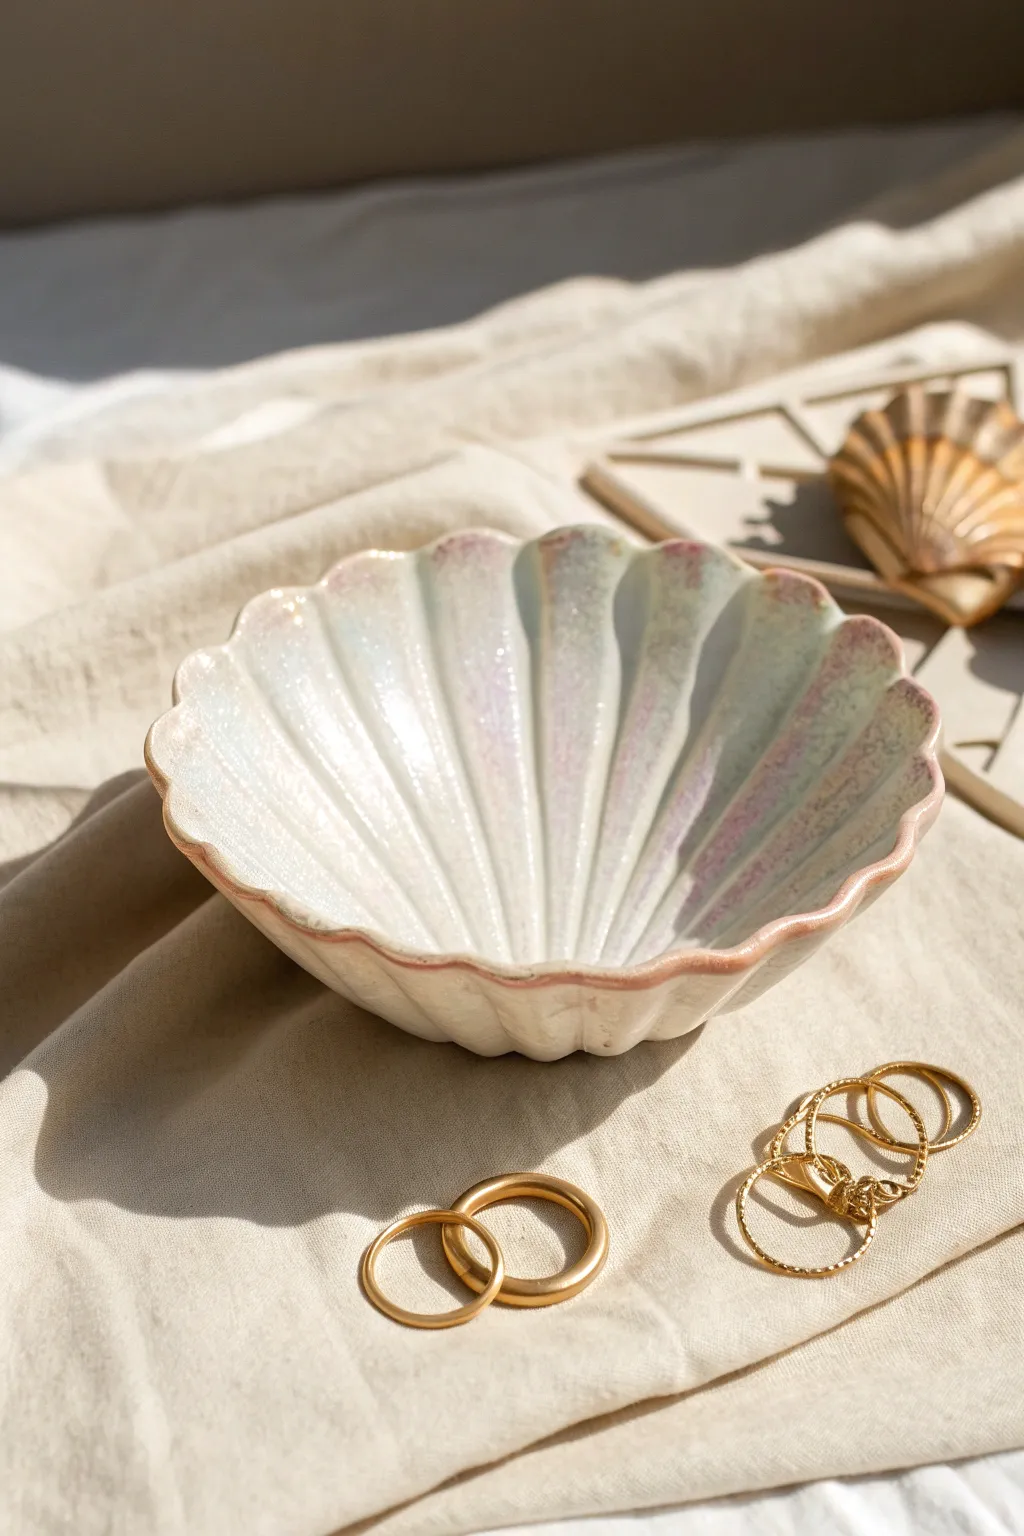
Capture the magic of the ocean with this iridescent scallop shell bowl, perfect for holding your favorite rings. Its gentle ridges and pearly finish give it an ethereal glow that looks beautiful on any vanity.
Step-by-Step Guide
Materials
- Air-dry clay or polymer clay (white)
- Rolling pin
- Real scallop shell (large) or a printed shell template
- Clay knife or craft scalpel
- Modeling tool or butter knife
- Bowl of water (for smoothing)
- Small bowl (for drying shape)
- Fine-grit sandpaper
- White acrylic paint
- Iridescent or pearlescent medium (or color-shift paint)
- Soft pink acrylic paint (watered down)
- Gold or copper metallic paint (optional for rim)
- High-gloss varnish
- Soft paintbrushes
Step 1: Shaping the Shell
-
Prepare the clay:
Begin by conditioning your clay. Knead a ball of white air-dry clay until it is soft, pliable, and free of cracks. I find warming it in my hands for a few minutes helps prevent tearing later. -
Roll it out:
Roll the clay out into a smooth, even slab about 1/4 inch thick. Make sure the slab is large enough to accommodate your shell shape. -
Cut the outline:
Place a large real scallop shell or a paper template onto the clay. Carefully trace around the edge with your clay knife to cut out the basic scallop shape. -
Define the ridges:
Using a modeling tool or the back of a butter knife, gently press indentation lines radiating from the bottom center of the shell out to the scalloped edges. Press firmly enough to create grooves but don’t cut all the way through. -
Accentuate the scallops:
Use your fingers to pinch and round off each ‘scallop’ on the outer rim, ensuring they align with the ridge lines you just created. This gives the bowl its organic, wavy edge. -
Smooth the surface:
Dip your finger in a little water and run it over the clay surface to smooth out any rough textures, fingerprints, or sharp edges created by the knife. -
Form the curve:
Leaf the clay shape into a small bowl or a curved drying form. Gently press it down so the clay takes on a cupped, bowl-like shape. Ensure the ridges are still distinct.
Cracks happen?
If you see hairline cracks while drying, mix a tiny bit of fresh clay with water to make a paste (slip) and fill them in before painting.
Step 2: Refining and Painting
-
Dry completely:
Let the clay dry fully according to the package instructions. This usually takes 24-48 hours. Rotate it occasionally so the bottom dries evenly. -
Sand for smoothness:
Once bone dry, use fine-grit sandpaper to buff away any uneven spots on the rim or back. Wipe away the dust with a slightly damp cloth. -
Base coat:
Apply a solid coat of white acrylic paint to the entire bowl. This creates a bright, clean canvas that will make the iridescent effects pop. -
Add pearlescence:
Paint the interior with an iridescent medium or a pearl white paint. Apply two thin layers rather than one thick one to build up a milky, shimmering depth. -
Create the blush effect:
Water down a tiny drop of soft pink paint until it is a wash. I like to lightly dab this into the deeper grooves of the shell and wipe the excess off the raised areas to create shadowy depth. -
Highlight the rim:
Using a small detail brush, paint the very edge of the scalloped rim with a mix of pink and a touch of metallic gold or copper. This mimics the natural coloration of a seashell edge. -
Seal the piece:
Finish with two coats of high-gloss varnish. This not only protects the paint but gives the bowl that wet, fresh-from-the-ocean ceramic look.
Gilded Edge
Instead of pink, use liquid gold leaf on the very rim for a luxurious, high-end jewelry dish look that catches the light.
Now you have a stunning little spot to keep your treasures safe
Bunny-Ear Rim Trinket Dish
This charming little dish features sweet bunny ears perched on the rim and a minimalist painted face, perfect for holding your favorite rings. Its speckled, creamy glaze gives it a warm, handmade feel that adds character to any dresser.
Detailed Instructions
Materials
- White air-dry clay or polymer clay
- Rolling pin
- Circle cutter or small bowl (approx. 3-4 inches)
- Small knife or clay tool
- Sponge and water
- Acrylic paints (black and white/cream)
- Fine detail paintbrush
- Varnish or sealant (glossy)
- Toothbrush (for speckling)
- Fine grit sandpaper
Step 1: Forming the Base
-
Roll the clay:
Start by conditioning your clay until it is soft and pliable. Roll it out on a flat surface to an even thickness of about 1/4 inch. -
Cut the circle:
Using a circle cutter or by tracing around a small bowl, cut out a perfect circle from your rolled clay. Remove the excess clay. -
Create the walls:
Gently lift the edges of the circle upwards to create a shallow bowl shape. Pinch and smooth the walls as you go to ensure they stand up slightly, creating a rim about 1/2 to 3/4 inch high. -
Smooth the surface:
Use a damp sponge or your finger with a little water to smooth out any cracks or fingerprints on the rim and inside the bowl.
Ears Falling Off?
If the ears won’t stay upright, prop them up from behind with a small piece of cardboard or foam while the clay dries to hold their position.
Step 2: Adding the Bunny Features
-
Shape the ears:
Take two small balls of leftover clay and roll them into short, oval logs. Slightly flatten them to resemble bunny ears, tapering the top ends. -
Attach the ears:
Score the bottom of the ears and the spot on the rim where they will sit. Apply a dab of water or slip, then press the ears firmly onto the back rim of the bowl. -
Blend the seams:
Using a modeling tool or your finger, blend the clay at the base of the ears into the rim so they look like one seamless piece. I like to smooth the back connection particularly well for stability. -
Final smooth:
Do a final pass with your damp sponge to ensure the ears are smooth and the rim is even. -
Dry partially:
Let the piece dry until it is leather-hard. This makes it easier to refine the shape without warping it.
Step 3: Painting and Finishing
-
Sand imperfections:
Once completely dry, use fine-grit sandpaper to gently smooth any rough edges on the rim or ears. -
Base coat:
Paint the entire dish with a creamy white acrylic paint. You may need two coats for full coverage; let each layer dry completely. -
Add speckles:
Mix a tiny amount of water with light brown or grey paint. Dip an old toothbrush into it and flick the bristles with your thumb to spray fine speckles over the dish for a ceramic look. -
Paint the face:
Using your finest detail brush and black paint, carefully add two small dots for eyes and a tiny ‘v’ or ‘u’ shape for the nose directly below the ears on the inside wall. -
Seal the dish:
Apply a coat of glossy varnish or sealant to the entire piece. This protects the paint and gives it that shiny, glazed ceramic appearance. -
Final cure:
Allow the varnish to cure fully according to the manufacturer’s instructions before placing any jewelry inside.
Make It Golden
Paint the very tips of the bunny ears with gold leaf or metallic gold paint for a luxurious, high-end accent.
Your adorable bunny dish is now ready to keep your tiny treasures safe and sound
Tiny Footed “Creature” Clay Bowl
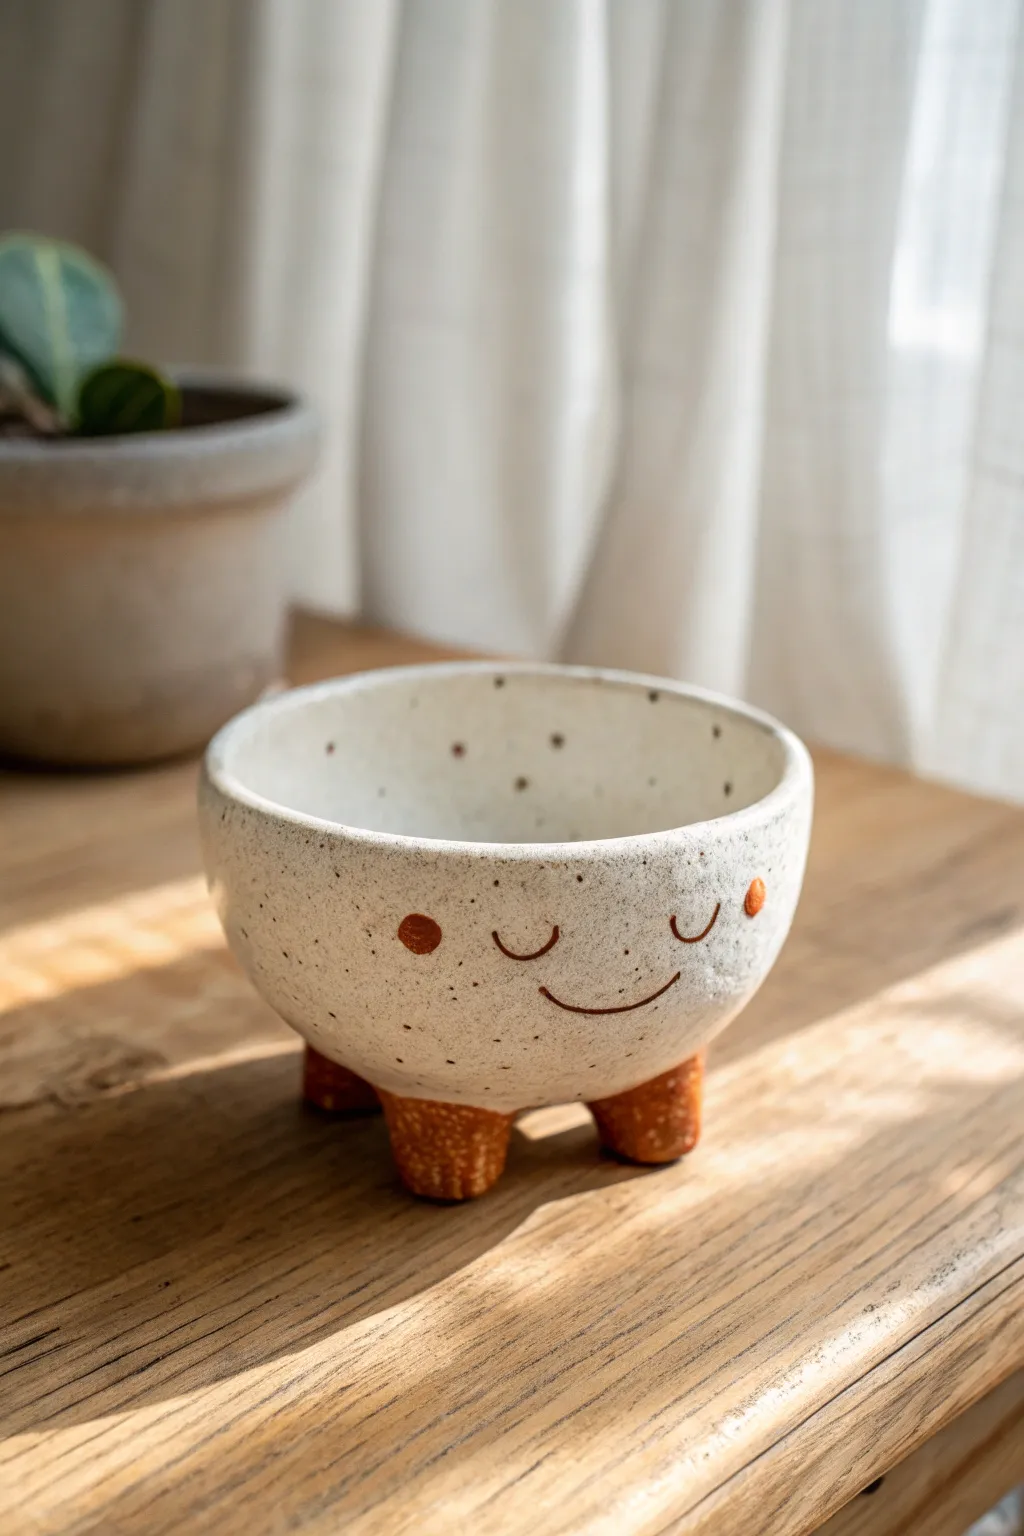
This delightful little creature pot combines a simple pinch-bowl form with whimsical facial features and tiny, chubby feet. Its speckled texture and gentle smile make it the perfect home for a small succulent or a handful of treasures.
Step-by-Step Tutorial
Materials
- Speckled cream stoneware clay (or white clay with speckles added)
- Red-orange underglaze
- Dark brown underglaze
- Clear matte or satin glaze
- Scoring tool or needle tool
- Slip (clay mixed with water)
- Small paintbrush
- Sponge
- Rib tool (optional)
Step 1: Forming the Body
-
Wedging the Clay:
Begin with a ball of speckled clay roughly the size of a large orange. Wedge it thoroughly to remove air bubbles, ensuring an even consistency before you start shaping. -
Opening the Form:
Hold the clay ball in your palm and press your thumb into the center, stopping about a half-inch from the bottom. This thickness is crucial because we’ll be attaching feet later. -
Pinching the Walls:
Gently pinch the clay between your thumb and fingers, rotating the ball as you go. Work from the bottom up, aiming for an even wall thickness of about 1/4 inch all around. -
Refining the Curve:
Smooth out finger marks using a damp sponge or a flexible rib tool. Gently cup the bowl in your hands to encourage a rounded, hemispherical shape rather than a straight-sided cup. -
Creating the Rim:
Tap the rim gently with a flat wooden tool or your finger to slightly flatten it, ensuring it’s level. Smooth over any sharp edges with your damp sponge.
Wobbly Bowl?
If the bowl rocks after attaching feet, place a piece of sandpaper on the table and gently rub the feet against it in a circular motion to sand them perfectly level before firing.
Step 2: Adding the Feet
-
Shaping the Feet:
Roll four small, equal-sized balls of clay, each about the size of a large marble or a grape. Tap one side of each ball on your work surface to create a flat attachment point. -
Positioning:
Turn your bowl upside down. Arrange the four feet on the bottom in a square pattern, ensuring they are spaced widely enough to provide stability but not right at the edge. -
Scoring and Slipping:
Use your needle tool to scratch cross-hatch marks (scoring) onto the flat side of a foot and the corresponding spot on the bowl. Apply a dab of slip to both scored areas. -
Attaching:
Press the foot firmly onto the bowl with a little wiggle motion to lock the clay particles together. Repeat this for all four feet. -
Blending the Seams:
Use a small modeling tool or your finger to smooth the clay where the feet meet the bowl ensuring a seamless transition. I prefer to leave the bottom of the feet slightly textured. -
Level Check:
Flip the bowl right-side up and gently tap it on the table to ensure all four feet touch the ground evenly. If it wobbles, press down gently on the high side to level it.
Step 3: Face & Details
-
Drying to Leather Hard:
Let the piece dry slowly until it reaches a ‘leather hard’ stage. It should feel cool and firm to the touch, but no longer sticky. -
Painting the Feet:
Apply two coats of red-orange underglaze to each foot. Be careful to create a clean line where the foot meets the cream-colored body. -
Adding Cheeks:
Using the same red-orange underglaze and a small round brush, paint two circular rosy cheeks on the front of the bowl. -
Drawing the Eyes:
Dip a fine liner brush into dark brown underglaze. Paint two small, U-shaped curves for the closed, happy eyes. -
Painting the Smile:
Paint a simple, wide curve for the mouth directly between the cheeks. Keep the line weight consistent with the eyes for a balanced look. -
Adding Freckles (Optional):
If your clay isn’t naturally speckled enough, you can flick a stiff toothbrush loaded with watered-down brown underglaze to add extra speckles.
Make it a Mug
Scale up the size of the initial pinch pot and add a sturdy loop handle on the side to transform this creature bowl into a morning coffee mug.
Step 4: Glazing & Firing
-
Bisque Fire:
Once the piece is bone dry (completely moisture-free), fire it in the kiln to bisque temperature (usually cone 04). -
Glazing:
Wipe the bisque-fired bowl with a damp sponge to remove dust. Dip the entire piece into a clear matte or satin glaze to seal it while letting the clay body show through. -
Cleaning the Foot Bottoms:
Use a wax resist heavily on the bottom of the feet, or wipe the glaze off the bottom of the feet completely with a sponge so they don’t stick to the kiln shelf. -
Final Fire:
Fire the bowl a final time to the maturity temperature of your clay and glaze (often cone 5 or 6 for stoneware).
Once cooled, your charming little footed bowl is ready to bring a smile to any shelf