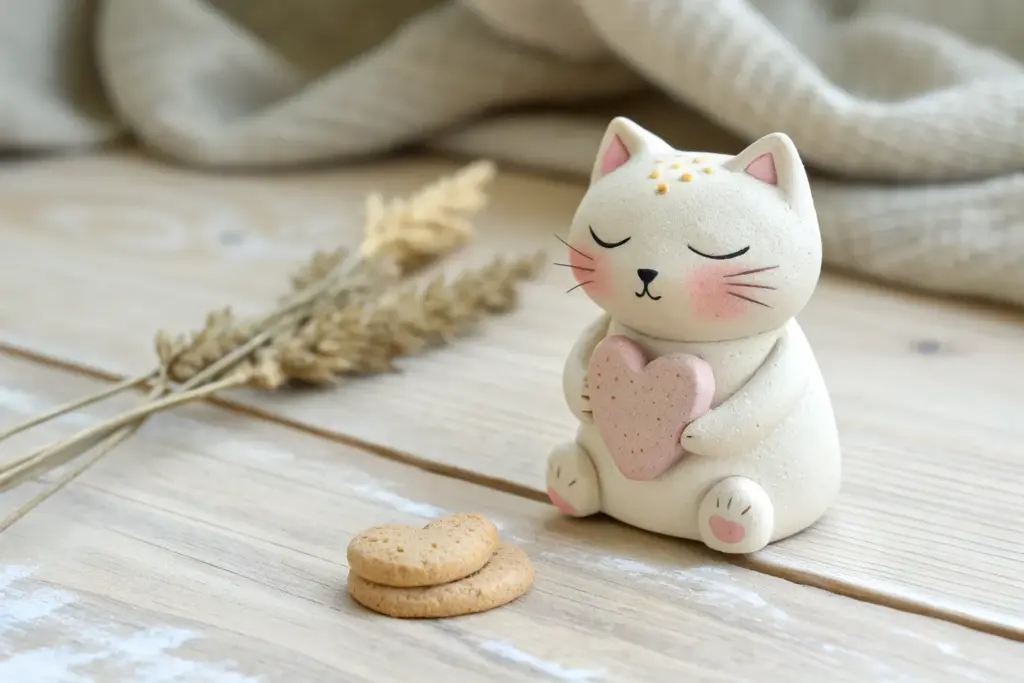
Whenever I’m craving an easy, happy project, I reach for air-dry clay or polymer clay and whip up a few cute clay figures with simple shapes and sweet little faces. These ideas are all about approachable miniatures you can finish in a cozy afternoon and display anywhere you need a bit of joy.
Chubby Bunny Buddies
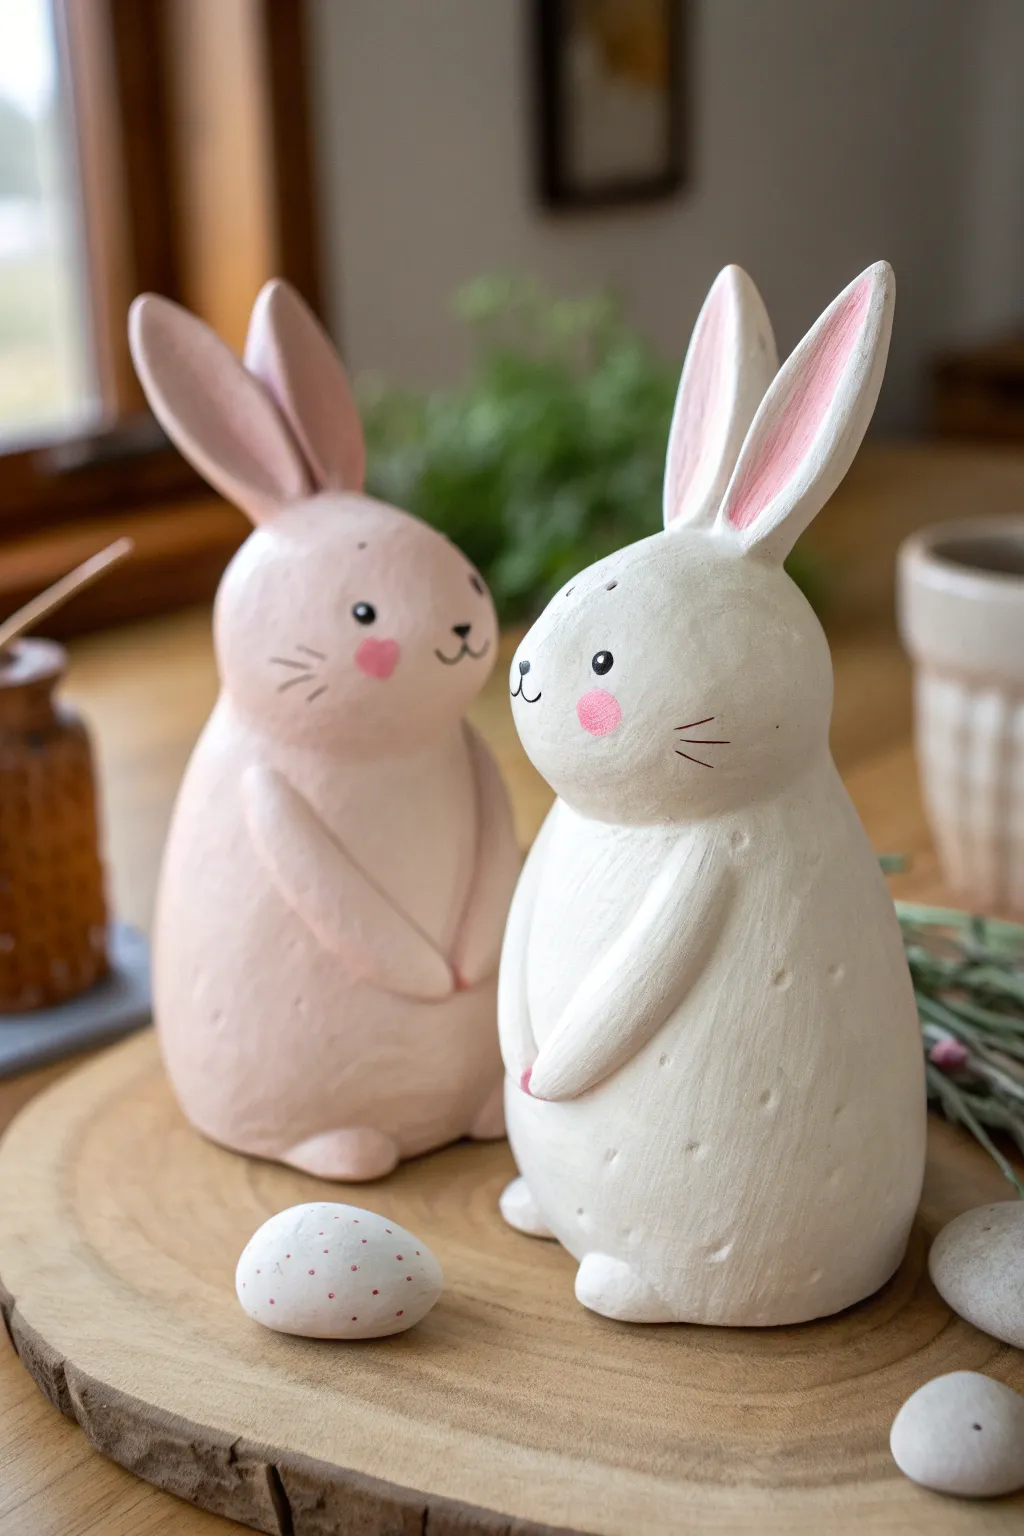
These two adorable, chubby bunnies make the perfect spring accent or year-round desk companions, featuring smooth, rounded forms and sweet, hand-painted details. Their simple shapes make them approachable for beginners, while the delicate finishing touches give them a professional, boutique look.
How-To Guide
Materials
- Air-dry clay (white and terracotta/pink or colorable)
- Acrylic paints (pink, white, black)
- Fine grit sandpaper
- Small rolling pin
- Sculpting tools (needle tool, smoothing tool)
- Water cup and sponge
- Fine detail paintbrushes
- Clear matte varnish or sealant
- Aluminum foil (for armature core)
Step 1: Forming the Body Base
-
Create the core:
Crumple a piece of aluminum foil into a tight egg shape about the size of a lemon. This saves clay and keeps the figure lightweight. Make sure the bottom is flattened so it stands stably on your work surface. -
Wrap the clay:
Roll out a slab of your chosen clay (white or soft pink) to about 1/4 inch thickness. Wrap this smoothly around your foil core, pinching the seams closed and rolling it gently between your palms to create a seamless egg-shaped body. -
Shape the head:
Add a slightly smaller ball of solid clay on top of the ‘egg’ for the head. Use your thumb or a smoothing tool to merge the clay from the head down onto the body so there is no neck seam—you want a continuous, chubby silhouette. -
Refine the surface:
Dip your finger in a tiny bit of water and rub away any fingerprints or cracks. The smoother you get the clay now, the less sanding you’ll have to do later.
Step 2: Adding Ears and Limbs
-
Sculpt the ears:
Roll two generous logs of clay, tapering them at the top. Flatten them slightly to create that classic rabbit ear shape. Gently press a thumb or tool into the center to create the inner ear depression. -
Attach the ears:
Score (scratch) the bottom of the ears and the top of the head where they will attach. Apply a dab of water or clay slip, then press the ears firmly into place, smoothing the clay at the join line to secure them. -
Form the arms:
Create two long, thin teardrop shapes for the arms. Attach these to the sides of the body, curving them forward so they meet or rest on the belly. I find blending the shoulder area into the main body helps them look more natural. -
Add the feet:
Roll two small balls of clay and flatten them slightly into ovals. Place these under the front bottom edge of the body so just the little paws peek out. -
Texture the surface:
Take a needle tool and poke tiny, random shallow holes primarily on the white bunny’s body to simulate a subtle fur texture or ceramic speckle effect.
Cracks Appearing?
If small cracks form while drying, create a ‘slip’ by mixing a bit of clay with water into a paste. Fill the cracks with this paste, let it dry, and sand smooth.
Step 3: Making the Egg Accessory
-
Form the egg:
Roll a small amount of leftover white clay into an unequal oval shape to create a miniature egg. -
Add texture:
If you want the egg to match the bunnies, give it a smooth finish with water, or add tiny indentations for texture.
Level Up: Seasonal Scarves
Before the clay dries, sculpt tiny scarves or bow ties and attach them around the neck. Paint them in contrasting seasonal colors for extra personality.
Step 4: Drying and Refining
-
Key drying time:
Let your figures sit undisturbed for at least 24-48 hours. Air-dry clay shrinks slightly, so don’t rush this part or cracks may appear. -
Sand for smoothness:
Once fully bone-dry, take your fine-grit sandpaper and gently buff the surface. Focus on the roundness of the cheeks and the back to get that porcelain-smooth finish. -
Dust off:
Wipe the figures down with a slightly damp cloth or dry brush to remove all clay dust before painting.
Step 5: Painting and Finishing
-
Base coat touches:
If you used colored clay, you might skip a full base coat. If using white clay for the pink bunny, mix a soft pastel pink acrylic and paint the entire body, leaving the inner ears slightly lighter if desired. -
Paint the inner ears:
Mix a rosy pink shade and carefully paint the depression inside the ears. Feather the edges slightly so the transition isn’t too harsh. -
Draw the face:
Using your finest detail brush and black paint, add two small dots for eyes. Add a tiny ‘Y’ shape or a curved anchor shape for the nose and mouth. -
Whiskers and cheeks:
Paint three very thin, short lines on each cheek for whiskers. Dip a Q-tip or a round brush into pink paint, blot most of it off, and stamp round rosy cheeks onto the face. -
Speckle the egg:
Flick a toothbrush dipped in watered-down reddish-brown paint over the small clay egg to create a speckled effect. -
Seal the work:
Finish by applying a coat of matte varnish. This protects your paint job and gives the clay a coherent, finished sheen without being too glossy.
Place your adorable bunny duo on a shelf or gift them to a friend for a handmade touch of joy


Tiny Chonky Cats
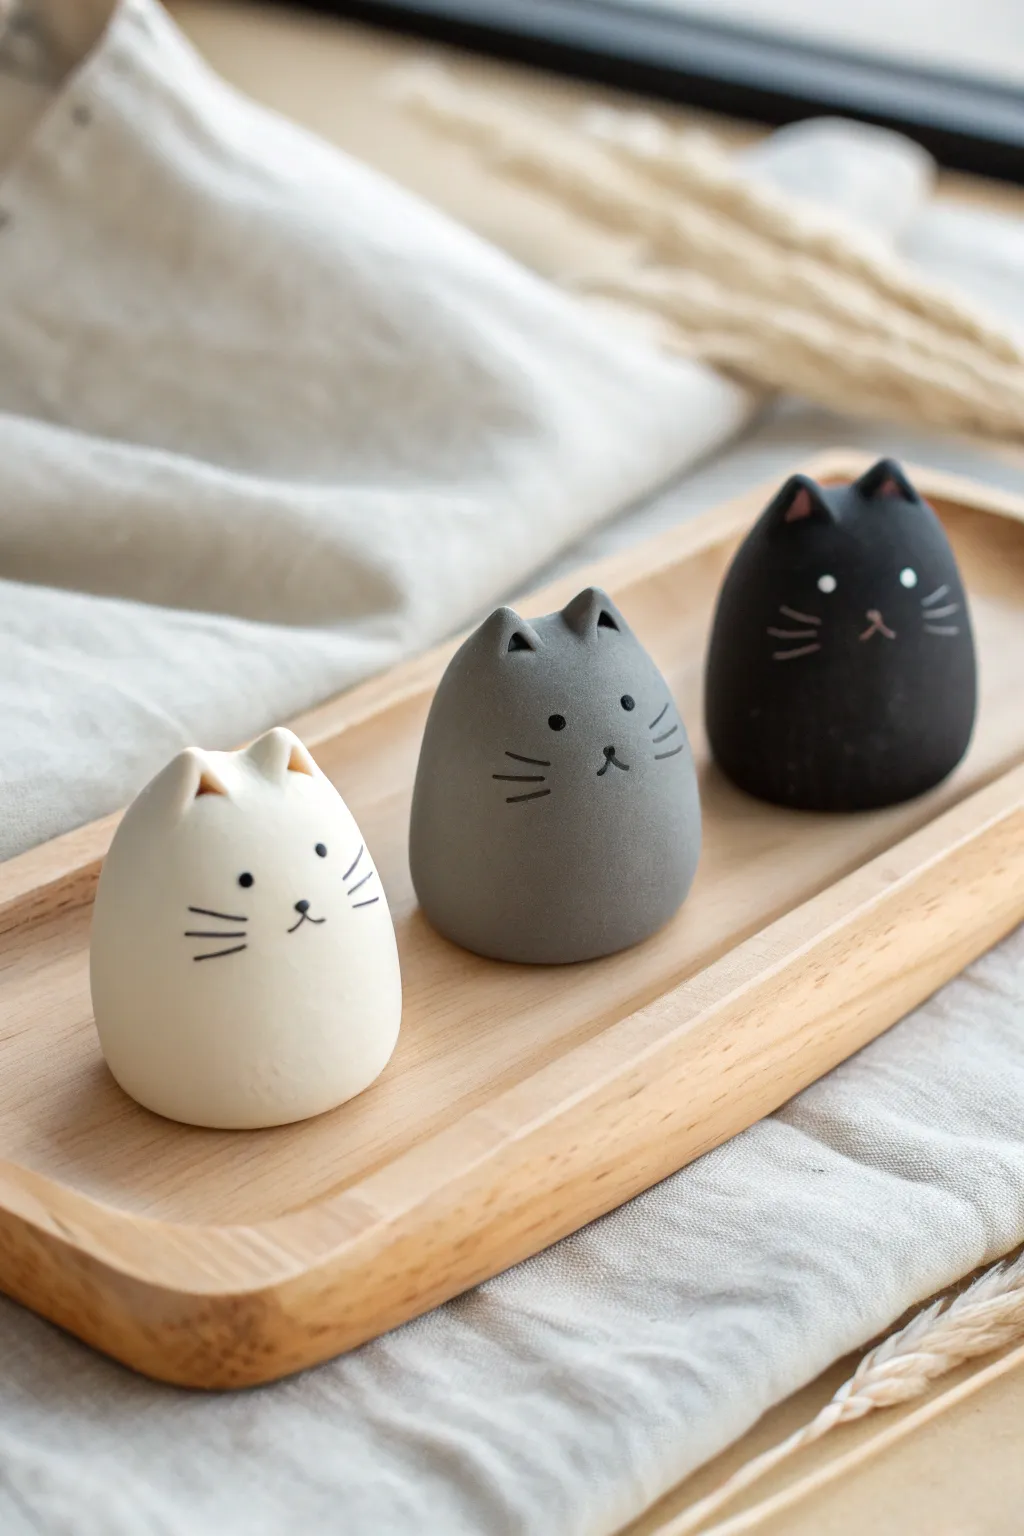
These delightfully chubby, minimalist cats rely on simple egg shapes and a smooth, matte finish for their charm. The trio features white, grey, and black felines, perfect for beginners looking to master basic clay forming and subtle detailing.
Detailed Instructions
Materials
- Polymer clay (white, grey, black, and a tiny amount of pale pink)
- Acrylic rolling pin or smooth work surface
- Fine-grit sandpaper (400-800 grit)
- Needle tool or toothpick
- Small ball stylus tool
- Black and white acrylic paint
- Fine detail paintbrush (size 000)
- Matte varnish or sealant
- Oven and baking tray lined with parchment paper
Step 1: Shaping the Bodies
-
Condition the white clay:
Start with the white cat. Take a walnut-sized amount of white polymer clay and knead it thoroughly until it is soft and pliable. This conditioning prevents cracks while baking. -
Form the base egg shape:
Roll the clay into a perfect sphere between your palms to remove any seams. Then, gently taper the top half slightly to create a plump egg shape with a wide, flat bottom so it sits securely. -
Repeat for grey and black:
Follow the same process for the grey and black cats, trying to keep them all roughly the same size for a cohesive set. I find it helpful to weigh the clay balls first if precision is important to you. -
Smooth the surfaces:
Gently glide your finger over the clay bodies to buff out any fingerprints. The charm of these figures lies in their flawlessly smooth, matte appearance.
Seamless Blending
To erase fingerprints before baking, lightly brush the raw clay with a little baby oil or clay softener. It smooths the surface instantly.
Step 2: Adding Ears
-
Create triangle ears:
For the white cat, pinch off two tiny pieces of white clay. Roll them into small balls, then flatten them slightly into triangles. -
Attach the ears:
Press the triangles onto the top of the white cat’s head. Use your ball stylus or finger to blend the seams downward into the body so the ears look like a seamless extension of the shape. -
Add pink inner ears:
Take a microscopic amount of pale pink clay, roll into tiny triangles, and press them into the center of the white ears for detail. -
Form grey and black ears:
Repeat the ear formation for the grey and black cats using their respective base colors. You can choose whether to add pink interiors to these or keep them solid for a sleeker look; the example image shows pink details on the black cat.
Add a Gradient
Mix your clays before shaping to create an ombré effect—start with white at the bottom blending into grey at the top for a unique look.
Step 3: Baking and Finishing
-
Prepare for baking:
Place all three figures on your parchment-lined baking tray. Ensure they aren’t touching each other. -
Bake the clay:
Bake according to your specific clay manufacturer’s instructions (usually around 275°F/135°C for 15-30 minutes). Let them cool completely inside the oven to prevent thermal shock cracks. -
Sand for smoothness:
Once cool, use fine-grit sandpaper to gently buff away any stray dust specks or subtle fingerprints, restoring that ultra-smooth texture.
Step 4: Painting the Faces
-
Paint the eyes:
Using a fine detail brush or a toothpick dotting technique, paint small black dots for eyes on the white and grey cats. Use white paint for the eyes on the black cat so they stand out. -
Add noses and mouths:
Paint a tiny ‘Y’ shape or a small triangle with a line dropping down for the nose and mouth. Keep the lines very thin and delicate. -
Draw the whiskers:
With the finest brush tip, paint three short, floating lines on each cheek area for whiskers. Ensure the paint is slightly thinned with water for smoother flow. -
Seal the figures:
Finish by applying a coat of matte varnish. Avoid glossy finishes, as the matte look is essential to this modern aesthetic.
Arrange your trio on a small tray or shelf to enjoy their calming, minimalist presence


Mini Bear Couple
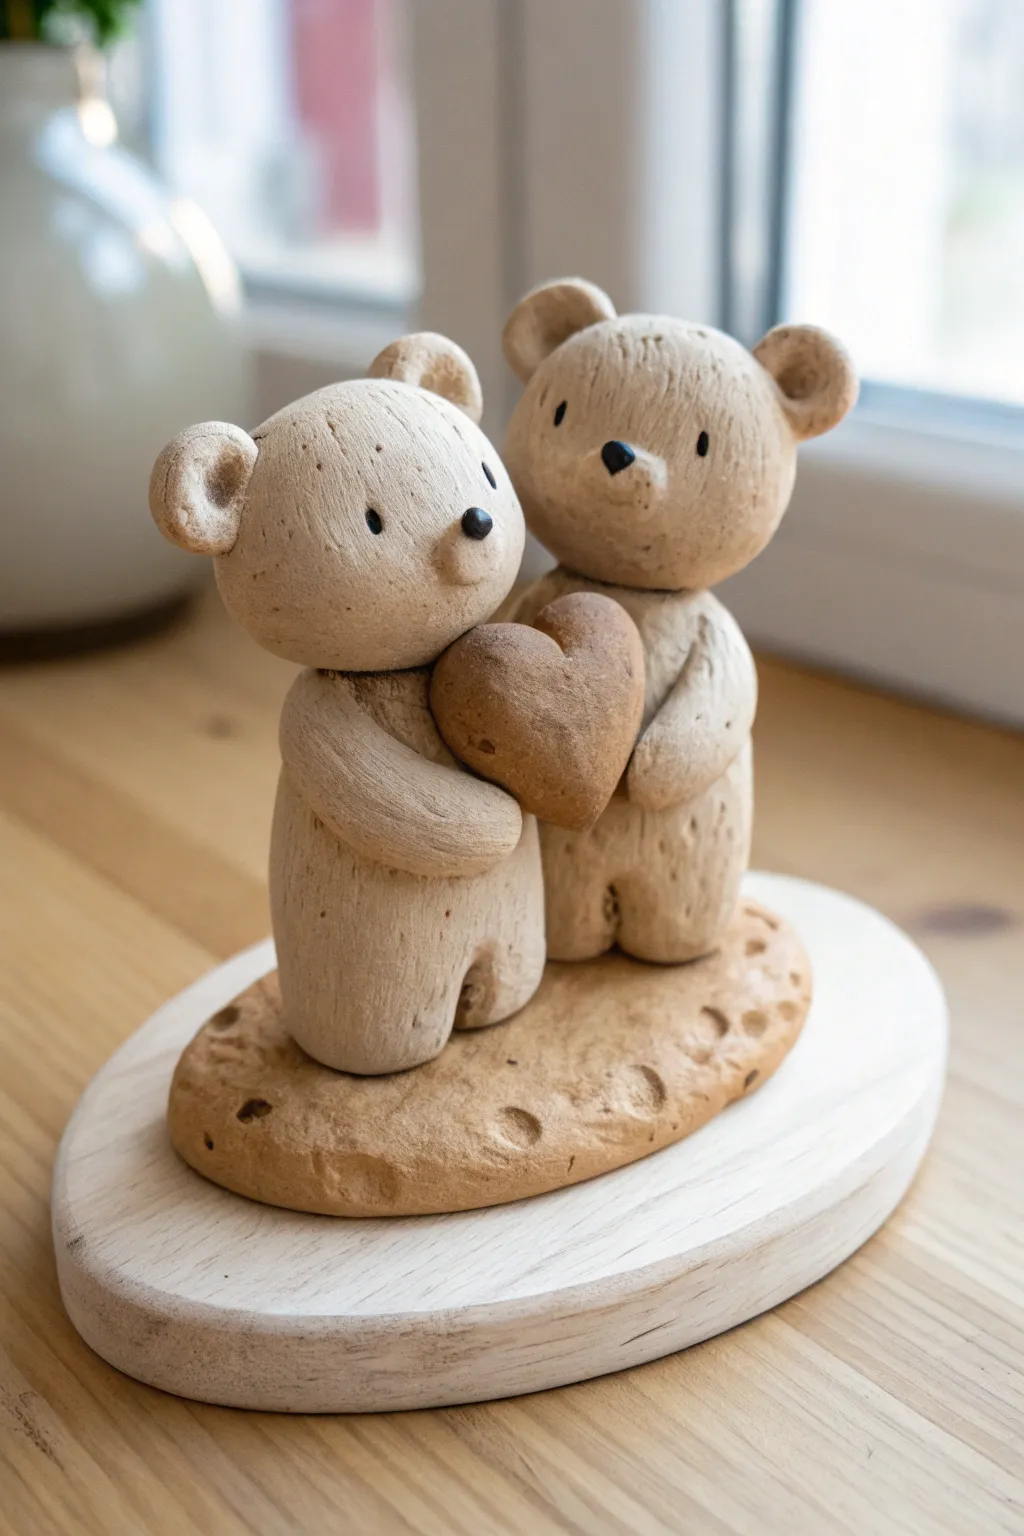
Celebrate affection with this adorable clay sculpture of two textured bears sharing a heart. This simple yet heartwarming project uses natural earth tones and subtle texture to create a timeless keepsake perfect for Valentine’s Day or anniversaries.
Step-by-Step Guide
Materials
- Polymer clay (beige/tan, light brown, dark brown, and black)
- Wooden oval base (about 4-5 inches)
- Aluminum foil (for armature)
- Sculpting tools (needle tool, ball stylus)
- Rough sandpaper or a stiff bristle brush (for texture)
- Adhesive (E6000 or super glue)
- Rolling pin
- Baking sheet and parchment paper
- Oven
Step 1: Creating the Base and Bodies
-
Form the clay base:
Start by conditioning a chunk of light brown clay until it’s pliable. Flatten it into an irregular oval shape, roughly matching the size of your wooden stand but slightly smaller. -
Texture the ground:
Use the rounded end of a tool or your fingertips to press gentle divots into the clay base, giving it a rocky, uneven ground appearance. This adds rustic charm right away. -
Shape the bodies:
Condition the beige clay. Roll two thick cylinders for the bears’ bodies. One should be slightly taller than the other if you want a size difference between the two characters. -
Create the legs:
At the bottom of each cylinder, use a modeling tool or knife to make a vertical slit about a half-inch up. Gently separate and round off each side to form stubby legs. -
Attach to the base:
Press the feet of both bears firmly onto your textured clay base. I like to position them close together so their shoulders will eventually touch. -
Add surface texture:
Before adding more limbs, take your stiff brush or sandpaper and gently press it all over the bodies. This creates a soft ‘fur’ texture that looks great once baked.
Stiff Brush Trick
Use an old toothbrush for texturing. It creates a random, realistic fur pattern much faster than using a needle tool.
Step 2: Adding Heads and Features
-
Roll the heads:
In the same beige clay, roll two spheres for the heads. Flatten them just slightly so they aren’t perfect balls. -
Sculpt the snouts:
Pinch a small amount of clay onto the front center of each sphere to create a protruding snout area. Use your thumb to smooth the seams so it integrates seamlessly. -
Attach ears:
Make small balls of clay, flatten them, and press an indentation into the center with a ball tool. Attach two to the top of each head. -
Add facial details:
Using tiny specks of black clay, add small oval eyes. Place a small triangular black nose on the tip of each snout. Use a needle tool to create a tiny vertical line under the nose for the mouth. -
Texture the heads:
Just like the bodies, tap your texture tool over the entire head surface, avoiding the black clay eyes and nose to keep them sharp. -
Connect heads to bodies:
Insert a small piece of toothpick or wire into the neck area of the bodies for support, then press the heads down firmly onto the shoulders.
Step 3: Arms and the Heart
-
Form the heart:
Take a piece of medium brown clay—slightly darker than the bears—and shape a puffy heart. Texture it heavily to match the rustic aesthetic. -
Position the heart:
Press the heart against the chest of the bears, right where they meet. -
Create the arms:
Roll four sausages of beige clay for the arms. They need to be long enough to reach from the shoulder to the center of the heart. -
Attach arms:
Blend the top of the arms into the shoulders. Bend them at the ‘elbows’ so the paws cup the heart from both sides, holding it securely. -
Final texture check:
Look closely at the places you just joined (shoulders and paws). Re-apply your texture tool to hide any fingerprints or smooth spots. -
Bake the piece:
Bake the clay sculpture according to the manufacturer’s instructions (usually 275°F for 15-30 minutes depending on thickness). Let it cool completely. -
Mount display:
Apply strong adhesive to the bottom of the baked clay base and center it on your wooden oval plaque.
Head Drooping?
If the heads feel heavy, bake the bodies first for 10 minutes to stiffen them, then add the raw clay heads and bake again.
Place this heartwarming duo on a shelf where it can bring a quiet smile to your day


Pocket-Sized Frog Friends

These charming little frogs bring a touch of whimsy to any shelf or plant pot with their expressive faces and chubby bellies. Sculpted from polymer clay in varied shades of green, this trio captures a simple, cartoonish style that is perfect for beginners looking to practice basic shapes.
Detailed Instructions
Materials
- Polymer clay (light green, medium green, and olive green)
- White polymer clay
- Black polymer clay
- Clay sculpting tools (needle tool, ball stylus)
- Rolling pin or pasta machine
- Aluminum foil (for armature, optional)
- Oven for baking
- Matte varnish (optional)
Step 1: Shaping the Bodies
-
Prepare your colors:
Begin by conditioning your three shades of green clay until they are soft and pliable. If you want custom shades, mix a little yellow or brown into a base green to create the olive or lime tones seen in the trio. -
Form the base shape:
Roll a smooth, round ball of clay for the body of the first frog. It should be slightly pear-shaped, wider at the bottom for a stable, chubby sitting pose. -
Flatten the base:
Gently tap the bottom of your pear shape against your work surface to create a flat base so the frog sits upright without tipping over. -
Refine the head shape:
Unlike a realistic frog, these figures have heads that merge seamlessly into their bodies. Use your fingers to subtly smooth the top half into a rounded dome shape where the eyes will eventually sit.
Keep it Clean
Keep wet wipes handy! Dark lint shows up easily on light green clay. Clean your hands thoroughly between colors, especially before touching the white eye clay.
Step 2: Adding Limbs
-
Create the hind legs:
Roll two smaller balls of the same green clay. Flatten them slightly into ovals and press them firmly against the lower sides of the body. -
Blend the seams:
Using a clay blending tool or your thumb, smooth the clay where the leg meets the back of the body, leaving the front part distinct to look like a folded thigh. -
Shape the front arms:
Roll two small snakes or cylinders of clay. These should be thinner than the back legs and long enough to reach from the ‘shoulder’ area down to the ground. -
Attach the arms:
Press the arms vertically against the front of the belly. Position them so the frog looks like it is resting its weight on its hands. -
sculpt the toes:
Use a needle tool or small knife to press three small indentations into the bottom of each foot and hand, creating cute, simple webbed toes.
Step 3: Creating the Face
-
Make the eye sockets:
Roll two small balls of green clay and place them on top of the head for the eye mounds. Blend the bottom edges into the head so they look like raised bumps. -
Insert the whites:
Press a small ball stylus into the center of each green eye mound to create a socket, then place a tiny ball of white clay inside, flattening it slightly. -
Add the pupils:
Place a minuscule dot of black clay onto the white circles. I like to position them slightly inward or upward to give the frog a goofy, friendly expression. -
Carve the smile:
Use a curved tool or the side of a needle tool to press a wide, U-shaped mouth across the face. Press deeper at the corners to create cute dimples. -
Add nostrils:
Poke two tiny, widely spaced holes just above the mouth line to serve as nostrils.
Leaning Frogs?
If your frogs slump while baking, prop them up with a little crumpled cushion of aluminum foil or polyester batting to hold their shape in the oven.
Step 4: Finishing Touches
-
Smooth fingerprints:
Dip your finger in a little baby oil or clay softener and gently rub over the entire sculpture to remove any fingerprints or tool marks. -
Repeat for friends:
Create the other two frogs using different shades of green, varying their sizes slightly to give the group character. -
Bake:
Bake the figures according to the instructions on your specific brand of polymer clay. Usually, this is around 275°F (135°C) for 15-30 minutes. -
Cool and protect:
Let the frogs cool completely before handling. If desired, brush on a coat of matte varnish to protect the surface and unify the sheen.
Now you have an adorable trio of amphibians ready to guard your houseplants

The Complete Guide to Pottery Troubleshooting
Uncover the most common ceramic mistakes—from cracking clay to failed glazes—and learn how to fix them fast.
Sweet Little Penguins
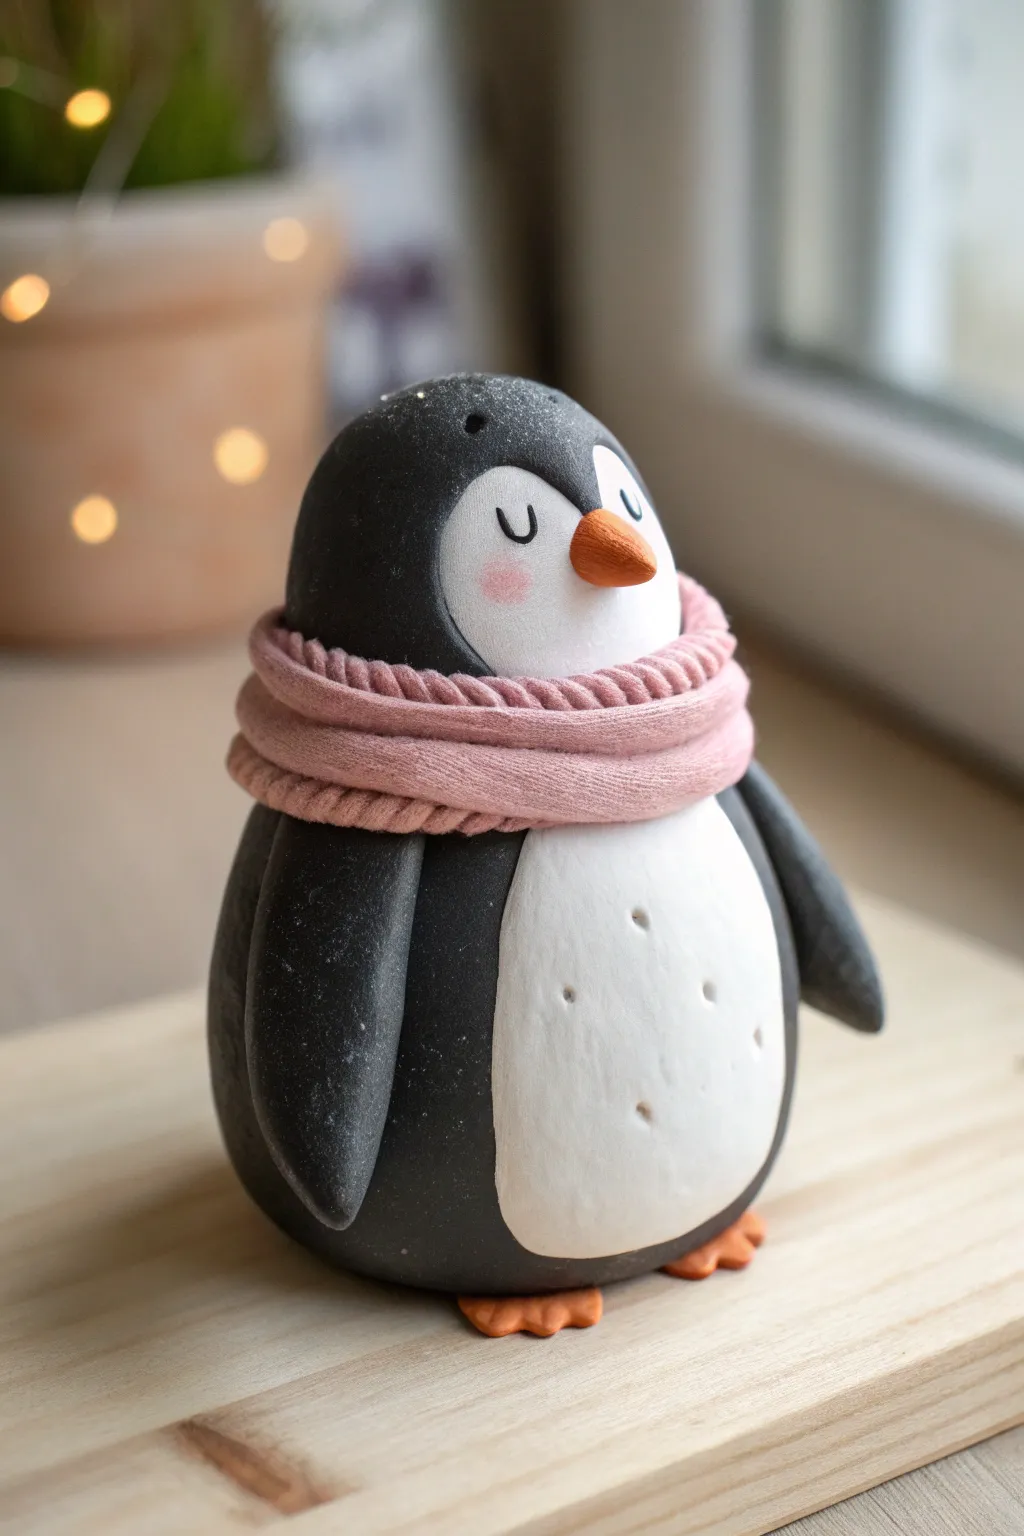
This adorable little penguin captures the essence of winter warmth with its chunky pink scarf and peaceful expression. Perfect for beginners, this project focuses on smooth, rounded shapes and simple textures to bring a charming character to life.
Step-by-Step Guide
Materials
- Black polymer clay
- White polymer clay
- Pale pink polymer clay
- Orange polymer clay
- Basic sculpting tools (needle tool, dotting tool)
- Acrylic roller or pasta machine
- Pink chalk pastel or blush (for cheeks)
- Small soft brush
- Oven for baking (as per clay instructions)
Step 1: Shaping the Base
-
Form the body:
Start by conditioning a large ball of black clay until it’s soft and pliable. Roll it into a smooth egg shape, slightly flatter at the bottom so it stands up on its own. This will be the main body of your penguin. -
Create the tummy:
Roll a smaller ball of white clay and flatten it into a thin oval sheet. Press this gently onto the front of the black egg shape to form the belly. Smooth the edges down with your thumb so it blends seamlessly into the black clay. -
Add texture:
Using a needle tool or a small dotting tool, poke three or four random, shallow indentations into the white belly area to give it a whimsical, organic look. -
Check stability:
Give the figure a gentle tap on your work surface to ensure the bottom is perfectly flat and the penguin won’t wobble.
Step 2: Adding Features
-
Make the face:
Flatten a second, smaller oval of white clay. Attach this to the upper part of the black body, slightly overlapping the top of the tummy section. Gently shape the top into a slight heart curve to suggest the forehead. -
Sculpt the beak:
Take a tiny amount of orange clay and roll it into a small cone. Press it onto the center of the white face area, curving it slightly downward. -
Form the wings:
Roll two equal-sized logs of black clay, tapering them at one end to look like teardrops. Flatten them slightly and attach one to each side of the body. I like to keep them close to the sides for a streamlined, cozy look. -
Add the feet:
Create two small flattened triangles from orange clay. Use a knife tool to make two notches in each for toes, then slide them under the front of the body so just the tips peek out.
Clean Clay Tip
Keep baby wipes nearby! Clean hands thoroughly between colors, especially before handling the white clay, to avoid transferring black lint or smudges onto the clean belly.
Step 3: The Cozy Scarf
-
Prepare the scarf base:
Roll a long, thin snake of pale pink clay. It needs to be long enough to wrap around the penguin’s neck twice. -
Create the knit texture:
Take two even thinner strands of pink clay and twist them together tightly to create a rope look. Make two of these twisted ropes. -
Assemble the scarf:
Lay the two twisted ropes side-by-side on top of a flattened strip of pink clay. Press them down gently to bond them into a single, chunky scarf piece. -
Wrap the penguin:
Carefully wrap this textured strip around the penguin’s neck, covering the seam where the black head meets the body. Overlap the ends slightly at the front or side.
Winter Texture
Before baking, gently roll a piece of sandpaper over the black body parts to give the penguin a matte, stone-like texture instead of a shiny finish.
Step 4: Finishing Touches
-
Draw the eyes:
Use a needle tool to carefully impress two small ‘U’ shapes into the white face clay for sleeping eyes. Keep them symmetrical for a peaceful expression. -
Add rosy cheeks:
Shave a tiny bit of pink chalk pastel into a powder. Use a small soft brush to gently dust two circles of pink onto the cheeks, just below the eyes. -
Dust and clean:
Check the dark clay for any white fingerprints or dust specks. You can clean these up using a cotton swab dipped in a tiny bit of rubbing alcohol or baby oil. -
Bake:
Place your penguin on a baking sheet or ceramic tile. Bake according to your specific polymer clay manufacturer’s instructions regarding temperature and time.
Once cooled, your peaceful penguin is ready to sit on a shelf and bring a bit of quiet calm to your space.
Smiling Strawberry Characters
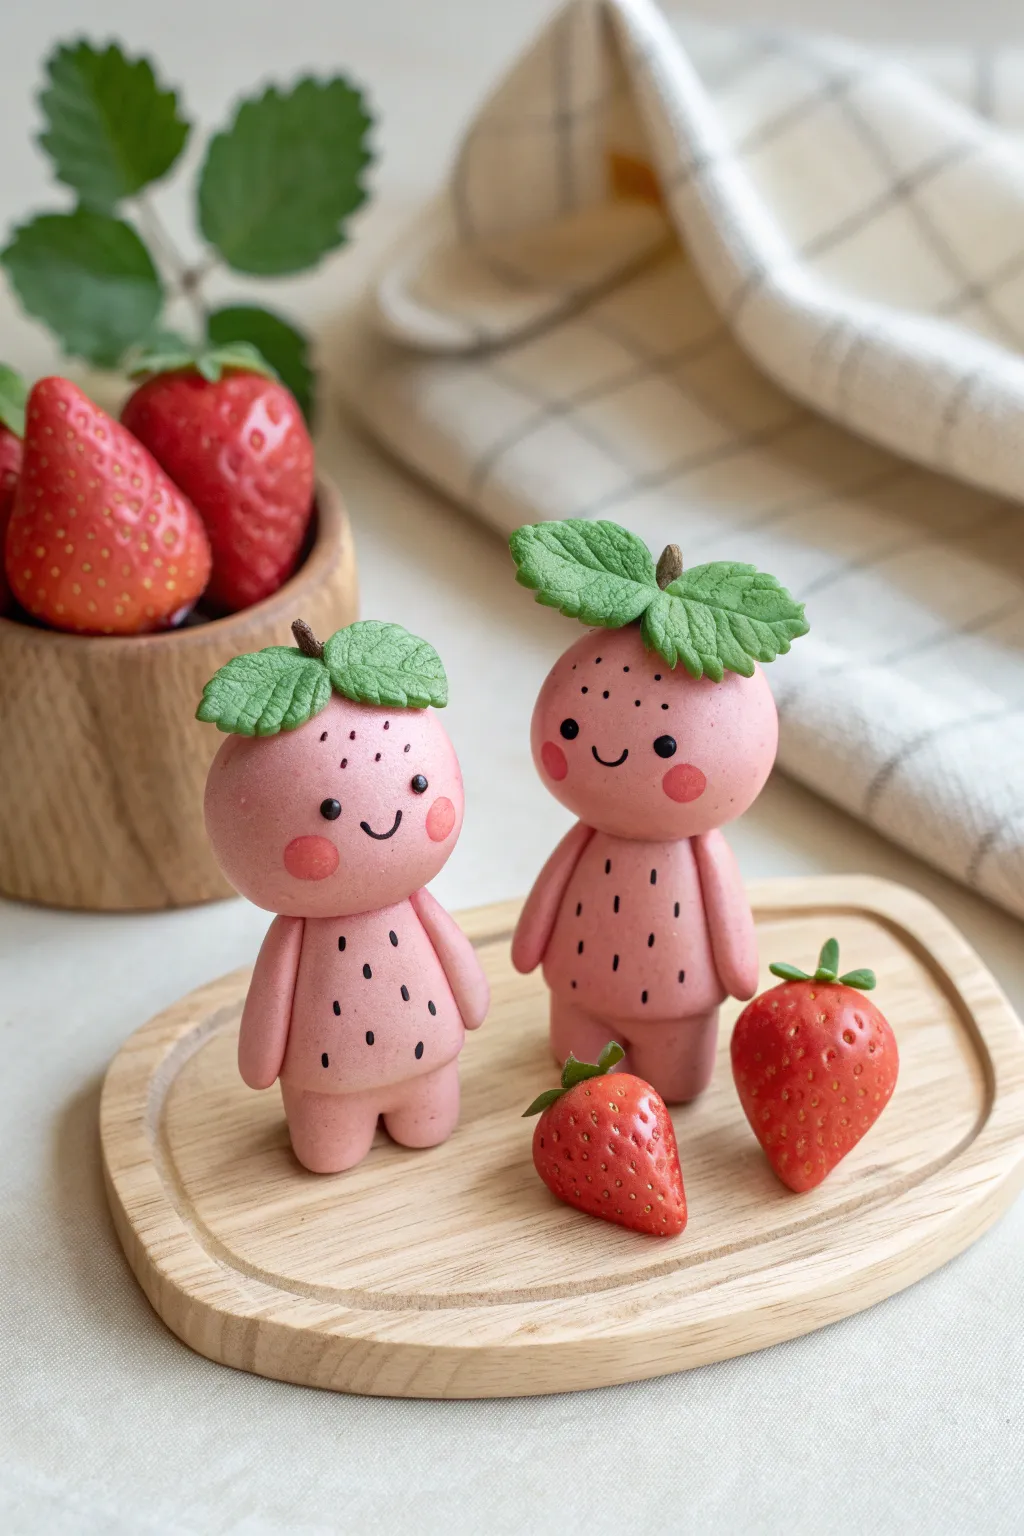
These adorable anthropomorphic strawberry figures bring a touch of sweetness to any shelf, featuring a soft matte pink finish and charming leafy hats. With their simple, friendly expressions and chubby limbs, they make for a delightful beginner-friendly sculpting project.
Detailed Instructions
Materials
- Polymer clay (light pink, leaf green, brown)
- Black acrylic paint or fine-tip permanent marker
- Pink soft pastel chalk (for cheeks)
- Basic sculpting tools (ball tool, needle tool)
- Small paintbrush
- Silicone sculpting mat
- Wire or toothpicks (for internal support)
- Oven (for baking according to clay instructions)
Step 1: Forming the Body and Head
-
Mix your base color:
Start by conditioning your light pink polymer clay until it is soft and pliable. If the pink is too bright, mix in a tiny amount of white or beige to achieve that soft, strawberries-and-cream hue shown in the photo. -
Shape the head:
Roll a smooth sphere of pink clay for the head, roughly the size of a large walnut. Gently press the sides to slightly flatten it, keeping the overall round shape intact. -
Create the body:
Roll a second piece of pink clay into a cylinder that is slightly taller than the head but slightly narrower. Round off the edges so it looks pillowy and soft. -
Connect the pieces:
Insert a short piece of wire or a toothpick into the top of the body cylinder, leaving half exposed. Push the head sphere onto this support to join them securely. -
Smooth the neck seam:
Using a silicone tool or your finger, gently blend the clay where the head meets the body just slightly to ensure a strong bond, though a distinct ‘neck’ groove is desirable for this cute style.
Step 2: Adding Limbs and Features
-
Roll the arms:
Create two small snake-like shapes from pink clay for the arms. They should be thicker at the shoulder and slightly tapered at the ends, with no distinct hands—just rounded nubs. -
Attach the arms:
Press the arms onto the sides of the body, blending the clay at the shoulder joint so they look seamless. Pose them hanging naturally downward. -
Form the legs:
Roll two small, short logs for the legs. These should be quite stubby to support the figure’s weight. -
Attach the legs:
Press the legs firmly onto the bottom of the body. You may need to press the figure down onto your work surface to flatten the soles of the feet, ensuring the figure stands upright on its own.
Keeping it Matte
To maintain that velvety look, avoid glossy varnishes. A matte varnish or even cornstarch lightly brushed on before baking can reduce shine.
Step 3: The Leafy Hat
-
Roll out green clay:
Condition your leaf green clay and flatten it into a small pancake. -
Cut the leaf shape:
Using a needle tool or small blade, cut out a shape resembling three or four connected oval leaves. Alternatively, shape small teardrops individually and press them together. -
Texture the leaves:
I like to use a needle tool to gently score vein lines into each leaf segment for realistic texture. Make a center line and smaller angled veins branching off. -
Attach the greenery:
Place the leaf cluster on top of the head, draping it slightly over the curve of the forehead. Press gently to adhere. -
Add the stem:
Roll a tiny piece of brown clay into a short stem. Press this into the very center of the green leaves.
Accessorize!
Make your berry distinct by adding tiny clay flowers to the hat, or giving one figure a tiny clay strawberry handbag to hold.
Step 4: Detailing and Finishing
-
Initial baking:
Bake your clay figure according to the manufacturer’s instructions (usually 275°F/135°C for 15-30 minutes). Let it cool completely before painting. -
Paint the seeds:
Using black acrylic paint and a very fine brush (or a fine-tip marker), add small vertical dashes all over the body and the top of the head to mimic strawberry seeds. -
Draw the face:
Paint two small black dots for eyes and a simple U-shape centered between them for the smile. Keep the features small and centered low on the face for maximum cuteness. -
Add the blush:
Scrape a little pink soft pastel into dust. Dip a dry paintbrush into the dust and gently dab circular rosy cheeks below the eyes. -
Seal (optional):
If you want to protect the paint, apply a coat of matte varnish, avoiding the pastel cheeks if possible so they don’t smear.
Once the paint is dry, your sweet strawberry companions are ready to brighten up your desk


What Really Happens Inside the Kiln
Learn how time and temperature work together inside the kiln to transform clay into durable ceramic.
Happy Veggie Squad
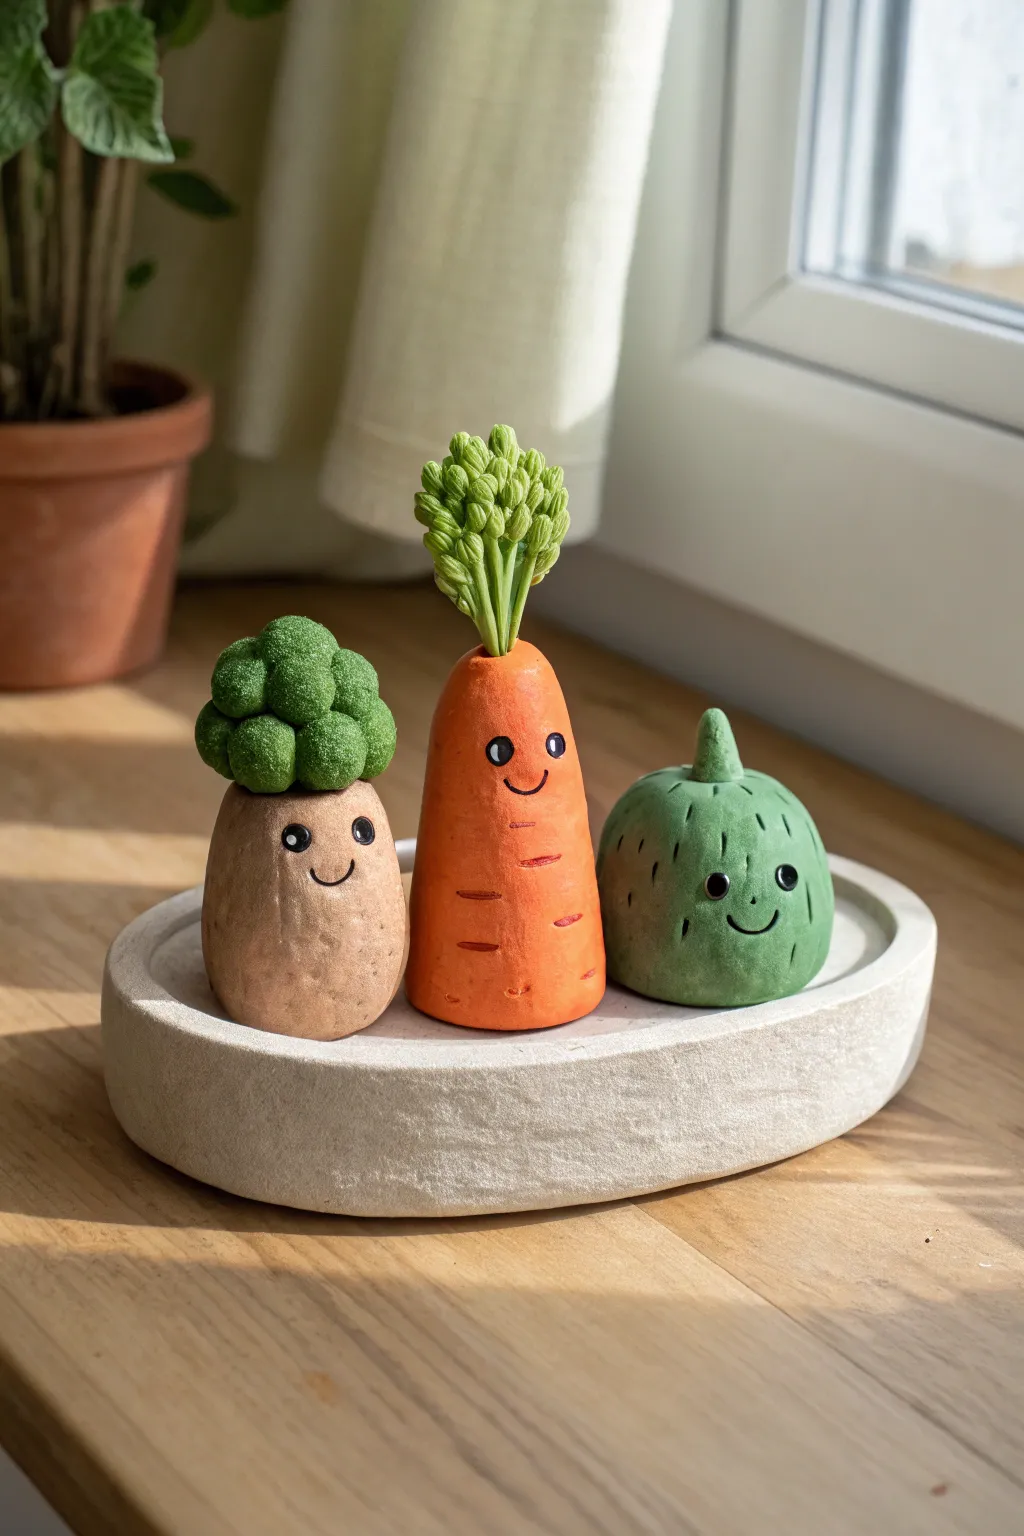
Brighten up your windowsill with this adorable trio of smiling clay vegetables. Featuring a textured potato creature, a cheerful carrot, and a round green gourd, these little friends are full of personality and simple to sculpt.
Step-by-Step Guide
Materials
- Polymer clay (orange, tan/brown, dark green, medium green, light green)
- Black polymer clay or black acrylic paint
- Sculpting tools (needle tool, ball stylus)
- Texture tools (toothbrush, crumpled foil, sandpaper)
- Wire armature or toothpicks (optional for structural support)
- Oven for baking
- Matte varnish (optional)
Step 1: Sculpting the Potato Pal
-
Base Shape:
Start with a generous ball of tan or light brown clay. Roll it into a smooth oval shape, slightly wider at the bottom to ensure it stands securely. Flatten the base gently against your work surface. -
Adding Texture:
To give the potato an earthy, organic feel, gently press a piece of crumpled aluminum foil or coarse sandpaper all over the surface. Avoid the area where you plan to put the face so it stays smooth. -
Broccoli Hat Base:
Take a piece of medium green clay and flatten it into a thick disc. Place this on top of the potato body to serve as the foundation for the leafy ‘hair’. -
Creating Florets:
Roll several small balls of the same medium green clay. Cluster them tightly together on top of the green disc you just placed, building up a rounded, bubbly broccoli shape. -
Floret Texture:
Using a needle tool or an old toothbrush, stipple the surface of the green balls vigorously to replicate the rough, fuzzy texture of broccoli florets.
Step 2: Crafting the Cheerful Carrot
-
Orange Body:
Condition your orange clay and roll it into a cone shape. Taper the top slightly, but keep the bottom wide and flat so it stands upright next to its potato friend. -
Carrot Markings:
Take a needle tool or a dull knife and press small horizontal notches randomly around the orange body. These mimic the natural ridges found on real carrots. -
Stem Preparation:
Use the back of a paintbrush to create a deeper indentation at the very top of the carrot cone. -
Leafy Stems:
Roll thin snakes of light green clay. Group several strands together and pinch them at the bottom so they fan out at the top. Insert this pinched end securely into the hole on top of the carrot. -
Stem Detail:
For extra realism, add tiny balls of green clay to the tips of the stems and texture them similarly to the broccoli hat using a needle tool.
Texture Master Class
For the broccoli head, press clay through a fine mesh strainer and cut it off to create ultra-realistic, tiny florets instantly.
Step 3: Forming the Gentle Gourd
-
Gourd Shape:
Roll a ball of muted green clay. Squish it slightly so it becomes a rounded, squat shape, like a pumpkin or acorn squash. -
Stem Accent:
Pinch the very top center of the ball and pull the clay upward to form a small, pointed stem. -
Surface Detail:
Using a needle tool, draw short, vertical dashed lines or small speckles all around the body of the gourd to break up the smooth surface.
Smudge Alert
If your lighter clay gets dirty from the darker colors, use a cotton swab dipped in rubbing alcohol or baby oil to gently wipe the unbaked surface clean.
Step 4: Bringing Faces to Life
-
Eye Sockets:
For all three figures, use a medium-sized ball stylus to press two distinct indentations where you want the eyes to go. Placing them wider apart makes them look cuter. -
Adding Eyes:
Roll tiny balls of black clay and press them firmly into the sockets. Add microscopic dots of white clay for highlights if you want an extra sparkle. -
Winning Smiles:
Roll extremely thin threads of black clay for the mouths. Gently curve them into ‘U’ shapes and press them onto the faces using your needle tool. Alternatively, you can paint these on after baking. -
Baking Time:
Place all figures on a baking sheet lined with parchment paper. Bake according to your clay manufacturer’s instructions, usually around 275°F (135°C) for 15-30 minutes. -
Finishing Touches:
Once cool, I usually like to check if the faces need any touch-ups. You can apply a matte varnish to protect the clay while keeping the natural vegetable look.
Arranging your trio on a small dish creates the perfect little scene to greet you every morning
Cozy Mushroom Sprites
Bring a touch of woodland whimsy to your desk with this adorable mushroom sprite, featuring a classic red spotted cap and a cozy green scarf. This simple clay character radiates charm with its blushy cheeks and friendly smile, making it a perfect beginner sculpting project.
Detailed Instructions
Materials
- Polymer clay (blocks of cream/white, terracotta red, sage green, and black)
- Foil (for the core)
- Acrylic paints (pink, white)
- Fine detail paintbrush
- Dotting tool or toothpick
- Sculpting tools (needle tool, smoothing tool)
- Matte varnish (optional)
- Baking sheet and parchment paper
- Oven
Step 1: Forming the Base
-
Create the core:
Begin by crumpling a small piece of aluminum foil into a cylinder shape, roughly 1.5 inches tall. This saves clay and helps the figure bake evenly. -
Condition the clay:
Take a generous amount of cream or off-white clay and knead it until it’s soft and pliable. Roll it into a smooth ball, then flatten it slightly. -
Wrap the body:
Wrap the cream clay sheet around your foil cylinder, smoothing the seams completely until you have a solid, pillar-like shape. Currently, it should look like a thick marshmallow. -
Create the head:
Refine the top of the cylinder to be slightly rounder to form the head area, and flatten the bottom firmly against your work surface so the sprite stands up straight. -
Add texture:
Using a needle tool or a stiff bristled brush, lightly scratch vertical lines up and down the cream body. This subtle texture mimics the fibrous look of a real mushroom stalk.
Step 2: Adding the Details
-
Sculpt the scarf:
Condition a piece of sage green clay and roll it into a long, thin snake. Flatten it slightly with your finger to create a ribbon shape. -
Wrap the neck:
Drape the green strip around the ‘neck’ area of your figure (about a third of the way down from the top), crossing the ends at the front. -
Form the knot:
Create a small, round bead of green clay and press it over the crossed section to simulate a knot. Then, attach two shorter, teardrop-shaped pieces of green clay hanging down from the knot to look like the scarf ends. -
Detail the scarf:
Use a needle tool or knife to press crease lines into the knot and the dangling scarf ends, giving the fabric realistic folds. -
Add arms:
Roll two small logs of cream clay for the arms. Press them vertically onto the sides of the body, just under the scarf line, blending the top shoulder area into the main body so they look seamless.
Sticky Fingerprints?
If you are leaving fingerprints on the clay, lightly dust your fingers with cornstarch or dip them in cool water before smoothing the final shapes.
Step 3: The Cap and Face
-
Shape the cap:
Take a large ball of terracotta red clay. Flatten the bottom and round the top into a classic dome shape. It should be slightly wider than the body. -
Texture the cap:
I like to gently press the surface of the red clay with a sponge or sandpaper before attaching it to give it an earthy, organic texture rather than a shiny plastic look. -
Attach the cap:
Place the red dome onto the head of your figure. Press down gently to secure it. If the head is too round, flatten the top of the head slightly first for a better seal. -
Create spots:
Roll tiny, irregular balls of cream or white clay. Flatten them into discs and press them randomly all over the red cap. Vary the sizes for a natural appearance. -
Bake the figure:
Place your sprite on parchment paper and bake according to your polymer clay package instructions (usually 275°F/135°C for 15-30 minutes). Let it cool completely.
Make it a Trio
Create a whole family by making two smaller sprites with different cap colors, like mustard yellow or deep purple, to arrange together.
Step 4: Painting and Finishing
-
Paint the eyes:
Since the eyes are small, use a dotting tool or the back of a paintbrush dipped in black acrylic paint to stamp two small, wide-set eyes on the face area. -
Add the smile:
With an ultra-fine detail brush and black paint reduced with a drop of water, paint a tiny, thin ‘U’ shape between the eyes for the smile. -
Add highlights:
Once the black eye paint is dry, add a minuscule white dot to the top right of each eye to bring the character to life. -
Rosy cheeks:
Dip a dry brush or a cotton swab into a tiny amount of pink paint (or chalk pastel dust) and gently dab it under the eyes to create soft, blushing cheeks. -
Seal (Optional):
If you want to protect the paint, apply a thin coat of matte varnish over the figure, avoiding the eyes if you want them to remain glossy.
Place your finished mushroom sprite near a potted plant or on a windowsill to add a little bit of magic to your day

TRACK YOUR CERAMIC JOURNEY
Capture glaze tests, firing details, and creative progress—all in one simple printable. Make your projects easier to repeat and improve.
Sleepy Sloth Huggers
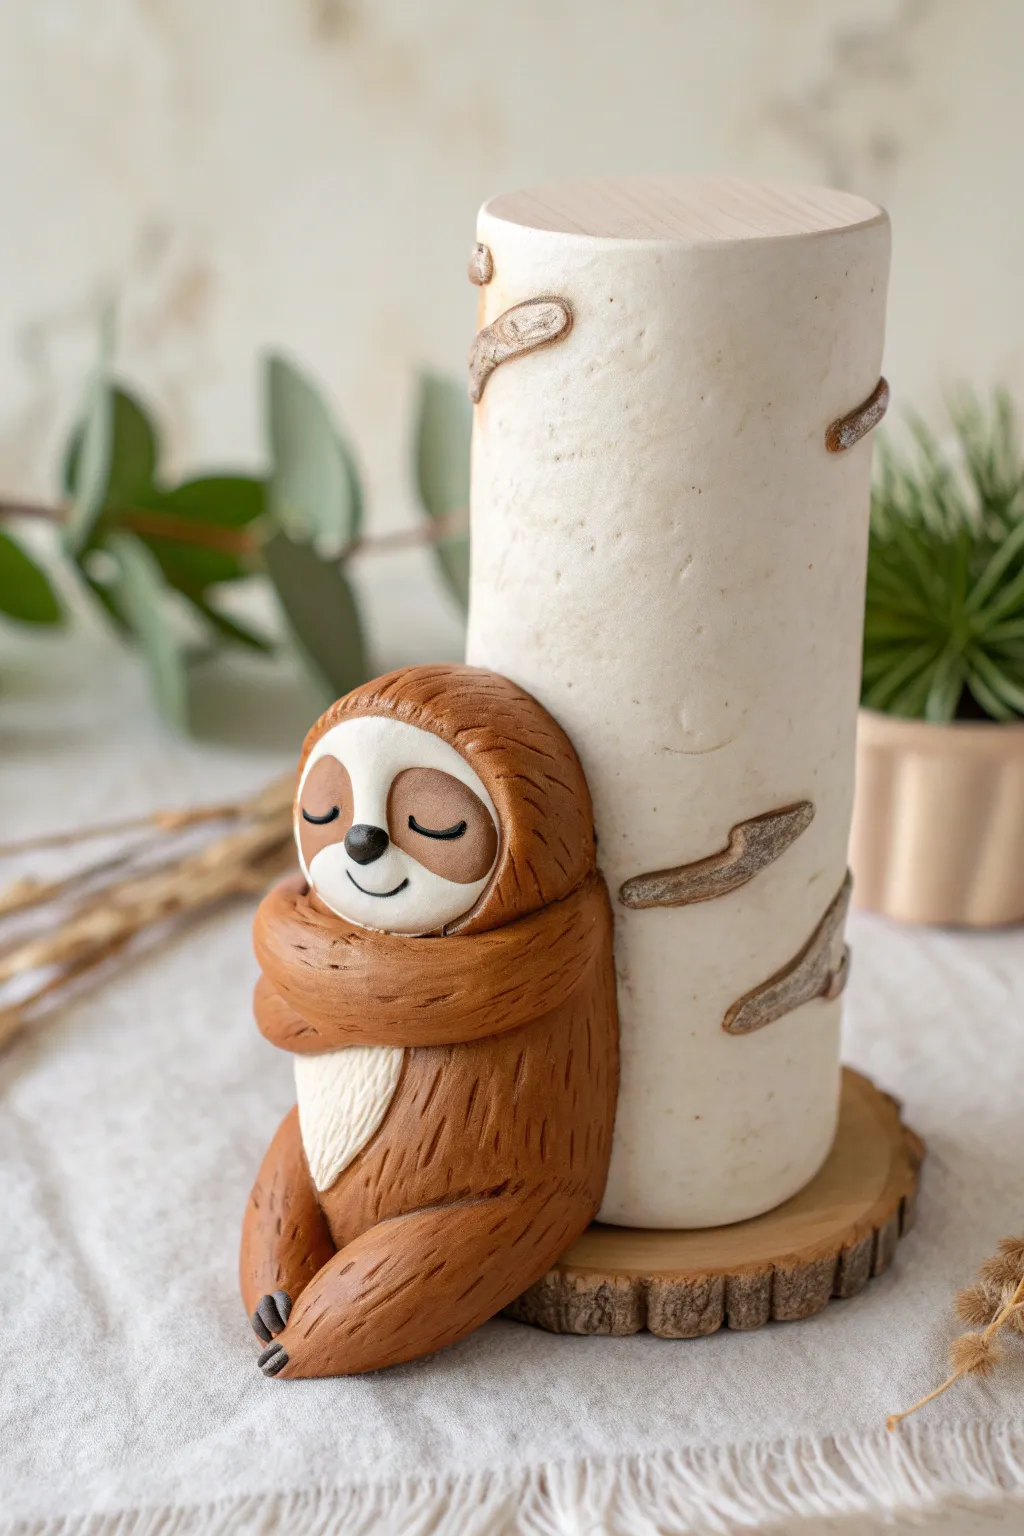
Create this heartwarming piece of decor featuring a serene brown sloth embracing a birch log column. The texture of the clay perfectly mimics both the animal’s fur and the rustic tree bark, making it a charming addition to any shelf.
Step-by-Step
Materials
- Polymer clay: Brown (medium shade), White, Beige/Cream, Dark Brown (for bark)
- Small cylindrical object for the base (e.g., a glass votive holder or cardboard tube)
- Wooden circular base slice
- Pointed sculpting tool or toothpick
- Ball stylus tools
- Blade or craft knife
- Acrylic roller
- Texturing tool (stiff brush or needle tool)
- Oven for baking
Step 1: Preparing the Birch Column
-
Cover the Core:
Begin by rolling out a sheet of white polymer clay to a thickness of about 4mm. Wrap this sheet fully around your glass votive holder or cardboard tube, smoothing the seam where the edges meet so it becomes invisible. -
Add Texture:
Gently roll the wrapped cylinder over a textured surface or lightly press crumpled aluminum foil against it to give the ‘bark’ a non-smooth, organic finish. -
Create Bark Markings:
Take tiny pinches of dark brown clay and roll them into small, thin snakes. Flatten them slightly and press them randomly onto the white column to simulate birch knots. -
Refine the Knots:
Drag a needle tool horizontally across the dark brown spots to create the characteristic peeling look of birch bark.
Clean Texture
Before texturing the cream belly or face, wipe your tools with a baby wipe. Dark clay residue can easily smudge onto light colors and ruin the crispness.
Step 2: Sculpting the Sloth Head
-
Form the Head Base:
Roll a sphere of medium brown clay roughly the size of a walnut. Flatten the back slightly so it will sit flush against the column later. -
Add the Face Plate:
Flatten a small disc of beige or cream clay into a heart-like shape without the sharp point. Press this onto the front of the brown sphere for the face area. -
Create Eye Patches:
Take two smaller bits of brown clay, flatten them into teardrop shapes, and press them onto the cream face plate, sloping downwards towards the outer edges. -
Facial Features:
Use a needle tool or small blade to impress two curved ‘U’ shapes for sleeping eyes onto the brown eye patches. Add a tiny black or dark brown oval nose at the center. -
The Smile:
Use a small, curved tool to press a gentle smile into the cream clay just below the nose. -
Fur Texture:
Using a pointed tool, make short, rhythmic strokes all over the brown head area (avoiding the cream face) to replicate fur texture.
Step 3: Building the Body
-
Shape the Torso:
Form a large, elongated teardrop shape from brown clay for the body. Flatten the back side and press it firmly against the birch column. -
Add the Tummy:
Create a teardrop of cream clay and flatten it onto the front of the brown torso. Texture this patch with vertical strokes to look like soft belly fur. -
Attach the Head:
Place the finished head on top of the torso. I find it helpful to insert a small piece of wire or a toothpick between the head and body for extra stability. -
Create the Arms:
Roll two long snakes of brown clay. Wrap the upper arm/shoulder area around the back of the column slightly, bringing the hands forward to clasp across the chest. -
Create the Legs:
Form two thick tear-drop shapes for legs. Attach them to the bottom of the torso, curving them upward as if the sloth is sitting cross-legged or resting. -
Adding Claws:
Use tiny bits of dark grey or black clay to form three small claws on each hand and foot, pressing them gently into the ends of the limbs. -
Final Texturing:
Go over the entire brown body, arms, and legs with your needle tool, adding the same fur texture you used on the head to blend all seams seamlessly.
Blush Effect
Shave a tiny bit of pink chalk pastel into a powder and brush it onto the sloth’s cheeks with a soft fluffy brush before baking for a rosy glow.
Step 4: Assembly and Baking
-
Mounting:
Place the clay-covered column onto your wooden slice base. You can bake it directly on the wood if the wood is untreated and dry. -
Baking:
Bake the entire sculpture according to your polymer clay package directions (usually 275°F/135°C for 15-30 minutes). -
Finishing Touches:
Once cool, you can lightly brush a tiny bit of brown pastel powder or acrylic paint into the textured fur grooves to enhance the depth.
Enjoy the calming presence of your new slow-moving friend as it adds a touch of nature to your home
Animal Ring Holder Figures

Sculpt a charming little companion for your jewelry with this teal bunny ring holder. The minimalist egg shape provides a sturdy base for rings, while the tall ears add sculptural height and whimsy to any dresser.
Step-by-Step Guide
Materials
- Polymer clay (teal/turquoise, white, black, light pink)
- Speckled clay effects (black pepper, dried tea leaves, or fine sand)
- Acrylic rolling pin
- X-acto knife or clay blade
- Needle tool or toothpick
- Ball stylus tool
- Small round cookie cutter (approx. 3-4 inches)
- Baking sheet and parchment paper
- Gloss or matte glaze (optional)
Step 1: Shaping the Bunny
-
Prepare the speckled clay:
Start by conditioning your teal clay until it’s soft and pliable. To achieve that organic, speckled look seen in the photo, knead in a tiny pinch of black pepper or fine black sand. Don’t overmix if you want distinct specks. -
Form the body base:
Roll a walnut-sized ball of your speckled teal clay. Gently taper the top portion while flattening the bottom against your work surface to create a rounded, egg-like cone shape. This needs to be stable enough to hold weight. -
Sculpt the ears:
Roll two smaller logs of the same teal clay, about 1.5 inches long. Taper both ends of each log, making one end slightly more pointed for the ear tip. -
Attach the ears:
Press the wider ends of the ears onto the top of the body. I find it helpful to use a blending tool or your finger to smooth the seam downwards until the clay joins seamlessly without a visible line. -
Refine the shape:
Once attached, gently shape the ears so they stand tall and straight. Their vertical height is perfect for stacking rings later.
Pepper Protocol
When using black pepper for specks, bake at slightly lower temps for longer. High heat can sometimes burn the organic material, turning specks brown instead of black.
Step 2: Creating the Dish
-
Mix the dish clay:
Take a larger amount of white polymer clay and mix in your speckling agent (pepper or sand) to match the textured aesthetic of the bunny, though keeping the base color natural white. -
Roll out the slab:
Roll the white clay out to an even thickness of about 1/4 inch. Use your circular cutter to punch out a clean, round base. -
Create the rim:
Roll a long, thin snake of the same white clay. It should be long enough to wrap around the entire circumference of your circle base. -
Attach the rim:
Place the snake on top of the circle’s edge. Blend the clay on the inside seam downwards into the base using your thumb or a modeling tool to create a smooth transition. -
Smooth the exterior:
Repeat the smoothing process on the outside seam so the rim looks like part of the dish rather than an attached coil. Tap the rim gently to flatten the top edge for a modern finish.
Gold Accents
Paint the very rim of the dish with liquid gold leaf after baking. The metallic edge creates a stunning, high-end contrast against the matte speckled finish.
Step 3: Details & Assembly
-
Position the bunny:
Place your teal bunny figure onto the center of the raw clay dish. Press down firmly to bond the two pieces together. You can score the bottom of the bunny slightly for a better grip. -
Add facial features:
Roll extremely tiny balls of black clay for the eyes and press them flat onto the face. Roll a microscopic heart or triangle shape for the nose. -
Draw the mouth:
Roll a whisper-thin thread of black clay for the mouth lines. Carefully curve two small pieces into a ‘w’ shape beneath the nose. Alternatively, you can paint this after baking if the clay is too fiddly. -
Apply blush:
Take two very small bits of light pink clay, flatten them into ovals, and press them onto the cheeks for a sweet, flushed look. -
Final texture check:
Before baking, give your piece a once-over. Smooth out any fingerprints with a drop of baby oil on your finger. -
Bake the project:
Bake according to your polymer clay package instructions (usually 275°F/135°C for 15-30 minutes). Let it cool completely in the oven to prevent cracking. -
Seal (Optional):
If you want a ceramic look, apply a thin coat of matte varnish to protect the clay and enhance the speckled texture.
Now your jewelry has a designated spot that is as decorative as it is functional
Open-Mouth Toothbrush Buddy
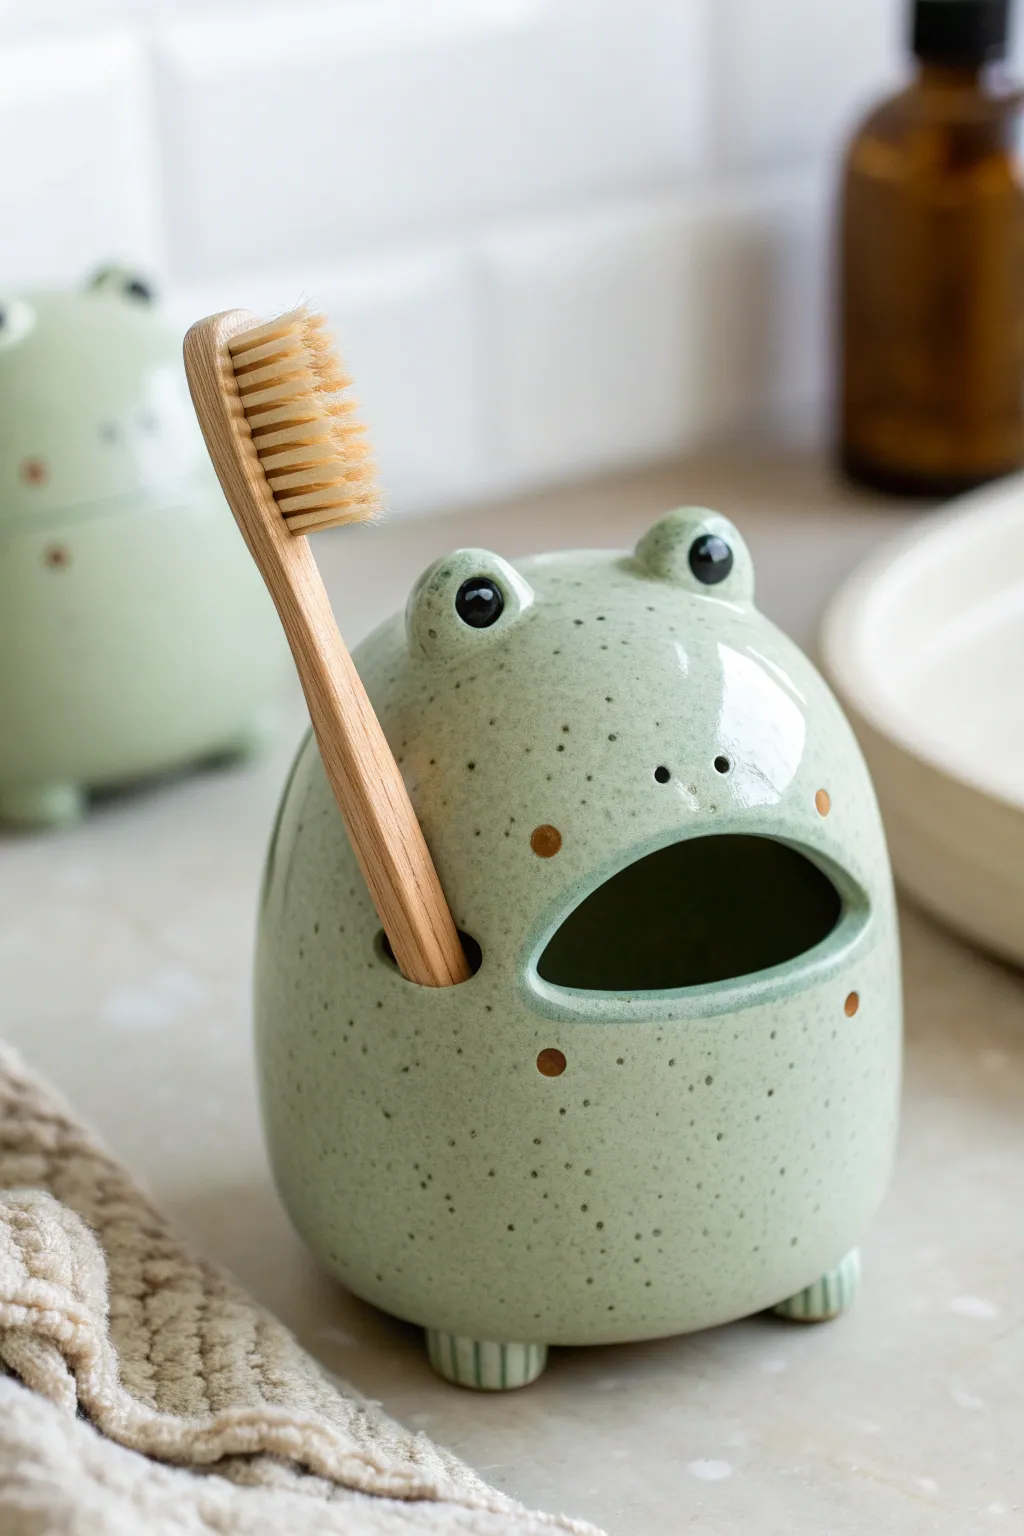
Bring a touch of swampy charm to your bathroom sink with this adorable frog-shaped toothbrush holder. With its speckled green glaze, wide open mouth, and eager eyes, this sturdy clay buddy is as functional as it is cute.
Detailed Instructions
Materials
- Stoneware clay or polymer clay (if not firing)
- Pottery tools (needle tool, sponge, rib)
- Light green underglaze or acrylic paint
- Dark green throwing slip or thin paint for speckling
- Clear glaze (if firing) or glossy varnish
- Small paintbrush
- Slip and score tools
- Rolling pin
Step 1: Forming the Body
-
Shape the Base:
Start with a softball-sized lump of clay and wedge it well to remove air bubbles. Gently shape this into a rounded, vertical egg shape, slightly wider at the bottom for stability. -
Hollow the Form:
If working with solid clay, use a loop tool to hollow out the center from the bottom up, leaving walls about 1/4 inch thick. Alternatively, use the pinch pot method to create two deep bowls and join them rim-to-rim to make a hollow sphere, then refine the shape. -
Smooth the Surface:
Use a flexible metal or rubber rib to smooth the exterior walls. You want a very organic, rounded finish without noticeable finger marks. -
Create the Mouth Opening:
Decide where the frog’s face will be. Use a needle tool to lightly sketch a wide, semi-circular mouth about halfway up the body. Cut this section out entirely. -
Refine the Mouth:
Take a damp sponge and gently round over the cut edges of the mouth opening so they aren’t sharp. The mouth should look like a smooth cavern. -
Add the Toothbrush Hole:
To the left or right of the mouth, use a hole cutter or a drinking straw to punch a clean, circular hole through the top of the ‘shoulder’ area. Ensure it’s wide enough for a standard toothbrush handle.
Wobbly Frog?
If the frog tips over, the bottom might be too round. Gently tap the base against a table while the clay is plastic to create a flat spot, or add slightly larger feet for balance.
Step 2: Adding Details
-
Form the Eyes:
Roll two small balls of clay, roughly the size of large marbles. Score and slip the top of the frog’s head, then attach these balls firmly to act as the eye sockets. -
Sculpt the Eye Details:
Using a modeling tool, create a slight depression in the center of each eye ball. Roll tiny beads of clay for pupils and press them into these depressions for a buggy-eyed look. -
Make the Feet:
Create four small, flattened cylinders or tabs for the feet. Score the bottom of the body and attach these so the frog stands slightly elevated. Use a needle tool to carve tiny vertical lines on the front of the feet to simulate toes. -
Clean Up:
Do a final pass with a slightly damp sponge to remove any crumbs or rough texture. I like to let the piece dry to a leather-hard state here before doing any final burnishing.
Step 3: Surface Decoration
-
Apply Base Color:
Once dry (or bisque fired if using ceramic kiln process), apply 2-3 coats of a light sage green underglaze or paint to the entire exterior. -
Add the Speckles:
Dip a stiff toothbrush or bristle brush into a dark green or brown watered-down paint. Run your thumb over the bristles to flick tiny speckles across the frog’s skin for texture. -
Paint the Details:
Use a fine liner brush to paint the pupils solid black. Add small brown or orange dots on the cheeks and sides for extra character. -
Glaze and Fire:
If using ceramic clay, dip the piece in clear glaze and fire it to the appropriate cone temperature. If using polymer or air-dry clay, seal the piece with a high-gloss waterproof varnish to protect it from bathroom moisture.
Waterproofing Tip
For air-dry clay, use dishwasher-safe Mod Podge or resin to coat the inside. Untreated air-dry clay will eventually dissolve if wet toothbrushes drip inside.
Now you have a charming little sink companion ready to hold your brush
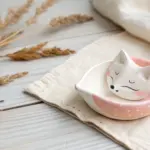
Desk Buddy Photo Holder Figures
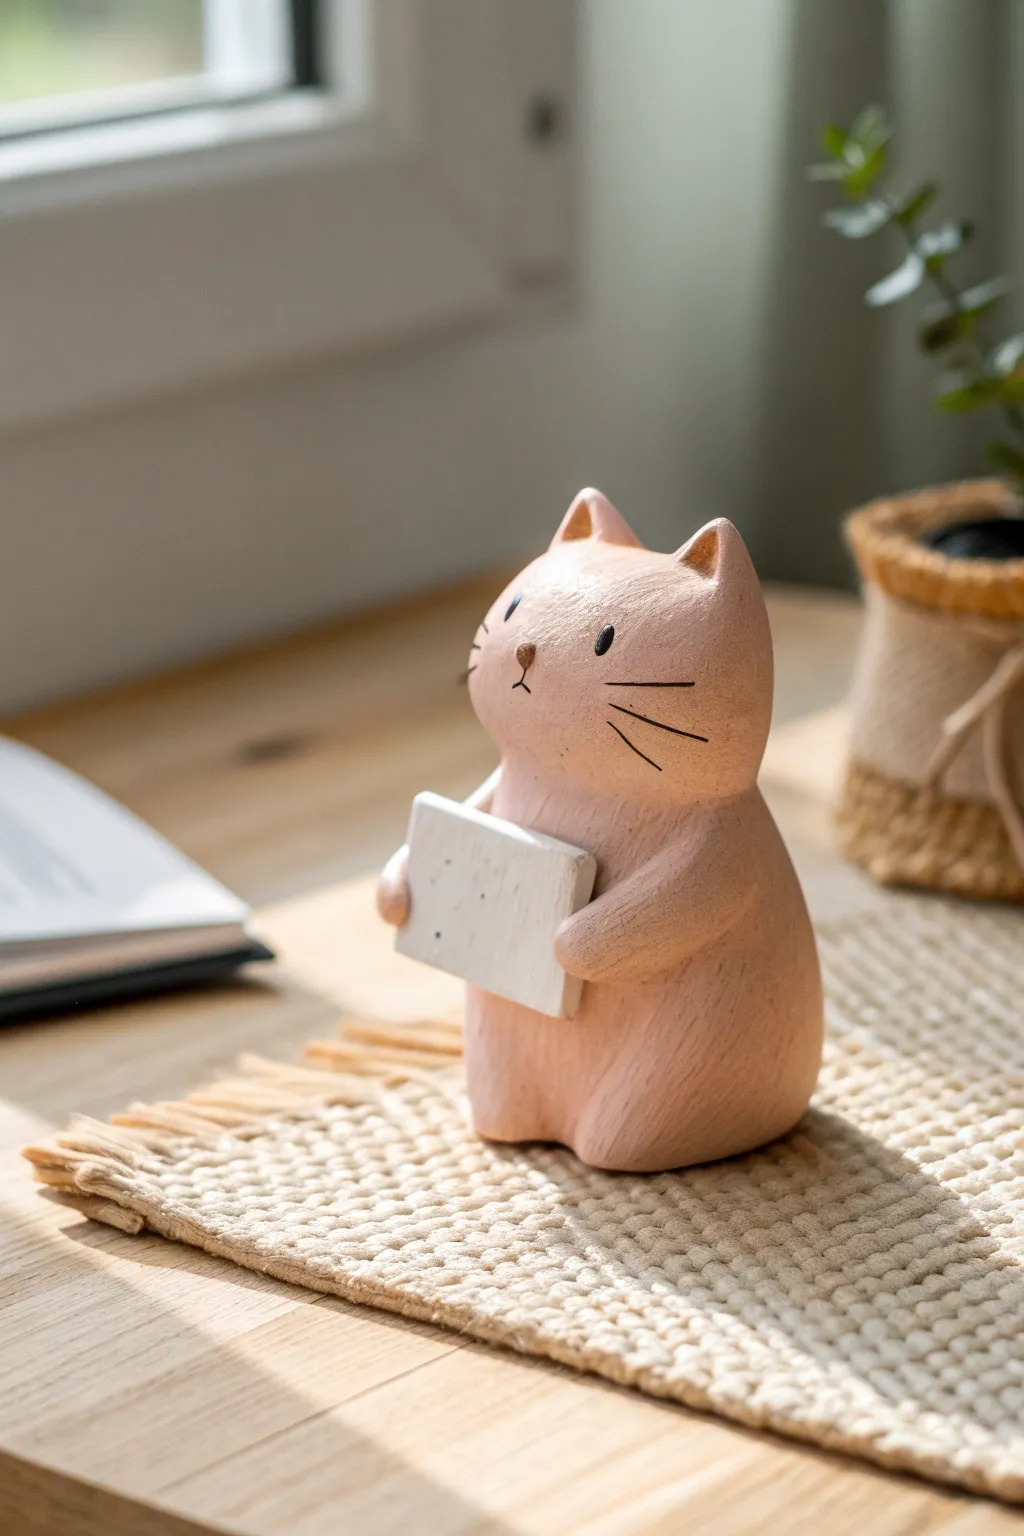
This charming, minimalist cat figure doubles as a sweet desk companion and a functional photo holder. With its warm peach tone and clever faux-wood texture, it brings a touch of rustic coziness to any workspace.
Step-by-Step Guide
Materials
- Polymer clay (flesh/peach tone and white)
- Acrylic paint (warm peach or salmon pink)
- Acrylic paint (black and brown)
- Matte varnish or sealant
- Sculpting tools (needle tool, small ball tool)
- Coarse sandpaper or stiff bristle brush
- Small square wooden tile or stiff cardboard
- Craft knife
- Fine-grit sandpaper
- Fine liner brush
Step 1: Sculpting the Base Shape
-
Condition the clay:
Start by warming up a generous handful of polymer clay in your hands until it becomes soft and pliable. You can mix white with a touch of orange or brown to achieve a pale, raw ceramic base color, though we will paint it later. -
Form the body:
Roll the clay into a smooth, large egg shape. Gently flatten the bottom so it sits securely on your work surface without tipping over. -
Shape the head:
Pinch the upper portion of the egg to define the neck slightly, then round out the top part to create a bulbous, gentle curve for the head. The transition from neck to head should be smooth, not sharp. -
Add the ears:
Pinch two small triangles of clay from the top of the head. Gently flatten them and use your thumb to curve them forward slightly, blending the seams flawlessly into the main head shape. -
Create the arms:
Roll two small sausages of clay for the arms. They shouldn’t be too long; we want distinct, stubby paws. -
Attach the arms:
Press the arms onto the sides of the body, curving them forward as if the cat is holding something against its chest. Smooth the clay where the shoulders meet the body so they look like one solid piece. -
Refine the paws:
Use a modeling tool to obscure the distinct ends of the paws slightly, ensuring they remain open enough to eventually hold your little sign.
Step 2: Adding Texture and Details
-
Create the wood grain texture:
This is the secret to the look. Take a stiff bristle brush or a piece of coarse sandpaper and gently drag it vertically down the entire sculpture. This mimics carved wood and breaks up the smooth plastic look of the clay. -
Prepare the sign:
From a scrap piece of clay (or using a small pre-cut wooden tile), form a small rectangle. If using clay, ensure the edges are sharp and square. -
Fit the sign:
Gently press the square tile into the cat’s embrace to ensure the arms are positioned correctly. Remove the tile carefully before baking so the cat retains the correct gap. -
Final smooth check:
Give the figure a once-over to remove any accidental fingerprints, re-applying the vertical texture if you smoothed it out too much. -
Bake the project:
Bake the cat figure and the clay tile (if you made one) according to your polymer clay package instructions. Let them cool completely before handling.
Texturing Secret
Brush vertical strokes with coarse sandpaper BEFORE baking. It creates those tiny grooves that catch the paint later, making it look like carved wood.
Step 3: Painting and Finishing
-
Apply the base coat:
Paint the entire cat with a matte, warm peach or salmon-pink acrylic paint. I like to dilute the paint slightly so the ‘wood grain’ texture shows through. -
Weather the finish:
Once the base is dry, use a very dry brush with a tiny amount of lighter cream paint to highlight the raised textures, enhancing the carved effect. -
Paint the sign:
Paint the separate rectangular tile a darker, warm white or pale grey to contrast with the cat’s pink tone. -
Draw the face:
Using a fine liner brush or a fine-tip paint pen, draw two simple vertical ovals for eyes. Add a tiny triangle nose in brown, centered just below the eyes. -
Add whiskers and mouth:
Draw three straight, horizontal whiskers on each cheek. Add a tiny vertical line dropping from the nose to create a subtle mouth. -
Secure the sign:
Place a dab of strong craft glue on the inside of the paws and the chest area, then slide your painted tile into place. Let the glue set fully.
Make it Magnetic
Instead of gluing the tile permanently, glue a tiny strong magnet to the cat’s belly and another to the back of the tile to make it swappable.
Now you have an adorable desk companion ready to hold your favorite mini-photo or motivational note.
Stackable Animal Totem Minis
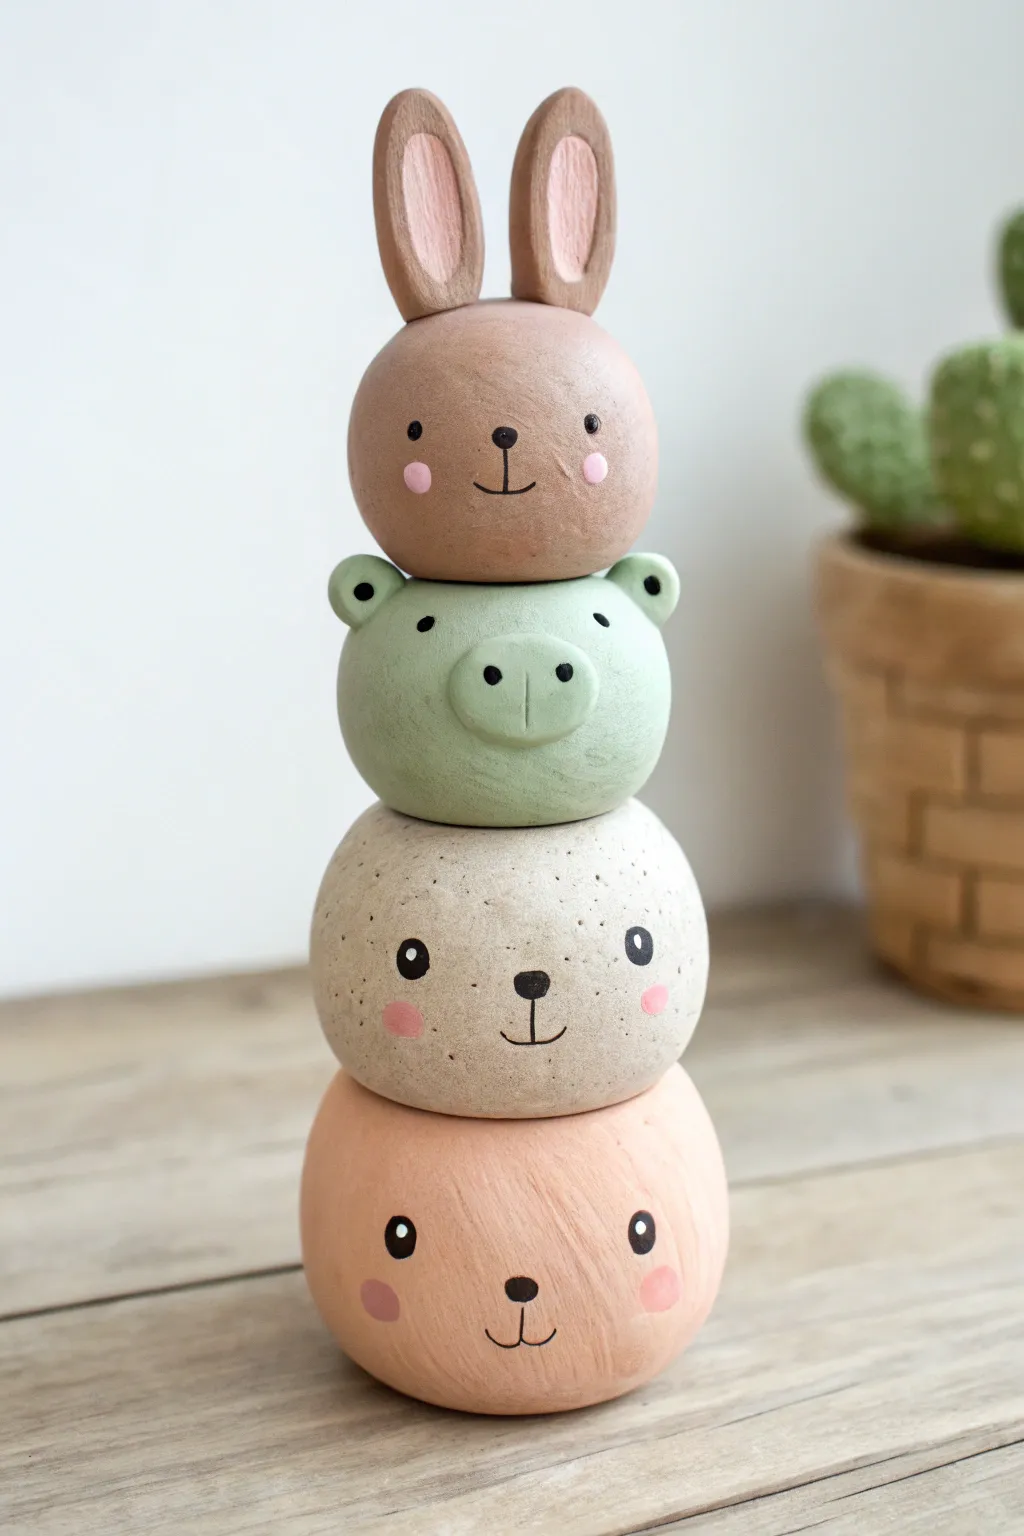
Create a charming vertical display with these stackable clay animal friends, featuring round, simplified shapes and sweet painted expressions. This project combines basic sphere sculpting with delicate character details to build a personalized totem pole of cuteness.
Step-by-Step Tutorial
Materials
- Polymer clay or air-dry clay (Brown, Sage Green, Beige, Peach/Light Orange)
- Acrylic paints (Black, White, Pink)
- Fine detail paintbrush (0 or 00 size)
- Dotting tools or ball stylus set
- Aluminum foil (for cores)
- Rolling pin
- Sculpting tools (needle tool, blending tool)
- Matte varnish or sealant
Step 1: Sculpting the Base Forms
-
Prepare foil cores:
To save clay and reduce weight, tightly crunch aluminum foil into four balls of roughly equal size, about the size of a golf ball or slightly larger. -
Condition the clay:
Knead your chosen clay colors (peach, beige, green, and brown) until they are soft, pliable, and free of cracks. -
Cover the cores:
Flatten a portion of the peach clay into a pancake and wrap it seamlessly around one foil ball. Roll it vigorously between your palms to smooth out any seams until it is a perfect sphere. -
Create the stack:
Repeat the covering process for the beige, green, and brown clay balls. Before the clay hardens, gently press them on top of each other to create a slight indentation ensuring they will stack stably later. -
Refine the shapes:
While the spheres are still pliable, gently tap the bottom of the lowest peach sphere on your work surface to create a flat base so the finished totem won’t roll away.
Step 2: Adding Animal Features
-
Sculpt the bunny ears:
For the top brown sphere, shape two long teardrops of brown clay. Flatten them slightly and use a ball tool to indent the inner ear, filling it with a thin layer of pink clay. -
Attach the ears:
Press the ears firmly onto the top of the brown sphere. Blend the clay at the base of the ears into the head using a sculpting tool to secure the bond. -
Form the pig features:
For the green sphere, create a small oval of green clay for the snout and press it onto the center of the face. Add two tiny triangles or rounded tabs near the top sides for ears. -
Detail the bear faces:
The bottom two spheres need minimal sculpting. Simply keep them round and smooth, perhaps adding tiny rounded nubs for ears if desired, although the painted details do most of the work here. -
Cure or dry:
Follow the manufacturer instructions for your specific clay. If using polymer clay, bake it in the oven; for air-dry clay, let it sit for 24-48 hours until fully hardened.
Balance Tip
Before baking or drying, run a long skewer or knitting needle straight down through the center of all four spheres to create a guide hole for perfect alignment.
Step 3: Painting and Finishing
-
Add texture (optional):
If you want the speckled look of the beige bear, flick a stiff toothbrush loaded with watered-down brown paint lightly over the surface before painting the face. -
Paint the eyes:
Using a dotting tool or the back of a paintbrush dipped in black paint, place two wide-set eyes on each character. For the bunny, set them slightly wider apart. -
Draw the noses and mouths:
With your finest brush, paint a small inverted triangle nose and a little anchor shape for the mouth. For the pig, use two vertical dashes on the snout instead. -
Highlight the eyes:
I always find this step brings them to life: dip a pin or needle tool in white paint and add a tiny catchlight dot to the upper right and lower left of each black eye. -
Add ruddy cheeks:
Mix a soft pink paint and dip your finger or a dry brush into it. Dab off almost all the paint on a paper towel, then gently smudge pink circles onto the cheeks. -
Seal the totem:
Once the paint is completely dry, apply a coat of matte varnish. This protects the paint and gives the clay a unified, professional finish.
Mix It Up
Try making the shapes graduated in size, with the largest animal at the bottom and the smallest at the top, for a more tapered totem pole effect.
Display your stacked friends on a shelf or desk where they can keep you company all day
Mystery Blob Spirits With Tiny Hats
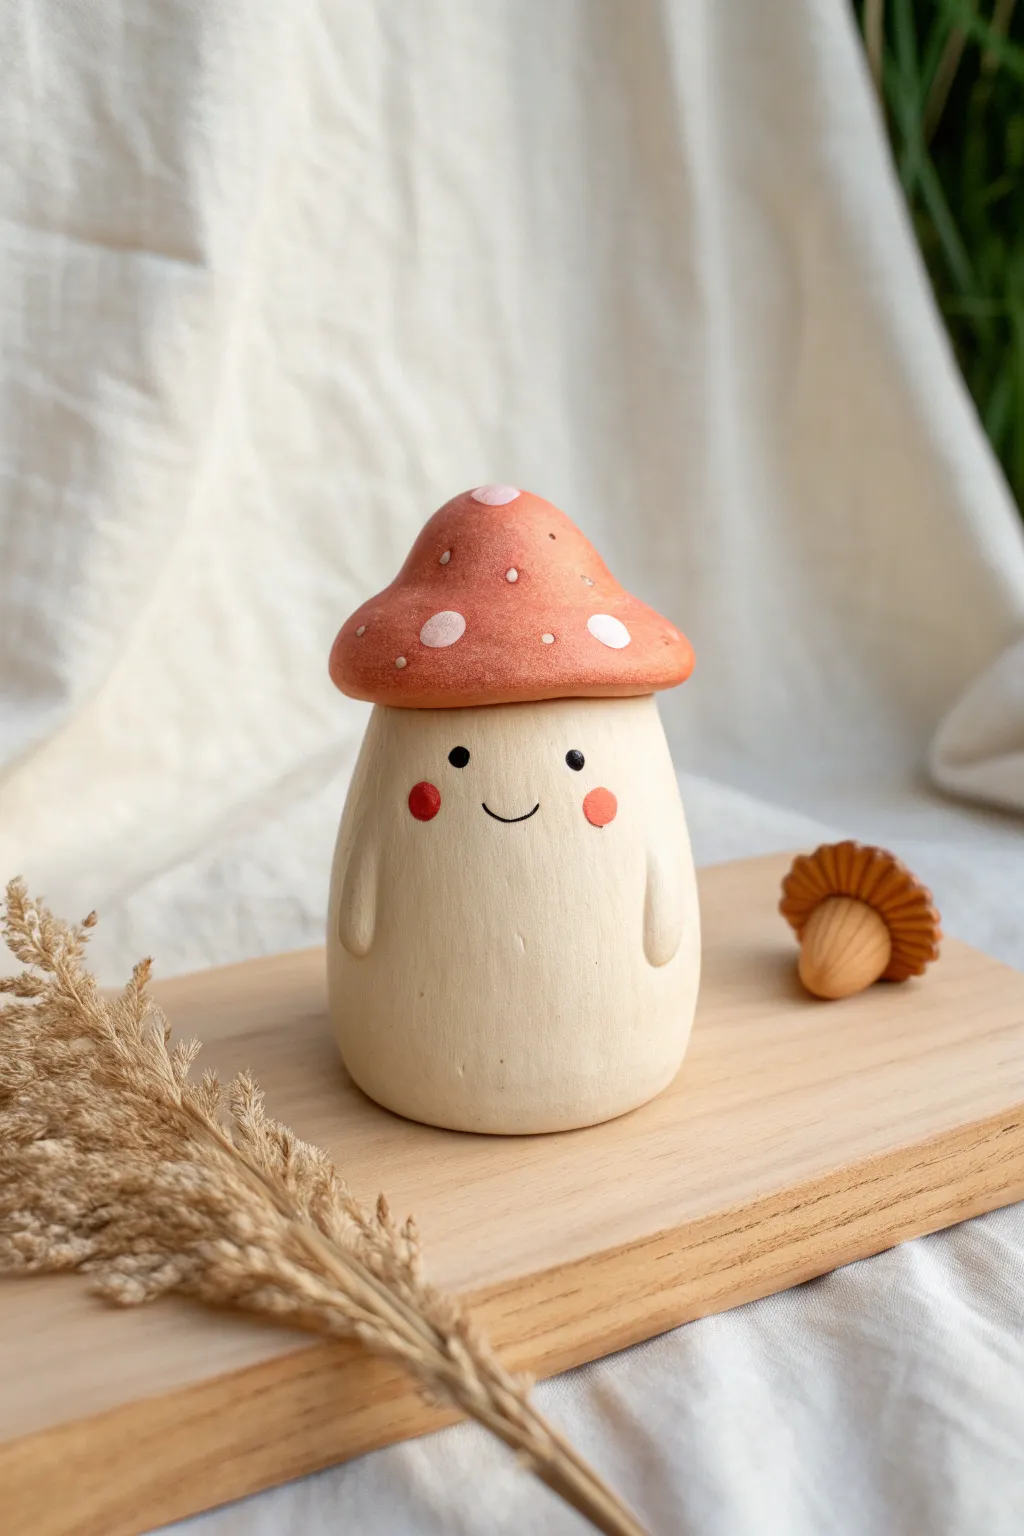
This adorable little forest guardian combines the charm of a woodland mushroom with a friendly spirit personality. With its smooth, rounded body and speckled cap, this clay project is perfect for adding a touch of magic to your desk or shelf.
Step-by-Step Guide
Materials
- Air-dry clay (white or natural stone color)
- Acrylic paints (burnt orange, cream/beige, black, pink, white)
- Small rolling pin
- Sculpting tools (needle tool, smoothing tool)
- Water and sponge for smoothing
- Fine-grit sandpaper
- Fine detail paintbrush
- Medium flat paintbrush
- Matte varnish or sealant
Step 1: Sculpting the Body
-
Form the Base:
Start with a ball of clay roughly the size of a tangerine. Roll it between your palms until it is smooth and round, eliminating any major cracks. -
Shape the Cylinder:
Gently roll the ball on your work surface to elongate it into a thick, sturdy cylinder. Tap the bottom flat against the table so it stands up straight on its own. -
Refine the Silhouette:
Using your fingers and a bit of water, smooth the sides upward, tapering the top slightly so it’s a bit narrower than the base. The shape should resemble a steadfast little blob. -
Create the Arms:
Instead of attaching separate pieces, create the arms directly from the body mass. Use a modeling tool to gently outline two long ovals on the sides of the body. -
Define the Limbs:
Carefully carve away a tiny amount of clay around the oval outlines to make the arms slightly raised. Smooth the edges of the arms so they look like they are resting flush against the belly.
Smooth Operator
Keep a small bowl of water nearby while sculpting. Regularly dipping your finger in water and running it over the clay prevents cracks before they happen.
Step 2: Creating the Cap
-
Roll a Ball:
Take a separate piece of clay, slightly smaller than the body. Roll it into a sphere and then flatten it gently into a thick disc. -
Dome the Shape:
Press the center of the disc with your thumb while cupping the edges to create a gentle dome shape. It should look like a classic mushroom cap. -
Test the Fit:
Place the cap onto the body to check the proportions. It should overhang slightly like a hat. Adjust the width if necessary by pressing or pinching the edges. -
Create the Connection:
Score the top of the body and the underside of the cap with a needle tool. Apply a dab of water or clay slip to these rough areas. -
Attach and Smooth:
Press the cap firmly onto the body. Use a smoothing tool to blend the clay on the underside of the cap slightly into the neck for a secure bond, or leave it distinct if you prefer the ‘hat’ look.
Wobbly Mushroom?
If the head is too heavy and creates instability, insert a small piece of toothpick or wire into the neck to act as an armature before attaching the cap.
Step 3: Finishing Touches
-
Final Smoothing:
Dip a sponge in water and wipe down the entire figure to remove fingerprints and tool marks. Let the figure dry completely, which may take 24-48 hours depending on thickness. -
Sanding:
Once bone dry, use fine-grit sandpaper to gently buff the surface. Focus on the roundness of the cap and the smoothness of the belly. -
Base Color:
Paint the body with a creamy beige acrylic. You might need two thin coats for opaque coverage. Leave the cap unpainted for this step. -
Painting the Cap:
Mix burnt orange with a touch of white to get a soft, earthy terracotta color. Paint the entire top of the cap. -
Adding Spots:
Using a small detail brush or the back of a paintbrush handle, dot irregular white or light pink spots onto the orange cap. Vary the sizes for a natural look. -
The Face:
I prefer to use a very fine liner brush here. Paint two small, wide-set black eyes and a tiny ‘u’ shape for the smile in the center of the face. -
Cheeky Details:
Add two soft pink or coral circles just below and outside the eyes for rosy cheeks. -
Sealing:
Protect your spirit friend with a coat of matte varnish. This seals the paint and gives the clay a lovely finished texture.
Place your little fungus friend near a houseplant for the perfect habitat check