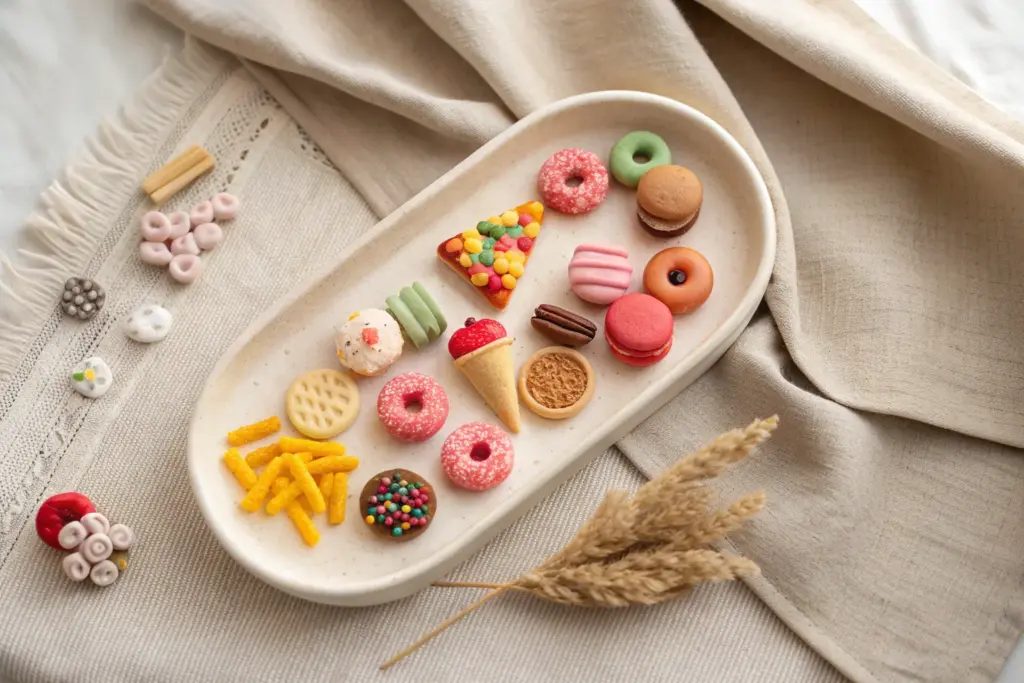
If you’ve ever looked at a tiny clay snack and thought, “I need ten of these,” you’re in the right place. I’m sharing my favorite cute clay food ideas that stay simple, sweet, and totally doable—even if you’re still getting comfy with clay.
Taco With Bright Lettuce and Cheese Shreds
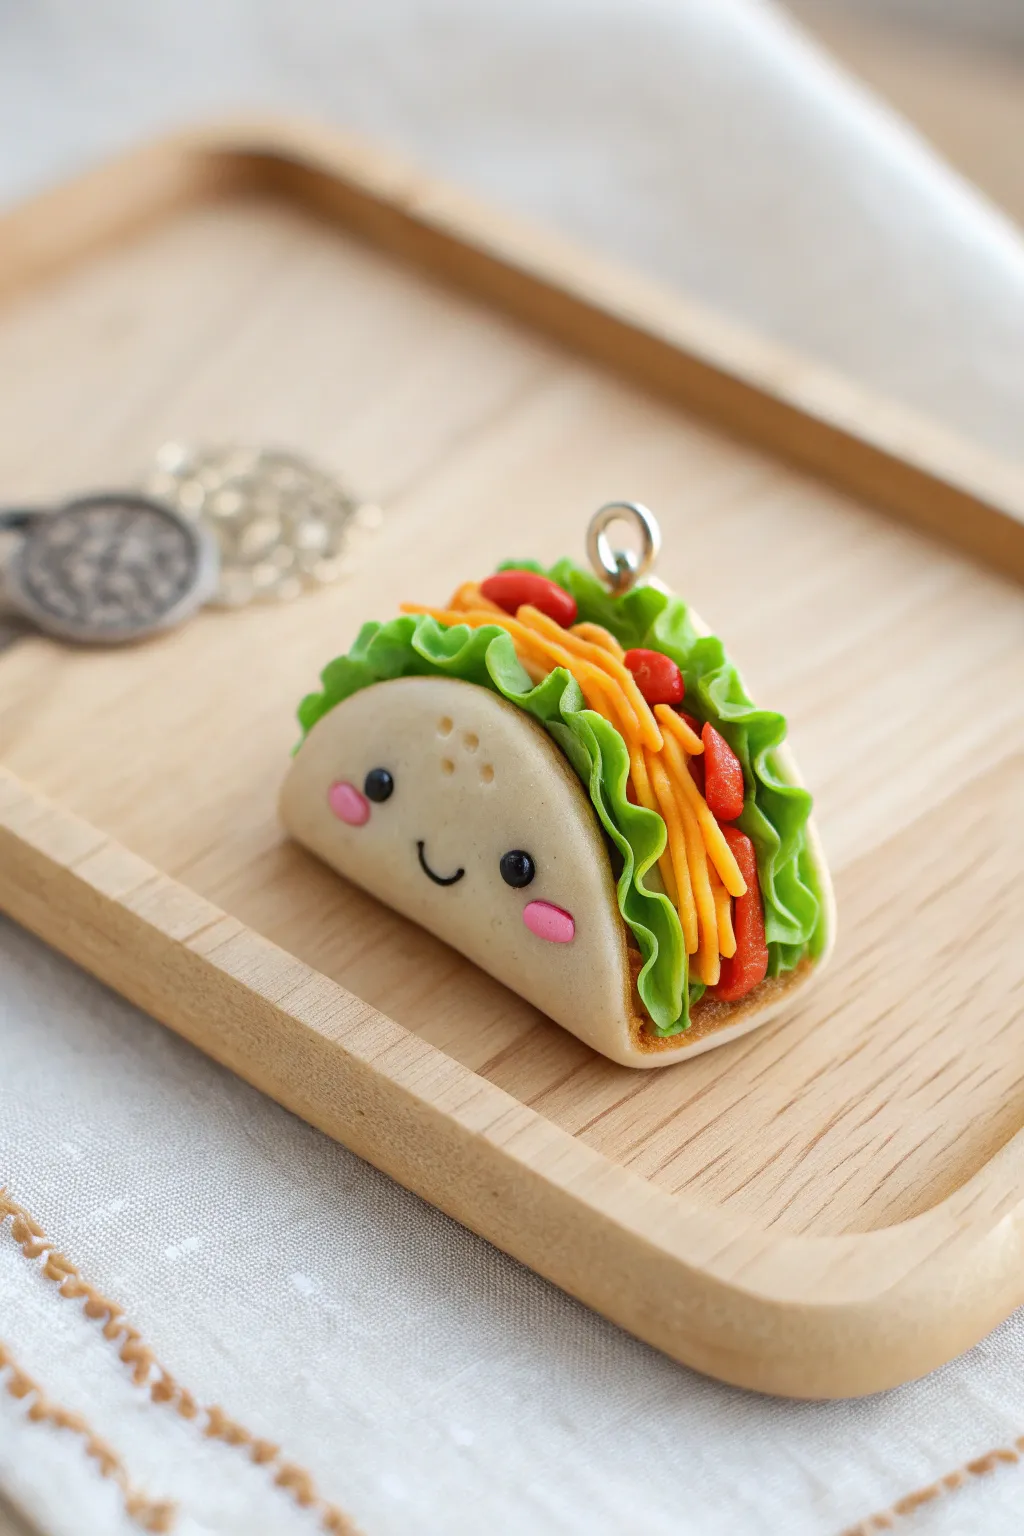
This adorable mini taco features ruffled lettuce, vibrant cheese shreds, and a sweet smiling face that turns a simple snack into a charming accessory. The soft matte finish and bright primary colors make this a fun, beginner-friendly sculpting project.
How-To Guide
Materials
- Polymer clay: Tan/Beige, Leaf Green, Orange-Yellow, Red, Black, Pink
- Rolling pin or pasta machine
- Circle cutter (approx. 1.5 inch)
- Dotting tool or ball stylus
- Needle tool or toothpick
- X-Acto knife or clay slicer
- Liquid clay or bake-and-bond
- Eyepin (silver tone)
- Texture sponge or sandpaper (optional)
- Oven for baking
Step 1: Making the Taco Shell
-
Condition the Clay:
Start by conditioning your tan or beige clay until it’s soft and pliable. If the color is too dark, mix in a little white to get that perfect corn tortilla shade. -
Roll and Cut:
Roll the tan clay out into a thin, even sheet, about 2-3mm thick. Use your circle cutter to punch out a perfect round shape for the tortilla base. -
Texture the Shell:
Gently tap the surface of your clay circle with a texture sponge or coarse sandpaper. This gives it a realistic baked texture rather than a shiny plastic look. -
Create the Filling Base:
Roll a small log of brown or dark beige clay to act as the ‘meat’ filling. Place this in the center of your tortilla circle to help the taco hold its shape later. -
Fold the Taco:
Carefully fold the tortilla circle in half over the filling log, but don’t press it completely flat. You want a U-shape that stays open at the top.
Realistic Ruffles
To get super realistic lettuce, roll the green clay paper-thin. When you fold it, twist it slightly so it doesn’t look too uniform or stiff.
Step 2: Adding the Fillings
-
Prepare the Lettuce:
Roll out a very thin strip of leaf green clay. Using your fingers or a needle tool, ruffle the edges to mimic leafy waves. -
Insert the Greens:
Tuck the ruffled green strip inside the taco shell, arranging it so the wavy edges peek out generously over the top of the shell. -
Make Cheese Shreds:
Take your orange-yellow clay and roll it into a very thin snake. Use your blade to chop this snake into many tiny, short segments. -
Arrange the Cheese:
Apply a tiny dab of liquid clay inside the taco opening. Sprinkle and arrange your cheese strands so they cascade down the center of the lettuce. -
Add Tomato Chunks:
Form tiny irregular balls or cubes from red clay. Nestle these amongst the cheese and lettuce for a pop of contrasting color.
Dirty Clay?
If dust gets on your light tan clay, dip a Q-tip in rubbing alcohol or acetone and gently wipe the surface before baking to clean it up.
Step 3: It’s All in the Details
-
Attach the Hardware:
Before baking, trim the stem of your silver eyepin if it’s too long. Dip the end in liquid clay and push it straight down into the center of the taco fillings. -
Make Eye Sockets:
On the front of the taco shell, use a medium-sized ball tool to make two shallow indentations where the eyes will go. -
Place the Eyes:
Roll two tiny spheres of black clay. Press them gently into the indentations you just made so they sit flush with the shell. -
Add the Blush:
Roll two slightly larger ovals of pink clay. Flatten them and place them underneath the outer corners of the eyes for rosy cheeks. -
Sculpt the Smile:
Roll an incredibly thin thread of black clay. Cut a tiny U-shape and gently press it between the eyes to create a happy smile. -
Freckle Detail:
Using a needle tool, gently poke three tiny dots on the ‘forehead’ area above the face for added texture and cuteness. -
Baking:
Bake the charm according to your clay manufacturer’s instructions (usually 275°F for 15-30 minutes). Let it cool completely before handling.
Attach a jump ring to the eyepin and your happy taco is ready to hang on a bag or necklace


Hot Dog With Mustard Squiggles

Recreate the iconic simplicity of a classic hot dog with hyper-realistic details, from the toasted bun texture to the perfect mustard squiggle. This project uses clever shading techniques to transform basic clay shapes into a mouth-watering miniature display piece.
Step-by-Step Tutorial
Materials
- Polymer clay (tan, dark red, brown, yellow)
- Translucent liquid clay (liquid sculpey)
- Soft pastel chalks (orange, brown, yellow ochre)
- Needle tool
- Toothbrush (for texturing)
- Blade or X-Acto knife
- Small paintbrush
- Rolling pin
- Speckled ceramic look polymer clay (or white with pepper)
- Gloss varnish
Step 1: Shaping the Bun
-
Mix the bun color:
Start by mixing translucent clay with a little bit of white and a tiny dot of yellow ochre to create a realistic ‘baked bread’ dough color. -
Form the base log:
Roll the clay into a smooth cylinder, approximately 2 inches long, rounding off the ends gently. -
Create the split:
Use your blade to make a deep, vertical cut down the center of the log, going about two-thirds of the way through, but keeping the bottom intact. -
Open and shape:
Gently pull the two sides apart to create the opening for the sausage, softening the cut edges with your fingertip so they look like soft dough. -
Texture the bread:
Take an old toothbrush and firmly tap it over the entire outer surface of the bun to mimic the porous texture of baked bread.
Step 2: Creating the Sausage
-
Mix the meat tone:
Combine dark red clay with a small amount of brown and a touch of translucent clay to get a cured-meat color. -
Roll the frankfurter:
Roll this mixture into a smooth snake that is slightly longer than your bun. -
Refine the ends:
Round the ends of the sausage, and use a needle tool to create a tiny, puckered indentation on each tip for realism. -
Add texture:
Lightly roll the sausage over fine sandpaper or texture it very subtly with a sponge to remove fingerprints; I find this helps the pastel adhere better later.
Make It Glossy
For ultra-wet looking mustard, mix gloss varnish directly into your liquid clay mixture before piping it onto the sausage.
Step 3: Shading and Assembly
-
Shade the bun:
Scrape some orange and brown pastel chalk into dust. Use a soft brush to apply the orange dust all over the bun, then add the brown specifically to the top ridges to simulate toasting. -
Insert the sausage:
Place the sausage into the bun’s opening. If it doesn’t fit snugly, press the sides of the bun gently inward to hug the meat. -
Make the mustard:
Mix yellow clay with a drop of translucent liquid clay in a small bowl until it creates a thick paste with the consistency of frosting. -
Pipe the squiggle:
Transfer the yellow paste into a tiny piping bag or use a needle tool to drag the ‘mustard’ in a continuous sine-wave pattern across the length of the sausage.
Sticky Issues
If your clay gets too soft and sticky to handle, pop it in the fridge for 10 minutes to firm it up before texturing.
Step 4: The Plate and Baking
-
Form the plate:
Roll out granite-effect or speckled clay into a flat circle. Use a round cutter for a clean edge. -
Lift the rim:
Gently curve the edges of the circle upward to create a shallow rim, ensuring the bottom remains flat. -
Place the hot dog:
Set the assembled hot dog onto the center of the speckled plate, pressing down very lightly to ensure it bonds during baking. -
Bake the project:
Bake according to your polymer clay package instructions (usually 275°F or 130°C for 15-30 minutes). -
Varnish touches:
Once cool, apply a semi-gloss varnish only to the sausage and the mustard to make them look wet and juicy, leaving the bun matte.
Display your delicious creation on a little shelf or turn it into a quirky fridge magnet.


Sushi Nigiri Trio With Cute Faces
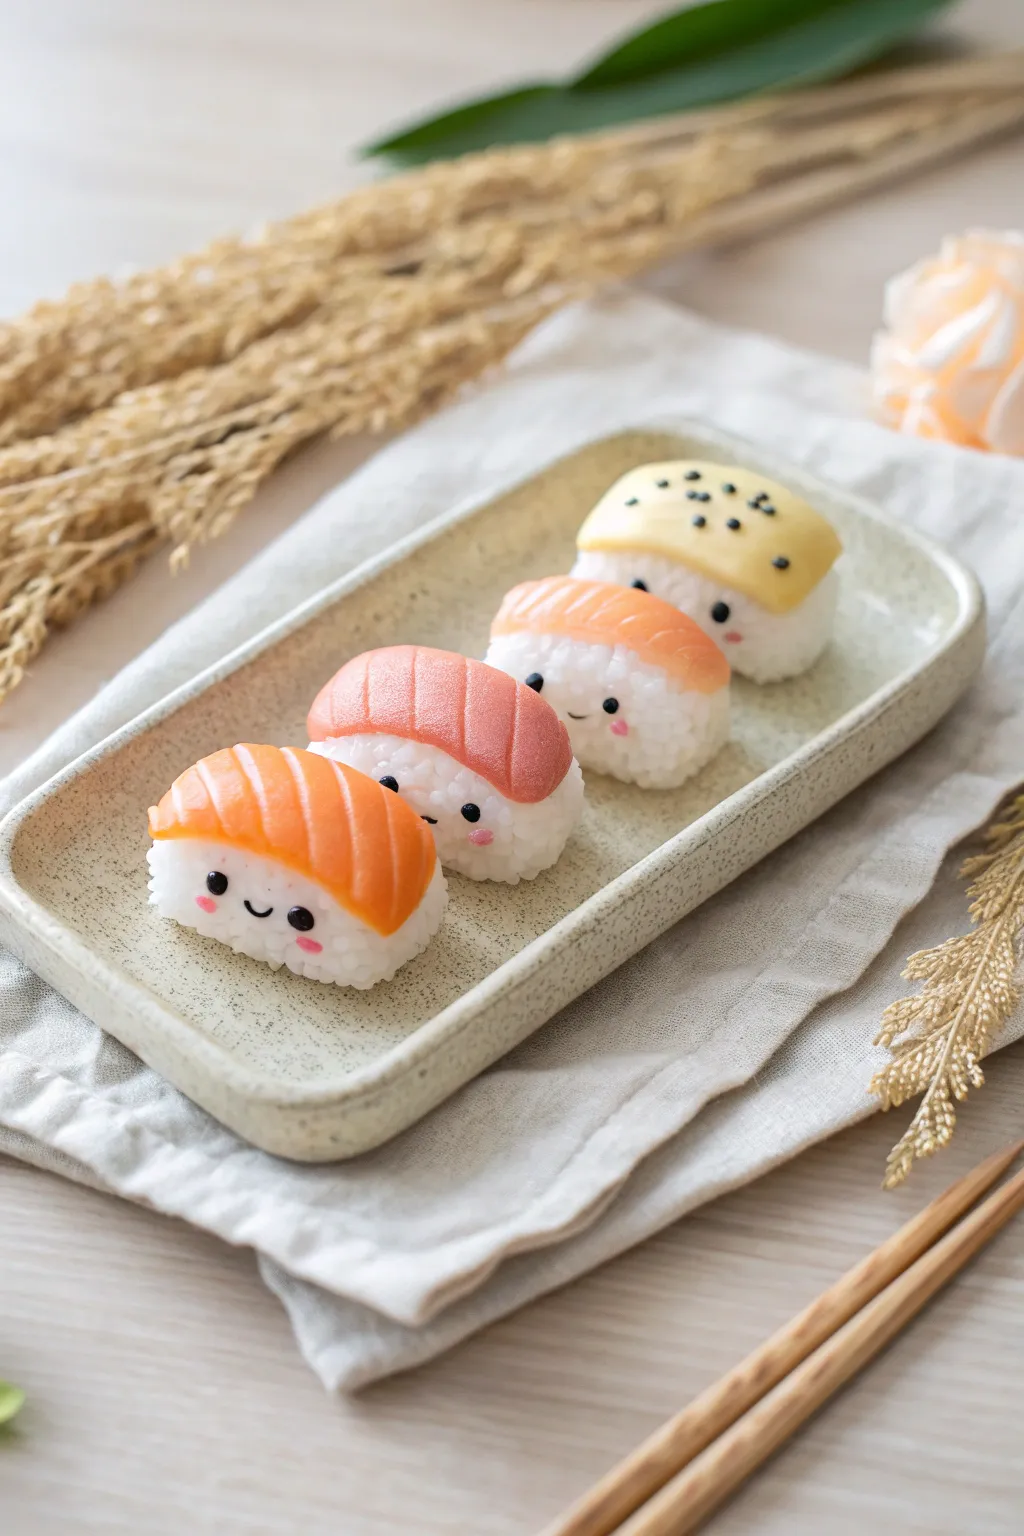
Bring your favorite Japanese treats to life with this collection of four adorable nigiri friends. Using textured white clay for rice and vibrant colors for toppings, you will craft a salmon, tuna, shrimp, and classic tamago sushi, each with a tiny, heartwarming smile.
Step-by-Step Tutorial
Materials
- White polymer clay (for rice)
- Translucent polymer clay
- Orange, pink, red, yellow, and black polymer clay
- Liquid polymer clay (optional)
- Old toothbrush or needle tool (for texturing)
- Blade or craft knife
- Dotting tool or toothpick
- Soft pastel chalks in pink (for cheeks)
- Small paintbrush
- Gloss glaze or UV resin
Step 1: Rice Base Preparation
-
Mix the rice color:
Start by mixing a large portion of white clay with a small amount of translucent clay. This gives the ‘rice’ a realistic, slightly waxy finish rather than a flat, opaque white look. -
Shape the rice blocks:
Divide your white mixture into four equal portions. Roll each into a ball and then gently flatten sides to form rectangular blocks with rounded corners, mimicking the shape of hand-pressed sushi rice. -
Texture the rice:
Take a clean, old toothbrush or a stiff-bristled brush. Firmly tap the bristles all over the surface of each white block to create a bumpy, grain-like texture. Don’t be afraid to press hard enough to make distinct marks. -
Refine the grains:
If the toothbrush texture looks too uniform, use a needle tool to pick at the clay randomly, pulling up tiny bits to simulate individual grains sticking out.
Step 2: Crafting the Toppings
-
Create the Salmon:
Mix orange clay with a touch of translucent. flatten it into a thick oval. Use your blade to gently indent curved diagonal lines across the top for the fat marbling striations. -
Create the Tuna:
Blend red and pink clay to get a soft, fleshy pink color. Shape this into a rectangular slab that drapes slightly over the edges of one rice block. Smooth the edges down so it hugs the rice. -
Create the Shrimp:
Form a tapered log of pale peach clay. Press it flat onto a rice block. Use a needle tool to impress horizontal lines along the length to mimic the segments of a shrimp tail. -
Create the Tamago (Egg):
Take yellow clay and form a slightly thicker, rectangular slab for the egg omelet. Place it on the final rice block. Use a thin strip of black clay to wrap around the middle like a nori seaweed belt. -
Add Tamago details:
Poke tiny random dots or small black sesame seeds onto the top of the yellow egg piece for added texture and visual interest.
Texturing Pro Tip
For ultra-realism, pre-bake a tiny bit of white clay, chop it into ‘grains,’ and mix these hard crumbs into your soft raw white clay before shaping.
Step 3: Bringing Faces to Life
-
Position the eyes:
Roll extremely tiny balls of black clay. Place two on the front vertical face of each rice block, spacing them wide apart for that signature ‘kawaii’ look. -
Add the mouths:
Roll thin snakes of black clay. Cut tiny segments and curve them into little ‘U’ shapes for smiles. Vary the expressions—maybe give one a simple dot mouth or a tiny smirk. -
Apply blushing cheeks:
Scrape a bit of pink soft pastel into a powder. Use a small, dry paintbrush to gently dab pink circles right under the eyes of each sushi piece. -
Optional sparkle:
If you want extra cuteness, add a microscopic dot of white paint or clay to the black eyes as a highlight after baking.
Level Up: Accessories
Create a mini wooden board from popsicle sticks or craft a tiny dab of green clay wasabi and pink ginger to arrange alongside your finished trio.
Step 4: Finishing Touches
-
Bake the batch:
Place all four pieces on a tile or parchment paper. Bake according to your brand of clay’s instructions (usually around 275°F/130°C for 15-30 minutes). Let them cool completely. -
Glaze toppings:
Using a gloss glaze or UV resin, coat only the colored toppings (salmon, tuna, etc.). This makes the fish look fresh and wet while keeping the rice matte and realistic.
Display your new sushi family on a miniature plate or turn them into the cutest set of fridge magnets you own


Tiny Bento Box With Mix-and-Match Kawaii Foods
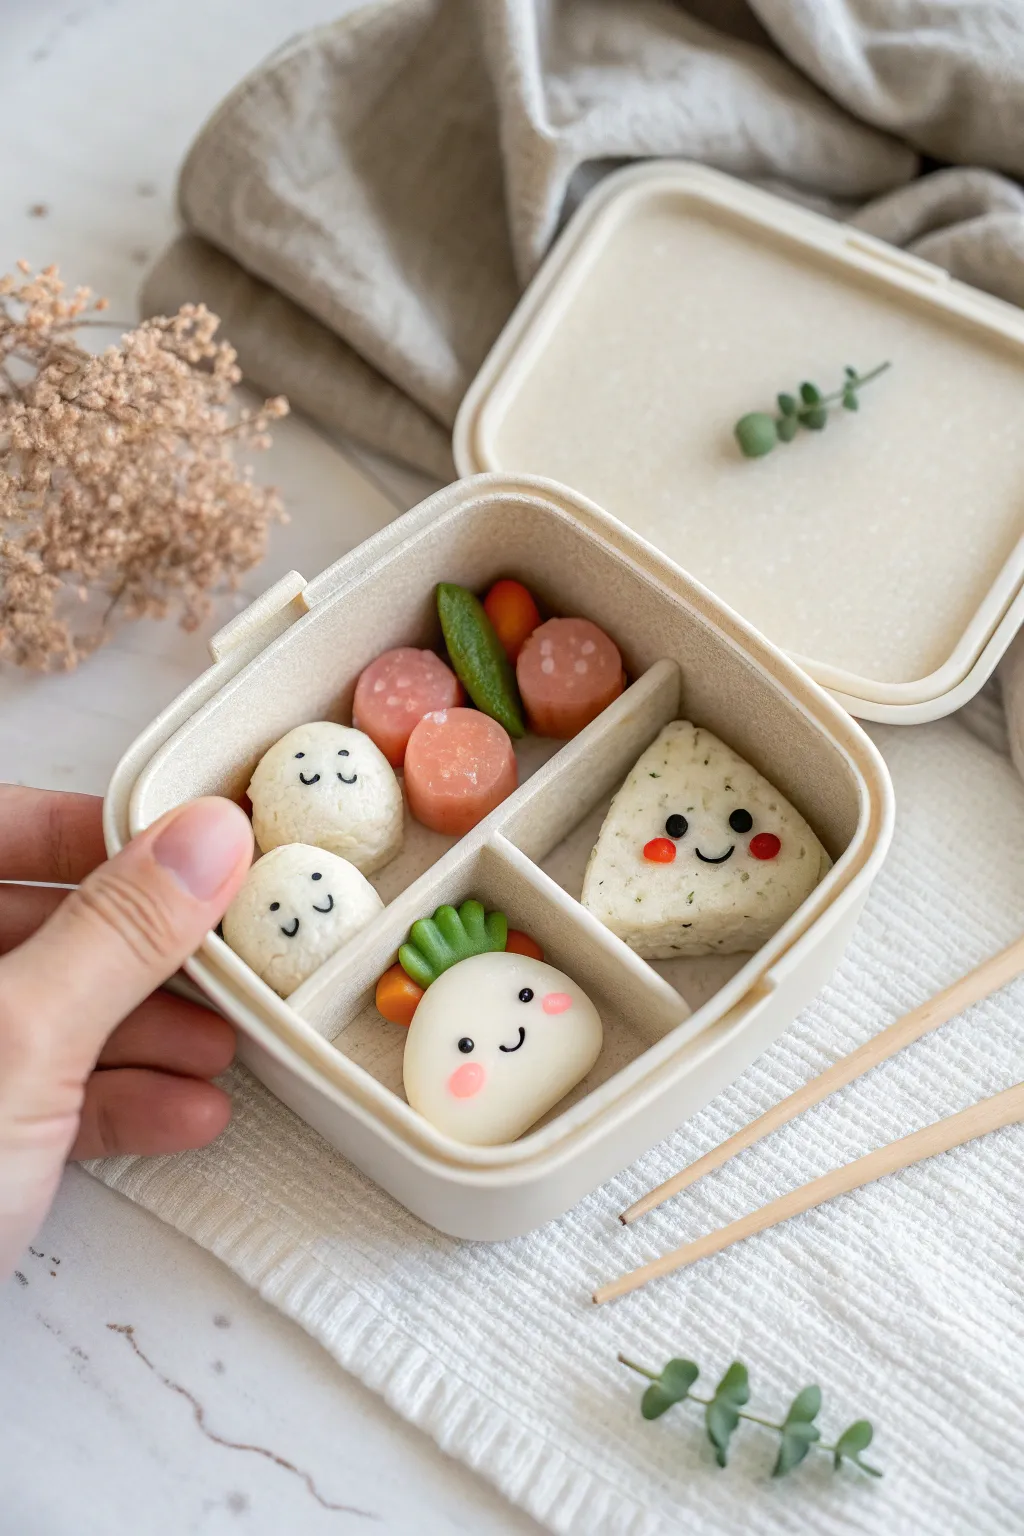
Create an adorable, tiny lunch that never spoils with this cute clay bento box project. Featuring smiling rice balls, tiny sausages, and a happy little radish, this miniature set is perfect for dollhouse displays or just to brighten your desk.
Step-by-Step Guide
Materials
- Beige polymer clay (granite or speckled effect preferred for the box)
- White polymer clay
- Pink polymer clay
- Green polymer clay
- Orange polymer clay
- Translucent liquid clay (Bake & Bond)
- Black acrylic paint or fine-point marker
- Needle tool or toothpick
- Small craft knife
- Texture tool (toothbrush or stiff brush)
- Dried herbs or green flocking powder (optional)
- Gloss glaze (optional)
Step 1: Sculpting the Bento Box
-
Form the base:
Start with your beige speckle-effect clay. Roll out a thick slab, about 5mm thick. Cut a rounded square shape, approximately 4cm by 4cm, to serve as the base of your box. -
Build the walls:
Roll a long snake of the same beige clay and flatten it into a strip. Wrap this strip around the perimeter of your base, smoothing the seams on the inside and outside so it looks like one solid piece. -
Add the dividers:
Creating sections is key for a neatly packed bento. Roll thinner strips of clay and insert them into the box to create three compartments: one large one for the main rice ball, and two smaller ones. -
Create the lid:
Make a second square slab slightly larger than the box base. Add a very thin lip around the edge so it can sit partly on top, or just fashion it as a flat lid shown in the display.
Step 2: Creating the Rice Balls (Onigiri)
-
Make the round onigiri:
Take two small balls of white clay. Roll them until smooth and press them gently into one of the smaller compartments to ensure they fit, then remove them for detailing. -
Sculpt the triangle onigiri:
For the larger rice ball, mix a tiny pinch of dried herbs or green flocking into white clay to simulate seasoning. Shape this into a soft, rounded triangle that fits the largest compartment. -
Texture the rice:
I find that using a toothbrush or a ball of aluminum foil to gently tap the surface of the clay gives it a perfect, realistic fluffy rice texture.
Smudged face paint?
If your painted smile smudges, dip a cotton swab in rubbing alcohol (for baked clay) or carefully scrape it off with a craft knife once dry to try again.
Step 3: Making the Veggies & Sides
-
Shape the sausages:
Roll a small log of pink clay. Slice it into three small discs. Using a needle tool, create a slightly rough texture on the cut sides to mimic the meat texture found in bento sausages. -
Form the snow peas:
Take a tiny amount of green clay and shape it into a flat, pointed oval. Use your needle tool to indent a line down the center for the pod seam. -
Sculpt the happy radish:
Roll a ball of white clay and pinch the bottom slightly to create a turnip or radish shape. Add a tiny orange carrot slice next to it for color contrast. -
Add radish greens:
Roll tiny teardrops of green clay. Press them together in a cluster and attach them to the top of the white radish body using a drop of liquid clay.
Level Up: Realistic Texture
Mix translucent clay with the fruit/veggie colors. It creates a fleshy, realistic look for the sausages and radish compared to opaque colors.
Step 4: Assembly and Finishing
-
Arrange the food:
Place all your sculpted food items back into their designated compartments in the bento box. Use a little liquid clay on the bottom of each piece to secure them permanently. -
Bake the clay:
Bake the entire piece according to your polymer clay manufacturer’s instructions (usually around 275°F/130°C for 15-30 minutes). Let it cool completely. -
Paint the faces:
Using a very fine needle tool or a 0000 brush dipped in black acrylic paint, carefully draw tiny eyes and smiles on the rice balls and the radish. A toothpick works well for this too. -
Add rosy cheeks:
Mix a tiny bit of red paint with water or glaze to make a sheer wash, or use pink pastel dust. Dab tiny pink spots onto the cheeks of the triangle onigiri and the radish. -
Glaze (optional):
If you want a wet look for the vegetables or sausages, apply a thin coat of gloss glaze to just those areas, keeping the rice and box matte.
Display your finished bento with the lid propped open to show off those cheerful little faces