If you’re anything like me, the sweetest gifts are the ones that feel small, handmade, and full of personality. These cute clay gift ideas are all about simple shapes, happy colors, and little details that make someone say, “You made this for me?”
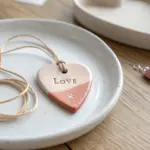
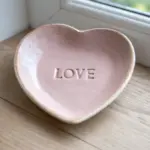
Mini Heart Ring Dishes
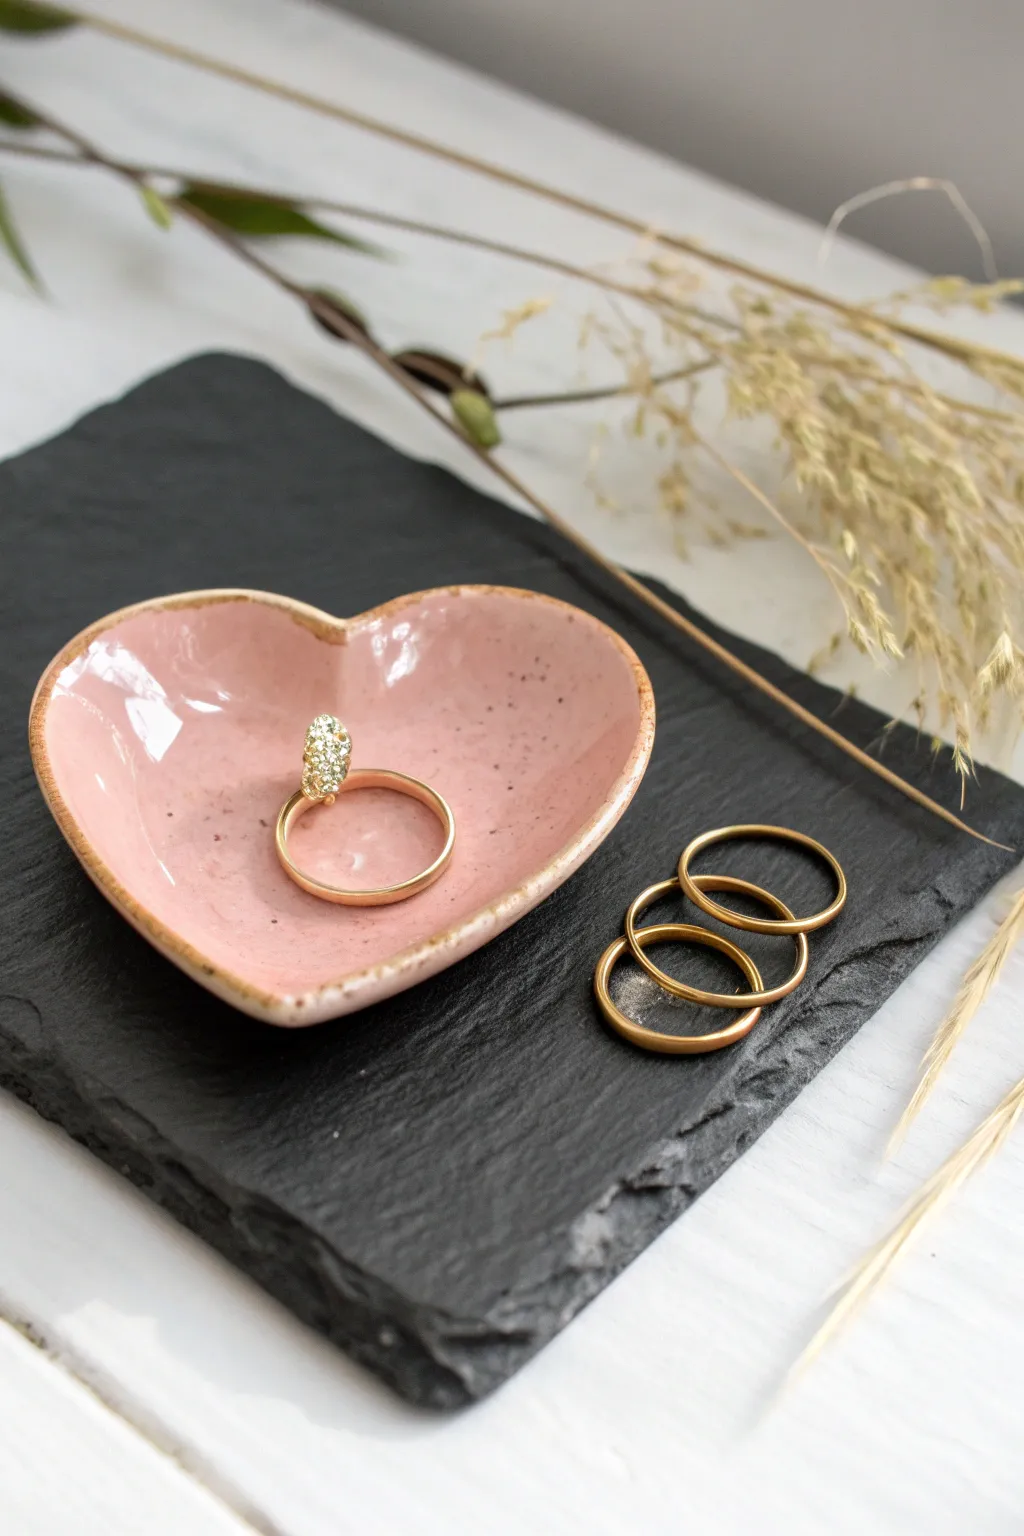
This darling little ring dish combines a sweet, organic heart shape with a high-gloss, speckled pink glaze for a modern handmade feel. It is perfectly sized for keeping your everyday jewelry bits safe and looks beautiful on a bedside table.
Step-by-Step Guide
Materials
- White air-dry clay or polymer clay
- Rolling pin
- Heart-shaped cookie cutter (approx. 3 inches)
- Small bowl of water
- Fine-grit sandpaper
- Pink acrylic paint (soft blush or rose quartz shade)
- Brown acrylic paint (for speckles)
- High-gloss varnish or resin
- Old toothbrush
- Soft synthetic paintbrushes
- Smooth work surface or silicone mat
Step 1: Shaping the Form
-
Condition the clay:
Begin by taking a ball of white clay about the size of a golf ball. Knead it in your hands until it becomes soft, pliable, and free of cracks. -
Roll it out:
Place the clay on your smooth work surface. Use a rolling pin to flatten it into an even sheet, aiming for a consistent thickness of about 1/4 inch. -
Cut the shape:
Press your heart-shaped cookie cutter firmly into the clay. Give it a tiny wiggle to ensure a clean cut, then remove the excess clay from around the outside. -
Smooth the edges:
Dip your finger into a small bowl of water and run it gently along the cut edges of the heart to soften any sharp ridges or burrs created by the cutter. -
Create the curve:
Lift the clay heart gently. Carefully pinch and curl the edges upward to create a rim. I like to continuously rotate the heart in my hand while doing this to ensure the curve is even all the way around. -
Refine the rim:
Smooth the transition between the base and the raised rim with a damp finger, making sure there are no stark angles. The goal is a soft, organic bowl shape.
Step 2: Finishing and Coloring
-
Dry thoroughly:
Set the dish aside to dry completely. If using air-dry clay, this usually takes 24-48 hours. Turn it over halfway through to let the bottom breathe. -
Sand imperfections:
Once fully cured, use fine-grit sandpaper to buff away any fingerprints or rough spots on the rim and surface. Wipe away dust with a slightly damp cloth. -
Apply base color:
Paint the entire interior and rim of the dish with your soft pink acrylic paint. You may need two coats for full opacity, allowing the first coat to dry before adding the second. -
Create the rustic rim:
Load a small brush with a tiny amount of diluted brown paint. Gently run the side of the bristles along the very top edge of the rim to create a subtle, distressed brown outline. -
Speckle effect:
Dilute a drop of dark brown paint with water. Dip an old toothbrush into this mixture, aim it at the dish, and run your thumb across the bristles to flick tiny speckles onto the pink surface. -
Clean up large spots:
If any speckles land too heavily or look like blobs, quickly dab them gently with a paper towel or paint over them with a dot of pink once dry. -
Seal carefully:
Once the paint is completely dry, apply a thick coat of high-gloss varnish. This mimics the look of fired ceramic glaze and protects your jewelry. -
Final cure:
Let the varnish or resin cure according to the manufacturer’s instructions in a dust-free area before placing any rings inside.
Cracked Clay?
If small cracks appear as the clay dries, make a ‘slurry’ by mixing a tiny bit of clay with water. Paint this paste into the cracks and smooth it over.
Gold Trim Upgrade
Swap the brown rim for liquid gold leaf paint. Apply it to the very edge after the pink paint dries but before the final gloss varnish.
Now you have a charming spot to rest your favorite rings at the end of the day


Rainbow And Cloud Bag Charms
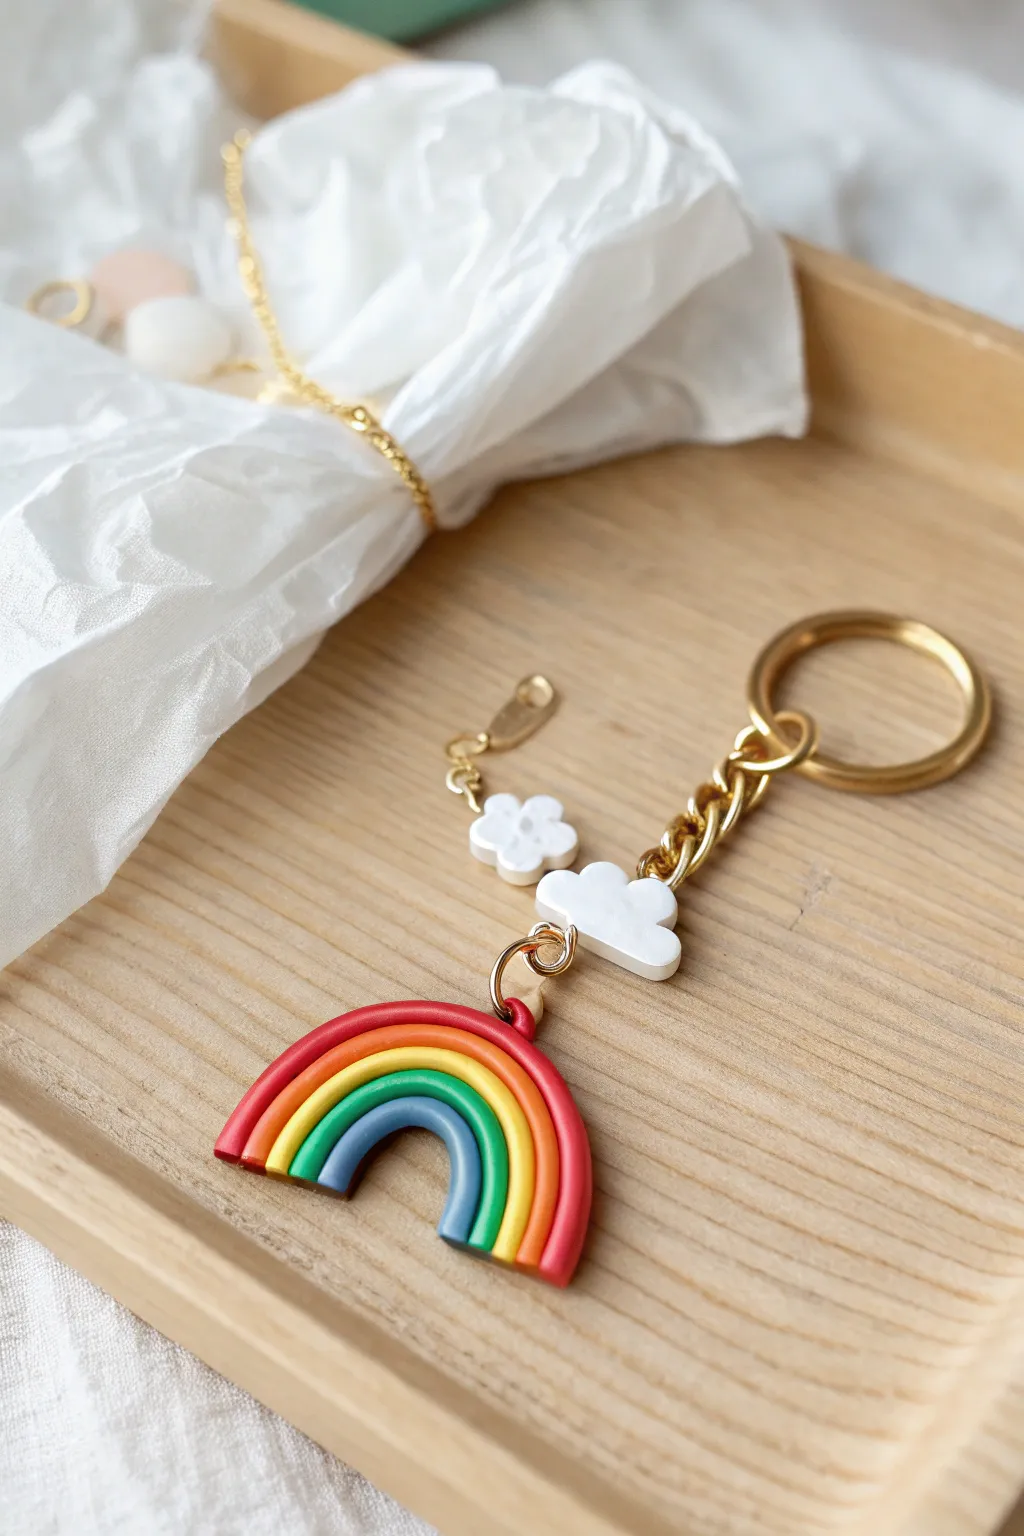
Bring a little sunshine wherever you go with this vibrant polymer clay accessory. Featuring a bold five-color rainbow, a fluffy cloud, and a dainty flower, this charm adds a playful pop of color to any tote or backpack.
Step-by-Step Tutorial
Materials
- Polymer clay (Red, Orange, Yellow, Green, Blue, White)
- Acrylic rolling pin
- Clay knife or craft blade
- Small flower cutter (optional)
- Small circle cutter (for cloud)
- Eye pins (gold)
- Gold chain link
- Gold keyring hoop
- Small lobster clasp
- Jump rings (gold)
- Needle nose pliers
- Oven for baking
- Gloss glaze (optional)
Step 1: Creating the Rainbow Arch
-
Condition the clay:
Begin by kneading small amounts of red, orange, yellow, green, and blue clay until they are soft and pliable. This prevents cracking later on. -
Roll the snakes:
Roll each color into a long, thin rope or ‘snake’. Try to keep the thickness consistent across all colors, roughly 3-4mm in diameter. -
Assemble the stack:
Curve the blue strand into a small U-shape to form the inner arch. Carefully press the green strand around the outside of the blue one, ensuring they stick together without distorting the shape. -
Complete the rainbow:
Continue adding the yellow, orange, and finally, the red strand. Gently press the strands together from the top and sides to ensure a solid bond. -
Trim the edges:
Use your clay blade to make a clean, straight cut across the bottom of the rainbow legs so they are perfectly flush. -
Add the attachment point:
Insert an eye pin into the top center of the red arch. You may need to trim the pin length with wire cutters so it doesn’t poke through the inner blue arch.
Sticky Situation
If your clay strands aren’t sticking together, lightly brush a tiny amount of liquid polymer clay or ‘Bake and Bond’ between the color rows before baking.
Step 2: Sculpting the Sky Elements
-
Form the cloud base:
Roll a piece of white clay into a flat sheet, about 4mm thick. You can freehand a cloud shape with a craft knife or use a small scalloped cutter. -
Define the fluff:
To make it look softer, I like to press small balls of white clay together and flatten the back to create a bumpy, bubbly cloud silhouette. -
Create the mini flower:
Flatten a small piece of white clay and use a tiny flower cutter, or shape five tiny distinct petals by hand and press them together in a circle. -
Insert hardware:
Insert an eye pin horizontally into the top vs side of the cloud if you want it to hang inline, or through the top for a dangler. Do the same carefully for the tiny flower.
Make it Sparkle
Mix a pinch of fine iridescent glitter into the white clay before rolling out your cloud to catch the light and give it a magical, shimmering effect.
Step 3: Baking and Assembly
-
Bake the pieces:
Arrange all your clay components on a parchment-lined baking sheet. Bake according to your brand of polymer clay instructions (usually around 275°F/135°C for 15-30 minutes). -
Cool and glaze:
Let the pieces cool completely. If you want a shiny finish like the photo, apply a thin coat of polymer clay gloss glaze. -
Attach the main chain:
Using your pliers, open the loop on the rainbow’s eye pin and attach it to a large gold jump ring. -
Connect the cloud:
Attach the cloud element to the chain, positioning it a few links above the rainbow so they stack nicely when hanging. -
Add the flower accent:
Using a small jump ring, attach the tiny flower charm near the top of the assembly or onto the clasp area for an extra detail. -
Final assembly:
Connect the top of the chain to the large gold keyring hoop. Ensure all jump rings are closed tightly so pieces don’t slip off.
Now you have a cheerful charm ready to brighten up your favorite bag


Smiley Face Fridge Magnets
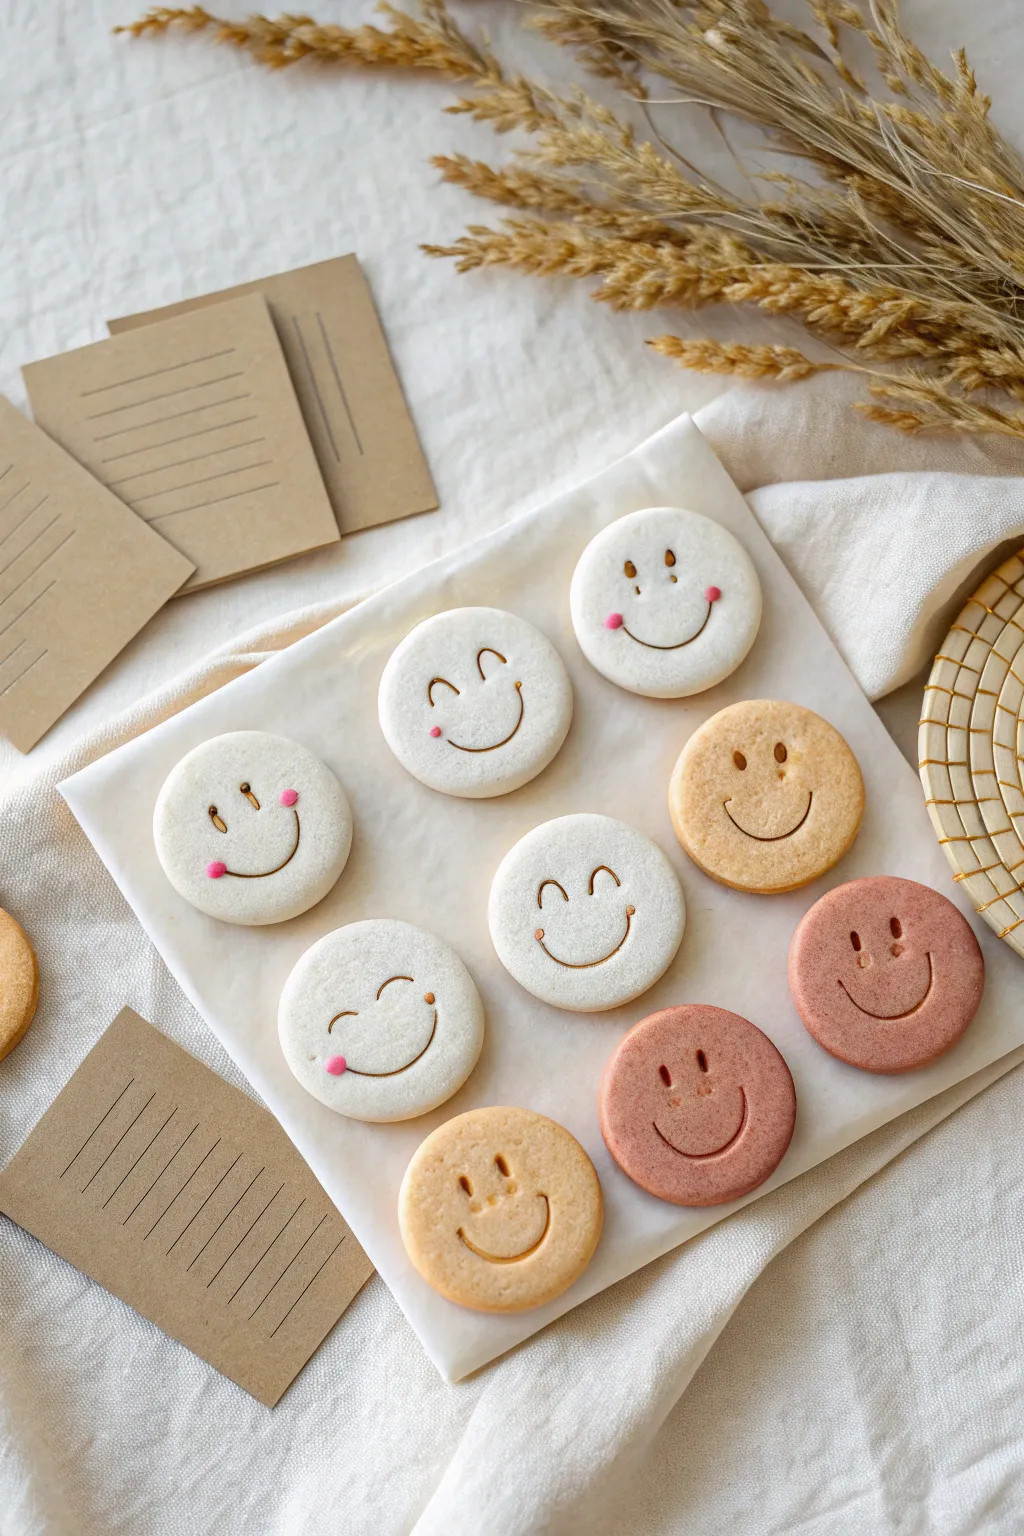
These charming fridge magnets look good enough to eat, resembling perfectly baked sugar cookies with cheerful expressions. With their matte finish and sweet stamped details, they make a delightful homemade gift that brings a smile to any magnetic surface.
How-To Guide
Materials
- Polymer clay (colors: white, ecru/beige, terracotta/light brown)
- Round cookie cutter (approx. 1.5 – 2 inches)
- Small circle cutter or piping tip (for eyes)
- Curved clay tool or a metal spoon edge (for the smile)
- Soft pastel chalk (pink/red)
- Small paintbrush
- Rolling pin or clay machine
- Strong craft magnets
- Super glue or E6000
- Parchment paper
Step 1: Prepping and Shaping
-
Condition the clay:
Start by warming up your polymer clay in your hands until it is soft and malleable. You will need separate balls for your white ‘sugar cookies’ and your tan or pinkish varieties. -
Roll it out:
Roll the clay flat on a clean surface or parchment paper. Aim for a thickness of about 1/4 inch (6mm) so they look thick and cookie-like, not like thin wafers. -
Cut the rounds:
Use your round cookie cutter to punch out clean circles. If the edges are jagged, gently smooth them with your finger to mimic a baked edge. -
Prep the surface:
Transfer your clay rounds onto a baking sheet lined with parchment paper before you start detailing. This prevents them from warping when you move them later.
Step 2: Creating Expressions
-
Stamp the eyes:
For the standard happy eyes, use a small, hollow circle cutter or the non-piping end of a metal piping tip. Press gently into the upper half of the circle to create two round indentations. -
Make whimsical eyes:
For the winking or sleeping faces, use a curved tool or just a fingernail to press small crescent shapes instead of circles. I find varying the expressions makes the set feel more personal. -
Carve the smile:
Use a specialized curved clay tool or the edge of a small spoon to imprint a wide, U-shaped smile. ensure the depth matches the eyes for consistency. -
Add cheek dimples:
On some faces, press little vertical lines at the ends of the smile to create cute dimples.
Sticky Situation?
If your clay sticks to the cutter, dip the cutter in a little cornstarch or water before pressing it into the clay for a clean release.
Step 3: Coloring and Finishing
-
Create the blush powder:
Scrape a small amount of pink soft pastel chalk into a fine dust using a craft knife or sandpaper. -
Apply the blush:
Dip a dry, soft paintbrush into the pastel dust. Gently dab it onto the cheeks of the white clay rounds. Blow away any excess dust so the clay stays clean. -
Texture texture (optional):
To make the tan magnets look even more like real cookies, gently tap the surface with an old toothbrush or sandpaper to give it a baked texture. -
Bake the clay:
Bake the pieces according to the manufacturer’s instructions on your specific package of clay. Typically, this is around 275°F (135°C) for 15-30 minutes. -
Cool down:
Let the clay pieces cool completely on the tray. They harden fully as they cool. -
Attach the magnets:
Flip the cooled cookies over. Apply a dab of strong adhesive like E6000 to the back and press a magnet firmly into the glue. -
Final dry:
Allow the glue to cure fully (usually 24 hours) before placing them on the fridge to ensure the magnets don’t pop off.
Sweet Scents
Mix a tiny drop of vanilla or sugar cookie fragrance oil into the raw clay during conditioning to make them smell as authentic as they look.
Now you have a batch of sweet, everlasting cookies to brighten up your kitchen organization


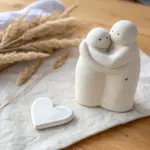
Tiny Animal Succulent Planters
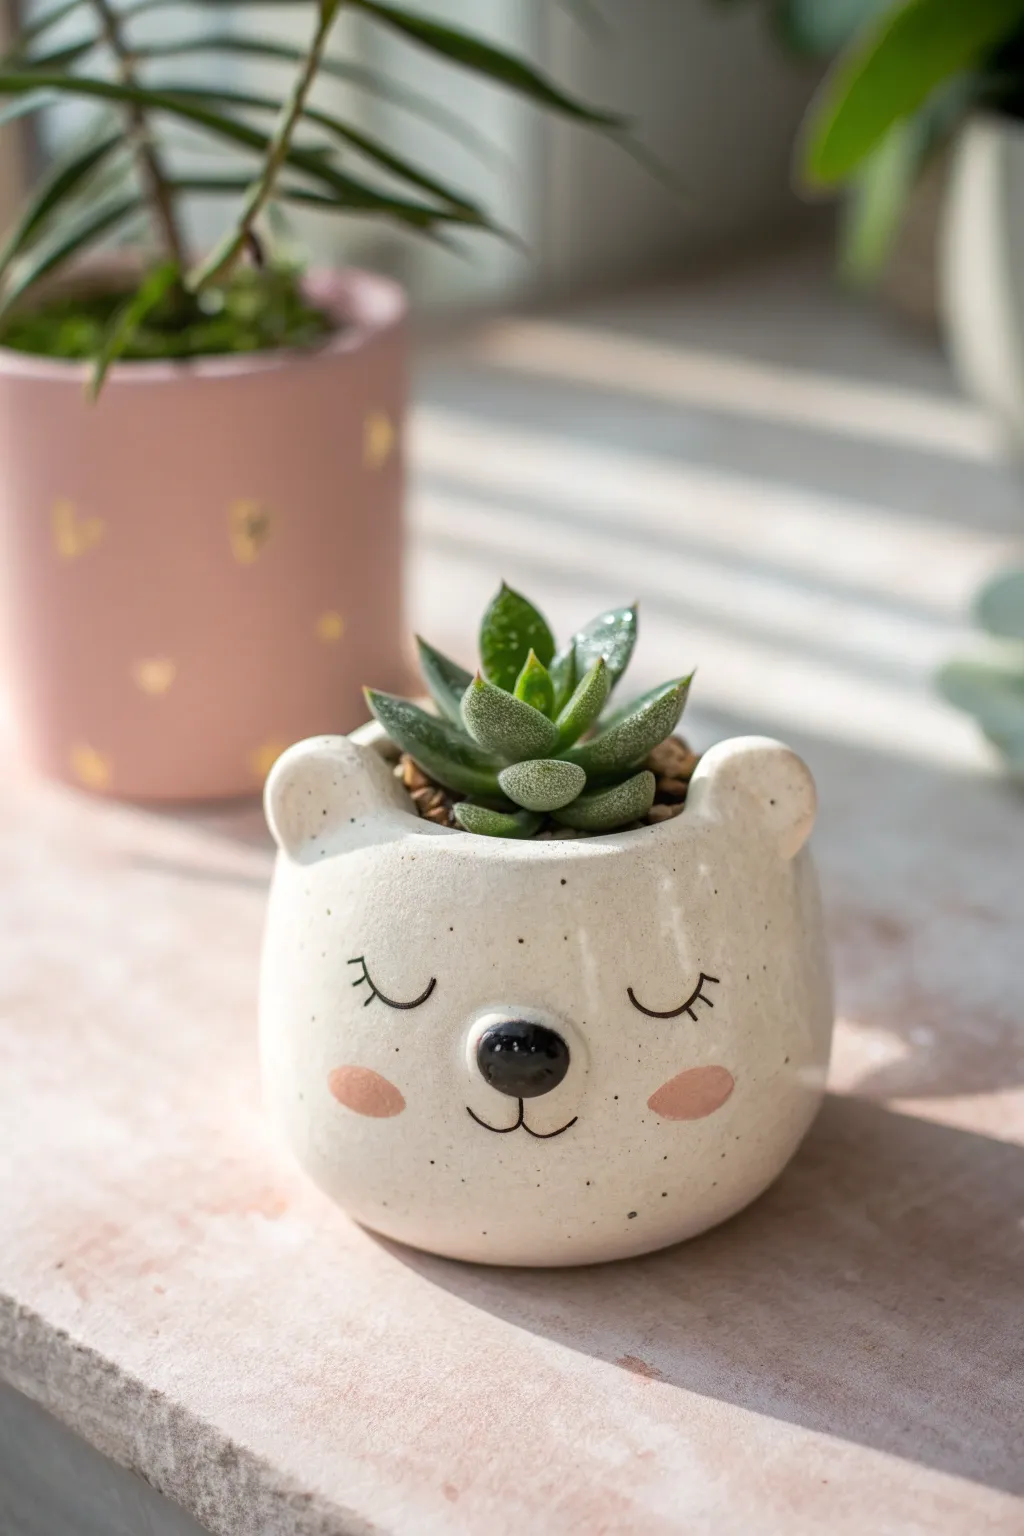
This adorable bear-shaped planter brings a touch of calm to any windowsill with its sweet, sleeping face and speckled finish. It’s perfectly sized for your tiniest succulents and makes a charming handmade gift.
Detailed Instructions
Materials
- White polymer clay or air-dry clay (approx. 200g)
- Small rolling pin
- Circle cookie cutter (approx. 3-inch diameter)
- Craft knife or scalpel
- Sculpting tools (ball styluses, smoothing tool)
- Water (for smoothing)
- Acrylic paints: Black, Soft Pink
- Fine detail paintbrush (00 or 000 size)
- Stiff bristle toothbrush (for speckling)
- Gloss varnish or resin (optional, for the nose)
- Matte sealant spray
Step 1: Shaping the Base
-
Condition the Clay:
Begin by kneading your white clay thoroughly until it’s soft, pliable, and free of cracks. This conditioning step is crucial for a smooth finish later. -
Form the Pot Body:
Roll a ball of clay slightly larger than a golf ball. Use your thumb to press into the center, pinching and turning the clay to form a simple pinch pot shape. Keep the walls about 1/4 inch thick for durability. -
Refine the Shape:
Gently gently roll the bottom of the pot on your work surface to flatten it so it stands upright. Smooth the walls upward to create a rounded, slightly bulbous cup shape. -
Add the Ears:
Roll two small, pea-sized balls of clay. Flatten them slightly and attach them to the top rim of the pot on opposite sides. Blend the clay downwards onto the rim using a sculpting tool so they are securely attached. -
Create the Ear Indentations:
Use a medium ball stylus or the back of a paintbrush to gently press into the center of each ear, creating a subtle concave shape. -
Form the Snout:
Roll a very small flattened oval of clay. Attach this below the center point of the face area. I find blending the edges of this oval perfectly flush with the face makes it look more integrated and high-quality. -
Add the Nose:
Roll a tiny, triangular piece of clay and press it onto the top center of the snout bump you just created. This will be the distinct black nose later. -
Smooth Everything Out:
Dip your finger in a little water and run it over the entire surface to eliminate fingerprints and harsh seams. Allow the clay to dry or bake according to package instructions.
Pro Tip: Clean Lines
Sketch the face lightly with a pencil before painting. If you make a mistake with the spacing, you can erase it or sand it off before committing with paint.
Step 2: Decorating & Finishing
-
Sand for Perfection:
Once fully cured, use fine-grit sandpaper to gently smooth away any remaining bumps or rough texture on the surface. -
Apply the Speckles:
Dilute a very small amount of black or dark grey acrylic paint with water. Dip a stiff toothbrush into the mix, and use your thumb to flick the bristles, spraying tiny specks over the entire pot. -
Draw the Eyes:
Using your finest detail brush and black acrylic paint, paint two downward-curving crescents for the sleeping eyes. Make sure they are symmetrical. -
Add Eyelashes:
Carefully add three tiny ticks to the outer corner of each eye curve to create delicate eyelashes. -
Paint the Nose:
Fill in the raised nose triangle with solid black paint. Paint a thin ‘J’ shape starting effectively from the bottom of the nose to create the mouth line, and mirror it on the other side. -
Blush the Cheeks:
Mix a soft pink color or dilute pink paint to be semi-transparent. Paint two soft oval shapes on the cheeks, just below the outer edges of the eyes. -
Seal the Project:
Once the paint is completely dry, spray the entire pot with a matte sealant to protect the clay and paint. -
Add Gloss Highlight:
For a professional touch, brush a tiny amount of gloss varnish specifically onto the black nose to make it look wet and shiny. -
Final Assembly:
Fill with potting soil and your chosen miniature succulent.
Level Up: Standing Bear
Before baking, add four small stumpy legs to the bottom of the pot so the bear stands elevated, rather than sitting flat on the surface.
Your peaceful little bear is now ready to hold its tiny green friend and brighten up your space

The Complete Guide to Pottery Troubleshooting
Uncover the most common ceramic mistakes—from cracking clay to failed glazes—and learn how to fix them fast.
Mini Bud Vases With Sweet Shapes
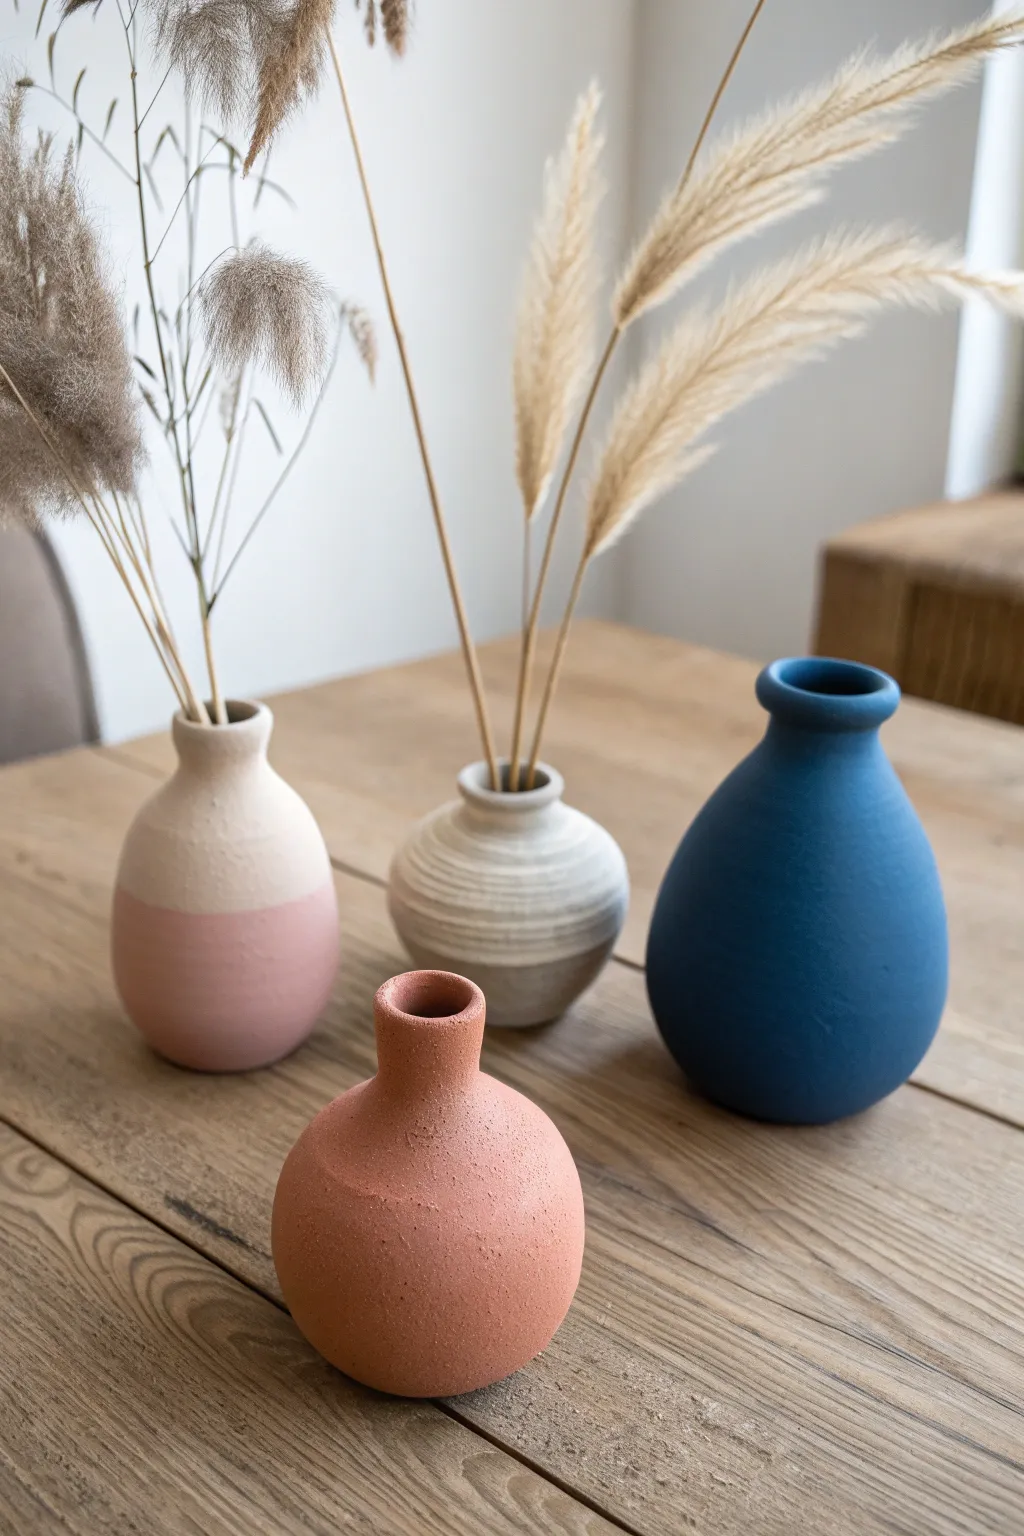
These charming mini bud vases bring a touch of minimalist elegance to any shelf with their soft, matte textures and muted color palette. Perfect for holding dried grasses or standing alone as sculptural pieces, they are surprisingly simple to craft at home using air-dry or polymer clay.
Step-by-Step
Materials
- White air-dry clay or polymer clay (approx. 1lb)
- Acrylic paints (Navy blue, dusty rose, terracotta, cream)
- Baking soda (to add texture to paint)
- Small rolling pin
- Pottery sponge or soft cloth
- Needle tool or toothpick
- Paintbrushes (medium flat and small detail)
- Fine-grit sandpaper
- Water cup (for smoothing)
- Plastic wrap optional (to keep clay moist)
Step 1: Shaping the Base Forms
-
Prepare your clay:
Start by conditioning your clay. If using polymer, knead it until soft and pliable. If using air-dry clay, ensure it’s moist but not sticky. Divide the clay into four equal portions, roughly the size of a tennis ball. -
Create the basic spheres:
Roll each portion of clay into a smooth ball between your palms. Focus on removing any cracks or seams at this stage, as they become harder to fix later. Tap the bottom of each sphere gently on your work surface to create a flat standing base. -
Form the pinch pots:
Hold a clay ball in one hand and gently press your thumb into the center, stopping about a half-inch from the bottom. Rotate the ball while pinching the clay between your thumb and fingers to thin out the walls and create the hollow body. -
Refine the shapes:
For the blue and two-tone vases, aim for a classic teardrop shape by gently smoothing the clay upwards. For the terracotta one, keep the body rounder and more spherical. The grey vase should be slightly flatter, like a squat pumpkin.
Clean Cuts Pro Tip
To get perfectly smooth rims, wet your finger slightly and run it around the top edge just before baking or drying. It saves tons of sanding time later
Step 2: Adding Necks and Details
-
Coil the necks:
Roll small snakes of clay to add height to your vases. Score the top opening of your pinch pot and the bottom of your clay snake with a needle tool. Add a dab of water (or liquid clay for polymer) and attach the coil to form the neck. -
Smooth the transitions:
Using your thumb or a modeling tool, blend the clay of the neck downwards into the body until the seam completely disappears. I find using a slightly damp sponge here helps create that seamless, professional look. -
Shape the mouths:
Flare the tops of the necks slightly outwards for the blue and pink/white vases. For the terracotta one, keep the rim thick and rounded. Roll the rim between your fingers to ensure it is even and smooth. -
Add texture to the grey vase:
For the squat grey vase in the center, use your needle tool to carve horizontal grooves around the circumference. Vary the pressure to create an organic, handmade feel rather than perfect machine lines. -
Final smoothing:
Dip your sponge in water and give all vases a final wipe down to remove fingerprints. Let air-dry clay cure for 24-48 hours or bake polymer clay according to the package instructions.
Level Up: Faux Stone
Splatter diluted black or brown paint onto your finished vases using an old toothbrush for a speckled, ceramic stoneware effect.
Step 3: Painting and Texturing
-
Sand imperfections:
Once fully dry or cured and cooled, lightly sand any rough spots or uneven rims with fine-grit sandpaper. Wipe away all dust with a damp cloth before painting. -
Mix the textured paint:
To achieve that earthy, stone-like finish seen in the photo, mix baking soda into your acrylic paints. Use a ratio of roughly 1 part baking soda to 2 parts paint. Mix until you have a fluffy, mousse-like consistency. -
Paint the solid vases:
Apply your textured navy blue paint to the tall teardrop vase and the terracotta color to the small round vase. Use dabbing motions rather than long strokes to enhance the gritty texture. -
Create the two-tone effect:
For the pink and white vase, paint the entire vase cream/white first and let it dry. Then, use painter’s tape or a steady hand to paint the bottom third in dusty rose, blending the transition slightly for a soft look. -
Detail the grooved vase:
Paint the grooved vase with a light grey or beige textured mix. Once dry, you can dry-brush a lighter white shade over the raised ridges to make the texture pop. -
Final Drying:
Let all paint dry completely. The baking soda mixture dries to a lovely matte finish, perfect for showcasing your dried botanicals.
Arrange your new collection together and fill them with dried bunny tails or grasses for an instant style upgrade to your space
Daisy And Starburst Coaster Set
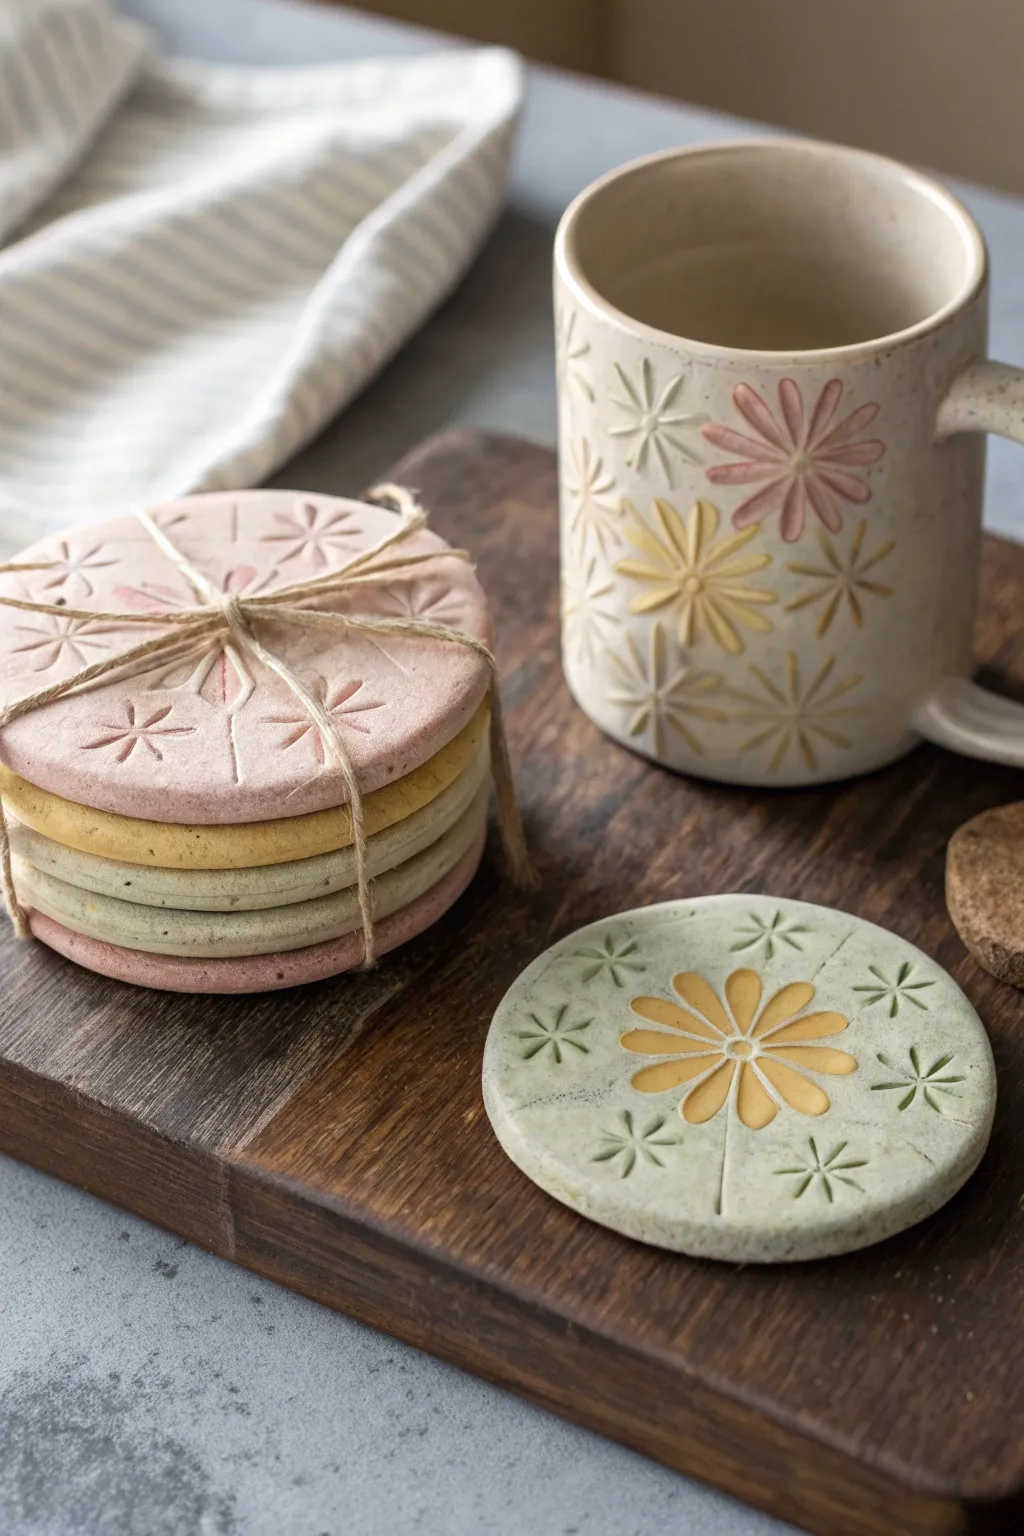
Bring a touch of whimsy to your coffee table with this charming set of handmade coasters featuring embossed floral motifs. The soft pastel tones and tactile patterns create a cozy, artisanal feel that makes them perfect for distinct, thoughtful gifts.
Step-by-Step Tutorial
Materials
- Air-dry clay (white or terracotta)
- Acrylic paints (pastel pink, yellow, sage green)
- Small rolling pin
- Round cookie cutter (approx. 4 inches)
- Fine-grit sandpaper
- Pointed sculpting tool or toothpick
- Small carving loop tool (optional)
- Detail paintbrush
- Matte spray sealant
- Jute twine for packaging
Step 1: Shaping the Base
-
Condition the clay:
Begin by kneading your air-dry clay until it is soft, pliable, and free of cracks. A warm environment helps make stiff clay easier to work with. -
Roll out the slab:
Roll the clay out onto a clean, flat surface to an even thickness of about 1/4 inch. I like using guide sticks on either side of the roller to ensure the thickness is perfectly uniform. -
Cut the circles:
Use your round cookie cutter to press firmly into the clay slab. Create as many circles as you need for your set, aiming for at least four to make a complete stack. -
Smooth the edges:
Dip your finger in a little water and gently run it around the circumference of each circle to smooth out any rough bits left by the cutter.
Preventing Curling
If your coasters curl while drying, place a flat, heavy book on top of them once they are partially dry (leather-hard) to weight them down flat.
Step 2: Carving the Design
-
Mark the center:
Lightly press a small dot in the very center of your coaster to guide your main flower placement. -
Sketch the daisy petals:
Using a needle tool or toothpick, lightly sketch eight petal shapes radiating from the center dot. Keep the pressure light so you can smooth over mistakes if needed. -
Carve the petals:
Go back over your sketch lines with a carving tool or the toothpick, pressing deeper to create a grooved outline. Scoop out a tiny bit of clay within the petal shapes to give them a recessed, embossed look. -
Add the stem line:
Draw a straight vertical line extending from the bottom of the flower down to the edge of the coaster to represent the stem. -
Create starburst accents:
around the main daisy, stamp or carve small 8-point starbursts. You can do this by pressing the side of a small tool into the clay in a radial pattern. -
Texture the surface:
If you want that stone-like texture, gently tap the flat bristles of an old toothbrush over the empty negative space on the coaster.
Step 3: Finishing Touches
-
Dry thoroughly:
Place the coasters on a wire rack to dry. This usually takes 24-48 hours depending on humidity; turn them over halfway through to prevent curling. -
Sand the surface:
Once fully dry and hard, use fine-grit sandpaper to buff the edges and surface, removing any sharp burrs created during carving. -
Paint the daisy:
Using a detail brush, paint the recessed petals. For the pink coaster, use a darker pink for the sketched lines or petal interiors to create depth. -
Paint the background:
apply a wash of your main pastel color (sage green, dusty pink, or mellow yellow) over the rest of the coaster, wiping it back slightly with a damp paper towel so the paint settles into the textures. -
Seal the coaster:
Spray the entire piece with a matte sealant to protect it from moisture. Apply two generous coats, allowing them to dry in between. -
Bundle for gifting:
Stack your finished set of coasters and wrap them securely with jute twine, tying a bow on top for that perfect rustic presentation.
Waterproof Upgrade
For fully waterproof coasters that can handle very hot mugs, swap air-dry clay for polymer clay or finish with a two-part resin coating.
Enjoy using your lovely new coasters or gifting them to a lucky friend who appreciates handmade charm


What Really Happens Inside the Kiln
Learn how time and temperature work together inside the kiln to transform clay into durable ceramic.
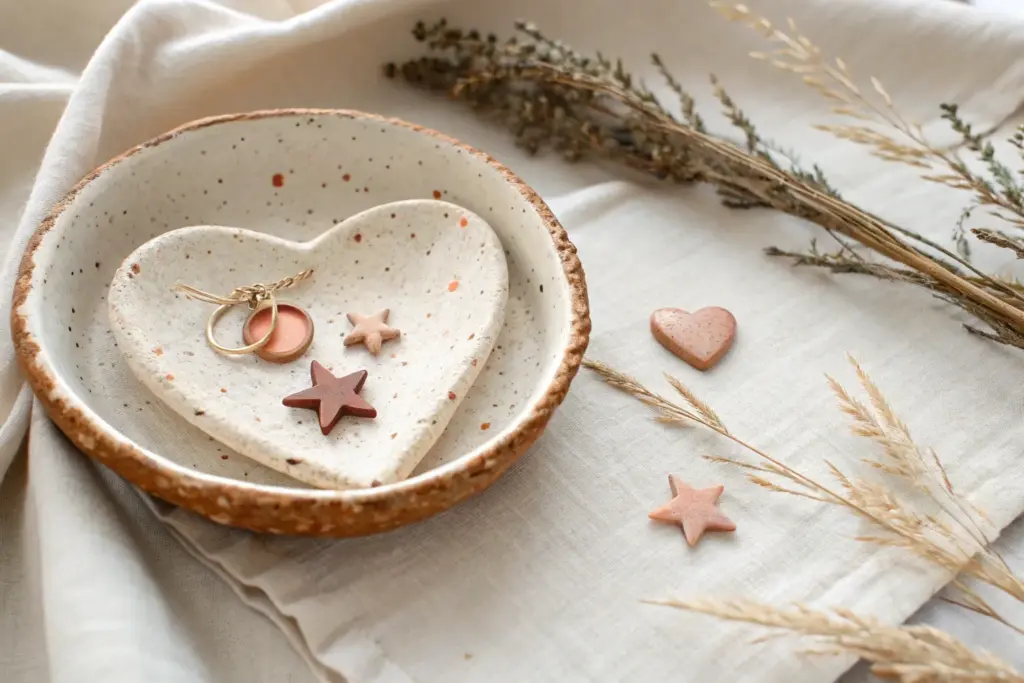
Terrazzo Trinket Trays
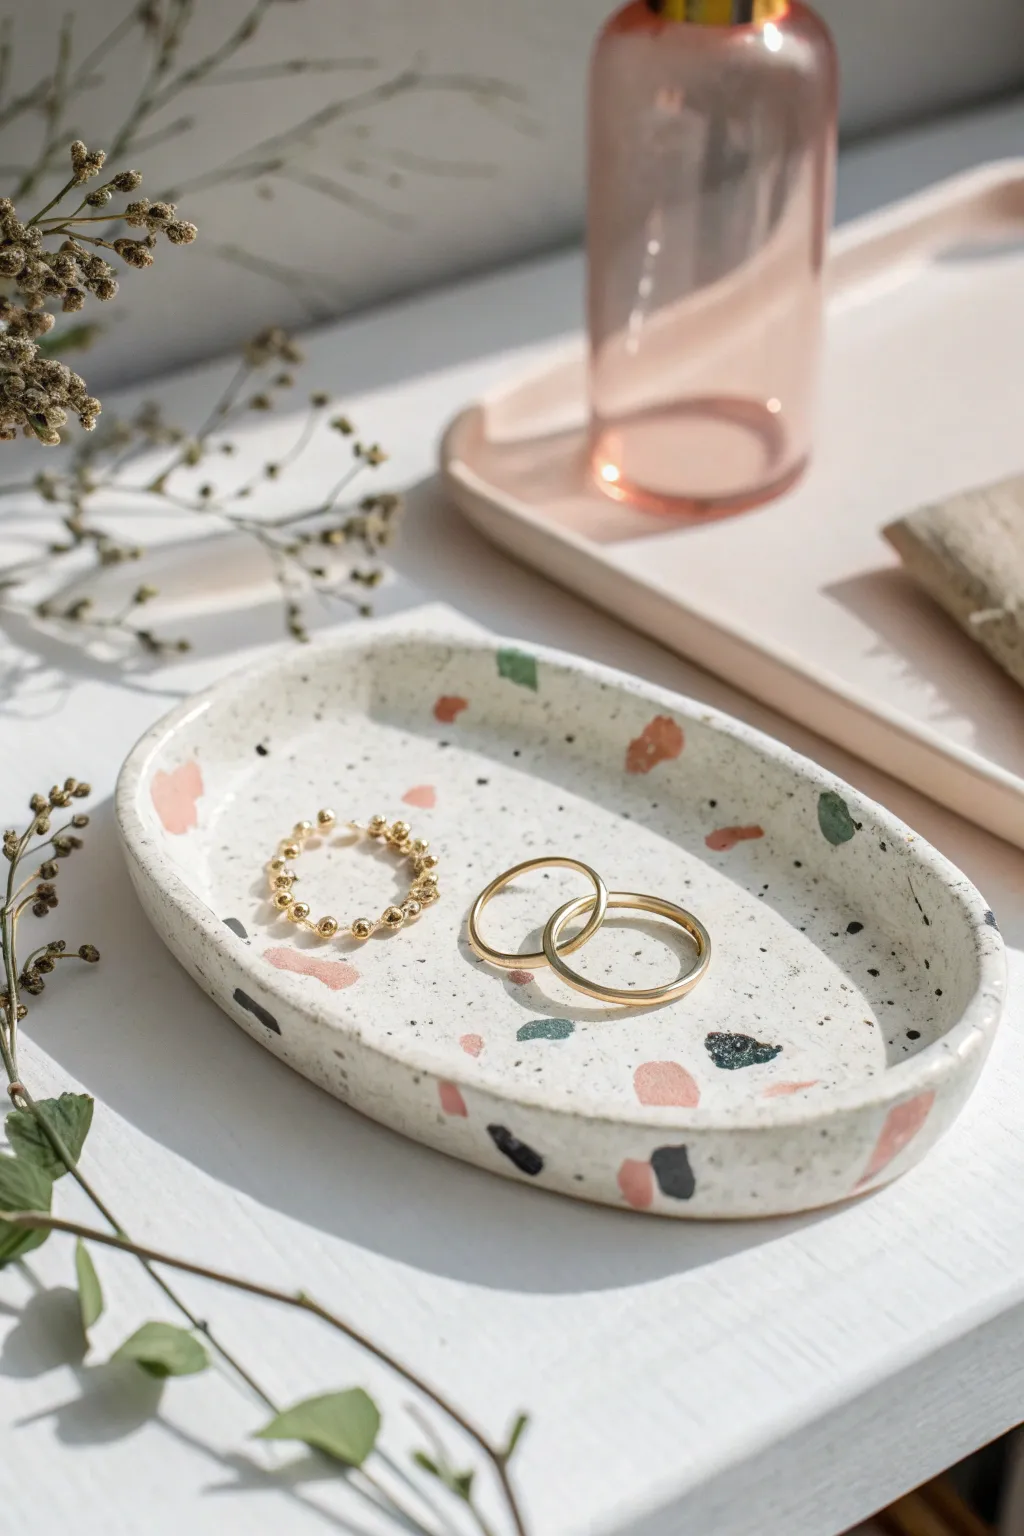
Capture the chic, speckled charm of modern terrazzo with this deceptively simple polymer clay project. The result is a smooth, sophisticated oval tray featuring pops of pink, terracotta, teal, and black embedded in a creamy white base, perfect for holding your favorite rings.
How-To Guide
Materials
- Polymer clay (White for base)
- Polymer clay (Small amounts of Pink, Terracotta, Teal/Green, Black)
- Acrylic rolling pin or glass bottle
- Oval clay cutter or paper template with craft knife
- Parchment paper or ceramic tile
- Sandpaper (various grits: 400, 800, 1000)
- UV resin or gloss sealant (optional)
- Oven
Step 1: Prepping the Chips
-
Condition the colors:
Start by taking your colored clays—the pink, terracotta, teal, and black—and conditioning them until they are soft and pliable. You only need a very small amount of each color. -
Roll thin sheets:
Roll each colored piece into a very thin sheet. The thinner you roll them, the more delicate your terrazzo chips will look later. -
Bake the sheets:
Place these thin sheets on parchment paper and bake them for just 10-15 minutes at the temperature recommended on your clay package. Let them cool completely until they are hard. -
Create the chips:
Once cool, crumble the baked sheets into little irregular pieces with your fingers or chop them roughly with a craft blade. Aim for a mix of sizes, from tiny specks to slightly larger chunks.
Smudged Colors?
If your colored chips are smearing into the white base during rolling, your clay was too warm or soft. Pop the slab in the fridge for 5 minutes before rolling again.
Step 2: Creating the Base
-
Condition the white clay:
Take a large block of white clay and condition it thoroughly until it’s warm and easy to work with. I find this prevents cracks during the rolling process. -
Form the slab:
Roll the white clay into a slab about 1/4 inch thick. It needs to be substantial enough to form a sturdy tray. -
Add the chips:
Sprinkle your prepared colored chips generously over the white slab. Press them gently into the surface so they adhere. -
Embed the pattern:
Roll over the slab again with your acrylic roller. The goal is to push the chips flush with the white clay, creating a smooth, unified surface. Roll in different directions to stretch the pattern organically. -
Cut the shape:
Use an oval cutter to stamp out your tray shape. If you don’t have a cutter, place a paper oval template on the clay and trace around it carefully with a craft knife.
Step 3: Shaping and Finishing
-
Curve the edges:
Gently lift the edges of your oval with your fingertips to create a shallow rim. You want a slight lip that will stop jewelry from sliding off. -
Smooth the seams:
Use your finger or a smoothing tool to round off the rim so it looks soft and organic rather than sharp. -
Final bake:
Bake the formed tray according to the manufacturer’s instructions, usually around 30 minutes. Use an oven thermometer to ensure the white clay doesn’t scorch. -
Cool down:
Allow the tray to cool completely before handling it further. It is fragile while warm. -
Sand for stone effect:
This is the magic step. Wet sand the piece under running water, starting with 400 grit and moving to 1000 grit. This reveals the crisp edges of the colored chips and makes the surface feel like real stone. -
Buff and seal:
Buff the tray with a soft cloth for a matte finish, or apply a thin layer of UV resin or gloss varnish if you prefer a shiny, ceramic-like look.
Add Subtle Sparkle
Mix a tiny pinch of gold leaf flakes in with your colored clay chips before embedding. The sanding step will reveal beautiful metallic glints alongside the colors.
Now you have a stylish spot to keep your dainty rings safe and organized
Mini House Or Alphabet Ornaments
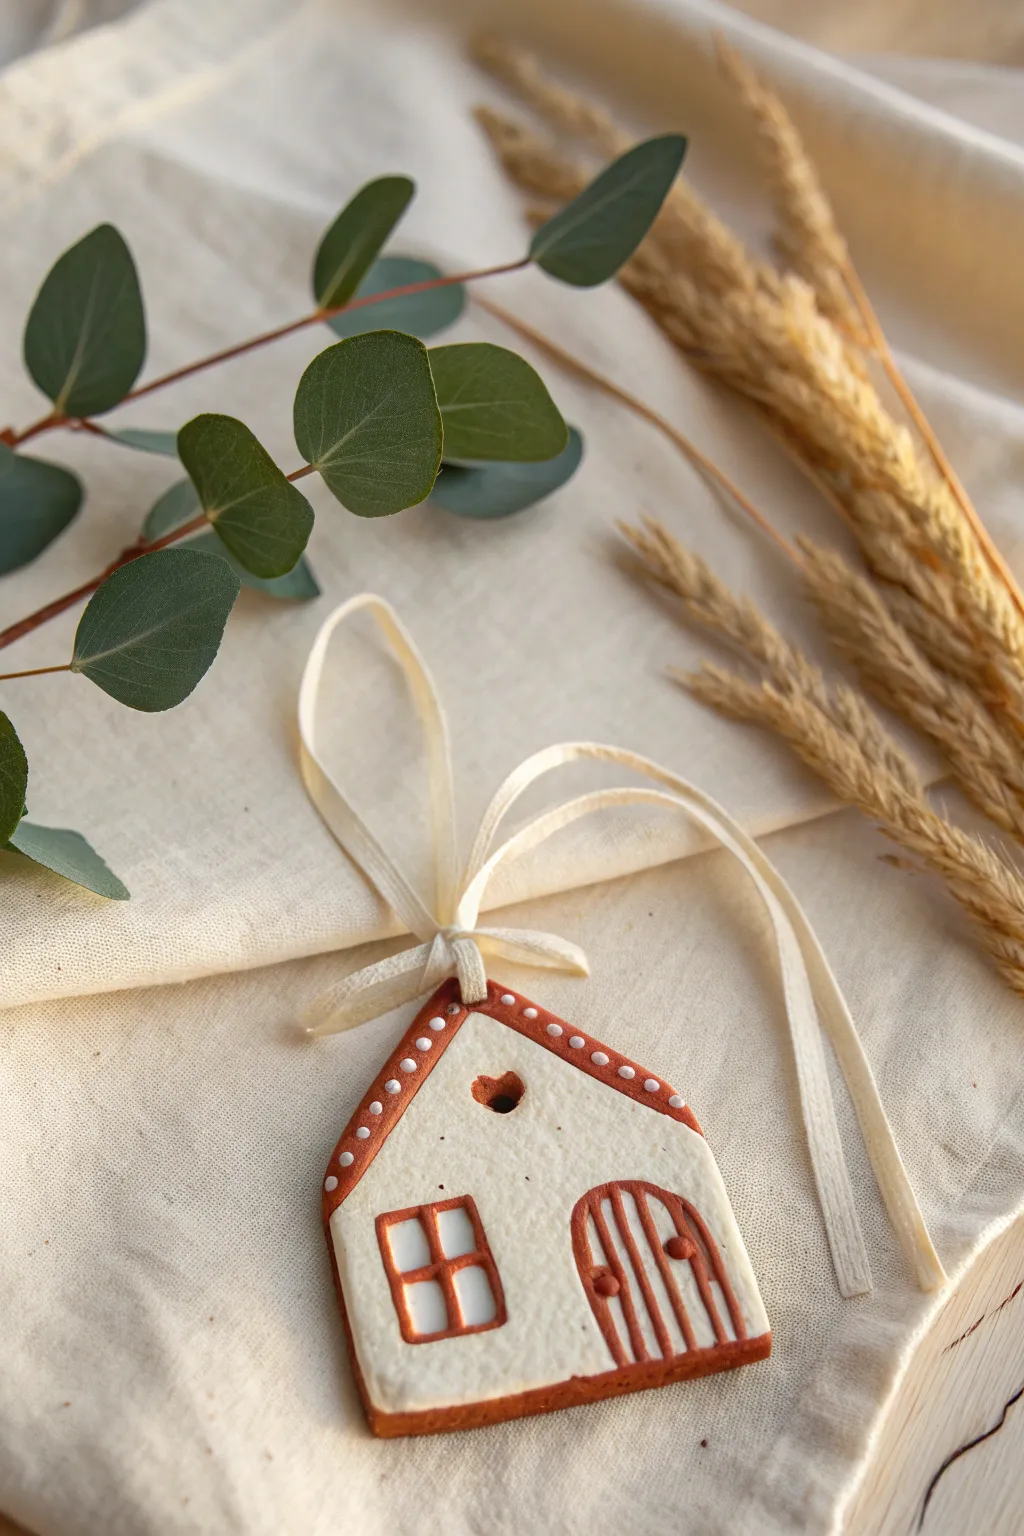
Create a cozy winter vibes with this delightful mini house ornament featuring intricate piping details and a charming heart cutout. The combination of raw terracotta tones and creamy white icing-like paint gives it the nostalgic look of a gingerbread cookie that will last forever.
Step-by-Step Tutorial
Materials
- Terracotta colored polymer clay or air-dry clay
- House-shaped cookie cutter (approx. 2-3 inches)
- Small heart-shaped mini cutter or straw
- Rolling pin
- Cream or off-white acrylic paint
- Fine detail paintbrush (size 0 or 00)
- Small ball stylus tool or toothpick
- Sandpaper (fine grit)
- Matte varnish (optional)
- Cream ribbon or twine for hanging
- Parchment paper or craft mat
Step 1: Shaping the Base
-
Condition the Clay:
Begin by warming up your terracotta clay in your hands until it becomes pliable and smooth. If you are using air-dry clay, knead it briefly to remove air bubbles. -
Roll It Out:
Place the clay on a piece of parchment paper or a craft mat. Roll it out to an even thickness of about 1/4 inch (6mm). You want it thick enough to be sturdy but not too heavy. -
Cut the House Shape:
Press your house-shaped cookie cutter firmly into the clay. Wiggle it slightly to ensure a clean cut before lifting it away. Remove the excess clay from around the shape. -
Smooth the Edges:
Dip your finger in a little water (for air-dry clay) or baby oil (for polymer clay) and gently run it along the cut edges to smooth out any roughness or sharp corners. -
Create the Heart Detail:
Position your small heart cutter or a shaped straw in the upper center of the house, just below the peak of the roof. Press down to cut out the heart-shaped window. -
Make a Hanging Hole:
Using a straw or a tool, punch a hole at the very top peak of the roof for the ribbon. Make sure the hole is large enough for your chosen ribbon to pass through. -
Cure or Dry:
If using polymer clay, bake according to the package instructions (usually 275°F/135°C for 15-30 mins). If using air-dry clay, let it sit in a dry place for 24-48 hours, flipping it occasionally to ensure even drying.
Oops! Smudged paint?
If you smudge paint on the raw clay border, don’t panic. Quickly wipe it with a damp Q-tip. For polymer clay, a tiny bit of acetone on a brush cleans it up perfectly.
Step 2: Painting and Detailing
-
Sand for Texture:
Once fully cured or dry, inspect the edges. If there are any sharp bits, lightly sand them with fine-grit sandpaper. Wipe away any dust with a damp cloth. -
Paint the Facade:
Squeeze out some cream acrylic paint. Focusing only on the front face of the house, paint the main wall area. Leave a thin border of the raw terracotta clay exposed around the very edge and on the roof area. -
Refine the Roof Line:
I like to use a clean, damp brush to wipe back any paint that accidentally got onto the roof section, keeping that nice terracotta contrast distinct. -
Outline the Window:
Using a very fine detail brush and the raw clay color (or a reddish-brown paint if you covered it all), paint a simple square window frame on the lower left side. Paint a cross in the center to create window panes. -
Paint the Door and Steps:
On the lower right, outline an arched door shape. Fill in vertical stripes to mimic wood planks. Add two tiny dots for door handles using the tip of your brush. -
Add Roof Dots:
Dip a small ball stylus or the cut end of a toothpick into white paint. Gently dot a line of white spots along the reddish-brown roof border to simulate icing or snow decoration. -
Let Dry Completely:
Allow the paint to dry fully. This usually takes about 20-30 minutes for acrylics. -
Seal (Optional):
For longevity, apply a thin coat of matte varnish over the front. Avoid glossy varnish if you want to maintain the cookie-like, rustic texture.
Step 3: Finishing Touches
-
Thread the Ribbon:
Cut a length of cream ribbon or textured twine, about 8 inches long. -
Secure the Loop:
Thread the ribbon through the hole at the top of the house. Bring the ends together and tie a secure knot or bow depending on your preference. -
Final Check:
Trim the ends of the ribbon at an angle to prevent fraying and give your ornament a polished look.
Make it Sparkle
While the white ‘roof dots’ are still wet, sprinkle a tiny pinch of ultra-fine iridescent glitter on them. It mimics the look of glistening fresh sugar snow.
Now you have a charming little keepsake that adds a warm, handmade touch to your decor

TRACK YOUR CERAMIC JOURNEY
Capture glaze tests, firing details, and creative progress—all in one simple printable. Make your projects easier to repeat and improve.
Secret Message Keepsake Boxes

This charming speckled clay box with a matching lid is the perfect vessel for hiding secret notes or tiny treasures. Its rustic, hand-built finish gives it a cozy, artisanal feel that makes any gift inside feel extra special.
Detailed Instructions
Materials
- Air-dry clay or polymer clay (creamy beige)
- Speckle adding agent (dried coffee grounds or black pepper)
- Circle cutters (two sizes: approx. 3-inch and 3.2-inch)
- Rolling pin
- Clay knife or craft blade
- Sponge and water
- Small wooden heart button or cutout
- Cardstock paper
- Sandpaper (fine grit)
- Clear matte varnish or sealant
- Small rolling guides or wooden dowels (optional)
Step 1: Preparing the Clay
-
Mix and Prep:
Begin by conditioning your beige clay until it is soft and pliable. If your clay doesn’t already have speckles, knead in a small pinch of dried coffee grounds or coarse black pepper to achieve that beautiful, organic texture. -
Roll Flat:
Place the clay between two parchment sheets or use rolling guides to ensure an even thickness of about 1/4 inch. Roll it out smoothly in all directions.
Make It Look Like Pottery
To mimic wheel-thrown pottery, lightly brush horizontal lines around the outside walls with a stiff paintbrush before the clay dries.
Step 2: Building the Base
-
Cut the Base:
Using your smaller circle cutter (roughly 3 inches), press firmly into the rolled clay to cut out the floor of your box. Set this disc aside. -
Create the Walls:
Roll a long, rectangular strip of clay. The width determines the height of your box—about 1.5 inches works well here. The length needs to be enough to wrap around the circumference of your base disc. -
Attach the Walls:
Score the edge of the base disc and the bottom edge of your clay strip. Add a little water or slip to the scored areas. Wrap the strip around the base, joining the ends of the strip together first. -
Blend the Seams:
Use your fingers or a modeling tool to smudge the clay downwards on the outside and inside, fully sealing the wall to the base. Blend the vertical seam where the wall ends meet until invisible.
Cracking Issues?
If cracks appear while drying, mix a tiny amount of fresh clay with water to make a paste and fill the cracks, then smooth over.
Step 3: Crafting the Lid
-
Cut the Lid Top:
Roll out a fresh slab of clay. Use the slightly larger circle cutter (3.2 inches) to creating the lid, ensuring it will overhang the base slightly for a good fit. -
Smooth the Profile:
Gently gently press the center of the lid disc over a curved object (like a large smooth stone or bowl bottom) or mould it with your hands to give it a slight dome shape rather than being perfectly flat. -
Add the Inner Lip:
Roll a thin coil of clay. Flip the lid upside down and attach this coil in a circle slightly smaller than the diameter of your box base. This lip prevents the lid from sliding off. -
The Knob:
Form a small ball of clay and flatten the bottom. Score and slip the center of the lid top, then press the knob into place. Smooth the connection point so it looks seamless.
Step 4: Refining and Finish
-
Smooth Edges:
Dip a small sponge in water and run it over all rims and surfaces. Pay close attention to the rim of the box and the edge of the lid to remove any sharpness. -
Drying Time:
Let your pieces dry completely. I prefer to let this dry slowly away from direct heat to prevent cracking, usually for 24-48 hours depending on humidity. -
Sanding:
Once bone dry, take fine-grit sandpaper and gently sand away any fingerprints or uneven bumps. This enhances the professional, pottery-like finish. -
Sealing:
Apply a coat of clear matte varnish. This protects the clay and seals in the speckles without making it look plasticky.
Step 5: The Secret Contents
-
Cut the Note:
Cut a small rectangle from cream cardstock, sized to fit comfortably inside the pot. -
Add the Heart:
Glue a small wooden heart to the center of the paper, or write a hidden message beneath where the heart sits. -
Assemble:
Place the note at the bottom of the box and cover with the lid, ready for lifting.
Now you have a timeless little keepsake box ready to hold a secret message for someone you love