Whenever I’m craving something sweet and calming to make, I reach for clay and go straight for tiny, softly colored projects with the simplest little faces. These cute clay ideas are all about that dreamy aesthetic look—whimsical, functional, and totally doable at your own pace.
Pastel Smiley Face Trinket Dish
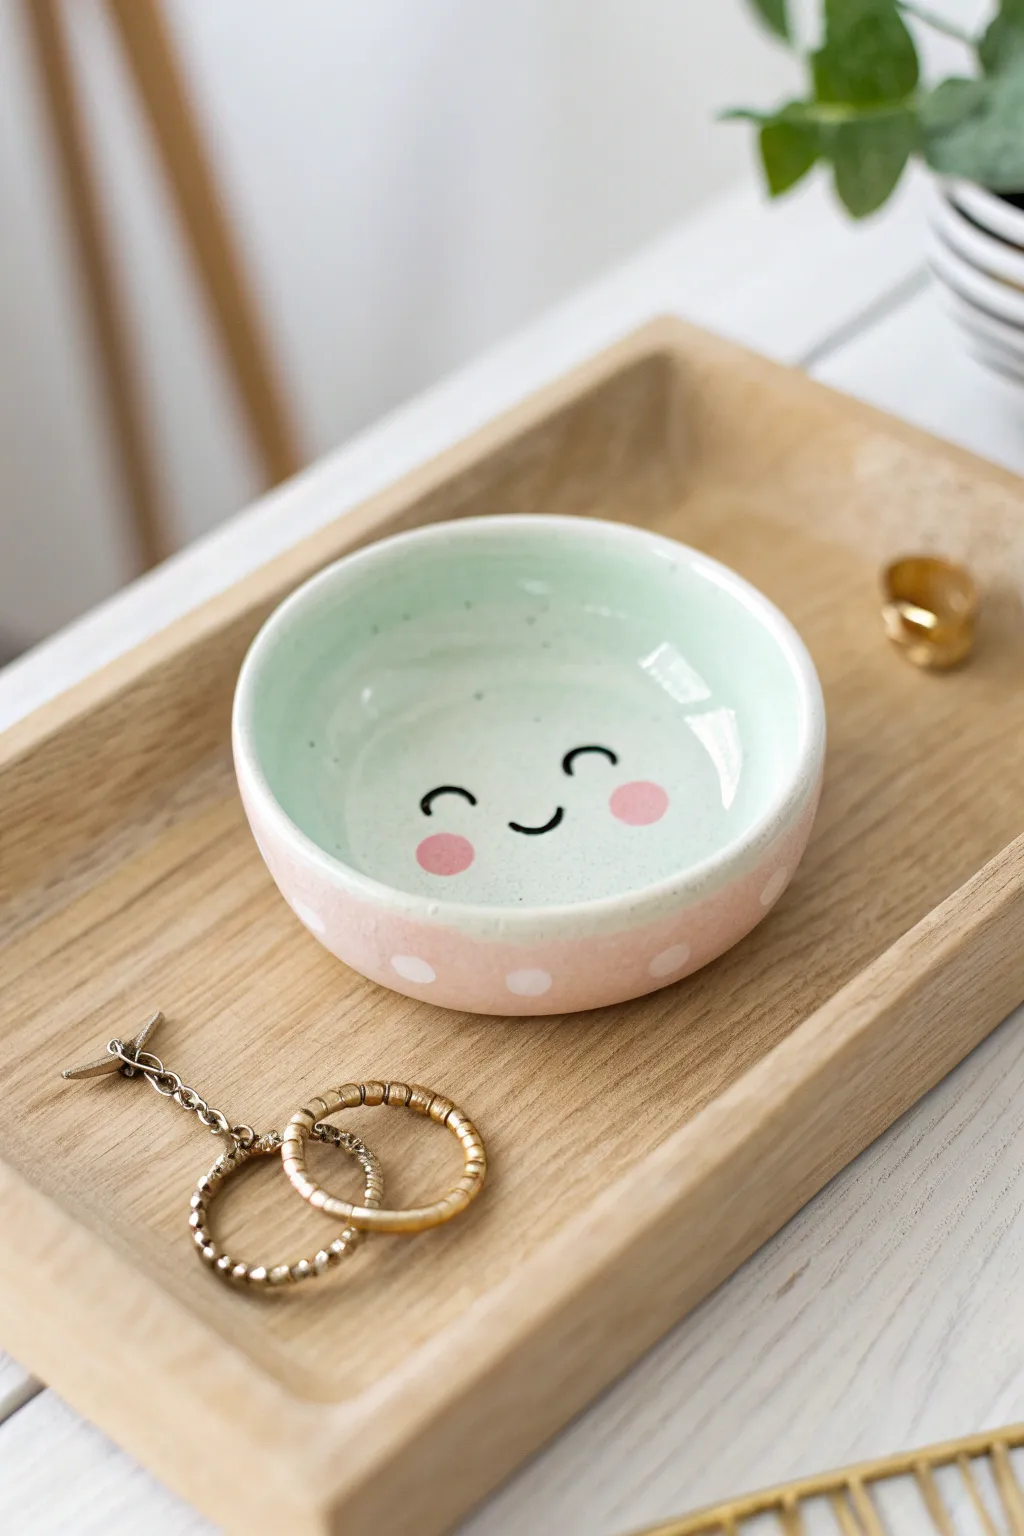
Bring a little joy to your bedside table with this adorable smiling trinket dish. Featuring a soft mint interior and polka-dot pink exterior, it’s perfect for holding your favorite rings and small treasures.
Detailed Instructions
Materials
- White polymer clay (or air-dry clay)
- Small rolling pin
- Circle cookie cutter (approx. 4 inches)
- Small oven-safe bowl (for shaping)
- Acrylic paints: Mint green, pastel pink, black, white
- Fine detail paintbrush
- Medium flat paintbrush
- Dotting tool or toothpick end
- High-gloss varnish or glaze
- Sandpaper (fine grit)
Step 1: Shaping the Base
-
Condition the clay:
Start by kneading your white clay until it is soft, pliable, and free of cracks. -
Roll it out:
Roll the clay out into an even slab, aiming for a thickness of about 1/4 inch to ensure durability. -
Cut the circle:
Use your large circle cookie cutter to punch out a perfect round shape from the slab. -
Form the bowl shape:
Gently lift the clay circle and drape it into your small oven-safe bowl, pressing it lightly so it takes the curved shape without getting stuck. -
Smooth the edges:
Dip your finger in a little water (or baby oil for polymer clay) and run it along the rim to smooth out any rough cutting marks. -
Cure or dry:
If using polymer clay, bake according to the package instructions while it’s still in the bowl. If using air-dry clay, let it sit for 24-48 hours until fully hardened.
Sticky Situation?
If using polymer clay, lightly dust your shaping bowl with cornstarch before placing the clay inside. This ensures the clay releases easily after baking without sticking to the mold.
Step 2: Painting the Design
-
Sand for smoothness:
Once cooled or fully dry, remove the clay from the mold and lightly sand any bumps to get a smooth, ceramic-like finish. -
Base coat the interior:
Paint the entire inside of the bowl with the mint green acrylic paint. You may need two thin coats for full coverage. -
Base coat the exterior:
Flip the bowl over and paint the outside with the pastel pink paint, slightly overlapping the rim to create a clean edge. -
Paint the face:
Using your finest detail brush and black paint, carefully draw two small crescent curves for the eyes and a tiny U-shape for the smile in the center of the mint area. -
Add rosy cheeks:
Dip the back of a paintbrush or a large dotting tool into pink paint and stamp two circles on either side of the smile for cheeks. -
Add exterior dots:
Use a dotting tool or a Q-tip dipped in white paint to create an evenly spaced polka-dot pattern around the pink exterior. -
Let the paint dry:
Allow all paint layers to dry completely before touching the bowl to avoid smudges.
Step 3: Finishing Touches
-
Seal the piece:
I prefer to apply a thick layer of high-gloss varnish over the entire piece to mimic the shiny look of fired ceramic. -
Final cure:
Let the varnish dry undisturbed for the time recommended on your specific product bottle.
Pro Tip: Faux Ceramic Look
To get that speckled pottery look seen in the photo, flick a toothbrush loaded with diluted grey paint over the mint interior before you paint the face details.
Now you have a sweet little spot to keep your jewelry safe and sound


Tiny Mushroom Desk Buddy Friends
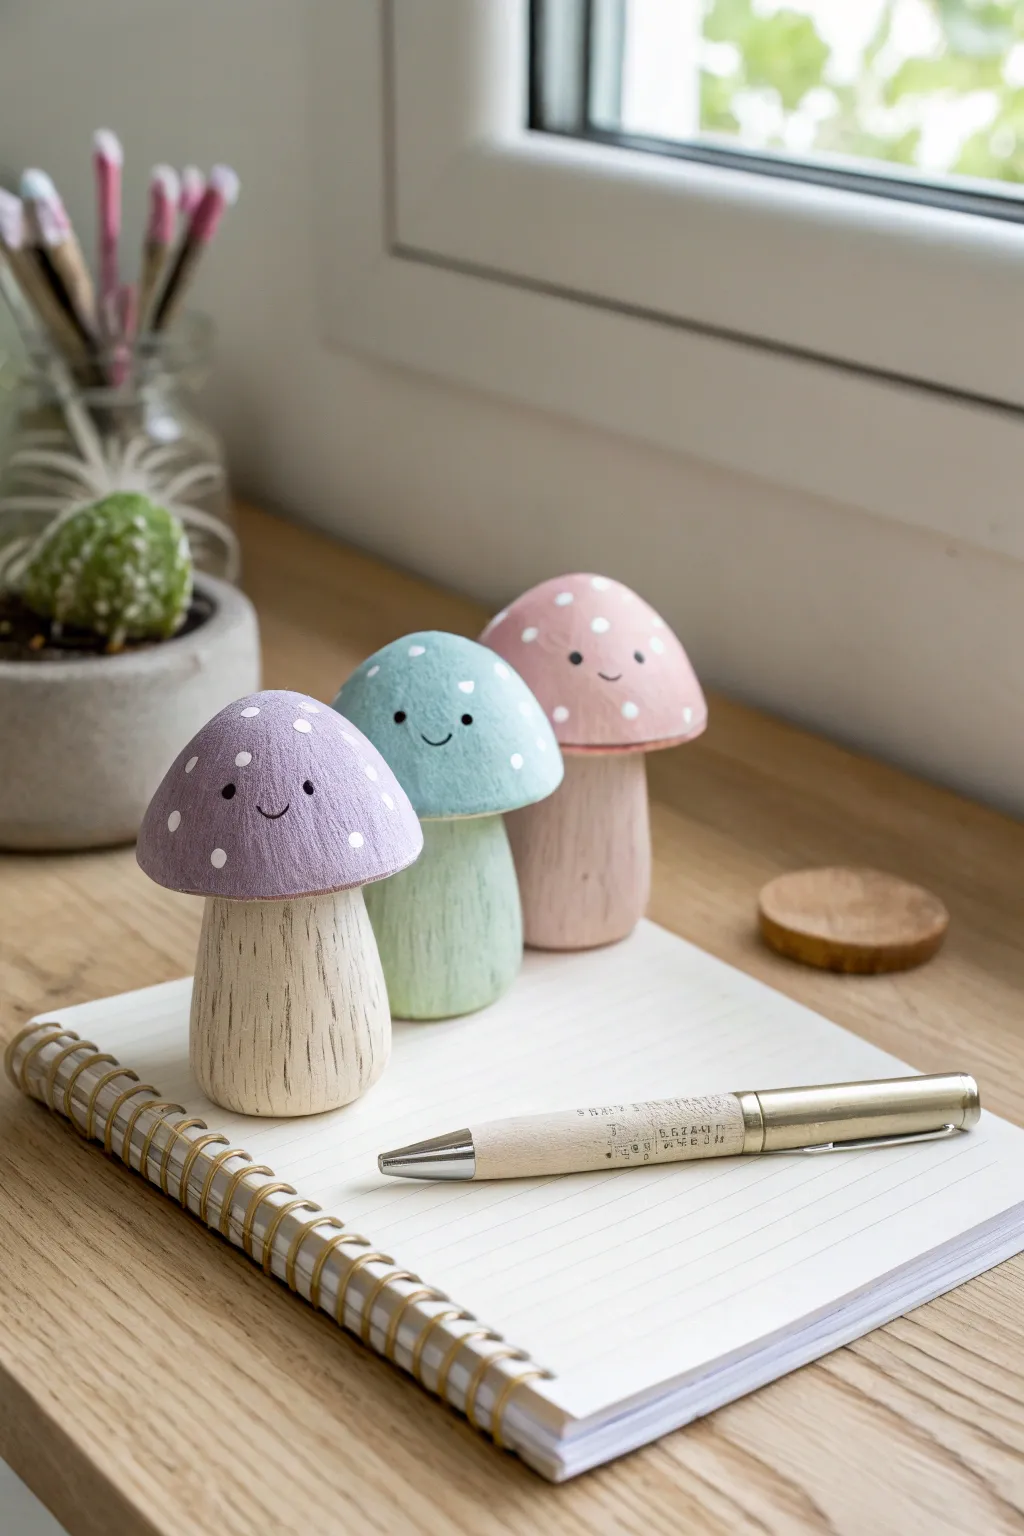
Bring a touch of forest charm to your desk with these adorable, pastel-capped mushrooms that look surprisingly like carved wood. Their sweet, smiling faces and textured stems make them the perfect quiet companions for study sessions.
How-To Guide
Materials
- Air-dry clay or polymer clay (white or light beige)
- Acrylic paints (pastel purple, mint green, blush pink, white, dark brown/black, beige)
- Fine-grit sandpaper
- Sculpting tools (needle tool or toothpick, ball tool)
- Small paintbrush (detail round and flat shader)
- Wire or toothpick (for internal structure)
- Matte varnish or sealant
- Optional: Texture tool or stiff bristle brush
Step 1: Sculpting the Base Forms
-
Prepare the core:
Start by conditioning your clay until it’s soft and pliable. Divide it into three equal portions if you want to make a trio like the photo. -
Form the stems:
Roll a cylinder of clay for the stem. Taper it slightly so it is wider at the base and narrower at the top. It shouldn’t be perfectly smooth; a little organic irregularity adds to the wood look. -
Create the caps:
Roll a separate ball of clay for the cap. Flatten the bottom and gently shape the top into a smooth dome. Use your thumb to create an indentation underneath where the stem will fit. -
Texturize the stem:
Before attaching the cap, use a needle tool or toothpick to scratch vertical grooves up and down the stem. Vary the depth and length of these lines to mimic wood grain bark texture. -
Join the pieces:
Insert a small piece of wire or half a toothpick into the top of the stem, leaving half sticking out. Push the cap onto this support. Smooth the clay slightly at the connection point underneath if needed, but keeping them distinct looks best. -
Dry or bake:
Follow the instructions for your specific clay type. If using air-dry clay, let it dry for 24-48 hours. If using polymer, bake according to the package directions.
Wood Grain Hack
Use a stiff-bristled toothbrush to stroke the wet clay stem vertically. This creates instant, realistic micro-textures that look just like wood grain once painted.
Step 2: Painting the Wood Effect
-
Base coat the stems:
Mix a very light beige or cream color. Apply this to the entire stem area, ensuring you get paint into the textured grooves. -
Highlight the grain:
Once the base is dry, use a ‘dry brush’ technique with a slightly darker beige or watered-down brown. Lightly brush over the raised parts of the texture, leaving the deeper grooves lighter, or vice versa depending on your preference. -
Paint the caps:
Select your pastel colors—lavender, mint, and soft pink. Paint the caps entirely, using two coats if necessary for opaque, smooth coverage. -
Add the dots:
Using the back of a small paintbrush or a dotting tool, dip into white paint and gently place uneven, organic dots scattered across the colored caps.
Wobbly Mushrooms?
If your mushrooms tip over, the bases aren’t flat enough. Press the wet clay stem firmly onto your work surface before drying, or sand the bottom flat after hardening.
Step 3: Face and Finishing Touches
-
Draw the eyes:
With an ultra-fine detail brush and black paint, dot two small eyes wide apart on the cap, positioned fairly low near the rim. -
Paint the smile:
Carefully paint a tiny ‘U’ shape between the eyes for the smile. I find resting my hand on a table while painting helps steady the brush for these tiny lines. -
Dry brush the texture:
To enhance the ‘carved wood’ aesthetic on the caps, lightly dry brush a tiny amount of white paint horizontally across the colored surface. This gives it a slightly weathered, chalky finish. -
Seal the work:
Once all paint is completely dry, apply a coat of matte varnish. Avoid glossy finishes, as the matte look is essential for the natural wood effect.
Set your new little friends on your desk or windowsill to keep you company while you work


Chubby Frog Magnets With Blushing Cheeks
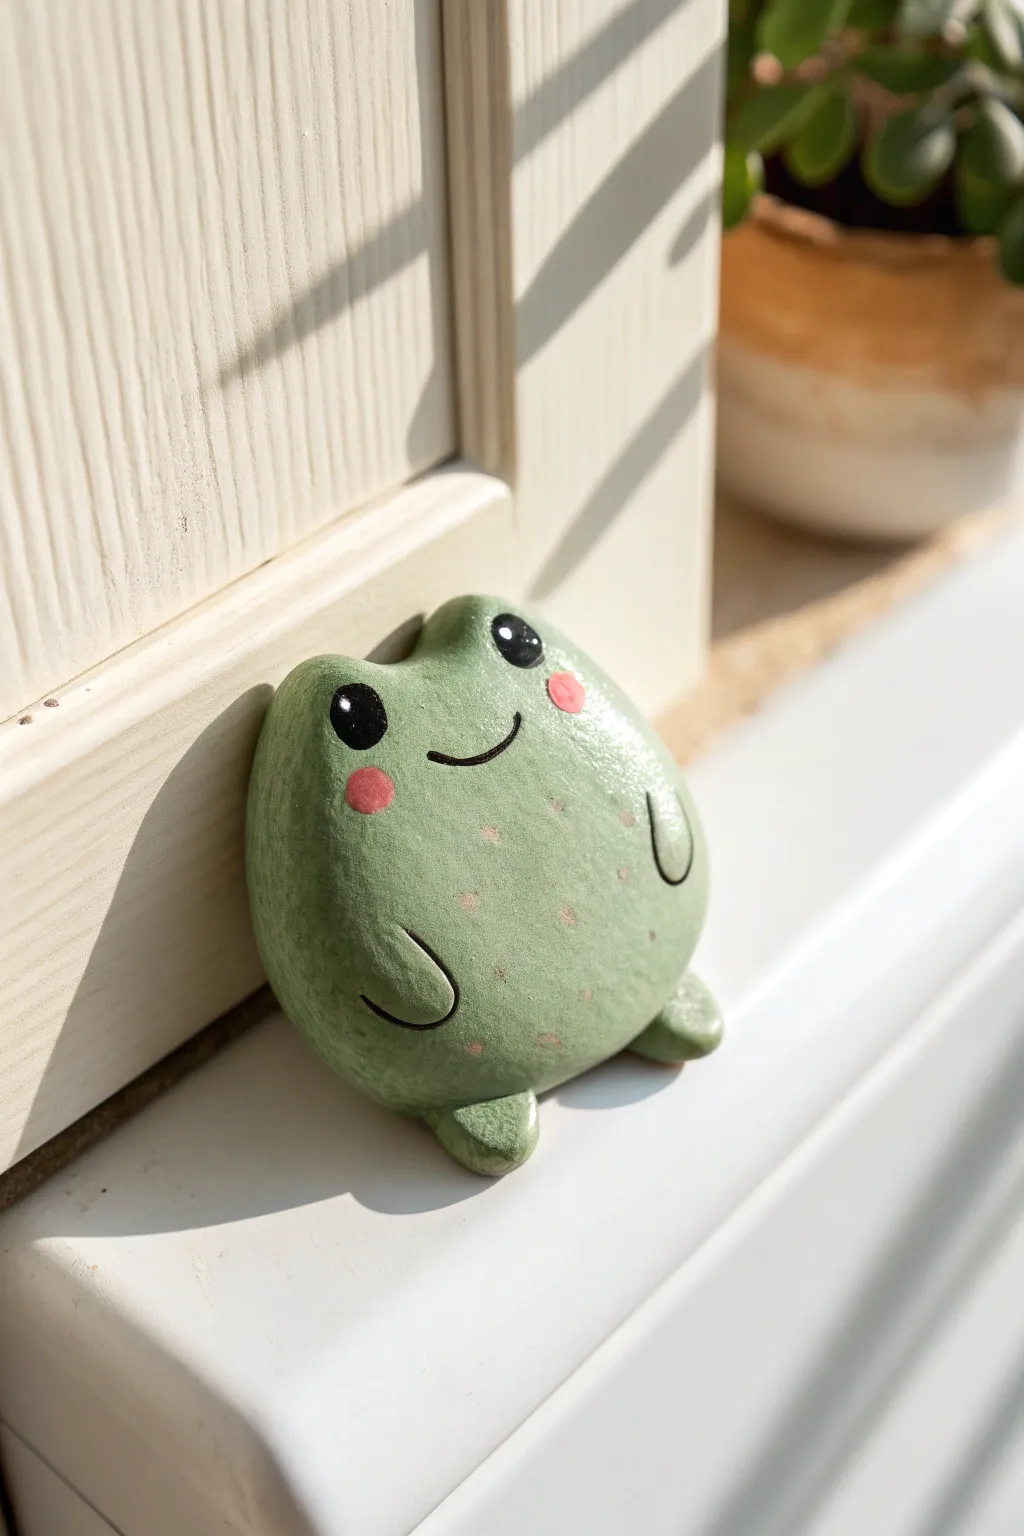
This adorable, chubby frog brings a touch of whimsy to any space with its soft green hue, gentle smile, and rosy cheeks. The smooth, rounded shape and glossy finish make this magnet not just cute to look at, but satisfying to hold.
Step-by-Step Tutorial
Materials
- Polymer clay (white or light green)
- Acrylic paints (sage green, black, soft pink)
- Paintbrushes (soft flat brush, fine detail brush)
- Dotting tool or ball stylus
- Gloss varnish or UV resin
- Small round magnet
- Super glue (liquid or gel)
- Parchment paper or baking tile
- Oven (for curing)
Step 1: Shaping the Base
-
Condition the clay:
Start by warming a chunk of polymer clay in your hands. Knead it thoroughly until it is soft, pliable, and free of any air bubbles or cracks. -
Form the body:
Roll the clay into a smooth ball about the size of a golf ball. Then, gently flatten it slightly into a rounded oval shape to create the chubby body. -
Create the eye bumps:
Pinch the top two corners of your oval gently upwards to form two distinct mounds. These will become the prominent frog eyes later. -
Smooth the surface:
Rub your finger lightly over the clay to remove any fingerprints. If the clay is sticky, a tiny dab of cornstarch on your finger can help smooth it out perfectly.
Smooth Operator
Before baking, brush a tiny amount of baby oil or clay softener over the raw clay. This melts away fingerprints and creates a flawlessly smooth surface for painting.
Step 2: Adding Limbs and Details
-
Make the legs:
Roll two small pea-sized balls of clay. Flatten them slightly into distinctive triangular shapes to serve as feet. -
Attach the feet:
Position the feet at the bottom of the body, angling them outwards so the frog looks like it is sitting comfortably. Blend the seam slightly on the underside to secure them. -
Create the arms:
Roll two very thin snakes of clay, about a half-inch long. Curve them slightly to mimic resting arms. -
Position the arms:
Press these arm pieces onto the lower front of the body, curving inwards toward the belly. Use a sculpting tool or your fingernail to seamlessly blend the edges into the main body. -
Embed the magnet:
Turn the frog over and press your magnet into the back to create an indentation. Remove the magnet before baking; we will glue it in later to avoid heat damage.
Varnish Sticky?
If your varnish feels tacky even after drying, you may have applied it too thick in high humidity. Let it sit in a dry, warm room for another 48 hours to fully cure.
Step 3: Baking and Painting
-
Bake the clay:
Place your frog on parchment paper or a ceramic tile. Bake according to your clay manufacturer’s instructions (usually around 275°F/130°C for 15-30 minutes depending on thickness). -
Cool down:
Let the piece cool completely inside the oven with the door slightly ajar to prevent cracking from thermal shock. -
Base coat:
Paint the entire frog with a sage green acrylic paint. I usually apply two to three thin coats rather than one thick one to avoid brush strokes, letting it dry fully between layers. -
Stipple texture (optional):
For a natural, stony look like the photo, dab a slightly lighter green on top using a dry sponge or stiff brush to create subtle texture. -
Paint the face:
Use a fine detail brush and black paint to draw a simple, curved smile centered on the face. -
Add the eyes:
Dip a large dotting tool or the back of a paintbrush into black paint. Press firmly onto the eye mounds to create perfectly round eyes. Add a tiny white highlight dot once dry. -
Blush and spots:
Using pink paint, paint round rosy cheeks just below the eyes. Then, add tiny, sparse pink dots across the belly for extra cuteness or ‘freckles’.
Step 4: Finishing Touches
-
Seal the piece:
Once all paint is bonedry, coat the front of the frog with a gloss varnish or UV resin. This protects the paint and gives it that polished ceramic look. -
Attach the magnet:
Apply a drop of super glue into the indentation on the back you made earlier and press the magnet firmly into place. -
Final cure:
Allow the glue and varnish to cure completely in a dust-free area for at least 24 hours before sticking it to your fridge.
Now your charming green friend is ready to hold up your notes while smiling back at you


Mini Fruit Charms With Tiny Faces
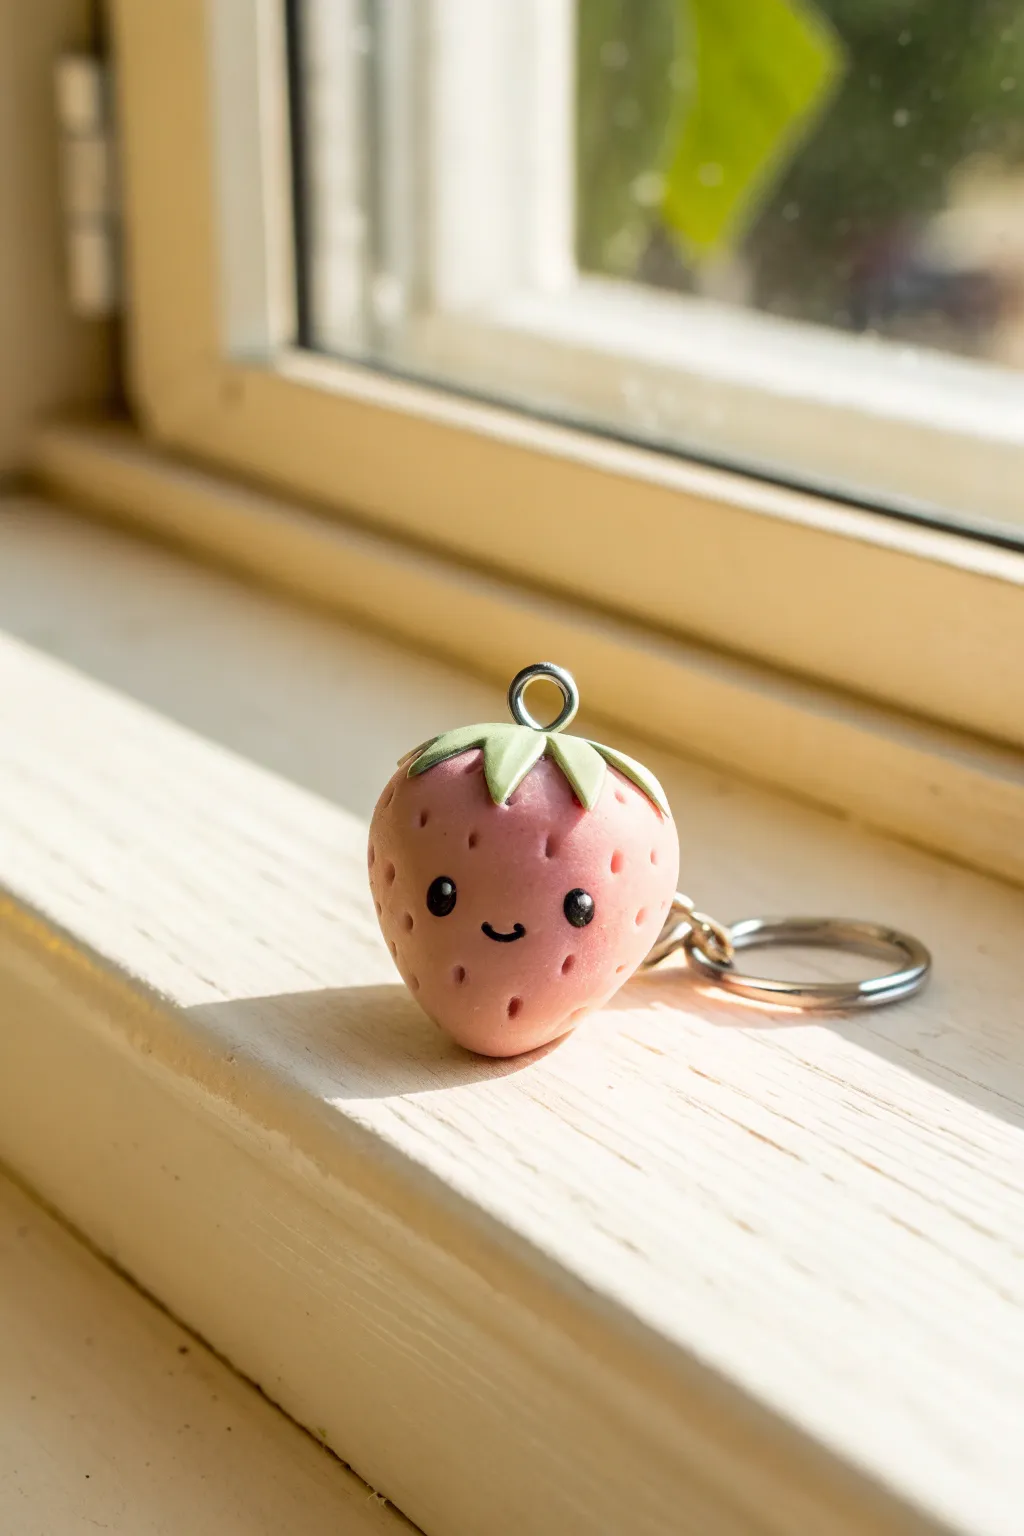
Capture the sweetness of summer with this adorable pastel pink strawberry charm, complete with a tiny, friendly face. This polymer clay project is perfect for creating custom keychains or zipper pulls that add a touch of kawai aesthetic to your everyday items.
Step-by-Step Guide
Materials
- Polymer clay (Pastel pink, Soft green, Black)
- Eye screw pin
- Jump ring and keychain hardware
- Ball stylus tool or toothpick
- Needle tool or craft knife
- Liquid polymer clay (optional)
- Gloss or matte glaze (optional)
- Oven for baking
Step 1: Shaping the Berry Base
-
Condition the pink clay:
Start by taking a small amount of pastel pink polymer clay, roughly the size of a large marble. Knead it in your hands until it becomes soft, pliable, and free of any cracks. -
Roll into a ball:
Roll the conditioned clay between your palms to form a smooth, perfect sphere. Check for any air bubbles or lint and smooth them out gently. -
Taper the shape:
Begin gently rolling just one side of the sphere against your palm or work surface to create a slight taper. You want a rounded, soft conical shape that mimics a plump strawberry, slightly wider at the top and narrower at the bottom. -
Flatten the top:
Press the wider end of your strawberry gently onto your work surface to create a flat area. This will be where the leaves eventually sit.
Fingerprint Troubles?
If you see fingerprints on your clay before baking, lightly brush the surface with a little baby oil or cornstarch to smooth them away instantly.
Step 2: Adding Texture and Details
-
Create seed indentations:
Using a needle tool, a toothpick, or a very small ball stylus, gently press tiny indentations all over the surface of the berry. Keep the pressure light; you want subtle dimples rather than deep holes. -
Space the seeds:
Distribute these indentations randomly but somewhat evenly, leaving a clear, smooth space in the center of the front face where the eyes and mouth will go. -
Insert the hardware:
Take your metal eye screw pin. To ensure a strong hold, I like to dip the threaded end into a tiny bit of liquid polymer clay before screwing it into the center of the flat top of the strawberry.
Make it Blush
Before baking, use a soft brush to apply a tiny bit of pink chalk pastel dust to the ‘cheeks’ under the eyes for an extra rosy, adorable expression.
Step 3: Creating the Leafy Cap
-
Prepare green clay:
Condition a small pea-sized amount of soft green clay. Flatten it into a thin, round disk using your finger or a roller. -
Cut the star shape:
Use a craft knife or needle tool to cut a 5 or 6-pointed star shape out of the green disk. The points don’t need to be mathematically perfect; a little irregularity looks more organic. -
Attach the leaves:
Carefully lift the green star and thread it over the eye screw on top of the berry. Provide a gentle press to adhere the center of the star to the pink fruit. -
Shape the leaves:
Gently drape the points of the star down the sides of the strawberry. You can curl the very tips upward slightly with a needle tool for a cute, dynamic look.
Step 4: The Tiny Face
-
Make eye sockets:
In the smooth area you reserved earlier, use a medium-sized ball stylus to press two distinct, round indentations for the eyes. Space them somewhat wide apart for maximum cuteness. -
Insert the eyes:
Roll two minuscule balls of black clay. Place them carefully into the eye sockets and press gently to flatten them so they sit flush with the berry surface. -
Roll a mouth noodle:
Roll an incredibly thin, thread-like snake of black clay. Cut a tiny segment, only a few millimeters long. -
Form the smile:
Curve the tiny black segment into a ‘U’ shape on your fingertip or tool, then transfer it to the space exactly between and slightly below the eyes. Press gently to secure. -
Add white highlights:
For that sparking look, take the tiniest speck of white clay (or white paint after baking) and add a reflection dot to the upper corner of each black eye.
Step 5: Finishing Up
-
Bake the charm:
Place your strawberry upright on a baking sheet or tile. Bake according to the temperature and time instructions on your specific package of polymer clay (usually around 275°F for 15-30 minutes). -
Cool down:
Allow the piece to cool completely in the oven or on a wire rack before handling, as the clay is fragile while hot. -
Glaze (Optional):
If you want a shiny, candy-like finish, coat the strawberry with a water-based polyurethane varnish or UV resin. -
Attach keychain:
Use pliers to open a jump ring, thread it through the eye screw on your strawberry, and attach it to your keychain ring before closing the jump ring securely.
Enjoy carrying your sweet little fruit friend on all your daily adventures

The Complete Guide to Pottery Troubleshooting
Uncover the most common ceramic mistakes—from cracking clay to failed glazes—and learn how to fix them fast.
Cottagecore Snail Trinket Holder
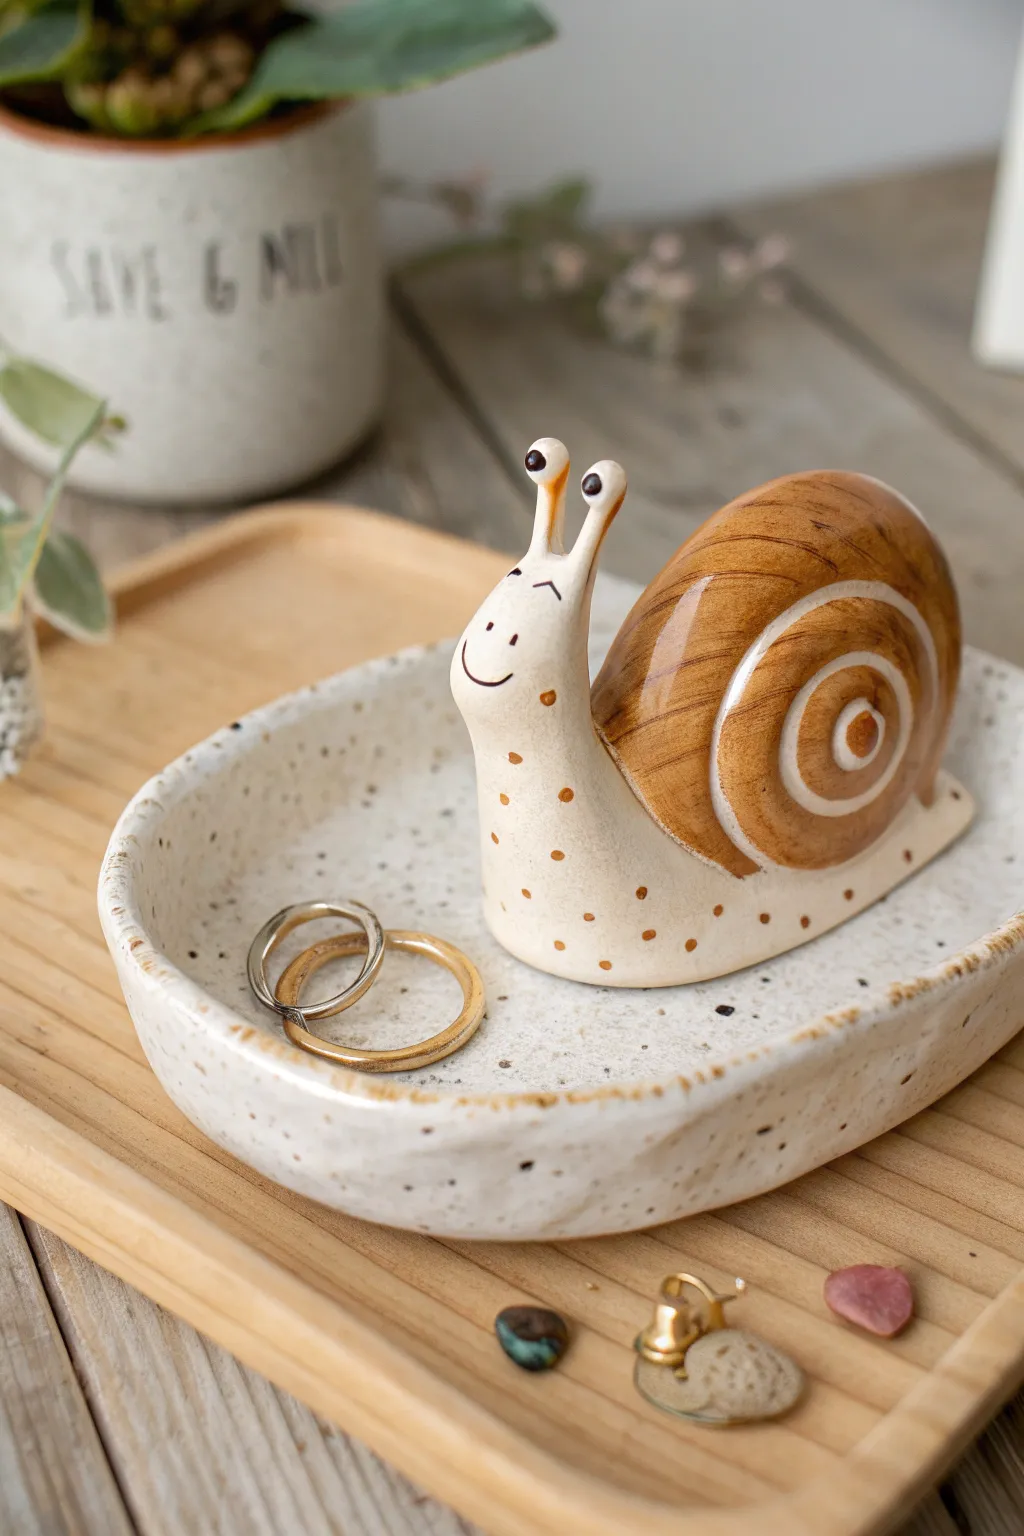
Capture the slow living cottagecore aesthetic with this charming ceramic trinket holder, featuring a cheerful snail companion perched on a speckled tray. The combination of warm, wood-like glazes on the shell and the organic, spotted texture of the dish creates a cozy home for your favorite rings and small treasures.
Step-by-Step Tutorial
Materials
- White stoneware or polymer clay (oven-bake)
- Potter’s needle tool or toothpick
- Rolling pin
- Small sponge
- Slip (liquid clay) and scoring tool (if using stoneware)
- Loop tool for carving
- Underglazes or acrylic paints: warm ochre/brown, white, black
- Clear glossy glaze or varnish
- Paintbrushes suited for fine details
- Old toothbrush (for speckling)
Step 1: Sculpting the Base Dish
-
Roll the slab:
Begin by rolling out a medium-sized ball of white clay until it is about 1/4 inch thick. Aim for an organic oval shape rather than a perfect circle to keep that rustic, handmade feel. -
Form the rim:
Gently pinch the edges of your clay oval upwards to create a raised rim. Smooth the edge with a damp sponge or your finger to ensure it is rounded and soft, not sharp. -
Create texture:
Lightly press your thumbs into the bottom of the dish to create subtle undulations, giving it a slightly uneven, hand-thrown appearance.
Clean Lines Pro-Tip
When painting the spiral groove, if you get paint on the ridges, wait for it to dry and then gently scrape it off with a craft knife for a crisp edge.
Step 2: Creating the Snail Companion
-
Shape the body:
Roll a fat coil of clay that tapers upwards into a neck and head. Flatten the bottom so it sits flush against the dish surface. -
Attach to the dish:
Score the bottom of the snail body and the spot on the dish where it will sit. Apply a little slip (or liquid clay/water) and press the snail firmly onto the dish rim, blending the clay at the seam for a seamless join. -
Form the shell:
Roll a larger ball of clay for the shell. Gently flatten it into a thick disc shape, keeping the edges rounded and voluminous. -
Mount the shell:
Attach this disc to the back of the snail’s body using the score-and-slip method. I prefer to tilt it slightly backward for a relaxed look. -
Carve the spiral:
Using a loop tool or a carving needle, carefully carve a deep spiral groove into the side of the shell, starting from the center and winding outward. Widen the groove slightly to mimic the segments of a real shell. -
Add the eye stalks:
Roll two tiny, thin coils for the eye stalks. Attach them to the top of the head, blending the clay downwards so they don’t break off easily. -
Refine the face:
Smooth the face area. Make sure the eye stalks are distinct, with small rounded bulbs at the tips for the eyes.
Drooping Eye Stalks?
If the eye stalks are drooping while the clay is soft, insert a small piece of wire or a trimmed toothpick inside each stalk for internal structural support.
Step 3: Detailing and Firing (or Baking)
-
Clean up:
Use a slightly damp sponge to wipe away any rough crumbs of clay, especially around the carved spiral and the base of the dish. -
First fire/bake:
If using ceramic clay, bisque fire the piece now. If using polymer clay, bake according to the package instructions and let it cool completely.
Step 4: Painting and Glazing
-
Base coat the shell:
Paint the shell with a warm, wood-toned ochre or brown glaze. Let the brushstrokes follow the curve of the shell to enhance the spiral shape. -
Highlight the spiral:
Carefully paint the carved groove of the spiral with a lighter cream or white color to make the design pop. -
Paint the face:
Using a very fine detail brush and black paint, add two small dots on the eye stalks and a tiny, simple curved smile on the face. Keep the expression minimal for maximum cuteness. -
Add body spots:
Dip the tip of a toothpick or small brush into your brown paint and dot small freckles along the snail’s neck and base. -
Speckle the dish:
Dilute some dark brown or black paint slightly. Dip an old toothbrush into it, point it at the dish, and run your thumb over the bristles to flick tiny speckles across the white tray surface. -
Final seal:
Apply a clear, glossy glaze or varnish over the entire piece, paying special attention to the shell to give it a wet, shiny look. -
Final cure:
If using ceramics, fire the glaze. If using polymer clay with varnish, let it dry completely in a dust-free area.
Now you have a delightful little friend to guard your jewelry on your bedside table
Sweet Little Cat Ring Cone
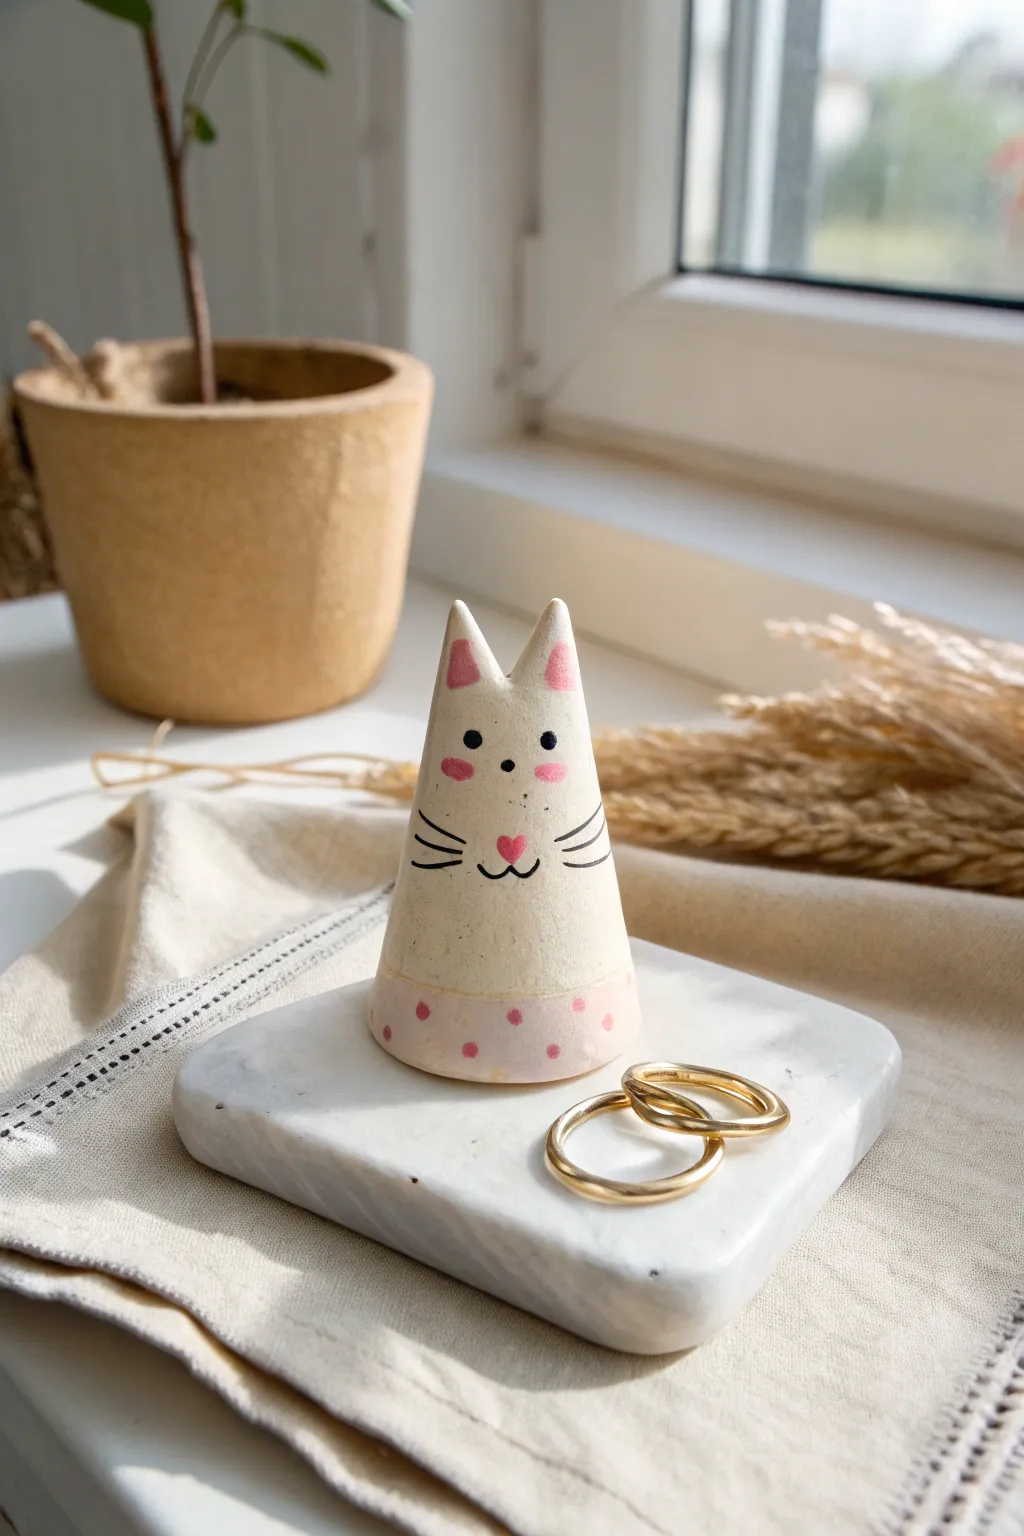
Keep your favorite rings organized with this adorable feline ring cone, featuring a gentle conical shape and sweet painted details. The minimalist design with soft pink accents creates a charming yet modern aesthetic perfect for any bedside table.
Step-by-Step Tutorial
Materials
- White air-dry clay or polymer clay
- Rolling pin
- Sharp blade or clay knife
- Small bowl of water (for smoothing)
- Fine-grit sandpaper
- Acrylic paints (black, soft pink, white)
- Small detail paintbrushes
- Matte sealant or varnish
- Cardstock or thick paper (for the template)
Step 1: Shaping the Clay Base
-
Prepare the cone template:
Cut a semi-circle out of cardstock to use as a template. The size of the semi-circle will determine the height and width of your cone, so aim for a radius of about 3-4 inches. -
Roll out the clay:
Condition your white clay until it is soft and pliable, then roll it out into a smooth slab approximately 1/4 inch thick. -
Cut the shape:
Place your cardstock template onto the clay slab and carefully trace around it with your clay knife to cut out the semi-circle shape. -
Form the cone:
Gently curl the straight edges of the semi-circle towards each other until they meet. The clay should naturally form a cone shape. -
Seal the seam:
Using your fingers and a little water, blend the seam where the edges meet. I find smoothing from both the inside and outside ensures the strongest bond and hides the join completely. -
Level the bottom:
Stand the cone upright on a flat surface. If it wobbles, gently tap it against the table or use your blade to trim the bottom edge until it stands perfectly straight.
Wobbly Cone?
If the cone leans, insert a taller object (like a marker) inside while shaping to act as a temporary scaffold, keeping it straight until the clay firms up.
Step 2: Sculpting the Ears
-
Pinch the top:
At the very peak of the cone, gently flatten the clay slightly to create a small platform rather than a sharp point. -
Create indentations:
Use your thumb to press slightly into the center of the top edge to delineate where the two ears will separate. -
Shape the ears:
Pinch and pull the clay upwards on the left and right sides of your indentation to form two triangular ear shapes. Keep them relatively short and rounded at the tips for a cute look. -
Smooth the transition:
Dip your finger in water again and smooth the area where the ears join the main body of the cone so the silhouette flows seamlessly. -
Final smooth and dry:
Do a final check for fingerprints or bumps, smoothing them away with damp fingers. Let the cone dry completely according to your clay package instructions (usually 24-48 hours for air-dry clay).
Step 3: Sanding and Painting
-
Sand for perfection:
Once fully dry, lightly gently buff the surface with fine-grit sandpaper. Focus on the seam area and the rim of the ears to make the surface silky smooth. -
Paint the base pink:
Mix a soft pink acrylic paint. Carefully paint a band around the bottom 1/2 inch of the cone. You can use masking tape if you want a crisp line, but a slightly freehand line adds charm. -
Add polka dots:
Using a slightly darker shade of pink, add small polka dots within the pink band along the bottom. -
Color the ears and cheeks:
Using the lighter pink paint, fill in the inner triangles of the ears. Dab two small oval shapes onto the ‘face’ area for rosy cheeks. -
Paint the facial features:
Switch to a very fine detail brush and black paint. Dot two small eyes just above the cheek line. -
Add the nose and mouth:
Paint a tiny pink heart for the nose between the cheeks. Using the black paint again, draw a small ‘w’ shape beneath the heart for the mouth. -
Draw the whiskers:
Add three thin, curved lines on each side of the face for whiskers. Light, quick strokes work best here to keep the lines tapered. -
Seal the piece:
Once the paint is completely dry, apply a coat of matte varnish to protect your ring holder from scratches and wear.
Make It a Set
Scale the template down by 50% to create a tiny ‘kitten’ version for holding simpler bands or stud earrings next to the larger momma cat.
Now you have a charming handcrafted companion to keep your jewelry safe and tidy


What Really Happens Inside the Kiln
Learn how time and temperature work together inside the kiln to transform clay into durable ceramic.
Smiling Toothbrush Holder Creature
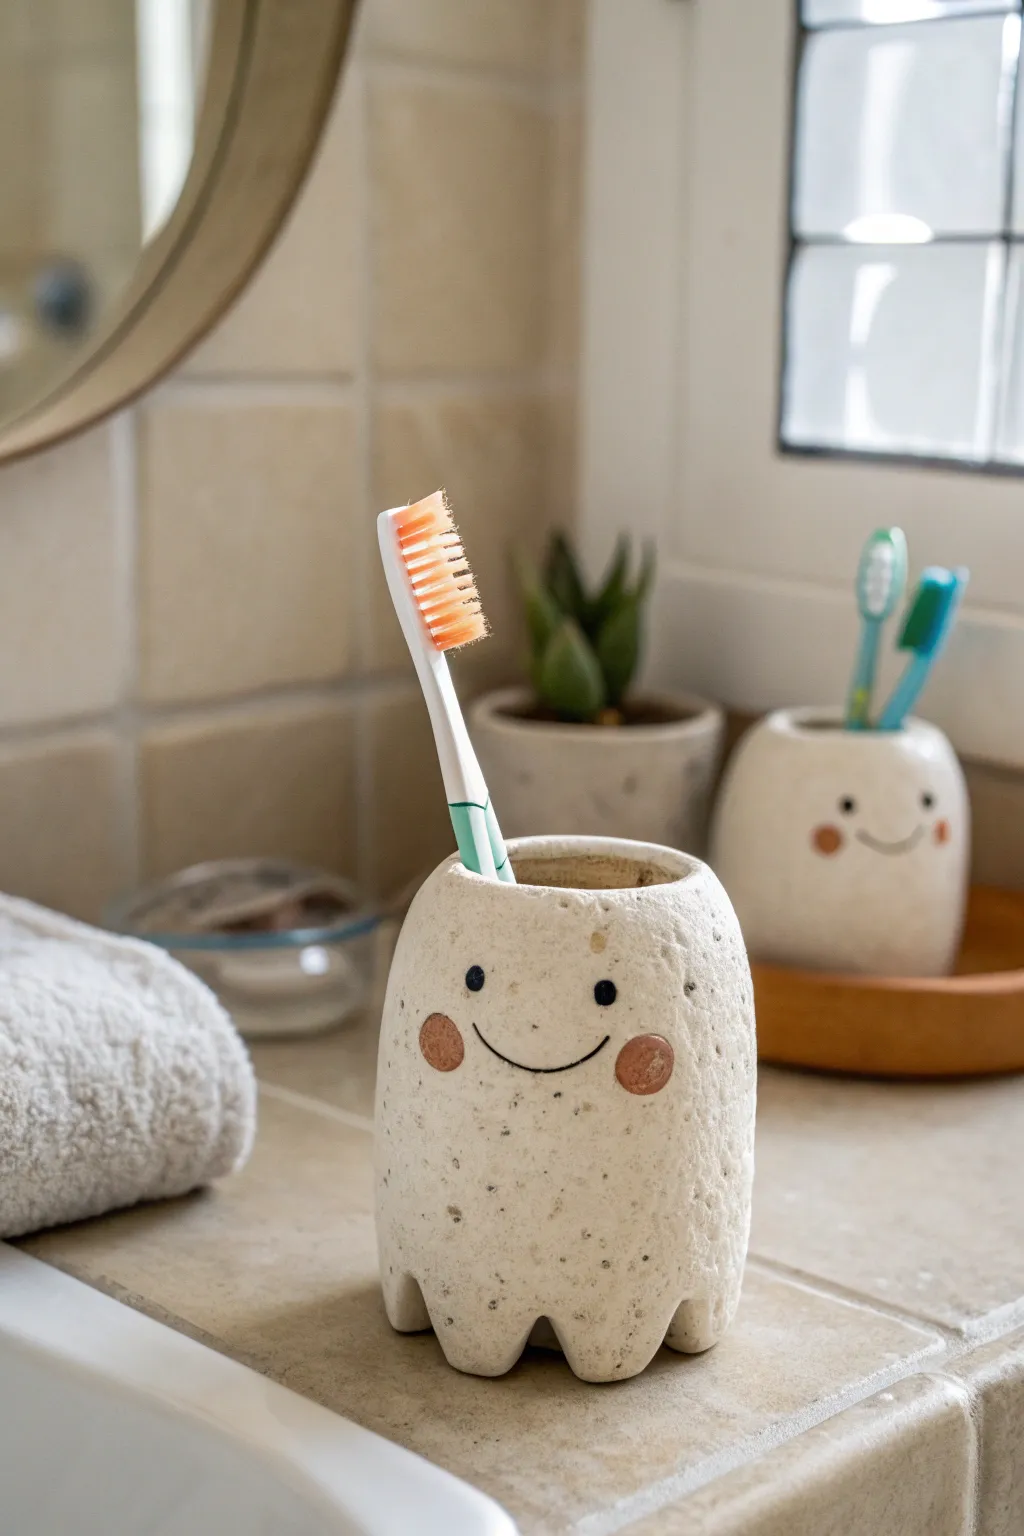
Bring a little joy to your morning routine with this adorable, ghost-shaped toothbrush holder. With its charming speckled finish and sweet rosy cheeks, this ceramic-style piece adds a touch of whimsy to any bathroom counter.
How-To Guide
Materials
- Air-dry clay (white or light beige)
- Speckled clay additive (or coarse black pepper/sand)
- Rolling pin
- Small round cookie cutter or glass (approx 2.5 inch diameter)
- Clay knife or fettling tool
- Recycled toilet paper roll or cardboard tube
- Water and slip (clay water mixture)
- Sponge
- Fine-grit sandpaper
- Acrylic paints (terracotta pink, black)
- Fine detail paintbrush
- Water-based matte varnish or sealant
Step 1: Preparing the Clay Body
-
Mix the texture:
Start by kneading your air-dry clay. To achieve that trendy speckled ceramic look, knead in a small amount of faux speckle additive. If you don’t have specialized additive, a pinch of coarse black pepper or clean sand works surprisingly well to mimic stoneware. -
Roll the slab:
Roll out the clay to a consistent thickness of about 1/4 inch. You want it sturdy enough to stand but not too heavy. -
Cut the rectangle:
Measure the height of your toilet paper roll. Cut a rectangle of clay that is slightly taller than the roll (about 4.5 inches) and long enough to wrap fully around it with a little overlap. -
Prepare the base:
Using your round cutter or a glass as a template, cut a circle from the remaining clay slab. This will be the bottom of your holder.
Step 2: Assembling the Form
-
Create the cylinder:
Wrap your clay rectangle around the cardboard tube. The tube acts as a support form to keep it perfectly round while you work. Score (scratch) the overlapping edges, add a little water or slip, and press them firmly together to create a seam. -
Smooth the seam:
Use your finger or a wet sponge to blend the seam until it disappears completely. The surface should look continuous. -
Attach the base:
Score the bottom edge of your clay cylinder and the outer edge of your clay circle. Press the circle onto the bottom of the cylinder. Smooth the clay from the walls down onto the base to seal it tight. -
Shape the top edge:
Gently round over the top rim of the cylinder with wet fingertips so it doesn’t feel sharp or unfinished.
Uneven Seams?
If your vertical seam keeps splitting during drying, you likely didn’t score it deeply enough. Patch it with a mix of clay and vinegar (creating a thick paste) and smooth it over.
Step 3: Sculpting the Details
-
Curve the top:
To get that soft, dome-like shape visible in the photo, gently curve the upper walls of the clay slightly inward toward the opening. Don’t close it; just taper the silhouette. -
Cut the feet:
At the bottom of the holder, use your clay knife to cut out three small arches—one in the front and two on the sides. This creates the illusion of four little ‘feet’ or prongs. -
Smooth the cutouts:
Dip your finger in water and run it along the cut edges of the feet to soften them. Sharp angles tend to be fragile, so rounded edges are better. -
Remove the support:
Once the clay has stiffened slightly (usually after an hour), carefully slide the cardboard tube out. If you leave it in too long while the clay shrinks, the holder might crack. -
Dry completely:
Let the piece dry for 24-48 hours. I like to rotate it occasionally so air reaches all sides evenly.
Go Glossy
While the reference image is matte, using a high-gloss varnish on just the eyes and cheeks can make the face pop and look like glazed ceramic.
Step 4: Finishing Touches
-
Sand the surface:
Once bone dry, use fine-grit sandpaper to smooth out any bumps or fingerprints. Be gentle with the feet area. -
Paint the cheeks:
Dip a round sponge dabber or your finger into terracotta pink acrylic paint. Dab two distinct, round circles onto the ‘face’ area for rosy cheeks. -
Add the face:
Using a fine detail brush and black paint, add two small dots for eyes just above the cheek line. Paint a thin, upward-curving line connecting the cheeks for that sweet smile. -
Seal the piece:
Since this will live in a humid bathroom, applying a sealant is crucial. Apply 2-3 coats of a waterproof matte varnish, letting each coat dry fully in between. This protects the clay from water splashes.
Place your finished holder on the sink and fill it with your favorite brush for an instant mood boost every morning
Cute Mini Bud Vases With Tiny Faces
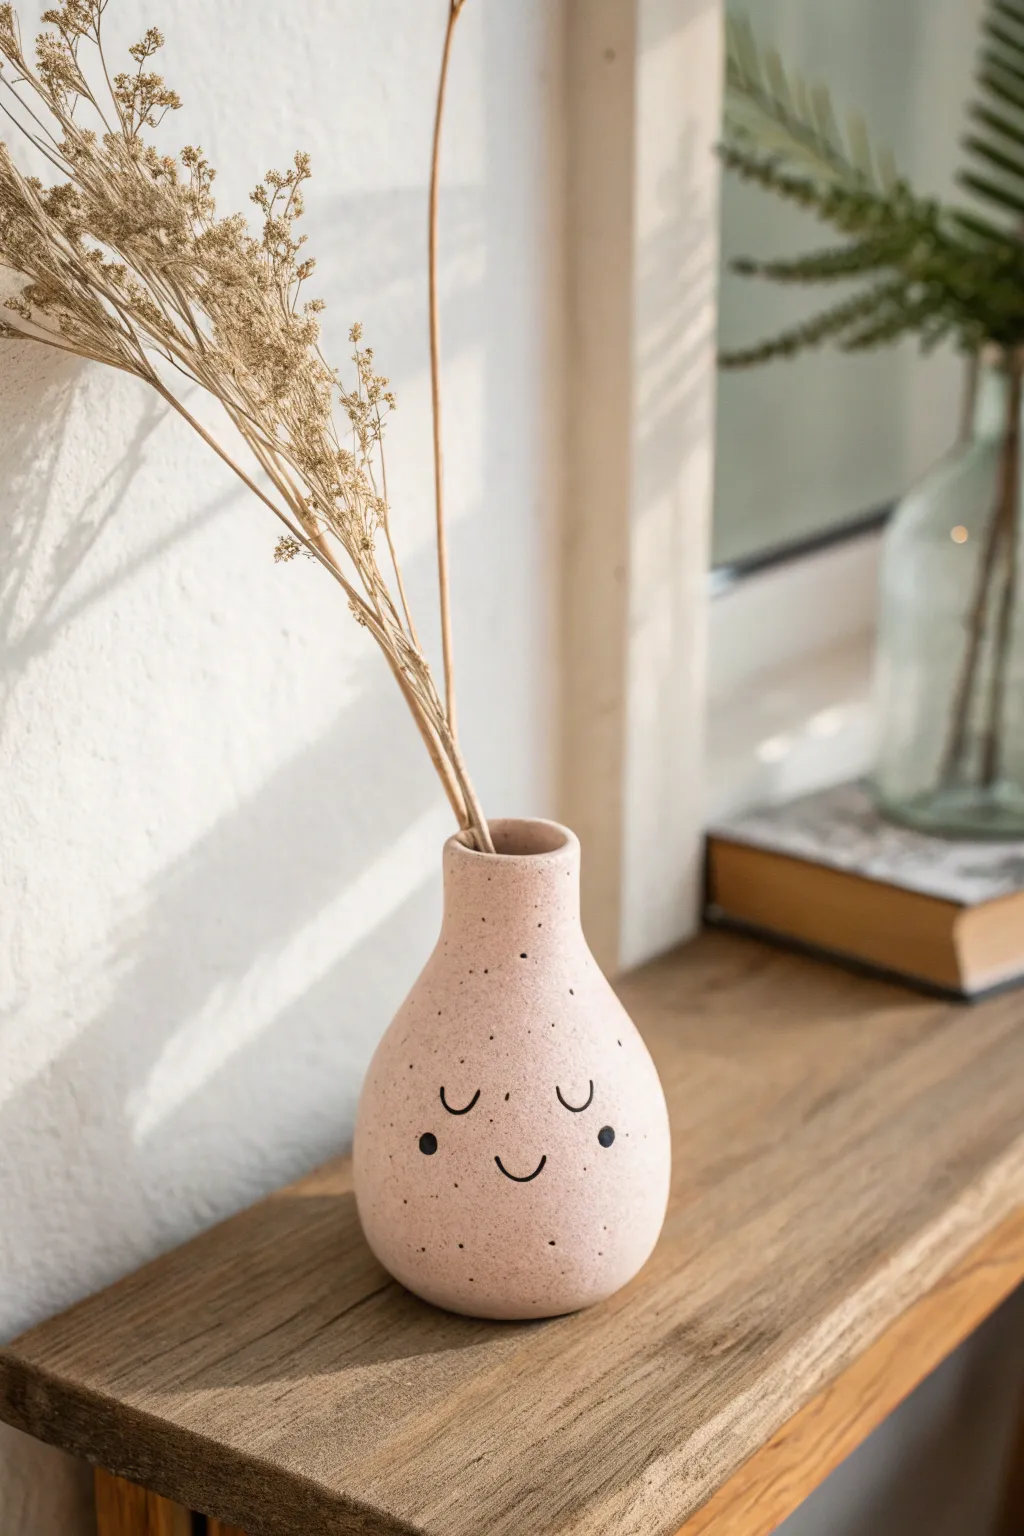
Add a touch of whimsy to your shelf with this adorable mini bud vase, featuring a sweet, sleepy happy face. The gentle speckled texture gives it a modern ceramic look that pairs perfectly with dried florals.
Detailed Instructions
Materials
- Air-dry clay (white or terracotta)
- Acrylic paints (pastel pink/peach, black, dark grey)
- Small paintbrush or toothpick
- Rolling pin
- Clay sculpting tools (or a butter knife)
- Small sponge (optional)
- Water in a small cup
- Fine-grit sandpaper
- Gloss or matte varnish/sealant
- Old toothbrush (for speckling)
Step 1: Shaping the Base
-
Condition the clay:
Start by kneading a ball of air-dry clay roughly the size of a tennis ball until it is soft, pliable, and free of any large air bubbles. -
Form the main body:
Roll the clay into a smooth sphere, then gently embrace it with your palms to elongate it slightly into a pear shape, keeping the bottom wider than the top. -
Create the opening:
Using your thumb or the back of a sculpting tool, press directly into the center of the top to create the vase opening. Don’t go all the way through; stop about a half-inch from the bottom. -
Refine the neck:
Gently pinch and pull the clay upwards around the opening to form a narrow neck. Smooth the transition from the round body to the neck using a little water on your finger. -
Smooth the surface:
Dip your finger in water and run it over the entire surface of the vase to erase fingerprints and cracks. Aim for a seamless, smooth finish. -
Dry partially:
Let the vase sit for a few hours until it is leather-hard. This makes it sturdy enough to handle without squishing the shape while you refine it.
Keep it Steady
To prevent the vase form from collapsing while drying, you can gently wad up a small piece of cling film or foil and place it inside the neck opening to hold the shape.
Step 2: Adding Character & Finish
-
Sand for perfection:
Once completely dry (usually 24-48 hours depending on humidity), take a piece of fine-grit sandpaper and gently buff out any remaining bumps or ridges for a professional ceramic look. -
Paint the base color:
Mix a soft, warm pink or peach acrylic paint. Apply two to three thin coats to the entire vase, letting each coat dry fully before adding the next. -
Create the speckled effect:
Dilute a small amount of dark grey or black paint with water. Dip an old toothbrush into the mixture, aim it at the vase, and run your thumb across the bristles to flick tiny specks onto the surface. -
Sketch the face:
Lightly mark the placement of the eyes and mouth with a pencil. Aim for the center of the rounded ‘belly’ of the vase to make it look cute. -
Paint the features:
Using a very fine detail brush or a toothpick dipped in black paint, carefully trace over your pencil marks. Draw two ‘U’ shapes for sleeping eyes and a simple curve for a smile. -
Add rosy cheeks:
Dip the back end of a paintbrush into the black paint to dot on two prominent, solid circles for cheeks on either side of the smile. -
Add freckles:
Using the tip of a toothpick, add three tiny dots under each eye area to create delicate freckles. -
Seal the project:
Protect your artwork with a coat of matte or gloss varnish. I prefer matte for this project as it mimics the look of unglazed stoneware. -
Style with flowers:
Once the sealant is cured, arrange a few stems of dried wheat or baby’s breath inside for the final aesthetic touch.
Make it Waterproof
Air-dry clay isn’t water-tight! If you want to use fresh flowers instead of dried ones, hide a small glass vial or test tube inside the clay body while shaping it.
Now you have a charming little friend to brighten up your desk or windowsill

TRACK YOUR CERAMIC JOURNEY
Capture glaze tests, firing details, and creative progress—all in one simple printable. Make your projects easier to repeat and improve.
Blob Character Photo and Note Holders
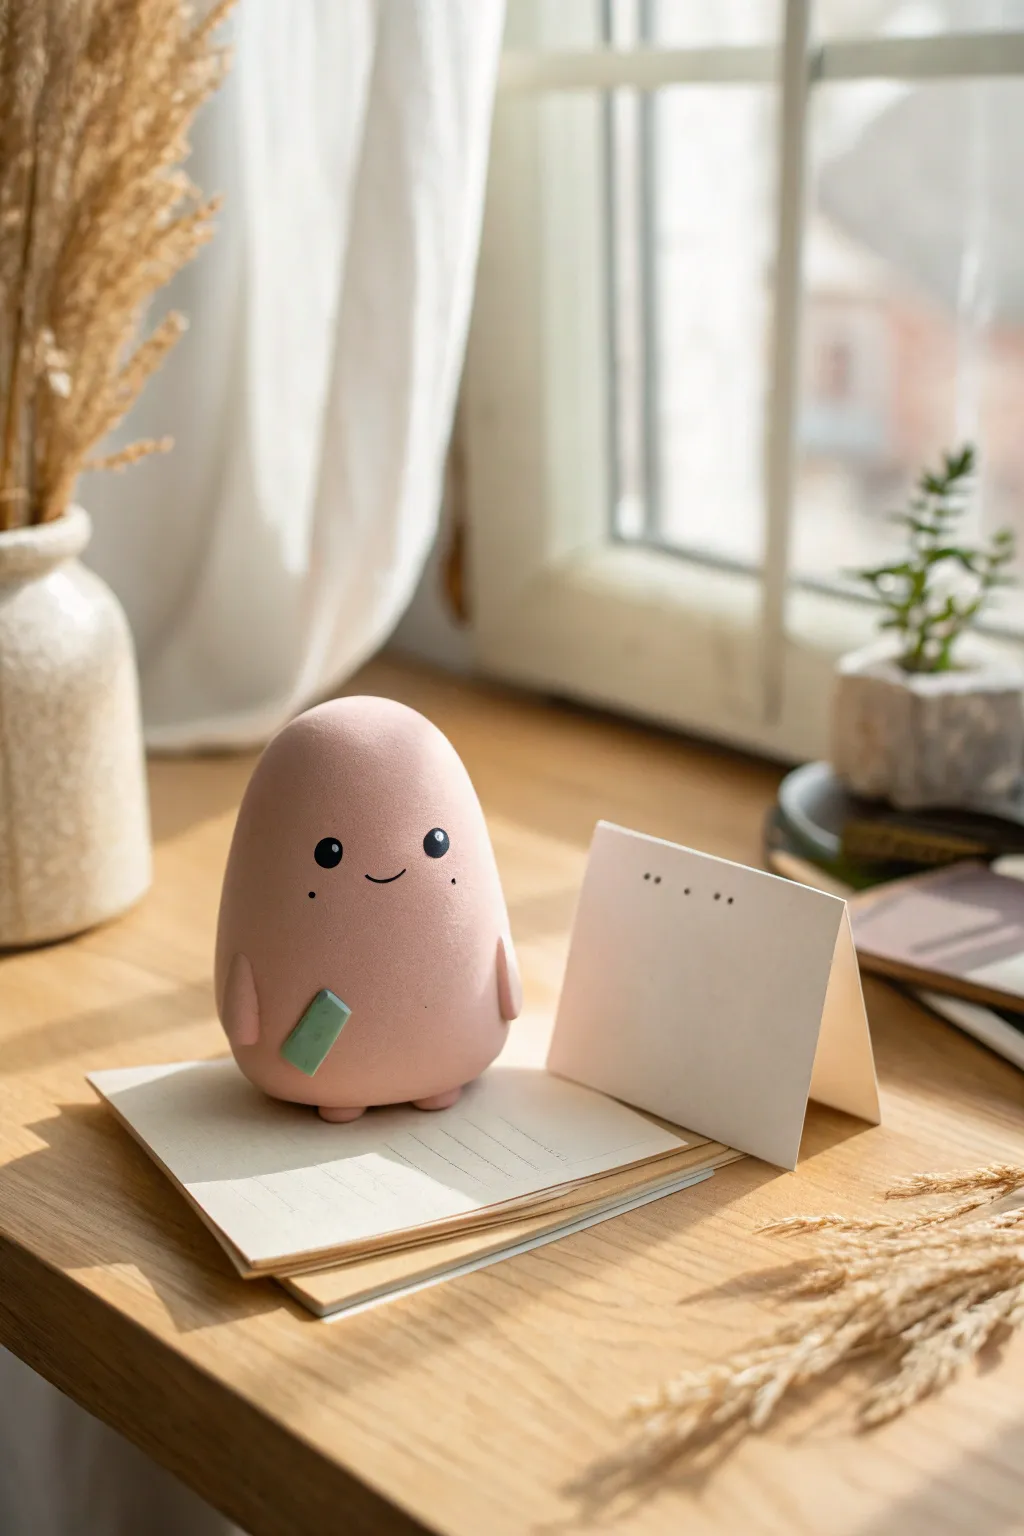
This adorable, egg-shaped character brings a touch of whimsy to your workspace while keeping your notes company. With its smooth matte finish for that soft aesthetic and a tiny accessory in hand, it’s the perfect blend of cute decor and practical paperweight.
Step-by-Step Guide
Materials
- Polymer clay (Soft Pink or Peach)
- Polymer clay (Muted Green or Sage)
- Black acrylic paint
- Fine detail paintbrush (size 00 or 000)
- Clay sculpting tools (specifically a smoothing tool)
- Aluminum foil (for armature)
- Baking sheet and parchment paper
- Matte varnish or sealant (spray preferred)
- Wet wipes or baby oil (for smoothing)
Step 1: Shaping the Base
-
Create the core:
Crumple a small piece of aluminum foil into a tight egg shape. This saves clay and makes the figure lighter. -
Preparing the clay:
Condition your soft pink polymer clay by rolling it in your hands until it’s warm and pliable. -
Covering the core:
Flatten the pink clay into a sheet about 1/4 inch thick and wrap it completely around your foil egg. -
Smoothing the form:
Roll the shape gently against your work surface or between your palms to remove seams and create a perfectly smooth, tapered egg silhouette. -
Creating the base:
Tap the bottom of the egg gently on the table to flatten it slightly so the figure stands securely on its own.
Clean Clay Tip
Keep light-colored clay distinct by wiping your hands and tools with baby wipes between colors. Dust shows easily on pink, so work on a clean non-porous mat.
Step 2: Adding Details
-
Forming the feet:
Roll two tiny balls of pink clay, flatten them slightly into ovals, and attach them to the bottom front of the body for feet. -
Sculpting the arms:
Create two small teardrop shapes from the pink clay. Attach them to the sides of the body, pointing downwards. -
Making the accessory:
Roll out a tiny piece of sage green clay and cut it into a small rectangle to resemble a smartphone or notebook. -
Positioning the accessory:
Press the green rectangle against the body near one of the arms. Gently nudge the arm so it overlaps the green piece, looking like it’s holding it. -
Final smoothing check:
Before baking, use a drop of baby oil on your finger to gently buff out any fingerprints or lint.
Step 3: Finishing Touches
-
Baking:
Bake the figure according to your clay package instructions (usually 275°F/135°C for 15-30 minutes). Let it cool completely. -
Painting the eyes:
Dip the handle end of a paintbrush into black acrylic paint to stamp two perfectly round circles for eyes. -
Adding highlights:
Once the black paint is dry, use a pin or toothpick to add a tiny white dot in the upper corner of each eye for a sparkling look. -
Drawing the smile:
Using your finest detail brush, paint a very thin, small ‘u’ shape between the eyes for a smile. -
Adding freckles:
Add two tiny black dots under each eye for freckles to enhance the whimsical expression. -
Sealing:
Spray the entire figure with a matte varnish to protect the paint and give the clay that soft, professionally finished texture.
Make It Functional
Before baking, carefully slice a thin slit across the top of the head with a craft knife. After baking, this slot can hold photos or small memo cards.
Place your new clay friend on top of a stack of envelopes or postcards to create a sweet vignette on your desk
Tiny Book Page Holder With a Sleepy Face
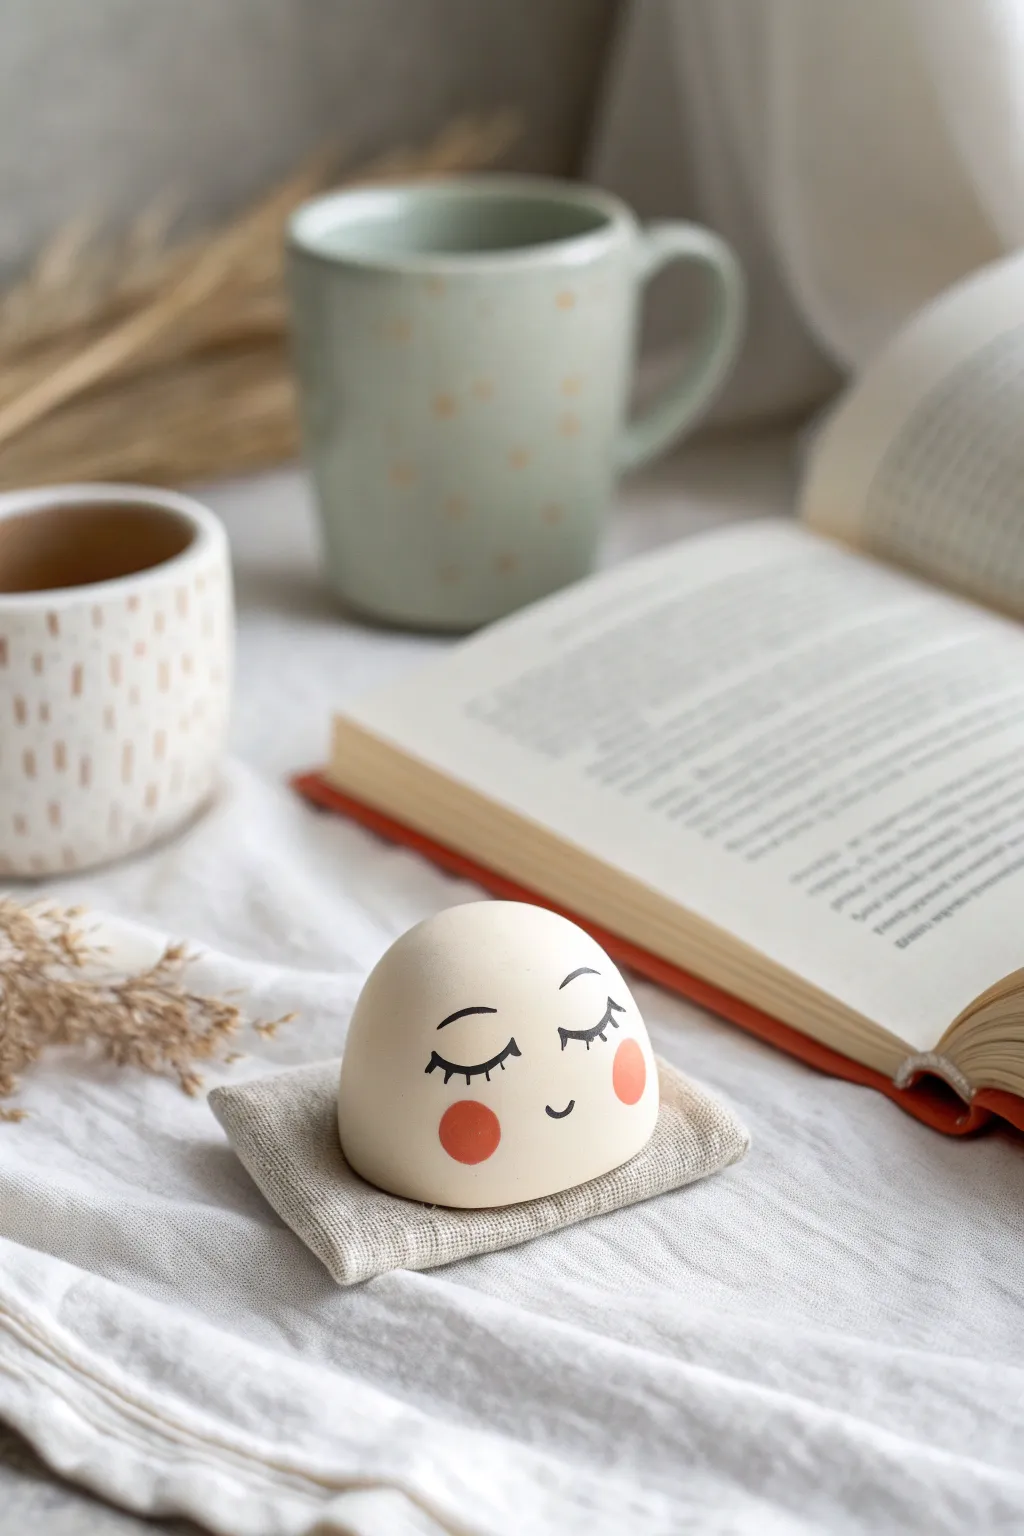
This soothing little desk companion serves as both a gentle paperweight to keep your pages flat and a calming presence during study sessions. Its minimalist dome shape and sweetly painted sleeping expression capture that perfect cozy reading aesthetic.
Step-by-Step Guide
Materials
- White air-dry clay or polymer clay (approx. 50-70g)
- Small bowl relative to desired size (for checking dome shape)
- Fine-grit sandpaper (400-600 grit)
- Acrylic paint (black and coral pink)
- Very fine detail paintbrush (000 size)
- Matte spray varnish or sealant
- Small scrap of linen or cotton fabric (approx. 3×3 inches)
- Needle and thread
- Rice or fabric scraps (for filling the pillow)
- Water and sponge (for smoothing)
Step 1: Sculpting the Dome
-
Condition the clay:
Begin by warming up your clay in your hands. Knead it thoroughly for a few minutes until it is soft, pliable, and free of any air bubbles that could crack later. -
Form a sphere:
Roll the clay between your palms to create a tight, smooth ball. Aim for a sphere about the size of a tangerine or a large golf ball. -
Create the base:
Place the sphere onto your smooth work surface. Gently press down from the top to flatten the bottom, creating a solid base so it won’t roll away. -
Refine the dome shape:
Using cupped hands, smooth the sides upwards to create a perfect semi-circle dome. You want the curve to be continuous and gentle, like a small hill. -
Smooth the surface:
Dip your finger or a small sponge in water and run it over the entire surface of the clay. This helps erase fingerprints and tiny ridges. Getting it glass-smooth now saves sanding time later. -
Initial drying:
Set the dome aside to dry. If using air-dry clay, let it sit for 24-48 hours. I recommend flipping it over halfway through so the bottom dries evenly.
Smooth Operator
To get that super-matte, flawless pottery look, wipe the unfinished clay with a baby wipe right before drying to remove all oils and dust.
Step 2: Painting and Finishing
-
Sanding for perfection:
Once fully dry (or baked and cooled if using polymer), take your fine-grit sandpaper and gently buff the surface. Focus on any tiny bumps to ensure a porcelain-like finish. -
Drafting the face:
Before painting, lightly sketch the sleepy expression with a pencil. Draw two closed, curved eyelids in the upper center and a tiny ‘u’ shape for the smile below them. -
Painting the lashes:
Load your fine detail brush with black acrylic paint. Carefully trace your pencil lines for the eyelids. Add 3-4 tiny, flicked lashes to the outer corner of each eye for a sleepy effect. -
Adding the smile:
Using the very tip of your brush, paint the small smile. Keep the line thin and delicate to maintain the minimalist look. -
Applying the blush:
Mix a soft coral or salmon pink color. Paint two solid circles on the cheeks, slightly lower than outside the eyes. Start smaller than you think—you can always widen them. -
Sealing the piece:
Allow the paint to dry completely. For protection, apply a coat of matte varnish. A spray varnish works best here to avoid brushstrokes on the white clay.
Step 3: Bonus: Mini Linen Pillow
-
Cut the fabric:
Cut your linen or cotton scrap into two identical squares, about 3 inches by 3 inches. -
Sew the edges:
Place the fabric pieces together. Sew around three edges and halfway up the fourth edge, leaving a small gap for filling. -
Fill and close:
Turn the fabric right-side out. Fill loosely with rice or fabric scraps—keep it flat rather than puffy. Hand-stitch the opening closed to finish your display base.
Make it Weighted
For a truly functional page holder, bury a small, clean rock or fishing weight in the center of your clay ball while sculpting to add heft.
Now you have a serene little friend to keep you company through every chapter you read
Food-Animal Hybrid Mini Figurines
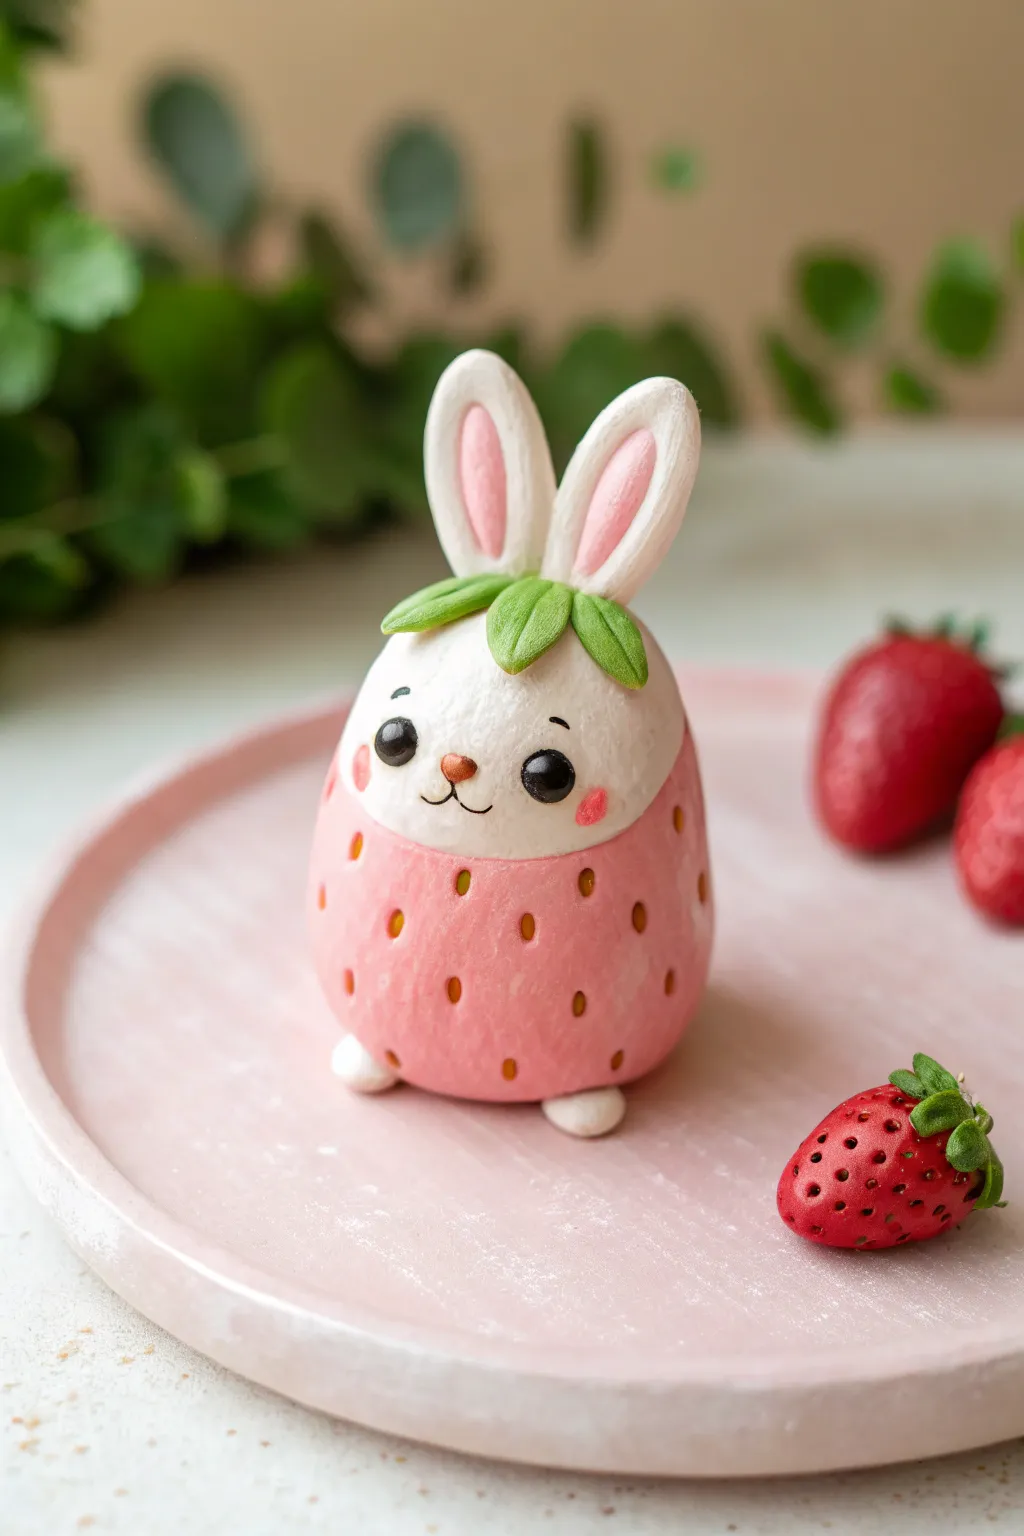
This adorable food-animal hybrid combines the sweetness of a strawberry with the charm of a bunny rabbit. With its textured seeds, rosy gradient body, and soft leafy hat, this polymer clay figurine makes a perfect desk companion or springtime gift.
Step-by-Step
Materials
- White polymer clay
- Pink polymer clay
- Green polymer clay
- Translucent liquid clay (optional)
- Black clay (or black acrylic paint)
- Burnt orange or golden-brown acrylic paint (for seeds)
- Soft pink pastel chalk (for cheeks/blush)
- Dotting tools or needle tool
- Small paintbrush
- Clay sculpting tools
- Gloss glaze (optional)
Step 1: Shaping the Base
-
Mix the body color:
Start by conditioning your pink clay until it’s soft and pliable. If you want that soft, milky pink look from the photo, mix a small amount of white clay into a standard pink to lighten it slightly. -
Create the egg shape:
Roll the pink clay into a smooth ball, then gently taper the top half to create a rounded egg shape. This will form the main body of the strawberry rabbit. -
Add the face section:
Take a portion of white clay and flatten it into a thick disc. Gently press this onto the upper front of your pink egg shape, smoothing the edges downward so it blends seamlessly into the pink base to create the bunny’s face area. -
Texture the body:
While holding the clay carefully so you don’t squash it, gently press the rounded end of a small paintbrush or dotting tool into the pink section to create the strawberry seed dimples. Space them irregularly for a natural look.
Step 2: Adding Details
-
Sculpt the ears:
Roll two small logs of white clay and taper the ends. Flatten them slightly and press a smaller, flattened piece of pink clay into the center of each for the inner ear. Pinch the bottoms and attach them securely to the top of the head. -
Create the leaves:
Condition your green clay and form 3-4 small teardrop shapes. Flatten them and use a needle tool or knife to score distinct vein lines down the center of each leaf. -
Assemble the hat:
Arrange the green leaves on top of the bunny’s head, right at the base of the ears, pressing them down gently so they curve slightly around the brow like a little cap. -
Add the feet:
Roll two tiny balls of white clay. Flatten the bottoms slightly and press them underneath the front of the body to create cute, nubby feet.
Sticky Fingerprints?
If you are leaving fingerprints on the smooth white face, lightly brush the unbaked clay with a little baby oil or cornstarch to smooth it out perfectly.
Step 3: Face and Finishing
-
Make the eyes:
Roll two small balls of black clay. Press them firmly into the white face area. I like to position them slightly wide apart to enhance the cute factor. -
Add eye highlights:
For that sparkling look, place a minuscule dot of white clay (or white paint after baking) near the top corner of each black eye. -
Create the nose and mouth:
Place a tiny triangular piece of orange or brown clay between the eyes for the nose. Use a needle tool to gently etch a small ‘w’ shape directly underneath for the mouth. -
Apply blush:
Before baking, use a soft brush to apply some shaved pink pastel chalk powder to the cheeks and the tips of the ears for a soft, airbrushed effect. -
Paint the seeds:
Using a very fine brush and golden-brown or burnt orange acrylic paint, carefully paint inside the dimples you created earlier to make the seeds pop. -
Bake the figurine:
Bake your creation according to the instructions on your specific brand of polymer clay (usually 275°F/135°C for 15-30 minutes). Let it cool completely. -
Final touches:
Once cool, you can add a coat of gloss glaze to the eyes and the strawberry body to make them look juicy and bright.
Make it a Necklace
Insert a metal eye screw into the top center of the head (between the ears) before baking to turn this figurine into a cute charm or pendant.
Now you have a sweet little berry bunny to keep you company on your desk
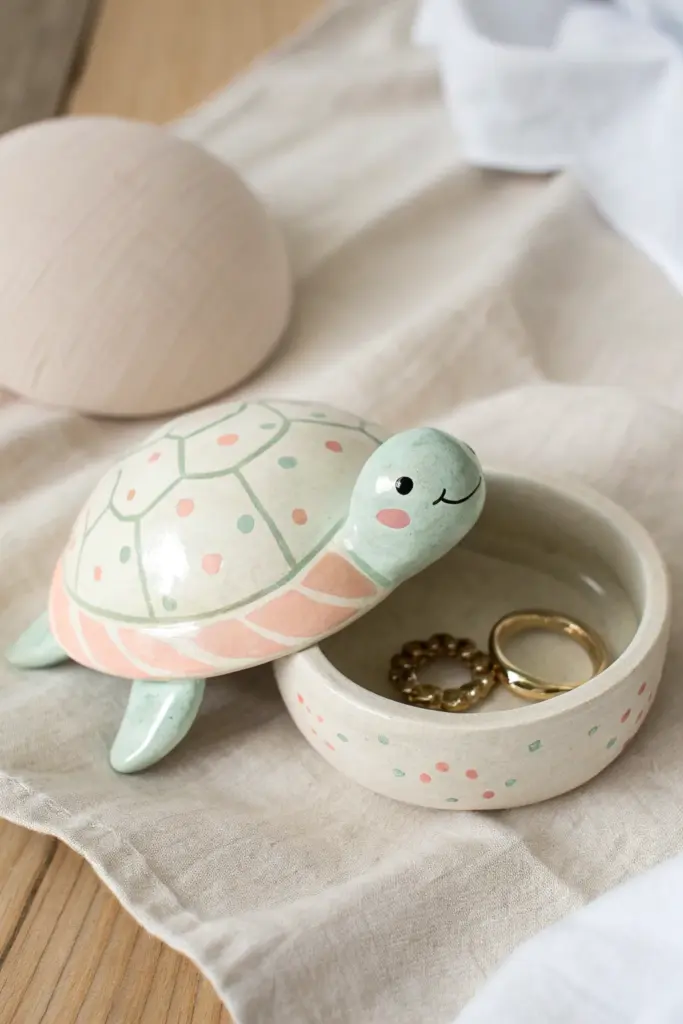
Secret-Compartment Turtle Jewelry Keeper
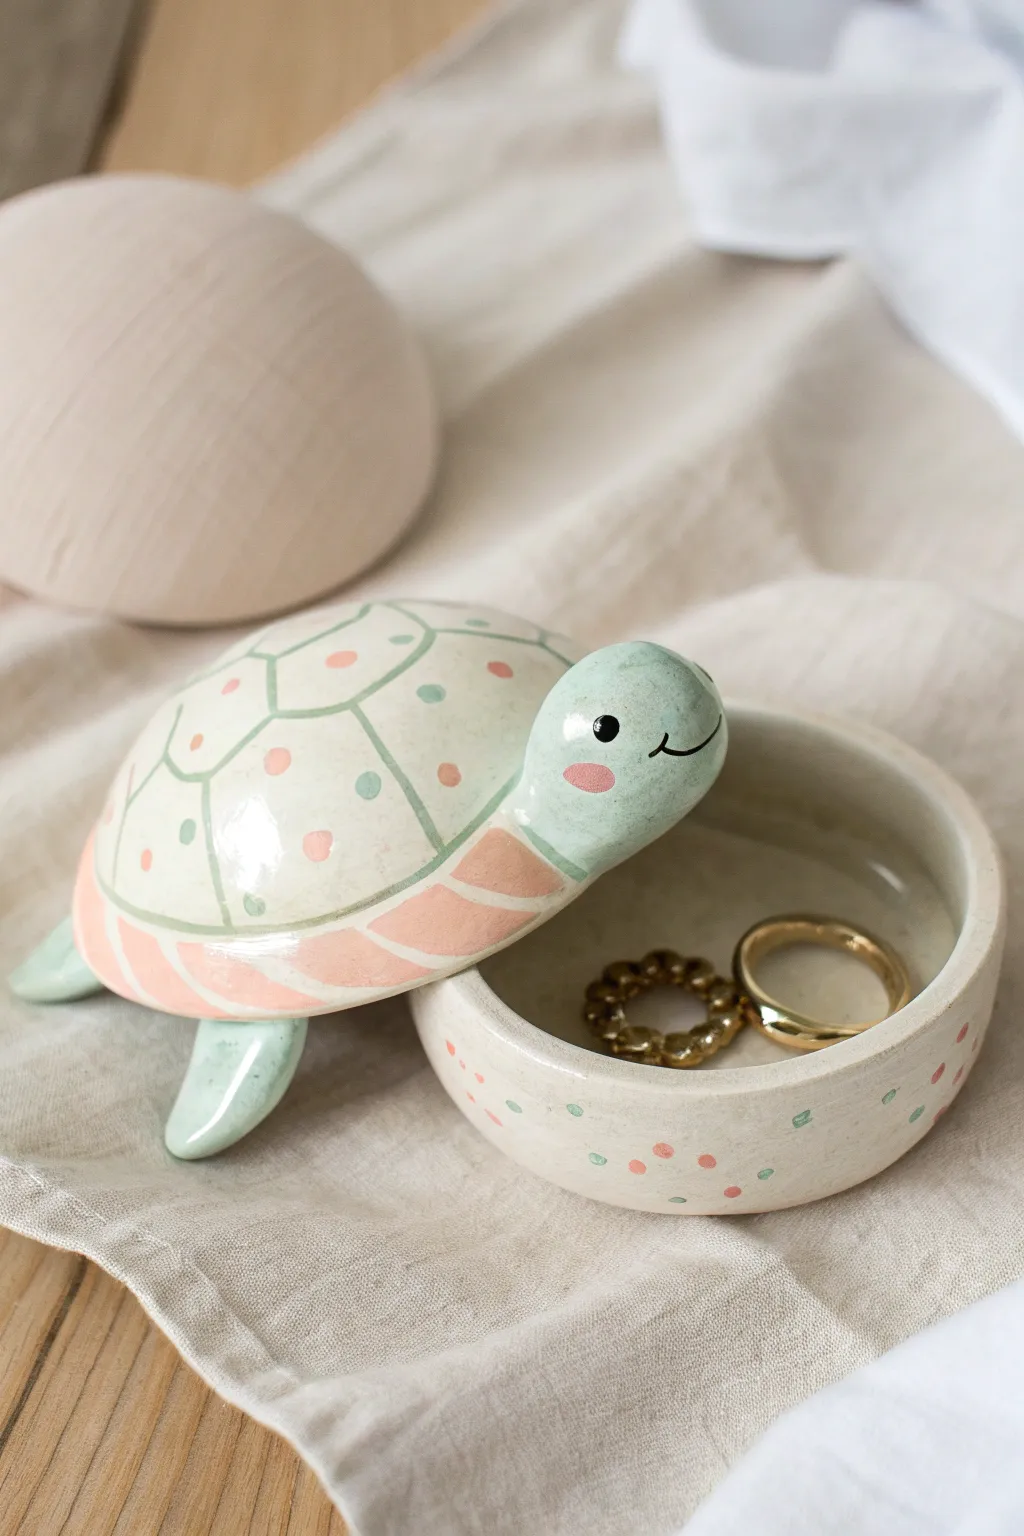
Keep your favorite rings safe inside this adorable ceramic turtle with a secret compartment. Its gentle pastel shell and friendly smile make it a charming addition to any nightstand or dresser.
Detailed Instructions
Materials
- White air-dry clay or polymer clay
- Rolling pin
- Circle cutter or small bowl (approx. 3-4 inches diameter)
- modeling tools (ball stylus, needle tool)
- Slip (clay/water mixture) or liquid clay adhesive
- Small sponge and water
- Acrylic paints (mint green, salmon/coral pink, white, black)
- Fine detail paintbrushes
- High-gloss varnish or sealant
Step 1: Shaping the Base
-
Roll the clay:
Begin by conditioning your clay until it’s pliable. Roll it out into a smooth slab about 1/4 inch thick. Ensuring even thickness here is key for the pieces fitting together later. -
Cut the circles:
Using your circle cutter or a bowl as a template, cut out two identical circles. One will be the floor of the bowl, and the other will become the domed shell lid. -
Form the bowl wall:
Roll a long snake of clay and flatten it into a strip about 3/4 inch wide. Wrap this strip around the edge of one circle base to create the walls. -
Secure the seams:
Score the edges where the wall meets the base, apply a little slip or adhesive, and press firmly. Smooth the inside and outside seams with a modeling tool or your finger until they vanish.
Smooth Operator
Use a tiny amount of baby oil on your finger to smooth out polymer clay before baking. It melts away fingerprints instantly.
Step 2: Sculpting the Lid
-
Dome the shell:
Take your second clay circle and gently drape it over a rounded object, like a styrofoam ball or the back of a small bowl, to create a dome shape. I like to let this firm up slightly so it holds its curve. -
Create the heavy rim:
Add a slightly thickened rim of clay around the bottom edge of the dome. This adds visual weight and helps it sit securely on the bowl base. -
Sculpt the head:
Roll a smooth ball of clay for the head. Shape it into a slight teardrop and attach the wider end to the front rim of the shell. Blend the clay downwards so the neck flows seamlessly into the shell. -
Attach the flippers:
Shape two flat, rounded triangles for the front flippers. Attach these to the underside of the shell rim, just behind the head, angling them slightly outward. -
Add back legs:
create two smaller, stubbier legs for the back. Attach these to the rear of the shell rim to balance the figure. -
Smooth everything out:
Use a damp sponge to wipe down the entire piece, removing fingerprints and ensuring the surface is perfectly smooth for painting. Let the clay dry or bake according to package instructions.
Felt Lining
Cut a circle of soft felt and glue it to the inside bottom of the bowl. It adds a luxury feel and protects delicate rings from scratches.
Step 3: Painting & Details
-
Base coat:
Once fully dry, paint the head, flippers, and the main sections of the shell with a creamy white or very pale off-white acrylic paint. -
Shell segments:
Mix a soft mint green. Paint the center of the shell segments, leaving white channels between them to define the turtle shell pattern. -
Rim details:
Using a salmon or coral pink shade, paint the rim of the shell with angled stripes. Paint the matching rim of the bowl base to coordinate. -
Polka dots:
Use a ball stylus or the end of a paintbrush handle dipped in paint to add small salmon and mint green dots randomly across the shell segments and the side of the bowl. -
Face features:
Using your finest brush and black paint, draw a simple curved smile and two small eyes. Add tiny white highlights to the eyes for a spark of life. -
Cheeky blush:
Dab two soft pink ovals on the cheeks, right below the eyes, to give the turtle its sweet expression. -
Seal it up:
Once the paint is completely dry, coat the entire piece (inside and out) with a high-gloss varnish. This mimics the look of glazed ceramic and protects your jewelry keeper.
Now you have a trusty little friend to guard your treasures