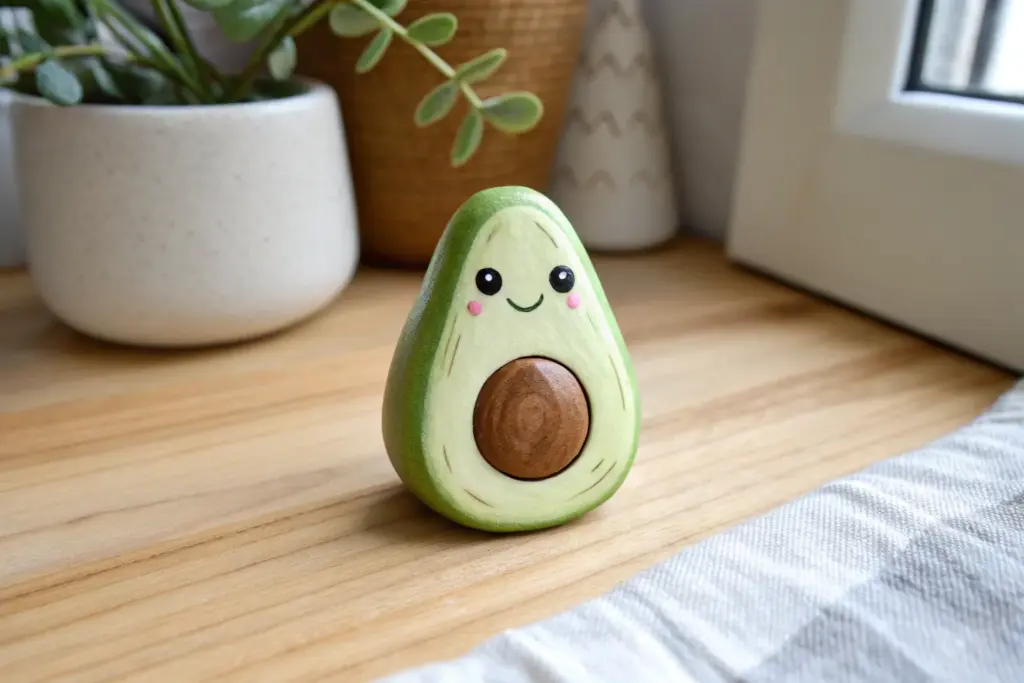
If you’re new to clay, the fastest way to fall in love with it is to make something tiny, sweet, and totally doable in one sitting. These cute clay ideas are my go-to beginner projects because they’re simple shapes with maximum charm.
Classic Kawaii Face Charms
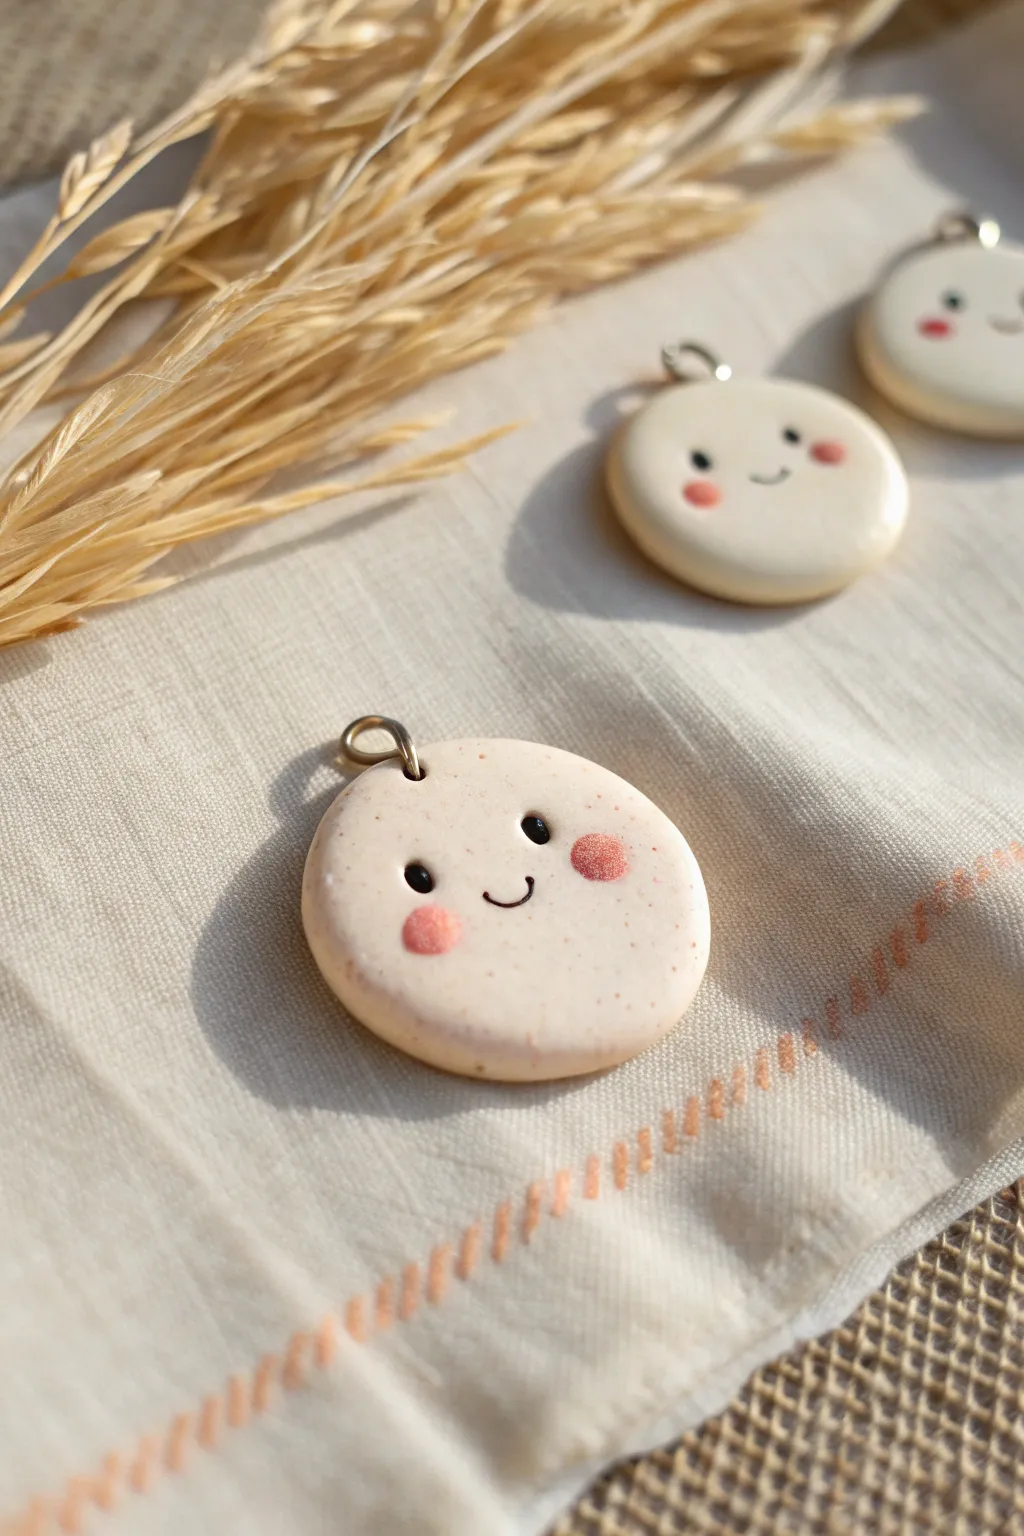
These delightfully simple round charms feature the quintessential sweet smile and rosy cheeks that make kawaii style so irresistible. Their speckled, creamy texture gives them an organic, handmade feel that belies just how beginner-friendly they truly are to create.
Detailed Instructions
Materials
- Light beige or cream polymer clay (preferably with granite/speckle effect)
- Small metal jump rings (approx. 6mm)
- Black acrylic paint
- Soft pink pastel chalk or blush powder
- Fine detail paintbrush (size 000)
- Small dotting tool or toothpick
- Rolling pin or smooth glass jar
- Round cookie cutter (approx. 1 inch)
- Cotton swab or small soft brush
- Gloss glaze or UV resin (optional)
Step 1: Shaping the Base
-
Condition the Clay:
Begin by warming your speckled cream clay in your hands, kneading it thoroughly until it is soft and pliable to prevent cracking during baking. -
Roll it Out:
Place the clay on a clean, flat surface and roll it out until it is about 1/4 inch thick. You want it substantial enough to hold the hardware but not too heavy. -
Cut the Circles:
Use your round cutter to punch out clean circles. If you don’t have a cutter, you can roll a ball of clay and flatten it gently with the bottom of a glass. -
Smooth the Edges:
Gently run your finger around the circumference of the cut circle to soften the sharp edge left by the cutter, giving it a puffy, marshmallow-like look. -
Insert the Hardware:
Take a metal jump ring and carefully push the opening into the very top edge of the clay circle. Ensure it goes deep enough to be secure but leaves the hole exposed. -
Secure the Ring (Optional):
For extra security, I like to take a tiny bit of liquid clay or a minuscule scrap of fresh clay and smooth it over the entry point of the jump ring on the back.
Pro Tip: Fingerprint Eraser
Before baking, lightly brush your raw clay with a little baby oil or cornstarch. This magically smooths out any accidental fingerprints for a professional finish.
Step 2: Creating the Face
-
Prepare the Cheeks:
Scrape a small amount of pink pastel chalk into a fine powder. You can use a craft knife or sandpaper to generate this dust. -
Apply the Blush:
Dip a cotton swab or a soft dry brush into the pink powder. Gently dab two round spots onto the raw clay where the cheeks should be. -
Build Color Intensity:
Layer the powder gradually. It’s easier to add more pigment than to take it away, so start with a whisper of pink and build up to that cute rosy glow. -
Bake the Clay:
Place your charms on a parchment-lined baking sheet and bake according to your specific clay brand’s instructions (usually around 275°F/135°C for 15-30 minutes). -
Cool Down:
Allow the pieces to cool completely before moving on to painting. Painting on warm clay can make the acrylic dry too fast and clumpy.
Level Up: Cookie Texture
Before adding the face, gently texture the edges with a toothbrush and shade them with soft brown pastel dust to make the charm look like a perfectly baked sugar cookie.
Step 3: Adding Details
-
Paint the Eyes:
Dip a dotting tool or the blunt end of a toothpick into black acrylic paint. Press gently onto the clay to create two small, perfectly round eyes just above the cheek line. -
Paint the Mouth:
Using a very fine detail brush (size 000), carefully paint a small ‘U’ shape between the eyes for the smile. Keep your hand steady and use very little pressure. -
Dry the Paint:
Let the black paint dry fully. This usually takes about 10-15 minutes depending on how thick your paint application was. -
Seal the Charm:
To protect the pastel powder and paint, apply a thin layer of matte or gloss varnish over the entire piece. -
Final Cure (If needed):
If using UV resin as a glaze, cure it under a UV lamp for 60 seconds. If using air-dry varnish, let it sit for several hours.
Now you have an adorable set of smiling charms ready to be turned into earrings, keychains, or sweet gifts for friends


Smiley Food Minis (Fruit and Veg)
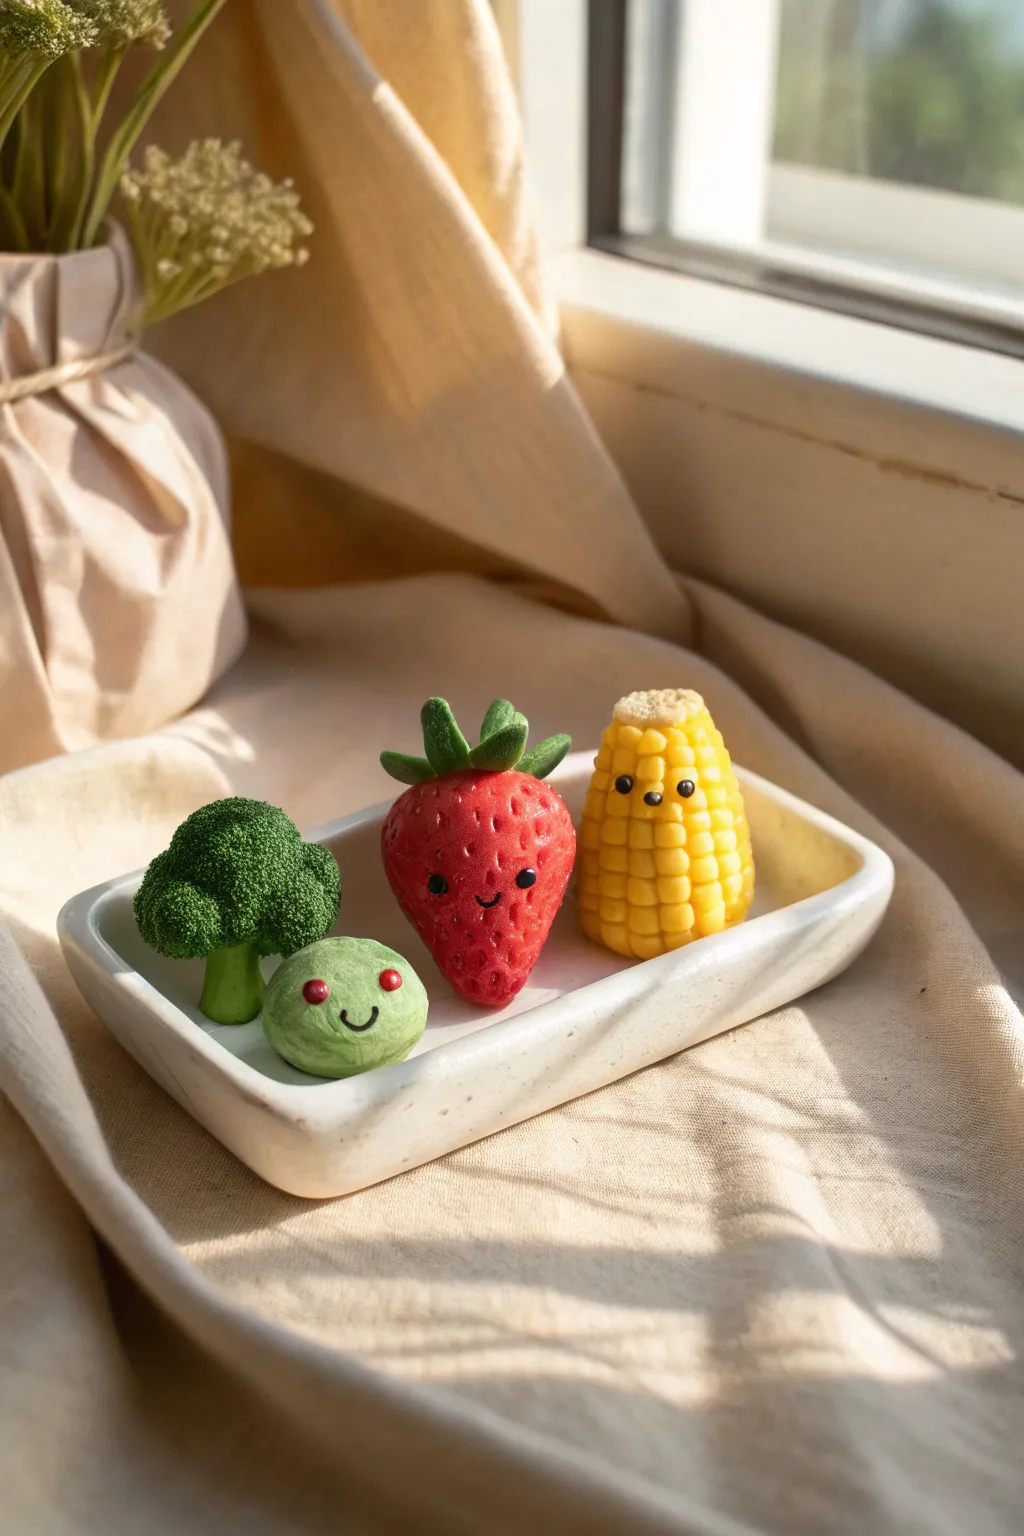
Brighten your windowsill with this adorable quartet of miniature clay produce. Featuring a textured broccoli floret, a smiling pea, a sweet strawberry, and a cheery corn cob, these tiny figures bring a dash of whimsy to any display.
Step-by-Step Tutorial
Materials
- Polymer clay (Green, Red, Yellow, Dark Green, White)
- Black clay or acrylic paint for eyes
- Modeling tools (needle tool, ball tool)
- Toothbrush or textured aluminum foil
- Liquid clay adhesive (optional)
- Gloss glaze (optional)
Step 1: Shaping the Broccoli
-
Mix colors:
Start by mixing a light green and a darker green to get a natural broccoli stem color. Roll a small cylinder for the stalk. -
Create the floret:
Form a rounded, slightly uneven dome shape from dark green clay for the top of the broccoli. -
Add texture:
Using a clean toothbrush or a crumpled ball of aluminum foil, tap firmly and repeatedly over the entire surface of the dark green dome to create that realistic, bubbly broccoli texture. -
Assemble:
Press the textured dome firmly onto the stalk. You can flare the bottom of the stalk slightly so it stands upright on its own.
Step 2: Crafting the Sweet Pea
-
Roll the base:
Take a small portion of light green clay, similar to the broccoli stalk color, and roll it into a neat, smooth ball. -
Add a blush:
Take two unimaginably tiny dots of red clay and press them gently onto the cheeks of the pea. -
Make the face:
Roll a very thin snake of black clay for the smile and two tiny spheres for eyes. Press them gently into place between the red cheeks.
Fixing Smudges
Fingerprints or dust on light clay? Dipping a Q-tip in rubbing alcohol or baby oil and gently wiping the unbaked clay smooths it instantly.
Step 3: Sculpting the Strawberry
-
Form the berry:
Roll red clay into a ball, then pinch one end to create a tapered teardrop shape. -
Indent seeds:
Using a needle tool, poke small, shallow holes all over the surface of the strawberry to mimic seeds. -
Add leaves:
Flatten small pieces of dark green clay into teardrops. Press a needle tool down the center of each to create a vein, then arrange 4-5 leaves on top of the berry. -
Give it personality:
Place two small black clay eyes and a tiny ‘u’ mouth near the wide bottom of the berry. I find using tweezers helps with placement here.
Make them Magnets
Before baking, press a small, strong neodymium magnet into the back of each veggie. Pop them out, add a dab of liquid clay, and bake the magnet inside.
Step 4: Building the Corn Cob
-
Core shape:
Roll a cylinder of yellow clay that is slightly tapered at the top. -
Create kernels:
Use a knife tool to score vertical lines all around the cylinder. Then, score horizontal lines across the vertical ones to create a grid of kernels. -
Refine kernels:
Gently press each square in the grid with a blunt tool to round them off slightly, making them look like individual corn kernels. -
Add the cob top:
Add a small, textured beige or white circle to the very top to look like the cut end of the cob. -
Final face details:
Add the face using black clay—tiny, wide-set eyes and a small mouth placed centrally on the kernels.
Step 5: Finishing Touches
-
Baking:
Follow your clay manufacturer’s instructions for baking temperature and time. Usually, 275°F (135°C) for 15-30 minutes creates a durable finish. -
Cooling:
Let the pieces cool completely before handling, as hot clay is fragile. -
Glazing:
Optionally, brush a thin layer of matte or gloss varnish over the eyes to make them sparkle.
Arranging these little friends on a sunny windowsill brings a wonderful charm to the room


Tiny Animal Blob Figurines
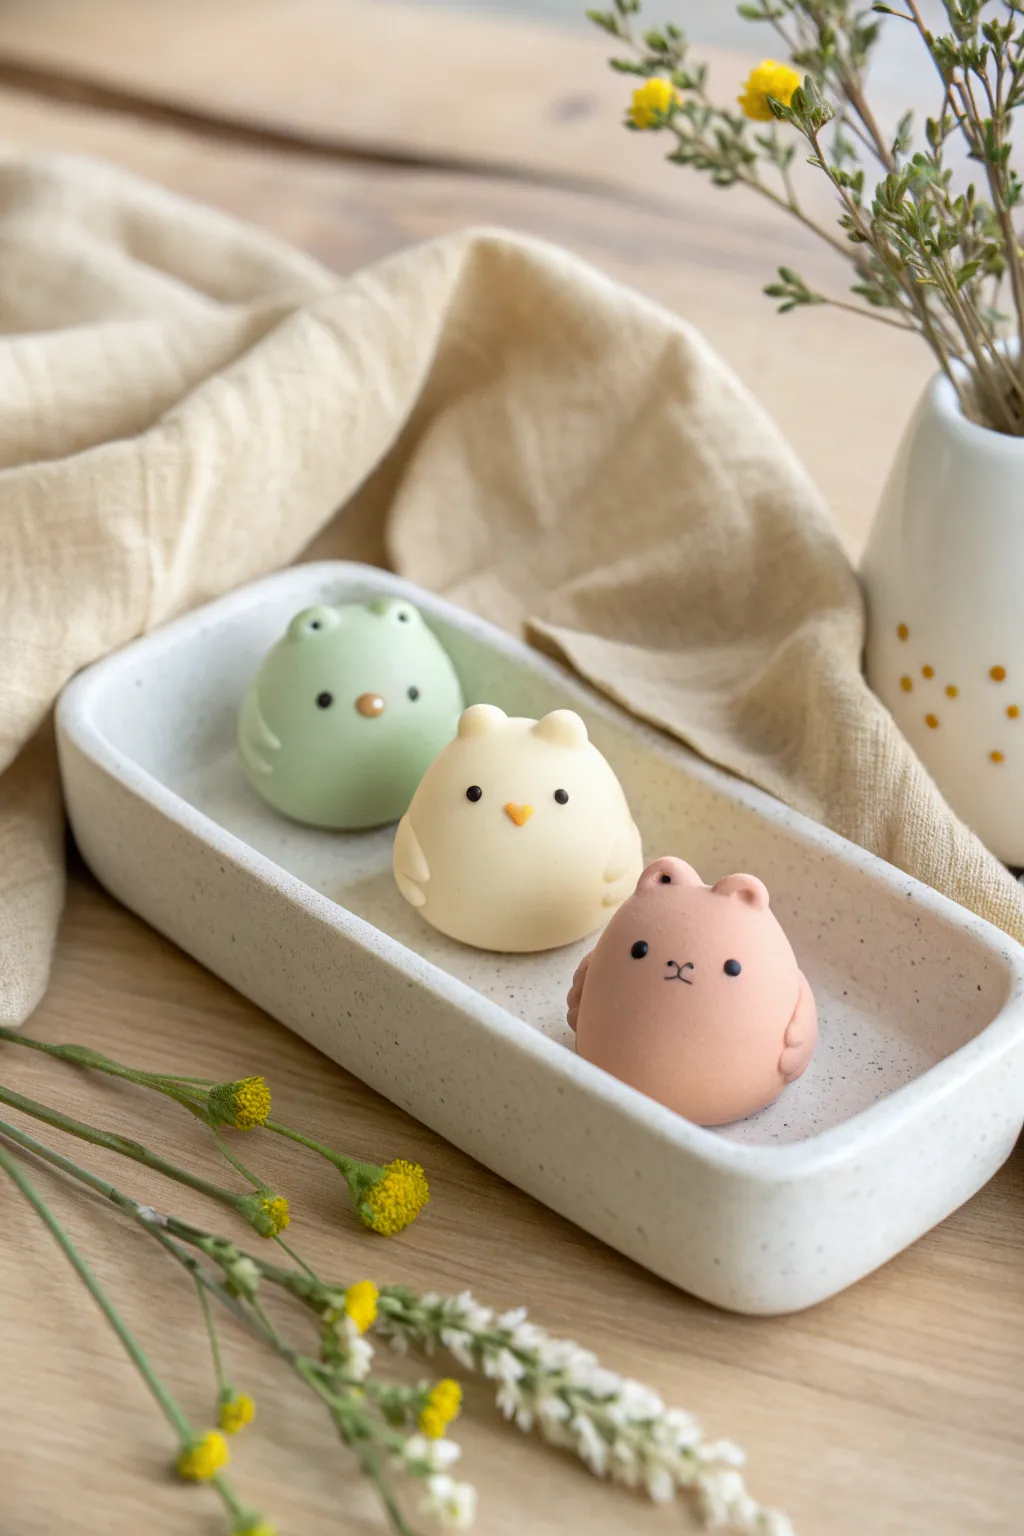
These delightfully round characters are the perfect introduction to modeling clay, featuring an ultra-simple “blob” shape that can transform into multiple animals. Their matte, pastel finish and tiny, minimalist faces give them a sophisticated charm that belies how easy they are to sculpt.
Detailed Instructions
Materials
- Polymer clay (Pastel Green, Pastel Yellow, Pastel Pink)
- Black polymer clay or black acrylic paint
- Orange polymer clay (tiny amount for beaks)
- Modeling tools (ball stylus, needle tool)
- Smooth work surface (ceramic tile or glass)
- Baking sheet and parchment paper
- Oven (for baking polymer clay)
Step 1: Shaping the Base
-
Prepare your colors:
Begin by conditioning your three main pastel clay colors—green, yellow, and pink—kneading them until they are soft and pliable. If the clay feels too stiff, warm it in your hands a bit longer. -
Roll the spheres:
Take a portion of clay about the size of a walnut for each animal. Roll them between your palms to create three perfectly smooth spheres. -
Form the blob shape:
Gently press the base of each sphere onto your work surface to flatten the bottom so they sit upright without wobbling. The shape should resemble a slightly squat gumdrop. -
Refine the surface:
Check for any fingerprints. I like to lightly brush the surface with a tiny drop of baby oil or cornstarch to smooth out any imperfections before adding details. -
Pinch the ears:
For the green and pink figures (frog and bear), gently pinch two small sections at the top of the head to pull up tiny, rounded ear shapes. Smooth the transition so the ears look like a natural extension of the body. -
Add separate ears:
For the yellow chick (middle figure), roll two tiny separate balls of yellow clay and press them onto the top of the head for a slightly different ear style. Blend the seams carefully with a modeling tool.
Clean Clay Tip
Keep wet wipes handy to clean your hands between colors. Even a speck of black or pink dust can dirty the pale yellow clay instantly.
Step 2: Adding Details
-
Create the wings:
Roll very small teardrop shapes from the matching body color clay. Flatten them slightly. -
Attach the wings:
Press these flattened teardrops onto the sides of the bodies, curving them forward slightly to hug the round shape. -
Make the eyes:
Take the tiniest speck of black clay and roll it into microscopic balls. You will need two for each character. Place them wide apart on the face for that ‘kawaii’ look. -
Press perfectly:
Use a small ball tool to gently press the black eyes into the face so they sit flush with the surface rather than bulging out. -
Add beaks:
For the green and yellow figures, create tiny triangles of orange clay or small balls. Press these into the center of the face between the eyes to create beaks. -
Draw the mouth:
For the pink bear, skip the beak. Instead, use a very fine needle tool or a tiny bit of black clay rolled into a thread to create a small ‘x’ or inverted ‘y’ shape for the mouth.
Level Up: Accessories
Make them customized by adding tiny accessories like a clay bow tie, a small flower on one ear, or holding a tiny heart.
Step 3: Finishing Touches
-
Final smoothing:
Do one last check around the seams of the ears and wings. The goal is a seamless, matte look. -
Bake carefully:
Place your trio on a parchment-lined baking sheet. Bake according to your specific clay brand’s instructions (usually around 275°F or 130°C for 15-30 minutes). -
Cool down:
Let the figures cool completely inside the oven with the door slightly ajar to prevent cracking from sudden temperature changes. -
Matte finish:
These look best left natural, but if you want to seal them, use a matte varnish rather than a glossy glaze to maintain the soft aesthetic shown in the photo.
Now you have a trio of adorable desk companions ready to brighten up your workspace


Mini Heart Trinket Dishes
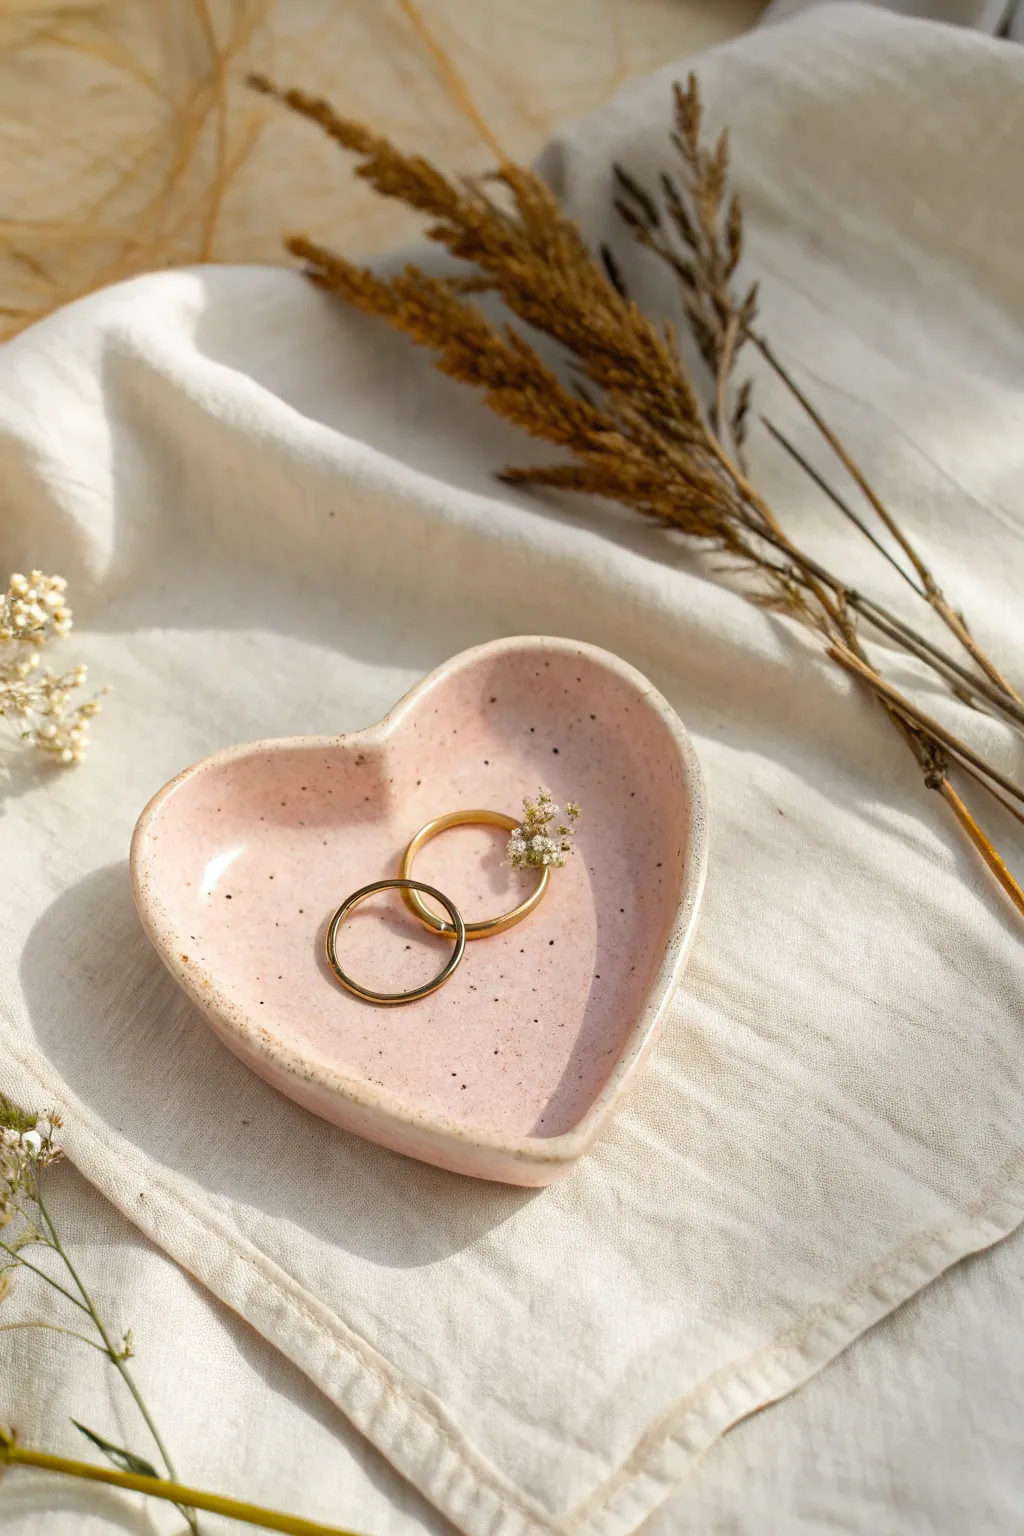
This charming little trinket dish combines a soft, blush-pink glaze with a rustic speckled finish and a handcrafted, organic shape. It’s the perfect size for holding your favorite rings or dainty earrings.
Step-by-Step
Materials
- White air-dry clay or polymer clay
- Rolling pin
- Heart-shaped cookie cutter (approx. 3-4 inches wide)
- Small bowl of water
- Sponge or smoothing tool
- Fine-grit sandpaper
- Soft pink acrylic paint
- Black or dark brown acrylic paint
- Old toothbrush
- Gloss varnish or resin sealant
- Paintbrushes
Step 1: Shaping the Clay
-
Condition the clay:
Begin by taking a handful of white clay and kneading it in your hands until it is soft, warm, and pliable. This prevents cracks later on. -
Roll it out:
Using your rolling pin, flatten the clay into a smooth slab. Aim for a thickness of about 1/4 inch—not too thin, or it will be fragile, but not too chunky either. -
Cut the shape:
Press your heart-shaped cookie cutter firmly into the clay slab. Wiggle it slightly to ensure a clean cut, then remove the excess clay from around the heart. -
Smooth the edges:
Dip your finger into a little water and run it gently along the cut edges of the heart to soften any sharp lines or burrs left by the cutter. -
Create the curve:
Now, gently curl the edges of the heart upwards to create a shallow bowl shape. You can do this by pinching the edges up lightly or pressing the center down with your thumb. -
Refine the form:
Work around the rim, using water to smooth out any fingerprints. I find that cupping the heart in my palm helps maintain the symmetry while I smooth the inside. -
Dry completely:
Set the dish aside to dry. If using air-dry clay, leave it for 24-48 hours. If using polymer clay, bake according to the package instructions.
Step 2: Finishing and Painting
-
Sand imperfections:
Once fully dry (and cool, if baked), use fine-grit sandpaper to gently buff away any rough spots on the rim or surface. Wipe away the dust with a damp cloth. -
Apply base color:
Mix a soft, muted pink shade using acrylic paint. Apply two to three thin coats to the entire dish, allowing each layer to dry before adding the next for opaque coverage. -
Prepare the speckles:
Dilute a small amount of black or dark brown paint with a few drops of water until it has an inky, fluid consistency. -
Splatter effect:
Dip an old toothbrush into the diluted dark paint. Hold it over the dish and run your thumb across the bristles to flick tiny speckles onto the surface. Practice on paper first to control the spray. -
Paint the rim:
This step is subtle but effective. Dip a paper towel or sponge slightly into a darker beige or brown paint and very lightly dab the very edge of the rim to give it a rustic, fired-pottery look. -
Seal the dish:
Once the paint is completely dry, apply a coat of high-gloss varnish. This mimics the look of a ceramic glaze and protects your jewelry from scratching the paint.
Level Up: Texture
Before drying, press a piece of lace or linen into the wet clay surface. The paint will settle into the texture for a vintage fabric look.
Fixing Cracks
If tiny cracks appear as the clay dries, make a paste of clay and water (slip) and fill them in. Smooth over and let dry again before painting.
Place your delicate rings inside and enjoy the handmade warmth this little dish brings to your dresser

The Complete Guide to Pottery Troubleshooting
Uncover the most common ceramic mistakes—from cracking clay to failed glazes—and learn how to fix them fast.
Cute Pinch Pots With Faces
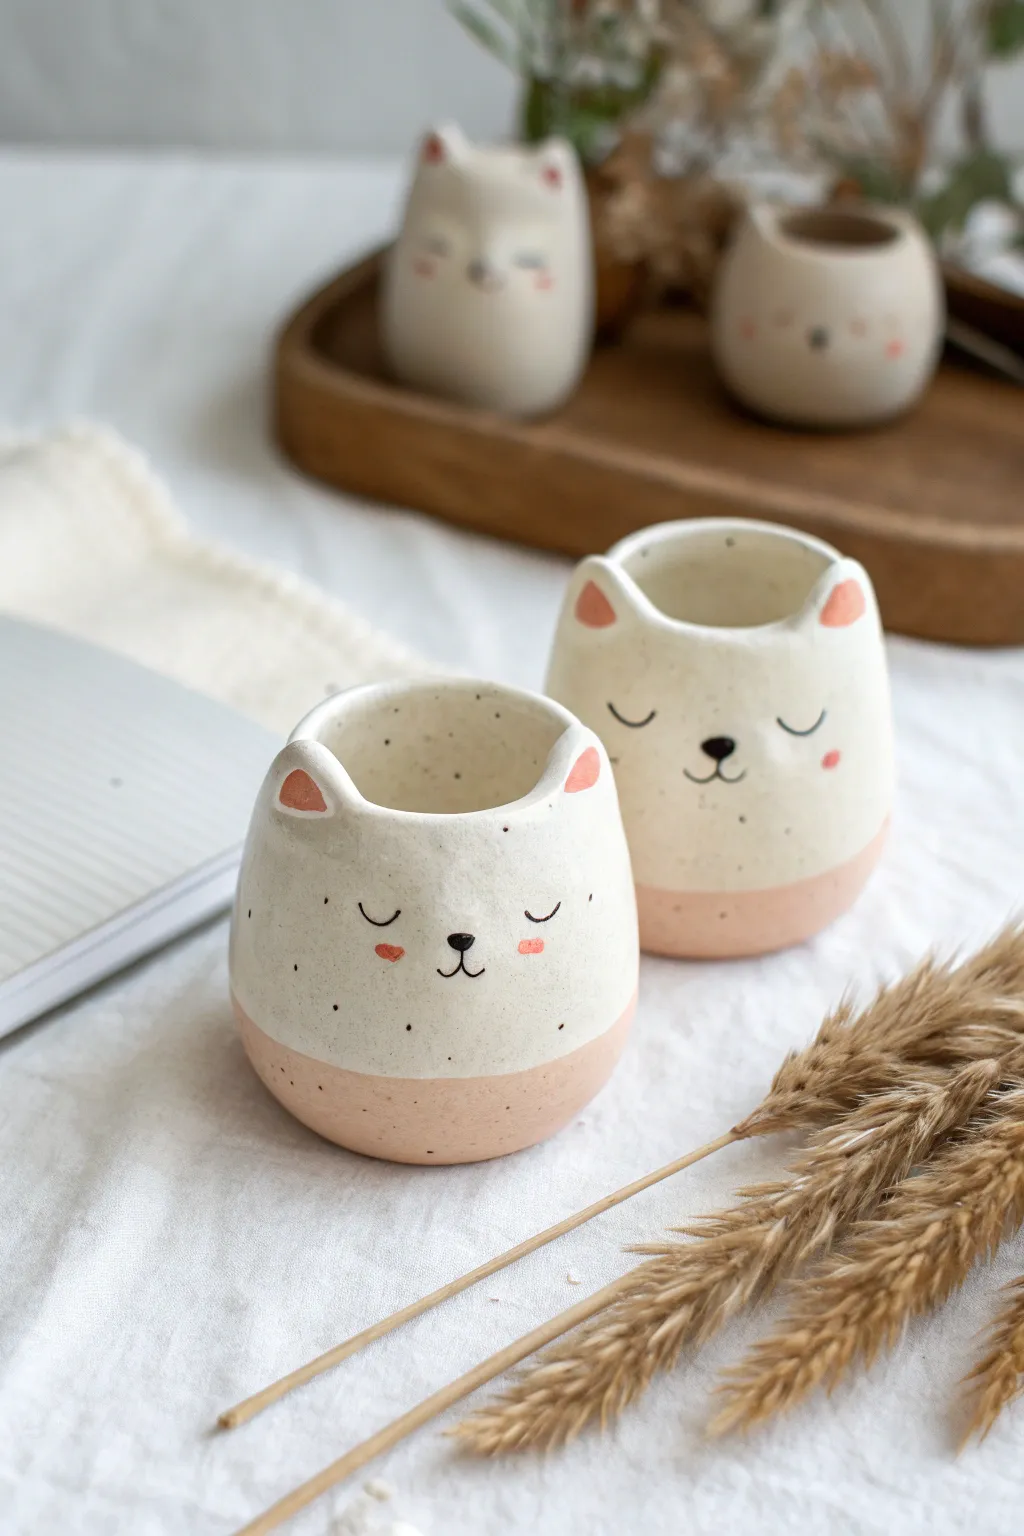
These adorable, speckled ceramic cups feature sweet, sleeping cat faces and distinct pink-dipped bottoms. Their handmade charm comes from the gentle curves of the pinch pot technique, making them a perfect, cozy project for beginners.
How-To Guide
Materials
- White stoneware or porcelain clay (speckled variety recommended)
- Pottery tools (needle tool, sponge, rib, carving tool)
- Underglaze (black for face, coral pink for blush/dipped effect)
- Clear transparent glaze
- Small fine-tip paintbrush
- Bowl of water
- Kiln (or access to firing services)
Step 1: Shaping the Form
-
Creating the Base:
Start with a ball of clay roughly the size of a tangerine. Holding it in one hand, press your thumb into the center, stopping about a half-inch from the bottom. -
Pinching the Walls:
Gently pinch the clay between your thumb and fingers, rotating the ball as you work. Ideally, pull the clay upwards to create height while keeping the walls even—aim for about 1/4 inch thickness. -
Refining the Shape:
Once you have a cup shape, gently tap the bottom against your table to create a flat, stable base so it doesn’t wobble. -
Smoothing:
Use a slightly damp sponge or a rubber rib to smooth out finger marks on both the inside and outside. I like to spend extra time here to get a really professional finish. -
Forming the Ears:
Instead of attaching separate ears, gently push the rim of the cup upwards at two opposite points using your thumb and forefinger to create subtle peaks. Reshape the rim between them so it dips slightly.
Step 2: Decorating & Firing
-
Drying to Leather Hard:
Let the pot sit until it reaches the leather-hard stage—firm enough to handle without deforming but still cool to the touch. -
Adding the Face Details:
Using a tiny sculpting tool or a dull pencil tip, very lightly sketch where you want the eyes and nose to go to ensure symmetry. -
Painting the Features:
With a fine-tip brush and black underglaze, paint two small U-shapes for sleeping eyes and a tiny nose with a mouth anchor. Keep the lines delicate. -
Adding Blush:
Dip a small round brush into coral pink underglaze. Dab small oval spots on the cheeks and paint the insides of the ear peaks. -
Creating the Dipped Look:
Paint the bottom third of the pot with the same coral pink underglaze. You might need 2-3 coats for opaque coverage, letting each dry in between. -
Bisque Fire:
Once fully bone dry, fire the piece to bisque temperature (usually Cone 04, depending on your clay body). -
Glazing:
After the first firing, coat the entire piece (except the very bottom foot) in a clear transparent glaze to seal it and make the speckles pop. -
Final Fire:
Fire the piece again to the glaze temperature recommended for your specific clay (often Cone 5 or 6 for stoneware).
Cracking at the rim?
If the rim starts cracking while shaping the ears, your clay is too dry. Dab a tiny amount of water on the cracks and compress the clay back together with your finger or a rib immediately.
Clean lines tip
Use masking tape to create a perfectly straight line for the pink bottom section. Peel it off gently when the underglaze is slightly tacky but not fully dry.
Now you have a sweet little companion for your morning coffee or to hold your favorite succulents
Simple Flower Coasters
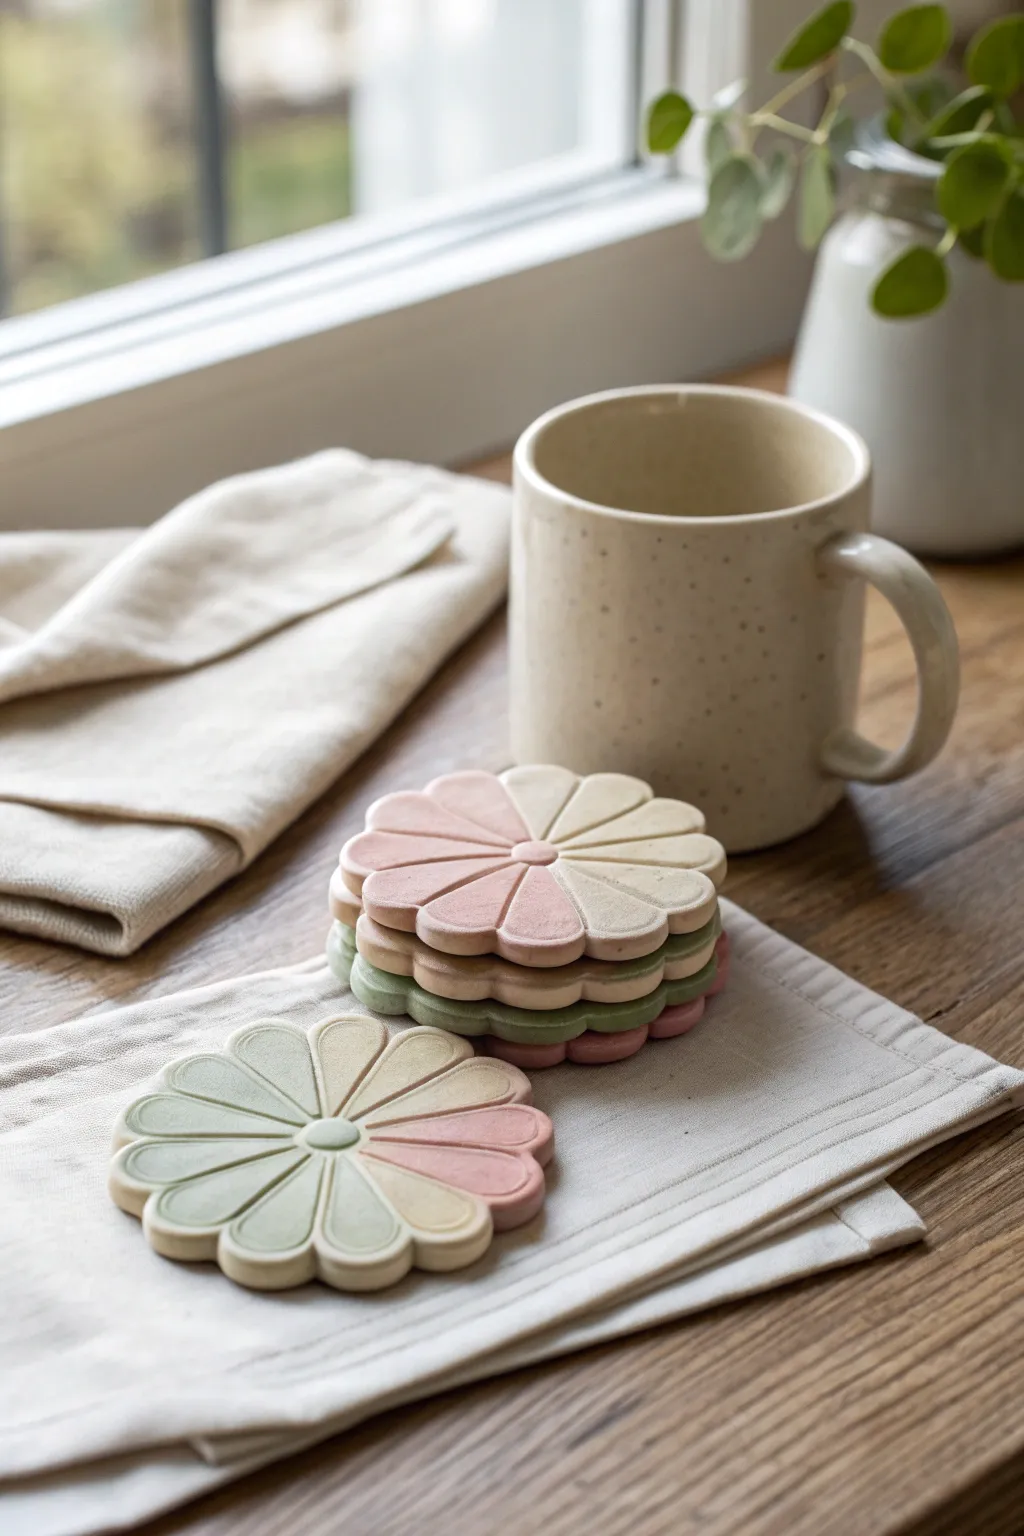
These charming flower coasters bring a soft, natural touch to your coffee table with their gentle scalloped edges and muted pastel tones. The design features a clever segmented look that mimics flower petals, making them as fun to assemble as they are to use.
Step-by-Step Guide
Materials
- Polymer clay (white, beige, dusty pink, sage green)
- Rolling pin or pasta machine
- Flower-shaped cookie cutter (approx. 3.5 inches)
- X-Acto knife or clay blade
- Small circular cutter (approx. 0.5 inch)
- Parchment paper
- Fine-grit sandpaper (optional)
- Oven (for baking)
- Matte varnish (optional)
Step 1: Preparing the Clay
-
Condition the clay:
Start by warming up your polymer clay in your hands until it is soft and pliable. You want a consistent texture to prevent cracks later. -
Mix your colors:
To achieve the muted, natural look seen in the photo, you may need to mix your base colors. Try mixing a little beige or grey into your pinks and greens to desaturate them. -
Roll out slabs:
Roll out each color of clay onto parchment paper to a uniform thickness of about 1/4 inch. A pasta machine is great for this, but a rolling pin with depth guides works perfectly too.
Step 2: Cutting and Shaping
-
Cut the flower shapes:
Using your large flower cookie cutter, press firmly into your clay slabs to cut out one flower shape from each color. -
Create the segments:
Take your clay blade and carefully slice each flower vertically and horizontally, cutting through the center to create separate wedge-like sections. -
Reassemble the pattern:
This is the fun part. Gently lift the cut sections and swap them between colors. Reassemble the flowers on a fresh sheet of parchment paper, alternating pink and beige segments (or green and beige) to create the two-tone petal effect. -
Bond the seams:
Once the pieces are arranged, gently press the edges together. You want them to stick without distorting the shape. I find laying a piece of parchment over the top and lightly rolling over it helps fuse the seams. -
Add the center:
Use your small circular cutter to remove the very center where all the points meet. Cut a small circle from a contrasting color clay and insert it into this hole, pressing it flush with the surface.
Seams splitting?
If the petal sections separate during baking, apply a tiny amount of liquid polymer clay (like Bake & Bond) to the edges before pressing them together for a stronger hold.
Step 3: Detailing and Finishing
-
Define the petals:
To give the coaster that distinct definition seen in the image, take a dull tool or the back of a knife and gently press indents along the seam lines where the colors meet, radiating from the center to the edge. -
Smooth the edges:
Run your finger lightly around the scalloped outer edge of the coaster to soften any sharp cuts left by the cookie cutter. -
Bake the coasters:
Place your parchment paper with the coasters onto a baking sheet. Bake according to your clay manufacturer’s instructions—usually around 275°F (135°C) for 15-30 minutes. -
Cool down:
Let the coasters cool completely on the baking tray. Moving them while they are still warm can cause them to warp. -
Sand imperfections:
Once cool, inspect the edges. If there are any rough spots, lightly buff them away with fine-grit sandpaper under running water. -
Optional sealing:
For extra durability against moisture, apply a thin coat of matte varnish to the top surface and let it dry completely.
Make it a Set
Make smaller versions using a 1.5-inch cutter to create matching magnets or even pendants. You can drill a tiny hole before baking to turn them into hanging ornaments.
Stack your finished coasters near a sunny window and enjoy the beautiful color palette you’ve created


What Really Happens Inside the Kiln
Learn how time and temperature work together inside the kiln to transform clay into durable ceramic.
Cloud and Star Magnets
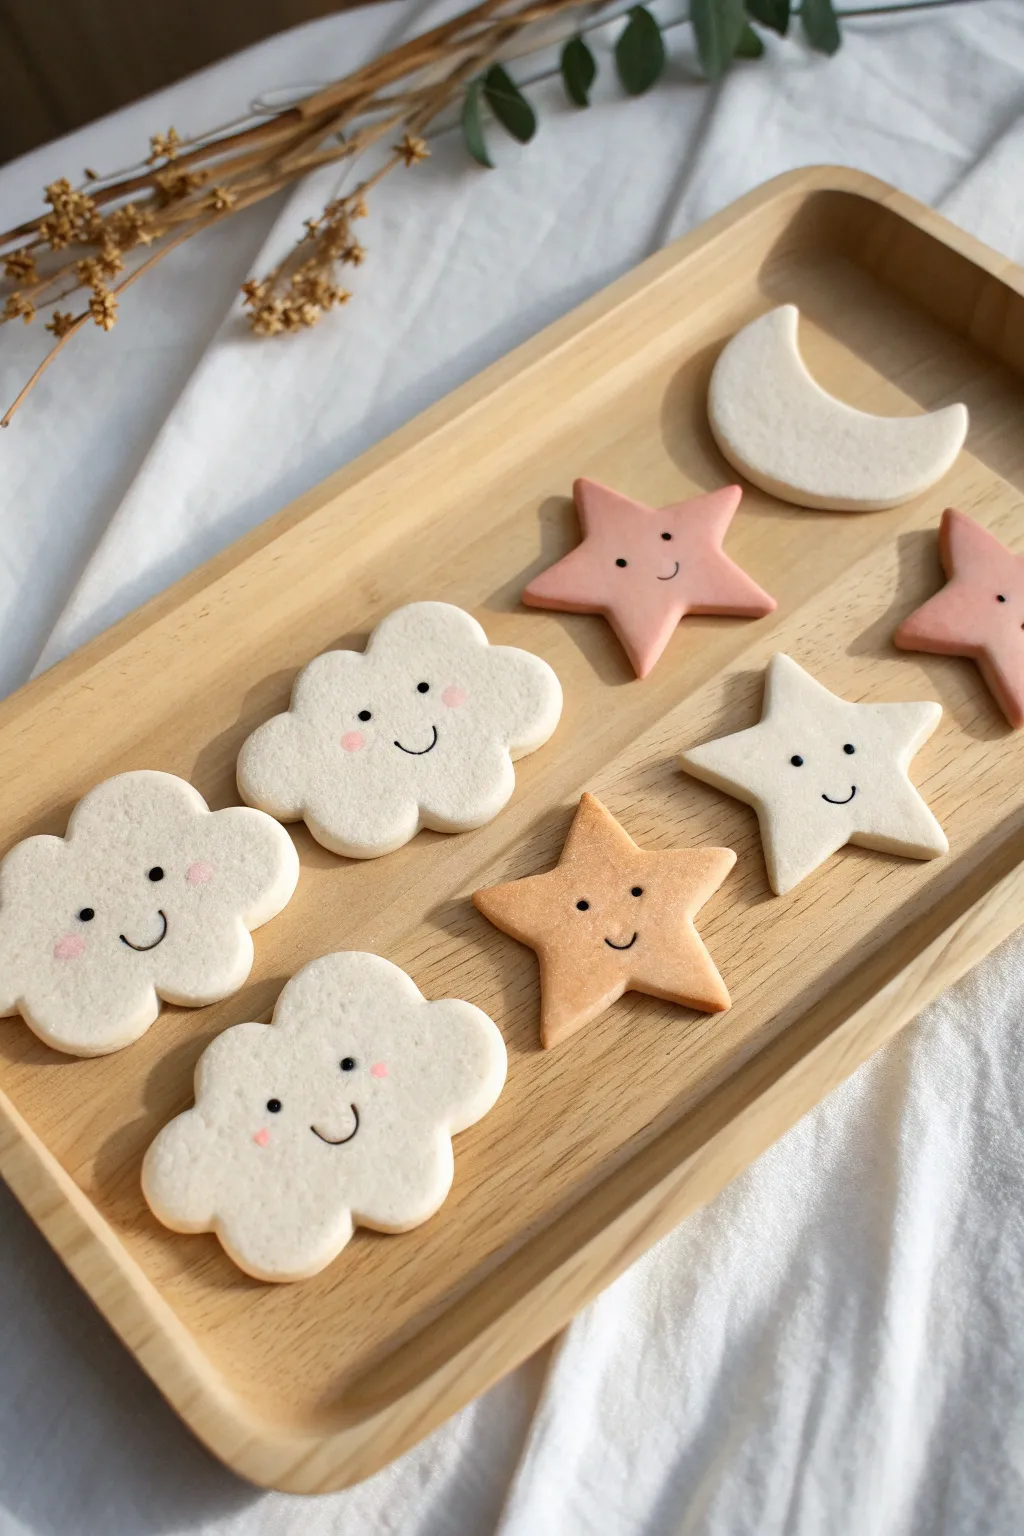
Transform simple clay into a sweet celestial collection featuring smiling clouds, twinkling stars, and a peaceful crescent moon. These matte-finish friends have a soft, marshmallow-like appearance that adds a touch of whimsy to any magnetic surface.
Step-by-Step
Materials
- White air-dry clay (or polymer clay)
- Acrylic paints (Soft pink, peach, white)
- Fine-grit sandpaper
- Rolling pin
- Cookie cutters (cloud, rounded star, moon)
- Black fine-tip acrylic paint pen or permanent marker
- Small round paintbrush or dotting tool
- Strong craft magnets
- Strong craft glue (E6000 or similar)
- wax paper or non-stick mat
Step 1: Shaping the Sky
-
Condition the Clay:
Begin by kneading your white clay until it is warm, soft, and pliable. If you are using polymer clay, make sure there are no air bubbles trapped inside. -
Roll it Out:
Place your clay on a piece of wax paper or a non-stick mat. Roll it out to an even thickness of about 1/4 inch (6mm). You want them thick enough to be sturdy but not too heavy for the magnets. -
Cut the Shapes:
Using your cookie cutters, press firmly into the clay to create three clouds, a few stars, and a crescent moon. If you don’t have cutters, you can lightly sketch the shape with a needle tool and cut it out with a craft knife. -
Soften the Edges:
Dip your finger in a tiny bit of water and gently run it along the cut edges of each shape. This smooths out any harsh lines and gives the pieces that soft, puffy ‘cookie’ look visible in the photo. -
Dry or Bake:
If using air-dry clay, let the pieces sit undisturbed on a flat surface for 24-48 hours, flipping halfway through. If using polymer clay, bake according to the package instructions. -
Sand for Perfection:
Once fully cured and cool, examine your pieces. Use fine-grit sandpaper to gently buff away any fingerprints or rough spots on the surface or edges.
Smooth Operator
For the smoothest surface, roll your clay between two wooden rulers or dowels. This acts as a depth guide so every single magnet is exactly the same thickness.
Step 2: Adding Color & Character
-
Tinting the Stars:
Keep the clouds and one star pure white. For the colored stars, dilute a tiny drop of pink or peach acrylic paint with water to create a wash, or mix colored clay into your white base during the first phase for a solid color. -
Paint Application:
Apply your color to the pink and beige stars. I like to use a matte finish to keep the soft aesthetic, so avoid glossy sealers here. -
Drafting the Faces:
Before committing to ink, you might want to lightly mark where the eyes and mouth will go using a pencil. Aim for the lower center of the shape to achieve that ‘cute’ ratio. -
Drawing the Eyes:
Using a fine-tip black paint pen or a very small dotting tool dipped in black paint, place two small dots for the eyes. Space them somewhat wide apart for a sweeter expression. -
Creating the Smiles:
Draw a small, simple ‘U’ shape between and slightly below the eyes. Keep the line thin and delicate. -
Adding Rosy Cheeks:
Dip a cotton swab or a dry paintbrush into a tiny amount of soft pink paint (or even real powder blush). Dab off almost all the pigment on a paper towel first. -
Blushing the Clouds:
Gently press the pink pigment onto the clay just outside the smile line to create soft, diffused rosy cheeks. -
Sealing (Optional):
If you want to protect the paint without adding shine, apply a very thin layer of matte varnish spray.
Step 3: Final Assembly
-
Prepare the Backs:
Flip your shapes over to the back side. Ensure the spot where the magnet will go is clean and dust-free. -
Attaching Magnets:
Place a dab of strong craft glue on the back of the clay piece and press your magnet firmly into it. Let the glue cure completely for at least an hour or two before testing them on your fridge.
Make it Sparkle
Before the clay dries or bakes, lightly dust the surface with edible luster dust or fine mica powder. It gives a dreamlike shimmer without looking like chunky glitter.
Now you have a charming set of celestial magnets ready to brighten up your workspace or kitchen
Mini Mushroom Friends
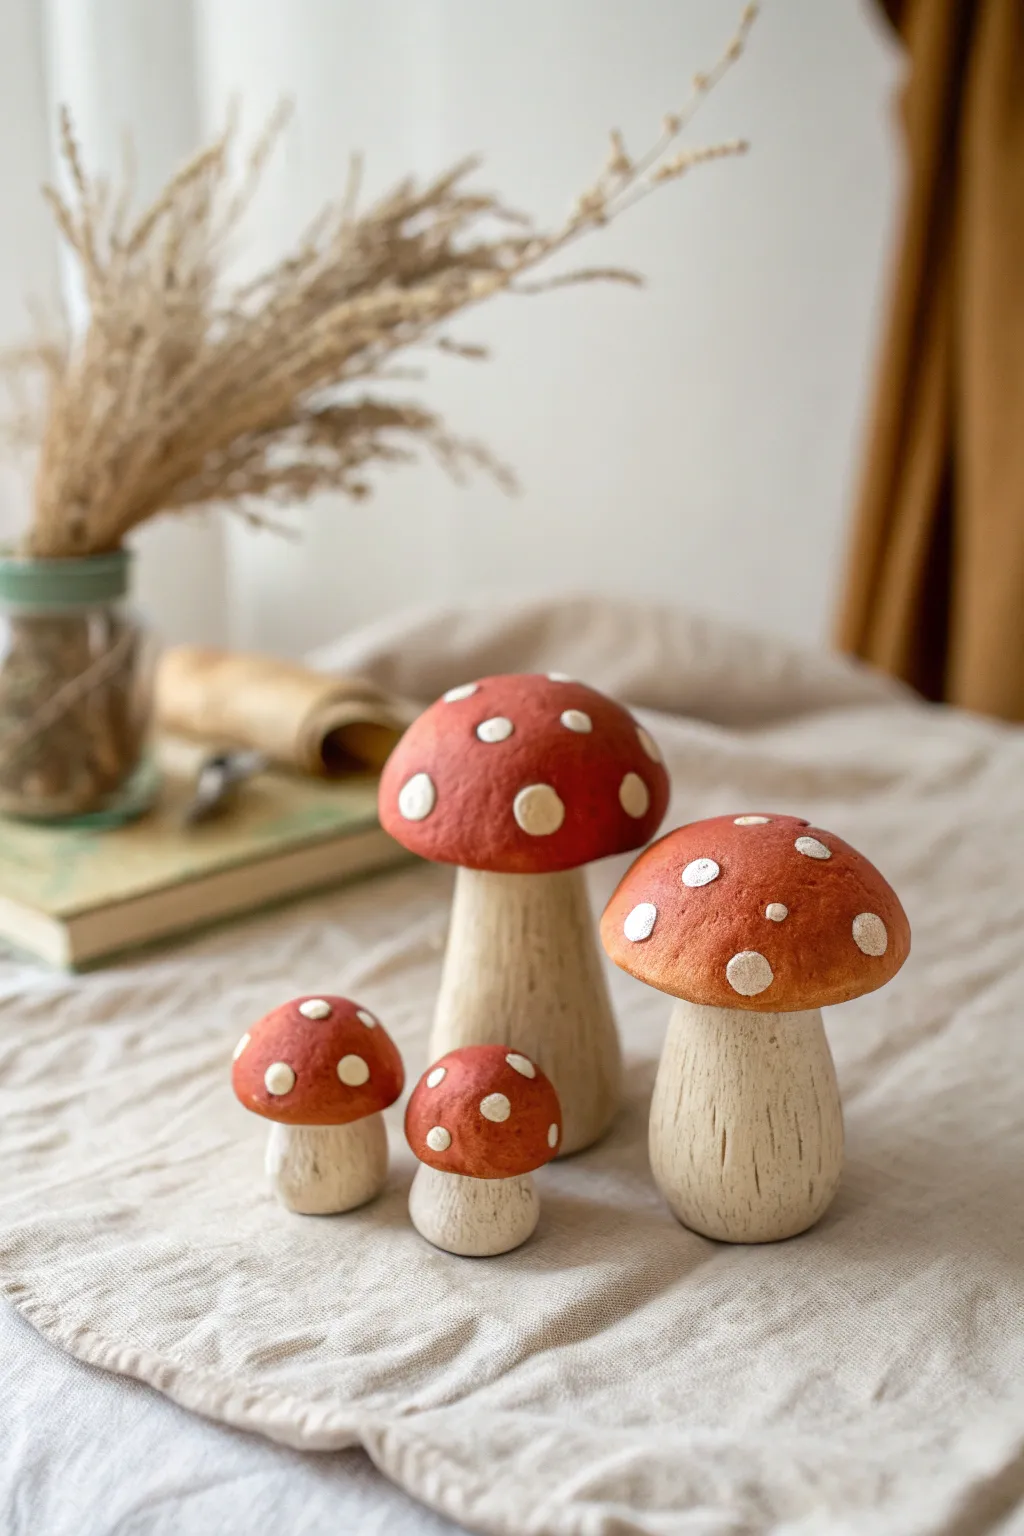
These charming clay mushrooms bring a touch of the forest floor right into your home with their rustic textures and classic fairytale colors. They feature chunky, wood-grain stems topped with matte red caps speckled with imperfect white dots for a handmade, earthy feel.
Detailed Instructions
Materials
- Air-dry clay (white or terracotta)
- Aluminum foil (for armature)
- Sculpting tools (needle tool and a flat spatula tool)
- Acrylic paints (Warm Red, Burnt Umber, Cream/Off-White, White)
- Stiff bristle paintbrush
- Fine detail paintbrush
- Water cup
- Matte varnish or sealant
Step 1: Sculpting the Base
-
Create foil cores:
Start by scrunching aluminum foil into rough shapes for the mushroom stems and caps. Create four sets: two large and two small. This saves clay and keeps the sculptures lightweight. -
Cover the stems:
Roll out a slab of clay to about 1/4 inch thickness. Wrap the clay around your foil stem shape, smoothing the seams together with a bit of water until the join is invisible. -
Shape the base:
Gently tap the bottom of the stem against your table to flatten it so the mushroom stands independently. Taper the top of the stem slightly where the cap will sit. -
Form the caps:
Cover the foil cap shapes with clay, molding them into domes. For a natural look, don’t make them perfectly spherical; let them be a bit lumpy or uneven. -
Attach cap to stem:
Score (scratch) the top of the stem and the underside of the cap. Add a dab of water or liquid clay (slip) to the scratched areas and press them firmly together. Smooth the clay at the connection point underneath. -
Texturize the stems:
Using a needle tool or a stiff wire brush, drag vertical lines down the length of the stem. Vary the pressure to create deep and shallow grooves that mimic wood grain or bark. -
Refine the cap texture:
Take a stiff bristle brush or a textured sponge and gently tap it all over the red cap area to remove fingerprints and add a subtle porous texture. -
Add the spots:
Roll tiny balls of fresh clay in varying sizes. Press them flat onto the mushroom caps to create the iconic Fly Agaric spots. Press them down firmly so they integrate with the cap surface rather than just sitting on top. -
Dry completely:
Set your mushrooms aside to dry. Depending on the humidity and thickness, this usually takes 24 to 48 hours. Turn them occasionally so the bottoms dry out too.
Loose cap?
If a cap falls off after drying, don’t worry. A dab of strong super glue or E6000 will reattach it permanently. The paint will cover any glue lines.
Step 2: Painting and Finishing
-
Base coat the stems:
Paint the stems with a cream or off-white acrylic paint. You want this base opaque, so apply a second coat if needed. -
Add an antique wash:
Mix a tiny amount of Burnt Umber paint with lots of water to create a wash. Brush this over the stem, letting the dark color settle into the texture grooves. -
Wipe back the wash:
Immediately wipe the stem gently with a paper towel or rag. This removes the brown from the raised areas but leaves it in the cracks, highlighting that wood-grain texture we sculpted earlier. -
Paint the caps:
Carefully paint around the white clay dots using a warm red acrylic paint. I find using a smaller flat brush helps get clean lines around the circles. -
Paint the dots:
Paint the raised clay dots with a clean white or slightly off-white color. A slightly creamy white looks more organic than a stark bright white. -
Dry brush highlights:
Take a dry brush with a tiny amount of lighter red or orange paint. Lightly dust the very top of the cap to give it dimension and a sun-faded look. -
Seal the work:
Finish with a coat of matte varnish. Avoid glossy finishes for this project, as the matte look contributes to the natural, earthy aesthetic shown in the photo.
Add mossy vibes
Glue small bits of dried moss or faux grass to the very bottom of the stems. It grounds the mushrooms and makes them look freshly plucked from the forest.
Group your new fungal friends on a bookshelf or mantle for an instant cottagecore update

TRACK YOUR CERAMIC JOURNEY
Capture glaze tests, firing details, and creative progress—all in one simple printable. Make your projects easier to repeat and improve.
Dainty Bow Charms
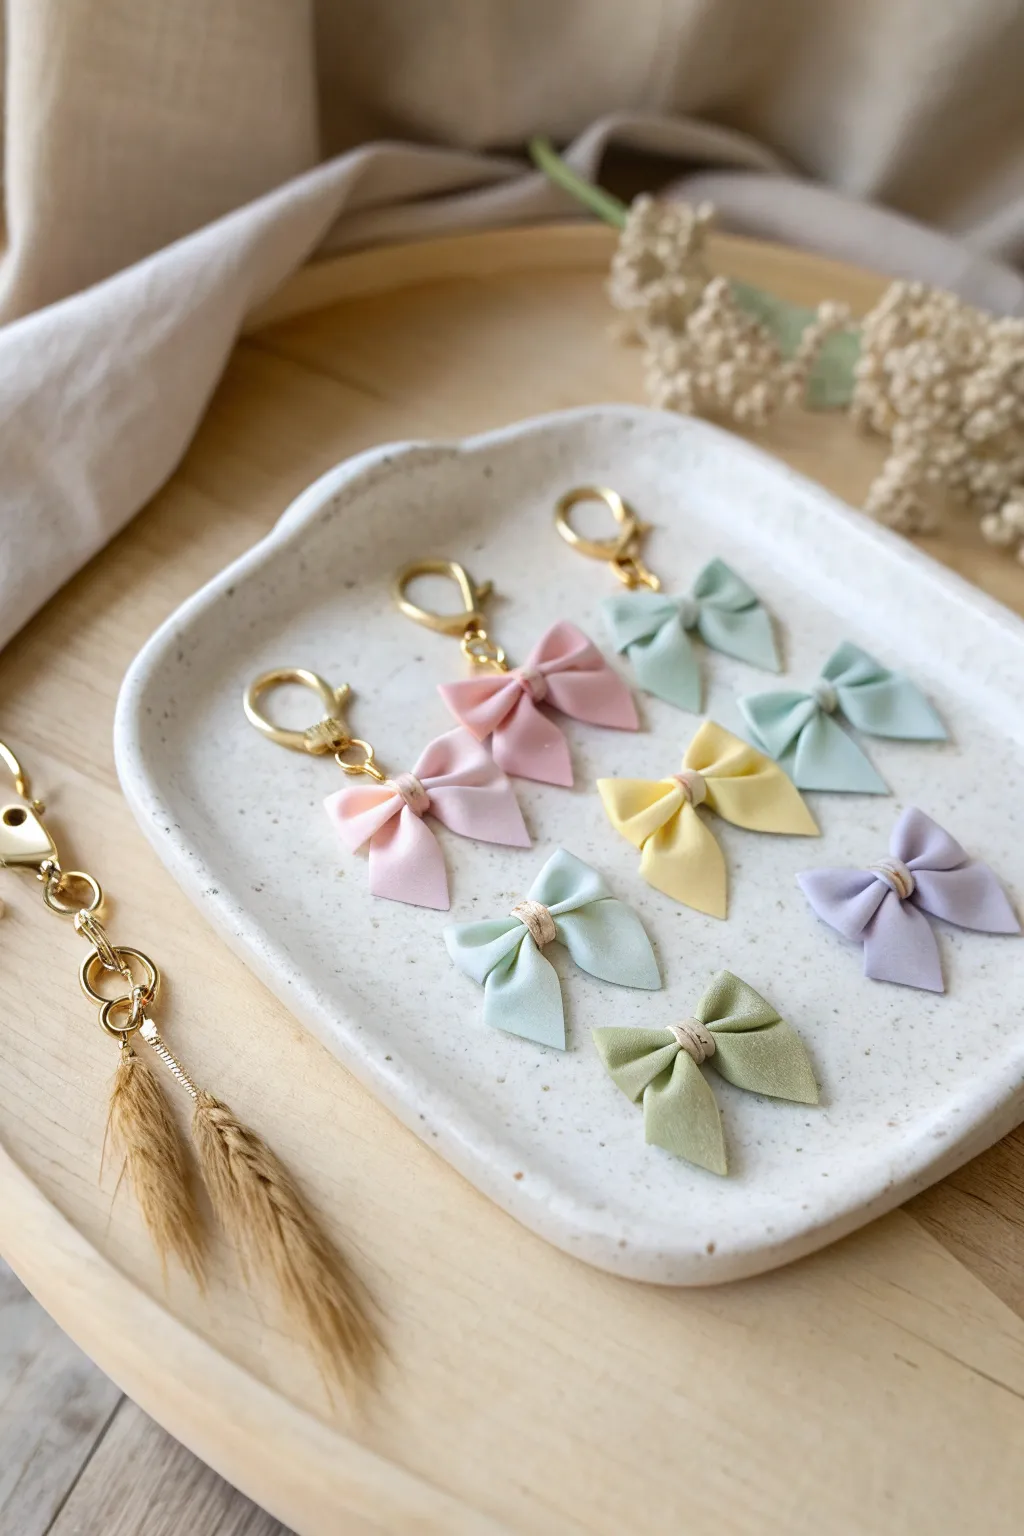
These incredibly sweet bow charms mimic the soft drape of fabric but are durable enough for daily use. Perfect for keychains or stitch markers, this beginner-friendly project teaches you how to create realistic folds and dainty details with simple tools.
Step-by-Step Guide
Materials
- Polymer clay in pastel shades (soft pink, sage green, lavender, pale yellow, baby blue)
- Beige or tan polymer clay for the center knots
- Rolling pin or pasta machine
- Flexible tissue blade or craft knife
- Needle tool or toothpick
- Small jump rings (gold or silver)
- Lobster clasps or keychain hardware
- Jewelry pliers (flat nose and round nose)
- Small dotting tool or ball stylus
- Smooth work surface (ceramic tile or glass mat)
Step 1: Preparing the Clay Sheets
-
Condition the clay:
Begin by thoroughly conditioning your pastel clay colors until they are soft and pliable. Warm clay is essential for getting those smooth, fabric-like folds without cracking. -
Roll it out:
Roll your conditioned clay into a thin, even sheet, approximately 1.5mm to 2mm thick. If you’re using a pasta machine, a setting around ‘4’ or ‘5’ usually works best for delicate bows. -
Cut the strips:
Use your flexible blade to cut a long, rectangular strip for each bow. Aim for strips that are about 1 cm wide and 6 cm long. Trim the ends cleanly so they are straight.
Soft Fingerprints
To remove fingerprints without ruining the texture, lightly brush the raw clay with a little baby oil or cornstarch before baking. It smooths the surface instantly.
Step 2: Forming the Bow Loops
-
Fold the ends:
Take one strip and fold both ends toward the center so they meet in the middle. Press them down gently just at the center point to secure the basic loop shape. -
Pinch the center:
Carefully pinch the center of the folded strip between your thumb and forefinger to create an accordion-style gather. This creates the ‘cinched’ waist of the bow. -
Shape the loops:
Insert the rounded end of a paintbrush handle or a dotting tool inside each loop to puff them out slightly, giving them a rounded, 3D shape rather than a flat one. -
Add texture:
Use your needle tool to gently impress soft creases radiating from the center pinch outward. This mimics the tension lines you see in real fabric bows.
Drooping Loops
If your bow loops collapse while you work, tuck small balls of tissue paper or cotton inside the loops to support them during baking. Remove them after cooling.
Step 3: Creating the Tails
-
Cut tail pieces:
From your remaining clay sheet, cut smaller rectangles, approximately 1 cm wide and 2.5 cm long. -
Cut the V-shape:
Use your blade to cut a ‘V’ notch into the bottom of each small rectangle to create the classic ribbon tail look. -
Attach the tails:
Place two tail pieces underneath the pinched center of your main bow loops. Press them gently to the back of the bow so they adhere. -
Shape the drape:
Gently ripple the tails with your fingers or a tool so they look like they are flowing naturally, rather than lying completely flat and stiff.
Step 4: Adding the Knot and Hardware
-
Make the center knot:
Roll a very thin snake of the beige or tan clay. Flatten it slightly with your finger. -
Wrap the center:
Wrap this thin beige strip around the center of the bow, covering the seam where the loops and tails meet. Trim the excess at the back and smooth the join. -
Insert the hardware:
While the clay is still raw, gently push a reasonably large jump ring into the top of the bow loops (either through one loop or centrally if robust enough), or use an eyepin inserted into the center knot. I find embedding an eyepin is often sturdier. -
Secure the metal:
Smooth the clay around the insertion point of the metal finding to ensure it is trapped securely within the clay structure.
Step 5: Baking and Assembly
-
Bake carefully:
Place your bows on a ceramic tile or baking sheet lined with parchment paper. Bake according to the manufacturer’s instructions for your specific brand of clay (usually around 275°F/135°C for 15-30 minutes). -
Cool down:
Allow the bows to cool completely inside the oven or on the tray before handling them. This prevents the delicate clay loops from snapping while warm. -
Attach clasps:
Once cool and hard, use your pliers to open the jump rings attached to the lobster clasps. Loop them through the embedded jump ring or eyepin on your bow. -
Final check:
Close the jump rings securely with your pliers, ensuring there is no gap for the charm to slip through.
Enjoy styling these charming little bows on your tote bags or planners for a touch of pastel sweetness
Tiny Totoro-Free “Forest Sprites”
Create a whimsical family of tiny forest guardians using simple shapes and natural textures. These adorable figurines combine the charm of mushrooms with the rustic look of acorns, perfect for a fall display.
Detailed Instructions
Materials
- Polymer clay (white, beige, translucent, various browns, russet)
- Acrylic paints (black, pink, white)
- Dotting tools or toothpicks
- Texture tools (needle tool, stiff toothbrush, or actual acorn cap)
- Soft pastel chalks (browns, ochres)
- Small paintbrush
- Aluminum foil (for armature if making larger ones)
- Baking sheet and parchment paper
- Matte varnish
Step 1: Shaping the Bodies
-
Mix the Base Color:
Start by mixing white polymer clay with a tiny amount of beige or translucent clay. You want an off-white, creamy color that looks remarkably like a natural mushroom stem. -
Form the Stems:
Roll balls of your mixed clay in varying sizes. Gently roll them into thick cylinders or teardrop shapes with flattened bottoms so they stand upright on their own. -
Refine the Shapes:
Tap the tops flat where the caps will sit. Don’t worry about perfection; slightly chubby or uneven shapes add organic character to your sprites. -
Add Speckles:
Using a needle tool or toothpick, gently poke tiny, shallow holes all over the body. This mimics the porous texture of a mushroom stem. -
Pre-Shading:
Before baking, use a soft brush to dust a little brown pastel chalk near the bottom of the sprites to make them look like they’ve been sitting in soil.
Uneven Standing?
If a sprite wobbles, gently sand the bottom against a piece of fine-grit sandpaper after baking until it sits perfectly flat.
Step 2: Creating the Acorn Caps
-
Prepare Cap Colors:
Choose different shades of brown for the hats. You can use lighter tans, warm russets, or deep chocolate browns to give each sprite a unique personality. -
Shape the Domes:
Roll balls of brown clay and flatten them slightly into domes. Press these firmly onto the tops of your stems, ensuring a good bond between the two pieces of clay. -
Add the Stalks:
Roll tiny snakes of clay and attach a small nub to the very top center of each cap. Pinch and twist gently to create a realistic stem look. -
Texture the Caps:
This is the fun part. Use a needle tool to scratch vertical lines or random dashes radiating from the top center down to the rim. For others, poke tiny stippled holes or use a crumpled ball of foil to press in a rough texture. -
Highlight the Texture:
Dust a slightly darker shade of brown pastel powder over the textured caps. The powder will settle into the grooves you just made, instantly adding depth and realism.
Step 3: Baking and Features
-
Bake the Sprites:
Place your figures on a baking sheet lined with parchment paper. Bake according to your specific clay manufacturer’s instructions (usually 275°F/135°C for 15-30 minutes depending on thickness). -
Cool Down:
Let the figures cool completely before handling. I like to let them sit for at least an hour, as the clay hardens fully as it returns to room temperature. -
Paint the Eyes:
Using a small dotting tool or the head of a pin dipped in black acrylic paint, gently stamp two wide-set eyes onto the face area. -
Add the Smiles:
With an ultra-fine detail brush or the very tip of a toothpick, paint a tiny, thin U-shape between the eyes for a sweet smile. -
Blush the Cheeks:
Dip a fresh dotting tool into pink paint and add rosy cheeks just below the eyes. For a softer look, dab off most of the paint on a paper towel first. -
Seal the Work:
Once the paint is completely dry, brush a thin layer of matte varnish over the sculptures to protect the paint and eliminate any unnatural shine from the clay.
Make it a Charm
Insert a metal eye screw into the top of the acorn hat before baking to turn these into adorable zipper pulls or necklaces.
Arranging your little sprite family on a wood slice or near a potted plant creates an instant bit of forest magic
Mini Donut and Cookie Charms
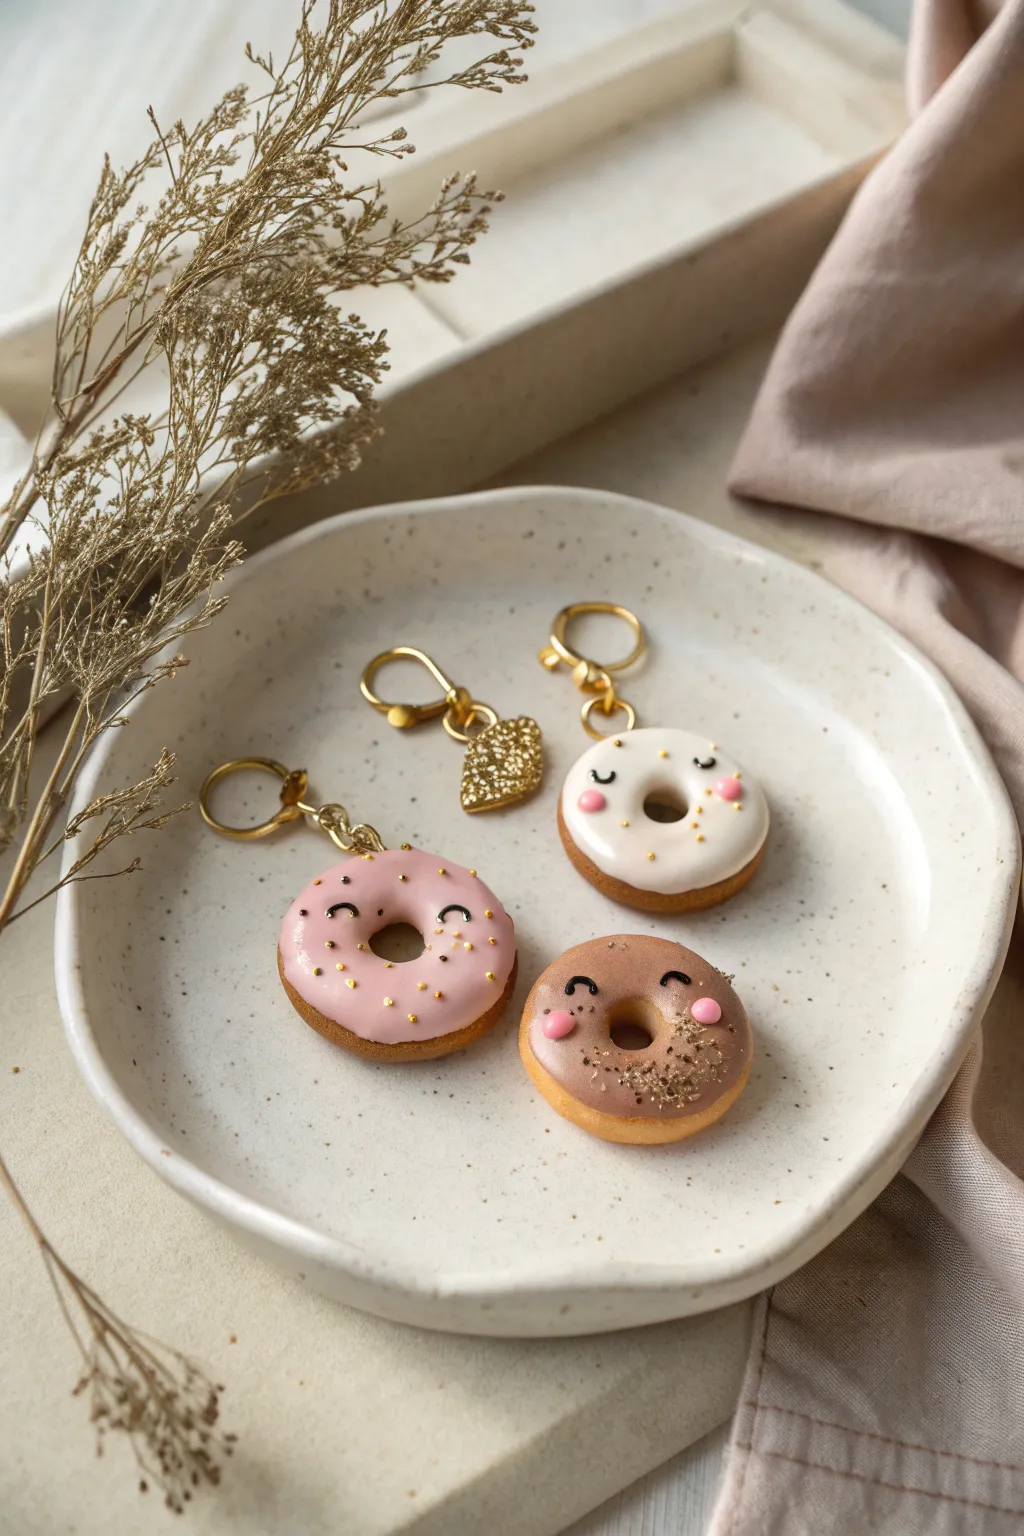
These adorable, bite-sized polymer clay charms feature sweet smiling faces and golden details. Perfect for keychains or stitch markers, they add a touch of playful elegance to your everyday accessories.
Step-by-Step
Materials
- Polymer clay (Tan/Beige for dough, Pink, White, Light Brown for icing)
- Liquid translucent polymer clay (Fimo liquid or similar)
- Gold glitter or gold mica powder
- Gold findings (lobster clasps, jump rings, screw eye pins)
- Black acrylic paint or fine detail pen
- Small ball tool or dotting tool
- Needle tool
- Soft pastel chalks (pink for cheeks, brown for shading)
- Gloss glaze (UV resin or polyurethane varnish)
- Small paintbrush
- Heart-shaped cutter (tiny size)
Step 1: Shaping the Dough Base
-
Condition the clay:
Start by warming up your tan or beige clay in your hands until it becomes soft and pliable. This prevents cracks later on. -
Form the donuts:
Roll three small balls of clay, each about the size of a marble. Flatten them slightly into thick discs. -
Create the hole:
Use the back of a small paintbrush or a dedicated tool to press a hole through the center of each disc, widening it gently to get that classic donut shape. -
Round the edges:
Softly tap the edges with your finger to remove any sharp angles, making the ‘dough’ look baked and puffy. -
Make the cookie heart:
Roll a smaller piece of tan clay flat and use your tiny heart cutter to punch out a shape for the heart charm accessory. -
Add texture:
Gently tap a toothbrush or crumpled foil over the surface of the donuts and the heart to mimic a realistic baked texture. -
Shade the dough:
Using a dry brush, dust a little brown soft pastel powder around the edges and center hole to give it a ‘golden brown’ baked look.
Fixing sticky icing
If your liquid clay icing is too runny and dripping too much, mix in a tiny pinch of cornstarch or let it sit on a piece of paper for 10 minutes to leach out excess plasticizer before applying.
Step 2: Applying Icing
-
Prepare the icing:
Mix a small amount of liquid translucent clay with your pink, white, and brown solid clays separately to create a thick, creamy paste consistency for the icing. -
Frost the donuts:
Carefully apply the colored ‘icing’ mixtures onto the top of your donut shapes. I like to let it drip naturally down the sides just a tiny bit for realism. -
Frost the heart:
Coat the entire top surface of the heart charm with a thin layer of liquid clay to act as an adhesive. -
Add the glitter:
Sprinkle coarse gold glitter heavily onto the heart charm until fully covered. Add a pinch of glitter to the donuts as ‘sprinkles’ too.
Step 3: Wait, Face & Finish
-
Insert hardware:
Screw a small eye pin into the top of each charm. Adding a tiny dab of liquid clay on the screw threads helps secure it permanently. -
Bake carefully:
Bake the pieces according to your clay package instructions (usually around 230°F/110°C for 15-30 minutes). Let them cool completely before handling. -
Paint the eyes:
Using a superfine brush and black acrylic paint (or a detail pen), draw two small U-shapes for sleeping eyes. -
Add rosy cheeks:
Mix a tiny bit of pink paint or use small dots of unbaked clay (if you prefer to rebake) to add the flushed cheeks under the eyes. -
Apply gold accents:
Use a toothpick to add tiny dots of gold paint or apply real gold leaf flakes as extra sprinkles for an elegant touch. -
Seal the piece:
Coat the icing area (avoiding the textured dough) with a gloss glaze or UV resin to make it shine like real glaze. -
Assemble the keychain:
Once fully dry, use jump rings to attach the donut charms and the heart accent to your gold lobster clasp keychains.
Scented Charms
Mix a drop of vanilla or chocolate fragrance oil into the clay before baking. The heat sets the scent, making your charms smell as sweet as they look.
Clip these sweet treats onto your zipper or bag for an instant dose of happiness
Rainbow Arch Shelf Decor
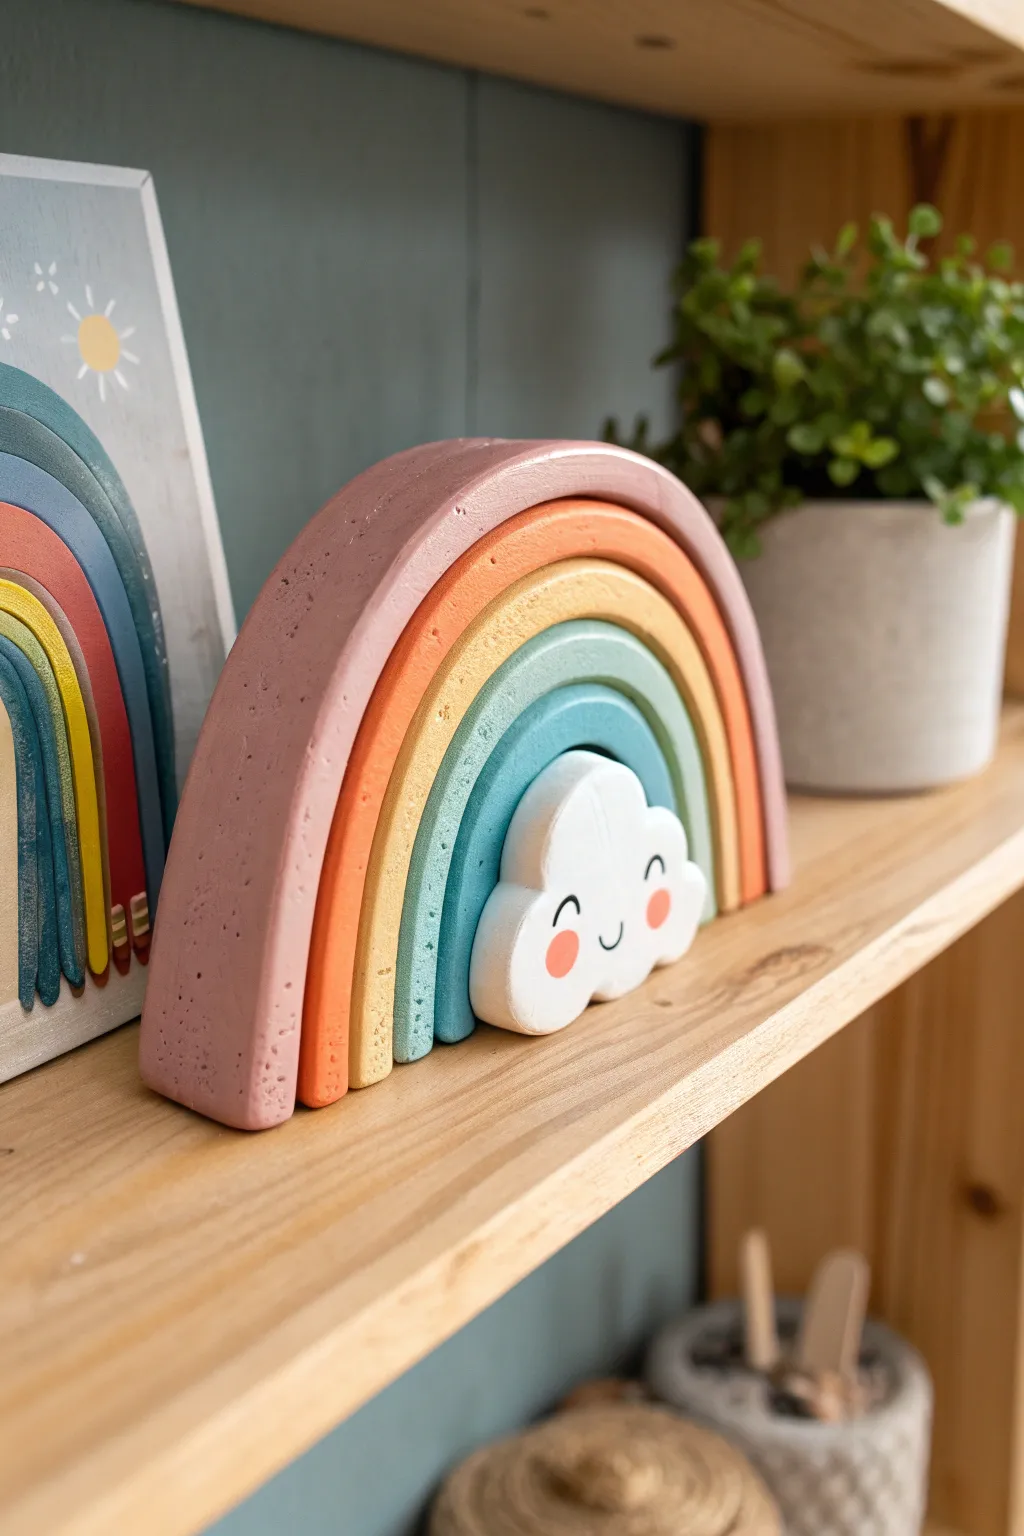
Brighten up any bookshelf with this adorable, chunky rainbow arch featuring a sweet little cloud nestled right in the center. Its soft, matte finish and pastel color palette give it a modern nursery vibe that’s surprisingly simple to sculpt by hand.
Step-by-Step Tutorial
Materials
- Air-dry clay (white) or polymer clay
- Acrylic rolling pin
- Clay knife or craft blade
- Fine-grit sandpaper
- Acrylic paints (dusty pink, terracotta, mustard yellow, teal, light blue, white, black, rosy pink)
- Small flat paintbrush
- Detail brush for the face
- Matte varnish or sealant
- Ruler
- Parchment paper or silicone mat
Step 1: Sculpting the Arches
-
Prepare your workspace:
Lay down a sheet of parchment paper or a silicone mat to prevent sticking. Knead your clay until it’s pliable and smooth, removing any air bubbles. -
Roll the main slab:
Roll out a large portion of clay into a thick, even slab, approximately 1/2 to 3/4 inch thick. You want it chunky enough to stand upright on its own. -
Cut the clay strips:
Using a ruler and your craft knife, cut five long strips of clay. They should all be the same width (about 3/4 inch), but their lengths will vary. -
Form the smallest arch:
Take the shortest strip and curve it into a tight U-shape. This will be the innermost arch layer (the teal/blue one). Stand it up to ensure the bottom edges are flat and flush. -
Layer the remaining arches:
Take the next strip, curve it gently over the first arch to measure the length, trim the excess, and press it snugly against the previous layer. Repeat this for all five strips, building outward. -
Create separation:
Once all layers are formed together, carefully separate them just slightly so they can dry individually, or score lines between them if you prefer a solid block. For this look, individual arches glued later often works best for clean painting. -
Sculpt the cloud:
Roll a ball of clay and flatten it slightly into a thick oval. Use your fingers to mold bumps along the top edge to create a fluffy cloud shape. Ensure the bottom is perfectly flat so it stands stably. -
Check the fit:
Place the cloud inside the smallest arch to ensure it fits snugly. Adjust the size if necessary, then set everything aside. -
Dry the pieces:
Let all pieces dry completely according to your clay’s package instructions. Flip them occasionally to prevent warping.
Wobbly Arch Fix
If arches won’t stand straight, sand the bottom of the whole stack on a flat surface sandpaper sheet.
Step 2: Painting and Assembly
-
Sand for smoothness:
Once fully dry, gently sand any rough edges or uneven surfaces with fine-grit sandpaper. Wipe away the dust with a slightly damp cloth. -
Paint the outer arch:
Paint the largest arch in a dusty pink shade. Apply thin, even coats, letting them dry in between to avoid brush strokes. -
Paint the middle layers:
Work your way inward with your palette: terracotta orange for the second arch, mustard yellow for the third, and a soft teal for the fourth. -
Paint the inner arch:
Paint the smallest, innermost arch a light blue. I find using a flat brush helps get crisp edges on these curved shapes. -
Detail the cloud:
Paint the cloud entirely white. Once dry, use a detail brush and black paint to add two small curved eyes and a tiny U-shaped smile. Add two rosy pink circles for cheeks. -
Assemble the rainbow:
If you separated the arches, apply strong craft glue or super glue between the layers and press them together firmly. Ensure the bottom remains flat. -
Attach the cloud:
Apply a dab of glue to the bottom and back of the cloud, then nestle it securely inside the center arch. -
Seal the project:
Finish by applying a coat of matte varnish over the entire piece to protect the paint and give it a professional, finished look.
Level Up: Texture
Before drying, gently press a textured sponge onto the cloud to give it a soft, fluffy surface appearance.
Place your charming new sculpture on a shelf or desk where it can bring a daily smile to your face
Cute Toothbrush or Brush Holder

Brighten up your morning routine with this minimalist, earthy toothbrush holder that features the sweetest little face. The warm terracotta tone and simple cylindrical shape give it a modern handmade charm that fits perfectly on any bathroom shelf.
Step-by-Step Guide
Materials
- Terracotta air-dry clay or polymer clay
- Rolling pin
- X-acto knife or clay blade
- Ruler
- Small cup or circular cookie cutter (approx. 2.5-3 inches diameter)
- Slip (water mixed with clay scraps) or liquid clay adhesive
- Smoothing sponge and water
- Black acrylic paint
- Fine detail paintbrush (size 0 or 00)
- Matte spray varnish or waterproof sealant
Step 1: Building the Form
-
Prepare the clay:
Start by conditioning your terracotta clay. Knead it in your hands until it is pliable, warm, and free of air bubbles or cracks. -
Roll the slab:
Roll out the clay onto a flat surface to an even thickness of about 1/4 inch. If you want perfectly even walls, place two magazines of equal thickness on either side of your dowel as guides. -
Cut the base:
Use your circular cookie cutter or trace around a small cup to cut out the base circle for your holder. Set this aside gently. -
Measure the walls:
Measure the circumference of your base circle. You will need a rectangle that is this length plus a tiny bit extra for overlap, and about 3.5 to 4 inches tall. -
Cut the rectangle:
Using your ruler and blade, cut a clean, straight rectangle from the remaining slab according to your measurements. -
Roughen the edges:
Score the outer edge of your circle base and the bottom edge of your rectangle using a needle tool or fork to create a rough texture. -
Attach the wall:
Apply a little slip or liquid clay to the scored areas. Carefully wrap the rectangle around the base circle, sitting it on top of the base rather than around the side. -
Join the seam:
Where the two ends of the rectangle meet, cut through both layers at an angle for a flush seam. Apply slip, press together, and smooth the clay with your finger or a tool until the line disappears. -
Smooth the interior:
Don’t forget the inside seam. Use a long tool or your finger to smooth the clay where the wall meets the floor to ensure it is watertight and sturdy.
Cracks Appearing?
If air-dry clay cracks while drying, mix a small amount of fresh clay with water to make a thick paste and fill the cracks, then sand smooth once dry.
Step 2: Refining and Decorating
-
Round the rim:
Dip your finger in a little water and gently run it along the top rim to soften the sharp cut edge into a nice, rounded lip. -
Final smooth:
Use a damp sponge to wipe down the entire exterior, removing fingerprints and ensuring a uniform terracotta texture. -
Drying time:
Let the piece dry completely. If using air-dry clay, this may take 24-48 hours; if using oven-bake clay, follow the package instructions for baking. -
Sanding:
Once fully dry or cured, lightly sand any rough spots with fine-grit sandpaper for a professional finish. -
Drawing the face:
Using a pencil, very lightly mark where you want the eyes and mouth. Center the face comfortably in the lower-middle half of the cylinder. -
Painting the details:
Dip your fine detail brush into black acrylic paint. Dot two small solid circles for eyes and add tiny dots outside them for cheeks if desired. -
Painting the smile:
I usually hold my breath for this part—carefully paint a thin, curved line for the smile. Keep it simple and delicate. -
Sealing:
Since this will live in a bathroom, apply 2-3 coats of a waterproof matte varnish inside and out to protect it from moisture.
Speckled Effect
create a faux-stone look by flicking a toothbrush loaded with diluted brown or white paint onto the cup before adding the face.
Now you have a cheerful little companion to greet you every time you brush your teeth
Octopus Pencil Topper
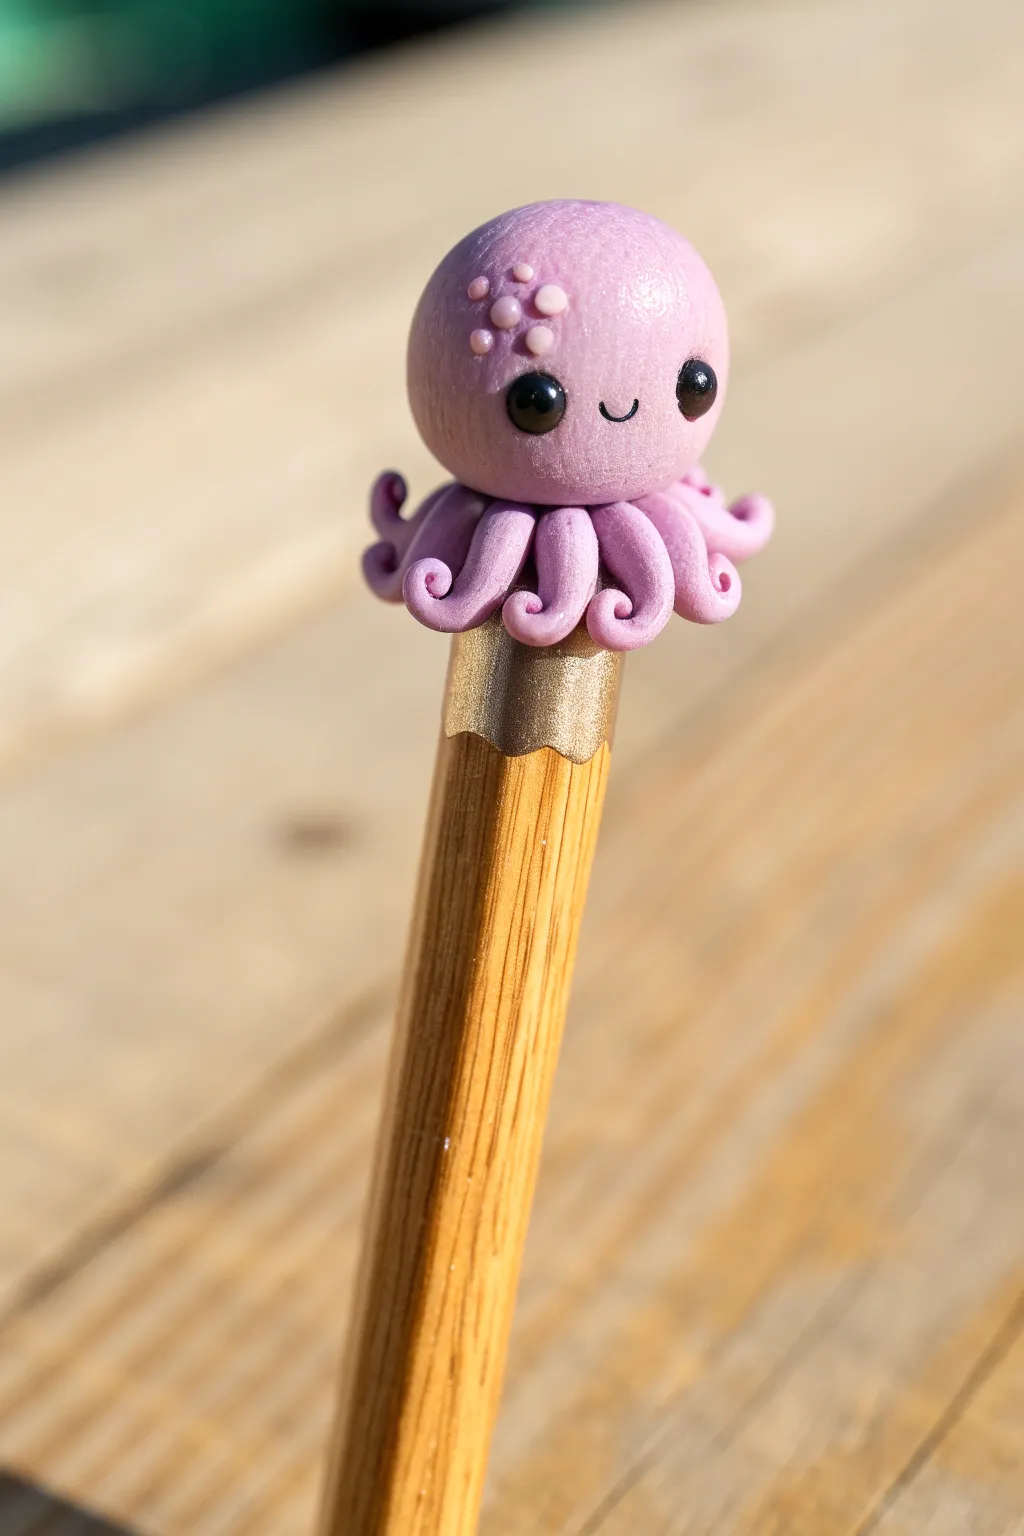
Transform a boring pencil into a charming writing companion with this adorable lilac clay octopus. This beginner-friendly project features curled tentacles and a sweet, smiling face that sits perfectly atop the metal ferrule of any standard pencil.
Step-by-Step Guide
Materials
- Polymer clay (lilac/light purple)
- Polymer clay (lighter pink or white for spots)
- Polymer clay (black for eyes)
- Standard wooden pencil with gold/metal ferrule
- Dotting tool or ball stylus
- Needle tool or toothpick
- Clay blade or craft knife
- Oven for baking
- Gloss glaze (optional)
Step 1: Prepping the Base
-
Cover the ferrule:
Take a small ball of lilac clay, about the size of a marble, and flatten it slightly. Press this onto the top of the pencil’s metal ferrule to create a base that grips the pencil securely. -
Smooth the transition:
Gently smooth the clay down over the metal part of the pencil so it sits flush, ensuring it won’t wobble later.
Loose fit?
If the baked topper slides off the pencil, add a drop of superglue inside the hole and slide it back on. The clay shrinks slightly but the wood might not bond perfectly on its own.
Step 2: Forming Tentacles
-
Create a coil:
Roll a snake of lilac clay on your work surface until it is roughly 3mm thick and even throughout. -
Cut segments:
Using your blade, cut the coil into about 8 equal segments, each approximately 1.5cm long. -
Taper the ends:
Roll one end of each segment between your fingers to make it slightly pointy, leaving the other end blunt. -
Attach the first tentacle:
Press the blunt end of one tentacle onto the clay base you created on the pencil, letting the pointed end hang down. -
Curl the tip:
Take the pointed tip and gently curl it upwards into a spiral shape. -
Complete the ring:
Repeat this process around the entire circumference of the pencil, spacing the tentacles evenly so they form a skirt of curls.
Tentacle Twist
Use a toothpick to help curl the tentacle tips. Wrap the thin clay end around the wood to get a tight, uniform spiral that holds its shape better than manual curling.
Step 3: Making the Head
-
Roll the head:
Roll a larger ball of lilac clay into a perfect sphere. This should be proportional to the tentacles, slightly larger than a marble. -
Attach to body:
Place the sphere directly onto the center of the tentacle ring. Press down gently to secure it without squashing the round shape. -
Blend seams:
I like to use a silicone tool or my finger to very lightly smooth the connection point underneath the head where it meets the tentacles.
Step 4: Adding Details
-
Make eye sockets:
Use a medium-sized ball stylus to press two indentations into the front of the face for the eyes. -
Insert eyes:
Roll two tiny balls of black clay. Place them into the sockets and press gently until they are secure. -
Carve the smile:
Use a needle tool or the edge of a small circular cutter to imprint a small, curved smile right between the eyes. -
Create spots:
Roll five or six tiny balls of the lighter pink clay. These should be very small, like poppy seeds. -
Apply spots:
Press these tiny balls onto the upper left side of the octopus’s forehead in a cluster. -
Texture the head:
For a matte, organic look, you can gently tap the surface with a toothbrush, or leave it smooth as shown in the photo.
Step 5: Finishing Up
-
Final check:
Check that the octopus is straight on the pencil and that all curls are secure. -
Bake:
Bake the clay directly on the pencil according to your clay package instructions (usually 275°F/130°C for 15-30 minutes). -
Cool down:
Let the pencil topper cool completely before using it, as warm clay is fragile.
Now you have a whimsical writing buddy to accompany your daily notes
Mini Photo or Note Holders
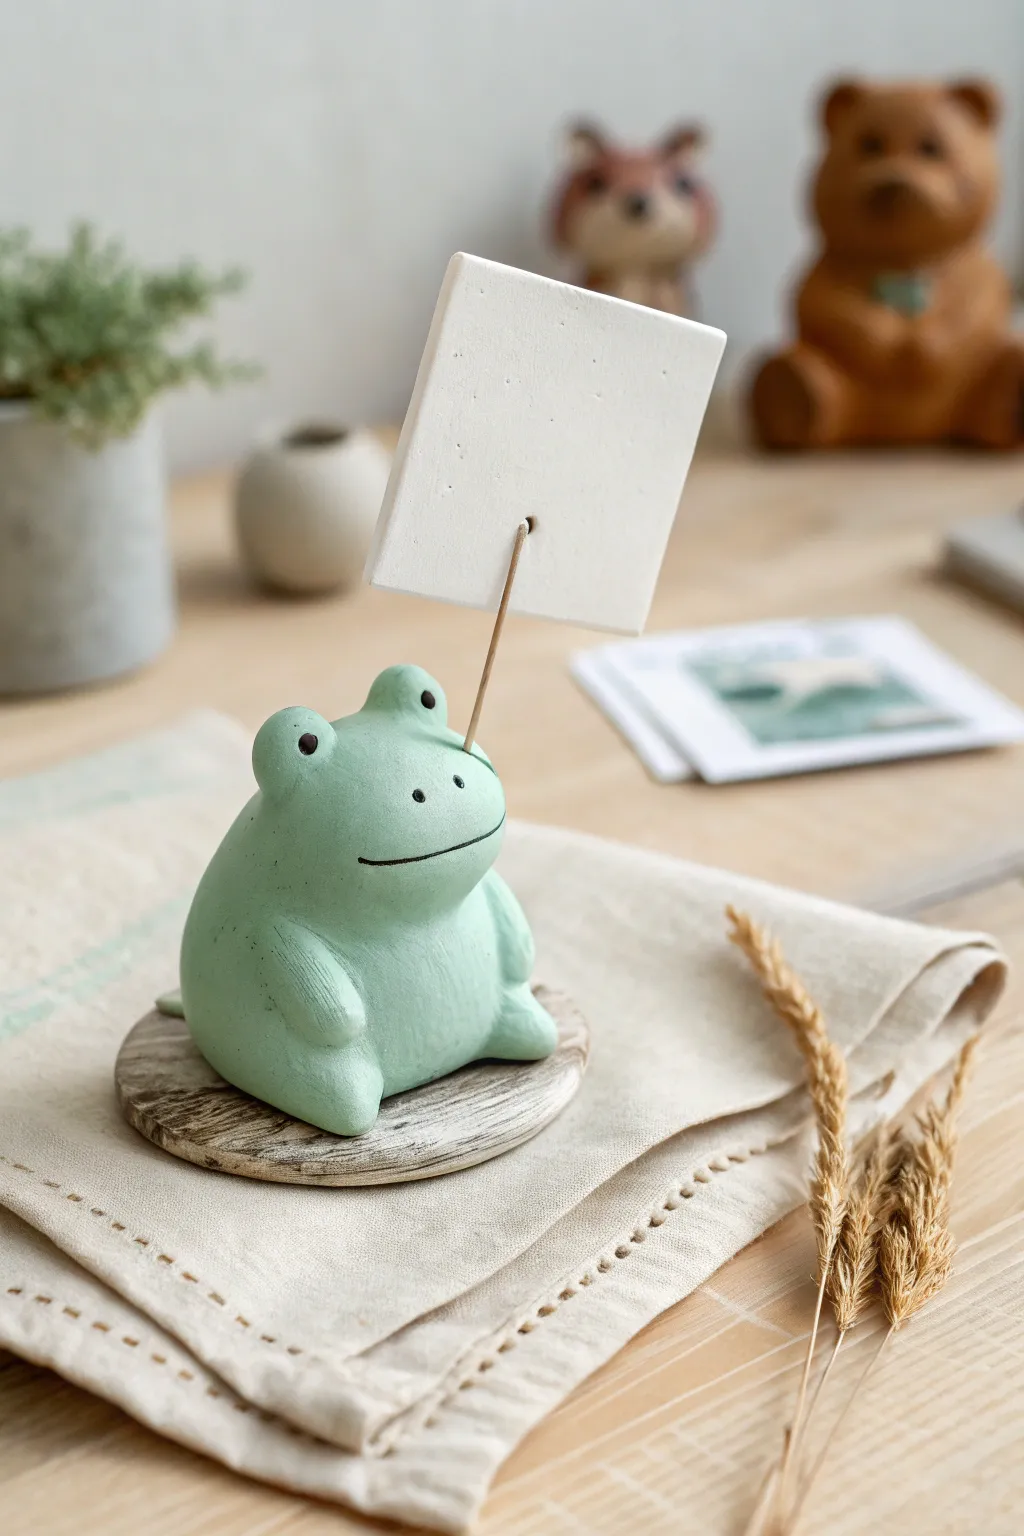
This adorable little amphibian serves a double purpose: keeping your desk company and holding your important reminders. With its soft mint green hue and simple rounded shapes, this clay frog is the perfect approachable project for beginners looking to make something functional.
How-To Guide
Materials
- Polymer clay (mint green or white mixed with green)
- White polymer clay
- Brown polymer clay (or wood finish acrylic paint)
- Thin crafting wire or a sturdy toothpick
- Basic sculpting tools (needle tool, smoothing tool)
- Black acrylic paint
- Fine tip paintbrush or dotting tool
- Rolling pin
- Texture sponge or toothbrush
- Baking sheet and parchment paper
- Gloss varnish (optional)
Step 1: Sculpting the Frog Body
-
Prepare the clay:
Start by conditioning your mint green clay until it is soft and pliable. If you don’t have the perfect shade, mix a small amount of green into white clay until you get a pastel mint tone. -
Form the base shape:
Roll a large ball of the green clay slightly tapering it towards the top to create a pear-like shape. This will be the main body and head combined. -
Flatten the bottom:
Gently tap the wider bottom of your pear shape onto your work surface to create a stable, flat base so the frog sits securely. -
Add the legs:
Roll two smaller balls of green clay for the legs. Press them gently against the lower sides of the body, blending the back seam so they look attached. -
Shape the feet:
Slightly pinch the front of the leg balls to suggest feet, keeping the shape rounded and cartoon-like rather than realistic. -
Create the arms:
Roll two small sausages of clay for the arms. Attach them to the front of the body, curving them slightly inwards as if the frog is resting its hands on its belly. -
Blend the seams:
Use a silicone smoothing tool or your finger to gently blend the clay where the arms meet the body, ensuring a seamless look.
Smooth Surface Secret
Before baking, lightly brush your unbaked clay with a little baby oil or cornstarch. This removes fingerprints and creates a professional finish.
Step 2: Adding Details & Base
-
Make the eyes:
Roll two very small balls of the green clay for the eye sockets. Place them on top of the head, spacing them slightly apart. -
Insert the holder rod:
Take your thin wire or toothpick. Insert it firmly into the center of the frog’s back or head, angling it slightly backward. Remove it for baking if using a plastic-coated wire, or bake it with the clay if it’s metal or wood. -
Create the note card:
Roll out a small slab of white clay. Cut it into a neat square or rectangle to serve as the ‘paper’ card. -
Texture the card:
Use a toothbrush or texture sponge to gently tap the surface of the white square, giving it a paper-like texture. Poke a small hole in the center if you plan to thread it later, or press it onto the wire. -
Form the wooden base:
Roll a disc of brown clay (or white clay you plan to paint later) slightly larger than the frog’s footprint. Flatten it to about 1/4 inch thickness. -
Texture the wood:
Use a needle tool to scratch uneven, parallel lines across the disc to mimic wood grain. I find adding a few swirls ‘knots’ makes it look more convincing. -
Add the mouth:
Use a needle tool or a thin blade to gently press a wide, curved smile into the frog’s face.
Step 3: Baking and Finishing
-
Bake the pieces:
Place the frog, the textured base, and the white square on a parchment-lined baking sheet. Bake according to your clay manufacturer’s instructions (usually 275°F/135°C for 15-30 minutes). -
Cool down:
Let all the pieces cool completely before handling them to prevent cracking. -
Paint the details:
Using a fine-tip brush or a dotting tool, paint small black dots inside the eye sockets. Carefully run a thin line of diluted black paint into the mouth groove. -
Highlight the base:
If you used plain clay for the base, paint it with a wash of brown acrylics. Wipe away excess paint so the darker color stays in the textured grooves. -
Assembly:
Glue the frog onto the wooden base using super glue or strong craft adhesive. -
Attach the note:
Re-insert the wire if you removed it, securing with a dot of glue. Mount the white clay square onto the top of the wire.
Fixing Wobbly Heads
If the wire holder keeps tilting/falling out of the heavy wet clay, bake the wire into a small scrap piece of clay first to make an ‘anchor’ to insert.
Place this cheerful little frog on your desk to hold your favorite photo or a daily mantra
Tiny Ghost and Pumpkin Minis
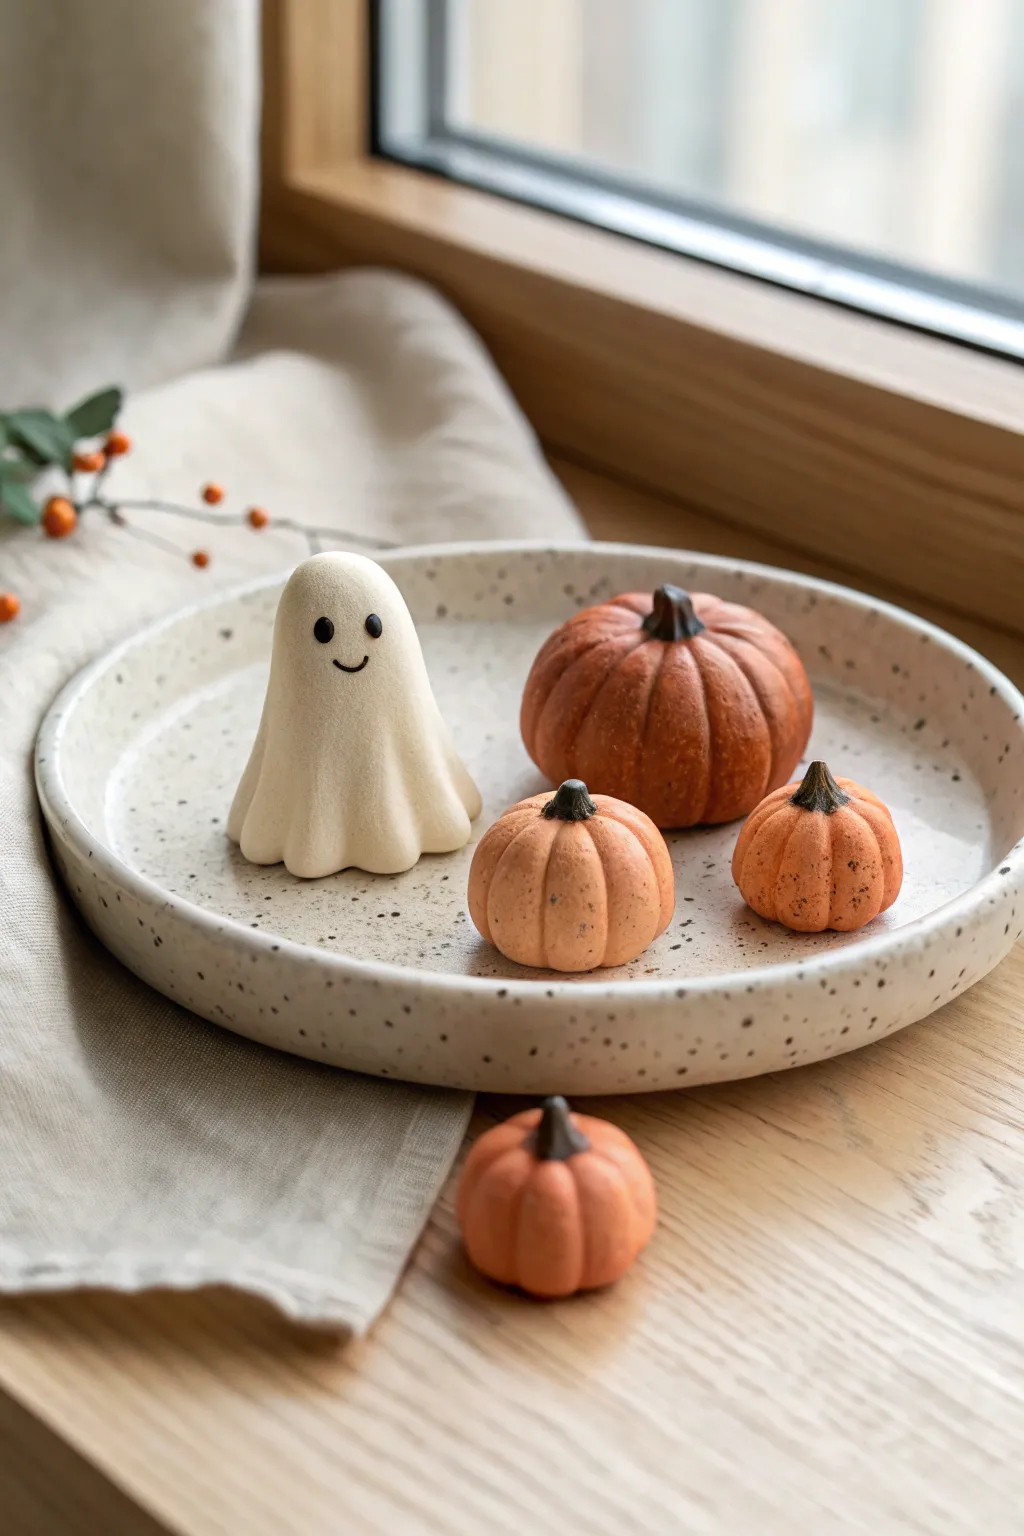
Create this adorable autumn vignette featuring a friendly little ghost and a trio of textured pumpkins. These polymer clay minis are perfect for windowsill decor or adding a touch of Halloween charm to any small corner.
Step-by-Step Tutorial
Materials
- White polymer clay
- Orange polymer clay (terracotta or muted orange)
- Black polymer clay
- Clay carving tools or a toothpick
- Soft pastel chalks (brown and burnt orange)
- Small paintbrush
- Toothbrush or textured sponge
- Baking sheet and parchment paper
- Oven
Step 1: Shaping the Ghost
-
Warm the clay:
Begin by conditioning a chunk of white polymer clay in your hands until it becomes soft and pliable. Roll it into a smooth ball about the size of a walnut to remove any air bubbles. -
Form the body:
Gently roll the ball into a thick, rounded cone shape. Flatten the bottom against your work surface so it stands upright on its own without tipping. -
Create the folds:
Using your thumb and forefinger, or a smooth modeling tool, gently pull and curve the bottom edges of the cone outwards to mimic the flowing fabric of a sheet. Make three or four distinct waves around the base. -
Smooth the surface:
Lightly buff the surface with your finger to remove any prints. I like to dust my finger with cornstarch if the clay feels too sticky during this step. -
Add the face:
Roll two incredibly tiny balls of black clay for the eyes and press them firmly onto the upper third of the ghost. Roll a thin, tiny thread for the smile and curve it gently into place between the eyes.
Step 2: Sculpting the Pumpkins
-
Prepare pumpkin bases:
Roll three balls of orange clay in varying sizes—one large for the center pumpkin and two smaller ones. Slightly flatten them so they look like squat spheres rather than perfect balls. -
Add ribbing:
Take a toothpick or a clay needle tool and press vertical lines from the top center down to the bottom of each ball. Go all the way around to create the distinctive sections of a pumpkin. -
Soften the shape:
Gently press down on the top center of each pumpkin with a ball tool or your pinky finger to create a small indentation where the stem will sit. This also helps bulge the sides out for a more natural look. -
Texturize the skin:
For that realistic, slightly rough skin texture seen in the photo, gently tap the surface of the pumpkins with an old toothbrush or a stiff stippling brush. Don’t overdo it; just a light pockmarking. -
Shade the grooves:
Scrape some brown pastel chalk into a fine powder. Use a small, dry brush to dust this powder into the vertical grooves and the top indentation of the pumpkins to add depth and an aged look. -
Create the stems:
Mix a tiny bit of black clay with a crumb of orange to get a dark brownish-black. Roll small cone shapes to fit each pumpkin size. -
Attach the stems:
Press the stems firmly into the indentations you made earlier. Use a needle tool to scratch vertical lines into the stems for a woody texture and slightly twist the tips.
Fixing Smudges
Did orange clay stain your white ghost? Dip a cotton swab in rubbing alcohol or nail polish remover and gently wipe the dirty area before baking to clean it up.
Step 3: Baking and Finishing
-
Final inspection:
Check all your pieces for stray dust or lint. You can use a bit of rubbing alcohol on a brush to clean up the white ghost if it picked up any orange pigment. -
Bake the batch:
Place your ghost and pumpkins on a parchment-lined baking sheet. Bake according to your brand of clay’s instructions—usually around 275°F (130°C) for 15-20 minutes depending on thickness. -
Cool down:
Allow the pieces to cool completely inside the oven with the door slightly ajar to prevent cracking from sudden temperature changes.
Matte Finish
To avoid a shiny, plasticky look after baking, brush on a thin layer of liquid matte varnish or cornstarch baby powder before baking for a velvety texture.
Arrange your new little friends on a tray or shelf to enjoy the cozy season
Animal Mini Planters for Succulents
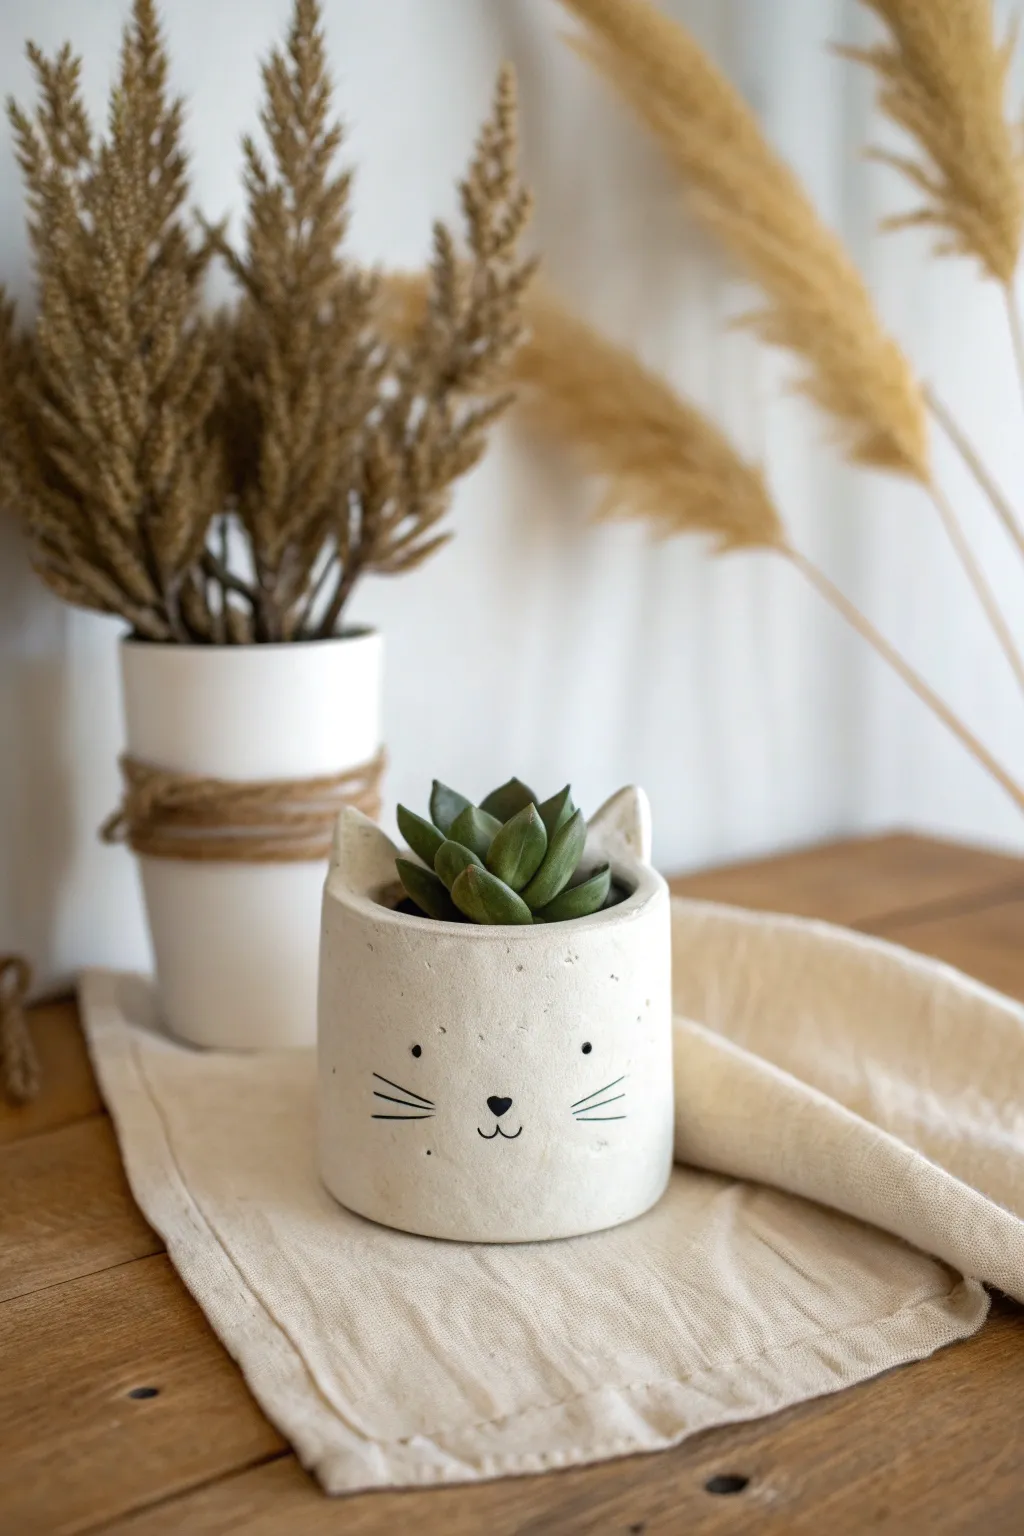
This charming, minimalist planter adds a touch of playful personality to any sunny window ledge. With its simple cylindrical shape, perky ears, and sweet hand-drawn face, it creates the perfect cozy home for a small rosette succulent.
How-To Guide
Materials
- White polymer clay (approx. 2oz) or air-dry clay
- Rolling pin or acrylic roller
- Clay blade or craft knife
- Small round cookie cutter (approx. 2.5 inches)
- Small bowl of water (for smoothing)
- Black fine-point permanent marker or acrylic paint pen
- Fine-grit sandpaper (optional)
- Matte finish varnish (optional)
- Small succulent plant and soil
Step 1: Forming the Base
-
Condition the Clay:
Begin by warming the white clay in your hands. Knead it thoroughly until it is soft, pliable, and free of any air bubbles or cracks. -
Roll the Slab:
Using your rolling pin, flatten the clay into a long, even strip about 1/4 inch thick. Aim for a consistent thickness to ensure the walls of your pot are sturdy. -
Cut the Wall:
Use your craft knife to cut a clean rectangle from the flattened clay. This strip will become the curved wall of the planter; a size of about 2 inches high and 8 inches long works well for small succulents. -
Cut the Base:
Roll out a separate piece of clay to the same thickness. Use your round cookie cutter to stamp out a perfect circle that will serve as the bottom of the pot.
Step 2: Assembling the Shape
-
Wrap the Wall:
Carefully lift your clay rectangle and wrap it around the circular base. Let the ends of the rectangle meet, overlapping slightly if necessary, or just touching depending on your measurement. -
Seal the Seams:
Where the wall meets the base, gently smudge the clay downward from the wall onto the base to fuse them together. Do this on both the inside and outside. -
Smooth the Vertical Joint:
Blend the vertical seam where the wall ends meet. I find using a slightly wet finger helps to erase the line completely, making the cylinder look seamless. -
Create Drainage (Optional):
If you plan to plant directly into the pot, use a straw or tool to poke a small hole in the center of the base for water drainage.
Fixing Cracks
If you see tiny hairline cracks appearing as the clay dries or after baking, mix a tiny bit of wet clay into a paste and fill them in, then sand smooth once dry.
Step 3: Adding the Details
-
Shape the Ears:
Take two small scraps of the remaining clay and shape them into little triangles. Pinch them slightly at the bottom to curve them. -
Attach the Ears:
Place the triangular ears on the top rim of the cylinder, spaced evenly apart. Blend the clay at the attachment point downward into the wall so they are securely fused and won’t pop off. -
Final Smoothing:
Dip your finger in water and run it over the entire surface of the pot to remove any fingerprints or tool marks. Ensure the top rim is smooth and rounded. -
Bake or Dry:
If using polymer clay, bake according to package instructions (usually 275°F for 15-30 minutes). If using air-dry clay, allow it to sit for 24-48 hours until fully hardened and white.
Make it a Set
Create a whole family by varying the height of the cylinders or changing the ear shapes to look like bears (round) or bunnies (long).
Step 4: Finishing Touches
-
Sand Imperfections:
Once fully cured and cool, you can lightly sand any rough edges or bumps with fine-grit sandpaper for a professional matte finish. -
Draw the Face:
Using a fine-point black marker or paint pen, draw a small heart shape for the nose in the center. Add two dots for eyes and three long, thin whiskers on each cheek. -
Add the Mouth:
Draw two small curved lines extending downward from the bottom of the heart nose to create a classic ‘w’ cat mouth. -
Seal the Pot:
Apply a coat of matte varnish to protect the clay and the ink, especially if the pot will be exposed to water. -
Planting:
Fill your new planter with cactus soil and tuck your succulent inside so the leaves just peek over the rim between the ears.
Now you have a sweet little companion to brighten up your desk or shelf
Mini “Room in a Box” Diorama
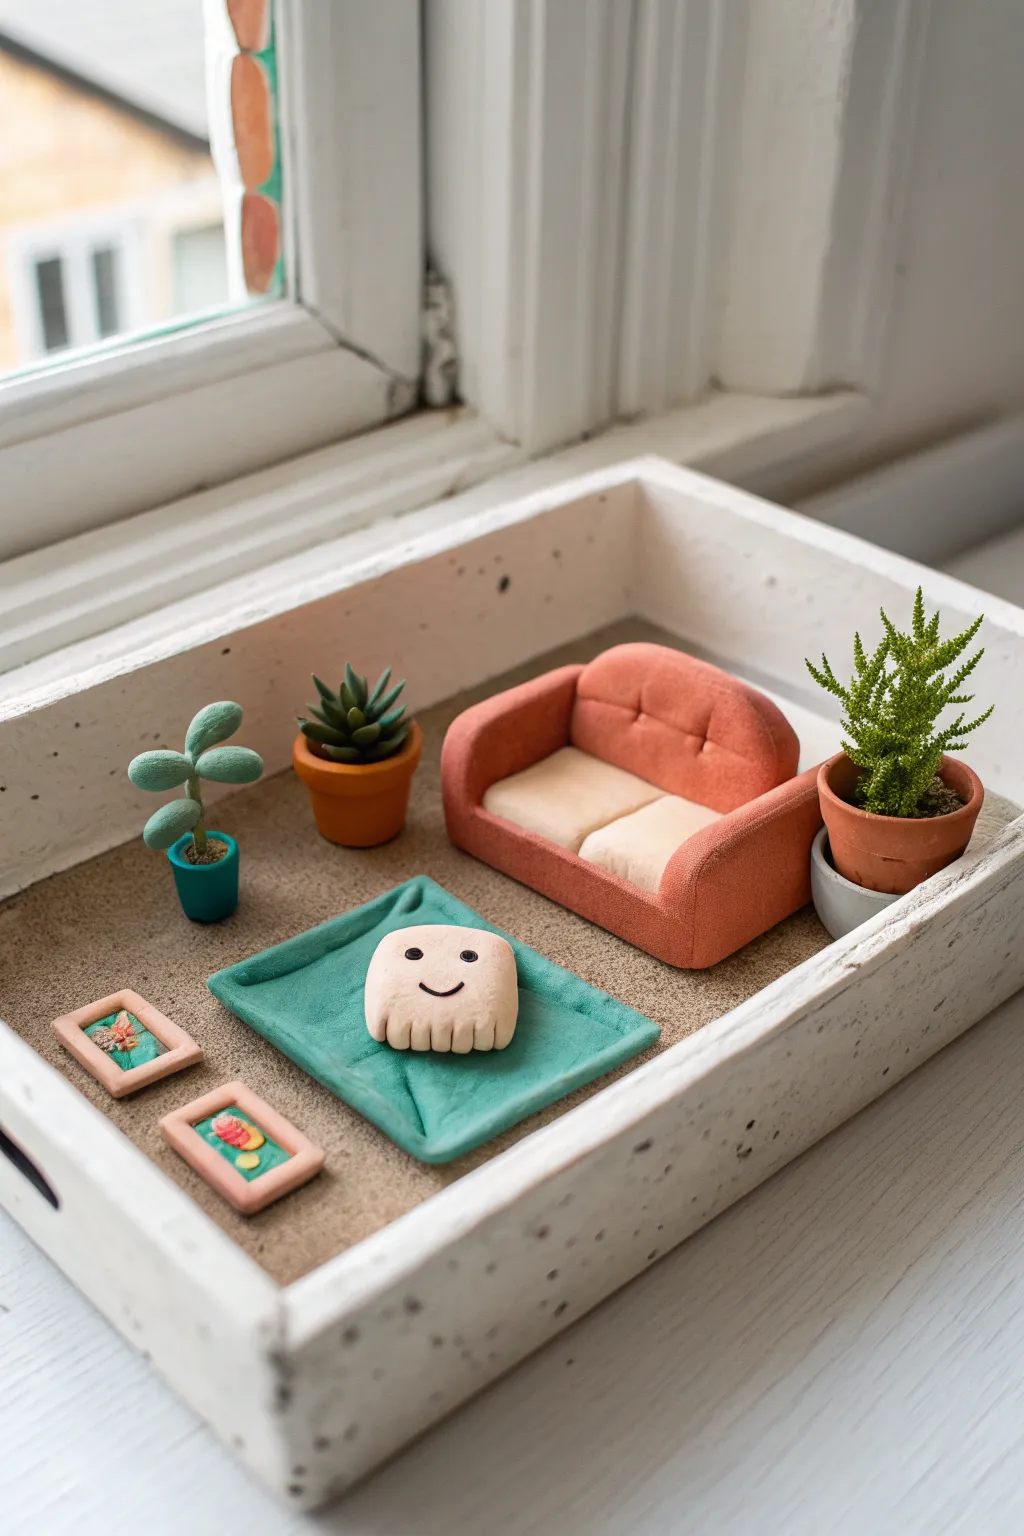
Create your own tiny world with this adorable “Room in a Box” diorama featuring a cozy clay sofa, miniature potted plants, and a smiling cushion friend. It’s the perfect beginner project to practice simple shapes while assembling a charming, self-contained scene.
Detailed Instructions
Materials
- Polymer clay (terracotta, white, teal/green, forest green, light pink, black)
- Small rectangular shallow tray or box (wood or concrete style)
- Fine sand or textured beige cardstock (for the floor)
- Liquid clay or PVA glue
- Modeling tools (or a toothpick and a craft knife)
- Small artificial moss or texturing brush
- Acrylic roller or smooth jar
Step 1: Setting the Scene
-
Prepare the base:
Start by selecting your shallow tray. If it’s plain wood, give it a coat of white or light grey acrylic paint to mimic the concrete look in the photo. Let it dry completely. -
Lay the flooring:
Apply a thin layer of PVA glue to the bottom of the tray and sprinkle fine sand over it for a textured carpet effect. Alternatively, cut a piece of beige textured cardstock to fit snugly inside.
Clean Lines
Wipe your clay with a little rubbing alcohol or baby oil on a brush before baking. It smooths away fingerprints and dust instantly.
Step 2: Sculpting the Furniture
-
Form the sofa base:
Condition a large block of terracotta or burnt orange clay. Shape a rectangular log for the seat base, bringing the back up slightly higher than the front. -
Add the backrest:
Roll a thick sausage of the same orange clay and curve it around the back and sides of the base to form the arms and backrest. Smooth the seams where the clay joins so it looks like one upholstered piece. -
Create the cushions:
Mix a small amount of white clay with the orange to create a lighter peach tone. Shape two square cushions with rounded corners and press them gently onto the seat. Use a needle tool to press two small indentations into the backrest for a tufted button look. -
Make the rug:
Roll out a sheet of teal clay. Cut a rectangle or irregular shape and gently fold or pinch the corners to make it look like fabric draped on the floor. Place this in the center of your tray.
Step 3: Creating the Character & Accessories
-
Sculpt the smiling cushion:
Form a soft square from pale pink or beige clay. Use a blade to gently cut vertical lines along the bottom edge to simulate tassels or feet. -
Add the face:
Take tiny micro-dots of black clay for the eyes and a very thin thread for the smile. Press them gently onto the cushion’s face. I find using a needle tool helps position these tiny pieces accurately. -
Make the picture frames:
Roll thin snakes of light terracotta clay and form two small square frames. Fill the centers with scraps of green and yellow clay to mimic abstract art or flowers.
Dusty Clay?
If lint gets stuck in your light-colored clay (like the sofa cushions), gently scrape it off with a craft knife or cover with a thin clay veneer.
Step 4: Potting the Plants
-
Shape the pots:
Roll three balls of terracotta clay. Flatten the tops and bottoms to make cylinders, and indent the tops with a ball tool to create the pot interior. Add a small rim of clay around the top edge of each. -
Create the succulent:
For the first plant, shape varying sizes of dark green clay into teardrops. Press them into the pot in a rosette pattern, starting from the outside and working in. -
Assemble the tall plant:
For the second plant, make a thin green stem and attach small, flattened ovals of teal-green clay as leaves. Pop this into a pot. -
Add the textured plant:
For the spiky plant, you can either use a piece of real preserved moss or sculpt a cone of green clay and texture it heavily with a toothbrush or needle tool. -
Bake everything:
Arrange all your clay pieces on a baking tile (not in the tray yet!). Bake according to your clay package manufacturer’s instructions, usually around 275°F (135°C) for 15-30 minutes. -
Final assembly:
Once cool, use a dab of super glue or strong craft glue to secure the rug, sofa, pots, frames, and smiling cushion into their final spots within the prepared box.
Place your finished diorama on a shelf to bring a tiny spark of joy to your room