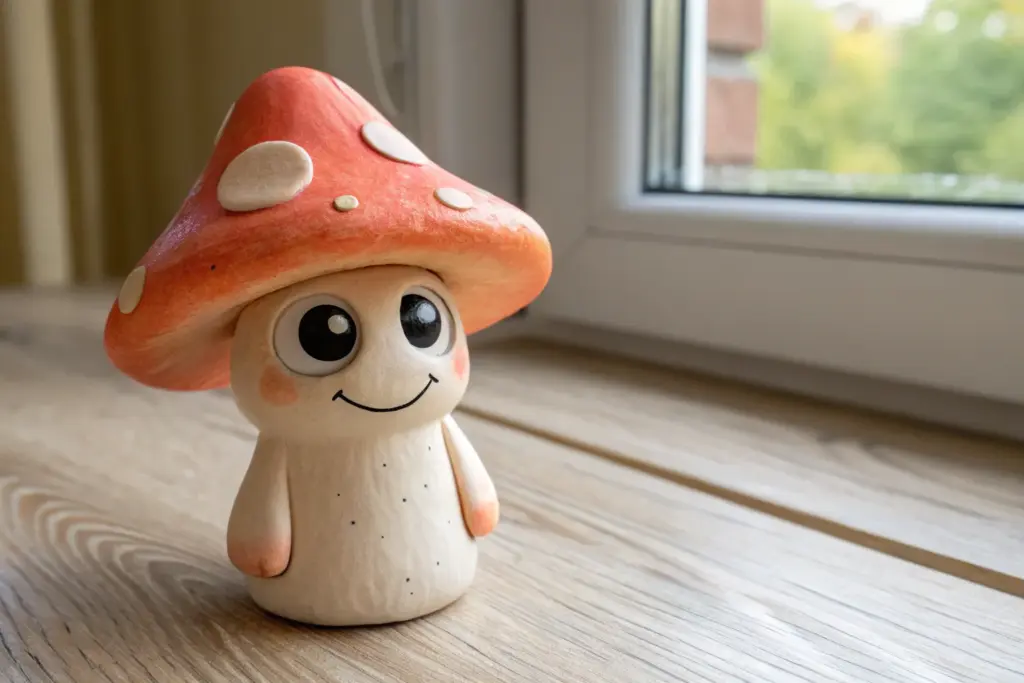
If you’ve got kids who love making little worlds and tiny characters, clay is basically magic. Here are my go-to cute clay projects that feel doable, colorful, and instantly lovable—no perfection required.
Smiley Face Mini Magnets
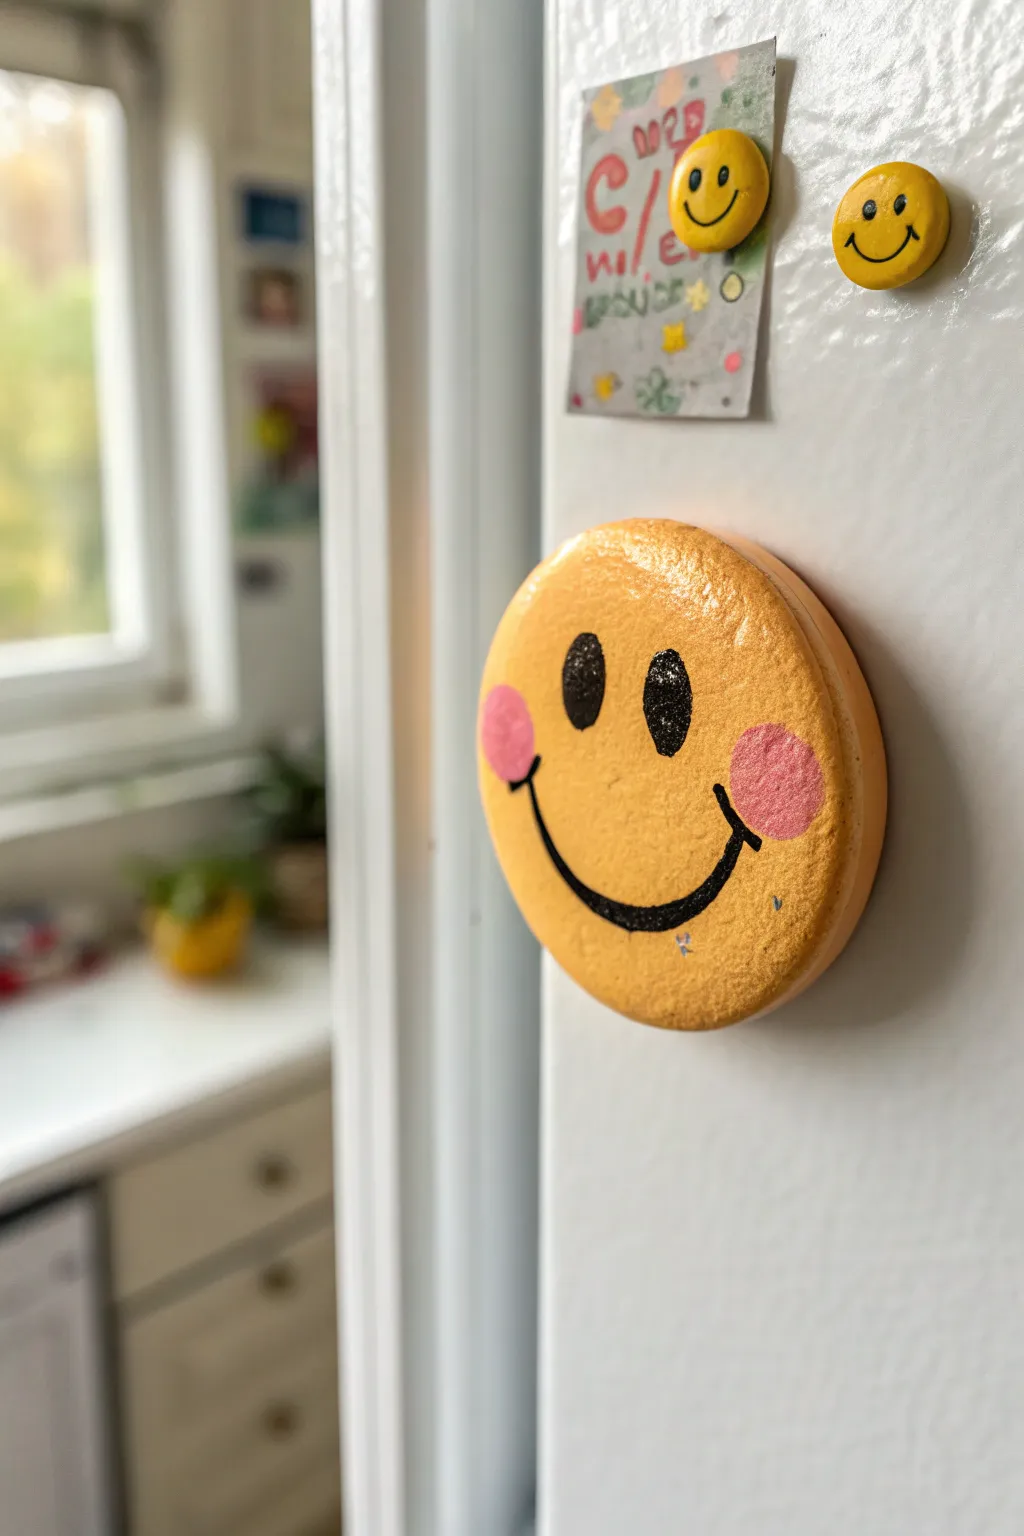
Add a touch of cheer to your fridge with these chunky, hand-sculpted smileys. Featuring a textured, glittery finish and sweet pink cheeks, these magnets are sturdy, happy little faces that are perfect for holding up your best drawings.
How-To Guide
Materials
- White air-dry clay (or polymer clay)
- Small rolling pin or smooth jar
- Circle cookie cutter (approx. 2-3 inches)
- Sandpaper (fine grit)
- Yellow acrylic paint (sunny yellow)
- Black acrylic paint
- Pink acrylic paint
- Mod Podge or craft sealer
- Fine iridescent glitter (optional)
- Strong round craft magnets
- Industrial strength glue (like E6000) or hot glue gun
- Small paintbrushes (flat and fine tip)
- Dotting tool or back of a paintbrush
Step 1: Sculpting the Base
-
Condition the Clay:
Start by taking a handful of clay and kneading it in your hands until it feels soft, warm, and pliable. This helps prevent cracks later on. -
Roll it Out:
Use a rolling pin to flatten the clay on a clean surface. You want these to be quite thick and chunky, so aim for a thickness of about 1/4 to 1/2 inch. -
Cut the Shape:
Press your circle cutter firmly into the clay. Give it a little wiggle before lifting it up to ensure a clean cut. -
Smooth the Edges:
Dip your finger in a tiny bit of water and run it around the cut edge of the circle. This smooths out any roughness or loose bits of clay left by the cutter. -
Dry Completely:
Place your clay circle on a piece of parchment paper or a wire rack. Let it air dry according to the package directions, usually 24-48 hours depending on thickness. Flip it halfway through drying. -
Safety Sanding:
Once bone dry, take fine-grit sandpaper and gently buff the surface and edges. We want a nice smooth canvas for our face.
Step 2: Painting the Features
-
Base Coat:
Load a flat brush with sunny yellow acrylic paint. Cover the entire front and sides of the disk. -
Second Layer:
If the white clay still peeks through after the first coat dries, add a second layer of yellow for a solid, opaque look. -
Sketch the Face:
Lightly sketch the position of the eyes and mouth with a pencil. Place the eyes slightly wide apart for that cute, classic look. -
Paint the Eyes:
Using a small brush and black paint, fill in two tall oval shapes for the eyes. I find two coats works best here to get a deep, solid black. -
Draw the Smile:
Switch to a fine liner brush. Carefully paint a wide ‘U’ shape for the smile, adding small perpendicular lines at the ends for dimples. -
Add Cheeks:
Mix a soft pink color or use straight pink paint. Paint two large circles right next to the ends of the smile line. -
Glitter Glaze:
For the specific texture seen in the photo, mix a tiny pinch of fine iridescent glitter into your Mod Podge or sealer. Brush this mixture over the entire face once the paint is fully dry. -
Extra Texture:
While the glaze is wet, you can tap it lightly with a dry sponge or stiff brush to create the slightly pitted, organic texture visible on the yellow surface.
Clay Cracking?
If small cracks appear while drying, don’t panic. Mix a tiny bit of fresh clay with water to make a paste and fill the cracks, then sand smooth once dry.
Step 3: Assembly
-
Prepare the Back:
Flip the dry, sealed face over. If the back is bumpy, give it a quick sand so the magnet will sit flat. -
Apply Glue:
Squeeze a generous dot of strong craft glue or hot glue onto the center of the back. -
Attach Magnet:
Press your round magnet firmly into the glue. If using industrial glue, let it cure overnight to ensure it holds up heavy papers.
Pro Tip: Eye Shine
To make the eyes look extra lively, add a tiny white dot to the upper corner of each black oval using the tip of a toothpick.
Pop your new friend onto the fridge and enjoy that contagious smile every time you walk by


Tiny Animal Pinch Pot Bowls
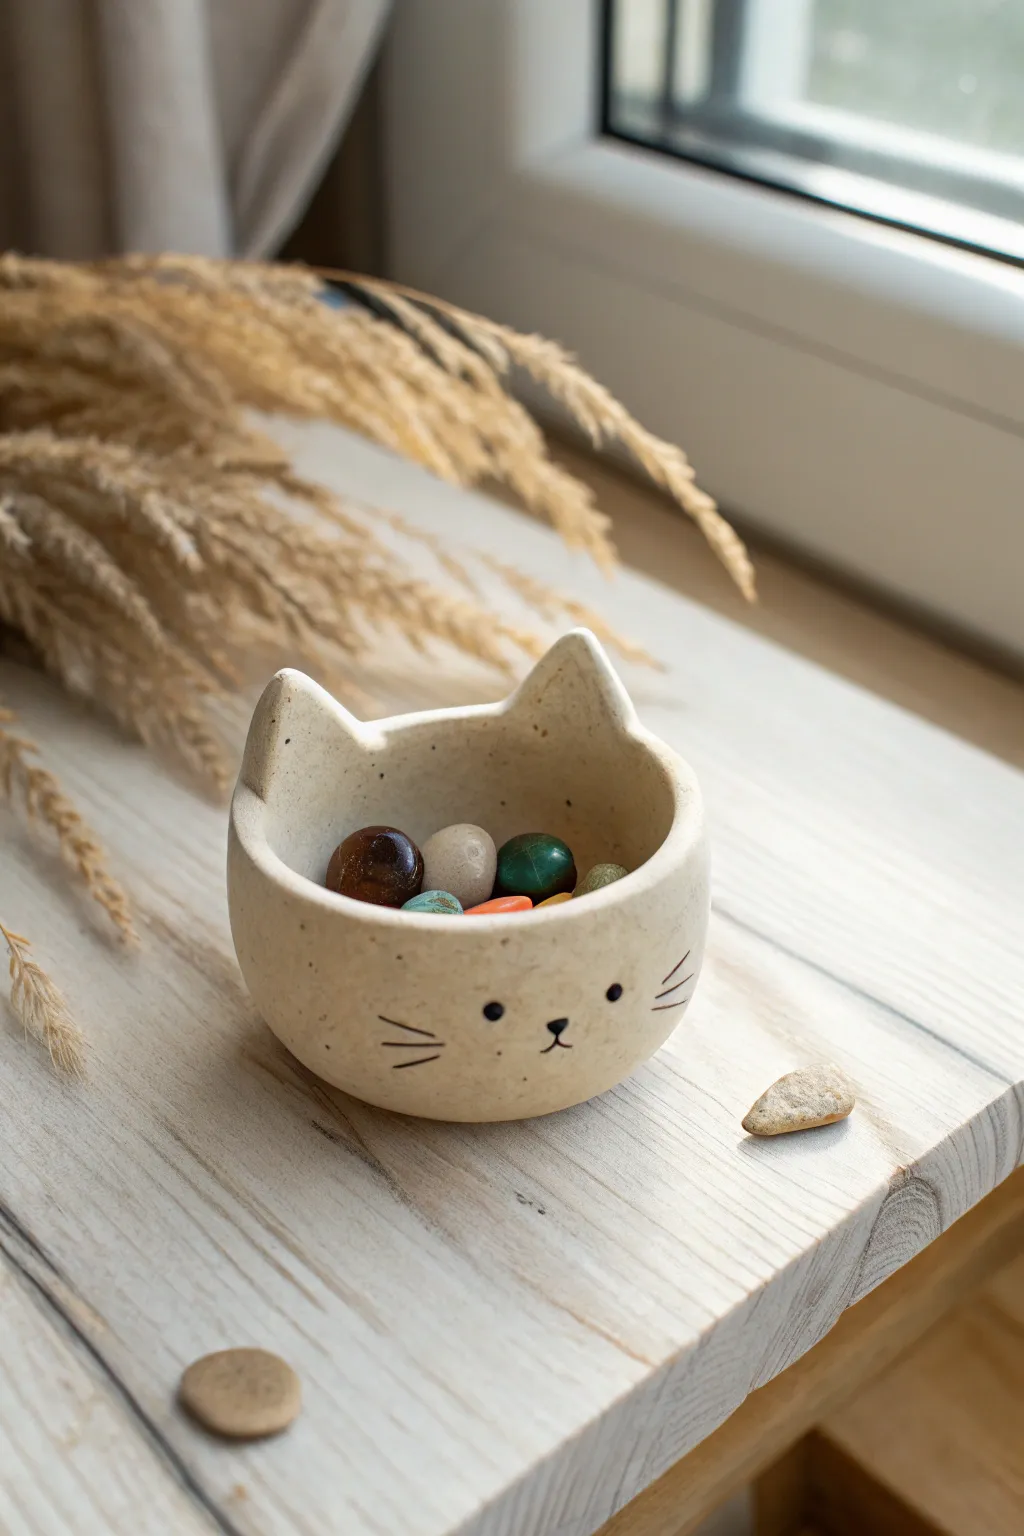
Learn to sculpt this darling little feline bowl, perfect for holding tiny treasures like beads or stones. With its soft, creamy finish and sweet painted face, this pinch pot transforms a lump of clay into a charming desk companion.
Detailed Instructions
Materials
- White air-dry clay or polymer clay (oven-bake)
- Small bowl of water
- Potter’s needle tool or a toothpick
- Fine-grit sandpaper
- Black acrylic paint or black permanent marker
- Fine detail paintbrush (if using paint)
- Clear matte varnish or sealant
- Rolling pin (optional)
Step 1: Shaping the Base
-
Roll the ball:
Start by taking a chunk of clay about the size of a tangerine. Roll it between your palms until it forms a smooth, crack-free sphere. -
Insert your thumb:
Hold the clay ball in one hand. Use the thumb of your other hand to press gently into the center of the ball, stopping about a half-inch from the bottom. -
Pinch the walls:
Begin pinching the clay between your thumb (inside) and fingers (outside). Rotate the ball as you pinch to ensure the walls are an even thickness. -
Refine the shape:
Continue turning and pinching until you have a nice bowl shape. Tap the bottom gently on your table to create a flat base so it stands up straight.
Cracking Up?
If you see tiny cracks forming while the clay dries, mix a tiny bit of fresh clay with water to make a paste and fill them in immediately.
Step 2: Adding Feline Features
-
Form the ears:
Pinch the top rim of the bowl at two opposite points to gently pull the clay upward. Shape these raised sections into triangles for the cat ears. -
Smooth the specific areas:
Dip your finger in a little bit of water and run it over the rim and inside the ears to smooth out any cracks or fingerprints. -
Check symmetry:
Look at your bowl from the front. If one ear looks taller, gently press it down or pinch the other one slightly higher until they match nicely. -
Final smoothing:
Use a damp sponge or your wet finger to smooth the entire outside surface. I find spending extra time here makes the final painting much easier.
Make it Speckled
For a stone-like look, flick a toothbrush loaded with diluted brown paint over the dried white clay before drawing the face.
Step 3: Drying and Refining
-
Let it dry:
If using air-dry clay, leave the pot in a safe spot for 24-48 hours. If using polymer clay, bake according to the package instructions. -
Sand imperfections:
Once fully dry (and cool), take fine-grit sandpaper and gently rub away any rough bumps or uneven spots on the rim and sides. -
Wipe away dust:
Use a slightly damp paper towel to wipe off all the white clay dust created by sanding so the surface is clean.
Step 4: Painting the Face
-
Plan the features:
Lightly engage your pencil to sketch where the eyes, nose, and whiskers will go. Keep the face low on the bowl for that cute ‘kawaii’ look. -
Paint the eyes:
Dip the handle end of a paintbrush into black paint and dot it onto the clay for perfectly round eyes. -
Draw the nose:
Paint a tiny inverted triangle between the eyes for the nose, adding a small vertical line coming down from the bottom point. -
Add whiskers:
Using your finest brush or a marker, draw three short, straight lines fanning out on each cheek. -
Seal the piece:
Once the paint is completely dry, apply a coat of clear matte varnish inside and out to protect your new friend.
Now your little cat is ready to organize your trinkets or simply sit pretty on a shelf


Coil Snakes With Silly Faces
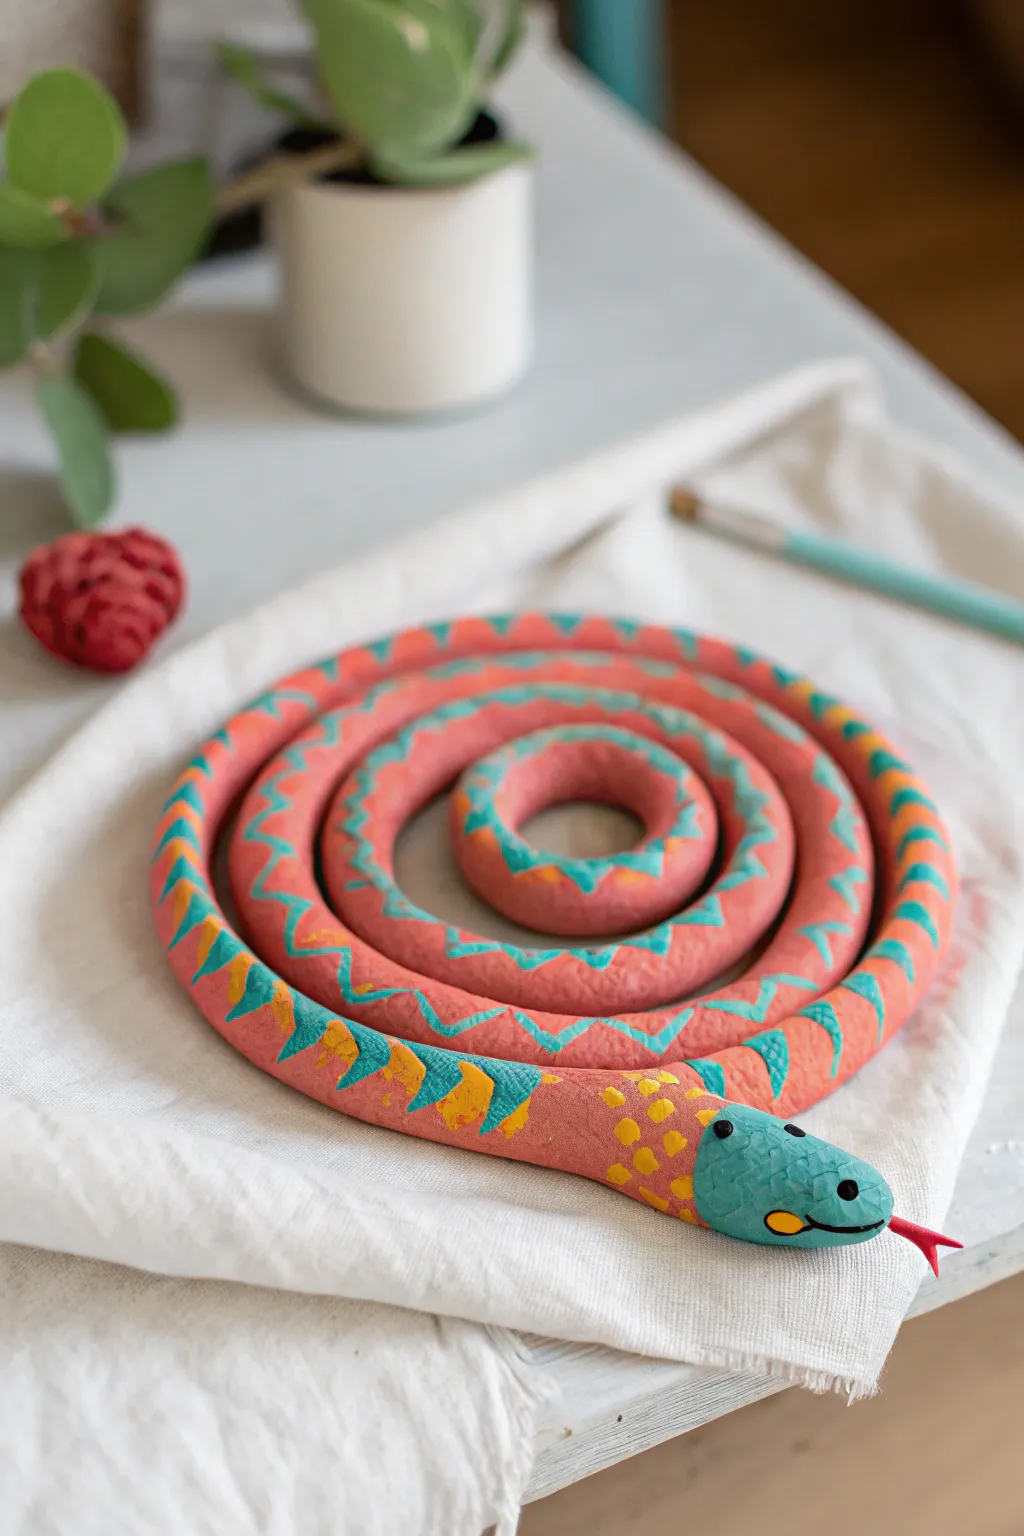
Slither into creativity with this charming coil snake project that turns a simple clay rope into a colorful, patterned reptile. With its vibrant coral body, playful teal zig-zags, and a friendly face, this spiral sculpture is a perfect introduction to classic coil-building techniques for kids.
Step-by-Step Guide
Materials
- Air-dry clay (or polymer clay)
- Acrylic paints (coral pink, teal/turquoise, yellow, black, red)
- Fine-grit sandpaper
- Small paintbrush (flat/round)
- Detail brush
- Cup of water
- Clean work surface or mat
- Rolling pin (optional)
- Spray varnish (optional)
Step 1: Shaping the Snake
-
Prepare the Clay:
Start with a generous handful of clay. Knead it in your hands for a minute or two to warm it up and make it pliable, removing any air bubbles. -
Roll the Coil:
Begin rolling the clay on your work surface using the palms of your hands. Apply gentle, even pressure and roll back and forth, working from the center outwards to lengthen the rope. -
Achieve Uniform Thickness:
Continue rolling until you have a long snake about the thickness of a thick marker or a finger (approx. 3/4 inch). Aim for a consistent thickness throughout the entire length, though the tail end can taper off slightly. -
Form the Head:
Identify which end will be the head. Gently round off the tip with your fingers to create a smooth, blunt snout shape rather than a point. -
Coil the Body:
Starting with the tail end, begin winding the clay rope into a spiral. Keep the coils close together but not fused; you want a visible separation between the rings. -
Position the Head:
As you finish coiling, lay the head section so it rests slightly outside the perfect circle, pointing outward as seen in the photo. Slightly flatten the bottom so it sits stable. -
Add the Tongue:
Roll a tiny, thin scrap of clay into a ‘Y’ shape. Gently press this onto the underside of the snout or make a tiny indentation and insert it. -
Smooth and Dry:
Dip your finger in a little water to smooth out any cracks or rough texture on the snake’s surface. Let the sculpture dry completely according to your clay package instructions (usually 24-48 hours for air-dry clay).
Step 2: Painting and Patterning
-
Base Coat Application:
Once fully dry, paint the entire body (except the head and tongue) with a coral pink acrylic paint. You may need two coats for opaque coverage. -
Paint the Head:
Paint the head section—stopping at the ‘neck’—with a bright teal or turquoise color. Creating a distinct line where the head meets the body adds a nice cartoony effect. -
Create Zig-Zag Guides:
Using a thin brush and the same teal paint, carefully paint a zig-zag or chevron line running along the spine of the coiled body. -
Fill the Patterns:
Thicken the zig-zag lines slightly, turning them into small triangular shapes pointing down the sides of the snake. -
Add Yellow Accents:
Using yellow paint, add small dots or dashed lines near the neck area to transition between the teal head and pink body. I find adding a tiny yellow cheek spot makes the face look extra friendly. -
Detail the Face:
Use a fine detail brush or a black paint pen to add two small eyes on the teal head. Add a small curved line for the mouth if desired. -
Paint the Tongue:
Carefully paint the forked tongue with bright red paint. -
Final Touches:
Inspect your work and touch up any paint lines. Once the paint is dry, you can seal your snake with a matte or satin spray varnish to protect the finish.
Cracked Clay?
If you see cracks forming while rolling, your clay might be too dry. Dip your fingers in water and smooth it over the crack, or knead a few drops of water into the raw clay.
Pro Tip: Consistent Coils
To keep the snake’s body perfectly round while drying, rest the coil on a piece of foam or a crumpled paper towel so the bottom doesn’t flatten out against the table.
Now you have a colorful, spiraled friend to keep you company on your desk or shelf


Chubby Sea Creatures
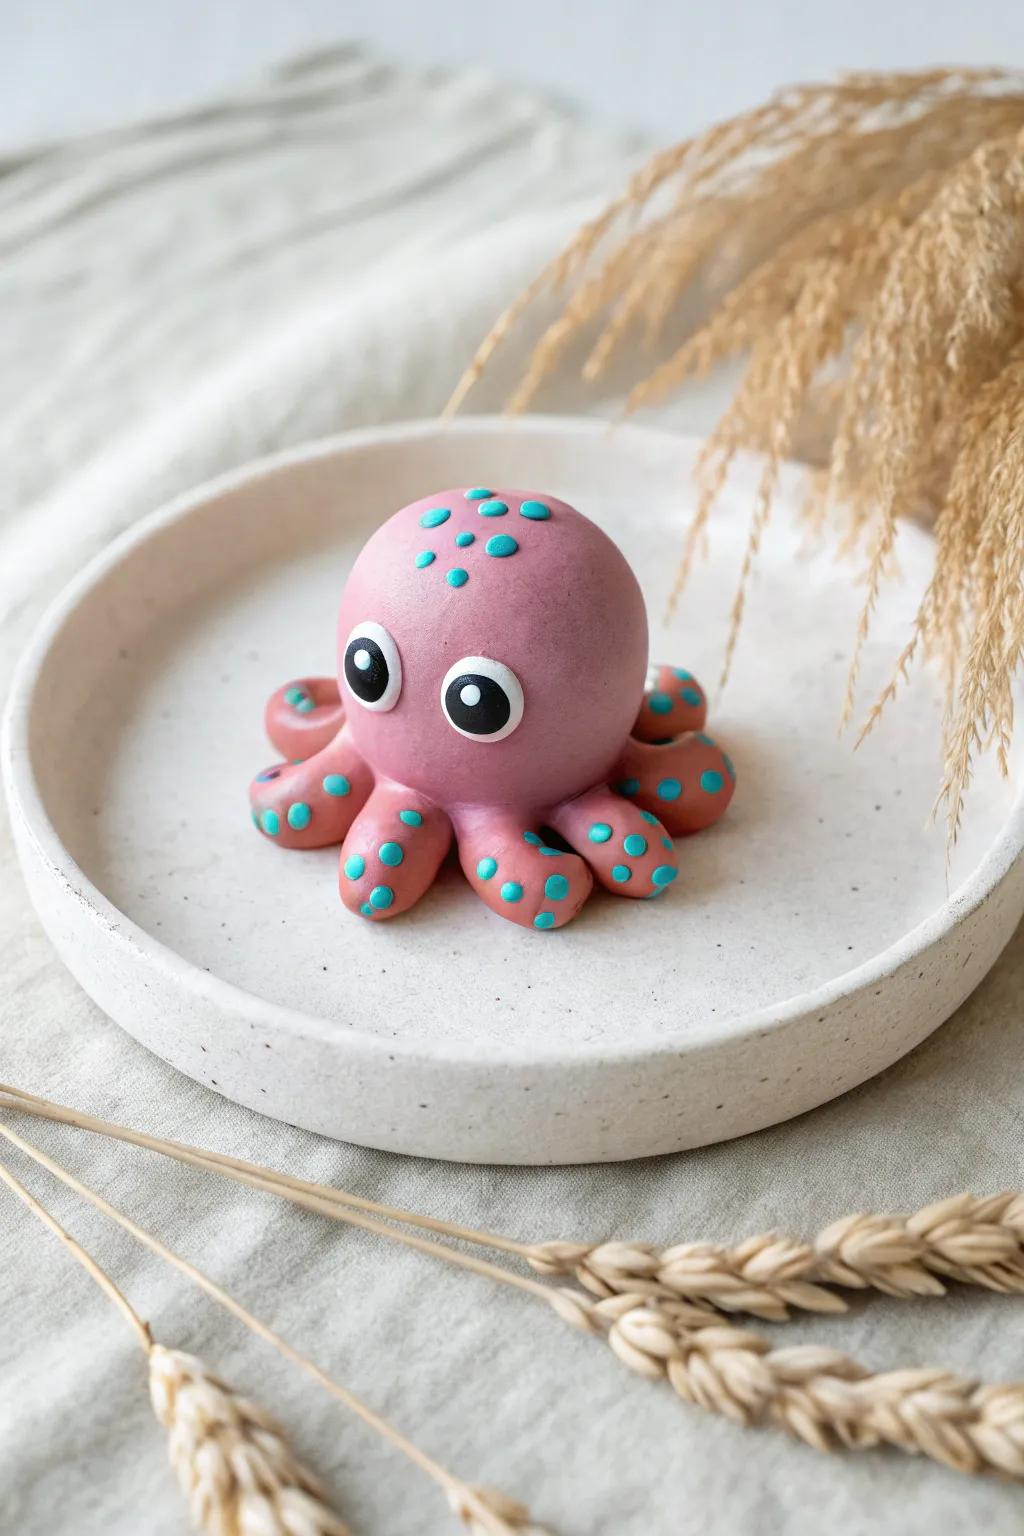
This perfectly round, cheerful little octopus makes a wonderful desk buddy or a tiny gift for a friend. With its oversized eyes and vibrant blue spots against a soft mauve body, this little creature is all about simple shapes and friendly vibes.
How-To Guide
Materials
- Polymer clay (Mauve/Dusty Pink, Bright Light Blue, White, Black)
- Clean work surface or mat
- Ball stylus tool (small)
- Needle tool or toothpick
- Wet wipes (for cleaning hands)
- Standard oven and baking sheet (if using bake-type polymer clay)
- Matte or glossy glaze (optional)
Step 1: Shaping the base
-
Mix your main color:
Start by conditioning your mauve or dusty pink clay until it is soft and pliable. If you don’t have the exact shade, try mixing a little brown into standard pink to tone it down. -
Roll the head:
Take a large chunk of the pink clay, about the size of a ping-pong ball, and roll it into a completely smooth sphere. This will be the main body. -
Create the tentacles:
Roll eight small, equal-sized balls of the same pink clay. These should be roughly the size of large peas. -
Shape the tentacles:
Gently roll each small pink ball into a teardrop or cone shape, slightly tapering one end. -
Attach the legs:
Arrange the eight tentacles in a circle on your work surface, with the pointy ends facing outward like a starburst. -
Join the body:
Place the large round body ball directly onto the center of the tentacle ring. Gently press down so the clay bonds together without smashing the round shape. -
Secure the seam:
Flip the octopus over carefully and use your thumb or a modeling tool to smooth the clay where the legs meet the body underneath, ensuring they won’t fall off.
Keep it clean
Baby wipes are essential! Use them to clean your hands between colors, especially before touching white clay, to avoid pink smears on the eyes.
Step 2: Adding the personality
-
Prepare the spots:
Roll out a very thin snake of bright light blue clay. Use a blade or your fingernail to pinch off tiny pieces and roll them into miniature balls. -
Apply forehead spots:
Gently press five or six of the tiny blue balls onto the top of the octopus’s head. Flatten them slightly with your finger so they look like flush polka dots. -
Decorate the legs:
Add two or three blue spots to each tentacle. I like to vary the placement—some near the tips and some near the body—for a more natural, playful look. -
Make the eye whites:
Clean your hands thoroughly before handling white clay. Roll two medium-sized balls of white clay and flatten them into thick discs. -
Place the eyes:
Press the white discs onto the front of the face, spacing them somewhat wide apart for that ‘chubby’ aesthetic. -
Add pupils:
Roll two smaller balls of black clay. Press these onto the white discs. -
Add the glint:
For the finishing touch of life, place a minuscule dot of white clay in the upper right corner of each black pupil.
Color Switch
Try making a whole family in different pastels like mint green or lavender, or give the octopus swirly spots instead of dots for variety.
Step 3: Finishing touches
-
Final smooth check:
Look over your little octopus for any fingerprints. Gently buff them away with a light touch of your finger or a drop of baby oil. -
Curve the tips:
Give the tentacles a little movement by gently curling the very tips upward or to the side. -
Bake:
Bake your creation according to the specific instructions on your package of clay. Usually, this is around 275°F (135°C) for 15-30 minutes per 1/4 inch of thickness. -
Cool and glaze:
Allow the figure to cool completely. If you want a wet look, brush a coat of gloss glaze over the eyes and spots.
Now you have an adorable, squishy-looking sea creature ready to brighten up your shelf

The Complete Guide to Pottery Troubleshooting
Uncover the most common ceramic mistakes—from cracking clay to failed glazes—and learn how to fix them fast.
Heart Charms and Keychain Tags
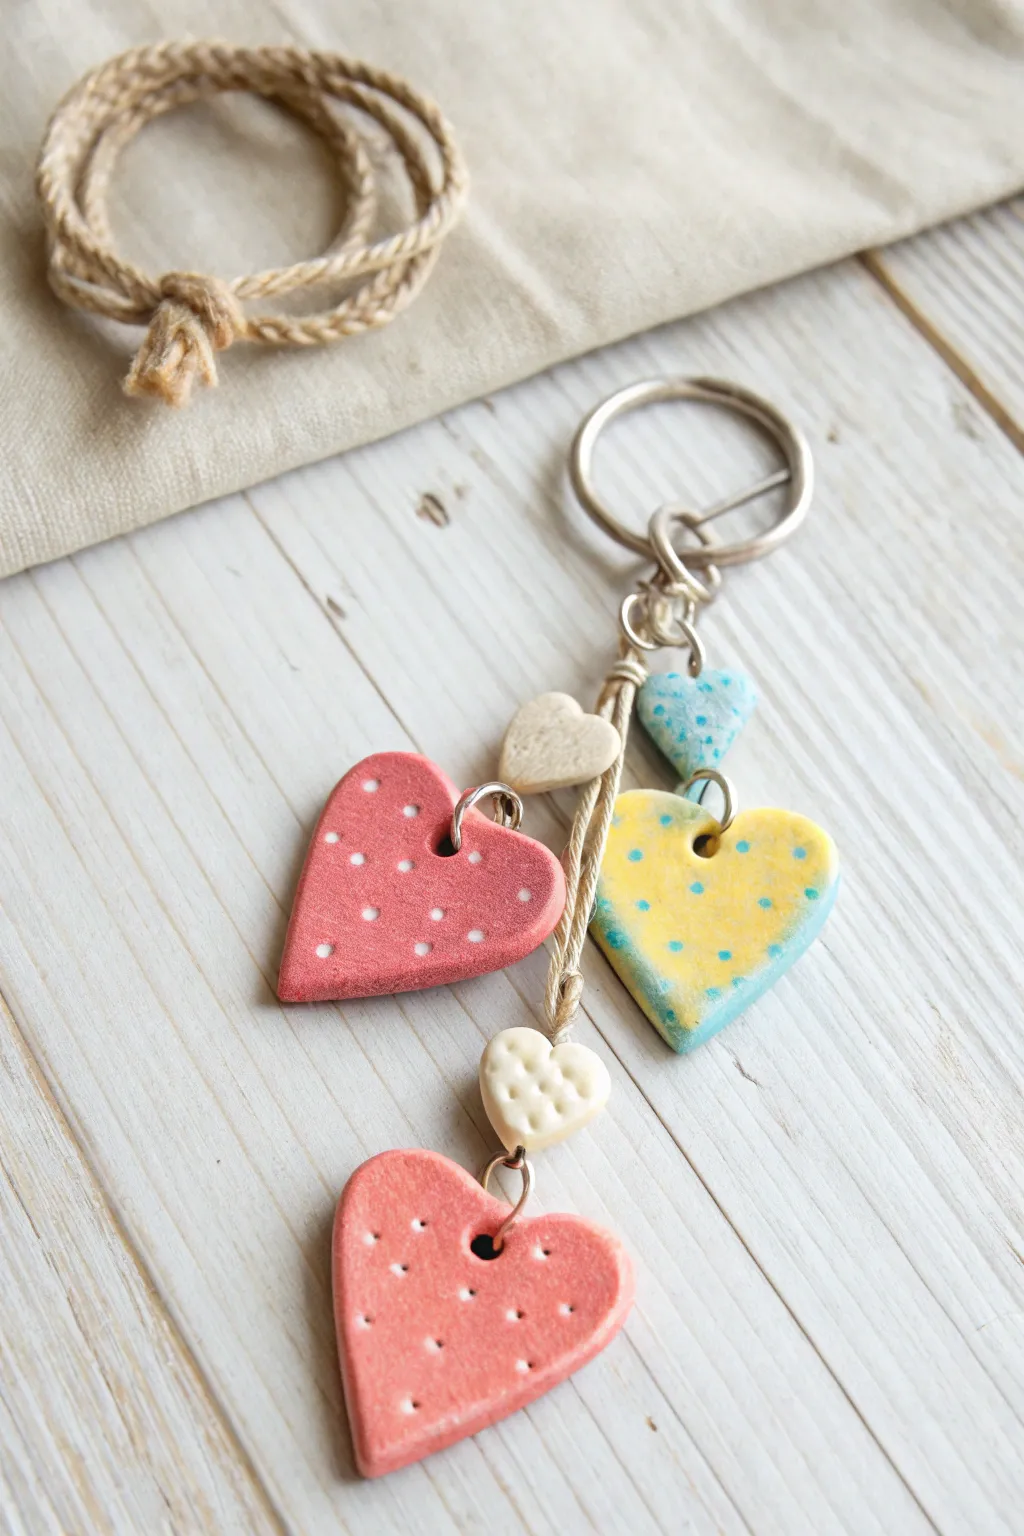
These delightful ceramic-style charms are a perfect beginner project, combining simple shapes with playful textures and colors. The finished keychain features a cascading cluster of rustic hearts in varying sizes, looped together with natural twine and sturdy metal hardware.
How-To Guide
Materials
- Air-dry clay (white or terracotta)
- Heart-shaped cookie cutters (small and medium)
- Acrylic paints (red, coral, yellow, blue, white)
- Glossy varnish or Mod Podge
- Rolling pin
- Toothpick or skewer
- Jute twine or hemp cord
- Metal key ring
- Jump rings
- Small pliers
- Fine grit sandpaper
Step 1: Shaping the Hearts
-
Prepare the Clay:
Take a handful of air-dry clay and knead it until it’s soft, pliable, and free of cracks. If it feels too dry, wet your fingers slightly. -
Roll it Out:
Use a rolling pin to flatten the clay to an even thickness of about 1/4 inch (5-6 mm). You want them thick enough to be sturdy but not heavy. -
Cut the Shapes:
Press your heart-shaped cutters firmly into the clay. For the look in the photo, cut out two medium hearts and three smaller hearts. -
Texture the Surface:
For the pink hearts shown, the dots are actually indentations. While the clay is still soft, gently press the blunt end of a small paintbrush or a toothpick into the surface to create a polka-dot pattern. -
Create the Holes:
Using a skewer or a straw, poke a hole near the top of each heart. Make sure the hole is large enough for your jump rings or twine to pass through later, keeping in mind that clay shrinks slightly as it dries. -
Smooth the Edges:
Dip your finger in a little water and run it along the cut edges of the hearts to smooth out any roughness or loose bits of clay.
Clean Edges Trick
Before drying, dip your finger in water and smooth clay edges. This “burnishing” step prevents sharp ridges and makes sanding much easier later.
Step 2: Decorating and Painting
-
Drying Time:
Let the clay hearts dry completely. This usually takes 24-48 hours depending on humidity. Flip them over halfway through to ensure even drying. -
Refining:
Once fully dry, use fine-grit sandpaper to gently buff away any remaining rough spots on the edges for a professional finish. -
Base Coats:
Paint the two textured hearts a coral-pink color. Paint one medium heart yellow, one small heart blue, and leave two small hearts in their natural creamy white color (or paint them off-white). -
Adding Details:
For the yellow heart, use a small brush or toothpick to dab on blue polka dots. Allow the paint to dry completely. -
Highlighting Texture:
For the pink indented hearts, you can lightly dry-brush white paint into the little divots you made earlier to make them pop. -
Sealing:
Apply a coat of glossy varnish or Mod Podge to all the hearts. This protects the paint and gives them that ceramic-glazed look.
Step 3: Assembly
-
Attach Jump Rings:
Using pliers, carefully open your jump rings and loop one through the hole of each painted heart. Close the rings securely. -
Tie the Twine:
Cut a few lengths of jute twine, varying them slightly in length (about 3-5 inches each). Thread one piece of twine through a jump ring (or directly through the clay hole for the smaller unpainted hearts) and tie a secure knot. -
Create the Cluster:
Gather all the twine ends together. I find it helpful to hold them up against the key ring to check how the hearts stagger; you want them to hang at different levels. -
Attaching to Ring:
Loop the collective bunch of twine strands through the main metal key ring. Fold the twine back on itself. -
The Wrapping Knot:
Take a separate piece of twine and wrap it tightly around the bundle of strings just below the key ring to secure everything together, creating a tassel-like top. -
Final Trim:
Trim any excess twine ends close to the wrapping knot for a neat finish.
Scented Clay
Mix a drop of essential oil (like lavender or vanilla) into the clay during kneading. Your keychain will act as a subtle, portable scent differ.
Now you have a charming, handmade accessory ready to brighten up any set of keys or backpack
Veggie Pals That Look Huggable
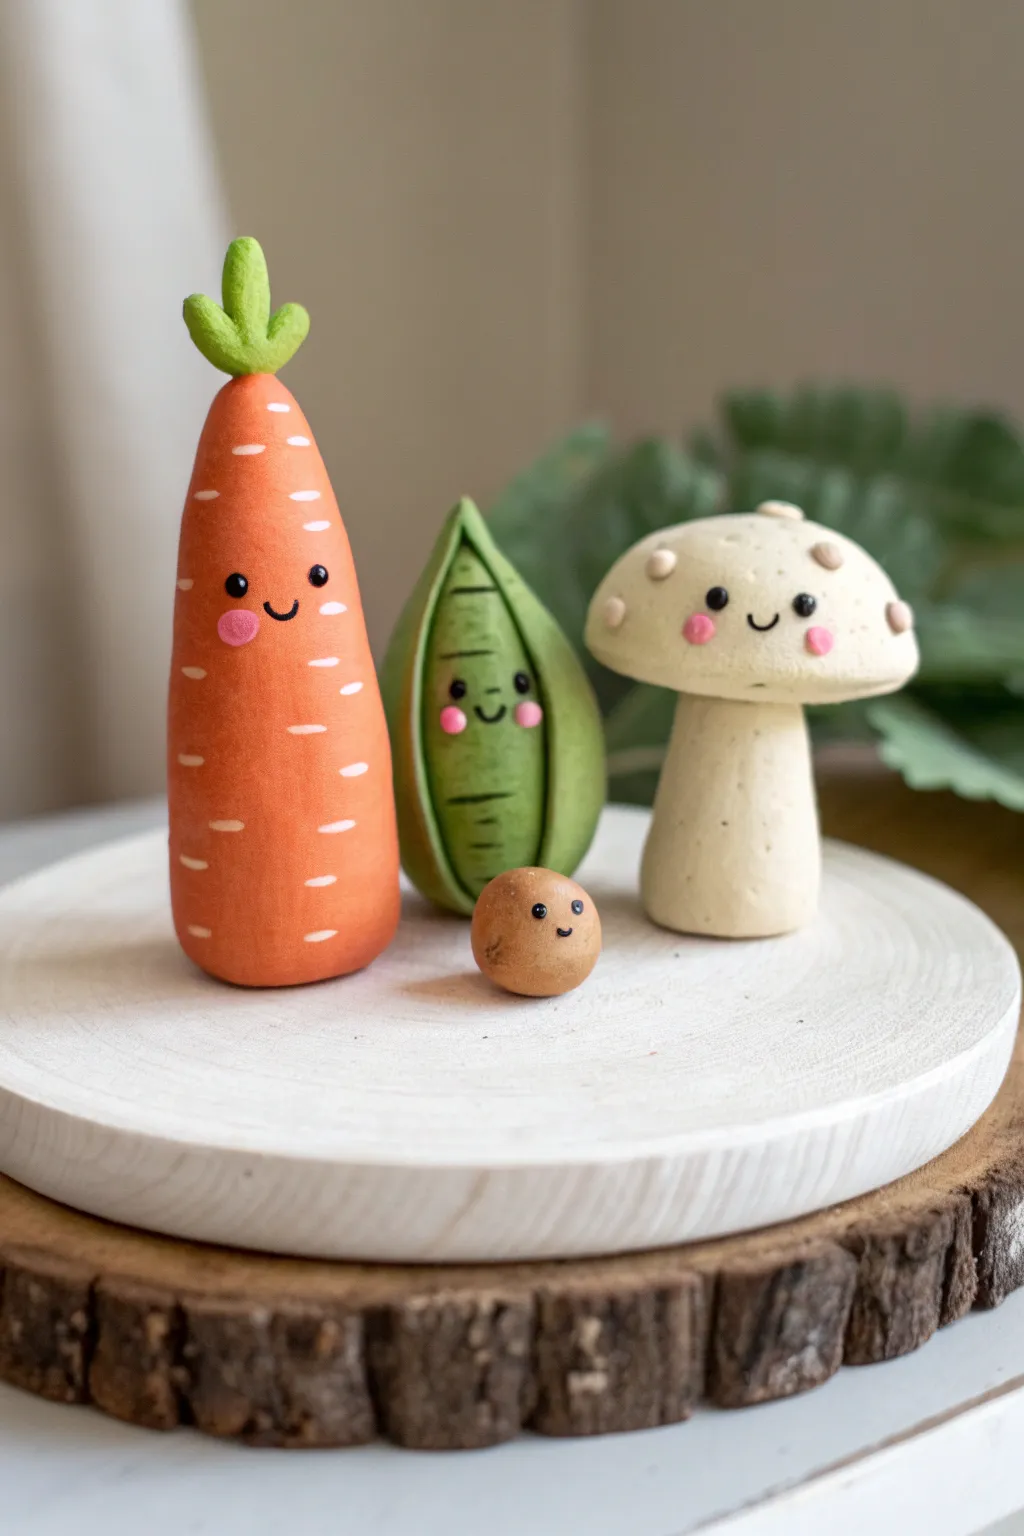
Create a cheerful team of garden friends that are almost too cute to be left in the dirt. These sculpted vegetable pals feature sweet, simple faces and smooth, rounded shapes that make them perfect for beginner sculptors.
Step-by-Step Tutorial
Materials
- Polymer clay or air-dry clay (orange, light green, dark green, cream/beige, brown)
- Black acrylic paint or fine-point marker
- Pink acrylic paint or pink clay
- Sculpting tools (needle tool/toothpick, smoothing tool)
- Small dotting tool or ball stylus
- Clear matte varnish (optional)
Step 1: Sculpting the Carrot
-
Base Triangle:
Start with a generous ball of orange clay. Roll it into a smooth cone shape that is wider at the bottom and gently tapers to a rounded point at the top, flattening the base so it stands upright. -
Texture Details:
Using a plastic knife or clay tool, gently press small, horizontal dashes randomly across the orange surface to mimic the natural ridges of a carrot. -
Leafy Top:
Take a small amount of bright green clay and shape three small, teardrop-shaped leaves. Press them together in a cluster and attach them securely to the very top of the carrot cone.
Smoothing Secrets
Fingerprints showing up on your clay? Dip your finger in a tiny bit of water (for air-dry clay) or baby oil (for polymer) to smooth them away instantly.
Step 2: Creating the Pea Pod
-
Pod Shape:
Roll a piece of medium-green clay into an oval, then flatten it slightly. Pinch the top and bottom ends to create pointed tips, forming a boat-like shape. -
The Opening:
Use a sculpting tool to gently slice a vertical line down the center of the pod, but don’t cut all the way through. Carefully widen this opening to reveal the inside. -
Adding Peas:
Roll three or four small balls of slightly lighter green clay. Place them vertically inside the pod opening, pressing them gently so they stay in place. -
Pod Texture:
Add subtle horizontal etched lines across the outer skin of the pod for a realistic veggie texture.
Give Them Texture
Before baking or drying, gently press a clean toothbrush against the mushroom cap or the potato skin to create a realistic, porous vegetable texture.
Step 3: Making the Mushroom
-
Stalk Formation:
Roll a cylinder of cream or beige clay. Make it slightly wider at the bottom for stability and flatten the top surface where the cap will sit. -
Mushroom Cap:
Create a large, smooth dome from the same cream clay. Gently press it onto the stalk, blending the seam underneath if necessary to secure it. -
Cap Spots:
Roll tiny balls of slightly darker beige or light brown clay. Flatten them into small discs and press them randomly onto the mushroom cap for spots.
Step 4: The Tiny Spud
-
Basic Shape:
Roll a small ball of light brown clay. I prefer to keep this one quite round but slightly imperfect to look like a natural little potato or seed.
Step 5: Bringing Them to Life
-
Adding Eyes:
Once your shapes vary, use a small dotting tool dipped in black paint to create widespread eyes on each character. Place them relatively low on the face for extra cuteness. -
Sweet Smiles:
Use a very fine brush or a thin black marker to draw a tiny ‘U’ shape between the eyes for a mouth. -
Rosy Cheeks:
Dip a larger dotting tool into pink paint, or use tiny flattened circles of pink clay, and place them just below and outside the eyes for blushing cheeks. -
Highlight Sparkles:
Add the tinest dot of white paint to the upper corner of each black eye to give them a sparkling, alive look. -
Finishing Touches:
If you used polymer clay, bake according to package instructions. If using air-dry clay, allow them to dry completely before handling.
Arrange your new veggie family on a shelf or plant pot to create a whimsical garden scene


What Really Happens Inside the Kiln
Learn how time and temperature work together inside the kiln to transform clay into durable ceramic.
Friendly Blob Monsters
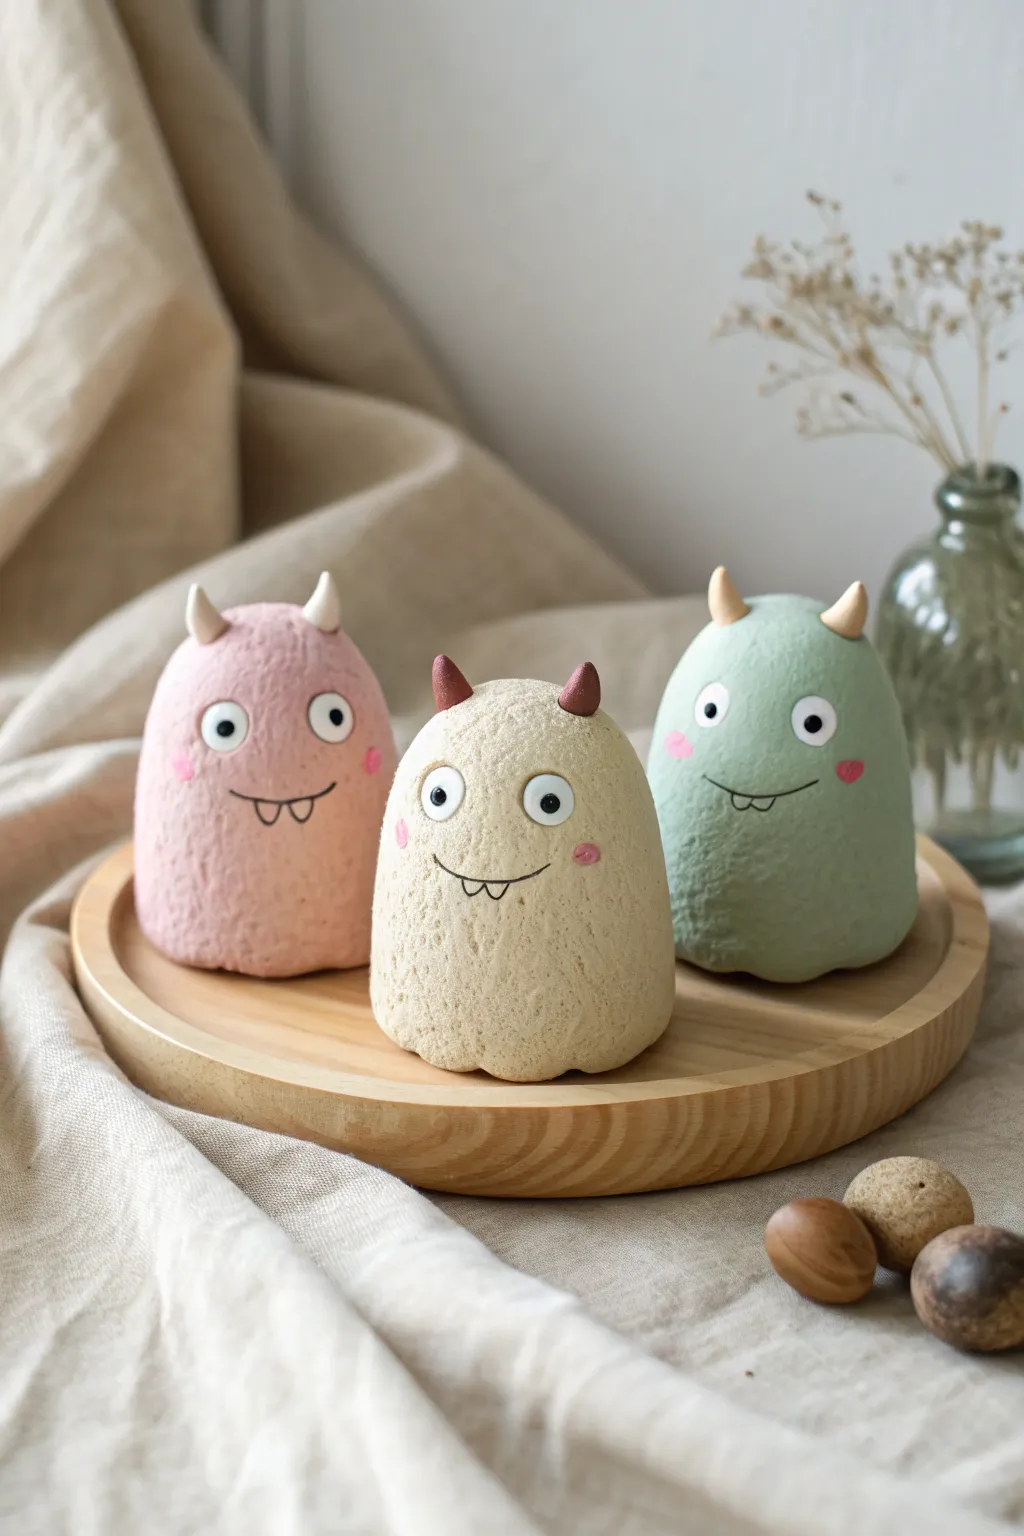
These adorable blob monsters are perfect little desk companions, featuring a unique, gritty texture that sets them apart from smooth clay creations. With their simple shapes and expressive little faces, this project is fantastic for beginners who want to practice shaping and texturing.
Step-by-Step Guide
Materials
- Air-dry clay (white or natural)
- Acrylic paints (pink, beige, sage green, white, black)
- Old toothbrush or texture sponge
- Small paintbrush
- Fine-point black permanent marker or detail paint pen
- Sculpting tools (or a toothpick)
- Matte sealant (optional)
Step 1: Fomring the Base Bodies
-
Prepare the clay:
Start by taking three handfuls of air-dry clay. Knead each piece well until it is soft, pliable, and free of cracks. -
Shape the blobs:
Roll each piece into a smooth ball first, then gently roll it back and forth on your table to create an egg-like shape. -
Flatten the base:
Press the wider bottom end of your egg shape firmly onto your work surface so the monster sits up straight without wobbling. -
Round the top:
Gently smooth the top dome with your fingers to ensure it isn’t too pointy; you want a nice, rounded ‘blob’ silhouette like a gumdrop.
Step 2: Adding Texture and Details
-
Create the signature texture:
This is the most important part! Take an old toothbrush or a rough stipple sponge and firmly press it all over the surface of the clay bodies to create a pitted, stone-like texture. -
Shape the horns:
Roll six tiny cones of clay for the horns. Make sure to keep the bottoms of the cones flat. -
Attach the horns:
Score the clay slightly where the horns will go, add a dab of water, and press two horns onto the top of each monster’s head. Blend the seams slightly for a strong hold. -
Make the eyes:
Roll small balls of white clay and flatten them slightly into discs. Press these onto the front of the bodies for the eyes. -
Add pupils:
Roll extremely tiny balls of black clay (or paint them later) and press them into the center of the white eye discs. -
Dry tight:
Let your monsters dry completely for 24-48 hours. They must be fully hardened before you start painting.
Cracking Clay?
If you see cracks forming while the clay dries, smooth a slurry of water and loose clay over the crack immediately to seal it.
Step 3: Painting and Expressions
-
Mix your colors:
Prepare your palette with a muted pink, a soft beige, and a sage green. I like to mix a little white into my colors to keep them looking pastel and soft. -
Paint the bodies:
Carefully paint around the eyes and horns, covering the textured body with your chosen color. The texture might require you to dab the brush rather than stroke it. -
Paint the horns:
Use a contrasting color for the horns—white for the pink and green monsters, and a dark brown for the beige monster. -
Let the paint dry:
Allow the base coats to dry fully. This usually takes about 20 minutes for acrylics. -
Draw the smiles:
Using a fine-point black marker or a very thin liner brush, draw a curved smile. Add two small downward triangles or loops for teeth. -
Add rosy cheeks:
Dip the very tip of a brush or a Q-tip into pink paint and dab small circles onto the ‘cheeks’ of each monster. -
Optional sealant:
To protect that great texture, finish with a coat of matte sealant spray if desired.
Pro Tip: Better Texture
Wait until the clay has dried for about 15 minutes before doing the toothbrush texturing—it holds the indentations better than wet clay.
Now you have a trio of friendly monsters ready to guard your shelf
Pocket Pet Rocks
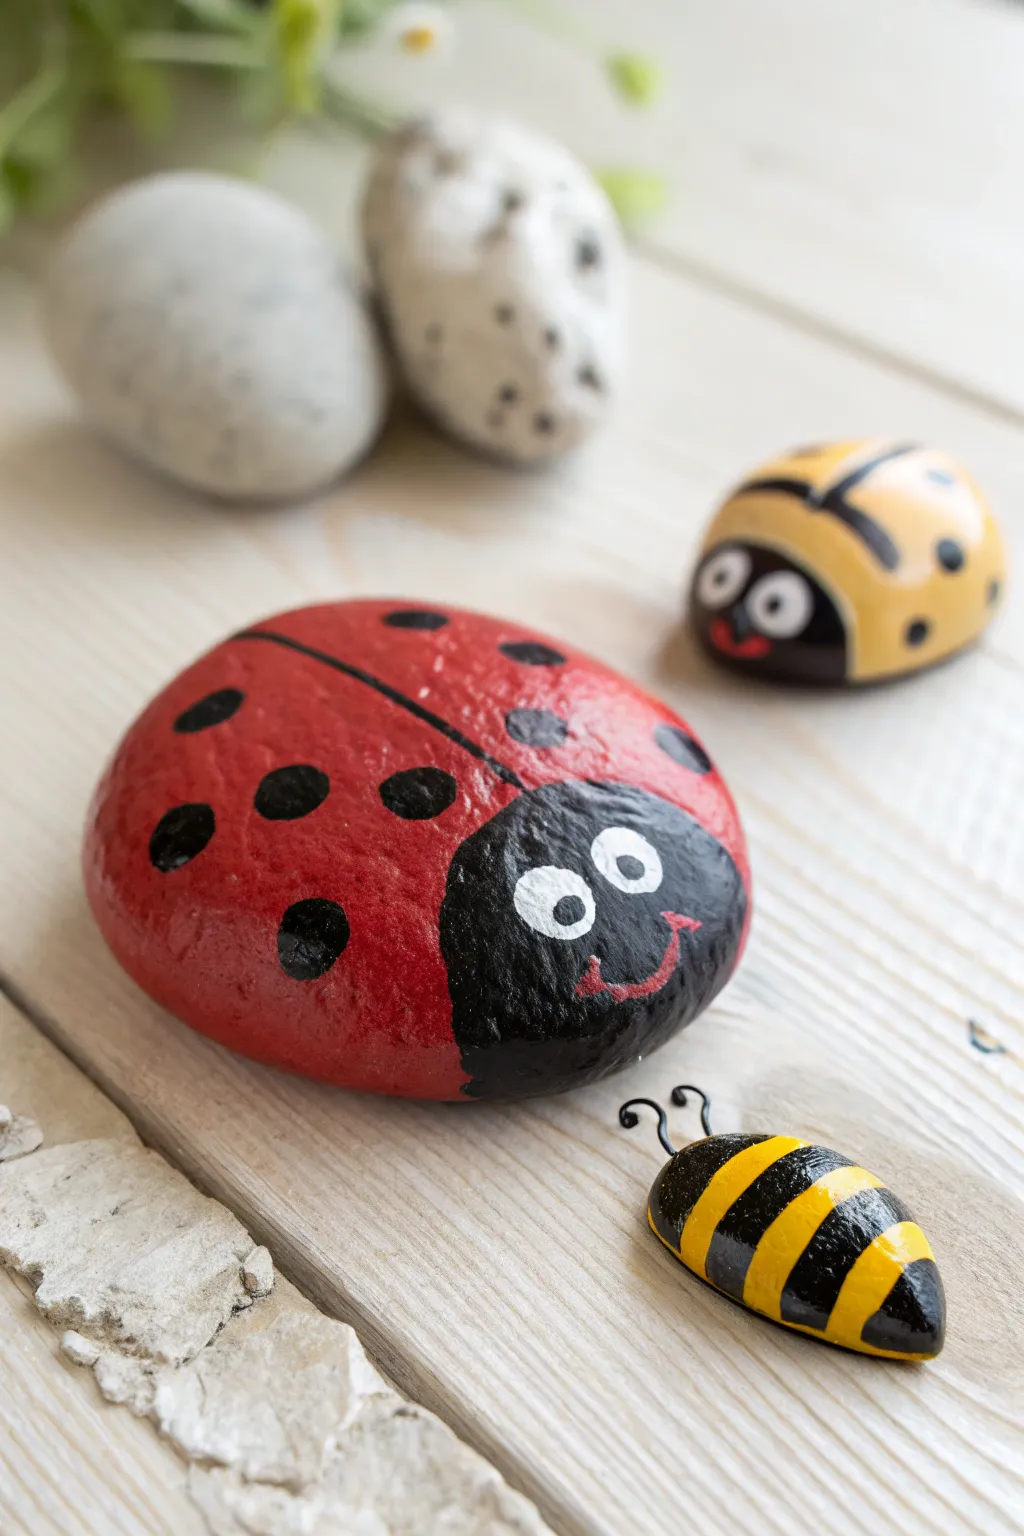
Transform smooth river stones into a charming family of garden bugs with just a little acrylic paint. These glossy, palm-sized pets—a ladybug, a yellow beetle, and a tiny bee—are perfect for hiding in flower pots or keeping in your pocket.
Step-by-Step Tutorial
Materials
- Smooth, rounded river stones (various sizes)
- Acrylic paints (red, yellow, black, white)
- Flat paintbrushes (medium and small)
- Fine-point detail brush or toothpick
- Glossy varnish or clear sealant (spray or brush-on)
- Water cup and paper towels
- Pencil (optional)
- Tiny wire for antennae (optional)
Step 1: Prepping and Base Coat
-
Clean your canvas:
Begin by washing your stones thoroughly with soap and water to remove any dirt or grit. Let them dry completely, as moisture will prevent the paint from adhering properly. -
Sketch the outline:
If you want precision, lightly sketch the division between the bug’s head and body with a pencil. A curved line about one-third of the way down the rock works best. -
Paint the ladybug body:
For the largest rock, paint the bottom two-thirds used for the body in a bright, solid red. You may need two coats to get a vibrant, opaque color. -
Paint the yellow beetle:
Select a smaller, rounder stone for the yellow beetle and paint the body section with a sunny yellow shade. -
Paint the bee stripes:
For the smallest, elongated rock, paint wide yellow stripes across the body, leaving alternating gaps of bare stone (or paint them black later). -
Let it dry:
Allow all the base colors to dry completely before moving on to the black paint to avoid smudging.
Paint looking streaky?
If your base colors look thin or streaky, avoid piling on thick globs. Instead, apply multiple thin layers, allowing each one to dry completely in between.
Step 2: Adding Details and Faces
-
Color the heads:
Using black acrylic paint, fill in the head section (the top third) of the ladybug and the yellow beetle. Create a smooth curve where the black meets the colored body. -
Finish the bee:
Fill in the alternating stripes on the bee with black paint, and paint the front tip black for its head. I find using a smaller flat brush helps keep these lines crisp. -
Draw the dorsal line:
On the ladybug and yellow beetle, use a fine liner brush to paint a thin black line straight down the center of the wings, starting from the head and going to the rock’s edge. -
Add spots:
Change to a small round brush or the handle end of a paintbrush to stamp varying sizes of black dots onto the red and yellow wings. Place them randomly for a natural look. -
Create the eyes:
Dip the handle of a brush into white paint and stamp two large circles onto the black head area of each bug. Let this white layer dry fully. -
Add pupils:
Once the white is dry, add a tiny black dot inside each white circle to make the eyes look outward or toward each other for a silly expression. -
Paint mouths:
Using a very fine detail brush and red paint, add a small, curved smile to the black face area of the ladybug and beetle. -
Optional antennae:
For the bee, you can paint tiny curly antennae on the rock itself, or glue on small bent wire pieces if you’re feeling adventurous.
Go 3D!
Instead of painted eyes, glue on plastic googly eyes for a wiggly, animated 3D effect that kids absolutely love.
Step 3: Sealing the Artwork
-
Check your work:
Look over your bugs for any paint gaps or smudges and touch them up with a little paint where needed. -
Apply varnish:
Once the paint is bone dry (wait at least an hour), coat the entire top surface of the rocks with a glossy varnish or clear sealant. This makes the colors pop and protects them from weather.
Now you have a trio of permanent garden guests that brighten your space without eating your plants

TRACK YOUR CERAMIC JOURNEY
Capture glaze tests, firing details, and creative progress—all in one simple printable. Make your projects easier to repeat and improve.
Desk Buddy Pencil Holders
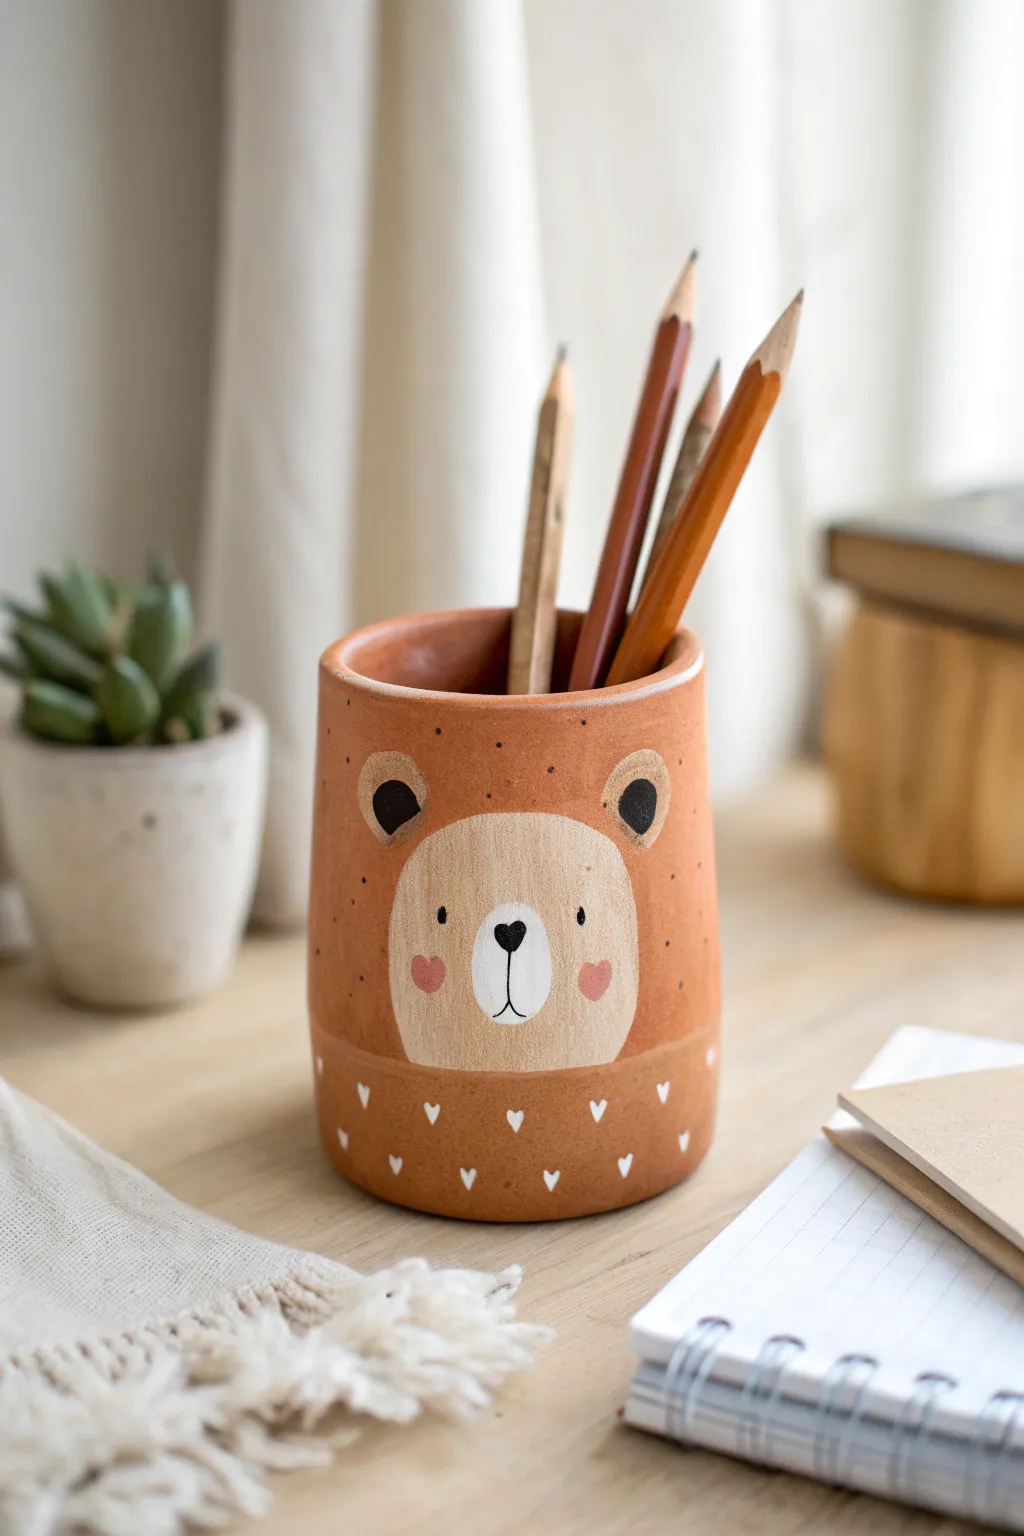
This adorable bear-themed pencil holder brings a touch of woodland charm to any desk with its warm terracotta base and sweet painted details. It’s a sturdy, functional piece of pottery art that’s perfect for keeping your favorite drawing tools organized.
Step-by-Step Guide
Materials
- Terracotta air-dry clay (approx. 500g)
- Rolling pin
- Clay knife or plastic cutting tool
- Empty can or jar (to use as a mold)
- Small cup of water
- Sponge
- Acrylic paints (beige/cream, white, black, rosy pink)
- Fine detail paintbrush
- Medium flat paintbrush
- Matte spray varnish or Mod Podge sealer
Step 1: Shaping the Base
-
Condition the Clay:
Start by kneading your terracotta clay in your hands until it feels soft, pliable, and free of any air bubbles. -
Roll the Slab:
Use your rolling pin to flatten the clay into a long rectangular slab, aiming for a consistent thickness of about 1/4 inch. -
Cut to Size:
Measure the height of your chosen mold (the can or jar) and trim your clay slab into a neat rectangle that is tall enough and long enough to wrap all the way around the mold with a slight overlap. -
Create the Base:
Roll out a separate, smaller circle of clay for the bottom of the pot. Place your mold on the clay and trace around it, cutting out a circle slightly larger than the mold’s footprint. -
Wrap the Form:
Carefully wrap your clay rectangle around the can/jar mold. Where the ends meet, score the clay (make little scratch marks) and add a drop of water, then press the seam together firmly to join. -
Attach the Bottom:
Place the wrapped cylinder onto the circular base. Smooth the clay from the walls down onto the base to seal the bottom seam completely so pencils won’t fall through. -
Smooth the Rim:
Use a damp sponge or your finger to smooth out the top rim, making it nice and rounded rather than sharp. -
Dry Time:
Gently slide the can/jar out of the clay cylinder. If the clay is stiff enough to stand, let it be; otherwise, leave the mold in for an hour or two. Allow the pot to dry completely for 24-48 hours until it turns a lighter color.
Cracks happen
If small cracks appear while drying, don’t panic. Mix a tiny bit of fresh clay with water to make a paste (slip) and fill in the cracks, then smooth it over.
Step 2: Painting the Character
-
Sand the Surface:
Once fully dry, you might find some rough spots. Quickly sand them down with fine-grit sandpaper for a smoother painting surface. -
Outline the Snout:
Using a pencil, lightly sketch a large oval shape on the smoother side of the pot. This will cover the lower middle section and become the bear’s snout area. -
Paint the Snout:
I like to use a medium flat brush here to fill in your sketched oval with the cream or beige acrylic paint. You may need two coats to get solid coverage over the darker clay. -
Add Ears:
Paint a small black semi-circle inside the beige area? No, wait—paint two small black semi-circles on the terracotta clay just above the beige snout area to represent the inner ears. -
Paint the Nose:
With your fine detail brush and black paint, create an inverted triangle or heart shape for the nose right in the center of the cream snout patch. -
Draw the Mouth:
From the bottom point of the nose, paint a thin black line straight down, splitting into two curved lines to form a smiling mouth. -
Add Cheeks and Speckles:
Dip a small brush into rosy pink paint and add two small heart shapes on the cheeks. Then, use a toothpick or the handle end of a brush to dot tiny black speckles (freckles) all over the upper terracotta section. -
Add the Bottom Pattern:
Using white paint and a fine brush, paint a row of small hearts or triangles around the very bottom edge of the cylinder for a decorative border. -
Seal the Deal:
Once all paint is perfectly dry, apply a coat of matte varnish or sealer to protect your artwork from chipping and smudging.
Forest Friends
Why stop at a bear? Use orange paint to make a fox version, or grey paint for a raccoon, creating a whole set of woodland desk organizers.
Now your desk has a friendly face to greeting you every time you reach for a pencil
Mini “Small World” Characters
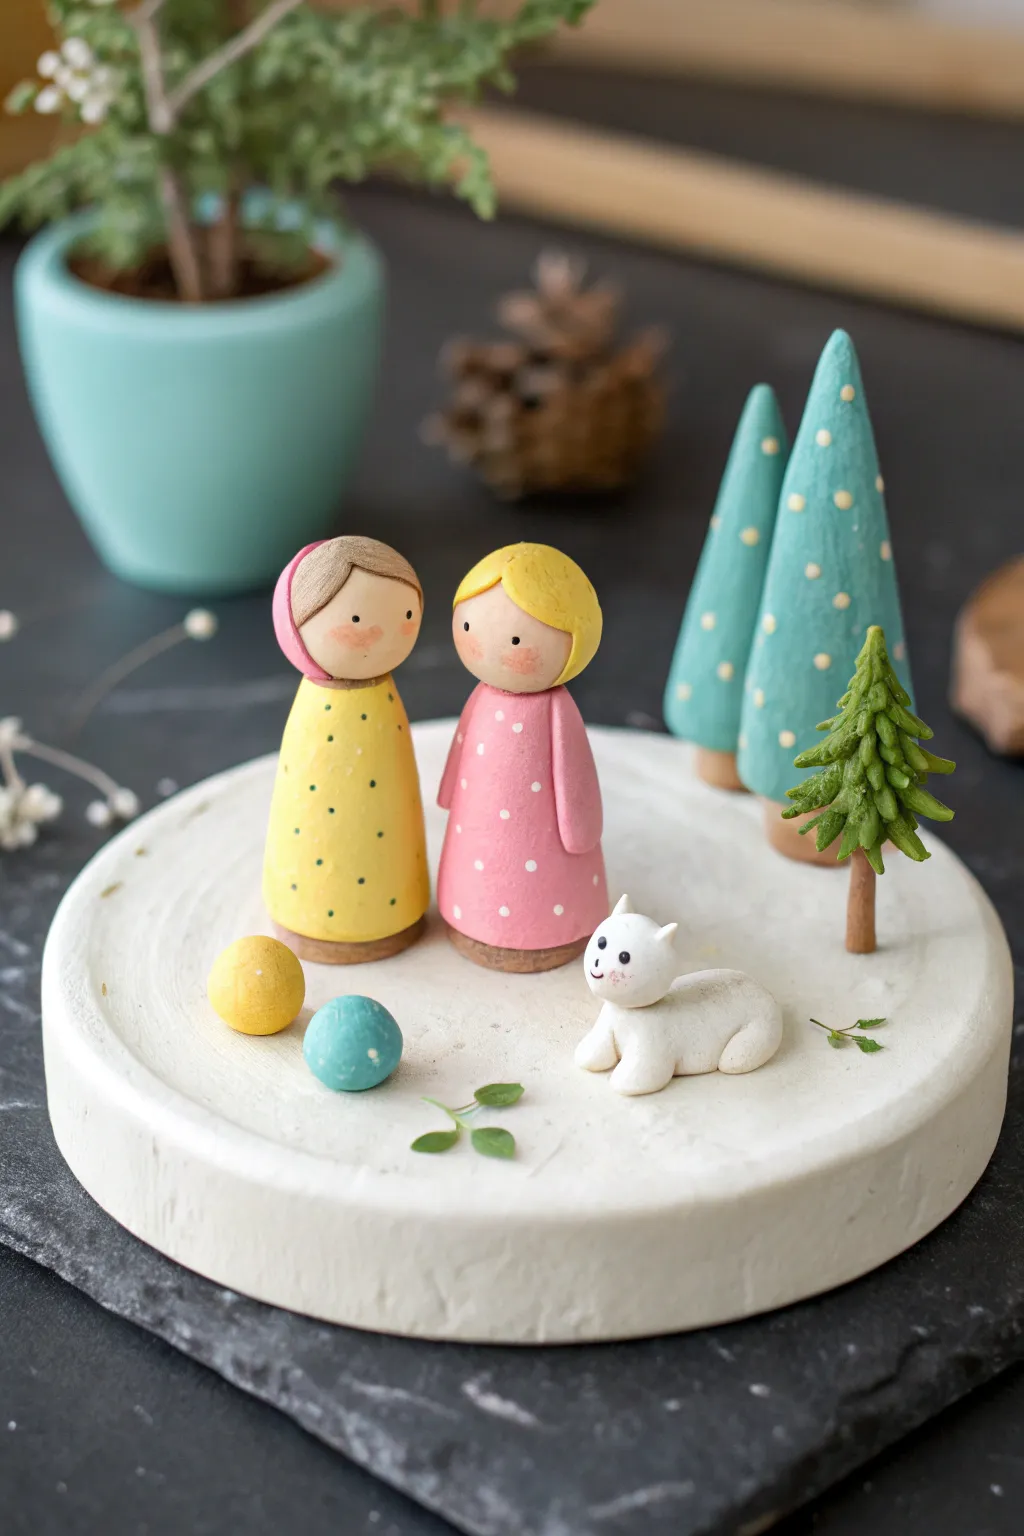
These charming, peg-style figures nestled in a snowy miniature world make for a delightful keepsake or storytelling prop. Their simple, rounded shapes and soft pastel colors create a gentle, inviting aesthetic perfect for a child’s shelf.
Step-by-Step
Materials
- Air-dry clay or polymer clay (white base)
- Wooden round base or coaster
- Acrylic paints (pastel pink, yellow, teal, white, brown, green)
- Fine detail paintbrushes
- Dotting tool or toothpick
- Sculpting tools (or a plastic knife)
- Water cup for smoothing
- Matte sealant or varnish (optional)
- Glue (PVA or super glue)
Step 1: Sculpting the Figures
-
Form the bodies:
Start with two medium-sized balls of clay. Roll each into a thick cone shape with a flattened bottom and a rounded top to create the dress forms. One should be slightly taller than the other. -
Add the heads:
Roll two smooth spheres for heads. Moisten the top of the body cones slightly (or use a dab of slip/liquid clay) and press the heads firmly onto the bodies. Blend the seam gently at the neck so the pieces are secure. -
Create the hair and hood:
For the figure on the right, flatten a small pancake of clay and mold it over the head to form a bob haircut. For the left figure, wrap a thin strip of clay around the face area to mimic a hood, smoothing it down the back. -
Add arms:
Roll tiny sausage shapes for arms. Attach them to the sides of the bodies, keeping them flush against the dress for that classic peg-doll silhouette. Make sure they don’t stick out too much. -
Sculpt the pet:
Form a small, kidney-bean shape for the cat’s body. Add a small ball for the head, pinching tiny triangles for ears. Roll a tiny tail and attach it to the back. Press the body down so it looks like it’s lying comfortably.
Smooth Operator
Before the clay dries, dip your fingertip or a brush in a little water and gently run it over your sculptures to erase fingerprints and cracks.
Step 2: Creating the Landscape
-
Form the trees:
Roll two tall, slender cones for the stylized trees. Keep the surface relatively smooth. For the realistic tree, make a smaller cone and use fine scissors or a tool to snip into the clay, pulling the cuts outward to resemble pine needles. -
Make the play balls:
Simply roll two very small spheres of clay. These will be the scattered toys on the ground. -
Prepare the base:
Take a larger ball of white clay and flatten it over your wooden round base to create the snowy ground. Leave the surface slightly textured rather than perfectly smooth to mimic packed snow. -
Drying time:
Allow all your clay pieces to dry completely according to the package instructions. Air-dry clay usually needs 24-48 hours. I find flipping the pieces halfway through helps the bottoms dry evenly.
Step 3: Painting and Assembly
-
Paint the dresses:
Paint the body of the hooded figure a soft yellow and the other figure pastel pink. You may need two coats for opaque coverage. -
Detail the faces and hair:
Use a light skin tone for the faces. Paint the hair yellow and the hood pink. Once dry, use a dotting tool for rosy cheeks and a very fine brush for the simple eyes. -
Decorate with polka dots:
Dip the end of a toothpick or a small dotting tool into white paint (for the pink dress) and green paint (for the yellow dress) to add the tiny polka dot patterns. -
Paint the trees:
Paint the smooth cone trees a soft teal color. Once dry, apply yellow/cream polka dots. Paint the textured pine tree a natural green with a brown trunk. -
Finish the accessories:
Paint the scattered balls in yellow and teal to match the color scheme. Paint the cat white with tiny black facial features and a touch of pink on the nose. -
Assemble the scene:
Arrange the dried figures, trees, and balls onto the white clay base. Use a strong glue to secure everything in place. Add tiny sprigs of dried greenery or painted clay leaves on the ground for extra detail.
Seasonal Switch
Change the color palette to oranges and browns for autumn, or add tiny clay flowers to the base to turn this snowy scene into a spring meadow.
Once assembled, place this adorable scene on a shelf to bring a quiet moment of joy to your room