If you can roll a ball and pinch a little hat, you can make cute clay mushrooms that look like they wandered out of a storybook. Here are my favorite mushroom clay ideas—from sweet little characters to tiny woodland décor—so you can pick one and start sculpting today.
Classic Red-and-White Toadstool Minis
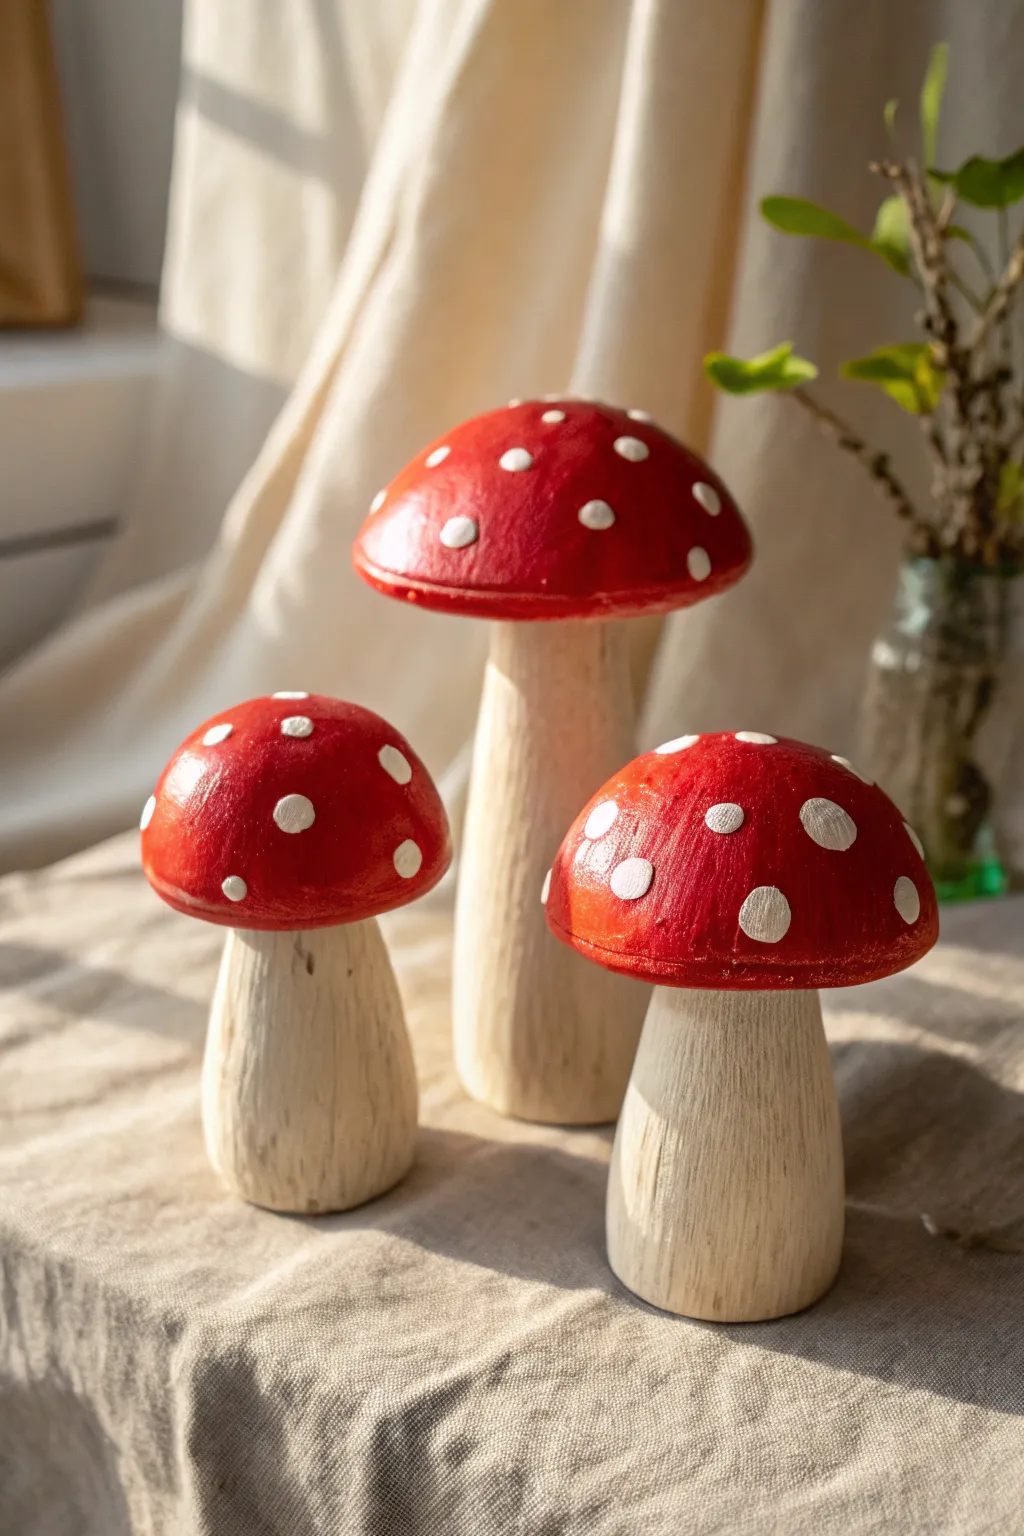
These charming rustic mushrooms bring a fairytale touch to any shelf with their vibrant red caps and natural wooden stems. By combining simple wood turnings with bold acrylics, you can create a timeless trio that looks plucked straight from an enchanted forest.
Step-by-Step Guide
Materials
- Unfinished wooden mushroom shapes (various sizes)
- Fine-grit sandpaper (220 grit)
- Red acrylic paint (bright crimson or scarlet)
- White acrylic paint
- Small flat paintbrush
- Detail paintbrush or dotting tool
- Matte or satin varnish
- Paper towels
- Palette or small dish
Step 1: Preparation
-
Inspect the wood:
Examine your wooden mushroom shapes for any rough patches or splinters. Since these are often mass-produced, a little quality control upfront makes a big difference. -
Sand the surfaces:
Lightly sand the entire surface of each mushroom using 220-grit sandpaper. Focus on the curves of the cap to ensure a smooth painting surface, but don’t worry about making the stem perfectly smooth—a little texture adds to the rustic look. -
Clean dust:
Wipe the mushrooms down thoroughly with a damp paper towel or a tack cloth to remove all sanding dust. Paint adheres much better to a clean, dust-free surface.
Clean Lines Tip
Struggle with shaky hands? Use low-tack painter’s tape or washi tape around the top of the stem to protect the wood while you paint the red rim of the cap.
Step 2: Painting the Caps
-
Establish the line:
Using your small flat brush and red acrylic paint, carefully paint the rim of the mushroom cap first. I like to rotate the mushroom in my hand while keeping the brush steady to get a clean edge where the cap meets the stem. -
Fill in the color:
Paint the rest of the cap surface with the red paint. Use smooth, long strokes starting from the top center and pulling down toward the rim to minimize visible brush marks. -
Check coverage:
Allow the first coat to dry for about 15-20 minutes. If the wood grain is still showing through too much for your liking, apply a second coat for a more opaque, vibrant red. -
Dry completely:
Let the red caps dry completely before moving on to the next step. This is crucial to prevent the red from bleeding into your pristine white dots.
Forest Floor Texture
Glue a small bit of dried moss or preserved reindeer moss to the very bottom of the stems to make them look freshly picked from the woods.
Step 3: Adding Details
-
Plan your dots:
Visualize where you want your spots to go. Aim for a random, organic pattern rather than a perfect grid. Varying the spacing makes them look more natural. -
Paint the white spots:
Dip a detail brush or a dotting tool into white acrylic paint. Gently press onto the dry red cap to create circular spots. For a hand-painted look like the photo, irregular circles painted with a small brush are actually better than perfect dots. -
Vary the sizes:
Make some dots larger and others smaller. Adding tiny specks between the larger spots creates visual interest and mimics the texture of real fly agaric mushrooms. -
Refine the edges:
If any red paint dripped onto the stem during the earlier steps, use a clean piece of sandpaper to gently buff it away, revealing the clean wood underneath.
Step 4: Finishing Touches
-
Seal the paint:
Once the white dots are fully dry, apply a coat of matte or satin varnish over the painted red cap. This protects the paint from chipping and gives it a finished sheen. -
Seal the stem (optional):
You can leave the stem raw for a matte texture, or apply a very thin layer of matte varnish to protect the wood without darkening it too much. -
Final cure:
Set the mushrooms aside in a dust-free area to let the varnish cure completely according to the bottle instructions.
Arranging these distinctively handcrafted mushrooms together creates a cozy woodland vignette perfect for any season


Kawaii Face Mushroom Buddies
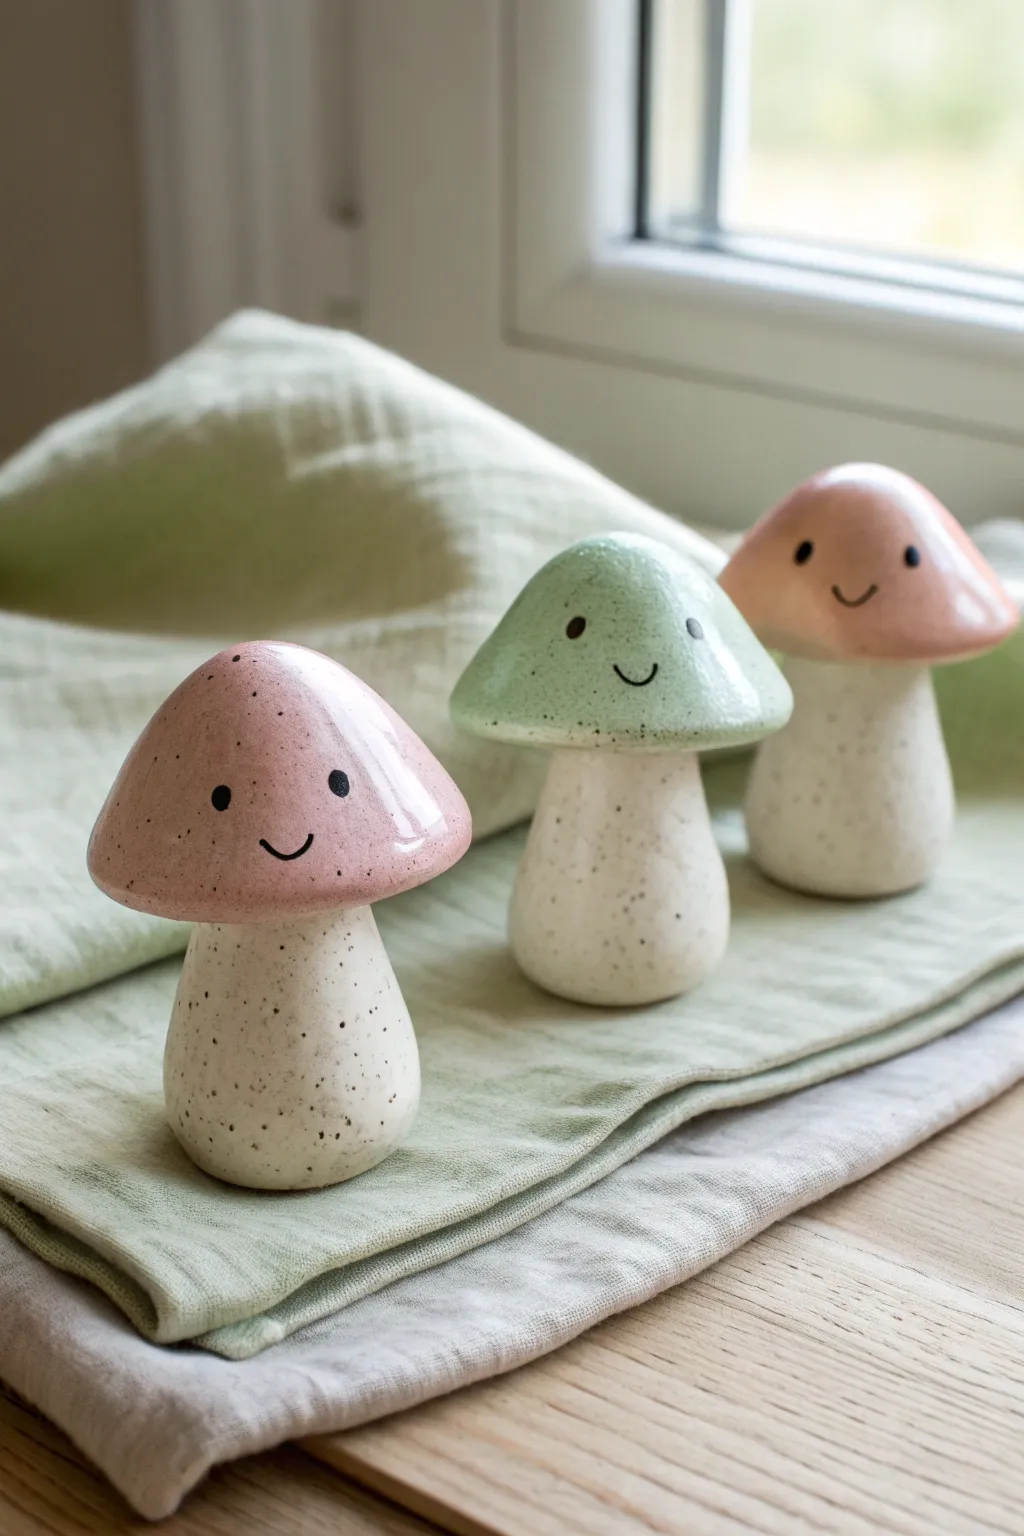
Create a cozy little family of clay mushrooms featuring speckled stems and glossy, pastel-colored caps. These kawaii buddies have an adorable ceramic finish that looks professionally fired, even if you make them right at home.
Step-by-Step Tutorial
Materials
- Polymer clay (white or beige)
- Acrylic paints (sage green, muted pink, black)
- Faux granite or speckle medium (or black acrylic paint + toothbrush)
- High-gloss polyurethane varnish or UV resin
- Sculpting tools (ball styluses, blade)
- Aluminum foil (for armatures)
- Fine grit sandpaper
- Small paintbrush
Step 1: Sculpting the Forms
-
Prepare the foil cores:
Start by scrunching small pieces of aluminum foil into rough cone shapes. This saves clay and keeps the mushrooms lightweight. -
Shape the stems:
Condition your white or beige polymer clay until pliable. Roll a thick log and cut it into three sections. Flatten slightly to create a sturdy base for each stem. -
Refine the stem silhouette:
Shape the stems so they are wider at the bottom (bulbous) and slightly tapered at the top. Insert your foil core if the stems are large, otherwise, solid clay works generally fine for this size. -
Form the caps:
Roll three balls of clay, slightly larger than the stem tops. Flatten them into thick discs and gently dome the top with your thumbs to create the mushroom cap shape. -
Hollow the underside:
Use a large ball stylus or your thumb to create an indentation underneath each cap. This ensures they sit securely on the stems rather than just balancing on top. -
Attach cap to stem:
Place the caps onto the stems. Gently press them down to bond the raw clay. I like to smooth the seam slightly underneath with a sculpting tool if visible. -
Smooth the surface:
Before baking, use a tiny bit of baby oil or clay softener on your finger to buff out any fingerprints. The surface needs to be pristine. -
Bake the clay:
Bake the pieces according to your clay manufacturer’s instructions (usually 275°F/130°C for 15-30 minutes). Let them cool completely.
Step 2: Sanding and Speckling
-
Sand for smoothness:
Once cool, use fine-grit sandpaper under running water to gently sand the stems and caps, removing any jagged edges or lint. -
Apply the speckle effect:
Dilute a tiny drop of black acrylic paint with water until it’s inky. Dip a toothbrush into it and flick the bristles to spray fine speckles all over the white stems. Avoid the caps if possible, or wipe them clean immediately. -
Let the speckles dry:
Allow the speckled paint to dry fully before moving to the next coloring step to prevent smearing.
Clean Lines
Mask off the stem with painter’s tape right under the cap before painting the color. This ensures a crisp, perfect line between the colored cap and the speckled white stem.
Step 3: Painting and Glazing
-
Paint the caps:
Mix a soft sage green and a muted dusty pink. Paint the caps carefully, applying 2-3 thin coats for full opacity, letting each coat dry in between. -
Draw the faces:
Using a very fine detail brush or a black paint pen, draw the kawaii faces. Place the eyes wide apart and slightly low on the cap for maximum cuteness, with a tiny ‘u’ shaped smile between them. -
Apply high-gloss finish:
This is the secret to the ceramic look. Apply a thick, even coat of high-gloss polyurethane varnish or UV resin over the entire mushroom, especially the caps. -
Cure or dry glaze:
If using resin, cure under a UV lamp. If using varnish, let it dry overnight in a dust-free box to achieve that glass-like shine.
Garden Variation
Make tiny versions and glue them onto floral wire stakes. You can then poke them into your indoor plant pots for instant, waterproof decor.
Arranging these little glossy friends on a shelf adds an instant touch of whimsy to your room


Tiny Mushroom Family Cluster
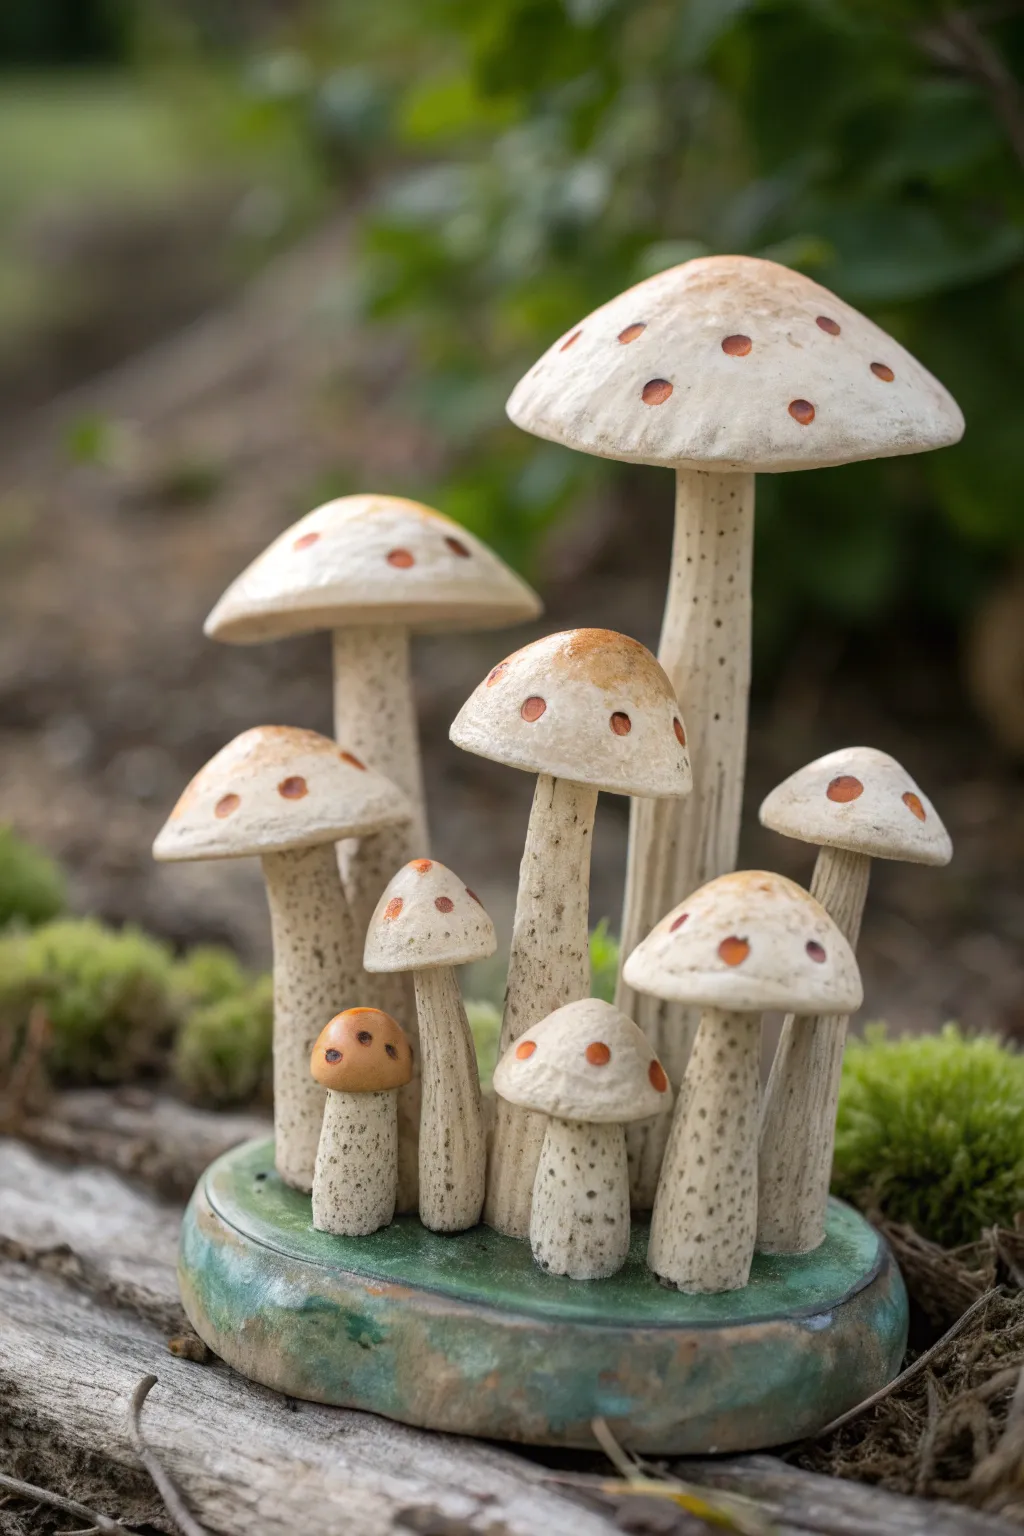
Create a whimsical slice of the forest floor with this charming family of clay mushrooms. Featuring natural textures and earthy speckles, this project captures the rustic beauty of woodland fungi gathered on a mossy green base.
Detailed Instructions
Materials
- Polymer clay (white, beige, and translucent)
- Acrylic paints (burnt sienna, raw umber, moss green, teal)
- Liquid clay or texturing medium
- Coarse black pepper or dried coffee grounds
- Needle tool and ball stylus tool
- Old toothbrush or stiff bristle brush
- Small round paintbrush
- Wire armature or toothpicks (optional for support)
- Matte varnish
Step 1: Sculpting the Base
-
Prepare the Clay Mix:
Start by mixing white polymer clay with a small amount of beige to get a creamy off-white base color. For that realistic speckled look seen in the photo, knead in a pinch of coarse black pepper or dried coffee grounds until evenly distributed. -
Form the Mound:
Take a walnut-sized ball of your speckled clay and flatten it slightly to form a domed variety of a base. It should be thick enough to support the stems but tapered at the edges. -
Texture the Base:
Texture the surface of the base by firmly pressing an old toothbrush or a ball of crumpled aluminum foil against it. This creates an earthy, uneven terrain.
Step 2: Forming the Stems
-
Plan the Arrangement:
Decide on your composition. You’ll need about 8-9 mushrooms. Vary the heights significantly, with one tall ‘parent’ mushroom and several medium and tiny ‘baby’ buttons. -
Roll the Stems:
Roll out cylinders of the speckled clay in varying thicknesses. Taper them slightly so they are wider at the bottom and narrower at the neck. -
Distress the Stems:
Use a needle tool to scratch vertical lines down the length of each stem. These shouldn’t be perfect stripes but rather rough, bark-like crevices to mimic natural growth. -
Attach to Base:
Press the stems firmly onto your base. I find that using a drop of liquid clay at the connection point helps them bond securely during baking. Blend the clay at the bottom of the stem into the base slightly.
Drooping Stems?
If tall stems lean while you work, prop them up with cornstarch or polyester fiberfill during baking. This supports the clay without leaving marks.
Step 3: Creating the Caps
-
Shape the Caps:
Roll balls of the same speckled clay mixture. Press them into domed shapes. Make the largest cap quite wide and flatter, while the tiny mushrooms should have rounder, button-like caps. -
Hollow the Underside:
Use your thumb or a large ball tool to gently hollow out the underside of each cap so it will sit naturally on the stem. -
Add Polka Dots:
Before attaching the caps, use a small ball stylus to press varied indentations into the top surface of each cap. These pits will hold the paint later. -
Attach Caps:
Place the caps onto their corresponding stems. If the tallest mushroom feels wobbly, insert a piece of wire or a toothpick inside the stem for internal structure before adding the cap. -
Baking:
Bake the entire sculpture according to your clay manufacturer’s instructions (usually 275°F/135°C for 15-30 minutes). Let it cool completely before painting.
Add Little Details
Make tiny balls of clay, texture them like moss, and glue them around the base of the stems after baking for extra woodland realism.
Step 4: Painting and Finishing
-
Washer Technique:
Mix raw umber acrylic paint with water to create a thin wash. Brush this over the entire sculpture, getting into all the textured cracks. -
Wipe Away:
Immediately wipe the surface with a damp paper towel or wet wipe. The dark paint will stay in the needle-tool crevices and the pepper speckles, instantly aging the piece. -
Painting the Spots:
Use burnt sienna paint to fill in the little indentations you made on the caps. You can tap the center of the tops with a slightly lighter tan color for a sun-bleached effect. -
Coloring the Base:
Paint the bottom disc base with a mix of moss green and a touch of teal. Apply it thinly so the speckled clay texture still shows through, giving it a glazed ceramic look. -
Varnish:
Finish by sealing the piece with a matte varnish to protect the paint and eliminate any unnatural plastic shine.
Place your finished cluster on a windowsill or shelf to bring a permanent touch of autumn magic to your home


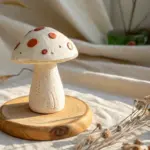
Textured Gills Under the Cap
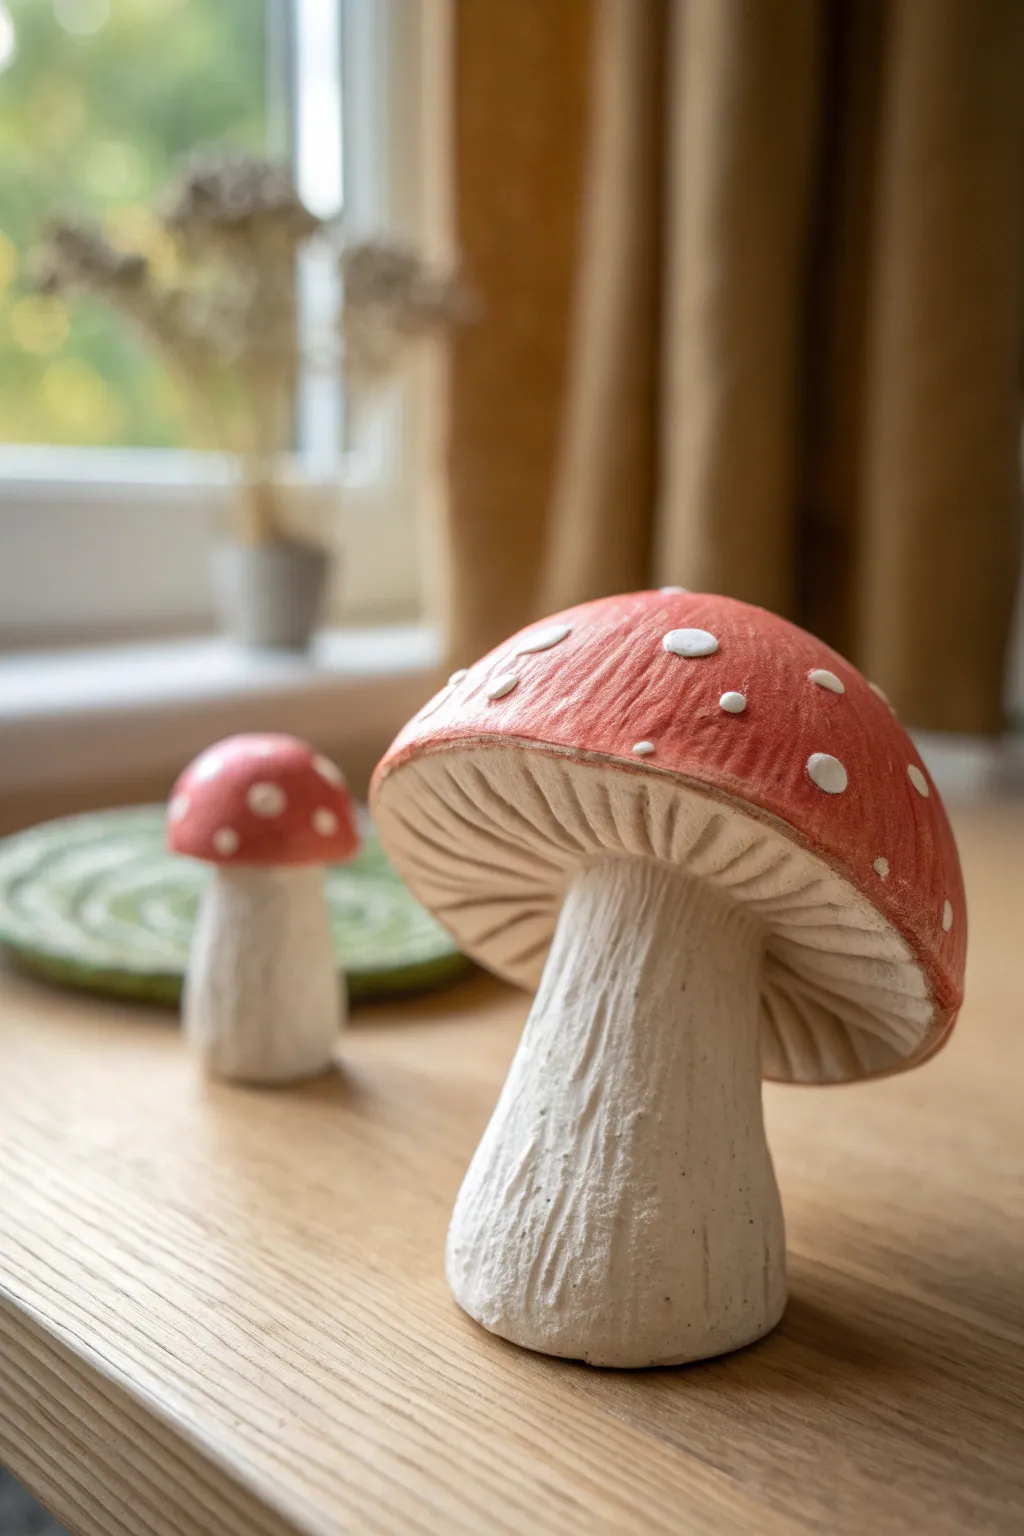
These charming decorative mushrooms bring a touch of woodland magic indoors with their highly detailed gill structures and organic textures. The matte finish and soft red glaze give them a lovely, rustic look that mimics the classic Amanita muscaria without looking too cartoonish.
Step-by-Step Tutorial
Materials
- Air-dry clay (white or light grey)
- Clay sculpting tools (needle tool, small loop tool)
- Acrylic paints (Red, White, Cream/Off-white)
- Matte sealant or varnish
- Aluminum foil
- Small paintbrush
- Fine-grit sandpaper
- Water cup and sponge
Step 1: Forming the Base Structure
-
Create the core:
Begin by crumpling a piece of aluminum foil into a mushroom shape—a thick stem and a domed cap. This saves clay and makes the finished piece lighter. -
Prepare the clay:
Condition your air-dry clay by kneading it until it is soft and pliable. If it feels too dry, add a tiny drop of water. -
Cover the stalk:
Roll out a sheet of clay about 1/4 inch thick. Wrap this around the foil stem, smoothing the seams together with a wet finger. -
Shape the cap:
Form a separate, thicker pancake of clay and drape it over the foil cap dome. Blend the clay downwards to meet the stem, ensuring the two parts are firmly joined. -
Refine the silhouette:
Gently shape the cap so it overhangs the stem significantly, creating a deep underside where the gills will go. The edges should curve slightly downward.
Cracking Clay?
If small cracks appear while drying, mix a small amount of fresh clay with water to make a paste (slip) and fill the cracks, then smooth over.
Step 2: Adding Texture and Detail
-
Texture the stem:
Drag a sculpting tool or an old toothbrush vertically up the stem to create bark-like ridges. I like to twist the lines slightly for a more organic feel. -
Carve the gills:
Flip the mushroom gently. Using a sharp needle tool or knife tool, carve straight lines radiating from the stem to the edge of the cap. -
Detail the gills:
Go back over the gill lines to deepen them. Vary the depth slightly; real mushrooms often have smaller intermediate gills near the outer edge. -
Smooth the cap surface:
Use a damp sponge to smooth out any fingerprints on the top of the red cap area, ensuring a nice canvas for painting. -
Dry completely:
Let the sculpture dry for at least 24-48 hours. Don’t rush this, or the paint might crack later. -
Sand imperfections:
Once fully dry, lightly sand any sharp burrs or rough patches, particularly around the bottom of the stem.
Sculpting Secret
Use a loop tool to scoop out clay from under the cap before detailing. This creates a deeper shadow and makes the gills look much more realistic.
Step 3: Painting and Finishing
-
Base coat the stem:
Paint the stem and the underside gills with a cream or off-white acrylic paint. You may need to water the paint down slightly to get it deep into the gill cracks. -
Dry brush texture:
Once the base is dry, lightly dry-brush a tiny amount of darker beige over the raised texture of the stem to highlight the ridges. -
Paint the cap:
Apply a coat of warm, earthy red acrylic paint to the top of the cap. Two thin coats are usually better than one thick one for even coverage. -
Add the spots:
Using a small detail brush or the back end of a paintbrush, dot white paint onto the red cap. Make them irregular sizes and slightly raised for texture. -
Seal the piece:
Protect your work with a matte varnish. Avoid glossy finishes if you want to maintain that natural, earthy clay aesthetic seen in the photo.
Now you have a charming woodland accent perfect for a bookshelf or windowsill display

The Complete Guide to Pottery Troubleshooting
Uncover the most common ceramic mistakes—from cracking clay to failed glazes—and learn how to fix them fast.
Mushroom Charm Necklaces

These delightful mushroom charms evoke a fairytale forest with their earthy tones and distinct white spots. Strung simply on a cord, this trio makes for an adorable, nature-inspired necklace that captures the charm of foraging without getting your boots muddy.
How-To Guide
Materials
- Polymer clay (white or translucent)
- Acrylic paints (burnt sienna, bright red, beige/grey, white)
- Small paintbrush (detail round size 0 or 1)
- Headpins or small eye pins (silver or gold)
- Jump rings
- Waxed cotton cord or hemp twine (beige)
- Gloss varnish or resin (optional for shine)
- Clay sculpting tools (or a toothpick)
- Round nose pliers
- Wire cutters
- Baking sheet and parchment paper
- Oven
Step 1: Sculpting the Caps
-
Portion the clay:
Start by cutting three small, equal-sized pieces of polymer clay, roughly the size of a marble. Condition the clay by kneading it in your hands until it is soft and pliable. -
Form the basic shape:
Roll each piece into a smooth ball. Gently press down on one side to flatten the bottom, creating a hemisphere shape. Keep the dome relatively high for that plump mushroom look. -
Shape the rim:
Use your thumb to gently widen the bottom edge of the dome, creating a slight overhang where the cap will meet the stem. Smooth out any fingerprints. -
Insert the hardware:
Take your eye pin or headpin and carefully push it through the center of the cap from the top down. If using a straight wire, form a small loop at the top first using round nose pliers.
Step 2: Creating the Stems
-
Roll the stems:
Create three cylinders from the clay, slightly thicker than the wire pins. These should be a bit chunky to match the rustic aesthetic shown. -
Attach stem to cap:
Slide the stem cylinder up the protruding wire on the underside of the cap. Gently press the clay of the stem against the flat underside of the cap to secure the bond. I find twisting slightly helps them fuse. -
Texture the stem:
The stems in the reference have a woody texture. Take a toothpick or needle tool and lightly scratch vertical lines along the stem to mimic wood grain or natural fibers. -
The final curve:
Gently curve the very bottom of the stem or flare it out slightly for a natural, organic finish. Trim any excess wire sticking out the bottom with wire cutters. -
Bake:
Arrange the mushrooms standing up on a parchment-lined baking sheet. Bake according to your polymer clay package instructions (typically 275°F/135°C for 15-30 minutes). Let them cool completely.
Uneven Spots?
If your painted dots look messy, wait for them to dry fully, then gently scrape them off with a toothpick or paint over them with the base cap color and try again.
Step 3: Painting & Finishing
-
Base coat the stems:
Mix a very light beige or off-white acrylic paint. Paint the stems entirely, making sure to get into the texture grooves. -
Paint the caps:
Paint each cap a different color: one bright red, one warm caramel brown, and one soft taupe or grey-beige. Ensure opaque coverage; you may need two thin coats. -
Add the spots:
Dip the very tip of a small paintbrush handle or a dotting tool into white acrylic paint. Carefully dot varying sizes of spots onto each cap. Don’t make them too uniform; randomness looks more natural. -
Seal (Optional):
For a glossy finish like the red mushroom in the photo, apply a coat of gloss varnish or UV resin over the painted caps once dry. The stems can remain matte. -
Add jump rings:
Open a jump ring using two pairs of pliers (twist sideways, don’t pull apart). Thread it through the wire loop at the top of a mushroom and close it securely. Repeat for all three. -
Stringing:
Measure a length of beige cord or twine that fits comfortably over your head. Find the center point. -
Assembly:
Thread the mushrooms onto the cord. Place the red one in the center, flanked by the brown and beige ones to replicate the balanced composition. -
Secure the trio:
Tie a simple overhand knot on the cord on either side of the charm group if you want them to stay centered, or leave them free-floating. Knot the ends of the cord to finish.
Add Sparkle
For a magical twist, mix a tiny amount of fine iridescent glitter into the varnish for the caps, or use metallic gold paint for the spots instead of plain white.
Now you have a charming accessory perfect for woodland walks or cozy cottagecore outfits
Cute Mushroom Earrings Set
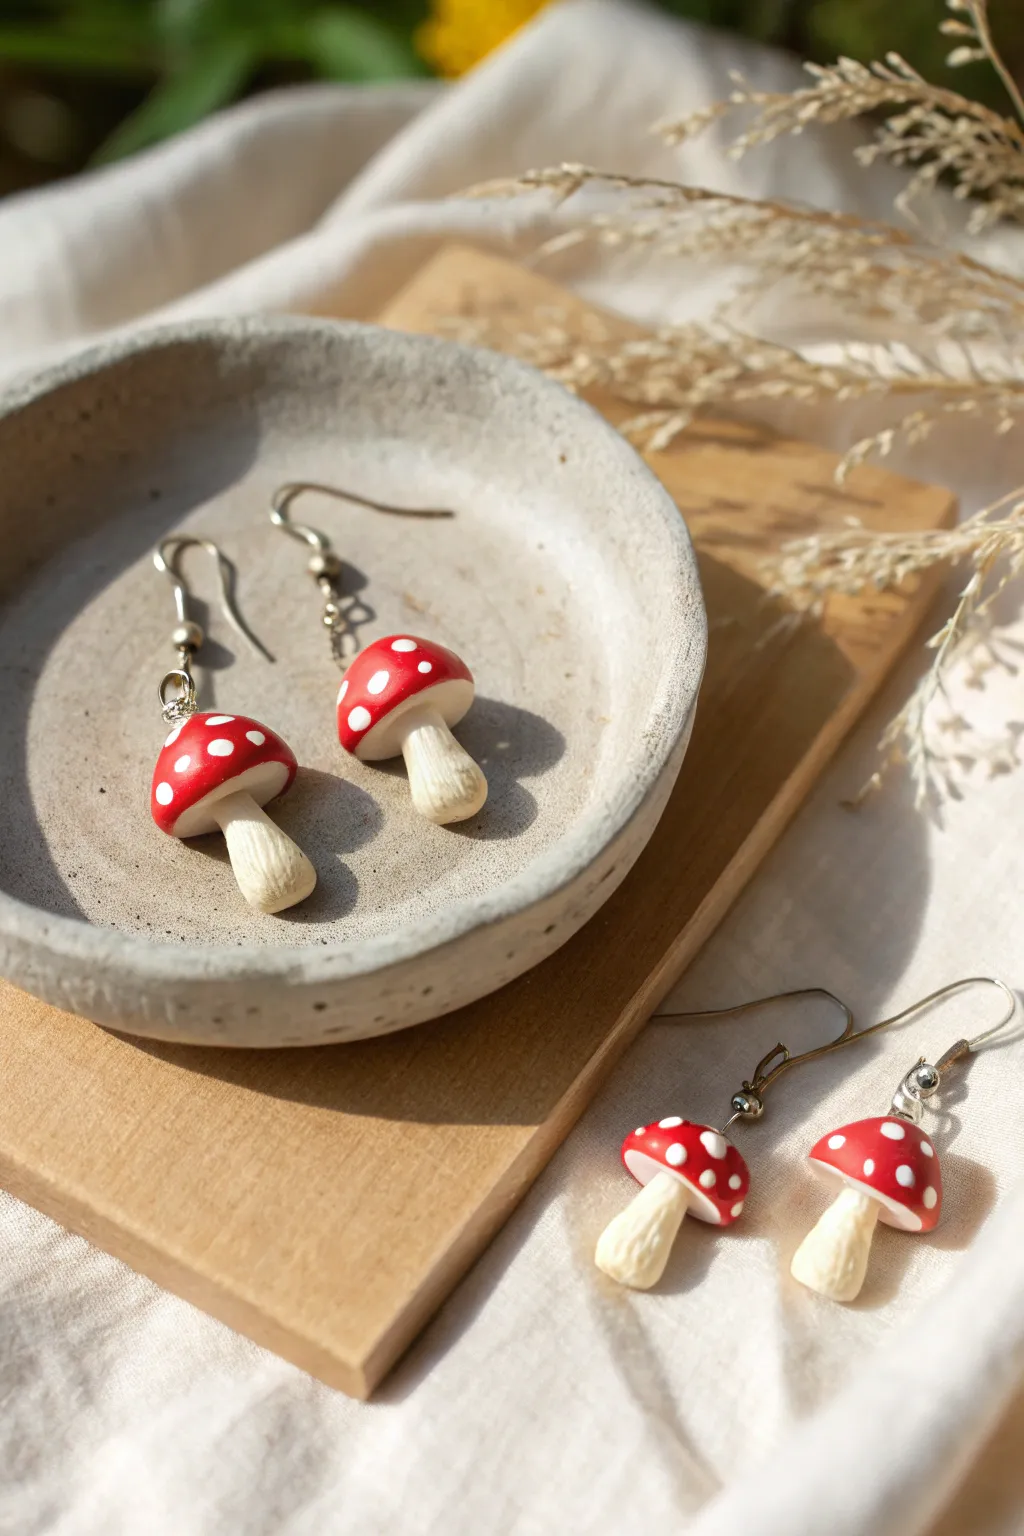
Capture the magic of the forest floor with these charming miniature mushroom earrings. Featuring bright red caps dotted with white and detailed textured stems, this project uses polymer clay to create a lightweight and durable accessory perfect for cottagecore enthusiasts.
Detailed Instructions
Materials
- Red polymer clay
- White or cream polymer clay
- Translucent liquid clay (optional)
- Eye pins (silver or gold tone)
- Earring hooks (French hooks)
- Needle tool or toothpick
- Detailing tool or toothbrush (for texture)
- Gloss glaze or polyurethane varnish
- Small paintbrush
- Jewelry pliers (round nose and flat nose)
- Baking tile or parchment paper
- Oven
Step 1: Sculpting the Caps
-
Condition the clay:
Start by warming up your red polymer clay in your hands. Knead it until it is soft, pliable, and free of any air bubbles. -
Portion the caps:
Pinch off two equal-sized pieces of red clay, each roughly the size of a blueberry. Roll them into smooth spheres. -
Shape the dome:
Gently press each red sphere onto your work surface to flatten the bottom. Use your finger to smooth the top into a classic rounded mushroom cap shape.
Loose Eye Pins?
If the eye pin feels loose after baking, pull it out gently, add a drop of super glue to the metal shaft, and slide it back into the existing hole.
Step 2: Creating the Stems
-
Prepare the stem clay:
Condition the white or cream clay. Roll it into a log that is slightly thicker at the bottom and tapers gently toward the top. -
Cut to size:
Cut two pieces from the log, each about 1/2 to 3/4 inch long. These will act as the mushroom stalks. -
Texture the stalks:
To give the stems a realistic, organic look, roll them gently over a clean toothbrush or lightly drag a needle tool vertically down the clay to create fine lines.
Glow in the Dark
Swap the standard white clay for glow-in-the-dark polymer clay when making the spots and stem for earrings that magically light up at night.
Step 3: Assembly and Details
-
Connect the parts:
Press the top (narrower end) of the stem firmly onto the flat underside of the red cap. If the clay isn’t sticking, a tiny drop of liquid clay can acting as glue here. -
Refine the seam:
Use a modeling tool or your finger to smooth the joint where the stem meets the cap so it looks like one cohesive piece. -
Create the signature dots:
Take tiny pinches of white clay and roll them into microscopic balls. Press these randomly onto the red caps to create the iconic toadstool spots. -
Flatten the spots:
Gently tap the white dots with your finger so they sit flush against the red surface rather than sticking out like bumps. -
Insert the hardware:
Trim an eye pin to an appropriate length (about halfway through the mushroom). Push the straight end down through the center of the red cap until the loop sits snugly against the top.
Step 4: Baking and Finishing
-
Bake the clay:
Place your mushrooms upright on a baking tile. Bake according to your brand of polymer clay instructions (usually around 275°F or 130°C for 15-30 minutes). -
Cool down:
Allow the mushrooms to cool completely inside the oven or on the counter before handling them to ensure durability. -
Add a protective shine:
I prefer to brush a coat of gloss glaze over the red cap to make it look wet and shiny, while leaving the stem matte for a natural texture. Let this dry fully. -
Secure the jump rings:
Open the loop of your earring hook using pliers. Twist it sideways rather than pulling it apart to maintain the shape. -
Final assembly:
Slide the eye pin loop of the mushroom onto the earring hook loop and close it securely with your pliers.
Now you have an adorable pair of woodland accessories ready to wear or gift


What Really Happens Inside the Kiln
Learn how time and temperature work together inside the kiln to transform clay into durable ceramic.
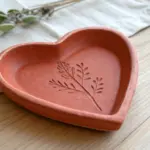
Mushroom Ring Dish Tray
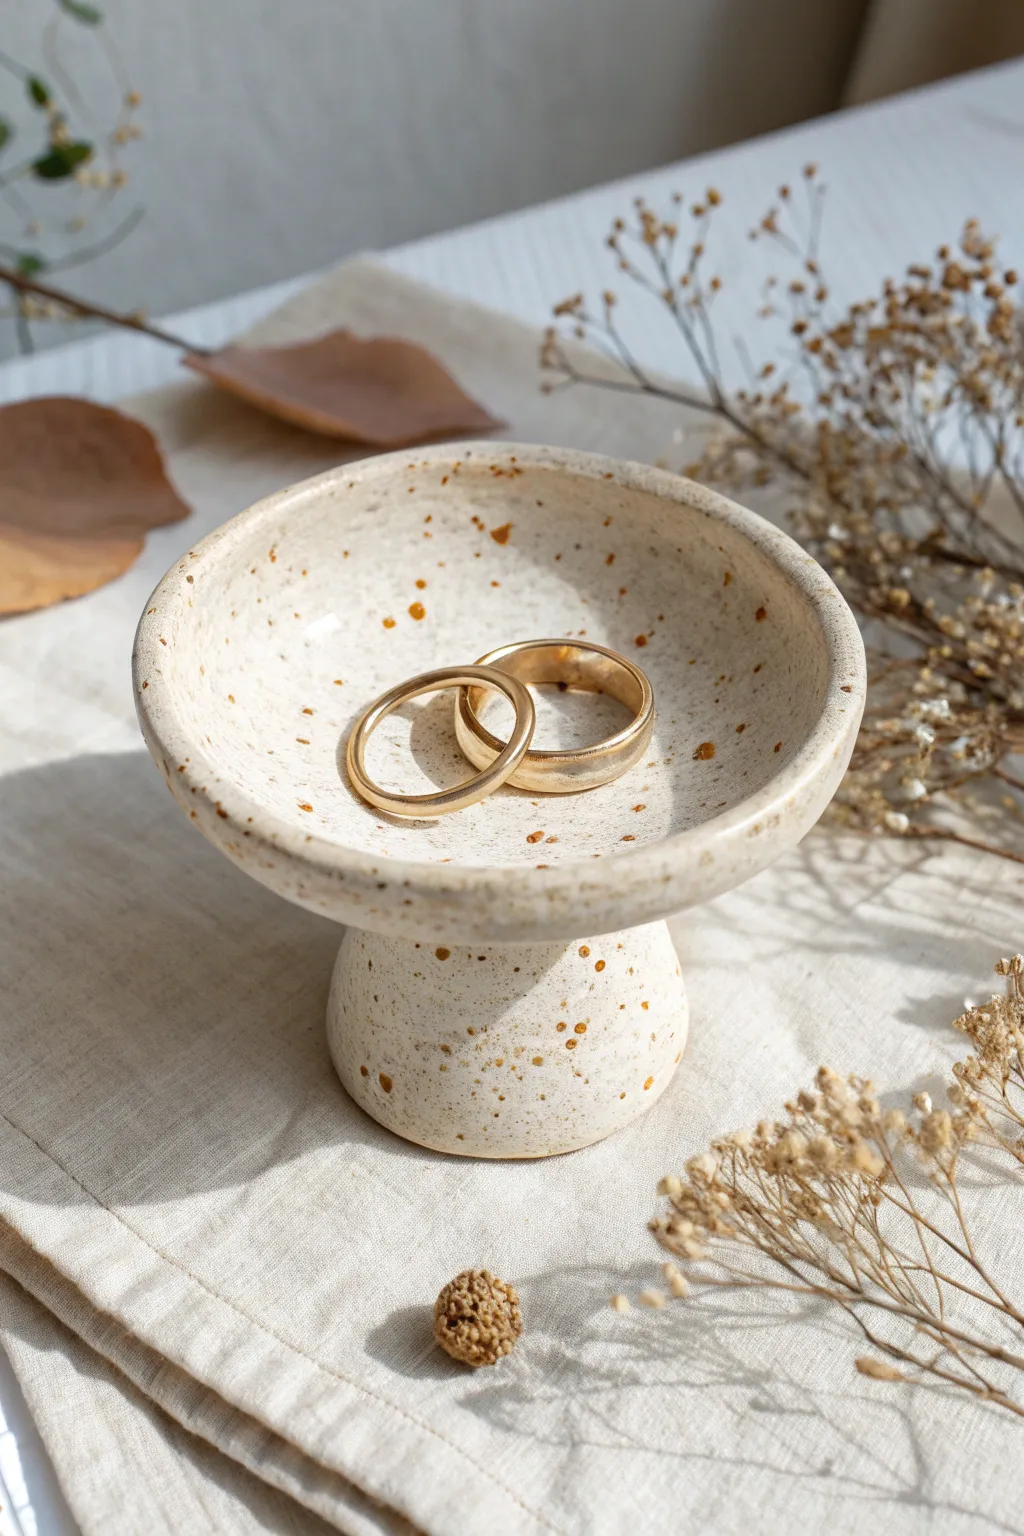
This charming, footed ring dish mimics the organic shape of a mushroom, offering a perfect perch for your favorite jewelry. With its warm, speckled finish and gentle curves, it brings a touch of nature-inspired whimsy to any dresser or nightstand.
Step-by-Step Guide
Materials
- White polymer clay or air-dry clay (approx. 200g)
- Brown, terra cotta, or gold acrylic paint (for speckles)
- Old toothbrush or stiff bristle brush
- Rolling pin
- Circle cutter or bowl (approx. 4-5 inches diameter)
- Small circle cutter or jar (approx. 2 inches diameter for base)
- Sponge or fine-grit sandpaper
- Gloss varnish or clear sealant
- Clay sculpting tools or a butter knife
- Water (if using air-dry clay)
Step 1: Creating the Mushroom Cap
-
Condition the Clay:
Begin by kneading your white clay until it is soft, pliable, and free of cracks. If you are using polymer clay, warm it in your hands to make it easier to work with. -
Roll out the Slab:
Roll the clay out into a smooth slab about 1/4 inch thick. Aim for an even thickness throughout to ensure the final dish sits properly. -
Cut the Circle:
Use a 4-5 inch circle cutter or trace around a small bowl to cut out a perfect circle. This will form the top bowl part of your mushroom. -
Form the Bowl Shape:
Gently lift the clay circle and place it inside a curved bowl or cupped object to help it hold a concave shape while drying or baking. Smooth the edges with a wet finger or sponge to round them off nicely. -
Add Texture (Optional):
While the clay is still in the mold, gently press your finger around the inner rim to give it a slightly organic, uneven lip, mimicking a real mushroom cap.
Uneven Wobble?
If the finished dish rocks on a flat surface, tape a sheet of sandpaper to a table and gently rub the bottom of the base in circles until it sits perfectly flat.
Step 2: Forming the Stem Base
-
Create the Stem:
Take a remaining lump of clay and roll it into a thick cylinder. It should be about 1.5 to 2 inches tall and roughly 2 inches wide at the bottom, tapering slightly toward the top. -
Hollow the Stem (Standard Clay):
If your stem is very thick, you might want to hollow it out slightly from the bottom to ensure even drying or baking, but leave the top solid so it can support the bowl. -
Level the Contact Points:
Slice the top and bottom of your cylinder with a knife or wire tool to ensure they are perfectly flat. This stability is crucial so your dish doesn’t wobble.
Step 3: Assembly and Refining
-
Score and Slip:
If using air-dry clay, score (scratch up) the top of the stem and the center underside of the bowl. Apply a little water or slurry to join them. For polymer clay, use liquid clay or simply press firmly to blend. -
Join the Parts:
Center the bowl on top of the stem. Gently press down from the inside center of the bowl to secure the connection, being careful not to distort the curve. -
Smooth the Seam:
Use a sculpting tool or your finger to smooth the seam where the stem meets the bowl underneath. I prefer to use a slightly damp sponge here to create a seamless transition. -
Dry or Bake:
Follow the instructions for your specific clay type. Bake polymer clay in the oven as directed. For air-dry clay, let it dry slowly over 24-48 hours away from direct heat to prevent cracking. -
Sand for Smoothness:
Once fully cured or dry, use fine-grit sandpaper to buff away any fingerprints or rough edges, focusing on the rim of the bowl.
Faux Ceramic Look
Mix a tiny pinch of dried coffee grounds or black pepper directly into the white clay before engaging in sculpting to achieve embedded speckles rather than painted ones.
Step 4: Decoration and Finish
-
Prepare the Speckle Paint:
Dilute a small mount of brown or terra cotta acrylic paint with a few drops of water. It needs to be fluid enough to flick easily from a brush. -
Apply the Speckles:
Dip an old toothbrush or stiff brush into the paint. detailed instruction. Run your thumb across the bristles to flick tiny droplets of paint onto the dish. Varing the distance creates different sized speckles. -
Let Speckles Dry:
Allow the paint speckles to dry completely. This usually takes only about 15-20 minutes since the droplets are so small. -
Seal the Dish:
Apply a coat of gloss varnish or clear sealant over the entire piece. This protects the paint and gives the clay that ceramic-like shine shown in the photo. -
Final Cure:
Let the varnish cure fully according to the bottle instructions before placing any jewelry inside.
Now you have a handmade piece of functional art ready to hold your most treasured rings
Mushroom Trinket Box With Lid
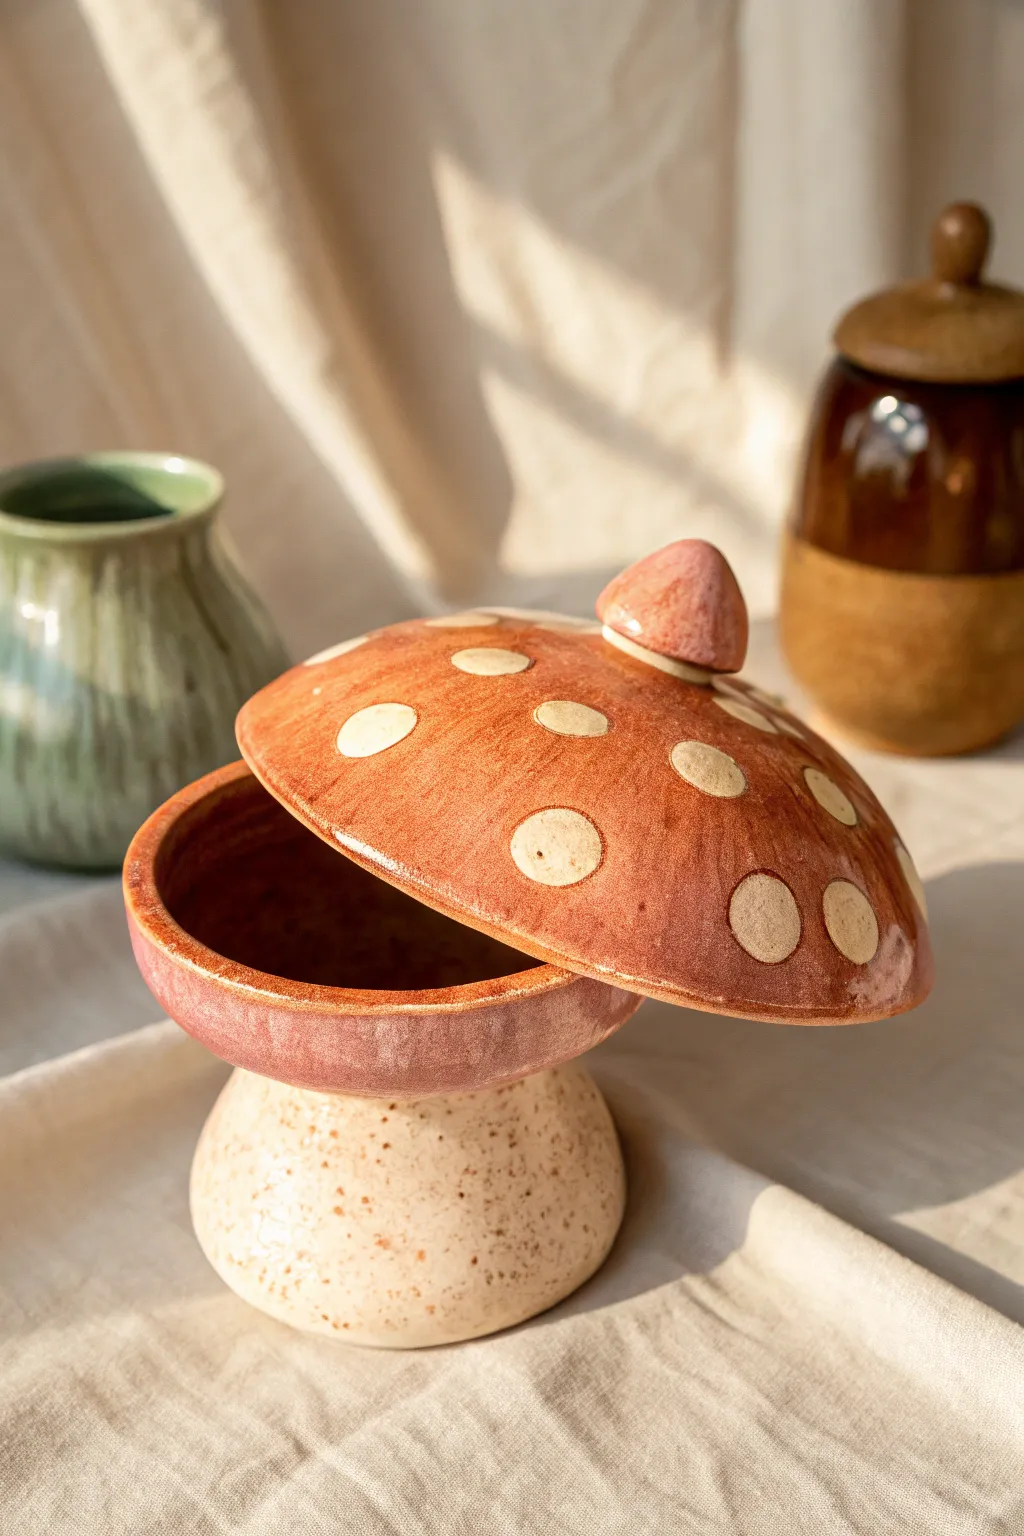
This whimsical mushroom jar combines utility with charm, featuring a distinct three-part structure that mimics a classic toadstool shape. The glossy, reddish-brown cap speckled with iconic white dots rests perfectly on a sturdy, speckled beige stem, creating an adorable hiding spot for your tiny treasures.
How-To Guide
Materials
- Stoneware or earthenware clay body
- Pottery wheel (or hand-building tools for coil method)
- Rib tool (metal and rubber)
- Needle tool
- Wire cutter
- Trimming tools
- Underglazes (Warm red-brown, White)
- Speckled beige glaze (or clear glaze over speckled clay)
- Clear glossy glaze
- Sponge
- Kiln
Step 1: Throwing the Form
-
Throw the base stem:
Center a medium ball of clay on the wheel. Throw a cylinder that is wider at the bottom and tapers slightly inward as it goes up, creating a sturdy ‘stipe’ or stem shape. -
Shape the vessel body:
Instead of a simple cylinder, flare the upper third of your form outwards significantly to create a shallow, wide bowl shape that sits atop the stem. This will be the bottom half of the mushroom cap. -
Refine the gallery:
Create a distinct gallery or ledge around the inside rim of this bowl section. This is crucial for the lid to sit securely without sliding off. -
Throw the lid:
Using a separate amount of clay (slightly less than the base), throw a low, wide dome shape inverted on the wheel (like a shallow bowl). Measure it using calipers against your base’s gallery to ensure a perfect fit. -
Add the knob:
While the lid is still on the wheel (or after trimming), attach a small nub of clay to the center top and shape it into a rounded point to act as the handle.
Step 2: Trimming and Assembly
-
Leather hard drying:
Allow both pieces to dry to a leather-hard state. They should be firm enough to handle without deforming but still cool to the touch. -
Trim the base:
Invert the stem piece on the wheel. Trim away excess weight from the bottom of the stem, refining the curve so it flows smoothly into the flared bowl section. -
Trim the lid:
Place the lid on the wheel to refine its curve. You want a smooth, continuous dome shape that mimics a natural mushroom cap. -
Smooth the surfaces:
Use a damp sponge or a soft rubber rib to burnish and smooth out any throwing lines or rough texture, preparing the canvas for glazing. -
Bisque fire:
Fire the pieces in the kiln to cone 04 (or your clay’s specific bisque temperature).
Lid Won’t Fit?
If the lid shrinks more than the base during drying, gently sand the inner rim of the base (when bone dry) to widen the opening slightly before bisque firing.
Step 3: Glazing and Finishing
-
Glaze the stem:
Dip or brush the stem section (up to the bottom of the bowl curve) with a speckled beige glaze. If using speckled clay, a clear glaze here works perfectly to show off the natural clay body. -
Base coat the cap:
Apply 2-3 coats of a warm reddish-brown underglaze or glaze to the top of the lid and the exterior of the bowl section. Leave the very rim free of glaze if you plan to fire with the lid on. -
Add the dots:
Using a round sponge dabber or a steady brush, apply circles of white glaze or underglaze over the red base. I try to vary the spacing slightly to make it feel more organic. -
Detail the interior:
Glaze the interior of the box with a dark brown or reddish glaze to add depth when opened. -
Clear coat application:
If you used underglazes for color, dip the entire lid and the exterior of the bowl section in a clear glossy glaze to seal it and make the colors pop. -
Wipe the feet:
Carefully sponge off any glaze from the bottom foot of the stem and the contact points where the lid meets the gallery to prevent them fusing shut. -
Final firing:
Load the kiln carefully and fire to your glaze’s maturation temperature (typically cone 5 or 6 for stoneware).
Textured Gills
Before glazing, carve thin, radiating lines on the underside of the lid piece to mimic the gills of a real mushroom for a surprise detail.
Now you have a charming woodland container ready to hold jewelry, sugar, or secrets on your shelf

TRACK YOUR CERAMIC JOURNEY
Capture glaze tests, firing details, and creative progress—all in one simple printable. Make your projects easier to repeat and improve.
Mushroom Magnet Minis
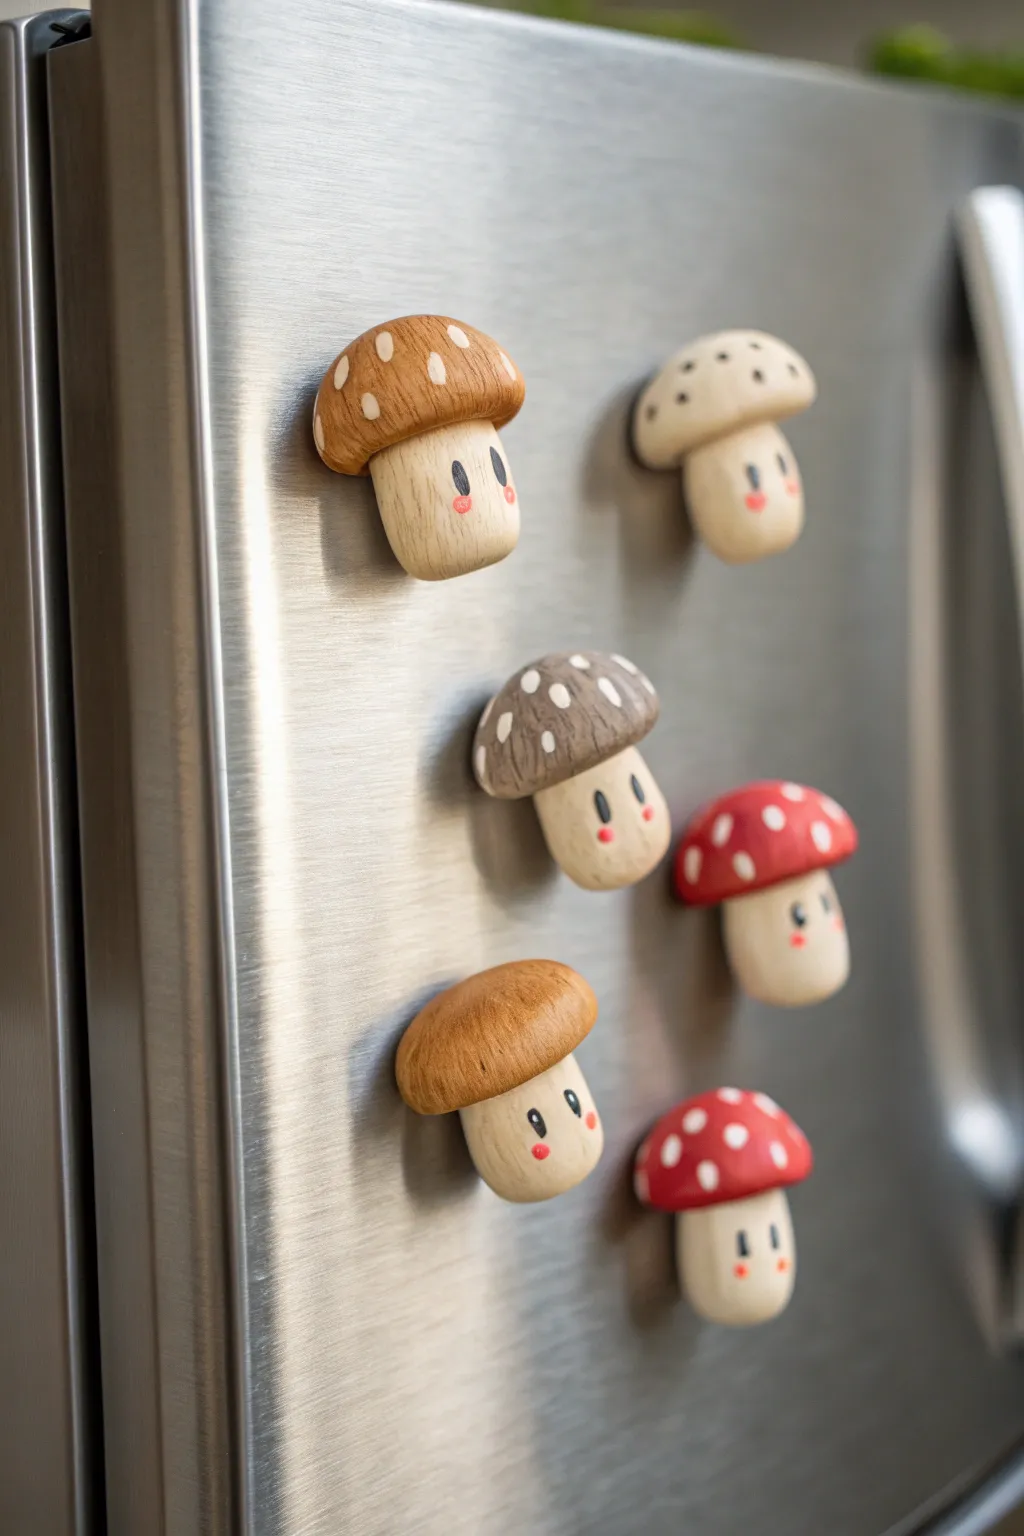
Transform simple wooden shapes into a charming forest family for your fridge with these adorable magnet characters. Their smooth finish and tiny, blushing faces add a cozy cottagecore vibe to any magnetic surface.
Detailed Instructions
Materials
- Unfinished wooden mushroom shapes (approx. 1.5 – 2 inches tall)
- Acrylic paints (Warm Brown, Cream/Off-White, Deep Red, Black, Pink)
- Fine grit sandpaper (400 grit)
- Matte finish sealant or varnish
- Small round strong magnets (neodymium)
- Strong craft glue (E6000 or heavy-duty superglue)
- Detail paintbrushes (fine tip #0 or #00)
- Small flat brush
- Dotting tool or toothpick
Step 1: Prepping the Wood
-
Sand for smoothness:
Begin by lightly sanding your wooden mushroom blanks. Run the 400-grit sandpaper over the caps and stems to remove any rough machine marks or splinters, ensuring the surface is perfectly smooth for painting. -
Wipe clean:
Use a slightly damp cloth or tack cloth to wipe away all the sanding dust. The wood needs to be completely dust-free so the paint adheres evenly without bumps.
Wood Grain Hack
Don’t have wood pieces? Make these from polymer clay! Roll a ball for the stem and a flattened dome for the cap, bake, and then paint them to look like faux wood.
Step 2: Painting the Caps
-
Base coat the brown caps:
Select a few mushrooms to be the ‘natural’ variety. Mix a warm brown acrylic paint with a tiny drop of water to create a semi-transparent wash, or use the paint full strength for opaque coverage. Paint just the caps of these mushrooms. -
Paint the red caps:
For the classic toadstool look, paint the caps of your remaining mushrooms with a vibrant deep red. You may need two thin coats to get a solid, rich color without brushstrokes showing. -
Create the greyish-brown cap:
To replicate the unique grey-brown mushroom in the center, mix your warm brown with a touch of white and a tiny speck of black. Apply this to one cap for variety. -
Adding texture lines (Optional):
If you want the wood grain, artificial texture look seen on the top left magnet, use a slightly darker brown on a dry brush and streak it vertically down the cap before the base coat fully cures. -
Dry thoroughly:
Let the caps dry completely before handling the stems to avoid smudging your work.
Forest Floor Texture
Before sealing, dry-brush a tiny bit of moss green paint at the very bottom of the stem to make it look like they were just plucked from the ground.
Step 3: Details & Faces
-
Paint the stems:
Paint the stems of all mushrooms with a cream or off-white acrylic shade. This mimics the look of clear-coated light wood seen in the photos. Apply two coats if the natural wood grain shows through too much. -
Add cap spots:
Using a small detail brush or a dotting tool, carefully dab spots onto the red and grey-brown caps. Use the cream paint for these dots rather than straight white for a softer, more organic look. -
Paint the grain spots:
For the brown caps, paint small oval ‘seeds’ or vertical dashes using a lighter tan or cream color to simulate wood texture or spores. -
Draft the faces:
Lightly mark where the eyes will go with a pencil. Place them wide apart and low on the stem for that signature cute aesthetic. -
Paint the eyes:
Dip a fine-tip brush or the end of a toothpick into black paint. Create two small, vertical ovals for the eyes. Keep the pressure light to maintain a clean edge. -
Add the blush:
Mix a soft pink color. Using the very tip of your brush or a dotting tool, place a small pink dot just below and to the outside of each eye. -
Add eye highlights (Optional):
If you want extra sparkle, add a microscopic dot of white inside the black eye ovals once they are fully dry.
Step 4: Assembly
-
Seal the surface:
Once all paint is chemically dry (give it a few hours), coat the entire mushroom including the painted cap and stem with a matte finish sealant. This protects the paint from chipping when the magnets snap together. -
Attach the magnet:
Flip the mushroom over to the flat back. Apply a generous dot of strong craft glue or E6000 to the center. -
Secure the backing:
Press a round neodymium magnet into the glue. I prefer to hold this in place for 30 seconds to ensure it doesn’t slide around before the glue grabs. -
Final cure:
Let the mushrooms sit undisturbed flat on their faces overnight to allow the glue to cure completely before placing them on your fridge.
Now your kitchen has a tiny patch of enchanted forest to hold up your grocery lists and photos
Mushroom Plant Stake Pals
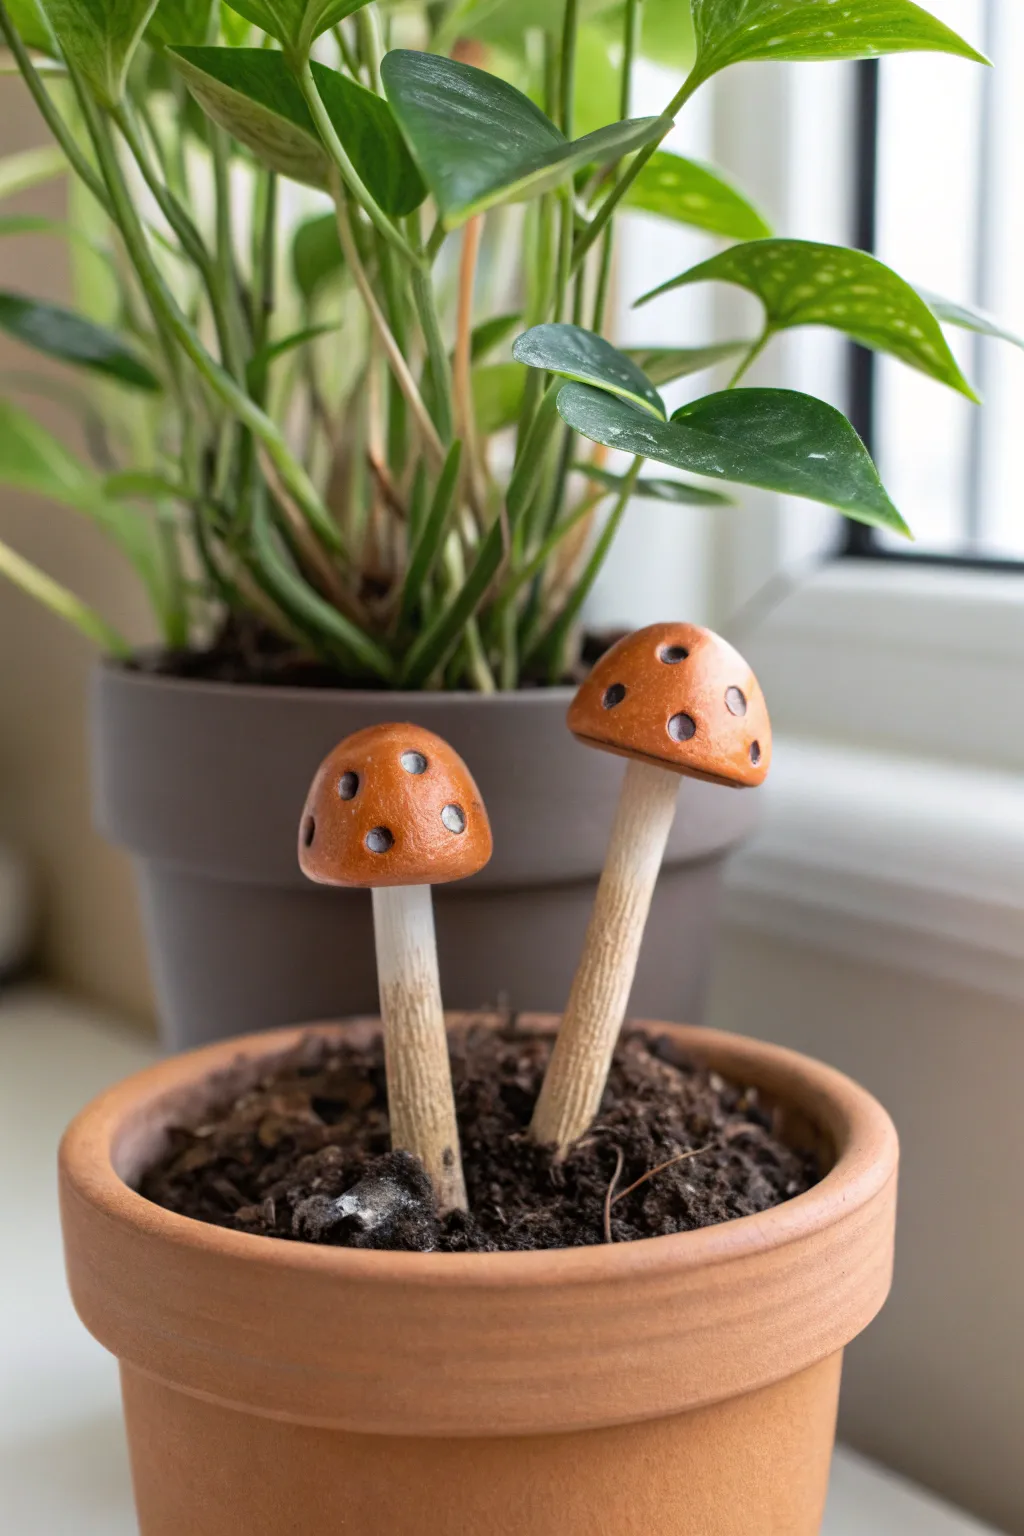
Add a touch of enchantment to your indoor garden with these adorable clay mushroom stakes. Featuring earthy terracotta tones and textured stems, these durable little fungi look perfect nestled into a potted plant alongside real greenery.
Step-by-Step Tutorial
Materials
- Polymer clay (terracotta/orange, beige/ecru, white/translucent)
- Aluminum foil
- Stiff wire or wooden skewers (for internal support)
- Clay sculpting tools (needle tool, small ball stylus)
- Texture tool (toothbrush or stiff bristle brush)
- Acrylic paint (dark brown/umber)
- Small paintbrush
- Gloss varnish or glaze (optional)
- Oven for baking
Step 1: Sculpting the Caps
-
Condition the Clay:
Begin by thoroughly conditioning your terracotta or orange polymer clay until it is soft and malleable. Warm clay is essential for preventing cracks later on. -
Shape the Base Cap:
Roll two balls of clay, one slightly larger than the other to create variety. Gently press them into rounded dome shapes, flattening the bottom surface while keeping the top smooth and curved. -
Refine the Form:
Smooth out any fingerprints with a light touch. For the larger mushroom, you might want to pitch the edges slightly downward to create a classic toadstool silhouette. -
Create the Spots:
Using a medium-sized ball stylus or the rounded end of a paintbrush, press indentations into the mushroom caps. Aim for a random pattern, placing 5-7 divots on each cap. -
Fill the Details:
Take tiny amounts of white or translucent clay and roll them into small balls. Press these into the indentations you just made, flattening them so they sit flush or slightly recessed within the cap. -
Add Depth:
To mimic the look in the photo, create a tiny divot in the center of each white spot using a smaller stylus. This adds a nice shadow effect that mimics natural textures.
Loose Mushroom Caps?
If the head feels wobbly on the stem wire, add a drop of liquid clay (like Sculpey Bake & Bond) to the connection point before baking to fuse them permanently.
Step 2: Forming the Stems
-
Prepare the Armature:
Cut your wire or wooden skewers to the desired length. Since these are plant stakes, I like to ensure there’s at least 2-3 inches of extra length at the bottom to anchor them securely in the soil. -
Bulk the Stem:
Wrap a small amount of aluminum foil tightly around the upper portion of the wire where the clay will go. This saves clay and makes the stake lighter, which is better for delicate plants. -
Apply the Clay:
Roll out a snake of beige or ecru clay. Wrap this around the foil-covered section of your armature, smoothing the seams until you have a consistent cylinder shape. -
Shape the Taper:
Gently roll the stem on your work surface, tapering it slightly so it is thicker near the top and thinner near the middle looks more organic. -
Texture the Surface:
This is the secret to the realistic look: take a toothbrush or a stiff bristle brush and tap it all over the stem. Alternatively, drag a needle tool vertically to create bark-like striations.
Pro Texture Tip
For ultra-realistic stems, roll the raw beige clay over a piece of coarse sandpaper or a clean rock before attaching it to the wire armature.
Step 3: Assembly and Finishing
-
Connect Cap and Stem:
Ideally, your wire armature should poke out slightly from the top of the stem. Push the mushroom cap onto this wire, twisting gently to secure it. Blend the clay at the join underneath the cap if necessary. -
Clean Up:
Do a final check for stray fingerprints or lint. You can use a tiny amount of rubbing alcohol on your finger to smooth out any imperfections before baking. -
Bake the Pieces:
Bake your mushrooms according to the clay manufacturer’s instructions. Usually, this is around 275°F (135°C) for 15-30 minutes, depending on thickness. -
Cool Down:
Allow the pieces to cool completely in the oven before moving them. This annealing process makes the clay stronger. -
Apply an Antique Wash:
Mix a small amount of dark brown acrylic paint with water. Brush it over the entire stem and wipe it away quickly with a paper towel. The dark paint will stay in the texture grooves, emphasizing the realistic finish. -
Final Seal:
Once the paint is dry, you can apply a matte or satin varnish to protect your work from moisture, especially since these clarify will be living in damp plant soil. I prefer skipping high gloss to keep the earthy vibe.
Pop these finished stakes into your favorite houseplant for an instant woodland forest upgrade
Mushroom Incense Holder
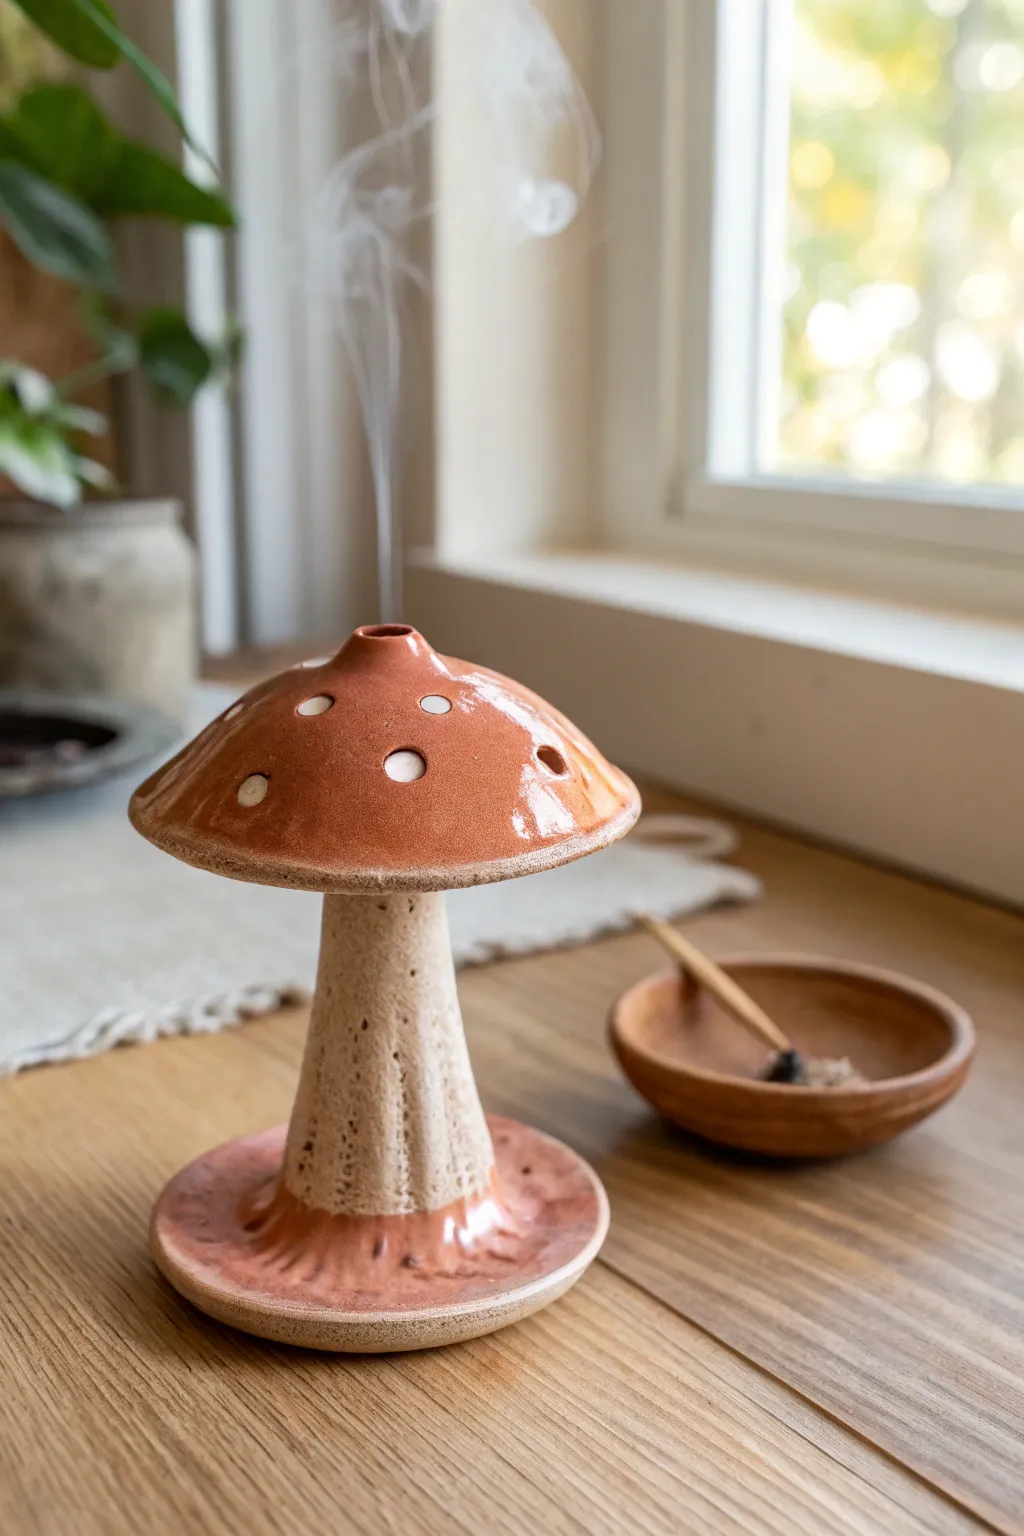
Bring a touch of the forest floor into your home with this charming ceramic mushroom that doubles as a functional incense burner. Smoke drifts lazily through the cap’s chimney, creating a magical atmosphere while the wide base catches any falling ash.
How-To Guide
Materials
- Stoneware clay (speckled or plain)
- Pottery wheel (or hand-building tools if preferred)
- Needle tool
- Loop trimming tool
- Sponge
- Small hole punch or straw
- Scoring tool (or fork)
- Slip (liquid clay)
- Terracotta or rust-colored glaze
- Clear glaze (transparent)
- Paintbrush
Step 1: Throwing the Form
-
Throw the base section:
Begin by centering a medium ball of clay on the wheel. Throw a flat, wide saucer shape for the bottom, leaving a mound of clay in the very center to pull up the stem. -
Pull the stem:
Pull the center mound upward into a hollow, tapered cylinder. It should be wider at the bottom where it meets the saucer and narrow slightly toward the top, resembling a natural mushroom stalk. -
Create the cap:
Using a separate ball of clay, throw a shallow bowl or dome shape upside down. This will be the mushroom cap. Ensure the rim is slightly thickened for durability. -
Open the chimney:
While the cap is still on the wheel (or leather hard), use your needle tool to carefully cut a small, neat hole in the very center of the dome to allow smoke to escape. -
Dry to leather hard:
Allow both pieces to dry until they are firm to the touch but still carveable—this usually takes a day depending on humidity.
Smoke Flow Check
Ensure the hole in the top of the cap is at least 1/4 inch wide. Glaze can run and shrink the hole during firing, which might block the smoke.
Step 2: Trimming and Sculpting
-
Trim the foot:
Place the leather-hard base upside down on the wheel and trim the underside of the saucer to create a clean, defined foot ring. -
Texture the stem:
Using a carving tool or a wire loop, drag vertical lines down the length of the stem. Don’t be too perfect; these grooves mimic the organic texture of a real mushroom stalk. -
Add cap details:
If you want the white polka dots to be recessed, gently press a small circular tool or the back of a paintbrush into the surface of the leather-hard cap to create shallow dimples. -
Construct the connection:
The cap needs to sit securely on the stem but remain removable if you want to clean it easily. If joining permanently, score and slip the top of the stem and the underside of the cap now. -
Pierce ventilation holes:
Use a small straw or hole punch to create the additional circular vents around the cap if you want smoke to drift from multiple points, though the top chimney is crucial. -
Smooth the edges:
Go over all cut edges, especially the rim of the cap and the saucer base, with a damp sponge to remove any sharp burs or rough spots. -
Bisque fire:
Let the piece bone dry completely before firing it in the kiln for the initial bisque firing.
Pro Tip: Stem Stability
Make the base saucer heavier than the cap. If the cap is too thick and heavy, the mushroom might tip over easily when bumped.
Step 3: Glazing and Finishing
-
Glaze the cap:
Dip or brush a warm, rust-colored or terracotta glaze onto the top of the mushroom cap. I prefer to apply three coats for a rich, opaque finish. -
Reveal the dots:
If you created recessed dots, carefully wipe the glaze out of the depressions with a damp brush, or wax resist the dots before glazing so the bare clay shows through. -
Glaze the base accent:
Apply the same rust glaze to the very bottom of the stem where it meets the saucer, blending it slightly upward into the textured stem area for a gradient effect. -
Leave the stem bare:
To achieve the textural contrast shown in the photo, leave the main part of the stem unglazed. The raw, speckled clay mimics natural organic matter beautifully. -
Clear glaze application:
Apply a thin coat of clear glaze over any bare clay areas if you want them to be sealed and shiny, or leave them raw for a matte finish. Always clear glaze the inside of the saucer for easy ash cleaning. -
Wipe the foot:
Use a wet sponge to wipe all glaze off the very bottom foot ring of the piece so it won’t stick to the kiln shelf. -
Final firing:
Fire the piece again to the maturation temperature of your specific clay and glaze body (usually cone 5/6 for stoneware).
Once cooled, place your favorite cone incense inside and watch the whimsical smoke trails begin
Mushroom Tea Light Cozy
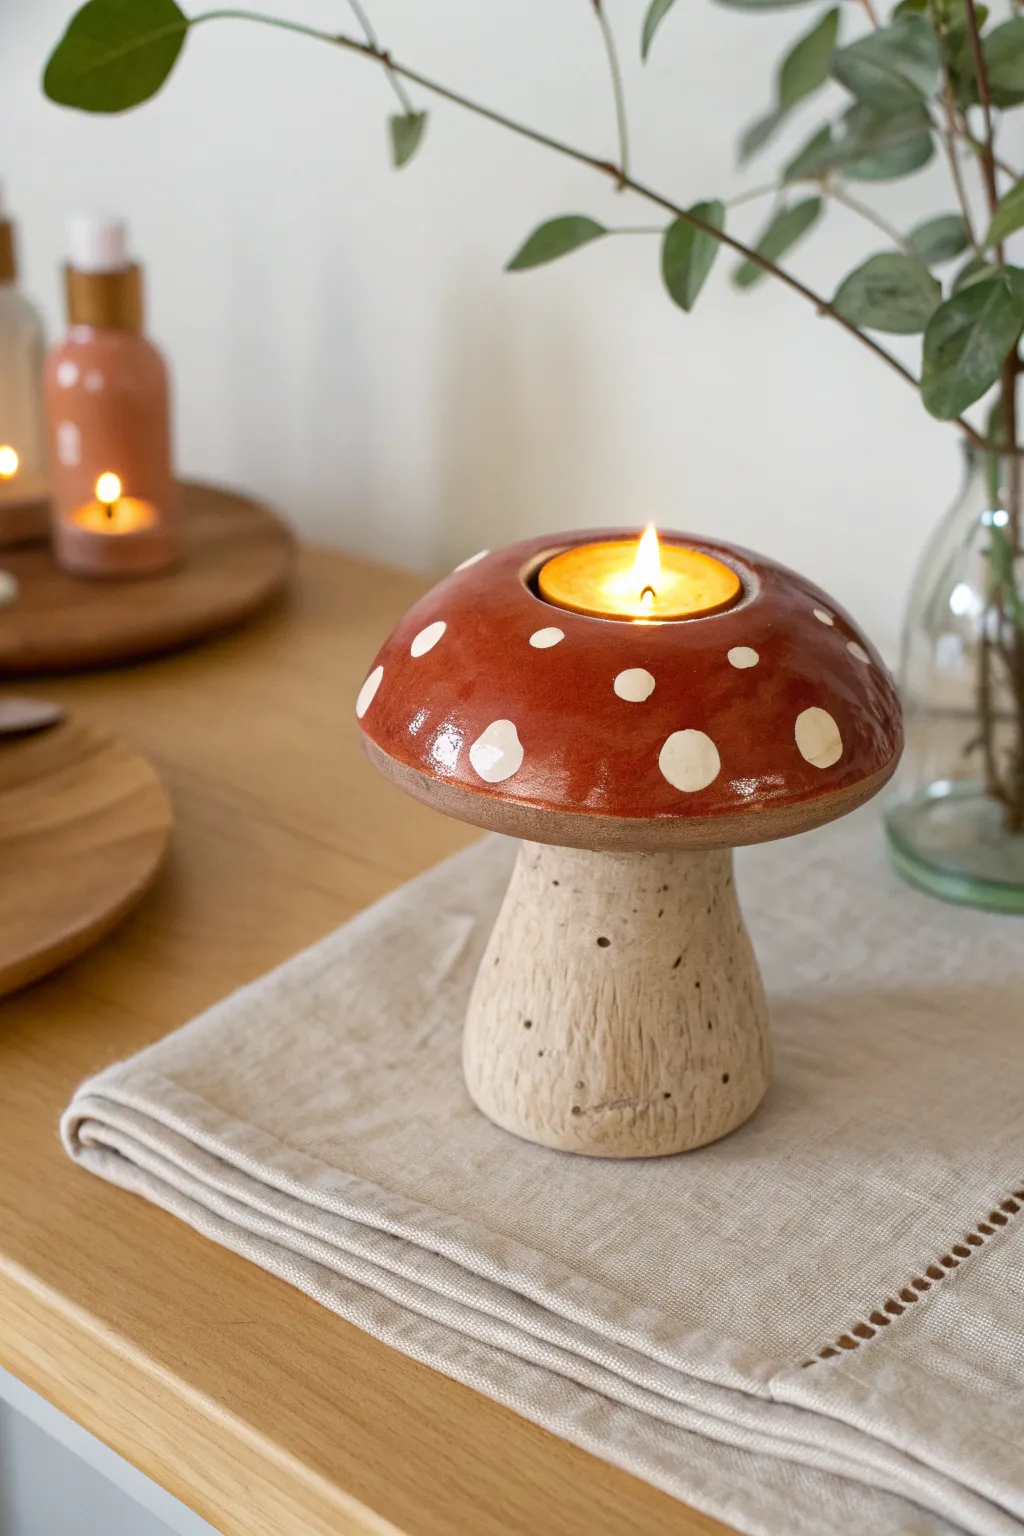
Brighten up your cozy corner with this charming mushroom tea light holder that combines earthy textures with a glossy finish. The textured stalk and smooth, spotted cap create a delightful contrast perfect for autumn or cottagecore decor.
Step-by-Step
Materials
- Air-dry clay or polymer clay (white or beige)
- Acrylic rolling pin
- Sculpting tools (needle tool, ball stylus)
- Standard tea light candle (for sizing)
- Aluminum foil
- Acrylic paints (burnt orange/terracotta, white, beige)
- Fine grit sandpaper
- Gloss varnish or glaze
- Sea sponge or stiff bristle brush
- Palette and water
Step 1: Sculpting the Stalk
-
Form the base:
Begin with a fist-sized ball of clay. Roll it into a thick cylinder that is slightly wider at the bottom than the top to ensure stability. It should be roughly 3-4 inches tall. -
Shape the stalk:
Gently press the cylinder onto your work surface to flatten the bottom. Round out the top edge slightly where the cap will eventually sit. -
Add texture:
Using a needle tool or a stiff bristle brush, scratch vertical lines up and down the length of the stalk. I like to vary the depth of these lines to mimic the fibrous texture of a real mushroom stem. -
Create pitting:
Poke random, shallow holes into the stalk using a needle tool or the tip of a toothpick to add organic, porous details.
Cracking Issues?
If using air-dry clay, small cracks may appear as it shrinks. Make a slip paste from clay and water to fill these gaps, then sand smooth once dry.
Step 2: Creating the Cap
-
Roll the cap:
Take a separate, larger ball of clay and flatten it into a thick pancake shape, about 1/2 inch thick. -
Shape the dome:
Curve the clay gently over a ball of crumpled aluminum foil to create a domed shape. Smooth the edges so they are rounded, not sharp. -
Size the insert:
Place your actual tea light candle in the center of the dome’s top. Press it down gently to mark the circumference, then remove the candle. -
Carve the recess:
Carve out the clay inside your marked circle. Make the hole deep enough for the tea light to sit flush with the top of the mushroom but leave enough clay at the bottom to connect to the stalk. -
Attach parts:
Score the top of the stalk and the underside of the cap. Apply a little water (or liquid clay if using polymer) and press them firmly together. Smooth the seam underneath using a modeling tool. -
Dry or bake:
Follow the manufacturer instructions for your specific clay. Ensure the piece is completely dry or cured before moving to paint.
Pro Tip: Weight it Down
Embed a small, clean stone or heavy washer into the base of the stalk before drying. This lowers the center of gravity and prevents tipping.
Step 3: Decoration and Finish
-
Base coat the stalk:
Paint the stalk with a beige or sandy-colored acrylic paint. Work the paint into the textured crevices you created earlier. -
Highlight the texture:
Once the base is dry, lightly dry-brush a lighter cream color over the raised ridges of the stalk to make the texture pop. -
Paint the cap:
Apply two coats of burnt orange or terracotta paint to the top of the mushroom cap, letting each layer dry completely for a rich, opaque color. -
Add the spots:
Dip a small round sponge or the end of a paintbrush handle into white paint. Press gentle dots onto the cap, varying their spacing for a natural look. -
Seal the cap:
Apply a high-gloss varnish only to the colored part of the cap. This gives it that ceramic-glazed look while keeping the stem matte and earthy.
Now you have a quaint little light source ready to warm up your evening atmosphere
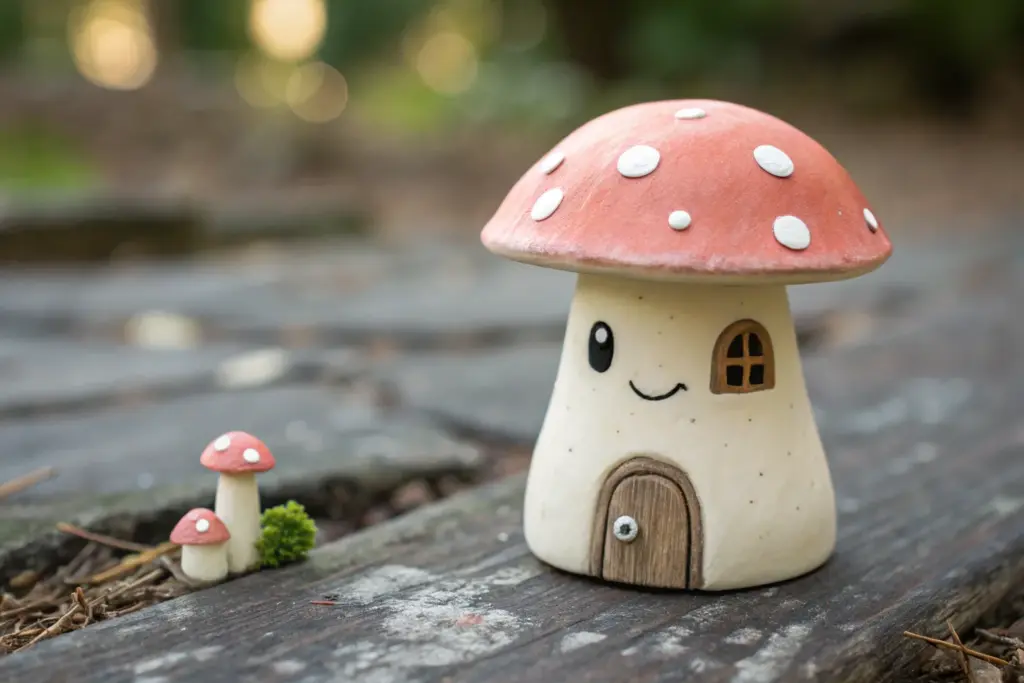
Storybook Mushroom Cottage
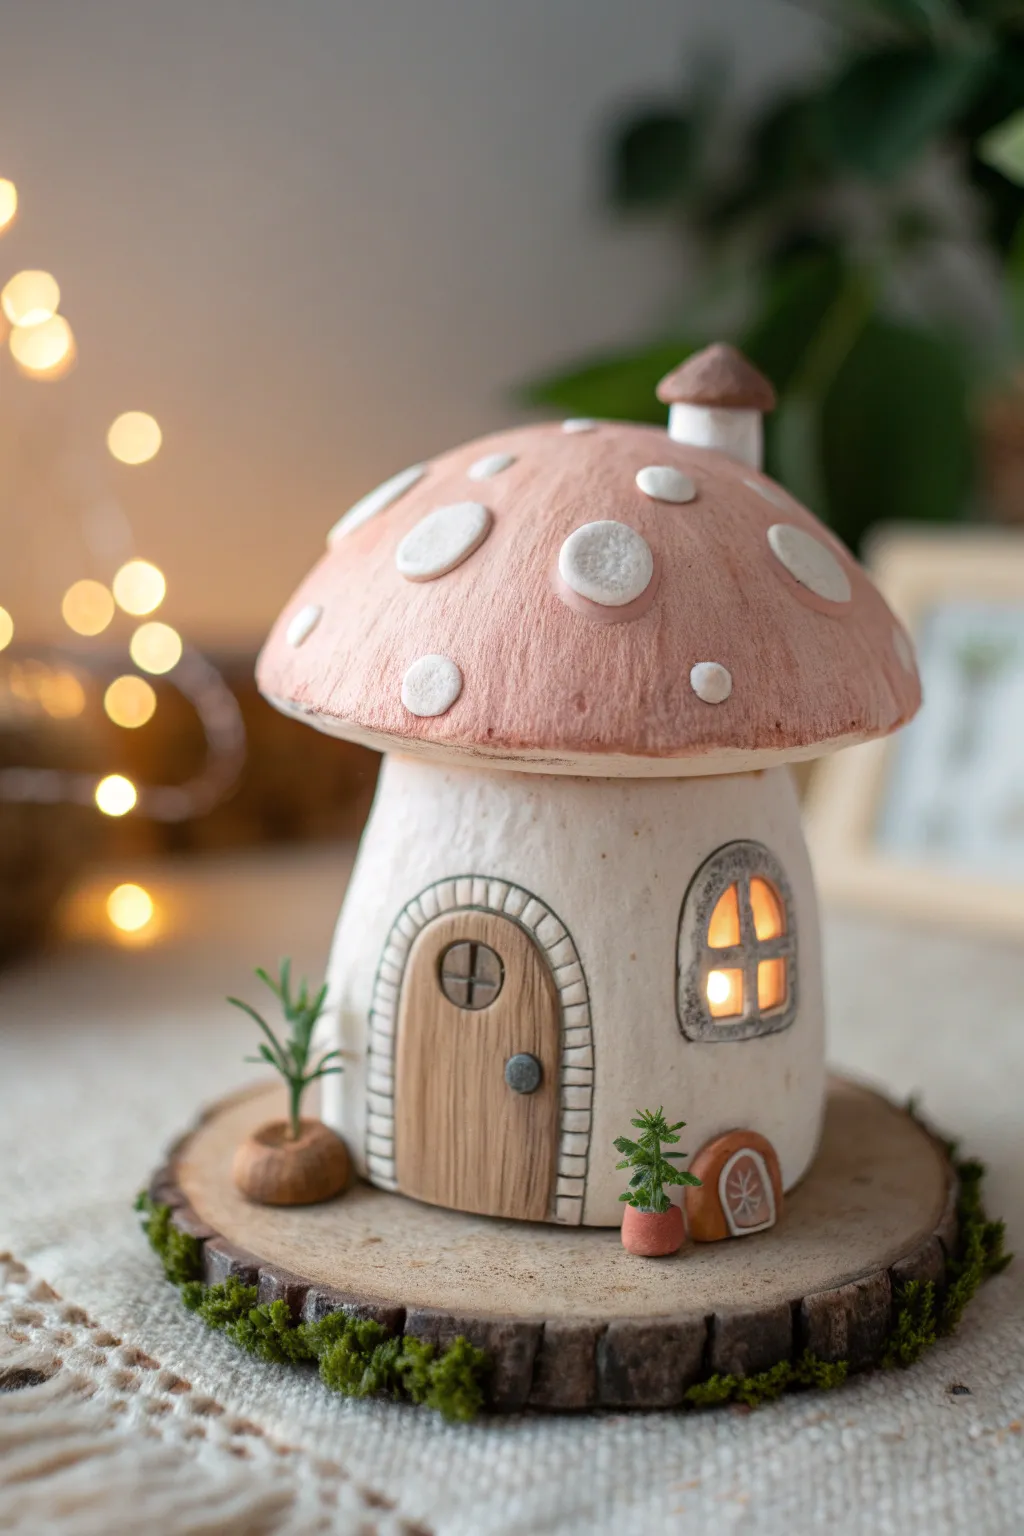
This enchanting clay lamp transforms simple materials into a cozy woodland dwelling straight out of a fairy tale. With its soft pink cap, textured details, and warm glowing window, it makes a perfect nightlight or desk companion.
Step-by-Step Guide
Materials
- Air-dry clay (white)
- Acrylic paints (pastel pink, white, warm brown, grey, dark green)
- Aluminum foil
- Small LED tea light or fairy lights
- Wooden slice base (approx. 4-inch diameter)
- Sculpting tools (needle tool, ball tool)
- Texturing tool (stiff brush or toothbrush)
- Rolling pin
- Craft glue or PVA glue
- Dried moss
- Small twigs or wire (for plant stems)
- Varnish (matte or satin)
Step 1: Shaping the Base Structure
-
Form the armature:
Crumple a ball of aluminum foil into a slightly tapered cylinder shape for the cottage stem. It should be wide enough at the bottom to be stable but slightly narrower at the top. -
Create the mushroom cap core:
Shape a larger, flattened dome from aluminum foil for the cap. Press the center underneath to create a slight indentation where it will sit on the stem, but don’t attach them permanently yet. -
Cover the stem:
Roll out a slab of white air-dry clay to about 1/4 inch thick. Wrap this fully around your foil stem cylinder, smoothing the seam with a bit of water until it’s invisible. -
Add texture:
Before the clay hardens, gently tap the entire surface with a stiff bristle brush or a toothbrush. This prevents the cottage from looking too plasticky and gives it a natural, stucco-like finish.
Step 2: Sculpting the Cap & Details
-
Wrap the cap:
Roll out a large circle of white clay and drape it over your foil dome. Smooth it down the sides, trimming any excess at the rim for a clean edge. -
Texture the cap:
Using a needle tool or a fine comb, score very faint lines radiating from the center of the cap down to the rim to mimic mushroom gills or natural fiber texture. -
Attach the spots:
Roll small, irregular pieces of white clay flat. Press these firmly onto the cap. I like to vary the sizes—some large, some tiny—to make it look more organic. -
Sculpt the chimney:
Form a tiny cylinder of white clay and a petite cone for its roof. Attach this chimney to the side of the mushroom cap using a dab of water and blending the clay at the base.
Cracking Clay?
If small cracks appear as the clay dries, mix a tiny amount of fresh clay with water to make a paste (slip) and fill the cracks. Smooth over with a damp finger.
Step 3: Windows, Doors, and Plants
-
Carve the window:
On the stem, trace an arched window shape. Carefully cut this section of clay out completely if you plan to put a light inside, or simply recess it deeply. -
Create the window frame:
Roll a thin snake of clay and frame the window arch. Add a vertical and horizontal strip inside to create the window panes. -
Form the door:
Shape a flat, arched piece of clay for the door. Use a needle tool to score vertical wood grain lines into it. Press a tiny ball of clay on one side for the doorknob. -
Build the doorframe:
Roll a thin strip of clay and flatten it slightly. Press brick-like indentations into it with your tool, then wrap this arch around your door piece. Attach the entire door assembly to the main stem. -
Model the tiny plants:
Create miniature pots from tiny balls of clay with the centers pressed in. Stick short bits of wire or twigs into them to serve as plant stalks.
Glow Up
Make the window ‘glass’ by cutting a small piece of tracing paper or vellum and gluing it to the inside of the stem behind the window hole to diffuse the LED light.
Step 4: Assembly and Painting
-
Let it dry:
Allow all your clay pieces to dry completely for at least 24-48 hours. They should feel hard and room temperature, not cool to the touch. -
Paint the cap:
Paint the main surface of the mushroom cap a soft, dusty pink. Carefully paint around the white raised spots, keeping them clean or touching them up with white acrylic later. -
Paint the door and trim:
Use a warm brown wash for the door to highlight the grain texture. Paint the stone trim around the door grey, and the chimney roof brown. -
Add a warm glow:
Paint the inside of the window panes a warm yellow-orange if you aren’t using a real light. If you are, leave them open. -
Final assembly:
Glue the stem to the center of your wood slice. Place the cap on top (if you want access to the light, don’t glue the cap; just let it rest heavily on the stem). -
Landscaping:
Glue dried moss around the base of the cottage to hide the join. Position your tiny clay pots and a mini clay door stop near the entrance.
Now turn on the little light inside and enjoy the magical atmosphere of your handmade cottage
Enchanted Forest Mushroom Diorama
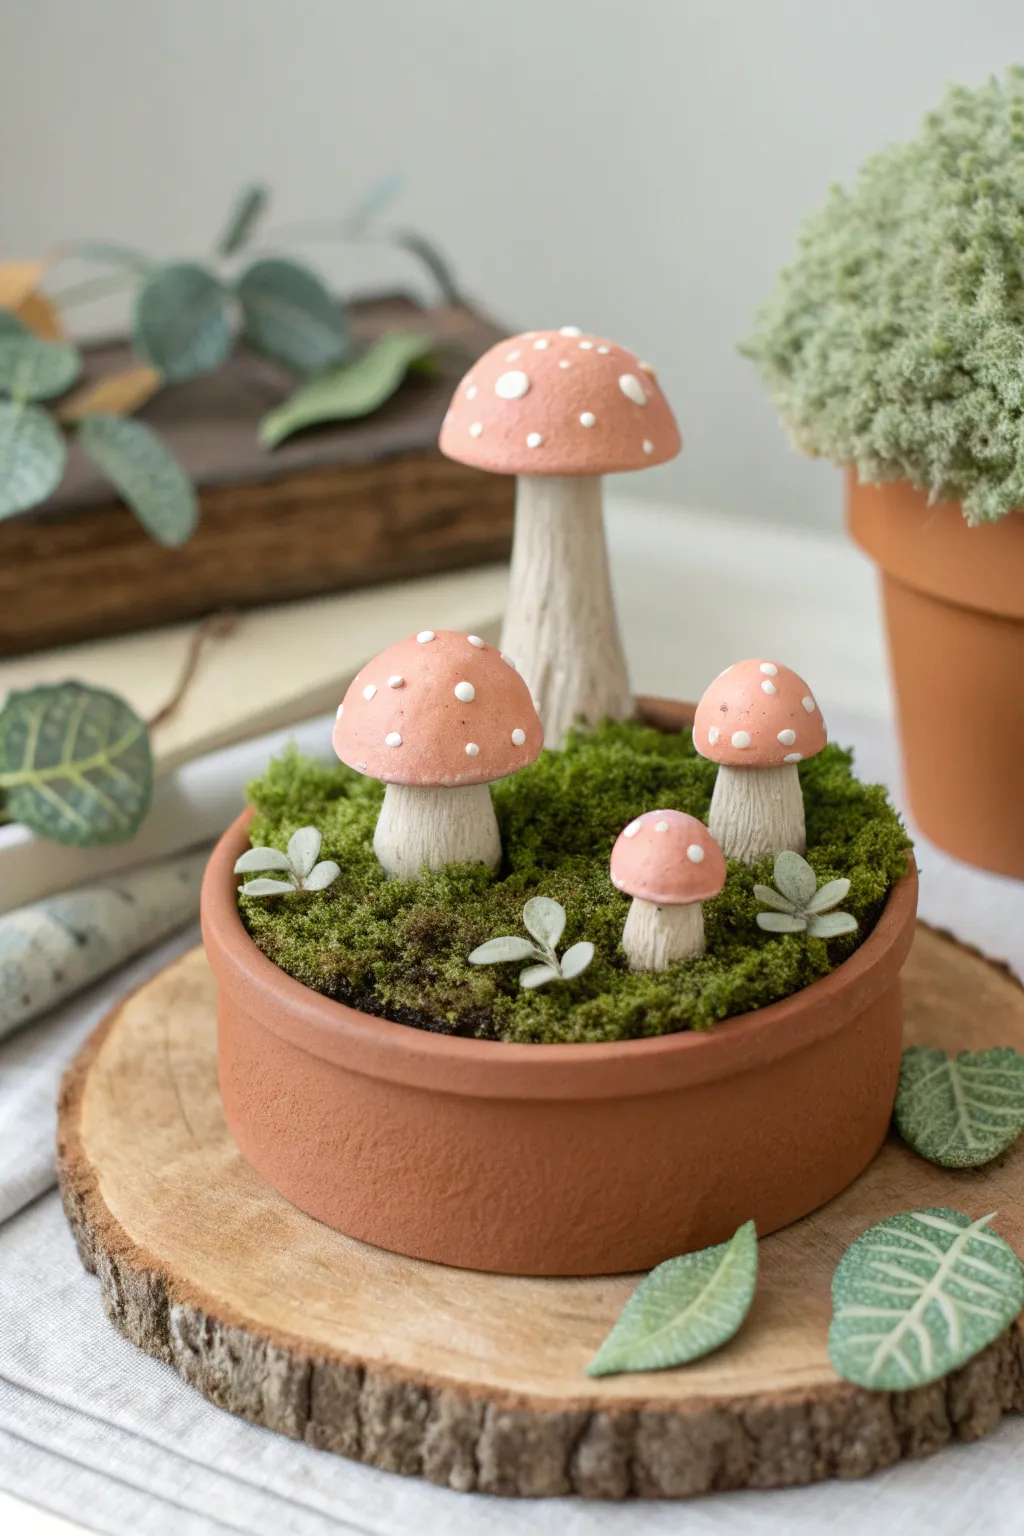
Bring a touch of forest whimsy indoors with this adorable diorama featuring handmade clay mushrooms nestled in a bed of lush moss. This project combines simple sculpting techniques with natural textures to create a charming, low-maintenance centerpiece.
Detailed Instructions
Materials
- Polymer clay (white and translucent)
- Acrylic paint (peach or coral pink, white)
- Shallow terracotta plant saucer (approx. 4-6 inches)
- Preserved moss (sheet moss or cushion moss)
- Aluminum foil
- Sculpting tools or toothpick
- Craft glue or strong adhesive
- Small faux greenery or paper leaves
- Small flat paintbrush
- Dotting tool or toothpick end
Step 1: Sculpting the Mushrooms
-
Prepare the Armature:
For the largest mushroom, scrunch a small piece of aluminum foil into a cone shape to create a lightweight core for the stem. This saves clay and speeds up baking. -
Mix the Stem Clay:
Blend white polymer clay with a very small amount of translucent clay. This gives the stems a slightly organic, less plastic look. -
Form the Stems:
Roll your clay into varying cylinder shapes. For the largest stem, wrap it around your foil core. Create three smaller, solid clay cylinders for the tinier mushrooms. Taper them slightly toward the top. -
Texture the Stems:
Use a sculpting tool or a toothpick to drag vertical lines down the length of each stem. I find that varying the pressure creates deep and shallow grooves that mimic real mushroom stalks perfectly. -
Shape the Caps:
Roll balls of clay for the caps—one large, one medium, and two small. Flatten the bottom of each sphere and gently round the top into a dome shape. -
Attach Caps to Stems:
Press the caps firmly onto the tapered tops of your stems. You can use a tiny drop of liquid clay or translucent liquid sculpey here for a stronger bond if you have it. -
Bake:
Place your mushrooms on a baking sheet or ceramic tile. Bake according to your specific polymer clay’s package instructions (usually around 275°F/130°C for 15-30 minutes). Let them cool completely.
Step 2: Painting and Assembly
-
Base Coat the Caps:
Paint the tops of the mushroom caps with a soft peach or coral pink acrylic paint. You might need two thin coats for full opacity. -
Add the Spots:
Once the pink paint is dry, use a dotting tool or the back of a paintbrush dipped in creating white to add raised dots. Vary the size of the dots for a natural look. -
Dry Wash the Stems (Optional):
If you want more depth, mix a tiny bit of brown paint with water and brush it over the stems, then wipe it off quickly. The dark color will settle into the grooves you sculpted earlier. -
Prepare the Base:
Fill your terracotta saucer with a filler material like floral foam or crumpled sturdy paper if you need height, or just glue the moss directly to the bottom. -
Position the Mushrooms:
Decide on your arrangement before gluing. I like to group the tallest one slightly off-center with the smaller ones clustered nearby. Glue the base of each stem firmly into the saucer. -
Add the Moss:
Tuck pieces of preserved moss tightly around the mushroom stems. Use a tool to push the moss into the gaps so no saucer bottom shows. -
Insert Greenery:
Cut tiny sprigs of faux leaves (like silver dollar eucalyptus or similar matte leaves). Dip the stems in glue and tuck them into the moss around the mushrooms to look like sprouting foliage.
Uneven Paint?
If your white dots look transparent or streaky, wait for the first dot to dry completely, then carefully apply a second dot of white paint directly on top for a crisp, raised finish.
Glow Up Idea
Use glow-in-the-dark polymer clay for the white spots on the caps. Your enchanted forest will subtly light up when the room gets dark, adding real magic to the piece.
Place your finished diorama on a shelf or desk where you can admire your tiny, handcrafted ecosystem
Mushroom and Snail Besties
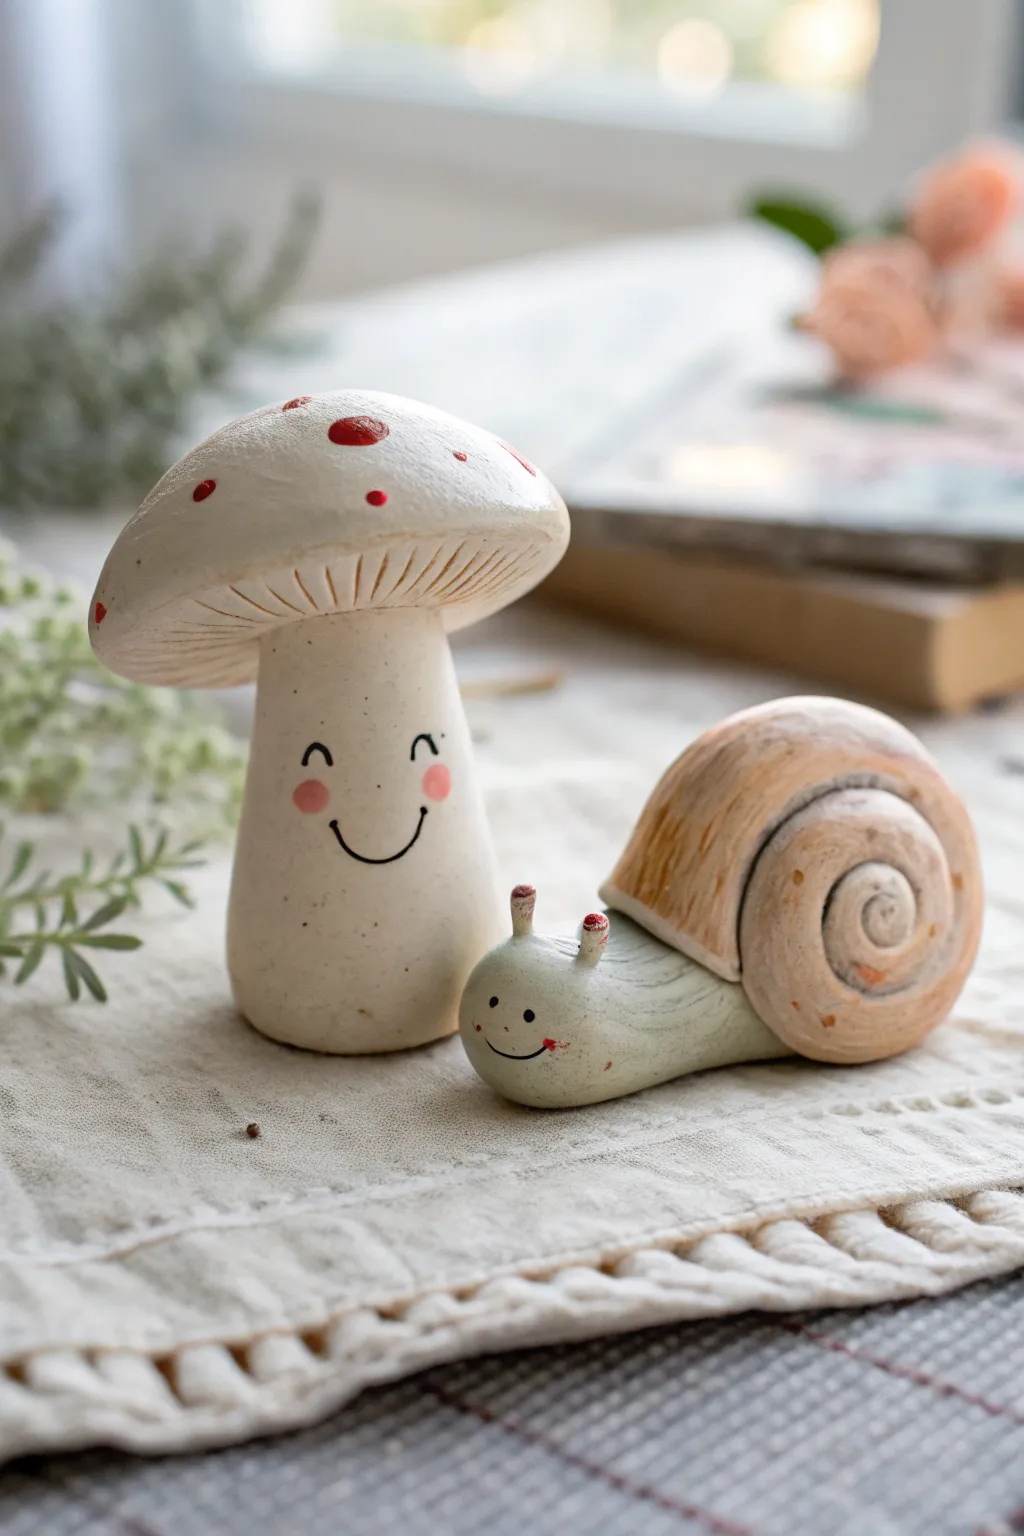
Create an inseparable pair of woodland pals with this adorable mushroom and snail set. Featuring charming painted faces and rustic texturing, they make for perfect whimsical shelf decor.
Step-by-Step Guide
Materials
- Polymer clay (white, beige, and light green)
- Acrylic paints (red, black, pink, warm brown, white)
- Fine detail paintbrush (00 or 000 size)
- Needle tool or toothpick
- Ball stylus tool
- Varnish (matte or satin)
- Aluminum foil (for armature)
- Clay roller or pasta machine
- X-acto knife
Step 1: Sculpting the Mushroom
-
Form the mushroom stem:
Begin by conditioning a generous amount of plain white or cream clay. Roll it into a thick cylinder that is slightly wider at the base than at the top to ensure stability. -
Shape the cap:
Roll a slightly larger ball of the same white clay and flatten the bottom. Dome the top with your palms until you have a smooth, classic mushroom cap shape. -
Create the gills:
Before attaching the cap, use a needle tool or knife to gently score lines radiating from the center of the cap’s underside out to the edges to mimic mushroom gills. -
Connect the pieces:
Press the cap firmly onto the stem. Blending the clay together isn’t necessary here since we want a distinct separation, but you can use a dab of liquid clay or ‘Bake and Bond’ if you’re worried about adhesion.
Step 2: Sculpting the Snail
-
Roll the body coil:
Mix a small amount of white clay with a tiny bit of green for a pale mint color. Roll this into a tapered log, lifting one end up slightly to form the head. -
Add sensory stalks:
Roll two miniscule cylinders of the mint clay. Attach them to the top of the head for the eye stalks, blending the seams gently with a rubber shaper or your finger. -
Create the shell:
Using beige or light tan clay, roll a long snake that tapers at one end. Begin coiling the snake starting from the thin end, wrapping it around itself to create a spiral shell. -
Mount the shell:
Place the spiral shell onto the snail’s back, pressing lightly to secure it. Ensure the shell sits upright and doesn’t tip the figure over. -
Add surface texture:
Take an old toothbrush or a stiff bristle brush and gently tap it over the surface of the mushroom stem and snail body. This creates that lovely organic, matte stone-like texture visible in the photo.
Pro Tip: Rustic Texture
Use a ball of crumpled aluminum foil to roll over the unbaked clay surface. This creates deeper, more random pitting than a toothbrush for an aged stone look.
Step 3: Baking and Painting
-
Bake the figures:
Place your creations on a ceramic tile or baking sheet covered with parchment. Bake according to your brand of clay’s instructions (usually around 275°F/135°C for 15-30 minutes per 1/4 inch thickness). -
Apply base washes:
Once cool, water down some warm brown acrylic paint significantly until it’s a transparency. Brush this over the snail’s shell and the texture of the mushroom to age them, wiping away excess with a paper towel immediately. -
Paint the mushroom spots:
Using undiluted red acrylic paint and a small round brush, dab irregular spots onto the top of the mushroom cap. -
Detail the stalks:
Add tiny dabs of the same red paint to the very tips of the snail’s eye stalks. -
Draw the faces:
This is the most critical step for cuteness. Using a 000 tiny liner brush or a fine-tip black paint pen, draw two wide-set U-shapes for smiling eyes and a simple curve for the mouth on both figures. -
Add rosy cheeks:
Dip a Q-tip or a dry brush into pink paint, dab almost all of it off on a paper towel, and gently apply circular blushes to the cheeks. -
Highlight the eyes:
For the snail specifically, add tiny white dots inside black eye dots if you chose filled-in eyes, or keep them as happy squinting lines. -
Final clear coat:
Protect your paint job with a layer of matte varnish. I find matte works best to keep that natural, earthy look intact.
Level Up: Mossy Details
Glue tiny bits of dried craft moss or green flocking powder at the base of the mushroom where it meets the table to make it look freshly plucked.
Set your new clay friends on a sunny windowsill or a bookshelf and enjoy their cheerful company
Light-Up Glowing Mushroom Cluster

Bring a touch of woodland magic indoors with this cozy cluster of clay mushrooms. These handcrafted light-up fungi feature natural stone textures and warm glowing portals, making them the perfect rustic centerpiece.
Step-by-Step Tutorial
Materials
- Air-dry clay or polymer clay (stone or granite effect preferred)
- Round wood slice or biscuit base
- LED fairy lights (battery operated)
- Sculpting tools (needle tool, ball stylus)
- Textured sponge or toothbrush
- Rolling pin
- Small straw or tubing (for cutting holes)
- Strong craft glue or E6000
- Acrylic paints (beige, brown, white)
- Clear matte varnish
Step 1: Sculpting the Stems
-
Prepare the clay:
Begin by conditioning your clay. If using polymer clay, knead it until soft. If using plain white air-dry clay, you might mix in a little sand or dried tea leaves now to achieve that speckled, natural stone look seen in the photo. -
Form the cylinders:
Roll out five individual cylinders of clay in varying heights and thicknesses. Keep the bases slightly wider for stability. Refer to the image to see how the heights are staggered for a natural grouping. -
Create the hollows:
Carefully hollow out the center of each stem from the bottom upwards using a loop tool or your thumb, ensuring the walls remain sturdy but thin enough to hold the lights later. This is crucial for the glowing effect. -
Cut the light windows:
Using a small circular cutter, a straw, or a crafting knife, cut one or two small portholes near the base of each stem where the light will shine through. -
Add texture:
Gently tap the surface of the stems with a coarse sponge or an old toothbrush. Drag a needle tool vertically up the stems to mimic the fibrous texture of real mushroom stalks.
Step 2: Creating the Caps
-
Shape the domes:
Roll five balls of clay corresponding to your stem sizes. Press them into domed shapes using the palm of your hand or a rounded mold. -
detail the tops:
Use a medium ball stylus to press shallow indentations randomly over the top of the caps. These shouldn’t go all the way through; they are just for surface interest. -
Attach to stems:
Score and slip (for air-dry clay) or press firmly (for polymer) to attach the caps to the stems. I find smoothing the connection point under the cap makes it much stronger. -
Final shaping:
Once assembled, make any final adjustments to the posture of the mushrooms. Tilt a few caps slightly for a more organic, less rigid appearance. -
Dry or Bake:
Follow the manufacturer’s instructions to cure your clay. Air-dry clay will need 24-48 hours; polymer clay will need baking in an oven.
Make it Sparkle
Add fine glitter or crushed mica powder into your clay mix before sculpting. When the light shines through, the walls will have a magical, subtle shimmer.
Step 3: Assembly and Lighting
-
Prepare the base:
Take your wooden slice and clean the surface. Arrange your cured mushrooms on the wood to finalize their positions before gluing. -
Drill base holes (Optional):
For a cleaner look, you can drill holes through the wood base directly under where each mushroom sits to feed the lights up from below. Otherwise, simply bundle the lights on top. -
Paint wash:
Mix a very watery wash of brown and beige acrylic paint. Brush it over the mushrooms and immediately wipe it back with a cloth. This leaves color in the textures and indentations, enhancing the stone effect. -
Dry brush highlight:
Lightly dry-brush a cream or off-white color over the raised areas of the caps and stems to make the texture pop. -
Seal:
Apply a coat of clear matte varnish to protect the clay and give it a finished ceramic feel. -
Install lights:
Thread your LED fairy light string into the hollow stems. If you didn’t drill the base, coil the wire carefully so it sits inside the hollow cavity of each mushroom. -
Final Glue:
Apply strong adhesive to the bottom rim of each mushroom stem and press them firmly onto the wood slice over the lights. Let the glue cure completely.
Hidden Switch Trick
Carve a small channel in the underside of the wood base to hide the battery pack cord, so the piece sits perfectly flat on your table.
Now you can switch on your little forest floor and enjoy the warm ambiance