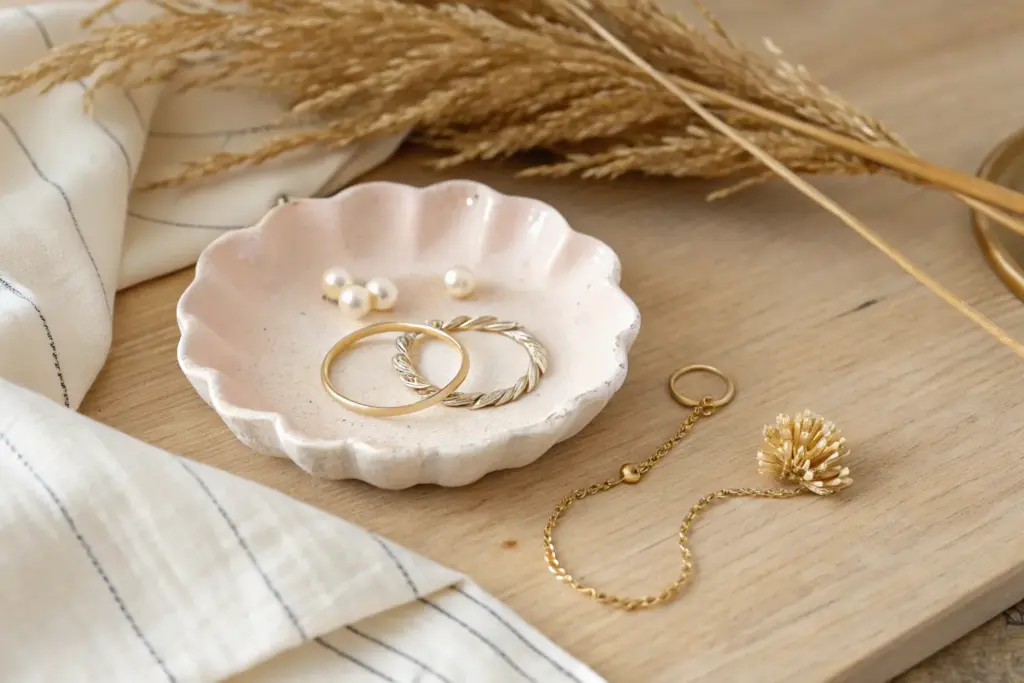
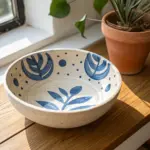
If your rings and earrings tend to wander around the house, a cute clay jewelry dish is the sweetest little fix. I love how these tiny dishes let you play with color, texture, and mini sculpted details while still being totally useful every day.
Simple Dish With a Gold Rim
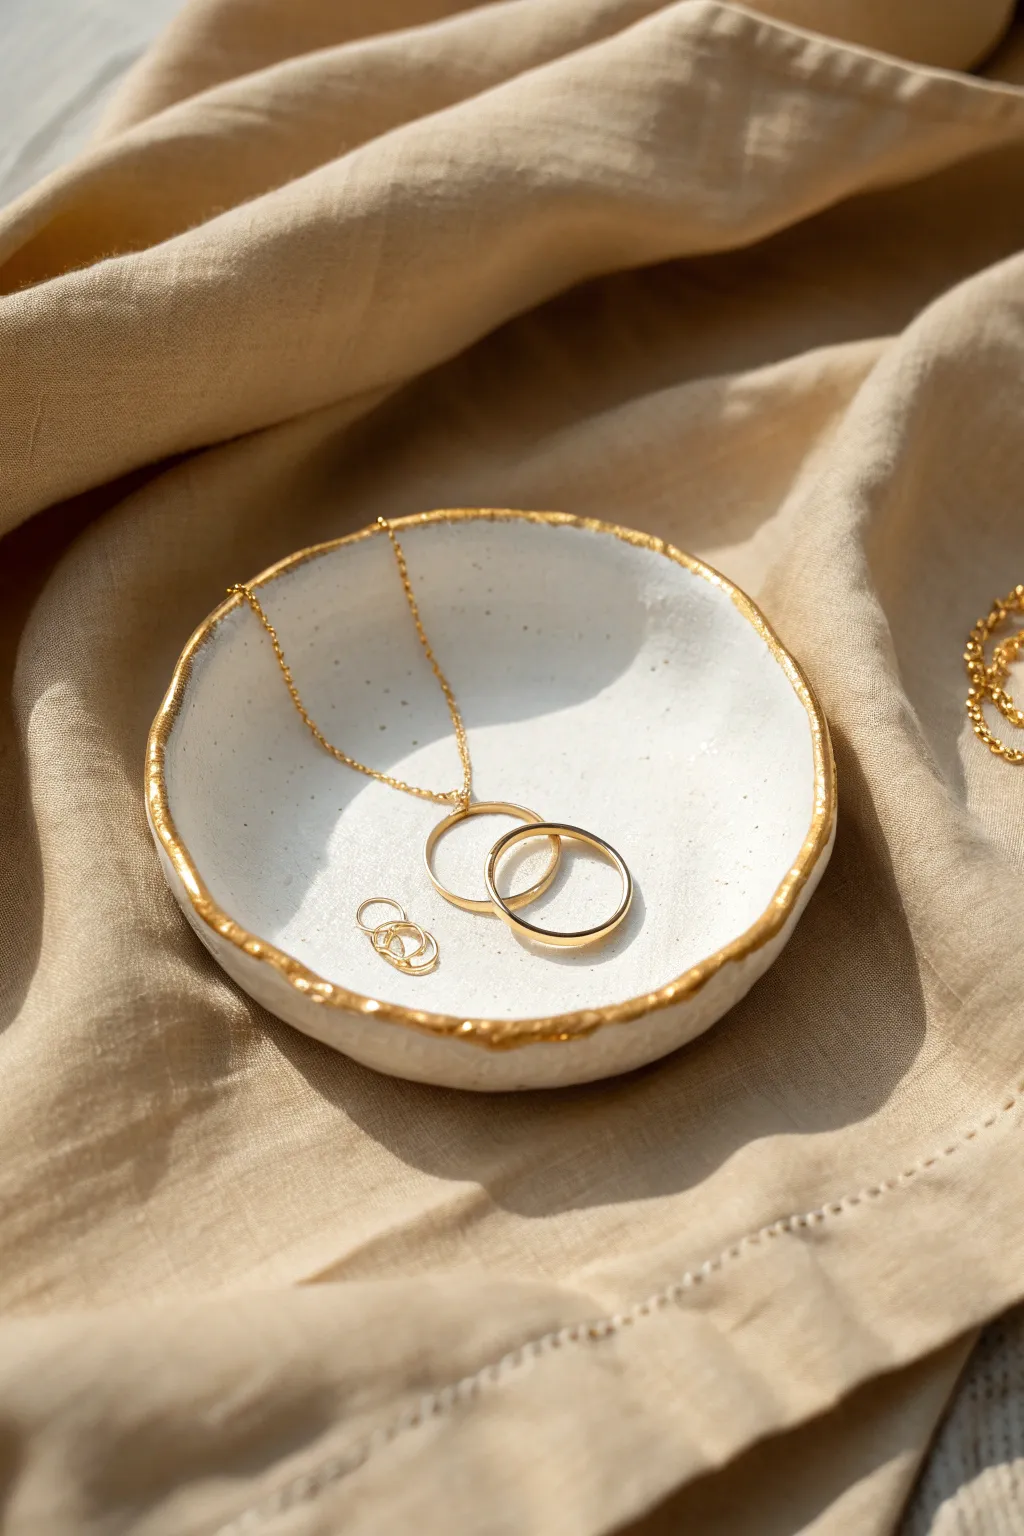
Elevate your nightstand with this stunningly simple organic clay dish, featuring a luxe gold edge that catches the light beautifully. The imperfect, hand-built shape gives it an artisanal charm that perfectly complements delicate gold jewelry.
Detailed Instructions
Materials
- White air-dry clay or polymer clay
- Rolling pin or smooth glass bottle
- Small bowl or cookie cutter (approx. 4 inches)
- Small sponge or fine-grit sandpaper
- Craft knife
- Liquid gold leaf or metallic gold enamel paint
- Small, fine-tipped paintbrush
- Clear gloss varnish or sealant
- Small bowl for shaping (optional)
- Water for smoothing
Step 1: Shaping the Clay Base
-
Condition the clay:
Begin by taking a handful of white clay and kneading it in your hands until it becomes soft, pliable, and free of any cracks. -
Roll it out:
Place the clay on a clean, flat surface and use your rolling pin to flatten it into an even sheet, aiming for about 1/4 inch thickness. -
Cut the circle:
Use a round 4-inch cookie cutter or place a small bowl upside down on the clay as a template, carefully cutting around it with your craft knife to get your base shape. -
Soften the edges:
Dip your finger in a little bit of water and run it along the cut edge to smooth out any sharpness or jagged bits left by the knife. -
Create the curve:
Gently lift the edges of the clay circle upwards with your thumbs to create a shallow lip, pinching slightly to encourage an organic, handmade feel rather than a perfect factory circle. -
Add texture:
If you want that slightly pitted, authentic ceramic look shown in the photo, gently tap the surface with a coarse sponge or a crumpled ball of aluminum foil. -
Dry the form:
Allow the clay to dry completely according to the package instructions; for air-dry clay, I usually let it sit for at least 24-48 hours to ensure it’s rock hard.
Liquid Gold Secret
For the brightest shine, use liquid gold leaf (solvent-based) rather than acrylic paint. It smells stronger but dries into a true metal finish.
Step 2: Refining and Gilding
-
Sand for smoothness:
Once fully dry, use fine-grit sandpaper to gently buff away any rough spots on the rim or the underside, wiping away the dust with a barely damp cloth. -
Seal the piece:
Apply a coat of clear gloss varnish to the entire dish to seal the porous clay and create a smooth, finished surface for the gold to adhere to. -
Wait for sealant:
Let the varnish dry completely before moving on to the metallic step, as painting over wet varnish can cause cloudiness. -
Prepare the gold:
Shake your liquid gold leaf or enamel paint well to ensure the metallic pigments are evenly distributed. -
Paint the rim:
Using a fine-tipped brush, carefully paint the very top edge of the rim; don’t worry about being perfectly straight, as the wobbly line adds character. -
Extend the edge:
Allow the gold paint to naturally bleed slightly down the inside and outside walls of the rim for that dipped, organic appearance. -
First coat drying:
Let the first layer of gold dry for about 20 minutes. -
Intensify the shine:
Apply a second coat of gold to the rim to make the metallic finish rich, opaque, and reflective. -
Final cure:
Allow the gold rim to cure fully for several hours before placing any jewelry inside to avid tacky spots.
Fixing Cracks
If small cracks appear as the clay dries, mix a tiny bit of fresh clay with water to make a paste and fill them in like spackle before painting.
Your personalized jewelry dish is now ready to hold your favorite rings and chains securely


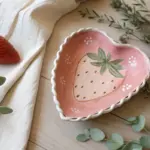
Heart-Shaped Jewelry Dish
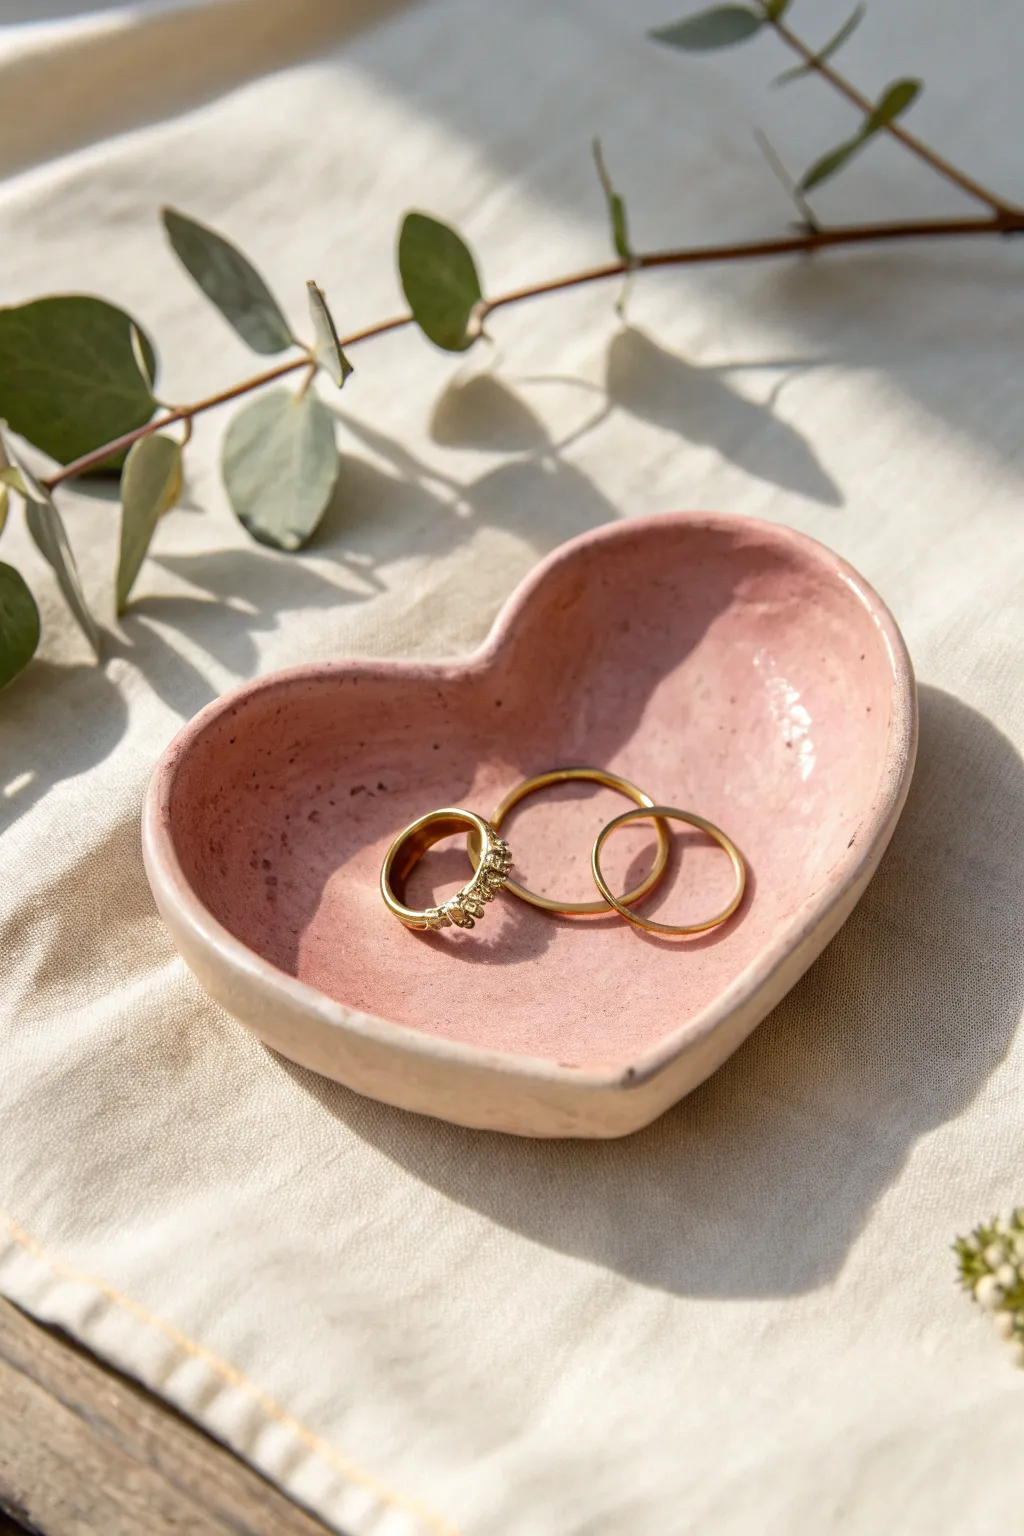
This sweet, heart-shaped dish features a soft pink glaze and an organic, handmade rim that perfectly cradles your favorite rings. Its gentle curve and glossy finish make it a charming addition to any bedside table or vanity.
Step-by-Step Tutorial
Materials
- White smooth air-dry clay (or polymer clay)
- Rolling pin
- Heart-shaped cookie cutter (large) or paper template
- X-acto knife or clay tool
- Small bowl or sponge (to shape the curve)
- Sandpaper (fine grit)
- Acrylic paint (soft dusty pink)
- High-gloss varnish or glaze
- Paintbrushes (soft synthetic)
- Small cup of water
Step 1: Shaping the Clay
-
Condition the clay:
Begin by taking a handful of clay and kneading it in your hands until it becomes warm, soft, and pliable. If the clay feels too dry, add a tiny drop of water to your fingers. -
Roll it out:
Place the clay on a smooth surface or a dedicated clay mat. Use your rolling pin to flatten it into an even slab, aiming for a thickness of about 1/4 inch. -
Cut the heart:
Press a large heart-shaped cookie cutter firmly into the clay. If you don’t have a cutter, place a paper template on top and carefully trace around it with a knife. -
Clean the edges:
Dip your finger in a little water and run it along the cut edges of the heart to smooth out any roughness or jagged bits left by the cutting tool. -
Create the curvature:
Gently lift the clay heart and place it into a shallow bowl or use your fingers to curl the edges upward. This creates the dish shape that will hold your jewelry securely. -
Refine the rim:
While preserving the curve, pinch the rim slightly to give it that organic, handmade thickness seen in the photo. Smooth out any fingerprints with a damp sponge.
Step 2: Drying and Refining
-
Let it dry completely:
Leave the dish to dry in a cool, dry place. Depending on the brand of clay and humidity, this usually takes 24 to 48 hours. The color will lighten as moisture evaporates. -
Check for dryness:
Touch the clay; it should feel room temperature, not cold. If it’s cold, there is still moisture inside, so give it a bit more time. -
Sand for smoothness:
Once fully cured, use fine-grit sandpaper to buff away any remaining uneven spots on the rim or surface. Wipe away the dust with a dry cloth.
Cracking Issues?
If small cracks appear while drying, don’t panic. Create a paste with a little clay and water (called ‘slip’) to fill the gap, smooth it over, and let it dry again.
Step 3: Painting and Glazing
-
Mix the pink shade:
Mix a small amount of red or pink acrylic paint with plenty of white to create a soft, dusty pink hue. I like to test the color on a scrap piece of paper first. -
Apply the first coat:
Paint the entire top surface of the heart, ensuring you get into the texture of the clay. Let this layer dry to the touch. -
Add a second coat:
Apply a second layer of pink paint for opaque, even coverage. Don’t forget to paint the outer rim and the bottom of the dish. -
Create the speckled effect:
For a subtle texture like the photo, dip an old toothbrush in slightly watered-down darker pink paint and flick fine speckles onto the dish (practice on paper first!). -
Seal with gloss:
Once the paint is bone dry, apply a generous coat of high-gloss varnish. This mimics the look of ceramic glazing and protects the surface. -
Apply final coat:
Let the first coat of varnish dry according to bottle instructions, then add a second coat to achieve that super-shiny, glass-like finish shown in the image.
Make It Luxe
Paint the very rim of the heart with liquid gold leaf or metallic gold paint after the pink base dries for an elegant, high-end gilded contour.
Place your finished dish on your dresser to keep your daily treasures safe and stylish


Press-and-Print Botanical Leaf Dish
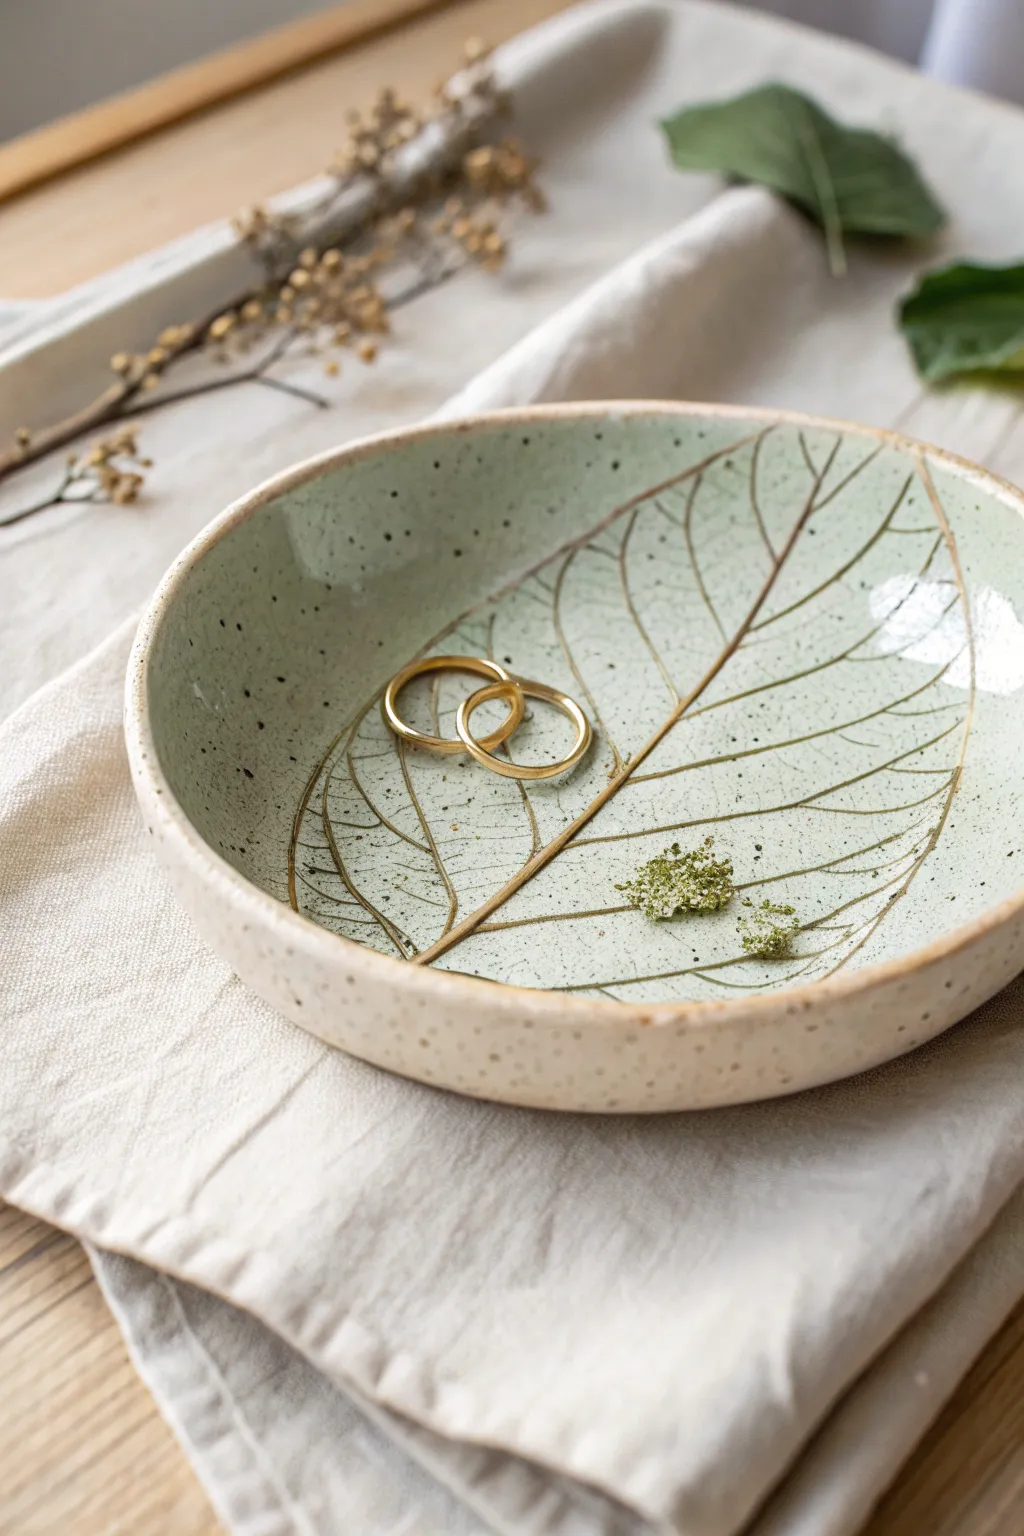
Capture the delicate skeleton of a real leaf in this elegant, speckle-finished ring dish. The natural impression combined with a soft sage glaze and metallic gold accents creates a sophisticated resting place for your favorite jewelry.
Step-by-Step
Materials
- White or speckled stoneware clay
- Rolling pin
- Large, veined leaf (fresh or dried)
- Circular bowl mold or slump mold (approx. 5-6 inches)
- Needle tool or X-Acto knife
- Sponge
- Soft sage green ceramic glaze (food safe)
- Clear transparent glaze (optional)
- Small paintbrush for detail work
- Gold luster or gold leaf paint
- Small kiln (if using firing clay) or sealant (if using air-dry clay)
Step 1: Shaping the Clay Base
-
Roll out the slab:
Begin with a ball of wedged white stoneware clay. Roll it out on a canvas cloth or smooth surface until you have an even slab about 1/4 inch thick. -
Select your leaf:
Choose a fresh leaf with prominent veins (like a hydrangea or bodhi leaf) that fits within your desired dish size. Ensure the leaf is clean and free of tears. -
Make the impression:
Place the leaf vein-side down onto your clay slab. Gently roll over the leaf with your rolling pin, applying firm, even pressure to embed the veins deeply into the clay surface. -
Cut the circle:
Place a circular template or bowl rim over the leaf area to visualize your composition. Using a needle tool, cut a clean circle around your chosen section, cutting through both the leaf and the clay. -
Remove the botanical:
Carefully peel the leaf away from the clay to reveal the intricate skeletal pattern imprinted below. Use a needle tool to gently lift an edge if it’s stuck. -
Smooth the edges:
Dip a small sponge in water and run it around the cut rim of the clay circle to soften any sharp edges created by the cut.
Clean Imprints
If the leaf sticks to your roller, place a piece of paper or plastic wrap between the roller and the leaf to prevent tearing while pressing.
Step 2: Forming and Dying
-
Create the curve:
Gently lift your clay circle and place it inside your bowl mold or atop a slump mold. Press it lightly so it takes on the curved, concave shape of a bowl. -
Refine the shape:
Check the rim again while it is in the mold to ensure it hasn’t warped. Smooth it out with your finger or a damp sponge one last time. -
Bisque fire:
Allow the clay to dry slowly until bone dry (usually 2-3 days). Fire the piece in a kiln to cone 04 (or according to your clay’s instructions) to harden it into bisque ware. -
Clean the bisque:
Once cool, wipe the bisque piece with a damp sponge to remove any kiln dust, which helps the glaze adhere properly.
Speckle Hack
Don’t have speckled clay? Flick diluted brown underglaze onto the wet clay with a toothbrush before glazing to mimic the look.
Step 3: Glazing and Detailing
-
Apply base glaze:
Pour a soft sage green glaze into the interior of the dish, swirling it to coat the surface evenly, then pouring out the excess. Alternatively, brush on 2-3 coats of glaze. -
Reveal the texture:
While the glaze is still damp, gently wipe the raised areas of the leaf veins with a clean, slightly moist sponge. This technique, called ‘wipe-back,’ leaves glaze in the recesses while exposing the clay texture on the ridges. -
Glaze the exterior:
Brush or dip the exterior of the bowl in a clear glaze or a speckled white glaze to complement the interior. -
Glaze fire:
Fire the piece again to the temperature required by your specific glaze (typically cone 5 or 6 for stoneware). -
Gold preparation:
Once the piece has been fired and cooled completely, prepare your gold overglaze (luster). Work in a well-ventilated area as these fumes can be strong. -
Apply gold accents:
Using a very fine liner brush, carefully paint the gold luster into the main recessed veins of the leaf impression. I find holding my breath for a moment helps steady my hand for these fine lines. -
Highlight the rim:
Run a thin line of gold luster along the very top edge of the dish rim to frame the artwork. -
Final firing:
Place the dish back in the kiln for a final low-fire luster firing (usually cone 018) to permanently fuse the gold to the glaze.
This sophisticated little dish is now ready to hold your most treasured rings or simply sit as a piece of functional art


Daisy Center Dish for Stud Earrings
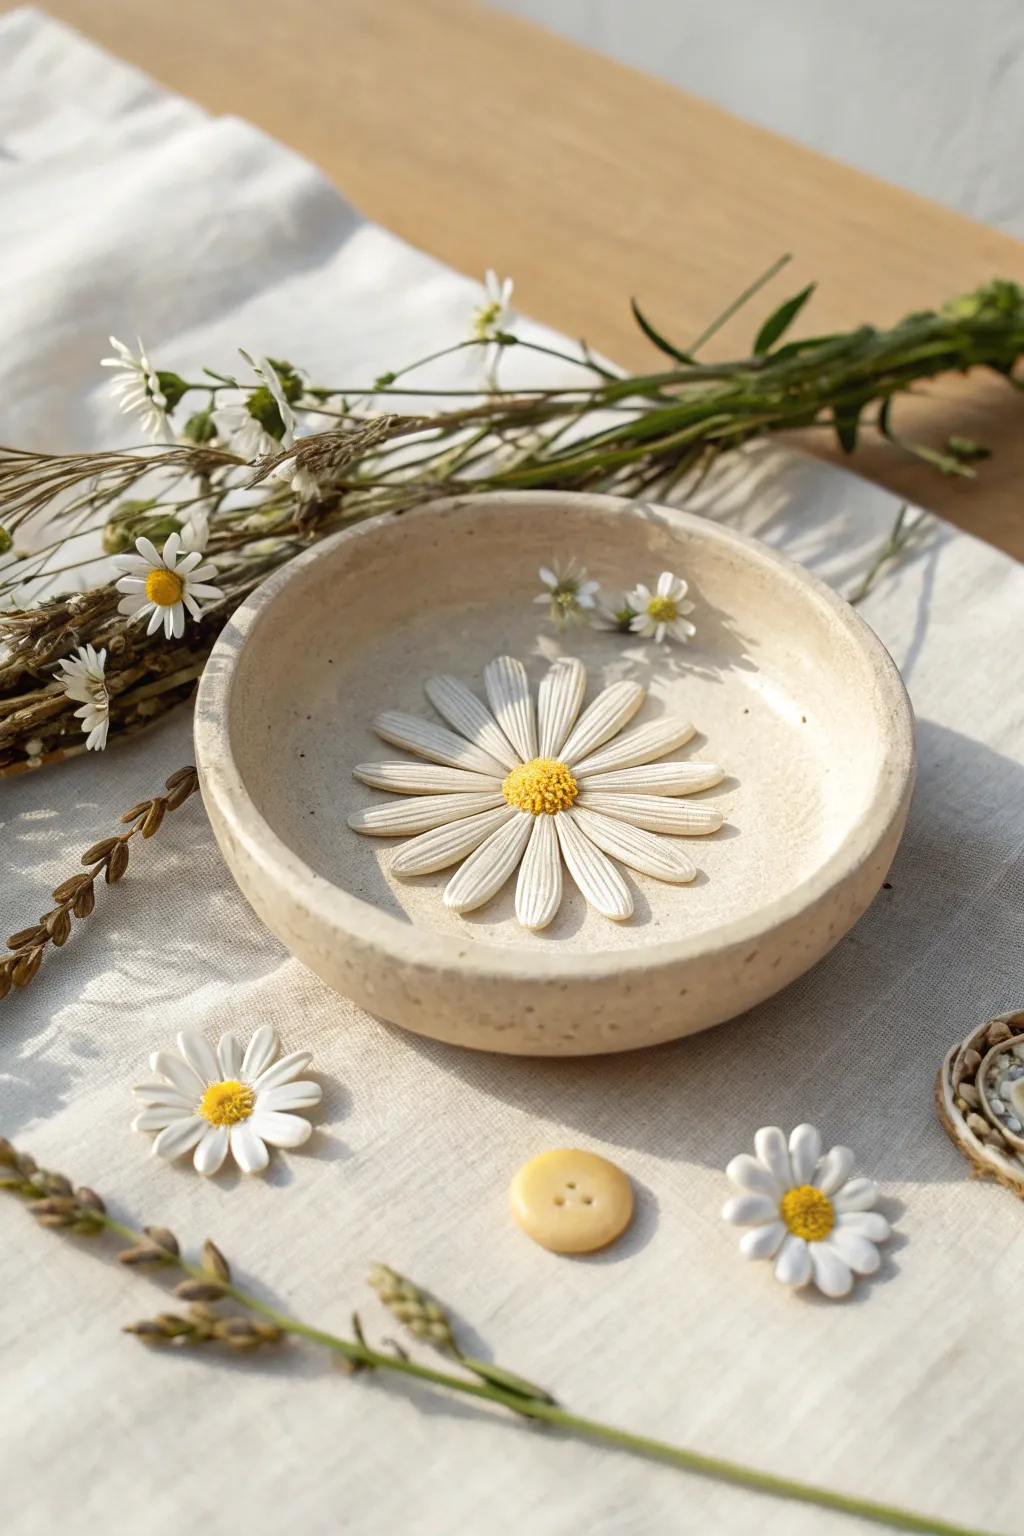
This charming jewelry dish features a lifelike daisy sculpted directly into the center, perfect for holding stud earrings or dainty rings. The speckled clay finish gives it a warm, organic feel that looks beautiful on any bedside table.
Step-by-Step Tutorial
Materials
- Speckled beige polymer clay (or air-dry clay)
- White polymer clay
- Yellow polymer clay
- Rolling pin
- Circle cutter (approx. 4-5 inches)
- Small bowl (for forming the curve)
- Needle tool or toothpick
- Texture tool (or toothbrush)
- Craft knife
- Liquid clay or clay glue (if baking)
- Fine-grit sandpaper
- Matte sealant or varnish
Step 1: Forming the Base Dish
-
Prepare the speckled clay:
Begin by conditioning your speckled beige clay until it is soft and pliable. Roll it out into an even slab, approximately 1/4 inch thick. I find using guides or playing cards on either side helps keep the thickness consistent. -
Cut the circle:
Use your large circle cutter or trace around a bowl to cut a perfect circle from the clay slab. Smooth the cut edges gently with your finger to remove any sharp angles. -
Shape the dish:
Gently lift the clay circle and drape it inside a small, oven-safe bowl to give it a curved shape. Press it lightly so it takes the form of the bowl without thinning the bottom too much. -
Refine the rim:
While the clay is in the mold, use your finger to smooth the rim again, ensuring it has a nice, rounded lip rather than a harsh cut edge.
Step 2: Sculpting the Daisy Center
-
Create the petals:
Roll out a thin sheet of white clay. Use a small teardrop cutter or cut long, thin teardrop shapes freehand with a craft knife. You will need about 14-16 petals. -
Texture the petals:
Using a needle tool, gently press longitudinal lines down the length of each petal to mimic the ridges of a real flower. This texture is key to the realistic look shown in the photo. -
Attach the first layer:
Apply a tiny dot of liquid clay or water (if using air-dry clay) to the center of your dish. Arrange the petals in a radial pattern, meeting in the center. Press them down gently so they adhere to the beige base. -
Make the flower center:
Roll a small ball of yellow clay and flatten it slightly into a dome shape. This will be the pistil of the daisy. -
Texture the center:
Before attaching it, texture the yellow dome deeply. Use a needle tool to poke many tiny holes, or gently tap it with a clean toothbrush or texturing tool to create a fuzzy, pollen-like appearance. -
Assemble the flower:
Place the textured yellow center directly over the point where all the white petals meet. Press down firmly enough to bond the clays, but be careful not to crush your beautiful texture.
Sticky Situation
If the clay sticks to your mold bowl, dust the bowl lightly with cornstarch before placing the clay inside. This creates a barrier for easy removal.
Step 3: Finishing Touches
-
Inspect the piece:
Look over the dish for any fingerprints or lint. You can smooth imperfections on the beige areas with a drop of baby oil on your finger. -
Bake or dry:
If using polymer clay, bake the dish inside the forming bowl according to the package instructions (usually 275°F for 15-30 minutes). If using air-dry clay, leave it in the bowl for at least 24 hours to set its shape. -
Sand the edges:
Once fully cured and cooled, remove the dish from the mold. Use fine-grit sandpaper to lightly buff the rim if there are any remaining rough spots. -
Seal the work:
Apply a thin coat of matte varnish or sealant to protect the clay, especially if you used air-dry clay. A matte finish keeps the natural, stone-like aesthetic intact.
Add Dimension
Lift the tips of a few white petals slightly off the base before baking. This 3D effect makes the flower look like it’s blooming right out of the dish.
Now you have a sweet little botanical dish ready to organize your treasures

The Complete Guide to Pottery Troubleshooting
Uncover the most common ceramic mistakes—from cracking clay to failed glazes—and learn how to fix them fast.
Checkerboard Pastel Jewelry Dish

Embrace the trendy cottagecore aesthetic with this charming handmade clay dish featuring a soft lilac and cream checkerboard pattern. The organic, hand-pinched shape combined with the geometric design creates a lovely balance perfect for holding your favorite rings.
Step-by-Step Guide
Materials
- Air-dry clay (white)
- Acrylic paints (lilac/lavender, cream/off-white, pale pink)
- Gold acrylic paint or gold leaf pen
- Rolling pin
- Small bowl (for molding)
- Pencil
- Fine detail paintbrush
- Flat shader paintbrush
- Sandpaper (fine grit)
- Glossy varnish or sealant
- Clay sculpting tool or butter knife
Step 1: Forming the Dish
-
Prepare the clay:
Start by grabbing a handful of air-dry clay roughly the size of a tennis ball. Knead it in your hands to warm it up and remove any air bubbles, making it pliable and easy to work with. -
Roll it out:
Using your rolling pin, roll the clay out on a flat surface until it is about 1/4 inch thick. Aim for an even thickness throughout to prevent cracking later. -
Cut the circle:
Find a circular object slightly larger than your desired finished bowl—a cereal bowl usually works well as a template. Place it upside down on the clay and trace around it with a knife or sculpting tool to cut out a perfect circle. -
Create the curve:
To give the dish its shape, gently drape your clay circle inside a small bowl lined with plastic wrap or over the bottom of a bowl. Press gently so it takes on the curved form. -
Shape the rim:
While the clay is still soft, use your fingers to gently pinch and smooth the rim. I like to create a slightly uneven, organic edge rather than a perfectly sharp one, as it adds to the handmade charm. -
Dry completely:
Leave the clay in the mold for at least 24-48 hours. It needs to be bone dry and white before you proceed. Don’t rush this step or the paint won’t adhere properly. -
Smooth it out:
Once fully dry, take a piece of fine-grit sandpaper and lightly sand the edges and the surface to remove any rough bumps or fingerprints.
Wobbly Lines?
Don’t stress about perfect geometry! If your grid looks uneven, just thicken the gold lines between the squares. The gold hides messy edges and enhances the organic feel.
Step 2: Painting the Grid
-
Sketch the grid:
Use a pencil to lightly draw a grid pattern inside the bowl. Start with a center point and draw radiating lines, then connect them with concentric circles to create the warped checkerboard effect seen in the photo. -
Define the checks:
Identify which squares will be painted lilac and which will remain cream. Following the curve of the bowl, refine your pencil lines so the squares appear to drape naturally rather than looking like a flat grid. -
Mix your colors:
Prepare your palette. You’ll need a soft lilac purple, a warm off-white cream, and a touch of pale pink for the outer rim area. -
Paint the cream base:
Using a flat shader brush, paint the ‘white’ squares with your cream color. Even if the clay is white, painting these squares adds depth and a cohesive finish. -
Fill the purple squares:
Switch to the lilac paint. Carefully fill in the alternating squares. Use a smaller detail brush for the corners to ensure crisp lines where the colors meet. -
Blend the rim colors:
For the very edge of the bowl, mix a little pink into your lilac or cream. Paint the rim area with this soft, variegated tone to frame the checkerboard inside. -
Add a second coat:
Acrylics can sometimes look streaky on clay. Once the first layer is dry, apply a second thin coat of both colors to make the pattern opaque and vibrant.
Step 3: Finishing Touches
-
Apply gold accents:
To recreate the elegant look in the photo, use a very fine brush with gold paint or a gold leaf pen. Trace over the grid lines where the lilac and cream meet. -
Highlight the rim:
Dab a small amount of gold along the uneven rim of the bowl. This highlights the organic shape and ties the whole piece together. -
Seal the dish:
Protect your hard work with a coat of glossy varnish. This will give the dish a ceramic-like sheen and prevent the paint from chipping over time.
Level Up: Texture
Before the clay dries, gently press a piece of lace or fabric into the alternating squares. When you paint over it later, the texture will catch the glaze beautifully.
Place your favorite gold rings inside and admire your distinctive new decor piece
Cute Cat Face Dish With Tiny Ears
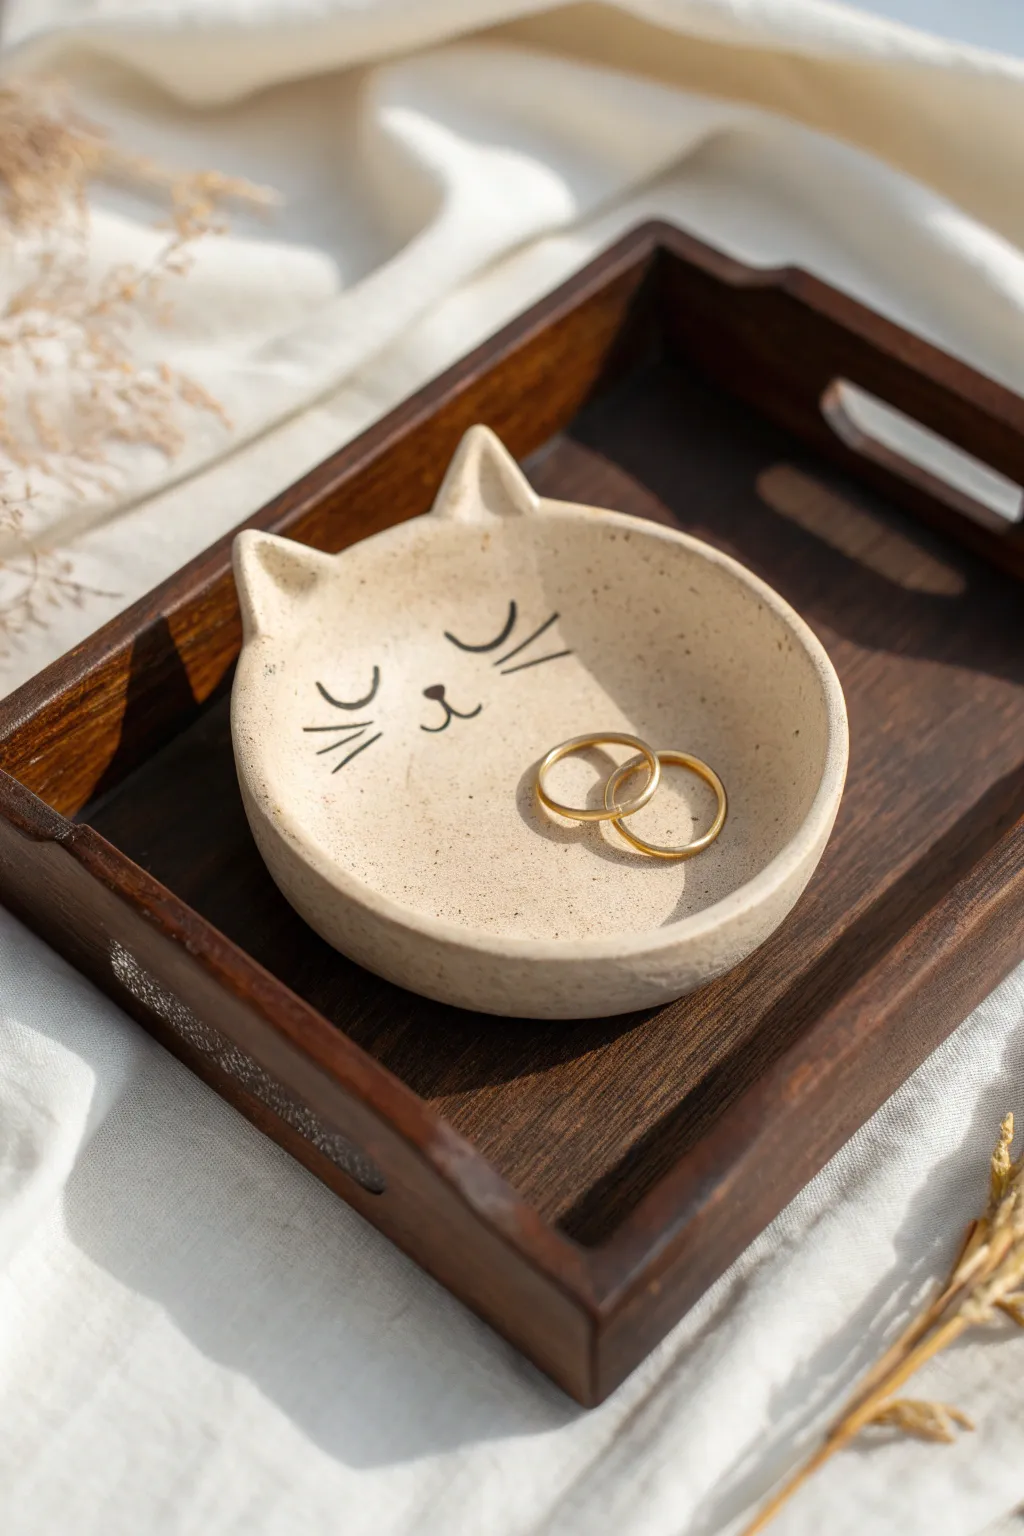
This adorable cat-faced ring dish combines minimalist charm with functional design, featuring delicate pointy ears and a sweet, drowsy expression. The speckled clay lends it a natural, earthy ceramic look without requiring a kiln, making it a perfect resting spot for your favorite jewelry pieces.
How-To Guide
Materials
- Speckled polymer clay (e.g., granite or sand effect)
- Acrylic rolling pin
- Circle cutter or a round bowl (approx. 4-5 inches)
- X-Acto knife or craft blade
- Black acrylic paint
- Fine detail paintbrush (size 000)
- Sandpaper (fine grit, 400-600)
- Matte varnish or sealant
- Smooth work surface (ceramic tile or glass mat)
- Oven for baking
Step 1: Shaping the Base
-
Condition the clay:
Begin by warming the speckled clay in your hands, kneading it thoroughly until it is soft and pliable. This conditioning step is crucial to prevent cracks during baking. -
Roll out the slab:
Place the clay on your work surface and use the acrylic rolling pin to flatten it into an even sheet. Aim for a thickness of about 1/4 inch so the dish feels substantial but not chunky. -
Cut the primary circle:
Press your circle cutter or place an inverted bowl onto the clay sheet. Using your craft knife, carefully trace around the edge to cut out a perfect circle. -
Smooth the edges:
Dip your finger in a little bit of water (or baby oil if the clay is sticky) and gently run it along the cut edge of the circle to round off any sharp corners.
Step 2: Forming the Features
-
Create the ears:
Pinch off two small, equal-sized pieces of leftover clay. Roll them into balls and then flatten them slightly into triangular shapes. -
Attach the ears:
Place the triangles at the top of your circle, slightly spaced apart. I like to blend the seams on the back side thoroughly with a modeling tool or my thumb so they become one solid piece. -
Curve the dish shape:
Gently lift the clay circle and cup it in your palm. Press the center down slightly while curling the edges upward to create a shallow bowl shape. -
Refine the curve:
Place the curved clay inside an oven-safe bowl or leave it resting on a curved baking form to ensure it holds its shape while baking. Smooth out any fingerprints one last time.
Uneven Edges?
If your circle distorts while lifting, try rolling the clay directly onto a piece of parchment paper. Lift the paper to move the clay into your shaping bowl.
Step 3: Baking and Finishing
-
Bake the project:
Preheat your oven according to the clay manufacturer’s instructions (usually around 275°F or 130°C). Bake the dish for the recommended time, which is typically 15-30 minutes per 1/4 inch of thickness. -
Cool completely:
Once baked, turn off the oven and let the dish cool down slowly inside, or remove it and let it rest until fully cold. Do not attempt to paint warm clay. -
Draft the face:
Lightly sketch the sleeping eyes, nose, and whiskers with a pencil directly onto the clay. This helps ensure symmetry before committing with paint. -
Paint the eyes:
Dip your fine detail brush into black acrylic paint. Carefully paint two downward curves for the closed eyes, tapering the ends slightly. -
Add the nose:
Paint a small, soft triangle or heart shape for the nose centered below the eyes. Add a small vertical line and two small curves branching off for the mouth. -
Detail the whiskers:
Using a very light touch, paint three short, straight lines on each cheek. Try to keep the lines thin and crisp. -
Sand for smoothness:
If the edges feel a bit rough after baking, gently run your fine-grit sandpaper along the rim to soften it. Wipe away dust with a damp cloth. -
Seal the dish:
Apply a thin layer of matte varnish over the entire dish to protect the paint and give the clay a professional finish. Let it dry completely according to the bottle instructions.
Add Some Glitz
Before baking, gently press gold leaf flakes into the rim or inside the ears for a chic, mixed-material look that catches the light.
Now your little clay cat is ready to keep your rings safe and sound on your nightstand


What Really Happens Inside the Kiln
Learn how time and temperature work together inside the kiln to transform clay into durable ceramic.
Mushroom Accent Dish With Ring Perch
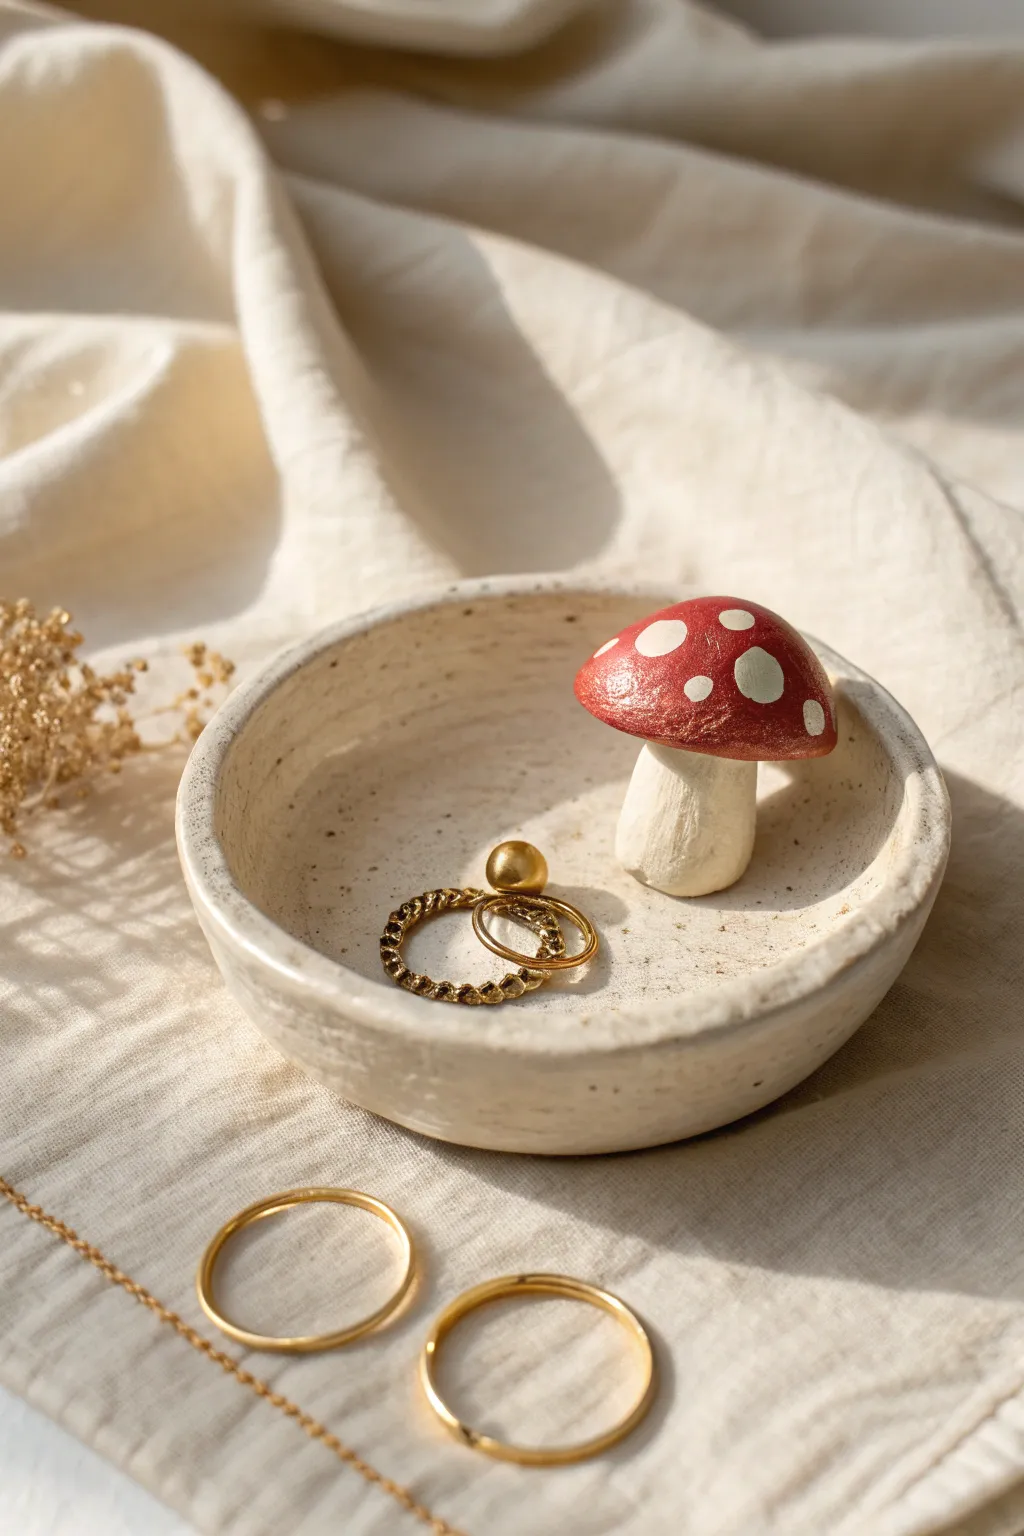
This charming, handmade trinket dish features a sweet speckled finish and a central mushroom that serves double duty as a decorative accent and a functional ring perch. The organic, slightly imperfect shape adds to its artisanal, cottagecore appeal, making it a perfect spot to keep your dainty gold rings safe.
Step-by-Step
Materials
- Air-dry clay (white or cream)
- Acrylic paints (red, cream/off-white, white)
- Matte or satin varnish/sealant
- Rolling pin
- Circular cutter or small bowl (approx. 4 inches)
- Small paintbrush (detail round)
- Medium paintbrush (flat shader)
- Water cup
- Sandpaper (fine grit)
- Sponge or paper towel
Step 1: Shaping the Base
-
Condition the clay:
Begin by taking a handful of air-dry clay and kneading it in your hands until it becomes soft, pliable, and free of air bubbles. If it feels too dry, dip your fingers in water and work the moisture in. -
Roll out the slab:
Use your rolling pin to flatten the clay into a consistent slab, aiming for a thickness of about 1/4 inch. Lift and rotate the clay occasionally to prevent it from sticking to your work surface. -
Cut the circle:
Place your circular cutter or an upside-down bowl (around 4 inches diameter) onto the slab and cut out a perfect circle. Remove the excess clay and set it aside for the mushroom later. -
Form the rim:
Gently pinch the edges of the circle upwards to create a lip. Use your thumbs to press into the center while your fingers guide the outer edge up, creating a shallow bowl shape. Smooth out any major cracks with a damp finger. -
Refine the surface:
For that textured, artisanal look seen in the photo, you don’t need the surface perfectly glass-smooth. However, I like to take a slightly damp sponge and run it around the rim to soften the sharp edges.
Cracks while Drying?
Minor cracks can happen as clay shrinks. Mix a tiny bit of fresh clay with water to make a paste (slip) and fill the crack. Smooth it over and let dry again.
Step 2: Sculpting the Mushroom
-
Create the stalk:
Take a small ball of leftover clay and roll it into a thick cylinder for the stem. It should be sturdy enough to hold rings but tapered slightly at the top. Flatten the bottom so it stands straight. -
Shape the cap:
Form a flattened half-sphere for the mushroom cap. It should be slightly wider than the stalk. Use your thumb to create a small indentation on the underside where it will connect to the stem. -
Attach the pieces:
Score (scratch cross-hatching marks) the top of the stem and the underside of the cap. Add a dab of water or clay slip, then press them firmly together. Smooth the seam with a sculpting tool or your finger so it looks like one piece. -
Secure to the dish:
Choose a spot inside your dish (off-center usually looks best) and score both the bottom of the mushroom stalk and the dish surface. Apply slip/water and press the mushroom down firmly. Use a small tool to blend the clay at the base of the stalk into the dish floor for a seamless bond. -
Dry completely:
Let your project air dry for 24-48 hours. It needs to be bone dry and rock hard before painting. Flip it over halfway through the drying process to ensure the bottom dries evenly.
Pro Tip: Weighted Drying
To keep the dish bottom perfectly flat, place a small, flat object (like a coaster) lightly inside the center of the dish while it dries to prevent curling.
Step 3: Painting and Finishing
-
Sand imperfections:
Once fully dry, take fine-grit sandpaper and gently gently buff away any rough fingerprints or sharp jagged bits on the rim. -
Paint the stalk and dish:
Mix a cream or off-white acrylic paint. Cover the entire dish and the mushroom stalk. You might need two thin coats for full opacity. I prefer a slightly streaky application here to mimic textured ceramic glazing. -
Add the speckles:
To get that speckled pottery effect, load an old toothbrush or stiff brush with watered-down brown or black paint. Run your thumb across the bristles to flick tiny specks onto the cream-painted areas. -
Paint the cap:
Carefully paint the mushroom cap a deep, earthy red. Use a smaller round brush to get a clean line where the cap meets the stem. -
Add the dots:
Using the handle end of a paintbrush or a dotting tool, dip into white paint and create irregular polkadots on the red cap. Vary the sizes slightly for a natural look. -
Seal the piece:
Finish by applying a coat of matte or satin varnish over the entire piece to protect the paint and give it a finished sheen.
Now you have a darling little forest-themed home for your favorite rings and accessories
Mini Pond Diorama Dish With Lily Pads
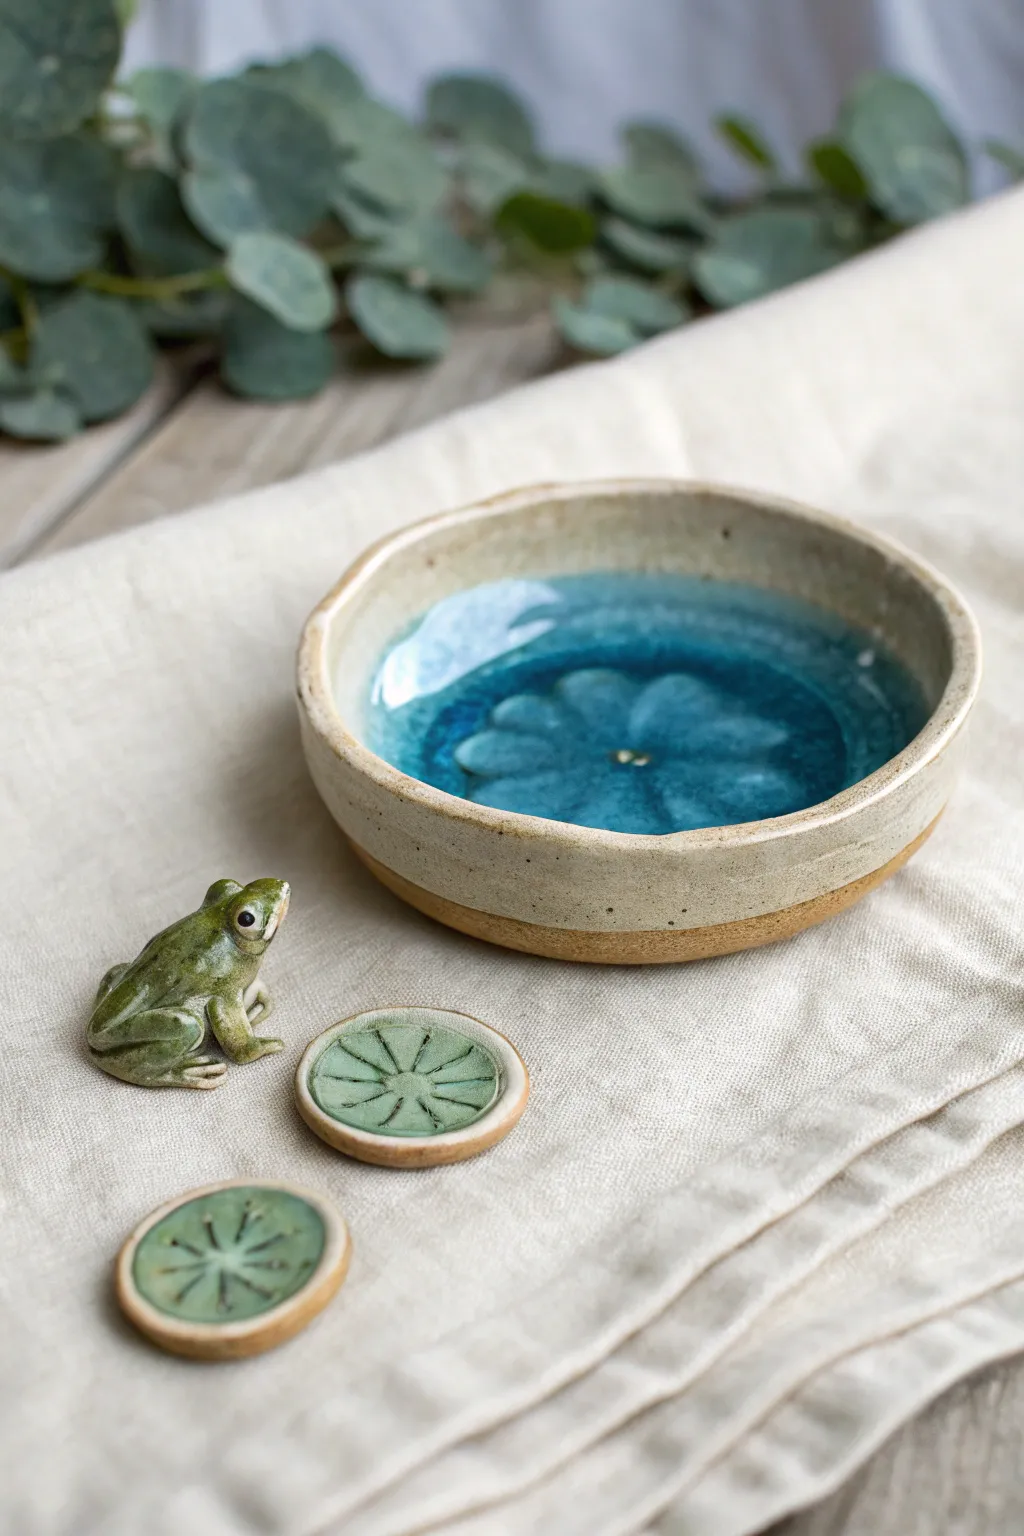
Create a serene resting spot for your rings with this charming ceramic set, featuring a deep blue glazed pond dish and accompanying nature-inspired accents. The glossy ‘water’ effect combined with the matte frog figurine makes for a delightful textural contrast.
Detailed Instructions
Materials
- White stoneware or porcelain clay
- Pottery wheel (optional, can be hand-built)
- Sponge and bucket of water
- Pottery trimming tools
- Needle tool
- Modeling tools (wooden or metal)
- Underglaze (green, black, white)
- translucent blue glaze (for pooling)
- Clear glaze
- Kiln
- Small paintbrush
Step 1: Creating the Pond Dish
-
Throw or pinch the base:
Begin with a ball of clay. If using a wheel, throw a low, wide bowl with thick walls. If hand-building, pinch a consistent bowl shape, ensuring the floor is flat and even. -
Define the rim:
Smooth the rim with a damp sponge or chamois to create a soft, rounded edge. The rim should be slightly organic and uneven to mimic a natural pond bank. -
Texture the interior:
While the clay is leather-hard, use a carving tool to gently press a flower or ripple pattern into the center floor of the bowl. This texture will catch the glaze later for depth. -
Trim the foot:
Once leather hard, flip the bowl and trim a clean foot ring. This elevates the ‘pond’ and gives the piece a professional finish.
Glassy Depth Tip
Add a pinch of clear crushed glass to the center of the bowl before the final firing. It melts into a stunning, ultra-transparent pool at the bottom.
Step 2: Sculpting the Frog and Pads
-
Shape the frog body:
Take a small lump of clay and roll it into a rough teardrop shape. Pinch the tapered end slightly to form the head. -
Add the legs:
Roll four small coils. Attach the back legs first, folding them against the body for that seated frog posture. Attach the front legs so they prop the chest up slightly. -
Detail the face:
Use a small ball tool to indent eye sockets, then add tiny spheres for the eyes. Use a needle tool to carve the mouth line and nostrils. -
Form the lily pads:
Flatten small balls of clay into discs. These should be thick enough to be sturdy but thin enough to look delicate. -
Carve pad details:
Using a needle tool or knife, gently carve radiating lines from the center of the discs to mimic the veins of a lily pad or lotus seed head. Indent small dots if desired. -
Dry completely:
Allow the bowl, frog, and pads to dry slowly to the bone-dry stage to prevent warping or cracking.
Make it Bloom
Instead of flat pads, sculpt a tiny 3D lotus flower to sit on one of the discs. Use pink underglaze on the tips for a pop of color.
Step 3: Glazing and Firing
-
Bisque fire:
Load all pieces into the kiln and fire to cone 04 (or your clay’s specific bisque temperature). -
Underglaze the accessories:
Paint the frog with varying shades of green underglaze to create a natural, mottled look. Use black for the pupils and white for a tiny highlight. -
Color the lily pads:
Apply a wash of green underglaze to the lily pads, wiping back the surface slightly with a damp sponge so the color remains darker in the carved crevices. -
Glaze the pond interior:
Pour a thick layer of translucent blue glaze into the bowl. Ideally, use a glaze known for ‘pooling’ or ‘crackling’ to mimic the depth of water. -
Glaze the exterior:
Dip the rim and upper exterior of the bowl into a transparent or light cream glaze, leaving the bottom unglazed to show the raw clay body. -
Clear coat accessories:
Apply a thin layer of clear glaze over the frog and lily pads to seal the underglaze and give them a wet, aquatic sheen. -
Final firing:
Fire all pieces to the maturity temperature of your clay and glaze (typically cone 5 or 6 for stoneware). -
Cool and inspect:
Allow the kiln to cool completely before opening. I personally love seeing how the blue glaze settles into the textures at the bottom of the bowl.
Arrange your little frog friend next to the water dish and enjoy this peaceful addition to your vanity

TRACK YOUR CERAMIC JOURNEY
Capture glaze tests, firing details, and creative progress—all in one simple printable. Make your projects easier to repeat and improve.
Tiny Swimming Pool Dish With Floatie Vibes
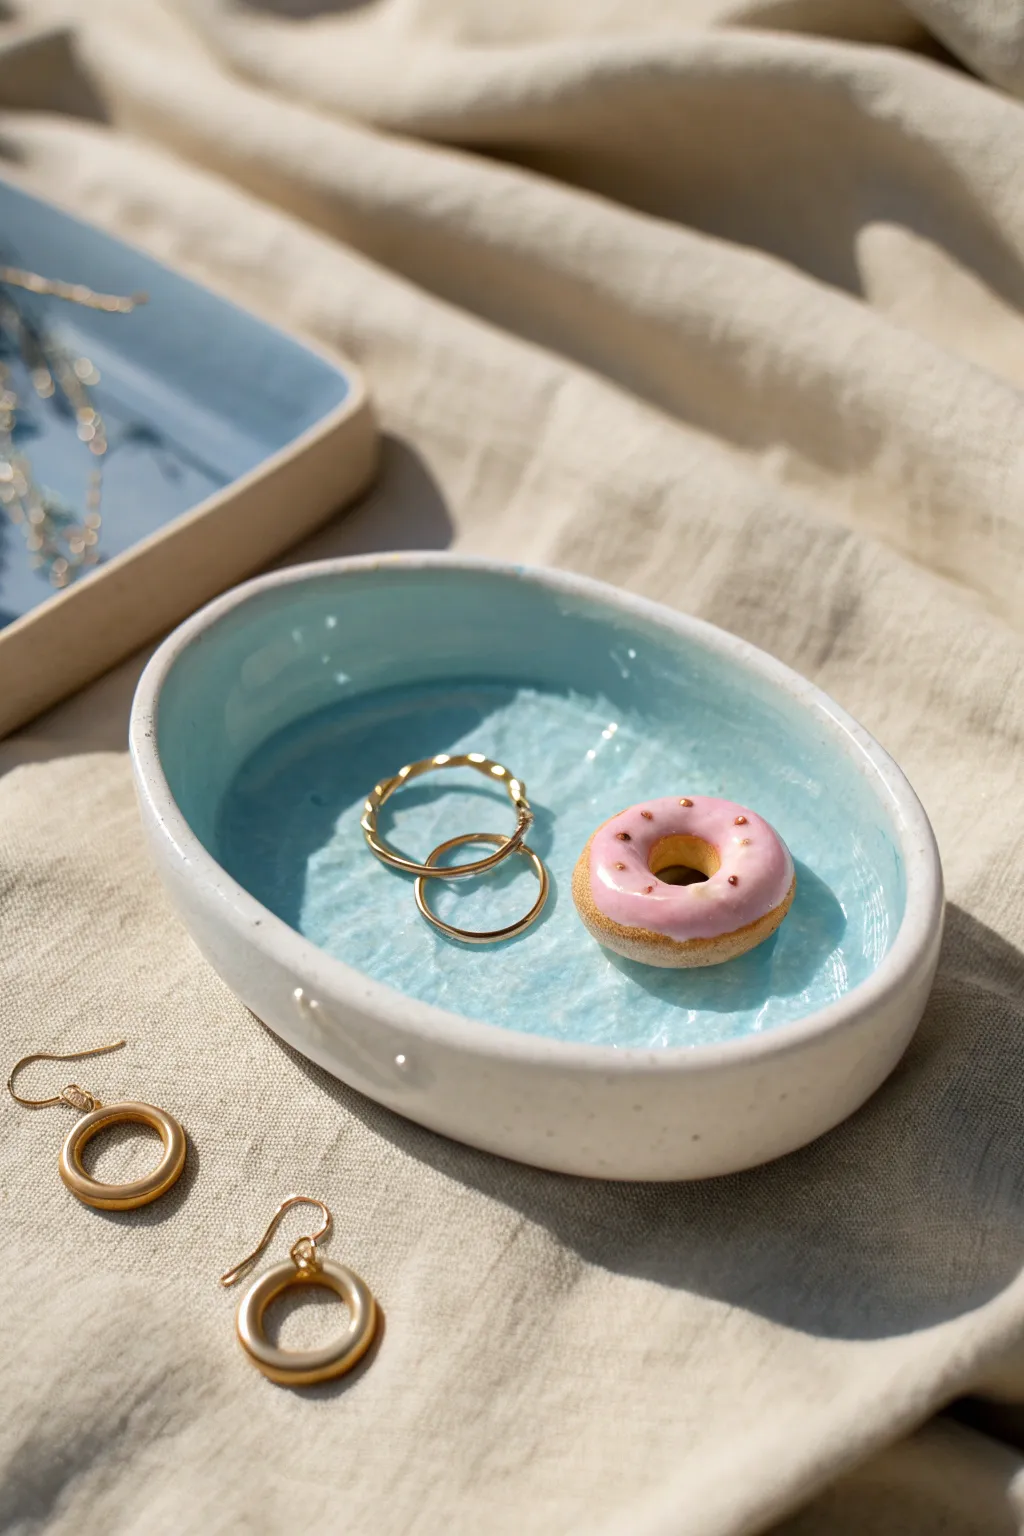
Create a splash on your vanity with this adorable jewelry dish that mimics a tiny swimming pool complete with a sweet donut floatie. The realistic water ripple effect and sugary-sweet miniature details make this a functional piece of art perfect for holding your favorite rings.
Step-by-Step Tutorial
Materials
- White air-dry clay or polymer clay
- Rolling pin
- Oval cutter or paper template
- Modeling tools (or a toothpick)
- Sandpaper (fine grit)
- Acrylic paints (light cyan, white, tan, pink)
- High-gloss varnish or resin
- Paintbrushes (small detail and medium flat)
- Small amount of foil
Step 1: Sculpting the Base
-
Roll the clay:
Start by conditioning your clay until it is soft and pliable, then roll it out to a uniform thickness of about 1/4 inch. -
Cut the shape:
Use an oval cookie cutter or a paper template with a craft knife to cut out the base shape of your pool. -
Form the walls:
Roll a long snake of clay approximately 1/4 inch thick. Gently score and slip (scratch and wet) the outer edge of your oval base to help the wall adhere. -
Attach the rim:
Place the clay snake onto the scored edge, trimming off any excess. Use your finger or a modeling tool to blend the seam on both the inside and outside until the transition is completely smooth. -
Create the basin:
Gently press the center of the dish down slightly while pulling the walls up to deepen the ‘pool’ area, smoothing any fingerprints as you work. -
Texture the water:
Take a ball tool or the end of a paintbrush and gently dimple the interior floor of the dish. This uneven texture is crucial for mimicking ripples later.
Step 2: Creating the Donut ‘Floatie’
-
Shape the dough:
Roll a tiny ball of clay, no bigger than a large pea, and flatten it slightly. -
Make the hole:
Use a toothpick to pierce the center of the ball, swirling it gently to create the classic donut hole shape. -
Add icing texture:
Roll a tiny, thin sheet of clay and lay it unevenly over the top of the donut to look like dripping icing, or simply sculpt the top to be slightly raised. -
Dry or bake:
Allow both your dish and the tiny donut to dry completely (for air-dry clay) or bake according to package instructions (for polymer clay).
Water Effect Pro-Tip
For the most realistic water, mix a tiny drop of blue ink into clear resin instead of painting the clay blue. Pour it in to create actual depth.
Step 3: Painting and Finishing
-
Sand until smooth:
Once hardened, use fine-grit sandpaper to smooth out the rim and outside walls of the dish for a professional ceramic look. -
Paint the exterior:
Apply two coats of white acrylic paint to the outside and rim of the dish to keep it crisp and clean. -
Paint the water base:
Mix a watery light cyan blue. Paint the interior floor of the dish, allowing the paint to pool naturally in the dimples you created earlier. -
Highlight the ripples:
Dry brush a tiny amount of white paint across the raised ridges of the interior texture to enhance the water illusion. -
Paint the donut:
Paint the bottom half of the donut a golden tan color. Paint the top ‘icing’ layer a soft baby pink. -
Add sprinkles:
Using the very tip of a toothpick, add tiny dots of brown or gold paint to the pink icing to represent sprinkles. -
Seal with gloss:
I like to apply a thick layer of high-gloss varnish or UV resin specifically to the blue interior to create that wet, shimmering pool water finish. -
Secure the floatie:
While the varnish or resin is still wet, place the donut into the ‘pool’ so it adheres as it dries, or glue it in separately afterward.
Cracked Clay?
If small cracks appear in air-dry clay as it dries, mix a small amount of fresh clay with water to make a paste and fill the gaps before painting.
Now you have a refreshing spot to rest your jewels that looks ready for a summer swim