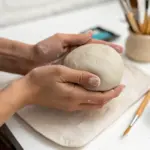
If you’ve ever looked at a plain mug and thought, “You could be way cuter,” you’re in the right headspace. These cute clay mug ideas are all about approachable shapes, sweet themes, and little 3D details that make your cup feel like a tiny art friend.
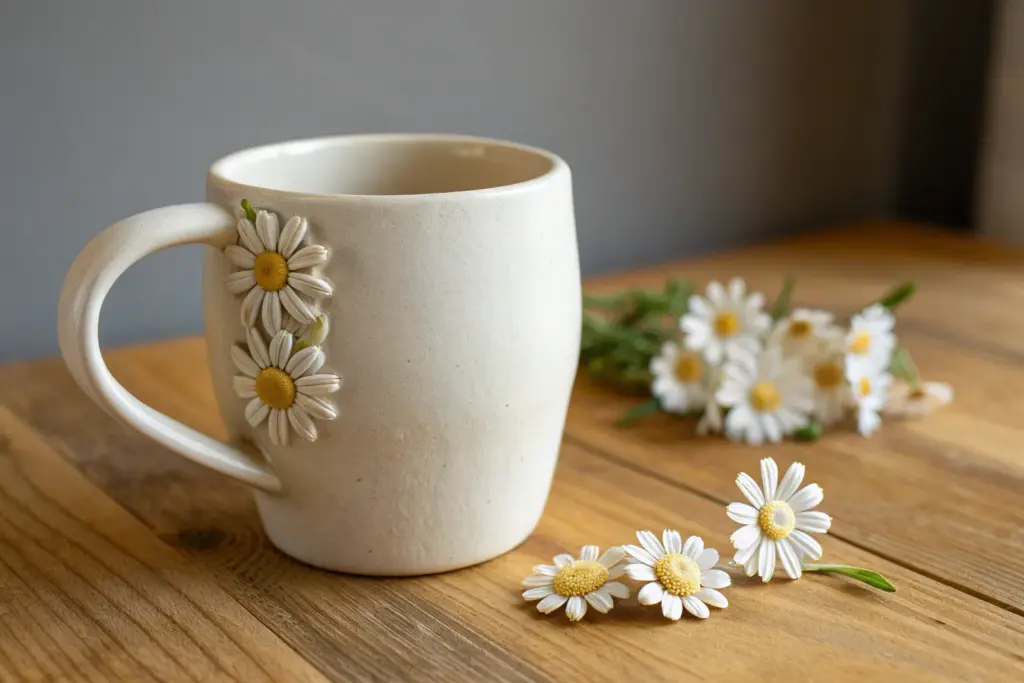
Dainty 3D Daisy Chain Wrap Mug
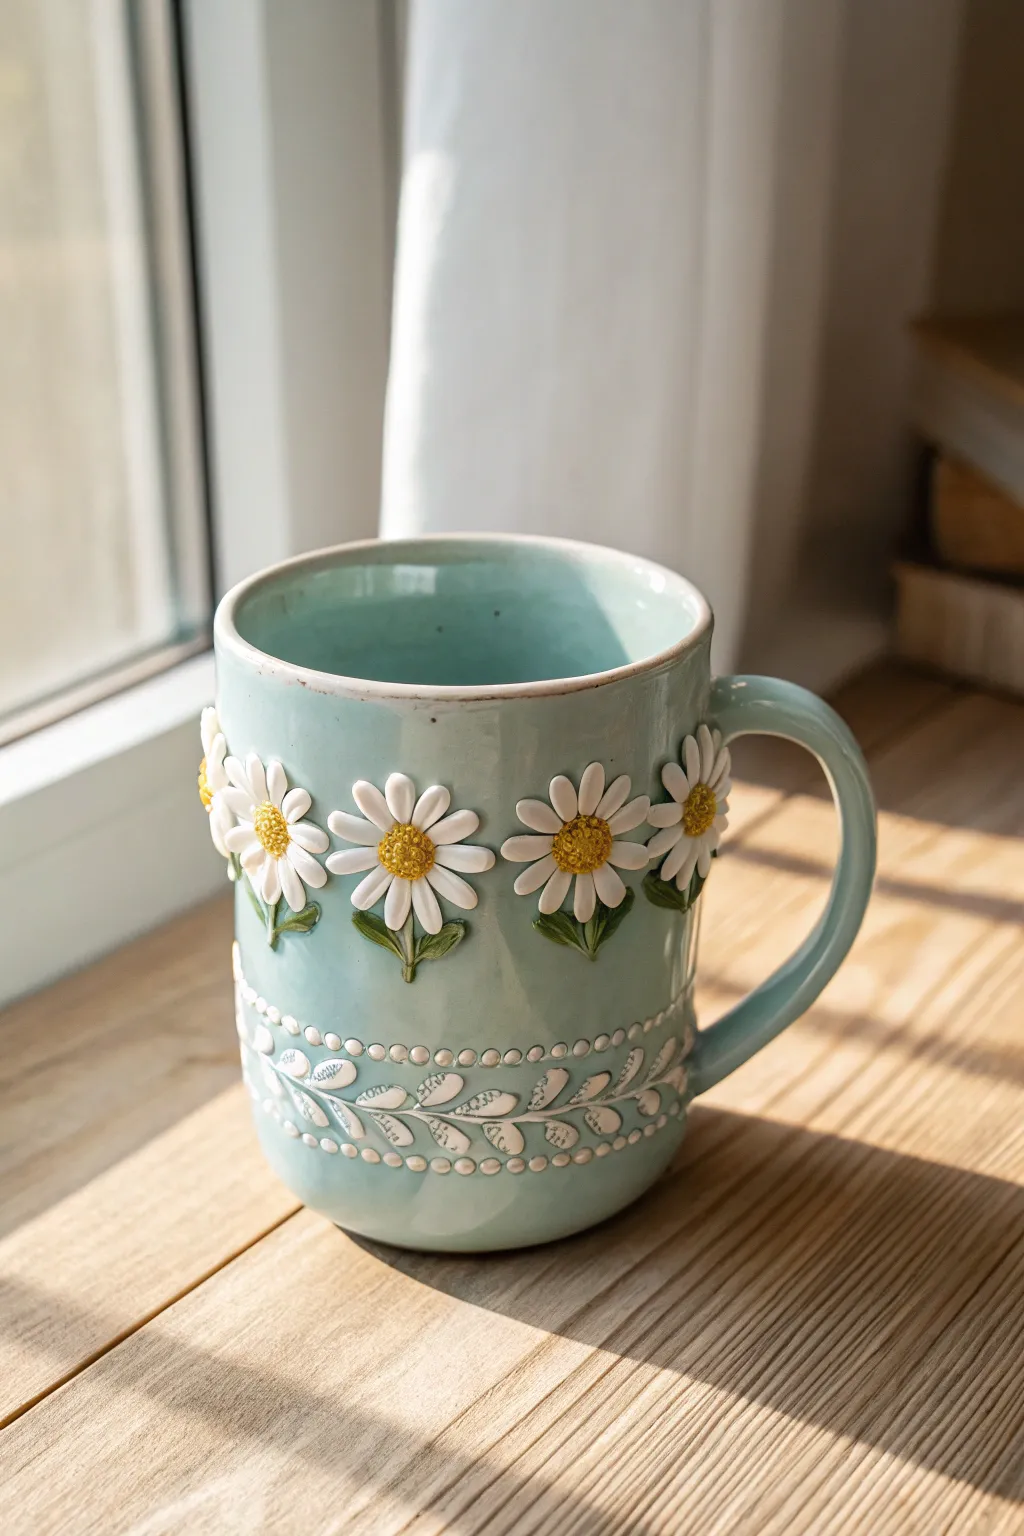
Transform a simple mug shape into a sunny garden masterpiece with this charming daisy chain design. The raised, tactile flowers and delicate leaf patterns create a delightful texture against the soft robin’s egg blue glaze.
Step-by-Step Guide
Materials
- Stoneware clay body
- Pottery wheel or rolling pin for hand-building
- Underglaze in white, yellow, and green
- Celadon glaze (Robin’s Egg Blue or similar)
- Small petal cutter or scalpel
- Needle tool
- Scoring tool or old toothbrush
- Slip
- Sponge
- Fine liner brush
Step 1: Creation & Preparation
-
Form the Base:
Begin by throwing a tall, cylindrical mug on the wheel or slab-building one with a rolling pin. Aim for walls that are about 1/4 inch thick to support the added weight of the decorations. -
Trim and Smooth:
Once leather hard, trim the foot and refine the walls. Use a damp sponge to smooth out any throwing lines if you want a sleek background, or leave them subtle for a handmade feel. -
Attach the Handle:
Pull or extrude a simple strap handle. Attach it securely using the score and slip method, ensuring the curve allows for a comfortable grip.
Step 2: Sculpting the Daisies
-
Prepare Clay Balls:
Roll out tiny balls of clay for the flower centers and small teardrop shapes for the petals. I find it helpful to make more than I need, as some might squish during assembly. -
Mark Placement:
Lightly sketch a horizontal line around the upper third of the mug with a needle tool to guide where your daisy chain will sit. -
Attach Centers:
Score and slip the small clay balls onto your marked line, spacing them evenly apart. Press gently to adhere. -
Create Texture:
Use the tip of a needle tool to stipple the centers, creating that classic fuzzy pollen look found on real daisies. -
Add Petals:
Flatten your teardrop shapes slightly and score them. Attach them radially around each center, slightly overlapping if necessary to create a full bloom. -
Refine Petals:
Use a modeling tool to press an indentation down the center of each petal, giving them dimension and firmly blending them onto the mug body. -
Leaves and Stems:
Roll tiny coils for short stems and attach them beneath each flower head. Add small leaf shapes near the base of the stems for greenery.
Petals Popping Off?
If your 3D additions fall off during drying, you likely didn’t score enough. Use vinegar in your slip for a super-strong bond.
Step 3: Carving the Lower Pattern
-
Plot the Band:
About an inch from the bottom, lightly trace a band where the leaf motif will go. -
Carve the Vine:
Using a small carving tool, gently incise a vining pattern with leaves or small sprigs encircling the mug base. -
Add Bead Detail:
To frame this lower section, roll tiny spheres of clay and attach them in a row above and below your carved vine, creating a beaded border effect.
Pro Tip: Clean Lines
Use a damp brush to clean up glaze around the flower petals before firing. It keeps the white petals bright and prevents blurry edges.
Step 4: Glazing & Firing
-
Bisque Fire:
Let the mug dry completely slowly to prevent cracking around the added sculptures. Fire to cone 04 (or your clay’s bisque temperature). -
Apply Underglaze:
Paint the daisy petals white, the centers yellow, and the stems/leaves green. For the lower carved vine, carefully fill the carved lines with white underglaze and wipe back the excess for an inlay effect. -
Wax Resist:
Apply wax resist carefully over the daisies and any other areas you want to remain matte or raw, primarily the flower heads. -
Dip Glaze:
Dip the entire mug into a translucent robin’s egg blue celadon glaze. The glaze should pool nicely around the raised flowers and carved grooves. -
Final Fire:
Clean the foot ring and fire to cone 5 or 6, depending on your clay and glaze specifications.
Now pour yourself a warm beverage and enjoy the garden vibes of your handmade creation


Strawberry Patch Mug With Tiny Berry Bumps
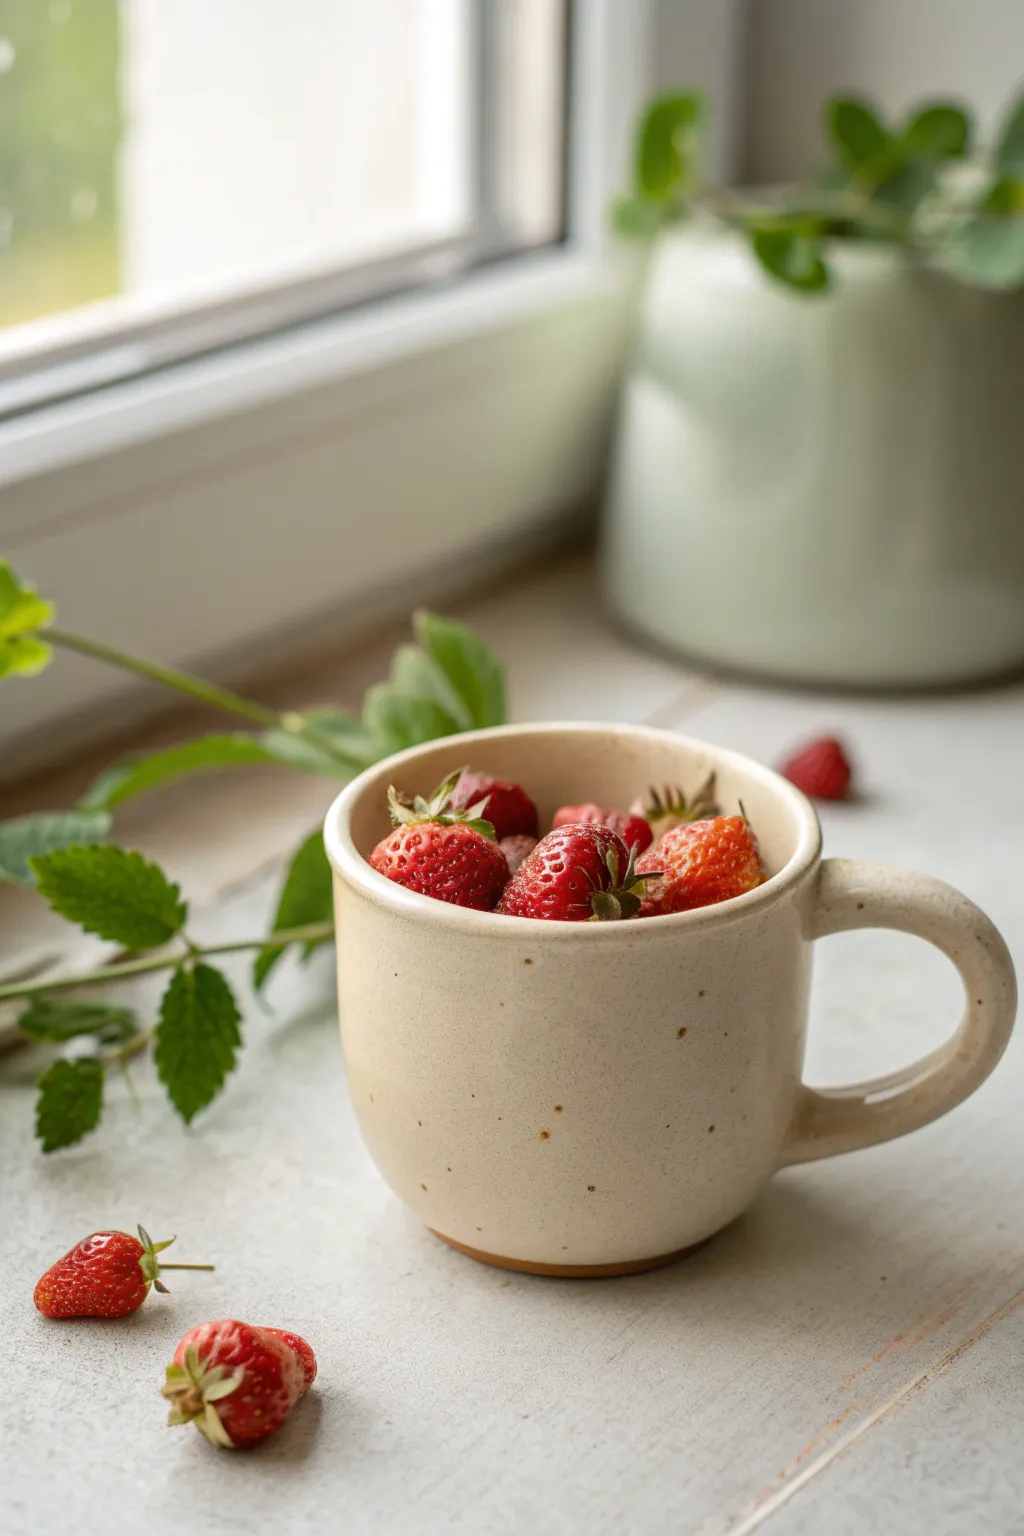
This charming, handmade mug features a warm, creamy glaze speckled with natural clay tones, perfect for holding a fresh harvest of summer berries. Its organic shape and comfortable handle make it a cozy addition to any kitchen cupboard, inviting you to slow down and savor the moment.
Step-by-Step
Materials
- Stoneware clay (buff or speckled)
- Pottery wheel (or rolling pin for hand-building)
- Rib tool
- Wire cutter
- Sponge
- Needle tool
- Scoring tool
- Cream matte glaze
- Iron oxide wash (optional for specks)
- Kiln
Step 1: Throwing the Body
-
wedge and Center:
Begin with about 1 pound of well-wedged stoneware clay. Slam it onto the center of your wheel head and use water and firm pressure to center the clay perfectly. -
Open the clay:
Press your thumbs into the center of the mound to open it up, leaving about a quarter-inch of thickness for the floor of the mug. -
Pull the walls:
Slowly pull the walls upward, aiming for a cylinder shape. I like to keep the walls slightly thicker at the bottom for stability and gently curve them inward just a tiny bit towards the top to keep that cozy, cupped shape. -
Refine the shape:
Use a rib tool on the outside while supporting the inside with your hand to smooth the surface and refine the gentle curve. This is where you can remove throwing rings if you want a cleaner look like the reference photo. -
Smooth the lip:
Use a chamois or a damp sponge to gently compress and round the rim. This ensures the mug is comfortable to drink from.
Glaze Crawling?
If your glaze pulls apart leaving bare spots, your bisqueware might have been dusty or oily. Always wipe bisque with a damp sponge before glazing to ensure adhesion.
Step 2: Trimming and Handle
-
Dry to leather hard:
Wire the mug off the wheel and let it dry until it reaches a leather-hard state—firm enough to handle but still cool to the touch. -
Trim the foot:
Center the mug upside down on the wheel. Trim away excess clay from the bottom to create a defined foot ring. Leave a small undecorated band of raw clay at the very base, just like in the image. -
Pull a handle:
Take a separate lump of clay and pull a handle using plenty of water. Aim for a simple, rounded C-shape that fits roughly two fingers comfortably. -
Attach the handle:
Score the attachment points on both the mug body and the handle endpoints. Apply slip and press the handle firmly onto the mug. -
Blend the seams:
Use your thumb or a small modeling tool to smooth the clay where the handle meets the body, ensuring a seamless connection. Wipe away any excess slip.
Add Texture
Before the clay dries, press real strawberry leaves into the soft clay near the handle or rim for a subtle fossil impression that matches the berry theme.
Step 3: Glazing and Firing
-
Bisque fire:
Once bone dry, fire the mug in the kiln to cone 04 (or your clay’s specific bisque temperature). -
Prepare the glaze:
Mix a cream-colored matte glaze. If your clay body doesn’t have natural specks, you can mix a tiny amount of granular ilmenite or iron into the glaze to achieve that speckled eggshell effect. -
Wax the foot:
Apply wax resist to the bottom foot ring and slightly up the side (about 1/4 inch) to create that raw clay reveal visible at the base. -
Dip the mug:
Using glazing tongs, dip the entire mug into the glaze bucket for about 3 seconds. Pull it out and shake off the last drips gently. -
Clean the bottom:
Even with wax resist, I always double-check the bottom with a sponge to ensure no glaze is touching the foot ring, which would stick to the kiln shelf. -
Glaze fire:
Load the mug into the kiln and fire to cone 6 (oxidation), or whatever temperature your specific clay and glaze recipe requires.
Now you have a beautiful, durable vessel ready for your morning coffee or a handful of sweet treats
Frog Face Mug With Little Cheek Spots
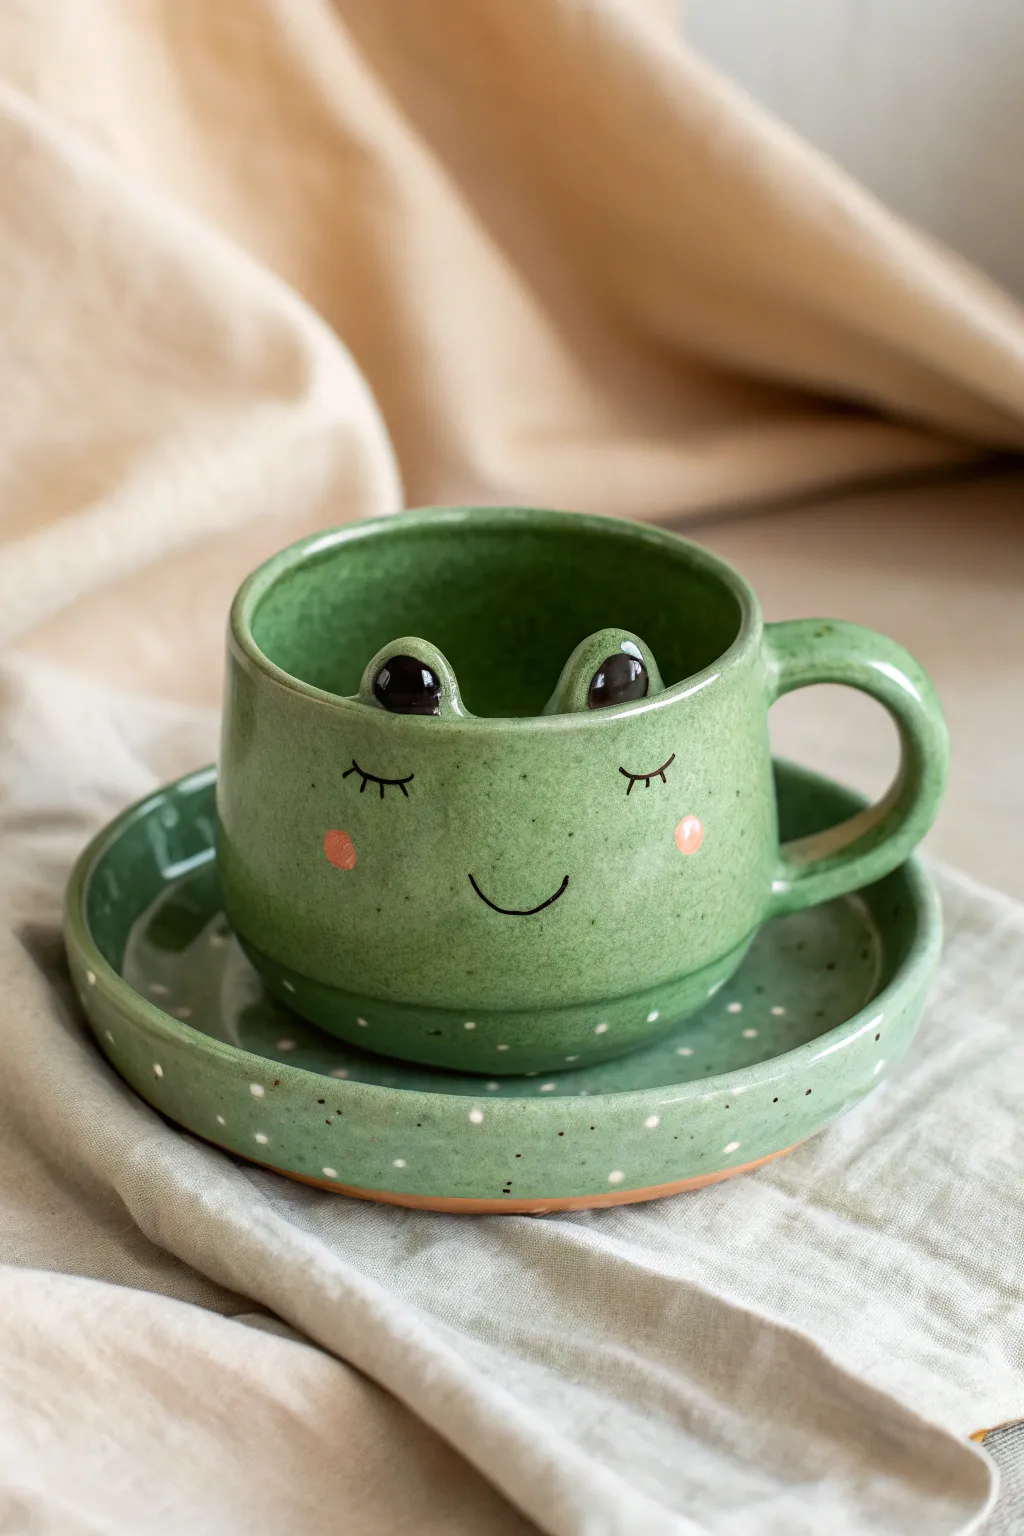
This adorable ceramic set features a wide-brimmed mug with a sleepy frog face and a matching speckled saucer. The charming design includes sculptural eye bumps peeking over the rim and delicate hand-painted facial details for a cozy, handmade feel.
Detailed Instructions
Materials
- Green stoneware or earthenware clay (approx. 1.5 – 2 lbs)
- Pottery wheel (or slab roller for hand-building)
- Cylinder trimming tool
- Needle tool
- Rib tool (kidney)
- Slip and scoring tool
- Underglazes: Black, pink, white
- Clear food-safe glaze
- Fine liner brush
- Sponge
- Wire cutter
Step 1: Forming the Mug Body
-
Throw the base cylinder:
Begin by centering about 1 pound of clay on the wheel. Open up the clay and pull the walls to create a short, stout cylinder shape. Aim for a slightly wider bottom that tapers just a bit towards the top before straightening out at the rim. -
Shape the belly:
Using a rib tool, gently push the clay outward from the inside to create a rounded, bell-shaped ‘belly’ for the mug. This gives the frog its chubby, cute appearance. -
Refine the rim:
Compress the rim with a chamois or sponge. The rim should be smooth and slightly rounded, not sharp. -
Create the saucer:
With the remaining clay, throw a flat, shallow plate. Leave a distinct raised edge or lip around the perimeter to catch spills. Ensure the base of your mug sits comfortably in the center. -
Let it firm up:
Allow both pieces to dry to a leather-hard state. This usually takes a few hours or overnight depending on humidity. They should be firm enough to handle without deforming.
Step 2: Sculpting and Handle Attachment
-
Trim the foot:
Place the mug upside down on the wheel (secured with clay lugs) and trim a clean foot ring. Do the same for the saucer. -
Pull a handle:
Pull a strap of clay for the handle. For this design, aim for a classic ‘C’ shape that is substantial but comfortable to hold. Let it stiffen slightly. -
Attach the handle:
Score the side of the mug and the contact points of the handle. Apply slip and press the handle firmly into place. Smooth the seams with a damp sponge or modeling tool until they are invisible. -
Form the eye bumps:
Roll two small balls of clay, roughly the size of large marbles. Flatten the bottoms slightly. -
Attach the eyes:
Score the interior rim of the mug where you want the frog’s eyes to peek out. Slip and attach the clay balls so they sit half-inside, protruding just above the rim line. Blend the clay downwards into the interior wall for a seamless join.
Droopy Eyes?
If the clay eye bumps slide down the wall, the clay is too wet. Let the eye balls and mug rim dry a bit longer before scoring and attaching heavily.
Step 3: Decoration and Glazing
-
Bisque fire:
Once bone dry, load the pieces into the kiln for the initial bisque firing (usually Cone 04). -
Apply base color:
This mug has a beautiful speckled green finish. If using a speckled clay body, simply apply a transparent green celadon glaze. If using white clay, apply a green underglaze or a specific green speckle glaze over the entire exterior and interior. -
Paint the eyes:
Wipe away any green glaze from the two eye bumps if you want them to be distinct, or layer over them. Using a fine brush and black underglaze, paint large, shiny pupils on the protruding bumps. -
Add facial features:
I prefer to use a very fine liner brush here. Carefully paint two curved lines for the sleeping eyelids below the eye bumps, complete with tiny eyelashes. Paint a simple ‘U’ shape for the smile. -
Adding cheeks:
Dip a small round sponge or brush into pink underglaze and gently dab two rosy spots on either side of the smile. -
Detailing the saucer:
For the saucer, apply the same green base glaze. Using white underglaze, flick speckles across the surface or paint small white dots around the rim for texture. -
Final clear coat:
Dip the pieces in a clear, food-safe glaze if you used underglazes for color. If you used a colored gloss glaze initially, you can skip this step, just ensure the painted details are fused. -
Glaze firing:
Load the kiln again for the final glaze firing (temperature depends on your specific clay and glaze, typically Cone 5 or 6). Ensure the foot rings are wiped clean of glaze so they don’t stick to the kiln shelf.
Clean Lines Pro Tip
Use a squeeze bottle with a fine metal tip for the black facial features instead of a brush. It offers steadier control for thin lines like eyelashes.
Now you have a charming frog companion to make your morning coffee ritual a little hoppier
Cozy Mushroom Mug With 3D Toadstools
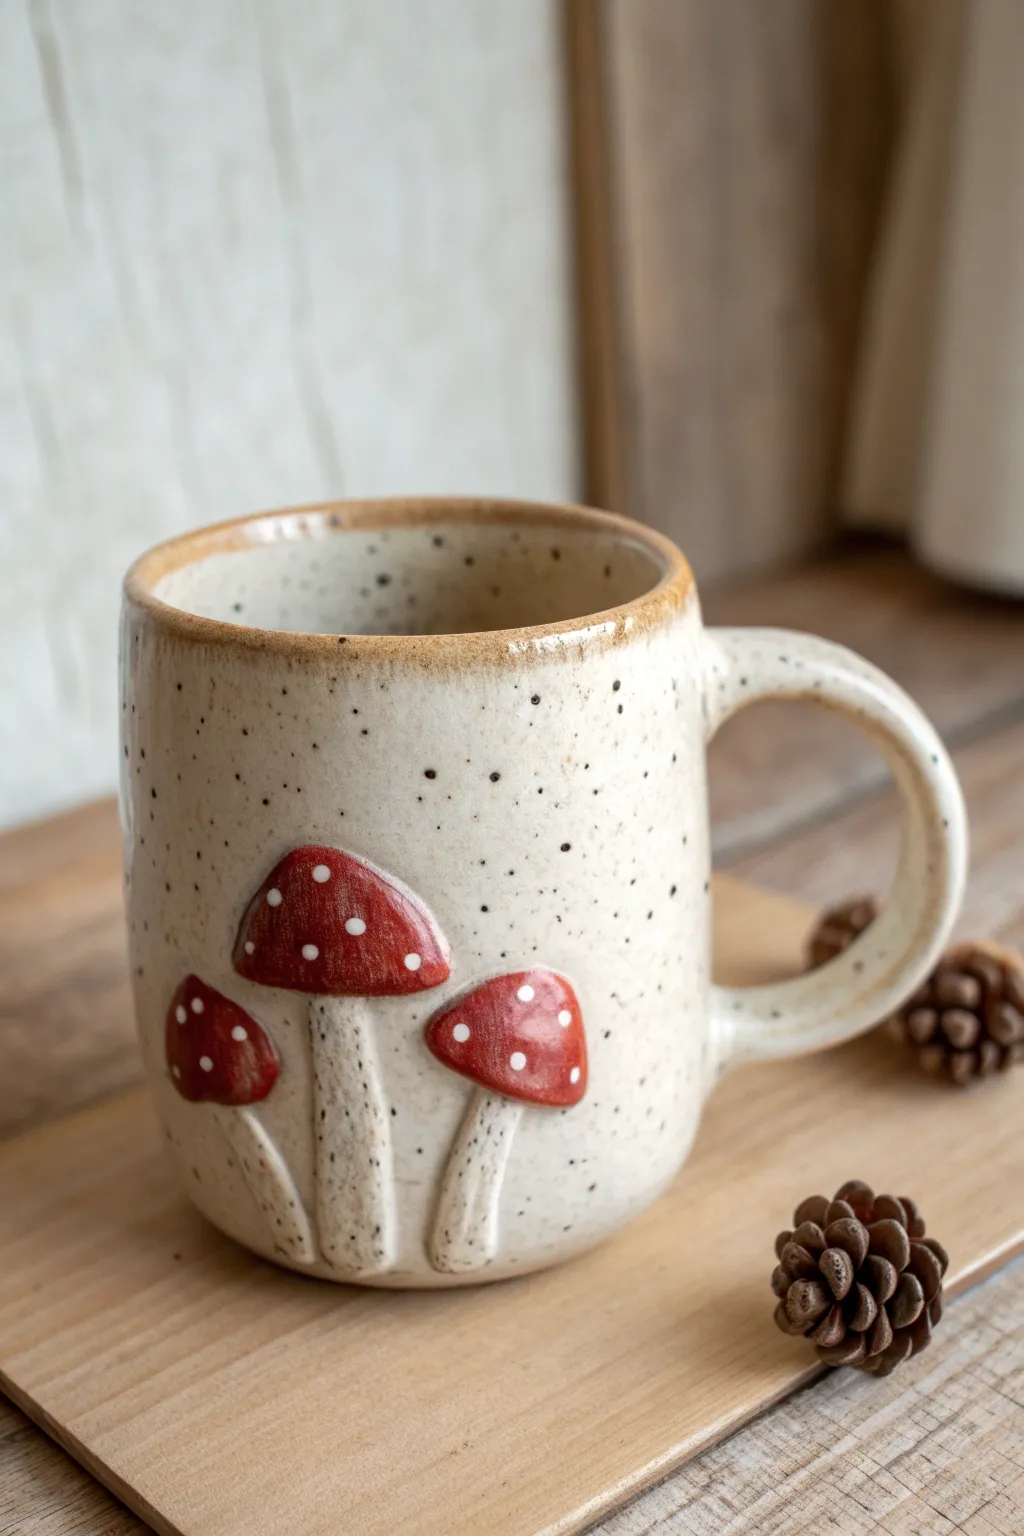
This charming handmade mug features a speckled clay body adorned with delightful, raised 3D toadstools. The earthy tones combined with the pop of red glaze make it the perfect vessel for sipping warm drinks on a chilly day.
How-To Guide
Materials
- Speckled clay body (stoneware recommended)
- Pottery wheel (or rolling pin for hand-building)
- Needle tool
- Scoring tool or serrated rib
- Slip (clay and water mixture)
- Small paintbrush
- Red underglaze or glaze
- White underglaze
- Clear transparent glaze
- Sponge
- Wire cutter
- Rib tool
- Small modeling tool
Step 1: Forming the Mug Body
-
Prepare the Clay:
Begin by wedging a ball of speckled clay thoroughly to remove any air bubbles. Center the clay on your pottery wheel bat. -
Throw the Cylinder:
Pull up a standard cylinder shape, aiming for straight or slightly rounded walls. Keep the rim slightly thicker to withstand use. -
Shape the Belly:
Use a rib or your fingers to gently belly out the bottom third of the mug, giving it a cozy, rounded feel. -
Refine the Rim:
Compress the rim with a sponge or chamois to ensure it’s smooth for drinking. Clean up the base using a wooden tool to create a slight undercut if desired. -
Pull a Handle:
While the mug stiffens slightly, pull a handle from a separate piece of clay. Aim for a comfortable C-shape that balances the mug’s weight. -
Attach the Handle:
When both pieces are leather-hard, score the attachment points on the mug and handle. Apply slip, press firmly to attach, and smooth the seams.
Attachment Issues?
If mushrooms pop off during drying, you didn’t score deep enough. Always score both surfaces aggressively and use plenty of slip to act as glue.
Step 2: Sculpting the Mushrooms
-
Roll the Stems:
Take small pinches of fresh clay and roll them into three tapered coils for the mushroom stems. Vary the lengths slightly for natural interest. -
Attach the Stems:
Score the mug wall where you want the mushrooms to sit. Apply slip and press the stems onto the surface. Gently flatten them against the mug so they are raised but integrated. -
Shape the Caps:
Form three small, rounded triangles or semi-circles of clay for the caps. Make them slightly thicker in the center and thinner at the edges. -
Connect Caps to Stems:
Score the top of the stems and the back of the caps. Slip and attach the caps so they slightly overlap the top of the stems. -
Refine the Edges:
Use a small modeling tool or paintbrush end to smooth the connection points. I usually run a damp brush around the perimeter of the mushrooms to seal them seamlessly to the mug wall. -
Add Texture (Optional):
If you want extra detail, lightly scratch vertical lines into the stems to mimic natural mushroom textures.
Step 3: Glazing and Firing
-
Bisque Fire:
Allow the mug to dry slowly and completely. Bisque fire according to your clay body’s specifications (usually Cone 04 or 06). -
Wax Resist:
Once cool, apply wax resist to the bottom of the mug and slightly up the foot ring to prevent sticking during the glaze firing. -
Glaze the Mushroom Caps:
Carefully paint 2-3 coats of deep red underglaze or glaze onto the mushroom caps. Stay neatly within the sculpted lines. -
Paint the Dots:
Using a fine-point brush or a dotting tool, apply small dots of white underglaze onto the dry red caps. Vary the spacing for an organic look. -
Apply Clear Glaze:
Dip the entire mug into a clear transparent glaze. This will seal the speckled clay and make the red mushrooms glossy and food-safe. -
Final Fire:
Fire the mug to maturity (Cone 5, 6, or 10 depending on your clay). Once cool, sand the bottom if necessary.
Forest Floor Vibe
Carve uneven grass blades at the base of the stems or press real fern leaves into the damp clay body before firing for extra botanical texture.
Enjoy your cozy mornings with this delightful woodland-inspired mug

The Complete Guide to Pottery Troubleshooting
Uncover the most common ceramic mistakes—from cracking clay to failed glazes—and learn how to fix them fast.
Heart Handle Mug That Looks Like A Hug
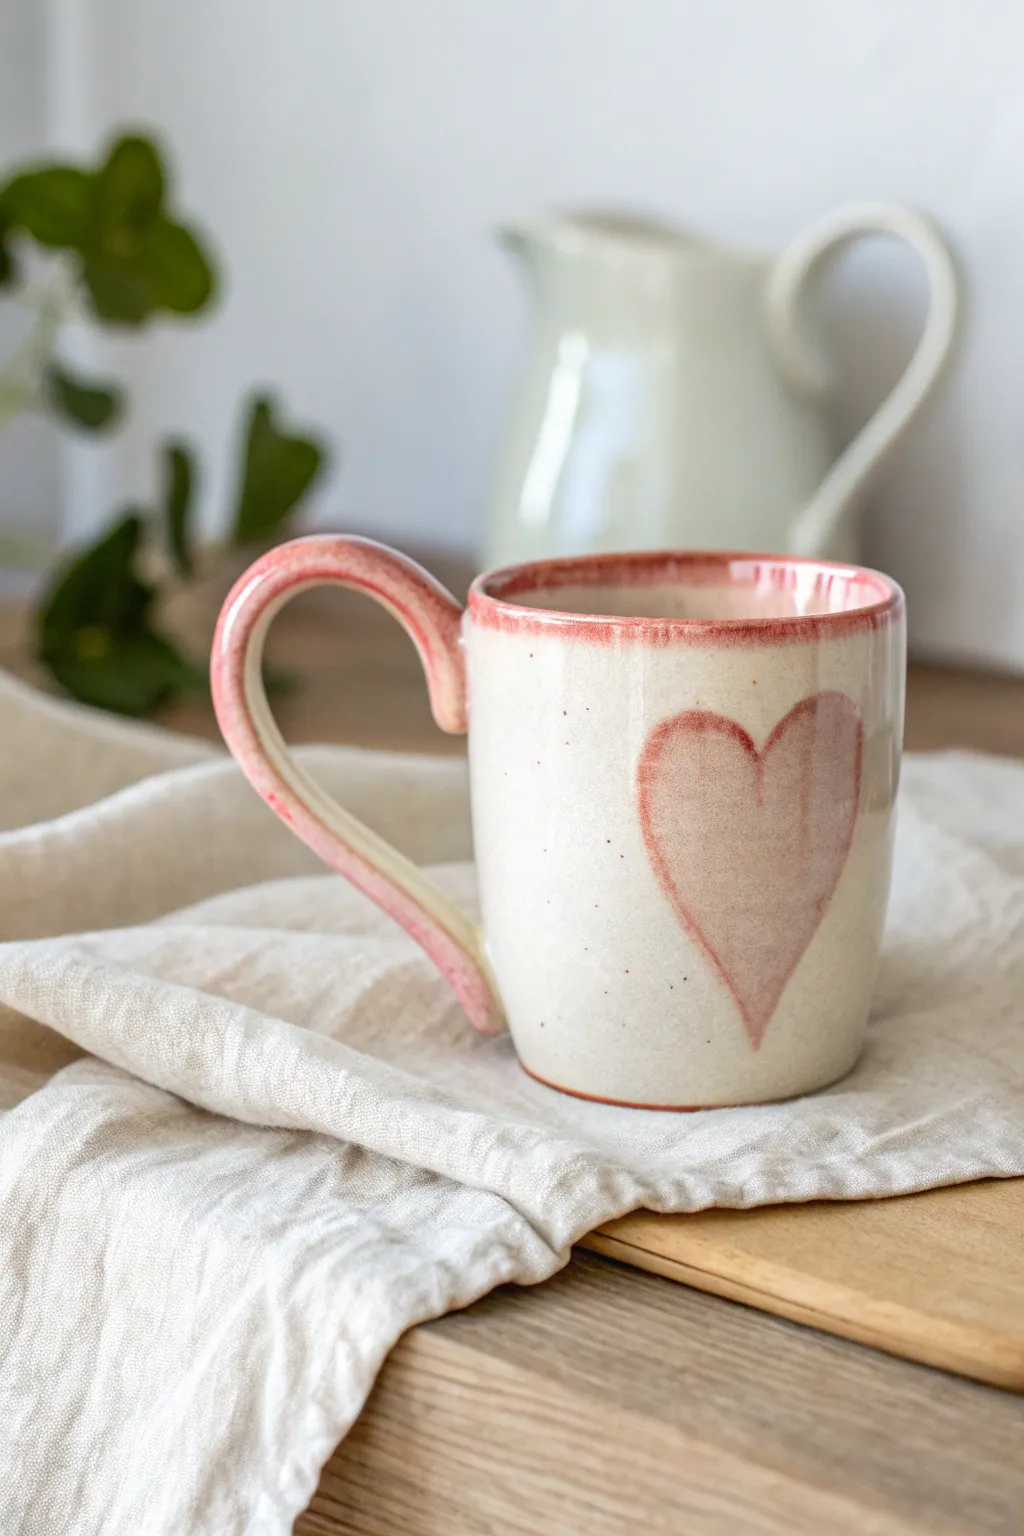
This charming ceramic piece features a soft, creamy base glaze accented by a hand-painted pink heart and matching rim. It evokes a cozy, farmhouse feel that turns every sip of coffee into a warm embrace.
Step-by-Step
Materials
- Stoneware clay (buff or white)
- Pottery wheel (or rolling pin/slab tools for handbuilding)
- Loop tool for trimming
- Needle tool
- Scoring tool or fork
- Slip (clay mixed with water)
- Sponge
- Cream/Opaque White dipping glaze
- Pink underglaze or glaze (watercolor consistency)
- Small tapered paintbrush
- Kiln
Step 1: Forming the Body
-
Throw or Build the Cylinder:
Begin by centering your clay on the wheel and opening it up. Pull the walls up to create a simple, straight-sided cylinder, slightly tapering it inward at the bottom for an elegant profile. Aim for a height of about 3.5 to 4 inches. -
Smooth the Surface:
While the wheel is spinning slowly, use a metal rib to smooth the exterior walls, removing any throwing lines. This smooth canvas is essential for the heart design later. -
Shape the Rim:
Use a chamois or a piece of plastic wrap over the rim to compress and round it off. A smooth, rounded rim is crucial for drinking comfort. -
Wire Off and Dry:
Wire the mug off the bat and set it aside to dry until it reaches a leather-hard state. This usually takes a few hours to a day, depending on humidity. -
Trim the Foot:
Once leather-hard, center the mug upside down on the wheel. Use a loop tool to trim away excess weight from the bottom and carve a neat foot ring.
Heart Shape Dripping?
If your painted heart runs during firing, your pink glaze might be too thick or fluid. Try thinning it slightly with water or using an underglaze for the design, topped with clear.
Step 2: Adding the Handle
-
Pull a Strap:
Pull a strap of clay using plenty of water, creating a handle that is slightly thicker at the attachment points. If you prefer, you can roll a coil and flatten it slightly. -
Shape the Curve:
Bend the pulled strap into a generous ‘ear’ shape. Hold it up to the leather-hard mug to gauge the proportion; it should feel roomy for your fingers. -
Score and Slip:
Mark the attachment points on the mug body and the handle ends. Vigorously score these areas and apply a generous dab of slip. -
Attach and Smooth:
Press the handle firmly onto the mug. Use your thumb to smooth the clay from the handle onto the body, blending the seams until they are invisible. Wipe away excess slip with a damp sponge. -
Bisque Fire:
Allow the mug to dry completely (bone dry). Load it into the kiln and bisque fire it to Cone 04 (or your clay’s specific bisque temperature).
Step 3: Glazing and Decoration
-
Dip the Base Coat:
Dip the entire bisque-fired mug into a bucket of Cream or Opaque White glaze. Hold it by the foot (or use dipping tongs) and count to three to ensure an even coat. -
Clean the Foot:
Immediately wipe the foot ring clean with a damp sponge to prevent the mug from sticking to the kiln shelf later. -
Allow Base to Dry:
Let the base glaze dry to the touch. It should feel powdery and not cool or damp before you add the decoration. -
Paint the Heart:
Using a tapered brush loaded with pink glaze (or underglaze depending on your preference), paint a freehand heart on the center of the mug. I like to use a slightly drier brush for the edges to give it that organic, watercolor texture. -
Highlight the Rim:
With the same pink glaze, carefully run the brush along the very edge of the rim. Allow the color to overlap slightly onto the interior and exterior for a rustic look. -
Paint the Handle:
Brush the pink glaze along the outer curve of the handle, letting it fade near the attachment points or covering the whole outer strip. -
Glaze Fire:
Once the decoration is dry, load the mug into the kiln for the final glaze firing (usually Cone 5 or 6 for stoneware). Ensure no glaze is touching the shelf.
Add a Hidden Message
Before the final glaze firing, paint a tiny heart or a short word like “Love” inside the bottom of the mug using the same pink glaze. It’s a sweet surprise for the drinker.
Now you have a handmade vessel ready to hold your favorite warm beverage
Polka Dot Mug With Raised Dot Texture

This charming ceramic mug features a soft blush body adorned with playful, palpable mint-green dots that add delightful texture to every sip. With its generous handle and tactile surface, this project is a perfect introduction to slip-trailing techniques and colored glazes.
Step-by-Step Guide
Materials
- Stoneware clay body (white)
- Circular cookie cutter or template (for the base)
- Rolling pin
- Fettling knife
- Serrated rib and scoring tool
- Wooden modeling tool
- Slip trailer bottle with a fine nozzle
- Blush pink underglaze or glaze
- Mint green underglaze or slip
- Clear transparent glaze (if using underglazes)
- Sponge
- Kiln access
Step 1: Forming the Mug Body
-
Roll the slab:
Begin by wedging your white stoneware clay to remove air bubbles. Roll it out into a smooth, even slab approximately 1/4 inch thick, ensuring consistency so your mug walls are uniform. -
Cut the components:
Using a template or ruler, cut a rectangular strip for the mug’s body. The length should match the circumference of your desired base plus a little overlap. Use your circular cutter to create the base disc. -
Texture the surface (optional):
Before assembling, you can gently smooth the surface with a damp sponge or a soft rib to ensure a flawless canvas for your dots later. -
Score and slip the base:
Score the outer edge of your circular base and the bottom long edge of your rectangular strip. Apply clay slip generously to these roughened areas. -
Assemble the cylinder:
Wrap the rectangular strip around the base, pressing the scored edges together firmly. Where the rectangle ends meet to form the cylinder’s seam, score and slip the vertical edges, then overlap or bevel cut them to join. -
Smooth the seams:
Use a wooden modeling tool or your fingers to blend the seams on both the inside and outside until they are invisible, reinforcing the structural integrity of the cylinder.
Step 2: Adding the Handle and Details
-
Pull or roll a handle:
Create a handle by either pulling a coil of clay or rolling a small strip. Curve it into a comfortable ‘C’ shape that fits roughly two or three fingers. -
Attach the handle:
Wait until the handle creates a slight ‘leather hard’ skin so it holds its shape. Score and slip the attachment points on the mug body and the handle ends, then press firmly to attach. Smooth the connection points for a seamless look. -
Refine the rim:
Gently compress the rim of the mug with a damp chamois or sponge to round it off, making it comfortable for drinking -
Bisque fire:
Allow the mug to dry slowly and completely. Once bone dry, fire the piece in the kiln to a bisque temperature (usually cone 04) to prepare it for glazing.
Slip Consistency Tip
If your dots are flattening out, your slip or glaze is too thin. Let the mixture sit open for an hour to evaporate some water and thicken up.
Step 3: Glazing and Dot Application
-
Apply the base color:
Dip the mug into a bucket of blush pink glaze, or brush on three even coats of pink underglaze. Ensure full coverage inside and out, then let it dry until it’s powdery to the touch. -
Prepare the slip trailer:
Fill your slip trailer bottle with mint green glaze (or a thick slip colored with mason stain). It should have the consistency of thick yogurt or icing. -
Test your flow:
Squeeze a few test dots onto a spare piece of paper or clay scrap. You want the dot to hold a peaked shape without running down vertical surfaces. -
Apply the first row:
Starting near the top rim, gently squeeze the bottle to deposit small, raised dots of mint glaze. Space them evenly around the circumference. -
Create the grid pattern:
Work your way down the mug in horizontal rows. I prefer to offset the dots in each subsequent row (like bricks) to create a pleasing geometric pattern. -
Clean the foot:
Wipe away any glaze from the very bottom of the mug (the foot ring) with a damp sponge to prevent it from sticking to the kiln shelf. -
Clear glaze (optional):
If you used underglazes for color instead of glaze, apply a layer of clear transparent glaze over the entire piece once the dots are dry. -
Final firing:
Fire the mug again to the maturity temperature of your clay and glaze (often cone 5 or 6 for stoneware). This will fuse the raised dots permanently to the surface.
Clogged Nozzle?
If the slip trailer stops flowing, use a thin needle tool or unbent paperclip to clear the tip immediately. Don’t squeeze harder, or the top might pop off!
Enjoy your morning coffee with the delightful tactile experience of your handmade mug

What Really Happens Inside the Kiln
Learn how time and temperature work together inside the kiln to transform clay into durable ceramic.
Wavy Checkerboard Mug In Sweet Pastels
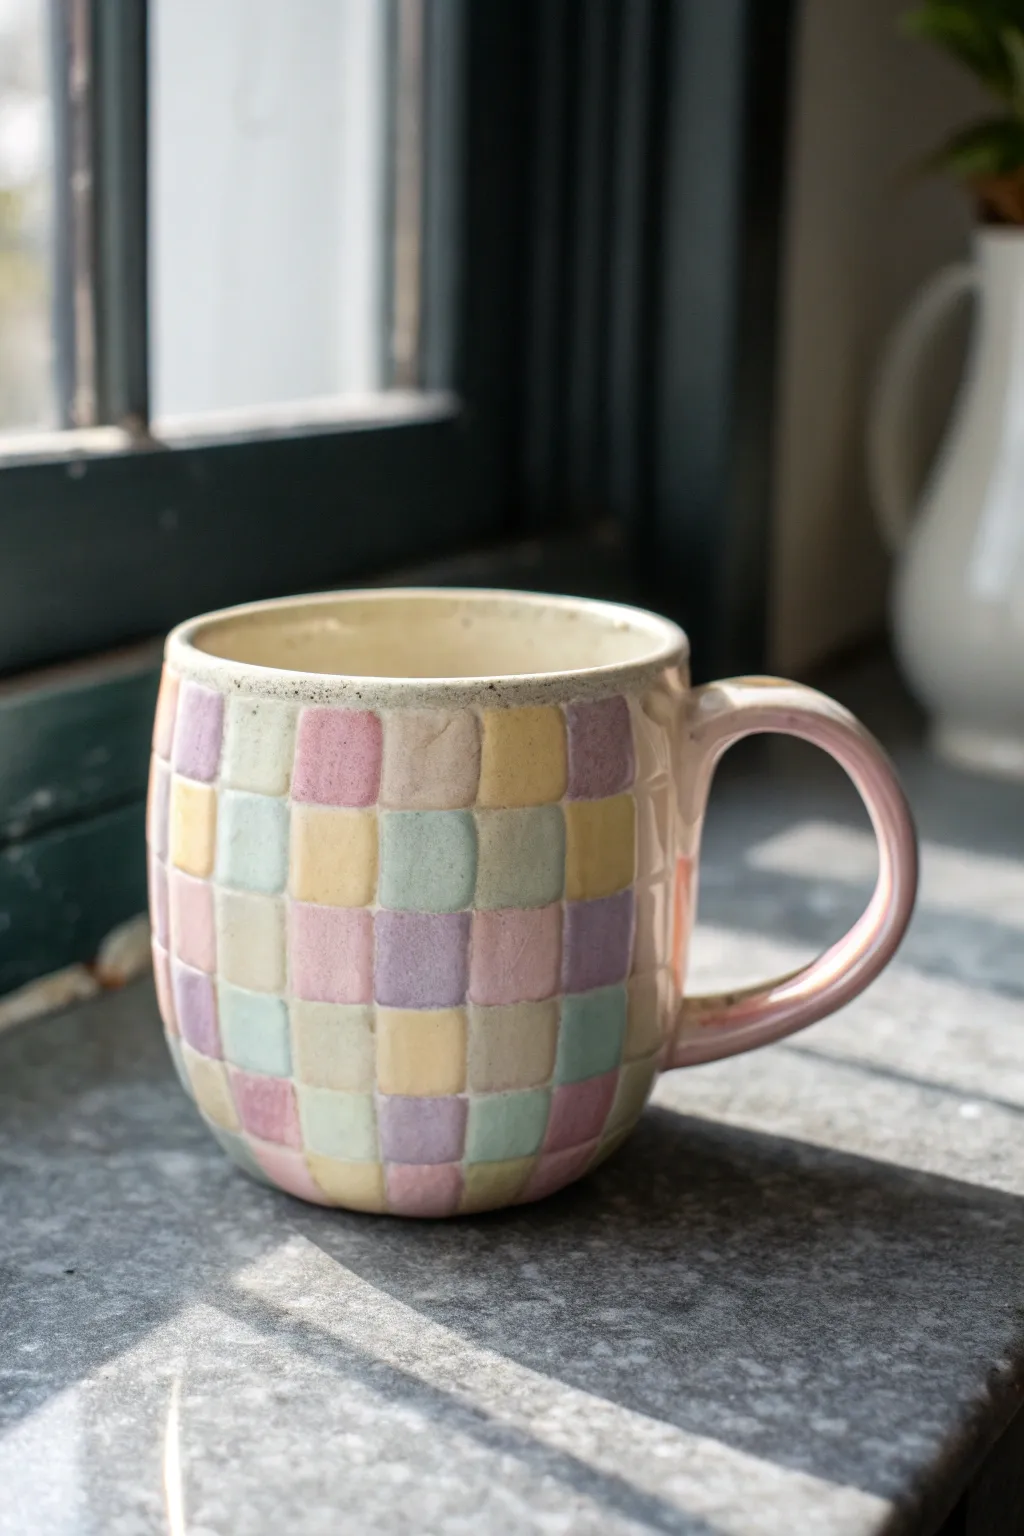
Bring a touch of whimsical charm to your morning coffee with this hand-built ceramic mug featuring a wavy checkerboard pattern. The soft pastel glazes and uneven, organic grid create a cozy, perfectly imperfect aesthetic that feels wonderful to hold.
Step-by-Step
Materials
- Stoneware clay suitable for wheel or hand-building
- Pottery wheel (or slab roller for hand-building)
- Fettling knife
- Needle tool
- Rib tool (kidney)
- Small carving loop tool (square or round profile)
- Sponge
- Rolling pin (if hand-building handle)
- Score and slip tool (or serrated rib)
- Underglazes in pastel pink, yellow, mint green, and lavender
- Clear transparent glaze
- Kiln
Step 1: Forming the Mug Body
-
Center and throw:
Start with a ball of wedged stoneware clay on your pottery wheel. Center it firmly and open the form to create a wide, flat bottom for stability. -
Pull the walls:
Pull the walls up into a gentle curve. Aim for a slightly rounded, barrel-like shape that tapers just slightly inward at the rim. Keep the walls thick enough (about 1/4 inch) to allow for carving later without piercing through. -
Refine the rim:
Use a chamois or a damp sponge to smooth the rim, making it comfortable for drinking. It should be slightly thicker than the walls for a nice lip feel. -
Trim the foot:
Once the piece is leather-hard, trim the bottom to create a clean foot ring. This lifts the mug visually and gives it a professional finish.
Step 2: Carving the Texture
-
Map out the grid:
Lightly sketch a grid pattern onto the leather-hard clay using a needle tool. Don’t use a ruler; the charm of this piece comes from the freehand, wavy lines that wobble slightly. -
Carve vertical channels:
Using a small loop tool, carefully carve shallow channels along your vertical grid lines. Keep the depth consistent, removing just the surface layer. -
Carve horizontal channels:
Repeat the process for the horizontal lines. Where the lines intersect, soften the corners slightly so the squares look pillowy rather than sharp. -
Smooth the edges:
Dip a sponge in water and wring it out almost completely. Gently wipe the carved surface to soften any sharp burrs of clay left by the carving tool, rounding over the individual ’tiles’ of the checkerboard.
Clean Lines Pro-Tip
Use wax resist in the carved channels before painting the squares. This prevents the pastel glazes from running into the grooves, keeping your grid lines crisp and distinct.
Step 3: Adding the Handle
-
Pull a handle:
Pull a strap of clay for the handle. For this style, a simple C-shape that mimics the curve of the mug works best. -
Attach firmly:
Score the attachment points on both the mug and the handle aggressively. Apply slip and press the handle firmly into place. I always check that the loop is large enough for two or three fingers. -
Secure the join:
Smooth the clay where the handle meets the body using a small wooden tool or your finger, ensuring there are no cracks. Let the mug dry slowly under plastic to reach the bone-dry stage.
Level Up: Texture Play
Instead of leaving the squares smooth, gently press a textured fabric or stamp into specific color blocks (like the yellow ones) while the clay is wet for added tactile variety.
Step 4: Glazing and Firing
-
Bisque fire:
Load the bone-dry mug into the kiln for a bisque firing (usually Cone 04). This hardens the clay and prepares it for glazing. -
Wipe down:
Once cool, wipe the bisque-ware with a damp sponge to remove any dust that might resist the glaze. -
Paint the squares:
Select your pastel underglazes. Paint each raised square in the checkerboard grid a different color, alternating between pink, yellow, mint, and lavender. Leave the carved channels unpainted to show the raw clay or base color. -
Coat the interior:
I usually pour a glossy white or clear glaze inside the mug and pour it out quickly for an even, food-safe coating. -
Handle detail:
Paint the handle in a solid pastel color, like the soft pink shown here, to complement the busiest part of the pattern. -
Clear glaze dip:
Once the underglaze is dry, dip the entire exterior into a clear transparent glaze to seal the colors and make the surface shiny and food-safe. -
Final fire:
Fire the mug again to the maturation temperature of your specific clay and glaze (typically Cone 5 or 6 for stoneware).
Enjoy the warmth of your handmade creation every morning with your favorite brew
Mini Rosebuds Mug With 3D Floral Sprigs
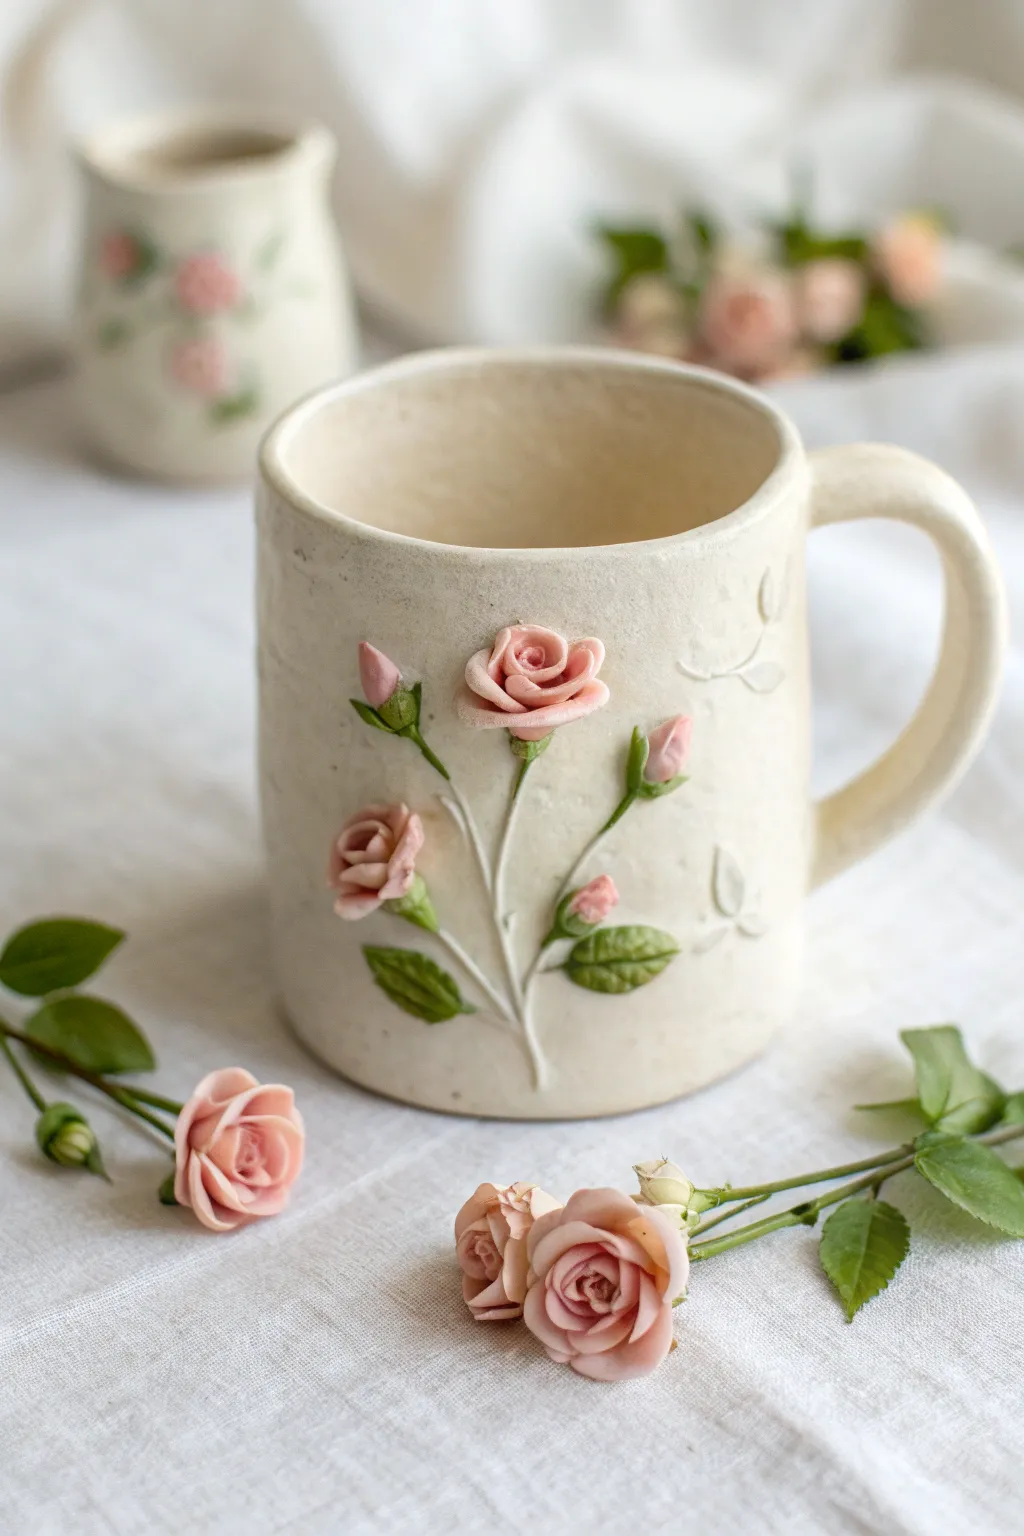
For this project, we are creating an elegant, cream-colored mug adorned with delicate, three-dimensional rose sprigs. The result is a charming piece of pottery where the raised floral elements offer a tactile experience every time you take a sip.
How-To Guide
Materials
- Light stoneware or porcelain clay body
- Rolling pin
- Mug template or ruler
- Fettling knife
- Scoring tool or serrated kidney
- Slip (clay slurry)
- Small needle tool
- Pink underglaze or mason stain
- Dark green underglaze
- Fine detail brushes
- Small blending sponge
- Clear glaze (food safe)
Step 1: Forming the Mug Body
-
Roll your slab:
Start by rolling out a consistent slab of your light clay to about 1/4 inch thickness. Compress the clay on both sides with a rib to prevent warping later. -
Cut the rectangle:
Using your template or ruler, cut a rectangular strip that will form the cylinder of the mug. Standard dimensions are roughly 10-12 inches long by 4-5 inches high. -
Create the cylinder:
Score and slip the short ends of your rectangle. Bring them together to form a cylinder, pressing the seam firmly. Smooth the seam inside and out until it’s invisible. -
Add the base:
Roll a small piece of clay for the base. Place your cylinder on top, trace around it, and cut out the circle. Score and slip the bottom edge of the cylinder and the edge of the base, then attach them securely. -
Pull and attach the handle:
Pull a simple, comfortable strap handle. Attach it to the side of the mug opposite where you plan to put the flowers, scoring and slipping the attachment points well.
Smoothing Secret
Use a small, slightly damp paintbrush to smooth your tiny sculpted petals and leaves after attaching them. This removes fingerprints without flattening the delicate shapes.
Step 2: Sculpting the Floral Sprigs
-
Roll tiny coils:
For the stems, roll extremely thin filaments of clay. Lay them gently onto the mug surface in a curved, organic branching pattern. Use a tiny bit of slip to adhere them, blending the edges into the mug body gently so they look embossed. -
Create rose petals:
Take tiny pinched balls of clay and flatten them into paper-thin ovals. I find it easiest to work on a separate surface for this step before transferring to the mug. -
Assemble the center:
Roll one tiny petal tightly into a spiral to create the bud’s center. -
Build the bloom:
Wrap 3-4 slightly larger flattened petals around the center spiral, flaring the edges outward slightly to mimic an opening rose. Make a few fully open flowers and several tight, conical buds. -
Attach the flowers:
Score the spots on the stems where the blooms will sit. Apply a dot of slip and press the base of your roses onto the mug. Use a modeling tool to smooth the attachment point underneath the petals so they don’t fall off. -
Form the leaves:
Shape tiny teardrops of clay and flatten them. Use a needle tool to impress delicate vein lines into each leaf. -
Attach greenery:
Add the leaves near the base of the stems and under the rosebuds. Give them a slight curve or twist for a natural, 3D look before securing them with slip. -
Add sepals:
For the tight buds, add tiny triangles of clay at the base to represent the green sepals hugging the pink petals. -
Ghost impressions:
Using a carving tool, lightly scratch or impress a few leaf shapes directly into the mug surface in the background. This creates depth behind your 3D sculpted elements.
Step 3: Finishing and Glazing
-
Initial bisque fire:
Allow the mug to dry very slowly to prevent cracking at the attachments. Once bone dry, bisque fire the piece to the appropriate cone for your clay. -
Paint the roses:
Mix a soft pink underglaze. carefully paint only the rose petals. You can use a slightly darker pink in the center spiral and lighter pink on the outer edges for realism. -
Paint the leaves:
Use a mossy green underglaze for the stems and leaves. A very fine liner brush is essential here to keep the green off the cream background. -
Apply clear glaze:
Dip or brush a clear, food-safe glaze over the entire flower design and the interior of the mug. Wipe the foot clean. -
Final firing:
Glaze fire the mug to seal the clay and make the colors pop.
Level Up: Texture
Before attaching the flowers, gently dab the main mug body with a coarse sponge. This creates a subtle sandstone-like texture that contrasts beautifully with the smooth flowers.
Enjoy using your new floral mug for a cozy afternoon tea time

TRACK YOUR CERAMIC JOURNEY
Capture glaze tests, firing details, and creative progress—all in one simple printable. Make your projects easier to repeat and improve.
Cloud Mug With Puffy 3D Edges
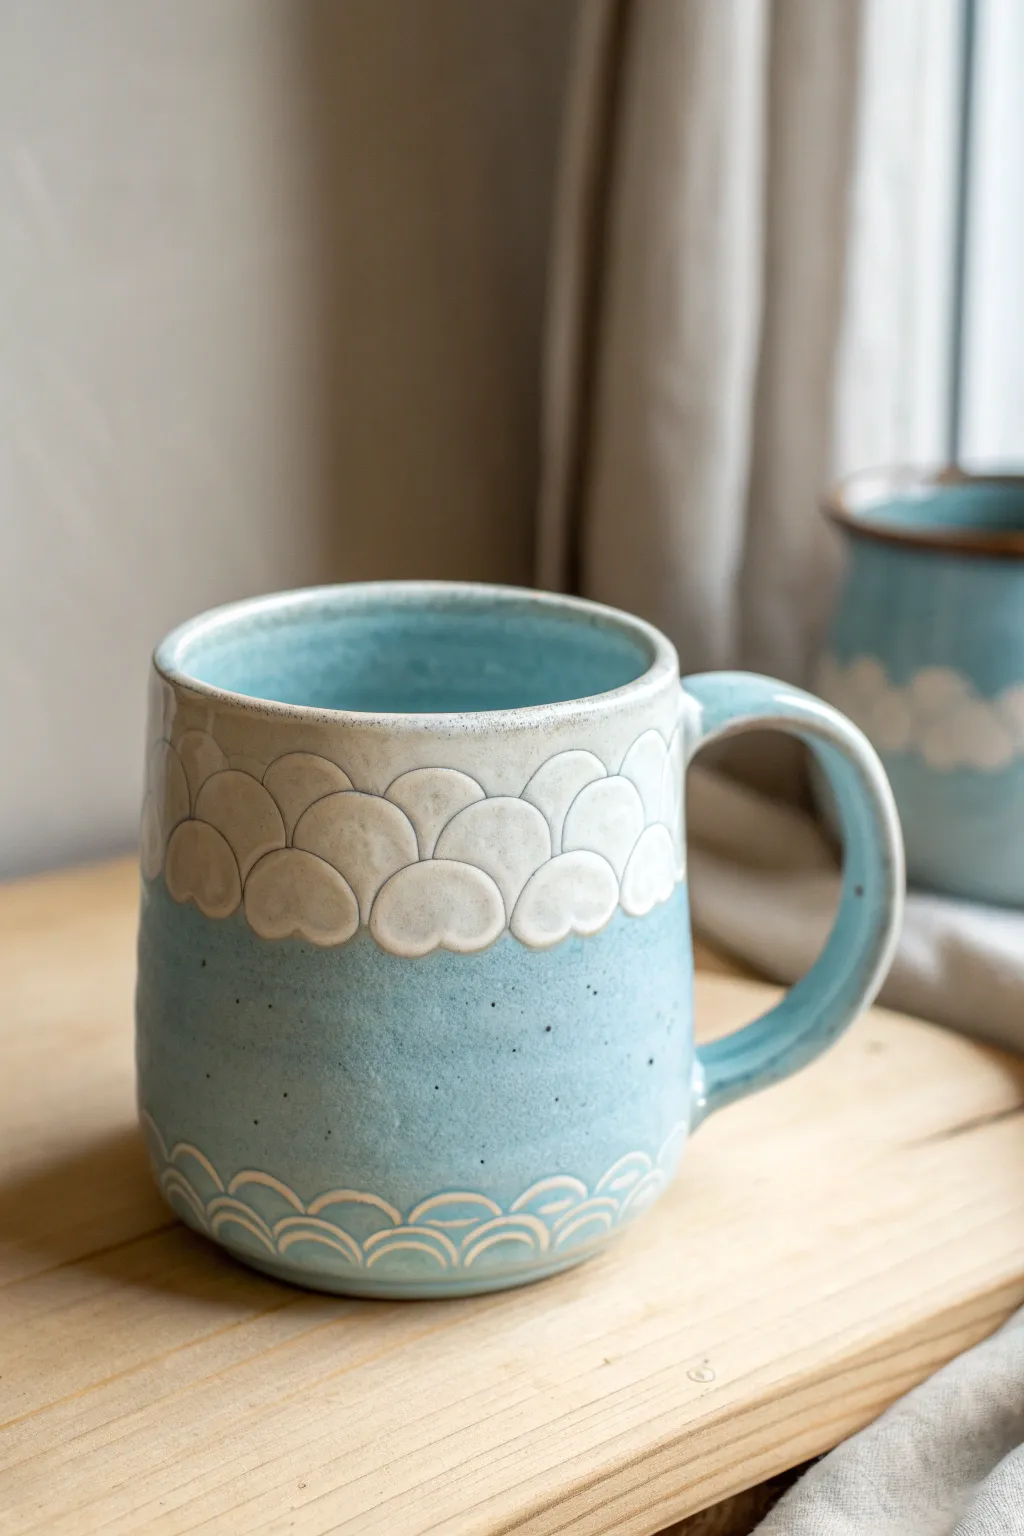
Bring a piece of the sky to your morning coffee with this tactile, dreamy ceramic project. The combination of puffy, relief-carved clouds and a calm speckled blue glaze creates a mug that is as delightful to hold as it is to look at.
Step-by-Step
Materials
- White stoneware clay
- Pottery wheel (or rolling pin for slab building)
- Small interaction/loop tool
- Needle tool
- Soft rib tool (silicone or rubber)
- Small sponges
- Speckled Robin’s Egg Blue glaze
- Glossy White glaze
- Wax resist
- Soft glazing brushes
Step 1: Shaping the Vessel
-
Throw the cylinder:
Center your white stoneware clay on the wheel and open it up. Pull the walls to create a cylinder that is approximately 4.5 inches tall. -
Create the belly:
Using a rib tool inside the pot, gently push the walls outward to create a slight, rounded curve in the bottom half of the mug, tapering slightly back in at the rim. -
Refine the rim:
Use a chamois or a small strip of plastic to compress the rim, ensuring it is rounded and comfortable for drinking. Cut the pot from the wheel. -
Trim and handle:
Once the clay is leather-hard, trim a clean foot ring on the bottom. Pull a handle from a separate lug of clay and attach it firmly to the side, blending the seams for a smooth transition.
Step 2: Carving the Clouds
-
Map the pattern:
Lightly trace horizontal guidelines around the top third of the mug using a needle tool. I find sketching the mesmerizing ‘U’ shapes of the clouds lightly on the surface first helps keep the pattern symmetrical. -
Relief carving:
Using a small wire loop tool, carefully carve away the ‘negative space’ between the cloud scallops. You want to remove the clay *between* the U-shapes so the clouds themselves remain raised and puffy. -
Rounding the edges:
After carving the background down, the cloud edges will be sharp. Use a damp sponge or your finger to gently round over every edge of the raised clouds to enhance that soft, pillowy look. -
Detailing the base:
At the very bottom of the mug, use your small loop tool to carve a single row of continuous wave patterns. These lines don’t need to be deep, just enough to catch the glaze later. -
Slow drying:
Cover the mug loosely with plastic to let it dry slowly. This prevents the handle from pulling away as the clay shrinks. Once bone dry, bisque fire the mug.
Troubleshooting: Sharp Edges
If your carved clouds feel rough after the bisque firing, use 400-grit sandpaper (wet-sanding is best to avoid dust) to gently smooth the ceramic burrs before you start glazing.
Step 3: Glazing Technique
-
Painting the clouds:
Wipe the bisque-fired mug with a damp sponge. Using a small brush, carefully paint two layers of glossy white glaze *only* onto the raised puffy cloud shapes. -
Resisting the white:
Allow the white glaze to dry completely. Then, carefully paint liquid wax resist exactly over the white glazed clouds. This will protect them from the next glaze layer. -
Dipping the blue:
Hold the mug by the foot (or use glazing tongs) and dip the entire piece into the speckled blue glaze. Lift it out and shake gently to remove drips. -
Cleanup:
Using a sponge, wipe away any blue glaze beads that sitting on top of the waxed clouds. The wax should repel the blue, revealing the white glaze underneath. -
Final wipe:
Ensure the foot ring is completely clean of glaze before loading it into the kiln for the final glaze firing.
Pro Tip: Breaking Glazes
Choose a blue glaze labeled as ‘breaking’ or ‘translucent’. These glazes thin out on sharp edges, which will naturally highlight the wave texture at the bottom without extra painting.
Once fired, you’ll have a stunning piece of functional art that makes every tea time feel like a break in the clouds.
Rainbow Arch Handle Mug
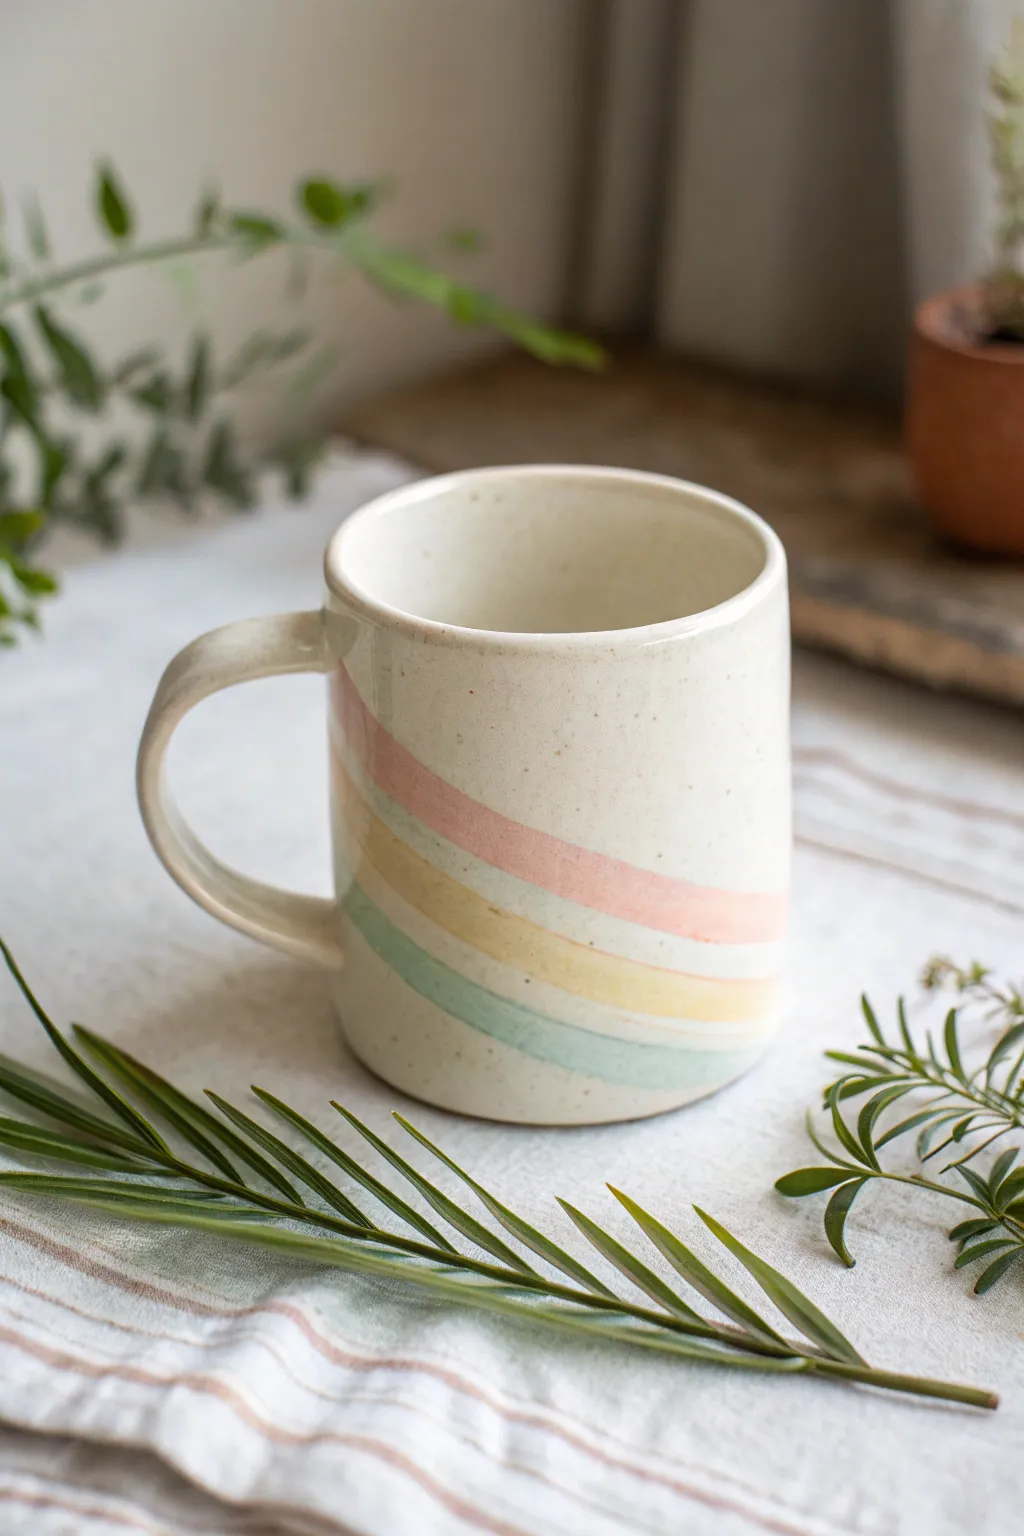
Bring a little sunshine to your morning coffee with this charming hand-painted clay mug. Featuring a subtle speckled finish and a soft, pastel rainbow arch wrapping around the base, this simple yet effective design adds instant warmth to your kitchen cabinet.
Step-by-Step Tutorial
Materials
- Stoneware clay body
- Pottery wheel (or rolling pin/slab tools for handbuilding)
- Needle tool
- Rib tool (kidney)
- Sponge
- Wire cutter
- Underglazes: Muted pink, mustard yellow, and sage green
- Small flat synthetic brush
- Speckled cream glaze (translucent or with suspended specks)
- Clear glaze (optional, if using a non-glossy speckled base)
- Kiln
Step 1: Forming the Mug Body
-
Prepare the clay:
Begin by wedging your stoneware clay thoroughly to remove any air bubbles. You want a ball roughly the size of a large orange. -
Center on the wheel:
Throw the ball onto your wheel bat and center it. This foundation is crucial for an even wall thickness later. -
Open and pull:
Open the clay and gently pull up the walls to form a cylinder. Aim for a slightly wider base that tapers very gently toward the rim, creating a cozy shape. -
Smooth the surface:
Use a rib tool to compress the outside walls and remove throwing lines. A smooth canvas is best for the rainbow graphic. -
Form the handle:
Pull a strap of clay for the handle. Allow it to sit until it reaches a soft leather-hard state so it can hold its arch shape without sagging. -
Attach the handle:
Score and slip both the contact points on the handle and the mug body. Press the handle firmly onto the mug, blending the seams with your thumb or a modeling tool for a seamless connection. -
Dry to leather hard:
Cover the mug loosely with plastic and let it dry slowly until the entire piece is leather hard. The surface should be firm but cool to the touch.
Brush Technique
For the smoothest arches, support your painting hand’s pinky finger against the mug for stability. Rotate the mug on a banding wheel while holding your brush steady for clean lines.
Step 2: Painting the Design
-
Sketch the arch guidelines:
Lightly trace the curve of your rainbow using a needle tool or a dull pencil. Start low on one side, arch up across the face of the mug, and dip back down. Keep the pressure very light to avoid carving into the clay. -
Mix your palette:
Pour out small amounts of your muted pink, mustard yellow, and sage green underglazes. If they feel too thick, add a tiny drop of water to improve flow. -
Paint the top band:
Using a flat synthetic brush, paint the top stripe in muted pink. Try to do this in one confident, sweeping motion to keep the line fluid rather than shaky. -
Add the middle stripe:
Clean your brush thoroughly, then paint the mustard yellow stripe directly below the pink one. Leave the tiniest gap of raw clay between them if you want distinct separation, or let them touch for a cohesive look. -
Finish the bottom stripe:
Paint the final sage green stripe at the bottom. Taper the ends of all three stripes so they fade naturally into the side or back of the mug. -
Apply second coats:
Once the first layer is dry to the touch, apply a second coat to each color band to ensure opacity and vibrancy after firing. -
Bisque fire:
Load the thoroughly dried greenware mug into the kiln and bisque fire it to Cone 04 (or your clay body’s specific recommendation).
Step 3: Glazing and Finishing
-
Clean the bisque:
Wipe the bisque-fired mug with a damp sponge to remove any kiln dust or oils from handling. -
Apply speckled glaze:
Dip the entire mug into a speckled cream glaze. This glaze should be translucent enough that the underglaze styling shows through, while adding those lovely brown flecks over the top. -
Clean the foot:
Use a wet sponge to wipe all glaze off the bottom foot of the mug so it doesn’t fuse to the kiln shelf. -
Final firing:
Place the mug in the kiln for the final glaze firing, typically to Cone 6 for stoneware. Allow the kiln to cool completely before opening.
Streaky Underglaze?
If your painted stripes look streaky after the first coat dries, brush the second coat in the opposite direction (horizontally vs vertically) to create a solid, woven finish.
Enjoy your morning brew in a piece of art that feels as good to hold as it looks on the shelf
Little Cat Face Mug With Pointy Ear Rim

Bring a little whiskered charm to your morning routine with this speckled stoneware mug featuring a minimalist cat face. The design combines the rustic warmth of unglazed clay with pops of deep indigo blue for a modern, cozy aesthetic.
Detailed Instructions
Materials
- Speckled stoneware clay
- Pottery wheel (or slab roller/rolling pin for hand-building)
- Throwing tools (sponge, wire cutter, ribs)
- Needle tool
- Trimming tools
- Scoring tool or serrated rib
- Slip
- Deep blue underglaze
- Clear matte glaze (optional for exterior)
- Clear glossy glaze (for interior)
- Small liner brush
- Detail brush
Step 1: Forming the Body
-
Prepare the Clay:
Begin by wedging about 1 to 1.5 pounds of speckled stoneware clay to remove any air bubbles and ensure consistency. -
Throw the Cylinder:
Center your clay on the wheel and open it up. Pull the walls to create a cylinder, aiming for a height of about 4-5 inches. -
Bell the Shape:
Using a rib on the inside, gently push the belly of the mug outward while collaring the rim slightly inward. This creates that lovely, huggable, rounded bottom shape seen in the photo. -
Refine the Rim:
Compress the rim with a chamois or your sponge to ensure it is smooth for drinking. Leave the rim flat and even. -
Dry to Leather Hard:
Cut the mug from the bat and let it dry slowly until it reaches a leather-hard state. It should be firm enough to handle without deforming.
Bleeding Blue?
If your blue underglaze smears during glazing, ensure it’s completely dry before applying wax. Dab the clear glaze over the design rather than brushing it.
Step 2: Trimming and Handle
-
Trim the Foot:
Place the mug upside down on the wheel and trim away excess clay from the bottom to define a clean foot ring. I like to smooth the trimmed area with a damp sponge afterwards to integrate the texture. -
Pull a Handle:
Pull a classic strap handle from a separate piece of clay. Let it curve naturally into a ‘question mark’ shape and allow it to stiffen slightly. -
Attach the Handle:
Score the attachment points on both the mug and the handle. Apply slip generously and press the handle firmly into place. Smooth the seams with a modeling tool or your finger for a seamless connection.
Smooth Sipping
Burnish the outer rim with a smooth stone or back of a spoon at the leather-hard stage. This makes the unglazed clay feel satiny smooth against the lips.
Step 3: Decoration and Glazing
-
Sketch the Face:
Lightly sketch the cat face design onto the leather-hard clay using a pencil. The pencil marks will burn off in the kiln. -
Carve the Lines:
Use a needle tool or a very fine sgraffito tool to gently incise the outlines of the ears, whiskers, eyes, and nose. Keep the lines thin and delicate. -
Apply Underglaze Details:
Using a small liner brush and deep blue underglaze, carefully paint inside the incised lines. Fill in the triangular tips of the ears and the heart-shaped nose. -
Bisque Fire:
Load the thoroughly dried mug into the kiln and bisque fire it to Cone 04 (or your clay’s specific bisque temperature). -
Wax Resist:
Apply wax resist to the foot ring and over the painted cat face details on the exterior to protect them from the exterior glaze. -
Glaze the Interior:
Pour a glossy clear glaze or a deep blue glaze (if you want the inside to match the details) into the interior. Swirl it around to coat completely and pour out the excess. -
Glaze the Exterior:
Dip the exterior quickly into a clear matte glaze to seal the clay but keep the natural texture visible. Alternatively, leave the exterior unglazed for a truly raw finish, rubbing a clear glaze just over the painted details. -
Final Fire:
Fire the mug to maturity (likely Cone 5 or 6 depending on your stoneware). Ensure the kiln is well-ventilated for the glazes to develop fully.
Now you have a charming handmade companion perfect for your favorite hot beverage
Cottage Basket Mug With Raised Woven Texture

This rustic yet elegant mug combines the tactile charm of woven basketry with the delicate beauty of painted wildflowers. By sculpting a faux-weave texture directly onto the clay, you get that cozy cottagecore aesthetic without sacrificing durability.
Step-by-Step Tutorial
Materials
- Stoneware clay body (speckled cream or white)
- Pottery wheel or slab roller
- Rolling pin
- Needle tool
- Rib tool
- Underglazes (Soft Pink, Sage Green, Dark Brown)
- Clear or speckled semi-transparent glaze
- Small extruder (optional but helpful)
- Scoring tool and slip
- Fine detail paintbrush
Step 1: Forming the Base
-
Throw or build the cylinder:
Begin by creating a basic cylinder shape on the pottery wheel or using a slab-building technique. Aim for a height of about 4-5 inches and consistent wall thickness. -
Smooth the surface:
Use a rib tool to compress the clay walls and ensure a smooth, even canvas for your textures. Let the mug dry to a firm leather-hard stage before proceeding. -
Attach the handle:
Pull or roll a handle and attach it securely. The handle in the reference is a classic C-shape, positioned to leave plenty of room for the basket texture at the bottom.
Cracking Weave?
If the thin basket coils crack while attaching, your main mug body is likely too dry. Spray the mug with water and wrap it in plastic overnight to rehydrate before adding more texture.
Step 2: Creating the Basket Texture
-
Extrude or roll coils:
Create long, thin strands of clay. Using a small hand extruder with a flat-ish rectangle die works best for the ‘weavers’, while thin round coils work for the vertical stakes. -
Place vertical stakes:
Score and slip the bottom half of the mug. Apply vertical clay strips spaced evenly apart, extending from the base up to where you want the basket section to end. -
Weave the horizontal bands:
Apply horizontal strips over the vertical ones. Instead of actually weaving, simply press the horizontal strip down between the stakes to create the illusion of an ‘under’ weave. I find using a modeling tool to press indentations makes this look convincing. -
Create the braided rim:
Roll two small coils of clay and twist them together to form a braid. Score the top edge of your basket section and attach this braid as a decorative border between the basket texture and the smooth clay.
Stained Glass Effect
Use a translucent celadon glaze solely on the basket weave section instead of underglaze. It will pool darkly in the crevices while breaking clear over the high points.
Step 3: Sculpting the Florals
-
Shape flower petals:
Roll tiny balls of clay and flatten them into petal shapes. Arrange five petals in a circle on the upper, smooth portion of the mug to form a flower. -
Add leaf details:
Shape small teardrop pieces of clay for leaves. Attach them near the flowers, pressing a needle tool into the center of each leaf to create a central vein. -
Connect stems:
Roll extremely thin coils for stems and attach them to connect your leaves and flowers. Or, simply paint the stems later if you prefer a flatter look, though relief stems add nice dimension. -
Refine the centers:
Press a small textured tool or the back of a needle tool into the center of each flower to mimic pollen stamens.
Step 4: Glazing and Finishing
-
Bisque fire:
Once the mug is bone dry, fire it to cone 04 (or your clay’s bisque temperature). -
Apply underglaze washes:
Dilute a honey-brown underglaze and wash it over the basket texture. Wipe it back with a damp sponge so the color stays in the crevices, highlighting the weave. -
Paint the flowers:
Carefully paint the raised petals with soft pink underglaze and the leaves with sage green. Add a dot of gold or yellow underglaze to the flower centers. -
Clear glaze application:
Dip or brush the entire mug with a clear glaze. If you used white clay but want the speckled look from the photo, use a ‘speckled clear’ glaze. -
Final firing:
Glaze fire the piece to the temperature required by your clay and glaze combination (usually cone 5 or 6).
Enjoy your morning coffee in a mug that feels as cozy as a picnic in the garden
Lemon Slice Mug With Zesty 3D Citrus Wheels
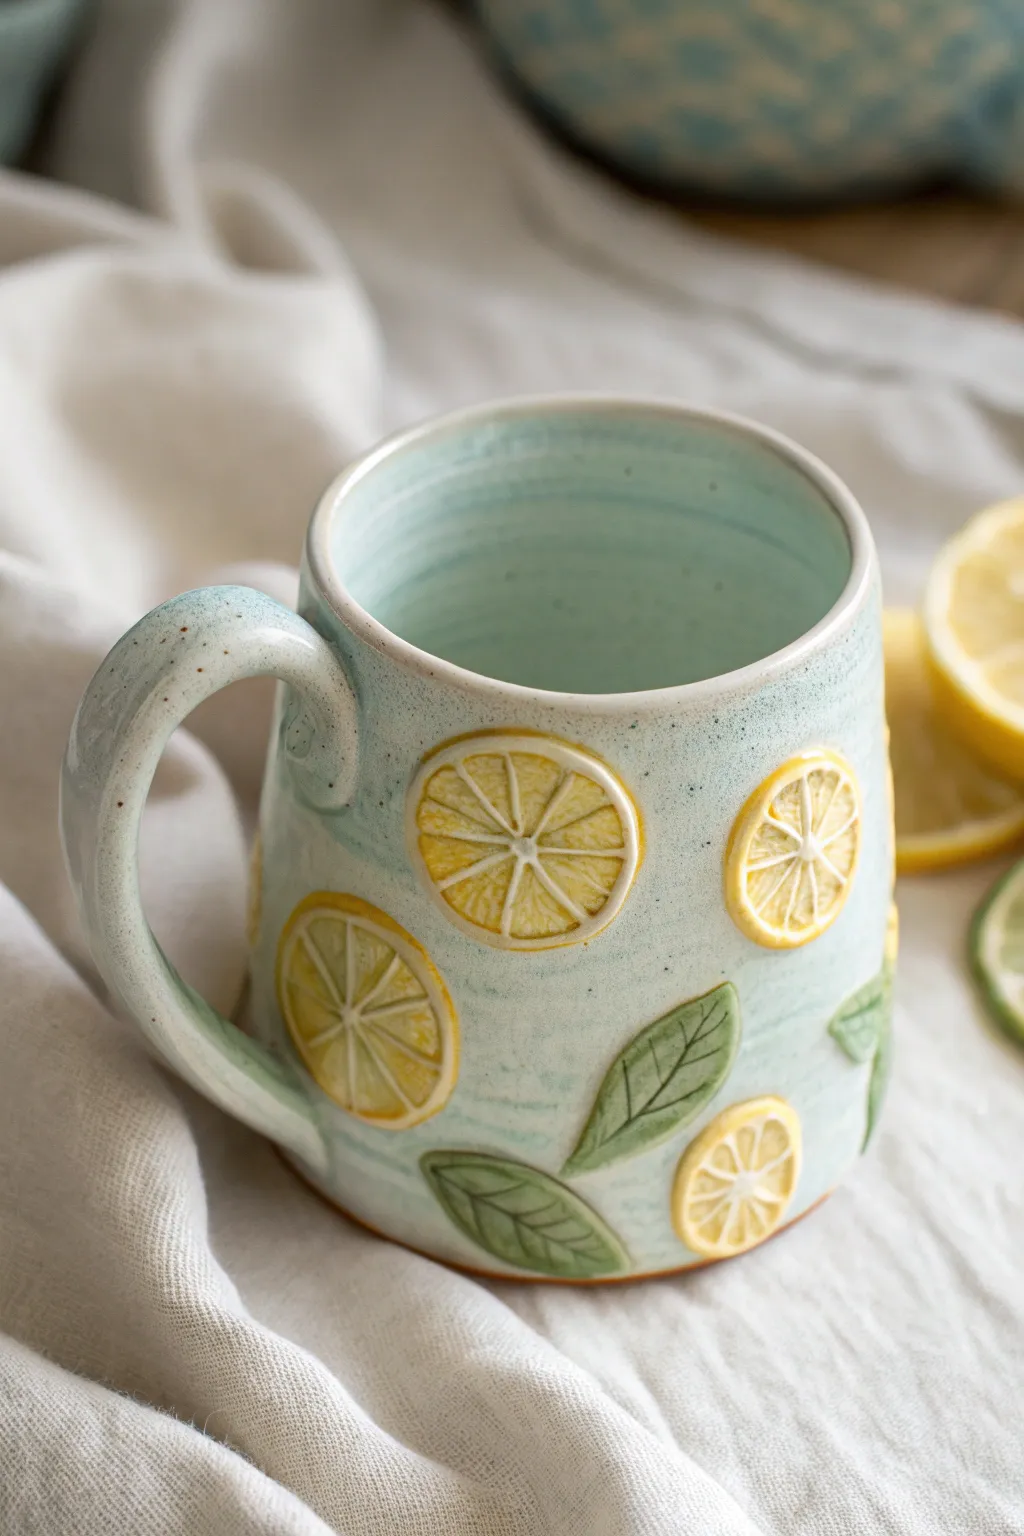
Bring a burst of summer to your morning coffee with this delightful ceramic mug featuring raised lemon slices and leaves. The specked turquoise glaze provides a cool background for the cheerful yellow citrus wheels, creating a tactile and vibrant 3D effect.
Step-by-Step
Materials
- Speckled stoneware clay (light or buff)
- Pottery wheel (or slab roller for hand-building)
- Needle tool
- Small rolling pin
- Scoring tool (or serrated kidney)
- Slip (liquid clay)
- Underglazes (lemon yellow, leaf green, white)
- Clear or light turquoise Celadon glaze
- Small paintbrushes
- Carving tool
- Sponge
Step 1: Forming the Mug Body
-
Throw the cylinder:
Begin by centering about 1-1.5 lbs of speckled clay on your wheel. Open the clay and pull up the walls to form a straight-sided cylinder, aiming for a consistent thickness of about 1/4 inch. -
Shape the vessel:
Once you have height, gently collar in the rim slightly to create a pleasant drinking edge. Use a rib tool to smooth the outside walls and remove throwing lines, creating a clean canvas for your lemons. -
Trim and dry:
Wire cut the mug from the bat and let it dry to a leather-hard state. Once firm enough to handle without deforming, trim the foot ring on the wheel to give the mug a finished look. -
Create the handle:
Pull a strap handle from a fresh lug of clay. I prefer to let this stiffen slightly into an arch shape on a board before attaching it. -
Attach the handle:
Score and slip the attachment points on both the mug and the handle. Press the handle firmly onto the mug, smoothing the seams with your thumb or a modeling tool to ensure a strong bond.
Clean Rims
When painting underglaze on the lemon slices, leave the very outer raised edge unpainted or lightly wiped back. The main glaze will break over this edge, creating a natural highlight for the rind.
Step 2: Sculpting the Citrus Sprigs
-
Roll small slabs:
Roll out a small amount of clay into a thin slab, approximately 1/8 inch thick. This will be used for your lemon slices and leaves. -
Cut the circles:
Using a small round cutter or a needle tool, cut several circles out of the slab. Vary the sizes slightly if you want a more organic look, but keep them roughly 1-1.5 inches in diameter. -
Detail the lemons:
On each clay circle, use a needle tool to gently impress a smaller inner circle, leaving a rim for the rind. Then, press lines radiating from the center to create the lemon segments. Don’t cut all the way through; just create indentations. -
Cut leaf shapes:
Freehand cut simple almond shapes from your slab to make the leaves. Use your needle tool to gently draw a central vein and small diagonal veins on each leaf. -
Plan your layout:
Before attaching, hold the pieces up against the mug to plan their placement. A random scattering creates a playful pattern.
Step 3: Assembly and Decoration
-
Score the surface:
Wherever you plan to place a lemon or leaf, vigorously score the surface of the mug and the back of your appliqué piece. -
Attach the sprigs:
Apply a dab of slip to the scored areas and press the clay shapes firmly onto the mug. Use a damp sponge to clean up any slip that oozes out from the edges. -
Bisque fire:
Allow the mug to dry completely—slowly is better to prevent handle cracks. Fire the piece in a bisque kiln to cone 04 (or your clay’s specific bisque temperature). -
Apply underglaze:
Once bisqued, paint the raised lemon segments with bright yellow underglaze and the leaves with green. You might want to carefully paint the rim of the lemon circles white or pale yellow to define the pith. -
Wipe back:
If you inadvertently get underglaze on the main mug body, wipe it away with a clean, damp sponge so the background remains bare clay for the main glaze. -
Glaze the mug:
Dip the entire mug into a translucent, light turquoise or celadon glaze. This type of glaze will break beautifully over the textures, showing the clay speckles and underglaze colors through it. -
Final smooth:
Check the rim and handle for any drips or rough spots, rubbing them down with your finger. Wipe the foot ring clean of any glaze. -
Glaze fire:
Fire the mug to your clay body’s maturity temperature (likely cone 5 or 6). Once cooled, sand the bottom if necessary.
Slipping Issues
If your lemon slices are sliding off while attaching, your slip might be too runny. Let the slip thicken slightly or hold the piece in place for 10-15 seconds until the clay grabs.
Now you have a refreshing, handmade mug perfect for sipping tea on a sunny afternoon
Tiny Tea Bag Pocket Mug With A Cute Tag Detail
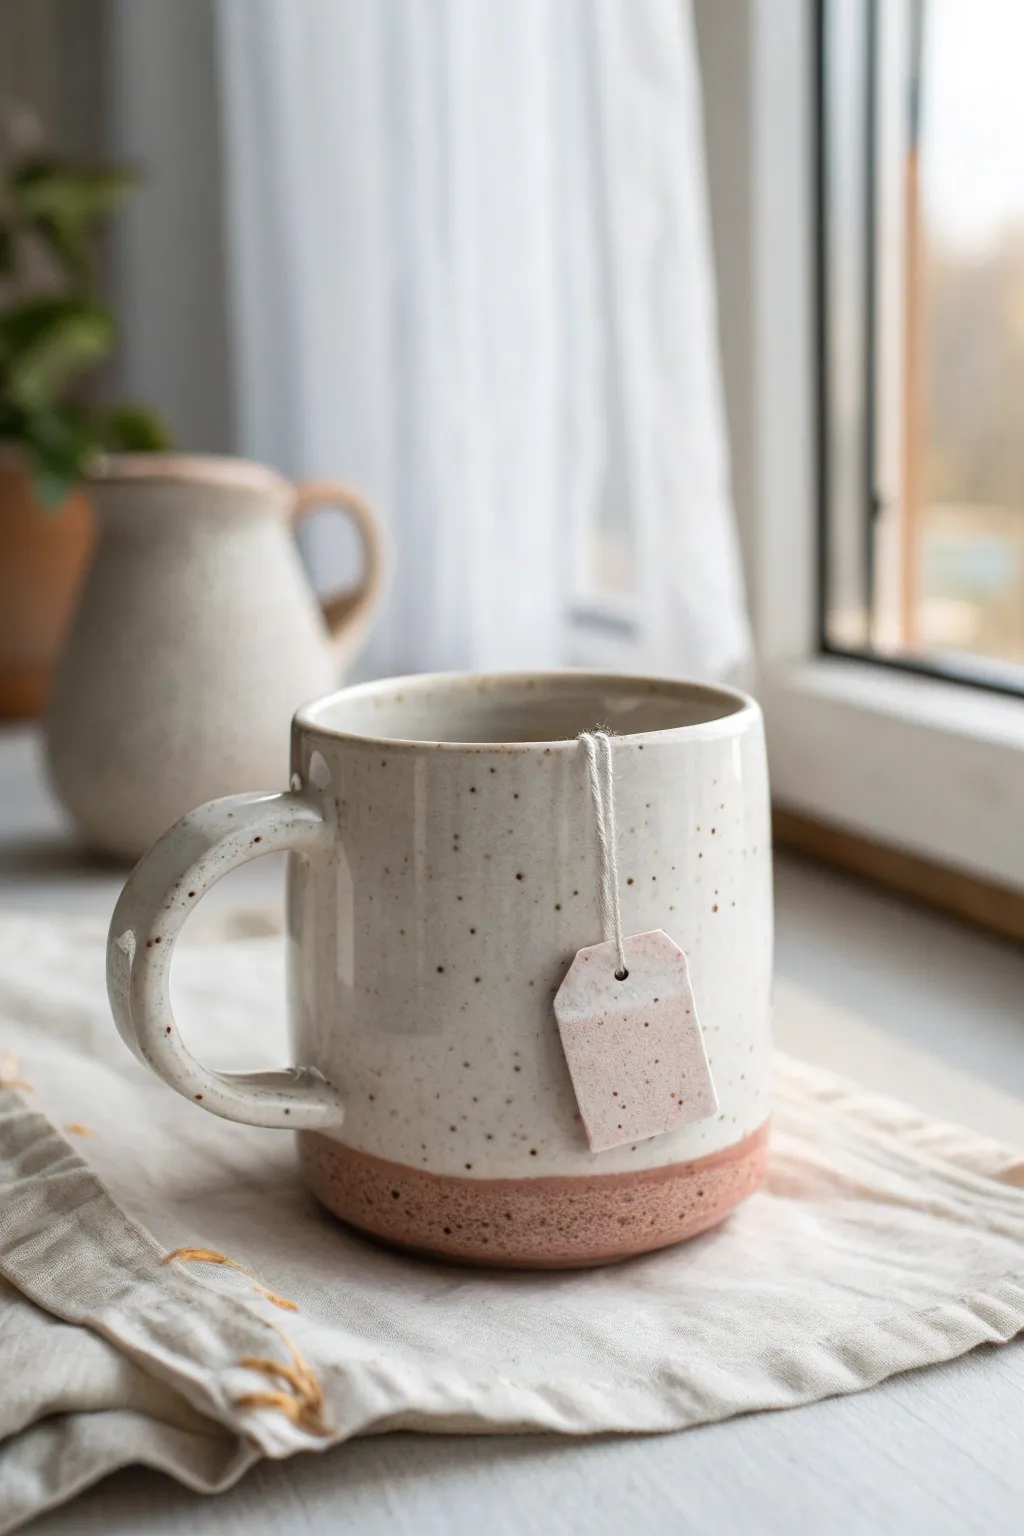
This charming handmade mug features a whimsical ‘tea bag’ tag hanging from a string, which is actually a clever little ceramic detail attached to the handle or rim. With its speckled glaze and exposed raw clay base, it perfectly balances rustic warmth with playful design.
How-To Guide
Materials
- Stoneware clay (speckled or light brown)
- Pottery wheel (or rolling pin for hand-building)
- Needle tool
- Loop tool for trimming
- Scoring tool (serrated rib)
- Clay slip
- High-temp wire or nichrome wire (optional for hanging mechanism)
- White or cream speckled glaze (food safe)
- Pink or terra cotta underglaze (optional if clay body isn’t pink)
- Natural fiber string or twine
- Sponge
- Kiln
Step 1: Forming the Mug Body
-
Throw or Build the Cylinder:
Begin by centering your clay on the wheel and throwing a straight-sided cylinder. Aim for a medium height, about 4-5 inches. Alternatively, slab-build a cylinder if you prefer hand-building. -
Refine the Shape:
Use a rib to smooth the walls, keeping them even. Create a slight inward curve at the very bottom to give the mug a gentle, grounded profile. -
Create the Handle:
Pull a strap of clay for the handle. For this cozy look, aim for a medium thickness that feels sturdy. Shape it into an ear-like curve and set it aside to stiffen slightly until it holds its shape. -
Attach the Handle:
Score the mug body and the handle attachment points deeply. Apply slip and press the handle firmly into place. Smooth the seams with a modeling tool or your finger, ensuring a seamless transition.
Glaze Flow Issues
If your glaze runs over the wax resist line during firing, use a ‘cookie’ (a flat piece of scrap clay with kiln wash) under your mug to protect the kiln shelf.
Step 2: Crafting the Tea Tag Detail
-
Shape the Tag:
Roll out a small, thin slab of clay (about 3mm thick). Cut a rectangle roughly 1 inch by 1.5 inches. Snip the top two corners at an angle to mimic the classic tea bag tag shape. -
Punch the Hole:
Using a small needle tool or a specialized hole punch, create a tiny hole near the top center of the ceramic tag. Make sure it’s large enough to thread a string through after firing, keeping in mind clay shrinks. -
Texture the Tag:
Lightly sponge the surface of the tag to soften the sharp edges. You can gently press it with a texture tool if you want it to look like paper, but a smooth finish works beautifully too. -
Create the ‘Pocket’ Spot:
Decide where the tag will rest. You have two choices: let it dangle freely after firing, or, for a trompe l’oeil effect, create a tiny shallow indentation on the mug wall where the tag will ‘sit’ so it doesn’t clink constantly.
Add a hidden message
Before firing, stamp a tiny word like ‘brew’ or ‘calm’ into the ceramic tag using small alphabet stamps for an extra personalized touch.
Step 3: Glazing and Finishing
-
Bisque Fire:
Load your bone-dry mug and the tiny tag into the kiln for the bisque firing. Ensure the tag is placed safely so it doesn’t warp. -
Wax the Base:
For that distinct two-tone look, apply wax resist to the bottom inch of the mug’s exterior. This will keep the glaze off the base, exposing the beautiful raw clay texture. -
Glaze Application:
Dip the mug into your white speckled glaze. Hold it upside down for a few seconds to let excess glaze drip off, ensuring an even coat down to the wax line. -
Glaze the Tag:
Dip the ceramic tag into a soft pink glaze to match the base tones, or use the same white speckle glaze. If you want the tag to look like the pinkish clay in the photo, you might just use a clear glaze over a pink clay body. -
Wipe and Clean:
Carefully sponge away any glaze beads from the wax line on the mug and clear out the tiny hole on the tag so it doesn’t seal shut. -
Glaze Fire:
Fire both pieces to the appropriate temperature for your clay and glaze combination. -
Assembly:
Once cool, cut a short length of natural twine. Thread it through the hole in the ceramic tag and tie the other end around the top of the handle. Secure it with a small, tidy knot.
Pour your favorite warm beverage and enjoy the cozy charm of your new custom mug
Drippy “Frosting” Rim Mug With Sprinkle Texture
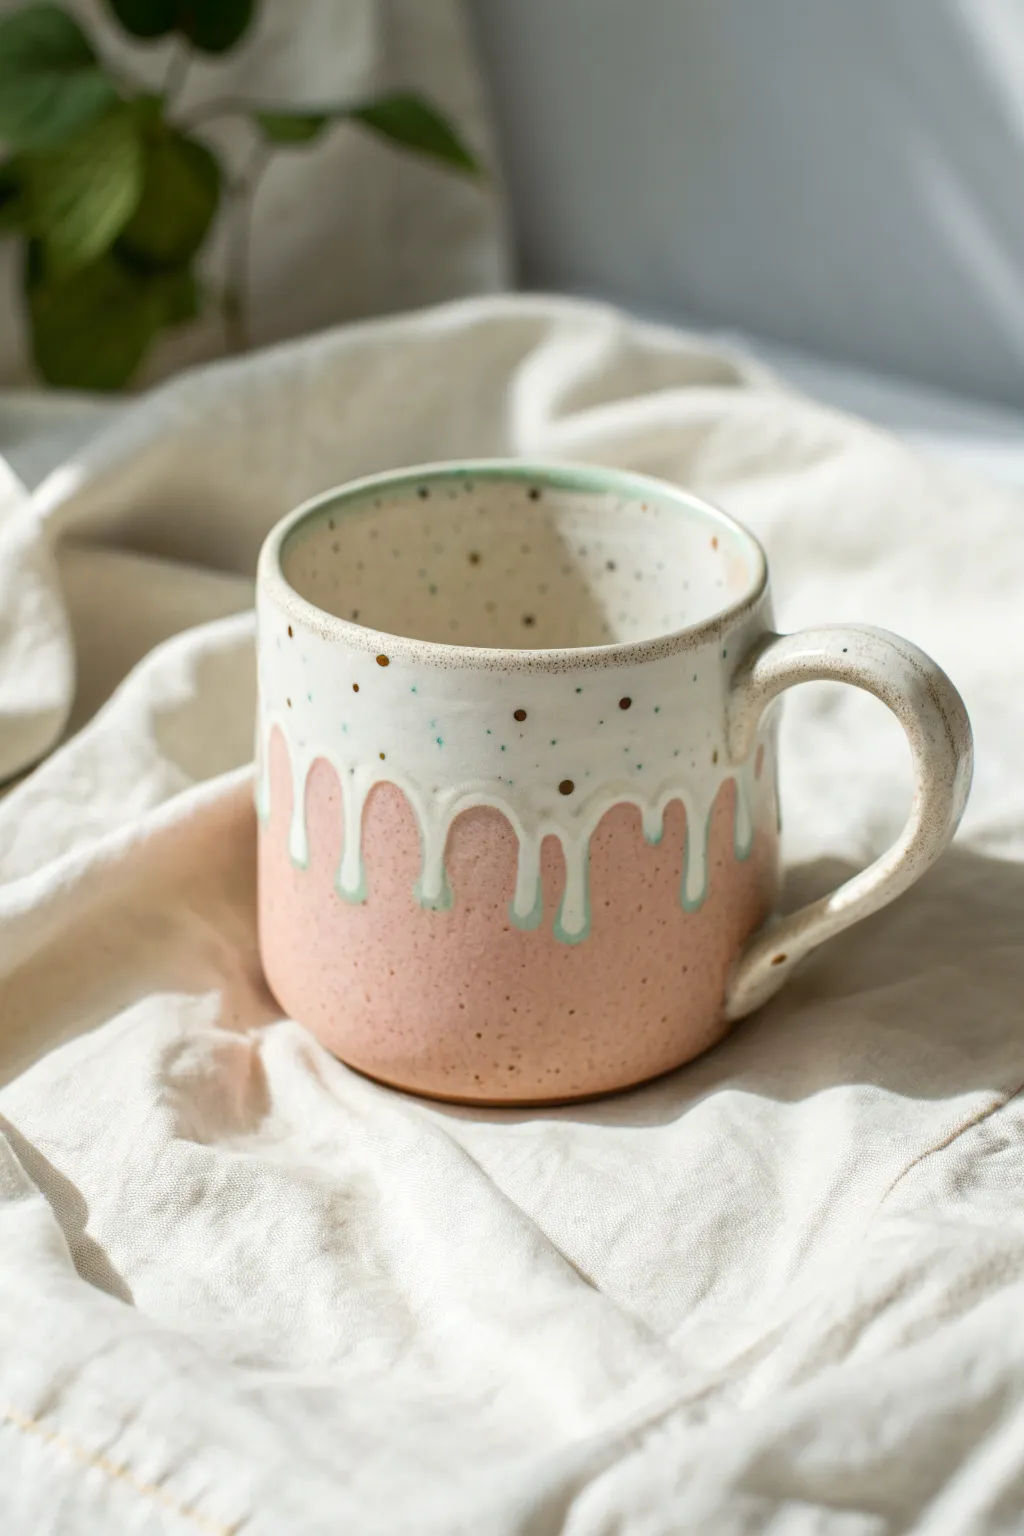
This charming handmade mug features a warm pink base accented by a drippy, glossy white glaze that looks just like melting frosting. The speckled clay body adds a rustic, confetti-like texture that makes every sip feel like a special treat.
Step-by-Step
Materials
- Speckled Stoneware Clay (cone 5/6)
- Pottery wheel (or rolling pin for slab building)
- Rib tool
- Wire cutter
- Trimming tools
- Sponge
- Pink Underglaze or Pink Matte Glaze
- Glossy White Opaque Glaze (needs to be thick)
- Small paintbrush
- Scoring tool
- Kiln
Step 1: Forming the Body
-
Prepare the clay:
Begin by wedging your speckled stoneware clay thoroughly to remove air bubbles. You’ll need about 1 to 1.5 lbs of clay for a standard-sized mug. -
Throw the cylinder:
Center your clay on the wheel and open it up. Pull the walls up to create a cylinder with slightly rounded bottom edges, keeping the walls relatively straight but gently curving inward near the rim. -
Refine the shape:
Use a rib tool to smooth the outside and inside surfaces. This step compresses the clay and brings out those lovely speckles even before firing. -
Form the rim:
Pay special attention to the lip of the mug. Use a chamois or your sponge to round it off smoothly, ensuring it will be comfortable to drink from. -
Dry to leather hard:
Wire the mug off the wheel and let it dry until it reaches a leather-hard state. It should be firm enough to handle without deforming but still cool to the touch.
Drips running too far?
If your glaze runs off the pot during firing, add a ‘glaze catcher’ or cookie under your mug. Next time, stop your drips 1 inch higher; gravity pulls them down significantly in the kiln.
Step 2: Handle & Trimming
-
Trim the foot:
Turn the mug over and center it on the wheel again. Trim away excess clay from the bottom to create a defined foot ring, mirroring the curve of the interior. -
Pull the handle:
Pull a strap of clay for the handle. For this style, aim for a medium thickness that feels sturdy. Curve it into a question-mark shape or a simple C-curve. -
Attach the handle:
Score the attachment points on both the mug body and the handle. Apply slip, then firmly press the handle onto the mug. I like to smooth the connection points with a small wooden tool to make it look seamless. -
Initial bisque fire:
Allow the mug to dry completely (bone dry). Place it in the kiln for a bisque firing to chemically harder the clay.
Pro Tip: enhancing speckles
For more dramatic spots, choose a glaze with high transparency or specifically buy ‘speckled’ glaze if your clay body doesn’t have enough iron flecks naturally.
Step 3: Glazing the Design
-
Apply the pink base:
Dip the entire mug into a matte pink glaze, or brush on three even coats of pink glaze. If using underglaze, apply it now, but you will need a clear coat later. -
Clean the foot:
Wipe away any glaze from the very bottom foot ring with a damp sponge to prevent it from sticking to the kiln shelf. -
Prepare the white glaze:
Ensure your glossy white glaze is mixed quite thickly. A thicker consistency is crucial for achieving that suspended ‘drip’ look without it running all the way down. -
Apply the rim ‘frosting’:
Dip just the top rim into the white glaze, holding it upside down. Alternatively, use a brush to apply a heavy band of white glaze around the top 2 inches. -
Manually add drips:
With a loaded brush, gently touch the bottom edge of the white glaze band and encourage droplets to run down. Vary the length of these drips for a natural look. -
Check overlap thickness:
Where the white glaze sits over the pink, it needs to be thick enough to be opaque. Touch up any thin spots. -
Final wipe:
Double-check the foot ring is completely clean of glaze. -
Glaze fire:
Load the mug into the kiln for the final glaze firing (Cone 5 or 6, depending on your clay and glaze). The heat will fuse the glazes and bring out the iron speckles in the clay body.
Once cooled, your charming drippy mug is ready for your favorite hot beverage
Starry Night Mug With Raised Mini Stars And Moon

Transform a simple piece of clay into a midnight dream with this enchanting mug project. Featuring a deep, speckled navy glaze and delicate gold luster accents, this piece captures the magic of a starry night sky right in your hands.
Detailed Instructions
Materials
- Stoneware clay (smooth body recommended)
- Pottery wheel or slab building tools
- Loop tools for trimming
- Sponge and bucket of water
- Navy blue speckled galaxy glaze
- Gold luster overglaze (real gold)
- Small fine-point synthetic brush
- Kiln
- Wax resist
- Fettling knife or needle tool
Step 1: Forming the Body
-
Preparing the clay:
Begin by wedging about 1 to 1.5 pounds of stoneware clay to remove air bubbles. Ensure the clay is smooth and pliable before centering it on your wheel. -
Throwing the cylinder:
Center the clay and pull up the walls to form a cylinder. Aim for a slightly wider base that tapers gently inwards towards the rim to mimic the cozy shape in the photo. -
Shaping the belly:
Use a rib tool on the inside to gently push the belly of current cylinder out just slightly near the bottom third, creating that subtle anchored weight. -
Refining the rim:
Smooth the drinking rim with a chamois or a wet sponge. A slightly rounded rim is key for comfort. Let the piece dry to a leather-hard state.
Gold Drip Danger
Gold luster is very runny heavily applied. If your brush is overloaded, the star will run down the side during firing. Use sparing amounts.
Step 2: Handle and Trimming
-
Trimming the foot:
Once leather-hard, invert the mug on the wheel. Trim away excess clay from the bottom, creating a clean foot ring that lifts the mug slightly off the table. -
Pulling the handle:
Pull a strap of clay for the handle. For this design, aim for a classic ‘C’ shape that is wide enough to fit two or three fingers comfortably. -
Attaching the handle:
Score and slip both the attachment points on the mug body and the handle ends. Press the handle firmly onto the mug, smoothing the joints so they look seamless. -
Bisque firing:
Allow the mug to dry slowly and completely (bone dry) before loading it into the kiln for the bisque fire (usually Cone 04 or 06).
Placement Pro Tip
To prevent smudging your gold work, paint the top rim and inside first, then work your way down the exterior body, holding the mug by the unglazed foot.
Step 3: Glazing the Sky
-
Applying wax resist:
Paint liquid wax resist on the bottom foot ring to prevent glaze from sticking to the kiln shelf. -
Glazing the interior:
Pour your navy speckled glaze inside the mug, roll it around to coat the entire interior, and pour out the excess. Wipe the rim immediately if any drips occurred. -
Glazing the exterior:
Dip the exterior of the mug into the same navy glaze. I like to hold it upside down by the foot for a quick, even dip. -
Glaze firing:
Once the glaze is dry and the foot is wiped clean, fire the mug to the glaze’s maturity temperature (typically Cone 5 or 6 for stoneware).
Step 4: Adding the Gold Stars
-
Cleaning the surface:
After the glaze firing, wash the mug with alcohol to remove any oils or dust. This ensures the gold luster adheres properly. -
Painting the moons:
Using a very fine liner brush and real gold luster, carefully paint small crescent moon shapes on the glossy surface. Keep the lines crisp. -
Painting the stars:
Add scattered four-pointed stars. Paint a vertical line crossed by a horizontal line, tapering the ends to sharp points. -
Adding stardust:
Fill the empty spaces with tiny gold dots to represent distant stars. Vary the spacing for a natural, organic look. -
Interior details:
Don’t forget to paint a few small stars on the inside of the rim, just like in the photo, for a peek-a-boo effect. -
Luster firing:
Load the mug into the kiln one last time for a low-fire luster firing (usually Cone 018 or 019). Be sure to have good ventilation as lusters fume.
Now you have a stunning, food-safe mug perfect for sipping tea while stargazing
Patchwork Quilt Mug With Mixed Texture Tiles
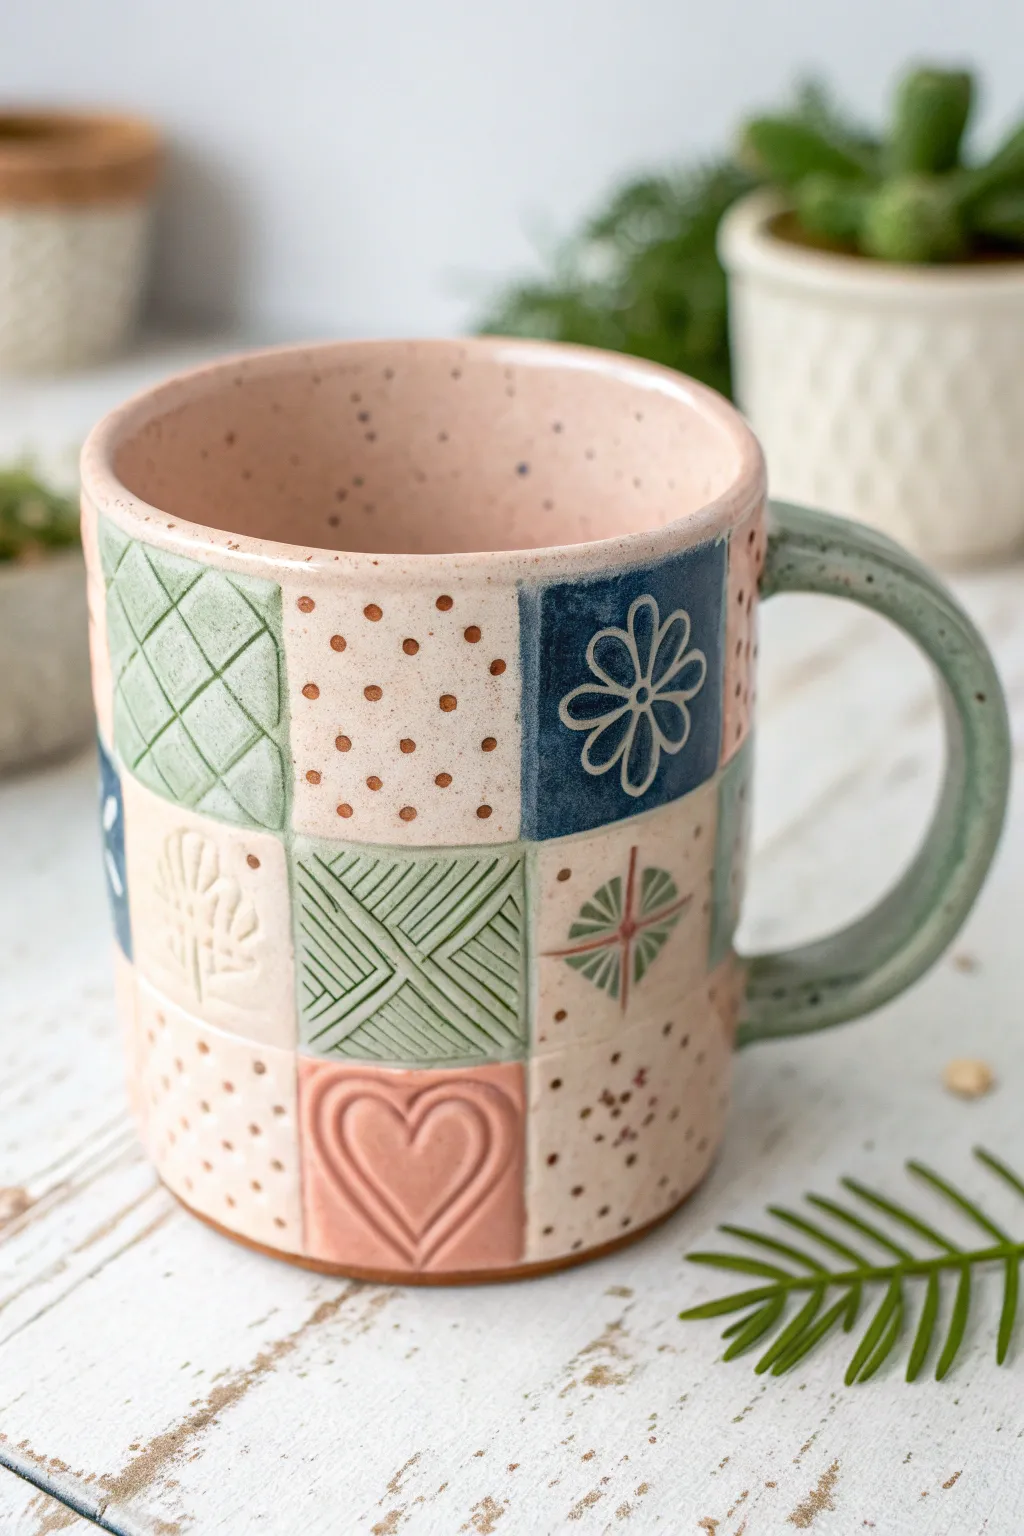
Embrace a cozy aesthetic with this slab-built mug featuring a delightful grid of mixed-texture tiles. The combination of gentle pastels, stamped patterns, and raw clay speckles creates a warm, vintage quilt effect perfect for your morning brew.
Step-by-Step Guide
Materials
- Speckled stoneware clay (mid-fire)
- Rolling pin with guide sticks (approx. 1/4 inch or 6mm)
- Ruler and precise craft knife or needle tool
- Various texture tools (stamps, lace, textured rolling pin, found objects)
- Slip and scoring tool (serrated rib or fork)
- Cylindrical form for shaping (like a PVC pipe or rolling pin covered in paper)
- Underglazes: Light pink, sage green, navy blue
- Clear transparent glaze
- Sponge and small paintbrushes
- Wooden modeling tool
Step 1: Creating the Tile Slab
-
Roll Initial Slab:
Start by wedging your speckled stoneware clay thoroughly to remove air bubbles. Roll it out into a long rectangle slab using your guide sticks to maintain an even thickness of about 1/4 inch. -
Mark the Grid:
Using a ruler and a dull tool (like the back of a knife), lightly score a grid pattern onto the slab. For a standard mug, square tiles of about 1.5 inches work well, but adjust based on your desired height. -
Texture the Tiles:
This is the creative part where you build the quilt. Press different textures into alternating squares. Use a cross-hatch tool for one, floral stamps for another, and perhaps a smooth heart shape or polka dots for others. Leave every other square relatively smooth if you want to paint patterns later. -
Refine the Edges:
Once textured, check your grid lines. If the stamping distorted the shape, gently press the ruler back against the lines to tidy them up. Cut the long rectangular slab to your final mug size (e.g., 10 inches long by 4.5 inches high).
Warped Walls?
If your slab sags while building, let it firm up to flexible ‘leather hard’ before forming the cylinder. Soft clay collapses easily.
Step 2: Assembling the Mug
-
Bevel the Sides:
Cut the two short ends of your rectangular slab at a 45-degree angle. This ensures a seamless overlap when you form the cylinder. -
Form the Cylinder:
Wrap your slab around your cylindrical form or PVC pipe. I find wrapping a sheet of newspaper around the form first prevents sticking. -
Score and Slip:
Score the beveled edges aggressively and apply slip. Press the ends together firmly to create the cylinder walls. Smooth the seam on the inside with a wooden tool, but be careful not to flatten your exterior textures. -
Attach the Base:
Roll a small separate slab for the base. Place your cylinder on top, trace around it, and cut it out. Score and slip the bottom of the cylinder and the edge of the base, then join them. -
Smooth the Rim:
Run a damp sponge or a piece of chamois leather over the drinking rim to make sure it is rounded and comfortable for lips.
Step 3: Handle and Details
-
Pull the Handle:
Pull a strap of clay for the handle, or roll a coil and flatten it slightly. Aim for a thickness that matches the mug walls. -
Attach Handle:
Shape the handle into a ‘C’ or ear shape. Score and slip the attachment points on the mug body and the handle ends. Press firmly to attach, blending the clay where it meets the body. -
Dry Slowly:
Cover the mug loosely with plastic to let it dry slowly to the leather-hard stage. This prevents the handle from cracking away from the body.
Custom Stamp Idea
Make your own ‘textile’ stamps by pressing burlap, lace, or buttons into small scraps of clay and bisque firing them for use.
Step 4: Decoration and Glazing
-
Bisque Fire:
Once bone dry, fire the mug in a kiln to cone 04 (or your clay’s bisque temperature). -
Underglaze Painting:
Using a small brush, paint the individual quilt squares. Use a sage green for the cross-hatched squares, a diluted pink wash for the dotted areas, and a deep navy for the floral stamp. Leave the relief areas (the raised clay) unpainted or wipe them back slightly to highlight the texture. -
Hand-Painted Details:
For the smooth squares, paint small repeating patterns like polka dots or tiny stars using the tip of a fine brush. -
Glazing:
Dip the entire mug into a clear, transparent glaze. This seals the underglaze and lets the natural speckles of the clay body shine through. -
Final Firing:
Fire the mug to maturity (likely cone 5 or 6 depending on your clay). Once cool, sand the bottom if necessary.
Now you have a charming, textured mug that feels just like a warm hug in a ceramic form