Whenever I need a quick joy-spark in the studio, I make a batch of cute clay ornaments—tiny little projects that look charming even if they’re not perfect. Here are my go-to ideas, starting with the classics and drifting into more playful, unexpected designs you can totally pull off at home.
Classic Cookie-Cutter Star Ornaments
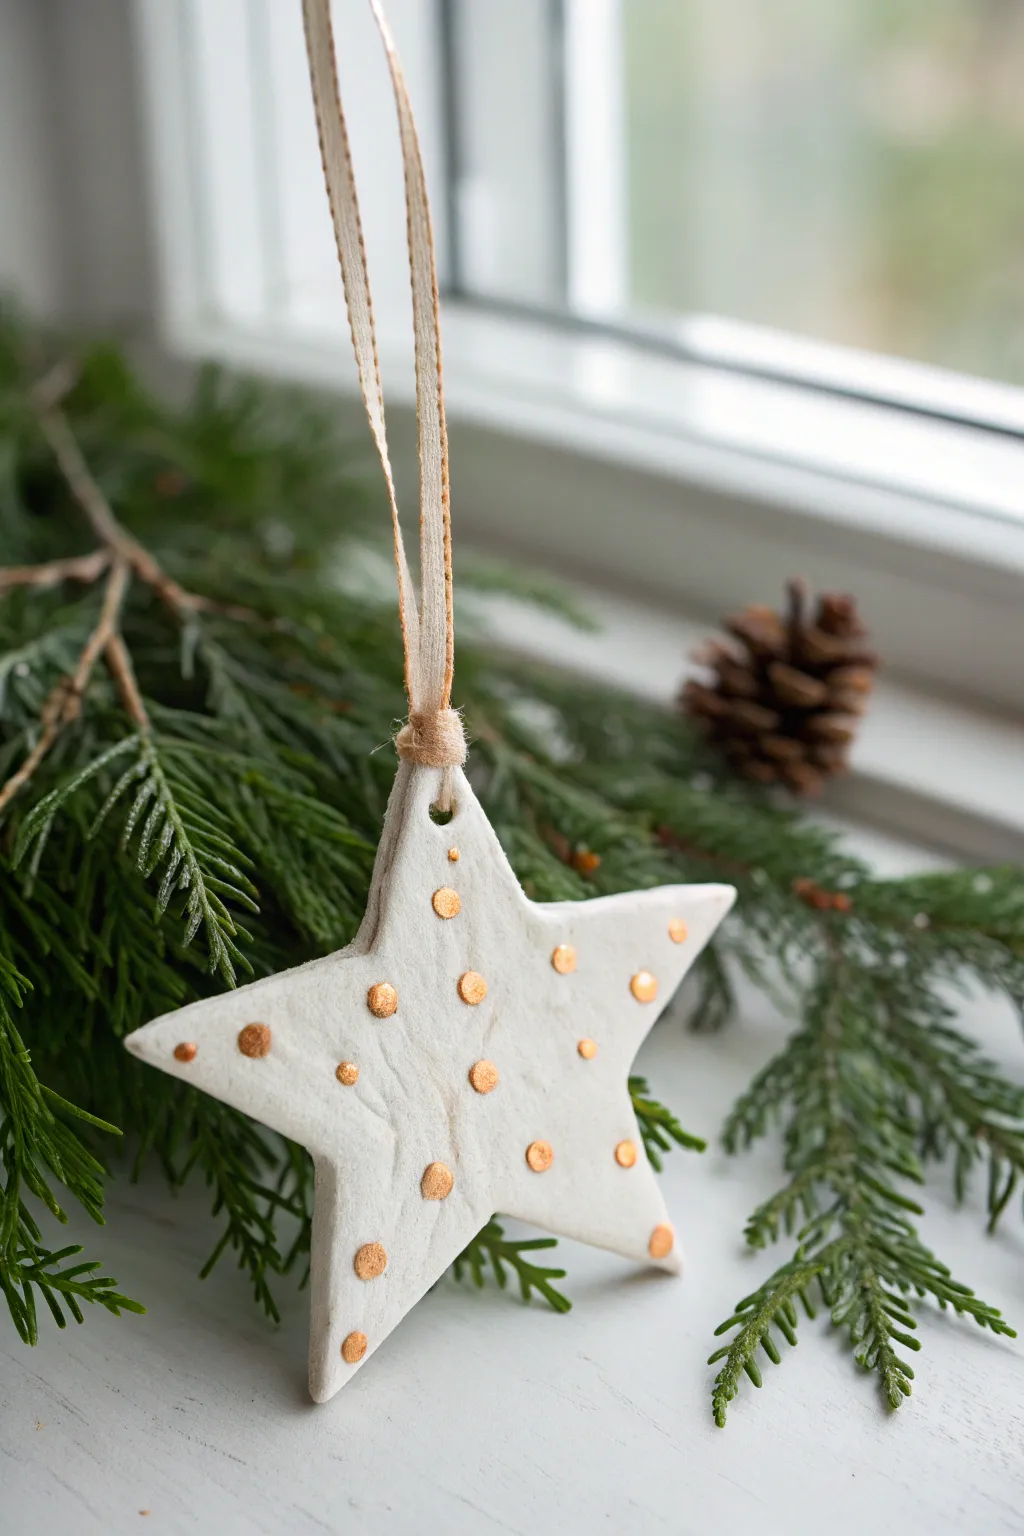
These simple yet elegant five-pointed stars bring a touch of minimalist sparkle to your holiday decor. Crafted from white clay and accented with raised golden dots, they have a charming, handmade cookie-style appeal perfect for any festive branch.
How-To Guide
Materials
- White air-dry clay or polymer clay
- Rolling pin
- Star-shaped cookie cutter (medium size)
- Parchment paper or non-stick mat
- Straw or toothpick (for making the hole)
- Gold puff paint (dimensional fabric paint) or gold acrylic paint with a fine dotting tool
- Fine grit sandpaper (optional)
- Thin beige or gold ribbon/twine
- Scissors
Step 1: Shaping the Star Base
-
Prepare your workspace:
Lay down a sheet of parchment paper or a non-stick craft mat to protect your surface and prevent the clay from sticking. -
Condition the clay:
Take a handful of white air-dry clay and knead it gently in your hands until it becomes soft, pliable, and free of cracks. -
Roll it out:
Place the clay on your mat and use a rolling pin to flatten it. Aim for an even thickness of about 1/4 inch (approx. 5-6mm) so the star is sturdy but not too heavy. -
Cut the shape:
Press your star-shaped cookie cutter firmly into the rolled clay. Wiggle it slightly before lifting to ensure a clean cut. -
Refine the edges:
Gently push the clay shape out of the cutter. Use a fingertip moistened with a tiny bit of water to smooth down any rough or jagged edges left by the cutter. -
Create the hanging hole:
Use a drinking straw or a thick skewer to punch a clear, round hole near the top point of the star. Make sure it’s not too close to the edge to prevent breaking later. -
Let it dry:
Set the star aside on a flat surface to dry completely. Depending on your specific clay brand and humidity, this could take 24-48 hours. Flip it over halfway through to ensure even drying. -
Sand for smoothness (optional):
Once fully dry and hard, inspect the edges. If there are any sharp bits, lightly sand them with fine-grit sandpaper for a polished look.
Cracked Clay Fix
If small cracks appear while drying, don’t toss it! Mix a tiny bit of fresh clay with water to make a paste and fill the cracks, then smooth with a finger.
Step 2: Adding the Golden Details
-
Select your gold medium:
For the raised effect seen in the photo, dimensional gold puff paint works best. If you only have standard acrylic, you can simulate this by applying thick dots with the handle end of a paintbrush. -
Plan the pattern:
Visualize a random scatter pattern. The charm comes from the irregularity, so you don’t need a grid. -
Apply the dots:
Holding the bottle vertically, gently squeeze small dots of gold paint onto the white surface. Space them out generously. -
Vary the sizes:
Try to keep the dots relatively uniform related to the example, but don’t stress over perfection. A few slightly larger or smaller dots add character. -
Allow paint to cure:
Let the gold dots dry completely. Dimensional paint often takes longer than standard acrylics—usually several hours or overnight—so be patient to avoid smudging.
Scented Variations
Level up by adding a few drops of essential oil like cinnamon or pine into the clay during the kneading phase for an ornament that smells like Christmas.
Step 3: Final Assembly
-
Select the ribbon:
Choose a thin, flat ribbon that complements the rustic look. A beige ribbon with a subtle gold thread running through it matches the example perfectly. -
Cut to length:
Snip a piece of ribbon approximately 8-10 inches long. -
Thread the ornament:
Fold the ribbon in half and push the loop end through the hole in the star from front to back. -
Secure the loop:
Pass the loose ends of the ribbon through the loop and pull tight to create a lark’s head knot right at the top of the star. -
Tie the ends:
Bring the two loose ribbon ends together and tie a simple overhand knot near the top to create the hanging loop.
Hang your finished star in a window or on a branch to catch the light and enjoy the sparkle.


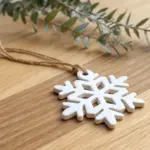
Stamped Snowflake Medallions
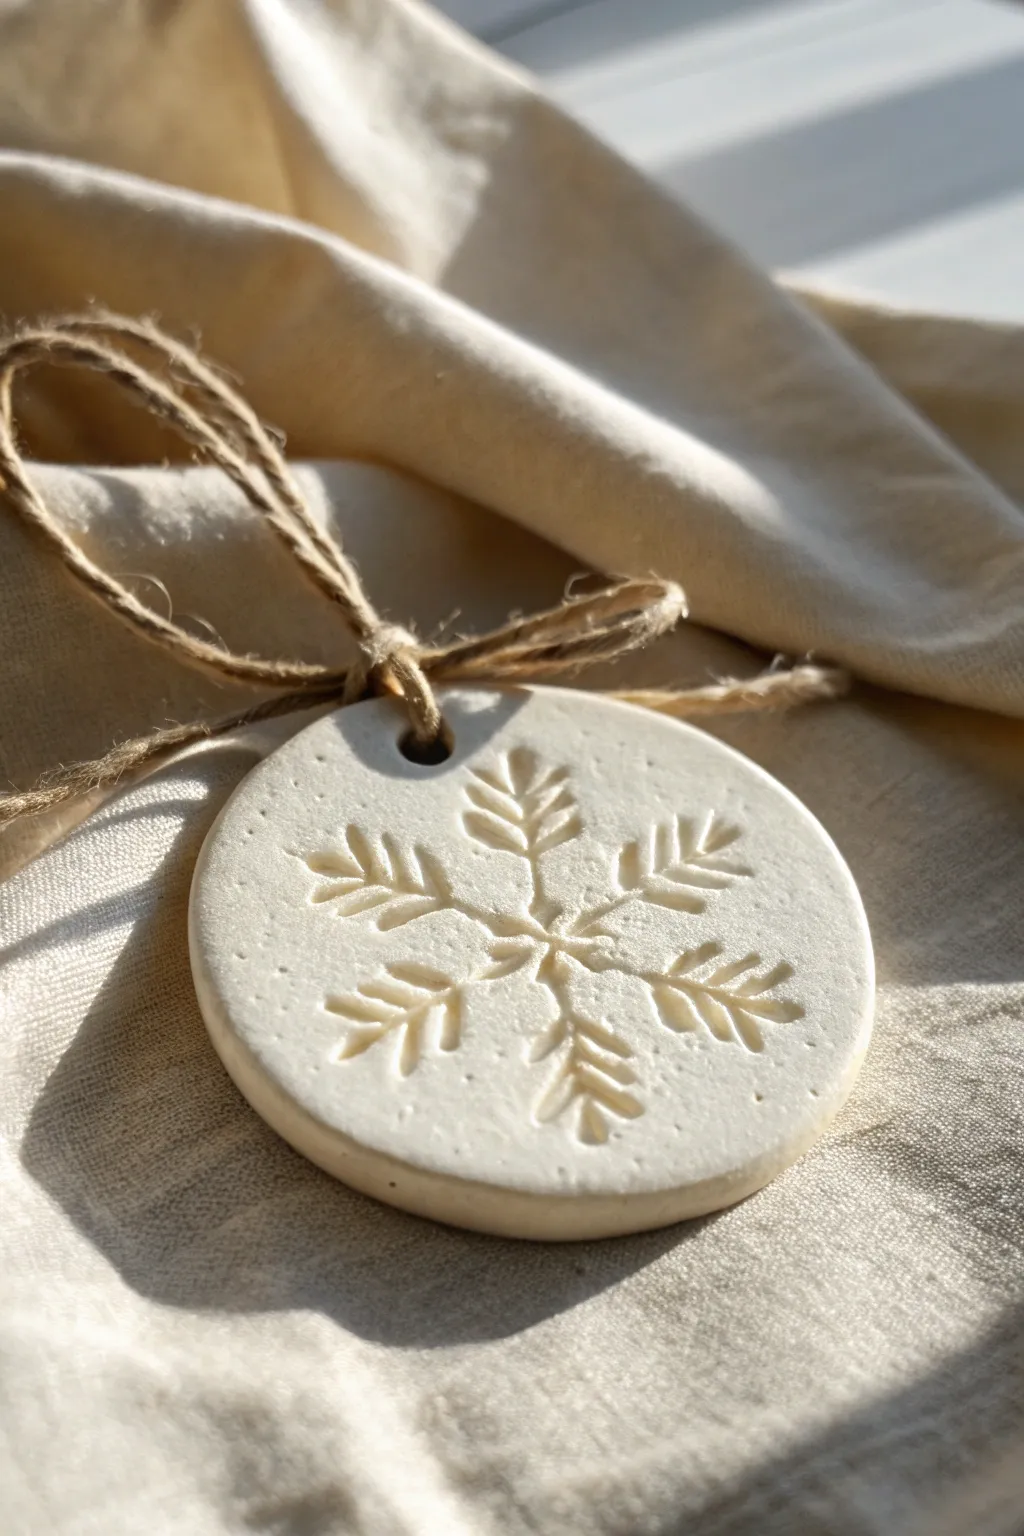
Capture the delicate beauty of winter with these charmingly rustic clay ornaments, featuring a deep-relief snowflake impression. The matte white finish and natural jute twine give them a timeless, Scandinavian-inspired look perfect for any holiday decor theme.
Step-by-Step Guide
Materials
- Air-dry clay (white or porcelain style)
- Circular cookie cutter or biscuit cutter (approx. 2.5-3 inches)
- Snowflake rubber stamp or embossed rolling pin segment
- Rolling pin
- Parchment paper or non-stick craft mat
- Drinking straw or small skewer stick
- Fine-grit sandpaper (400-600 grit)
- Jute twine or hemp cord
- Small bowl of water
- Sponge or paper towel
Step 1: Shaping the Base
-
Prepare your workspace:
Lay down parchment paper or a non-stick silicone mat on a flat surface to prevent the clay from sticking as you work. -
Condition the clay:
Take a handful of air-dry clay and knead it in your warm hands for about a minute. This softens the clay and helps prevent cracks from forming later. -
Roll it out:
Using your rolling pin, flatten the clay to a uniform thickness. Aim for about 1/4 inch thick—too thin and it might be brittle, too thick and it will take ages to dry. -
Cut the shape:
Press your circular cookie cutter firmly into the rolled clay. Give it a tiny wiggle to ensure a clean cut, then lift the cutter away. -
Smooth the edges:
Dip your finger lightly into a bowl of water and gently run it around the cut edge of the circle. This smooths down any harsh ridges left by the cutter.
Fixing Cracks
If tiny hairline cracks appear while drying, mix a small amount of fresh clay with water to make a paste (slip) and smooth it into the cracks with your finger.
Step 2: Adding the Design
-
Position the stamp:
Identify the center of your clay circle. Hover your snowflake stamp directly over the middle to align it visually before making contact. -
Press the impression:
Press the stamp down firmly and evenly. You want a deep impression to catch the light, but be careful not to push all the way through the clay. -
Remove the stamp:
Lift the stamp straight up to avoid smudging the crisp lines of the snowflake pattern. If the clay sticks slightly, gently peel it back. -
Create the hanging hole:
Use a drinking straw to punch a clean hole near the top edge of the ornament. Position it centered above the design, leaving enough clay margin so the top doesn’t break. -
Final smooth:
Check the back of the ornament where the straw exited; if there’s a little frayed bit of clay, smooth it down with a damp finger.
Step 3: Drying and Finishing
-
Let it dry:
Place the ornament on a clean sheet of parchment paper in a safe spot. Allow it to air dry for 24-48 hours. I like to flip mine over halfway through to ensure the back dries evenly. -
Sand imperfections:
Once bone dry, take fine-grit sandpaper and gently buff the edges or surface if there are any rough spots. The clay creates dust, so do this over a trash can or outside. -
Dust off residue:
Wipe the ornament with a dry cloth or soft brush to remove any sanding dust from the snowflake grooves. -
Cut the twine:
Cut a piece of jute twine approximately 8-10 inches long. -
Thread the loop:
Fold the twine in half and push the folded loop through the hole from front to back. -
Secure the knot:
Pass the loose ends of the twine through the loop and pull tight to create a lark’s head knot right at the top of the ornament. -
Tie the bow:
Tie the loose ends into a simple bow or a secure knot at the top to create the hanger.
Antique Wash
Mix brown acrylic paint with water (1:5 ratio) and brush it over the dried ornament. Wipe off the surface immediately with a rag, leaving dark paint only in the snowflake grooves.
Hang your new handcrafted medallion on the tree or use it as a special gift topper


Smiley Stocking Ornaments

Bring a touch of cozy charm to your tree with this delightful clay stocking ornament. Featuring a sweet, minimalist smiley face and warm earth tones, it combines the nostalgic feel of a classic Christmas stocking with a modern, handmade aesthetic.
Step-by-Step
Materials
- Polymer clay (white, beige/tan, terracotta/rust)
- Acrylic paint (black, pink for cheeks)
- Detail paintbrush or dotting tool
- Rolling pin or pasta machine
- X-acto knife or clay blade
- Stocking cookie cutter (optional, or a paper template)
- Jute twine
- Small circular cutter or straw (for the hanging hole)
- Toothbrush or textured sponge (optional for texture)
- Matte varnish or glaze
Step 1: Shaping the Base
-
Prepare the Clay:
Start by conditioning your white polymer clay until it’s soft and pliable. Roll it out to a consistent thickness of about 1/4 inch so the stocking feels sturdy. -
Cut the Shape:
Using a stocking-shaped cookie cutter or a sharp blade following a paper template, cut out the main stocking silhouette from the white clay sheet. -
Smooth the Edges:
Gently run your finger along the cut edges of the clay to soften created sharpness. This gives the finished piece a more polished, ceramic-like look.
Seamless Smoothness
Before baking, use a tiny bit of baby oil or clay softener on your fingertip to lightly buff away any fingerprints or lint for a professional finish.
Step 2: Adding the Color Blocks
-
Create the Cuff:
Roll out a small amount of beige or tan clay. Cut a rectangular strip that is slightly wider than the top of your stocking shape. -
Attach the Cuff:
Lay the beige strip over the top of the white stocking. Press it down gently to adhere, smoothing the seams slightly at the back, but leaving the front distinct to look like a folded cuff. -
Create the Foot Pattern:
Roll out your terracotta or rust-colored clay—I like to mix in a tiny bit of translucent clay here for depth—and cut a piece that covers the heel and main foot area, leaving space for a white toe. -
Shape the Toe Cap:
Using the main white clay again, fashion a small half-moon shape for the very tip of the toe. -
Assemble the Sock Color:
Place the rust clay piece onto the lower half of the stocking and the white toe cap at the end. Gently press them onto the white base layer so they bond without distorting the shape. -
Add Texture (Optional):
If you want the rust section to look like fabric, lightly tap it with a clean toothbrush or texturing sponge to create a subtle pitted surface.
Clay Won’t Stick?
If your layered pieces (like the cuff or toe) aren’t sticking to the base, apply a thin layer of liquid polymer clay (Bake & Bond) between the layers as glue.
Step 3: Details and Baking
-
Make the Hanging Hole:
Using a straw or a small circular clay cutter, punch a hole directly in the center of the beige cuff. Make sure it’s not too close to the edge to prevent tearing. -
Add the Eyelet:
Roll a tiny snake of rust or brown clay and surround the hole you just punched to create a reinforced grommet look. -
Bake the Clay:
Place your ornament on a parchment-lined baking sheet. Bake according to your specific polymer clay’s package instructions (usually 275°F for 15-30 minutes). -
Cool Down:
Let the ornament cool completely on the baking sheet. It will be fragile while warm, so patience is key here.
Step 4: Painting the Personality
-
Paint the Eyes:
Once cool, use a fine detail brush or a dotting tool dipped in black acrylic paint to create two small, widely spaced eyes on the white section of the leg. -
Add the Smile:
carefully paint a small, U-shaped smile between the eyes. Keeping the features small creates that signature ‘kawaii’ look. -
Rosy Cheeks:
Dip a balled-end tool or the back of a paintbrush into pink paint. Dab two small dots on the outer edges of the smile for blush. -
Speckle the Sock:
To mimic the speckled look in the photo, mix a watered-down brown or black paint. Flick a stiff brush over the rust-colored section to create tiny random dots. -
Seal the piece:
Apply a thin coat of matte varnish to protect the paint and give the clay a unified finish. -
Attach the Twine:
Cut a length of jute twine, thread it through the grommet hole, and tie a secure knot to form the hanger.
Hang your charming little stocking on a prominent branch and enjoy the smile it brings to your holiday décor


Mini Wreath Ring Ornaments
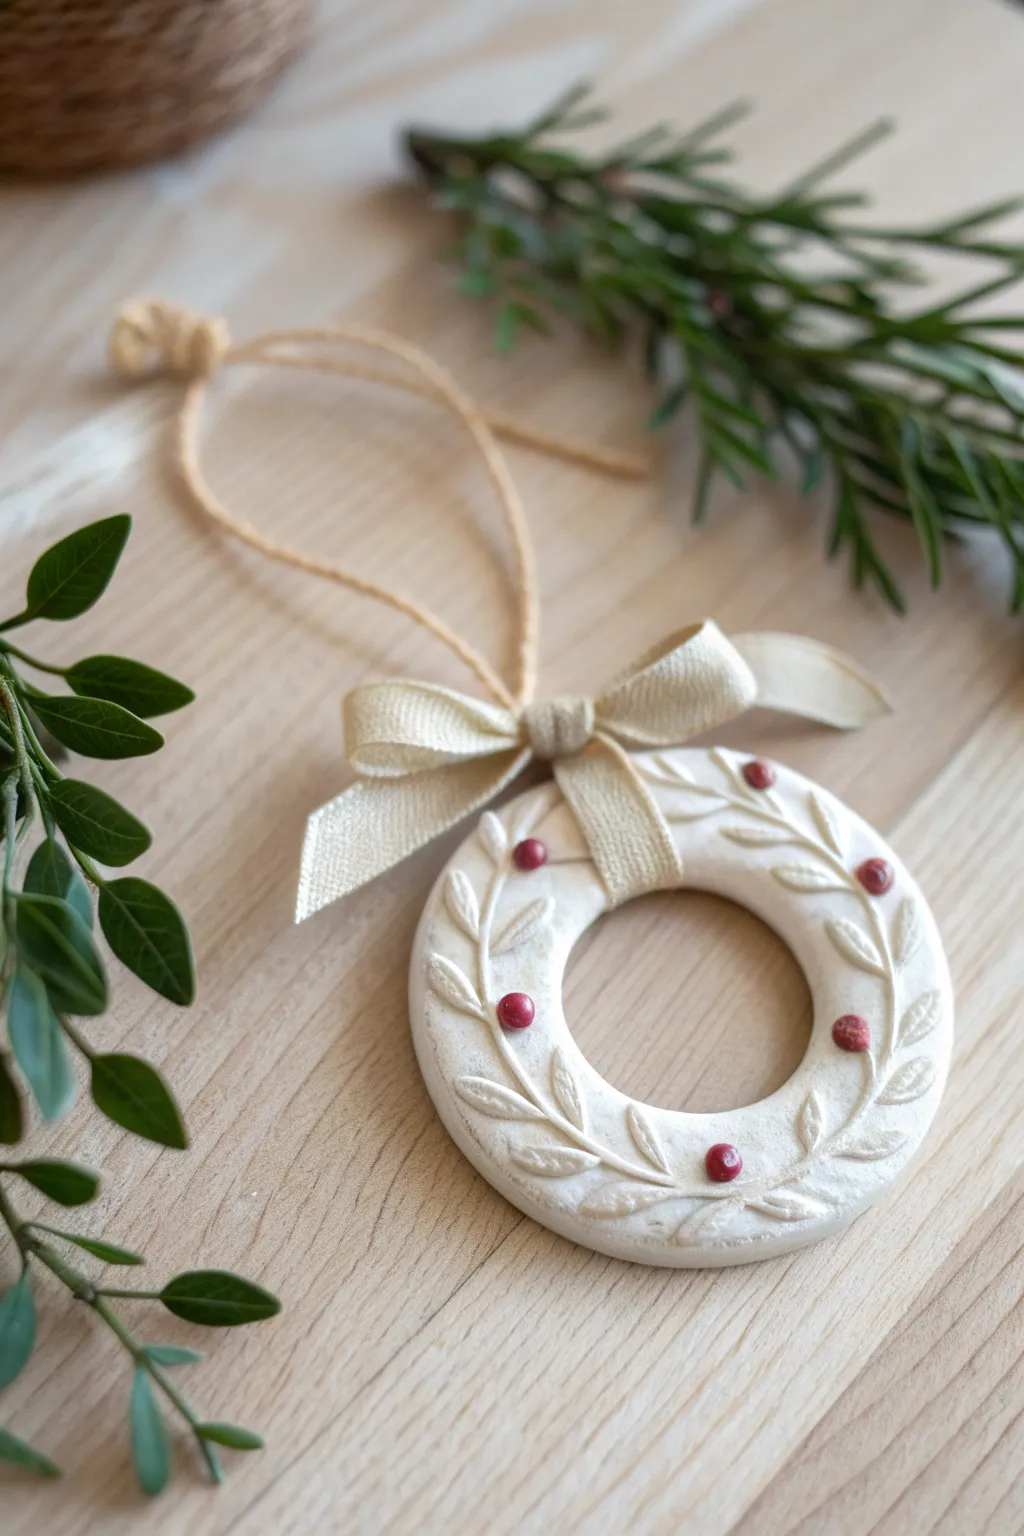
These charming mini clay wreaths capture the essence of a winter woodland with their delicate leaf patterns and pop of red berries. Finished with a sweet bow, they offer a timeless, handcrafted look perfect for hanging on the tree or gifting to loved ones.
Detailed Instructions
Materials
- White smooth air-dry clay or polymer clay
- Rolling pin
- Round cookie cutters (one approx. 3-inch, one approx. 1.5-inch)
- Small carving tool, needle tool, or X-Acto knife
- Small round beads (red) or red acrylic paint
- Fine grit sandpaper
- Cream or beige ribbon (approx. 1/2 inch wide)
- Twine or jute cord
- Strong craft glue (e.g., E6000 or super glue)
- Matte varnish or sealant (optional)
Step 1: Shaping the Base
-
Condition the Clay:
Start by taking a handful of white clay and kneading it in your hands until it becomes soft, pliable, and free of cracks. If using air-dry clay, keep your hands slightly moist to prevent drying. -
Roll out the Slab:
Using a rolling pin, flatten the clay on a smooth surface or silicone mat. Aim for an even thickness of about 1/4 inch so the ornament feels substantial but isn’t too heavy. -
Cut the Outer Circle:
Press your larger round cookie cutter firmly into the clay to create the outer edge of your wreath. Wiggle it slightly to ensure a clean cut before lifting. -
Cut the Inner Circle:
Center the smaller round cutter inside the first circle and press down to remove the center. This creates the classic donut or wreath shape. -
Smooth the Edges:
Dip your finger in a little water (for air-dry clay) or baby oil (for polymer) and gently run it along the cut edges. This softens any sharp ridges left by the cutters for a more professional finish.
Cracking Issues?
If you see tiny cracks forming as your air-dry clay dries, mix a tiny bit of fresh clay with water to make a paste and smooth it into the cracks.
Step 2: Adding Details
-
Carve the Stems:
Using a needle tool or small carving tool, lightly etch a continuous, wavy line that meanders around the surface of the ring. This will serve as the central vine for your leaves. -
Create Leaf Shapes:
Along the vine you just drew, use your carving tool to press or carve small leaf shapes. I find pressing the side of a small loop tool into the clay creates a perfect leaf impression instantly. -
Add Leaf Veins:
For extra detail, use the very tip of your needle tool to scratch a tiny central vein down the middle of each leaf impression. -
Attach the Berries:
If you are using small red beads, press them firmly into the clay at random intervals along the vine. Push them deep enough so they are flush with the surface. -
Create Hanging Hole:
Use a straw or a tool to poke a hole at the very top of the wreath for the hanger. Make sure it’s big enough for your twine to pass through later.
Add Sparkle
Before the sealant dries, sprinkle a tiny pinch of ultra-fine clear glitter over the wet varnish to give your wreath a frosty, snowy shimmer.
Step 3: Finishing Touches
-
Dry or Bake:
Follow the instructions for your specific clay. If air-drying, let it sit for 24-48 hours, flipping halfway through. If baking polymer clay, bake according to the package directions and let cool completely. -
Sand Imperfections:
Once fully cured, use fine-grit sandpaper to gently buff the edges and back of the ornament. This removes any final roughness or fingerprints. -
Paint Berries (Alternative):
If you didn’t use beads, now is the time to take a tiny detail brush and dot red acrylic paint where the berries should be. Let the paint dry completely. -
Seal the Ornament:
Brush on a thin layer of matte varnish to protect the clay and give it a finished sheen. Allow this to dry fully before handling. -
Attach the String:
Cut a length of jute twine, thread it through the hole you made earlier, and knot the ends to create a rustic hanging loop. -
Make the Bow:
Tie a small, neat bow using the cream ribbon. Trim the tails at an angle so they drape nicely but don’t cover too much of the design. -
Glue the Bow:
Place a dab of strong craft glue right over the hanging hole area (or just below it) and press the bow firmly in place. Hold it for a few seconds until it sets.
Hang your lovely little wreath on a sturdy branch and admire the winter magic you’ve created

The Complete Guide to Pottery Troubleshooting
Uncover the most common ceramic mistakes—from cracking clay to failed glazes—and learn how to fix them fast.
Sweet Snowman Face Ornaments
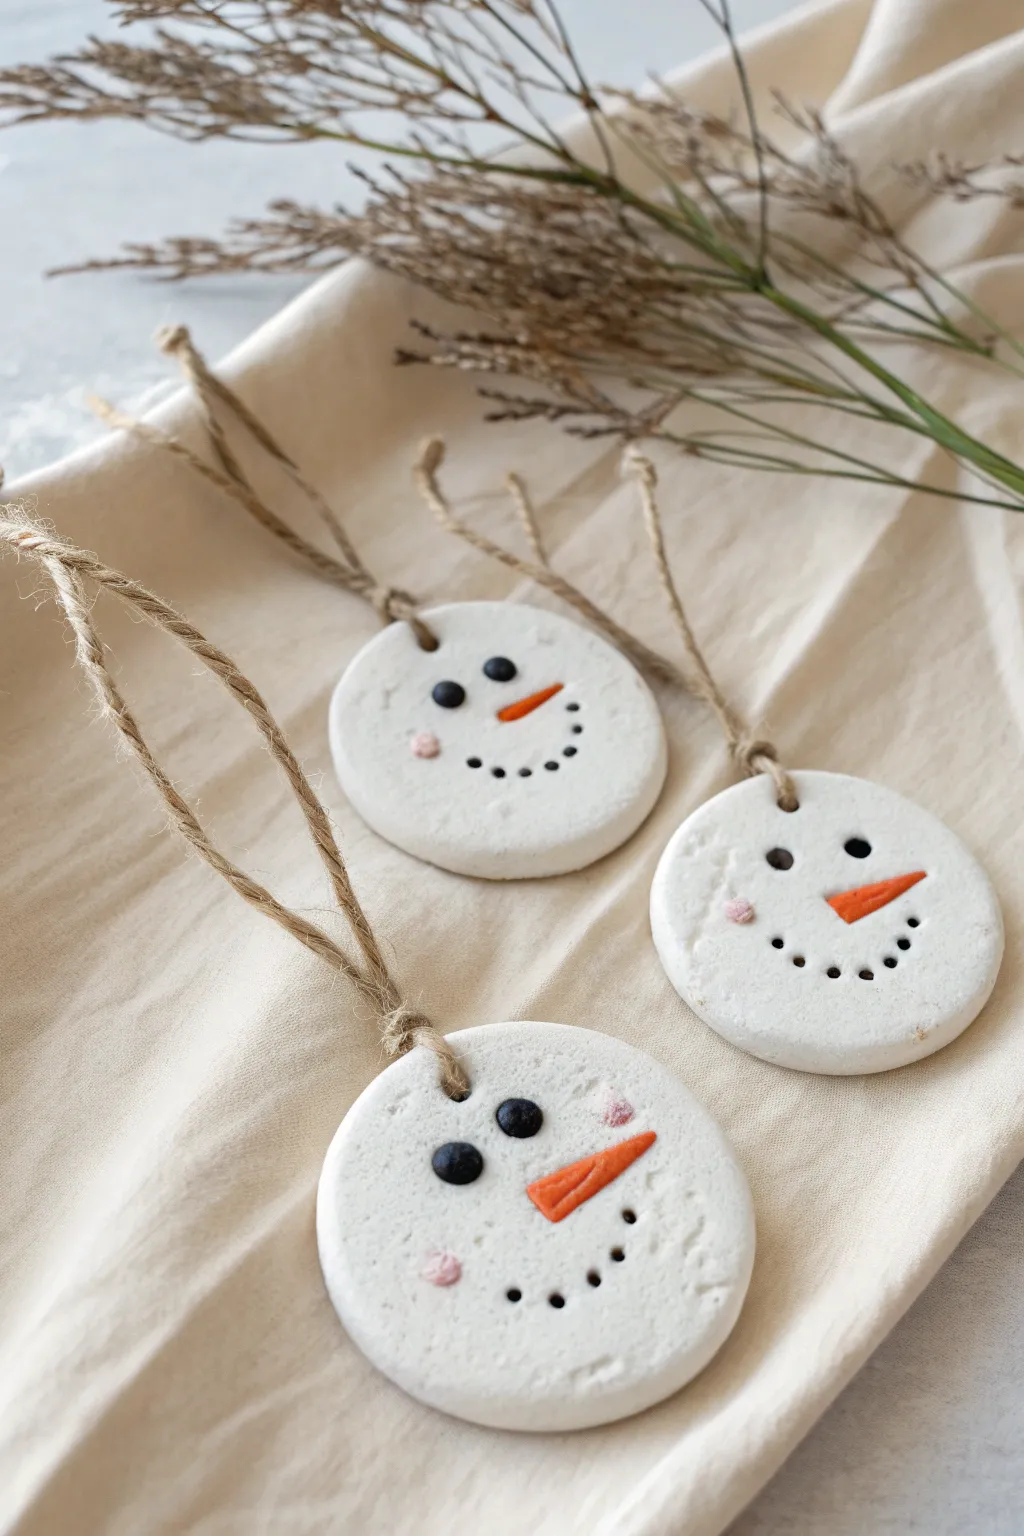
These simple and minimalist disc ornaments capture the joyful spirit of winter with sweet, smiling snowman faces. With their rustic white finish and natural twine loops, they bring a cozy, handmade charm to any holiday tree or gift wrap.
Step-by-Step Guide
Materials
- Air-dry clay (white)
- Small rolling pin
- Circular cookie cutter (approx. 2-3 inches)
- Straw or skewer (for poking holes)
- Small black beads (for eyes)
- Orange polymer clay or orange acrylic paint
- Tool for creating textures (toothpick or darning needle)
- Slightly damp sponge
- Jute twine
- Sandpaper (fine grit)
- Pink chalk pastel or blush
Step 1: Shaping the Base
-
Roll the Clay:
Begin by taking a generous amount of white air-dry clay and kneading it until soft. Roll it out on a smooth surface to an even thickness of about 1/4 inch. -
Cut the Circles:
Use your circular cookie cutter to punch out rounds from the clay slab. If the edges are ragged, gently smooth them with a slightly damp finger. -
Create Hanging Holes:
While the clay is still wet, use a straw or a wooden skewer to poke a hole near the top edge of each circle. Make sure it’s large enough for your twine to pass through later. -
Clean Edges:
Check the back of the holes for any pushed-out clay and smooth that away so both sides look tidy.
Clean bead hack
If you don’t have beads, roll tiny balls of black polymer clay or simply poke holes for eyes and fill them with black paint after the ornament dries.
Step 2: Building the Face
-
Add the Eyes:
Take two small black beads and press them firmly into the upper half of the clay circle. Push them deep enough so they won’t pop out when the clay shrinks slightly during drying. -
Make the Nose:
Roll a very tiny piece of orange clay into a teardrop or carrot shape. If you don’t have orange clay, you can sculpt this from white clay and paint it later. -
Attach the Nose:
Score the back of the nose and the spot on the face where it will go, dab a tiny bit of water or slip, and press the carrot nose securely into place. -
Detail the Carrot:
Use a needle tool or toothpick to gently press small lines into the carrot to mimic the texture of a real vegetable. -
Create the Smile:
Using the tip of a toothpick or a small dotting tool, press a series of small holes into the clay to form a smile curve. Five to seven dots usually creates the perfect happy expression. -
Initial Drying:
Set the ornaments aside on a flat surface lined with parchment paper. Let them dry for 24-48 hours, flipping them occasionally to prevent curling.
Level Up: Scarves
Wrap a scrap of flannel or ribbon around the bottom of the ornament face to give your snowman a cozy 3D scarf.
Step 3: Finishing Touches
-
Smooth the Surface:
Once fully cured and hard, check the edges. If there are any rough spots, gently gently sand them down with fine-grit sandpaper. -
Paint the Nose (Optional):
If you used white clay for the nose, now is the time to carefully paint it with bright orange acrylic paint. Let it dry completely. -
Add Rosy Cheeks:
Scrape a little dust from a pink pastel stick or use real powder blush. Dip your finger or a dry brush into the powder and gently smudge a rosy spot onto one or both cheeks. -
Seal (Optional):
For longevity, you might want to brush a thin layer of matte varnish over the piece, though leaving it raw gives it a lovely rustic texture shown in the photo. -
Cut the Twine:
Cut a length of jute twine, approximately 8 inches long. -
Loop the Hanger:
Fold the twine in half, push the loop end through the hole from front to back, and pull the tails through the loop to secure it with a lark’s head knot. -
Tie the Ends:
Bring the two loose ends of the twine together and tie a simple overhand knot to close the loop.
Hang your new frosty friends on the tree and enjoy the handmade warmth they bring to your decor
Sleepy Reindeer Face Ornaments
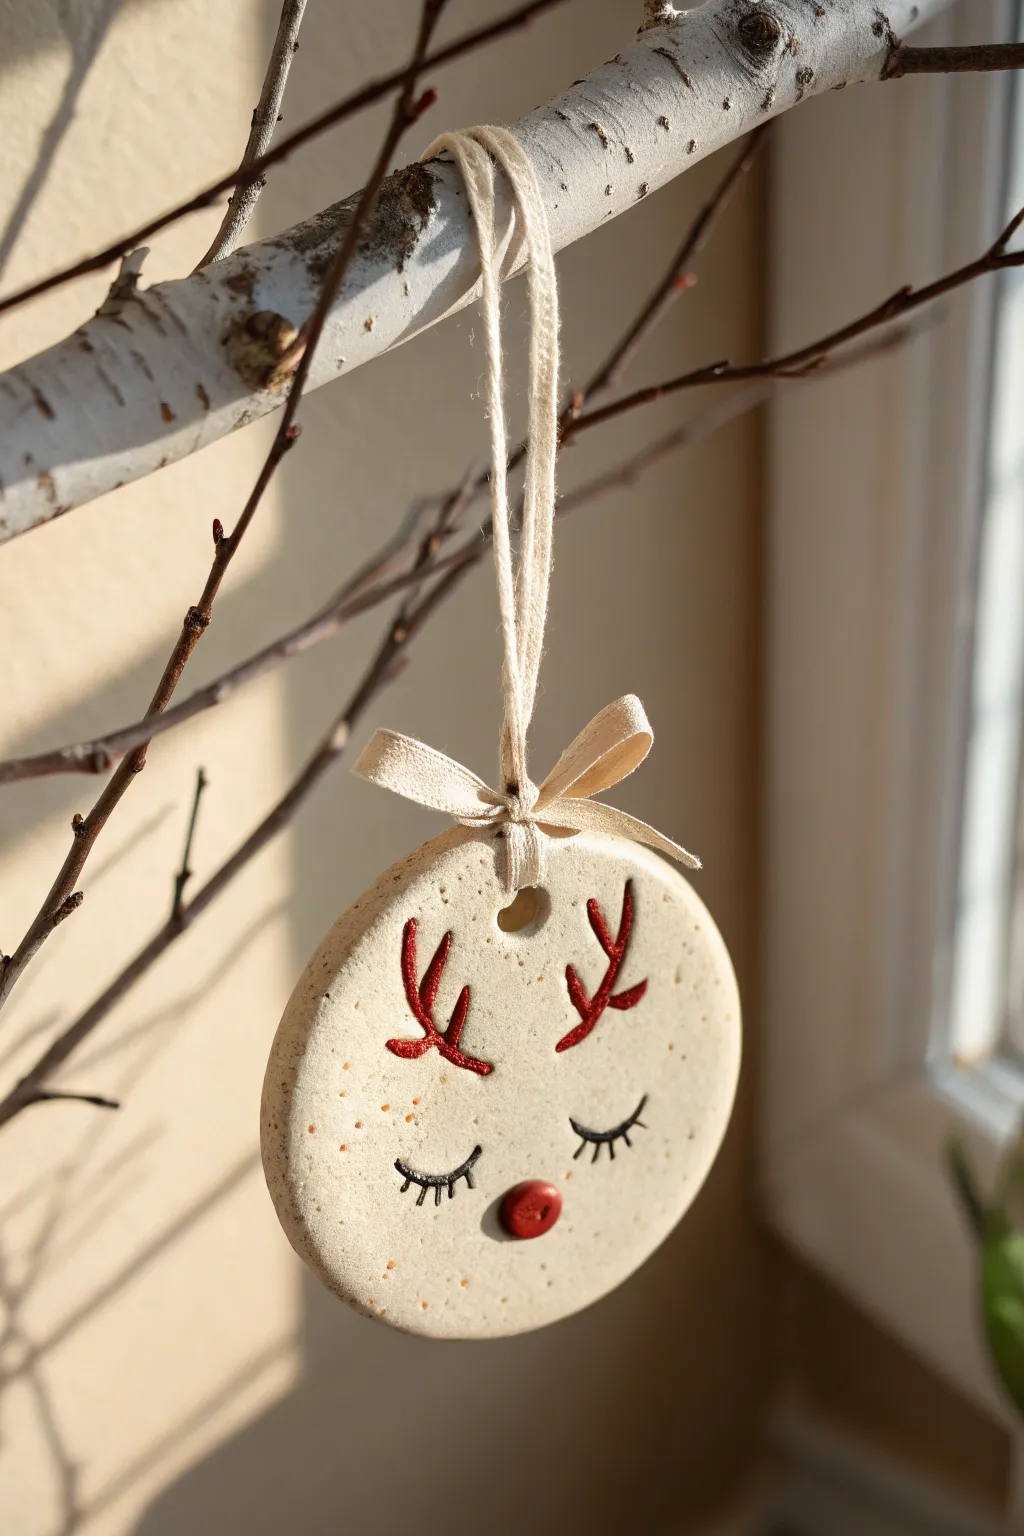
Capture the peaceful magic of the season with this darling, minimalist reindeer ornament. Made from speckled clay and featuring sweet, sleepy eyes, this rustic decoration adds a warm, handmade touch to any holiday display.
Step-by-Step Tutorial
Materials
- White or beige air-dry clay (or salt dough)
- Small rolling pin
- Round cookie cutter (approx. 3 inches)
- Drinking straw or small dowel
- Sandpaper (fine grit)
- Brown acrylic paint or water-based marker
- Black fine-point permanent marker or acrylic paint pen
- Red acrylic paint
- Small detail paintbrush
- Small red button
- Strong craft glue (e.g., E6000 or Tacky Glue)
- Cinnamon or nutmeg (optional, for speckling)
- Natural jute twine
- Beige cotton ribbon (1/4 inch wide)
- Toothbrush (optional, for splattering)
Step 1: Shaping the Clay Base
-
Prepare the clay:
Begin by conditioning a handful of air-dry clay until it is soft and pliable. If you want to achieve the speckled look shown in the photo but have plain white clay, knead in a small pinch of cinnamon or nutmeg now. -
Roll it out:
Roll the clay out on a smooth surface to an even thickness of about 1/4 inch. Avoid making it too thin, as it needs to support the button nose later without cracking. -
Cut the circle:
Press your round cookie cutter firmly into the clay to create a clean circle. If the edges are rough, dip your finger in a little water and gently smooth them down. -
Create the hanging hole:
Use a drinking straw or a small wooden dowel to punch a hole near the top edge of the circle. Make sure it’s centered and not too close to the edge to prevent breakage. -
Add texture (optional):
If your clay is plain, you can create a faux-stone texture now. Dip an old toothbrush in watered-down brown paint and lightly flick speckles onto the wet clay surface. -
Let it dry:
Place the clay circle on a drying rack or a sheet of parchment paper. Allow it to dry completely according to the package instructions, flipping it halfway through to keep it flat.
Natural Speckle Trick
Mix wet coffee grounds into your clay before rolling it out. This creates a beautifully organic, granite-like texture similar to the photo.
Step 2: Adding the Reindeer Features
-
Sand the surface:
Once fully dry, lightly sand the edges and surface with fine-grit sandpaper to ensure a smooth canvas for your artwork. -
Outline the antlers:
Using a very fine paintbrush dipped in red acrylic paint, carefully draw two simple antlers near the top half of the circle. They should branch out slightly toward the edges. -
Thicken the antlers:
Go over the red lines again to add a little volume and opacity to the antlers, ensuring the color pops against the neutral background. -
Draw the eyes:
With a black fine-point marker or paint pen, draw two curved U-shapes for the sleepy eyelids. Position them evenly in the lower half of the circle. -
Add eyelashes:
Add three small, straight lines extending downward from each eyelid curve to create delicate eyelashes. -
Glue the nose:
Apply a dab of strong craft glue to the back of a small red button. Press it firmly onto the center of the face, just below and between the eyes.
Curling Clay Fix
If the edges curl up while drying, place a lightweight book on the clay face once the surface is dry to the touch but the center is still curing.
Step 3: Final Assembly
-
Cut the twine:
Cut a piece of jute twine approximately 8 inches long. Clean ends make threading easier. -
Thread the hanger:
Fold the twine in half and push the looped end through the hole from the front to the back. Pull the tails through the loop to create a lark’s head knot, or simply tie it off at the top. -
Create a bow:
Take a length of beige cotton ribbon and tie a tiny, neat bow. Trim the tails at an angle so they don’t look too bulky. -
Attach the bow:
Place a small dot of glue right at the base of the twine knot on the front of the ornament. Press the ribbon bow into the glue and hold it for a few seconds until secure.
Hang your finished reindeer on the tree or use it as a charming gift topper for a rustic holiday look


What Really Happens Inside the Kiln
Learn how time and temperature work together inside the kiln to transform clay into durable ceramic.
Cozy Sweater Texture Ornaments
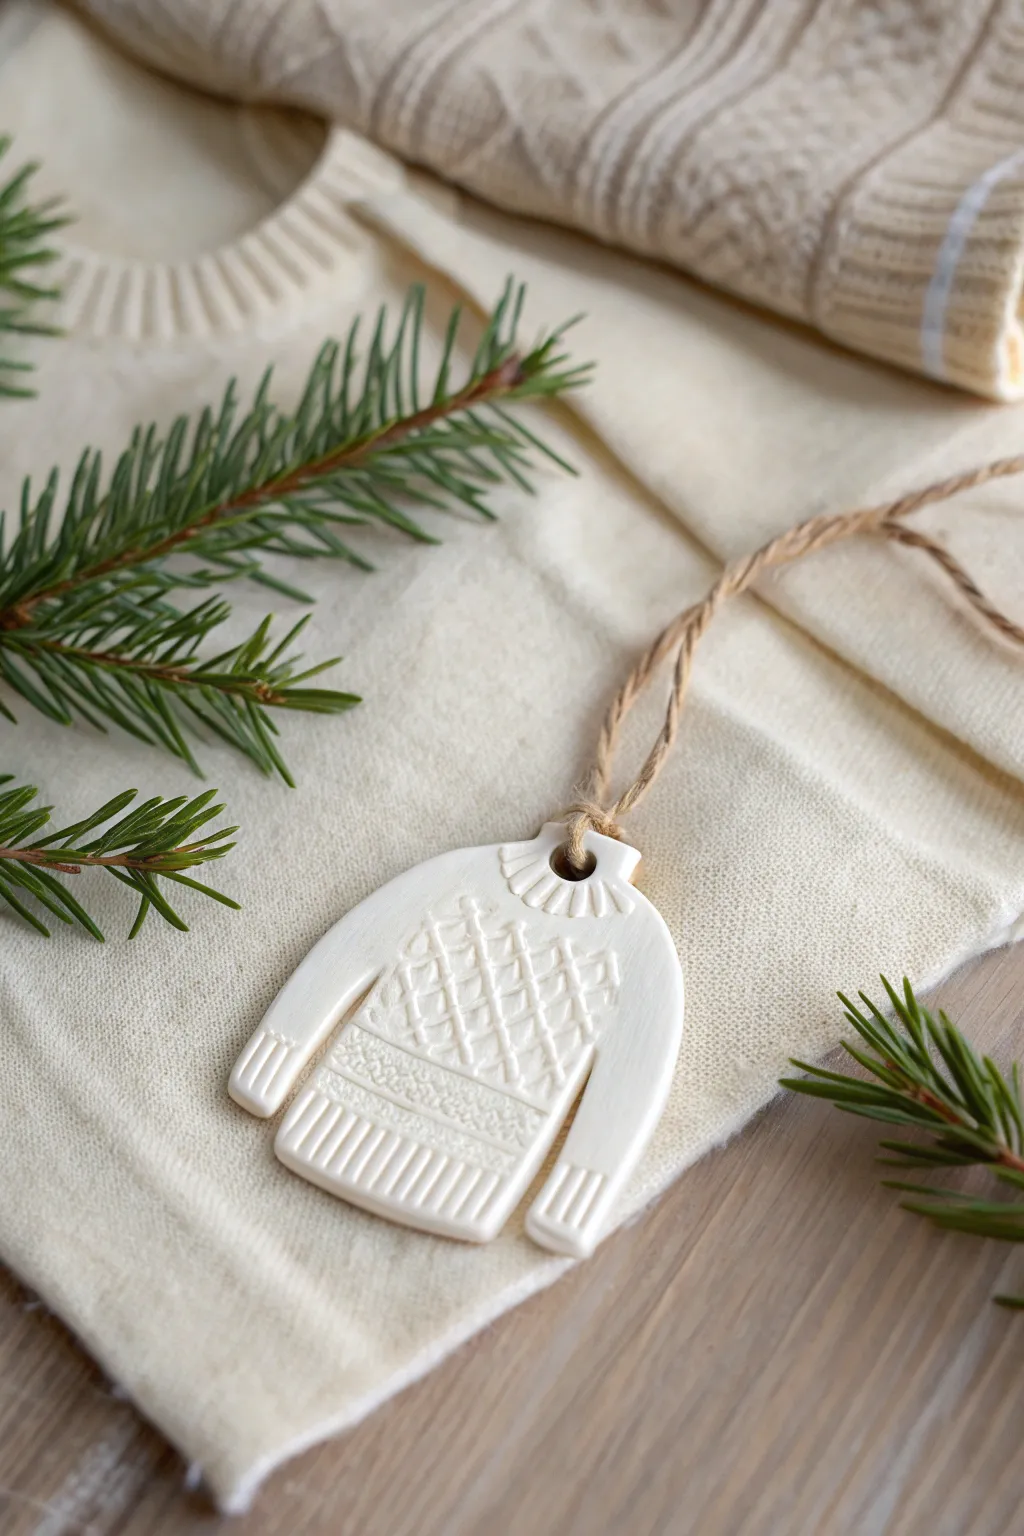
Capture the warmth of your favorite winter woolens with this adorable clay ornament shaped like a cozy sweater. By using simple impressions and patience, you can mimic realistic knit textures like ribbing and cable patterns on a sleek, minimalist white surface.
Step-by-Step
Materials
- White polymer clay or air-dry clay
- Rolling pin or acrylic roller
- Sweater-shaped cookie cutter (or craft knife and paper template)
- Needle tool or toothpick
- Small dull detail tool or clay shaper
- Texture sheet (knitted pattern) or fabric/lace for impression (optional but helpful)
- Straw or small circle cutter (for the hanging hole)
- Fine-grit sandpaper
- Jute twine or ribbon for hanging
- Gloss or matte varnish (optional)
Step 1: Shaping the Base
-
Condition the clay:
Start by kneading your white clay until it is soft, pliable, and free of cracks. If you are using polymer clay, warm it in your hands for a few minutes to ensure it’s easy to work with. -
Roll out the slab:
Roll the clay out on a smooth surface to an even thickness of about 1/4 inch (6mm). You want it thick enough to take deep impressions without becoming fragile. -
Cut the shape:
Press your sweater-shaped cookie cutter firmly into the clay. If you don’t have a cutter, print a small sweater silhouette on paper, cut it out, place it on the clay, and trace around it carefully with a craft knife. -
Smooth the edges:
Remove the excess clay and gently run your finger along the cut edges of the sweater to soften any sharp corners or burrs left by the cutter. -
Create the hanging hole:
Use a straw or a small circular tool to punch a clean hole at the top neck area of the sweater. Make sure the hole is not too close to the edge to prevent tearing later.
Use Real Fabric
Instead of drawing lines manually, press a piece of actual coarse knit fabric or lace into the clay slab before cutting out the shape for instant, realistic texture.
Step 2: Creating the Knit Textures
-
Mark the ribbed zones:
Using a dull tool or the back of a knife, gently press parallel vertical lines into the bottom hem, the cuffs of the sleeves, and the collar area. These lines mimic the ribbing found on real sweaters. -
Define the collar:
For the neckline, press your tool slightly deeper to create a distinct curve where the collar meets the body of the sweater, ensuring the ribbing radiates outward slightly. -
Create the central panel:
Decide on the central area for your main pattern. You can lightly sketch a rectangular box on the chest area with a needle tool to serve as a guide. -
Impress the diamond pattern:
Using a needle tool, draw intersecting diagonal lines to create a lattice or diamond grid pattern within your central panel. Press gently but firmly. -
Add texture dots:
Inside each diamond shape or at the intersections of your lines, poke a very small, shallow hole or indentation. This mimics the stitch detail of a cable knit. -
Texture the fill:
Beneath the diamond pattern area, use a toothbrush or a stippling sponge to dab the clay surface gently. This creates a moss-stitch or fuzzy wool texture contrast against the smooth clay. -
Clean up details:
Inspect your design for any stray clay crumbs created during the texturing process and carefully brush them away with a soft paintbrush.
Make It a Set
Create a matching collection by cutting out mitten and stocking shapes, using the same ribbing and diamond patterns to tie the look together.
Step 3: Finishing Touches
-
Dry or bake:
If using polymer clay, bake according to the manufacturer’s instructions on the package. If using air-dry clay, verify it is on a flat surface and let it dry for 24-48 hours, flipping it halfway through. -
Sand for smoothness:
Once fully cured or dried, take fine-grit sandpaper and very gently sand the edges and the back of the ornament to ensure a professional, smooth finish. -
Seal (Optional):
For longevity, especially with air-dry clay, apply a thin coat of matte or satin varnish. This protects the intricate textures from dust and moisture. -
Add the hanger:
Cut a length of natural jute twine, loop it through the hole at the neckline, and tie a secure knot to complete the rustic look.
Hang your miniature sweater on the tree and enjoy the cozy charm it brings to your holiday decor
Botanical Imprint Leaf Disc Ornaments

Capture nature’s intricate details with this elegant clay ornament featuring a delicate leaf impression. The subtle golden inlay against the stark white clay creates a sophisticated, organic decoration perfect for any season.
Step-by-Step Guide
Materials
- White air-dry clay (or polymer clay)
- Small rolling pin
- Circular cookie cutter (approx. 3 inches)
- Fresh leaf with prominent veins (like oak or rose)
- Gold metallic acrylic paint or gilt wax
- Fine-grit sandpaper
- Thin paintbrush
- Jute twine or hemp cord
- Drinking straw or skewer
- Parchment paper
Step 1: Preparation & Clay Work
-
Prep your surface:
Lay down a sheet of parchment paper on a flat work surface. This prevents sticking and makes lifting the delicate clay easier later. -
Condition the clay:
Take a handful of your white air-dry clay and knead it until it’s soft, pliable, and free of cracks. Warm hands help this process immensely. -
Roll the slab:
Using your rolling pin, roll the clay out to an even thickness of about 1/4 inch. Try to keep the surface as smooth as possible. -
Select your botanical:
Choose a fresh leaf. Stiff leaves with raised veins on the back work best for a crisp impression. Ensure it is clean and dry. -
Create the imprint:
Place the leaf vein-side down onto the clay slab. Gently roll over the leaf with the rolling pin once, applying firm, even pressure to push it into the clay. -
Reveal the texture:
carefully lift the stem of the leaf and peel it away from the clay to reveal the imprinted design. -
Cut the shape:
Position your circular cookie cutter over the imprint, centering the leaf design pleasingly. Press down firmly to cut the disc. -
Clean edges:
Remove the excess clay from around the circle. If the edges are ragged, dip your finger in a little water and smooth them gently. -
Make the hole:
Use a drinking straw or a skewer to punch a hole near the top edge for hanging. Make sure it’s not too close to the edge to prevent tearing.
Vein Definition Tip
Use leaves with thick, woody veins (like hydrangea or deeply veined oak) rather than tender greens. Result is 10x sharper.
Step 2: Drying & Finishing
-
Let it dry:
Allow the ornament to dry completely according to the clay package instructions. This usually takes 24-48 hours. flip it halfway through to prevent curling. -
Sand for smoothness:
Once fully dry and hard, use fine-grit sandpaper to buff away any rough spots on the edges or surface, wiping away dust with a dry cloth. -
Highlight the veins:
I like to use a very fine brush to paint gold metallic paint strictly into the recessed veins of the leaf imprint. -
Wipe back excess:
If painting feels too tedious, rub a gold gilding wax over the imprint and quickly wipe the surface with a paper towel, leaving gold only in the deep grooves. -
Seal (Optional):
To protect the finish, you can apply a matte varnish over the entire piece, though leaving the raw clay texture looks lovely too. -
Add the hanger:
Cut a length of natural jute twine, thread it through the hole, and tie a simple knot at the top to create a loop.
Scented Variation
Knead a few drops of essential oil (like cinnamon or pine) into the clay before rolling for ornaments that smell as good as they look.
Hang your new botanical creation near a window to catch the light on those golden details

TRACK YOUR CERAMIC JOURNEY
Capture glaze tests, firing details, and creative progress—all in one simple printable. Make your projects easier to repeat and improve.
Soft Watercolor-Wash Ornaments

Capture the soft, ethereal beauty of winter morning light with these delicate watercolor-wash ornaments. Using simple air-dry clay and diluted paints, you can create a dreamy, faded gradient that looks lovely hanging on a branch or adorning a gift.
Detailed Instructions
Materials
- White air-dry clay (or polymer clay)
- Rolling pin
- Christmas tree cookie cutter
- Fine-grit sandpaper
- Watercolor paints (pink, yellow, pale green)
- Small soft paintbrush
- Cup of water
- Paper towels
- Skewer or straw (for the hole)
- Jute twine or ribbon
- Clear matte sealant (optional)
Step 1: Shaping the Clay
-
Condition the clay:
Begin by working a handful of white air-dry clay in your hands until it becomes warm, pliable, and free of cracks. -
Roll it out:
Place the clay on a clean, smooth surface—I find a silicone mat works best here to prevent sticking. Roll it out to an even thickness of about 1/4 inch. -
Cut the shape:
Press your Christmas tree cookie cutter firmly into the clay. Give it a tiny wiggle to ensure clean edges before lifting it away. -
Smooth the edges:
Dip your finger in a little water and gently run it along the cut edges of the tree to smooth down any roughness left by the cutter. -
Create a hanging hole:
Use a skewer or a straw to punch a hole near the top tip of the tree. Make sure the hole is large enough for your twine to pass through later. -
Let it dry:
Lay the ornament flat on a piece of parchment paper or a drying rack. Allow it to air dry for 24-48 hours, flipping it over halfway through to ensure it dries evenly without warping. -
Sand for perfection:
Once fully dry and hard, take a piece of fine-grit sandpaper and lightly buff the surface and edges to create a pristine, smooth canvas for your paint.
Clay Smoothness Tip
To fix small cracks while the clay is wet, use a tiny amount of vinegar on your finger instead of water. It helps ‘melt’ the clay together seamlessly.
Step 2: Applying the Watercolor Wash
-
Prepare your palette:
Mix your watercolor paints with a generous amount of water. You want very watery, translucent washes rather than opaque colors. -
Start with the top:
Dip your brush into the pale green wash. Lightly dab it onto the top third of the tree. Don’t aim for perfect coverage; let the white clay show through in spots. -
Add the middle tone:
While the green is still slightly damp, pick up your watery pink paint. Apply this to the middle section of the tree. -
Blend the transition:
Use a clean, damp brush to gently touch the area where the green and pink meet. This encourages them to bleed together softly, creating that dreamy watercolor look. -
Finish the bottom:
Apply a very faint yellow or warm beige wash to the lower section of the tree, blending it upwards into the pink. -
Blot for texture:
If a color looks too heavy, quickly blot it with a crumpled paper towel. This lifts some pigment and adds a nice, organic texture. -
Dry the paint:
Allow the paint to dry completely. Because watercolors dry quickly on porous clay, this should only take about 15-20 minutes.
Add Subtle Sparkle
While the watercolor paint is still wet, sprinkle a tiny pinch of ultra-fine iridescent glitter on the edges for a frosty, glistening snow effect.
Step 3: Finishing Touches
-
Seal (optional):
To protect the water-soluble paint, you can spray a light coat of matte clear sealant over the ornament. This prevents smudging if it gets damp. -
Cut the twine:
Cut a length of natural jute twine, approximately 8 inches long. -
Thread the loop:
Fold the twine in half and push the looped end through the hole from front to back. -
Secure the hanger:
Pull the loose ends of the twine through the loop and tighten gently to create a lark’s head knot at the top of the tree. -
Tie the ends:
Knot the two loose ends of the twine together to finish the hanging loop.
Now you have a serene, handcrafted piece of holiday decor ready to display.
Terrazzo Confetti Shape Ornaments
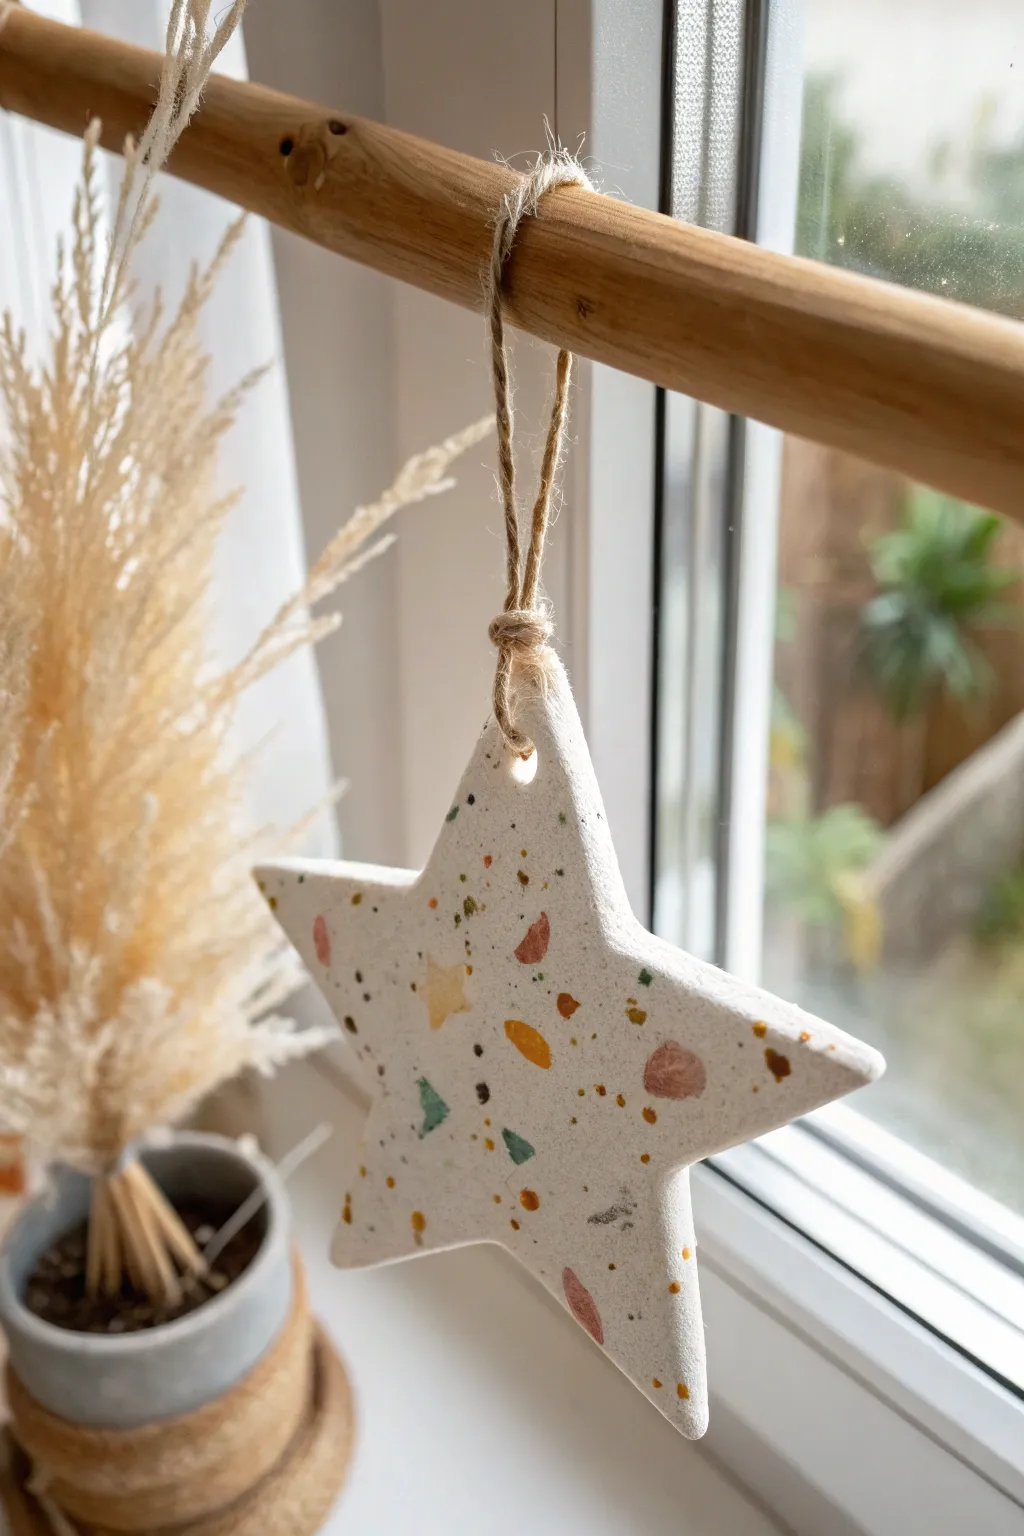
Bring a trendy, playful touch to your decor with this chic terrazzo-style star ornament. By mixing colorful clay fragments into a plain white base, you achieve a sophisticated speckled finish that looks incredibly high-end but is surprisingly simple to make.
Detailed Instructions
Materials
- White polymer clay (or air-dry clay)
- Small amounts of colored polymer clay (terra cotta, mustard yellow, sage green, teal)
- Rolling pin (acrylic or wooden)
- Star-shaped cookie cutter (approx. 4 inches)
- Parchment paper or silicone baking mat
- Craft knife or scalpel
- Straw or small circle cutter (for the hole)
- Jute twine or rustic string
- Fine-grit sandpaper (optional)
- Matte sealant or glaze (optional)
Step 1: Creating the Chips
-
Prepare the colored clay:
Begin by conditioning small amounts of your colored clays—terra cotta, mustard, sage, and teal—until they are soft and pliable. You only need a tiny pinch of each color for the confetti effect. -
Flatten deeply:
Roll each colored piece out as thin as possible, almost paper-thin. The thinner these sheets are, the better they will integrate into the base clay later. -
Create the confetti:
Use your craft knife to chop these thin sheets into irregular, tiny shards. Aim for varied sizes, from microscopic specks to slightly larger triangles and polygons, to mimic real stone terrazzo. -
Mix the chips:
Gather all your colored shards into a loose pile. I like to toss them gently with my fingers to ensure the colors are well-distributed before adding them to the white base.
Step 2: Forming the Ornament
-
Condition the white base:
Take a larger block of white polymer clay and knead it until it’s completely smooth and warm. This prevents cracks from forming during the rolling process. -
Initial rolling:
Roll the white clay out on your parchment paper until it is about 1/4 inch thick. It doesn’t need to be perfect yet, just a flat canvas. -
Apply the confetti:
Sprinkle your prepared colored chips randomly over the surface of the white clay. Be generous, but leave some white space visible for contrast. -
Embed the chips:
Gently run the rolling pin over the clay again. Press down firmly enough to force the colored chips into the white base so they become flush with the surface. -
Smooth the surface:
Continue rolling in different directions until the clay is uniform in thickness (about 1/8 to 1/4 inch) and the surface feels completely smooth to the touch. -
Cut the shape:
Position your star cookie cutter over a section of the slab that has a pleasing distribution of colors. Press down firmly and give it a little wiggle to cut clean through the clay. -
Make the hanging hole:
While the clay is still in the cutter (or immediately after removing the excess clay), use a plastic straw or a small circle tool to punch a hole near the top point of the star. -
Clean edges:
Gently lift away the excess clay. If the edges of the star look a bit rough, smooth them lightly with your fingertip or a soft tool.
Stone Effect
Add a pinch of black pepper or used dried coffee grounds into your white clay base before rolling. This adds tiny organic speckles that make the clay look like real ceramic or stone.
Step 3: Finishing Touches
-
Bake or dry:
If using polymer clay, bake according to the package instructions (usually around 275°F for 15 minutes per 1/4 inch of thickness). If using air-dry clay, let it sit undisturbed for 24-48 hours. -
Sand for smoothness:
Once fully cured and cooled, use fine-grit sandpaper to buff the surface lightly. This removes any fingerprints and makes the colored chips pop even more. -
Add texture (optional):
For a more organic look like the reference creates, you can lightly tap a toothbrush on the unbaked surface or flick a tiny bit of diluted paint for extra speckles before baking. -
Attach the hanger:
Cut a length of jute twine, about 8 inches long. Thread one end through the hole in the star. -
Knot the loop:
Bring the ends of the twine together and tie a secure overhand knot right close to the top of the star’s point to create a neat loop. -
Secure the top:
Tie another knot a few inches up the twine if you want a specific hanging length, or simply leave the main loop open for hanging on branches or dowels.
Smearing Colors?
If the colored chips are smearing into the white during rolling, your clay might be too warm. Let the chips and base slab cool in the fridge for 5 minutes before the final roll.
Hang your new terrazzo star near a window to let the natural light highlight those beautiful colors
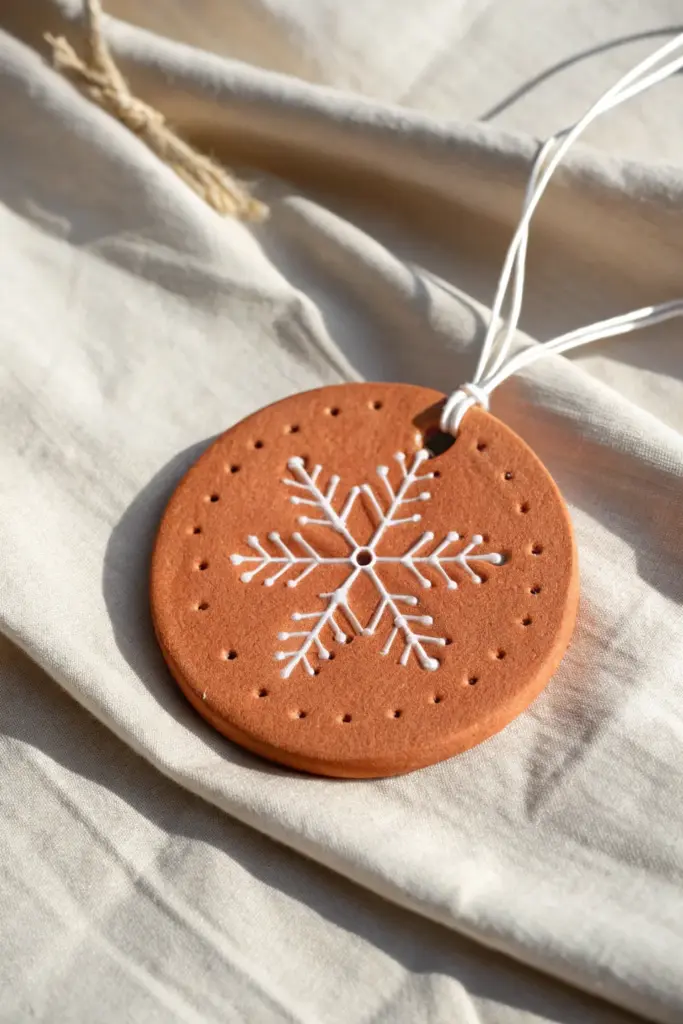
Stitched Snowflake Thread Ornaments

Embrace the warmth of natural textures with this charming terracotta-style ornament featuring an embroidered snowflake finish. The combination of earthy clay tones and crisp white thread creates a cozy, handmade aesthetic perfect for rustic holiday decor.
Detailed Instructions
Materials
- Polymer clay (terracotta color) or air-dry clay
- Rolling pin
- Circle cookie cutter (approx. 3-4 inches)
- White embroidery floss
- Embroidery needle (dull tip preferred)
- Toothpick or small skewer
- Sandpaper (fine grit)
- White cord or twine for hanging
- Parchment paper
Step 1: Shaping the Clay Base
-
Condition the Clay:
Begin by warming the terracotta polymer clay in your hands until it becomes soft and pliable. If you are using air-dry clay, knead it briefly to remove air bubbles and ensure a smooth consistency. -
Roll it Out:
Place the clay between two sheets of parchment paper to prevent sticking. Use your rolling pin to flatten the clay into an even slab, aiming for a thickness of about 1/4 inch so it’s sturdy enough for handling. -
Cut the Shape:
Press your circle cookie cutter firmly into the clay slab. Wiggle it slightly to ensure a clean cut, then peel away the excess clay from the outside. -
Smooth the Edges:
Dip your finger in a tiny bit of water (or baby oil for polymer clay) and gently run it around the circumference of the circle to smooth down any rough ridges left by the cutter.
Step 2: Creating the Stitching Guide
-
Mark the Center:
Find the approximate center of your circle. Use a toothpick to gently create a hole right in the middle; make this hole slightly larger than the others, as multiple threads will pass through it. -
Mark Main Spokes:
Visualize a clock face. Using your toothpick, poke holes at the 12, 2, 4, 6, 8, and 10 o’clock positions, leaving a border of about half an inch from the edge. -
Add Decorative Holes:
Along each ‘spoke’ line connecting the center to the outer holes, poke two smaller holes evenly spaced. These will act as anchors for the V-shaped details on the snowflake arms. -
Create the Border Holes:
To mimic the cookie-like border seen in the inspiration, use your toothpick or a small dotting tool to press shallow indentations around the very edge of the circle. These are just for texture, not for stitching. -
Make the Hanging Hole:
At the very top of the ornament, piercing through the clay completely, make a larger hole (approx. 5mm) to accommodate the final hanging cord.
Needle Know-How
Use a tapestry needle or one with a blunt tip. Since the holes are pre-drilled, you don’t need a sharp point, and a blunt tip prevents you from accidentally scratching the baked clay surface.
Step 3: Baking and Stitching
-
Bake or Dry:
Follow the manufacturer’s instructions for your specific clay. For polymer clay, bake on a lined sheet (usually 275°F/135°C for 15-30 mins). For air-dry clay, let it sit for 24-48 hours until fully hardened. -
Smooth the Surface:
Once the ornament is completely cool and hard, lightly sand the edges if there are any sharp bits. Wipe away any dust with a damp cloth. -
Prepare the Thread:
Cut a generous length (about 24 inches) of white embroidery floss. Thread your needle and refuse the urge to tie a knot at the end just yet. -
Stitch the Spokes:
Coming from the back of the ornament, pull the needle through the center hole, leaving a 2-inch tail on the back. Stitch outward to one of the main outer holes, then go back down. Repeat for all six main spokes, always returning to the center. -
Stitch the Details:
Bring your needle up through one of the holes midway along a spoke. Stitch a V-shape by connecting it to the clay surface (or small pre-made holes if you made them close enough). If you didn’t make side holes, simply loop the thread under the main spoke thread to create a knot-like V-shape. -
Secure the Thread:
Once your snowflake pattern is complete, turn the ornament over. Tie the working thread to the starting tail you left earlier. Secure it with a double knot and trim the excess close to the clay. -
Add the Hanger:
Fold a piece of white cord in half. Push the loop through the large top hole from front to back, then pull the loose ends through that loop to create a lark’s head knot.
Sparkle & Shine
Brush a rigorous layer of matte varnish over the clay before stitching for a sealed finish, or use metallic gold embroidery thread instead of white for a glamorous, festive upgrade.
Hang this rustic beauty on your tree and enjoy the cozy contrast of thread against clay