If you’re craving a clay project that’s quick, functional, and guaranteed to make you smile, cute clay plates are it. I love how a simple little dish can turn into a tiny character, snack, or pastel daydream that holds your jewelry in style.
Classic Heart Trinket Plate
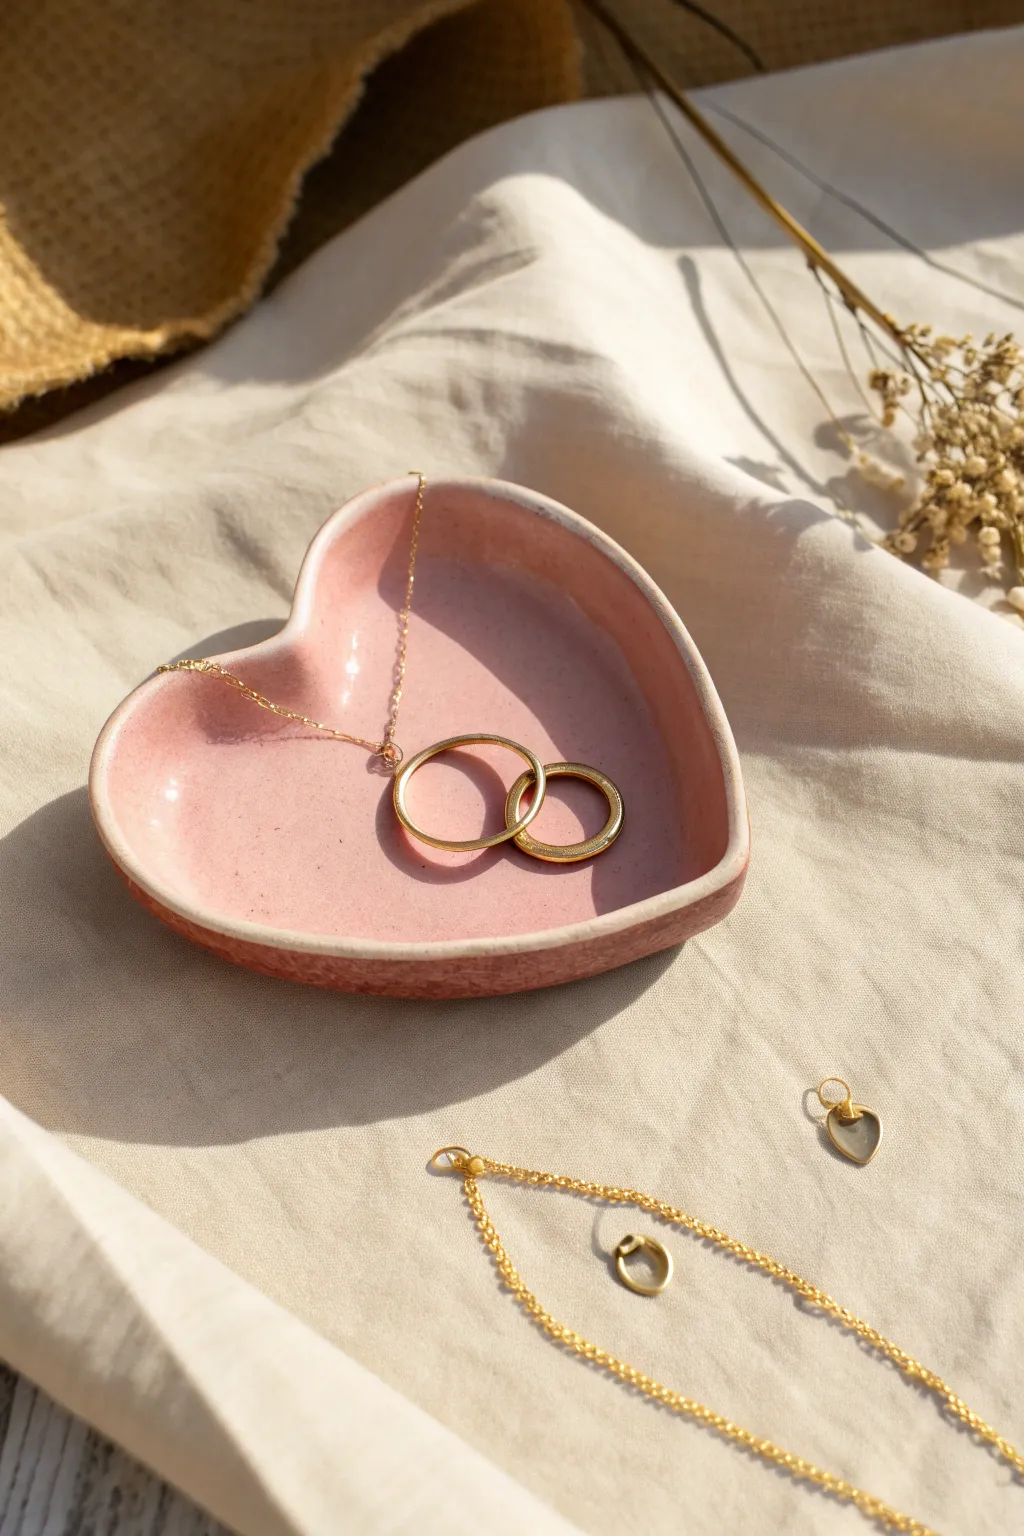
This sweet, heart-shaped trinket dish features a glossy pink glaze with subtle speckling that gives it a beautiful, organic feel. It is the perfect size for holding your favorite delicate gold chains and rings on a nightstand.
Step-by-Step
Materials
- White air-dry clay or polymer clay
- Rolling pin
- Heart-shaped cookie cutter (medium size)
- Small bowl or sponge (for drying)
- Sandpaper (fine grit)
- Glossy pink acrylic paint or ceramic glaze
- Clear high-gloss varnish (if using acrylics)
- Paintbrush (soft bristle)
- Water cup
- Clay sculpting tool or butter knife
Step 1: Shaping the Clay
-
Condition the clay:
Begin by taking a handful of clay and kneading it in your hands until it becomes warm, soft, and pliable. This prevents cracks later on. -
Roll it out:
Place the clay on a clean, flat surface. Use your rolling pin to flatten it into an even sheet, aiming for a thickness of about 1/4 inch. -
Cut the shape:
Press your heart-shaped cookie cutter firmly into the rolled clay. If you don’t have a cutter, you can sketch a heart lightly with a needle tool and cut it out carefully with a knife. -
Smooth the edges:
Dip your finger in a little bit of water and run it along the cut edge of the heart to smooth out any roughness or loose bits of clay. -
Create the curvature:
Gently lift the clay heart. To give it a dish shape, you need to curve the edges upward. You can do this by pinching the edges up with your fingers. -
Refine the form:
For a smoother curve, place the clay heart into a slightly larger, shallow bowl to dry. This will help it hold a cupped shape as it hardens. -
Let it dry:
Allow the clay to dry completely according to the package instructions. This usually takes 24-48 hours. Don’t rush this part or the clay might crack.
Cracked edges?
If you see tiny cracks forming while the clay dries, mix a small amount of fresh clay with water to make a paste and fill them in immediately.
Step 2: Sanding and Painting
-
Sand imperfections:
Once fully dry, take your fine-grit sandpaper and gently sand the edges and surface. Focus on the rim to make sure it feels smooth to the touch. -
Wipe clean:
Use a slightly damp cloth or paper towel to wipe away all the sanding dust. The surface needs to be totally clean for the paint to adhere well. -
Mix your base color:
Prepare your pink paint. If you want that specific speckled look seen in the photo, I like to mix a tiny drop of brown or dark grey into a small portion of pink paint separately for the speckles. -
Apply the first coat:
Paint the entire interior and exterior of the dish with your main pink shade. Use smooth, long strokes to minimize brush marks. -
Add a second coat:
Let the first layer dry to the touch, then add a second coat of pink to ensure the color is solid and opaque. -
Create the texture effect:
To mimic the stone-like texture, dip an old toothbrush or a stiff brush into your slightly darker speckle mixture. Run your thumb over the bristles to flick tiny specks of paint onto the dish. -
Dry the paint:
Allow the paint to dry completely. If you used heavy distinct speckles, give it a little extra time.
Step 3: Finishing Touches
-
Apply varnish:
To achieve that high-gloss ceramic look, apply a thick, even coat of high-gloss varnish or glaze over the entire dish. -
Watch for drips:
Check the edges for any dripping varnish and wipe them away immediately with your brush before they harden. -
Final cure:
Let the varnish cure fully. A good glossy finish often needs 24 hours to become rock hard and non-tacky.
Gold Rim Upgrade
Once the pink glaze is dry, paint just the very top rim of the heart with metallic gold leaf paint for a luxurious, high-end finish.
Now your lovely handmade dish is ready to keep your jewelry safe and organized


Flower Petal Mini Plate
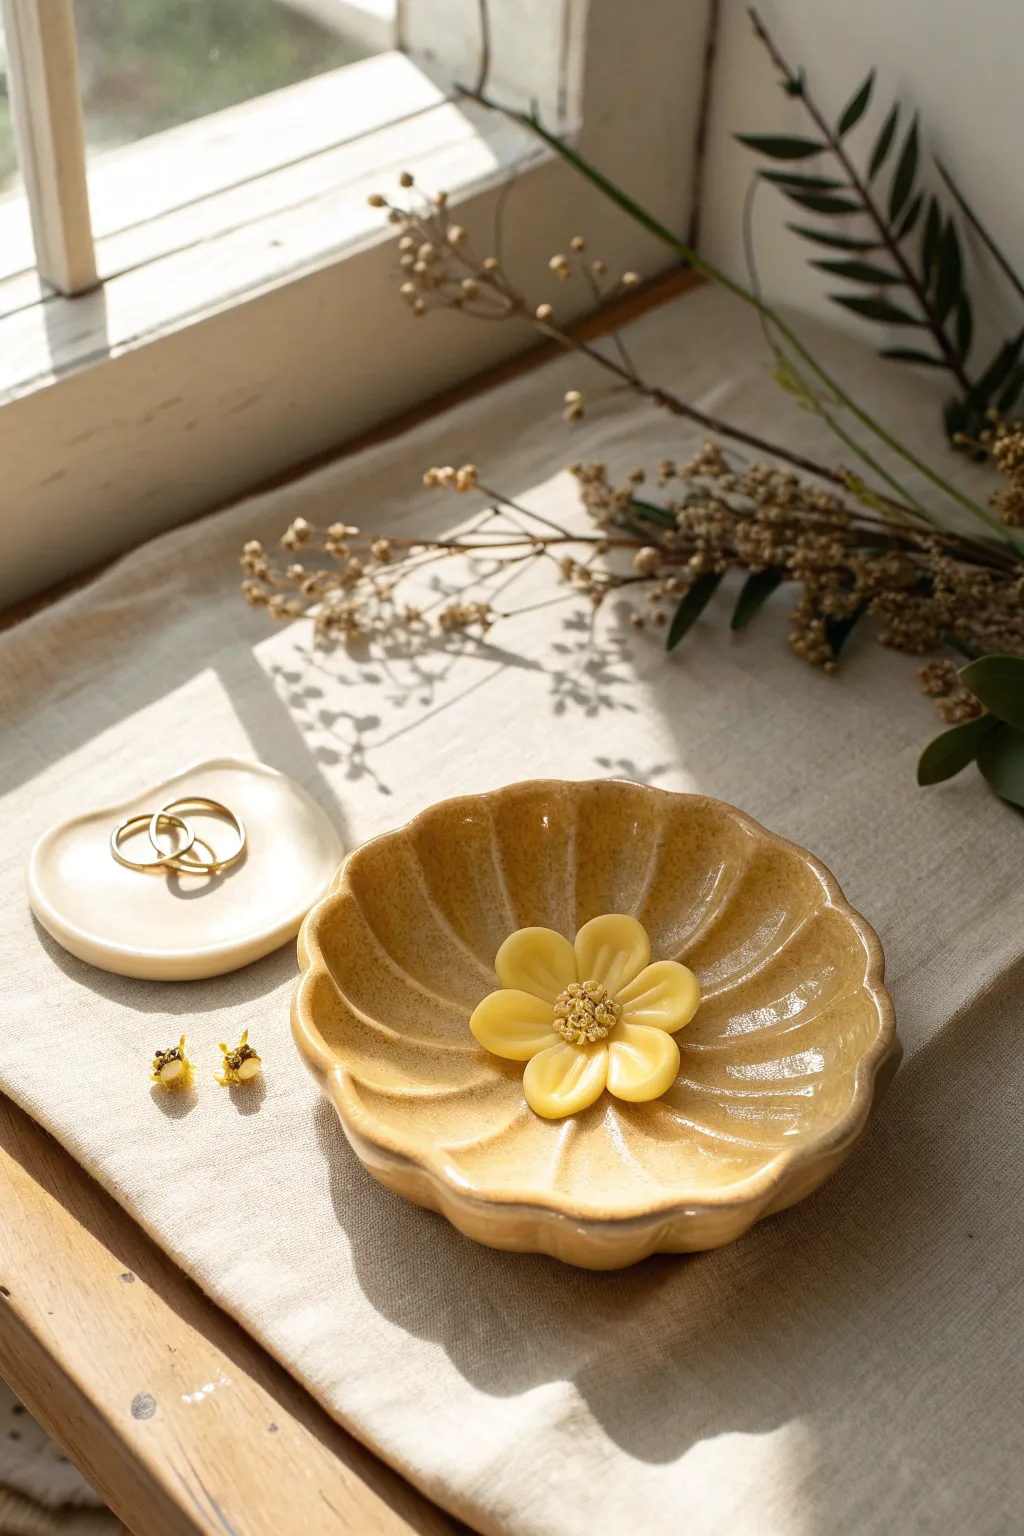
Bring a touch of eternal spring to your dressing table with this scalloped, golden-yellow trinket dish. Modeled to look like an open bloom with a delicate center, its glossy finish catches the light beautifully, making it the perfect home for your favorite rings.
Detailed Instructions
Materials
- Air-dry clay or polymer clay (white)
- Acrylic rolling pin
- Circle clay cutter (approx. 4-5 inches)
- Small sculpting tool or toothpick
- Sponge or soft paintbrush
- Water (for smoothing)
- Deep yellow or ochre acrylic paint (if using air-dry clay)
- High-gloss varnish or glaze
- Small bowl (for shaping)
- Cling film/plastic wrap
Step 1: Shaping the Base
-
Roll the slab:
Begin by conditioning your clay until it is soft and pliable. Roll it out into an even slab, approximately 1/4 inch thick. Aim for a consistent thickness to ensure even drying. -
Cut the circle:
Use your large circle cutter or trace around a bowl to cut a perfect circle from the clay slab to serve as the main body of the plate. -
Create the scalloped edge:
Gently press your thumb or a rounded tool into the edge of the circle at regular intervals to create the initial petal curves. Work your way around the entire circumference. -
Define the petals:
Using a modeling tool or the side of a paintbrush handle, press indentation lines radiating from the center of the circle out to the divots between your scallops. This creates the illusion of individual petals. -
Form the bowl shape:
Line a small bowl with cling film. Gently lift your clay flower and place it inside the bowl, allowing it to slump slightly to take on a curved, dish-like form. -
Smooth the edges:
Dip your finger in a little water (or clay softener) and run it along the rim of the petals to remove any sharp edges or roughness.
Cracking Clay?
If you notice tiny cracks while shaping air-dry clay, dip your finger in water and smooth them out immediately. Cover clay with a damp cloth if you step away.
Step 2: Adding the Center Bloom
-
Shape center petals:
Roll five small balls of clay, roughly pea-sized. Flatten them into teardrop shapes to form the inner flower petals. -
Arrange the center:
Place these five teardrops in the very center of your dish, points meeting in the middle. Press them down gently to adhere them to the base. -
Create the stamen:
Roll a tiny ball of clay and flatten it slightly. Using a needle tool or toothpick, poke many tiny holes into the surface to create a textured, pollen-like appearance. -
Attach the stamen:
Score the center of the attached petals lightly, add a dab of water or liquid clay, and press your textured button into the middle. -
Refine the details:
Use a small tool to press a central line into each of the inner petals, adding depth and realism to the miniature flower.
Step 3: Finishing Touches
-
Initial drying:
Allow the clay to dry (or bake, if using polymer) while still in the bowl support. This ensures it holds its cupped shape. -
Sanding:
Once fully cured and hard, gently sand any rough spots, particularly around the rim, using fine-grit sandpaper. -
Painting the base:
Apply a coat of warm, ochre-yellow paint to the entire piece. I like to water the paint down slightly for the first coat to really get into the crevices of the stamen. -
Adding dimension:
Mix a slightly lighter yellow or cream color and dry-brush it onto the raised parts of the petals to highlight the texture. -
Highlighting the center:
Carefully dab a tiny bit of gold or pale yellow paint onto the textured stamen center to make it pop against the petals. -
Glazing:
Finish with two or three coats of high-gloss varnish. This step is crucial to achieving that ceramic-like, glass-smooth shine shown in the inspiration image.
Glaze Hack
For a glass-like finish without a kiln, use UV resin instead of varnish. Brush a thin layer over the painted clay and cure under a UV lamp for a durable shine.
Place this sunny little dish near a window and watch how it brightens up your jewelry collection


Cloud-Shaped Jewelry Dish
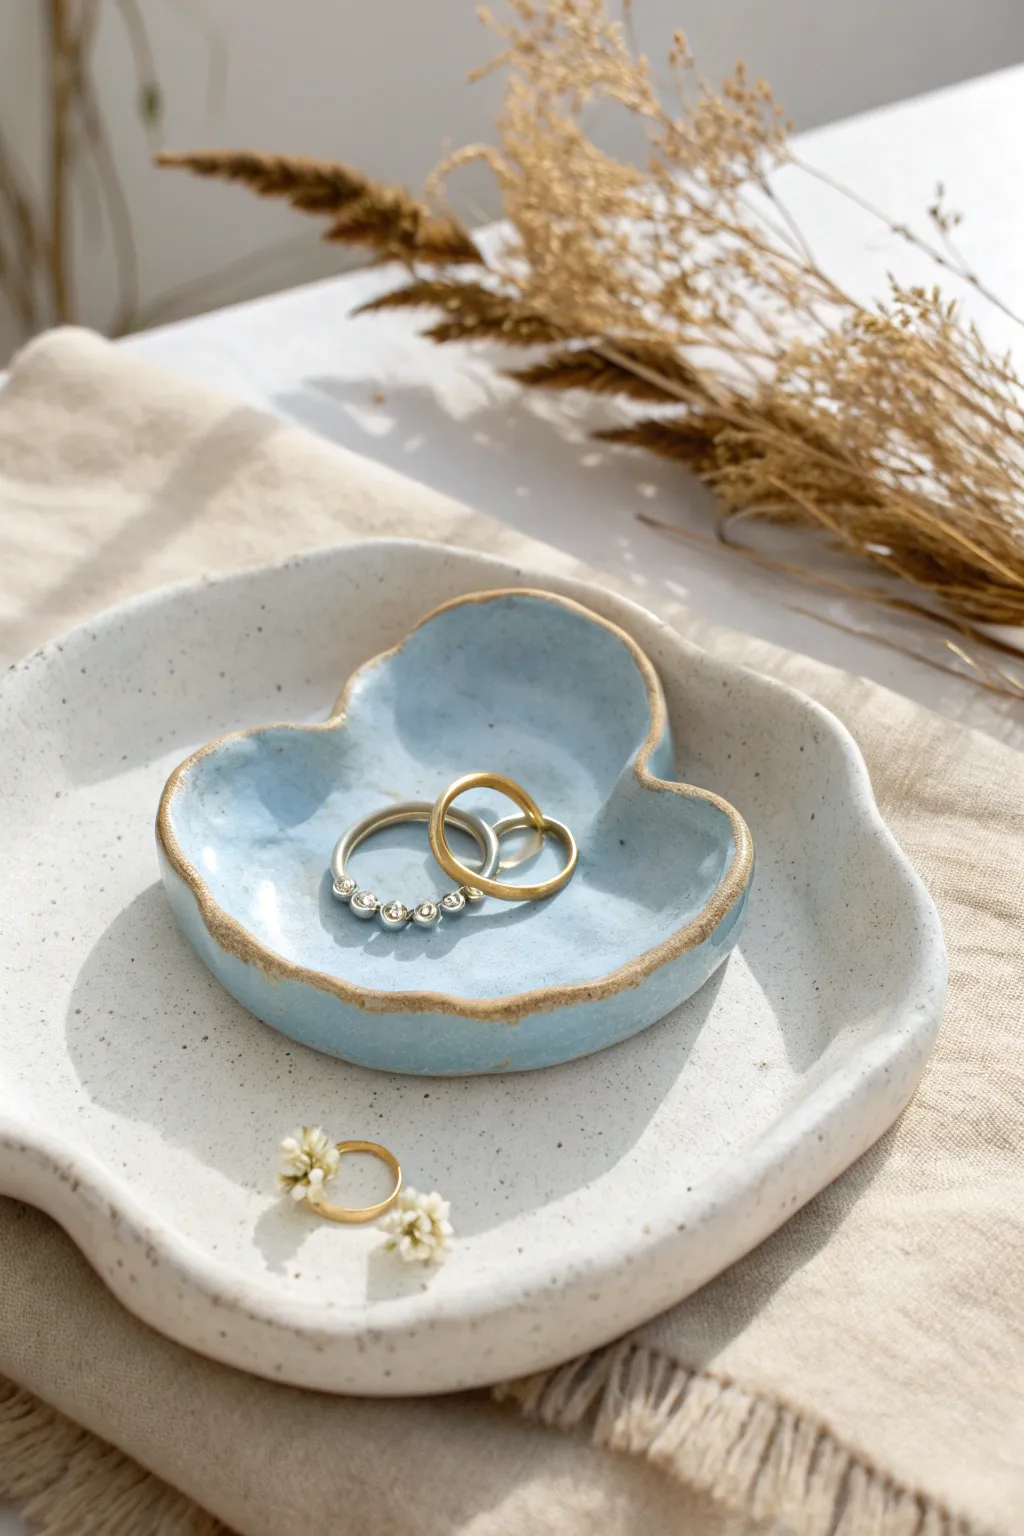
This whimsical two-piece jewelry dish set combines a larger, speckled white tray with a smaller, blue-glazed cloud insert for a layered, organic look. The gold rim adds a touch of sophistication, making it perfect for holding daily treasures like rings and stud earrings.
Step-by-Step
Materials
- White speckled stoneware clay (or white air-dry clay)
- Cloud template (printed or hand-drawn on paper)
- Clay rolling pin
- Canvas mat or slab roller
- Needle tool or X-Acto knife
- Small bowl of water
- Sponge
- Modeling tool (curved rib or spoon)
- Sandpaper (fine grit)
- Light blue ceramic glaze (or acrylic paint)
- Clear glossy glaze (if using ceramic)
- Gold luster overglaze (or gold leaf/gold acrylic)
- Small paintbrush
Step 1: Shaping the Clouds
-
Roll the slab:
Begin by rolling out your white speckled clay on a canvas mat until it is an even slab, approximately 1/4 inch thick. Ensure the surface is smooth and free of air bubbles. -
Cut the larger cloud:
Place your larger paper cloud template onto the clay slab. Using a needle tool, trace around the edge carefully to cut out the base shape. -
Cut the smaller cloud:
Repeat the process with a smaller template to inconsistent the inner blue dish. This shape should be significantly smaller than the base so it nests comfortably inside. -
Smooth the edges:
Dip your finger or a small sponge into water and run it along the cut edges of both clay pieces. This rounds off the sharp cuts and prevents cracking later. -
Form the rim:
Gently lift the edges of the larger cloud slab. Use your thumbs to press the center down while pulling the edges upward to create a shallow bowl depth. -
Shape the small dish:
Perform the same lifting motion on the smaller cloud piece. I like to make the walls of this inner piece slightly steeper to securely hold rings. -
Refine the forms:
Use a damp sponge to smooth out any fingerprints or uneven textures on the surface of both dishes. Ensure the smaller dish sits flat by tapping it gently on the table.
Smooth Rim Secret
Use a piece of plastic wrap over the clay before cutting with a cookie cutter. This creates a pillowy, rounded edge instantly, reducing sanding time later.
Step 2: Drying and Finishing
-
Dry partially:
Let the clay dry until it reaches a leather-hard state. This usually takes a few hours to a day depending on humidity. -
Final smoothing:
Once leather-hard, check for any rough spots. You can lightly burnish the edges with a spoon or a smooth stone to compress the clay particles for a cleaner finish. -
Dry completely:
Allow both pieces to dry completely until they are bone dry. The clay should feel room temperature to the touch, not cool. -
Bisque fire:
If using stoneware, fire the pieces in a kiln to cone 04 (bisque). If using air-dry clay, ensure it is fully cured according to package instructions. -
Sand imperfections:
After the initial firing (or curing), gently sand any sharp burs or rough patches with fine-grit sandpaper. Wipe away dust with a damp cloth.
Adding Texture
Press dried flowers or lace into the wet clay of the larger dish before drying. The subtle impression adds a beautiful, fossil-like detail to the base.
Step 3: Glazing and Decorating
-
Glaze the small cloud:
Apply 2-3 coats of light blue glaze to the interior and exterior of the smaller dish. Leave the very bottom unglazed (wax resist helps here) if kiln firing. -
Glaze the large cloud:
Apply a clear glossy glaze to the larger speckled dish to highlight the natural clay texture. Alternatively, leave the exterior matte and only glaze the interior. -
Glaze fire:
Fire the pieces again to the temperature required by your specific glaze (typically cone 5 or 6). If using paint, allow it to dry fully and seal with a varnish. -
Apply gold rim:
Once the glaze firing is complete and pieces are cool, carefully paint a thin line of gold luster (or gold leaf paint) along the wavy rim of the blue dish. -
Final cure:
If using real gold luster, fire the piece one last time at a very low temperature (cone 018). If using acrylic gold paint, simply let it cure for 24 hours.
Now you have a stunning, professional-looking place to keep your jewelry safe and organized

Bear Ears Trinket Plate
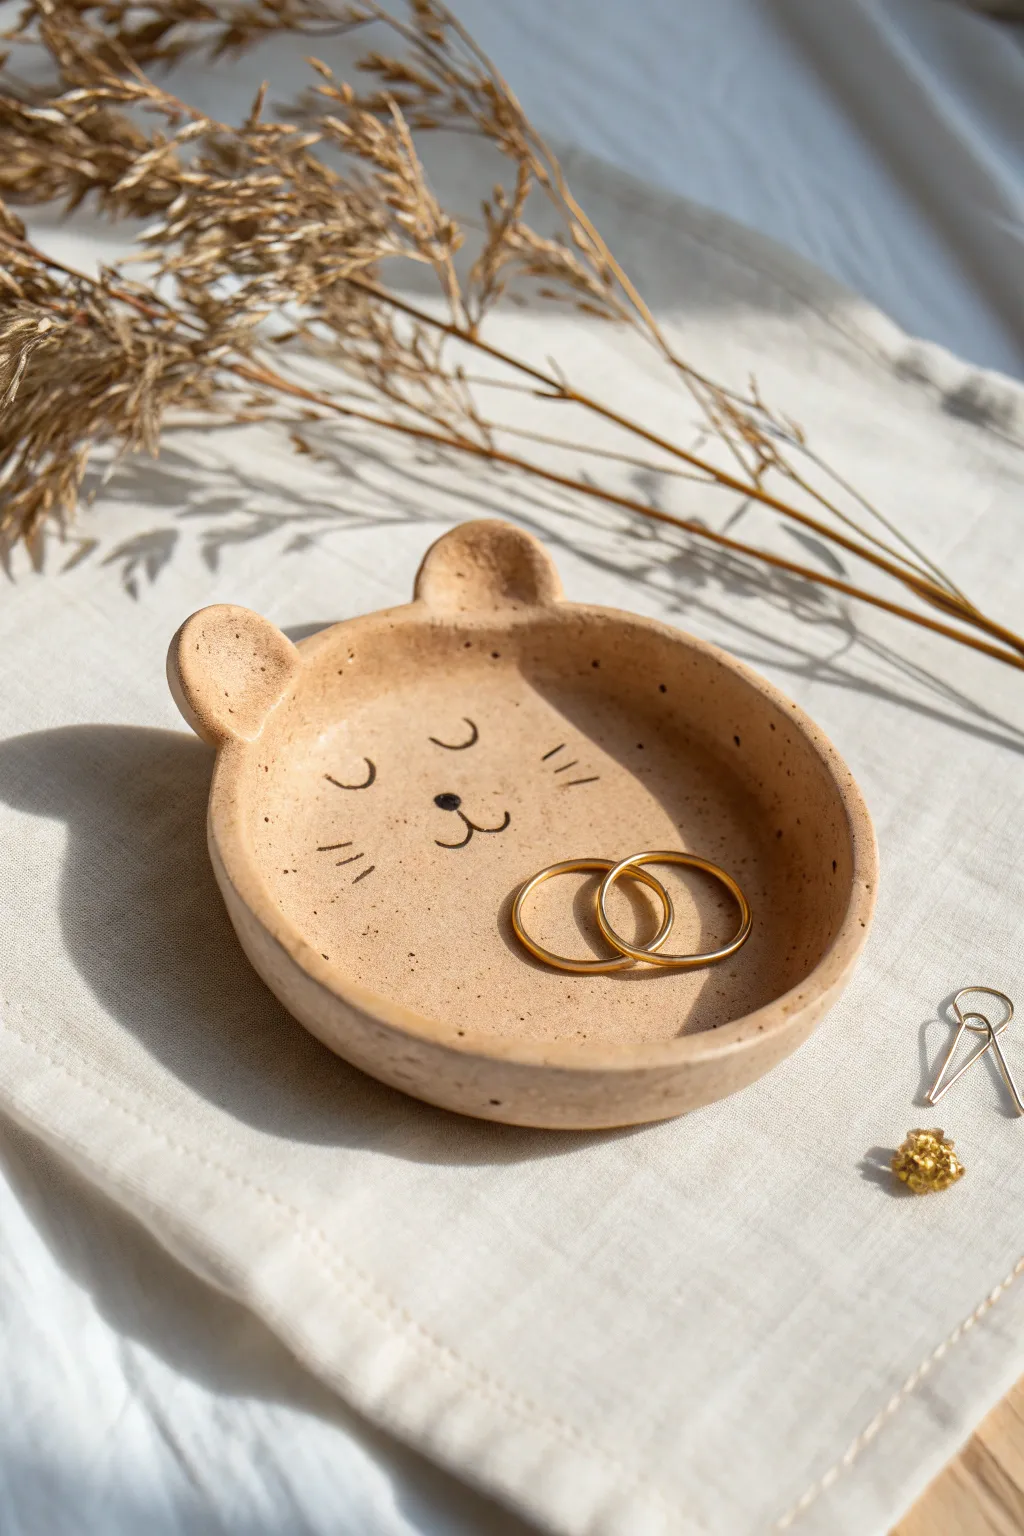
This adorable trinket dish combines a warm, speckled finish with a simple line-art face for a piece that’s as sweet as it is functional. It’s perfect for holding your favorite rings or earrings and brings a touch of nature-inspired charm to any dresser or nightstand.
Step-by-Step Guide
Materials
- Air-dry clay (terracotta or buff color) or polymer clay
- Rolling pin
- Small bowl or round cookie cutter (approx. 4 inches)
- Craft knife or clay needle tool
- Small sponge
- Water (for smoothing)
- Fine grit sandpaper
- Black acrylic paint
- Fine liner brush (size 00 or 0)
- Matte or satin varnish
- Speckle medium or brown acrylic paint (optional)
Step 1: Shaping the Base
-
Prepare the clay:
Start by conditioning your clay. Knead a fist-sized ball until it is soft, pliable, and free of any air bubbles or cracks. -
Roll it out:
Using your rolling pin, roll the clay out onto a flat surface or canvas mat. Aim for an even thickness of about 1/4 inch so the plate feels sturdy. -
Cut the circle:
Place your bowl or cookie cutter onto the clay and cut out a perfect circle. Remove the excess clay from around the edges. -
Add the ears:
Roll two small, equal-sized balls of leftover clay. Flatten them slightly into semi-circles and attach them to the top edge of your main circle to form the bear ears. -
Secure the join:
To ensure the ears don’t fall off, use a clay tool or your finger to smudge the clay across the seam on the back, blending the ear clay into the main plate clay.
Step 2: Forming the Dish
-
Smooth the edges:
Dip your finger or a small sponge in a little water and run it along the cut edges of the circle and around the ears to soften any sharp cuts. -
Create the curve:
Gently lift the edges of the circle upwards with your fingertips to create a shallow rim. I find it helpful to pinch slightly as I rotate the plate to keep the wall height consistent. -
Refine the shape:
Spend a moment smoothing the interior curve where the base meets the wall, ensuring there’s no harsh angle. -
Initial drying:
Let the piece dry according to your clay’s instructions. If using air-dry clay, waiting 24-48 hours usually allows it to fully harden and turn a lighter color. -
Sand for smoothness:
Once fully dry, take a piece of fine-grit sandpaper and gently sand any rough spots, especially around the rim and the join of the ears.
Smooth Surface Secret
Before drying, verify the clay surface is pristine. Use a slightly damp brush to erase fingerprints, as these are much harder to sand away later.
Step 3: Painting and Finishing
-
Create the speckles:
If your clay isn’t naturally speckled, mix a tiny bit of brown paint with water. Dip an old toothbrush in it and flick the bristles to spray fine dots over the dish. -
Draw the nose:
Using your fine liner brush and black acrylic paint, paint a small, solid oval spot in the center of the face for the nose. -
Add the mouth:
Paint a small vertical line down from the nose, then curve two small hooks outwards to the left and right to form the classic animal smile. -
Paint the eyes:
Paint two simple downward-curving arcs above the nose for closed, sleepy eyes. Keep the lines thin and delicate. -
Add whiskers:
Finish the face design by adding three short, angled dashes on each cheek area for the whiskers. -
Seal the piece:
Once the paint is completely dry, apply a coat of matte or satin varnish over the entire dish to protect it from moisture and scratches. -
Final cure:
Allow the varnish to cure fully before placing any jewelry inside.
Golden Touch
For a luxe upgrade, paint the very edge of the rim and the tips of the ears with metallic gold leaf paint after the main design is dry.
Now you have a charming little guardian for your daily treasures

The Complete Guide to Pottery Troubleshooting
Uncover the most common ceramic mistakes—from cracking clay to failed glazes—and learn how to fix them fast.
Frog Peek-A-Boo Plate
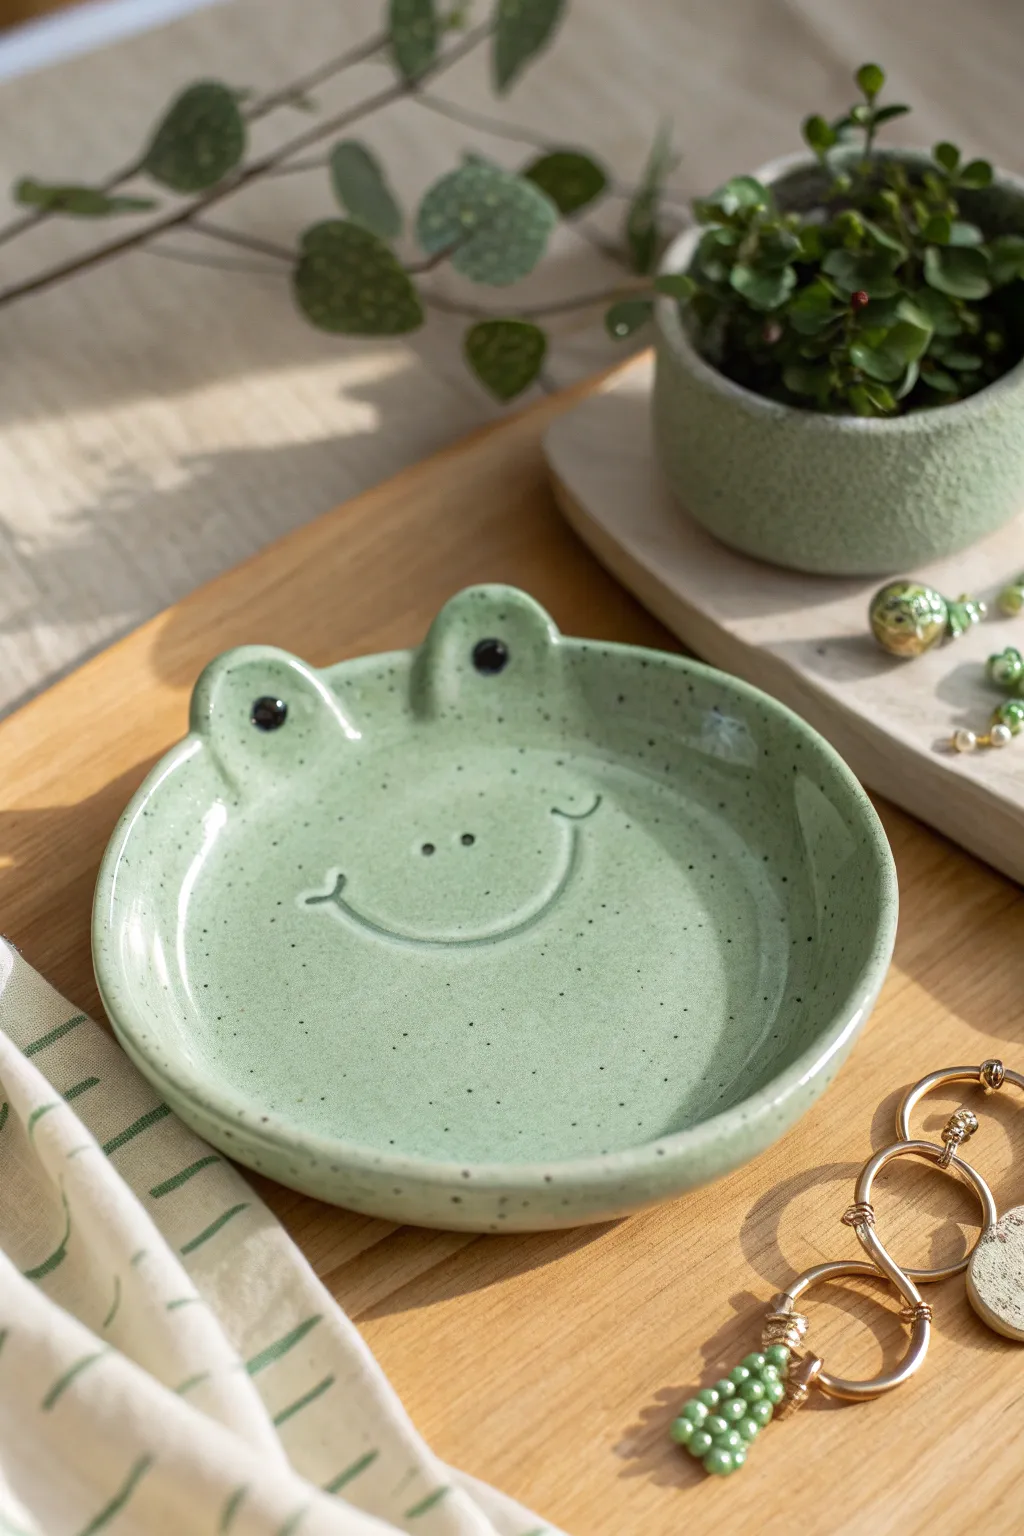
Brighten up your bedside table or vanity with this charming ceramic frog dish, perfect for holding rings and trinkets. Its speckled green glaze and gentle smile bring a touch of whimsical nature indoors.
Detailed Instructions
Materials
- White stoneware or earthenware clay
- Rolling pin
- Canvas mat or slab roller
- Circle template or bowl (approx. 5-6 inches diameter)
- Needle tool or fettling knife
- Potter’s ribs (rubber and wood)
- Sponge
- Small loop tool or carving tool
- Underglaze (black)
- Speckled green glaze (food safe if used for snacks)
- Clear glaze (if your green glaze isn’t glossy)
- Kiln
- Small paintbrush
Step 1: Shaping the Base
-
Prepare the Clay:
Begin by wedging a ball of white clay to remove any air bubbles. This ensures your plate won’t crack during firing. -
Roll a Slab:
Roll your clay out into a smooth, even slab about 1/4 inch thick. Turn the clay frequently to prevent it from sticking to your canvas. -
Cut the Circle:
Place your circle template or bowl gently onto the slab. Using your needle tool, cut cleanly around the edge to create your base disk. -
Smooth the Edges:
Take a damp sponge and run it along the cut rim to compress the clay and smooth out any sharp edges or burrs.
Uneven Rim?
If the rim warps while drying, place a light weight (like a small bean bag) in the center while it’s leather hard to help hold the shape down.
Step 2: Forming the Frog Features
-
Lift the Rim:
Gently lift the outer edges of your circle upwards to create a shallow dish shape. You can use a foam mold or simply pinch and curve it with your fingers. -
Create Eye Bumps:
Roll two small balls of clay, roughly the size of large marbles. Score and slip the top rim of the plate where you want the eyes to sit. -
Attach the Eyes:
Press the clay balls firmly onto the scored areas. I like to blend the clay downwards into the rim using a wooden tool so the eyes look like extensions of the plate rather than add-ons. -
Refine the Eyes:
Smooth the connection points with a damp sponge until the transition is seamless. Flatten the front of the eye bumps slightly to face forward.
Step 3: Carving and Drying
-
Mark the Face:
Lightly trace the smile and nose dots with a needle tool first to ensure you are happy with the placement. -
Carve the Smile:
Use a small loop tool or a carving tool to deepen the smile line. Create a gentle, wide curve with small upturned chevrons at the ends for the cheeks. -
Add Nose Detail:
Press the rounded end of a paintbrush handle or tool gently into the clay to form two small indentations for the nostrils. -
Dry Slowly:
Cover the piece loosely with plastic allow it to dry to the bone-dry stage. This usually takes a few days depending on humidity. -
Bisque Fire:
Load your bone-dry plate into the kiln and fire it to cone 04 (or your clay’s specific bisque temperature).
Speckle Secret
Don’t have speckled clay? Mix a teaspoon of granular ilmenite into your regular green glaze to create those lovely natural dark spots.
Step 4: Glazing and Finishing
-
Wax Resist (Optional):
Apply wax resist to the bottom foot of the plate to prevent glaze from sticking to the kiln shelf. -
Paint the Details:
Using a fine brush and black underglaze, carefully paint inside the carved smile line, the nostril dots, and create round pupils on the eye bumps. -
Apply Base Glaze:
Dip the entire plate into your speckled green glaze or brush on 2-3 even coats. If brushing, let each coat dry before applying the next. -
Check the Eyes:
If your green glaze is very opaque, you might want to wipe it back slightly over the black eyes so they show through clearly, or apply the black detail *over* the glaze if using a suitable overglaze product. -
Glaze Fire:
Fire the plate again to the maturity temperature of your glaze (typically cone 5 or 6 for stoneware).
Once cooled, your little ceramic friend is ready to hold your favorite jewelry pieces
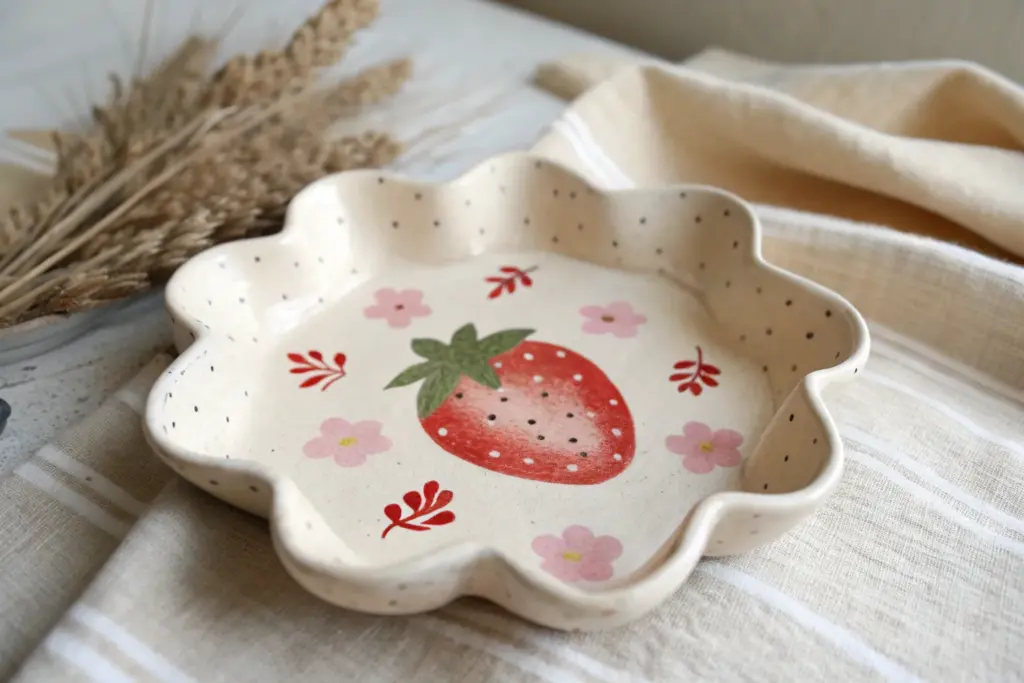
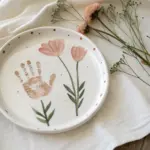
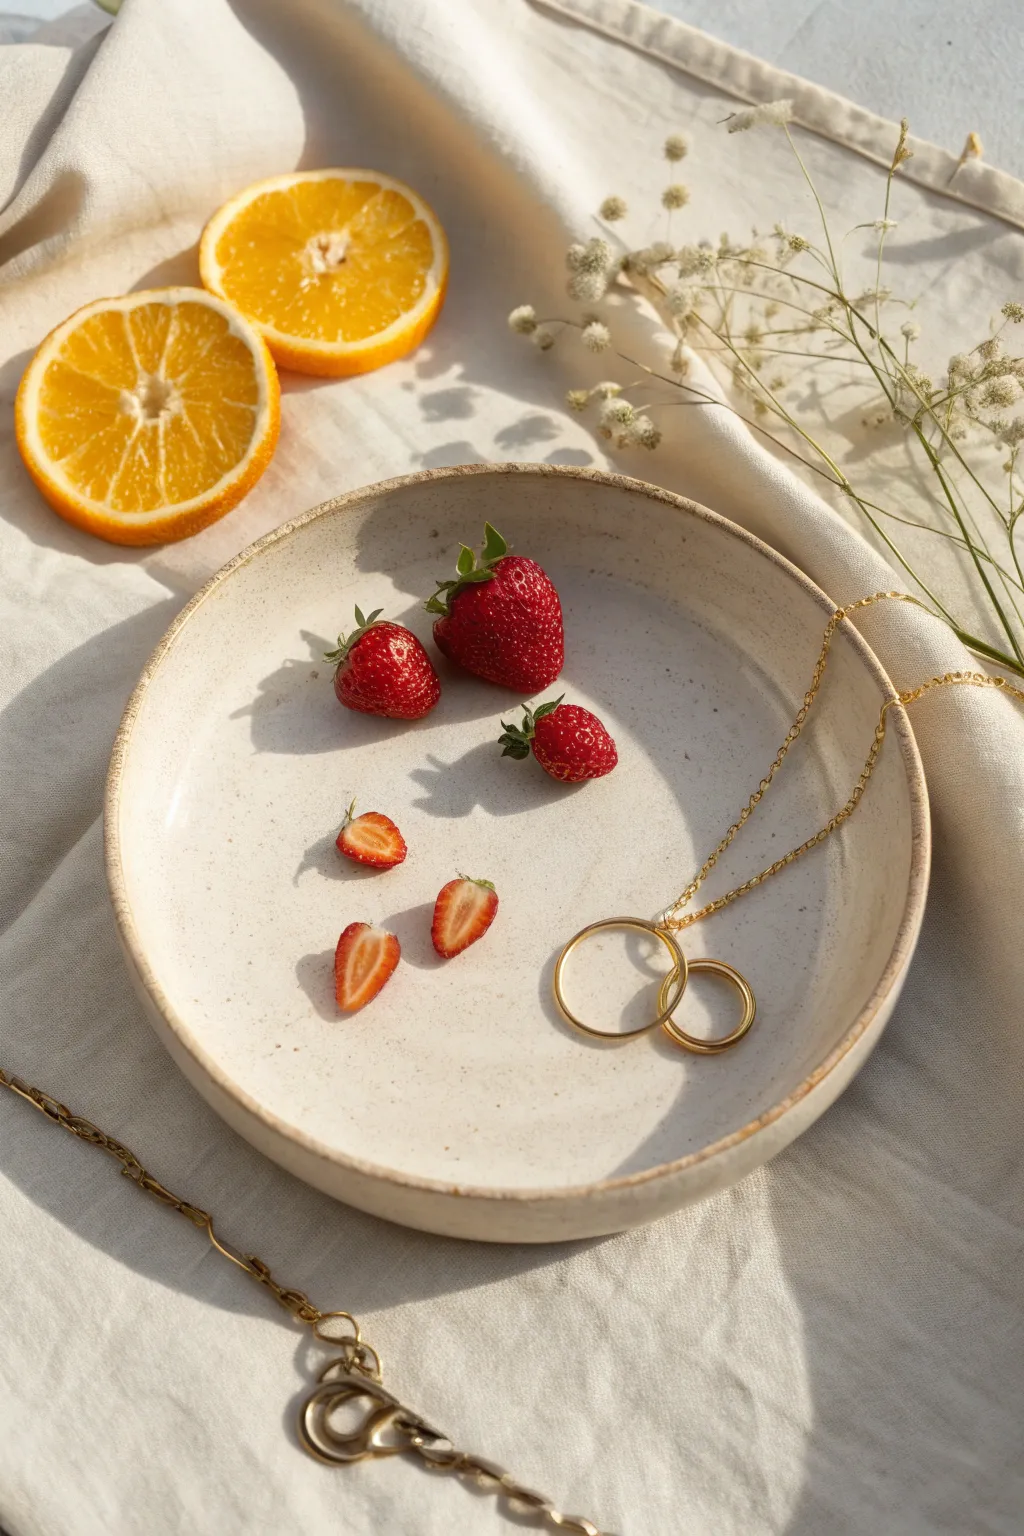
Strawberry Sprinkle Plate

This charming trinket dish combines whimsical cottagecore vibes with elegant details, featuring realistic strawberries and delicate gold accents on a soft pink background. It is the perfect size for holding your favorite rings or dainty jewelry pieces.
Step-by-Step Tutorial
Materials
- Air-dry clay or polymer clay (white)
- Rolling pin
- Circle template or small bowl (approx. 4-5 inches)
- Craft knife
- Sponge or fine sandpaper
- Acrylic paints (pale pink, cherry red, deep green, sage green, metallic gold)
- Fine detail paintbrushes (sizes 0 and 00)
- Toothbrush (for speckling)
- Gloss varnish or resin (for sealing)
- Palette for mixing
Step 1: Shaping the Clay Base
-
Condition and roll:
Begin by conditioning your white clay until it is soft and pliable. Roll it out on a non-stick surface to a uniform thickness of about 1/4 inch. -
Cut the circle:
Place your circle template or bowl onto the clay and trace around it with a craft knife to cut out a perfect circle. -
Form the rim:
Gently lift the edges of the circle with your fingers to create a slight rim. You want a shallow, lipped edge similar to a saucer, smoothing out any cracks with a little water if using air-dry clay. -
Smooth the surface:
Use a damp sponge (for air-dry) or baby oil (for polymer) to smooth the surface perfectly. The flatter the bottom, the better your painted details will look later. -
Dry or Bake:
Follow the instructions for your specific clay type. If baking, ensure it cools completely. If air-drying, wait 24-48 hours until it’s bone dry. -
Prep for painting:
Once hardened, give the piece a very light sanding if there are any rough spots on the rim, then wipe away the dust.
Step 2: Painting the Design
-
Apply the base coat:
Mix a very pale, dusty pink acrylic paint. Apply two thin coats over the entire top surface of the plate to create a soft, blush-colored canvas. -
Sketch the layout:
Lightly sketch the position of your strawberry vines with a pencil. Aim for an organic flow, placing larger strawberries near the bottom left and smaller clusters towards the top. -
Paint the leaves:
Using a sage green mixed with a touch of grey, paint the jagged strawberry leaves. Add darker green veins while the paint is still slightly wet for depth. -
Add the strawberries:
Block in the strawberry shapes with a bright cherry red. Vary the shapes slightly; some should be plump and round, others slightly more tapered. -
Detail the berries:
Once the red is dry, use your finest brush (00) to add tiny seeds. I generally use a mix of pale yellow or very light pink for these minuscule dots. -
Cross-hatching texture:
For the singular berry near the center, paint a grid-like cross-hatch pattern using a darker red or terracotta shade to give it a textured, unripe appearance. -
Paint the vine accents:
Using a thin liner brush and brown-green paint, connect your elements with fine, trailing stems. Add small red spherical berries on the upper right branch. -
Layer the gold ferns:
With metallic gold paint, carefully add the small fern-like leaves tucked between the main strawberry clusters. The gold adds a lovely shimmer against the matte colors. -
Create the speckles:
Dilute a small amount of brown or dark grey paint with water until it is inky. Dip an old toothbrush into it and flick the bristles with your thumb to create a fine mist of speckles across the whole plate. -
Paint the outer decorations:
Don’t forget the outside rim! Add simple gold leaf shapes or stylized flower motifs along the exterior vertical edge for a finished look from all angles.
Practice Run
Before speckling your finished plate, test the ‘flick’ technique on a piece of scrap paper to gauge how much water needed for the perfect splatter density.
Step 3: Final Touches
-
Seal the artwork:
Once all paint is completely dry, apply a coat of high-gloss varnish. This mimics the look of glazed ceramic and protects your painting from scratches. -
Second coat:
Apply a second glassy topcoat if needed to ensure a perfectly smooth, durable finish suitable for holding metal jewelry.
Gilded Edge
Elevate the final look by painting the very top lip of the rim with a solid line of metallic gold paint or liquid gold leaf to frame the artwork.
Now you have a delicate, vintage-inspired dish ready to display your favorite treasures


What Really Happens Inside the Kiln
Learn how time and temperature work together inside the kiln to transform clay into durable ceramic.
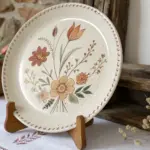
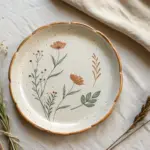
Cherry Border Mini Plate
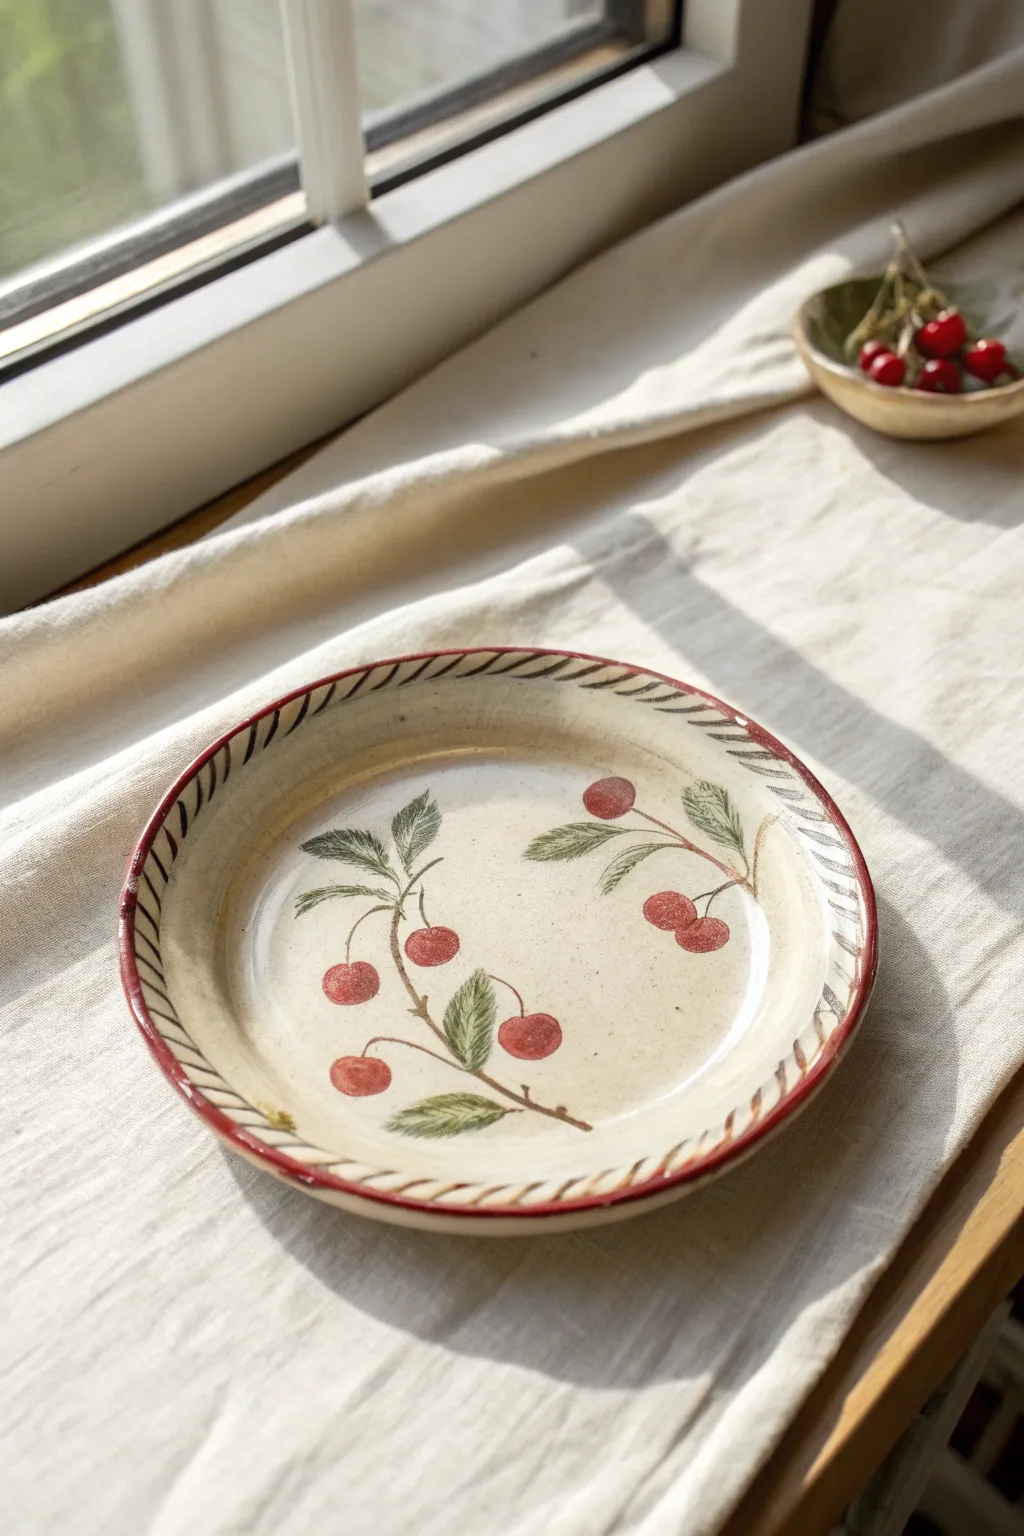
Bring a touch of vintage orchard charm to your table with this handmade ceramic mini plate. Featuring a lovely speckled cream base, hand-painted cherry sprigs, and a distinctive diagonal-stripe rim, this piece feels both rustic and refined.
Step-by-Step Guide
Materials
- White or speckled buff stoneware clay
- Rolling pin
- Canvas mat or slab roller
- Circular template (approx. 6-7 inches) or bowl
- Needle tool
- Sponge
- Foam crafting block or small towel
- Underglazes: Deep red, hunter green, dark brown/black
- Fine detail brushes (liner brush and small round brush)
- Clear transparent glaze
- Kiln (or access to a pottery studio)
Step 1: Forming the Plate
-
Roll the slab:
Begin by wedging your clay to remove air bubbles, then roll it out into an even slab about 1/4 inch thick. I find that using guide sticks helps keep the thickness consistent across the entire surface. -
Cut the circle:
Place your circular template or an upside-down bowl onto the clay slab. Trace around it carefully with a needle tool to cut out your perfect circle shape. -
Smooth the edges:
Use a damp sponge to gently compress and smooth the cut edge of the circle. This prevents sharpness later and gives the plate a more professional finish. -
Lift the rim:
Place your clay circle onto a piece of foam or a folded towel. Gently press the center of the plate down while simultaneously pulling up the edges with your fingers to create a shallow, flared rim. -
Dry to leather hard:
Set the plate aside on a porous surface until it reaches the leather-hard stage. It should be firm enough to handle without bending but still contain moisture.
Step 2: Painting the Design
-
Sketch the layout:
Very lightly sketch your cherry branch placement using a pencil. Don’t worry about the graphite marks; they will burn off completely in the kiln firing. -
Paint the branches:
Using a very thin liner brush and dark brown underglaze, paint the delicate stems. Keep your hand steady and vary the pressure slightly to make the branches look organic rather than uniform. -
Add the cherries:
Switch to a small round brush and your deep red underglaze. Paint small circles attached to the stems. I like to do two thin coats here to ensure the red pops against the background. -
Paint the leaves:
Mix a touch of brown into your green underglaze for an earthier tone. Paint the serrated leaves, using quick, short strokes to mimic the leaf veins and texture shown in the reference. -
Create the border guide:
Paint a thin, solid red line around the very outer edge of the rim and another concentric circle just inside where the rim begins to slope up. -
Fill the striped rim:
Between your two red guide rings, paint diagonal hatch marks using a dark brown or black underglaze. Keep the spacing relatively tight to create that classic rope-like border effect. -
Clean up:
Check for any smudges or stray underglaze marks and gently scrape them away with a clean needle tool or wipe with a barely damp brush.
Smudged Underglaze?
If you smear underglaze while painting, let it dry completely rather than wiping it wet. Once dry, scratch it off gently with a needle tool.
Step 3: Finishing and Firing
-
Bisque fire:
Allow the plate to bone dry completely, which may take several days. Once dry, load it into the kiln for a bisque fire (usually cone 04). -
Apply clear glaze:
Wipe the bisque-fired plate with a damp sponge to remove dust. Dip the entire plate into a clear transparent glaze, or brush on three smooth flowing coats. -
Wipe the foot:
Clean the bottom (foot) of the plate thoroughly with a sponge to ensure no glaze touches the kiln shelf. -
Glaze fire:
Fire the plate a final time to the temperature required by your specific clay and glaze body (typically cone 5 or 6 for stoneware).
Vintage Patina
For an aged look, wipe a diluted brown wash over the piece and sponge it off before glazing to highlight the texture in the clay.
Now you have a charming, hand-painted plate perfect for serving sweets or holding jewelry
Pastel Swirl Marble Plate
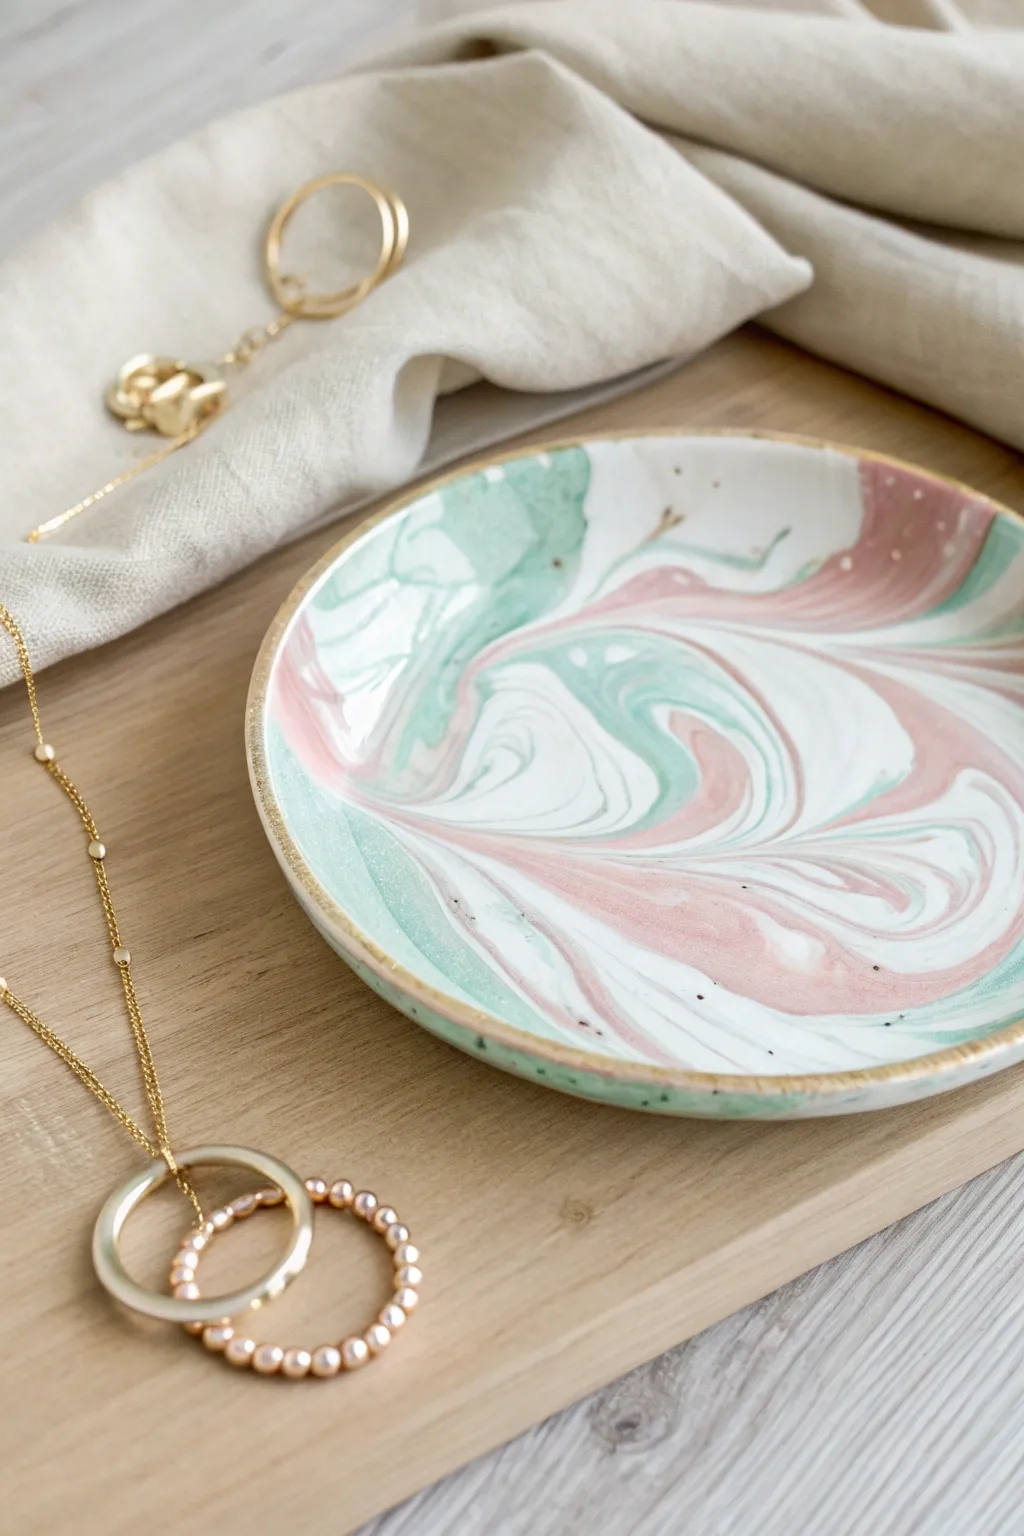
Capture the dreamy essence of watercolors in solid form with this elegant marbled clay plate. The soft interplay of mint and blush pink against a white base creates a sophisticated swirl pattern that looks far more complex than it actually is.
Detailed Instructions
Materials
- Polymer clay (White, Pastel Pink, Mint Green)
- Rolling pin or acrylic roller
- Circle cutter or a bowl and craft knife
- Sandpaper (fine grit)
- Gold acrylic paint or liquid gold leaf
- Small paintbrush
- Toothbrush (for speckling)
- Gloss glaze or sealant (optional)
- Oven-safe bowl (for shaping)
Step 1: Creating the Marble Mix
-
Condition the Clay:
Start by warming up your white, pink, and mint clay separately in your hands. Knead each color until it is soft, pliable, and free of cracks. -
Form Snakes:
Roll each color into long, snake-like ropes. You’ll want about 50% white clay compared to 25% pink and 25% mint to keep the look light and airy. -
Twist Together:
Gather your three colored ropes and twist them together into one large, multi-colored candy cane shape. -
Fold and Roll:
Fold the twisted rope in half, then roll it out to lengthen it again. Repeat this twisting, folding, and rolling process. -
Check the Pattern:
Stop twisting once you see nice streaks of color. Don’t over-mix, or the colors will blend into a muddy grey instead of distinct marble swirls. -
Create a Ball:
Once you are happy with the marbling definition, scrunch the clay snake into a smooth, tight ball.
Clean Rolling
Wipe your work surface and rolling pin with a baby wipe before starting. Dust or lint shows up easily on white polymer clay and can ruin the clean marble effect.
Step 2: Shaping and Baking
-
Roll Flat:
Using your acrylic roller, flatten the marbled ball into a sheet approximately 1/4 inch thick. Turn the clay occasionally to ensure an even circle. -
Cut the Shape:
Place your circle cutter or an inverted bowl onto the clay sheet. Press down firmly or trace around the bowl with a craft knife to cut your perfect circle. -
Smooth the Edges:
Gently run your finger along the cut edge to soften any sharpness or irregularities before baking. -
Form the Curve:
Place your clay circle inside an oven-safe bowl to give it a slight concave, dish-like shape. Ensure it’s pressed gently against the bottom curve. -
Bake:
Bake the clay according to the manufacturer’s instructions on the packet. Temperatures usually range between 230°F and 275°F (110°C – 135°C). -
Cool Down:
Remove from the oven and allow the plate to cool completely inside the shaping bowl before trying to pop it out.
Textured Bottom
Before cutting your circle, press a piece of lace or a textured rubber stamp into the underside of the clay sheet for a hidden surprise pattern.
Step 3: Finishing Touches
-
Sand for Smoothness:
Once cool, use fine-grit sandpaper to lightly buff the edges and surface if there are any fingerprints or rough spots. -
Paint the Rim:
Dip a small brush into liquid gold leaf or metallic acrylic paint. Carefully paint the very edge of the plate rim to create a gilded border. -
Add Speckles:
For the speckled effect, dip an old toothbrush into the gold paint. Run your thumb across the bristles to flick tiny droplets across the plate surface. -
Seal (Optional):
If you plan to use this for jewelry or trinkets, you can leave it matte. For a glossy, ceramic-like finish, apply a coat of polymer clay glaze. -
Dry Completely:
Allow the paint and glaze to cure fully, usually for 24 hours, before placing any items on your beautiful new dish.
This delicate dish makes a perfect bedside tray for your favorite rings and necklaces

TRACK YOUR CERAMIC JOURNEY
Capture glaze tests, firing details, and creative progress—all in one simple printable. Make your projects easier to repeat and improve.
Scalloped Candy Rim Plate
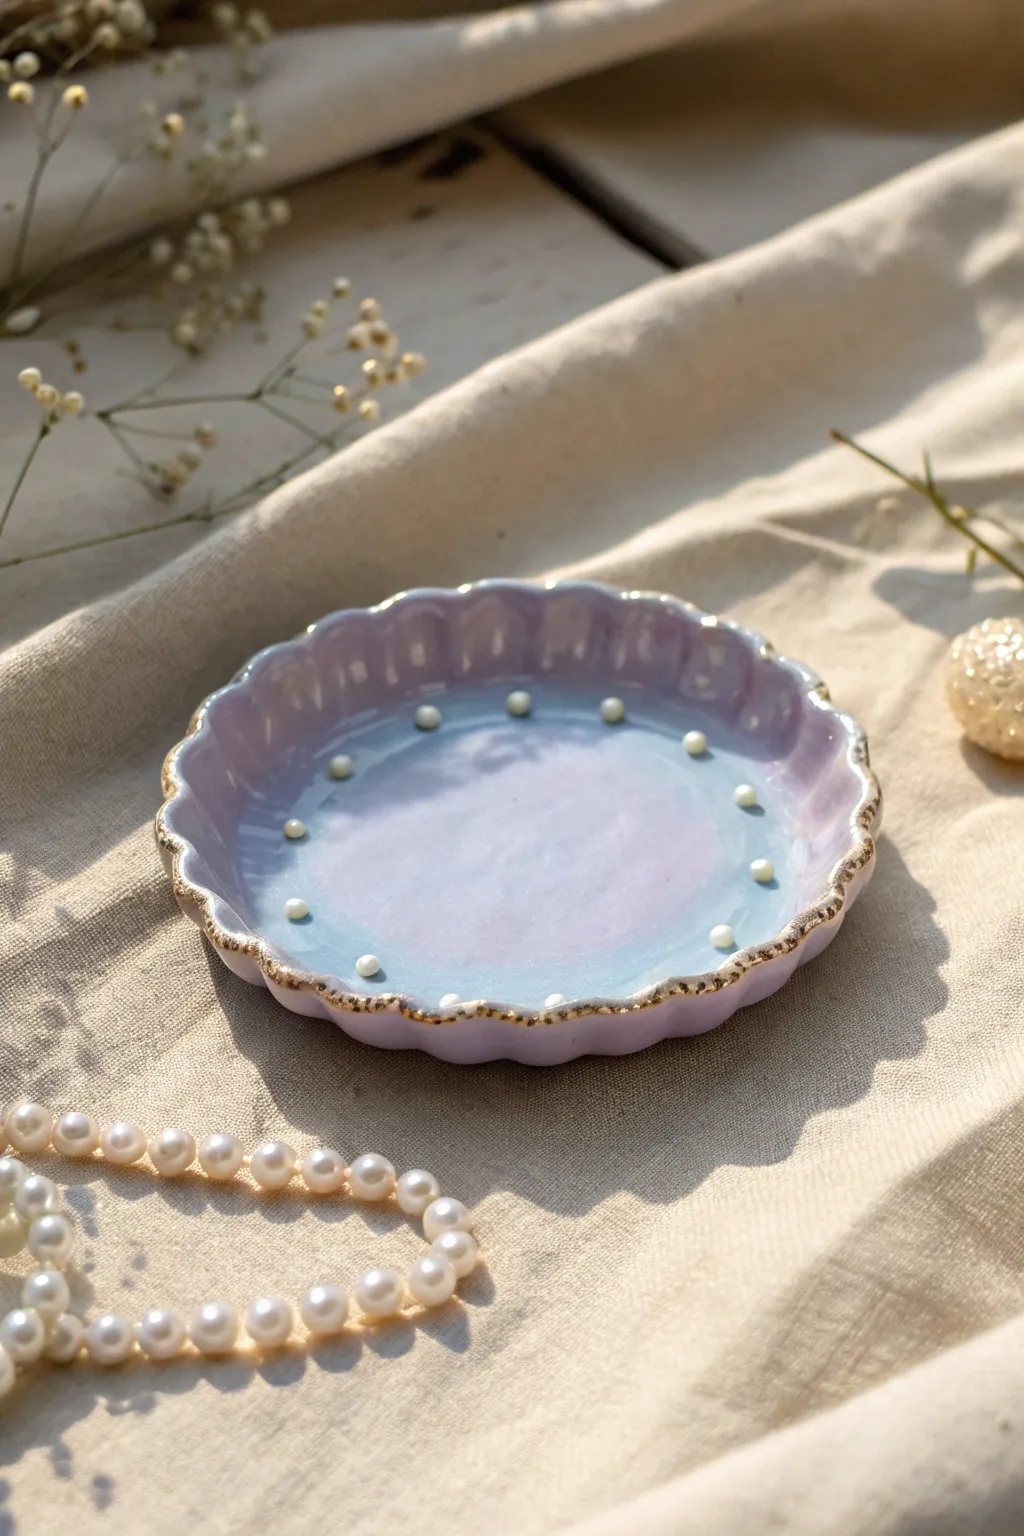
This whimsical little jewelry dish combines a dreamy, swirled pastel base with the elegance of pearls and gold. The gentle scalloped edges give it a soft, flower-like silhouette perfect for holding your favorite rings.
Step-by-Step Tutorial
Materials
- Polymer clay (white or translucent)
- Acrylic rolling pin
- Round cookie cutter (approx. 4 inches)
- Small round sculpting tool or chopstick (for fluting)
- Small faux pearl beads (heat safe or for gluing later)
- Soft pastel chalks (lavender and light blue) or mica powders
- Gold acrylic paint or liquid gilding
- Gloss glaze or UV resin
- Paintbrush (fine tip for gold, soft fluffy brush for pastels)
- Super glue (if adding pearls after baking)
Step 1: Shaping the Base
-
Condition the Clay:
Begin by thoroughly kneading your white polymer clay until it is soft and pliable. This prevents cracks later on. -
Roll Out the Slab:
Use your acrylic roller to flatten the clay into an even sheet, about 1/4 inch thick. Aim for a consistent thickness so it bakes evenly. -
Cut the Circle:
Press your round cookie cutter firmly into the clay sheet to create a perfect circle. Peel away the excess clay from the edges. -
Create the Dish Shape:
Gently lift the clay circle and place it into a slightly curved bowls or form to inhibit slumping, or simply pinch up the edges manually to create a shallow rim. -
Scallop the Edges:
Using your thumb and forefinger, or the handle of a paintbrush, gently press indents around the rim at regular intervals. Push the clay outward between indents to create the wavy, scalloped look. -
Smooth the Rim:
Run your finger lightly over the new scalloped edges to soften any sharp angles or tool marks.
Fixing Cracks
If you see tiny cracks after the scalloping step, smooth them with a bit of baby oil or clay softener on your fingertip before baking.
Step 2: Coloring and Details
-
Prepare the Colors:
Scrape a bit of lavender and light blue soft pastel chalk into fine dust piles. I find using a craft knife works best for getting a fine powder. -
Apply the Gradient:
Using a soft, fluffy brush, pick up the lavender powder. Dust it around the outer edges of the dish’s interior. -
Blend the Center:
Clean your brush, then apply the light blue powder to the center of the dish, blending it outwardly into the purple to create a seamless, dreamy transition. -
Position the Pearls:
Take your faux pearls and press them gently into the clay floor in a circle formation about midway between the center and the rim. Press deep enough so they sit securely.
Make it Starry
Before glazing, flick a tiny amount of white acrylic paint from a toothbrush over the blue center to create a subtle starry night effect.
Step 3: Finishing Touches
-
Bake the Piece:
Bake the dish according to your clay manufacturer’s specific instructions (usually around 275°F/135°C for 15-30 minutes). Let it cool completely. -
Secure Pearls (Optional):
If your pearls popped out during baking or you chose not to bake them, add a tiny drop of super glue to the indents and set the pearls back in. -
Glaze the Interior:
Apply a coat of gloss glaze or UV resin over the pastel-colored interior (covering the pearls is fine if you want them sealed). This seals the chalk powder and gives it that ceramic-like shine. -
Gild the Rim:
Dip a fine-tip paintbrush into gold acrylic paint or liquid gilding. -
Edge Detailing:
Carefully trace the very top edge of the scalloped rim with the gold paint. Use a light hand to get that delicate, uneven vintage look. -
Full Cure:
Allow the glaze and gold paint to dry fully before placing any jewelry in the dish.
Now you have a charming, pearlescent spot to keep your treasures safe
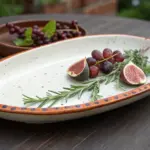
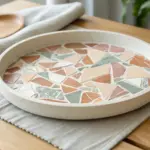
Tiny 3D Fruit Topped Plate
This rustic, hand-built clay plate features a charmingly uneven rim and a warm, creamy speckled glaze that mimics vanilla bean ice cream. While the photo shows real fruit, this tutorial guides you through creating the ceramic vessel itself, perfect for holding jewelry or serving tiny treats.
Detailed Instructions
Materials
- White stoneware clay with grog or speckles
- Rolling pin
- Wooden guide sticks (approx. 1/4 inch thick)
- Round template (paper or bowl, approx. 6 inches)
- Fettling knife or needle tool
- Soft rib tool (rubber or silicone)
- Sponge
- Slump mold or a shallow bowl for shaping
- Creamy white speckled glaze (food safe)
- Kiln (or access to a firing service)
Step 1: Forming the Base
-
Prepare the slab:
Begin by wedging your speckled stoneware clay thoroughly to remove air bubbles. Place the clay between two wooden guide sticks on a canvas surface and roll it out into an even slab. -
Smooth the surface:
Before cutting, take your soft rib tool and gently compress the clay slab in multiple directions. This aligns the clay particles to prevent warping and creates that smooth surface essential for the finished look. -
Cut the circle:
Place your 6-inch round template onto the slab. Using your needle tool or fettling knife, trace around the template to cut out your circle. Keep the knife upright for a clean edge. -
Soften the rim:
I like to take a damp sponge or even just a fingertip and run it gently along the cut edge to round it off. The plate in the photo has a soft, organic rim, so don’t worry about making it mechanically perfect.
Step 2: Shaping and Refining
-
Slump the form:
Carefully lift your clay circle and lay it into your shallow bowl or slump mold. Ensure it is centered. Gently press the clay down so it takes the curve of the mold. -
Create the walls:
If using a shallow bowl, you might need to gently coax the edges upward with your fingers to define the transition between the flat base and the rising rim. -
Refine the lip:
While the clay is in the mold, check the rim again. For that rustic look, you can slightly press down on random sections of the rim to create a subtle undulation. -
Dry slowly:
Cover the plate loosely with plastic and let it dry to a leather-hard state. This ensures it holds its shape when you remove it from the mold. -
Clean up the foot:
Once leather hard, flip the plate over. You can carve a shallow foot ring if desired, or simply smooth the bottom with a damp sponge to ensure it sits flat without wobbling. -
Bisque fire:
Allow the plate to dry completely until bone dry (chalky white and room temperature to the touch). Fire it to cone 04 (or your clay’s bisque temperature).
Natural Speckles
For the most authentic look, use a clay body like ‘Laguna Speckled Buff’. The iron spots bleed through white glaze naturally during firing.
Step 3: Glazing and Finishing
-
Clean the bisque:
Wipe the fired plate with a damp sponge to remove any kiln dust. This helps the glaze adhere properly and prevents pinholing. -
Mix the glaze:
Stir your creamy white speckled glaze thoroughly. If your clay body provides the speckles, a semi-transparent white glaze is best; if the clay is plain, use a glaze that contains speckles. -
Apply the glaze:
Pour the glaze into the center of the plate, swirl it to coat the entire interior, and pour out the excess. Alternatively, you can dip the entire plate using tongs. -
Detail the rim:
If the glaze looks too thick on the rim, gently wipe a tiny bit back with a sponge to let the clay body peek through, emphasizing that toasted edge seen in the image. -
Clean the foot:
Crucially, wipe away all glaze from the bottom of the plate and about 1/4 inch up the side to prevent it from sticking to the kiln shelf. -
Final Fire:
Fire the plate to the maturity temperature of your clay and glaze (typically cone 5 or 6 for stoneware).
Warped Rim?
If your plate warps during drying, use sandbags or small weights on the center while it dries to keep the base perfectly flat against the mold.
Once cooled, your plate is ready to cradle delicate jewelry or fresh fruit.
Dainty Bow Accent Plate
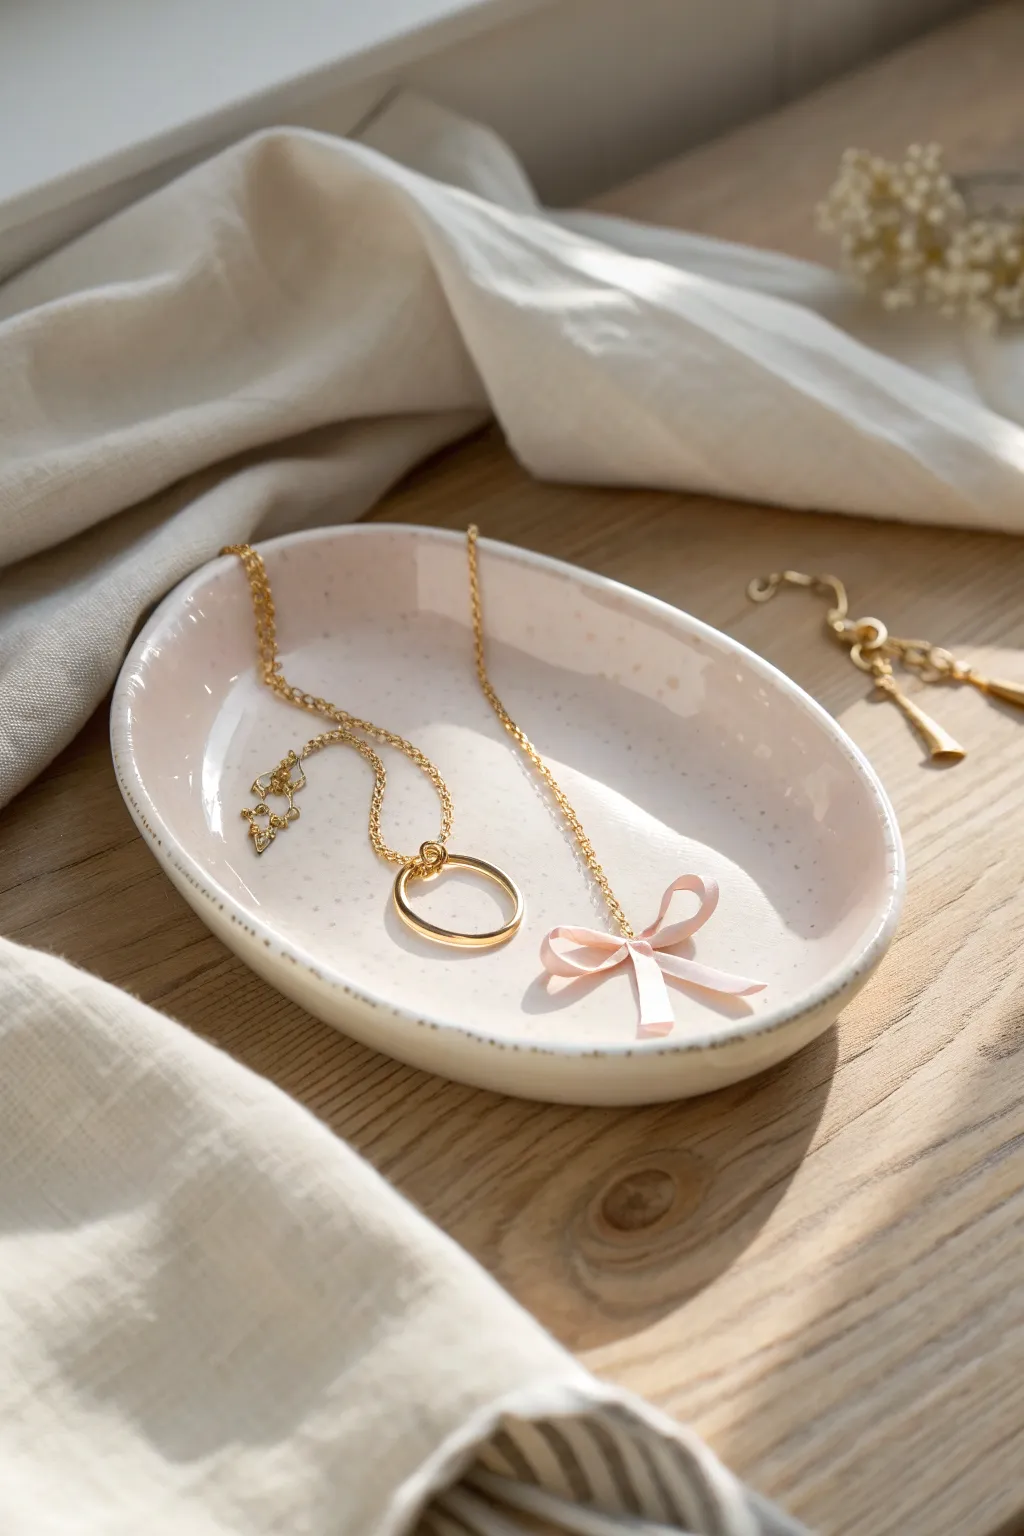
Embrace the coquette aesthetic with this delicate, handmade catch-all featuring a sweet sculpted bow. This project mimics the look of high-end speckled ceramics using polymer or air-dry clay, perfect for resting your dainty gold chains and favorite rings.
Step-by-Step Tutorial
Materials
- White polymer clay (approx. 2oz block)
- Speckled clay (or black pepper/faux granite clay for mixing)
- Small rolling pin
- Oval template (paper or cookie cutter)
- Craft knife or clay blade
- Small detail brush
- Soft pink acrylic paint
- Gold leaf paint or metallic liquid gilding
- Gloss varnish or resin sealant
- Sponge or sanding block (fine grit)
- Small bowl or curved form (for drying shape)
Step 1: Preparing the Clay Base
-
Condition the clay:
Begin by kneading your white polymer clay until it is soft and pliable. If you want that trendy speckled pottery look shown in the photo, mix in a tiny pinch of granite or ‘black pepper’ effect clay. -
Roll it out:
Roll the clay onto a smooth work surface or parchment paper until it is about 1/4 inch thick. Aim for an even thickness so the plate sits flat later. -
Cut the shape:
Place your oval template or cookie cutter onto the clay. Using your craft knife, trace around the shape cleanly to cut out your dish base. -
Soften the edges:
Dip your finger in a little bit of water (or baby oil if using polymer clay) and gently run it around the cut edge to smooth out any sharp corners or drag marks from the knife. -
Form the curve:
Carefully lift the clay oval and place it into a shallow bowl or curved form. Press gently so the clay takes on a slightly cupped shape, which will help keep your jewelry contained.
Step 2: Sculpting the Bow
-
Create the ribbon strips:
Roll a small snake of white clay and flatten it into a thin ribbon, approximately 3mm wide and 2 inches long. -
Loop the ends:
Take the ends of your ribbon strip and fold them inwards to meet in the middle, creating two loops resembling a figure-eight. -
Add the tails:
Cut two smaller strips of flattened clay for the ribbon tails. V-notch the bottom of each strip for a classic ribbon look. -
Assemble the center:
Place a tiny strip of clay vertically over the center where the loops meet to create the ‘knot’ of the bow. -
Attach to the dish:
Apply a tiny dab of liquid clay or scoring water to the spot on the oval dish where you want the bow. I prefer placing it slightly off-center for a natural look. Press the bow and tails gently onto the surface. -
Adjust the drape:
Use a toothpick or tool to slightly lift the loops or curl the tails so the bow looks like it is resting naturally rather than being smashed flat.
Clean Edges Trick
Before baking, wipe the clay surface lightly with a rubbing alcohol wipe or baby wipe. This removes lint, dust, and fingerprints instantly.
Step 3: Finishing and Painting
-
Bake or dry:
Follow the instructions for your specific clay. For polymer clay, bake on a baking sheet (still inside its shaping bowl if oven-safe) at the recommended temperature, usually around 275°F (135°C) for 15-30 minutes. -
Sand for smoothness:
Once fully cured and cooled, use a fine-grit sanding sponge to buff the edges of the dish until they feel perfectly smooth like real ceramic. -
Paint the bow:
Using a fine detail brush, carefully paint just the bow section with soft pink acrylic paint. You may need two thin coats for opaque coverage. -
Gild the rim:
Dip your brush into the liquid gold gilding. Run the side of the brush along the very edge of the dish to create an uneven, organic gold rim. -
Create speckles (optional):
If you didn’t use speckled clay, you can flick a toothbrush dipped in diluted brown paint over the dish for a faux-ceramic speckle effect. -
Seal the piece:
Apply a coat of gloss varnish over the entire dish, or specifically over the bow and the inside well, to protect the paint and give it a shiny, glazed porcelain finish.
Bow Looking Flat?
If your bow loops collapse while working, tuck tiny balls of parchment paper or foil inside the loops to hold them open while the clay bakes or dries.
Now you have a charming spot to keep your everyday treasures organized and displayed beautifully
Sleepy Face Minimal Plate
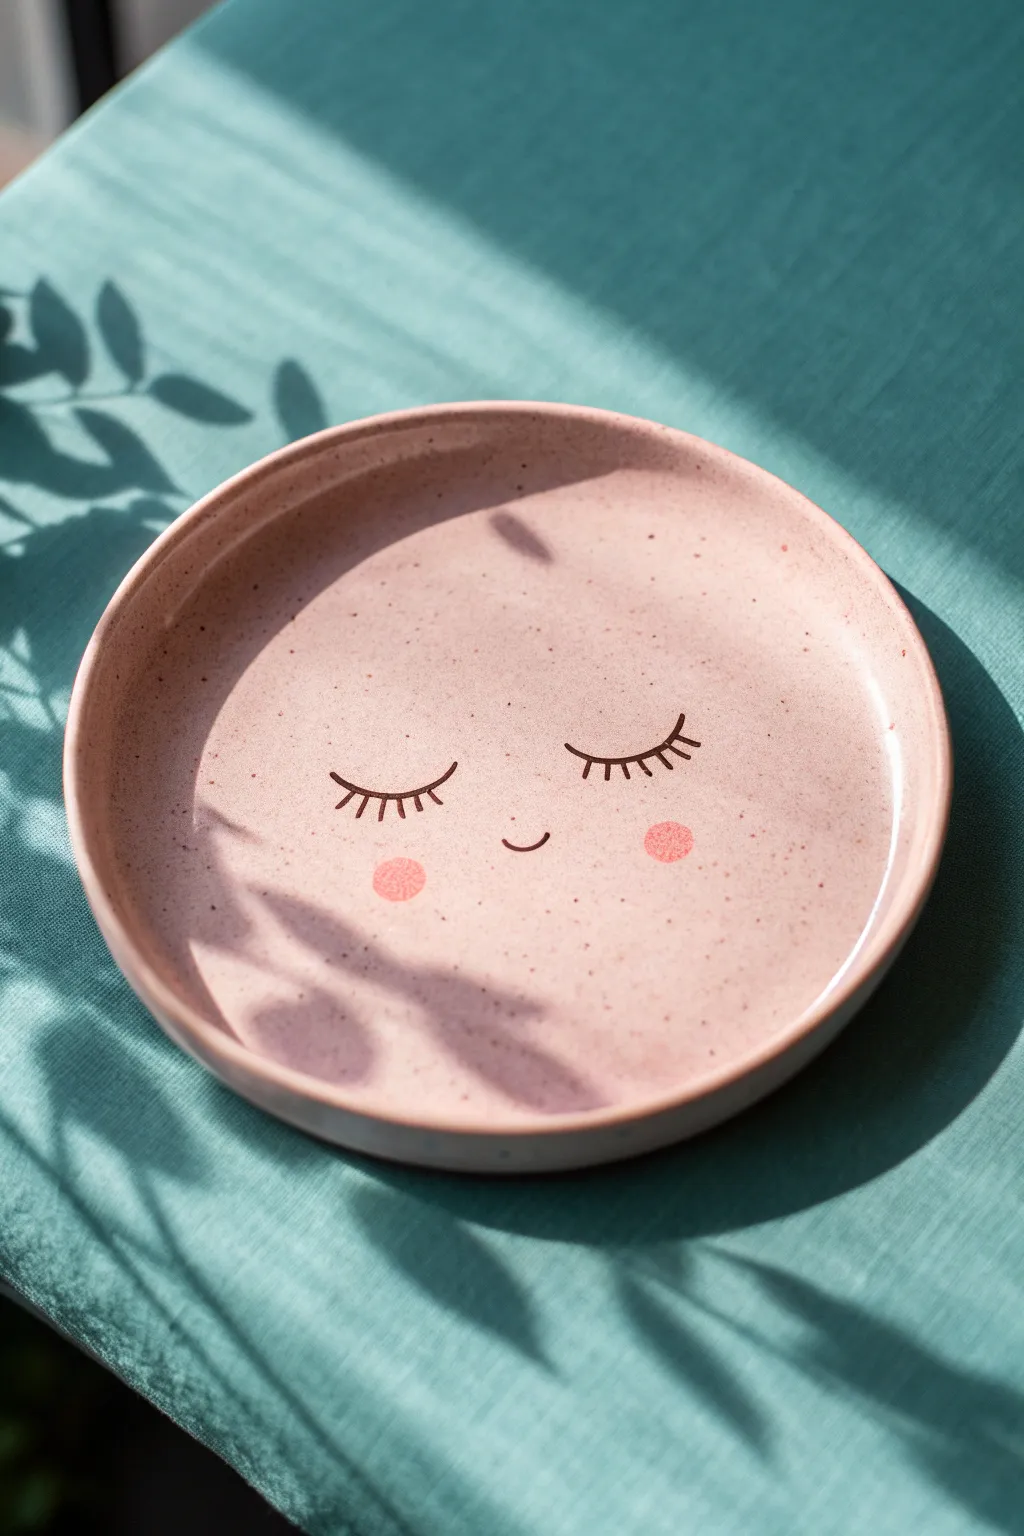
Embrace simplicity with this adorable sleepy-faced plate that adds a touch of whimsy to any table setting. The soft pink speckled clay and minimalist line art create a calming, modern aesthetic perfect for serving treats or displaying jewelry.
How-To Guide
Materials
- Speckled stoneware clay (pink or buff)
- Rolling pin
- Canvas mat or slab roller
- Circular template or existing plate (approx. 6-8 inches)
- Needle tool or fettling knife
- Potter’s sponge
- Flat geometric mold or shallow bowl (for shaping)
- Underglaze (black for details, coral/pink for cheeks)
- Fine detail brush (liner brush)
- Small round brush
- Clear transparent glaze
- Kiln (or access to a firing service)
Step 1: Forming the Plate
-
Prepare the clay:
Begin by wedging your speckled stoneware clay thoroughly to remove any air bubbles. This ensures a smooth surface later on. -
Roll the slab:
Place the clay on your canvas mat. using a rolling pin, roll out an even slab that is approximately 1/4 inch thick. Turn the clay periodically to ensure uniform thickness. -
Smooth the texture:
Take a rib tool or a slightly damp sponge and compress the surface of the slab. This aligns the clay particles and creates that perfectly smooth canvas we need for painting. -
Cut the shape:
Place your circular template onto the slab. Using your needle tool, cut straight down around the edge to create a clean circle. -
Refine the edges:
Once the circle is cut, dip your finger in a little water or slip and run it along the cut edge to soften the sharpness. -
Shape the rim:
Gently lift your clay circle and place it onto a shallow mold or inside a shallow bowl lined with plastic. Press it gently so the edges curve upward to form a rim. -
Dry to leather hard:
Let the plate sit in the mold until it reaches a leather-hard state. It should be firm enough to hold its shape but still cool to the touch.
Wobbly Lines?
If your hand shakes while painting thin lines, try resting your pinky finger on the dry clay surface to stabilize your hand while using the liner brush.
Step 2: Decorating and Firing
-
Clean the surface:
Remove the plate from the mold. Use a damp sponge to do a final wipe-down, smoothing out any imperfections on the rim or face. -
Draft the face:
Lightly sketch the position of the eyes and mouth with a pencil. Don’t worry about marks; the graphite will burn away in the kiln. -
Paint the eyes:
Load a fine liner brush with black underglaze. With a steady hand, paint two downward-curving arcs for the closed eyelids. -
Add eyelashes:
Add small, delicate ticks along the eyelid arcs to create the eyelashes. Keep them short and spaced out for a clean look. -
Paint the smile:
Between the eyes, paint a vary small, simple ‘u’ shape for the smiling mouth. -
Add rosy cheeks:
Using a small round brush and coral or pink underglaze, dab two small circles beneath the outer corners of the eyes. I like to twist the brush slightly to keep the circle round. -
Bisque fire:
Allow the underglaze to dry completely, then fire the piece to bisque temperature (usually Cone 04 or 06, depending on your clay). -
Apply clear glaze:
Once cool, dip the plate into a clear transparent glaze or brush on three even coats. This will make the speckles pop and make the plate food-safe. -
Final firing:
Wipe the foot of the plate clean of any glaze and fire it again to the maturation temperature of your specific clay body (often Cone 5 or 6).
Make it a Set
Create a companion plate with the eyes open using simple ovals and pupils, or change the mouth expression to create a ‘moody’ breakfast set.
Now you have a charming piece of functional art ready for your morning toast
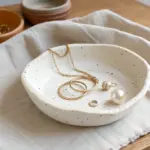
Stackable Tiny Plate Set
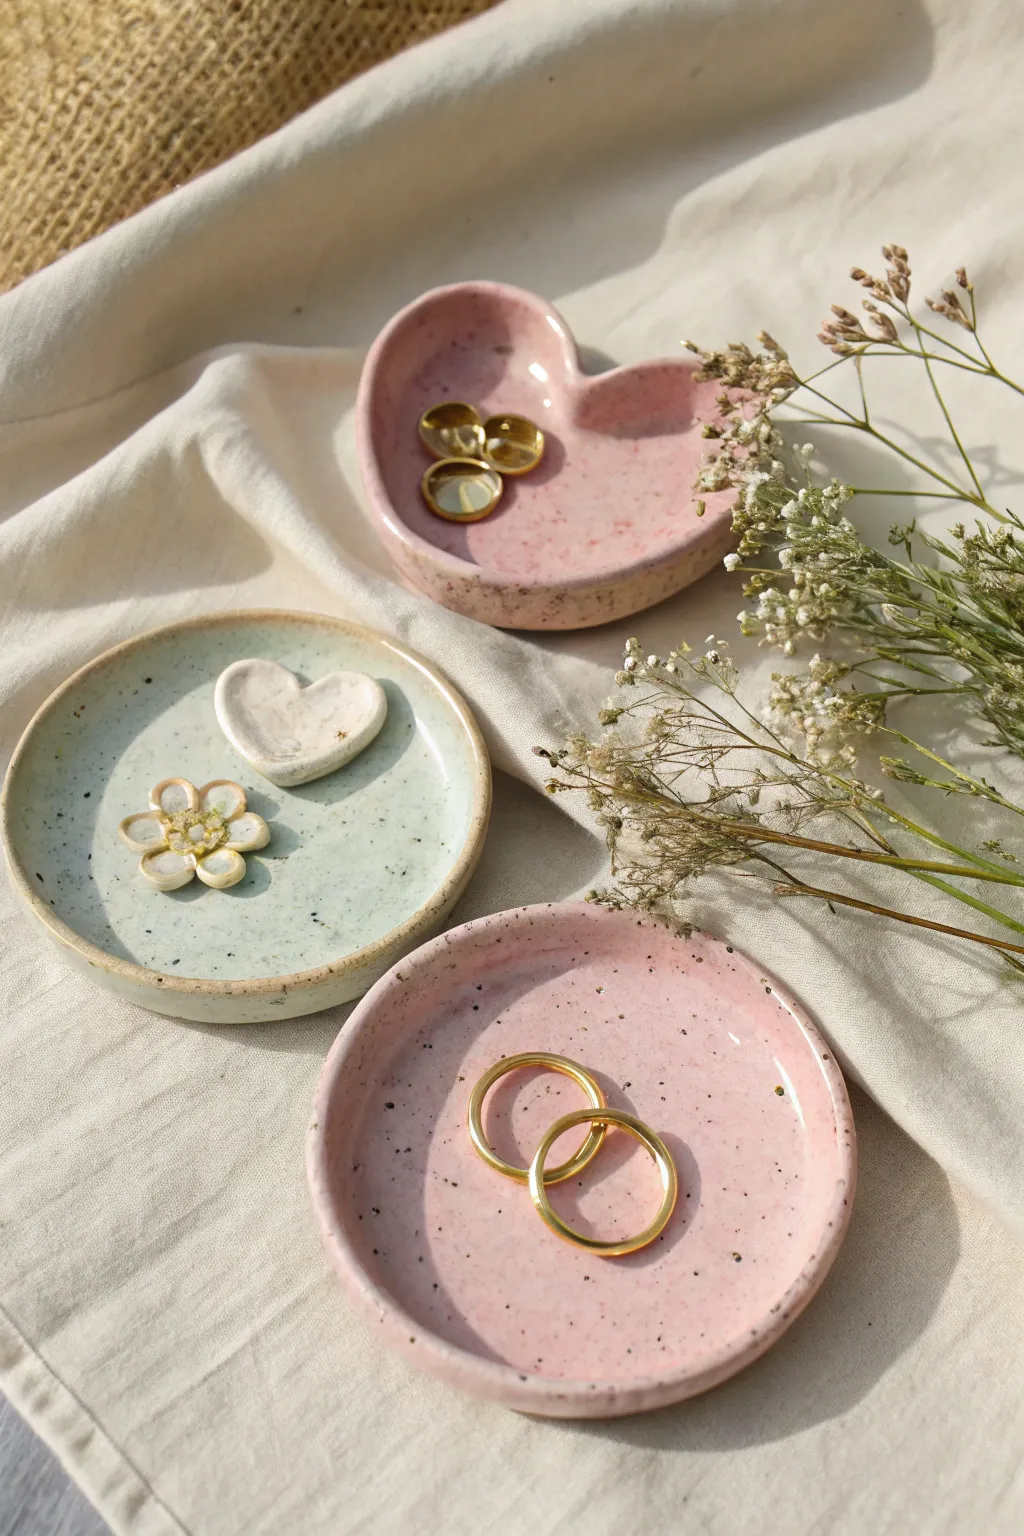
Create this charming set of miniature plates featuring a rustic speckled finish and soft pastel glazes. Perfect for holding rings, earrings, or simply adding a touch of handmade warmth to your bedside table, this trio includes classic rounds and a sweet heart shape.
Detailed Instructions
Materials
- Speckled stoneware clay (white or buff with grog)
- Rolling pin
- Canvas mat or cloth (to prevent sticking)
- Round cookie cutters (approx. 3-4 inches)
- Heart-shaped cookie cutter (approx. 3-4 inches)
- Smoothing sponge
- Needle tool or fettling knife
- Pastel pink pottery glaze
- Pale mint green pottery glaze
- Soft fan brush
- Kiln (or access to a firing service)
Step 1: Shaping the Clay Base
-
Prepare the slab:
Begin by wedging a baseball-sized ball of speckled stoneware clay to remove air bubbles. Flatten it slightly with your palm onto your canvas mat. -
Roll to thickness:
Use your rolling pin to roll the clay out into an even slab. Aim for a thickness of about 1/4 inch; too thin and they may warp, too thick and they look clunky. -
Cut the shapes:
Press your round cookie cutter firmly into the slab to create two circles. Then, use the heart-shaped cutter to make the third dish. Lift away the excess clay. -
Smooth the edges:
Dip your finger in a little water or use a damp sponge to gently run along the cut edges of each shape. This softens the sharp angle left by the cutter.
Warped Rim Woes?
If rims fall flat while drying, support them with small coils of clay wrapped in newspaper tucked underneath the edges until they firm up to leather-hard.
Step 2: Forming the Rims
-
Lift the edges:
Pick up one of the clay circles. Gently pinch and lift the outer edge upwards with your thumb and forefinger to create a raised rim. Rotate the piece as you work to keep it even. -
Refine the heart:
For the heart dish, carefully pinch up the rim along the curves, paying special attention to the indent at the top and the point at the bottom so they stay defined. -
Smooth the interior:
Place the dishes back on the mat. Use a barely damp sponge to smooth the interior curve where the floor meets the wall, ensuring a seamless transition. -
Add texture (optional):
If you want a more organic feel, lightly tap the rim with your fingertip to create slight undulations, rather than a perfectly machine-made straight line. -
Dry slowly:
Cover the greenware loosely with plastic and let them dry slowly for a few days until they are bone dry. This is crucial to prevent cracking.
No Kiln? No Problem
Make this with air-dry clay! Seal with acrylic paint and a glossy varnish instead of glaze. Note: these won’t be food safe or water-proof.
Step 3: Glazing and Firing
-
Bisque fire:
Load the bone-dry pieces into the kiln for a bisque firing (usually Cone 04). This hardens the clay and prepares it for glaze. -
Wipe down:
Once cool, wipe each piece with a damp sponge to remove any kiln dust. This helps the glaze adhere properly without crawling. -
Apply pink glaze:
Using a soft fan brush, apply 2-3 coats of the pastel pink glaze to the heart dish and one of the round dishes. Allow each coat to dry to the touch before adding the next. -
Apply mint glaze:
Glaze the remaining round dish with the pale mint green glaze, following the same layering process. I personally like to leave the very bottom rim unglazed for contrast. -
Clean the foot:
Use a wet sponge to meticulously wipe off any glaze from the bottom of the plates where they will touch the kiln shelf. This prevents them from sticking during firing. -
Glaze fire:
Fire the pieces a second time to the temperature specified by your clay and glaze manufacturer (typically Cone 5 or 6 for stoneware).
Arrange your delicate new dishes on a dresser to beautifully display your favorite jewelry pieces