If you’ve ever looked at a plain terracotta pot and thought, “You could be way cuter,” you’re in the right headspace. These ideas are all about turning simple pots into little personality-packed buddies you’ll actually want to display (and gift).
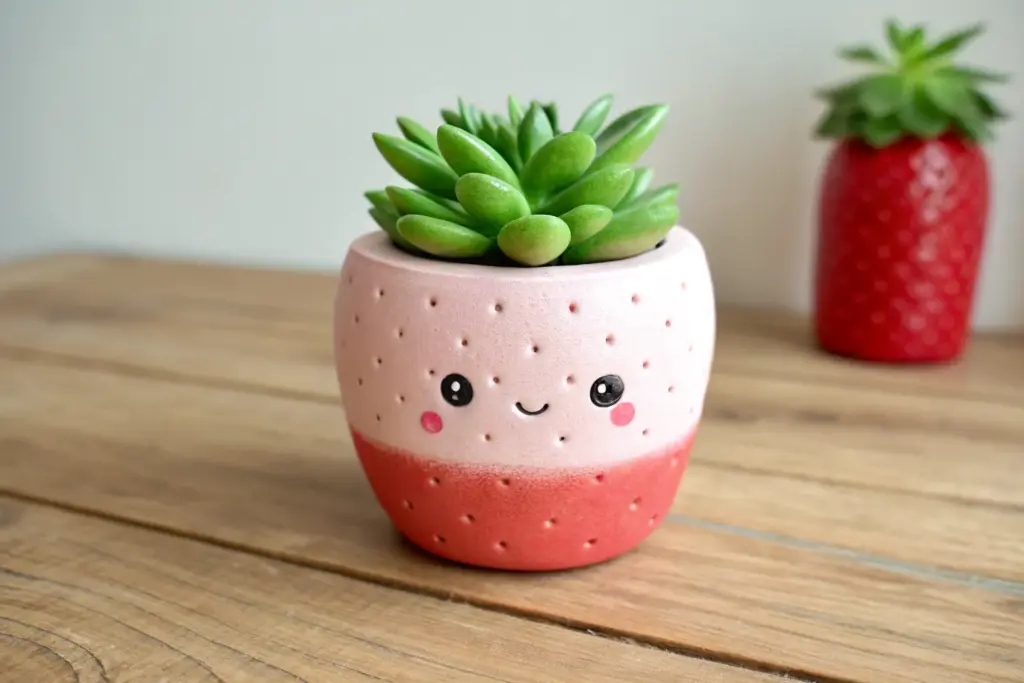
Smiley Face Mini Planters
Add a literal smile to your windowsill with this impossibly cheerful mini planter. Using a classic terracotta base, this project combines minimalist line art with rosy cheeks for a sweet, charming look that makes your succulents pop.
Step-by-Step
Materials
- Small terracotta pot (3-4 inch diameter)
- Black acrylic paint or oil-based paint pen (fine tip)
- Soft pink acrylic paint
- Small round paintbrush or foam dauber
- Paper towel
- Matte spray sealer (optional)
- Pencil
- Succulent plant and cactus soil
Step 1: Prepping the Canvas
-
Clean the surface:
Start by wiping down your terracotta pot with a slightly damp cloth to remove any warehouse dust or loose clay particles. Let it dry completely so the paint adheres properly. -
Map out the face:
Lightly sketch the face features using a pencil. I like to place the features slightly lower on the pot—about halfway down or just below—creates a cuter, ‘kawaii’ proportion. -
Position the eyes:
Draw two small, upward-curving arches for the happy eyes. Space them widely apart to leave room for the smile and cheeks. -
Sketch the smile:
Center a simple U-shape between the eyes, placed slightly lower than the eye line. -
Mark the cheeks:
Draw faint circles on the outer edges of the face, right next to the lower corners of the eye arches.
Step 2: Painting the Features
-
Paint the eyes:
Using a fine-tip black paint pen or a very thin liner brush with black acrylic paint, trace over your pencil lines for the eyes. Go slowly to keep the curves smooth. -
Trace the smile:
Carefully ink the U-shaped smile. If using a brush, slightly thin the paint with a drop of water to help it glide over the textured clay surface. -
Refine the lines:
Check your black lines. If they look too thin or shaky, go over them a second time to thicken them up and make the expression bold and readable. -
Prepare the blush color:
Dip your small round brush or a foam dauber into the soft pink acrylic paint. Dab off the excess paint onto a paper towel; you want faint coverage rather than a thick glob. -
Apply the first cheek:
Press the brush or dauber gently onto the penciled cheek circle. A stippling (tapping) motion works well here to work the paint into the porous clay. -
Apply the second cheek:
Repeat on the other side. Try to keep the size consistent, but don’t worry about perfection; slightly uneven cheeks just add character. -
Let it dry:
Allow the paint to dry completely. Acrylics on terracotta dry fast, usually within 15 to 20 minutes.
Uneven Cheeks?
If one cheek circle ends up wonky, use a damp Q-tip to immediately wipe away wet acrylic paint from the raw terracotta. It lifts surprisingly well before it cures.
Step 3: Finishing Up
-
Erase guidelines:
Once the paint is bone dry, gently erase any visible pencil marks that weren’t covered by paint. -
Seal the design:
To protect your face from water damage when watering plants, mist the outside of the pot with a matte clear acrylic sealer. Two light coats work better than one heavy one. -
Add drainage:
Place a small mesh screen or a shard of broken pottery over the drainage hole to keep soil in. -
Fill with soil:
Fill the pot about two-thirds full with a cactus or succulent potting mix. -
Plant the succulent:
Gently nestle your succulent into the soil. Add a little more soil around the edges to secure it, brushing any dirt off the rim.
Paint Pen Precision
For the crispest black lines on rough clay, use an oil-based paint marker instead of a brush. It won’t snag on the texture and gives a solid opaque line instantly.
Now you have a happy little friend ready to brighten up your desk or shelf


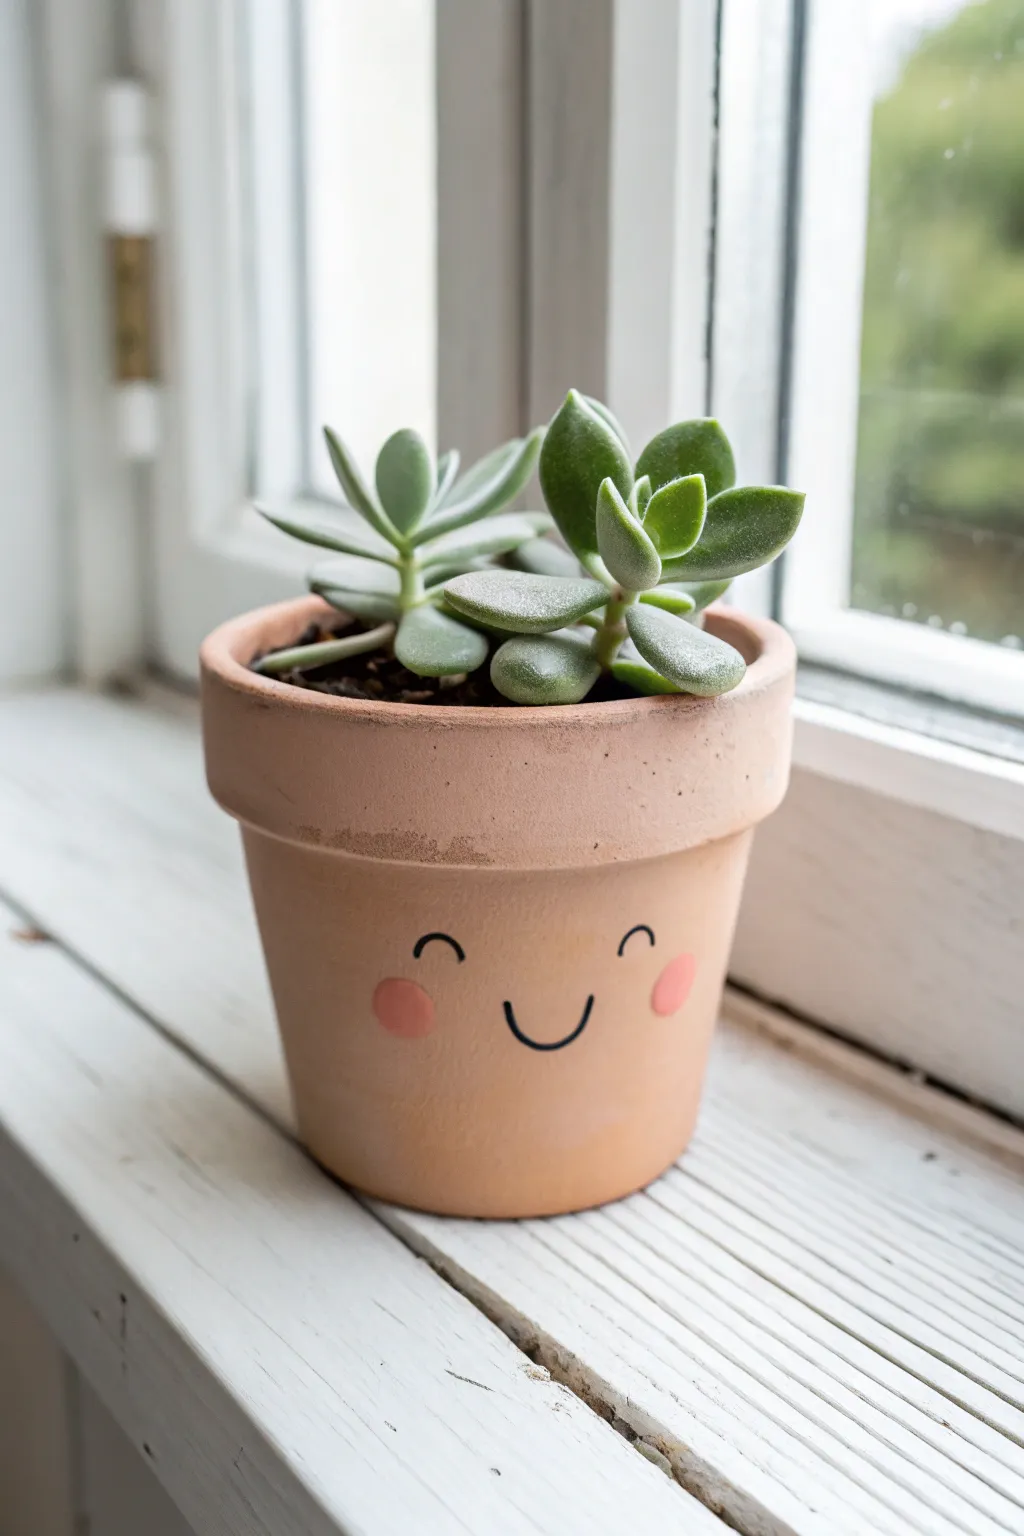
Blush Cheek Face Pots With Hair

Transform a plain terra cotta pot into a charming character with this simple customization project. The combination of natural clay, creamy white glaze, and simple painted details creates a serene, sleeping face that adds personality to any succulent collection.
Detailed Instructions
Materials
- Small terra cotta pot (approx. 3-4 inches)
- White or cream acrylic paint (matte finish)
- Black fine-point permanent marker or black acrylic paint with a detail brush
- Soft pink acrylic paint
- Painter’s tape or masking tape
- Foam sponge brush or flat synthetic brush
- Small round sponge dobber or Q-tip
- Matte clear sealant spray (optional)
- Small cactus or succulent
Step 1: Preparation and Base Coat
-
Clean the surface:
Begin with a fresh, clean terra cotta pot. Wipe it down with a damp cloth to remove any warehouse dust or loose clay particles. Let it dry completely before you start panting. -
Tape the rim:
To achieve that crisp, exposed clay rim shown in the photo, apply a strip of painter’s tape around the very top edge of the pot. Press the tape down firmly to prevent paint from bleeding underneath. -
Tape the base:
Similarly, run a line of tape around the bottom third of the pot. Ensure the tape is level all the way around so your painted section looks straight. -
Apply the first coat:
Using your foam brush or flat synthetic brush, apply a layer of creamy white acrylic paint to the exposed middle section. Brush horizontally to minimize stroke marks. -
Let it dry:
Allow the first coat to dry to the touch, which usually takes about 15 to 20 minutes depending on your room’s humidity. -
Add a second coat:
Terra cotta is porous and soaks up paint, so a second coat is usually necessary for opaque coverage. Look for complete coverage where the orange clay doesn’t peek through. -
Create the speckles:
While the white paint is still slightly tacky or just dry, you can add a subtle speckled texture to mimic ceramic glaze. Dip an old toothbrush in watered-down brown or grey paint and gently flick it onto the white section. -
Remove the tape:
Carefully peel off the painter’s tape while the final coat is still slightly damp. Pull the tape away at a 45-degree angle to ensure a sharp, clean line between the paint and natural clay.
Clean Lines Only
If paint seeped under your tape, don’t panic. Wait for it to dry, then gently scrape the excess paint off the raw clay sections using a craft knife or fine-grit sandpaper.
Step 2: Adding the Facial Features
-
Sketch the face:
Before committing with permanent ink or paint, lightly sketch the sleeping eyes and smile with a pencil. Center the face in the middle of the white band. -
Draw the eyelashes:
Using a fine-point black permanent marker or a tiny detail brush with black paint, trace over your pencil lines. Draw two downward curves for the closed eyelids. -
Detail the lashes:
Add three to four small vertical dashes extending downward from each eyelid curve to create sweet, fluttering eyelashes. -
Draw the smile:
Center a small, simple upward curve between and slightly below the eyes for the mouth. Keep the line thin and delicate. -
Add the cheeks:
Dip a small round sponge dobber into your soft pink paint. If you don’t have a dobber, I find using the end of a pencil eraser works perfectly. -
Stamp the blush:
Gently press the pink paint onto the pot on either side of the smile. Dab straight down and lift straight up to keep the circle perfect. -
Seal the work:
To protect your paint from water damage when you water your plant, spray the entire pot with a matte clear sealant. This is crucial for terra cotta since moisture moves through the clay walls. -
Pot your plant:
Once fully dry, fill the pot with cactus soil and plant your spiky cactus inside. The prickles of the cactus act as a funny, punk-rock ‘hairdo’ for your new friend.
Accessorize It
Glue a small fabric bow to the rim or paint small glasses onto the face. You can also vary the cactus type to give the pot different hairstyles, like a trailing plant for long hair.
Now you have an adorable little companion to brighten up your windowsill or desk


Tiny Bear Buddy Pots
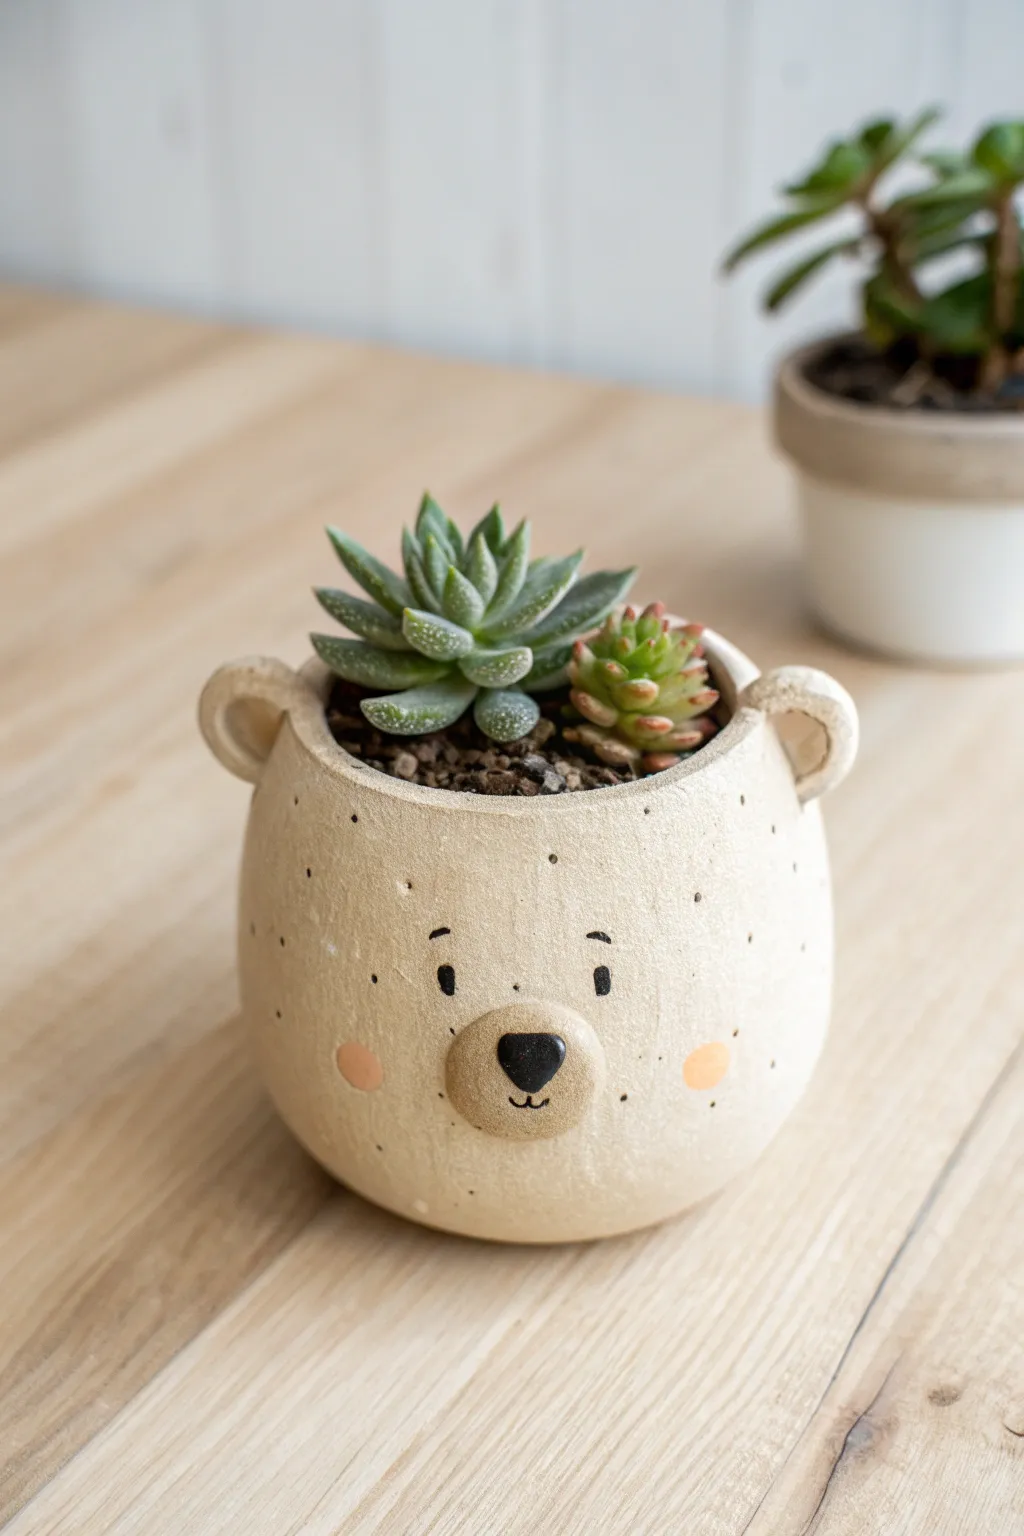
Bring a touch of woodland charm to your desk with this adorable hand-sculpted bear pot. Its natural beige tone, gentle speckles, and sweet painted face make it the perfect cozy home for your favorite succulents.
Step-by-Step Guide
Materials
- Air-dry clay (stone or speckled beige color)
- Small bowl of water
- Rolling pin
- Clay sculpting tools (needle tool, smooth rib)
- Slip (clay mixed with water)
- Black acrylic paint
- Soft peach or pink acrylic paint
- Fine detail paintbrush
- Gloss varnish or clear sealant
- Sandpaper (fine grit)
Step 1: Forming the Base
-
Prepare the Clay:
Start by kneading a tennis-ball-sized amount of air-dry clay to warm it up and remove air bubbles. This ensures your pot won’t crack later. -
Roll a Ball:
Roll your conditioned clay into a smooth, tight sphere between your palms. -
Create the Pinch Pot:
Insert your thumb into the center of the ball, pushing down about three-quarters of the way, stopping before you break through the bottom. -
Pinch the Walls:
Gently pinch and turn the clay between your thumb and fingers, working from the bottom up to thin the walls evenly. Aim for a thickness of about 1/4 inch. -
Shape the Belly:
Push the walls slightly outward from the inside to create a rounded, bulbous ‘belly’ shape for the pot, curving back in slightly at the rim. -
Flatten the Bottom:
Set the pot down firmly on your work surface and tap it gently to create a flat, stable base so it won’t tip over.
Pro Tip: Drainage is Key
Since air-dry clay degrades with water, nest a small plastic nursery pot inside your bear sculpt instead of planting directly. This keeps the clay dry and safe.
Step 2: Adding the Features
-
Make the Ears:
Roll two small marble-sized balls of clay. Flatten them slightly and use your thumb or a modeling tool to create an indentation in the center of each, forming a cup shape. -
Score and Slip:
Use a needle tool to scratch cross-hatch marks on the bottom of the ears and the rim of the pot where they will attach. Apply a dab of slip (clay water) to act as glue. -
Attach the Ears:
Press the ears firmly onto the rim. Smooth the seam where the clay joins using your finger or a tool so the ears look seamless and integrated. -
Create the Snout:
Form a small, flattened oval of clay for the muzzle. Score, slip, and attach this to the lower center of the pot’s face. -
Refine the Snout:
Blend the edges of the snout onto the pot slightly, but leave the center raised to give the face dimension. -
Add Texture (Optional):
If your clay isn’t naturally speckled, you can gently flick a stiff toothbrush dipped in watered-down brown paint over the wet clay for a faux-stone look, or poke tiny, shallow holes sporadically with a needle for texture.
Troubleshooting: Cracking Clay
If you see hairline cracks while drying, mix a tiny bit of vinegar into your clay slip and fill the crack immediately, then smooth it over with a damp finger.
Step 3: Finishing Touches
-
Dry Completely:
Let the pot dry for at least 24-48 hours. I find letting it dry slowly away from direct heat prevents surface cracks. -
Sand for Smoothness:
Once bone dry, use fine-grit sandpaper to gently smooth out any rough fingerprints or sharp edges on the rim. -
Paint the Details:
Using a fine detail brush and black acrylic paint, add two small vertical dashes for eyes and a small inverted triangle on the snout for the nose. -
Add the Mouth and Cheeks:
Paint a delicate ‘w’ shape under the nose for the mouth. Dip your finger or a round sponge in peach paint and blot excess before dabbing soft circles for rosy cheeks. -
Seal the Pot:
Apply a coat of waterproof sealer or varnish to protect your paint job and the clay from moisture.
Pop in your favorite succulent and enjoy your new little desk companion


Kitty Whisker Pots
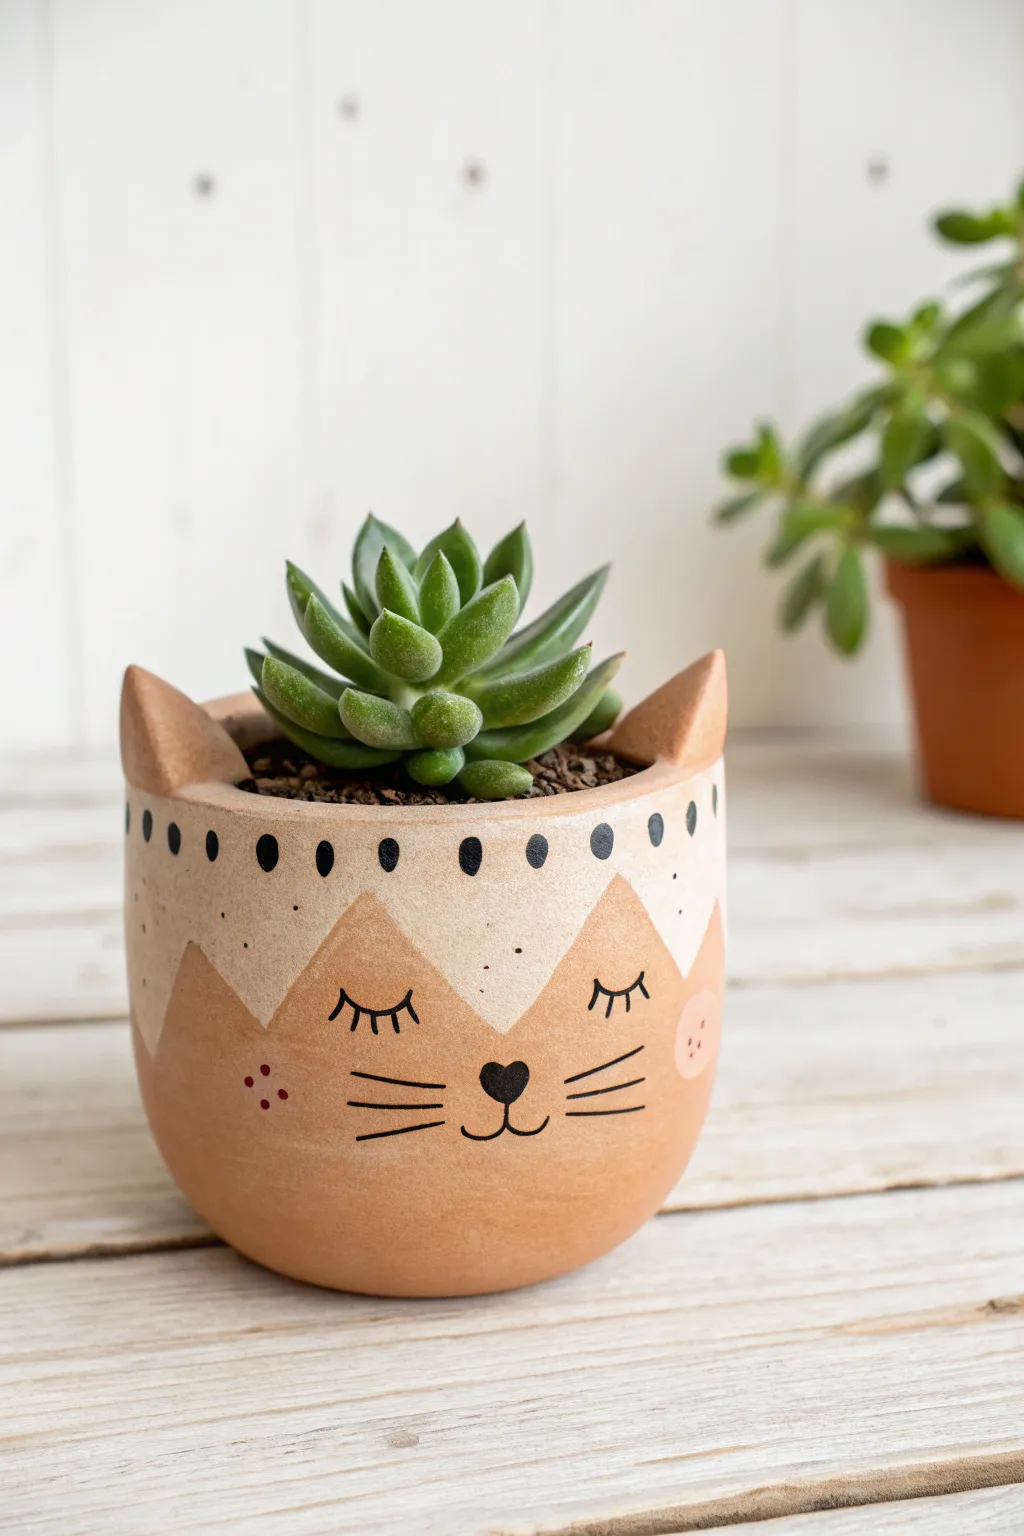
Transform a plain terracotta pot into an adorable sleeping cat companion for your favorite succulent. This project uses simple geometric shapes and sweet details like closed eyes and rosy cheeks to create a charming, personalized home for your plants.
Step-by-Step
Materials
- Small terracotta pot (approx. 4-6 inches)
- Air-dry clay or polymer clay (terracotta color preferred)
- Strong craft glue or E6000
- Acrylic paints: Cream/Off-white, Black, Pink, Red
- Paintbrushes: Medium flat brush, fine detail liner brush
- Pencil and eraser
- Matte spray sealer or Mod Podge
- Succulent and potting soil
Step 1: Sculpting the Ears
-
Shape the clay:
Take two small balls of clay, roughly the size of large marbles. Flatten them slightly and pinch the tops to form triangles that mimic cat ears. -
Fit to the rim:
Press the base of each triangle onto the inner rim of your terracotta pot to check the fit. You want them to curve slightly with the pot’s shape. -
Attach and dry:
Apply a dab of strong glue to the bottom of the ears and press them firmly onto the rim. Smooth out the seam where the clay meets the pot using a little water on your finger. Let the clay dry completely according to the package instructions.
Uneven Lines?
If your lines are shaky, use a black permanent marker instead of paint for the thin whiskers and eyes. It gives you way more control.
Step 2: Creating the Base Design
-
Clean surface:
Wipe the pot down with a damp cloth to remove any dust or oils, ensuring a smooth painting surface. -
Sketch the hairline:
Using a pencil, lightly draw a zigzag line around the upper third of the pot. This creates the ‘fur’ pattern where the cream color meets the natural terracotta. -
Paint the top section:
Use your medium flat brush and cream acrylic paint to fill in the area above the zigzag line, painting right up to the rim and covering the front of the clay ears. -
Apply a second coat:
Once the first layer is dry, apply a second coat of cream paint to ensure the terracotta color doesn’t show through. I usually find two coats give the crispest finish. -
Add the decorative dots:
Dip the handle end of a paintbrush into black paint. Stamp small dots along the cream rim, spacing them evenly between the zigzag points.
Make it a Tabby
Add orange or grey stripes to the terracotta section before painting the face to create a totally different breed of cat.
Step 3: Painting the Face
-
Sketch the features:
Lightly sketch the sleeping eyes, nose, mouth, and whiskers on the bare terracotta section using a pencil. Center the nose below the central ‘V’ of the cream paint. -
Detail the eyes:
Using a fine liner brush and black paint, carefully trace over your pencil lines for the closed eyelids. Add three small lashes to the outer corner of each eye. -
Paint the nose:
Paint a small, inverted heart shape for the nose in the center using black paint. -
Add the mouth:
Draw two curved lines extending outward from the bottom point of the nose to create the classic cat smile. -
Paint the whiskers:
With a steady hand, paint three horizontal lines on each cheek area for whiskers. Keep the pressure light so lines stay thin. -
Create rosy cheeks:
Mix a tiny amount of red into your pink paint (or use plain pink) to get a soft blush color. Paint small circles on the outer cheeks. -
Add cheek freckles:
Once the pink circles are dry, use the very tip of your brush or a toothpick to add three tiny red or dark pink dots inside the blush area for extra cuteness.
Step 4: Finishing Touches
-
Seal the pot:
After all paint is completely dry, spray the entire pot (inside and out) with a matte sealer. This protects your artwork from water damage when you water your plant. -
Planting:
Fill the pot with succulent soil and gently nestle your chosen succulent inside the ears.
Now you have a sweet little feline friend ready to brighten up your windowsill or desk

The Complete Guide to Pottery Troubleshooting
Uncover the most common ceramic mistakes—from cracking clay to failed glazes—and learn how to fix them fast.
Whale Hug Pots
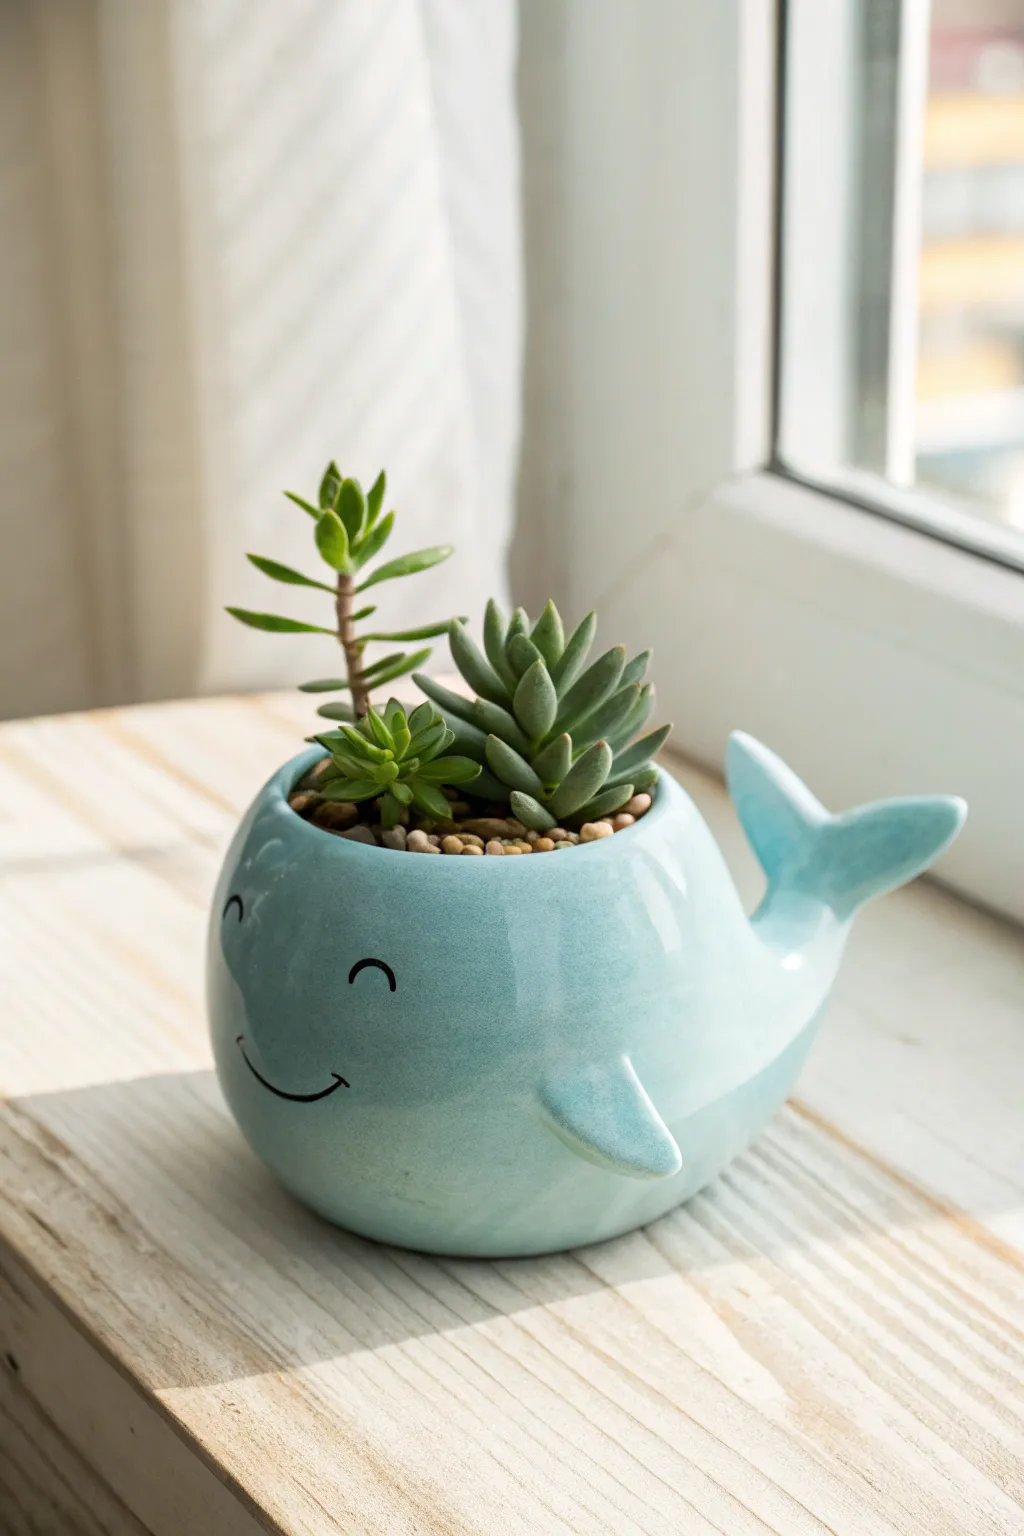
Bring a splash of the ocean to your windowsill with this adorable whale-shaped succulent planter. Its smooth, glossy blue finish and friendly smiling face make it a charming home for your favorite little green friends.
How-To Guide
Materials
- Air-dry clay or polymer clay (white)
- Small rolling pin
- Clay sculpting tools (knife tool, smoothing tool)
- Small bowl (for shaping the body)
- Water (for smoothing air-dry clay)
- Acrylic paints (light baby blue, black)
- High-gloss varnish or glaze
- Paintbrushes (medium flat, fine detail)
- Small succulents and potting soil
- Small pebbles or gravel
Step 1: Sculpting the Body
-
Prepare the base:
Start by rolling a large ball of clay, roughly the size of a grapefruit. Use your thumb to create a deep indentation in the center, pinching and rotating to form a hollow bowl shape. This will hold your plant. -
Smooth the shape:
If I’m using air-dry clay, I keep my fingers slightly damp to smooth out any cracks as I work. You want the bowl to be round and bulbous, curving inward slightly at the top rim. -
Form the tail:
Take a separate piece of clay and roll it into a thick cone. Flatten the wide end slightly and split it down the middle to create two flukes. Gently curve the tips outward for that classic whale tail silhouette. -
Attach the tail:
Score the back of your bowl and the base of the tail with a tool to roughen the surfaces. Add a dab of water (or liquid clay if using polymer) and press them firmly together. -
Blend the seams:
Use a smoothing tool or your finger to blend the clay from the tail onto the body so it looks like one continuous piece. The transition should be seamless and curve upward. -
Add side fins:
Shape two small triangles of clay for the pectoral fins. Attach one to each side of the body, fairly low down, angling them slightly backward just like a swimming whale. -
Refine the surface:
Do a final pass over the entire piece. Smooth out any fingerprints or bumps. The smoother your clay is now, the glossier the final finish will look. -
Drying or baking:
Depending on your clay type, either let the pot air dry completely (usually 24-48 hours) or bake it according to the package instructions. Ensure it is fully hardened before moving on.
Cracking Up?
If air-dry clay cracks while drying, mix a tiny bit of fresh clay with water to make a paste. Fill the cracks, smooth it over, and let it dry again before painting.
Step 2: Painting and Finishing
-
Base coat:
Mix a soft, sky-blue acrylic paint. Apply an even coat over the entire exterior and the inner rim of the pot. You may need two or three coats to get solid, opaque coverage. -
Let it dry:
Allow the blue paint to dry completely between coats to avoid streaking. -
Paint the face:
Using a very fine detail brush and black paint, carefully paint two small, curved semicircles for the closed, happy eyes. Place them fairly wide apart on the front. -
Add the smile:
Paint a simple, curved line for the mouth below the eyes. Add tiny perpendicular tick marks at the ends of the smile for extra cuteness. -
Gloss it up:
Once the paint is fully dry, apply two thick coats of high-gloss varnish. This mimics the wet, shiny look of a ceramic glaze and protects your paint job. -
Add drainage (optional):
If you plan to plant directly inside and forgot a drainage hole, add a layer of gravel at the bottom first. -
Planting:
Fill the cavity with succulent soil and gently nestle your succulents into the top. Use small decorative pebbles to cover the soil surface for a polished look.
Make a Splash
Try painting the belly a lighter white or cream color, blending it into the blue sides for a realistic counter-shaded whale look before adding the gloss.
Place your little whale in a sunny spot and enjoy the cheerful vibe it adds to your room
Cute Hanging Pocket Pots
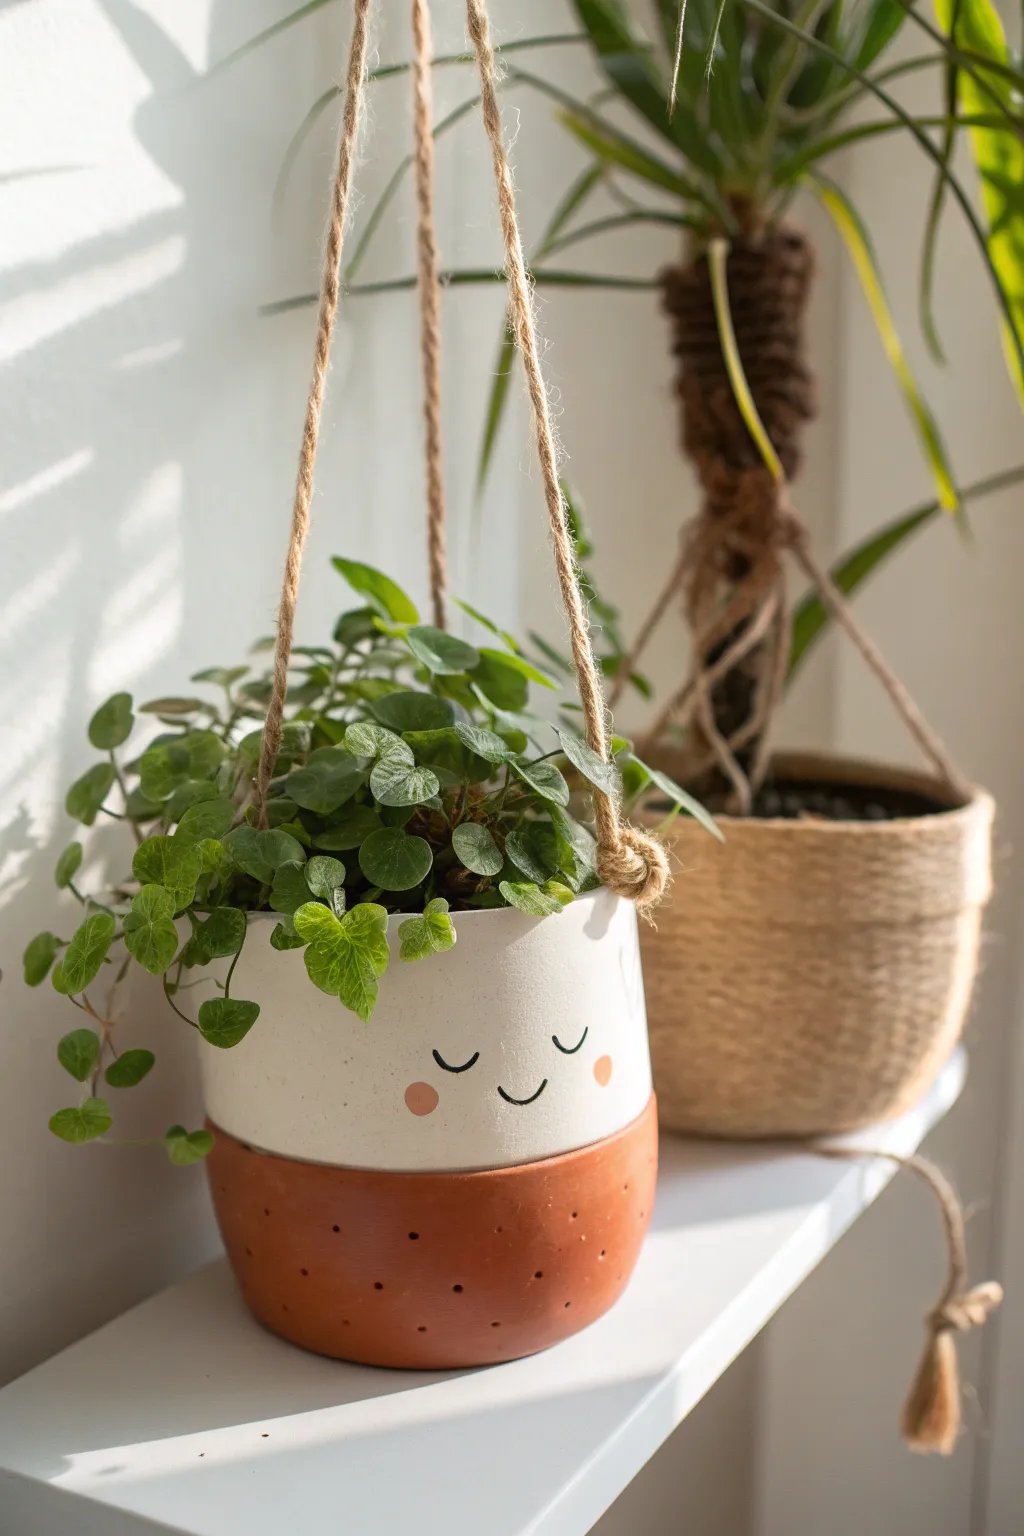
Bring a touch of whimsy to your indoor garden with this adorable two-toned hanging planter featuring a sweet, sleepy face. The combination of raw terracotta texture and smooth white paint creates a modern yet cozy aesthetic perfect for trailing plants.
Step-by-Step
Materials
- Small to medium terracotta pot (standard shape)
- White acrylic paint (outdoor or multi-surface preferred)
- Black acrylic paint or a fine-tip permanent marker
- Soft pink acrylic paint
- Painter’s tape or masking tape
- Medium flat paintbrush
- Small fine-point liner brush
- Small round sponge dobber or cotton swab
- Jute twine or macramé cord
- Drill with a small masonry bit (optional, for decorative dimples)
- Clear matte sealer spray
Step 1: Preparation and Base Design
-
Clean the surface:
Begin by thoroughly wiping down your terracotta pot with a damp cloth to remove any dust or manufacturing residue. Let it dry completely so the tape adheres properly. -
Tape the boundary:
Determine where you want the white section to end. For this look, aim for a line about one-third of the way up from the bottom. Apply painter’s tape firmly around the circumference of the pot to create a crisp separation. -
Seal the tape edge:
I like to run my fingernail or a credit card along the tape’s edge to ensure a tight seal, which prevents paint from bleeding onto the raw terracotta section below.
Step 2: Painting the Face
-
Apply base coat:
Using your flat brush, paint the upper section of the pot white. Make sure to paint slightly over the tape edge for a sharp line later. -
Build opaque layers:
Terracotta is porous and drinks up paint, so apply 2-3 coats of white, allowing the paint to dry to the touch between each layer until you have a solid, opaque finish. -
Reveal the line:
Once the final white coat is semi-dry (not fully cured), carefully peel away the painter’s tape at a 45-degree angle to reveal the two-tone effect. -
Sketch the face:
Using a pencil very lightly, mark the center of the pot. Sketch two small ‘U’ shapes for sleeping eyes and a gentle curve for the smile. -
Paint the features:
Using a fine liner brush dipped in black paint (or a permanent marker for easier control), carefully trace over your pencil lines to create the sleepy expression. -
Add rosy cheeks:
Dip a small round sponge dobber, the handle end of a paintbrush, or a cotton swab into the soft pink paint. Dab gently beneath each eye to create perfectly round, rosy cheeks.
Clean Lines Pro-Tip
Before painting white, paint a thin layer of clear matte medium or varnish over the tape edge. This seals the gap, ensuring absolutely zero bleed-under for a perfect line.
Step 3: Texture and Assembly
-
Create decorative dimples:
This step is optional but adds great texture. On the unpainted terracotta bottom, use a drill with a small masonry bit to create shallow divots in a random or grid pattern. Do not drill all the way through. -
Alternative texture method:
If you don’t have a drill, use the handle end of a paintbrush dipped in a darker brown paint to create small dots that mimic the look of indentations. -
Seal the pot:
Once all paint is totally dry, spray the entire pot with a clear matte sealer. This protects the painted face from water damage and fading. -
Prepare the hanger:
Cut three equal lengths of jute twine, each about 4 feet long (adjust based on how low you want it to hang). -
Knot the base:
Gather all three strands and tie a large, sturdy overhand knot at one end. This knot will sit underneath the drainage hole to support the pot. -
Thread the pot:
Thread the loose ends of the twine through the drainage hole from the bottom up. Settle the pot so it rests securely on the large knot. -
Secure the top:
Tie the loose ends together at the top to create a loop for hanging, ensuring the pot hangs level. -
Add your plant:
Fill with potting soil and your favorite trailing plant, brush off any stray dirt from the white rim, and hang your new creation.
Wobbly Hand Fix
Mess up the black smile? Don’t panic. Let it dry completely, then paint over the mistake with a dab of your white base coat. Let that dry, and try again.
Now you have a charming new friend to brighten up your window sill or corner