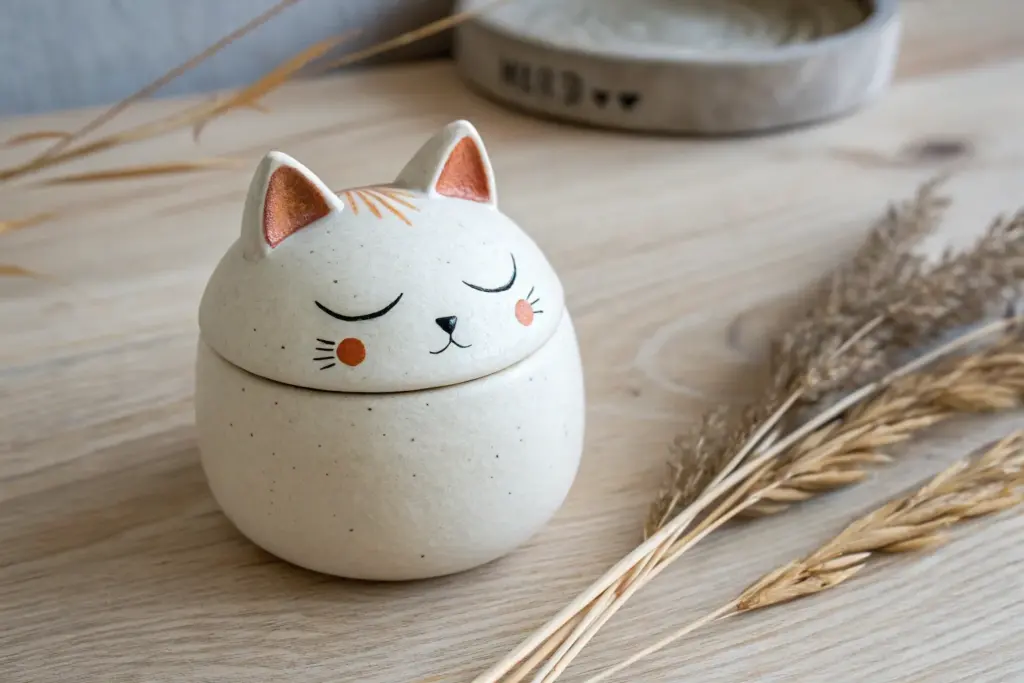
When I’m craving something instantly smile-worthy, I reach for cute clay pottery that doubles as real-life functional decor. These ideas are all about adorable characters, rounded shapes, and little details that make your shelves and countertops feel extra happy.
Animal Planter With Succulent Hair
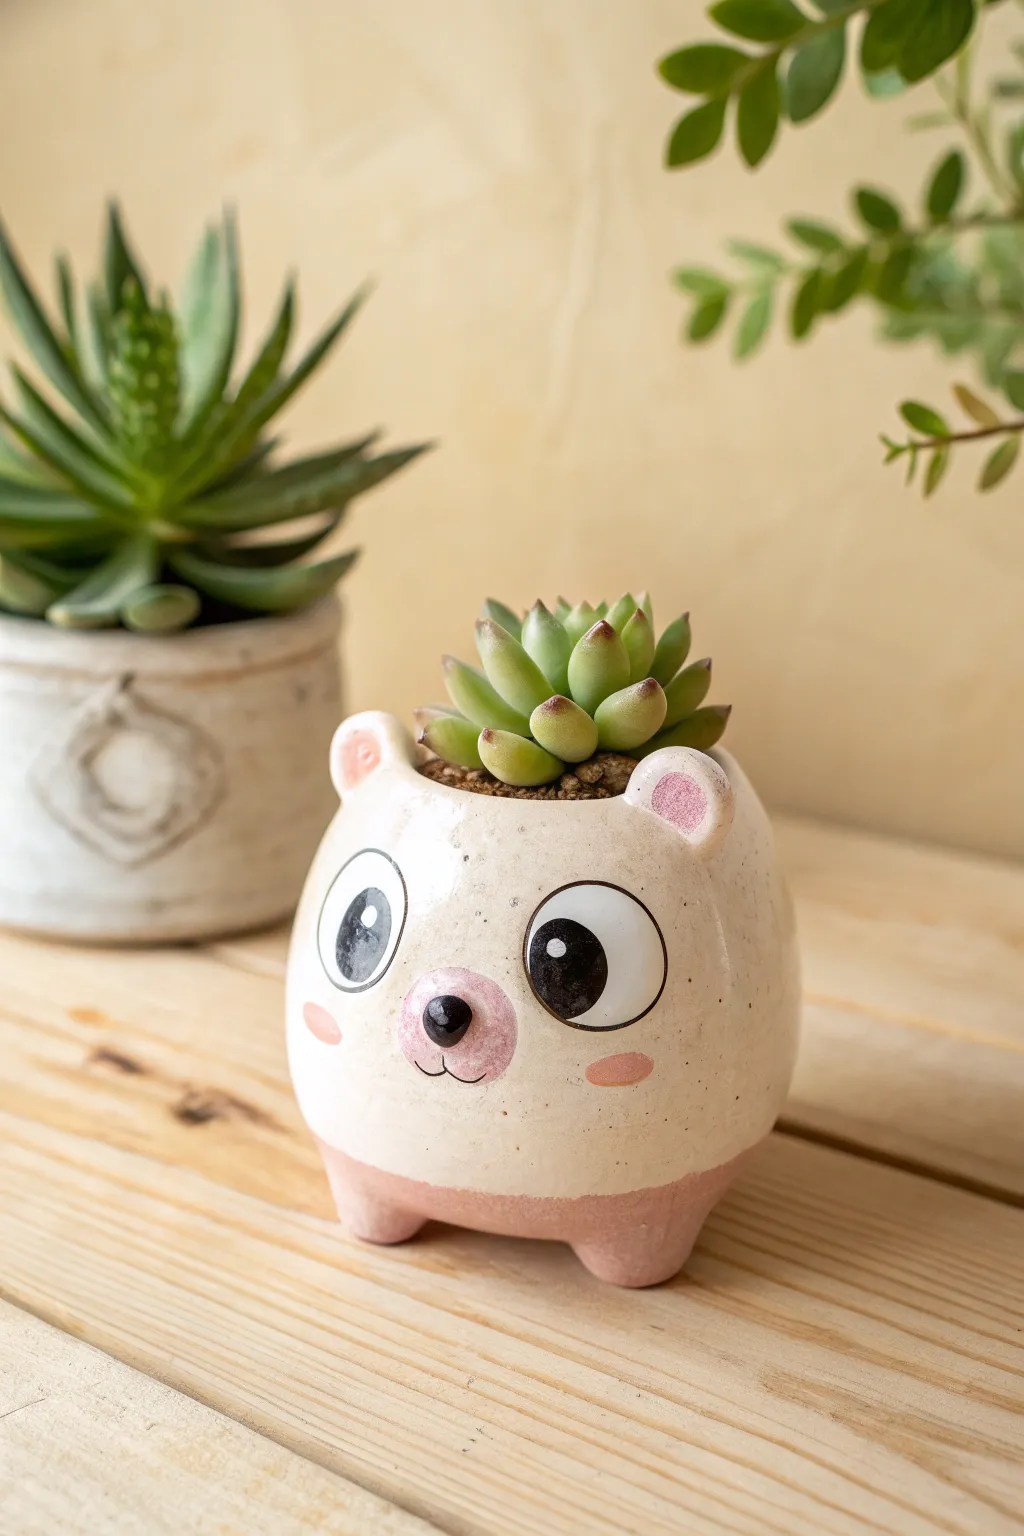
Bring a touch of sweetness to your plant collection with this adorable bear cub planter. This hand-built clay pot features big, expressive eyes and soft pink accents, creating the perfect home for a chubby succulent to act as its leafy hair.
Step-by-Step Guide
Materials
- White earthenware or stoneware clay
- Pottery tools (needle tool, rib tool, loop tool)
- Slip and score tool (or fork)
- Underglazes: Black, white, soft pink
- Clear transparent glaze
- Small fine-point paintbrushes
- Rolling pin
- Canvas work surface
- Kiln access (or use air-dry clay and acrylics for a non-functional version)
Step 1: Shaping the Base
-
Form the pinch pot:
Start with a ball of clay roughly the size of a large orange. Insert your thumb into the center and gently pinch and rotate the clay to open up a hollow bowl shape. Aim for walls that are an even thickness, about a quarter-inch. -
Refine the curve:
Gently paddle the outside of the pot with a wooden spoon or flat tool to round it out. You want a slightly chubby, spherical shape that tapers slightly inward at the top opening. -
Smooth the surface:
Use a flexible metal or rubber rib tool to smooth the exterior walls. Remove any fingerprints or lumps to create a clean canvas for the face later. -
Add the feet:
Roll four small balls of clay for the feet. Flatten them slightly and attach them to the bottom of the pot using the score and slip method. Blend the seams completely so the feet look like they are growing out of the body. -
Create the ears:
Form two small, rounded triangles for the ears. Attach these to the upper rim of the pot, spacing them widely apart. Use your thumb to create a small indentation in the center of each ear. -
Check stability:
Set the pot down on a flat surface to ensure it sits evenly on its new feet. Gently tap the top to level it if it wobbles.
Step 2: Sculpting the Face
-
Define the muzzle:
Roll a small, flattened oval of clay and attach it to the lower center of the face for the muzzle area. Smooth the edges down so it transitions seamlessly into the main body. -
Add the nose:
Place a tiny ball of clay at the top center of the muzzle area for the nose button. Press it on securely. -
Drainage hole:
Before the clay hardens, use a circular cutter or tools to create a drainage hole in the very bottom of the pot. This is crucial for succulent health. -
Bisque fire:
Allow your piece to dry slowly and completely (leather hard to bone dry) before firing it in the kiln for the bisque firing.
Wobbly Pot?
If the feet seem uneven before firing, place the pot on a piece of canvas and gently drop it from a heigh of 1 inch a few times. This naturally levels the feet.
Step 3: Painting and Glazing
-
Base coat the bottom:
Once bisque fired, mix a watered-down pink underglaze. Dip the feet and the very bottom of the pot into this mixture to create the ‘dipped’ pink pants effect shown in the image. -
Paint the eyes:
Using a medium brush, paint two large white circles for the eyes. Let them dry, then outline them carefully with black underglaze. Add large black pupils, leaving room for a white highlight, or paint the pupil solid black and add a white dot on top later. -
Add facial details:
Paint the inner ears and the cheeks with the soft pink underglaze. Paint the nose black and draw two small curved lines below it for the mouth. -
Refine the highlights:
I like to go back with a tiny brush and pure white underglaze to add the ‘sparkle’ dot in the eyes. This brings the character to life. -
Apply clear glaze:
Once the underglaze is fully dry, dip or brush the entire piece with a clear transparent glaze. Avoid the very bottom of the feet so they don’t stick to the kiln shelf. -
Final firing:
Fire the piece again according to your glaze’s temperature instructions (usually cone 06 or 6 depending on clay type). -
Planting:
Once cool, fill with gritty succulent soil and plant a rosette-shaped succulent like an Echeveria to serve as the bear’s spiky hair.
Make it a Panda
Switch the color palette! Use black underglaze for the ears and create black patches around the eyes instead of just outlining them to transform this bear into a panda.
Your finished glazed planter is now ready to brightly guard your windowsill with its sweet smile


Bunny Ear Ring Holder Bowl
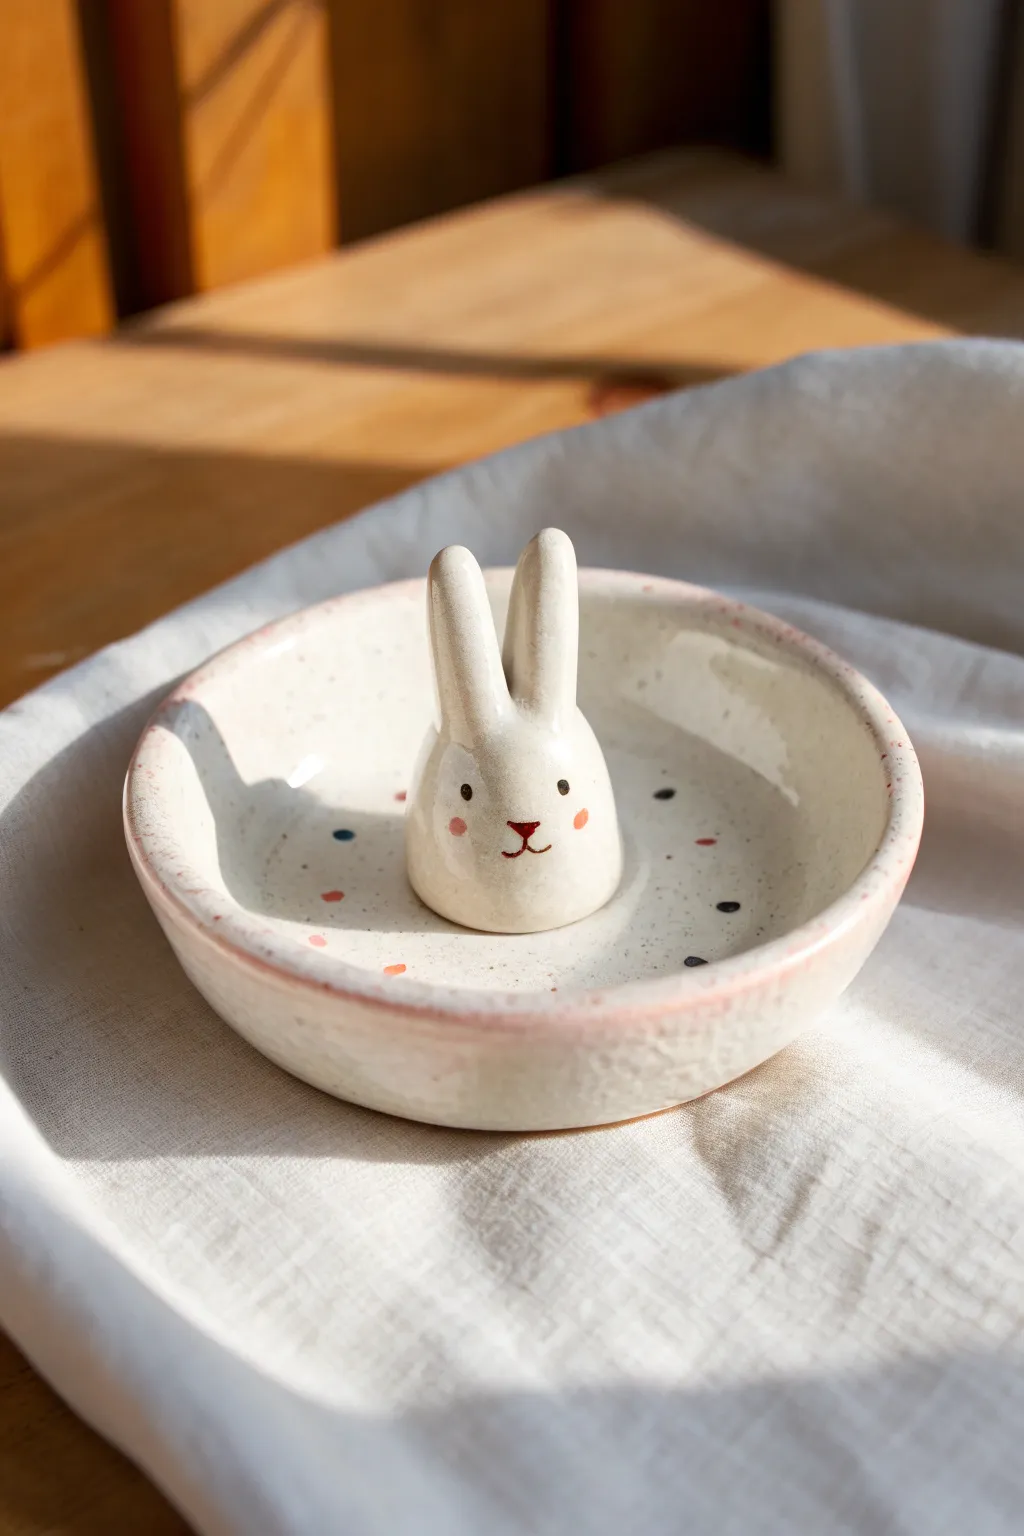
This adorable ring holder features a sweet bunny peeking out from a shallow dish, perfect for keeping your jewelry safe. With its speckled confetti details and delicate pink rim, it adds a touch of playful charm to any dresser or nightstand.
Step-by-Step Tutorial
Materials
- White clay (low-fire or earthenware)
- Small rolling pin
- Needle tool or clay knife
- Sponge
- Slip (clay mixed with water)
- Scoring tool (or fork)
- Small bowl (for use as a mold)
- Underglazes: Black, pink, blue, orange
- Fine detail paintbrush
- Clear glossy glaze
- Kiln (or access to firing services)
Step 1: Shaping the Base
-
Roll the slab:
Start by rolling out a ball of white clay until it is about 1/4 inch thick. Aim for an even thickness throughout to prevent warping during drying. -
Cut the circle:
Find a circular object or template that is about 4-5 inches in diameter. Place it on your clay slab and use your needle tool to cut out a clean circle. -
Form the curve:
Gently lift the clay circle and press it lightly into your small bowl mold. You don’t need to press hard; use a damp sponge to smooth the clay against the curve of the bowl, ensuring there are no air pockets. -
Smooth the rim:
While the clay is in the mold, run your damp finger or a smooth sponge along the top edge to round it off and fix any cracks or rough spots.
Step 2: Sculpting the Bunny
-
Form the head shape:
Roll a separate piece of clay into a smooth ball, roughly the size of a walnut. Flatten the bottom slightly so it sits stable. -
Make the ears:
Roll two small snakes of clay, tapering them at one end. Flatten them gently to look like bunny ears. -
Attach the ears:
Score the top of the head and the bottom of the ears. Apply a dab of slip and press the ears firmly onto the head. Use a modeling tool to blend the seams so the ears look like they are growing out of the head, not just stuck on. -
Place inside the dish:
Find the center of your dish (still in the mold). deeply score both the bottom of the bunny head and the center of the dish. Add slip generously. -
Secure the bunny:
Press the bunny firmly into the center. Use a small tool or your finger to smooth the clay where the neck meets the dish, creating a seamless transition. This is crucial so the bunny doesn’t pop off later.
Sticky Situation
If your clay sticks to the bowl mold, place a layer of plastic wrap or a piece of thin fabric (like an old t-shirt) between the clay and the mold for easy release.
Step 3: Decorating and Firing
-
Initial drying:
Let the piece dry slowly to the leather-hard stage. This makes it easier to paint on without smudging the clay texture. -
Paint the face:
Using a very fine brush and black underglaze, dot two widespread eyes and draw a small ‘Y’ shape for the nose and mouth. Keep the lines delicate. -
Add the cheeks:
dip a small round brush or the back of a paintbrush handle into pink underglaze and stamp two rosy cheeks on either side of the smile. -
Create the confetti:
Using blue, orange, and black underglaze, paint tiny, random dots scattered around the inside of the bowl. I like to vary the spacing so it feels casual and organic. -
Rim the edge:
Dilute your pink underglaze slightly with water. Run a loaded brush along the very rim of the bowl to create a soft, watercolor-like border. -
Bisque fire:
Once the piece is bone dry (completely moisture-free), fire it in the kiln for a bisque firing. -
Glazing:
Dip the entire piece into a clear glossy glaze or brush it on evenly. Make sure not to get glaze on the very bottom foot of the dish so it doesn’t stick to the kiln shelf. -
Final fire:
Fire the piece again according to your clear glaze instructions (usually cone 06 or 05).
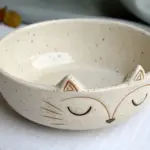
Make it yours
Swap the bunny for a cat, fox, or even a cactus shape. You can also match the confetti colors to your bedroom decor for a personalized touch.
Place your favorite rings on the bunny’s ears and enjoy this sweet handmade organizer


Whale Soap Dish With Water Drops
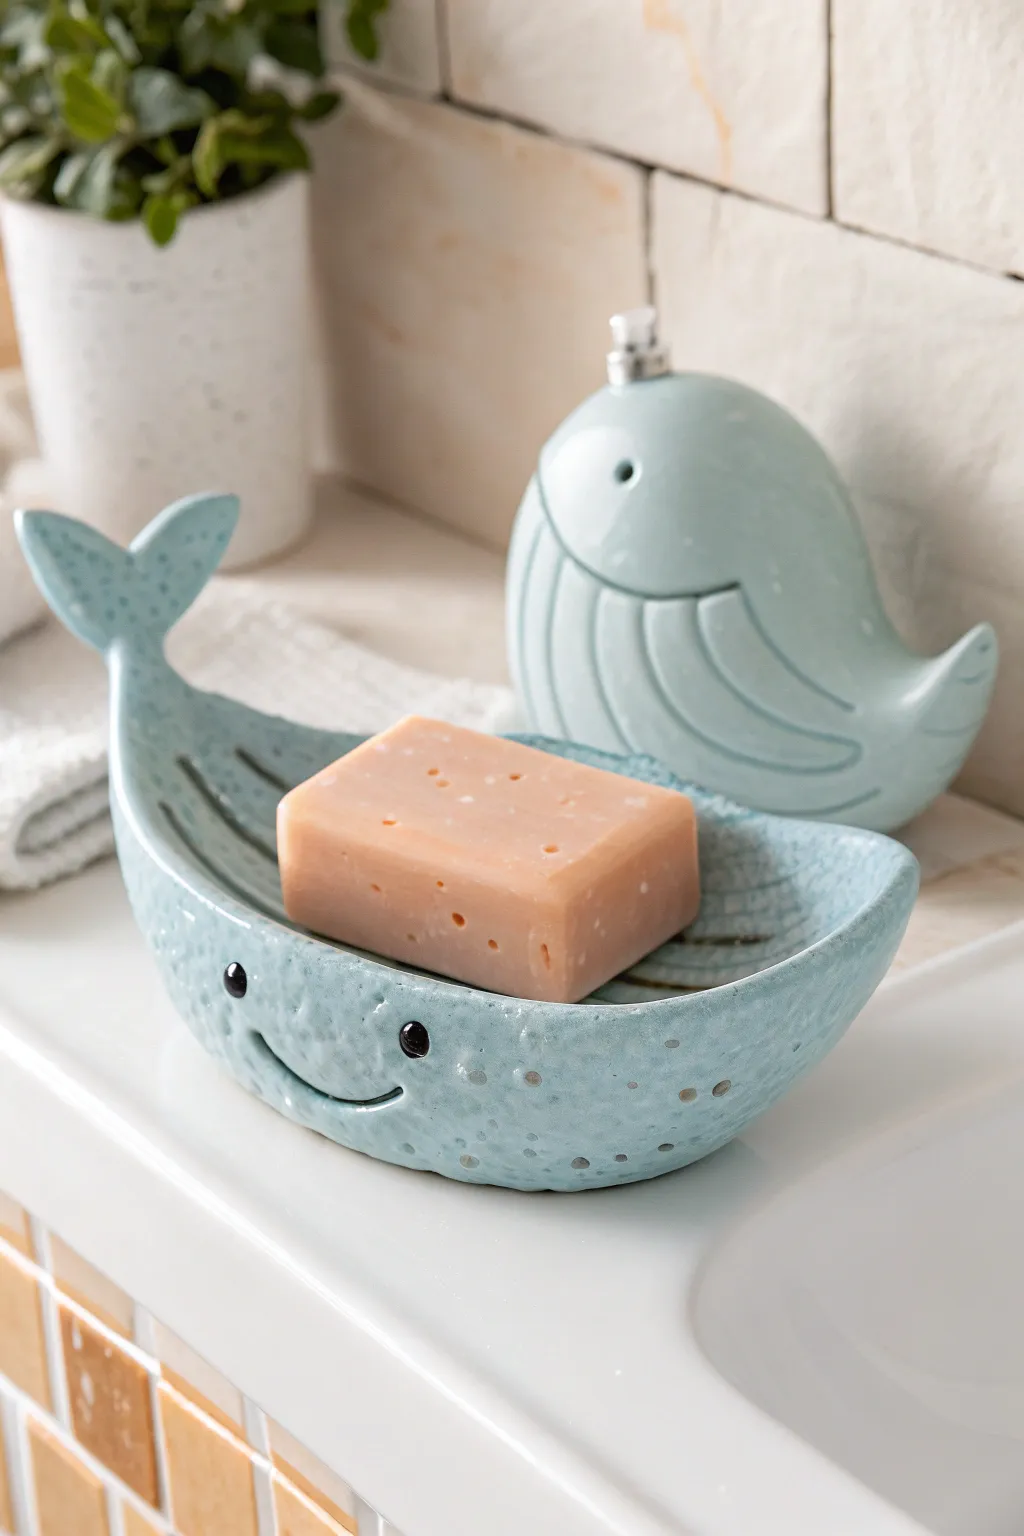
This adorable whale-shaped soap dish adds a splash of marine charm to any bathroom sink. With its gentle curve, friendly smile, and handy drainage holes, it’s a functional piece of pottery that keeps your soap dry and your counter tidy.
Step-by-Step
Materials
- White stoneware or earthenware clay
- Rolling pin and guide sticks (about 6mm thickness)
- Rib tool (smooth wood or rubber)
- Needle tool or fettling knife
- Small circle cutter or straw (for drainage)
- Scoring tool (or an old toothbrush)
- Slip (liquid clay)
- Modeling tool with a small ball end
- Sponge
- Underglaze (black and light blue)
- Speckled blue glaze (or clear glaze if using speckled clay)
- Kiln
Step 1: Forming the Basin
-
Roll the slab:
Start by wedging your clay to remove air bubbles, then roll it out into an even slab about 6mm (1/4 inch) thick. Using guide sticks helps keep the thickness consistent. -
Cut the oval:
Cut a large, elongated oval shape from your slab using a needle tool. This will form the main body of the whale. It should be roughly 15-18cm long at this stage. -
Curve the body:
Gently lift the sides of the oval to create a shallow bowl shape. Smooth the interior with a damp sponge or rib tool to erase any canvas texture. -
Shape the tail:
Pinch one end of the oval to taper it slightly, creating the area where the tail will attach. At the opposite end, round it out nicely for the whale’s head.
Tail Support Trick
While drying, prop the upturned tail with a small wedge of foam or a crumpled ball of paper towel. This prevents gravity from drooping the tail before the clay hardens.
Step 2: Adding Features
-
Cut the flukes:
From your remaining slab scraps, cut out a distinct tail shape (the flukes). It should look like a wide ‘Y’ or a traditional whale tail silhouette. -
Attach the tail:
Score the tapered end of the body and the base of the tail piece. Apply slip generously and press the tail firmly onto the body, angling it upward for that cheerful, splashing look. -
Reinforce the joint:
Use a small coil of clay along the seam where the tail meets the body. Smooth this coil down completely on both the inside and outside so the connection is seamless and strong. -
Create the face:
Using a needle tool, lightly carve a long, upward-curving smile on the front of the whale. For the eyes, press a small round tool or the end of a paintbrush handle into the clay to create distinct indentations. -
Add texture:
With a needle tool or a specialized texture rib, add subtle grooves along the tail and the interior bottom of the dish to mimic the whale’s belly pleats. -
Drill drainage holes:
Using a small hole cutter or a clean straw, punch 3-4 holes in the lowest part of the belly. This ensures soapy water drains away instead of pooling. -
Smooth the edges:
Run a damp sponge along the entire rim of the dish to soften any sharp edges. I usually spend extra time here because sharp rims can be uncomfortable to use later.
Step 3: Glazing and Firing
-
Bisque fire:
Allow the piece to dry slowly and completely under loose plastic to prevent the tail from cracking. Once bone dry, fire it to bisque temperature (usually cone 04). -
Paint the details:
Using a fine brush, fill the eye indentations and the smile line with black underglaze. Wipe away any excess that spills onto the surface with a damp sponge, leaving the color only in the recesses. -
Apply main glaze:
Dip or brush the entire piece in a light blue glaze. If available, choose a glaze that breaks over texture to highlight the belly grooves. -
Add speckles (optional):
If your glaze isn’t pre-speckled, you can flick a stiff toothbrush dipped in a darker blue or iron oxide over the surface to create minimal texture spots. -
Final fire:
Wipe the bottom where the dish sits on the kiln shelf completely clean of glaze. Fire to the maturity temperature of your clay and glaze (often cone 5 or 6).
Beach Glass Accent
For a unique twist, melt a deeper blue glass bead in the bottom center during firing (skip the drainage holes for this) to create a ‘pool’ effect inside.
Place your favorite soap bar inside and enjoy your happy little ocean companion


Strawberry Pinch Pot Mini Bowl
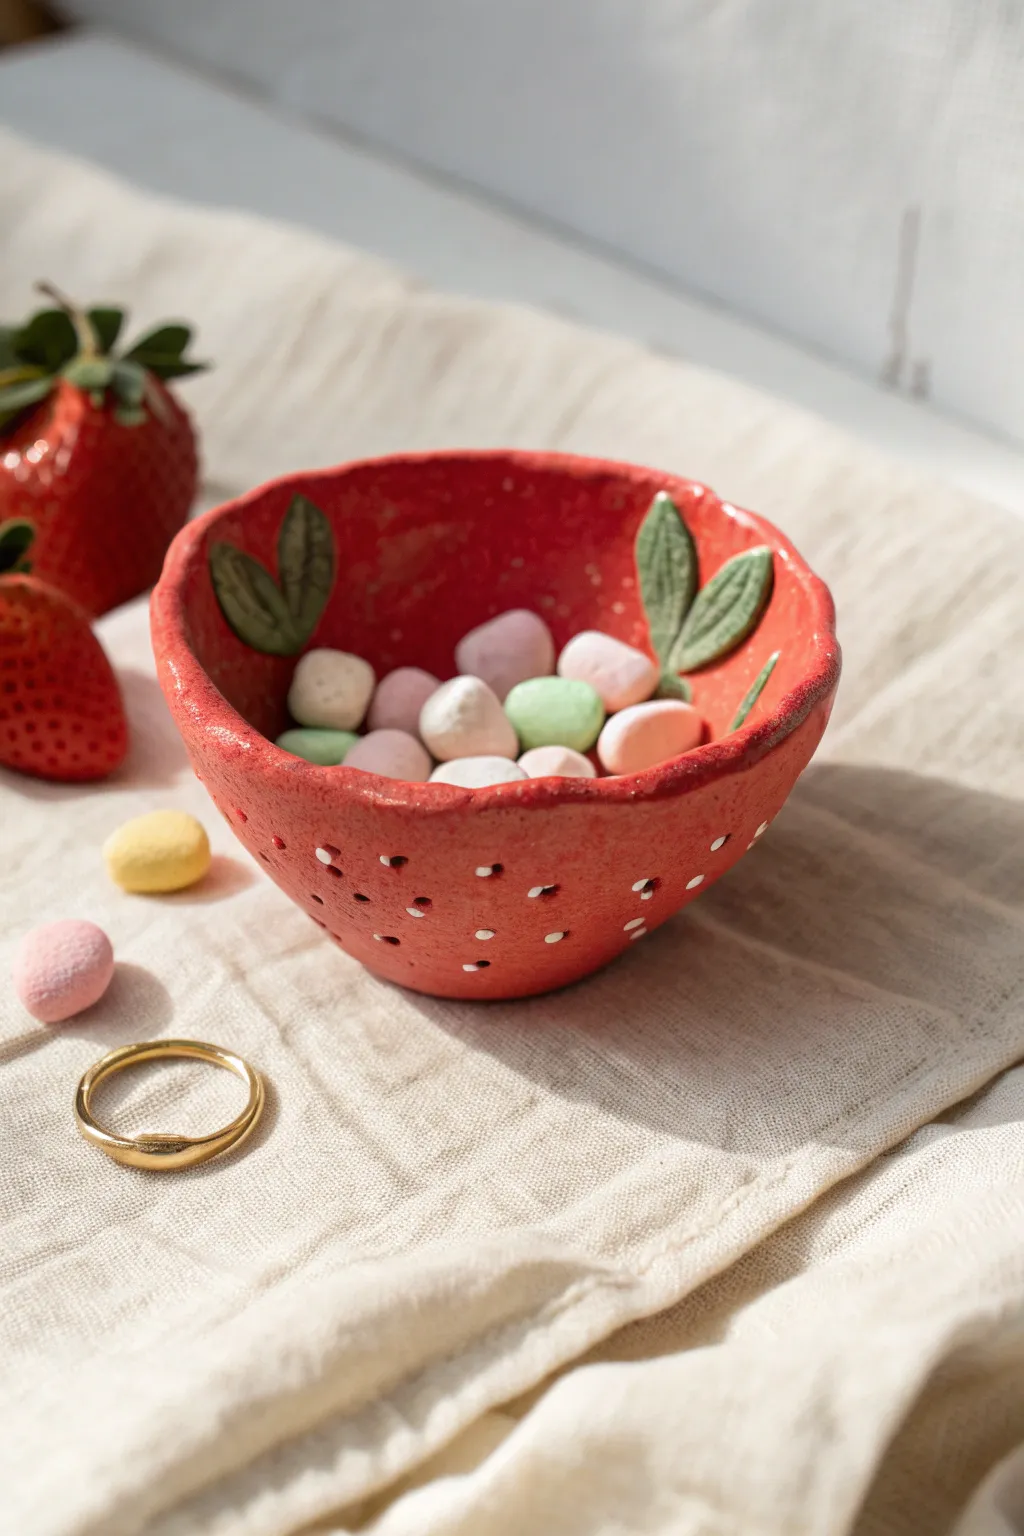
Capture the charm of summer with this adorable strawberry-shaped mini bowl, perfect for holding rings or tiny treats. Crafted from air-dry clay and painted in a vibrant red, this textured pinch pot features delightful details like attached green leaves and delicate white seeds.
How-To Guide
Materials
- Air-dry clay (white or terracotta)
- Acrylic paints (bright red, deep green, white, pink)
- Gloss varnish or sealant
- Clay sculpting tools (needle tool, small ball stylus)
- Small paintbrush (flat and detail round)
- Cup of water
- Rolling pin
- Sandpaper (fine grit)
Step 1: Forming the Berry Base
-
Condition the clay:
Start by taking a glob of air-dry clay about the size of a tangerine. Work it in your hands, kneading until it becomes warm, soft, and pliable to prevent cracking later. -
Create a sphere:
Roll the clay firmly between your palms to create a smooth ball. Try to smooth out any major lines or seams at this stage. -
Start the pinch pot:
Push your thumb gently into the center of the ball, stopping before you break through the bottom. This central hole is the beginning of your bowl. -
Shape the walls:
Using your thumb and fingers, gently pinch and rotate the clay, working continuously from the bottom upwards. Aim for walls that are roughly 1/4 inch thick. -
Define the rim:
As you get to the top, create an uneven, organic rim rather than a perfectly flat one. You can widen the opening slightly to give it a more open bowl shape. -
Smooth the surface:
Dip your finger in a tiny bit of water and rub it over the exterior and interior to smooth out fingerprints and minor cracks.
Cracked Clay?
If small cracks appear while the clay dries, mix a tiny bit of fresh clay with water to make a paste (slip) and fill the cracks. Smooth it over with a wet finger.
Step 2: Adding Details
-
Create indentations:
Using a small ball stylus or the round end of a paintbrush, gently press small, random dots all over the exterior of the bowl. These indentations will become the strawberry seeds later. -
Shape the leaves:
Take small bits of fresh clay and flatten them into tiny teardrop shapes. Use a needle tool to gently score a central vein and small side veins onto each leaf. -
Attach the leaves:
Score the back of each leaf and the spot on the inner rim where you want to place it. Add a dab of water (slip) and press the leaves firmly onto the inside edge so they peek out over the top. -
Let it dry:
Set your creation aside in a dry, room-temperature spot. Let it cure completely for 24-48 hours until it feels hard and room temperature to the touch. -
Sand imperfections:
Once fully dry, use fine-grit sandpaper to gently smooth any rough edges on the rim or bumps on the exterior that you don’t want.
Make it Shine
For an extra finish, mix a tiny amount of gold mica powder into your varnish for a subtle shimmer, or paint the rim with liquid gold leaf for a luxe look.
Step 3: Painting and Finishing
-
Base coat:
Paint the entire exterior and interior with a bright, opaque red acrylic paint. You may need two coats for full coverage, letting the first dry before applying the second. -
Paint the leaves:
Using a small detail brush, carefully paint the clay leaves a deep, earthy green. I find that mixing a tiny bit of brown into the green makes it look more natural. -
Highlight the interior:
For a bit of depth, you can dilute some pink paint and execute a light wash on the very bottom interior of the bowl, though solid red works beautifully too. -
Add the seeds:
Dip a fine-point detail brush or a toothpick into white paint. Carefully fill in the indented dots you made earlier on the exterior to create the signature strawberry seeds. -
Seal the piece:
Once the paint is bone dry, apply a coat of gloss varnish. This gives the strawberry a juicy, fresh look and protects the paint from chipping.
Now you have a charming handmade vessel ready to brighten up your dresser or desk.

The Complete Guide to Pottery Troubleshooting
Uncover the most common ceramic mistakes—from cracking clay to failed glazes—and learn how to fix them fast.
Frog Toothbrush Cup Buddy
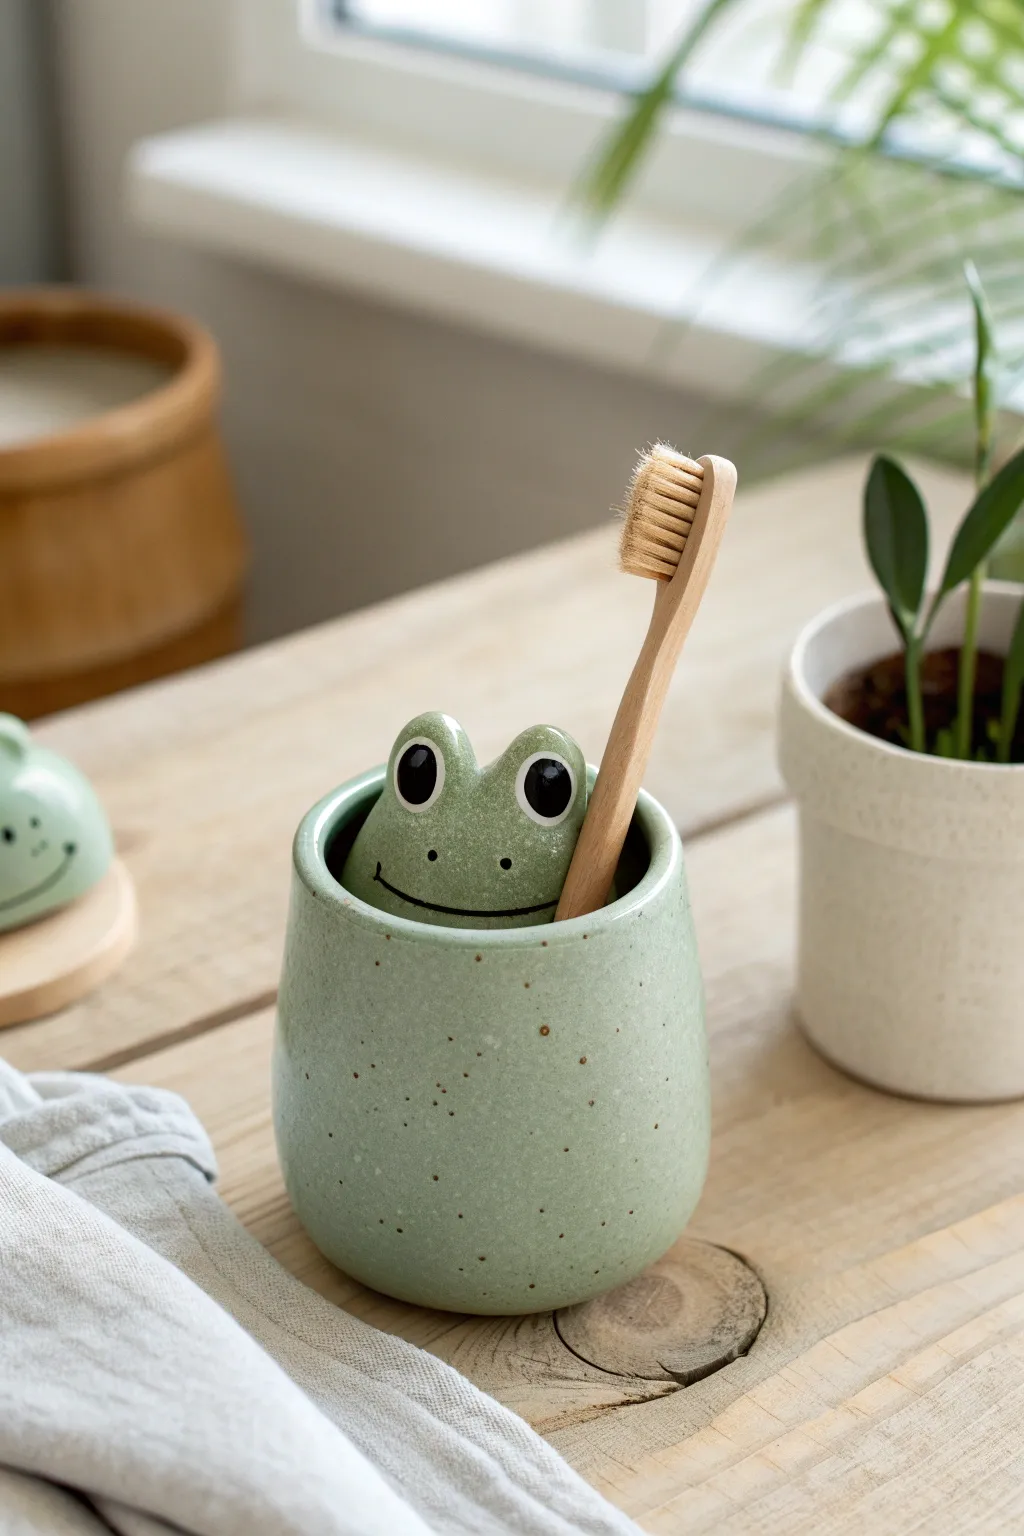
Brighten up your morning routine with this adorable speckled ceramic toothbrush cup featuring a shy little frog peeking over the rim. This project combines simple slab building with playful sculptural details to creating a functional piece that’s bursting with character.
Detailed Instructions
Materials
- Stoneware clay (speckled or light)
- Rolling pin
- Canvas work surface
- Fettling knife
- Scoring tool or fork
- Slip (clay mixed with water)
- Round cookie cutter or template (for the base)
- Small sponge
- Green underglaze (sage or moss tone)
- Black underglaze
- White underglaze
- Transparent glaze
- Fine detail paintbrush
Step 1: Forming the Cup Base
-
Roll the slab:
Begin by rolling out a chunk of speckled clay on your canvas until it is an even thickness, roughly 1/4 inch. Ensure the slab is large enough to cut both a long rectangle and a circular base. -
Cut the components:
Using a ruler, cut a long rectangle (approx. 4 inches high by 10 inches long) for the cup walls. Then, use a round cutter or template to cut a circle for the base, making sure its circumference matches the length of your rectangle. -
Texture the surface (optional):
If your clay isn’t naturally speckled, you can gently flick iron oxide specks or dark grog onto the slab and roll them in lightly to achieve that earthy look. -
Score and slip the base:
Score the outer edge of your circular base and the bottom long edge of your rectangle wall. Apply a generous amount of slip to the scored areas. -
Assemble the cylinder:
Wrap the rectangular slab around the circular base. Join the vertical seam where the two ends meet by scoring, slipping, and pressing them firmly together. -
Smooth the seams:
Use a modeling tool or your finger to smooth the vertical seam inside and out. Then, work the clay downwards on the outside to seal the wall to the base. I like to use a barely damp sponge here to make the join invisible. -
Shape the vessel:
Gently gently push the walls outward from the inside with a curved rib or your fingers to give the cup a slightly rounded, organic ‘belly’ shape, rather than being a perfect straight cylinder.
Step 2: Sculpting the Frog
-
Create the head insert:
Roll a thick coil or small slab of clay that fits the internal curve of the cup. Cut the top into a curved mound shape with two prominent bumps for eye sockets. -
Attach the frog:
Score the inside wall of the cup near the rim and the back of your frog piece. Slip and press the frog head firmly against the inside wall so it looks like it’s peeking out. -
Blend the connection:
Smooth the clay on the underside of the frog head into the interior wall of the cup so there are no crevices for water to get trapped in later. -
Add the eyes:
Roll two small balls of clay and slightly flatten them. Score and slip them onto the bumps you created on the frog’s head to define the eyes. -
Smooth the rim:
Run a damp sponge or a piece of chamois leather around the rim of the cup and the top of the frog’s head to ensure all edges are soft and rounded.
Clean Seams
When joining the frog to the cup wall, use a small coil of clay along the seam on the underside. Smooth it out completely to strengthen the bond and preventing cracking.
Step 3: Glazing and Finishing
-
Bisque fire:
Allow the piece to dry slowly under plastic for a day, then uncover until bone dry. Fire it in the kiln to bisque temperature (usually Cone 04). -
Apply base color:
Paint the frog’s face with 2-3 coats of a sage green underglaze. Using a different green or leaving the cup body bare (if using speckled clay) creates a nice contrast. -
Paint the details:
Using a very fine brush, paint large black circles for the pupils on the eye mounds. Add two small dots for nostrils and a long, thin, smiling line for the mouth. -
Add highlights:
Once the black underglaze is dry, add a tiny dot of white underglaze to the top corner of each black pupil. This ‘catchlight’ brings the character to life. -
Clear glaze application:
Dip the entire cup into a transparent glaze. Make sure to pour the glaze out quickly so it doesn’t pool too thickly at the bottom. -
Wipe the foot:
Use a sponge to wipe any glaze off the very bottom of the cup so it doesn’t stick to the kiln shelf. -
Final firing:
Fire the piece again to your clay body’s maturity temperature (often Cone 5 or 6). Once cool, your buddy is ready to hold your toothbrush.
Lily Pad Plate
Create a matching soap dish shaped like a lily pad! Roll a slab, cut an organic notched circle, and lift the edges slightly to catch water.
Now you have a charming amphibian friend to greet you every time you brush your teeth
Smiling Cloud Catchall Tray
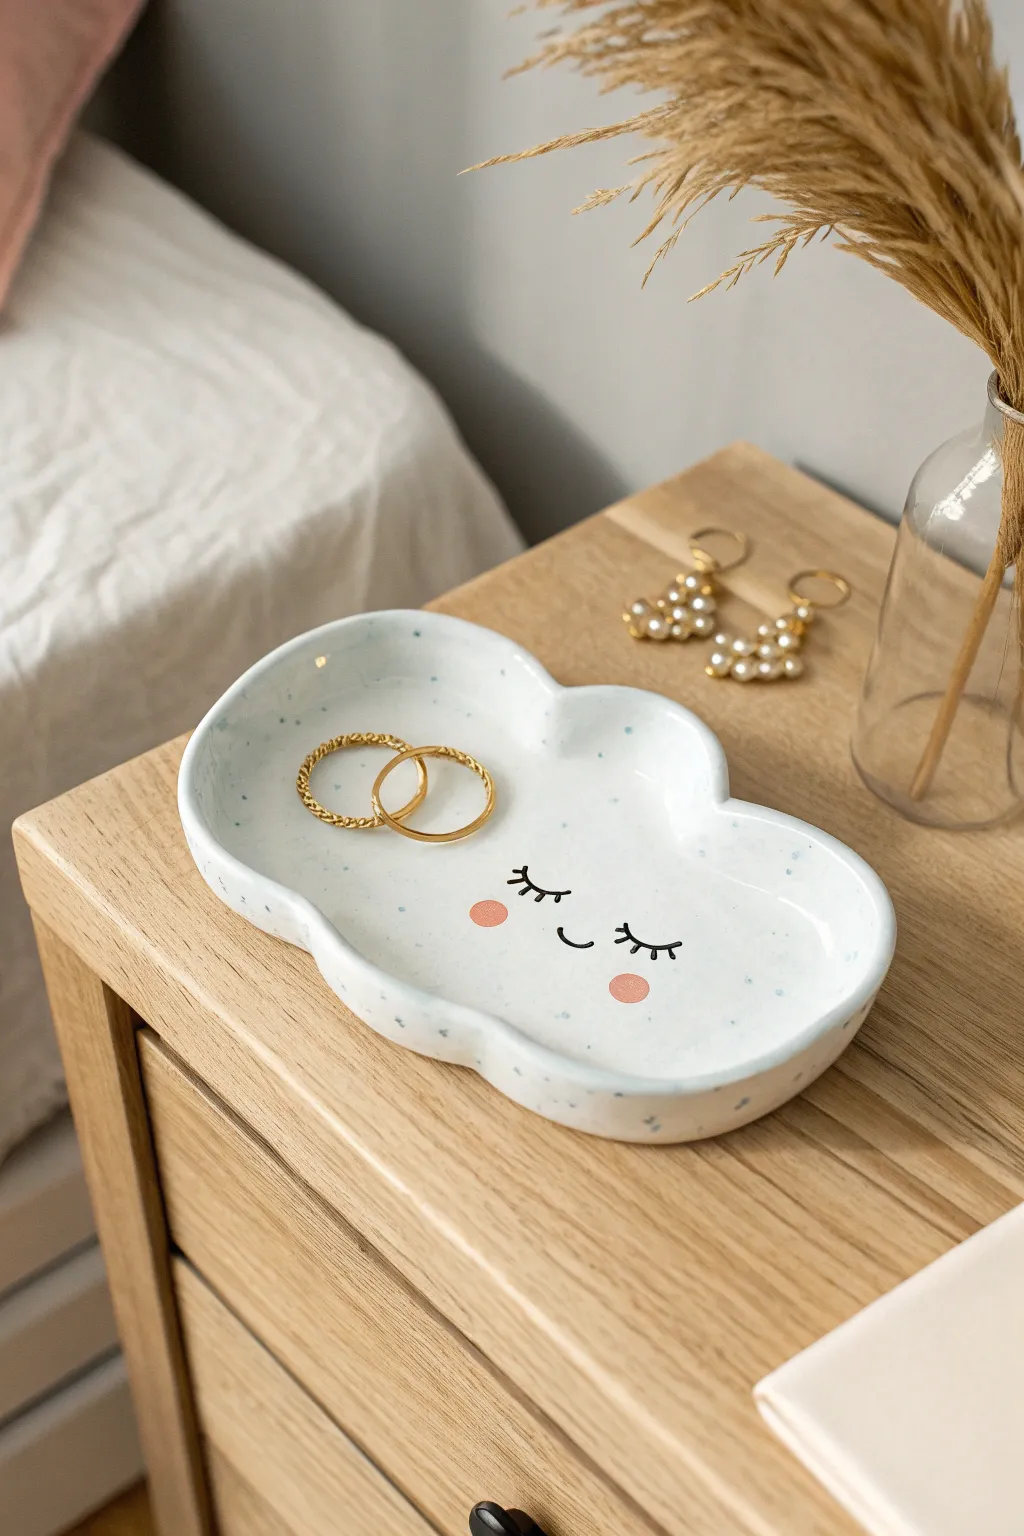
This whimsical little catchall brings a touch of sky-high charm to your nightstand with its sweet, sleepy expression. Crafted from polymer or air-dry clay, it features gentle scalloped edges and delicate speckles that mimic high-end ceramic glaze.
How-To Guide
Materials
- White polymer clay (or air-dry clay)
- Acrylic rolling pin
- Cloud template (printed paper) or cloud cookie cutter
- Craft knife or scalpel
- Fine-grit sandpaper
- Small paintbrush
- Black acrylic paint (or fine tip marker)
- Pink acrylic paint
- Light blue acrylic paint
- Glossy varnish or glaze
- Old toothbrush (for speckling)
Step 1: Shaping the Cloud
-
Condition the Clay:
Begin by warming up a ball of white clay in your hands. Knead it thoroughly until it is soft, pliable, and free of cracks. This conditioning step is crucial for preventing breakage later on. -
Roll it Out:
Place the clay on a clean, flat surface. Using your acrylic rolling pin, roll the clay out to an even thickness of about 1/4 inch (6mm). Rotate the clay occasionally to ensure it doesn’t stick. -
Cut the Shape:
Place your paper cloud template on top of the clay and trace around it with a craft knife, or simply use a cloud-shaped cookie cutter. Press straight down for a clean edge. -
Smoothen Edges:
Dip your finger in a tiny bit of water (for air-dry clay) or baby oil (for polymer) and gently run it along the cut raw edges. You want to round them off slightly so they aren’t sharp or jagged. -
Create the Lip:
Gently lift the edges of the cloud upwards with your thumbs while pressing the center down. You are aiming for a shallow bowl shape; support the raised rim with small pieces of foam or crumpled foil underneath if it sags.
Uneven Rim?
If the edges warp while baking, sand them flat after cooling. For air-dry clay, weigh down the center with a small bag of rice while it dries to prevent curling up.
Step 2: Adding Details
-
Dry or Bake:
Follow the instructions for your specific clay. If using polymer, bake on a tile or parchment-lined tray. If using air-dry, let it sit for 24-48 hours until fully hardened. -
Sand for Smoothness:
Once fully cured and cool, take your fine-grit sandpaper and lightly buff the surface. Focus on the rim to ensure it feels perfectly smooth to the touch. -
Paint the Sleepy Eyes:
Using a very fine detail brush and black acrylic paint, carefully draw two closed eyelids with eyelashes in the lower center of the dish. A small U-shape between them makes the smiling mouth. -
Add Rosy Cheeks:
Dip a round tool (like the back of a paintbrush handle) into pink paint. Dot this gently onto the clay just below each eye to create perfectly circular blushing cheeks. -
Create the Speckles:
Dilute a small drop of light blue paint with water. Dip an old toothbrush into this mixture, aim it at the dish, and run your thumb across the bristles to flick tiny, random speckles across the white surface.
Step 3: Finishing Touches
-
Let Paint Dry:
Allow all your painted details to dry completely. Since the speckles are watery, give them a little extra time so they don’t smear during the glazing step. -
Apply Varnish:
Brush a coat of glossy varnish or glaze over the entire top surface of the dish. This seals the paint and gives the piece that professional, ceramic-like shine. -
Seal the Back:
Once the front is dry, flip the cloud over and seal the bottom as well. This adds durability and ensures moisture won’t affect the clay over time. -
Final Cure:
Let the varnish cure according to the bottle’s directions before placing any jewelry inside. I usually leave it overnight just to be safe.
Add Golden Accents
Paint the very rim of the cloud with liquid gold leaf or metallic paint before sealing. It adds a luxe, upscale finish that makes jewelry pop.
Now you have a charming spot to keep your favorite rings safe while you sleep


What Really Happens Inside the Kiln
Learn how time and temperature work together inside the kiln to transform clay into durable ceramic.
Mini Mushroom Lidded Jar
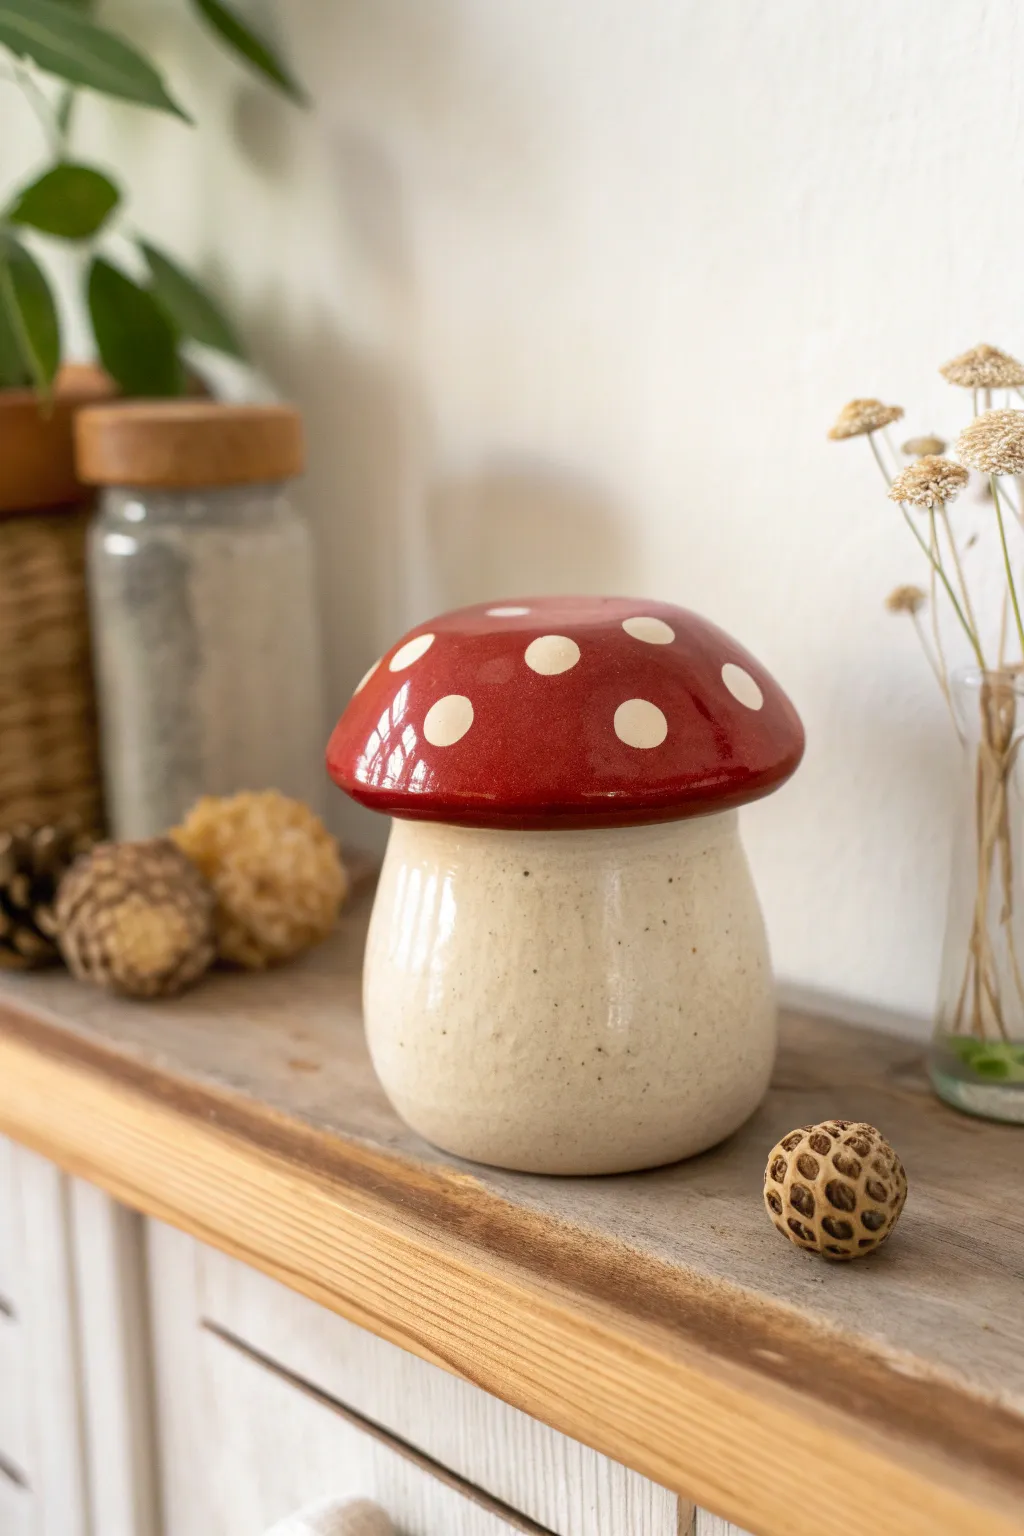
This delightful ceramic jar brings a touch of fairytale magic to your home decor with its vibrant red cap and earthy, speckled stem. Perfect for storing trinkets or dried herbs, this two-part wheel-thrown project combines functional pottery with playful sculpture.
Detailed Instructions
Materials
- Speckled buff stoneware clay
- Pottery wheel
- Throwing tools (sponge, needle tool, rib, cutting wire)
- Trimming tools
- Calipers
- Underglaze (bright red and white)
- Clear transparent glaze
- Small round paintbrush
- Wax resist (optional)
Step 1: Throwing the Stem (Base)
-
Center the clay:
Start with about 1 pound of speckled clay. Center it firmly on the wheel head, ensuring it creates a stable mound. -
Open and pull:
Open the clay and pull the walls up. Aim for a bulbous, rounded bottom that tapers slightly inward as you go up, mimicking a mushroom stem. -
Shape the gallery:
At the rim, carefully split the clay or press significantly inward to create a distinct gallery (a ledge) where the lid will eventually sit. This needs to be sturdy. -
Measure the gallery:
Before removing the pot from the wheel, use your calipers to measure the exact inner width of the gallery. Lock the calipers in place; you will need this measurement for the lid. -
Cut and dry:
Wire the base off the wheel and set it aside to reach leather-hard consistency.
Step 2: Throwing the Cap (Lid)
-
Prepare the lid clay:
Center a slightly larger amount of clay, perhaps 1.5 pounds, as the cap needs to overhang the base. -
Throw a shallow bowl:
Throw a bowl shape that is wider than it is tall. Curve the walls outward generously to create that classic mushroom dome silhouette. -
Measure the fit:
Using your set calipers, check the rim of your bowl. You need to create a flange that will fit inside the base’s gallery, or ensure the rim matches the gallery width if you are throwing upside down. -
Refine the curve:
Use a rib to smooth the outside curve of the ‘bowl’ (which will become the top of the mushroom) to ensure it is perfectly round and smooth. -
Cut off:
Wire the lid off and let it stiffen up alongside the base.
Uneven Lid Issues?
If your lid wobbles after trimming, use a little grinding paste or valve grinding compound between the lid and seat after firing. Twist them back and forth to sand them into a perfect, airtight fit.
Step 3: Trimming and Assembly
-
Trim the base:
Once leather hard, flip the base over on the wheel. Trim away excess weight from the bottom and create a clean foot ring. -
Trim the lid:
Invert the lid onto the wheel (using a chuck or foam bat if necessary to protect the curve). Trim the underside to define the overhanging lip and ensure the flange fits the base perfectly. -
Test the fit:
Place the lid onto the base. It should sit snugly without wobbling. If it’s too tight, carefully trim a tiny bit more off the flange. -
Smooth the surface:
Use a damp sponge or a soft rib to smooth out any trimming marks on both pieces, ensuring the clay is pristine for glazing. -
Bisque fire:
Let both pieces bone dry completely, then load them into the kiln for a bisque firing.
Level Up: Texture
Before the clay dries, use a carving tool to create ‘gills’ on the underside of the mushroom cap. This hidden detail adds a wonderful surprise when you open the jar.
Step 4: Glazing
-
Apply red underglaze:
On the bisque-fired lid, apply 2-3 coats of bright red underglaze to the top surface. I like to let each coat dry for a few minutes before adding the next to get solid coverage. -
Paint the dots:
Dip a round brush into white underglaze (or use white slip). Paint circles of varying sizes on top of the dry red underglaze. Make them slightly raised for texture if you like. -
Wax the gallery:
Apply wax resist to the flange of the lid and the gallery of the base. This prevents the pieces from fusing together during the final firing. -
Clear glaze application:
Dip the entire lid into a clear transparent glaze. For the base, you can either dip it in clear glaze to show off the speckles or leave the exterior raw if the clay body is vitrified and you prefer a matte texture. -
Final wipe:
Wipe away any stray glaze from the foot ring and the contact points where the lid meets the jar. -
Glaze fire:
Fire the kiln to the maturity temperature of your clay and glaze (likely Cone 5 or 6). Once cooled, your jar is ready.
Now you have an adorable forest-themed container ready to hide your tiny treasures
Tiny Bear Cub Snack Plate
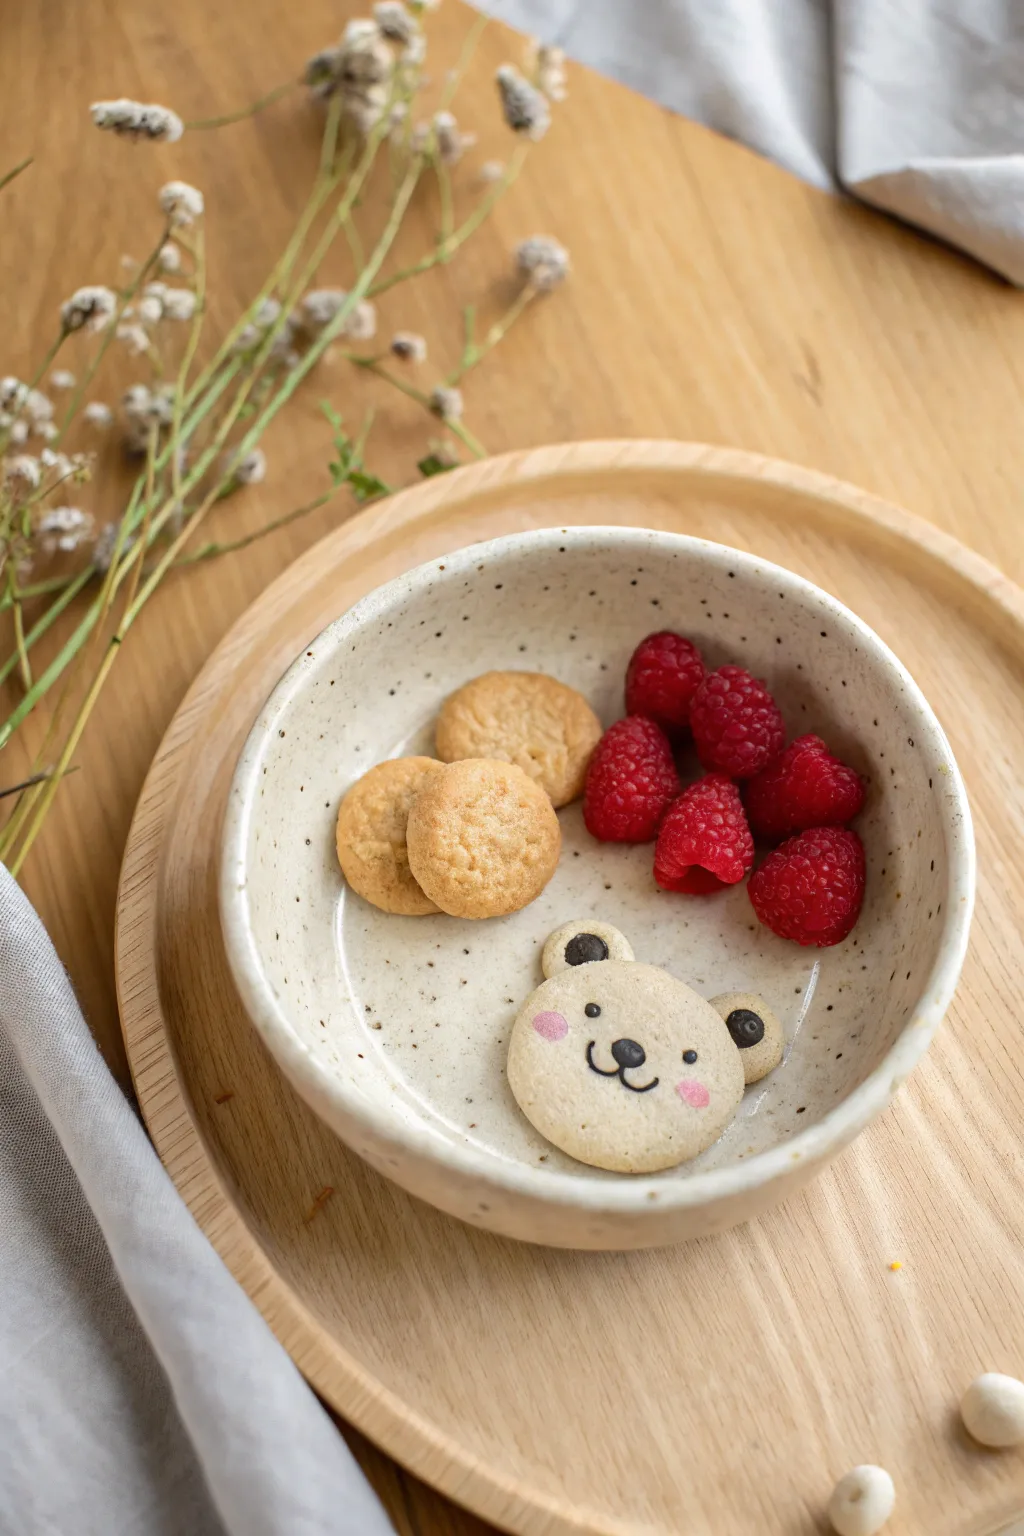
Transform a simple wheel-thrown or hand-built bowl into an adorable feeding companion with this subtle character design. The natural speckled clay body provides a warm, sandy backdrop for a sweet, minimalist bear face that peeks out as you finish your snack.
Step-by-Step Guide
Materials
- Speckled stoneware clay (mid-fire)
- Pottery wheel (or slab roller for hand-building)
- Rib tool
- Sponge
- Trimming tools
- Underglaze (black and pink)
- Fine detail brush (000 or 00 size)
- Clear matte or glossy glaze
- Kiln
Step 1: Forming the Bowl
-
Wedging:
Start by wedging about 1.5 lbs of speckled stoneware clay to remove air bubbles and ensure uniform consistency. -
Centering:
Secure the clay on the wheel head and center it using firm pressure and water for lubrication. -
Opening the Clay:
Open the centered mound, creating a flat floor that is slightly wider than you might for a cup, as this will be the bear’s ‘canvas’. -
Pulling Walls:
Pull the walls up gently, aiming for a shallow curve rather than vertical height. A height of about 2-3 inches is perfect for a snack bowl. -
Shaping the Rim:
Use a chamois or sponge to round off the rim for a comfortable, smooth finish. -
Refining the Interior:
Run a rib tool along the interior curve to remove throwing lines and compress the floor, ensuring a smooth surface for painting later. -
Drying to Leather Hard:
Wire the pot off the wheel artfully and let it dry until it reaches a leather-hard state.
Smudge Control
If you smear underglaze while painting the face, let it dry completely. Then, scratch the mistake off gently with an X-Acto knife rather than wiping it wet.
Step 2: Trimming and Decorating
-
Trimming the Foot:
Place the bowl upside down on the wheel, secure it, and trim a neat foot ring. This elevates the bowl and gives it a professional profile. -
Smoothing:
Flip the bowl back over and do a final check for rough spots; smooth them with a slightly damp sponge, but avoid bringing too much grog to the surface. -
Sketching the Face:
Lightly sketch the bear face placement relative to the rim using a dull pencil; the graphite will burn off in the kiln. -
Painting the Ears:
Actually, looking at this specific design, the ears are part of the drawn motif, not sculpted clay. Paint the outline of the head and the small semi-circle ears using a very watered-down grey or tan underglaze if you want a subtle ‘cookie’ color background, or skip this if just relying on the clay body. -
Refining the Ears:
Using black underglaze and your finest brush, carefully paint the dark semi-circles inside the ear outlines. -
Adding the Eyes:
Dot two small, widely spaced eyes using the back end of a paintbrush dipped in black underglaze for perfect symmetry. -
Drawing the Nose and Mouth:
Paint a small oval nose in black, then drag the brush downward and curve outward to create the classic ‘W’ mouth shape. -
Blushing Cheeks:
I like to water down pink underglaze slightly for a watercolor effect. Dab two soft pink oval cheeks just outside the mouth lines.
Step 3: Glazing and Firing
-
Bisque Firing:
Load the bone-dry bowl into the kiln for a bisque fire (usually cone 04) to harden the clay and set the underglaze. -
Waxing the Foot:
Apply wax resist to the bottom foot ring to prevent glaze form adhering where it shouldn’t. -
Applying Clear Glaze:
Dip the entire bowl into a clear glaze. A transparent glaze is crucial here so the speckles and the bear face show through clearly. -
Final Firing:
Fire the bowl to the maturity temperature of your clay (likely Cone 5 or 6). Once cooled, sand the foot of the bowl if needed for a smooth finish against table surfaces.
Make it 3D
For a tactile twist, add small clay balls to the rim or inside the bowl before the bisque fire to create 3D ears, rather than just painting them on.
Your speckled bear bowl is now ready to hold your favorite afternoon treats

TRACK YOUR CERAMIC JOURNEY
Capture glaze tests, firing details, and creative progress—all in one simple printable. Make your projects easier to repeat and improve.
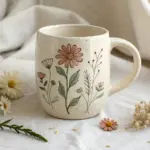
Heart Pocket Wall Vase
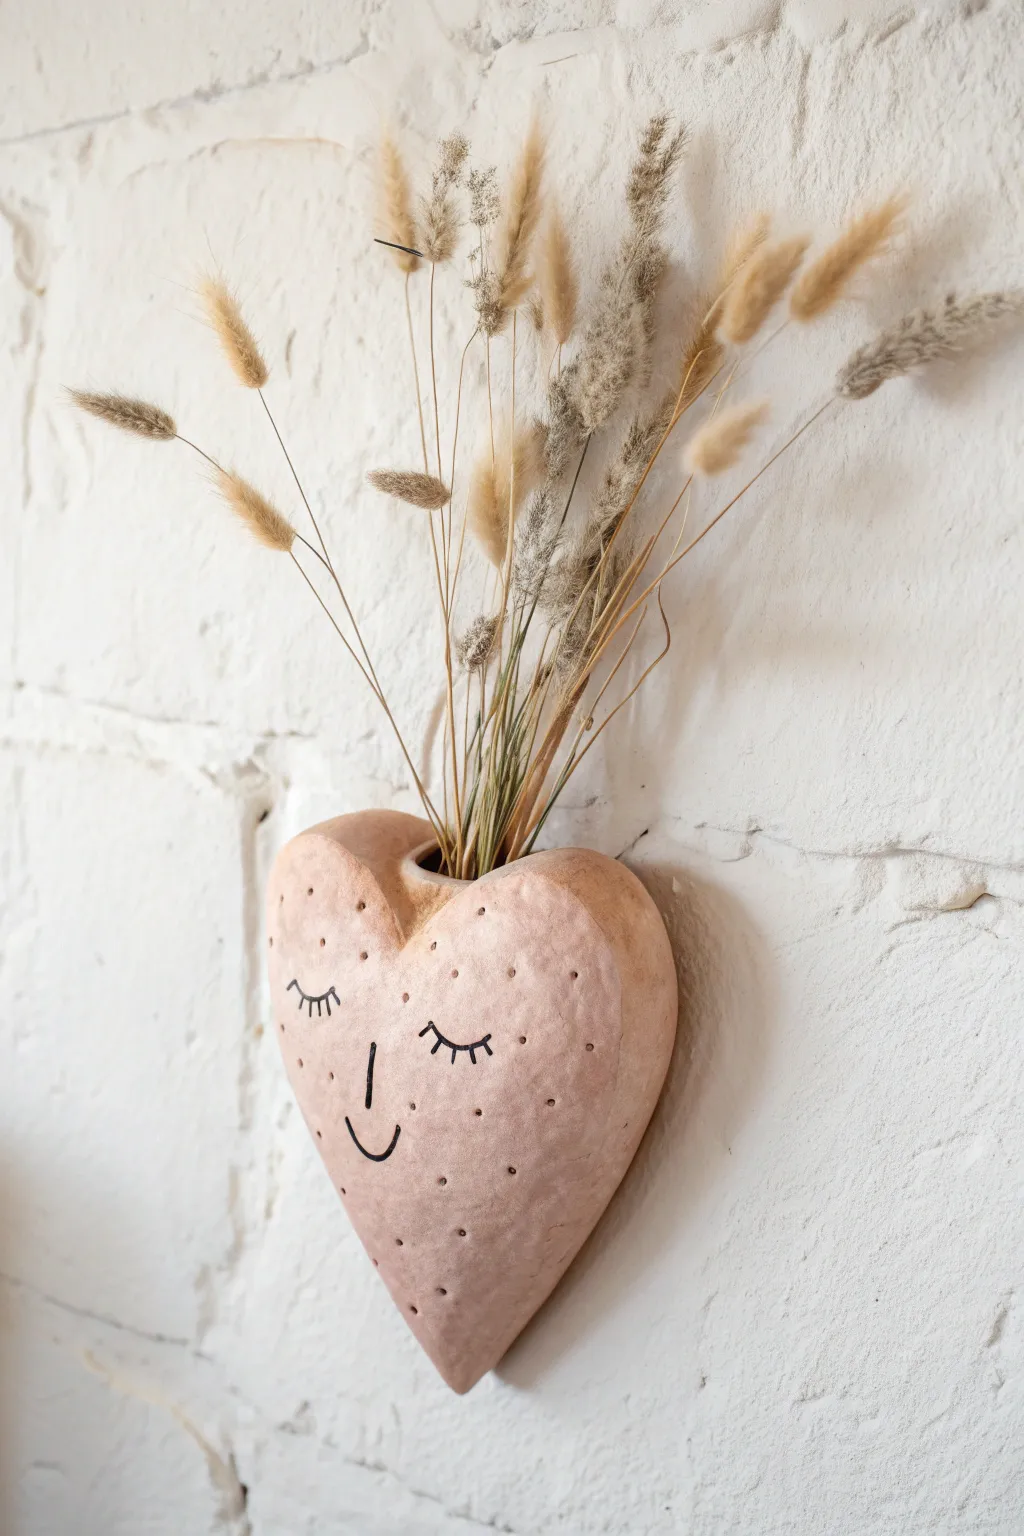
Add a touch of sweetness to any wall with this charming heart-shaped pocket vase. Crafted from clay with a gentle speckled texture and a sleepy smiling face, it’s the perfect home for a bundle of dried bunny tails or wildflowers.
Detailed Instructions
Materials
- Air-dry clay (terra cotta or peach tone)
- Rolling pin
- Heart-shaped paper template (approx. 5-6 inches)
- Small bowl of water
- Ceramic needle tool or toothpick
- Sharp craft knife
- Black fine-tip permanent marker or acrylic paint pen
- Fine-grit sandpaper
- Matte spray varnish (optional)
- Straw or small dowel (for the hanging hole)
Step 1: Shaping the Base
-
Prepare the Clay:
Begin by kneading a generous handful of air-dry clay until it is soft and pliable. If the clay feels too dry or cracks, dampen your hands slightly or work in a tiny drop of water. -
Roll the Slabs:
Roll out the clay to an even thickness of about 1/4 inch. You will need enough surface area to cut out two identically sized heart shapes. -
Cut the Hearts:
Place your paper template onto the clay slab and trace around it with a craft knife to cut out two heart shapes. Smooth the rough cut edges gently with a wet fingertip. -
Create the Pocket Depth:
Shape a small, elongated ‘U’ shape from leftover clay, about 1/4 inch thick, to act as a spacer. This strip should follow the curve of the bottom half of the heart, creating room inside for the flower stems. -
Score and Slip:
Use your needle tool to scratch cross-hatch marks (scoring) along the outer edges of the bottom half of both hearts, as well as on both sides of your clay spacer strip. Dab a little water (slip) onto these scored areas. -
Assemble the Pocket:
Sandwich the spacer strip between the two heart cutouts, pressing the edges firmly together to seal the bottom half. The top ‘V’ of the heart should remain open.
Smoother Seams
If you struggle blending the side seams, use the back of a spoon dipped in water. The curve of the spoon helps compress the clay layers together firmly without leaving finger dents.
Step 2: Refining and Detailing
-
Blend the Seams:
Using a modeling tool or your finger, smudge the clay across the seams on the outside edge until the join is invisible and the side of the heart looks like one solid piece. -
Smooth the Surface:
Dip your finger in water and run it over the entire front surface to remove any fingerprints or imperfections. I like to take extra time here to ensure the curve of the heart feels soft and organic. -
Add Texture:
Take a toothpick or a small dotting tool and gently press small indentations all over the front surface of the heart. Space them randomly to create a speckled, porous look. -
Make the Hanger:
Turn the heart over to the back side. Attach a small horizontal loop of clay securely near the top, or simply poke a hole through the back layer of the heart (avoiding the front layer) so it can hang on a nail. -
Dry Completely:
Let the piece dry flat in a cool, dry place for at least 24-48 hours. Turning it over occasionally helps it dry evenly and prevents warping.
Step 3: Finishing Touches
-
Sand Smooth:
Once bone dry, use fine-grit sandpaper to gently buff away any sharp edges or rough spots, especially around the rim of the opening. -
Draw the Face:
With a fine-tip black marker or paint pen, carefully draw the facial features. Start with two closed, curved eyelids with eyelashes, centered on the heart. -
Add the Nose and Smile:
Draw a small vertical line for the nose and a simple ‘U’ shape underneath for the smile. Keep the lines thin and delicate for a sweet expression. -
Seal (Optional):
To protect the drawing and the clay, you can spray the piece with a light coat of matte varnish. This is recommended if you live in a humid environment. -
Arrange Flowers:
Gather a small bundle of dried grasses, such as bunny tails or wheat. Trim the stems so they sit at the right height and place them into the top opening of your new wall pocket.
Level Up: Rosy Cheeks
Before sealing, dry brush a tiny amount of pink pastel chalk or diluted watercolor onto the ‘cheeks’ area for a soft, blushing effect that adds extra life to the face.
Hang your new creation on a bright wall and enjoy the calm, friendly vibe it brings to the room
Sleepy Sloth Hanging Planter
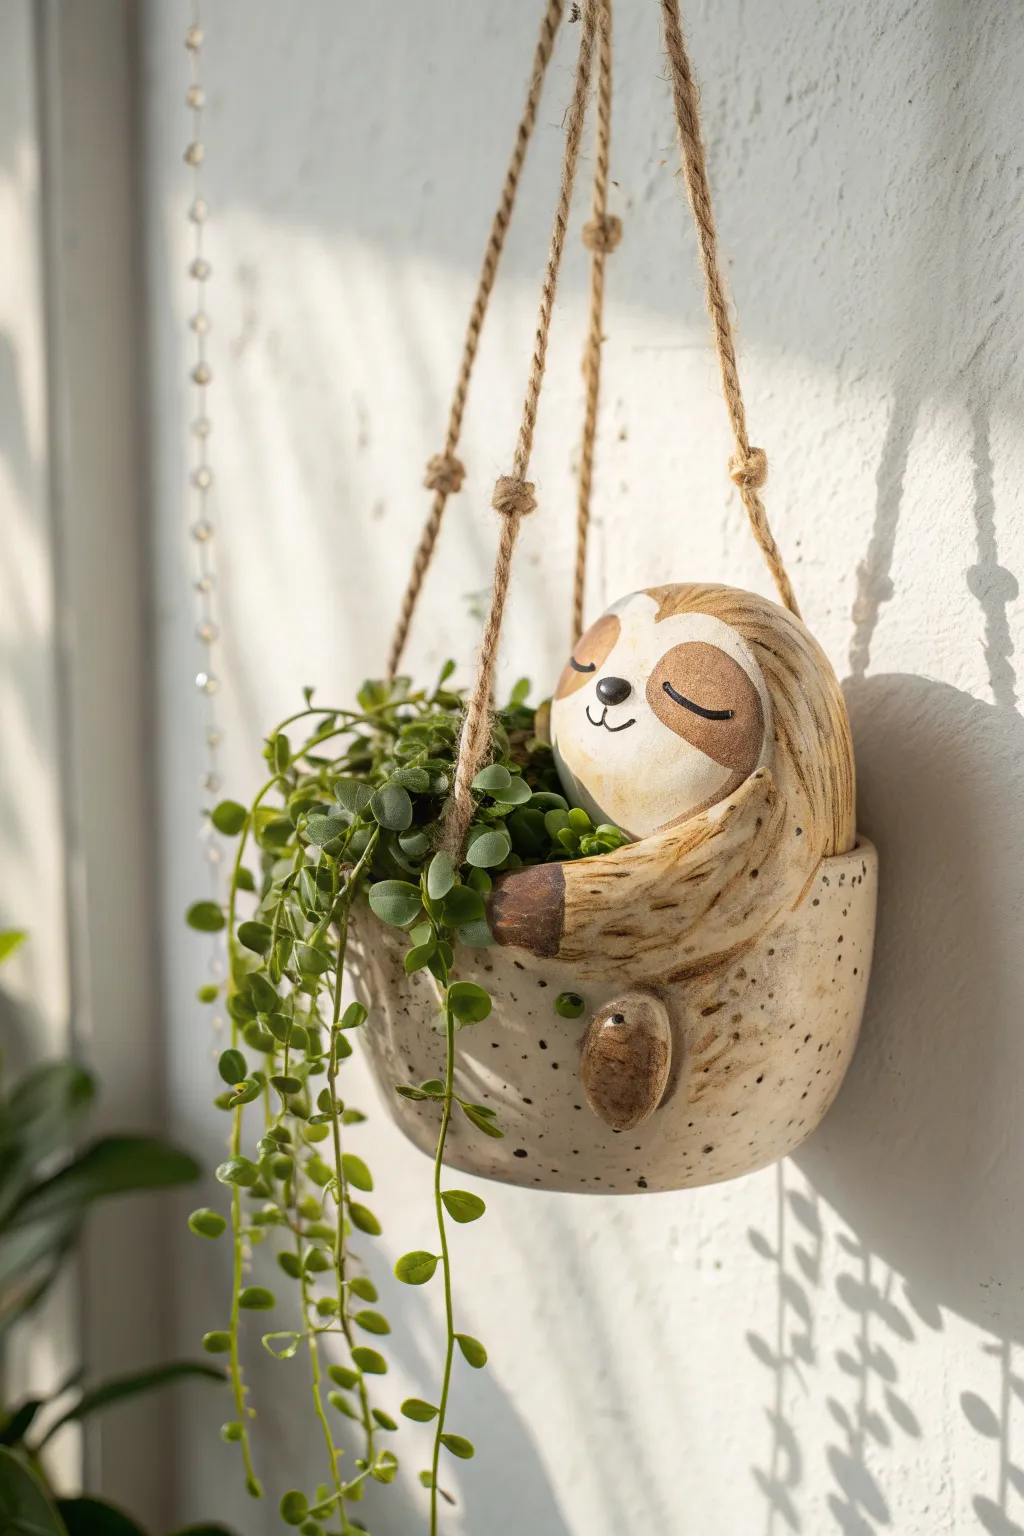
This whimsical hanging planter brings a touch of calm to any corner, featuring a peaceful sloth lovingly cradling your favorite trailing plant. The speckled clay finish and natural jute rope give it an organic, handmade charm that perfectly complements succulents or string-of-hearts vines.
Step-by-Step Tutorial
Materials
- Speckled buff stoneware clay (or polymer clay for non-functional decorative use)
- Ceramic sculpting tools (needle tool, rib, sponge)
- Small bowl or sphere mold (for the base)
- Rolling pin
- Slip and score tool
- Underglazes: White, Dark Brown, Light Brown
- Clear matte glaze
- Jute twine or hemp rope
- Paintbrushes (detail and flat)
- Kiln (if using stoneware)
Step 1: Forming the Base Body
-
Roll the slab:
Begin by rolling out a medium-thickness slab of speckled clay, aiming for about 1/4 inch thickness to ensure the walls are sturdy enough to hold soil. -
Mold the pinch pot:
You can either use a pinch pot technique to form a deep bowl shape or drape your slab over a small bowl mold to get a uniform curve. This will be the sloth’s bottom and the actual planter area. -
Smooth the surface:
Use a damp sponge or a soft kidney rib to smooth out the exterior. Since we are using speckled clay, you don’t need it perfectly glass-smooth; a little texture adds character. -
Create the holes:
While the clay is leather hard, use a hole punch or needle tool to create three or four evenly spaced holes near the rim for the hanging ropes. Make sure they are about half an inch down from the edge to prevent cracking.
Step 2: Sculpting the Sloth Features
-
Add the head:
Roll a solid ball of clay for the head and flatten the back slightly. Score and slip the area on the rim where the head will sit, then attach the ball firmly, blending the clay at the neck seam. -
Form the arms:
Roll two long coils of clay for the arms. These should be thick enough to look supportive. Attach one end of each coil to the ‘back’ of the pot and wrap them around to the front, as if the sloth is hugging the bowl. -
Attach the paws:
Flatten the ends of the arm coils slightly where they meet the rim near the head. Score and slip these points to secure the hug. Add small indentations to suggest claws. -
Add the leg:
Create a smaller oval shape for the back leg. Attach this to the lower front section of the bowl, just below the arms, so it looks like the knee is drawn up.
Keep it Light
If the clay feels too heavy, hollow out the sloth’s head slightly from the bottom before attaching it to the rim. This reduces weight and prevents tipping.
Step 3: Painting and Glazing
-
Bisque fire:
Allow the piece to dry slowly and thoroughly to prevent cracking, then bisque fire it according to your clay body’s specifications. -
Base face color:
Paint a heart-shaped area on the face using white underglaze. I find that doing two or three thin layers here gives a nice opaque base for the details. -
Facial features:
Using a very fine detail brush and dark brown underglaze, paint the sleepy eye slits, a small triangular nose, and a gentle smile inside the white heart area. -
Fur texture:
Dilute some light brown underglaze and wash it over the head and arms. While it’s wet, gently wipe some away with a sponge to leave color in the recesses, highlighting the clay’s texture. -
Glaze and final fire:
Dip or brush the entire piece with a clear matte glaze. This seals the clay while letting the beautiful speckles show through. Fire the piece for the final glaze cycle.
Uneven Hanging?
If the planter tilts when lifted, adjust the knots inside the rim. You can add a bead inside the knot to make adjustment easier before cutting the excess rope.
Step 4: Assembly
-
Prepare the rope:
Cut three equal lengths of jute twine, roughly 24-30 inches long depending on how low you want it to hang. -
Tie the knots:
Thread one end of each rope through the holes from the outside in, tying a sturdy double knot on the inside of the planter to secure it. -
Gather and hang:
Gather all three ropes at the top, ensuring the planter sits level, and tie them together in a large loop knot for hanging.
Once filled with lush greenery, your sleepy sloth will look right at home hanging by a sunny window.
Duckling Spoon Rest
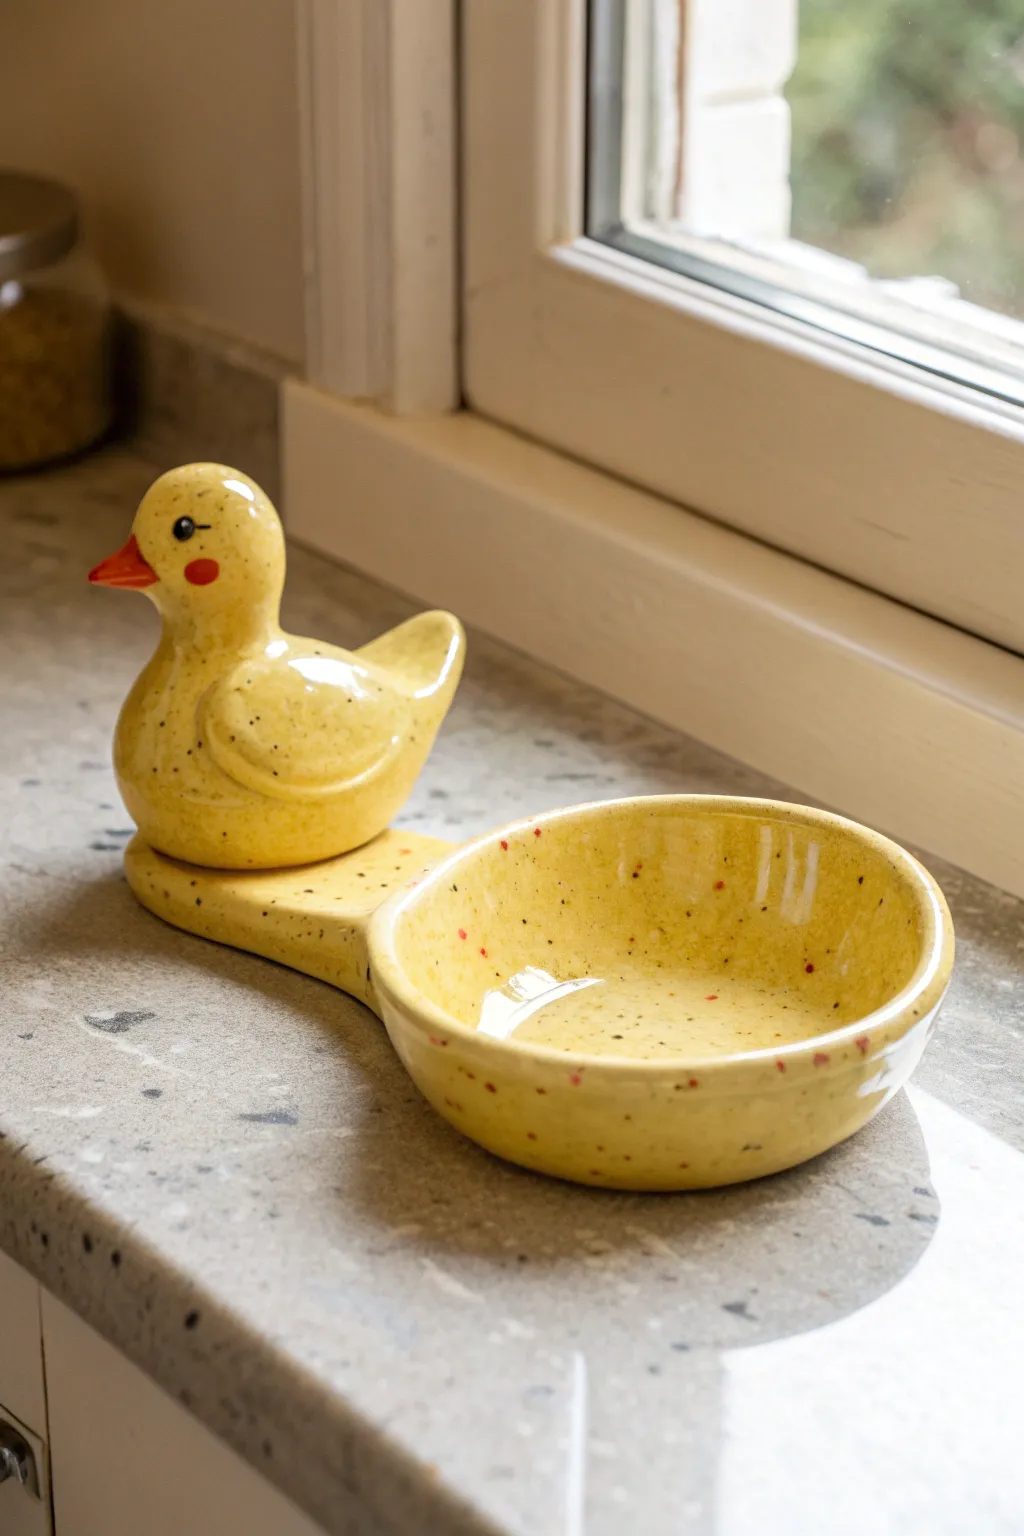
Bring a little cheer to your kitchen counter with this adorable ceramic duck spoon rest. Featuring a bright yellow glaze with playful speckles and a dedicated spot for your utensils, it combines whimsical sculpture with everyday utility.
How-To Guide
Materials
- White stoneware clay
- Rolling pin
- Needle tool
- Rib tool
- Scoring tool (or fork)
- Slip (clay and water mixture)
- Sponge
- Underglazes: Bright yellow, orange, black, pink/red
- Clear dipping glaze (food safe)
- Speckled clay body OR speckled glaze additive
- Small paintbrushes
- Modelling tools
Step 1: Forming the Base
-
Roll the slab:
Begin by rolling out a slab of white stoneware clay to approximately a 1/4 inch thickness. Ensure the surface is smooth and free of air bubbles by compressing it lightly with a rib tool. -
Cut the shape:
Using your needle tool, cut a shape that resembles a figure-eight or a peanut. One end should be a larger circle for the bowl (about 4 inches) and the other a slightly smaller oval for the duck to sit on. -
Create the bowl rim:
Roll a coil of clay about the thickness of a pencil. Attach this coil to the perimeter of the larger circle using the score and slip method. Gently pinch and smooth the coil upwards to create the walls of the spoon rest bowl. -
Smooth the transition:
Use your thumb or a modeling tool to blend the inside seam where the wall meets the base, ensuring a seamless curve that will be easy to clean later.
Hollow Out Tip
If your duck body is thicker than an inch, hollow it out from the bottom before attaching to the base. This prevents explosions in the kiln due to trapped moisture.
Step 2: Sculpting the Duck
-
Shape the body:
Form a ball of clay roughly the size of a lime into a teardrop shape for the duck’s body. Gently flatten the bottom so it sits securely. -
Form the head:
Roll a smaller ball for the head and attach it to the steeper side of the teardrop body. Use your thumb to smooth the clay downwards to connect the neck seamlessly. -
Add wings and tail:
Pinch the back of the body slightly to emphasize the tail feathers. For wings, create small, flat teardrop shapes and slip-and-score them onto the sides of the body. -
Attach the beak:
Make a tiny cone shape for the beak. Score the face and the back of the beak, dab on some slip, and press firmly into place. -
Mount the duck:
Score the flat section of your base (the smaller oval) and the bottom of your duck sculpture. Apply slip generously and press the duck onto the base. Clean up any excess slip with a damp brush.
Step 3: Decorating and Glazing
-
Bisque fire:
Allow the entire piece to dry slowly to the bone-dry stage. Fire it in the kiln to cone 04 (or your clay’s specific bisque temperature). -
Apply base color:
Paint the entire piece with three solid coats of bright yellow underglaze. I like to let each coat dry for a few minutes to prevent streaking. -
Add facial details:
Using a very fine detail brush, paint the beak orange. Add two black dots for eyes with tiny white highlights, and cute pink circles for the cheeks. -
Create speckles:
Dilute a small amount of reddish-brown or dark orange underglaze with water. Dip a stiff-bristled brush or toothbrush into it and flick the bristles to spatter speckles across the duck and the bowl. -
Dip glaze:
Once the underglaze is completely dry, dip the entire piece into a transparent, food-safe clear glaze. -
Final fire:
Stilt the piece (if you glazed the bottom) or wipe the foot ring clean. Fire to the maturity temperature of your clay and glaze (typically cone 5 or 6 for stoneware).
Functionality Level-Up
Carve a small notch in the rim of the bowl directly opposite the duck. This gives the spoon handle a secure place to rest without sliding sideways.
Now you have a charming, functional piece of pottery ready to brighten up your cooking routine
Star Face Tealight House
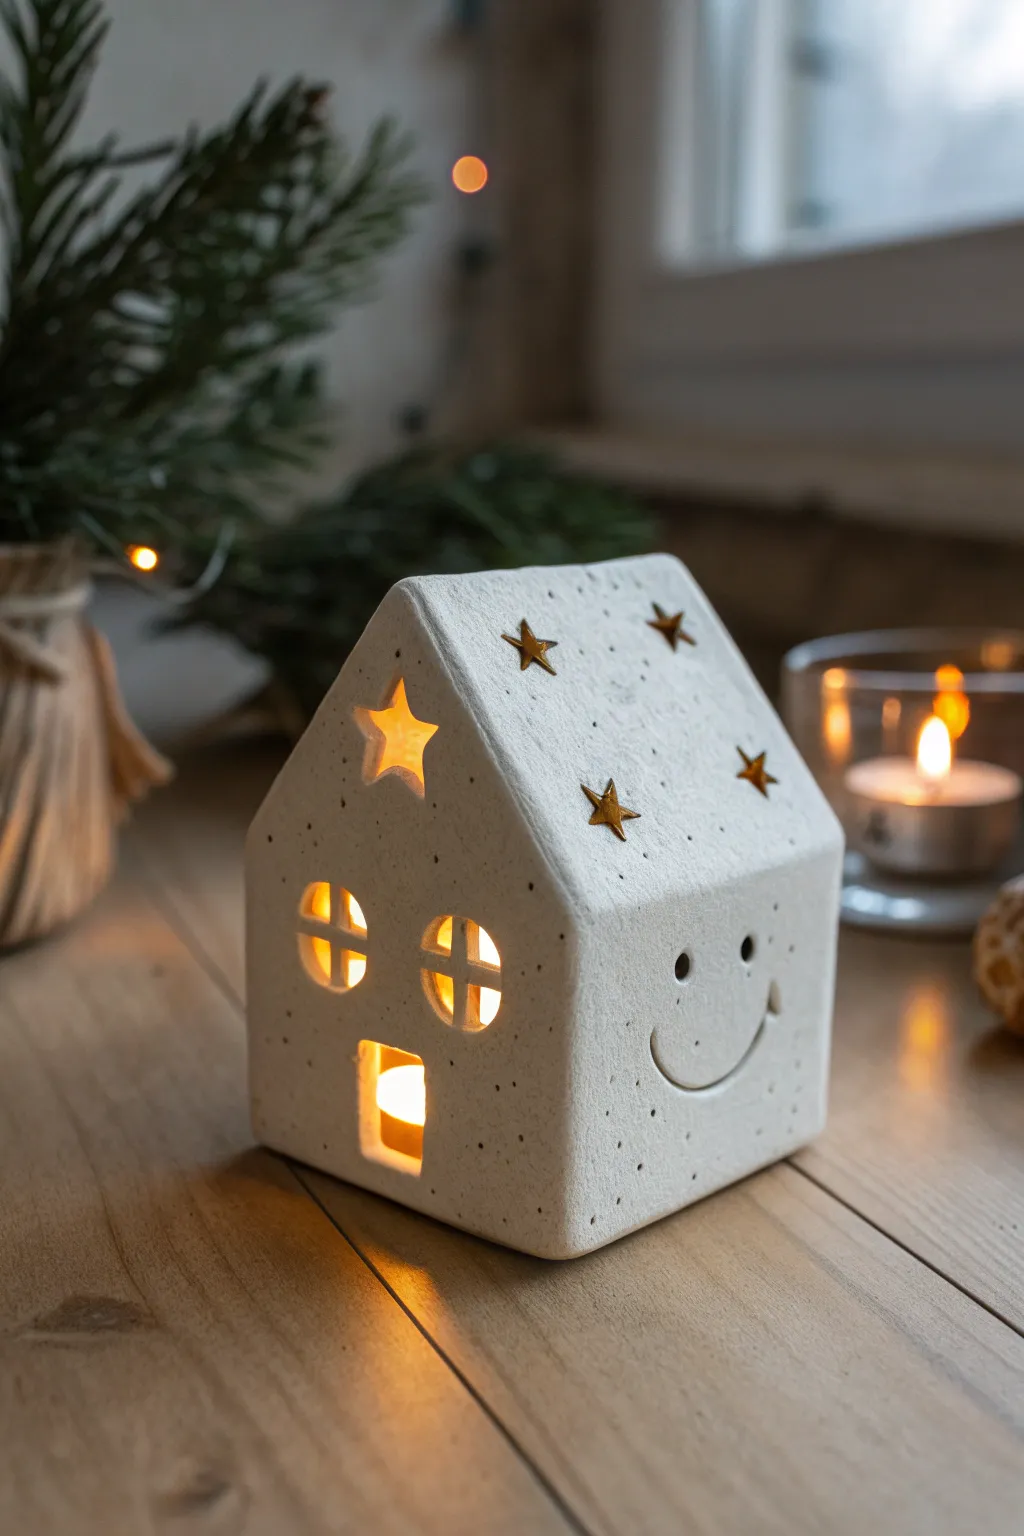
Bring a warm, cheerful glow to your mantle with this adorable ceramic tealight house. Featuring star cutouts, a welcoming smile, and a speckled creamy finish, this slab-built project is perfect for beginners looking to create functional decor.
Step-by-Step Tutorial
Materials
- White earthenware or speckle-tone clay (low fire)
- Rolling pin with guide strips (approx. 1/4 inch)
- Fettling knife or X-Acto blade
- Paper templates (front/back, side walls, roof panels)
- Star-shaped clay cutters (small)
- Small round cutter or drinking straw (for window panes)
- Slip and scoring tool (or serrated rib)
- Wooden modeling tool or spoon back
- Sponge
- Matte clear glaze (optional)
Step 1: Planning and Cutting
-
Draft your templates:
Sketch your house dimensions on cardstock first. You need two pentagon shapes for the front and back (about 4 inches wide by 5 inches tall at the peak), two rectangular side walls (3 inches tall by 4 inches wide), and two roof rectangles (slightly larger than the side walls to allow for overhang). -
Roll the slab:
Roll out your clay onto a canvas board or cloth until it is an even 1/4 inch thickness. I find using wooden guide strips on either side of the rolling pin ensures the walls are perfectly uniform. -
Cut the shapes:
Place your paper templates onto the slab and trace around them lightly with a needle tool. Once traced, cut cleanly through the clay using your fettling knife. Don’t discard the scraps yet; you’ll need them for testing. -
Leather hard stage:
Let your cut pieces sit out for about an hour or until they reach a ‘soft leather hard’ state. They should be firm enough to stand up without flopping over, but soft enough to manipulate.
Clean Cuts Pro Tip
When cutting out the windows, let the clay firm up slightly more than the walls. Clean up any ragged edges with a soft brush dipped in water or vinegar.
Step 2: Adding Details
-
Cut the front star:
On the front panel, use a star cutter to punch a shape near the peak of the roof. Gently push the star out from the back to keep the edges sharp. -
Create the windows:
Use a small circle cutter to make two round windows. Instead of removing the whole circle, cut a ‘plus’ sign shape inside the circle first to create the muntins (window bars), then carefully remove the four quarters, leaving the cross shape intact. -
Carve the door:
Cut a small rectangle at the bottom center for the door. Ensure it’s large enough for candlelight to flicker through effectively. -
Add the smile:
Using a needle tool or a small loop tool, gently carve a curved smile line on the side wall. Press two small indentations for eyes above the smile to give the house its cheerful personality. -
Roof details:
Take your two roof panels and press small star cutters into the surface. Unlike the front window, you don’t need to cut all the way through—just deep enough to embed the shape, or cut through for extra light ventilation if you prefer.
Warping Woes?
Does the roof withstand drying? Sometimes thin slabs warp. Dry the house slowly away from drafts. You can also place a crumpled paper towel inside to support the roof.
Step 3: Assembly
-
Score the edges:
Take your front, back, and side walls. Use a serrated rib or needle tool to scratch up (score) every edge that will connect to another piece. -
Apply slip:
Dab clay slip or water onto the scored areas. It acts as the glue for your structure. -
Construct the base:
Stand the walls up and press them together firmly inside the seams. It helps to work on a small banding wheel so you can turn the project as you join the corners. -
Reinforce seams:
Roll a very thin coil of clay and press it into the interior corners of the house. Smooth this coil down to reinforce the structural integrity of the walls. -
Attach the roof:
Score and slip the top edges of your wall structure. Place the roof panels on top, joining them at the peak first. Smooth the roof seam completely so it looks like one folded piece. -
Refine the surface:
Once assembled, use a damp sponge to smooth away any fingerprints or rough texture. Pay attention to the window edges to ensure they look tidy. -
Simulate speckles (optional):
If you aren’t using speckled clay, you can flick a stiff toothbrush dipped in iron oxide wash or brown underglaze lightly over the surface to mimic the stone look. -
Drying and firing:
Allow the house to dry slowly under plastic for at least 24 hours to prevent warping, then uncover for full drying. Bisque fire to cone 04, then apply a matte clear glaze or leave raw if the clay body is fully vitrified at high fire.
Place a battery-operated tealight inside and enjoy the cozy atmosphere this little house creates
Cherry Mini Vase Pair

This whimsical project creates a pair of mini vases shaped like luscious, ripe cherries complete with a long, elegant stem. Finished with a deep red glaze that shines in the light, these tiny vessels are perfect for holding a single wildflower or a delicate sprig of greenery.
Step-by-Step Guide
Materials
- Red earthenware or stoneware clay (white clay works too, if glazing opaque)
- Pottery wheel (or hand-building tools for pinch pot method)
- Needle tool
- Small loop tool
- Sponge
- Kidney rib (smooth metal or rubber)
- Deep cherry red glossy glaze
- Dark brown or green underglaze (for the stem)
- Kiln
- Thin floral oasis or clay support (for firing)
- Clear glaze (optional, if using underglazes for color)
Step 1: Shaping the Cherry Bodies
-
Prepare your clay:
Start by wedging your clay thoroughly to remove any air bubbles. Divide the clay into two equal balls, roughly the size of a large tangerine or small orange. -
Form the base spheres:
If using a wheel, throw two small, enclosed forms. If hand-building, create two pinch pots for each cherry and join them together to form a hollow sphere. The goal is a round, plump shape. -
Refine the curve:
Gently paddle or smooth the spheres with a kidney rib to remove finger marks and create that perfect, taut fruit skin appearance. -
Create the dimples:
On the top of each sphere, gently press down with your thumb to create the characteristic indentation found where a cherry stem connects. Do this while the clay is still plastic but firm. -
Open the hole:
Use a needle tool or small drill bit to create an opening in the center of the dimple. This hole needs to be wide enough to accept a small flower stem later, but not so wide it ruins the illusion.
Stem Drooping?
If the long clay stem wilts while drying, prop it up with a custom support made of crumpled newspaper or a spare chunk of clay until it is leather-hard.
Step 2: Creating the Stems
-
Roll the stem coil:
Take a small amount of clay and roll out a long, slender coil. It should be slightly thicker at the base and taper very gently toward the tip. -
Curve and cut:
Cut the coil to your desired length—one cherry needs a very long, dramatic curved stem, while the other vase will remain stemless (just the fruit). -
Attach the long stem:
Score the area next to the opening on one of your cherry bodies. Score the base of your long coil. Apply slip and firmly attach the stem, smoothing the seam so it looks like it grew there. -
Shape the arch:
Gently bend the attached stem into a graceful arch. I like to let this stiffen up slightly while supported by a sponge or crumpled paper so it holds its shape against gravity. -
Create the stem stub:
For the stemless vase, create a very tiny nub of clay and attach it near the opening to suggest where the stem would have been broken off, adding realism.
Step 3: Finishing and Firing
-
Bisque fire:
Once the pieces are bone dry, load them into the kiln for the initial bisque firing. Be very careful with the long stem; it is fragile. -
Apply base color:
Pour your deep cherry red glaze inside the vases first, swirling to coat, then pour out excess. Then, dip or brush the exterior with the same rich red glaze. -
Detail the stem:
Carefully wipe the red glaze off the long stem and the tiny stem stub on the second vase. Paint these with a dark brown or mossy green underglaze or specialized glaze to differentiate them from the fruit. -
Clean the foot:
Wipe the very bottom of both vases with a damp sponge to remove any glaze that would touch the kiln shelf. -
Glaze fire:
Fire the pieces again to the temperature required by your specific glaze. The red should turn glossy and deep, mimicking the skin of the fruit.
Speckled Realism
To get the natural look shown in the photo, choose a glaze that has tiny iron flecks or ‘speckles’ in the formula, adding depth to the red surface.
Place these charming ceramic fruits on a windowsill where the sunlight can catch their glossy curves
Donut-Shaped Bud Vase
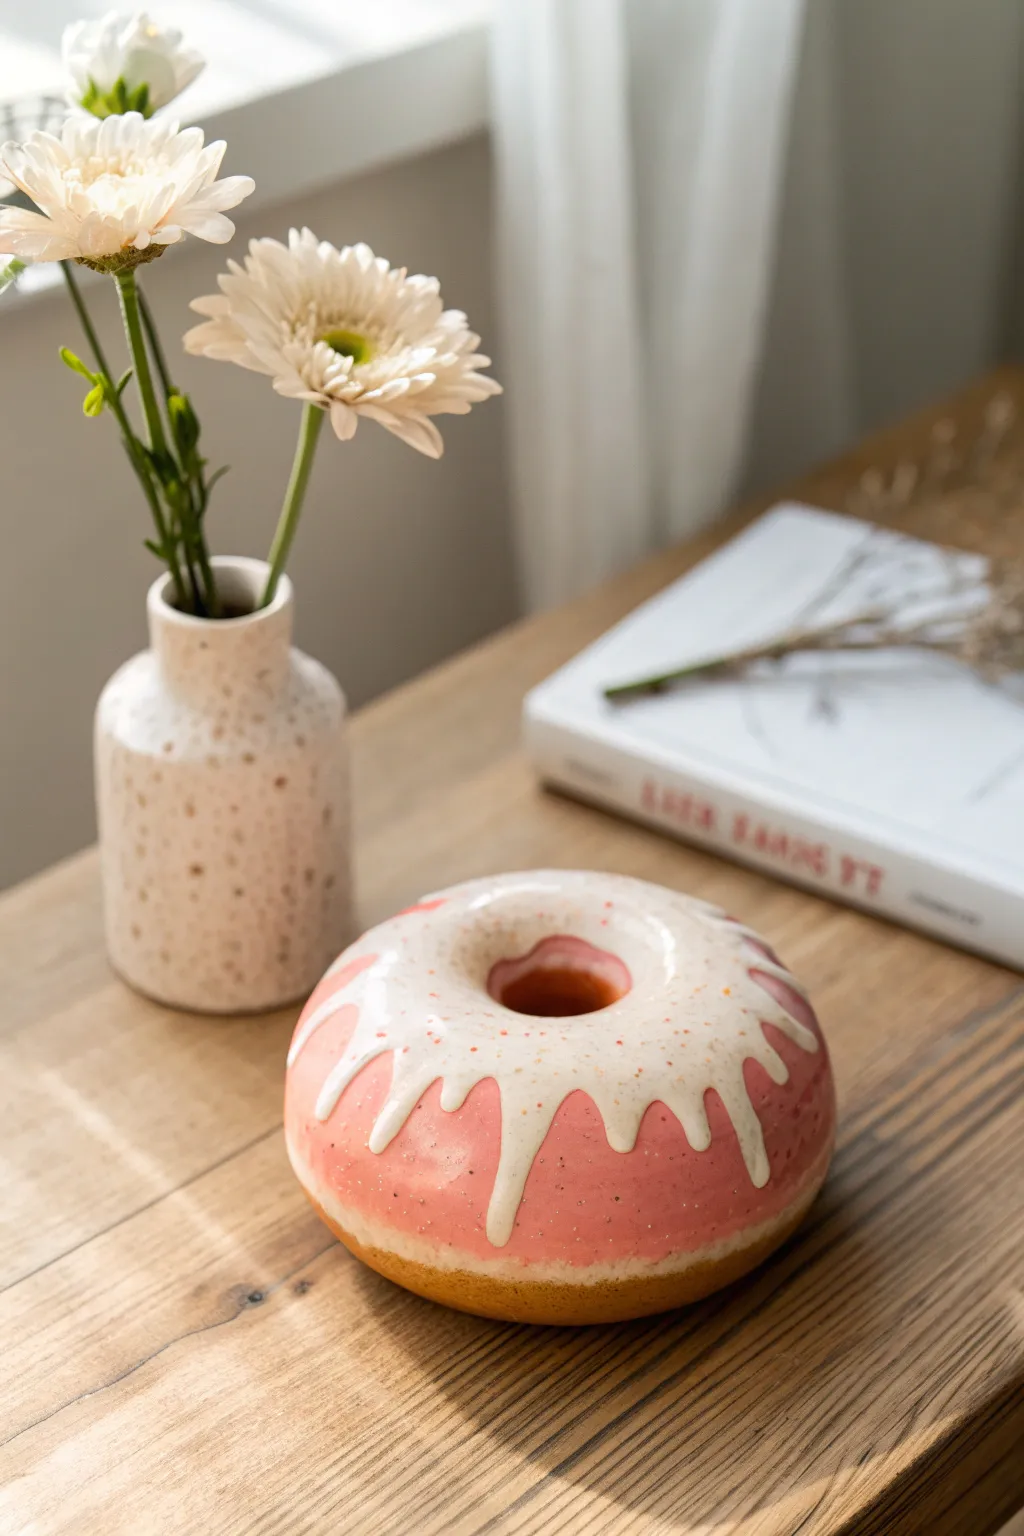
Add a sprinkle of whimsy to your decor with this delightful donut-shaped bud vase. Featuring a glossy pink glaze, realistic white drippy icing, and speckled details, this functional piece looks almost good enough to eat.
How-To Guide
Materials
- Low-fire white earthenware clay
- Rolling pin
- Fettling knife
- Scoring tool and slip
- Sponge
- Soft styling brush
- Pink ceramic underglaze
- White pouring glaze (opaque)
- Speckled transparent glaze or glaze speckles
- Small round cutter (approx. 1 inch)
- Medium bowl (for molding shape)
- Clear dipping glaze (optional)
Step 1: Forming the Donut Base
-
Prepare the Clay:
Begin by wedging your earthenware clay thoroughly to remove air bubbles. Roll it into a smooth, thick coil about 1.5 inches in diameter and roughly 10 inches long. -
Form the Ring:
Gently curve the coil into a circle to form the donut shape. Join the two ends together by scoring both surfaces, applying slip, and pressing them firmly to connect. -
Smooth the Seam:
Use your fingers and a little water to blend the clay across the seam until the join is invisible. The ring should look continuous and seamless. -
Refine the Shape:
Gently flatten the bottom of the donut slightly by tapping it on your work surface so it sits stable without rolling. -
Create the Opening:
If you want this to hold water for flowers, you’ll need a sealed bottom section, but for this specific ‘hole-in-the-middle’ donut style, we need to create the interior chamber. Cut the donut in half horizontally (like a bagel). -
Hollow the Interior:
Carefully pinch and scoop out the center of the clay coil halves, leaving walls about 1/4 inch thick. Don’t go too thin or it may collapse. -
Rejoin the Halves:
Score and slip the cut edges of both halves. Place them back together, matching the seams perfectly. Smooth the outside connection line completely with a modeling tool and sponge. -
Cut the Top Hole:
Use your small round cutter to punch a hole in the very top center of the donut. This is where your flower stems will go.
Pro Tip: Gravity is Key
When applying ‘icing’ glaze, let the heavy drips settle for a few seconds before firing. Gravity creates the most natural-looking drips.
Step 2: Refining and Bisque Firing
-
Smooth the Surface:
Once the clay is leather hard, use a damp sponge to wipe down the entire piece. Remove any fingerprints or rough texture to ensure a smooth ‘baked goods’ finish. -
Initial Drying:
Let the donut dry slowly under loose plastic for a day, then uncover to bone dry completely. This prevents cracking at the seams. -
Bisque Fire:
Fire the piece in the kiln to cone 04 (or according to your clay’s specifications) to prepare it for glazing.
Step 3: Glazing and Decoration
-
Apply Base Color:
Paint the bottom half of the donut with a warm, golden-brown underglaze to mimic the baked dough color. Feather the edge upward slightly. -
Pink Glazing:
Apply three coats of pink glaze to the top half of the donut, slightly overlapping the brown dough section. Let each coat dry before applying the next. -
Create the Icing:
I like to mix a thick batch of white opaque glaze for this step. Pour or spoon the white glaze over the top pink section, allowing it to naturally drip down the sides in irregular patterns. -
Adding Speckles:
Before the white glaze dries, lightly flick a toothbrush dipped in brown or diluted orange underglaze over the surface to create tiny texture speckles. -
Clean the Foot:
Wipe the very bottom of the vase with a clean, damp sponge to remove any glaze so it won’t stick to the kiln shelf. -
Final Firing:
Fire the piece again to the recommended temperature for your glazes (usually cone 06 or 05) to achieve that glossy, delicious finish.
Troubleshooting: Cracking Seams
If your donut splits at the seam during drying, you likely didn’t score enough. Patch it immediately with vinegar slip and compress the area well.
Place a single wildflower in your finished vase and enjoy that sugar-sweet aesthetic without the calories
Silly Monster Desk Cup
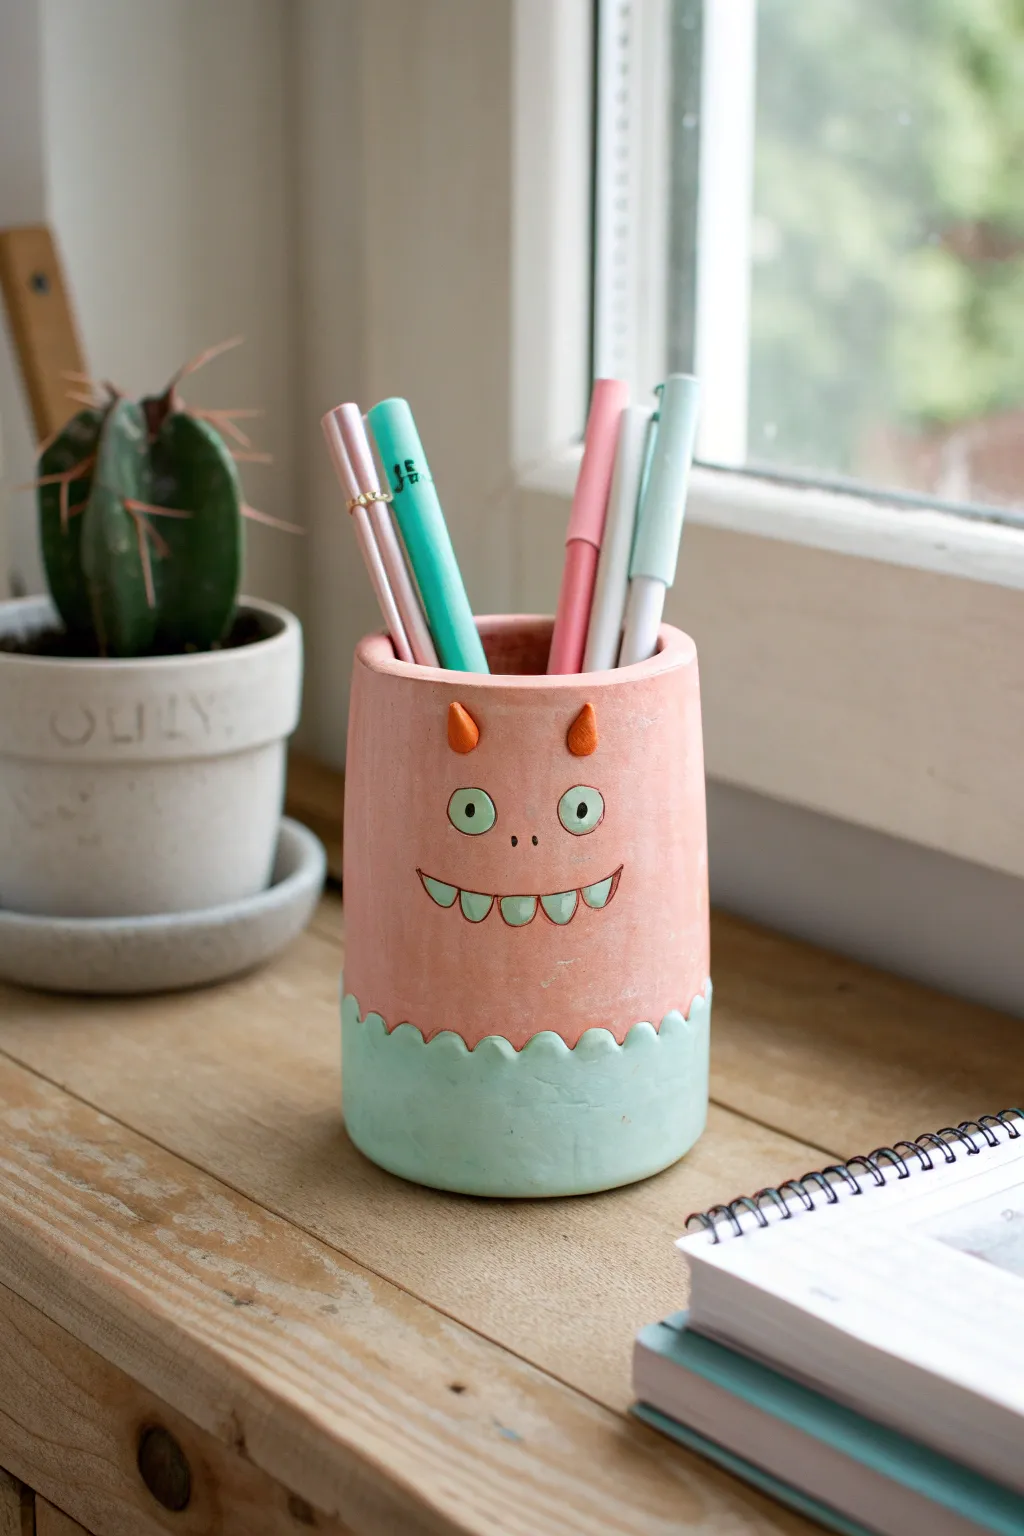
Add some whimsical charm to your workspace with this adorable monster-themed desk cup, perfect for holding your favorite pens or brushes. This beginner-friendly project combines simple slab building with playful sculpting details like tiny horns and a toothy grin.
Step-by-Step Guide
Materials
- Air-dry clay or polymer clay (white)
- Acrylic paints (pastel pink, teal/mint, white, orange)
- Black fine-tip marker or detail paint pen
- Rolling pin
- Clay knife or craft blade
- Clear varnish or sealant (matte or satin)
- Small bowl or can (to use as a mold)
- Sandpaper (fine grit)
- Small paintbrushes
- Water cup (for smoothing)
Step 1: Building the Base Form
-
Roll the slab:
Start by conditioning your clay until it’s pliable, then roll it out into a flat, even slab about 1/4 inch thick. Aim for a rectangular shape that is long enough to wrap around your chosen mold. -
Trim to size:
Using a ruler and your craft knife, cut a clean rectangle from the slab. The height should be about 4-5 inches. -
Form the cylinder:
Wrap the clay rectangle around your mold (like a soda can or glass jar wrapped in parchment paper). Bring the two short ends together. -
Join the seam:
Score the edges where they meet, add a little water or slip, and press them firmly together. Use your finger to smooth the seam until it disappears completely. -
Add the bottom:
Place your cylinder on the remaining clay slab and trace around the base. Cut out this circle, then attach it to the bottom of your cylinder using the score-and-slip method, smoothing the connection well.
Cracking Seams?
If the vertical seam starts to open while drying, wet it slightly and fill the gap with fresh soft clay, smoothing it back down.
Step 2: Sculpting the Details
-
Create the scallop trim:
Roll a thin snake of clay and flatten it slightly. Use your knife to cut a wavy or scalloped pattern along one edge, then attach this strip around the very bottom of the cup to create the monster’s textured base. -
Shape the horns:
Roll two very small cones of clay between your fingers. Attach these near the top rim of the cup, spacing them apart to leave room for the face. -
Smooth everything:
Dip your finger in a little water and gently go over the entire piece to remove fingerprints and harsh edges. I like to pay special attention to the rim to ensure it’s comfortable to touch. -
Dry thoroughly:
Let the piece dry completely according to your clay’s instructions. This usually takes 24-48 hours for air-dry clay. -
Sand for finish:
Once bone dry, use fine-grit sandpaper to gently smooth out any bumps, especially along the joined seam and the top rim.
Step 3: Painting and Finishing
-
Base coat:
Paint the upper body of the monster with a soft pastel pink acrylic. You may need two coats for opaque coverage. -
Paint the bottom:
Paint the scalloped bottom section in a fresh mint or teal color. -
Add the face details:
Using a small brush, paint two white circles for eyes and a curved line for the mouth. Add small triangles hanging from the mouth line for teeth. -
Color the horns:
Paint the two small horns a bright orange to make them pop against the pink. -
Fill in accents:
Paint the irises of the eyes with the mint teal color to match the base. Fill in the teeth with the same teal color. -
Outline and define:
Once the paint is dry, use a fine-tip black marker or a very thin liner brush to outline the mouth, teeth, and add pupils to the eyes. -
Seal the piece:
Finish by applying a coat of matte or satin varnish to protect your paint job and give the cup a professional look.
Make it Functional
Before drying, poke a small hole in the very bottom center if you want to use this as a planter for a real succculent instead of pens.
Pop in your pens and enjoy your new goofy desk companion
Fruit Slice Coaster Set
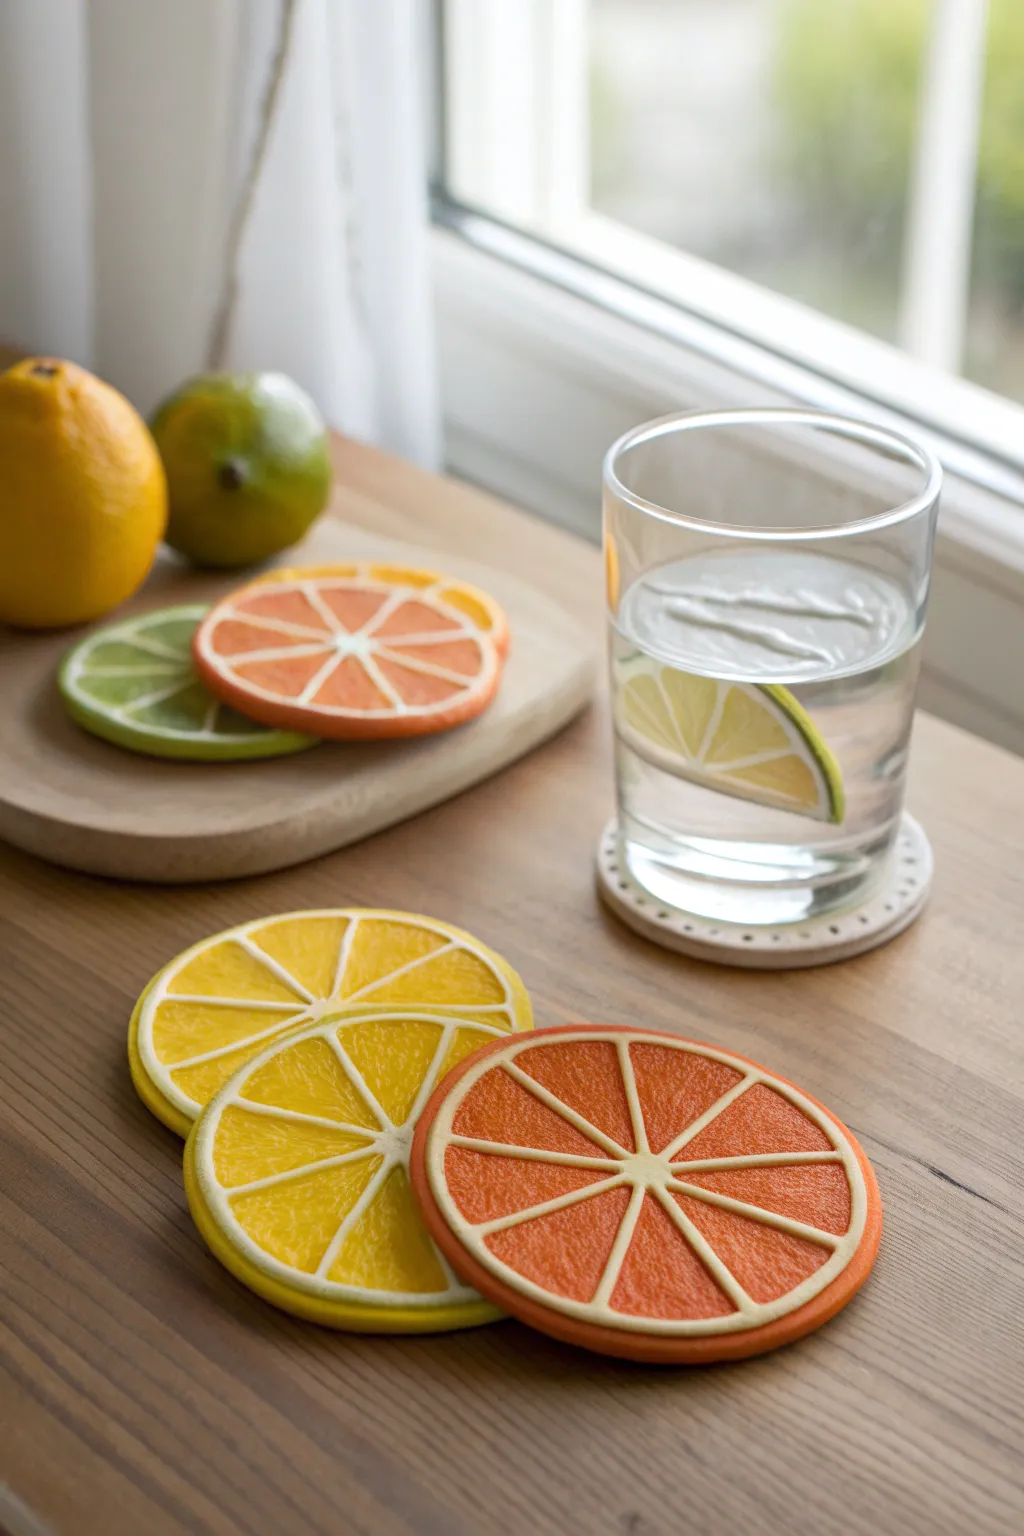
Add a splash of permanent summer to your coffee table with these delightful fruit slice coasters. Modeled to look like fresh oranges, lemons, and limes, their textured pulp and vibrant colors make them a refreshing DIY project.
Step-by-Step
Materials
- Polymer clay (Orange, Yellow, Lime Green, Translucent White/Frost)
- Non-stick rolling pin
- Circle cookie cutters (approx. 3.5 – 4 inches diameter)
- Needle modeling tool or toothpick
- Dotting tool or small ball stylus
- Blade or X-Acto knife
- Small stiff-bristled brush (like an old toothbrush)
- Sandpaper (fine grit)
- Matte or satin varnish (optional)
- Parchment paper or baking tile
Step 1: Creating the Base
-
Prepare the Ring:
Start by conditioning your white or translucent white clay until it is soft and pliable. Roll it into a long, thin snake, roughly 1/8 inch thick. -
Roll the Rind Color:
Choose your fruit flavor—let’s say orange. Condition the orange clay and roll it into a sheet about 1/4 inch thick. Use your large circle cutter to punch out a perfect round disc. -
Add the Pith:
Take your white snake and flatten it slightly. Wrap this flattened strip around the outer edge of your orange disc to create the white pith layer found just under the skin. -
Add the Skin:
Roll a very thin strip of orange clay and wrap it over the white layer to finish the outer rind. Smooth the seams gently with your finger so the layers bond together.
Step 2: Forming the Segments
-
Marking the Center:
Find the center of your disc and make a small indentation with your dotting tool. This will be your guide for creating symmetrical slices. -
Dividing the Fruit:
Roll very thin snakes of white clay for the segment dividers. Lay one straight across the diameter of the circle, crossing the center point. -
Adding Cross Sections:
Lay a second thin white snake perpendicular to the first, creating a cross. You now have four quadrants. -
Final Segmentation:
Add two more lines diagonally to split each quadrant in half, resulting in eight equal pizza-slice segments. I find it helpful to press these down gently with a flat tool to ensure they stick. -
Refining the Edges:
Trim any excess white clay hanging off the edge of the coaster with your blade so it sits flush with the rind.
Fixing Sticky Clay
If your white dividing lines are smearing into the colored fruit, chill the clay in the fridge for 10 minutes. Cooler clay is firmer and holds sharp lines better during placement.
Step 3: Texturing and Finishing
-
Creating the Pulp:
This is the crucial step for realism. Take the needle tool or the stiff brush and gently stipple the colored clay inside each segment. -
Enhancing Texture:
Vary your pressure while stippling to create deep and shallow pockets, mimicking the juicy vesicles of real citrus fruit. Avoid damaging the white divider lines. -
The Outer Texture:
Use a piece of sandpaper or a toothbrush to lightly texture the very outer orange rim, giving it that porous skin look. -
Slight Beveling:
Run your finger around the top edge of the coaster to slightly round it off, softening the sharp cut edge. -
Baking:
Place your coasters on a baking tile or parchment paper. Bake according to your specific brand of polymer clay instructions (usually 275°F for 15-30 minutes per 1/4 inch thickness). -
Cooling:
Allow the coasters to cool completely in the oven or on a wire rack before handling them to prevent warping. -
Sealing:
For extra durability against moisture, apply a thin coat of matte or satin varnish to the top and sides, letting it dry fully between coats.
Make It a Set
Create a ‘mixed drink’ set by making smaller versions in lime green and lemon yellow. Glue strong magnets to the backs of the smaller ones for a coordinating fridge set.
Enjoy your fresh and fruity coasters, perfect for brightening up any beverage station
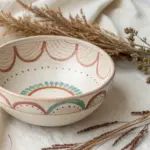
Peekaboo Critter Inside Bowl
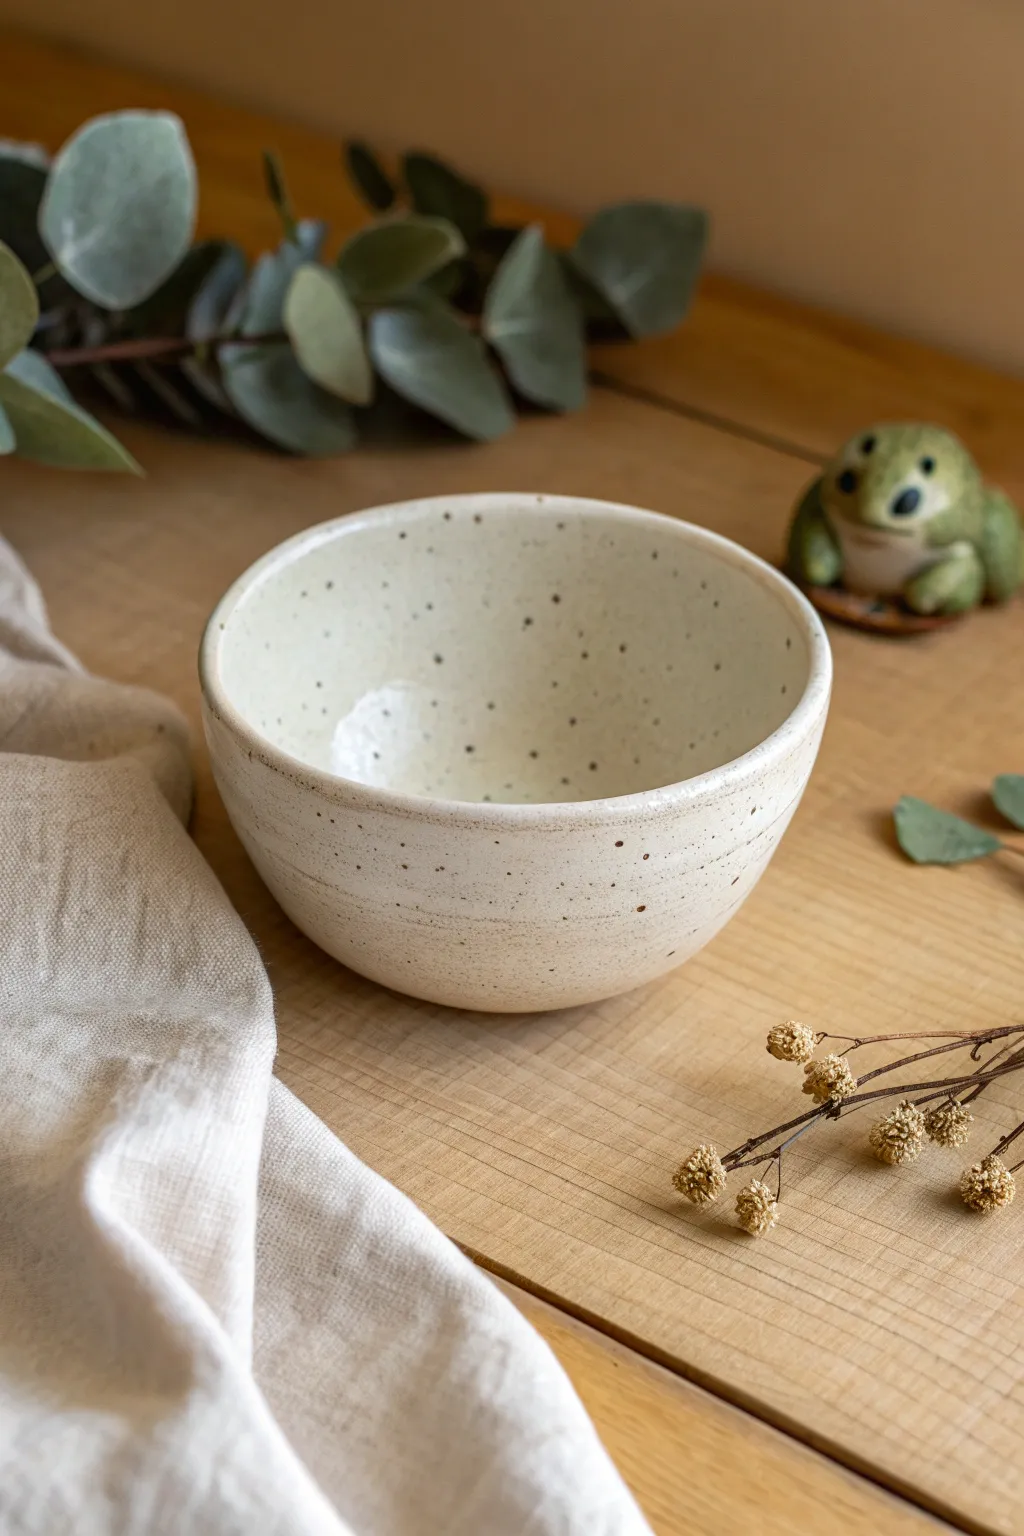
This charming, handmade bowl features a wonderfully textured, speckled cream glaze that brings warmth to any table setting. While it functions beatifully as a simple breakfast bowl, its gentle curve masks a delightful secret nestled inside for a playful twist.
Step-by-Step Guide
Materials
- White stoneware clay or porcelain
- Pottery wheel (or rolling pin for hand-building)
- Small sponge
- Rib tool
- Wire cutter
- Loop trimming tool
- Speckled vanilla/cream stoneware glaze
- Underglaze in green, black, and white (for the critter)
- Fine detail paintbrush
- Clear transparent glaze (optional)
- Kiln
Step 1: Throwing the Form
-
Center the clay:
Start with a ball of clay about the size of a large orange. Center it firmly on the wheel head, ensuring it spins without wobbling. -
Open the clay:
Press your thumbs into the center to open the form, leaving about a half-inch of thickness for the base to allow for later trimming. -
Open the floor:
Pull the clay outward to establish the floor width. Compress the bottom thoroughly with a rib to prevent S-cracks during drying. -
Pull the walls:
Slowly pull the walls upward. Keep the walls relatively thick at the bottom and taper slightly as you go up, aiming for a gentle, rounded curve rather than straight vertical sides. -
Shape the rim:
Use a chamois or a wet sponge to compress and smooth the rim. This rounded edge gives the finished piece a professional, comfortable touch. -
Refine the curve:
Use a kidney rib on the inside of the bowl to push the clay out gently, perfecting that continuous, smooth curve shown in the photo.
Step 2: Sculpting the Surprise
-
Form the critter base:
Hand-roll a very small ball of clay, roughly the size of a marble. This will be your ‘peekaboo’ creature—perhaps a frog like the figurine in the photo, or a tiny bear. -
Attach the critter:
Score the center of the bowl’s interior floor and the bottom of your clay marble. Apply slip and press the marble firmly into place. -
Detail the creature:
Using a needle tool or small modeling tool, gently press in eye sockets or add tiny ears. Keep the shapes simple properly accommodate the glaze later. -
Dry to leather hard:
Cut the bowl from the wheel and let it dry slowly until it reaches a leather-hard state.
Clean The Rim
Glaze tends to run slightly during firing. Wipe the rim lightly with a damp sponge before firing to thin the glaze there; this highlights the clay body color.
Step 3: Trimming and Finishing
-
Center and secure:
Flip the bowl upside down onto the wheel head. Center it perfectly and secure it with lugs of clay. -
Trim the exterior:
Use a sharp loop tool to trim away excess weight from the bottom third of the bowl. Follow the interior curve to create an even wall thickness. -
Leave throw lines:
I like to leave the subtle horizontal throwing lines visible rather than smoothing them completely; they catch the glaze beautifully. -
Bisque fire:
Allow the piece to dry completely (bone dry) before loading it into the kiln for the bisque firing (usually cone 04 or 06).
Texture Play
Instead of buying speckled glaze, add granular ilmenite or manganese to a plain white glaze to create your own custom speckle density and size.
Step 4: Glazing
-
Paint the critter:
Using your fine brush, paint the interior creature with underglazes. If making a frog, use a soft green, adding black dots for eyes. -
Wax resist:
Apply a liquid wax resist carefully over your painted creature. This prevents the main glaze from obscuring your hard work. -
Dip the bowl:
Stir your speckled cream glaze thoroughly to suspend the speckles. Dip the entire bowl for 3 seconds to get an even coat. -
Check the interior:
Once the glaze dries, wipe any stray droplets off the waxed creature. The wax will burn off, revealing the underglaze. -
Final wipe:
Use a damp sponge to wipe the foot ring clean so it doesn’t stick to the kiln shelf. -
Glaze fire:
Fire the piece to the maturity temperature of your clay and glaze (typically cone 5 or 6 for stoneware).
Once cooled, your bowl is ready to surprise anyone who finishes their soup to reveal the tiny friend at the bottom